
Walkthrough Menu
- General Tips
- Chapter 1
- Chapter 2
- Chapter 3
- Chapter 4
- Chapter 5
- Chapter 6
- Chapter 7
- Chapter 8
- Chapter 9
- Chapter 10
General Tips
- Awakening: The Dream Castle is a Hidden Object Puzzle Adventure game that consists of 10 chapters.
- The game is not timed; however the game will keep track of your overall playing time. Skipping mini-games adds 10 minutes to your overall time.
- When you see a magnifying glass appear in scene it means it is an area of interest. You can click on that item for a closer look or to obtain clues regarding the game.
- A single sparkle in a scene symbolizes an area of interest.
- A cluster of floating stars indicates a Hidden Object Scene.
Journal
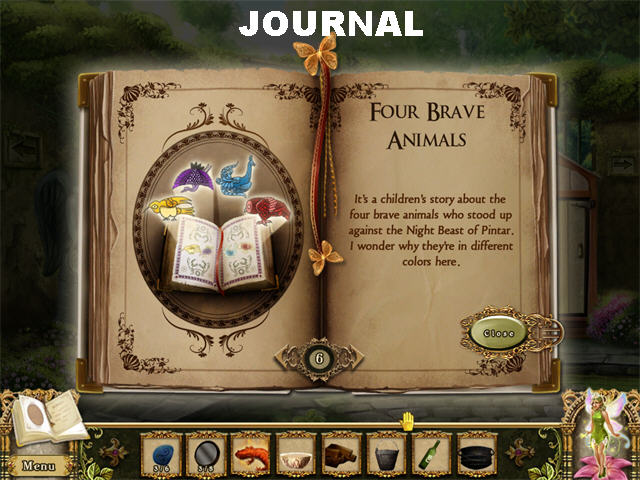
- Your journal holds vital information for solving mini-games, interesting tidbits about the story and information found on notes in various parts of the castle.
- Check your journal often, especially if you’re having a hard time figuring out a puzzle.
- The journal can be viewed at anytime by clicking on it in the lower left corner of each scene.
- Click on the arrows at the bottom of the journal to scroll through all available pages.
- Each page in the journal has a title above it for easy reference.
- Each time an entry gets added to your journal, it will start flashing.
Mini-games
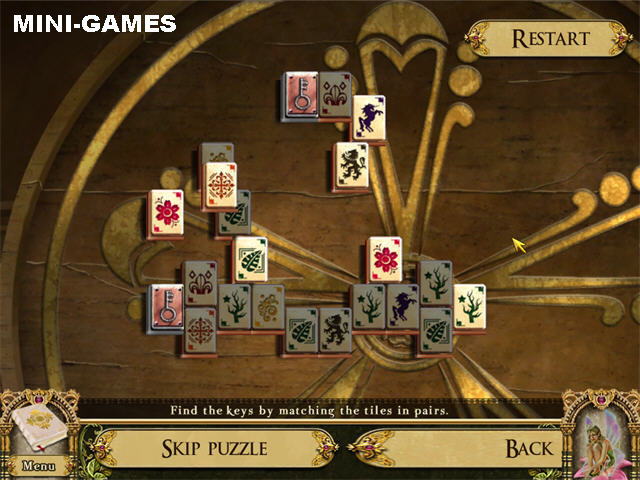
- There are over 10 assorted mini-games in this game. Some of them repeat themselves but they may be variations of the same puzzle.
- All puzzles and mini-games can be skipped once the skip button becomes available, which can take several minutes to do.
- Some puzzles offer a Restart button in the upper right which allows you to reset the puzzle. You can also reset any puzzle or mini-game by exiting out of it.
- Skipping puzzles will add 10 minutes to your overall playing time.
Inventory
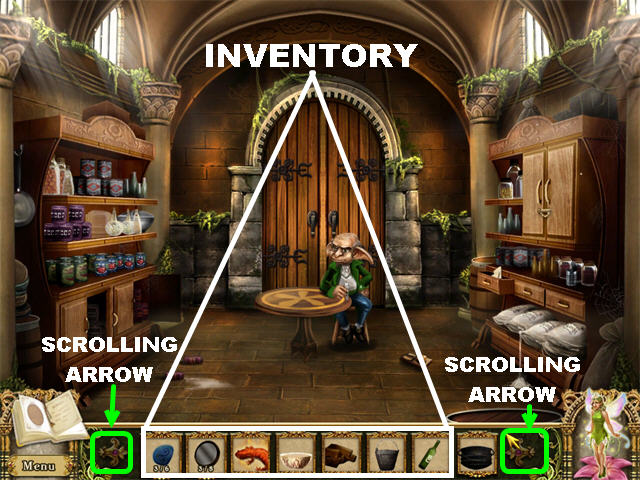
- Inventory items can be picked up in Hidden Object Scenes or in any of the scenes in the game.
- Inventory items found in a Hidden Object Scene will not be revealed to you until you complete that round.
- The inventory items will be stored in the tray at the bottom of each scene.
- Use the arrows on the left and right side of the inventory tray to sort through all available items.
- To use an inventory item, pick it up and click it onto the area you wish to use it in.
- Some items in your inventory will be stackable, meaning you can find several pieces of the same item but they will remain in one box in the tray. These items will have a counter at the bottom letting you know how many pieces you’ve found and how many are left to find.
Hints
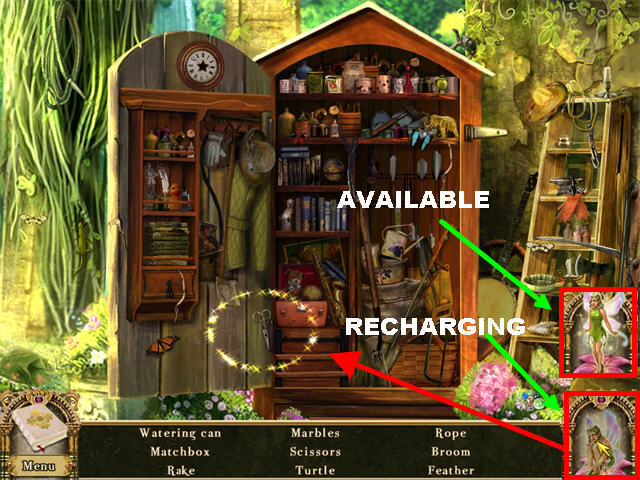
- Click on Mira, the Hint Fairy in the lower right to use a hint. She is available for use when she is in a standing position. If she is kneeling down it means she is recharging.
- A sparkly circle will appear over an item on your list in the Hidden Object Scenes.
- The Hint Fairy can also be used to figure out what you have to do in a room. These hints will be shown in order of priority from highest to lowest.
- Hints are unlimited but they need to recharge before they can be used again.
- During mini-games and puzzles the Hint Fairy can give you extra clues that are not given in the instructions.
Chapter 1
Bedroom
- Click on the egg-shaped jewelry box on the dresser for a closer look. You need to find a key for it, close the pop-up box for now.
- Click on the balcony to enter it.
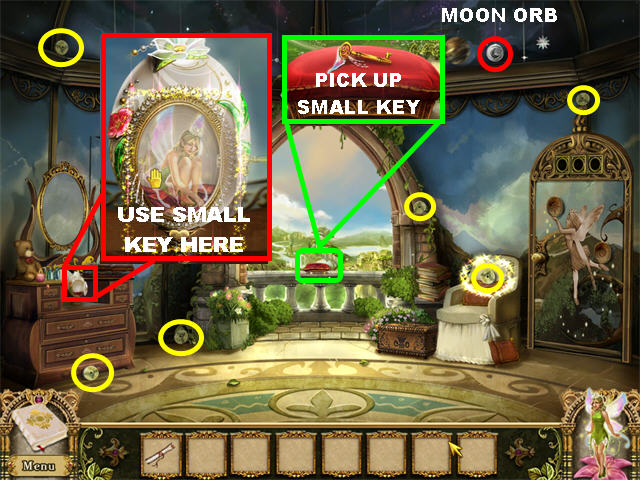
- Pick up the SMALL KEY on the red pillow. Go back inside.
- Click on the jewelry box one more time.
- Place the SMALL KEY on the lock.
- Inside you will find Mira, your Hint Fairy. She gives you a note from the Queen and wants you to return the note to her messenger who is waiting by the pond.
- The NOTE FROM THE FAIRY QUEEN goes into your inventory.
- Click on the locked chest in the lower right and you will be asked to find 6 discs.
- The 6 GOLD DISCS are circled in yellow.
- Pick up the MOON ORB in the upper right.
- Click on the chest for a closer view.
Chest Puzzle
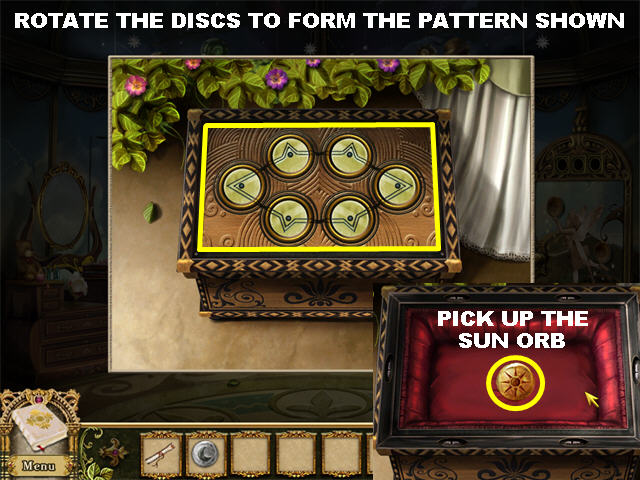
- Place the 6 GOLD DISCS on the chest to begin the puzzle.
- Rotate the discs by clicking on them until they form the pattern shown on the screenshot.
- Pick up the SUN ORB inside the chest.
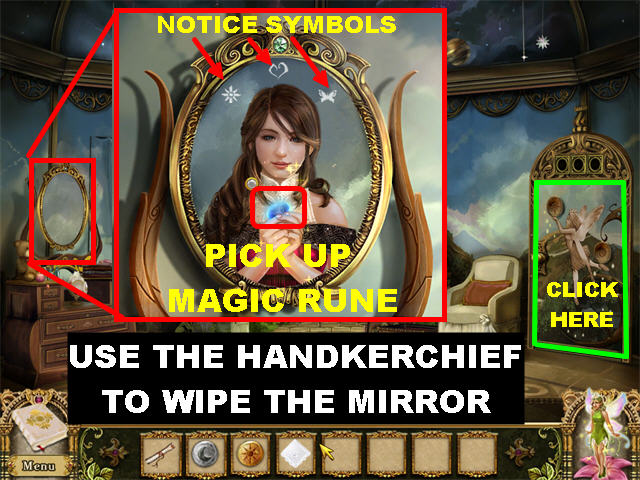
- Click on the mirror on the left, it’s dusty and needs cleaning.
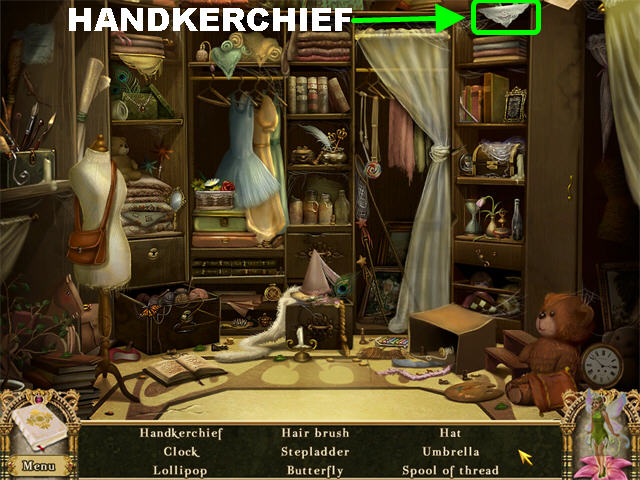
- Click on the closet door on the left to trigger a Hidden Object Scene.
- Pick up the HANDKERCHIEF in the upper right to enter it into inventory at the end of your search.
- Click on the mirror on the left one more time.
- Place the HANDKERCHIEF on the mirror to wipe it clean.
- Pick up MAGIC RUNE #1on the reflection in the mirror.
- Notice the symbols above the mirror, the snowflake, the heart and the butterfly.
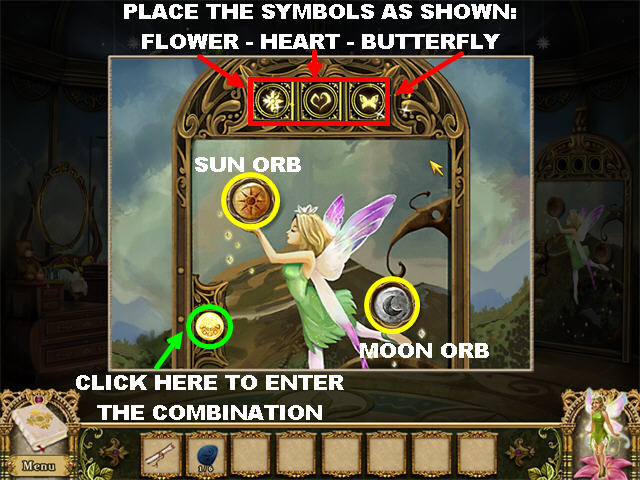
- Click on the large mirror on the right.
- Place the MOON ORB in the lower right slot.
- Place the SUN ORB in the upper left slot for the symbols to appear above the puzzle.
- Click on the symbols to change them.
- Place the symbols from left to right in this order to solve the puzzle: Snowflake – Heart – Butterfly.
- Click on the small gold button in the lower left to enter your selection.
- Click on the large mirror on the right to head towards South Tower Landing.
Chapter 2
South Tower Landing
- Click on the angel in the upper center. Then click on the journal to read the entry.
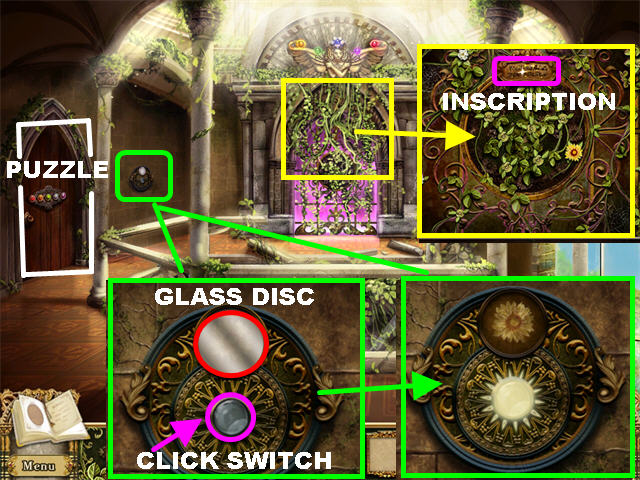
- Click on the vines on the back wall for a closer look. Click on the inscription above the vines. It states the only a ballerina can make the flowers bloom.
- There are several flowers missing in the close-up view, close the pop-up window.
- Pay attention to the color pattern above the back wall, you need that for the next puzzle.
- Click on the panel on the left for a closer look.
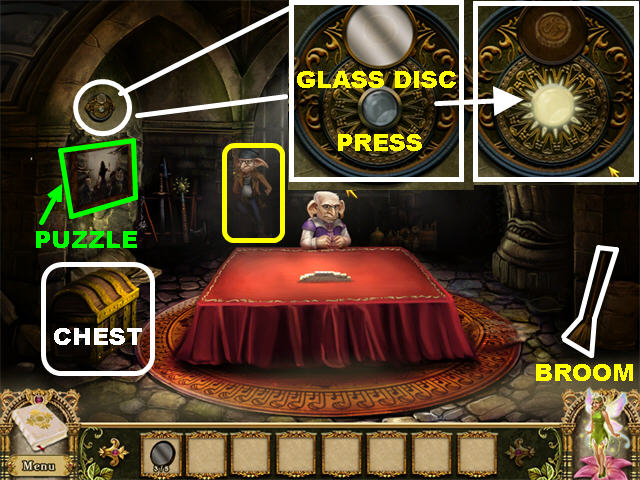
- Pick up GLASS DISC #1 above the panel. Behind the disc there is an imprint of a flower.
- Click on the switch at the bottom of the panel.
Guest Room Door Puzzle
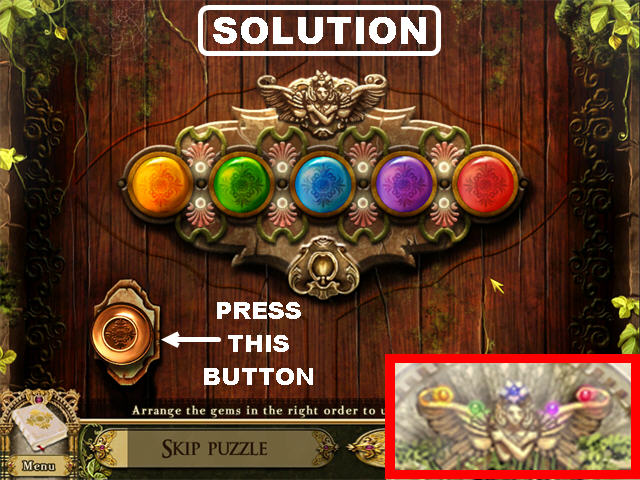
- Click on the door on the left to trigger a puzzle.
- Your goal is to place the lights in the correct order.
- Click on 2 lights and they will swap places.
- The solution for this puzzle can be found by looking at the ceiling design.
- Please place the lights in this order: Yellow – Green – Blue – Purple – Red
- Click on the button in the lower left to enter your solution.
- Click on the door to enter the guest room.
Guest Room
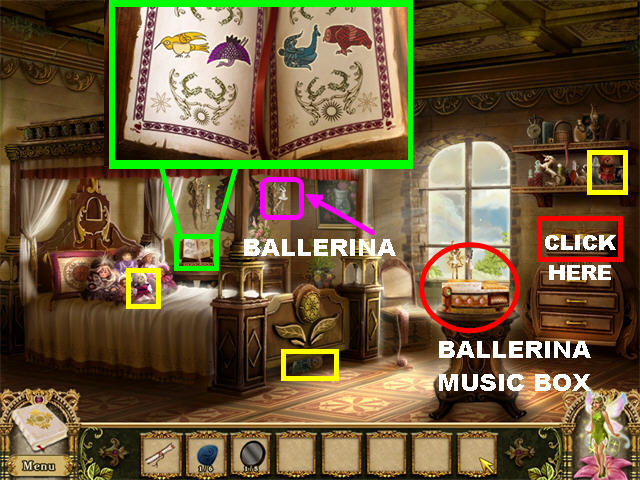
- Pick up TEDDY BEAR #1 on the bed.
- Pick up TEDDY BEAR #2 below the bed.
- Pick up TEDDY BEAR #3 on the shelf in the upper right.
- Pick up BALLERINA #1 on the wall to the right of the bed.
- Click on the storybook to the right of the bed. You will see images of The 4 Brave Animals. This image will be added to your journal.
- Click on the area on top of the dresser on the right to trigger a puzzle.
Teddy Bear Puzzle
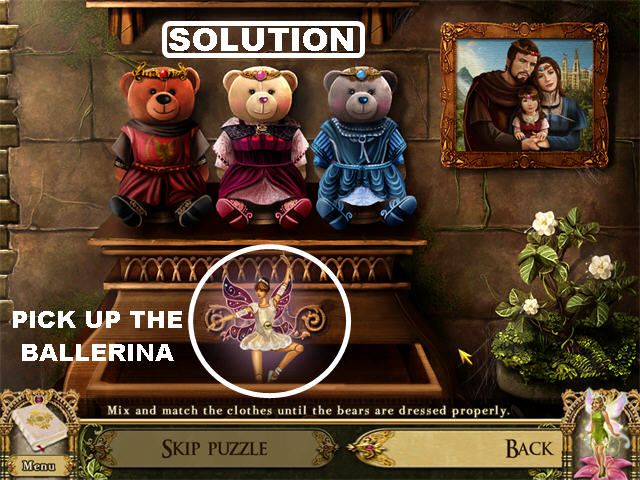
- Place the 3 TEDDY BEARS from inventory on the stands.
- Your goal is to mix and match the clothes until the bears are dressed properly.
- Click on 2 clothing items to swap their positions. Make sure that you swap out the shirts, arms, pants and shoes.
- The picture in the upper right corner gives you a clue on the proper attire for each bear. You can also match the headbands to the color of the outfits.
- Please look at the screenshot for the solution. The left teddy bear should be dressed in brown, the middle in pink and the last one in blue.
- Pick up BALLERINA #2 that appears inside the drawer upon the completion of this puzzle.
Ballerina Puzzle
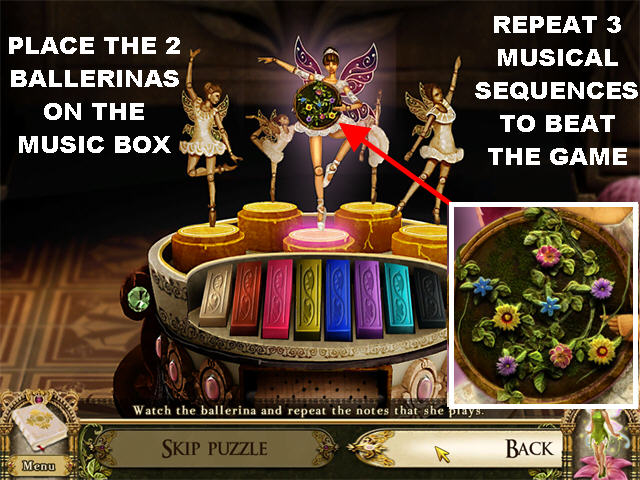
- Click on the music box on the pedestal for a closer view.
- Place BALLERINA #1 and BALLERINA #2 on the music box.
- Click on the music box once all pieces are in place.
- This is like a "Simon Says" game; just repeat the notes shown on the puzzle.
- The solution is random.
- Each time you click on the wrong pattern, you will have to start over with a new pattern.
- After the game gives you the sequence, the middle ballerina will crouch down.
- Once a sequence has been duplicated, the middle ballerina will strike a new pose.
- If you fail to duplicate the sequence, the middle ballerina will return to her original position.
- Correctly identify 3 patterns to win the game.
- Click on the wreath the top ballerina is holding for a closer view. You will receive a message that flowers should be blooming in the next room. You will need the pattern of this wreath for a future puzzle.
- Go back to South Tower Landing.
South Tower Landing
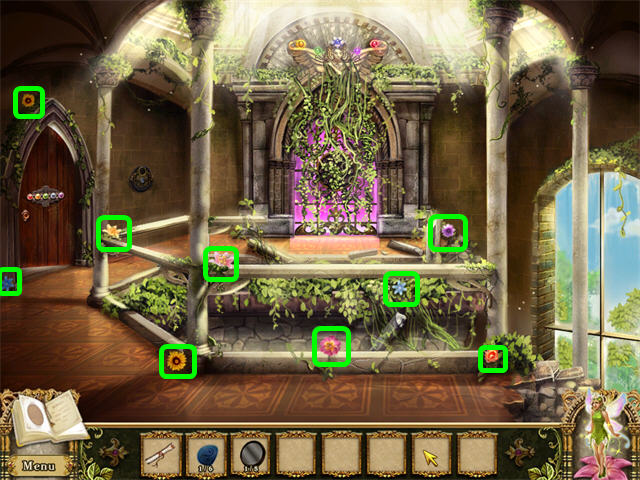
- Collect the 9 flowers shown on the screenshot.
- Click on the vines on the back wall to trigger a puzzle.
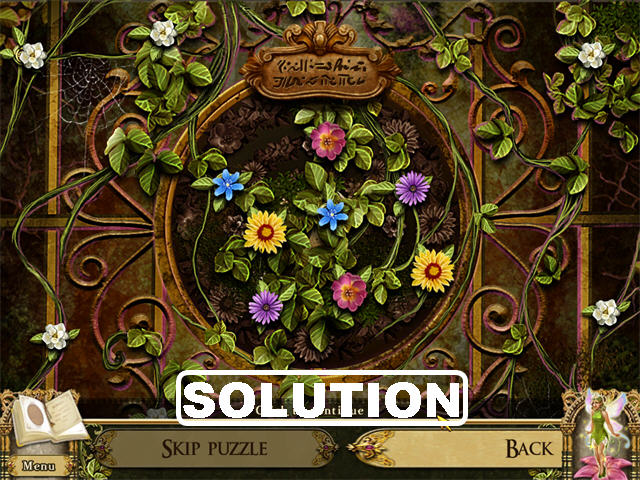
- Place the FLOWERS from inventory on the vines.
- Your goal is to arrange the flowers according to the image of the flowers in the ballerina puzzle.
- Click on any 2 flowers to swap their positions.
- Please look at the screenshot for the solution.
- Go through the portal that appears once the puzzle has been completed.
Chapter 3
South Tower Lobby
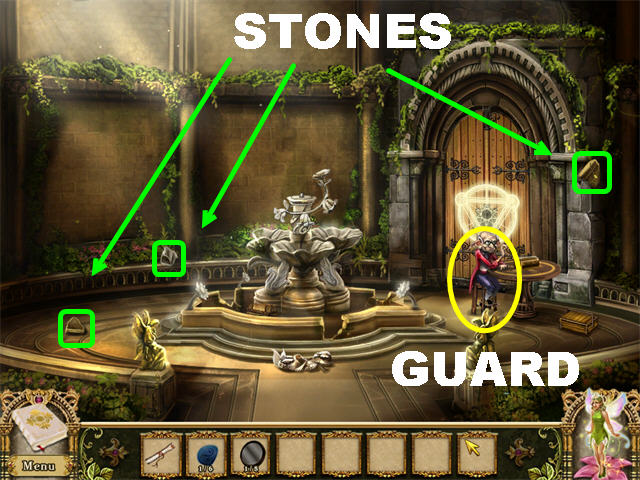
- Pick up STONE PIECE #1 in the upper right, next to the door.
- Pick up STONE PIECE #2 in the lower left side of the floor.
- Pick up STONE PIECE #3 behind the left side of the fountain.
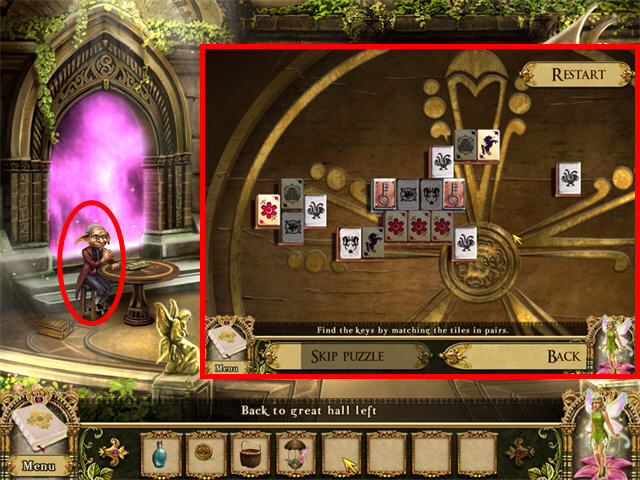
- Click on the guard goblin by the door. He wants you to solve the Goblinjong box. This action triggers a puzzle.
Goblinjong Puzzle
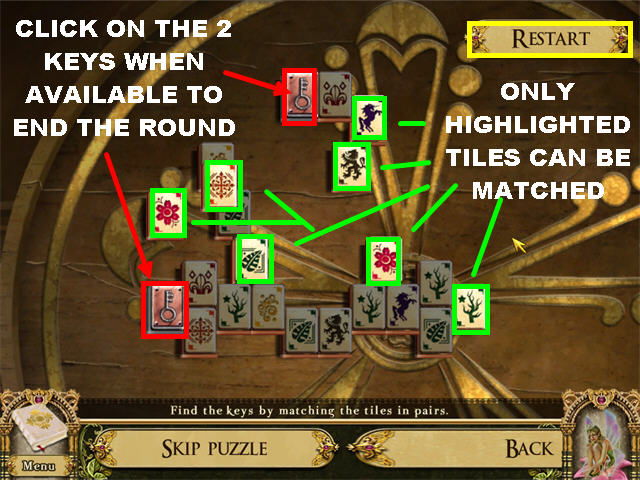
- Your goal in this puzzle is to match the tiles in pairs until you can find the keys hidden below the tiles.
- Click on two matching available tiles to eliminate them off the board.
- If a tile is not highlighted you cannot click on it.
- You can click on RESTART button in the upper right if you run out of moves.
- Once the 2 keys are available, click on them to end that round.
- Complete 3 rounds to win this game.
- The SIILVER KEY goes into your inventory once the puzzle has been solved.

- Click on the box in the lower right for a closer view.
- Pick up STONE PIECE #4 inside the box.
Statue Puzzle
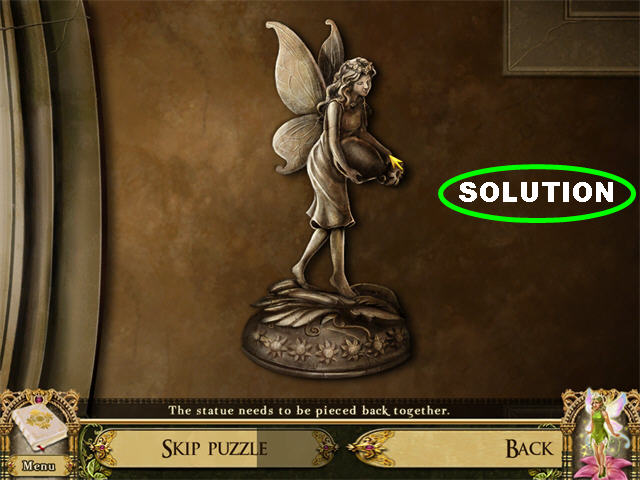
- Click on the broken piece in front of the fountain to trigger a puzzle.
- Your goal is to piece the statue back together.
- Drag the pieces scattered around the scene into the silhouette of the statue in the middle of the field.
- Correct pieces will lock into place.
- Please look at the screenshot for the solution.
- The FAIRY FIGURINE will go into inventory after the puzzle has been solved.
- Place the 4 STONE PIECES on the fountain.
- Place the FAIRY FIGURINE above the fountain to make the water flow.
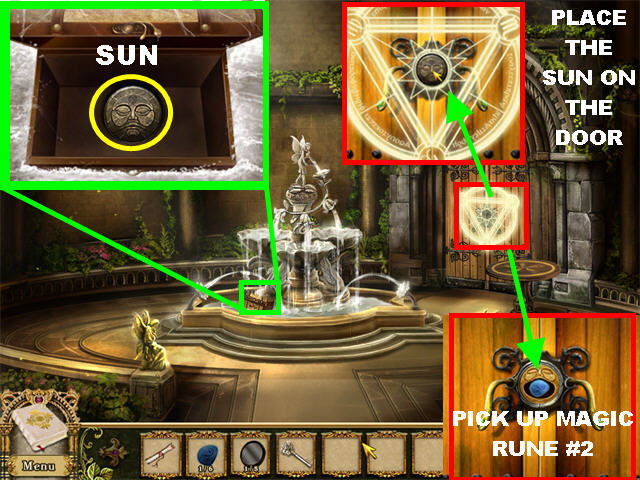
- Click on the box on the left side of the water.
- Pick up the SUN inside the box.
- Click on the door for a closer view.
- Place the SUN on the door.
- Pick up MAGIC RUNE #2 on the door.
- Click on the door to enter the Garden.
Chapter 4
The Garden
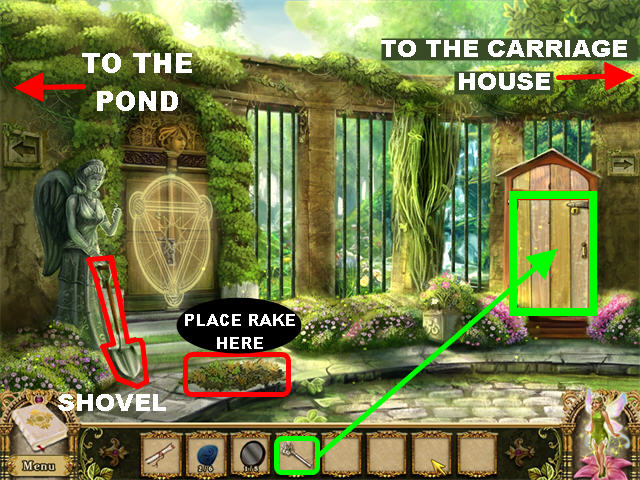
- You can access different areas from this scene. On the left you can reach the Pond. On the right you can access the Carriage House.
- Pick up the SHOVEL the statue on the left is holding.
- Place the SILVER KEY on the door on the right.
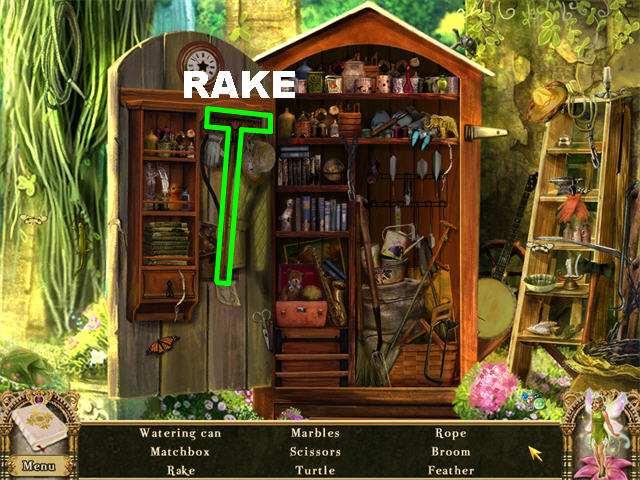
- Click on the door to enter a Hidden Object Scene.
- Pick up the RAKE in the upper left and it will be added to your inventory at the end of your search.
- Place the RAKE on the pile of leaves close to the statue to discover a trapdoor. You need something to pry it open, you can come back to this area later.
- Click on the right side of the screen to reach the Carriage House.
Carriage House
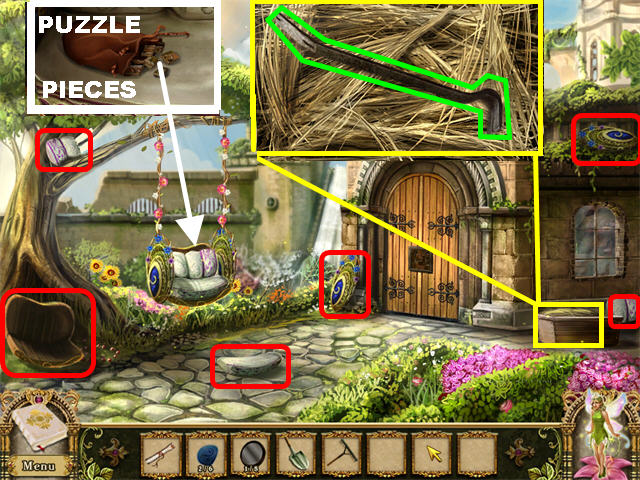
- The 6 SWING SEATS are marked in red in the screenshot.
- Place the SWING SEAT on the tree on the left.
- Click on the swing seat for a closer view. The pattern on the cushion enters your journal.
- Pick up the PUZZLE PIECES on the swing seat.
- Click on the fairy ring in the lower left. You need a basket to pick them up, you can come back to this area later.
- Click on the trough in the lower right for a closer view to see a bunch of hay.
- Click on the hay several times until you see the CROWBAR appear.
- Pick up the CROWBAR to enter it into inventory.
- Go left to return to the Garden.
Garden
- If you haven’t already done so, place the RAKE on the pile of leaves to reveal the trapdoor.
- Place the CROWBAR on the trapdoor to open it. There is a crest below the trapdoor which is missing its symbols. Close out of that view for now.
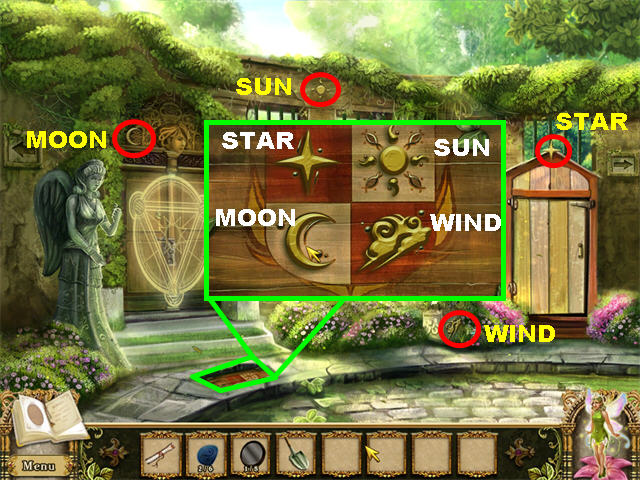
- Pick up the WIND SYMBOL in the lower right.
- Pick up the MOON SYMBOL above the left door.
- Pick up the SUN SYMBOL in the upper center.
- Pick up the STAR SYMBOL above the right door.
- Click on the left door to receive a message which states that only the pure of heart can pass through that field.
- Click on the trapdoor for a closer view.
- Place the STAR SYMBOL in the upper left.
- Place the SUN SYMBOL in the upper right.
- Place the MOON SYMBOL in the lower left.
- Place the WIND SYMBOL in the lower right.

- Colored buttons appear after the symbols have been placed correctly. Use the symbols of the 4 Brave Animals in your journal to solve this puzzle.
- Push the buttons in the following order: Yellow – Purple – Blue – Red.
- Pick up the SHIELD inside the box.
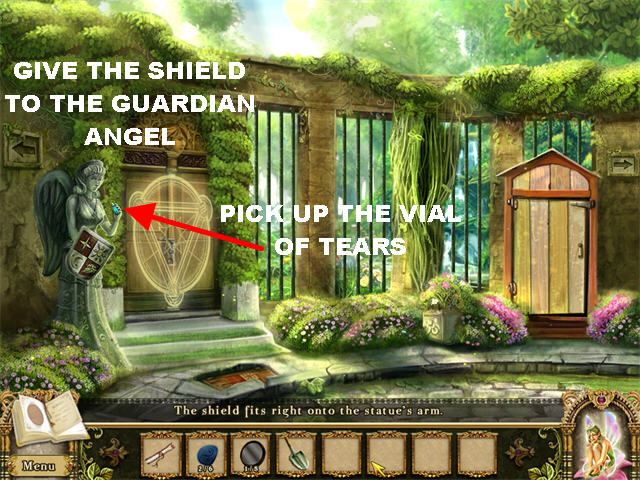
- Give the SHELD to the guardian angel on the left.
- Pick up the VIAL OF TEARS in the guardian’s hand.
- Go left to reach the Pond.
The Pond
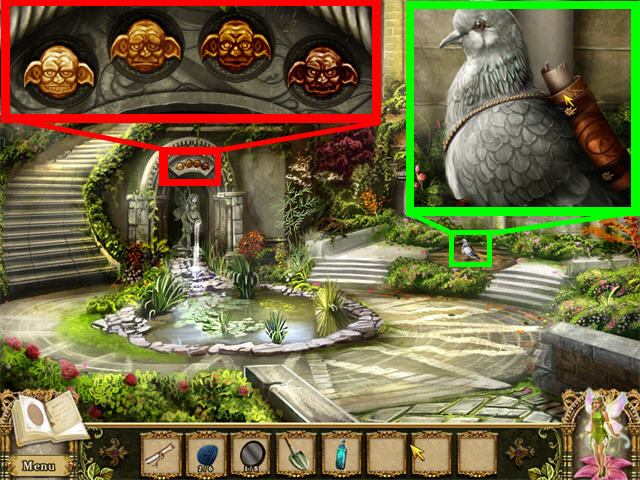
- Click on the pigeon on the right.
- Place the NOTE FROM THE FAIRY QUEEN on the pouch on the pigeon’s back and it will fly away.
- Place the SHOVEL on the spot in which the pigeon was standing.
- Click on the Goblin Heads above the statue on the left for a closer look. Pay attention to the expressions on their faces.
- Go back to the Carriage House.
Carriage House Door Puzzle
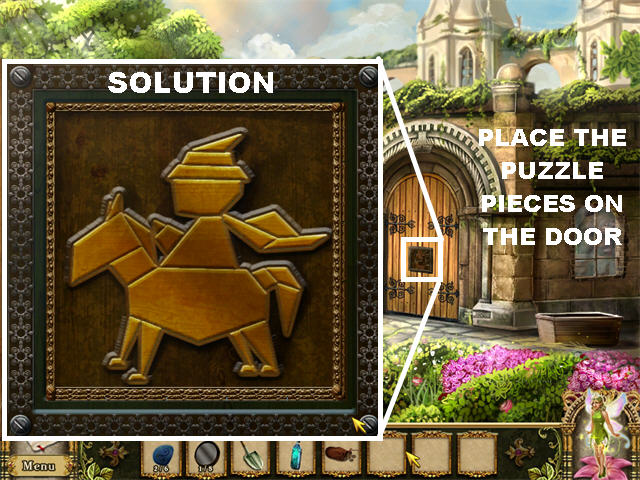
- Place the PUZZLE PIECES on the door to trigger a puzzle.
- The solution to this puzzle can be found on the swing seat outside the Carriage House.
- Your goal is to form the correct image.
- Click on two pieces and they will swap positions.
- A piece placed correctly will lock into place.
- Enter through the door upon completing the puzzle.
Mathematical Barrel Puzzle

- Click on the barrel on the lower right to trigger a puzzle.
- Your goal is to move the numbers so they all add up to the center number which is 15.
- You can only swap out the numbers on the white tiles only.
- The top section has already been solved for you.
- For the solution place the white tiles in this order, starting from the top and going clockwise: 7-3-1-5 -9
- Pick up the FEATHER DUSTER inside the barrel; it can be used several times in this area.
- Pick up the POTION OF RAPID GROWTH inside the barrel.
- Place the FEATHER DUSTER on the trunk in the lower left.
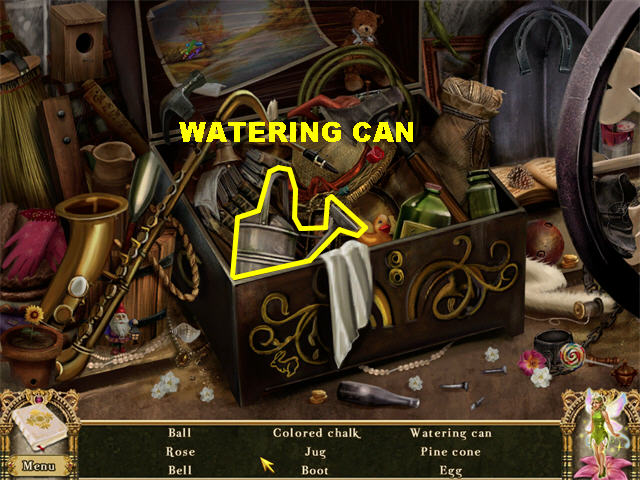
- Click on the trunk to trigger a Hidden Object Scene.
- Pick up the WATERING CAN in the left side of the trunk.
Goblins Puzzle
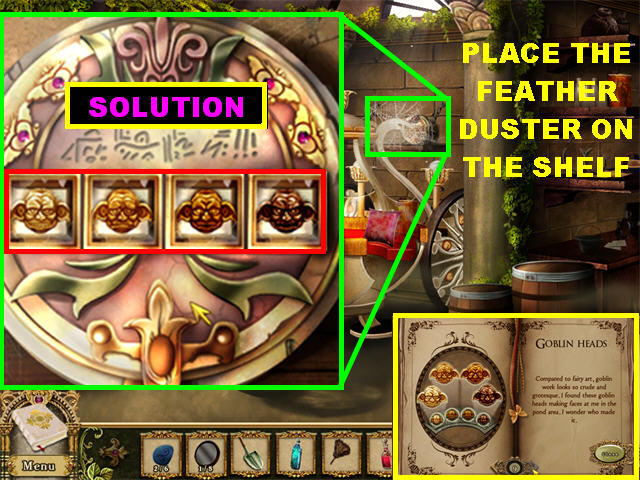
- Place the FEATHER DUSTER on the shelf in the upper right to get rid of the cobwebs and trigger a puzzle.
- The solution for this puzzle is in your journal under the "Goblin Heads" title.
- Click on each tile to change the images of the goblin heads.
- The heads should be placed from lightest to darkest. Please look at the screenshot for the solution.
- Another puzzle will appear as soon as that puzzle has been solved.
Find Identical Beans
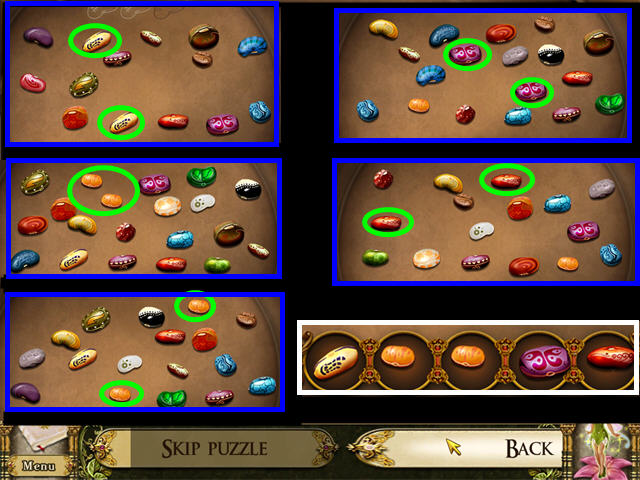
- In this puzzle you have to click on the 2 beans that are identical.
- Find 5 sets of beans to complete this puzzle. The solution to this puzzle is random.
- The MAGIC BEANS go into your inventory upon completion of this puzzle.
Unicorn Puzzle
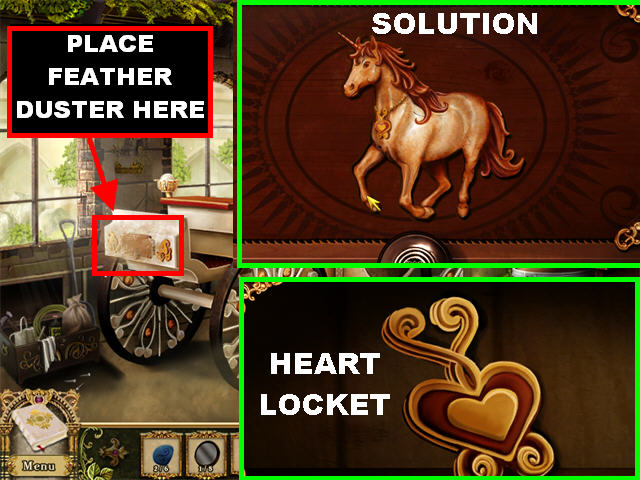
- Place the FEATHER DUSTER in the front of the carriage.
- Click on the front of the carriage to trigger a puzzle.
- Drag the pieces scattered around the scene into the silhouette of the unicorn in the middle of the field.
- Correct pieces will lock into place.
- Please look at the screenshot for the solution.
- Pick up the HEART LOCKET after the puzzle has been completed.
- Go back to the Pond.
Pond
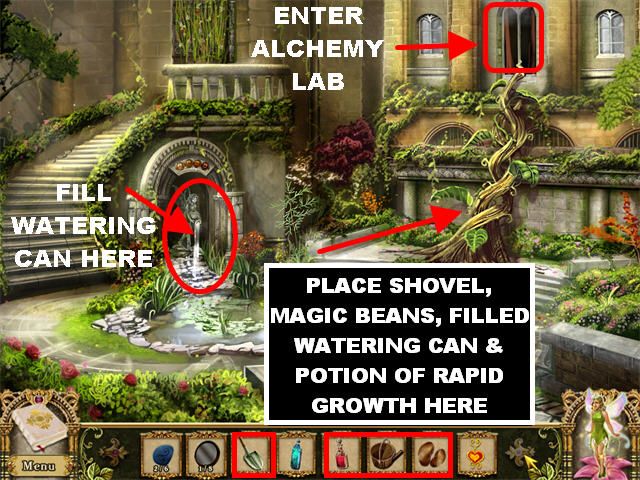
- Place the WATERING CAN in the fountain to receive a FILLED WATERING CAN in your inventory.
- If you haven’t already done so, use the SHOVEL to dig the hole in the ground in between the steps on the right.
- Place the MAGIC BEANS in the hole in the ground.
- Place the FILLED WATERING CAN in the hole in the ground.
- Place the POTION OF RAPID GROWTH on the magic beans you just planted.
- Click on the window above the vine to enter the Alchemy Lab.
Alchemy Lab
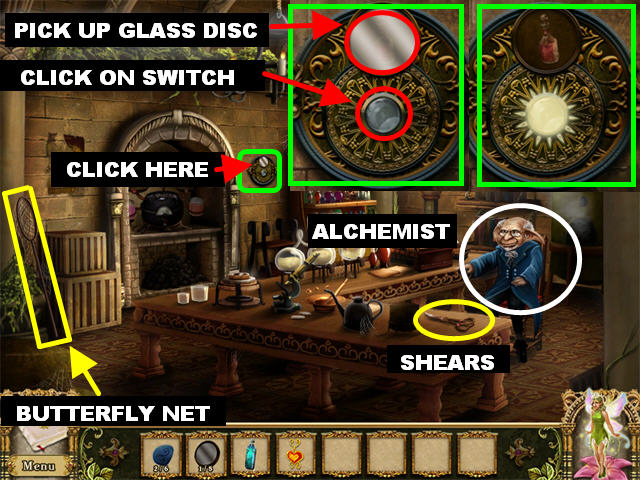
- Click on the Alchemist to talk to him. He tells you there is a stone behind the wall that bears your name. Once you find it return to the lab and place it in the magnifier.
- Pick up the SHEARS on the right side of the table.
- Pick up the BUTTERFLY NET in the lower left.
- If you click on the torch stand, the Alchemist will tell you not to touch it.
- Click on the panel on the left for a closer view.
- Pick up GLASS DISC #2 on top of the panel. Behind the disc there is an imprint of a potion bottle.
- Click on the switch at the bottom of the panel.
- Go to the Pond.
Pond - Picture Puzzle
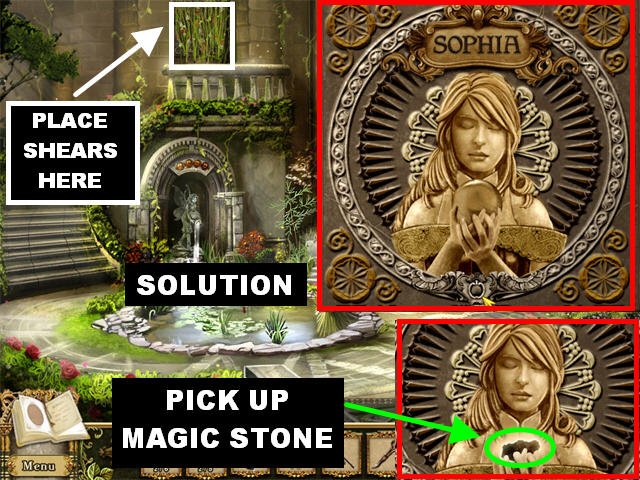
- Place the SHEARS on the vines in the upper left several times until the vines disappear.
- Click on the stone wall to trigger a puzzle.
- Swap the pieces around to form the correct image.
- Click on two pieces and they will swap places.
- A piece placed correctly will lock into place.
- Pick up the MAGIC STONE that appears in the picture after it has been solved.
Butterfly Mini-game

- Place the BUTTERFLY NET in the butterfly pond to trigger a mini-game.
- Your goal is to eliminate all the butterflies by clicking on matching pairs.
- Click on 2 matching butterflies to eliminate them.
- There will be one purple BUTTERFLY that will not have a match. It will be entered into your inventory.
- Go back inside the lab.
Alchemy Lab
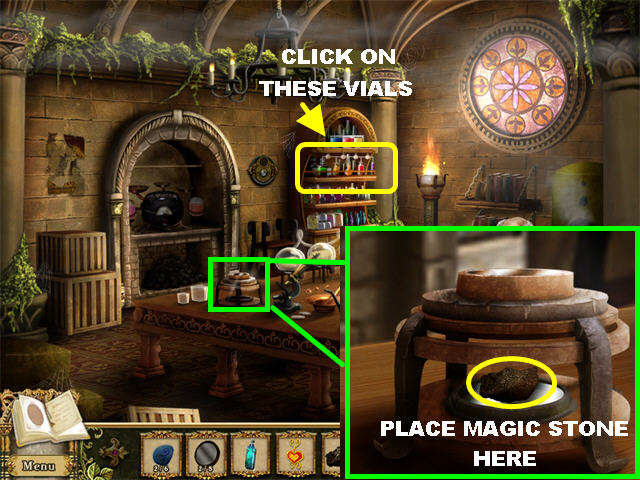
- Click on the magnifier on the table.
- Place the MAGIC STONE at the bottom of the magnifier. The Alchemist says that in order for you to see the stone’s true form you need a potion of corrosion.
- Click on the vials in the upper center.

- Your goal is to mix the right combination of colors in order to form the color shown at the bottom of each set of vials.
- Click on the color above the vials to add it to your cursor. Place that color into the vial of your choice.
- The solution is as follows:Green = Blue and Yellow Purple = Red and Blue Orange = Yellow and Red
- The POTION OF CORROSION will be added to your inventory.
- Click on the alchemy book on the table, it states: "Wings of a butterfly, tears of an angel, heart of a unicorn."
- Click on the magnifier.
- Place the POTION OF CORROSION on the MAGIC STONE that is already in the magnifier.
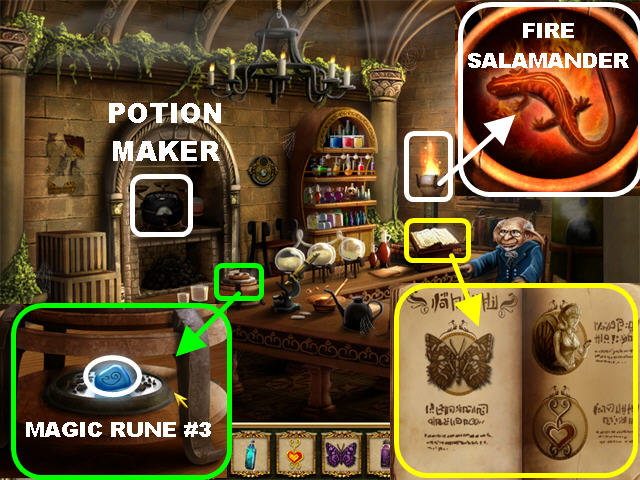
- Pick up MAGIC RUNE #3 that appears on the magnifier.
- Click on the torch stand in the back of the room.
- Pick up the FIRE SALAMANDER in the stand.
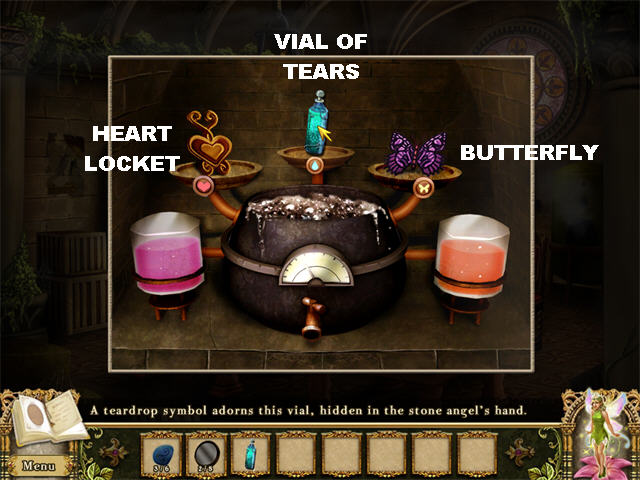
- Click on the potion maker on the left.
- Place the HEART LOCKET on the left scale of the potion maker.
- Place the VIAL OF TEARS on the middle scale of the potion maker.
- Place the BUTTERFLY on the right scale of the potion maker.
- You will obtain a POTION OF PURE HEART in your inventory.
- Go back to the Garden.
Garden
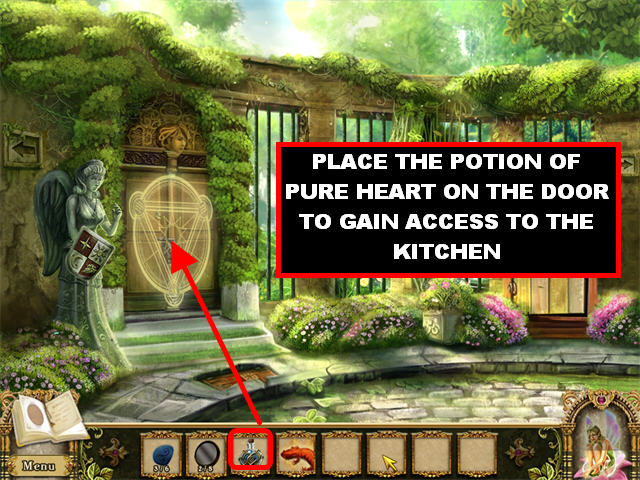
- Place the POTION OF PURE HEART on the door.
- Go through the door to enter the Kitchen.
Chapter 5
Kitchen

- From this scene you can access the Pantry on the left, the Hallway on the right and the Garden by clicking downwards.
- Click on the panel on the left for a closer view.
- Pick up GLASS DISC #3 on top of the panel. Behind the disc there is an engraving of a cauldron.
- Click on the switch at the bottom of the panel.
- Go right to access the Hallway.
Hallway
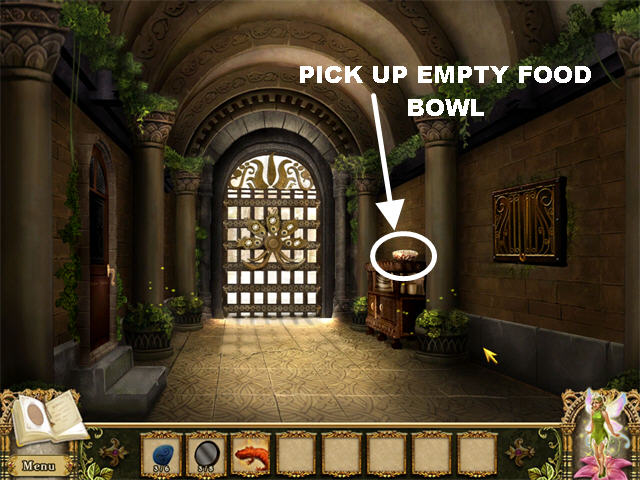
- Pick up the EMPTY FOOD BOWL on the right.
- Go down and then left to access the Pantry.
Pantry
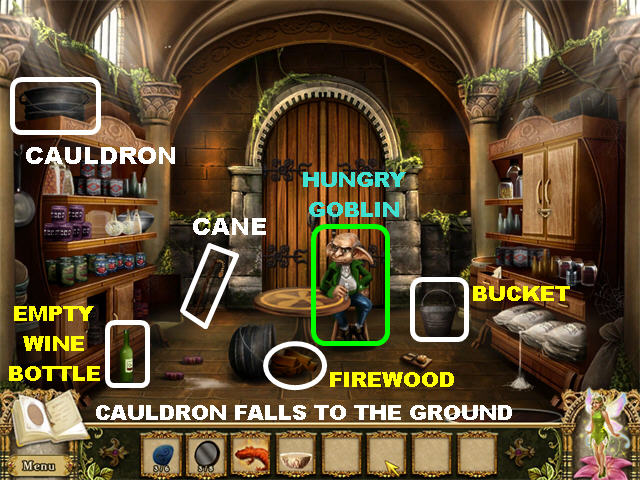
- Click on the hungry goblin. He asks you to cook him some stew. He says that all you have to do is get the fire going and place the vegetables in the cauldron.
- Pick up the CANE on the left side of the door.
- Place the CANE on the cauldron in the top left to knock it down to the floor.
- Grab the DIRTY CAULDRON from the ground.
- Pick up the FIREWOOD in front of the table.
- Pick up the WINE BOTTLE in the lower left.
- Pick up the BUCKET on the right side of the ground.
- Go back to the Garden.
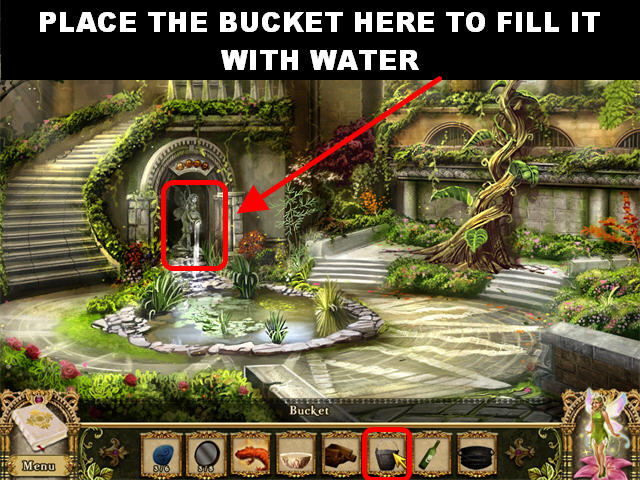
- Place the BUCKET in front of the statue poring water and you will obtain the BUCKET OF WATER in your inventory.
- Go to the Hallway by going right and entering through the left door.
Kitchen
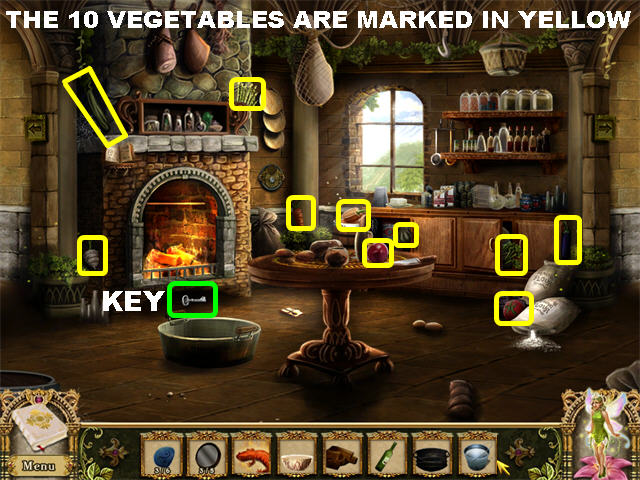
- Place the FIREWOOD in the fireplace.
- Use the FIRE SALAMANDER to light the fire in the fireplace.
- Pick up the 10 VEGETABLES marked in yellow in the screenshot.
- Pick up the KEY that appears in front of the fireplace.
- Go back to the pantry on the left.
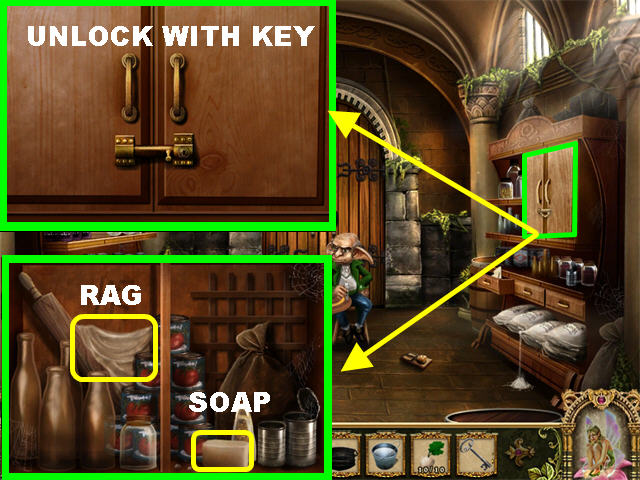
- Click on the cabinet on the right for a closer look.
- Place the KEY on the lock.
- Grab the SOAP inside the cupboard.
- Pick up the RAG inside the cupboard.
- Go back to the Kitchen.
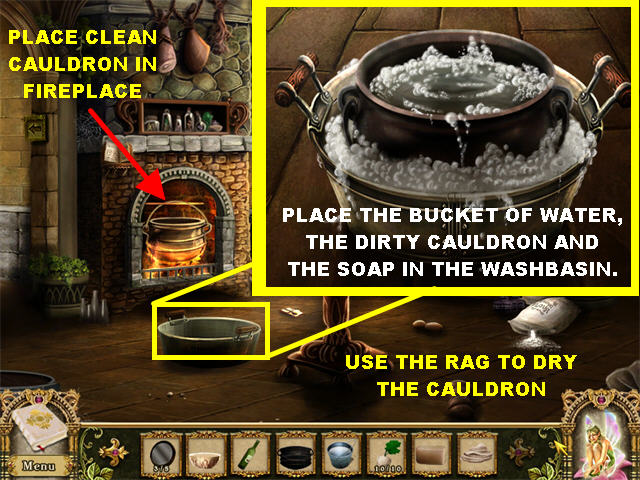
- Click on the washbasin on the floor for a closer view.
- Place the BUCKET OF WATER in the washbasin to fill it.
- Place the DIRTY CALUDRON in the washbasin.
- Place the SOAP in the cauldron.
- Put the RAG on the cauldron to dry it off.
- You now have a CLEAN CAULDRON in your inventory.
- Place the CLEAN CAULDRON in the fireplace.
- Place the VEGETABLE in the cauldron to trigger a mini-game.
Cook Goblin Stew Mini-game
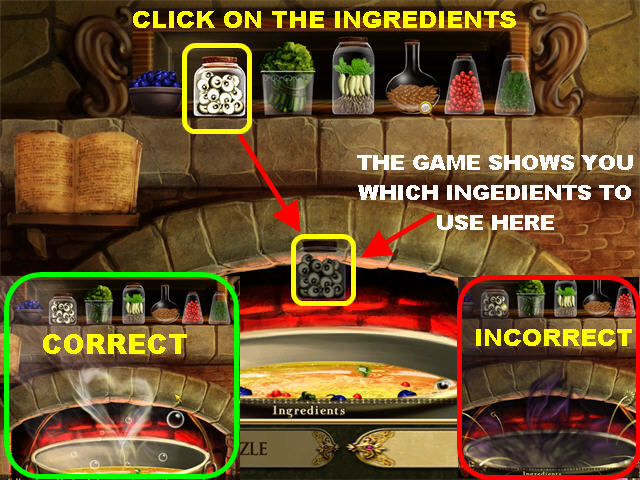
- Your goal is to add the ingredients into the pot in the order the game shows you.
- Add the ingredients by clicking on the correct food containers on top of the screen.
- The game shows you which ingredients to use directly above the cauldron. The matching ingredient on top of the screen will light up as well for easy identification.
- A steamy white heart appears over the cauldron when items are placed correctly. If you placed the wrong ingredients in the cauldron a purple fog will appear instead.
- The cauldron will fill up after each set of correct ingredients.
- You now have GOBLIN STEW in the cauldron.
- Place the EMPTY FOOD BOWL in the cauldron.
- The BOWL OF GOBLIN STEW goes into your inventory.
- Go left.
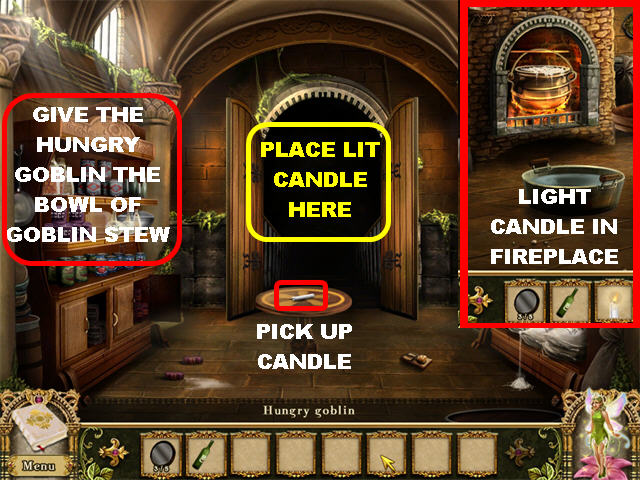
- Give the BOWL OF GOBLIN STEW to the hungry goblin to make him leave his post.
- Pick up the CANDLE on the table.
- Go back to the Kitchen and place the CANDLE on the fire to light it.
- Go back to the Pantry.
- Place the LIT CANDLE in the doorway to light the way into the Wine Cellar.
Wine Cellar
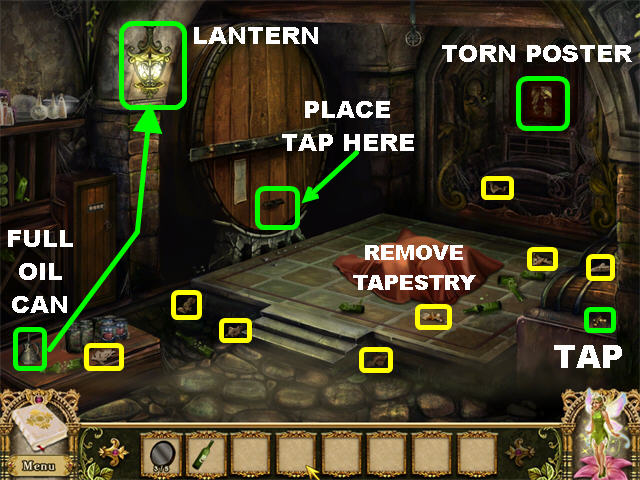
- The scene is still dark when you enter.
- Pick up the FULL CAN OF OIL in the lower left corner.
- Place the FULL CAN OF OIL on the lantern in the upper left to light the place.
- Click on the tapestry on the ground to remove it.
- Click on the drunk goblin on the ground. He says he needs a drink.
- Pick up the TAP in the lower right.
- Place the TAP at the bottom of the wine cask on the left.
- Place the WINE BOTTLE on the tap. The FULL WINE BOTTLE goes back into inventory.
- Give the FULL WINE BOTTLE to the drunk goblin on the floor. A trapdoor appears on the ground once the drunk goblin moves away.
- Pick up the 8 PAPER PIECES shown in the screenshot.
- Place the 8 PAPER PIECES on the torn poster in the upper right to trigger a puzzle.
Torn Poster Puzzle

- Drag the pieces scattered around the scene into the silhouette in the middle of the field.
- Correct pieces will lock into place.
- Please look at the screenshot for the solution.
- The POSTER will be entered into your journal. Remember the number "3124" noted at the bottom of the poster.
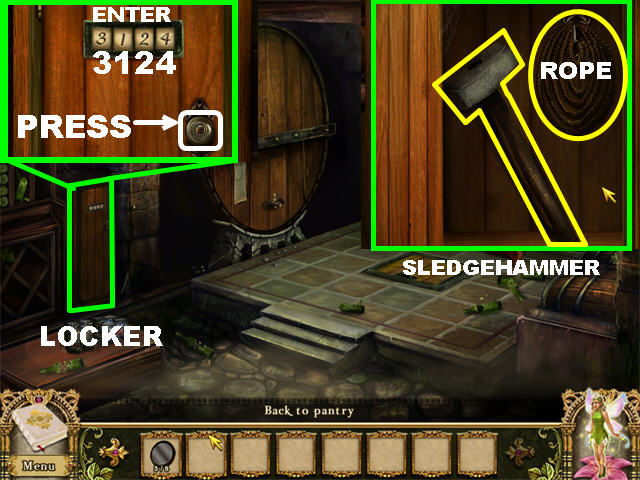
- Click on the locker in the lower left.
- Enter the number "3124" found on the assembled poster.
- Click on the button in the lower right to enter the combination.
- Pick up the SLEDGEHAMMER inside the locker.
- Pick up the ROPE inside the locker.
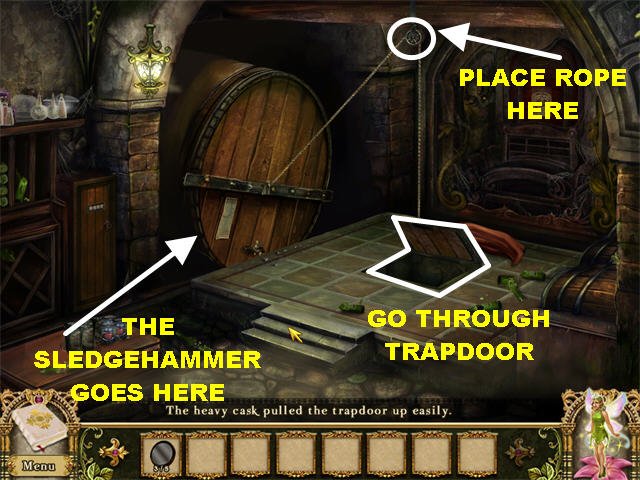
- Place the ROPE on the pulley in the upper center.
- The SLEDGEHAMMER goes below the wine cask.
- Go through the trapdoor to enter the Secret Passage.
Chapter 6
Secret Passage
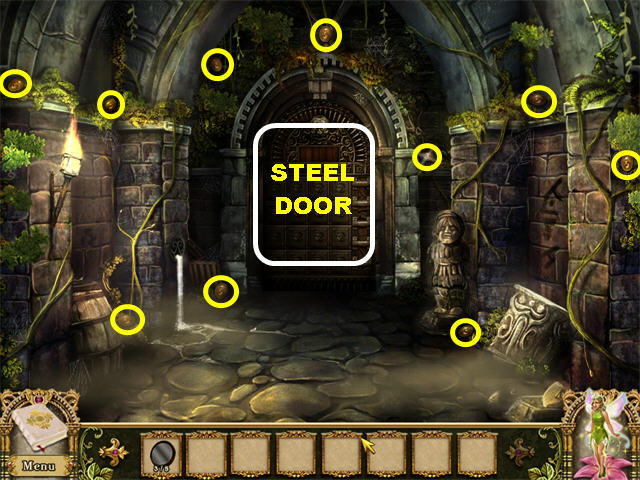
- Click on the steel door and a goblin will appear asking you for 10 Bolgin coins.
- Find the 10 Bolgin coins in the scene. They are all marked in yellow in the screenshot.
Goblin Door Puzzle
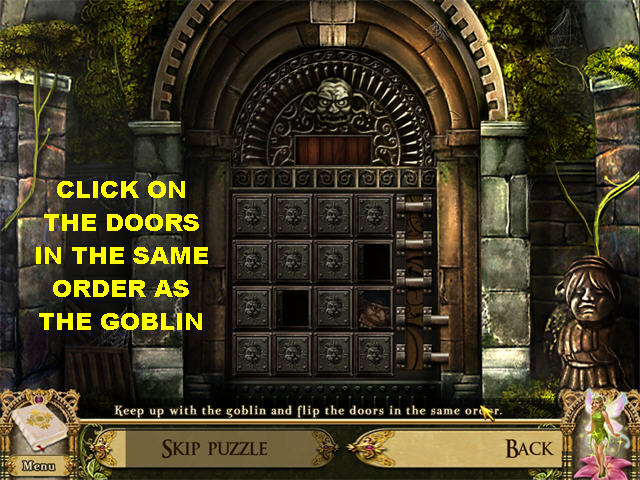
- Place the 10 SHINY BOLGIN COINS on the door to make the goblin appear again. He asks you if you can repeat codes as fast as the goblin.
- Your goal is to click on the doors in the same order as the Goblin.
- The Goblin appears at a door and leaves it empty as it moves on to the next spot.
- Once the sequence has been completed, the Goblin will appear above the door.
- Complete 5 sequences to win the mini-game.
- Go through the door to enter the Gambling Den.
Gambling Den
- Click on the thug goblin in the back of the scene. He asks you to help him sort out the coins.
- Click on the panel on the left for a closer view.
- Pick up GLASS DISC #3 on top of the panel. Behind the disc there is an engraving of a Bolgin coin.
- Click on the switch at the bottom of the panel.
- Pick up the BROOM in the lower right.
- Click on the picture on the left to trigger a puzzle.
Tapestry Puzzle

- Click on 2 pieces to swap their positions.
- Correct pieces will lock into place.
- Please look at the screenshot for the solution.
- Pick up the CHEST KEY above the puzzle.
Duplicated Coins Mini-game
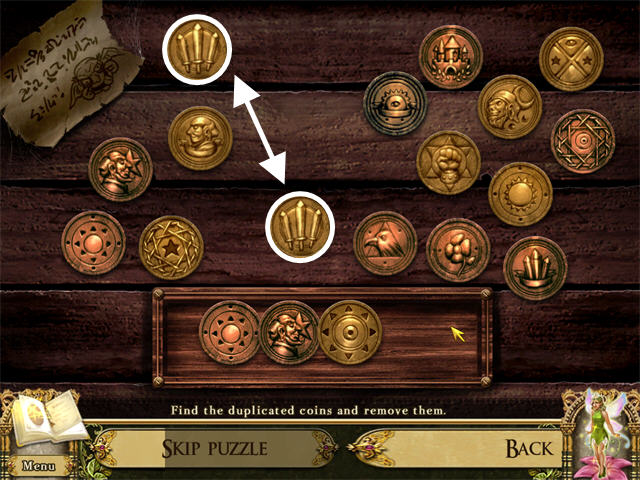
- Place the CHEST KEY on the chest in the lower left.
- Click on the open chest to trigger a mini-game.
- Your goal is to find the duplicated coins and remove them.
- Click on the 2 matching coins to remove them from the board.
- Find 4 matching pairs to win the game.
- The FAKE BOLGINS go into your inventory.
- Give the FAKE BOLGINS to the thug goblin in the back of the scene.
- Click on the gambler goblin at the table to speak to him. He challenges you to a game of Goblinjong .
Goblinjong
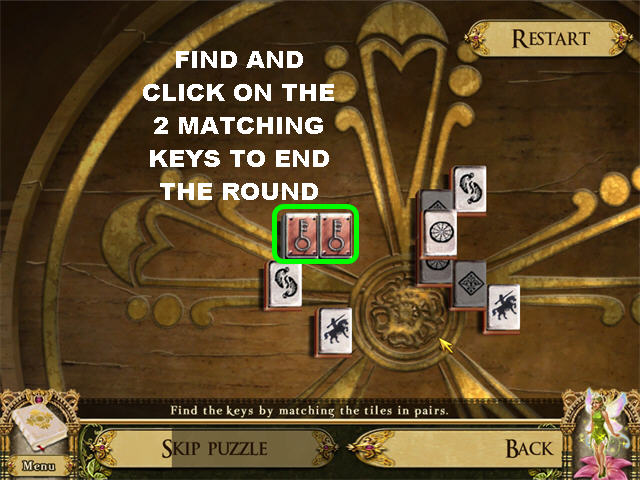
- Your goal in this puzzle is to match the tiles in pairs until you can find the 2 keys hidden below the tiles.
- Click on two matching available tiles to eliminate them off the board.
- If a tile is not highlighted you cannot click on it.
- You can click on the RESTART button in the upper right if you run out of moves.
- Once the 2 keys are available, click on them to end that round.
- Complete 3 rounds to win this game.
- The Goblin gives you a clue about finding out where the Rune is.
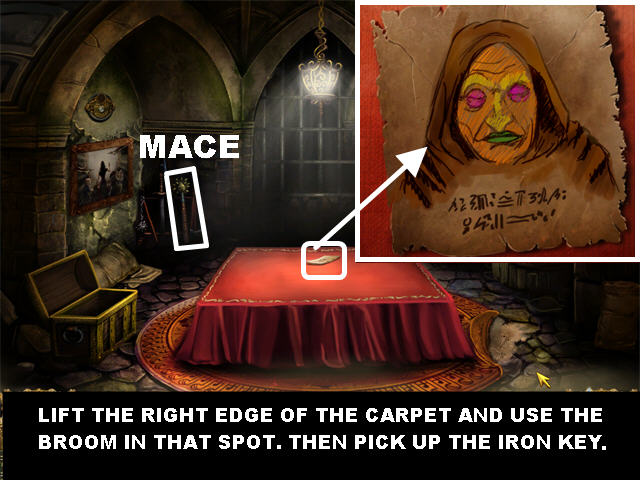
- Pick up the MACE on the left.
- Click on the right edge of the carpet to lift it.
- The BROOM must be placed below the right edge of the carpet.
- Grab the IRON KEY below the carpet.
- Click on the scrap paper on the table that the Goblin left behind.
Goblin Statue Puzzle
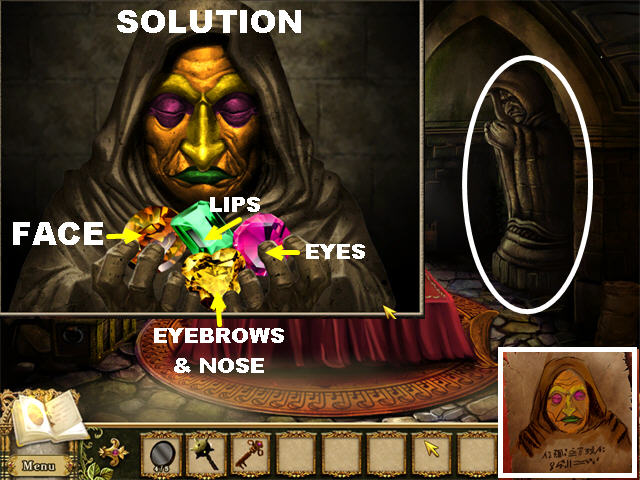
- Click on the statue on the right for a closer view.
- Open your journal to see the right color combination or you can look at the paper on the table.
- Your goal is to place the jewels on the correct places on the faces it will look just like the image on the table.
- Grab a gem to attach it to your cursor. The color will stay attached to your cursor until you pick a different color.
- Place the gem on the part of the face you wish to place it on.
- For the solution please place the gems on these parts of the face:Pink on both Eyes Green Mouth Yellow Eyebrows and Nose Amber on the Face
- I would recommend painting the green lips first since it can be harder to do. Then continue with the rest of the face.
- Click on the right to enter the Secret Library.
Chapter 7
Secret Library
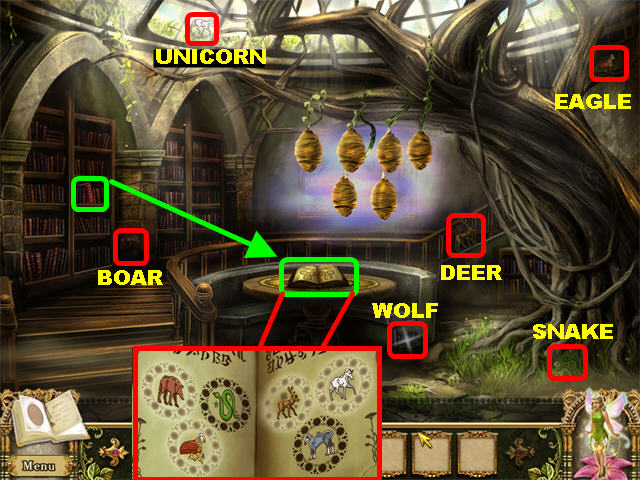
- Pick up the red DUSTY BOOK sticking out of the bookcase on the left.
- Place the DUSTY BOOK on the table.
- Click on the book for a closer look, there are 6 symbols sketched inside the book. Close the book.
- Pick up the WOLF SYMBOL on the lower right side of the booth.
- Pick up the EAGLE SYMBOL in the upper right corner.
- Pick up the DEER SYMBOL on the far right.
- The SNAKE SYMBOL is in the lower right corner.
- Grab the UNICORN SYMBOL in the upper left corner.
- The BOAR SYMBOL is at the bottom of the column in between the 2 bookcases on the left.
- Click on the DUSTY BOOK again to open it.
- Place the 6 ANIMAL SYMBOLS inside the book.
- Close the book and open it back up. Some of the animals are now highlighted in the book. Use this pattern for the cocoon puzzle.
Cocoon Puzzle

- Click on the cocoons in the upper center to trigger a puzzle.
- Your goal is to click on the cocoons so they light up in the correct pattern shown in the Dusty Book.
- The solution is as follows:Top Row: Lit – Dark – Lit – Lit Bottom Row: Lit – Dark
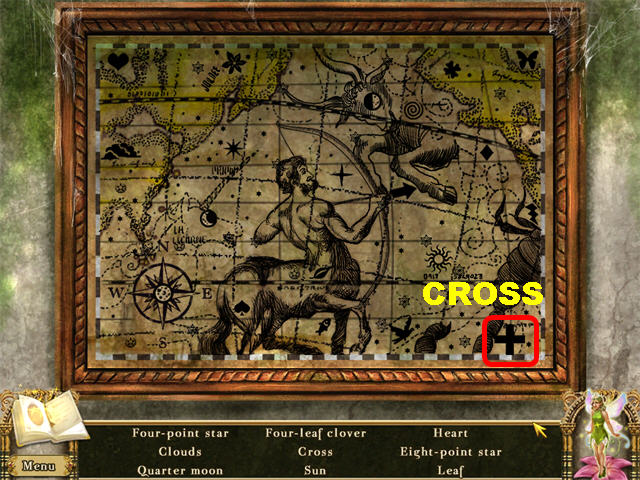
- Click on the map that appears on the back wall to trigger a Hidden Object Scene.
- The CROSS in the lower right corner will be added to your inventory once your search has been completed.
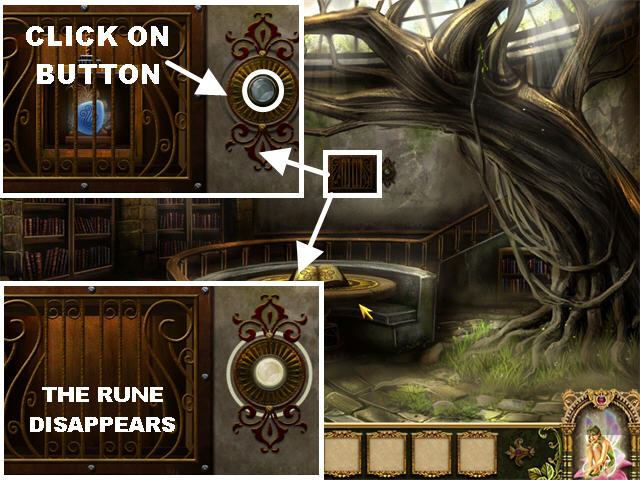
- Click on the dumbwaiter on the back wall for a closer look.
- Click on the button on the right and the Magic Rune disappears down the chute.
- Go back to the Hallway located on the right side of the Kitchen.
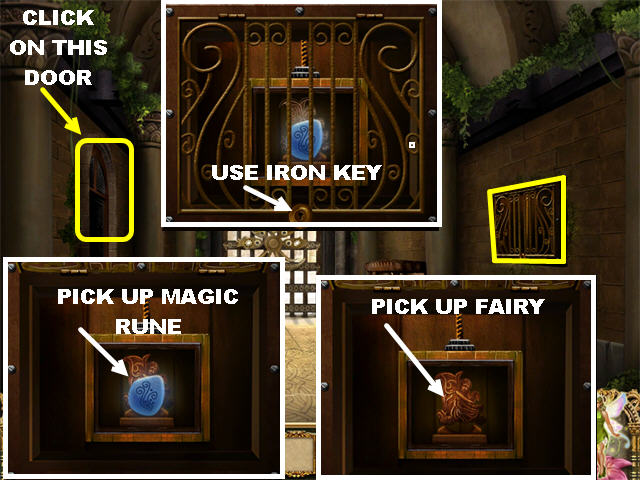
- Click on the dumbwaiter on the right.
- Place the IRON KEY on the lock at the bottom of the dumbwaiter.
- Click on the KEY to unlock it
- Pick up MAGIC RUNE #4 in the dumbwaiter.
- Pick up the FAIRY CARVING that appears behind the Magic Rune.
- Click on the locked door on the left.
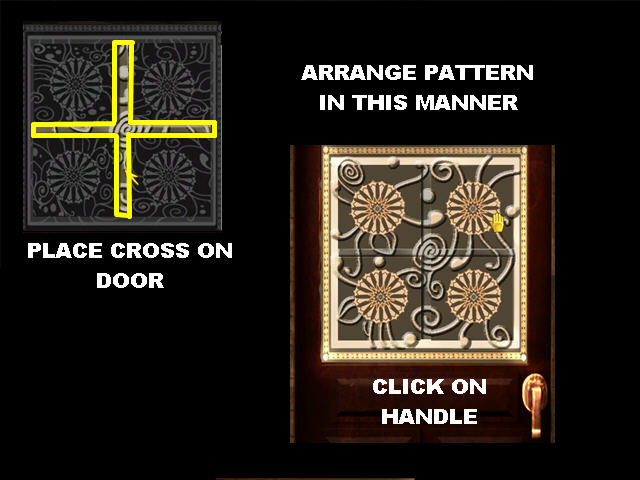
- Place the CROSS on the door to trigger a puzzle.
- Click on the squares to change their pattern.
- Please look at the screenshot for the solution.
- Click on the handle to unlock the door after you’ve entered the correct pattern.
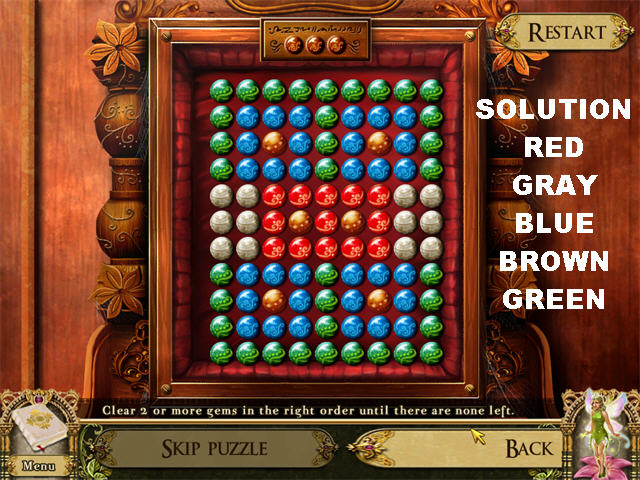
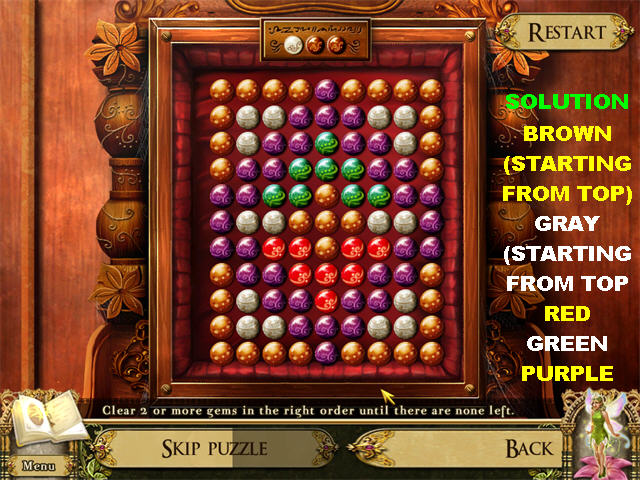
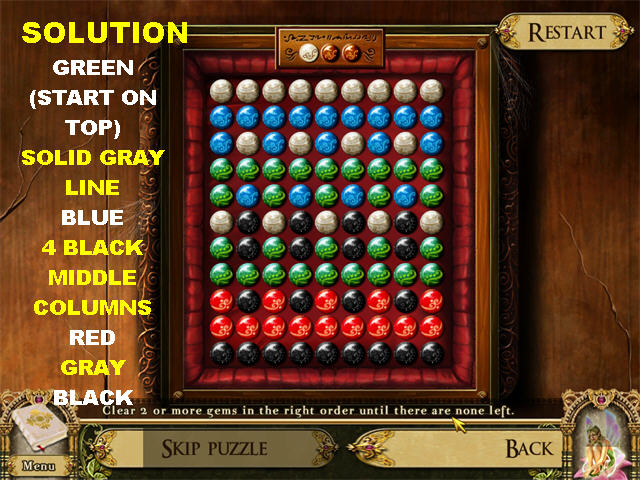
Parlor - Gem Puzzle
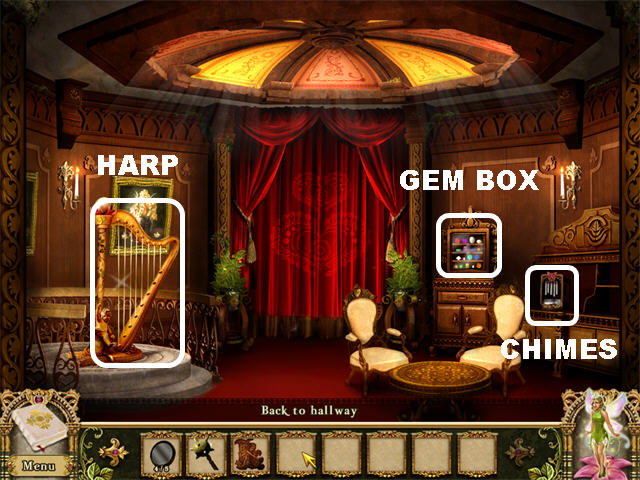
- Click on the gem box on the left to trigger a puzzle.
- Your goal is to eliminate 2 or more gems in the right order until there are none left.
- When you mouse-over the gems all the ones that can be eliminated will glow.
- To eliminate the gems click on them.
- If you do not eliminate the gems in the right order or you will get stuck and will have to restart.
- You can restart the puzzle at anytime by clicking on the Restart button in the upper right.
First Set Solution
- To solve this puzzle please eliminate the marbles in this order:
Second Set Solution
- To solve this puzzle please eliminate the marbles in this order:
Third Set Solution
- To solve this puzzle please eliminate the marbles in this order:
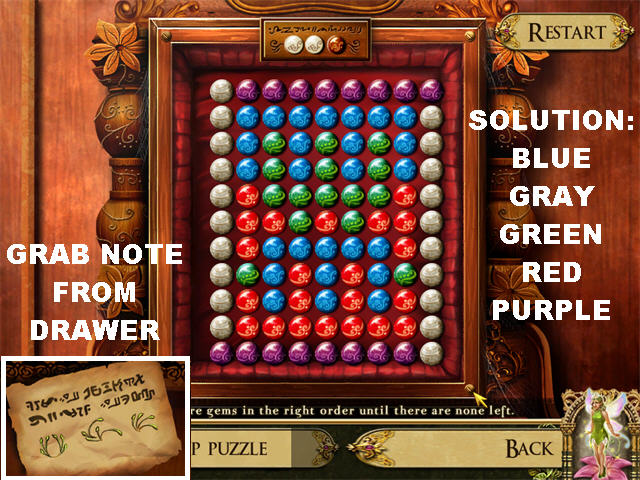
- Click on the sparkly drawer that appears below the puzzle upon its completion.
- Click on the note inside the drawer and it states:"The legs upon which we stand, from many to few."
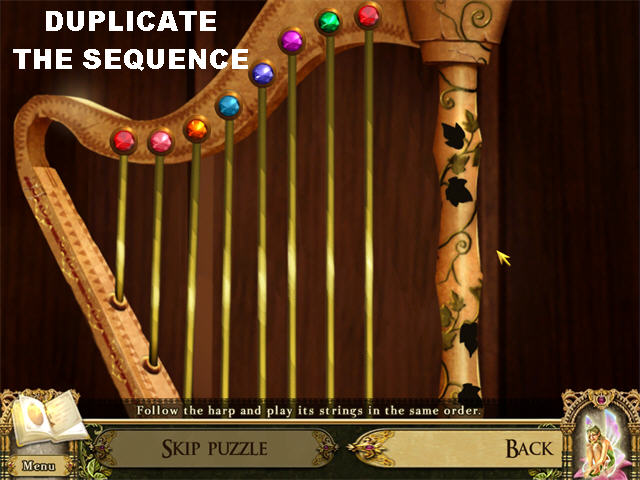
Harp Mini-game

- Click on the harp on the left to trigger a puzzle.
- This is another Simon Says game in which you need to reproduce the musical sequence.
- The solution for this section is random.
- If you click on a wrong string it will turn red.
- Complete 4 sequences to win the game.
- Once this puzzle has been solved, the curtain will open.
Mirror Puzzle
- Click on the mirror in the back of the room upon the completion of the puzzle.
- Open your journal to the page marked "A Riddle."
- The riddle states:"The legs upon which we stand, from many to few."
- Click on any 2 items to swap their positions.
- Place the images starting with the ones that have the most stems and ending with the one with the least amount of stems.
- The solution starting from the top and going clockwise is: 6 – 5 – 4 – 3 – 2 - 1
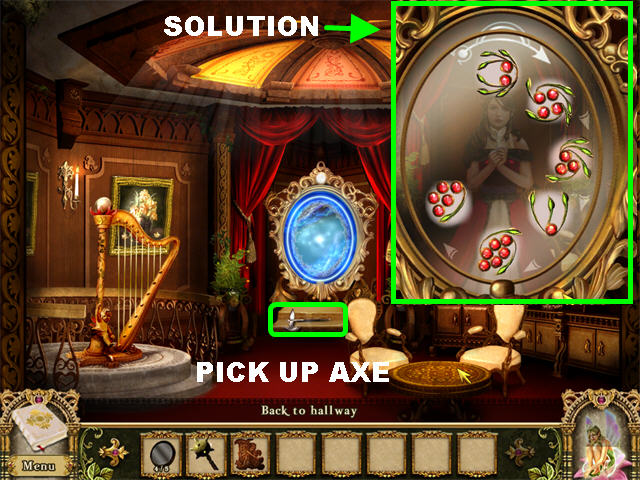
- Pick up the AXE that appears below the mirror.
- Go through the mirror.
The Reverse Parlor
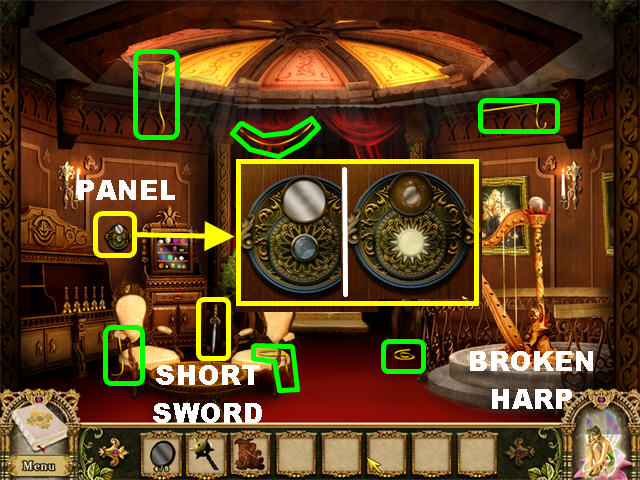
- Pick up the 6 STRINGS FOR THE MAGIC HARP circled in green in the screenshot.
- Grab the SHORT SWORD on the lower left side of the scene.
- Click on the panel on the left for a closer view.
- Pick up GLASS DISC #5 on top of the panel. Behind the disc there is an imprint of a round mirror.
- Click on the switch at the bottom of the panel.
Harp Mini-game
- Place the 6 HARP STRINGS on the broken harp on the right. Click on the harp again to trigger a mini-game.
- This is another Simon Says game in which you need to reproduce the musical sequence.
- The solution for this section is random.
- If you click on a wrong string it will turn red.
- Complete 4 sequences to win the game.
- You will receive the SPARKLING CRYSTAL at the end of this game.
Reverse Gem Box Puzzle
- Click on the reverse gem box on the left.
- Your goal is to eliminate 2 or more gems in the right order until there are none left.
- When you mouse-over the gems the ones that can be eliminated will glow.
- To eliminate the gems click on them.
- If you do not eliminate the gems in the right order or you will get stuck and will have to restart.
- You can restart the puzzle at anytime by clicking on the Restart button in the upper right.
First Solution
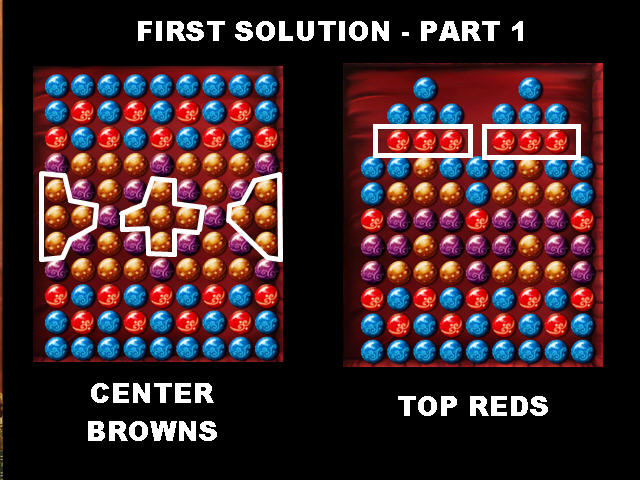
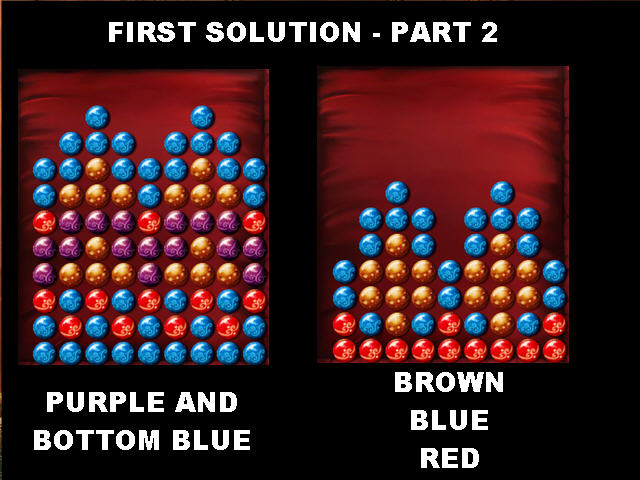
- To solve this puzzle please eliminate the marbles in this order:
Second Solution
- To solve this puzzle please eliminate the marbles in this order:
Third Solution
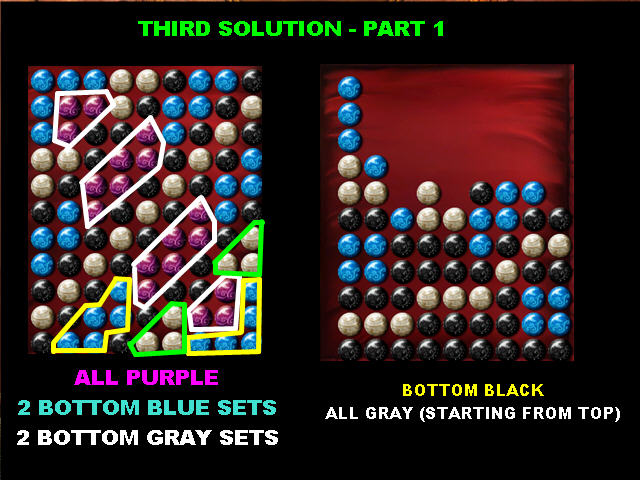
- To solve this puzzle please eliminate the marbles in this order:
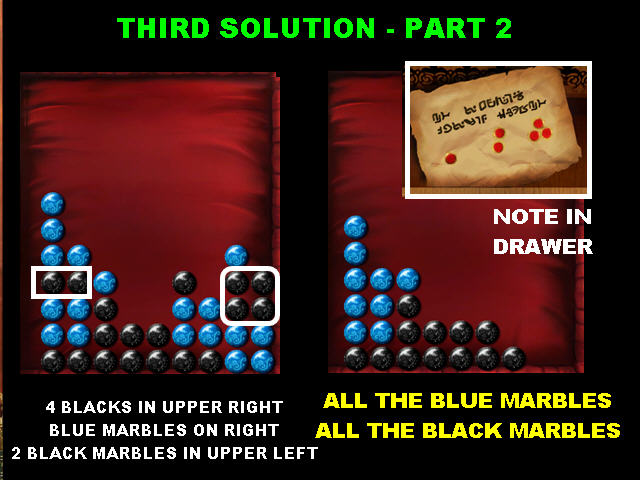
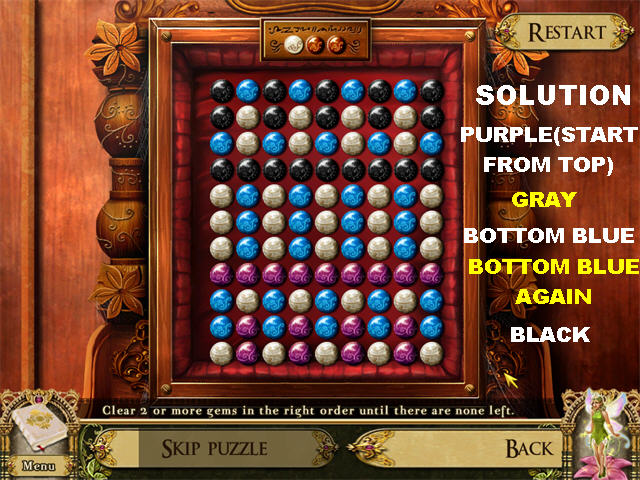
- 4 Black Marbles on Upper Right Blue Marbles on Right 2 Black Marbles in upper Left All the Blue Marbles All the Black Marbles
- Click on the note in the drawer which states:"The eyes upon which we see, from few to many."
Bells
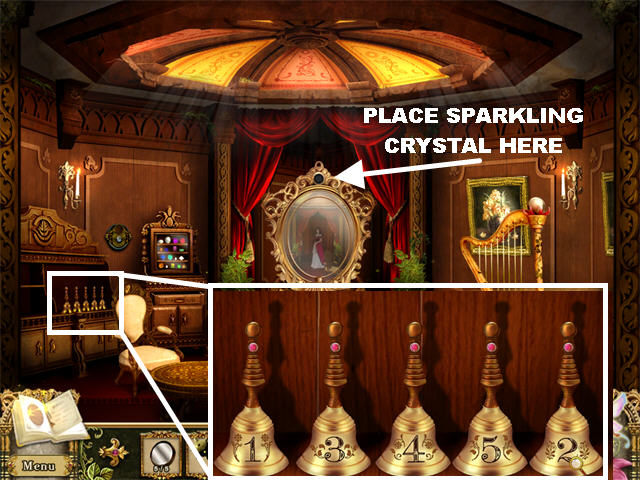
- Click on the bells on the left.
- Click on all the bells until a number is displayed on each of them.
- Click on your journal to find the musical code which states: "A code was engraved behind these bells: ring the 1st, then the 3rd. Then ring the 4th, 5th, and end with the 2nd.
- Place the SPARKLING CRYSTAL above the mirror on the back wall.
- Click on the mirror to trigger a puzzle.
Mirror Puzzle

- The solution to this puzzle can be found by turning to the page in the journal marked "Another Riddle" which states:"The eyes upon which we see, from few to many."
- Place the flowers with the least amount of seeds (eyes) on top of the puzzle and then increase the numbers as you go clockwise.
- Place the seeds starting from the top and going clockwise as follows: 1-2-3-4-5-6
- Click on the mirror to go back to the Parlor.
Parlor
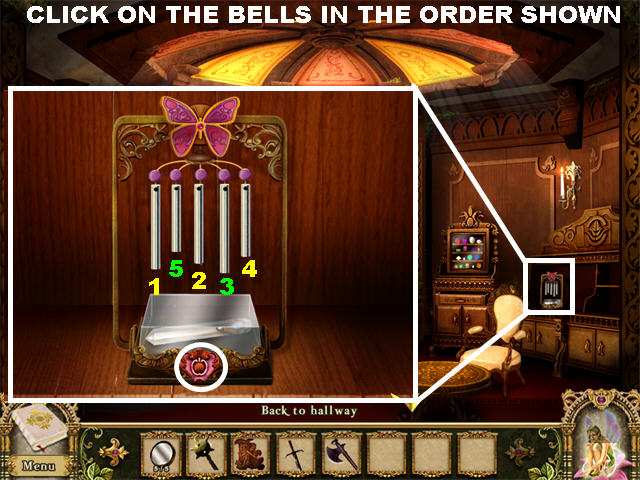
- Click on the chimes on the right to trigger a puzzle.
- Click on your journal and the Musical Code says: "A code was engraved behind these bells: ring the 1st, then the 3rd. Then ring the 4th, 5th, and end with the 2nd."
- For the solution, please click on the chimes in the following order: 1-3-4-5-2
- Click on the red button at the bottom of the chimes after you’ve pressed the chimes correctly.
- You will receive PRISM #1 in your inventory.
- Go back to the Hallway.
Hallway – Glass Disc Puzzle
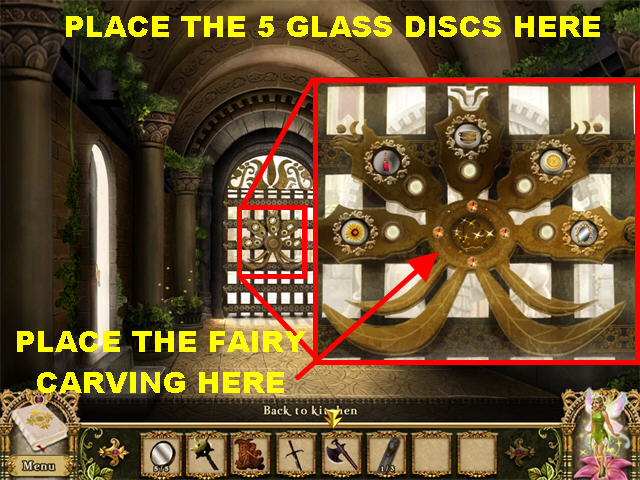
- Click on the back door for a closer view.
- Place the Glass Discs on the slots.
- If some of the lights are not on it means that you forgot to click on the switch in one of the rooms.
- Go back to the room in which you forgot to click on the switch. The code for the rooms is as follows:South Tower Landing – Flower Alchemy Lab – Potion Bottle Kitchen – Cauldron Gambling Den – Coin Reverse Parlor - Mirror
- Come back here after you’ve clicked on all the switches.
- Place the FAIRY CARVING in the center of the puzzle upon the completion of the puzzle.
- Go through the door to access the Entrance Hall.
Chapter 8
Entrance Hall
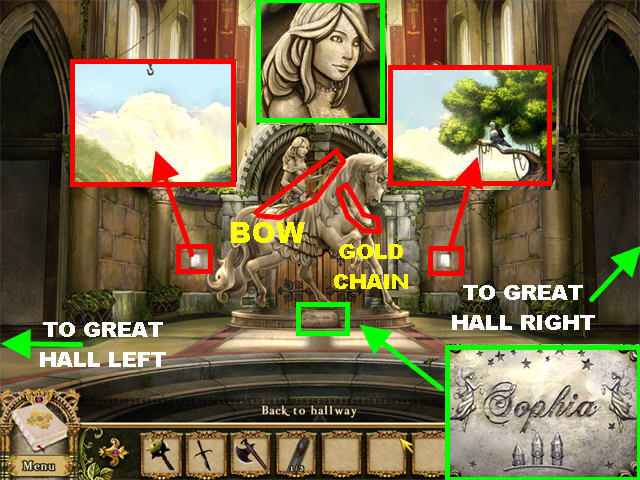
- You can access the Great Hall Left or the Great Hall Right from this location.
- Pick up the GOLD CHAIN on the horse’s neck.
- Pick up the BOW from the lady’s hand on top of the horse.
- Click on the right window on the back wall.
- Click on the pigeon to receive this message:"It’s the pigeon from the pond! How do I get the pigeon inside here?"
- Click on the left window and notice the hook in the top center. You don’t have all the necessary tools right now; you will have to come back to it later.
- Click on the face of the female statue on the horse for a closer look.
- Click on the inscription at the bottom of the horse, the inscription says Sophia and shows 3 prism symbols.
- Go left to enter the Great Hall Left.
Great Hall Left
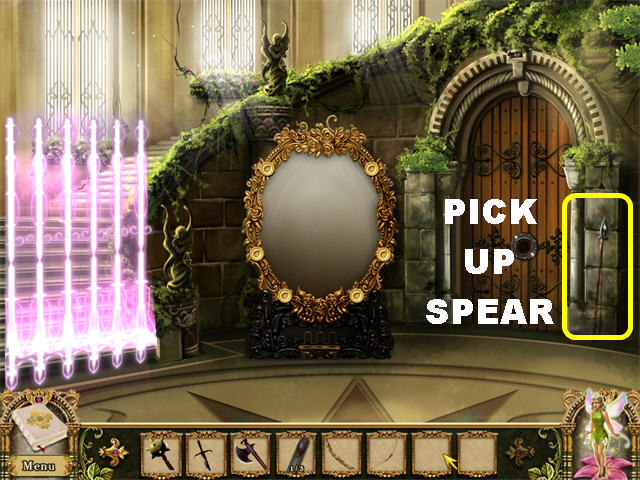
- Pick up the SPEAR on the right side of the door.
- Go down and then right to enter the Great Hall Right.
Great Hall Right
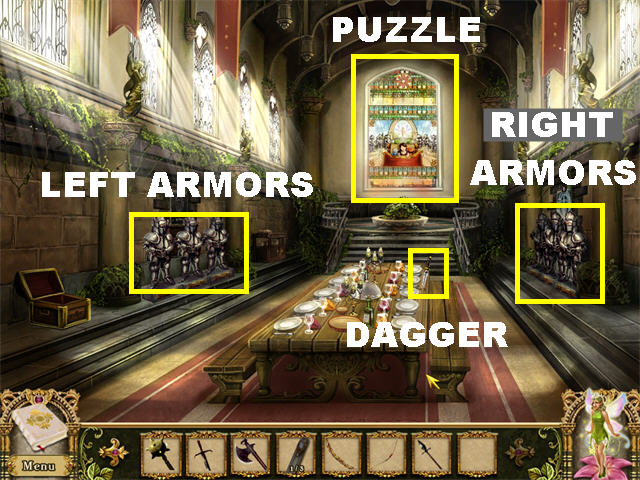
- Pick up the DAGGER on the right side of the table.
- Notice the suits of armors on the left and right side of the scene; you will need to interact with them soon.
Stained Glass Puzzle
- Click on the stained glass puzzle on the back wall.
- Click on 2 pieces to swap their positions.
- Correct pieces will lock into place.
- After the puzzle has been solved, pay attention to the direction in which armors are facing.
Left Armored Suits
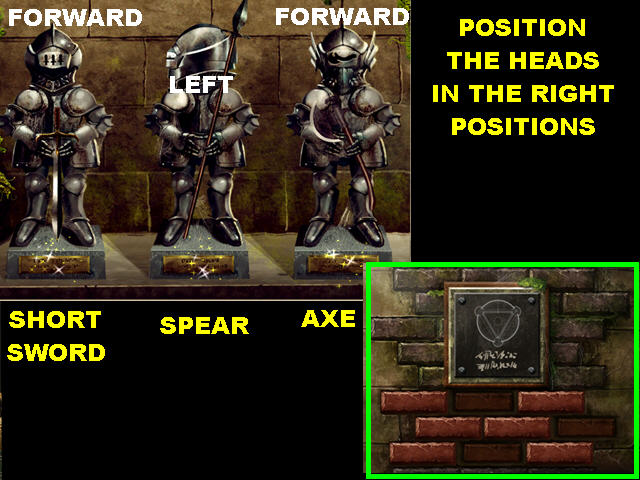
- Click on the suits of armor on the left for a closer view.
- The plaque below the armor on the left states:"An expert swordsman."
- The plaque below the armor on the middle states:"Feared for his mighty spear."
- The plaque below the armor on the right states:"The most famous woodcutter of Goblin Forest."
- Place the SHORT SWORD on the left armor.
- Place the left helmet facing FORWARD.
- Place the SPEAR in the center armor.
- Place the center helmet facing LEFT
- The AXE goes on the right armor.
- Place the right helmet facing FORWARD.
- Pay attention to the way the bricks are pushed in after the puzzle has been solved.
Right Armored Suits
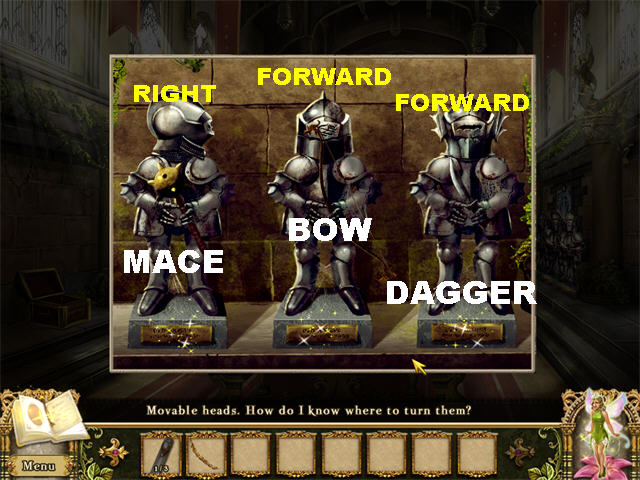
- Click on the suits of armor on the right for a closer view.
- The plaque below the armor on the left states:"Smashes faces with its mace."
- The plaque below the armor on the middle states:"There is no one quicker with the bow."
- The plaque below the armor on the right states:"Do not underestimate his dagger."
- Place the MACE on the left armor.
- Place the left helmet facing RIGHT.
- Place the BOW in the center armor.
- Place the middle helmet facing FORWARD.
- The DAGGER goes on the right armor.
- Place the right helmet facing FORWARD.
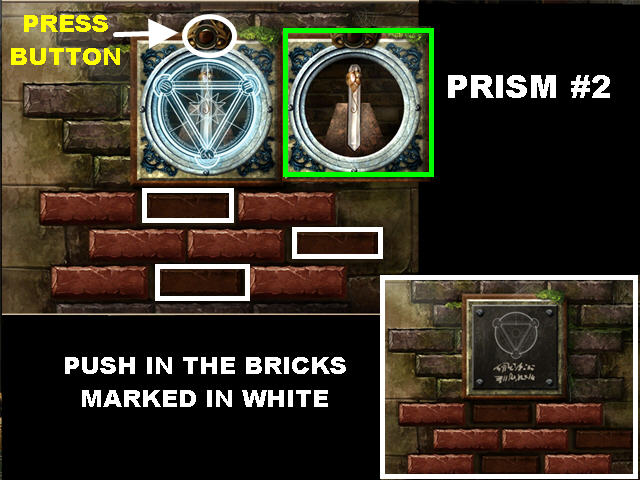
- After the puzzle has been completed, a puzzle will appear. The solution can be found by looking at the brick pattern on the left.
- Please click on the following bricks so they form the following pattern:First Row: OUT – IN – OUT Second Row: OUT – OUT – IN Third Row: OUT – IN – OUT
- Press the button above the puzzle after the bricks have been placed correctly.
- Pick up PRISM #2 on the wall after the puzzle has been solved.
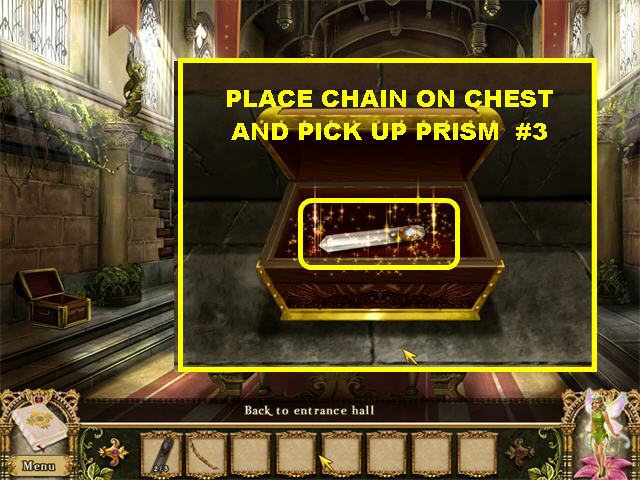
- Click on the chest on the lower left for a closer look.
- Place the GOLD CHAIN inside the chest.
- Pick up PRISM #3 inside the chest.
- Go down and then left to access the Great Hall Left.
Great Hall Left
- Click on the base of the large mirror.
- Place the 3 PRISMS into the slots.
- Open your journal to the page marked "Inscription" to see the positions of the crystals.
- Click on the crystals to place them in the following order from left to right: DOWN – UP – UP
- Click on the red button to activate the mirror.
- Click on the mirror for a closer view and you’ll notice there are 6 empty slots around the mirror. You can return to this area later.
- Go up the left steps.
Second Floor Landing
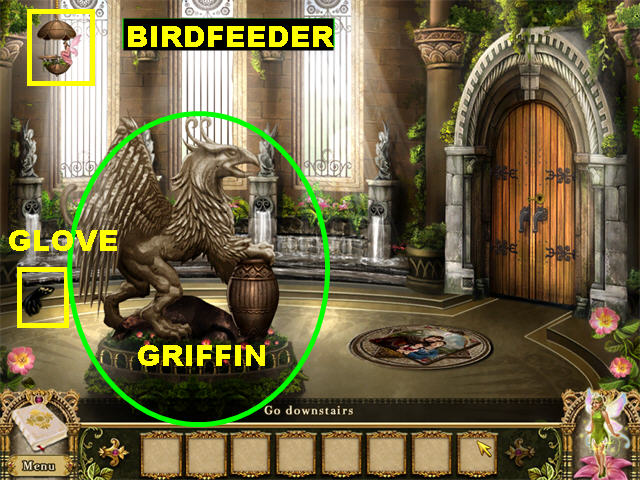
- Pick up the GLOVE in the lower left corner.
- Pick up the BIRDFEEDER in the upper left.
Griffin Puzzle
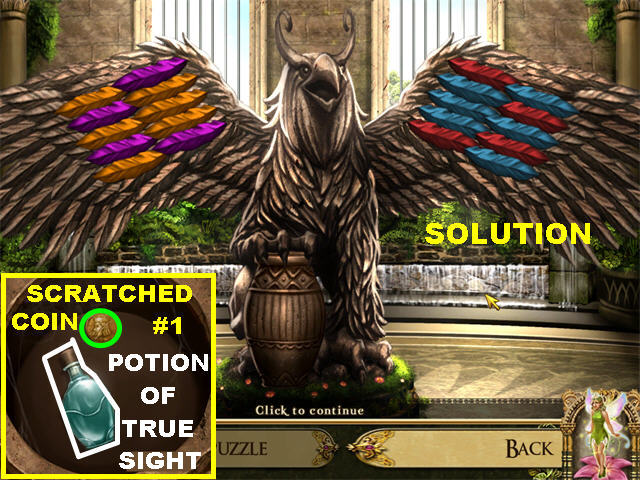
- Click on the large griffin statue on the left.
- Your goal is to swap the feathers on the right wing to match the mirror image pattern on the left wing.
- Click on any 2 feathers to swap their positions.
- Please look at the screenshot for the solution.
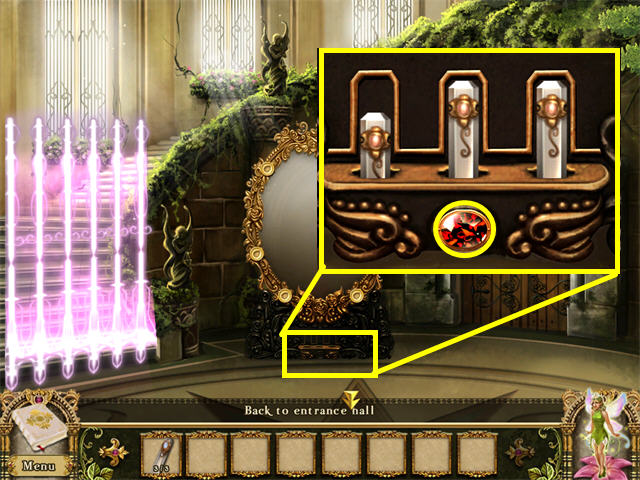
- Click on the vase the griffin is holding for a closer look.
- Pick up the POTION OF TRUE SITE inside the vase.
- Grab SCRATCHED COIN #1 inside the vase.
Mosaic Puzzle
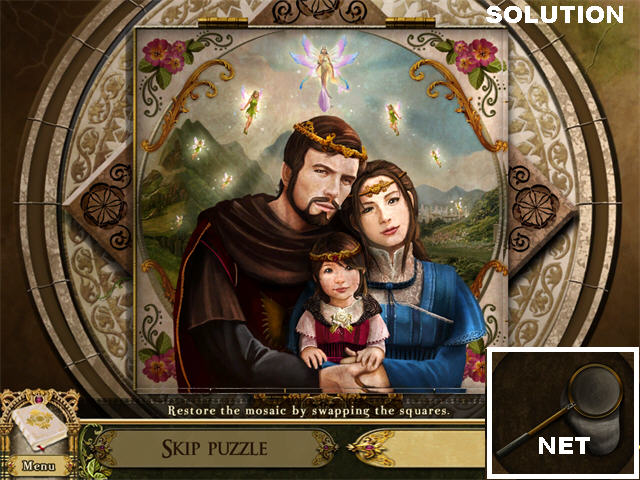
- Click on the mosaic on the floor to trigger a puzzle.
- Your goal is to restore the picture.
- Click on any 2 squares to swap their positions.
- Please look at the screenshot for the solution.
- Click on the NET that appears after the puzzle has been solved.
Keys Mini-game
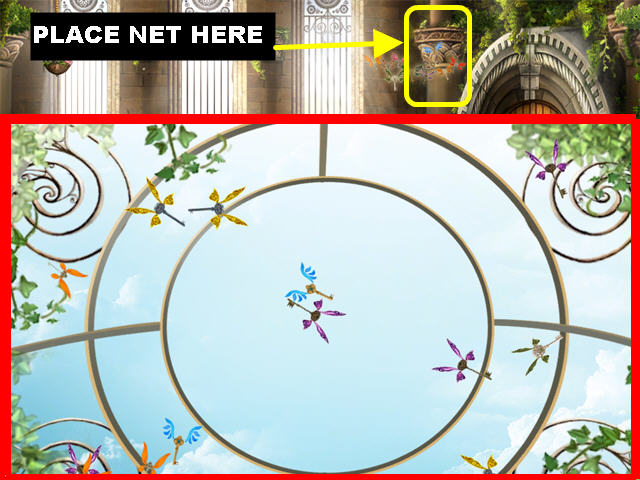
- Place the NET on the pillar on the left side of the door to trigger a puzzle.
- Your goal is to eliminate all the matching pairs of keys.
- Click on two matching keys to eliminate them off the board.
- The last FLYING KEY on the board goes into your inventory after you click on it.
- Place the FLYING KEY on the locked door on the right to enter the Art Gallery.
Art Gallery
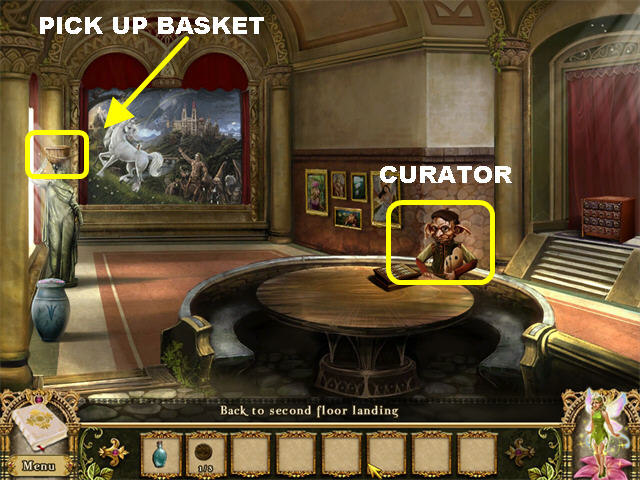
- Pick up the BASKET on the head of the statue on the left.
- Click on the curator Goblin to talk to him; this triggers a puzzle.
Gem Puzzle
- You must eliminate 2 or more gems by clicking on them in the correct order, until none are left.
- When you mouse over the gems, the ones that can be eliminated will glow.
- If you do not eliminate the gems in the correct order, you will have to restart.
- You can restart the puzzle at anytime by clicking on the Restart button in the upper right, or by exiting the puzzle.
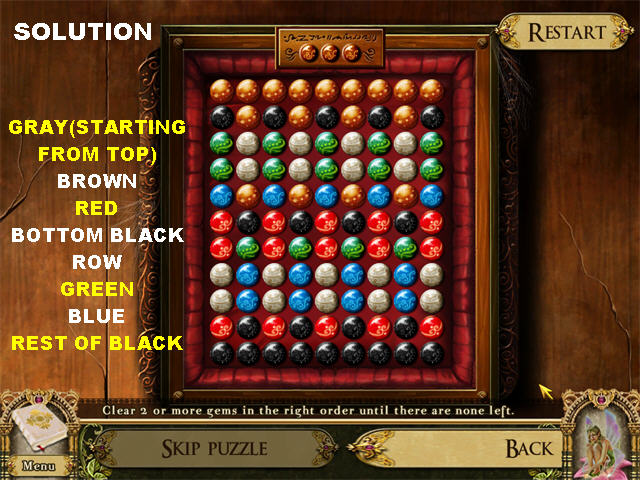
- To solve the first puzzle, please eliminate the marbles in this order:
- To solve the second puzzle, please eliminate the marbles in this order:
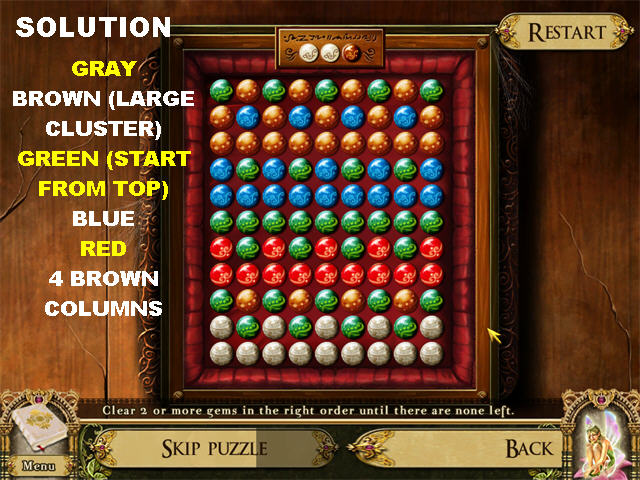
- To solve the third puzzle, please eliminate the marbles in this order:
Drawers Puzzle
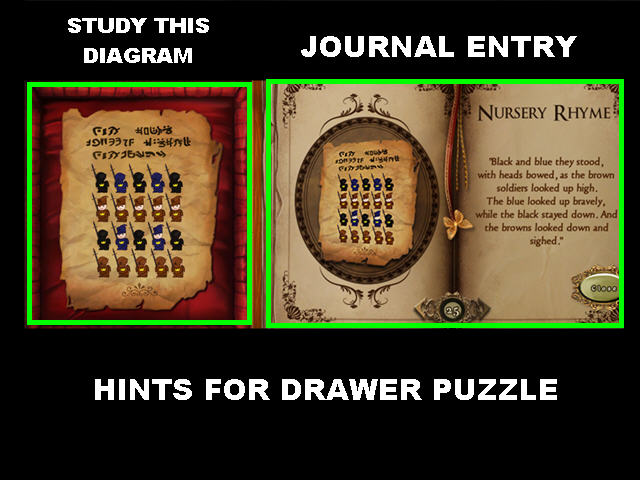
- Click on the gem box after the puzzle has been solved. A long and complicated rhyme has been added to your journal, under the Nursery rhyme page: "Black and blue they stood, with heads bowed, as the brown soldiers looked up high. The blue looked up bravely, while the black stayed down. And the browns looked down and sighed."
- Click on the drawer in the lower right.
- The handles are color coded and must be placed in a particular order. The order appears in the journal.
- When you click on the handles, 3colors will appear: black, blue, and brown.
- Each handle on the colored drawer can be positioned up or down.
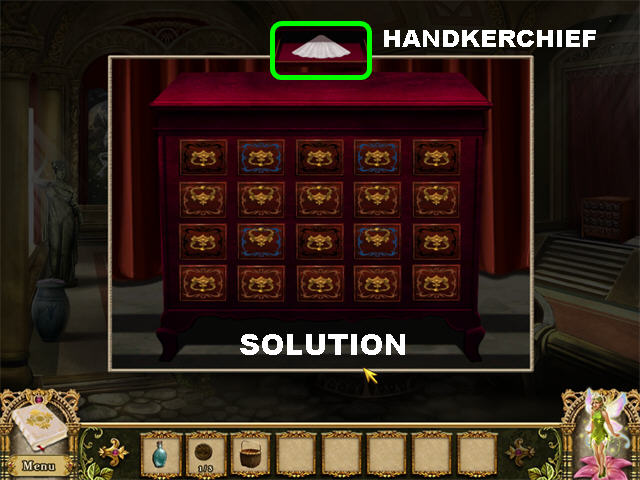
- Place the colors in the following manner to solve the puzzle:
- First Row: Black Down – Blue Down - Black Down – Blue Down - Black Down.
- Second Row: Brown Up - Brown Up - Brown Up - Brown Up - Brown Up.
- Third Row: Black Down – Blue Up - Black Down – Blue Up – Black Down.
- Fourth Row: Brown Down - Brown Down - Brown Down - Brown Down - Brown Down.
- Pick up the HANDKERCHIEF that appears above the puzzle after you solve it.
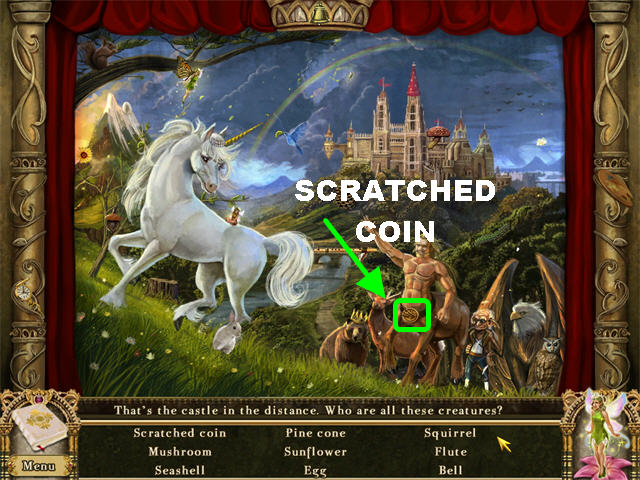
- Click on the sparkly mural on the back wall to trigger a Hidden Object Scene.
- Pick up SCRATCHED COIN #2 around the waist of the centaur.
Paintings Puzzle
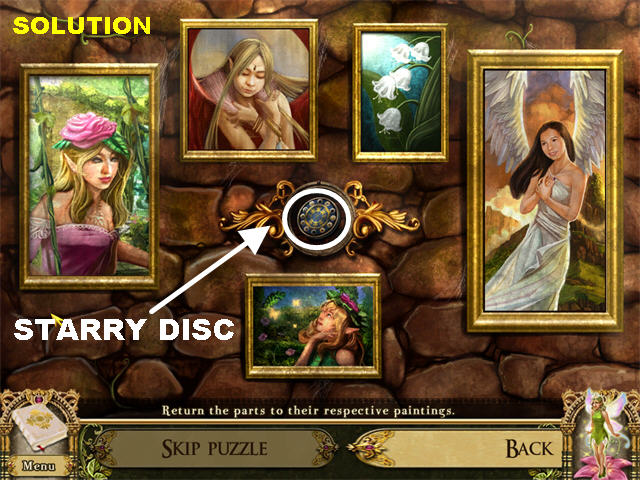
- Click on the set of paintings, on the right wall, to trigger a puzzle.
- Rearrange the paintings so they all look towards the center.
- You can exit the puzzle to look at the paintings on the wall, reminding yourself of their arrangement.
- Click on any 2 tiles, regardless of which painting they are in, to swap their locations.
- Correct tiles will lock into place.
- Pick up the STARRY DISC after the puzzle has been solved.
- Go down to Great Hall Left.
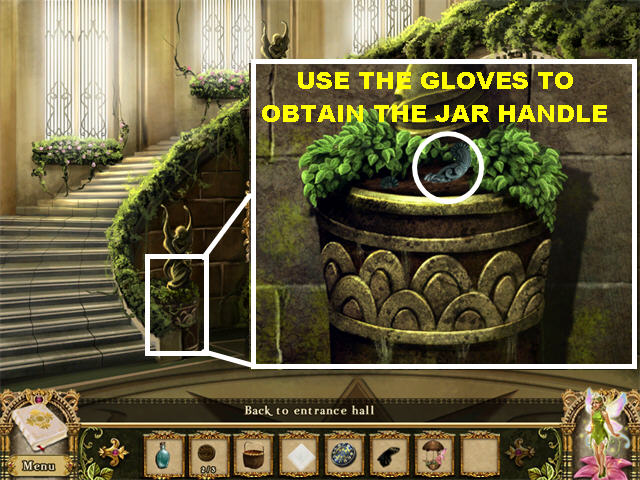
- Click on the potted plant on the left.
- Place the GLOVE on the strange object to pick up the JAR HANDLE inside the potted plant.
- Go back to the Art Gallery.
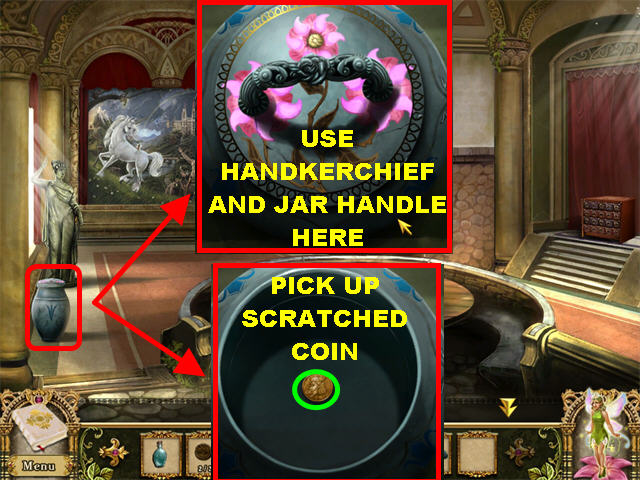
- Click on the jar in the lower left for a close-up.
- Use the HANDKERCHIEF on the jar to clean it.
- Place the JAR HANDLE on the jar; then click on it.
- Pick up SCRATCHED COIN #3 from inside the jar.
- Go back down to the Great Hall Left.
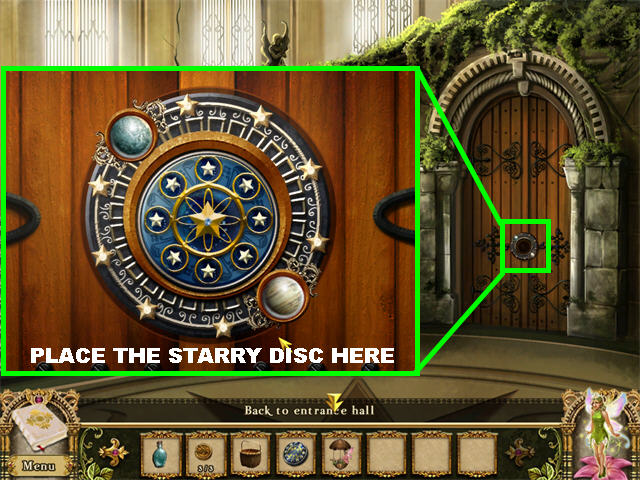
- Click on the door for a closer view.
- Place the STARRY DISC on the door; then go through the door.
Chapter 9
North Tower Lobby
- Click on the dragon keeper on the left to play a round of Goblinjong.
- Match the tiles in pairs until you uncover the keys hidden below the tiles.
- Click on two matching available tiles to eliminate them.
- If a tile is not highlighted you cannot click on it.
- You can click the Restart button, in the upper right, if you run out of moves.
- Once the 2 keys are available, click them to end the round.
- Complete 3 rounds to win the game.
- The DRAGON EGG is added to your inventory once you solve the puzzle.
- The Goblin tells you that if you want to obtain the Magic Rune, you must hatch the egg in the nest on the statue and feed it mushrooms from outside.
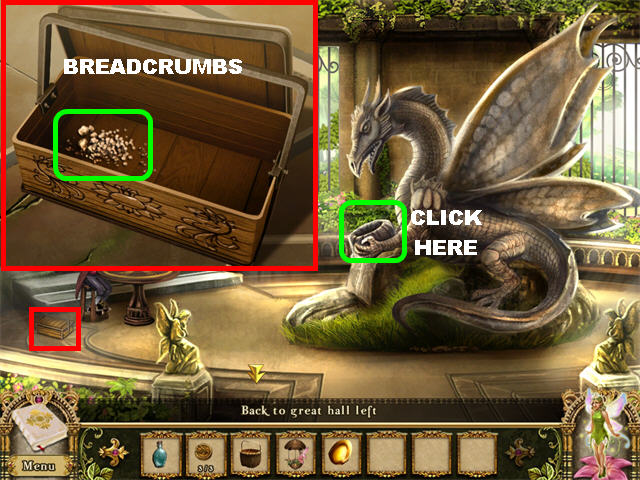
- Click on the lunchbox in the lower left for a closer view.
- Pick up the BREADCRUMBS from inside the lunchbox.
Beetles Mini-game
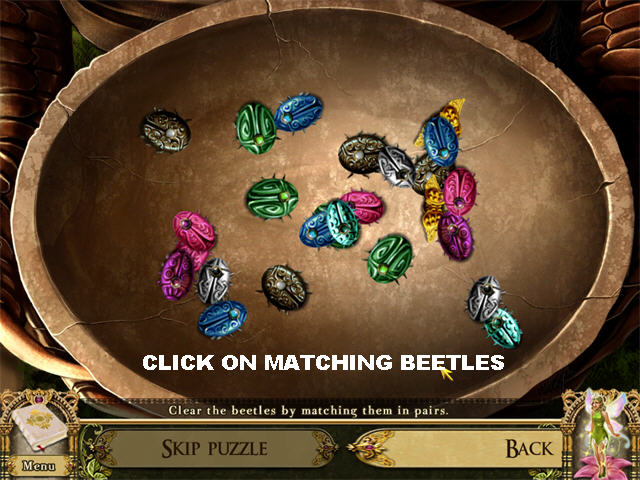
- Click on the bowl (recess) the dragon is holding to trigger a mini-game.
- Eliminate all the matching pairs of beetles in order to clear the recess.
- Click on GOLDEN BEETLE #1 that was left without a pair inside the bowl.
Mushroom Mini-game
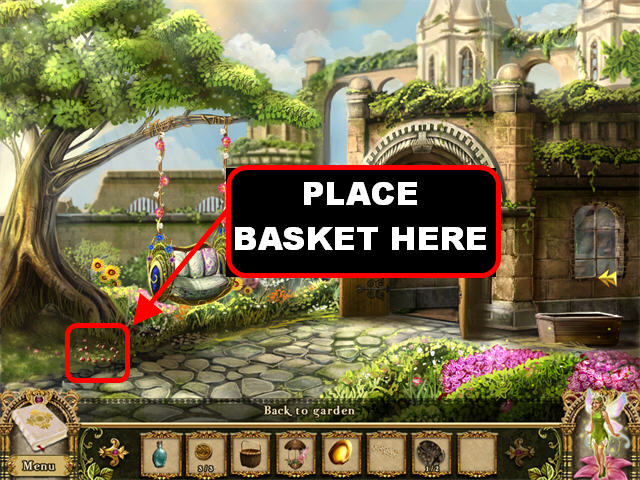
- Go down to the Outside of the Carriage House.
- If you haven’t done so already, click on the fairy ring in the lower left corner; then click on the journal.
- Place the BASKET on the fairy ring in the lower left corner to trigger a mini-game.
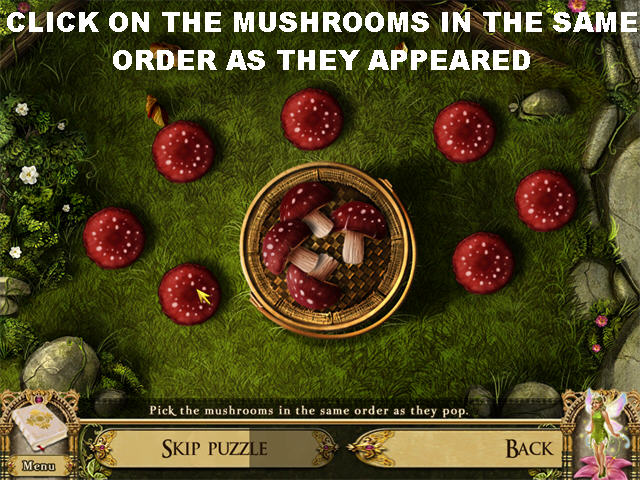
- Click the mushrooms in their order of appearance.
- Each time you complete a sequence successfully, a mushroom will appear in the center basket.
- Complete 5 sequences to beat the game.
- The MUSHROOM will be added to your inventory at the end of this game.
- Go to the Entrance Hall. Take a right by the Kitchen; then go through the door in the back.
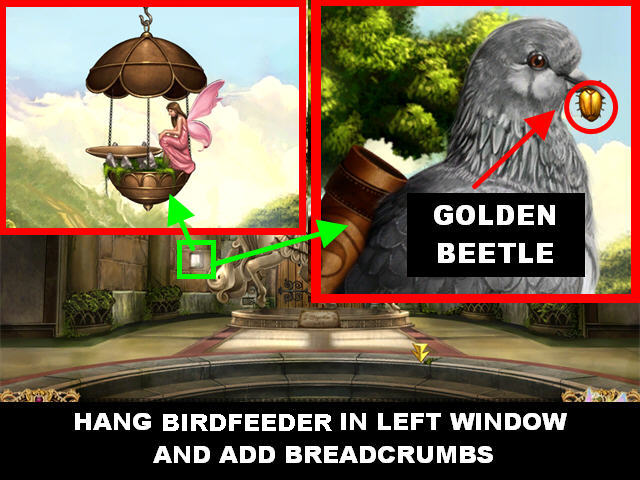
- Click on the left window for a closer view.
- Place the BIRDFEEDER on the hook above the window.
- Place the BREADCRUMBS in the BIRDFEEDER.
- Click on the left window again to see the pigeon.
- Pick up GOLDEN BEETLE #2; the pigeon is holding it in its mouth.

- Go back to the North Tower Lobby. Go through the door located in the Great Hall Left.
- Place the DRAGON EGG into the recess the dragon is holding.
- Click on the egg to make it hatch.
- Give the baby dragon the MUSHROOM from your inventory.
- Pick up MAGIC RUNE # 5 once it lands on the floor.
- Click on the goblin to talk to him. The goblin moves away from the portal; go through it to access the Observatory.
Chapter 10
Observatory
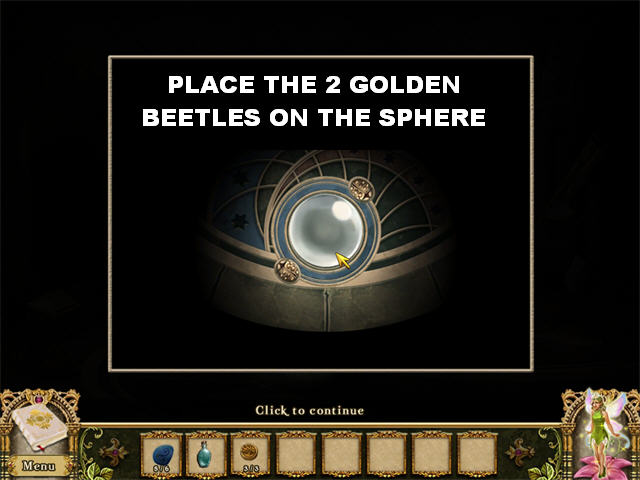
- The room is pitch black when you enter it.
- Click on the sphere in the middle of the ground.
- Place the 2 GOLDEN BEETLES on the sphere to light up the room.
- Click on the astronomer. He tells you the answers you seek can be found in the Book of Truth. Once you find it, you must place it on the stand.
- Click on the engraving on the right side of the wall to add an entry to your journal.
Gargoyle Puzzle

- Click on the gargoyle stand, on the left, to trigger a puzzle.
- Your goal is to reassemble the gargoyle, piece by piece.
- Place the pieces scattered around the scene inside the outline.
- Correct pieces will lock into place.
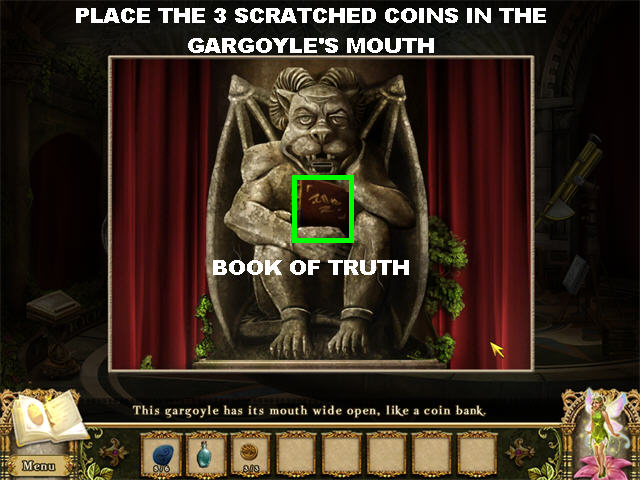
- Click on the gargoyle again.
- Place the 3 SCRATCHED COINS in the gargoyle’s mouth.
- Grab the BOOK OF TRUTH from the gargoyle’s grip.
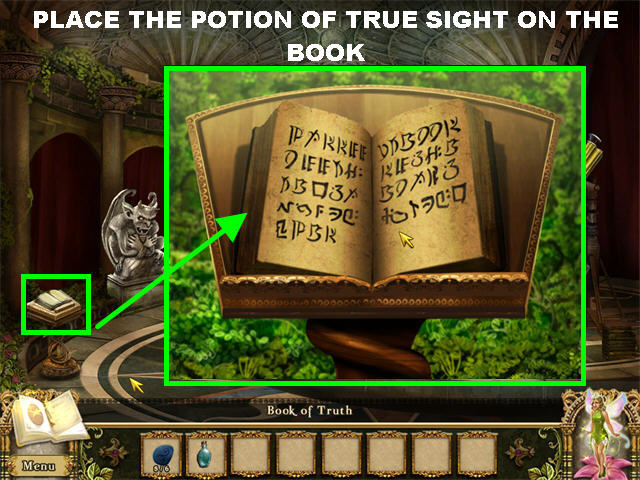
- Place the BOOK OF TRUTH on the stand in the lower left.
- Click on the BOOK OF TRUTH for a closer look.
- Place the POTION OF TRUE SIGHT on the book to reveal some symbols.
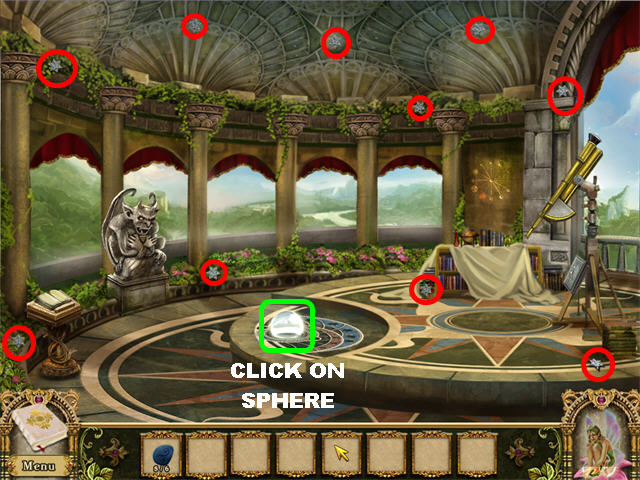
- Click on the sphere on the ground.
- Pick up the 10 TWINKLING STARS circled in red in the screenshot.
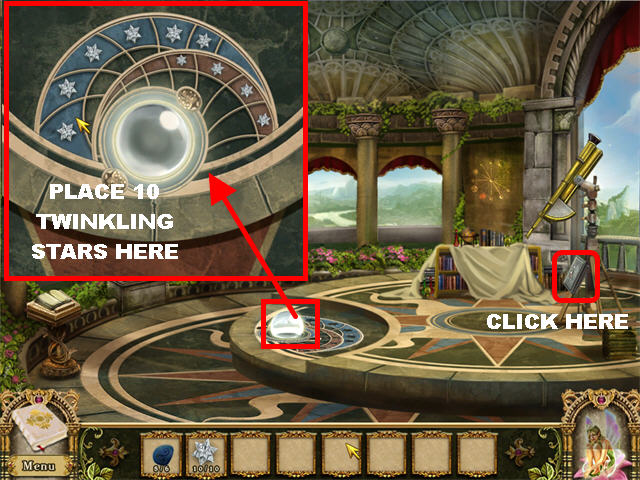
- Click on the sphere on the ground.
- Place the 10 TWINKLING STARS on the sphere.
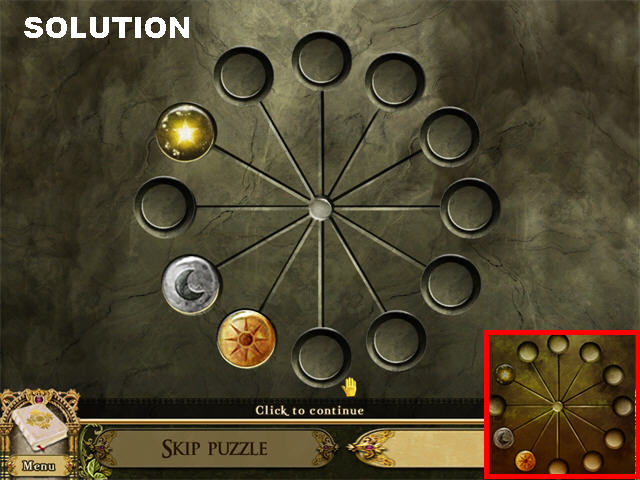
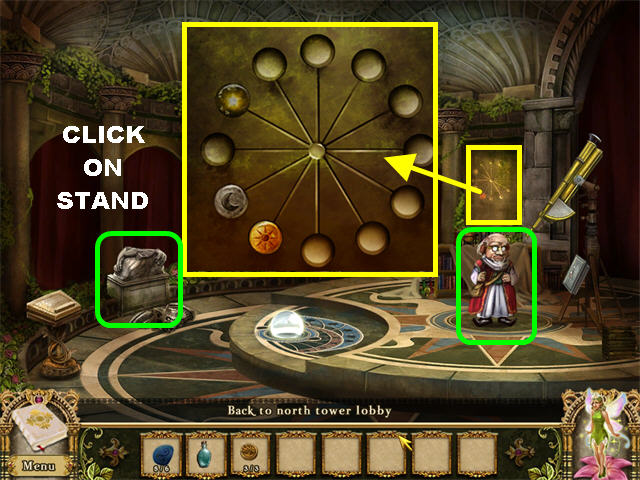
- Click on the panel below the telescope.
- Pick up the sun, moon, and star; arrange them in the 12 circles according to the image on the back wall.
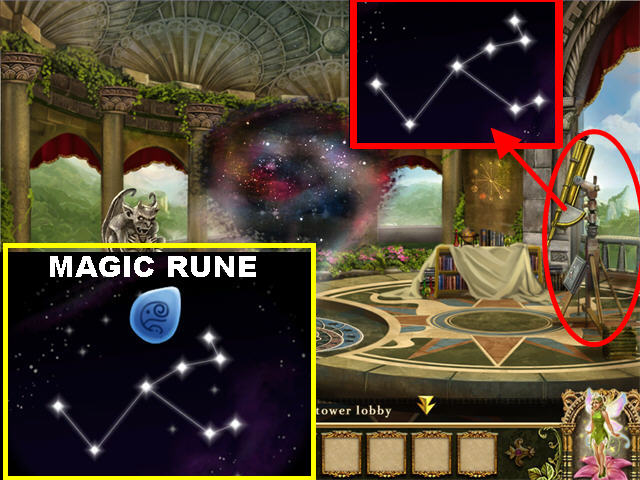
- The telescope is now available; click it to see the constellation.
- Click on the sky map that appears above the sphere.
- Click on each star to make it blink on or off. Your goal is to reproduce the constellation shown in the telescope.
- Use the image in your telescope, along with this screenshot, to solve the puzzle.
- Pick up MAGIC RUNE #6 that appears after the puzzle has been solved.
- Go back to Grand Left Hall by clicking downwards 2 times.
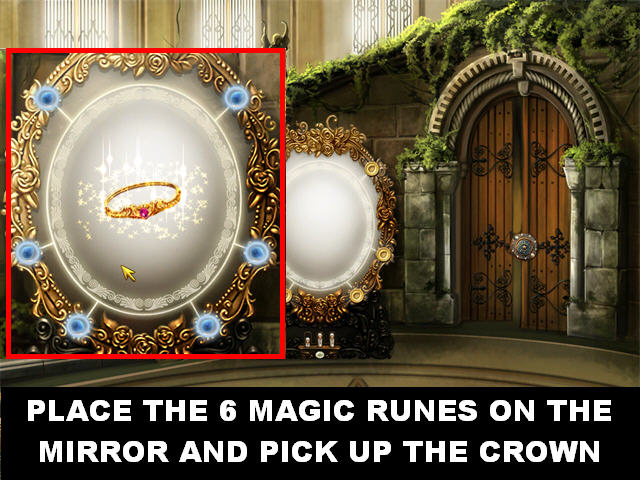
- Click on the large mirror.
- Place the 6 MAGIC RUNES on the mirror.
- Pick up the CROWN that appears in the center of the mirror.
- Go to the Entrance Hall by clicking down once.
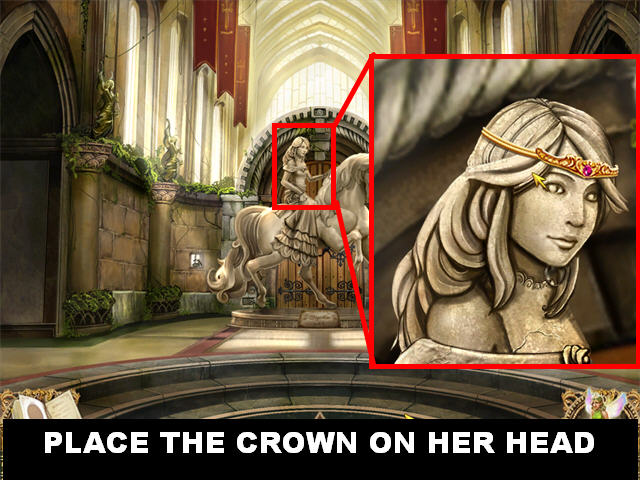
- Click on the head of the statue for a closer look.
- Place the CROWN on the head.
- Leave the castle through the door in the back; enjoy the ending scenes!
Created at: 2010-02-13