

Walkthrough Menu
- General Tips
- Chapter 1: The Village
- Chapter 2: Across the Frozen Lake
- Chapter 3: Trapped
- Chapter 4: The Chief's Hut
- Chapter 5: The Tree
- Chapter 6: Entering the Castle
General Tips
- This is the official guide for Awakening: The Golden Age.
- Hidden-object puzzles are referred to as HOPs. This guide will not show screenshots of the HOPs, however, it will mention when an HOP is available and the inventory item you'll collect from it.
- This guide will not mention each time you have to zoom into a location; the screenshots will show each zoom scene.
- Use the map to travel to a location.
Chapter 1: The Village
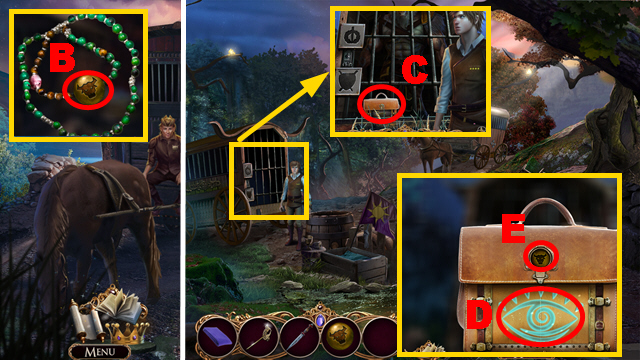
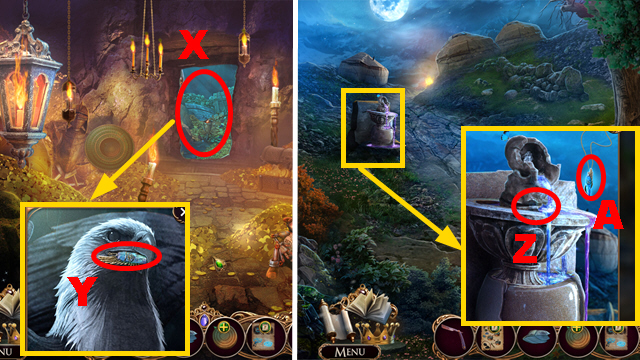
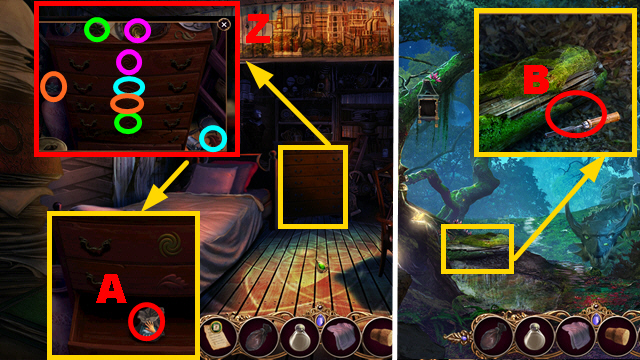
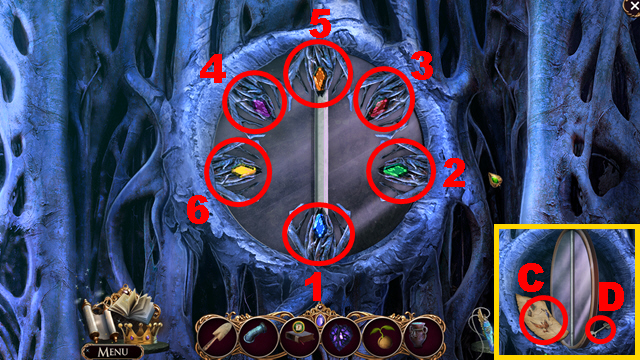
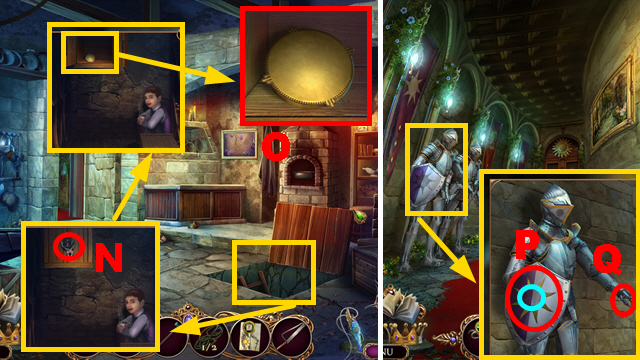
- Talk to Caity (A).
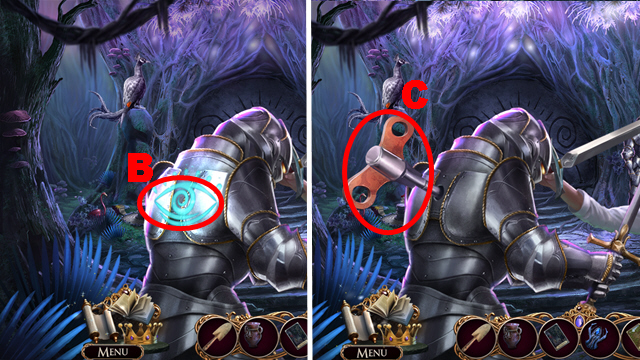
- Move the mirror; take the DRAGON PIECE (B).
- Place the DRAGON PIECE (C).
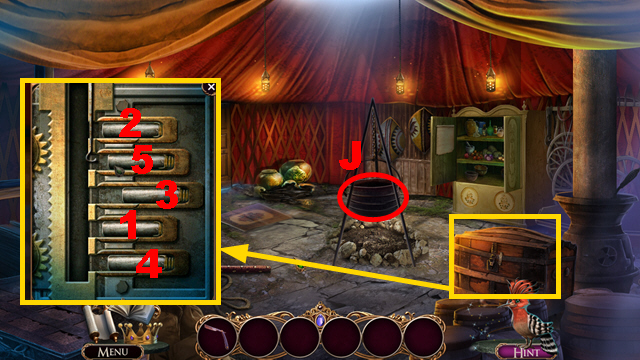
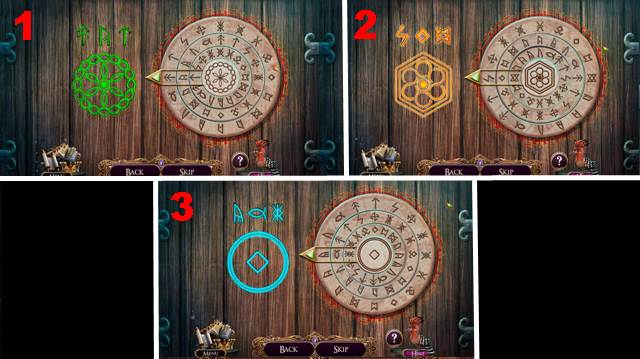
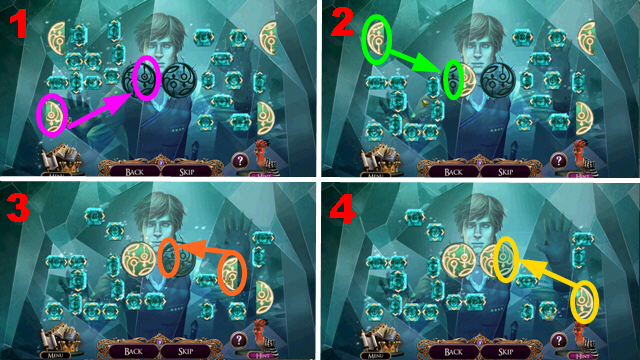
- Play the mini-game.
- Solution: 1-5.
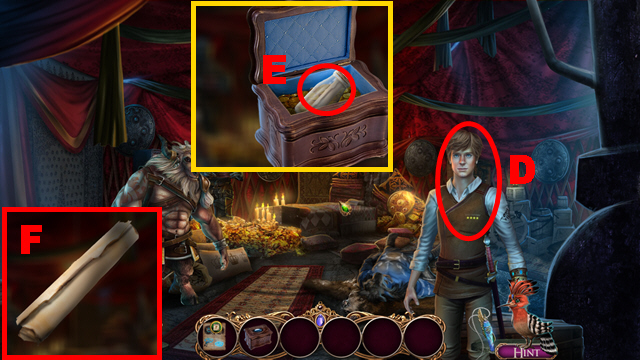
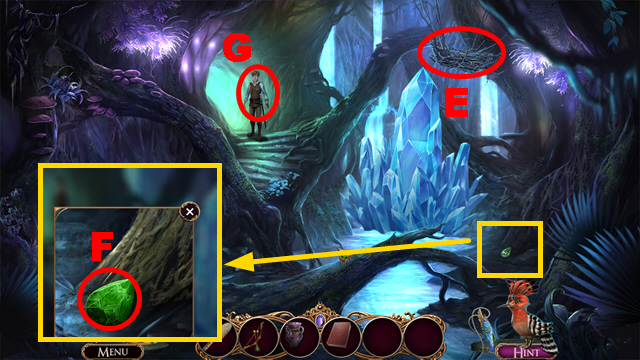
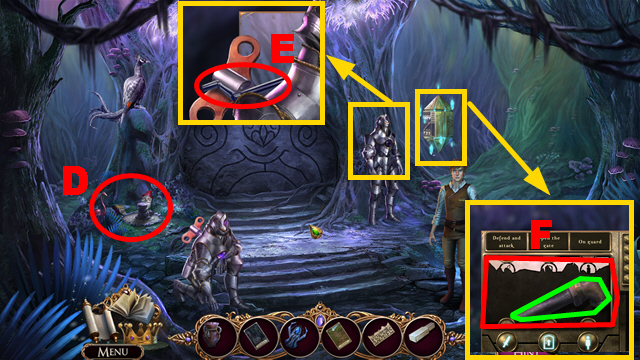
- Take the ALL-SEEING PENDANT (D).
- Move forward.
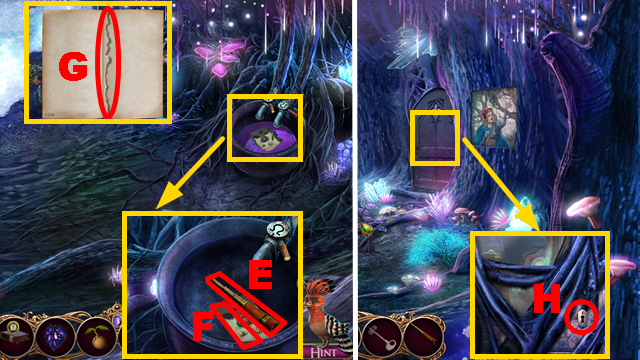
- Take the note (E) and APPLE (F).
- Use the ALL-SEEING PENDANT (G) to play the HOP.
- Take the RANGER'S CREST (H).
- Move forward.
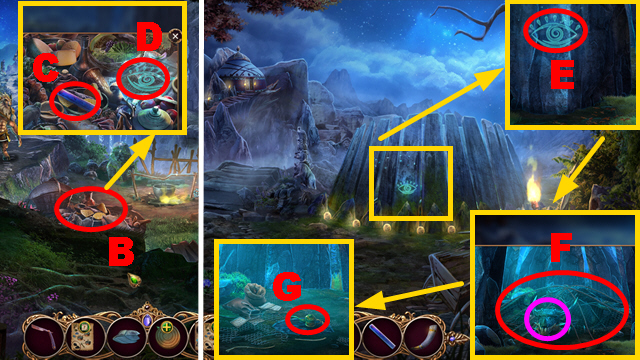
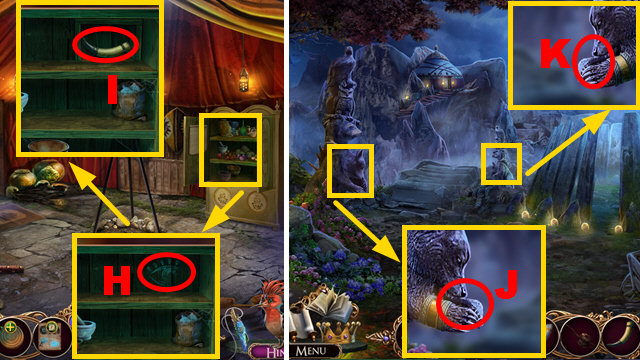
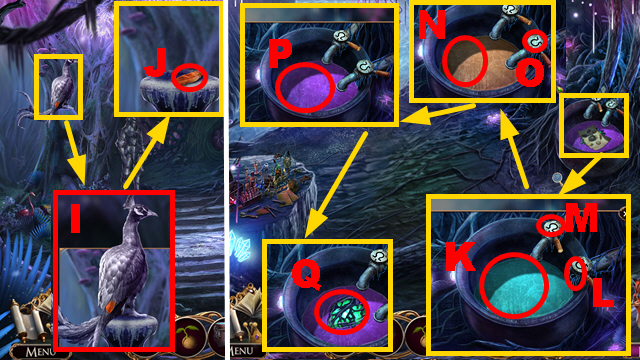
- Take the BUCKET OF FERTILIZER (I).
- Walk down.
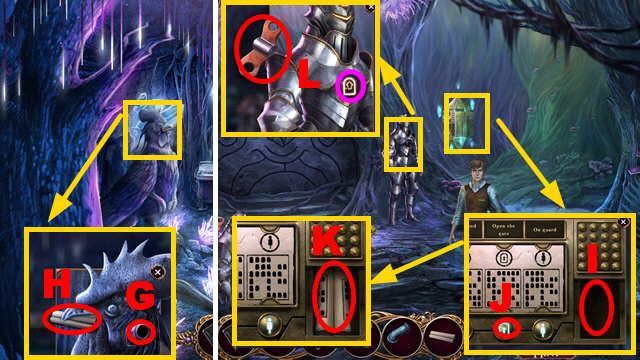
- Place the BUCKET OF FERTILIZER (J); take the HAMMER (K).
- Move forward.
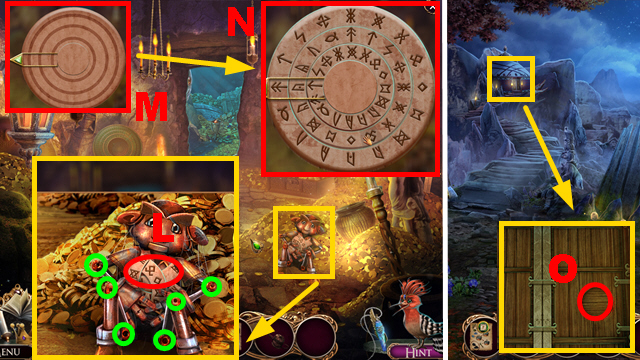
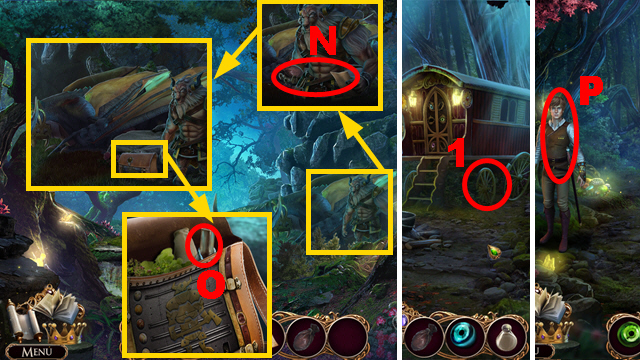
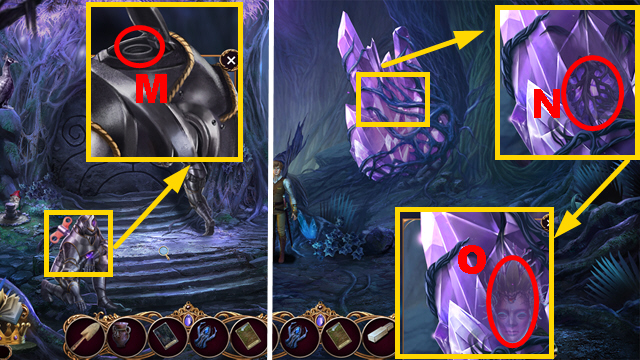
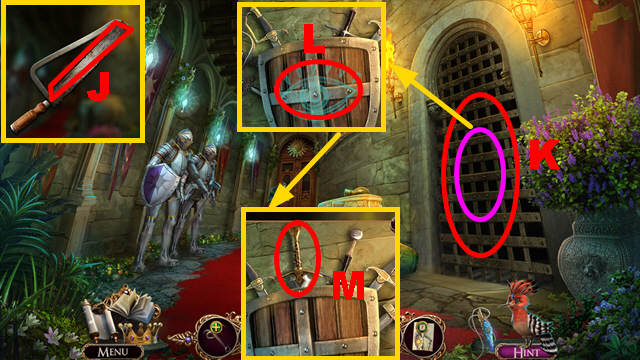
- Use the HAMMER (L); take the PLANK (M).
- Use the PLANK (N).
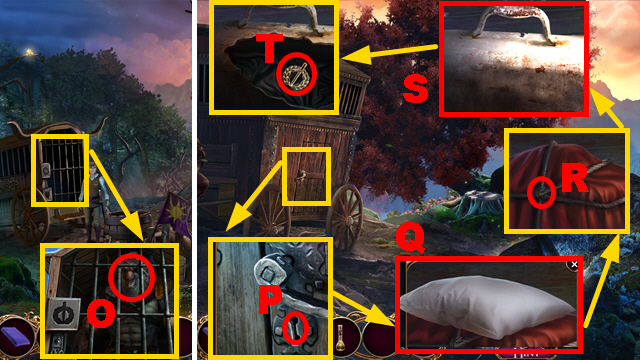
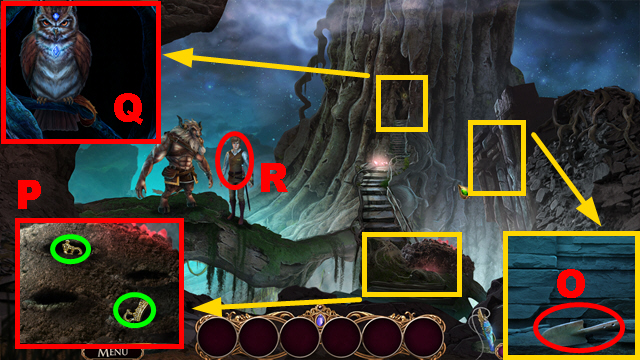
- Remove the photo (O); pull the pot (P).
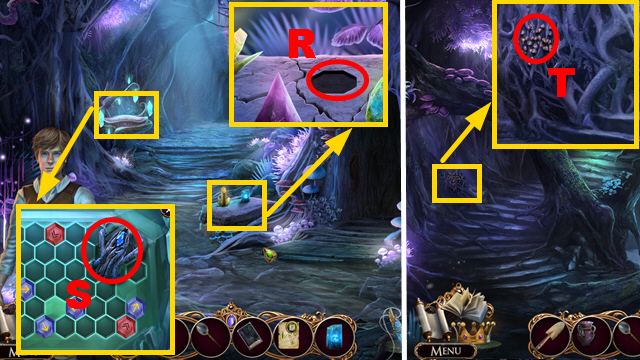
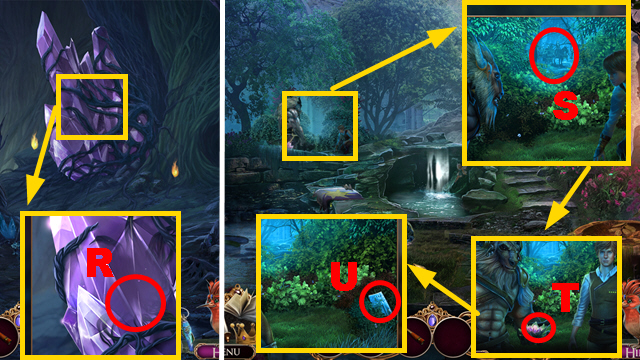
- Take the RANGER'S CREST PIECES (Q) and MAGIC ENERGY LINE (R).
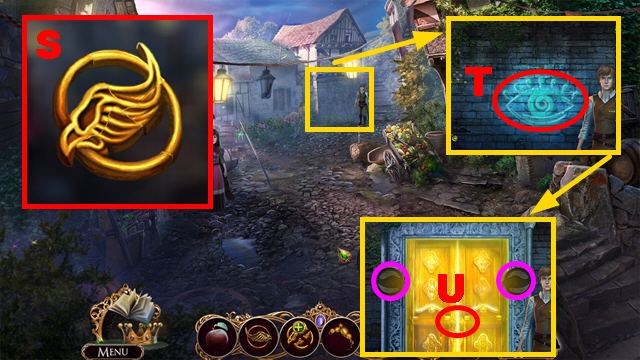
- Reassemble the RANGER'S CREST PIECES (S); take the RANGER'S CREST.
- Use the ALL-SEEING PENDANT (T).
- Place 2 RANGER'S CRESTS (purple); open the door (U).
- Move forward.
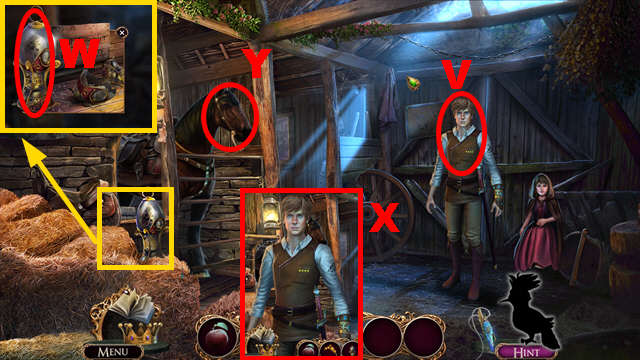
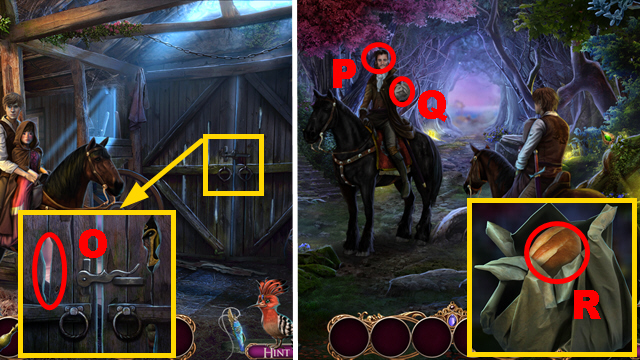
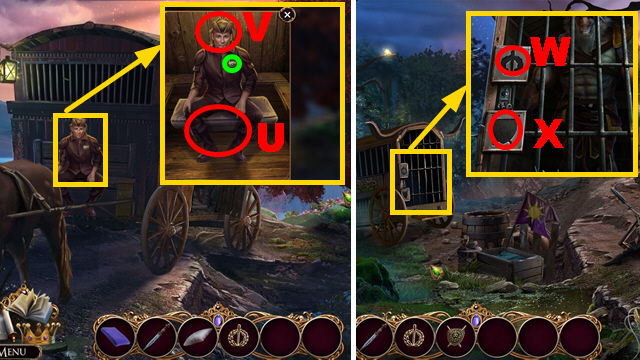
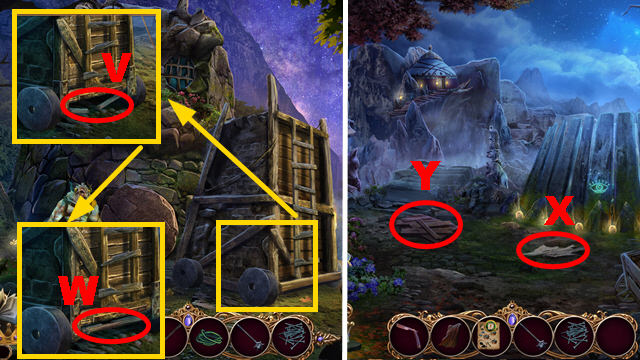
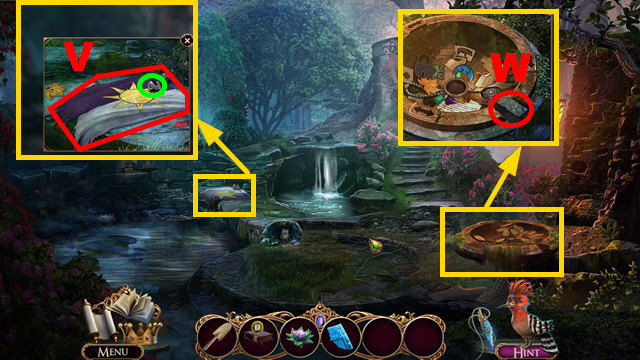
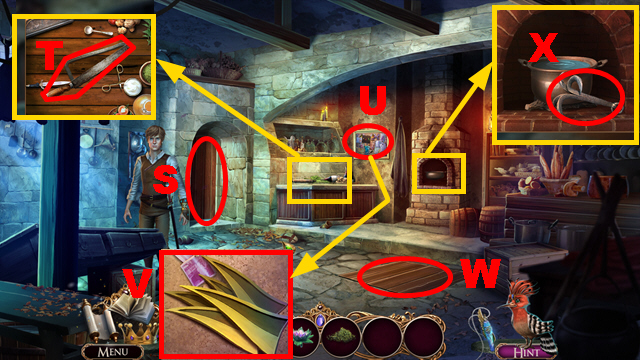
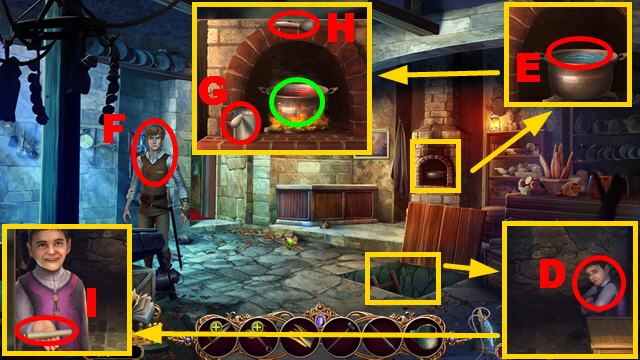
- Talk to Cedric (V).
- Take the HOOPOE INCUBATOR (W).
- Give the HOOPOE INCUBATOR to Cedric (X) to acquire the HEATED INCUBATOR.
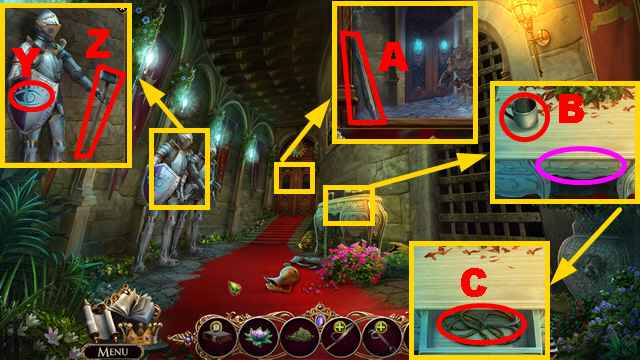
- Give the APPLE to the horse (Y).
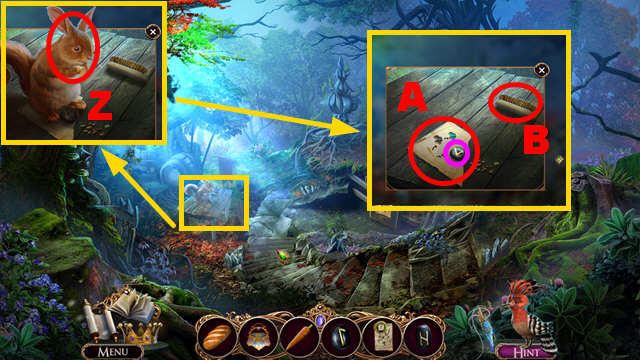
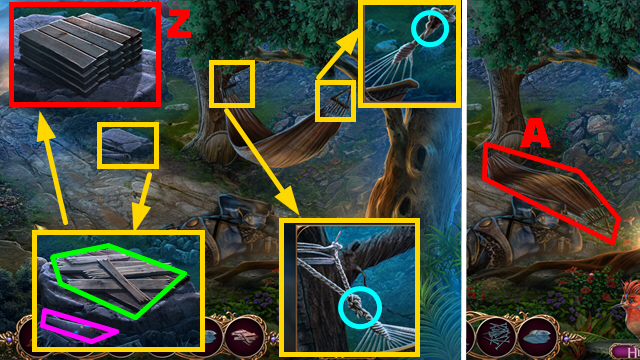
- Open the bag; take the scroll (Z) and MAGIC QUILL (A).
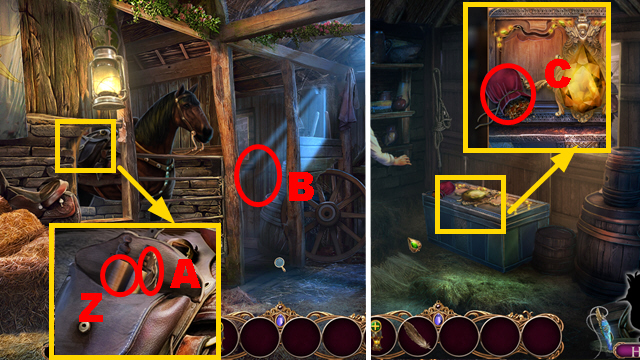
- Examine the area (B).
- Take the BIRDSEED (C).
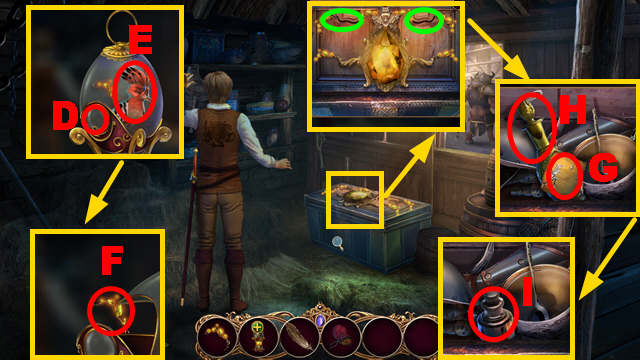
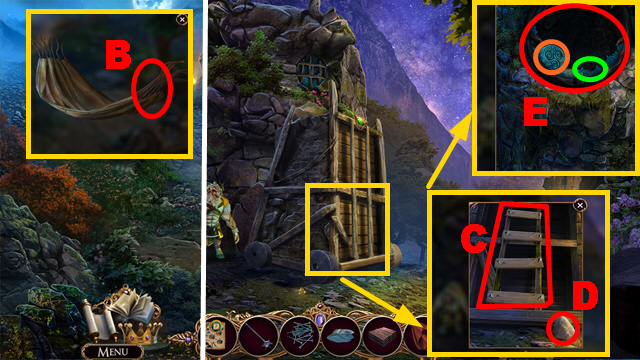
- Open the HEATED INCUBATOR and use the BIRDSEED (D); take the bird (E) and MAGIC ENERGY LINE (F).
- Place 2 MAGIC ENERGY LINES (green); take the INSTRUCTIONS (G), BOTTLED SMOKE POTION (H), and MAGIC INK (I).
- Walk down.
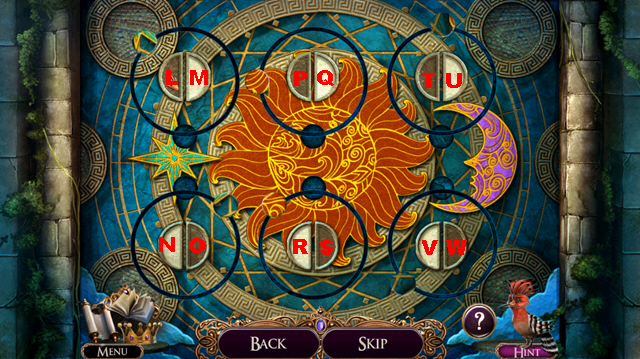
- Place the MAGIC INK (J) and MAGIC QUILL (K).
- Play the mini-game.
- Solution: L-M.
- Take the map (N).
- Throw the BOTTLED SMOKE POTION (O).
- Talk to General Claudius (P); take the PACK (Q).
- Open the PACK; take the LOAF (R).
- Talk to Cedric (S).
- Talk to Cedric (T); take the SPIRIT OF ICE (U).
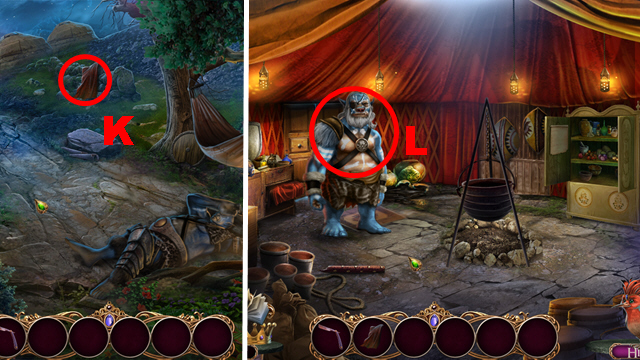
- Rotate the lid four times (V), take the CARROT (blue).
- Move the signpost; take the RUNE (W).
- Move forward.
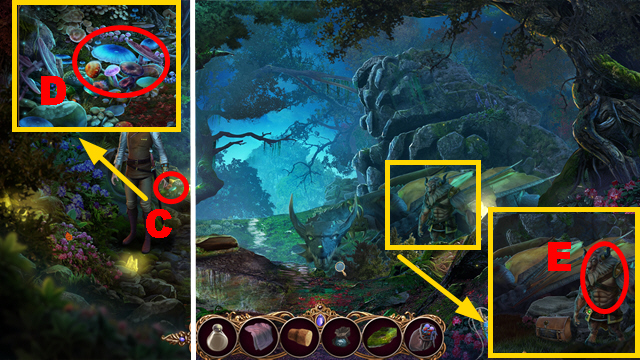
- Take the ANNOUNCEMENT (X); move the note (green).
- Take the RUNE (Y).
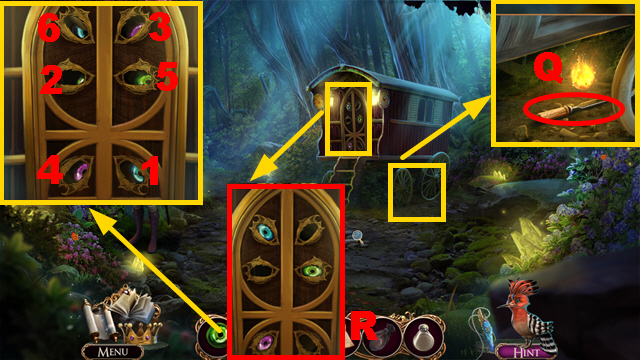
- Give the CARROT to the rabbit (Z); take the RUNE (purple), TORN POSTER (A), and BRUSH (B).
- Walk down.
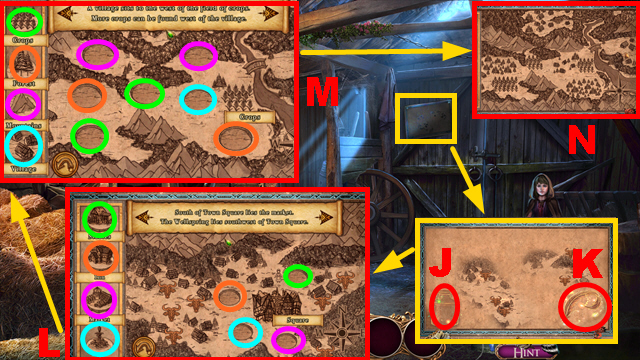
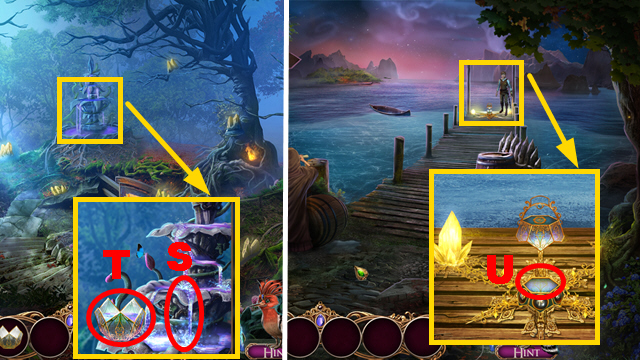
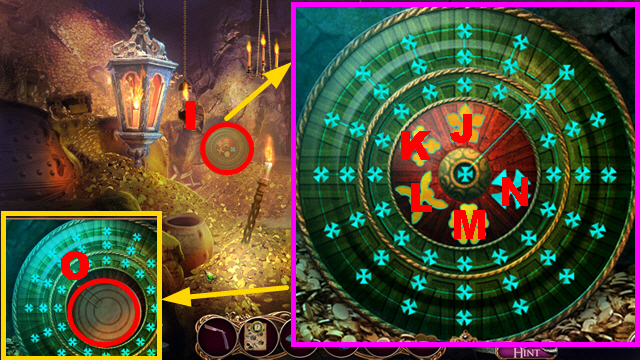
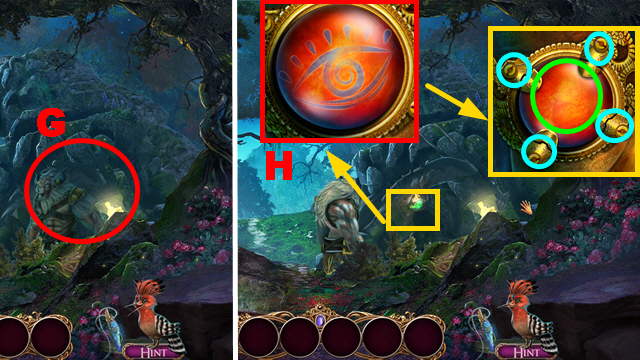
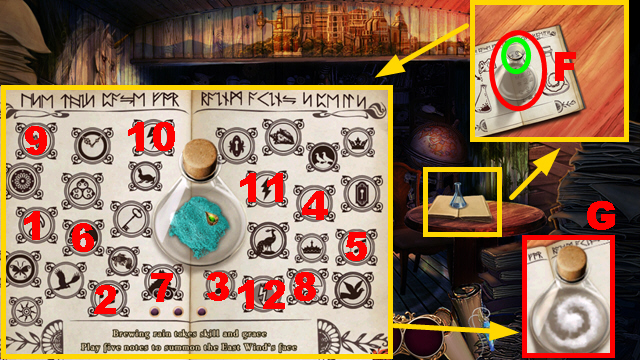
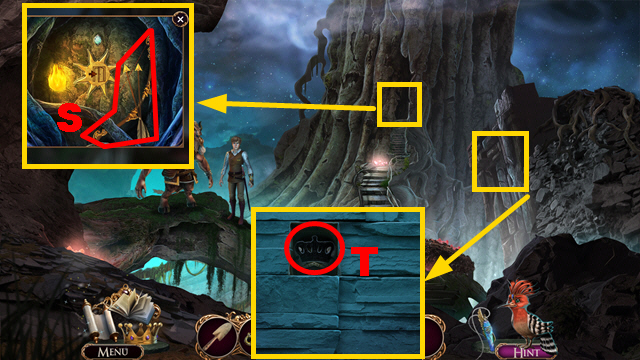
- Use the BRUSH and ALL-SEEING PENDANT (C).
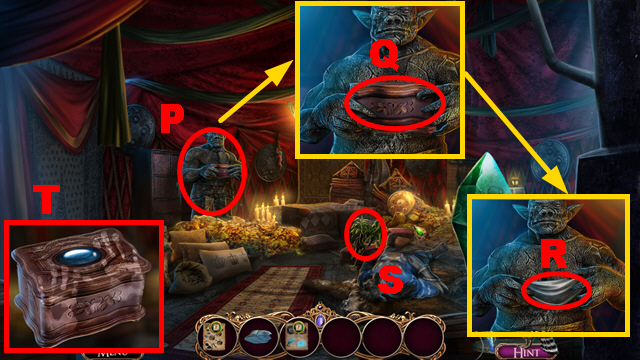
- Push the button (D); place 3 RUNES (E) and the SPIRIT OF ICE (F).
- Play the mini-game.
- Solution: (G).
- Take the MAGIC RECEPTACLE (H).
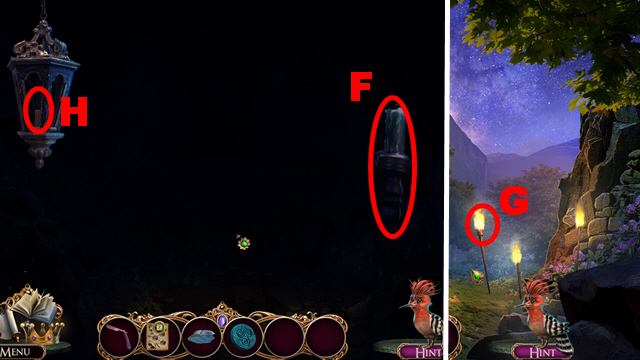
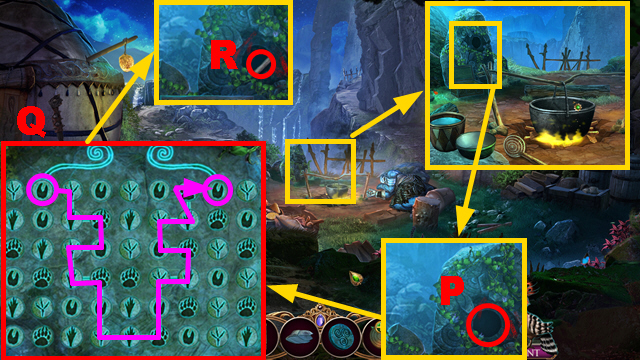
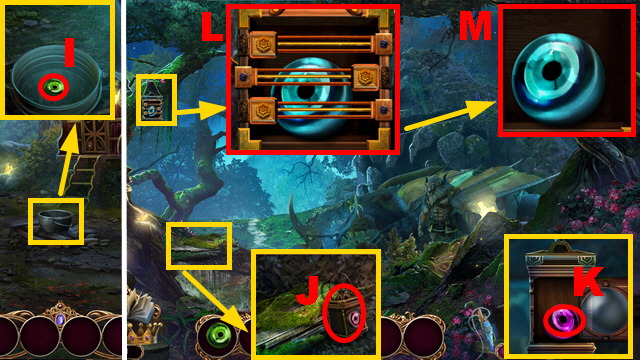
- Play the HOP (I); move the water skin (J) into the water (K) to acquire the WATER SKIN.
- Move left.
- Use the WATER SKIN (L).

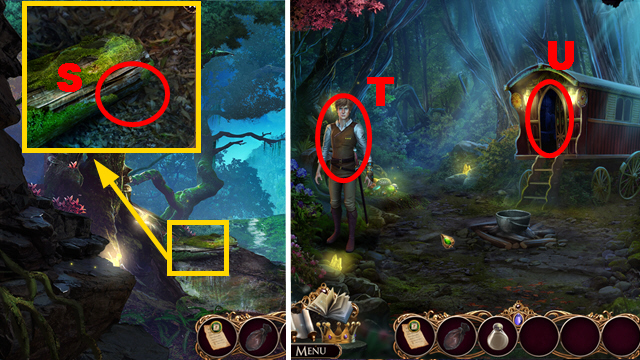
- Talk to Cedric (M).
- Take the MESSENGER BAG (N).
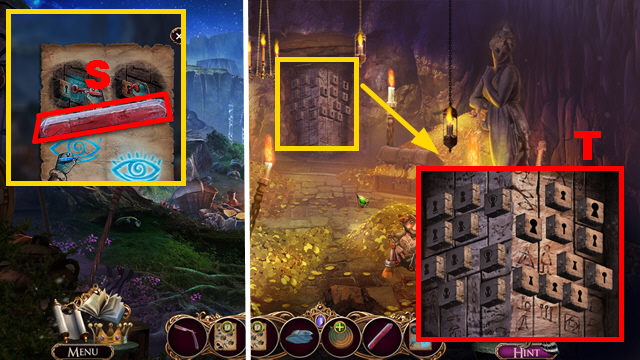
- Open the MESSENGER BAG; take the TORN POSTER (O) and CRYSTAL TUNER (P).
- Combine 2 TORN POSTERS (Q).
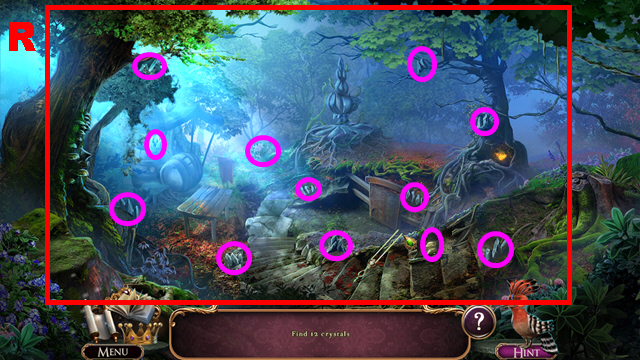
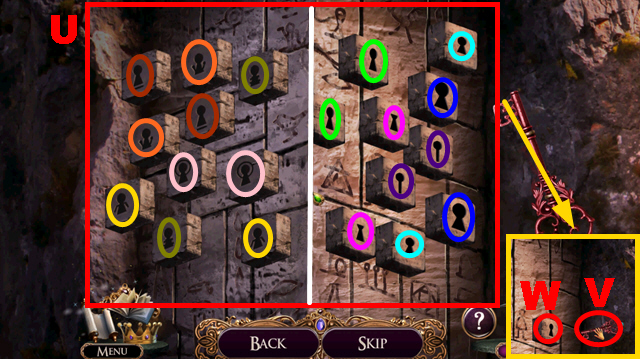
- Use the CRYSTAL TUNER (R).
- Collect 12 crystals (purple).
- Place the MAGIC RECEPTACLE (S); take the FILLED RECEPTACLE (T).
- Walk down.
- Place the FILLED RECEPTACLE (U).
- Move forward.
Chapter 2: Across the Frozen Lake
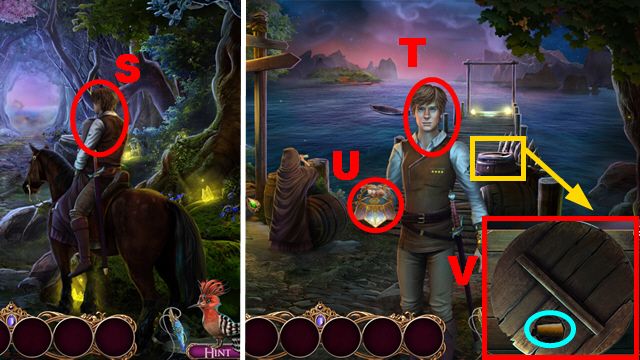
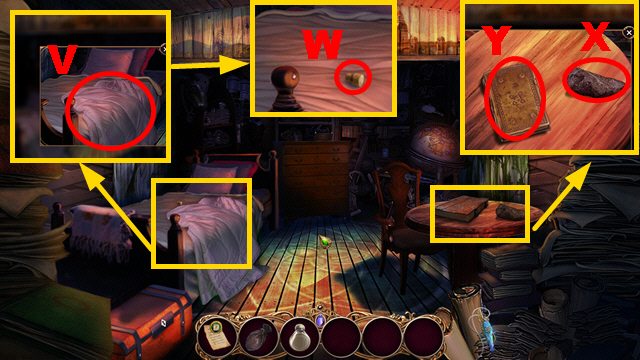
- Take the BLANKET (V).
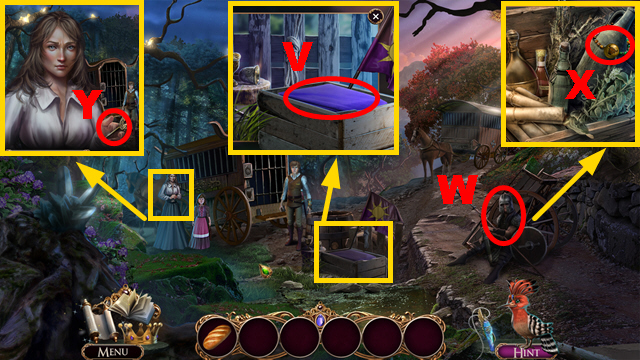
- Give the LOAF to the ranger (W); take the NECKLACE (X).
- Talk to the woman; take the PIN (Y).
- Move forward.
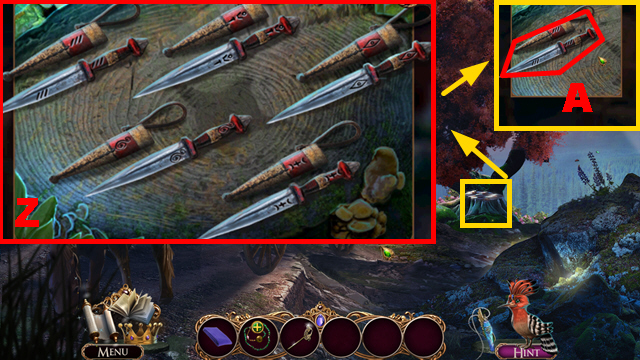
- Assemble the knives correctly (Z).
- Take the KNIFE (A).
- Cut the NECKLACE with the KNIFE (B) to acquire the METAL BEAD.
- Walk down.
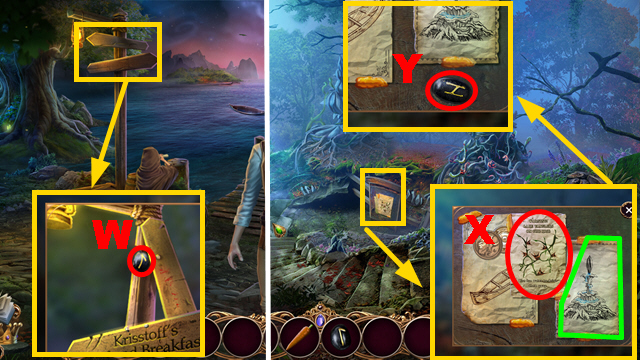
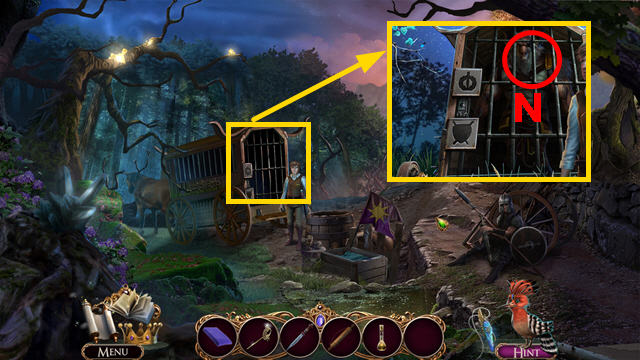
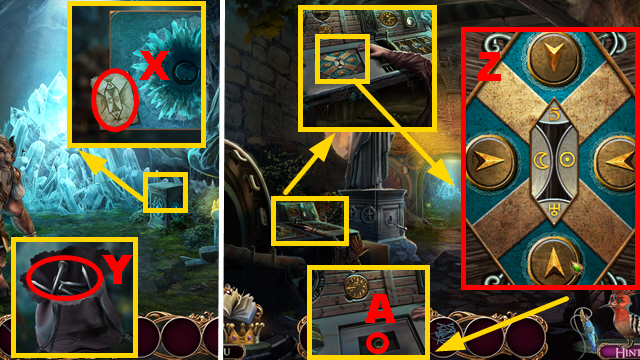
- Take the KNAPSACK (C).
- Open the KNAPSACK with the ALL-SEEING PENDANT (D); place the METAL BEAD (E).
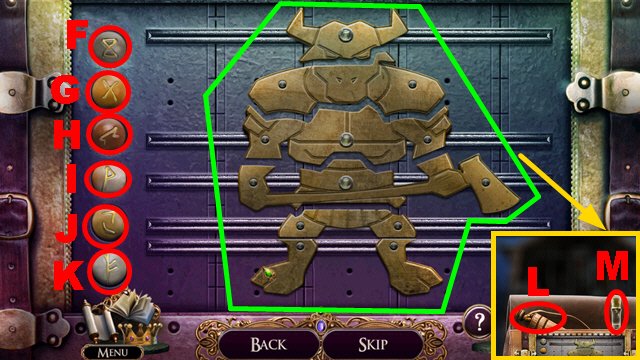
- Play the mini-game.
- To solve this puzzle (green), push buttons F-K to assemble the correct figurine.
- The starting position is randomized.
- Take the MEMORY SCROLL (L) and ACID POTION (M).
- Give the MEMORY SCROLL to Longhorn (N).
- Longhorn will talk to you.
- Play the mini-game.
- Solution: 1-4.
- Talk to Longhorn (O).
- Move forward.
- Use the PIN (P); take the PILLOW (Q).
- Use the KNIFE (R) and ACID POTION (S); take the SWORD BADGE (T).
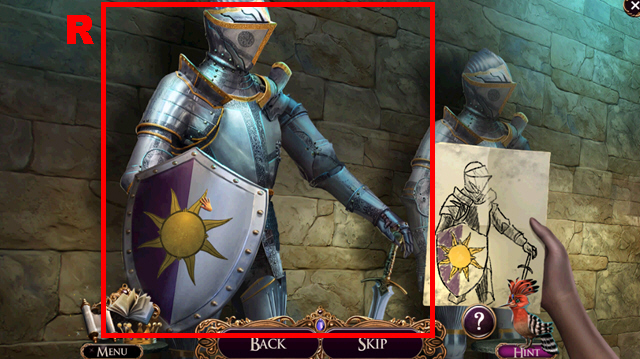
- Place the BLANKET (U) and PILLOW (V); take the SHIELD BADGE (green).
- Walk down.
- Place the SWORD BADGE (W) and SHIELD BADGE (X).
- Collect 5 FLAGS with the KNIFE (purple).
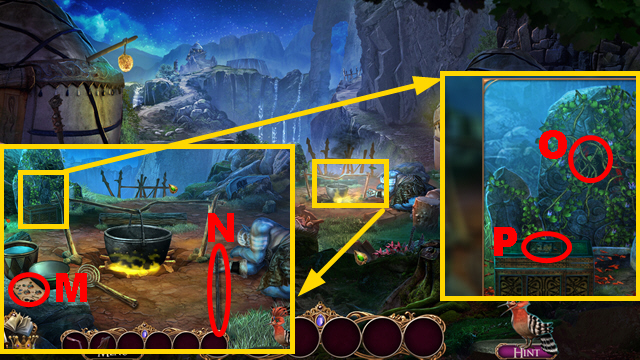
- Take the STICK (Y); place 5 FLAGS (Z).
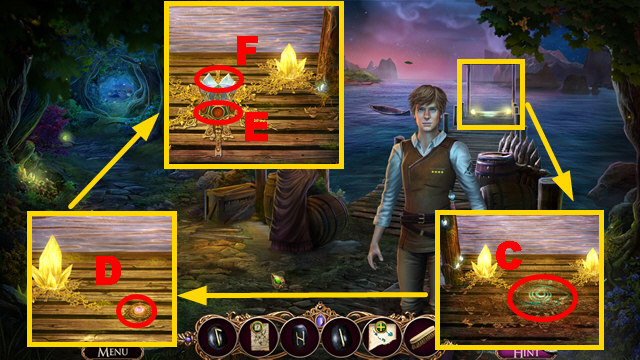
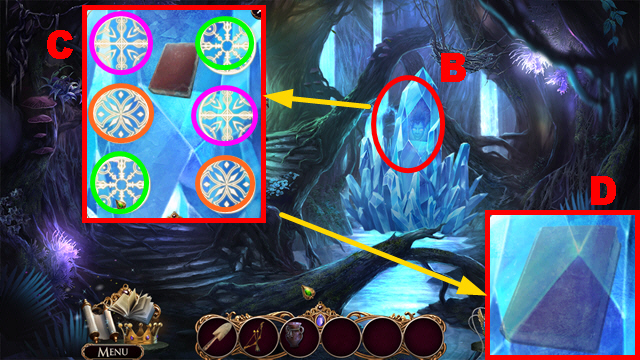
- Take the SUNSTONE (A).
- Play the HOP (B); take the MOON LANTERN (C).
- Move forward.
- Take the MACE (D); place the MOON LANTERN (E).

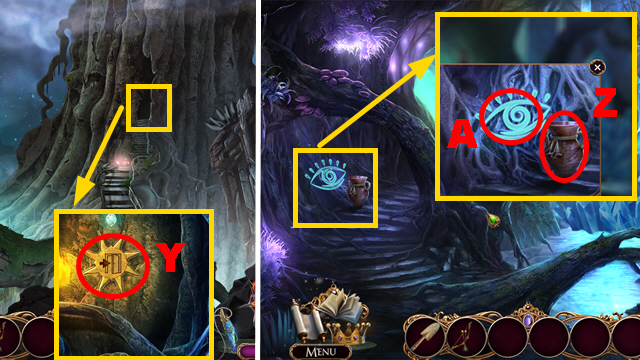
- Take the ROPE (F); use the ALL-SEEING PENDANT (G).
- Take the POUCH (H); place the SUNSTONE (I).
- Place the STICK (J); pull it.
- Examine the wall (K).
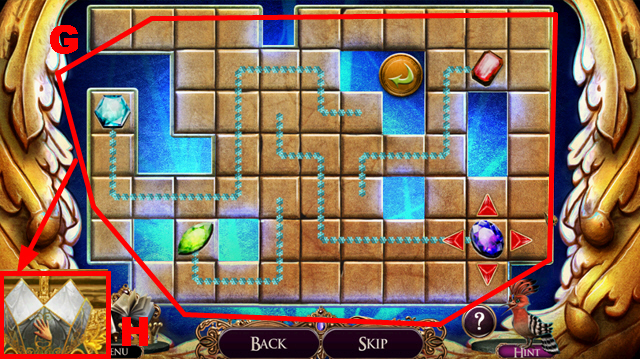
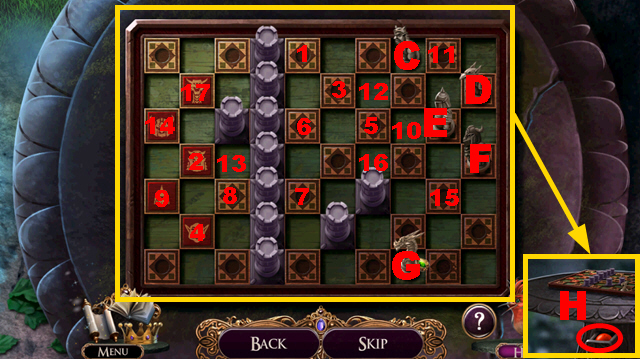
- Play the mini-game.
- Solution: Lx3-Mx3-O-N-Sx7-Rx2-Vx8-Wx5-Vx5-Px2-Qx2-Tx4-Ux4-Rx5.
- Move forward.
- Take the COMBINATION (X).
- Open the POUCH; take the NAILS (Y).
- Walk down.
- Enter the correct code (Z).
- Open the compartment; take the SIGNET RING (A).
- Move forward.

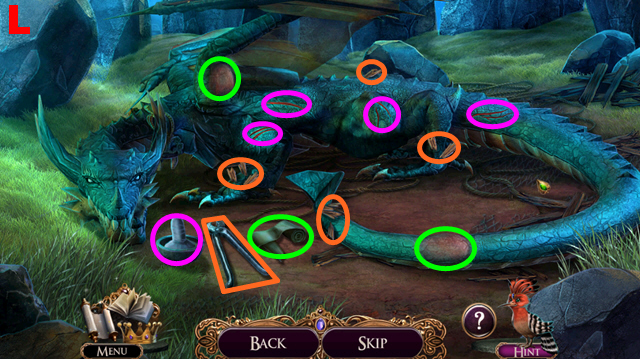
- Place the SIGNET RING (B).
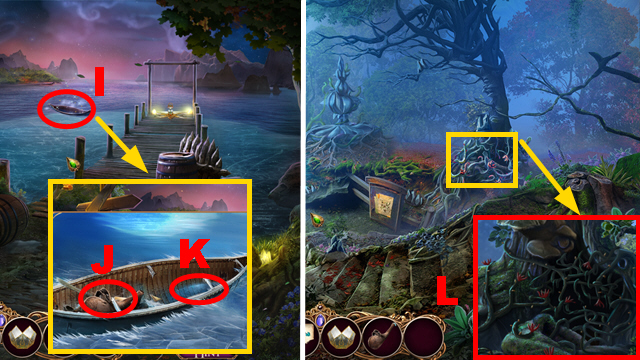
- Play the HOP to free the dragon.
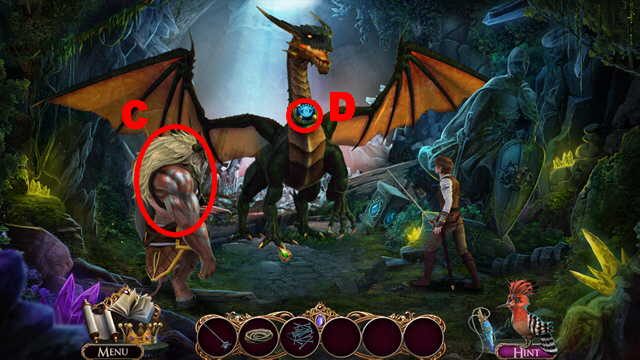
- Give the ROPE to Longhorn (C).
- Use the ALL-SEEING PENDANT (D).
Chapter 3: Trapped
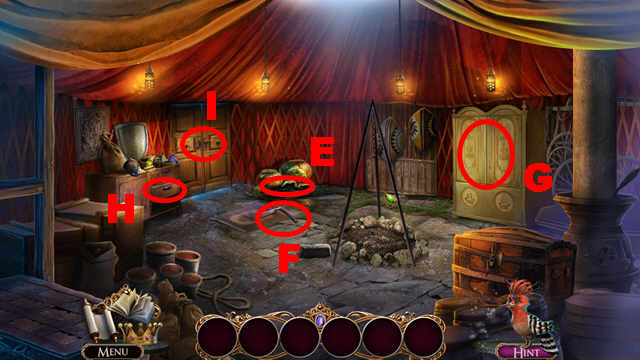
- Hit the pots (E); take the RAZOR (F).
- Open the cupboard (G), drawer (H), and door (I).
- Play the HOP.
- HOP mini-game solution: 1-5.
- You receive the NUTS.
- Use the NUTS (J).
- Move forward.
- Take the BED SHEET (K).
- Walk down.
- Talk to the cook (L).
- Move forward twice.
- Take the BLACK CHARCOAL RECIPE (M) and POLE (N).
- Use the RAZOR (O) to acquire the VINE.
- Examine the chest (P).
- Play the mini-game.
- Solution: Q-down, Q-left, R-left, R-down, R-left, R-up, R-left, Q-right, S-down, S-left, S-up, S-right, S-down, Q-left, Q-down, Q-right, Q-up, Q-left, Q-down.
- Take the MACE (T) and NAILS (U).
- Turn right.
- Remove the broken pole (V); place the POLE and VINE (W).
- Walk down, turn left.
- Take the BLANK TAPESTRY PIECE (X) and UNCUT PLANKS (Y).
- Walk down twice.
- Place the UNCUT PLANKS (green); use the saw (purple) to cut them.
- Take the CUT PLANKS (Z).
- Use the RAZOR twice (blue).
- Take the HAMMOCK (A).
- Connect the BED SHEET to the HAMMOCK (B); fold it twice to acquire the LONG SHEET.
- Move forward, turn right.
- Replace the old planks with the CUT PLANKS and NAILS (C); hit 4 planks with the stone (D).
- Use the MACE (E); take the STONE DISC (orange).
- Place the LONG SHEET (green).
- Take the UNLIT LIGHTING POLE (F).
- Walk down.
- Place the UNLIT LIGHTING POLE (G) to acquire the LIT LIGHTING POLE.
- Move forward.
- Use the LIT LIGHTING POLE (H) to play the HOP.
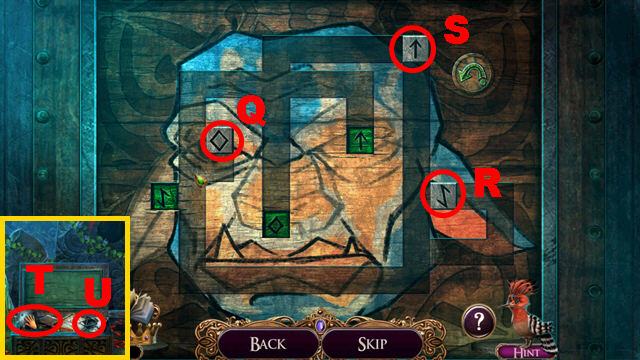
- Examine the shield (I).
- Play the mini-game.
- Push the buttons J-N to solve the puzzle (purple).
- This puzzle is randomized.
- Take the CIPHER BASE (O).
- Walk down twice.
- Place the STONE DISC (P).
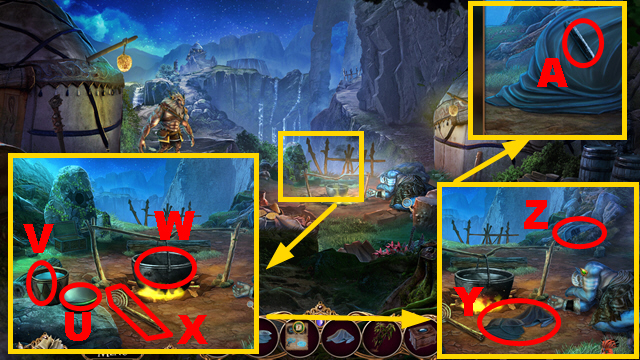
- Play the mini-game.
- Solution: (Q).
- Take the DRAWING (R).
- Open the DRAWING; take the RED CHARCOAL STICK (S).
- Turn right, move forward.
- Use the RED CHARCOAL STICK (T).
- Play the mini-game.
- Solution: (U). The puzzle is randomized.
- Put the key (V) into the lock (W).
- Play the HOP (X); take the UNCHARGED PENDANT (Y).
- Walk down three times.
- Place the UNCHARGED PENDANT (Z); take the ALL-SEEING PENDANT (A).
- Move forward.
- Play the HOP (B); take the BLUE CHARCOAL STICK (C).
- Use the ALL-SEEING PENDANT (D) to play the HOP; you receive the GOLD WARHORN.
- Turn left.
- Use the ALL-SEEING PENDANT (E).
- Use the RAZOR four times (F); touch the dragon (purple).
- Take the OIL CAN (G).
- Walk down three times.
- Use the BLUE CHARCOAL STICK and ALL-SEEING PENDANT (H).
- Open the compartment; take the IVORY WARHORN (I).
- Move forward twice, then left.
- Place the GOLD WARHORN (J) and IVORY WARHORN (K).
- Walk down, turn right, move forward.
- Use the OIL CAN six times (green); take the CIPHER PARTS (L).
- Place the CIPHER PARTS on the CIPHER BASE (M).
- Arrange the CIPHER PARTS correctly (N) to acquire the CLAN CIPHER.
- Walk down twice, turn left.
- Place the CLAN CIPHER (O).
- Play the mini-game.
- Solution: 1-3.
- Move forward.
Chapter 4: The Chief's Hut
- Play the HOP (P); take the MYSTERIOUS BOX (Q) and BLANK TAPESTRY PIECE (R).
- Take the BLACK DYE (S).
- Try to open the MYSTERIOUS BOX (T).
- Walk down twice.
- Place the BLACK DYE (U); pour the water (V) and black dye into the kettle (W).
- Place 2 BLANK TAPESTRY PIECES in the kettle; pull out the 2 pieces with the ladle (X).
- Connect two pieces (Y) to the cloth (Z).
- Take the BLACK CHARCOAL STICK (A).
- Move forward twice.
- Examine the rock (B).
- Use the BLACK CHARCOAL STICK (C).
- Play the mini-game.
- Solution: 1-4.
- Give the MYSTERIOUS BOX to Cedric (D).
- Take the MESSAGE IN A BOTTLE from the MYSTERIOUS BOX (E).
- Open the MESSAGE IN A BOTTLE (F).
- Open the cave (G).
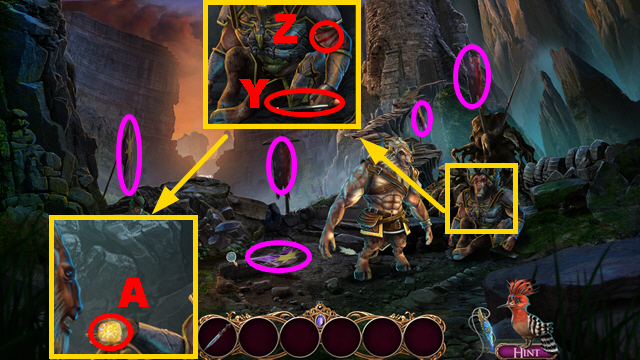
- Use the ALL-SEEING PENDANT (H); move four holdings (blue).
- Remove the collar (green).
- Move forward.
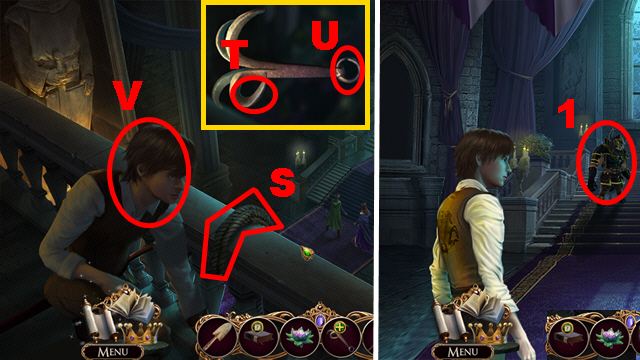
- Take the EYE SYMBOL 3 (I).
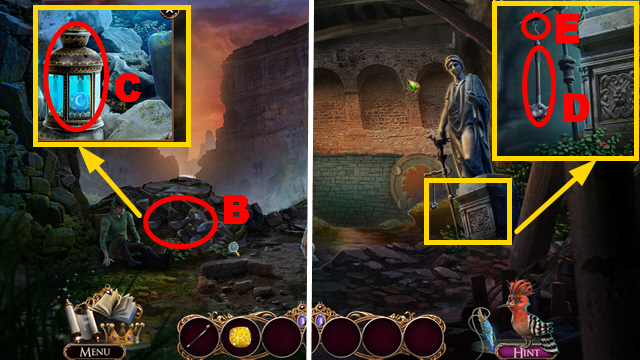
- Walk down.
- Take the LANTERN (J).
- Open the LANTERN; take the EYE SYMBOL 2 (K).
- Put the symbols into the correct place (L); take the EYE SYMBOL 1 (M).
- Talk to Longhorn; take the LIST and EMPTY POUCH (N).
- Open the bag; take the EMPTY FLASK (O).
- Move forward.
- Examine the area (1).
- Talk to Cedric (P).
- Take the CHISEL (Q).
- Place EYE SYMBOL 1, EYE SYMBOL 2, and EYE SYMBOL 3 (R).
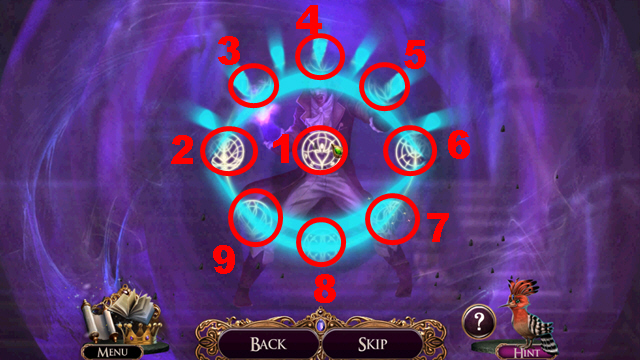
- Play the mini-game.
- Solution: 1-6.
- Walk down.
- Place the CHISEL (S).
- Move forward twice, then walk down.
- Talk to Cedric (T).
- Play the HOP (U).
- Take the COMFORTER (V) and CORK (W).
- Take the ROCK (X); open the book (Y).
- Place the symbols correctly (Z); take the POWDER OF RAINCLOUD (A).
- Walk down twice.
- Place the ROCK (B) to acquire the BARK WITH MOSS.
- Move forward.
- Play the HOP (C); use the EMPTY POUCH (D) to acquire the POUCH OF MUSHROOMS.
- Walk down.
- Give the POUCH OF MUSHROOMS and BARK WITH MOSS to Longhorn (E).
- Move forward twice.
- Place the EMPTY FLASK (F); use the POWDER OF RAINCLOUD and CORK (green).
- Shake the flask to play the mini-game.
- Solution: 1-12.
- Take the BOTTLED RAINCLOUD (G).
- Walk down.

- Use the BOTTLED RAINCLOUD (H).
- Talk to Cedric (I); place the EMPTY FLASK (J) to acquire the HOT WATER.
- Walk down.
- Give the HOT WATER to Longhorn (K).
- Play the mini-game.
- Solution: (L).

- Give the COMFORTER to Longhorn (M).
- Fly with the dragon (N).
Chapter 5: The Tree
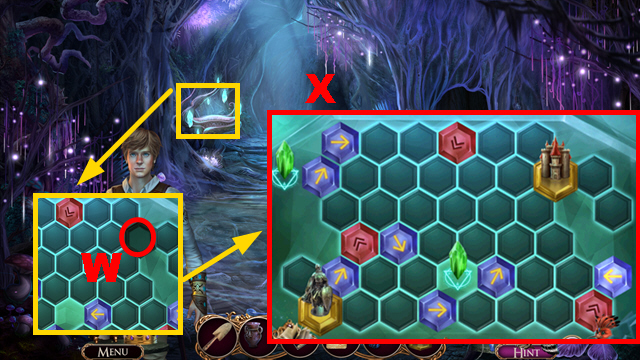
- Take the SPADE (O).
- Use the SPADE (P); take 2 ALCOVE PIECES (green).
- Examine the cave (Q).
- Talk to Cedric (R).
- Take the BOW AND ARROW (S).
- Place 2 ALCOVE PIECES (T) to play the HOP.
- Push the button (Y).
- Move forward.
- Take the EMPTY POT (Z); use the ALL-SEEING PENDANT (A).
- Talk to the mask (B).
- Match the correct patterns (C); the placement is randomized.
- Take the BOOK (D).
- Shoot the BOW AND ARROW (E).
- Take the BUTTON (F).
- Talk to Cedric (G).
- Move forward.
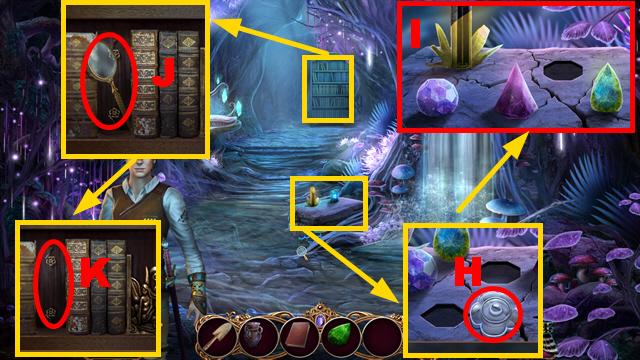
- Take the VALVE (H); place 3 crystals correctly (I).
- Take the LENS (J); place the BOOK (K).
- Play the mini-game.
- Solution: (L).
- This puzzle is randomized.
- Take the TRAITOR'S CARD (M); place the VALVE (N).
- Place the BUTTON (O); take the ELEVATOR NOTE (P) and POWER CRYSTAL (Q).
- Place the POWER CRYSTAL (R).
- Take the CLAW (S).
- Walk down.
- Place the LENS (T).
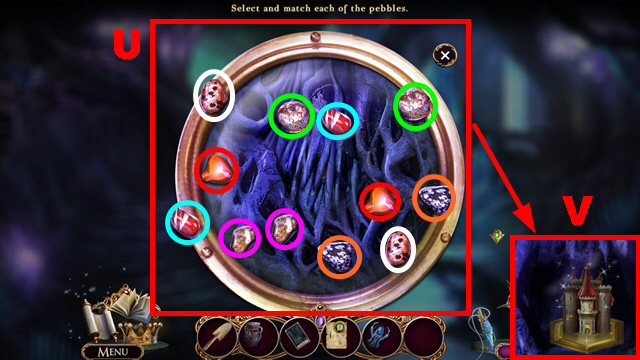
- Match similar pebbles (U); the positions are randomized.
- Take the THRONE PIECE (V).
- Move forward.
- Place the THRONE PIECE (W).
- Play the mini-game.
- Solution: (X).
- Push the button (Y).
- Move forward.
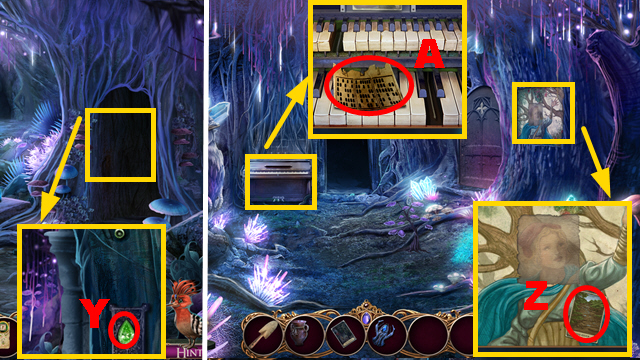
- Take the RIVER'S CARD (Z) and AUTOMATON COMMANDS (A).
- Move forward.
- Use the ALL-SEEING PENDANT (B).
- Turn the key (C).
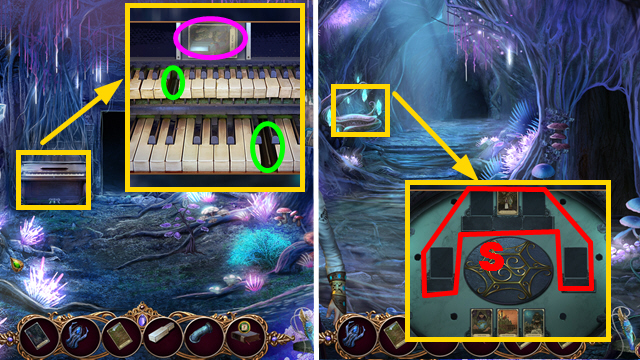
- Play the HOP (D) to receive the PIANO KEY.
- Take the CRANK (E) and PIPE SEGMENT (green).
- Place the AUTOMATON COMMANDS (F).
- Walk down.
- Place the CRANK (G); take the BLANK SCROLL (H).
- Move forward.
- Place the BLANK SCROLL (I); push the button (J).
- Take the COMMAND SCROLL (K).
- Inspect the button (purple); turn the key (L).
- Open the compartment and remove the scroll; place the COMMAND SCROLL (M) and close the compartment.
- Move forward.
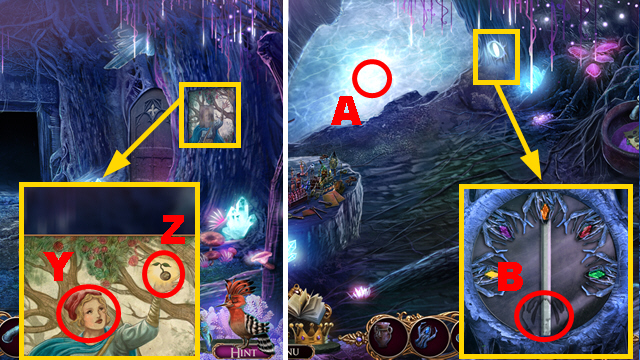
- Grab the heart (N); talk to the mask (O).

- Take the BOOK OF MAGIC (P); turn three pages.
- Take the KNIGHT'S CARD (Q) and PIANO KEY (R).
- Walk down twice.
- Place 2 PIANO KEYS (green); take the KING'S CARD (purple).
- Walk down.
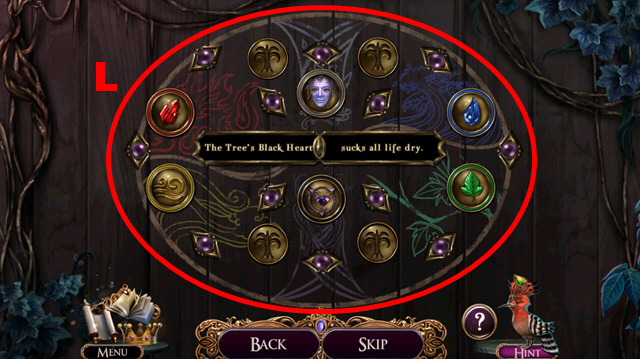
- Place the KNIGHT'S CARD, RIVER'S CARD, KING'S CARD, and TRAITOR'S CARD (S).
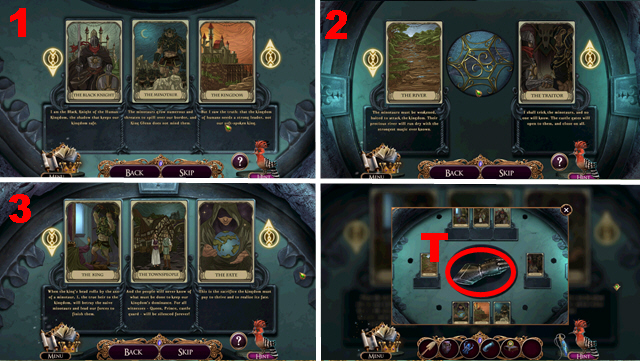
- Play the mini-game.
- Solution: 1-3.
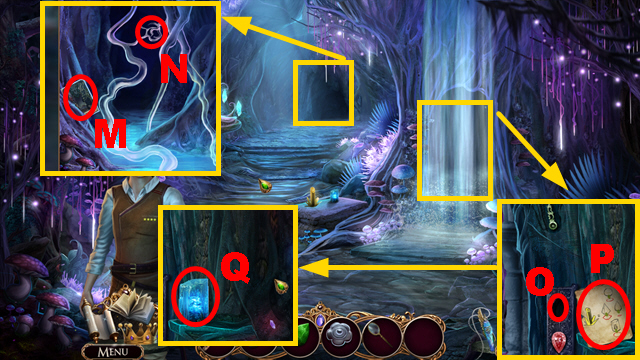
- Take the KNIGHT'S GAUNTLET (T).
- Move forward three times.
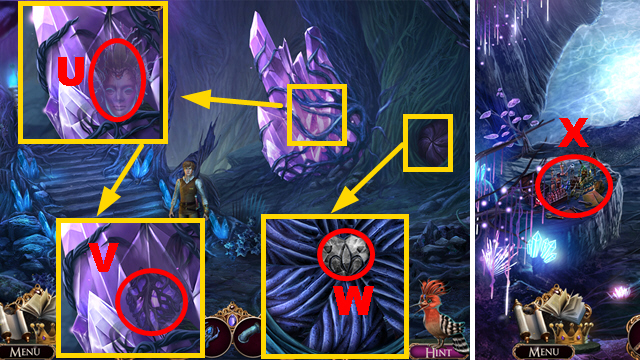
- Use the KNIGHT'S GAUNTLET (U); take the BLACK HEART (V).
- Remove the heart (W).
- Go through the opening.
- Play the HOP (X) to receive the MURAL PIECE.
- Walk down three times.
- Place the MURAL PIECE (Y); take the ESSENCE OF LIFE (Z).
- Move forward three times.
- Place the EMPTY POT (A) to acquire the JAR OF WATER.
- Place the CLAW (B).
- Play the mini-game.
- Solution: 1-6.
- Take the PHOENIX NOTE (C) and KEY (D).
- Take the SPYGLASS (E) and LAST PAGE (F).
- Open the MAGIC BOOK and turn three pages; place the LAST PAGE (G).
- Walk down three times.
- Use the KEY (H) to play the HOP; you receive the COCKATRICE'S TEARS.
- Move forward.
- Use the COCKATRICE'S TEARS (I); take the PHOENIX FEATHER (J).
- Move forward twice.
- Add the JAR OF WATER and BLACK HEART (K); place the PIPE SEGMENT (L) and turn the valve (M).
- Add the PHOENIX FEATHER (N); turn the valve (O).
- Add the ESSENCE OF LIFE (P); take the GREEN HEART OF LIFE (Q).
- Walk down.
Chapter 6: Entering the Castle
- Place the GREEN HEART OF LIFE (R).
- Use the SPYGLASS (S); take the GREENSPARK (T).
- Remove the leaves twice; take the SHIELD FRAGMENT (U).
- Take the GAME PIECE (green) and TATTERED FLAG (V).
- Remove leaves three times; take the WEDGE (W).
- Move forward.

- Place the SHIELD FRAGMENT (X); take ORB 1/3 (Y).
- Use the WEDGE (Z); take the BIRD BATH PIECE (purple).
- Take the TEA LEAVES (A); place the GAME PIECE (B).
- Play the mini-game.
- Solution: C1-C2-D3-D4-E5-E6-E7-E8-E9-F10-F11-F12-F6-F13-F14-G15-G16-G6-G13-G17.
- Take ORB 2/3 (H).
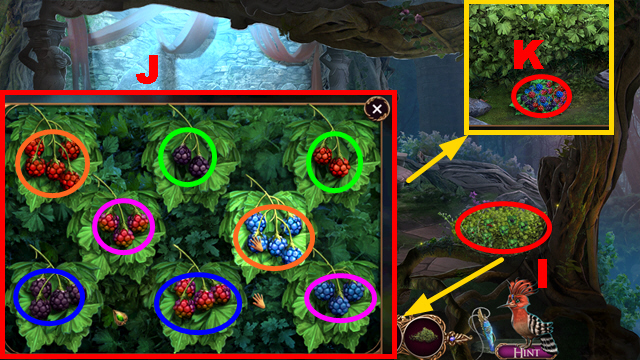
- Examine the bush (I).
- Play the mini-game.
- Match pairs with the equal amount of berries (J); the position is randomized.
- Take the BERRIES (K).
- Walk down.
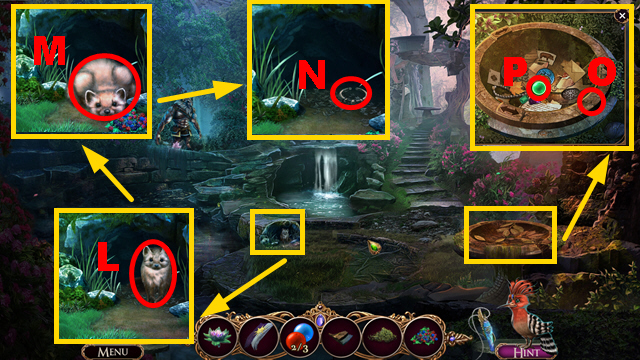
- Give the BERRIES to the marten (L); use the TATTERED FLAG (M).
- Take the HANDLE (N).
- Place the BIRD BATH PIECE (O) to play the HOP; take ORB 3/3 (P).
- Move forward.

- Place 3 ORBS (Q).
- Place the HANDLE (R).
- Turn left.
- Open the door (S).
- Remove 7 items; take the BLUNT HACKSAW (T).
- Play the HOP (U); take the DECORATIVE SUNRAYS (V).
- Open the trapdoor (W).
- Take the BENT HOOK (X).
- Move forward.
- Use the ALL-SEEING PENDANT (Y); take the MALLET (Z).
- Take the TRIANGULAR FILE (A) and MUG (B).
- Open the drawer (purple); take GRAPPLING HOOK 1/2 (C).
- Walk down.
- Try to talk to the boy (D).
- Add the TEA LEAVES (E).
- Talk to Cedric (F).
- Place the MUG (G); put the strainer (H) on the mug.
- Pour the kettle (green) into the mug; take the HOT TEA.
- Give the HOT TEA to the boy to play the HOP.
- Take the ARMOR DISPLAY COMBINATION (I).
- Move forward.
- Use the TRIANGULAR FILE on the BLUNT HACKSAW (J); take the HACKSAW.
- Use the HACKSAW (K); play the HOP (purple).
- Use the ALL-SEEING PENDANT (L); take the DECORATIVE SWORD (M).
- Walk down.
- Use the HACKSAW (N); take the DECORATIVE SUN (O).
- Move forward.
- Place the DECORATIVE SUNRAYS (P), DECORATIVE SUN (blue), and DECORATIVE SWORD (Q).
- Play the mini-game.
- Solution: (R).
- Go upstairs.
- Take the ROPE (S).
- Hit the BENT HOOK with the MALLET (T); connect the ROPE to the HOOK (U) and take GRAPPLING HOOK 2/2.
- Give 2 GRAPPLING HOOKS to Cedric (V). Give the GREENSPARK to General Blacktail.
- Play the mini-game.
- Solution: 1-5-3-8-8-2-6-1-9-9-4-7-5-6-2-3.
- Congratulations, you have completed Awakening: The Golden Age.
Created at: 2014-11-30