

Walkthrough Menu
- General Tips
- Chapter 1: Landsong Village
- Chapter 2: Cloud Court
- Chapter 3: The Skyward Castle
- Chapter 4: Ascension
- Achievements
General Tips
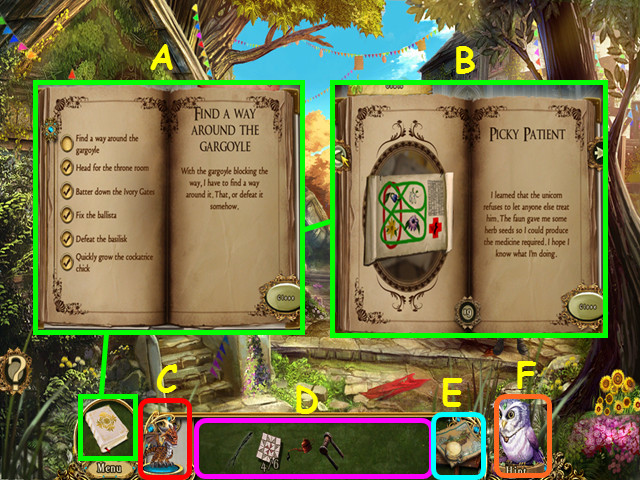
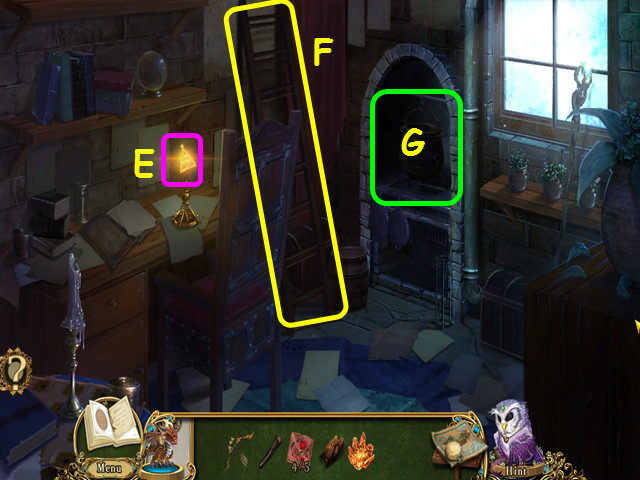
- Read your Journal for your current tasks (A) and important clues that you have found (B).
- Use the Pocket dragon when you need fire (C).
- Your inventory (D) is located in the lower panel – select an item to use it.
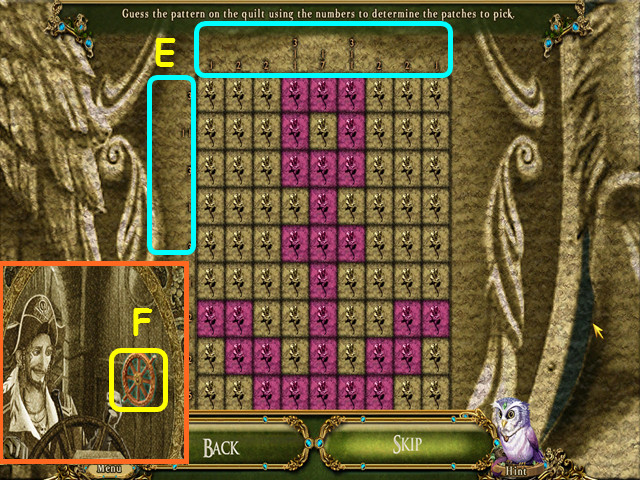
- Use your map to travel to previously visited locations (E).
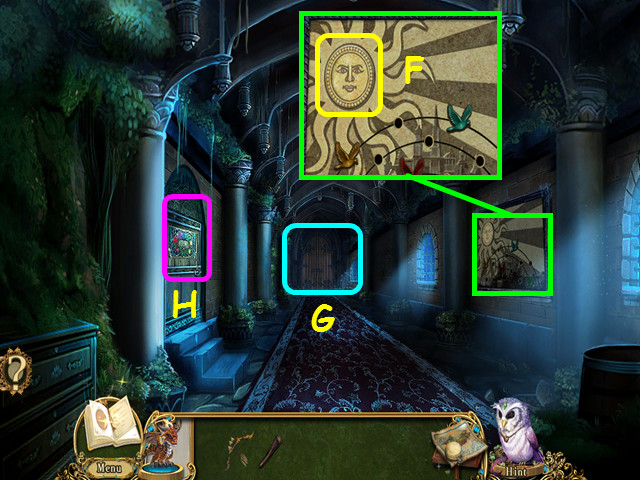
- Hints are unlimited, but you must wait for the meter to refill (F).
- Hidden Object Scenes and mini-games are often randomized - your solution may vary.
- Hidden Object Scenes will be referred to as HOS in this walkthrough. Items listed in yellow in HOS are hidden or require additional actions.
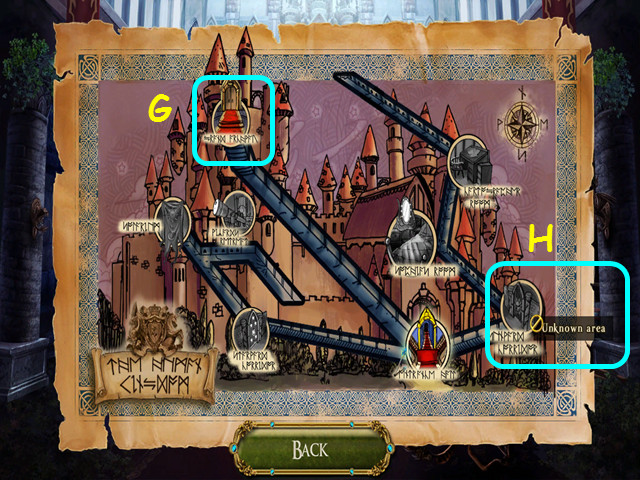
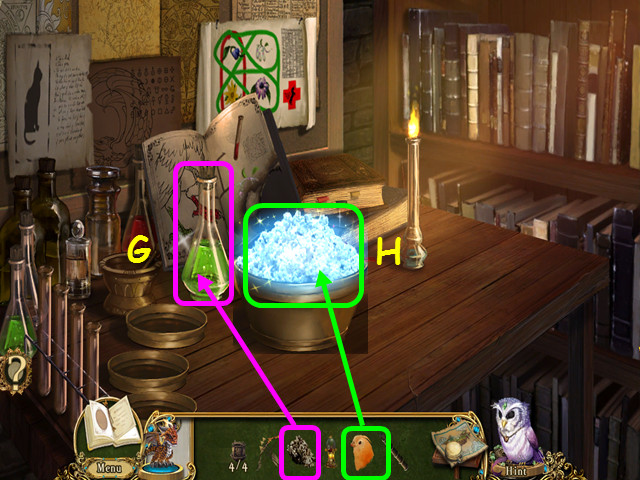
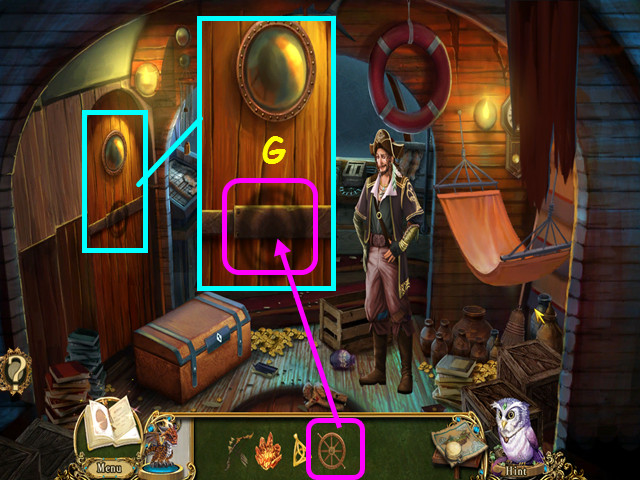
- You can use your map to travel to previously visited locations (G). Available locations will be in color and will show the name when you hover your mouse.
- Locations you have not been to will be grayed out and will appear as an unknown area (H).
- Not all locations are initially visible.
Chapter 1: Landsong Village
- You will have the option of a brief tutorial.
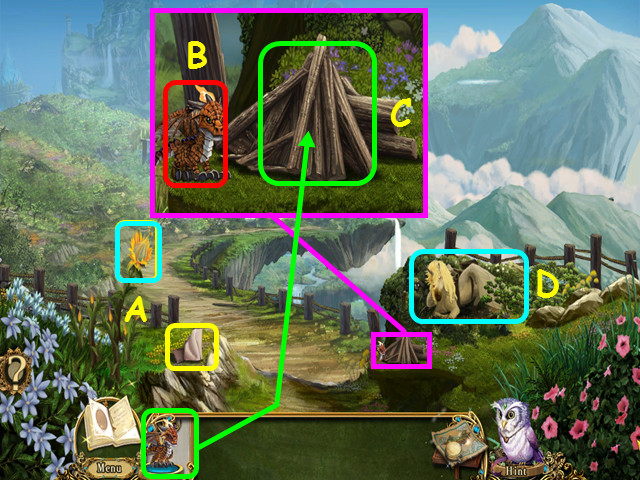
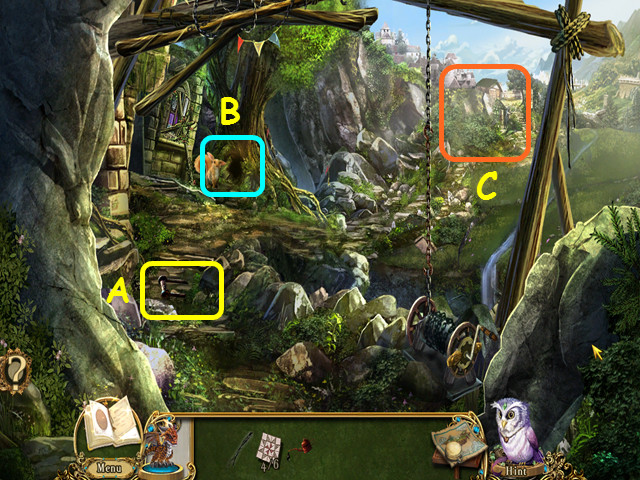
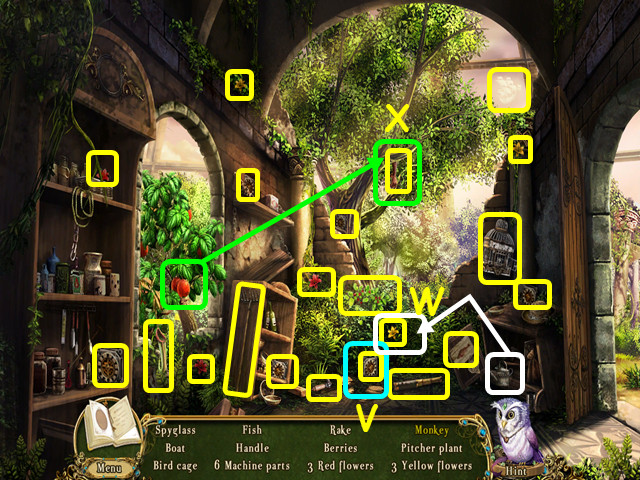
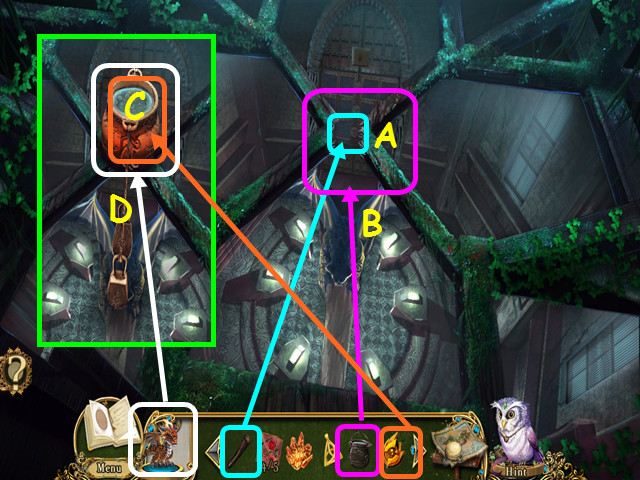
- Take the BANDAGES and the SUNSKY FLOWER (A).
- Look at the woodpile and take the POCKET DRAGON (B).
- Take the POCKET DRAGON from his perch and use him on the woodpile to start a fire (C).
- Look at the injured unicorn for a HOS (D).
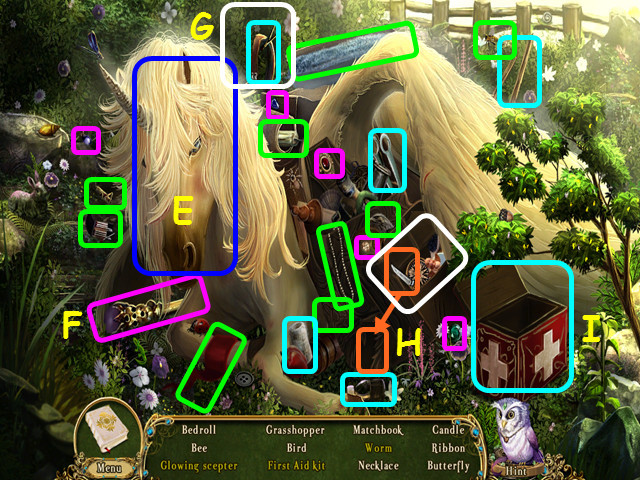
- Locate all the items on the list. Items listed in yellow are hidden or require additional steps.
- Talk to the unicorn (E).
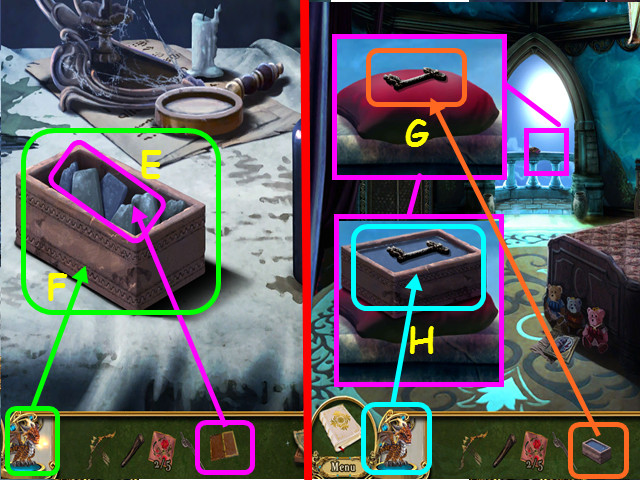
- Find the 5 gems (pink) and place them in the scepter to make the glowing scepter (F).
- Remove the disturbed leaves (G).
- Open the flap, take the knife and cut the laces (H).
- Find the 5 first aid items (aqua) and place them in the box to make the first aid kit (I).
- Take the worm that was hidden under the first aid kit.
- The items you earn will combine with the BANDAGES to make the UNICORN SPLINT.
- Place the UNICORN SPLINT on the unicorn.
- Walk forward to Ancient Goldleaf.
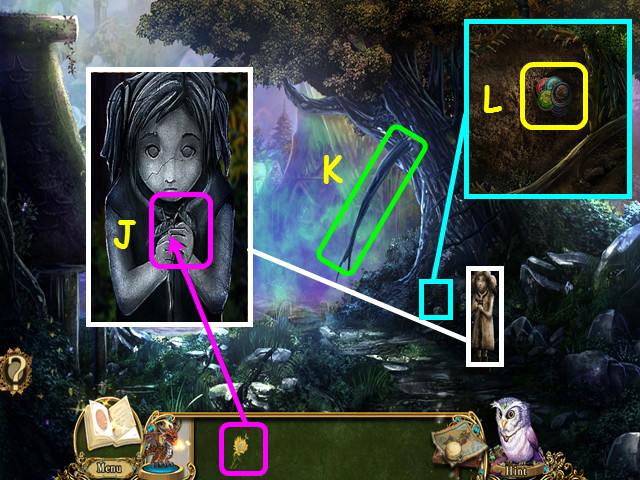
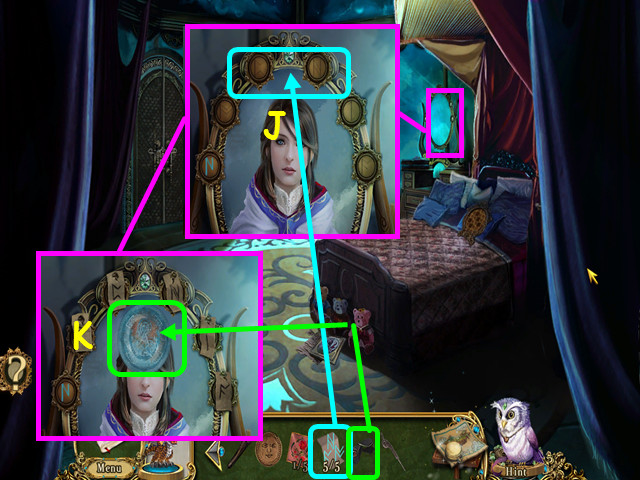
- After the cut-scene, look at the statue and place the SUNSKY FLOWER in her hands. (J).
- Take the GOLDLEAF BRANCH (K).
- Look at the root cache and take the JEWELED EMBLEMS (L).
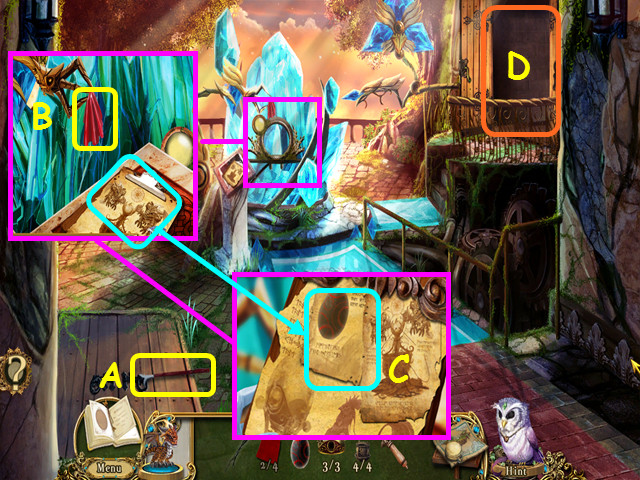
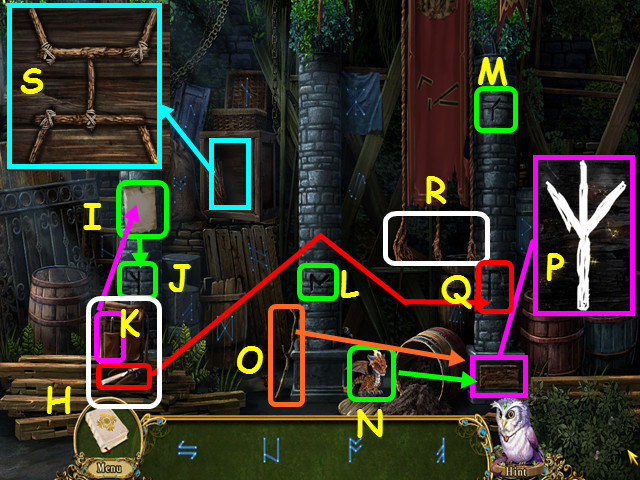
- Walk forward to the Bridged Crossings.
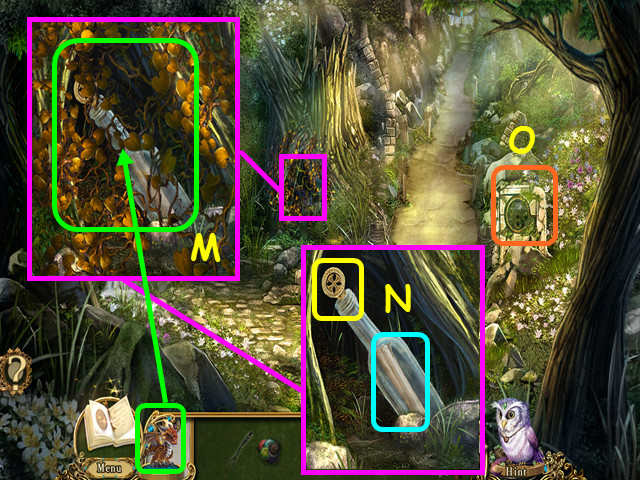
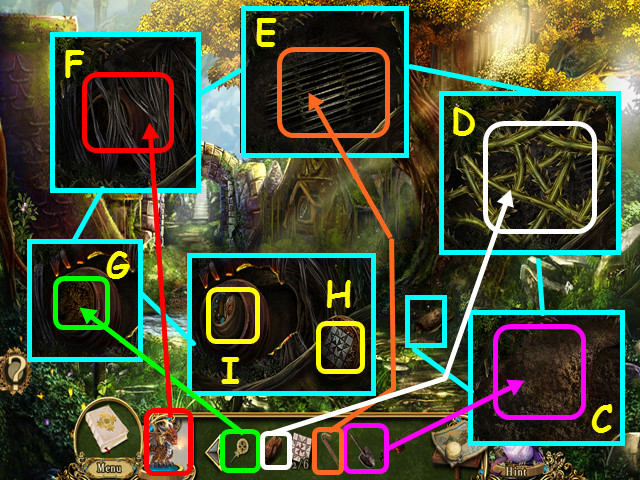
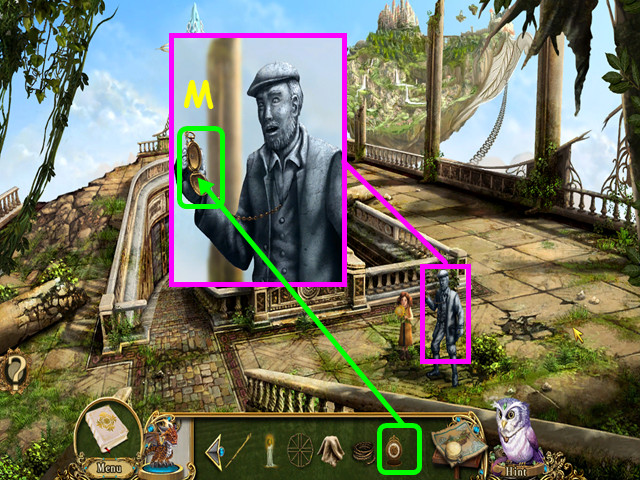
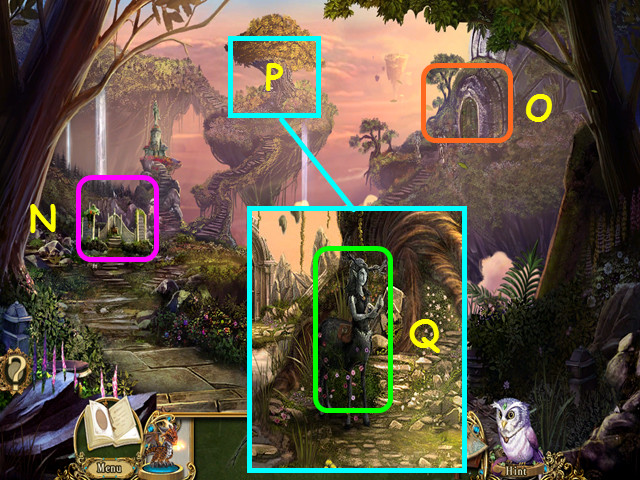
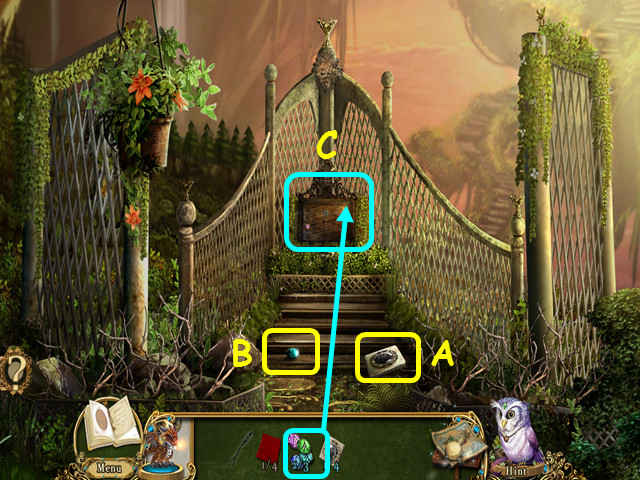
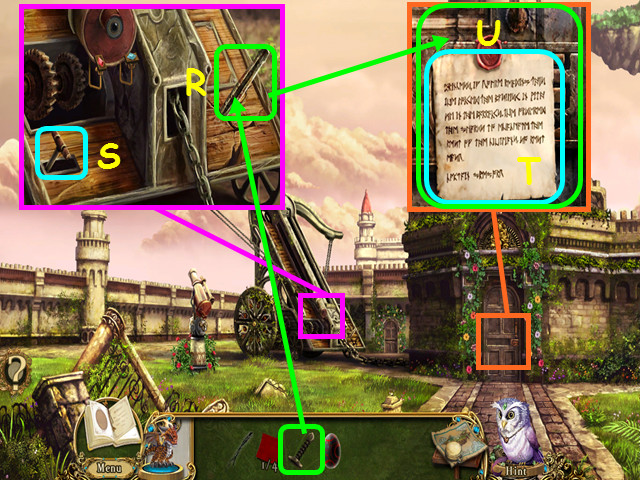
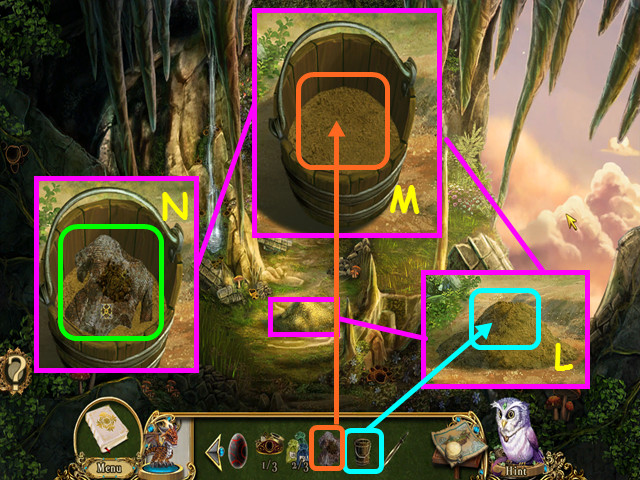
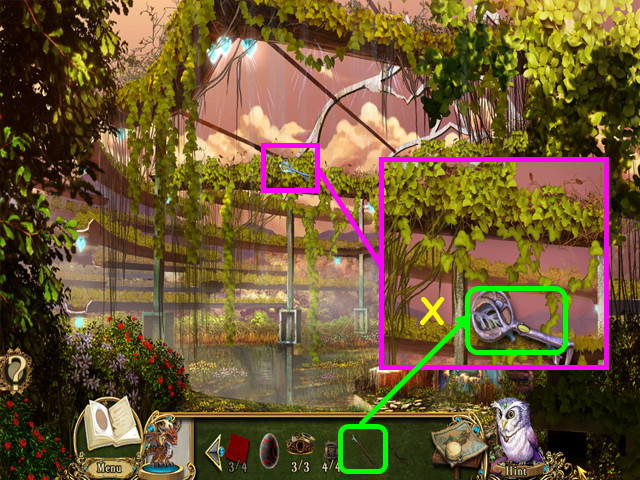
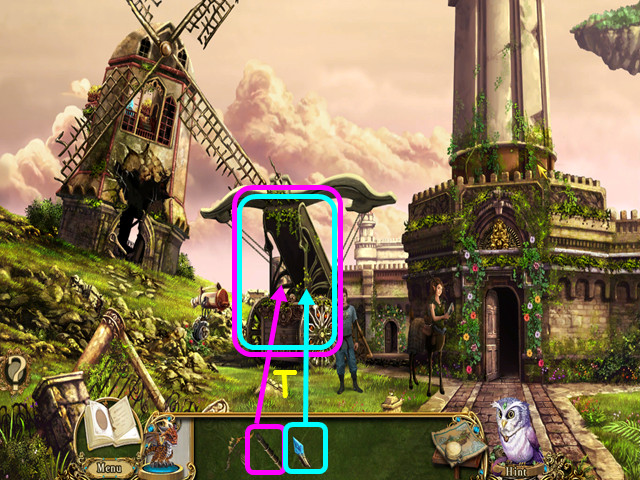
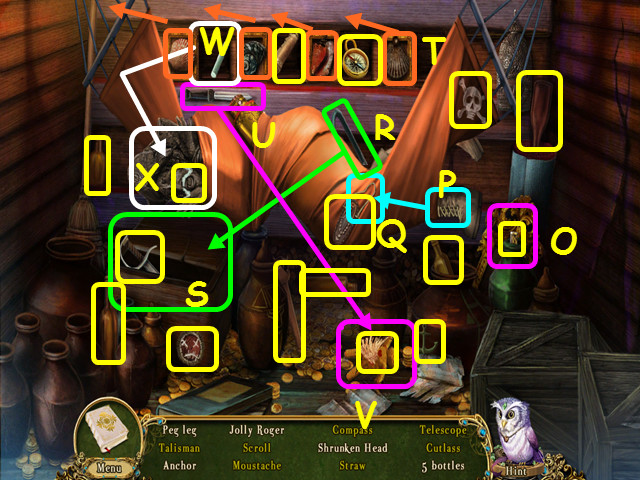
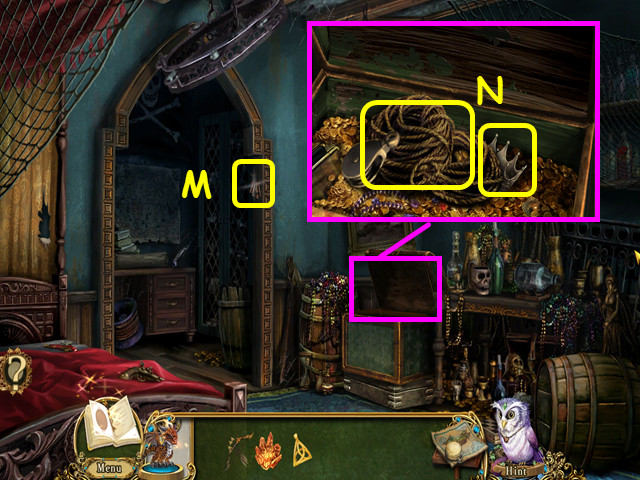
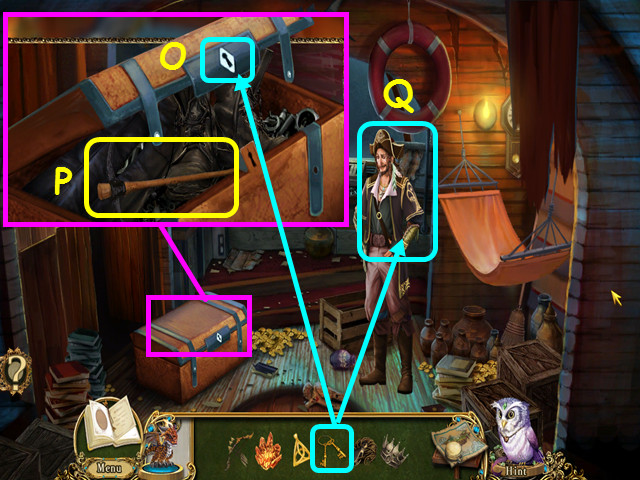
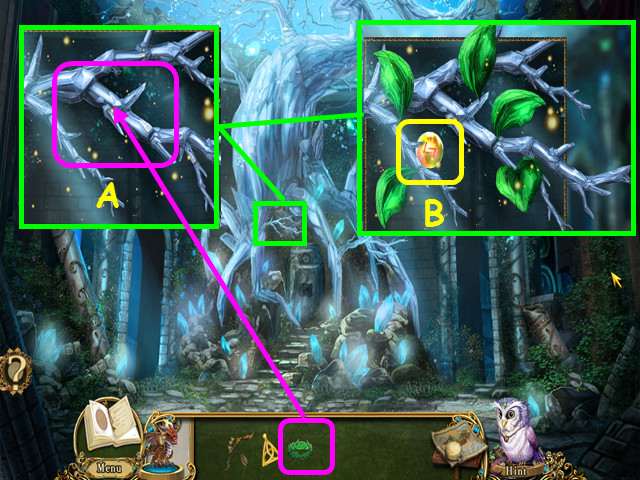
- Look in the hollow and use the POCKET DRAGON on the vines (M).
- Take the CORKSCREW and read the message (N).
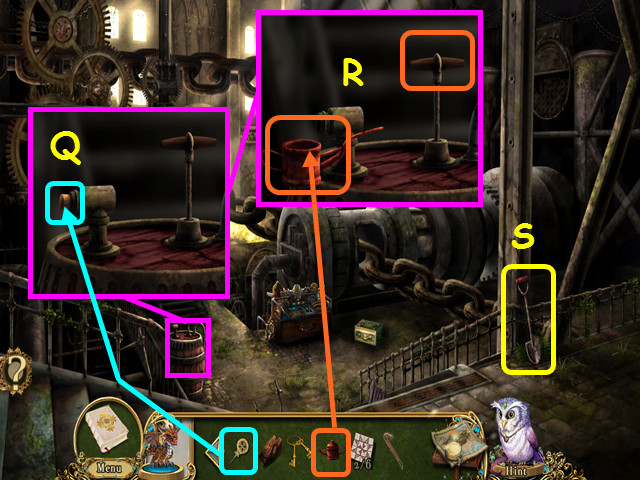
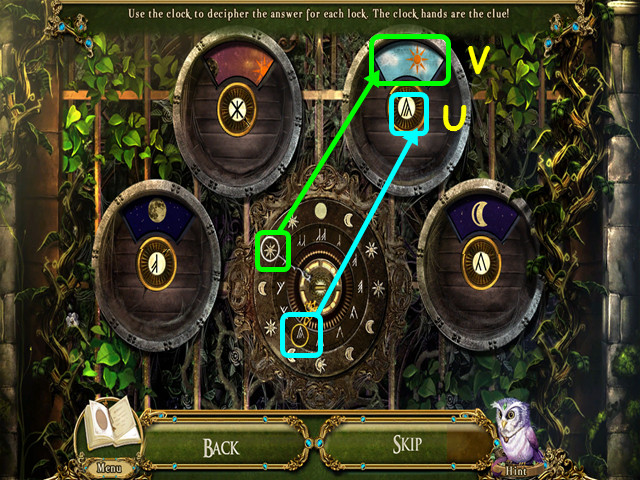
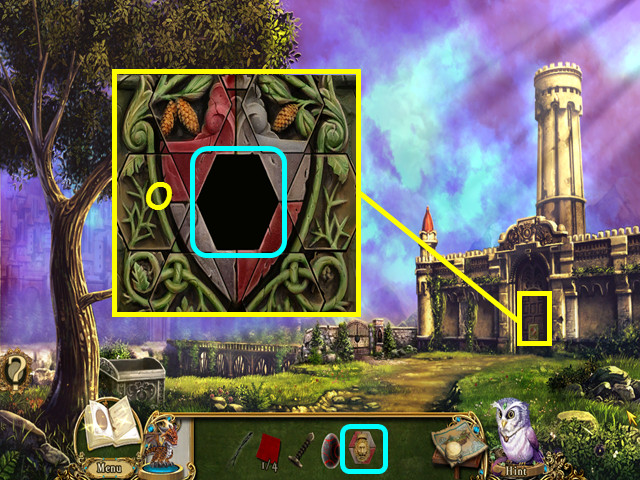
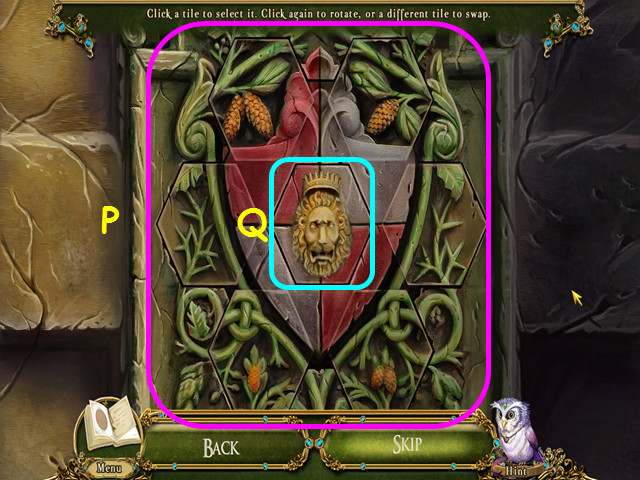
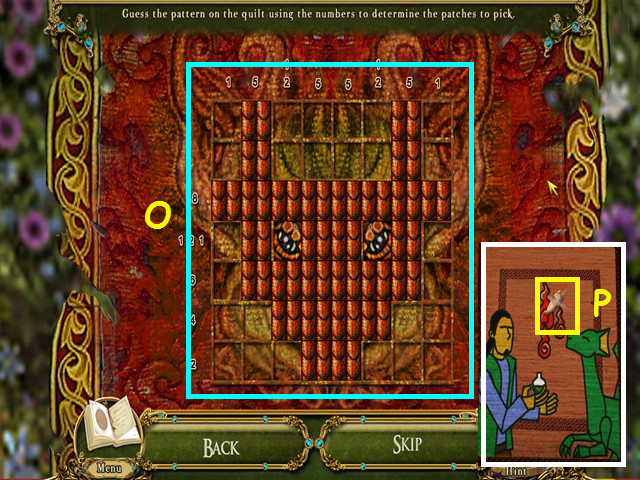
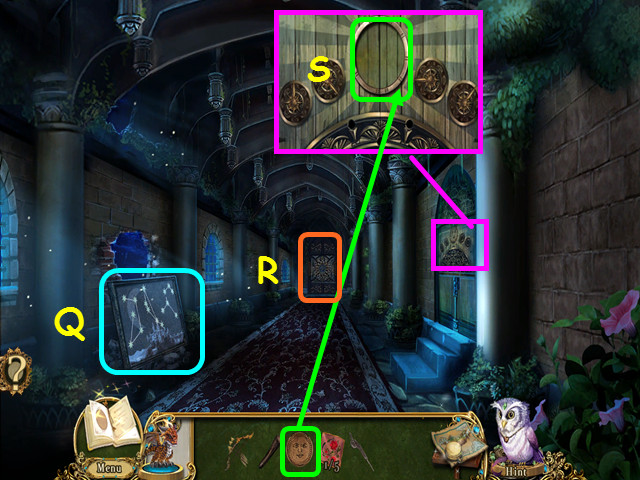
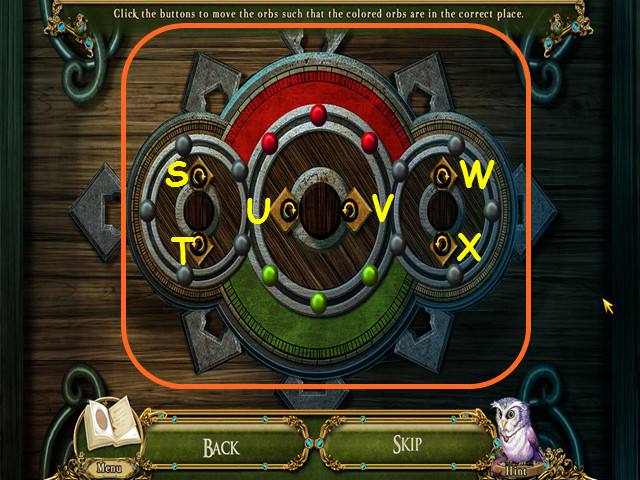
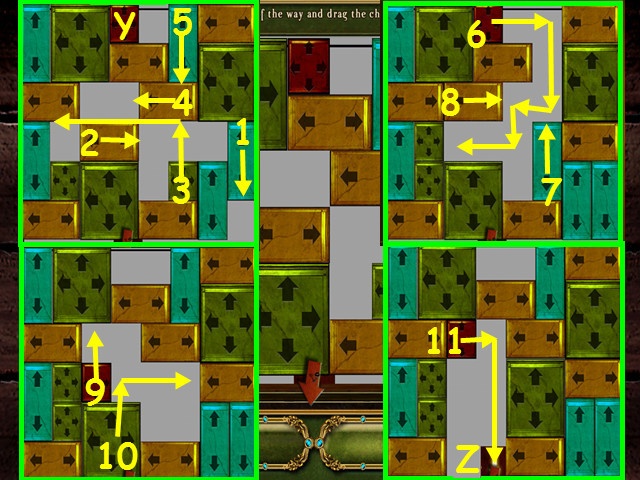
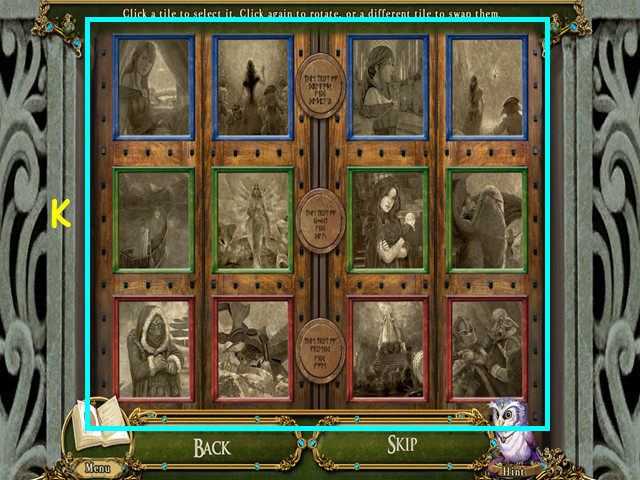
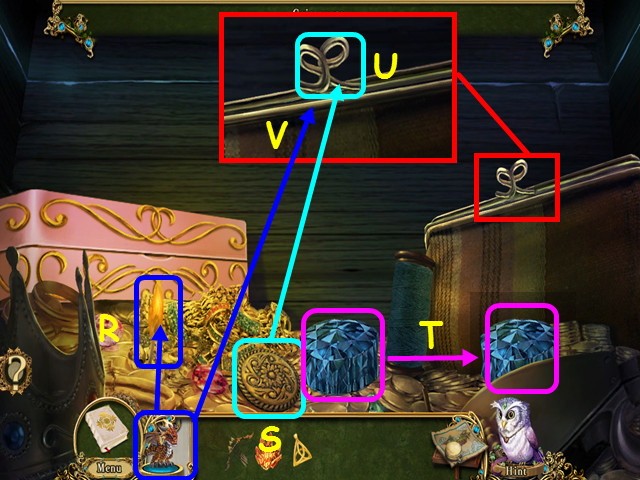
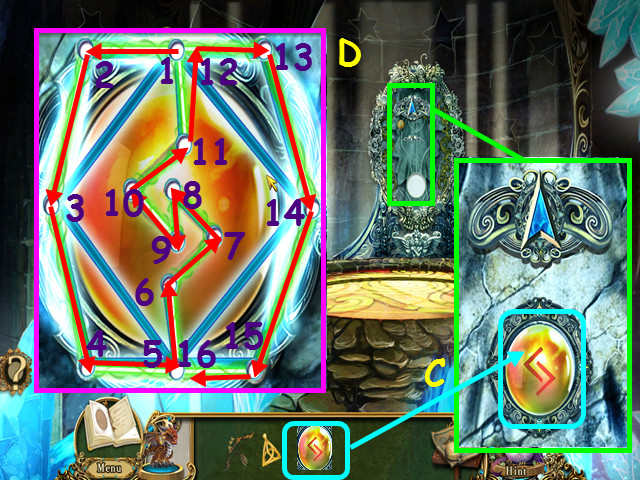
- Look at the golden slate for a mini-game (O).
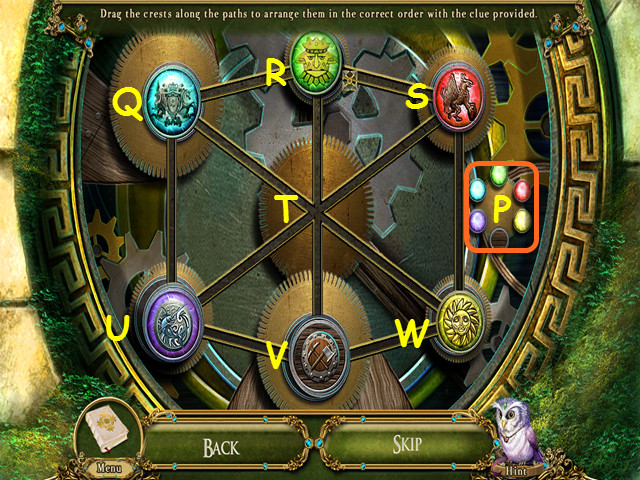
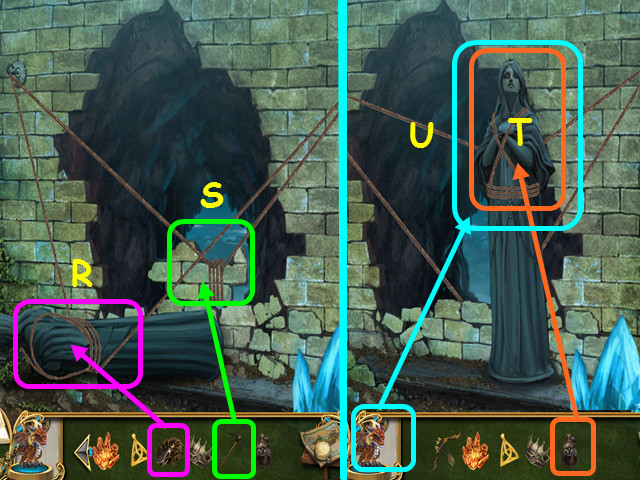
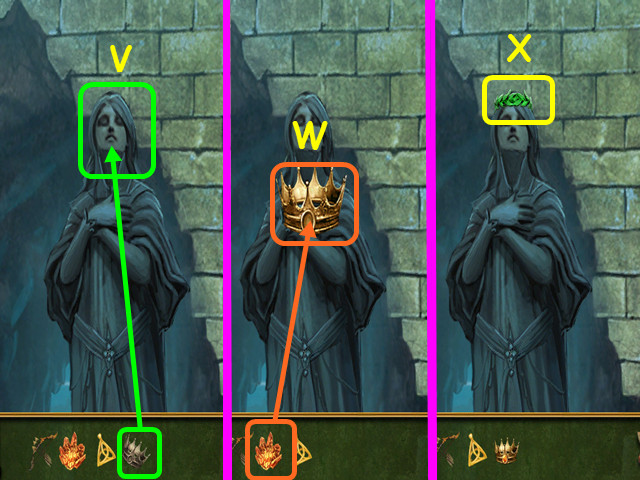
- Place the JEWELED EMBLEMS into the mechanism to trigger the mini-game.
- Move the crests along the paths to match the clue (P).
- Drag a crest to the adjacent empty position to move.
- This mini-game is randomized and will reset upon exit; your solution may vary.
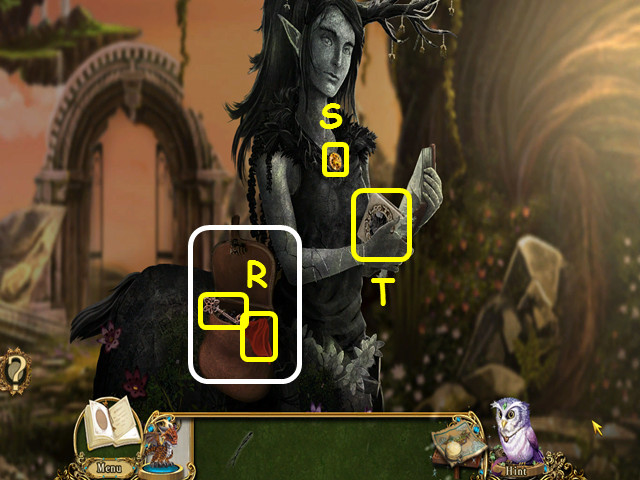
- Our solution was to move the crests in this order: U, V, T, S, R, Q, T, W, S, R, and T.
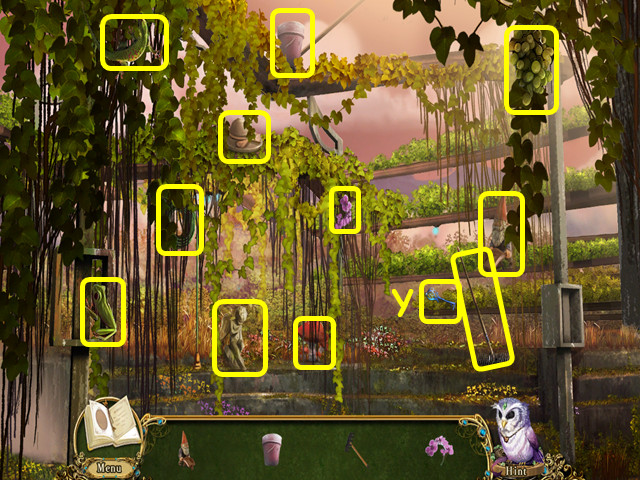
- Walk to the left.
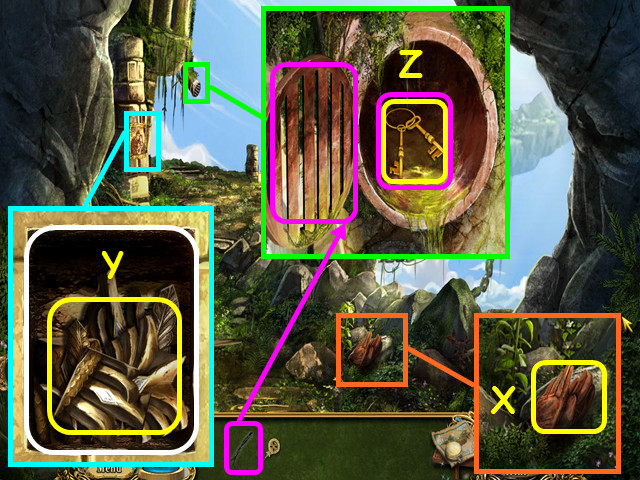
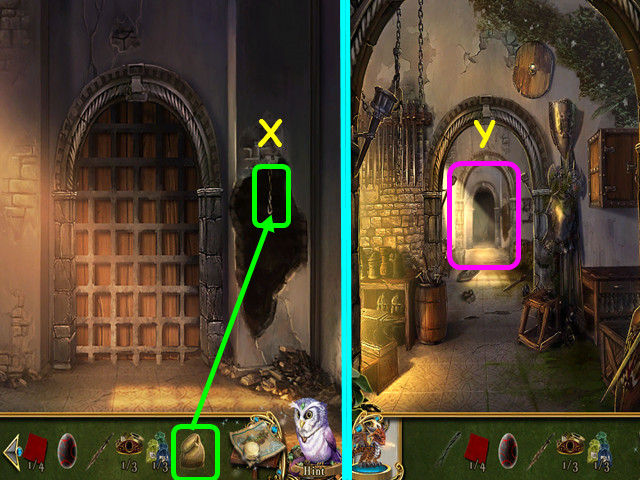
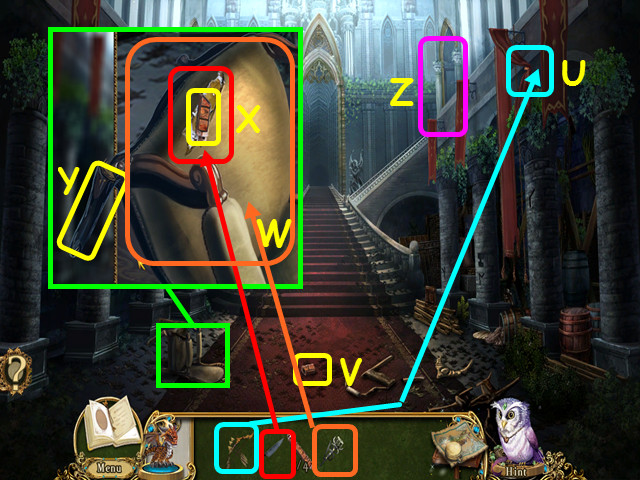
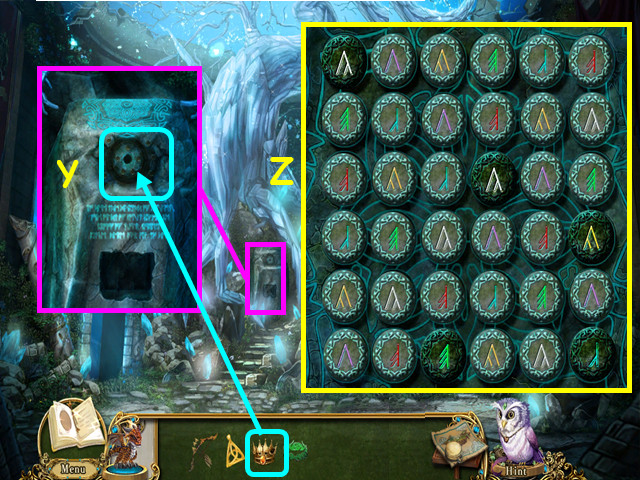
- Look at the pile of rocks and take the LEATHER GLOVES (X).
- Look at the pillar, remove the poster and take the PORTCULLIS FITTINGS (Y).
- Look at the drainpipe, use the GOLDLEAF BRANCH to open the grill, then use it to take the KEY RING (Z).
- Walk down, then go forward up the stairs.
- Look at the left reflector and take the EMPTY OIL CAN (A).
- Look at the gate for a mini-game (B).
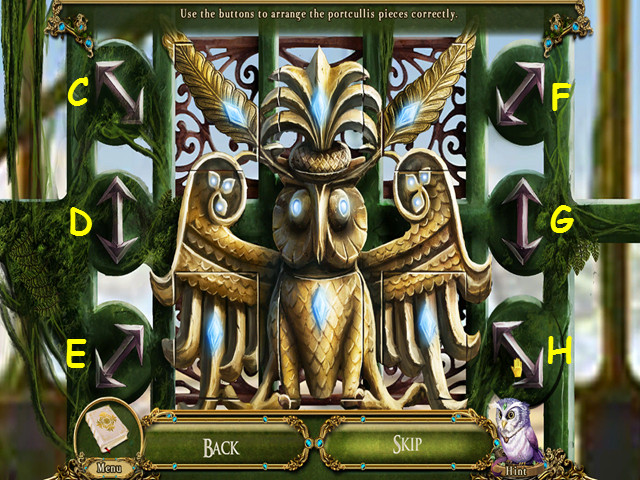
- Place the PORTCULLIS FITTINGS into the machinery to trigger the mini-game.
- Use the arrows to move the pieces to complete the carving.
- This mini-game is randomly generated; your solution may vary.
- Each time you exit the game, it will scramble.
- Our solution was: D, E, F, G, F, and H.
- Walk forward.
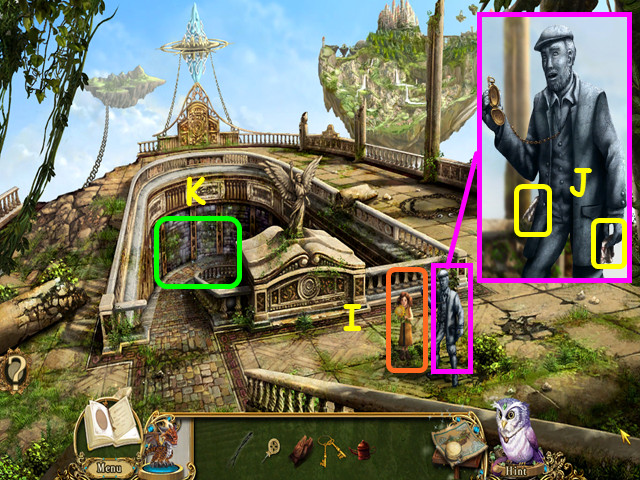
- Talk to the little girl (I).
- Look at the statue; take the 1/6 and 2/6 QUILT PATCH (J).
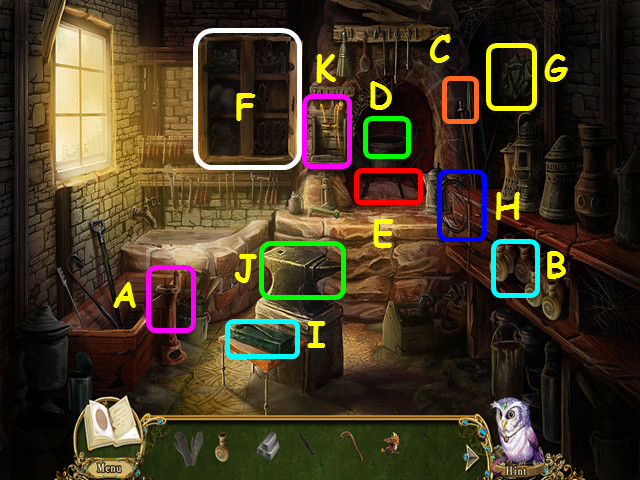
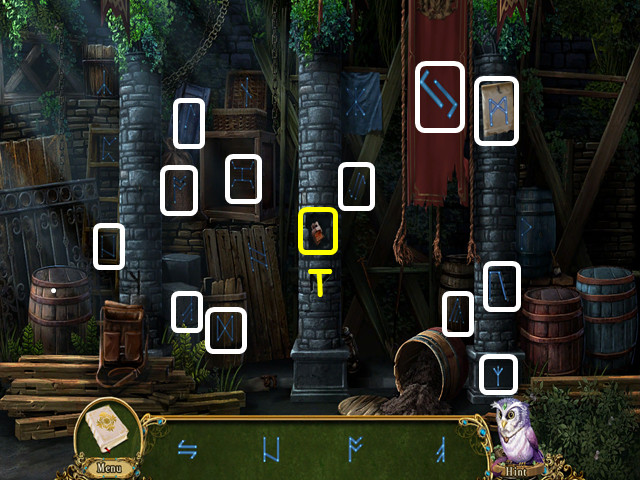
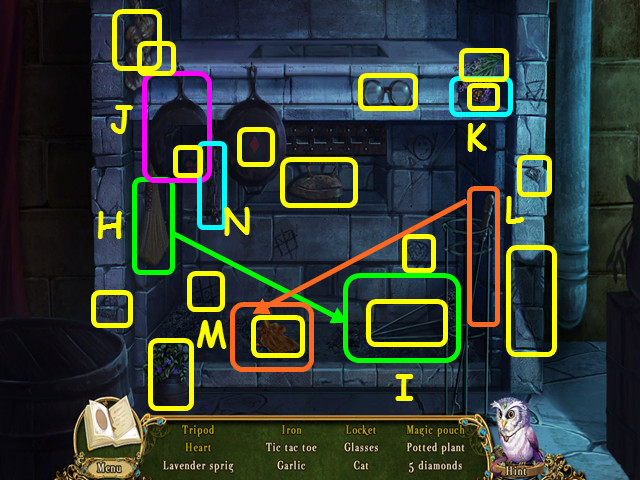
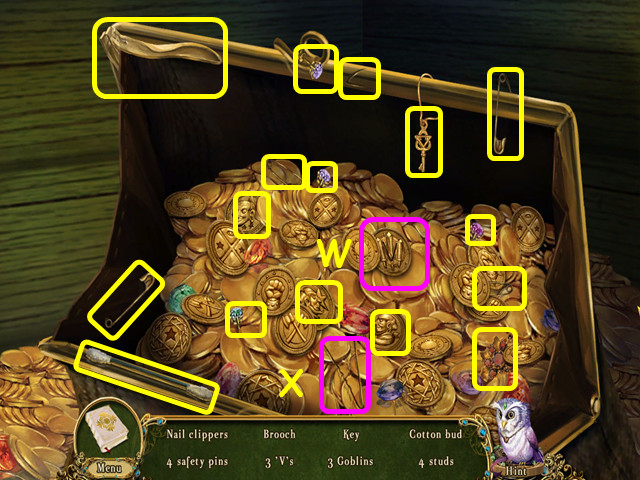
- Look at the entrance for a HOS (K).
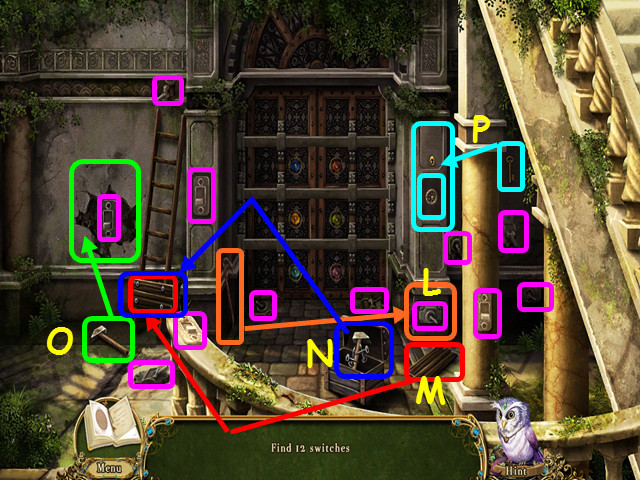
- Locate the 12 switches.
- Use the crowbar to remove the board from the wall (L).
- Take the board from the floor and place it on the ladder (M).
- Open the toolbox, take the hammer and nails, then use them on the ladder (N).
- Take the hammer from the floor and use it on the wall (O).
- Take the key and use it on the lock, slide the panel up, then push the button (P).
- You can now find all 12 switches (pink).
- You will earn the CROWBAR.
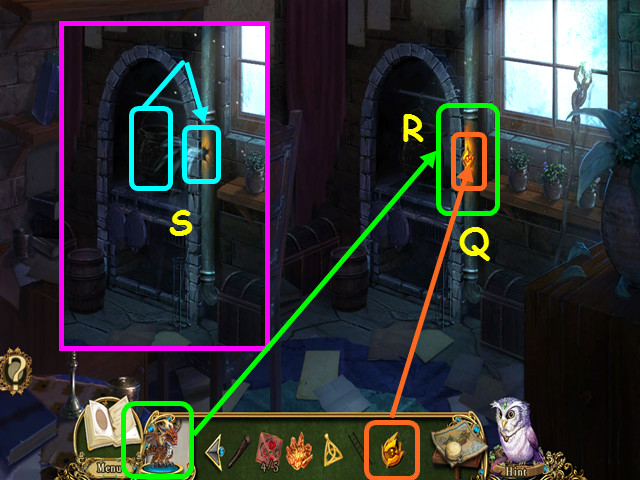
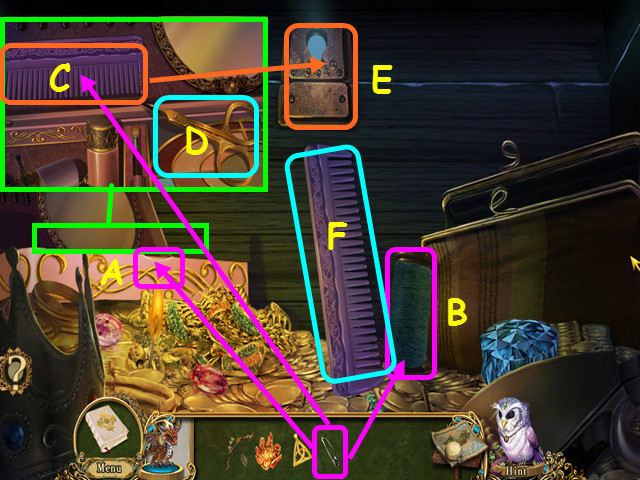
- Look at the oil drum and use the CORKSCREW to remove the cork (Q).
- Place the EMPTY OIL CAN on the barrel, then push the pump to get the FILLED OIL CAN (R).
- Take the SHOVEL (S).
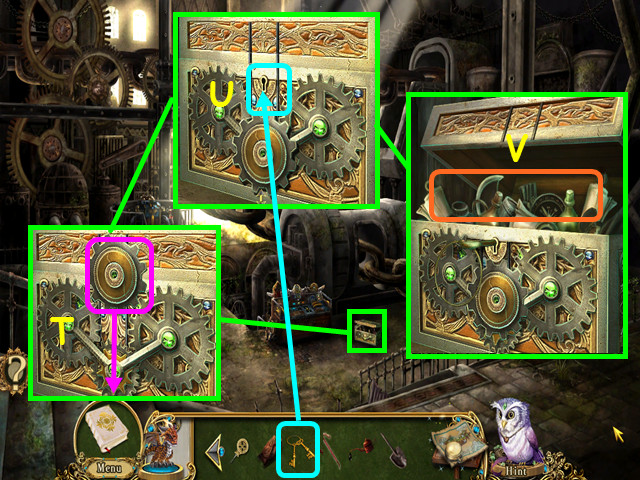
- Look at the footlocker and slide the center gear down (T).
- Use the KEY RING on the lock; turn the key and open the lid (U).
- Look inside the footlocker for a HOS (V).
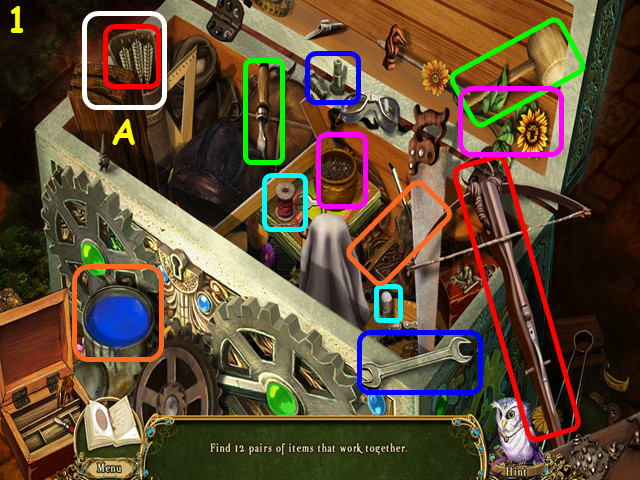
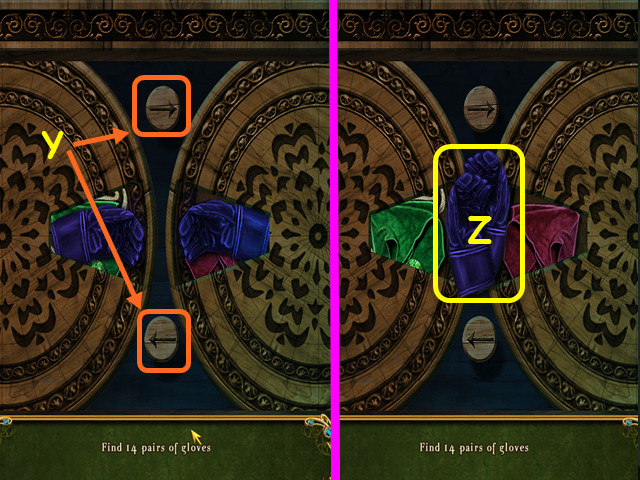
- Locate 12 pairs of items that work together.
- The first 6 pairs are shown here (1).
- Open the cover to find the arrows (A).
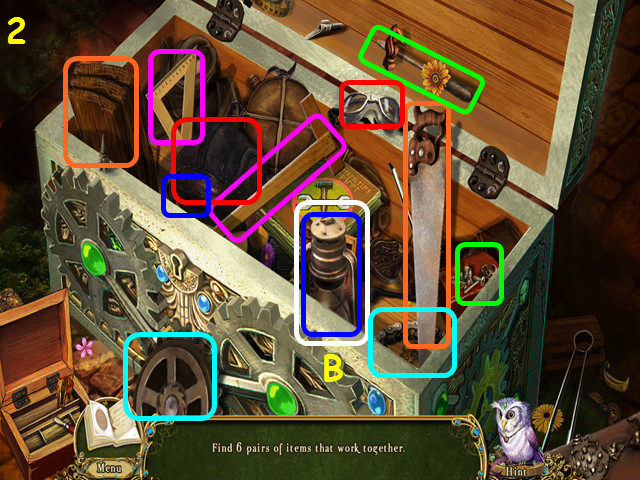
- The second 6 pairs are shown here (2).
- Remove the cover from the lantern (B).
- Use your map to travel to Ancient Goldleaf.
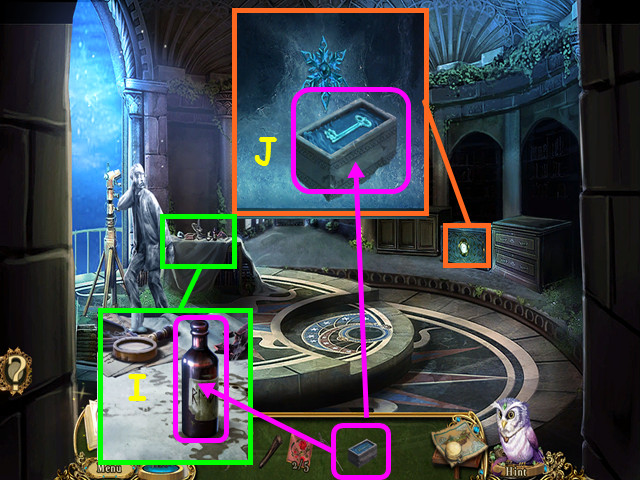
- Look at the root cache and use the SHOVEL to remove the dirt (C).
- Use the LEATHER GLOVES to remove the brambles (D).
- Use the CROWBAR to remove the metal grill (E).
- Use the POCKET DRAGON on the dried roots (F).
- Use the CORKSCREW to remove the lid (G).
- Take the 3/6 QUILT PATCH (H).
- Take the MACHINE PARTS (I).
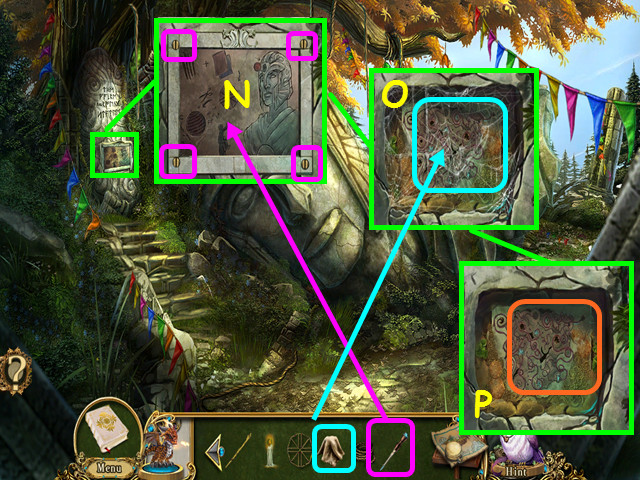
- Look at the torn-up paper under the machine parts for a mini-game.
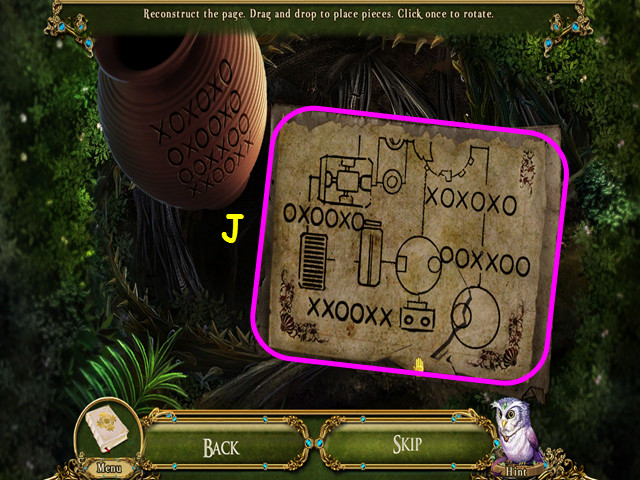
- Restore the diagram by placing the pieces in the correct position (J).
- Drag pieces into position; select once to rotate in place.
- Pieces will lock into position when correct.
- You will earn the SCHEMATICS PAGE.
- Use the map to travel to Wingferry.
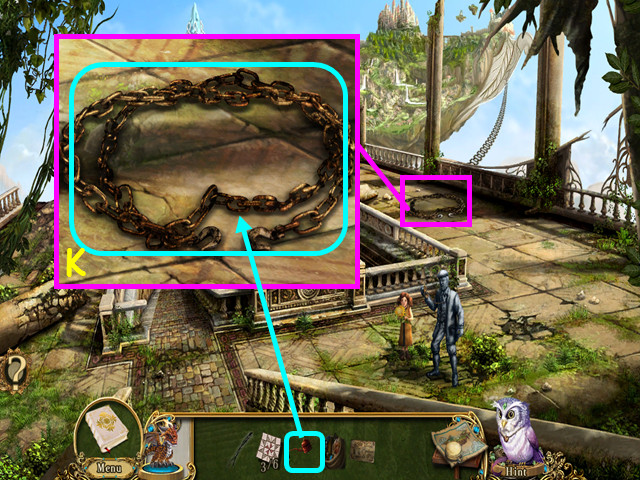
- Look at the rusted chains and use the FILLED OIL CAN on them (K).
- Take the CHAINS.
- Walk forward.

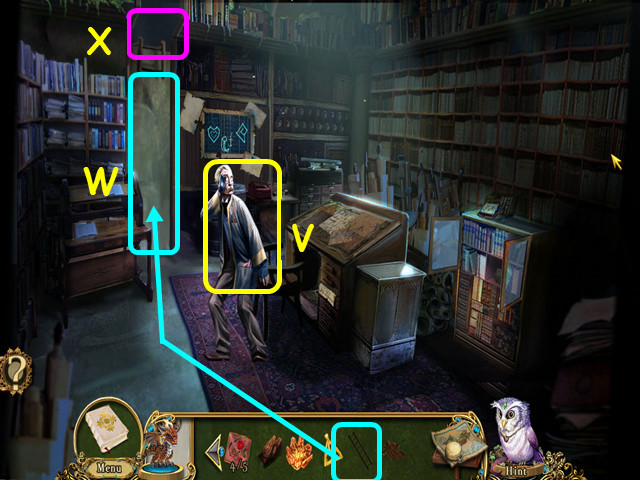
- Look at the footlocker, then look at the repair manual (L).
- Place the SCHEMATICS PAGE into the manual to get the REPAIR MANUAL (M).
- Look at the lower control panel and remove the damaged panel (N).
- Place the REPAIR MANUAL (O) and the MACHINE PARTS (P) on the panel to trigger a mini-game.
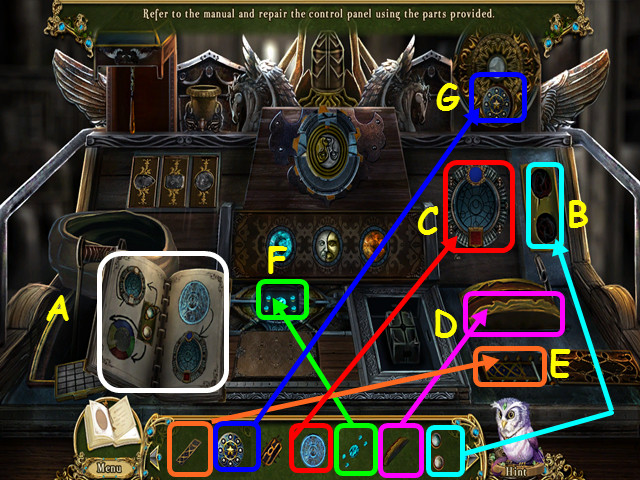
- Repair the console by following the directions in the manual (A).
- Once you complete a page in the manual, a black 'X' will appear on that page.
- Place the pair of buttons on the right (B); press the bottom button until you see red and blue vertically on the circle next to it, then press the upper button.
- Place the blue disc into the circle (C). Place the cover over the wires and push the lever to the right (D).
- Place the plate into the opening (E). Place the blue crystals into the center (F).
- Rotate the large disc so the opening is facing down, then put the disc into the hole (G).
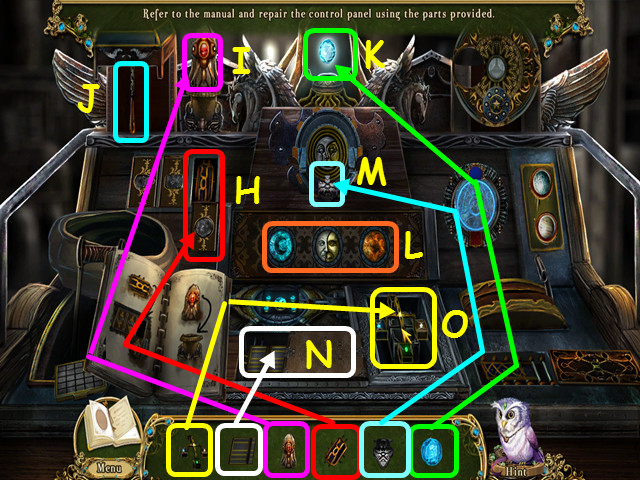
- Open the sliding cover, then place the component inside (H). Place the knob on the stand (I). Pull the chain (J).
- Place the gem onto the stand (K). Press the left button once, press the center button 3 times, and press the right button 5 times (L).
- Your settings may vary; you need to rotate the rings so that all 3 open at the bottom.
- Place the knob at the base of the rings (M).
- Slide open the compartment and place the chip inside (N). Place the buttons on the switch (O).
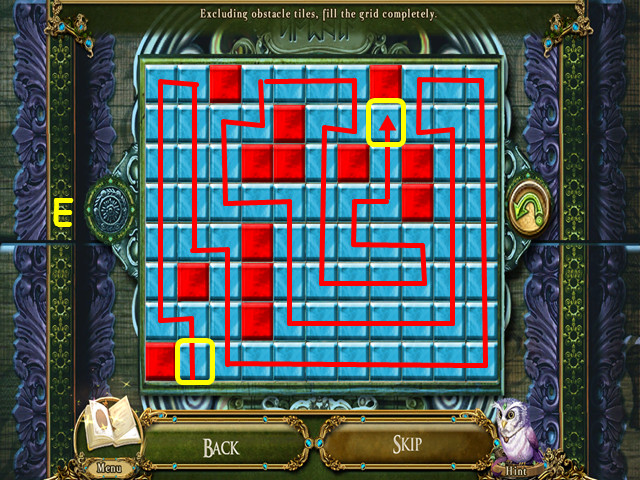
- Select the grid tile near the manual for a mini-game.
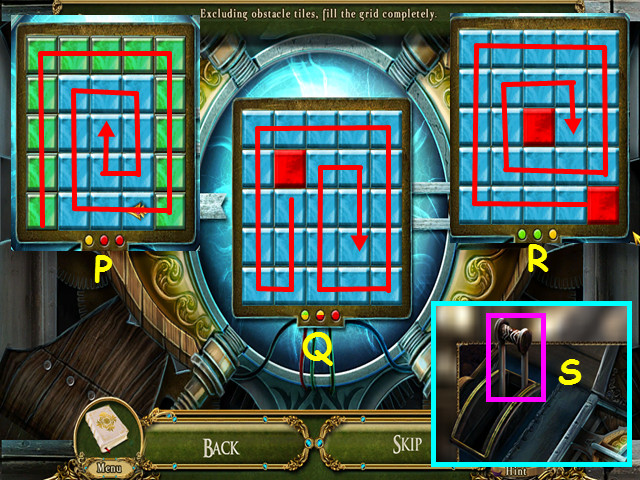
- Starting from any square, fill in the grid.
- Select a square, then the arrow pointing in the direction you want to move.
- The squares will fill until an obstacle is hit.
- There are 3 different grids to fill (P-R).
- Pull the lever (S).
- Walk down.
- After the island moves, use the map to travel to the Faireground Entrance.
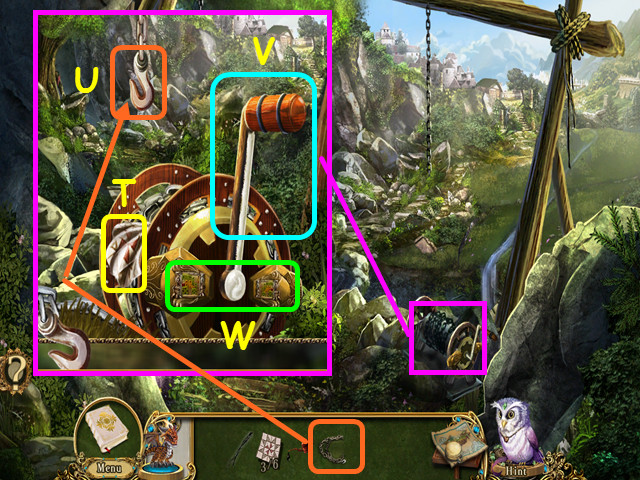
- Look at the winch and take the 4/6 QUILT PATCH (T).
- Attach the CHAINS to the hook (U).
- Note the winch lever (V).
- Look at the safety locks for a mini-game (W).
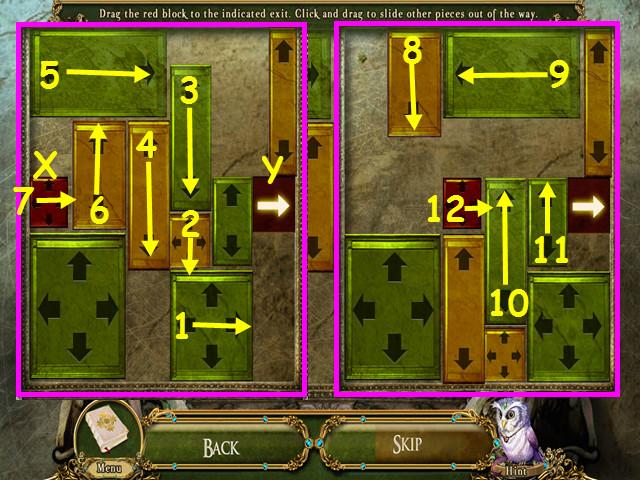
- Move the red block (X) on the left to the red square on the right (Y).
- Drag the blocks in the direction indicated in numerical order (1-12).
- Turn the winch lever.
- Take the LEVER (A).
- Note the squabbit den (B).
- Walk forward (C).
- Note the entrance to the Weaver's hut (D).
- Look at the scaffolding for a HOS (E).
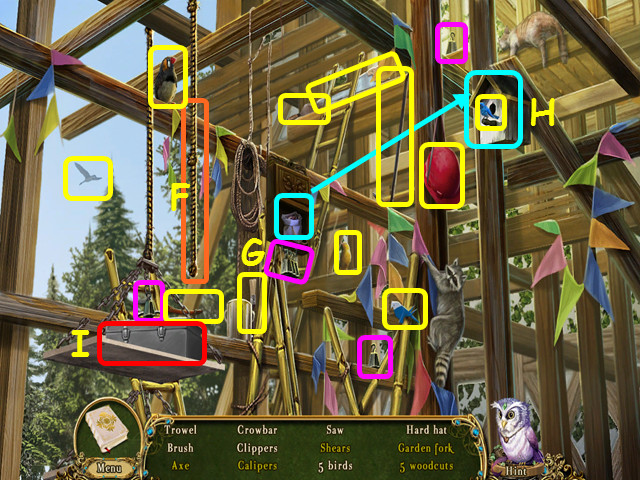
- Locate all the items on the list.
- Pull the rope twice to raise the platform (F).
- Take the 3 weights (pink) and hang them on the box (G).
- Take the birdseed from the box and use it on the birdhouse (H).
- Once you find all the items in white, look at the toolbox (I).
- The toolbox has 3 tiers that are accessed using the colored buttons (J).
- You will earn the CLIPPERS.
- Use the CLIPPERS on the bamboo scaffolding to get the BAMBOO POLE.
- Enter the Weaver's hut.
- Use the POCKET DRAGON to light the CANDLE and then take it (K).
- Note the magic quilt (L).
- Look at the rattan basket and use the CLIPPERS to cut it open for a mini-game (M).
- Find the two ends that are connected by an unbroken strand.
- You will need to solve 3 instances (1-3).
- You will earn the RATTAN STICKS.
- Look in the basket; take the RAGS (N), and the DUSTPAN AND BROOM (O).
- Walk down, then go forward to the huge statue.
- Take the 5/6 QUILT PATCH (P).
- Use the CLIPPERS to cut the ROPE (Q).
- Walk down twice.
- Note the open window (R).
- Look at the squabbit den and use the DUSTPAN AND BROOM on the mess for a HOS (S).
- Locate the 12 carrots.
- Use the hammer on the bank (A).
- Use the flyswatter on the fly when it lands (B).
- Place the dead fly on the web (C).
- Use the soft brush on the dirt mound (D) and the crystal (E).
- Place the crystal in the socket (F).
- Use the chisel on the soft brick (G).
- Use the stick to trigger the mousetrap (H).
- You will earn the BUNCH OF CARROTS; give them to the SQUABBIT.
- Walk forward.
- Note the children's workbench (I).
- Look at the statue and give him the SQUABBIT (J).
- Talk to the boy and he will give you the 6/6 QUILT PATCH.
- Enter the Weaver's and look at the magic quilt.
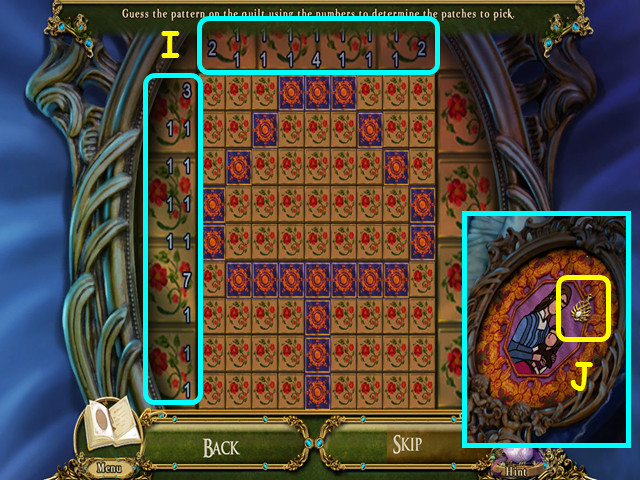
- Place the 6 QUILT PATCHES onto the quilt for a mini-game.
- Select the squares so that the numbers on the top and left are represented (K).
- Press on a square to select it; press again to turn it back over.
- Take the POCKET WATCH (L).
- Use the map to return to Wingferry.
- Look at the Wingferry operator statue and place the POCKET WATCH in his hand (M).
- Talk to the Wingferry operator and he will give you the SCREWDRIVER.
- Use the map to travel to Faire of Stars, then walk forward to the huge statue.
- Look at the plaque; use the SCREWDRIVER on the 4 screws to get the LANTERN DIAGRAM (N).
- Use the RAGS on the cobwebs (O); the rags will become the STICKY RAGS ON A STICK.
- Look at the statue mechanism for a mini-game (P).
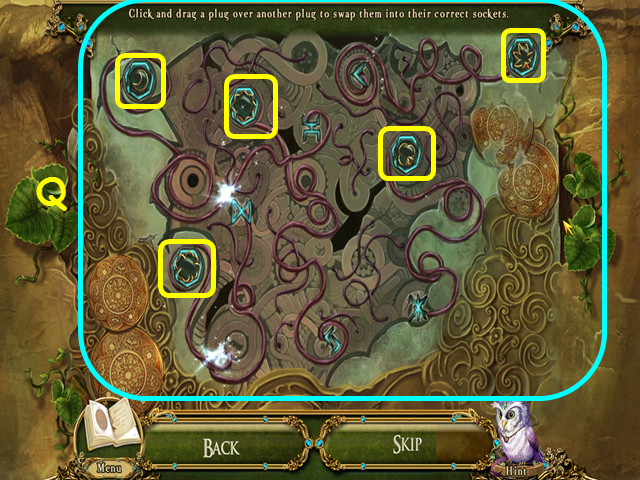
- Drag the plugs to the correct location.
- Pull a plug aside to see the symbol beneath.
- Please look at the screenshot for the solution (Q).
- Walk down twice.
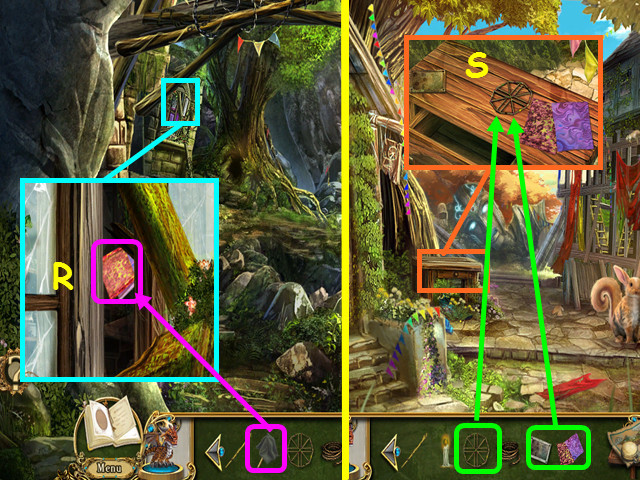
- Look at the window and use the STICKY RAGS ON A STICK to get the CRAFT PAPER (R).
- Walk forward.
- Look at the children's worktable; place the CRAFT PAPER, LANTERN DIAGRAM, and RATTAN STICKS on the table (S).
- Select any of the items for a mini-game.
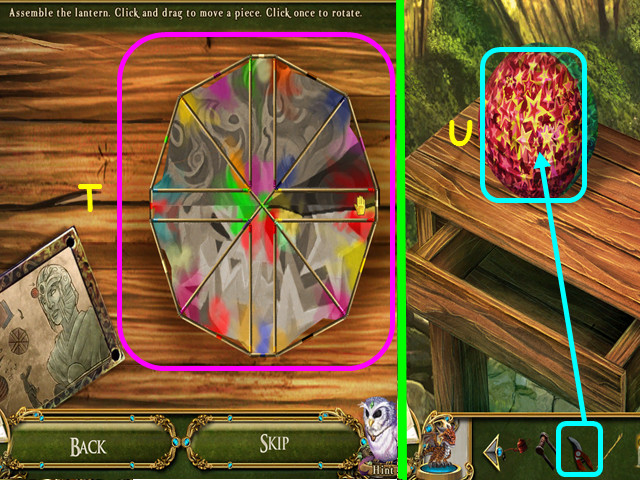
- Place the paper pieces on the frame to assemble the lantern (T).
- Left-press to rotate a piece in place, then drag into position.
- Use the CLIPPERS on the lantern for a HOS (U).
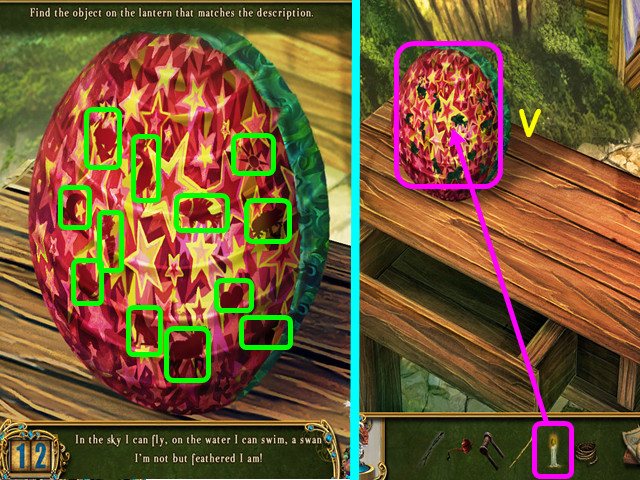
- Locate all the items based on the given description.
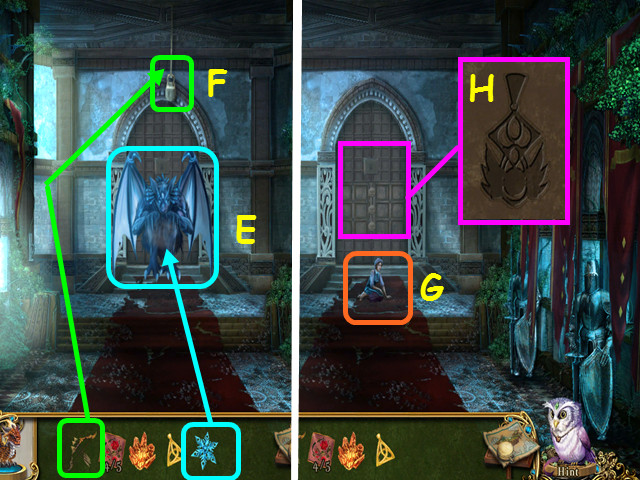
- Place the CANDLE into the lantern to get the STAR LANTERN (V).
- Walk forward to the huge statue.

- Place the STAR LANTERN into the head of the statue (W).
- Take the SKY CRYSTALS (X).
- Use the map to travel to the crystal generator, then look at the left reflector.

- Place a SKY CRYSTAL in the holder (A).
- Use the FILLED OIL CAN on the 3 small drums (B).
- Use the BAMBOO STICK on the large winch (C).
- Place the ROPE on the left winch (D).
- Take the PUMICE that falls to the ground (E).
- Look at the right reflector.
- Place the SKY CRYSTAL in the holder (F).
- Use the PUMICE on the reflector (G).
- Drag the pumice back and forth until a HOS appears.
- Locate all the items by their silhouettes.
- Select the crystal control for a mini-game (H).
- Press the buttons to guide the beam to recreate the pattern (I).
- Press the buttons in numerical order (1-6).
- Walk forward twice to the Enginarium.
- Look at the upper control panel and place the LEVER into the control (J).
- Pull the lever to launch the Wingferry.
Chapter 2: Cloud Court
- Note the Briar gate (A).
- Look at the unicorn to learn you need to find something to help him heal (B).
- Walk up the path to the barracks entrance (C).
- Note the stone chest (D) and the barracks gate (E).
- Walk to the Castle bridge and select the gate for a mini-game (F).
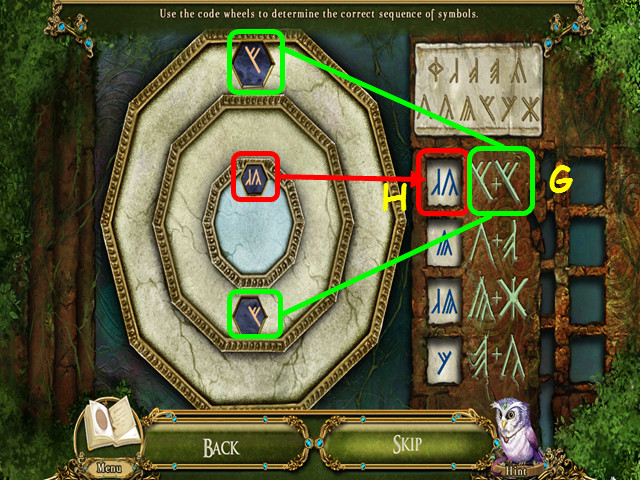
- Press the outer wheel until the 2 outer symbols match a pair of symbols in white (G).
- Change the symbol in blue to match the symbol on the inner wheel (H).
- Do this for all 4 sets of symbols.
- Walk forward, then try to walk forward again.
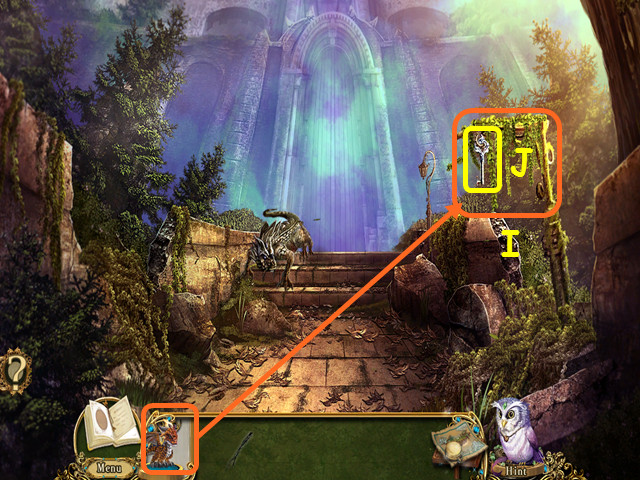
- Use the POCKET DRAGON on the vines (I).
- Take the OLD KEY (J).
- Walk down.
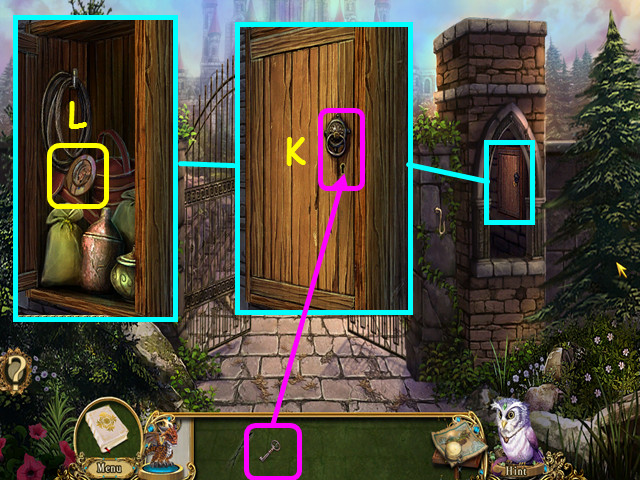
- Look at the cabinet and use the OLD KEY on the lock (K).
- Open the cabinet and take the OAK RING (L).
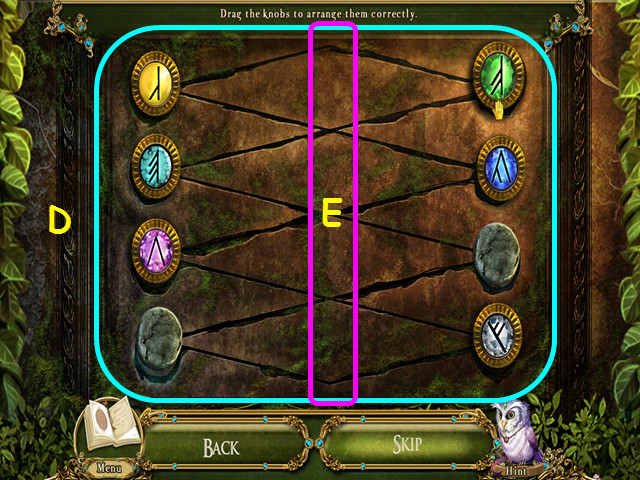
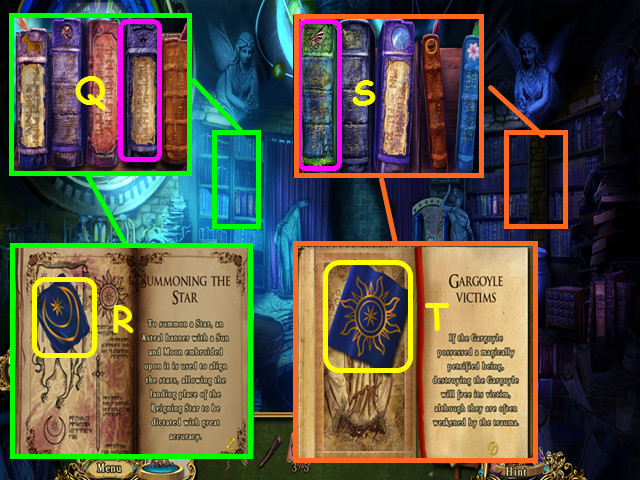
- Use the map to return to the Castle landing, then look at the Briar gate for a mini-game.
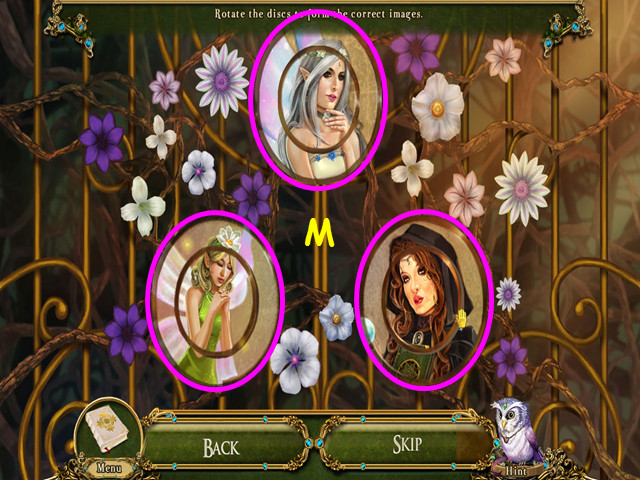
- Place the OAK RING into the upper circle to trigger the mini-game.
- Rotate the rings to restore the 3 portraits (M).
- Enter the gate to go to the High gardens.
- Note the Crystal Lattice (N) and the greenhouse (O).
- Walk forward on the center path to the Giant Goldleaf Oak (P).
- Look at the petrified faun (Q).
- Open the bag; take the 1/4 QUILT PATCH and the GREENHOUSE KEY (R).
- Take the 1/3 GEMSTONES (S).
- Take the 1/4 STONE TABLET (T).
- Exit the close-up, then walk down.
- Look at the greenhouse for a mini-game.
- Place the GREENHOUSE KEY in the center of the clock to trigger the mini-game.
- Turn the key until the gold hand is on a symbol that is in the center of one of the 4 locks (U).
- Look at the symbol in the silver hand and change the lock to that symbol (V).
- Do this for all 4 locks.
- Walk up the path to the greenhouse area and look at the garden shed for a HOS.
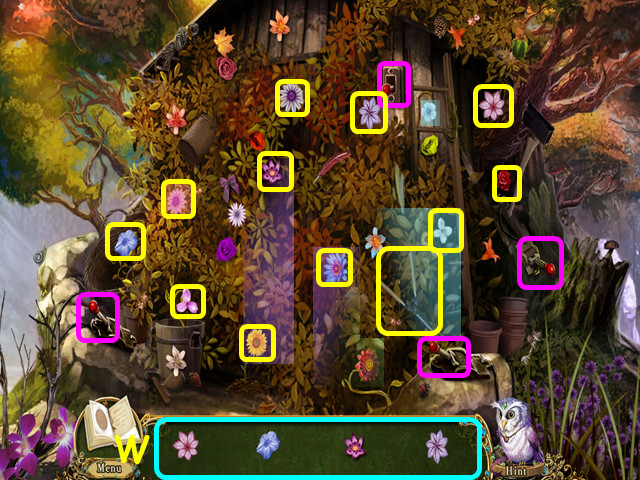
- Locate all the flowers shown in the bottom panel (W).
- Flip the switches to reveal or hide flowers (pink).
- Some flowers need 2 switches on to appear.
- You will earn the GARDEN SHEARS.
- Look inside the shed again and use the GARDEN SHEARS three times to remove the vines (X).
- Take the 2/3 GEMSTONES (Y).
- Exit the shed, walk down and look at the crystal lattice.
- Take the 2/4 STONE TABLET (A).
- Take the 3/3 GEMSTONES (B).
- Place the 3 GEMSTONES onto the panel for a mini-game (C).
- Drag the knobs to the correct position (D).
- This mini-game is randomized; your start positions will vary.
- Knobs can rest in the center positions (E).
- Some of the positions have symbols as clues.
- Take the 3/4 and the 4/4 STONE TABLETS (F).
- Use the map to travel to the barracks.
- Look at the stone chest; place the 4 STONE TABLETS on the lid for a mini-game (G).
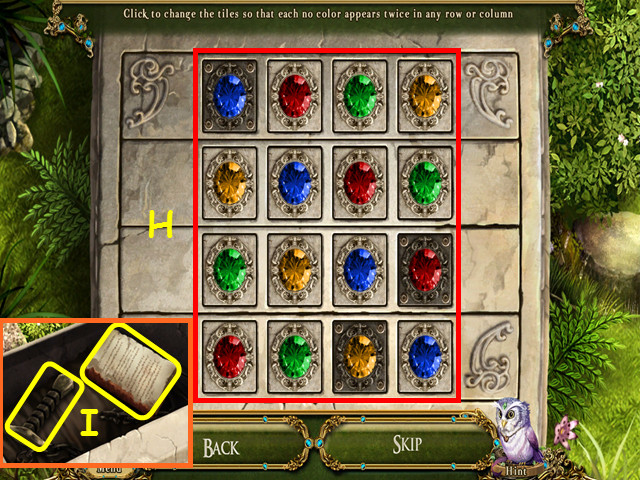
- Change the tiles so that no color is repeated in any column or row (H).
- Select a tile to change the color; 3 tiles with darker bases are not changeable.
- Take the BROKEN HILT and the TORN BOOK (I).
- Use the map to return to the Giant Goldleaf Oak.
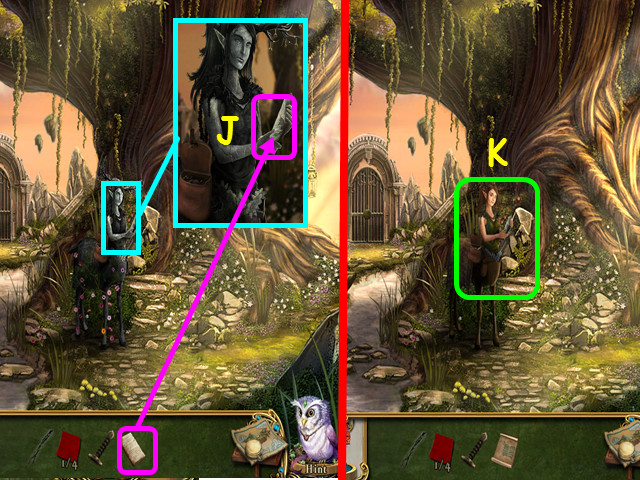
- Look at the petrified faun and place the TORN BOOK into her hands (J).
- Talk to the faun and she will give you the SCROLL OF MEDICINAL HERBS (K).
- Travel to the greenhouse, then enter the garden shed.
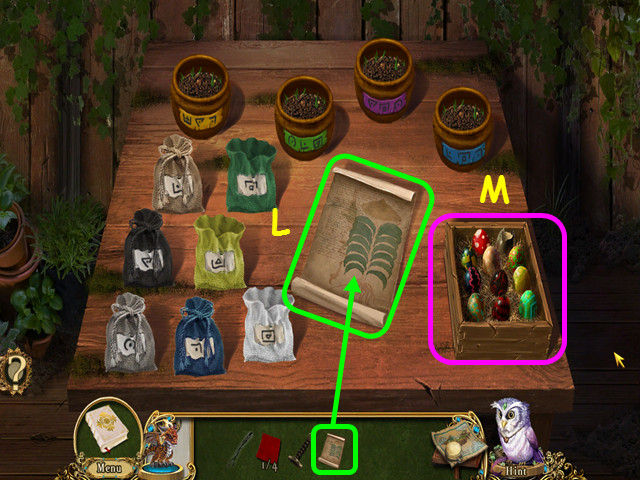
- Place the SCROLL OF MEDICINAL HERBS on the table (L).
- Look at the crate of eggs for a mini-game (M).
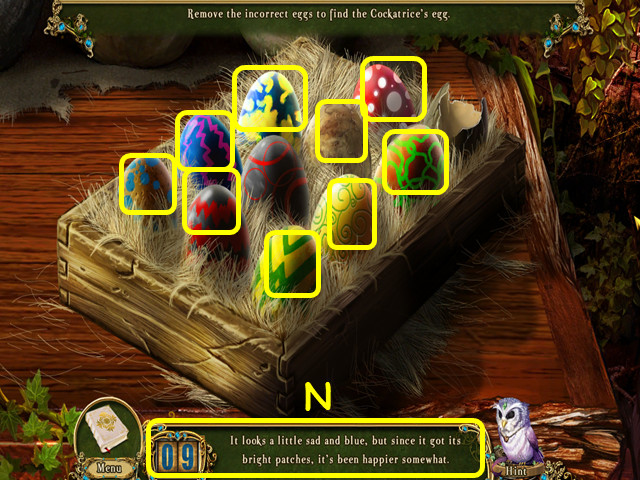
- Select the eggs based on the descriptions at the bottom (N).
- You will earn the COCKATRICE EGG.
- Return to the Giant Goldleaf Oak and show the COCKATRICE EGG to the faun.
- She will give you the BARRACKS PASS.
- Use the map to travel to the barracks.
- Look at the barracks gate and place the BARRACKS PASS into the shield (O).
- This will trigger a mini-game.
- Restore the carving by placing the tile in the correct position (P).
- Rotate the center until the lion's head is upright (Q).
- Select a tile to rotate in place; select 2 tiles to swap positions.
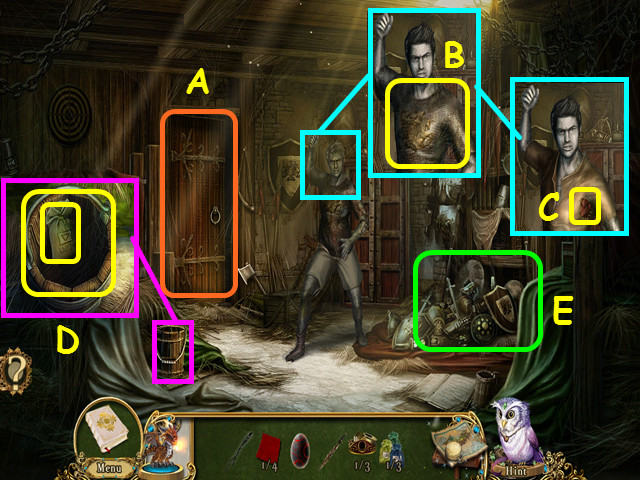
- Go through the gate to the barracks courtyard.
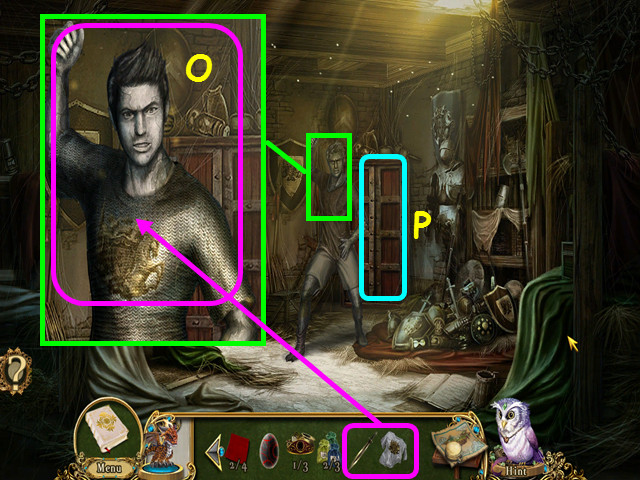
- Look at the ballista; use the BROKEN HILT on the blade to get the RUSTY SWORD (R).
- Pull the firing lever to learn it is jammed (S).
- Look at the armory entrance and read the note (T).
- Use the RUSTY SWORD on the lock (U).
- Enter the armory and select the blacksmith's forge on the left.
- Place the handle on the pump, then pump the handle (A).
- Place the bottle on the shelf (B). Place the tip on the spear (C).
- Place the ingots in the casting vat (D). Place the wood under the casting vat (E).
- Use the Pocket Dragon on the wood. Select the casting vat and it will pour into the mold.
- Open the cabinet and place the horseshoe inside (F). Place the crossed swords on the shield (G).
- Place the riding crop with the whip (H).
- Use the tongs on the mold (I). Use the hammer on the anvil (J).
- Use the gloves on the anvil. Use the nails on the incubator frame (K).
- You will earn the 1/3 INCUBATOR PARTS and the GREASE.
- Walk down to the courtyard.
- Look at the ballista and use the GREASE on the gears (L).
- Pull the lever for a mini-game (M).
- Press the red button (N) when the two red hands are in the same position in the center (O).
- Press the blue button when the 2 blue hands in the center are in the same position (P).
- Enter the windmill.
- Look at the damaged pillar and use the RUSTY SWORD 4 times to remove the boards (Q).
- Use the POCKET DRAGON on the chain (R).
- Note the alchemy table (S).
- Enter the hole in the floor (T).
- Take the 1/3 SOIL CONDITIONERS (U) and the SANDBAG (V).
- Note the entryway (W).
- Walk down twice, enter the armory and look at the portcullis.
- Place the SANDBAG on the hook (X).
- Once the way is clear, walk forward to the barracks (Y).
- Open the barred door (A).
- Look at the petrified guard captain and take his CRUSTY CHAINMAIL (B).
- Take the 2/4 QUILT PATCH (C).
- Look at the sand bucket; take the 2/3 SOIL CONDITIONERS and then take the SAND BUCKET (D).
- Select the scrap metal pile for a HOS (E).
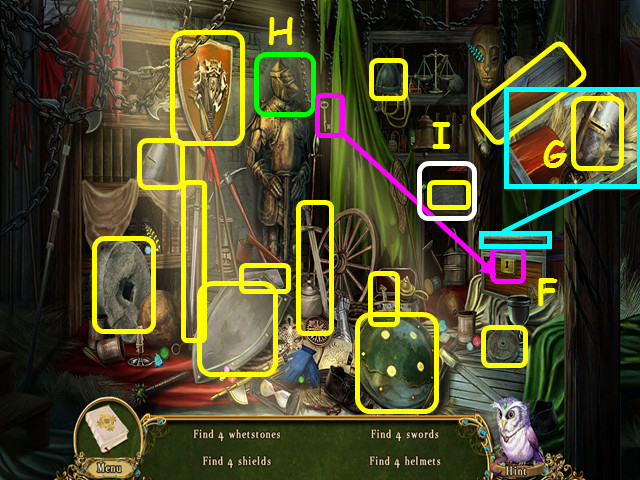
- Locate all the items on the list.
- Use the key to open the chest (F).
- Look inside the chest to find a helmet (G).
- Look at the suit of armor; take the helmet and the sword underneath the helmet (H).
- Remove the cloth cover (I).
- You will earn the ROUND WHETSTONE.
- Walk down to the armory.
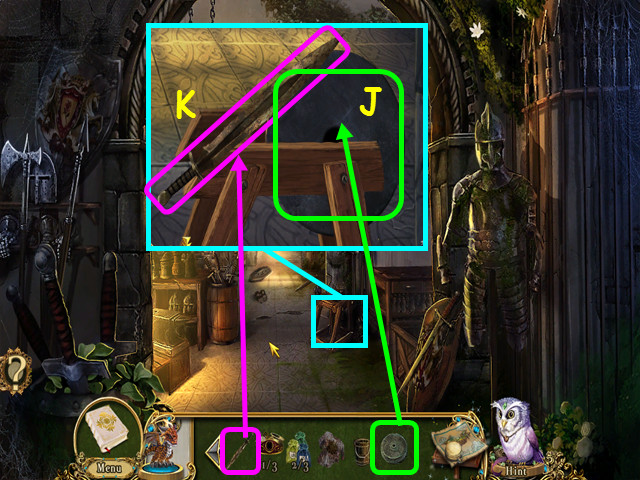
- Look at the stand and place the ROUND WHETSTONE into it (J).
- Place the RUSTY SWORD on the whetstone (K).
- Select the whetstone and release; move your mouse in a circular motion to sharpen the sword.
- You will now have the SHARP SWORD.
- Return to the windmill observation deck and enter the hole in the floor.
- Look at the pile of sand and use the SAND BUCKET to scoop it up (L).
- Place the CRUSTY CHAINMAIL into the bucket (M).
- Select the bucket and release, then move your mouse back and forth to shake the bucket until you receive the CHAINMAIL (N).
- Return to inside the barracks.
- Look at the petrified guard captain; place the CHAINMAIL and SHARP SWORD on him (O).
- Talk to the guard captain.
- After he leaves, select the locker for a mini-game (P).
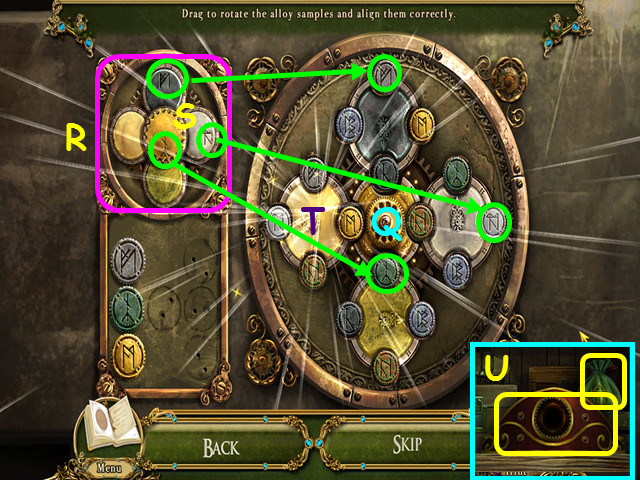
- Rotate the wheels to align the alloy samples.
- Spin the center wheel (Q) so the colors of the outer wheels match the guide in the upper left (R).
- Spin three of the outer wheels to position the symbols to match the ones on the guide (S).
- Spin the left wheel until it locks and solves (T).
- Take the 2/3 INCUBATOR PARTS and the 3/3 SOIL CONDITIONER (U).
- Walk forward.
- Talk to the faun and she will give you the HERB SEEDS and MEDICAL NOTES.
- Return to the greenhouse and enter the garden shed.
- Place the 3 SOIL CONDITIONERS on the table (V).
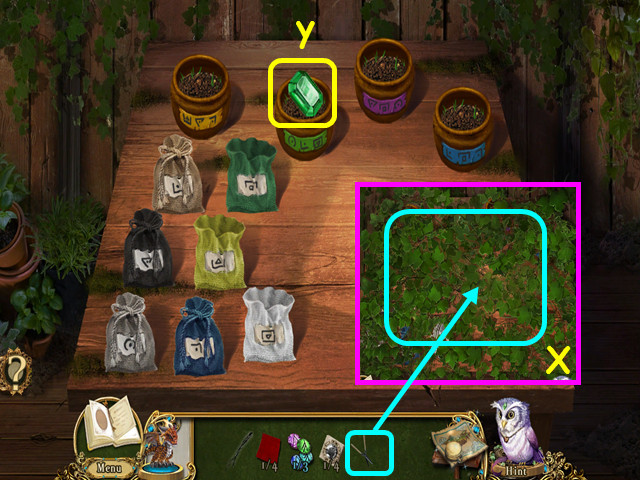
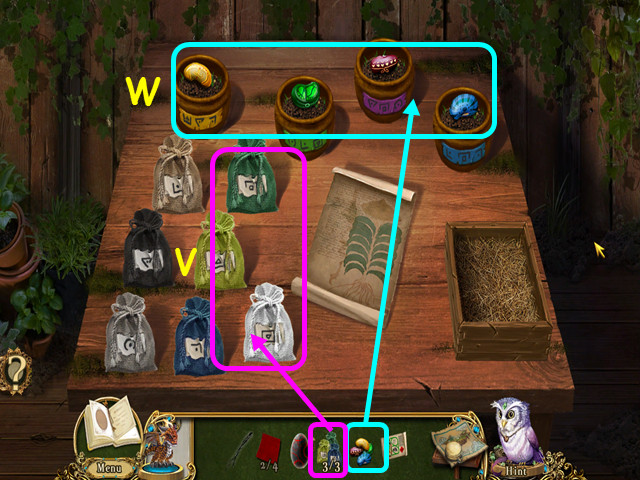
- Place the HERB SEEDS into the pots for a mini-game (W).
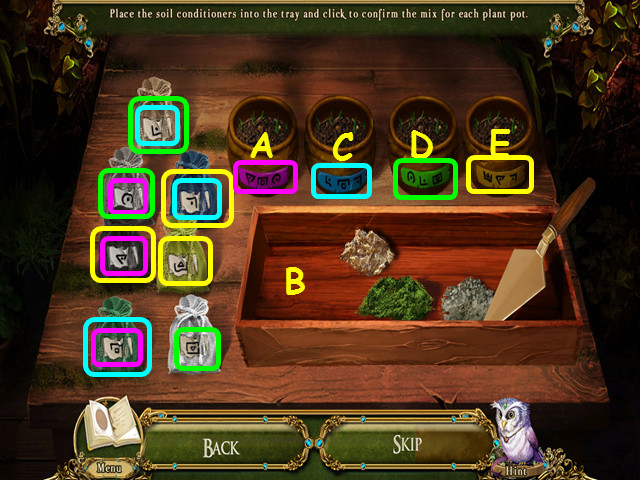
- Look at the label on the first pot (A), then find the 3 pouches with the same symbols (pink); place those items into the box (B).
- Press on the box to confirm your mixture.
- Look at the label on the second pot (C), then find the 3 pouches with the same symbols (aqua); place those items into the box. Press on the box to confirm your mixture.
- Look at the label on the third pot (D), then find the 3 pouches with the same symbols (green); place those items into the box. Press on the box to confirm your mixture.
- Look at the label on the fourth pot (E), then find the 3 pouches with the same symbols (yellow); place those items into the box. Press on the box to confirm your mixture.
- You will earn the HERB SAPLINGS.
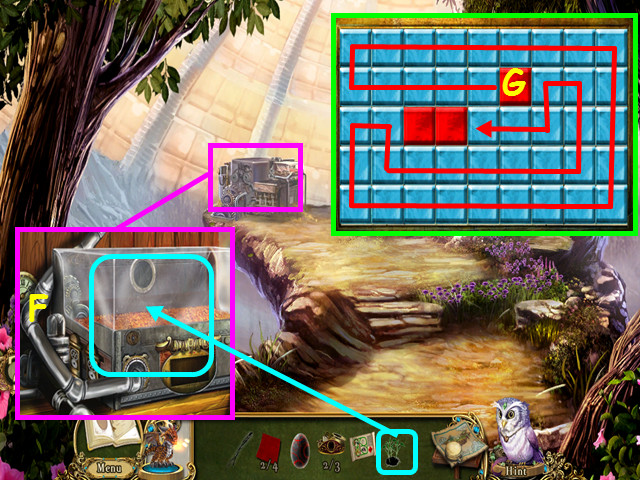
- Look at the incubator and place the HERB SAPLINGS inside (F) to trigger a mini-game (G).
- Starting from any square, fill in the grid.
- Select a square, then the arrow pointing in the direction you want to move.
- The squares will fill until an obstacle is hit.
- Fill in the next two grids in the same manner (H-I).
- You will earn the DEWGLINT, SAPPHIREBUD, SPARKLELEAF, and SUNBRIGHT.
- Travel to the windmill and look at the alchemy workstation.
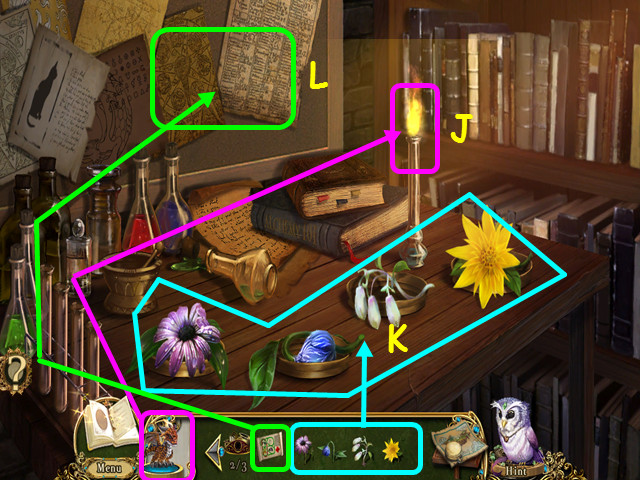
- Use the POCKET DRAGON to light the burner (J).
- Place the DEWGLINT, SAPPHIREBUD, SPARKLELEAF, and SUNBRIGHT into the dishes (K).
- Place the MEDICAL NOTES on the bulletin board for a mini-game (L).
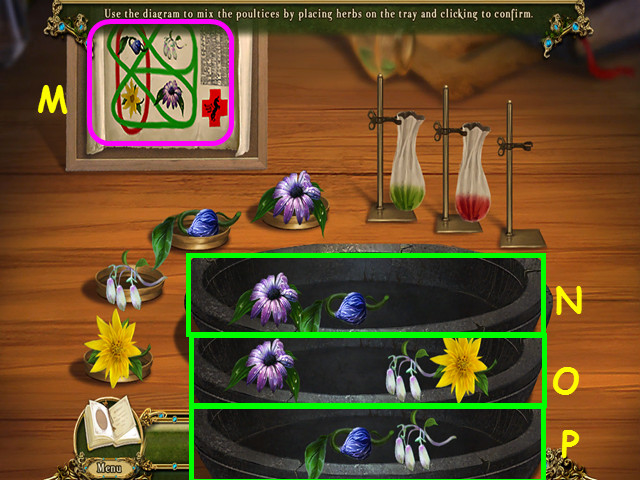
- Use the diagram to mix the herbs (M).
- Place the herbs in the pan, then press in the pan to mix.
- There are three correct combinations shown here (N, O, P).
- You will earn the HEALING POULTICES.
- Use the map to travel to the castle landing.
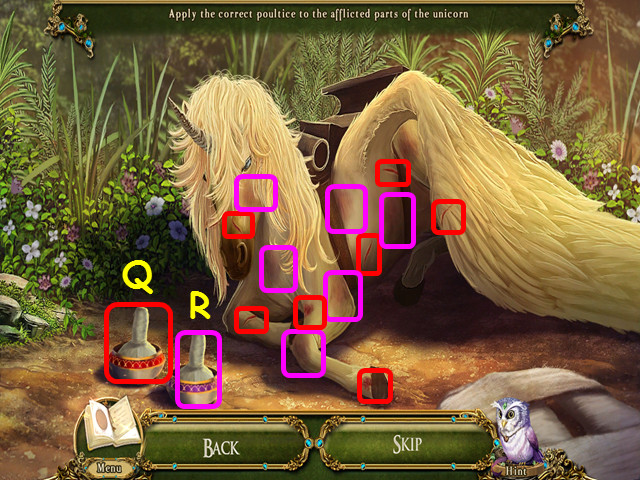
- Use the HEALING POULTICES on the unicorn for a mini-game.
- Use the red poultice on the red injuries (Q).
- Use the purple poultice on the purple injuries (R).
- Select the unicorn, then choose the Aviary in the upper right or the map.
- Look at the aviary entrance for a mini-game.
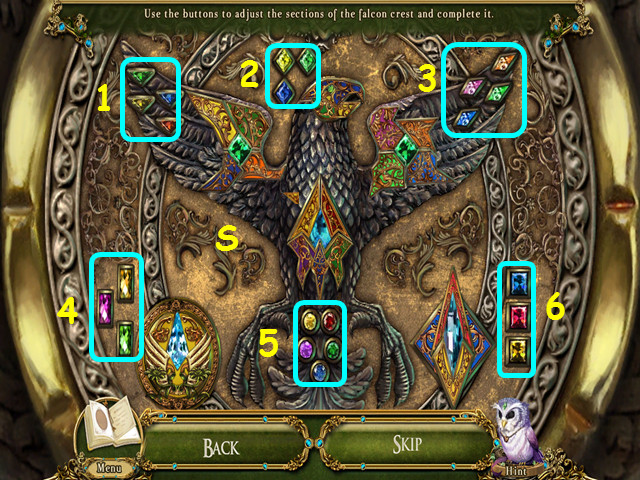
- Use the buttons to rotate the mosaic pieces and restore the falcon crest (S).
- There are 6 sets of buttons (1-6).
- Walk forward to the aviary.
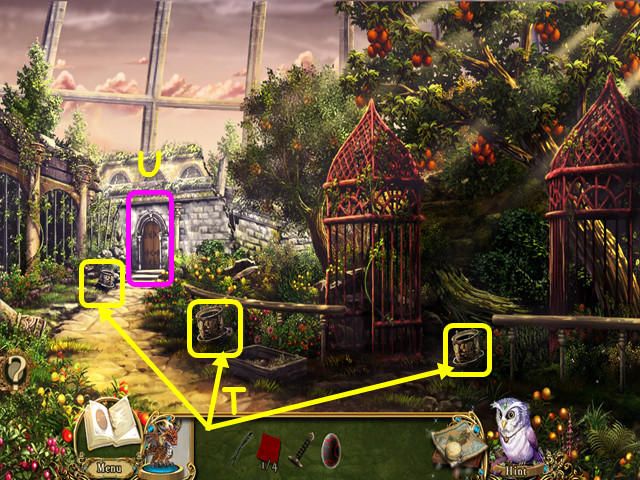
- Take the 3 BIRD FEEDERS (T).
- Look in the storeroom for a HOS (U).
- Locate all the items on the list.
- Move the bushes (V).
- Use the water can on the plant (W).
- Give the fruit to the arm to find the monkey (X).
- You will earn the 3/3 INCUBATOR PARTS and the HANDLE.
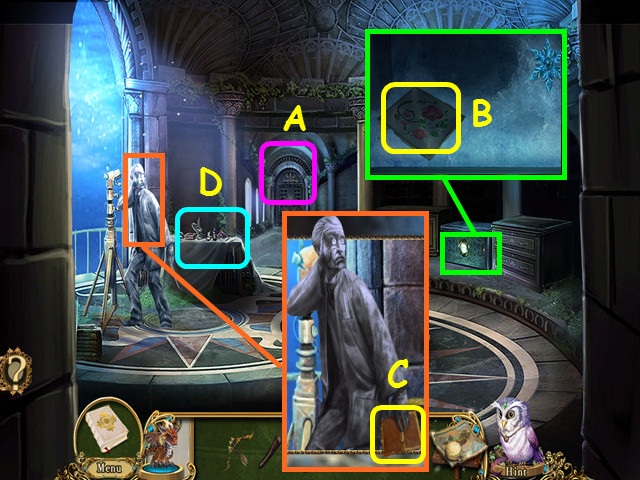
- Look at the map and select the Windmill-Crystal Forge.
- Take the GAFF HOOK (A).
- Look at the forge crystal and take the 3/4 QUILT PATCH (B).
- Zoom into the clipboard and read the information (C).
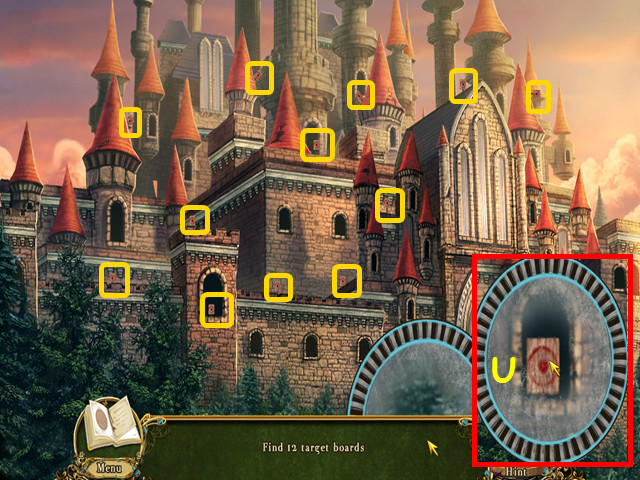
- Walk right to the gear room for a HOS (D).
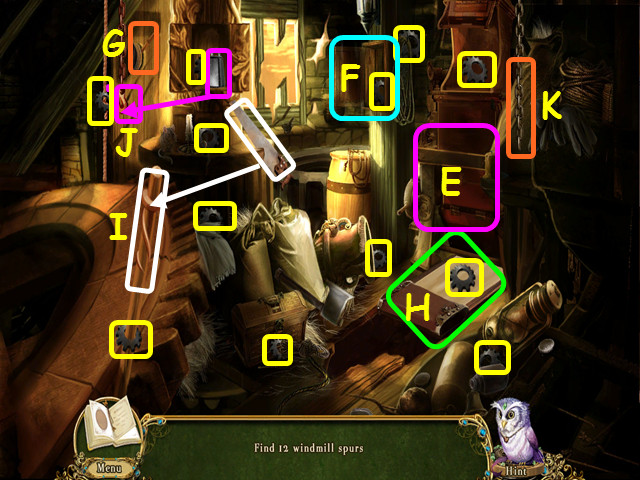
- Locate the 12 windmill spurs.
- Remove the green cloth (E). Open the cabinet (F).
- Pull the lever (G). Pull out the board (H).
- Use the saw on the pole (I).
- Place the weight on the left chain (J). Pull the right chain (K).
- You will earn the WINDMILL SPURS.
- Walk right to the gear room.
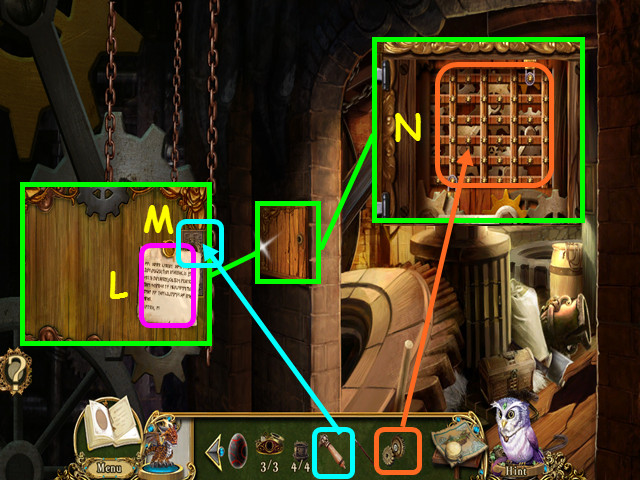
- Look at the gear box and read the letter (L).
- Use the HANDLE on the latch to open the box (M).
- Use the WINDMILL SPURS on the gears for a mini-game (N).

- Use all the links to connect the upper (O) and lower (P) gears.
- Drag a link into position; press to rotate in place.
- Take the BROKEN BOW that falls.
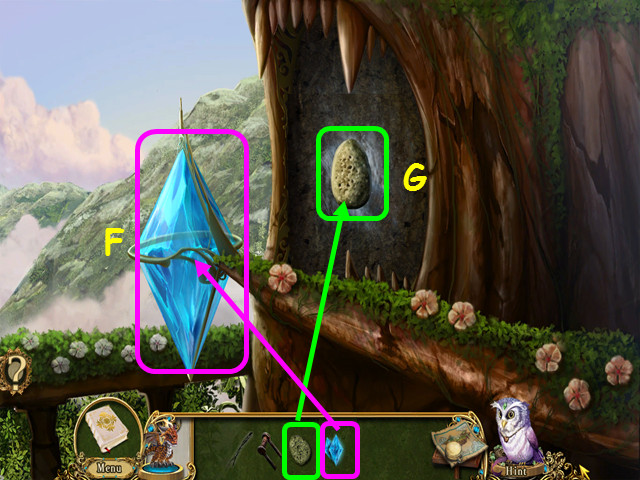
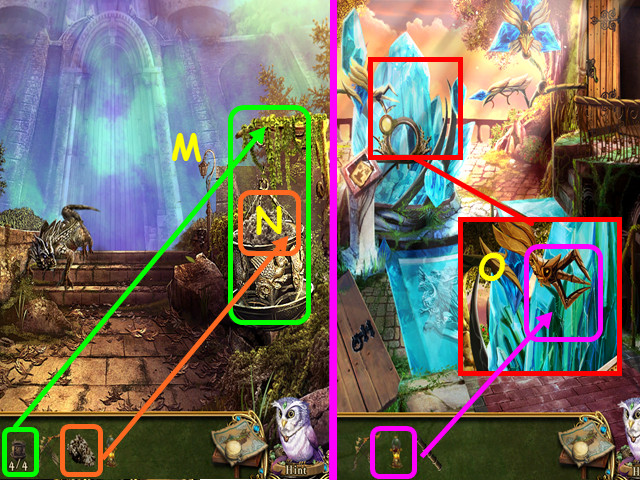
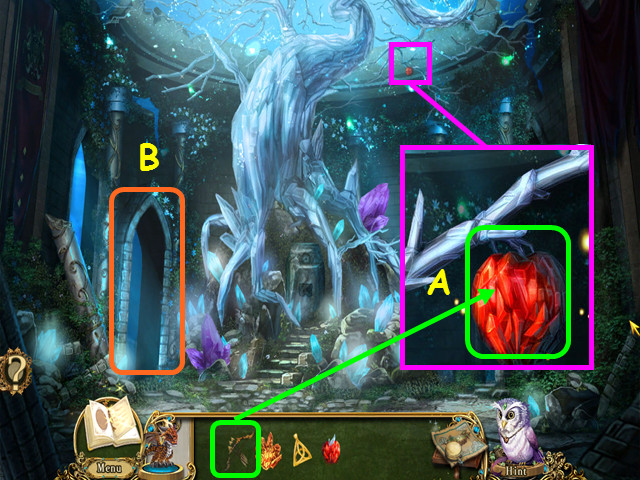
- Use the map to travel to the high gardens and look at the crystal lattice.
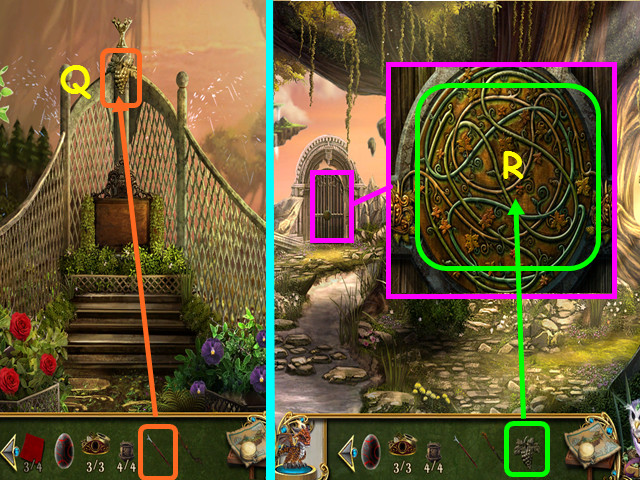
- Use the GAFF HOOK to get the BRONZE GRAPES (Q).
- Walk to the giant Goldleaf Oak.
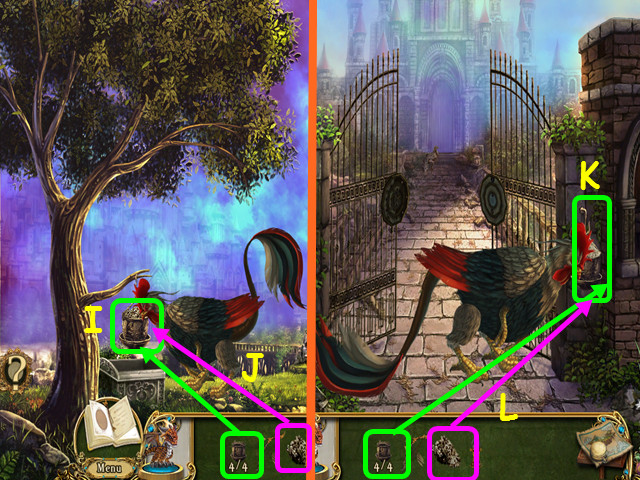
- Look at the gate and use the BRONZE GRAPES on the plaque for a mini-game (R).
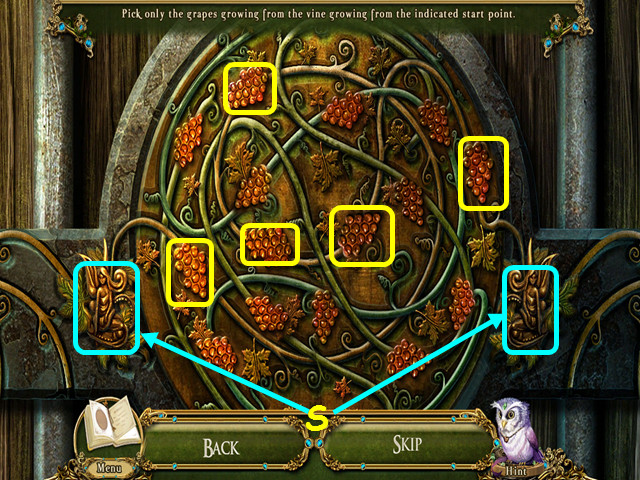
- Follow the vine between the 2 fairies (S); pick only the grapes on that vine (yellow).
- Walk forward to enter the vineyard.
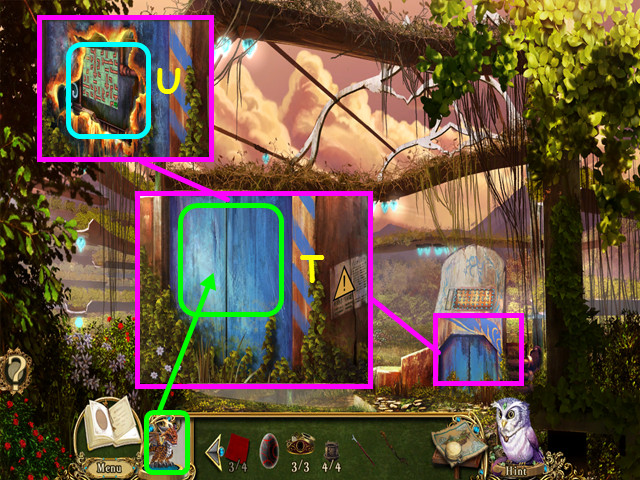
- Look at the water pumping controls and use the POCKET DRAGON on the door 3 times (T).
- Look at the controls for a mini-game (U).
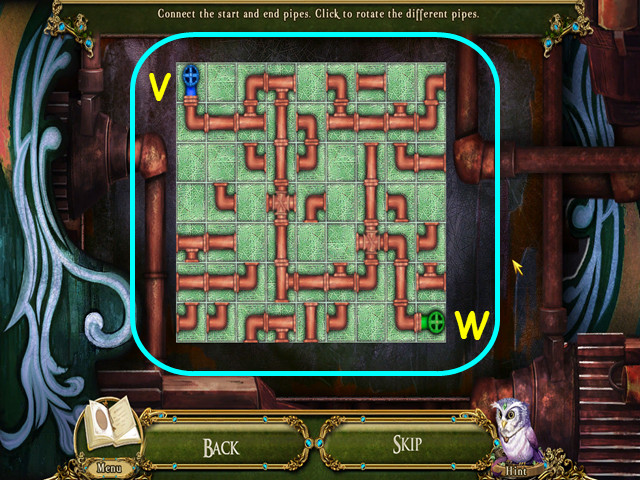
- Rotate the pipes to connect the blue pipe (V) to the green pipe (W).
- Select a pipe to rotate it in place.
- Look at the vines and use the GAFF HOOK on the blue key (X).
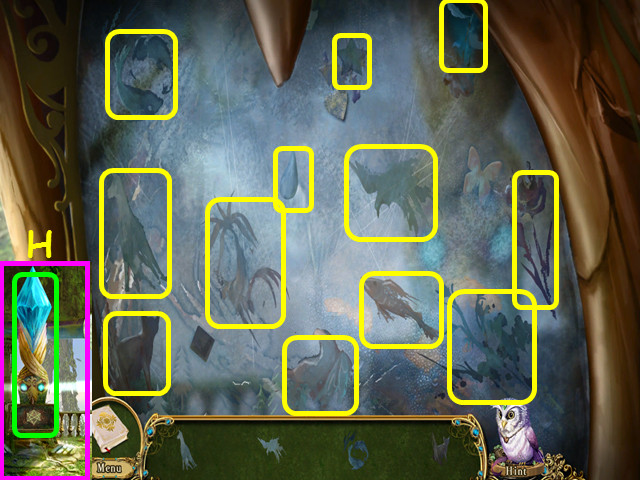
- This will trigger a HOS.
- Locate all the items on the list.
- You will earn the WEAPONS CABINET KEY (Y).
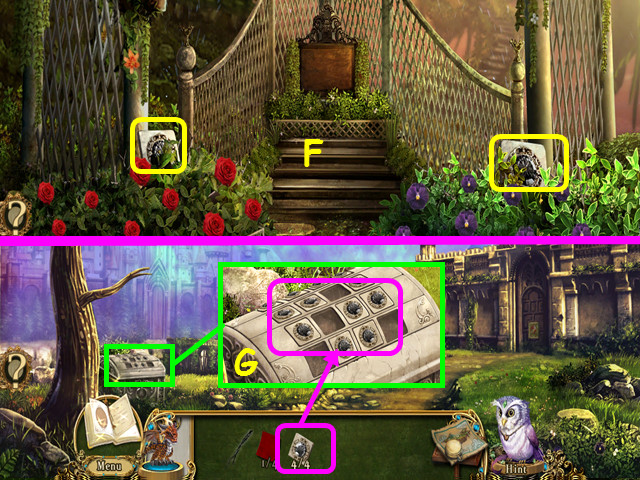
- Return to the barracks courtyard; enter the armory, then look at the weapons cabinet on the right.
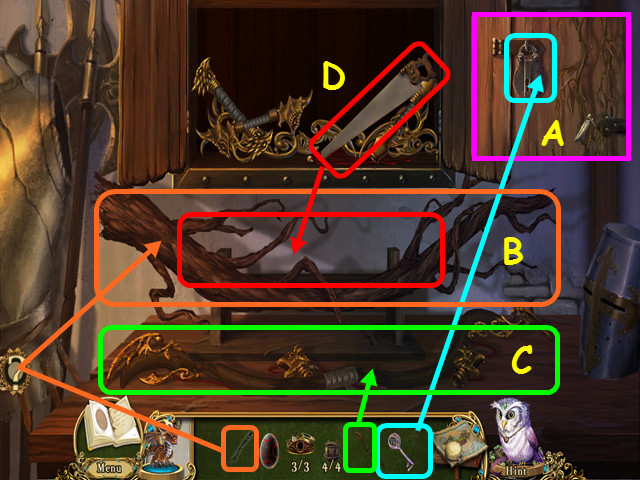
- Use the WEAPONS CABINET KEY on the lock and you will earn 1/8 DRAGON'S TOOTH (A).
- Open the cabinet.
- Place the GOLDLEAF BRANCH in the stand (B).
- Place the BROKEN BOW on the table (C).
- Use the saw on the branch for a mini-game (D).
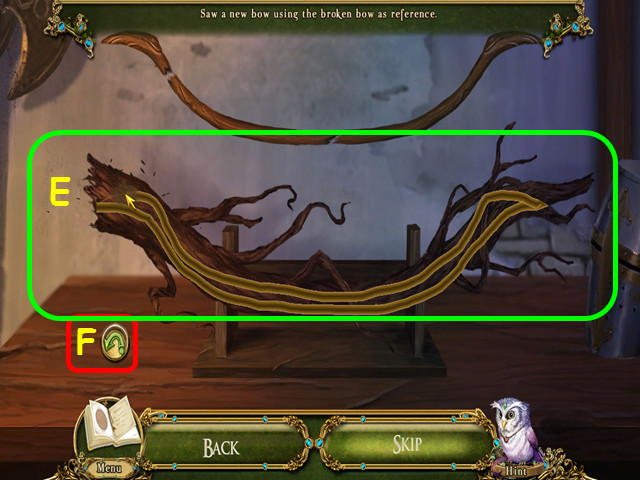
- Drag your mouse along the pattern lines on the bow (E).
- Try to hit each of the dots on the line; it does not have to be perfect.
- Press the arrow button to restart (F).

- Place the hand grip on the bow (G).
- Place the two ends on the bow (H-I).
- Place the string on the bow (J).
- Take the GOLDLEAF BOW.
- Use the map to travel to the Cliffside caves.

- Zoom into the POCKET DRAGON and take him (K).
- Use the POCKET DRAGON on the tapestry (L).
- Take the 4/4 QUILT PATCH, 2/8, 3/8, 4/8, and 5/8 DRAGON'S TEETH, and the ARROWS (M).
- The arrows will combine with the bow to make the BOW AND ARROWS.
- Look at the entryway and use the BOW AND ARROWS on the tapestry for a mini-game (N).
- Place the 4 QUILT PATCHES on the grid to trigger the mini-game.
- Select the squares so that the numbers on the top and left are represented (O).
- Press on a square to select it; press again to turn it back over.
- Take the 6/8 DRAGON'S TOOTH (P).
- Walk forward.
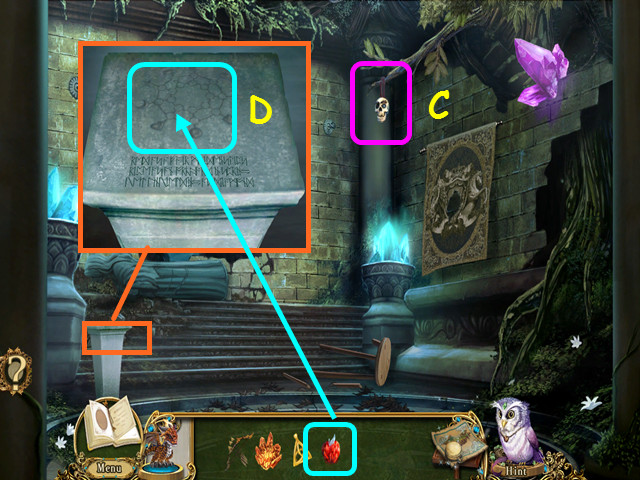
- Note the petrified pocket dragon (Q).
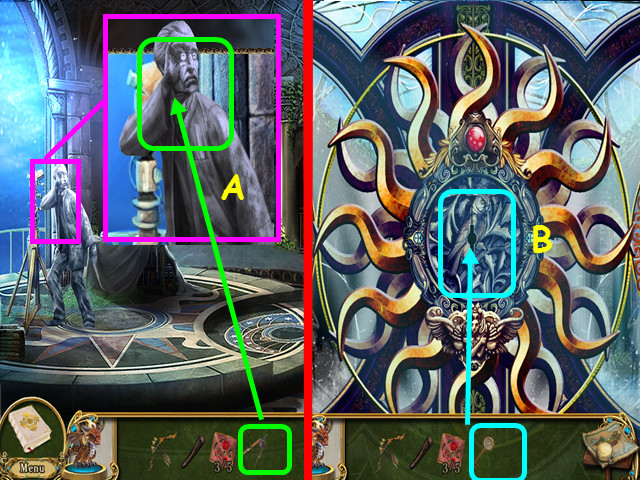
- Select the broken brazier for a mini-game (R).
- Restore the Essence of fire (S).
- Drag the pieces into place; press to rotate a piece in place.
- You will not use all the pieces.
- Use the POCKET DRAGON on the ears of corn (T).
- Take the POPPED SABLECORN (U).
- Take the 7/8 and 8/8 DRAGON'S TEETH (V).
- Look at the petrified pocket dragon.
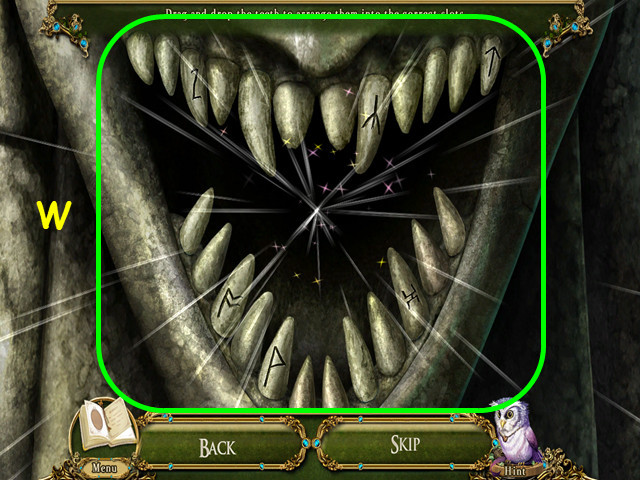
- Look at the petrified pocket dragon and use the 8 DRAGON'S TEETH on his mouth for a mini-game.
- Restore the dragon's smile (W).
- Drag and drop the teeth into position based on size and angle.
- Look at the brazier and use the POCKET DRAGON on the bulb (X).
- Use the 3 INCUBATOR PARTS on the lighted bulb for a mini-game (Y).
- Place the 8 incubator parts onto the device (A).
- Drag the pieces into position; press on a piece to rotate in place.
- Use the arrows at the base of the device to turn the incubator (B).
- Place the COCKATRICE EGG into the incubator (C).
- You will earn the ESSENCE OF FIRE and the COCKATRICE CHICK.
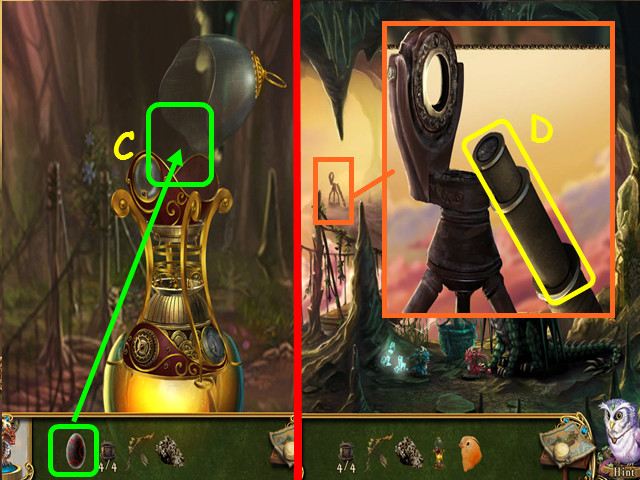
- Look at the observation point and take the SPYGLASS (D).
- Return to the windmill and look at the alchemy table.
- Look at the bulletin board for a HOS.
- Locate the all the items on the list.
- You will need to move 4 papers out of the way (E).
- Look at the formula book on the table for a mini-game.
- Using the recipe book (F) as reference, mix the ingredients for the potion.
- Place the items in the tray, then select the tray to mix them.
- Turn the page in the book to view the next recipe.
- There are 6 mixtures to make (1-6).
- Use the POPPED SABLECORN on the potion (G).
- Place the COCKATRICE CHICK on the bowl of popped sablecorn (H).
- Walk down twice.
- Hang a BIRD FEEDER on the branch (I).
- Place some POPPED SABLECORN into the feeder (J).
- Walk forward to the Castle bridge.
- Hang a BIRD FEEDER on the hook (K).
- Place some POPPED SABLECORN into the feeder (L).
- Walk forward.
- Hang a BIRD FEEDER on the lamppost (M).
- Place some POPPED SABLECORN into the feeder (N).
- Once the basilisk is defeated, use the map to travel to the windmill-crystal forge.
- Look at the forge crystal and use the ESSENCE OF FIRE on the crystal for a mini-game (O).
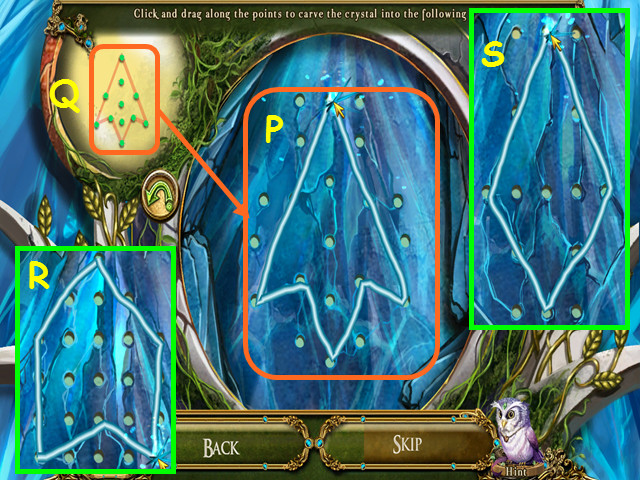
- Drag your mouse through the points in the center area (P) to recreate the diagram (Q).
- You will have two additional shapes to duplicate (R-S).
- You will earn the BALLISTA BOLT HEAD.
- Walk down twice to the barracks courtyard.
- Place the BALLISTA BOLT HEAD and the SPYGLASS on the ballista (T).
- This will trigger a mini-game.
- Use the viewfinder (U) to find the 12 targets.
- The targets are only visible for a few seconds; move the viewfinder over the area and wait for the target to pop-up, then select the target.
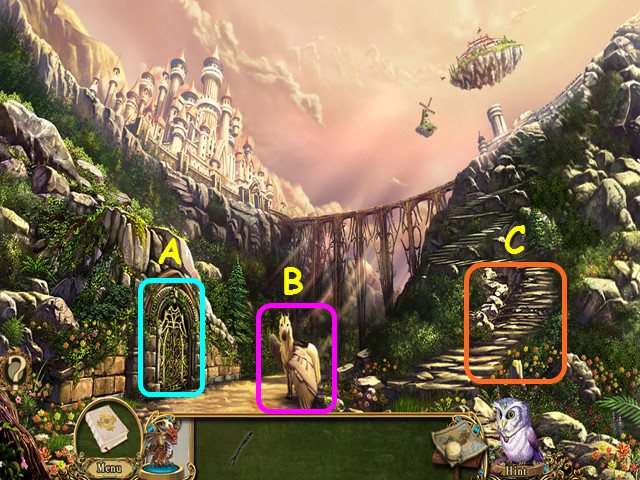
Chapter 3: The Skyward Castle
- Take the APRON (A).
- Note the locked Starward gate (B).
- Note the locked Sunward gate (C).
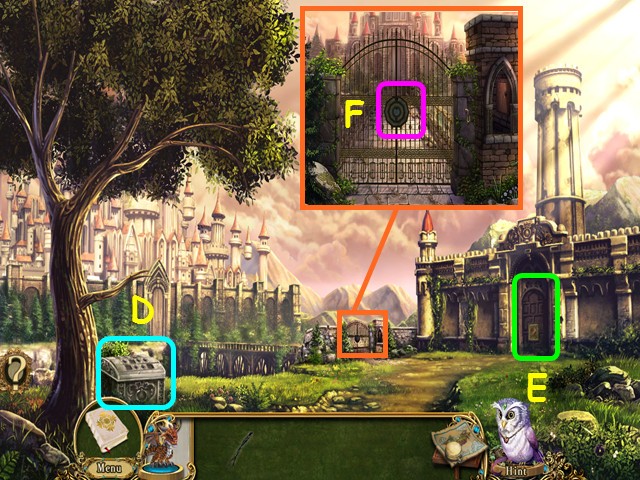
- Walk forward to the Grand Archway (D).
- Look at the petrified maid and take the KITCHEN KNIFE (E).
- Use the APRON on the maid (F).
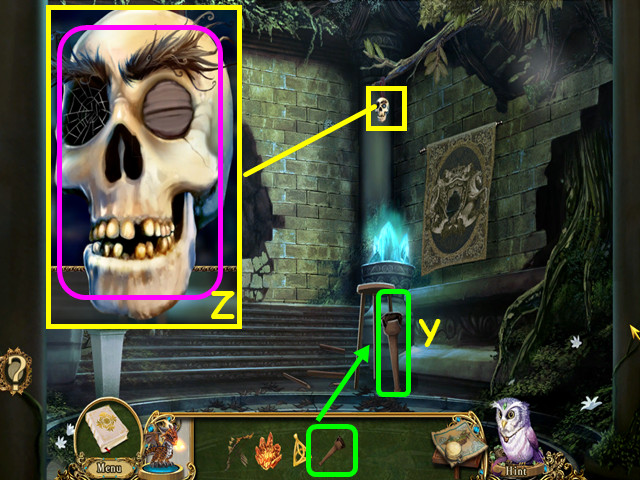
- Look at the wall sconce, use the POCKET DRAGON to light, then take the TORCH (G).
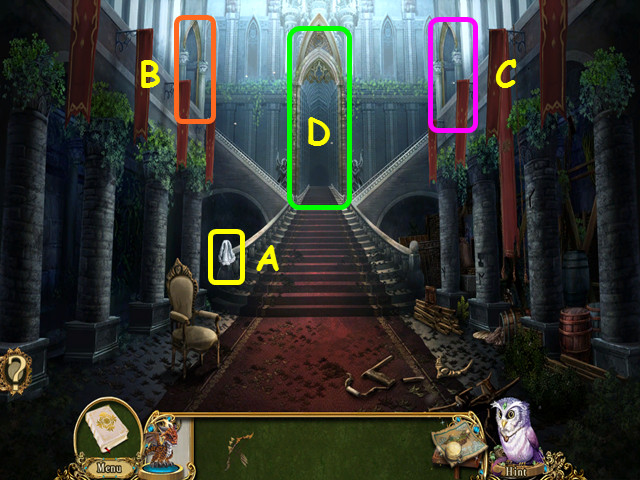
- Walk down and select the pillars on the right for a HOS.
- Before you can locate all the symbols on the list, you have many things to do.
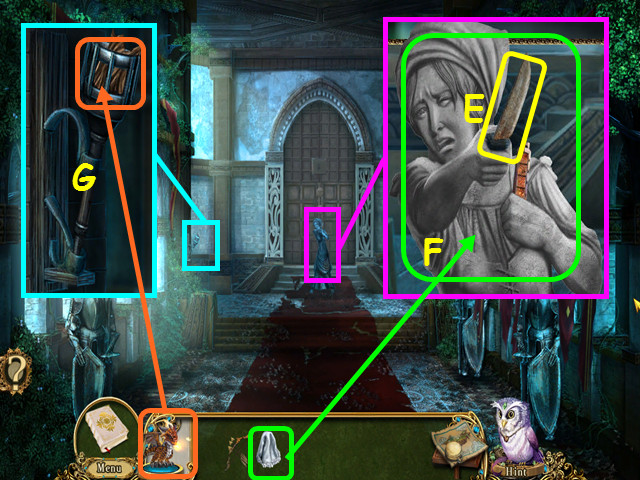
- Open the artist's satchel (H).
- Take the paper (I), place it on a carving (J), then use the charcoal (K) on the paper.
- Repeat this process with 2 more carvings (L-M).
- Use the Pocket dragon on the board (N).
- Use the stick on the soot for a mini-game (O).
- Drag your mouse to fill in the outline (P).
- Use the chisel on the incomplete carving (Q).
- Pull the left rope 4 times, pull the center rope once, and pull the right rope twice (R).
- Look at the wooden plaque; drag the sticks into the outline and press to rotate in place (S).
- Locate all the items on the list.
- You will earn the 1/4 CIPHER KEY FRAGMENT (T).
- Use the BOW AND ARROWS on the banner (U).
- Take the 2/4 CIPHER KEY FRAGMENT (V).
- Look at the chair; use the TORCH on the chair (W).
- Use the KITCHEN KNIFE on the tear, then take the 3/4 CIPHER KEY FRAGMENT (X).
- Take the BROKEN CHAIR LEG (Y).
- Walk to the SUNWARD GATE (Z).
- Take the 4/4 CIPHER KEY FRAGMENT (A).
- Use the 4 CIPHER KEY FRAGMENTS on the gate control for a mini-game (B).
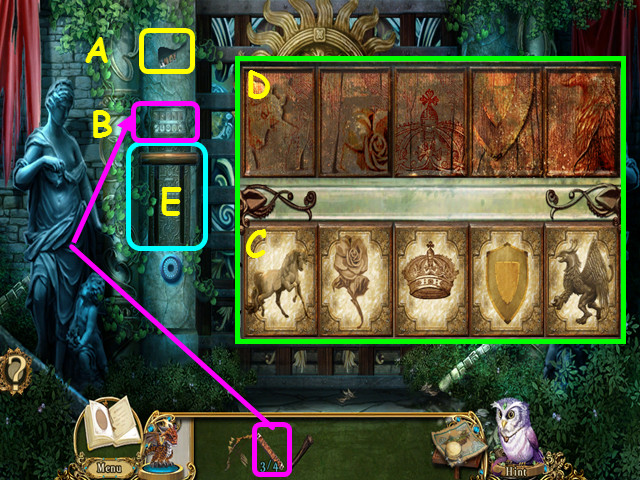
- Change the lower tiles (C) to an item similar to the ones in the upper tiles (D).
- Pull the lever (E).
- Look at the Sun painting and take the SUN EMBLEM (F).
- Note the door at the end of the hall needs a doorknob (G).
- Look at the door on the left for a mini-game (H).
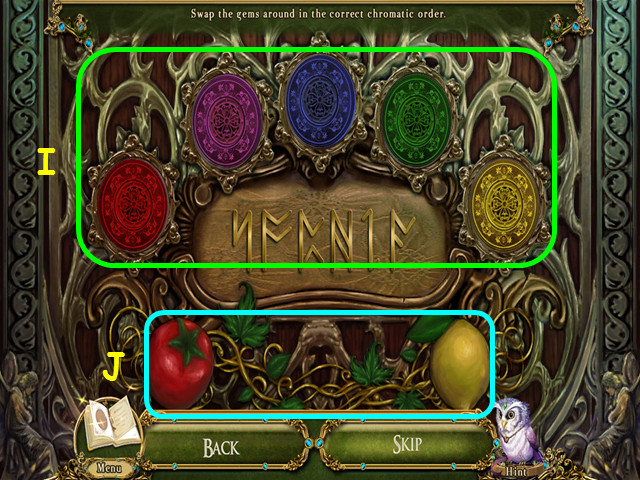
- Put the gems in correct chromatic order (I).
- Base the order on the tomato and lemon at the bottom (J).
- Select 2 gems to swap position.
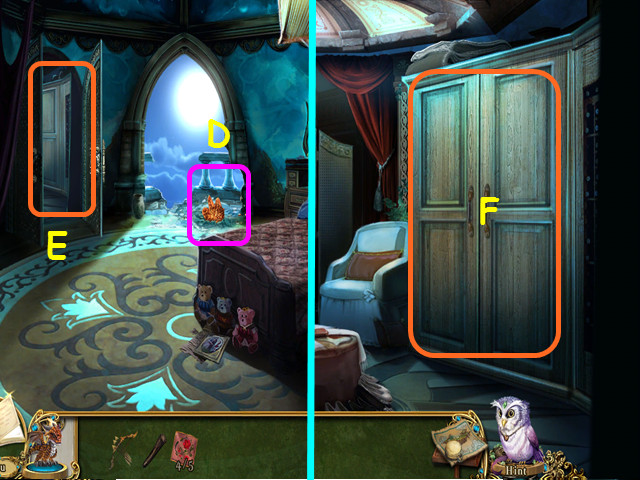
- Walk left to Sophia's room.
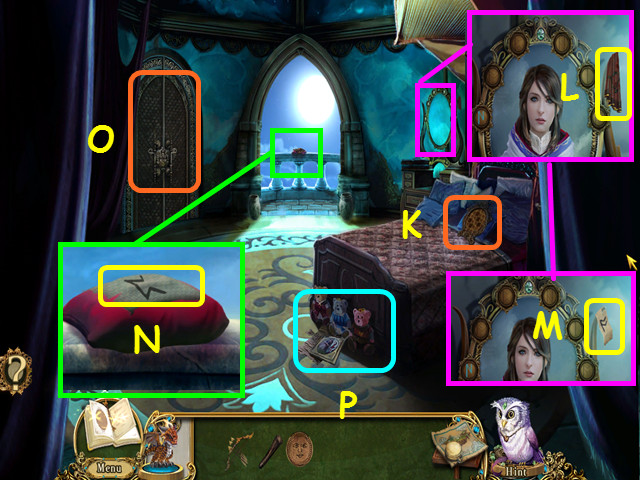
- Note the quilt frame on the bed (K).
- Look at the mirror and take the 1/5 QUILT PATCH (L).
- Take the 1/5 RUNES that was under the quilt patch (M).
- Look out the balcony and take the 2/5 RUNES (N).
- Note the worn key that was under the runes.
- Note the locked wardrobe (O).
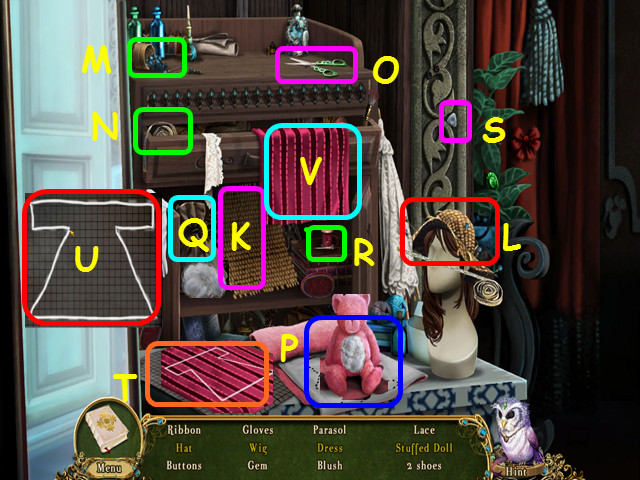
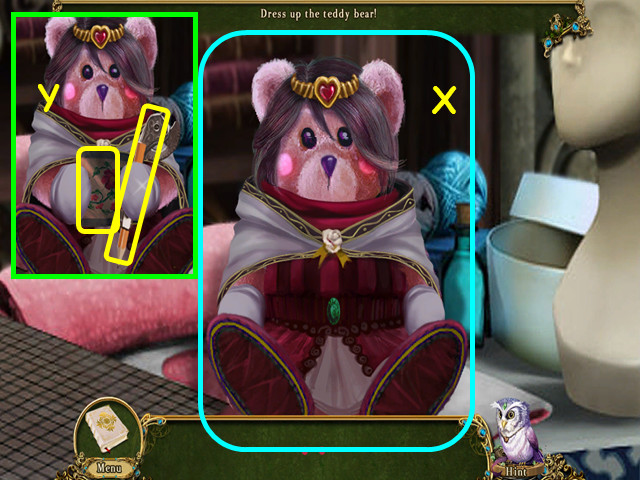
- Look at the teddy bears for a mini-game (P).
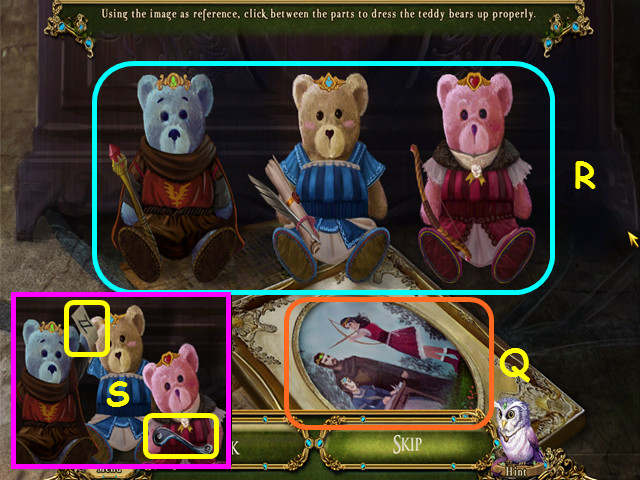
- Using the photograph (Q) as reference, Dress the bears properly (R).
- You will need to change crown, clothing, shoes, and the hand held item.
- Take the DOORKNOB and the 3/5 RUNES (S).
- Walk down, look at the door at the end of the hall and use the DOORKNOB on the latch.
- Turn the handle, then walk forward to the Cartographer's room.
- Note the out of reach maintenance hatch (T).
- Note the mini-game on the star map (U).
- Note the locked book display case (V).
- Select the map desk for a mini-game (W).
- Arrange the maps to form a diagram (X).
- Drag a piece into position; press to rotate in place.
- Not all the maps are used in the solution.
- Note the diagram and take the LOUPE (Y).
- Look at the star map for a mini-game.
- Untangle the constellations so that no lines are red.
- Drag the astral bodies to move the lines.
- You will need to solve 3 instances (1-3).
- Take the 4/5 RUNES (Z).
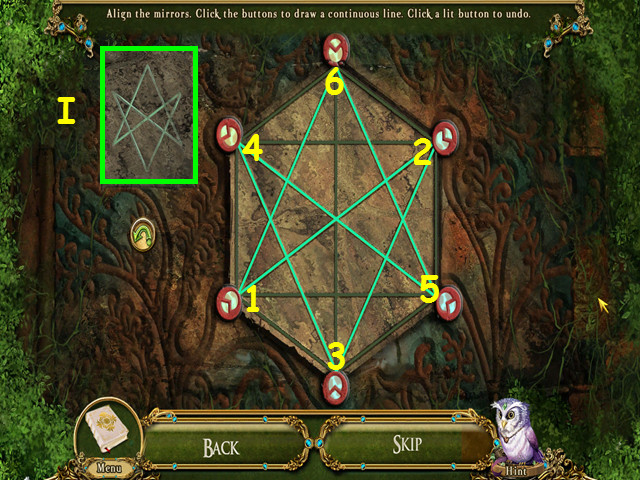
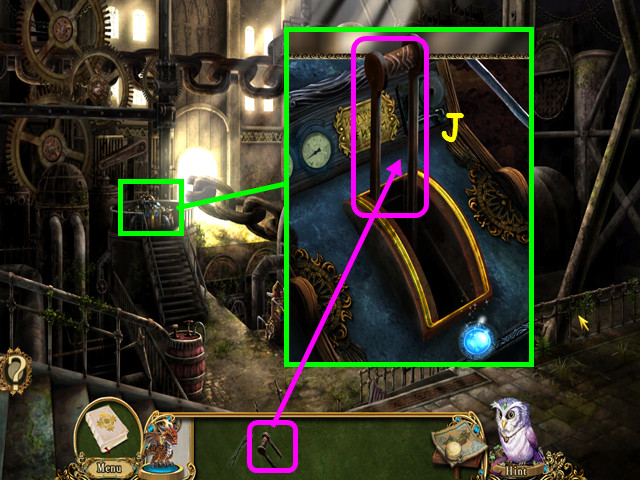
- Look at the locked book display case for a mini-game.
- Press the buttons to draw a continuous line.
- Press the buttons in this order: A, B, F, C, E, B, C, D, E, F, and A.
- The figure should match the one in the diagram (G).
- Move the carved image up (H).
- Take the 5/5 RUNES and the COMPASS HALF (I).
- Return to the bedroom.
- Look at the mirror and place the 5 RUNES on the frame (J).
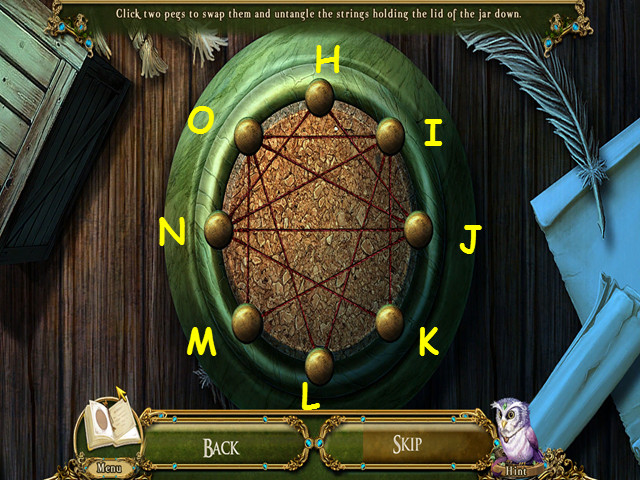
- Use the LOUPE on the symbol for a mini-game (K).

- Rotate the rings to reform the image.
- Rotating one ring may cause another to move as well.
- This mini-game is randomized; your solution may vary.
- Our solution was: Lx1, Nx1, Ox1, and Mx1.
- Take the SILVER STAR (P).
- Walk down twice and look at the Starward gate in the upper left.
- Place the SILVER STAR in the lock and turn the key.
- Look at the Moon mural; take note of the constellations (Q).
- Note the Solar door (R).
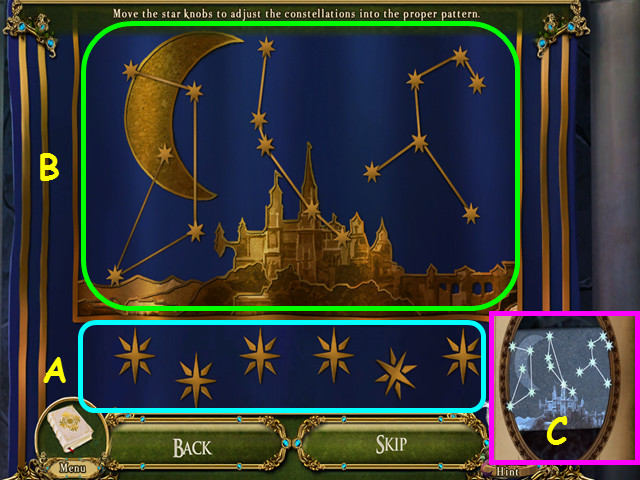
- Look at the door to the Wizard's retreat and place the SUN EMBLEM in the center circle for a mini-game (S).
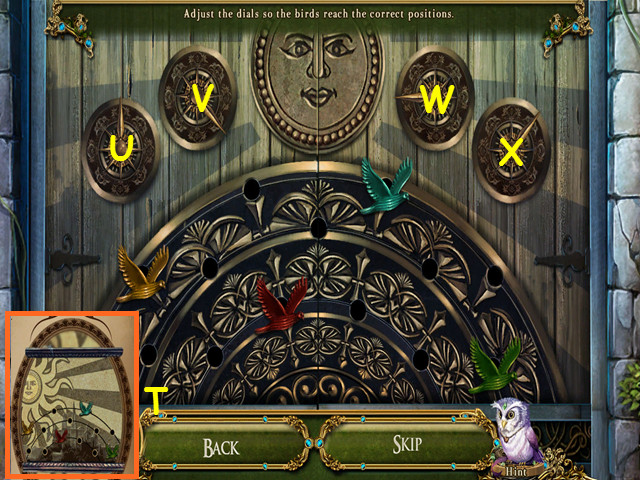
- Rotate the dials to move the birds to the correct location.
- Refer to your journal for the correct positions (T).
- This mini-game is randomized; your solution may vary.
- Turn the dials: Ux3, Vx1, Wx3, and Xx1.
- Walk right to enter the Wizard's retreat.
- Note the research room door (A).
- Look at the specimen storage and take the 2/5 QUILT PATCH (B).
- Look at the cartographer and take the WAX TABLET (C).
- Look at the worktable (D).
- Place the WAX TABLET into the mold (E).
- Use the pocket dragon on the mold, then take the WAX MOLD (F).
- Use the map to return to Sophia's room.
- Look out the balcony and use the WAX MOLD on the key (G).
- Use the POCKET DRAGON on the mold, then take the KEY MOLD (H).
- Return to the Wizard's retreat.
- Look at the worktable and use the KEY MOLD on the Frostbreath resin (I).
- You will get the LIQUID KEY MOLD.
- Look at the specimen case and place the LIQUID KEY MOLD inside (J).
- Once the door reopens, take the FROSTBREATH KEY.
- Return to Sophia's room.
- Look at the wardrobe and use the FROSTBREATH KEY on the lock; turn the key, then enter the wardrobe.
- Select the dollmaker's stand for a HOS.
- Before you can locate all the items on the list, you have many things to do.
- Use the straw weave (K) on the hat (L) followed by the hat pins (M). Use the measuring tape (N) on the hat, followed by the scissors (O).
- Use the scissors on the stuffed doll plans (P) and the bag of stuffing (Q). Use the cotton stuffing on the stuffed doll. Use the sewing kit (R) on the stuffed doll.
- Use the triangle (S) chalk on the unfinished plans (T). Trace around the lines (U).
- Place the cloth (V) on the plans, followed by the scissors.
- Locate all the items on the list.
- The stuffed doll will become a mini-game (W).
- Place all the parts back onto the bear (X).
- Take the 3/5 QUILT PATCH and the second COMPASS HALF (Y).
- The 2 COMPASS HALVES will combine to make the CARTOGRAPHER'S COMPASS.
- Return to the Wizard's retreat.
- Look at the cartographer and give him the CARTOGRAPHER'S COMPASS (A).
- Talk to the cartographer and he will give you the SOLAR KEY.
- Walk down, then look at the Solar door and the end of the hall.
- Use the SOLAR KEY on the lock (B).
- Turn the key, then spin the center until the door opens.
- Walk forward.
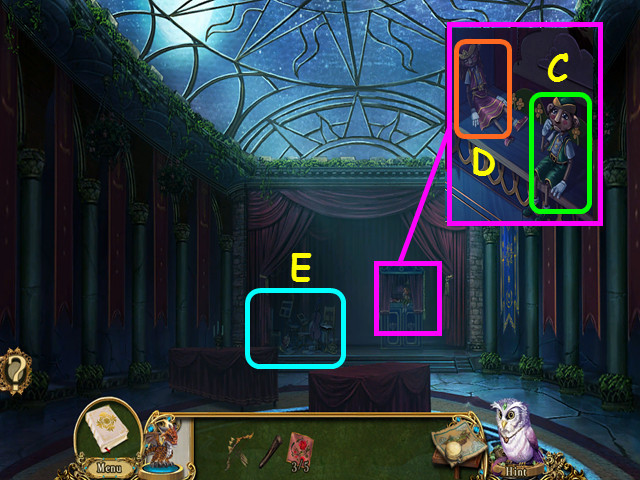
- Look at the puppet stage and talk to Xim (C).
- Look at Jyx (D).
- Exit the stage and look at the musician's stand for a HOS (E).
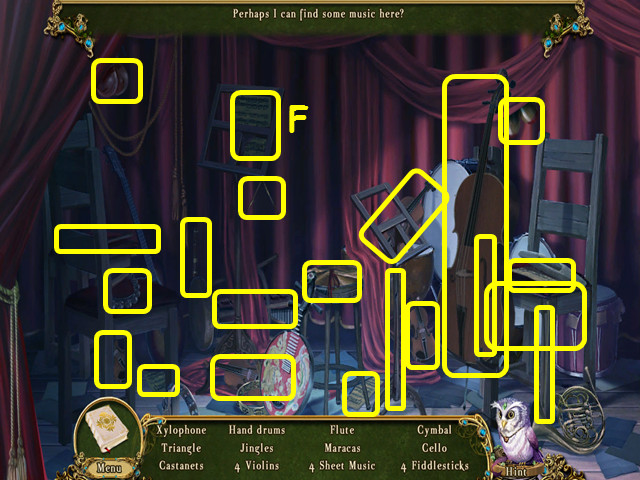
- Locate all the items on the list.
- You will earn the MUSIC SHEETS (F).
- Return to the walk-in wardrobe.
- Look at the shelf and note the music box (G).
- Add the MUSIC SHEETS to the book for a mini-game (H).
- Using the top row as a guide (I), arrange the footsteps under the correct notes (J).
- Select 2 footsteps to swap position.
- Take the MUSIC BOX.
- Return to the Solarium and look at the puppet stage.
- Use the MUSIC BOX on Xim for a mini-game.
- Find the correct positions for the notes (K).
- Press the green arrow (L) and watch the notes.
- Green notes are properly placed, yellow notes are near the correct position, and red notes are far from the correct position.
- Drag the incorrect notes to another position and try pressing the arrow again; continue until all are green.
- Talk to the puppets and they will give you the SHIMMERGEMS.
- Return to the wizard's retreat.

- Look at the research room door and use the SHIMMERGEMS on the lock for a mini-game.
- Arrange the gems so that none are repeated in the same row or column (M).
- Select a gem to change it; some gems are not changeable.
- Walk forward into the research room; select the crystal brazier on the left for a mini-game.
- Collect the crystal pairs in the order of the symbols (N).
- Hover over a crystal to see its symbol (O).
- Collect the pairs in this sequence: pink-purple-blue-green-yellow-orange-red-white (P).
- Inspect the left bookshelf; look at the book, ‘Astrological Events and Phenomena’ (Q).
- Turn the pages of the book until you find the CLOTH MOON (R).
- Inspect the right bookshelf; look at the book, ‘Monsters and Mythical Creatures’ (S).
- Turn the pages of the book until you find the CLOTH SUN (T).
- Return to the Solarium.

- Look at the Astral banner and take the 4/5 QUILT PATCH (U).
- Place the CLOTH SUN in the top of the banner (V), and place the CLOTH MOON in the bottom of the banner (W) to trigger a mini-game.
- Press the buttons (A) to move the stars into position (B).
- Refer to your journal for the correct placement (C).
- Our solution was to press each button twice.
- Return to Sophia's room.
- Look at the balcony; try to take the star, but its too hot (D).
- Go into the walk-in closet (E); select the wardrobe on the right for a HOS (F).
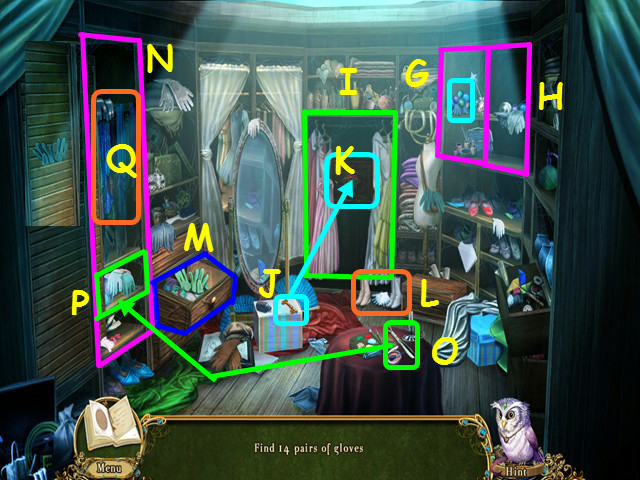
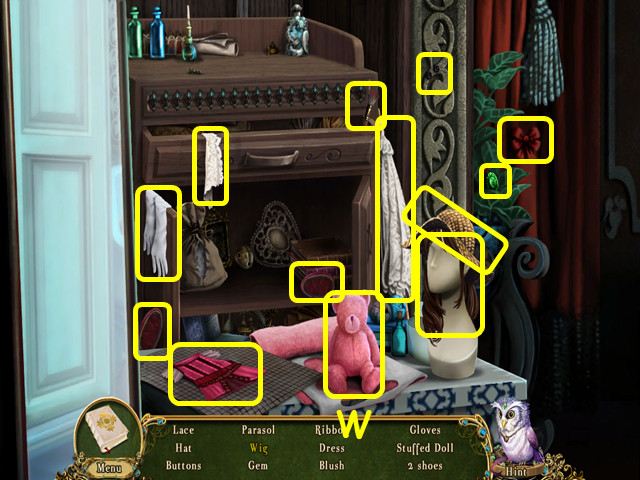
- Before you can find all the gloves, there are many steps to take.
- As you are playing, take all the gloves you find. This guide will show the actions on one screenshot and the glove locations on another.
- Open the left cupboard door and remove the messy pile (G). You will also need to open the right cupboard door (H).
- Move the dresses aside (I).
- Use the key (J) to unlock the accessories shelf (K).
- Move the shoes aside (L). Open the drawer (M). Slide open the slat door (N).
- Note the glove on the door.
- Use the shoe horn (O) on the wooden cover (P).
- Select the scarf rack for a mini-game (Q).

- Arrange the scarves so no row or column has the same color or symbol (R).
- Select the accessories shelf for a mini-game.
- Use the buttons to rotate the wheels and place the colored buttons in the correct area.
- This mini-game is randomized, your solution may vary.
- Our solution was: Vx1, Sx2, Vx1, Wx1, Vx4, Xx1, Vx3, Xx1, Vx3, Wx2, and Vx2.
- Look at the accessories shelf again for another mini-game.
- Push the 2 buttons until a glove shows in each opening (Y).
- Take the gloves (Z).
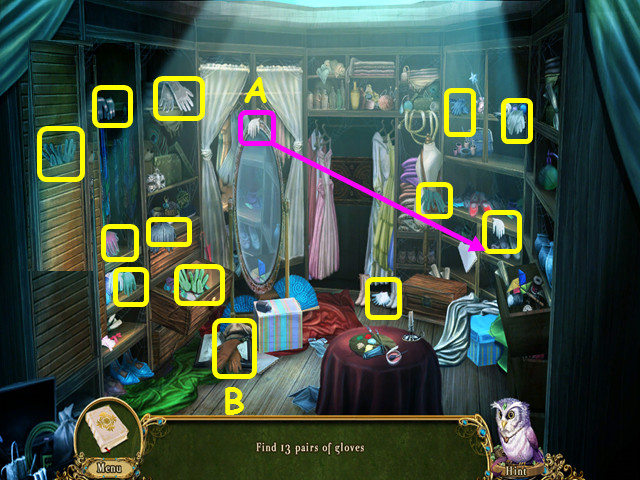
- Locate all the gloves.
- Move the glove from the mirror to its partner on the right shelf (A).
- You will earn the PADDED GLOVES (B).
- Walk down.
- After the cut-scene, look at the balcony and use the PADDED GLOVES to take the REIGNING STAR.
- Talk to the cartographer, then return to the research room.
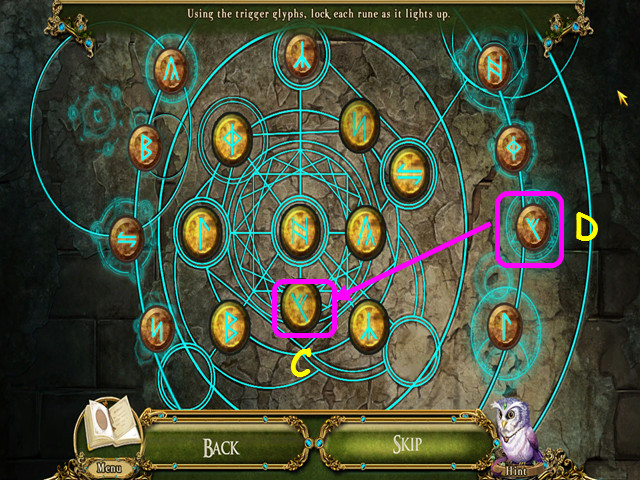
- Look at the glowing mural on the back wall for a mini-game.
- Use the REIGNING STAR to activate the mural.
- As the runes in the center area light up (C), push the button with the matching symbol (D) to lock them in place.
- Walk forward to the secret chamber.
- Take the TESSERACT PRISM (E).
- Take the STEPLADDER (F).
- Look at the fireplace for a HOS (G).
- Locate all the items on the list.
- Use the hand broom (H) on the ashes (I).
- Remove the left pan (J).
- Remove the loose brick (K).
- Use the poker (L) on the embers (M).
- Pull the chain (N).
- You will earn the FIREPROOF POUCH.
- Walk down once.

- Look at the incubator and use the PADDED GLOVES to open the door (O).
- Use the FIREPROOF POUCH to take the FIRE CHARM (P).
- Walk forward to the secret chamber.
- Use the FIRE CHARM on the water pipe (Q).
- Use the POCKET DRAGON on the FIRECHARM (R).
- Take the cauldron and use it on the hole in the pipe to get the CAULDRON OF WATER (S).
- Walk down twice to the Wizard's retreat.

- Look at the specimen storage and place the FIRE CHARM in the ice (T).
- Use the BROKEN CHAIR LEG to dig out the FROST CHARM (U).
- The FIRE CHARM will return to inventory automatically.
- Travel to the cartographer's room.
- Talk to the cartographer (V).
- Use the STEPLADDER on the hatch (W).
- Look at the hatch for a mini-game (X).
- Slide the boxes in order to get the red box (Y) to the exit (Z).
- Slide the boxes in the indicated direction in numerical order (1-11).
- Walk up to the rafters.
- Place the BROKEN CHAIR LEG into the rafters (A).
- Hand the CAULDRON OF WATER from the chair leg (B).
- Use the FIRE CHARM on the cauldron (C), then use the POCKET DRAGON on the charm (D).
- Use the map to return to the Grand Archway.
- Use the FROST CHARM on the gargoyle (E).
- Use the BOW AND ARROWS on the hanging weight (F).
- Talk to the maid and she will give you the 5/5 QUILT PATCH (G).
- Look at the Paradise Doors to learn you need an artifact to open them (H).
- Return to Sophia's room and look at the quilt frame on the bed for a mini-game.
- Place the 5 QUILT SQUARES on the frame to trigger the mini-game.
- Select the squares so that the numbers on the top and left are represented (I).
- Press on a square to select it; press again to turn it back over.
- Take the PARADISE PENDANT (J).
- Return to the Grand Archway, look at the Paradise doors and place the PARADISE PENDANT in the indentation for a mini-game.
- Put the story board in order (K).
- Select 2 tiles to swap positions: press on a tile to rotate in place.
- Enter the Throne Room.
Chapter 4: Ascension
- Look at the crystal tree branch and use the BOW AND ARROWS to shoot the RUBY APPLE (A).
- Walk left to the Antechamber (B).
- Talk to Skullface (C).
- Look at the pedestal and place the RUBY APPLE on top for a mini-game (D).
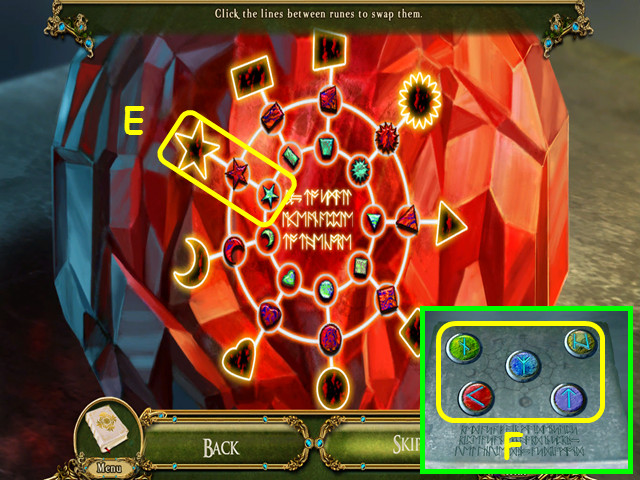
- Move the runes on the inner 2 tracks to line up with the outer runes, largest to smallest (E).
- Select the lines between runes to swap positions.
- Take the 5 SIGIL STONES (F).
- Walk down, then go right to the Conduit.
- Look at the controls and place the 5 SIGIL STONES into the circles with the same symbols (G).
- This will trigger a mini-game.
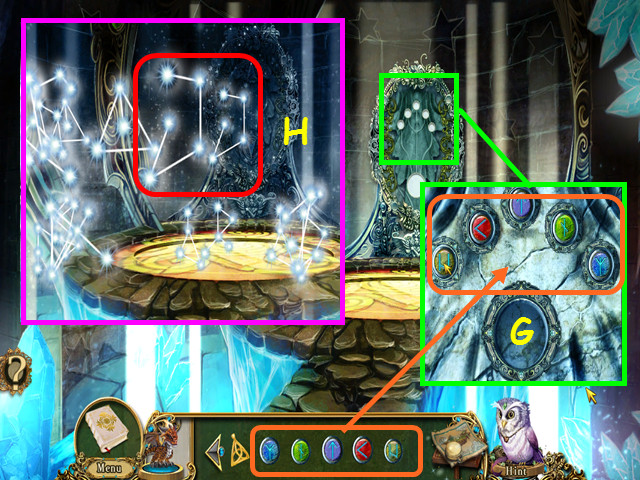
- Select matching pairs of constellations as they spin around the room (H).
- There are 12 pairs to match.
- Press the up arrow on the controls to travel to the Navigator's Cradle.
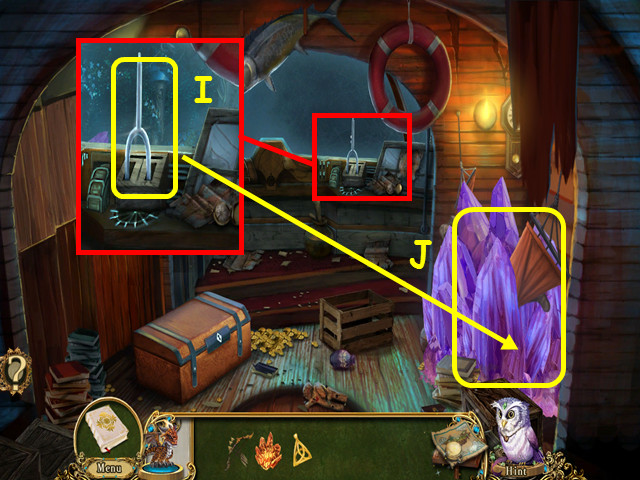
- Look at the console and take the TUNING FORK (I).
- Exit the console and use the TUNING FORK on the crystal (J).
- Return to the Crystal Tree.
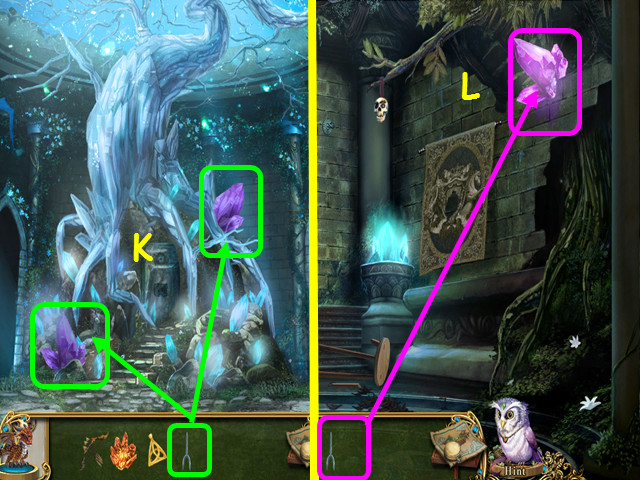
- Use the TUNING FORK on the 2 dark crystals (K).
- Walk to the left.
- Use the TUNING FORK on the dark crystal to get the TUNED FORK (L).
- Return to the Navigator's Cradle.
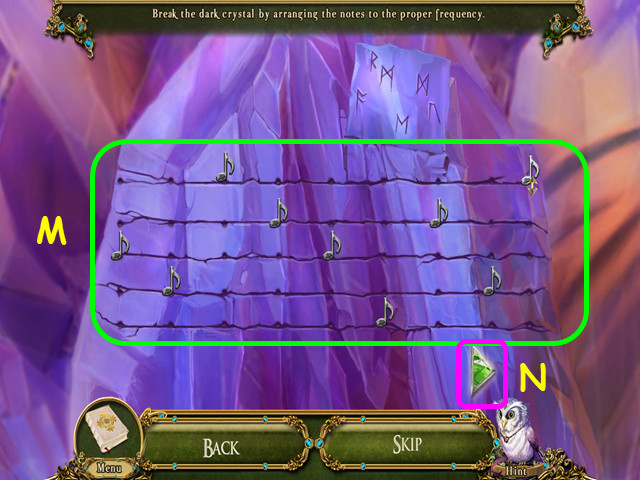
- Use the TUNED FORK on the dark crystal for a mini-game.
- Move the notes to the correct positions (M).
- Notes that play green are correct, notes that play yellow are close, and notes that play red are far from being correct.
- Press the green button to see the colors of the notes (N).
- Select the navigator in the hammock for a HOS.
- Locate all the items on the list.
- Remove the urn lid (O).
- Untie the bootlace (P) and tie it on the talisman (Q).
- Use the crowbar (R) to open the crate (S).
- Move the 4 shells (T).
- Use the knife (U) on the ritual doll (V).
- Use the chalk (W) on the navigator (X).
- You will earn the PEG LEG.
- Return to the Antechamber.
- Use the PEG LEG on the chair (Y).
- Look at the skull and try to take it for a HOS (Z).
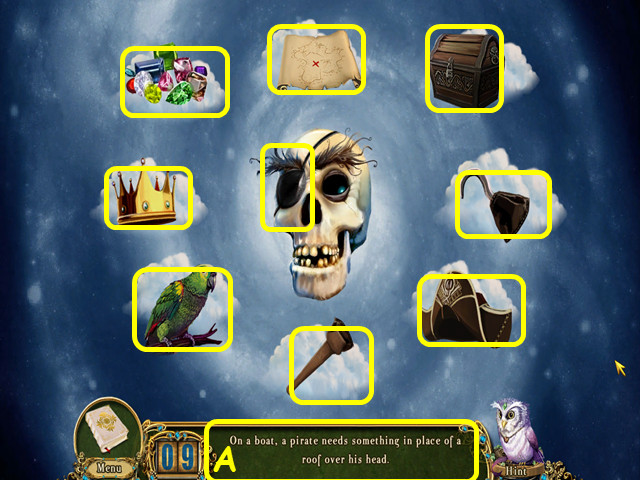
- Locate all the items mentioned in the clues (A).
- You will earn SKULLFACE THE TALISMAN.
- Return to the Navigator’s Cradle.
- Look at the Navigator and give him SKULLFACE THE TALISMAN.
- Talk to Captain Jackdaw, the Navigator and he will give you the CAPTAIN'S BRACELET.
- Return to the Crystal Tree and look at the Guardian Stone at the base of the tree.
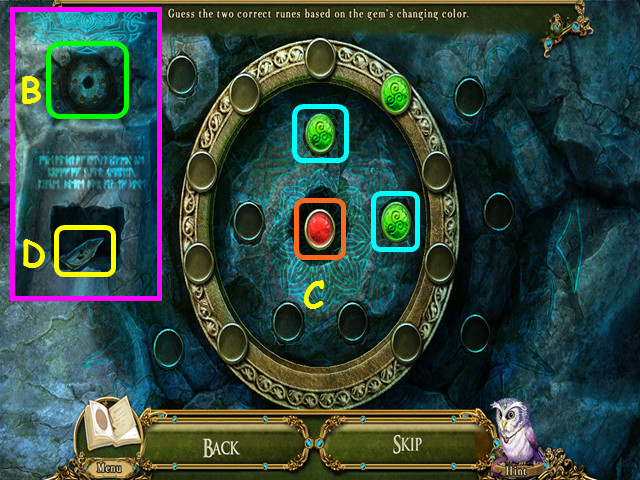
- Place the CAPTAIN'S BRACELET in the top of the stone for a mini-game (B).
- Guess the 2 correct runes based on the changing color in the center (C).
- This mini-game is randomized; your solution may vary.
- Hover your mouse over the available stones to see what color the center stone changes to, then select the 2 with the same color.
- Our pairs were all blue.
- Take the TAPESTRY PATCH (D).
- Exit the close-up, then walk to the left.
- Look at the tapestry on the right wall and place the TAPESTRY PATCH in the hole for a mini-game.
- Select the squares so that the numbers on the top and left are represented (E).
- Press on a square to select it; press again to turn it back over.
- Take the WHEEL HANDLE (F).
- Return to the Navigator's Cradle.
- Look at the cabin door and place the WHEEL HANDLE on the door (G).
- Turn the wheel handle until the door opens.
- Try to enter the cabin but the Captain stops you with a mini-game.
- Untangle the strings by swapping the buttons.
- Red strings are tangled, white strings are not.
- Make the following swaps: O-K, I-M, O-N, and J-I.
- You will earn the GEM OF GIANTS.
- Walk left into the cabin.
- Look at the chest and use the GEM OF GIANTS on the lock (P).
- This will trigger a memory mini-game.
- Select two of the floating balls to see the symbols underneath (Q).
- If the symbols do not match, select two others.
- You must match pairs of symbols until all the balls are gone.
- Use the POCKET DRAGON on the match (R).
- Take the STEEL BUTTON (S).
- Move the sapphire to the right (T).
- Look at the coin purse clasp and use the STEEL BUTTON on it (U).
- Use the POCKET DRAGON on the clasp, followed by the STEEL BUTTON (V).
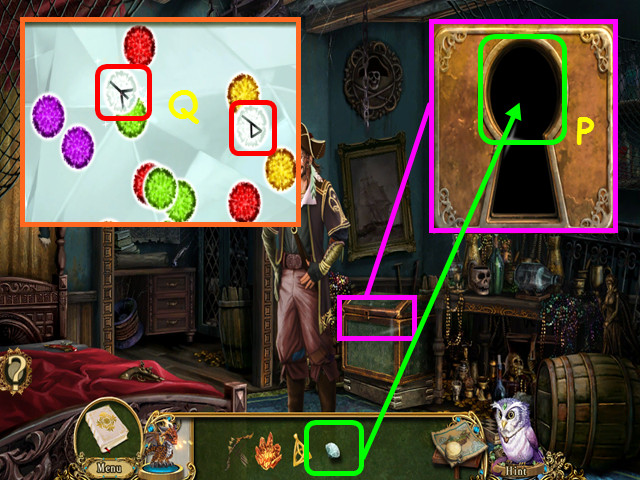
- Look inside the coin purse for a HOS.
- Locate all the items on the list.
- Open the hairpin to make a 'V' (W).
- Move some coins to find a 'V' (X).
- You will earn a SAFETY PIN.
- Use the SAFETY PIN to pick the vanity box lock and you will get the BENT SAFETY PIN (A).
- Use the BENT SAFETY PIN on the thread to make the GRAPPLING HOOK (B).
- Look inside the vanity case and use the GRAPPLING HOOK on the comb (C).
- Open and close the scissors to cut the hair and get the COMB (D).
- Use the COMB on the keyhole (E), then use the GRAPPLING HOOK on the comb (F).
- Look at the keyhole for a mini-game.
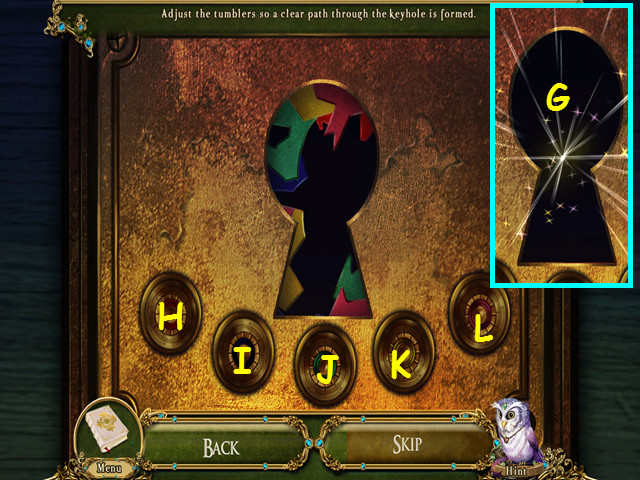
- Adjust the tumblers so there is a clear path through the keyhole (G).
- Each tumbler causes more than one color to move.
- This mini-game is randomized; you solution may vary.
- Our solution was: Hx3, Ix4, Lx3, Ix2, Hx4, and Ix3.
- Take the KEYRING (M).
- Look in the chest; take the ROPE PULLEY and IRON CROWN (N).
- Walk down.
- Look at the Captain's stash and use the KEYRING on the lock (O).
- Open the chest and take the PICKAXE (P).
- Give the KEYRING to the Captain (Q) and he will give you the BOTTLE OF KRUG.
- Return to the Antechamber and look at the toppled statue.
- Use the ROPE PULLEY on the statue (R).
- Use the PICKAXE on the masonry (S).
- Pour the BOTTLE OF KRUG on the statue (T).
- Use the POCKET DRAGON on the statue (U).
- Place the IRON CROWN on the statue (V).
- Place the REIGNING STAR into the gold crown to make the PRINCESS CROWN (W).
- Take the EMERALD GEMLEAVES (X).
- Walk down to the Crystal tree.
- Look at the Guardian Stone and place the PRINCESS CROWN into the circle (Y). This will trigger a mini-game.
- Change the tiles so the no rune is repeated in any row or column (Z).
- Some runes are locked into place; select a rune to change it to another.
- Look at the crystal branch and place the EMERALD GEMLEAVES on the branch (A).
- Take the SIGIL ORB (B).
- Walk right.
- Look at the conduit controls and place the SIGIL ORB in the lower circle (C).
- This will trigger a mini-game.
- Trace the figure using a continuous line (D).
- Press the buttons in numerical order (1-16).
- Look at the controls and press the down arrow.
- Look at the jeweled box at the end of the hall for a mini-game.
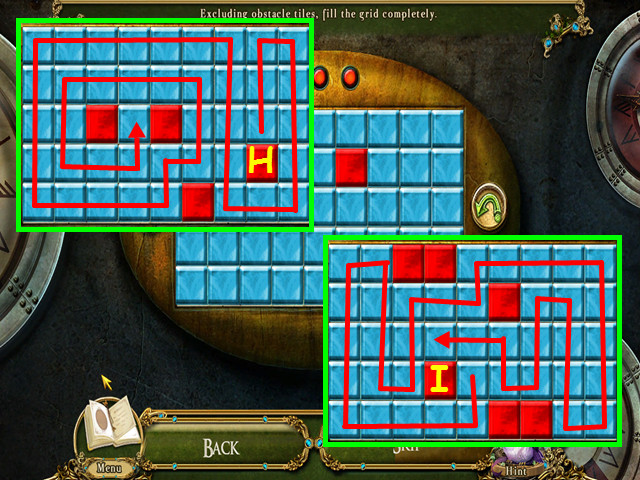
- Starting from any square, fill in the grid (E).
- Select a square, then the arrow pointing in the direction you want to move.
- The squares will fill until an obstacle is hit.
- Take the STEERING WHEEL from the box, then Talk to Patrick's shade.
- Return to the Navigator's Cradle and look at the Navigator's Console.
- Place the STEERING WHEEL on the console (F).
- Spin the wheel until you see a cut-scene.
- Walk down; talk to the Captain and Skullface.
- Look at the Timeless sphere (G).
- Use the TESSERACT PRISM on Dreadmyre (H).
- To travel through the mirrors, select the mirror that is different at each location (1-5).
- If you wait too long to choose a mirror, the images will change.
- Choosing an incorrect mirror will cause the images to reset.
- This maze is randomized; your solution may vary.
Achievements
- Please note that some of the achievements listed here can only be unlocked while playing the collector's edition.
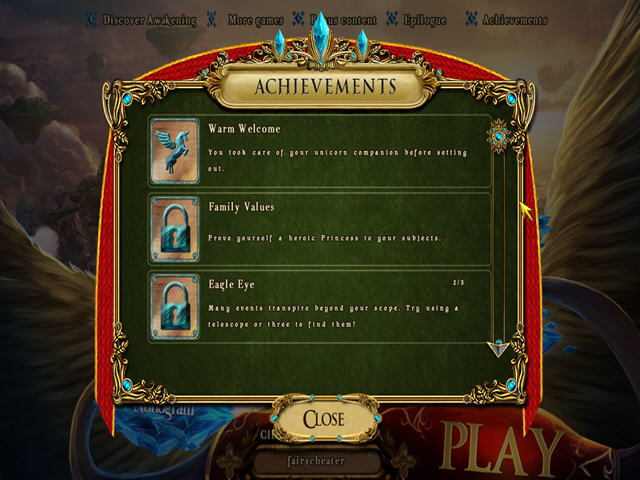
- Warm Welcome: Start a warm fire and splint the unicorn's wing before leaving the first scene.
- Family Values: Save the Wingferry Family.
- Eagle Eye: Used the telescope in the Barracks Courtyard, used the telescope at the Aviary entrance, and used the Spyglass on the broken telescope stand in the Cliffside Caverns.
- Assassination Attempt: Try to shoot the gargoyle from the rafters with the bow and arrows.
- Yo Ho Ho: Try to share the bottle of krug with Captain Jackdaw.
- Look Out!: Try to shoot Skullface with the bow and arrow.
- Savage Treatment: Try to get Skullface down using fire.
- No, Thank you: Complete all the bonus Nonograms (excluding Classics).
- Echoes of the Past: Found the message in the bottle at the Bridged Crossings, looked at the fairy queen’s statue in the High Gardens, examined the Moon Mural in the Starward Corridor, found Jackdaw’s diary in the Captain’s Cabin, and examined all the statues in the Crystal Mausoleum.
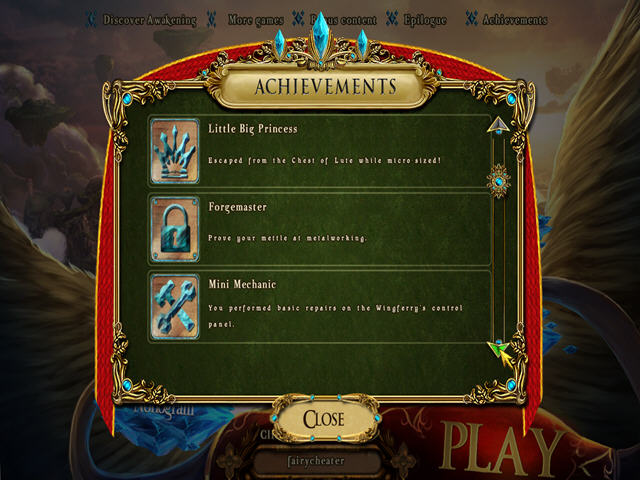
- Mini Mechanic: Perform basic repairs on the Wingferry's control panel.
- Forgemaster: Prove your mettle at metalworking in the Armory's forge.
- Green Thumb: Cultivate the herbs with the correct soil mixtures.
- Plumber and Princess: Restore the flow of water in the vineyard in 3 minutes or less.
- Wardrobe Warrior: Complete the wardrobe HOS in eight minutes or less.
- Picture Puzzlemaster: Complete all story mode Nonograms picture puzzles in 5 minutes or less.
- Does this look familiar?: Discover your old bedroom in a new locale.
- Puppetmaster: Revive Jyx in five attempts or less.
- Crown Princess: Solve the guardian stone's crown sodoku puzzle in tree minutes or less.
- Little Big Princess: Escape from the Chest of Lute while micro-sized!
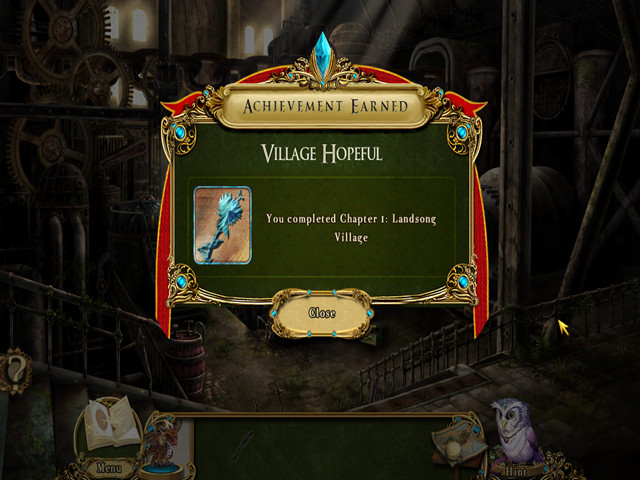
- Village Hopeful: Complete Chapter 1.
- Noble of the Sky: Complete Chapter 2.
- Castle Crasher: Complete Chapter 3.
- Savior Queen: Complete Chapter 4.
- Par One: Complete Chapter 1 in one hour or less.
- Two-Timer: Complete Chapter 2 in two hours or less.
- Triptych of Fate: Complete Chapter 3 in one and a half hours or less.
- Foray into the Future: Complete Chapter 4 in one hour or less.
- Bane of Darkness: Complete the game in five and a half hours or less.
- Keen Lookout: Complete 5 Hidden or Reverse Hidden Object games in 6 minutes or less.
- Sharpened Senses: Complete 10 Hidden or Reverse Hidden Object games in 6 minutes or less.
- Acute Awareness: Complete 20 Hidden or Reverse Hidden Object games in 6 minutes or less.
- Beacon of Brilliance: Complete all Hidden or Reverse Hidden Object games in 6 minutes or less.
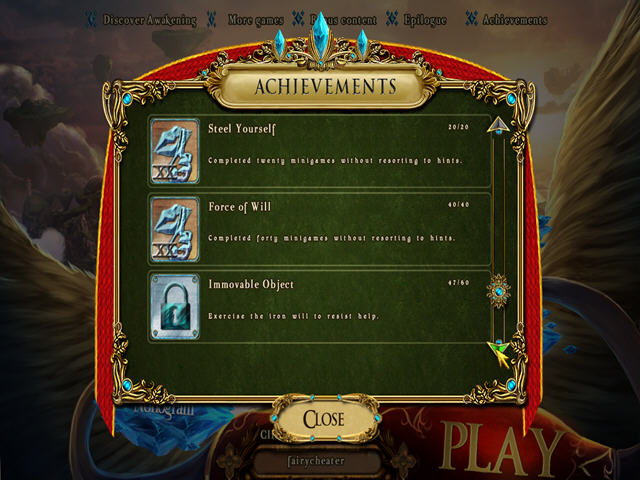
- Force of Will: Completed 20 mini-games without any hints.
- Steel Yourself: Completed 40 mini-games without any hints.
- Immovable Object: Completed 60 mini-games without any hints.
- Unstoppable Force: Completed 80 mini-games without any hints.
- True Grit : Completed all mini-games without any hints.
- Puzzle Trickster: Completed 20 non-Hidden Object mini-games without skipping.
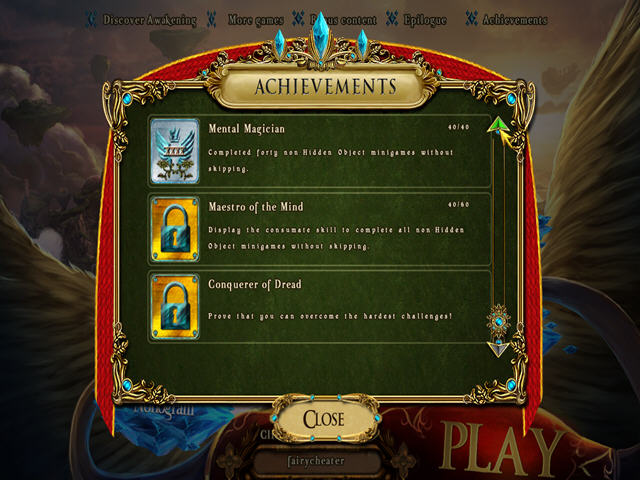
- Mental Magician: Completed 20 non-Hidden Object mini-games without skipping.
- Maestro of the Mind: Completed 20 non-Hidden Object mini-games without skipping.
- Conquerer of the Dead: Beat the game on Dreadmyre difficulty.
- The Queen of Hearts: Completed the game in five and a half hours or less with no skips or hints on the hardest difficulty.
- The Empress: Earn all the other achievements.
Created at: 2012-09-28