

Walkthrough Menu
- General Tips
- Chapter 1: The Adventure Begins!
- Chapter 2: The First Key
- Chapter 3: The Second Key
- Chapter 4: The Forest
- Chapter 5: The Third Key
General Tips
- This is the Official Guide for Azada: In Libro Standard Edition.
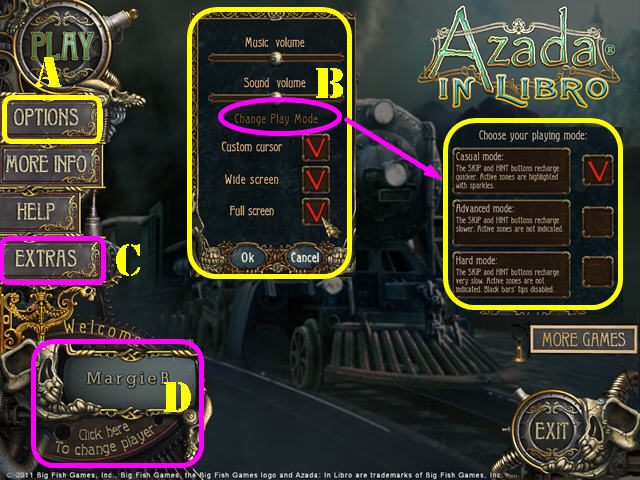
- The Options (A) Button allows you to change Play Mode, adjust the Screen (Wide Screen Option is available), Music, Cursor, and Sound.
- You can opt to play the game in Casual Mode, Advanced Mode, or Hard Mode from the Options Menu. Click on 'Change Play Mode' (B) at any time during the game to switch between modes.
- The Extras (C) Button in only accessible in the Collector's Edition.
- The ‘Click here to change player' button (D) can be used to manage your profiles in the game.
- Open the Key Box in the lower right corner that stores the Guardian's magic keys. The Keys will give you access to different areas in the game.
- The use of the Hint button is unlimited but you must wait for it to recharge between uses.
- All mini-games can be skipped once the skip button has recharged. Most puzzles have a RESET button; use it if you want to follow the solutions shown in this guide.
Chapter 1: The Adventure Begins!
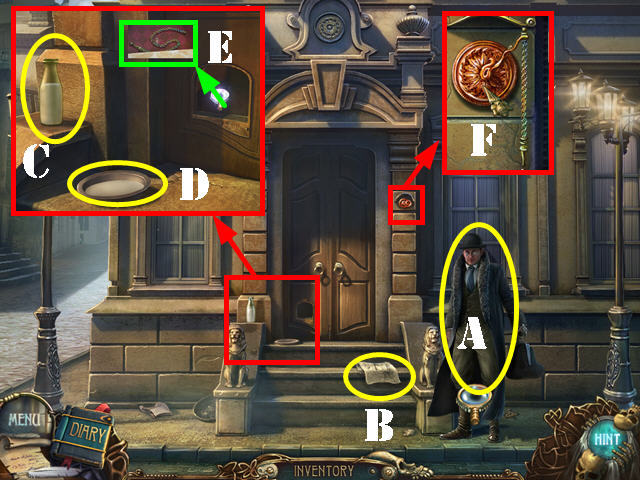
- Talk to the Notary outside the building (A).
- Take the DIARY NOTE (B) on the steps.
- Examine the bottom left side of the door; take the MILK (C).
- Pour the MILK into the BOWL (D).
- Take a closer look at the pet door after the cat goes through it; take the BELL CORD (E).
- Examine the bell; put the BELL CORD on it and ring the bell (F).
- Open the door and go into the house.
- Click on the cat on the stairs.
- Talk to the man.
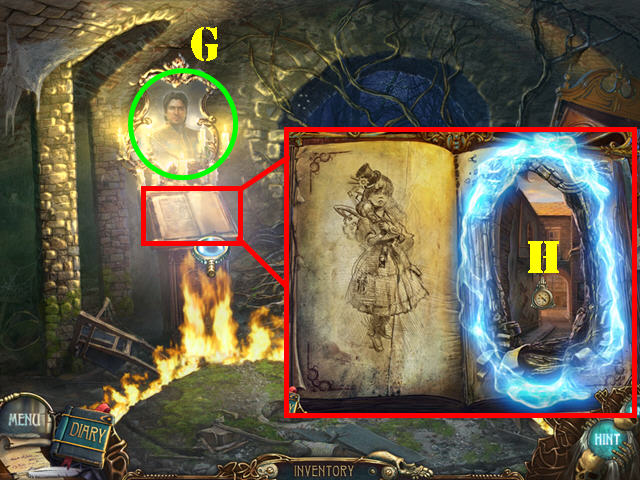
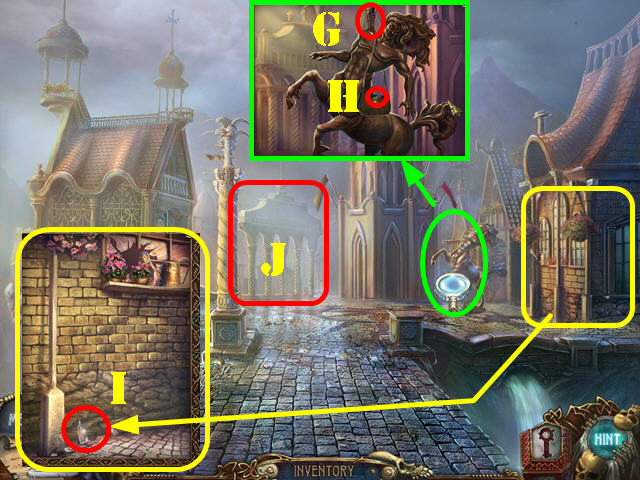
- Talk to Titus in the mirror (G).
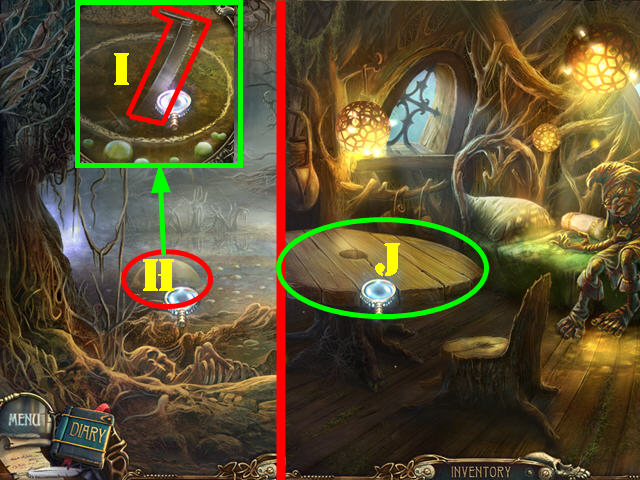
- Zoom into the book; flip the page and go through the portal (H).
- Titus' ghost will appear in the alley.
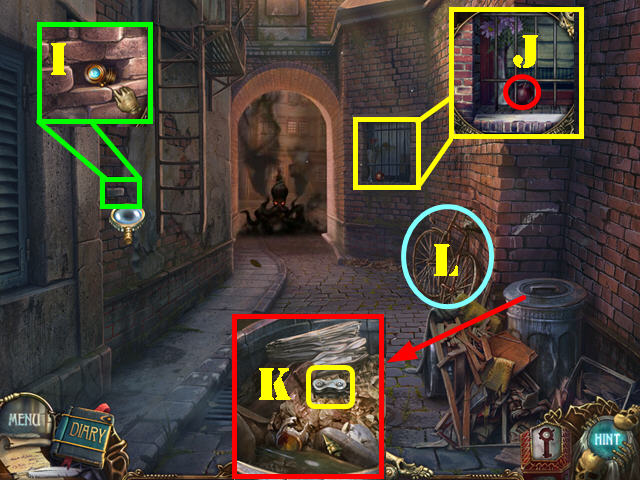
- Zoom into the bricks on the left; take the BRICK and the BRACELET (I).
- Examine the bars; take the APPLE (J).
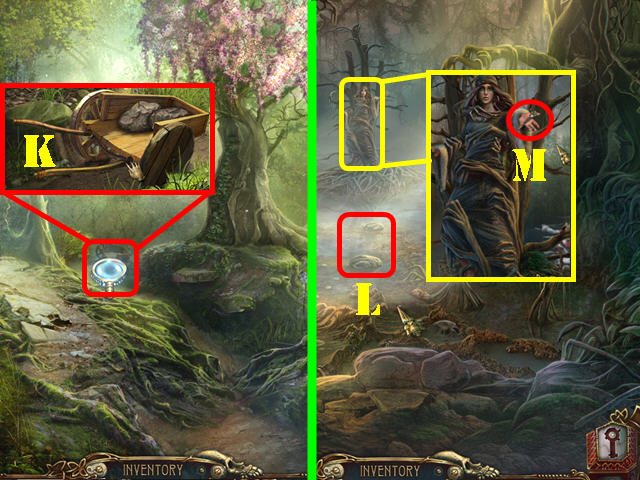
- Open the trash can lid; zoom into it and click on the debris twice; take the CHAIN LINK (K).
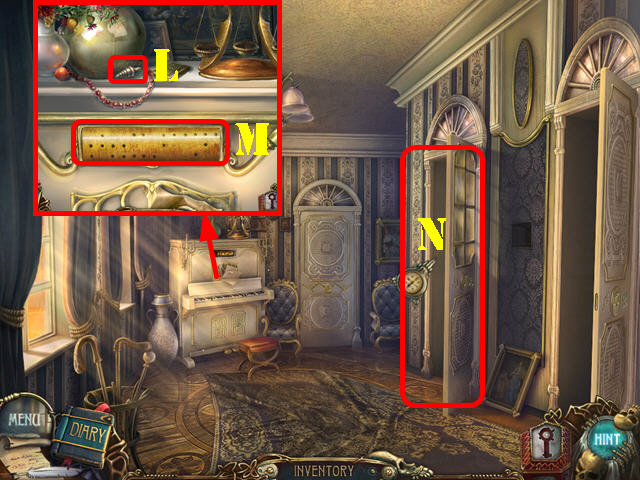
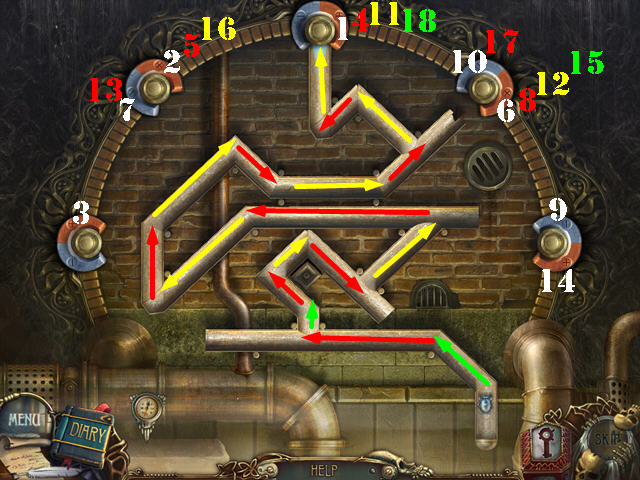
- Zoom into the bicycle (L); put the CHAIN LINK on the chain to activate a puzzle.
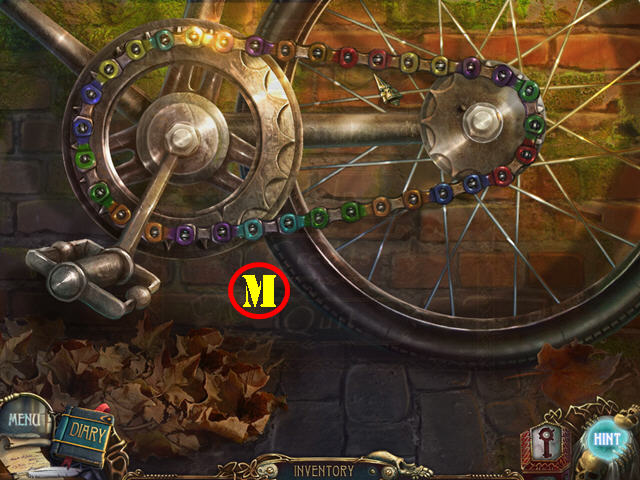
- Connect the links of the same color.
- Click on a link twice to rotate it.
- Make sure you pick up the links in between the wheels.
- Please look at the screenshot for the solution (M).
- The CHAIN will be added to inventory.
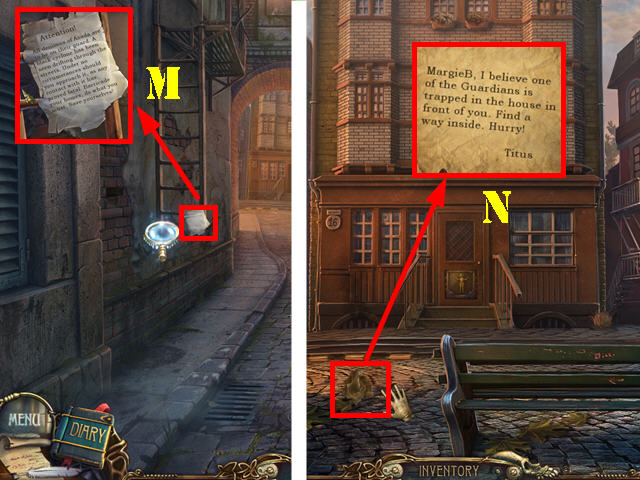
- Look at the NOTE (M) on the ladder.
- Go forward.
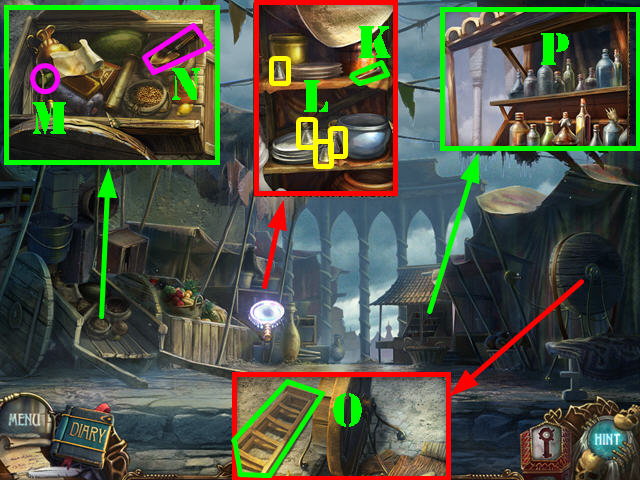
- Take the DIARY NOTE on the ground (N).
- Head left and board the tram.
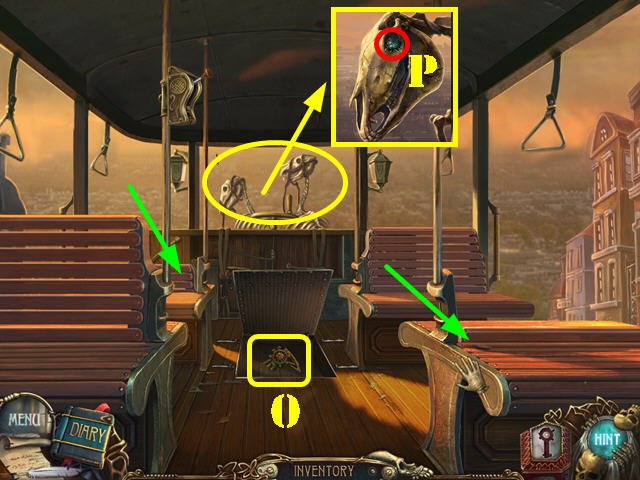
- Click on the front right seat and the back left seat (green arrows) to unlock the hatch.
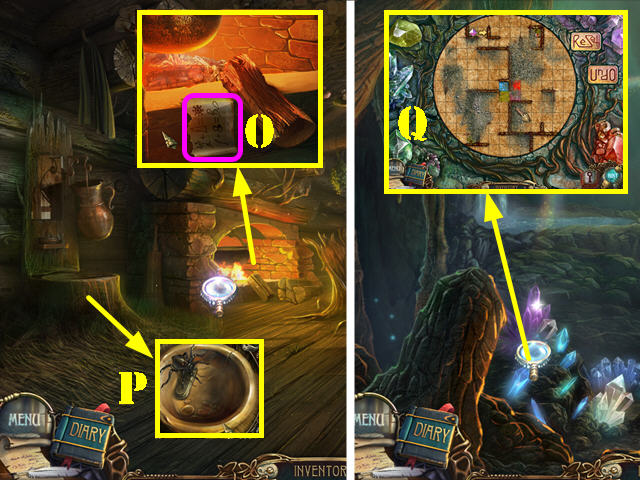
- Take the WING (O) in the hatch.
- Examine the skeleton; take the METAL BUG (P).
- Click down twice and head right.
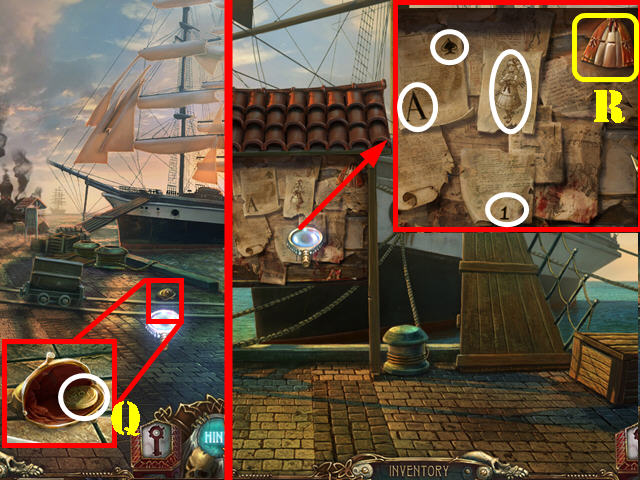
- Move the tiny train compartment and zoom into that area.
- Open the coin purse and take the COIN (Q).
- Head towards the ship.
- Look at the message board and take the SKIRT (R).
- Note the symbols on the board and the doll sketch (white).
- Board the ship.
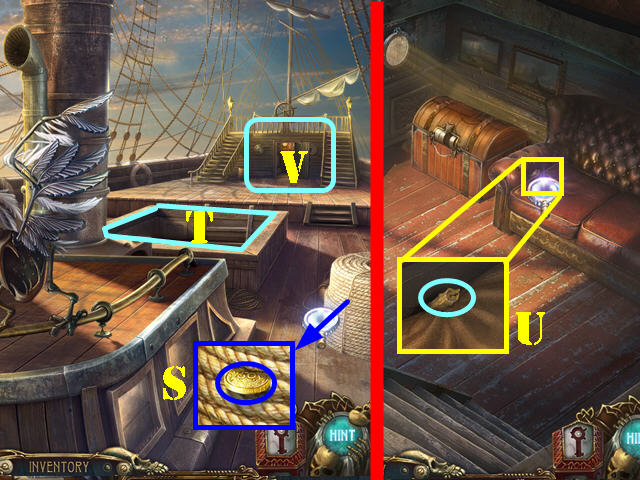
- Examine the rope and take the COIN (S).
- Go into the ship's hold (T).
- Examine the couch; take the CANDLE (U).
- Click down and go into the Captain's cabin in the back (V).
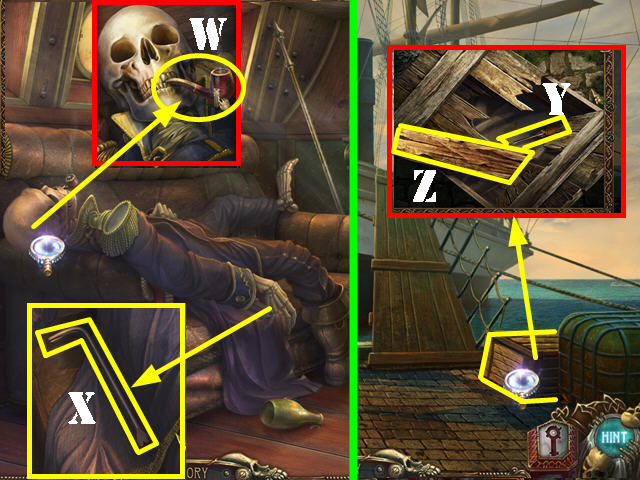
- Zoom into the skeleton; put the CANDLE on the pipe to create the BURNING CANDLE (W).
- Examine the skeleton's hand; take the CROWBAR (X).
- Click down twice.
- Examine the crate; use the CROWBAR on it.
- Take the SCREWDRIVER (Y) and the BOARD (Z).
- Click down.
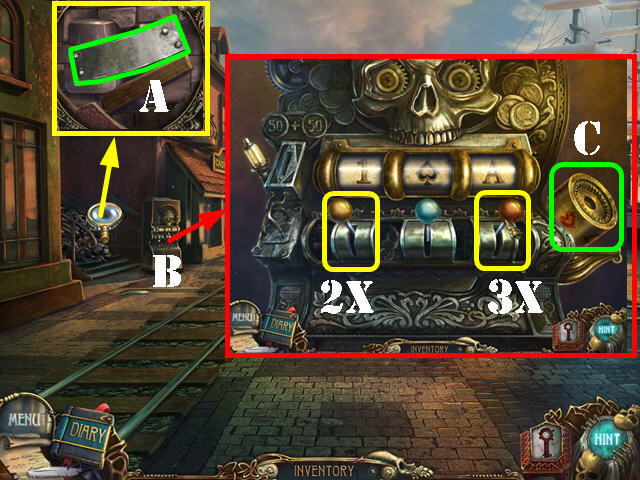
- Zoom into the metal sheet on the left; use the CROWBAR to retrieve the METAL SHEET (A).
- Examine the slot machine (B).
- Put the 2 COINS in the coin slot to activate a puzzle.
- To solve the puzzle, click on the left lever twice (2x) and the right lever three (3x) times.
- The CODE WHEEL will be added to inventory (C).
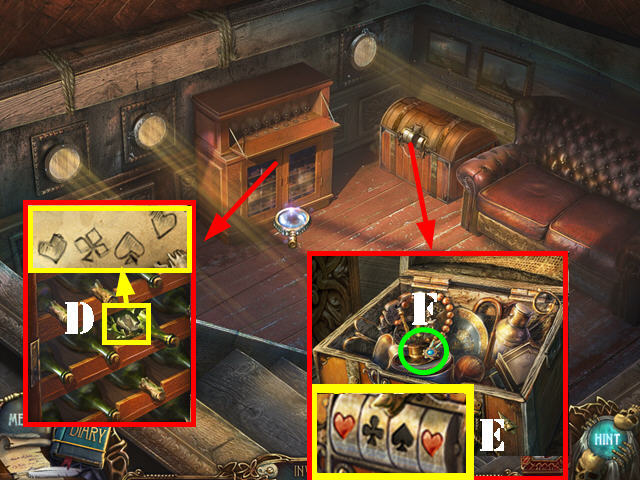
- Return to the ship's hold.
- Examine the wine rack; use the BRICK to break the bottle.
- Take the DIARY NOTE with the code (D).
- Examine the chest; put the CODE WHEEL in the slot.
- Turn the tumblers to the following code: heart, clover, spade, and heart (E).
- Take the HAT (F) from inside the chest.
- Return to the tram area.
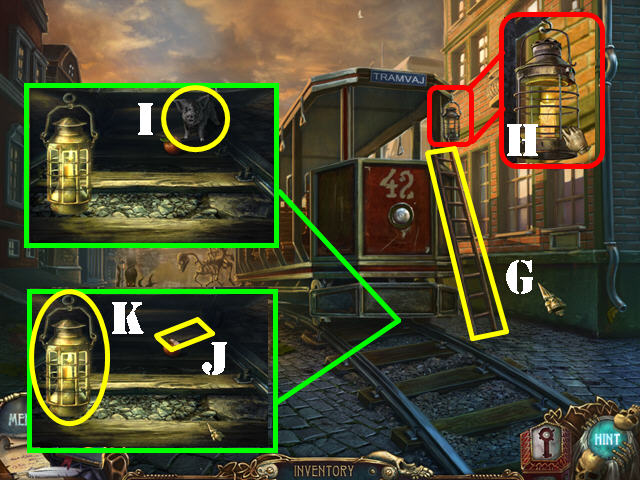
- Click on the LADDER (G).
- Zoom into the lantern (H); put the BURNING CANDLE in it.
- Take the LANTERN.
- Examine the bottom of the tram; put the LANTERN in the darkened area.
- Give the APPLE to the pig (I).
- Take the BOARD (J) and the LANTERN (K).
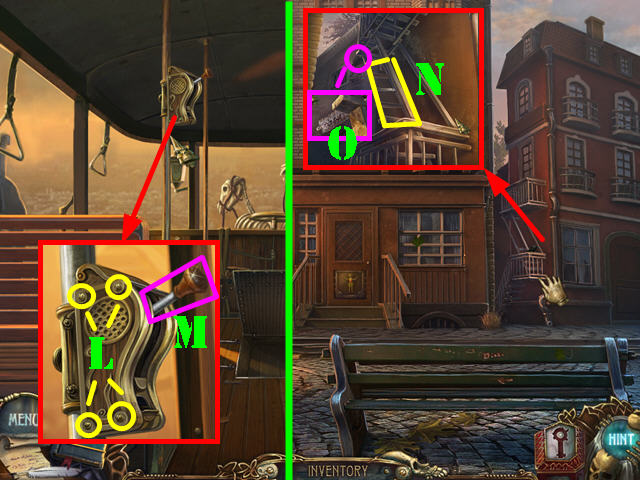
- Board the tram.
- Zoom into the device; loosen the 4 screws with the SCREWDRIVER (L).
- Remove the cover and click on the handle (M) to automatically receive the GEAR.
- Click down twice.
- Click on and examine the staircase; put the 2 BOARDS and the METAL SHEET on the broken ladder (N).
- Zoom into the area above the ladder and take the BRUSH (O).
- Go back to the ship.
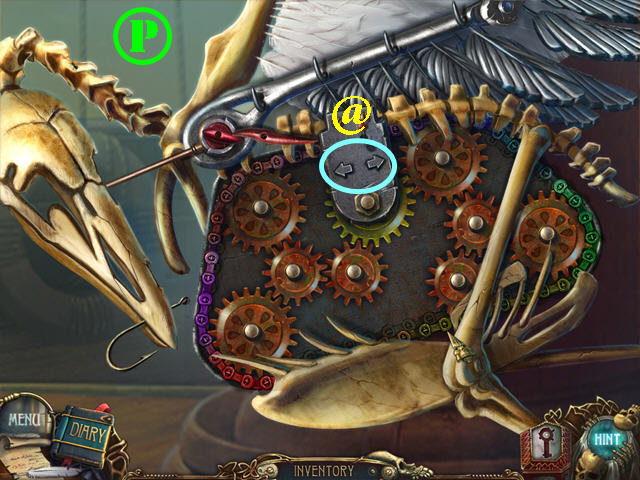
- Zoom into the mechanical bird; add the CHAIN and the GEAR to activate the puzzle.
- Put the gears in the correct order so that they rotate the red lever counterclockwise.
- Please look at the screenshot for the solution (P). Use the arrows in the center to test your connections (@).
- The HOOK will be added to inventory.
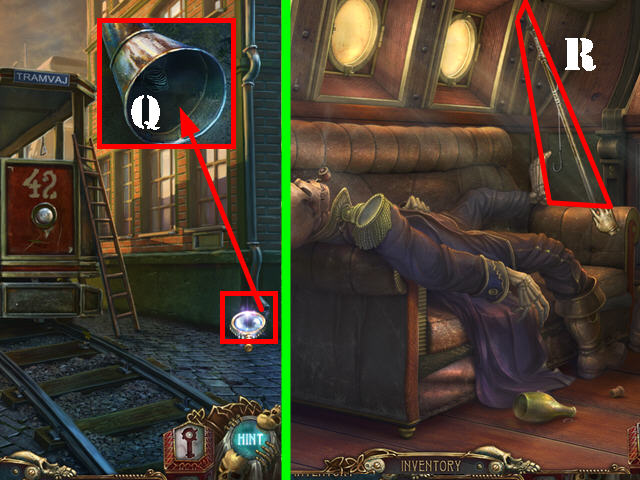
- Return to the tram area.
- Examine the rain spout; remove the FISHING LINE with the BRUSH (Q).
- Return to the Captain's cabin.
- Put the FISHING LINE and the HOOK on the flagpole.
- Take the FISHING ROD (R).
- Click down 4 times.
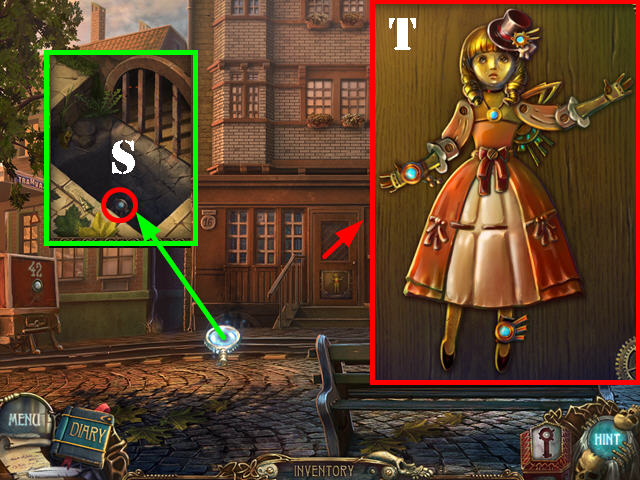
- Zoom into the grate; use the FISHING ROD to retrieve the ANKLET (S).
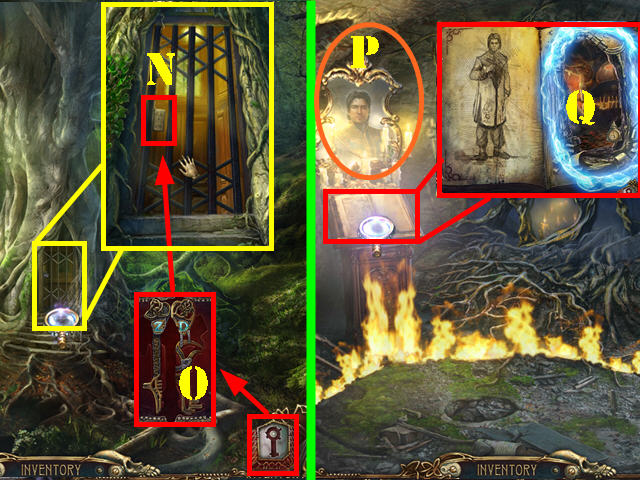
- Zoom into the door; put the SKIRT, HAT, BRACELET, WING, and the ANKLET on the doll to activate a puzzle.
- Reposition the doll parts by clicking on her joints. When a part is in the right position, one of the locks on the side will unlock.
- Please look at the screenshot for the solution (T).
- Enter the building.
Chapter 2: The First Key
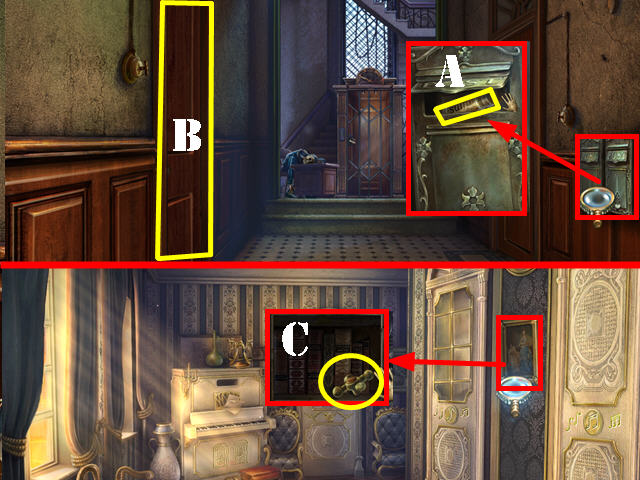
- Examine the postboxes; open it and take the SULFUR (A).
- Go through the left door (B).
- Examine the painting; click on the frame and take the FAUCET (C).
- Click down; go forward and head left.
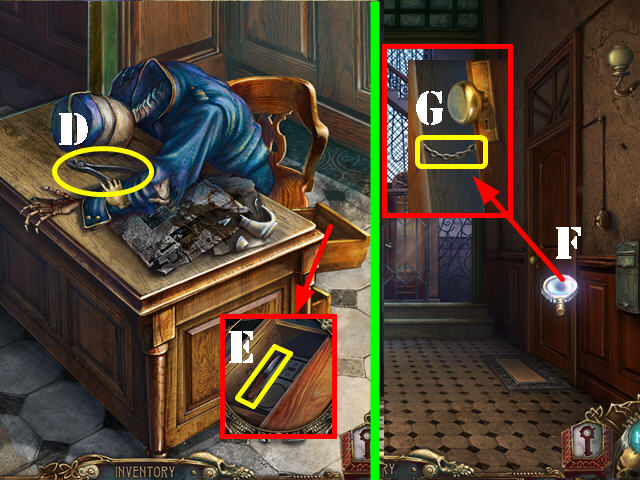
- Move the skeleton's hand and take the CLIPPERS (D).
- Examine the drawer and take the KNIFE (E).
- Click down twice and zoom into the right door (F).
- Cut the chain with the CLIPPERS (G) and go through the door to access the living room.
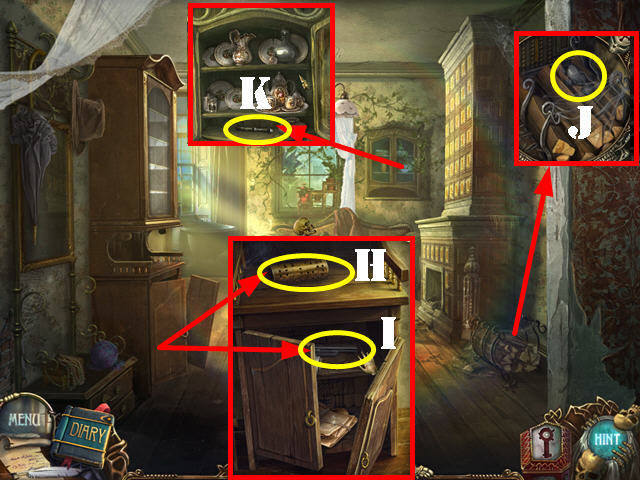
- Take a closer look at the bottom cabinet; take the PIANO SCROLL (H).
- Move the paper aside on the top shelf and take the GUN BARREL (I).
- Examine the firewood and take the CARBON (J).
- Zoom into the wall cabinet and take the PESTLE (K).
- Return to the piano room.
- Examine the piano and take the BULLET (L).
- Put the PIANO SCROLL in the slot (M); this action opens both side doors.
- Go into the far right door (N).
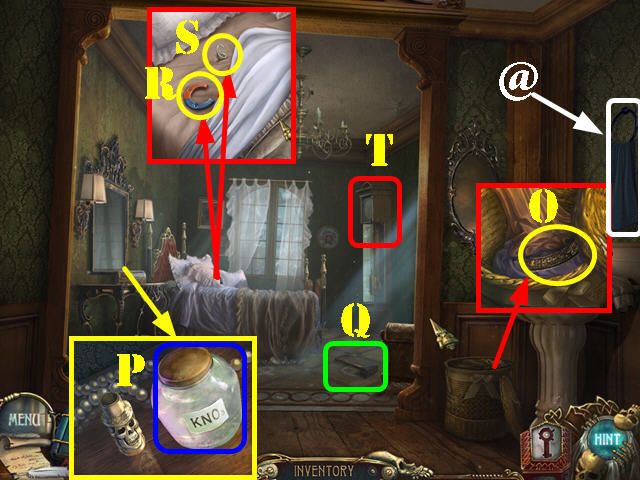
- Zoom into the hamper; open it, push aside the clothes and take the PUZZLE PART (O).
- Take the TOWEL on the wall (@). Note: If you pick up this towel, you will not be able to pick up the one in the bathroom.
- Examine the side table; take the SALTPETER (P).
- Move the chair aside and take the HAMMER (Q).
- Examine the bed; pull the sheets back twice and take the MAGNET (R).
- Use the KNIFE to cut the mattress and take the SPRING (S).
- Examine the grandfather clock; open the face and click on it (T).
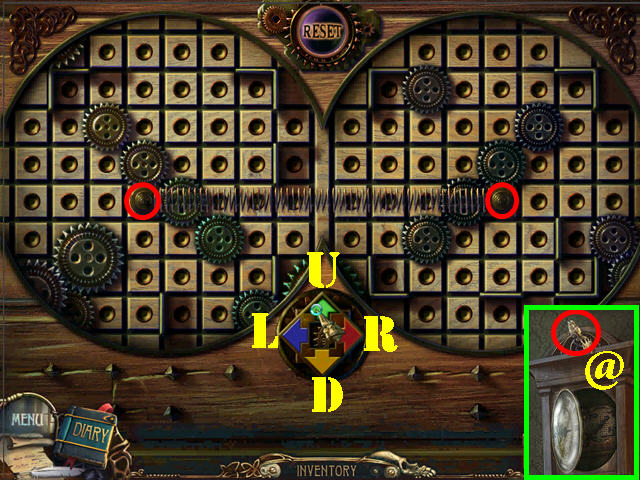
- Put the SPRING on the mechanism to activate a puzzle.
- Using the colored arrows to move the springs so they fit in the holes.
- To solve the puzzle, click on the arrows in this order: U x 2, R x 3, D x 5, L x 2, U x 2, L, and U.
- Take the CUCKOO (@).
- Click down and go into the rightmost door.
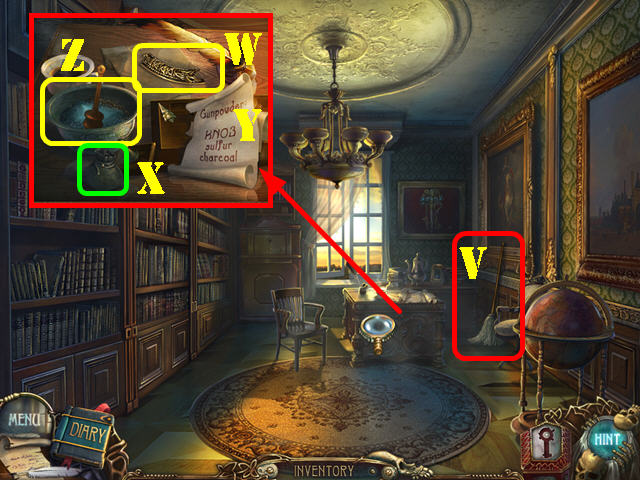
- Move the right chair aside; take the MOP (V).
- Examine the desk; take the PUZZLE PART (W) and the POUCH (X).
- Look at the GUNPOWDER RECIPE (Y).
- Put the SALTPETER, SULFUR, and the CARBON into the bowl (Z).
- Put the PESTLE in the bowl to crush all the ingredients.
- Put the POUCH in the bowl to collect the POWDER.
- Return to the bedroom.
- Examine the side table; put the POWDER inside the cartridge.
- Put the BULLET in the cartridge.
- Take the CARTRIDGE (A).
- Return to the living room and go through the back door to access the bathroom (B).
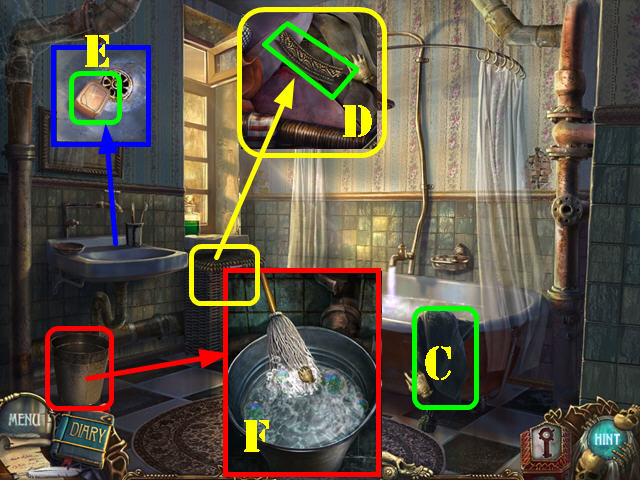
- Take the TOWEL (C). Note: if you took the towel in the bedroom, you will not be able to pick up this one.
- Open the hamper; zoom into it, push aside the clothes and take the PUZZLE PART (D).
- Examine the sink and take the SOAP (E).
- Zoom into the bucket and put the SOAP in it (F).
- Put the MOP into the soapy water to obtain the LATHERY MOP.

- Return to the elevator area.
- Break the chains (G) on the right with the HAMMER; go through the door.
- Put the LANTERN on the hook in the ceiling to light up the area (H).
- Examine the pipes; use the TOWEL on the pipes to activate a puzzle (I).
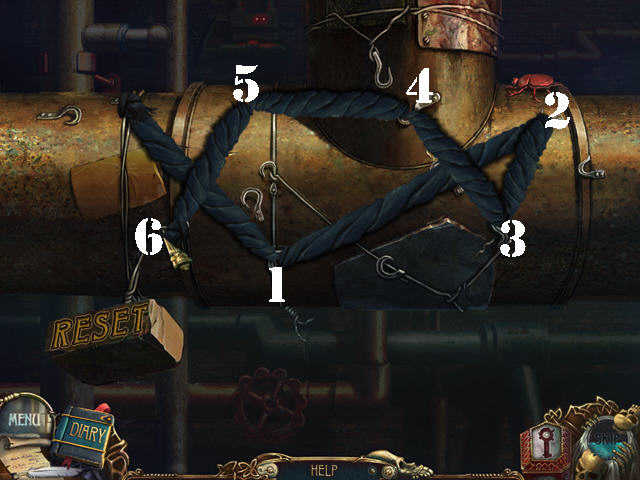
- Click on the towel to add it to your cursor.
- Click the towel onto the hooks which will cover the holes.
- You have to complete the puzzle in 6 moves.
- Follow the steps in the screenshot (1-6) to solve the puzzle.
- The METAL BUG will be added to inventory.
- Return to the bathroom.
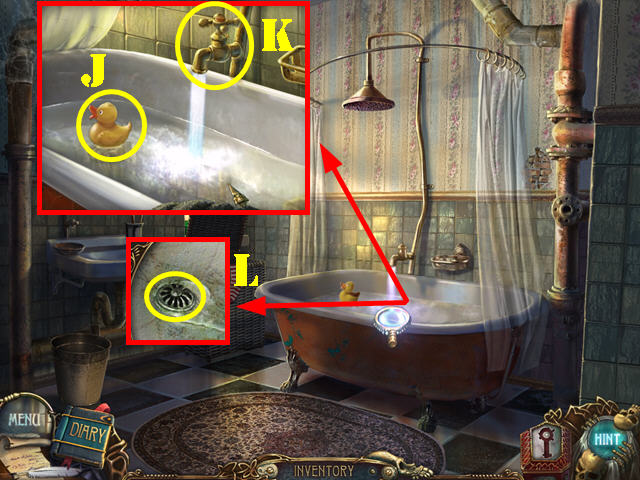
- Zoom into the tub; take the DUCK (J).
- Put the FAUCET on the spigot (K).
- Zoom into the tub and click on the drain (L).
- Put the MAGNET in the empty slot to activate the puzzle.
- Click on the magnets so the metal bug can move around the pipes and make its way to the top.
- Please look at the screenshot for the solution and click on the magnets in the order shown. You have to click on the side of the magnet the number is next to.
- The arrows marked in the screenshot represent the points in which the bug has to be moved in a different direction.
- The METAL BUG will be added to inventory.
- Return to the study.
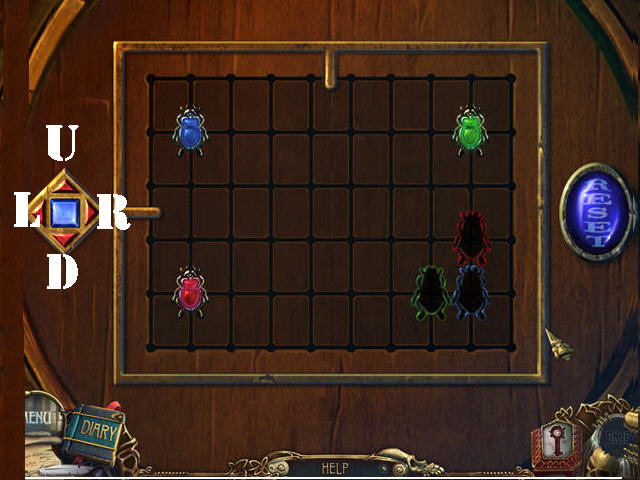
- Examine the globe; put the 3 PUZZLE PARTS on it to activate a puzzle.
- Put the puzzle pieces into the correct slots; puzzle pieces will automatically shift positions once you move it around the globe.
- Please look at the screenshot for the solution (M).
- Once that puzzle is solved, another will appear.
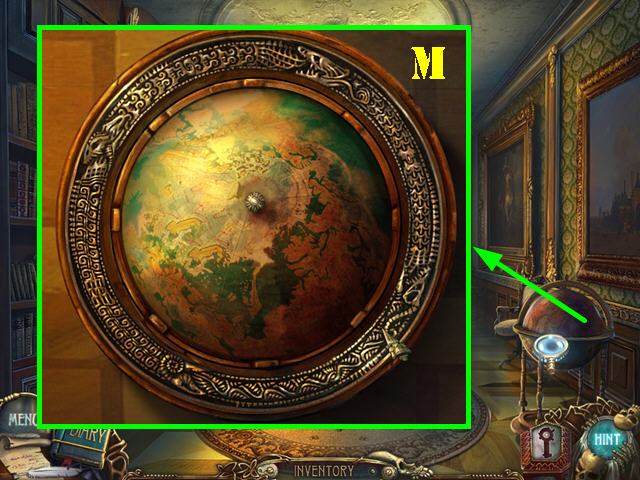
- Put the 3 METAL BUGS on the board to activate the puzzle.
- Use the arrows to put the metal bugs into their matching spots in the lower right.
- Click on the RESET button on the right to start over.
- To solve the puzzle click on the arrows in the following order:
- R x 4, U, L, U x 3, D, L, U, L x 2, D x 2.
- L, D, U, L, D, L x 3, U, R x 6, D, L x 2, U x 2.
- L x 4, D x 2, R x 5, U, L, D x 3, and R x 3.
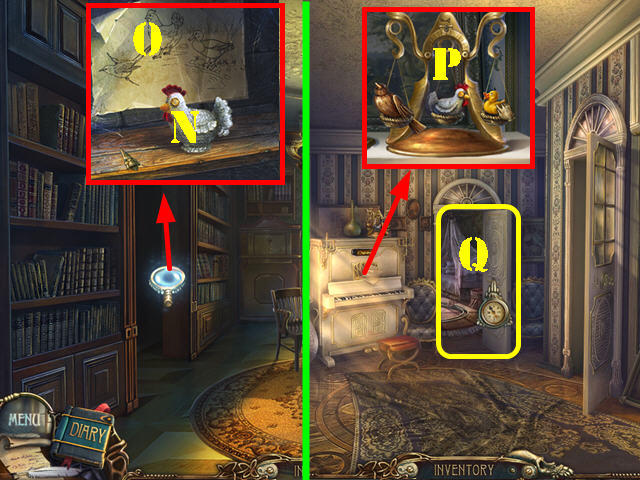
- Solving the puzzle unlocks the hidden section in bookcase; view it.
- Take the CHICKEN (N).
- Look at the diagram (O).
- Click down.
- Zoom into the piano.
- Put the animals into the baskets in this order: CUCKOO, CHICKEN, and DUCK (P). This action opens the back door; go through it (Q).
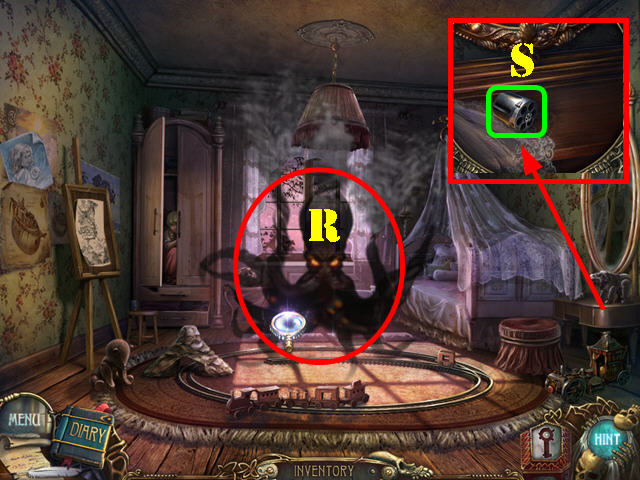
- Click on the black cyclone to see the little girl hiding in the closet (R).
- Examine the drawer; take the GUN CYLINDER (S).
- Return to the elevator area and go down the right steps.
- Examine the steps; use the LATHERY MOP on the oil spill (T).
- Zoom into the barrel; put the GUN BARREL, the GUN CYLINDER, and then the CARTRIDGE into the gun (U).
- Close the barrel and take the REVOLVER.

- Return to the bedroom with the black cyclone.
- Shoot the window with the REVOLVER (Y).
- Click on the closet for the little girl to appear (X).
- Take the Z KEY (Z) from her hand; it will be entered into the Key Box in the lower right ().
- Return to the elevator area.
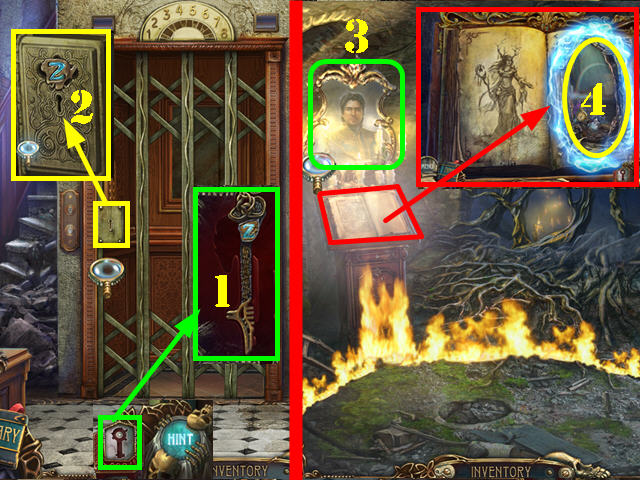
- Zoom into the lock; open the Key Box and take the Z KEY (1).
- Use the Z KEY in the lock (2).
- Enter the elevator.
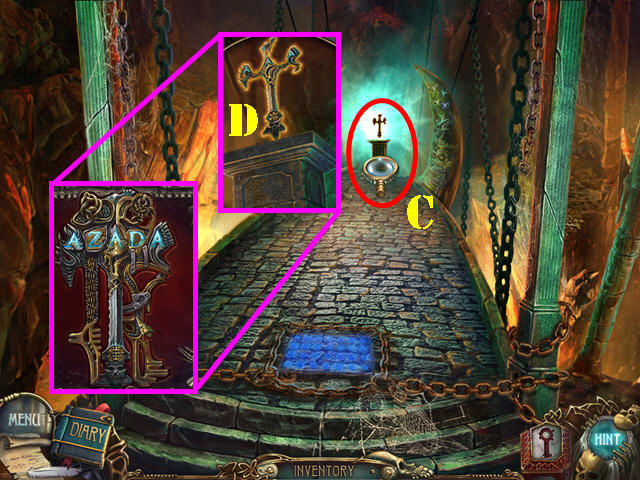
- Click on Titus in the mirror (3).
- Zoom into the book; flip the page and go through the portal (4).
Chapter 3: The Second Key
- Click on the cat.
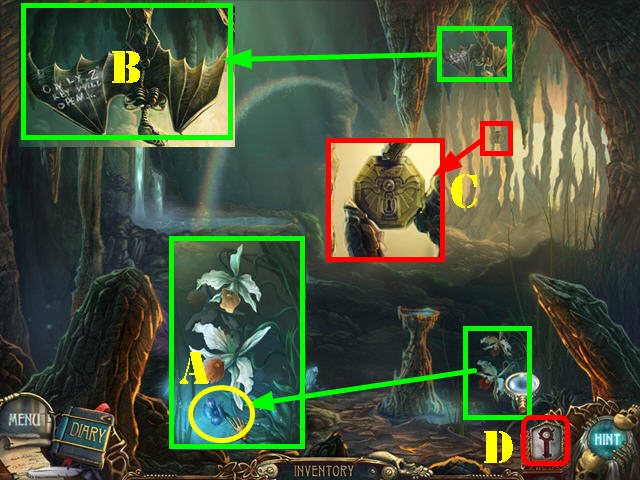
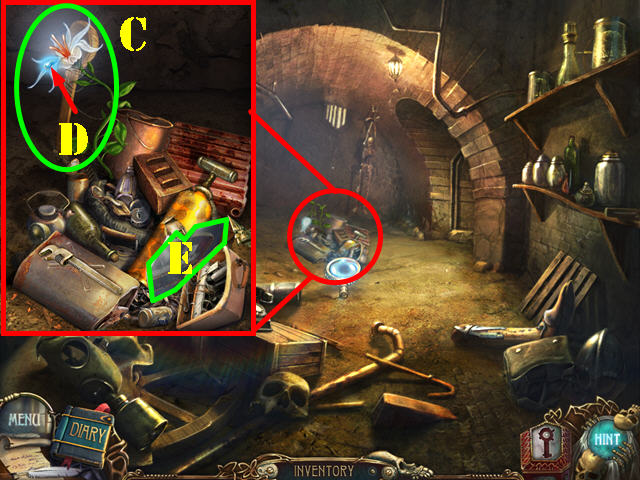
- Examine the plants and take the FLOWER (A).
- Look at the bat; read the note on its wing (B).
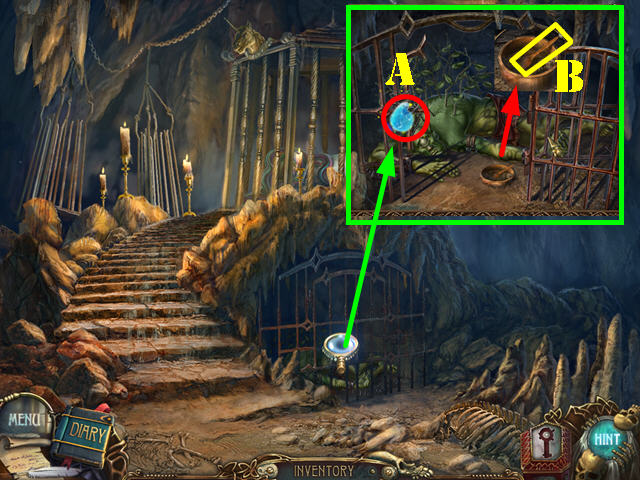
- Examine the right side of the cave (C).
- Open the Key Box and take the Z KEY (D).
- Put the Z KEY into the lock and go through the cave.

- Click on the cat.
- Examine the bushes; take the FEATHER (E).
- Head left.
- Examine the bale of hay; click on it 2 times and take the GLOVE (F).
- Click down and head towards the castle.
- Examine the statue; open the purse and take the MOSAIC PART (H).
- Take the ARROW (G).
- Examine the right building; take the GLASS with the GLOVE (I).
- Go towards the columns to reach the town center (J).
- Look at the shelves; take the PIPETTE (K) and the BOTTLES (L). Clicking on any bottle will enter all of them into inventory.
- Examine the cart; move the paper aside and take the FRUIT (M).
- Take the SCOOP (N).
- Zoom into the grindstone; take the LADDER (O).
- Look at the shelves on the right (P); click on the bottles and the wood log will fall and break all the bottles.
- Use the PIPETTE on the broken bottles to activate a puzzle.
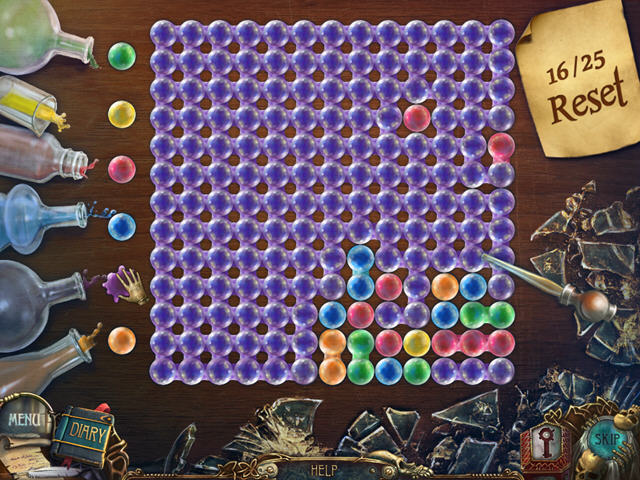
- You have to change the puddle to one color in 25 moves or less.
- The puddle starts in the upper left corner.
- Click on any of the 6 color globs on the left to start changing the color of the puddle.
- Make the most matches per click as you can so you can solve the puzzle in fewer steps.
- The puzzle is random; the screenshot shows you a partially-solved puzzle. If you were to solve the puzzle in the screenshot you would want to click on the colors in this order: Orange, Green, Blue, Yellow, Red, and Green. This would allow you to solve the puzzle in the least possible moves.
- The ACID will be added to inventory.
- Click down.

- Zoom into the building on the right.
- Put the LADDER below the window and take the EMPTY CAN (Q).
- Take back the LADDER (R).
- Click down.
- Zoom into the plant in the lower left corner.
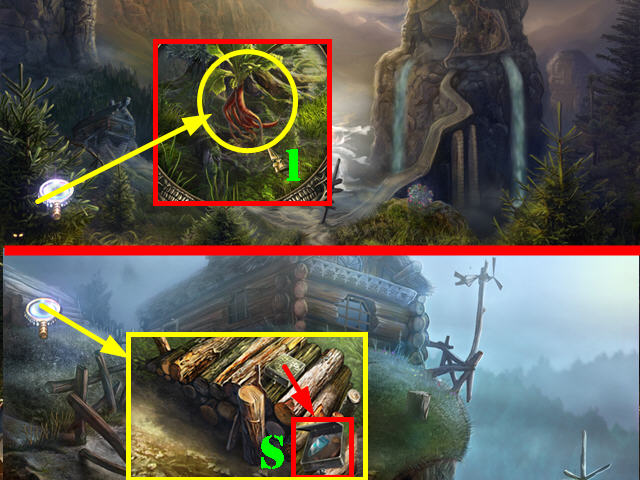
- Use the SCOOP to obtain the ROOT (1).
- Head left.
- Examine the logs; click on the top log to reveal a strange lock.
- Zoom into the lock.
- Pour the ACID on the lock and take the MOSAIC PART (S).
- Click down twice.
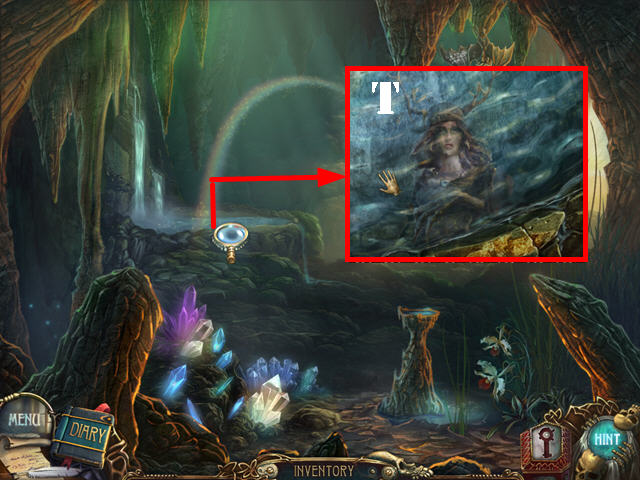
- Examine the water; click on the female reflection in the water (T).
- Put the EMPTY CAN in the water to receive the FILLED CAN.
- Exit and head towards the castle.

- Examine the left door; click on the snail to remove it (1).
- Use the FILLED CAN on the mucus (2).
- Click on the handle and go into the boutique.
- Take the AXE (3) and the 2 DIARY NOTES (A and B).
- Click on the horseshoe table to activate a puzzle (4).
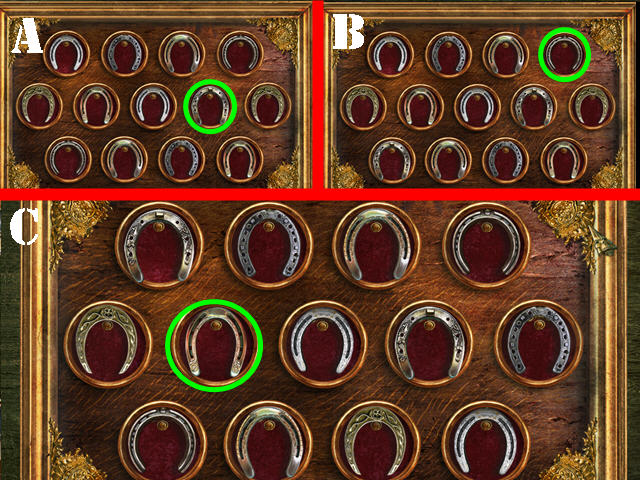
- Click on the horseshoe on the table that does not have a matching pair.
- The puzzle will reset itself when an incorrect match is made.
- Please look at the screenshot for the solution (A, B, and C).
- The HORSESHOE will be added to inventory.
- Click down and go towards the center building.
- Examine the painting; take the DANDELION (C).
- Go up the steps.
- Take the GRINDSTONE from the third statue (D).
- Click down 3 times and head left.
- Zoom into the logs on the left; use the AXE on the upright log to obtain a SPLINTER (E).
- Examine the window; take the DIARY NOTE (F) and the RING (G).
- Zoom into the door; put the RING in the lock and go into the cursed house (H).
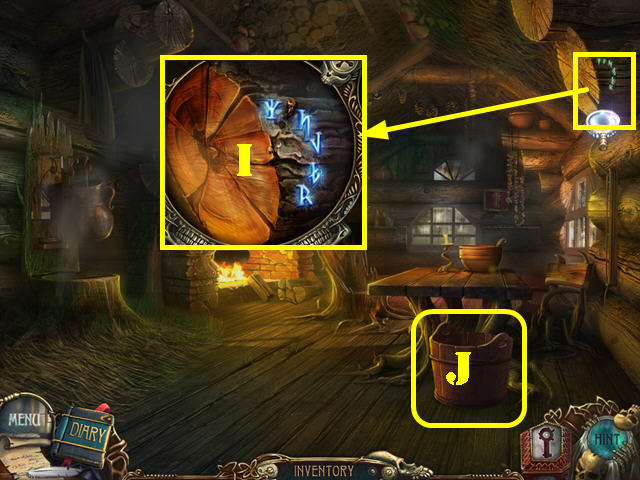
- Examine the upper right corner; put the HORSESHOE on the nail to remove the curse (I).
- Zoom into the bucket to activate a puzzle (J).
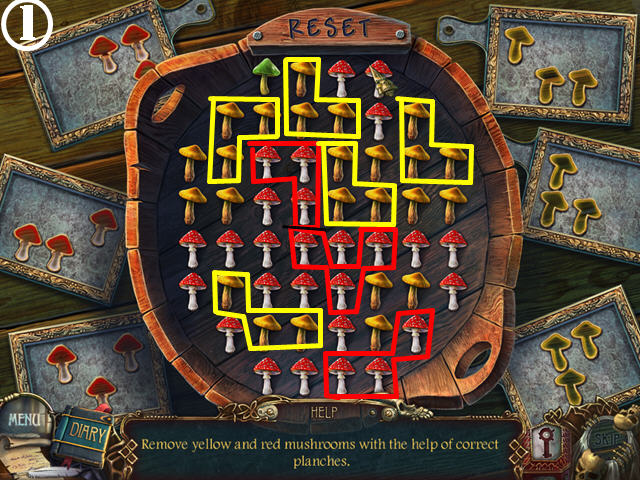
- Remove the yellow and red mushrooms.
- Use the boards on the left and right side of the board to remove the mushrooms.
- You can only use the boards on the mushrooms of the same color.
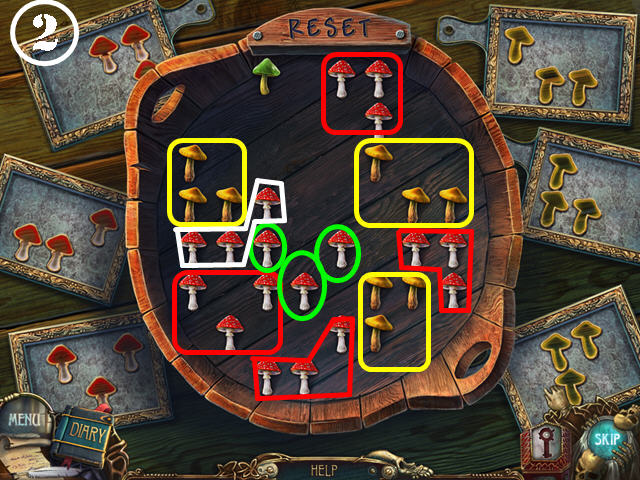
- Once you have 3 mushrooms showing through the holes in the board, click on them to eliminate them.
- Please look at the 2 screenshots for the solution (1 and 2).
- The MUSHROOM will be added to inventory.
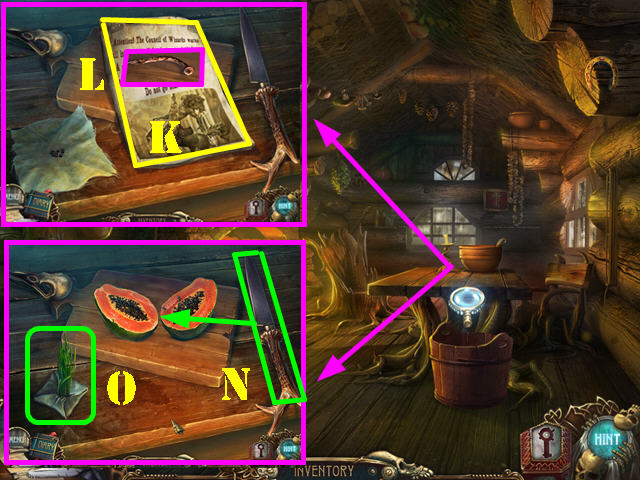
- Examine the table; take the DIARY NOTE (K) and the NAIL below it (L).
- Put the FRUIT on the cutting board.
- Cut the FRUIT with the KNIFE (N).
- Click on the cloth with seeds on the left.
- Use the FILLED CAN on the seeds; click on the pouch and take the GRAIN (O).
- Look at the fireplace; take the DIARY NOTE (O).
- Put the SPLINTER in the fire to receive the BURNING SPLINTER.
- Examine the stump; use the BURNING SPLINTER on the spider and take the BRUSH (P).
- Click down 3 times.
- Zoom into the crystals; use the BRUSH on the dirt 3 times to activate the puzzle (Q).
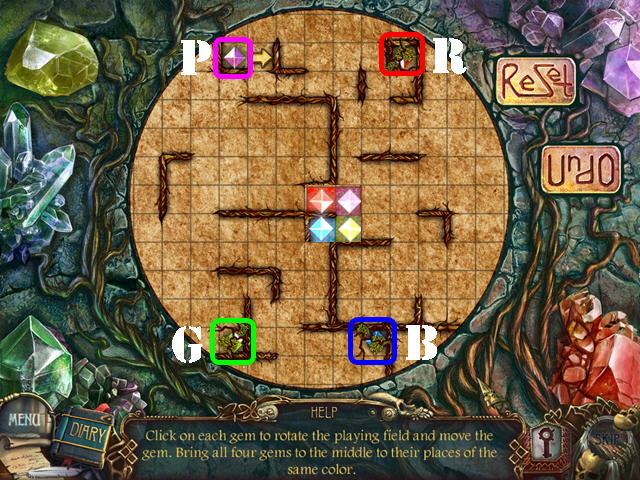
- Click on the gems for an arrow to appear; click on the arrow to move the gem in that direction.
- Your goal is to place all the gems on their matching spots in the center of the board.
- To solve the puzzle, follow the 4 steps below.
- Select the Purple Gem (P) and follow these steps: R x 4.
- Select the Blue Gem (B) and follow these steps: R x 3 and L.
- Select the Green Gem (G) and follow these steps: R x 2, L, and R x 3.
- Select the Red Gem (R) and follow these steps: R x 5.
- The ROUGH DIAMOND will be added to inventory.

- Return to the town square.
- Zoom into the grindstone; put the GRINDSTONE on the machine (1).
- Place the ROUGH DIAMOND on the side of the machine (2).
- Click on the pedal (3) and take the DIAMOND.
- Return to the library.
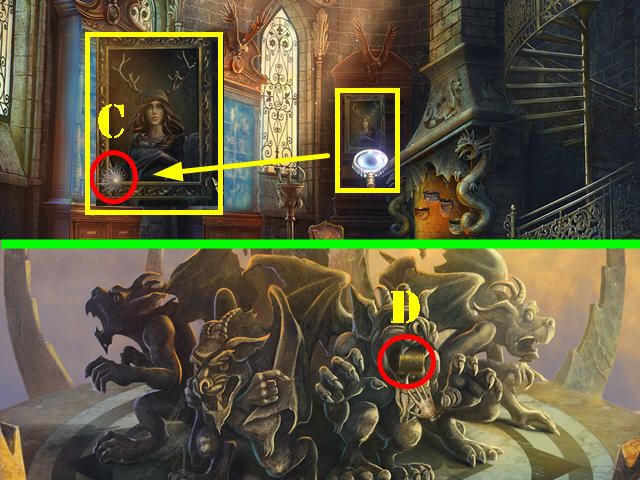
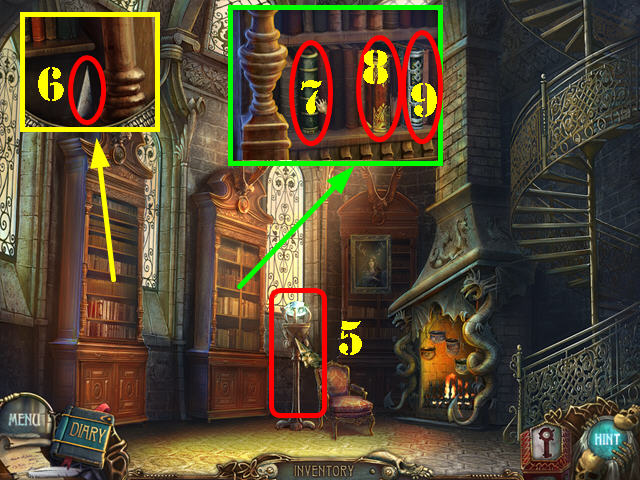
- Examine the stand (5); put the DIAMOND in it to remove the force fields on the bookcases.
- Zoom into the left bookcase; take the MOSAIC PART (6).
- Zoom into the right bookcase; click on the left book (7).
- Click on the brown book and read the DIARY NOTE (8).
- Click on the last book; it contains the rest of the recipe (9).
- Zoom into the fireplace.
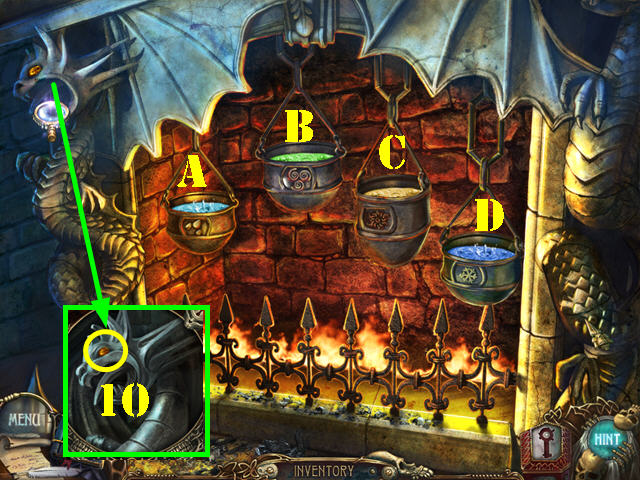
- Examine the dragon's head; use the NAIL to remove the AMBER (10).
- Put the MUSHROOM and the GRAIN into the first cauldron (A). Put the BOTTLES into the first cauldron to obtain the RAIN POTION.
- Put the DANDELION and the FEATHER into the second cauldron (B). Put the BOTTLES into the second cauldron to obtain the WIND POTION.
- Put the FLOWER and the AMBER into the third cauldron (C). Put the BOTTLES into the second cauldron to obtain the SUN POTION.
- Put the ROOT and the GLASS into the last cauldron (D). Put the BOTTLE into the last cauldron to obtain the FROST POTION.
- Go up the steps.
- Zoom into the window.
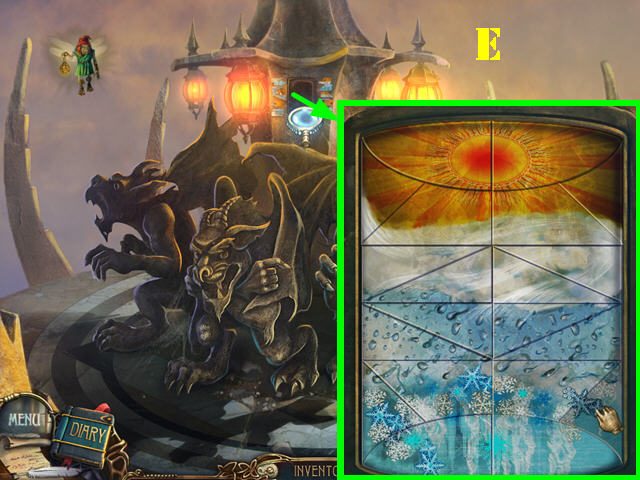
- Put the 3 MOSAIC PARTS on the window to activate a puzzle.
- Reassemble the mosaic.
- Right-click on the mosaic piece to rotate it.
- Please look at the screenshot for the solution (E).
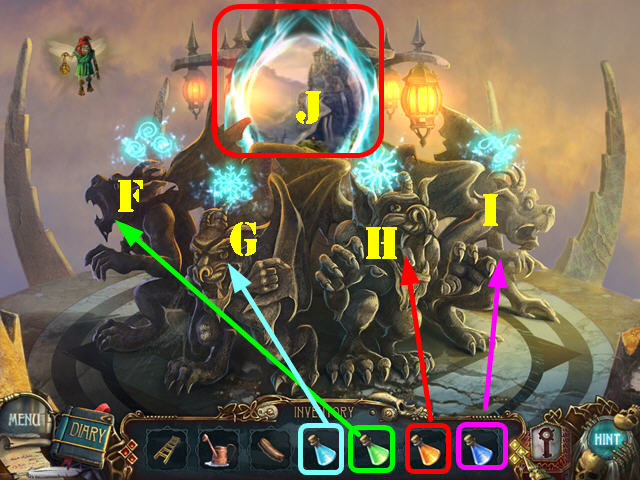
- Give the WIND POTION to the first statue (F).
- Give the FROST POTION to the second statue (G).
- Give the SUN POTION to the third statue (H).
- Give the RAIN POTION to the last statue (I).
- Go through the portal (J) and then go forward.
Chapter 4: The Forest
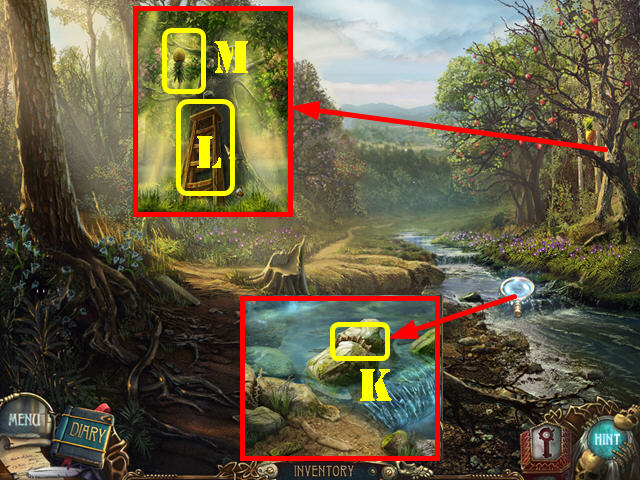
- Examine the water; take the first FIN (K).
- Zoom into the tree; lean the LADDER against it and take the PINEAPPLE (L).
- Go forward.
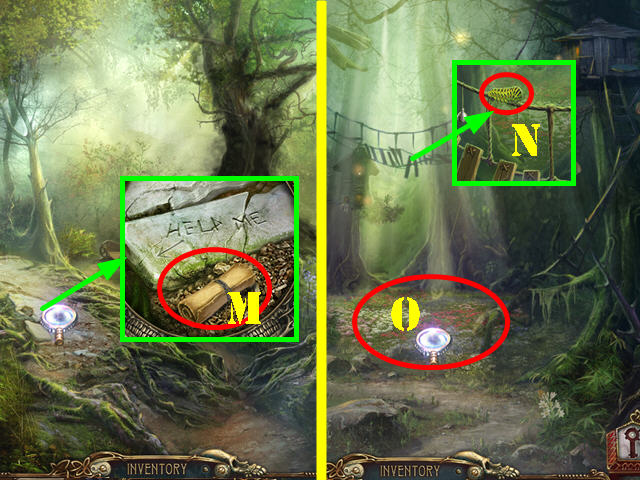
- Examine the left side of the ground; take the DIARY NOTE (M).
- Take the left path.
- Examine the bridge; take the CATERPILLAR (N).
- Use the FILLED CAN on the ground; zoom into the flowers to activate a puzzle (O).
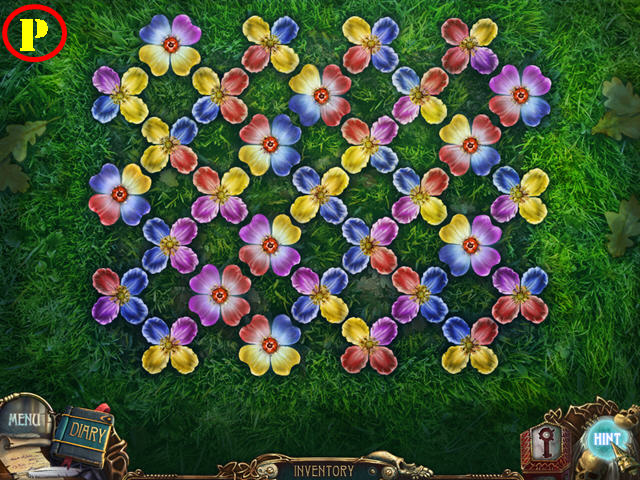
- Click on the petals to rotate them so touching petals of the same color are facing each other.
- Only certain flowers can be moved. Use the static pieces as a clue.
- Please look at the screenshot for the solution (P).
- The CART HANDLE will be added to inventory.
- Click down and head right.
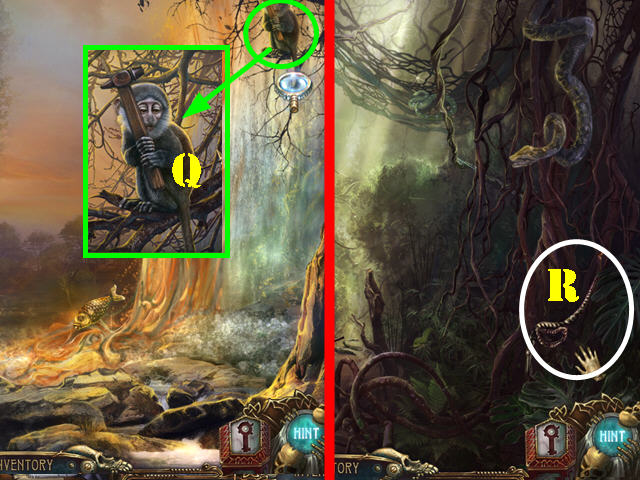
- Look at the monkey up in the tree; give him the PINEAPPLE to receive the HAMMER (Q).
- Go forward.
- Click on the cat.
- Take the ROPE (R).
- Click down and head right.
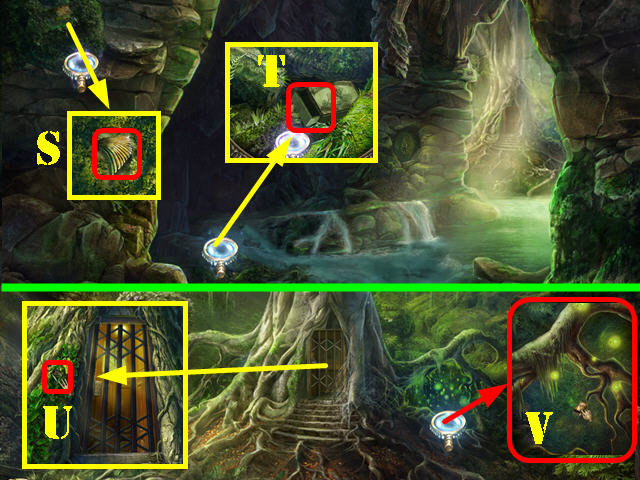
- Examine the moss on the wall; use the BRUSH on it and take the second FIN (S).
- Zoom into the box; use the ARROW on it to obtain the MATCHBOX (T).
- Head right.
- Zoom into the tree; take the third FIN on the left (U).
- Exit the tree by clicking down.
- Examine the fireflies in the lower right; use the MATCHBOX on them to activate a puzzle (V).
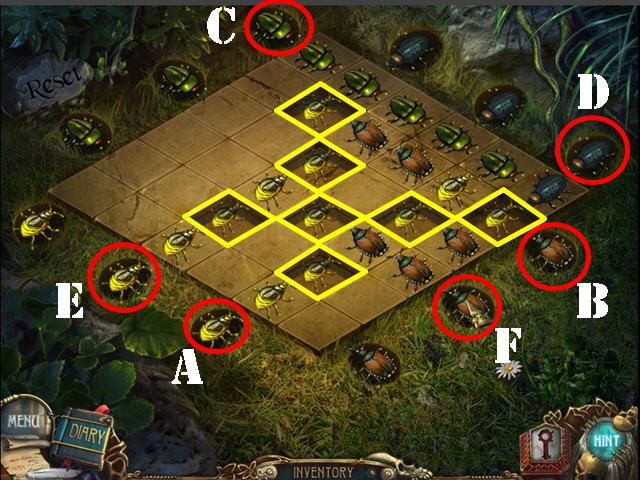
- Put the fireflies (yellow bugs) into the hollow sections on the board. Use the bugs around the board to push the fireflies into place.
- To solve the puzzle click on the bugs in this order: A x 5, B x 4, A x 2, C x 5, D x 1, E x 4, and F x 2.
- The BOX WITH FIREFLIES will be added to inventory.
- Click down twice.
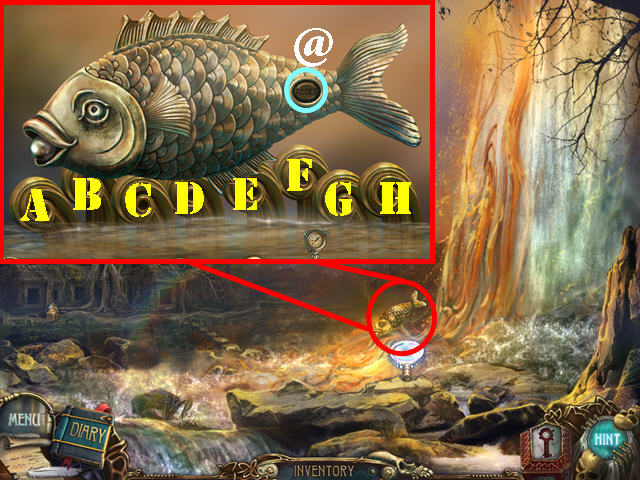
- Examine the fish; put the 3 FINS on it to activate a puzzle (1).
- Click on the waves until all of them are gone.
- Click on the RESET (@) button to start over.
- To solve the puzzle, click on the waves in this order: A, B, C, G, F, H, D, and C.
- The PEARL will be added to inventory.
- Click down twice.
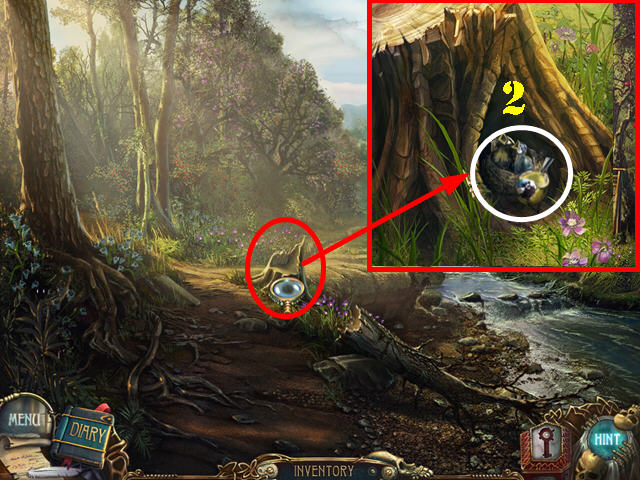
- Zoom into the tree stump; give the CATERPILLAR to the birds to receive the BELL (2).
- Go forward and head left.
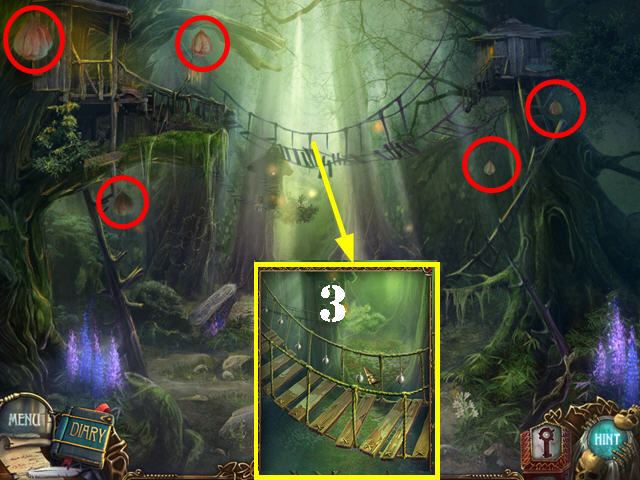
- Put the BOX WITH FIREFLIES on one of the 5 lanterns marked in red.
- Examine the bridge; put the ROPE on it (3).
- Hang the BELL on the rope.
- The STONE SYMBOL will be added to inventory.
- Go into the tree house.
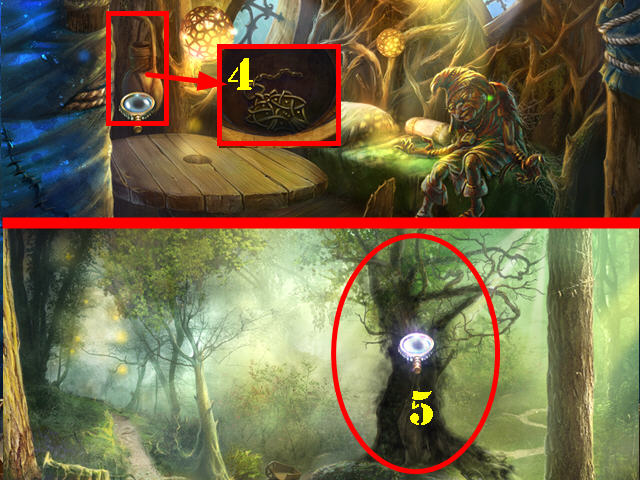
- Examine the vase; take the TALISMAN (4).
- Click down twice.
- Zoom into the tree (5).

- Put the TALISMAN on the 9 branch faces marked in red.
- Take the HANDLE by the base of the tree (6).
- Go back to the tree house.
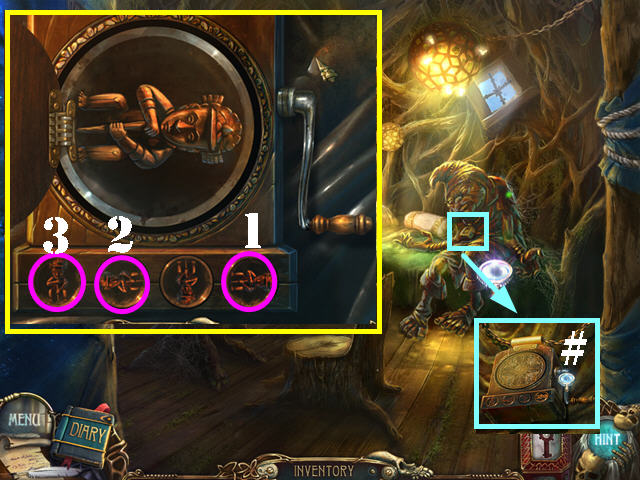
- Zoom into the creature.
- Put the HANDLE on the device around his neck and click on the handle to activate a puzzle (#).
- Click on the handle to begin; watch the movement of the box and guess the position of the figure inside.
- Once the box stops moving, choose one of the four positions the figure is currently in by clicking on your choice below the box.
- Complete 3 rounds of this puzzle to win. The correct order appears on the screenshot (1, 2, and 3).
- The STAKE will be added to inventory.
- Click down twice and head right.
- Zoom into the sword in the lower left; put the STAKE in the stone (A).
- Use the HAMMER on the STAKE and take the SHORT SWORD.
- Head right.
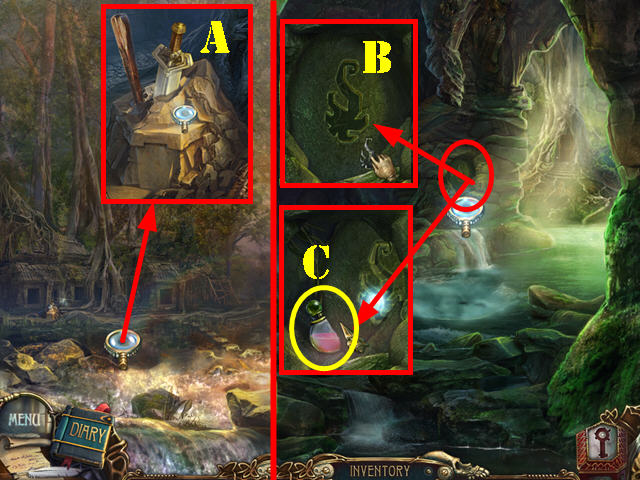
- Examine the crevice; put the STONE SYMBOL in the slot (B).
- Put the PEARL on the stone symbol.
- Take the ANTIDOTE (C). Note: The antidote has 9 portions.
- Click down and go forward.
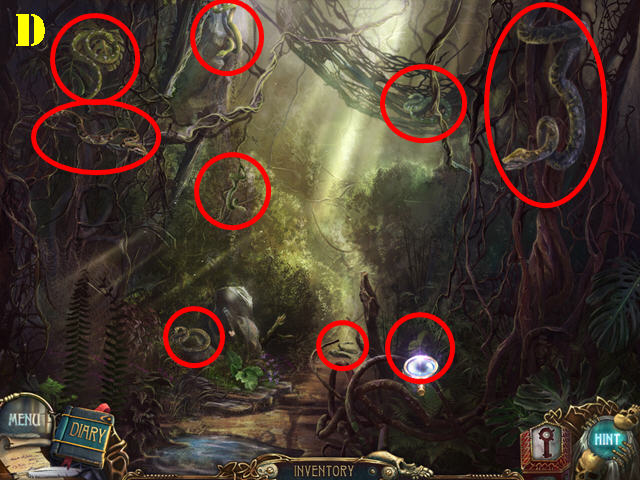
- Put the ANTIDOTE on each of the 9 snakes marked in red (D).
- Go forward.
- Talk to the Guardian.
- Zoom into the hand; use the SHORT SWORD on the hand and take the CART HANDLE (E).
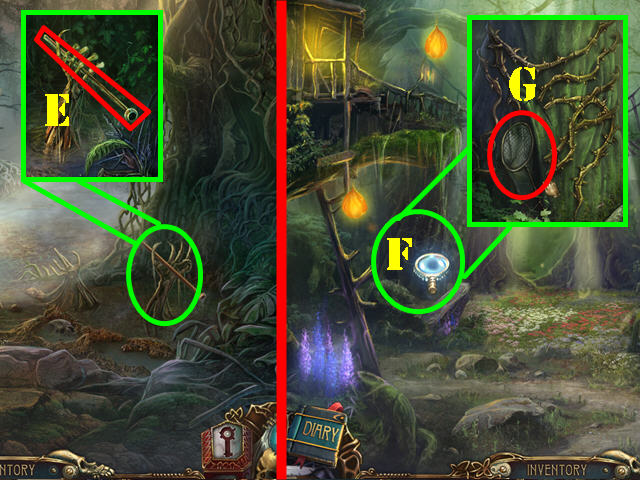
- Click down 3 times and head left.
- Zoom into the thorns on the left (F); use the SHORT SWORD on the thorns 3 times.
- Take the NET (G).
- Click down; head right, and go forward twice.
- Examine the bubble and click on it (H).
- Use the NET to obtain the SAW (I).
- Return to the tree house.
- Use the SAW on the round table to receive the WHEEL (J).
- Click down twice.
- Zoom into the broken cart; put the 2 CART HANDLES and the WHEEL on it.
- Take the CART (K).
- Head right and go forward twice.
- Put the CART in the water (L).
- Zoom into the Guardian; take the D KEY from her hand (M).
- Click down twice and head right twice.
- Zoom into the door and then into the lock (N).
- Open the Key Box; take the D KEY and use it in the lock (O).
- Go through the door.
- Click on Titus in the mirror (P).
- Zoom into the book; flip the page and go through the portal (Q).
Chapter 5: The Third Key
- Grab the LADDER (A).
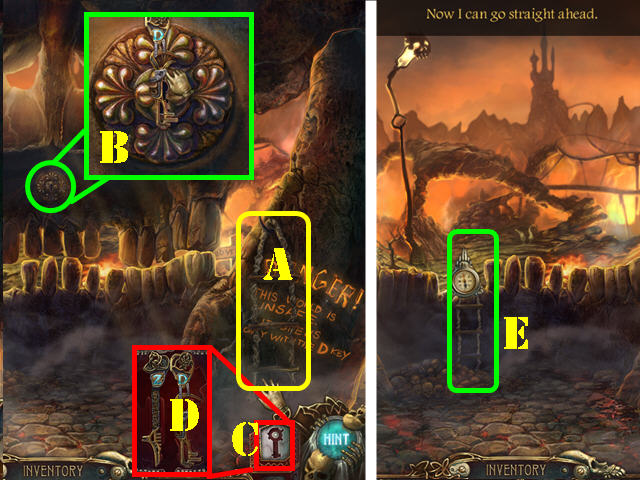
- Zoom into the lock (B).
- Open the Key Box (C) and take the D KEY (D).
- Use the D KEY in the lock.
- Place the LADDER on the teeth and go up the ladder (E).
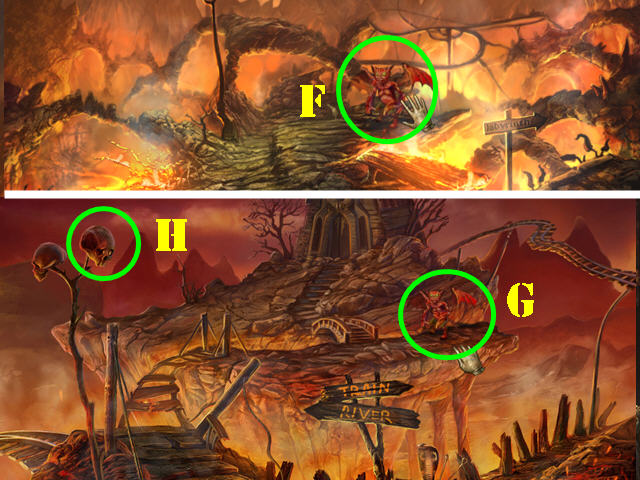
- Click on the demon (F).
- Go forward.
- Click on the demon (G).
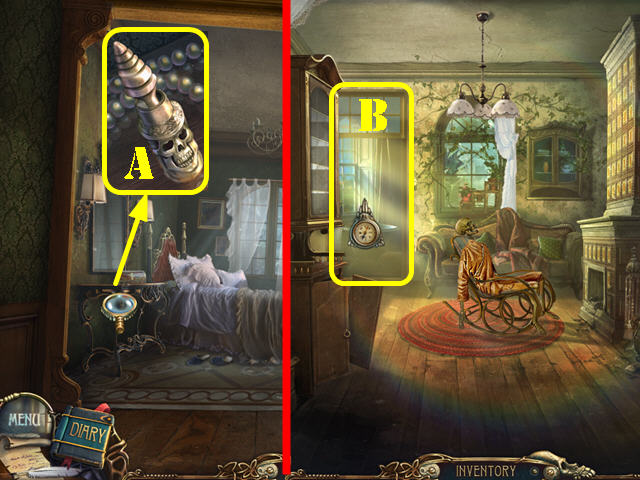
- Take the SKULL (H).
- Head left.
- Examine the ground; take the SHELL (I).
- Go forward.
- Take the RIBS on the left (J).
- Click down twice; head right and go into the train.
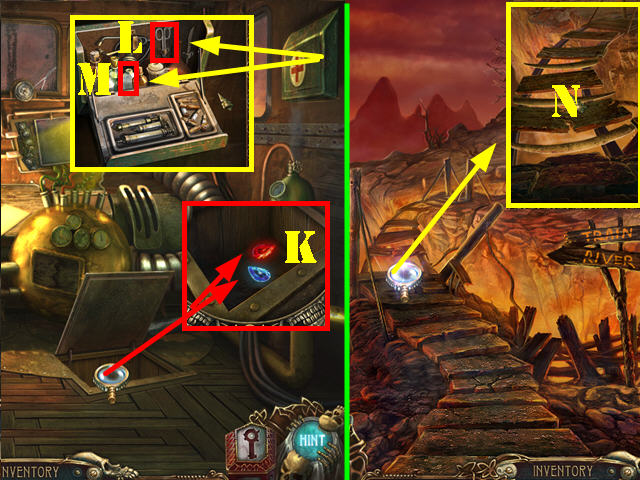
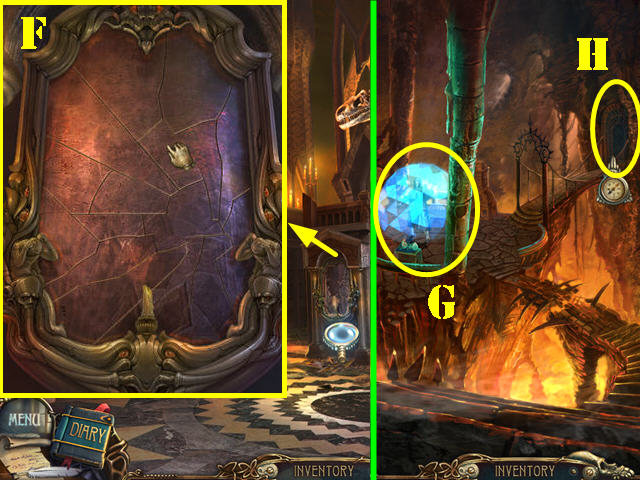
- Open and examine the trapdoor; take the BLUE GEM and the RED GEM (K).
- Examine and open the first-aid kit; take the SCISSORS (L) and the BOTTLE (M).
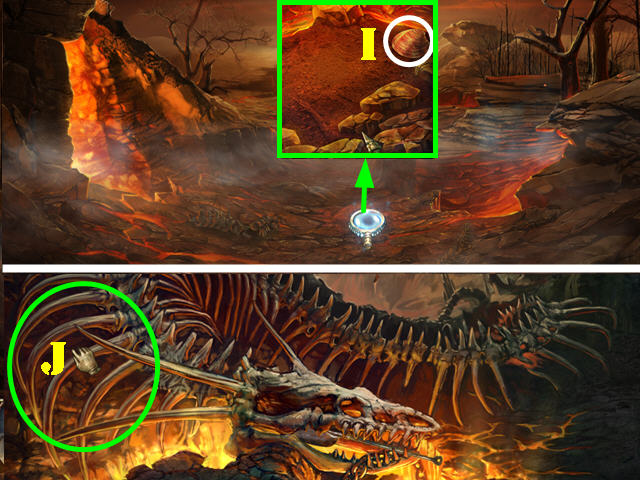
- Head left and click down.
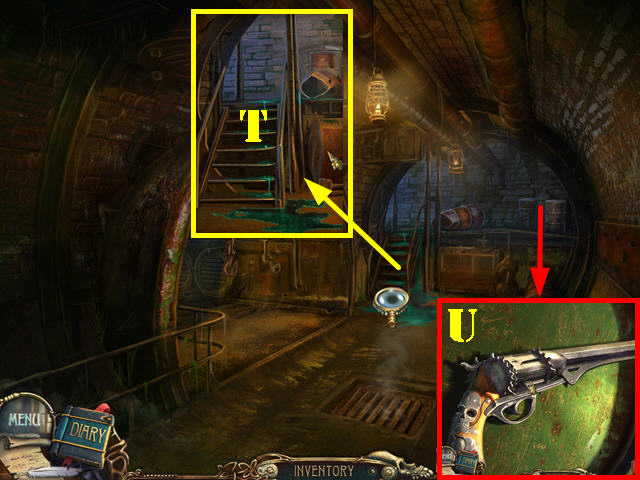
- Zoom into the tracks; put the RIBS on them and proceed forward (N).
- Take the BROOM (O).
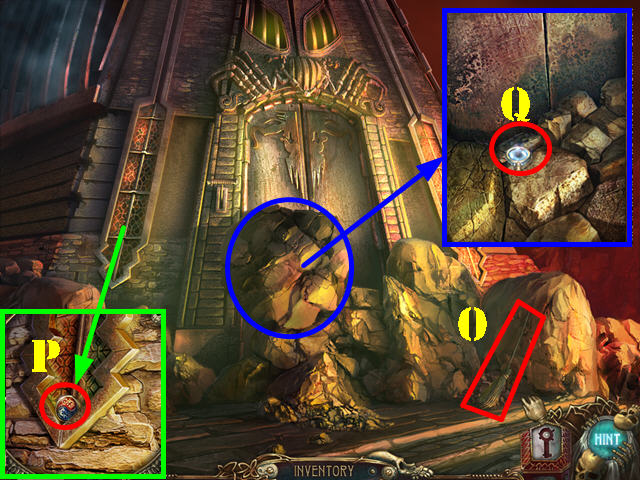
- Examine the area to the left side of the door; take the PUZZLE PART (P).
- Examine the large rock and push it out of the way.
- Collect the TERMITES with the BOTTLE (Q).
- Click down twice and head right.
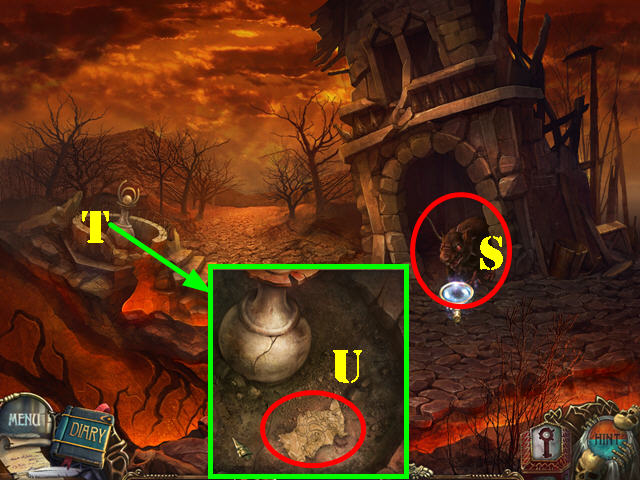
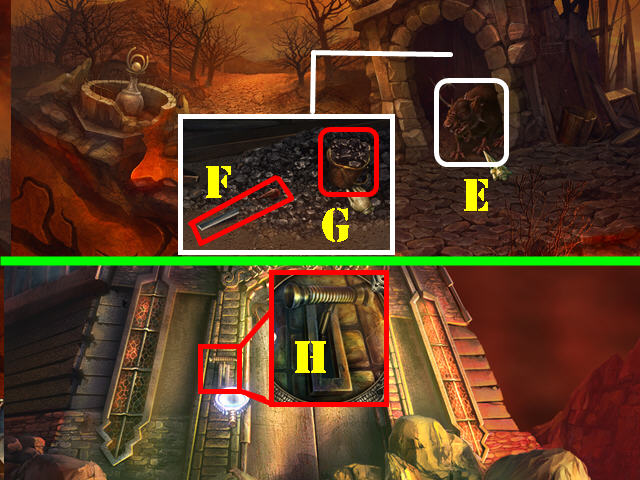
- Examine the giant rat to add a diary entry (S).
- Examine the area on the left (T); use the BROOM on the dirt twice.
- Take the MAP (U).
- Head forward.

- Click on the demon.
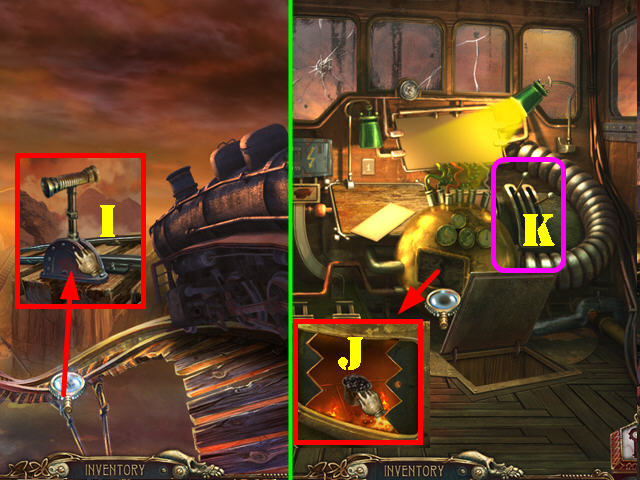
- Examine the bench; take the LAMP (V).
- Zoom into the left column; put the SHELL in the recess and take the BUCKET (W).
- Zoom into the right column; put the SKULL in the recess to obtain the FLUTE (X).
- Examine the sign; put the MAP on it (Y).
- Go up the left steps.
- Examine the left mushrooms and take the CANE (1).
- Click down 3 times and head forward.
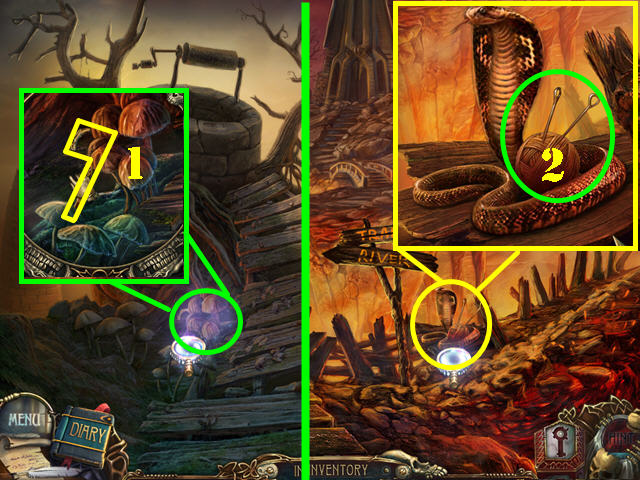
- Examine the cobra.
- Use the FLUTE on the cobra; take the NEEDLES and the BALL OF YARN (2).
- Head left.
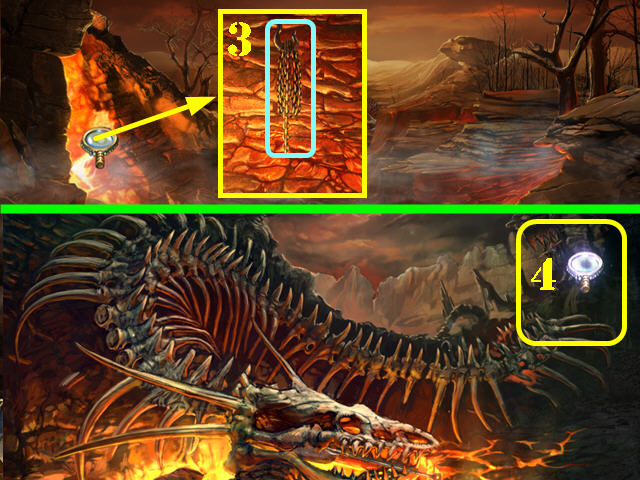
- Examine the cave; grab the CHAIN with the CANE (3).
- Go forward.
- Zoom into the upper right area; put the PUZZLE PART on the board to activate a puzzle (4).
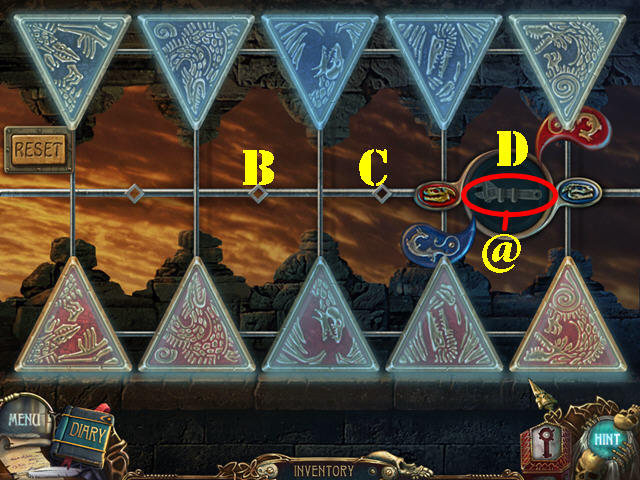
- Move the triangles so the red and blue matching symbols are opposite of each other. The blue triangles should be on top, and the red ones at the bottom.
- Use the small blue and red snake heads to move the yin-yang symbol (B through D) left and right.
- To solve the puzzle, click on the yin-yang button in this order: D x 3, C x 3, B x 2, D, C, and D.
- Take the WRENCH (@).
- Click down twice and head right.
- Examine the track; take the LAMP with the NEEDLES (5).
- Click down twice; head right, forward, and then up the left steps.
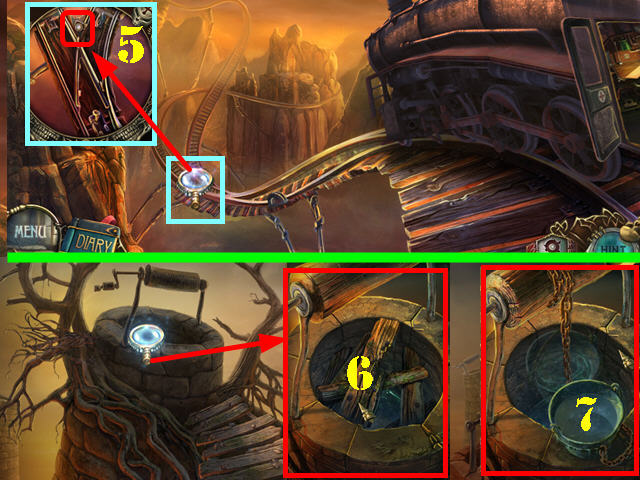
- Zoom into the well and add the TERMITES to the boards (6).
- Put the BUCKET and the CHAIN on the well.
- Click on the bucket and take the BUCKET OF WATER once it comes back up (7).
- Click down 3 times.
- Examine the burning boards; use the BUCKET OF WATER on the fire and take the ROD (8).
- Examine the burning branches; use the BUCKET OF WATER on the fire and take the LAMP (9). Note: the BUCKET will automatically go back into inventory.
- Go forward and then right twice to return to the train.
- Zoom into the panel (10); put the 3 LAMPS on the panel to activate a puzzle.
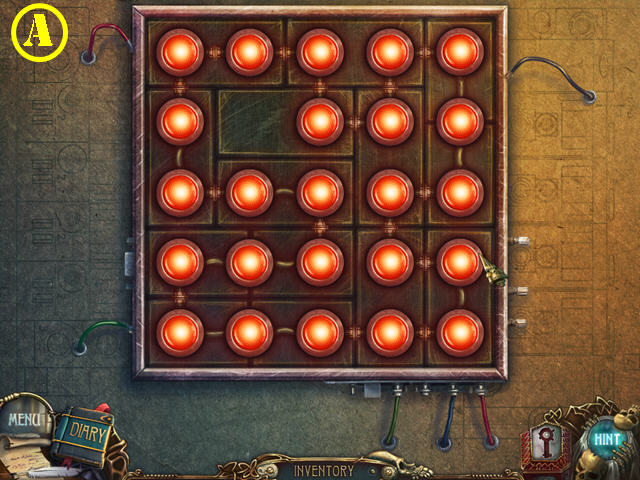
- Your goal is to light up all the lights by putting the pieces in the correct spots.
- Right-click on a piece to rotate it.
- Please look at the screenshot for the solution (A).
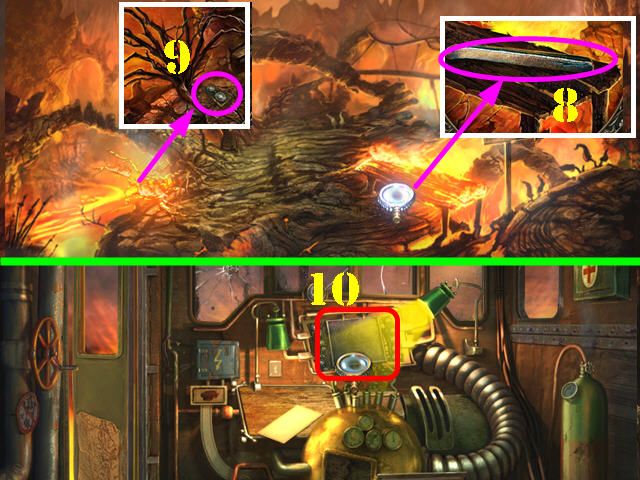
- Head left; click down, left again and go forward.
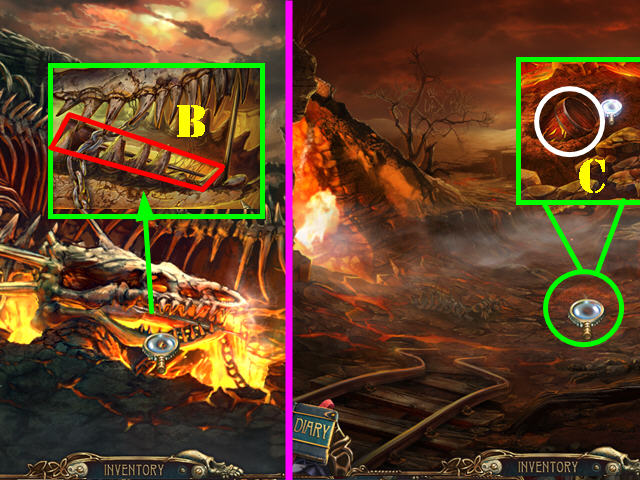
- Zoom into the skeleton's head; put the ROD in its mouth and take the SHOVEL (B).
- Click down.
- Zoom into the dirt; use the SHOVEL on the dirt twice.
- Click on the barrel to activate a puzzle (C).
- Move the 2 arrows in the center to select two halves of the image; click on the button to swap their positions.
- Keep swapping images until all fruits are complete.
- Please look at the screenshot for the solution (D).
- The BARREL OF HONEY will be added to inventory.
- Click down twice and head right.
- Give the BARREL OF HONEY to the giant rat (E).
- Zoom into the tower and take the FILE (F).
- Use the BUCKET on the COAL; take the COAL (G).
- Click down and go forward twice.
- Zoom into the lever; use the FILE on it to obtain the LEVER (H).
- Click down and head right.
- Zoom into the tracks; put the LEVER in the slot and pull on the lever (I).
- Go into the train.
- Zoom into the furnace door; use the WRENCH on the bolt and open the door.
- Put the COAL in the furnace (J).
- Click on the levers (K) to move the train. Exit the train once it stops. Make sure you solved the lamp puzzle first or the train will not move.
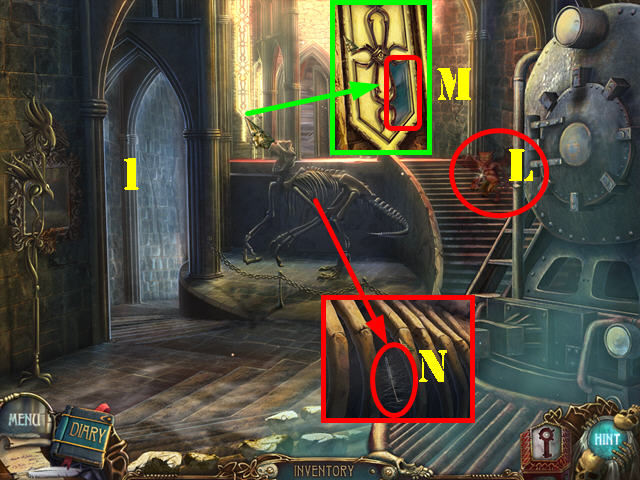
- Click on the demon on the steps (L).
- Zoom into the area on the left side of the top door; take the MIRROR (M).
- Examine the skeleton; use the SCISSORS to obtain the LOCKPICK (N).
- Go through the left door (1).
- Take the SPONGE (P).
- Examine the Clockwork Sailor and zoom into its chest.
- Remove the bolt with the WRENCH and take the STONE HEART (Q).
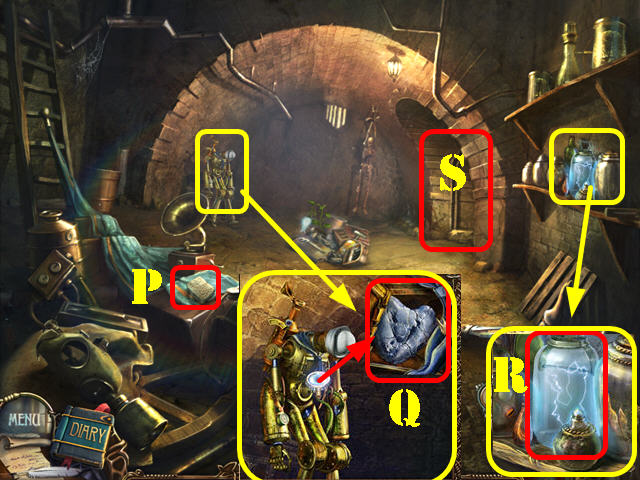
- Zoom into the shelf; take the LIGHTNING JAR (R).
- Go through the back door (S).
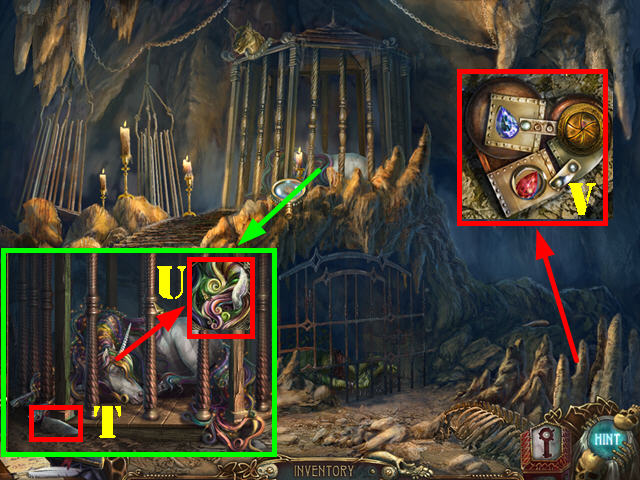
- Examine the cage; take the MIRROR (T).
- Zoom into the unicorn's hair; cut the UNICORN'S HAIR with the SCISSORS (U).
- Examine the area in the lower right. Put the RED GEM, BLUE GEM, and the UNICORN'S HAIR into their respective slots (V).
- Take the CLOCKWORK HEART.
- Click down.
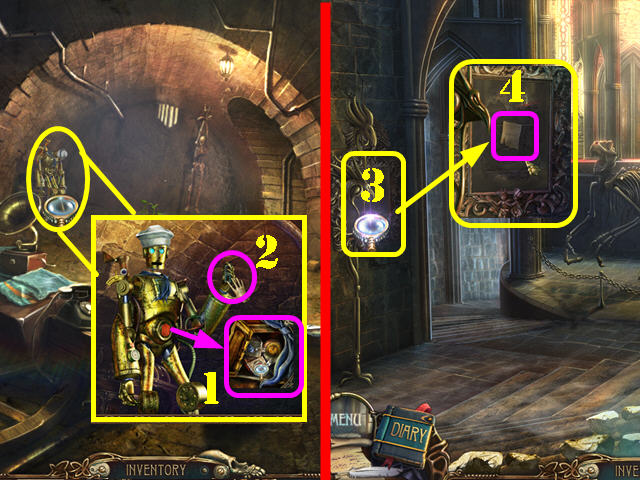
- Zoom into the Clockwork Sailor's chest; put the CLOCKWORK HEART and the LIGHTNING JAR in it (1).
- Take the PUZZLE PART from the Clockwork Sailor's hand (2).
- Click down.
- Zoom into the left mirror (3).
- Clean the mirror with the SPONGE 2 times; click on the mirror and take the SPELL (4).
- Go forward.
- Click on the demon (5).
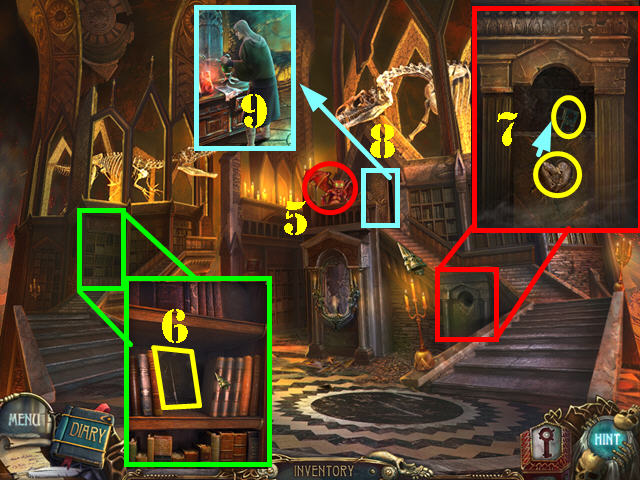
- Examine the bookcase.
- Push 2 sets of book aside; take the BRUSH and the DIARY NOTE behind it (6).
- Zoom into the tomb; put the STONE HEART in the recess and take the PUZZLE PART (7).
- Go through the door in the upper center (8).
- Go towards the Dark Magician and talk to him (9).
- Return to the room with the cages.
- Zoom into the cage on the ground; put the SPELL on the lock (A).
- Use the LOCKPICK on the lock to open the cage.
- Zoom into the bowl and take the SPOON (B).
- Click down and zoom into the items on the ground.
- Put the SPOON and the BALL OF YARN on the flower (C).
- Use the BRUSH on the drop to acquire the STICKY POLLEN (D).
- Take the MIRROR (E).
- Go back to the library.
- Examine the mirror; put the 3 MIRROR pieces and the STICKY POLLEN on the mirror to activate the puzzle.
- Assemble the mirror as shown in the screenshot (F).
- The MIRROR will be added to inventory.
- Go through the door in the upper center.
- Put the MIRROR on the area where the Dark Magician is located (G).
- Go through the door in the upper right (H).
- Zoom into the net and put the 2 PUZZLE PARTS on the board to activate the puzzle.
- You must fit all the puzzle parts into the right spots.
- Right-click on the pieces to rotate them. Start with the corner pieces first and then fill in the rest of the pieces.
- Please look at the screenshot for the solution (A).
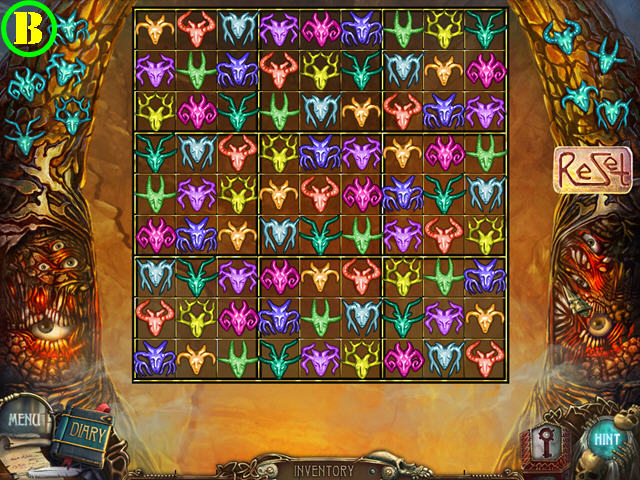
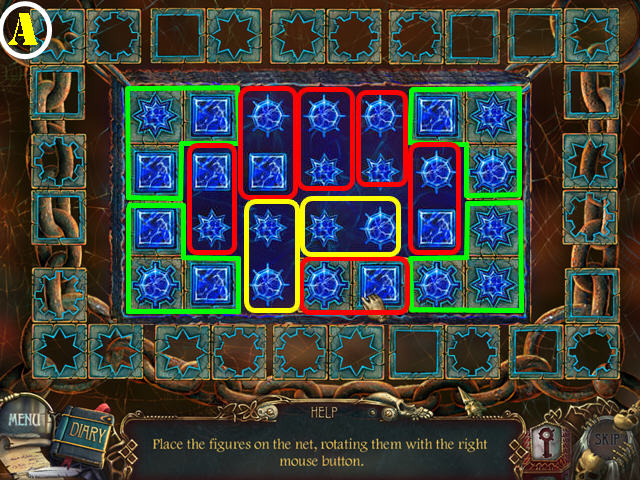
- Examine the back door for a puzzle.
- Drag the head signs on the net so that none of the same signs are in the same vertical or horizontal line. There can only be one of the same piece in each quarter.
- Use the static pieces on the net as a clue.
- Please look at the screenshot for the solution (B).
- Examine the altar (C).
- Take the KEY (D).
- Congratulations! You have completed Azada: In Libro Standard Edition!
Created at: 2011-12-16