

Walkthrough Menu
- General Tips
- Chapter 1 – The Ballet Dancer
- Chapter 2 – Expose the Evil Granny
- Chapter 3 – Rescue Myles
- Chapter 4 – Perfect Chocolate
General Tips
 • This is the Official Guide for Bedtime Stories: The Lost
Dreams. • The best way to use this walkthrough is by clicking
on the ‘CTRL’ and ‘F’ keys on your keyboard to simultaneously
bring up a search box. • Type the keyword into the search box
at the bottom of your screen and click on ‘NEXT’ to find the
section you need help with. Clicking ‘NEXT’ again will bring
up all instances in which that keyword was mentioned in the
guide. • In this guide we will use the acronym ‘HOS’ for
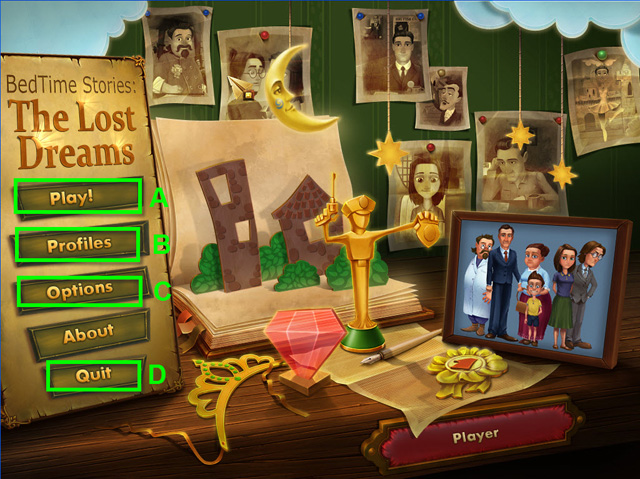
Hidden Object Scenes. • Press on Play (A) to begin or continue
your game. • The Profiles (B) can be used to manage your
profiles in the game. • The Options (C) Button allows you to
adjust the screen size (wide screen and fullscreen), music and
sound. The Options menu is accessible from both the main
screen and the in-game menu. • The Quit button (D) will close
the game and save your progress. • Items will stay in
inventory until they are no longer needed.
• This is the Official Guide for Bedtime Stories: The Lost
Dreams. • The best way to use this walkthrough is by clicking
on the ‘CTRL’ and ‘F’ keys on your keyboard to simultaneously
bring up a search box. • Type the keyword into the search box
at the bottom of your screen and click on ‘NEXT’ to find the
section you need help with. Clicking ‘NEXT’ again will bring
up all instances in which that keyword was mentioned in the
guide. • In this guide we will use the acronym ‘HOS’ for
Hidden Object Scenes. • Press on Play (A) to begin or continue
your game. • The Profiles (B) can be used to manage your
profiles in the game. • The Options (C) Button allows you to
adjust the screen size (wide screen and fullscreen), music and
sound. The Options menu is accessible from both the main
screen and the in-game menu. • The Quit button (D) will close
the game and save your progress. • Items will stay in
inventory until they are no longer needed.
 • Some puzzle solutions and HOS are random. Items written in
orange in HOS require an action to be performed before the
item(s) can be visible. • The HINT button is accessible in
both HOS and in quest scenes but you must wait for it to
recharge in between uses. • Most puzzles and mini-games can be
skipped once the SKIP button has recharged. Most puzzles have
a RESET button; use it if you want to follow the solutions
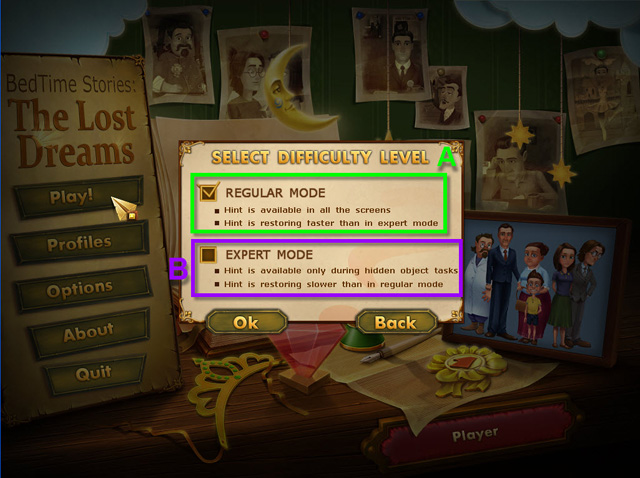
shown in this guide. • You are prompted to select a difficulty
level when you start a new game. The Regular Mode (A) provides
hints outside HOS. The Expert Mode (B) does not provide hints
outside HOS.
• Some puzzle solutions and HOS are random. Items written in
orange in HOS require an action to be performed before the
item(s) can be visible. • The HINT button is accessible in
both HOS and in quest scenes but you must wait for it to
recharge in between uses. • Most puzzles and mini-games can be
skipped once the SKIP button has recharged. Most puzzles have
a RESET button; use it if you want to follow the solutions
shown in this guide. • You are prompted to select a difficulty
level when you start a new game. The Regular Mode (A) provides
hints outside HOS. The Expert Mode (B) does not provide hints
outside HOS.
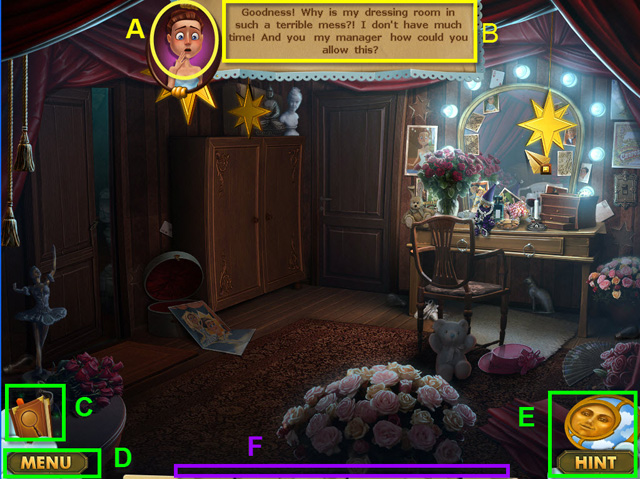 • You will see dialogues of characters (B) before getting a
new task. Dialogues provide useful information about the
current task. You can skip them by pressing anywhere on the
screen. You cannot use or pick up items while the dialogue is
present. • The image (A) to the left of the text shows what
that character is saying. • The Diary (C) includes brief
information mentioned in dialog and gives hints regarding the
tasks. It is highlighted with green particles when updated. •
The Menu button (D) open up the in-game menu. • The Hint
button (E) highlights an active area or item. You need to wait
for it to recharge.. • The Inventory (F) tray is not visible
when no items are available.
• You will see dialogues of characters (B) before getting a
new task. Dialogues provide useful information about the
current task. You can skip them by pressing anywhere on the
screen. You cannot use or pick up items while the dialogue is
present. • The image (A) to the left of the text shows what
that character is saying. • The Diary (C) includes brief
information mentioned in dialog and gives hints regarding the
tasks. It is highlighted with green particles when updated. •
The Menu button (D) open up the in-game menu. • The Hint
button (E) highlights an active area or item. You need to wait
for it to recharge.. • The Inventory (F) tray is not visible
when no items are available.
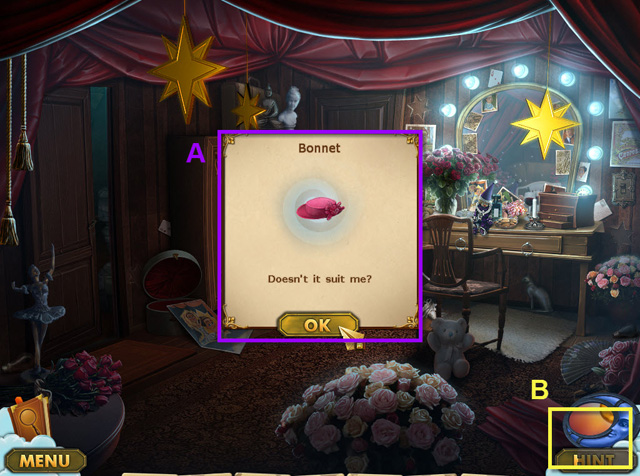 • Inventory items are sometimes given after completing a HOS,
but sometimes they lie around non HOS screens. When you pick
up an inventory item, you will see a window with the item's
description (A). • The Hint button (B) is in the recharging
state.
• Inventory items are sometimes given after completing a HOS,
but sometimes they lie around non HOS screens. When you pick
up an inventory item, you will see a window with the item's
description (A). • The Hint button (B) is in the recharging
state.
 • The cursor will change to a cursor with a red gear if
something can be used on that area but the cursor is either
empty or has the wrong item (A). • The cursor will change to
Magnifying Glass (B) if the area opens up a HOS or a close-up.
• If you hover over an inventory item, you will see its label
(C).
• The cursor will change to a cursor with a red gear if
something can be used on that area but the cursor is either
empty or has the wrong item (A). • The cursor will change to
Magnifying Glass (B) if the area opens up a HOS or a close-up.
• If you hover over an inventory item, you will see its label
(C).
Chapter 1 – The Ballet Dancer
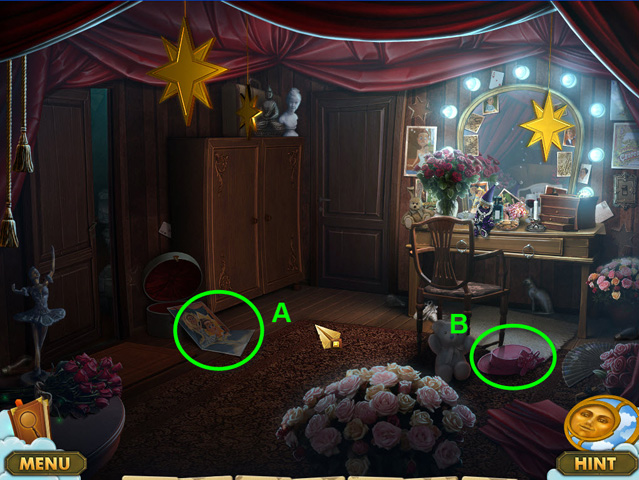 • First you will need to pick up the poster (A) and the bonnet
(B).
• First you will need to pick up the poster (A) and the bonnet
(B).
 • Then you need to place the poster onto the wall and the
bonnet should go into the box.
• Then you need to place the poster onto the wall and the
bonnet should go into the box.
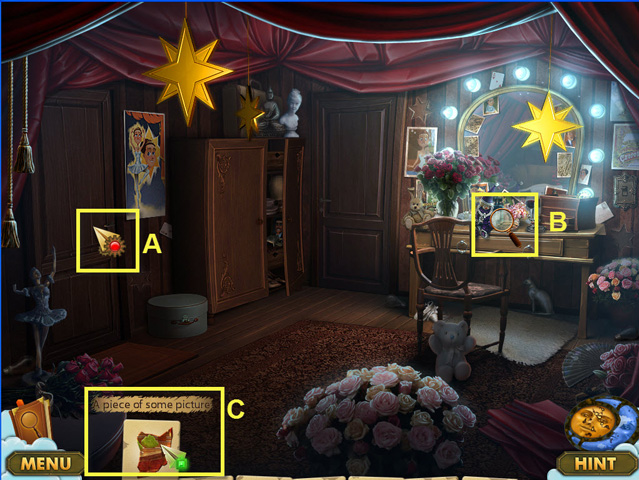
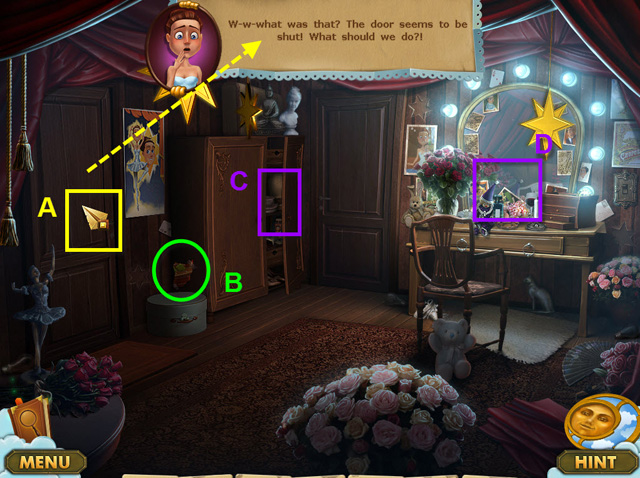 • Then you need to exit the door and see how it gets shut (A).
• Pick up the puzzle piece (B). • Check out the closet with
the coffee (C). • Open up and complete a HOS (D).
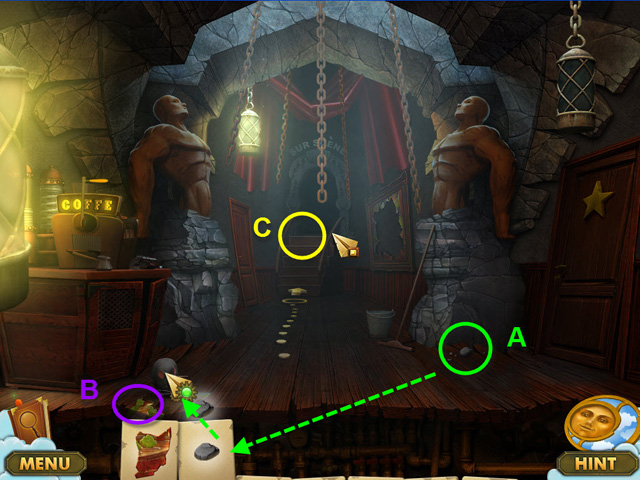
• Then you need to exit the door and see how it gets shut (A).
• Pick up the puzzle piece (B). • Check out the closet with
the coffee (C). • Open up and complete a HOS (D).
 • Open the door with the key and go to the corridor (C).
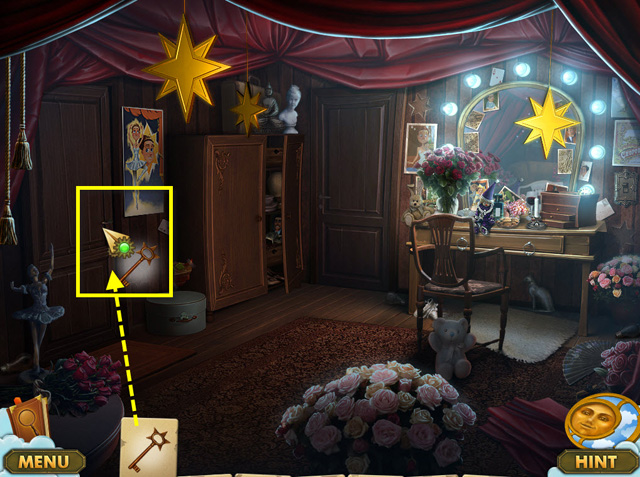
 • Pick up the state and use it on the mouse. (A) • Then pick
up a puzzle piece (B) and try to go onto the stage (C).
• Pick up the state and use it on the mouse. (A) • Then pick
up a puzzle piece (B) and try to go onto the stage (C).
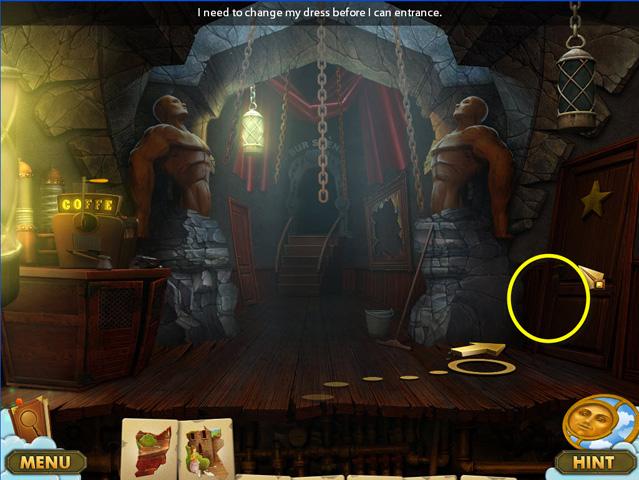 • We need to go change but the light in the dressing room will
go off. You will now have to find a source of light to fix the
lights in the dressing room.
• We need to go change but the light in the dressing room will
go off. You will now have to find a source of light to fix the
lights in the dressing room.
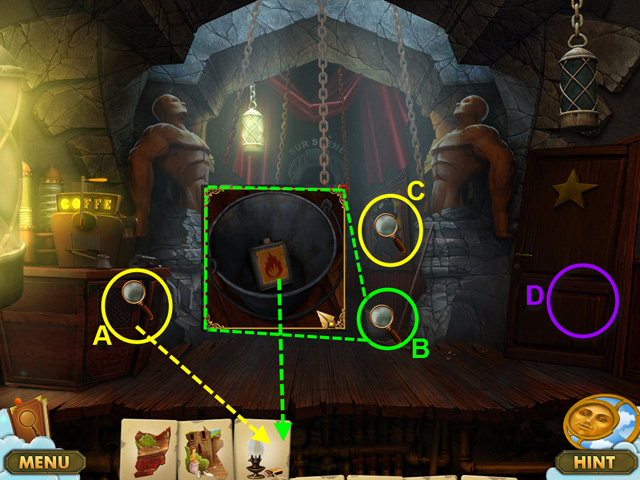 • Open up the HOS (A) on the left to get the empty lamp. •
Find the kerosene in the bucket (B); it will fill the lamp. •
Check out the broken painting (C). • Go back to the dressing
room (D).
• Open up the HOS (A) on the left to get the empty lamp. •
Find the kerosene in the bucket (B); it will fill the lamp. •
Check out the broken painting (C). • Go back to the dressing
room (D).
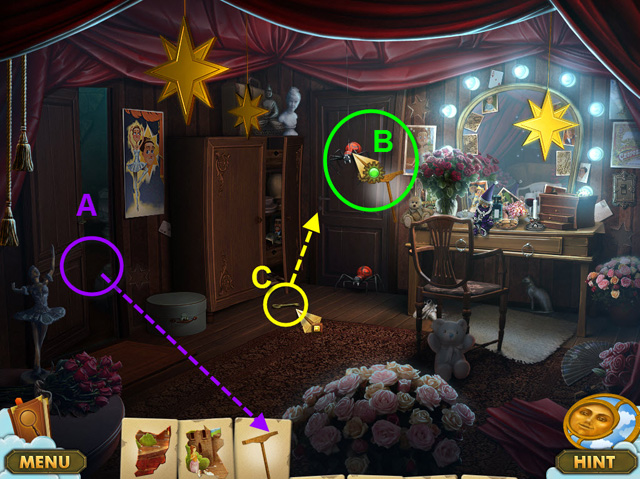
 • Collect the light bulbs (A). • Then use them in the empty
slots around the mirror (B). • Turn on the light (C).
• Collect the light bulbs (A). • Then use them in the empty
slots around the mirror (B). • Turn on the light (C).
 • Get the mop from the corridor (A) to collect the light bulbs
(A). • Use the mop on the spider (B). • Grab the key and use
it to open the wardrobe (C).
• Get the mop from the corridor (A) to collect the light bulbs
(A). • Use the mop on the spider (B). • Grab the key and use
it to open the wardrobe (C).
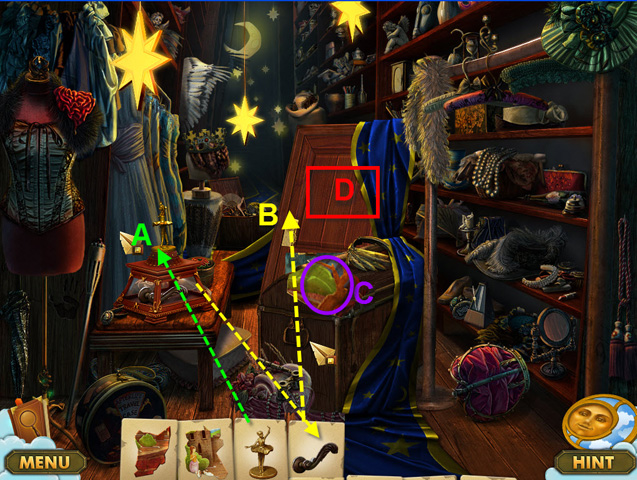 • Complete the HOS. • Use the ballerina statue on the box with
the door handle (A). • Pick up the handle and use it on the
door (B). It will open up and a puzzle piece will fly out (B).
• Pick up the puzzle piece (C). • Enter the door (D).
• Complete the HOS. • Use the ballerina statue on the box with
the door handle (A). • Pick up the handle and use it on the
door (B). It will open up and a puzzle piece will fly out (B).
• Pick up the puzzle piece (C). • Enter the door (D).
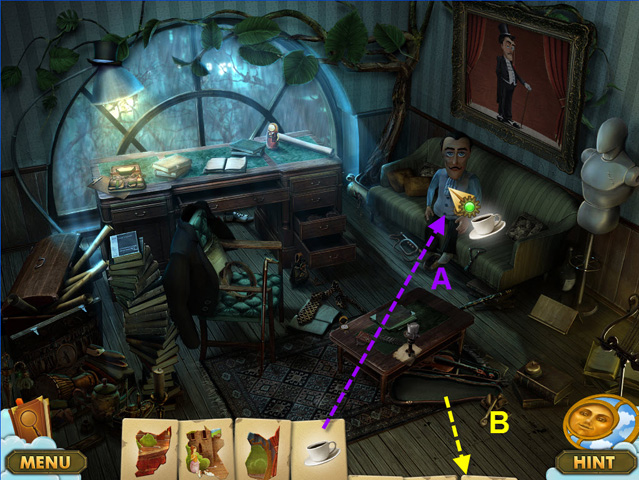
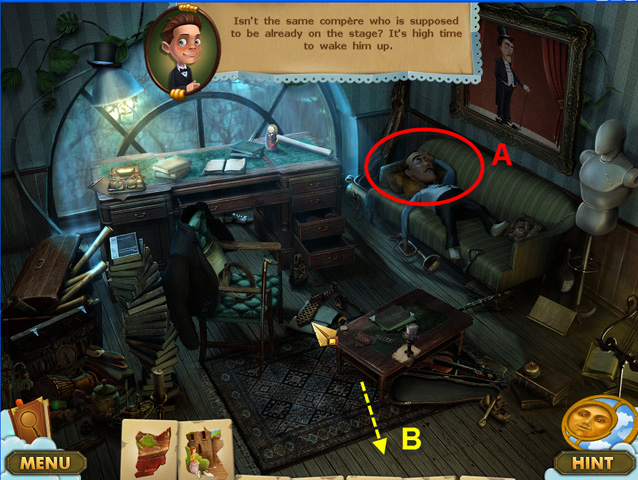 • Press on the compere to wake him up (A). • Go to the
dressing room to find coffee (B).
• Press on the compere to wake him up (A). • Go to the
dressing room to find coffee (B).
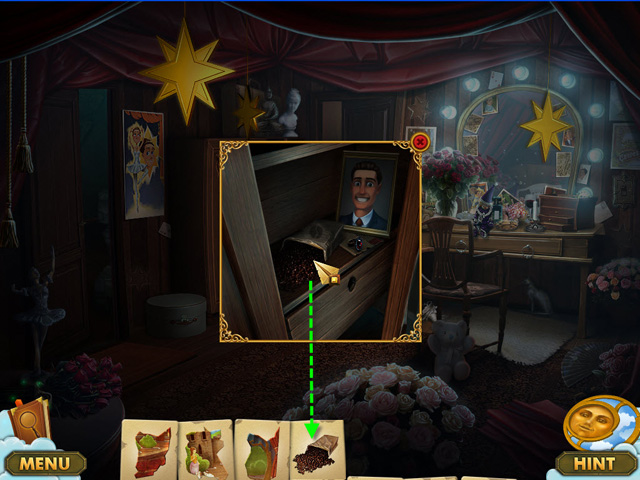 • Grab the coffee from the closet.
 • Use coffee on the coffee machine (A). • A cup will appear.
Pick it up (B). • Go to the compere's room (C).
• Use coffee on the coffee machine (A). • A cup will appear.
Pick it up (B). • Go to the compere's room (C).
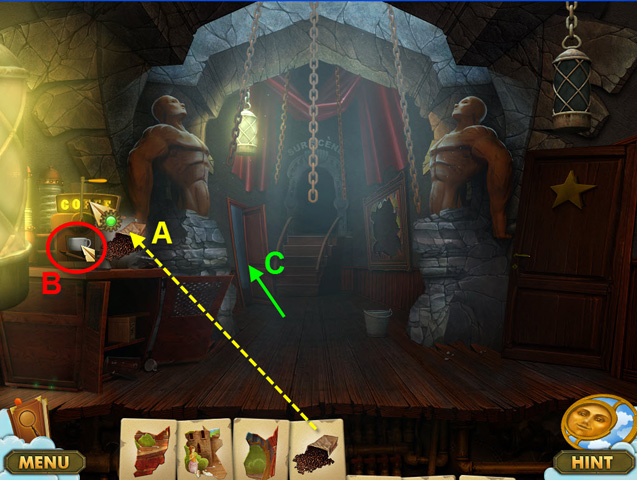
 • Give a cup of coffee to compere (A). • Go to the corridor
and take a look at the painting (B).
• Give a cup of coffee to compere (A). • Go to the corridor
and take a look at the painting (B).
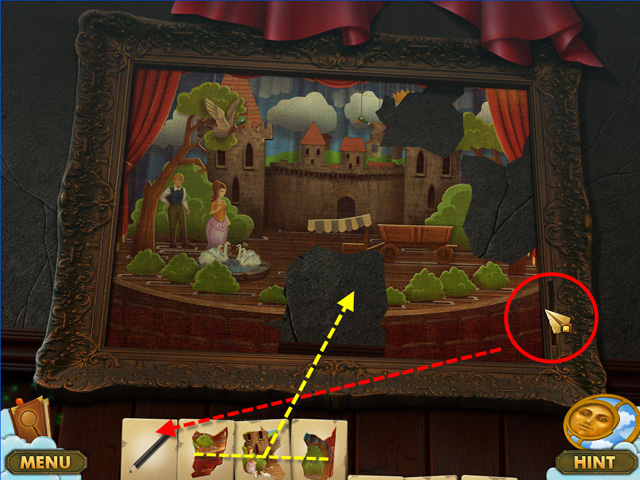 • Place the puzzle pieces on the broken painting.. • Grab the
pencil to the right of the painting.
• Place the puzzle pieces on the broken painting.. • Grab the
pencil to the right of the painting.
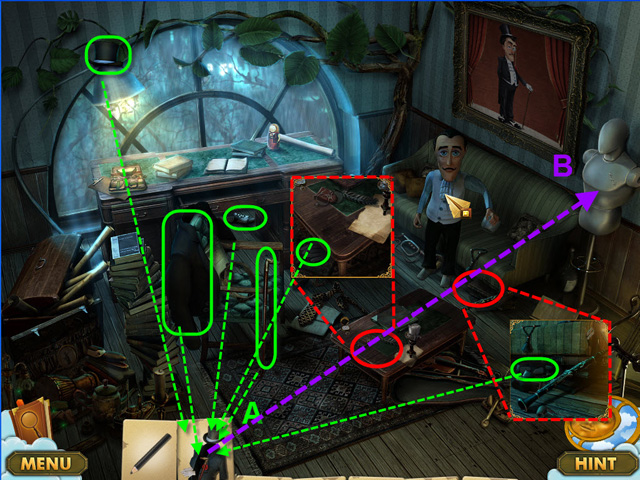 • Give a cup of coffee to compere. • Collect the clothes for
compere (A). • Place the collected outfit on the mannequin
(B).
• Give a cup of coffee to compere. • Collect the clothes for
compere (A). • Place the collected outfit on the mannequin
(B).
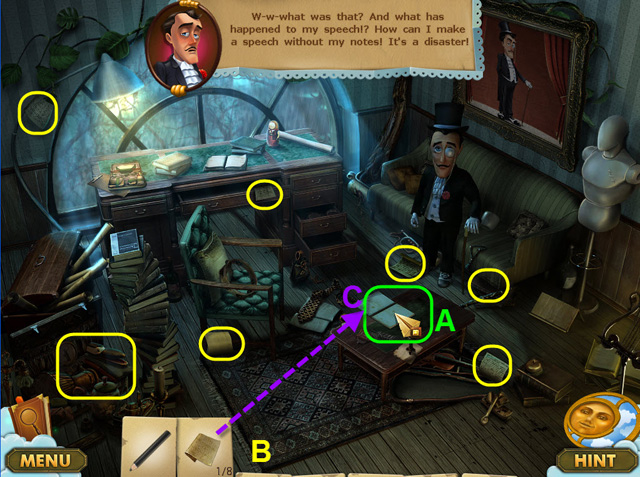 • Try to pick up the folder with the speech (A). • Collect all
the paper pieces (B), 2 of them will be in the HOS on the
left.. • Place all the 8 collected pieces back into the folder
on the table (C). He will then go to the stage and give you
one more puzzle piece.
• Try to pick up the folder with the speech (A). • Collect all
the paper pieces (B), 2 of them will be in the HOS on the
left.. • Place all the 8 collected pieces back into the folder
on the table (C). He will then go to the stage and give you
one more puzzle piece.
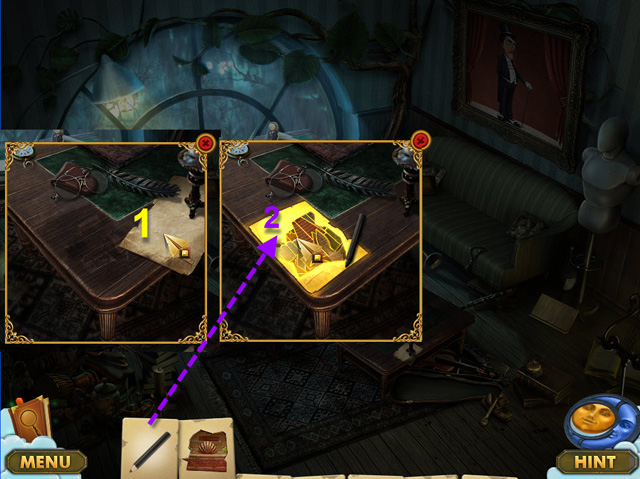 • Close up the table. • First press on the paper (1). • Second
– use the pencil on the paper (2). You will now get the last
puzzle piece.
• Close up the table. • First press on the paper (1). • Second
– use the pencil on the paper (2). You will now get the last
puzzle piece.
 • Go to the corridor and open up the puzzle with the broken
picture. • Place all the puzzle pieces in the correct spots to
complete the puzzle. • You are ready to go to the stage.
• Go to the corridor and open up the puzzle with the broken
picture. • Place all the puzzle pieces in the correct spots to
complete the puzzle. • You are ready to go to the stage.
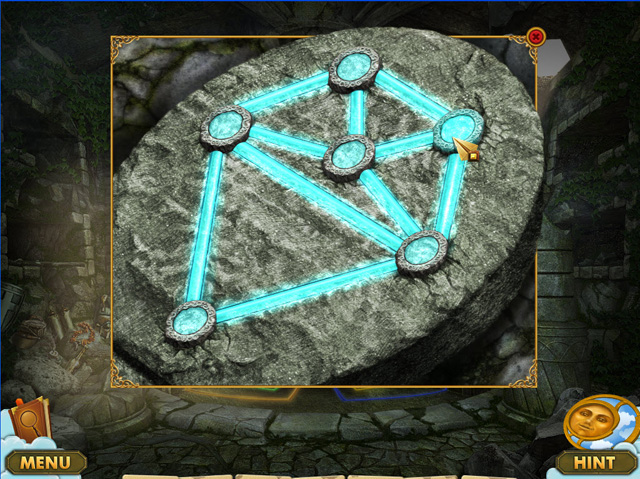
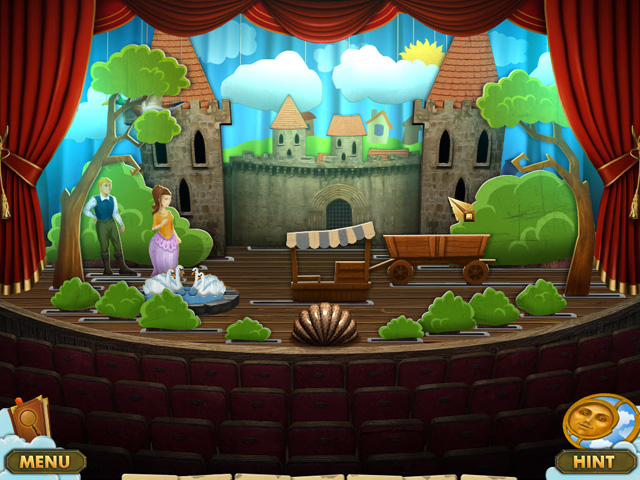 • On the stage move the movable parts around until everything
is in the same place as the completed picture puzzle in the
corridor. • You can skip the mini-game if you want.
• On the stage move the movable parts around until everything
is in the same place as the completed picture puzzle in the
corridor. • You can skip the mini-game if you want.
Chapter 2 – Expose the Evil Granny
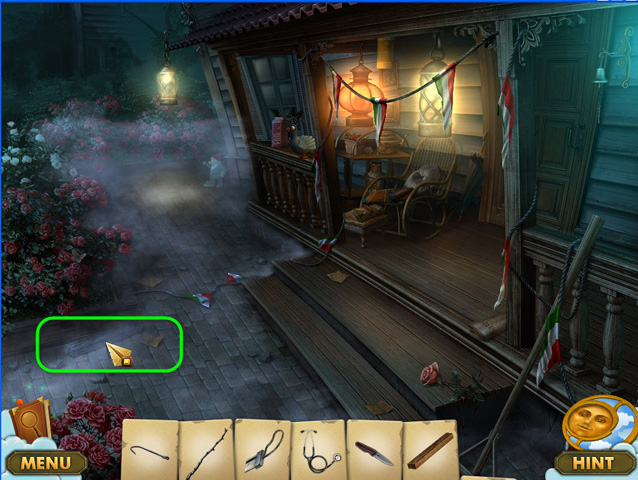
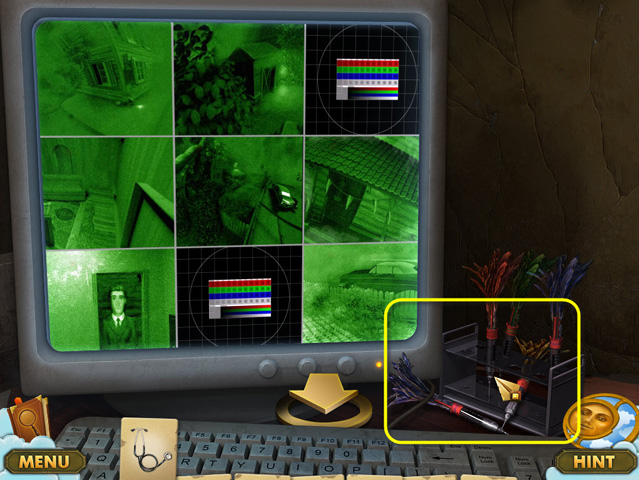
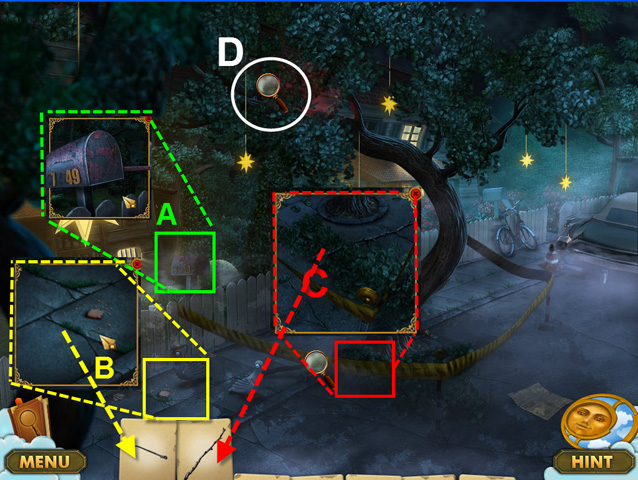 • You need to look around the crime scene. • There are several
active spots on the first screen. • Check out the weird
numbers on the mailbox (A). • Zoom into the bottom left; pick
up a hook (B). • Look under the tree; pick up a tree branch
(C). • Press on the top of the tree and see a hint that it is
too high to get there (D). • Go to the next scene.
• You need to look around the crime scene. • There are several
active spots on the first screen. • Check out the weird
numbers on the mailbox (A). • Zoom into the bottom left; pick
up a hook (B). • Look under the tree; pick up a tree branch
(C). • Press on the top of the tree and see a hint that it is
too high to get there (D). • Go to the next scene.
 • Check out the trunk lock. (A) You don't yet have the key.. •
Go further. (B)You need to look around the crime scene.
• Check out the trunk lock. (A) You don't yet have the key.. •
Go further. (B)You need to look around the crime scene.
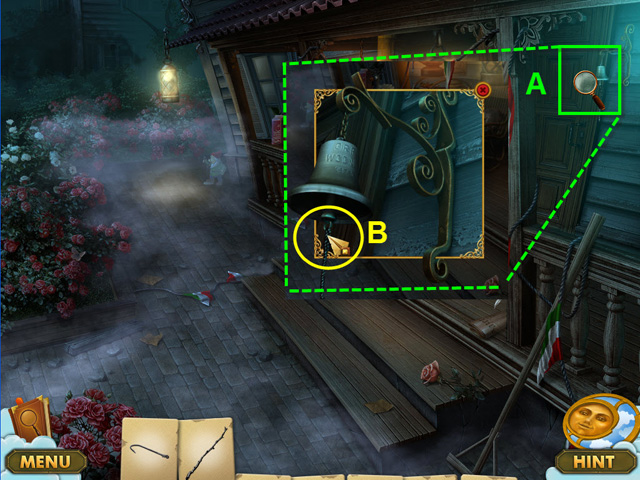 • Look at the bell (A). • Ring the bell (B). It will break it
but you have now unlocked a new HOS.
• Look at the bell (A). • Ring the bell (B). It will break it
but you have now unlocked a new HOS.
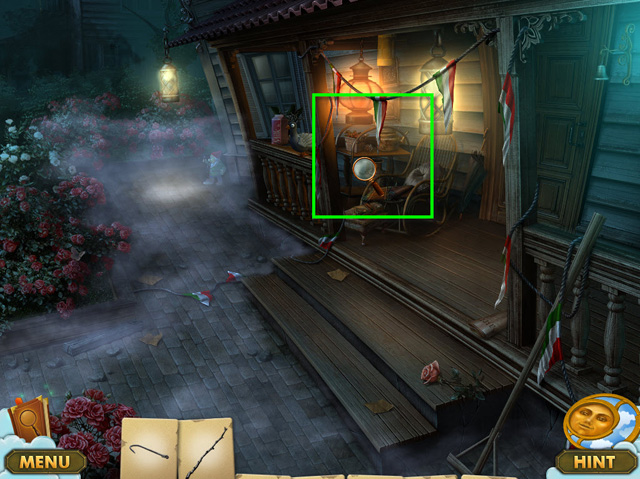 • Complete the HOS.
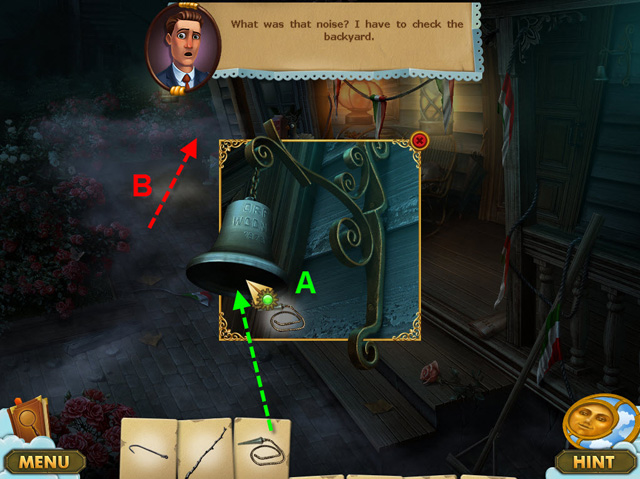 • Fix the bell and ring it (A). • Go to the backyard to check
out what caused the breaking sound (B).
• Fix the bell and ring it (A). • Go to the backyard to check
out what caused the breaking sound (B).
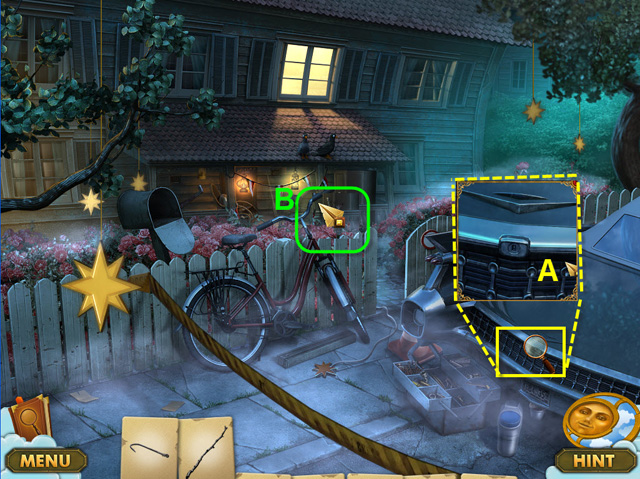
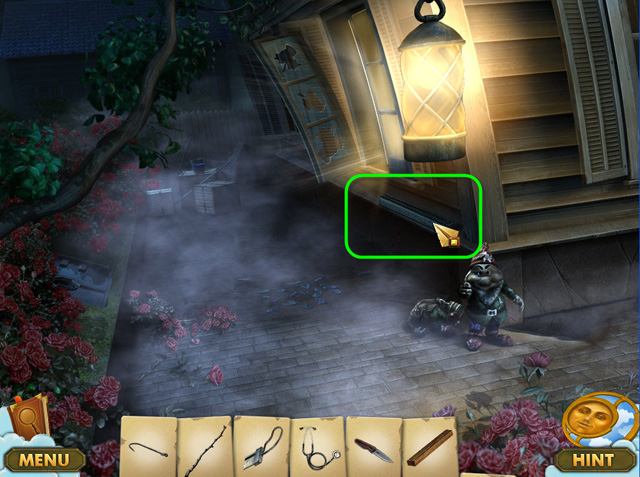
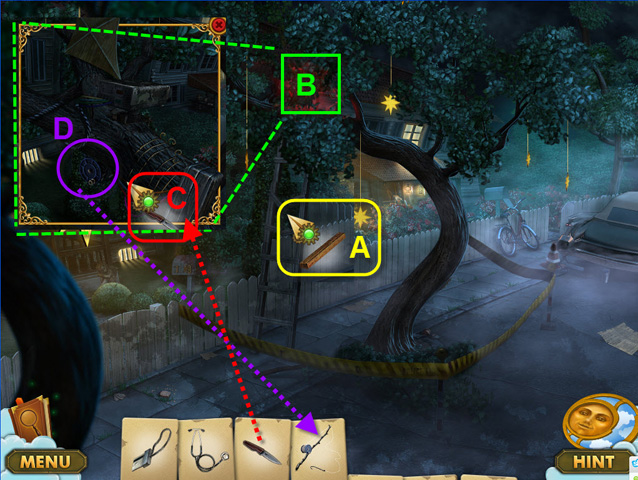
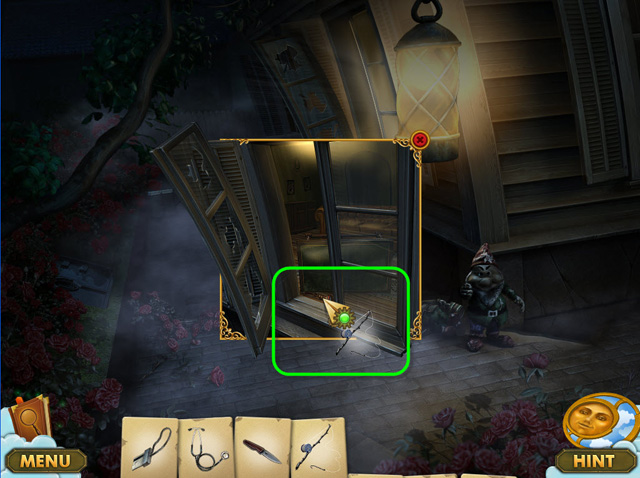
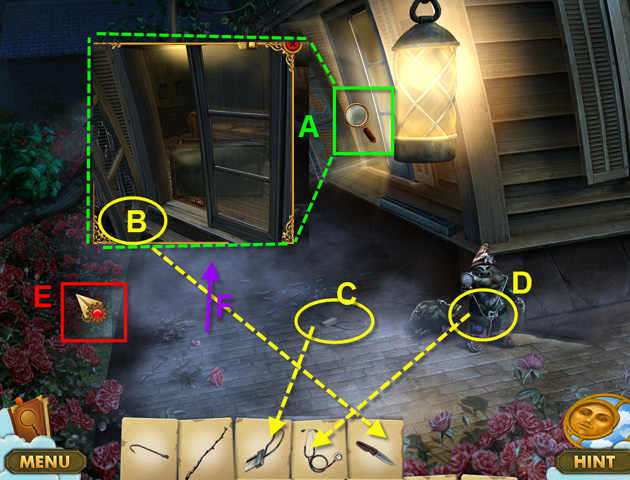 • Look at the broken window (A). • Grab all the items (B, C,
and D). • Check out the roses (E). You can't cut them for
now.. • Go further to the garage (F).
• Look at the broken window (A). • Grab all the items (B, C,
and D). • Check out the roses (E). You can't cut them for
now.. • Go further to the garage (F).
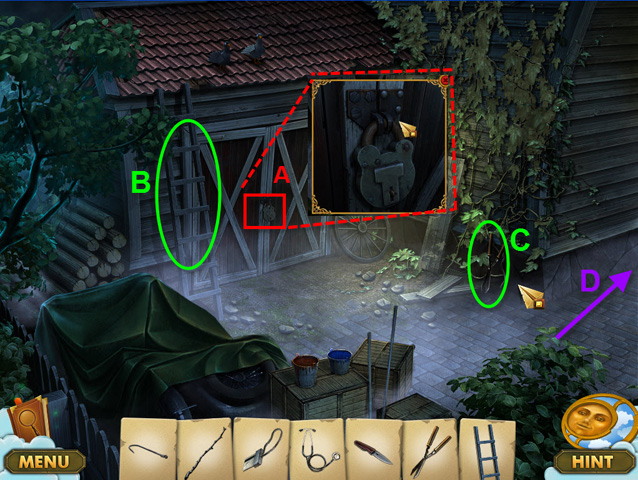 • Check out the lock on the garage (A). You cannot unscrew the
bolts now. • Grab the ladder (B) and the pruners (C). • Go
back (D).
• Check out the lock on the garage (A). You cannot unscrew the
bolts now. • Grab the ladder (B) and the pruners (C). • Go
back (D).
 • Use the pruners on the rose bushes to cut them off (A). •
You will see secret door. Check out its close up (B). • Go to
the tree on the first scene (C).
• Use the pruners on the rose bushes to cut them off (A). •
You will see secret door. Check out its close up (B). • Go to
the tree on the first scene (C).
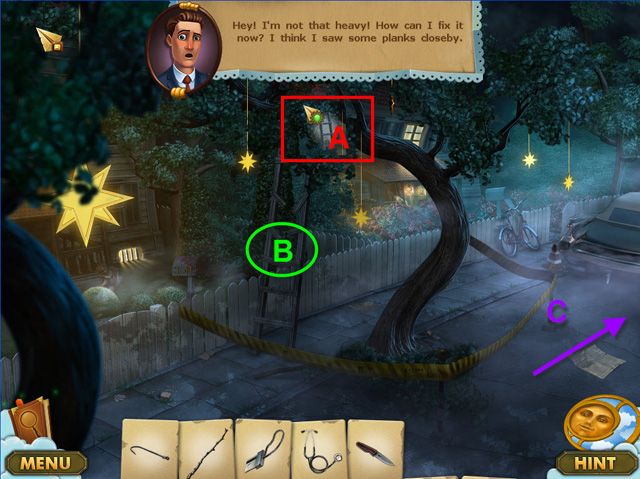 • Use the ladder on the tree branch (A). • Press on the ladder
(B). It will break.. • Go to the car (C).
• Use the ladder on the tree branch (A). • Press on the ladder
(B). It will break.. • Go to the car (C).
 • Pick up the first plank.
 • Pick up the second plank.
 • Pick up the third plank. Now you can go and fix the ladder.
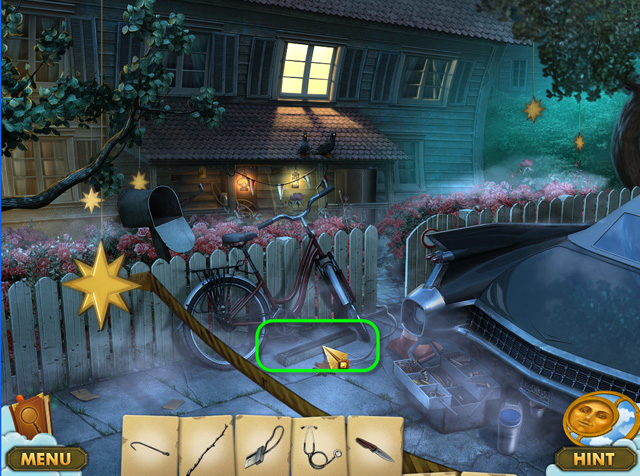
 • Use all 3 planks on the ladder (A). • Open up the close-up
of the tree branch (B). • Cut the wires (C) using your knife.
• Grab the roulette (D). It will complete a fishing rod.. • Go
to the broken window.
• Use all 3 planks on the ladder (A). • Open up the close-up
of the tree branch (B). • Cut the wires (C) using your knife.
• Grab the roulette (D). It will complete a fishing rod.. • Go
to the broken window.
 • Use the fishing rod to grab the key. • Now open up the close
up view of rose bushes.
• Use the fishing rod to grab the key. • Now open up the close
up view of rose bushes.
 • Use the weird key on the lock.
 • Press the green button. See how the path lights up but then
the lock brakes. • Go to the car.
• Press the green button. See how the path lights up but then
the lock brakes. • Go to the car.
 • Open the car trunk using the key. • Complete the HOS and get
the screwdriver. • Go to the garage.
• Open the car trunk using the key. • Complete the HOS and get
the screwdriver. • Go to the garage.
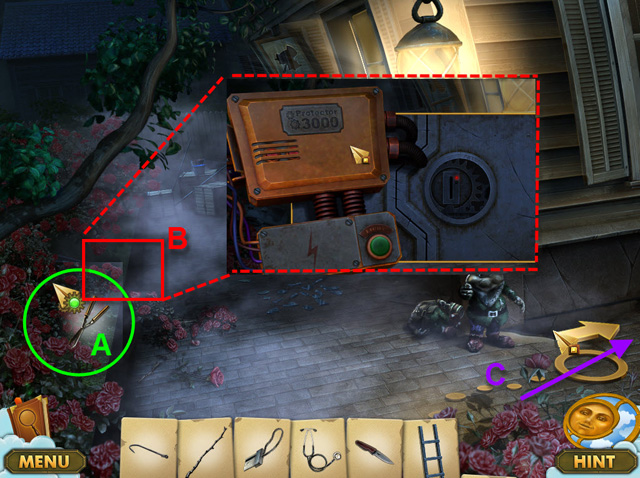
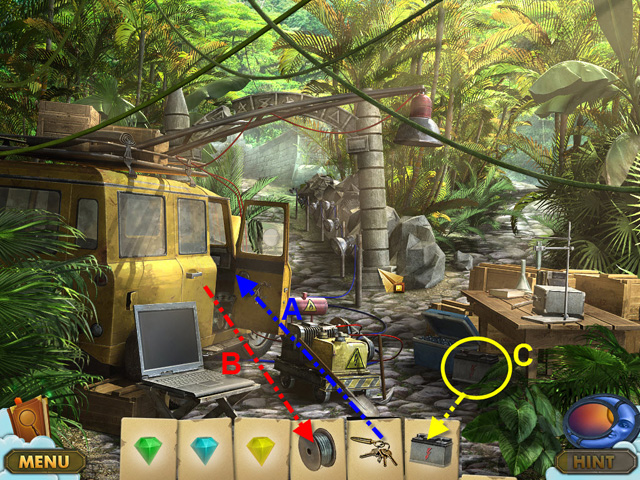
 • Use the screwdriver on the lock to the garage to open the
HOS. • Complete it and get the battery. • Complete it and get
the missing fuse for the lock to the underground. • Go to the
mailbox on the first scene.
• Use the screwdriver on the lock to the garage to open the
HOS. • Complete it and get the battery. • Complete it and get
the missing fuse for the lock to the underground. • Go to the
mailbox on the first scene.
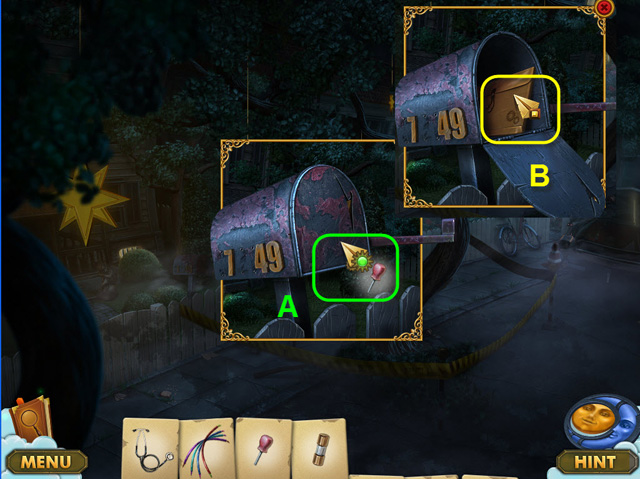 • Use the screwdriver on the mailbox (A) and get the
instructions for the lock to the underground (B). •
Instructions will now appear in the diary. • Go to the
underground lock.
• Use the screwdriver on the mailbox (A) and get the
instructions for the lock to the underground (B). •
Instructions will now appear in the diary. • Go to the
underground lock.
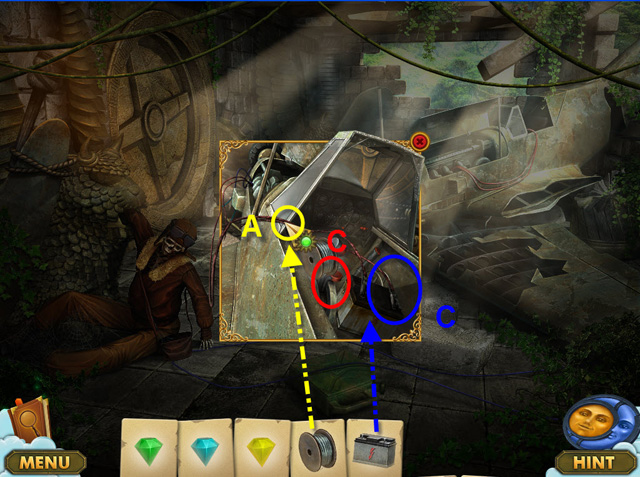
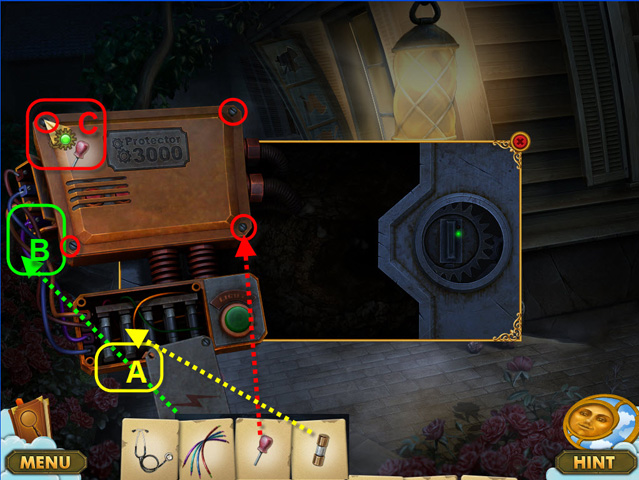 • Open up the entrance to the underground. • First use the
missing fuse (A). Then use the wires (B). • Then use the
screwdriver on all the 4 screws (C). • This will open up a
panel with many red buttons.
• Open up the entrance to the underground. • First use the
missing fuse (A). Then use the wires (B). • Then use the
screwdriver on all the 4 screws (C). • This will open up a
panel with many red buttons.
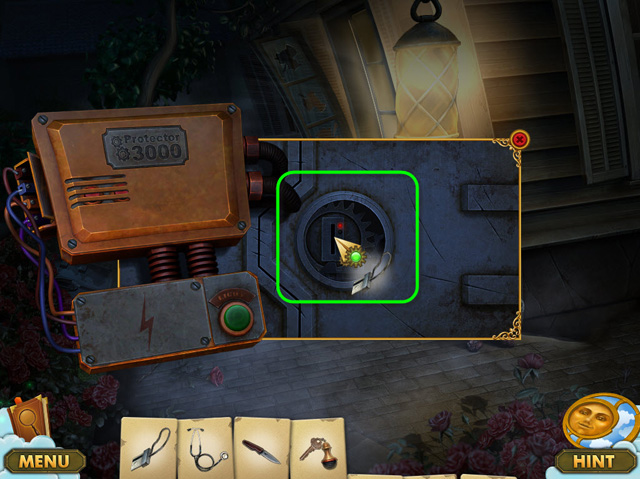
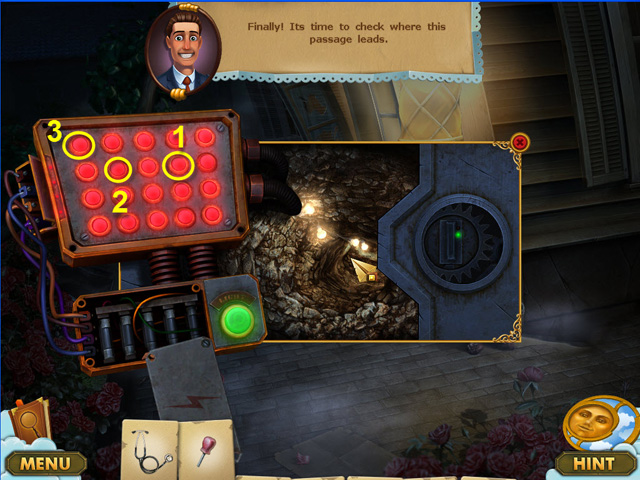 • In the mini-game with the red buttons, you need to press the
non-lit buttons in a certain order. • Press the buttons in the
order shown in the screenshot (1-3). • When all buttons are
bright red – you can enter the underground.
• In the mini-game with the red buttons, you need to press the
non-lit buttons in a certain order. • Press the buttons in the
order shown in the screenshot (1-3). • When all buttons are
bright red – you can enter the underground.
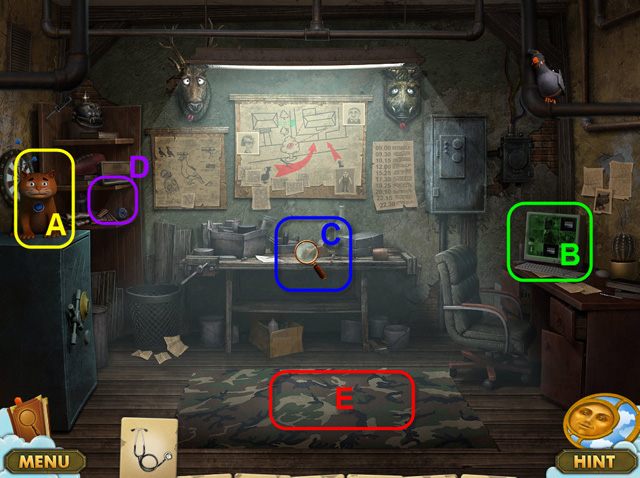 • The underground takes you to granny’s basement! • Look
around. • Touching the cat will let you know it's a very angry
beast protecting the safe (A). • Pressing on the computer will
open a close up view. We will examine it later (B). • Pressing
on the table in the middle will open up a HOS (C). Complete it
and get the hammer. • The shelf on the left has a weird photo.
We will examine it in a bit (D). • Touching the carpet on the
floor will uncover one more lock (E).
• The underground takes you to granny’s basement! • Look
around. • Touching the cat will let you know it's a very angry
beast protecting the safe (A). • Pressing on the computer will
open a close up view. We will examine it later (B). • Pressing
on the table in the middle will open up a HOS (C). Complete it
and get the hammer. • The shelf on the left has a weird photo.
We will examine it in a bit (D). • Touching the carpet on the
floor will uncover one more lock (E).
 • We need to make the cat fall asleep. • First of all open up
the area around the computer. Grab the syringe.
• We need to make the cat fall asleep. • First of all open up
the area around the computer. Grab the syringe.
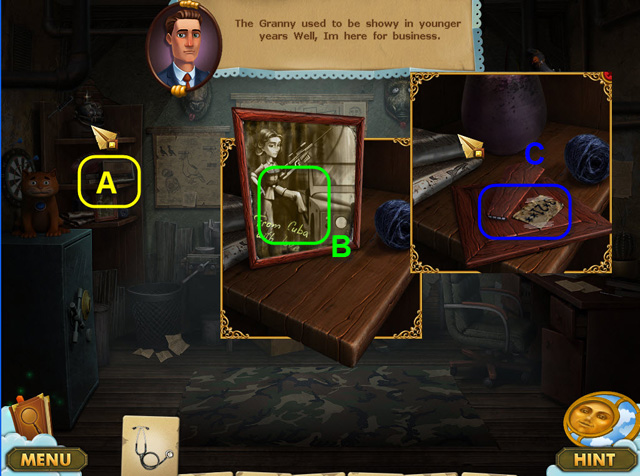 • Now take a look at the shelf on the left (A). • Select the
photo (B). Memorize the numbers. They will now appear in the
diary.
• Now take a look at the shelf on the left (A). • Select the
photo (B). Memorize the numbers. They will now appear in the
diary.
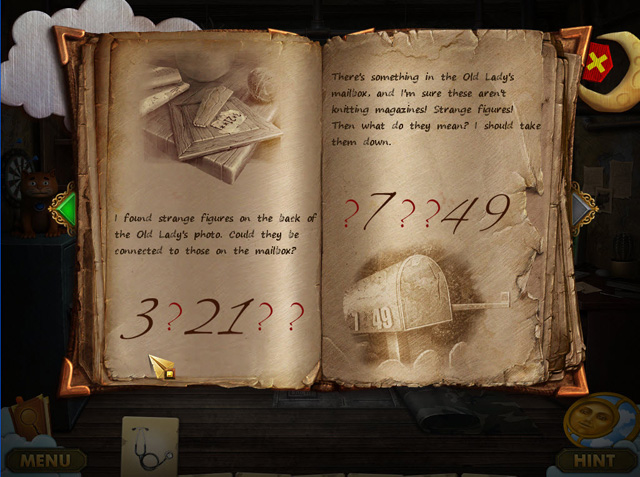 • Open the diary. We can merge the numbers from the mailbox
and the numbers from the photo. This is the code to the secret
door under the carpet.
• Open the diary. We can merge the numbers from the mailbox
and the numbers from the photo. This is the code to the secret
door under the carpet.
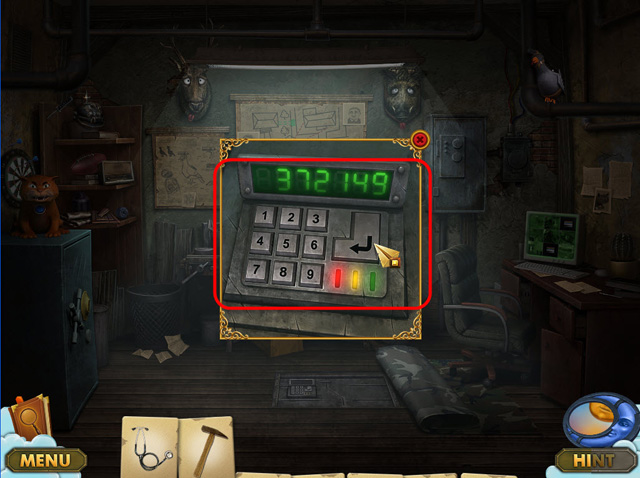 • Open up the code lock under the carpet. • Enter the code
372149. • The door is open.
• Open up the code lock under the carpet. • Enter the code
372149. • The door is open.
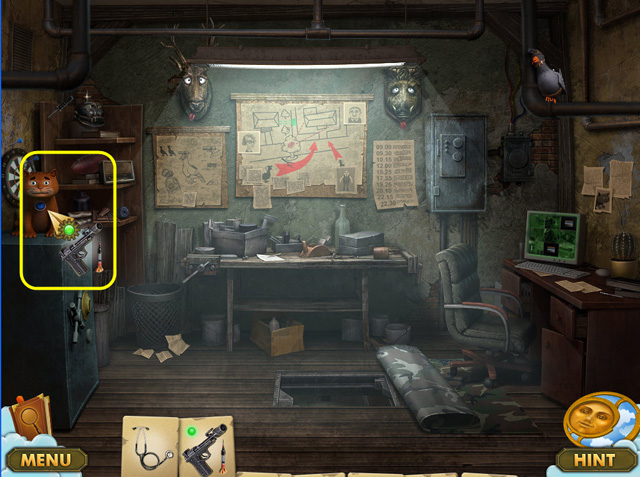
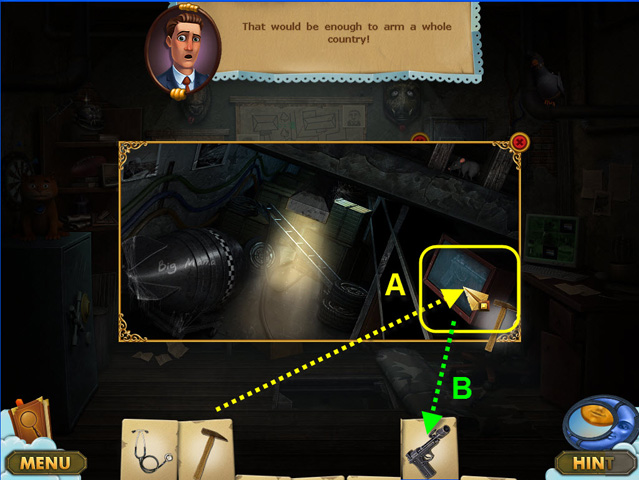 • First use the hammer on the box with the gun (A). • Then
grab the gun (B).
• First use the hammer on the box with the gun (A). • Then
grab the gun (B).
 • Use the gun with the syringe on the cat. Your second attempt
will be successful and the cat will fall asleep.
• Use the gun with the syringe on the cat. Your second attempt
will be successful and the cat will fall asleep.
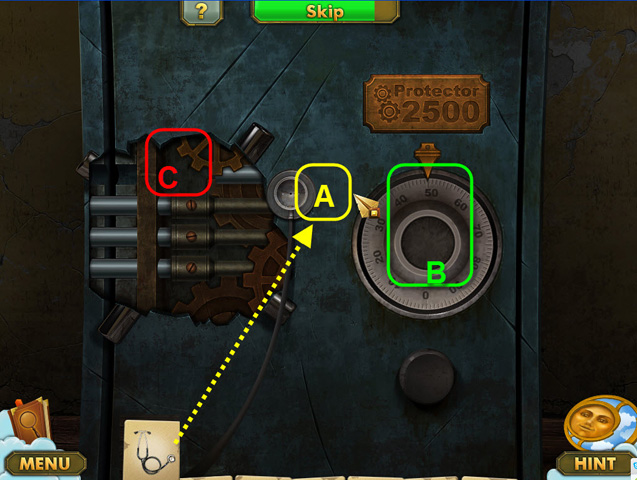 • Now take a look at the safe. • First of all use the
stethoscope on the central part of the safe (A). • Then start
rotating the handle. First do it clockwise (B). • When you
hear a clicking sound – you should stop. Rotate the handle
very slowly, or you risk skipping the correct spot. • You
should rotate it 4 times, till you hear 4 clicks. Turn
clockwise, counterclockwise, clockwise and counterclockwise
again. • You can use the skip button if you want.
• Now take a look at the safe. • First of all use the
stethoscope on the central part of the safe (A). • Then start
rotating the handle. First do it clockwise (B). • When you
hear a clicking sound – you should stop. Rotate the handle
very slowly, or you risk skipping the correct spot. • You
should rotate it 4 times, till you hear 4 clicks. Turn
clockwise, counterclockwise, clockwise and counterclockwise
again. • You can use the skip button if you want.
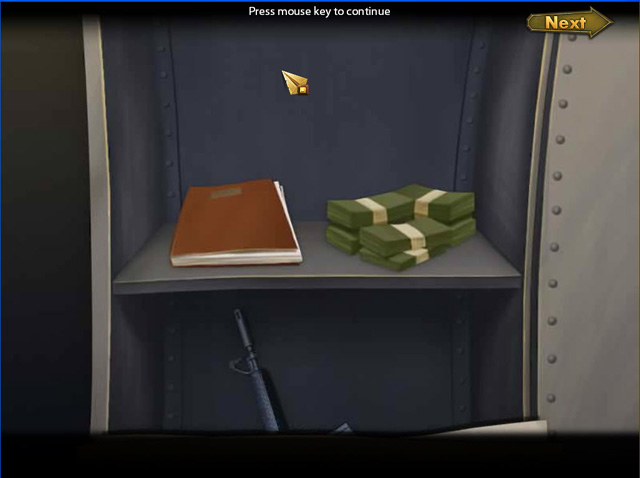 • When you open the safe, you will find the final evidence
against granny.
• When you open the safe, you will find the final evidence
against granny.
Chapter 3 – Rescue Myles
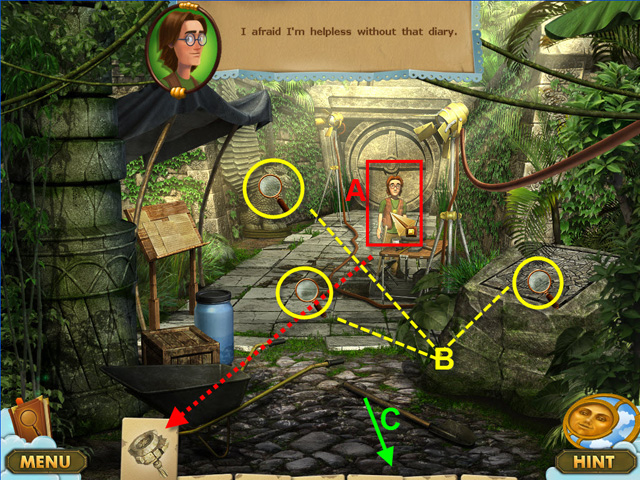 • In the first location you will talk to Myles and get the key
from a box in the tent (A). • Then check out all the active
areas (B) and remember them. • Go to the car (C).
• In the first location you will talk to Myles and get the key
from a box in the tent (A). • Then check out all the active
areas (B) and remember them. • Go to the car (C).
 • Check out the active Areas (A). • Go to the tent (B).
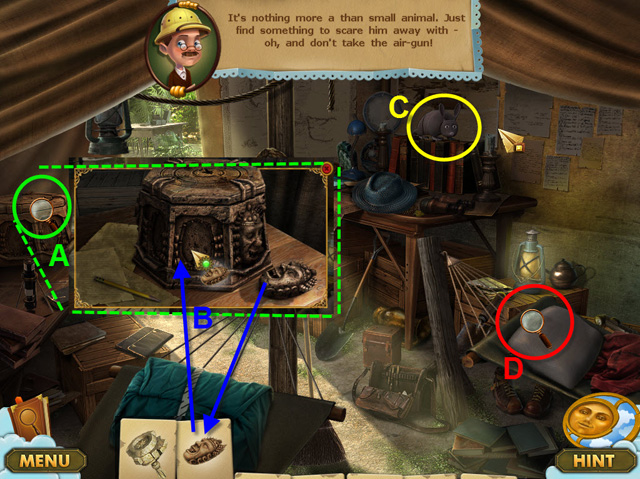 • Check out the box in the tent. It will open a close-up view
(A). Grab the mask and place it in the box (B). You will need
to find one more mask till the key that Myles gave can be
used. • Try to see what is on the table (C). You won’t be able
until the armadillo is chased away. We will need fire
extinguisher, which is near the car. • Then, check out the
active area on the right (D), and go to the car.
• Check out the box in the tent. It will open a close-up view
(A). Grab the mask and place it in the box (B). You will need
to find one more mask till the key that Myles gave can be
used. • Try to see what is on the table (C). You won’t be able
until the armadillo is chased away. We will need fire
extinguisher, which is near the car. • Then, check out the
active area on the right (D), and go to the car.
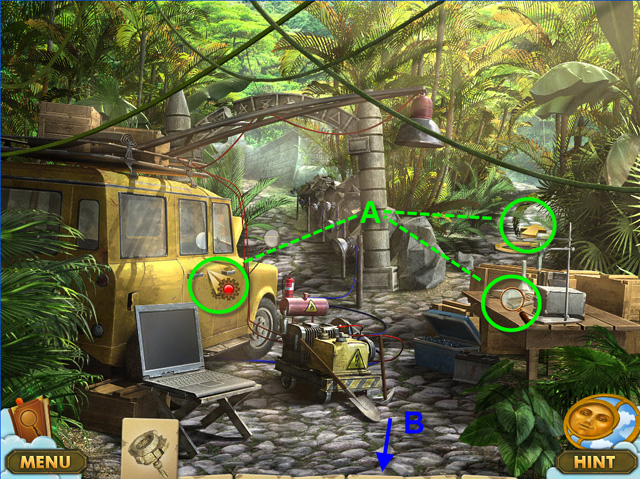
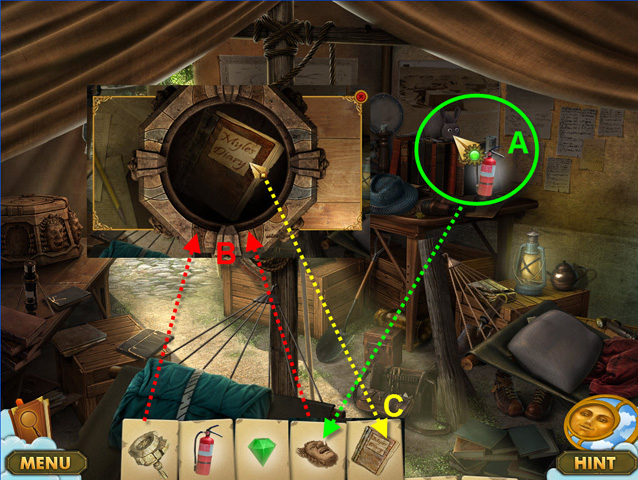
 • Grab the fire extinguisher near the car (A). • Look at the
table on the right and grab the green stone (B). • Go back to
the tent.
• Grab the fire extinguisher near the car (A). • Look at the
table on the right and grab the green stone (B). • Go back to
the tent.
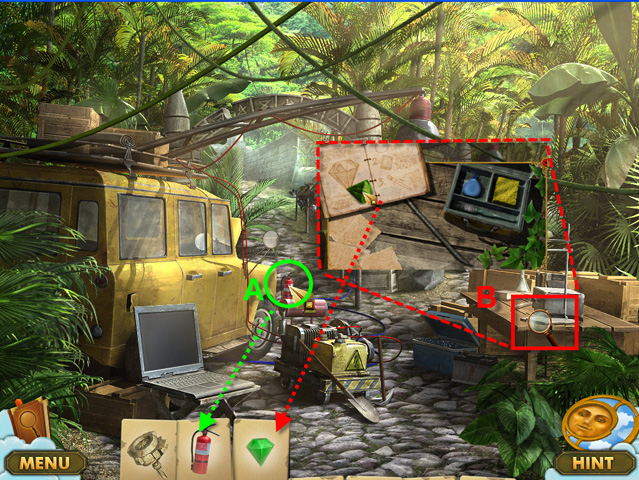
 • Go to the tent and use the fire extinguisher on the
armadillo. • Play the HOS to receive the second mask (A). •
Use the mask and the key on the box on the left (B). You will
get the diary for Miles (C).. • Go to Myles.
• Go to the tent and use the fire extinguisher on the
armadillo. • Play the HOS to receive the second mask (A). •
Use the mask and the key on the box on the left (B). You will
get the diary for Miles (C).. • Go to Myles.
 • Give Myles the diary (A) and you will get a task to find a
key to use on the lion.. • Go around searching for the key.
• Give Myles the diary (A) and you will get a task to find a
key to use on the lion.. • Go around searching for the key.
 • Go to the right path from the track. • There you will need
to finish a HOS and get a machete (A).. • Check out the other
2 active areas (B). Nothing we can do with them for now.
• Go to the right path from the track. • There you will need
to finish a HOS and get a machete (A).. • Check out the other
2 active areas (B). Nothing we can do with them for now.
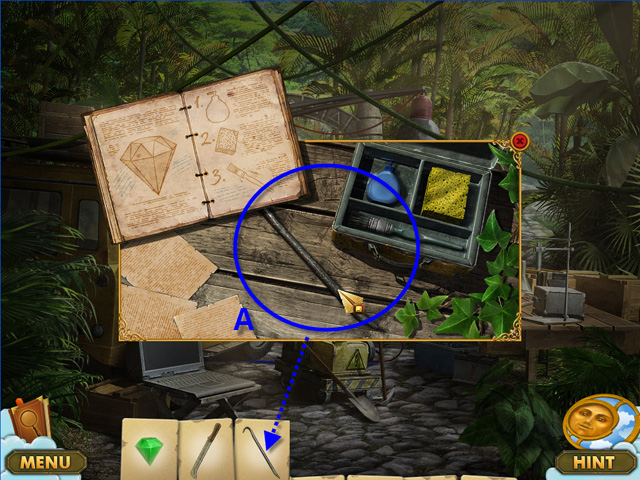 • Go back to the car and get the crowbar on the table.. • Go
to the temple.
• Go back to the car and get the crowbar on the table.. • Go
to the temple.
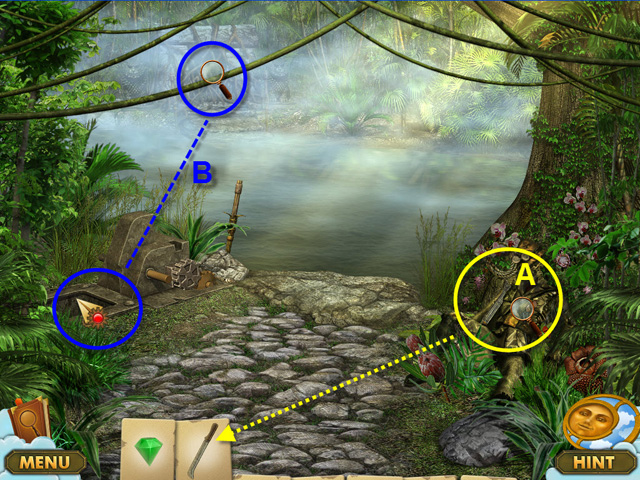
 • Near the temple, open a close-up view of the stone floor.
Use the crowbar (A). • You will get a puzzle piece (B).
• Near the temple, open a close-up view of the stone floor.
Use the crowbar (A). • You will get a puzzle piece (B).
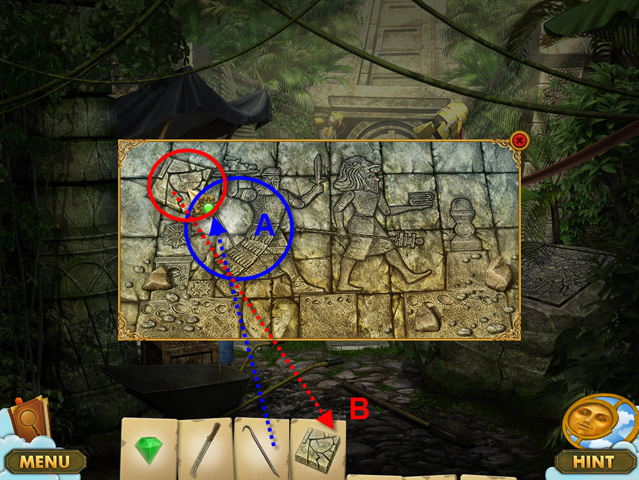
 • Open up the active area on the right with the puzzle board
(A). • Use the puzzle piece and solve the puzzle (B). • You
will find the stone horn (C).
• Open up the active area on the right with the puzzle board
(A). • Use the puzzle piece and solve the puzzle (B). • You
will find the stone horn (C).
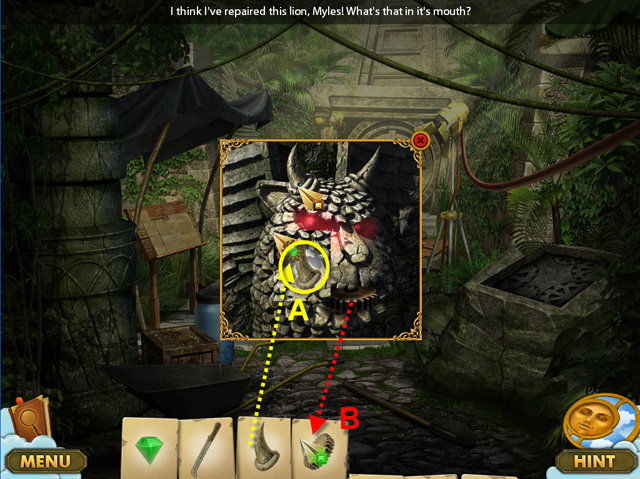 • Use the stone horn on the lion statue (A). • Get the gear..
• Go to the river.
• Use the stone horn on the lion statue (A). • Get the gear..
• Go to the river.
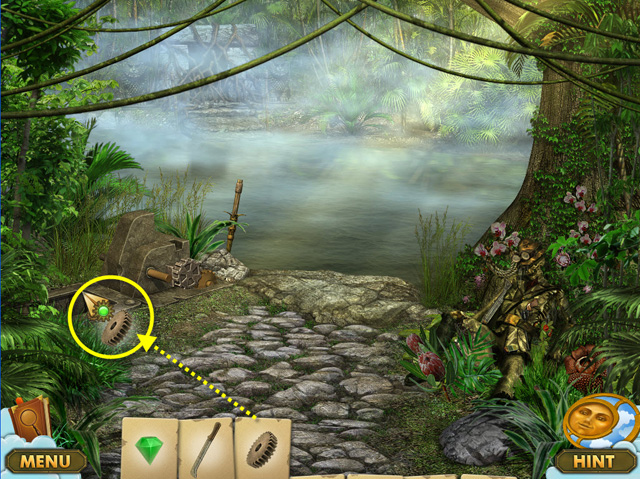 • Use the gear on the mechanism on the right. • Now you can
take a closer look at it.
• Use the gear on the mechanism on the right. • Now you can
take a closer look at it.
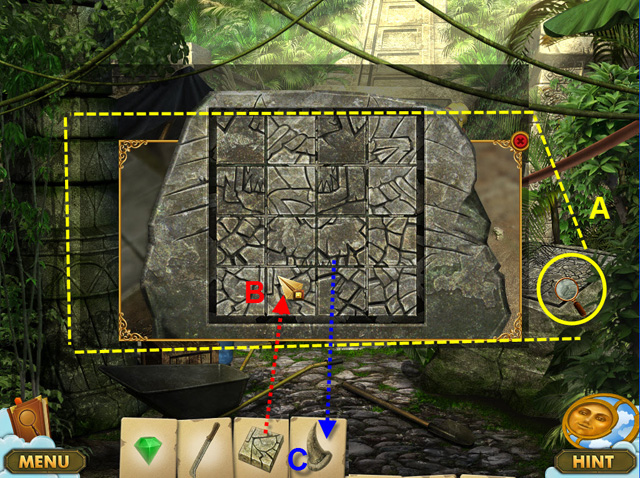
 • Grab the stone (A). • Solve the puzzle by placing all the
movable pats into the correct positions (B). You can see the
hint of the correct placement on the floor near the temple. •
After puzzle is solved you will be able to cross the river.
• Grab the stone (A). • Solve the puzzle by placing all the
movable pats into the correct positions (B). You can see the
hint of the correct placement on the floor near the temple. •
After puzzle is solved you will be able to cross the river.
 • Take a closer look at the other side of the river (A). • Use
machete on the lianas (B). • Get the ancient key (C). • Now
you can take a closer look at it.
• Take a closer look at the other side of the river (A). • Use
machete on the lianas (B). • Get the ancient key (C). • Now
you can take a closer look at it.
 • Give the ancient key to Myles (A). • He will go and use it
on the lion statue. Unfortunately it is a trap and he will get
stuck. • After that you can enter the temple.
• Give the ancient key to Myles (A). • He will go and use it
on the lion statue. Unfortunately it is a trap and he will get
stuck. • After that you can enter the temple.
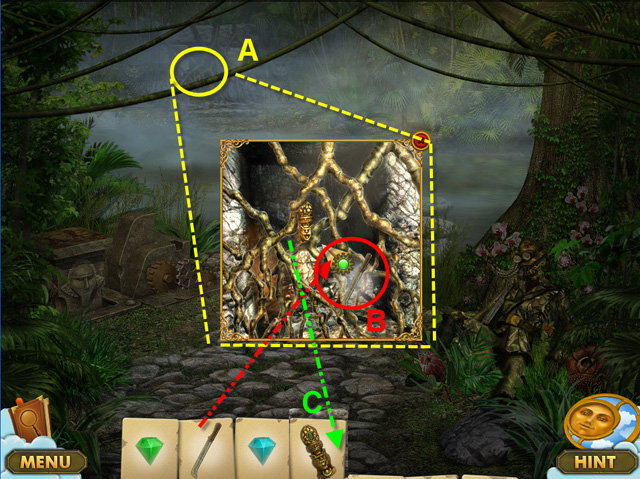
 • Enter the temple and take a look at the dead body of a pilot
(A). • Grab the 2 useful items: the stone (A) and the pilot's
diary. Use the machete on the lianas (B). • Go back and give
the diary to Myles.
• Enter the temple and take a look at the dead body of a pilot
(A). • Grab the 2 useful items: the stone (A) and the pilot's
diary. Use the machete on the lianas (B). • Go back and give
the diary to Myles.
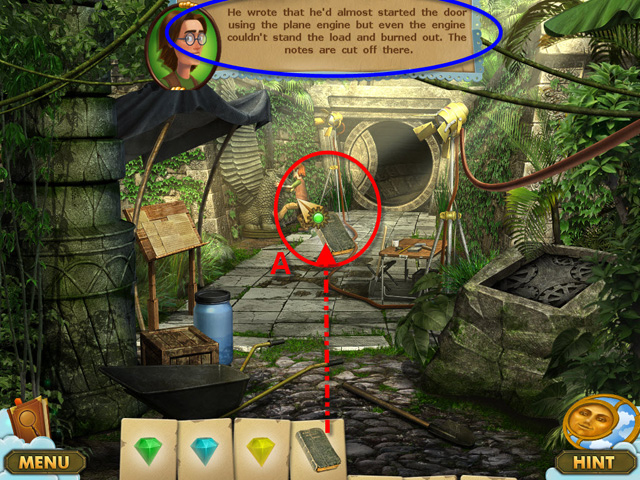 • Give the diary to Myles (A). • Myles will explain that the
pilot tried to open the door to the second room of the temple
by the airplane engine. But the battery died. It means we will
need to find a way to start the plane engine (B). • Miles will
also tell you to check out the car. The keys to the car are in
the tent somewhere on the hammock.
• Give the diary to Myles (A). • Myles will explain that the
pilot tried to open the door to the second room of the temple
by the airplane engine. But the battery died. It means we will
need to find a way to start the plane engine (B). • Miles will
also tell you to check out the car. The keys to the car are in
the tent somewhere on the hammock.
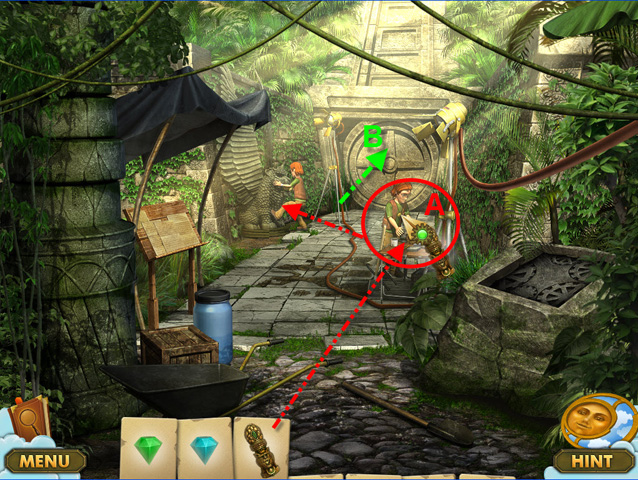
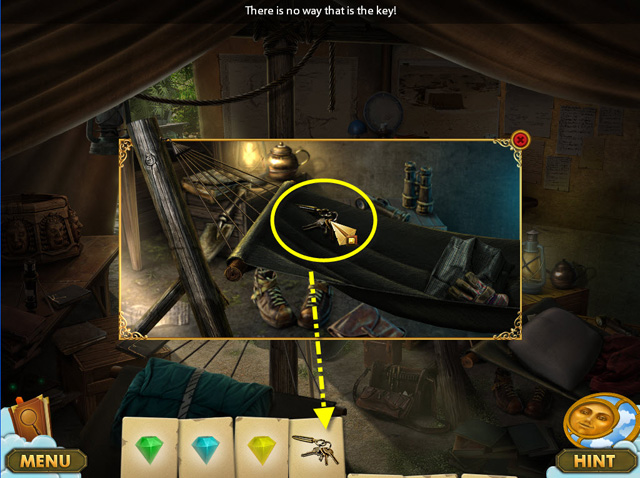 • Find the keys in the hammock and go to the car.
 • Open the car using the keys (A). • Play the HOS and get the
reel of wire (B). • Grab the spare accumulator (C). • Go back
to the temple.
• Open the car using the keys (A). • Play the HOS and get the
reel of wire (B). • Grab the spare accumulator (C). • Go back
to the temple.
 • Take a closer look at the airplane. • Use the wire reel on
the wires (A). • Use the accumulator on top of the old one
(B). • Move the handle to start the engine (C). • Go to the
second temple room.
• Take a closer look at the airplane. • Use the wire reel on
the wires (A). • Use the accumulator on top of the old one
(B). • Move the handle to start the engine (C). • Go to the
second temple room.
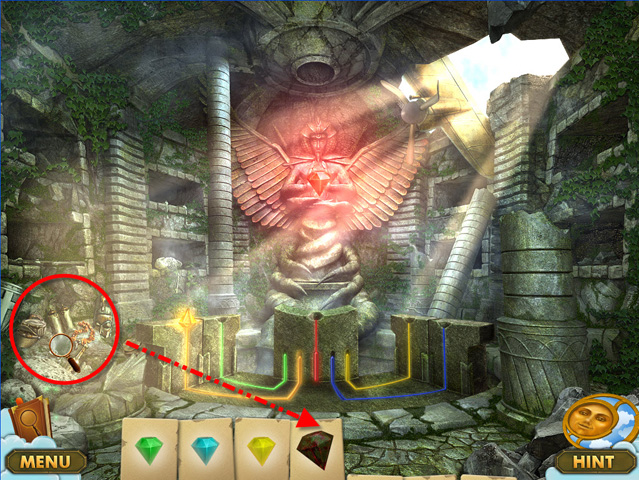 • Play the HOS on the left to get the ruby. • You will need to
clean the ruby. Go back to the car.
• Play the HOS on the left to get the ruby. • You will need to
clean the ruby. Go back to the car.
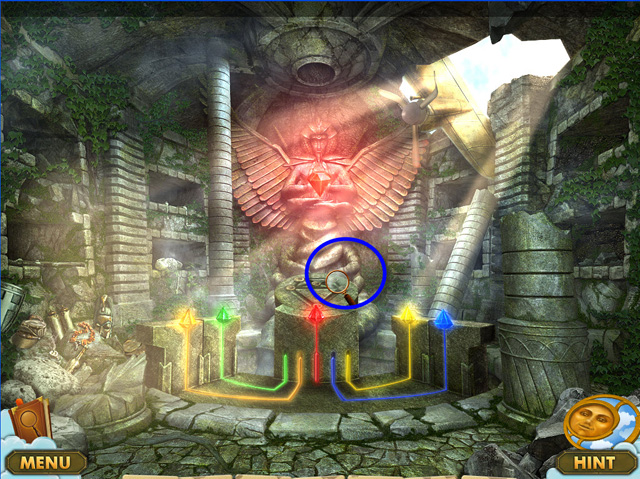
 • Put the dirty ruby on the table. • Use the tools in the
proper order (A). • Get the clean ruby and go to the temple.
• Put the dirty ruby on the table. • Use the tools in the
proper order (A). • Get the clean ruby and go to the temple.
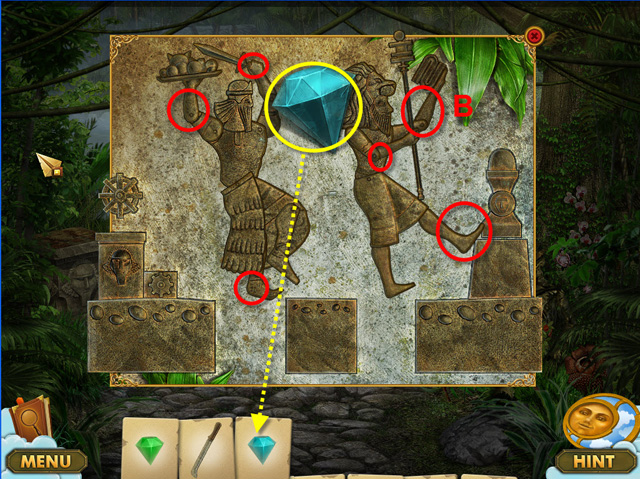
 • Place the stones into the corresponding areas. • Open up the
puzzle board.
• Place the stones into the corresponding areas. • Open up the
puzzle board.
 • Solve the puzzle and see the happy ending.
Chapter 4: Perfect Chocolate
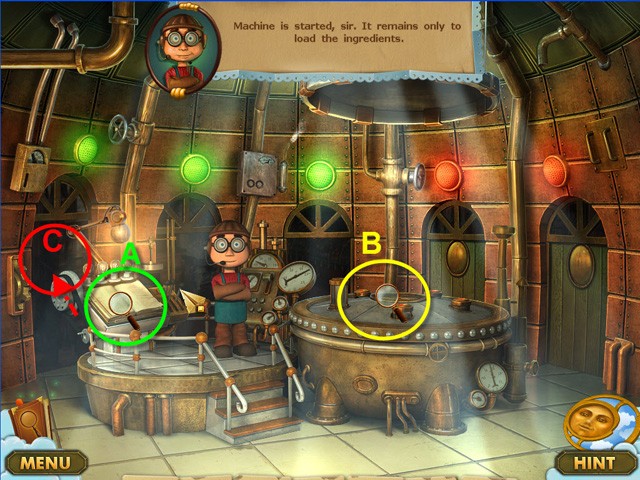 • The first room is the laboratory. First of all you need to
take a look at the perfect chocolate recipe (A) and the
machine where the ingredients should go (B). • Enter the first
room on the left (C).
• The first room is the laboratory. First of all you need to
take a look at the perfect chocolate recipe (A) and the
machine where the ingredients should go (B). • Enter the first
room on the left (C).
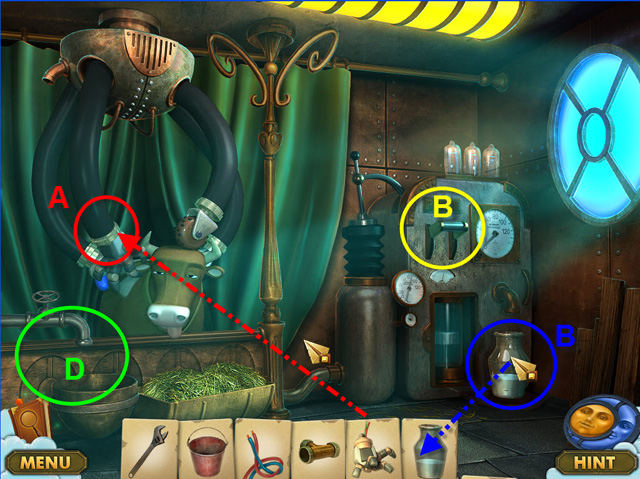
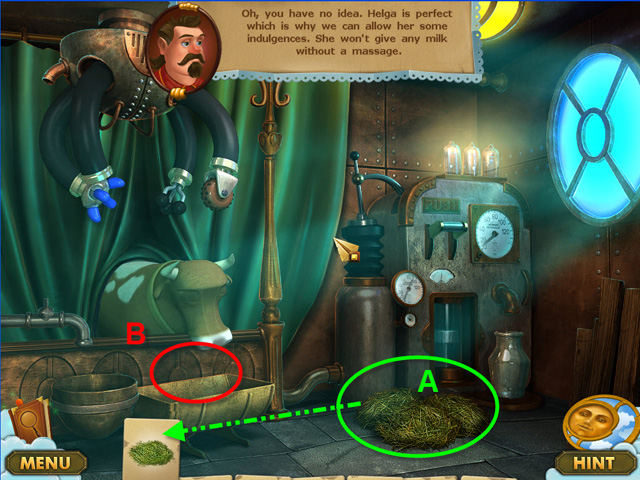 • This is Helga, a perfect cow with the perfect milk. But she
won't give any milk without a massage.. • Pick up the hay on
the right (A).. • Take a look at Helga's feeding area (B).
• This is Helga, a perfect cow with the perfect milk. But she
won't give any milk without a massage.. • Pick up the hay on
the right (A).. • Take a look at Helga's feeding area (B).
 • Place the hay in the feeding area (A). • Note the wrench and
pick it up (B). • Take a look at the tap (C). It is lacking a
valve to open the water for Helga. • Leave the room and go to
the second door.
• Place the hay in the feeding area (A). • Note the wrench and
pick it up (B). • Take a look at the tap (C). It is lacking a
valve to open the water for Helga. • Leave the room and go to
the second door.
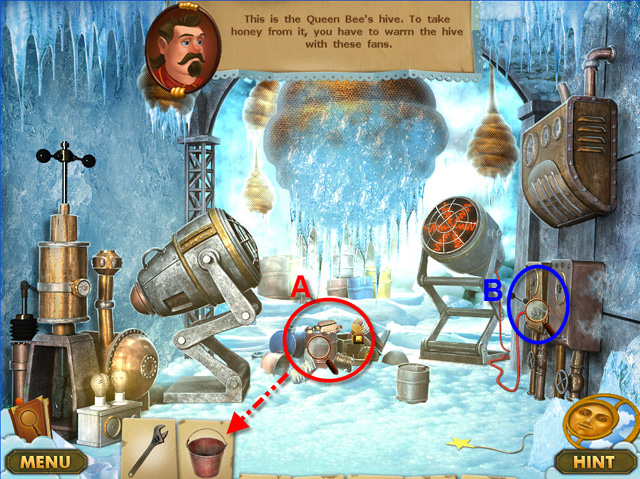 • The second room is where the perfect bees live. They like
cold surroundings. But something went wrong and it has become
too cold, so the perfect honey cannot be taken out. • Check
out the area in the middle and do the HOS (A). You will find a
bucket there. • Then take a closer look at the heat controller
on the right (B).
• The second room is where the perfect bees live. They like
cold surroundings. But something went wrong and it has become
too cold, so the perfect honey cannot be taken out. • Check
out the area in the middle and do the HOS (A). You will find a
bucket there. • Then take a closer look at the heat controller
on the right (B).
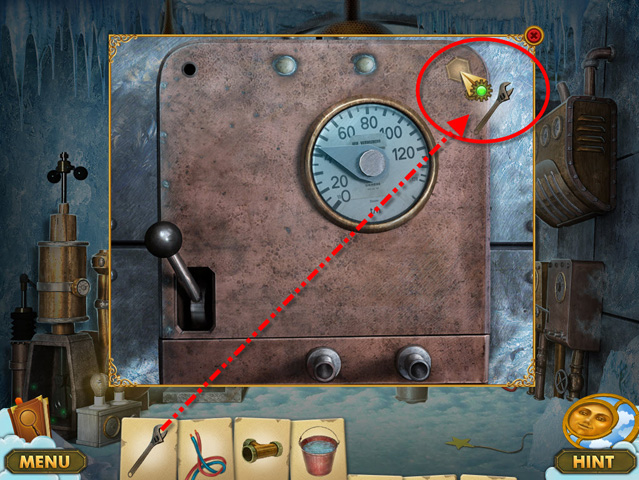
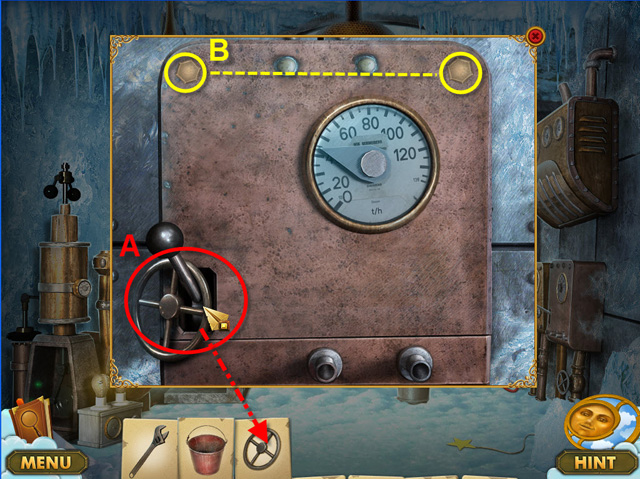 • Pick up the valve (A). • Take a look at the screw bolts.
Note you need to unscrew them somehow (B). • Go to the third
room.
• Pick up the valve (A). • Take a look at the screw bolts.
Note you need to unscrew them somehow (B). • Go to the third
room.
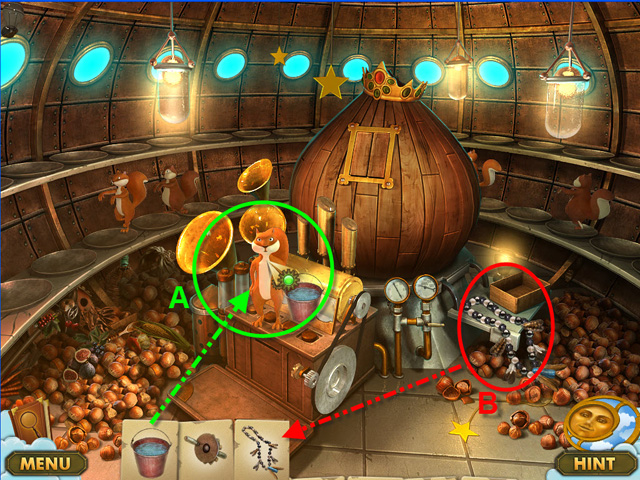
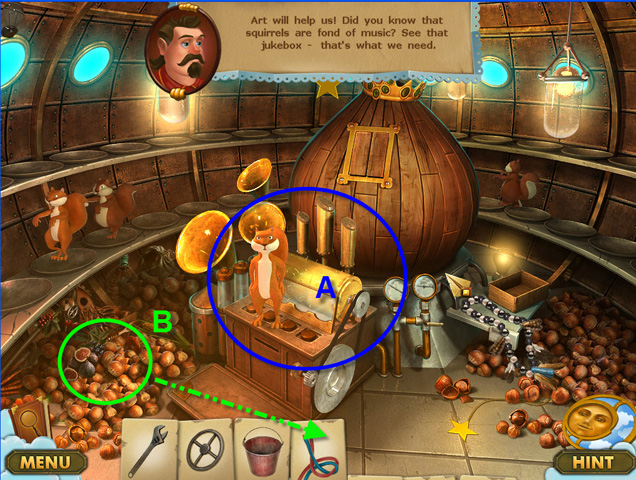 • In the third room the squirrels are worshiping and
protecting the perfect nuts. You need to play music to calm
them down and access the nuts. Take a look at the jukebox (A).
• Check out the messy area on the left for something handy
(B), you will find wires there.. • Go to the Helga's room
(first door).
• In the third room the squirrels are worshiping and
protecting the perfect nuts. You need to play music to calm
them down and access the nuts. Take a look at the jukebox (A).
• Check out the messy area on the left for something handy
(B), you will find wires there.. • Go to the Helga's room
(first door).
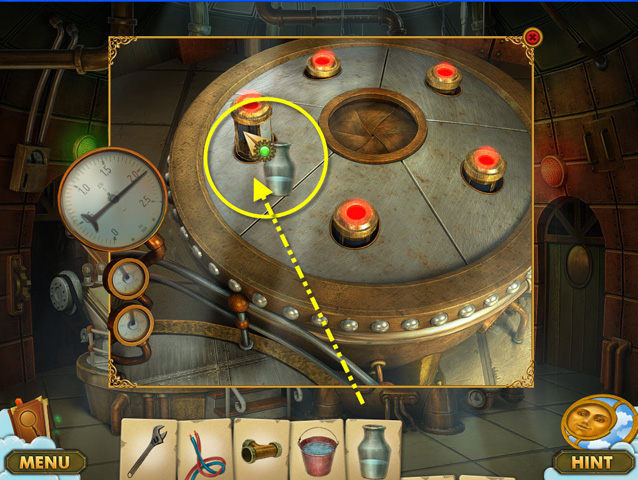
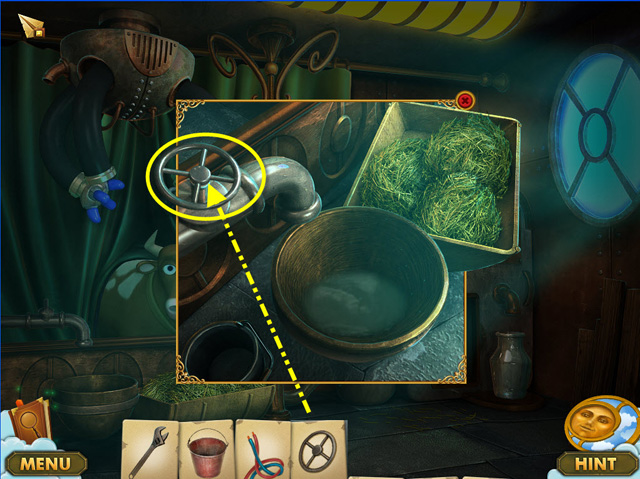 • Place the valve on the crane and fill the bowl with the
water. • Exit the room.
• Place the valve on the crane and fill the bowl with the
water. • Exit the room.
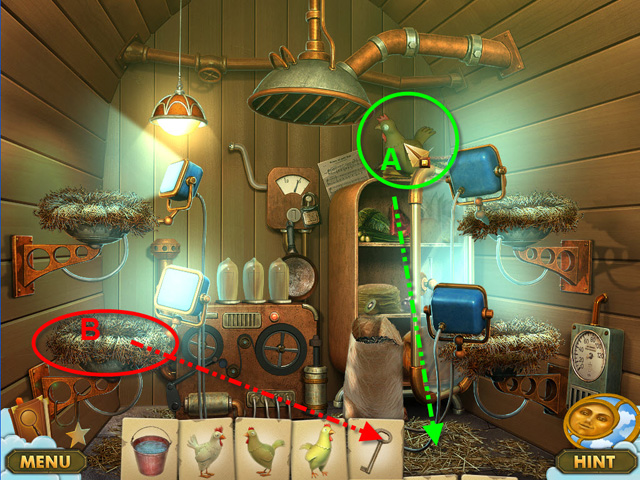
 • In the main laboratory you will see a crazy hand from
Helga's massage machine. • Pick up the hand and the tube part
(A). • Go to Helga's room.
• In the main laboratory you will see a crazy hand from
Helga's massage machine. • Pick up the hand and the tube part
(A). • Go to Helga's room.
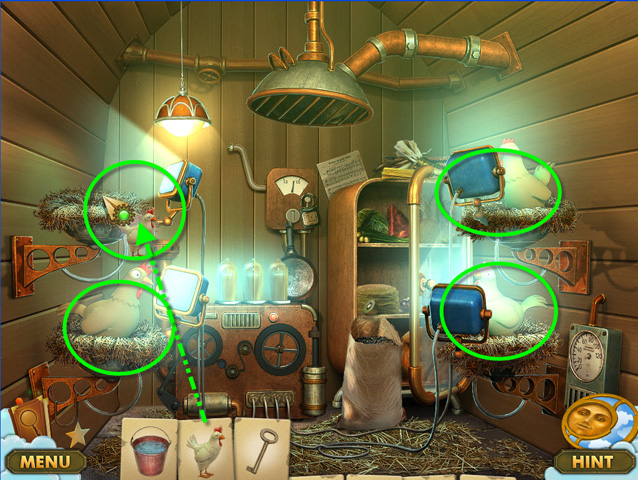
 • Use the hand on the machine and see Helga enjoy the massage
(A). • Push the handle to collect the milk (B). • Pick up the
jar of milk (C). First ingredient collected! • Take a closer
look at the water bowl.
• Use the hand on the machine and see Helga enjoy the massage
(A). • Push the handle to collect the milk (B). • Pick up the
jar of milk (C). First ingredient collected! • Take a closer
look at the water bowl.
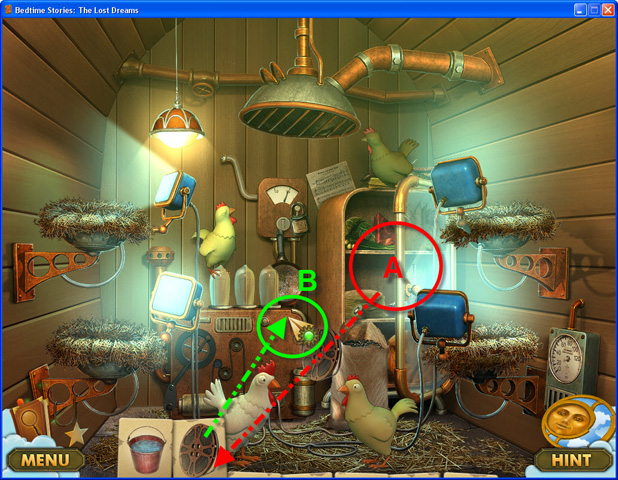
 • Use the empty bucket on Helga's water bowl to collect water.
Might be handy.. • Leave the room and go to the chocolate
making machine
• Use the empty bucket on Helga's water bowl to collect water.
Might be handy.. • Leave the room and go to the chocolate
making machine
 • Put the milk in the chocolate making machine. • Go to the
bee's room.
• Put the milk in the chocolate making machine. • Go to the
bee's room.
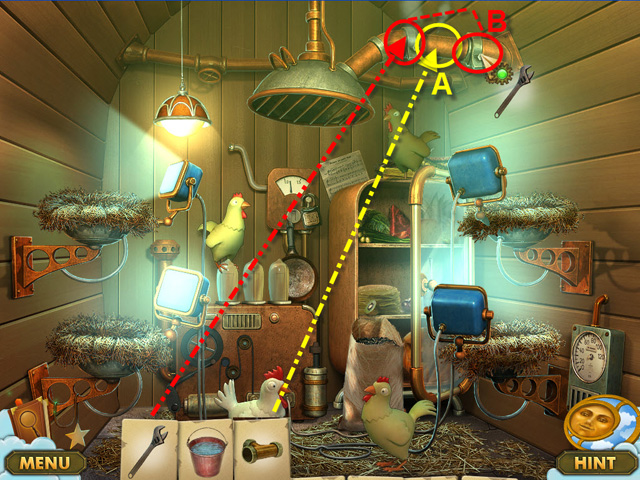
 • Use the wrench to unscrew the bolts and open up the
mechanism.
• Use the wrench to unscrew the bolts and open up the
mechanism.
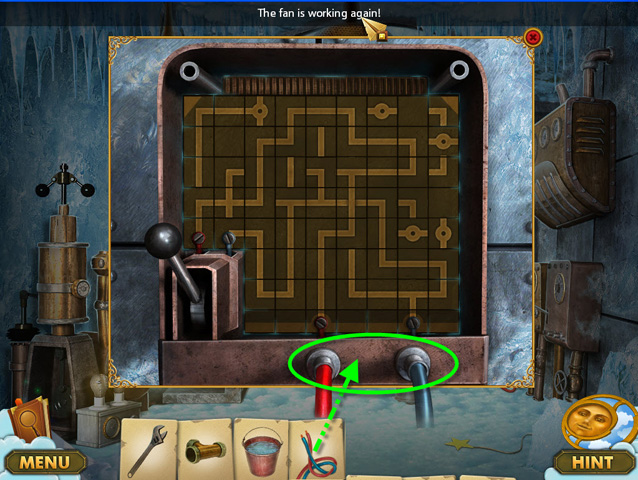 • Use the wires on two exits at the bottom of the mechanism. •
Fix it by connecting corresponding wires.
• Use the wires on two exits at the bottom of the mechanism. •
Fix it by connecting corresponding wires.
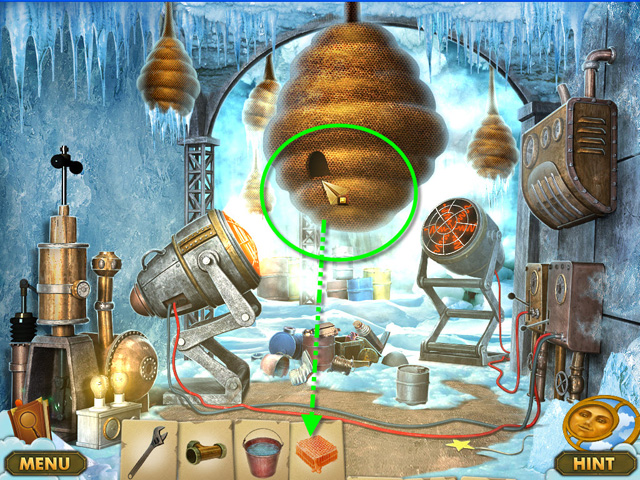 • Wait until the bees are gone. • Take out the perfect honey
and go back to the lab to place it.
• Wait until the bees are gone. • Take out the perfect honey
and go back to the lab to place it.
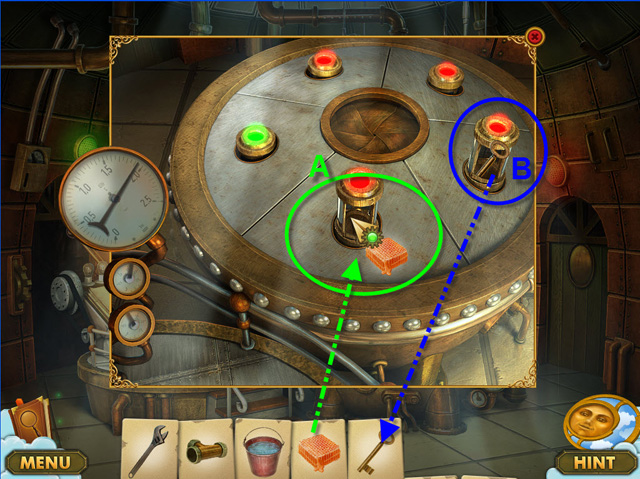 • Place the honey (A). • Pick up the key from hen-house (B).
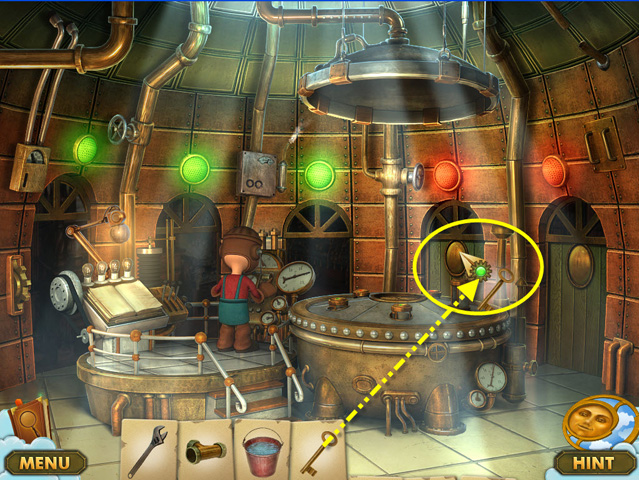 • Hen-house is the 4th door. Use the key on it and enter.
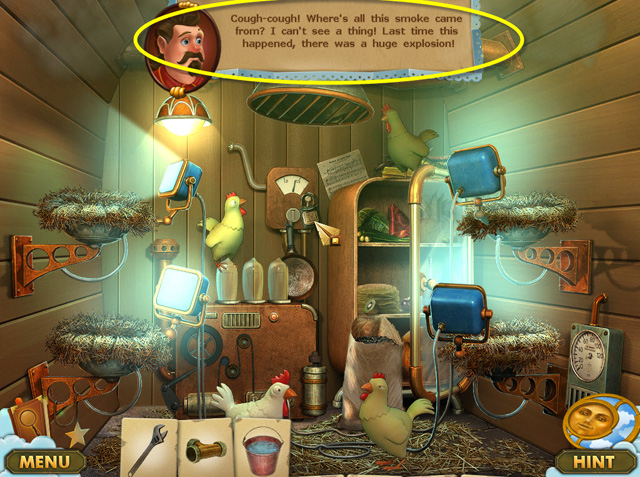 • The pipe is broken and the room is full of steam. You need
to fix it to calm down the poor perfect hens.
• The pipe is broken and the room is full of steam. You need
to fix it to calm down the poor perfect hens.
 • First place the missing tube part (A). • Then to fasten it
tightly using the wrench (B).
• First place the missing tube part (A). • Then to fasten it
tightly using the wrench (B).
 • Check out the shelves and get the favorite hens' record
there (A). • Use it over the record player (B).
• Check out the shelves and get the favorite hens' record
there (A). • Use it over the record player (B).
 • Now pick up all the hens (A). • Check out the nest on the
left and find the Ancient hall Key there (B).
• Now pick up all the hens (A). • Check out the nest on the
left and find the Ancient hall Key there (B).
 • Place the chickens on their nests and leave the room; come
back later and get the perfect egg. • Go the Ancient Hall room
(the last door).
• Place the chickens on their nests and leave the room; come
back later and get the perfect egg. • Go the Ancient Hall room
(the last door).
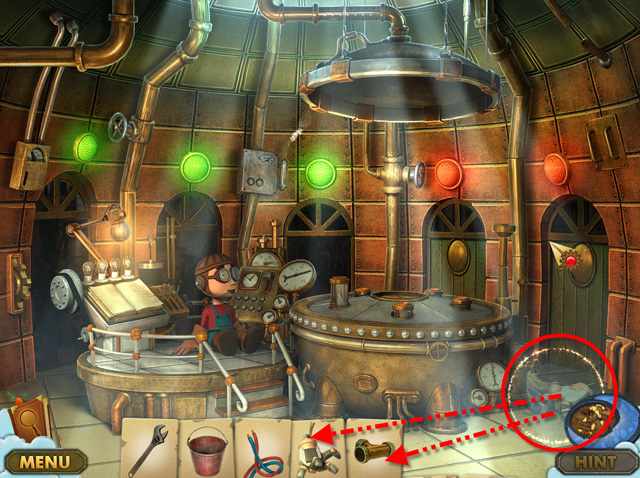
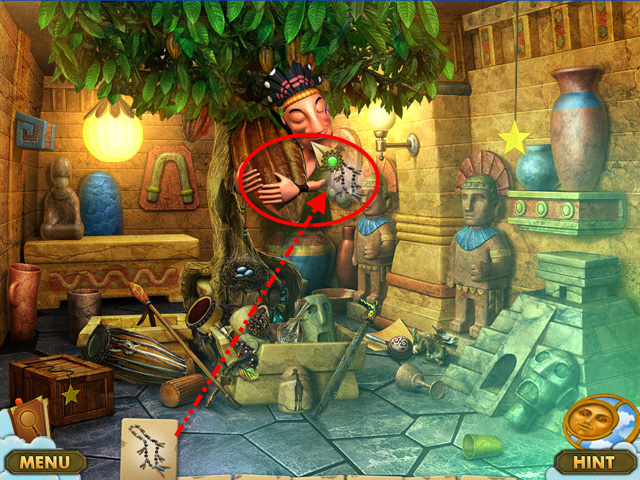
 • Try to pick up the perfect cocoa. But the ancient priest
won't let you touch it. • Check if there is anything of value
to give to the priest (B). Find the necklace and give it to
the priest (C). Unfortunately it will not be enough. • Find
the jukebox key in the mini temple on the right (D). • Go to
the squirrel’s room.
• Try to pick up the perfect cocoa. But the ancient priest
won't let you touch it. • Check if there is anything of value
to give to the priest (B). Find the necklace and give it to
the priest (C). Unfortunately it will not be enough. • Find
the jukebox key in the mini temple on the right (D). • Go to
the squirrel’s room.
 • Chase the squirrel away by scaring him with the water (A). •
Pick up the necklace on the right (B). • Now look closer at
the jukebox.
• Chase the squirrel away by scaring him with the water (A). •
Pick up the necklace on the right (B). • Now look closer at
the jukebox.
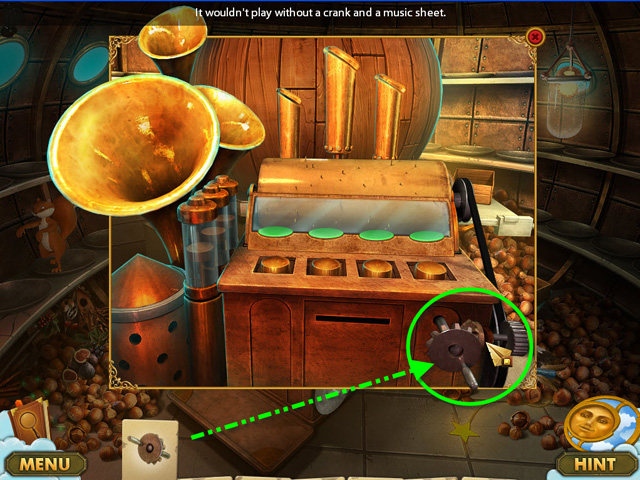 • Use the key. But you still need to find the music sheet with
the correct melody.. • Go to the hen's room.
• Use the key. But you still need to find the music sheet with
the correct melody.. • Go to the hen's room.
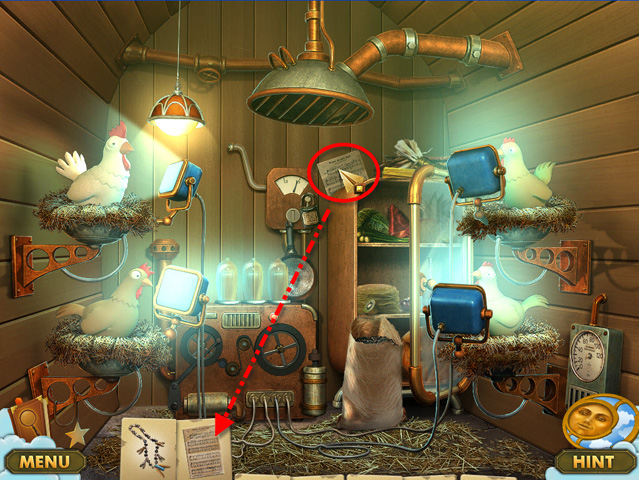 • Pick up the music sheet and go back to the squirrel’s room.
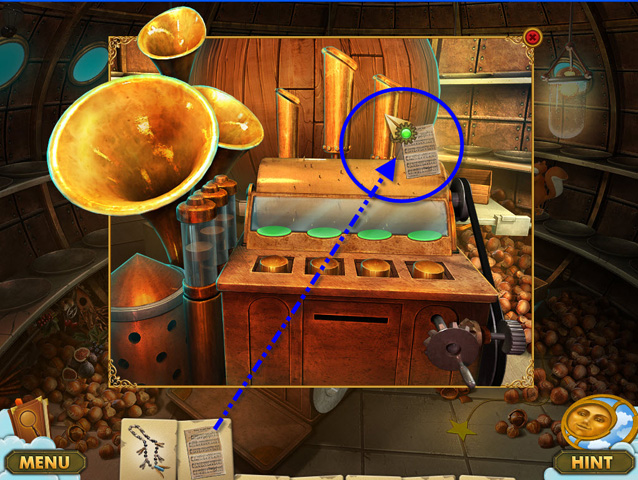 • Place the music sheet and play the melody. • You should
press on the buttons as soon as the green circle reaches them.
• Place the music sheet and play the melody. • You should
press on the buttons as soon as the green circle reaches them.
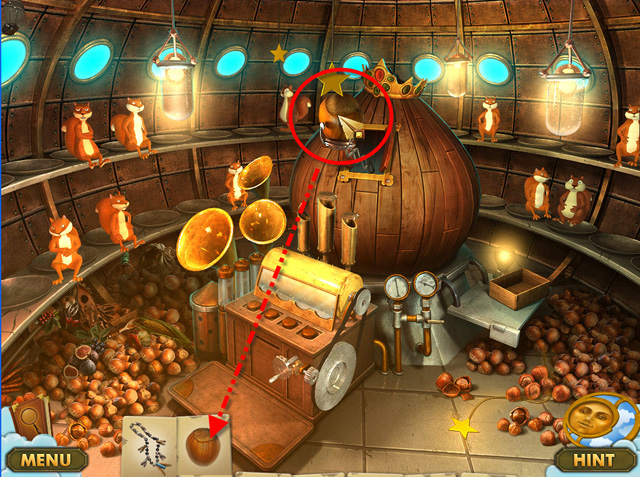 • Now pick up the perfect nut and take it to the machine in
the lab. • Then go to the hen-house.
• Now pick up the perfect nut and take it to the machine in
the lab. • Then go to the hen-house.
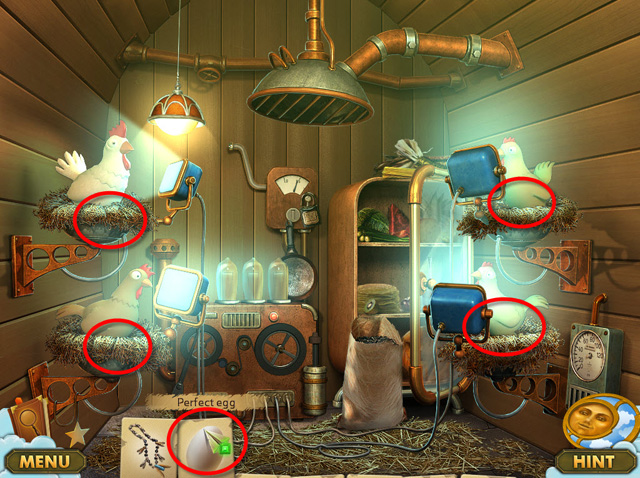 • Check each of the nests to find that one perfect egg! • Go
place the egg and then go to the ancient priest.
• Check each of the nests to find that one perfect egg! • Go
place the egg and then go to the ancient priest.
 • Give the priest the second beads necklace. He will ask you
to play a game.
• Give the priest the second beads necklace. He will ask you
to play a game.
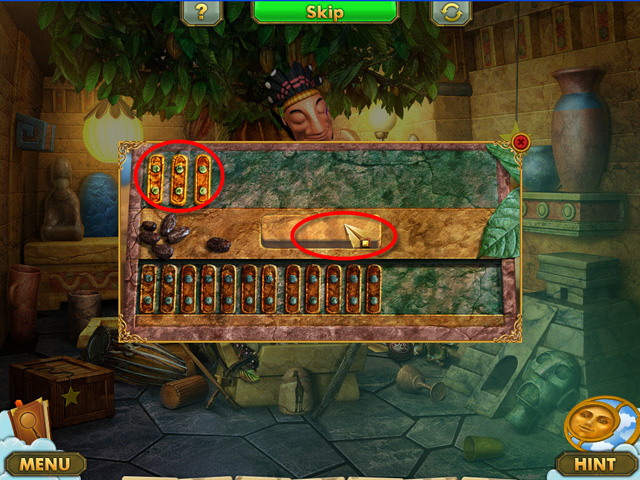 • Now you need to win the game. Your task is to be the one who
picks up the last stick. You can pick up to 3 sticks at a
time. • Select from 1 to 3 sticks by pressing on them and then
press the button in the middle of the board to move them. •
When you win, the perfect cocoa is yours! Go place it to the
machine.
• Now you need to win the game. Your task is to be the one who
picks up the last stick. You can pick up to 3 sticks at a
time. • Select from 1 to 3 sticks by pressing on them and then
press the button in the middle of the board to move them. •
When you win, the perfect cocoa is yours! Go place it to the
machine.
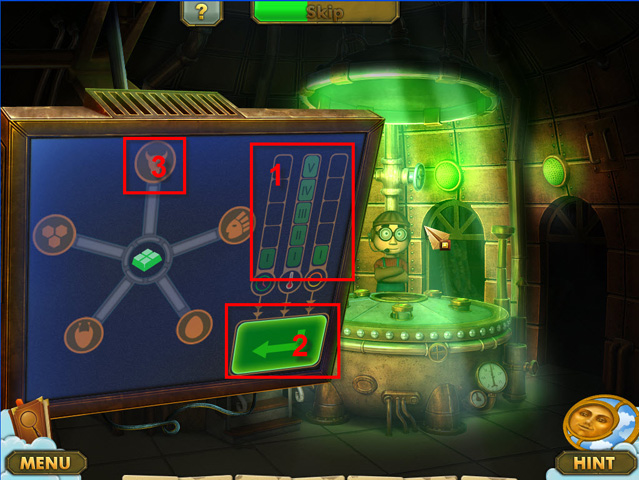 • There are a few steps you need to do to start the machine
and create the perfect chocolate. (1) Select the proper
parameters for each of the ingredients. You will find the
values in the diary and receipt book. For milk it is 1, 5, and
1. • Then press the Enter button to start the process (2). •
When the machine starts, you need to press on an ingredient
sign as soon as it turns red (3). • Repeat the same process
for each of the ingredients. • If you succeed – the perfect
chocolate is yours!. • Congratulations, you have completed the
last chapter and the game!
• There are a few steps you need to do to start the machine
and create the perfect chocolate. (1) Select the proper
parameters for each of the ingredients. You will find the
values in the diary and receipt book. For milk it is 1, 5, and
1. • Then press the Enter button to start the process (2). •
When the machine starts, you need to press on an ingredient
sign as soon as it turns red (3). • Repeat the same process
for each of the ingredients. • If you succeed – the perfect
chocolate is yours!. • Congratulations, you have completed the
last chapter and the game!
Created at: 2012-02-15