

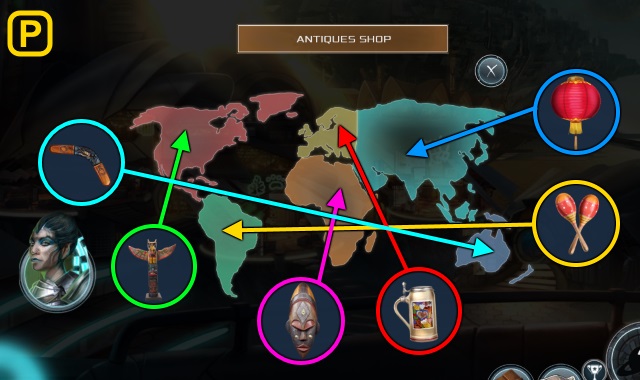
Walkthrough Menu
- General Tips
- Chapter 1: Thomas
- Chapter 2: Nenshe
- Chapter 3: The Moon Port
- Chapter 4: Geriza
- Chapter 5: The Amusement Park
General Tips
- This is the official guide for Beyond: Star Descendant.
- This guide will not show when you have to zoom into a location; the screenshots will show each zoom scene.
- Hidden-object puzzles are referred to as HOPs. This guide will not show screenshots of the HOPs, however, it will mention when an HOP is available and the inventory item you'll collect from it.
- Use the Map to fast travel to a location.
Chapter 1: Thomas
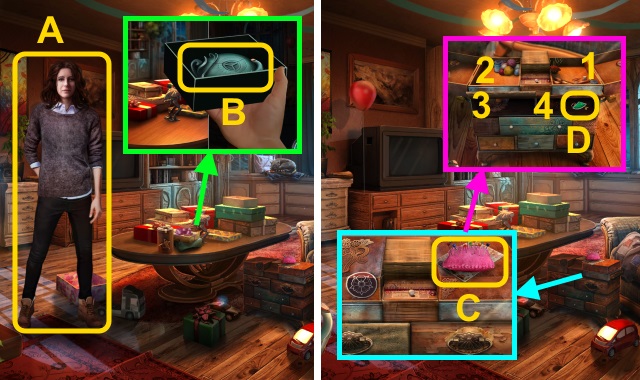
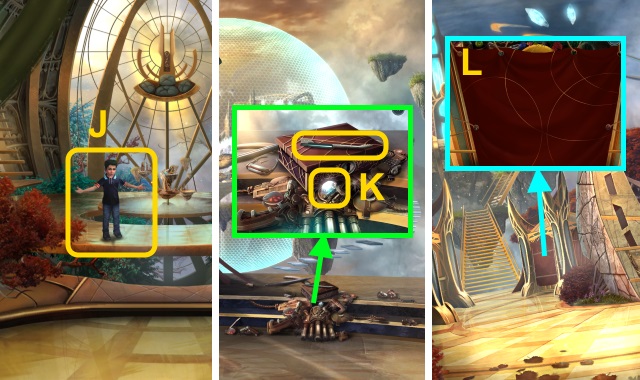
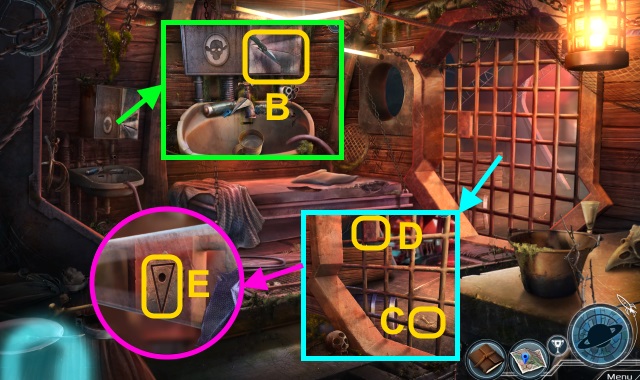
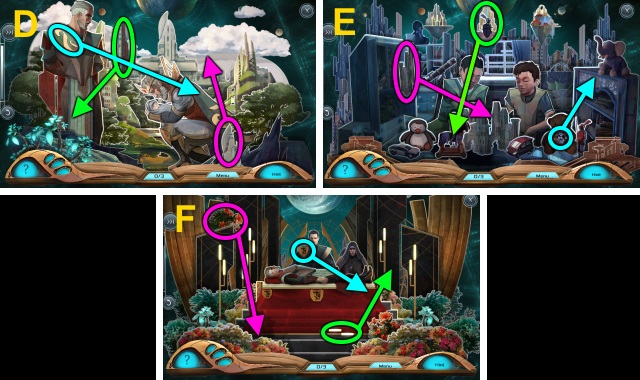
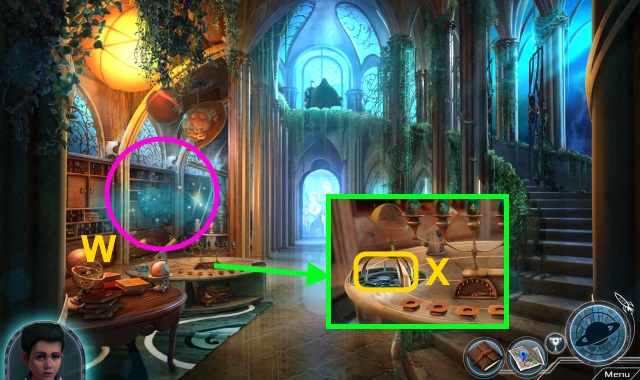
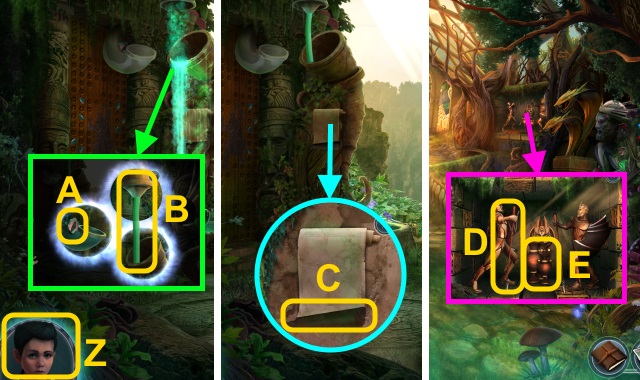
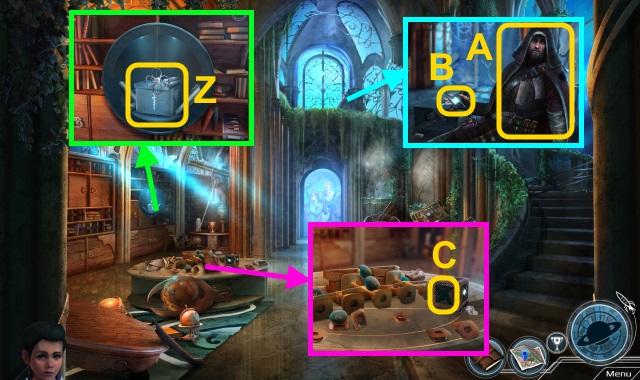
- Talk to Sarah (A).
- Open the presents; take the device (B).
- Move the pincushion; examine the photo (C).
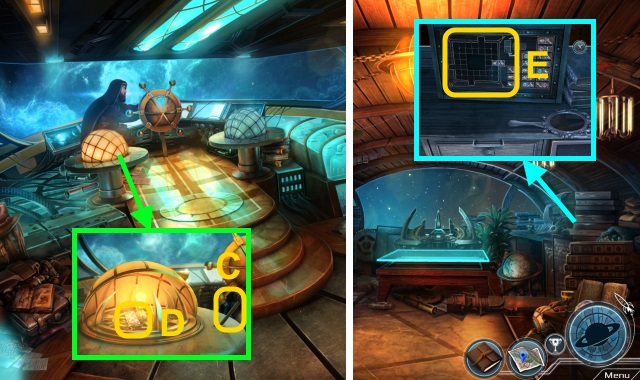
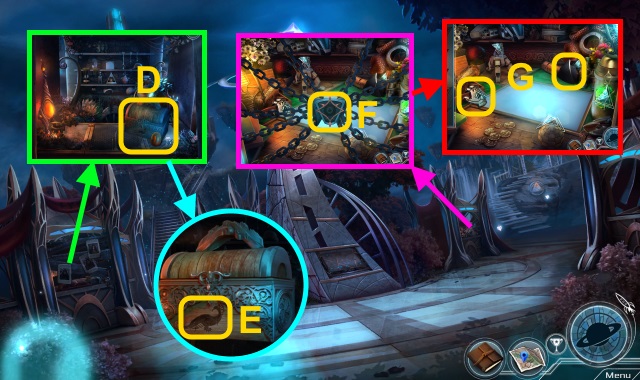
- Open the drawers (1-4); take the piece and key (D).
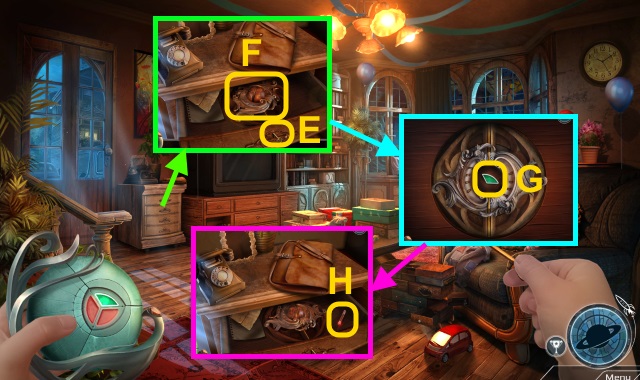
- Use the key (E); move the papers (F).
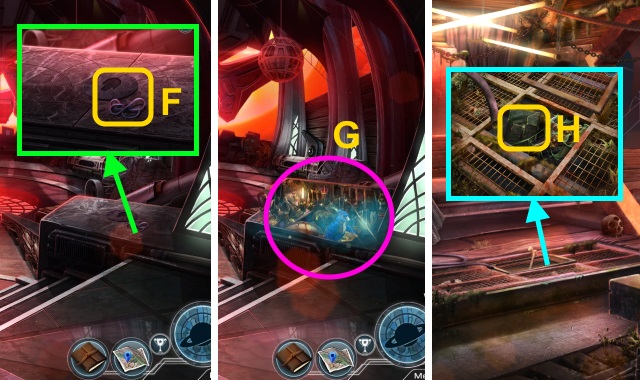
- Examine the drawer 2x; take the piece (G).
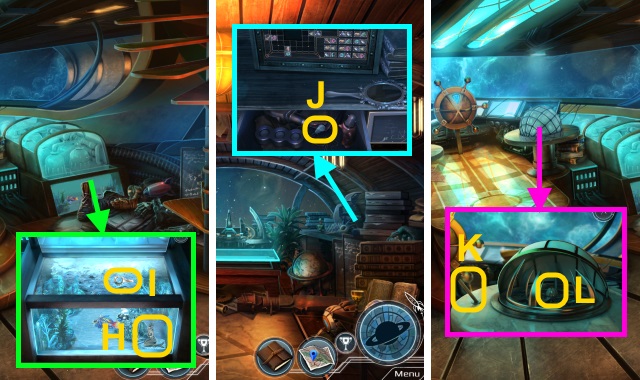
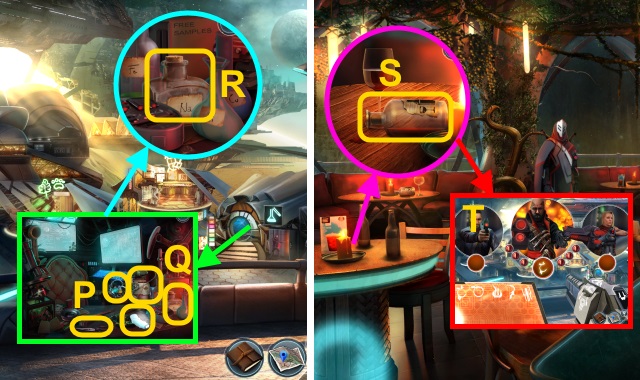
- Take the laser pointer (H).
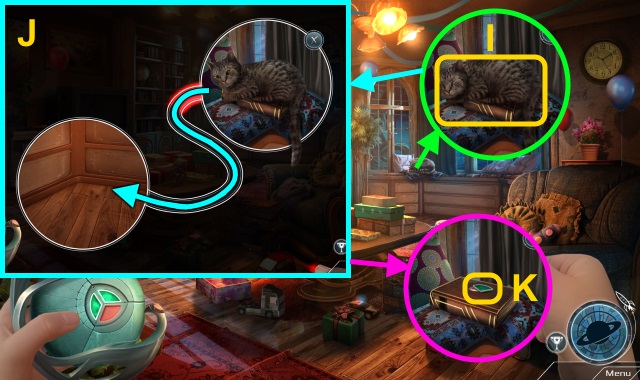
- Examine the cat for a mini-game (I).
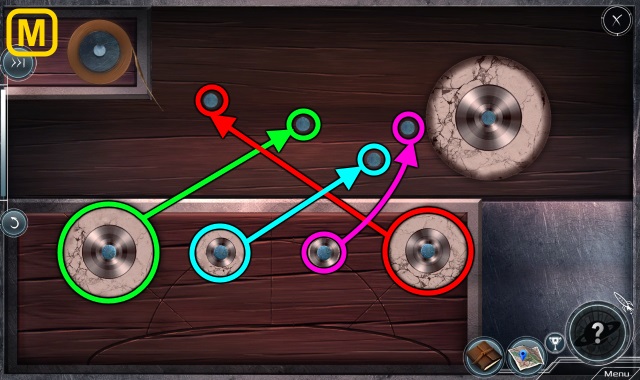
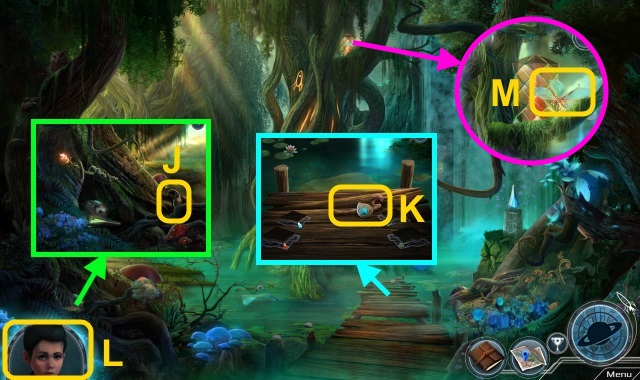
- Solution (J); examine the floor.
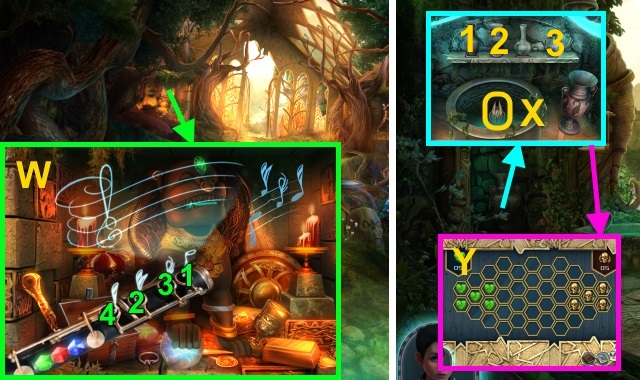
- Take the piece and book (K).
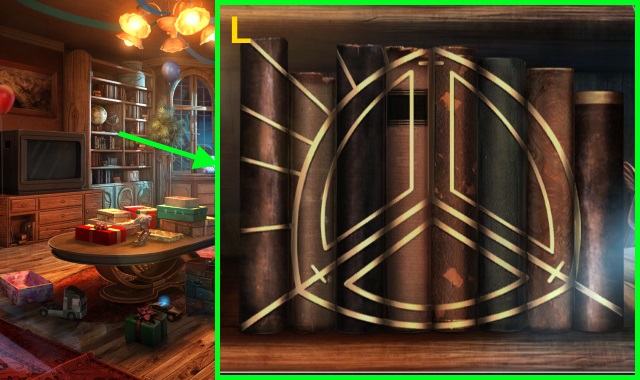
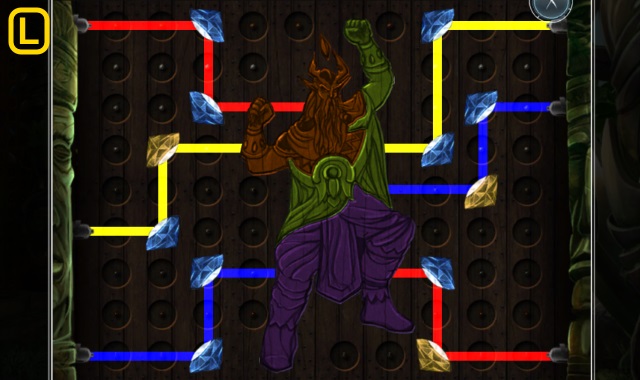
- Place the book for a mini-game; solution (L).
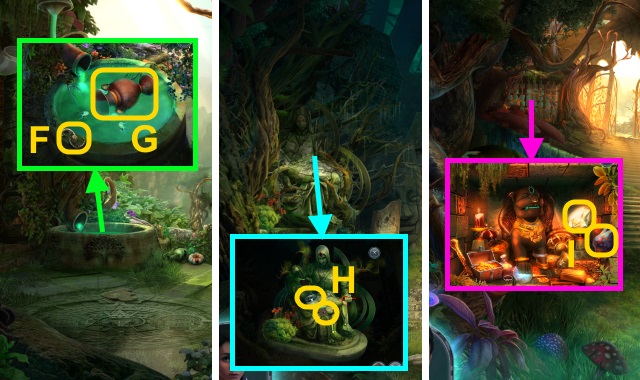
- Walk forward.
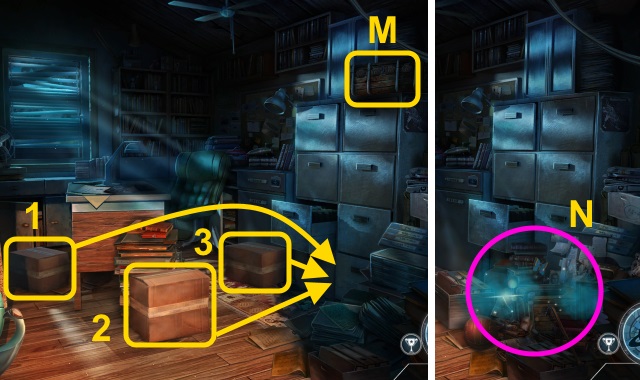
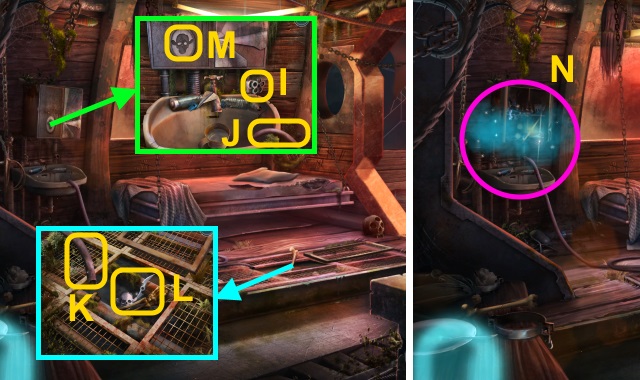
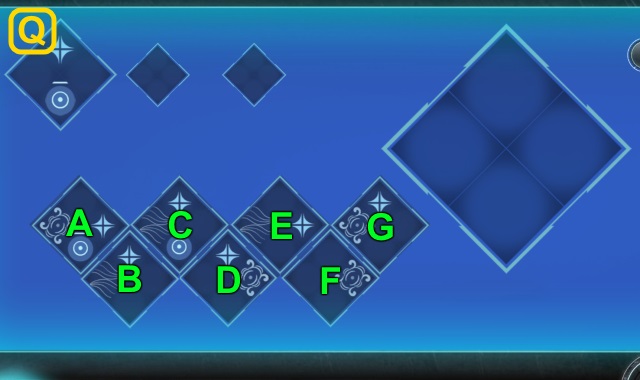
- Stack the boxes (1-3).
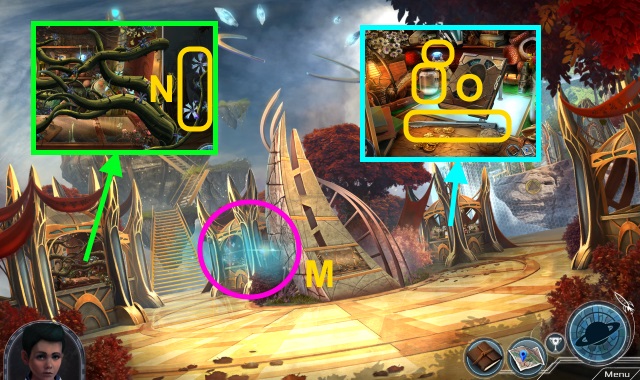
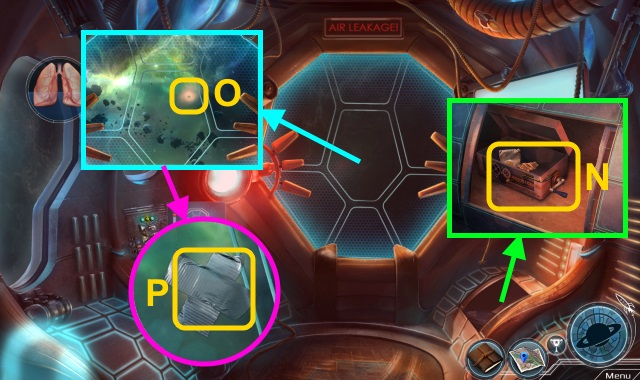
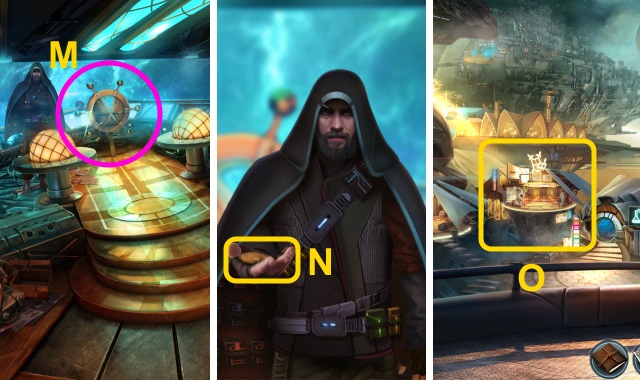
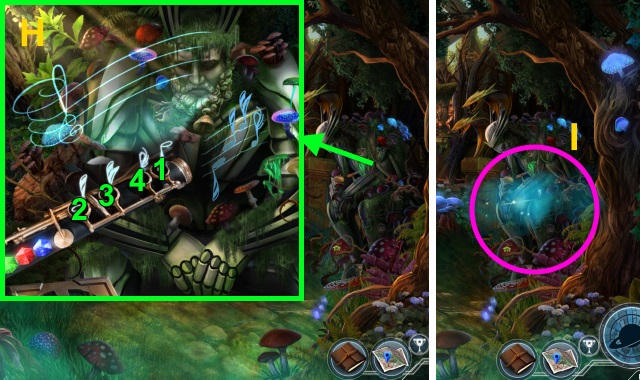
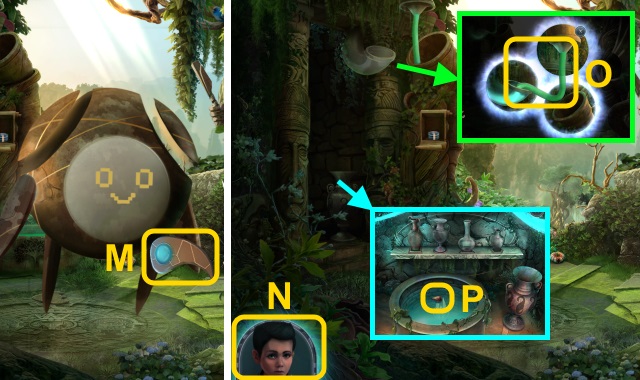
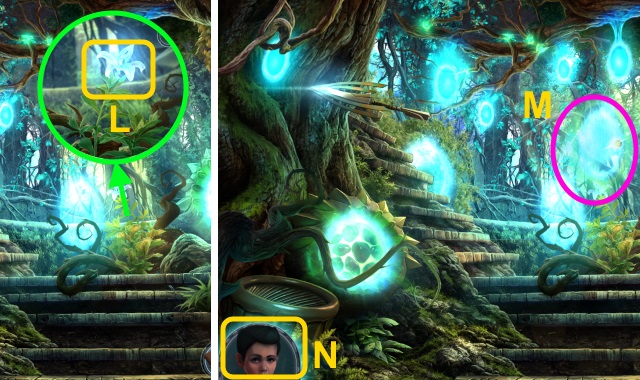
- Examine the suitcase 3x (M).
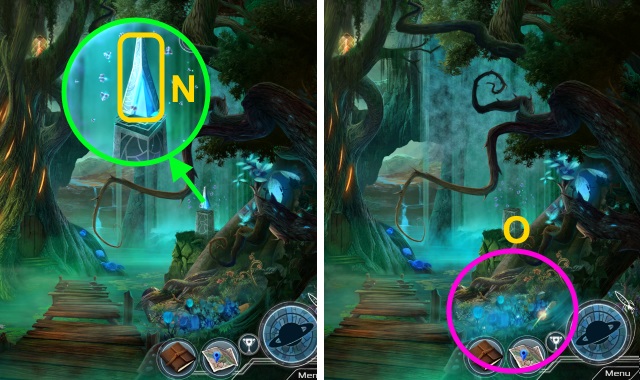
- Play the HOP; receive the Saturn token (N).
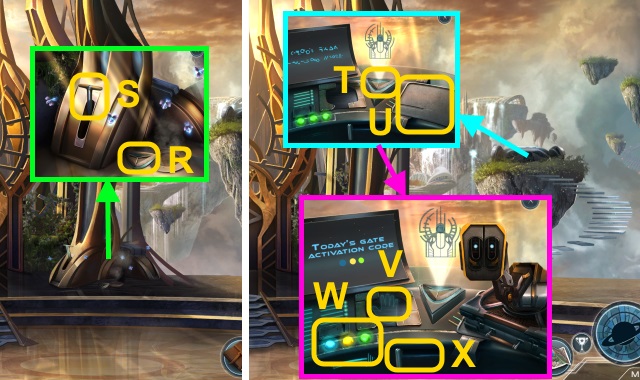
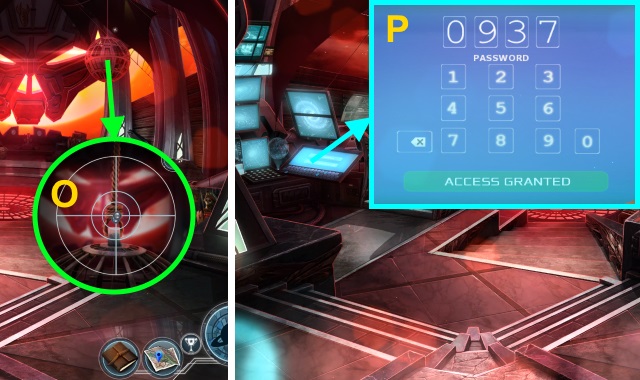
- Flip the switch (O).
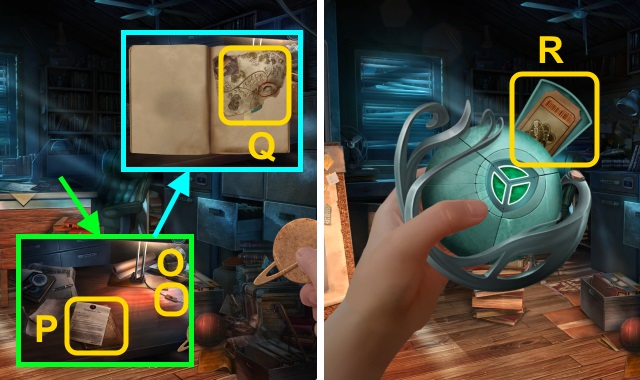
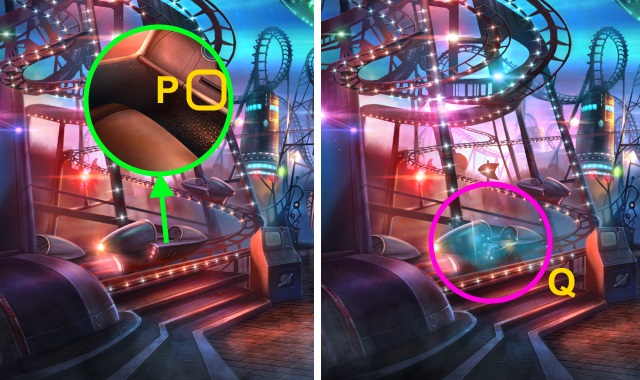
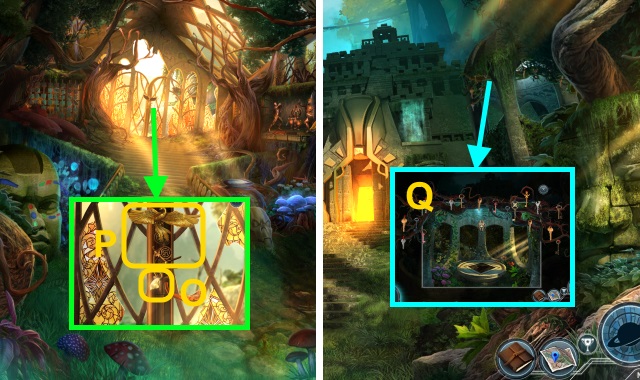
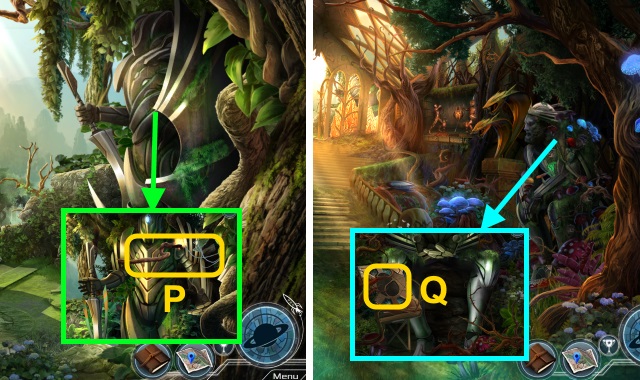
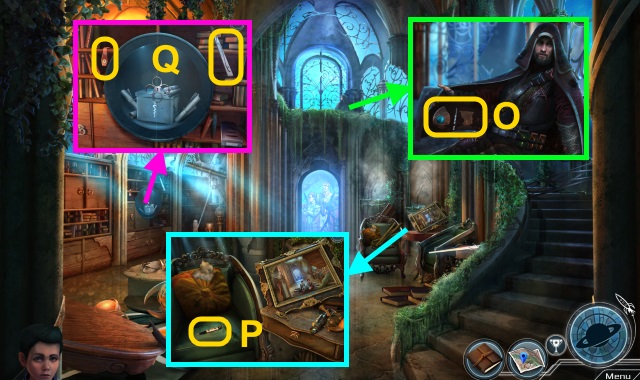
- Read the letter (P); place the Saturn token. Read the notebook.
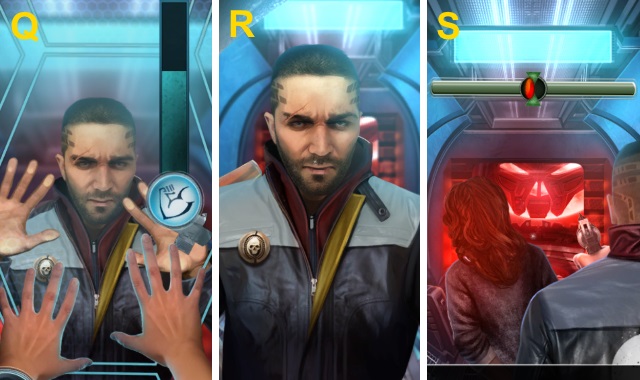
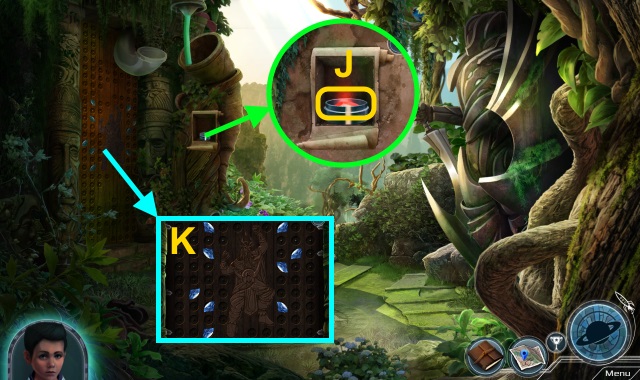
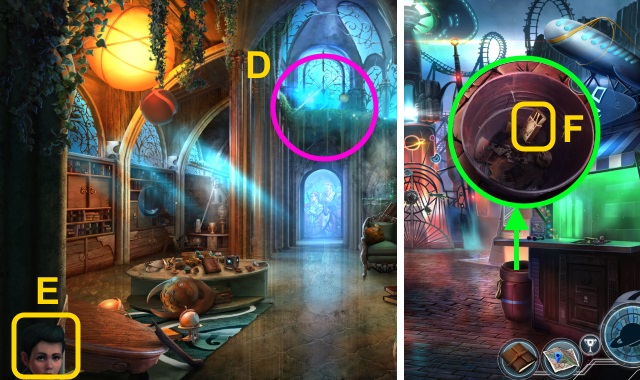
- Examine the map (Q). Remove the tape; take the piece.
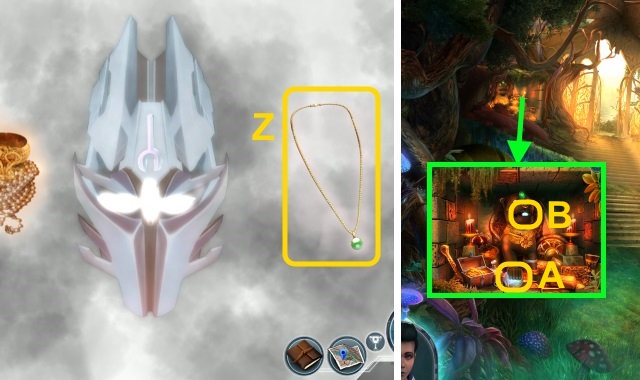
- Examine the device; take the ticket (R). Examine the device.
- Try to walk forward.
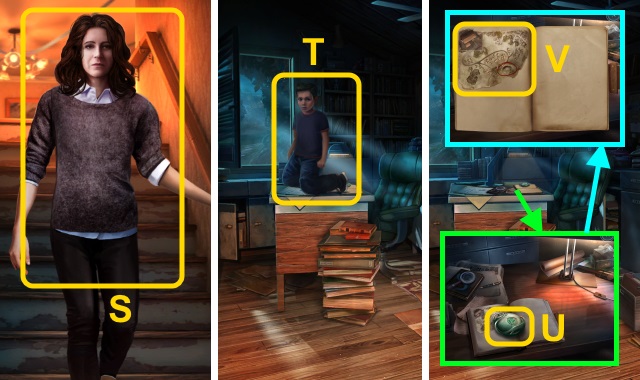
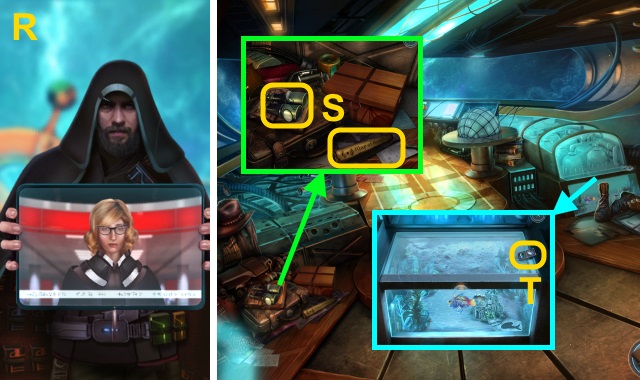
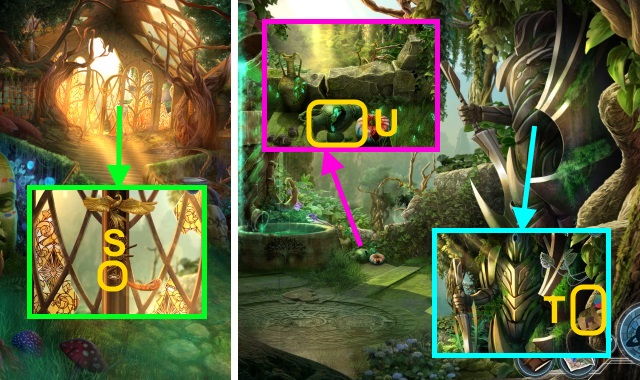
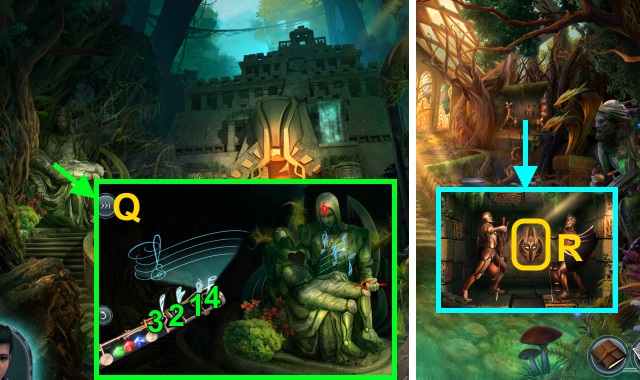
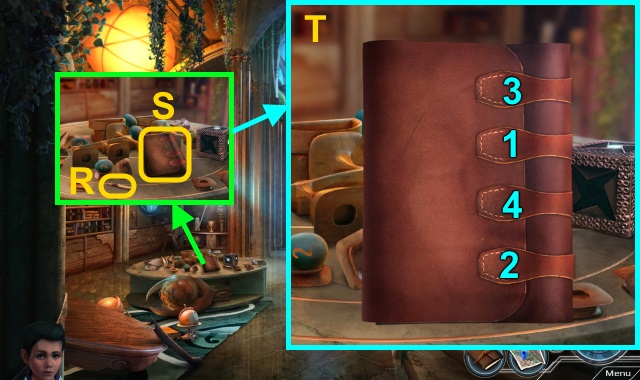
- Talk to Sarah (S).
- Examine Thomas (T).
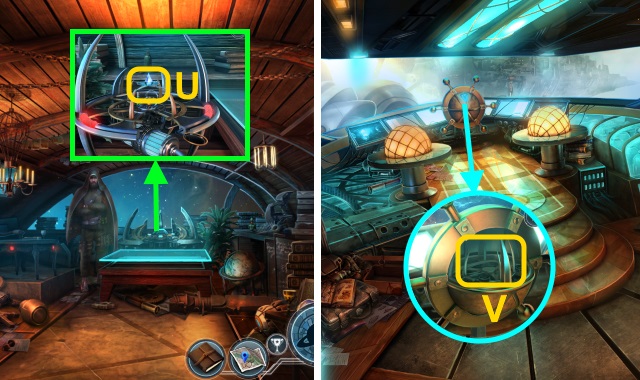
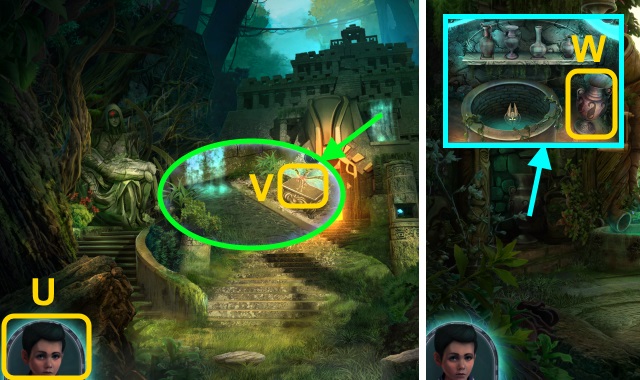
- Examine the device 2x (U).
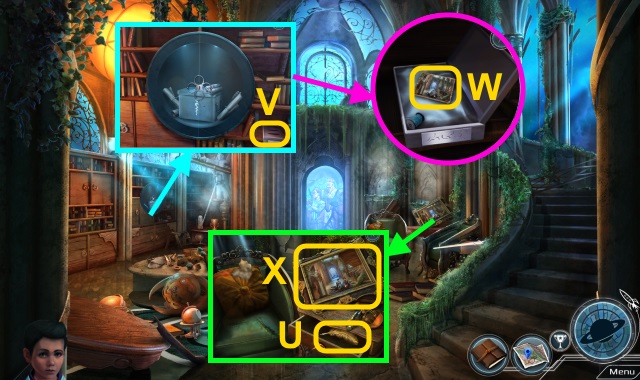
- Read the notebook; take the Map (V).
- Walk down.
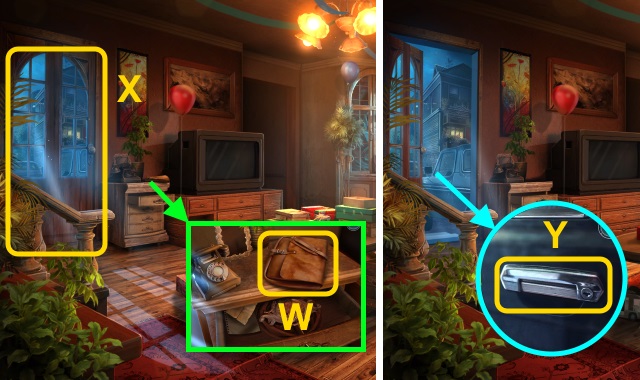
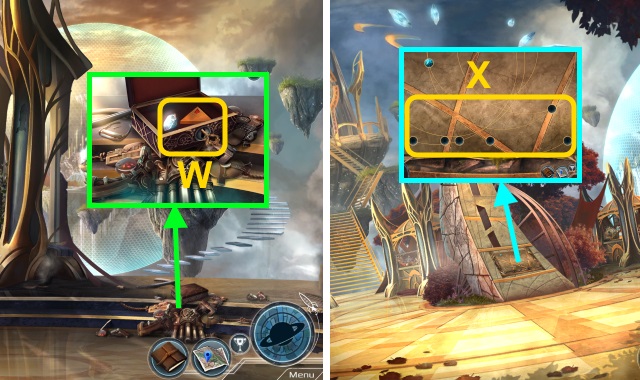
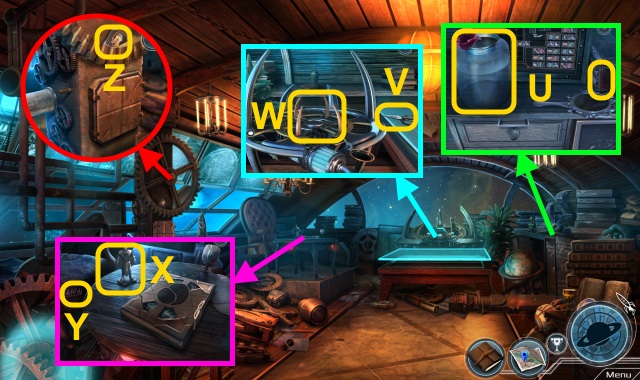
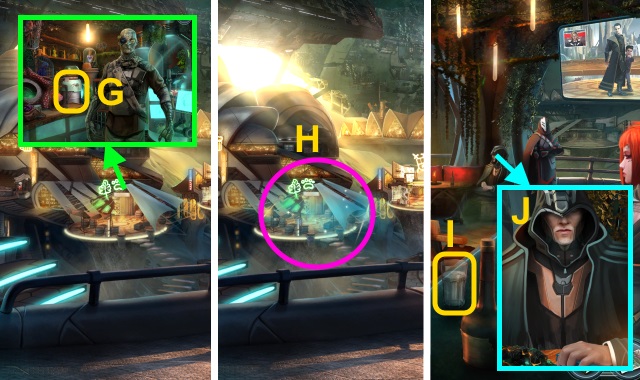
- Take the PURSE (W).
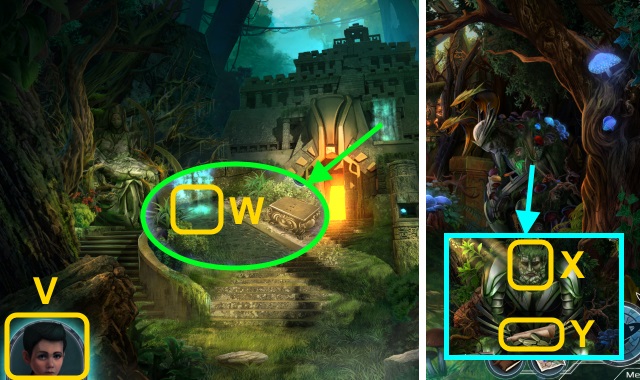
- Open the PURSE; take the PEPPER SPRAY and CAR KEY.
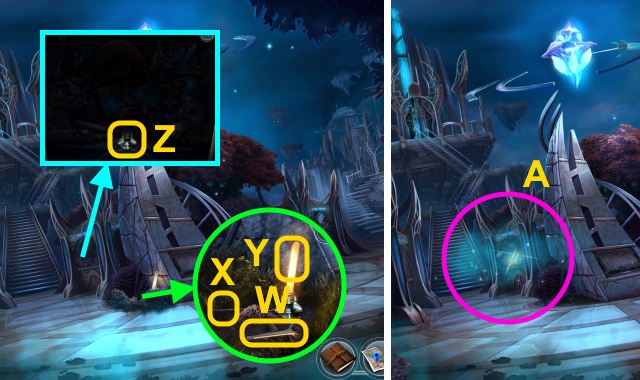
- Open the door (X).
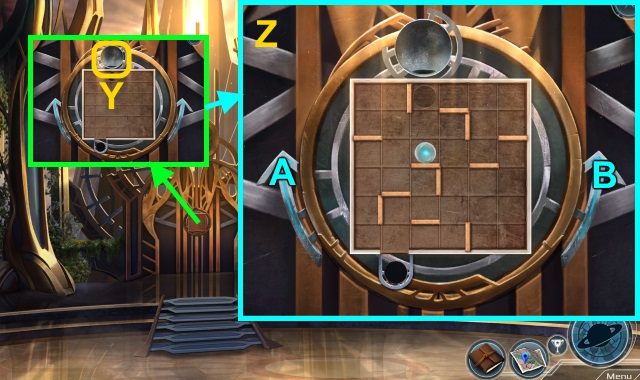
- Use the CAR KEY (Y); open the door.
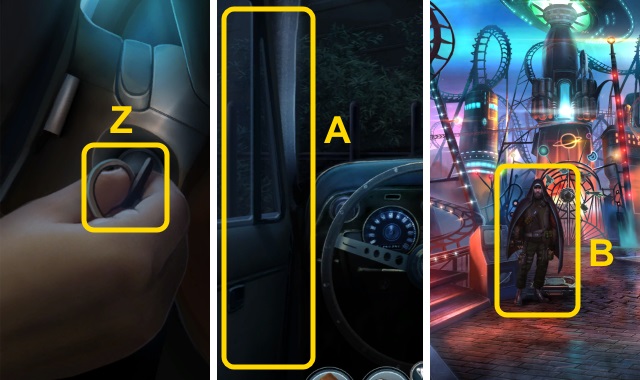
- Turn the key (Z); open the door.
- Open the door (A).
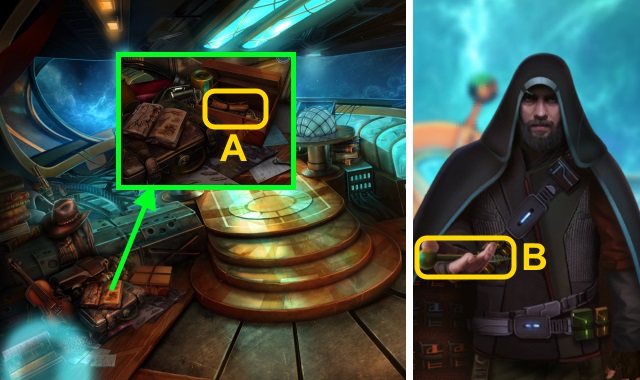
- Walk forward twice.
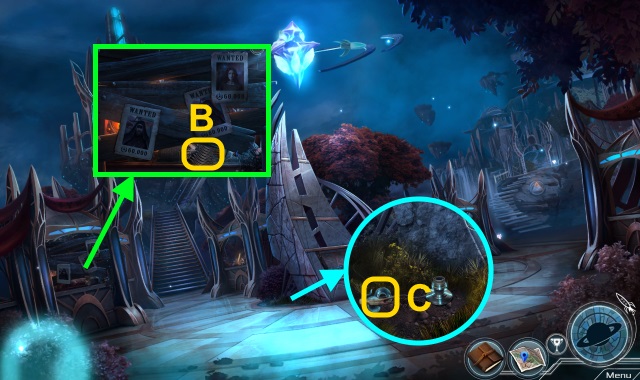
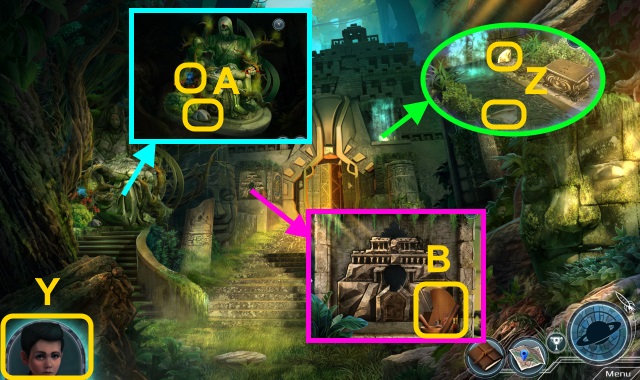
- Examine the scene; talk to Seth (B).
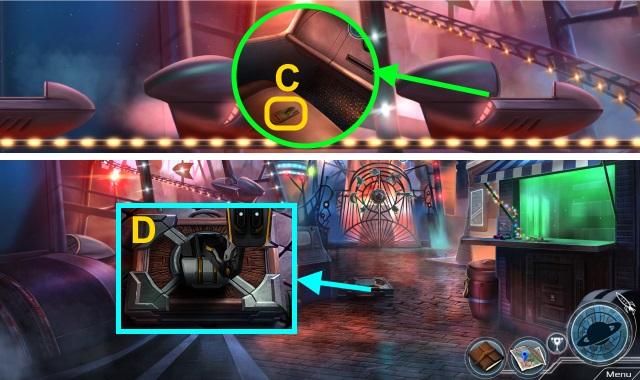
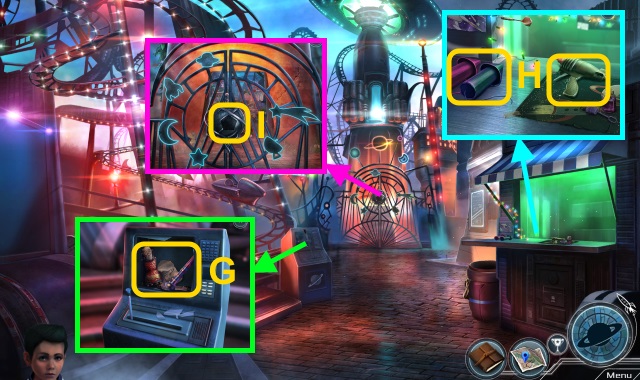
- Take the USED TICKET (C).
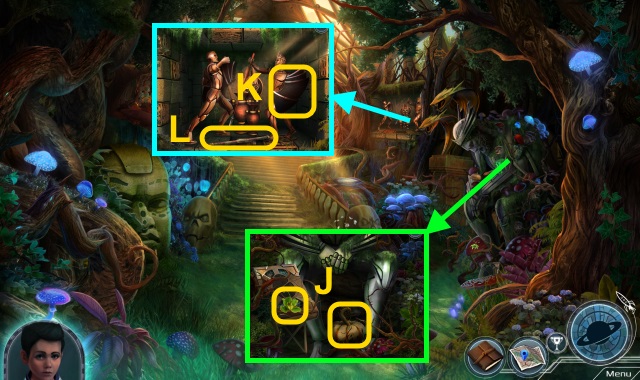
- Examine the briefcase (D).
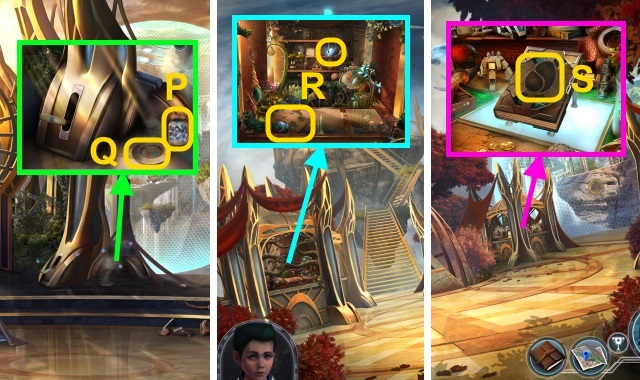
- Take the TICKET PAPER (E). Use the scalpel (F) on the poster (G); move the gun and bubbles (H).
- Collect the METAL TOKENS (I).
- Remove the lid and garbage; take the METAL CAN (J).
- Take the IRON BAR and SATELLITE EMBLEM (K).
- Give the METAL CAN, METAL TOKENS, IRON BAR, and SATELLITE EMBLEM (L); take the ROBOTIC BRIEFCASE.
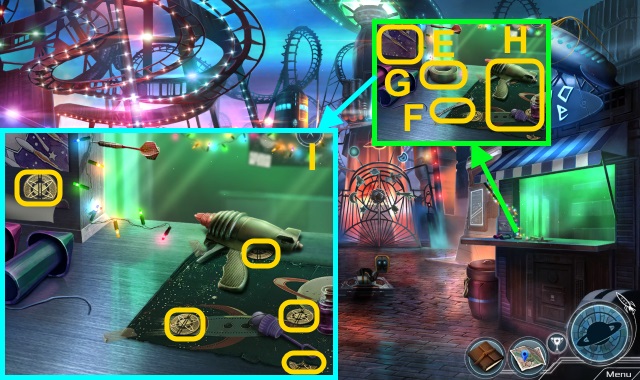
- Combine the ROBOTIC BRIEFCASE, TICKET PAPER, and USED TICKET; examine the briefcase for a mini-game.
- Solution (M).
- Examine the briefcase for a mini-game.
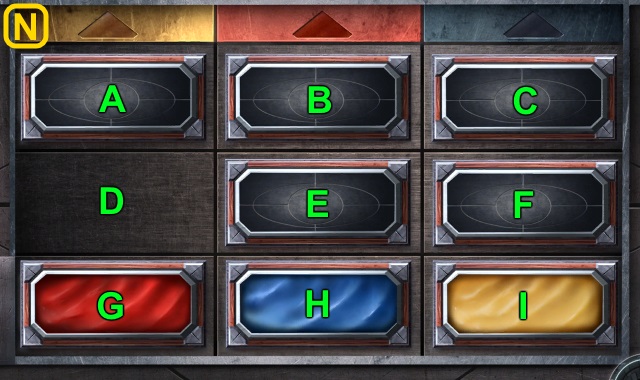
- Solution (N): E-H-G-D-E-F-I-H-G-D-E-H-G-D.
- E-B-C-F-I-H-E-D-A-B-C-F-I-H-G-D-A-B-C-F.
- Examine the briefcase for a mini-game.
- Solution (O).
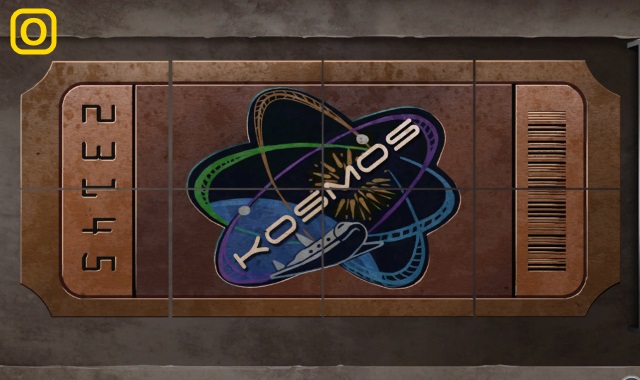
- Take the KOSMOS TICKET and ROBOTIC BRIEFCASE.
- Use the KOSMOS TICKET (P).
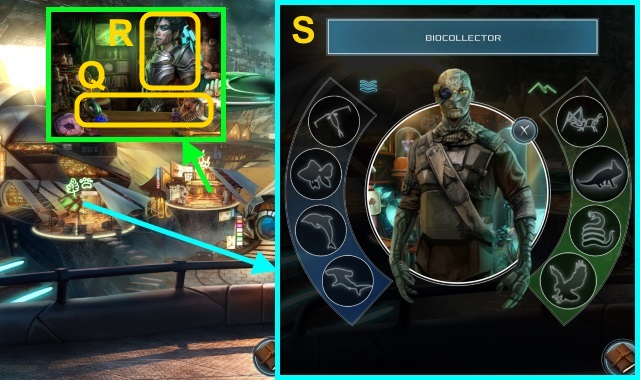
- Play the HOP; receive the GRAVITY STONE (Q).
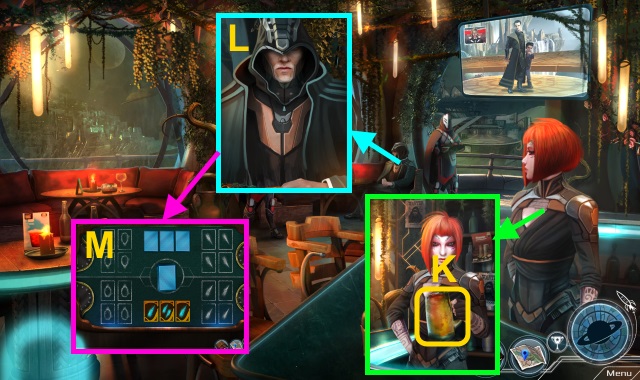
Chapter 2: Nenshe
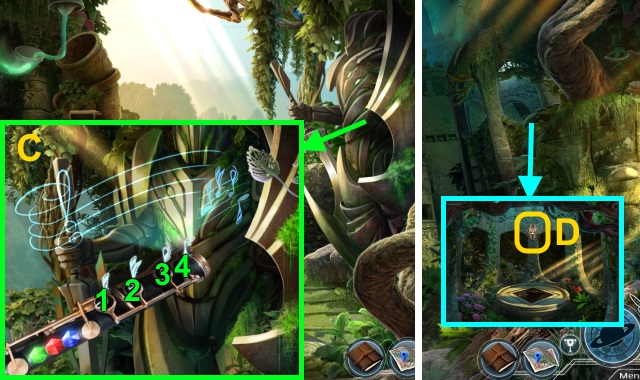
- Examine the scene.
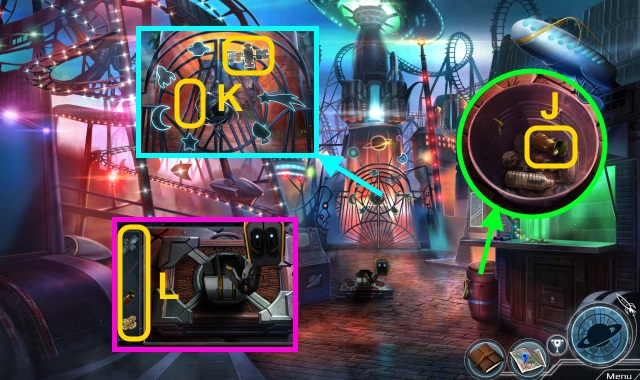
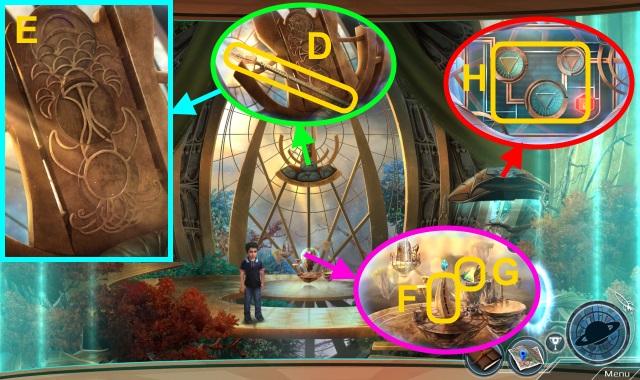
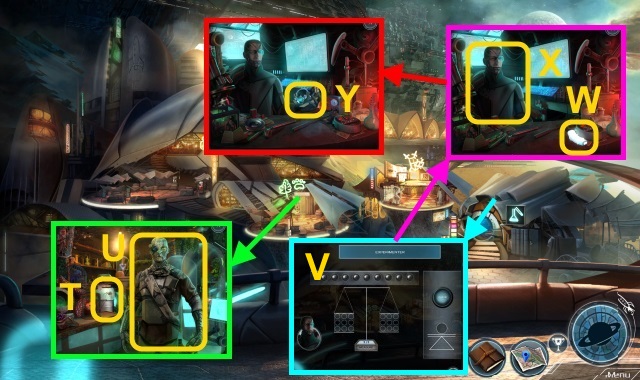
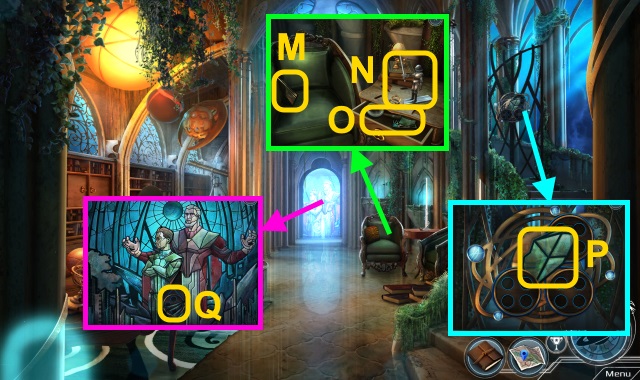
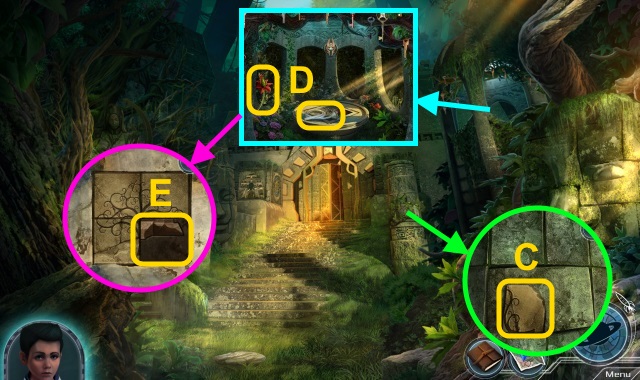
- Take the HOLO PLATE (R); pull the lever (S).
- Place the HOLO PLATE (T); place the ROBOTIC BRIEFCASE (U).
- Examine the reader (V); arrange the lights (W). Pull the lever (X).
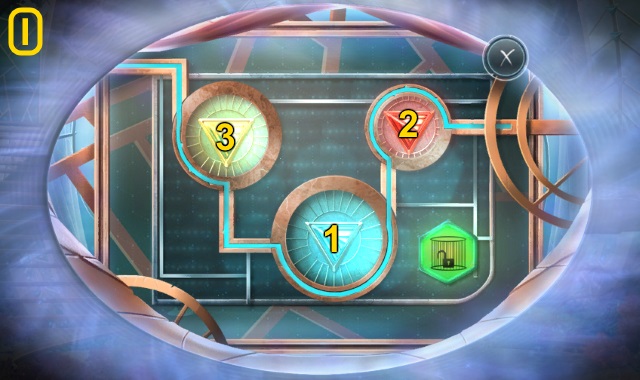
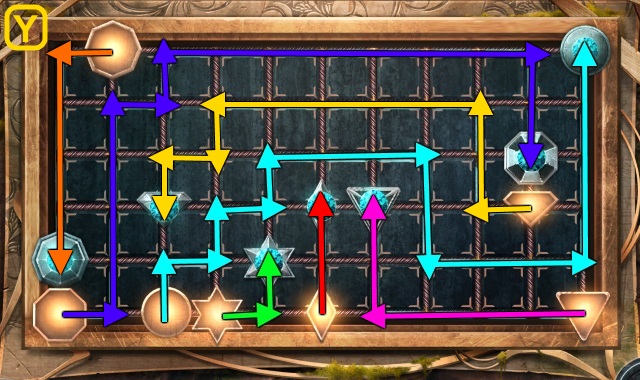
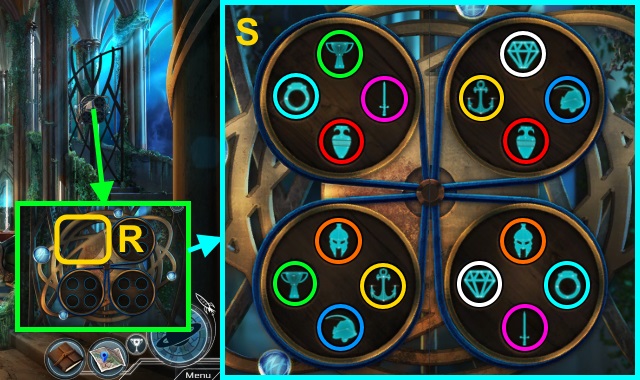
- Use the GRAVITY STONE for a mini-game (Y).
- Solution (Z): B-Ax4-Bx3-A-Bx2-A.
- Walk left.

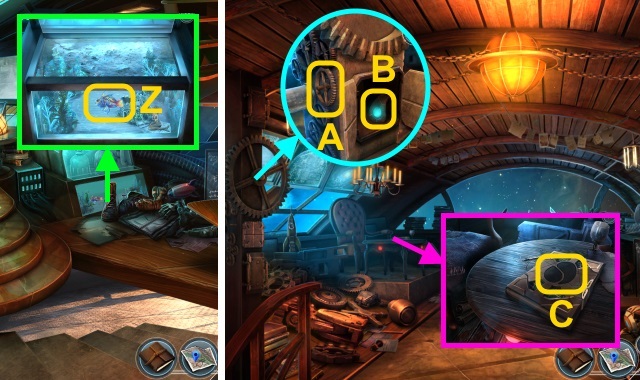
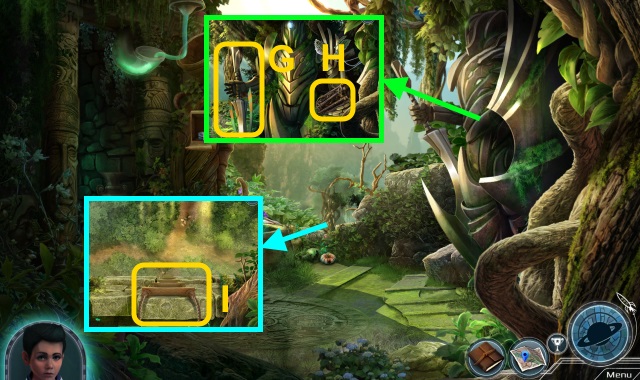
- Talk to Kaine (A).
- Examine the scene 2x.
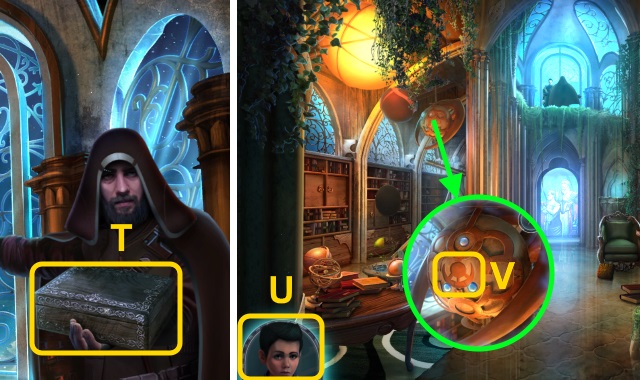
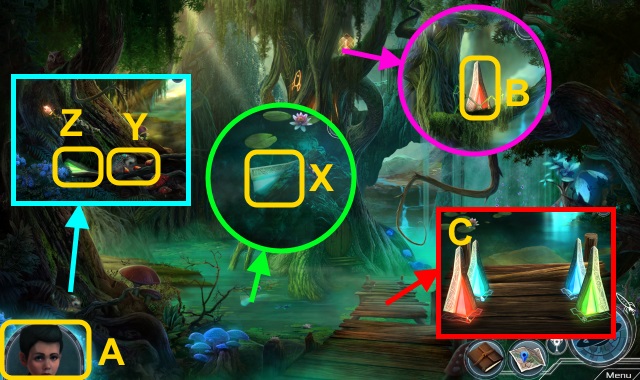
- Take the CEREMONIAL DAGGER and ROBOTIC BRIEFCASE (B).
- Use the CEREMONIAL DAGGER (C); receive the BLUE GEM.
- Take the SCEPTER (D).
- Turn the stones (E); take the RED GEM.
- Take the note; place the SCEPTER (F). Take the YELLOW GEM (G).
- Place the RED GEM, BLUE GEM, and YELLOW GEM for a mini-game (H).
- Solution (I).
- Talk to Thomas (J).
- Walk down twice.
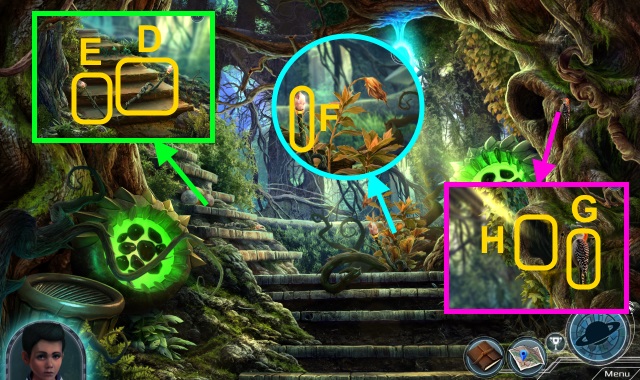
- Take the CRYSTALS (1/6) and BROKEN TONGS (K).
- Scroll left; walk left.
- Use the CEREMONIAL DAGGER (L).
- Play the HOP; receive the GARDEN SHEARS (M).
- Use the GARDEN SHEARS (N); receive the ALIEN PLANT SAMPLE.
- Take the CRYSTALS (2/6), TONGS PART, and JAR (O).
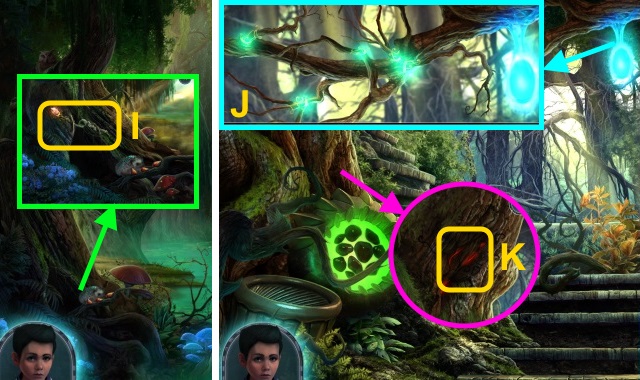
- Combine the BROKEN TONGS and TONGS PART; take the TONGS.
- Open the JAR; place the ALIEN PLANT SAMPLE. Take the BAITED JAR.
- Walk down.
- Use the BAITED JAR; open it. Take the JAR WITH BUGS (P).
- Use the TONGS 3x (Q); receive the GALAXY ORNAMENT HALF and CRYSTALS (3/6).
- Walk left.
- Use the JAR WITH BUGS; take the note, GALAXY ORNAMENT HALF, and CRYSTALS (4/6)-(5/6) (R).
- Place the 2 GALAXY ORNAMENT HALVES (S); open the book for a mini-game.
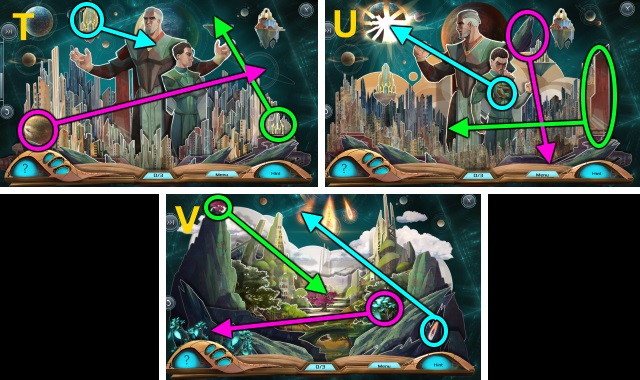
- Solution (T-V).
- Take the FANCY KEY.
- Walk down.
- Use the FANCY KEY; take the CRYSTALS (6/6) and CITY KEY (W).
- Walk left.
- Place the CRYSTALS (6/6) for a mini-game (X).
- Solution (Y).
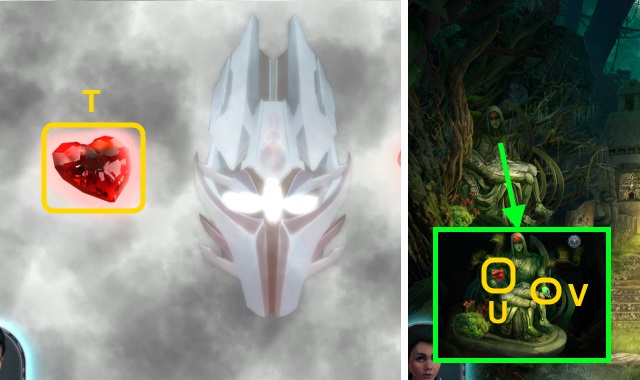
- Take the HEART CRYSTAL.
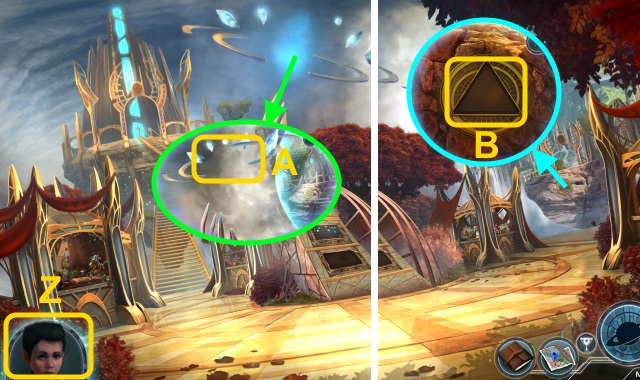
- Examine Thomas (Z).
- Place the HEART CRYSTAL (A).
- Place the CITY KEY (B).
- Walk right.
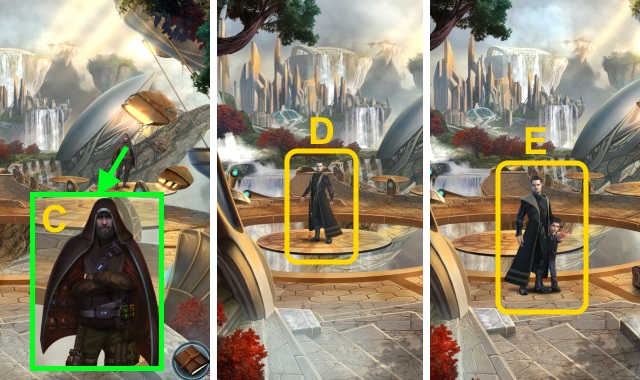
- Talk to Seth; give the ROBOTIC BRIEFCASE (C).
- Talk to Kaine (D).
- Use the CEREMONIAL DAGGER (E).
- Examine the scene.
- Use the CEREMONIAL DAGGER (F); take the SPARE TUBE and DUCT TAPE (G).
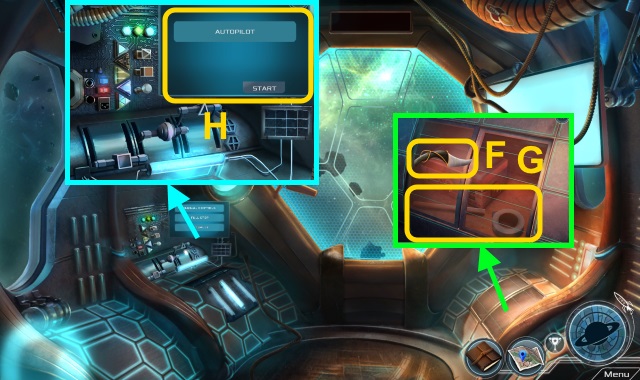
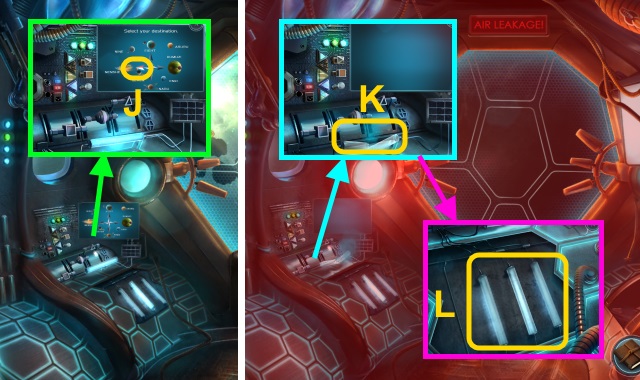
- Select 'Autopilot'; select 'Start' for a mini-game (H).
- Solution (I): (B-A-E)-(A-C-G-D)-(A-B-F-C-E).
- Select the arrow (J).
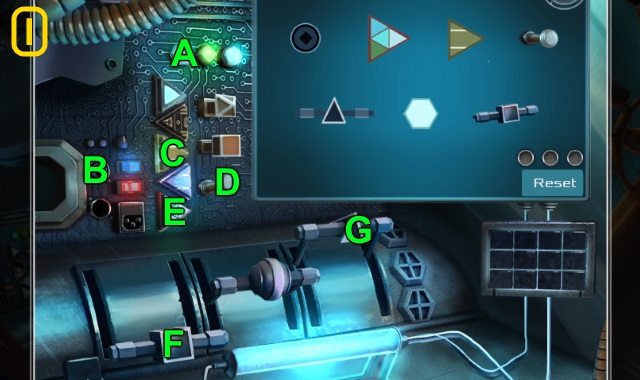
- Examine the tube; place the SPARE TUBE (K).
- Examine the tubes for a mini-game (L).
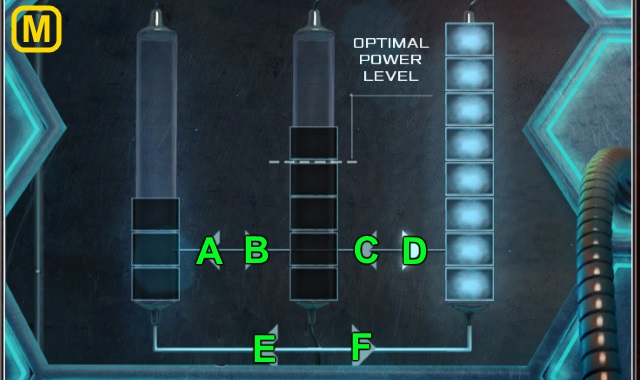
- Solution (M): E-B-E-B-D-B-E-B.
- Take the HANDLE.
- Place the HANDLE; take the NUTRITION BAR and POWDERED JUICE DRINK (N).
- Use the POWDERED JUICE DRINK (O); examine the hole.
- Use the DUCT TAPE (P).
- Play the mini-game; solution (Q): select the symbol until the meter is full.
- Use the PEPPER SPRAY (R).
- Play the mini-game; solution (S): stop the marker when it aligns with the green indicator.
- Take the SKULL STAMP (T).
- Examine the cup; turn the valve (U). Use the NUTRITION BAR (V); take the NUTRITION BAR.
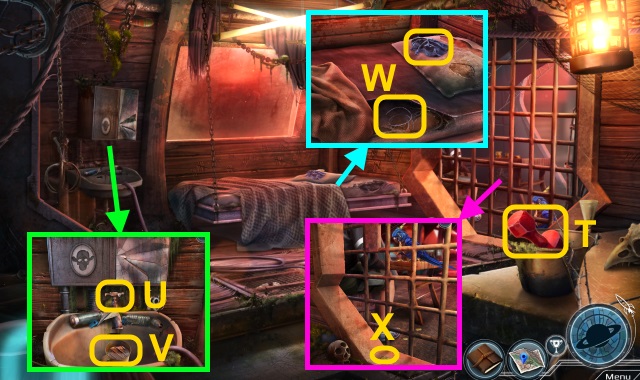
- Move the blanket; examine the bed. Take the COT SPRING and FILTHY RAG (W).
- Examine the COT SPRING 3x; use the NUTRITION BAR. Take the BAITED HOOK.
- Take the GOLDEN COIN (X).
- Use the GOLDEN COIN; examine the hole 2x. Examine the knife 3x (Y); receive the POCKET KNIFE.
- Use the BAITED HOOK (Z); receive the CLEAN HOOK.
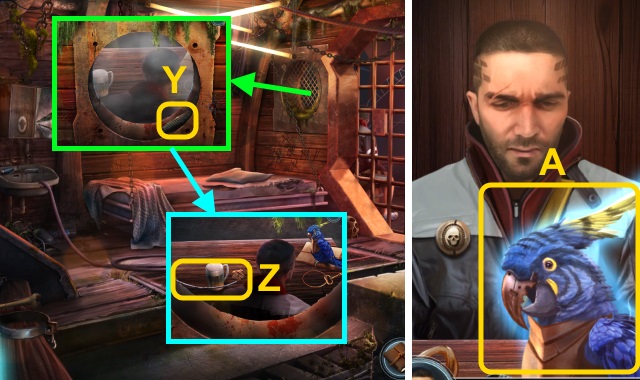
- Examine the bird (A), cup, then man.
- Use the POCKET KNIFE; take the MIRROR SHARD (B).
- Combine the MIRROR SHARD and FILTHY RAG; receive the MIRROR SHARD KNIFE.
- Use the CLEAN HOOK; take the BRIG KEY (C). Use the MIRROR SHARD KNIFE (D).
- Use the BRIG KEY (E).
- Walk right.
- Take the STRONG ROPE; use the SKULL STAMP (F).
- Play the HOP; receive the CROWBAR (G).
- Walk down.
- Use the CROWBAR. Read the notebook (H); take the DISTRESS CODE.
- Remove the valve (I); place the hose (J).
- Use the hose (K); take the IMPROVISED THROWING BLADE and SKULL AND CROSSBONES (L).
- Use the SKULL AND CROSSBONES (M).
- Play the HOP; receive the BLADE PART (N).
- Combine the IMPROVISED THROWING BLADE, BLADE PART, and STRONG ROPE; take the THROWING BLADE.
- Walk right.
- Use the THROWING BLADE for a mini-game. Solution (O): stop both balls inside the target.
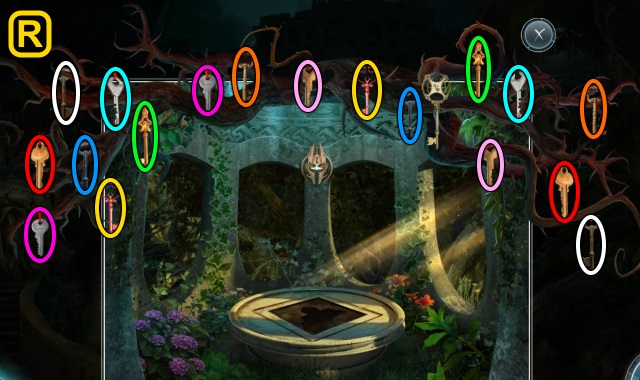
- Select 'General distress call'; use the DISTRESS CODE for a mini-game. Solution (P); examine the arrow for a mini-game.
- Solution (Q): (D-F-G-A-E-B)-(A-C-E-G-B)-(D-B-E).
Chapter 3: The Moon Port
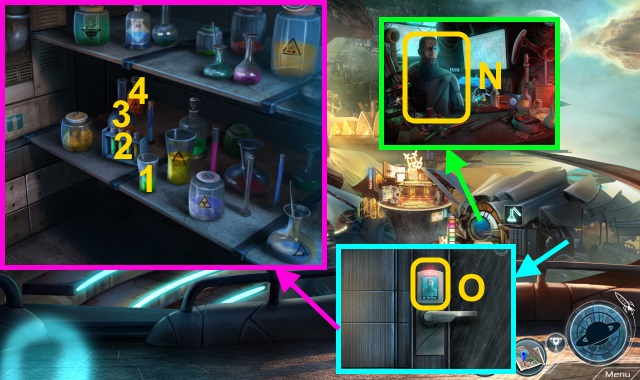
- Scroll right twice (R).
- Take the OLD BINOCULARS and MAP OF NENSHE (S).
- Move the items; take the PICTURE TILE (1/3) (T).
- Walk right.
- Take the CONTAINER and LIGHTER (U).
- Take the SCISSORS (V); use the MAP OF NENSHE (W).
- Take the KAINE STATUE (X). Move the chair; take the THREAD (Y).
- Take the PICTURE TILE (2/3) (Z).
- Walk down.
- Use the SCISSORS; open the box. Take the list and ANIMATED MEDALLION (A).
- Take the CONSOLE HANDLE (B).
- Place the CONSOLE HANDLE; pull the lever (C). Take the PICTURE TILE (3/3) (D).
- Walk right.
- Place the PICTURE TILE (3/3) (E); examine the box for a mini-game.
- Solution (F-G).
- Take the KAINE FIGURINE.
- Combine the ANIMATED MEDALLION and KAINE FIGURINE; take the MERMAID.
- Combine the MERMAID and THREAD; take the MERMAID ON A THREAD.
- Walk down.
- Open the tank; place the MERMAID ON A THREAD (H). Take the DESK DRAWER KEY (I).
- Walk right.
- Use the DESK DRAWER KEY; take the CONSOLE LIGHT (J).
- Walk down.
- Pull the lever (K); place the CONSOLE LIGHT (L).
- Play the HOP; receive the CLUSTER ORNAMENT (M).
- Take the SEVENTY SHEPHERDS (N).
- Go to the Moon Port.
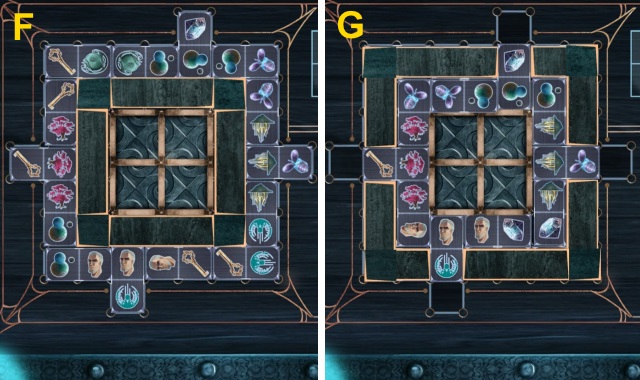
- Examine the shop for a mini-game (O).
- Solution (P).
- Examine the gear and lens (Q); give the KAINE STATUE and OLD BINOCULARS (R). Receive the MAGNIFYING MIRROR and GEAR.
- Examine the shop for a mini-game; solution (S).
- Examine the venom (T); give the SEVENTY SHEPHERDS (U). Take the FISH NET.
- Examine the CONTAINER; remove the flower. Use the FISH NET; take the JAR AND NET.
- Examine the shop for a mini-game; solution is random (V).
- Examine the tube (W); give the MAGNIFYING MIRROR (X). Receive the GRAVITY LIGHT TUBE.
- Examine the item; take the picture (Y).
- Walk down.
- Use the JAR AND NET; take the EXOTIC PET (Z).
- Walk right.
- Place the GEAR (A); take the CLUSTER ORNAMENT PIECE (B).
- Place the CLUSTER ORNAMENT and CLUSTER ORNAMENT PIECE for a mini-game (C).
- Solution (D-F).
- Take the THIRTY SHEPHERDS.
- Go to the Moon Port.
- Give the EXOTIC PET (G).
- Play the HOP; receive the SPIDER VENOM (H).
- Examine the SPIDER VENOM; read the note.
- Walk left.
- Take the GLASS OF WATER (I).
- Talk to the man (J).
- Talk to the woman; give the THIRTY SHEPHERDS. Take the STARBREW (K).
- Give the STARBREW (L); examine the man for a mini-game.
- Solution is random (M); take the BLACKSTONE.
- Walk down.
- Give the BLACKSTONE (N).
- Pour the GLASS OF WATER (O); open the doors.
- Examine the bottles (1-4); scroll down. Use the LIGHTER.
- Take the SCISSORS, SPIDER VENOM, GRAVITY LIGHT TUBE, and EXPERIMENT EQUIPMENT (P); examine the bottles (Q).
- Take the NA BOTTLE (R).
- Walk left.
- Take the BOTTLE OF ALCOHOL for a mini-game (S).
- Solution is random (T).
- Examine the SPIDER VENOM; examine the bottle and tube. Examine the tube; move the tube. Use the NA BOTTLE and BOTTLE OF ALCOHOL on the bottle; take the SPIDER VENOM.
- Walk right.
- Place the GRAVITY LIGHT TUBE; use the EXPERIMENT EQUIPMENT and SPIDER VENOM; take the PORTAL (U).
- Walk down.
- Remove the cover; place the PORTAL (V).
- Go to the Crystal Square.
- Move the plants; take the WOODEN HANDLE (W). Use the SCISSORS (X); take the LAMP LIGHT (Y).
- Place the LAMP LIGHT (Z).
- Play the HOP; receive the BIRD FIGURINE (A).
- Take the LARGE COMB (B).
- Combine the WOODEN HANDLE and LARGE COMB; receive the IMPROVISED RAKE.
- Use the IMPROVISED RAKE 2x; take the CLAW HAMMER PART and SERPENTINE ORNAMENT (C).
- Combine the IMPROVISED RAKE and CLAW HAMMER PART; receive the IMPROVISED CLAW HAMMER.
- Move the papers; use the IMPROVISED CLAW HAMMER. Take the 3 KG WEIGHT (D); examine the box.
- Place the BIRD FIGURINE (E); turn the box. Place the SERPENTINE ORNAMENT; turn the box. Take the ORNAMENTAL GEAR.
- Place the ORNAMENTAL GEAR (F). Take the STAINED GLASS PIECE (1/4) and SOLID SHIELD (G).

- Gather the pieces (H); take the TRIANGULAR PIECES.
- Place the TRIANGULAR PIECES for a mini-game; solution (I).
- Solution (J): avoid the guards.

- Place the 3 KG WEIGHT for a mini-game (K).
- Solution (L).
- Take the PLANET PART and LITTLE SABER.
- Move the pillow take the STAINED GLASS PIECE (2/4) (M).
- Give the LITTLE SABER; examine the ring (N). Take the MAGNIFYING GLASS and STAINED GLASS PIECE (3/4) (O).
- Take the STAINED GLASS PIECE (4/4) (P).
- Place the STAINED GLASS PIECE (4/4); take the WHEEL (Q).
- Place the WHEEL for a mini-game (R).
- Solution (S).
- Walk right.
- Take SETH'S BOX (T).
- Open SETH'S BOX; take the INCOMPLETE PORTAL, note, and SETH'S FAMILY HEIRLOOM.
- Examine Thomas (U).
- Place the PLANET PART (V).
- Play the HOP; receive the MAP OF GERIZA (W).
- Combine the INCOMPLETE PORTAL and MAP OF GERIZA; take SETH'S PORTAL.
- Place SETH'S PORTAL (X).
- Walk left.
Chapter 4: Geriza
- Examine Thomas (Y).
- Take the LASER MIRROR (1/3) and ANIMAL SCAPULA (Z); examine Thomas.
- Take the BLUE FLOWER and STONE (A).
- Take the EMPTY PALETTE (B).
- Move the plants; take the TABLE TILE (C). Use the ANIMAL SCAPULA and STONE; take the TEMPLE RELIEF (1/2), BIRD WING (1/2), and PAPER WITH PATTERNS.
- Take the RED FLOWER and HOSE (D); examine the table.
- Place the TABLE TILE (E). Take the TEMPLE RELIEF (2/2).
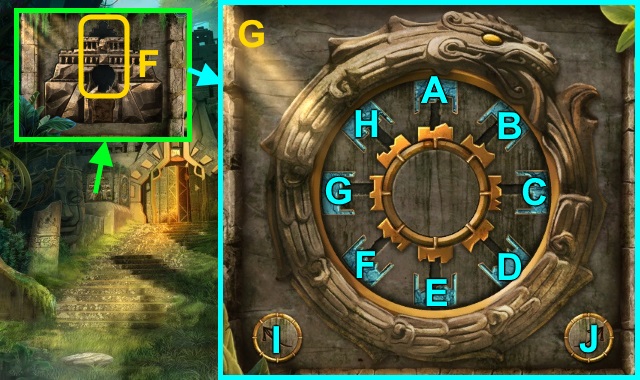
- Place the TEMPLE RELIEF (2/2) (F); take the TEMPLE LOCK PART. Scroll left; place the TEMPLE LOCK PART for a mini-game.
- Solution (G): Ix2-F-E-Ix3-B-C-D-Ix2-A-H-G.
- Walk forward.
- Use SETH'S FAMILY HEIRLOOM for a mini-game (H); solution.
- Play the HOP; receive the STICKY MUSHROOM (I).
- Scroll down; take the GOURD and GREEN FLOWER (J).
- Place the SOLID SHIELD (K); take the METAL ROD and SOLVENT BOTTLE (L).
- Combine the EMPTY PALETTE, RED FLOWER, BLUE FLOWER, GREEN FLOWER, and SOLVENT for a mini-game.
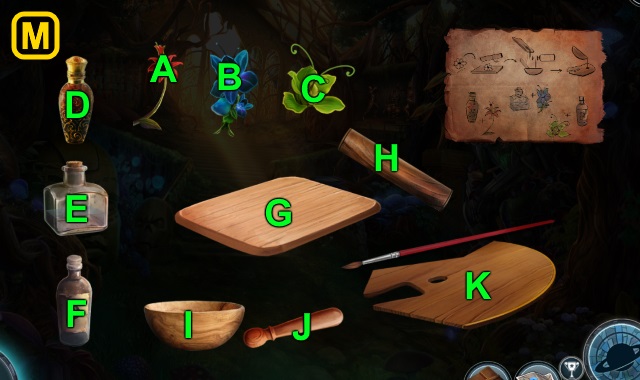
- Solution: (B-G)-(H-G)-(G-I)-(E-I)-(J-I).
- (I-K)-(A-G)-(H-G)-(G-I)-(D-I)-(J-I)-(I-K).
- (C-G)-(H-G)-(G-I)-(F-I)-(J-I)-(I-K).
- Take the PALETTE WITH PAINT.
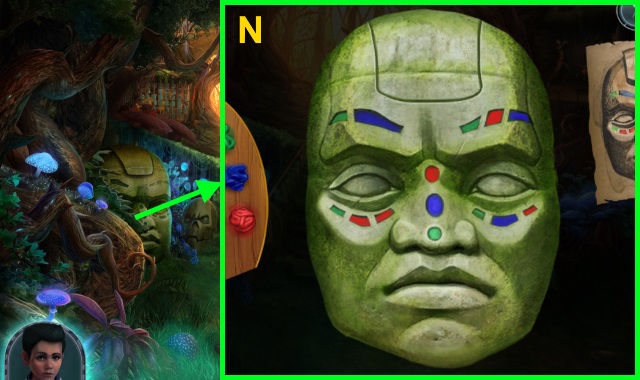
- Use the PAPER WITH PATTERNS and PALETTE WITH PAINT for a mini-game; solution (N).
- Take the BIRD WING (2/2) and CAGED LADYBUG.
- Take the LASER MIRROR (2/3) (O). Place the BIRD WING (2/2); take the FAKE KEY (P).
- Walk down.
- Place the FAKE KEY for a mini-game (Q).
- Solution (R).
- Take the GATE KEY.
- Walk forward.
- Use the GATE KEY (S); open the door.
- Walk forward.
- Take the FIGURE DRAWING and BEAD (1/3) (T).
- Use the METAL ROD; take the POT SHARDS (U).
- Combine the GOURD, SCISSORS, STICKY MUSHROOM, and POT SHARDS; take the WATER GOURD.
- Walk down twice.
- Examine Thomas (V).
- Use the WATER GOURD (W); receive the FULL GOURD. Examine Thomas.
- Walk forward.
- Scroll up; use the FULL GOURD (X). Take the STONE CHARTER FRAGMENT (Y).
- Walk forward.
- Examine Thomas (Z).
- Take the BEAD (2/3) (A); use the HOSE (B). Examine Thomas.
- Place the STONE CHARTER FRAGMENT (C); take the FIGURINE SPEAR.
- Walk down.
- Place the FIGURINE SPEAR (D). Move the pitchers (E); take the EMPTY PITCHER.
- Walk forward.
- Take the BOWL DECORATION (1/3) (F). Use the EMPTY PITCHER (G); receive the PITCHER OF ACID.
- Walk down twice.
- Pour the PITCHER OF ACID; take the BEAD (3/3) and MUNIMENT KEY (H).
- Walk forward.
- Place the BEAD (3/3). Take the LASER MIRROR (3/3) and FRUITS (1/4)-(2/4) (I).
- Walk forward.
- Place the MUNIMENT KEY; take the LOVE STATUE KEY (J).
- Place the LASER MIRROR (3/3) and FIGURE DRAWING for a mini-game (K).
- Solution (L).
- Take the TEMPLE BOOK ORNAMENT (M).
- Examine Thomas (N).
- Move the hose (O).
- Take the FRUITS (3/4) (P).
- Walk down twice.
- Place the LOVE STATUE KEY; use SETH'S FAMILY HEIRLOOM for a mini-game. Solution (Q).
- Take the LOVE KEY.
- Walk forward.
- Examine the statue (R); place the LOVE KEY for a mini-game.
- Solution (S): Ax2-B-Cx2-Dx2-Ex2.
- Fx2-Gx2-H-I-J-K-L-Mx2-N.
- Take the LOVE STATUE KEY (T).
- Walk down.
- Place the LOVE STATUE KEY (U); take the GREED STATUE KEY (V).
- Walk forward.
- Place the GREED STATUE KEY; use SETH'S FAMILY HEIRLOOM for a mini-game. Solution (W).
- Take the GREED KEY.
- Walk forward.
- Use the urns on the well (1-3).
- Examine the statue (X); place the GREED KEY for a mini-game. Solution is random (Y).
- Take the NECKLACE (Z).
- Walk down.
- Place the NECKLACE (A); take the COURAGE STATUE KEY (B).
- Walk forward.
- Place the COURAGE STATUE KEY; use SETH'S FAMILY HEIRLOOM for a mini-game. Solution (C).
- Take the COURAGE KEY.
- Walk down twice.
- Examine the statue (D); use the COURAGE KEY for a mini-game.

- Solution (E).
- Take the COURAGE IDOL (F).
- Walk forward twice.
- Place the COURAGE IDOL (G); take the SWORD OF COURAGE and ROPE LADDER (H).
- Examine the wall; use the ROPE LADDER (I).
- Go forward.
- Move the mushrooms; take the BOWL DECORATION (2/3) (J).
- Take the TEMPLE BOOK ORNAMENT and SMALL BRANCH (K).
- Examine Thomas (L).
- Take the DRAGONFLY FIGURINE (M).
- Examine the crystal (N); examine Thomas.
- Play the HOP; receive the AIR SYMBOL (O).
- Walk down.
- Use the MAGNIFYING GLASS and SMALL BRANCH; receive the LIT BRANCH (P).
- Walk down.
- Scroll down; place the 2 TEMPLE BOOK ORNAMENTS for a mini-game (Q).
- Solution (R-T).
- Take the SWORD OF COURAGE PART.
- Combine the SWORD OF COURAGE and SWORD OF COURAGE PART; take the GREAT SWORD.
- Walk down.
- Examine Thomas (U).
- Use the DRAGONFLY FIGURINE (V); take the FRUITS (4/4) and BOWL DECORATION (3/3).
- Walk forward twice.
- Place the BOWL DECORATION (3/3) (W); take the STRONG NET.
- Walk forward.
- Use the STRONG NET (X); take the WATER SYMBOL.
- Place the FRUITS (4/4) (Y); take the EARTH SYMBOL (Z).
- Examine Thomas (A).
- Use the LIT BRANCH; take the FIRE SYMBOL (B).
- Place the AIR SYMBOL, WATER SYMBOL, EARTH SYMBOL, and FIRE SYMBOL (C).
- Walk forward.
- Take the PORTAL BRANCH (1/5) (D). Examine the spores; take the PORTAL BRANCH (2/5) (E).
- Take the PORTAL BRANCH (3/5) (F).
- Take the SMALL WOODPECKER (G). Use the LIT BRANCH; take the PORTAL BRANCH (4/5) (H).
- Walk down.
- Use the SMALL WOODPECKER (I); take the PORTAL BRANCH (5/5).
- Walk forward.
- Place the PORTAL BRANCH (5/5) (J).
- Use the GREAT SWORD (K).
- Examine the flower (L).
- Play the HOP (M).
- Examine Thomas (N).
- Walk forward.
Chapter 5: The Amusement Park
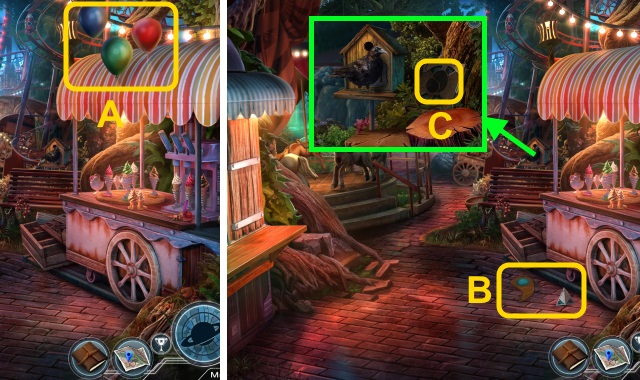
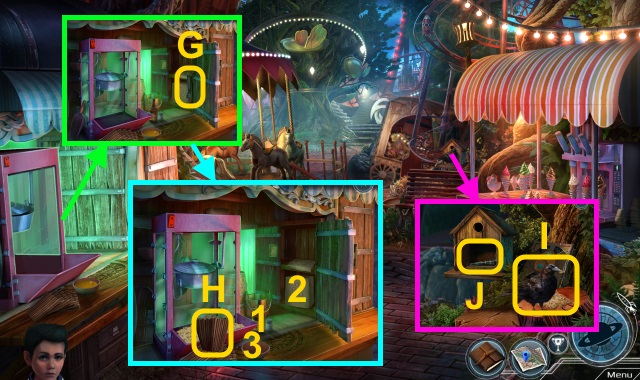
- Talk to Seth; take the FELT PEN, TEARDROP ORNAMENT, and SAFE CODE (O).
- Move the debris; take the REGULAR PENCIL (P).
- Take the SILVER BAR and OLD STRAP (Q).
- Take the FOUNTAIN PEN (R); place the OLD STRAP for a mini-game (S).
- Solution (T).
- Move the papers; take the PICTURE PART.
- Use the SILVER BAR; take the QUILL PEN (U).
- Examine the box; place the FOUNTAIN PEN, FELT PEN, REGULAR PENCIL, and QUILL PEN (V).
- Move the items; take KAINE'S PHOTOGRAPH (W).
- Place the PICTURE PART and KAINE'S PHOTOGRAPH for a mini-game (X).
- Solution (Y).
- Take the SHELF KEY.
- Use the SELF KEY; take the FIRST AID KIT (Z).
- Use the FIRST AID KIT. Use the bandage and medicine (A); take the DEVICE KEY (B).
- Use the DEVICE KEY; take SETH'S RECORDING (C).
- Give SETH'S RECORDING (A).
- Play the HOP; receive the AMUSEMENT PARK INSET (D).
- Examine Thomas (E).
- Walk forward.
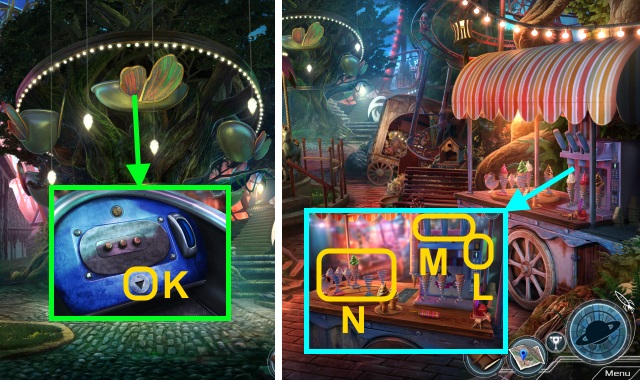
- Take the MATCHES (F).
- Use the METAL ROD; take the THEATER PUPPET, SAFE CODE SNIPPET (1/2), and ROSE BOAT LEVER (G).
- Take the BALL GUN and FIREWORKS (1/4)-(2/4) (H).
- Place the AMUSEMENT PART INSET (I).
- Walk forward.
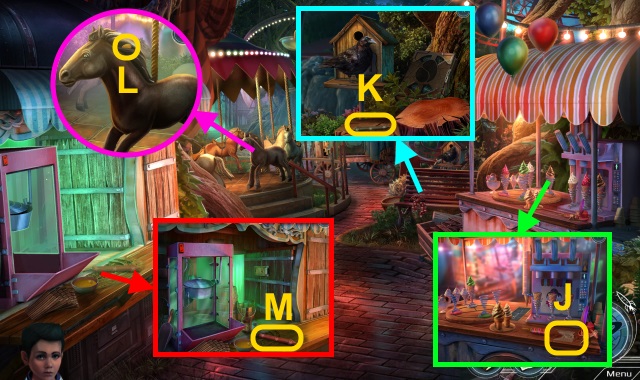
- Move the items; take the SAFE CODE SNIPPET (2/2) (J).
- Combine the SAFE CODE and SAFE CODE SNIPPET (2/2); take the SAFE CODE.
- Take the FIREWORKS (3/4) (K).
- Take the COIN (1/3) (L).
- Take the FIREWORKS (4/4) (M).

- Move the cloth and papers; take the PUPPET RIGHT LEG and STURDY ROPE (N).
- Place the FIREWORKS (4/4); use the STURDY ROPE and MATCHES (O).
- Play the HOP; receive the SADDLE (P).
- Walk down.
- Move the bubbles and poster; place the SAFE CODE for a mini-game (Q).

- Solution (R): A-Bx3-C-Dx3.
- Take the YELLOW BOAT LEVER.
- Walk forward twice.
- Place the ROSE BOAT LEVER; pull it (S).
- Scroll left; take the HORSE BRIDLE (T).
- Scroll left. Place the YELLOW BOAT LEVER; pull it (U).
- Walk down.
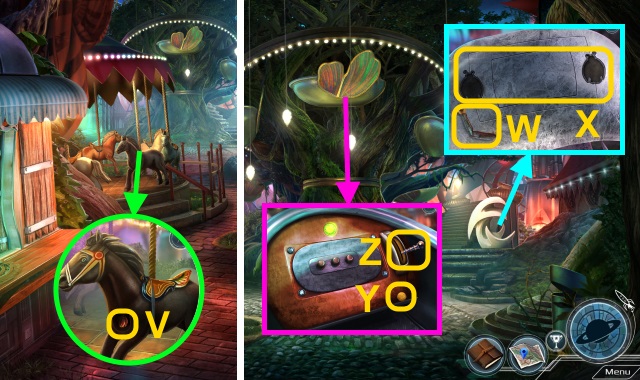
- Place the SADDLE and HORSE BRIDLE; take the BUG INSET (V).
- Walk forward.
- Take the PUPPET RIGHT ARM (W); place the CAGED LADYBUG and BUG INSET (X). Take the BAG OF MARBLES and ORANGE BOAT LEVER.
- Combine the BALL GUN and BAG OF MARBLES; take the LOADED GUN.
- Scroll left twice; take the COIN (2/3) (Y). Place the ORANGE BOAT LEVER; pull it (Z).
- Walk down.
- Use the LOADED GUN (A).
- Take the TEARDROP ORNAMENT and BOAT KEY (B).
- Place the 2 TEARDROP ORNAMENTS for a mini-game (C).
- Solution (D-F).
- Take the CUPBOARD KEY.
- Use the CUPBOARD KEY; take the PUPPET LEFT LEG (G).
- Pour the oil, kernels, and butter into the pot (1-3); turn the machine on. Use the scoop; take the BAG OF POPCORN (H).
- Give the BAG OF POPCORN (I). Open the door; take the TEAL BOAT LEVER (J).
- Walk forward.
- Scroll right; use the BOAT KEY (K). Take the COIN (3/3).
- Walk down.
- Use the COIN (3/3) (L); pull the levers (M).
- Place the ice cream cones for a mini-game (N).

- Solution: B-A-C-D-E-B-C.
- Take the PUPPET LEFT HAND.
- Combine the THEATER PUPPET, PUPPET LEFT LEG, PUPPET RIGHT LEG, PUPPET LEFT HAND, and PUPPET RIGHT ARM; take the THEATER PUPPET.
- Walk forward.
- Place the THEATER PUPPET (P); pull the lever (Q).
- Play the HOP; receive the BLUE BOAT LEVER (R).
- Place the BLUE BOAT LEVER; pull it (S).
- Scroll left twice. Place the TEAL BOAT LEVER; pull it (T).
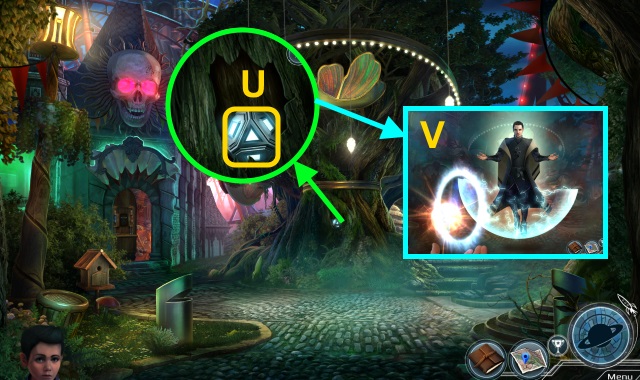
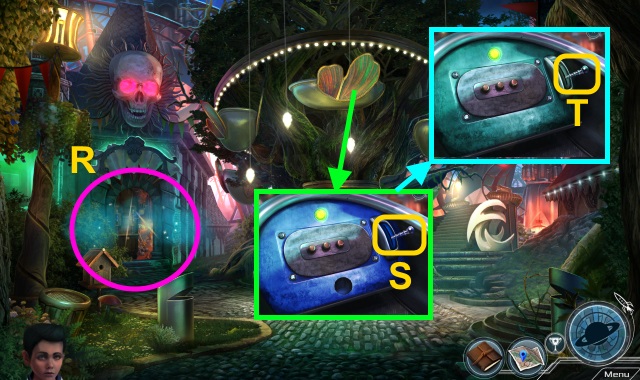
- Take the ANCIENT DEVICE for a mini-game (U).
- Solution (V): use the portal to deflect the energy balls. If you get hit, you must select the meter until to fill it.

- Solution (W).
- Congratulations! You have completed Beyond: Star Descendant.
Created at: 2016-12-11