

Walkthrough Menu
- General Tips
- Chapter 1: Reggie
- Chapter 2: The Medallion
- Chapter 3: The Contagion
- Chapter 4: The Sentinel
General Tips
- This is the official guide for Beyond: The Fading Signal.
- This guide won't tell you when to zoom into a location; the screenshots show each zoom scene.
- Hidden-object puzzles are referred to as HOPs. Only the locations of the HOPs will be shown.
- Use the Map to fast travel to a location.
Chapter 1: Reggie
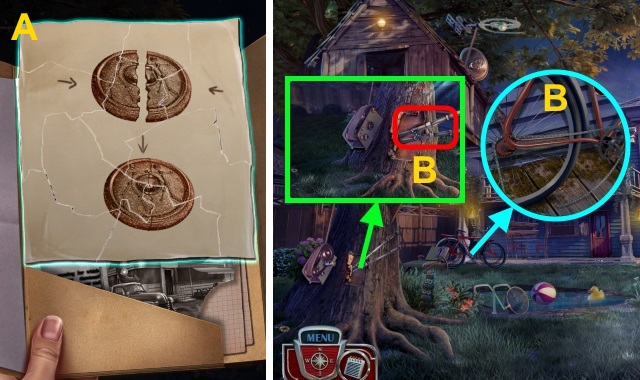
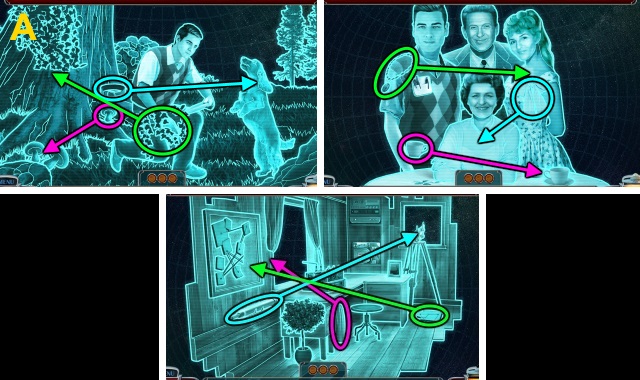
- Read; place pieces (A). Take MEDALLION HALF.
- Take GARDEN SHEARS and BIKE CHAIN (B).
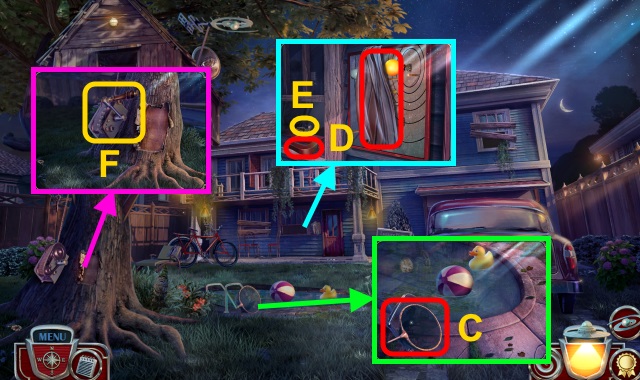
- Take NET (C).
- Take CLEANING CLOTH and MAGNET (D); use GARDEN SHEARS (E). Receive METAL POLE; take WOODEN HANDLE.
- Talk.
- Place BIKE CHAIN and WOODEN HANDLE (F); pull.
- Go left.
- Examine scene.
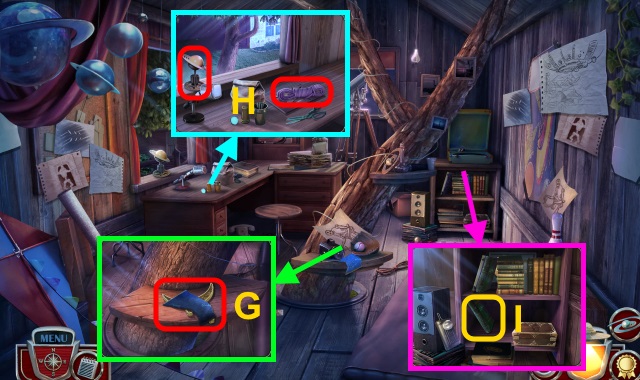
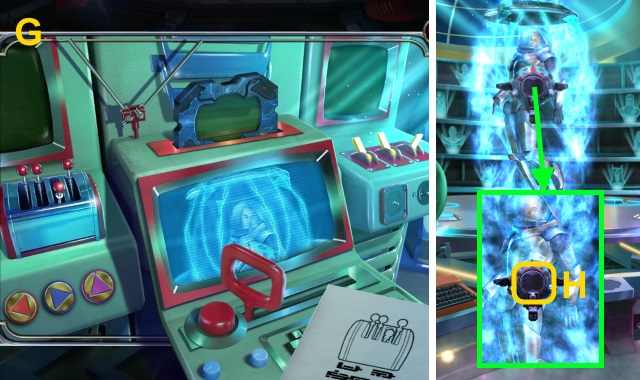
- Move items; take STAR MAP PIECE (1/3) and ORNAMENT (G).
- Move items; take PIECE OF ROPE and ASTRONOMICAL ORNAMENT (H).
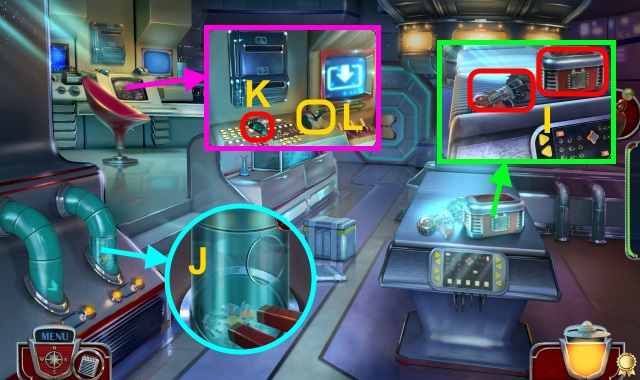
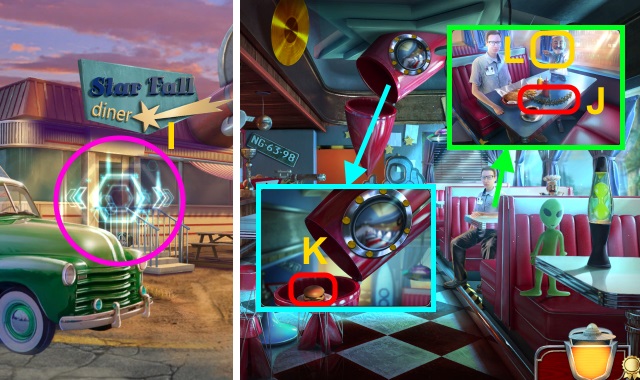
- Move books; read book (I). Take STAR MAP PIECE (2/3) and ORNAMENT.
- Walk down.
- METAL POLE and PIECE OF ROPE on NET; receive FISHING NET.
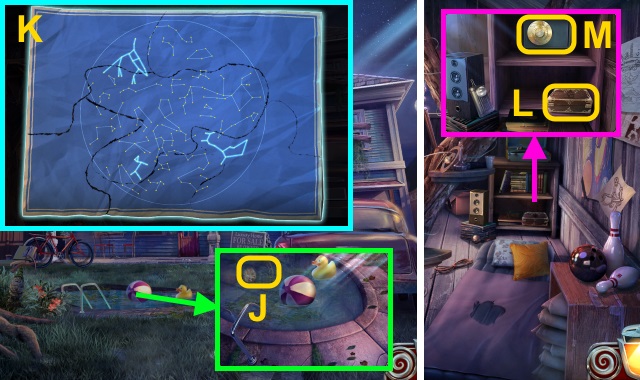
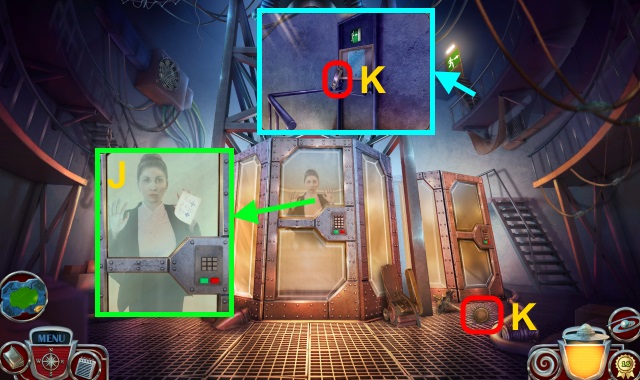
- Use FISHING NET (J); take ASTRONOMICAL ORNAMENT.
- Open ASTRONOMICAL ORNAMENT; take INCOMPLETE STAR MAP and MICROSCOPE EMBLEM.
- Examine INCOMPLETE STAR MAP; place pieces (K). Take COMPLETE STAR MAP.
- Walk left.
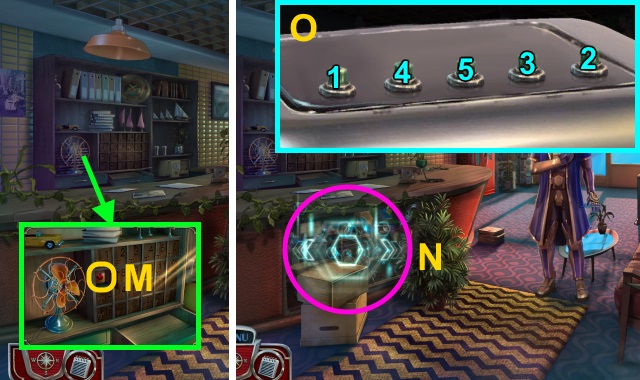
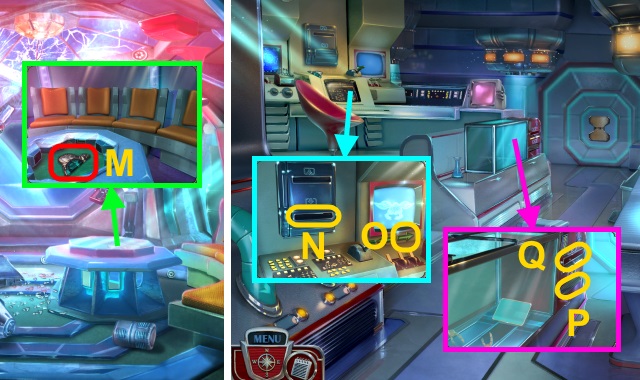
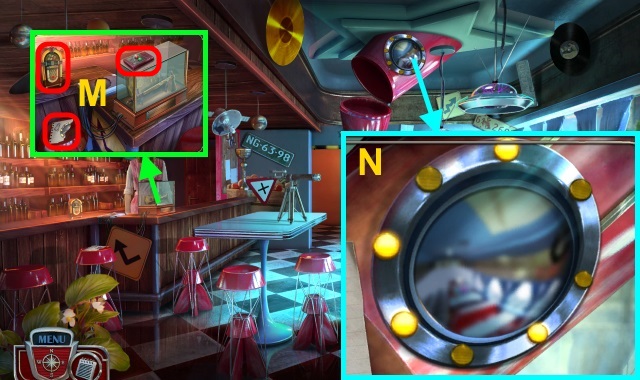
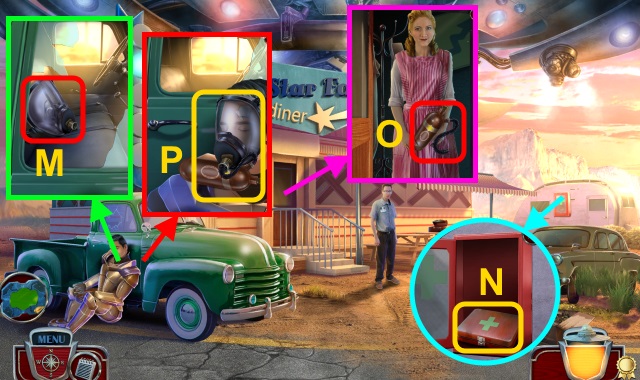
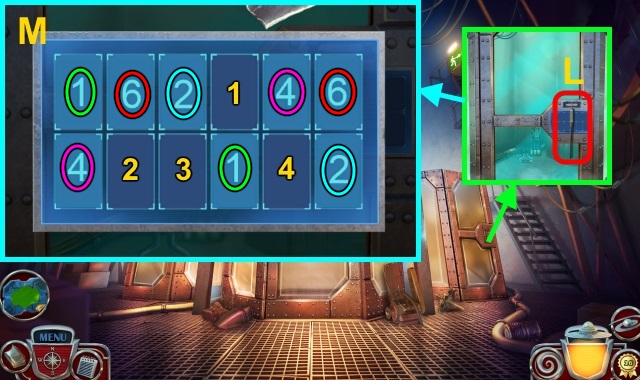
- Examine (L); place MICROSCOPE EMBLEM. Open; take ASTRONOMICAL ORNAMENT and ORNAMENT. Move books; use COMPLETE STAR MAP (M).
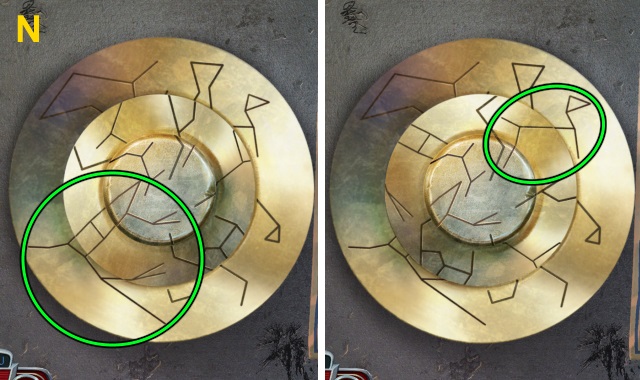
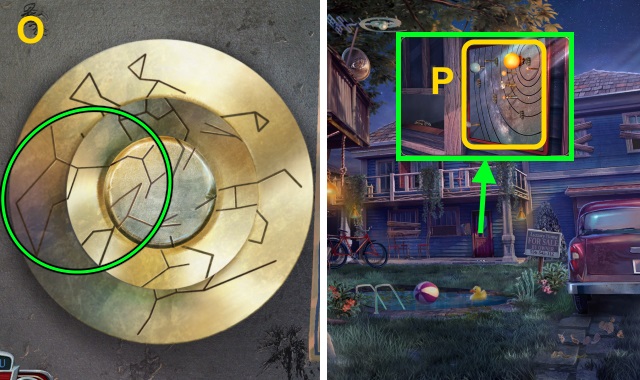
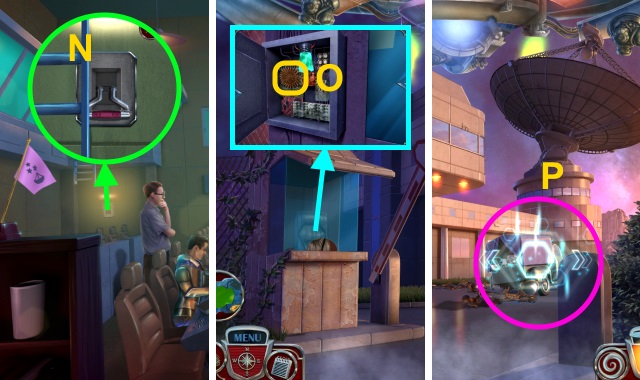
- Solution (N-O).
- Open; take TUBE OF GLUE and MODEL ROCKET.
- Walk down.
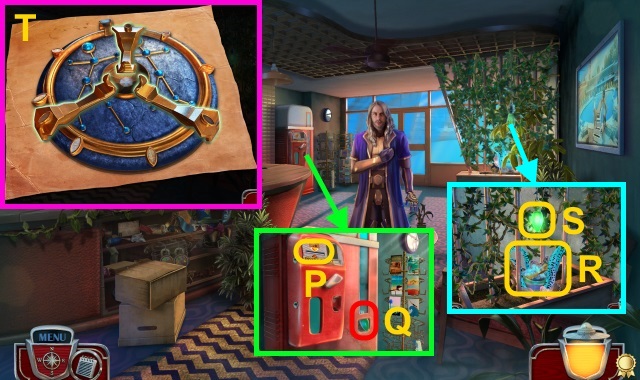
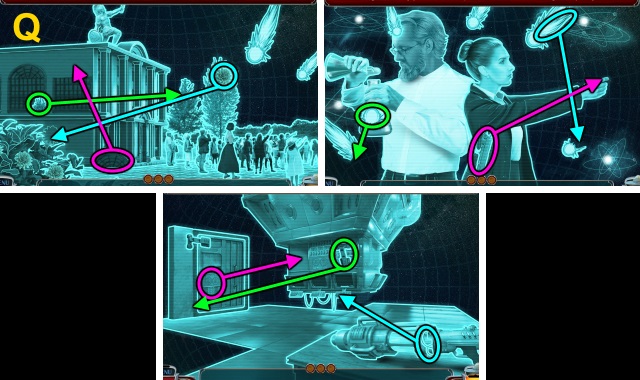
- Place 3 ASTRONOMICAL ORNAMENTS and MODEL ROCKET (P).
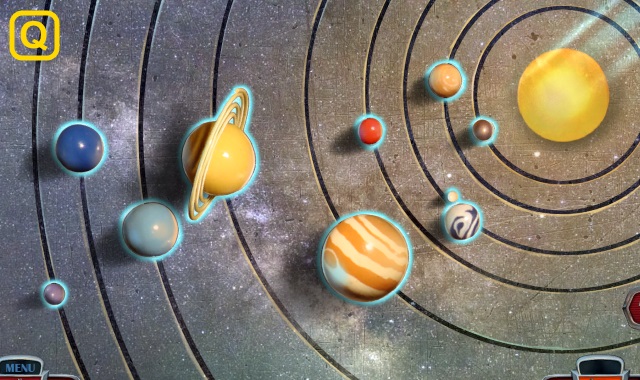
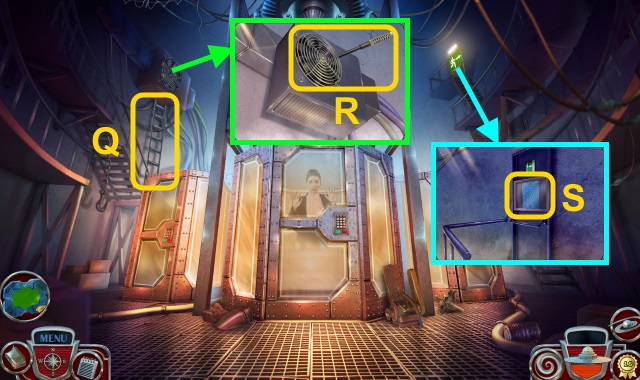
- Solution (Q).
- Take ORNAMENT.
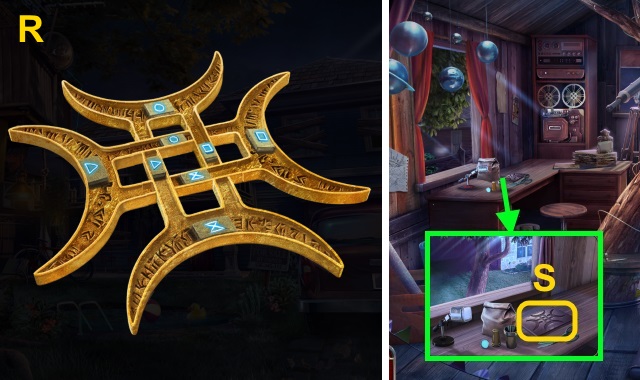
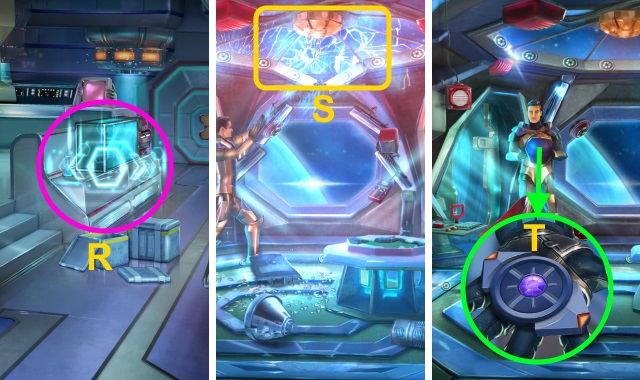
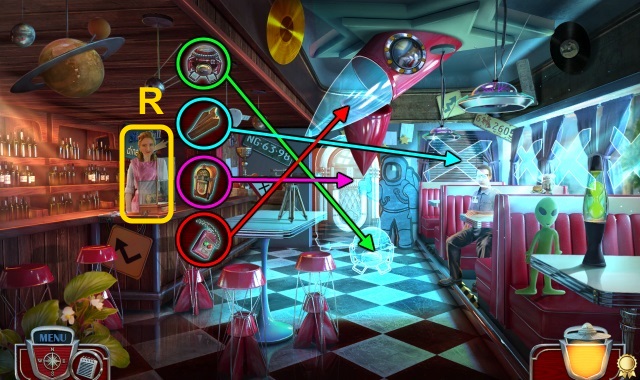
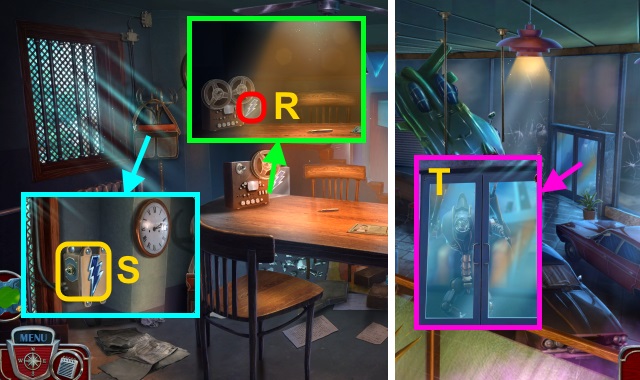
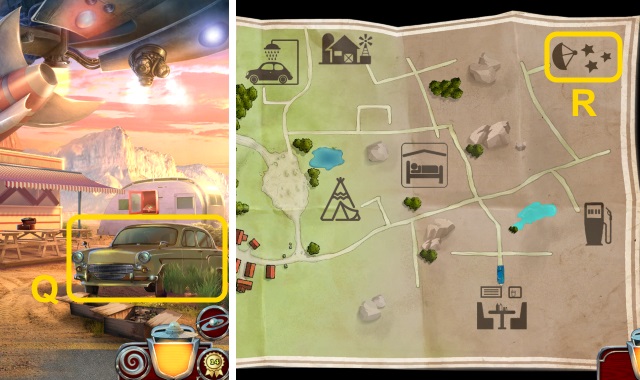
- Examine ORNAMENT; place pieces (R).
- Walk left.
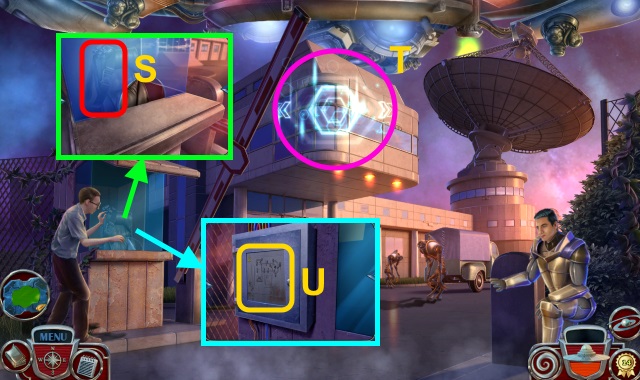
- Place ORNAMENT (S).
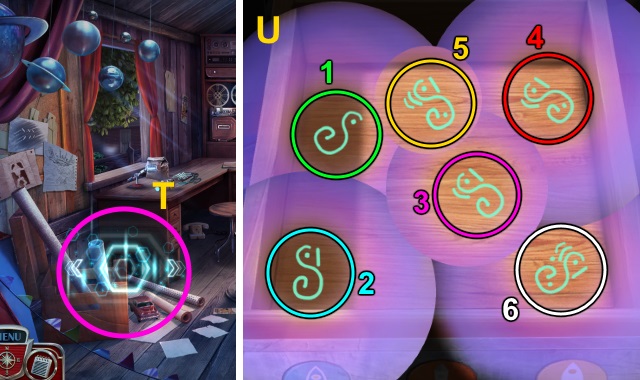
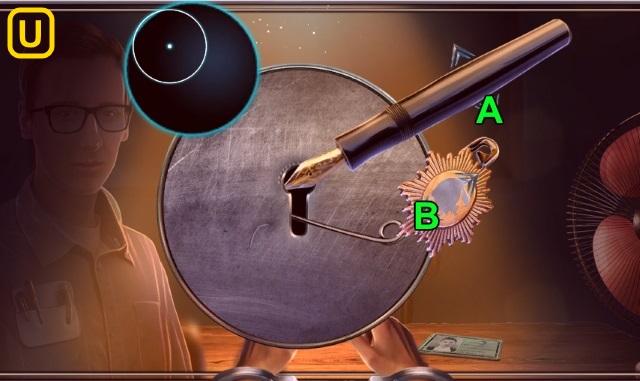
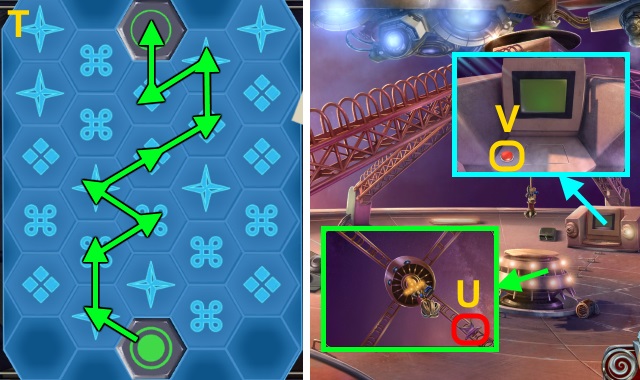
- Play HOP; receive MEDALLION HALF (T).
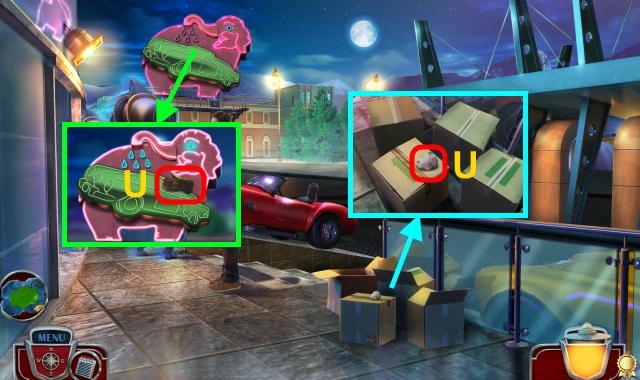
- HOP solution (U).
- Combine 2 MEDALLION HALVES; take MEDALLION.
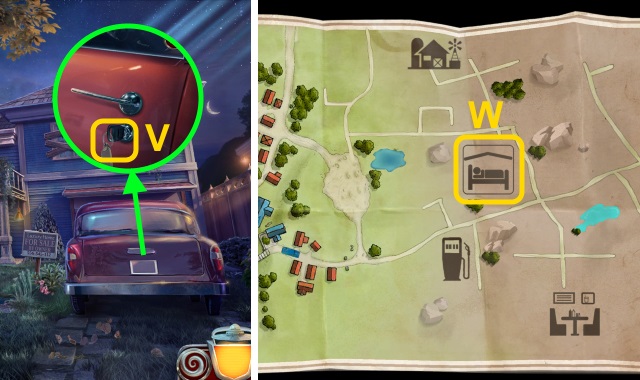
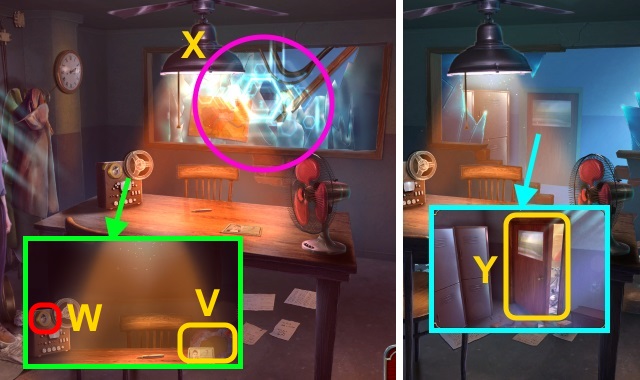
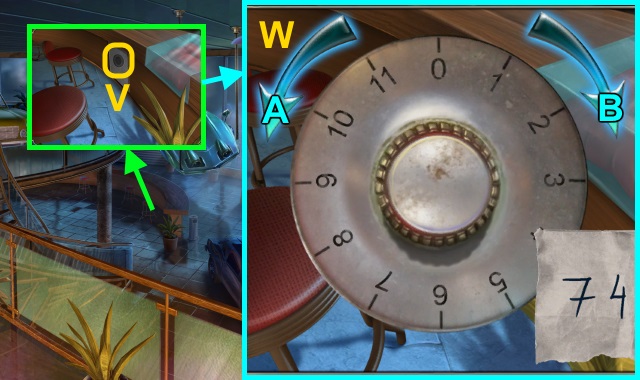
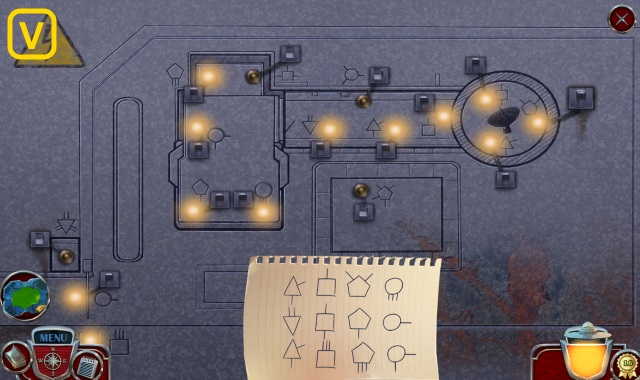
- Use CAR KEYS (V).
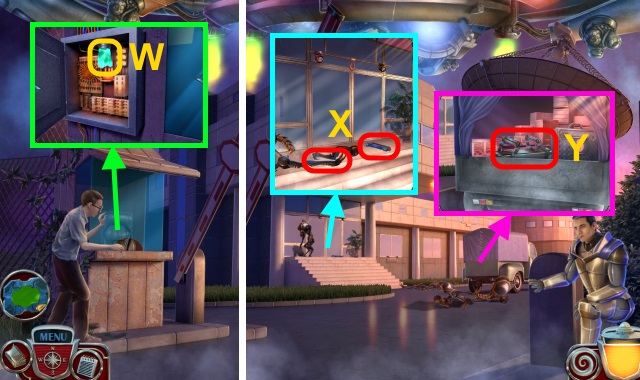
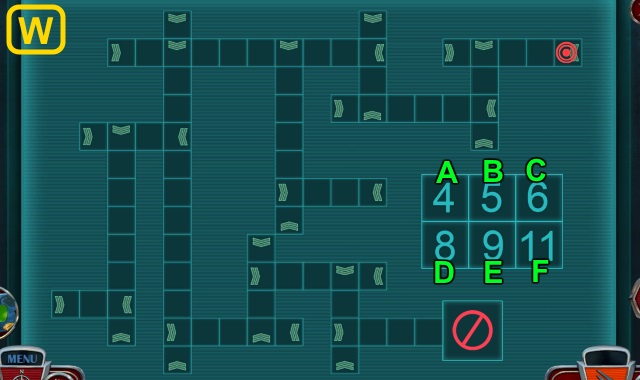
- Select (W).
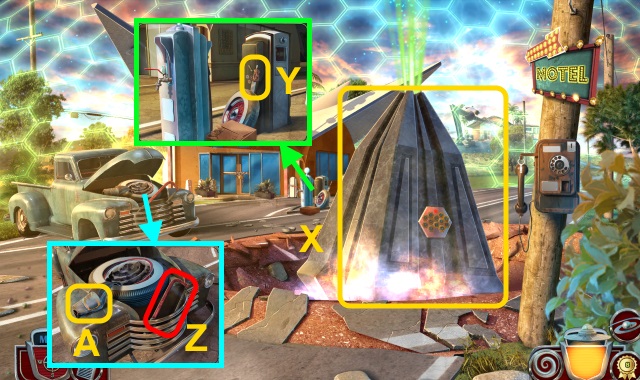
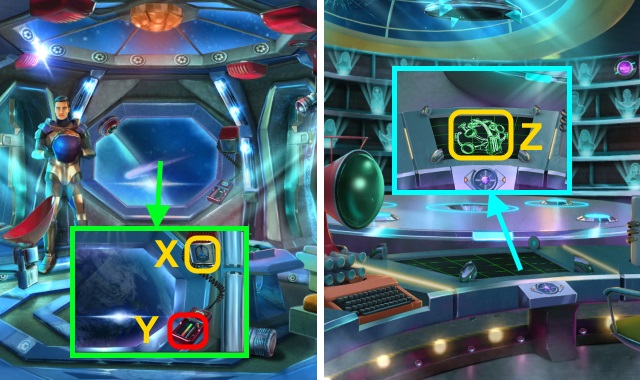
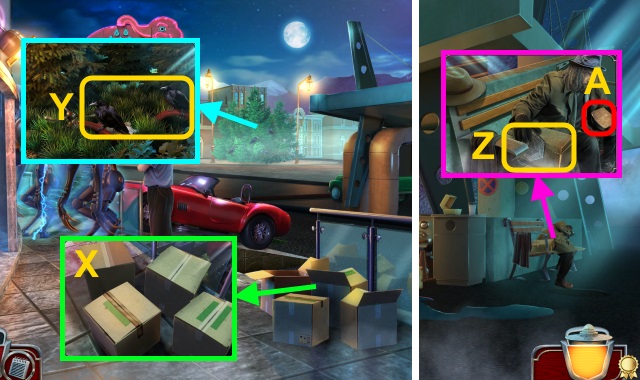
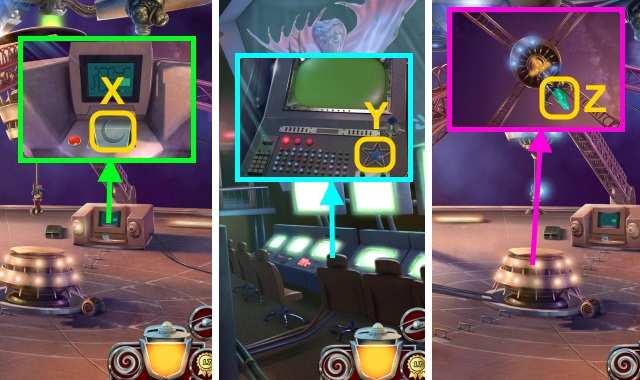
- Examine (X).
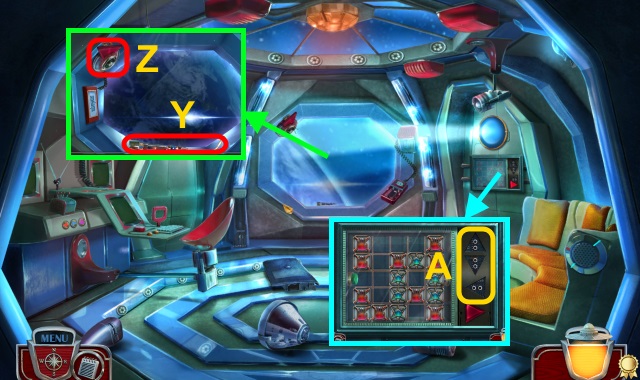
- Use CLEANING CLOTH (Y); take IMPROVISED KNIFE.
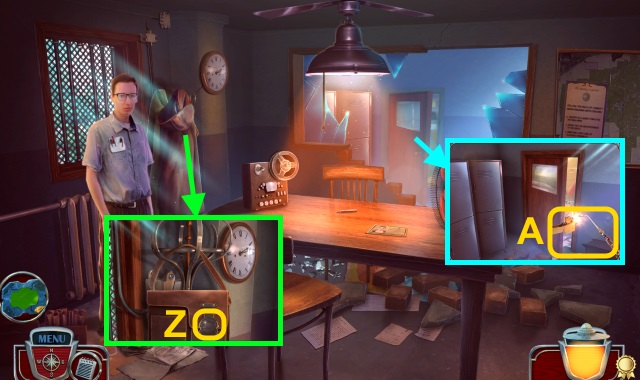
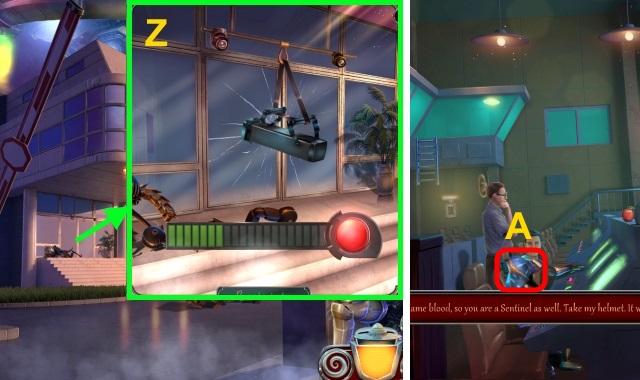
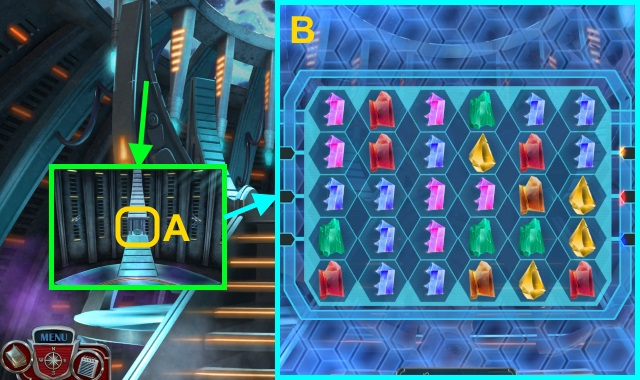
- Take HACKSAW (Z). Use IMPROVISED KNIFE (A); receive RUBBER PATCH.
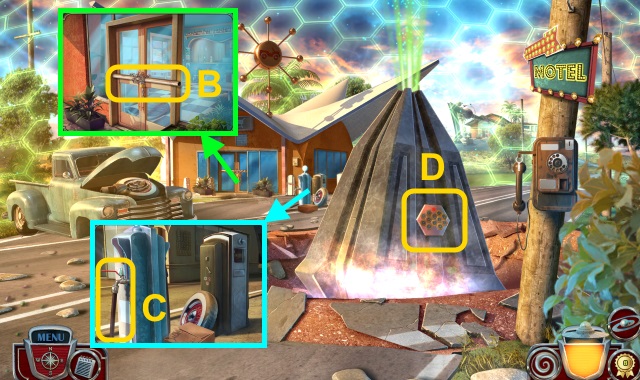
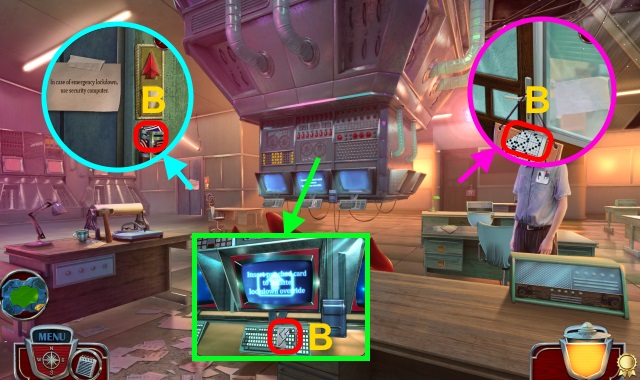
- Use HACKSAW (B); remove chain. Take METAL PIPE; open door. Take TORN HOSE.
- TUBE OF GLUE and RUBBER PATCH on TORN HOSE; receive REPAIRED HOSE.
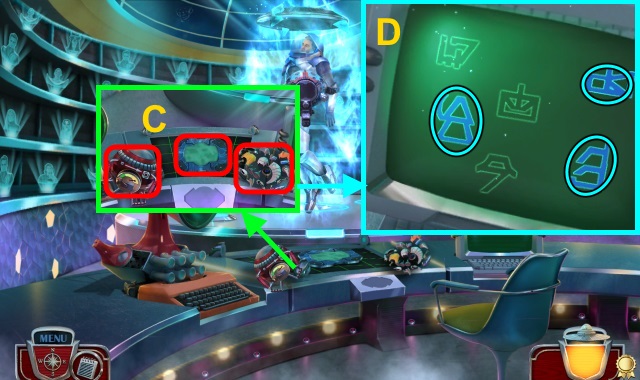
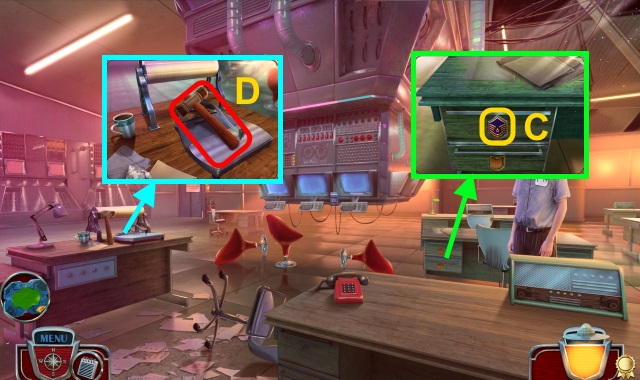
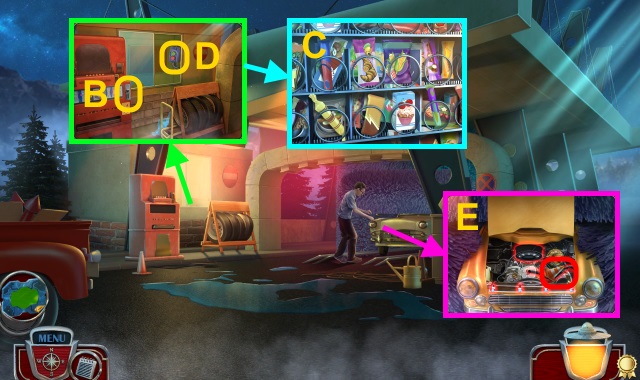
- Use REPAIRED HOSE (C); turn handle.
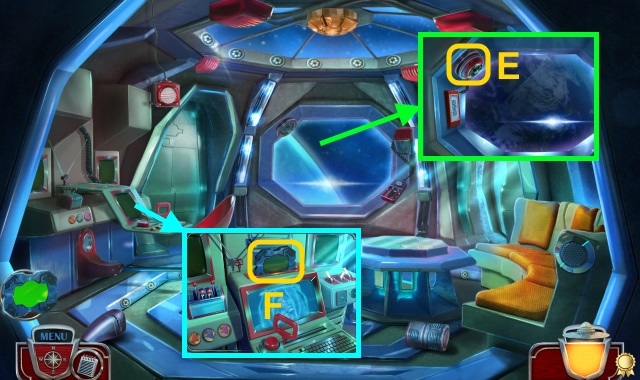
- Examine (D).
- Solution (E).

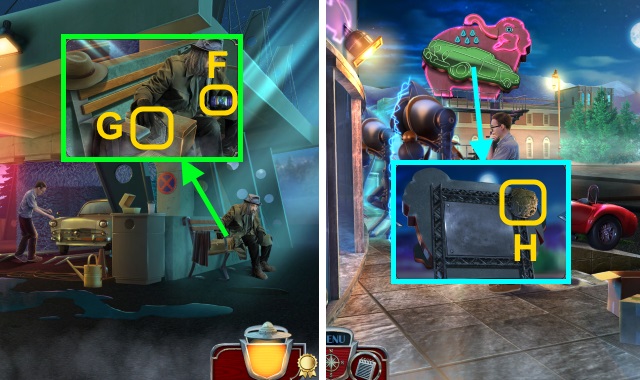
- Use METAL PIPE (F).
- Walk right.
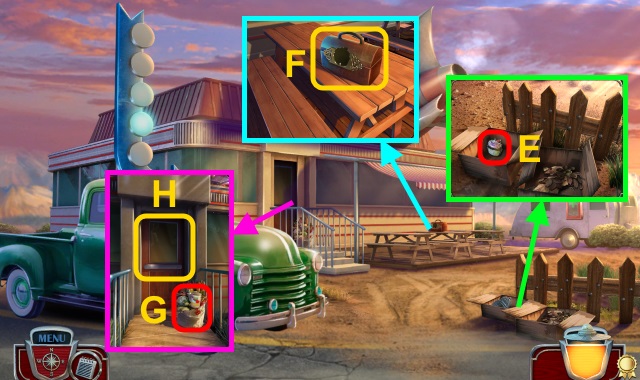
- Take TRUNK HANDLE and METAL ORNAMENT (1/3) (G).
- Examine; take BROOM (H). Place TRUNK HANDLE (I).
- Play HOP; receive CLAW HAMMER (J).
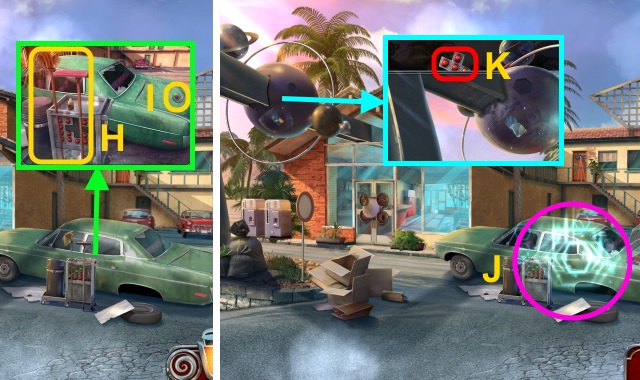
- Use BROOM (K); receive RED BUTTONS.

- Place RED BUTTONS (L); examine.
- Solution (M).
- Move items; take RUST REMOVER.
- Walk down.
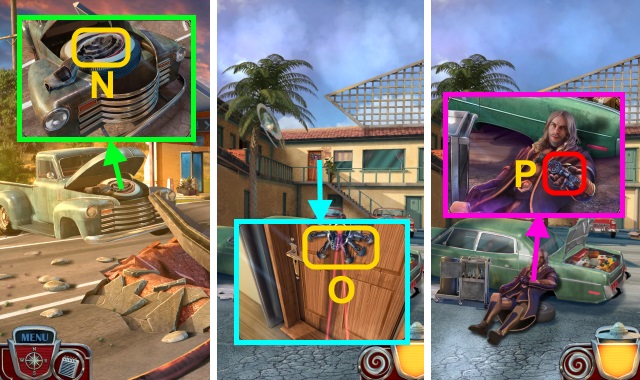
- Use CLAW HAMMER (N); receive RUSTY HUBCAP.
- RUST REMOVER and CLEANING CLOTH on RUSTY HUBCAP; take SHINY HUBCAP.
- Walk right.
- Use SHINY HUBCAP (O).
- Talk; take NICO'S KEY (P).
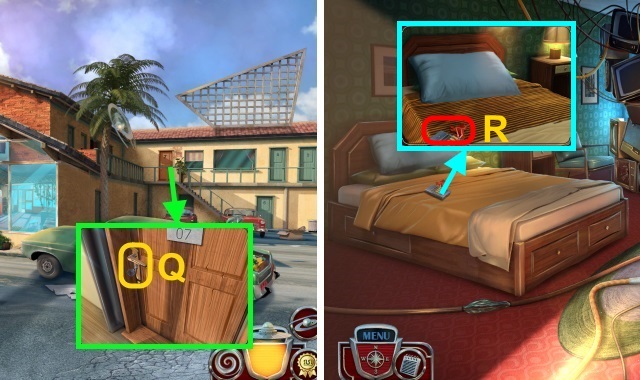
- Use NICO'S KEY (Q); open.
- Enter Nico's Room.
- Take TELEVISION REMOTE and ZODIAC ORNAMENT (1/3) (R).
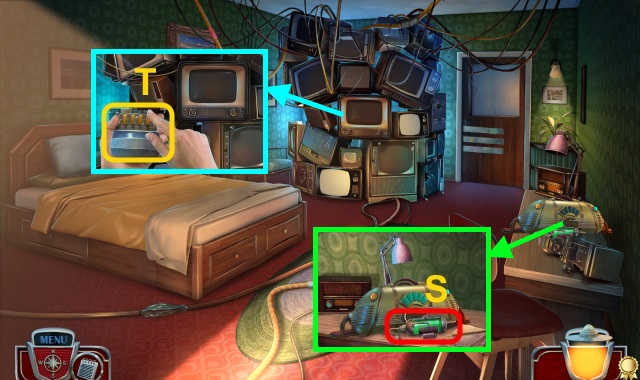
- Take STRANGE ELECTRONIC PART (S).
- Use TELEVISION REMOTE; press 4x (T). Take METAL ORNAMENT (2/3).
- Walk down.
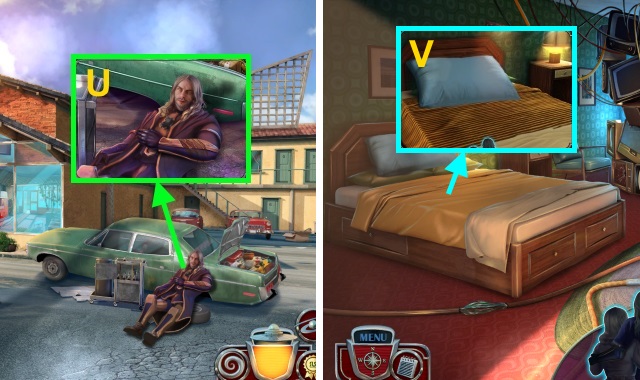
- Examine (U).
- Walk right.
- Examine bed (V); talk.
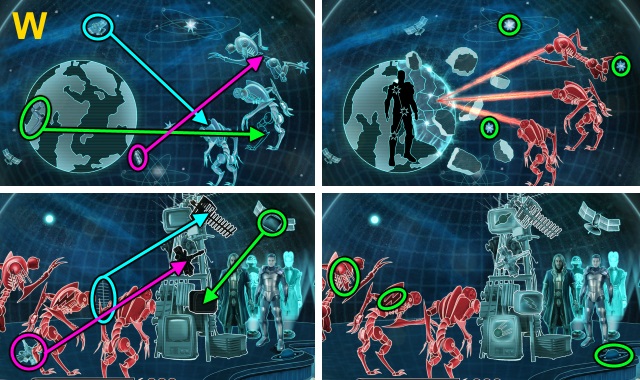
- Solution (W).
- Take NICO'S CODE.
Chapter 2: The Medallion
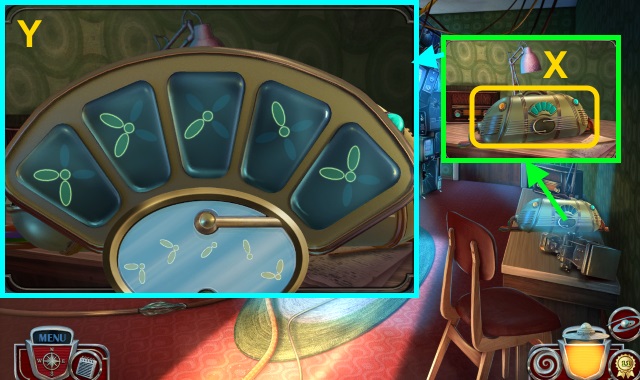
- Examine (X); place NICO'S CODE.
- Solution (Y).
- Take ZODIAC ORNAMENTS (2/3) and METAL ORNAMENT (3/3).
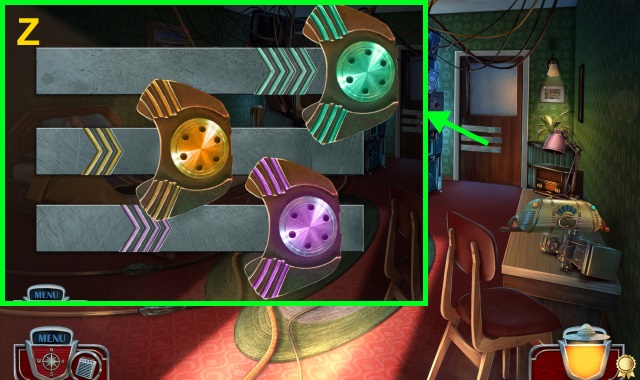
- Place METAL ORNAMENT (3/3); solution (Z).
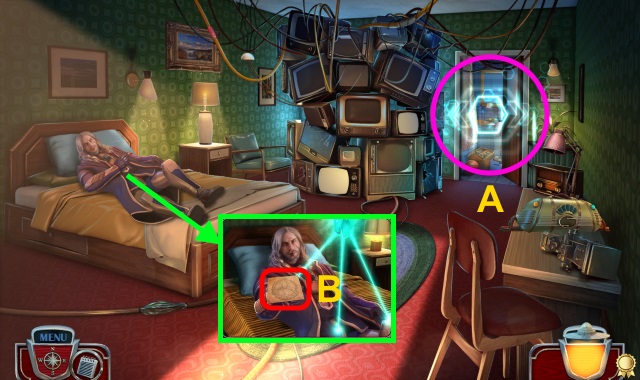
- Play HOP; receive HEALING CRYSTAL (A).
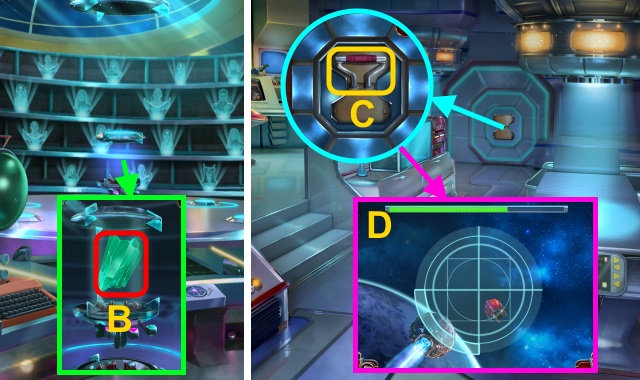
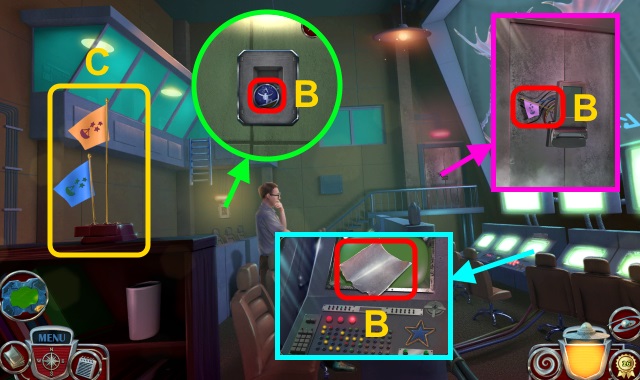
- Use HEALING CRYSTAL; talk. Take MEDALLION DIAGRAM (B).
- Open MEDALLION DIAGRAM; take CONTAINER PLATE.
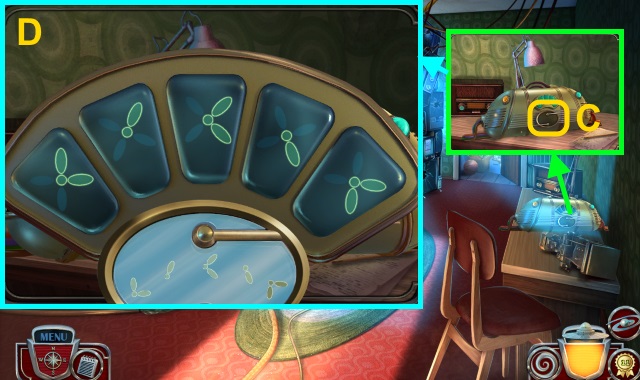
- Examine (C); place CONTAINER PLATE.
- Solution (D).
- Take RECEPTION KEY and MODEL SATELLITE.
- Walk down.
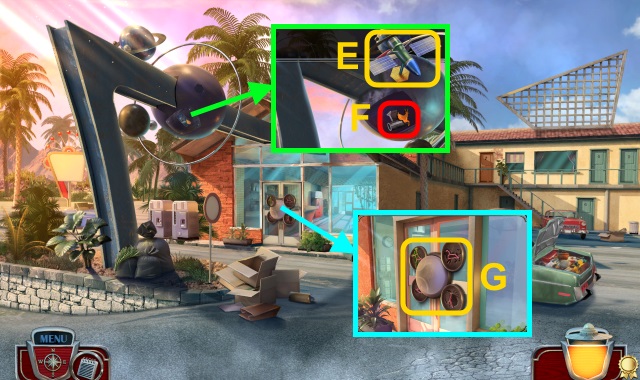
- Place MODEL SATELLITE (E); take ZODIAC ORNAMENTS (3/3) and RECEPTION KEY SEGMENT (1/3) (F).
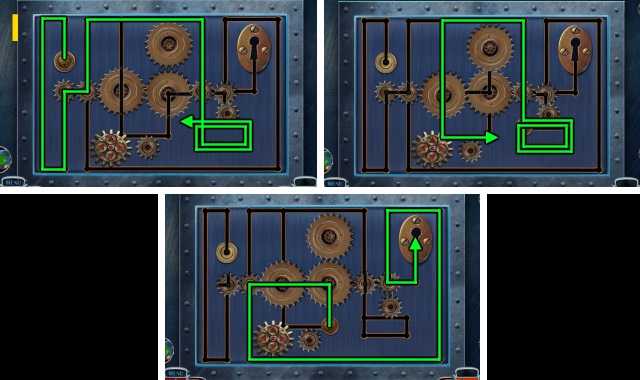
- Place ZODIAC ORNAMENTS (3/3) (G).
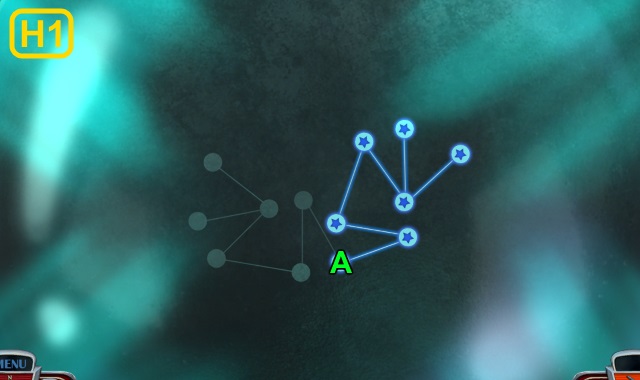
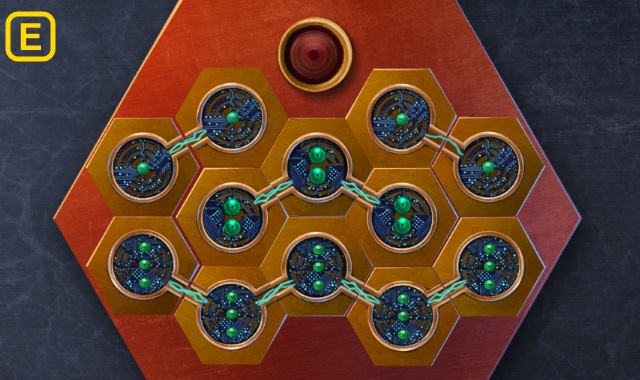
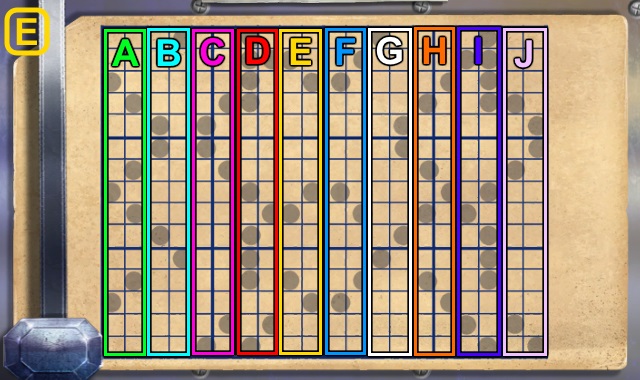
- Solution (H1): select A until images align.
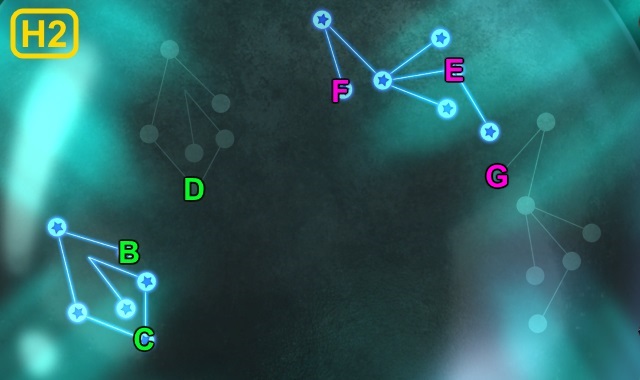
- Solution (H2): Select B until C aligns with D. Select D until images align.
- Select E until F aligns with G. Select G until images align.
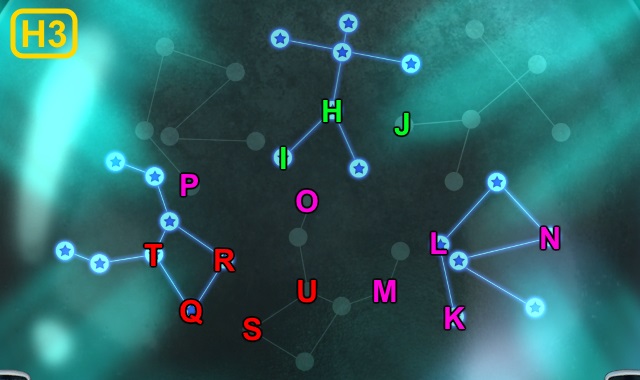
- Solution (H3): Select H until I aligns with J. Select J until images align.
- Select K until L aligns with M. Select M until N aligns with O. Select O until K aligns with P. Select P until images align.
- Select Q until R aligns with S. Select S until T aligns with U. Select U until images align.
- Open door.
- Walk forward.
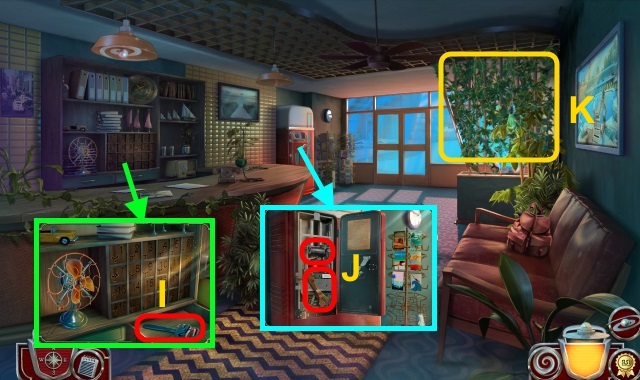
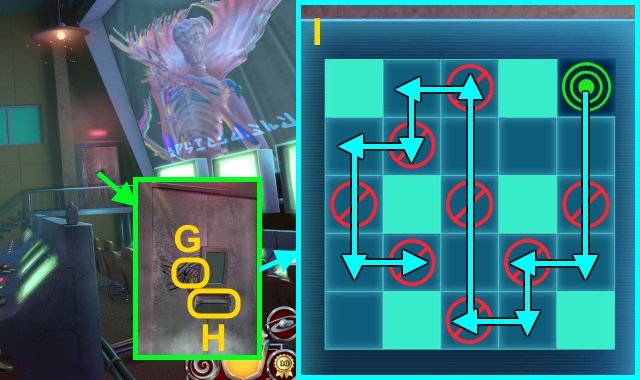
- Open drawer; take WRENCH (I).
- Use WRENCH; open. Take MEDALLION PART (1/3) and RECEPTION KEY SEGMENT (2/3) (J).
- Examine (K).
- Solution (L).
- Take RECEPTION KEY SEGMENT (3/3).
- RECEPTION KEY SEGMENT (3/3) on RECEPTION KEY.
- Use RECEPTION KEY; press button (M).
- Play HOP; receive SAFE (N).
- Examine SAFE; solution (O).
- Take TICKET and MEDALLION PART (2/3).
- Use TICKET (P); take GREEN LIGHT BULB (Q).
- Examine (R). Place GREEN LIGHT BULB (S); take MEDALLION PART (3/3).
- MEDALLION and MEDALLION PART (3/3) on MEDALLION DIAGRAM (T); place pieces. Take REGGIE'S MEDALLION.

- Use REGGIE'S MEDALLION (U).
- Examine scene; receive TRIANGULAR SWITCH (1/3).
- Take SLEEPING SERUM and GREEN LEVER (V).
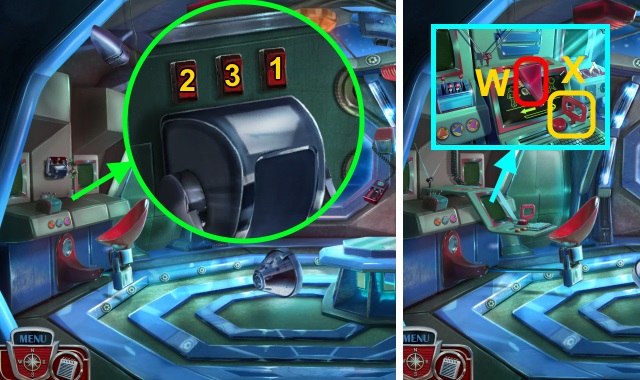
- Pull switch; press buttons (1-3).
- Take TRIANGULAR SWITCH (2/3) (W). Press button; pull lever (X).
- Examine window; take CUTTING TORCH (Y). Take TRIANGULAR SWITCH (3/3) (Z); examine. Take YELLOW CRYSTAL.
- Place TRIANGULAR SWITCH (3/3) (A).
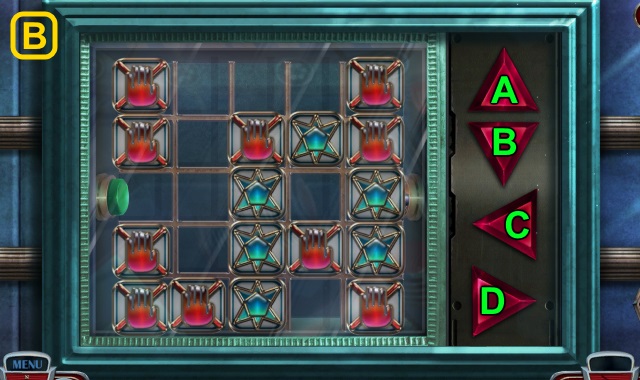
- Solution (B): A-D-A-Cx2-A-C-D-B.
- Take Weird Device, AUGMENTATION DEVICE, and ROBOT PARTS (1/3) (C).
- Solution (D); take HOLOGRAM EMITTER.
- Walk down.
- Place HOLOGRAM EMITTER (E); take STASIS SEQUENCE.
- YELLOW CRYSTAL on Weird Device.
- Place Weird Device (F); use STASIS SEQUENCE.
- Solution (G).
- Walk right.
- Use Weird Device (H); place REGGIE'S MEDALLION.
Chapter 3: The Contagion
- Talk.
- Walk left.
- Take SONIC DEVICE and ROBOT PARTS CONTAINER (I).
- Use MAGNET; take ROBOT PARTS (2/3) (J).
- Take MECHANICAL BUG PART (1/2) (K). Place GREEN LEVER (L); pull.
- Walk down.
- Use SONIC DEVICE; take MECHANICAL BUG PART (2/2) (M).
- MECHANICAL BUG PART (2/2) on ROBOT PARTS CONTAINER; take ROBOT PARTS (3/3) and EMPTY MEMORY SLATE.
- Walk left.
- Place EMPTY MEMORY SLATE (N); press arrow 4x (O). Take REPAIR ROBOT BLUEPRINTS.
- Open (P); place ROBOT PARTS (3/3). Use REPAIR ROBOT BLUEPRINTS (Q).
- Play HOP; receive THE WORKER CLOUD (R).
- Walk down.
- Use THE WORKER CLOUD (S).
- Take ACTIVATION KEY (T).
- Walk right.

- Place ACTIVATION KEY (U).
- Play HOP (V).
- Take MEMORY HELMET and UNITY SEAL (W).
- Walk down.
- Place UNITY SEAL (X); take CHARGED BATTERY (Y).
- CHARGED BATTERY on MEMORY HELMET; take WORKING MEMORY READER.
- Walk right.
- Place WORKING MEMORY READER (Z).
- Solution (A).
- Take GREEN POWER CRYSTAL (B).
- Walk down.
- Receive HATCH LEVER.
- Walk left.
- Use HATCH LEVER (C); pull.
- Solution (D): dodge obstacles.
- Move cloth; take CUPCAKE ORNAMENT (E).
- Examine (F); place CUPCAKE ORNAMENT. Take GIRL SCOUT PIN and CAN OPENER.
- Take DOG FOOD CAN (G).
- CAN OPENER and SLEEPING SERUM on DOG FOOD CAN; take DOG FOOD.
- Open door (H); give DOG FOOD. Examine doorway.
- Play HOP (I).
- Take ROCKET REMOTE ANTENNA (J).
- Take BURGER PLATE (K).
- Place BURGER PLATE (L); take ROCKET CODE PART (1/2).
- Take ROCKET HATCH CODE, INCOMPLETE ROCKET REMOTE, and TINY JUKEBOX (M).
- Use ROCKET HATCH CODE; solution (N).
- Take COG ORNAMENT.

- Place COG ORNAMENT (O); take OLD TOMAHAWK (P).
- ROCKET REMOTE ANTENNA on INCOMPLETE ROCKET REMOTE; take REPAIRED ROCKET REMOTE.
- Walk down.
- Use OLD TOMAHAWK (Q); take BOARDS.
- Go forward.
- Examine (R); give AUGMENTATION DEVICE, TINY JUKEBOX, REPAIRED ROCKET REMOTE, and BOARDS. Place items.

- Talk (S).
- Use GIRL SCOUT PIN (T).
- Solution (U): Ax3-Bx3.
- Receive HANDCUFFS.
- Examine ID; take WEIRD DEVICE (V). Take DUCT TAPE (W).
- Play HOP; receive REINFORCEMENT BAR (X).
- REINFORCEMENT BAR and DUCT TAPE on HANDCUFFS; take IMPROVISED HOOK.
- Move chair and locker; open door (Y). Use IMPROVISED HOOK; receive AGENCY BADGE.
- Move coats; place AGENCY BADGE (Z). Move items; take LIGHTER.
- Use CUTTING TORCH and LIGHTER (A).
- Take PUNCH CARD INSTRUCTIONS (1/2)-(2/2) and BLUE EMBLEM (B).
- Place BLUE EMBLEM (C). Move items; take BLANK PUNCH CARD and CAR KEYS.
- Take MALLET (D); place BLANK PUNCH CARD and PUNCH CARD INSTRUCTIONS.
- Solution (E): (E-I-E)-(B-H-B)-(A-G-C-A)-(D-F-B-D).
- Receive PUNCH CARD.
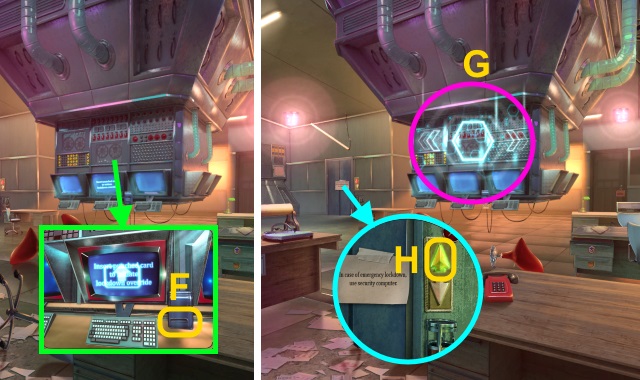
- Use PUNCH CARD (F).
- Play HOP (G).
- Press button (H).
- Walk left.
- GREEN POWER CRYSTAL on Weird Device. Take RAYGUN BLUEPRINTS; receive GREEN POWER CRYSTAL.
- Play HOP; receive ENERGY EMITTER (I).
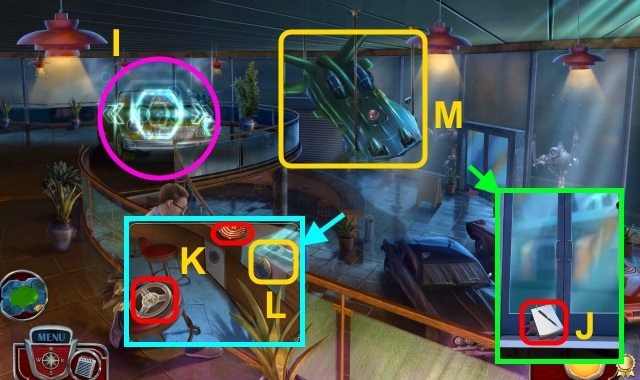
- Take NOTEPAD and FUTURE CAR ORNAMENT (J).
- Move plant; take MAGNETIC TAPE and BOTTOM DRAWER EMBLEM (K). Place FUTURE CAR ORNAMENT; take CAR REMOTE (L).
- Use CAR REMOTE (M).
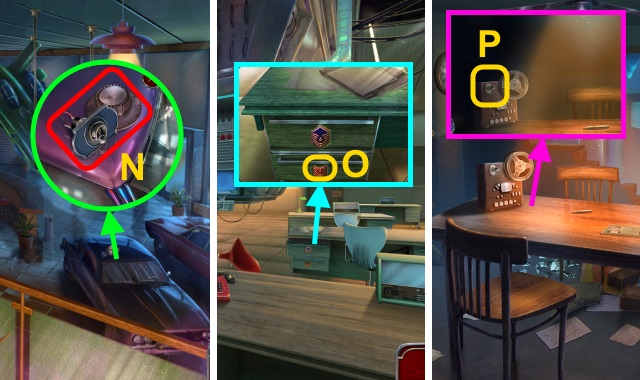
- Take SWITCH and SAFE DIAL (N).
- Walk down.
- Place BOTTOM DRAWER EMBLEM (O); move items. Examine paper; take LIGHT BULB.
- Walk down.
- Place MAGNETIC TAPE (P).
- Solution (Q).
- Take LIGHTNING SYMBOL (R).
- Move bag; place LIGHTNING SYMBOL and SWITCH (S). Flip switch; take LEVER.
- RAYGUN BLUEPRINTS, STRANGE ELECTRONIC PART, LIGHT BULB, and LEVER on ENERGY EMITTER; take WORKING ENERGY EMITTER.
- Walk forward, then left.
- Use WORKING ENERGY EMITTER (T); go through door.
Chapter 4: The Sentinel
- Talk.
- Take WORK GLOVE and NOTE WITH CODE (U).
- Walk left.
- Place SAFE DIAL (V) and NOTE WITH CODE.
- Solution (W): Bx5-Ax9-B.
- Take LETTER OPENER and MONEY (1/2).
- Walk right.
- Use LETTER OPENER on each box (X); take LOUD HORN.
- Move leaves; use LOUD HORN (Y). Take HOSE and MONEY (2/2).
- Walk right.
- Examine (Z); take FRUIT LIST (A).
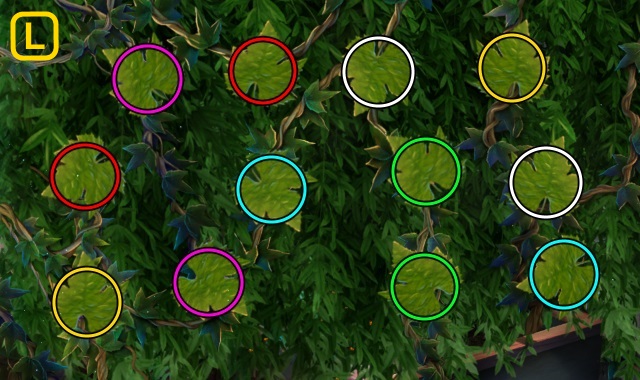
- Use MONEY (2/2) (B); use FRUIT LIST (C). Play HOP; receive BLUEBERRY JUICE.
- Use MALLET; examine (D).
- Open; take TRAFFIC CONE ORNAMENT (E).
- Give BLUEBERRY JUICE (F); place TRAFFIC CONE ORNAMENT (G). Read note; take SMOKER and AIR FILTER.
- Walk down.
- Use SMOKER (H).
- Solution (I).
- Take WRENCH.
- Walk right.

- Place HOSE and AIR FILTER (J); use WRENCH (K). Examine; use CAR KEYS.
- Select (L).
- Scroll up. Use WORK GLOVE; take INCOMPLETE OXYGEN MASK (M).
- Open; examine box (N). Open; take BANDAGE.
- Open door; take OXYGEN TANK (O).
- OXYGEN TANK on INCOMPLETE OXYGEN MASK; take OXYGEN MASK.
- Use BANDAGE and OXYGEN MASK (P).
- Use CAR KEYS (Q).
- Select (R).
- Open; examine chair. Take BINOCULARS and SECURITY BELT (S).
- Use BINOCULARS. Play HOP; receive FUSE BOX CODE (T).
- Rotate; use FUSE BOX CODE (U).
- Solution (V).
- Place GREEN POWER CRYSTAL (W).
- Examine; take TRACKER CLAW and UV LIGHT STICK (X).
- Use TRACKER CLAW; open. Take BATTERING RAM (Y).
- Place SECURITY BELT and BATTERING RAM. Solution (Z): select button until meter is full.
- Walk forward.
- Take REGGIE'S HELMET (A).
- Take OBSERVATORY EMBLEM (1/2), PIECE OF PAPER, and SMALL FLAG (B).
- Place SMALL FLAG (C); take CONSOLE KEY.

- Use CONSOLE KEY (D1); take OBSERVATORY EMBLEM (2/2) (D2).
- Walk down.
- Place OBSERVATORY EMBLEM (2/2) (E).
- Play HOP; receive ID CARD (F).
- Walk forward.
- Use DUCT TAPE (G); examine. Use ID CARD (H).
- Solution (I).
- Walk right.
- Use NOTEPAD (J); receive AGENT'S CLUE.
- Take SUN SWITCH and EMPTY UV LAMP (K).
- UV LIGHT STICK and EMPTY UV LAMP on PIECE OF PAPER; examine paper. Receive NUMBER SEQUENCE.
- Take BATON; place NUMBER SEQUENCE (L).
- Solution (M): match numbers, then select (1-4).
- Open; take MOON SWITCH and LEVER.
- Walk down.
- Place LEVER; pull. Take LADDER (N).
- Walk down.
- Place SUN SWITCH (O).
- Play HOP; receive HEXAGON SYMBOL (1/2) (P).
- Go forward, then right.
- Place LADDER (Q).
- Use BATON; remove cover (R). Take HEXAGON SYMBOL (2/2).
- Examine (S); place HEXAGON SYMBOL (2/2) and AGENT'S CLUE.
- Solution (T).
- Walk right.
- Take STAR SWITCH (U).
- Press button (V).
- Solution (W): B-A-C-A-F-Bx3-A-B-Ax2.
- Place MOON SWITCH (X).
- Go to the Operations Room.
- Place STAR SWITCH (Y).
- Walk right twice.
- Place GREEN POWER CRYSTAL (Z).
- Use REGGIE'S HELMET on scene; play HOP.
- Examine Weird Device; receive ORANGE CRYSTAL, YELLOW CRYSTAL, GREEN CRYSTAL, and BLUE CRYSTAL.
- Examine (A); place GREEN CRYSTAL. Scroll right; examine. Place ORANGE CRYSTAL. Scroll right; examine. Place YELLOW CRYSTAL. Scroll right; examine. Place BLUE CRYSTAL.
- Walk forward.
- Solution is random (B).
- Congratulations! You have competed Beyond: The Fading Signal.
Created at: 2018-09-23