

Walkthrough Menu
- General Tips
- Chapter 1: The Crash
- Chapter 2: The Evil Spirit
- Chapter 3: The Shore
- Chapter 4: The Forest
- Chapter 5: The Ruins
General Tips
- This is the official guide for Beyond the Unknown: A Matter of Time.
- This guide will not mention each time you have to zoom into a location; the screenshots will show each zoom scene.
- Hidden-object puzzles are referred to as HOPs. This guide will not show screenshots of the HOPs, however, it will mention when an HOP is available and the inventory item you will collect from it.
- This guide will give step-by-step solutions for all puzzles which are not random. Please read the instructions in the game for each puzzle.
Chapter 1: The Crash
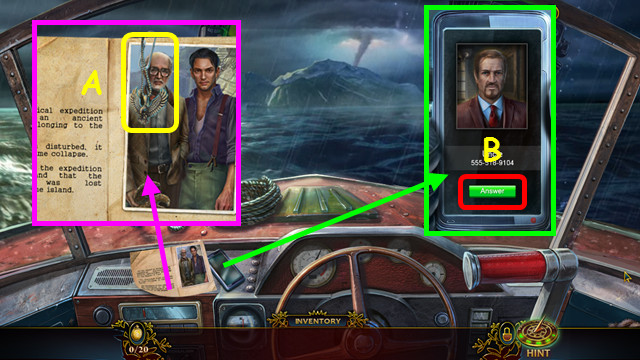
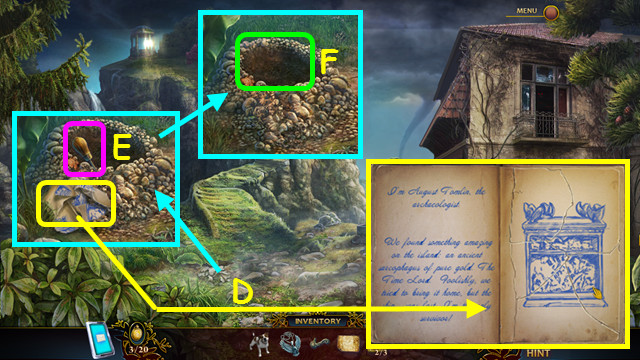
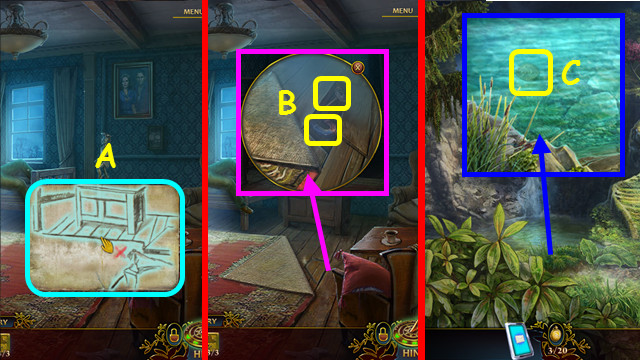
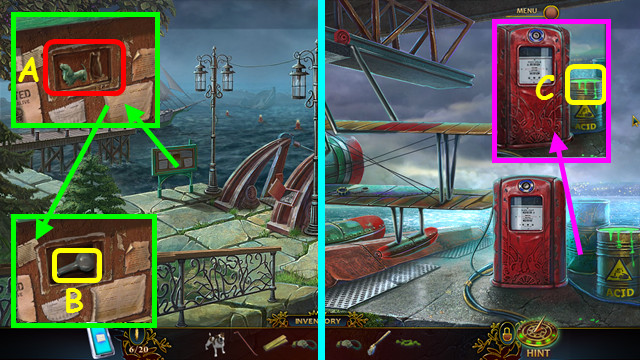
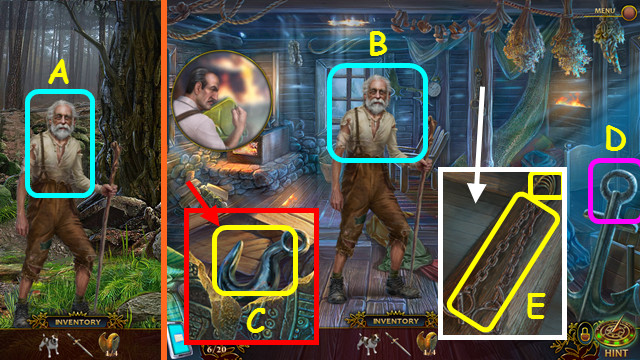
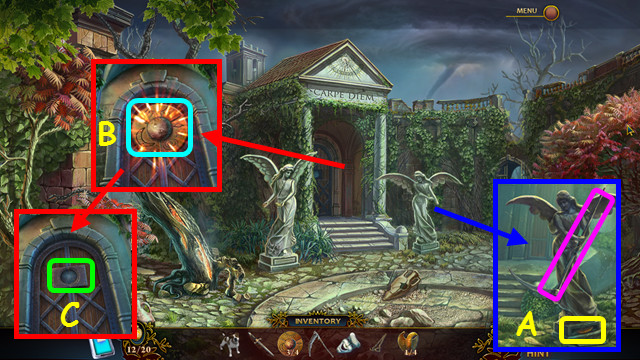
- Read the note and take the MEDALLION (A).
- Answer the phone (B).
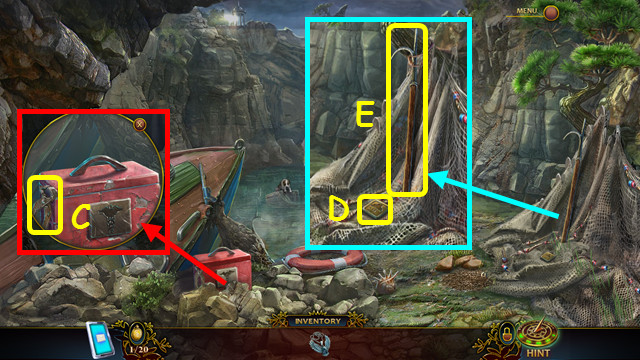
- Take the WIRE CUTTER (C).
- Take the 1/3 PICTURE BUTTON (D).
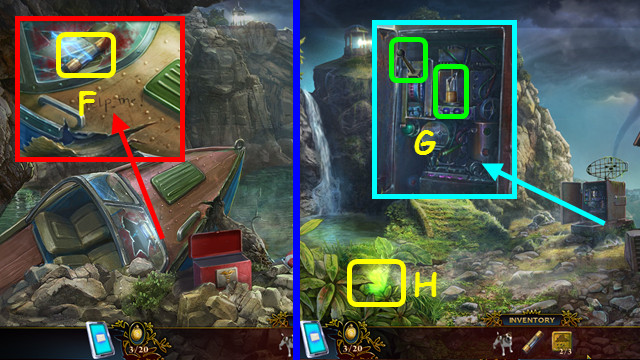
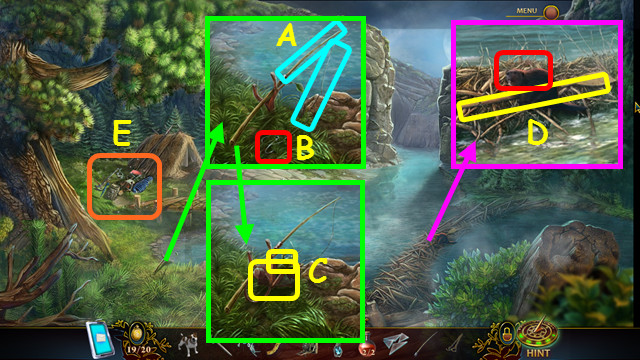
- Use the WIRE CUTTER to take the BOATHOOK (E).
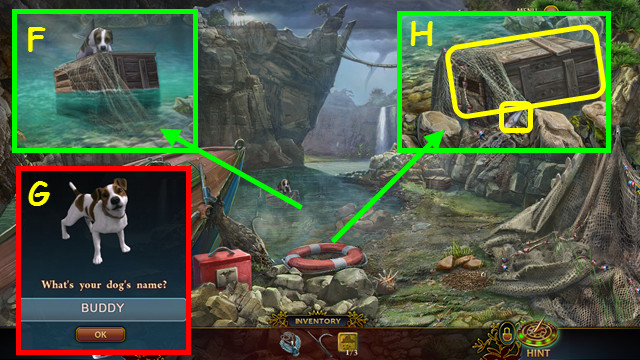
- Use the BOATHOOK on the box (F).
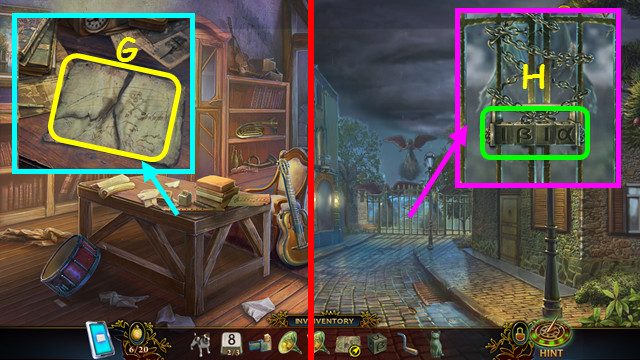
- Choose a name for your dog (G).
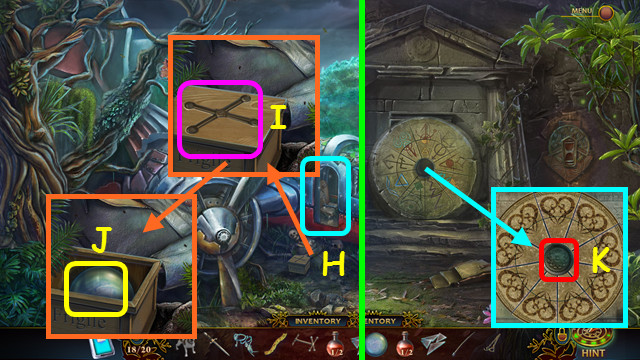
- Take the FISH and the BOX (H).
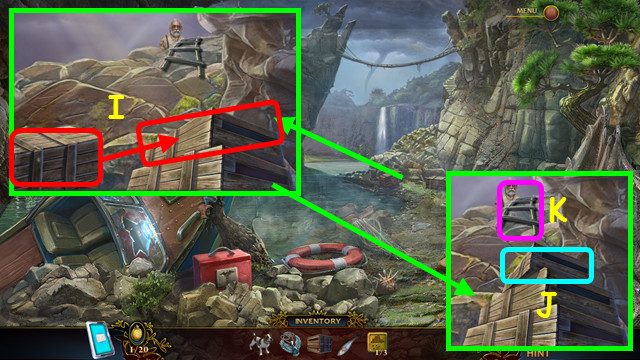
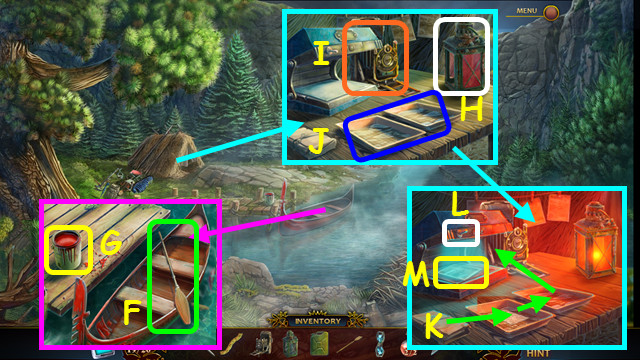
- Stack the box in the scene (I).
- Place the BOX on the stack (J).
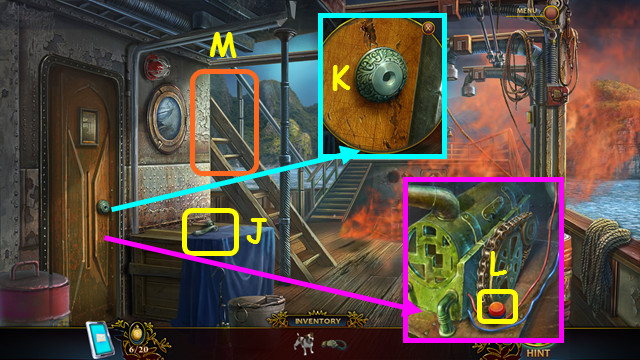
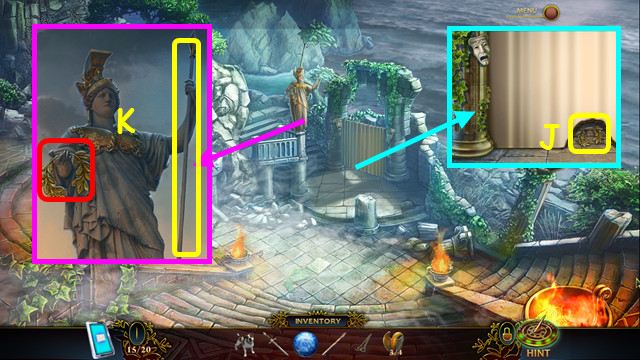
- Climb up the ladder (K).
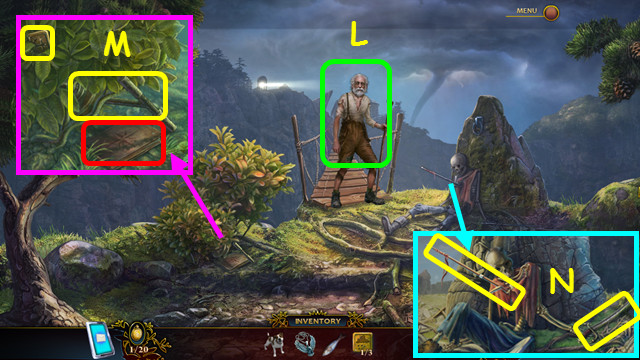
- Talk to the old man (L).
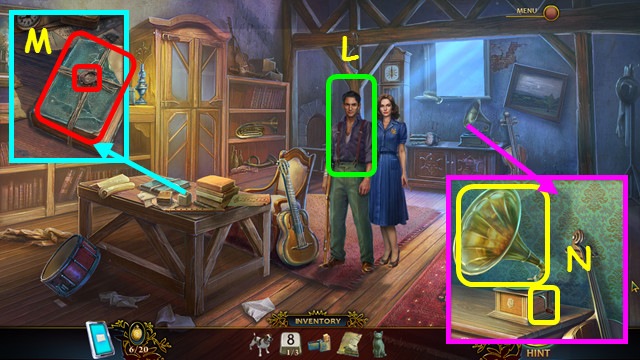
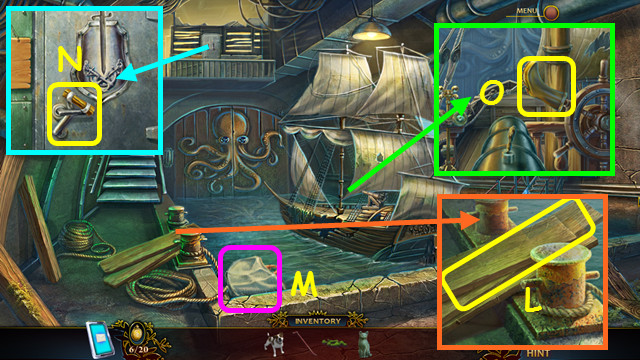
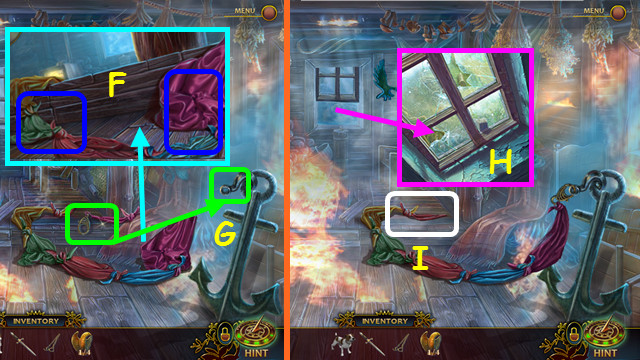
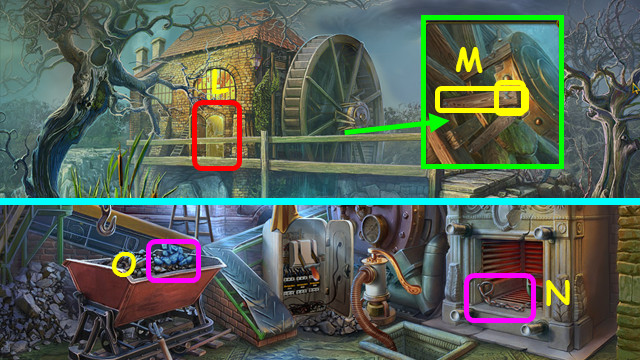
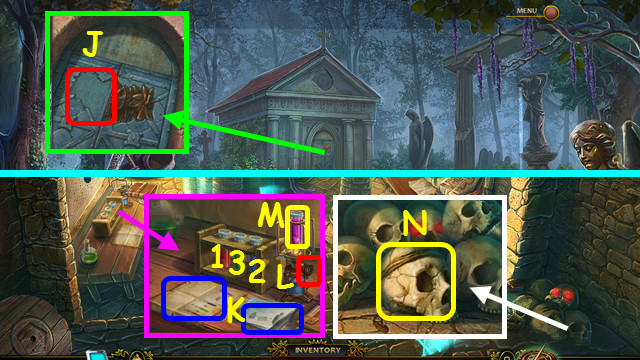
- Take the 2/3 PICTURE BUTTON, the diary, and the WHEEL BLOCK (M).
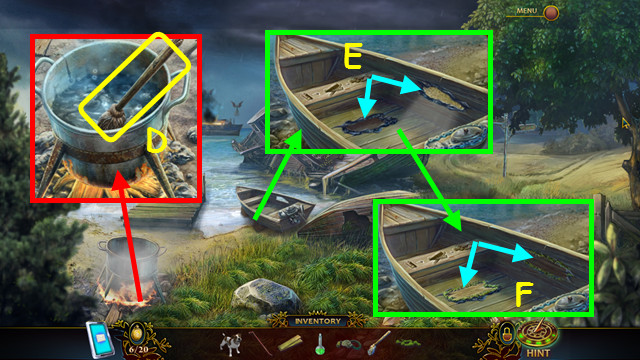
- Take the HARPOON ARROW and the SABER (N).
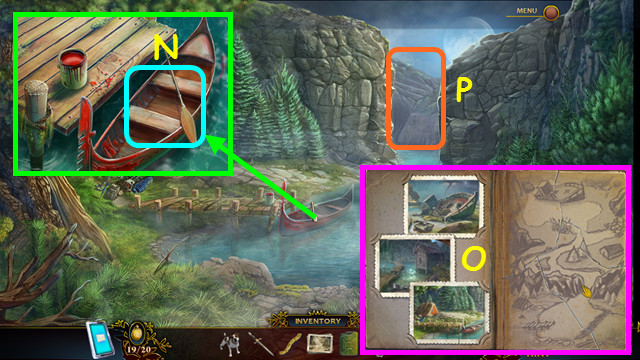
- Walk down.
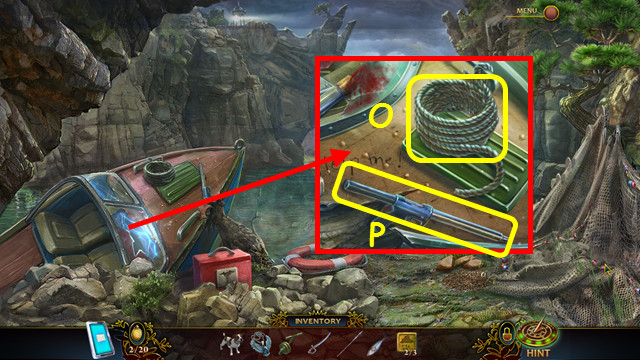
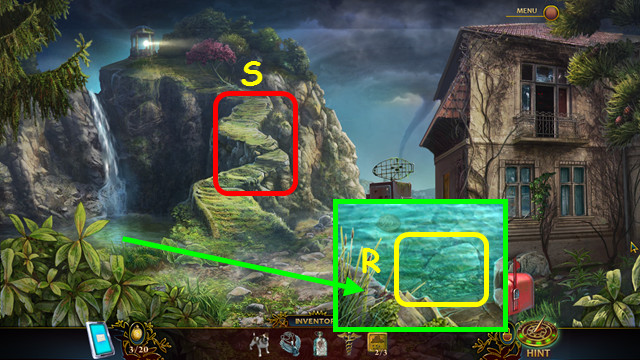
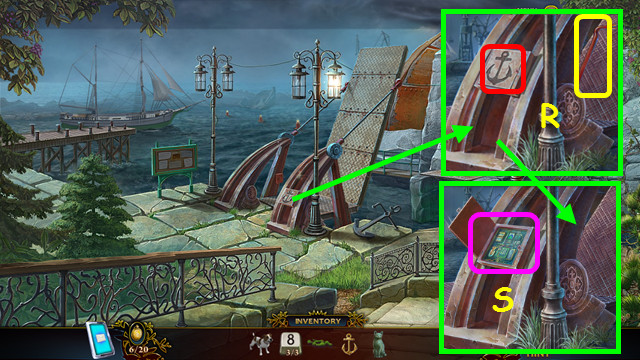
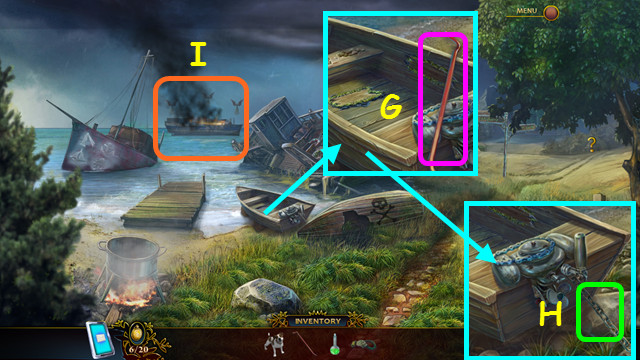
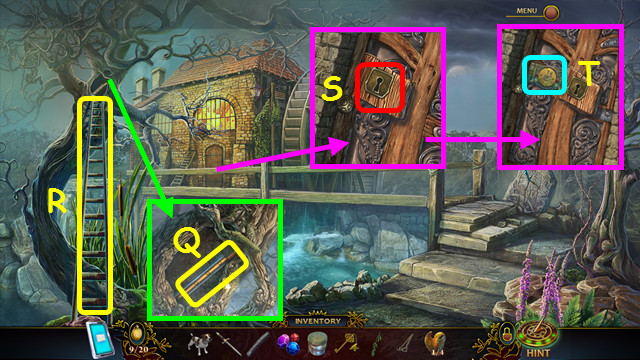
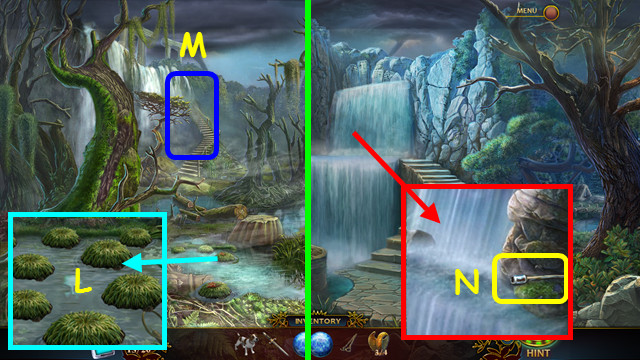
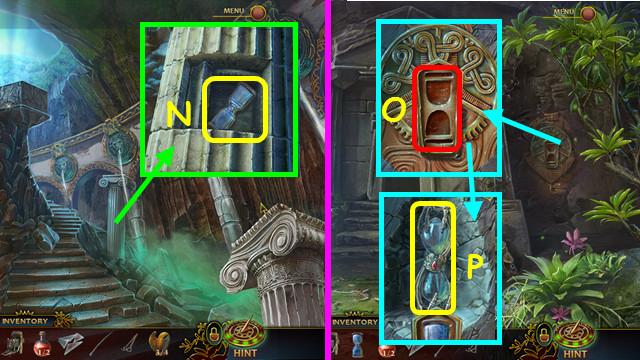
- Use the SABER to take the STRONG ROPE (O).
- Place the HARPOON ARROW to get the LOADED HARPOON (P).
- Go up the ladder.
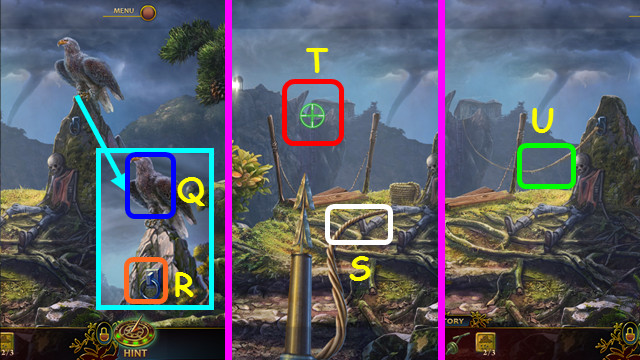
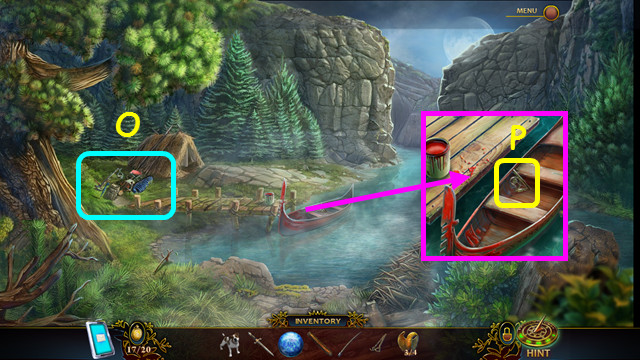
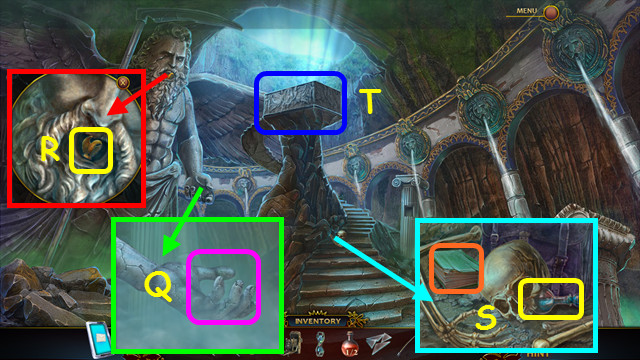
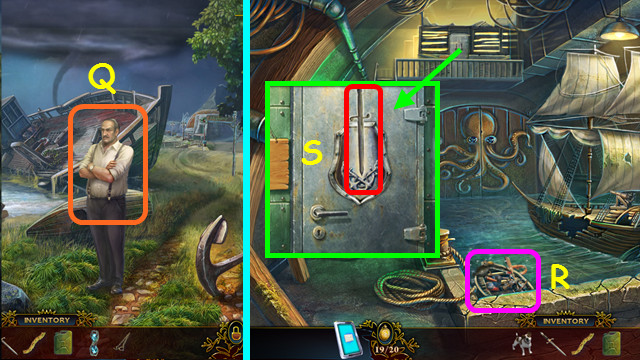
- Give the FISH to the eagle (Q).
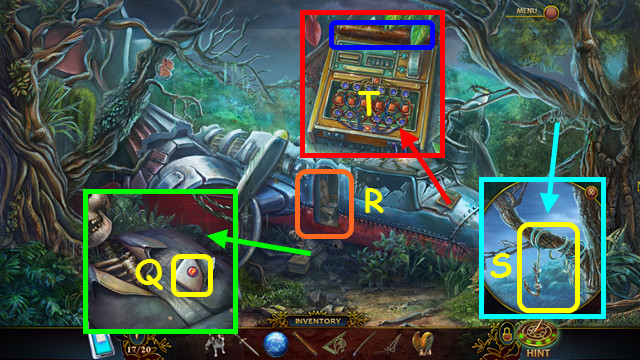
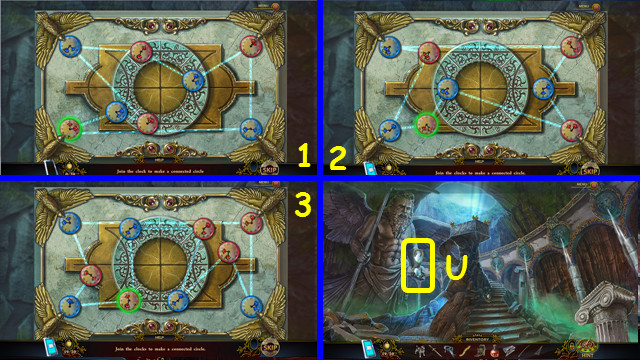
- Use the STRONG ROPE on the ring (R).
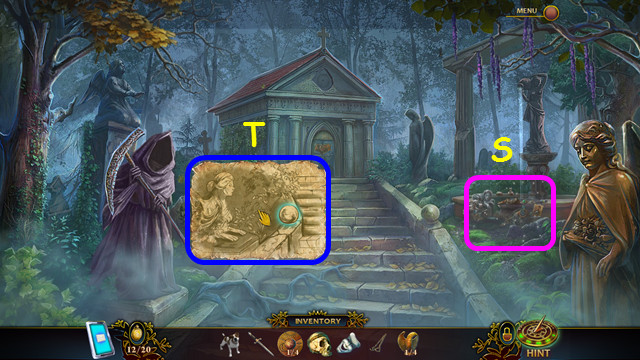
- Use the LOADED HARPOON on the rope end (S).
- Aim and fire the harpoon at the opposite side of the bridge (T).
- Use the WHEEL BLOCK on the rope (U).
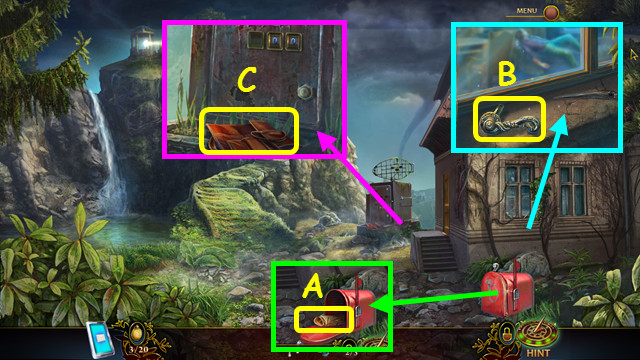
- Select the mailbox to view a photo.
- Take the OLD PAPER (A).
- Take the DOOR HANDLE (B).
- Take the EMPTY TOOL BELT (C).
- Use the EMPTY TOOL BELT on the DOG in your inventory.
- Take the scraps and restore the diary page (D).
- Try to take the awl (E).
- Use the DOG on the hole (F).
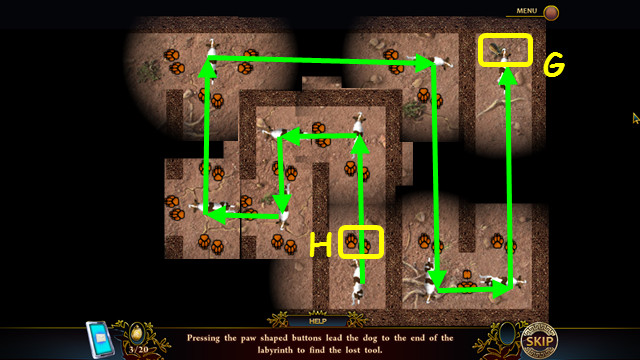
- Move the dog through the maze to the awl (G).
- Press the paws to select the direction (H).
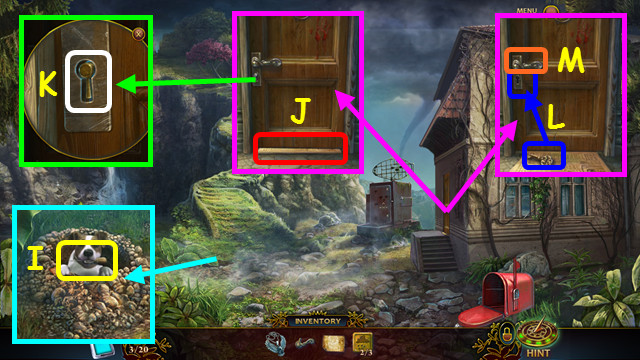
- Take the AWL (I).
- Place the OLD PAPER under the door (J).
- Use the AWL on the keyhole (K).
- Pull the paper, take the key, and use it in the lock (L).
- Place the DOOR HANDLE on the door and turn it (M).
- Walk right.
- Take the code 3-4-6 and the EMPTY FLASK (N).
- Look at the portrait (O).
- Take the MEDICAL SYMBOL (P).
- Talk to Andre (Q).
- Walk down.
- Use the EMPTY FLASK on the pond to get the FLASK OF WATER (R).
- Try to walk up the path (S).
- Return to the Boat Crash Site.
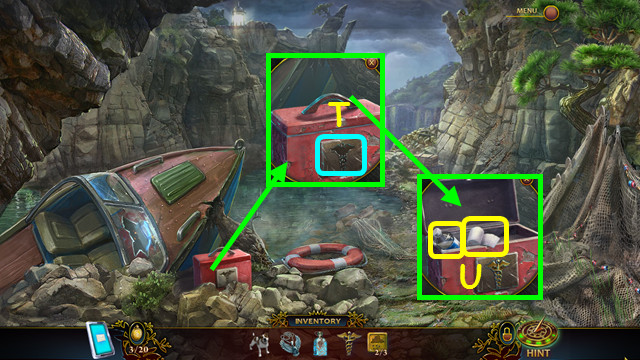
- Use the MEDICAL SYMBOL on the panel (T).
- Open the case; take the HYDROGEN PEROXIDE and the BANDAGE (U).
- Return to Andre's House.
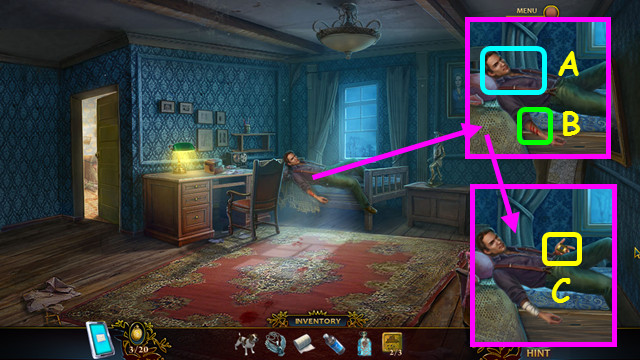
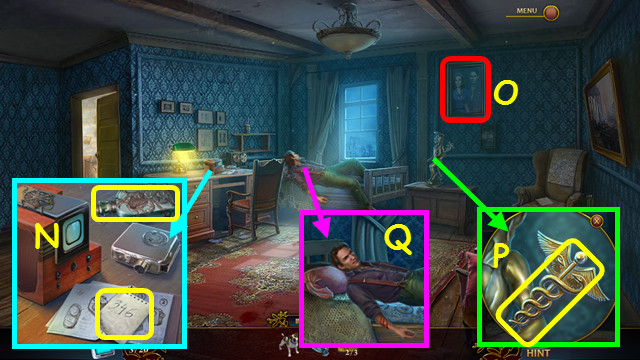
- Give the FLASK OF WATER to Andre (A).
- Use the HYDROGEN PEROXIDE and the BANDAGE on the wound (B).
- Give him the MEDALLION.
- Take the RADAR LOCK PART (C).
- Walk down.
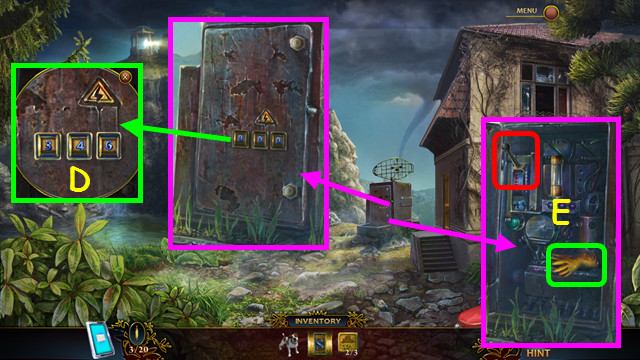
- Place the RADAR LOCK PART on the door and set it to 3-4-6 (D).
- Take the RUBBER GLOVES and pull the LEVER (E).
- Walk to the Boat Crash Site.
- Use the RUBBER GLOVES to take the FUSE (F).
- Walk forward twice.
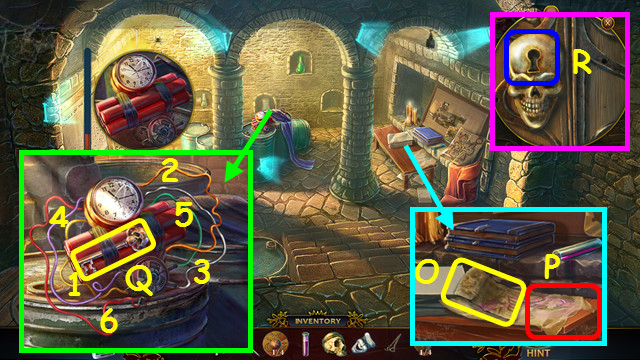
- Place the FUSE in the device, and pull the lever (G).
- Take the STRANGE DEVICE (H).
- Enter Andre's House.
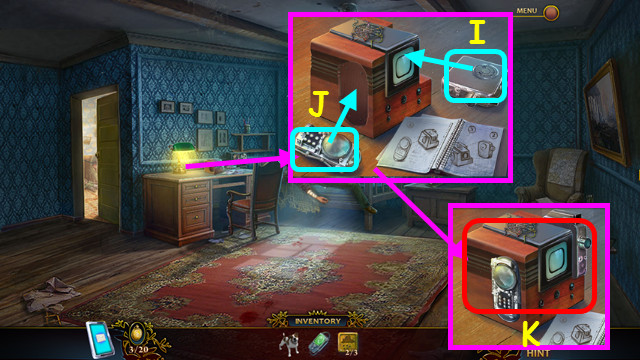
- Attach the camera to the far side of the device (I).
- Place the STRANGE DEVICE on the table, and then place it in the device (J).
- Select the device (K).
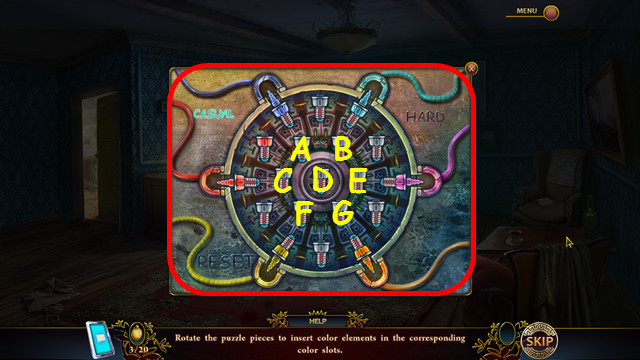
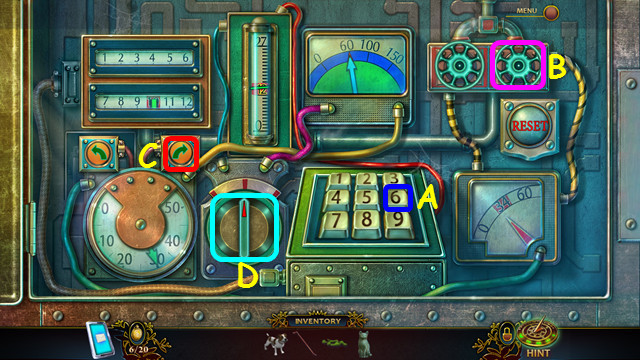
- The Casual solution is (Bx5), (Ax5), (Dx1), (Gx5), (Ex4), (Dx1), (Fx4), (Dx1), and (Cx4).
- The Hard solution is (Ax2), (Ex1), (Bx1), (Dx3), (Ex2), (Dx5), (Gx4), (Cx2), (Dx2), and (Fx2).
- You earn the VIDEO PHONE.
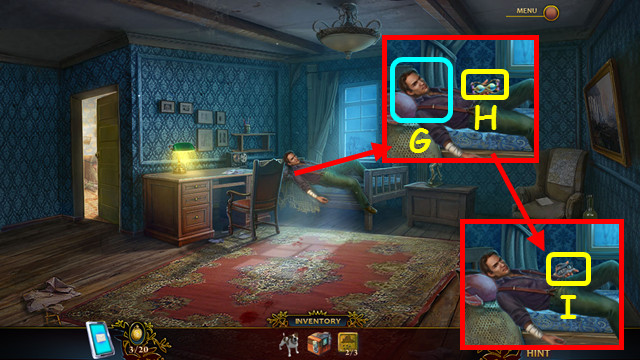
- Give the VIDEO PHONE to Andre (G).
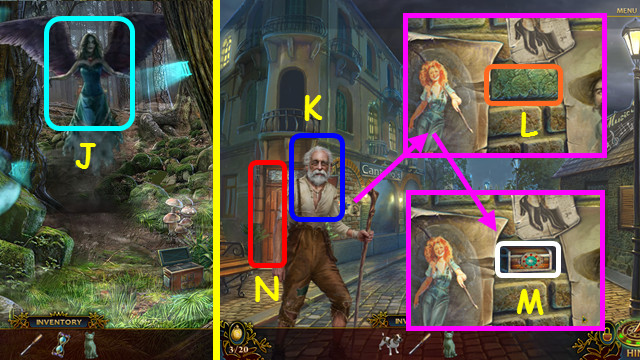
- Take the ANCIENT HOURGLASS (H).
- Take the disguise (I).
- Walk down.
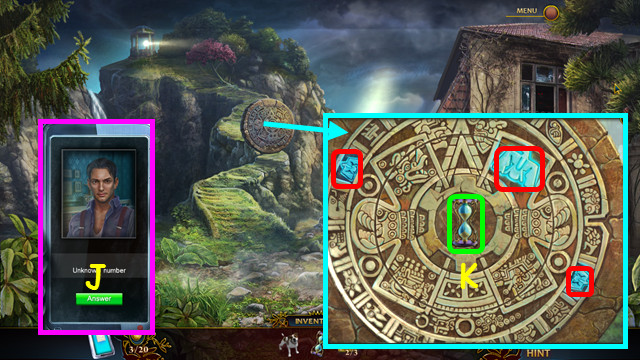
- Answer the phone (J).
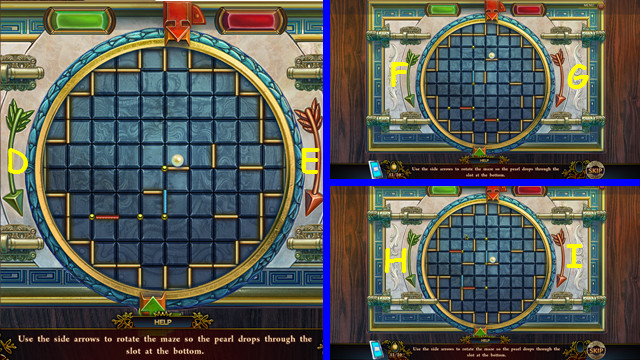
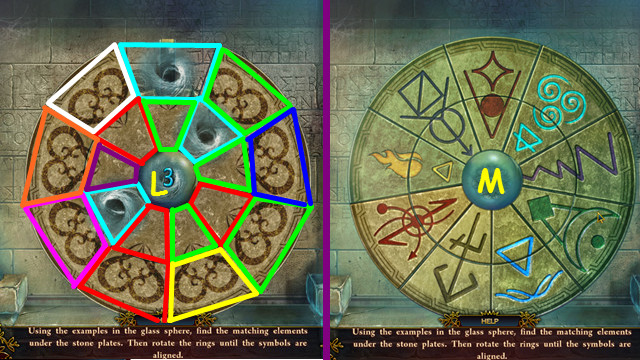
- Place the ANCIENT HOURGLASS in the center and rotate the rings to restore the carving (K).
- Take a photo; press the 3 eagles (red).
- Walk forward.
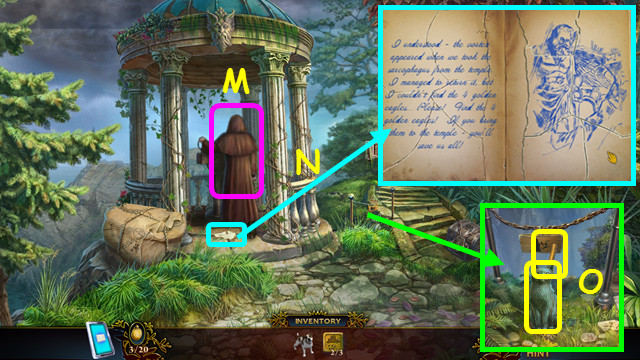
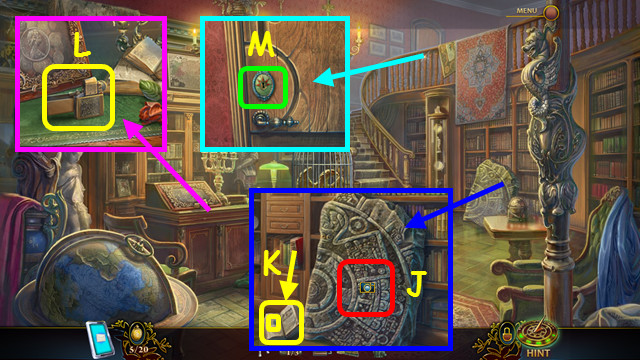
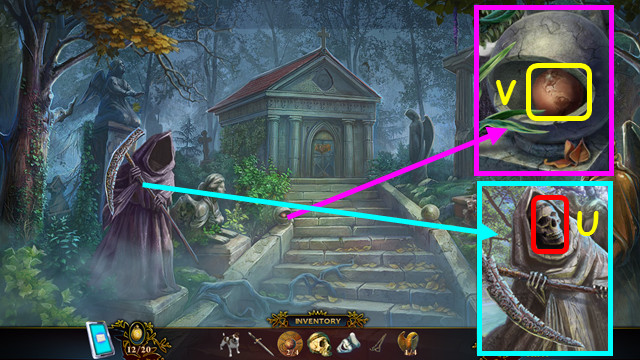
- Touch the robe (M); take the scraps and restore the diary page (N).
- Take the CAT FIGURINE and the GARDEN PRUNER PART (O).
- Walk down.
- Place the GARDEN PRUNER PART on the 2nd piece to make the GARDEN PRUNER (P).
- Walk forward.
- Use the GARDEN PRUNERS on the rope (Q).
- Select the debris to play the HOP; you earn the 3/3 PICTURE BUTTON (R).
- Use the GARDEN PRUNERS on the branches (S).
- Walk forward.
Chapter 2: The Evil Spirit
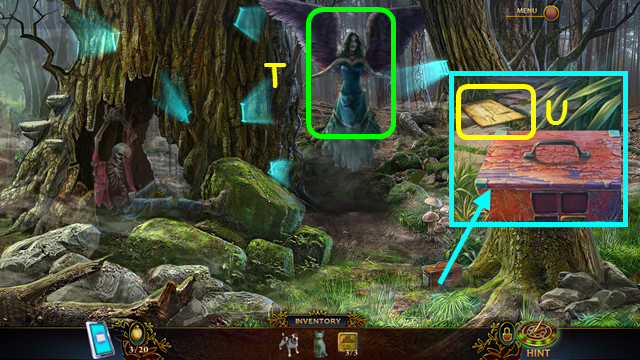
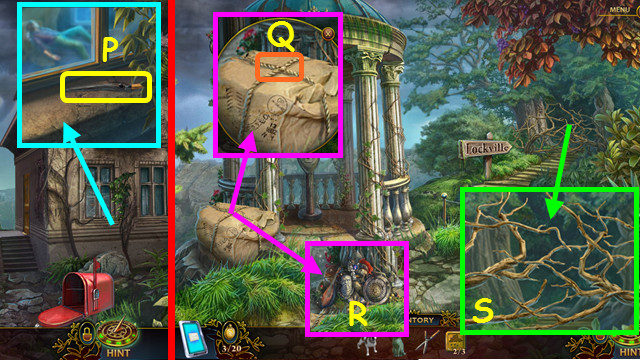
- Talk to the Evil Spirit (T).
- Take the LOCATION MAP (U).
- Travel to Andre's House.
- Place the LOCATION MAP in the scene (A).
- Lift the board; take the MAGNET and the CHEST KEY (B).
- Walk down.
- Use the MAGNET to take the COIN (C).
- Walk forward.
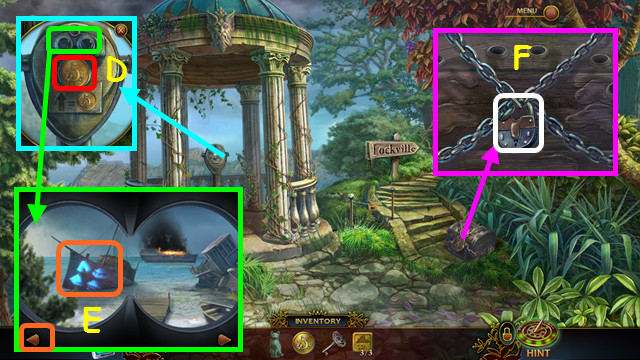
- Use the COIN on the telescope and look at the lens (D).
- Pan to the left and note the symbols (E).
- Use the CHEST KEY on the lock (F).
- Walk forward.
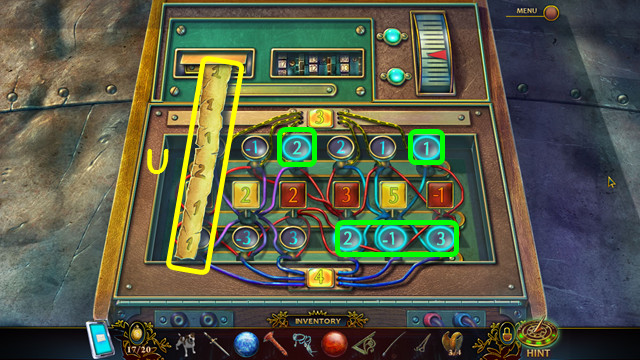
- Place the 3 PICTURE BUTTONS on the box and enter the code (H).
- Take the CHISEL and the CRAB FIGURINE (I).
- Walk down and select the chest.
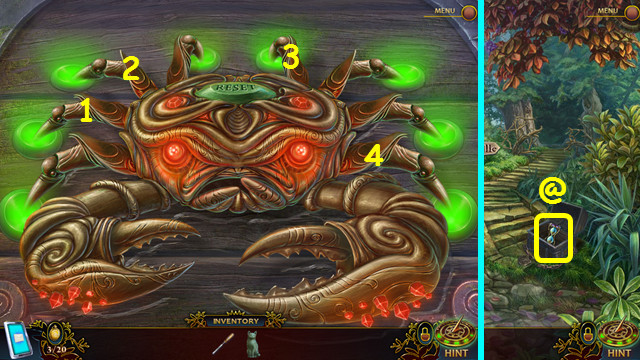
- Place the CRAB FIGURINE on the chest.
- Press the legs (1-4).
- Take the ANCIENT HOURGLASS (@).
- Walk forward.
- Give the ANCIENT HOURGLASS to the Spirit (J).
- Walk forward.
- Talk to the Old Man (K).
- Remove the poster; use the CHISEL on the brick (L).
- Note the chest mini-game (M).
- Open the door and enter Cantello's Shop (N).
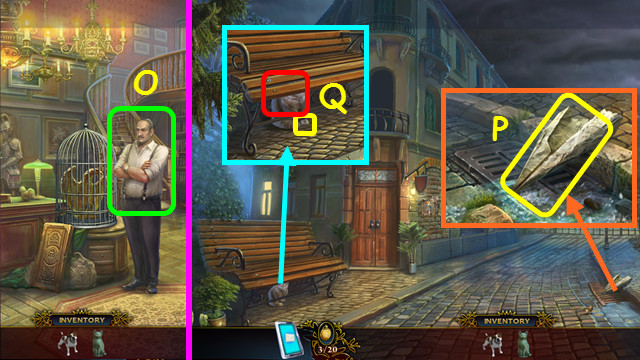
- Talk to Cantello (O).
- Walk down.
- Take the LETTER (P).
- Use the DOG on the cat; take the 1/3 BUTTON (Q).
- Return to Andre's House.
- Give the LETTER to Andre (R).
- Take the CROWBAR BUTTON (S).
- Return to Town and select the chest mini-game.
- Place the CROWBAR BUTTON on the board.
- The hard solution is H-A-E-E-C-B-B-E-C-D-D-C.
- The casual solution is A-C-D-D-E-G.
- Take the 1st TREASURE MAP PIECE and the LOCK PICK (I).
- Enter Cantello's Shop.
- Take a photo of the slab (J).
- Take the book and the FLINT WHEEL (K).
- Use the FLINT WHEEL to repair the LIGHTER (L).
- Use the LOCK PICK on the lock (M).
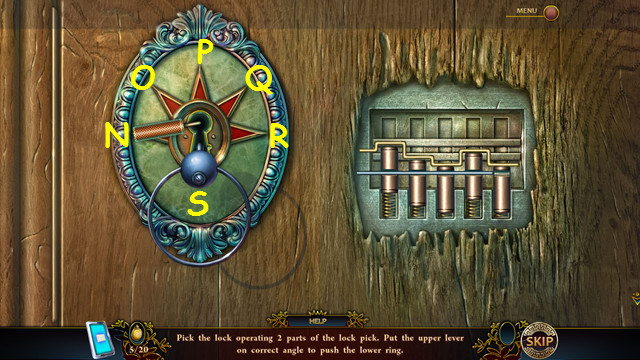
- Move the lever and select the pick (S) after each time.
- Solution: Q-S-N-S-P-S-N-S.
- Walk forward.
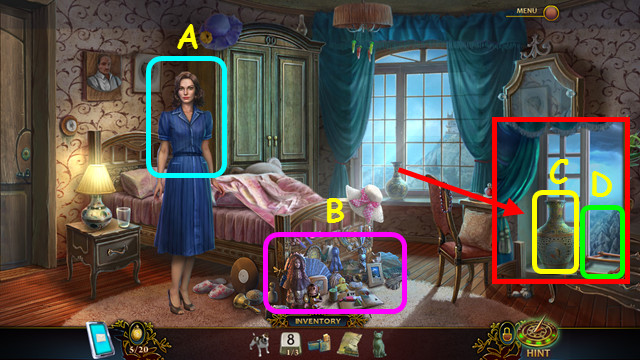
- Talk to Laura (A).
- Play the HOP to earn the ROPE LADDER (B).
- Take the VASE (C).
- Open the window and use the ROPE LADDER on the sill (D).

- Take the ROPE LADDER and close the window (E).
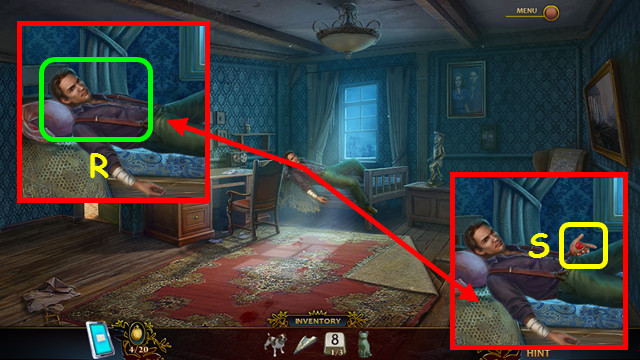
- Read the diary; take the WIG and the PILLOW (F).
- Place the VASE, WIG, and the PILLOW on the bed (G).
- Pull up the covers (H).
- Enter the wardrobe (I).
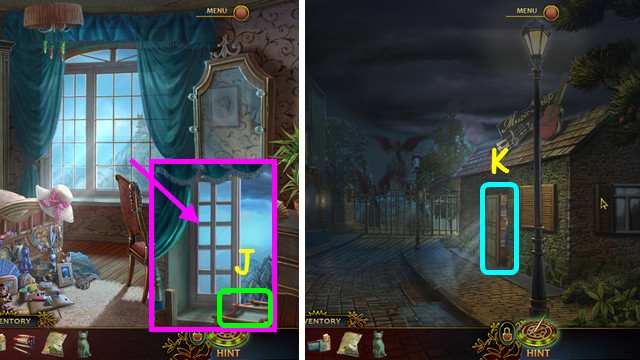
- Open the window, place the ROPE LADDER on the sill, and go forward (J).
- Enter the Music Shop (K).
- Talk to Andre (L).
- Use the LIGHTER on the seal; open and read the alphabet (M).
- Take the CURVED HANDLE and the GRAMOPHONE HORN (N).

- Take the HIPPO'S EYE (O).
- Note the guitar mini-game (P).
- Walk down and climb the ladder to Laura's Room (Q).
- Play the HOP to earn the 2/3 BUTTON (R).
- Place the HIPPO'S EYE (S); take the MUSIC KEY (T).
- Return to the Music Shop.
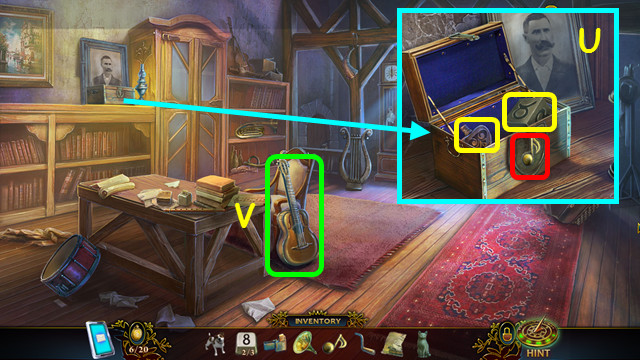
- Place the MUSIC KEY; take the GUITAR PEG and the SWIVEL (U).
- Select the guitar (V).
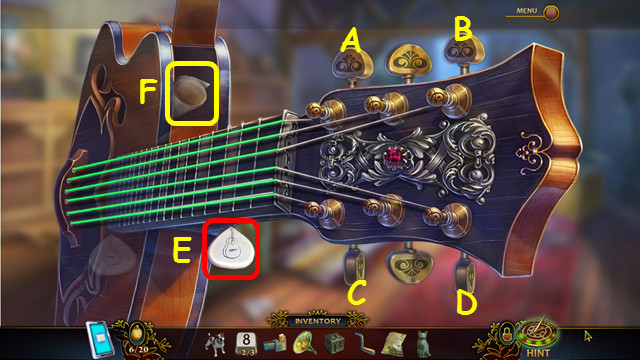
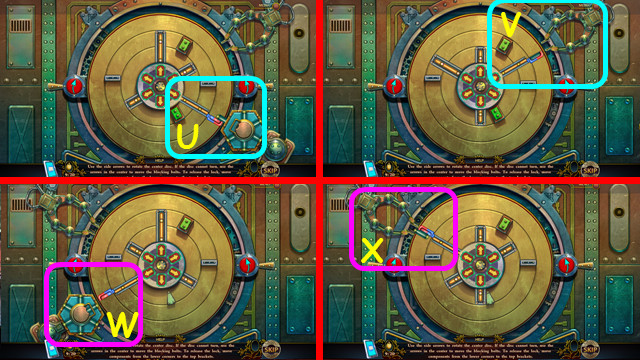
- Place the GUITAR PEG on the guitar (A).
- Turn the pegs (Ax2), (Bx2), (Cx4), and (Dx4).
- Select the pick (E).
- Take the 2nd TREASURE MAP PIECE (F).
- Place the 2 TREASURE MAP PIECES on the third piece (G).
- Take a photo, and then take the TREASURE MAP.
- Walk down.
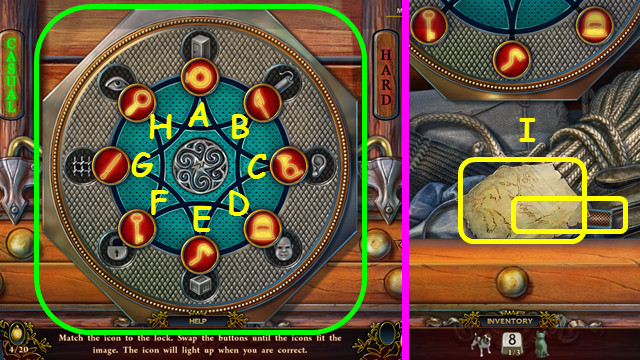
- Place the SWIVEL on the lock and set the code (H).
- Walk forward.
Chapter 3: The Shore
- Place the TREASURE MAP on the scene (J).
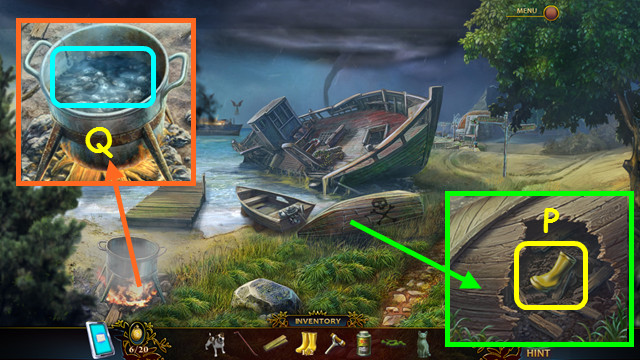
- Use the LIGHTER on the firewood (K).
- Play the HOP to earn the SHELL (L).
- Take the KEY (M).
- Walk to the Drawbridge (N).

- Read the clipping and take the 3/3 BUTTON (O).
- Use the SHELL to take the MOSS (P).
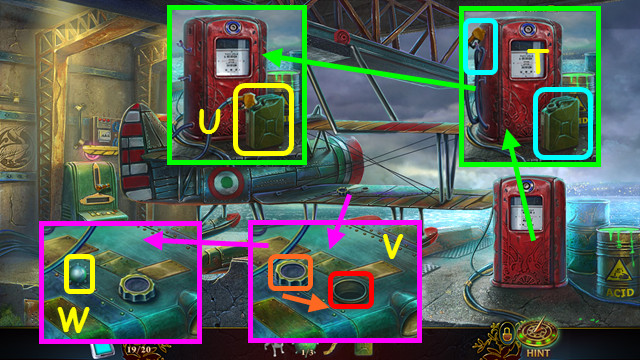
- Place the CURVED HANDLE and the GRAMOPHONE HORN on the box; turn the handle (Q).
- Take the CROWBAR and place the KEY (R).
- Select the control box (S).
- Place the 3 BUTTONS on the keypad.
- Press the buttons/dials A-B-B-B-B-C-D.
- Open the door and walk forward.
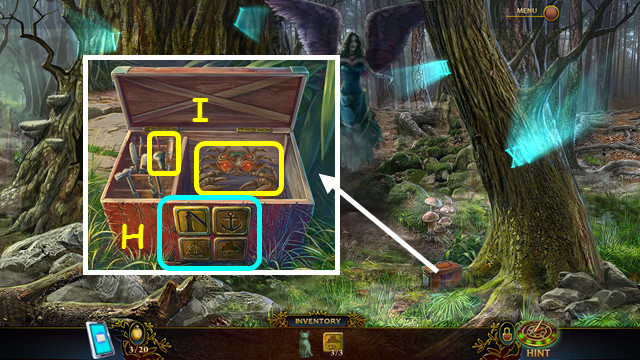
- Take the BOARDS (L).
- Remove the tarp; play the HOP to earn the GLUE (M).
- Take the CRANE LEVER (N).
- Take the 1/2 RUBBER BOOTS (O).
- Walk down twice.
- Use the CROWBAR on the boat; take the 2/2 RUBBER BOOT (P).
- Place the GLUE in the pot (Q).
- Return to the Shipyard.
- Use the 2 RUBBER BOOTS on the walkway (R).
- Walk forward.
- Take the DOG STATUETTE (S).
- Place the CRANE LEVER in the upper slot and pull it down (T).
- Take the GAS MASK (U).
- Take the MOP (V).
- Walk down twice.
- Place the CAT FIGURINE and the DOG FIGURINE (A).
- Take the FLASK (B).
- Return to the Hydroplane.
- Use the FLASK on the acid to get the FLASK OF ACID (C).
- Walk down 3 TIMES.
- Use the MOP in the pot to get the GLUE MOP (D).
- Use the GLUE MOP on the holes (E).
- Place the BOARDS on the holes, followed by the MOSS (F).
- Use the CROWBAR to push the boat (G).
- Use the FLASK OF ACID on the chain (H).
- Go to the Burning Ship (I).
- Take the DOOR HANDLE (J).
- Use the DOOR HANDLE on the door (K).
- Take the FIRE ALARM BUTTON (L).
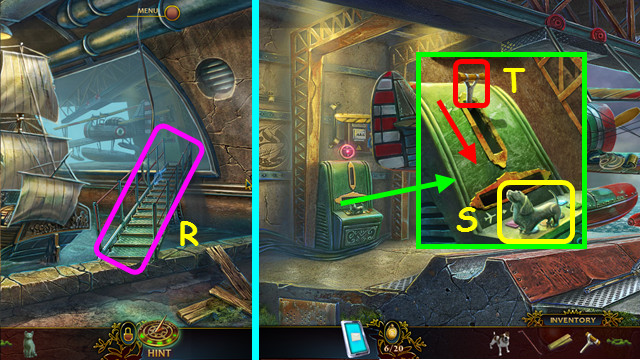
- Go up the stairs (M).
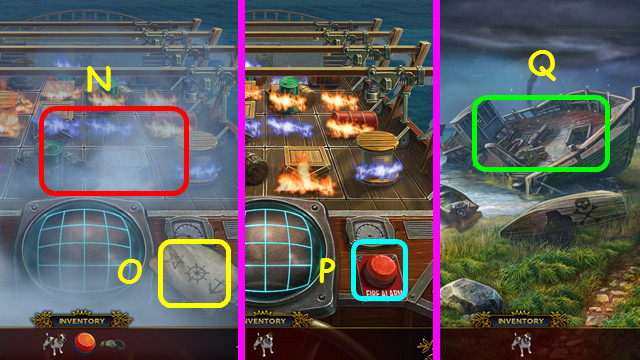
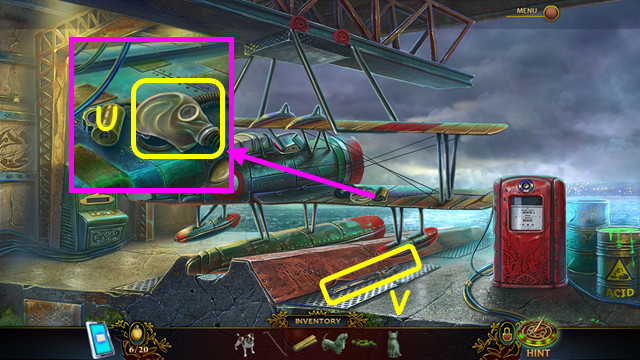
- Use the GAS MASK on the smoke (N).
- Take the code (O).
- Place the FIRE ALARM BUTTON on the dash (P).
- Walk down twice.
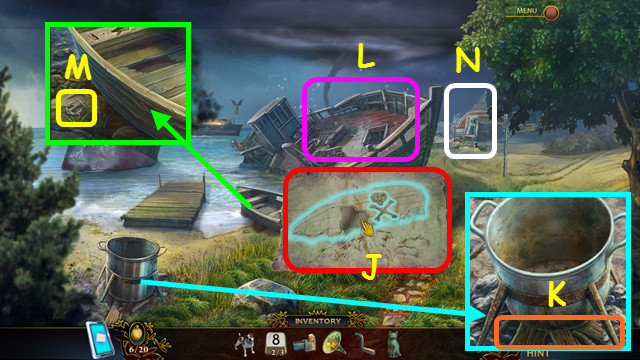
- Select the ship for a HOP; you will earn the TORCH (Q).
- Return to the Burning Ship.
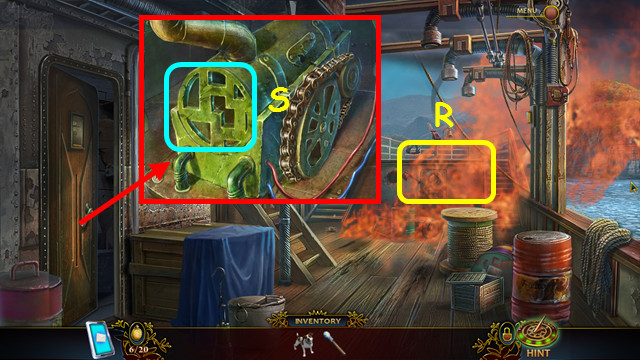
- Use the TORCH on the fire to make the BURNING TORCH (R).
- Use the BURNING TORCH on the power plant (S).
- Walk up the stairs.
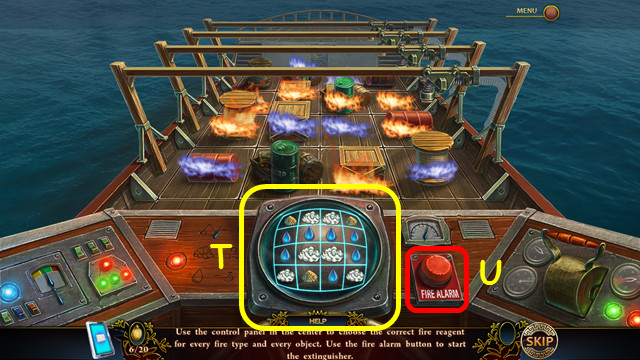
- Change the grid as shown (T).
- Press the button (U).
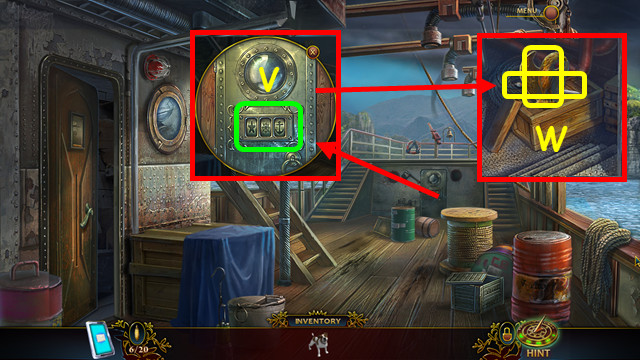
- Set the code (V).
- Take the 1/4 GOLDEN EAGLE and the CAPTAIN'S DAGGER (W).
- Walk down. Take the right path after the cut-scene.
Chapter 4: The Forest
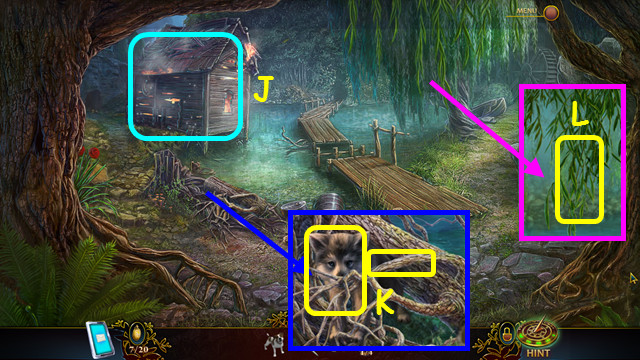
- Talk to the old man and walk forward (A).
- Talk to the old man (B).
- Move the carving and take the HOOK (C).
- Place the HOOK on the anchor (D).
- Take the BROKEN SHACKLES and the SPRING HOOK (E).
- Tie the cloth pieces together and add the SPRING HOOK (F).
- Move the spring hook to the anchor (G).
- Use the CAPTAIN'S DAGGER on the window (H).
- Use the cloth rope on the window and exit out the window (I).
- Play the HOP for the SAW (J).
- Use the SAW to take the HANDLE; take the WOLF PUP (K).
- Use the CAPTAIN'S DAGGER to take the WILLOW BRANCH (L).
- Walk left.

- Give the WOLF PUP to its mother; take the SIEVE and the FORGE KEY (M).
- Open the book and read the drawing; take the SCOOP NET and the EMPTY JAR (N).
- Walk down.
- Use the SIEVE to find the PRECIOUS STONES (O).
- Walk right.
- Talk to the old man (P).
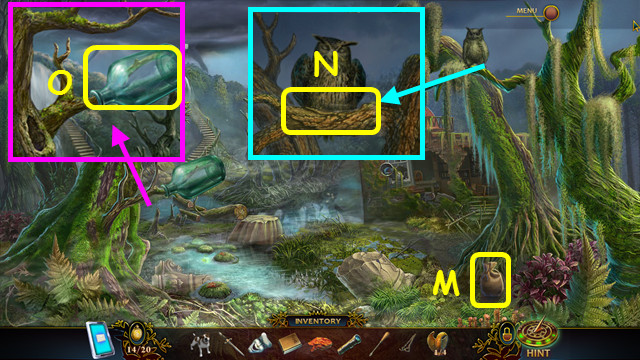
- Use the SCOOP NET to capture the 12 butterflies and earn the JAR OF BUTTERFLIES (green).
- Take the DOOR BOLT (Q).
- Take the LADDER (R).
- Use the FORGE KEY on the lock (S).
- Select the mini-game (T).
- Place the DOOR BOLT on the device.
- Move the carrier bolt to position (U).
- Then move it to position (V).
- Do the same for the second level; go to position (W), and then to (X).
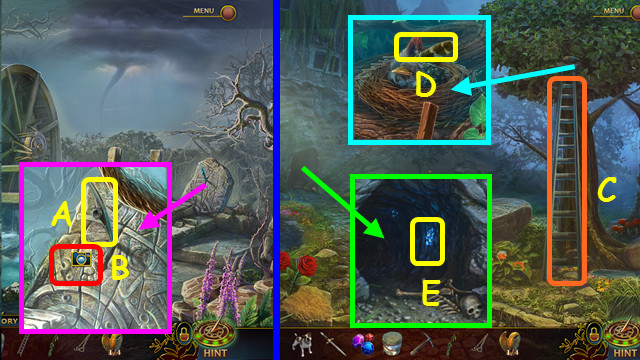
- Use the HANDLE to take the PICK (A).
- Take a picture of the stone (B).
- Walk down and left.
- Use the LADDER on the tree (C).
- Take the FEATHERS (D).
- Use the PICK to take the GLOWING ORE (E).
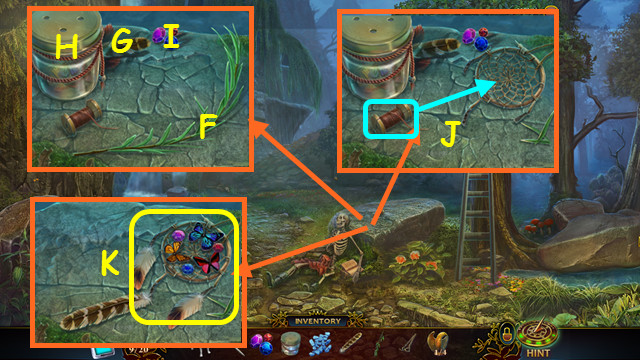
- Place the WILLOW BRANCH (F), the FEATHERS (G), the JAR OF BUTTERFLIES (H), and the PRECIOUS STONES (I) on the slab.
- Select the willow branch to form a circle.
- Use the thread on the circle (J).
- Place the feathers, precious stones, and the butterflies on the frame to make the DREAM CATCHER (K).
- Walk down and right.
- Select the Forge for a HOP (L).
- Use the DREAM CATCHER on the 5 ghosts then complete the HOP to earn the CROWBAR.
- Use the CROWBAR to take the nails and planks (M).
- Select the Forge again.
- Place the BROKEN SHACKLES (N).
- Place the GLOWING ORE (O).
- Play HOP to earn MYSTICAL SHACKLES.
- Walk down.

- Place the planks, and then the nails on the posts (A).
- Play the HOP to earn the HAMMER (B).
- Use the HAMMER on the nails (C).
- Walk forward and right.
- Play the HOP to earn the BOATHOOK (D).
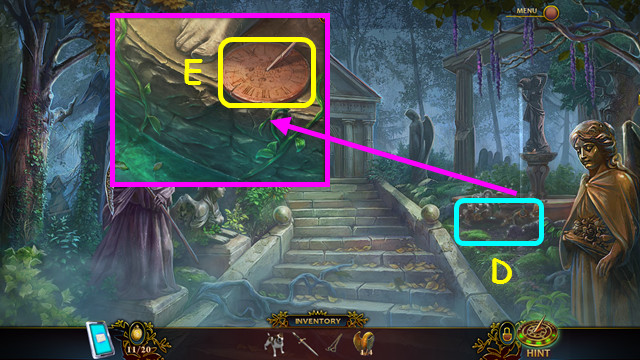
- Take the STONE SUNDIAL (E).
- Walk down.
- Place the STONE SUNDIAL in the hand to earn the 1/4 DOOR CREST PART (F).
- Use the BOATHOOK to take the BUCKET (G).
- Walk right.
- Use the BUCKET on the water to get the BUCKET OF WATER (H).
- Walk down.
- Use the BUCKET OF WATER on the flames; take the COMEDY MASK and the CRYPT DOOR CREST (I).
- Walk right.
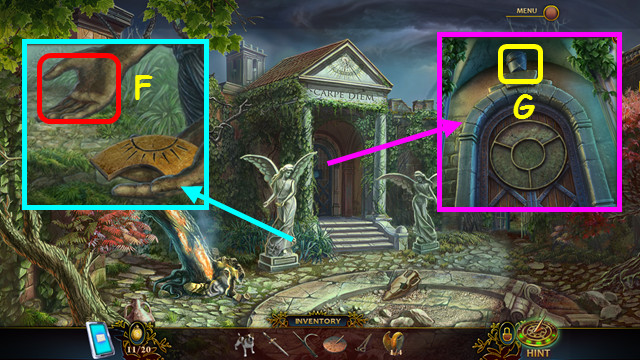
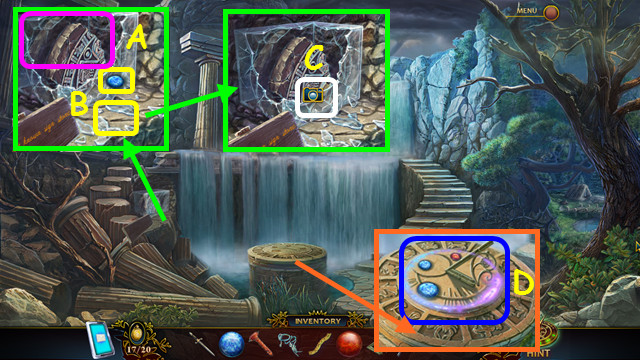
- Use the CRYPT DOOR CREST on the door; walk forward (J).
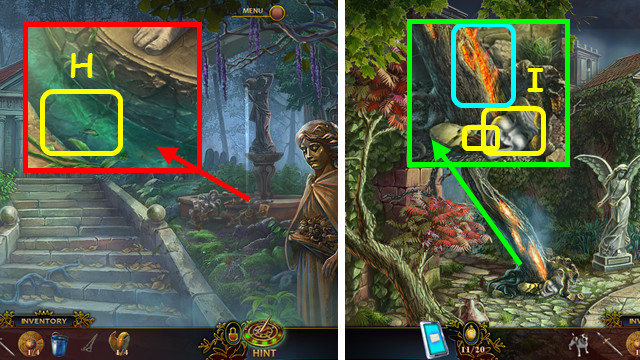
- Read the 2 notes (K).
- Turn on the burner (L).
- Select the vials (1-3); take the REAGENT (M).
- Take the SKULL (N).
- Take the LOCATION SITE PICTURE (O).
- Use the REAGENT on the instructions; read the instructions (P).
- Cut the wires in order (1-6).
- Take the CRYPT KEY (Q).
- Walk down; use the CRYPT KEY in the lock (R).
- Walk down again.
- Play the HOP to earn the 2/4 DOOR CREST PART (S).
- Place the LOCATION SITE PICTURE (T).
- Place the SKULL in the cowl to get the STONE SCYTHE (U).
- Take the 3/4 DOOR CREST PART (V).
- Walk down.
- Use the STONE SCYTHE on the statue; take the 4/4 DOOR CREST PART (A).
- Place the 4 DOOR CREST PARTS on the door (B).
- Select the lock (C).
- Press E-E-E-E-E-D.
- For the second level, press G-F-F-F-F-G-F-F-G-F-F-F-F-F.
- The third level is I-H-H-H-H-H-I-I-I-H-H-H-H-I.
- Enter the Excavation Site.
Chapter 5: The Ruins
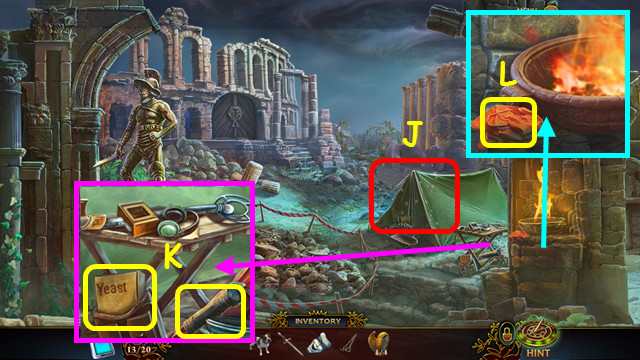
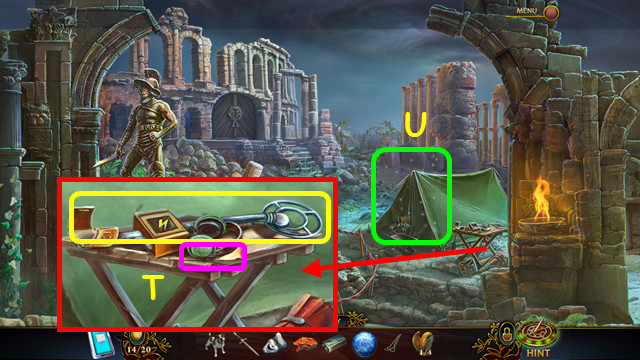
- Play the HOP to earn the SCREWDRIVER (J).
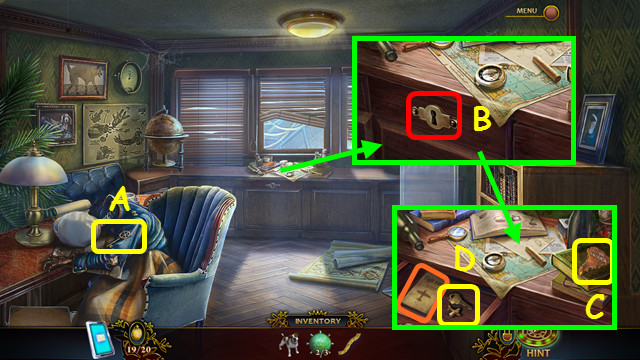
- Take the YEAST and the FLASHLIGHT (K).
- Take the RAG (L).
- Walk forward.
- Take the SUGAR (M).
- Use the FLASHLIGHT to get the FORKED STICK (N).
- Use the FORKED STICK to take the BOTTLE (O).
- Place the BOTTLE, the SUGAR, and then the YEAST on the table (P).
- Take the 1st BLUE STAR (Q).
- Use the SCREWDRIVER to take the BATTERY (R).
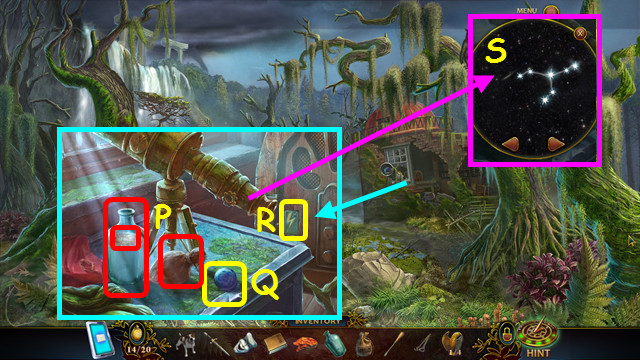
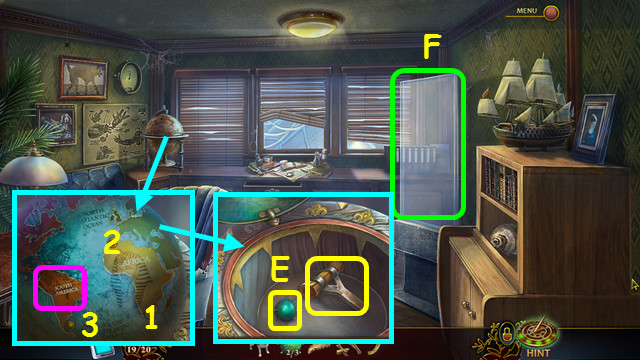
- Look at the telescope; pan to see the 3 constellations (S).
- Walk down.
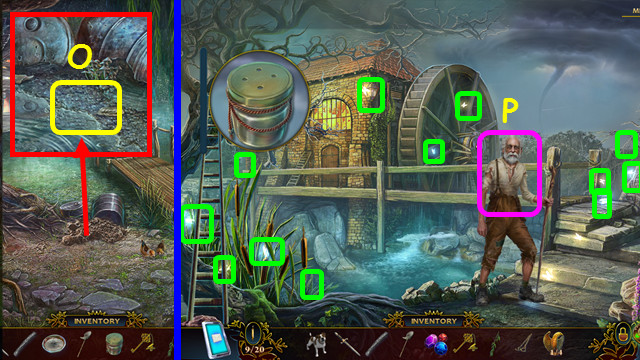
- Use the BATTERY to take the METAL DETECTOR; read the note (T).
- Play the HOP to earn the BRUSH (U).
- Walk down.
- Use the METAL DETECTOR on the area (V).
- Take the ROUND SHIELD (W).
- Walk left.
- Place the ROUND SHIELD and use the RAG on it (A).
- Use the DOG on the dirt; select the area (B).
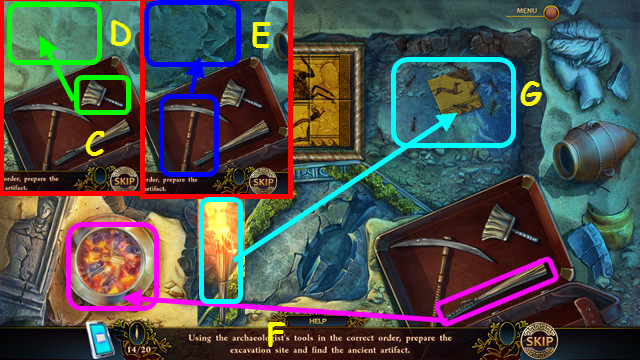
- Place the BRUSH in the tool kit (C).
- Select the brush and use it on the sand (D).
- Use the pick to remove all the stone (E).
- Use the torch on the coals (F), and then on the ants (G).
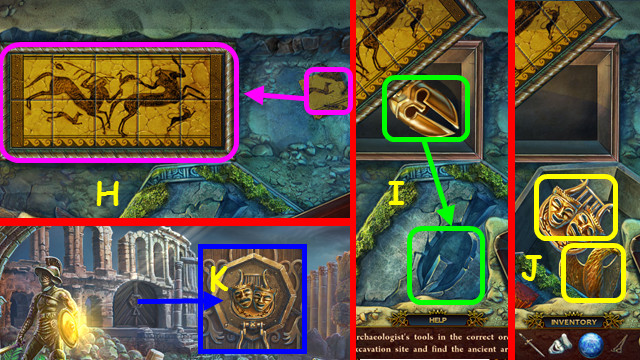
- Place the tile in the mosaic; swap the tiles to restore the picture (H).
- Take the helmet and place it on the lid (I).
- Take the THEATER MASK CREST and the 2/4 GOLDEN EAGLE (J).
- Place the THEATER MASK CREST in the lock (K).
- Walk left.
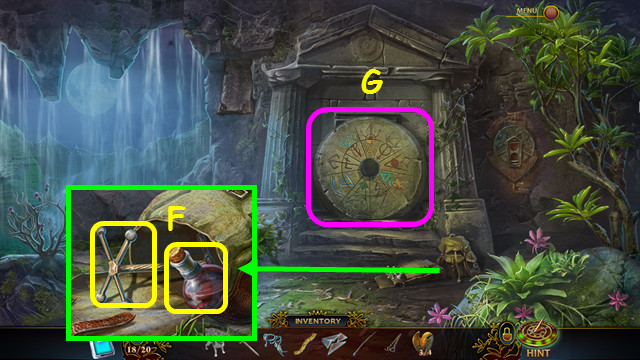
- Take the TORCH (L).
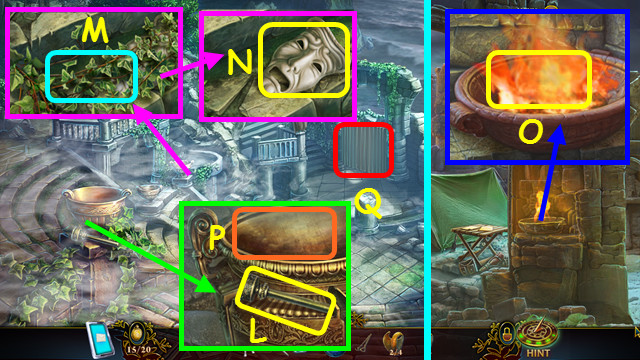
- Use the CAPTAIN'S DAGGER on the ivy (M).
- Take the TRAGEDY MASK (N).
- Walk down.
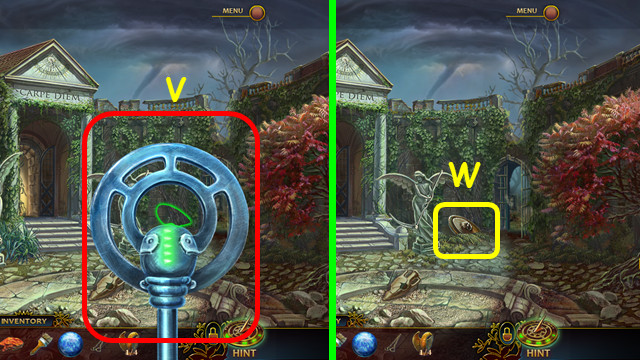
- Use the TORCH on the flame to make the LIT TORCH (O).
- Walk left.
- Use the LIT TORCH on the urn (P).
- Select the stage (Q).
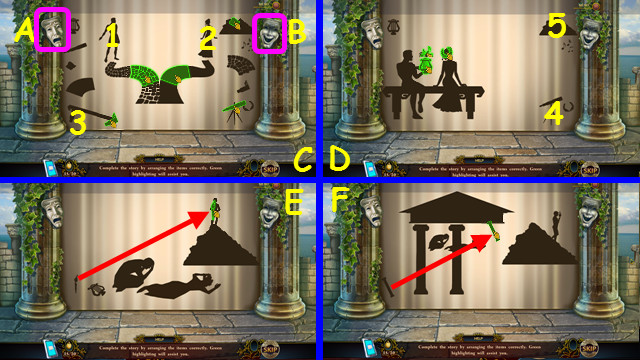
- Place the TRAGEDY MASK on the left (A), and the COMEDY MASK on the right (B).
- Move the pieces as shown (C).
- Select the man (1), the woman (2), and then the bench (3).
- Move the pieces as shown (D).
- Select the telescope (4) and the mountain (5).
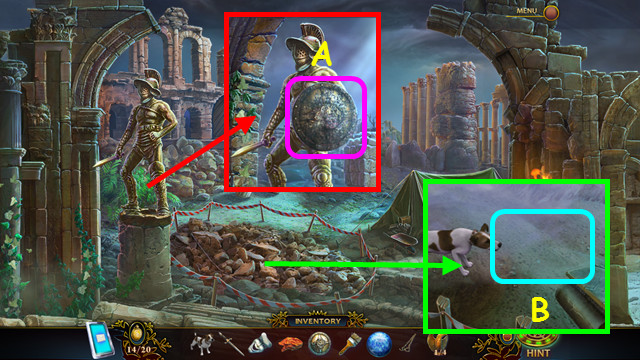
- Use the torch on the mountain man (E).
- Move the pillar (F).
- Take the LAUREL WREATH (J).
- You earn the 3/4 GOLDEN EAGLE.
- Place the LAUREL WREATH and take the SPEAR (K).
- Walk down and forward.
- Use the SPEAR on all the tufts (L).
- Walk up the stairs (M).
- Take the FISHING ROD PART (N).
- Walk right.
- Play the HOP to earn the ENCRYPTING ROLL (O).
- Take the STONE TRIANGLE (P).
- Walk down and left.
- Use the CAPTAIN'S DAGGER on the pocket to take the RED STAR (Q).
- Play the HOP to earn the EMERGENCY HAMMER (R).
- Use the CAPTAIN'S DAGGER to take the FISHING LINE AND HOOK (S).
- Place the ENCRYPTING ROLL on the machine and select it (T).
- Select the numbers shown (green).
- Take the CODE TAPE (U).
- Walk down.
- Use the EMERGENCY HAMMER on the glass (A).
- Take the 2nd BLUE STAR and the GLASS SHARDS (B).
- Take a picture of the carving (C).
- Place the 2 BLUE STARS, the RED STAR, and the STONE TRIANGLE on the sundial (D).
- Select the sundial.
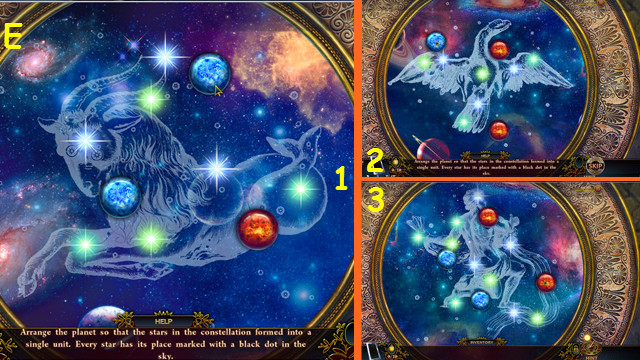
- Move the planets and stars as shown (E).
- There are 3 constellations to complete (1-3).
- Walk forward.
- Take the CROSS KEY and the 1/2 PHOTO REAGENT (F).
- Note the mini-game (G).
- Walk down and left.
- Play the HOP to earn the OLD CAMERA (H).
- Use the CROSS KEY on the box (I); take the MYSTICAL SPHERE (J).
- Walk down and forward.
- Place the MYSTICAL SPHERE in the center (K).
- Select the number of storms as they appear in the center (L).
- Our solution is shown here (color-coded).
- Turn outer ring 3 times (M).
- Walk forward.
- Use the CAPTAIN'S DAGGER to open the column; take the CHRONOS CREST (N).
- Walk down.
- Place the CHRONOS CREST (O).
- Take the HOURGLASS (P).
- Walk forward.
- Place the HOURGLASS (Q).
- Take the 4/4 GOLDEN EAGLE (R).
- Read the journal and take the 2/2 PHOTO REAGENT (S).
- Select the sarcophagus (T).
- Place the 4 GOLDEN EAGLES on the board.
- Connect the clocks, alternating red and blue.
- There are 3 levels to connect (1-3).
- Take the CHARGED HOURGLASS (U).
- Return to the Canoe.
- Place the FISHING ROD PART and the FISHING LINE AND HOOK on the pole (A).
- Select the hook (B).
- Select the pole; take the CRAYFISH and the BROKEN LANTERN (C).
- Use the CRAYFISH on the beaver and take the PADDLE (D).
- Play the HOP to earn the CANISTER (E).
- Place the PADDLE in the canoe (F).
- Use the GLASS SHARDS on the paint to get the RED GLASS SHARDS (G).
- Place the BROKEN LANTERN on the table and use the RED GLASS SHARDS on it (H).
- Place the OLD CAMERA on the table (I).
- Use the 2 PHOTO REAGENTS on the pans (J).
- Open the package; put the photo paper (K) in the left pan, and then the right pan.
- Move the paper to the developer and flip the switch (L).
- Take the RIVER PHOTOS (M).
- Use the RIVER PHOTOS on the canoe (N).
- Restore the diary page (O).
- Travel forward (P).
- Talk to Cantello; use the MYSTICAL SHACKLES on him, followed by the CHARGED HOURGLASS (Q).
- Walk forward twice.
- Play the HOP to earn the 1/3 MINE (R).
- Place the CAPTAIN'S DAGGER on the door (S).
- Walk right.
- Place the CANISTER and select the pump (T).
- Take the CANISTER OF FUEL (U).
- Use the CANISTER OF FUEL on the hole, and then replace the lid (V).
- Take the 2/3 MINE (W).
- Walk down and forward.
- Take the CREDENZA KEY (A).
- Use the CREDENZA KEY on the lock (B).
- Take the GLOBE PIECE (C).
- Take the manual and the HYDROPLANE KEY (D).
- Place the GLOBE PIECE and press the buttons (1-3).
- Take the 3/3 MINE and the CRANE LEVER (E).
- Select the panel (F).
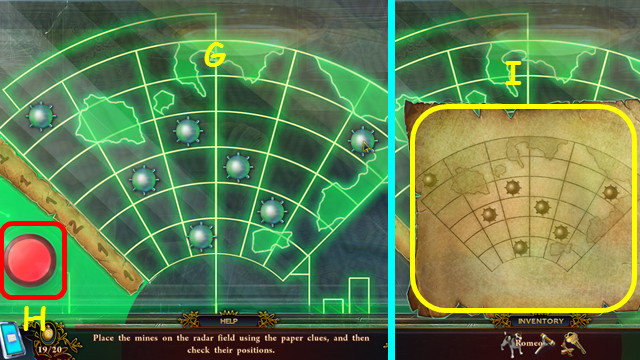
- Place the 3 MINES and the CODE TAPE on the board.
- Place the mines as shown (G).
- Press the button (H).
- Take the map (I).
- Walk down and right.
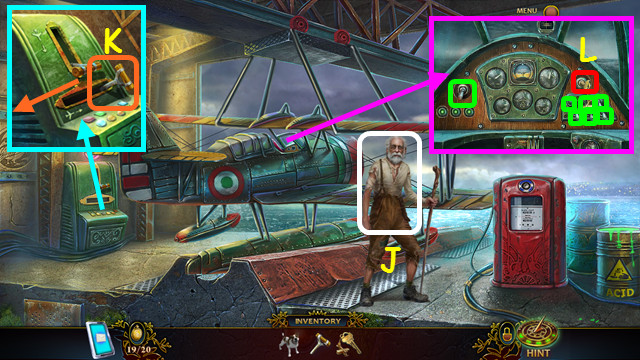
- Talk to the old man (J).
- Place the CRANE LEVER in the bottom slot and pull it (K).
- Place the HYDROPLANE KEY in the ignition (L).
- Flip the 7 switches (green).
- Congratulations! You have completed Beyond the Unknown: A Matter of Time!
Created at: 2014-08-08