

Walkthrough Menu
- General Tips
- Chapter 1: Leave Station
- Chapter 2: Lake Shore Ares
- Chapter 3: Dam Area
- Chapter 4: Police Station Area
- Chapter 5: Chasing Alan
General Tips
- This is the official guide for Bonfire Stories: Manifest Horror.
- This guide won't tell you when to zoom into a location; the screenshots show each zoom scene.
- Hidden-object puzzles are referred to as HOPs. Only the locations of the HOPs will be shown.
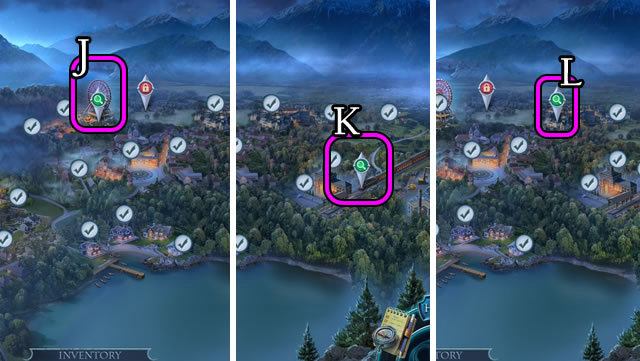
- Use the Map to fast travel to a location.
Chapter 1: Leave Station
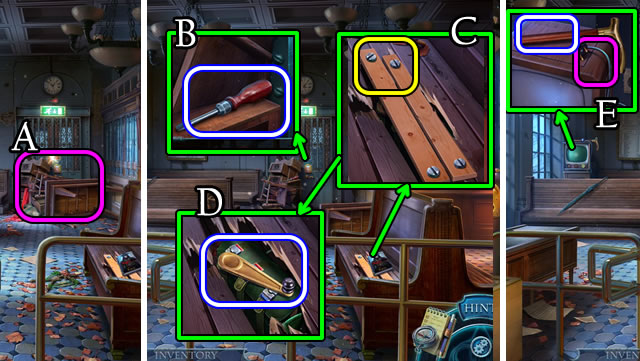
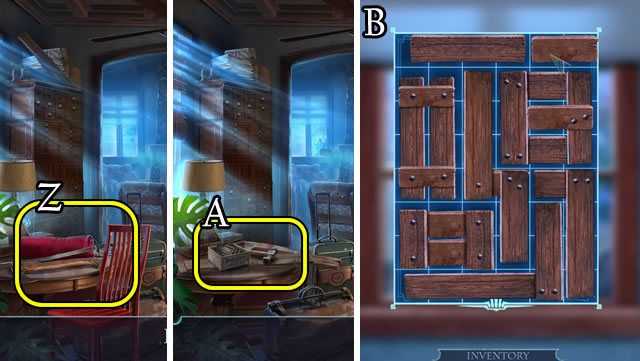
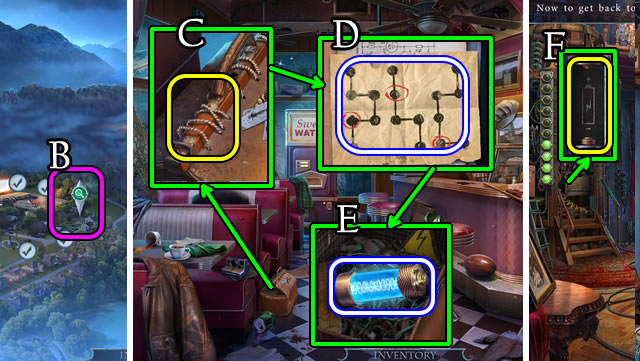
- Select scene; move furniture (A); take SCREWDRIVER (B).
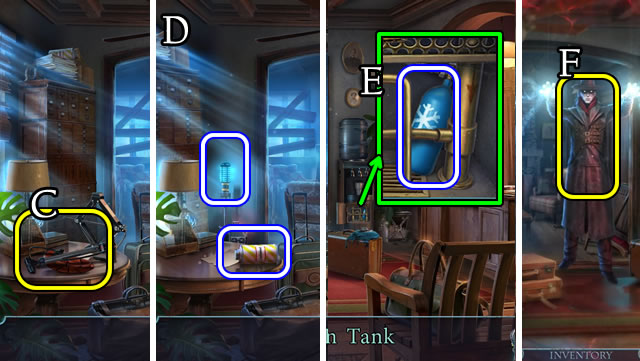
- Take book; use SCREWDRIVER (C); take LEVER (D).
- Select plug; take CANE PART (E).
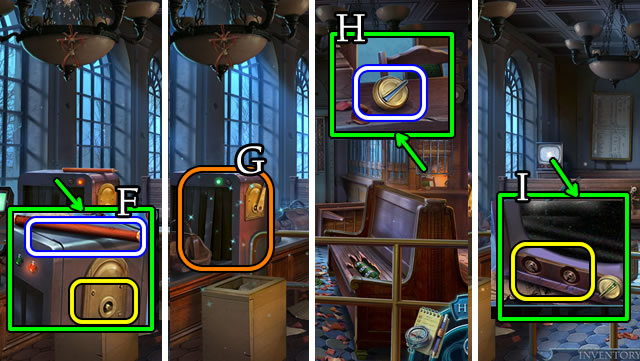
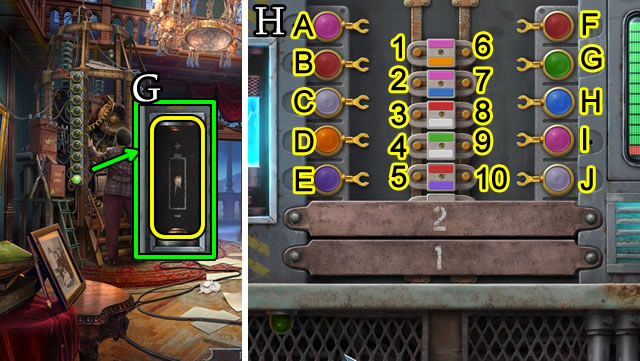
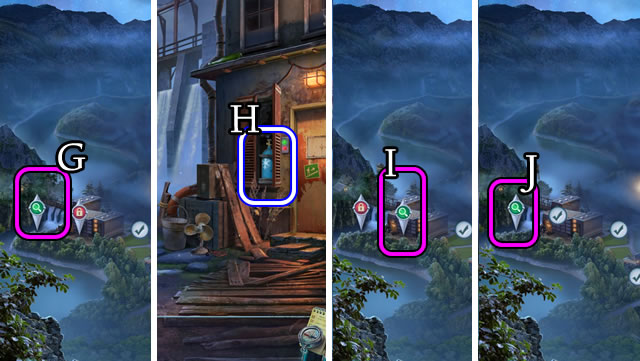
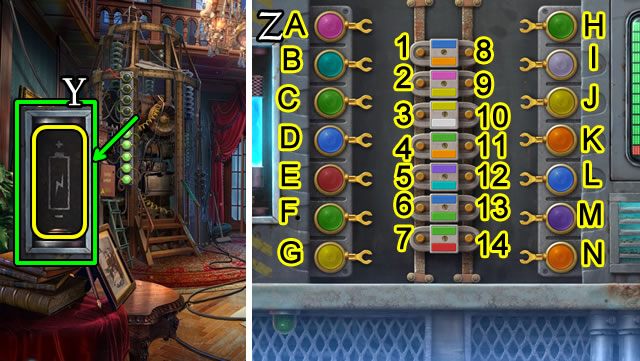
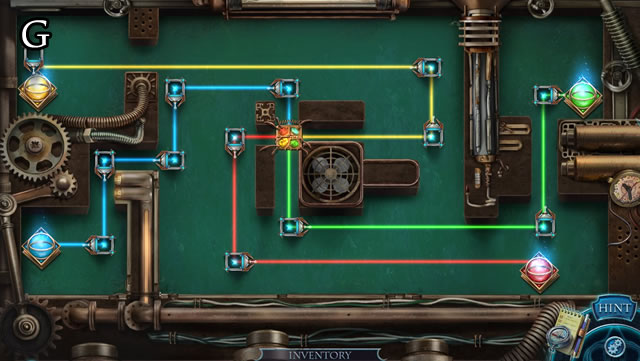
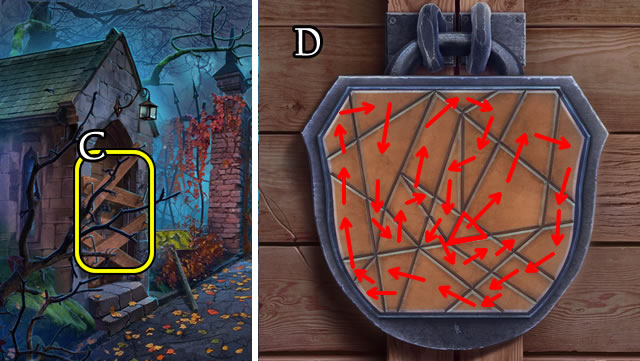
- Take CANE PART; use LEVER (F) for HOP (G); receive TV DIAL.
- Take TV DIAL (H).
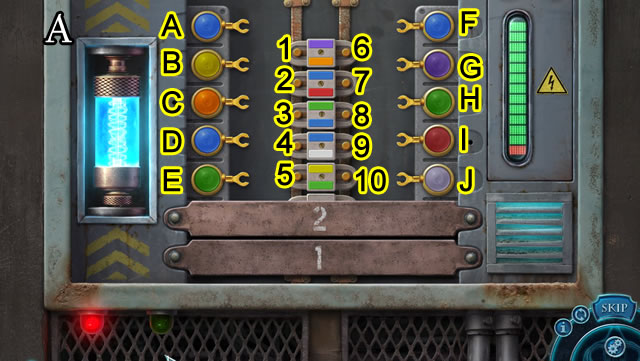
- Place 2 TV DIALS (I); select TV.
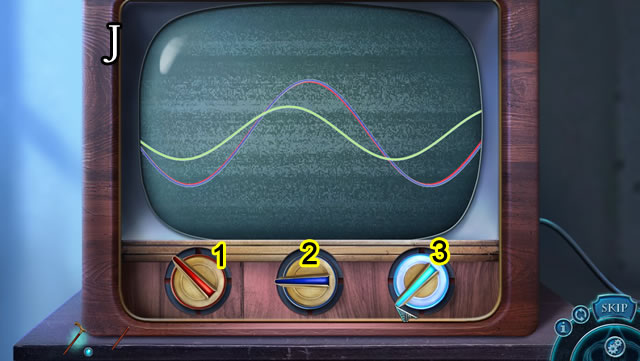
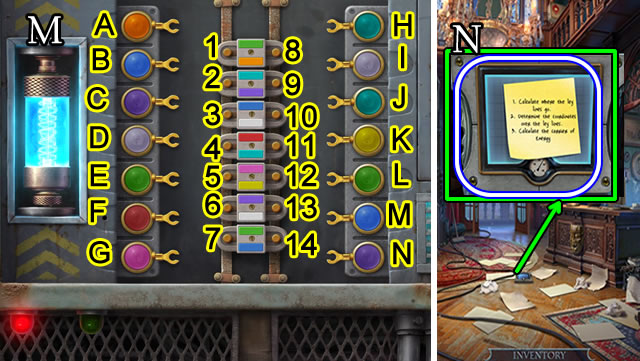
- Solution. (J) 1-3.
- Take MAGNET.
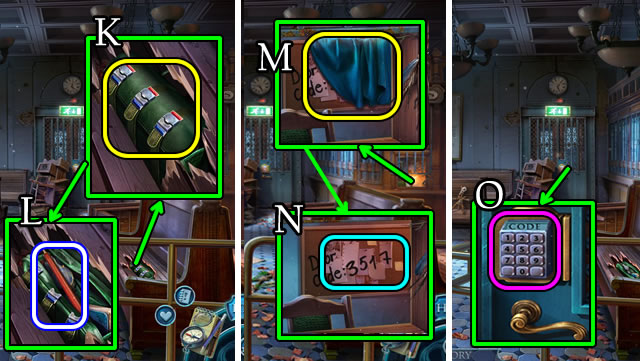
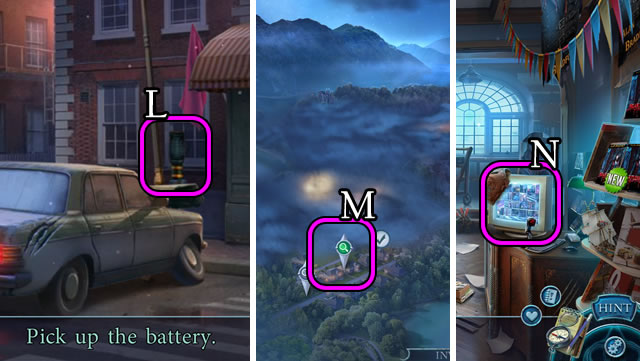
- Use MAGNET (K); take CANE PART (L).
- 2 CANE PARTS on CANE PART for CANE.
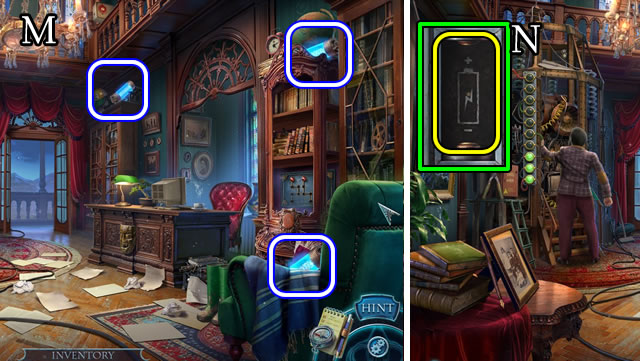
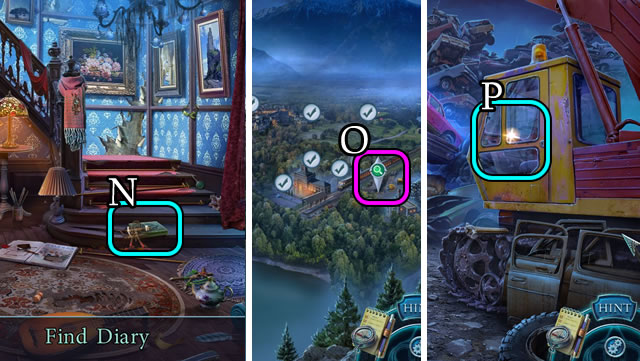
- Use CANE (M); note code (N).
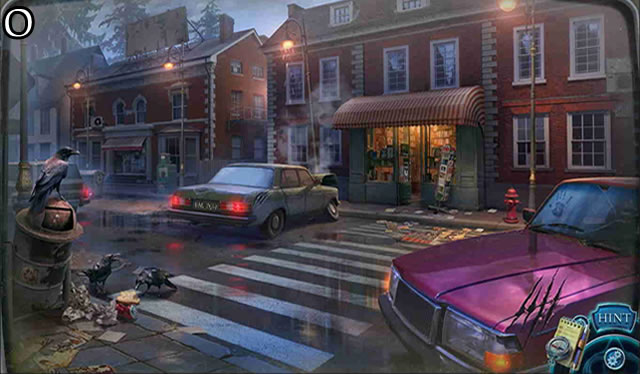
- Select (O); enter 3-5-1-7.
- Go forward.
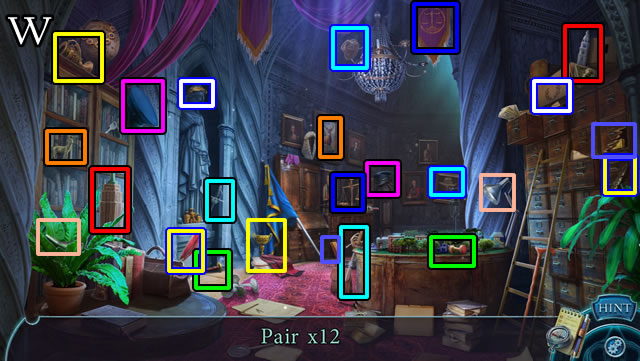
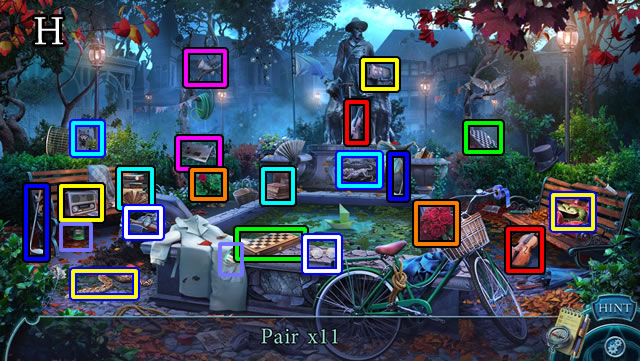
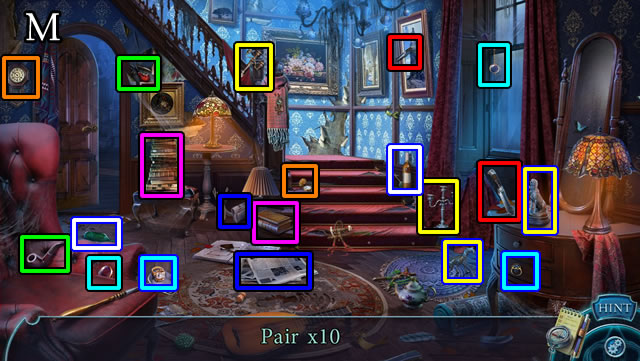
- Speak to character; play HOP.
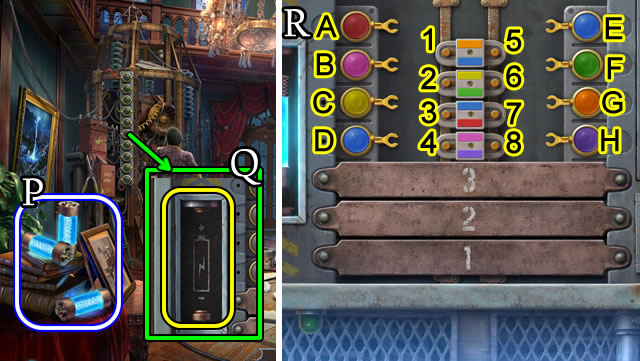
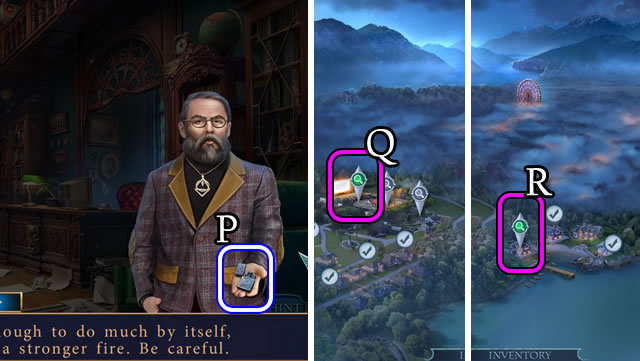
- Take 3/3 BLUE BATTERY (P).
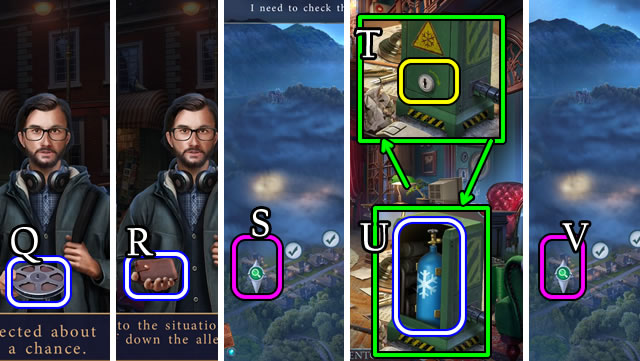
- Place 3/3 BLUE BATTERIES (Q).
- Solution (R). (A-3)-(B-4)-(C-2)-(D-1)-(E-7)-(F-6)-(G-5)-(H-8).
- Speak to character.
- Go forward.
- Speak to character.
Chapter 2: Lake Shore Area
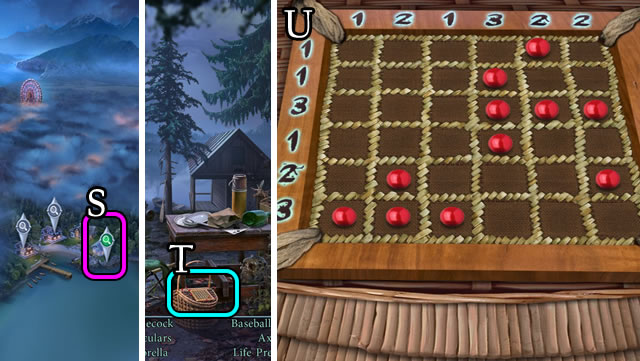
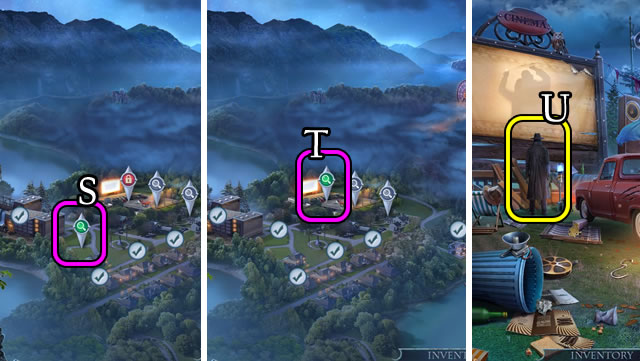
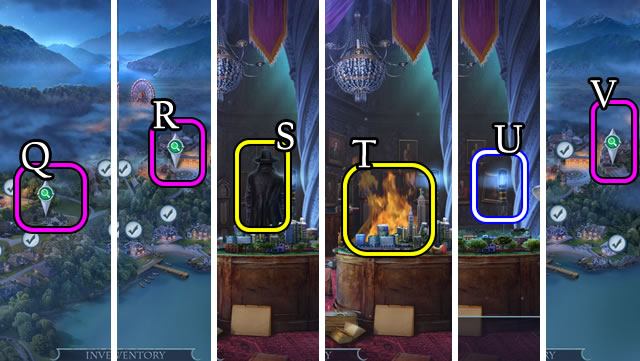
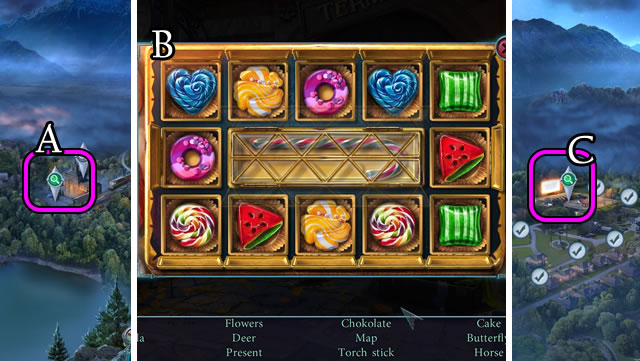
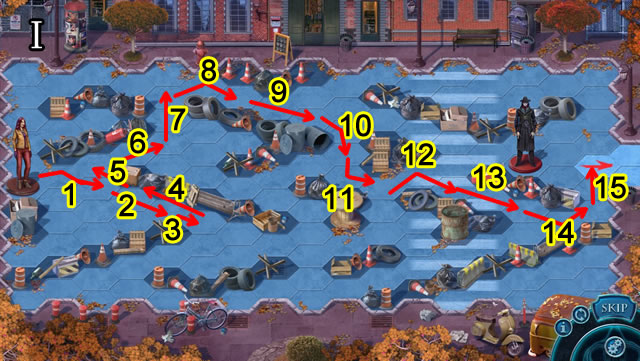
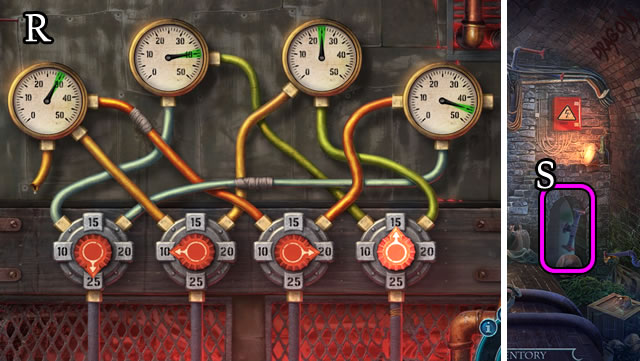
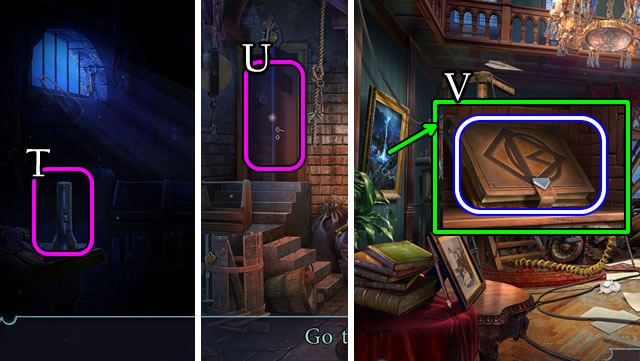
- Select (S); speak to character; select (T); solution (U).
- Play HOP; take 1/3 BLUE BATTERY.
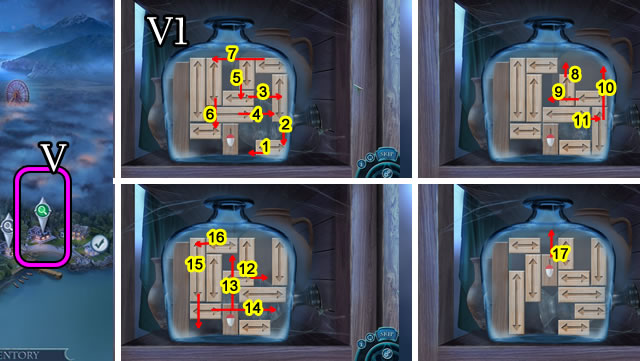
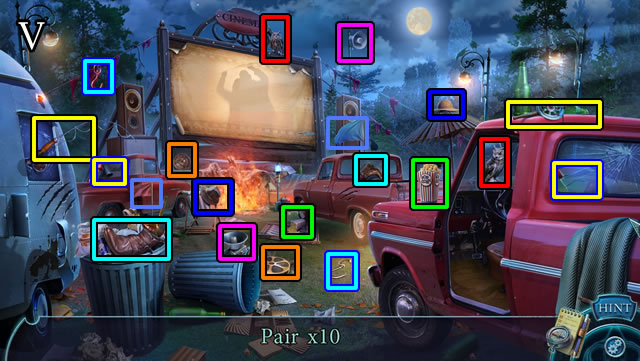
- Select (V).
- Solution (V1).

- Solution (V2).
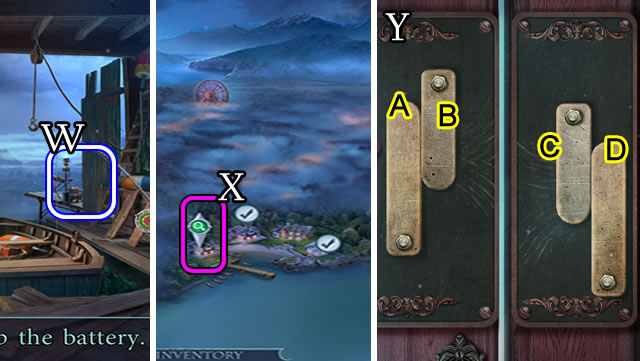
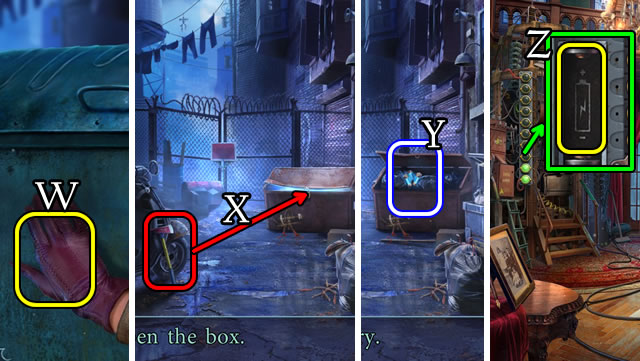
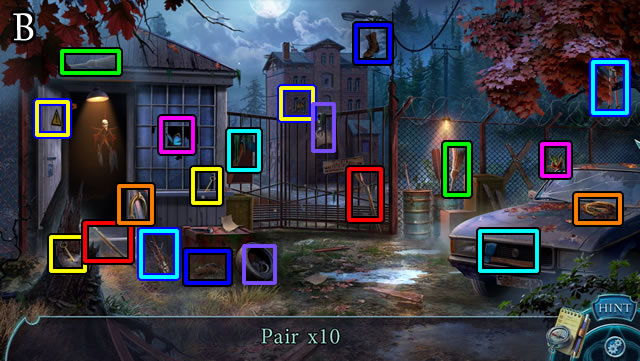
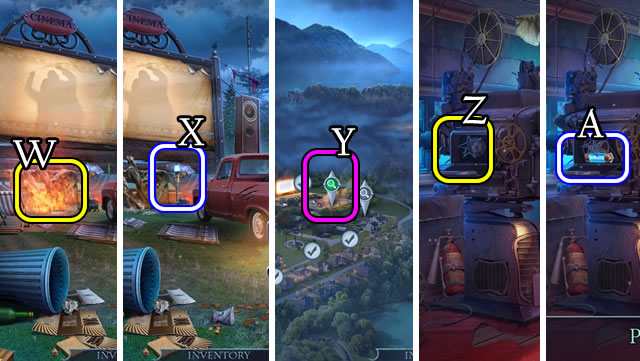
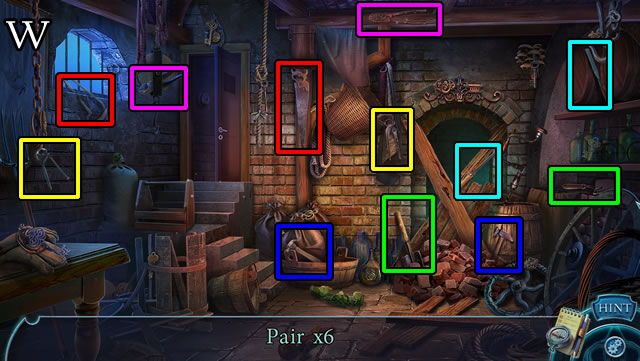
- Play HOP; receive BOBBER; speak to character; take 2/3 BLUE BATTERY (W).
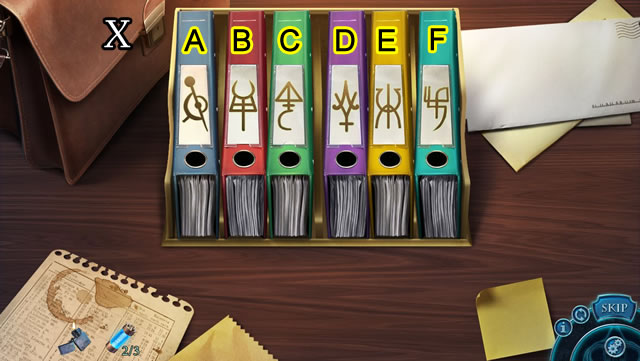
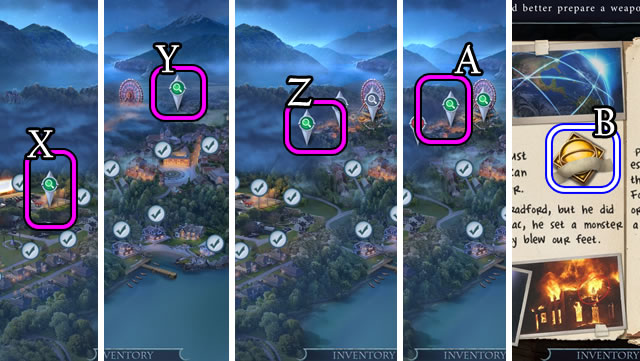
- Select (X).
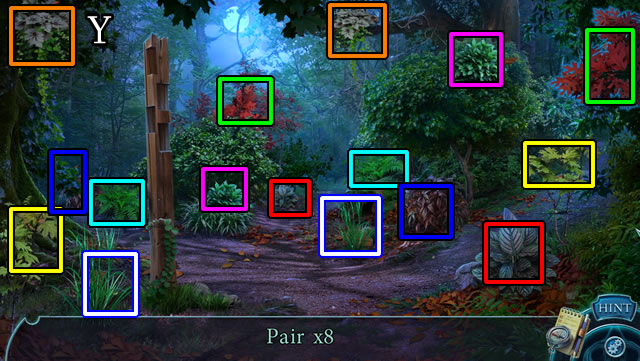
- Solution (Y). C-D-C-B-A-C.
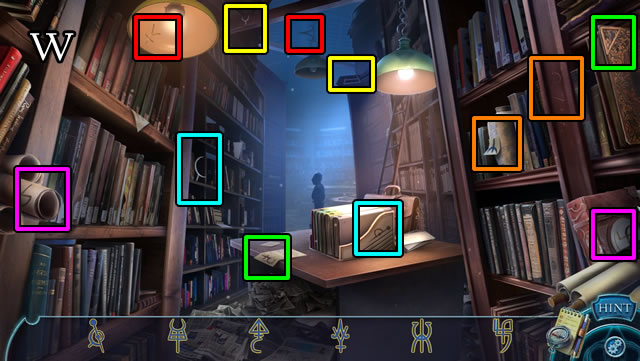
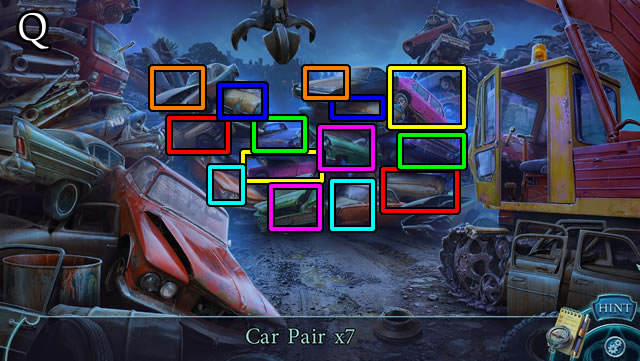
- Play HOP; select (Z); play HOP; select (A).
- Solution (B).
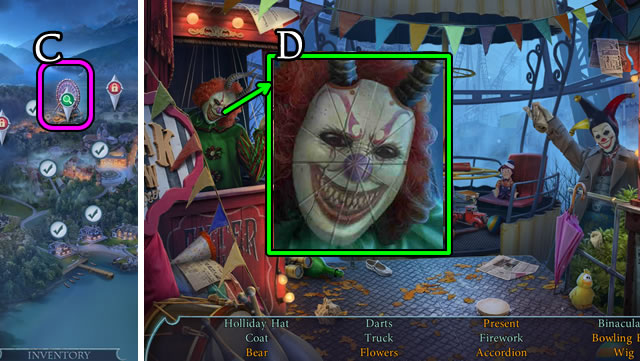
- Play HOP; select (C); take SOLVENT, 3/3 BLUE BATTERY (D).
- SOLVENT on BOBBER; select BOBBER; take note.
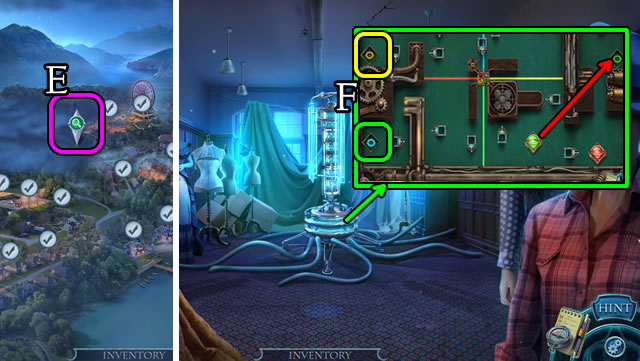
- Open, take LIQUID NITROGEN (E).
- Use LIQUID NITROGEN (F).
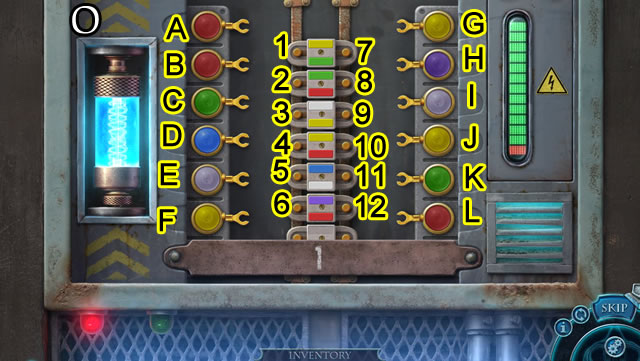
- Speak to character; place 3/3 BLUE BATTERIES (G).
- Solution (H). (A-2)-(B-3)-(C-4)-(D-1)-(E-5)-(F-10)-(G-9)-(H-7)-(I-6)-(J-8).
- Go forward.
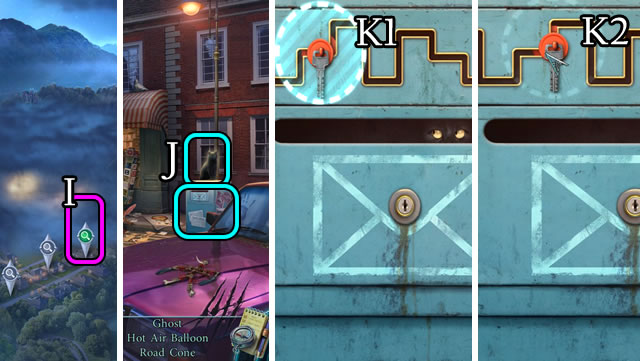
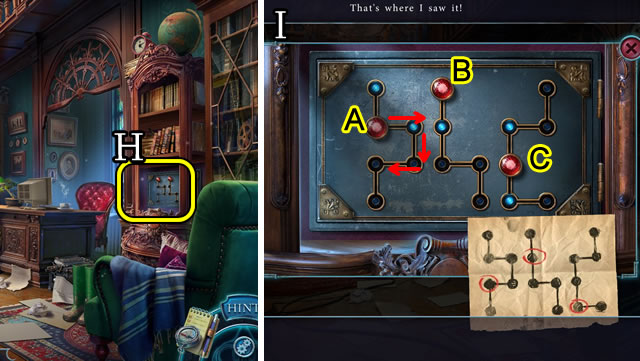
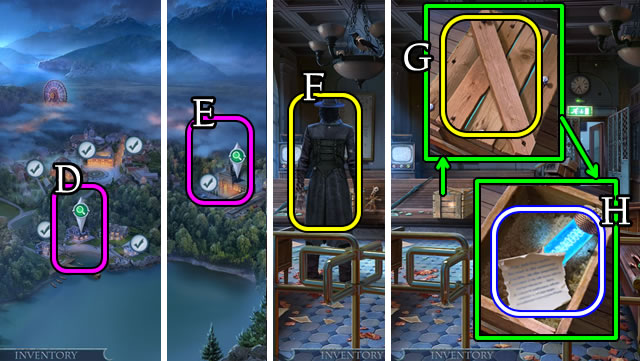
- Speak to character; select (I); select cat, then mailbox (J), take paper.
- Solution. Move curser away from key when cat is looking (K1); move key when cat is hiding (K2).
- Take newspaper; play HOP; take battery (L); select (M); play HOP; select monitor (N).
- Solution (O).

- Solution (P).
- Go forward.
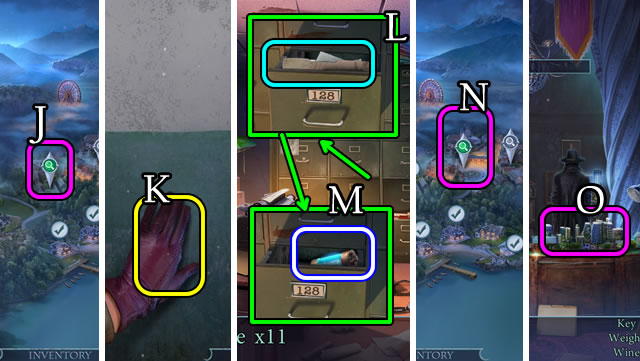
- Speak to characters; receive FILM (Q), ALAN'S WALLET (R); select (S).
- Go down.
- ALAN'S WALLET for photo, note and ALAN'S KEY.
- Use ALAN'S KEY (T); take note, LIQUID NITROGEN (U).
- Go forward.
- Select (V).
- Place LIQUID NITROGEN (W); play HOP; use axe (X); take 3/3 BATTERIES (Y).
- Take note; place 3/3 BATTERIES (Z).
- Solution (A). (A-2)-(B-5)-(C-1)-(D-4)-(E-3)-(F-8)-(G-6)-(H-10)-(I-7)-(J-9).
- Go forward.
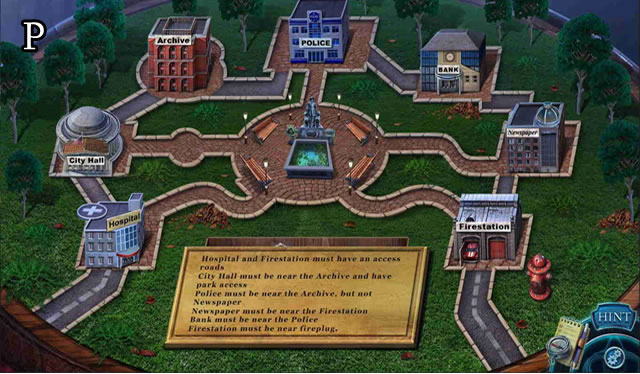
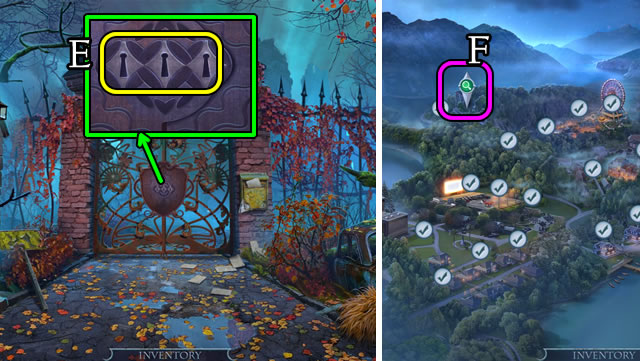
- Select Gate.
Chapter 3: Dam Area
- Solution (B).
- Go forward.
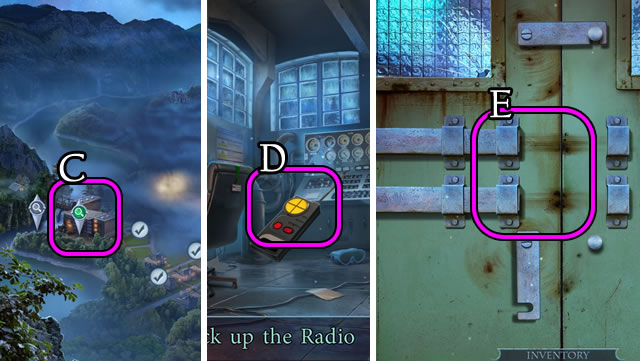
- Select (C); HOP; take walkie-talkie (D); speak to character; Select door (E).
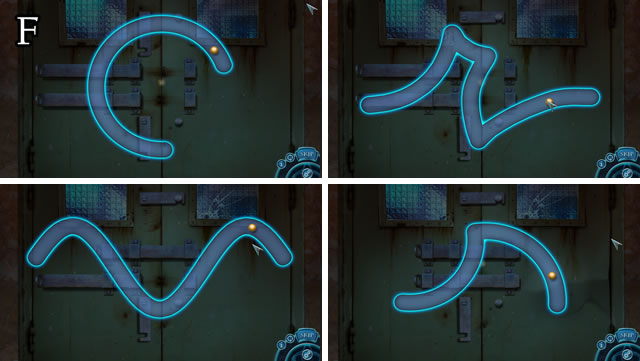
- Solutions (F).
- Select (G); play HOP; take LIQUID NITROGEN (H).
- Select (I); play HOP; select (J).
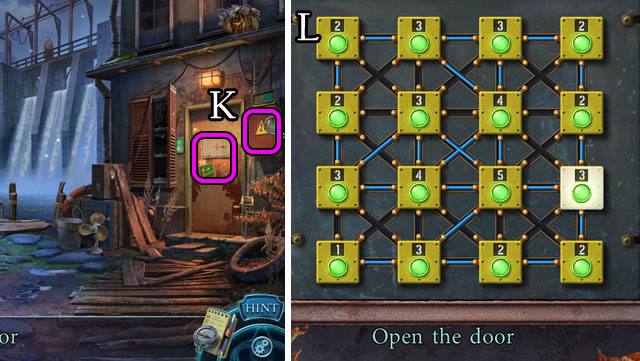
- Select door, fuse box (K).
- Solution (L).
- Go right.
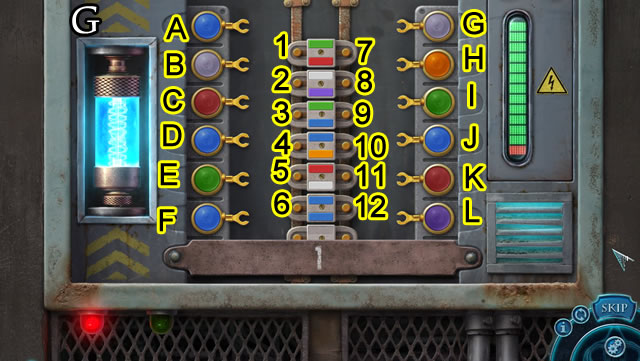
- Speak to character; select 3/3 BLUE BATTERY (M); place 3/3 BLUE BATTERIES (N).
- Solution (O). (A-2)-(B-6)-(C-1)-(D-5)-(E-3)-(F-4)-(G-7)-(H-12)-(I-11)-(J-9)-(K-8)-(L-10).
- Speak to character; receive LIGHTER (P).
- Go forward.
- Select (Q); select (R); play HOP; receive GASOLINE.
- Select (S); play HOP; receive RAG.
- RAG, LIGHTER on GASOLINE for MOLOTOV COCKTAIL.
- Select (T); use MOLOTOV COCKTAIL (U).
- Solution (V); receive EXTINGUISHER.
- Use EXTINGUISHER (W); take 1/3 BLUE BATTERY (X).
- Select (V); play HOP; place FILM (Z); take 2/3 BLUE BATTERY (A).
- Select (B); play HOP; receive SCISSORS.
- Use SCISSORS; (C) take folder, CODE (D), 3/3 BLUE BATTERY (E).
- Place 3/3 BLUE BATTERIES (F).
- Solution (G). (A-4)-(B-2)-(C-5)-(D-3)-(E-1)-(F-6)-(G-11)-(H-10-)-(I-9)-(J-12)-(K-7)-(L-8).
- Place CODE (H).
- Solution (I).
- Take note, BLOWTORCH.
- Go forward.
- LIGHTER on BLOWTORCH for LIT BLOWTORCH.
Chapter 4: Police Station Area
- Select (J); place LIT BLOWTORCH (K).
- Play HOP; open, take folder (L), 1/3 BLUE BATTERY (M).
- Select (N); select model (O).
- Solution (P).
- Take lion; play HOP; receive LANTERN.
- Go down.
- Select (Q); Play HOP; receive EXTINGUISHER.
- Select (R).
- Use LANTERN (S); EXTINGUISHER (T); take 2/3 BLUE BATTERY (U).
- Select (V).
- Solution (W).
- Select file holder.
- Solution (X). (A-B)-(E-B)-(C-D)-(D-F)-(E-F).
- Take note, 3/3 BLUE BATTERY.
- Place 3/3 BLUE BATTERIES (Y).
- Solution (Z). (A-2)-(B-5)-(C-6)-(D-1)-(E-7)-(F-4)-(G-3)-(H-14)-(I-10)-(J-9)-(K-11)(L-13)-(M-12)-(N-8).
- Go forward.
- Select (A); remove covers, play HOP; solution (B); receive FLAGPOLE.
- Select (C); play HOP; receive RAG.
- Select (D); play HOP; receive TAR.
- RAG, TAR and LIGHTER on FLAGPOLE for LIT TORCH.
- Select (E); use LIT TORCH (F); play HOP; receive CROWBAR.
- Use CROWBAR (G); take NOTE, 1/3 BLUE BATTERY (H).
- Go down.
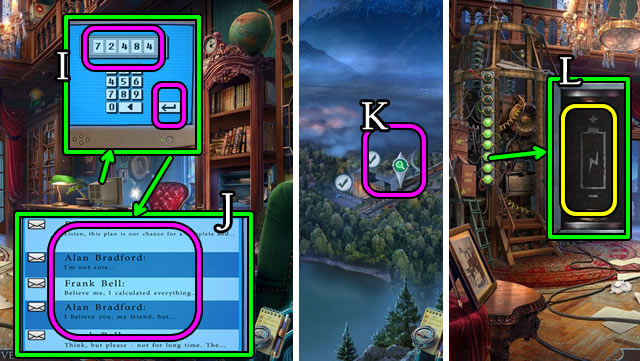
- Read NOTE; enter 7-2-4-8-4; select arrow key (I); read e-mails (J).
- Go forward.
- Select (K); play HOP; read note, receive 3/3 BLUE BATTERY.
- Place 3/3 BLUE BATTERIES (L).
- Solution (M). (A-1)-(B-3)-(C-2)-(D-6)-(E-7)-(F-4)-(G-5)-(H-11)-(I-10)-(J-9)-(K-12).
- (L-8)-(M-14)-(N-13).
- Take note, DETECTOR (N).
- Go forward.
Chapter 5: Chasing Alan
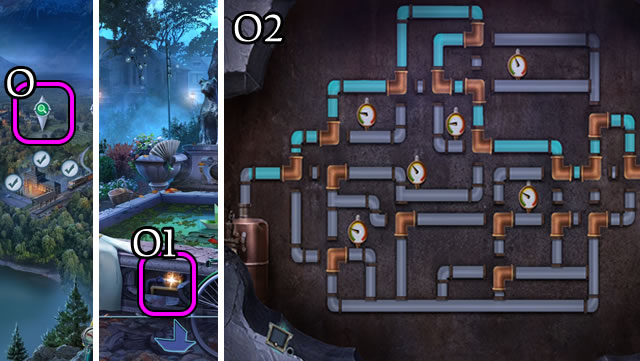
- Select (O); play HOP; select (O1).
- Solution (O2).
- Select (P); play HOP.
- Select (Q).
- Select (R); play HOP; receive SPRAY BOTTLE.
- Select (S); use SPRAY BOTTLE (T); play HOP; solution (U); receive EMPTY BOTTLE.
- Select (V).
- Solution (W); receive FUNNEL.
- Select (X); play HOP; receive ACID.
- FUNNEL, ACID on EMPTY BOTTLE for ACID.
- Select (Y); Speak to character; receive EMPTY BOTTLE.
- Select (Z); play HOP.
- Go down.
- Select (A); play HOP; open folder; take YELLOW FUSE (B).
- Select (C).
- Solution (D).
- Play HOP; receive BLUE FUSE.
- Select (E) select device; place YELLOW FUSE, BLUE FUSE and element fuse (F).
- Solution (G).
- Select Square; solution (H); receive ACID.
- FUNNEL, ACID on EMPTY BOTTLE for ACID.
- Select Alan's Hideout; speak to character.
- Solution (I). 1-15.
- Select (J); play HOP; select, read note.
- Select (K); play HOP; read note.
- Select (L).
- Solution (M).
- Take Diary (N), open.
- Select (O); select (P); play HOP.
- Solution (Q).
- Go forward.
- Play HOP; select pipes.
- Solution (R).
- Go (S).
- Select (T); play HOP.
- Go (U).
- Tale DIARY (V).
- Go down.
- Solution (W).
- Go forward.
- Play HOP; select switchboard.

- Solution (X). Position handles as shown.
- Select Forest.
- Solution (Y).
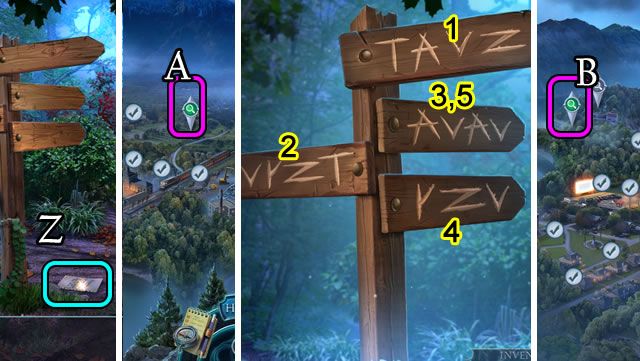
- Play HOP; select sign pieces; take note (Z).
- Go down.
- Select (A) play HOP; speak to character; solution 1-5.
- Select (B); play HOP; receive AXE.
- Use AXE (C); select lock.
- Solution (D).
- Go left.
- Play HOP; receive KEYS.
- Use KEYS (E).
- Select (F).
- Solution (G). 1-7.
- Congratulations. You have completed playing Bonfire Stories: Manifest Horror.
Created at: 2020-03-15