

Walkthrough Menu
- General Tips
- Chapter 1: Shadowland Gates
- Chapter 2: The Jail
- Chapter 3: the Order
- Chapter 4: Cheshire
- Chapter 5: The Island of Refugees
- Chapter 6: Tweedledum and Tweedledee
- Chapter 7: The Castle
General Tips
- This is the official guide for Bridge to Another World: Alice in Shadowland.
- This guide will not show when you have to zoom into a location; the screenshots will show each zoom scene.
- Hidden-object puzzles are referred to as HOPs. This guide will not show screenshots of the HOPs, however, it will mention when an HOP is available and the inventory item you'll collect from it.
- Use the Map to fast travel to a location.
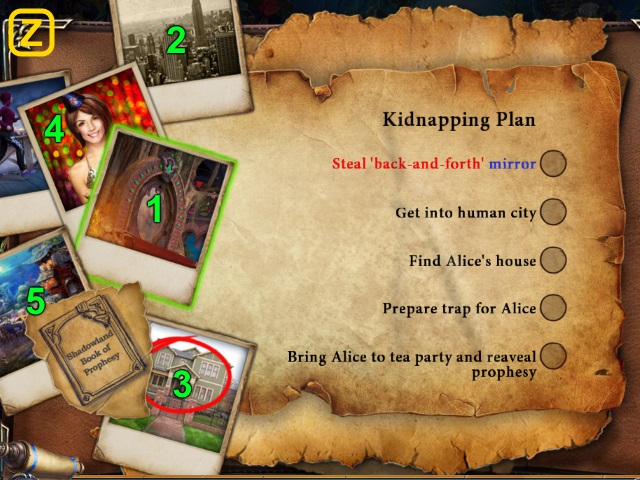
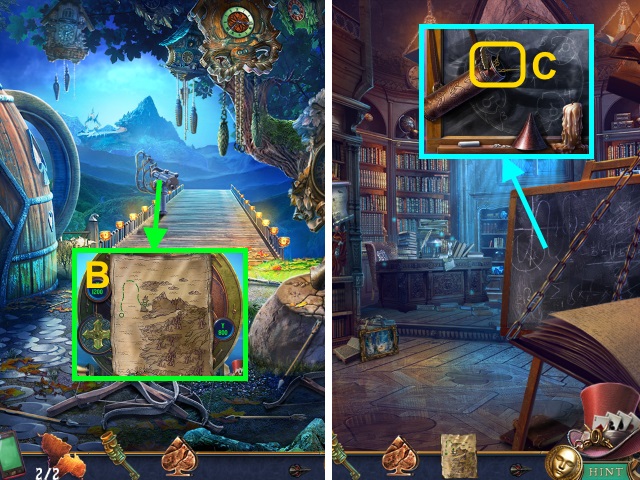
Chapter 1: Shadowland Gates
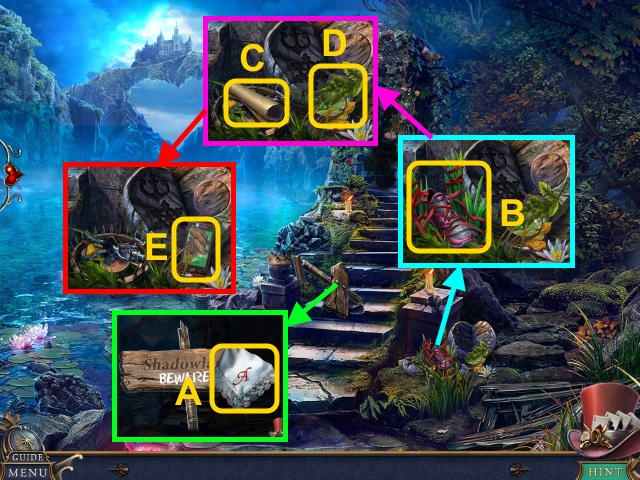
- Take the HANDKERCHIEF (A).
- Examine the laces 3x; take the SHOE (B).
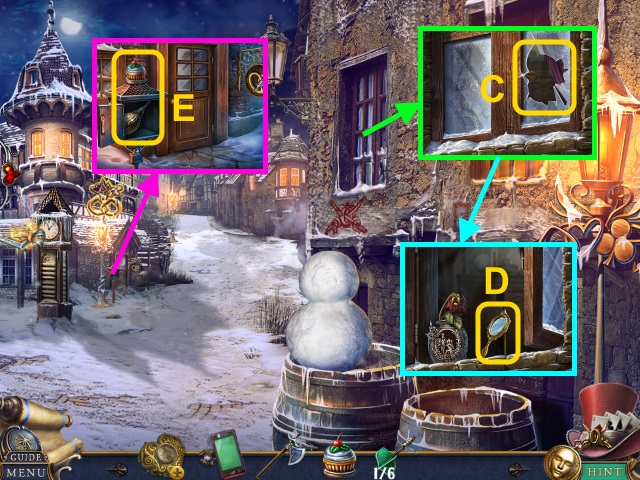
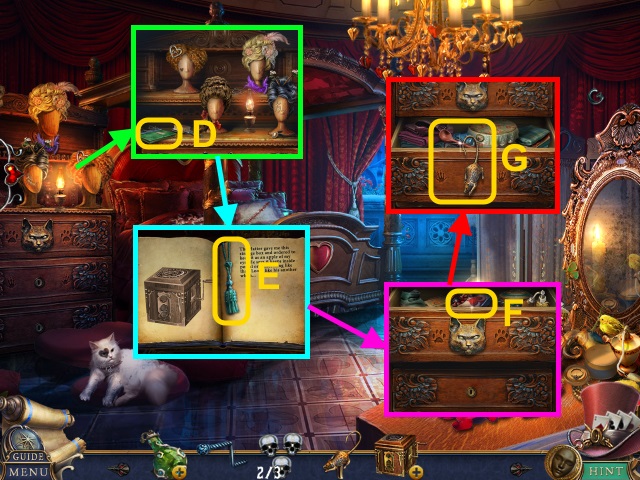
- Read the note (C); move the leaves (D).
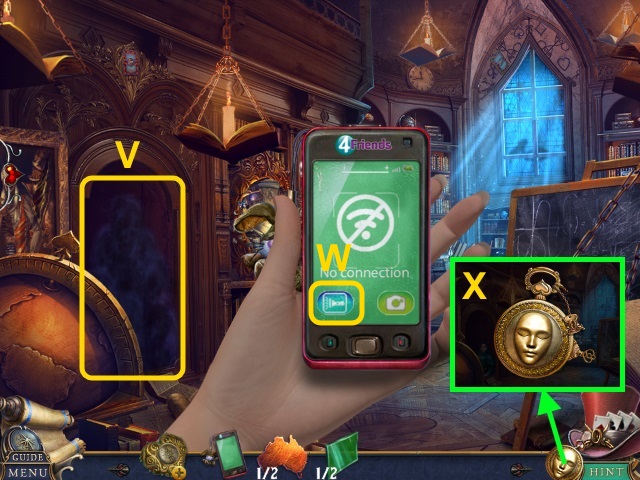
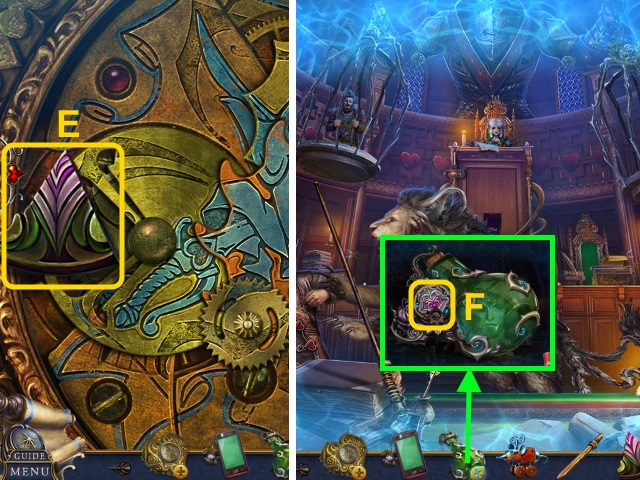
- Take the DIRTY PHONE (E).
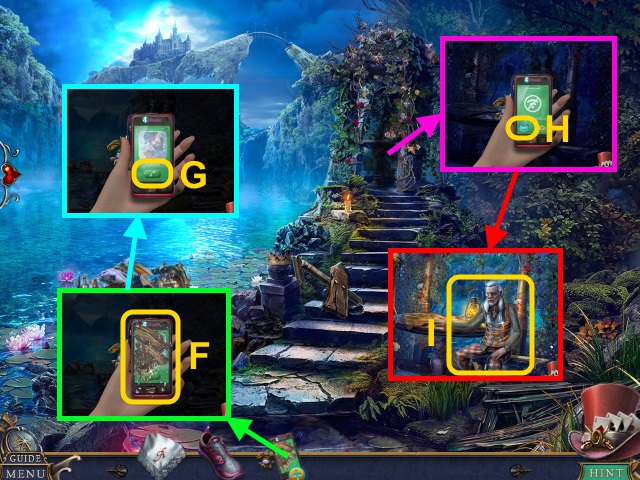
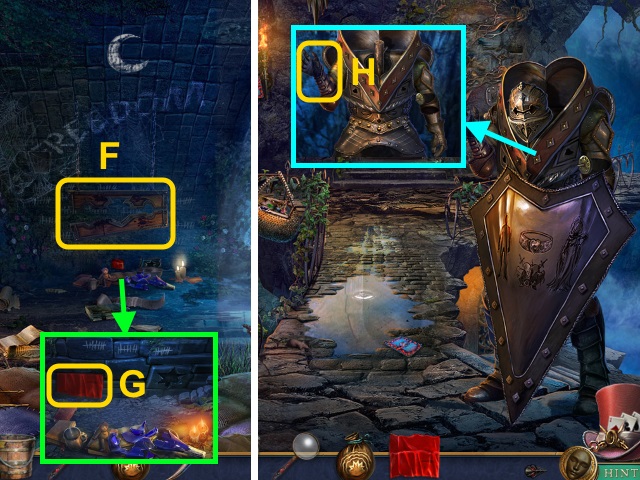
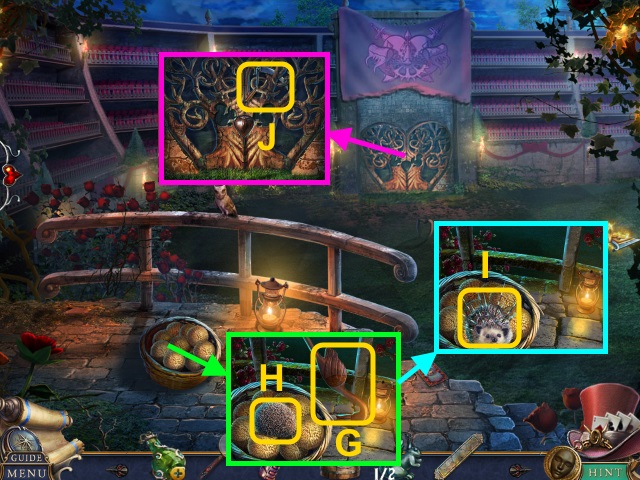
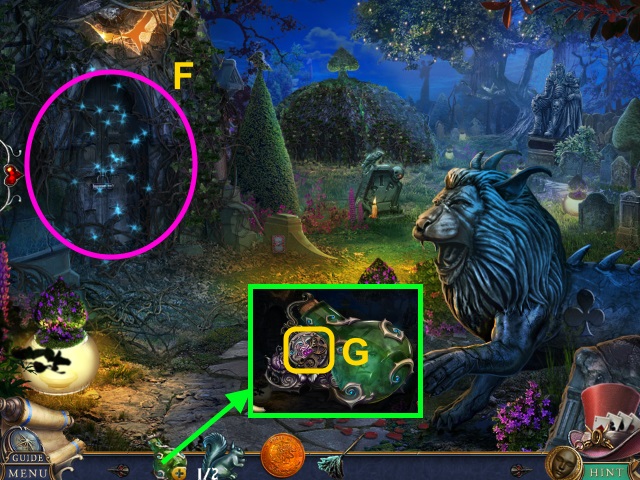
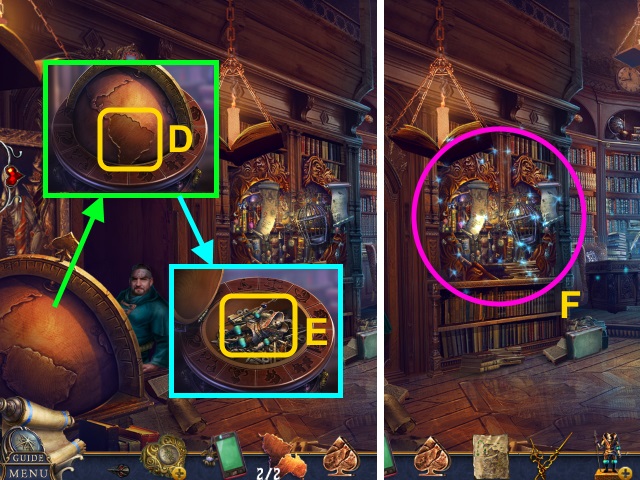
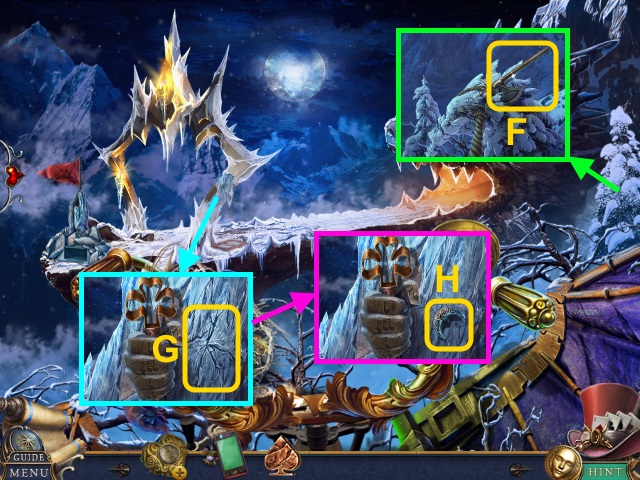
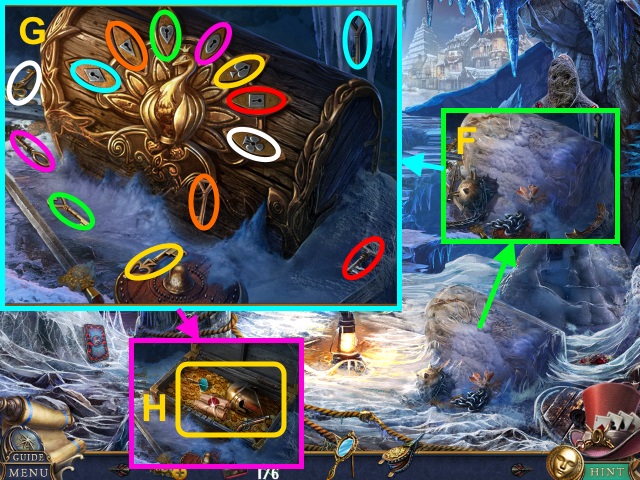
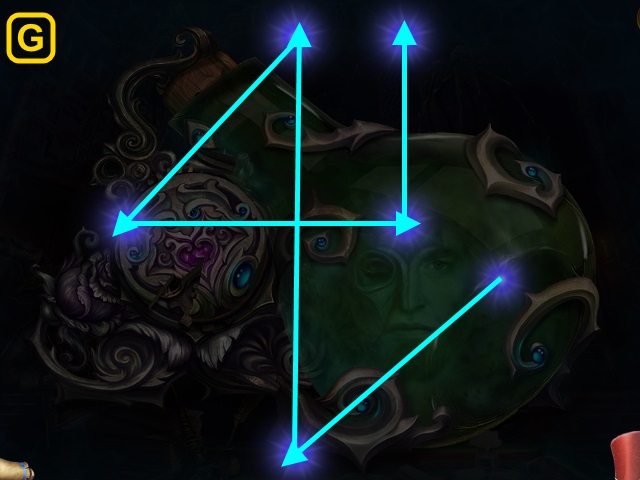
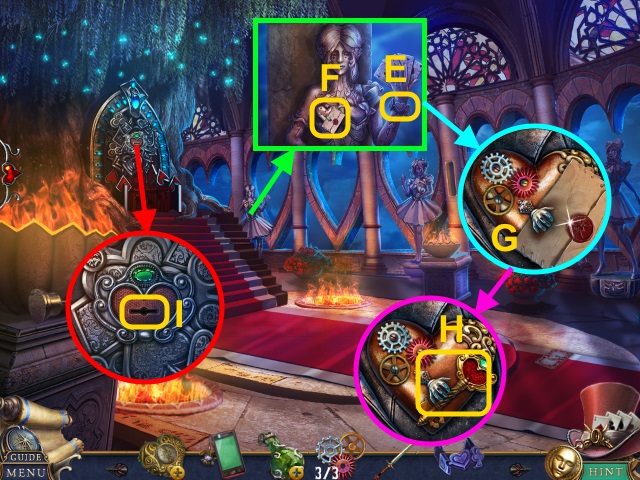
- Combine the DIRTY PHONE and HANDKERCHIEF (F); press the button (G). Take the PHONE.
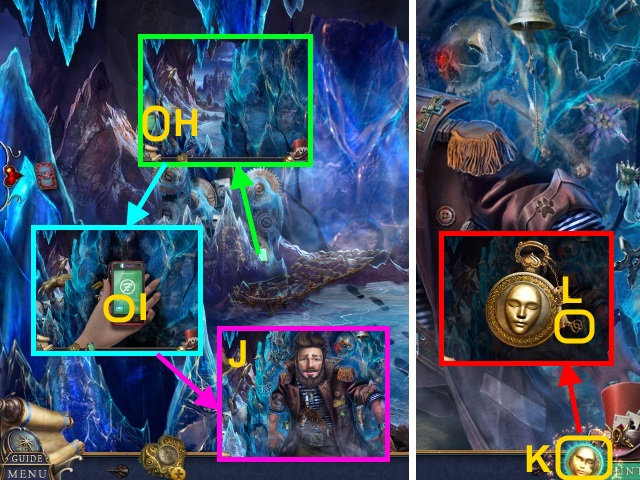
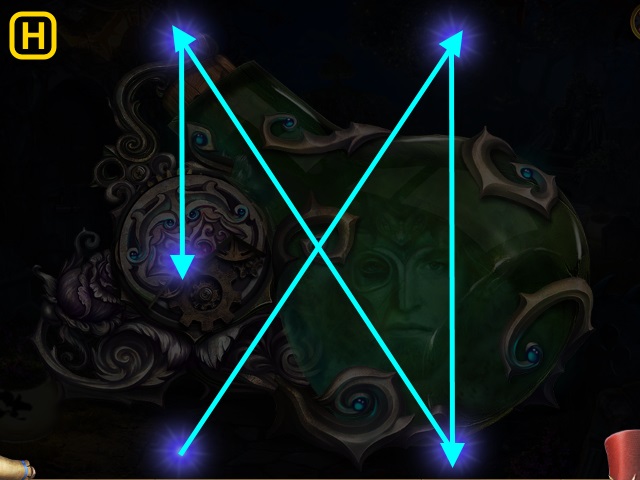
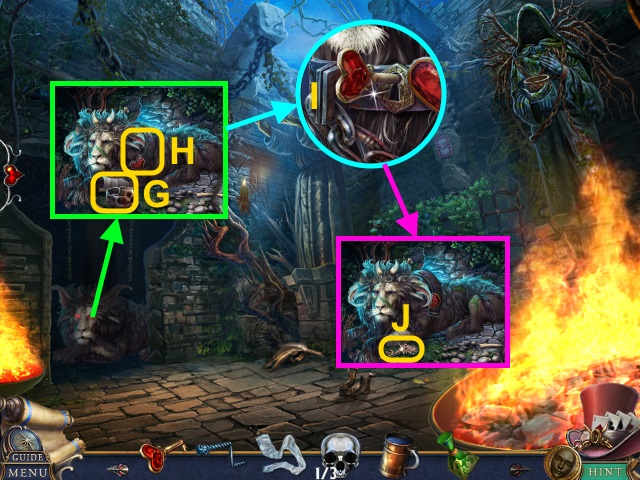
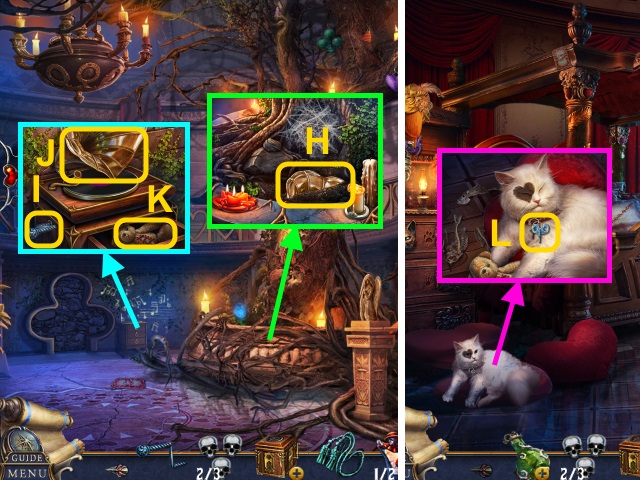
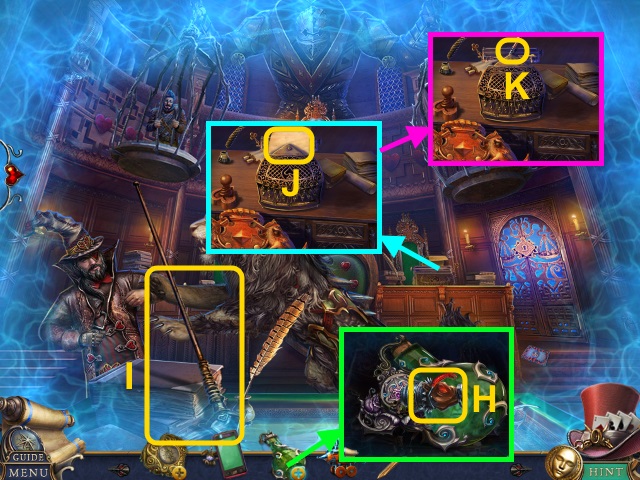
- Use the PHONE; press the button (H).
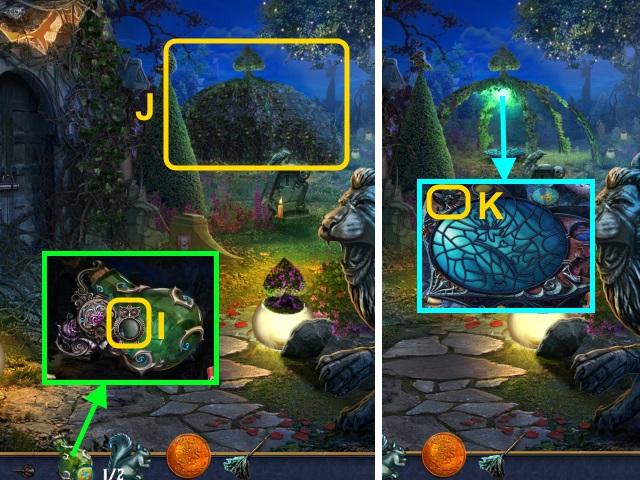
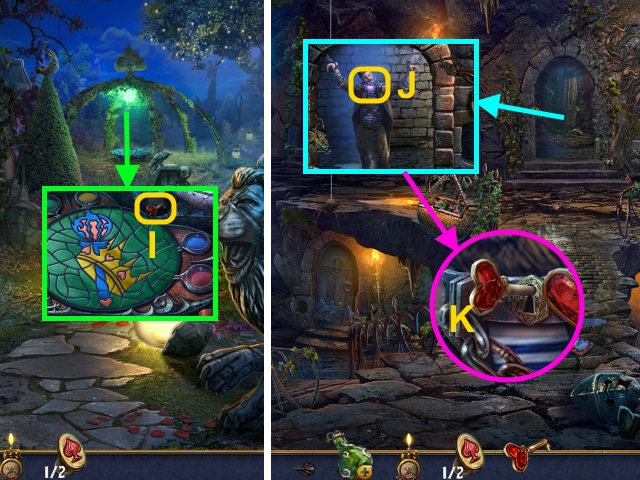
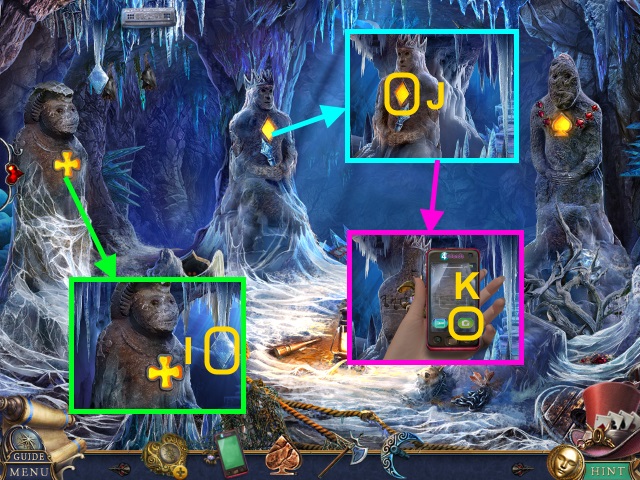
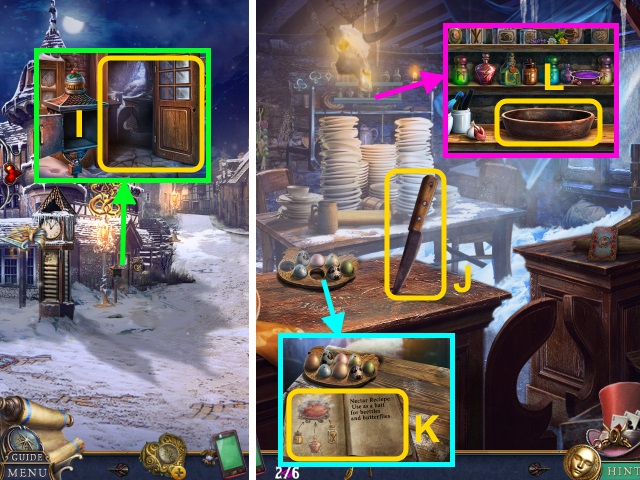
- Talk to Rabbitson (I).
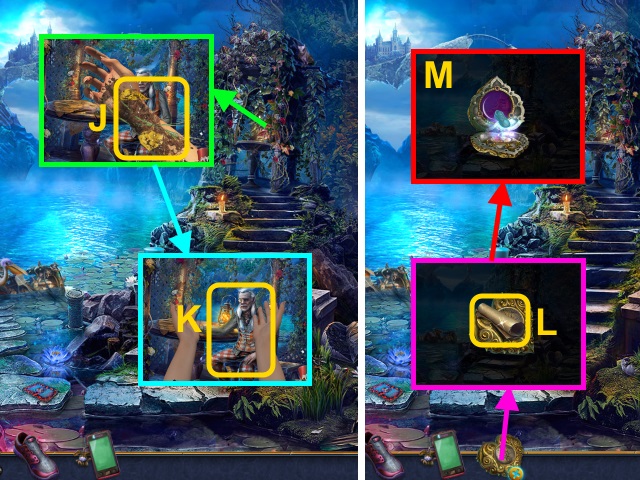
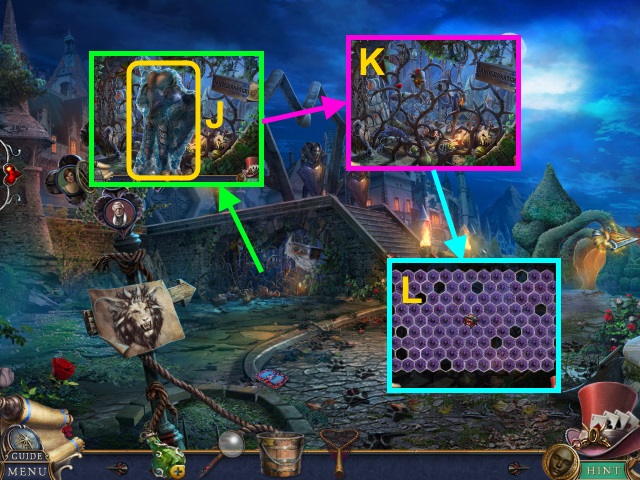
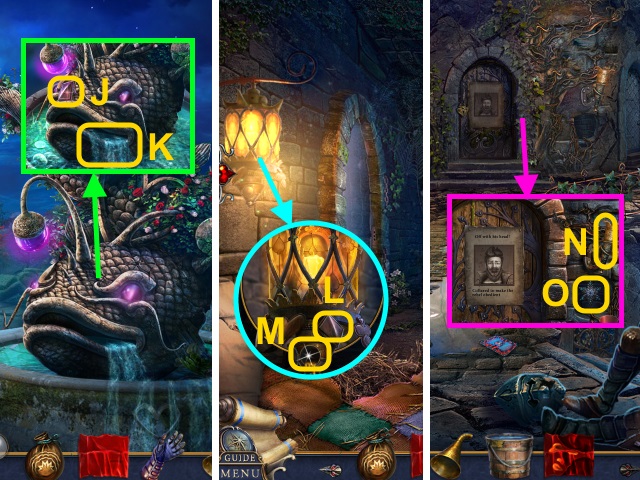
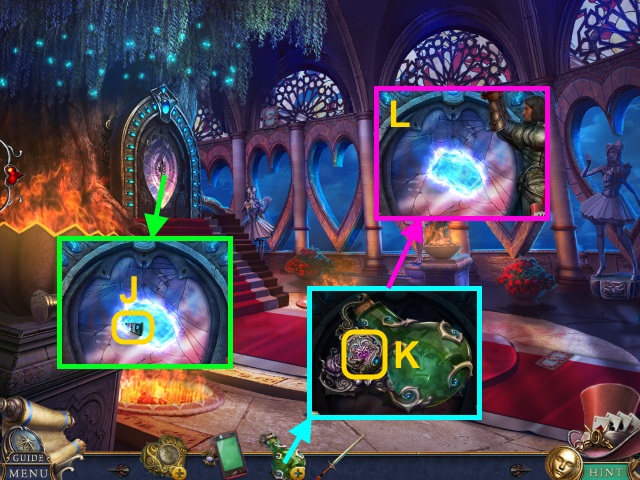
- Examine your arm 3x (J).
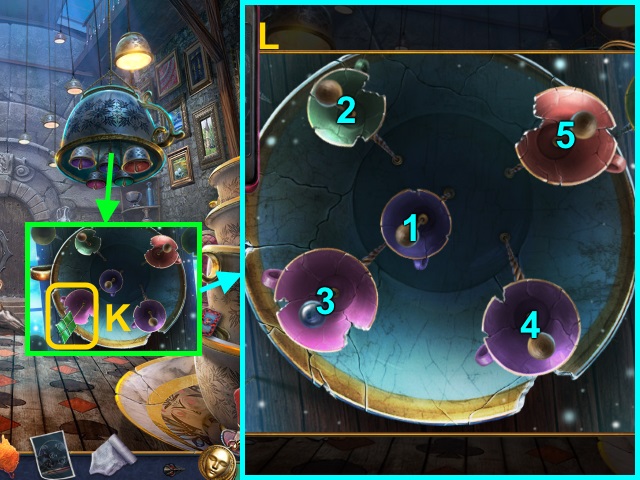
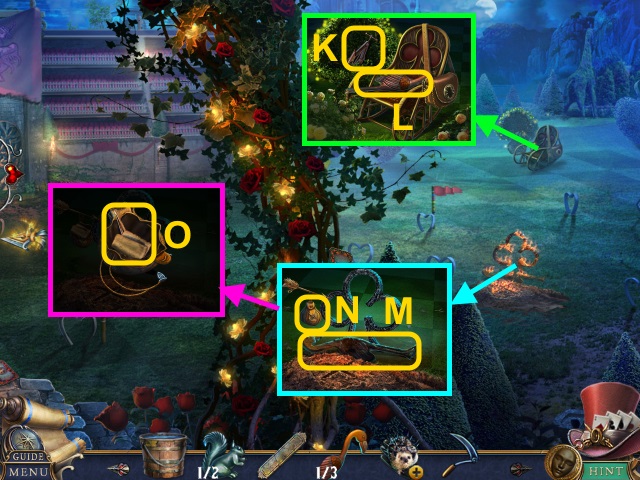
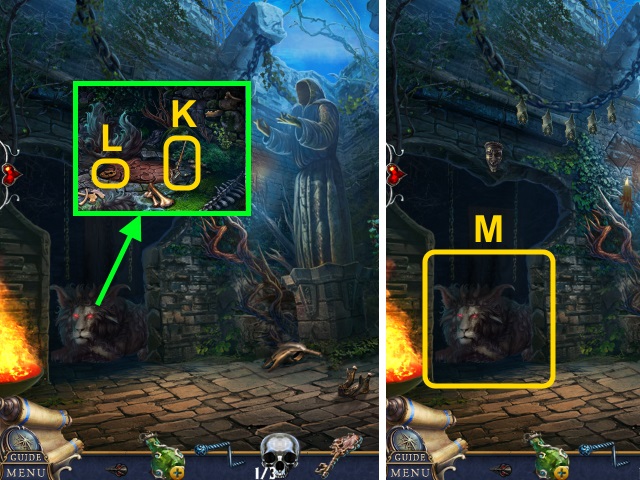
- Talk to Rabbitson (K); receive the SEARCHING COMPASS.
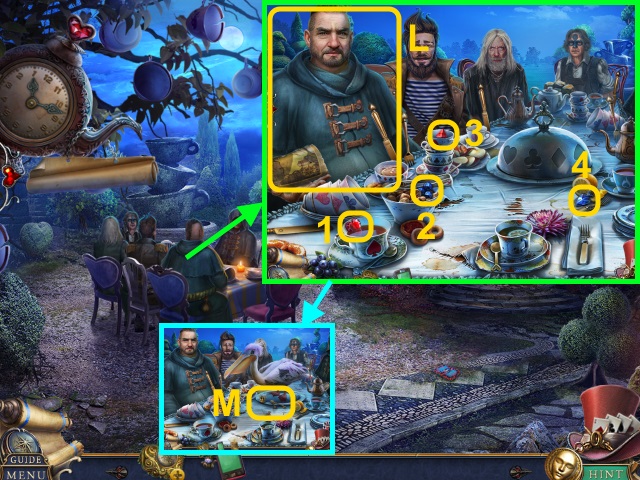
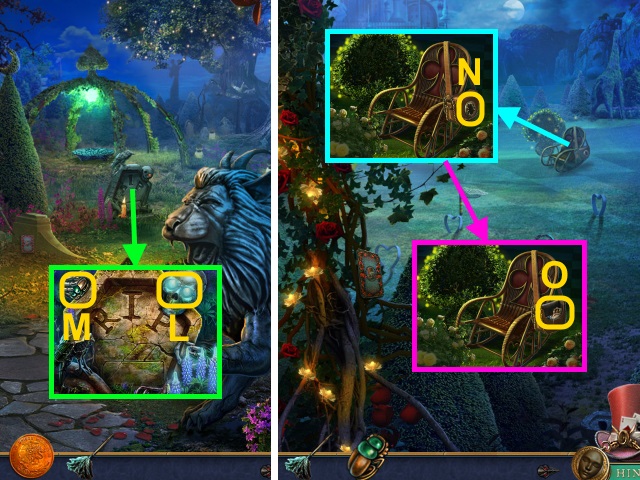
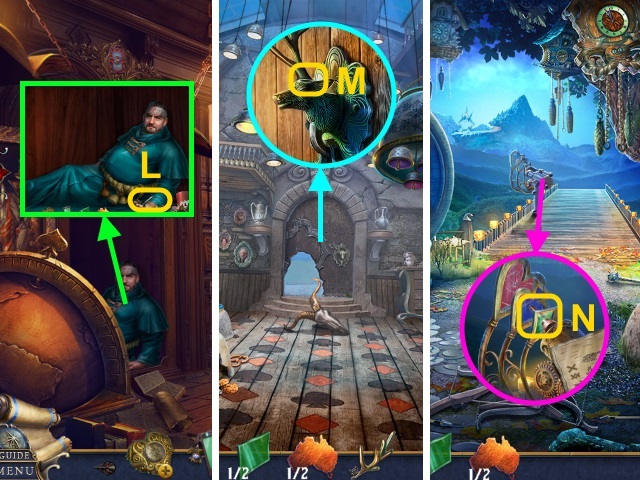
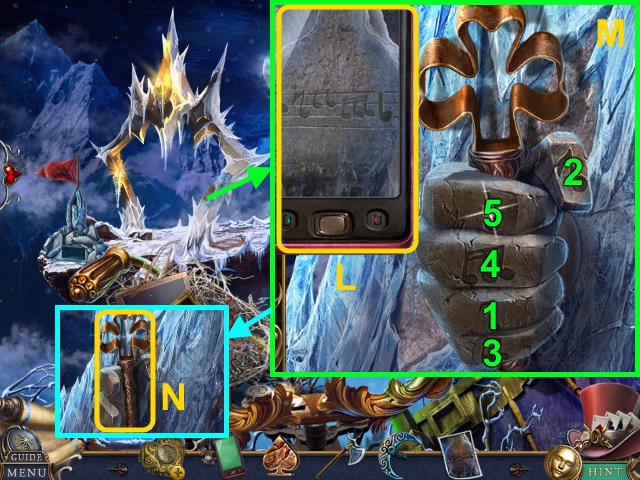
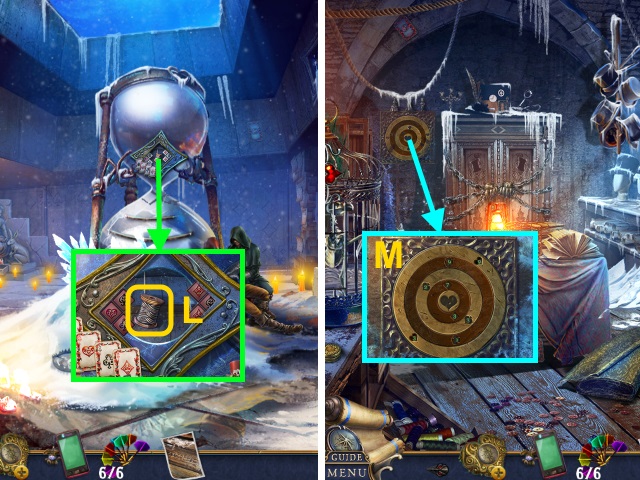
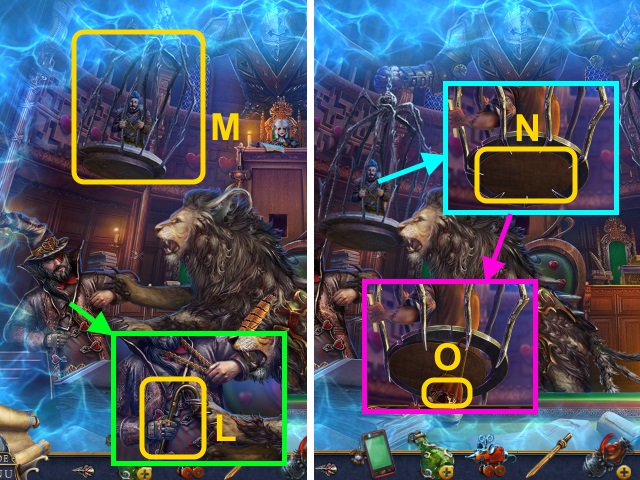
- Examine the SEARCHING COMPASS; read the note (L).
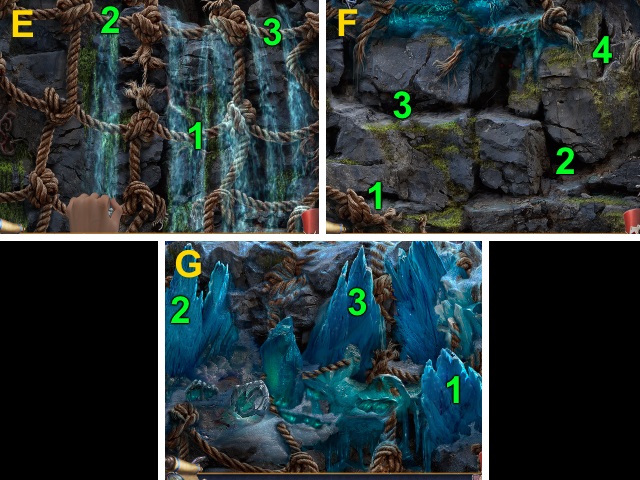
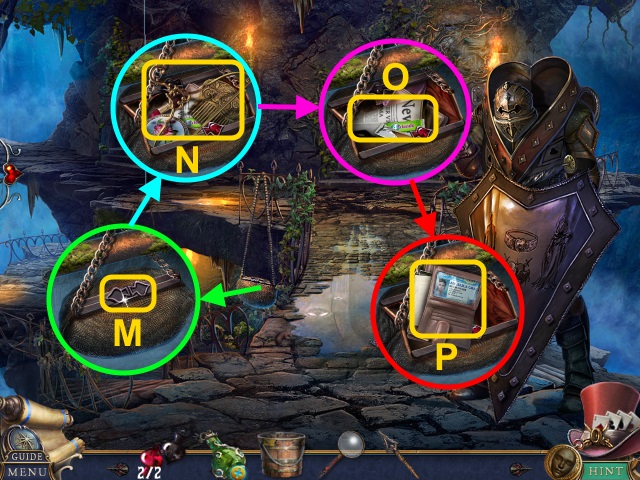
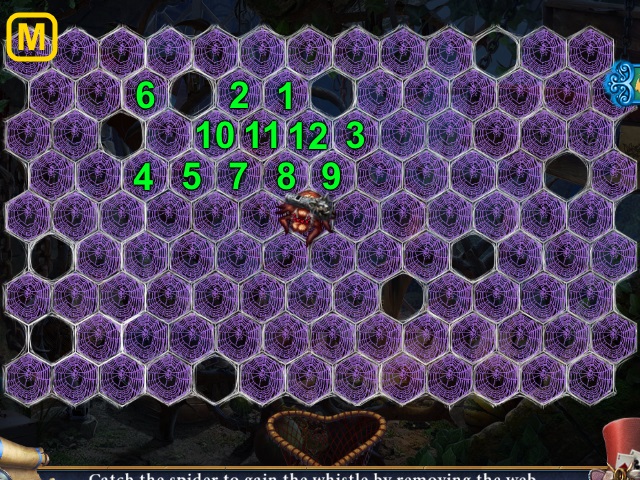
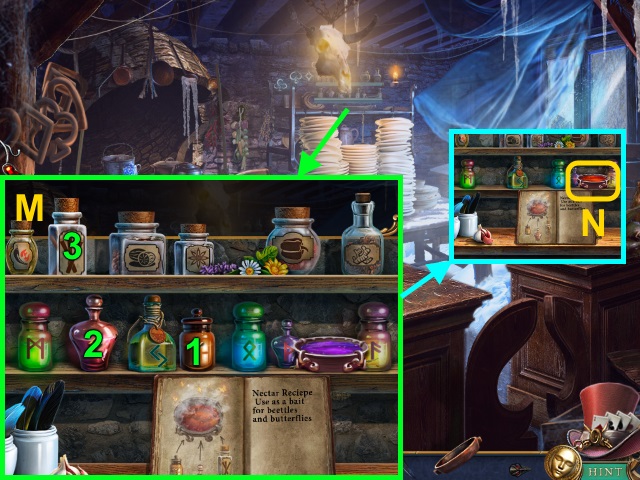
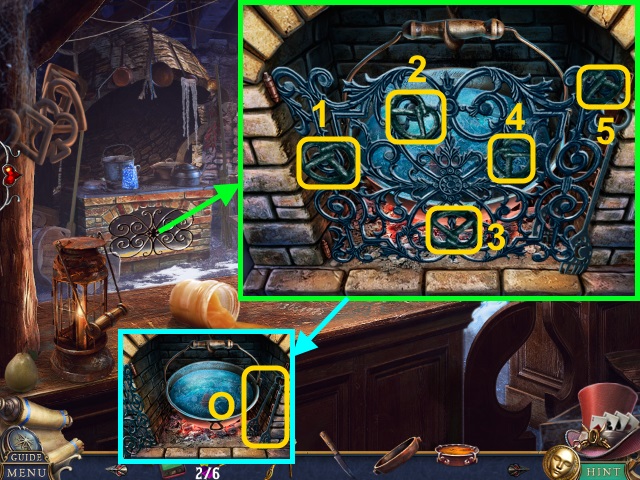
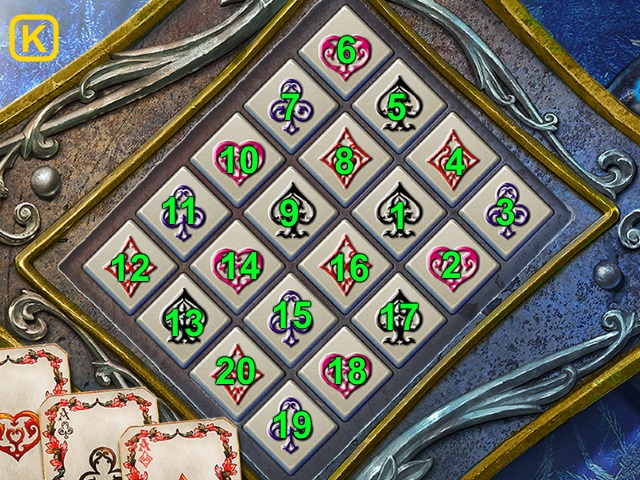
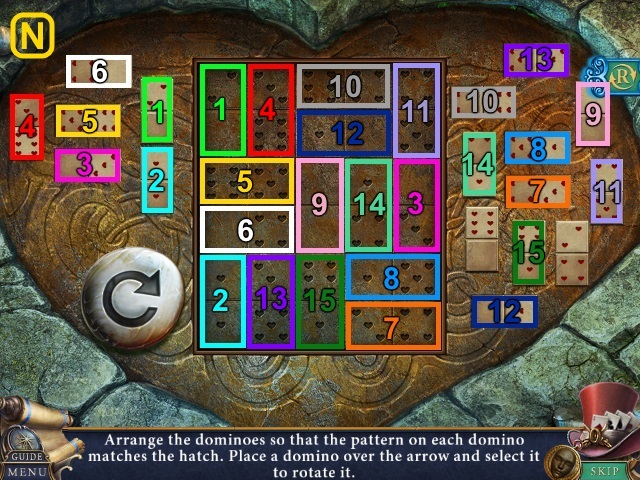
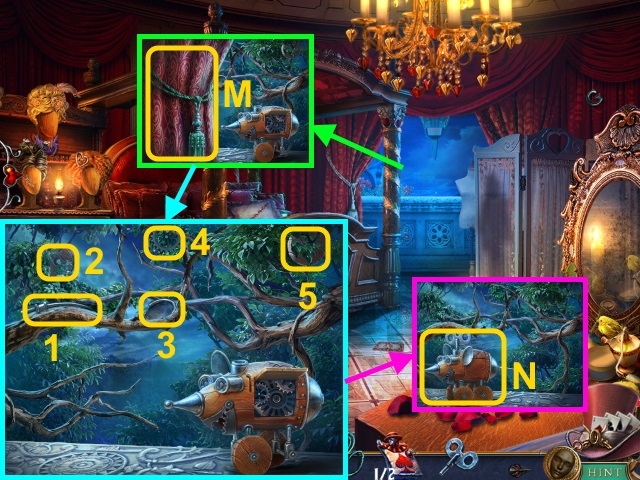
- Open the compass; use the SHOE for a mini-game (M).
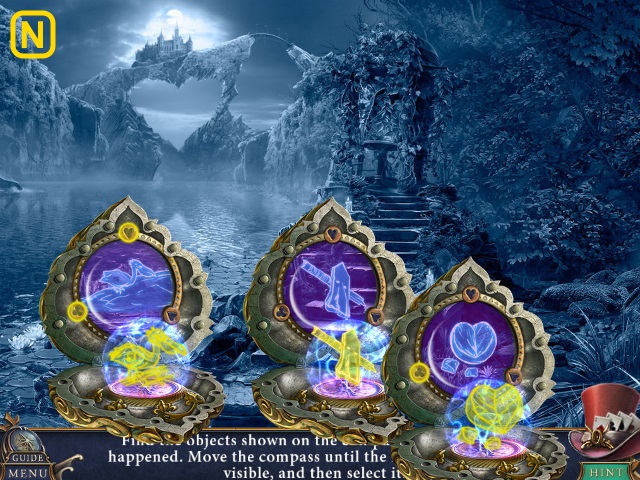
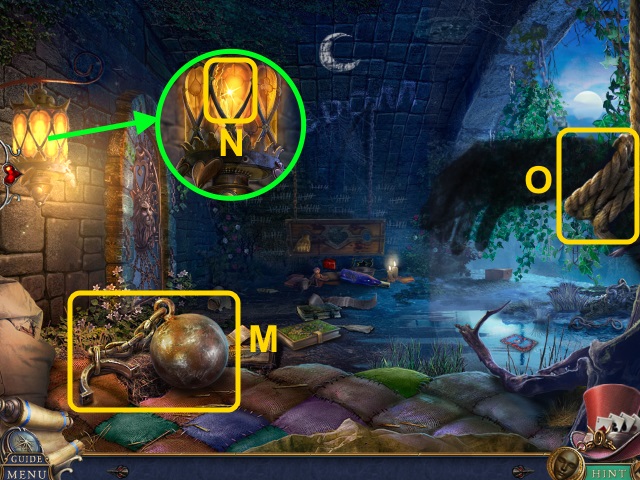
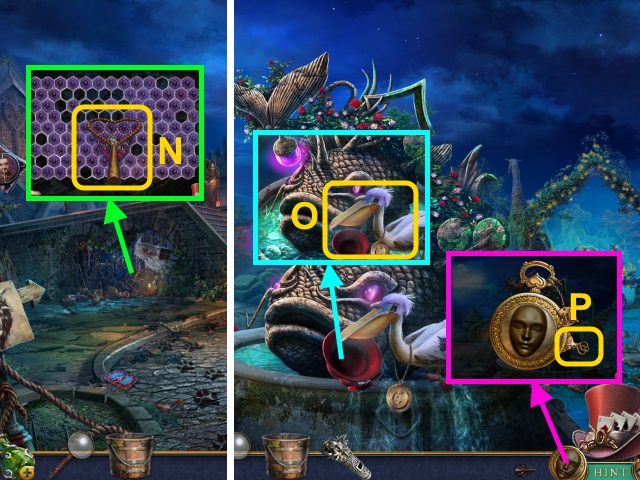
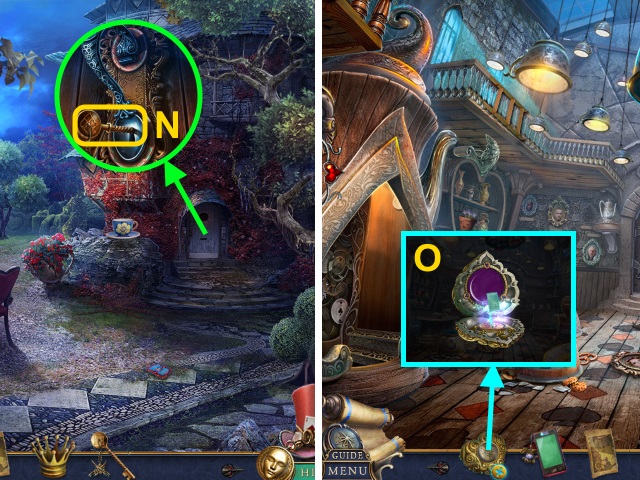
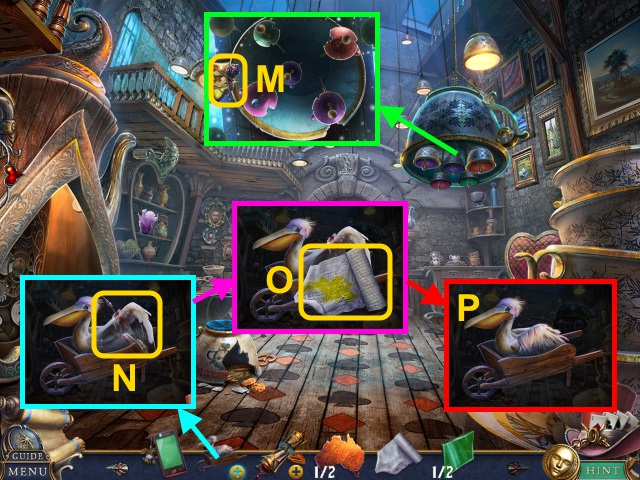
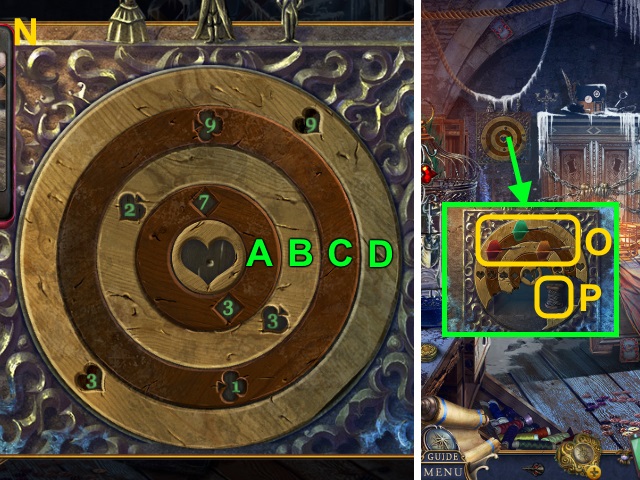
- Solution (N).
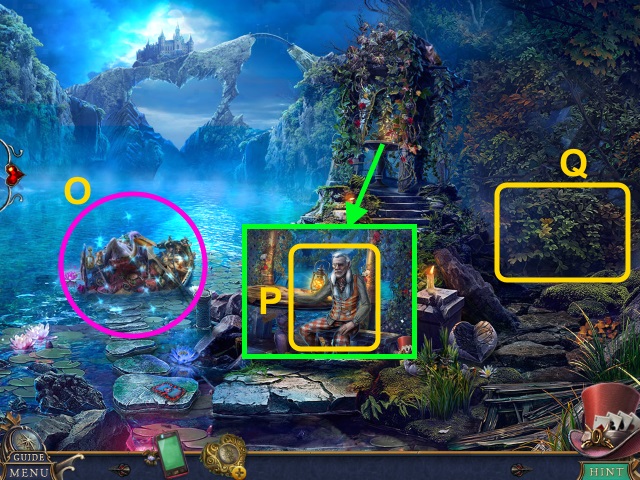
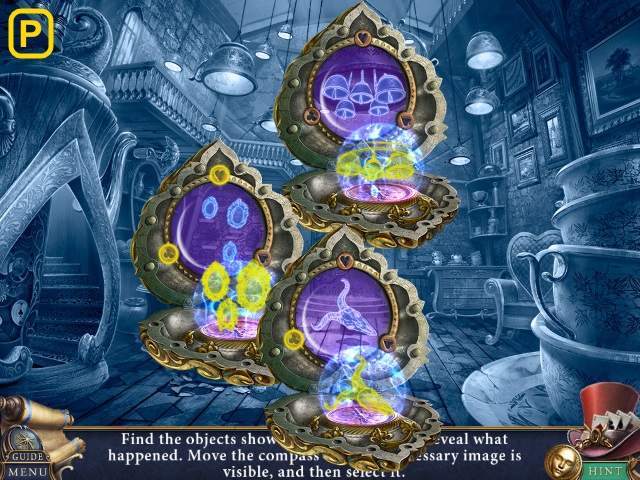
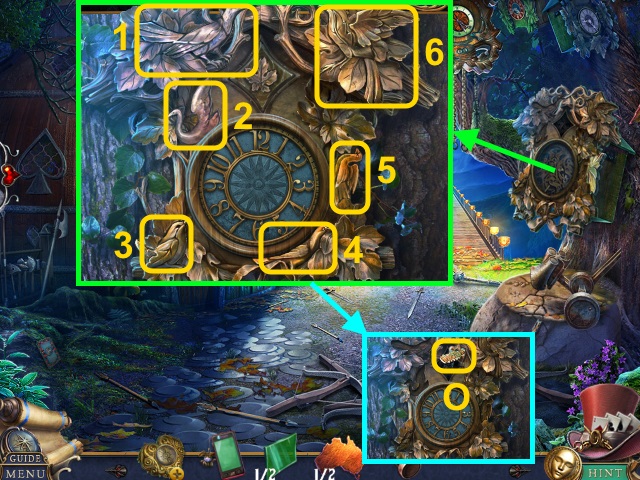
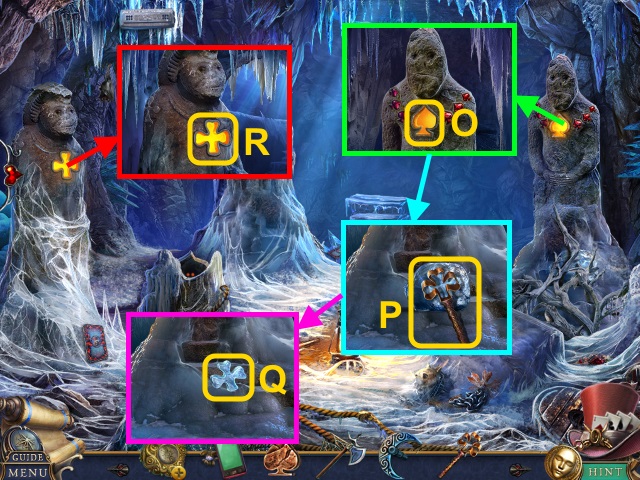
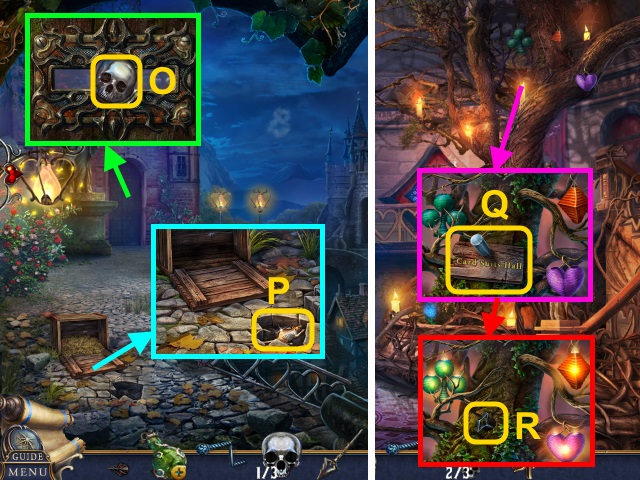
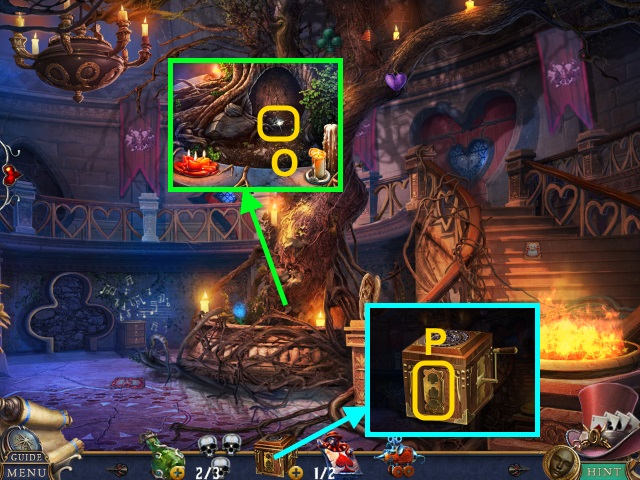
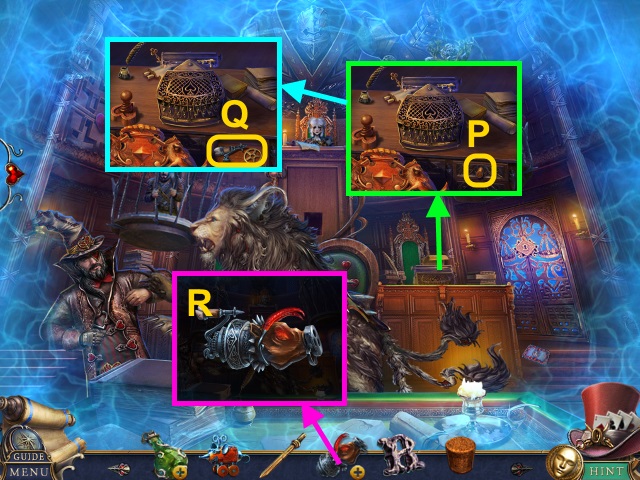
- Play the HOP; receive the CRUSHED MIRROR SHARD (O).
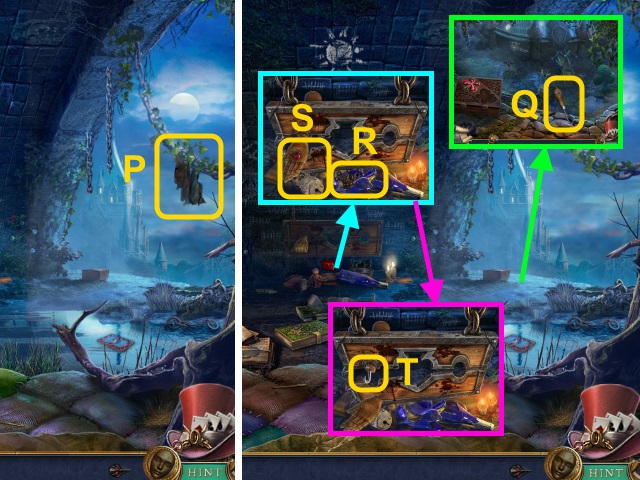
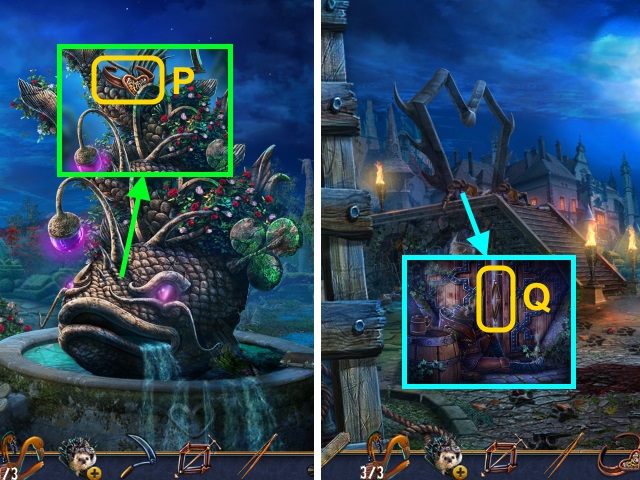
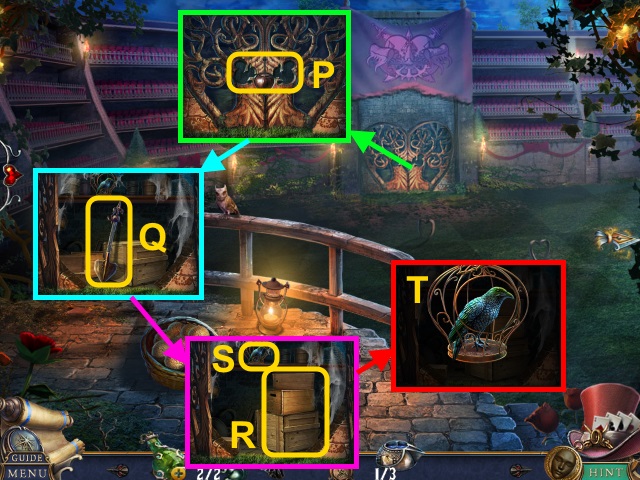
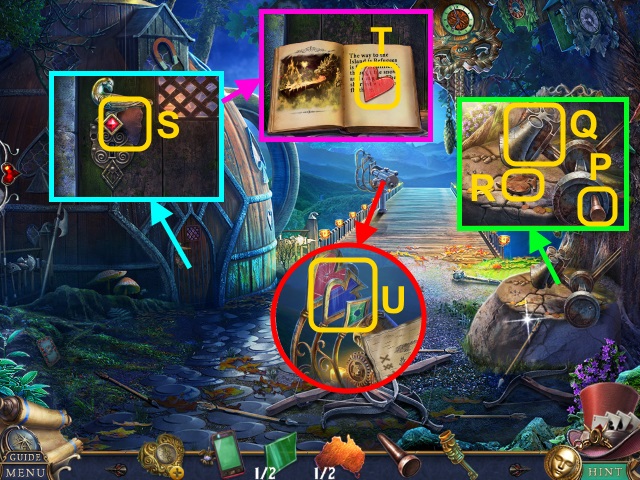
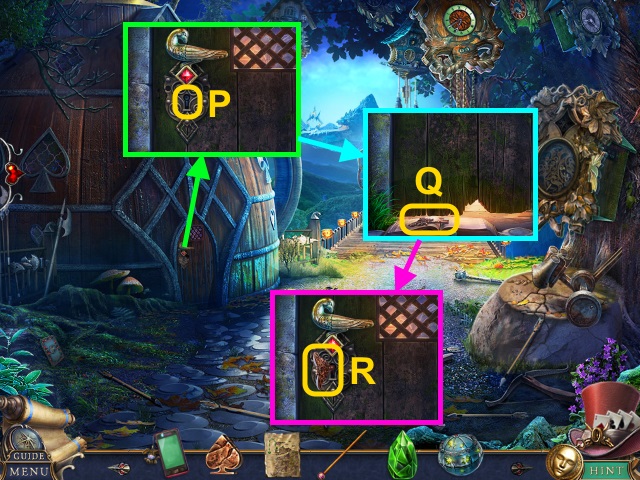
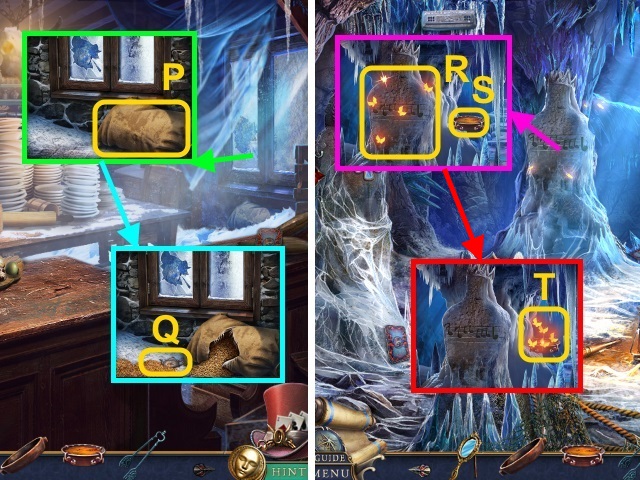
- Give the CRUSHED MIRROR SHARD (P).
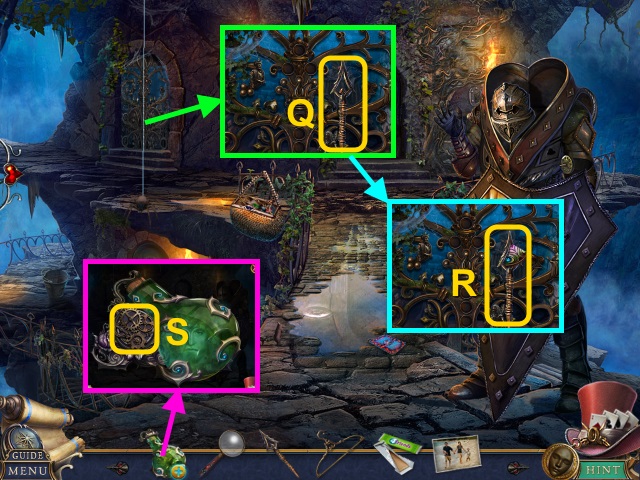
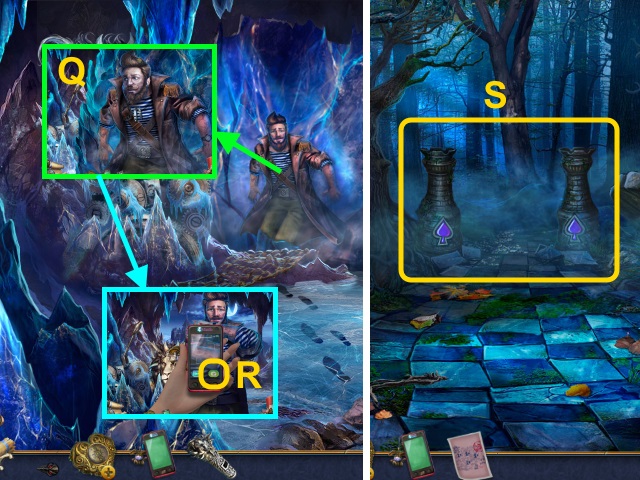
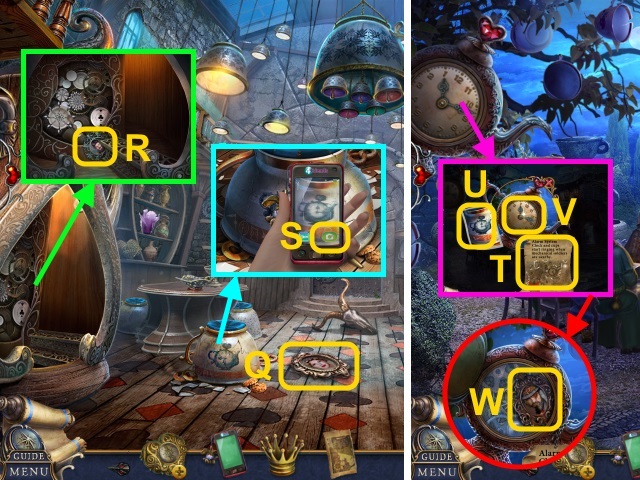
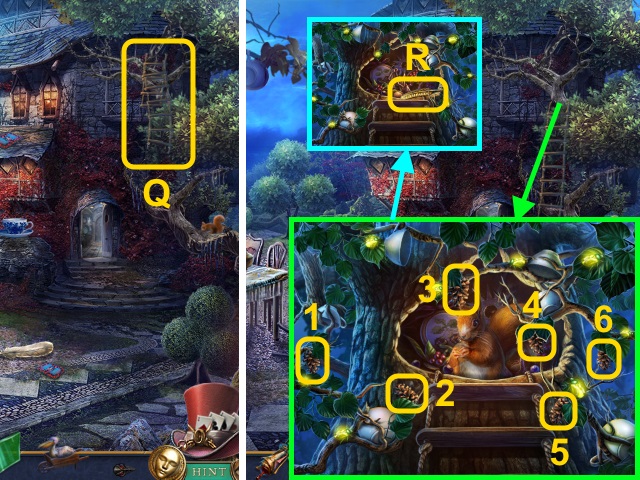
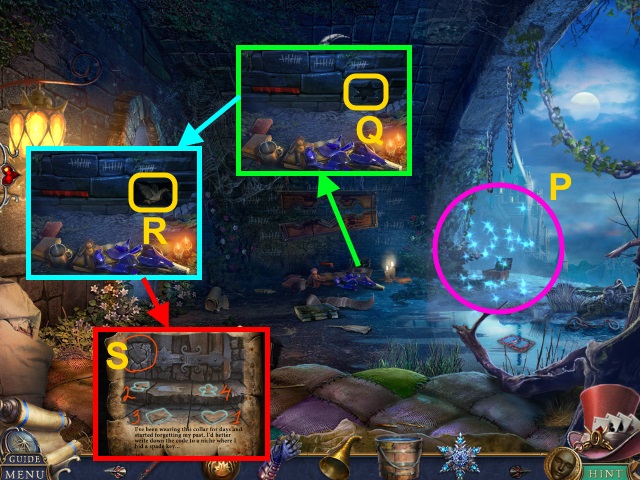
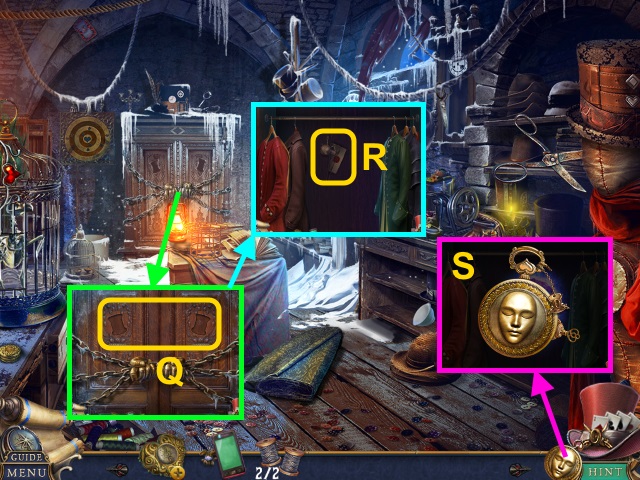
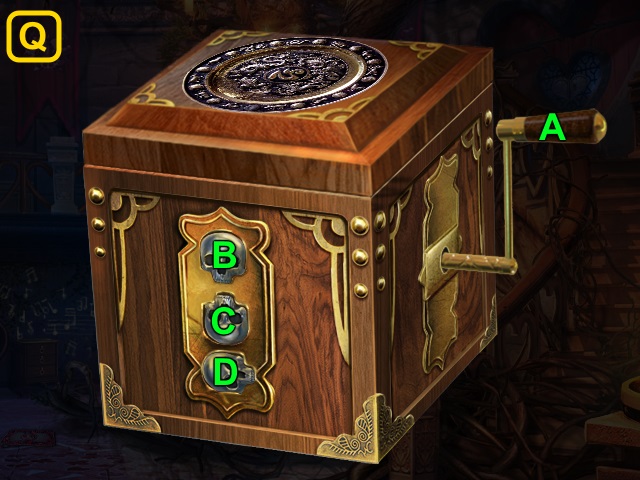
- Examine the bushes (Q).
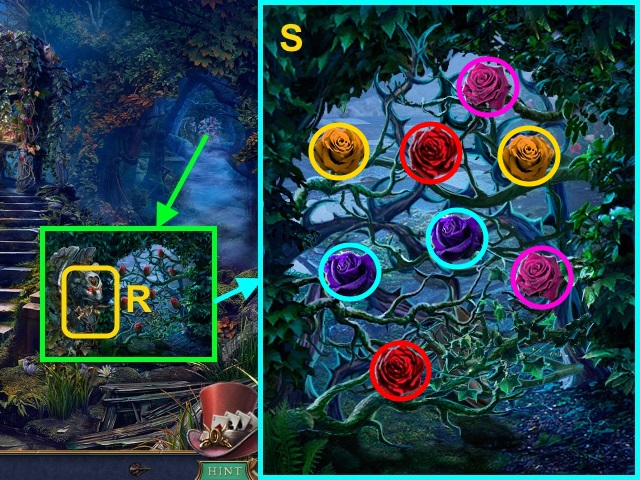
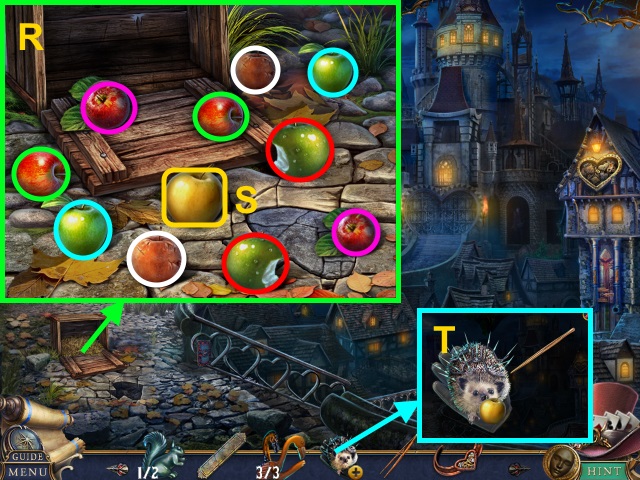
- Press the button; take the HATTER FIGURINE (R).
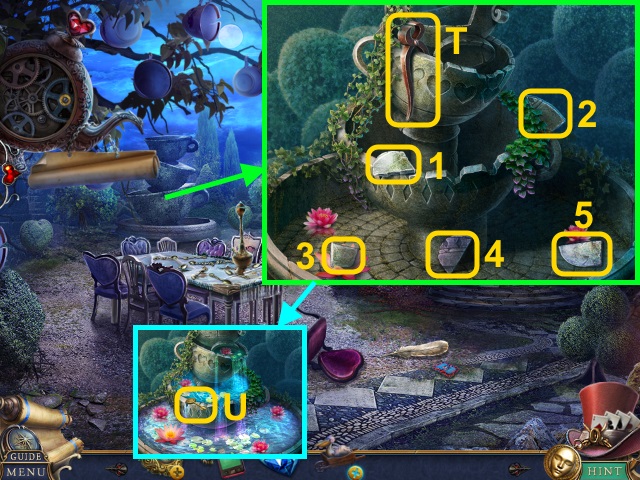
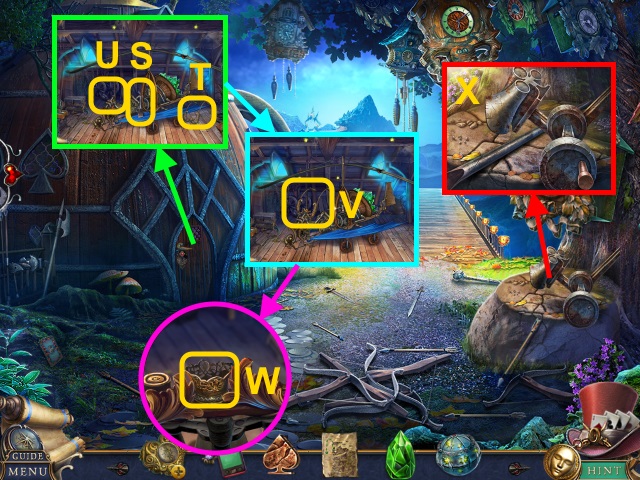
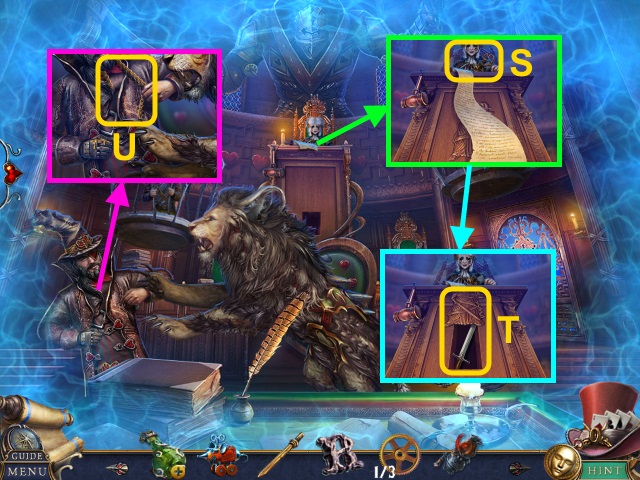
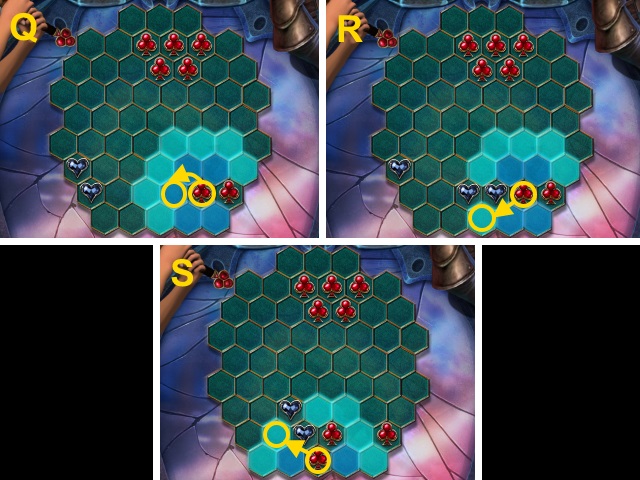
- Play the mini-game; solution (S).
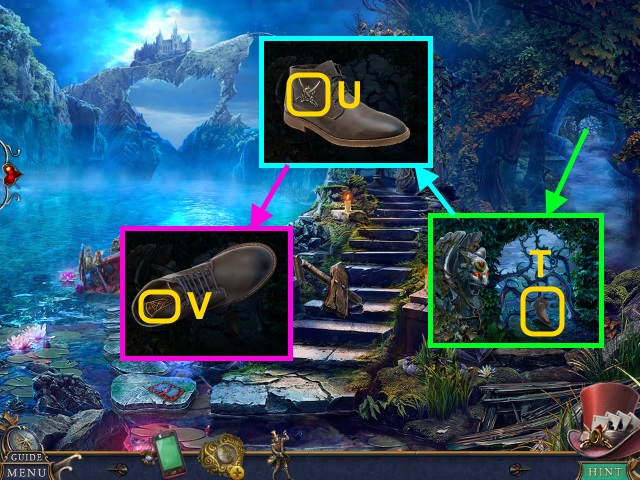
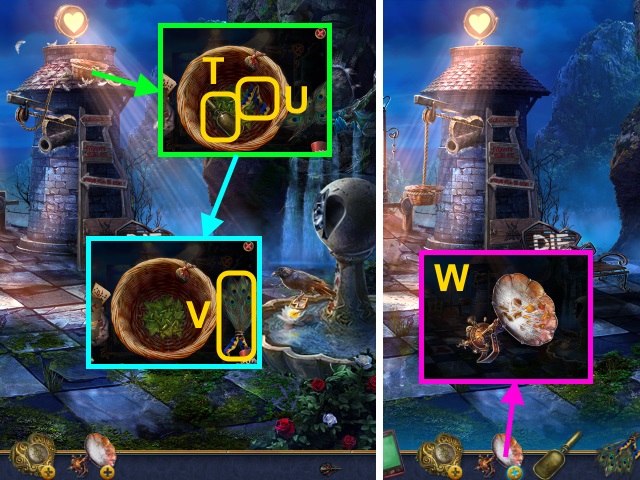
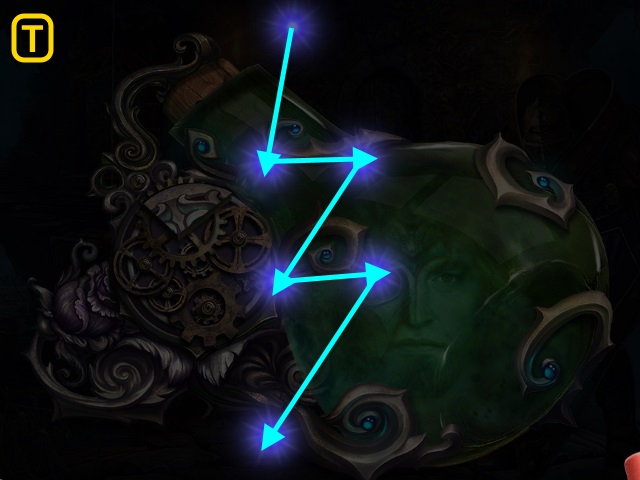
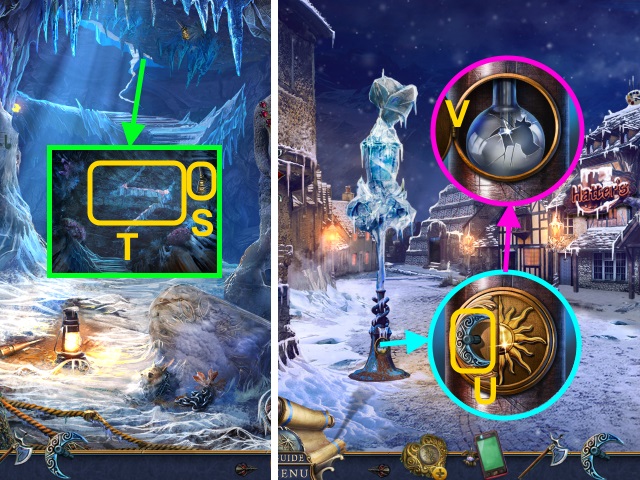
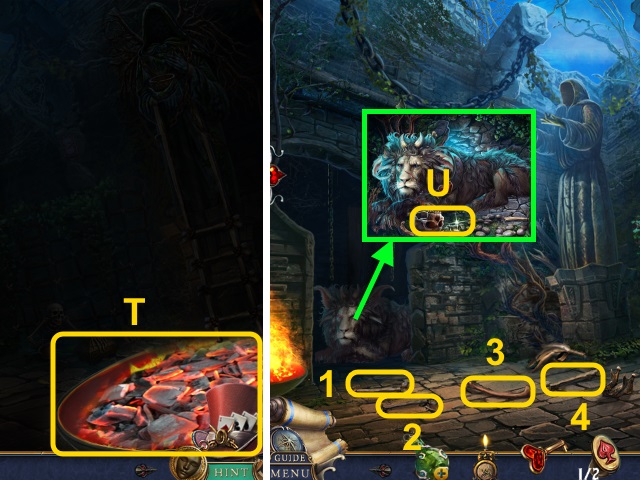
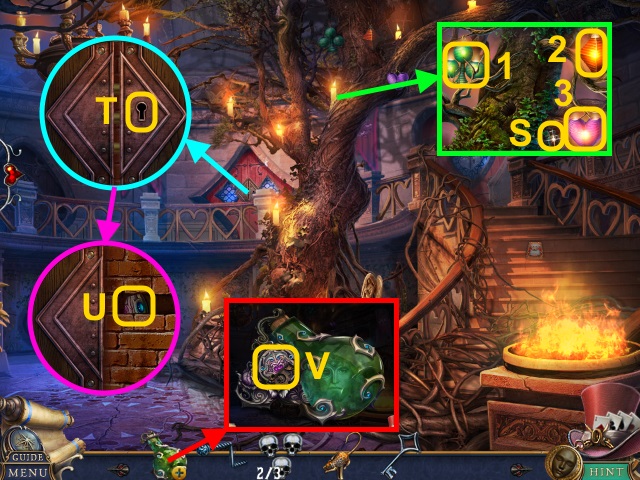
- Examine the boot (T).
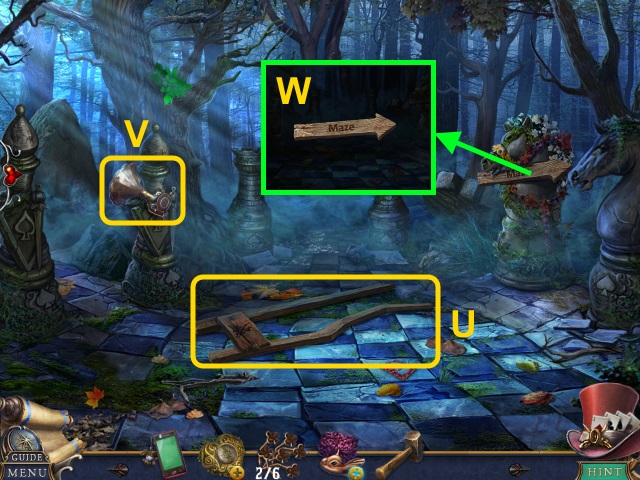
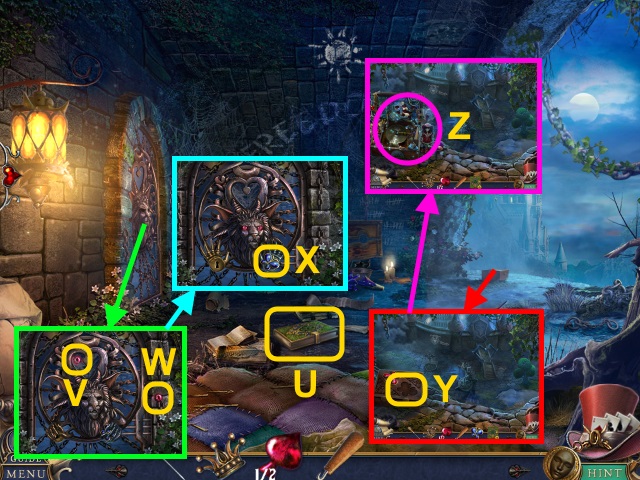
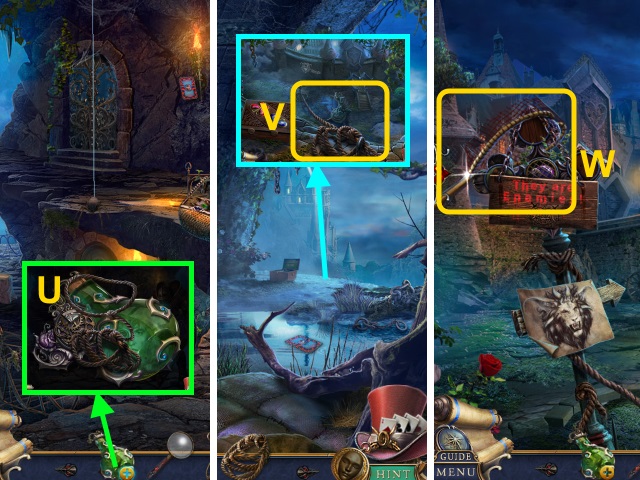
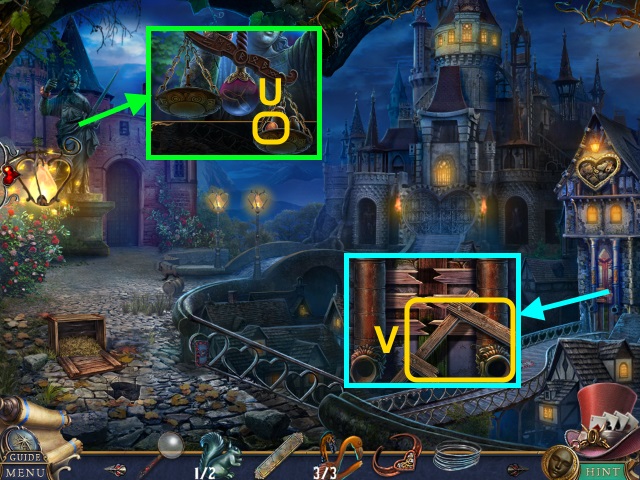
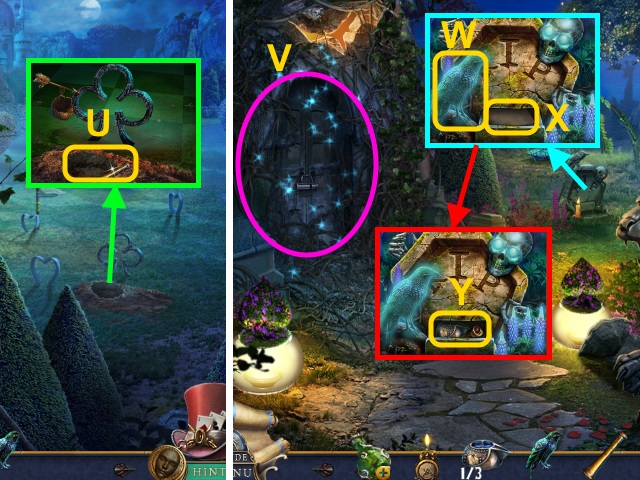
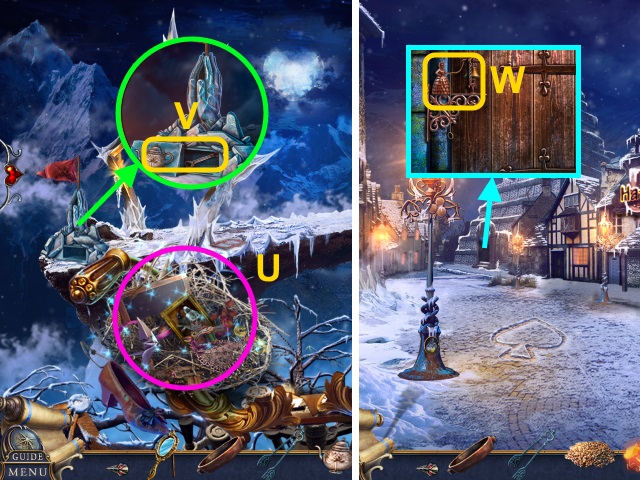
- Take the ORDER SYMBOL (U).
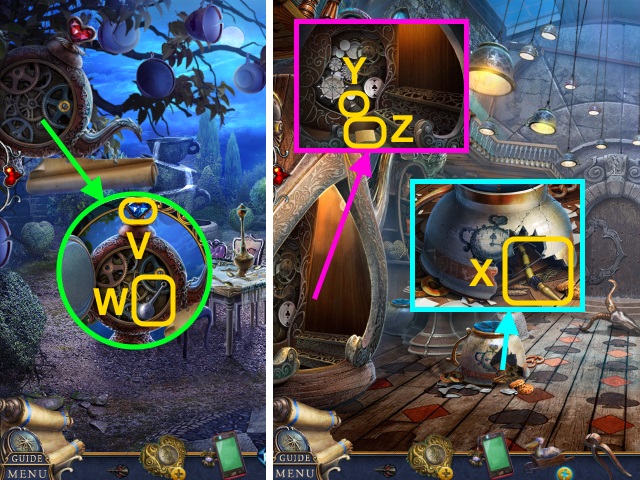
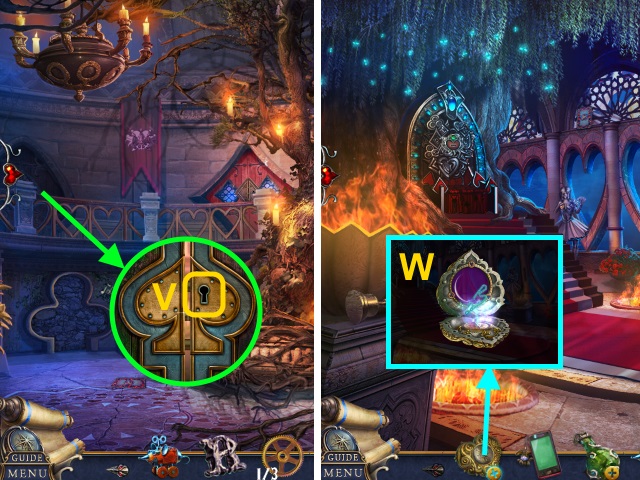
- Turn the boot; take the SCRAPER (V).
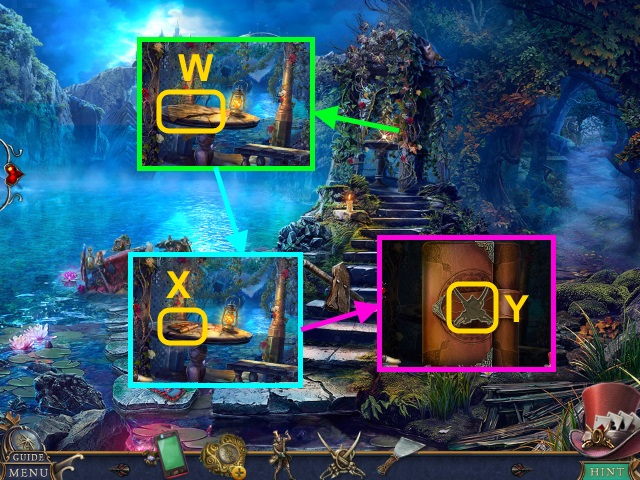
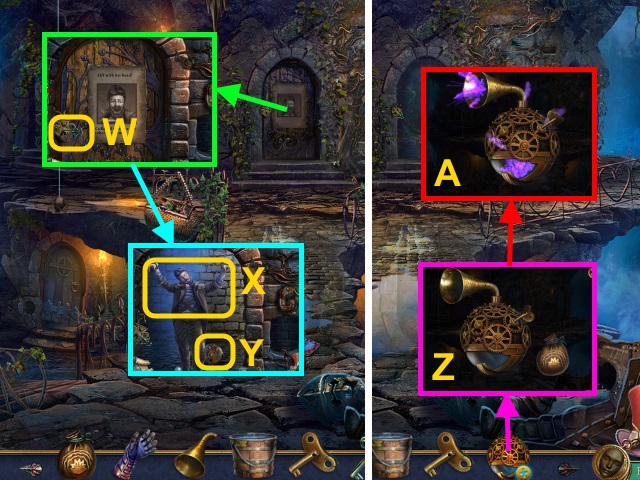
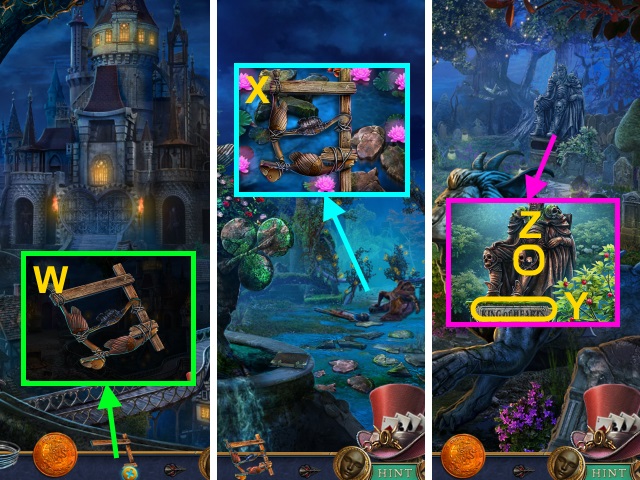
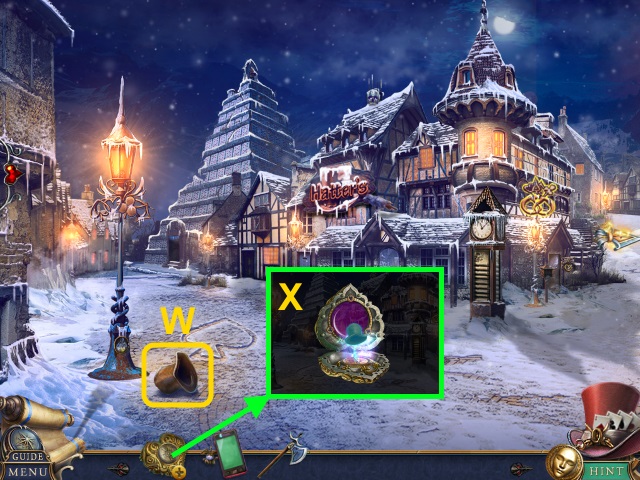
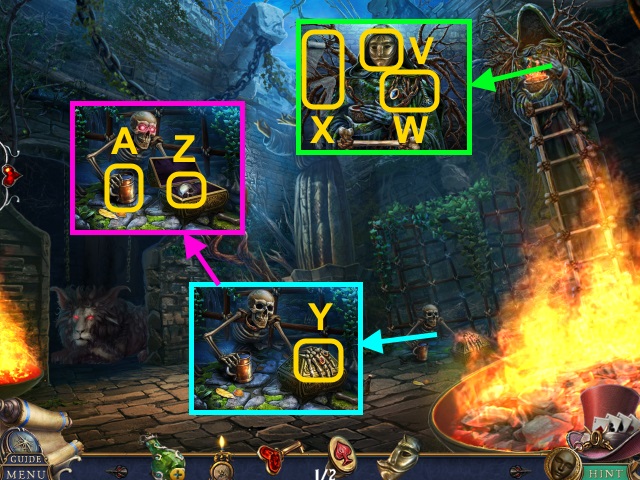
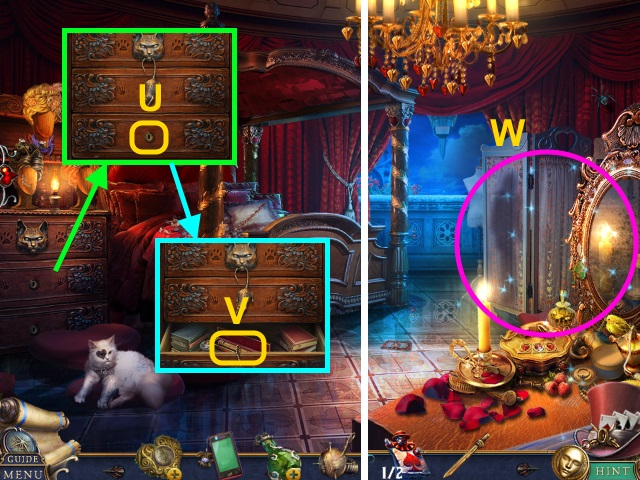
- Take the Map (W).
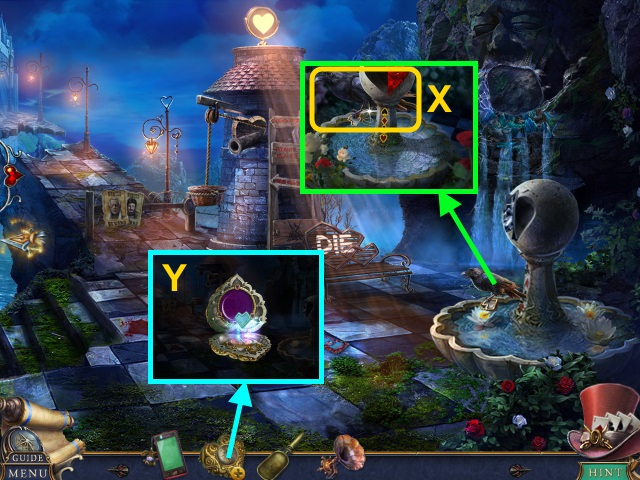
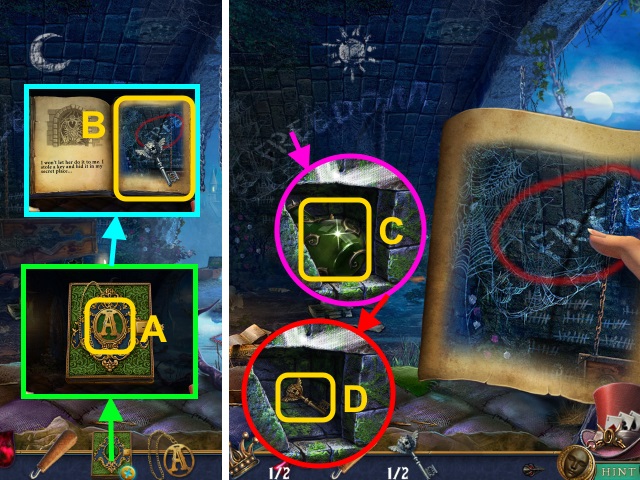
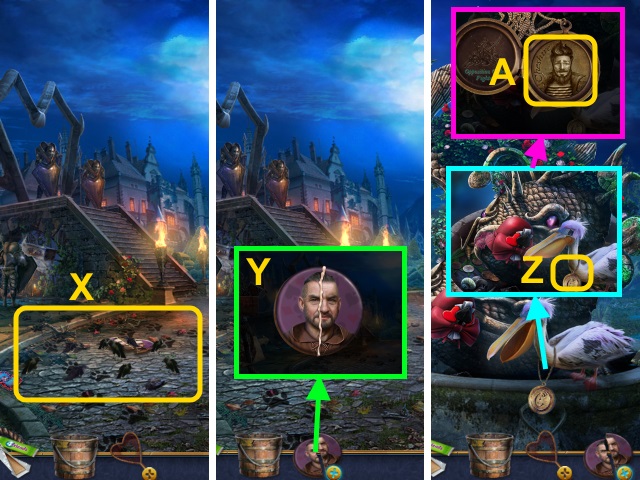
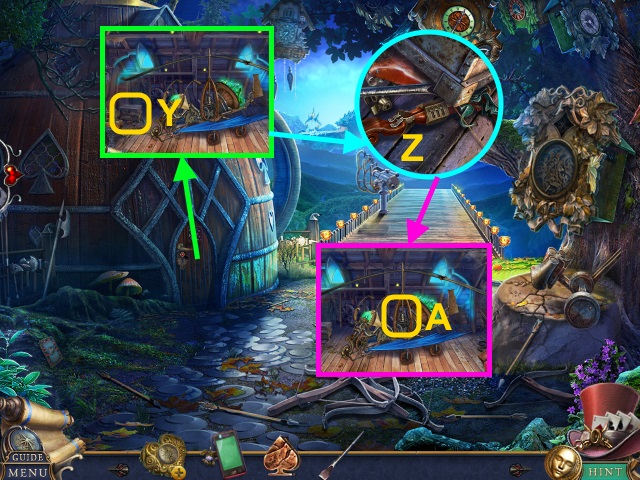
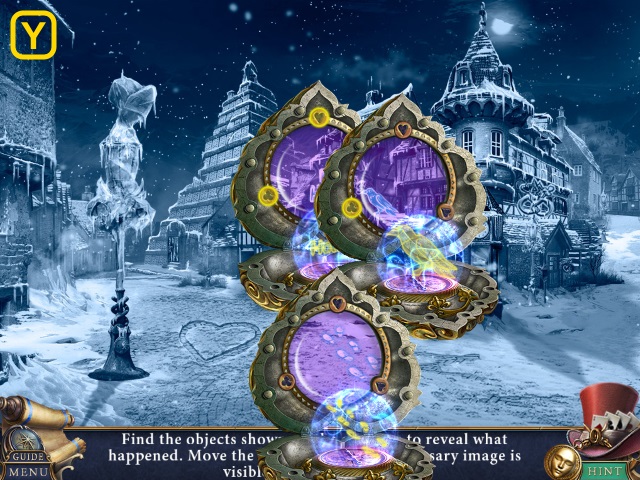
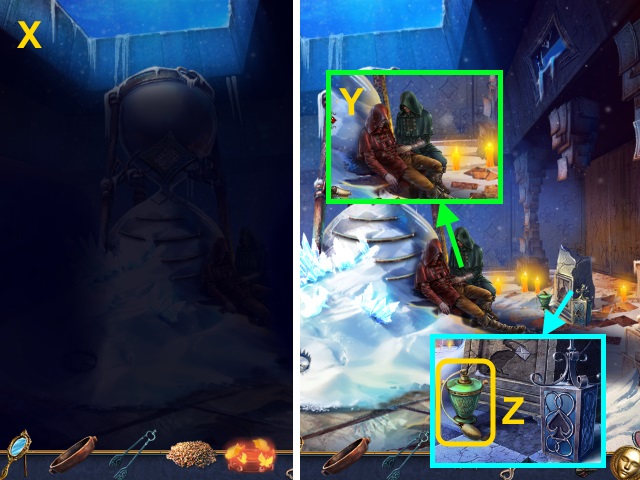
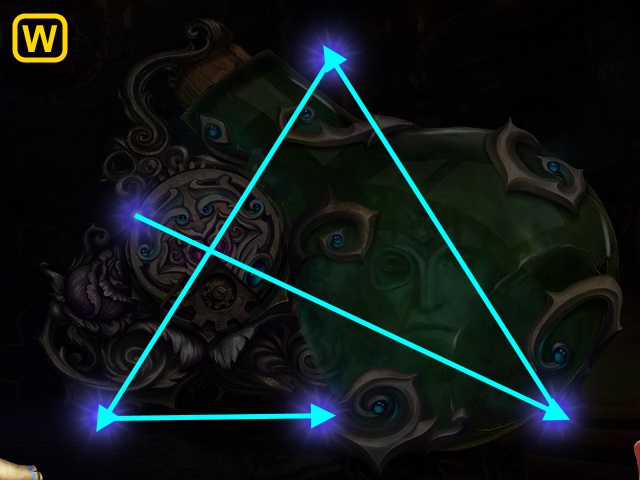
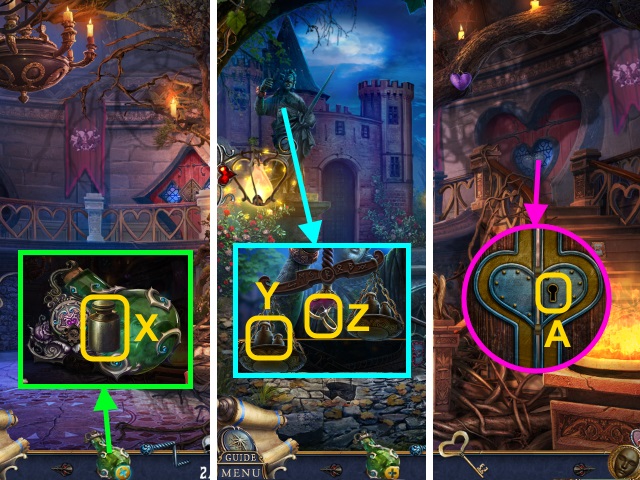
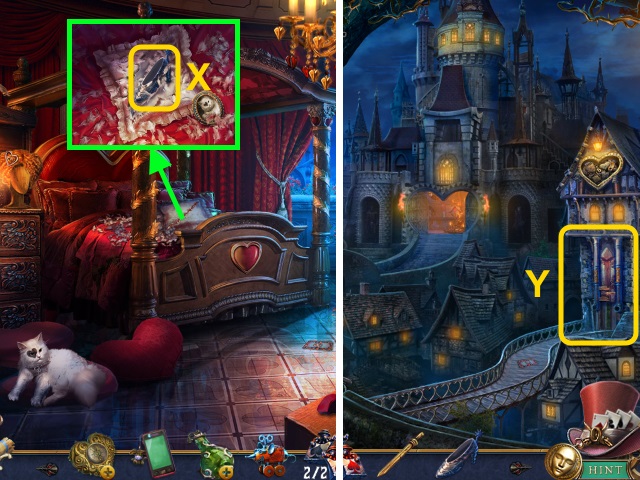
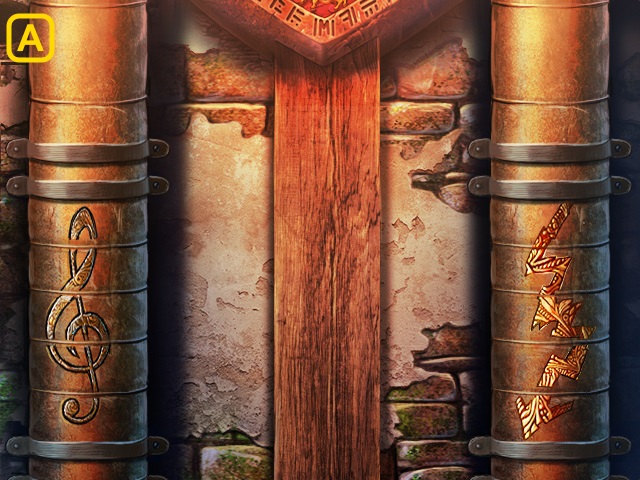
- Place the ORDER SYMBOL (X); open the book for a mini-game (Y).
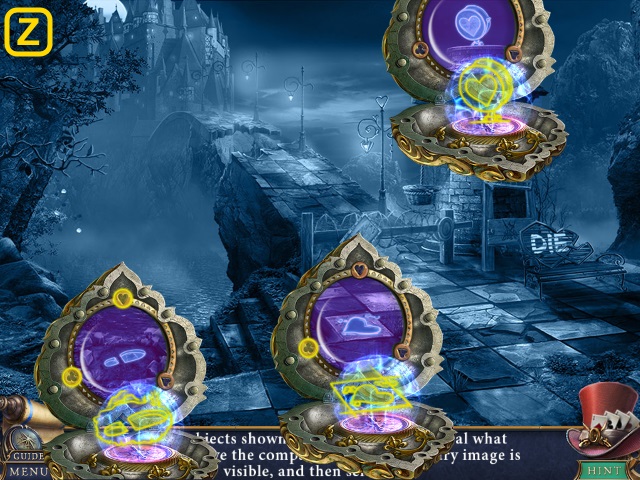
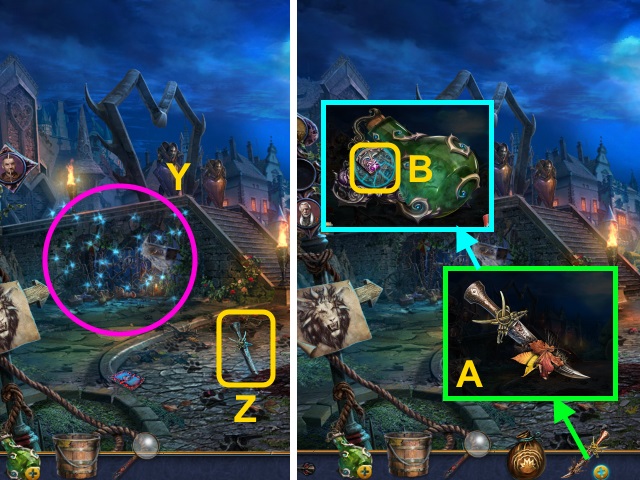
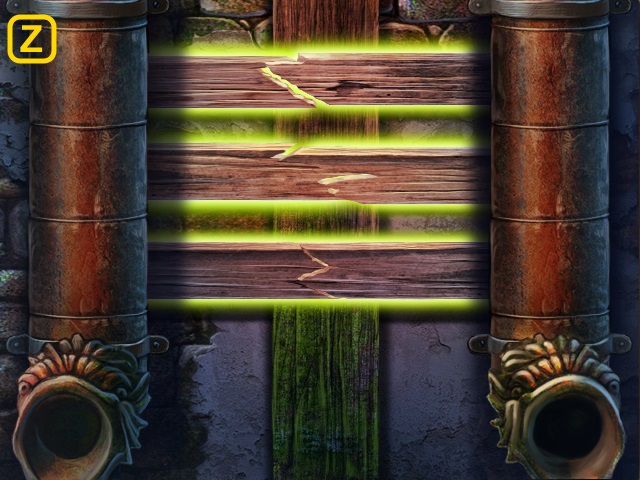
- Solution (Z).

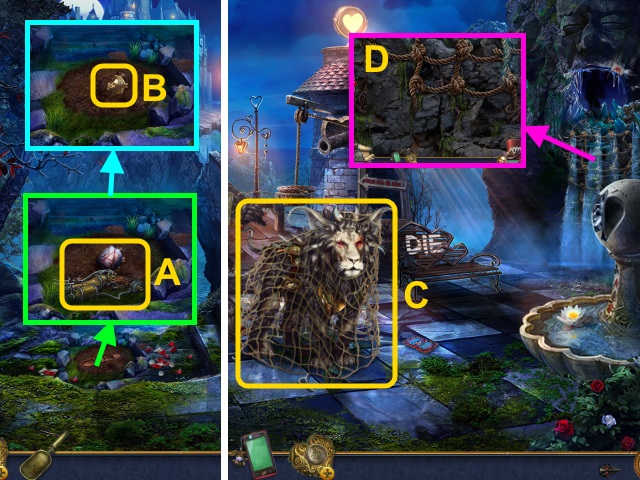
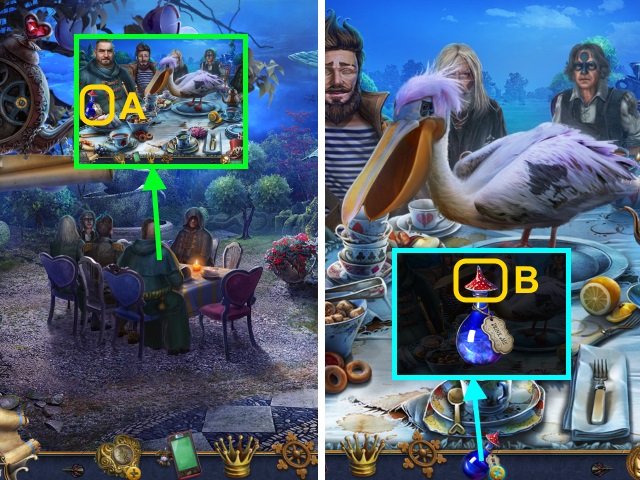
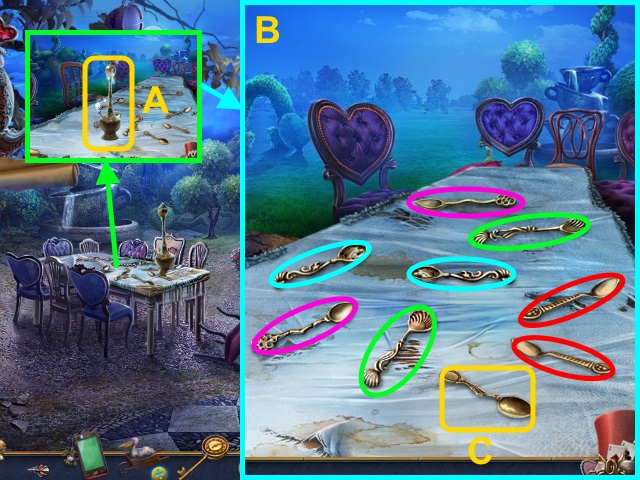
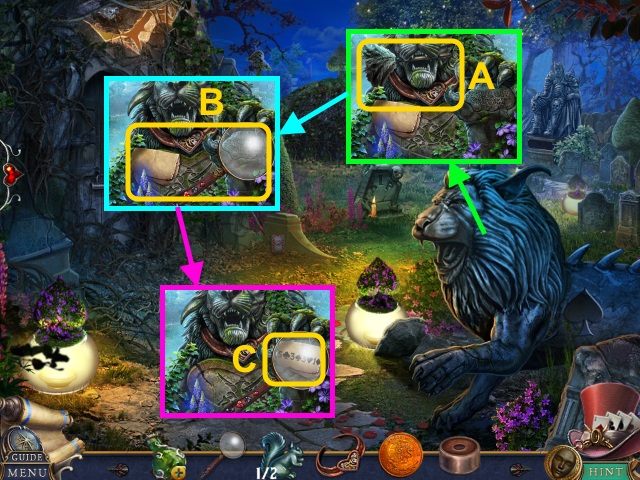
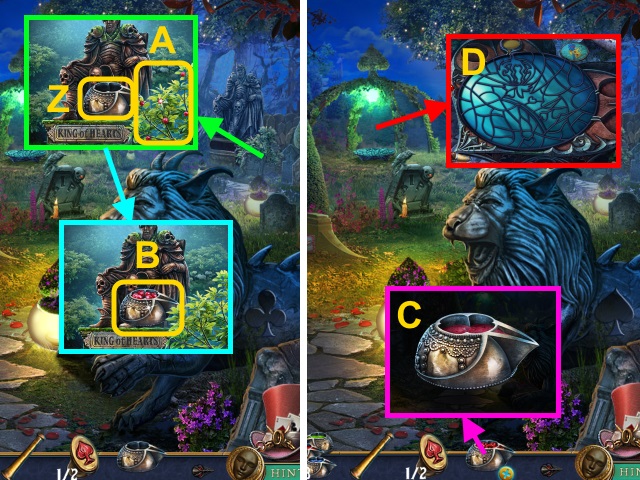
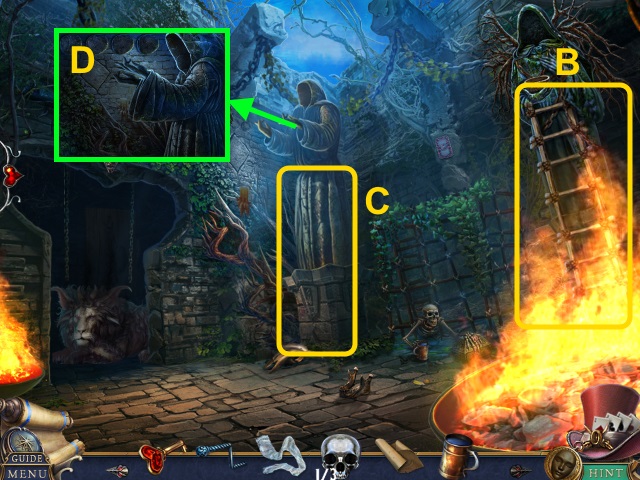
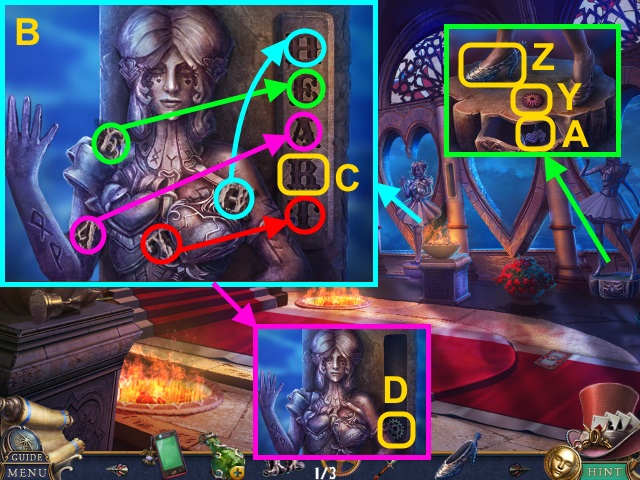
- Take the GARDEN SHEARS (A).
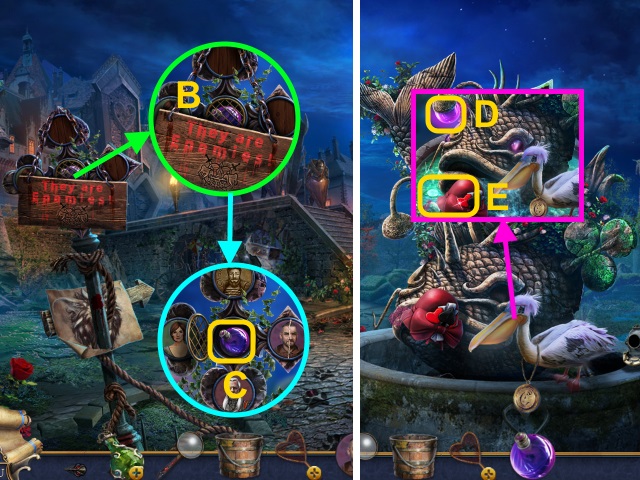
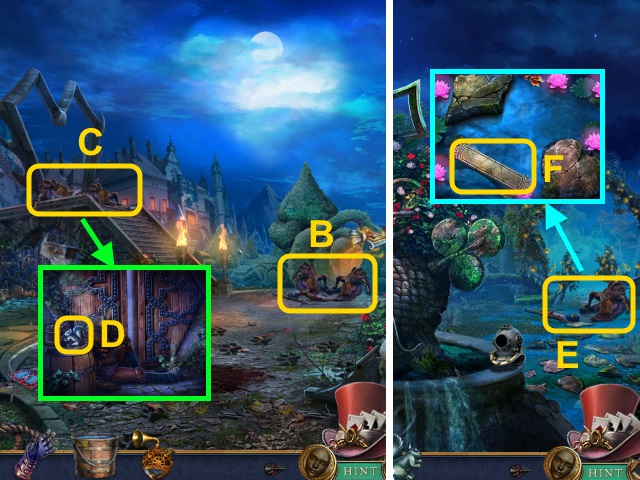
- Use the GARDEN SHEARS (B).
- Walk through the hedge.
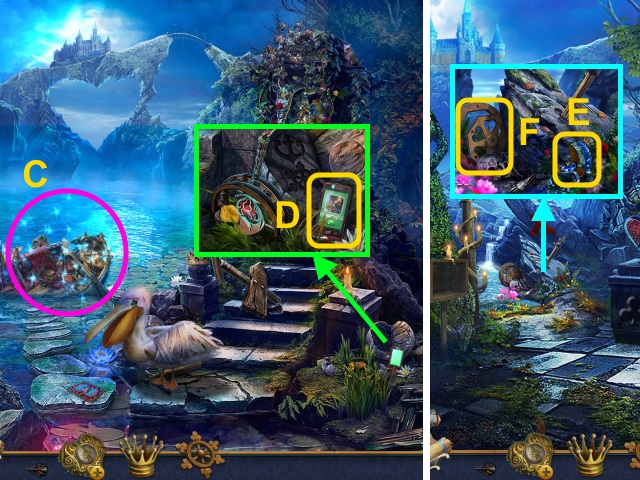
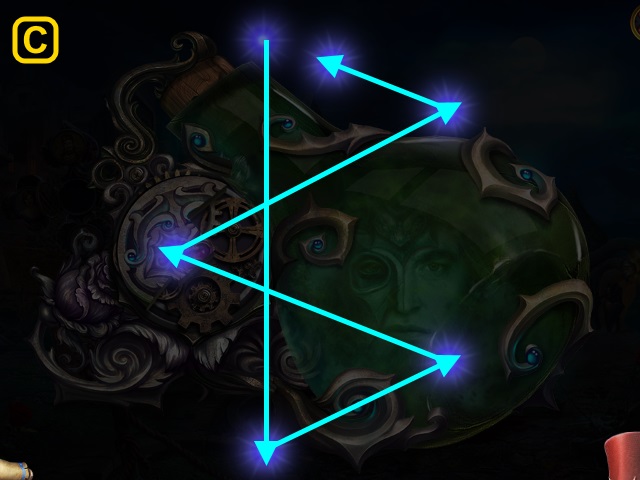
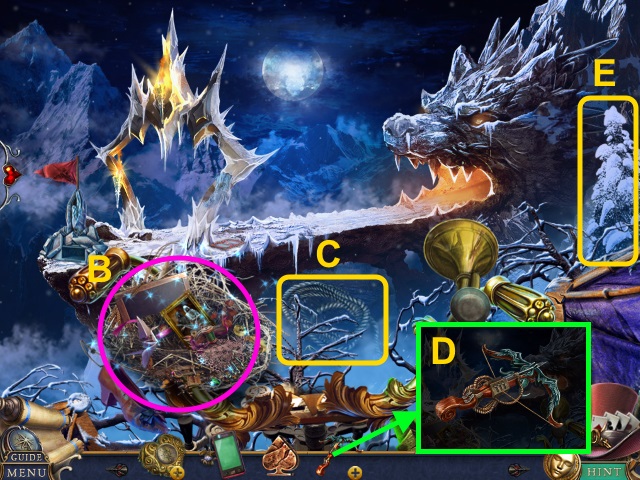
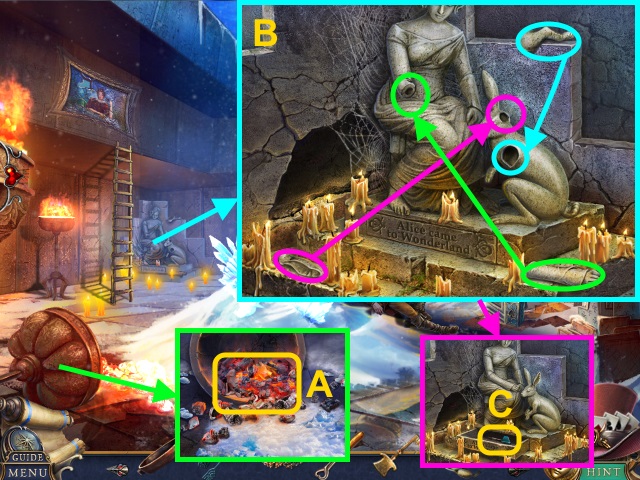
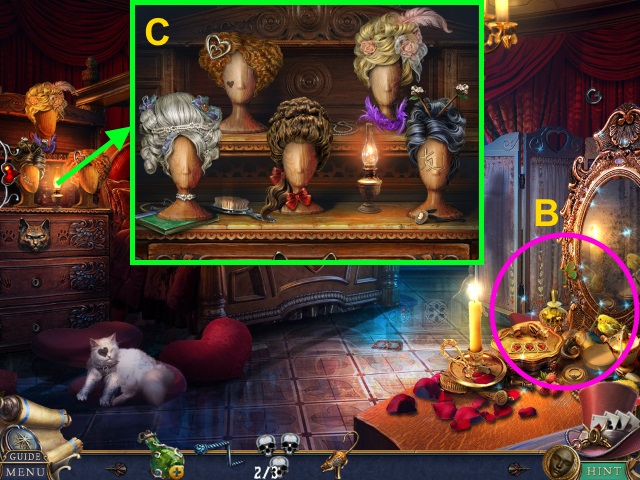
- Examine the scene (C).
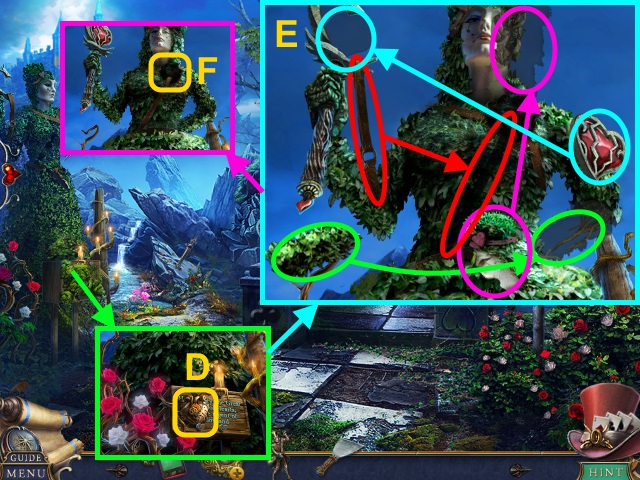
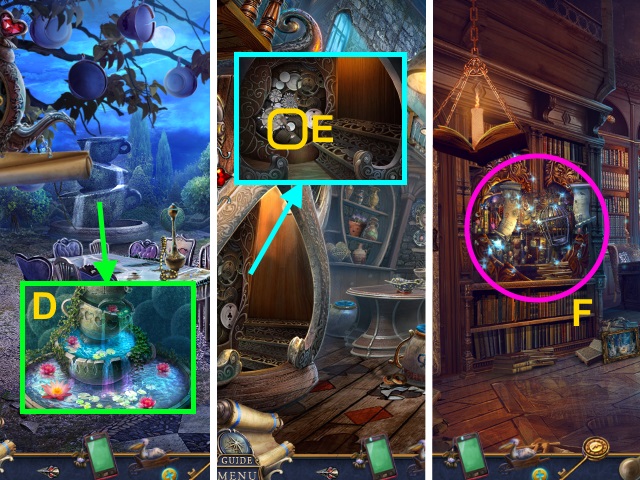
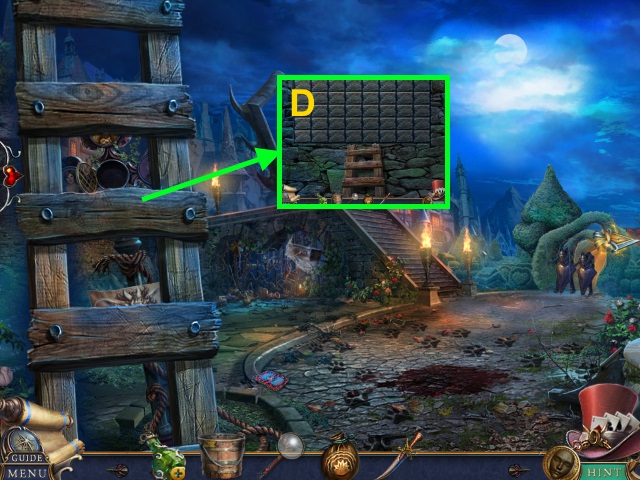
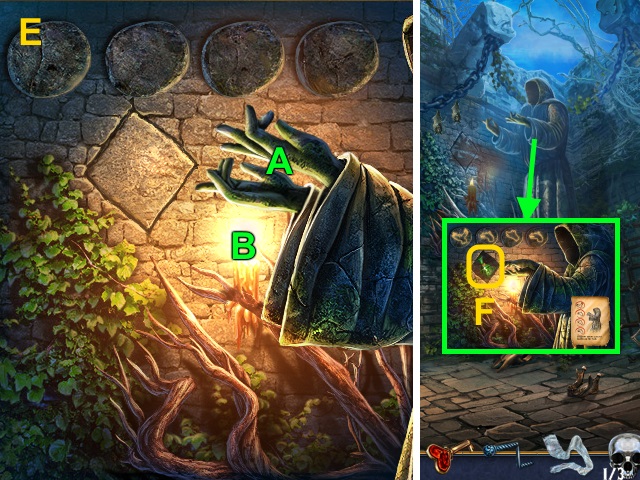
- Use the SCRAPER 3x; take the STATUE'S HEART (D).
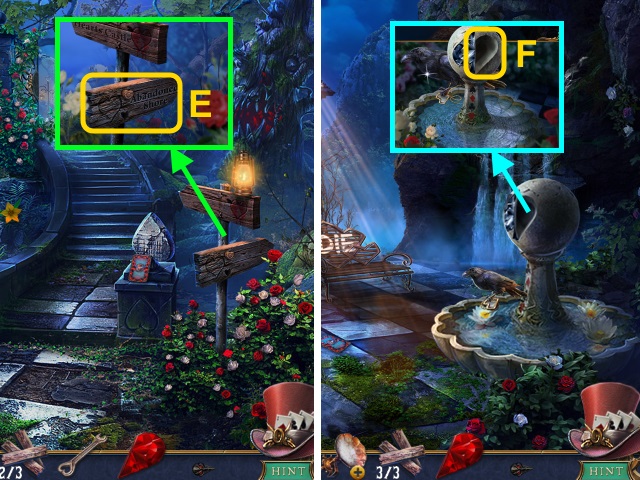
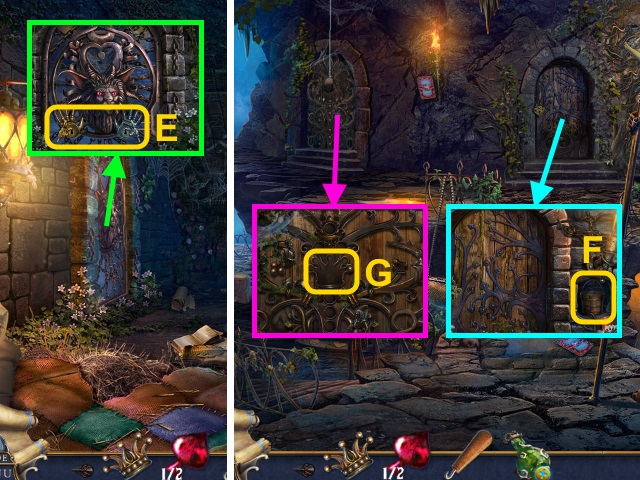
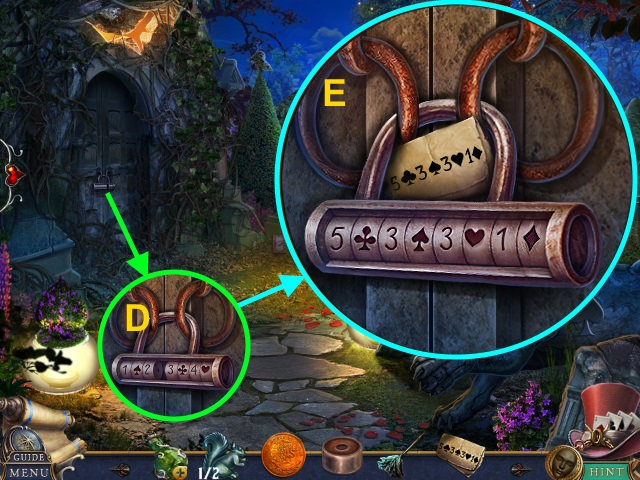
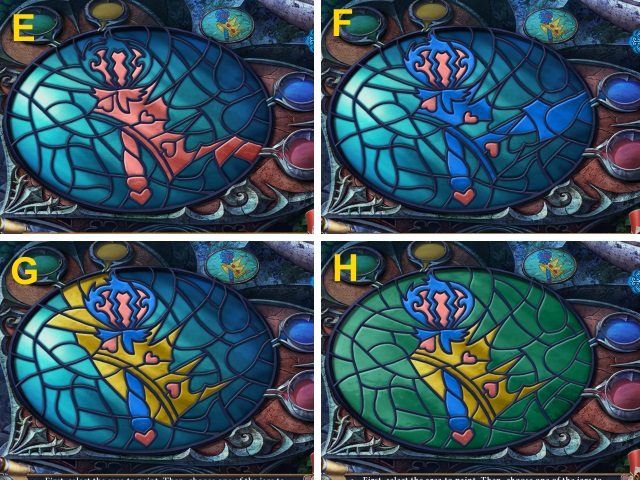
- Place the parts (E).
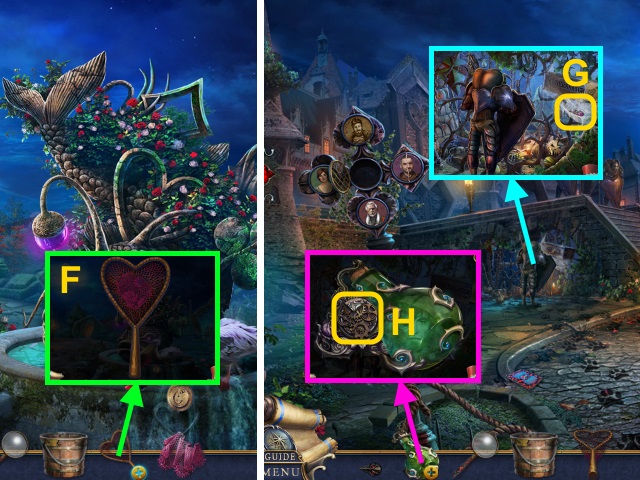
- Place the STATUE'S HEART (F).
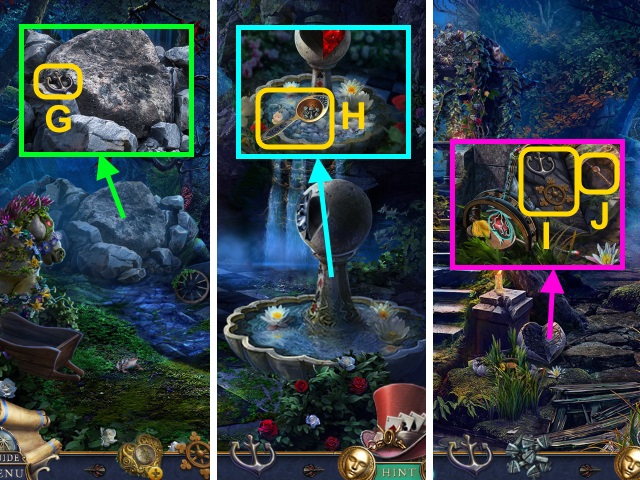
- Take the METAL SCEPTER (G).
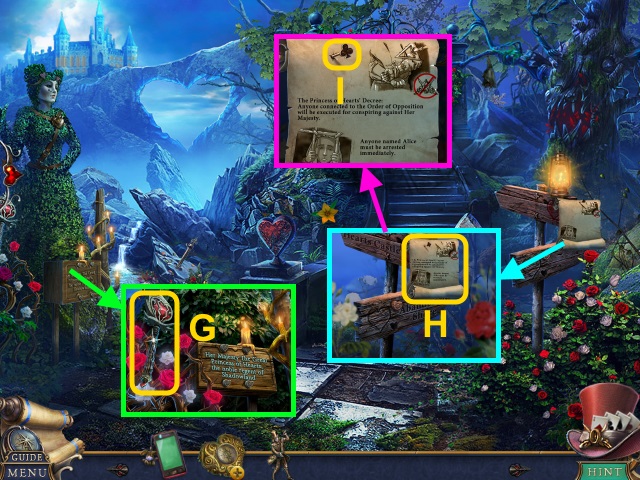
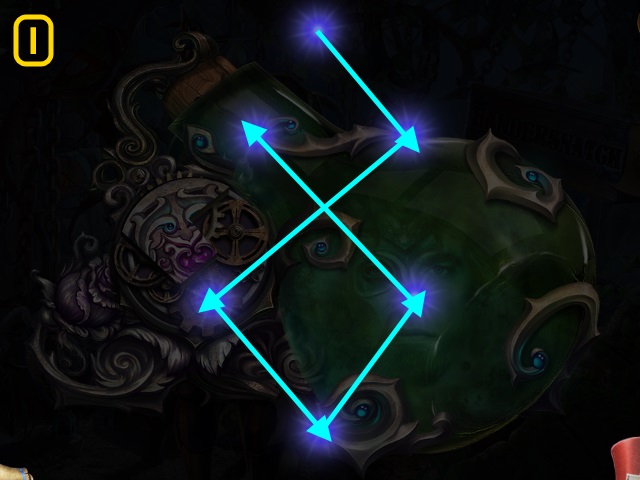
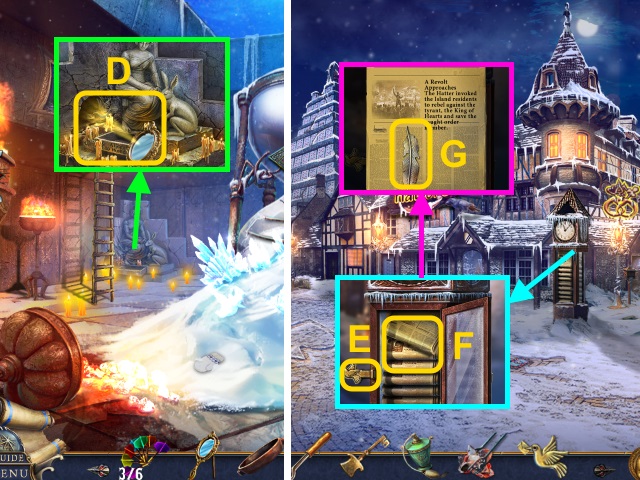
- Examine the paper (H); take the NAIL (1/6) (I).
- Walk down.
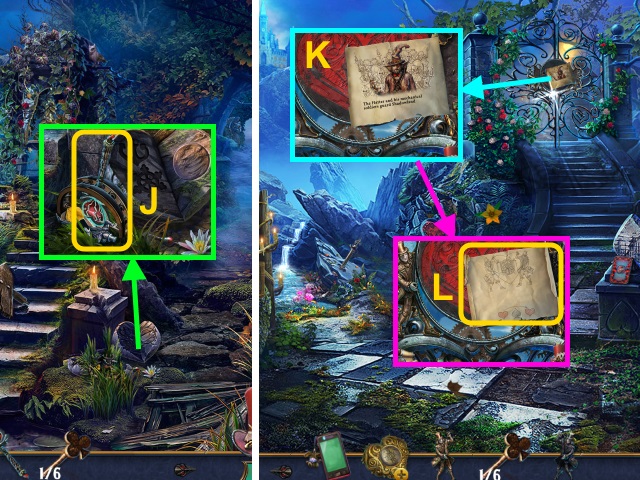
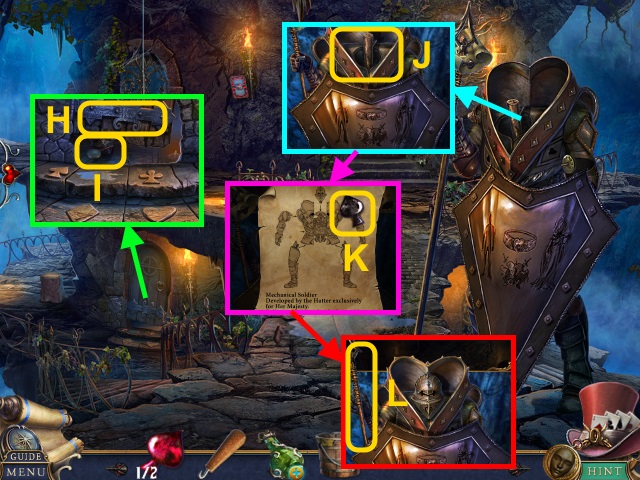
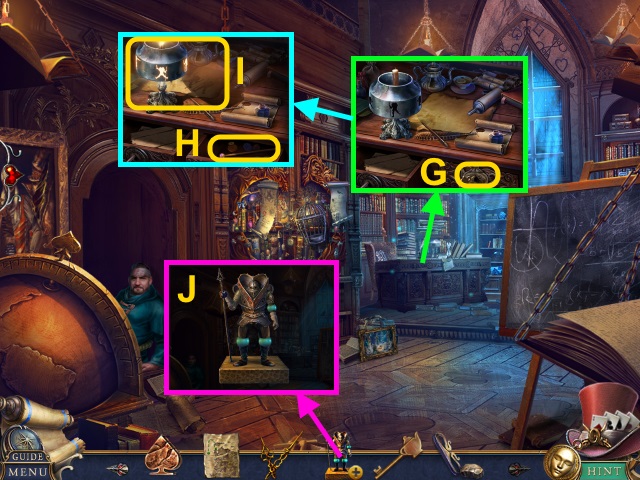
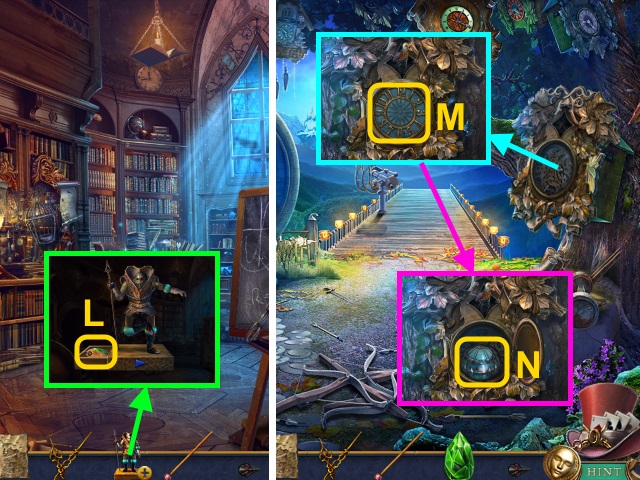
- Use the METAL SCEPTER; take the HATTER FIGURINE (J).
- Walk right.
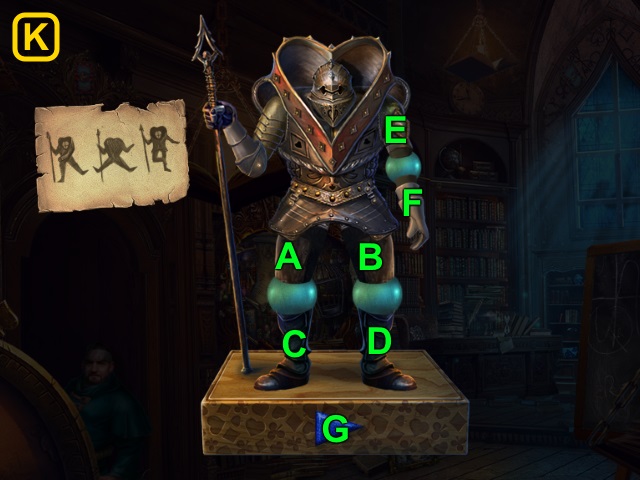
- Examine the paper; use the 2 HATTER FIGURINES (K).
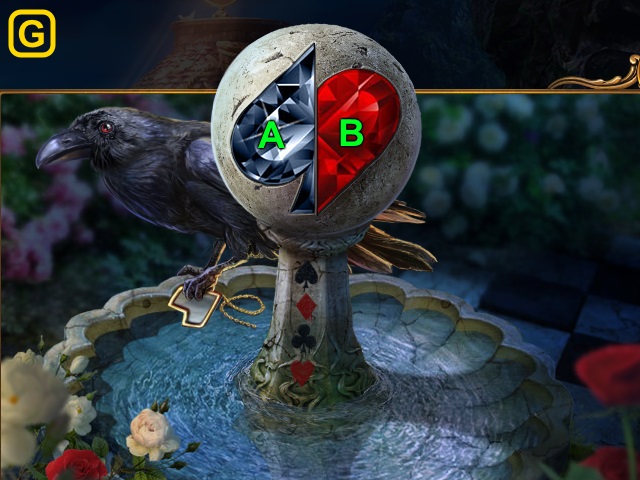
- Examine the paper for a mini-game (L).
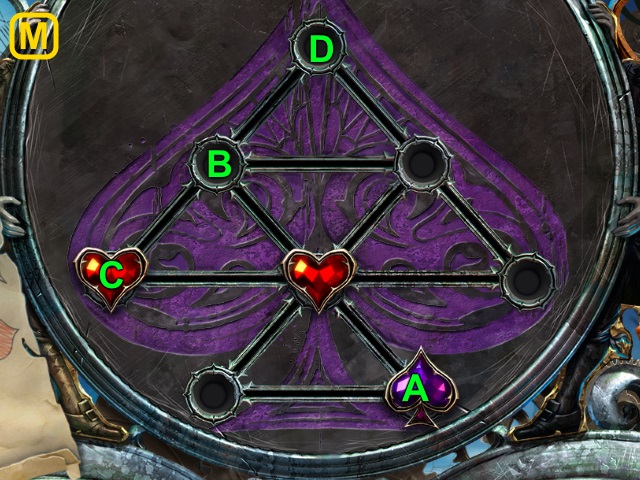
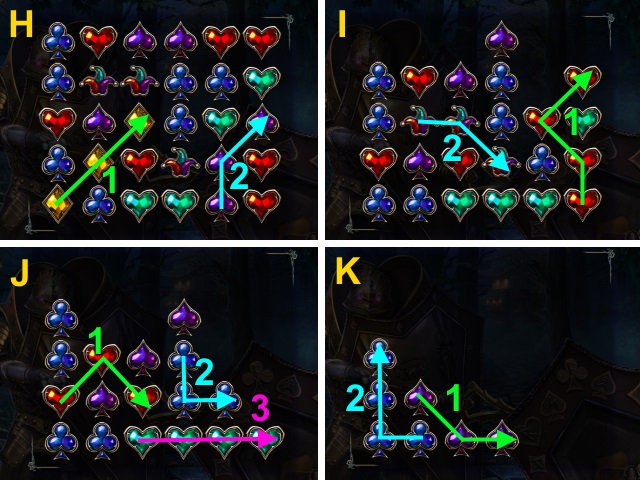
- Solution (M): (A-B)-(C-D).
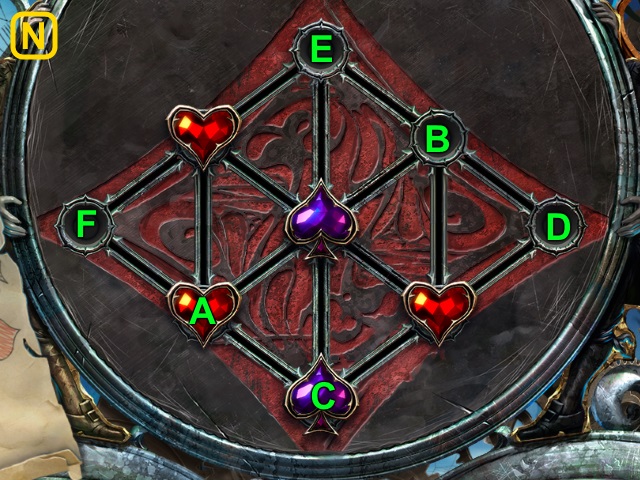
- Solution (N): (A-B)-(C-D)-(D-E)-(E-F).
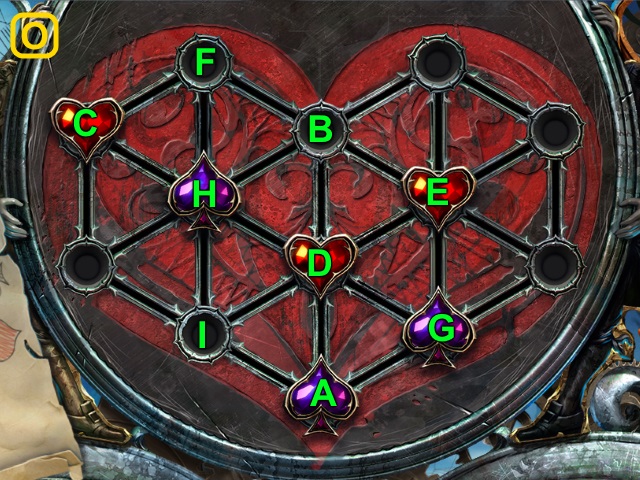
- Solution (O): (A-B)-(C-D)-(E-F)-(G-H)-(F-I).
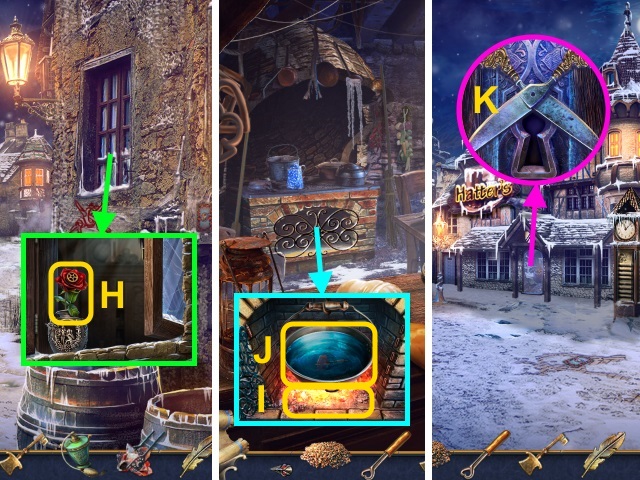
- Walk forward.
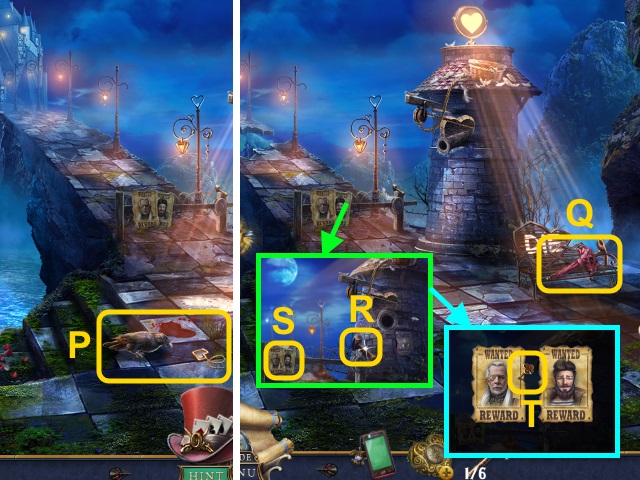
- Examine the monocle (P).
- Take the UMBRELLA (Q).
- Take the HAMMER (R); examine the posters (S).
- Take the NAILS (2/6) (T).
- Scroll left; walk left.
- Examine the scene; take the BROKEN LADDER (U).
- Take the MEGAPHONE (V).
- Take the SIGN (1/3) (W).
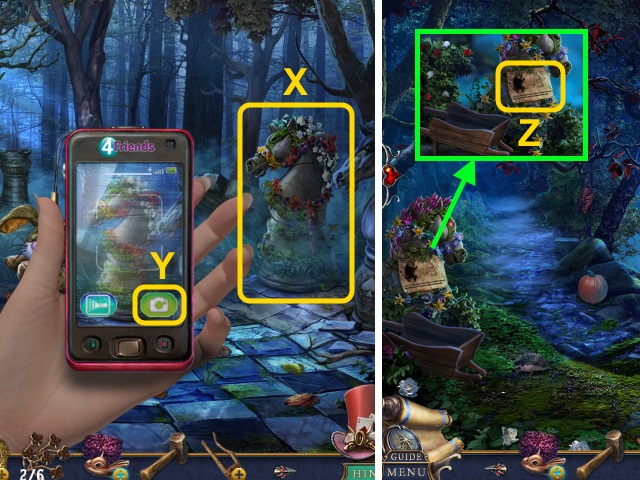
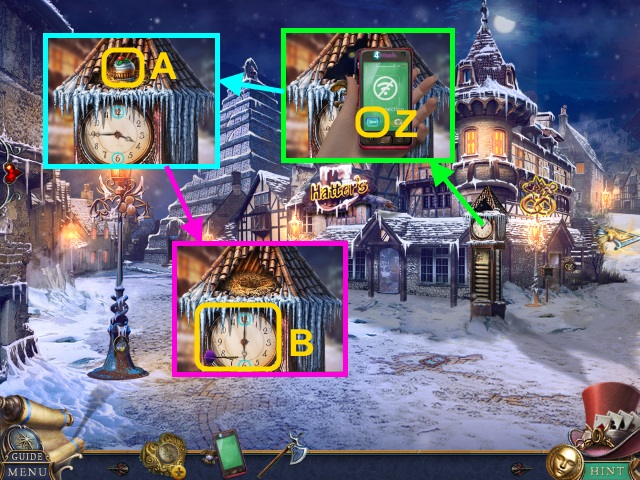
- Use the PHONE (X); press the button (Y). Receive the HORSE-STATUE PICTURE.
- Walk down.
- Examine the note (Z); place the HORSE-STATUE PICTURE for a mini-game.
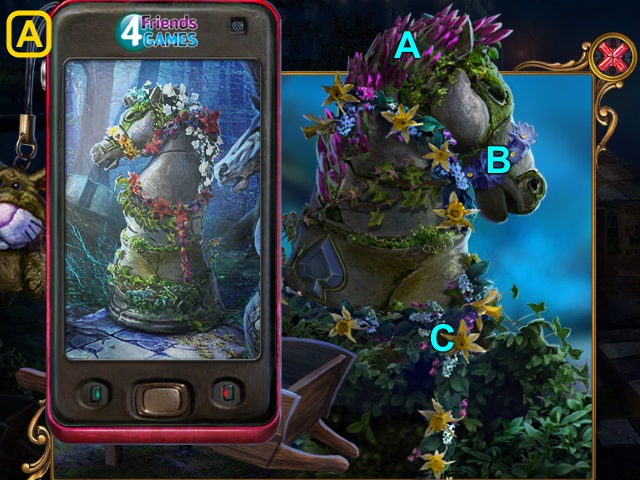
- Solution (A): A-Bx2-C.
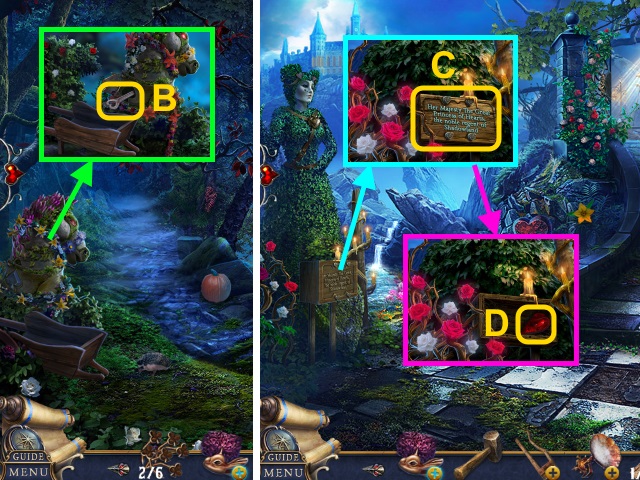
- Take the SCREWDRIVER (B).
- Walk down.
- Use the SCREWDRIVER; take the SIGNS (2/3) (C).
- Take the HEART PIECE (D).
- Use the SCREWDRIVER (E); receive the SIGNS (3/3).
- Walk forward; scroll right.
- Place the HEART PIECE for a mini-game (F).
- Solution (G): Bx2-Ax6-Bx2-Ax3.

- Take the GREEN GEM (H).
- Examine the UMBRELLA; place the GREEN GEM (I).
- Open the umbrella; take the NAILS (3/6)-(6/6) (J).
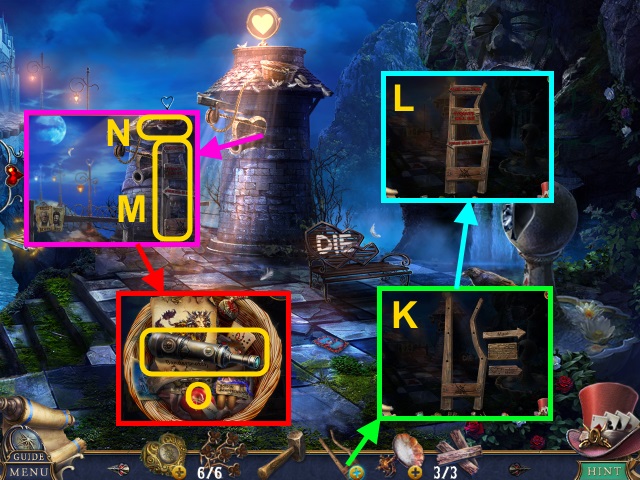
- Combine the BROKEN LADDER and SIGNS (3/3) (K); place the signs.
- Use the NAILS (6/6) and HAMMER; take the LADDER (L).
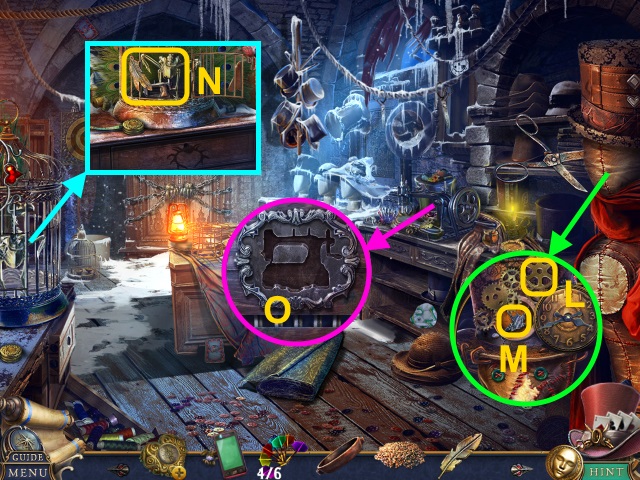
- Place the LADDER (M); examine the basket (N).
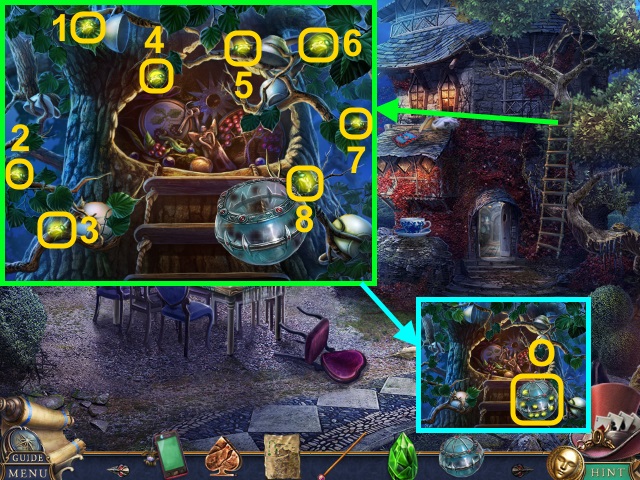
- Examine the telescope (O).
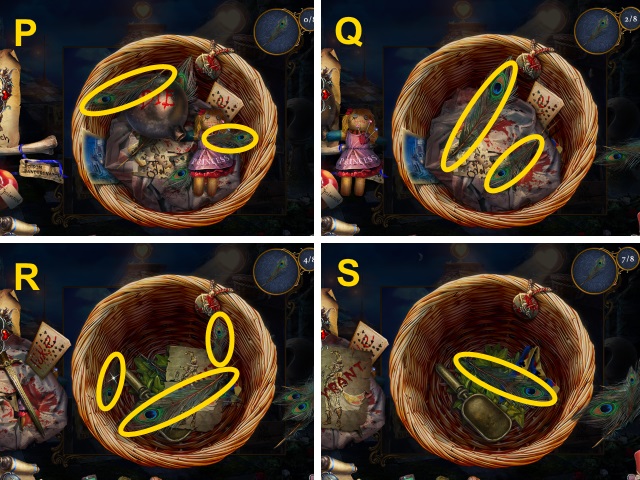
- Move the items; collect the feathers (P-S).
- Take the TROWEL (T); examine the ribbon (U).
- Take the BRUSH (V).
- Combine the MEGAPHONE and BRUSH (W); take the MEGAPHONE.
- Use the MEGAPHONE; take the MONOCLE (X).
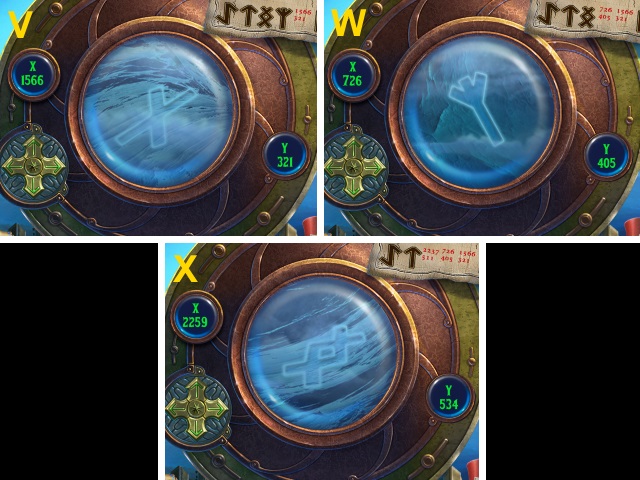
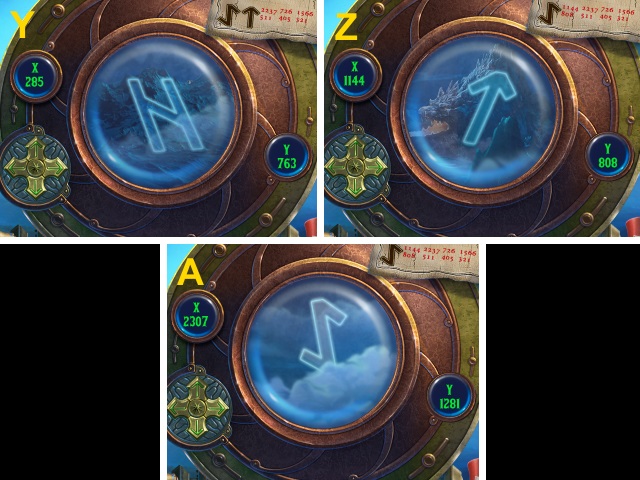
- Combine the SEARCHING COMPASS and MONOCLE for a mini-game (Y).
- Solution (Z).
- Scroll left.
- Use the TROWEL. Take the NET GUN; read the note (A).
- Take the Watch (B).
- Use the NET GUN (C).
- Examine the net for a mini-game (D).
- Solution (E-G).
Chapter 2: The Jail
- Take the PHONE (H).
- Use the PHONE; press the button (I).
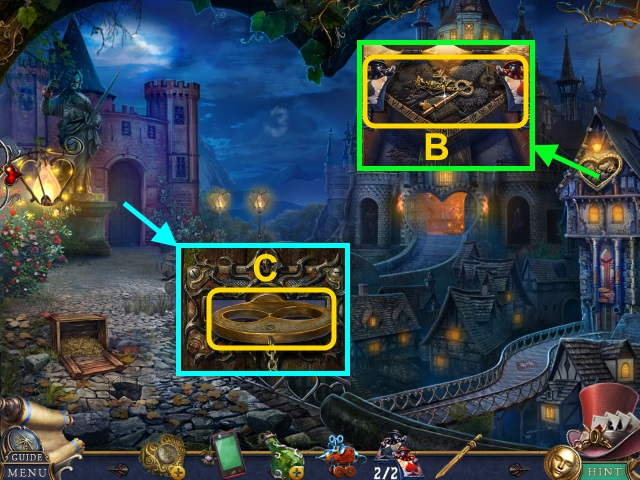
- Play the HOP; receive the WINDING KEY (J).
- Examine the Watch (K); use the WINDING KEY (L).
- Take the WEIGHT (M).
- Use the WEIGHT; take the SHARP GLASS (N).
- Use the SHARP GLASS (O).
- Move the plants 3x; examine the bats (P).
- Take the AWL (Q).
- Use the WEIGHT; take the JESTER-HAT FIGURINE (R).
- Use the AWL; take the SPADE GEM (1/2) (S).
- Take the HOOK (T).
- Take the DIARY (U).
- Examine the gate; gather the gems (V-W).
- Take the BUTTERFLY FIGURINE (X).
- Place the BUTTERFLY FIGURINE (Y).
- Play the HOP; receive the 'A' PENDANT (Z).
- Combine the DIARY and 'A' PENDANT (A); read the diary.
- Take the SILVER KEY (1/2) and note (B).
- Use the AWL; take the MAGICAL BOTTLE (C).
- Take the SILVER AND GOLD KEYS (2/2) (D).
- Use the SILVER AND GOLD KEYS (E).
- Go through the gate.
- Take the BUCKET (F).
- Place the JESTER-HAT FIGURINE (G).
- Examine the door (H). Use the HOOK (I); take the MAGNIFIER and SOLDIER'S HELMET.
- Place the SOLDIER'S HELMET (J).
- Take the SPADE GEMS (2/2) and note (K).
- Take the SPEAR (L).
- Examine the purse; place the SPADE GEMS (2/2) (M).
- Take the HANGER (N); move the items.
- Take the CHEWING GUM; read the newspaper (O).
- Open the wallet; take the ID and FAMILY PHOTO (P).
- Use the SPEAR and FAMILY PHOTO (Q).
- Examine the spear; take the SEAL PIECE (R).
- Examine the MAGICAL BOTTLE; place the SEAL PIECE for a mini-game (S).
- Solution (T).
- Take the ROPE (U).
- Walk down.
- Use the ROPE and HANGER (V).
- Take the TORN NET (W).
- Examine the birds; take the BROKEN TOKEN (X).
- Combine the BROKEN TOKEN and CHEWING GUM (Y); take the TOKEN.
- Scroll right.
- Examine the locket (Z); open it.
- Take the TOKEN (A).
- Scroll left.
- Remove the sign (B).
- Place the 2 TOKENS; take the FISH LANTERN (C).
- Scroll right.
- Place the FISH LANTERN (D); take the VEIL (E).
- Combine the TORN NET and VEIL; take the NET (F).
- Scroll left.
- Take the SEAL PIECE (G).
- Combine the MAGICAL BOTTLE and SEAL PIECE for a mini-game (H).
- Solution (I).
- Examine the soldier (J).
- Play the HOP (K).
- Use the NET for a mini-game (L).
- Solution (M).
- Take the BANDERSNATCH WHISTLE (N).
- Scroll right.
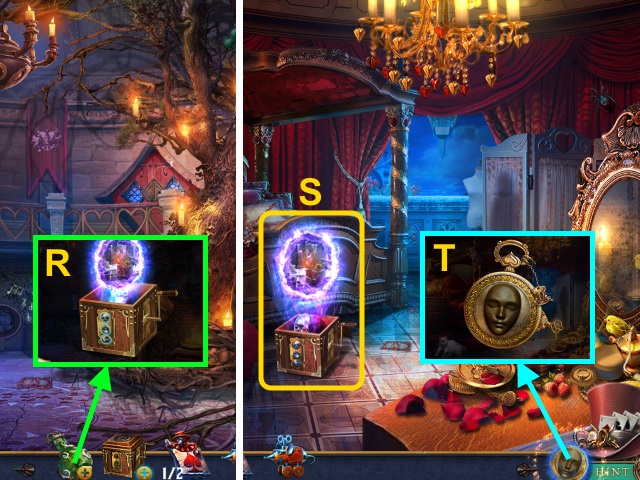
- Give the BANDERSNATCH WHISTLE (O).
- Use the Watch (P); receive the BANDERSNATCH WHISTLE.
- Use the BANDERSNATCH WHISTLE (Q).
- Use the PHONE; press the button (R).
- Receive the MAZE ROUTE.
- Walk forward, scroll left, then walk left.
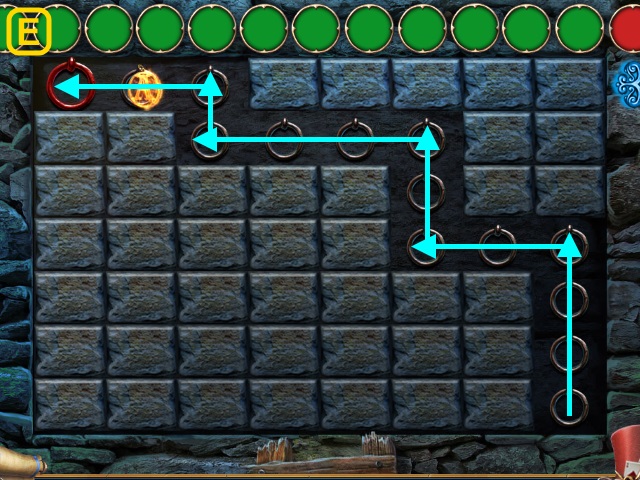
- Use the MAZE ROUTE for a mini-game (S).
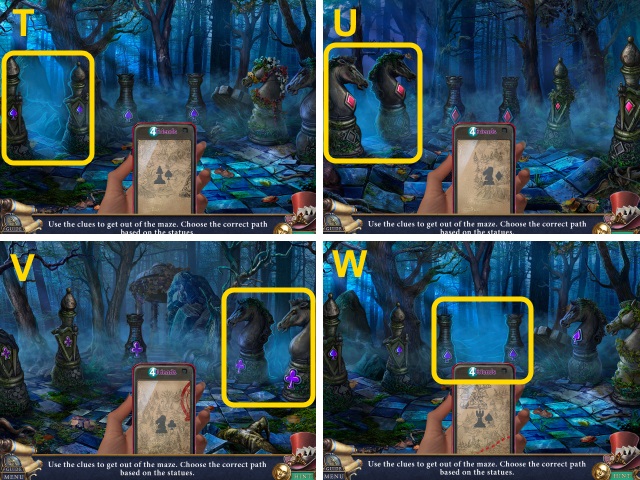
- Solution (T-W).
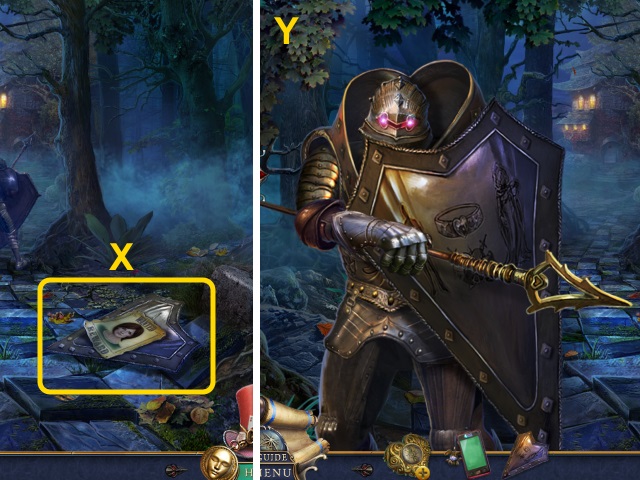
- Examine the poster; take the SHIELD (X).
- Use the SHIELD for a mini-game (Y).
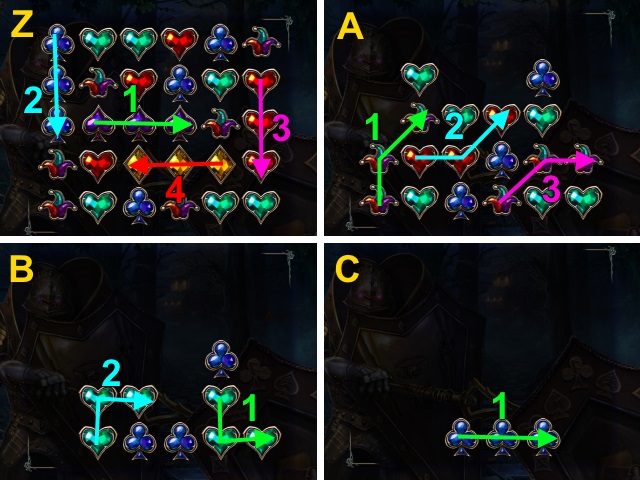
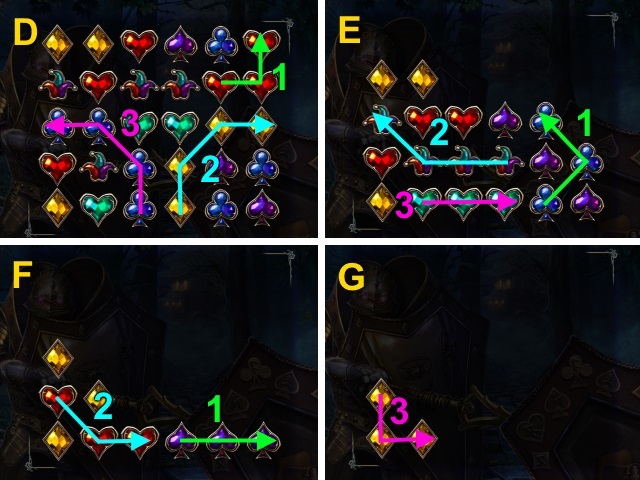
- Solution (Z-G).
- Solution (H-K).
- Walk forward.
Chapter 3: The Order
- Talk to Chronicle; take the MAP PIECE (L).
- Collect the gems (1-4).
- Take the CROWN and HOUSE KEY (M).
- Use the HOUSE KEY (N).
- Walk forward.
- Combine the SEARCHING COMPASS and MAP PIECE for a mini-game (O).
- Solution (P).
- Take the PORTRAIT (1/3) (Q).
- Take the PORTRAIT (2/3) (R).
- Use the PHONE; press the button (S). Receive the TIME CODE.
- Walk down.
- Examine the scroll (T); use the TIME CODE (U). Examine the clock (V).
- Take the PORTRAIT (3/3) (W).
- Walk right.

- Place the PORTRAITS (3/3) (X).
- Take the STEERING-WHEEL FIGURINE; examine the map (Y).
- Use the MAP PIECE; examine the map 2x (Z). Receive the CASTLE MAP.
- Walk down.
- Give the CASTLE MAP; take the SHRINKING POTION (A).
- Remove the cap; drink the SHRINKING POTION (B).
- Play the HOP; receive the STRAINER (C).
- Take the PHONE (D).
- Walk right.
- Place the CROWN; take the HEART GEM (E) and BROKEN WHEEL (F).
- Walk forward.
- Take the ANCHOR FIGURINE (G).
- Scroll right.
- Use the STRAINER; take the SCREWS (H).
- Walk down twice.
- Place the STEERING WHEEL FIGURINE and ANCHOR FIGURINE (I); take the FLUTE (J).
- Walk right.
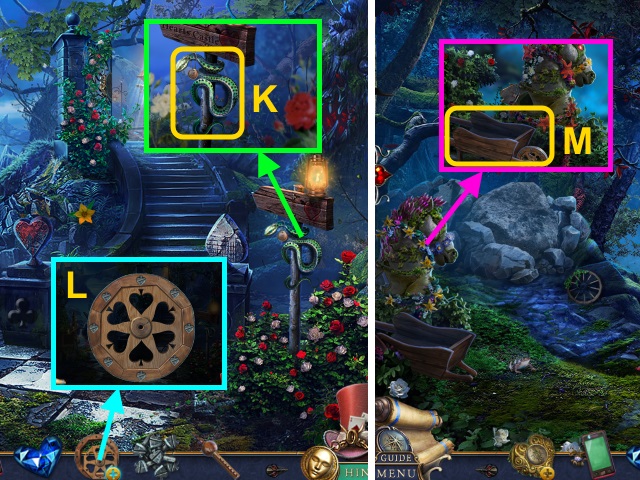
- Use the FLUTE; take the COIN (K).
- Combine the BROKEN WHEEL and SCREWS; use the COIN. Take the WHEEL (L).
- Walk forward; scroll left.
- Place the WHEEL; take the CART (M).
- Walk down twice.
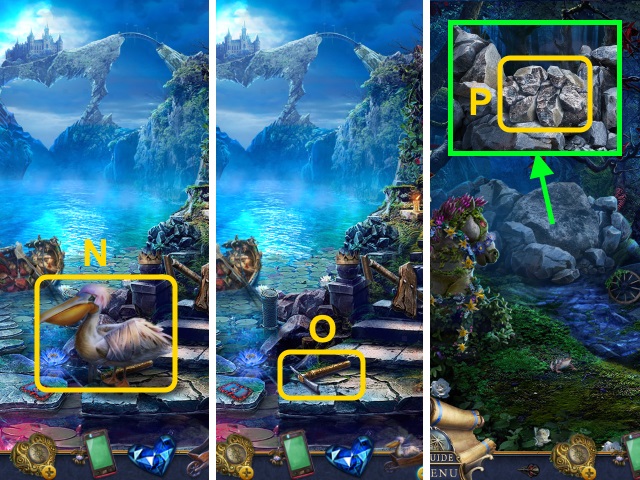
- Examine the pelican; use the CART (N). Receive the WOUNDED PELICAN.
- Take the PICKAXE (O).
- Walk right, then forward.
- Use the PICKAXE; remove the stones (P).
- Go forward.
- Take CHRONICLE'S MEDALLION (Q).
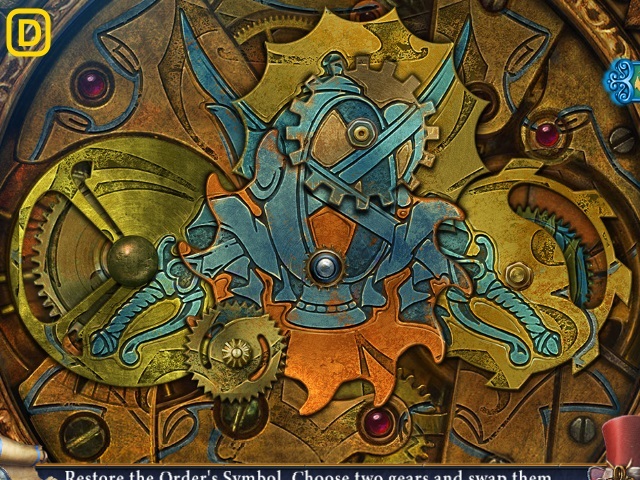
- Combine the SEARCHING COMPASS and CHRONICLE'S MEDALLION for a mini-game (R).
- Solution (S).
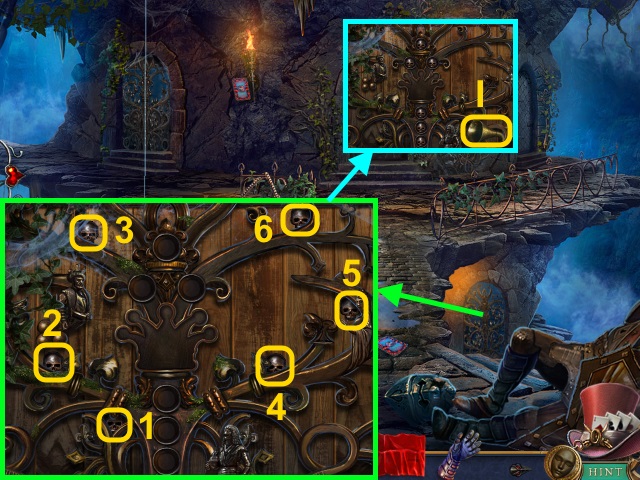
- Take the NIPPERS (T); gather the pieces (1-5).
- Take the CLOCK-SHAPED KEY (U).
- Examine the gem; place the HEART GEM (V). Take the BELL TONGUE (W).
- Walk right.
- Use the NIPPERS; take the HOSE (X).
- Examine the lever (Y); take the DRY SPONGE (Z).
- Walk down.
- Place the HOSE for a mini-game (A).
- Solution (B).
- Take the IMPROVISED LEVER (C).
- Use the DRY SPONGE (D); receive the WET SPONGE.
- Walk right.
- Place the IMPROVISED LEVER (E); pull it.
- Go upstairs.
- Play the HOP; receive the PROPHECY SCROLL (F).

- Take the CONTINENT (1/2) (G); use the WET SPONGE.
- Use the PHONE; press the button (H). Receive the PHOTO OF BELLS.
- Use the CLOCK-SHAPED KEY (I).
- Take the BANDAGE (J).
- Walk down.
- Take the DIAMOND LENS (1/2); place the BELL TONGUE (K). Use the PHOTO OF BELLS for a mini-game.
- Solution (L).
- Take the HEALING POTION (M).
- Examine the WOUNDED PELICAN; remove the arrow (N).
- Use the BANDAGE and HEALING POTION; apply the potion to the bandage (O).
- Examine the bandage; take the PELICAN (P).
- Walk down.
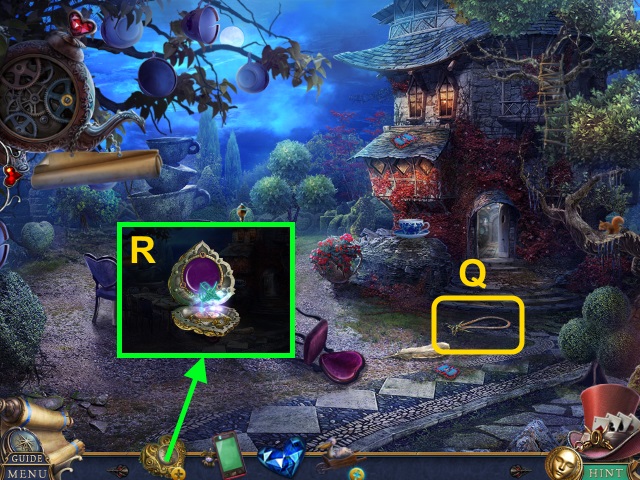
- Use the PELICAN (Q).
- Collect the pinecones (1-6).
- Take the QUILL FIGURINE (R).
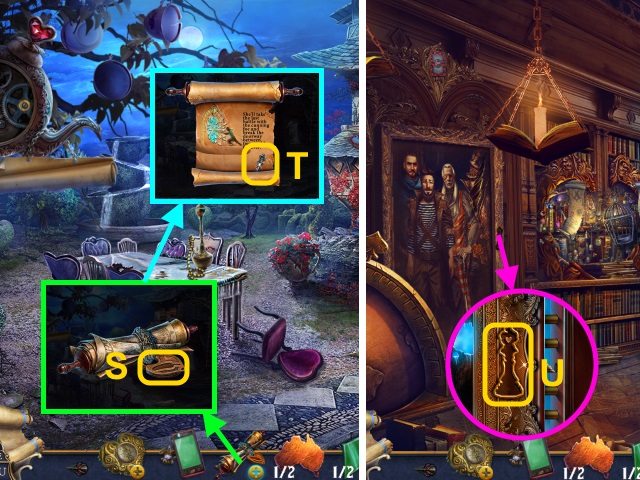
- Combine the PROPHECY SCROLL and QUILL FIGURINE (S); read the scroll.
- Take the CHESS KING (T).
- Walk right, then left.
- Place the CHESS KING (U).
- Use the PHONE (V); press the button (W).
- Use the Watch (X).
Chapter 4: Cheshire
- Scroll left.
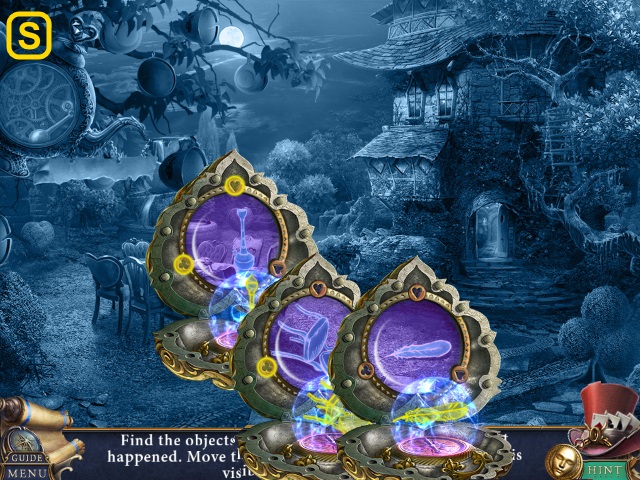
- Play the HOP; receive the POWDER (Y).
- Take CHESHIRE'S DAGGER (Z).
- Examine CHESHIRE'S DAGGER 5x (A); receive the SEAL PIECE and DAGGER.
- Combine the MAGICAL BOTTLE and SEAL PIECE for a mini-game (B).
- Solution (C).
- Examine the ladder for a mini-game (D).
- Solution (E).
- Move the stocks (F).
- Use the DAGGER; receive the FABRIC (G).
- Walk left.
- Remove the shield and helmet; take the GAUNTLET (H).
- Collect the skulls (1-6).
- Take the HORN (I).
- Walk down, then right; scroll right.
- Take the LAMP DECORATION (J).
- Use the BUCKET (K); receive the WATER.
- Scroll left; go left.
- Place the LAMP DECORATION (L). Use the FABRIC (M); receive the OILY FABRIC.
- Walk left.
- Use the OILY FABRIC; examine the torch (N). Take the SNOWFLAKE (O).
- Walk down.
- Play the HOP; receive the WINDING KEY (P).
- Place the SNOWFLAKE (Q).
- Examine the bird (R); take the STAIRS CODE (S).
- Walk left.
- Place the STAIRS CODE for a mini-game (T).
- Solution (U).
- Take the SPADE KEY (V).
- Use the SPADE KEY (W); open the door.
- Use the WATER (X); take the BROKEN BOMB (Y).
- Combine the BROKEN BOMB, POWDER, HORN, and WINDING KEY (Z). Pour the powder; turn the key.
- Take the ANTI-KNIGHT BOMB (A).
- Walk down, then right.
- Use the ANTI-KNIGHT BOMB 2x (B-C).
- Take the SQUIRREL STATUETTE (1/2) (D).
- Scroll right.
- Use the ANTI-KNIGHT BOMB (E).
- Take the STONE PLATE (F).
- Walk left.
- Take the CROQUET MALLET (1/3) (G). Move the balls; examine the hedgehog (H).
- Use the GAUNTLET (I); receive the HEDGEHOG.
- Take the SICKLE (J).
- Scroll right.
- Use the SICKLE 2x; take the JACK (K) and CROQUET MALLETS (2/3) (L).
- Use the WATER; take the CROQUET MALLETS (3/3) (M).
- Examine the pouch (N).
- Open the pouch; take the note and TWEEZERS (O).
- Walk down.
- Use the SICKLE; take the STONE COLLAR (P).
- Scroll left.
- Use the JACK (Q).
- Go through the door.
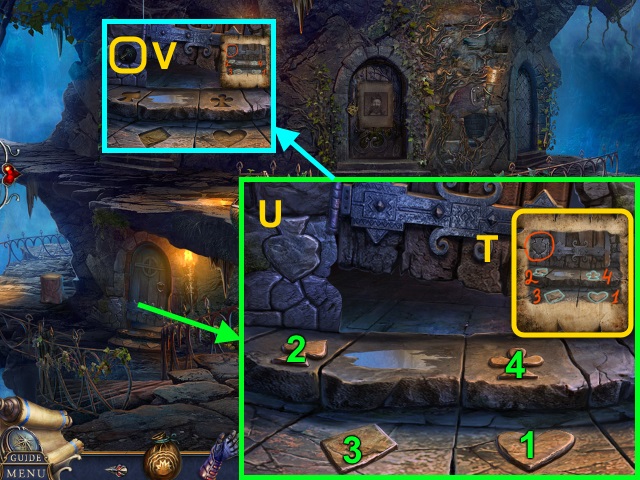
- Examine the crate for a mini-game; solution (R).
- Take the APPLE (S).
- Combine the HEDGEHOG and APPLE. Use the TWEEZERS (T); receive the WIRE.
- Take the COIN (U).
- Take the BROKEN BRIDGE (V).
- Combine the BROKEN BRIDGE, CROQUET MALLETS (3/3), and WIRE (3/3) (W); take the PORTABLE BRIDGE.
- Walk down; scroll right.
- Place the PORTABLE BRIDGE (X).
- Walk right.
- Place the STONE PLATE (Y); take the CODE LOCK BUTTON (Z).
- Place the STONE COLLAR; take the DUST BROOM (A).
- Use the MAGNIFIER; examine the paper (B).
- Take the LOCK CODE (C).
- Place the LOCK CODE and CODE LOCK BUTTON for a mini-game (D).
- Solution (E).
- Play the HOP; receive the SEAL PIECE (F).
- Combine the MAGICAL BOTTLE and SEAL PIECE for a mini-game (G).
- Solution (H).
- Take the MONOCLE OF REVEALING (I).
- Use the MONOCLE OF REVEALING (J).
- Examine the glass; take the SQUIRREL STATUETTES (2/2) (K).
- Place the COIN (L); take the BEETLE (M).
- Walk down, then left.
- Place the BEETLE (N).
- Take the LIGHTER and BLUE PAINT (1/3) (O).
- Scroll left.
- Place the SQUIRREL STATUETTES (2/2) (P).
- Use the DUST BROOM; take the SHOVEL (Q).
- Stack the boxes (R); examine the cage (S).
- Take the STONE CROW (T).
- Scroll right.
- Use the SHOVEL; take the PESTLE (U).
- Walk down, then right.
- Play the HOP; receive the PAINTS (2/3) (V).
- Move the stone; place the STONE CROW (W). Read the paper (X).
- Take the JAR and SPADES RING (1/2) (Y).
- Use the JAR (Z); collect the berries (A).
- Take the JAR WITH BERRIES (B).
- Combine the JAR WITH BERRIES and PESTLE (C); take the PAINTS (3/3).
- Place the PAINTS (3/3) for a mini-game (D).
- Solution (E-H).
- Read the note; take the COLLAR KEY (I).
- Walk down. Scroll left; go left twice.
- Examine the collar (J).
- Move the gem; use the COLLAR KEY (K).
Chapter 5: The Island of Refugees
- Talk to Chronicle; take the ANTLER (L).
- Walk down.
- Use the ANTLER (M).
- Walk forward.
- Take the ANVIL HANDLE (N).
- Examine the birds (1-6).
- Take the FIREWORKS KEY (O).
- Examine the handle; place the ANVIL HANDLE (P). Examine the anvil (Q).
- Take the SPADE SYMBOL (R).
- Examine the door; take the CONTINENTS (2/2) (S).
- Scroll down; open the book. Take the TELESCOPE LENSES (2/2) (T); close the book.
- Examine the lenses (U); place the TELESCOPE LENSES (2/2) for a mini-game.
- Solution (V-A).
- Take the MAP WITH COORDINATES (B).
- Walk down, then left.
- Use the FIREWORKS KEY; take the CLOCK HANDS (C).
- Place the CONTINENTS (2/2) (D).
- Take the KNIGHT BOX and POT-SHAPED KEY (E).
- Play the HOP; receive the FLINT (F).
- Use the POT-SHAPED KEY (G).
- Take the KNITTING NEEDLE (H).
- Use the FLINT; examine the lamp 2x (I). Take the KNIGHT SOLUTION.
- Combine the KNIGHT BOX and KNIGHT SOLUTION for a mini-game (J).
- Solution (K): (Bx3-D-E-Fx3)-(G-C-A-Ex2-Fx2)-(G-B-D-Cx2-A-F).
- Take the ENERGY CRYSTAL (L).
- Walk down, then forward.
- Place the CLOCK HANDS (M).
- Take the JAR (N).
- Walk down twice.
- Place the JAR; gather the fireflies (1-8).
- Take the FIREFLIES (O).
- Walk right, then forward.
- Scroll up. Use the KNITTING NEEDLE (P); scroll down.
- Examine the book; take the SHED KEY (Q).
- Scroll up; use the SHED KEY (R).
- Use the FIREFLIES; take the BENT CROWBAR (S).
- Place the handlebars (T) on the machine (U).
- Examine the handlebars (V).
- Place the ENERGY CRYSTAL and MAP WITH COORDINATES (W).
- Place the BENT CROWBAR; use the anvil. Take the CROWBAR (X).
- Examine the trunk (Y).
- Use the CROWBAR; take the UNLOADED CROSSBOW and SADDLE (Z).
- Place the SADDLE (A).
- Play the HOP; receive the CROSSBOW BOLT (B).
- Take the ROPE (C).
- Combine the UNLOADED CROSSBOW, CROSSBOW BOLT, and ROPE (D); examine the crossbow 3x. Receive the LOADED CROSSBOW.
- Use the LOADED CROSSBOW (E).
- Examine the tree; take the PICKAXE (F).
- Use the PICKAXE; examine the ice (G).
- Take the CRESCENT HANDLE (H).
- Walk right.
- Use the PICKAXE (I); receive the DIAMOND SYMBOL.
- Place the DIAMOND SYMBOL (J).
- Use the PHONE; press the button (K). Receive the MUSICAL-NOTES PHOTO.
- Walk down.
- Place the MUSICAL-NOTES PHOTO for a mini-game (L).
- Solution (M).
- Take the CLUB MOLD (N).
- Walk right.
- Place the SPADE SYMBOL (O).
- Move the roots; place the CLUB MOLD (P).
- Use the PICKAXE; take the CLUB SYMBOL (Q).
- Place the CLUB SYMBOL (R).
- Take the OIL (S); use the PICKAXE 3x (T).
- Go forward.
- Place the CRESCENT HANDLE (U); turn it.
- Use the OIL (V).
- Take the TOP HAT (W).
- Combine the SEARCHING COMPASS and TOP HAT for a mini-game (X).
- Solution (Y).
- Use the PHONE; press the button (Z).
- Take the CUPCAKE FIGURINE (A).
- Turn the clock hands; take the DART (1/6) (B).
- Scroll right.
- Use the PICKAXE; turn the handle (C).
- Take the HAND MIRROR (D).
- Place the CUPCAKE FIGURINE; take the BELLOWS (E).
- Walk down.
- Use the BELLOWS (F).
- Move the items; use the keys (G).
- Open the chest; take the scroll, GUN, and DARTS (2/6) (H).
- Walk forward.
- Use the GUN; open the door (I).
- Walk through the door.
- Take the KNIFE (J).
- Take the NECTAR RECIPE (K).
- Take the BOWL (L); use the NECTAR RECIPE for a mini-game.
- Solution (M).
- Take the NECTAR (N).
- Find the pretzels (1-5).
- Take the TONGS (O).
- Move the sacks; use the KNIFE (P).
- Take the TEAPOT FIGURINE and GRAIN (Q).
- Walk down twice.
- Use the NECTAR (R); collect the butterflies (S).
- Take the FIRE BUTTERFLIES (T).
- Walk down.
- Play the HOP; receive the METAL FIGURINE (U).
- Place the TEAPOT FIGURINE; take the SCREWDRIVER (V).
- Walk right, then forward; scroll left.
- Place the METAL FIGURINE (W); open the door.
- Walk through the door.
Chapter 6: Tweedledum and Tweedledee
- Use the FIRE BUTTERFLIES (X).
- Talk to the men (Y); receive the HATTER'S KEY.
- Take the FERTILIZER (Z).
- Use the TONGS; receive the HOT COALS (A).
- Place the pieces (B); take the DARTS (3/6) (C).
- Use the HAND MIRROR; take the MESSENGER CLASP (D).
- Walk down.
- Place the MESSENGER'S CLASP (E).
- Open the case; read the newspaper (F).
- Take the METAL FEATHER (G).
- Scroll right.
- Use the FERTILIZER; take the GEAR (H).
- Walk left.
- Use the HOT COALS (I); take the DARTS (4/6) and WATER (J).
- Walk down; scroll left.
- Use the SCREWDRIVER; move the scissors (K). Use the HATTER'S KEY.
- Walk forward.
- Remove the gear; place the GEAR (L).
- Take the STAINED-GLASS PIECE (M).
- Place the METAL FEATHER; examine the skeleton. Take the SEWING MACHINE FIGURINE (N).
- Place the SEWING MACHINE FIGURINE (O).
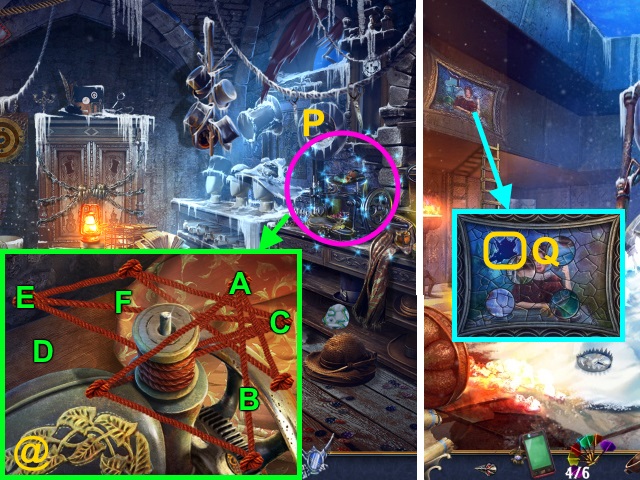
- Play the HOP; receive the SPADE FIGURINE (P).
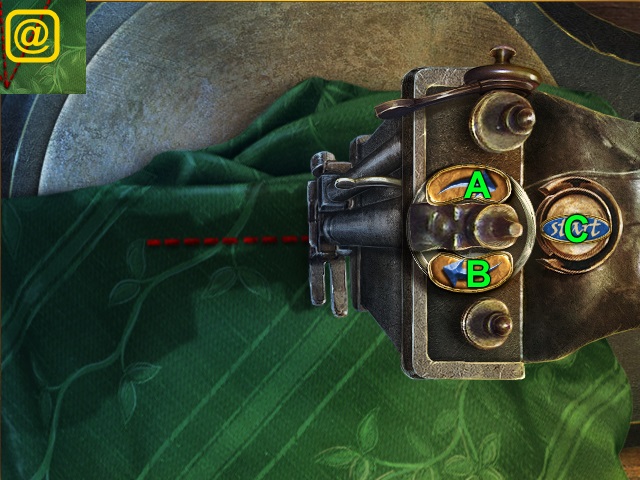
- HOP mini-game solution (@): (A-B)-(C-D)-(E-F).
- Walk down, then left.
- Place the STAINED GLASS PIECE for a mini-game (Q).
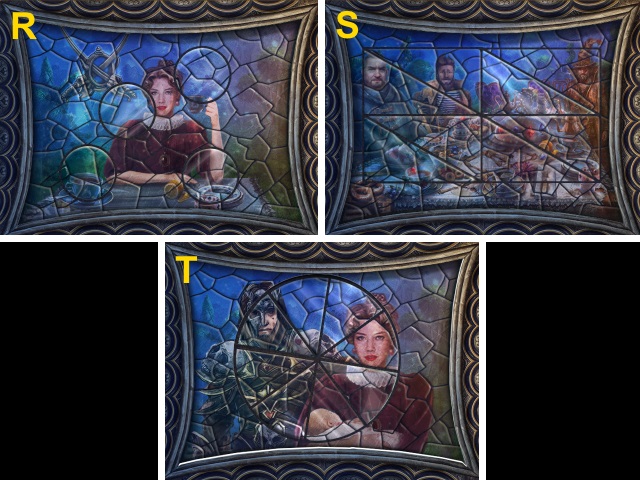
- Solution (R-T).
- Take the DRAWER HANDLE (U).
- Place the SPADE FIGURINE (V).
- Take the DARTS (5/6) (W).
- Walk down, then forward.
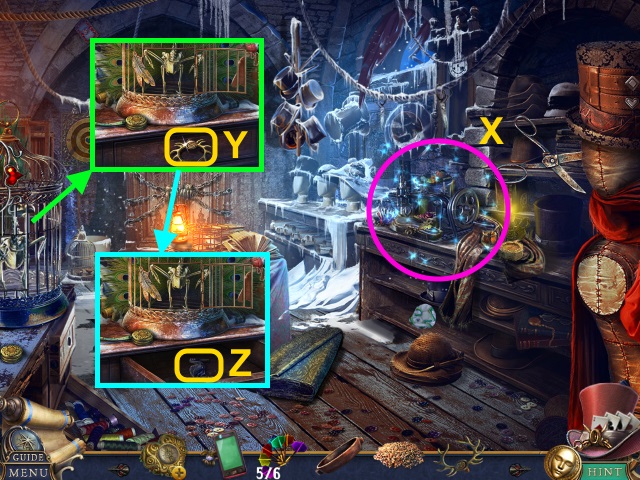
- Play the HOP; receive the DART (6/6) (X).
- Place the DRAWER HANDLE (Y); open the drawer.
- Take the PELICAN FIGURINE (Z).
- Walk down, then left.
- HOP mini-game solution (@): B-C-Bx2-C-Bx2-C-B-C.
- A-C-Bx4-C-Bx4-C-Bx4-C.
- Place the PELICAN FIGURINE (A).
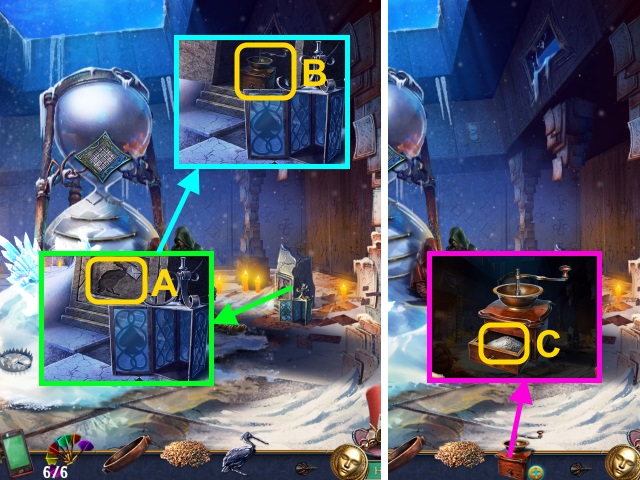
- Take the COFFEE GRINDER (B).
- Combine the COFFEE GRINDER and GRAIN; take the FLOUR (C).
- Walk down; scroll right. Walk left.
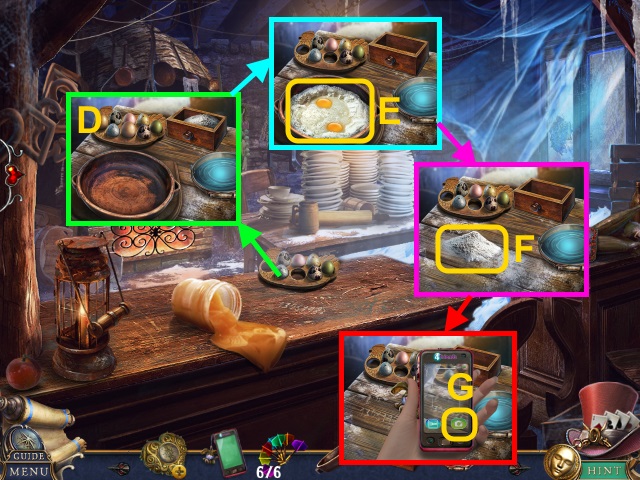
- Place the BOWL, WATER and FLOUR (D).
- Use the flour, eggs, and water; examine the mixture 2x (E). Receive the WARM DOUGH.
- Move the flour (F); use the PHONE.
- Press the button (G); receive the DART CODE.
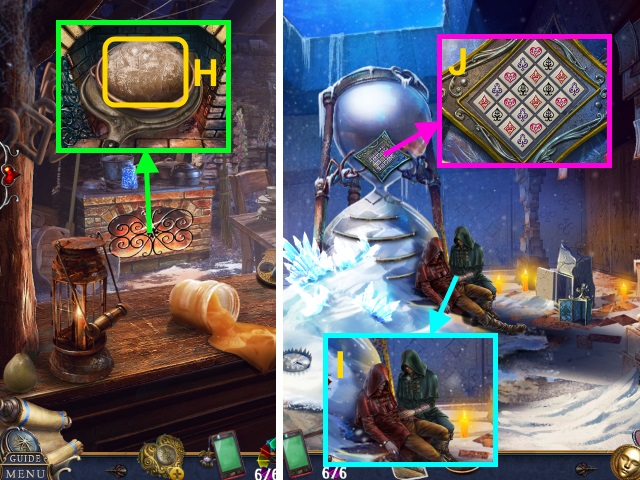
- Use the WARM DOUGH; take the BREAD (H).
- Walk down; scroll left. Walk left.
- Give the BREAD (I); receive the PLAYING CARDS.
- Place the PLAYING CARDS for a mini-game (J).
- Solution (K).
- Take the SPOOL (1/2) (L).
- Walk down, then forward.
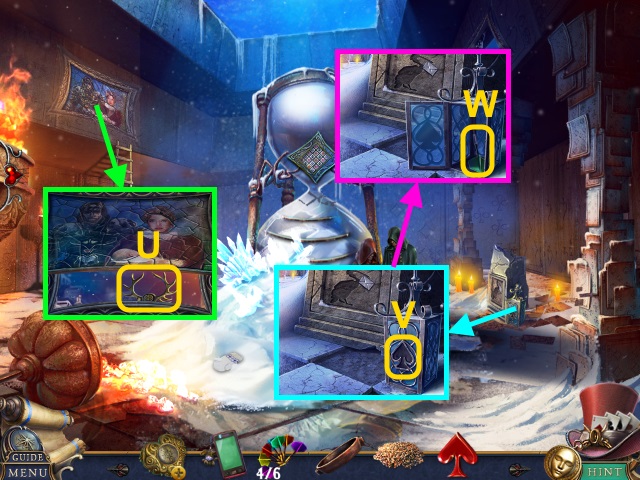
- Place the DART CODE for a mini-game (M).
- Solution (N): Ax2-Bx3-C.
- Use the DARTS (6/6) (O); take the SPOOLS (2/2) (P).
- Place the SPOOLS (2/2) (Q); open the door.
- Move the clothes. Read the letter; take the YARN HANDLE (R).
- Examine the portal; use the Watch (S).
- Use the LIGHTER (T).
- Move the skull; take the STONE MASK (U).
- Collect the bones (1-4).
- Place the STONE MASK (V); take the RINGS (2/2), GRAMOPHONE HANDLE (W), and BANDAGE (X).
- Place the RINGS (2/2) (Y); open the chest.
- Take the SKULL TOKEN (1/3) and SHADOWS CLUE (Z).
- Examine the cup 2x (A); receive the WATER.
- Place the ladder (B) under the statue (C).
- Use the LIGHTER and SHADOWS CLUE for a mini-game (D).
- Solution (E): Ax4-B-Ax3-B-Ax4-B-Ax4-B.
- Take the HEALING POTION (F).
- Use the BANDAGE and HEALING POTION; pour the water (G).
- Examine the collar (H).
- Examine the gem; use the COLLAR KEY (I).
- Take the HATCH KEY (J).
- Take the BROKEN SPEAR (K); use the HATCH KEY (L).
- Examine the cave for a mini-game (M).
- Solution (N).
- Go down the ladder.
Chapter 7: The Castle
- Take the SKULL TOKENS (2/3) (O).
- Use the BROKEN SPEAR; take the MOUSE HANDLE (P).
- Walk forward.
- Remove the sign (Q).
- Take the DIAMOND KEY (R).
- Examine the lanterns (1-3); take the SCALE WEIGHT (1/2) (S).
- Use the DIAMOND KEY (T); take the SEAL PIECE (U).
- Combine the MAGICAL BOTTLE and SEAL PIECE for a mini-game (V).
- Solution (W).
- Take the SCALE WEIGHTS (2/2) (X).
- Walk down.
- Place the SCALE WEIGHTS (2/2) (Y); take the HEART KEY (Z).
- Walk forward.
- Use the HEART KEY (A).
- Walk right.
- Play the HOP; receive the SKULL BOX (B).
- Examine the dresser for a mini-game; solution (C).
- Examine the book (D).
- Take the TASSEL (E).
- Open the drawer; take the CARD STATUETTE (2/2) (F).
- Place the MOUSE HANDLE; take the SPOON (G).
- Walk down.
- Use the SPOON; take the TUBE (H).
- Place the GRAMOPNONE HANDLE (I) and TUBE (J); take the TEDDY BEAR (K).
- Walk right.
- Give the TEDDY BEAR; take the WINDING KEY (L).
- Use the TASSEL; move the curtain (M).
- Gather the parts (1-5).
- Use the WINDING KEY; examine it. Take the WIND-UP MOUSE (N).
- Walk down.
- Use the WIND-UP MOUSE; take the SKULL TOKENS (3/3) (O).
- Combine the SKULL BOX and SKULL TOKENS (3/3) for a mini-game (P).
- Solution (Q): A-B-A-D-A-C.
- Take the BOX WITH PORTAL (R).
- Walk right.
- Place the BOX WITH PORTAL (S).
- Use the Watch (T).
- Place the YARN HANDLE (U); take the SWORD EMBLEM (V).
- Play the HOP; receive the CARD STATUETTES (2/2) (W).
- Move the pillows; use the WIND-UP MOUSE. Take the METAL SHOE (X).
- Walk down twice.
- Examine the boards for a mini-game (Y).
- Solution (Z-A).
- Place the CARD STATUETTES (2/2); take the COURTROOM KEY (B).
- Use the COURTROOM KEY (C).
- Walk left for a mini-game.
- Solution (D).
- Take the SEAL PIECE (E).
- Combine the MAGICAL BOTTLE and SEAL PIECE for a mini-game (F).
- Solution (G).
- Take the BROKEN PEPPERMILL (H).
- Take the SPEAR (I).
- Read the paper (J).
- Take the PIPETTE WITH OIL (K).
- Use the PIPETTE WITH OIL; take the WALKING STICK (L).
- Use the SPEAR (M).
- Use the WALKING STICK (N).
- Open the pouch; take the METAL LETTER and CORK (O).
- Place the CORK (P); open the drawer.
- Take the GEAR (1/3) and HANDLE (Q).
- Combine the BROKEN PEPPERMILL and HANDLE (R); take the PEPPERMILL.
- Use the PEPPERMILL; receive the SPADE KEY (S).
- Place the SWORD EMBLEM; take the SWORD (T).
- Use the SWORD; take the HATTER'S CHAIN (U).
- Walk down, then forward.
- Use the SPADE KEY (V).
- Walk left.
- Combine the SEARCHING COMPASS and HATTER'S CHAIN for a mini-game (W).

- Solution (X).
- Take the GEARS (2/3) (Y); place the METAL SHOE (Z).
- Take the BRACELET (A).
- Place the letters (B); place the METAL LETTER (C).
- Take the GEARS (3/3) (D).
- Place the BRACELET (E); examine the heart (F).
- Place the GEARS (3/3); read the letter (G).
- Take the THRONE KEY (H).
- Use the THRONE KEY (I).
- Take the SEAL PIECE (J).
- Combine the MAGICAL BOTTLE and SEAL PIECE (K).
- Use the SWORD for a mini-game (L).

- Solution (M-S).
Created at: 2016-09-02