

Walkthrough Menu
- General Tips
- Chapter 1: The Bridge
- Chapter 2: Into the Mist
- Chapter 3: The Town
- Chapter 4: The Miner
- Chapter 5: Bryan
- Chapter 6: The Countess' Estate
- Chapter 7: The Lake
General Tips
- This is the official guide for Bridge to Another World: Burnt Dreams.
- This guide will not show when you have to zoom into a location; the screenshots will show each zoom scene.
- Hidden-object puzzles are referred to as HOPs in this guide. Interactive items in HOPs are color-coded.
- HOPs are sometimes randomized; your solution may vary.
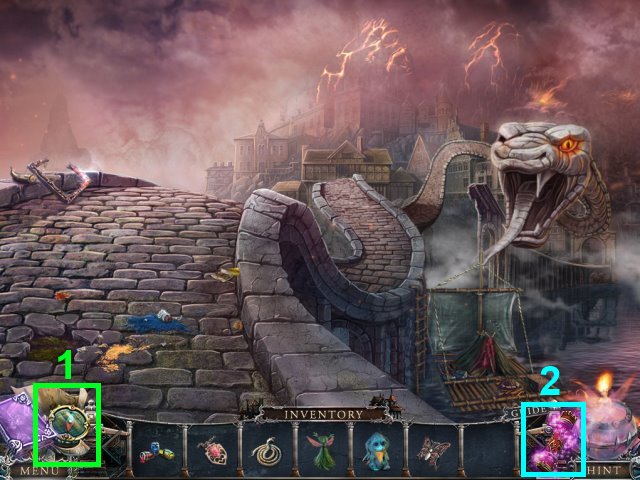
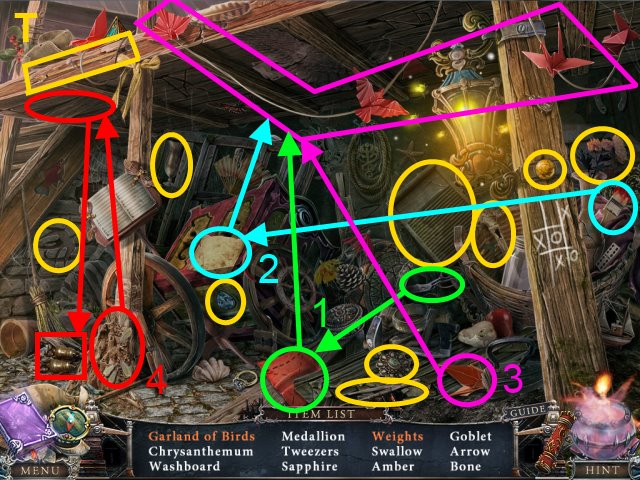
- Use the Map to travel to a location (1).
- Select the canister when it lights up for a mini-game (2).
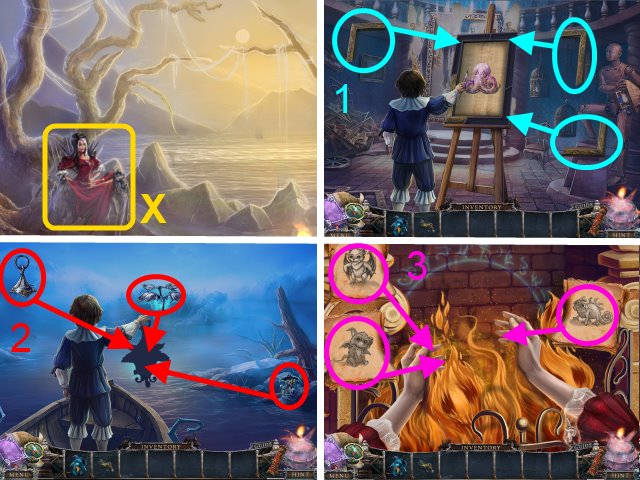
Chapter 1: The Bridge
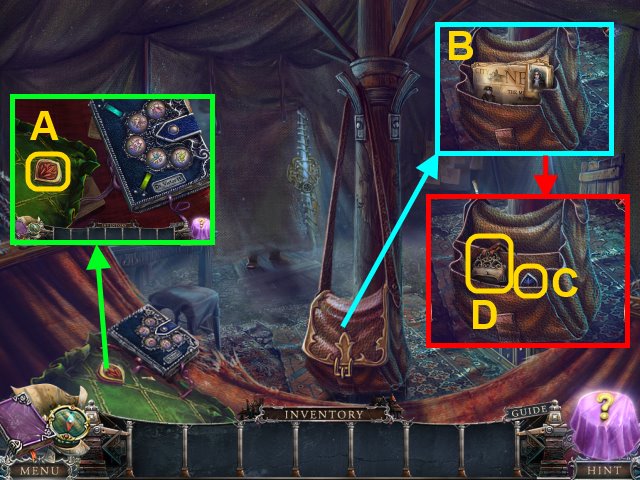
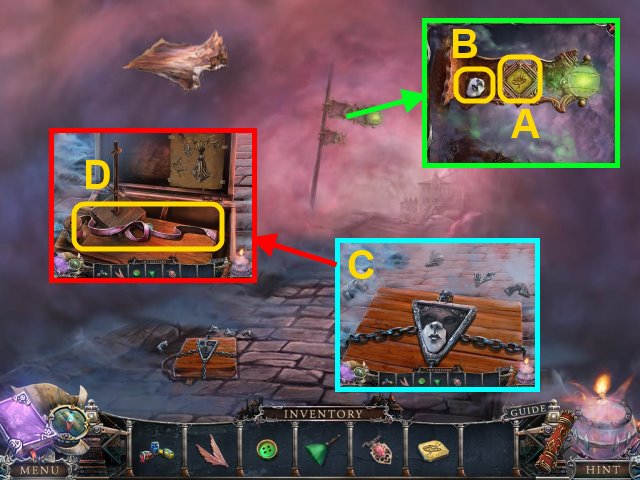
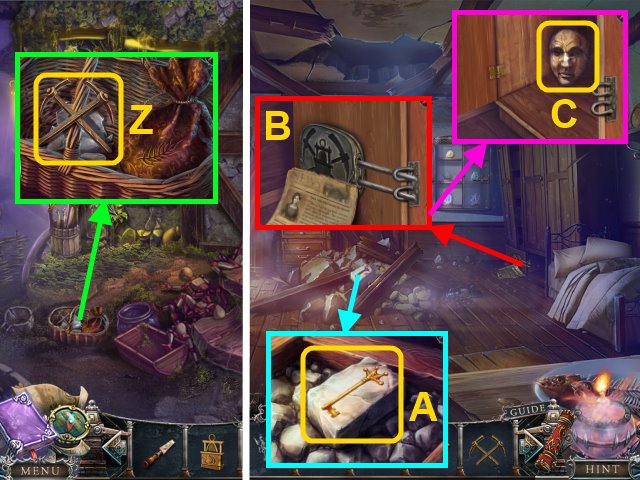
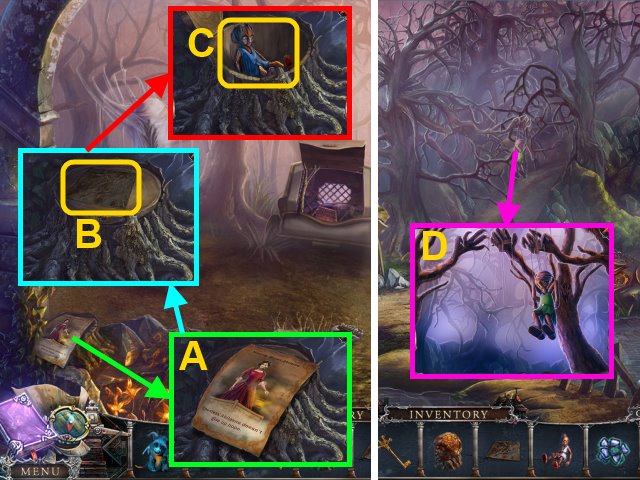
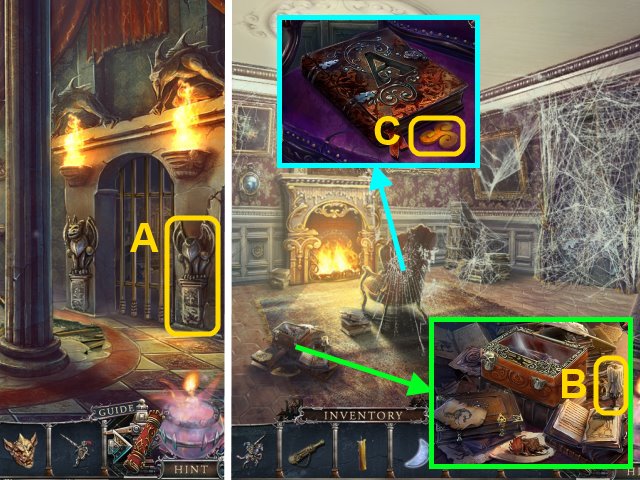
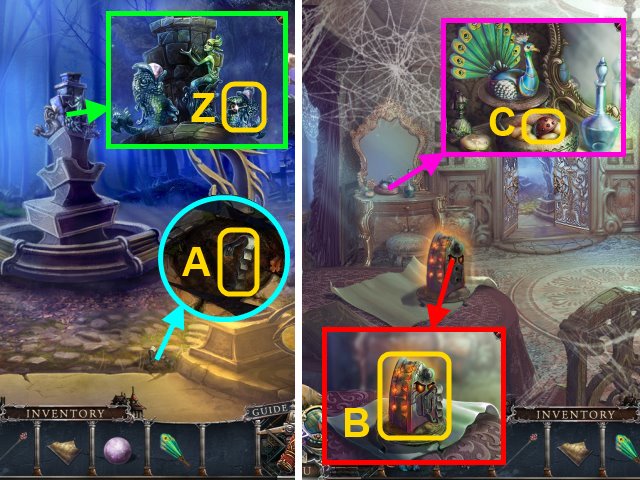
- Take the RED EMBLEM (A).
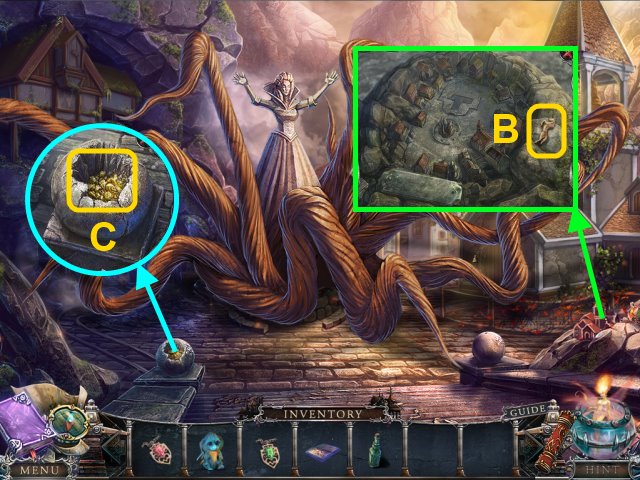
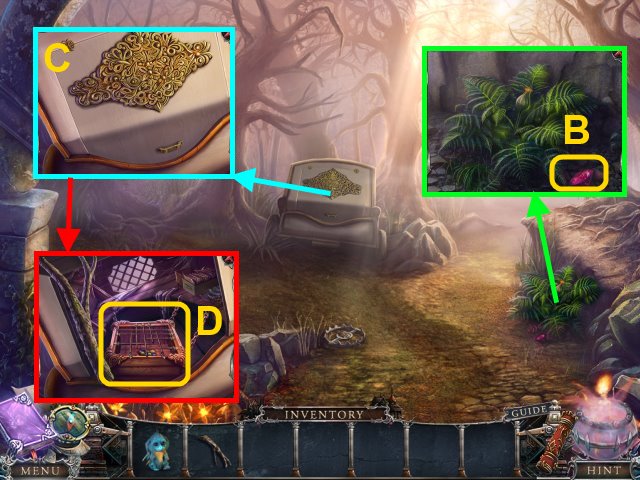
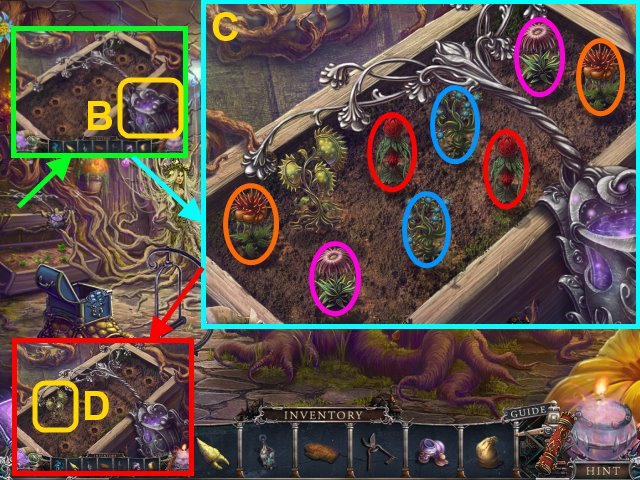
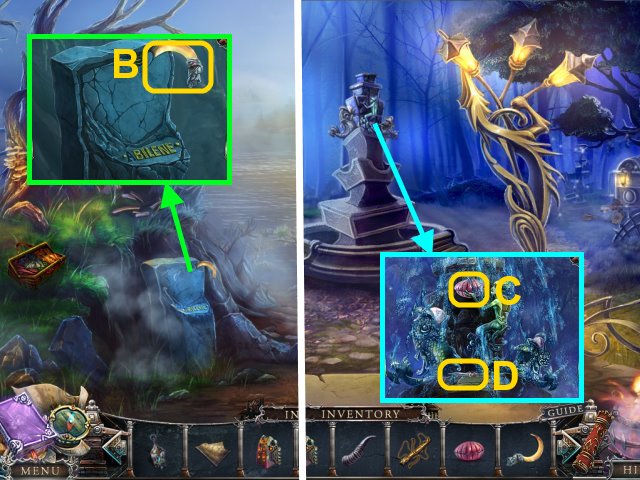
- Open the bag; read the newspaper (B).
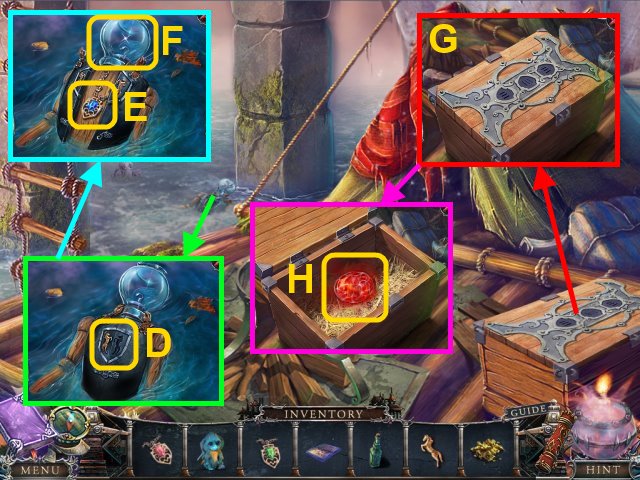
- Take the BLUE EMBLEM (C) and FLINT (D).
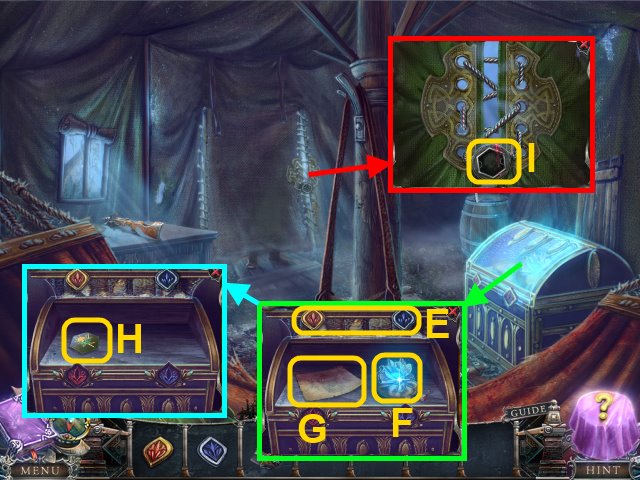
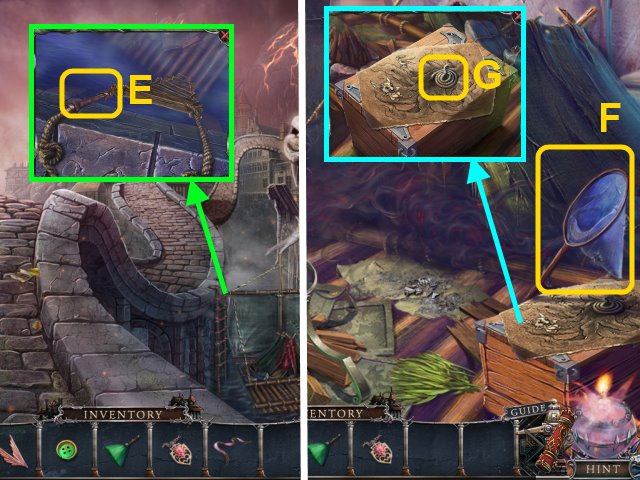
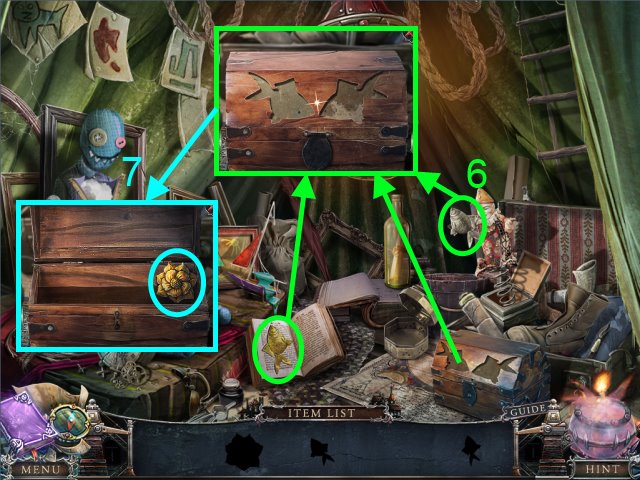
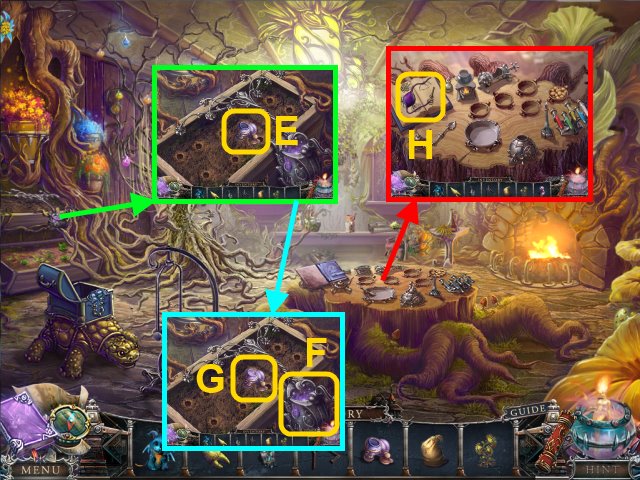
- Place the RED EMBLEM and BLUE EMBLEM on the chest (E).
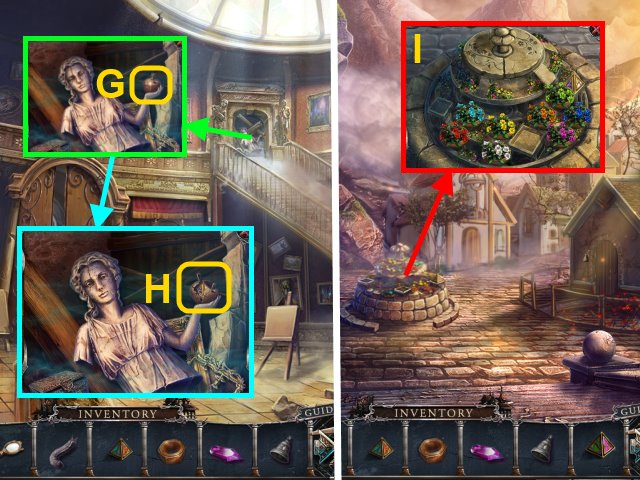
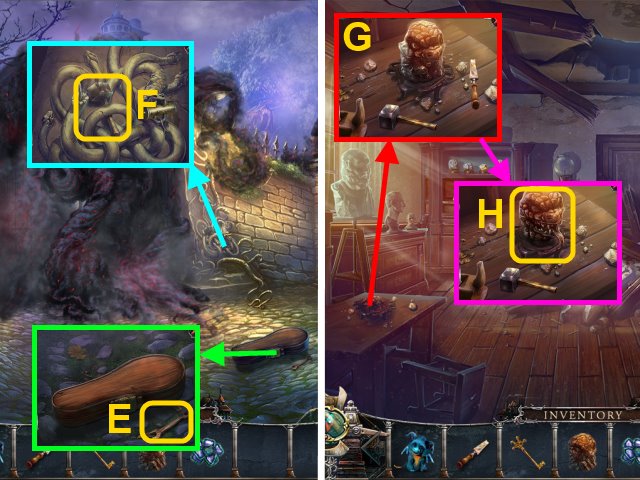
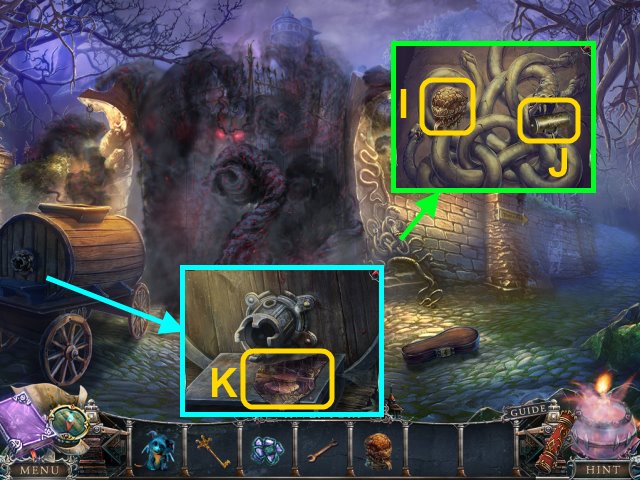
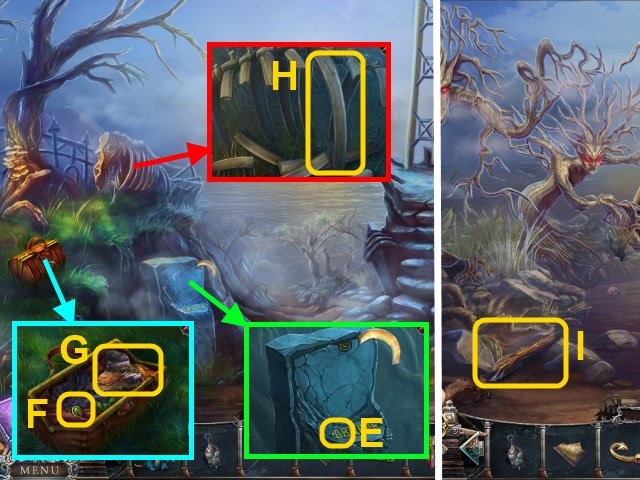
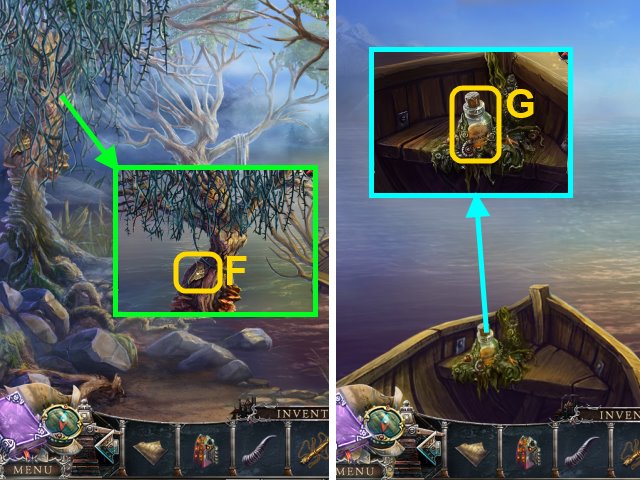
- Take the FAIRY BAIT (F); read the note (G).
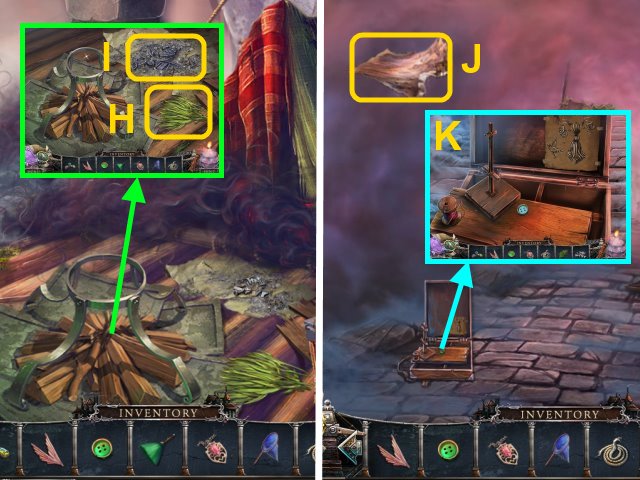
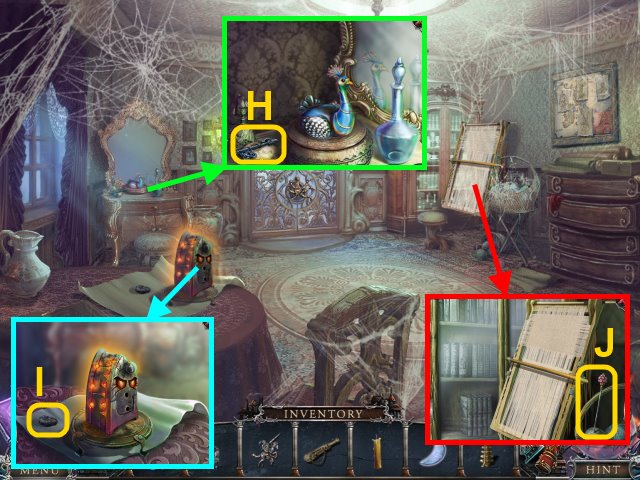
- Take the TENT LOCK (H).
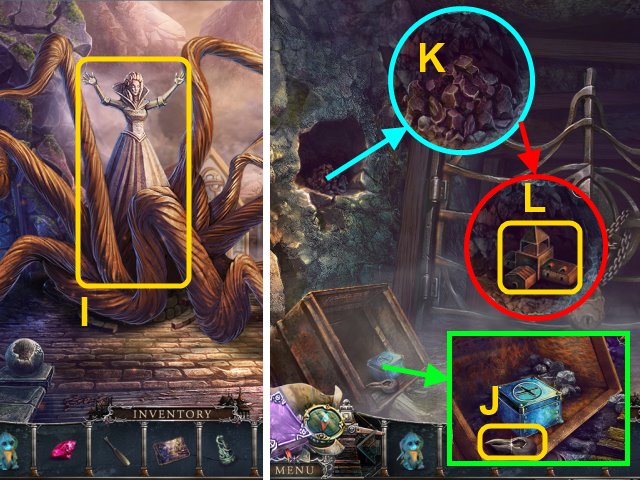
- Place the TENT LOCK in the lock for a mini-game (I).
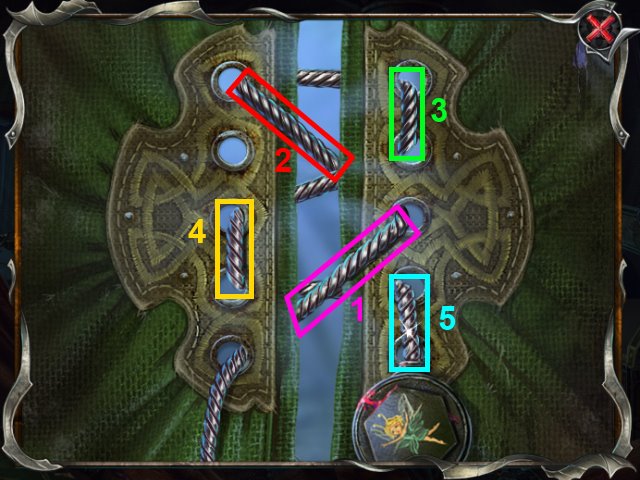
- Solution: 1-5.
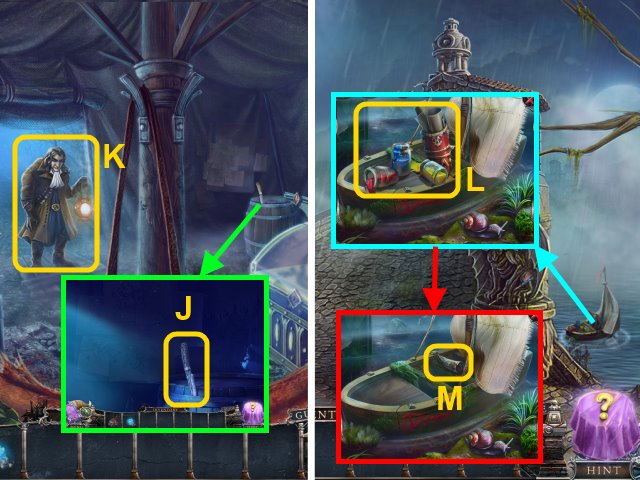
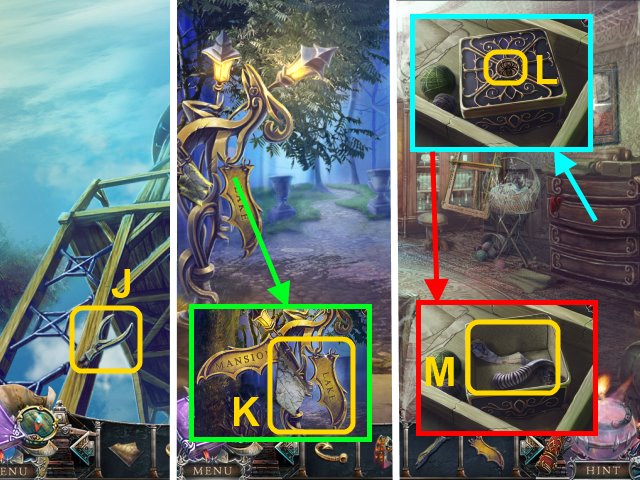
- Take the KNIFE (J).
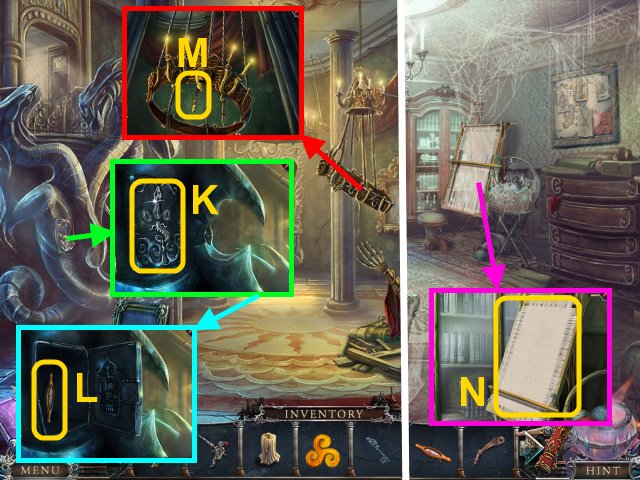
- Talk to VICTOR (K).
- Move forward.
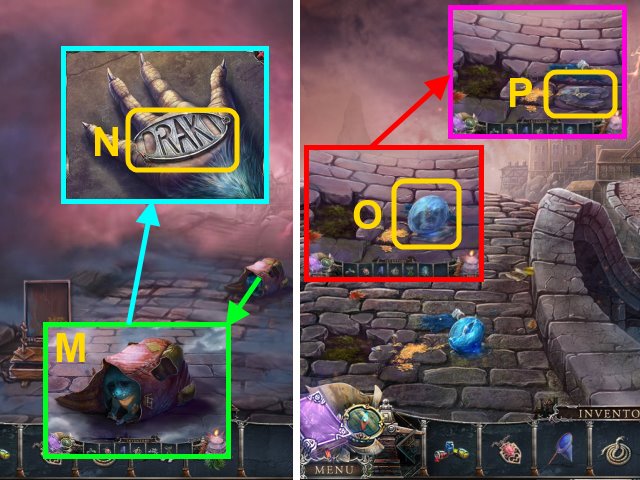
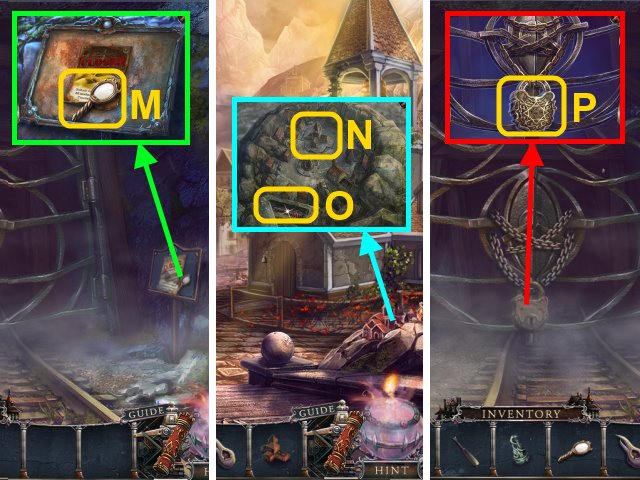
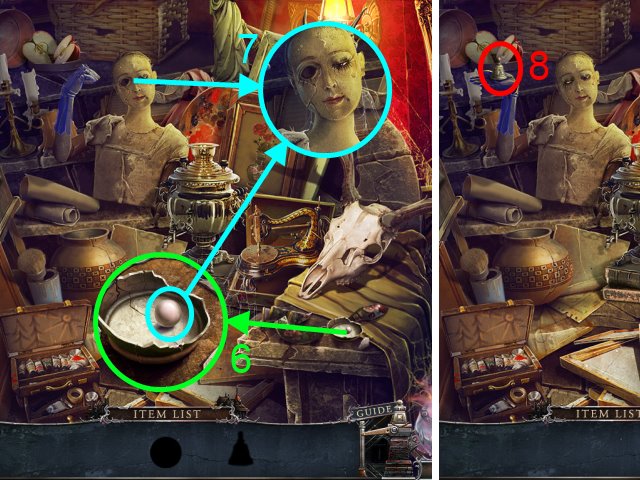
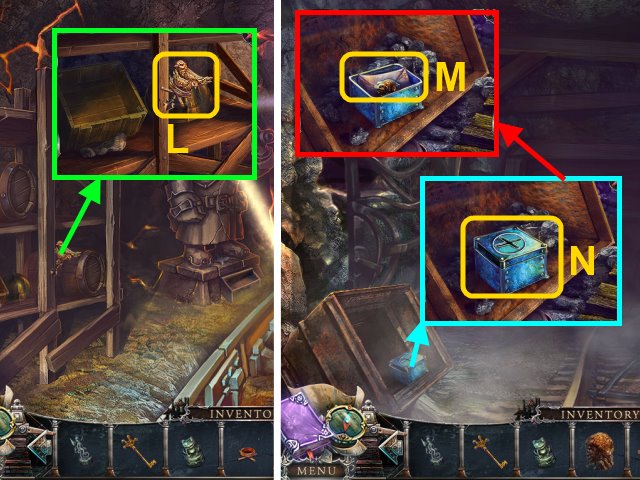
- Take the PAINT and canister (L); take the FANG (M).
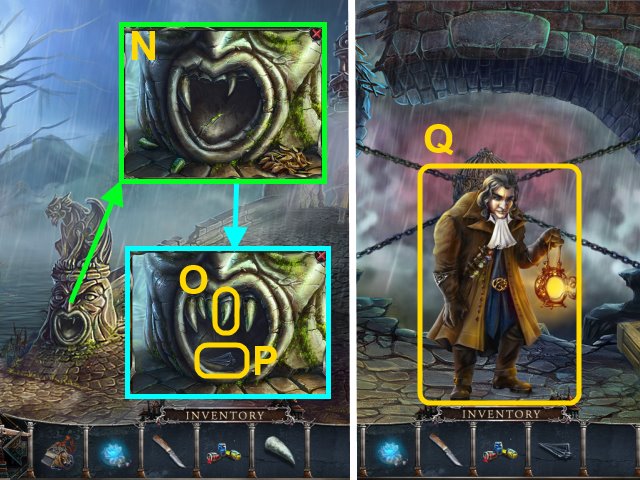
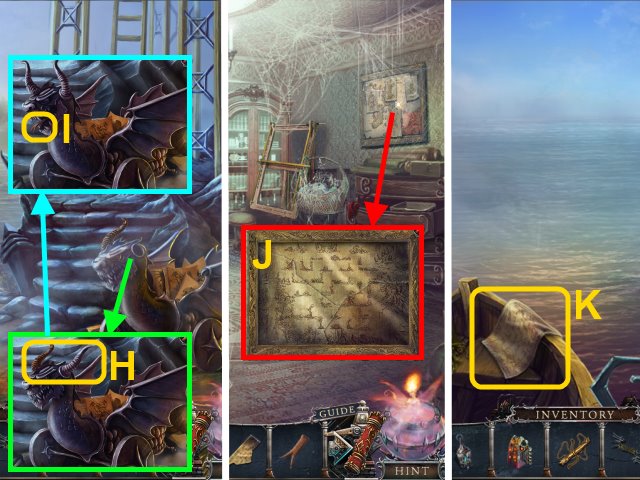
- Move the leaves; place the stone fangs in the statue's mouth (N).
- Place the FANG in the statue's mouth (O); take the ARROW HEAD (P).
- Walk forward.
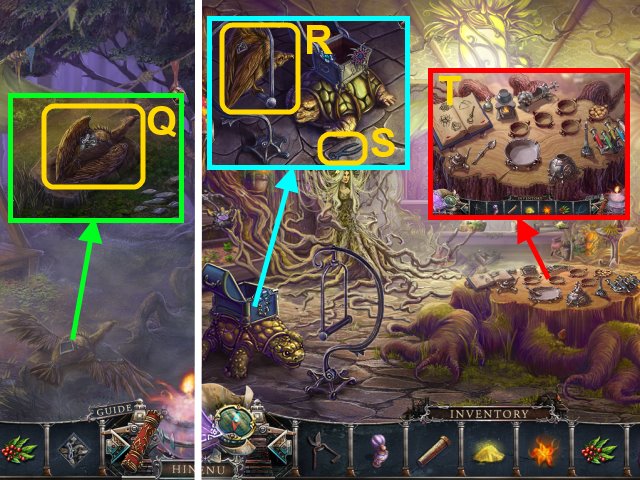
- Talk to Victor (Q).
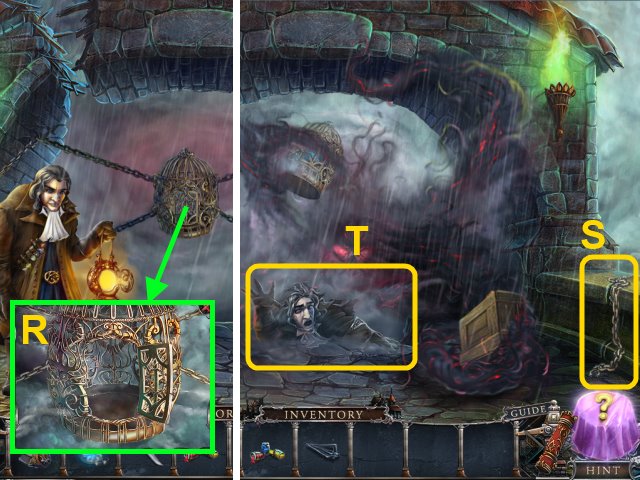
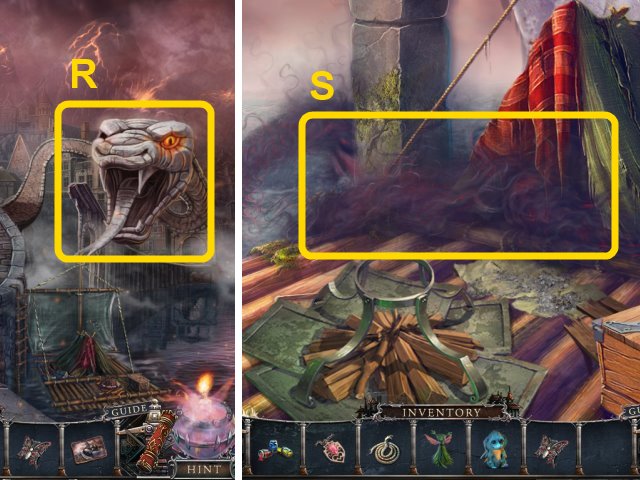
- Place the FAIRY BAIT in the cage (R).
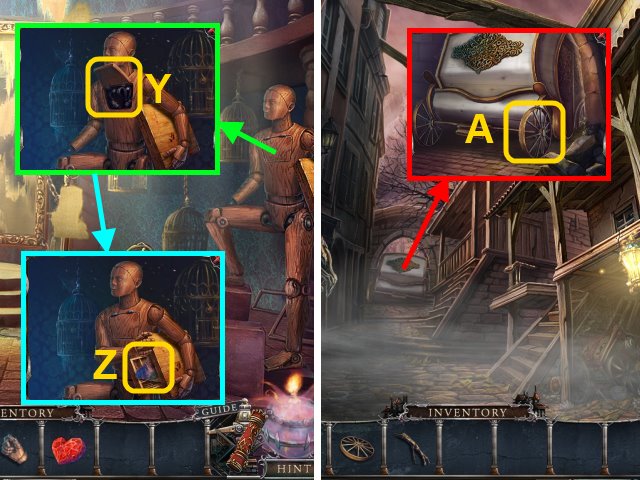
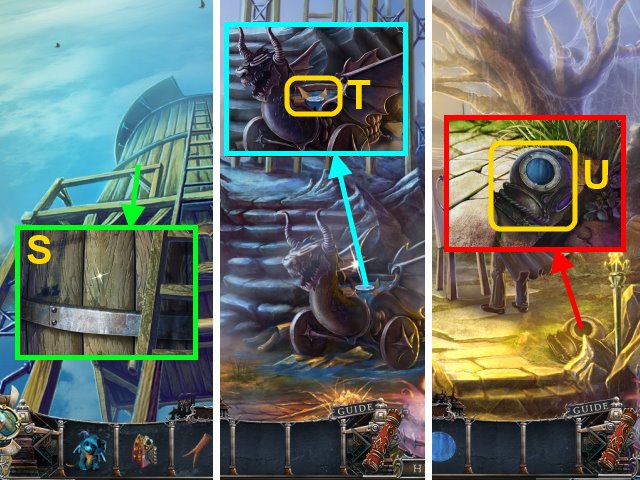
- Take the CHAIN (S).
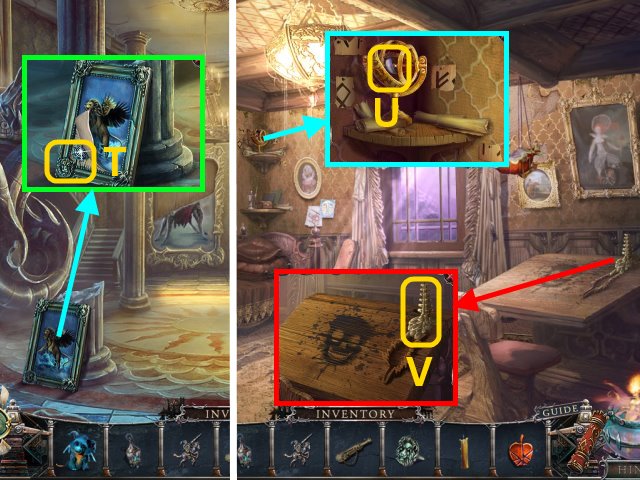
- Give the CHAIN to Victor (T).
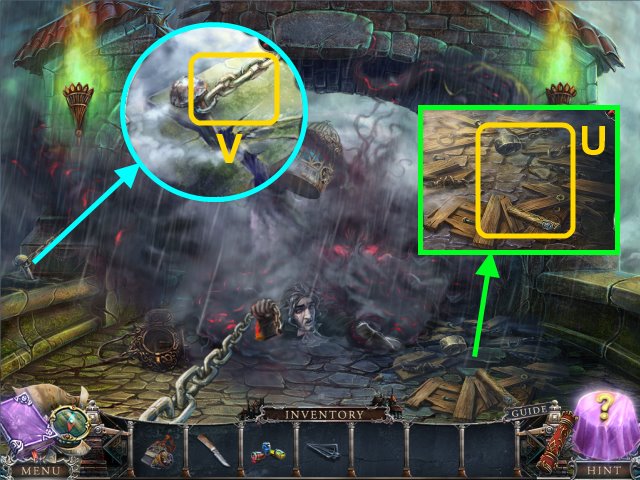
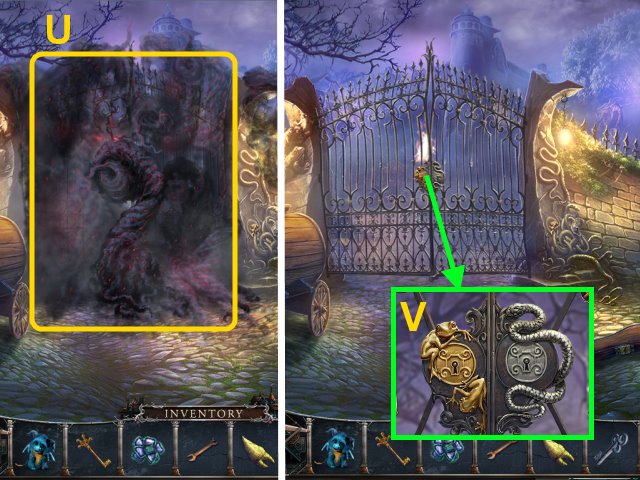
- Place the handle on the hammer head; take the HAMMER (U).
- Use the HAMMER on the chain (V).
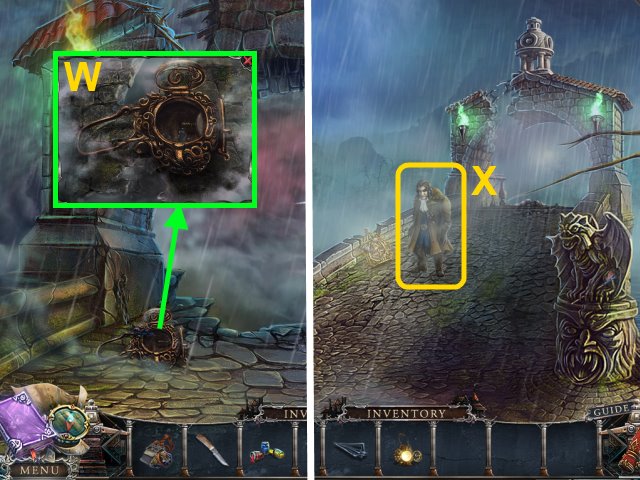
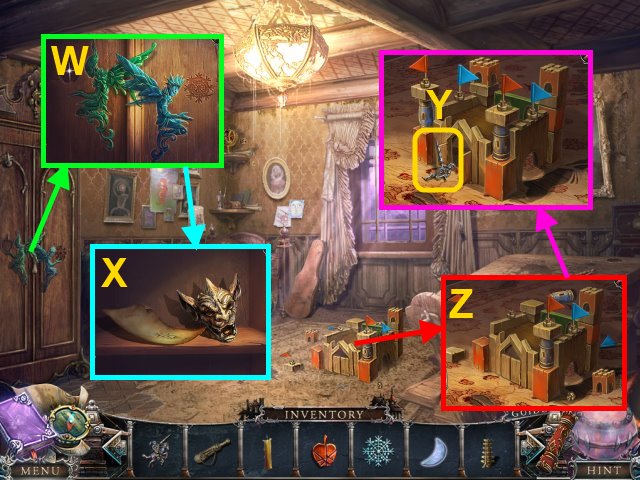
- Use the FLINT on the lantern (W); take the LAMP.
- Walk down.
- Talk to Victor (X).
- Walk left.
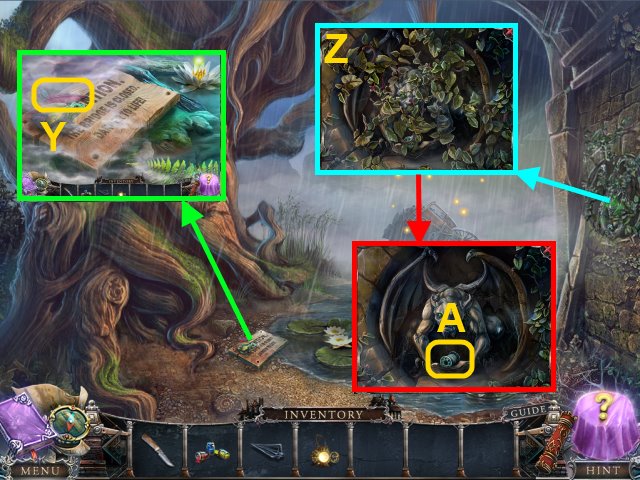
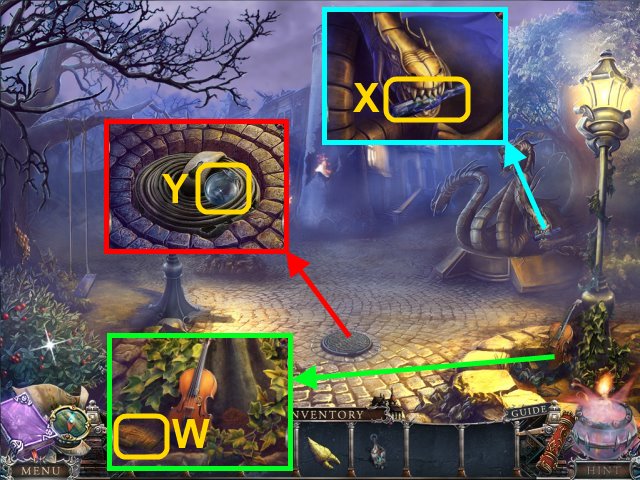
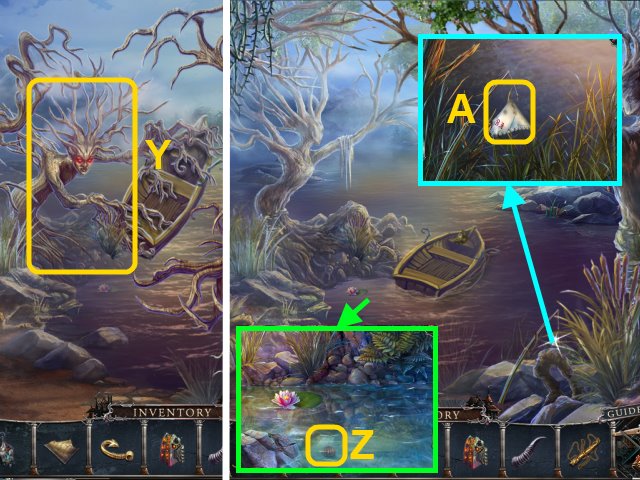
- Take the FEATHER (Y).
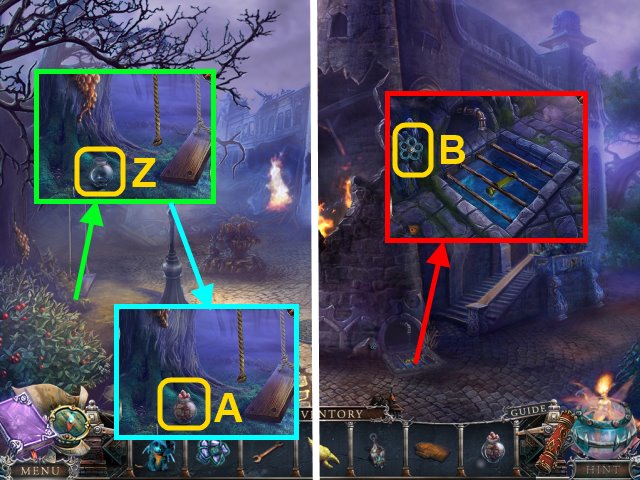
- Use the KNIFE on the ivy (Z); take the COIL (A).
- Walk down.
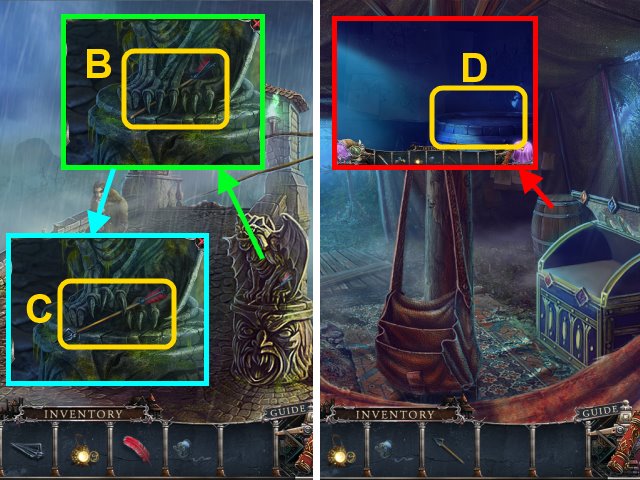
- Try to take the arrow (B).
- Place the FEATHER and ARROWHEAD on the shaft; take the ARROW (C).
- Walk down.
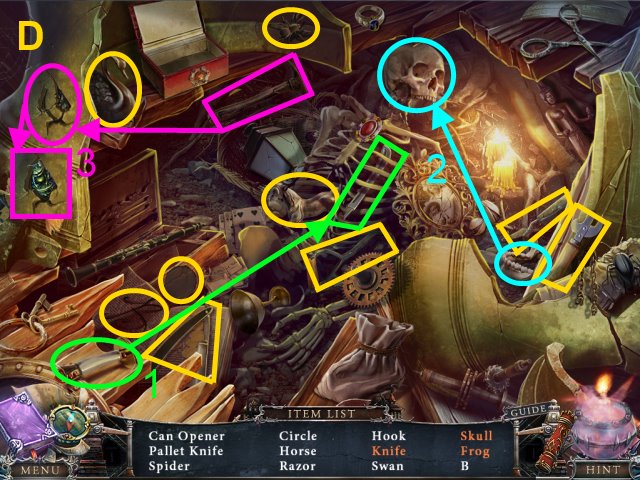
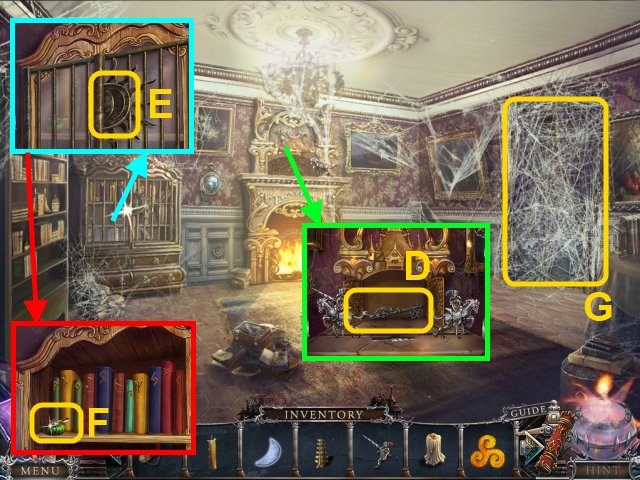
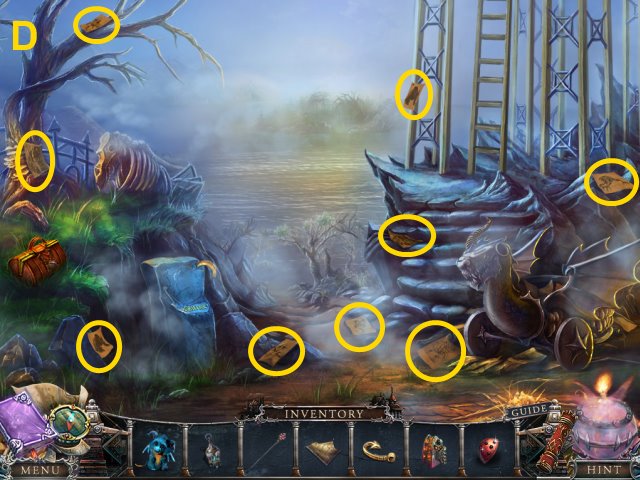
- Place the LAMP on the barrel for a mini-game (D).
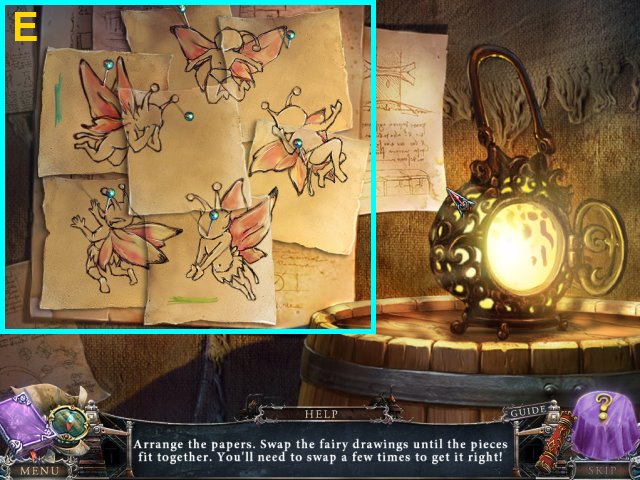
- Solution (E).
- You receive the FAIRY PAPERS.
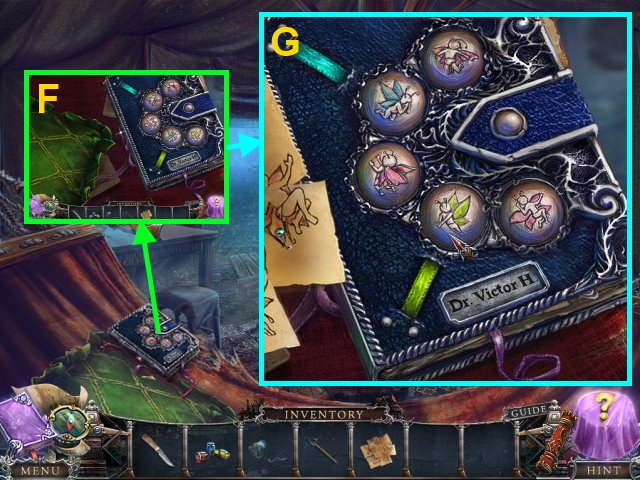
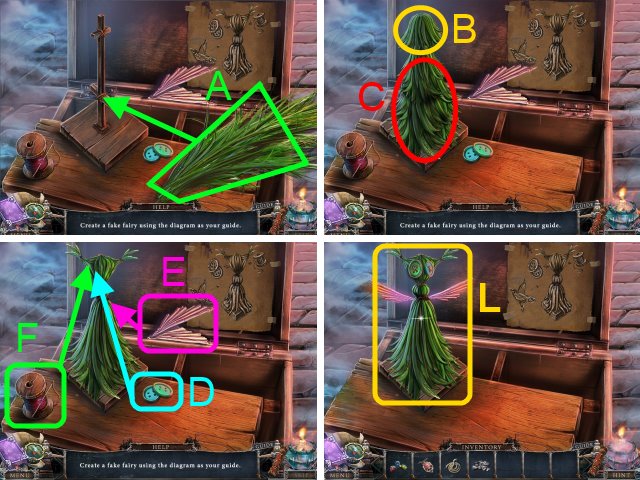
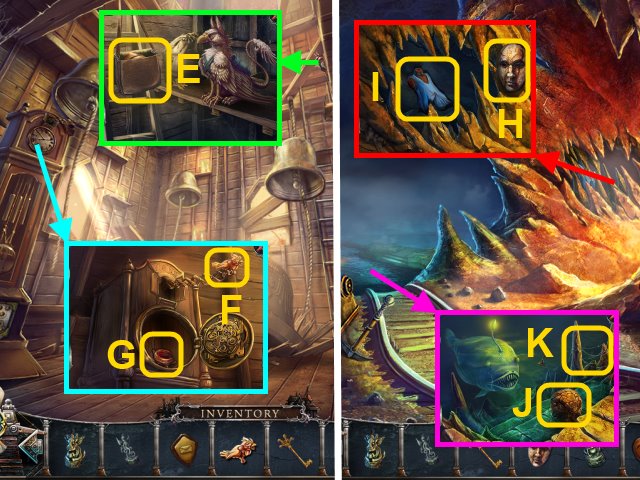
- Place the FAIRY PAPERS next to the book for a mini-game (F).
- Solution (G).
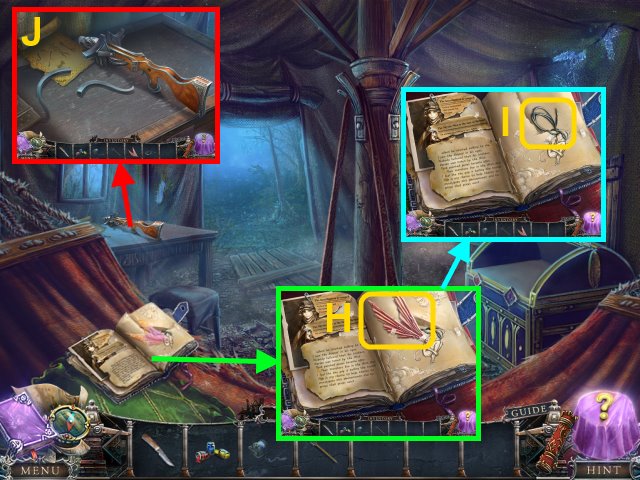
- Take the FAIRY WINGS (H).
- Move the paper scrap; take the BOWSTRING (I).
- Place the ARROW, COIL, and BOWSTRING on the table for a mini-game (J).
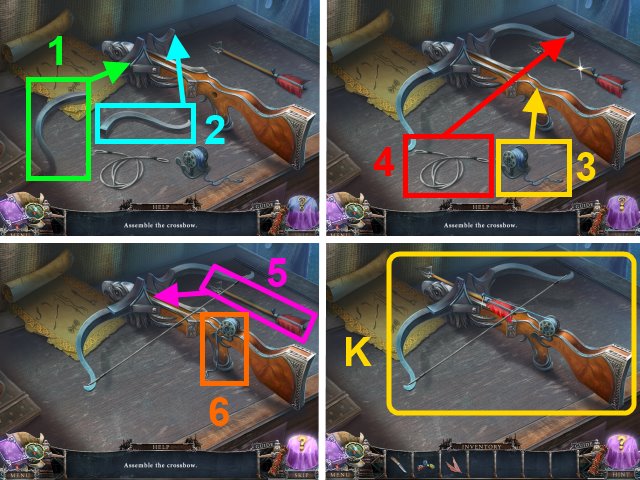
- Solution: 1-6.
- Take the CROSSBOW (K).
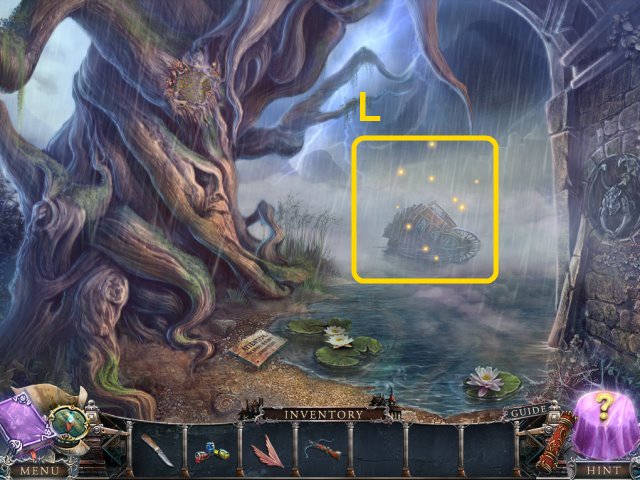
- Go to the Tree.
- Use the CROSSBOW on the carriage (L).
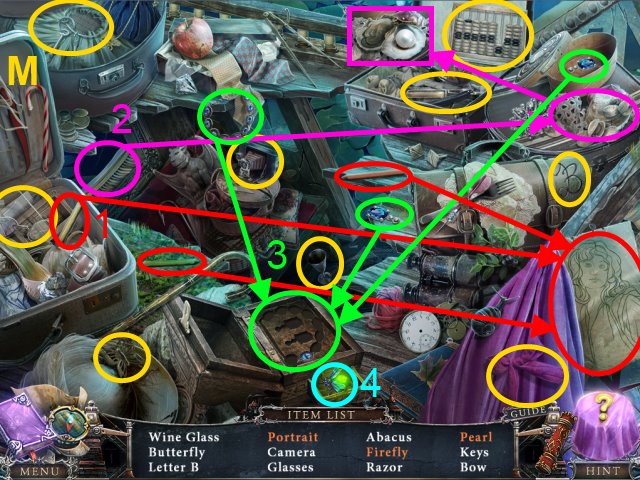
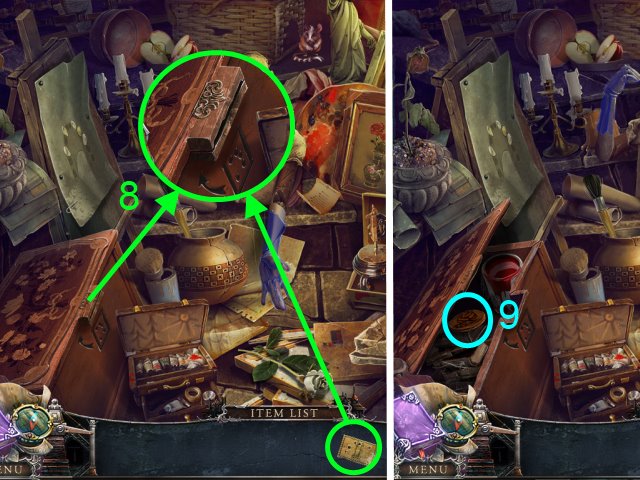
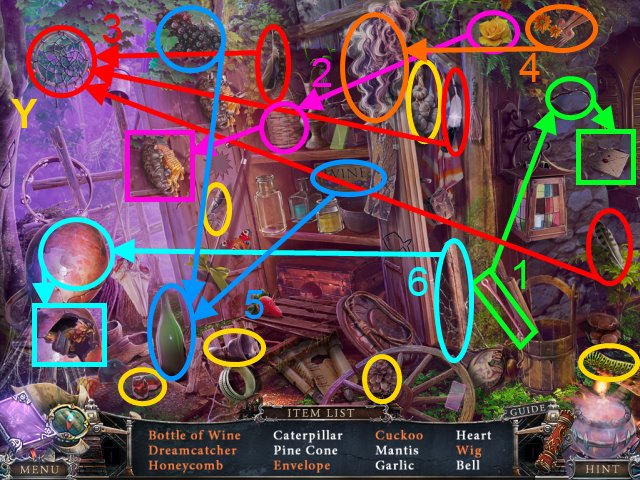
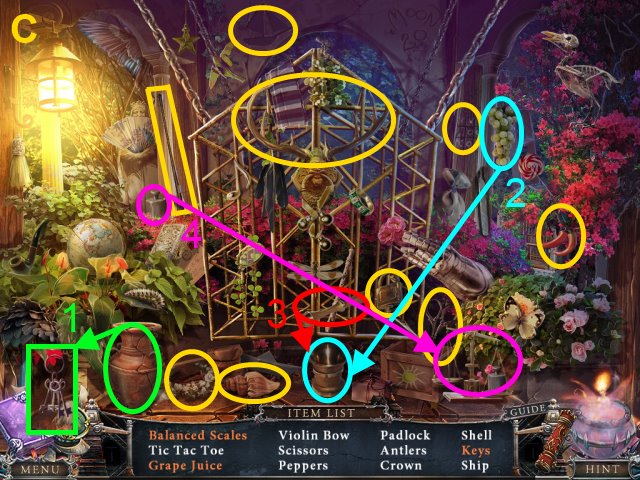
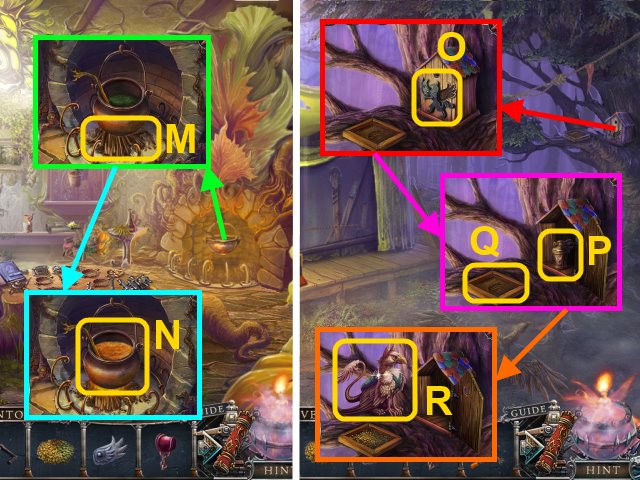
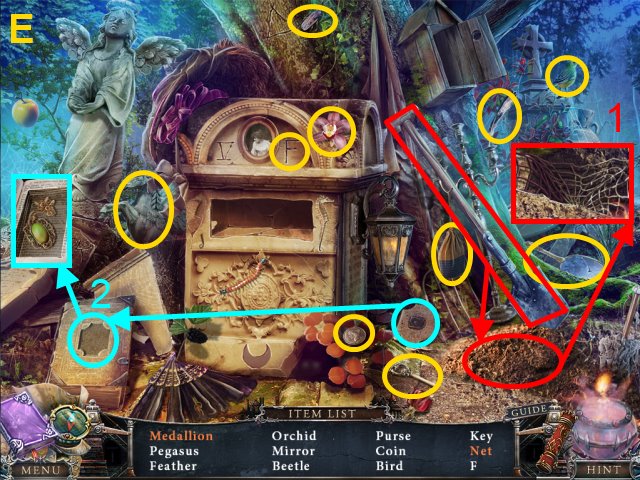
- Play the HOP (M).
- You receive the FIREFLY.
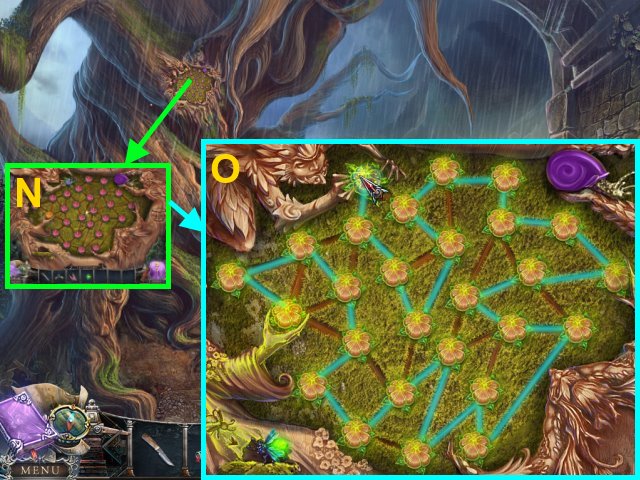
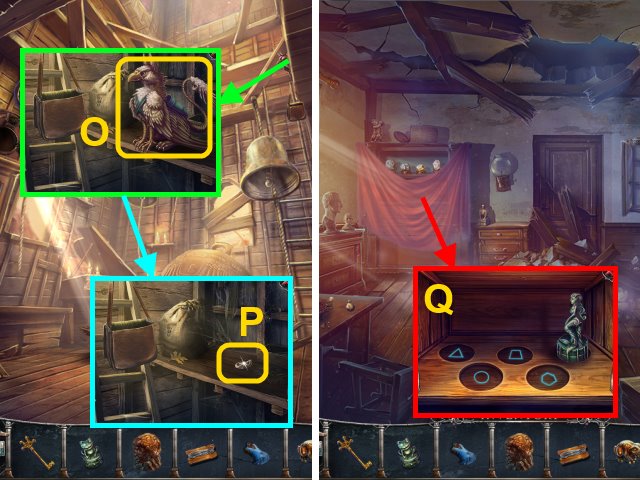
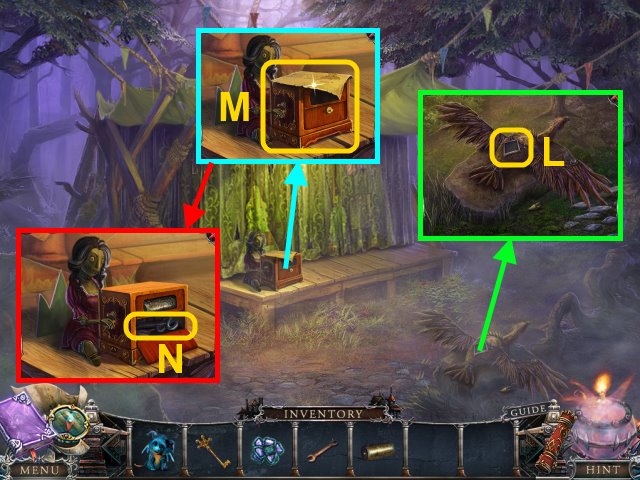
- Place the FIREFLY on the tree for a mini-game (N).
- Solution (O).
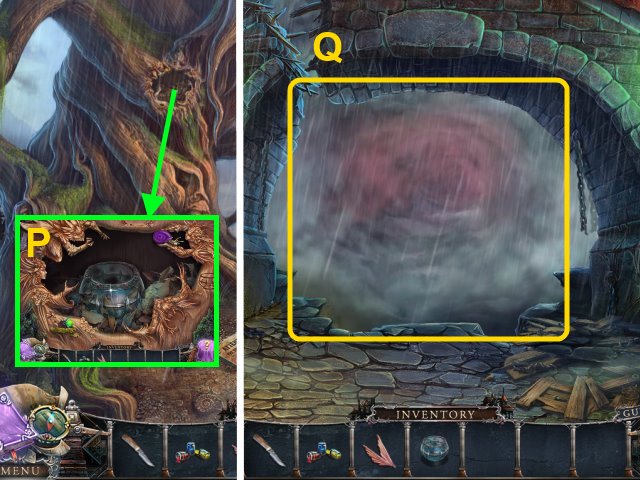
- Take the JAR (P).
- Go to the Bridge Gate.
- Use the JAR on the mist to receive the JAR WITH MIST (Q).
- Walk down.
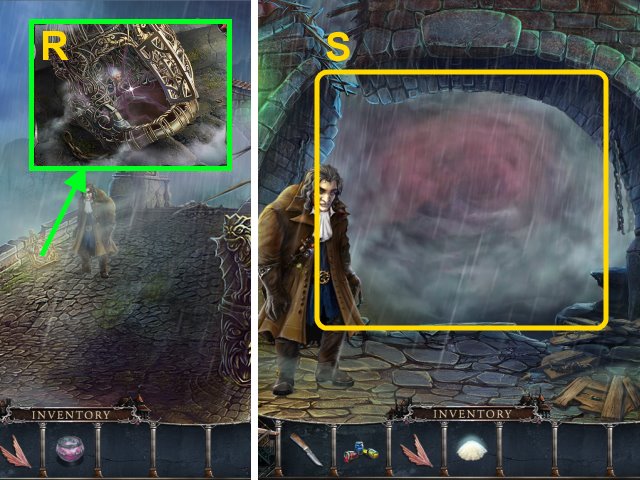
- Use the JAR WITH MIST on the fairy to receive the MAGIC DUST (R).
- Walk forward.
- Use the MAGIC DUST on the mist (S).
- Walk forward.
Chapter 2: Into the Mist
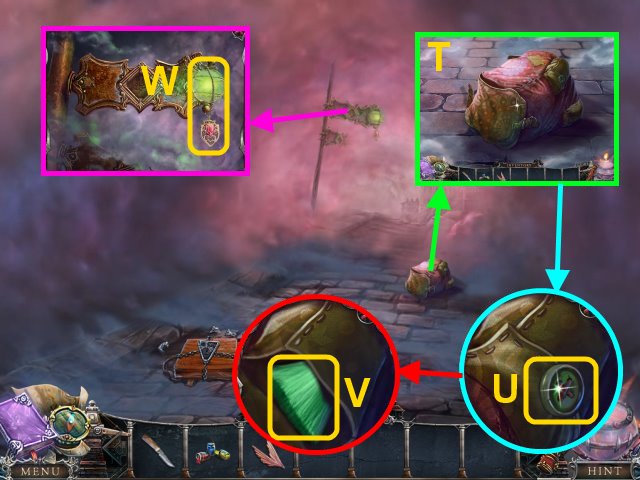
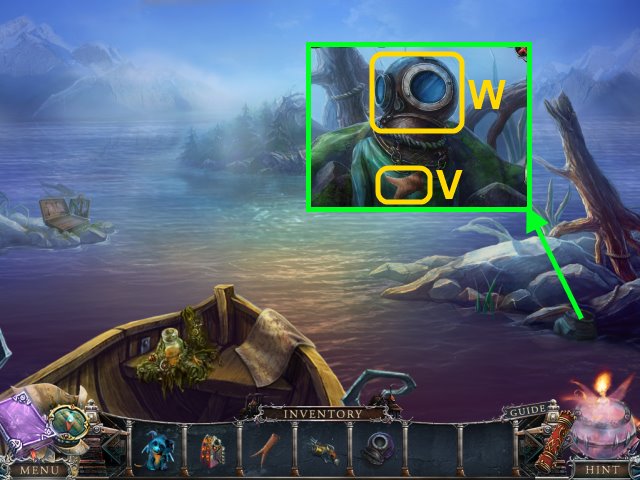
- Open the bag (T); take the BUTTON (U) and BRUSH (V).
- Take the RED MEDALLION (W).
- Walk forward.
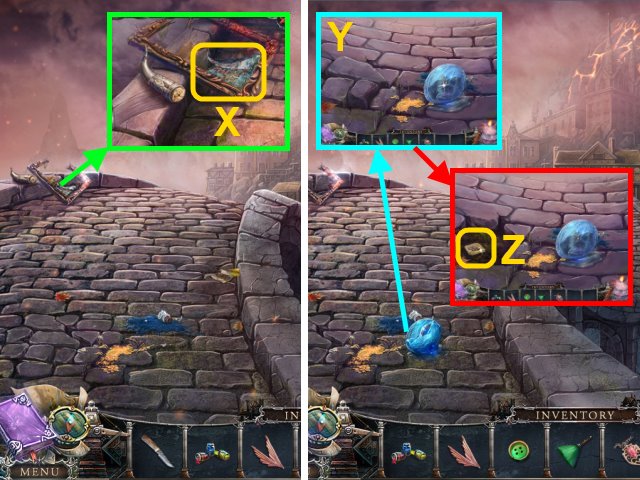
- Use the KNIFE on the painting to get the painting piece (X).
- Try to walk forward.
- Move the stones (Y); take the ELEMENT (Z).
- Walk down.
- Place the ELEMENT on the sign (A); take the MASK PART (B).
- Place the MASK PART on the lock; put the other parts on the lock (C).
- Take the STRAP (D).
- Walk forward.
- Use the STRAP on the ladder (E).
- Go down.
- Take the NET (F).
- Take the LANTERN WICK (G); look at the drawing.
- Take the GRASS (H).
- Use the BRUSH on the ashes (I); take the BROKEN KEY CHAIN PIECES.
- Go to the Portal.
- Use the NET to get the painting piece (J).
- Place the GRASS, BUTTON, and FAIRY WINGS on the stand for a mini-game (K).
- Solution: A, Bx2, C, D, E, F.
- Take the FAIRY FIGURE (L).
- Give the BROKEN KEY CHAIN PIECES to the dragon (M).
- Complete the keychain (N); take the DRAGON.
- Walk forward.
- Use the DRAGON on the ice (O); take the BUTTERFLY and drawing piece (P).
- Select the canister for a mini-game.
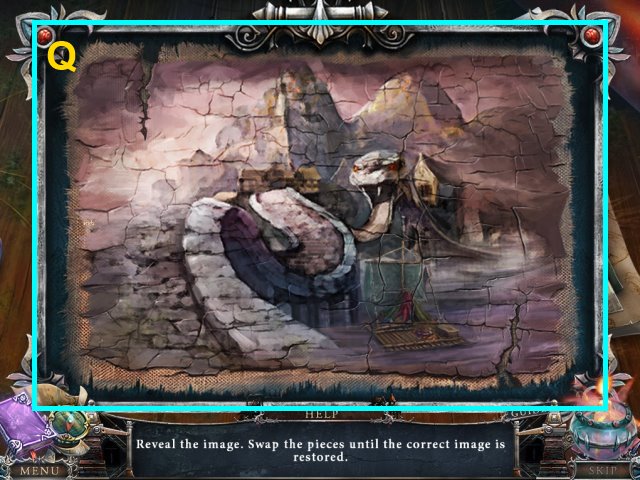
- Solution (Q).
- You receive the SNAKE BRIDGE PICTURE.
- Use the SNAKE BRIDGE PICTURE on the snake (R).
- Go to the Broken Raft.
- Use the FAIRY FIGURE on the mist (S).

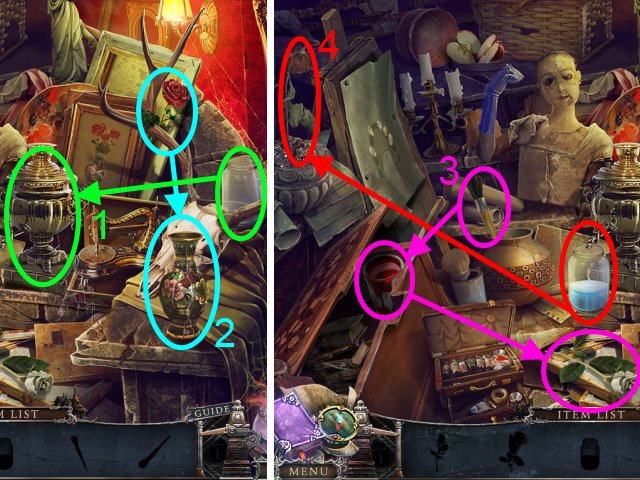
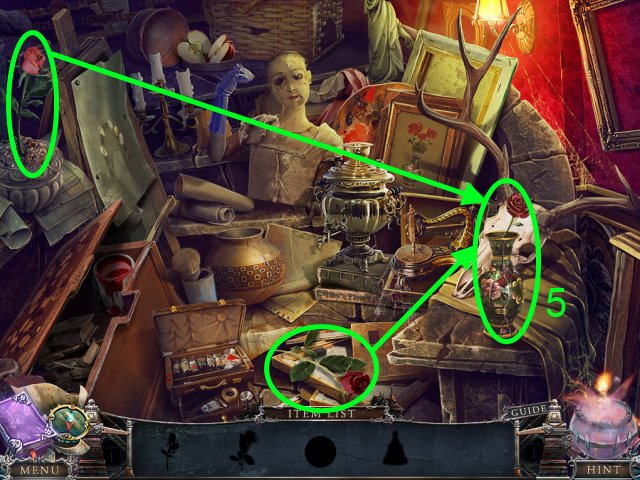
- Play the HOP (1-14).
- You receive the BUTTERFLY.
- Go up; walk forward.
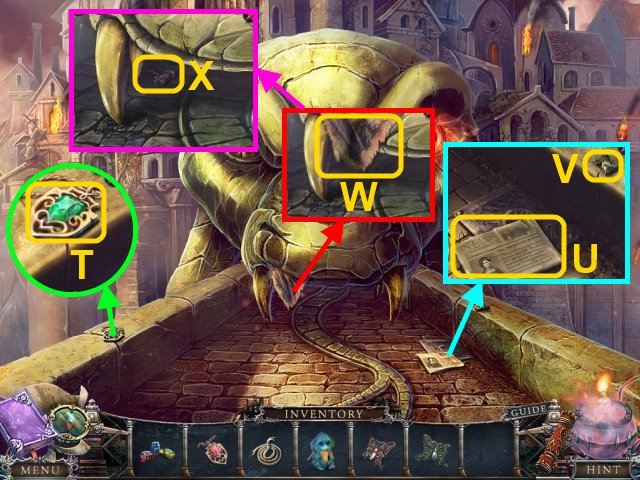
- Take the GREEN MEDALLION (T).
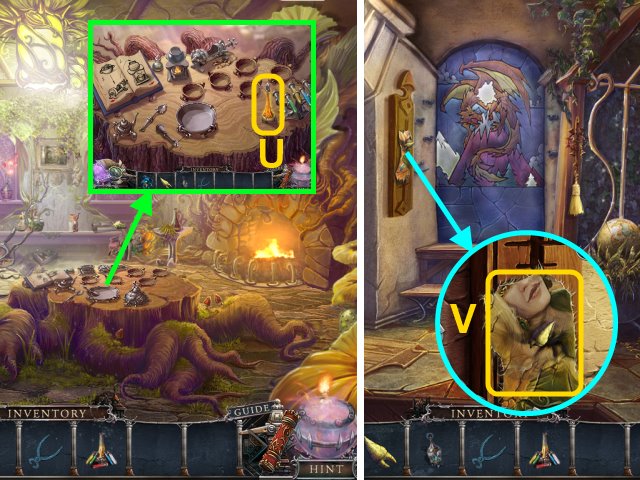
- Read the newspaper (U); take the GARGOYLE (V).
- Take the painting piece (W); use the DRAGON to get the CORKSCREW (X).
- Walk down.
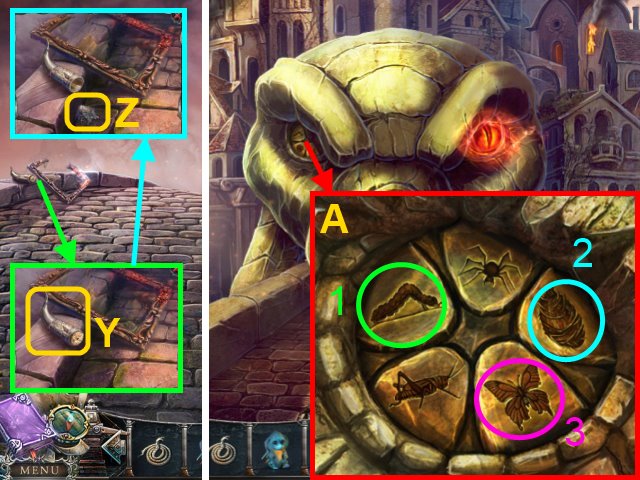
- Use the CORKSCREW on the cork (Y); take the BUTTERFLY (Z).
- Walk forward.
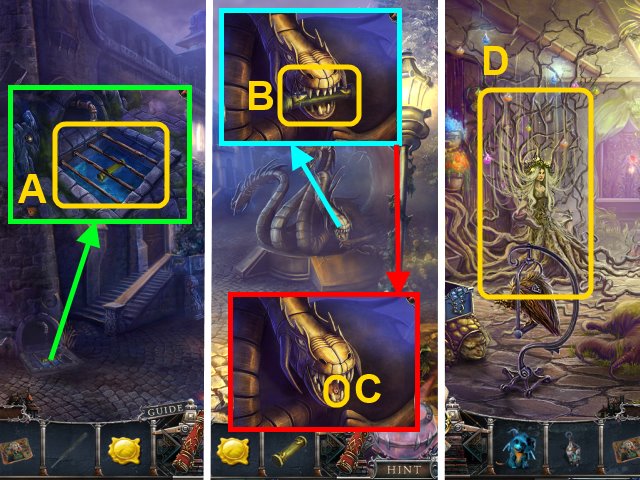
- Examine the snake's eye for a mini-game.
- Solution (A).
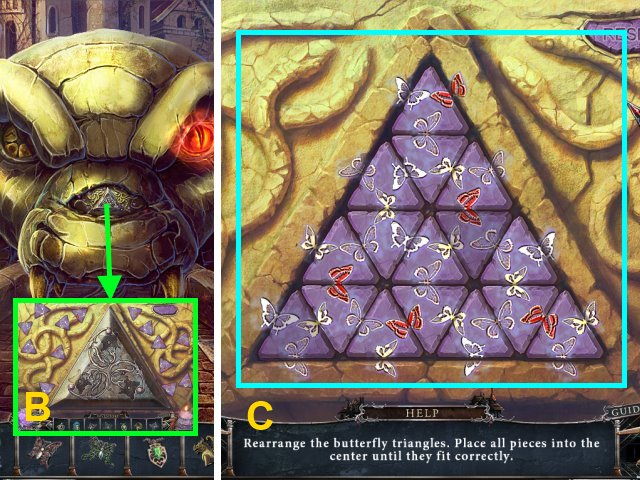
- Place the 3 BUTTERFLYS on the statue for a mini-game (B).
- Solution (C).
- Walk forward.
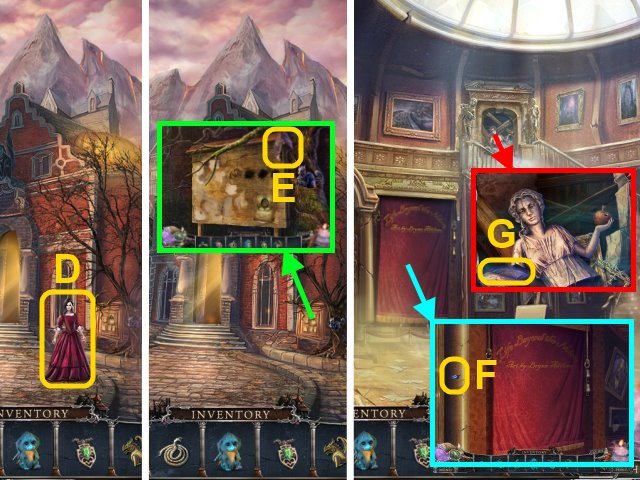
- Talk to the woman (D).
- Take the drawing piece (E).
- Walk into the building.
- Take the CHIMERA EYE (F).
- Take the SKETCH BOOK (G).

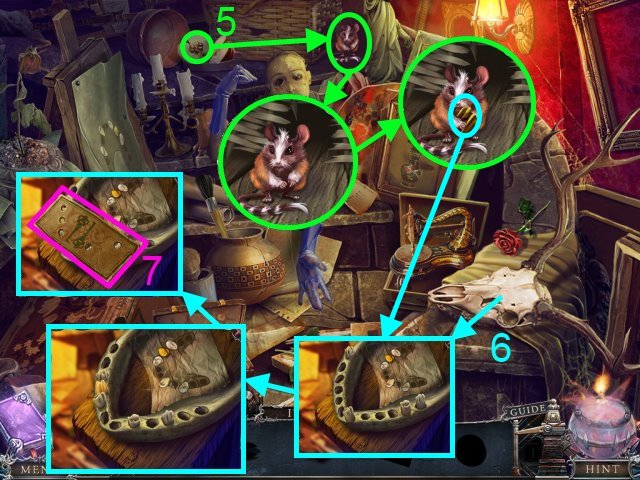
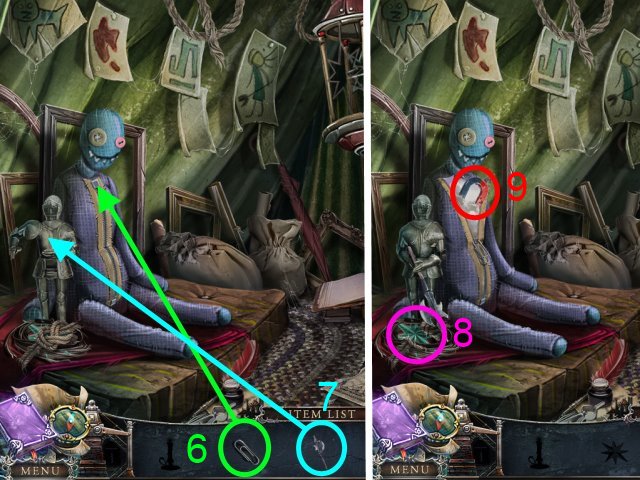
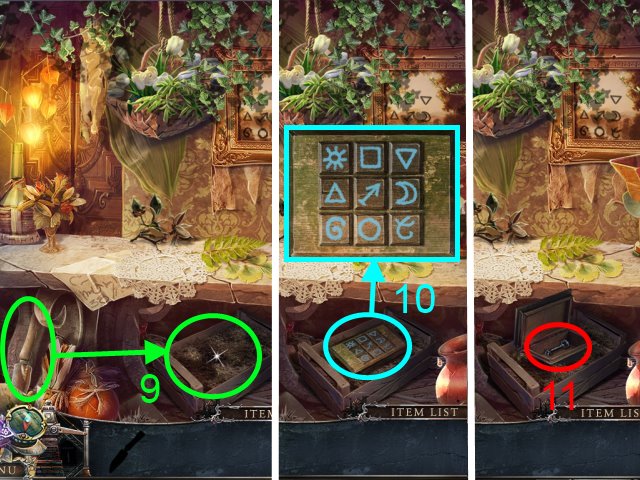
- Play the HOP (1-9).
- You receive the TOKEN.
- Walk down.
- Use the paint scraper on the easel (H); place the TOKEN on the easel for a mini-game.
- Solution (I): 1-4.
- Take the CHIMERA EYE (J).
- Walk forward up the stairs.
- Take the SOLVENT (K).
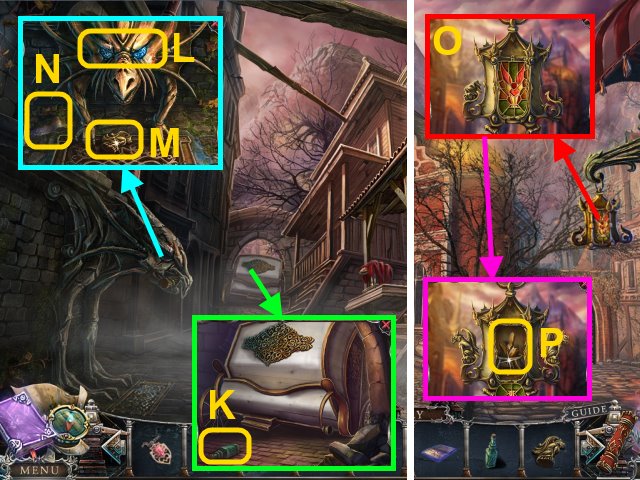
- Place the 2 CHIMERA EYES in the statue (L); take the GARGOYLE (M) and drawing piece (N).
- Walk down.
- Place the 2 GARGOYLES on the lantern (O); take the WAX (P).
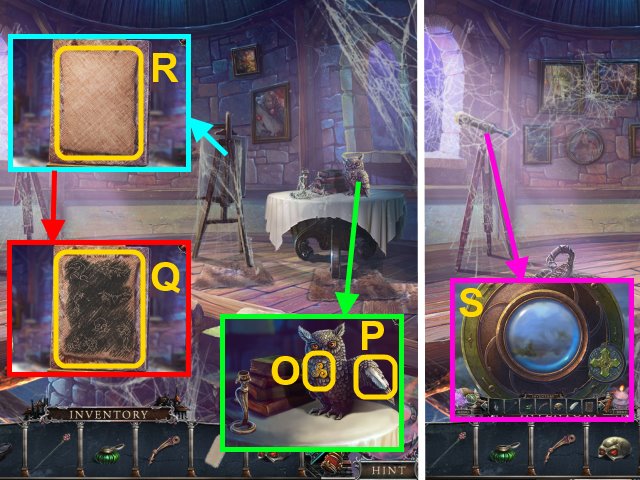
- Go to the Gallery.
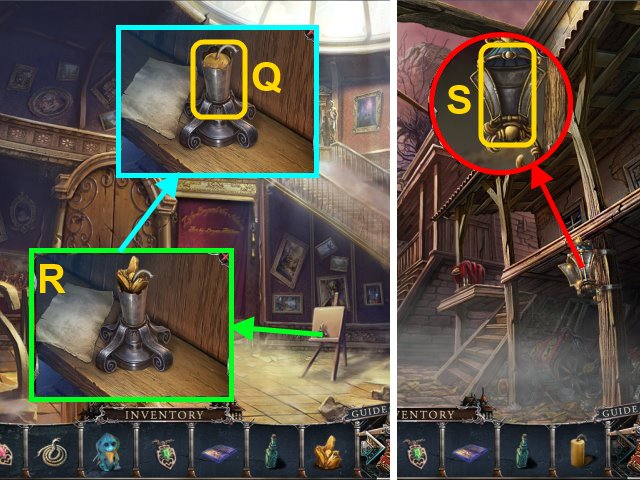
- Place the LANTERN WICK and WAX in the mold (Q); use the DRAGON.
- Take the CANDLE (R).
- Go to the Stairs.
- Place the CANDLE in the lantern (S).
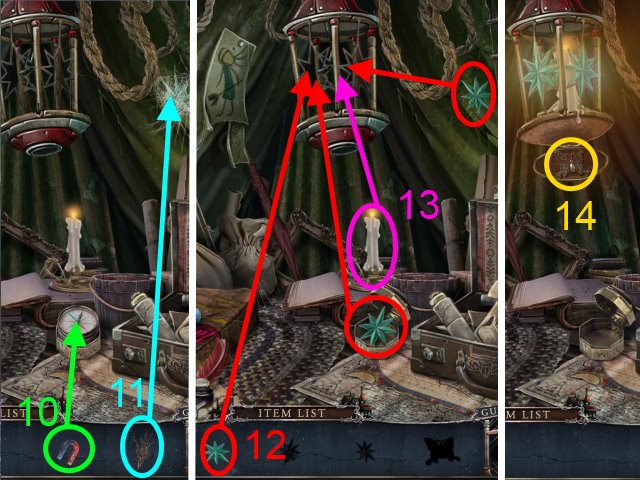
- Play the HOP (T).
- You receive the WEIGHTS.
- Go to the Gallery.
- Use the WEIGHTS on the cord (U).
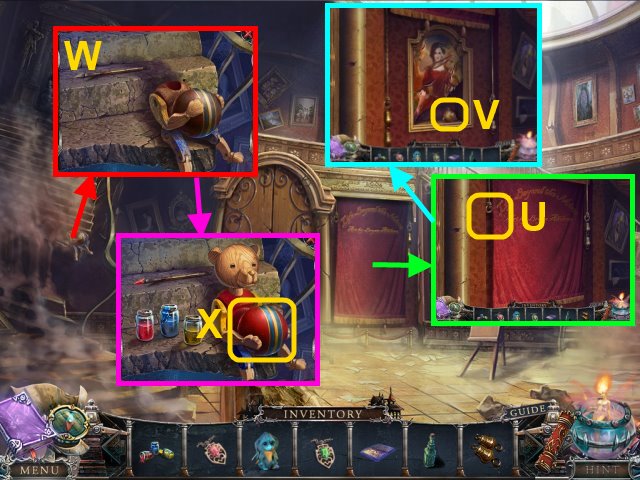
- Move the painting scrap; read the note.
- Take the BEAR HEAD (V).
- Place the BEAR HEAD and PAINT with the toy (W).
- Use the brush and paints on the toy; take the BALL (X).
- Walk down.
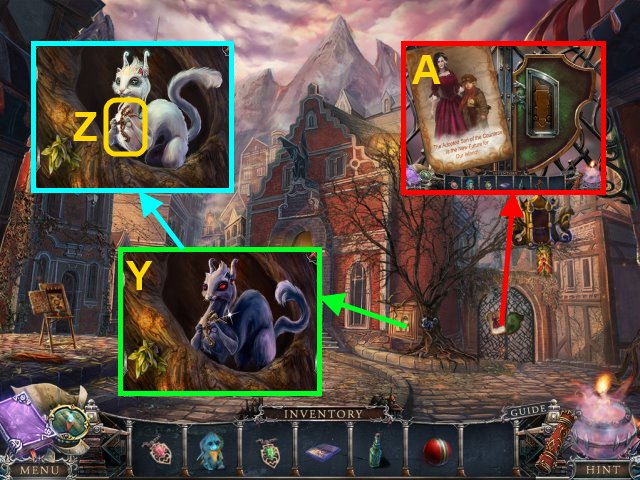
- Try to take the figurine from the creature (Y).
- Give the BALL to the creature; take the MINER FIGURE (Z).
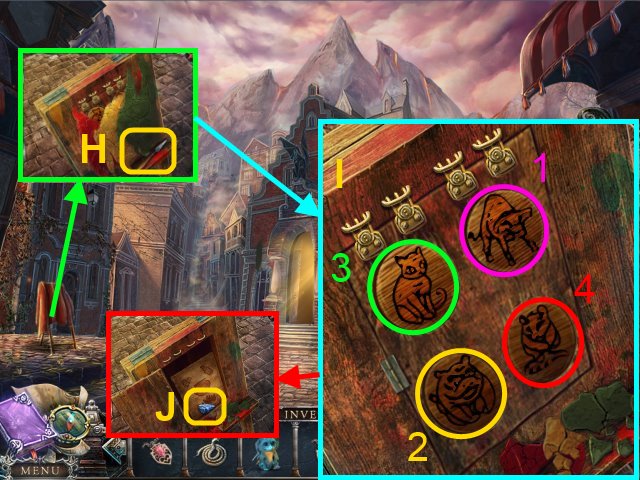
- Remove the poster; place the MINER FIGURE on the gate for a mini-game (A).
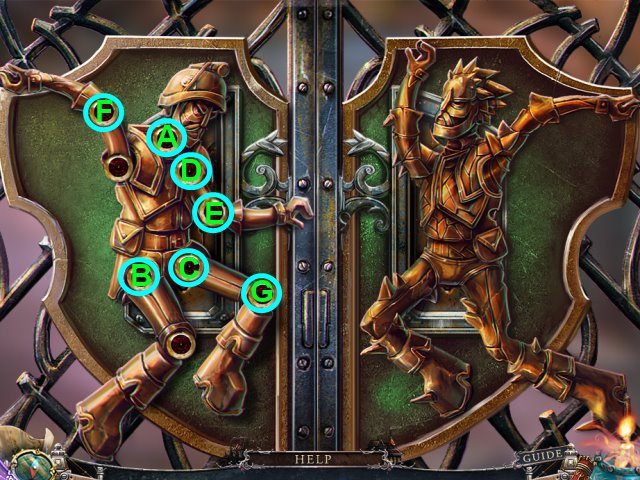
- Solution: A, B, C, D, E, Fx2, G.
- Walk through the gate.
Chapter 3: The Town
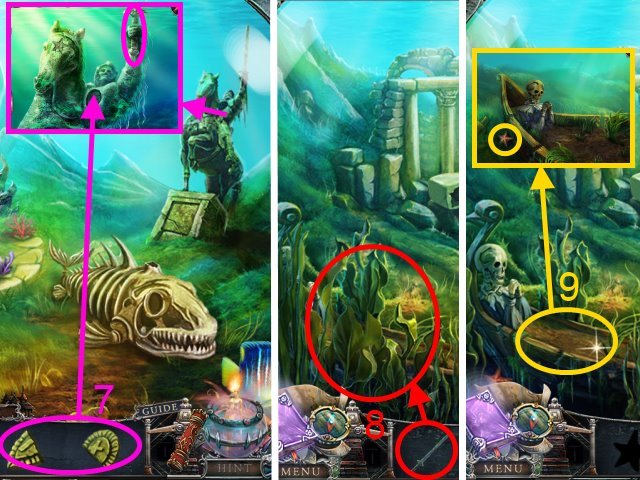
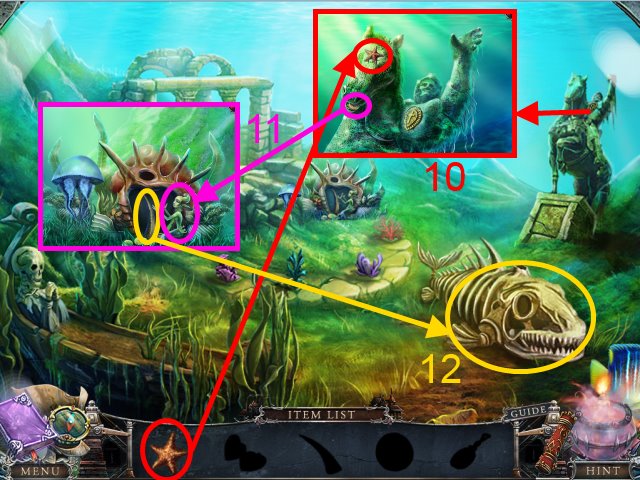
- Take the HORSE (B).
- Take the SULFUR (C).
- Go to the Broken Raft.
- Place the HORSE on the mannequin (D); take the BLUE MEDALLION (E) and the GLASS CAULDRON (F).
- Place the RED MEDALLION, GREEN MEDALLION, and BLUE MEDALLION on the chest (G); take the RED GEM (H).
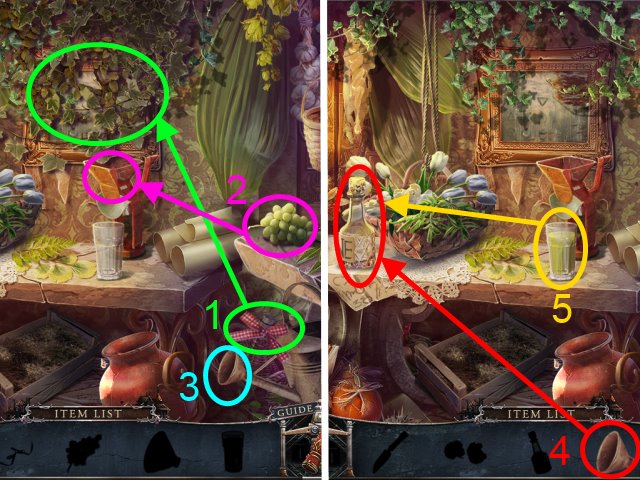
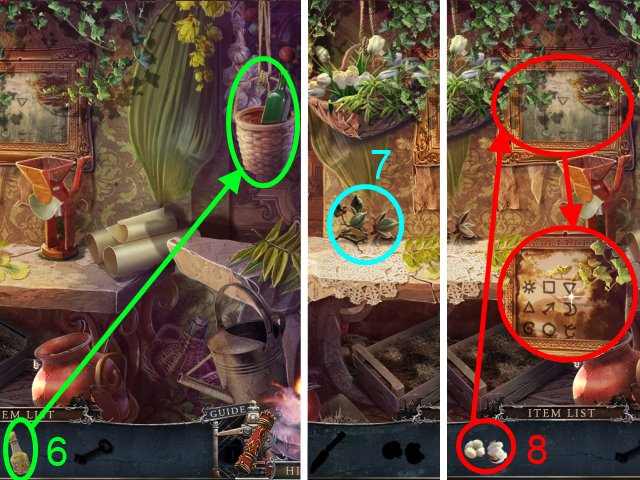
- Play the HOP (1-7).
- You receive the FLOWER.
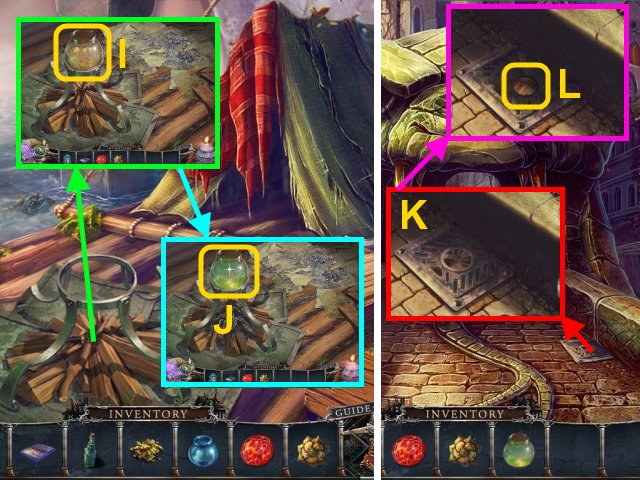
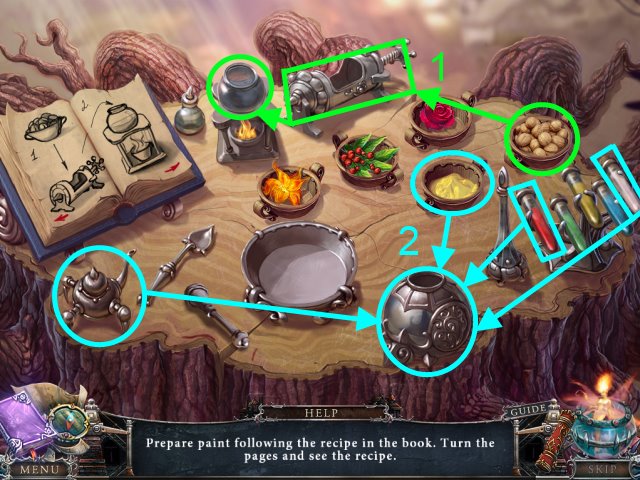
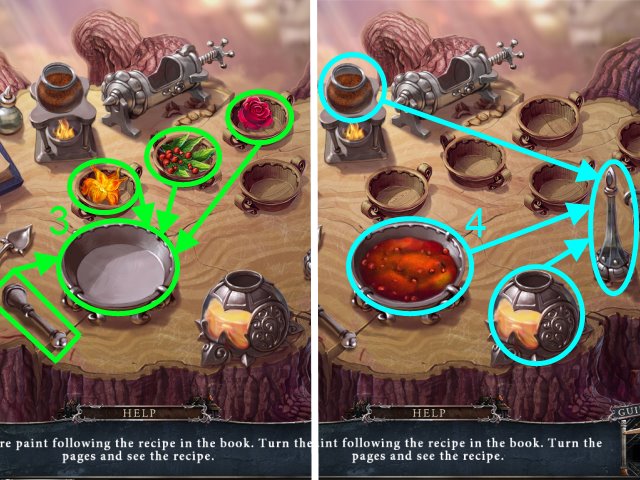
- Place the GLASS CAULDRON over the fire; place the SULFUR and SOLVENT in it (I).
- Use the DRAGON on the wood; take the ACID (J).
- Go up; walk forward.
- Pour the ACID on the grate (K); take the LOCK PART (L).
- Go to the Gallery.
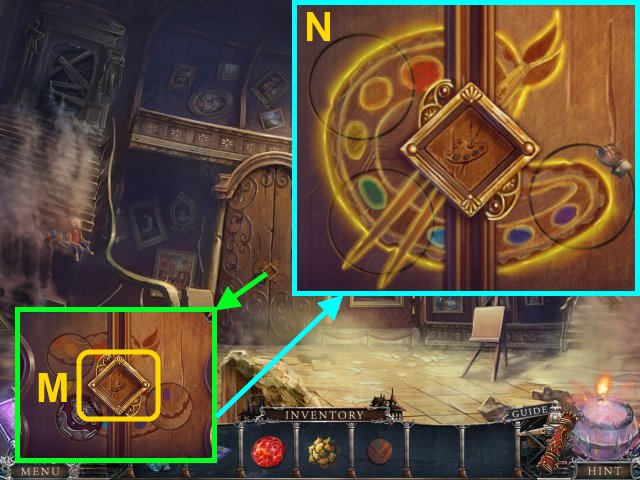
- Place the LOCK PART on the lock for a mini-game (M).
- Solution (N).
- Walk forward.
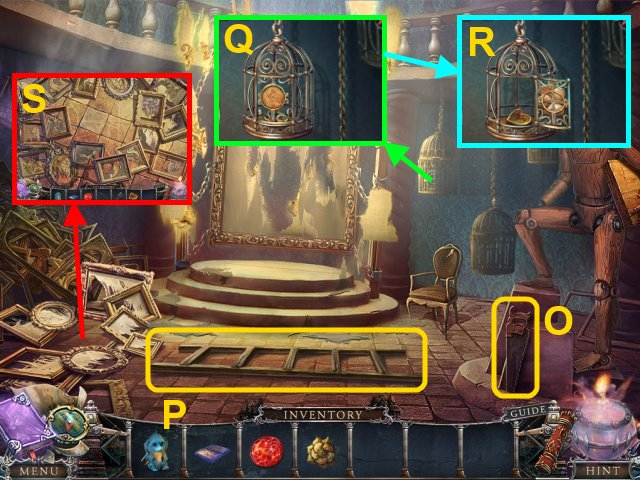
- Take the SAW (O) and LADDER (P).
- Place the FLOWER on the cage (Q); take the HEART MOLD (R).
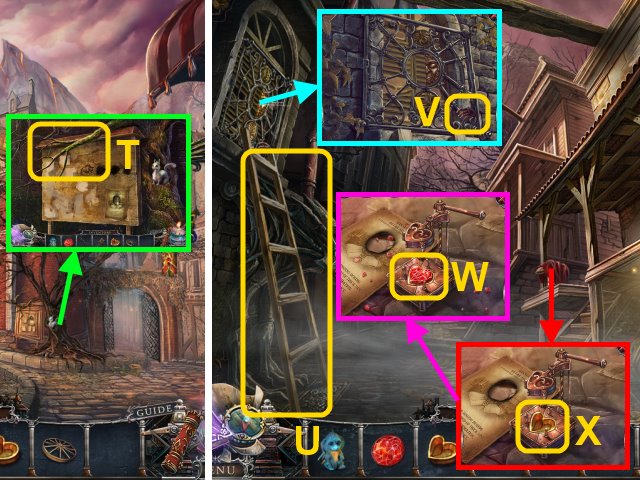
- Place the SKETCH BOOK with the paintings for a mini-game (S).
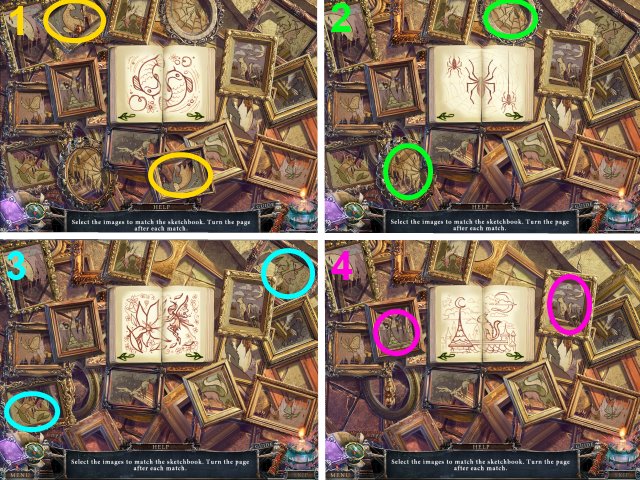
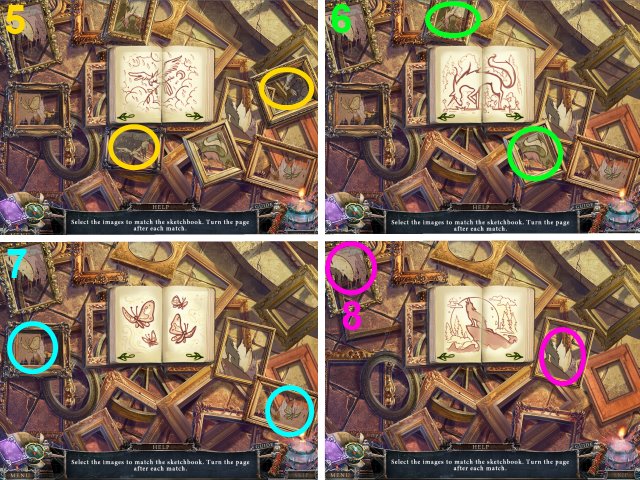
- Solution: 1-8.
- Take the CARRIAGE WHEEL.
- Walk down twice.
- Use the SAW on the tree to receive the BRANCH (T).
- Go to the Stairs.
- Place the LADDER under the window (U); take the ARM (V).
- Move the cloth; place the HEART MOLD on the stand (W).
- Place the RED GEM in the mold; take the HEART (X).
- Go to the Inner Gallery.
- Open the mannequin (Y); place the HEART on the ARM on it.
- Read the note; take the drawing piece (Z).
- Go to the Stairs.
- Place the CARRIAGE WHEEL on the carriage (A); push it.
- Walk forward.
- Take the GEM (B).
- Use the BRANCH on the carriage door (C); examine the box for a mini-game (D).
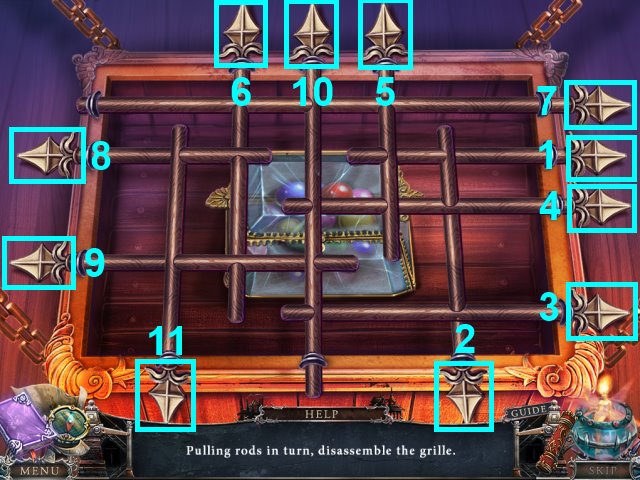
- Solution: 1-11.
- Take the MARBLES.
- Walk forward.
- Take the NAIL PULLER (E).
- Take the STATUETTE (F).
- Place the MARBLES on the frog; take the painting piece (G).
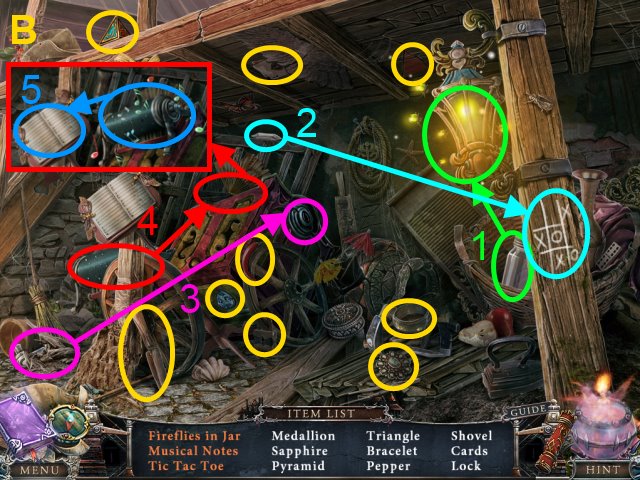
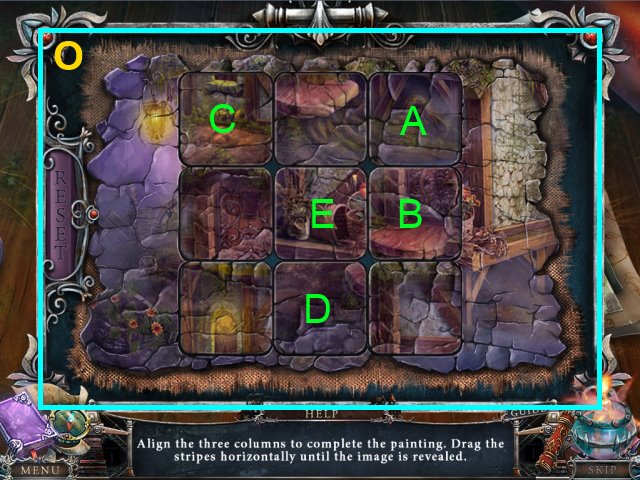
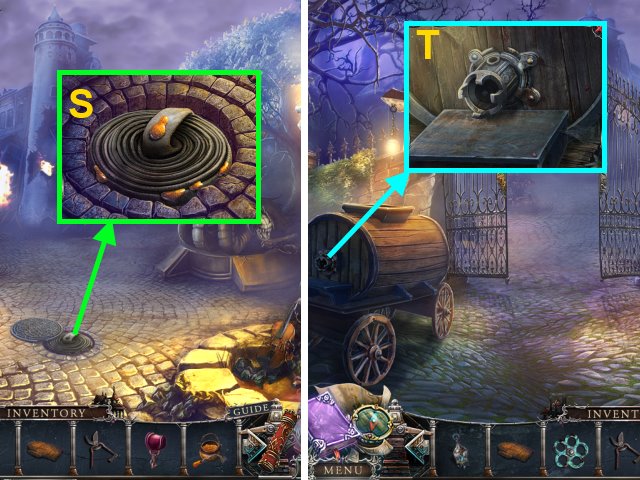
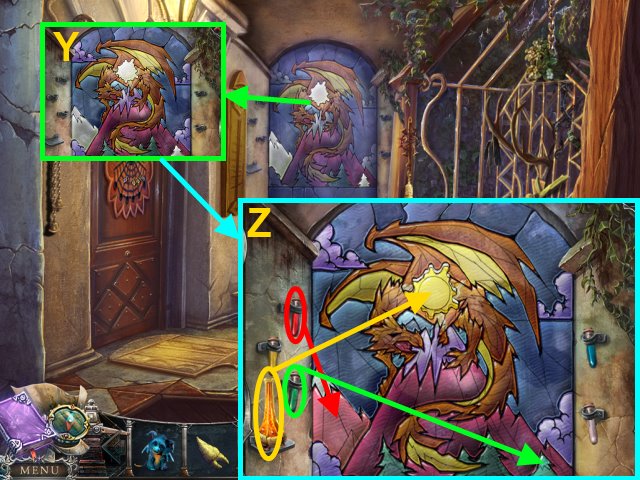
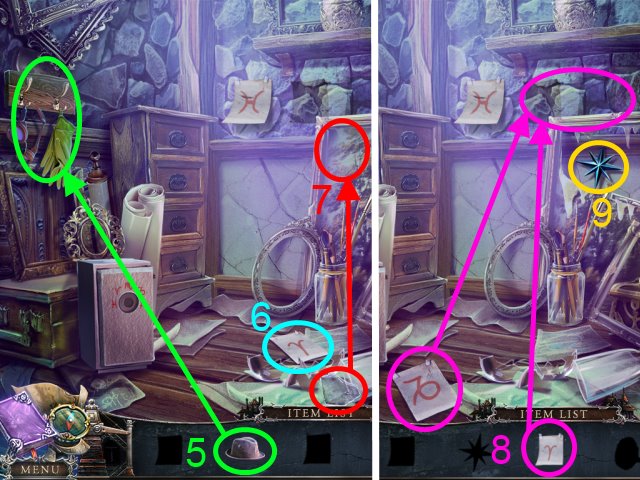
- Select the canister for a mini-game.
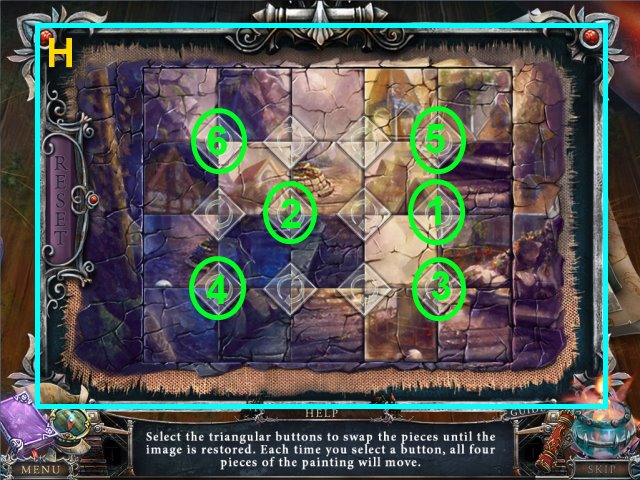
- Solution (H): 1-6.
- You receive the STATUE SQUARE PICTURE.
- Go the Square.
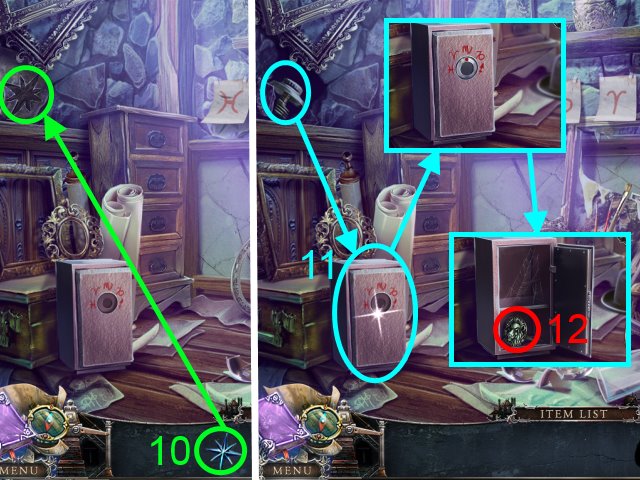
- Use the STATUE SQUARE PICTURE on the statue (I).
- Walk forward.
- Take the BIRD SKULL (J).
- Remove the coal (K); take the CHURCH LAYOUT (L).
- Take the MIRROR (M).
- Walk down.
- Place the CHURCH LAYOUT on the model city (N); take the KEY (O).
- Walk forward.
- Use the KEY on the lock (P).
- Walk forward.

- Take the BUTTERFLY (Q).
- Use the NAIL PULLER on the crate (R); take the SPRING (S).
- Go to the Forest.
- Place the BIRD SKULL on the skeleton (T).
- Take the CATERPILLAR (U).
- Place the SPRING in the trap; take the FACE PART (V).
- Walk forward.
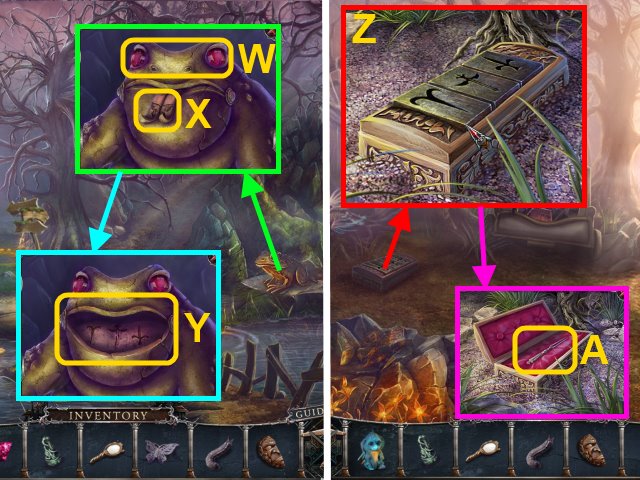
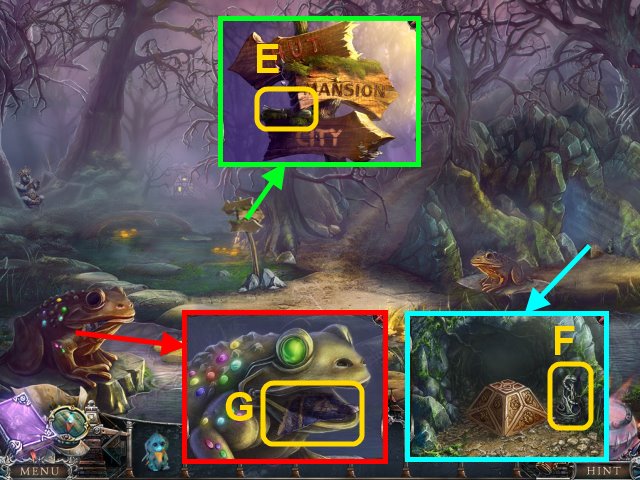
- Place the GEM in the frog statue (W); place the BUTTERFLY on its tongue (X).
- Note the symbols (Y).
- Walk down.
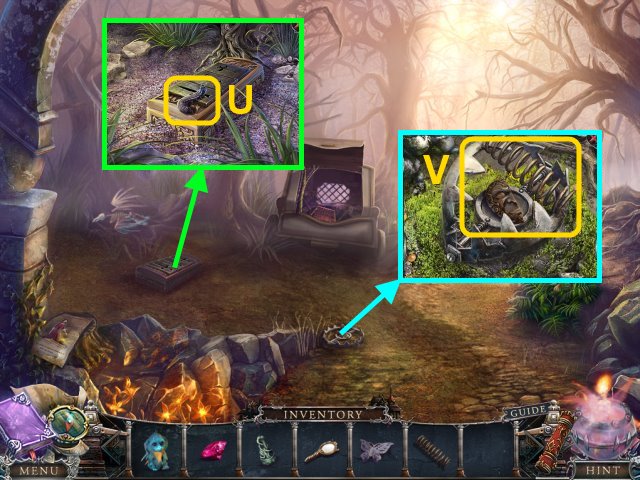
- Arrange the symbols correctly (Z); take the FORK (A).
- Walk down.
- Play the HOP (B).
- You receive the PYRAMID.
- Use the FACE PART on the grate (C).
- Go through the window.
- Take the NUT (D).
- Use the FORK to open the cabinet (E); take the CRYSTAL and painting piece (F).
- Go to the GALLERY.
- Play the HOP (1-8).
- You receive the BELL.
- Place the CATERPILLAR in the apple (G); take the PYRAMID (H).
- Go to the Square.
- Place the 2 PYRAMIDS in the planter for a mini-game (I).
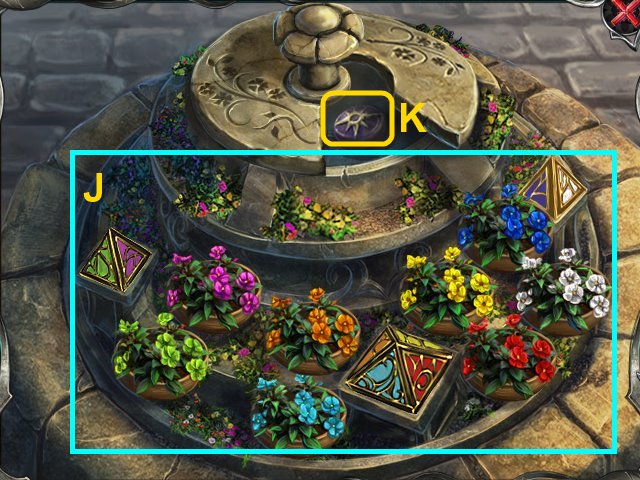
- Solution (J).
- Take the PRISM (K).
- Go forward twice.
- Place the MIRROR in the light (L).
- Assemble the metal pieces (M); place the PRISM in the ring (N).
- Place the CRYSTAL in the crevice (O).
- Walk forward.
Chapter 4: The Miner
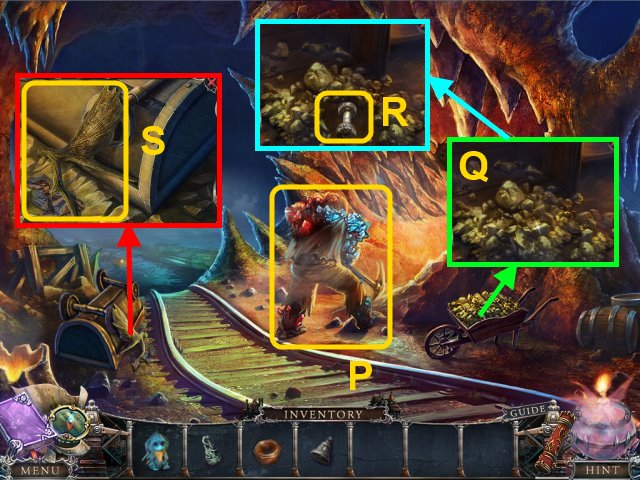
- Talk to the miner; you receive the BELL (P).
- Push the cart; use the DRAGON to move the rocks (Q).
- Take the SPOOL (R).
- Take the painting piece and ANTLER (S).
- Walk down three times.
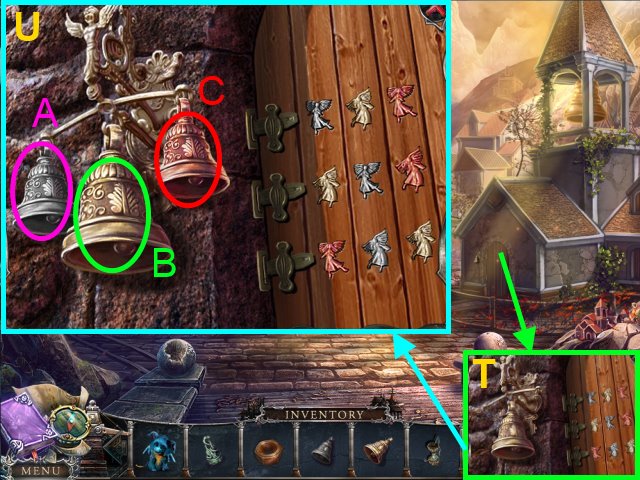
- Place the two BELLS on the stand for a mini-game (T).
- Solution (U): A, B, C, B, A, C, C, A, B.
- Walk through the door.
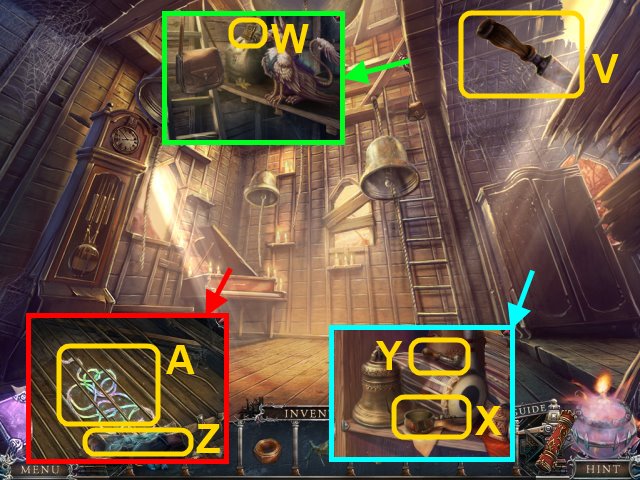
- Take the CHISEL (V).
- Take the LOCK PART (W).
- Open the cabinet; take the COFFEE POT (X) and PIANO KEY (Y).
- Take the painting piece (Z); use the PIANO KEY on the piano.
- Use the SPOOL on the thread to get the MAGIC THREAD (A).
- Go to the Inner Gallery.
- Use the MAGIC THREAD on the painting (B).
- Take the BELL FIGURINE PIECE (C).
- Return to the Belfry.
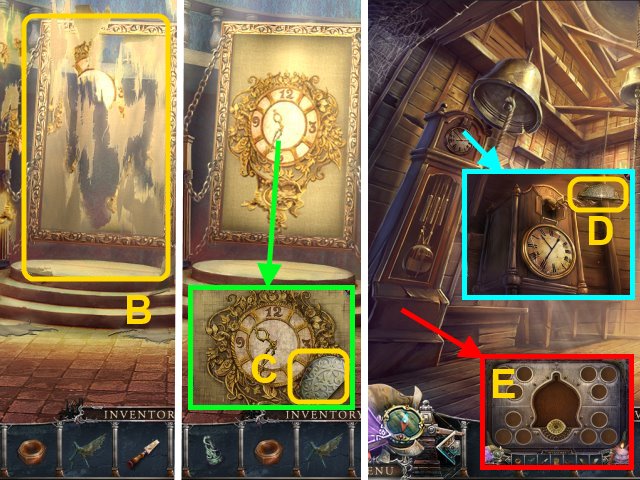
- Turn the clock hands; take the BELL FIGURINE PIECE (D).
- Open the clock; use the 2 BELL FIGURINE PIECES for a mini-game (E).
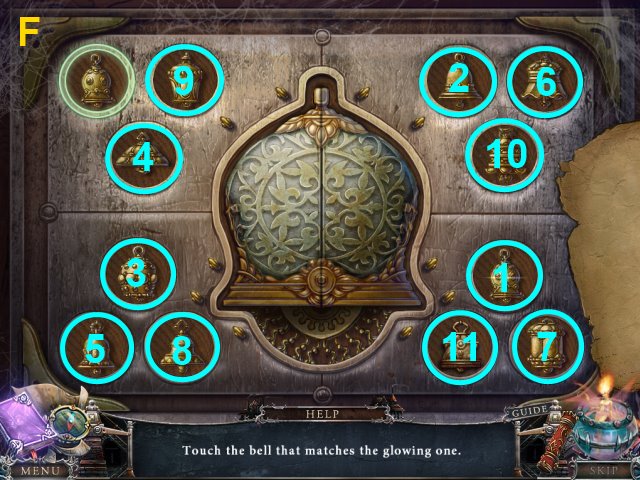
- Solution (F).
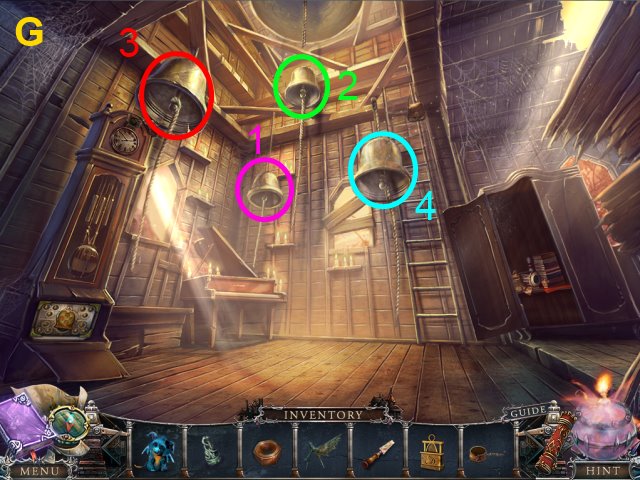
- Ring the bells in order. Solution: (G).
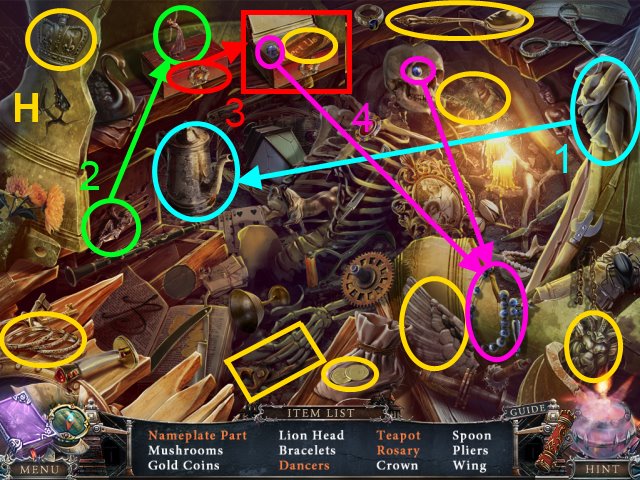
- Play the HOP (H).
- You receive the NAMEPLATE PART.
- Go to the Mine.
- Place the NAMEPLATE PART on the nameplate (I); take the painting piece (J) and CHALK (K).
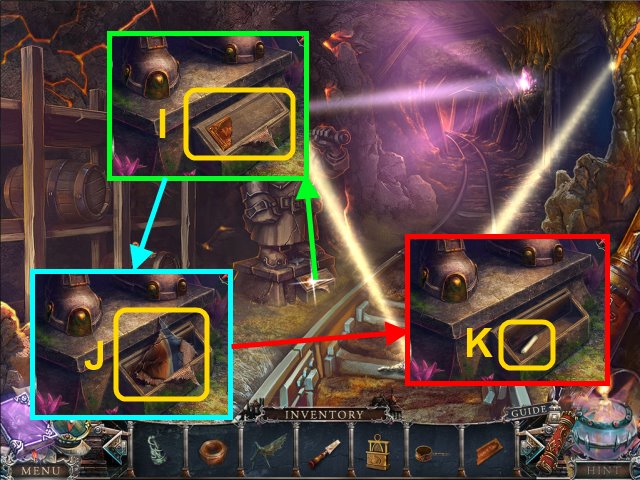
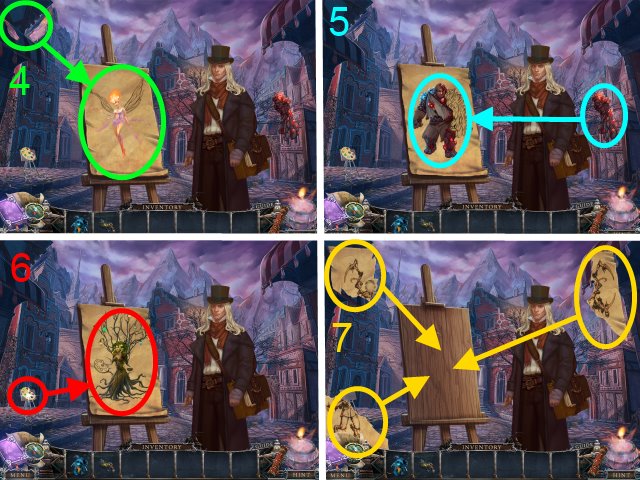
- Select the canister for a mini-game.
- Solution (L).
- You receive the MINER PICTURE.
- Walk forward.
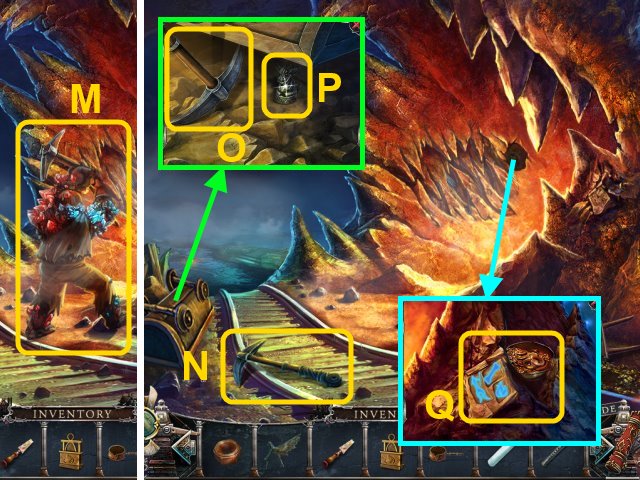
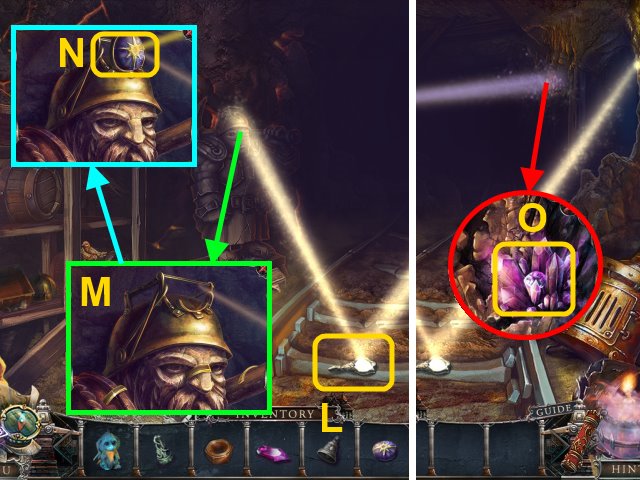
- Use the MINER PICTURE on the miner (M).
- You receive the FLUTE.
- Take the PICK (N).
- Use the PICK on the cart (O); take the STATUETTE (P).
- Use the CHALK on the symbols; take the JEWELRY (Q).
- Walk down.
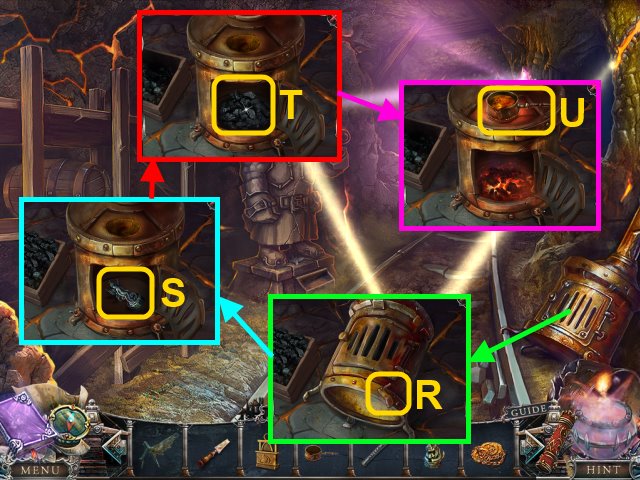
- Use the NUT on the furnace (R); open it.
- Take the STATUETTE (S).
- Place the coal in the furnace (T); use the DRAGON to light it.
- Place the COFFEE POT on the stovetop.
- Place the JEWELRY in the pot; take the MOLTEN GOLD (U).
- Go to the Swamp.
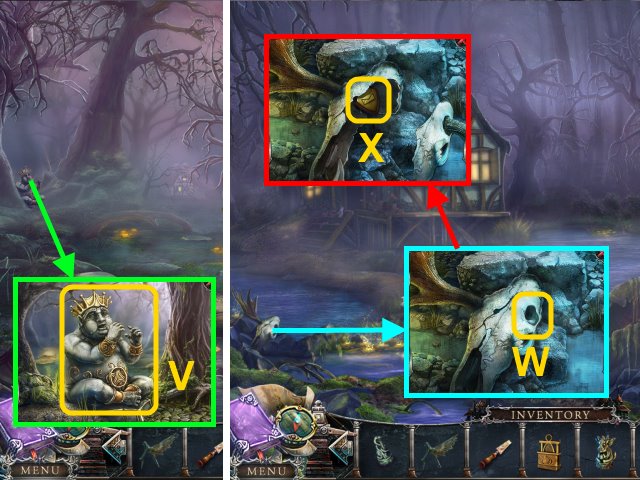
- Give the FLUTE to the statue (V).
- Go forward.
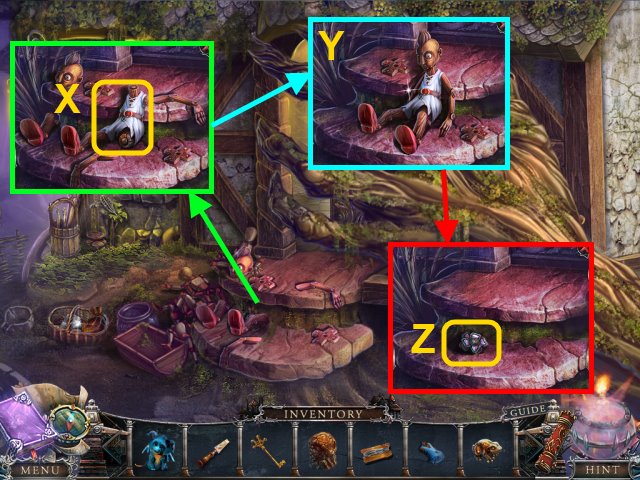
- Place the ANTLER on the skull (W); take the POSTMAN'S BADGE (X).
- Walk forward.
- Play the HOP (Y).
- You receive the CUCKOO.
- Take the LOCK PART (Z).
- Go to the Miners Room.
- Pour the MOLTEN GOLD in the mold; take the GOLDEN KEY (A).
- Read the newspaper; place the 2 LOCK PARTS in the lock (B).
- Take the STONE MASK (C).
- Go to the Belfry.
- Play the HOP (D).
- You receive the STATUETTE.
- Place the POSTMAN'S BADGE on the bag; take the BREAD (E).
- Place the COCKOO on the clock (F); take the BIRD PART (G).
- Go to the Cave.
- Place the STONE MASK in the imprint (H); take the PUPPET PART (I).
- Give the BREAD to the fish; take the SNAKE STONE (J) and the FISHING LINE (K).
- Walk down.
- Place the BIRD PART on the bird; take the BIRD (L).
- Walk down.
- Place the BIRD on the box (M); take the FROG and LETTER (N).
- Go to the Belfry.
- Give the LETTER to the gryphon (O); take the DOOR LOCK PIECE (P).
- Go to the Miners Room.
- Place the 4 STATUETTES on the stand for a mini-game (Q).

- Solution (R).
- Take the EGG (S).
- Walk down, then forward three times.
- Place the EGG in the nest (T); take the DOOR LOCK PIECE (U).
- Place the FROG on the basket (V); take the painting piece and STENCIL-PLATE.
- Walk forward.
- Place the 2 DOOR LOCK PIECES on the door (W).
- Try to walk forward.
- Place the PUPPET PART on the step (X); attach the puppet pieces.
- Use the FISHING LINE on the puppet (Y); take the PUPPET and FLOWER SYMBOL (Z).
- Go to the Forest.
- Take the poster (A); place the STENCIL-PLATE on the stump (B).
- Use the DRAGON on the stump; take the PUPPET (C).
- Walk forward.
- Place the 2 PUPPETS in the tree (D).
- Walk up the path.
Chapter 5: Bryan
- Take the WRENCH (E).
- Take the HAMMER (F).
- Go to the Miners Room.
- Place the HAMMER, CHISEL, and SNAKE STONE on the table (G).
- Place the chisel on the stone; use the hammer.
- Take the SNAKE HEAD (H).
- Go to the Gates.
- Place the SNAKE HEAD on the statue (I); take the CYLINDER (J).
- Take the painting piece (K).
- Walk right.
- Take the STONE TOOTH (L).
- Read the note; place the CYLINDER in the music box (M).
- Take the SILVER KEY and painting piece (N).
- Select the canister for a mini-game.
- Solution (O): A down, B right, C down, D left, E up.
- You receive the HUT PAINTING.
- Go to the Hut Entrance.
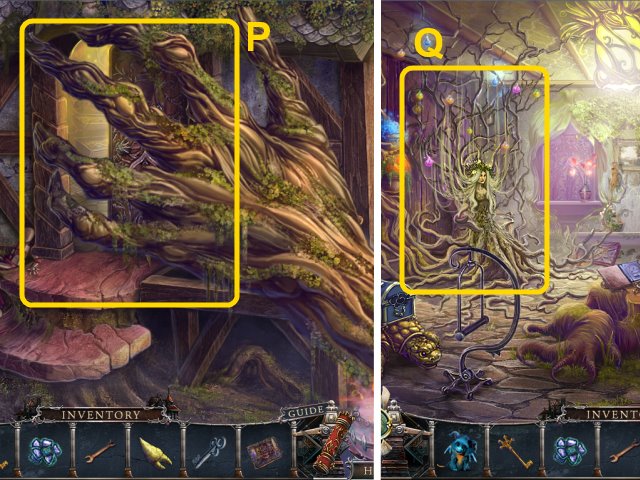
- Use the HUT PAINTING on the door (P).
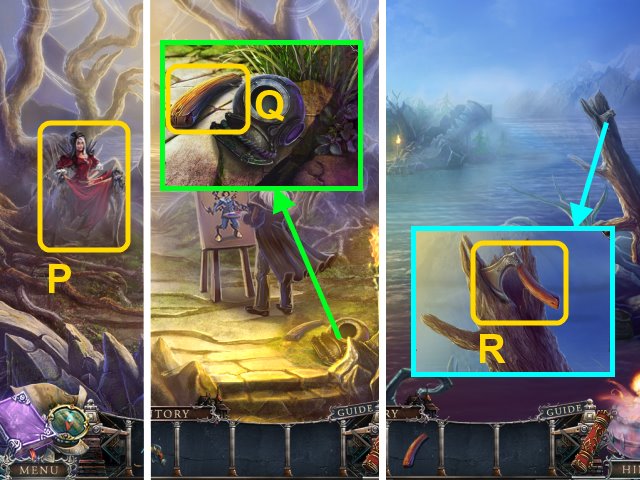
- Walk forward.
- Talk to Willow (Q); you receive BRYAN'S FIGURINE.
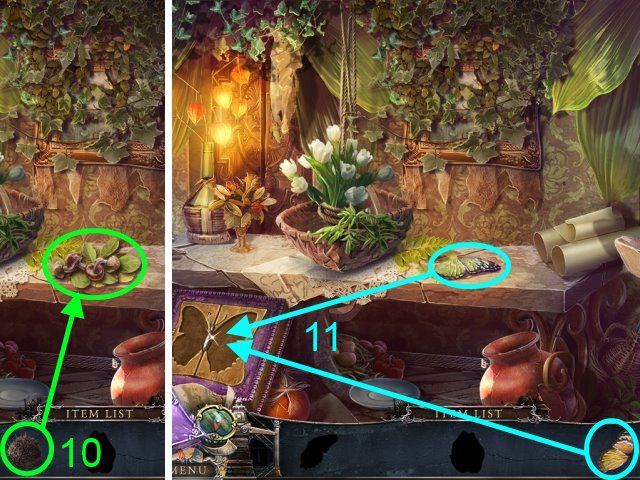
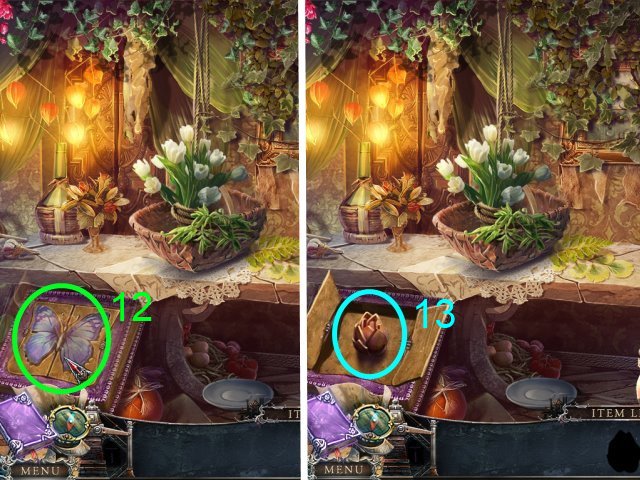
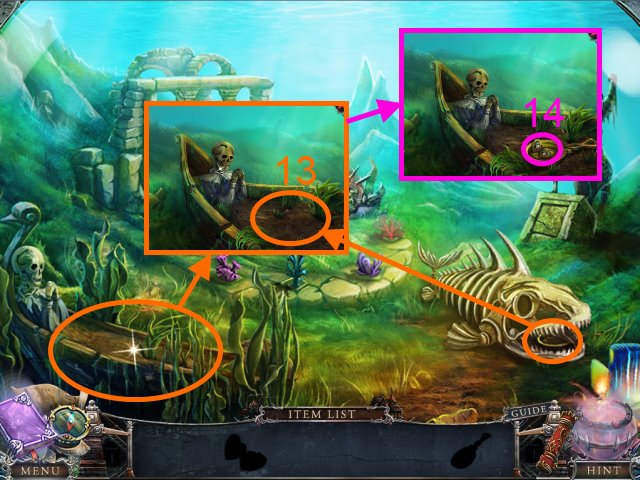
- Play the HOP (1-13).
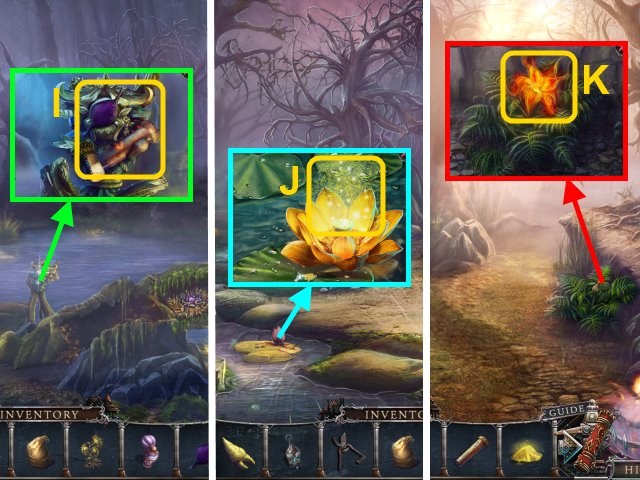
- You receive the LOTUS.
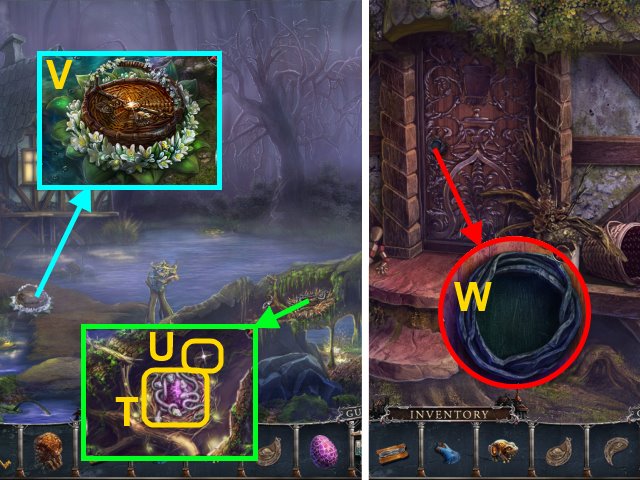
- Go to the Swamp.
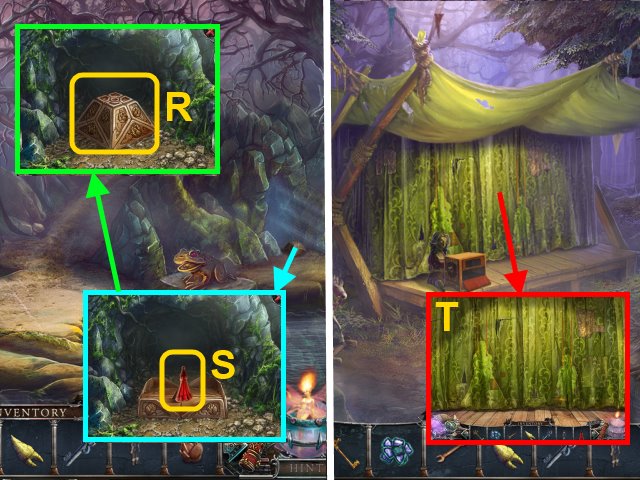
- Place the LOTUS on the box (R); take the COUNTESS FIGURINE (S).
- Go to the Theater.
- Place the COUNTESS FIGURINE and BRYAN'S FIGURINE on the stage for a mini-game (T).
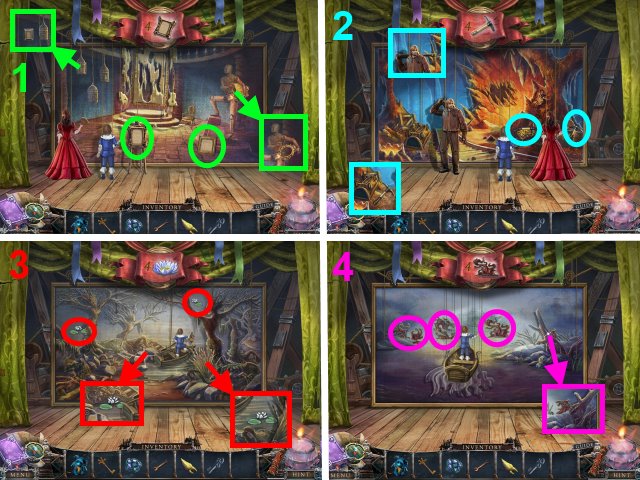
- Solution: 1-4.
- Take BRYAN'S LANTERN.
- Walk down.
- Use BRYAN'S LANTERN on the mist (U).
- Place the GOLDEN KEY and SILVER KEY in the lock (V).
- Walk forward.
- Take the MITTEN (W).
- Press the snake statue; take the painting piece (X).
- Open the manhole; take the EMPTY JAR (Y).
- Place the EMPTY JAR under the tree (Z); use the DRAGON.
- Take the RESIN (A).
- Walk forward.
- Use the WRENCH to take the VALVE (B).
- Walk forward.
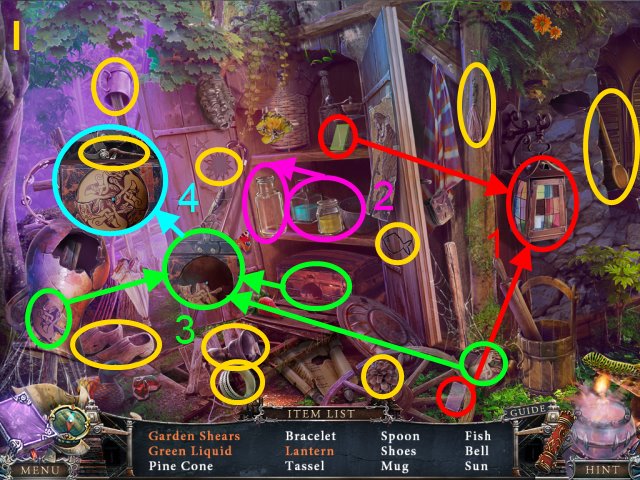
- Play the HOP (C).
- You receive the BOW.
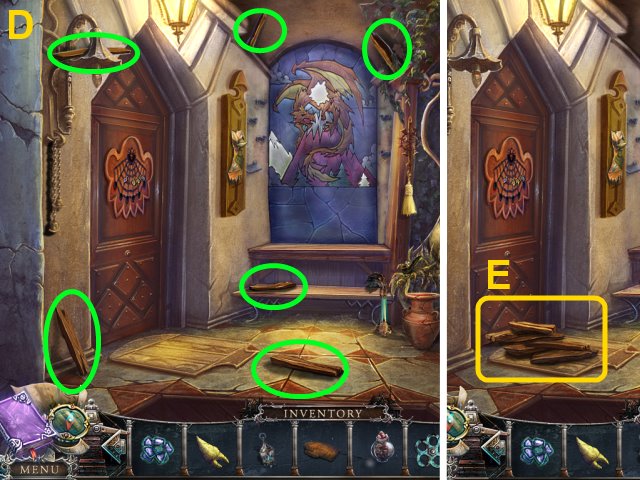
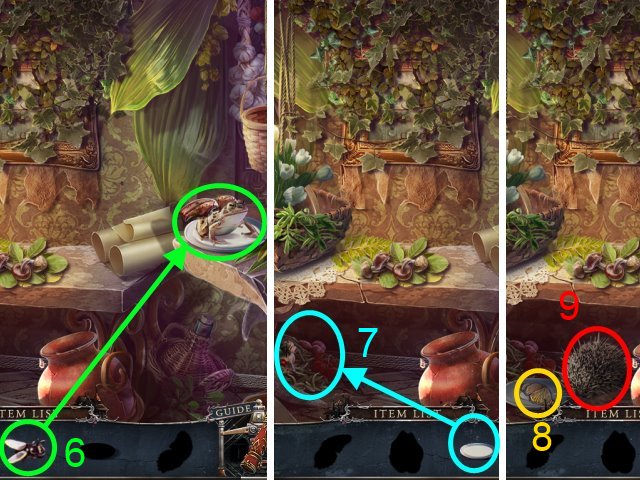
- Gather the pieces of wood (D); take the FIREWOOD (E).
- Walk down twice.
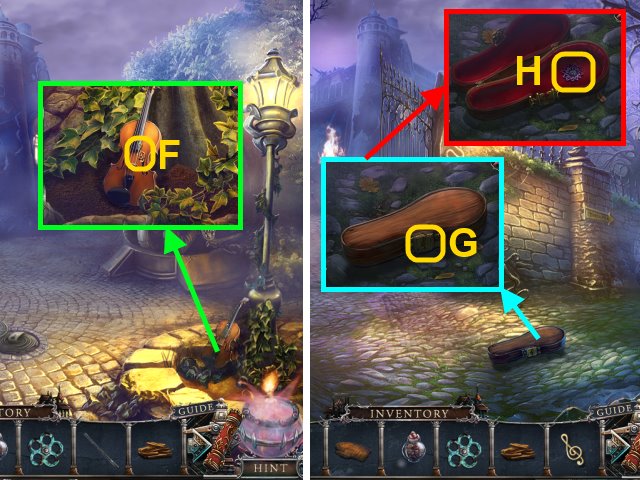
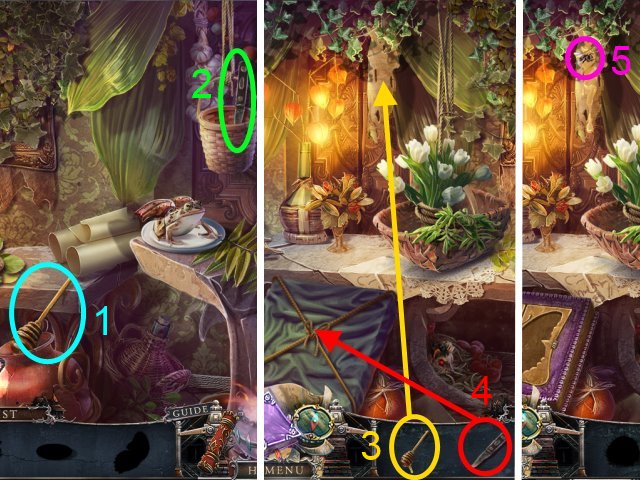
- Use the BOW on the violin; take the TREBLE CLEF SYMBOL (F).
- Walk down.
- Place the TREBLE CLEF SYMBOL on the violin case (G); take the FLOWER SYMBOL (H).
- Go to the Hut Entrance.
- Play the HOP (I).
- You receive the GARDEN SHEARS.
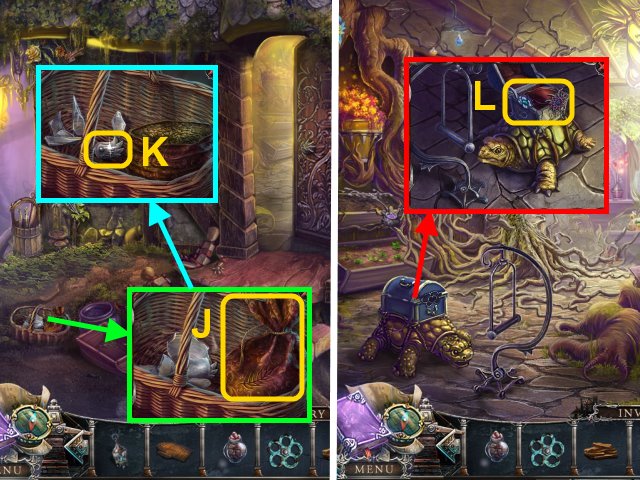
- Use the GARDEN SHEARS on the satchel (J); take the SEEDS.
- Use the MITTEN on the glass; take the WING SYMBOL (K).
- Walk forward.
- Place the 2 FLOWER SYMBOLS on the chest; take the SADDLE (L).
- Place the FIREWOOD under the pot (M).
- Place the RESIN in the pot; use the DRAGON to heat it.
- Take the RESIN (N).
- Go to the Theater.
- Place the WING SYMBOL on the birdhouse (O).
- Take the EMPTY SPRAY BOTTLE (P); place the SEEDS in the bird feeder (Q).
- Take the letter and painting piece (R).
- Go to the Alley.
- Use the RESIN on the hose; take the FIRE HOSE (S).
- Walk down.
- Place the VALVE and FIRE HOSE on the tap (T).
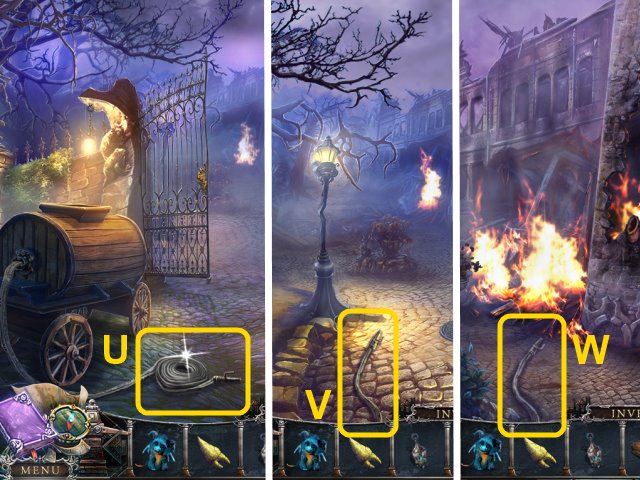
- Move the hose (U).
- Walk forward.
- Move the hose (V).
- Walk forward.
- Use the hose on the fire (W).
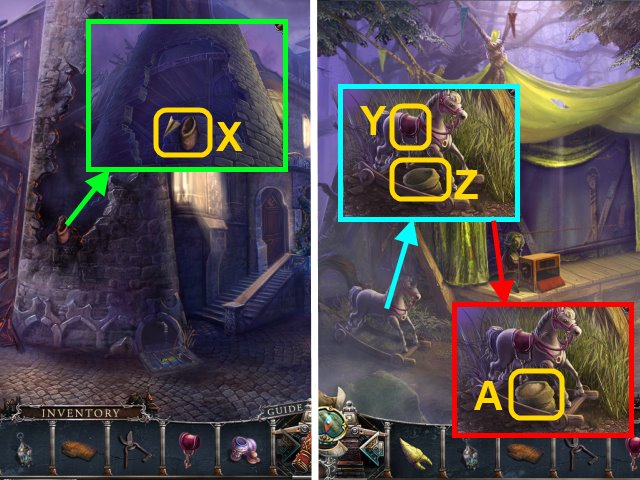
- Take the note and BAG (X).
- Go to the Theater.
- Put the SADDLE on the horse (Y); place the BAG under the horse (Z).
- Rock the horse 3 times; take the BAG OF SAND (A).
- Go to the Dryad Hut.
- Pull the lever (B).
- Match the flowers (C).
- Use the MITTEN to take the VENUS FLYTRAP (D).
- Place the EMPTY SPRAY BOTTLE in the planter; remove the lid (E).
- Pull the lever (F); take the FERTILIZER (G).
- Open the book; take the EYE PATCH (H).
- Walk down twice.
- Use the EYE PATCH on the eye; take the PESTLE (I).
- Walk down.
- Spray the FERTILIZER on the flower; take the POLLEN (J).
- Walk down.
- Spray the FERTILIZER on the fern; take the FERN FLOWER (K).
- Go to the Alley.

- Place the VENUS FLYTRAP in the soil; take the WOLF BERRIES (L).
- Walk forward.
- Spray the FERTILIZER on the roses; use the GARDEN SHEARS to take the RED ROSE (M).
- Put the BAG OF SAND on the wood (N); move the wood to take the MECHANICAL BIRD KEY (O) and painting piece (P).
- Go to the Theater.
- Place the MECHANICAL BIRD KEY in the bird; take the MECHANICAL BIRD (Q).
- Go to the Dryad Hut.
- Place the MECHANICAL BIRD on the perch (R); take the TONGS (S).
- Place the POLLEN, WOLF BERRIES, FERN FLOWER, PESTLE, and RED ROSE on the table for a mini-game (T).
- Solution: 1-4.
- Take the PAINTS (U).
- Go to the Porch.
- Use the TONGS to take the STONE TOOTH and painting piece (V).

- Select the canister for a mini-game.
- Solution (W).
- You receive the DRYAD PICTURE.
- Play the HOP (X).
- You receive the METAL FILE.
- Place the PAINTS on the stands for a mini-game (Y).
- Solution (Z).
- Take the STAINED GLASS.
- Walk down.
- Use the METAL FILE on the grate; take the METAL TUBE (A).
- Walk down.
- Place the 2 STONE TEETH and the METAL TUBE in the statue (B).
- Take the FIREFLY (C).
- Go to the Dryad Hut.
- Use the DRYAD PICTURE on Willow (D); you receive the FIREFLY.
Chapter 6: The Countess' Estate
- Play the HOP (1-11).
- You receive the SCORPION KEY.
- Go to the Porch.

- Place the 2 FIREFLIES on the web for a mini-game.
- Solution: A down x2, A left, B up, C right, C down x2, D down x2, B right, E down x2, E right, E down, F right x2, F down.
- Walk left.
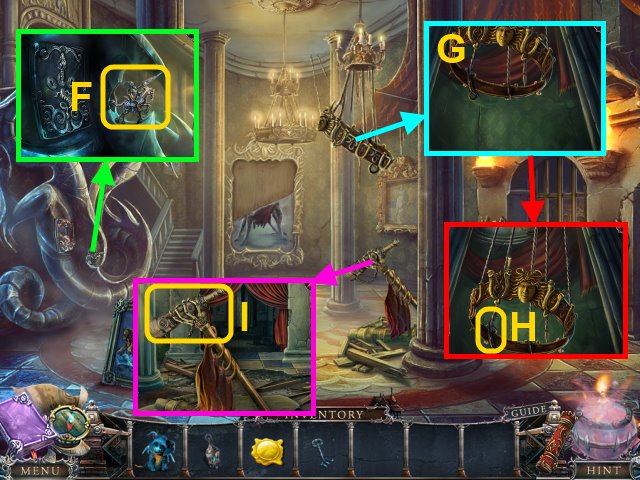
- Take the KNIGHT (F).
- Use the DRAGON on the chandelier (G); take the HOOK (H).
- Move the skeleton's fingers; take the SPYGLASS (I).
- Walk down three times.
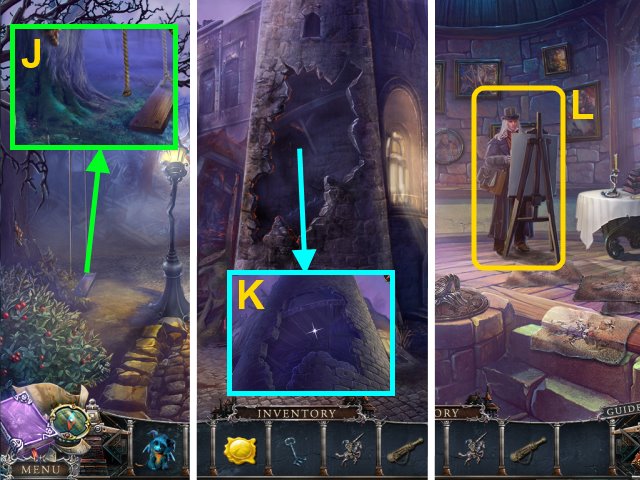
- Use the HOOK on the swing to receive the ROPE WITH HOOK (J).
- Walk forward.
- Use the ROPE WITH HOOK on the tower (K).
- Go up.
- Talk to Dorian (L).
- Play the HOP (1-12).
- You receive the LION PIN.
- Read the scroll (M); take the CANDLE (N).
- Use the SCORPION KEY on the scorpion (O).
- Gather the red pieces; take the APPLE SYMBOL (P).
- Move the paintings; take the STAINED GLASS (Q).
- Go to the Hall.
- Place the 2 STAINED GLASS on the door for a mini-game (R).
- Solution (S).
- Place the LION PIN on the frame; take the SNOWFLAKE SYMBOL (T).
- Walk forward.
- Take the MOON SYMBOL (U).
- Take the CANDLE (V).
- Place the APPLE SYMBOL and the SNOWFLAKE SYMBOL on the door (W).
- Read the note; take the GARGOYLE HEAD (X).
- Move the blocks onto the castle (Y); take the KNIGHT (Z).
- Walk down.
- Place the GARGOYLE HEAD on the statue (A).
- Walk right.
- Take the CANDLE (B).
- Take the AMBER SYMBOL (C).
- Place the 2 KNIGHTS on the mantle; take the DRAGON KEY (D).
- Place the MOON SMYBOL on the lock (E); take the INK POT (F).
- Use the DRAGON on the door (G).
- Open the door and walk forward.
- Take the DRAGON KEY (H).
- Take the COAL (I).
- Take the KNITTING NEEDLE (J).
- Walk down twice.
- Place the 2 DRAGON KEYS in the lock (K); take the SHUTTLE (L).
- Place the 3 CANDLES on the chandelier; take the SPIDER KEY (M).
- Go to the Countess Room.
- Place the SHUTTLE on the loom; take the CANVAS (N).
- Go to the Painters Tower.


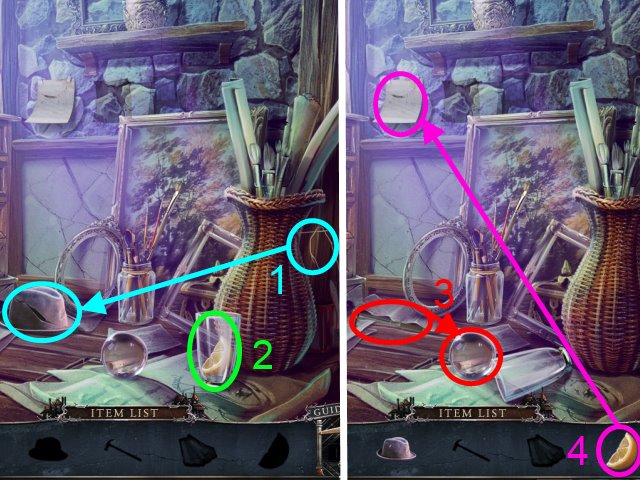
- Play the HOP (1-15).
- You receive the SKULL BUTTON.
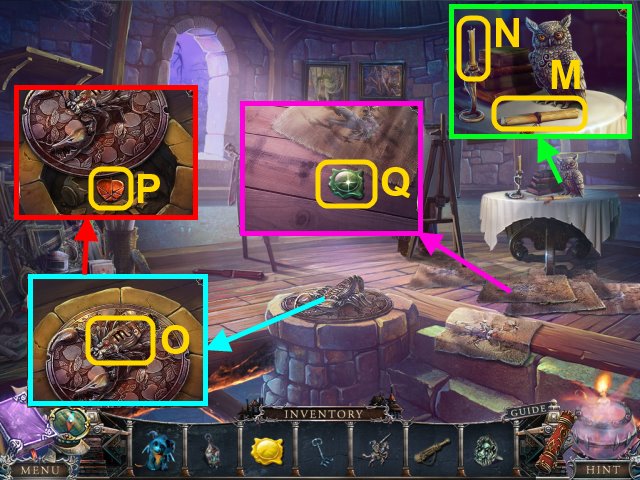
- Place the AMBER SYMBOL on the owl (O); take the FEATHER (P).
- Move the canvas scrap; place the CANVAS on the easel (Q).
- Use the COAL; take DORIAN'S CLUE (R).
- Fix the stand; place the SPYGLASS on it.
- Place DORIAN'S CLUE on the lens for a mini-game (S).
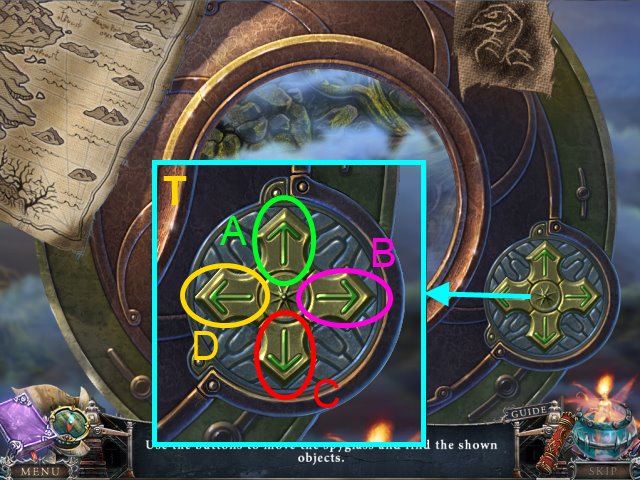
- Solution (T): Bx14, Ax3, select the snake, Bx5, Ax2, select the tree, Dx15, Cx2, select the hand, Bx6, Ax2, select the skull, Ax3, Dx5, select the plant, Bx12, A, select the fish, Dx9, A, select the island.
- Take the MAP PIECE.
- Go to the Boy's Room.
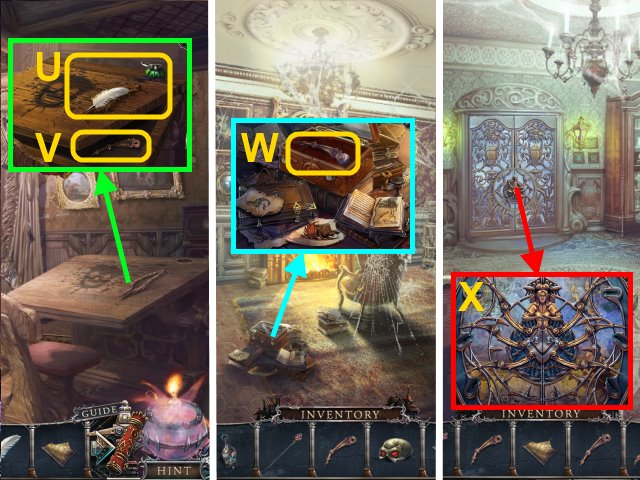
- Place the INKPOT and FEATHER on the desk (U); take the SPIDER KEY (V).
- Go to the Library.
- Use the SKULL BUTTON on the box; take the SPIDER KEY and MARBLE BALL (W).
- Walk forward.
- Place the 3 SPIDER KEYS on the door (X).
- Walk forward.
Chapter 7: The Lake
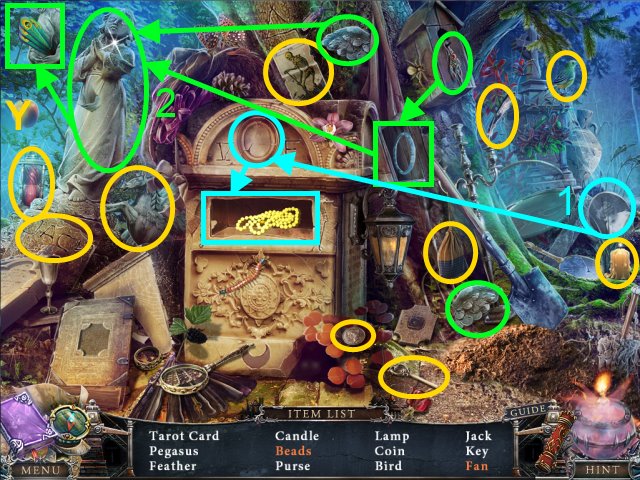
- Play the HOP (Y).
- You receive the FAN.
- Place the MARBLE BALL in the fish's mouth; take the FISHHOOK (Z).
- Take the IRON HANDLE (A).
- Walk down.
- Place the IRON HANDLE on the iron; take the IRON (B).
- Place the FAN on the peacock; take the LADYBUG WING (C).
- Walk forward twice.
- Gather the drawings (D).
- Use the KNITTING NEEDLE to get the LETTER A (E).
- Place the LADYBUG WING on the bag; take the SIGNET (F) and painting piece (G).
- Take the BONE (H).
- Walk forward.
- Take the BRANCH (I).
- Walk down, then up the ladder.
- Take the PLIERS (J).
- Walk down twice.
- Use the PLIERS to get the SIGN BOARD; take the painting piece (K).
- Walk down.
- Open the drawer; place the SIGNET on the box (L).
- Take the HORN and painting piece (M).
- Walk down.
- Place the LETTER A on the book (N); read the note.
- Take BRYAN'S KEY (O).
- Go to the Water Tower.
- Place the BONE, BRANCH, and SIGN BOARD on the ladder (P).
- Take the BELLOWS (Q).
- Take the painting piece (R).
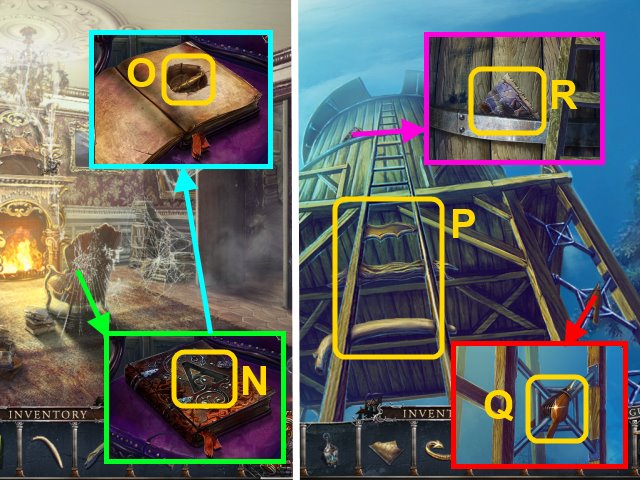
- Go to the Boy's Room.
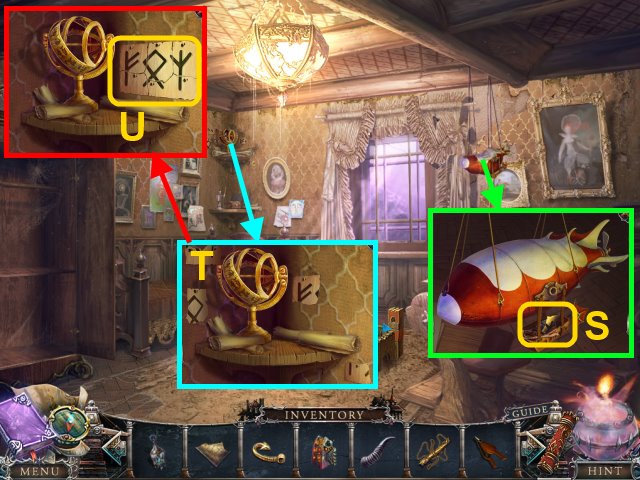
- Use the BELLOWS on the blimp; take the RUNIC CODE PIECE and painting piece (S).
- Gather the paper scraps (T); place the RUNIC CODE PIECE on the wall (U).
- Go to the Library.
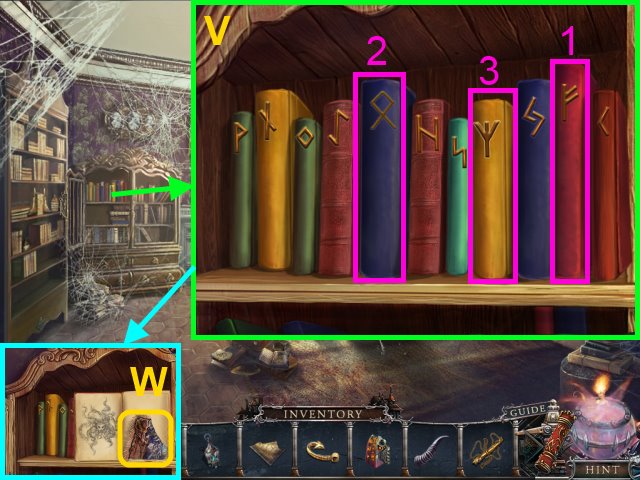
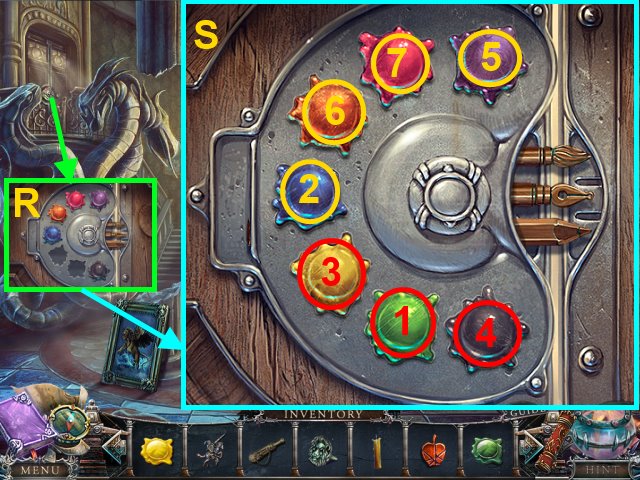
- Examine the bookshelf for a mini-game.
- Solution (V): 1-3.
- Take the painting piece (W).
- Select the canister for a mini-game.
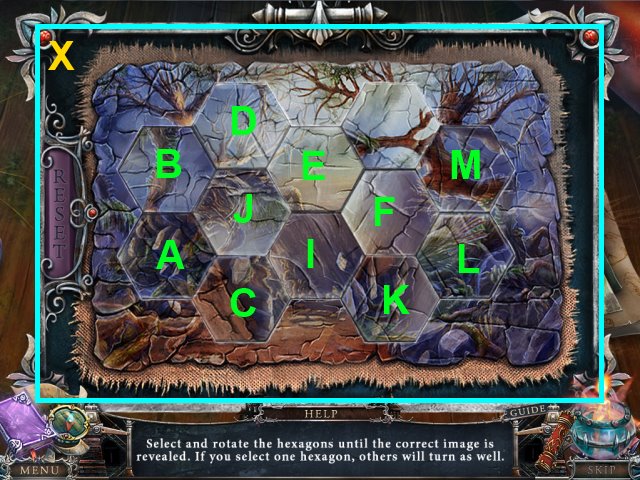
- Solution (X): Ax2, Bx3, Cx2, Dx1, Ex3, Fx1, Dx3, Ex1, Fx2, Dx1, Jx5, Ix4, Kx4, Lx5, Mx1.
- You receive the LAKE SHORE PAINTING.
- Go to the Lake Shore.
- Use the LAKE SHORE PAINTING on the trees (Y).
- Use the DRAGON on the water (Z); take the SHELL.
- Use the FISHHOOK on the fishing pole; take the HANDKERCHIEF (A).
- Walk down.
- Place the HANDKERCHIEF on the sickle; take the SICKLE (B).
- Walk down.
- Give the SHELL to the statue (C); take the EYE DROPPER (D).
- Play the HOP (E).
- You receive the NET GUN.
- Walk forward twice.
- Use the SICKLE on the vines; take the MAP PIECE (F).
- Walk forward.
- Open the bottle (G); use the EYE DROPPER on the bottle to get the FISH OIL.
- Walk down twice.
- Use the FISH OIL on the dragon's horn; place the HORN on the dragon (H).
- Open the dragon's mouth; take the RUBBER PATCH (I).
- Walk down twice.
- Take the poster; place the MAP PIECES in the frame. Take the MAP (J).
- Go to the Boat.
- Place the MAP on the boat; examine it for a mini-game (K).
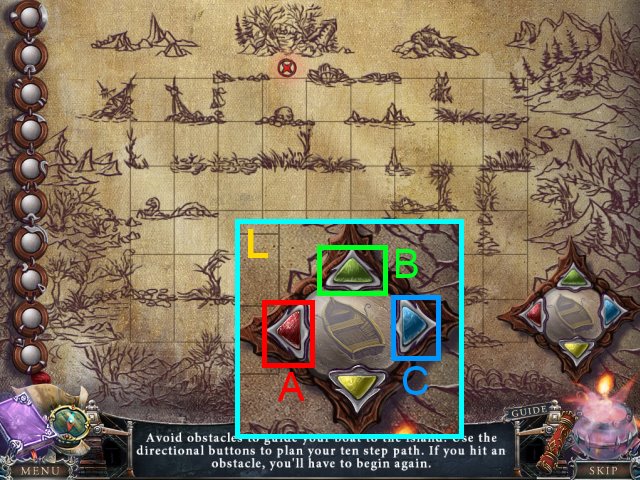
- Solution (L): B, C, Bx2, C, B, A, B, A, B.
- Use BRYAN'S LANTERN on the mist (M).
- Move the drawings (N).
- Use BRYAN'S KEY to open the box; read the note.
- Place the NET GUN in the net gun (O); take the LOADED GUN.
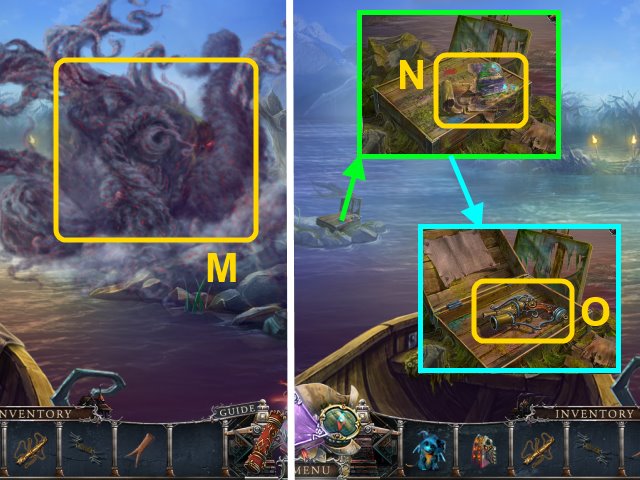
- Move forward.
- Talk to Abilene (P).
- Take the AX HANDLE (Q).
- Move down.
- Place the AX HANDLE on the blade; take the AX (R).
- Go to the Water Tower.
- Use the AX on the tower (S).
- Go down.
- Take the GLASS (T).
- Go to the Island.
- Place the GLASS in the helmet; take the DIVING HELMET (U).
- Go down.
- Place the RUBBER PATCH on the diving suit; use the IRON to attach it (V).
- Place the DIVING HELMET on the diving suit (W).
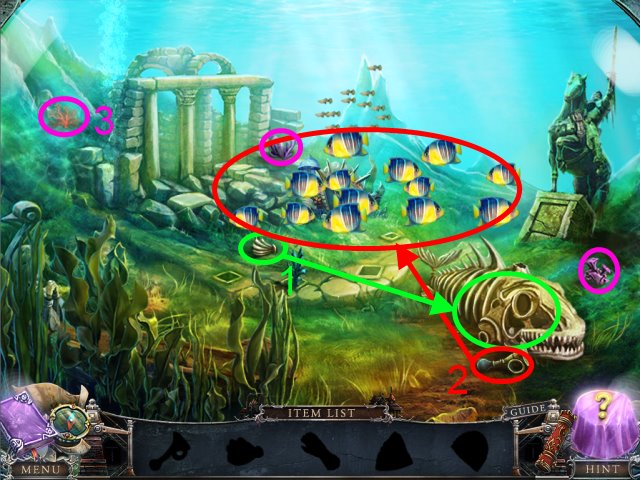
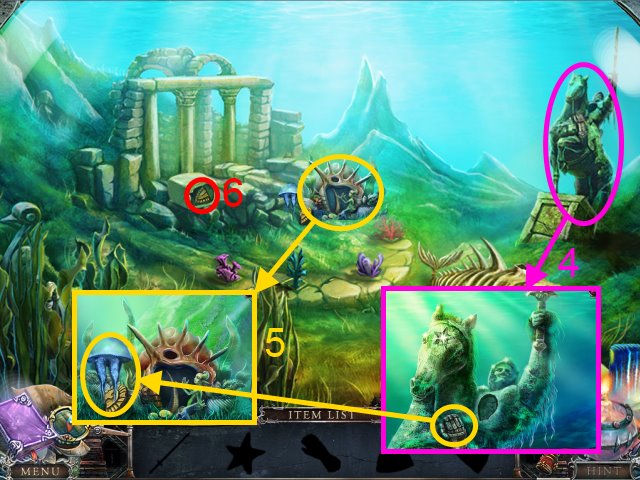
- Play the HOP (1-14).
- You receive BRYAN'S PORTRAIT.
- Move forward.
- Give BYRAN'S PORTRAIT to Abilene for a mini-game (X).
- Solution: 1-7.
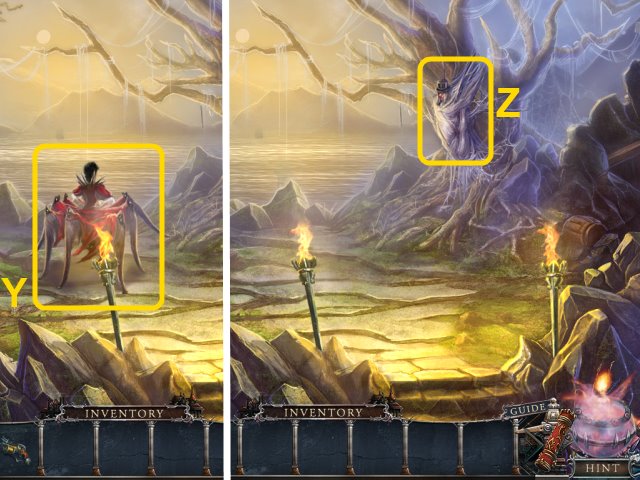
- Use the LOADED GUN on Abilene (Y).
- Use the DRAGON on the web (Z).
- Congratulations! You have completed Bridge to Another World: Burnt Dreams.
Created at: 2014-04-27