

Walkthrough Menu
- General Tips
- Chapter 1: The Tornado
- Chapter 2: West Oz
- Chapter 3: South Oz
- Chapter 4: North Oz
- Chapter 5: Emerald City
General Tips
- This is the official guide for Bridge to Another World: Escape from Oz.
- This guide won't tell you when to zoom into a location; the screenshots show each zoom scene.
- Hidden-object puzzles are referred to as HOPs. Only the locations of the HOPs will be shown.
- Use the Map to fast travel to a location.
Chapter 1: The Tornado
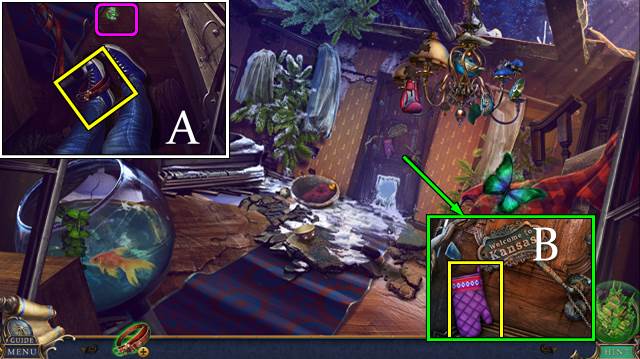
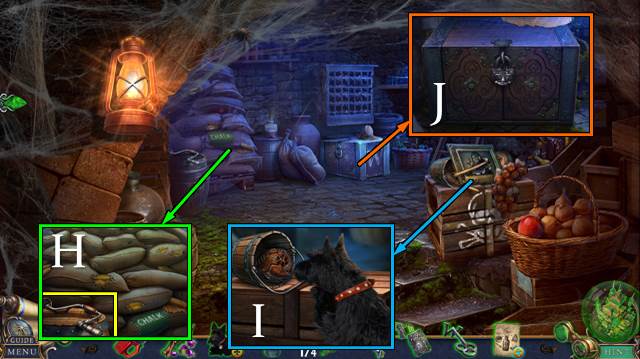
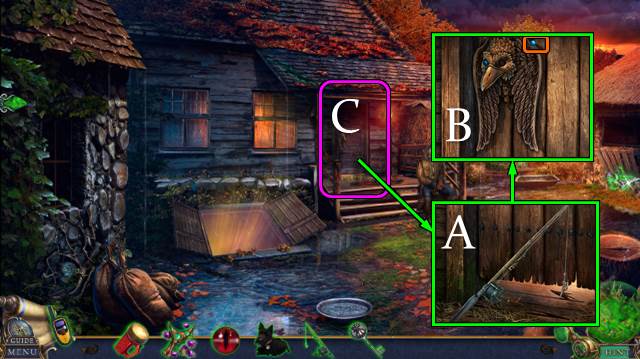
- Remove objects; take COLLAR. Go (A).
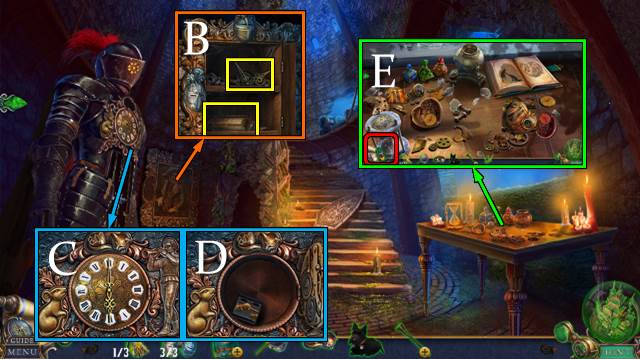
- Take OVEN MITT. Pull handle (B).
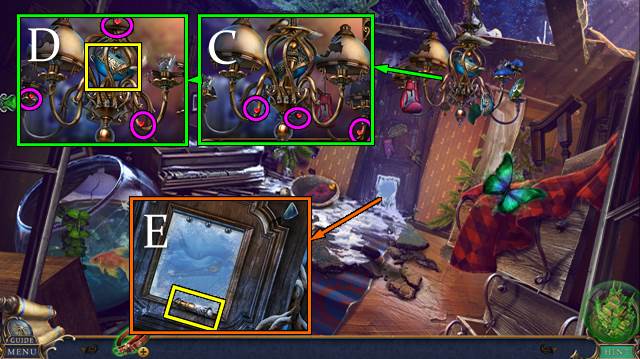
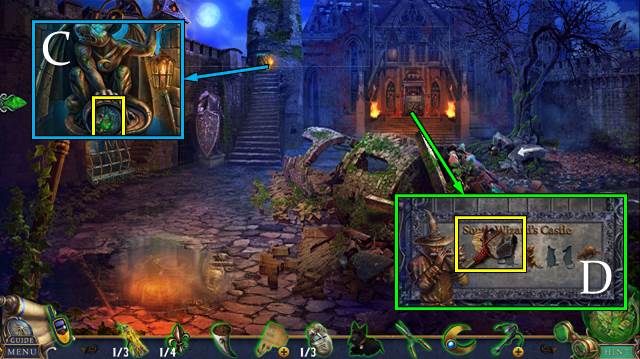
- Take TAG. Move objects and hearts (C).
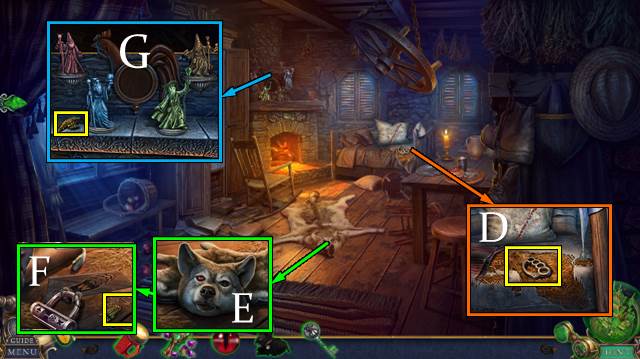
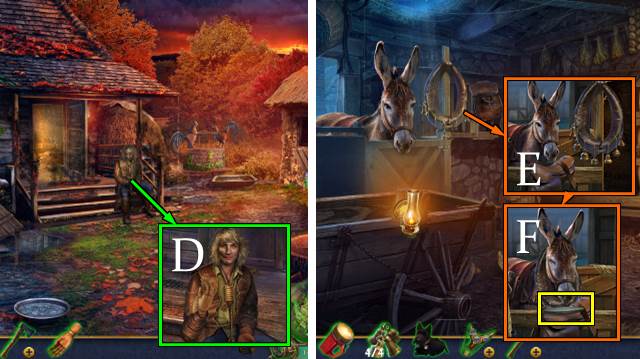
- Turn lamp and repeat. Take HOT WATER with OVEN MITT (D).
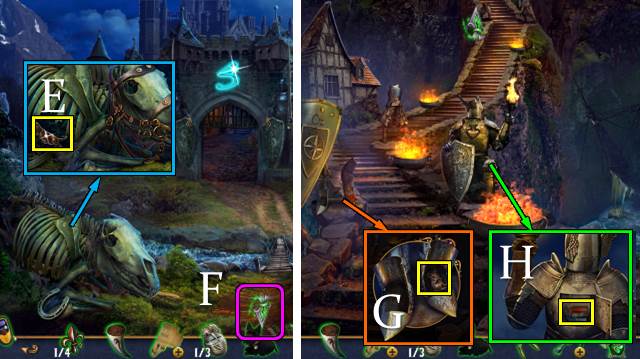
- Use HOT WATER; take DOG WHISTLE (E).
- TAG on COLLAR; take TOTO'S COLLAR.
- Clean DOG WHISTLE.
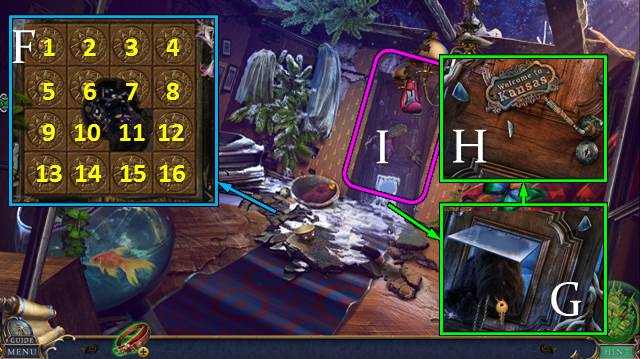
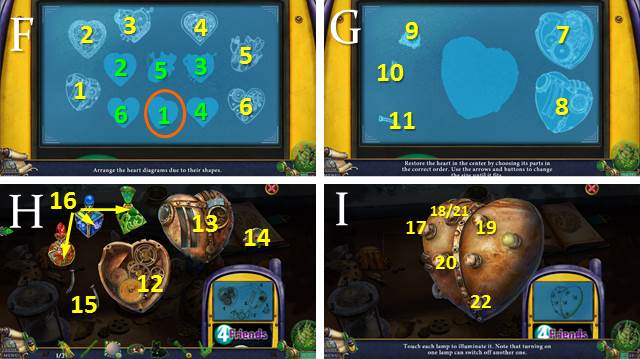
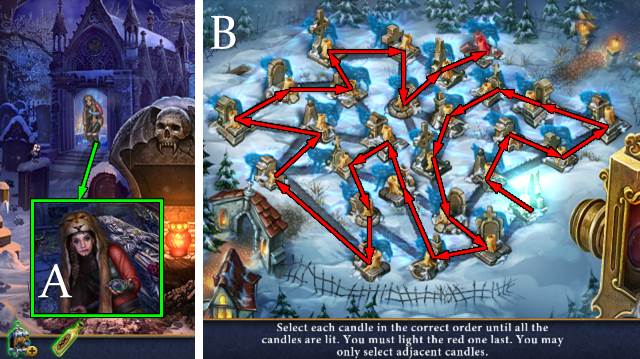
- Remove items. Solution: 7-8-12-11-10-6-7-11-10-6-7-3-2-6-7-3-2-1-5-9-13-14-10-9-5-6-10-14-15-11. Receive FRAZZLED TOTO (F).
- Access FRAZZLED TOTO for a HOP; receive CLOTHESPIN 1/2.
- Place TOTO'S COLLAR; take TOTO.
- Send TOTO; take DOOR KEY (G).
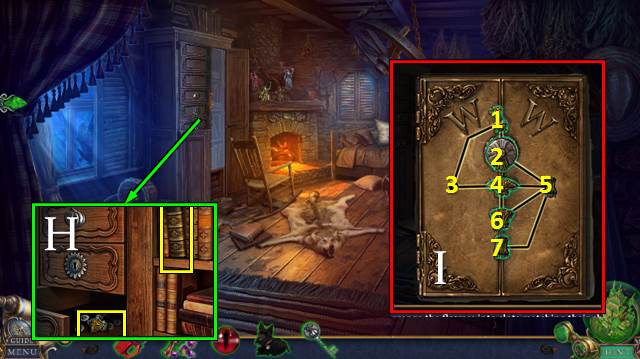
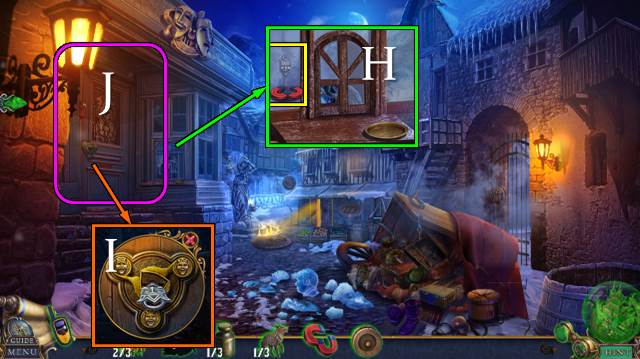
- Use DOOR KEY (H).
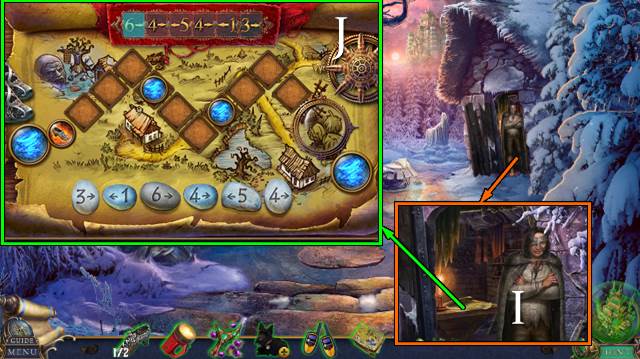
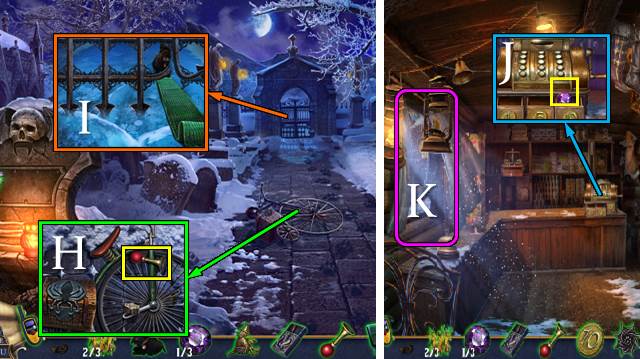
- Go (I).

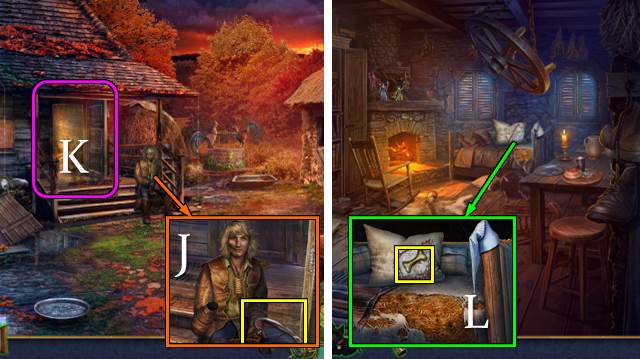
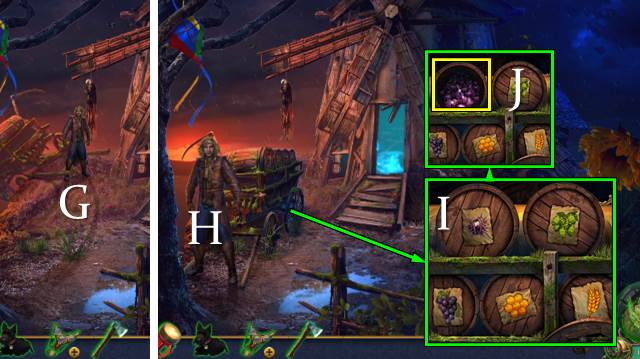
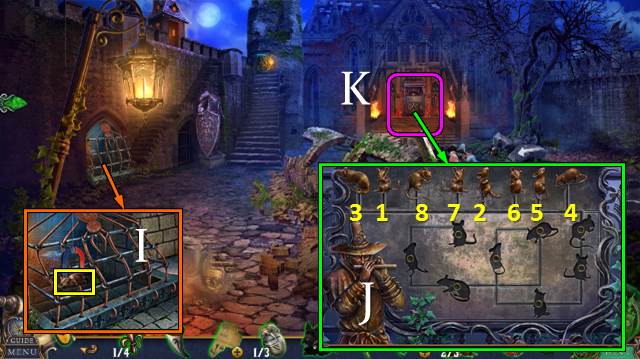
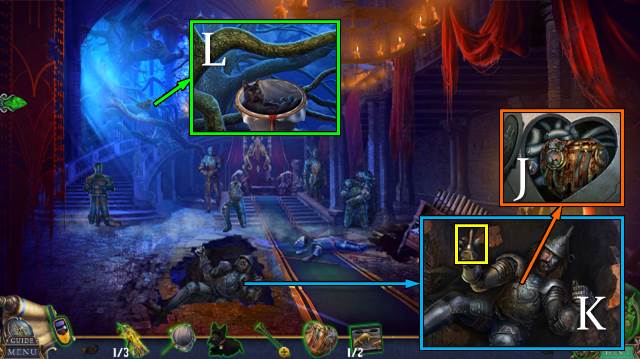
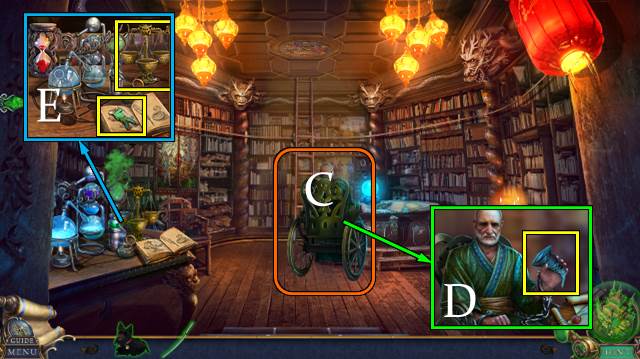
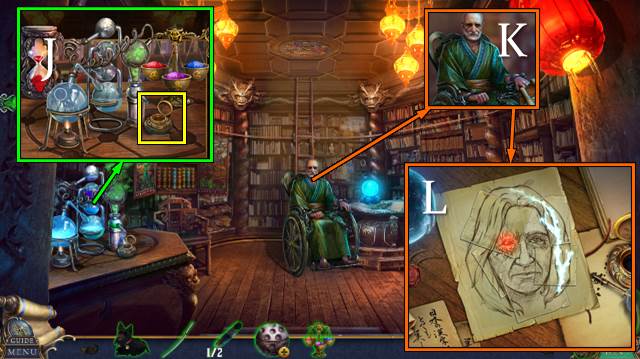
- Take CROWBAR (J).
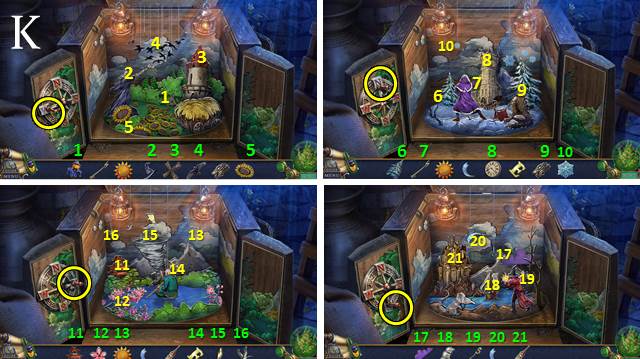
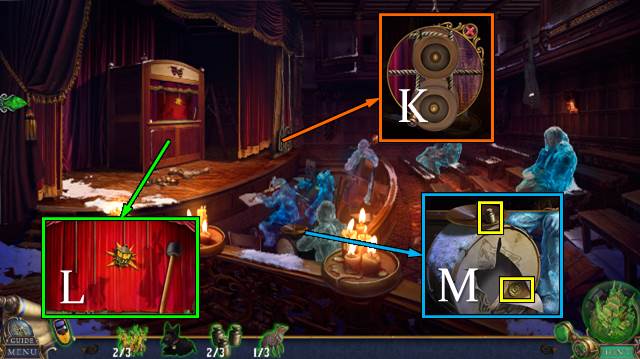
- Use CROWBAR (K).
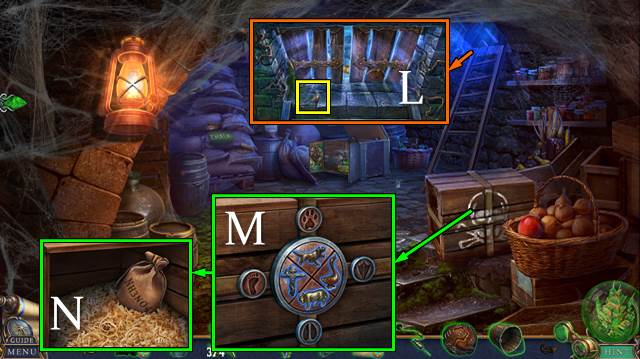
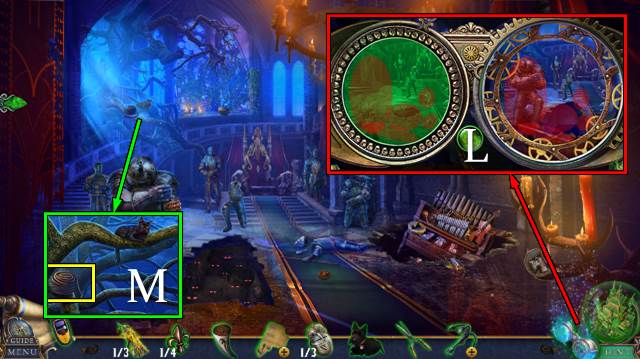
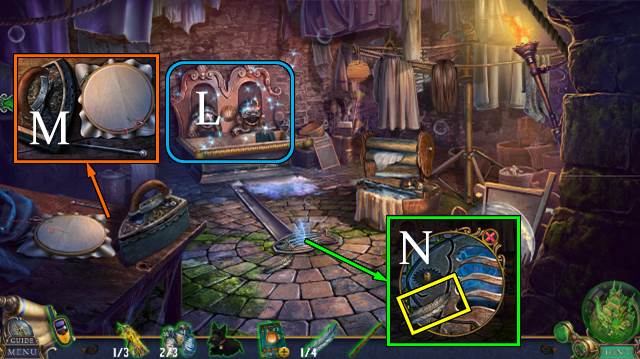
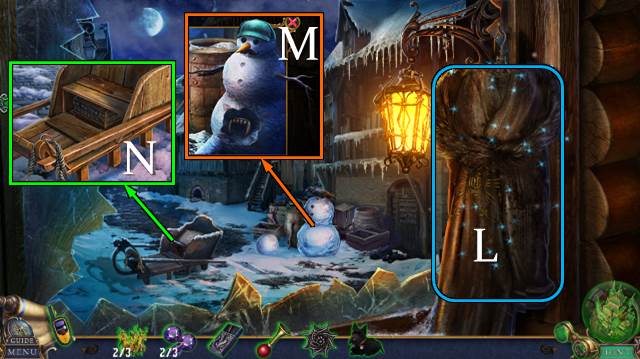
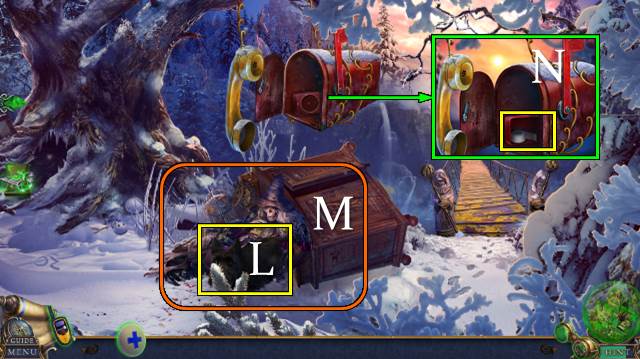
- Take SILVER SHOE 1/2 (L).
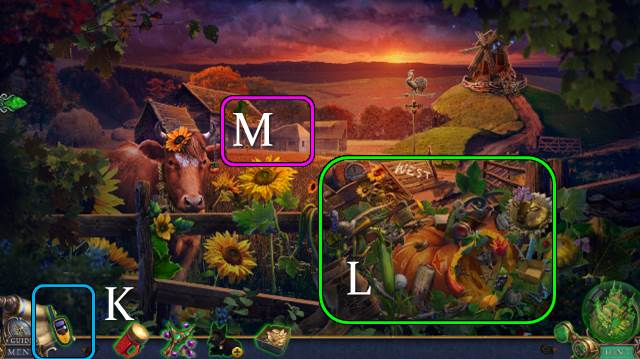
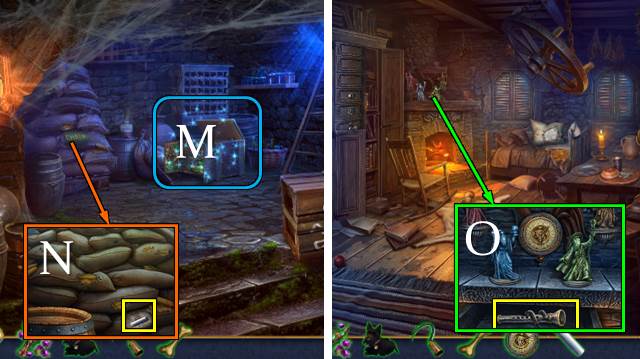
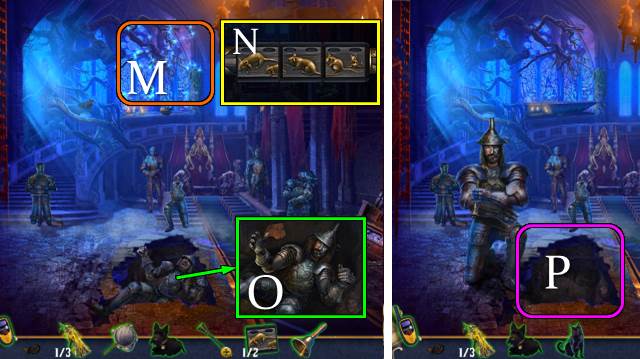
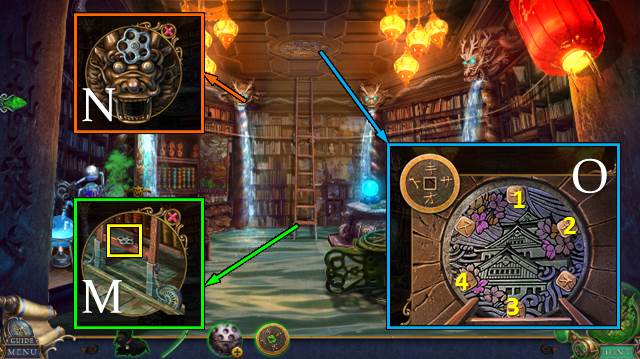
- Touch phone (M).
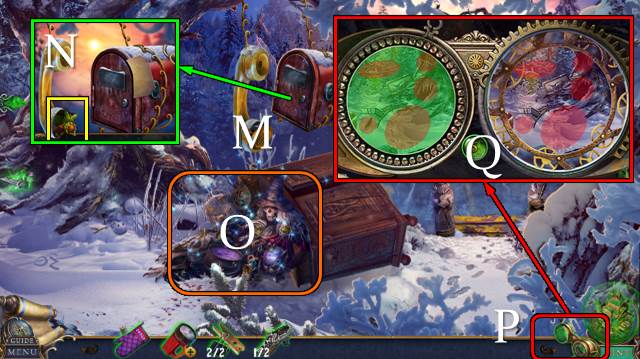
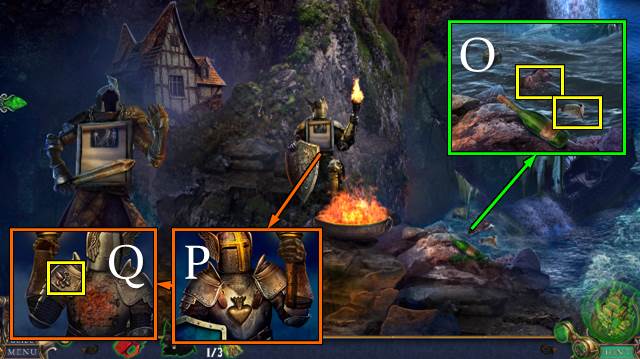
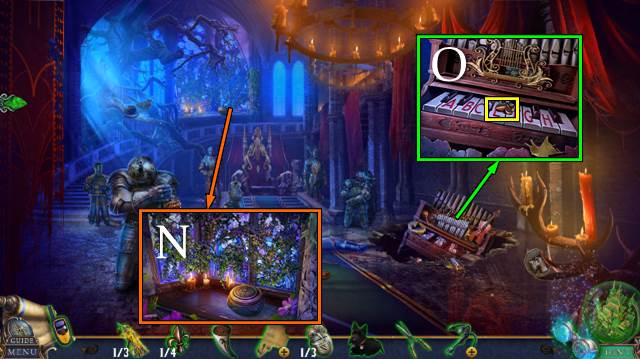
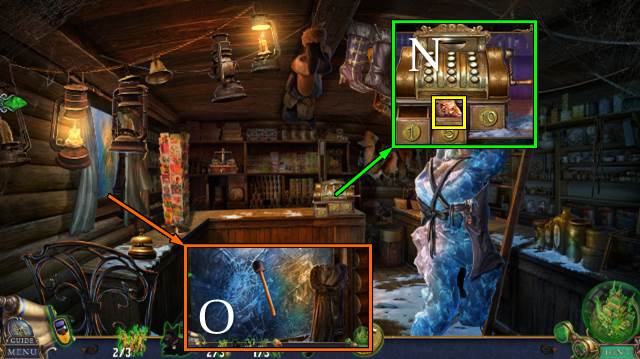
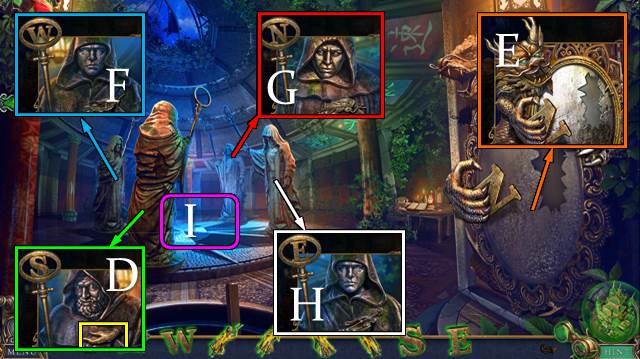
- Remove cap; take HAZELNUTS and note (N).
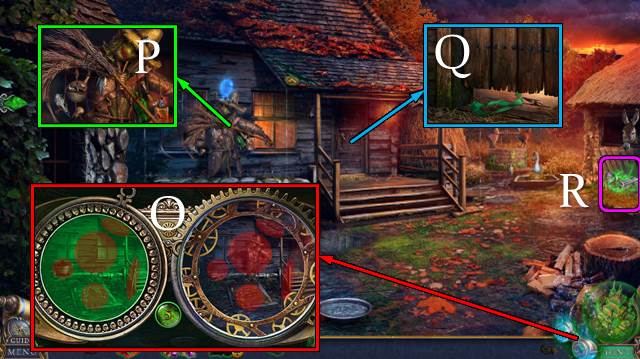
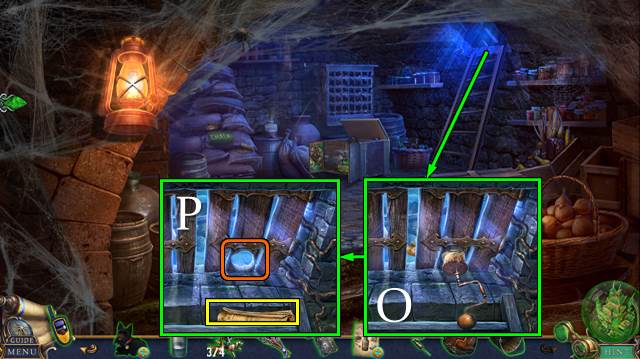
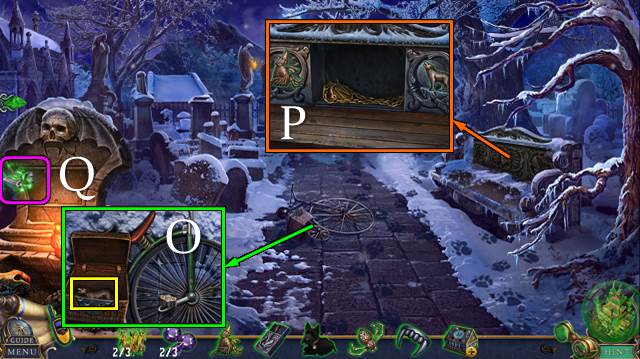
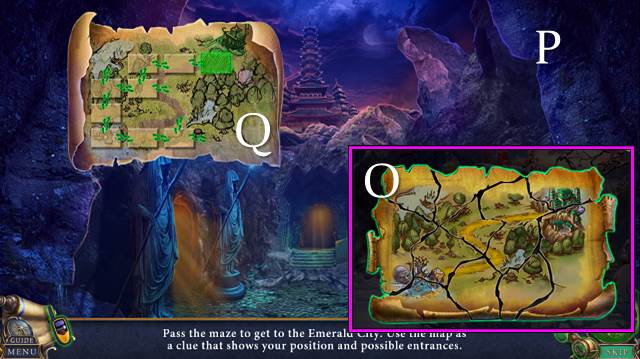
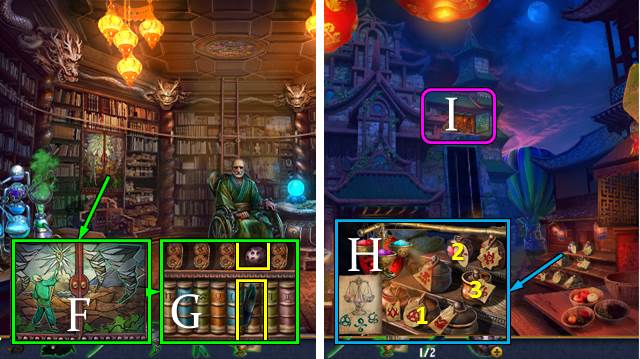
- Play HOP (O); receive SORCERESS' MEDALLION and glasses.
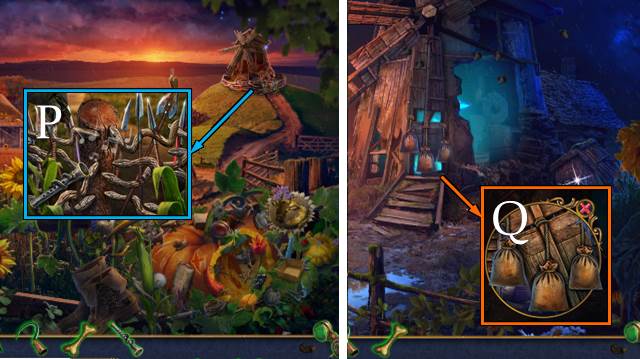
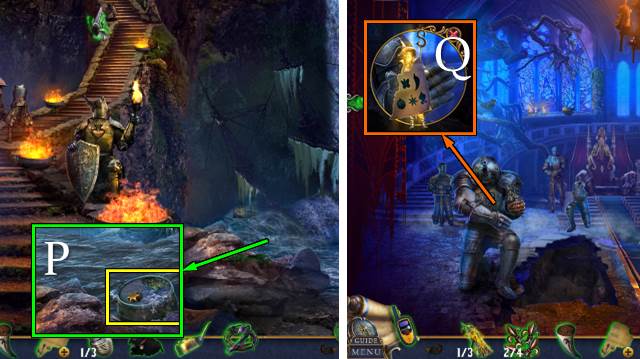
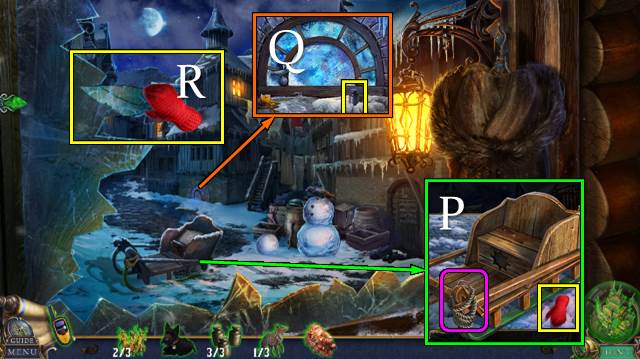
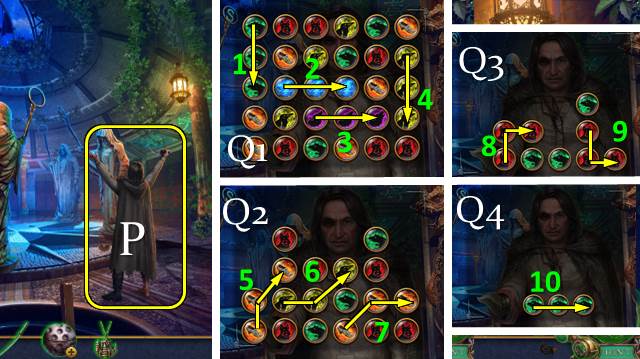
- Use glasses (P).
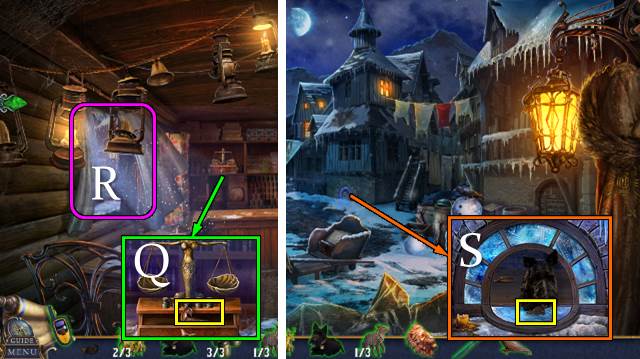
- Solution (Q).
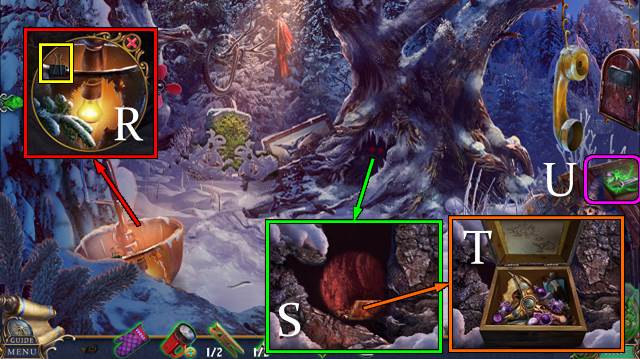
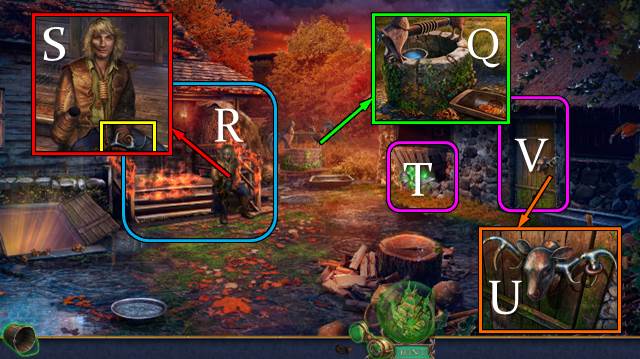
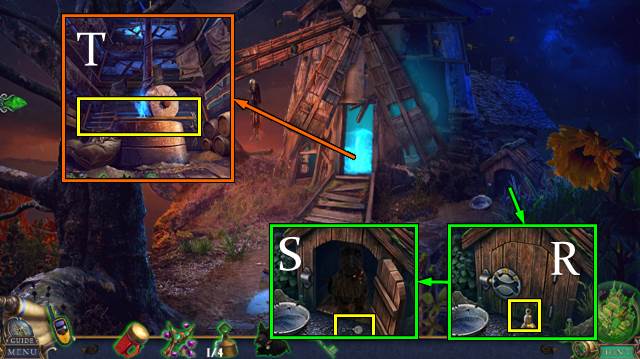
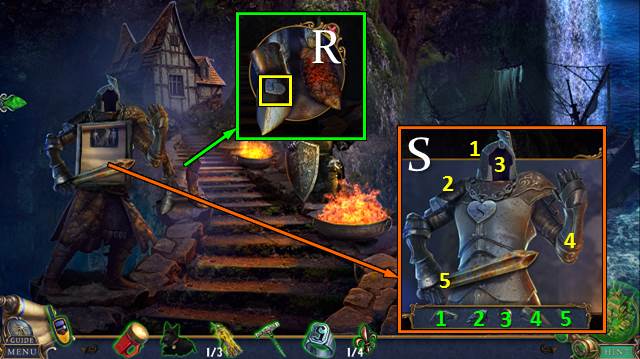
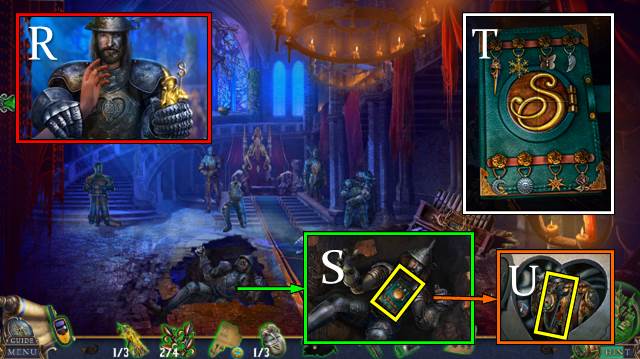
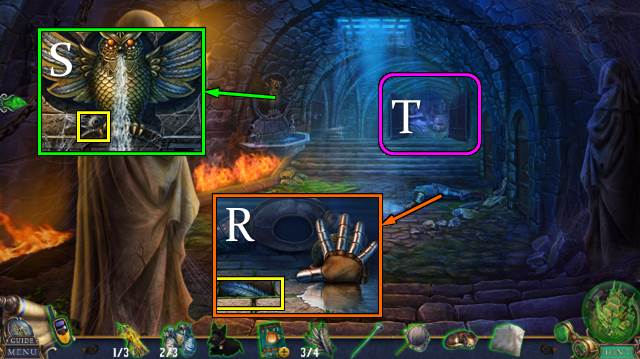
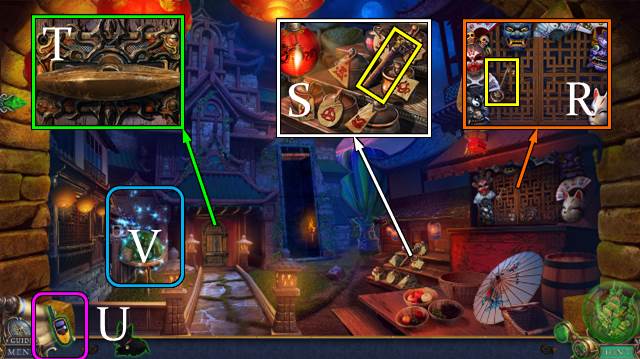
- Take CLIPS 2/2. Offer HAZELNUTS; take LIGHT BULB with OVEN MITT (R).
- LIGHT BULB in BROKEN FLASHLIGHT; take FLASHLIGHT.
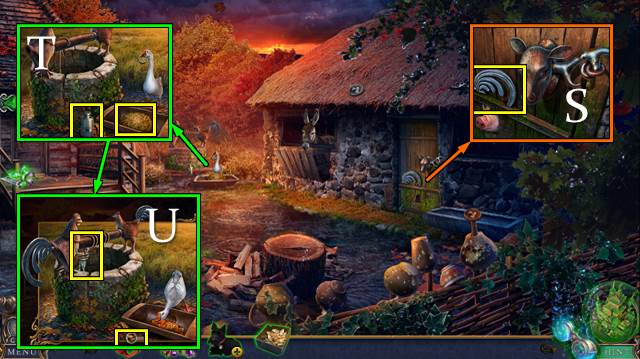
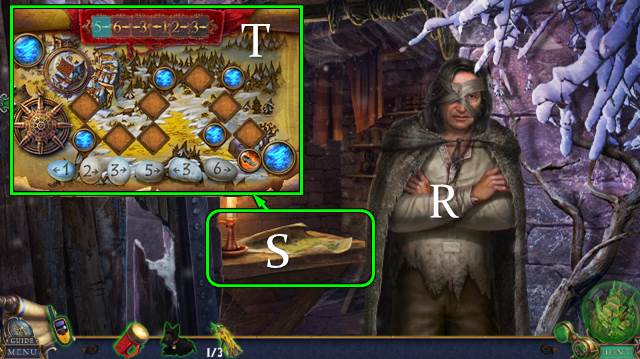
- Use FLASHLIGHT (S).
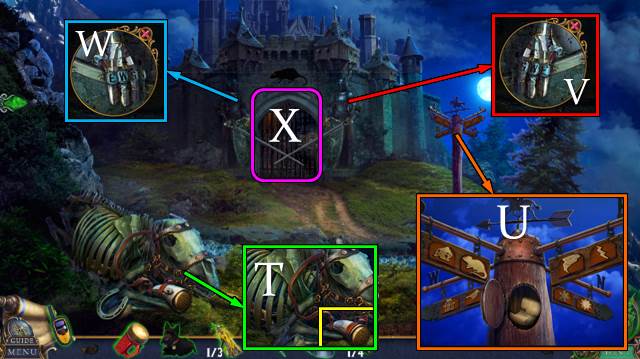
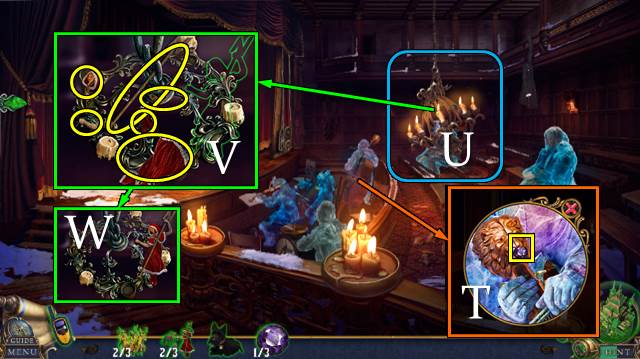
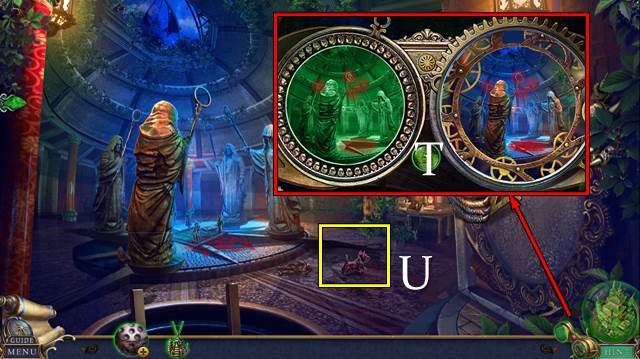
- Place SORCERESS' MEDALLION; take SLINGSHOT (T).
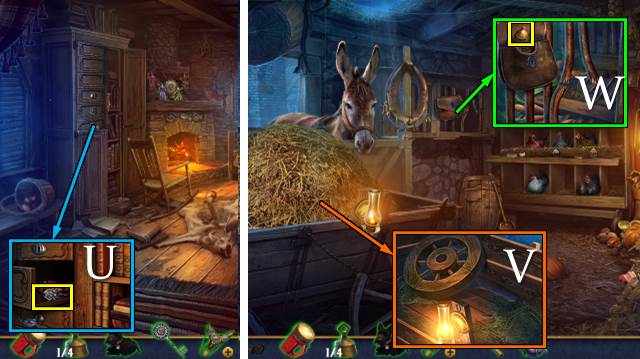
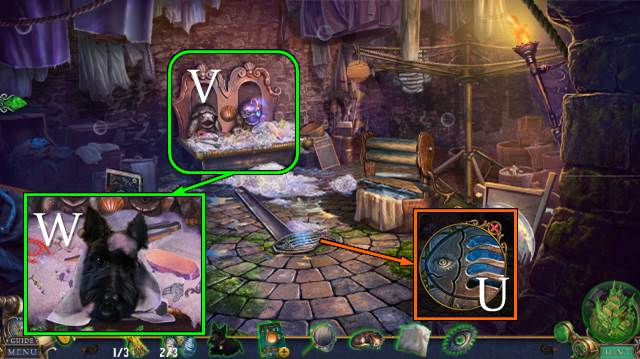
- Go (U).
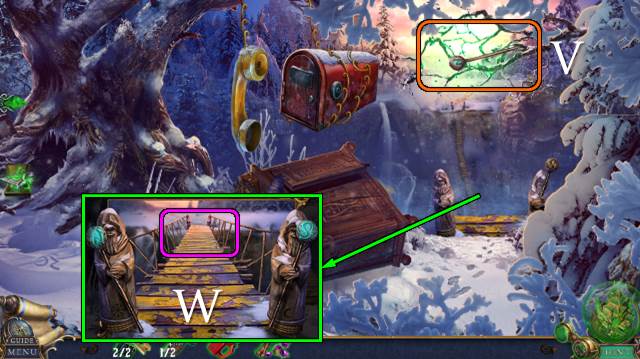
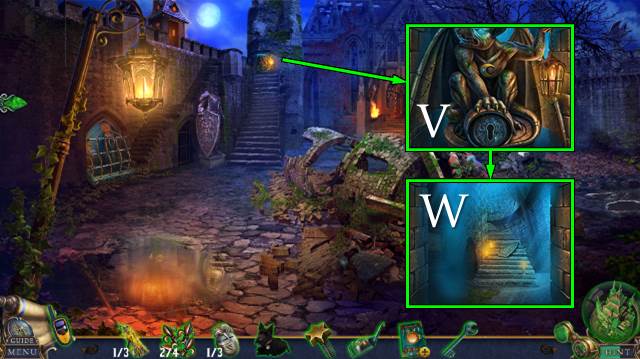
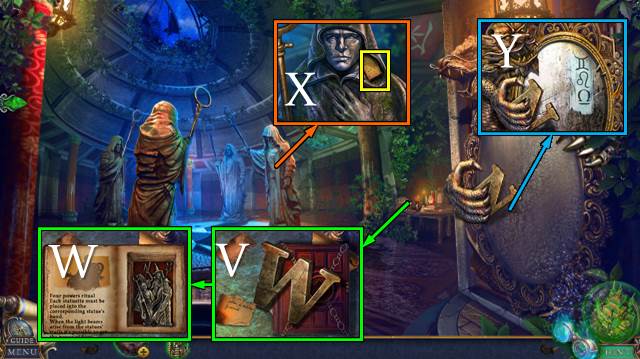
- Use SLINGSHOT; receive SCEPTER (V).
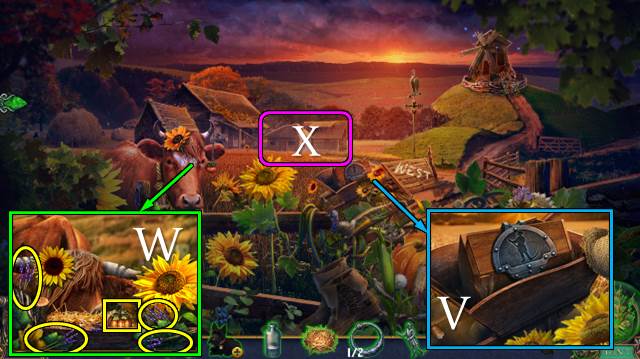
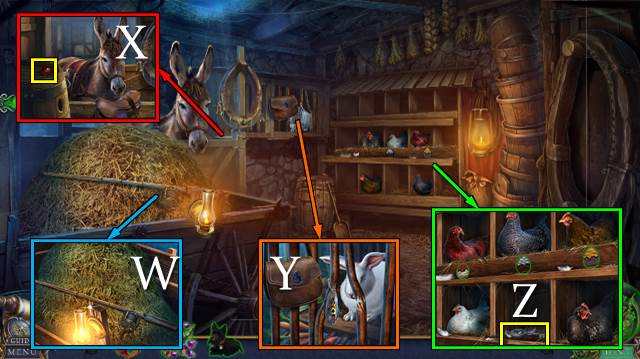
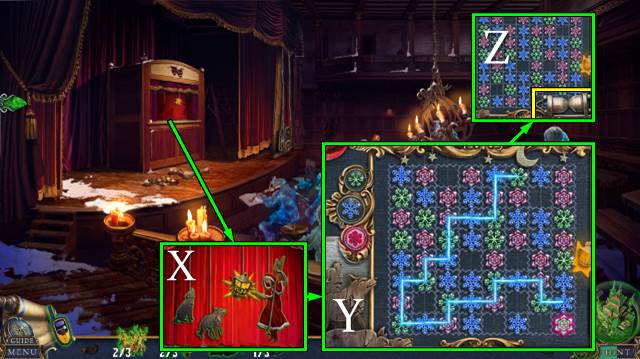
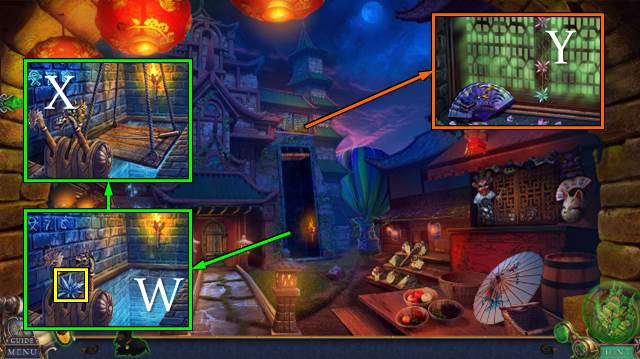
- Place SCEPTER; go (W).
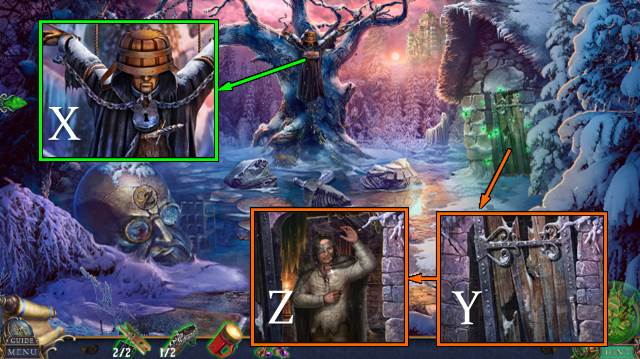
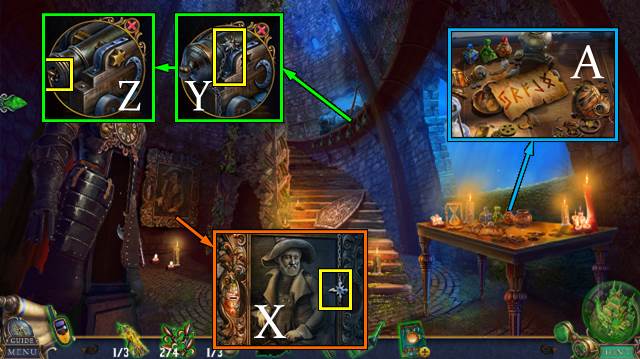
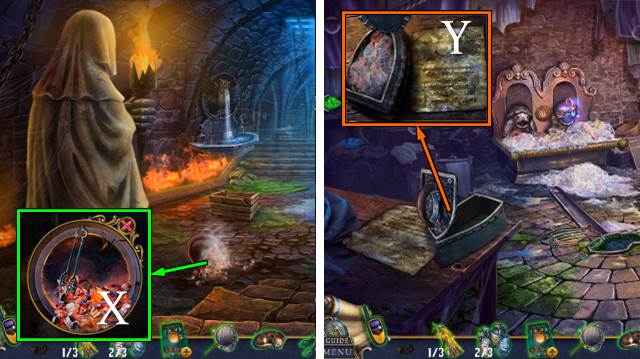
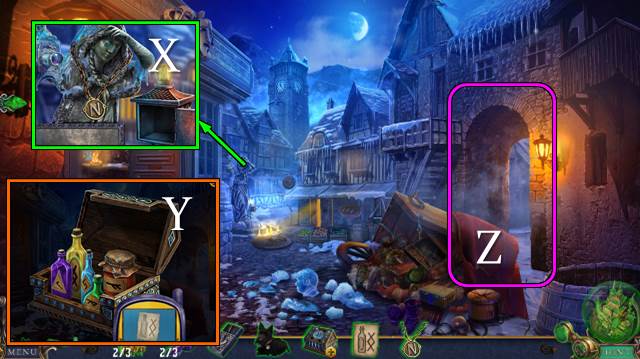
- Take BROKEN BASKET. Move board; take DAGGER (X).
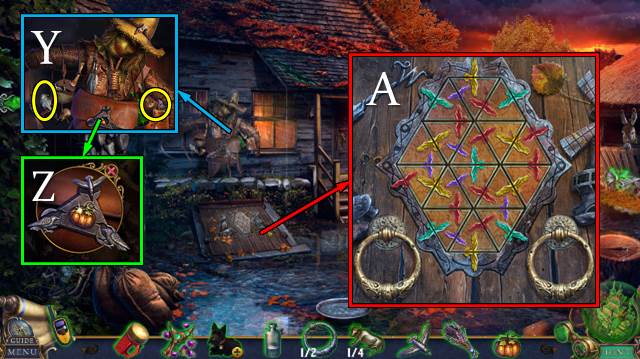
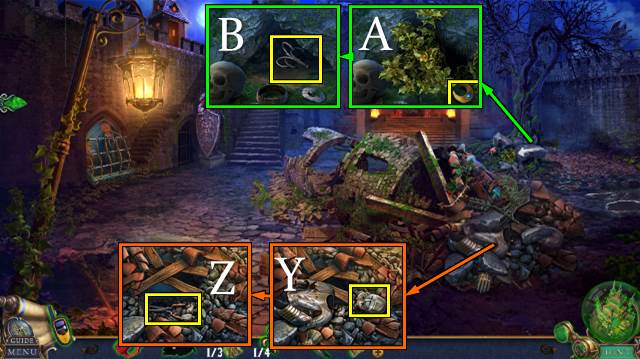
- Open door; use FLASHLIGHT. Use SLINGSHOT; receive TOTO (Y).
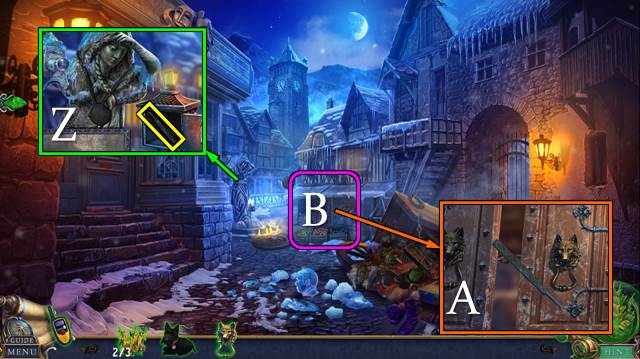
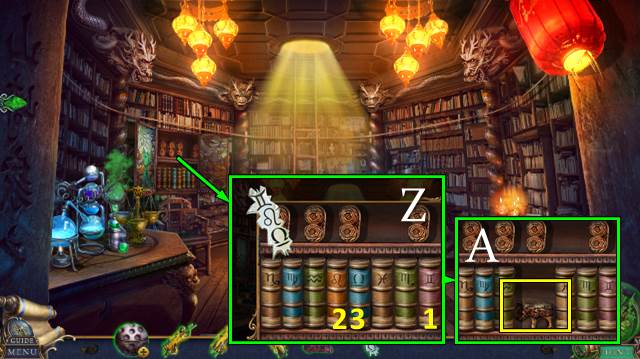
- Talk (Z).
- CLIPS on BROKEN BASKET; take BASKET.
- TOTO in BASKET.
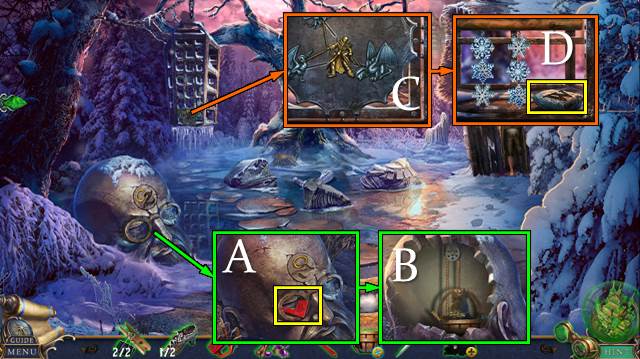
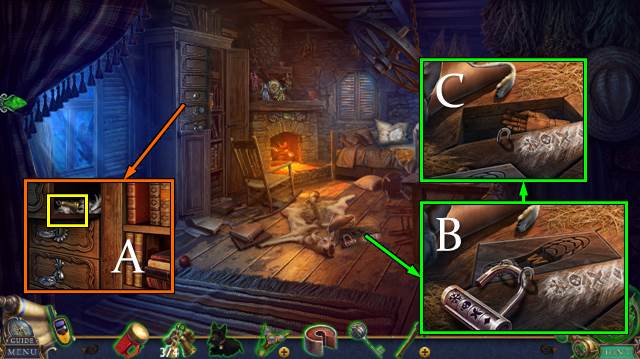
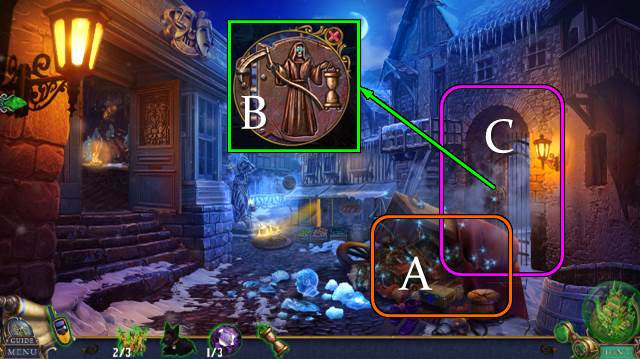
- Take KNOB. Turn head (A).
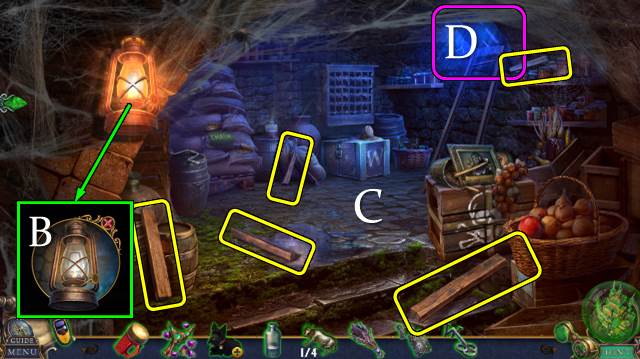
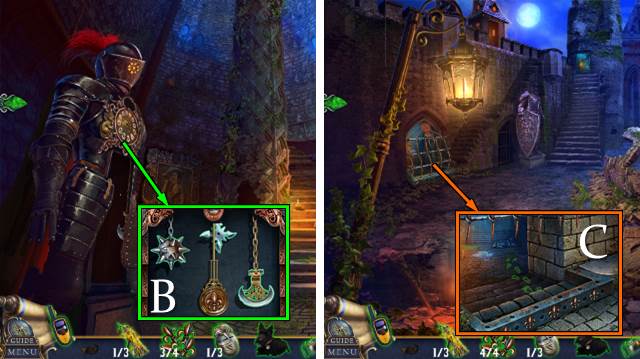
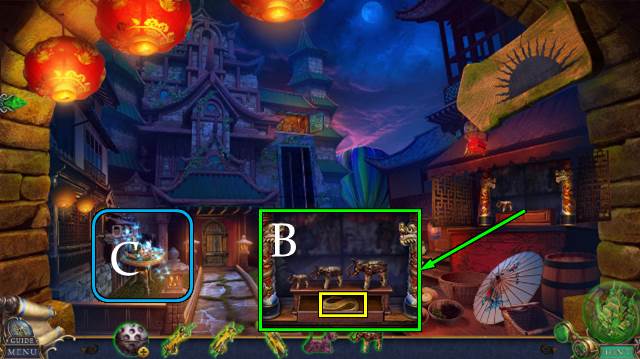
- Touch statuette, use FLASHLIGHT and TOTO; take TAMER STATUETTE (B).
- Place TAMER STATUETTE (C).
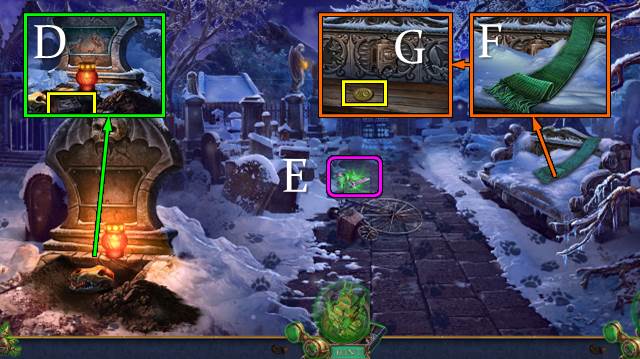
- Take WEST STONE (D).
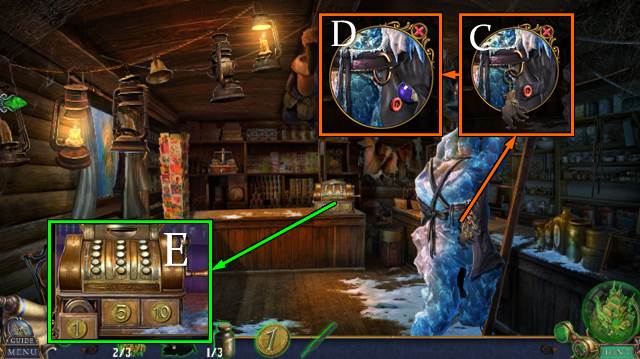
- Walk down.

- Use KNOB; take DELIVERY BOX (E).
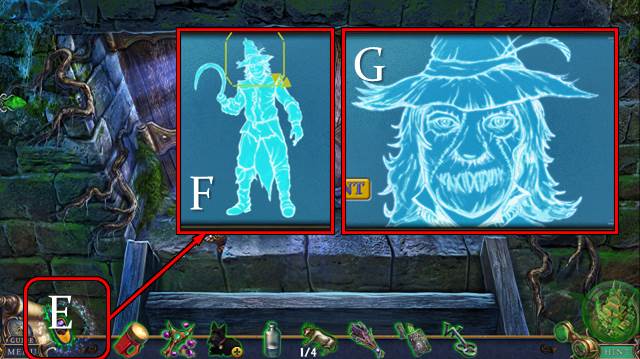
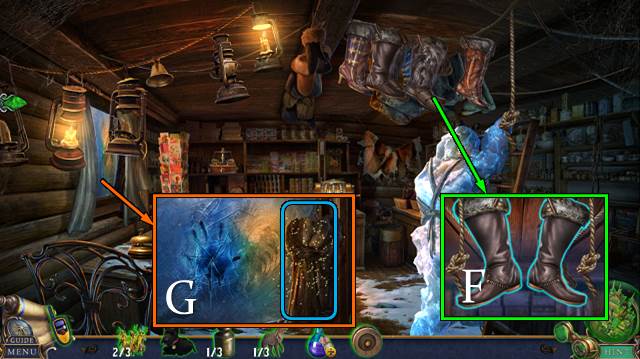
- Go (F).
- Clear stone; place WEST STONE. Solution: 4-5-2-3-4-5-2-1-3. Take MAP OF WEST OZ (G).
- Go (H).
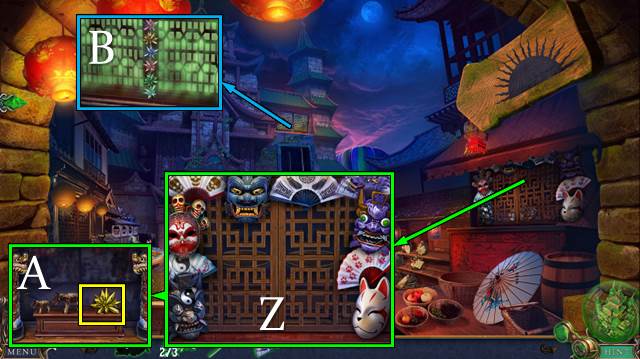
- DAGGER on DELIVERY BOX; take WALKIE-TALKIE SET.
- Offer MAP OF WEST OZ (I).
- Take SILVER SHOE 2/2.
- Offer WALKIE-TALKIE SET.
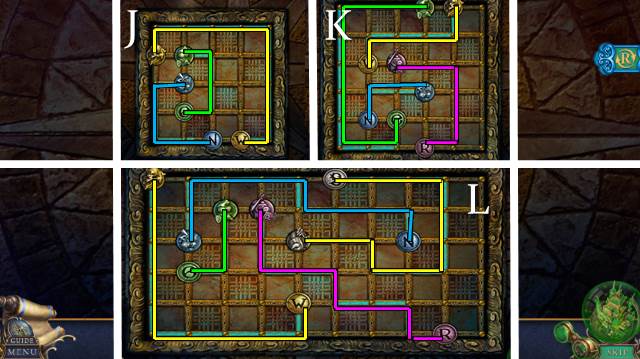
- Place SILVER SHOES. Solution (J).
Chapter 2: West Oz
- Talk (K).
- Use SLINGSHOT.
- Play HOP (L); receive PUMPKIN SEEDS.
- Go (M).
- Use glasses (O).
- Take BROKEN BROOM (P).
- Open door; take RIBBON (Q).
- Go (R).
- Take ROOSTER TAIL (S).
- Take BOTTLE OF WATER and STRAW (T).
- Offer PUMPKIN SEEDS; use ROOSTER TAIL. Take HARVESTER FIGURINE and HATCH HANDLE 1/2 (U).
- Walk down.
- Place HARVESTER FIGURINE. Take COW FIGURINE 1/4 and RAVEN (V).
- Offer STRAW. Collect DRIED LAVENDER; take PUMPKIN SYMBOL (W).
- Go (X).
- Move ravens (Y).
- Remove broken pumpkin; place RAVEN and PUMPKMIN SYMBOL. Take MATCHES and HATCH HANDLES 2/2 (Z).
- RIBBON on BROKEN BROOM; take BROOM.
- Use BROOM; place HATCH HANDLES. Solution (A).
- Use FLASHLIGHT.
- Open lamp, take CHEST KEY and use MATCHES. Turn lamp; turn knob (B).
- Find 5 ladder rungs (C).
- Go (D).
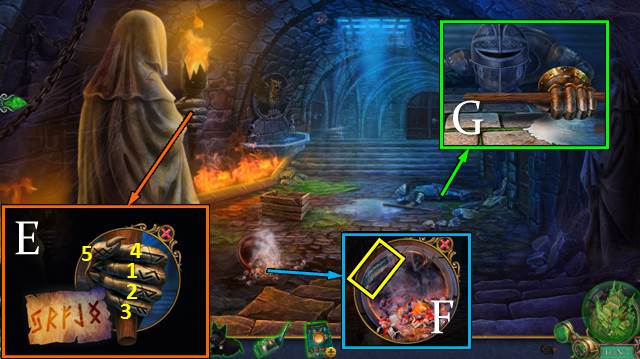
- Talk (E).
- Solution 1 (F).
- Solution 2 (G).
- Take SMOKE BOMB RECIPE.
- Take HAND DRILL (H).
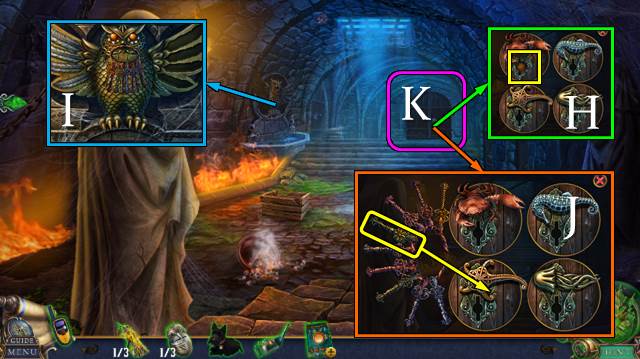
- Move items; take OLD BALL and BUCKET (I).
- Use CHEST KEY; use MATCHES (J).
- Solution (K).
- Receive FIGURINE 2/4.
- Give TOTO the OLD BALL; take FIGURINE 3/4 and WICK.
- Take FIGURINE 4/4 (L).
- Turn crate; place FIGURINES. Solution (M).
- Take POWDER (N).
- Use HAND DRILL (O).
- Take NEWSPAPER (P).
- BOTTLE OF WATER, DRIED LAVENDER, WICK, NEWSPAPER and POWDER on SMOKE BOMB RECIPE. Add powder, lavender, newspaper and wick. Use MATCHES; take SMOKE BOMB.
- Place SMOKE BOMB. Remove bottle; send TOTO (P).
- Get WATER with BUCKET (Q).
- Use WATER (R).
- Talk. Receive TOTO. Take HORN (S).
- Go (T).
- Place HORN (U).
- Go (V).
- Take BROKEN FISHING ROD (W).
- Take WOLF EYE (X).
- Touch fishing line, remove bar and send TOTO; take FISHING LINE WITH HOOK (Y).
- Solution; take ONION KEY (Z).
- Walk down and left.
- FISHING LINE WITH HOOK on BROKEN FISHING ROD; take FISHING ROD.
- Use FISHING ROD; take HOUSE KEY (A).
- Move eye; use HOUSE KEY (B).
- Go (C).
- Take BRASS KNUCKLES (D).
- Place WOLF EYE (E).
- Take DANDELION TOKEN 1/3 (F).
- Move wizards as shown; take DANDELION TOKEN 2/3 (G).
- Use ONION KEY and BRASS KNUCKLES; take DANDELION TOKEN 3/3 and WIZARD'S DIARY (H).
- DANDELION TOKENS on WIZARD'S DIARY. Solution: 1-6-2-5-4-3-1-2-5-6-5-4-3-4-5-7-4-5-6-5-4-3 (I).
- Receive SCARECROW'S STORY.
- Walk down.
- Offer SCARECROW'S STORY. Take SICKLE (J).
- Go (K).
- Use SICKLE; take BONE TOKEN (L).
- Go to Cellar.
- Play HOP (M); receive CLOCK DIAL.
- Use SICKLE; take CHALK (N).
- Go to Farmhouse.
- Place CLOCK DIAL; take CHARMER'S FLUTE (O).
- Walk down twice.
- Use CHARMER'S FLUTE. Remove spears and go (P).
- Use SICKLE 3 times (Q).
- Take BELL 1/4; place BONE TOKEN (R).
- Send TOTO; take SUNFLOWER KEY (S).
- Use SLINGSHOT; take PITCHFORK (T).
- Go to Farmhouse.
- Use SUNFLOWER KEY; take BEETLE BUTTON (U).
- Go to Stable.
- Use PITCHFORK 3 times. Take WHEEL and BUTTON (V).
- Place BEETLE BUTTON; take BELL 2/4 (W).
- Walk down twice.
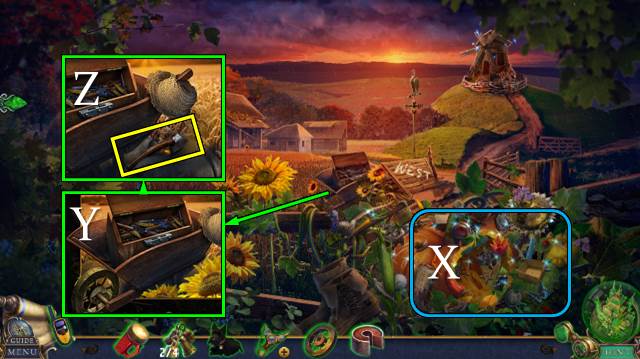
- Play HOP (X); receive PUMPKIN KEY.
- Place WHEEL; move wheelbarrow (Y).
- Take RUSTY AXE and BELLS 3/4 (Z).
- Go to Farmhouse.
- Use PUMPKIN KEY; take BELLS 4/4 (A).
- Use CHALK, place BUTTON and enter code (B).
- Take note and WOODEN ARM (C).
- Walk down.
- Offer WOODEN ARM (D).
- Go to Stable.
- Place BELLS and move collar (E).
- Take WHETSTONE (F).
- Go to Windmill.
- Talk (G).
- Talk (H).
- WHETSTONE on RUSTY AXE; take AXE.
- Solution (I).
- Use AXE. Take EXPLOSIVE SHELLS (J).
- EXPLOSIVE SHELLS on SLINGSHOT. Take LOADED SLINGSHOT.
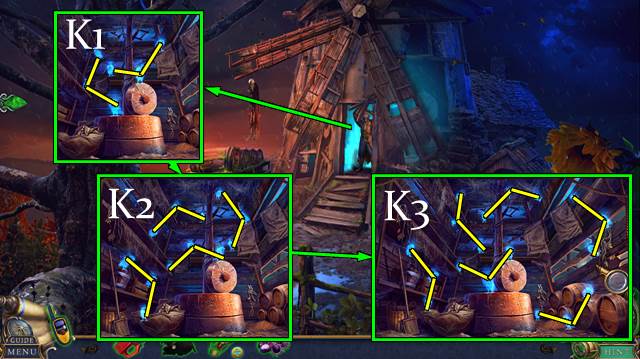
- Use LOADED SLINGSHOT. Solution (K1-3).
- Receive WEST WIZARD STATUETTE 1/3.
Chapter 3: South Oz
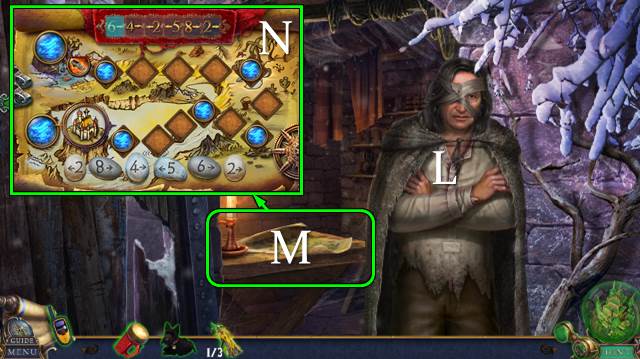
- Talk (L).
- Go (M).
- Solution (N).
- Take METAL HEART and CORKSCREW. Use CORKSCREW; take KNIGHT'S RING (O).
- Take note; place METAL HEART (P).
- Turn knight; take FLEUR-DE-LIS 1/4 (Q).
- Take METAL HEART (R).
- Take note; place METAL HEART. Place items (S).
- Use CORKSCREW; take SNUFF TOBACCO (T).
- Place boards as shown; take KNIGHT'S RING and TORN CODE (U).
- Place KNIGHT'S RING (V).
- Place KNIGHT'S RING (W).
- Go (X).
- Move items; take HELMET 1/3 (Y).
- Move items, send TOTO and take SHEARS (Z).
- Move crescent, use SHEARS and take CRESCENT (A).
- Use FLASHLIGHT; take HOOK (B).
- Place CRESCENT; take ACID (C).
- Take HAMMER (D).
- Walk down.
- Use HAMMER; take RAT FIGURINE 1/3 (E).
- Go (F).
- Use ACID; take RAT FIGURINES 2/3 (G).
- Use ACID; take MAGNET (H).
- Go to Castle Yard.
- Touch paper. Use MAGNET and take RAT FIGURINES 3/3 (I).
- Place RAT FIGURINES; solution (J).
- Go (K).
- Use glasses (L).
- Take ROPE (M).
- Use SHEARS and play HOP (N); receive EMPTY OILCAN.
- Move instruments and keys; take FLEURS-DE-LIS 2/4 (O).
- Go to Southern Coast; scroll down.
- ROPE on HOOK; take HOOK WITH ROPE.
- Use HOOK WITH ROPE; take STAR SCREW, open barrel and take OIL with EMPTY OILCAN (P).
- Go to Castle Hall.
- Use OIL; take CODE PIECE and statuette (Q).
- Use SNUFF TOBACCO (R).
- Take SOUTH WIZARD'S DIARY (S).
- CODE PIECE on TORN CODE; take DIARY CODE.
- DIARY CODE on SOUTH WIZARD'S DIARY. Solution (T). Take WRENCH.
- Use WRENCH twice; take CRESCENT KEY (U).
- Walk down.
- Use CRESCENT KEY (V).
- Go (W).
- Take COUNTERWEIGHT and remove rusty mask (X).
- Take COUNTERWEIGHT (Y).
- Place and turn STAR SCREW; take FLEURS-DE-LIS 3/4 (Z).
- Take RUNIC CODE (A).
- Place 2 COUNTERWEIGHTS. Move weights and take FLEURS-DE-LIS 4/4 (B).
- Walk down.
- Place FLEURS-DE-LIS; go (C).
- Place RUNIC CODE. Select 1-5 (E).
- Take METAL FEATHER 1/4 (F).
- Take HELMETS 2/3. Use OIL; take STICK (G).
- Take AMBER EYE (H).
- Place AMBER EYE; take KEYS (I).
- Place KEYS; solution (J).
- Go (K).
- Play HOP (L); receive METAL FEATHERS 2/4.
- Take KNITTING NEEDLE and HOOP (M).
- Take METAL FEATHERS 3/4 (N).

- Remove items 1-5 (O).
- Take CRANK (P).
- Take CAT FIGURINE. Use CRANK; take FABRIC (Q).
- Walk down.
- Use KNITTING NEEDLE; take METAL FEATHERS 4/4 (R).
- Place METAL FEATHERS; take EYE SCREW (S).
- Go (T).
- Place EYE SCREW (U).
- Play HOP (V); receive TONGS.
- Use FABRIC (W); receive WET SHEET MUSIC.
- Walk down.
- Take COAL with TONGS (X).
- Go forward.
- Open iron and place COAL and WET SHEET MUSIC. Use iron and take SHEET MUSIC (Y).
- Go to Castle Hall.
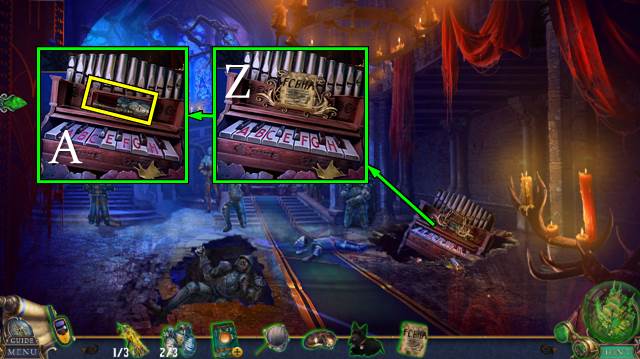
- Place SHEET MUSIC; play FCBHA (Z).
- Take BROKEN FLUTE and HELMETS 3/3 (A).
- Go to Tower.
- Place HELMETS; take CLOCK HANDS and DIARY PAGES (B).
- Place CLOCK HANDS and CAT FIGURINE; set to 6:00 (C).
- Take FLUTE PART 1/2 (D).
- DIARY PAGES on SOUTH WIZARD'S DIARY.
- Place SOUTH WIZARD'S DIARY. Talk (E).
- First solution (F).
- Second solution (G).
- Third solution (H).
- Fourth solution (I).
- Receive MECHANICAL HEART.
- Go to Castle Hall.
- Replace MECHANICAL HEART (J).
- Take CAT BELL (K).
- Dismantle HOOP, place STICK and take NET.
- Use CAT BELL and NET. Take CAT (L).
- Play HOP (M); receive FLUTE PIECE 2/2.
- Put FLUTE PIECES on BROKEN FLUTE. Solution (N). Take FLUTE.
- Offer FLUTE (O).
- Go (P).

- Place CAT (Q).
- Solution (Q1-3).
- Receive STATUETTE 2/3.
Chapter 4: North Oz
- Talk (R).
- Go (S).
- Solution (T).
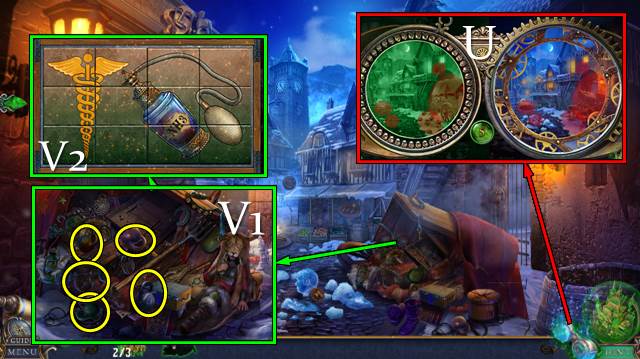
- Use glasses (U).
- Move pitchfork and weights. Play HOP (V1); solution (V2). Receive DOOR KNOCKER.
- Take WEIGHT 1/3 (W).
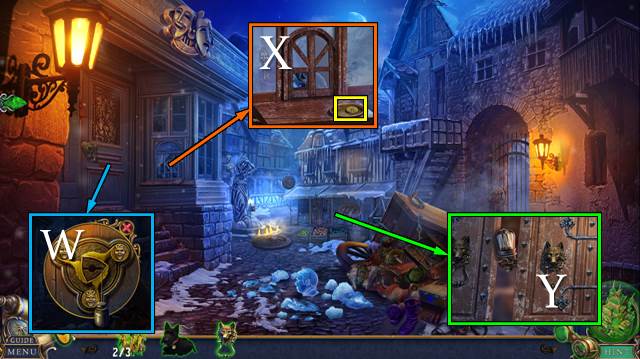
- Take paper and COIN (X).
- Use DOOR KNOCKER; take LIGHT BULB (Y).
- Replace LIGHT BULB; take FILE (Z).
- Use FILE (A).
- Go (B).
- Use FILE; remove keys and take WOODEN FIGURINE 1/3 (C).
- Take note and MOTH REPELLANT (D).
- Use COIN; take REEL (E).
- Match boots; receive SPRAY BOTTLE (F).
- MOTH REPELLANT in SPRAY BOTTLE. Take ANTI-MOTH SPRAY.
- Look through window. Use ANTI-MOTH SPRAY (G).
- Play HOP (G); receive MAGNET.
- Walk down.
- Take THEATER KEY with MAGNET (H).
- Use THEATER KEY (I).
- Go (J).
- Use REEL (K).
- Take DRUM HAMMER (L).
- Remove cymbal; use DRUM HAMMER. Take COIN and WEIGHTS 2/3 (M).
- Go to Shop.
- Use COIN; take LION HEAD PIECE (N).
- Use DRUM HAMMER (O).
- Take MITTEN (P).
- Take WEIGHTS 3/3 (Q).
- Take SHARD with MITTEN (R).
- Use SHARD; take RUNNER (P).
- Walk down.
- Place WEIGHTS; take WINDOW HANDLE (Q).
- Go (R).
- Place WINDOW HANDLE. Send TOTO; take PUPPETS 2/3 (S).
- Go to Theater.
- Place LION HEAD PIECE; take GEM 1/3 (T).
- Use RUNNER (U).
- Restore figurine (V).
- Take PUPPETS 3/3 (W).
- Place PUPPETS (X).
- Solution (Y).
- Take HOURGLASS TOKEN (Z).
- Walk down.
- Play HOP (A); receive WITCH CARVING.
- Use HOURGLASS TOKEN (B).
- Go (C).
- Move skull and take MATCHES (D).
- Go (E).
- Take SCARF (F).
- Move snow and take COIN (G).
- Place pedal; take BICYCLE HORN (H).
- Send TOTO. Use SCARF; receive SNOWFLAKE (I).
- Go to Shop.
- Use COIN; take GEM 2/3 (J).
- Go (K).
- Play HOP (L); receive SPIDER BODY.
- Use BICYCLE HORN. Restore snowman, dig and take FANGS (M).
- Place SNOWFLAKE; take JEWELED BOX (N).
- Go to Cemetery.
- Place SPIDER BODY; take WOLF CARVING (O).
- Place WITCH CARVING and WOLF CARVING; take MEDALLION (P).
- Go (Q).

- Place FANGS; take SAW (R).
- Use SAW (S).
- Talk (T).
- Talk (U).

- First solution (V).
- Second solution (W).
- Take RECIPE.
- Walk down.
- Place MEDALLION; receive BROKEN LANTERN (X).
- Clean BROKEN LANTERN, turn and take GEM 3/3. Use MATCHES.
- GEMS on JEWELED BOX. Place labels. Place RECIPE; take POTION (Y).
- Go (Z).
- Offer POTION. Take LENSES (A).
- LENSES on BROKEN LANTERN; try all lenses.
- Solution (B).
- Receive STATUETTES 3/3 and PATCH.
Chapter 5: Emerald City
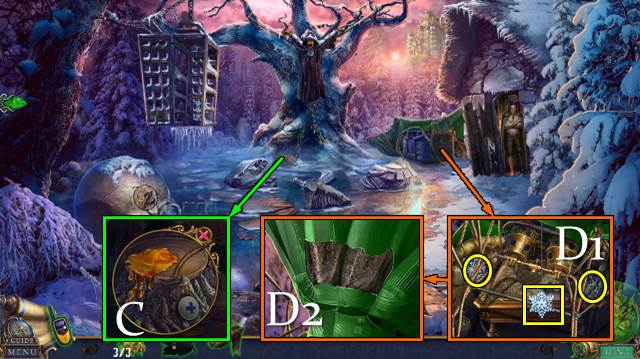
- Take TOKEN and some RESIN with the stick (C).
- Select snowflakes and take DREAM CATCHER PART (D1).
- Place PATCH and RESIN (D2).
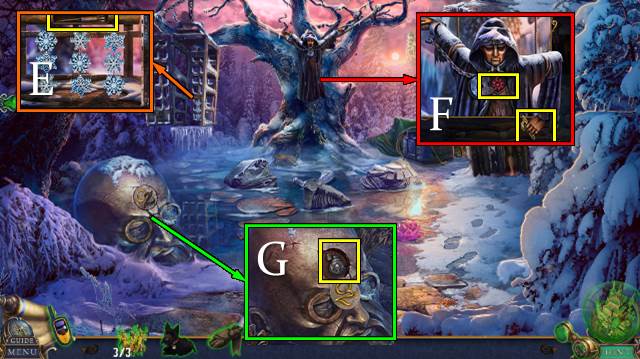
- Place DREAM CATCHER PART; take LOCKPICK (E).
- Use LOCKPICK; take VALVE and LETTER ‘Z' (F).
- Place LETTER ‘Z'; take LIGHTER (G).
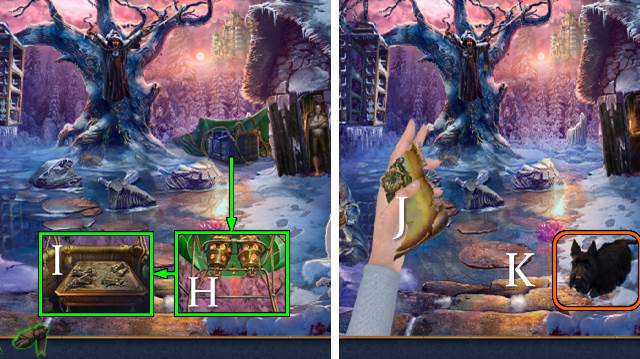
- Use VALVE and LIGHTER (H).
- Place STATUETTES and TOTO (I).
- Take MAP SCRAP (J).
- Offer MAP SCRAP (K).
- Take TOTO (L).
- Play HOP (M); receive TORN MAP OF EAST OZ.
- Place TOKEN; take TAPE (N).
- Restore TORN MAP OF EAST OZ; use TAPE (O).
- Go (P).
- Go left-left-up-up-right-up-right-right-up (Q).
- Take ‘O' KEY 1/2 (R).
- Take DRAGON LEVER (S).
- Take KEYS 2/2 (T).
- Talk (U).
- Play HOP (V). Place KEYS and play second HOP; receive GREEN FLOWER 1/3.
- Take FLOWERS 2/3 (W).
- Place DRAGON LEVER, pull levers and take KATANA (X).
- Look through window; take FAN (Y).
- Place FAN. Move fans as shown (Z).
- Take FLOWERS 1/3 (A).
- Place FLOWERS. Go (B).
- Use KATANA (C).
- Talk. Take GLASS TORNADO (D).
- Take GLASS WIZARD and RECIPE AND SCALES (E).
- Place GLASS WIZARD and GLASS TORNADO (F).
- Remove scroll and take BOX and QUILL 1/2 (G).
- Walk down.
- Place RECIPE AND SCALES; select 1-3 and take INK INGREDIENTS (H).
- Go (I).
- Place INK INGREDIENTS. Select all ingredients and take ink for QUILL AND INK 2/2 (J).
- Offer QUILL AND INK (K).
- Solution (L). Take COIN CODE.
- Take VALVE and use KATANA (M).
- Use VALVE (N).
- Place COIN CODE. Select 1-4; take MEDALLION. Go (O).
- Use KATANA (P).
- First solution (Q1-4).
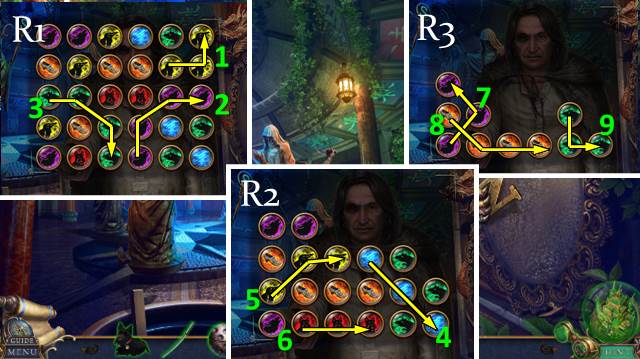
- Second solution (R1-3).
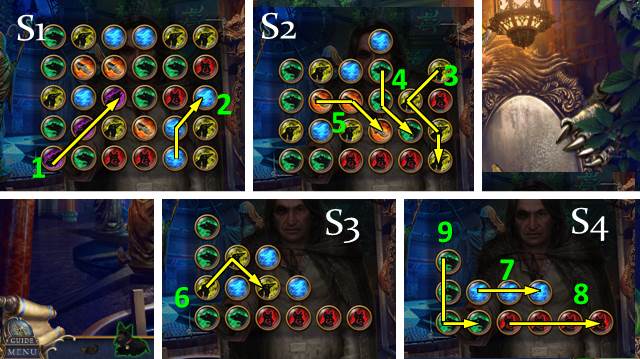
- Third solution (S1-4).
- Use glasses (T).
- Take TOTO'S STATUETTE (U).
- Take METAL LETTER (V).
- Place MEDALLION; take NORTH SORCERESS'S STATUETTE, SOUTH WIZARD'S STATUETTE, WEST WIZARD'S STATUETTE and EAST WIZARD'S STATUETTE (W).
- Take SPONGE (X).
- Use SPONGE; take BOOK CLUE (Y).
- Walk down.
- Place BOOK CLUE; select 1-3 (Z).
- Take ELEPHANT FIGURINE (A).
- Walk down.
- Place ELEPHANT FIGURINE; take METAL LETTER (B).
- Play HOP (C); receive PEARLS.
- Go to Emerald Hall.
- PEARLS on BOX; take METAL LETTER.
- Place METAL LETTER and take HORN; place SOUTH WIZARD'S STATUETTE (D).
- Place HORN; take METAL LETTER (E).
- Place METAL LETTER and WEST WIZARD'S STATUETTE (F).
- Place METAL LETTER and NORTH SORCERESS'S STATUETTE (G).
- Place METAL LETTER and EAST WIZARD'S STATUETTE (H).
- Go (I).
- Place TOTO'S STATUETTE. First solution (J).
- Second solution (K).
- Third solution (L).
- Congratulations, you have completed Bridge to Another World: Escape from Oz!
Created at: 2017-06-30