

Walkthrough Menu
- General Tips
- Chapter 1: Entrance World
- Chapter 2: The Hut
- Chapter 3: The Waterfall
- Chapter 4: Clock Tower
- Chapter 5: Prison Cell
- Chapter 6: Morai's House
- Chapter 7: The Supreme Tree
General Tips
- This is the official guide for Bridge to Another World: The Others!
- This guide will not mention each time you have to zoom into a location; the screenshots will show each zoom scene.
- Hidden-object puzzles are referred to as HOPs. This guide will not show screenshots of the HOPs, however, it will mention when an HOP is available and the inventory item you'll collect from it.
- This guide will give step-by-step solutions for all puzzles which are not random. Please read the instructions in the game for each puzzle.
- Some items shown in the guide may be hidden at first; we may not always mention these cases, but we will show you their locations.
Chapter 1: Entrance World
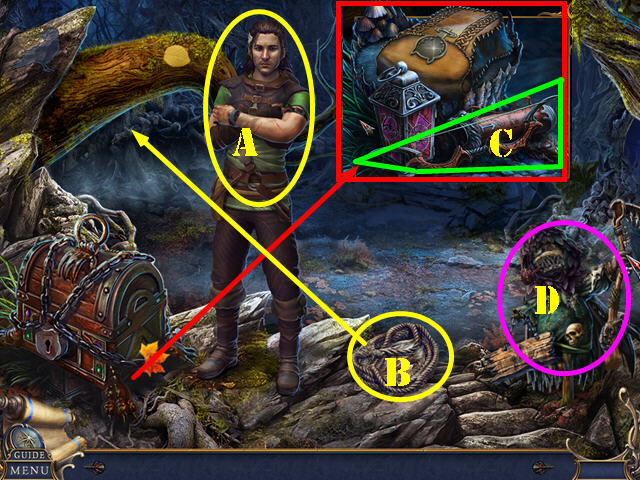
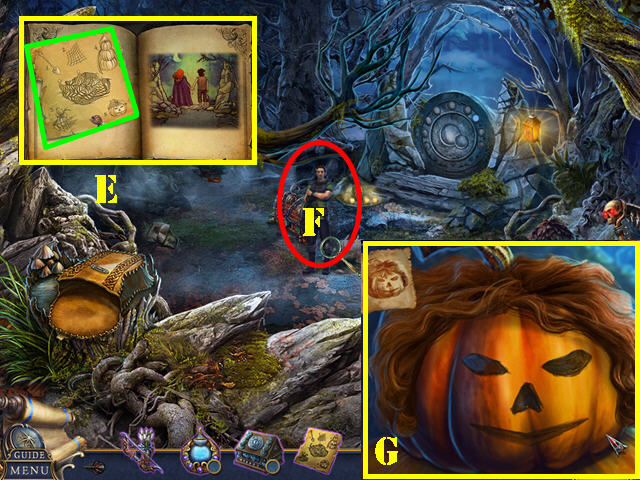
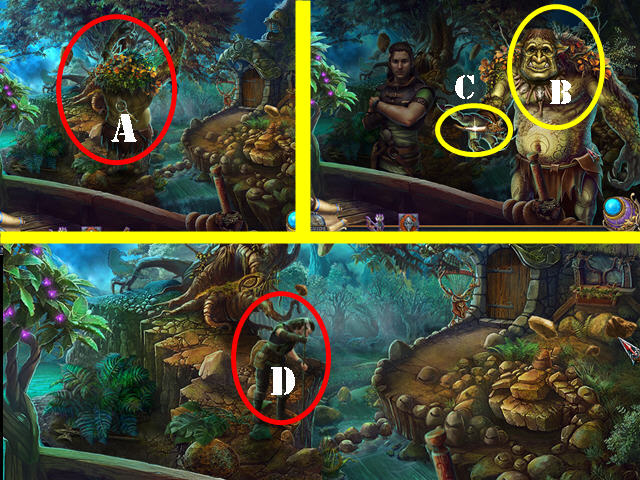
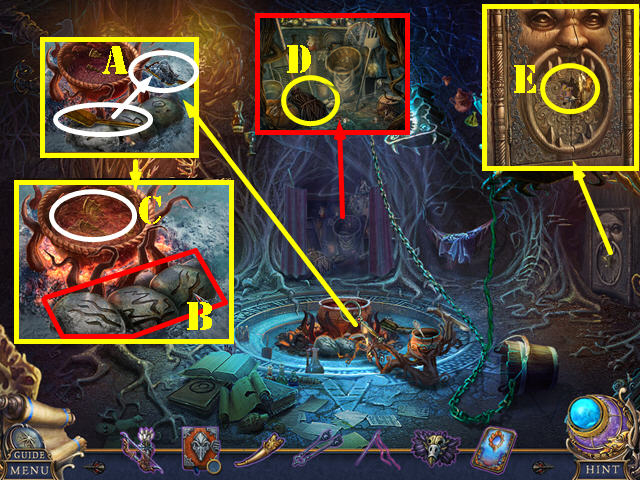
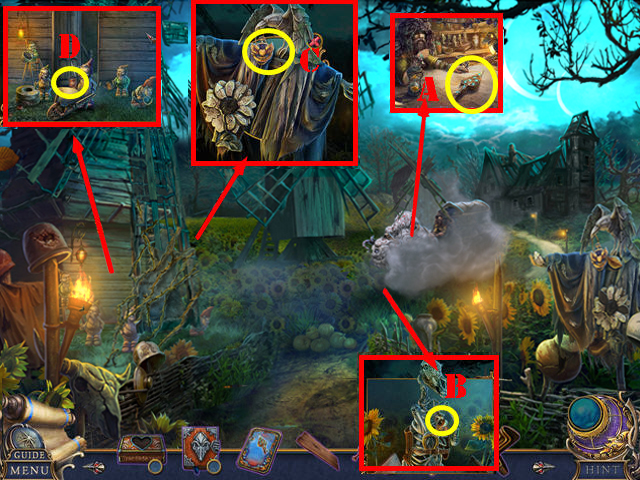
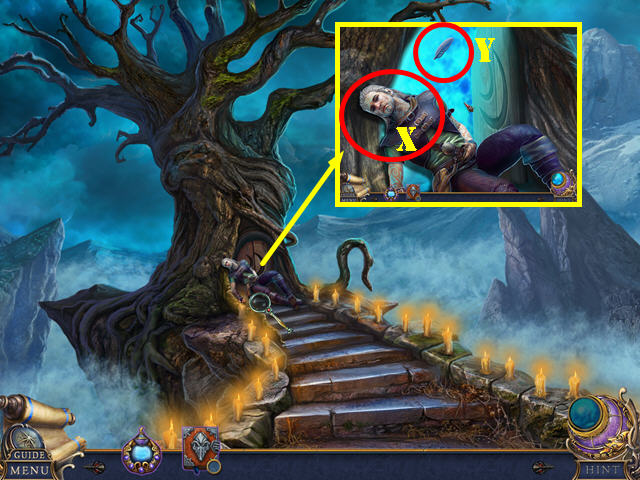
- Talk to Jace (A); take the button from him.
- Take the ROPE (B); place it and select it.
- Talk to Jace again.
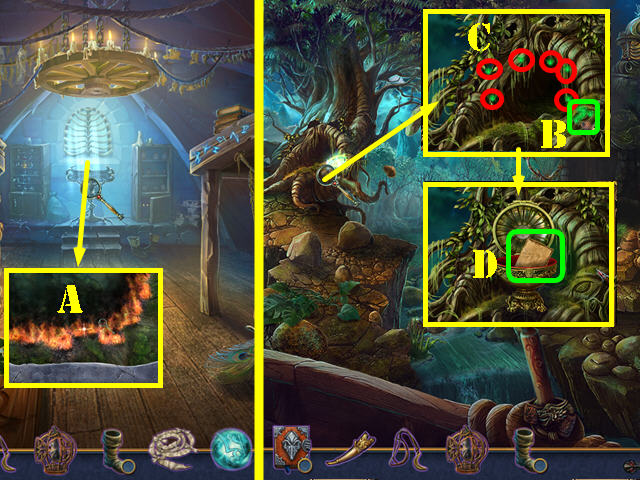
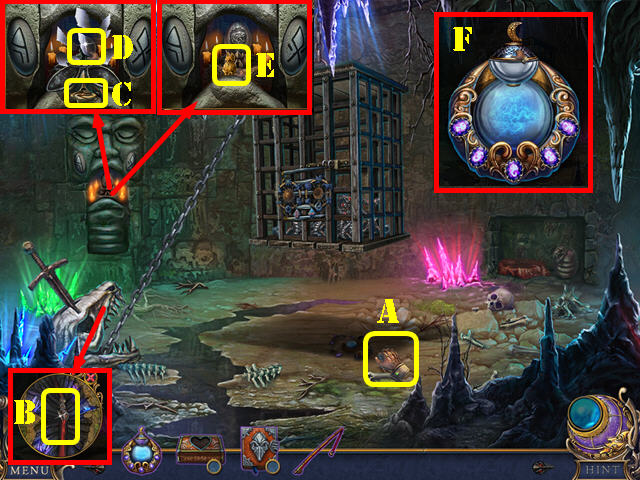
- Take the BOW AND QUIVER (C).
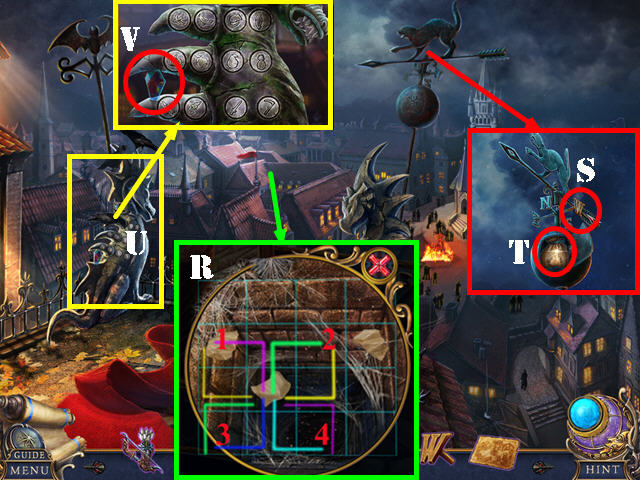
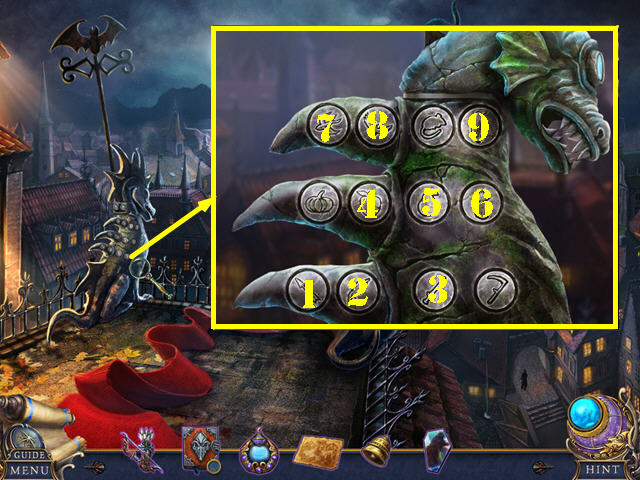
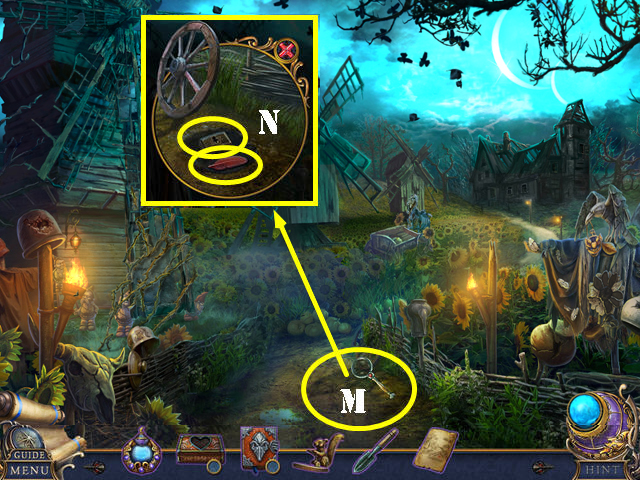
- Play the puzzle (D).
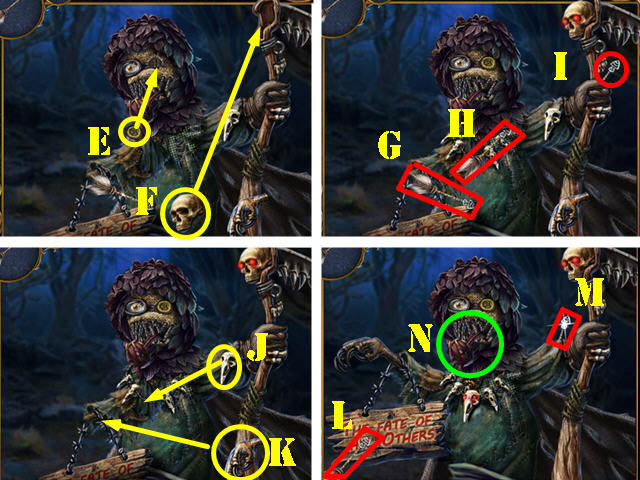
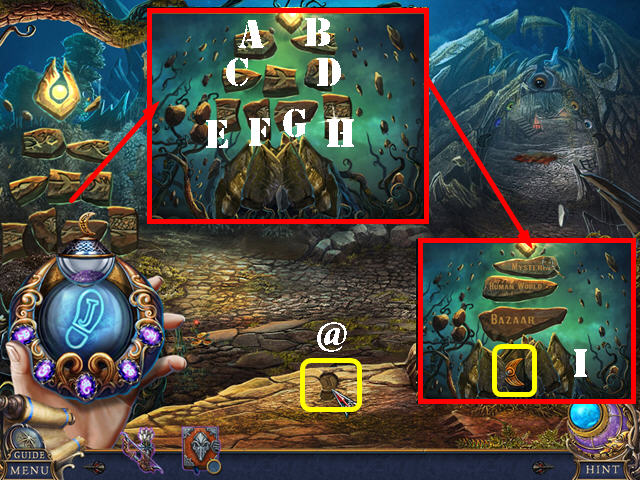
- Solution: Place E-F. Pick up G-H-I. Place J-K. Take L-M. You receive the ARROWS.
- Take the SMOKING PIPE (N).
- Place the ARROWS in the BOW AND QUIVER to get the BOW AND ARROWS (inventory).
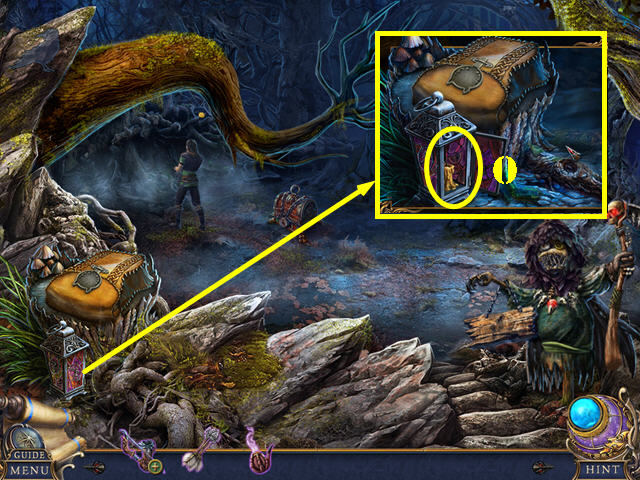
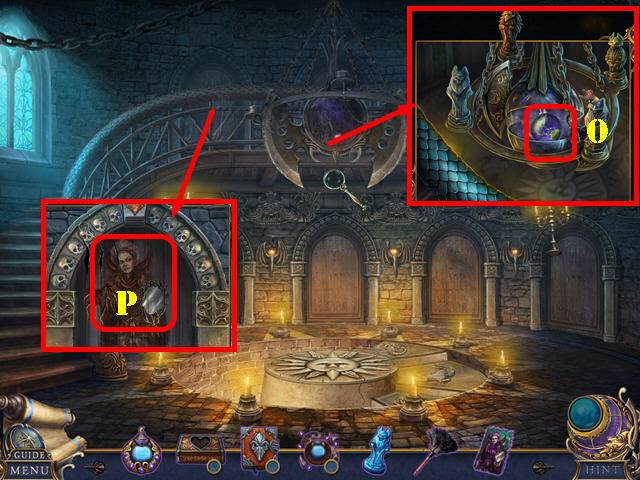
- Open the LANTERN; place the SMOKING PIPE (O) and take the LANTERN.
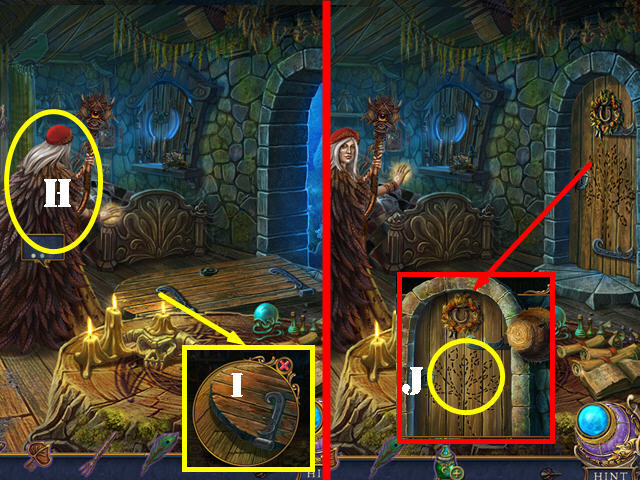
- Go right.
- Touch the scene.
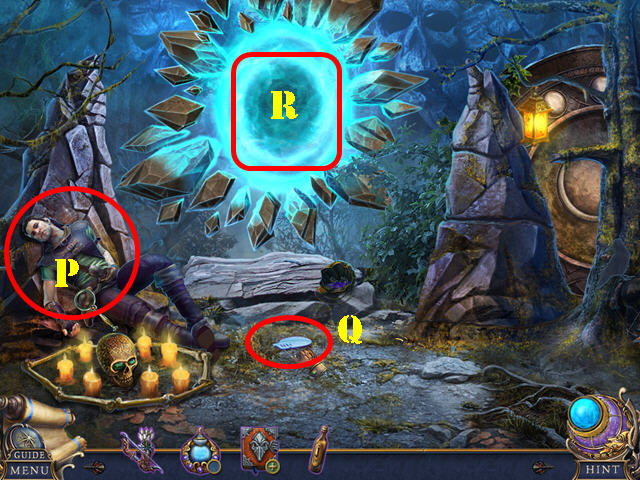
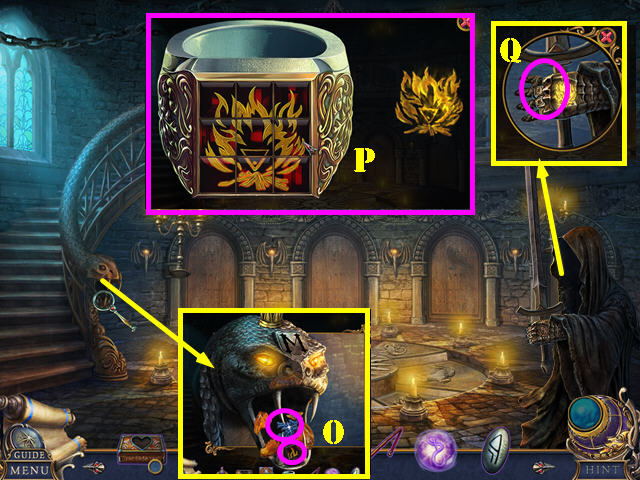
- Hang the LANTERN (P).
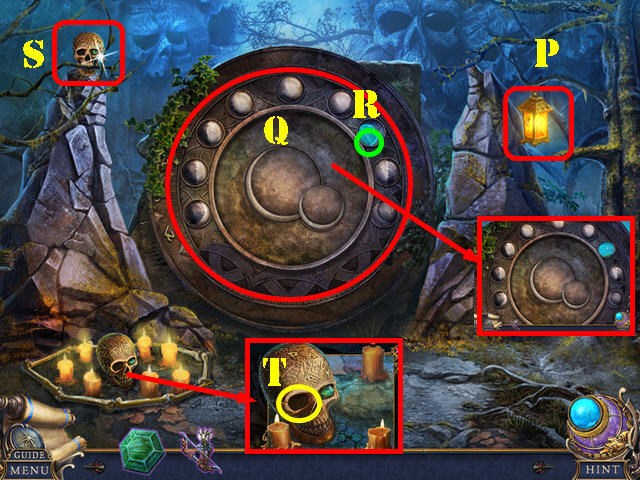
- Remove the vines 3x; select the area (Q).
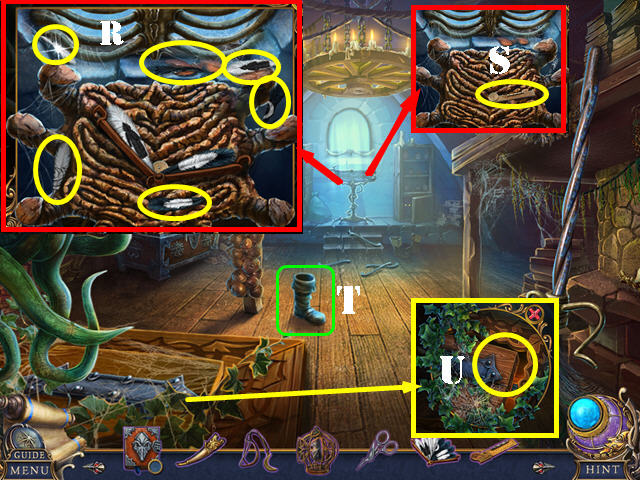
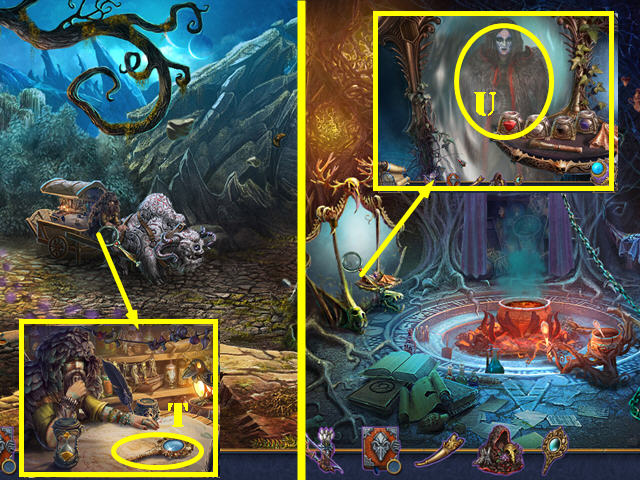
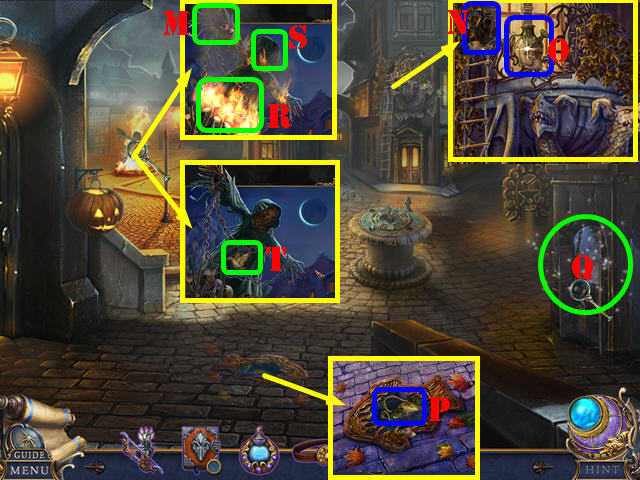
- Remove the cobweb; take the EMERALD (R).
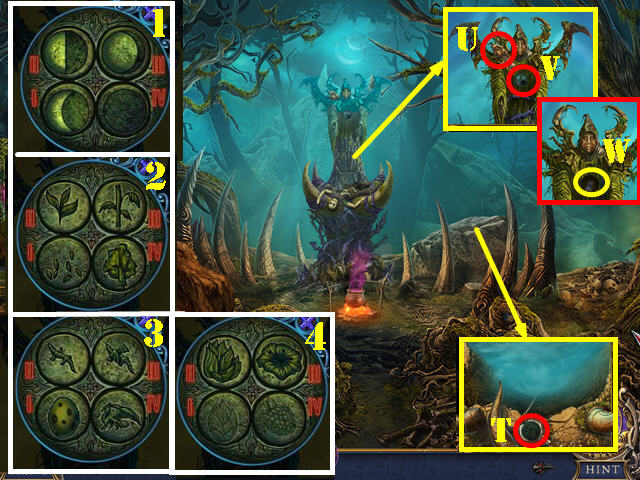
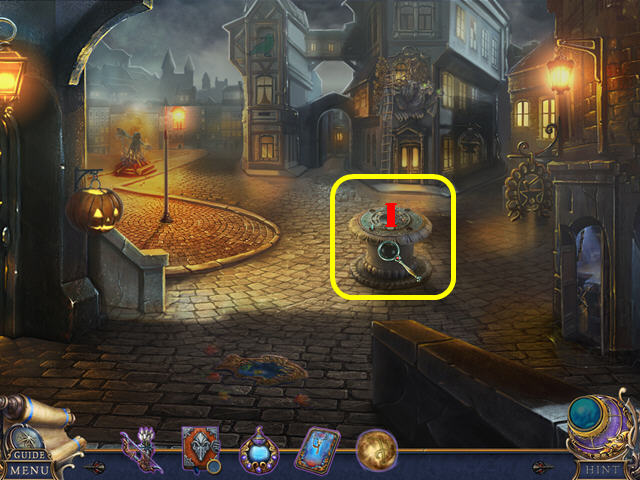
- Use the BOW AND ARROWS (S).
- Place the EMERALD for a puzzle (T).
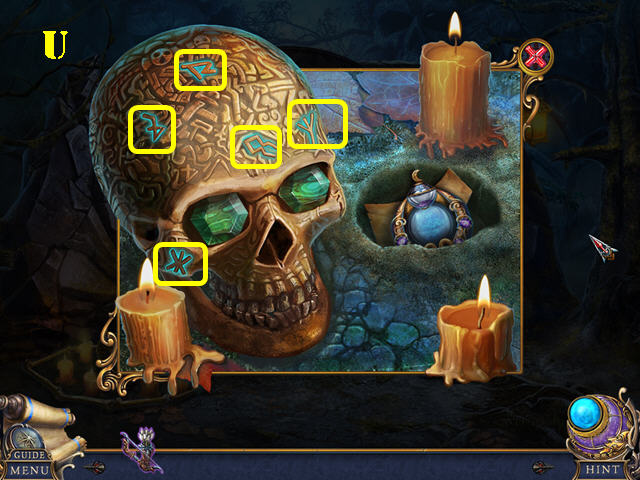
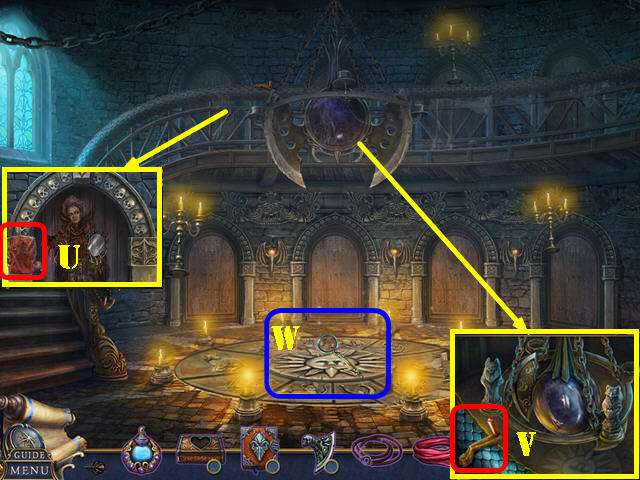
- Solution (U); take the UNKNOWN DEVICE.
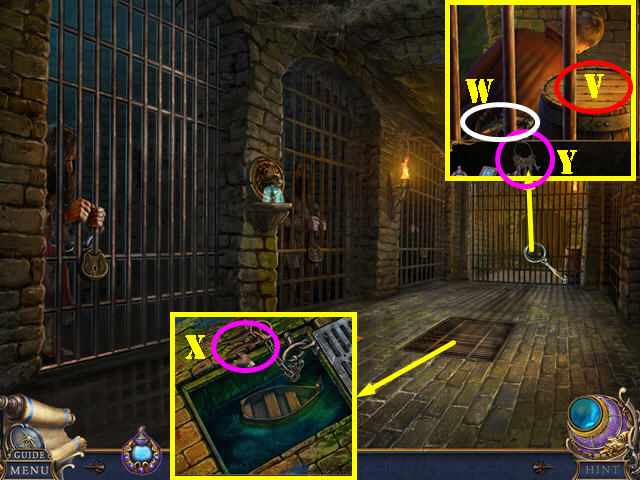
- Walk down.
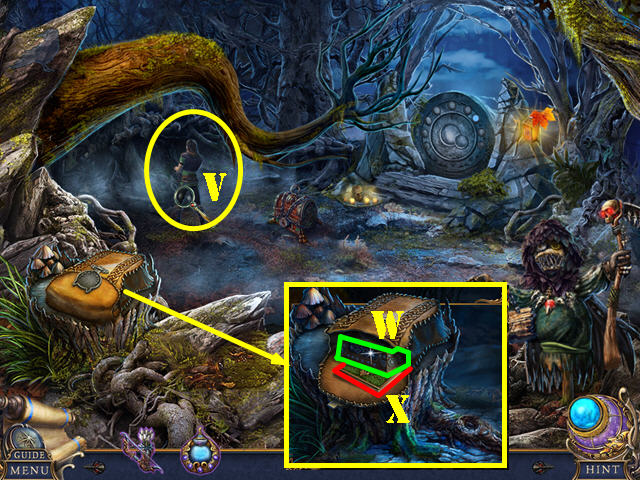
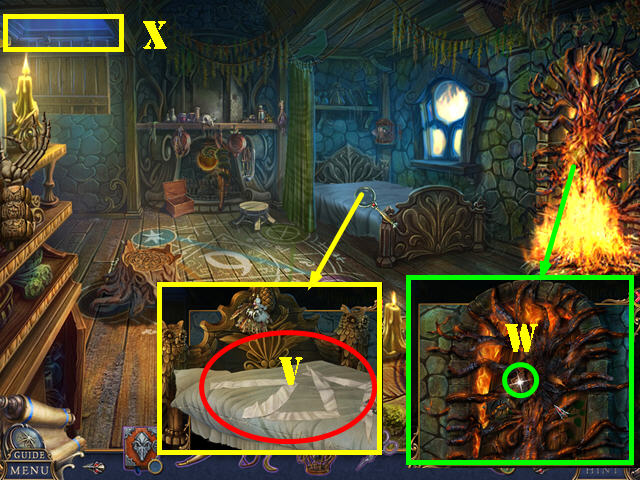
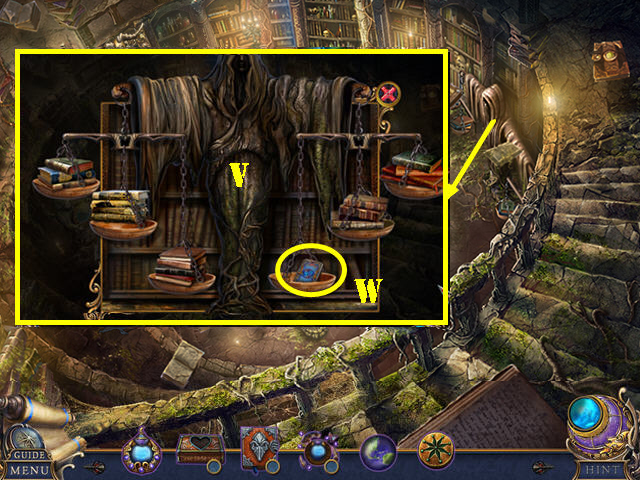
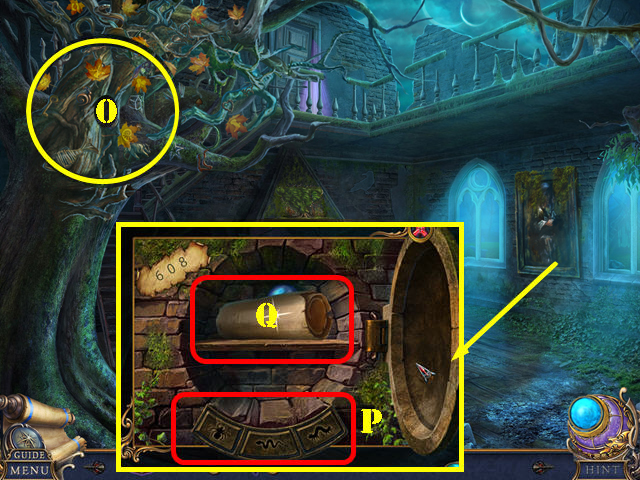
- Give the UNKNOWN DEVICE (V) to receive the MAGIC COMPASS.
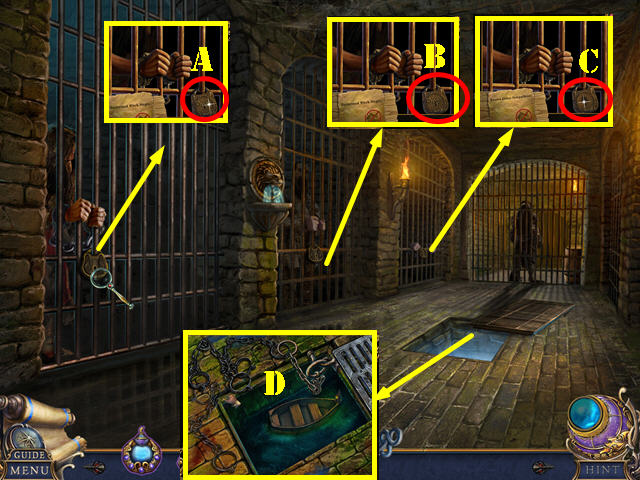
- Talk to Jace to get the WOLF KEY.
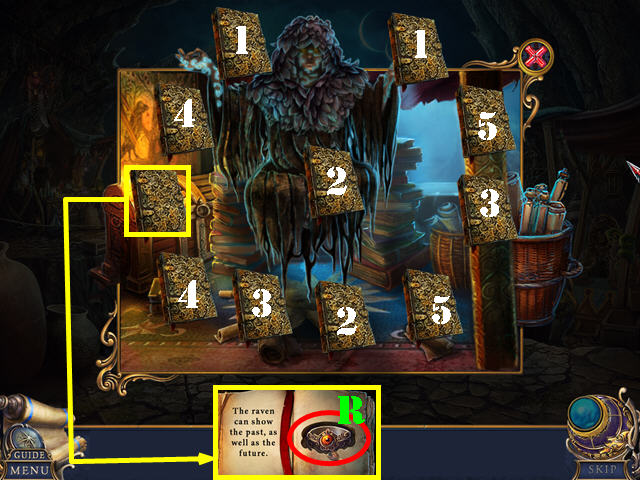
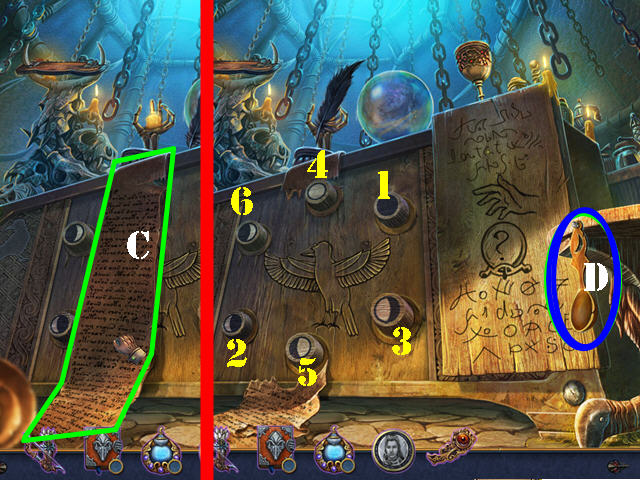
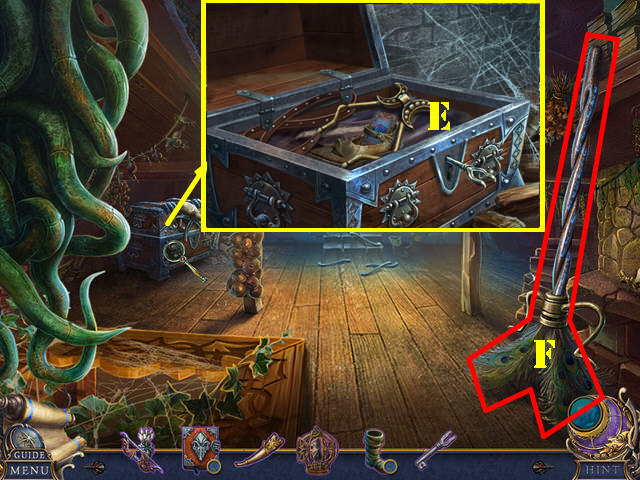
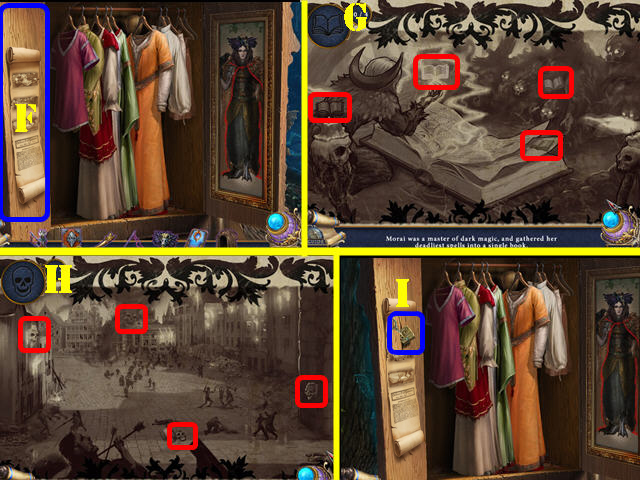
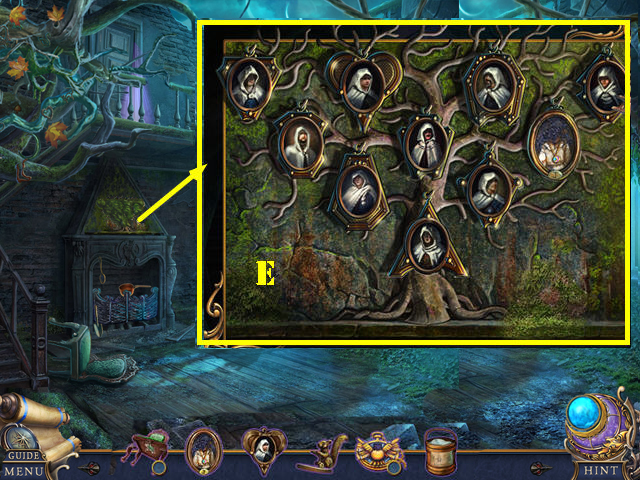
- Place the WOLF KEY; take JACE'S BOX (W). Open the book (X), flip the page and touch it for a puzzle.
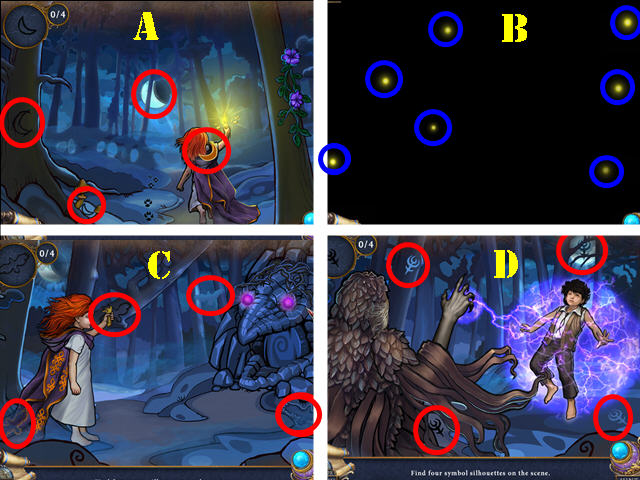
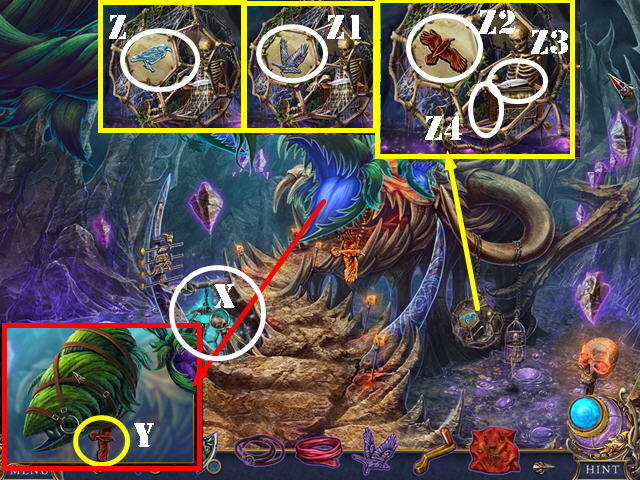
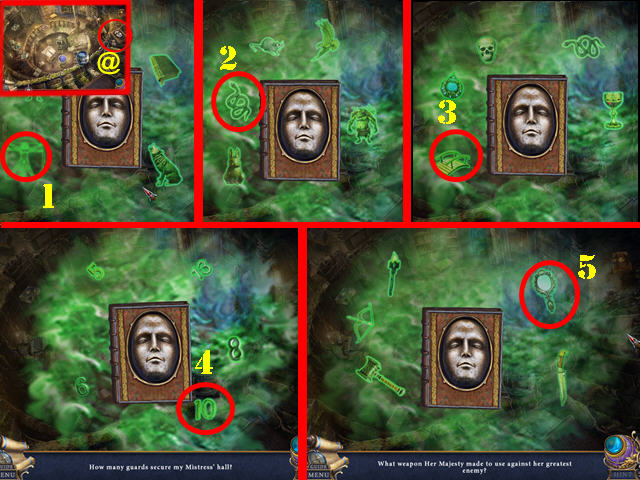
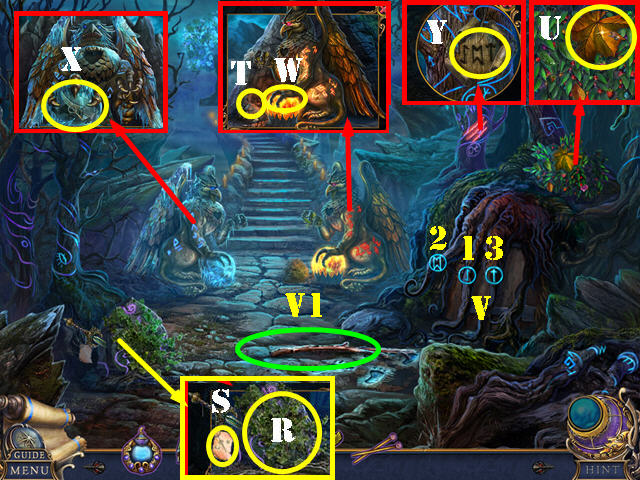
- Some items need to be moved for them to appear.
- Moons (A), Fireflies (B), Ravens (C), Symbols (D).
- Match pairs (1-4).
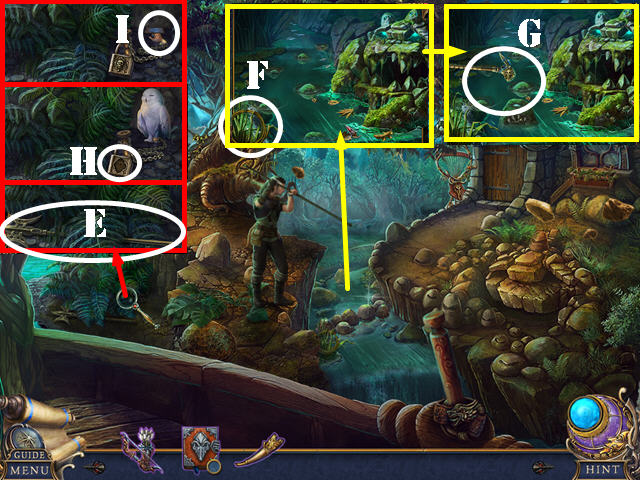
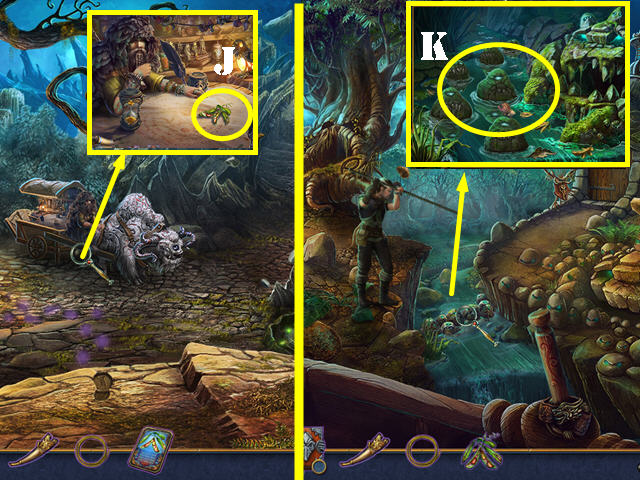
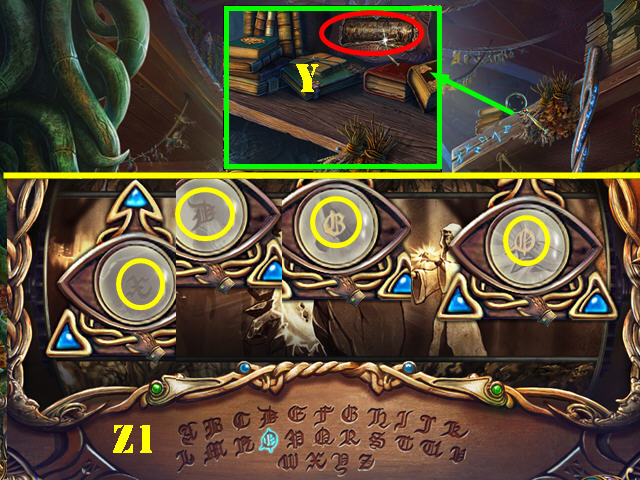
- Take the TRAP DIAGRAM (E).
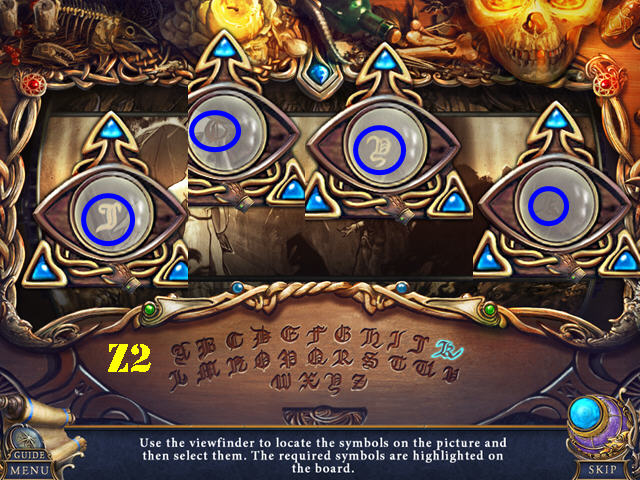
- Give the TRAP DIAGRAM (F) for a HOP; play it to get the DAGGER. Mini-game solution (G).
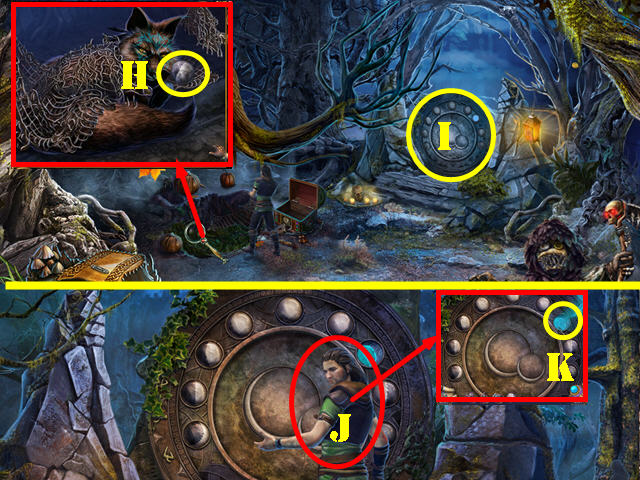
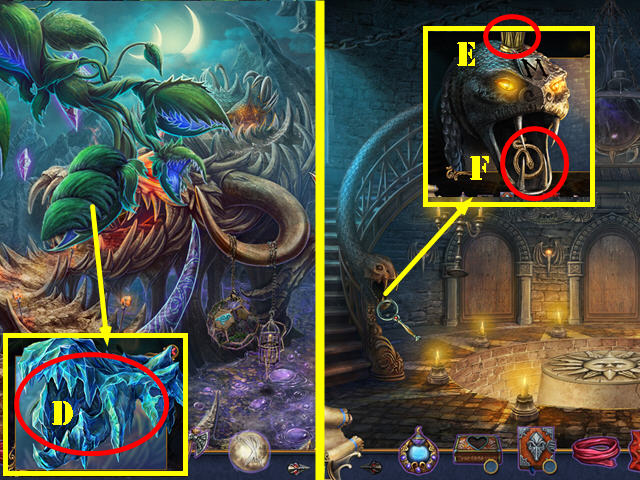
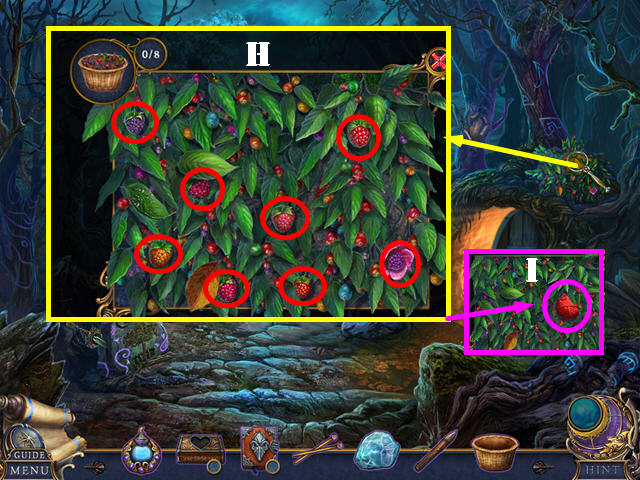
- Remove all the leaves; use the DAGGER; take the MOONSTONE (H).
- Go (I).
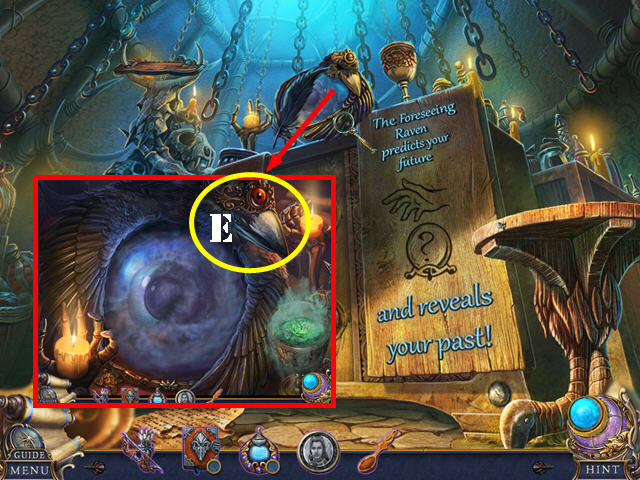
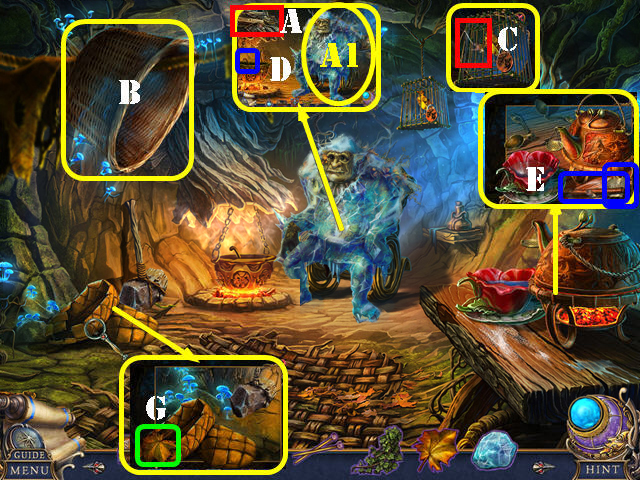
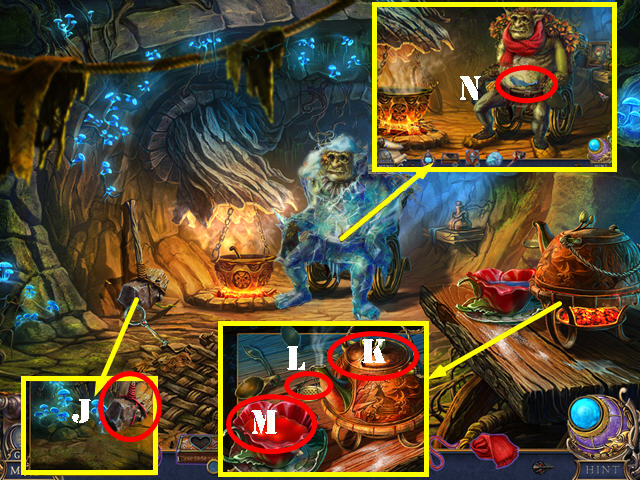
- Talk to Jace (J).
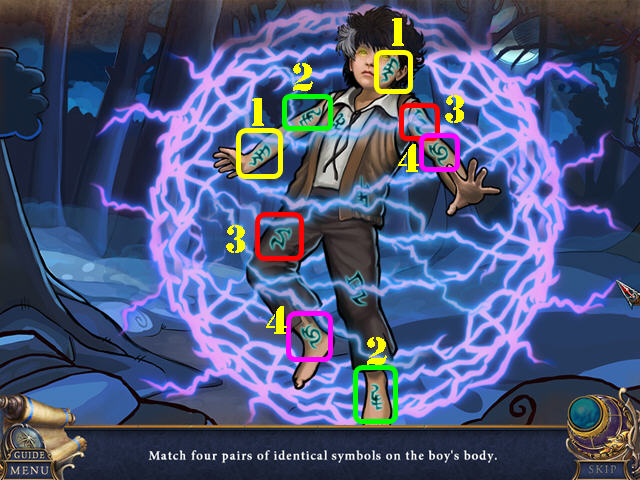
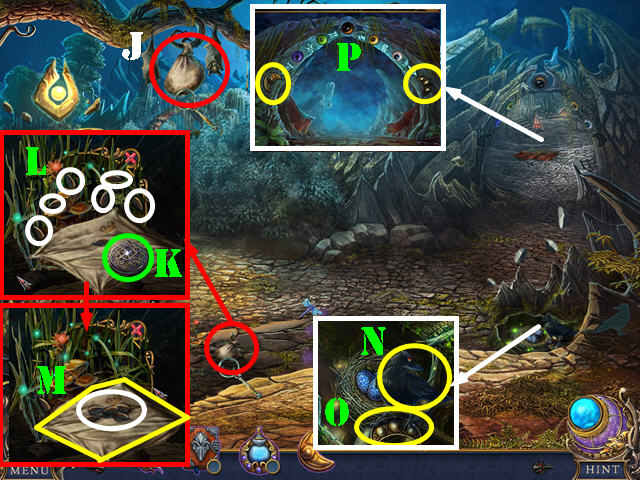
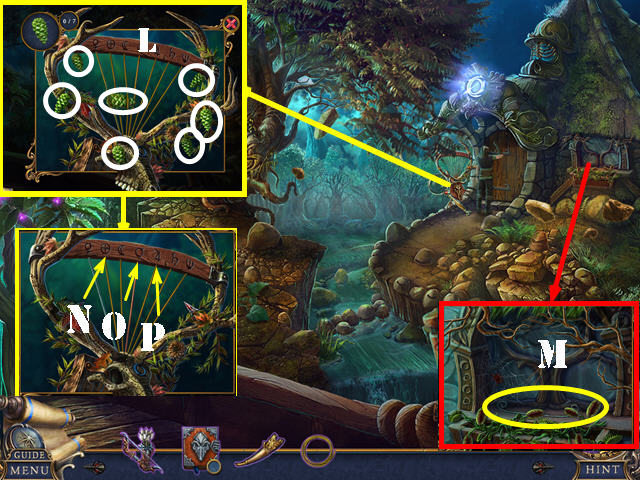
- Place the MOONSTONE (K) for a puzzle.
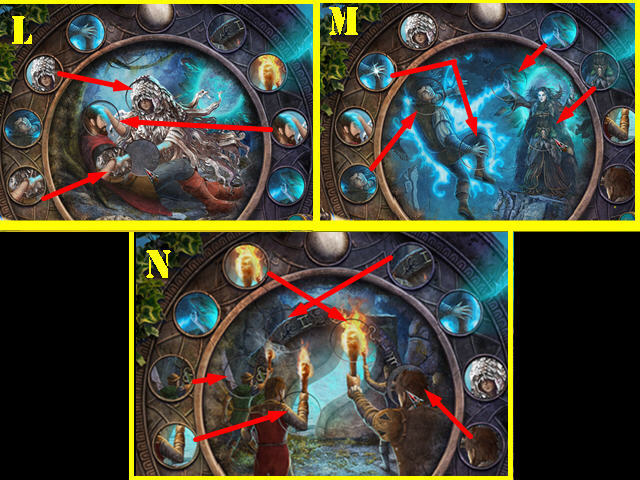
- Solution 1 (L).
- Solution 2 (M).
- Solution 3 (N).
- You receive the SPELLBOOK.
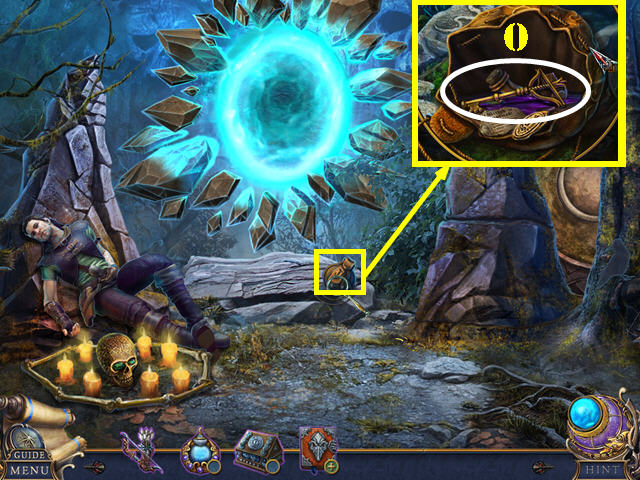
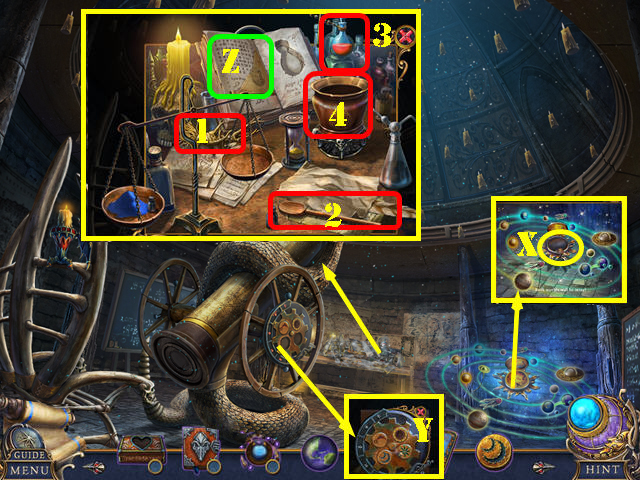
- Open the bag; remove the items; take the KEY (O).
- Use the KEY on the JACE'S BOX (inventory) for a puzzle.
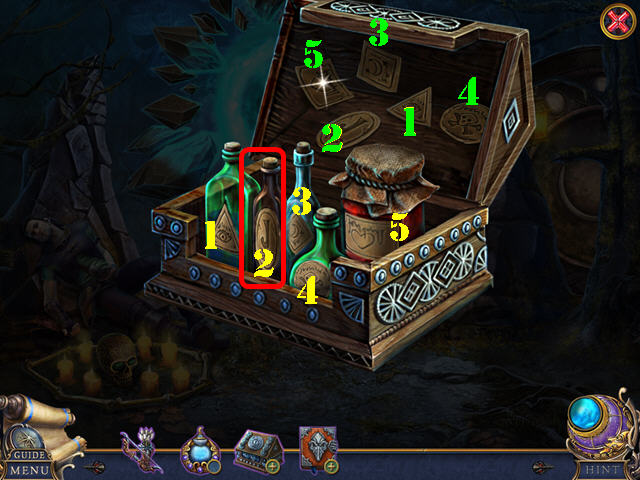
- Solution (1-5).
- Take JACE'S POTION (2).
- Give JACE'S POTION (P). Take the CHALK FEATHER (Q).
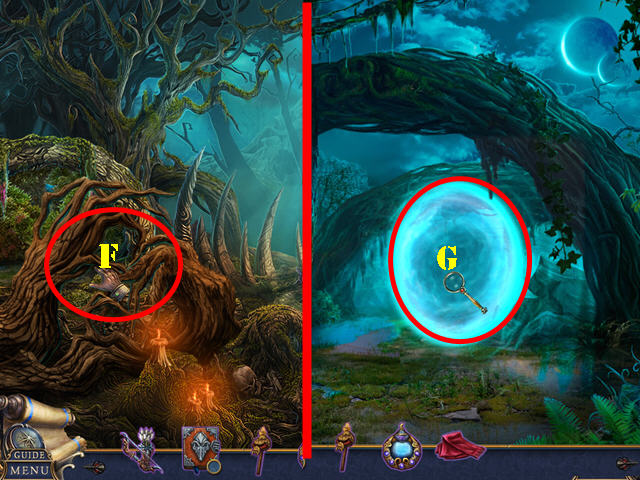
- Open the SPELLBOOK (inventory); flip the page; use the CHALK FEATHER; take the LEVITATION SPELL. Flip the page.
- Place the LEVITATION SPELL (R); go forward.

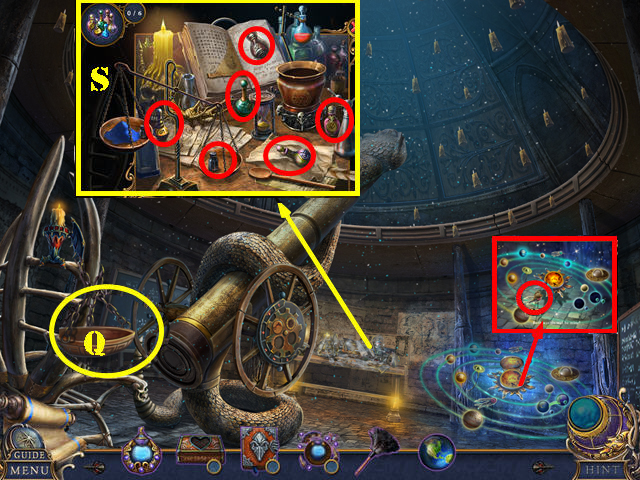
- Take the COMPASS POWDER (S).
- Use the COMPASS POWDER on the MAGIC COMPASS to get the CHARGED COMPASS (inventory).
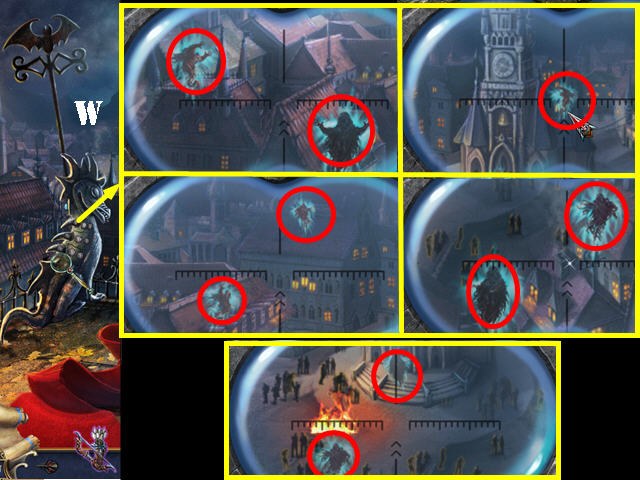
- Place the CHARGED COMPASS for a puzzle (T).
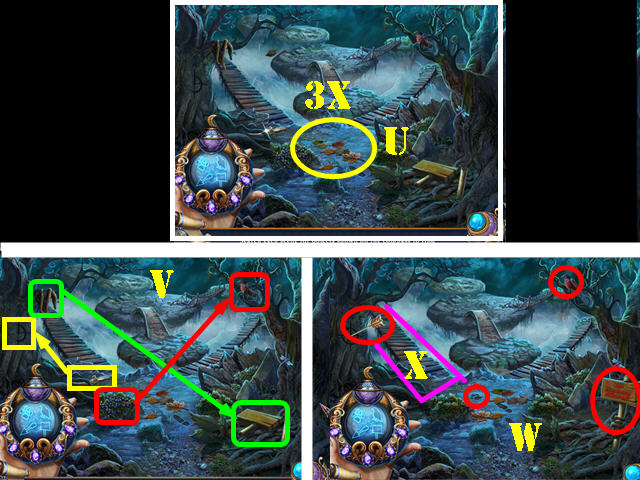
- Some items are hidden.
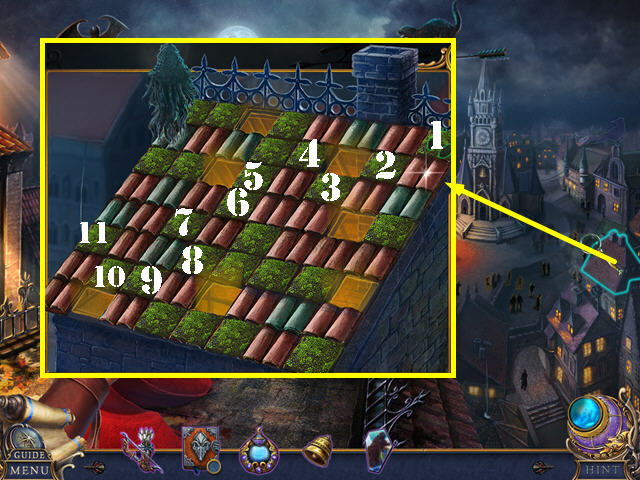
- Select the leaves 3x (U). Use the items as shown (V). Select (W).
- Cross the bridge (X).
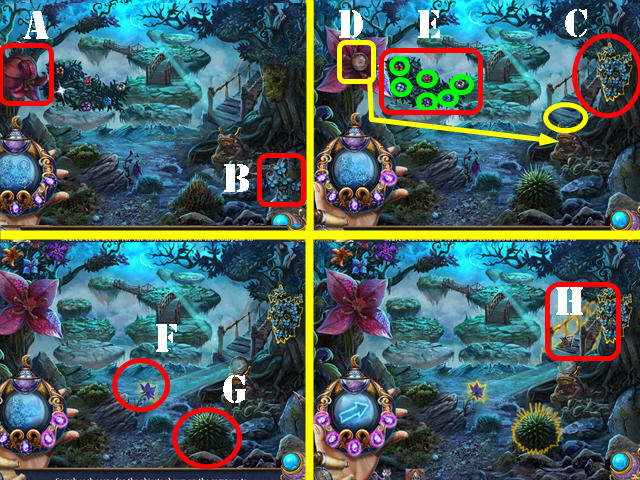
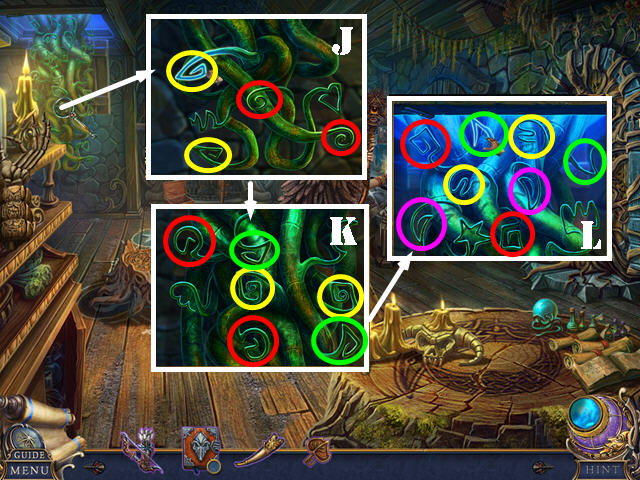
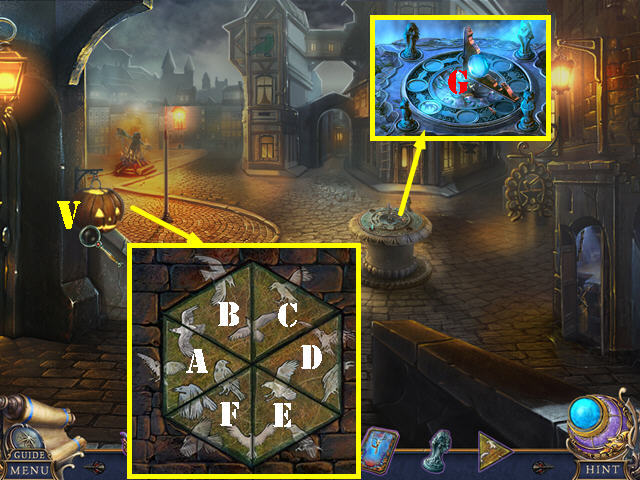
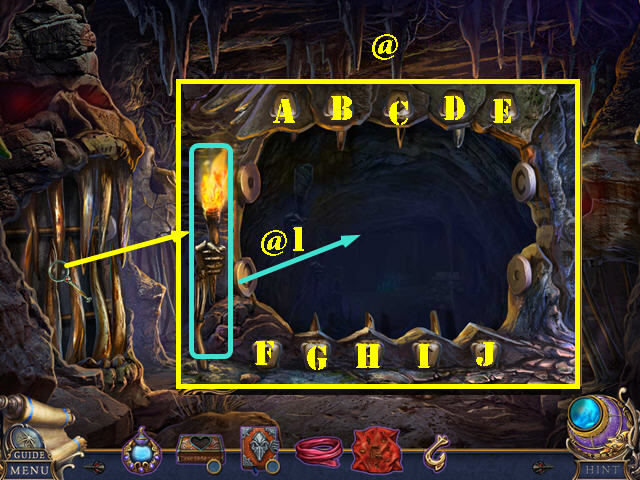
- Select (A-B). Select (C). Place (D). Select each flower (E). Select (F) once and G twice.
- Go (H).
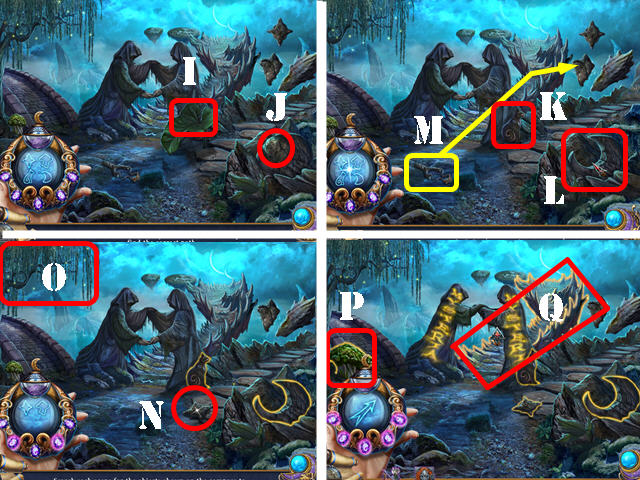
- Select (I-J-K-L). Place (M); select (N). Shake (O); select (P).
- Go (Q).
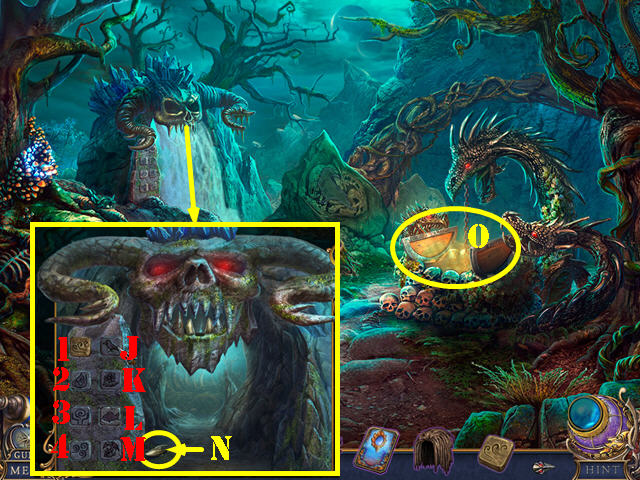
- Select (@). Receive the EMPTY COMPASS.
- Select the puzzle. Solution: (A-B)-(C-D)-(E-F)-(H-G)-(F-G).
- Take the CRESCENT MOON (I).
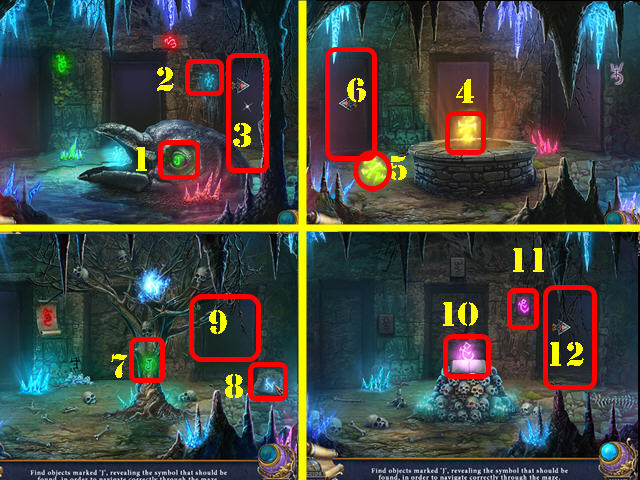
- Use the BOW AND ARROWS (J). Open the bag; take JACE'S PORTRAIT (K).
- Select all the seeds (L). Take the SEEDS and FABRIC PIECE (M).
- Give the SEEDS (N); take the CRESCENT MOON (O).
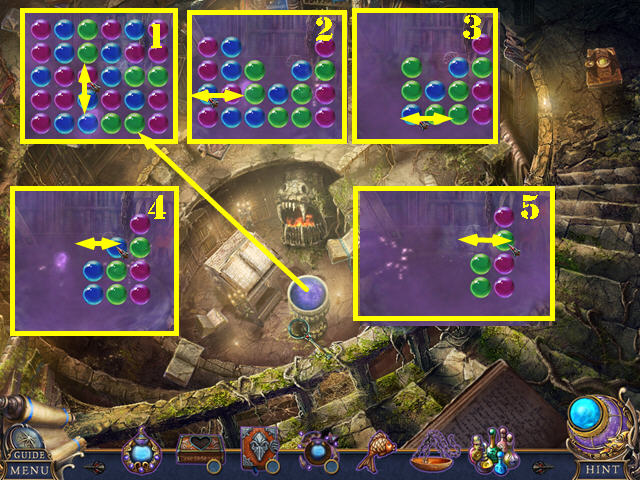
- Select the arc. Place the 2 CRESCENT MOONS for a puzzle (P). The sequence is random.
- Go forward.
- Select the scene.
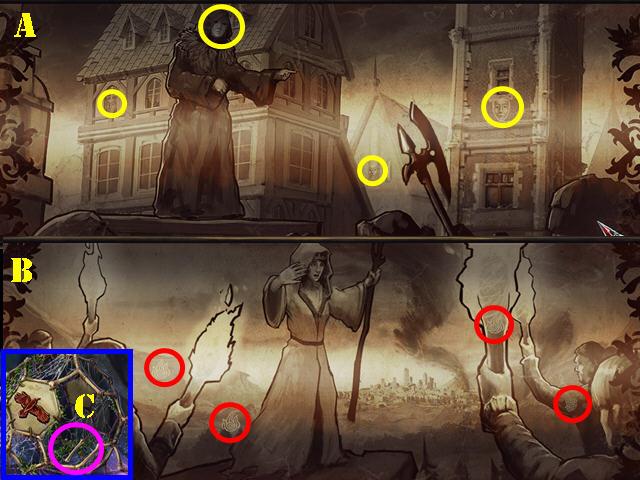
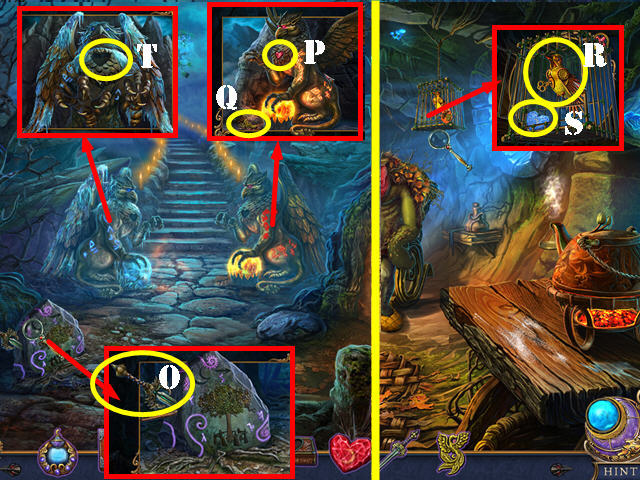
- Remove all the items; talk to the Other (Q).
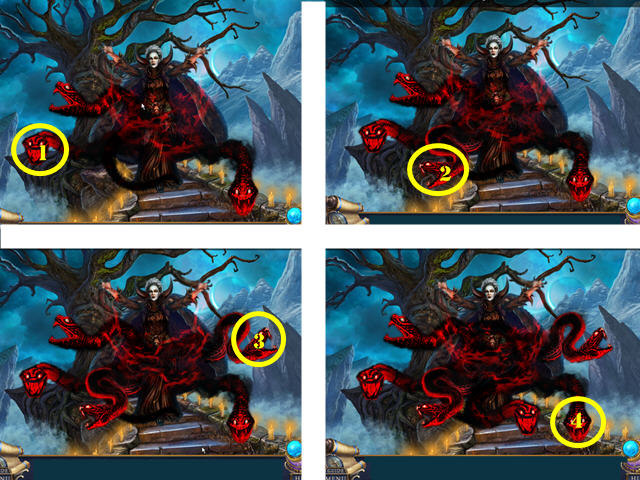
- Use JACE'S PORTRAIT (R) for a puzzle.
- Solution (1-5). This solution only works if you don't make any incorrect choices.
- Take the book; flip the pages 2x; take the EYE RING (R).
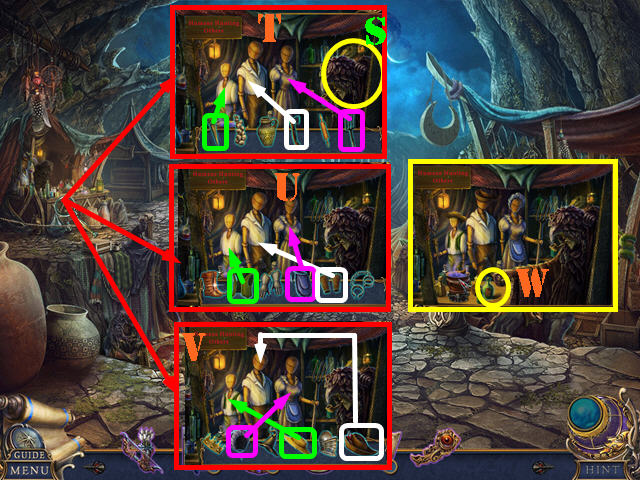
- Use JACE'S PORTRAIT (S) for a puzzle.
- Solution 1 (T).
- Solution 2 (U).
- Solution 3 (V).
- Take the HEALING POTION (W).
- Use the HEALING POTION on the FABRIC PIECE; take the BANDAGE (inventory).
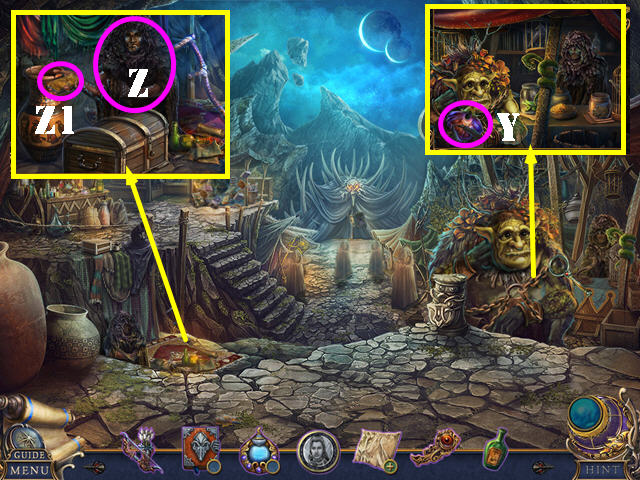
- Use the BANDAGE; take the FRUIT (Y).
- Touch the FRUIT 3x; take the PEELED FRUIT (inventory).
- Give the PEELED FRUIT and then use JACE'S PORTRAIT (Z). Take the PUNCH CARD (Z1).
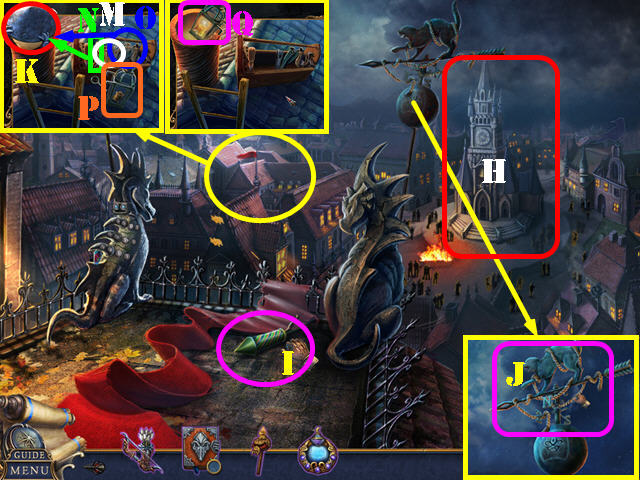
- Go forward.
- Select (A).
- Use the PUNCH CARD (B).
- Remove the scroll (C); select (1-6).
- Take the SPOON (D).
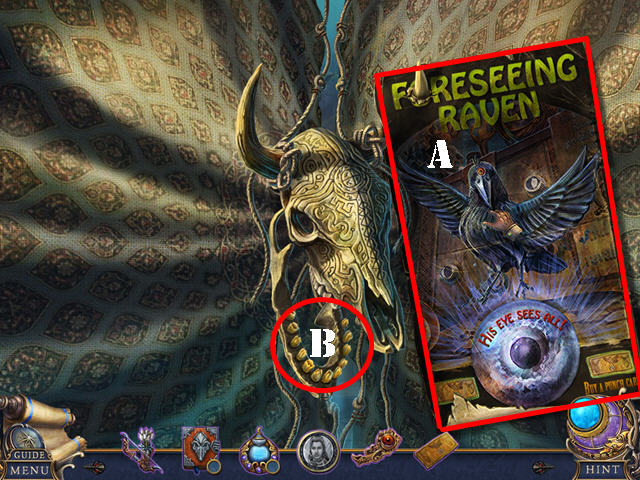
- Talk to the raven and place the EYE RING (E) for a HOP; play it to get the COMPASS POWDER.
- Place the COMPASS POWDER in the EMPTY COMPASS to get the MAGIC COMPASS (inventory).
- Walk down twice.
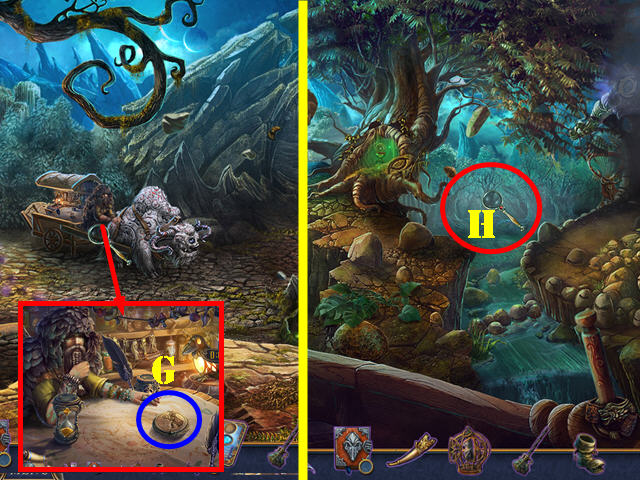
- Use the MAGIC COMPASS (F).
- Go (G).
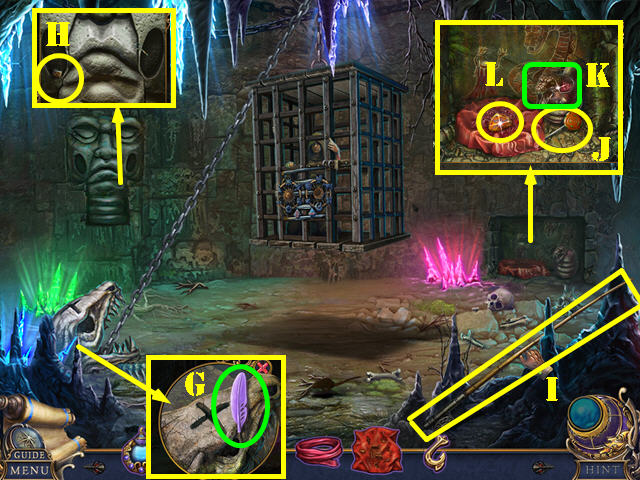
- Take the BELT (H) and HAMMER (I).
- Use the SPOON to get the SAP (J).
- Walk down.
- Use the HAMMER 3x; take the CHALK FEATHER (K).
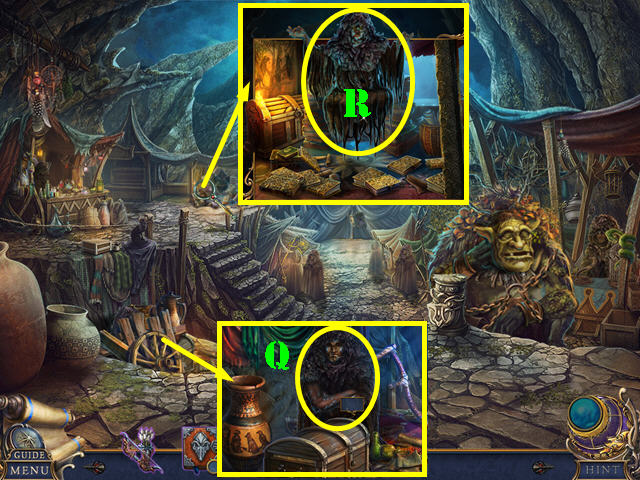
- Talk to the merchant (L); show him JACE'S PORTRAIT.
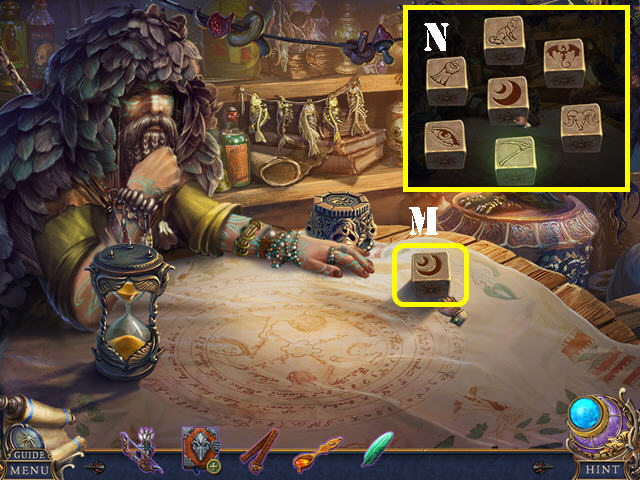
- Take the DICE (M).
- Use the CHALK FEATHER on the SPELLBOOK; take the MULTIPLY SPELL (inventory). Flip the page.
- Use the MULTIPLY SPELL on the DICE for a puzzle; select them to get the DICE SET (inventory).
- Take the DICE SET (N); give to merchant for a puzzle.
- Match the dice as shown in the example (O). The solution is random.
- Take the TROLL SERVANT CARD (P).
- Return to the Bazaar.
- Give the TROLL SERVANT CARD (Q).
- Take the key (R) and use it (S).
- Take the TROLL BELL (T).
- Use the TROLL BELL (U).
- Use the TROLL BELL (V) for a HOP; play it to get the BROKEN PADDLE.
- Place the pieces (W). Use the SAP.
- Use the BELT on the BROKEN PADDLE to get the PADDLE (inventory).
- Place the PADDLE (X); go forward.
Chapter 2: The Hut
- Use the TROLL BELL (A).
- Use the TROLL BELL (B); take the BUGLE (C).
- Talk to Jace (D).
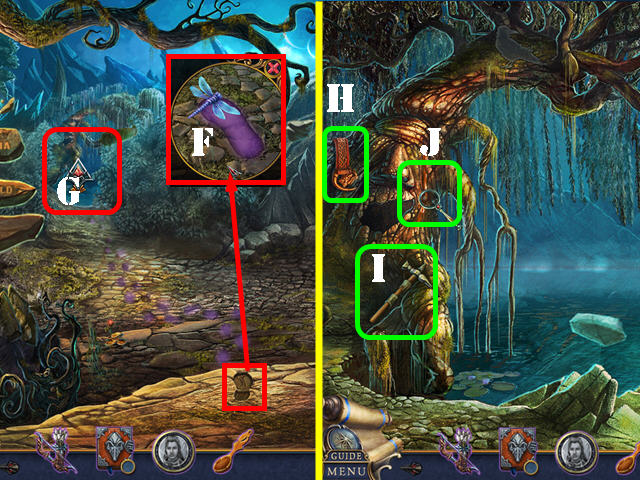
- Take the SPEAR (E). Touch the leaves.
- Take the COPPER STRING (F).
- Use the SPEAR; take the SKULL PENDANT (G).
- Use the SKULL PENDANT (H); take the SLEEPY BEANS CARD (I).
- Walk down twice.
- Place the SLEEPY BEANS CARD; take the SLEEPING BEANS (J).
- Return to Outside the Hut.
- Use the SLEEPING BEANS (K).
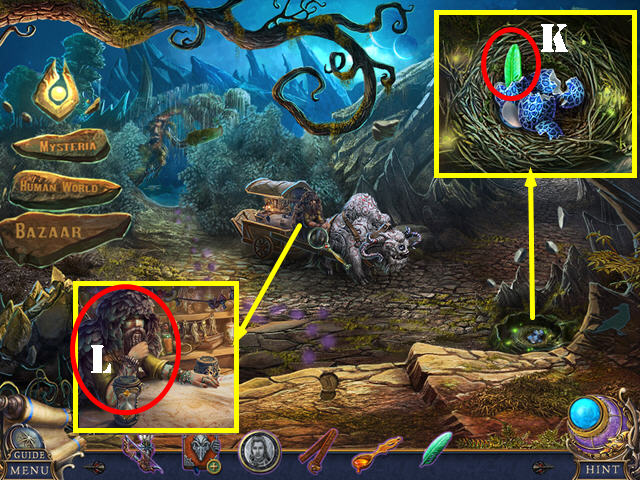
- Take all the PINECONES (L).
- Use the PINECONES; take the SILVER STRING (M).
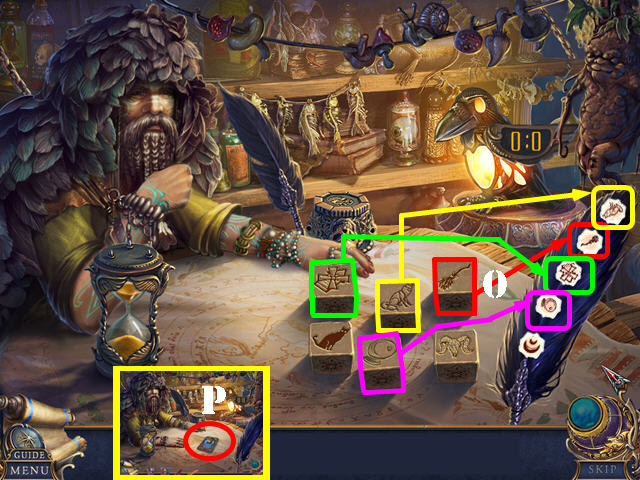
- Place the COPPER STRING and SILVER STRING for a puzzle.
- Solution: N-O-P.
- Go forward.
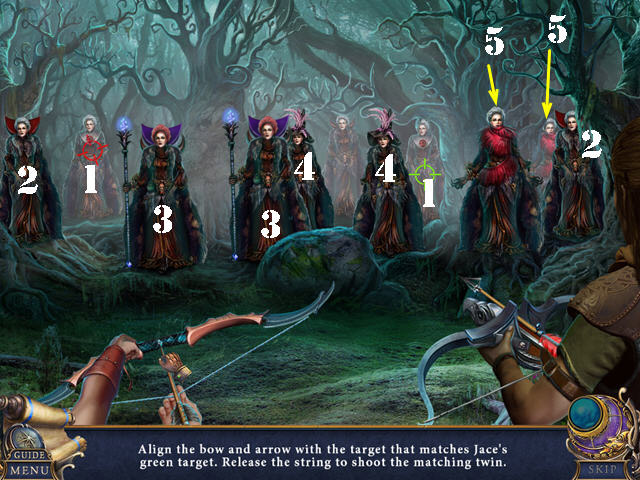
- Use the BOW AND ARROWS on the scene for a puzzle.
- Shoot the identical twin of the person who has the green target.
- Solution (1-5).
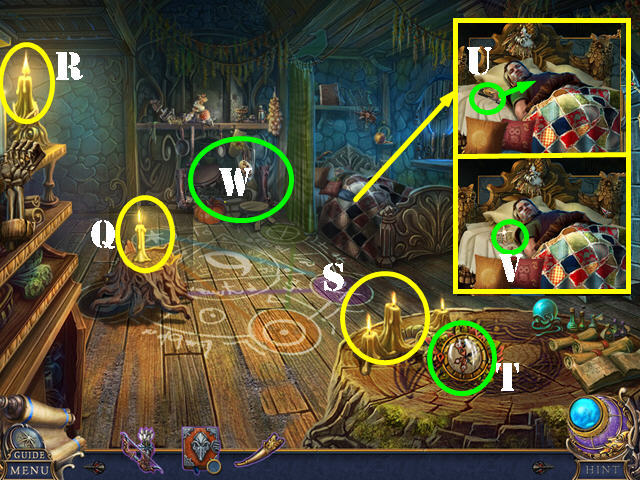
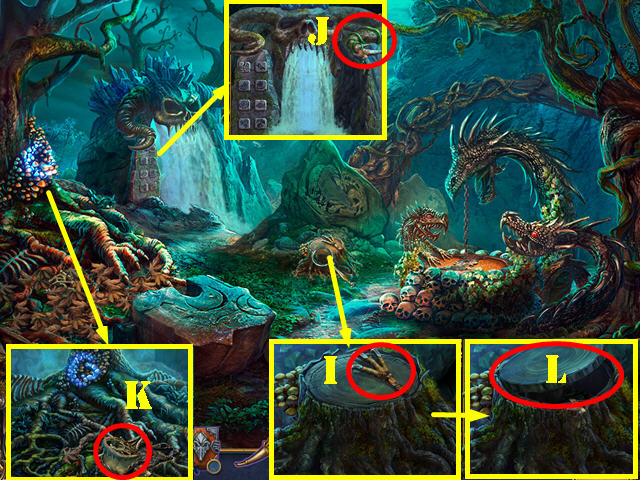
- Touch the stump 4x; take the CANDLE (Q).
- Use the CANDLE twice (R-S).
- Take the CLOCK (T).
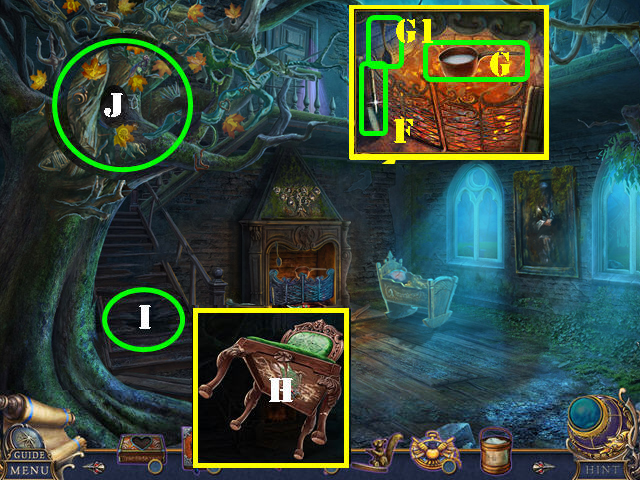
- Open the curtains; move the pillows. Give the bottle (U); take the SAFETY PIN (V). Select the torn note for a HOP.
- Play the HOP (W) to get the BRACELET.
- Take the BRACELET (X).
- Move the items; take the LEAF KEY (X1).
- Place the 2 BRACELETS and arrange as shown (X2).
- Take the CLOCK CODE (X3).
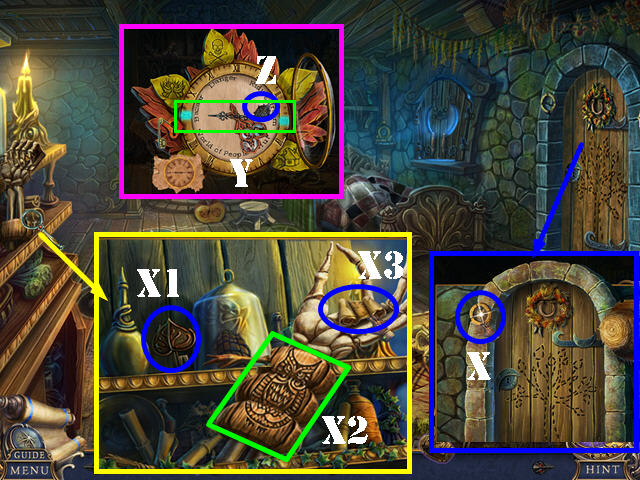
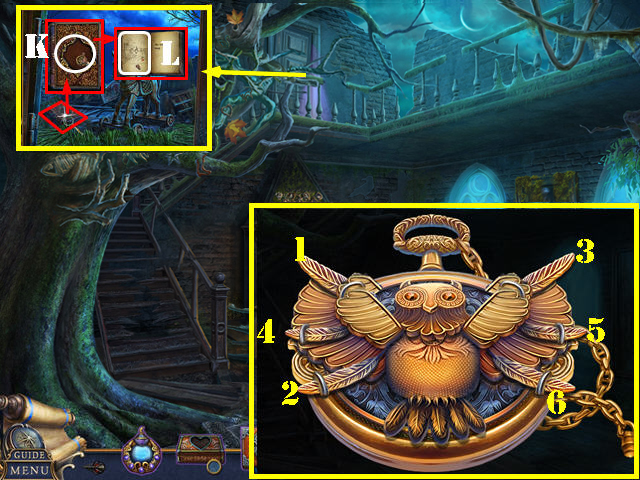
- Place the SAFETY PIN and CLOCK CODE on the CLOCK (inventory). Change the clock hands (Y).
- Take the LADYBUG (Z).
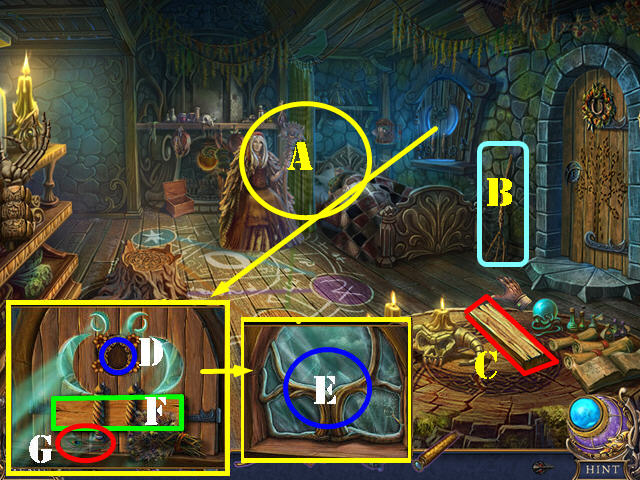
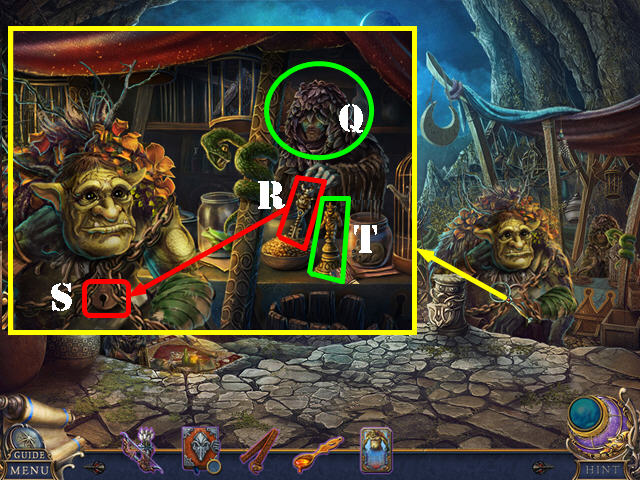
- Talk to Mathilda. Play the HOP (A) to get the SPYGLASS.
- Take the PITCHFORK (B) and PLANK (C).
- Place the LADYBUG (D) and use the SPYGLASS (E).
- Place the PLANK (F); take the FEATHER (G).
- Talk to Mathilda (H) to get the MAGIC PAINT.
- Use the PITCHFORK (I).
- Open the MAGIC PAINT; dip the FEATHER; take the FEATHER WITH PAINT (inventory).
- Use the FEATHER WITH PAINT (J).
- Solutions (J-K-L).
- Select the broom (M).
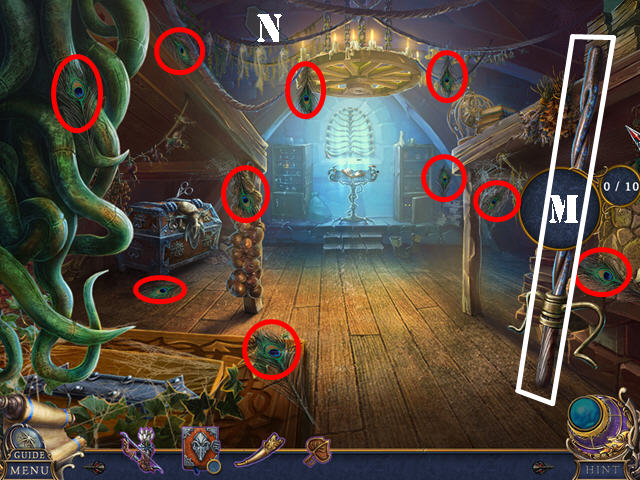
- Gather all the feathers (N).
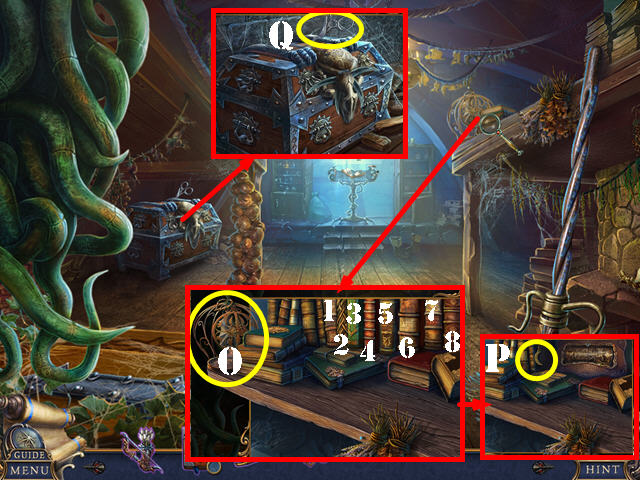
- Take the CLOSED CAGE (O).
- Select: 1-8, 2-5, 3-4, 6-7.
- Take the CRESCENT PENDANT (P).
- Place the LEAF KEY on the CLOSED CAGE; take the BAT (inventory).
- Take the SCISSORS (Q).
- Grab the feathers (R), then the FAN and RULER (S).
- Take the BOOT (T).
- Use the RULER (U); enter.
- Use the SCISSORS; select 2x; take the ROPE (V).
- Use the FAN; take the VIEWFINDER (W).
- Take the note from the BOOT (inventory).
- Go to the Attic (X).
- Use the VIEWFINDER (Y).
- Solutions (Z1-Z2).
- Take the CHALK FEATHER.
- Use the CHALK FEATHER on the SPELLBOOK; take the BLAZE SPELL. Flip the page (inventory).
- Use the BLAZE SPELL and then the ROPE (A). Go down.
- Select (B) and then select all fireflies (C). Move the vessel; use the CRESCENT PENDANT. Open the note (D) and take the KEY.
- Go to the Attic.
- Use the KEY. Take the MAGIC HARNESS and SEARCHING CARD (E).
- Attach the MAGIC HARNESS; take the FLYING BROOMSTICK (F).
- Return to Two Raven Valley.
- Give the SEARCHING CARD; take the FINDING POWDER (G).
- Use the FINDING POWDER on the BOOT; take JACE'S BOOT (inventory).
- Return to Outside the Hut.
- Use JACE'S BOOT and then the FLYING BROOMSTICK (H).
Chapter 3: The Waterfall
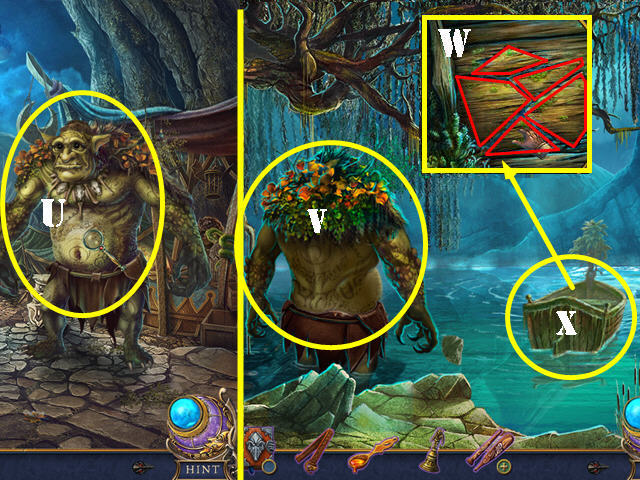
- Select the scene.
- Take the BIRD CLAW (I).
- Touch the VINE 4x; take it (J).
- Use the BIRD CLAW 3x; take the TRAP and CHISEL (K).
- Use the CHISEL; take the ROUND WOOD and OIL (L).
- Use the OIL on the TRAP; select 2x; take the RED GEM (inventory).
- Use the RED GEM (M); tilt the bucket and take the TONGS (M1).
- Place the ROUND WOOD (N); touch the bucket and go down.
- Select the fireflies (O).
- Use the VINE (P); place the thread on the needle; take the NEEDLE AND THREAD (Q).
- Open the curtains; remove the cobwebs 3x. Open the book; flip the page 2x; take the CHALK FEATHER (R).
- Use the CHALK FEATHER on the SPELLBOOK; take the REVEAL SPELL. Flip the page (inventory).
- Use the REVEAL SPELL; select the BUCKET (S) and then take it.
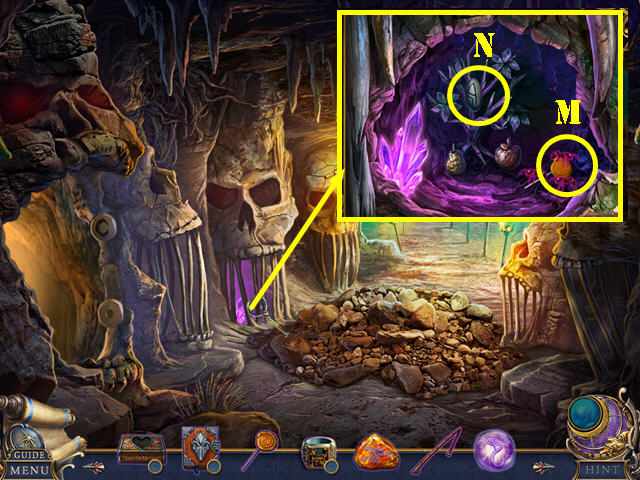
- Take the BLUE CRYSTAL (T).
- Use the BUCKET and BAT (U).
- Use the BLUE CRYSTAL (V).
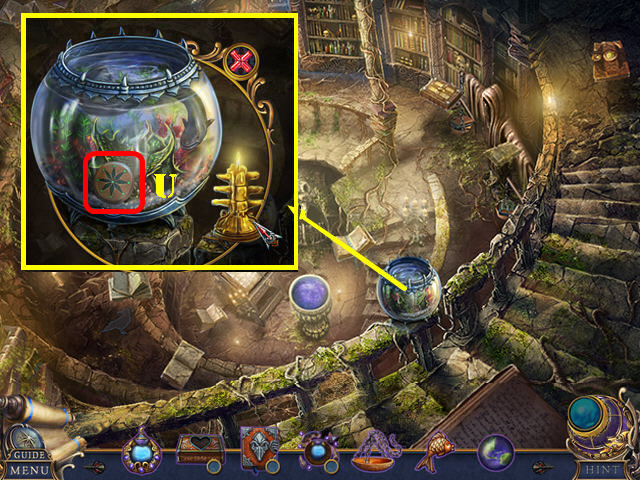
- Select the 6 roses (W). Take HELGA'S HAT and MAGIC MIRROR CARD.
- Use the Shovel; take the ASHES (A).
- Flip the symbols (B). Use the TONGS to get the DRAGON HANDLE (C).
- Use the ASHES on the mop; take the WIG (D).
- Place the DRAGON HANDLE (E).
- Select the scroll for a puzzle (F).
- Solution (G-H).
- Take the WATER BUTTON (I).
- Go to the Waterfall.
- Remove the broken button. Place the WATER BUTTON for a puzzle.
- Solution: (1-L)-(2-M)-(3-K, 4-J). Take the TOOTH (N).
- Go (O).
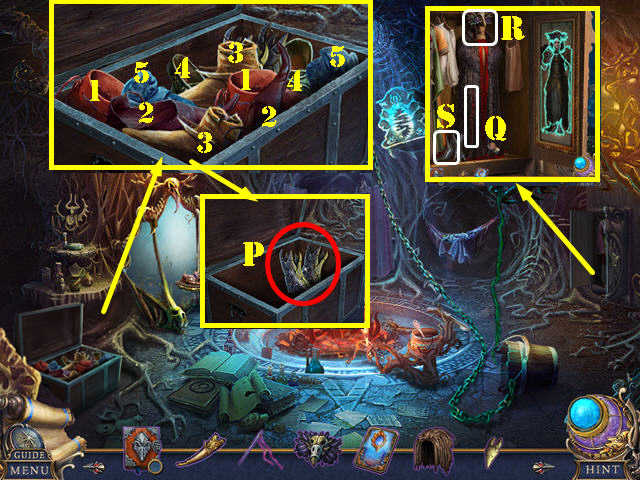
- Select matching shoes (1-5). Touch the boots and place the TOOTH. Take HELGA'S BOOTS (P).
- Move all the dresses.
- Use the NEEDLE AND THREAD (Q). Place the WIG and HELGAS' HAT (R). Place HELGA'S BOOTS (S). Take the DARK OTHER'S GARMENT.
- Return to Two Raven Valley.
- Place the MAGIC MIRROR CARD; take the MAGIC MIRROR (T).
- Return to In the Well.
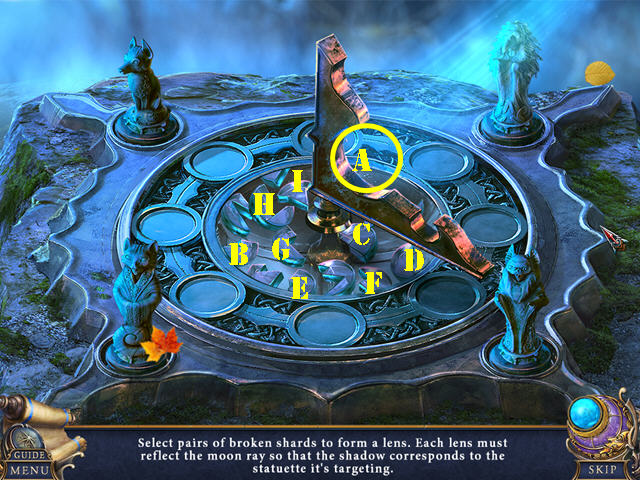
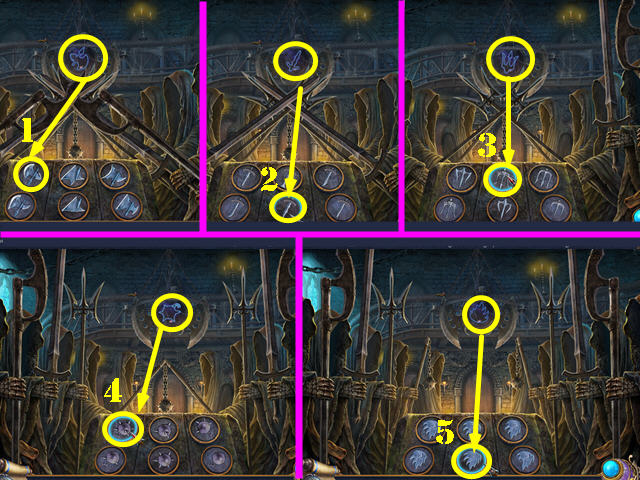
- Use the MAGIC MIRROR for a puzzle (U).
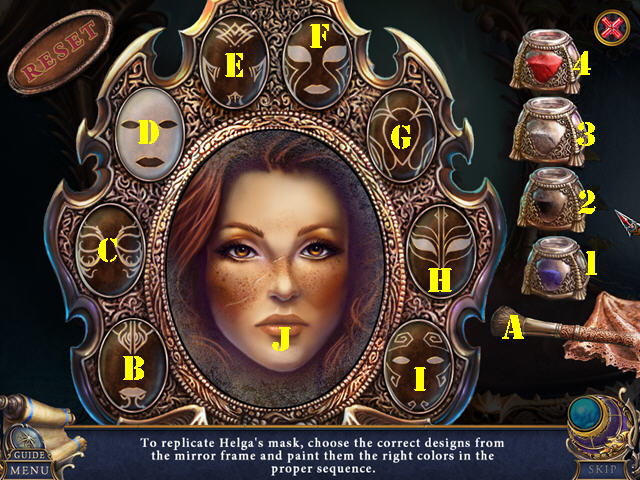
- Solution: (D-3, A-J)- (G-1, A-J)-( B-4, A-J)-(F-2, A-J).
- Go to the Waterfall.
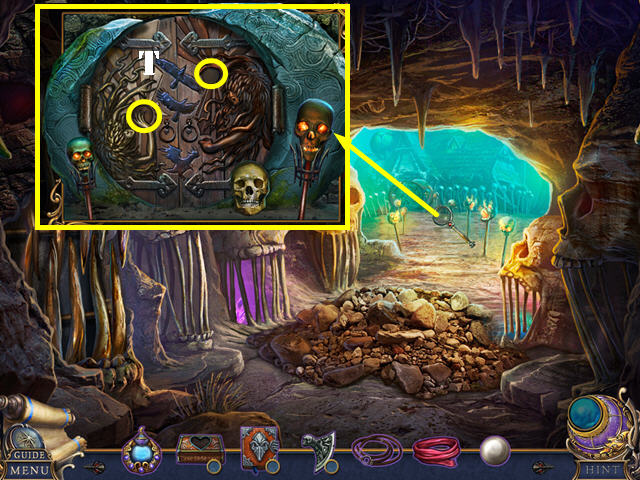
- Place the DARK OTHER'S GARMENTS (K).
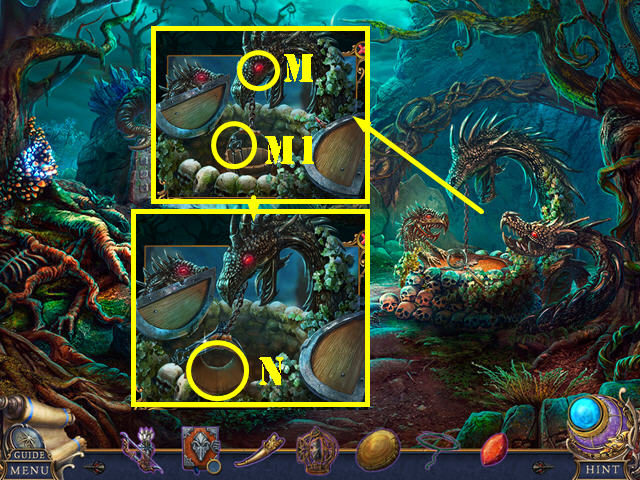
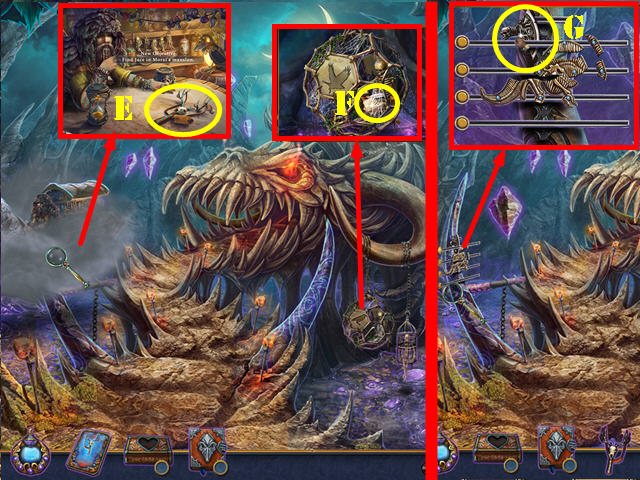
- Take the TORCH (L).
- Use the TORCH (M).
- Use the KNIFE 4x (N).

- Play the HOP (O) to get the NEEDLE.
- Use the NEEDLE (P).
- Use the BUGLE (Q).
- Take the MAGIC COMPASS (R).
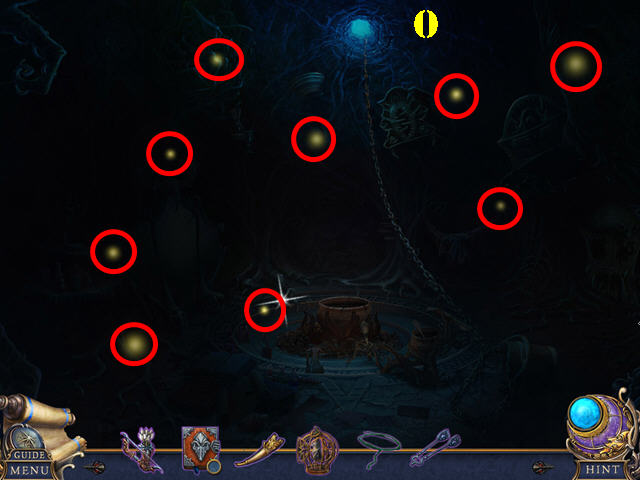
- Select (S).
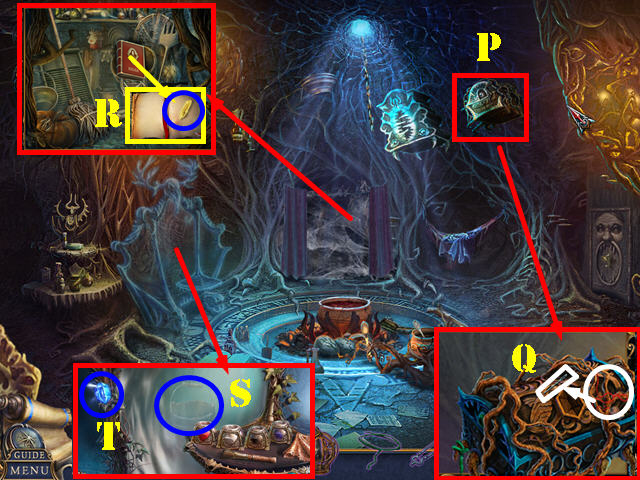
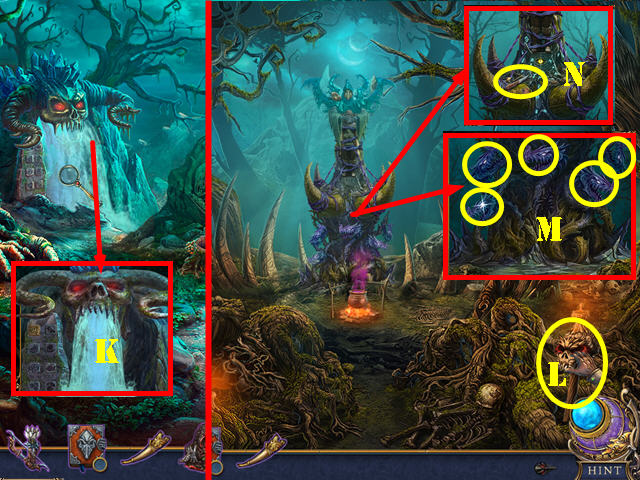
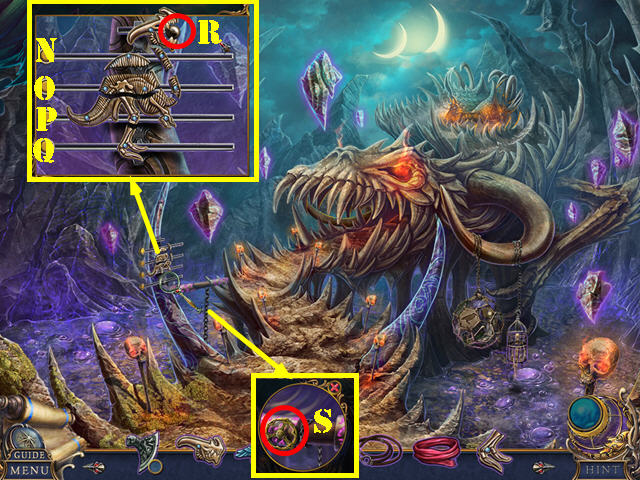
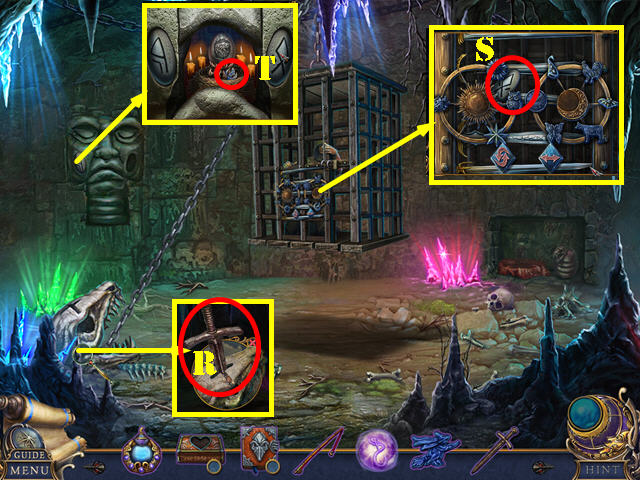
- Take the STONE BUTTON (T) and STONE IDOL HEAD (U).
- Place the STONE BUTTON for a puzzle (V).
- Solution: (1-4).
- Take the REVEALING FEATHER CARD (W).
- Play the HOP (X) to get the SKULL TOKEN.
- Place the STONE IDOL HEAD; touch it 2x; take MORAI'S DIARY (Y).
- Return to Two Raven Valley.
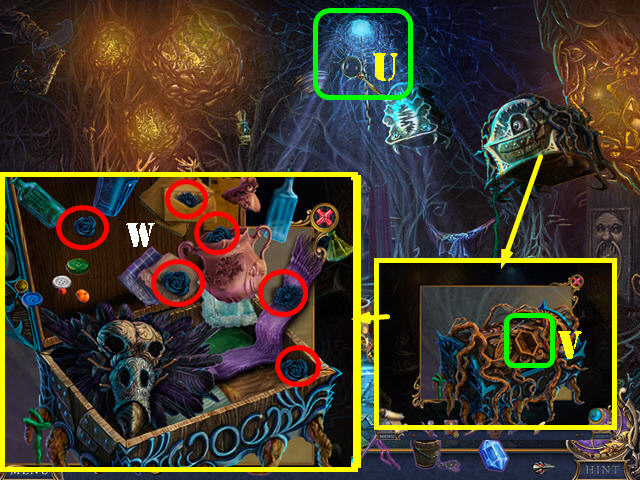
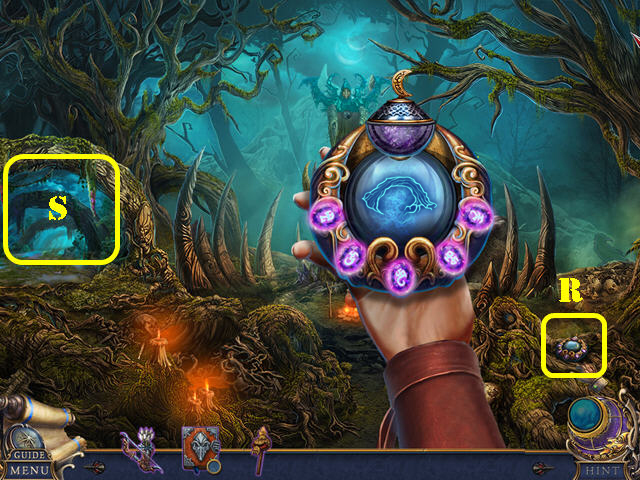
- Place the REVEALING FEATHER CARD; take the REVEALING FEATHER (Z).
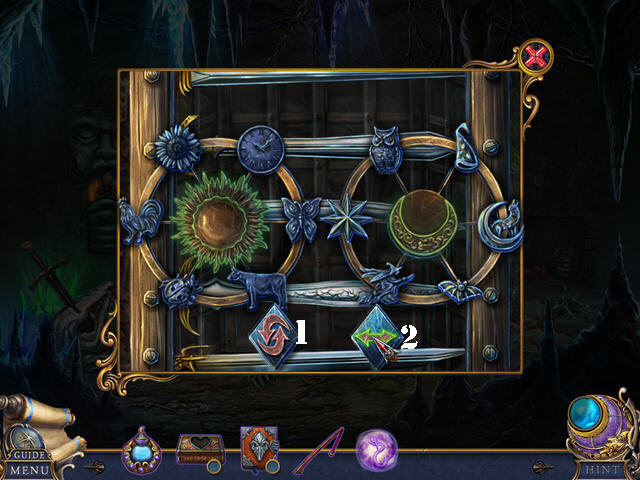
- Place the SKULL TOKEN on MORAI'S DIARY for a puzzle (inventory).
- Solution: 1-D, 2-A, 3-C, 4-B.
- Use the REVEALING FEATHER on MORAI'S DIARY (inventory). Touch the page 2x and take the CHALK FEATHER (E).
- Use the CHALK FEATHER on the SPELL BOOK; take the BEAUTIFY SPELL. Flip the page (inventory).
- Return to the Sabbath.
- Use the BEAUTIFY SPELL to activate a HOP (F); play it to get the ENCHANTED SCARF.
- Use the ENCHANTED SCARF (G); go forward.
Chapter 4: Clock Tower
- Use the MAGIC COMPASS on the scene.
- Select (H).
- Take the FIRECRACKER (I).
- Select the ROPE 8x, then take it (J).
- Place the ROPE on the BOW AND ARROWS; take the BOW WITH ROPE (inventory).
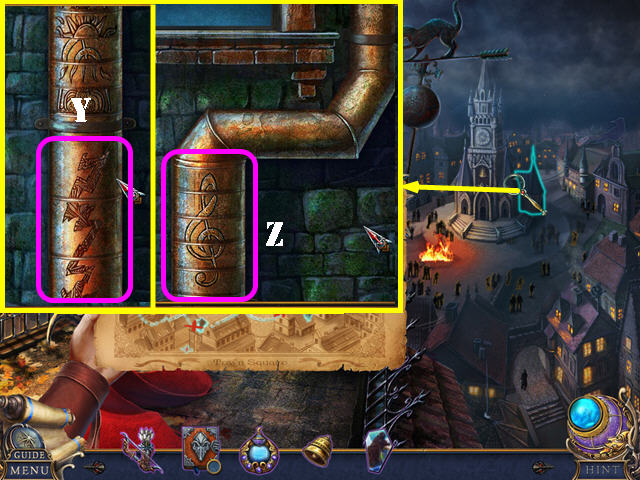
- Use the BOW WITH ROPE; select (K) and take the LETTER W (M).
- Use the wrench (N) and wire (O).
- Use the TORCH (P); place the lantern (Q).
- Solution: (R). Take the TOWN SQUARE MAP.
- Place the LETTER W (S); take the GUNPOWDER and BELL (T).
- Open The FIRECRACKER; place the GUNPOWDER; use the TORCH on it and take the IGNITED FIRECRACKER (inventory).
- Use the IGNITED FIRECRACKER (U). Take the STAINED GLASS PIECE (V).
- Play the puzzle.
- Solution: 1-2-3-4-5-6-7-8-9.
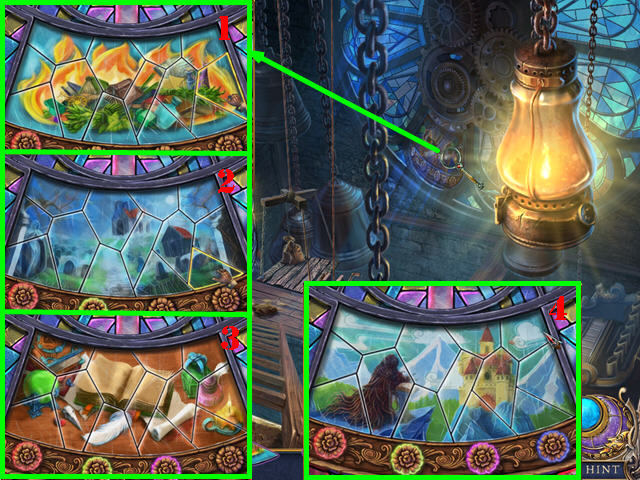
- Place the TOWN SQUARE MAP for a puzzle.
- Solution: (W).

- Solution (X).
- Solution (1-11).
- Solutions (Y-Z).
- Enter the Clock Tower.
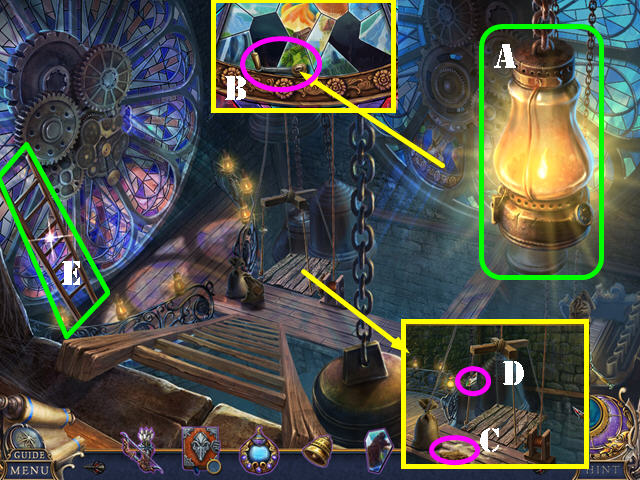
- Touch the lantern 2x (A).
- Take the WINCH HANDLE (B).
- Touch the sandbag (C). Take the STAINED GLASS PIECE (D).
- Move the ladder (E).
- Take the CHAIN (F).
- Take the SANDBAG (H).
- Place the WINCH HANDLE and pull it (I).
- Place the CHAIN and SANDBAG (J). Touch the sandbags.
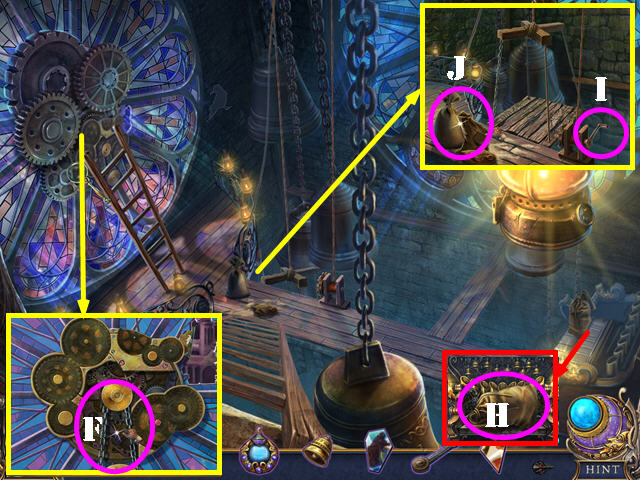
- Place the MAGIC COMPASS (@).
- Take the STAINED GLASS PIECE (K), BELL (L), and ORIGAMI (M).
- Tilt the pumpkin; take the ACID (N).
- Use the ACID; take the BLACKSMITH KEY and BELT (O).
- Touch the BELT 2x; take the CLASPED BELT (inventory).
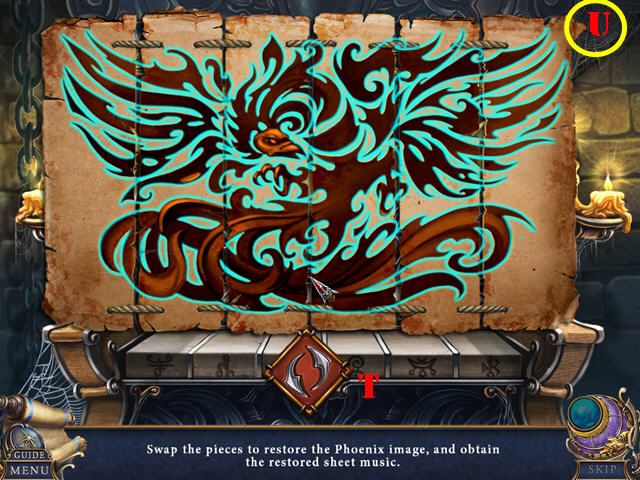
- Select the ORIGAMI 2x; take the ALARM SHEET MUSIC (inventory).
- Walk down.
- Place the 3 STAINED GLASS PIECES. Solutions (1-2-3-4).
- Take the BLACKSMITH FIGURINE.
- Return to Town Square.
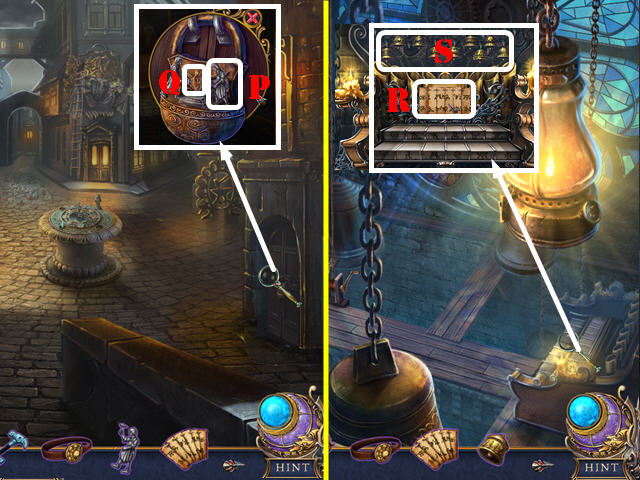
- Place the BLACKSMITH FIGURINE (P).
- Open the lock; use the BLACKSMITH KEY for a HOP (Q); play it to get the BELL.
- Walk down.
- Touch the sheet music several times (R). Place the ALARM SHEET MUSIC and the 3 BELLS (S).
- Select the sheet music and press the arrows (T) to begin.
- Solution (U). Press the arrows twice.
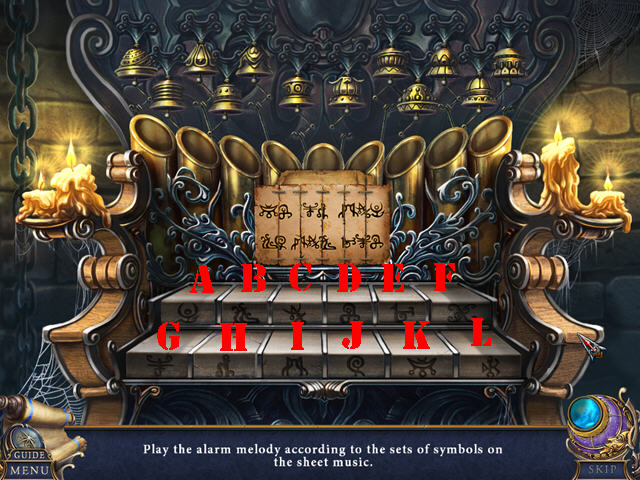
- Solution: (K-D)-(G-H)-(I-C-A)-(B-J)-(I-C-B)-(E-G-D).
- You receive the STONE STATUETTE.
- Go to Town Square.
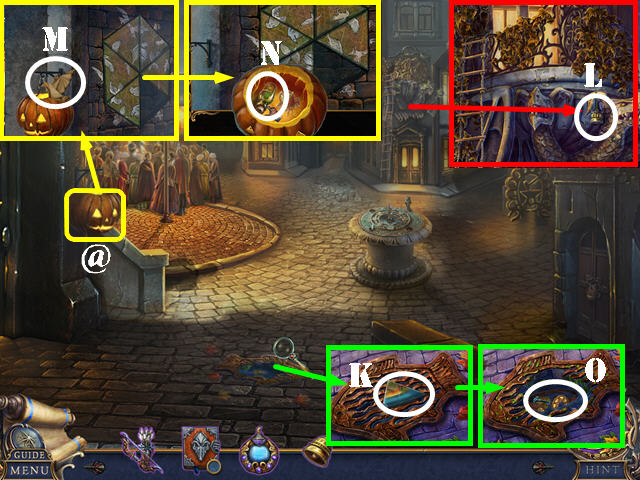
- Take the BROOM (M); use it (N).
- Remove the vines; take the WATERING CAN (O).
- Dip the WATERING CAN; take the WATER (P).
- Play the HOP (Q) to get the SET OF GEARS.
- Use the WATER (R); remove the hood (S).
- Open the shirt; take the ACCURACY CARD, note, and STONE STATUETTE (T).
- Walk down.
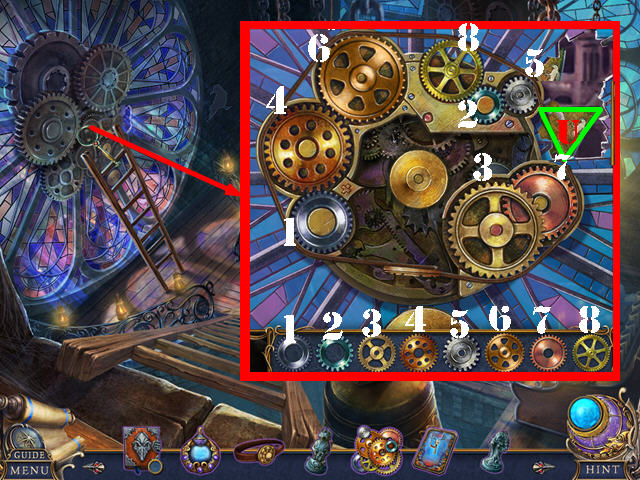
- Place the SET OF GEARS. Solution (1-8). Place the CLASPED BELT. Take the STONE TRIANGLE (U).
- Go to Town Square.
- Place the STONE TRIANGLE (V).
- Solution: A-Bx3-Cx2-Dx2-Ex2-Fx2. Take the STONE STATUETTE.
- Place the 3 STONE STATUETTES (G).
- Solution: (B-C)-(A-D-E)-(A-F-G)-(A-H-I).
- Take the CHALK FEATHER.
- Use the CHALK FEATHER on the SPELLBOOK; take the PORTAL SPELL and flip the page (inventory).
- Use the PORTAL SPELL (I).
Chapter 5: Prison Cell
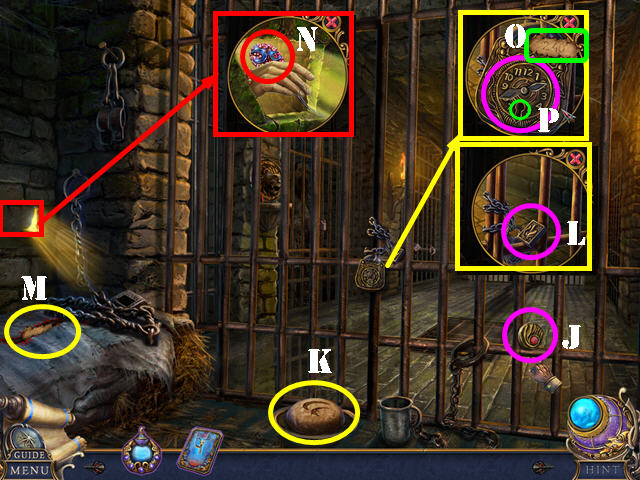
- Take the BAS-RELIEF PIECE (J), BREAD (K), and MATCHES (L).
- Open the MATCHES; strike the match to get the BURNING MATCH (inventory).
- Take the KNIFE from inside the BREAD (inventory).
- Move the items; use the KNIFE; take the PAPER SCRAP (M).
- Use the KNIFE; take the HAIRPIN (N).
- Use the BURNING MATCH on the PAPER SCRAP; take the CODE (inventory).
- Place the CODE (O); adjust the hands as shown; use the HAIRPIN (P).
- Go forward.
- Take the MUG (Q) and MAGNET (R).
- Try to take the coin (S); use the MAGNET and take the BAS-RELIEF PIECE.
- Open the bag (T); take the SPELLBOOK PAGE and BULLETS.
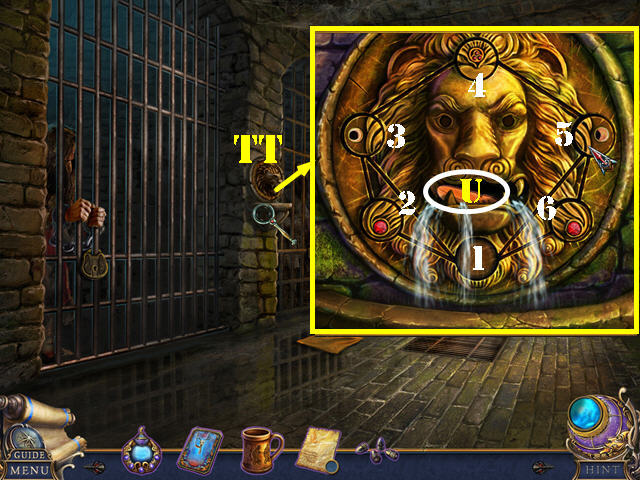
- Place the 2 BAS-RELIEF PIECES (TT).
- Solution: Move the following tokens to the empty position: 1-5-4-3-1-5-6-1-3-4-5-6-1.
- Take the CHALK FEATHER (U).
- Use the MUG in the water to get the WATER.
- Use the CHALK FEATHER on the SPELLBOOK PAGE to get the SLUMBER SPELL (inventory).
- Place the SLUMBER SPELL in the WATER; take the SLEEPING POTION (inventory).
- Put down the SLEEPING POTION (V).
- Insert the BULLETS (W); take the LOADED MUSKET.
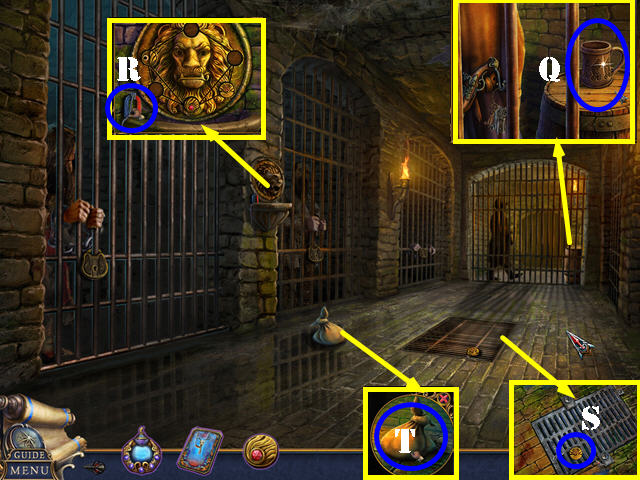
- Use the LOADED MUSKET; remove the grill. Touch the chain; take the PLIERS (X).
- Use the PLIERS; take the SET OF KEYS (Y).
- Take the 3 CELL KEYS from the SET OF KEYS (inventory).
- Use the CELL KEY (A); take the SHACKLES.
- Use the CELL KEY (B); take the SHACKLES.
- Use the CELL KEY (C); take the SHACKLES.
- Mathilda appears; you receive the CHEST FOR SHARDS.
- Take the SPELLBOOK from the CHEST FOR SHARDS (inventory).
- Place the 3 SHACKLES and pull them (D).
- Go down for a puzzle.
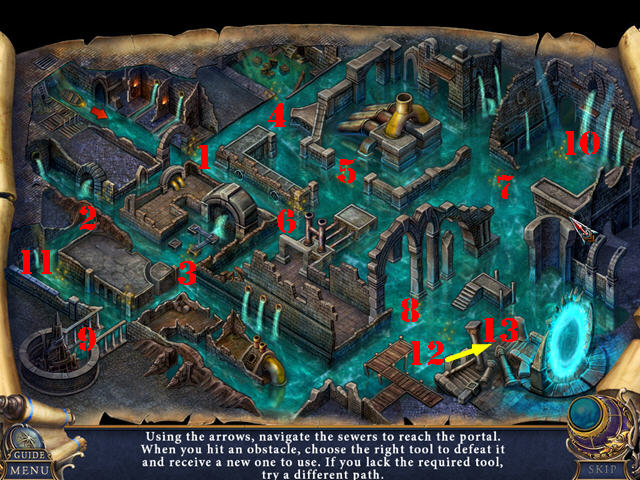
- Go to the locations in order of 1-12, 13 is the last spot you go to.
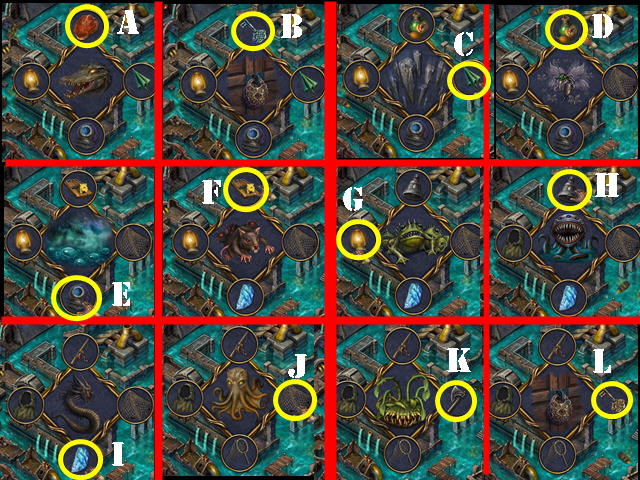
- The right tools for each location are: (1-A)-(2-B)-(3-C)-(4-D)-(5-E)-(6-F)-(7-G)-(8-H)-(9-I)-(10-J)-(11-K)-(12-L).
- Touch the scene.
- Give the ACCURACY CARD; take the ACCURATE SLINGSHOT (E).
- Take the SHARP SHELL (F) and AXE BLADE (G).
- Go forward.

- Take the FOSSIL (H).
- Use the ACCURATE SLINGSHOT to receive the RAVEN FIGURINE (J).
- Touch the bones; take the VALVE and the GLOWING CRYSTAL (I).

- Take the MUZZLE (K).
- Touch the bones. Place the GLOWING CRYSTAL (L); take the DOLL (M).
- Take the RIBBON from the DOLL, then use the SHARP SHELL; take the FOSSIL (inventory).
- Walk down.
- Place the two FOSSILS. Solution: Nx2-O-Px3-Q.
- Take the BLACK PEARL (R).
- Place the VALVE (S); turn it for a HOP; play it to get the WHITE PEARL.
- Go forward.
- Place the BLACK PEARL and WHITE PEARL (T).
- Go forward for a puzzle.
- Solution (1-5).
- Play the HOP (U) to get the RAVEN FIGURINE.
- Take the BARREL ORGAN HANDLE (V) and HANDKERCHIEF (W).
- Walk down twice.
- Play the HOP (X) to get the CROWN.
- Use the MUZZLE; take the RAVEN FIGURINE (Y).
- Place the RAVEN FIGURINE (Z); spin the globe; place the 2 RAVEN FIGURINES (Z1-Z2). Take the CHALK FEATHER (Z3).
- Place the BARREL ORGAN HANDLE and touch it (Z4).
- Find the items (A-B).
- Take the BONE (C).
- Place the BONE on the AXE BLADE to get the AXE (inventory).
- Use the CHALK FEATHER on the SPELLBOOK; take the FREEZE SPELL. Flip the page (inventory).
- Use the FREEZE SPELL and then the AXE to get the FISHING HOOK (D).
- Go forward twice.
- Place the CROWN (E); take the SNAKE FIGURINE (F).
- Walk down.
- Place the SNAKE FIGURINE for a puzzle.
- Solution: F-I-E-H-A-F-D-B (@).
- Use the TORCH (@1). Go forward for a puzzle.
- Follow steps 1-12.
- Take the CHALK FEATHER (G), SIGNET RING (H), BROKEN FISHING ROD (I), and CANDY (J).
- Place the HANDKERCHIEF; touch the snake (K); take the AMBER (L).
- Place the RIBBON and FISHING HOOK on the BROKEN FISHING ROD to get the FISHING ROD (inventory).
- Use the CHALK FEATHER in the SPELLBOOK; take the WEAKEN SPELL. Flip the page (inventory).
- Walk down.
- Use the CANDY (M); take the SYMBOL (N).
- Go forward.
Chapter 6: Morai's House
- Place the AMBER; take the WITCH FIGURINE and TILE (O).
- Place the TILE on the SIGNET RING for a puzzle (inventory).
- Solution (P). Take the SIGNET RING.
- Place the SIGNET RING (Q); take the ENCHANTED SWORD.
- Return to the Underground Cave.
- Place the ENCHANTED SWORD and tilt it (R).
- Take the SYMBOL (S).
- Place the 2 SYMBOLS; take the WOLF FIGURINE (T).
- Place the WITCH FIGURINE and WOLF FIGURINE for a puzzle (S).
- Solution: 2-1-1-2-1-1-2-1-2.
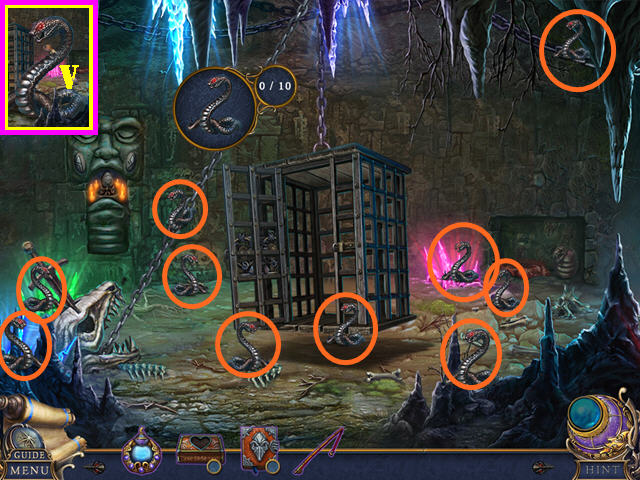
- Use the WEAKEN SPELL (V).
- Find 10 snakes (orange).
- Close the cage; pull it.
- Take the BROKEN COMPASS (A).
- Use the FISHING ROD (B); take the SNAKE KEY and SHACKLES.
- Use the SNAKE KEY (C); take the BLACK MIRROR SHARD (D) and GOLDEN STATUETTE (E).
- Place the BLACK MIRROR SHARD in the CHEST FOR SHARDS (inventory).
- Assemble the BROKEN COMPASS (F) (inventory).
- Return to Morai's Hall.

- Play the HOP (G) to get the CRYSTAL APPLE.
- Go (H).
- Touch the book.
- Solution (1-5). You receive the SCREAMING BOOK.
- Take the SILVER STATUETTE (I).
- Place the SCREAMING BOOK and open it; use the key (J); take the FEATHER DUSTER (K).
- Select twice; place the SHACKLES (L).
- Break the apple (M); place the CRYSTAL APPLE; take the SHARP FANG.
- Place the SHARP FANG (N); take MORAI'S PORTRAIT.
- Walk down.
- Place the GOLDEN STATUETTE and SILVER STATUETTE; take the PLANET MODEL (O).
- Place MORAI'S PORTAIT (P); enter.
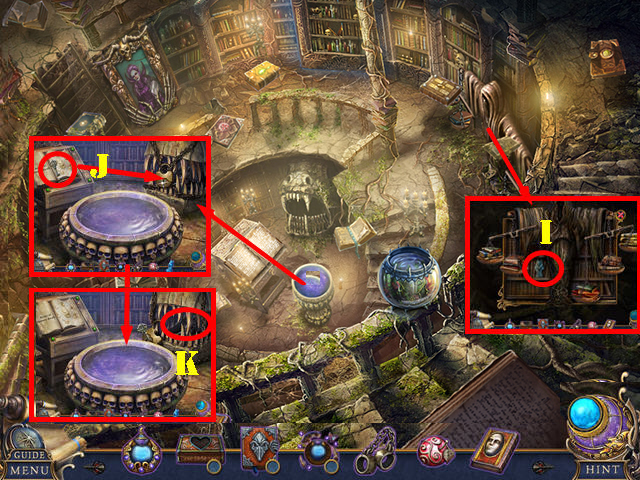
- Take the SCALE (Q) and FISH FIGURINE (R).
- Use the DUSTER; take the 6 bottles to get the POTION SET (S).
- Return to Morai's Library.
- Place the POTION SET for a puzzle.
- Solution (1-5). Take the PLANET MODEL.
- Place the FISH FIGURINE; take the GEAR PART (U).
- Place the SCALE for a puzzle.
- Solution (V).
- Take the EXPANDING BELLOWS CARD and GEAR PART (W).
- Go to Morai's Observatory.
- Place the 2 PLANET MODELS; take the PAGE FRAGMENT (X).
- Place the 2 GEAR PARTS and turn (Y).
- Place the PAGE FRAGMENT (Z).Select 1-4 to get the COMPASS POWDER.
- Place the COMPASS POWDER in the BROKEN COMPASS; take the RESTORED COMPASS (inventory).
- Return to Morai's Library.
- Use the RESTORED COMPASS (A); open the door.
- Take the WING (B).
- Return to Morai's Observatory.
- Place the WING (C).
- Play the HOP (D) to get the MAGNIFIER.
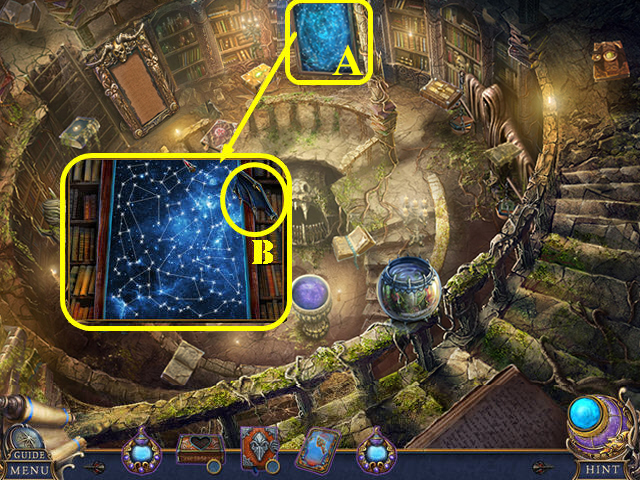
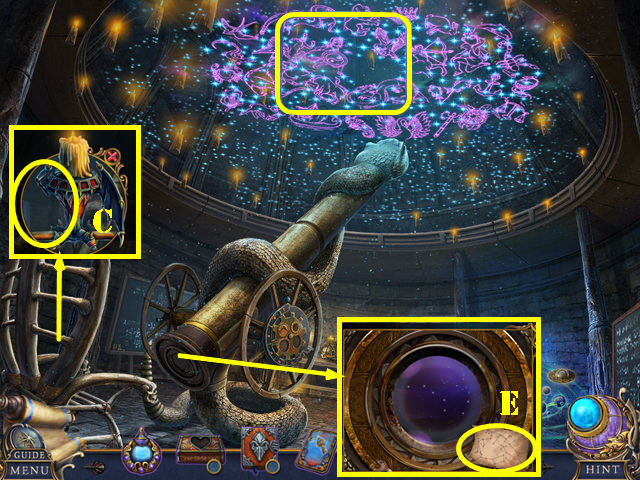
- Take the CONSTELLATION DIAGRAM (E).
- Return to Morai's Library.
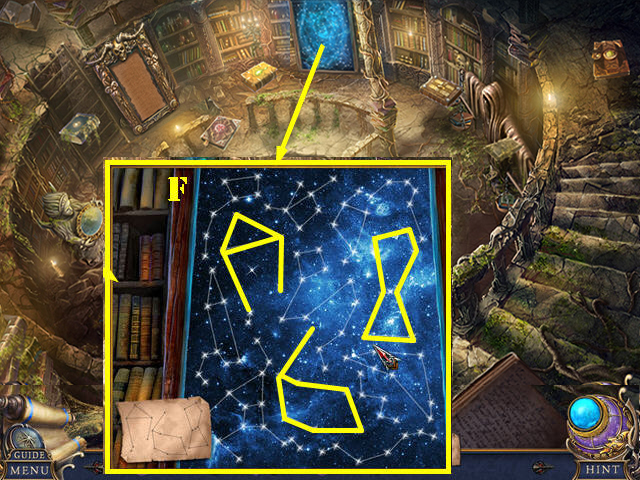
- Place the CONSTELLATION DIAGRAM.
- Solution (F).
- Go forward.
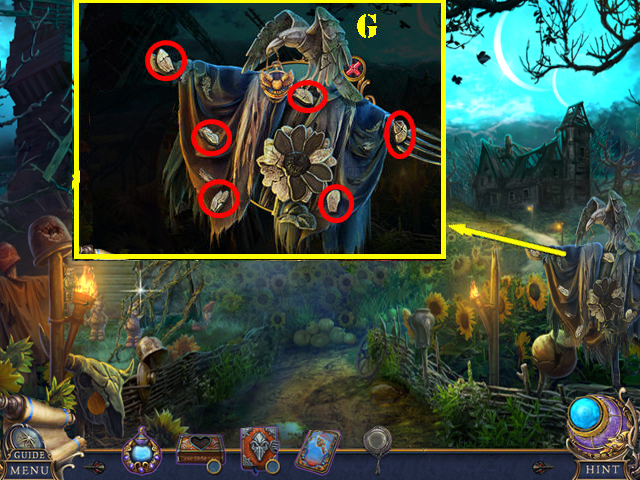
- Find 6 petals (G). Take the SICKLE.
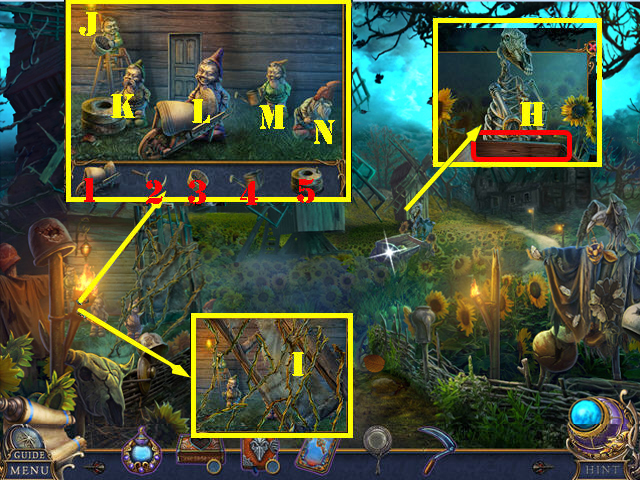
- Take the BOARD (H).
- Use the SICKLE; remove the cloth (I).
- Solution: 1-L, 2-N, 3-J, 4-M, 5-K.
- Go forward.
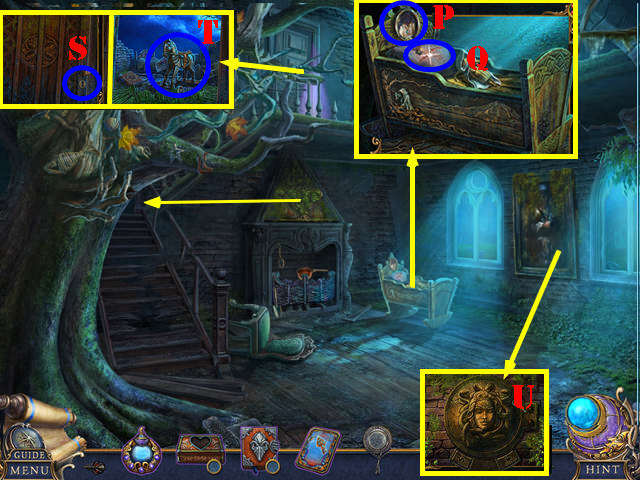
- Take the BROKEN CHAIR (O) and CHILD'S PORTRAIT (P).
- Use the SICKLE; take the SHINY PENDANT (Q).
- Use the MAGNIFIER; take the KEY (R).
- Use the KEY (S).
- Use the SICKLE 2x; move the horse and take the SADDLE (T).
- Touch the portrait to reveal a safe (U).
- Walk down.
- Place the EXPANDING BELLOWS CARD; take the EXPANDING BELLOWS and SYBIL'S PORTRAIT (A).
- Place the SADDLE; take the NUTCRACKER (B).
- Place the SHINY PENDANT; take the WATCH (C).
- Use the EXPANDING BELLOWS; open the door; take the FLOUR (D).
- Go forward.
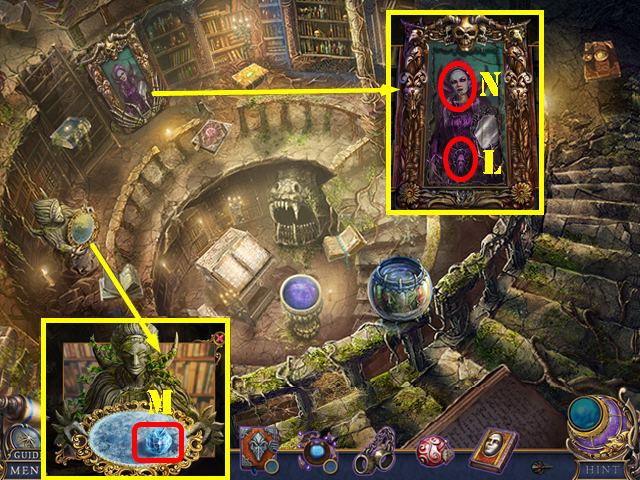
- Place the CHILD'S PORTRAIT and SYBIL'S PORTRAIT.
- Solution (E).
- Take the TROWEL (F).
- Place the FLOUR (G); select (G1). Take the HOMEMADE GLUE.
- Put the HOMEMADE GLUE on the BROKEN CHAIR. Assemble (H) and place the BOARD to get the CHAIR.
- Place the CHAIR (I) to activate a HOP; play it to get the OWL HEAD (J).
- Place the OWL HEAD on the WATCH (inventory). Select 1-6. Take the BOOK SYMBOL.
- Place the BOOK SYMBOL (K). Flip 4x; take the HIDDEN TREASURE MAP (L).
- Walk down.
- Place the HIDDEN TREASURE MAP (M). Use the TROWEL; take the SAFE BUTTON and CHALK FEATHER (N).
- Use the CHALK FEATHER on the SPELLBOOK; take the TELEPORTRAIT SPELL. Flip the page (inventory).
- Go forward.
- Play the HOP (O) to get the GOLDEN NUT.
- Use the NUTCRACKER on the GOLDEN NUT; take the BIRD FIGURINE and SAFE CODE (inventory).
- Place the SAFE BUTTON and SAFE CODE for a puzzle.
- Solution (P). Take the MAGIC KNITTING NEEDLES, look at the note; take the CRYSTAL GLOBE (Q).
- Use the TELEPORTRAIT SPELL on the CRYSTAL GLOBE (inventory).
Chapter 7: The Supreme Tree
- Select the IVY BRANCHES 3x (R). Look at the note (S).
- Take the COAL (T) and MAPLE LEAF (U).
- Select door (V); take STICK (V1).
- Use the STICK (W) to get the BURNING STICK.
- Use the BURNING STICK (X); take the KNIFE and ICE LUMP.
- Use the KNIFE, then COAL (Y).
- Select (1-2-3). Go through door.
- Select (A). Talk to the troll (A1).
- Take the LEAKY BASKET (B) and NEEDLE AND THREAD (C).
- Take the HOT WATER (D).
- Take the WEDGE; look at the note (E).
- Use the MAPLE LEAF and the NEEDLE AND THREAD; take the TROLL'S SHOES (G).
- Use the IVY BRANCHES on the LEAKY BASKET; take the BASKET (inventory).
- Walk down.
- Use the BASKET. Solution (H). You receive the HEALING BERRIES; take the WOOL YARN (I).
- Use the MAGIC KNITTING NEEDLES on the WOOL YARN; take the THREAD and WARM SCARF (inventory).
- Go to the Troll's Lair.
- Use the THREAD; take the TROLL'S HAMMER (J).
- Remove the top; place the HOT WATER and HEALING BERRIES (K). Re-cover. Select (L); take the HEALING TEA (M).
- Give the TROLL'S SHOES, WARM SCARF, and HEALING TEA; take the BLACK MIRROR SHARD and FIERY HEART (N).
- Place the BLACK MIRROR SHARD in the CHEST FOR SHARDS; take MORAI'S MIRROR SHARDS (inventory).
- Walk down.
- Use the WEDGE and the TROLL'S HAMMER; take the MAGICAL SWORD (O).
- Place the FIERY HEART (P); take the BIRD FIGURINE (Q).
- Go to the Troll's Lair.
- Place the 2 BIRD FIGURINES; place the ICE LUMP and touch the bird (R); take the ICY HEART (S).
- Walk down.
- Place the ICY HEART (T).
- Go forward.
- Select anywhere on the scene.
- Use the MAGICAL SWORD (U); take the BLACK MIRROR (V).
- Remove the glass from the BLACK MIRROR; place MORAI'S MIRROR SHARDS; take the RESTORED BLACK MIRROR (inventory).
- Place the RESTORED BLACK MIRROR and then the MAGICAL SWORD (W) for a puzzle.
- Talk to Jace (X).
- Take the CHALK FEATHER (Y).
- Use the CHALK FEATHER on the SPELLBOOK; take the RESURRECT SPELL (inventory).
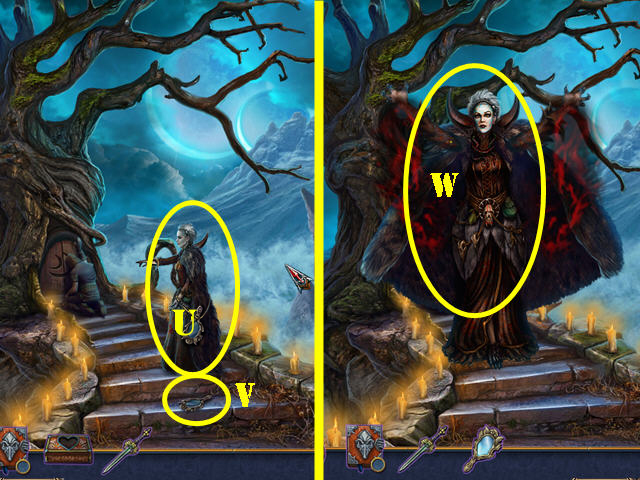
- Use the RESURRECT SPELL (X).
- Congratulations, you've completed Bridge to Another World: The Others!
Created at: 2015-04-26