

Walkthrough Menu
- General Tips
- Chapter 1 – The Palais Royale
- Chapter 2 – Quayside
- Chapter 3 – Paris Café
- Chapter 4 – Nico
- Chapter 5 – Clown Chasing
- Chapter 6 – Ireland
- Chapter 7 – Marquet
- Chapter 8 – The Tripod
- Chapter 9 – Mabia
- Chapter 10 – Bull’s Head Hill
- Chapter 11 – Villa de Vasconcellos
- Chapter 12 – Montfaucon Church
- Chapter 13 – Baphomet
- Chapter 14 – The Children
- Chapter 15 – Scotland
General Tips
- This is a point and click Adventure Game.
- Click on Options and then on the Audio tab to adjust the Sound Effects, Music and Speech Volume.
- Click on Options and the Screen Resolution tab to choose between Full Screen, Original or Augmented resolutions.
- Click on the flag below the Credits to choose the language for the subtitles.
- A flashing blue circle cursor indicates an area of interest.
- There are many hotspots that are not necessary to progress and not included in the walkthrough, but they provide humor and background and investigating all of them allows for a more complete experience.
- Moving your cursor over the flashing blue circle will bring up various action icons.
- An eye icon indicates you can examine an item.
- A mouth icon means you can speak to another character.
- Click on the conversation choices you want to have, it is always good to exhaust all conversations to get the most clues.
- In addition to clicking on the conversation options, you can click on the inventory items as well during an interaction with another character to discuss them.
- If there are more than one action icon on the same item, you can left click on your mouse to get the primary action and you can examine with a right click.
- To walk, just click on the floor where you want to move, or click on a hotspot and your character will move towards it.
- You can left click the mouse to skip through the dialogues.
- To exit out of close-ups or end conversations, click on the blue arrow on the bottom right of the screen.
- If there is no arrow and you cannot exit, you have not finished everything you need to do.
- You cannot skip any puzzles, but none of them are random, so the solutions are all in the walkthrough.
- Click on the Briefcase Icon to access your inventory.
- You can combine inventory items by click-holding one of the items and dragging it to the item you wish to combine it with. When both items are highlighted in gold, you can release the mouse button.
- To use an inventory item on a hotspot or person click-hold and drag the item to a hotspot or person and release when it is highlighted in gold.
- Click on the Diary Icon on the task bar to access the Diary.
- The Diary contains clues and recaps of what you have done, so it is wise to check frequently.
- Click on the Question Mark on the task bar to get hints.
- There are two levels of hints, the first one will be a subtle hint, and the second one will be a spoiler.
- Click on the Wrench on the bottom left of the task bar to save or load a game and adjust the settings.
- Your cursor will change to a pointing hand if you can head to another area.
- Click on the Wrench on the bottom left of the task bar to exit the game.
Chapter 1 – The Palais Royale
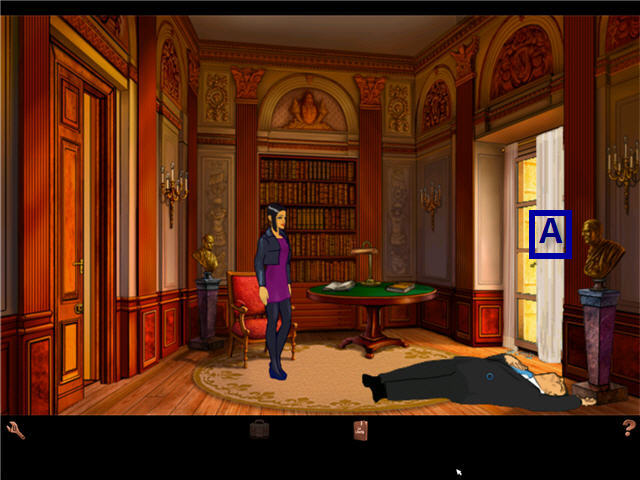
- Click on the right curtain panel (A) to expose the hole in the glass.
- Click on the glass door handle to check out the ledge.
- Click on the body of Pierre Carchon.
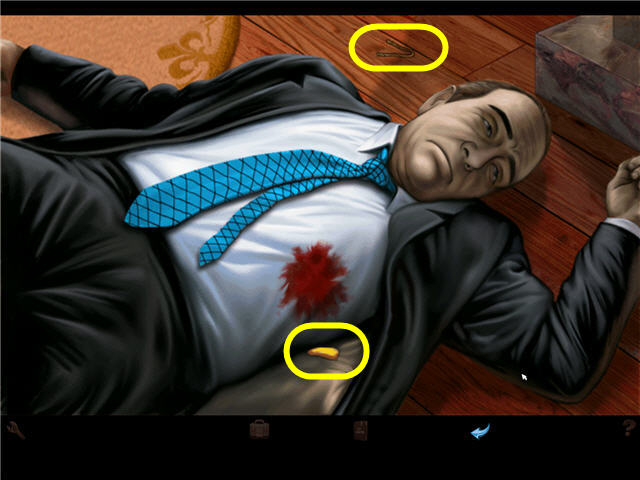
- Take the HAIR CLIP next to Pierre’s body.
- You can click on Pierre’s eyes to open and close them.
- Click on Pierre’s suit jacket to expose the wound.
- Click on the wound.
- Take the BOAT TICKET from inside the jacket.
- Exit the room.
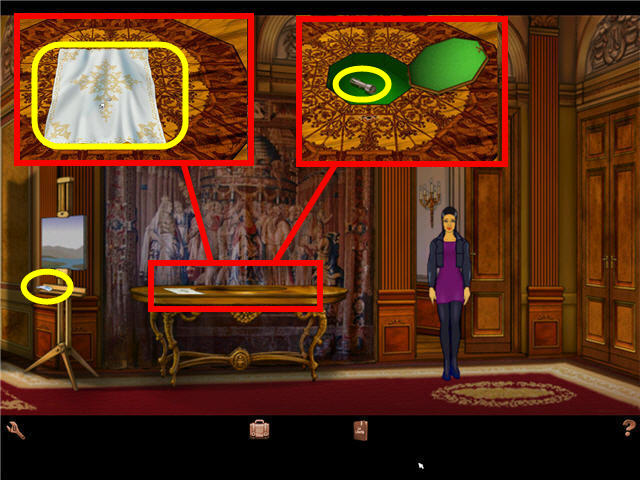
- Click on the table to get a close-up.
- Take the LACE CLOTH.
- Click on the hole in the table.
- Click-hold and drag the HAIR CLIP on the hole.
- Take the SAFE KEY from the compartment.
- Take the TUBE OF PAINT from the easel.
- Speak to Imelda in the sitting area to the left of the easel and exhaust all conversation and you will get the DRAWING ROOM KEY.
- Use the DRAWING ROOM KEY on the door at the end of the hall on the right.
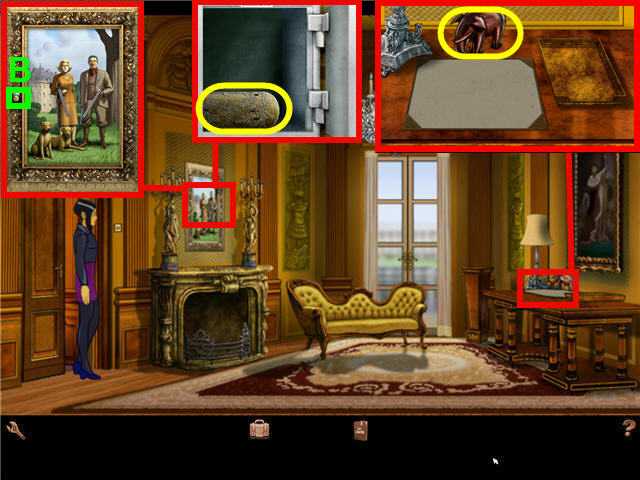
- Click on the desk to get a close-up and take the ELEPHANT.
- Click on the in-tray and blotter desk pad.
- Click on the painting on the wall on the other side of the room to get a close-up.
- Press the button (B) on the left side of the frame.
- Click on the picture again to expose the safe.
- Use the SAFE KEY on the key hole.
- Click on the STONE CYLINDER in the safe and pay attention to the printing that needs to be done.
- You will automatically get the STONE CYLINDER in inventory.
- There are two ways to get the CODE from the stone cylinder.
- Option 1; combine the PAINT and the LACE CLOTH in inventory to get a PAINT COVERED CLOTH, and then combine the PAINT COVERED CLOTH with the STONE CYLINDER to get a PAINT COVERED STONE CYLINDER.
- Option 2; place the PAINT in the in-tray and place the STONE CYLINDER in the tray to get a PAINT COVERED STONE CYLINDER.
- For either option, roll the PAINT COVERED STONE CYLINDER on the blotting paper on the desk.
- Take the CODED MESSAGE from the blotter pad and automatically get the STONE CYLINDER and CODED MESSAGE in inventory.
- Leave the room and go to the sitting area on the left side of the hall and speak to Imelda.
Chapter 2 – Quayside
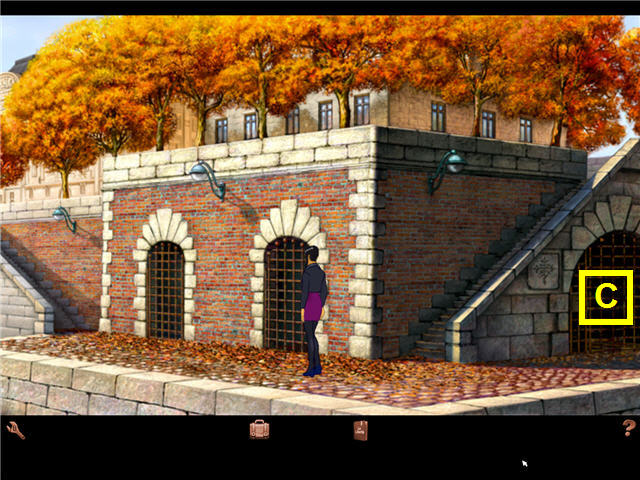
- Walk to the right and click on the large gate (C) underneath the stairs.
- Click on the puzzle lock on the left.
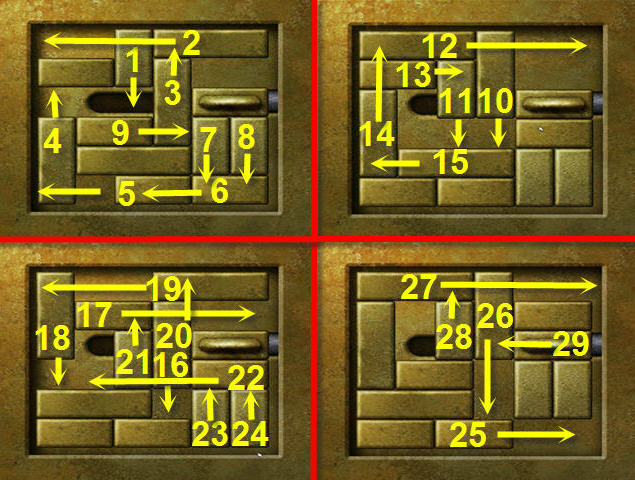
- The object is to slide the latch with the knob over to the slot on the left by moving the pieces out of the way. See screenshot for solution.

- The object is to slide the latch over to the slot on the right by moving the pieces out of the way. See screenshot for solution.
- Enter the skiff room behind the fallen gate.
- Click on the hull of the upright skiff to knock it over.
- Take the SHELL CASE from the area the stood on.
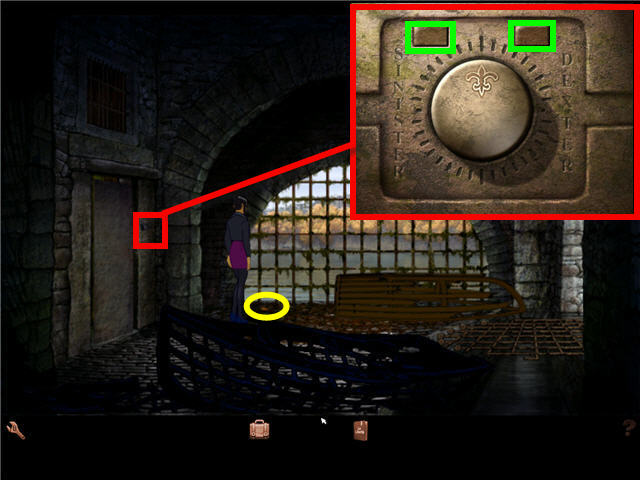
- Click on the area to the right of the door on the left.
- Drag the STONE CYLINDER from inventory into the very center of the hole. Release it when it turns gold.
- Following the code on the CODED MESSAGE, rotate the dial by clicking on the two buttons on the top of the dial.
- The left button is the S and the right button is D, the order in which to push is; S, D, S, S, D, S, S or Left, Right, Left, Left, Right, Left, Left.
- Before entering the anti-chamber, take the STONE CYLINDER back from the slot.
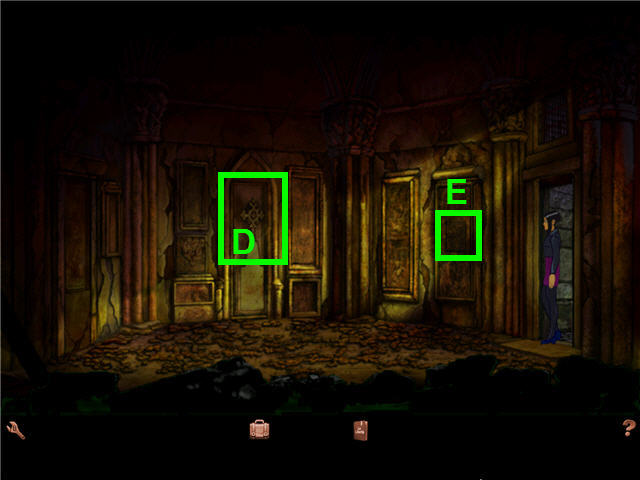
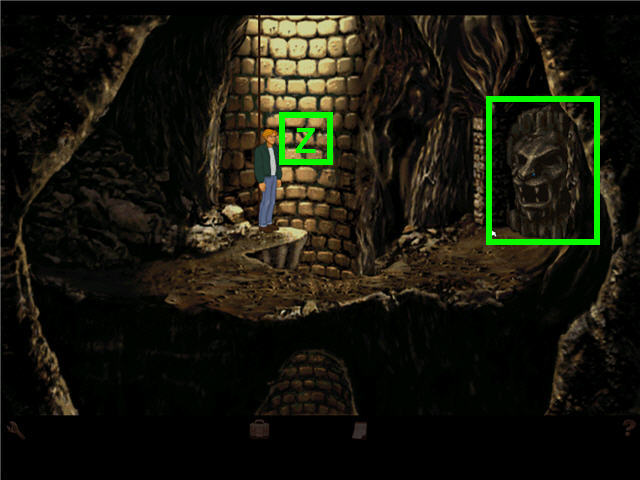
- Click on the cross (D) and note the door closes and a stone panel (E) opens.
- Click on the cross again and the door opens.
- Drag the SHELL CASE to the opened doorway and click on the cross to lower the door.
- Click on the cross to open the door.
- Take the CRUSHED SHELL CASE from the doorway.
- Click on the cross and be sure the door is down; while Nico is still holding the cross up, open the inventory and drag the CRUSHED SHELL CASE onto the cross till it highlights in gold and then release it.
- Click on the panel (E) to the left of the closed door on the right.
- Place the STONE CYLINDER into the hole in the panel. (If you do not have it in your inventory, go back to the skiff room and take it from the panel next to the door).
- Remove the CRUSHED SHELL CASE from under the cross.
- Click on the stuck door on the left.
- Place the CRUSHED SHELL CASE to the door on the left.
- Head into the secret chamber on the left.
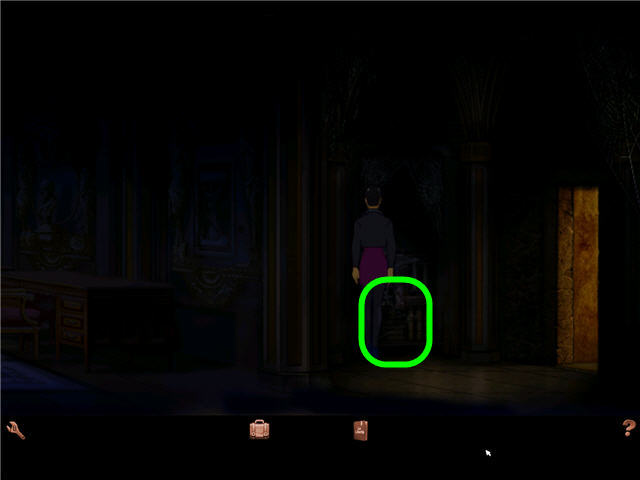
- You will automatically walk into the center of the darkened chamber.
- Head back towards the entrance and click on the generator to the left of the doorway to turn on the lights.
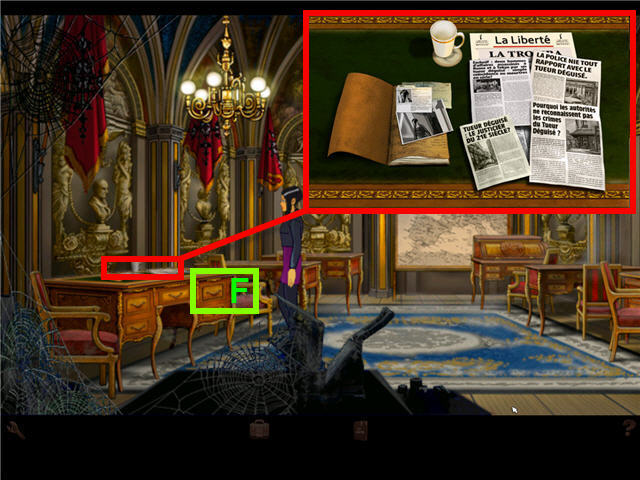
- Head into the room and walk to the desk on the left.
- Click on the desktop and click on the pictures of Nico, the articles and the cup.
- Open the upper right drawer in the desk (F) and automatically get a CRYPTIC MESSAGE in inventory.
- Click on the drawer (F) again and the drawer will fall to the ground.
- Click in the space on the desk where the drawer used to be and take the PHOTO OF CARCHON.
- Open your inventory and right click on the CRYPTIC MESSAGE.
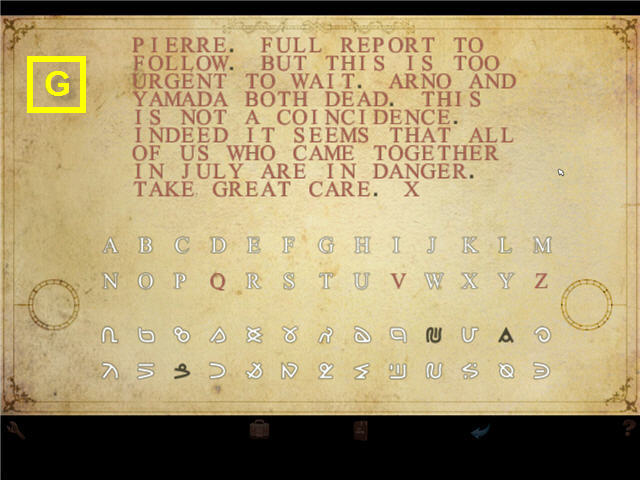
- Decode the message by correctly choosing a symbol on the bottom and matching it with the correct letter of the alphabet.
- After clicking on both the letter and symbol, the symbol in the note will automatically change to the letter.
- You can change your letter/symbol choices any time. See screenshot (G) for solution.
Chapter 3 – Paris Café
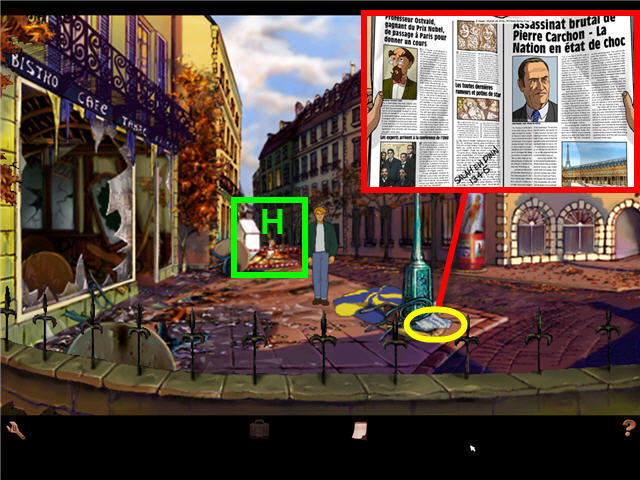
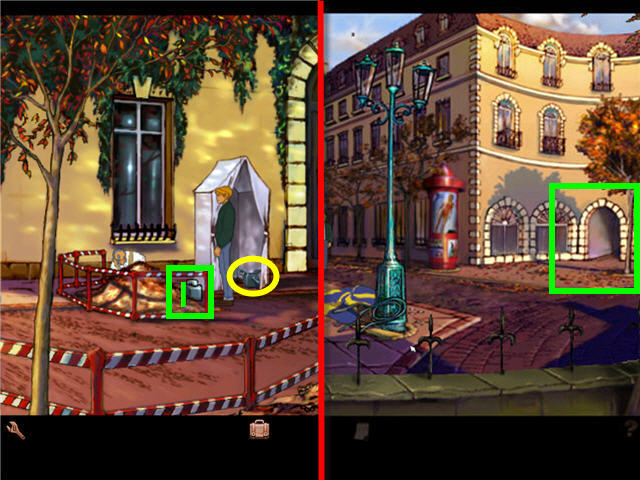
- Walk towards the workman (H) and Sergeant Moue will approach you.
- Speak to Inspector Rosso. It does not matter what answers you give, choose any response.
- You will automatically get ROSSO’S CALLING CARD in inventory.
- Pick up the NEWSPAPER next to the street lamp and check out the stories and the writing on the paper. You will not be able to back out of the screen till you have clicked on everything.
- Speak to Nico and exhaust all options. Nico will give you her phone number but it will not appear in your inventory.
- Walk towards the workman.
- Speak to the workman and exhaust all conversation.
- Give the NEWSPAPER to the workman.
- Click on the toolbox in the tent after the workman leaves and automatically take a SEWER KEY.
- Note the location of the phone (I) for later.
- Head to the left to go back to the front of the café and then go right to the alley.
- Click on the manhole cover.
- Use the SEWER KEY on the manhole cover.
- Click on the open manhole to enter in the sewer system.
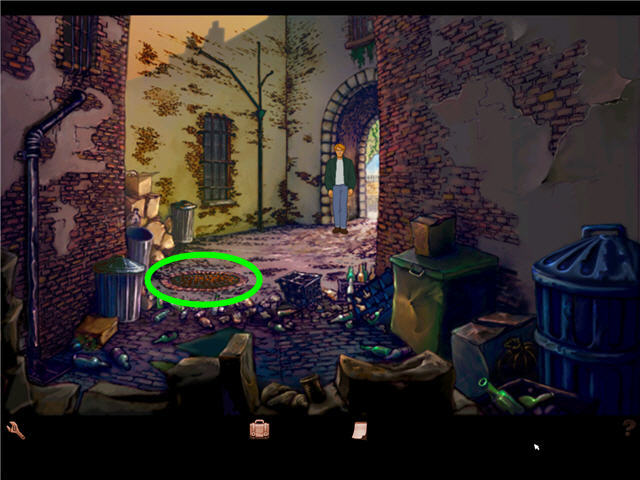
- Pick up the CLOWN NOSE on the ground and right click on it in inventory to find out where it came from.
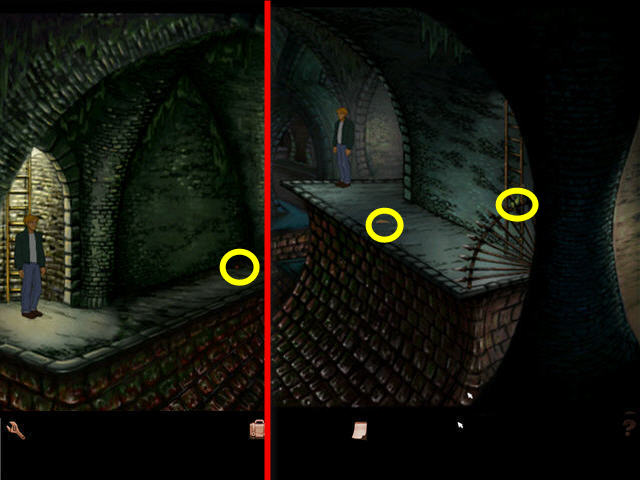
- Head further into the sewer system and pick up the TISSUE.
- Pick up the CLOTH stuck on the spikes.
- Go up the ladder by the spikes to follow the path of the clown.
- Speak to Albert and show him ROSSO’s CALLING CARD when he doubts who you are.
- Speak to Albert after showing him the card and exhaust all topic options.
- Be sure to show Albert the inventory items especially the CLOTH.
- Click on the phone on the ground to the left of the tent and call Nico.
Chapter 4 – Nico
- Exit Nico’s apartment and speak to the woman at the flower stand.
- Head to the left and a map opens up.
- Click on the Café de la Chandelle Verte location on the map.
- Head left to the Café and speak to the workman boarding up the front.
- Exhaust all conversation with the workman till he turns to primp; then walk into the destroyed café.
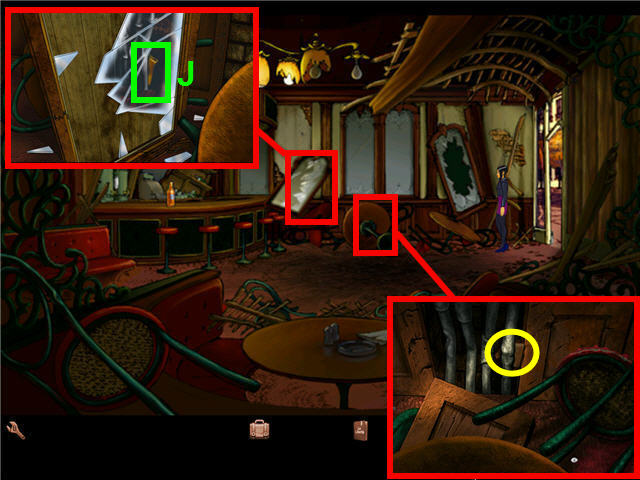
- Click on the mirror two times to get a close-up.
- Click on the reflection of a POUCH (J) in the mirror.
- Back out of the close-up and click on the overturned table to the right of the mirror.
- Remove the POUCH stuck in the pipes.
- Open your inventory and right click on the POUCH.
- Right click on the METALLIC ARTIFACT.
- Right click on the CODED MESSAGE.
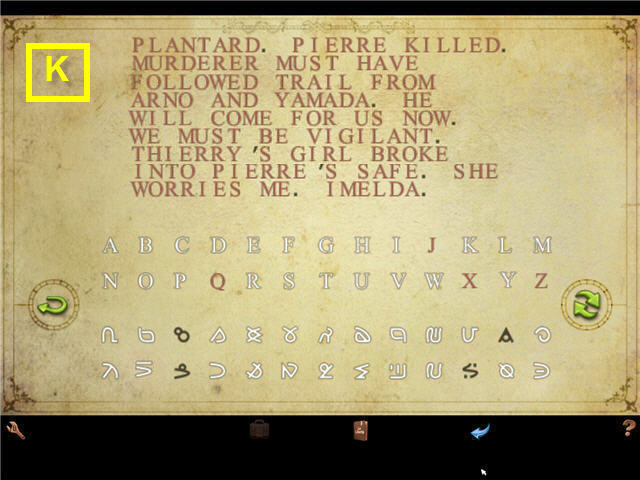
- Decode the message by correctly choosing a symbol on the bottom and matching it with the correct letter of the alphabet.
- After clicking on both the letter and symbol, that symbol in the note will automatically change to the letter.
- You can change your letter/symbol choices any time. See screenshot (K) for solution.
- Exit the café and go down the street towards the tent two times and you will arrive at the quayside.
- Enter the skiff room and head into the anti-chamber.
- Click on the cross to lift it up and while still holding it up; open your inventory and drag the CRUSHED SHELL CASE to the cross.
- Use the STONE CYLINDER on the hole in the panel on the right.
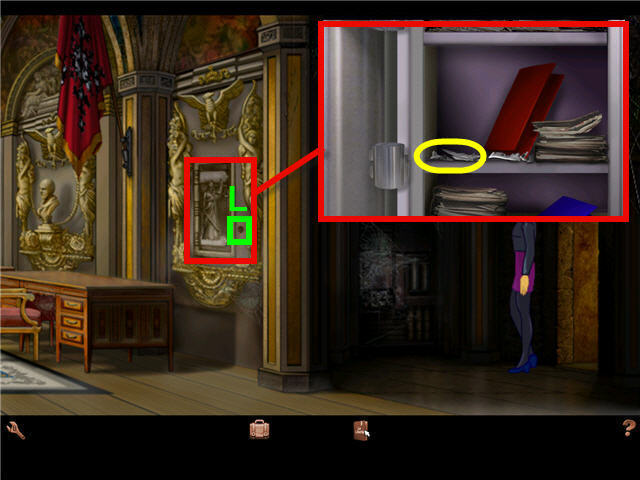
- Use the METALLIC ARTIFACT in the round slot (L) next to the safe on the wall.
- Click on the opened safe to get a close-up.
- Take the PHOTOGRAPH FRAGMENTS.
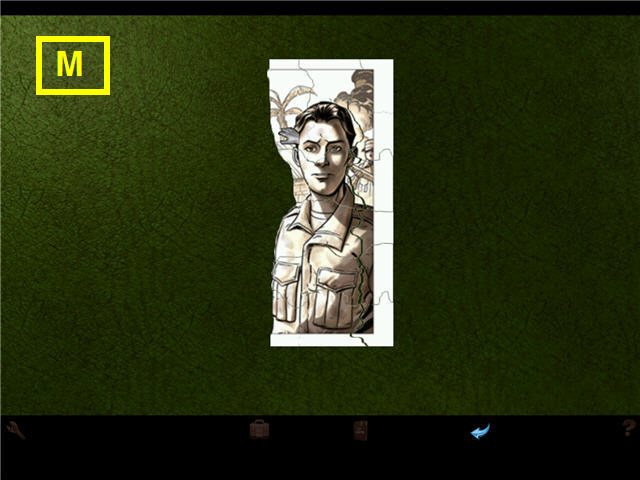
- Arrange the PHOTOGRAPH FRAGMENTS to complete the photo.
- You can click and drag the pieces into place.
- Use the fragment on the upper right that is in the correct place already to build around. See screenshot (M) for solution.
- If you back out before completing the photo, you can find it on the desk below the safe.
Chapter 5 – Clown Chasing
- Speak to the flower merchant in front of Nico’s apartment and exhaust all options.
- Click on the door to Nico’s apartment building to enter.
- Speak to Nico and exhaust all conversation.
- Show the CLOWN NOSE to get Nico and get a new map location.
- Show the CLOTH to Nico and get a PHOTOGRAPH.
- Click on the blue arrow on the bottom task bar to exit the apartment.
- Head to the left to get the map.
- Click on the La Risee du Monde location on the map.
- Speak to the costumier and exhaust all conversation.
- Show the costumier the TISSUE and the PHOTOGRAPH.
- The costumier will give you a HAND BUZZER when you are done conversing.
- Exit the shop and click on the Café de la Chandelle Verte location on the map .
- Click on the phone next to the tent and call Todryk the tailor, and get a new location on the map.
- Head to the right to access the map and click on Hotel Ubu.
- Head into the Hotel Ubu and note the thugs hanging out by the entrance.
- Enter the hotel and walk left to the reception desk and speak to the hotel clerk entirely.
- Click on the PHOTOGRAPH in inventory while still engaged in conversation with the clerk.
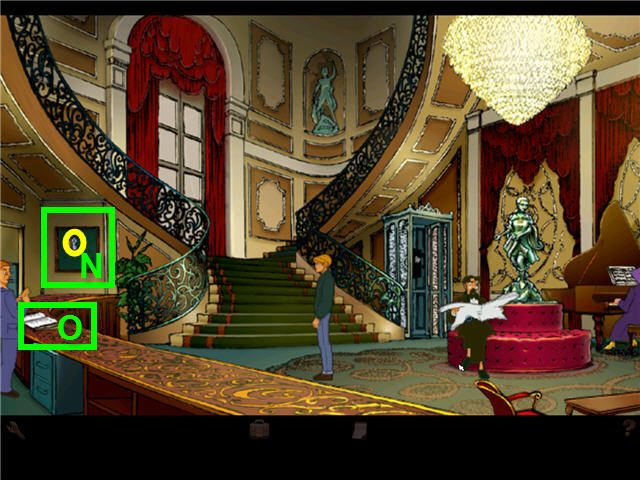
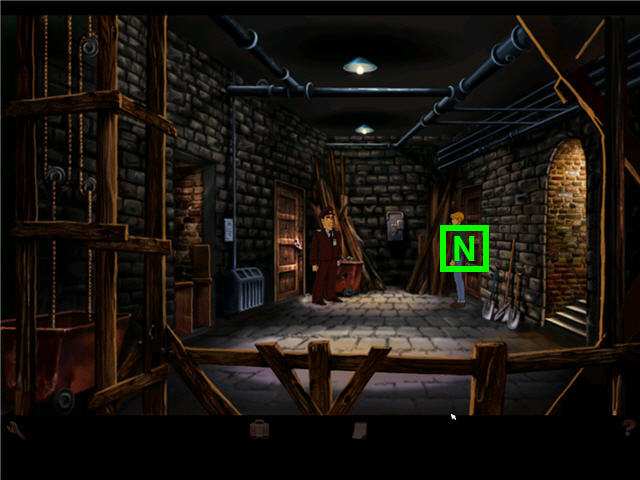
- Attempt to take the key from the wall (N) behind the counter.
- Speak to the man reading the newspaper entirely and show him the PHOTOGRAPH and exhaust all conversation again.
- Speak to Lady Piermont at the piano entirely and show her the PHOTOGRAPH and exhaust all conversations again.
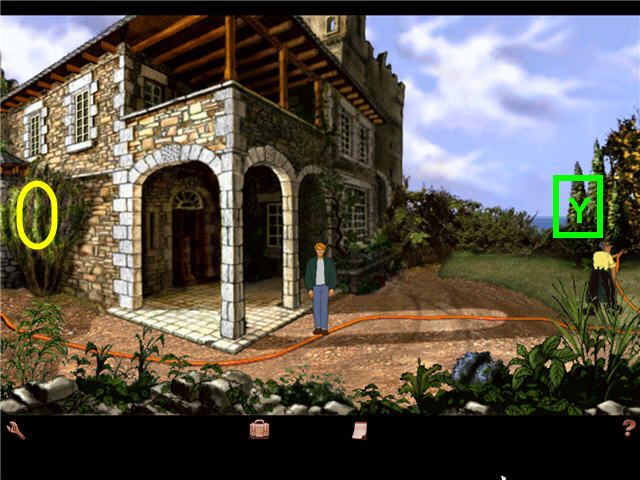
- Check the guest log (O) on the counter in front of the hotel clerk.
- Speak to the hotel clerk again and exhaust all conversation.
- Speak to Lady Piermont regarding the key.
- Take the ROOM KEY as soon as the hotel clerk exits the room.

- Click on the green staircase and go upstairs.
- Use the ROOM KEY on the first door to the right.
- Click on the window to open it.
- Click on the opened window to climb out on the ledge.
- Move across the ledge to the right and click on Khan’s open window to climb in.
- Click on the bed, the wardrobe and the nightstand.
- Attempt to exit the room through the door to the hall and automatically hide in the wardrobe while Khan changes clothes.
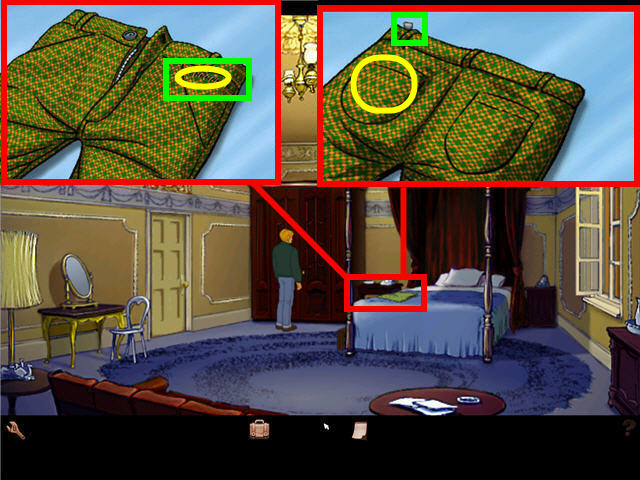
- Search the green checked pants on the bed and note the sewed up compartment on the top right of the pants.
- Click on the button area of the waistband of the slacks to turn them over.
- Take the MATCH BOOK out of the left rear pocket.
- Click on the metal silver tab on the top left of the waistband to rip out the thread.
- Turn the pants over again by clicking on the middle of the waistband.
- Click on the now opened secret compartment on the front of the pants and automatically take the ID CARD.
- Head out the door to the hall and go down to the lobby.
- Click on the hotel clerk to initiate conversation and click on the ID CARD.
- Speak to Lady Piermont and show her the ID CARD.
- If showing Lady Piermont the ID CARD does not trigger her to speak to the clerk, go back to the clerk again and then speak to Lady Piermont again so she makes the clerk give you the MANUSCRIPT.
- Try and leave out the front door.
- Head back upstairs and enter the first room on the right.
- Head out of the window and onto the ledge.
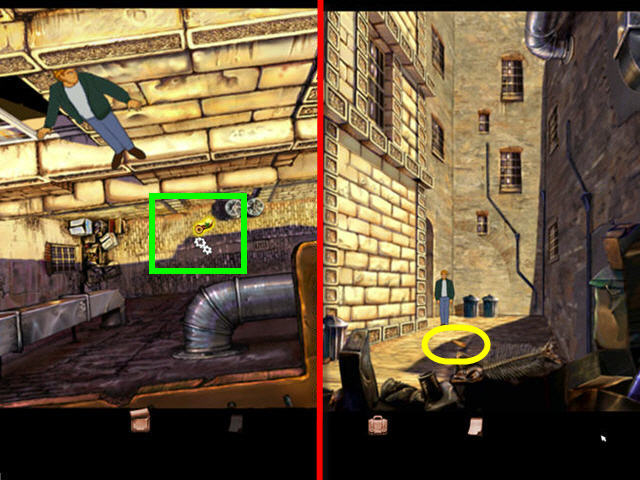
- Throw the MANUSCRIPT into the alley.
- Enter the room through the window and exit the room.
- Exit the hotel and the thugs pat you down.
- Head into the alley to the left of the hotel entrance.
- Pick up the MANUSCRIPT on the ground.
- Speak to Nico and exhaust all conversation.
- Click on the MANUSCRIPT when done conversing with Nico.
- Click on the MANUSCRIPT again and click on each of the 4 scenes on the manuscript and the center to gather clues.
- Nico will give you the name of a curator, Lobineau, and you get a new location on your map.
- Exit the conversation to leave the apartment and head left to trigger the map.
- Click on the Musee Crune location on the map.
- Enter the museum on the right.
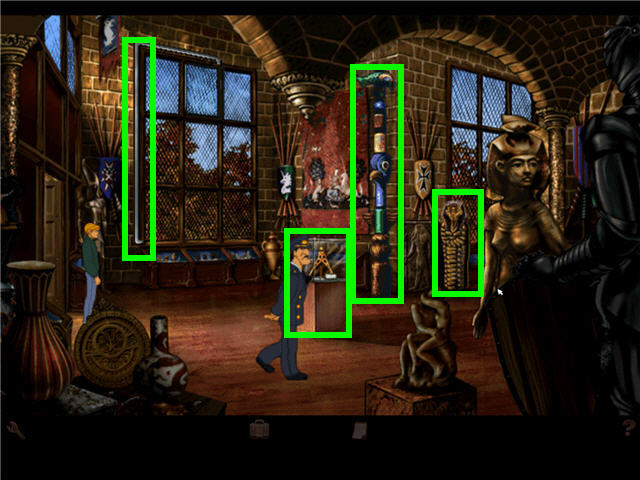
- Examine the tripod in the glass case in the center of the room.
- Speak to the custodian and exhaust all topics.
- Click on the totem next to the red tapestry on the wall to see that it is wobbly.
- Click on the sarcophagus to the right of the totem.
- Click on the window mechanism on the left of the window.
- Exit the museum and exit the area to the left to access the map.
- Click on the Rue Jarry location on the map to head back to Nico’s apartment.
- Speak to Nico and exhaust all conversations.
- Leave the apartment and head to the left to access the map.
- Click on the large red arrow on the upper right of the map to access the map of Europe.
- Click on the Lochmarne location on the map.
Chapter 6 – Ireland
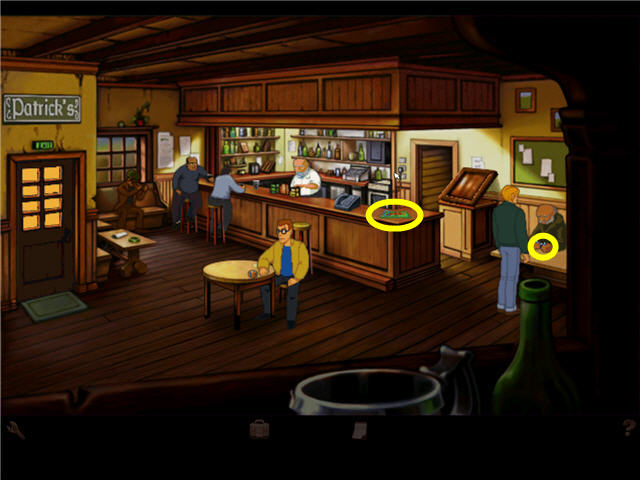
- Head into the pub and click on the inn owner, Mick Leary, behind the bar, and exhaust all topics.
- Speak to Sean Fitzgerald in the yellow jacket and exhaust all topics.
- Speak to Patrick Doyle in the light blue shirt on the barstool.
- Speak to O’Brien in the dark blue shirt at the corner of the bar.
- Speak to Ron in the green sweater at the right of the bar.
- After speaking to Ron, wait for him to sneeze and he will put down the WIRE and you can take it.
- Walk to the corner of the bar and take the green TOWEL.
- Exit the pub and speak to Maguire, the boy outside the pub.
- Head back onto the pub and speak to Sean Fitzgerald again and exhaust all conversation.
- Head back outside and speak with Maguire after the accident.
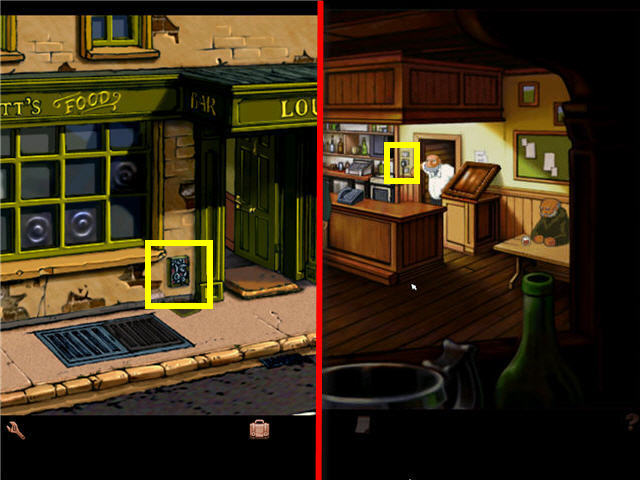
- Click on the switch to the left of the entrance.
- Head inside the bar and speak to Leary behind the bar and exhaust all conversation.
- Show Leary the ID CARD from inventory to prove you are an electrician.
- Click on the dishwasher behind the bar.
- Drag the WIRE from inventory to the plug in the socket above the dishwasher.
- Head through the doorway next to the dishwasher and go to the cellar.
- Click on the hatch lever on the wall.
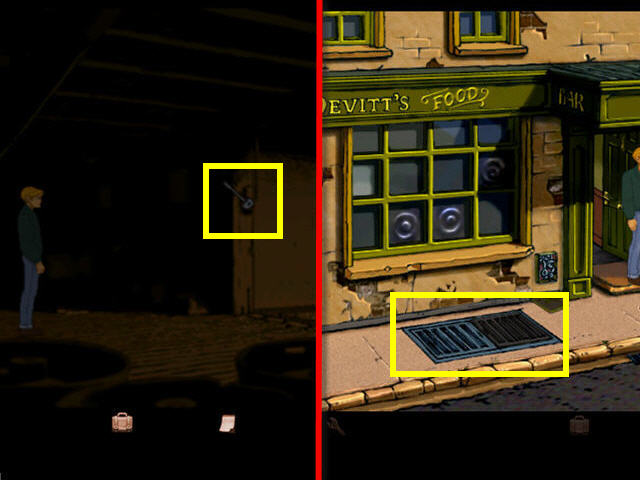
- Head back upstairs and go outside the pub to the grate on left of the doorway.
- Pull the grate open and go back inside to the cellar after speaking to Kahn.
- Automatically pick up the GEM under the grate.
- Exit the cellar and the pub and head up the path to the castle on the right of Maguire.
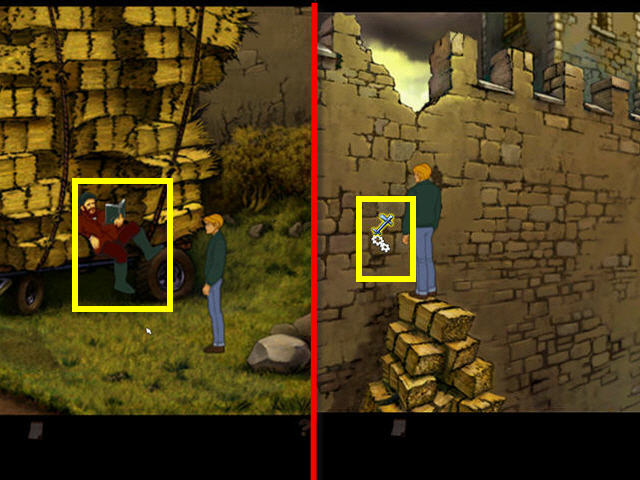
- Speak to the farmer on the hay wagon and exhaust all conversation.
- After the farmer leaves, click on the haystack to climb up to the top.
- Use the SEWER KEY on the crack in the wall.
- Click on the break in the wall above George to climb over the wall.
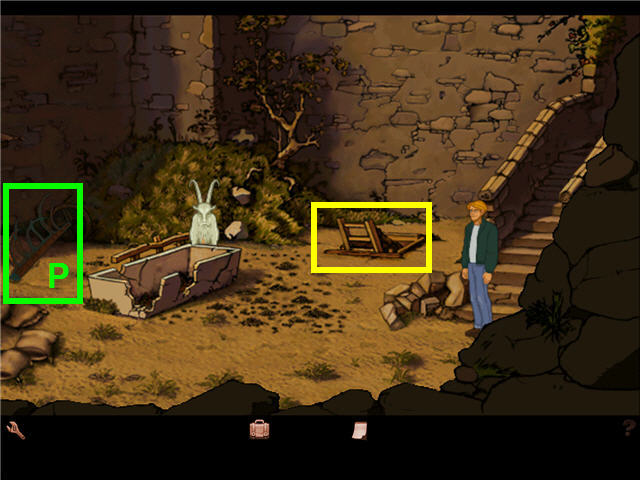
- Try and go down the ladder to the excavation site and the goat rams you.
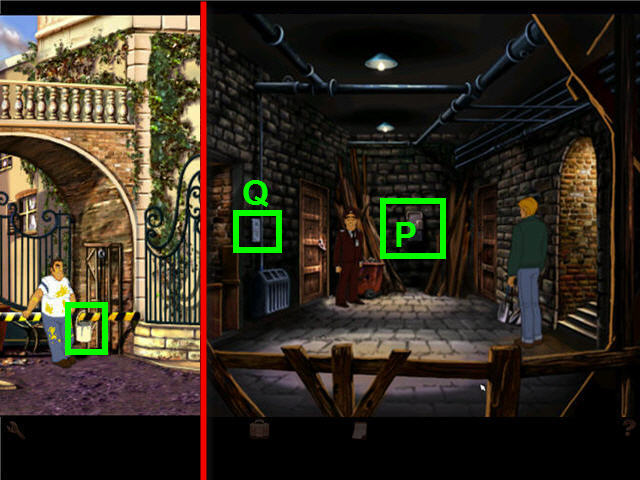
- Move the plowshare (P) and the goat’s rope will become entangled in the blades.
- Head down the ladder to the excavation site.
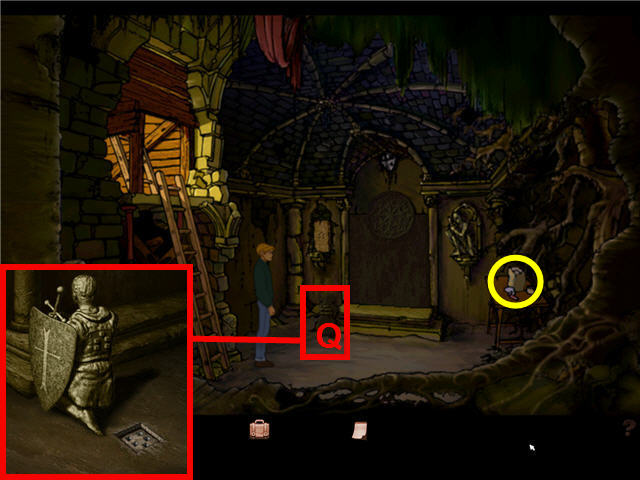
- Click on the panel to the left of the sealed doorway.
- Click on the statue (Q) on the ground to get a close-up.
- Click on the statue again and it will fall over.
- Click on the statue again to stand it upright and note the impressions left in the ground match the holes on the panel.
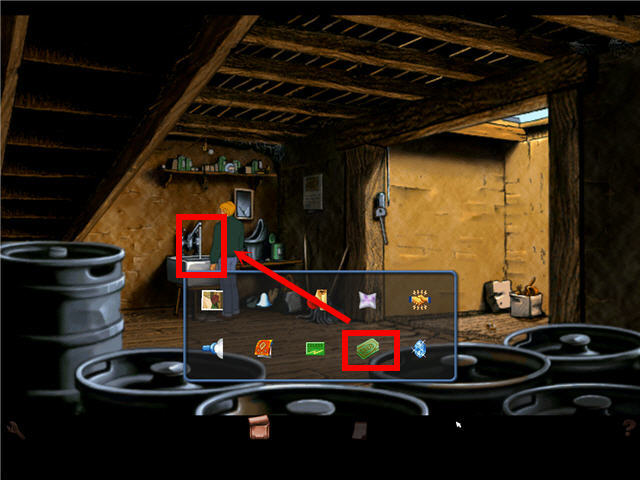
- Take some PLASTER OF PARIS from the bag on the table.
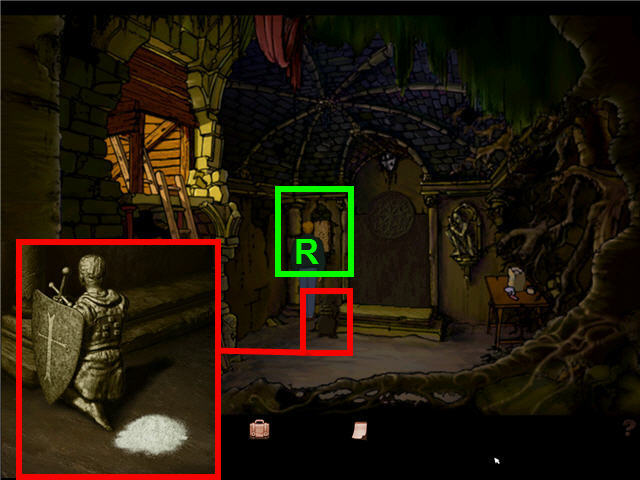
- Click on the statue and use the PLASTER OF PARIS on the impression the statue left in the ground.
- Exit the excavation site via the ladder, and then go up the stairs, down the haystack, and to the right to get back to the pub.
- Head down to the cellar of the pub.
- Turn the tap on and use the TOWEL on the faucet to get a WET TOWEL.
- Head back to the excavation site.
- Click on the statue to get a close-up.
- Use the WET TOWEL on the PLASTER OF PARIS on the ground.
- Remove the hardened MOLD from the ground.
- Use the MOLD on the panel (R) to the left of the door.
- Enter into the secret chamber.
Chapter 7 – Marquet
- Click on the answering machine on the shelves and automatically be transported to the Palais Royale.
- Click on the door and the intercom button to the left of the door under the light and see you cannot get hold of Imelda.
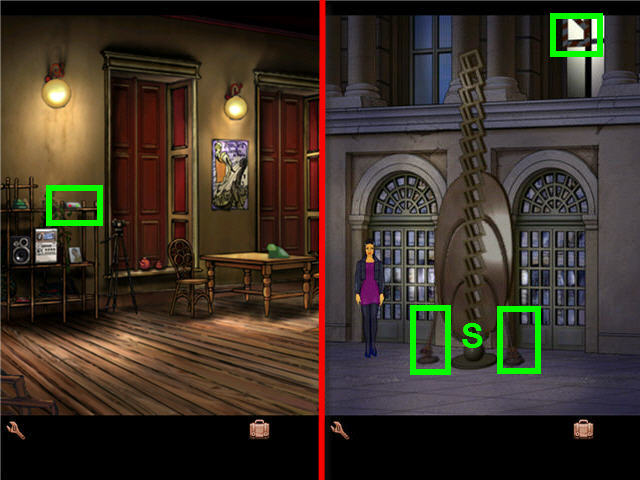
- Click on the taped up broken window above the sculpture.
- Click on the sculpture.
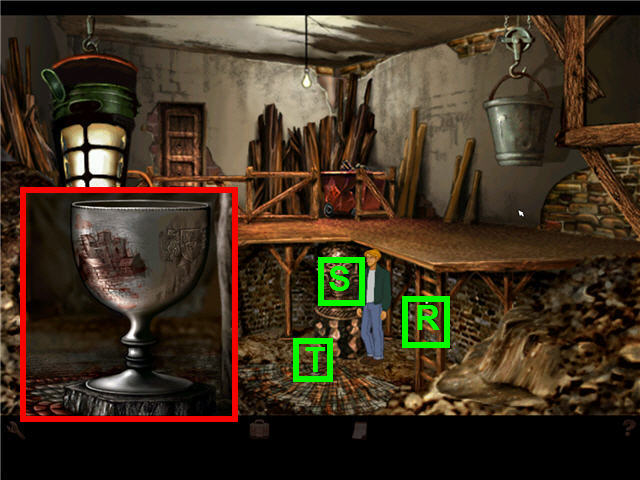
- Unhook the 2 wires (S) holding the sculpture.
- Push the untethered sculpture so it falls and creates a ladder to the window.
- Click on the makeshift ladder to climb up.
- Click on the plastic sheeting over the broken window.
- Use the CRUSHED SHELL on the plastic sheet covering the window.
- Click on the exposed hole to gain entry.
- Exit the library and head right into the drawing room.
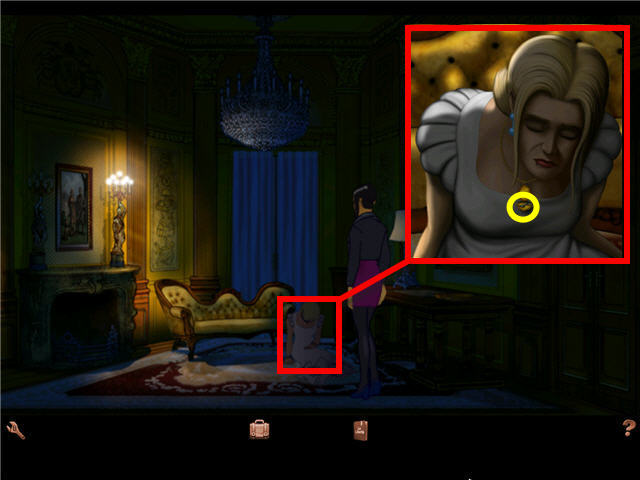
- Speak to Imelda.
- Click on Imelda’s body to get a close-up.
- Click on the locket around Imelda’s neck and take the TINY KEY.
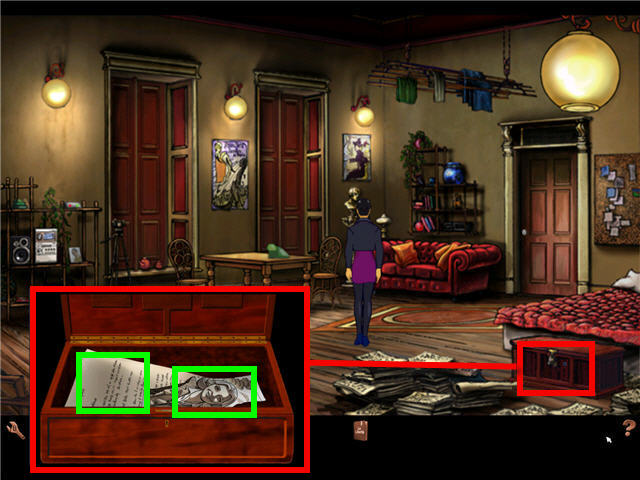
- Click on the chest at the foot of the bed on the right and find the bug that was planted.
- Click on the elephant box inside the chest.
- Use the TINY KEY from Imelda’s locket on the elephant box and take out the photo of Imelda.
- Read the letter from Imelda to Nico’s father.
- George leaves the apartment and triggers the map.
- Click on Poste de Police location on the map.
- Speak to Moue and exhaust all conversations to get the hospital added to the map.
- Leave the police station and click on the hospital location on the map.
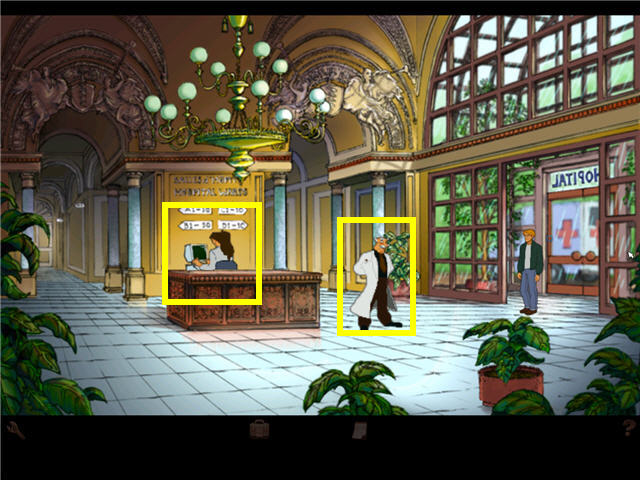
- Speak to Dr. Haganmeyer in the lobby and exhaust all conversations.
- Speak to the receptionist. You can say yes or no to her question, the results are the same.
- Click on the ID CARD in inventory while speaking to the receptionist and she will tell you where Marquet is.
- Click on either the left or right hallway and you will find yourself by Sam the floor polisher.
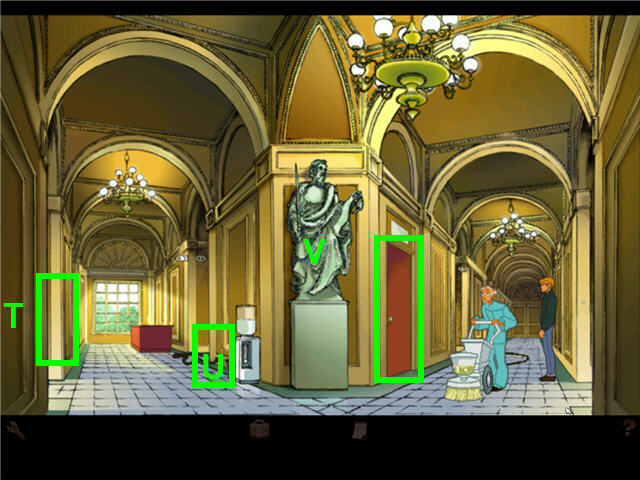
- Head to the hallway on the left (T) and speak to Nurse Grendel.
- Head back to where Sam is and attempt to open the hall closet.
- Speak to Sam and exhaust all conversation.
- Pull the plug (U) to Mr. Shiney, the floor polishing machine.
- When Sam goes to investigate, open the hall closet and automatically take the lab coat and put it on.
- Head back to the front lobby and speak to Dr. Haganmeyer. Say yes or no to his request, results are the same.
- Speak to Benoir and exhaust all conversation.
- Head back to Nurse Grendel’s ward.
- Speak to Nurse Grendel and get a BLOOD PRESSURE CUFF.
- Attempt to go to the area to the right by Marquet’s room.
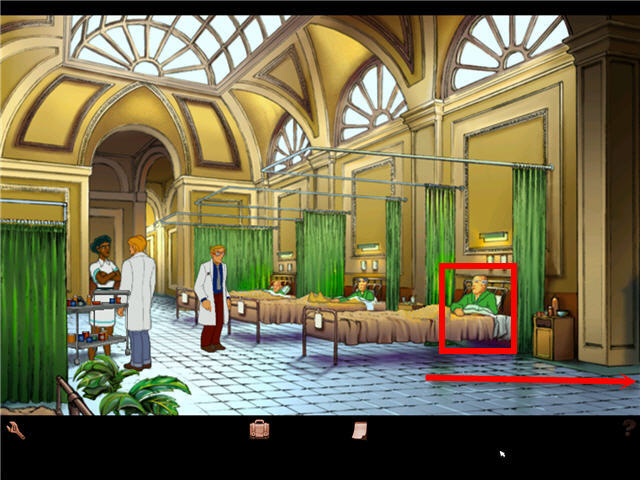
- Click on Eric Sopwath in bed 3 and automatically take his blood pressure.
- Click on Benoir and then click on the BLOOD PRESSURE CUFF in inventory to give it to him.
- Back out of the conversation with Benoir and then click on him again so that you can ask him to take Eric’s blood pressure.
- While Benoir preoccupies the patient, head to the right and speak to the guard.
- Enter Marquet’s room and speak with him.
- Speak to Nico and exhaust all conversation.
- Exit the conversation to trigger the map and click on the Musee Crune location.
Chapter 8 – The Tripod
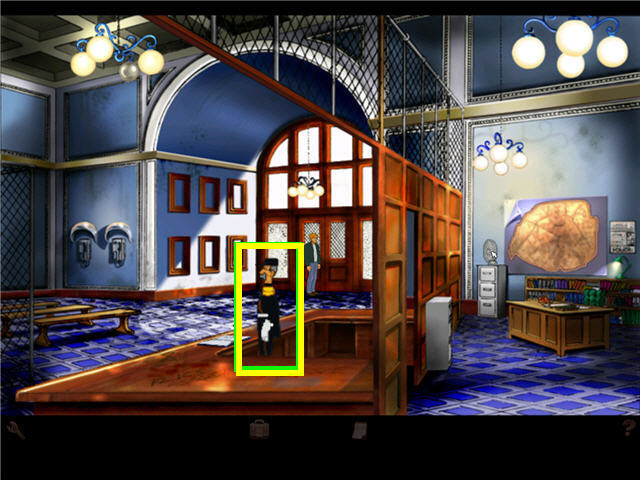
- Speak to Lobineau by the display case and exhaust all conversation.
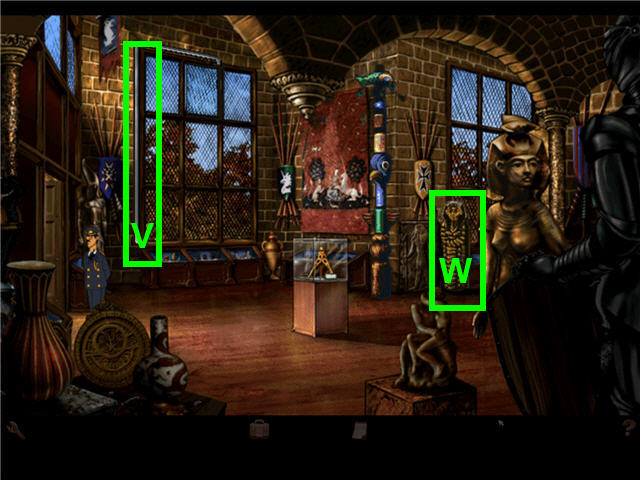
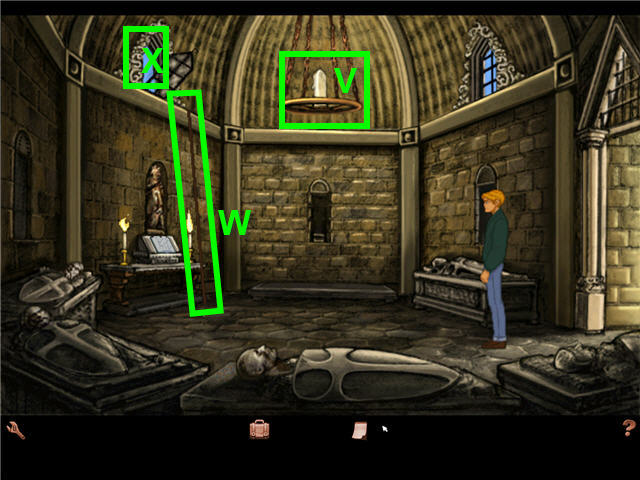
- While the guard is facing away from the window click on the window control (V) and open the window.
- When the guard walks over to close the window, climb into the sarcophagus (W).
- Click on the totem after the crooks pause and watch the cutscene.
- Speak to Nico entirely and then leave the apartment.
- You will automatically take the TRIPOD on your way out.
- Head to the Musee Crune and speak to Lobineau.
- Leave the museum and exit to the left to get the map.
- Click on the new location of Montfaucon.
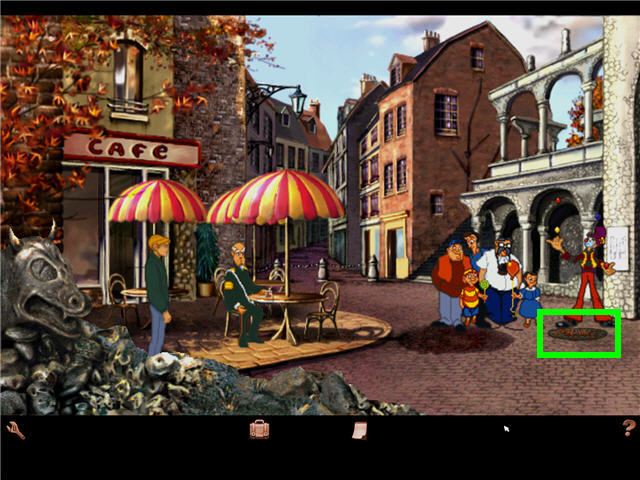
- Note the manhole cover where the clown is juggling.
- Speak to the juggler and exhaust all conversation.
- Speak to the officer sitting at the cafe.
- Show the CLOWN NOSE in inventory to the policeman while you are speaking with him.
- Talk to juggler again but this time click on the CLOWN NOSE in inventory while speaking with him.
- When the juggler leaves, you will automatically have a RED BALL in inventory.
- Use the SEWER KEY on the manhole cover.
- Enter the sewer.
- Click on the 3 doorways.
- Examine the one on the right again after examining the other 2, till George notes that it is weaker than the others.
- Use the SEWER KEY on the doorway to the right to break a hole in it.
- Click on the hole in the door to pull the lever.
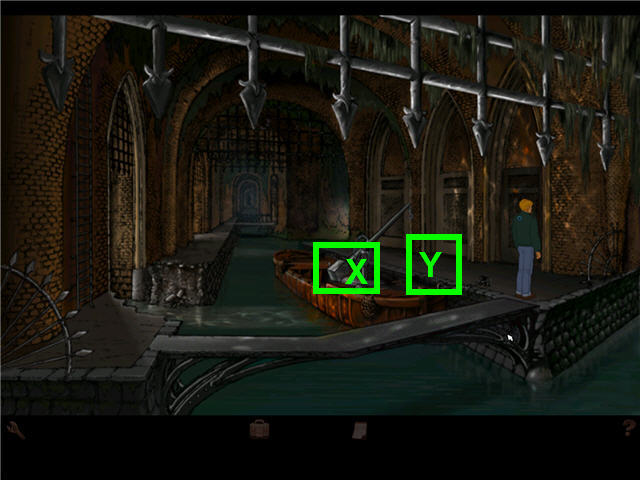
- Click on the crane (X) on the barge and the chain unwinds.
- Click on the chain (Y) on the ground and George will automatically hook it up to the door and reel it in till the wall breaks.
- Head into the secret cave.
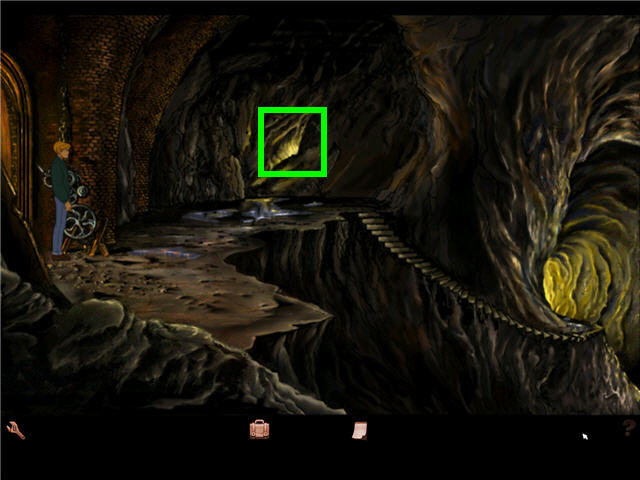
- Try and go down the stairs.
- Click on the hole in the cave wall and listen in on the meeting.
- Head down the stairs when the meeting is over.
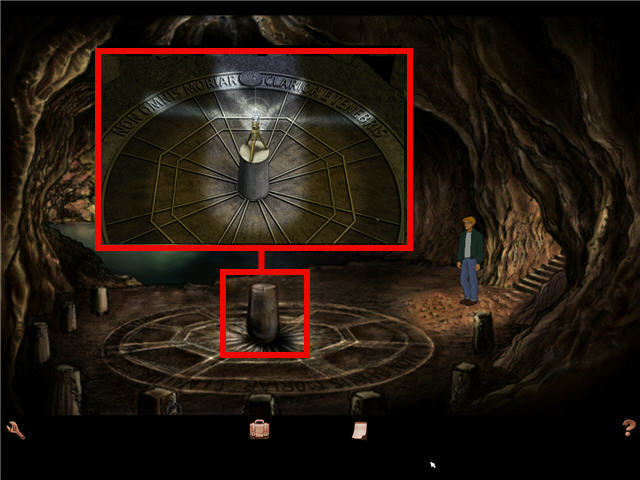
- Click on the stone pedestal in the center of the circle to get a close-up.
- Place the TRIPOD on the pedestal.
- Place the GEM on the TRIPOD and it will spell out Marib.
- Speak to Nico and she will take the GEM and the TRIPOD.
- End the conversation to leave the apartment and get the map.
- Click on the red arrow in the upper right to get to the map of Europe and click on Marib.
Chapter 9 – Syria
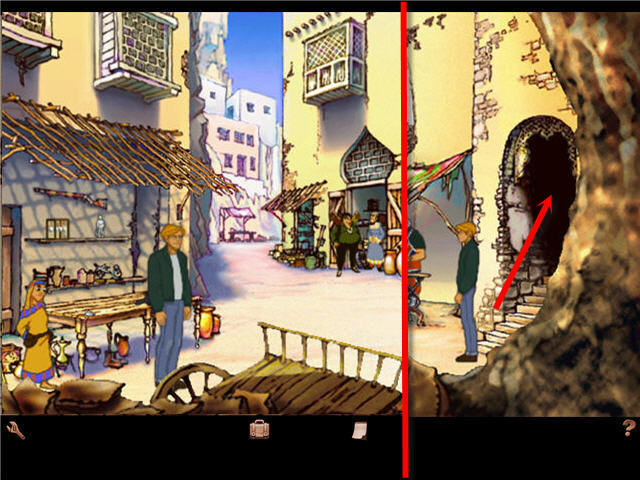
- Speak to the merchants and the tourists and exhaust all conversations.
- Show the RED BALL to Nejo.
- Head to the right past the kebab vendor and go up the stairs.
- Note the pattern on the red rug hanging matches the pattern on the MATCHBOOK.
- Click on the carpet merchant and then click on the MATCHBOOK to gain entry to the Club Alamut.
- Speak to Ultar, the taxi driver.
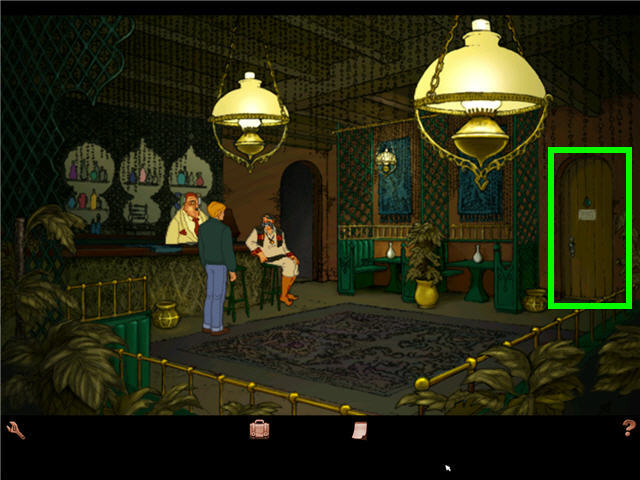
- Click on the restroom door to trigger conversation.
- Click on the sign on the washroom door.
- Try and speak to the manager behind the bar and Ultar will speak for him.
- Click on Ultar again and exhaust all conversation.
- Show Ultar the PHOTOGRAPH in inventory.
- Leave the Club and head downstairs and click on Arto, the kebab seller and see that he is using the toilet brush on the grill.
- Speak to Nejo, the boy at the merchant stall on the left of the market square and give him the RED BALL.
- Head to the Kabob stall and speak to Arto.
- Art chases you up the stairs.
- Head back to the market and speak with Nejo again and he will give you the TOILET BRUSH.
- Head upstairs and walk towards the hanging red rug and the carpet merchant will let you pass.
- Give the TOILET BRUSH to the manager and he will give you the CLUB TOILET KEYS.
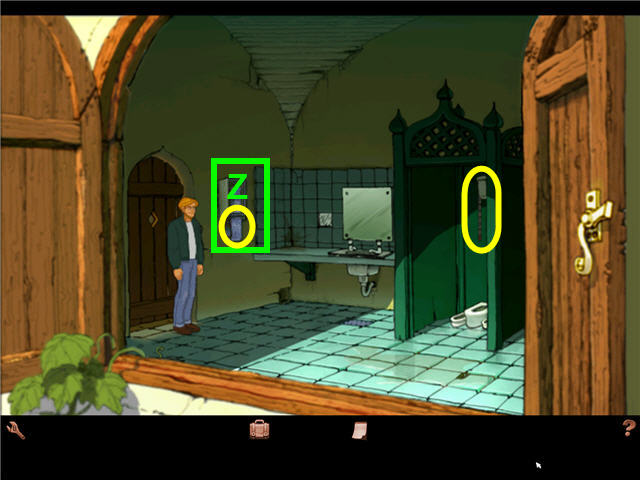
- Use the CLUB TOILET KEYS on the bathroom door and enter.
- Try and flush the toilet and you will get a TOILET CHAIN.
- Use the CLUB TOILET KEYS on the towel roll dispenser (Z) and take the TOWEL ROLL.
- Head back to the market square.

- Head back to Nejo’s stall and pet the cat (A) and get him to jump on the shelf.
- While the cat is sitting on the shelf, quickly tap the bell (B). If you hesitate to hit the bell, you may have to do this more than once.
- The cat will knock over the STATUETTE.
- Pick up the STATUETTE from the ground and speak to Nejo.
- Click on the STATUETTE in inventory while speaking to Nejo and he lets you keep it.
- Exit the conversation and open the inventory.
- Combine the TISSUE with the STATUETTE to make it look like aged marble.
- Speak to Pearl and Duane, the two American tourists.
- Click on the STATUETTE in inventory while speaking to Pearl and Duane.
- Sell the STATUETTE to Duane for 50 DOLLARS.
- Head up to the Club Alamut.
- Speak to Ultar and exhaust all conversation.
- Say yes when Ultar asks you if you want to go to Bull’s Head Hill. The 50 DOLLARS will be taken automatically from inventory.
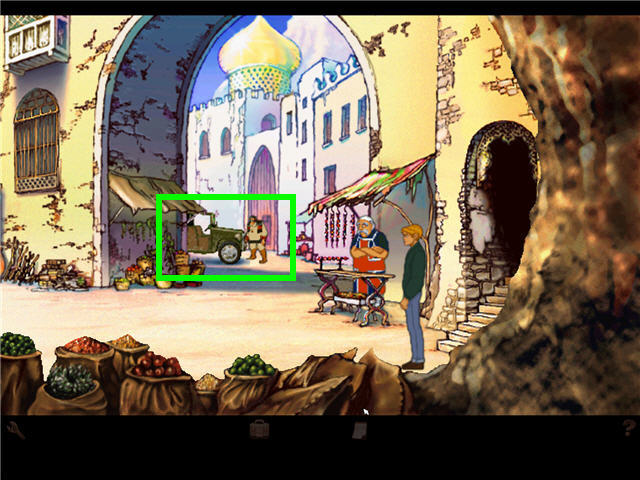
- Head down to the market square and walk towards Ultar by the truck.
- Speak to Ultar and give the TOWEL ROLL to him so can fix the truck.
- You will still have half the TOWEL ROLL in your inventory.
Chapter 10 – Bull’s Head Hill
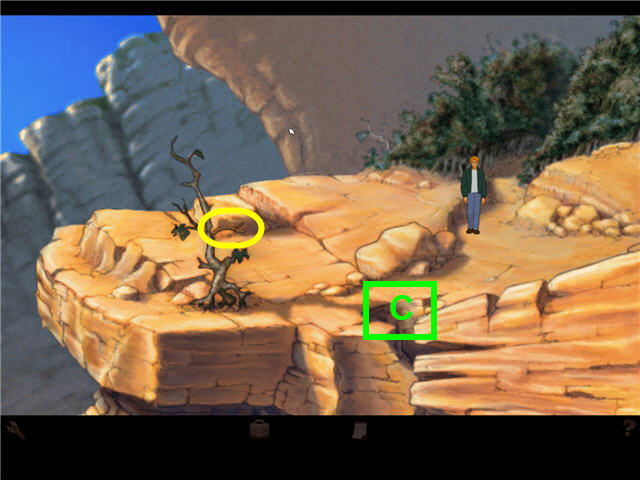
- Try and go down the path off the cliff and note there is no access to the path.
- Click on crevice on side of cliff (C).
- Snap a branch off the tree to get a STICK.
- Combine the TOWEL ROLL and the STICK in inventory to get a TOWEL TIED TO STICK.
- Place the TOWEL TIED TO STICK in the crevice on the side of the cliff.
- Climb down the crevice to a ledge.
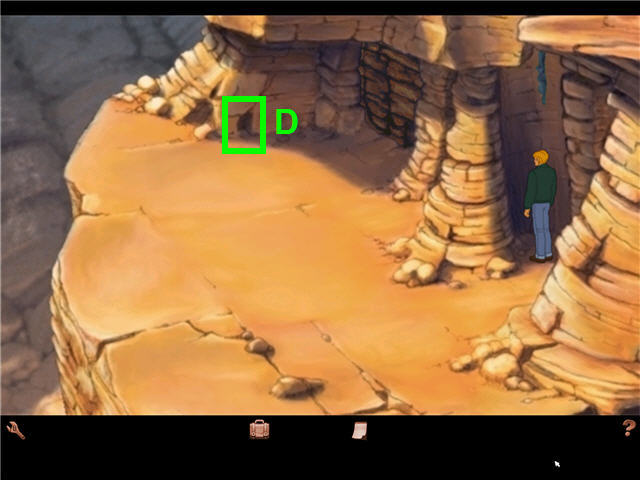
- Click on the hole in the rock (D) on the side of the cliff and note that there is a ring in there.
- Click on the hole again to pull the ring and open the stone door.
- Enter into the cave.

- Click on the body of Klausner to get a close-up.
- Click on his jacket and take the LENS from the pouch.
- Click on the drawing (E) on the left of the body and read the inscription.
- Left and then right-click on the stone carving (F) to the right of the body.
- When you have examined everything, Kahn should appear and open the door.
- Speak to Kahn and choose any of the responses.
- When Kahn asks you to shake his hand, use the HAND BUZZER.
- Speak to Nico and show her the LENS.
- Leave the apartment and click the red arrow to go to the Europe map.
- Click on the Villa de Vasconcellos location.
Chapter 11 – The Villa de Vasconcellos
- Speak to Lopez the gardener and exhaust all conversation.
- Choose any answer to his question regarding the lottery.
- Try and enter the Villa and Lopez will stop you.
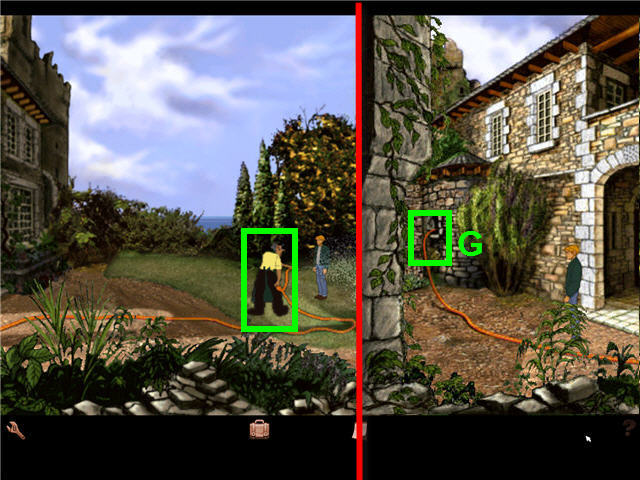
- Use the BLOOD PRESSURE CUFF on the hose (G) where it enters the window on the side of the house to cut off the water to the hose.
- Sneak into the house when Lopez goes to investigate the hose.
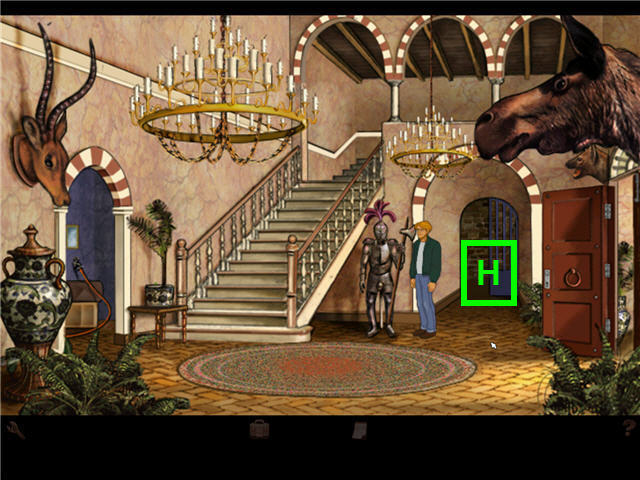
- Turn to the right (H) past the armor and the dogs will start barking.
- Click on the armor to hide behind it and wait for Lopez to go and quiet the dogs.
- Head upstairs to the Countess’s room when Lopez disappears to the room with the dogs.
- Speak to the Countess and exhaust all conversations.
- Click on the lectern (I) and George will discover a chessboard hidden under the Bible.
- Click on the chessboard and then speak to the Countess and exhaust all conversation.
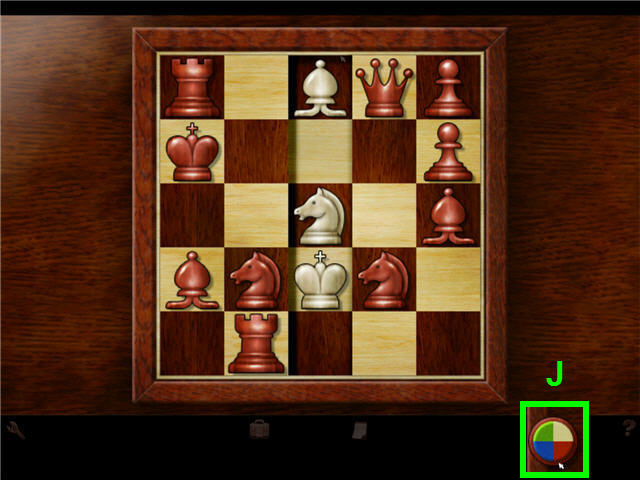
- Click on the chess pieces to flip them over for a second and check the color patterns on the base (J) of each piece.
- Then, click on the black circles on the chessboard to see the color patterns that are on there.
- When you have found a matching pattern, click on the chess piece, move your cursor slightly till you get a hand icon, and then drag them to the black slot on the board.
- When the pieces have been placed you will get 3 additional white pieces to place on the board.
- In the center vertical column, place the Bishop in the first square, the Knight in the 3rd square and the King in the 4th.
- See screenshot for solution.
- You will get the CHALLIS in inventory when complete.
- Speak to Nico and end conversation to access the map.
- Click on the Montfaucan location.
Chapter 12 – Montfaucon Church
- Speak to the policeman sitting at the café.
- Head up the stairs to enter the church.
- Speak to the priest and exhaust all conversation.
- Click on the CHALLIS in inventory while speaking to the priest.
- Allow the priest to polish the CHALLIS.
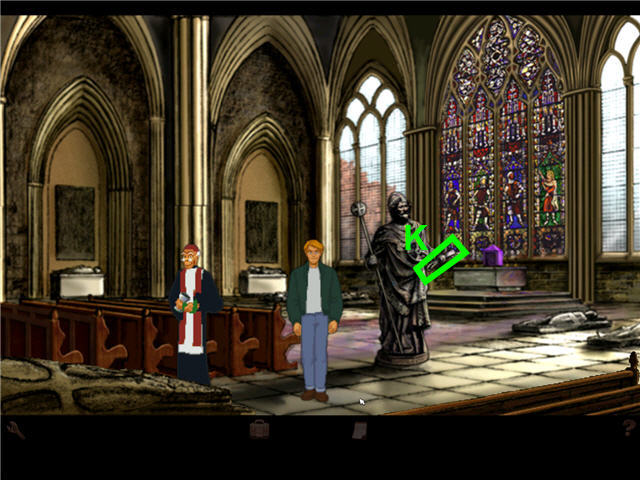
- Examine the statue to the right of the priest by left and right clicking.
- Use the LENS on the scroll (K).
- Click on the scroll after placing the LENS to look through it.
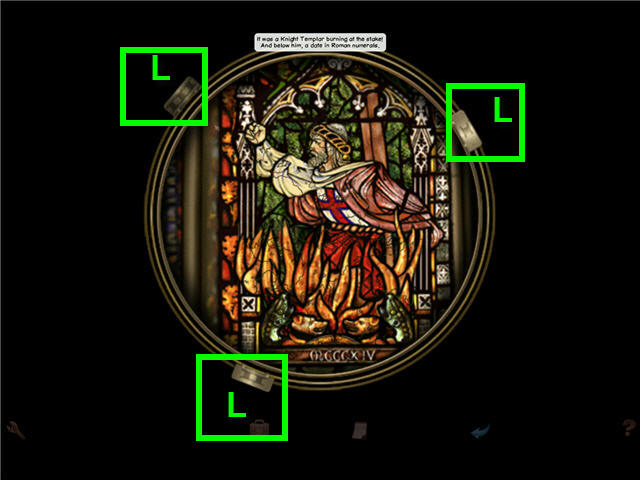
- Align the three lenses by moving the tabs (L) to complete the picture. See screenshot for solution.
- Speak to the priest and exhaust all conversation.
- You will have the CHALLIS back in inventory.
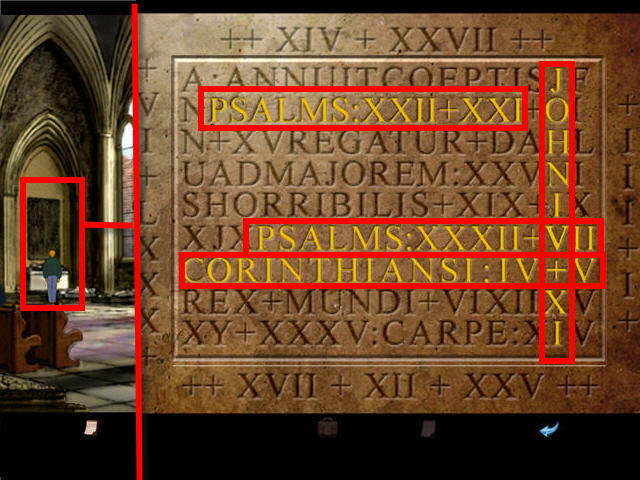
- Walk to the tomb at the far right by the windows and click on it.
- Find the 4 biblical references on the close-up of the tomb inscription.
- You must click and drag your cursor to highlight the verses. See screenshot for solution.
- Exit the church and go left of the officer by the café to access the map.
- Click on the Musee Crune location and enter the Museum.
- Speak to Lobineau and get a new location on the map.
- Leave the museum and exit to the left to get the map.
- Click on the Site de Baphomet location.
Chapter 13 – Baphomet
- Speak to the painter and exhaust all conversation.
- Left and right-click on the paint can (M).
- Enter into the building through the opened gate on the right.
- Try and enter the washroom (N) on the right.
- Speak to the guard and exhaust all conversation.
- The guard gives you the SET OF KEYS.
- Use the SET OF KEYS on the washroom door and enter the room.
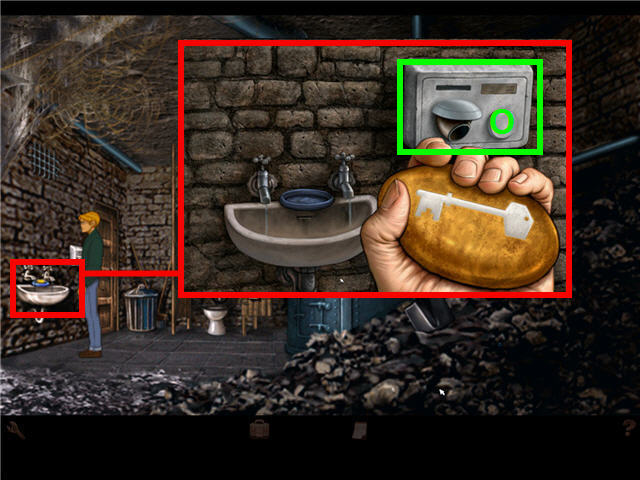
- Click on the sink to get a close-up and automatically be holding the soap.
- Use the SET OF KEYS on the bar of soap while you are holding it.
- Use the PLASTER OF PARIS on the imprint of the KEY in the soap.
- Click on the left tap on the sink to wet the PLASTER OF PARIS in the soap.
- You will not see George wet the soap; click on the bar of soap to be sure he states that the bar of soap is now filled with wet plaster.
- Click on the hand dryer (O) to dry the plaster and get a PLASTER KEY in inventory.
- Attempt to leave but the guard wants his SET OF KEYS.
- Speak to the guard and click on the SET OF KEYS in inventory to give them back.
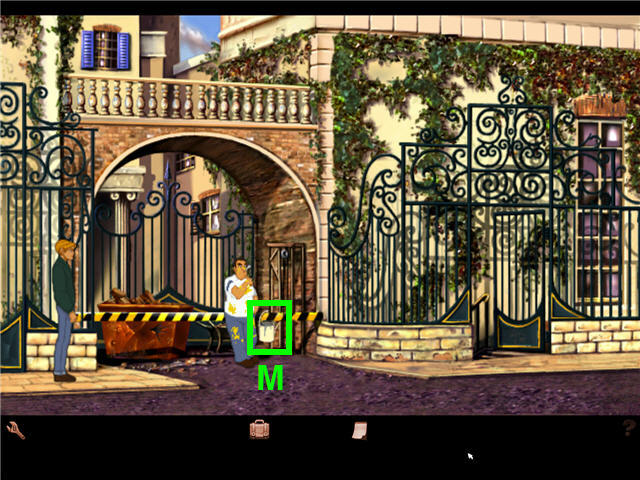
- Head outside and attempt to use the PLASTER KEY on the bucket of paint hanging to the right of the painter.
- Head back inside the building and call Nico on the phone (P) next to the guard and ask her to talk to the painter.
- Head back to the painter and inform him he has a phone call.
- When the painter is out of sight, dip the PLASTER KEY in the bucket of paint.
- Head into the building again and left and right click on the thermostat (Q).
- Speak with the guard about the thermostat and then ask to use the washroom again.
- Walk over to the thermostat and turn the temperature down and watch the guard put his gloves on.
- Use the SET OF KEYS of the washroom door and enter.
- Drag the PLASTER KEY to the SET OF KEYS in inventory so that you get the KEY.
- Leave the washroom and speak to the guard.
- Click on the SET OF KEYS in inventory while speaking to the guard.
- Call Nico from the phone next to the guard and ask her to call the guard.
- While the confrontation continues between the painter and the guard, head into the building.
- Use the KEY on the door that the guard was previously guarding.
- Enter the excavation area and go down the ladder (R).
- Click on the idol (S) underneath the platform.
- Click on the distorted image (T) on the floor.
- Place the CHALLIS at the base of the idol to get the completed image.
- Speak to Nico and exit the conversation to get the map.
- Click on the red arrow to get the Europe map.
- Click on the Villa de Vasconcellos location on the map.
Chapter 14 – The Children

- Talk to Lopez watering the grass.
- Click on the CHALLIS in inventory while speaking to Lopez.
- Walk into the entryway of the house and head straight into the utility room where the hose is plugged into.
- Take the MIRROR (U) off the wall.
- Head up the stairs and speak to the Countess.
- You will automatically give the Countess the CHALLIS during your conversation.
- Exit the villa and head over to the Mausoleum.
- Click on the hotspot just to the right of the palm tree to access the Mausoleum area.
- If you click directly on the Mausoleum, George will not walk there.
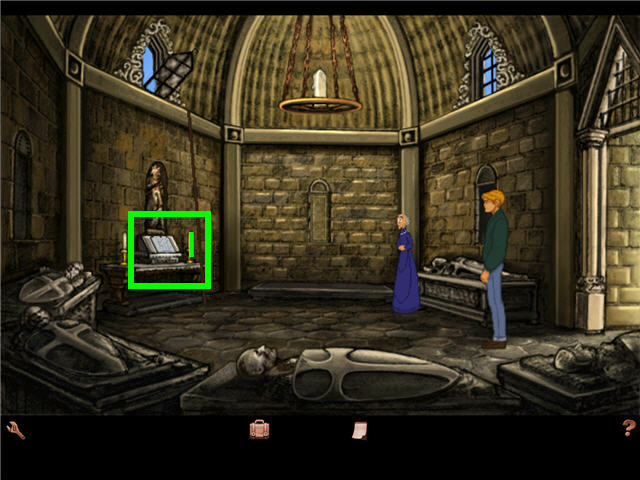
- Enter the Mausoleum.
- Take the BIBLE off the lectern.
- Click on the candle (V) hanging from the ceiling in the center of the room.
- Use the TISSUE on the pole (W) and George will automatically light the large candle.
- The flame goes out.
- Click on the open window (X) and George will automatically close it with the pole.
- Use the TISSUE on the pole for the second time and George will automatically light the candle again.
- The candle burns down quickly and you will get a STONE KEY automatically from the burned down candle.
- Exit the Mausoleum and walk to the left to get the hotspot to head back to the front of the villa.
- Enter the Villa and go upstairs and speak to the Countess.
- Click on the BIBLE while speaking to the Countess and get the clues from the Bible verses.
- Click on the STONE KEY while speaking to the Countess.
- Head out to the grounds and speak to Lopez repeatedly regarding the well.
- Lopez shows you a hazel tree to get a Y-shaped stick; click on the hotspot (Y), but there is no useable branch.
- Head to the left of the house next to the utility room window and click on the hazel tree to get a DIVINING WAND.
- Speak to Lopez and show him the DIVINING WAND and George will search the grounds for the well.
- Click on the lion head on the opposite side of the ledge in the well.
- Click on the lion head again to pull the fang.
- Click on the dark wall where the lion head was.
- Use the MIRROR on the lower hotspot (Z) on the lit well wall.
- Click on the dark wall again to discover the socket.
- Use the STONE KEY on the dark wall to place it in the socket.
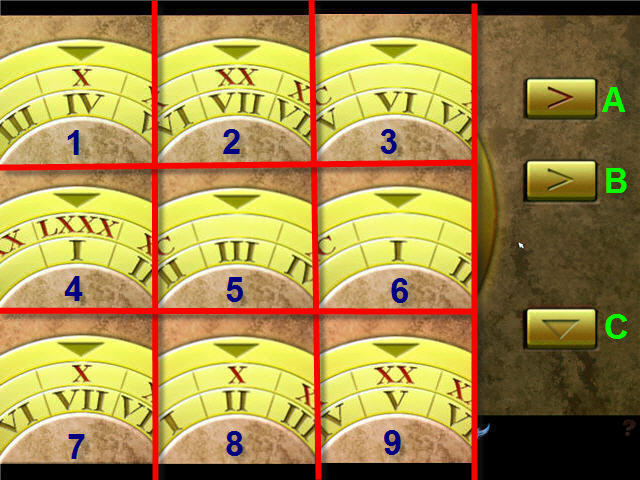
- You have to turn the dial using the arrows on either side to enter the Roman numerals that you found at the tomb in the church.
- The red arrows (A) turn the outer ring with the red numerals; the gold arrows (B) turn the inner dial with the gold numerals.
- The arrows on the left side, turns the ring counter clockwise, the arrows on the right, turns the rings clockwise.
- Click the down arrow button (C) on the bottom right after each set of numerals.
- Click on the large button in the center when all 9 of the numerals have been entered and set.
- The solution is; X/IV – XX/VII – /VI – LXXX/I – / III – /I – X/VII – X/II –XX/V. Before the slash is the outer ring, the inner ring is after the slash.
- If you make a mistake, it will reset automatically and you will need to begin again. See screenshot for solution.
- Enter the secret passage to the chamber and watch the cutscene.
Chapter 15 – Scotland
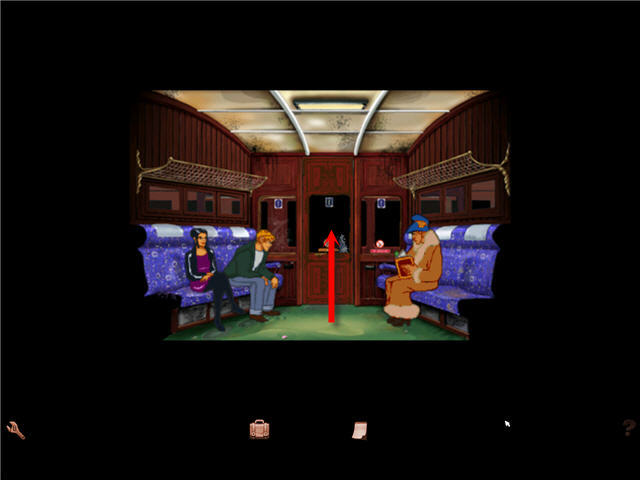
- Click on the door to attempt to leave the train car and it triggers a cutscene.
- Speak to the man in disguise in the train car.
- Click on the items in inventory while speaking to the man in disguise.
- Click on the door to leave the train car.
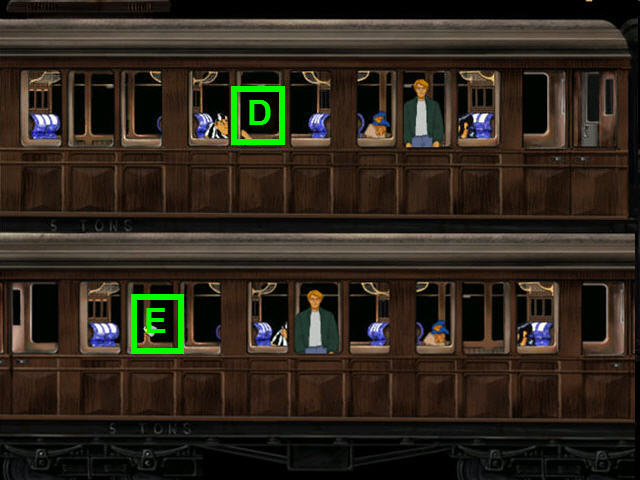
- Click on the train car to the left (D).
- Speak to the man with the striped shirt.
- Try and open the middle window but he won’t let you.
- Exit via the bottom of the screen and click on the empty car to the left (E).
- Click on the open doorway behind George to exit and then click on the car to the left and watch the cutscene.
- Exit the car to the right and then click on the empty car to the right of the man in the striped shirt that used to hold Nico and the disguised man.
- Exit the car and head to the car with the man in the striped shirt.
- Speak to the man in the striped shirt and exhaust all conversation.
- Click on the middle window 2 times to get on the roof of the train.
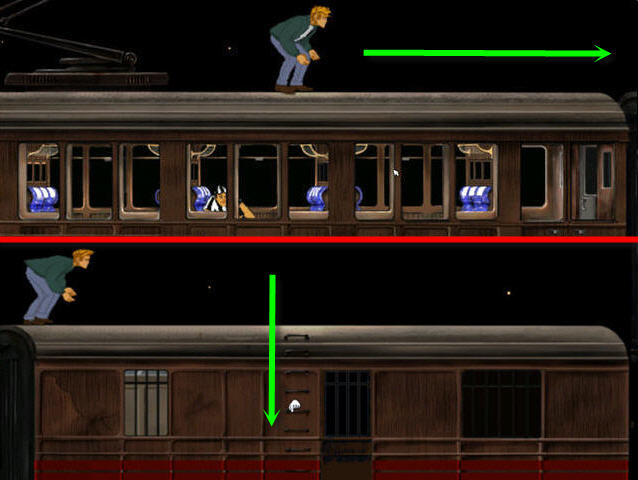
- Click on the front of the train to the right.
- Click on the ladder to enter the train car and watch cutscene.
- Exhaust all conversation with Khan.
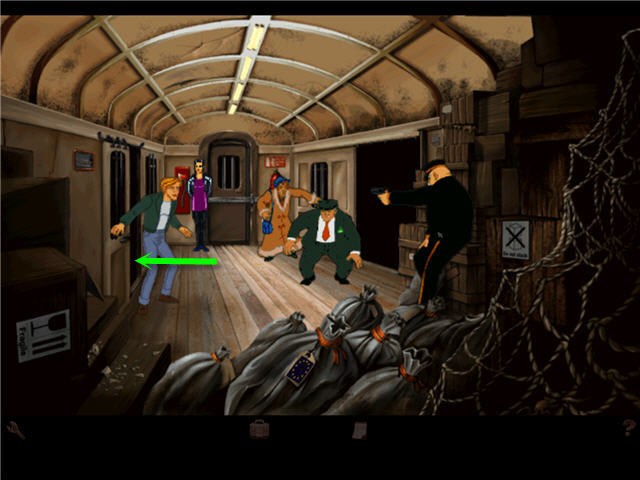
- Click on Nico to untie her.
- Click on the doorway to the left to exit the train car.
- Enter into the ruins of the church.
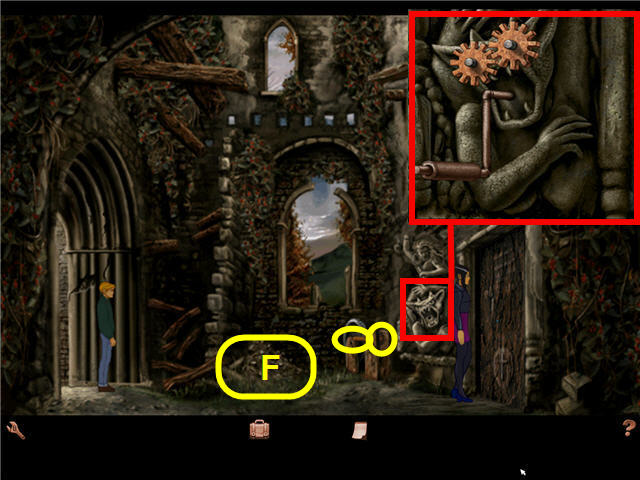
- Click on the pile of rubble (F) till George no longer finds anything.
- You should have found a PIPE, a GREEN COIN, a COG AND SPINDLE and a PLASTIC PEN CAP.
- For a laugh, you can place the PIPE in the mouth of the gargoyle next to the door on the right, remove it and try it on the gargoyles nose.
- Click on the winch to the left of the demon and get the HANDLE.
- Click on the winch again to get another COG AND SPINDLE.
- Click on the gargoyle and place the smaller COG AND SPINDLE in the eye socket on the left, and the larger of the two COG AND SPINDLES in the right eye.
- Place the HANDLE in the mouth of the gargoyle.
- Enter the newly opened room to the right.
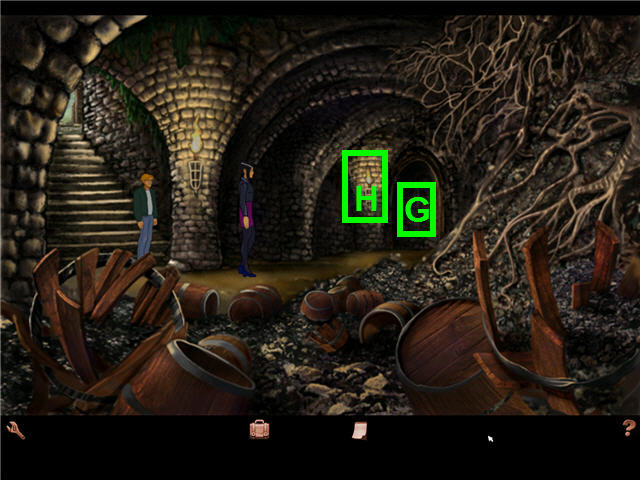
- Click on the entryway to the right (G) and watch the cutscene.
- When stopped by Guido, click on the torch (H) on the wall.
- Congratulations! You have successfully completed Broken Sword: Shadow of the Templars – The Director’s Cut!
Created at: 2011-01-13