
Walkthrough Menu
- General Tips
- Chapter 1: Journey Begins…
- Chapter 2: Meeting the Great Wizard
- Chapter 3: Expected the Unexpected
- Chapter 4: Dragon’s Lair
- Chapter 5: A Land Wasted by Magic
- Chapter 6: Sultan’s Shard
- Chapter 7: Magic University
- Chapter 8: Port of Halenburg
- Chapter 9: Grey Stone Stronghold
- Chapter 10: The Showdown
General Tips
- You can change players by clicking on your username in the middle of the screen.
- From the Manage Profiles screen you can delete rename or create new profiles.
- From the Options menu you can adjust the volume of the sfx, music and voice. You can also mute the demon’s comments, enable a custom cursor, set fullscreen, and panoramic screen options.
- At the bottom of the screen are 4 icons – alchemy, wizardry, telepathy, and telekinesis.
- Alchemy, wizardry and telepathy are the mini-games that you play during the game. Doing well in a mini game makes it so you can play that game from the main menu.
- Telekinesis lets you replay different levels that you have already finished.
- In this game you will have a quest panel at the bottom that tells you what you are looking for or need to do next.
- If you can’t do something in the current scene it will tell you there.
- Also if the scene doesn’t have any of the hidden objects you are looking for it will tell you there as well.
- To the left of the quest panel is a tree that tells you the progress of the current chapter and the game.
- There are 10 chapters in all, and 10 branches of the tree.
- When the middle is full you are done with a chapter.
- On the right side of the quest panel is the bag with demon in it.
- Under the bag is a magnifying glass. Click on it to get a larger view of an area to help you find objects. Right click to get rid of the magnifying glass.
- On the bag is a seal. When the seal is full you can get a hint. You can’t use a hint when there are no hidden objects left in the scene.
- When you start the game you can choose casual or adventure mode.
- Casual mode uses sparkles to show you where important things are and has more hints.
- Adventure mode doesn’t show you as much with sparkles and has less hints.
Chapter 1: Journey Begins…
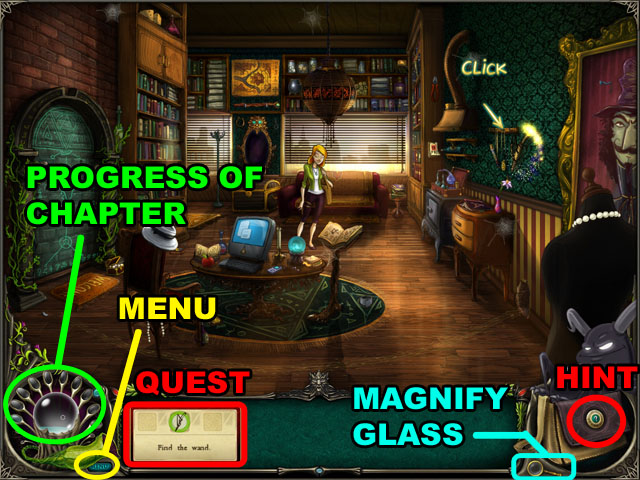
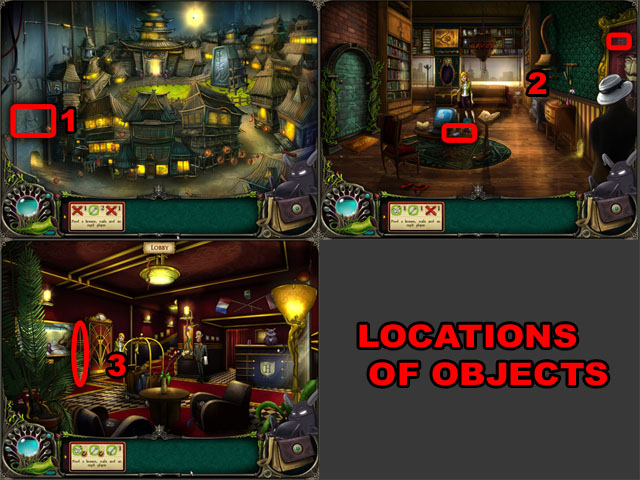
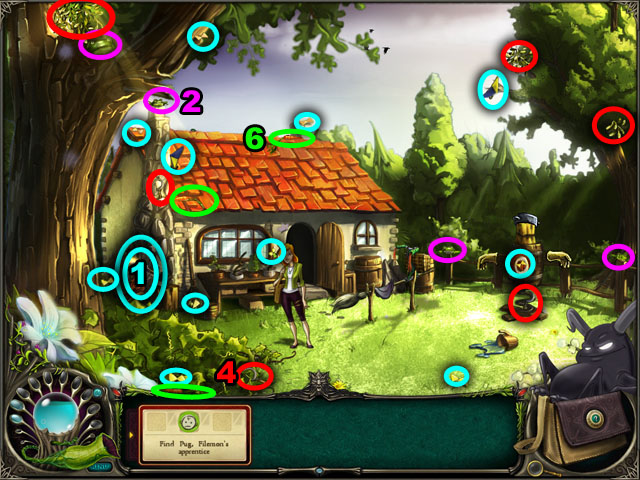
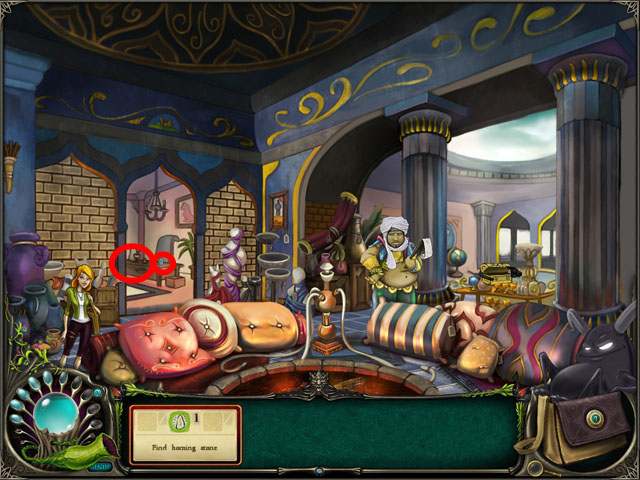
- Click the bag circled in green in the screenshot (1).
- You will find a small demon in the bag and he will give you your first quest, to find the wand of telekinesis.
- You can check your active quest at the bottom of the screen (2).
- Find the wand of telekinesis (3). After picking this up the character can move objects around the room without needing to walk to pick them up.
- The next steps are only if you do not skip the tutorial.
- Find an apple for the demon to eat (4).
- Then find the HAT (5) and click on the card with the HAT at the bottom and place the hat on the mannequin (6). This ends the tutorial.
- Click on the magical portal in aunt’s apartment (7). The portal will not work without a NEXUS STONE, which becomes your next quest.
- Click on the rathole at the left of the screen, you will get a new quest to make a shrinking potion.
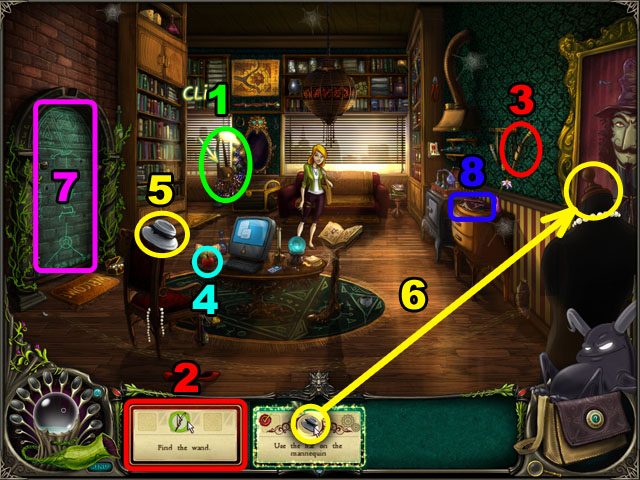
- Find the ALCHEMY MAGAZINE (8).
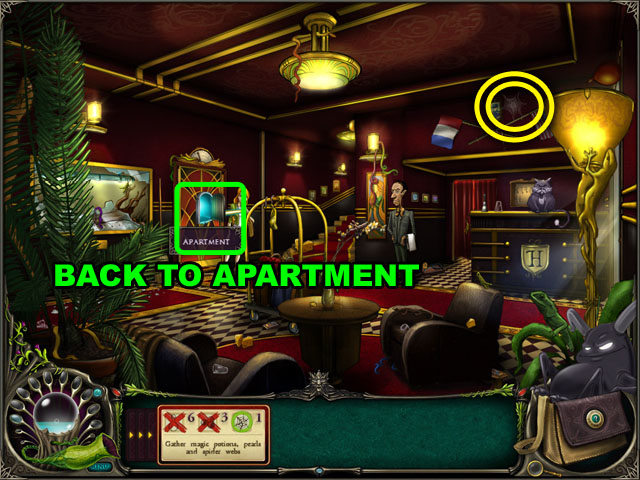
- Find 6 magic potions, 3 pearls and 6 spider webs highlighted in yellow in the screenshot.
- After finding all the items in this room, you will be told that sometimes all of the items aren’t in the same location.
- To find the last spider web you will need to go to the lobby using the door on the left.
- You can use magnify glass by clicking the magnify icon in the bottom right corner. Also you can switch by clicking right button on your mouse.
- Find the spider web in the upper right corner, circled in yellow in the screenshot.
- Return to the apartment from the door in the left.
- Complete finding all the items by following the previous screenshot.
- After finding all the items, click on the alchemy set circled in light blue.
- Click on the alchemy set to start making the potion.
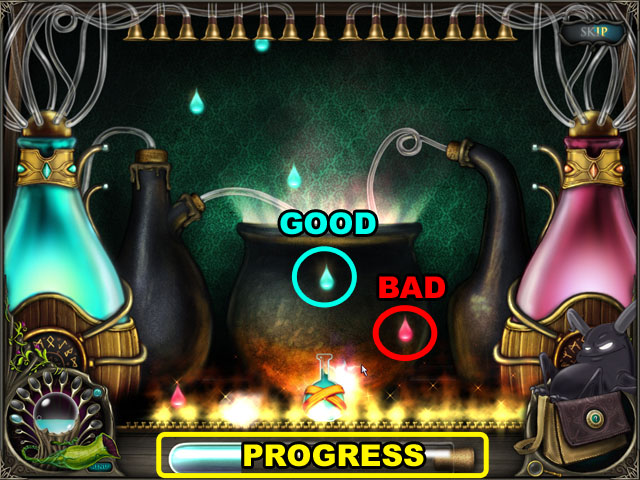
- Slide your cursor to the right and left to catch blue drops to make the blue potion.
- The red drops will count against you and lower your progress bar.
- The potion moves a little slower than your mouse, so you will have to move early to get to the correct position.
- Any part of the potion bottle can receive the drops. You can use the sides or the bottom to pick them up.
- You can move up and down as well to try to get around red drops and collect the blue ones before they disappear off the bottom of the screen.
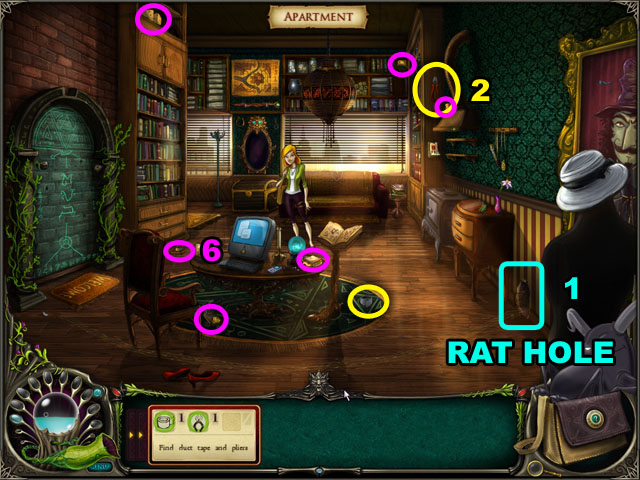
- Once the mini-game is completed, place the POTION from the inventory to the rat hole (1).
- Go inside and talk with the first rat you see in the bottom left corner of the screen. He will ask you to collect a few things.
- Return to the previous room and collect the DUCT TAPE and pliers highlighted in yellow (2).
- Click the rat hole to go back inside.
- Click and drag the DUCT TAPE to the sparking cable at the top of the screen.

- Talk to the rickshaw driver at the bottom of the screen to get another quest (3).
- You can use the hint by clicking the demon seal in the bottom right corner to find items.
- Find the 11 matches highlighted in red.
- Talk with the rickshaw driver again to finish that quest.
- Click on the Nexus Stone highlighted in purple to get your next quest (4).
- Talk with another rat circled in green in the bottom right corner to get his cheese for the Nexus Stone quest. He will ask you to set off fireworks for him (5).
- Find 7 fireworks highlighted in green and click them to set them off.
- Speak to the drunken rat highlighted in purple again. Then, collect the cheese that was behind the rat highlighted in purple.
- Go back to the apartment and find the 2 traps and 4 pieces of cheese circled in purple in the previous screenshot (6).
- Return to the lobby.
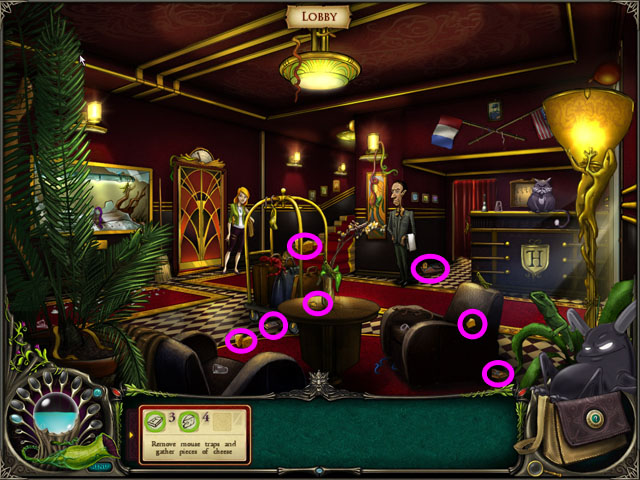
- Find 3 traps and 4 cheeses in the lobby.
- Go through the apartment and back into the rat hole.
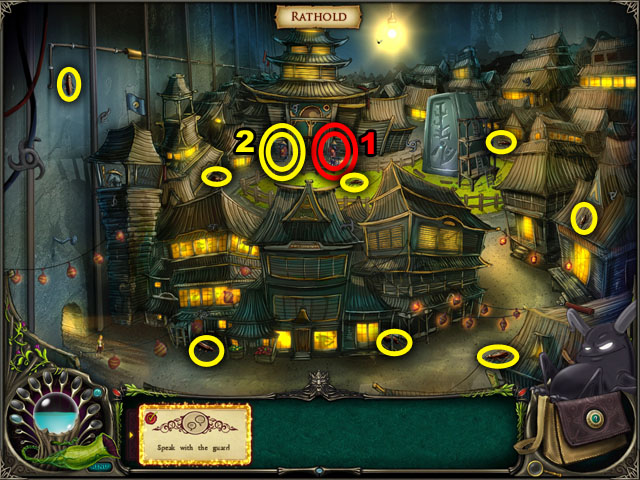
- Talk with the guard circled in red on the right of the door (1).
- This will finish his quest, but you will need to do another quest for the guard on the left (2).
- Find 8 cockroaches circled in yellow and click on the guards to enter the next room.
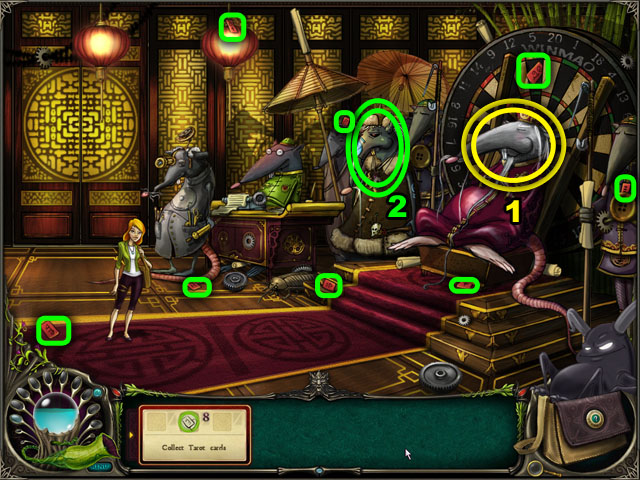
- Speak with the master Tofu on the throne to the right (1).
- The mystic to his right will ask you to find 8 tarot cards highlighted in green (2).
- Speak with the rat mystic again and they will agree to give you the stone for the bell that Pierre has.
- Go through the rat hole and the apartment and return to the lobby.
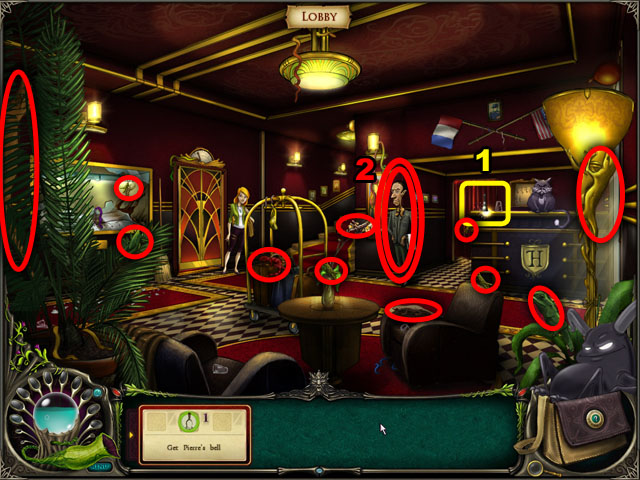
- Try to collect Pierre’s bell highlighted in yellow (1).
- He will give you the bell if you catch 5 geckos and 6 cicadas that have escaped their terrarium.
- Speak with Pierre, highlighted in red, to receive the bell (2) and then click on the bell.
- Go through the apartment and the rat hole and return to the rats’ throne room.
- Speak with the rat mystic.
- Exit to the rat hole and place the bell on the bell tower.
- Speak with the master Tofu (1) to finish the bell quest.
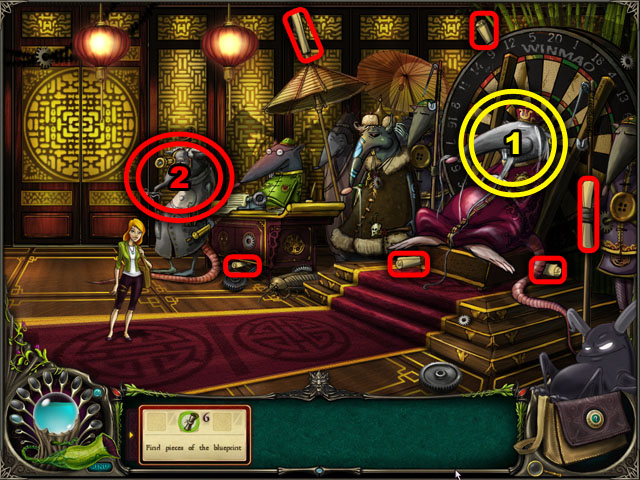
- Next you will receive a quest from the engineer to find 6 blueprints highlighted in yellow.
- Speak with the rat engineer after finishing that quest (2).
- He will ask you to go pick up a few things around the apartment building.
- Return to the rat hole city.
- Find the nail on the left wall (1) and continue to the apartment.
- Find the nail on the right wall and the MP3 player on the table in the middle (2). Go to the lobby.
- Try to collect the broom next to the elevator door, Pierre will give you a new task (3).
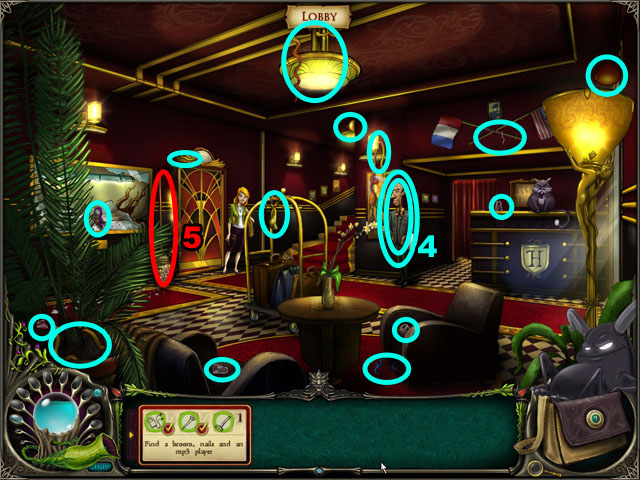
- Clean up all of the items left over from the party - 7 ribbons, 4 cups and 3 balloons - and then click on Pierre (4).
- He will then let you take the broom (5) and return the supplies back to the mouse engineer.
- Go back to the mouse throne room.

- Talk to the engineer again and he will send you out to find some cogs.
- Find all 10 cogs in the throne room, circled in green in the screenshot.
- He will tell you to go back to the lobby and destroy any furniture marked with an “x”.
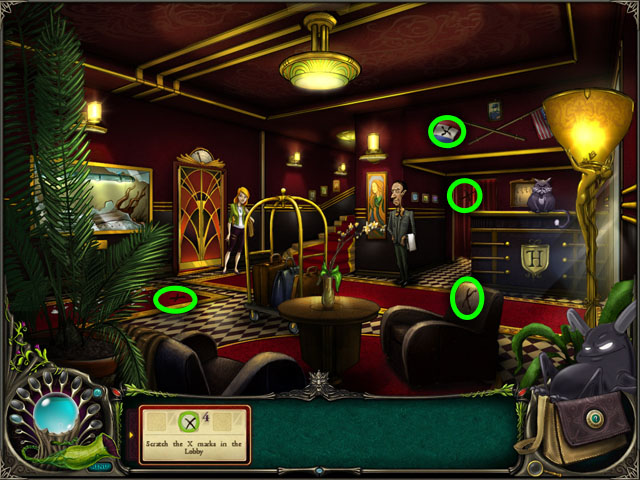
- Return to the lobby and click the 4 places maked with an “x”.
- Pierre will then kick the cat out of the lobby.
- Return to the engineer and the rats will put the NEXUS STONE outside of the hole for you.
- Exit the throne room and click the hole to go back to the apartment.
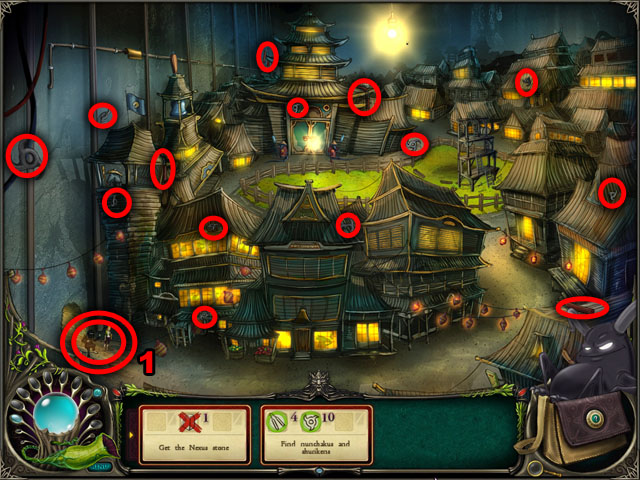
- The rat ninja will demand that you help him find 4 nunchakus and 10 throwing stars (1).
- Find the objects circled in red and then you can leave the rat hole.
- Take the NEXUS STONE from the ground and use it on the gate to the left again to enter the portal and finish the chapter.
Chapter 2: Meeting the Great Wizard
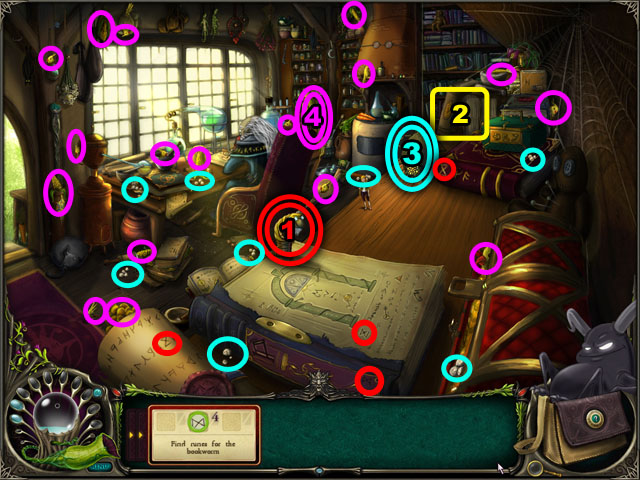
- Click on the bookworm and then find him 4 runes circled in red (1).
- Speak with the bookworm again to finish his quest.
- Click on the books at the top of the bookshelf to go to the next scene and a spider will get in your way.
- Find 8 mothballs circled in light blue for the spider (3).
- Next talk to the parrot and help her find her10 children and 7 pieces of corn circled in purple (4).
- Speak with the parrot again to finish the quest and speak with the spider again and it will let you pass.
- Click on the previous spot to continue on to the next scene.
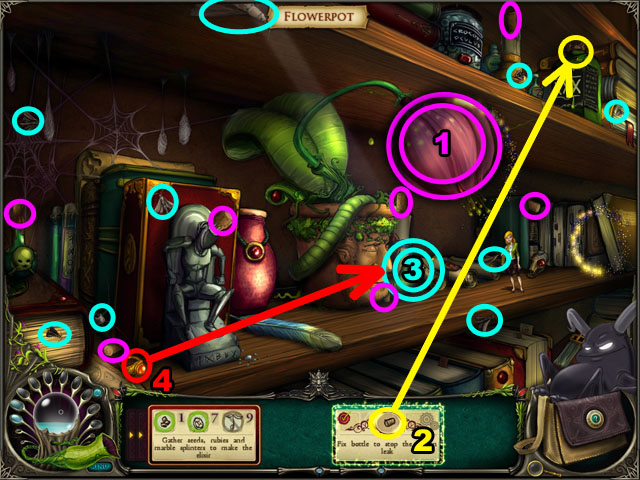
- Click on the big pink flower in the middle of the screen (1).
- The caterpillar below it will tell you to find 7 corks, circled in purple in the screenshot.
- After finding the corks, click and drag the cork from the inventory to the green bottle that is poisoning the flower in the upper right corner (2).
- The caterpillar will then ask you to find 9 moths, circled in light blue (3).
- Speak with the caterpillar after catching all the moths. He will give you another quest.
- Find the ring in the bottom left corner and put it on him (4) to open up the flower and spread its seeds.

- Find 1 pile of marble fragments (1) in purple.
- Find 7 rubies in green (2) and 4 seeds in red (3) in this scene.
- You will need to return to the last scene to find the rest of the seeds.
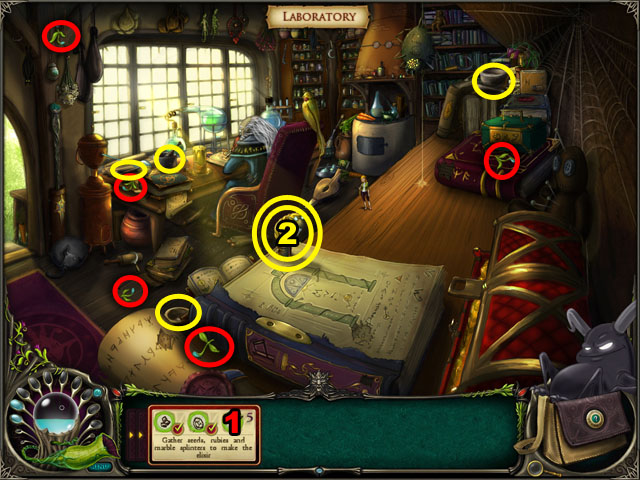
- Enter the room and find the remaining 5 seeds circled in red (1).
- Speak with the bookworm in the middle (2).
- He will tell you to find 4 mortars, circled in yellow in the image.
- Speak with the bookworm again to finish the quest and brew the potion.
- Click on the cabinet to start creating the potion and play the same mini-game as before, trying to get only the blue drops into the blue potion.
- You will then talk to the wizard and he will ask you to get some herbs for his tea.
- Click on the rug in the bottom left corner to move to the other side of the cabin.
- Click on the door to the right to go to the garden.
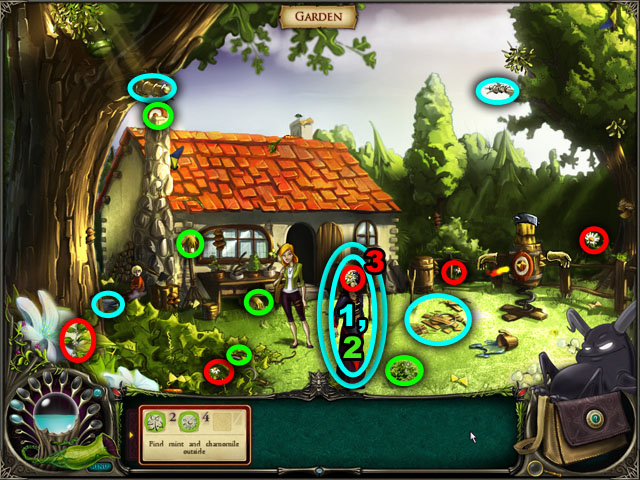
- Find the 2 mint and 4 chamomiles that are circled in red.
- When you click on the chamomile on Verena’s hair in the middle, you will get a quest from her that you must complete first (1).
- Find 2 springs, 1 broken barrel and 1 pot highlighted in light blue.
- Speak with Verena again and she will give you a second quest (2).
- Find 2 gloves and 2 target parts. They are circled in green.
- Speak with Verena again.
- After finding all of the objects, you will be able to collect the chamomile in her hair (3).

- Return to the cabin by clicking on the outside door.
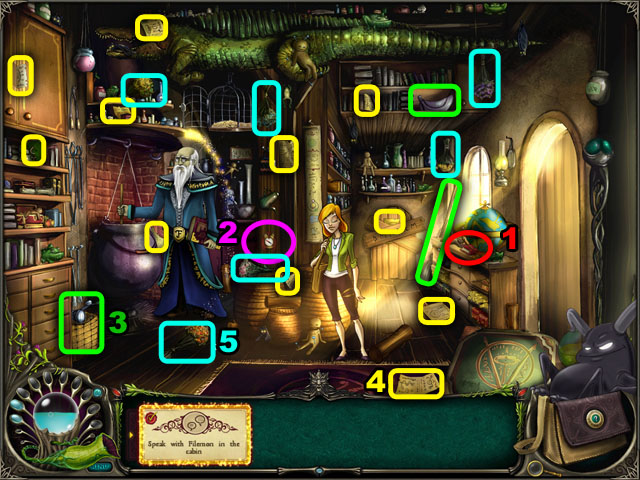
- Speak with Filemon in the middle.
- He will give you many quests to find things around the cabin and outside.
- Refer to the screenshots for the locations of all the items.
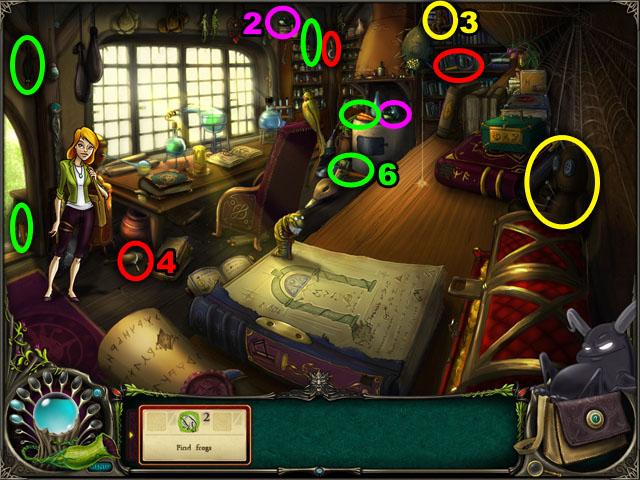
- For the first quest, items circled in red, get the red book and go to the laboratory to get the glasses (1).
- Next speak with Filemon again and get the dragon compass, circled in purple (2).
- Speak with him again and find the broom, saddle and handle-bar highlighted in green in the same room (3).
- Next, he will have you find the 10 pages and the 1 green book cover in the cabin and the laboratory. These items are circled in yellow (4).
- Next you will need to get the 6 herb bunches and 7 funguses.
- The 6 herb bunches are in the cabin and the laboratory, highlighted in light blue (5).
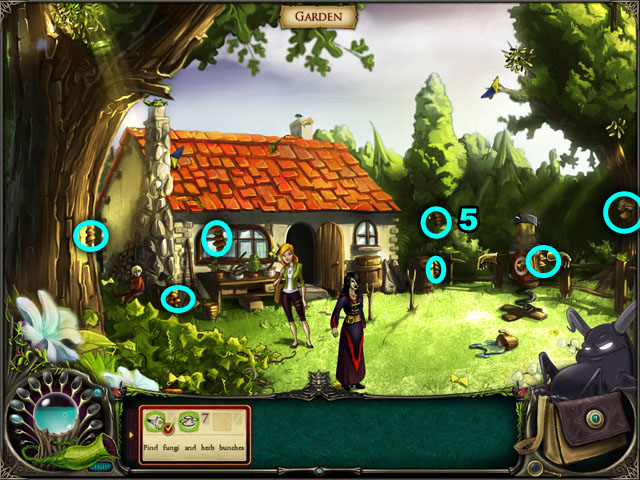
- The 7 funguses are outside, also circled in light blue.
- Return to the cabin and talk to him one last time, he will tell you to cast the binding spell on your broom outside.
- Go outside and click on the space Filemon set up for you to work on your broom.
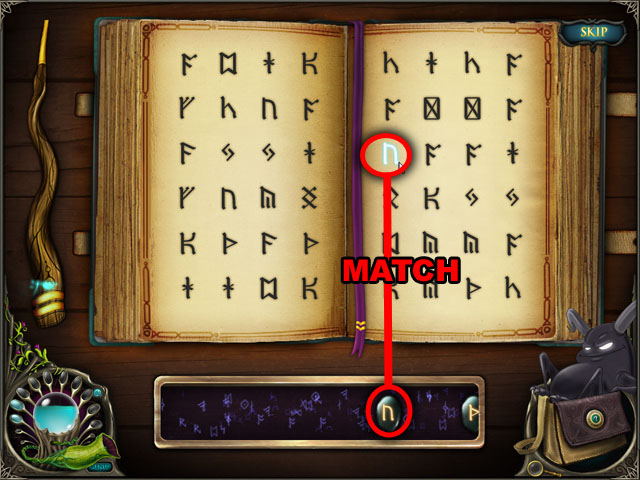
- This is the magical spell casting mini-game.
- Click on the runes in the book that match the runes that move by the window at the bottom of the screen.
- You can click any of the runes currently in the window, not just the first one in the row, but you should work on finding the one closest to the end first.
- If you click the wrong rune or if a rune passes the left side before you can find it, points are taken away. If you find the rune points are given.
- Once you have enough points, you win the mini-game.
- Try to look for multiple ruins at the same time so you don’t get stuck on one and get behind.
- After you finish the mini-game, drag the magic spell from your inventory to the broom to bind the spell to it.
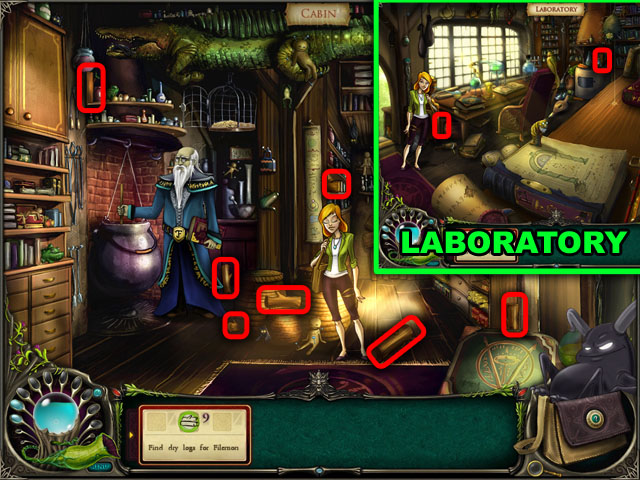
- Talk to Filemon again and he will have you gather some more ingredients for spells.
- First find 7 logs in the cabin and the laboratory, circled in red.
- Next he will send you outside to meet Pug, his apprentice and look for more ingredients.
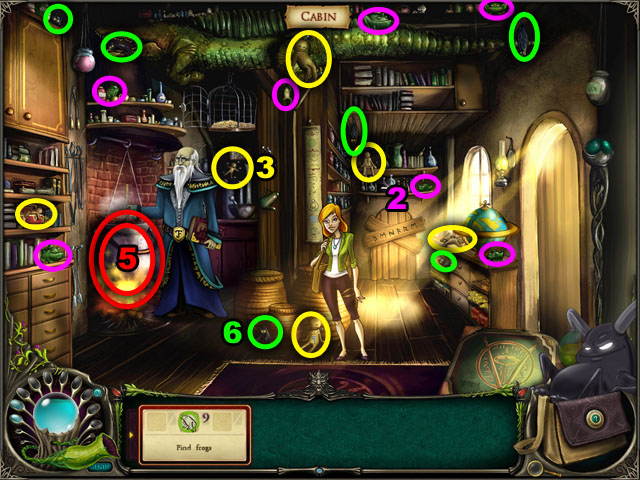
- Click on Pug to the left of cabin and he will have you find 9 bows and 2 kit pieces, circled in blue.
- Talk to him again and he will start you on the ingredients quests.
- First you need to find 13 frogs, inside and outside the cabin, circled in purple (2).
- After finding the frogs speak with Filemon again. He will give you a new quest, to find 6 of Pug’s dolls.
- The dolls can be found in the cabin and the laboratory (3).
- Next you will need to find 6 sickles and 3 mistletoes hidden inside and outside the cabin (4).
- There are 3 sickles in the laboratory and the rest are outside of the cabin.
- Once those are collected, use the mistletoe on the large pot in front of Filemon (5).
- Next you need to find 8 bats and 6 carrots. These items are also hidden throughout the three scenes (6).
- Finally, add the carrots to the pot as well.
- Exit the cabin and use the broom to fly away.
Chapter 3: Expected the Unexpected
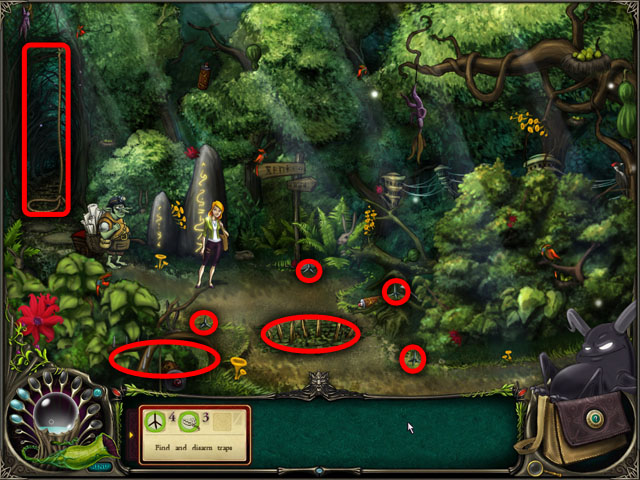
- Find 4 caltrops and 4 traps highlighted in red to help out the goblin.
- Speak with goblin at the left.
- Follow the path in the left to go to the hamlet and speak with the goblin again.
- Click on the door in the bottom left corner to go to herbalist’s shop.
- After the conversation you will start the quest to find 8 rags to plug up the holes in his shop.
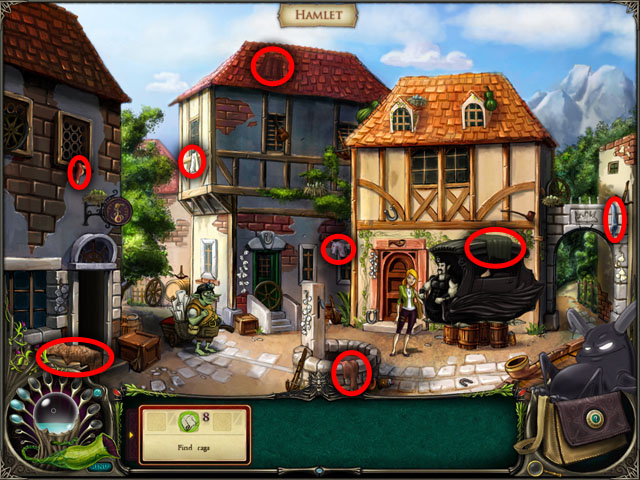
- Find 8 rags highlighted in red.
- Return to the herbalist’s shop.
- Click on the 9 holes highlighted in red to cover them with rags.
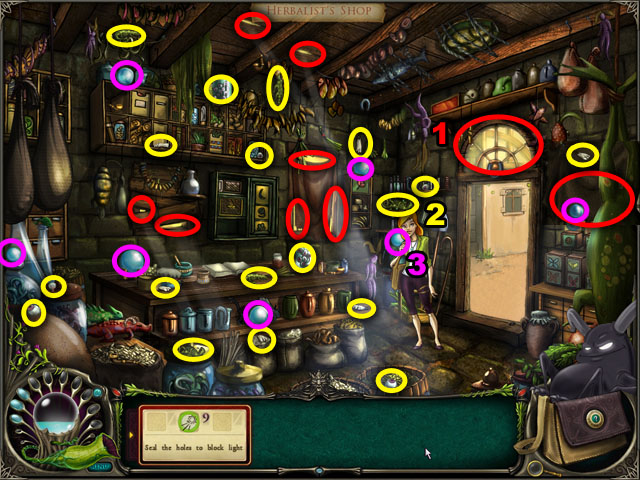
- The herbalist will then appear and give you a quest to find 7 crocodile eyes, 6 rabbit feet and 5 stuffed lizards in his shop.
- These are all highlighted in yellow (1).
- Speak with herbalist after you are finished and he will give you the crystal balls you are looking for.
- Find 7 crystal balls circled in purple (3).
- The herbalist will then tell you that you need a goblin engineer to make the crystal balls work again.
- Exit the shop and go back to the hamlet.
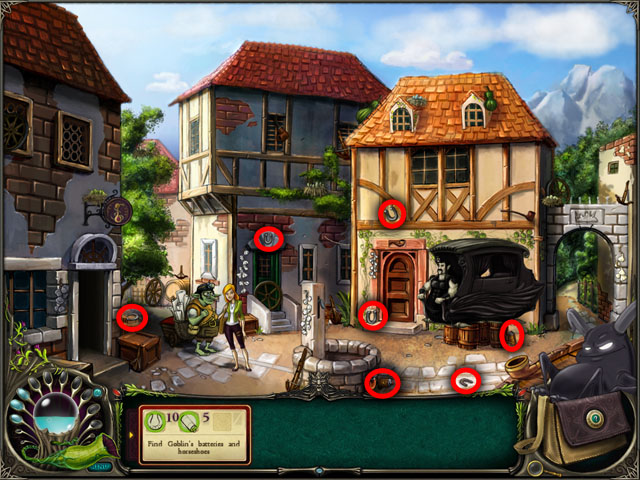
- Speak with goblin and he will send you on a quest for 10 horseshoes and 5 batteries.
- There are 5 horse shoes and 2 batteries in the town scene, highlighted in red.
- After finding all the objects go to the woods.
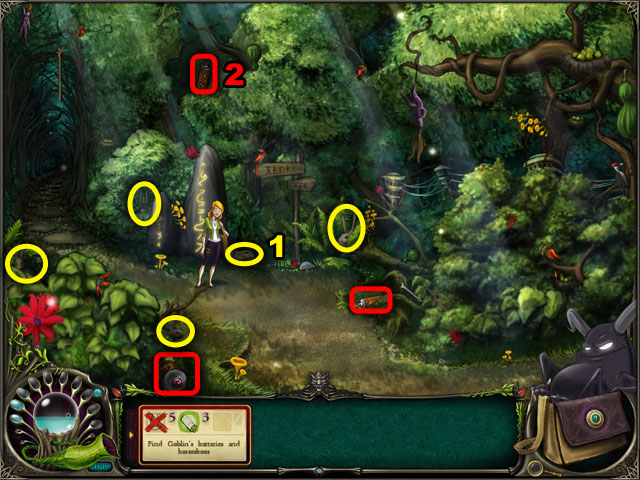
- Click on one of the batteries. A fairy will come out and give you a new quest to find 5 missing hares.
- Find 5 hares highlighted in yellow (1).
- Speak with the fairy again in the middle of the screen.
- You will then be able to find the 3 batteries highlighted in red (2).
- Return to town and go to the herbalist’s shop.
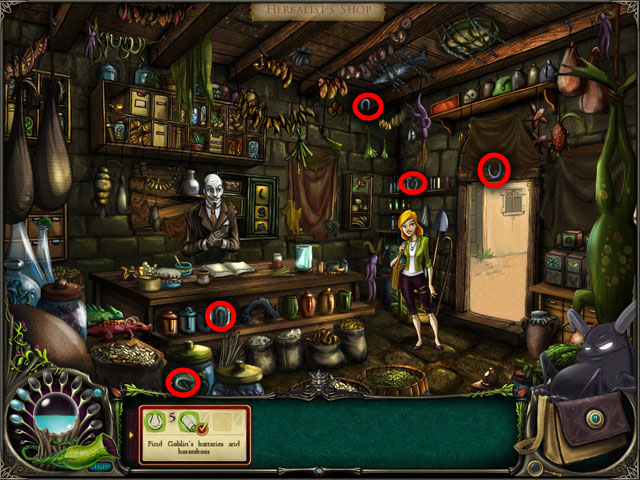
- Find the 5 horse shoes highlighted in red.
- Return to the hamlet and speak with the goblin.
- After the conversation you will be able to use the crystal balls.
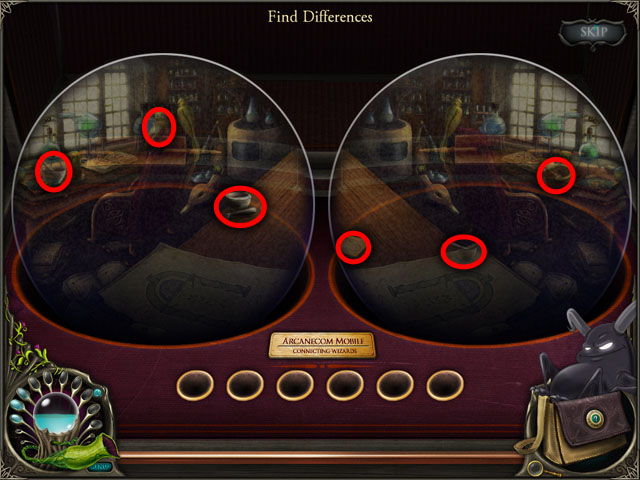
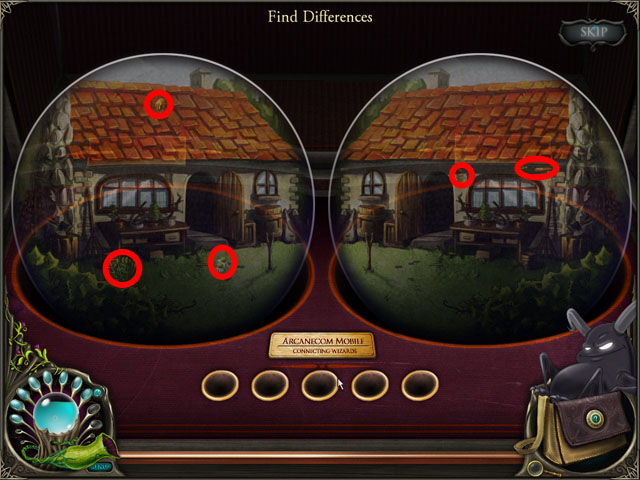
- You will need to play a find the differences mini-game to use the crystal balls.
- Find 6 differences between the two images on the crystal balls.
- The images are mirrored from each other, but you can click on either side when you find a difference.
- The images will be hard to see sometimes, but if you wait it will appear again clearly.
- After finishing the mini-game, speak with Vincent to your right. He looks like a man sitting in a black carriage.
- You will receive a quest to see the herbalist about a motion sickness remedy.
- Go to the herbalist’s shop and speak with him.
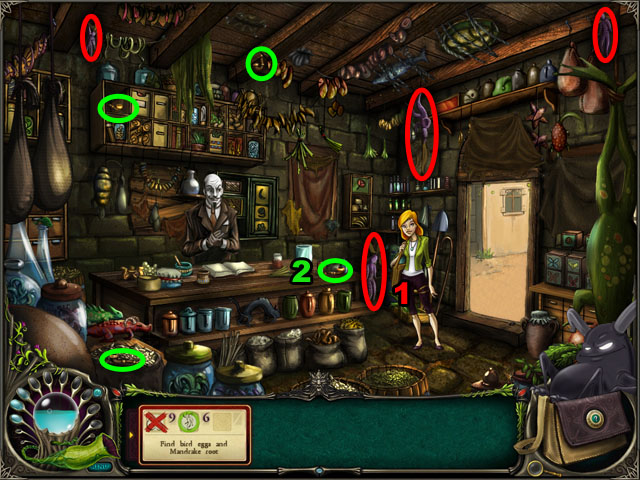
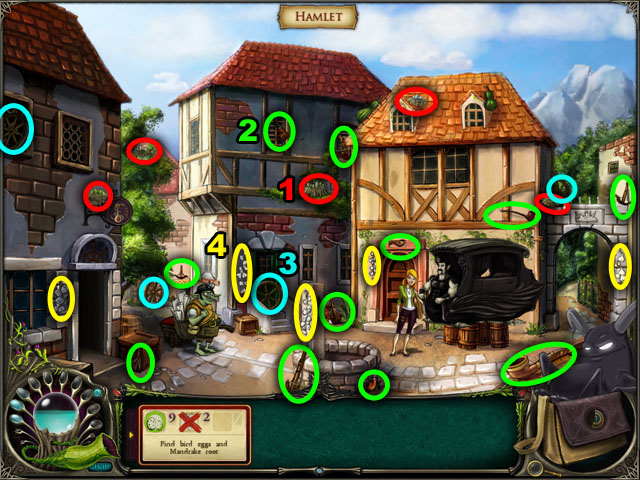
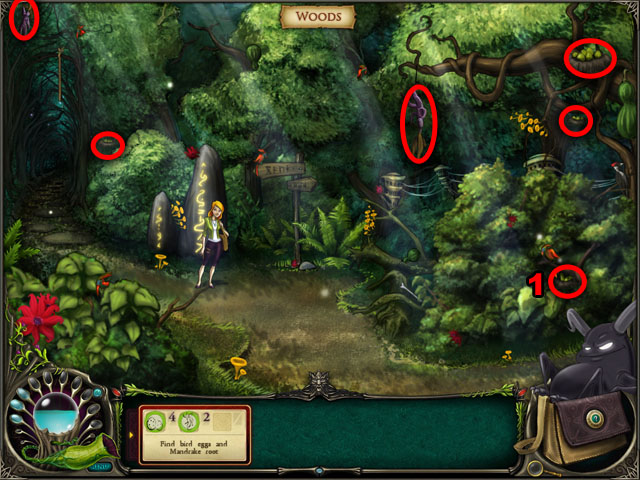
- Find 9 mandrake roots and 6 bird eggs to brew the motion sickness potion.
- The objects are in the shop, the town and the forest.
- There are 3 mandrake roots in the shop, 5 eggs in the town, and 4 eggs and 2 mandrake roots in the forest (1).
- After finding all the ingredients, play the potion brewing mini-game to complete the potion.
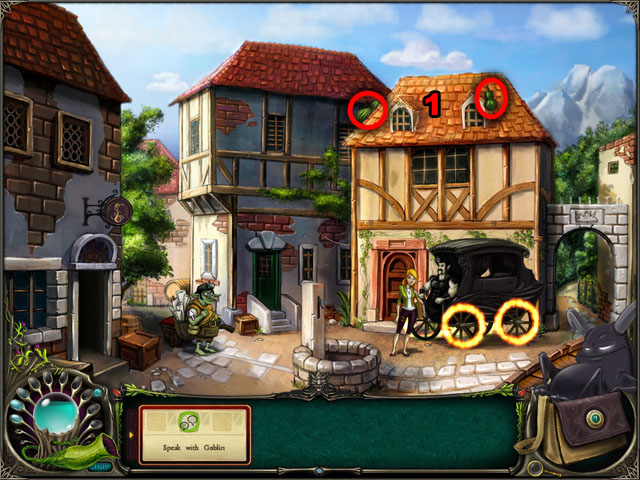
- After finishing the potion, talk to Vincent again and he will give you a quest to find 6 crossbows and 9 pipes (2).
- The crossbows and pipes are in the town and the herbalist’s shop.
- After finding all of these items, return to Vincent and he will have you find 4 wheels (3), circled in light blue in the screenshot.
- Next, he will need the herbalist to help you make an enchantment for his wheels.
- Go to the shop and talk to the herbalist. He will ask you to remove 5 strings of garlic from the town (5).
- After finding and removing all the garlic he will give you an enchantment.
- Click on Vincent’s carriage and play the enchantment mini-game to enchant his wheels.
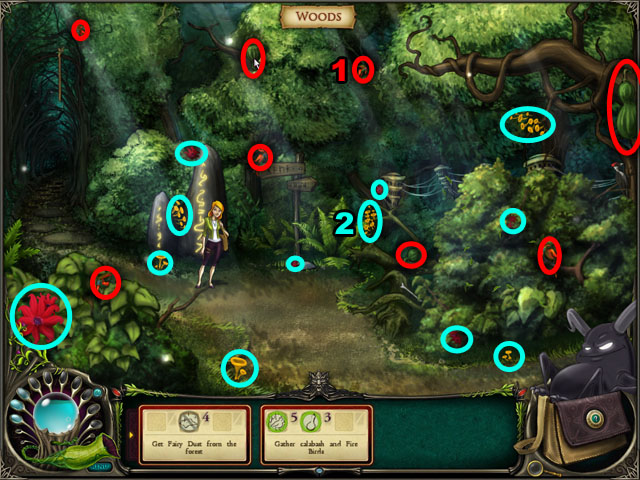
- Talk to the goblin next, so that you can get 4 fairy dust for Vincent for fuel.
- The goblin needs 5 fire birds and 4 calabashes in order to make explosives and kill the fairies.
- Find 2 calabashes in the town, circled in red (1).
- Find the other calabashes and the 5 fire birds in the forest and then return to the goblin.
- Next you will need to find 6 red petals and 6 yellow mushrooms in the forest (2).
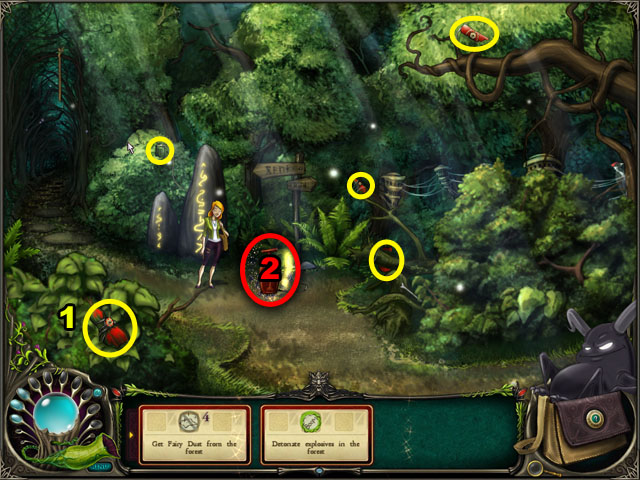
- Return to the goblin and he will have marked places for you in the forest to put the explosives.
- Click the 5 places with the “x” on them (1), and then trigger the explosion with the trigger in the middle of the screen (2).

- After exploding the fairies’ bushes, you can find 4 fairy dust, hidden around the forest circled in red.
- Return to Vincent and have him take you away from this town.
Chapter 4: Dragon’s Lair
- When you first get to the mountain town, Verena will set the roofs of the buildings on fire.
- You need to put the fires out before you continue along the pass.
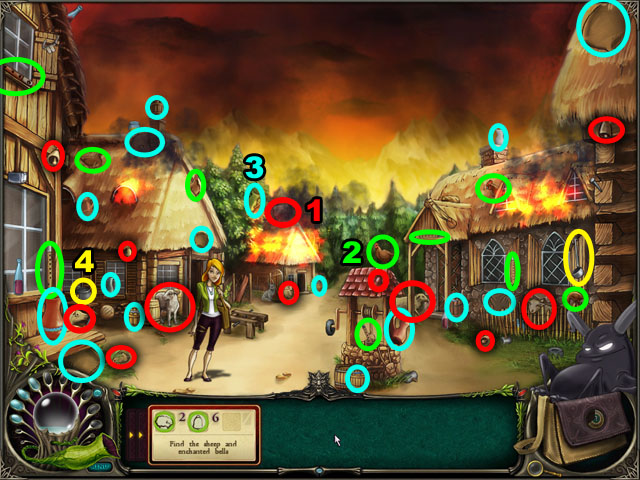
- First you will need to find 6 sheep and the 6 bells that they are bound to (1).
- After that you will need to find 5 chickens and 5 flutes (2).
- After gathering all of the animals away from danger, you will need to make a spell to put out the fire.
- Gather the ingredients for the spell – 5 jugs, 5 sacks, and 5 buckets (3).
- Last you will need a kettle and a ladle to finish the spell (4).
- Drag the spell from your inventory to the well, and then play the spell casting mini-game by matching runes.
- There is a troll in the next scene that won’t let you cross the bridge to the mountain.
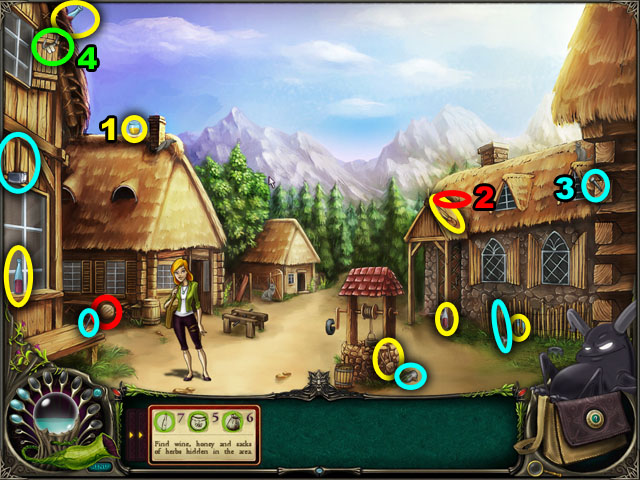
- He will give you a quest to find herbs and honey wine for him.
- Return to previous scene and click on the barrel to the left.
- It will be empty, but you will get a recipe of 7 wine, 5 honey, and 6 bags of herbs.
- Find the ingredients in the village and by the bridge, circled in yellow (1).
- After finding the ingredients, play the potion making mini-game by collecting blue droplets.
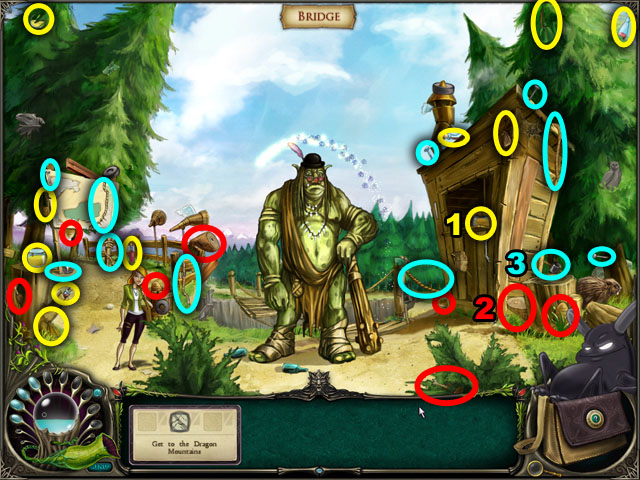
- The troll will then ask for 4 roasts and 6 loaves of bread in both scenes (2), highlighted in red.
- After feeding him, the troll will help you repair the bridge, but he needs 6 hammers, 5 pieces or rope, and 6 nails (3). These can be found in both areas.
- The troll will introduce you to the beaver, who needs his dentures to help you.
- Go back to the village, and find the dentures in the upper left corner of the screen (4).
- Return to the beaver and give him his dentures.
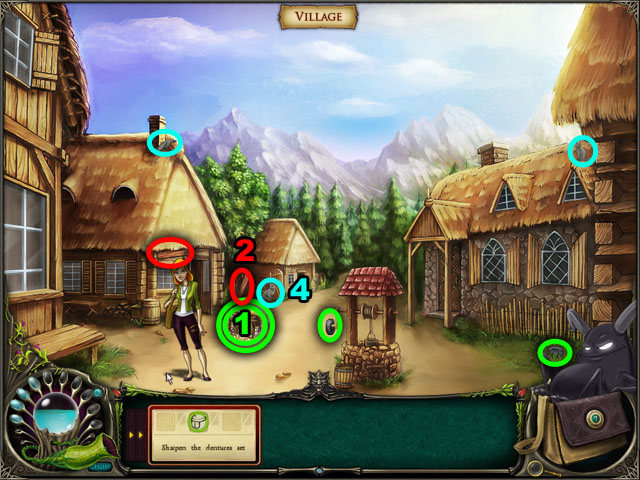

- The beaver will then give you a quest to sharpen his dentures.
- Return to the village and click on the grinder to the left of the well.
- The grindstone will be missing. Find 5 grindstones in the village and the bridge scenes to repair it (1).
- Give the beaver his dentures back by talking to him.
- He will send you out to find wood planks to repair the bridge.
- Look for 5 dark wood planks in both scenes (2).
- Once you get the planks talk to the troll, and then use the planks from your inventory on the bridge.
- Before you can leave, Demon recommends you put together the map pieces he has seen around the bridge area.
- Find 7 map pieces in only the bridge area (3).
- Next cross the bridge and go to the cave entrance. There will be 6 animal shaped holes that you must fill with ANIMAL STATUES (4).
- The ANIMAL STATUES will be in both the village and the bridge scenes.
- Once you have collected them all, drag the STATUES from your inventory onto the door to open it.
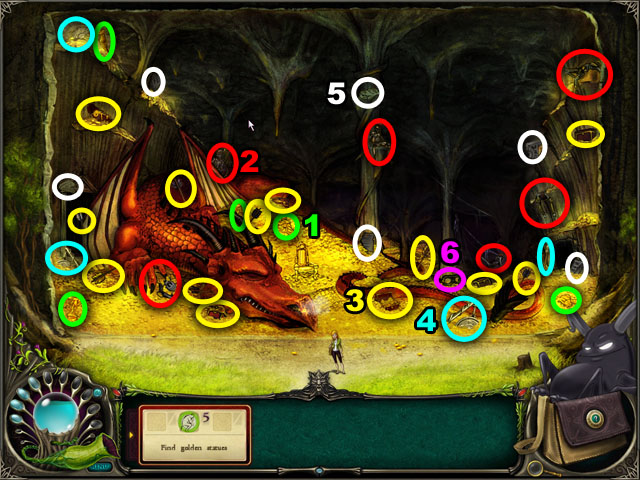
- When you enter the dragon’s cave, he will be asleep. Find the things that he is missing to help wake him up.
- First you will need to find his 5 golden sculptures (1) circled in green.
- Next you will need to find the remains of 6 thieves that tried to take his gold (2). They will all look like skeletons, highlighted in red in the screenshot.
- Next you need to find 6 chests of gold and 7 arrows that are still stuck into the dragon (3), circled in yellow.
- In order to wake him up you need to put together the 3 pieces of a gong and find a MALLET (4), circled in blue.
- Once it is put together, click on the gong with the MALLET from your inventory to talk to the dragon.
- He will give you directions to the rest of the shards if you find all 6 stone tablets (5), circled in white.
- Lastly find the goggles highlighted in purple, to protect your eyes during the trip when the dragon flies you there (6).
Chapter 5: A Land Wasted by Magic
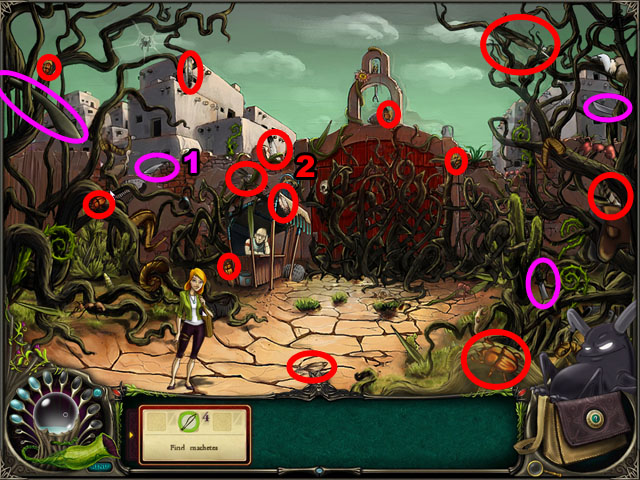
- When you arrive at the next town, there will be a man trapped off to the left of the screen behind some vines. Click on him to get your first quest.
- He wants you to find 4 MACHETES to get him out of the vines. They are highlighted in the image with purple (1).
- Use the MACHETE from your inventory on the bushes in front of the man.
- Next, collect 6 firebugs and 7 eagle feathers highlighted in purple (2) to make an inferno spell.
- Play the spell craft mini-game to get the spell ready and use it from your inventory on the main gate.
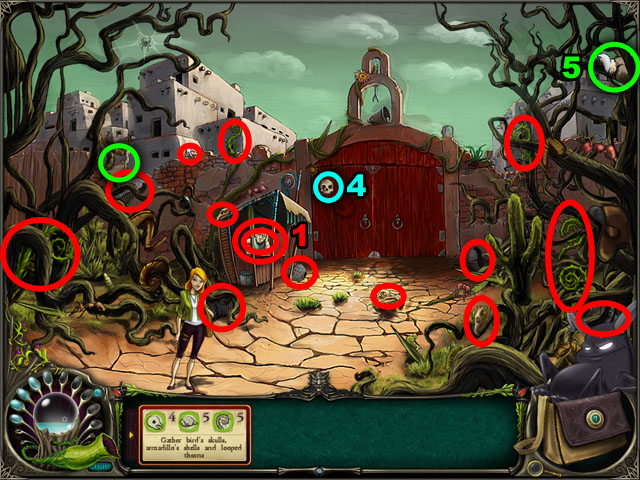
- Lastly, before you can go in, find the items to make a totem – 4 bird’s skulls, 5 armadillo’s shells, and 5 looped thorns (1).
- After you find the materials talk to the man again and then click the gate to enter the town.
- Once inside the town, talk to the village chief.
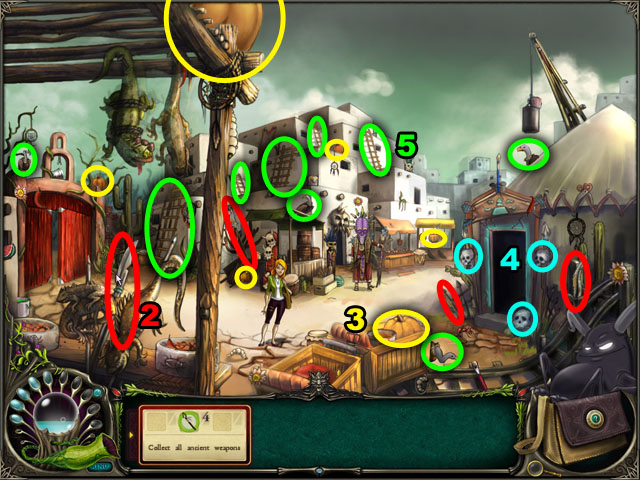
- He will ask you to remove 4 ancient weapons from the area (2).
- Next you will decide to redecorate the old amusement park.
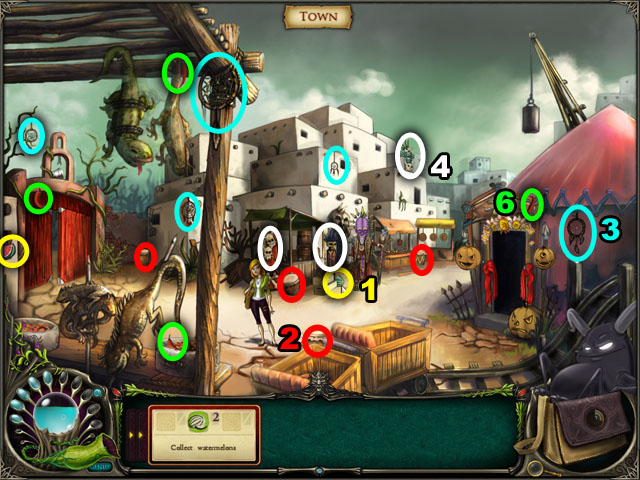
- Collect 6 pumpkins from around the town (3).
- After they are collected, place them over the skulls - 5 on the inside town and one outside on the wall (4).
- Next clean up the 5 ladders and 6 vultures inside and outside the town (5).
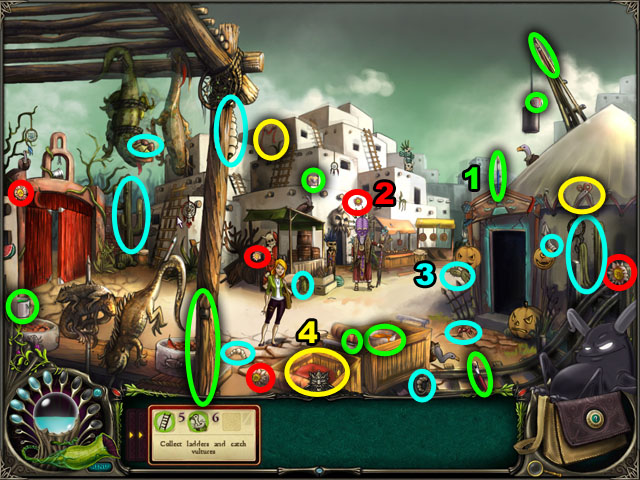
- Find 5 PAINTBRUSHES and 6 buckets of paint inside and outside the town to continue your clean up (1).
- All of the PAINTBRUSHES are in the town, but 2 of the paint buckets are outside. They are all highlighted in green.
- Use the PAINTBRUSH from your inventory on the temple on the right side of the town.
- Next, find 7 flowers in the same two locations, highlighted in red (2).
- After the flowers, find 6 cactuses, 7 worms, and 7 ants in the same area (3).
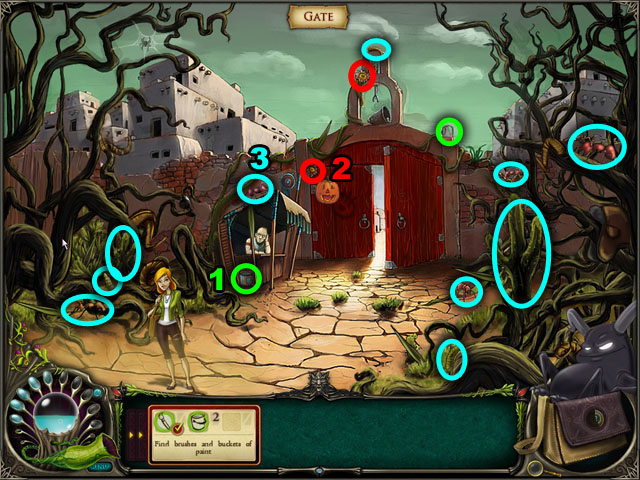
- Talk to the town leader again, and he will let you inside the temple after you find three more things – a ribbon, some SCISSORS, and a red pillow (4).
- Use the SCISSORS on the red ribbon in front of the temple to the right to enter it.
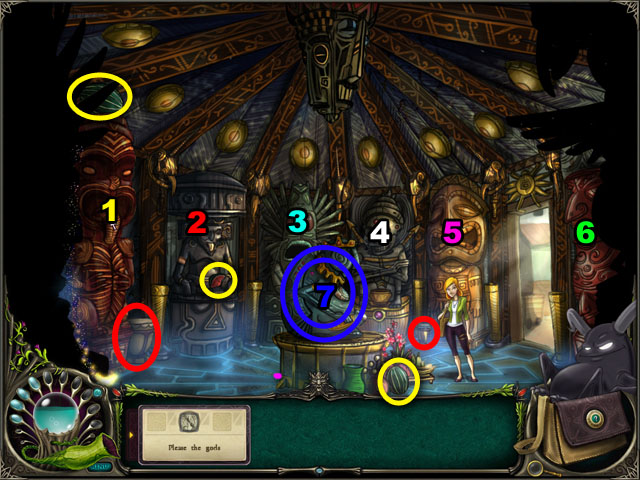
- Once you enter the temple you will be asked to find items for all of the god statues in the temple.
- Click on the left most statue, the god of thirst, and find him 5 WATERMELONS (1).
- Collect the WATERMELONS inside the temple and around town, highlighted in yellow.
- Once collected use the WATERMELLON from your inventory on the statue.
- Talk to the next statue to the right, the god of thunder.
- He asks for 6 DRUMS, circled in red in the screenshots (2).
- Give him the DRUM after you find them, and talk to the next god – the god of nightmares.
- The god of nightmares wants DREAMCATCHERS, circled in light blue in the screenshots (3).
- The DREAMCATHERS are all in the town. Once collected give them to the god and talk to the next god.
- The god of the dead wants 3 IDOLS. They can all be found in the town, circled in white (4).
- Give the IDOLS to the statue and talk to the next statue – the god of pain.
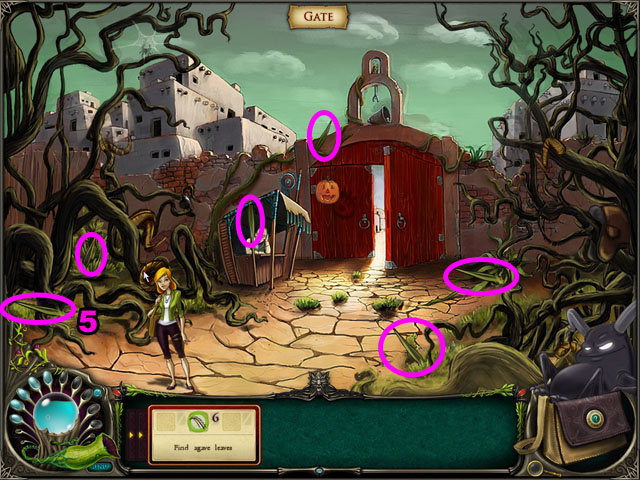
- The god of pain wants 6 AGAVE LEAVES, which can be found outside of town, highlighted in purple (5).
- The last god is the god of spicy food. He asks for 4 CHILI PEPPERS, circled in green in the screenshots (6).
- After collected the CHILI PEPPERS from the town and giving them to the statue, talk to the statue in the middle again (7).
- You will then receive the gem shard that you were looking for.
- Walk out of the town and talk to the dragon again.
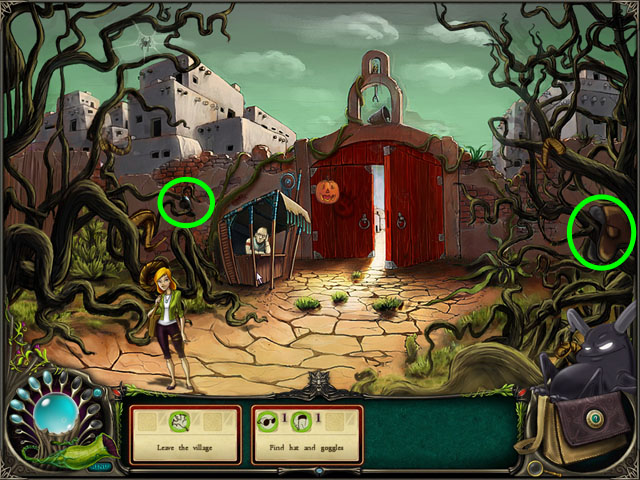
- He will ask you to find his goggles and hat before you go.
- Find them, circled in red in the screenshot.
Chapter 6: Sultan’s Shard

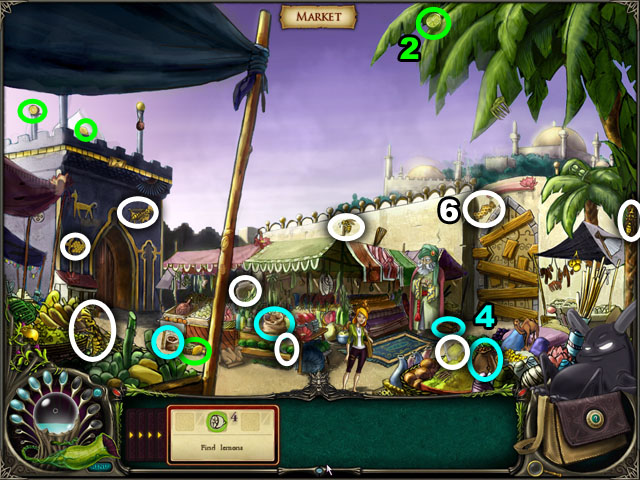
- When you first enter this area, Demon will want to make a cooling elixir using ingredients from the market – 5 pineapples and 5 scarabs.
- Find them highlighted in red in the screenshot (1).
- Next click on the door to the palace on the right and a carpet seller will talk to you (2).
- He will let you have his flying carpet if you can lower his insurance rates by visiting the souq.
- Click on the gorilla guarding the door to the tent on the left (3).
- He will let you in to the souq if you find him 7 bananas.
- After finding the bananas, enter the souq.

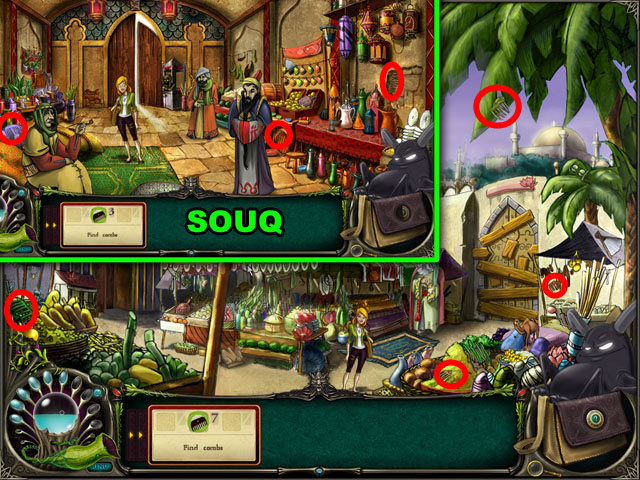
- Talk to the man in the small tent to the right of the door.
- He will let you talk to the other thieves if you can find him 6 thief signs around the room (1).
- Find them highlighted in yellow in the screenshot.
- Next talk to all of the other merchants in the room starting with the man to the right of the first man (2).
- Find him 9 lemons from around the souq and the market. These are market in green in the images.
- Talk to the next man and get a quest to remove the 4 oil lamps from the inside of the souq, circled in red (3).
- After that, talk to the merchant sitting on the left.
- He will ask you to find 6 sacks of coffee beans in both scenes, circled in light blue (4).
- After that is over he will ask you to put out the 5 incense sticks in the souq (5).
- Return to the first man and ask him what else you can do. He will tell you that everyone wants the hourglass merchant to go away.
- Collect 6 jars, 5 pieces of honey, and 7 WASPS to make a trap for the hourglass merchant and scare him away (6).
- These items are in both scenes, highlighted in white.
- When finished use the WASPS from your inventory on the hourglass merchant.
- Speak with the carpet merchant in the market again and he will let you take his carpet over the wall.
- But first you will need to find 7 combs in both scenes.
- Travel over the wall to the palace by clicking the flying carpet.
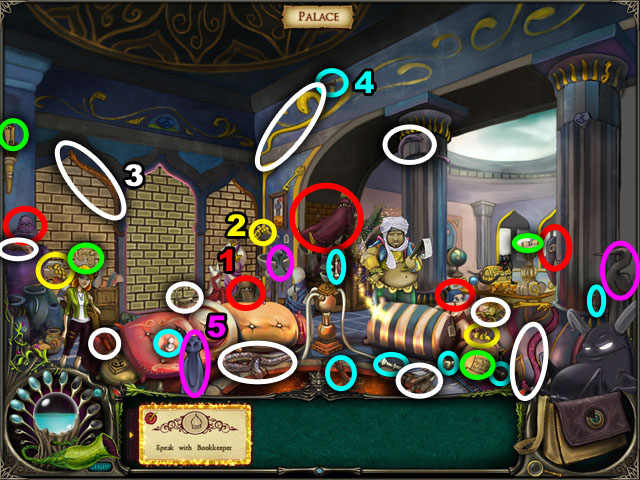
- Once in the palace talk to the bookkeeper. He will first ask you to look for the dead sultan’s 5 wives (1).
- After finding his wives, talk to the bookkeeper again.
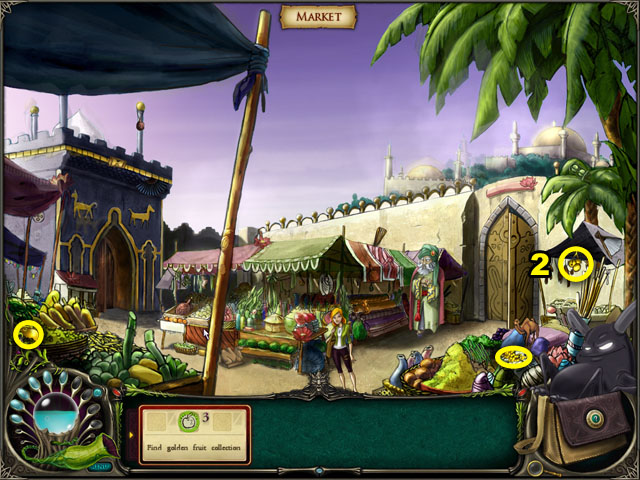
- Look around the palace and the market for 6 pieces of golden fruit (2).
- Talk to the bookkeeper again and search for 8 missing chess pieces around the palace (3).
- Then continue on and find 6 rattle snakes and 4 scorpions in the room, highlighted in white (4).
- Next look for the 4 diary pages circled in green (5) and the 3 animal-shaped vases circled in purple (6).
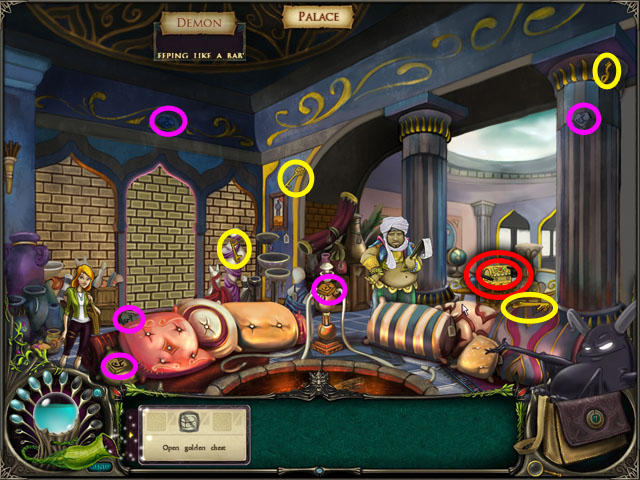
- After finding all of these missing items you will be allowed to try to open his golden chest.
- Before you can open it however, you must put the panther beside it to sleep.
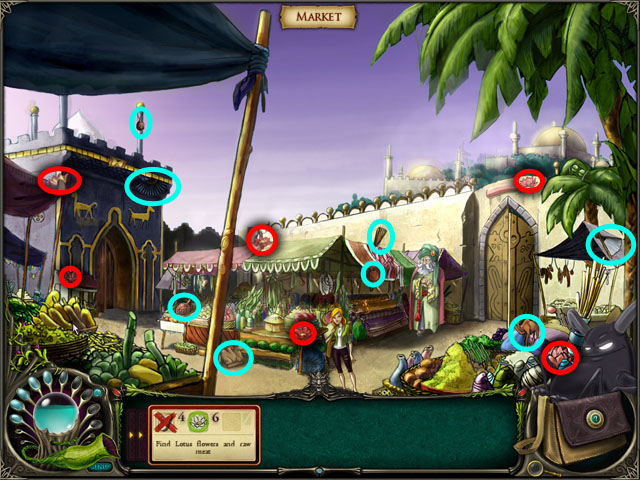

- Putting the panther to sleep requires 6 lotus flowers and 4 pieces of MEAT, both circled in red in the market and souq screenshots (1).
- Neither the flowers nor the MEAT is in the palace. The flowers are in the market and the MEAT is in the souq.
- Give the MEAT from your inventory to the panther and try to open the chest. You will still need some keys to open the chest.
- Find the 4 missing KEYS inside the mansion, highlighted in yellow (2).
- Use the KEYS from your inventory on the chest and retrieve the last piece of the diary.
- Collect the sultan’s sign’s in purple to deactivate the barrier at the left of the screen (3).
- You will need a spell to break the magic. Collect the ingredients of 6 fans, 6 goatskins and 4 camel statues in the market and the souq.
- After finding the ingredients you will be able to cast the spell. Finish the spell casting mini-game by matching the symbols at the bottom of the screen with the symbols in your book.
- Take the shard and the small blue homing stone beside it to the right.
- The stone will automatically teleport you to the next location.
Chapter 7: Magic University
- You will next be teleported to the Magic University.
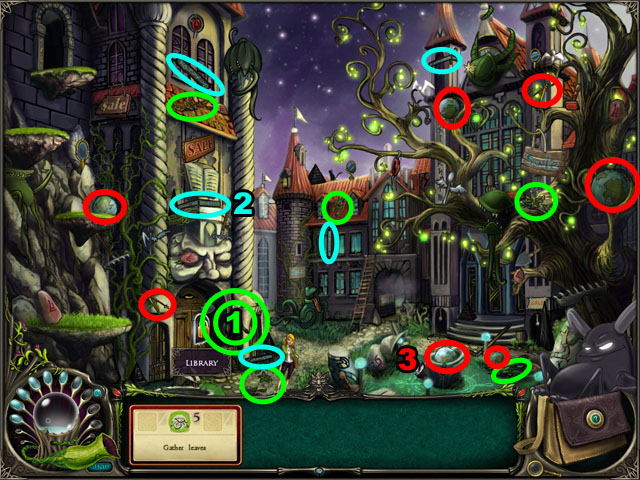
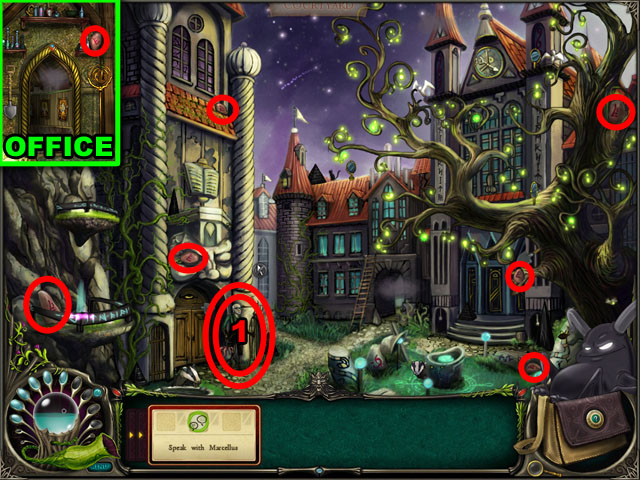
- After teleporting talk to the gardener – Marcellus – circled in green (1) and help him clean up 5 piles of leaves from around the scene.
- He will then have you search for 5 MAGIC RAILINGS to fix the teleporters up to the provost’s office (2).
- Once you find all the RAILINGS use them on the steps to the left of the scene.
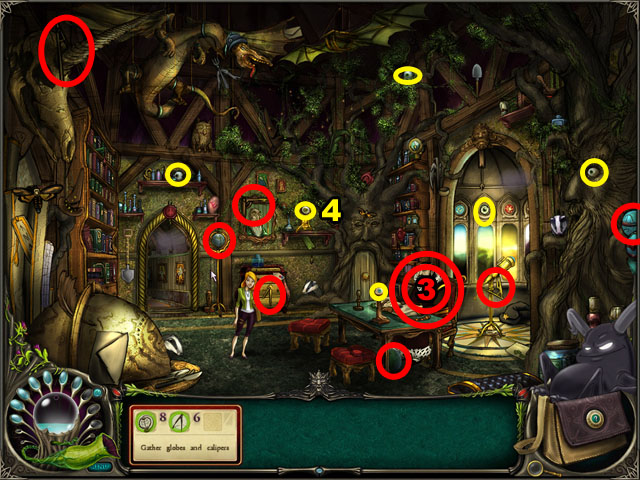
- Click on the doorway at the top left of the scene to go to the provost’s office.
- Talk to the provost, circled in red, and he will have you search for 8 globes and 6 calipers (3) also highlighted in red.
- These items will be in both scenes.
- After this, talk to the provost again, and search for 6 magical eyes in the provost’s office, highlighted in yellow.
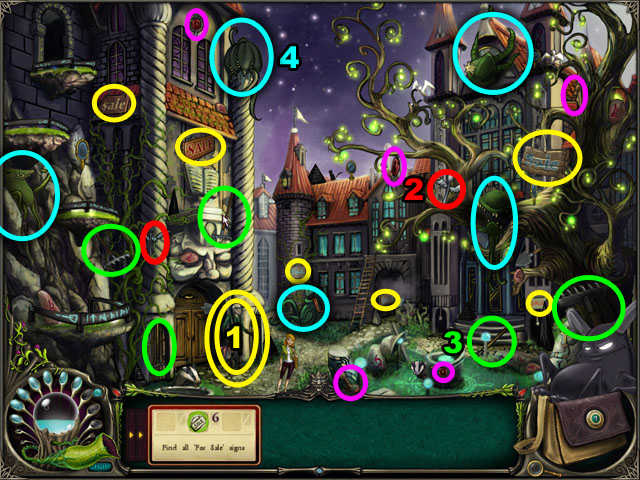
- Next talk to Marcellus again and he will have you take down the 6 “SALE” signs around the courtyard, highlighted in yellow (1).
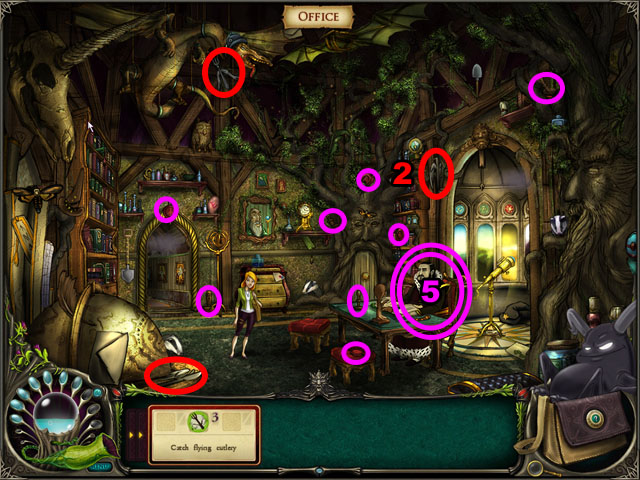
- After the signs you will need to find him 5 pieces of flying cutlery.
- There are two pieces in the courtyard and 3 pieces in the provost’s office, circled in red (2).
- Next you will need to remove the 5 rakes (3) and the 5 man eating plants (4) from the courtyard.
- After finishing all of Marcellus’s quests go up to the office and talk to the provost again.
- He will need you to find 6 stamps and 7 university seals in order to make a pass for the library.
- The stamps and seals are highlighted in purple in the screen shot and are in both scenes.
- Talk to Marcellus on last time and he will send you to find 7 magical paper weights to protect you from the grimoires in the library.
- There is one magical paper weight in the office, while the rest are in the courtyard.
- Click on the door to enter the library when you are done.
- Click on the closed book in the bottom left corner of the screen to get your next quest.
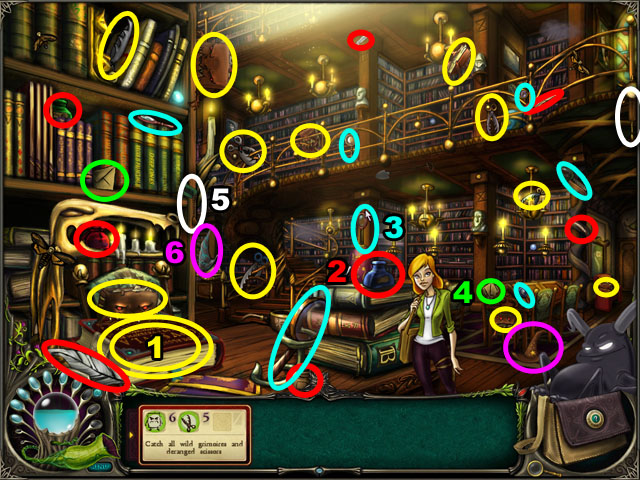
- The book will ask you to catch all 6 wild grimoires and 5 deranged scissors in the room, circled in yellow (1).
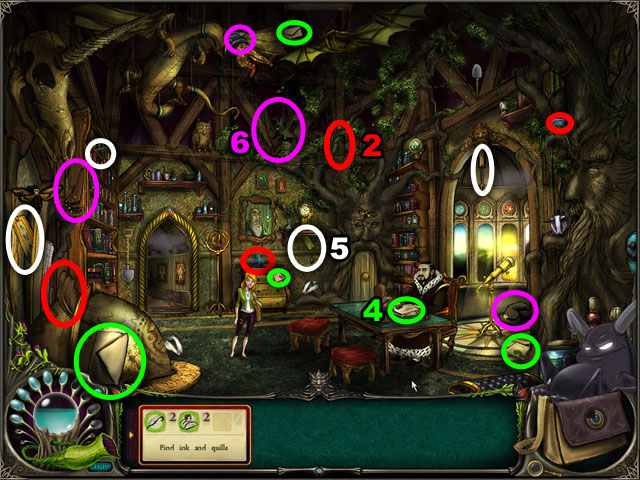
- Next he will need 6 quills and 6 bottle of ink to feed him.
- Find these in the library and the provost’s office, circled in red (2).
- After find these, talk to the book again and he will send you looking for 7 magnifying glasses. These are highlighted in blue in the screenshots (3).
- All the magnifying glasses can be found in the library.
- Next you will need 7 pieces of mail in the library and the provost’s office (4) highlighted in green.
- In the last quest for the book, you will need to find 6 bookmarks in both scenes. These are highlighted in white (5).
- Once you have collected all of the bookmarks, you will realize all you have left to find is 6 magical hats.
- Search for the hats in the library and the provost’s office. They are highlighted in purple (6).
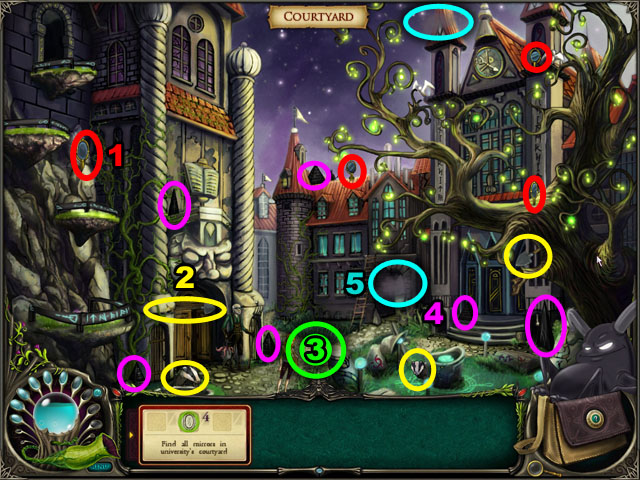

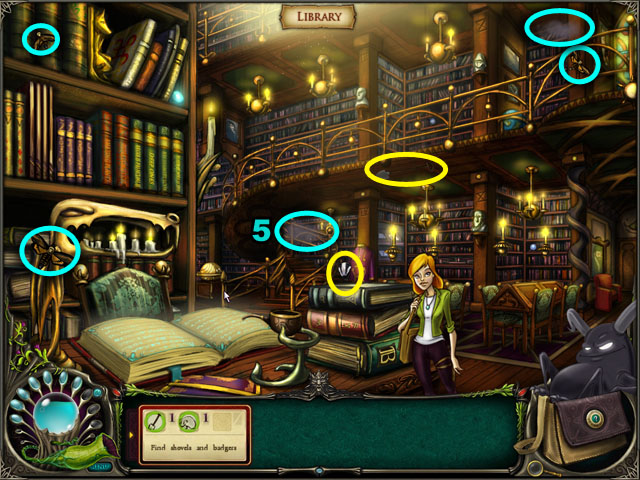
- After finding all the hats, return to the courtyard and click the 4 mirrors to highlight the place where the shard is buried (1).
- Find 5 shovels and 6 badgers in all three areas of this chapter to cast a digging spell (2).
- Play the spell casting mini-game by match the runes below with the runes in the book.
- Use the SPELL from your inventory on the piece of ground highlighted by the mirrors (3).
- Take the shard.
- Talk to Marcellus and he will have you search for 6 black stones in the courtyard (4).
- After finding the stones, go talk to the provost about the missing nexus stone (5).
- He will ask you to find 6 mist clouds and 5 moths to make an elixir for his tree.
- Find the clouds and moths in all three scenes, circled in blue.
- Play the potion making mini-game by collecting the blue drops of liquid.
- Give the POTION to the tree at the very right side of the provost’s office. He will then give you the nexus stone.
- Talk to the Marcellus to leave this area.
Chapter 8: Port of Halenburg
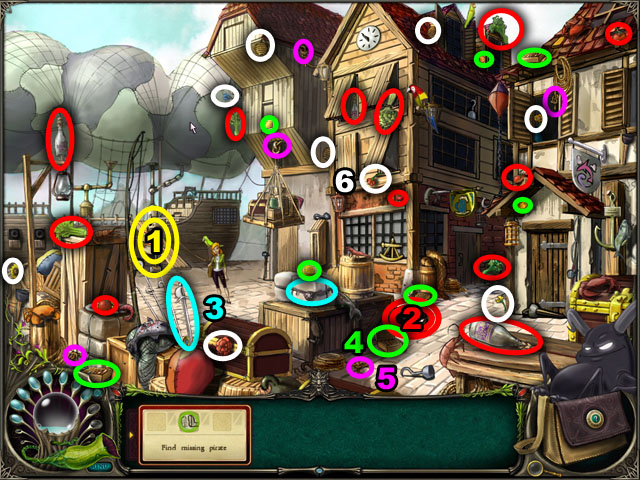
- When you first arrive at the docks, talk to the pirate – called the boatswain – in front of the ship highlighted in yellow (1).
- He will ask you to find the missing pirate.
- Click the feet sticking out of the crate in the middle of the screen to talk to the missing pirate (2).
- Make him a hangover remedy by collecting 4 tomatoes, 5 pieces of celery, and 3 bottles of moonshine around the docks circled in red.
- After finding the ingredients play the potion making mini-game by collected all of the blue liquid.
- Use the POTION from your inventory on the pirate with the hangover.
- Talk with the boatswain again about joining the crew.
- He will have you find 1 eye patch and 1 cutlass, circled in blue in the image (3).
- After you find these items he will let you work for the ship.
- Your first work will be to gather 4 cigar crates and 4 citrus fruits (4).
- Next you will need to find 5 different knots around the docks, circled in purple (5).
- While finding the knots you will break the crane. Make a magic spell to fix it.
- Gather the ingredients for the spell – 6 flowers and 3 bee hives circled in white in the screenshot (6).
- Play the spell casting mini-game and then use the SPELL on the items in front of the door to the docks office.
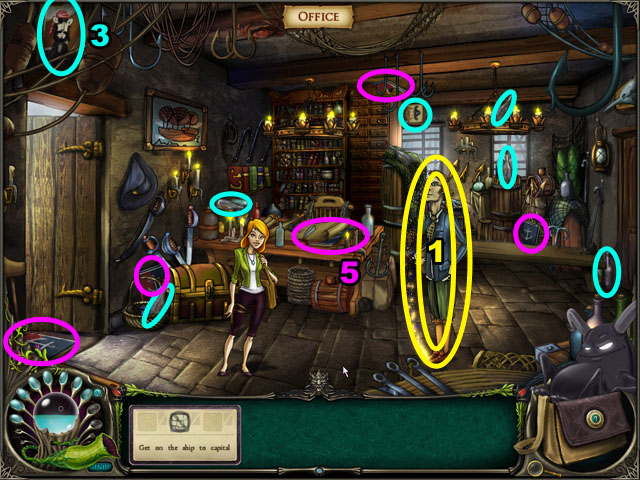

- Enter the office and talk to the port master circled in yellow (1).
- Find 3 peg legs, 3 hooks and 3 parrots. All of these items are on the docks also circled in yellow.
- Return to the port master and he will send you to talk to the boatswain.
- The boatswain is looking for a captain, talk to the port master to persuade him to be the captain.
- He will have you search for 3 rods and 3 butterflies (2).
- Find all the rods and butterflies in the docks, highlighted in red.
- His next quest will be to find 5 bottled ships and 2 pirate paintings in his office. They are circled in blue (3).
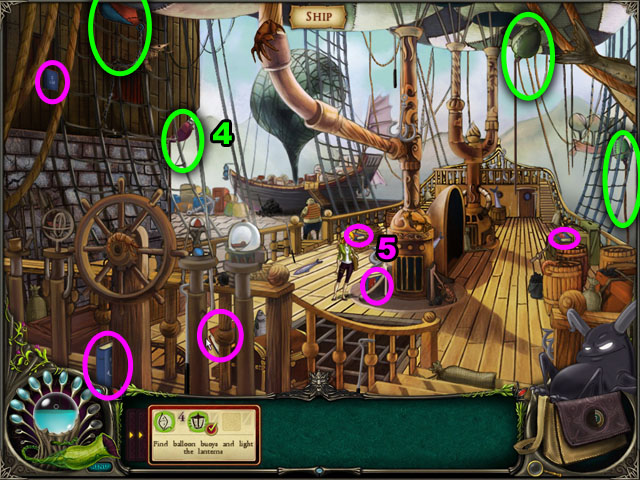
- Next the port master will ask you to find 7 balloon buoys and to light 7 lanterns (4).
- The lanterns are all in the docks scene, along with 3 buoys circled in green.
- The rest of the buoys are on the ship, click to the right of the boatswain to travel there.
- After doing these tasks the port master will become the captain of the ship.
- He will then ask you to find 11 atlas volumes and 2 sextants (5).
- The sextants are in the docks circled in purple.
- The atlas volumes are on the ship and in the office.
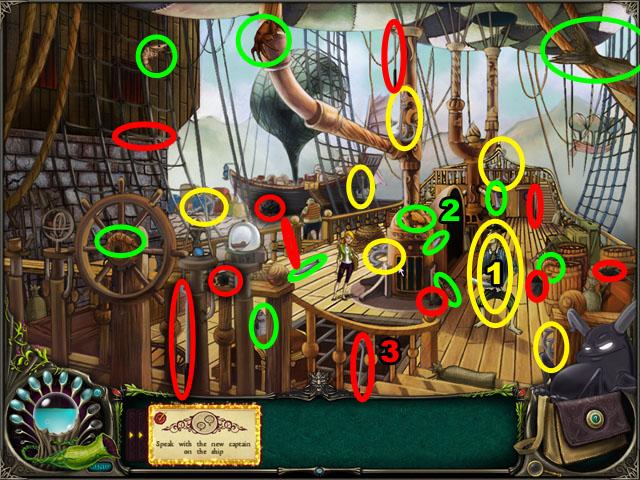
- Return to the ship to talk to the new captain (1).
- First he will ask you to find 6 anchors on the ship, highlighted in yellow in the screenshot.
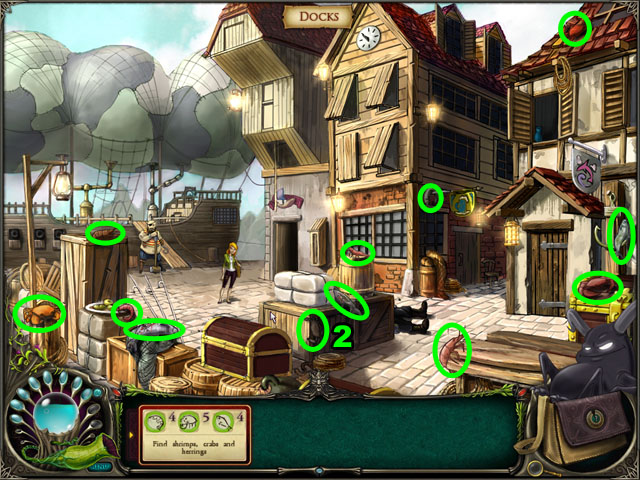
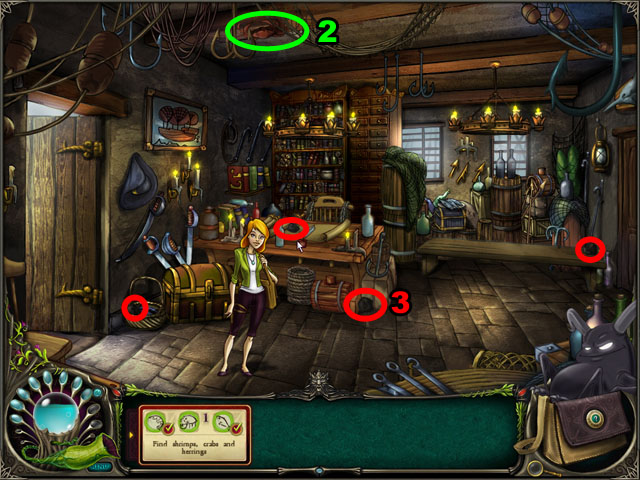
- Talk to the captain again and he will send you on a quest for sea food – 8 shrimp, 7 crabs, and 9 herrings (2).
- The sea food can be found on the ship and on the docks.
- One crab is in the office.
- Speak with the captain again, and search for 9 pieces of charcoal and 6 FIRE POKERS (3).
- Find the items circled in red in the office and on the ship.
- Use the FIRE POKERS on the stove in the middle of the boat when you are finished find them all.
- You will receive a distress call from Filemon on the crystal balls you used before.
- Like before find the 5 differences in the two scenes.
- The scenes will become hard to see sometimes, just wait until they clear up again to start searching.
- You can click on either side to find the differences.
- See the screenshot for all of the differences.
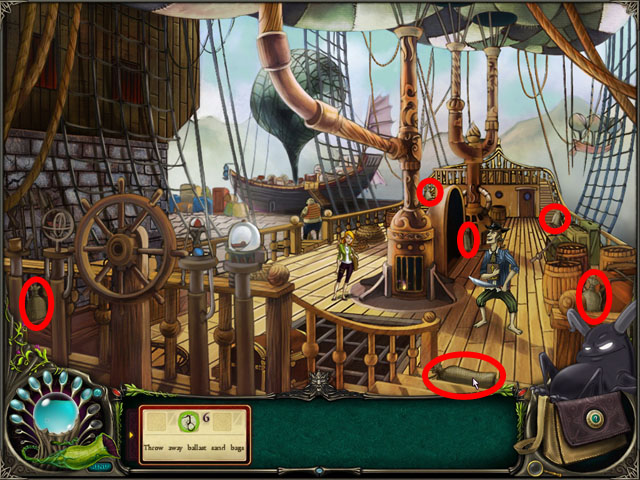
- Find the ballast bags to lighten the ship for takeoff.
- After the ship has taken off you will have more work to do.
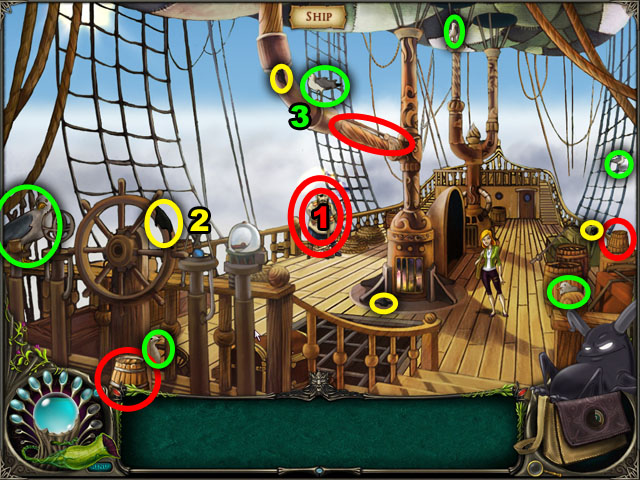
- Talk to the boatswain and he will have you find 1 mop and 2 buckets (1), highlighted in red.
- Next you will need to find and remove 4 black stains (2).
- Last, click on 6 seagulls circled in green to get rid of them (3).
- You will then land at your next destination.
Chapter 9: Grey Stone Stronghold
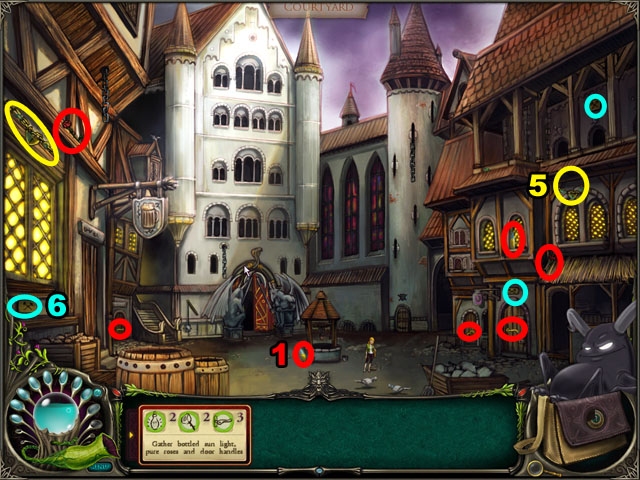
- You will be transported to the courtyard outside Grey Stone stronghold.
- First you need to get inside the castle, but there is a barrier in front of the door.
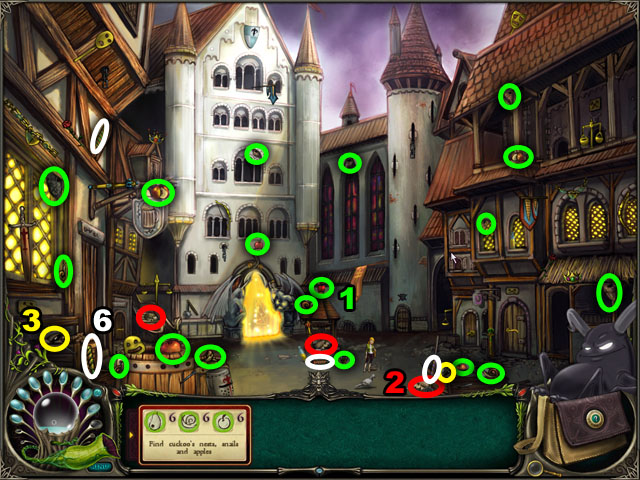
- Gather the ingredients for the shadow elixir – 6 cuckoo’s nests, 6 snails and 6 apples, highlighted in green (1).
- After finding the ingredients, finish the potion brewing mini-game by capturing blue drops into the potion bottle.
- By this time the game should be very difficult, click the skip button if you get stuck.
- Use the POTION on the glowing yellow doorway and go inside.
- After you get inside and talk to the kind, talk to the jester to get help rescuing Filimon.
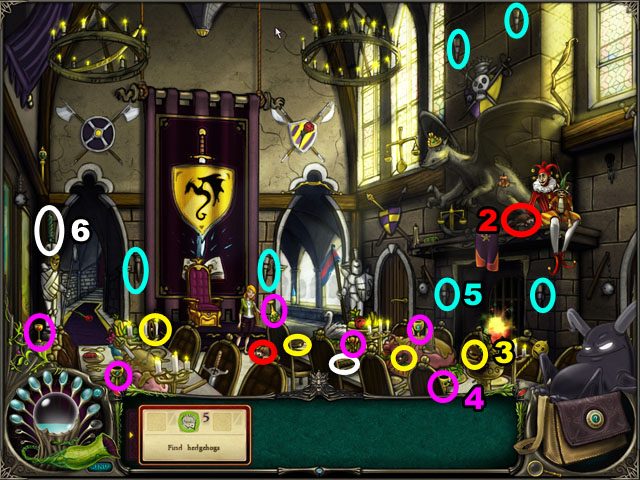
- He will give you a quest to find 5 hedgehogs in the castle and the courtyard (2), circled in red in the screenshots.
- Return to the jester and then search for 6 oysters in both scenes (3).
- Next search for 6 chalices highlighted in purple (4).
- The chalices are found only inside the castle.
- Next talk to the jester and he will tell you to turn all 6 torches in the hall (5).
- Talk to the jester again and he will ask for 6 roman candles. These are highlighted in white and can be found in both scenes (6).

- Next the jester will ask you to find 6 unlit candles, highlighted in green, inside the castle only (1).
- And lastly the jester will tell you to pull all 4 flails to open the secret gat in the fireplace to the dungeon (2).
- There is 1 mace in the courtyard and 3 in the hall.
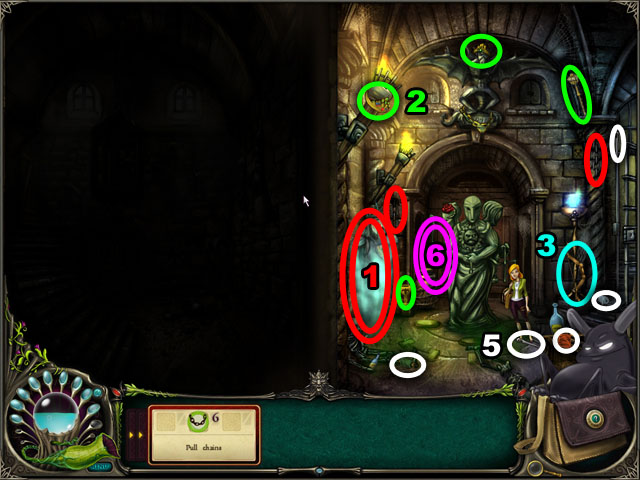

- Once inside the dungeon talk to the ghost on the left side of the room you are in (1).
- Search for 6 chains all around the castle.
- They are highlighted in red and can be found in the dungeon, the hall and the courtyard.
- Return to the ghost and he will ask for his BELONGINGS – 5 royal insignias, 5 crowns and 6 scepters. These can also be found in all three locations (2) circled in green.
- Use the BELONGINGS on the magical fire to the right of the door in the dungeon.
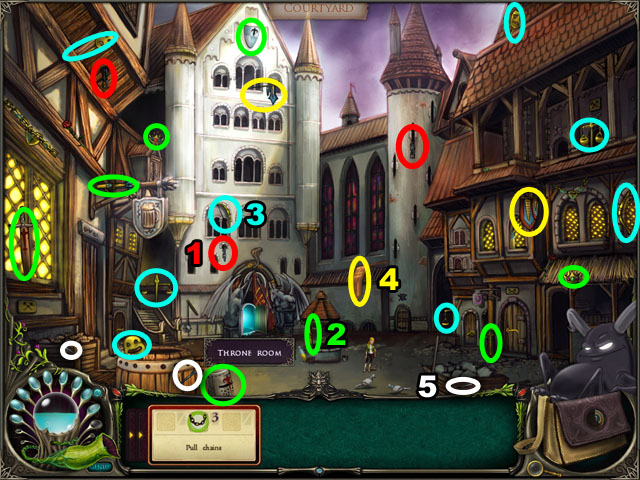
- Next you need to find ITEMS to put in the guarding sculpture’s hands – 5 scales, 6 bows and 5 masks.
- These items are circled in blue in the screenshots and found in all three locations (3).
- Place the ITEMS from your inventory to the sculpture.
- To get the shard from the urn you will next need 5 banners (4). These can be found in the castle and the courtyard highlighted in yellow.
- Last you need to find 5 NEEDLES and 5 THREAD to fix the banners that you placed in the urn. They are circled in white and can be found in all three scenes (5).
- Use the NEEDLE AND THREAD from your inventory on the banners to get the shard.
- Pick up the shard from the urn (6).
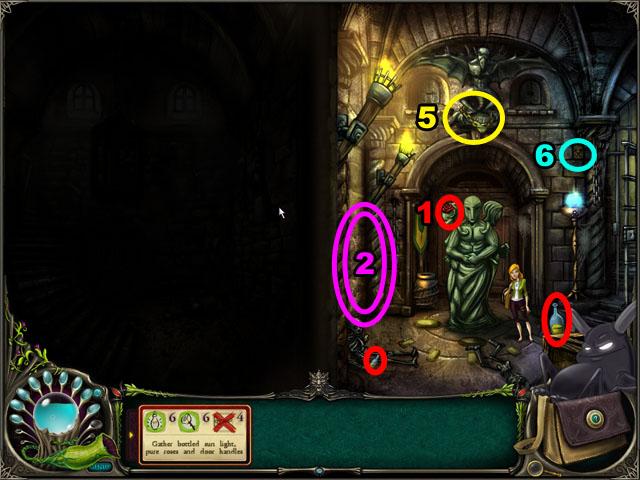
- Next you will need to find the ingredients for a portal spell to get to the other side of the dungeon.
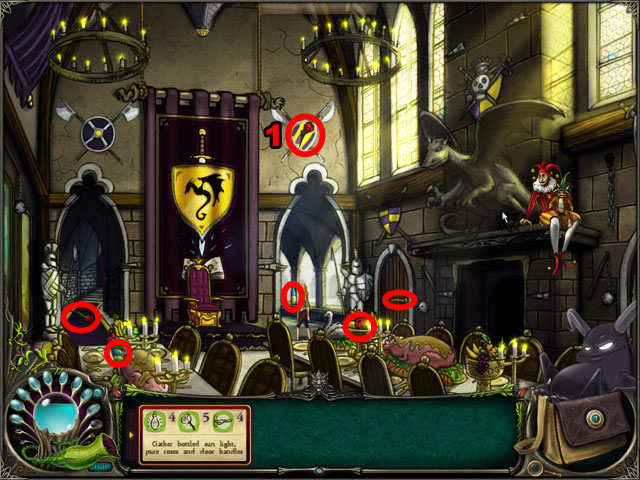
- Collect 6 bottles of sunlight, 6 pure red roses and 4 door handles from the dungeon, the castle and the courtyard (1).
- Play the spell casting mini-game by matching the runes in the book to the floating runes below it.
- Cast the spell on the wall between the two rooms (2).
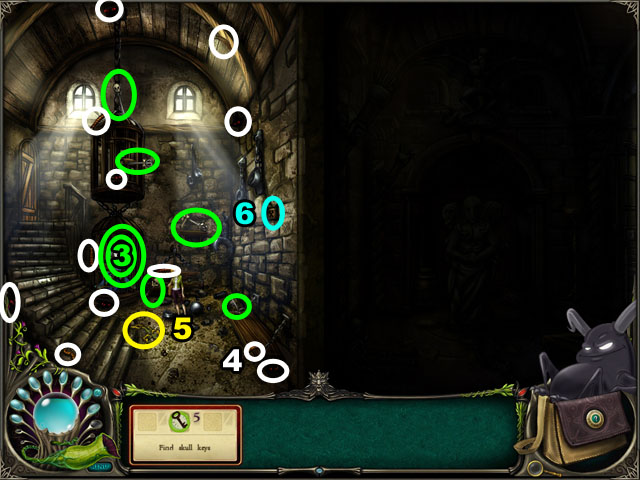
- Once in the next room talk to Filemon and find him 5 SKULL KEYS hidden in the left room of the dungeon (3).
- These keys are circled in green in the image.
- Use the KEYS on the cage to release Filemon.
- Next Filemon will need 6 rabit rats and 6 centipedes to cast a spell to get you out of the dungeon. These ingredients are circled in white in the image (4).
- Talk to Filemon again and he will tell you to gather 4 pendants from this room, the other side of the dungeon and the courtyard to prepare to attack the king (5).
- You will have to walk all the way around through the castle to get to the other side of the dungeon.
- Lastly, to get to the secret passage under the castle you need to press 5 buttons with dwarven symbols on them.
- These symbols are hidden in both sides of the dungeon and the courtyard and are highlighted in blue (6).
- Once all of the symbols have been pushed, go to the hall inside the castle again and the secret entrance will be revealed behind the king’s throne.
- Enter the secret entrance to have your final fight with the king.
Chapter 10: The Showdown
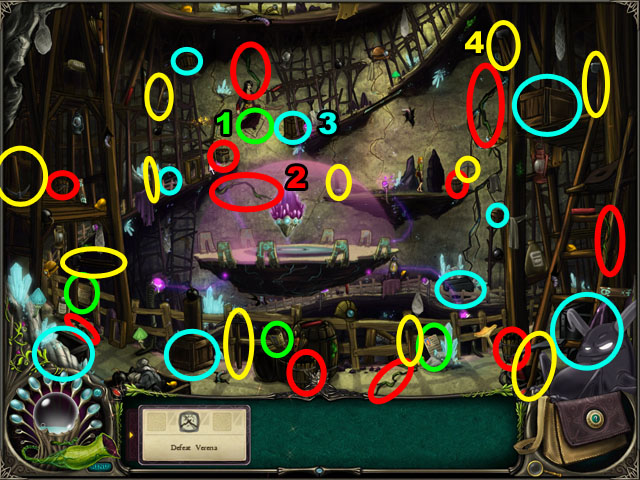
- When you enter the secret passage, Verena will appear and take out the king.
- Defeat Verena to win the game.
- First you will need some stronger magic. Collect the 4 pages on the ground from the king’s grimoire (1). These are circled in green in the screenshot.
- Next summon gather the ingredients for a rain summoning SPELL – 5 buckets and 6 green roots (2).
- Use the SPELL from your inventory on Verena.
- Next find 4 carts and 5 crates circled in blue to make a barricade spell (3).
- Cast the SPELL in your inventory to the left of the rock you are hiding behind.
- Next gather ingredients so she can’t cast lighting spells anymore – 5 pickaxes and 6 hammers (4).
- Cast the SPELL from your inventory on Verena.

- Verena will then freeze you in a block of ice.
- Collect the ingredients for a warming ELIXER – 4 pieces of green moss and 5 heated rocks circled in yellow in the image (1).
- Use the warming ELIXER on yourself.
- Next she will put thorn bushes around you with a spell.
- Cast a frost SPELL to freeze it by collecting the following ingredients – 6 icicles, 5 ice cubes, and 4 sieves (2).
- Cast the SPELL from your inventory on yourself.
- Then she will cast a black cloud over the top of your head.
- Make a sunshine SPELL by collecting 6 golden nuggets, highlighted in blue in the image (3).
- Use the SPELL on the dark clouds above.
- Verena will then attack you with magical bats.
- Make a whirlwind SPELL to scatter them, with 5 bellows and 6 moth cocoons (4).
- Cast the SPELL on yourself.
- Cast the blast of light SPELL to defeat her bolts of darkness.
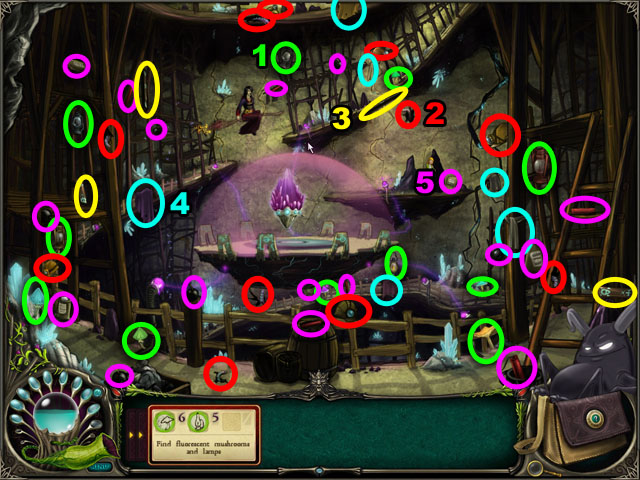
- Gather the following ingredients for the SPELL – 6 mushrooms and 5 lamps. These are circled in green in the image (1).
- Use the SPELL from your inventory directly on Verena.
- Finally to seal Verena in a magical bubble find 5 dwarven helmets and 6 worm holes (2).
- Click the SPELL on Verena to send her away in a bubble.
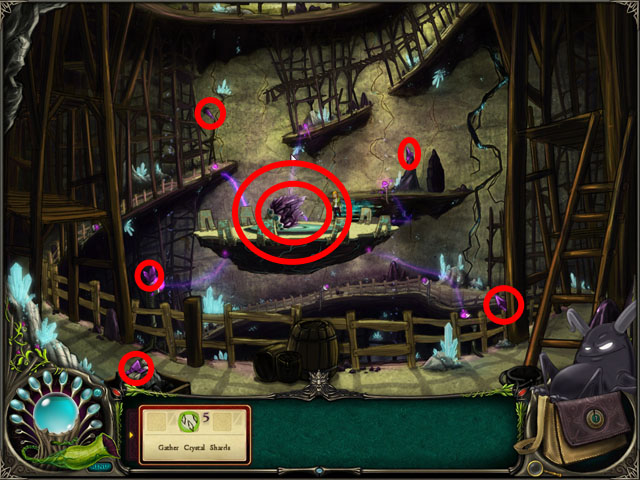
- Now you have to get the dark crystal.
- Find 4 rune planks circled in yellow in the screenshot (3).
- Then find 5 pieces of cloth to charge the crystals (4).
- Lastly you need to find the ingredients for an earthquake SPELL – 6 dynamites, 6 bombs and 5 bags of saltpeter (5).
- Once you find all the ingredients, use the SPELL from your inventory on the crystal in the middle of the screen.
- The explosion will have broken the crystal in pieces.
- Find the MISSING PIECES circled in red and then use them on the dark crystal in the middle of the screen.
- Congratulations! You Finished Brunhilda and the Dark Crystal!
Created at: 2010-08-04