

Walkthrough Menu
- General Tips
- Chapter 1: The Concert
- Chapter 2: Villa
- Chapter 3: Blue Owl Cave
- Chapter 4: Amusement Park
- Chapter 5: The Confrontation
General Tips
- This is the official guide for Cadenza: Fame, Theft and Murder.
- This guide does not mention each time you have to zoom into a location; the screenshots show each zoom scene.
- Hidden-object puzzles are referred to as HOPs. This guide does not show screenshots of the HOPs, however, it is mentioned when a HOP is available and the inventory item collected.
- Use the Map to travel quickly to a location.
Chapter 1: The Concert
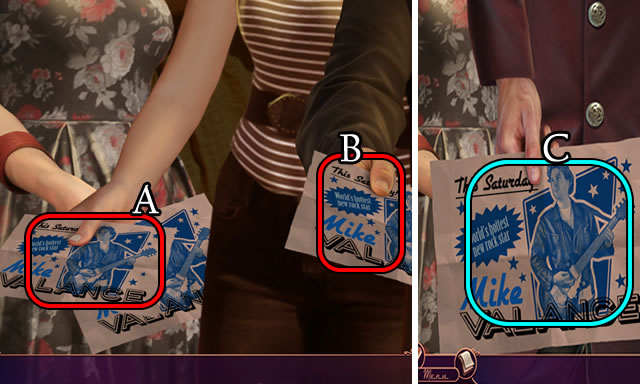
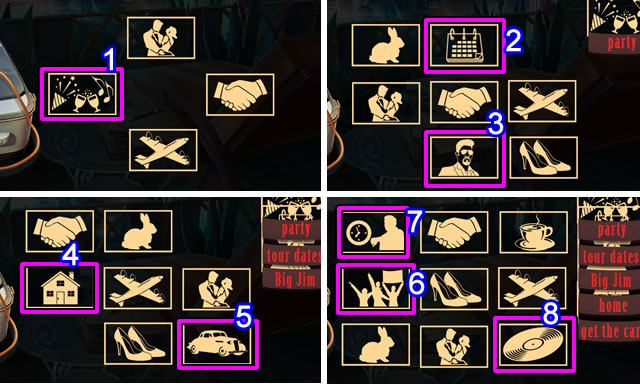
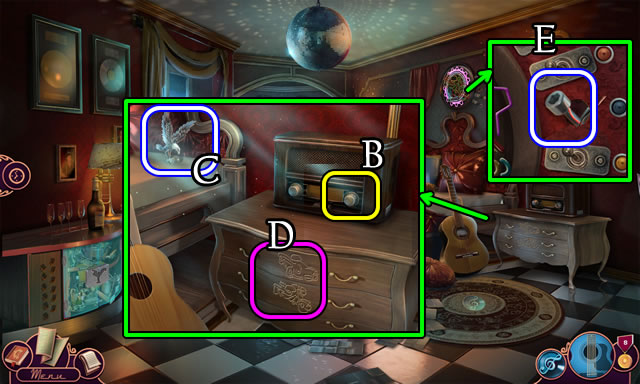
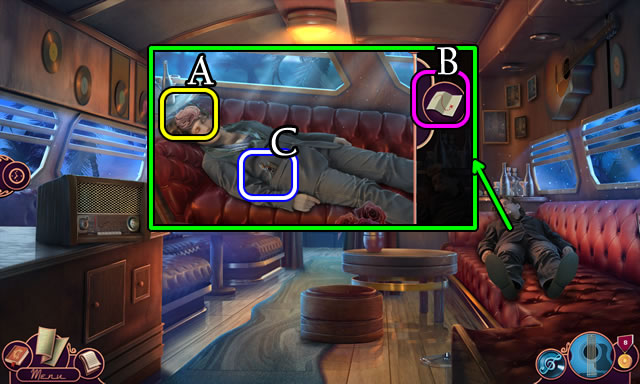
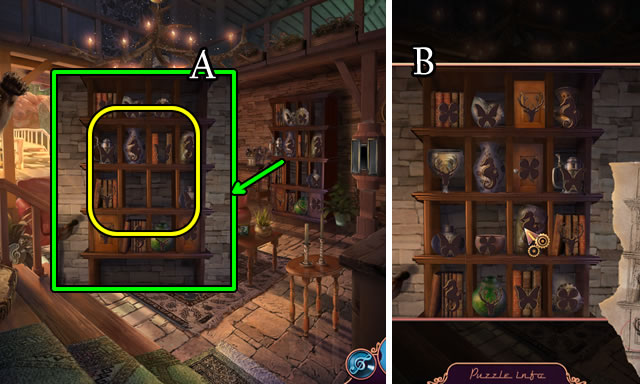
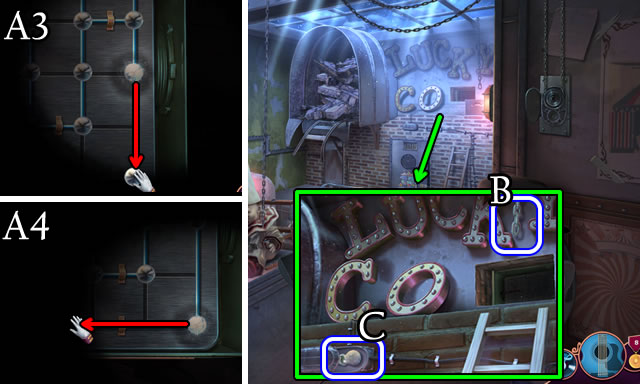
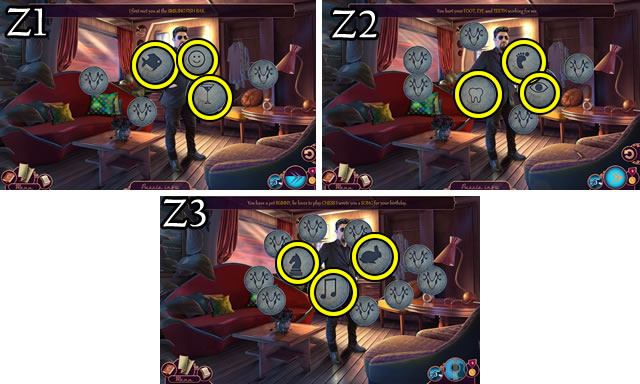
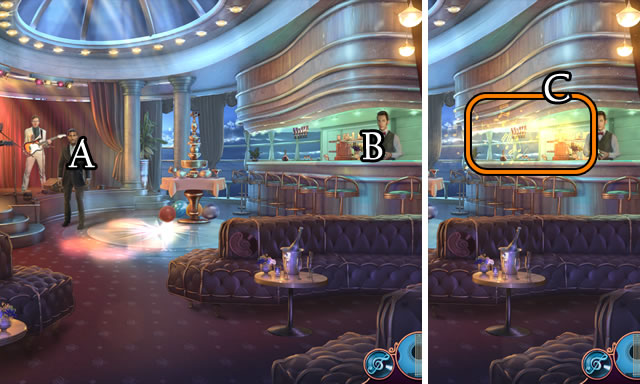
- Sign (A), (B).
- Select (C) 2x.

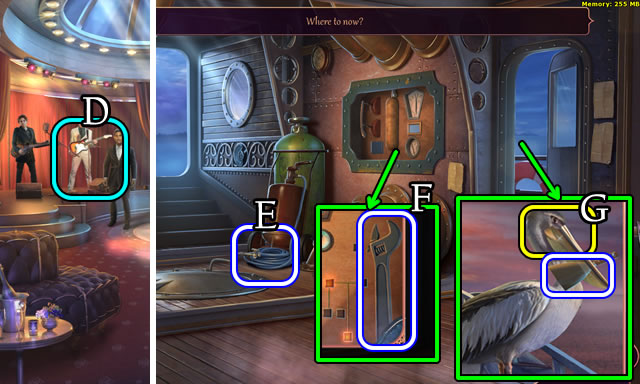
- Speak to the character; take the box, take the LUCKY PICK (D).
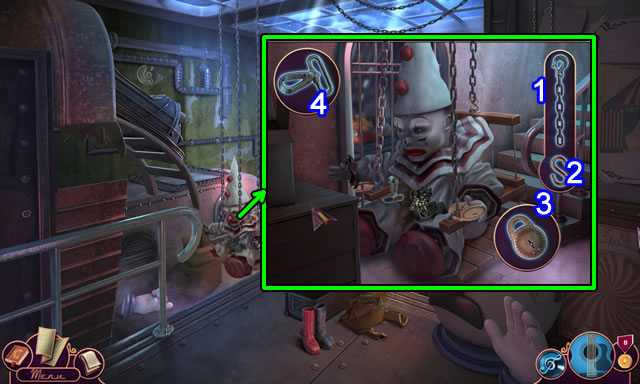
- Take the GUITAR CASE (E).
- Combine the GUITAR CASE and LUCKY PICK. Open and take the GUITAR CORD and guitar.
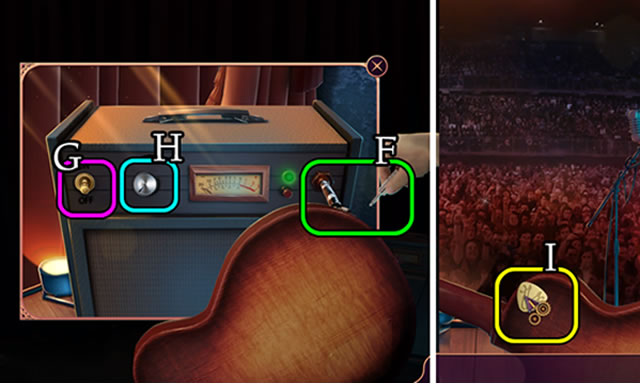
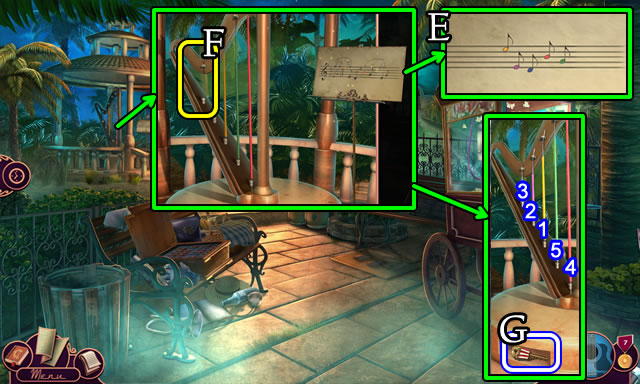
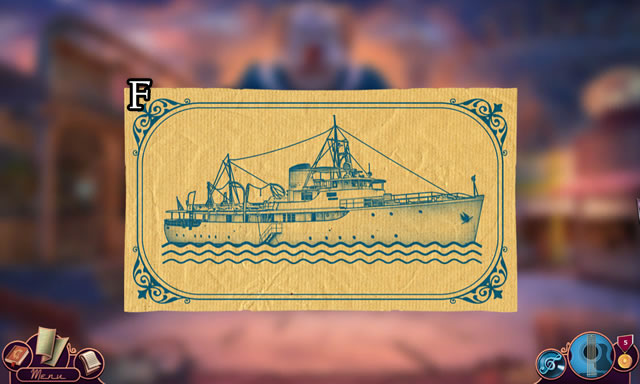
- Place, then select the GUITAR CORD (F). Select (G). Rotate (H) right.
- Select the character 3x.
- Place the LUCKY PICK (I).
- Interact with the characters.
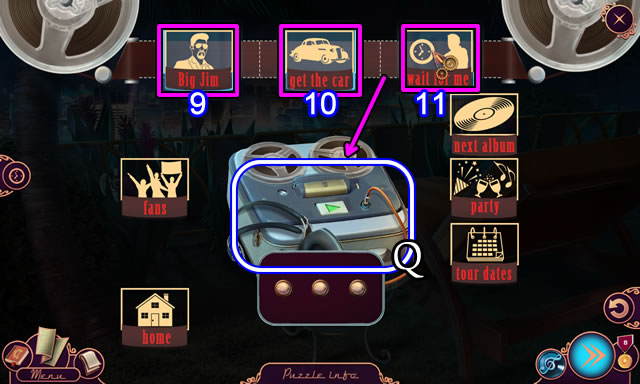
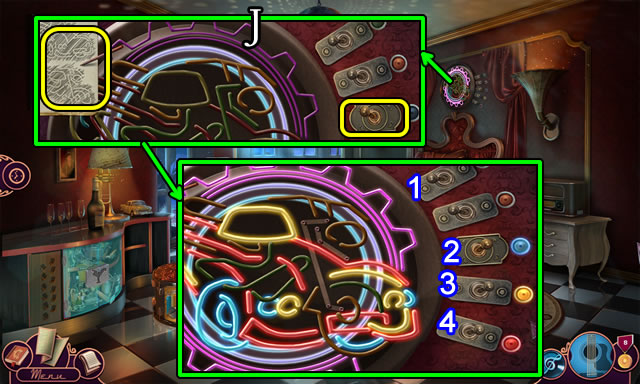
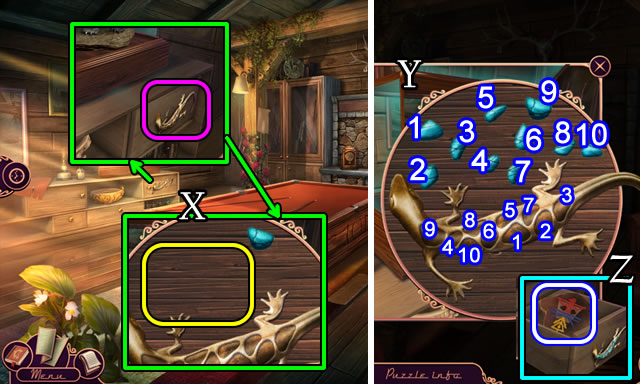
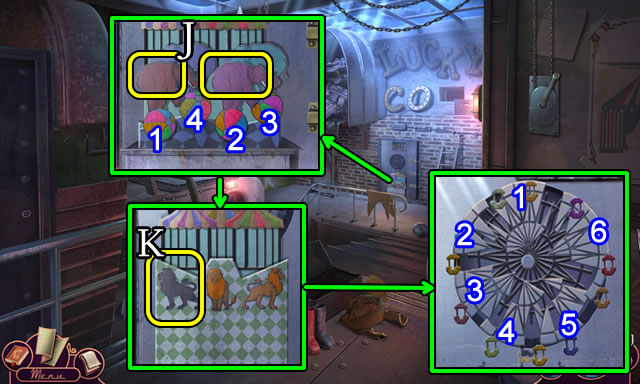
- Select the guitar for a puzzle.
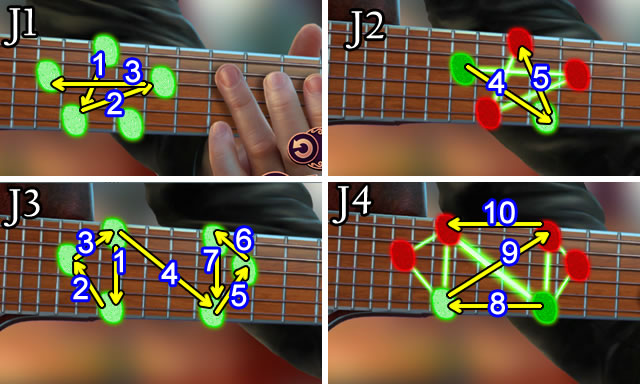
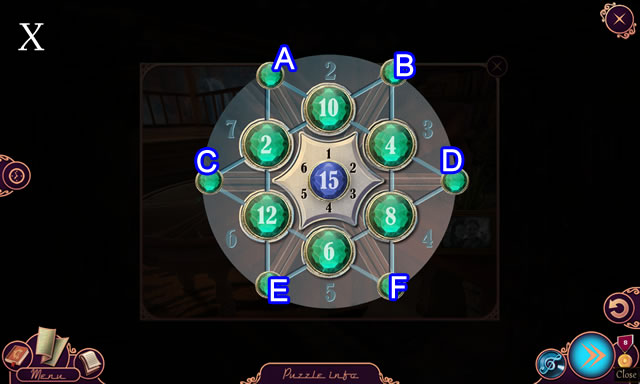
- Solution (J1)-(J2). 1-5.
- Solution (J3)-(J4). 1-10.
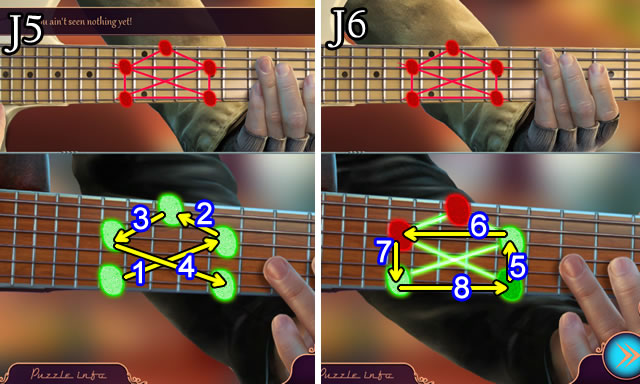
- Solution (J5)-(J6). 1-8.
- Interact with the characters.
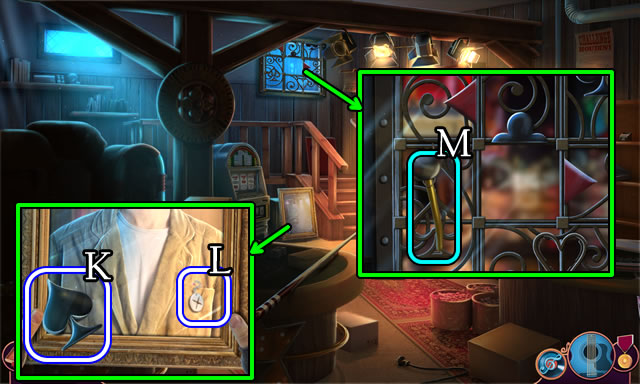
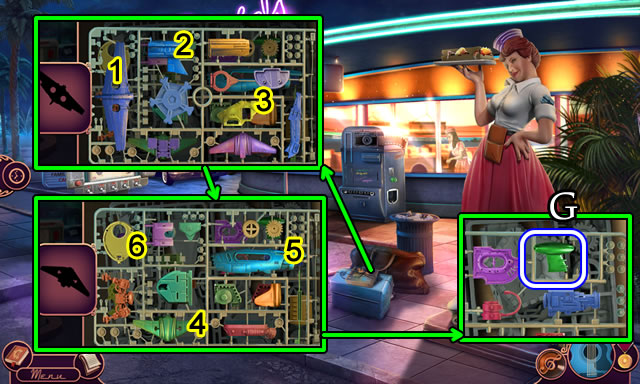
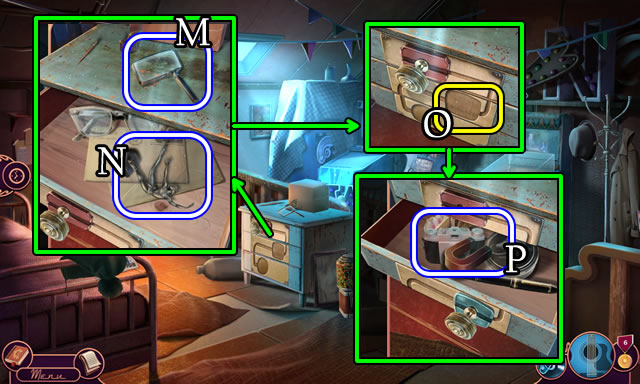
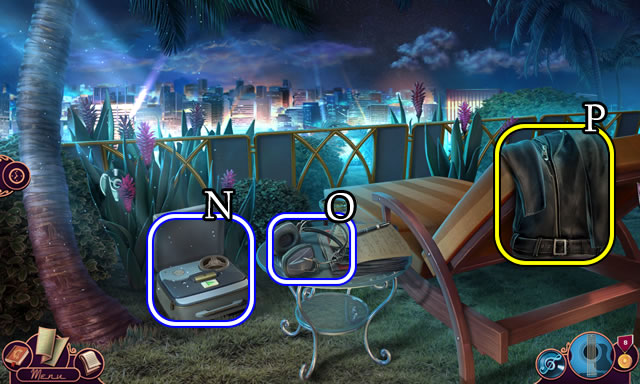
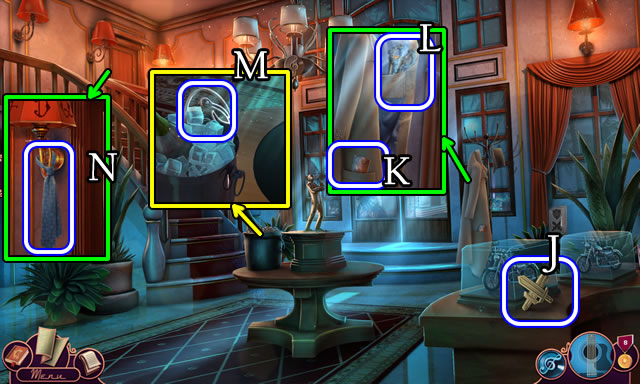
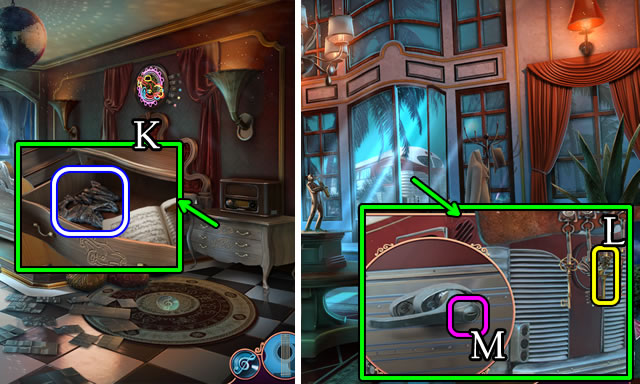
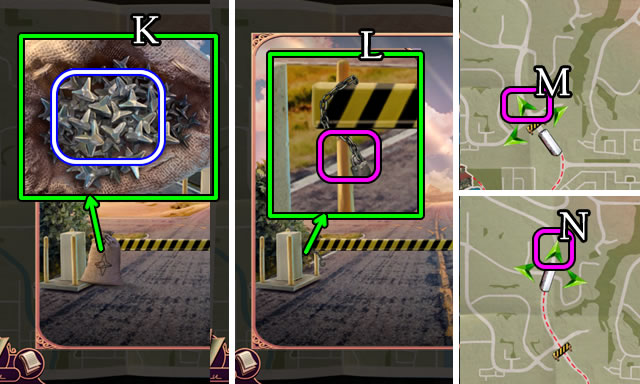
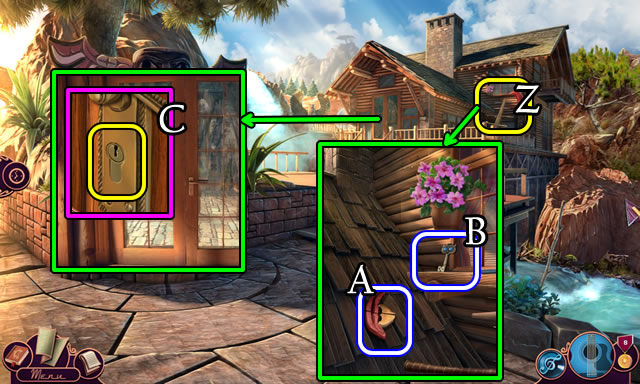
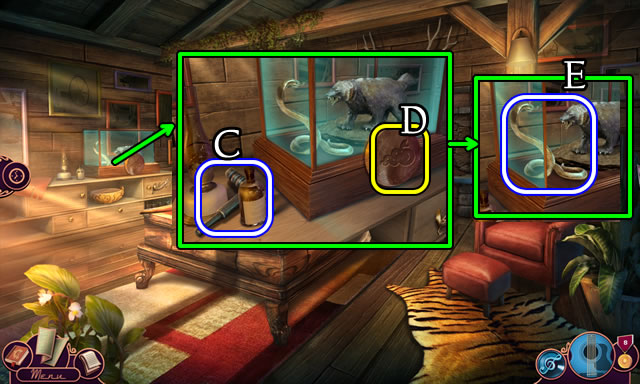
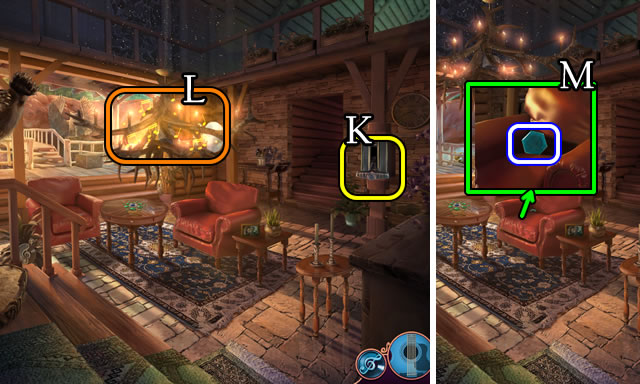
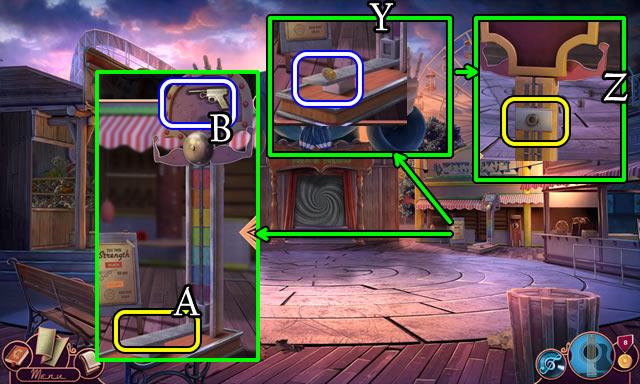
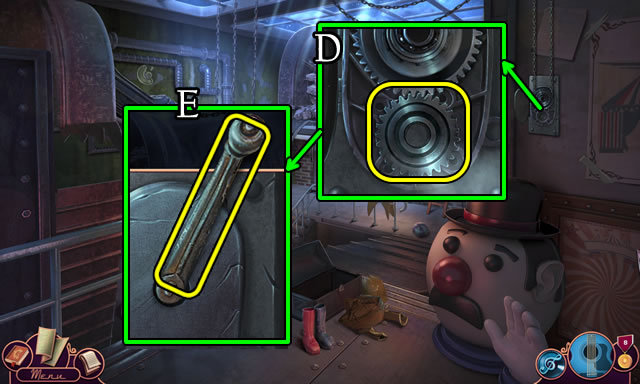
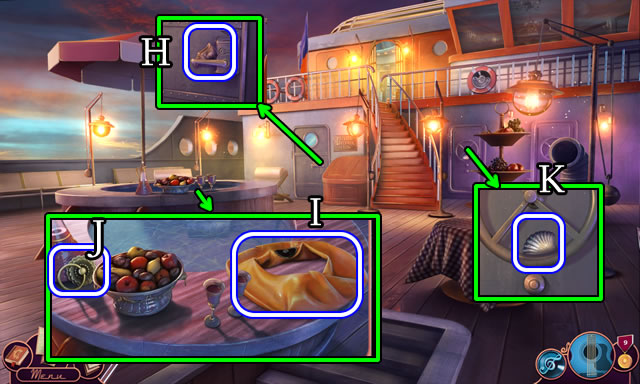
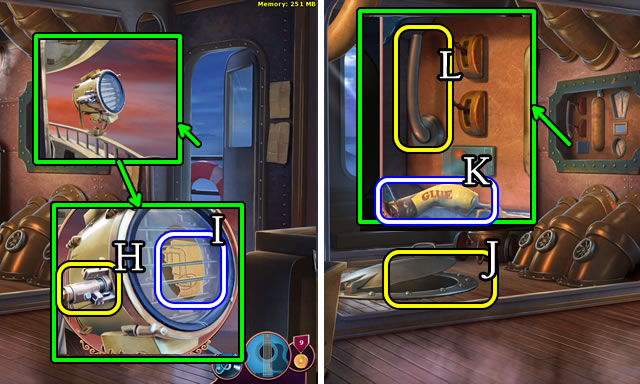
- Take the SPADE (K) and TOY ROCKET (L).
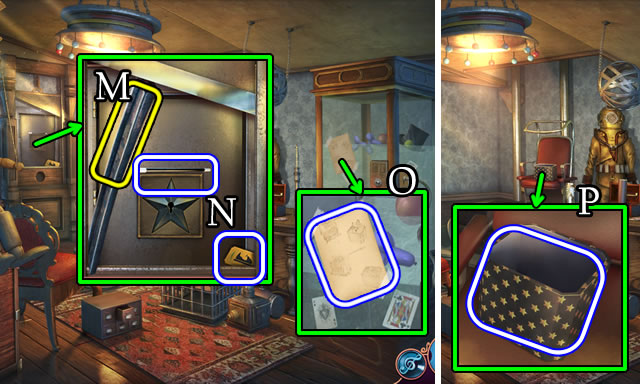
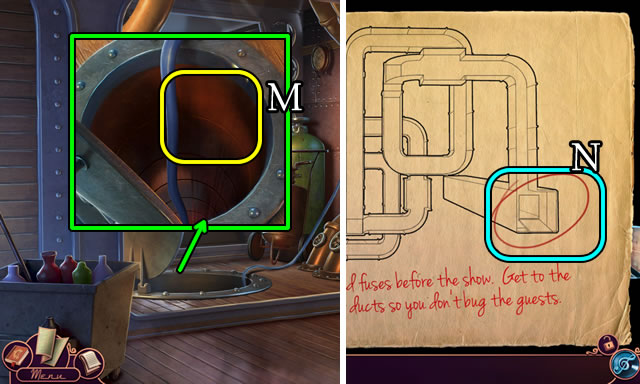
- Take the LEVER (M). Speak to the character.
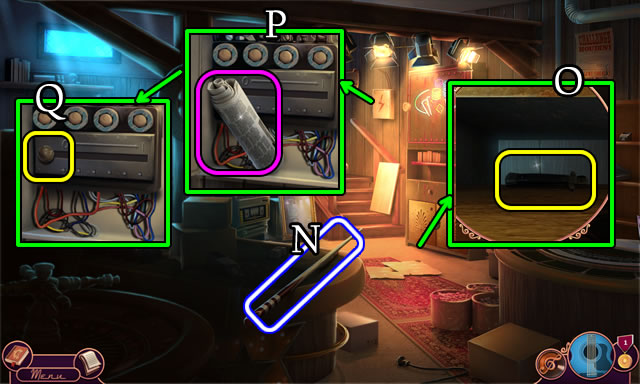
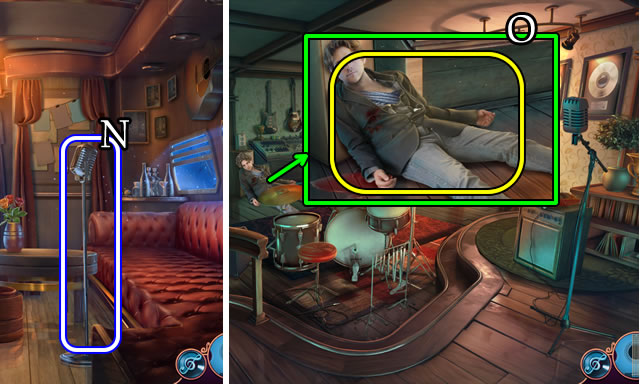
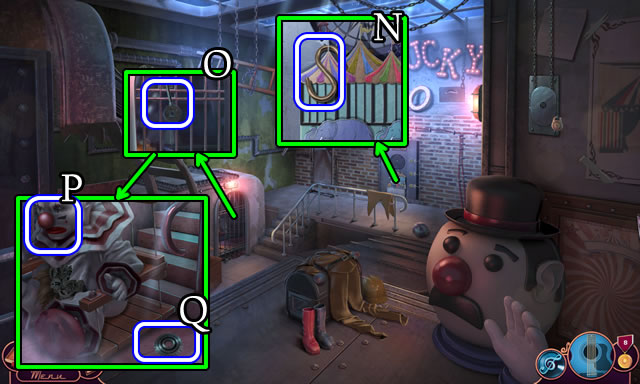
- Take (N), then use the POOL CUE to get the SWITCHBLADE (O).
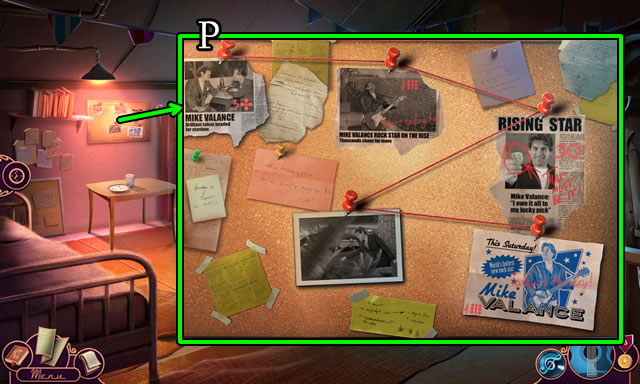
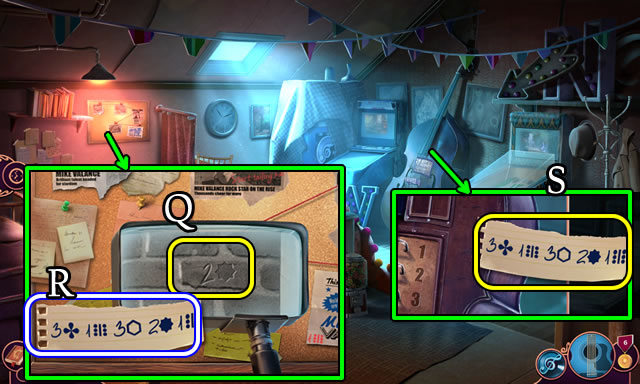
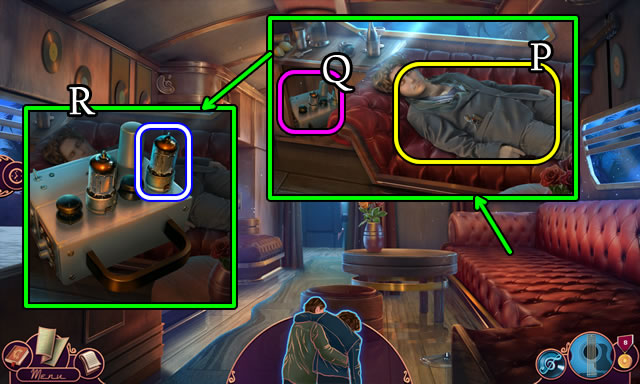
- Use the SWITCHBLADE. Open, read the paper (P), move the button (Q) to the right.
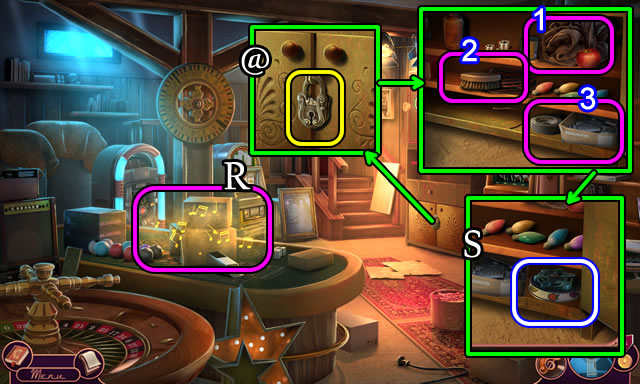
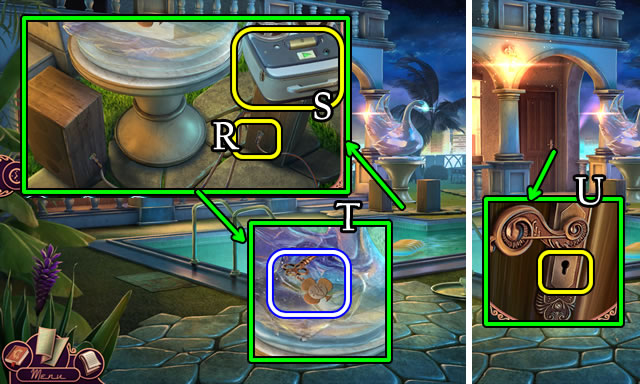
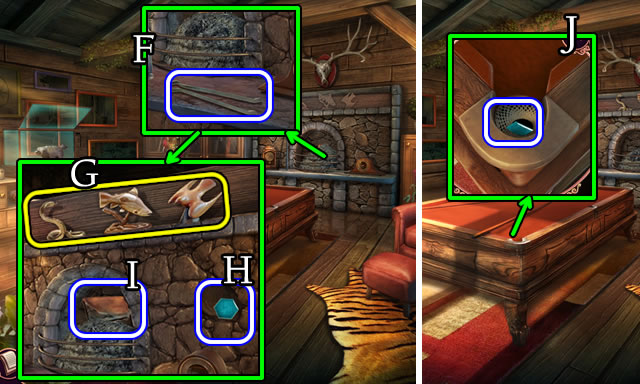
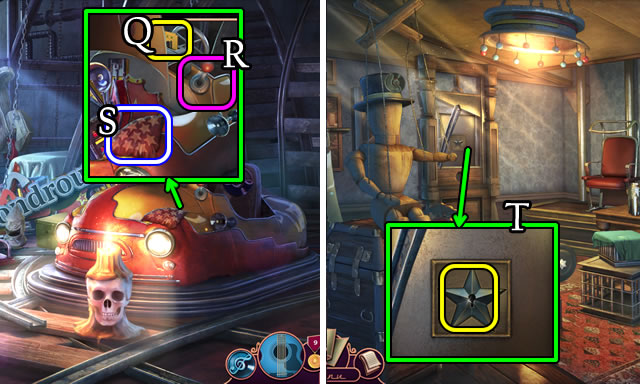
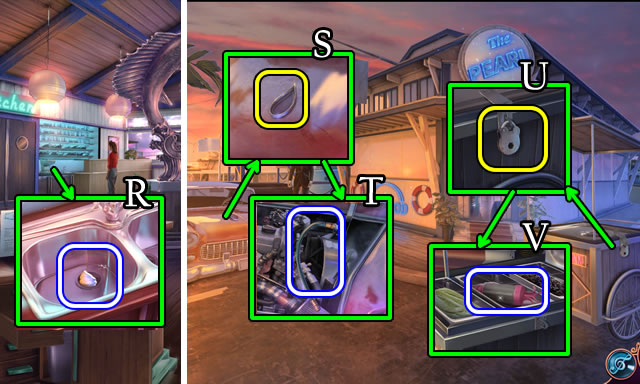
- Play the HOP (R) for a HARP KEY.
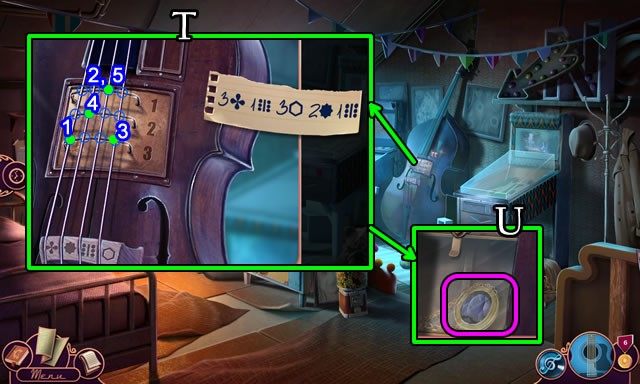
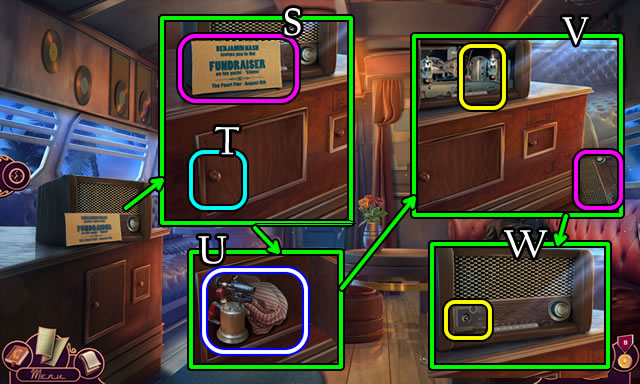
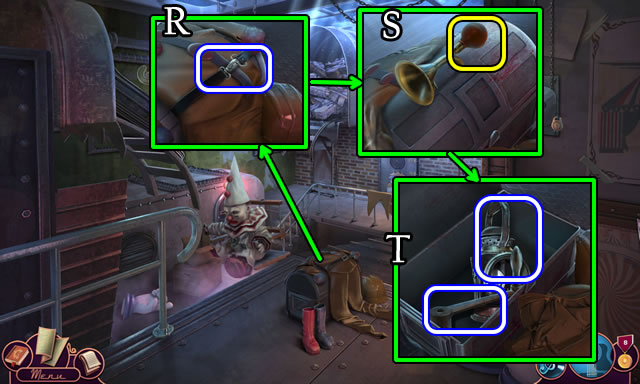
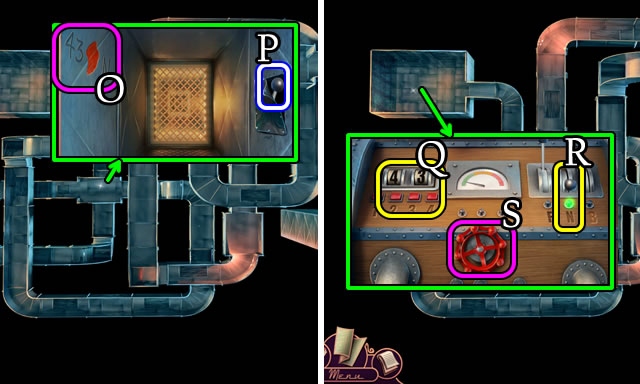
- Use the HARP KEY (@). Open, move (1-3) and take the VALVE and SLOT PART (S).
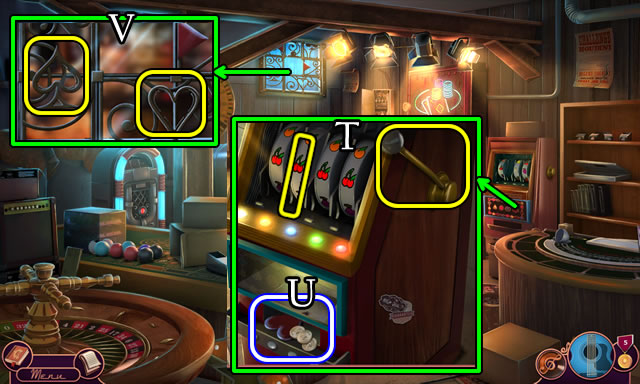
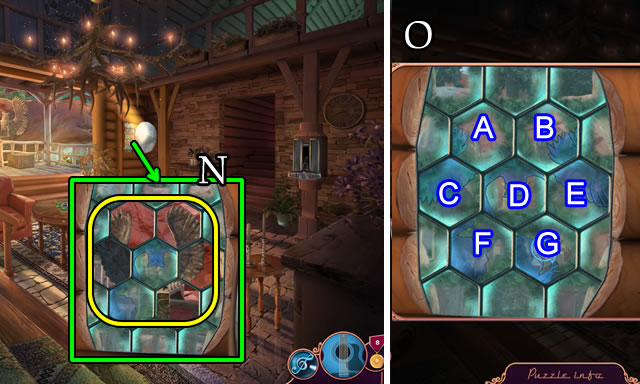
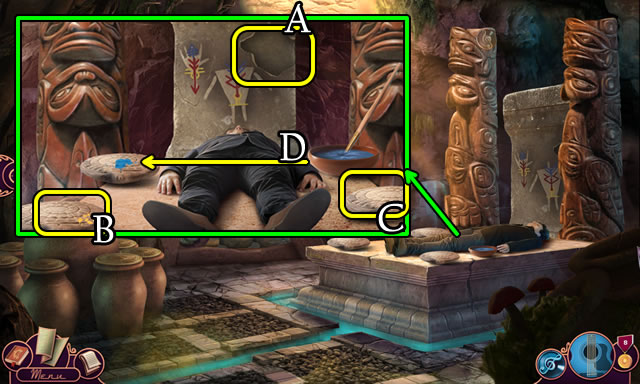
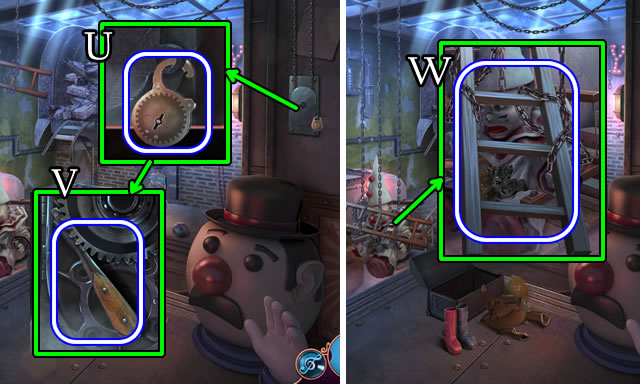
- Place the LEVER and SLOT PART (T). Pull the lever 3x. Take the FIFTY CENTS and HEART (U).
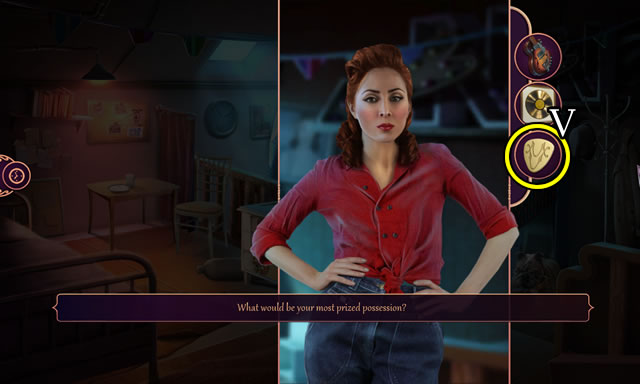
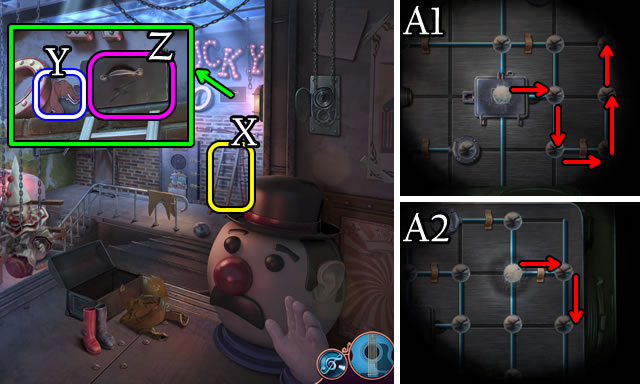
- Place the SPADE and HEART (V).
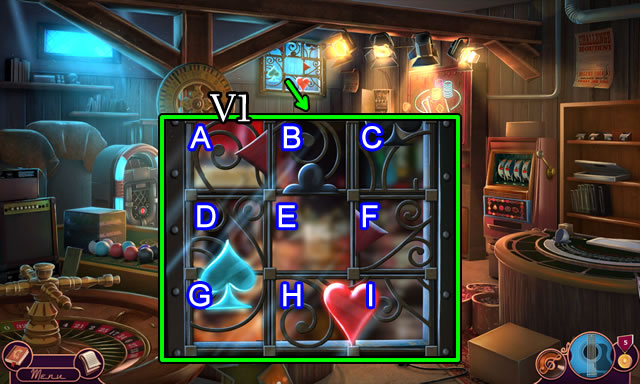
- Solution (V1). F-C-B-E.
- Walk forward.
- Speak to the character.
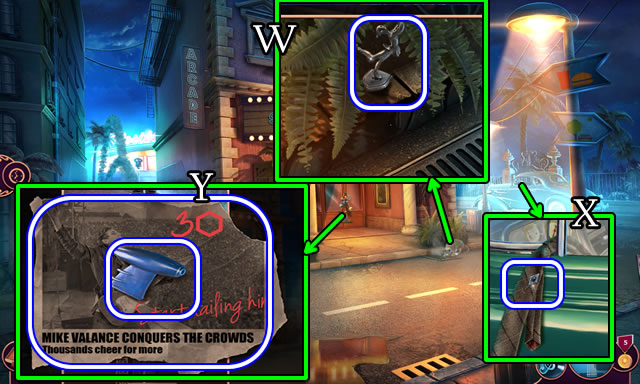
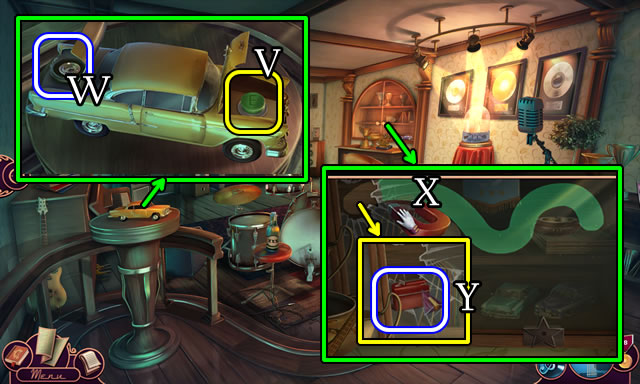
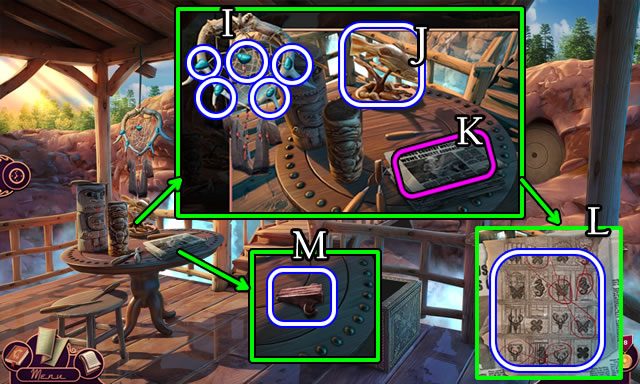
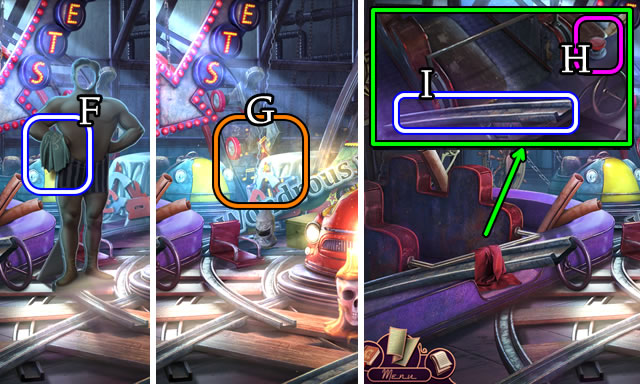
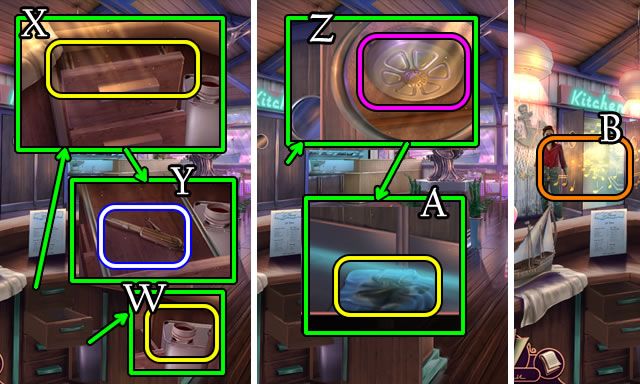
- Shoo the cat. Move the leaf to take the 1/3 ROLLER-SKATER FIGURINE (W).
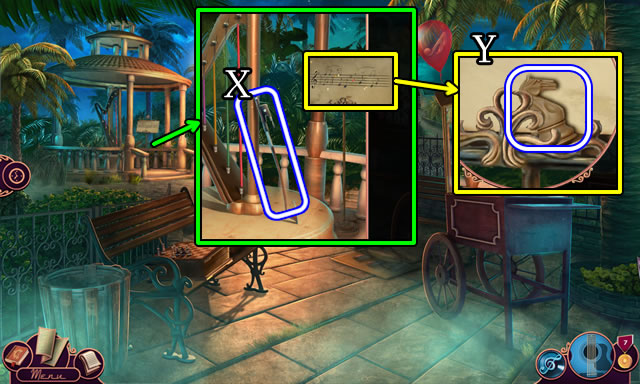
- Take the DIAMOND PIN (X).
- Open the crumpled paper for 1/4 ROCKET FIN and 1/3 ARTICLE ABOUT ME (Y).
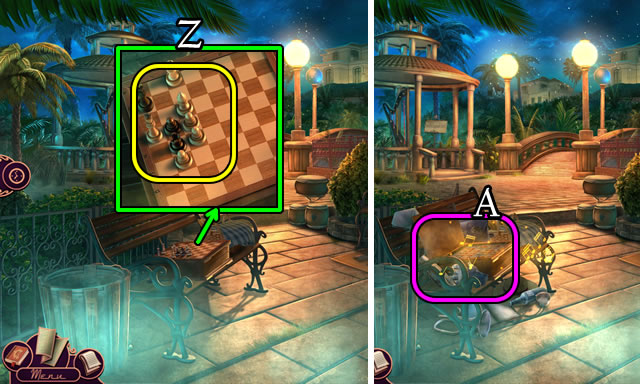
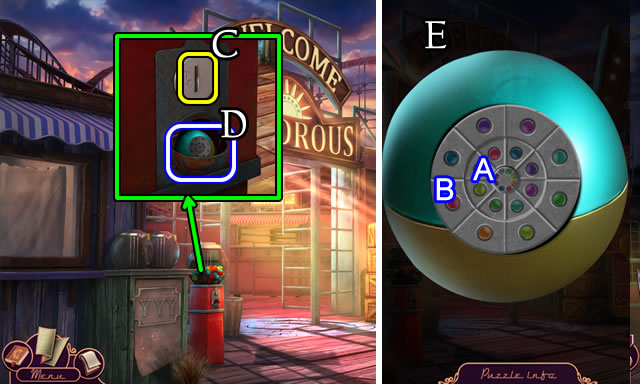
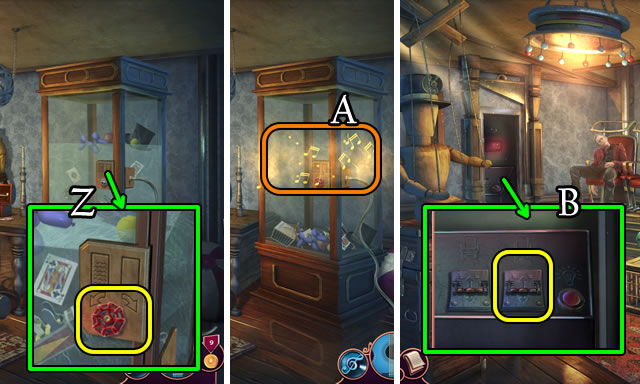
- Open the box and uncover the WIRE CUTTERS (Z).
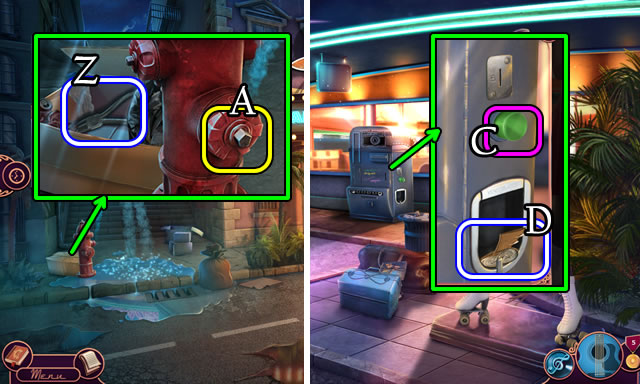
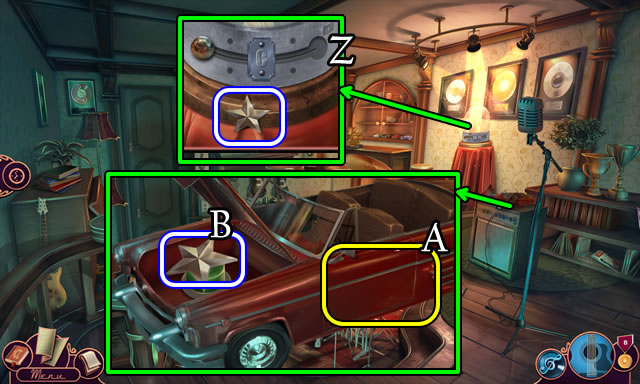
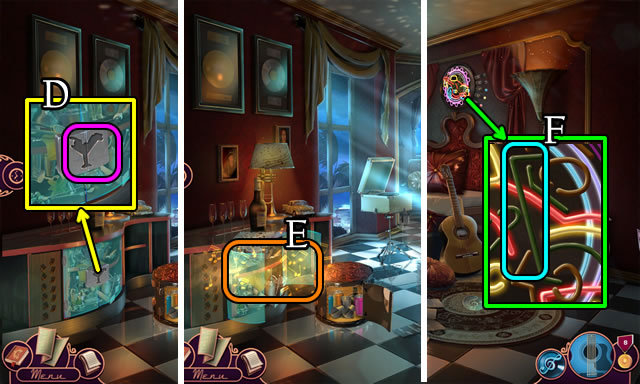
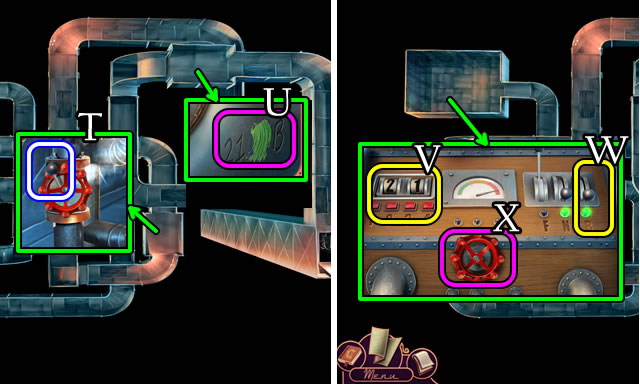
- Place, then select the VALVE (A).
- Walk forward.
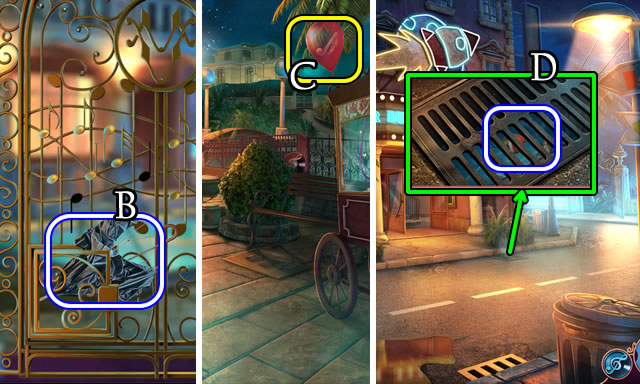
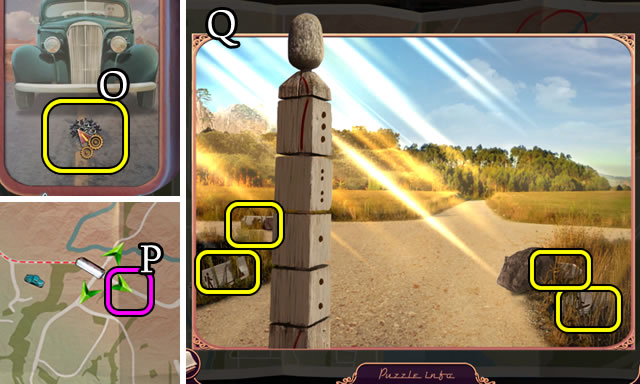
- Select (C). Take SEVENTY-FIVE CENTS and 2/4 ROCKET FINS (D).
- Use the DIAMOND PIN to take 3/4 ROCKET FINS (E).
- Select the box (@), use the WIRE CUTTERS, open and select the panel (F).
- Match the shapes (1-6) to take 4/4 ROCKET FINS (G).
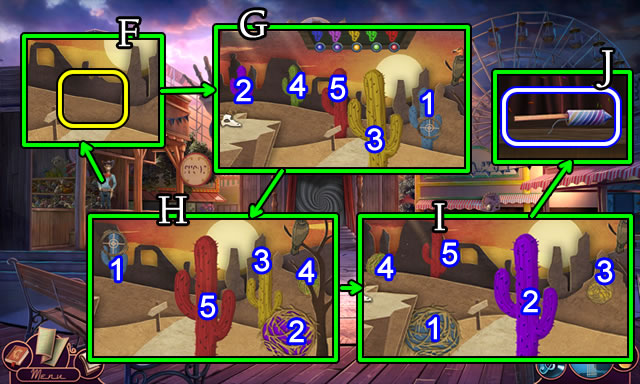
- Combine the TOY ROCKET AND 4/4 ROCKET FINS for a ROCKET-SHAPED KEY.
- Take the DRAWER PLATE (H).
- Walk down.
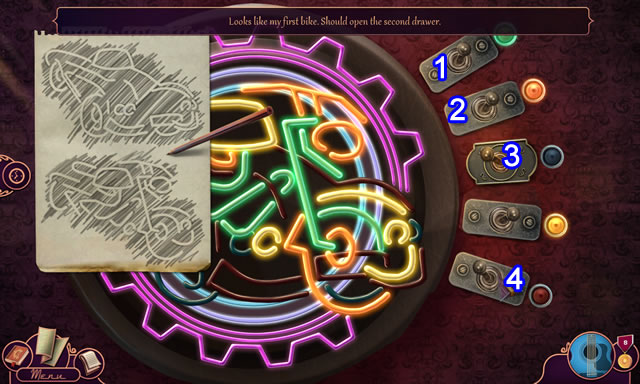
- Place the ROCKET-SHAPED KEY (I).
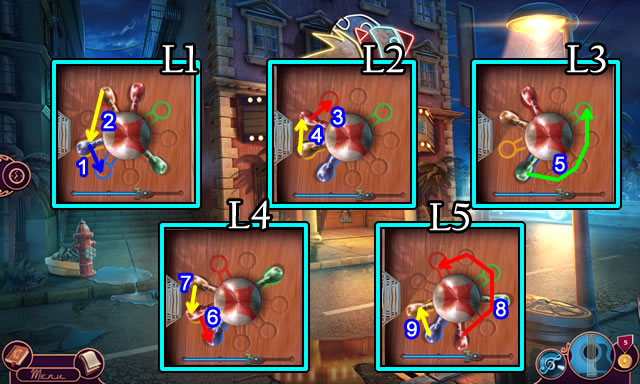
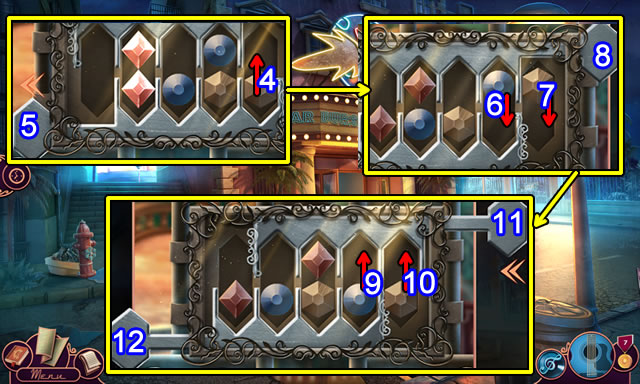
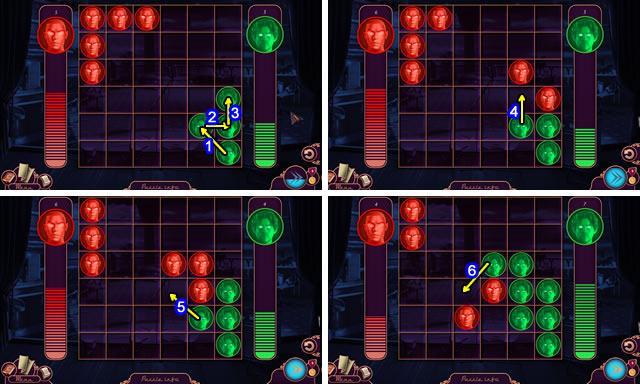
- Solution (J). Match the fins and colored slots.
- Solution (K1)-(K2). 1-4.
- Solution (L1)-(L5). 1-9.
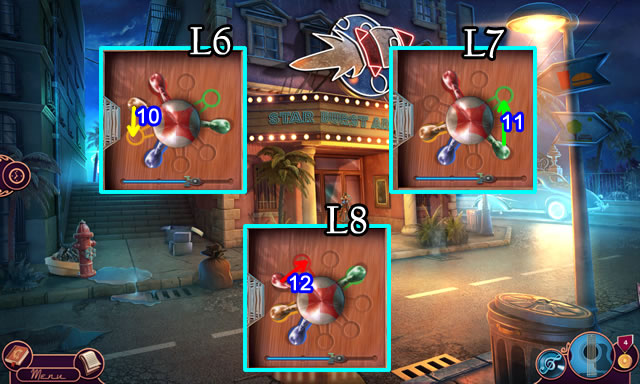
- Solution (L6)-(L8). 10-12.
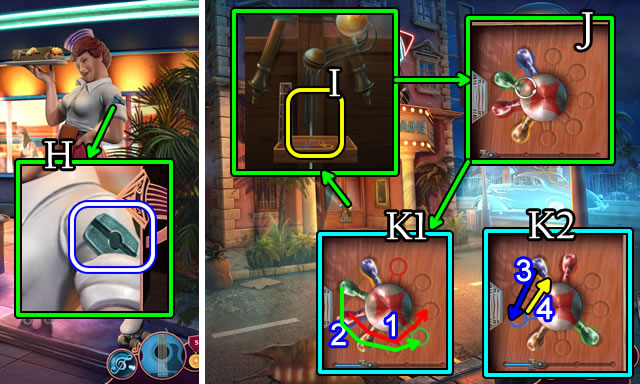
- Open the door. Enter the Arcade.
- Interact with the dog.
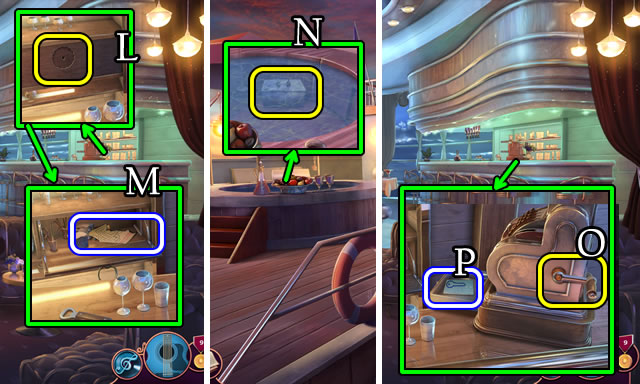
- Take the MAGNIFYING GLASS (M).
- Open the drawer and take 2/3 ROLLER-SKATER FIGURINE (N).
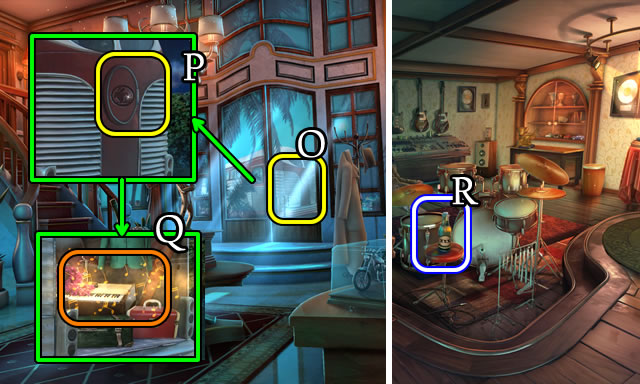
- Place the DRAWER PLATE (O). Select the knob.
- Take the MAGNET and CAMERA (P).
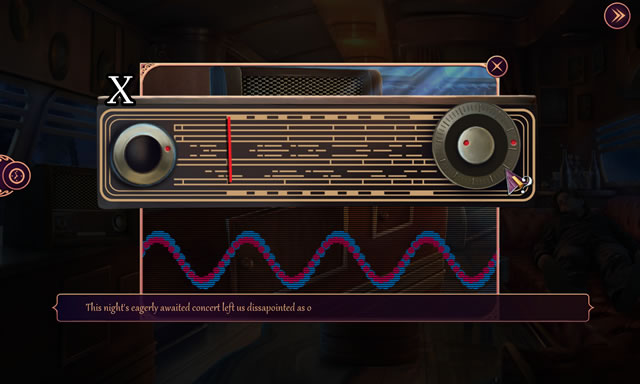
- Select the CAMERA, then the arrow dial 3x. Open and take the FILM.
- Return to the Diner.
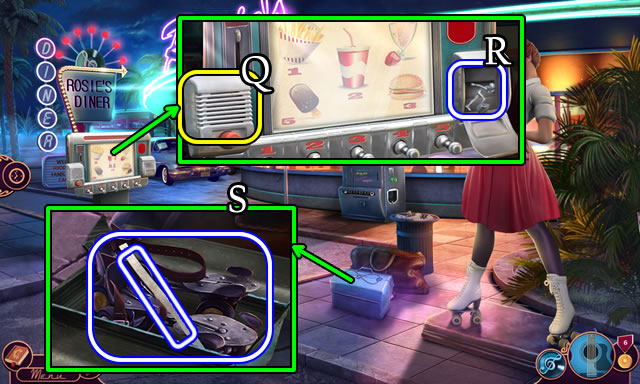
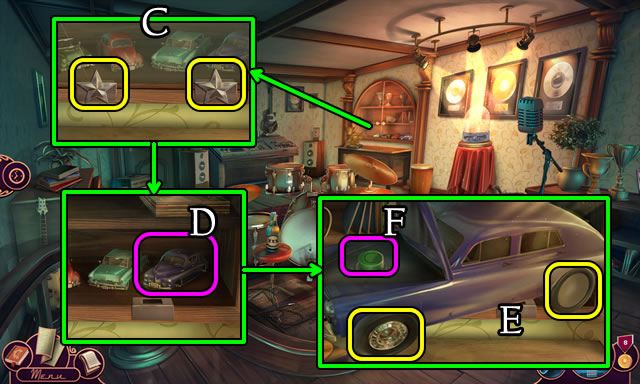
- Select (Q) 2x. Take 3/3 ROLLER-SKATER FIGURINE (R).
- Place 3/3 ROLLER-SKATER FIGURINES. Take the METAL STRIP and ROLLER SKATES (S).
- Take the SPARE WHEEL and LEATHER STRAP from the ROLLER SKATES.
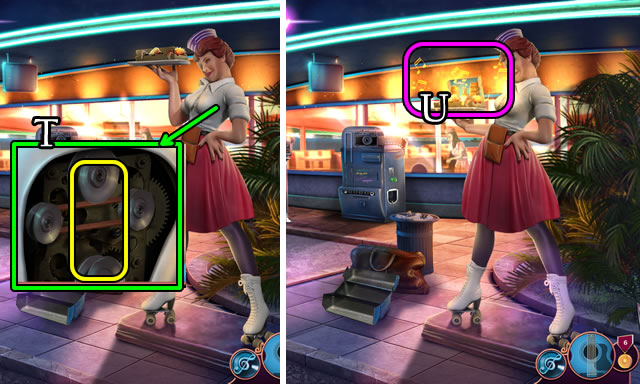
- Select the statue, rotate and remove the panel. Place the LEATHER STRAP (T).
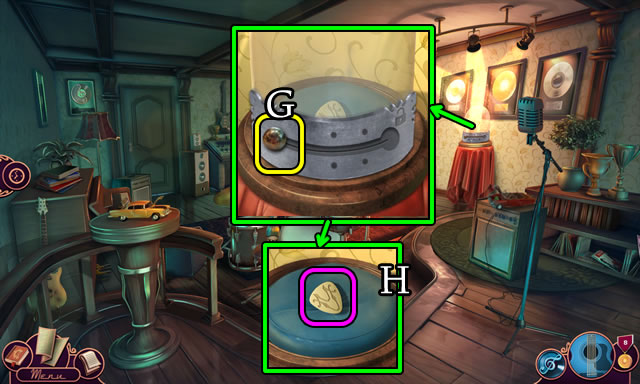
- Play the HOP for a PHOTO COUPON (U).
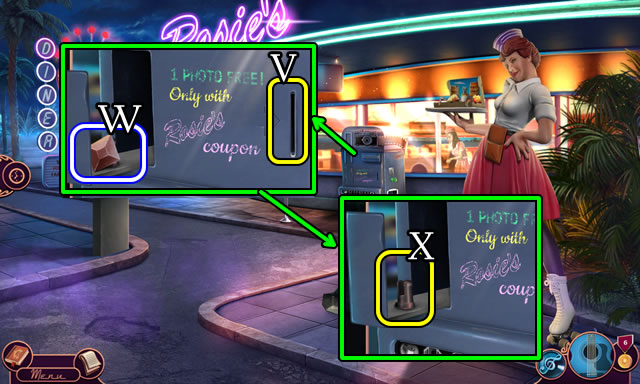
- Use the PHOTO COUPON (V).
- Take the RED STONE (W).
- Place the FILM (X) to get a PHOTO.
- Walk down.
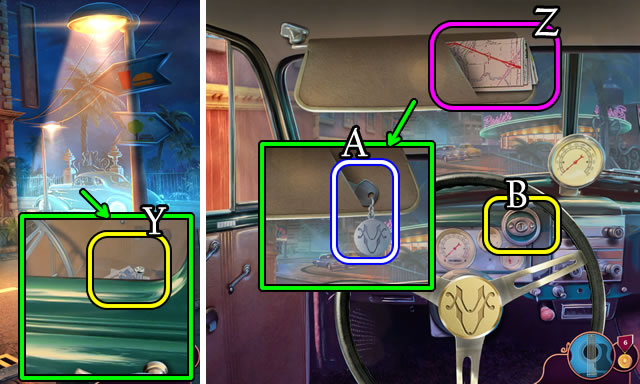
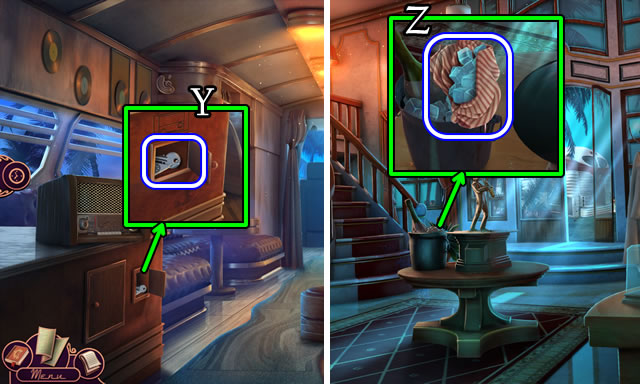
- Use the METAL STRIP (Y). Open and enter the car.
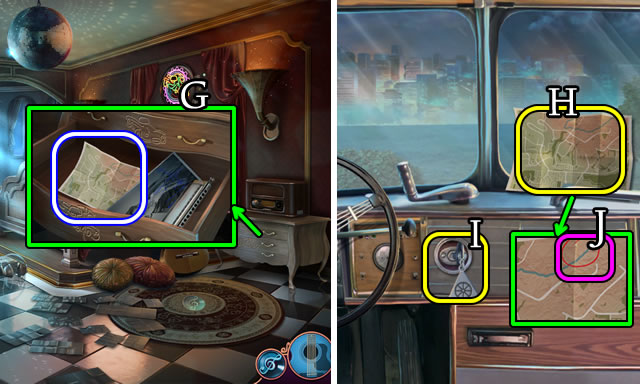
- Select the visor. Take the Map (Z) and CAR KEY (A).
- Place the CAR KEY (B).
- Drive forward.
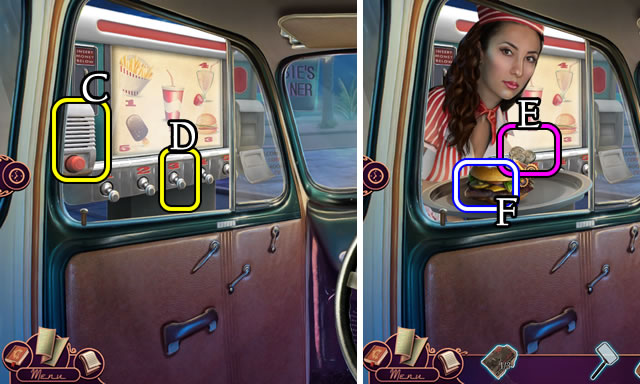
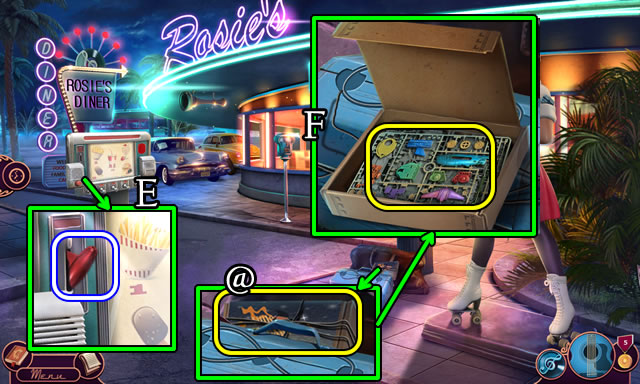
- Select (C). Select (D).
- Give SEVENTY-FIVE CENTS (E); take the BURGER (F).
- Enter the Arcade.
- Give the BURGER (G).
- Take the WOOL CAP (H).
- Take the underlying 2/3 ARTICLES ABOUT ME(I).
- Take 3/3 ARTICLES ABOUT ME(J).
- Take the DRAWER PLATE (K).
- Use the DRAWER PLATE; select the knob; open the drawer (L).
- Select the journal (M) 4x for ADAM'S LIST (N).
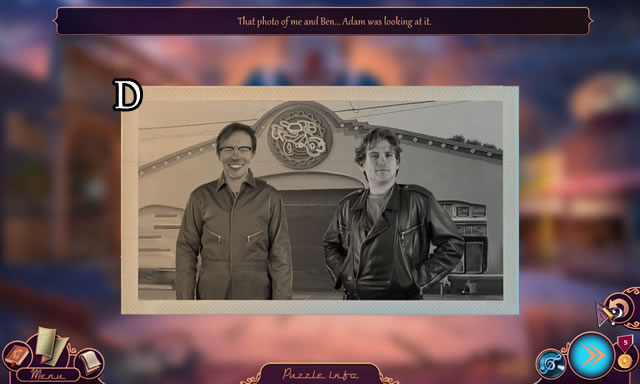
- Place the 3/3 ARTICLES ABOUT ME, ADAM'S LIST and PHOTO (O).
- Solution (P).
- Use the MAGNIFYING GLASS on the photo (Q).
- Select the photo to take a STRANGE CODE (R).
- Place the STRANGE CODE (S).
- Solution (T). 1-5.
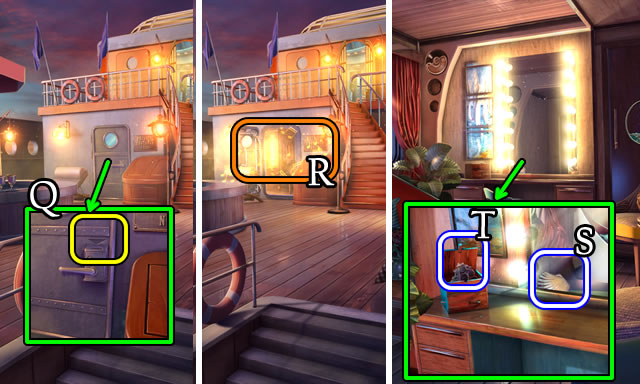
- Take the locket (U).
- Speak to the character; select (V).
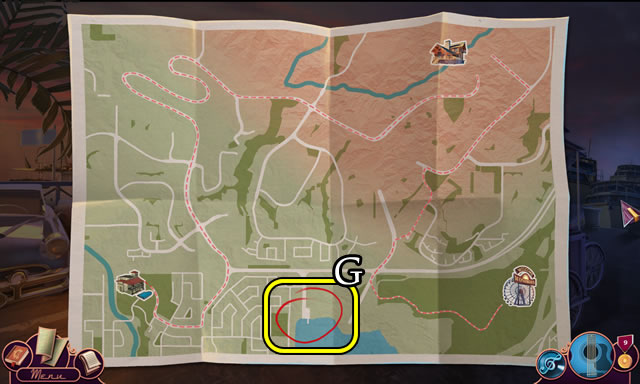
- Walk down.
Chapter 2: Villa

- Place the RED STONE (W).
- Solution. 1-12.
- Enter the Park.
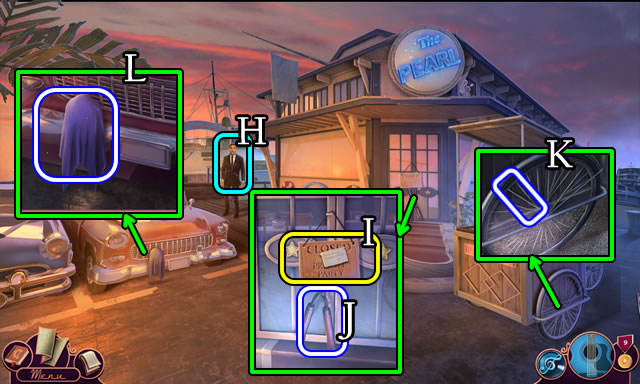
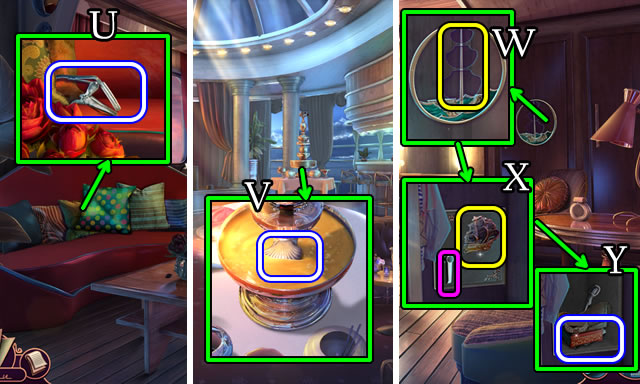
- Take the CELLO BOW (X) and CHESS PIECE (Y).
- Place the CHESS PIECE (Z). Speak to the character.
- Play the HOP (A) for an ERASER.
- Walk forward.
- Take the BROKEN UMBRELLA (B).
- Take the UMBRELLA HANDLE and SHARP UMBRELLA WIRE from the BROKEN UMBRELLA.
- Select the string on the WOOL CAP for a BALL OF YARN.
- Combine the CELLO BOW, BALL OF YARN and SHARP UMBRELLA WIRE for a MAKESHIFT BOW.
- Walk down.
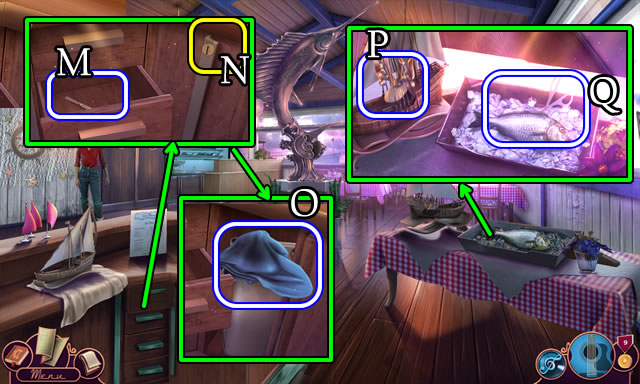
- Use the MAKESHIFT BOW (C). Pick up 1/3 GOLDEN NOTE.
- Walk down.
- Use the UMBRELLA HANDLE to get a FLOATER (D).
- Take the BLUE STRING and 2/3 GOLDEN NOTE from the FLOATER.
- Return to the Park.
- Use the ERASER to remove all but the colored notes (E).
- Place the BLUE STRING (F).
- Solution. 1-5.
- Take the POPCORN KEY (G).
- Use the POPCORN KEY. Take the OIL and 3/3 GOLDEN NOTES (H).
- Walk forward.
- Place the 3/3 GOLDEN NOTES (I).
- Open the cover and use the OIL (J).
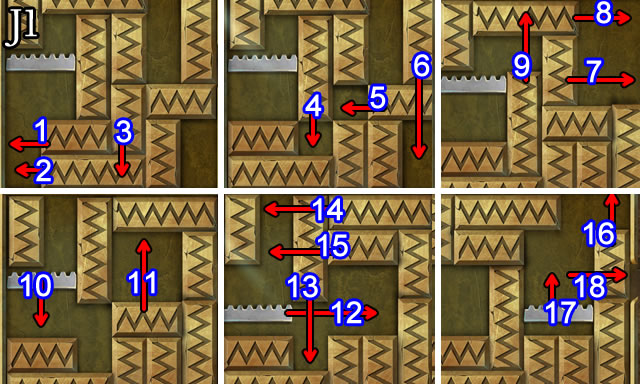
- Solution (J1). 1-18.
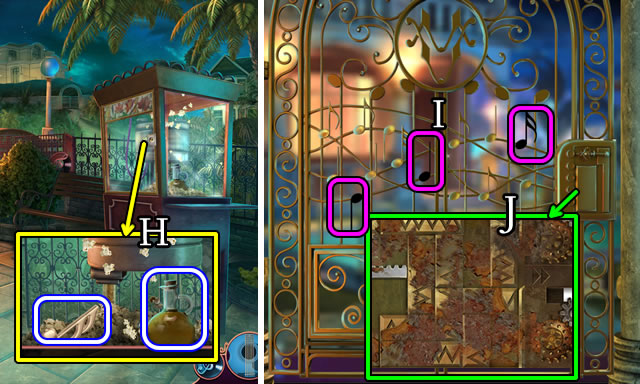
- Open the gate; speak to the character. Select the scene.
- Take the POOL NET (K).
- Use the POOL NET to retrieve and take the SPEAKER CABLE (L).
- Take the INTERVIEW TAPE (M).
- Walk forward.
- Take the TAPE RECORDER (N) and HEADPHONES (O).
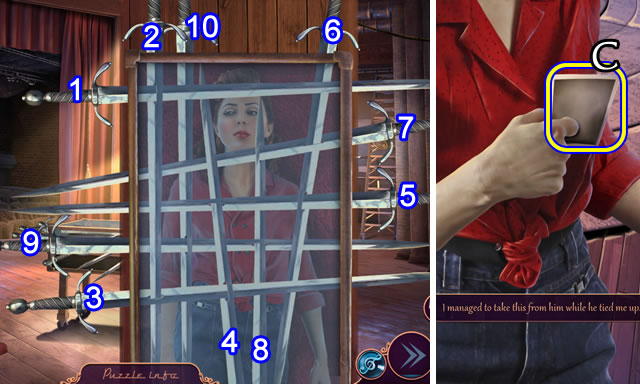
- Select (P). Open the pockets to take the LIGHTER.
- Combine the TAPE RECORDER, INTERVIEW TAPE and HEADPHONES. Press the button.
- Solution positions vary. 1-11.
- Take the MESSAGE FOR JIM (Q).
- Walk down.
- Use the SPEAKER CABLE (R).
- Place the MESSAGE FOR JIM (S).
- Use the LIGHTER to take the MANSION KEY (T).
- Use the MANSION KEY (U), open the door and enter the Studio.
- Open the hood, press the button (V) and open the trunk to take the TOY WHEEL (W).
- Move the objects. Use the MAGNET (X) to slide the TOY CAR DOOR (Y).
- Take 1/2 STAR (Z).
- Place the TOY CAR DOOR (A). Take 2/2 STAR (B). Press the button.
- Place 2/2 STARS and open (C).
- Select (D).
- Place the SPARE and TOY WHEELS (E). Press (F).
- Slide the button and remove the cover (G).
- Select and take (H).
- Speak to the characters.
- Select the man. Walk forward.
- Take the CROSSED SWORDS (J).
- Take BIG JIM'S KEYHOLDER (K). Open the coat. Take the SCISSORS (L).
- Take the TOUR BUS EMBLEM (M).
- Take the NECKTIE (N).
- Open (O).
- Place the TOUR BUS EMBLEM (P).
- Play the HOP (Q) to receive the FIRST AID KIT.
- Walk down.
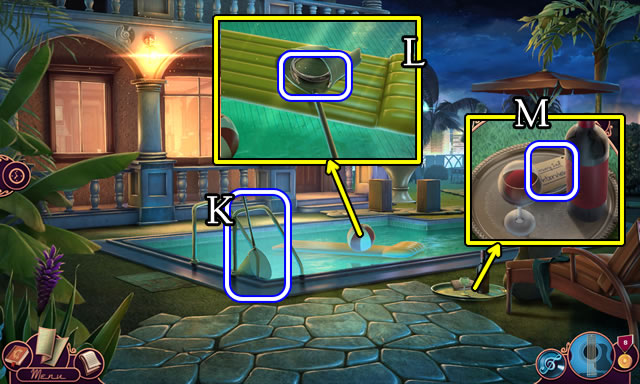
- Take the BRANDY (R).
- Open the FIRST AID KIT. Add the NECKTIE, SCISSORS and BRANDY. Take the COMPLETED FIRST AID KIT.
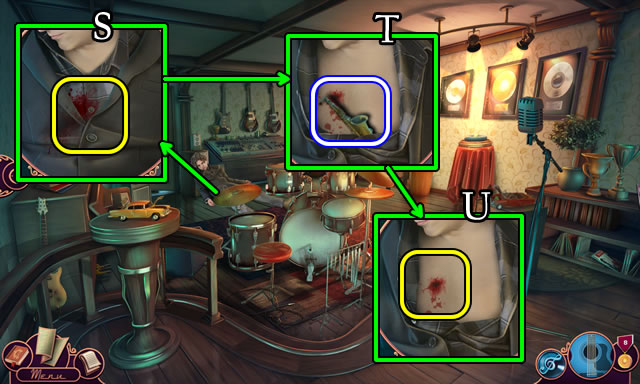
- Place and open the COMPLETED FIRST AID KIT. Use the scissors (S).
- Take the SAX (T).
- Place the brandy, gauze and necktie (U).
- Speak to the character.
- Walk forward.
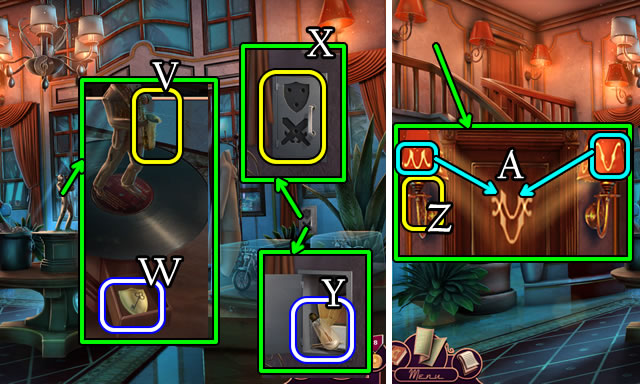
- Place the SAX (V). Take the SHIELD SYMBOL (W).
- Move the curtains. Place the CROSSED SWORDS and SHIELD SYMBOL (X).
- Take the LIGHT BULB (Y).
- Use the LIGHT BULB (Z).
- Solution (A).
- Walk forward.
- Remove and take the RADIO BUTTON (B).
- Move the pillow. Take the GOLDEN EAGLE (C).
- Select the drawers (D) to take the SKETCHED SYMBOLS.
- Take the DRUM-TUNING KEY (E).

- Use the DRUM-TUNING KEY (F).
- Open, uncover and take the BOTTLE OPENER (G).
- Take the photo (H).
- Open; use the BOTTLE OPENER; take the GRAMOPHONE SWITCH (I).
- Place the SKETCHED SYMBOLS and GRAMOPHONE SWITCH (J).
- Flip the switches-1-4.
- Open the drawer. Uncover and take the WOLF EMBLEM (K).
- Combine BIG JIM'S KEYHOLDER, GOLDEN EAGLE and SILVER WOLF. Open and take the TOUR BUS KEYS.
- Walk down.
- Place, then select the third (L) of the TOUR BUS KEYS. Use the key (M).
- Open the door; walk forward.
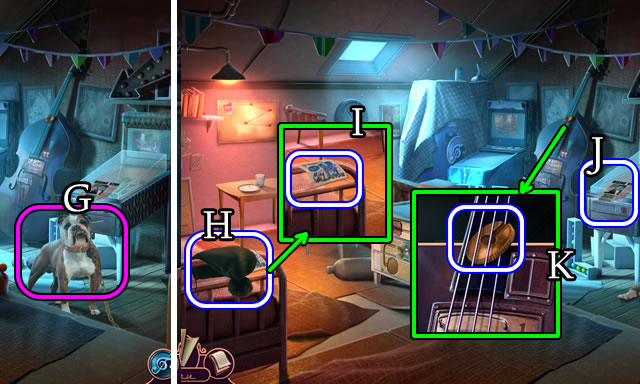
- Take the MIC STAND (N).
- Select the MIC STAND for a MIC STAND PART.
- Walk down 2x. Select (O).
- Place (P).
- Open (Q).
- Take the VACUUM TUBE (R).
- Take (S). Open (T) and take the BLOWTORCH and STRIPED CLOTH (U).
- Remove the panel and replace the VACUUM TUBE (V).
- Replace the panel and attach the RADIO BUTTON (W).
- Solution (X).
- Take the IGNITION KEY (Y).
- Walk down.
- Use the STRIPED CLOTH to get an ICE PACK (Z).
- Return to the Tour Bus.
- Place the ICE PACK (A).
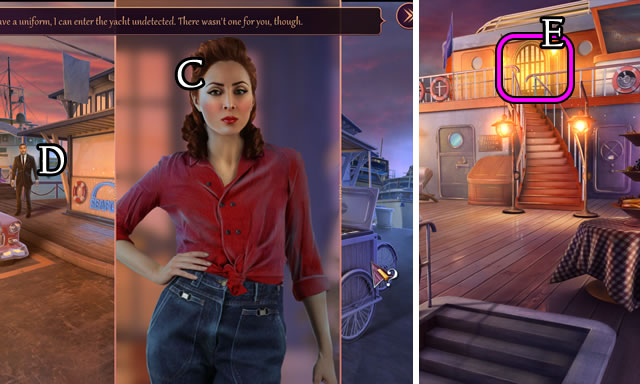
- Attempt to take the map (B). Speak to the character.
- Take the COCKTAIL TOKEN (C).
- Return to the Bedroom.
- Use the COCKTAIL TOKEN (D) to play a HOP (E) for a NEON LIGHT.
- Place the NEON LIGHT (F).
- Flip switches 1-4.
- Open the drawer. Uncover and take the MARKED MAP (G).
- Return to the Tour Bus. Walk forward.
- Place the MARKED MAP (H). Place and select the IGNITION KEY (I).
- Select (J).
- Open the bag. Take the CALTROPS (K).
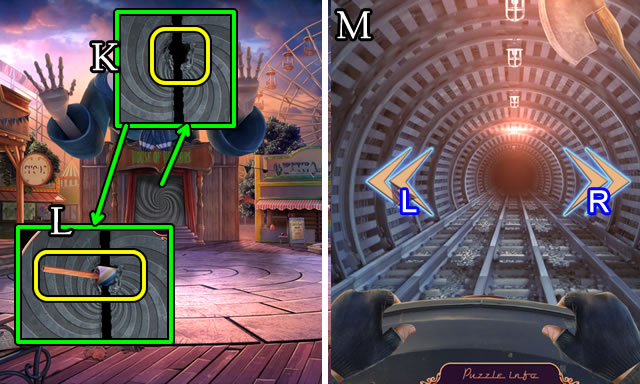
- Use the BLOWTORCH (L). Raise the bar.
- Select arrows (M), (N).
- Place the CALTROPS (O).
- Select the arrow (P).
- Pick up the signs (Q).

- Align the signs (R). Go left.
- Walk down; speak to the character.
- Walk down.
Chapter 3: Blue Owl Cave
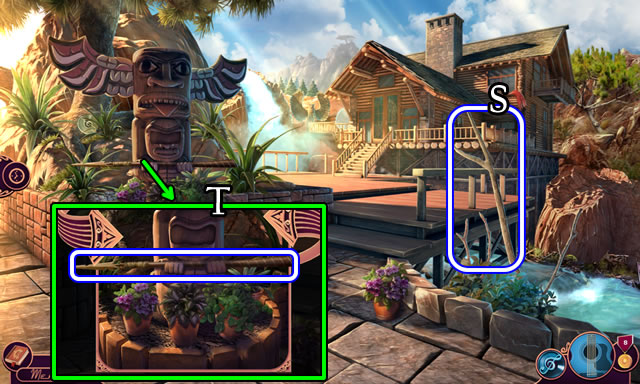
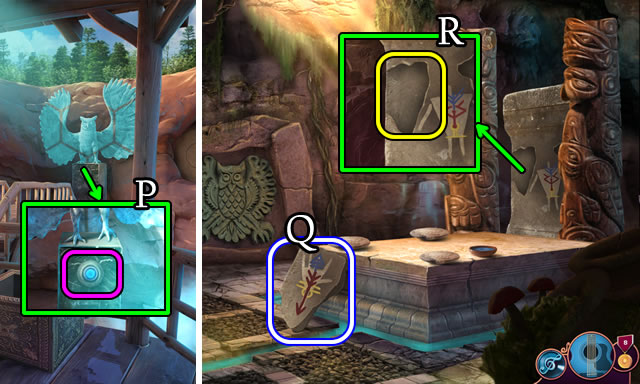
- Grab the PINE BRANCH (S).
- Take the CEREMONIAL SPEAR (T).
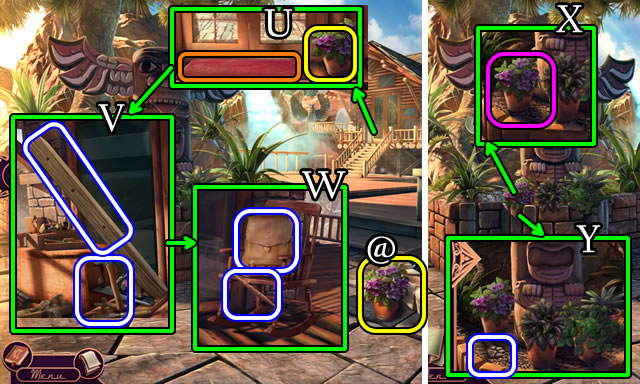
- Lift the mat for a note. Lift the plant (U).
- Pan left.
- Take the HAMMER and BROKEN FENCE BEAM (V).
- Pan right 2x.
- Take the CHAIR PART and HUNTER'S BAG (W).
- Lift (@).
- Lift (X) for a BEAR PAW SYMBOL (Y). Please note: the BEAR PAW SYMBOL is under the last plant lifted.
- Combine the HUNTER'S BAG and BEAR PAW SYMBOL. Open to take the COMPASS, Map and MACHETE. Take the SHOTGUN SHELL.
- Combine the PINE BRANCH and MACHETE for a TRIMMED BRANCH.
- Combine the BROKEN FENCE BEAM, HAMMER, MIC STAND PART, CEREMONIAL SPEAR, CHAIR PART and TRIMMED BRANCH for a MAKESHIFT LADDER.
- Place the MAKESHIFT LADDER (Z).
- Use the HAMMER; take the TOTEM MOUTH (A).
- Lift the pot; take the LODGE KEY (B).
- Use the LODGE KEY (C) and open the doors.

- Take the CURLED SNAKE SYMBOL (D).
- Take the TOTEM EYES (E).
- Walk forward.
- Take 1/5 MOSAIC PIECE (F).
- Arrange the owl pieces (G). Take the BIRD SCULPTURE (H).
- Take 1-5/9 BEADS (I).
- Take the FISH SCULPTURE (J).
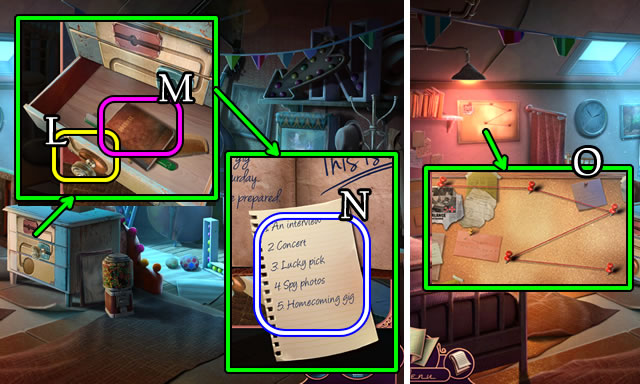
- Take (K); select for a BOOKSHELF CLUE (L).
- Take the TOTEM NOSE (M).
- Walk down 2x.
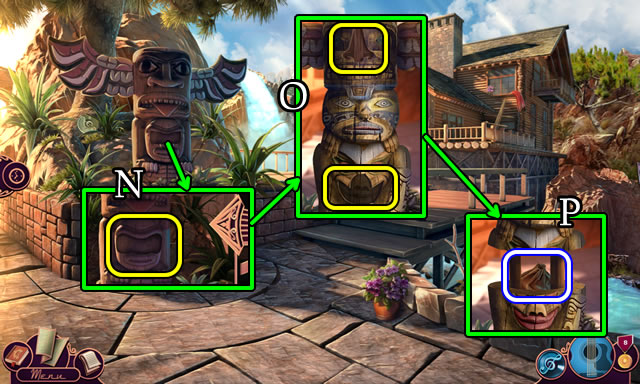
- Place the TOTEM EYES; rotate (N).
- Place the TOTEM MOUTH and TOTEM NOSE (O).
- Take the LEATHER POUCH (P).
- Walk forward.
- Open the LEATHER POUCH; take the RHINO HORN and STAG CHALICE.
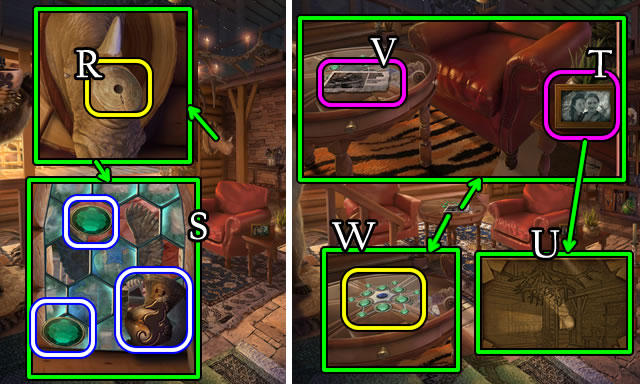
- Place the RHINO HORN (R).
- Take the CLAY VASE and 1-2/2 GREEN JEWEL (S).
- Select (T). Take the SIX-SIDED ORNAMENT and note the drawing (U).
- Take (V).
- Place the 2/2 GREEN JEWELS and SIX-SIDED ORNAMENT for a puzzle (W).
- Solution (X). B-C-A-C.

- Take the ENCYCLOPEDIA and BEAR EYE (Y).
- Place the BEAR EYE. Take the CLOVER BOWL (Z).
- Place the BOOKSHELF CLUE, STAG CHALICE, CLAY VASE, ENCYCLOPEDIA and CLOVER BOWL (A).
- Solution (B).
- Enter the Trophy Room.
- Take the LEVER (C). Place the CURLED SNAKE SYMBOL (D).
- Take the SNAKE SCULPTURE (E).
- Take the TONGS (F).
- Place the SNAKE, FISH and BIRD SCULPTURES (G). Take 2/5 MOSAIC PIECE (H).
- Use the fireplace poker to take the BURNED BOOK (I).
- Use the TONGS to get 3/5 MOSAIC (J).
- Open the BURNED BOOK. Take the paper and 4/5 MOSAIC PIECE.
- Walk down.
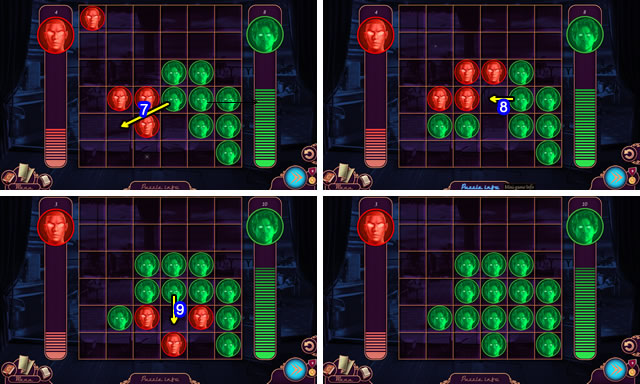
- Place, then select the LEVER (K) to play a HOP (L).
- Select, then take 5/5 MOSAIC PIECE (M).
- Place the 5/5 MOSAIC PIECES (N).
- Solution (O). A-Bx5-Cx4-Dx3-Ex2-Fx4-Gx4.
- Walk to the Terrace.
- Press (P).
- Walk forward.
- Take (Q), then place the STONE SLAB (R).
- Return to the Tour Bus.
- Select (S).
- Place (T), then speak to the character.

- Remove all the pot lids to take the YELLOW PAINT and 6-9/9 BEADS (U).
- Slide (V) to play the HOP (W). Receive RED PAINT.
- Return to the Trophy Room.
- Place the 9/9 BEADS (X).
- Solution (Y). 1-10.
- Take the STONE SLAB (Z).
- Return to the Blue Owl Cave.
- Place the STONE SLAB (A).
- Place the YELLOW (B) and RED PAINT (C). Move (D).
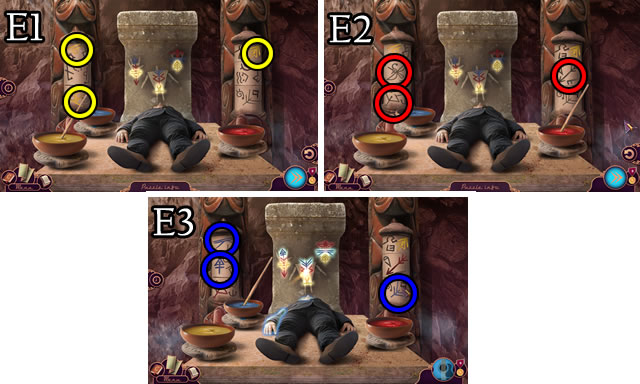
- Solution (E1)-(E3).
- Speak to the characters.
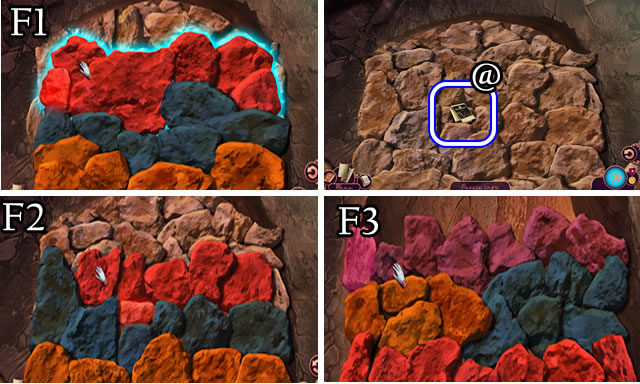
- Solution (F1).
- Take the MATCHES (@).
- Solution (F2), (F3).
- Return to the Tour Bus.
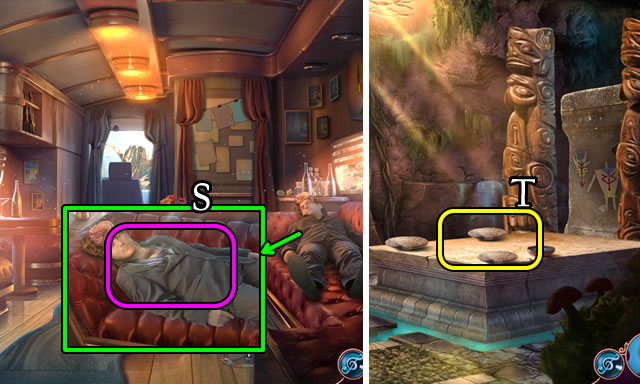
- Walk forward. Turn the ignition key. Walk down 2x.
- Speak to the character. Select (H). Speak to the character.
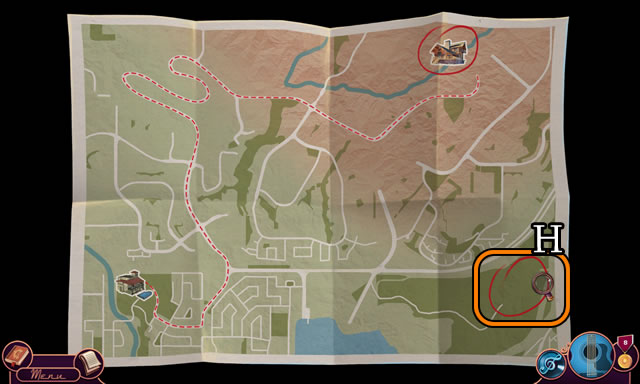
Chapter 4: Amusement Park
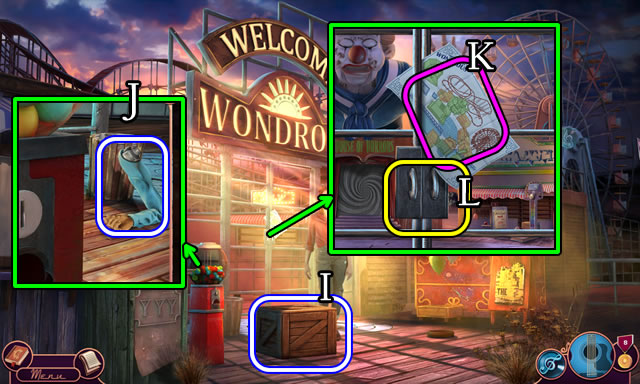
- Take 1/4 SMALL CRATE (I).
- Take the METAL ARM (J).
- Take the Map (K).
- Use the BLOWTORCH (L).
- Take 2/4 SMALL CRATE (M).
- Examine (N); take 3/4 SMALL CRATE (O) and the COWBOY HAT (P).
- Take 4/4 SMALL CRATE (Q).
- Place the METAL ARM and COWBOY HAT (R).
- Take the PUNCH CARD (S).
- Walk down.
- Place the 4/4 SMALL CRATES (T). Take the HAMMER (U).
- Take the CLOWN GLOVES (V).
- Rotate.
- Use the PUNCH CARD (W) to trigger a HOP (X) and receive a HEX KEY.
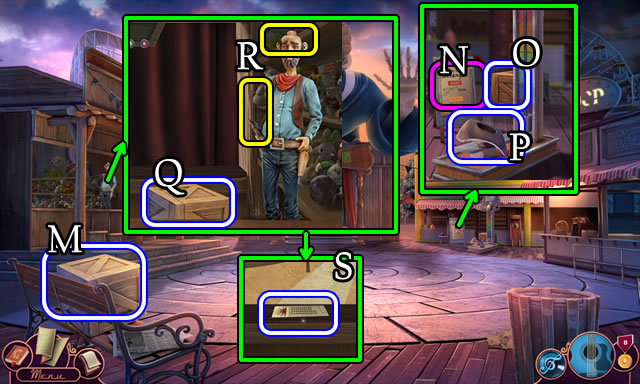
- Walk forward.
- Use the HAMMER. Take the SURPRISE BALL TOKEN (Y).
- Rotate.
- Use the HEX KEY (Z).
- Rotate.
- Use the MALLET (A). Take the EMPTY BB GUN (B).
- Walk down.
- Use the SURPRISE BALL TOKEN (C); take the SURPRISE BALL (D).
- Select the SURPRISE BALL for a puzzle.
- Solution (E). Ax4-B.
- Open and take the BB GUN AMMO.
- Combine the EMPTY BB GUN and BB GUN AMMO for a LOADED BB GUN.
- Walk forward.
- Use the LOADED BB GUN (F).
- Solution (G). 1-5.
- Solution (H). 1-5.
- Solution (I). 1-5.
- Take the FIREWORK (J).
- Use the BLOWTORCH (K).
- Combine the FIREWORK and SHOTGUN SHELL for a BOOSTED FIREWORK.
- Use the BOOSTED FIREWORK and MATCHES (L).
- Walk forward.
- Speak to the character.
- Go forward and avoid the obstacles (M): R-L-R-L.
- Select the scene to speak to the character.
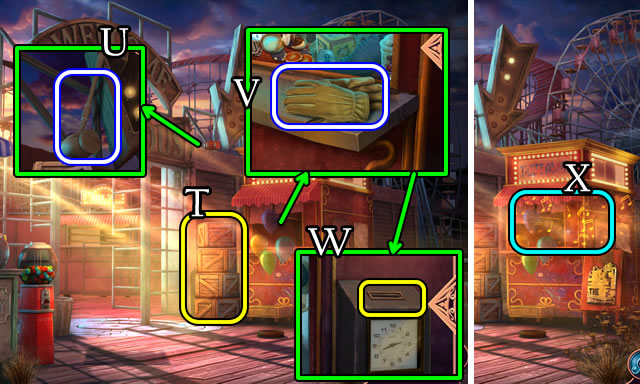
- Take the METAL HOOK (N).
- Take the IRON KEY (O).
- Take the RUBBER NOSE (P). Pick up the COG (Q).
- Select to take the BELT BUCKLE (R).
- Place, then select the RUBBER NOSE (S).
- Take the LAMP and HANDLE (T).
- Use the IRON KEY; take the PADLOCK (U).
- Open to take the SCREWDRIVER (V).
- Take the LADDER (W).
- Place the LADDER (X).
- Take the RED ELEPHANT (Y). Open and place the LAMP (Z).
- Solution (A1)-(A4).
- Take the CHAIN PIECE (B).
- Slide the cover; take the LIGHTBULB (C).
- Place the CHAIN PIECE (1), METAL HOOK (2), PADLOCK (3) and BELT BUCKLE (4).
- Place the COG (D).
- Close the panel, place and select the HANDLE (E).
- Open the metal gate and walk left.
- Take the DOVE CLOTH (F).
- Play the HOP (G) for a LION FIGURINE.
- Press (H). Take the RAIL PIECE and underlying PURPLE ELEPHANT (I).
- Walk down.
- Place the RED and PURPLE ELEPHANTS (J). Select 1-4.
- Place the LION FIGURINE (K). Select 1-6.
- Walk right.
- Select the guillotine, then place the RAIL PIECE (M). Take the MAGIC WAND and BUMPER TICKET (N).
- Take the MAGIC TRICK INSTRUCTIONS (O).
- Take the MAGIC BOX (P).
- Walk down, then left.
- Use the BUMPER TICKET (Q); pull the lever (R). Take the STAR CLOTH (S).
- Combine the MAGIC BOX, MAGIC TRICK INSTRUCTIONS, DOVE CLOTH and MAGIC WAND.
- Combine the MAGIC BOX, STAR CLOTH and MAGIC WAND. Take the STAR KEY.
- Walk down, then right.
- Use the STAR KEY (T).
- Walk forward.
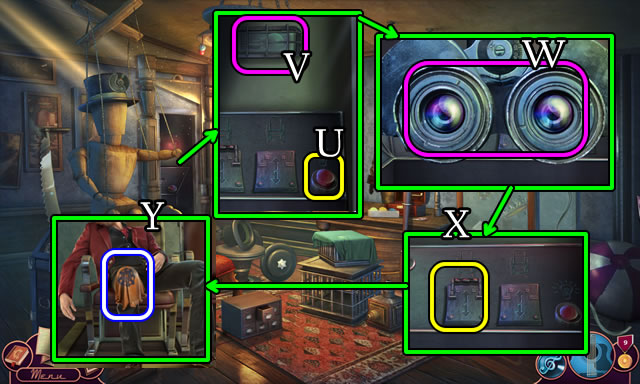
- Press (U). Remove the cover and replace the LIGHT BULB (V). Press the button again. Look through the lenses (W). Select, then scroll right.
- Pull (X).
- Take the VALVE CLOTH (Y).
- Combine the MAGIC BOX, VALVE CLOTH and MAGIC WAND. Take the VALVE.
- Place the VALVE (Z).
- Play the HOP (A) for a CONTROL LEVER.
- Walk forward.
- Place, then select the CONTROL LEVER (B).
- Speak with the characters.
- Solution. 1-10.
- Speak with the character; take the photo (C).
- Solution (D).
- Select the photo.
- Solution (E).
- Select the picture.
- Solution (F).
- Select the picture 2x.
- Select (G).
Chapter 5: The Confrontation
- Speak to the character (H).
- Take the paper, remove the sign (I) and take the GARDEN SHEARS (J).
- Use the GARDEN SHEARS; take the WHEEL RUNG (K).
- Take the POLISHING RAG (L).
- Open the door; walk forward.
- Open the drawer. Take the BUTTER KNIFE (M).
- Combine the COMPASS and BUTTER KNIFE for a NEEDLE.
- Use the NEEDLE (N).
- Open; use the POLISHING RAG. Take the GREASY CLOTH (O).
- Select the WHEEL RUNG 4x for a BENT RUNG.
- Use the BENT RUNG to take the BRASS ORNAMENT (P). Take the FISH and ICE GRABBER (Q).
- Use the ICE GRABBER to get a SMALL KEY (R).
- Walk down.
- Place the BRASS ORNAMENT (S).
- Take the FUEL HOSE (T).
- Use the SMALL KEY (U); open and take the BASTER (V).
- Combine the BASTER and FUEL HOSE for an EMPTY BASTER.
- Walk forward.
- Use the EMPTY BASTER for a BASTER WITH OIL (W).
- Open; use the BASTER WITH OIL (X).
- Take the KITCHEN LIGHTER (Y).
- Select the door, smoke detector (Z) and down arrow.
- Place the GREASY RAG. Use the KITCHEN LIGHTER (A).
- Play the HOP (B) for a WAITER'S UNIFORM.
- Walk down.
- Speak with the characters (C), (D).
- Walk to the Yacht Deck.
- Open (E); walk forward.
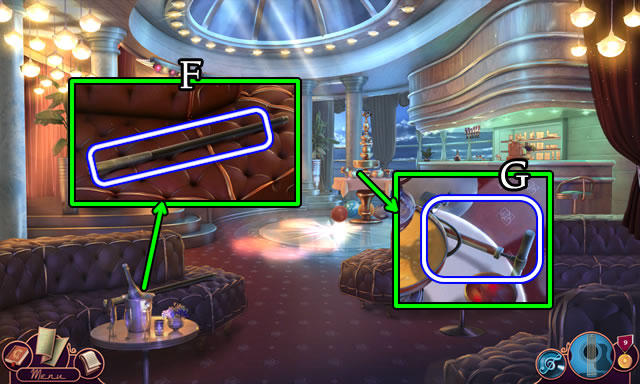
- Take the BROKEN WALKING STICK (F).
- Take the AIR PUMP (G).
- Walk down.
- Take the METAL ORNAMENT (H).
- Combine the BROKEN WALKING STICK and METAL ORNAMENT. Take the INCOMPLETE MAP.
- Take the DEFLATED LIFE PRESERVER (I) and CABINET HANDLE (J).
- Combine the DEFLATED LIFE PRESERVER and AIR PUMP for a LIFE PRESERVER WITH PUMP.
- Take the 1/3 METAL SHELL (K).
- Walk forward.
- Use the CABINET HANDLE (L).
- Take 1/2 MAP PART and THREAD (M).
- Combine the BROKEN WALKING STICK, THREAD and BENT RUNG for a MAKESHIFT FISHING ROD.
- Walk down.
- Use the MAKESHIFT FISHING ROD for a METAL BOX (N).
- Walk forward.
- Open the METAL BOX; take the CASH REGISTER LEVER.
- Use the CASH REGISTER LEVER (O). Take the PUNCH CARD (P).
- Walk down.
- Use the PUNCH CARD (Q).
- Play the HOP (R) for ADAM'S GUITAR.
- Enter the Dressing Room.
- Use the NEEDLE for 2/3 METAL SHELL (S). Open and take the ORNAMENTAL SHIP (T).
- Move the pillows to take the FRET PRESS (U).
- Return to the Ballroom.
- Use the FRET PRESS to take 3/3 METAL SHELL (V).
- Return to the Dressing Room.
- Place the 3/3 METAL SHELLS (W).
- Uncover the safe. Place the ORNAMENTAL SHIP; pull the handle (X).
- Take the box (Y); open for a DIAMOND RING.
- Speak to the character.
- Solution (Z1)-(Z3).
- Speak to the character; return to the Ballroom.
- Speak to the characters (A), (B).
- Play the HOP (C) for COCKTAILS.
- Give the COCKTAILS (D).
- Speak with the characters.
- Enter the Maintence Corridors.
- Take the EXTINGUISHER HOSE (E).
- Take the WRENCH (F).
- Give the FISH (G); take the SCRAPER.
- Use the WRENCH and DIAMOND RING (H). Take the 2/2 MAP PART (I).
- Open the hatch; place the LIFE PRESERVER WITH PUMP (J).
- Use the SCRAPER; take the GLUE (K).
- Place the EXTINGUISHER HOSE (L).
- Combine the INCOMPLETE MAP, 2/2 MAP PARTS and GLUE for a CORRIDOR MAP.
- Place the CORRIDOR MAP (M).
- Select (N).
- Note the code (O). Use the SCREWDRIVER; take the CONTROL LEVER 'N' (P).
- Place CONTROL LEVER 'N'; select 4-3 (Q); select (R) and turn (S).
- Take CONTROL LEVER 'B' (T); Use the CLOWN GLOVES to turn the valve.
- Note the code (U).
- Place CONTROL LEVER 'B'; select 2-1 (V); select (W) and turn (X).
- Walk forward.
- Speak to the characters.

- Solution (Y1)-(Y3). 1-12.
- Solution. 1-9.
- Speak to the characters.
- Congratulations. You have completed Cadenza: Fame, Theft, and Murder.
Created at: 2017-04-02