

Walkthrough Menu
- General Tips
- Chapter 1: The Diamante Club
- Chapter 2: Radio Fiesta
- Chapter 3: The Hospital
- Chapter 4: Bronco's Gym
- Chapter 5: The Fort
General Tips
- This is the official guide for Cadenza: Havana Nights.
- This guide will not mention each time you have to zoom into a location; the screenshots will show each zoom scene.
- Hidden-object puzzles are referred to as HOPs. This guide will not show screenshots of the HOPs, but it will mention when a HOP is available and the inventory item you'll collect from it.
- This guide will give step-by-step solutions for all puzzles that are not random. Please read the instructions in the game for each puzzle.
Chapter 1: The Diamante Club
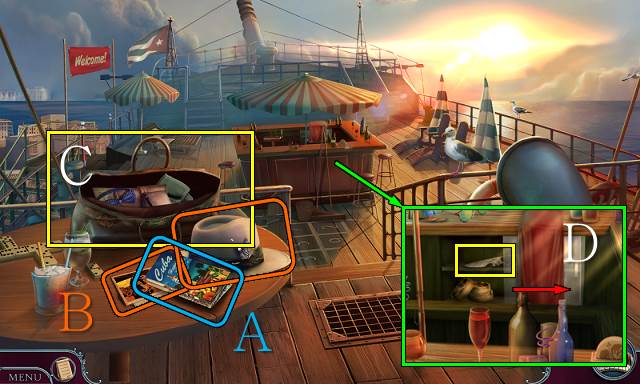
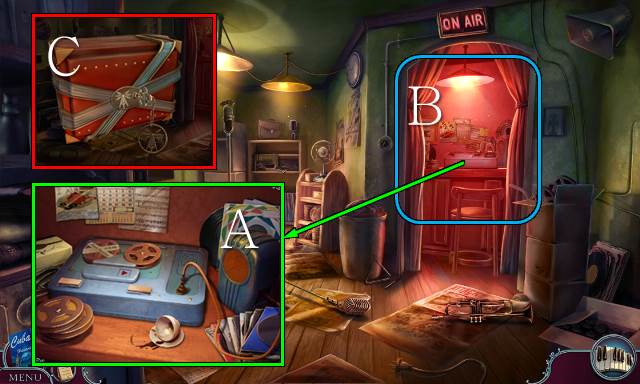
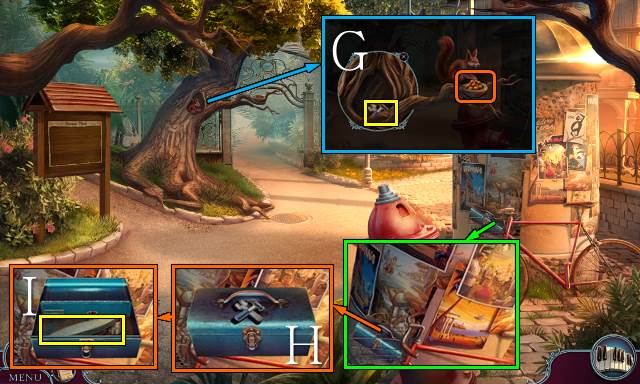
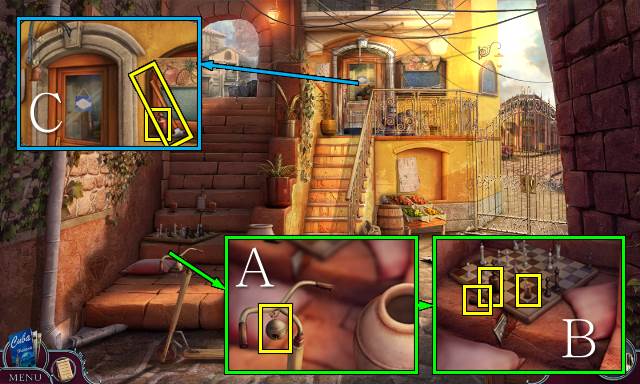
- Pick up the map (A), inspect the brochure and put on your hat (B).
- Take the TRAVELING BAG (C).
- Move the drape and slide open the cabinet; take the BARTENDER'S KNIFE (D).
- Go left.
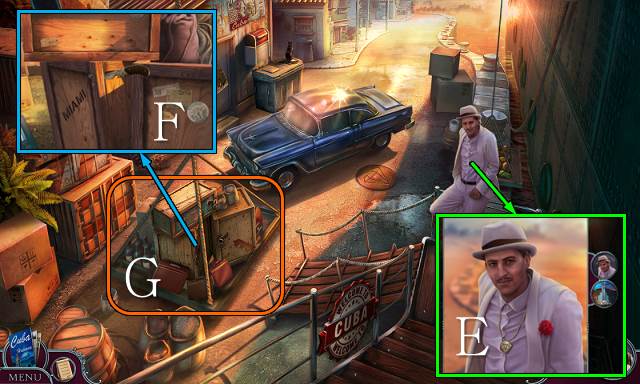
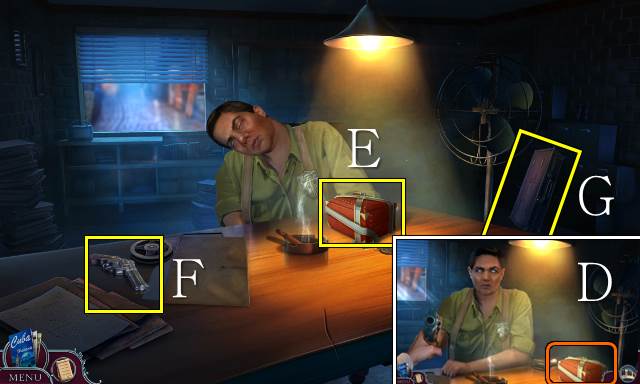
- Talk to Ernesto; go through the dialog options (E).
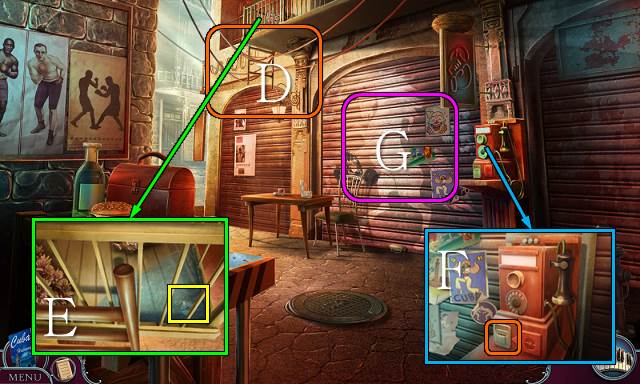
- Use the BARTENDER'S KNIFE (F).
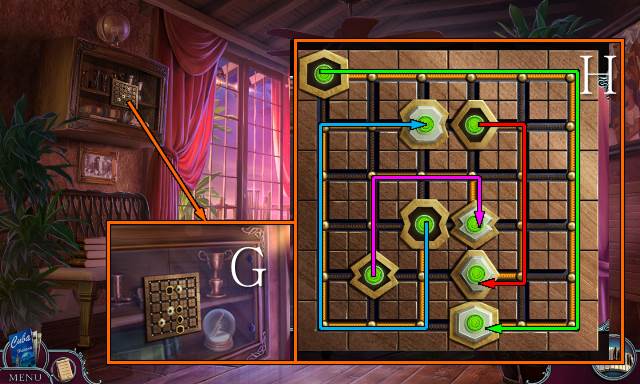
- Play the HOP (G).
- You receive a TRUMPET CASE.
- Talk to Ernesto.
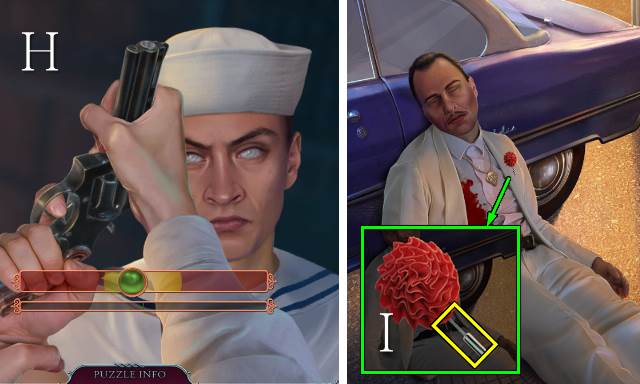
- Play the mini-game (H).
- You receive a REVOLVER.
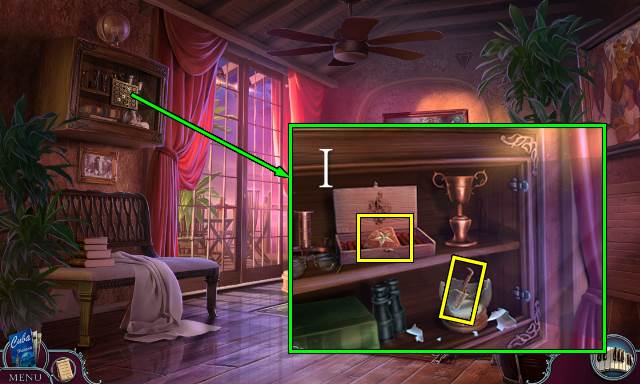
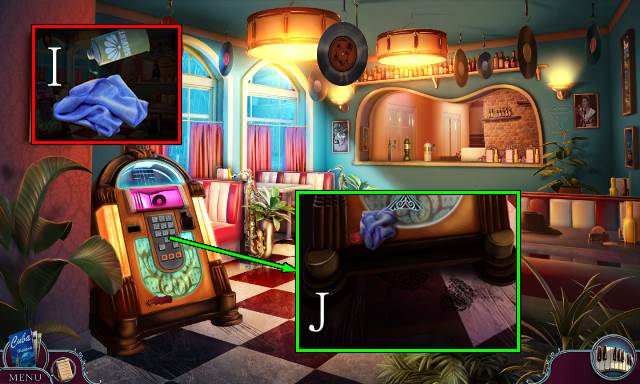
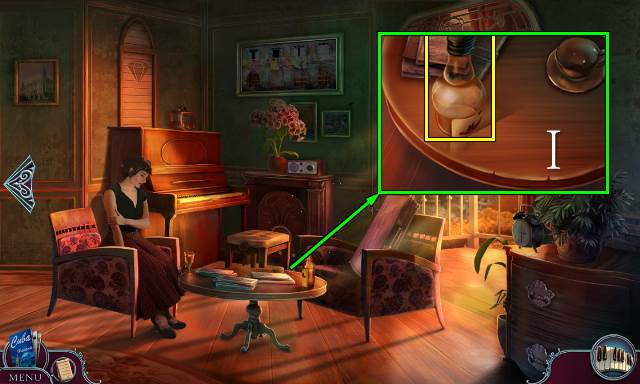
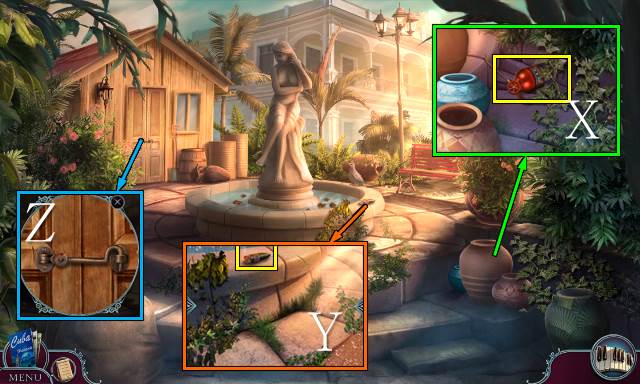
- Remove the flower and take the PIN (I).
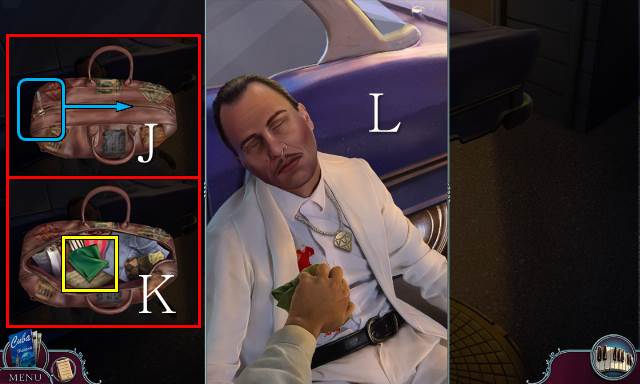
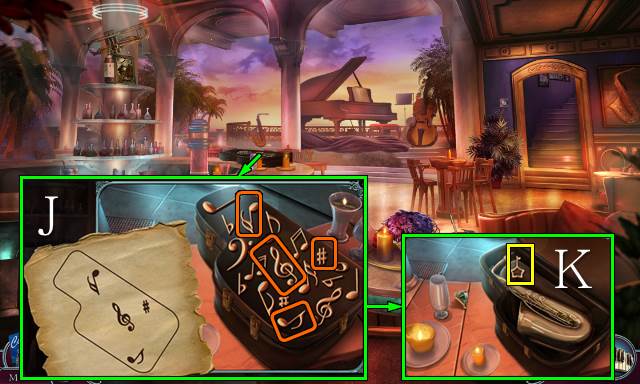
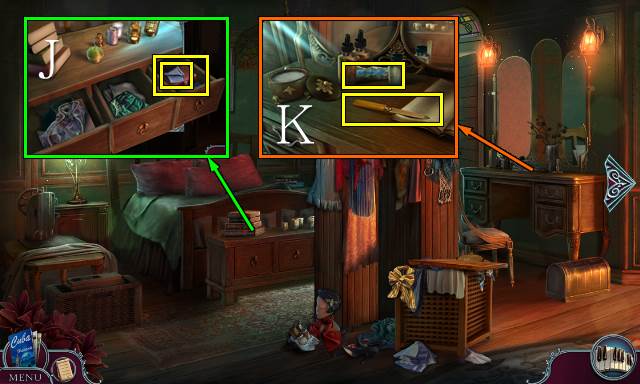
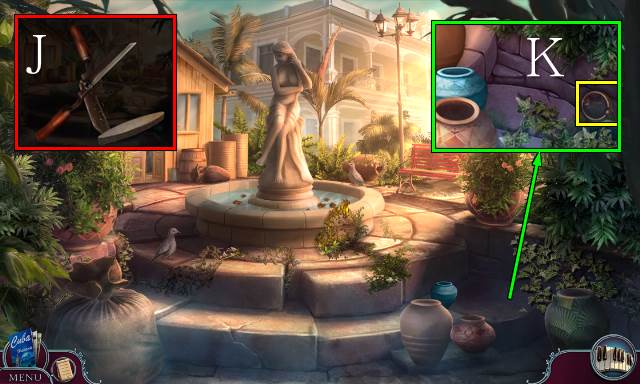
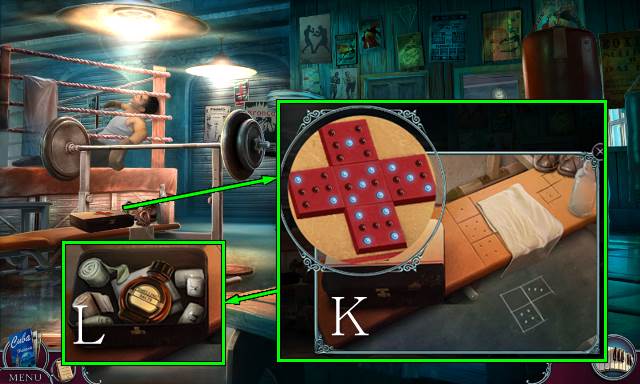
- Access the TRAVELING BAG and try to open it, then use the PIN and slide the zipper (J); open the bag, remove the items and take the HANDKERCHIEF (K).
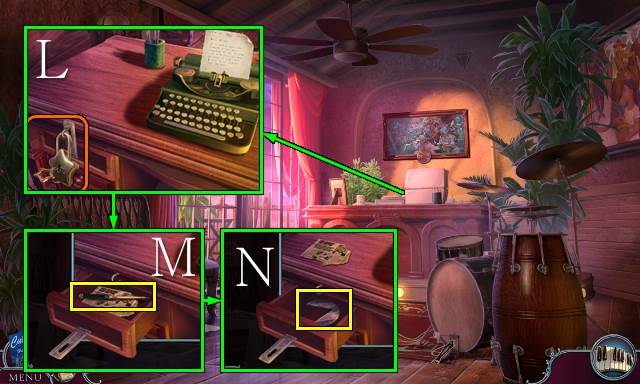
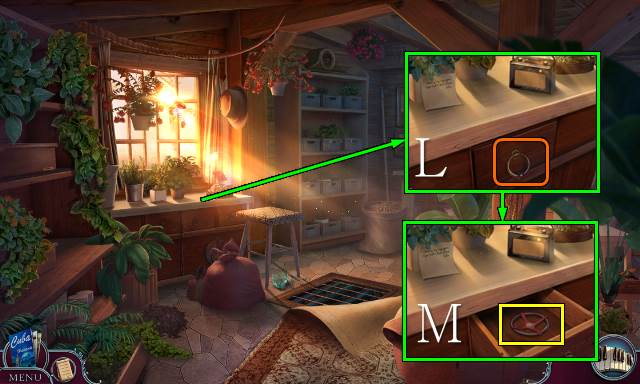
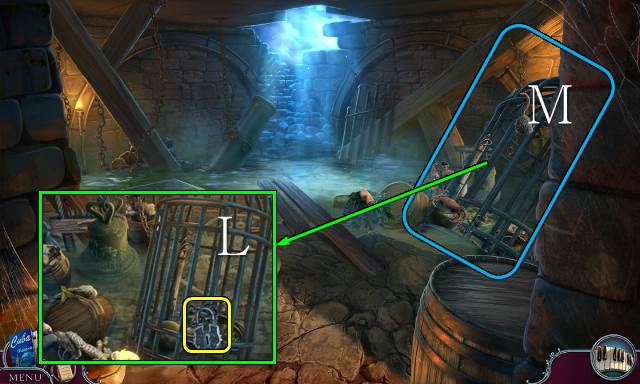
- Use the HANDKERCHIEF (L).
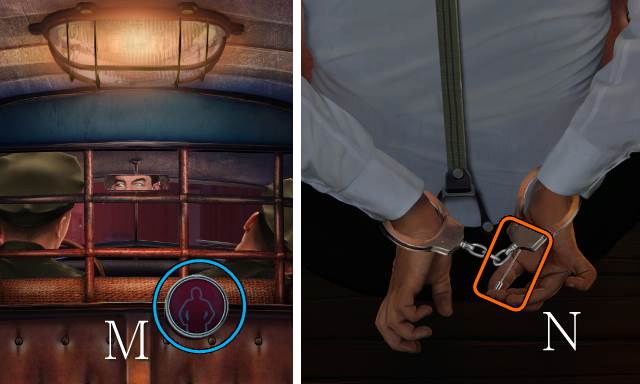
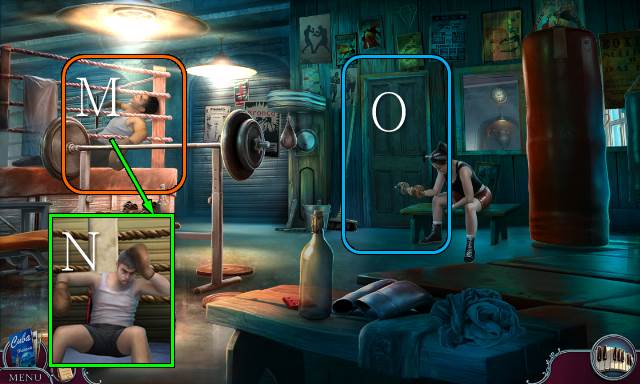
- Enter Awareness Mode (M).
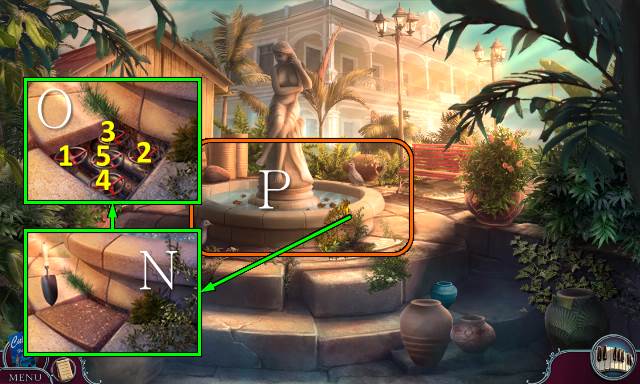
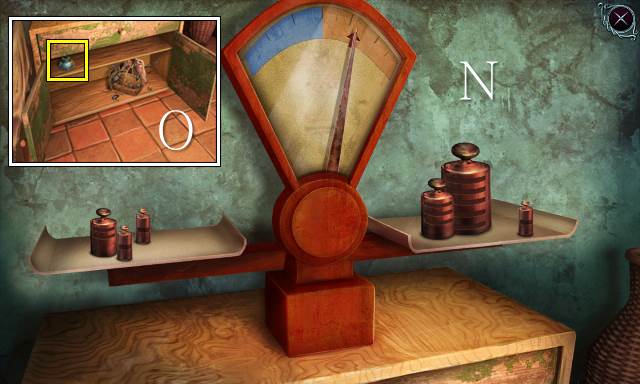
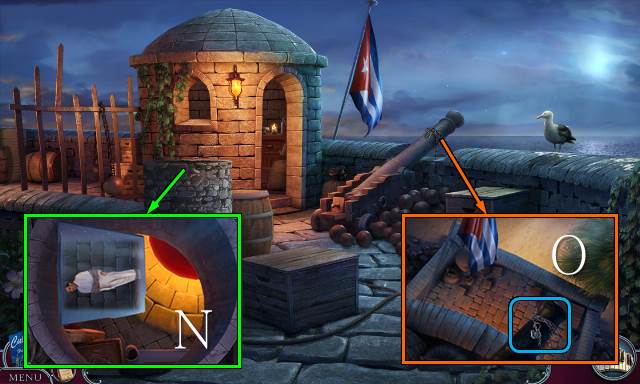
- Use the PIN and move it until the handcuffs are unlocked (N).
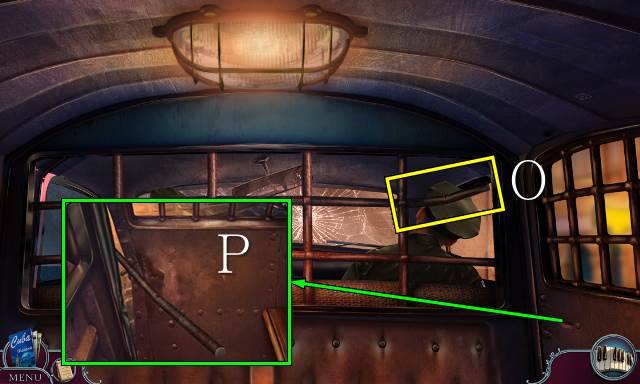
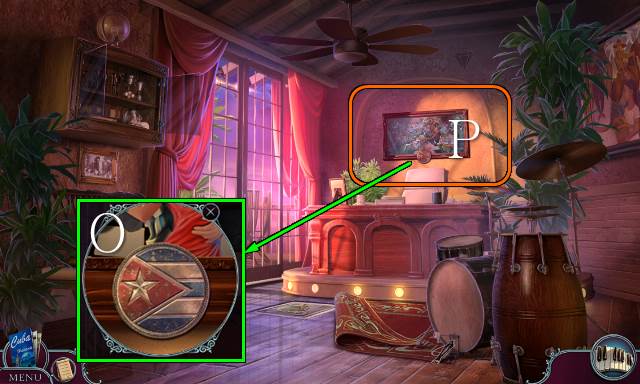
- Take the METAL BAR (O).
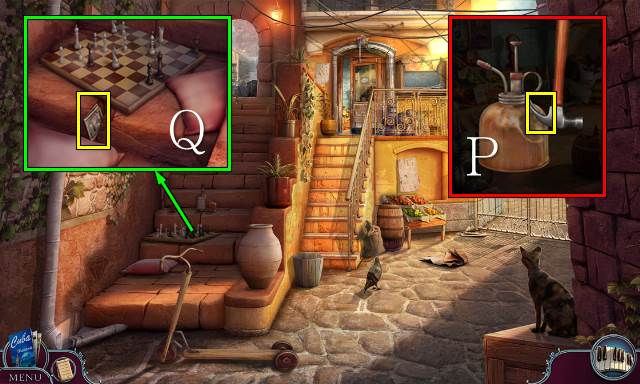
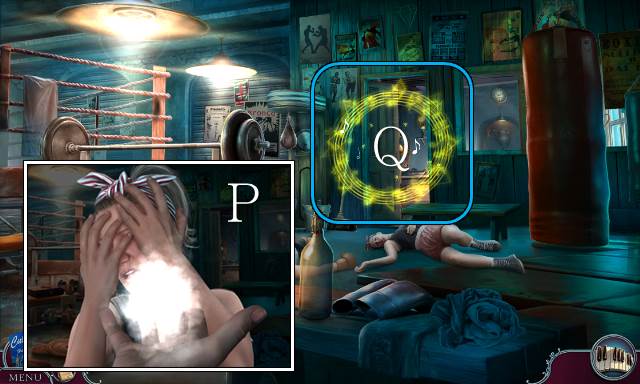
- Use the METAL BAR and move it until the door is open; exit the car (P).
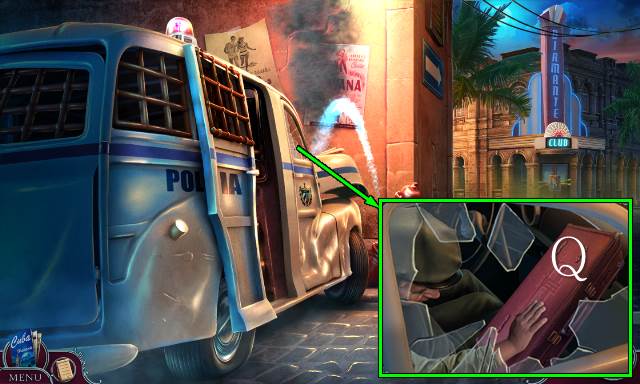
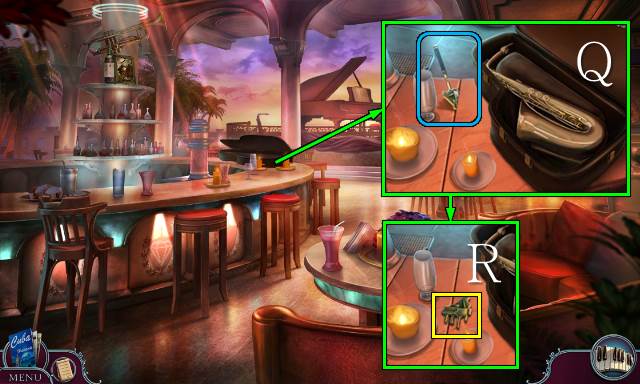
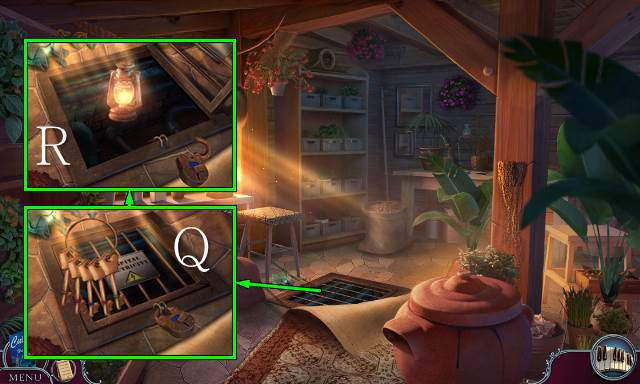
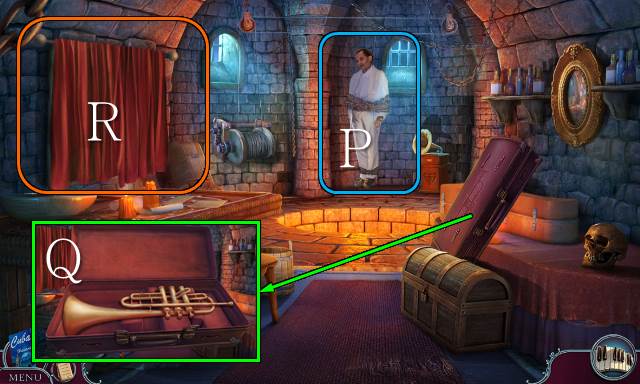
- Move the hand twice and take the TRUMPET CASE (Q).
- Go forward.
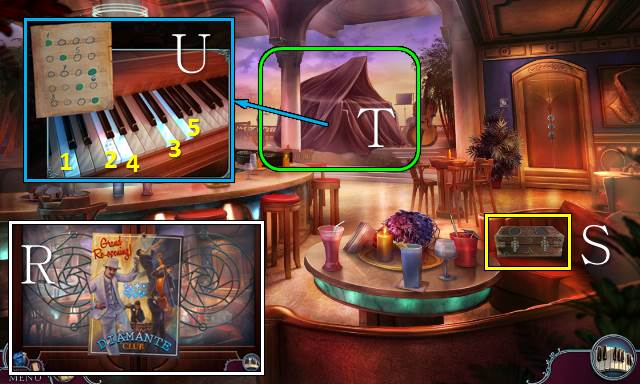
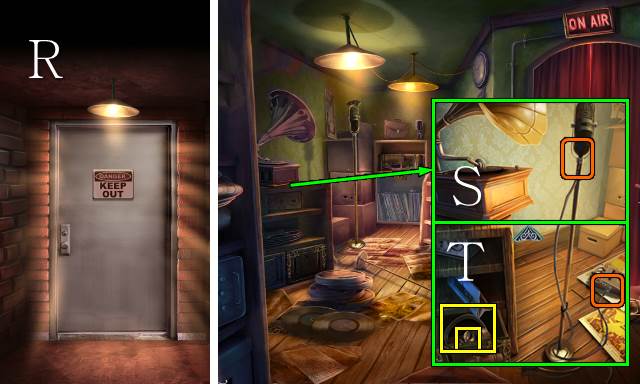
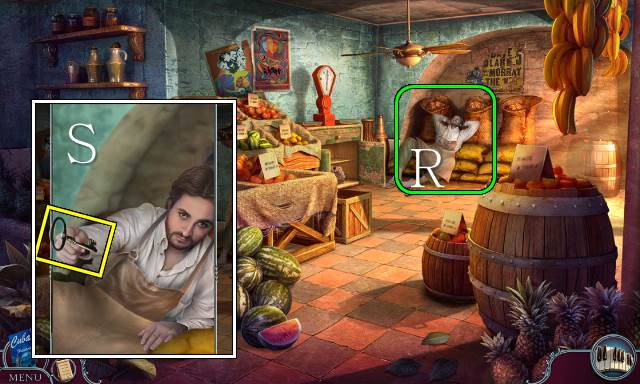
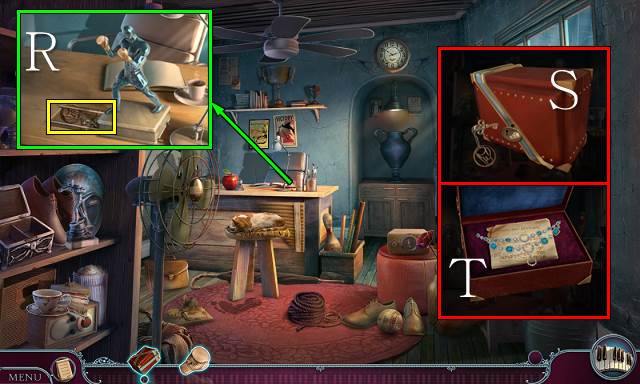
- Remove the flyer and open the doors (R).
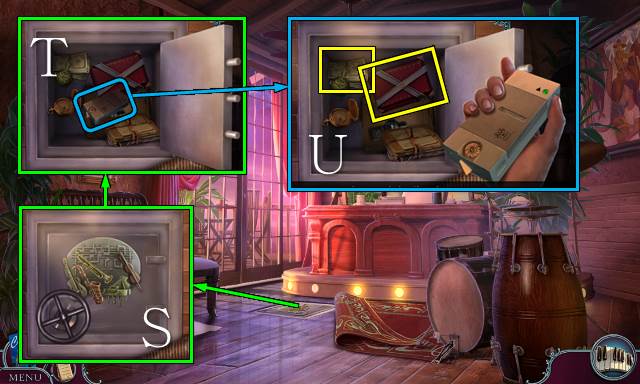
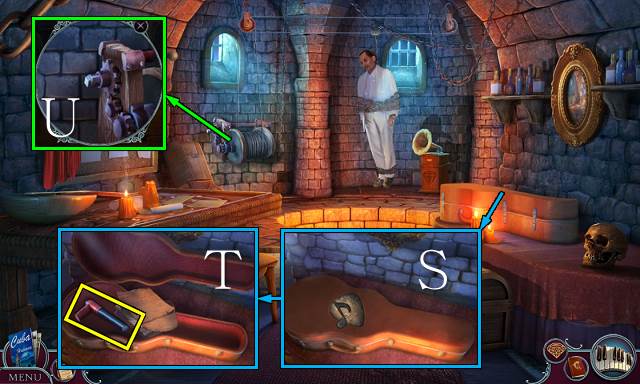
- Take the TOOLBOX (S).
- Remove the sheet; play the HOP (T).
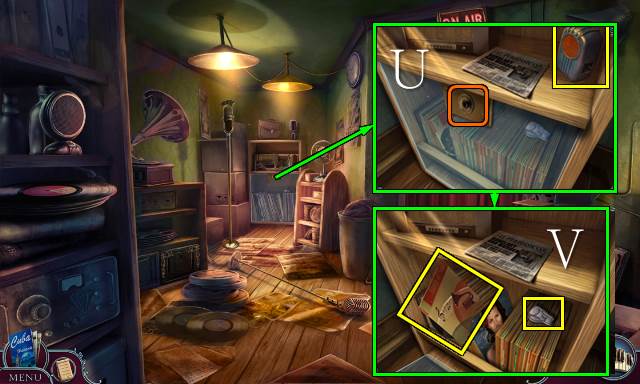
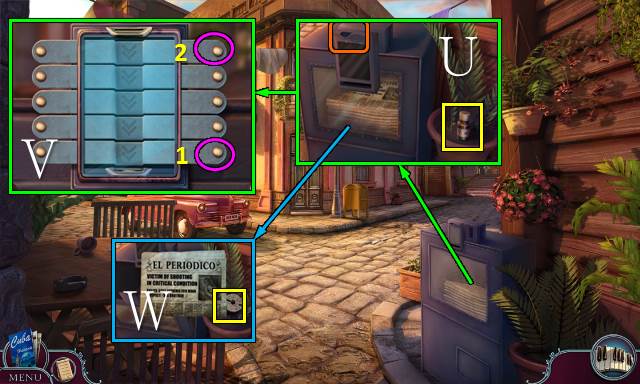
- HOP mini-game solution (U).
- You receive a WRENCH EMBLEM.
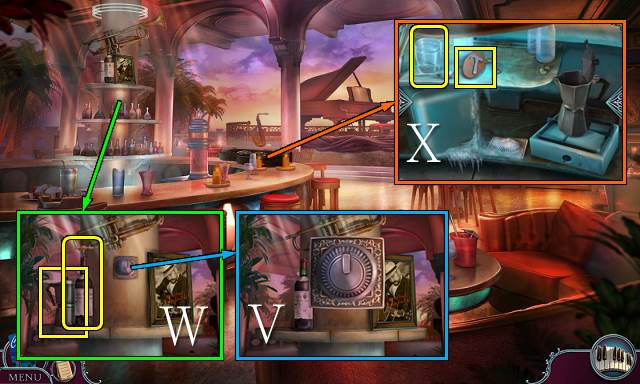
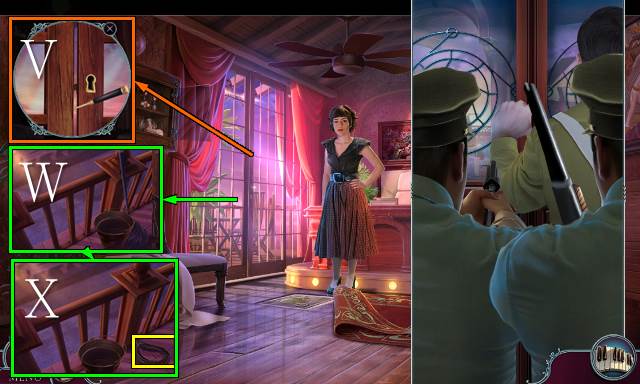
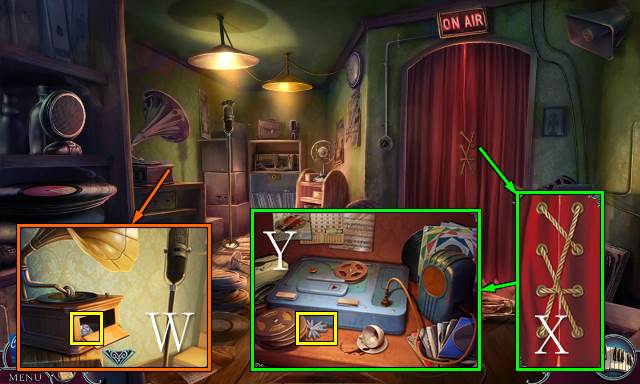
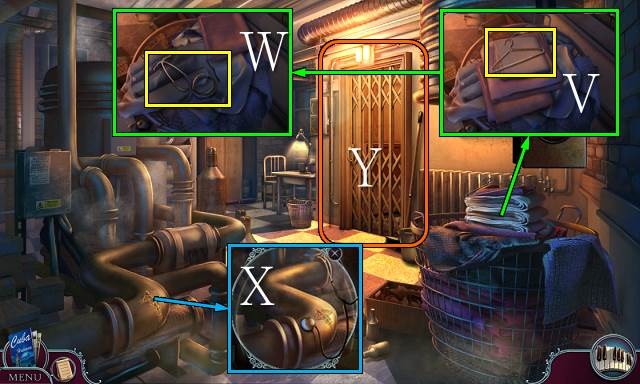
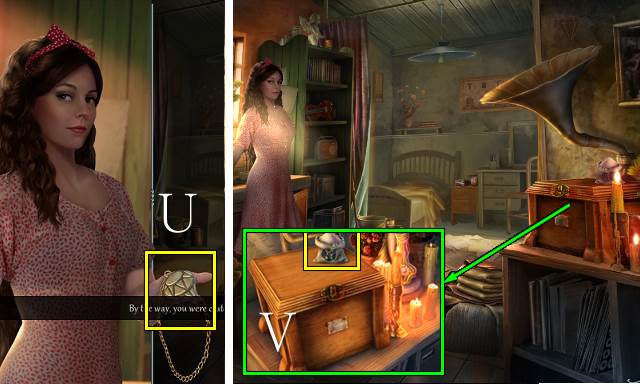
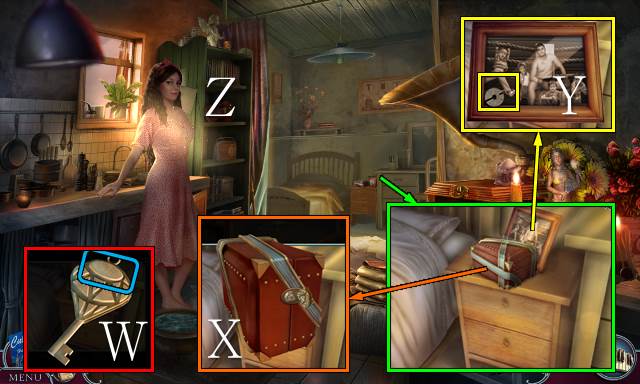
- Move the picture and turn the knob four times (V); pick up the bottle, take the CORKSCREW and take the COFFEEPOT (W).
- Turn the zoom; take the HAMMER EMBLEM, place the COFFEEPOT and pour in the water (X).
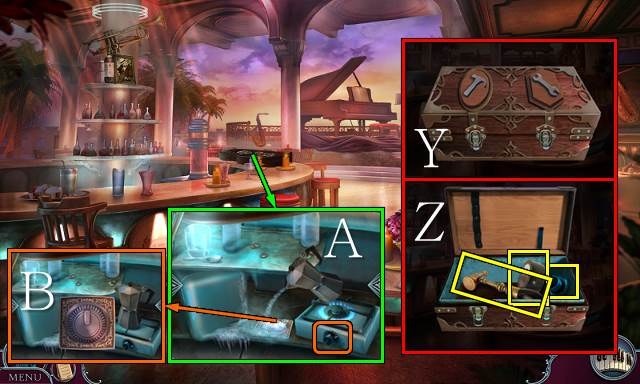
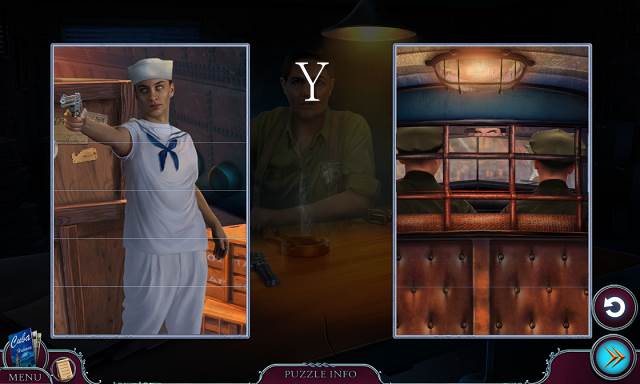
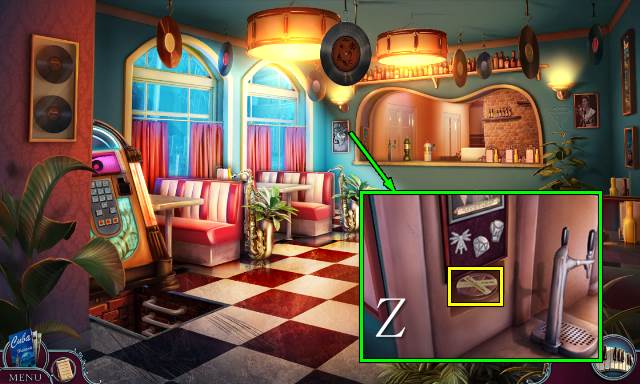
- Access the TOOLBOX and place the HAMMER EMBLEM and WRENCH EMBLEM (Y); push both emblems and take HAMMER, ELECTRICAL TAPE and STOVE BUTTON (Z).
- Place the STOVE BUTTON, turn it and pour the water (A); turn the knob three times (B).
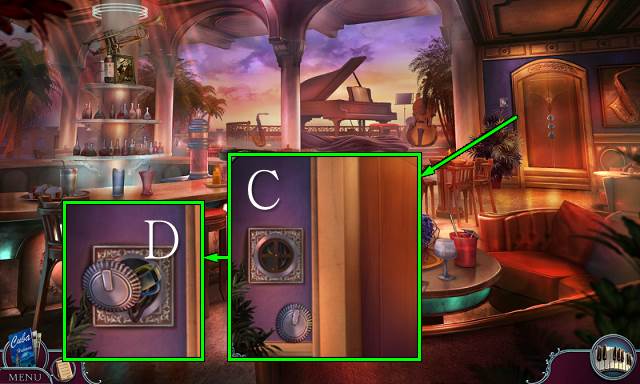
- Move the plant, place the knob and turn it (C); use the ELECTRICAL TAPE, place the knob and turn the knob once (D).
- Go forward.
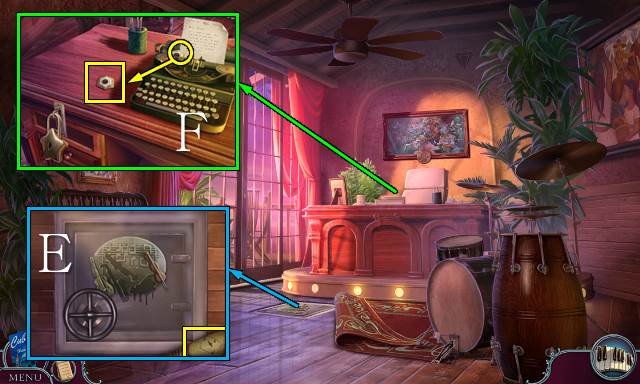
- Move the rug.
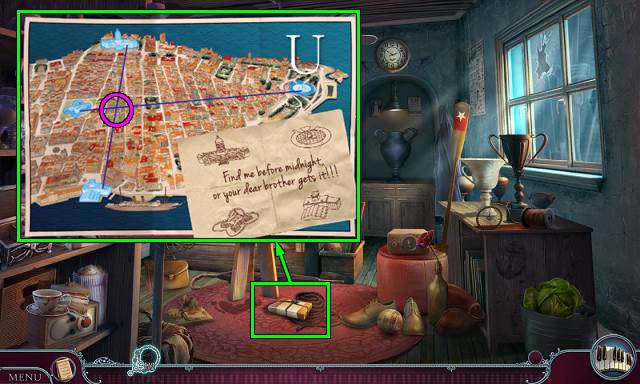
- Take the CLUE (E).
- Read the note and take the METAL BUTTON (F).
- Place the METAL BUTTON (G).
- Play the mini-game (H).
- Open the cabinet, move the glasses, open the box and take the STAR EMBLEM; use the HAMMER and take the SAXOPHONE EMBLEM (I).
- Walk down.
- Place the CLUE and play the mini-game (J).
- Open the case and take the STAR KEY (K).
- Go forward.
- Use the STAR KEY and open the drawer (L); take the LETTER OPENER (M), read the article and take the STRIPED EMBLEM (N).
- Place the STAR EMBLEM and STRIPED EMBLEM (O).
- Play the HOP (P).
- You receive a TRUMPET EMBLEM.
- Walk down.
- Use the LETTER OPENER (Q) and take the PIANO EMBLEM (R).
- Walk forward.
- Place the SAXOPHONE EMBLEM, TRUMPET EMBLEM and PIANO EMBLEM (S); play the recording (T), take and turn the RED BOX and take the MONEY (U).
- Walk down.
- Place the LETTER OPENER and move it (V).
- Move the bucket and mop (W), take the ROPE, place the ROPE and climb down (X).
Chapter 2: Radio Fiesta
- Play the mini-game (Y).
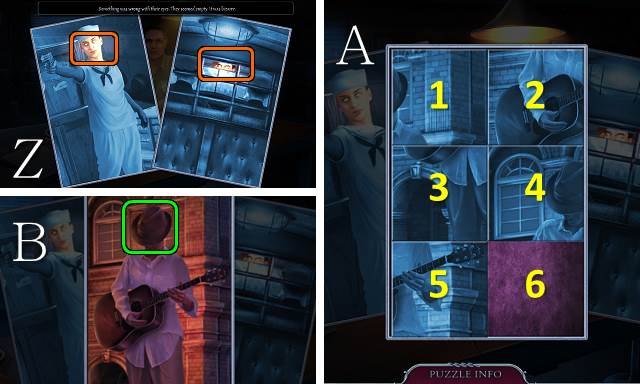
- Select the eyes (Z).
- Play the mini-game (A).
- Solution: 5-3-4-2-1-3-4-6.
- Select the hat (B).
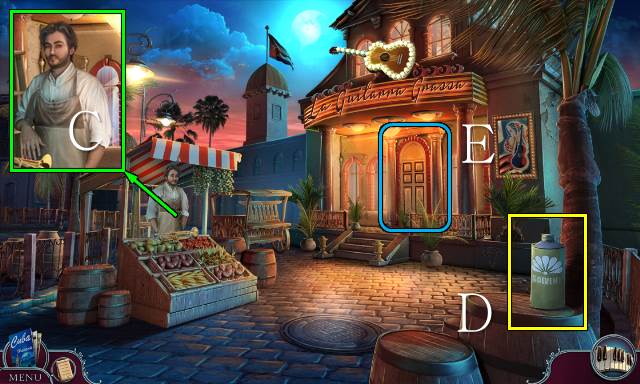
- Talk to the grocer (C).
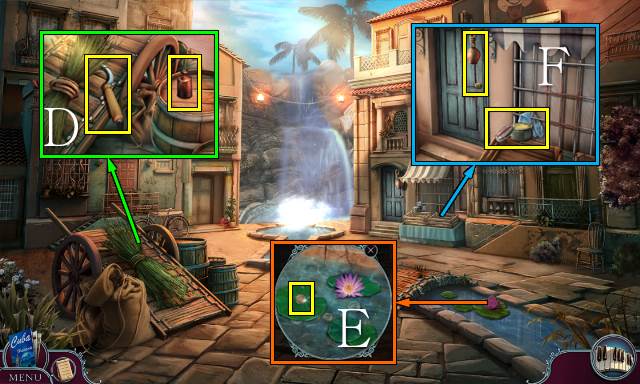
- Take the SOLVENT (D).
- Open the door (E).
- Go forward.
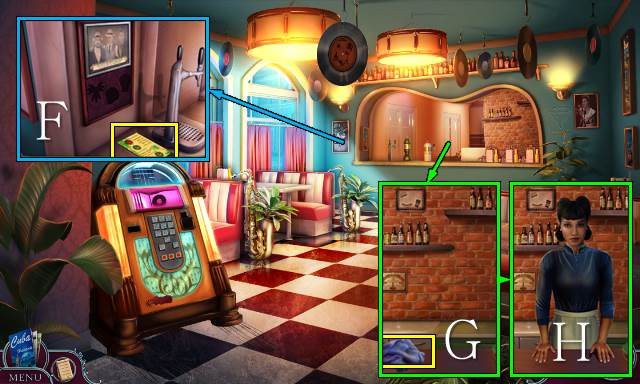
- Take the MENU (F).
- Take the CLOTH (G); talk to the waitress (H).
- Access the CLOTH and use the SOLVENT; you receive a CLOTH WITH SOLVENT (I).
- Scroll down and use the CLOTH WITH SOLVENT (J).
- Walk down.
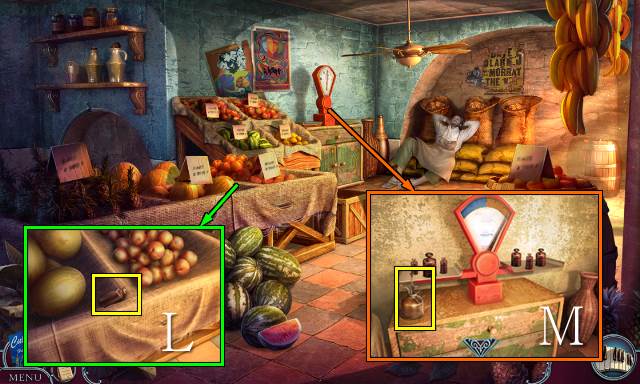
- Talk to the grocer (K).
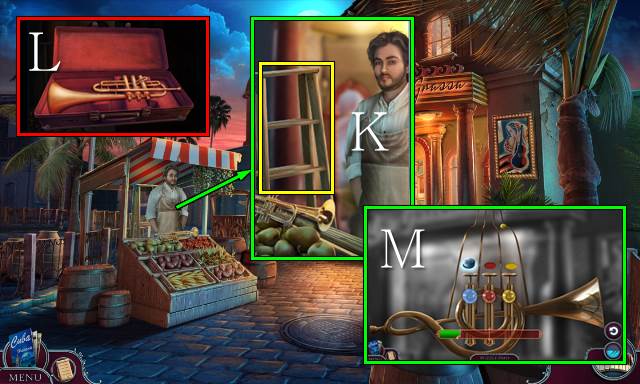
- Access your TRUMPET CASE, open it and take the TRUMPET (L).
- Use the TRUMPET for a mini-game (M).
- Take the LADDER (K).
- Go forward.
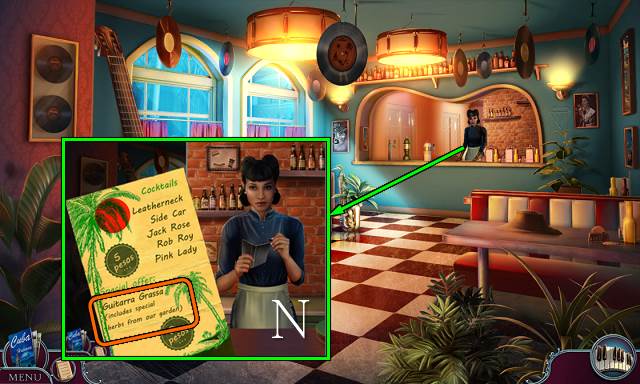
- Give the MENU to the waitress; order the Guitarra Grassa and give her the MONEY (N).
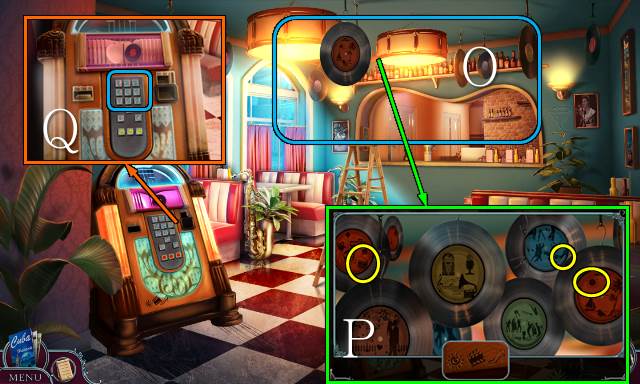
- Place the LADDER (O).
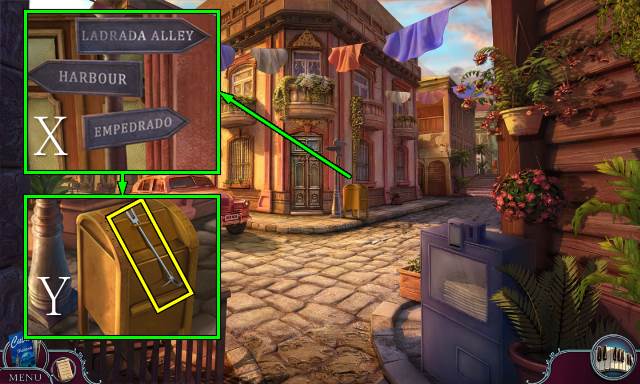
- Find the symbols (P).
- Enter 921 (Q).
- Go down the ladder.
- Open the door (R).
- Go forward.
- Unplug the cable (S), scroll down and unplug the other end to receive a CABLE; use the CORKSCREW to open the drawer and take the PROTECTIVE HEADPHONES and KNOB (T).
- Read the paper and take the SPEAKER (U); place the KNOB, open the compartment, take the BOXING GLOVE SYMBOL, move the records and take the RECORD (V).
- Scroll up, place the RECORD and take the DIAMOND SYMBOL (W).
- Remove the rope and open the curtain (X); remove the broken speaker, place the SPEAKER and CABLE, plug in the cable and take the RADIO SYMBOL (Y).
- Walk down.
- Place the RADIO SYMBOL, BOXING GLOVE SYMBOL and DIAMOND SYMBOL; take RAUL'S TAPE (Z).
- Go down the ladder.
- Place RAUL'S tape and push play (A).
- Play the HOP (B).
- You receive the RED BOX KEY.
- Access the RED BOX and use the RED BOX KEY (C).
- Grab the red box (D).
- Take the RED BOX and RED BOX KEY (E).
- Take the GUN (F).
- Take the TRUMPET CASE (G).

- Use the GUN (H).
- Go forward.
Chapter 3: The Hospital
- Take the ALCOHOL (I).
- Scroll left.
- Open the drawers; take the HANDKERCHIEF and FIRST AID KIT (J).
- Move the bottles and take the NAIL FILE and ANTISEPTIC (K).
- Scroll right.
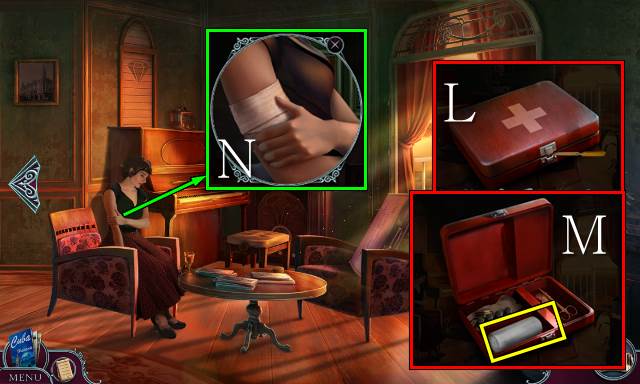
- Access the FIRST AID KIT and use the NAIL FILE (L); open the box and take the BANDAGE (M).
- Use the ALCOHOL, ANTISEPTIC and BANDAGE (N).
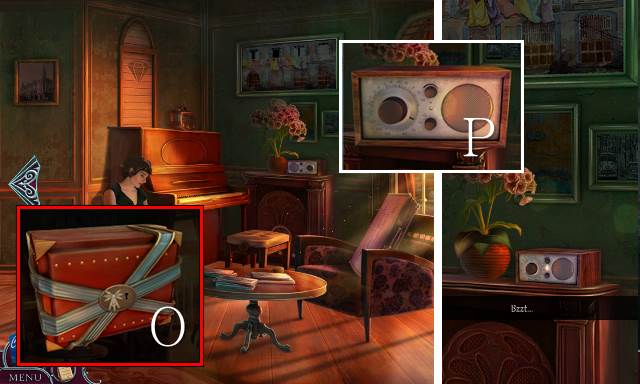
- Access the RED BOX and place and turn the RED BOX KEY (O).
- Turn the knob three times (P).
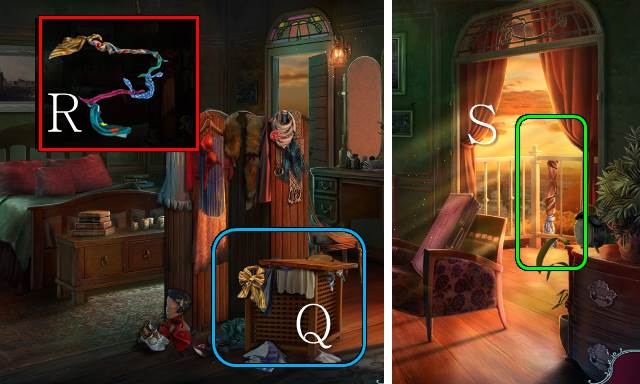
- Open the laundry hamper and play the HOP (Q).
- You receive some SCARVES.
- Access the SCARVES and tie them together into an IMPROVISED ROPE (R).
- Scroll right.
- Use the IMPROVISED ROPE (S).
- Go forward.
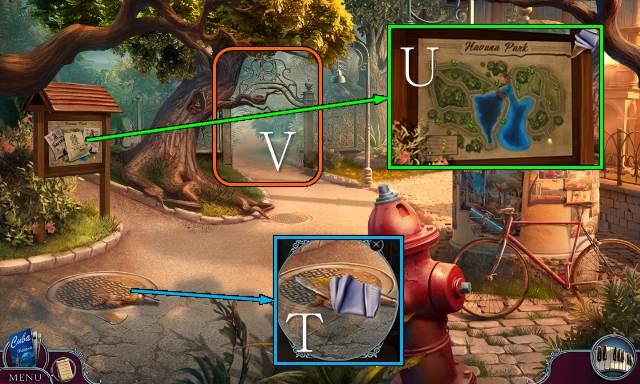
- Use the HANDKERCHIEF and take the IMPROVISED KNIFE (T).
- Remove the flyers and use the IMPROVISED KNIFE; take the PARK MAP (U).
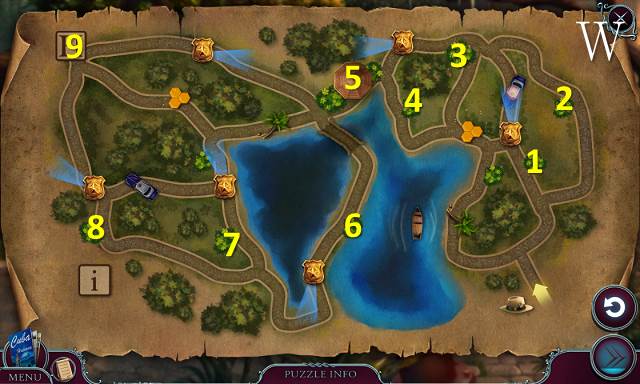
- Use the PARK MAP (V).
- Go forward.
- Play the mini-game (W).
- Move the pots and take the OILCAN (X).
- Take the LIT CIGAR (Y).
- Use the OILCAN, open the lock and open the door (Z).
- Go forward.
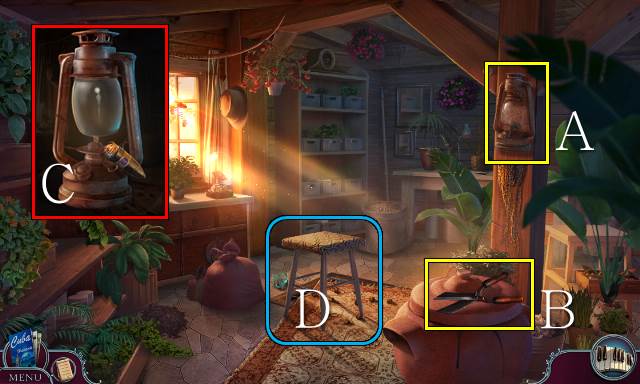
- Take the LANTERN (A).
- Take the DULL SHEARS (B).
- Access the LANTERN and use the LIT CIGAR; take the LIT LANTERN (C).
- Move the stool (D).
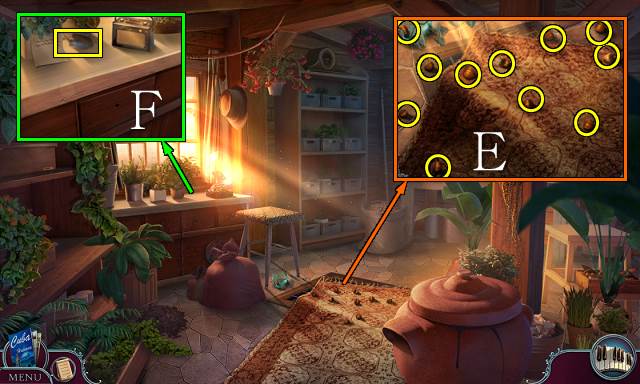
- Pick up all the nuts and take the NUTS (E).
- Read the note and play the radio; take the TROWEL (F).
- Walk down twice.
- Place the NUTS; move the leaves and take the TOOLS EMBLEM (G).
- Pick up the toolbox and place the TOOLS EMBLEM (H); open the toolbox and take the WHETSTONE (I).
- Go forward.
- Access the DULL SHEARS and use the WHETSTONE; you receive the SHARP SHEARS (J).
- Use the SHARP SHEARS; take the DRAWER RING (K).
- Go forward.
- Place the DRAWER RING and open the drawer (L); take the VALVE RING (M).
- Walk down.
- Use the TROWEL and lift the paver (N); place the VALVE RING and turn the rings in order (O).
- Play the HOP (P).
- You receive a KEY RING.
- Go forward.
- Lift the rug, place the KEY RING and use the blue key (Q); lift the hatch and place the LIT LANTERN (R).
- Go down the hatch.
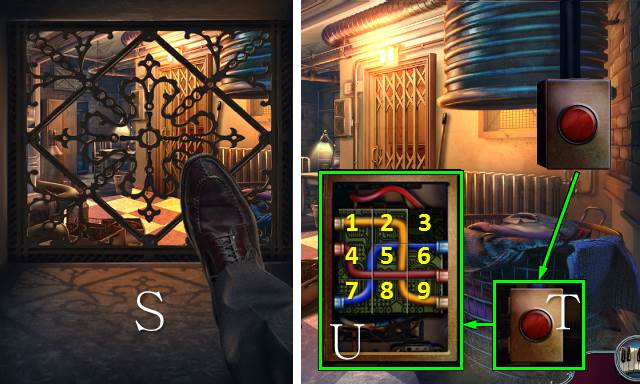
- Kick the grid until it opens (S).
- Push the button (T) and open the box for a mini-game (U).
- Solution: 5-6-9-8-7-4-5-2-3-6-9-8-7-4-1-2-3.
- Push the button.
- Take the COATHANGER (V); remove the laundry and take the STETHOSCOPE (W).
- Use the STETHOSCOPE (X).
- Open the door (Y).
- Go forward.
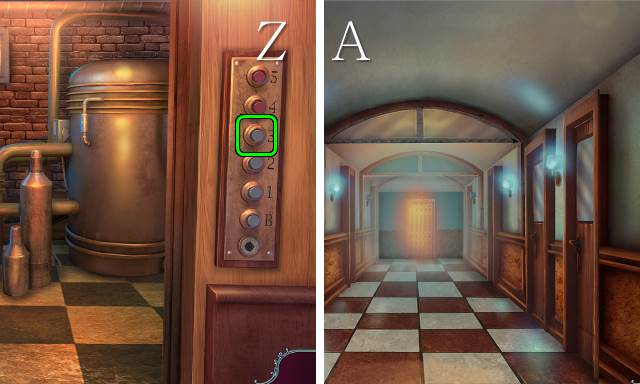
- Push 3 (Z).
- Go forward.
- Open doors until you find Ernesto's Room (A).
- Go in.
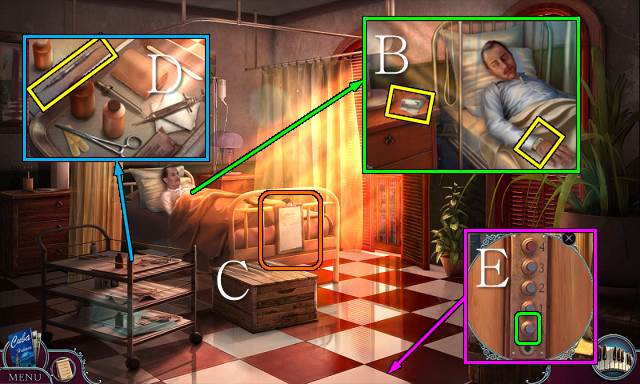
- Move the curtain.
- Interact with Ernesto three times; take the SAFETY PIN and ERNESTO'S TAG (B).
- Check the chart (C).
- Take the MEDICAL HOOK (D).
- Walk down and go to B (E).
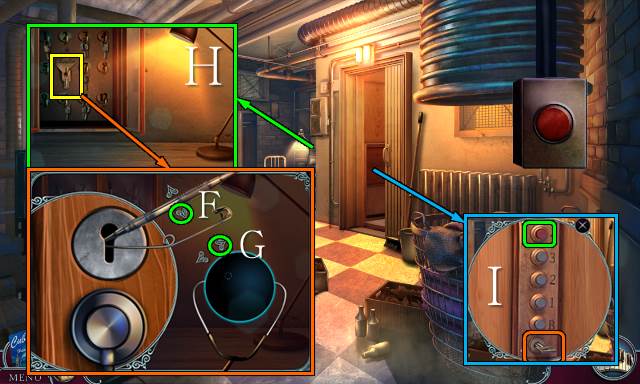
- Place the SAFETY PIN, MEDICAL HOOK and STETHOSCOPE for a mini-game.
- Solution: Fx3, Gx3.
- Take the ELEVATOR KEY (H).
- Place the ELEVATOR KEY and go to 4 (I).
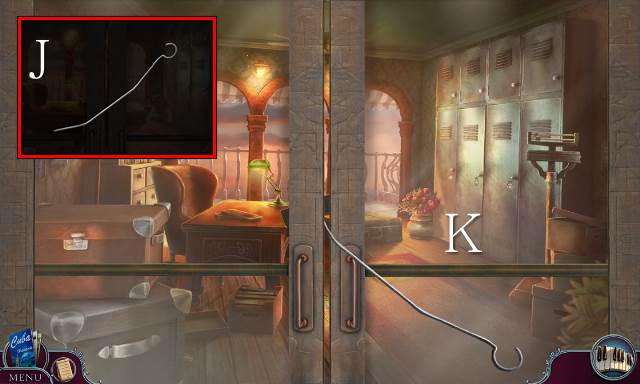
- Access the COATHANGER and turn it into a WIRE HOOK (J).
- Place and use the WIRE HOOK (K).
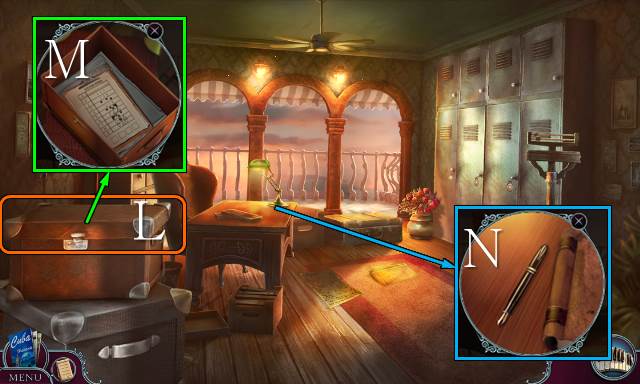
- Open the box (L).
- Take the LOCKER INDEX (M).
- Take the PEN (N).
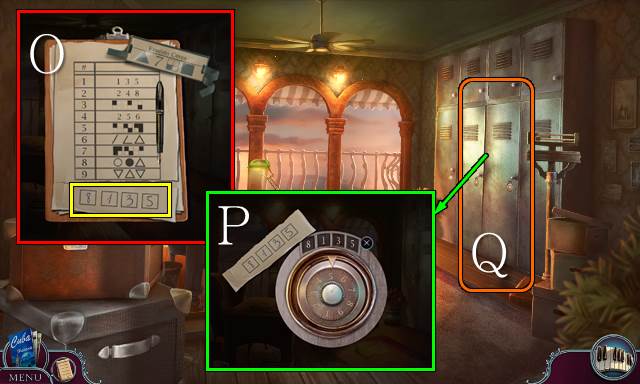
- Access the LOCKER INDEX and place ERNESTO'S TAG and the PEN; select 8, 1, 3 and 5 and take the LOCKER CODE (O).
- Place the LOCKER CODE and enter 8135 (P).
- Play the HOP (Q).
- You receive ERNESTO'S NECKLACE.
- Try to walk down.
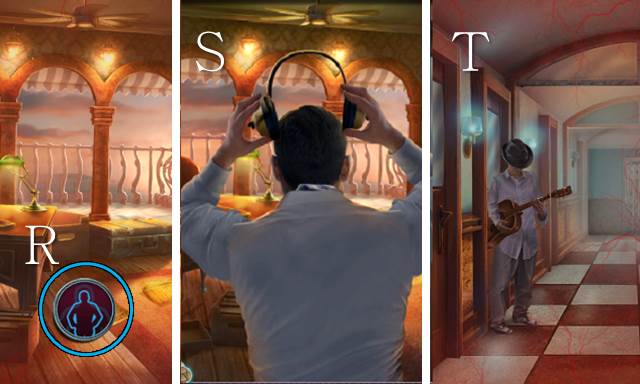
- Go into Awareness Mode (R).
- Use the PROTECTIVE HEADPHONES (S).
- Attack the musician (T).
- Go forward.
Chapter 4: Bronco's Gym
- Take ERNESTO'S NECKLACE (U).
- Take the SLEEPING POWDER (V).
- Access ERNESTO'S NECKLACE and push the button; take the RED BOX KEY (W).
- Pick up the red box, use the RED BOX KEY and turn and take the RED BOX (X); inspect the photo and take TELEPHONE TOKEN 1/3 and the BOXER'S PHOTO (Y).
- Show the BOXER'S PHOTO to Cassandra (Z).
- Walk down.
- Take the BELL (A); take the three WEIGHTS (B).
- Take the HAMMER and WEIGHT 4/6 (C).
- Go forward.
- Move the grass and take WEIGHT 5/6 and the SICKLE (D).
- Take the COIN (E).
- Use the SICKLE and take the BELL and RUST REMOVER (F).
- Walk down twice.
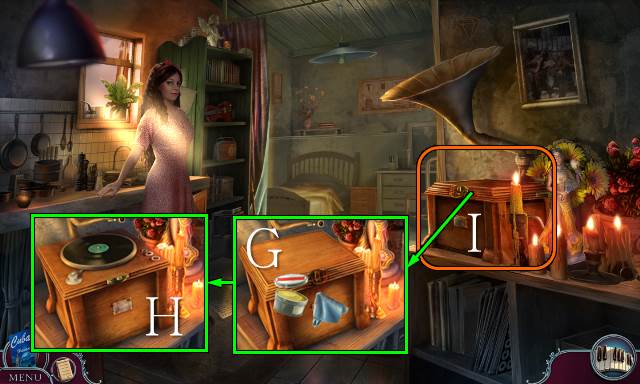
- Use the RUST REMOVER and open the record player (G); lower the needle (H).
- Play the HOP (I).
- You receive another BELL.
- Walk down.

- Hang the three BELLS and ring them; go in (J).
- Talk to Juan (K).
- Take WEIGHT 6/6 (L).
- Take the SPRAYER, place the WEIGHTS one by one and zoom in for a mini-game (M).
- Solution (N).
- Scroll down and take the OILCAN (O).
- Walk down.
- Access the SPRAYER and use the HAMMER until you can take the NAIL; remove the canister and take the SPRAYER HEAD (P).
- Use the NAIL and take the BANKNOTE (Q).
- Go into the Grocery Store.
- Give the BANKNOTE to Juan (R).
- Take the GATE KEY (S).
- Walk down.

- Use the GATE KEY and OILCAN; turn the key (T).
- Go right.
- Take the INSECTICIDE and use the COIN (U); zoom in for a mini-game (V).
- Take a paper and take TELEPHONE TOKEN 2/3 (W).
- Select the top sign (X).
- Scroll down; take the HALLIGAN HOOK (Y).
- Go right.
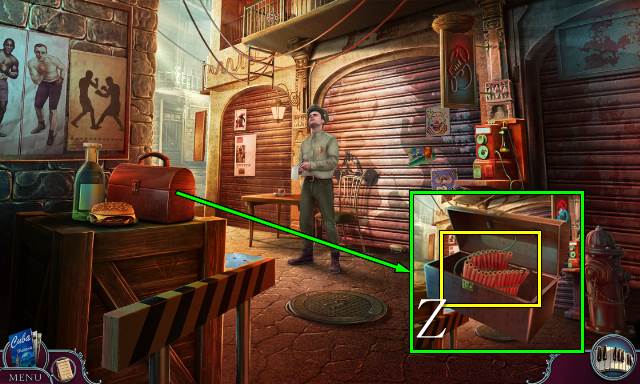
- Take the toolbox, open it and take the FIRECRACKERS; put the box back (Z).
- Go to the Grocery Store.
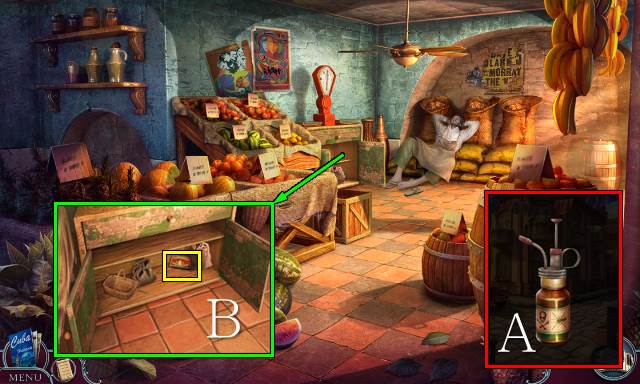
- Access the SPRAYER HEAD and attach the INSECTICIDE; you receive INSECTICIDE SPRAY (A).
- Use the INSECTICIDE SPRAY; move the items and take the MATCHBOX (B).
- Go down and right.
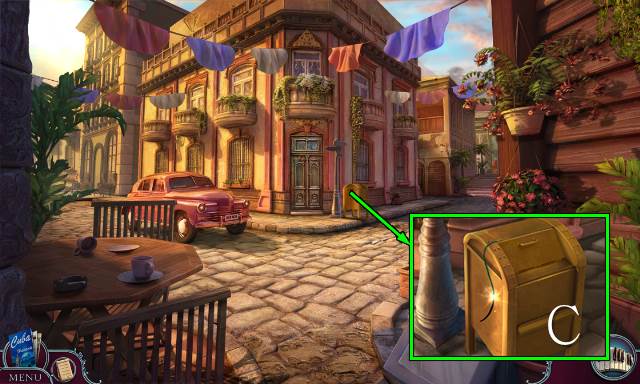
- Open the mailbox and place the FIRECRACKERS; use the MATCHBOX (C).
- Go right.
- Use the HALLIGAN HOOK (D).
- Take TELEPHONE TOKEN 3/3 (E).
- Place the three TELEPHONE TOKENS and open the box (F).
- Play the HOP (G).
- Go forward.

- Talk to the woman (H).
- Take TILE 1/2 (I).
- Punch the bag three times, remove the sand and take TILE 2/2 (J).
- Place the TILES for a mini-game (K).
- Remove the items and take the SMELLING SALTS (L).
- Use the SMELLING SALTS (M).
- Talk to Bronco (N).
- Open the door (O).
- Go forward.
- Walk down.
- Use the SLEEPING POWDER (P).
- Play the HOP (Q).
- You receive a BOXING GLOVE.
- Place the BOXING GLOVE and take the RED BOX KEY (R).
- Access the RED BOX and use the RED BOX KEY (S); open the box and take the DIAMOND NECKLACE (T).
- Pick up and open the parcel for a mini-game (U).
Chapter 5: The Fort

- Open the gate.
- Take the NAILS (V).
- Take the MESSAGE (W).
- Take the WALKIE-TALKIE (X).
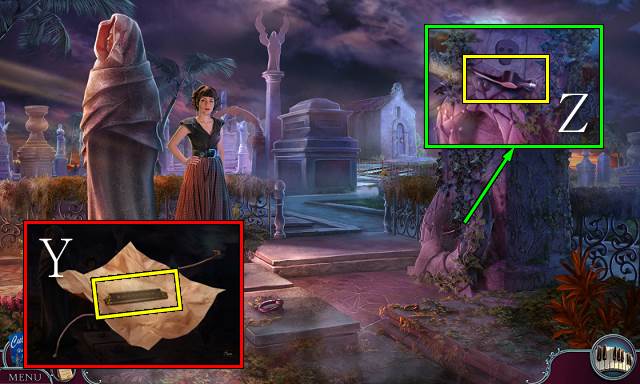
- Access and open the MESSAGE; take the NAMEPLATE (Y).
- Move the vines and take the PICKAXE HEAD (Z).
- Go forward.
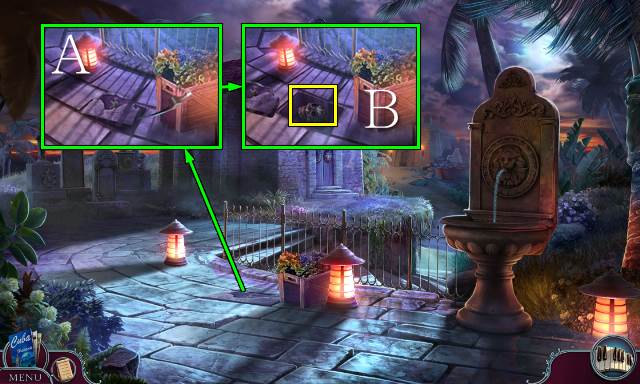
- Use the PICKAXE HEAD (A), move the tile and take the SLIVER SKULL (B).
- Walk down.
- Place the SILVER SKULL (C), remove the stone and take the TILE (D).
- Place the TILE for a mini-game (E).
- Take the BAS-RELIEF (F).
- Go forward.
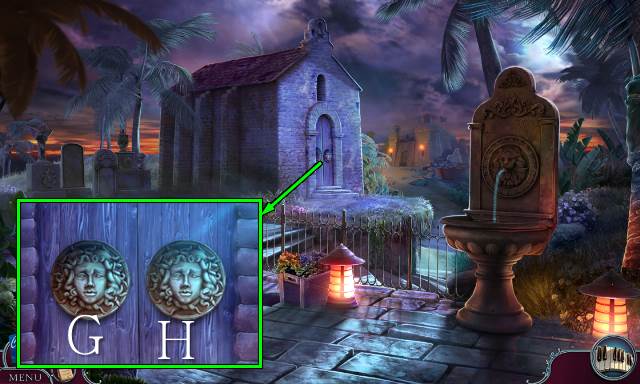
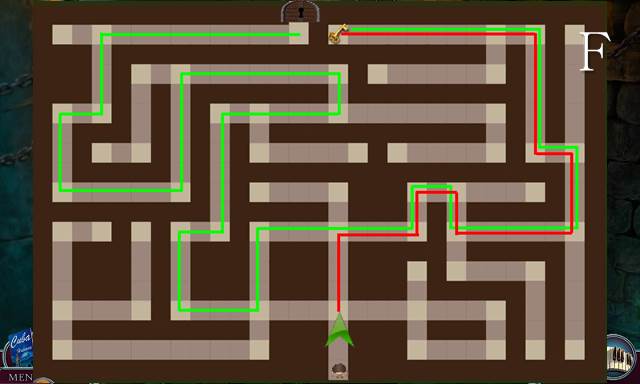
- Place the BAS-RELIEF for a mini-game.
- Solution: alternate G and H eight times.
- Open the door.
- Go forward.
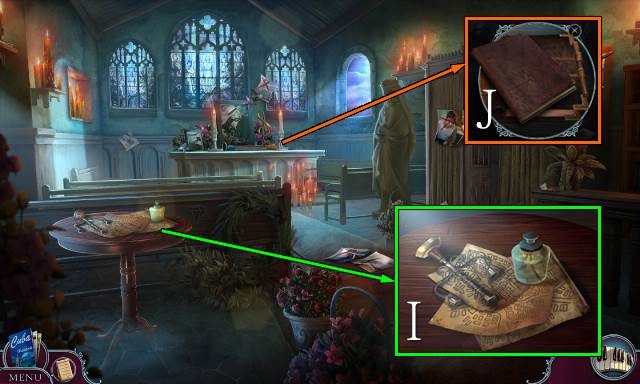
- Take the CANDELABRA and LAMP FUEL (I).
- Take the CEMETERY DIRECTORY (J).
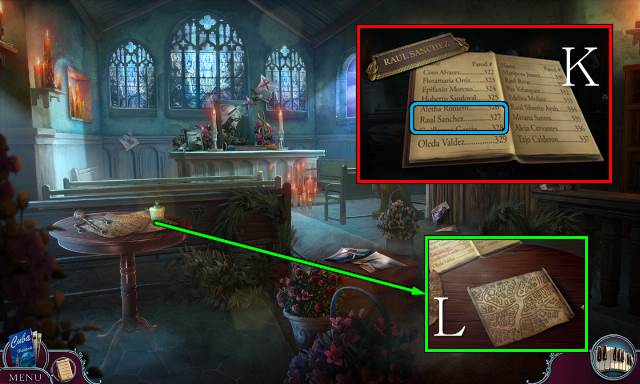
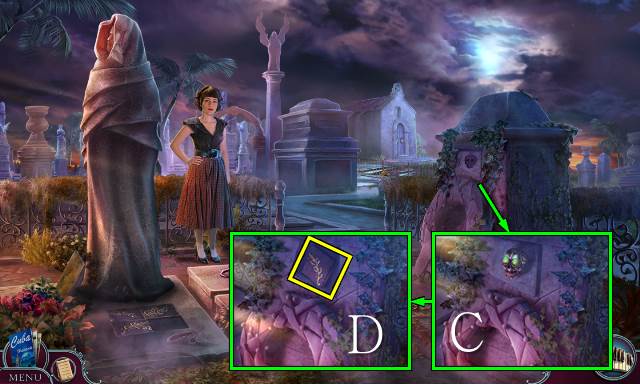
- Access and open the CEMETERY DIRECTORY, place the NAMEPLATE and select Raul Sanchez; you receive the CEMETERY CLUE (K).
- Place the CEMETERY CLUE, go through the papers and take the CEMETERY MAP (L).
- Walk down twice.
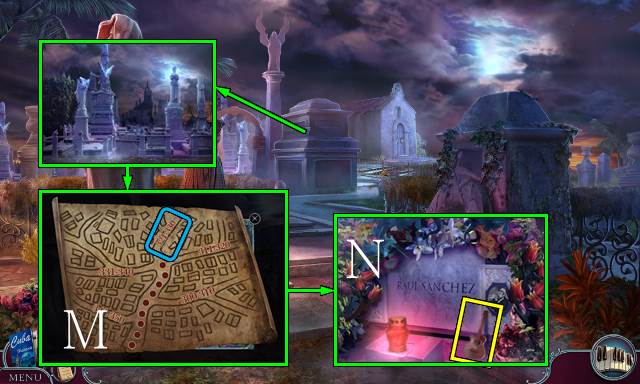
- Place the CEMETERY MAP and select the top numbers (M).
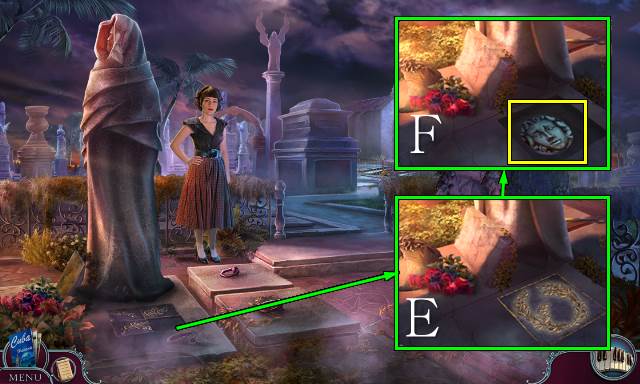
- Move the items and take the GUITAR INSET (N).
- Go forward twice.
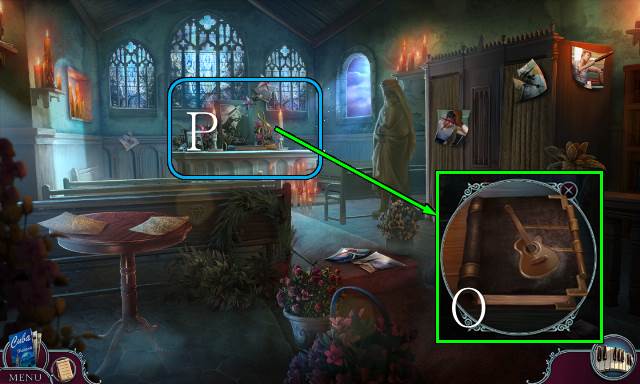
- Place the GUITAR INSET (O).
- Play the HOP (P).
- You receive a POSTCARD.
- Walk down.
- Go to the Fort.
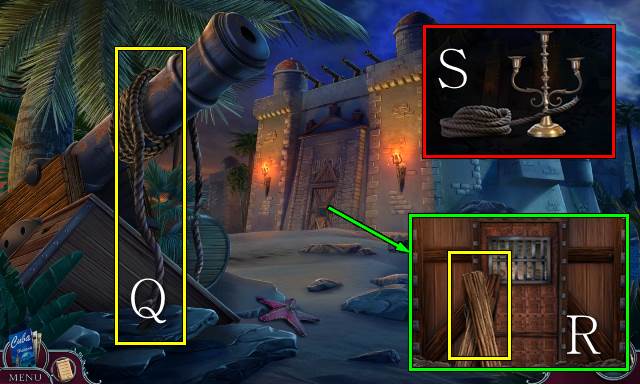
- Take the ROPE (Q).
- Take the three WOODEN PLANKS (R).
- Access the ROPE and place the CANDELABRA; you receive a CANDELABRA WITH ROPE (S).
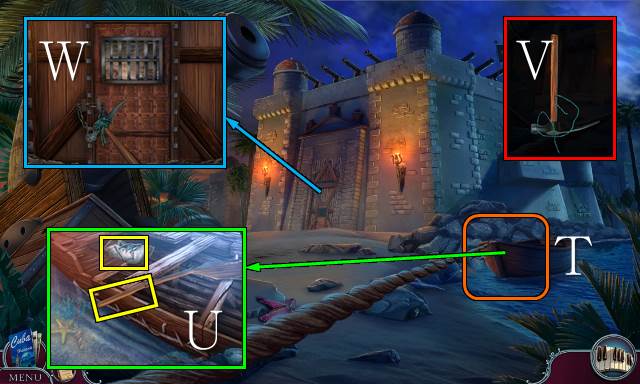
- Use the CANDELABRA WITH ROPE (T).
- Take the shoe and remove the SHOELACE; take the OAR HANDLE (U).
- Access the PICKAXE HEAD and place the OAR HANDLE and SHOELACE; you receive a PICKAXE (V).
- Use the PICKAXE and remove the chain (W).
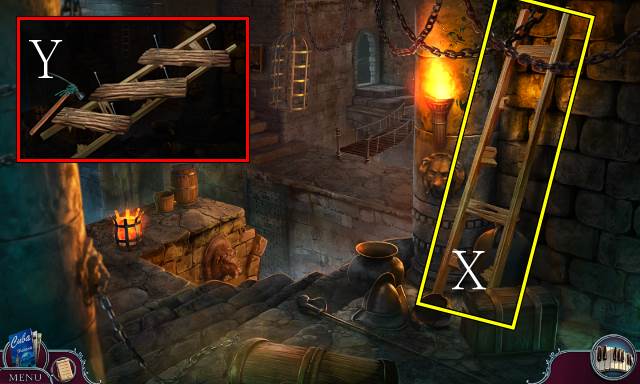
- Take the BROKEN LADDER (X).
- Access the BROKEN LADDER, place the WOODEN PLANKS and NAILS and place the nails; use the PICKAXE to receive an IMPROVISED BRIDGE (Y).
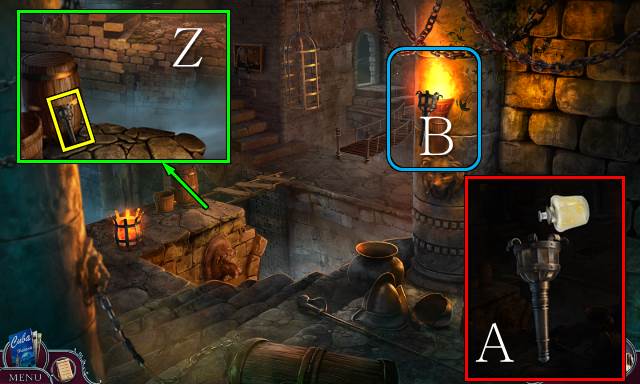
- Move the bucket and take the DRY TORCH; place the IMPROVISED BRIDGE (Z).
- Access the DRY TORCH and use the LAMP FUEL; you receive an OILED TORCH (A).
- Use the OILED TORCH to get a BURNING TORCH (B).
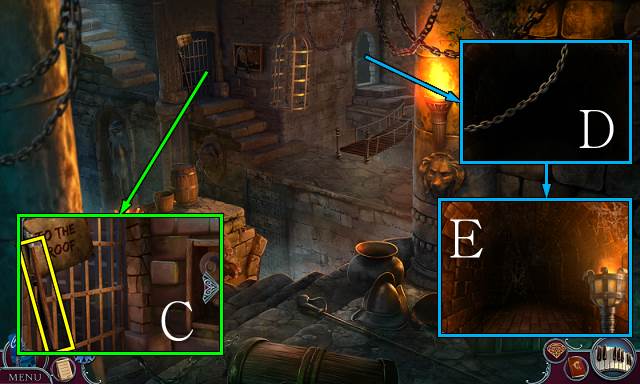
- Scroll left and take the HALBERD (C).
- Take the CHAIN (D) and use the BURNING TORCH (E); move forward for a mini-game.
- Solution (F).
- Use the HALBERD (G).
- Talk to Cassandra; take the AMULET (H).
- Find the six gears; take the GEARS (I).
- Walk down.
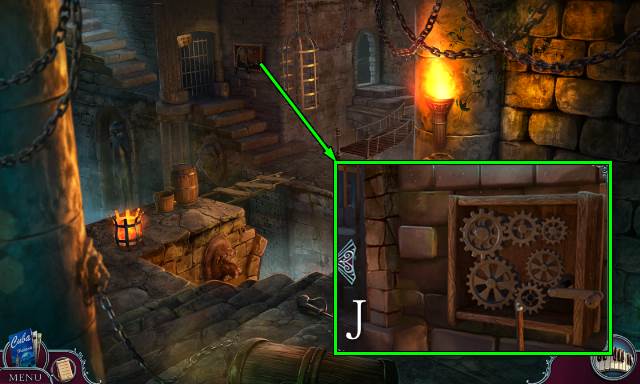
- Scroll right and place the GEARS; activate the mechanism, place the HALBERD, scroll left and go left (J).
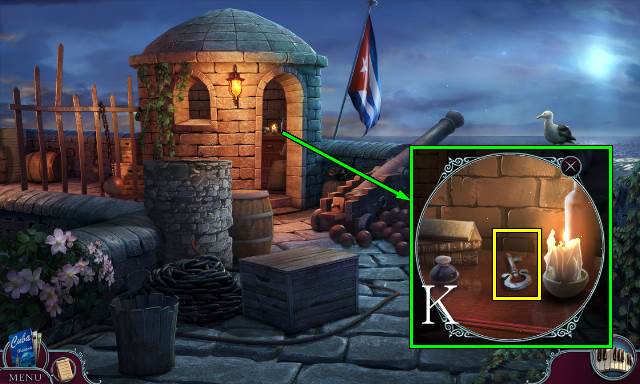
- Move the candle and take the CAGE KEY (K).
- Walk down and forward.
- Use the CAGE KEY and take the PADLOCK (L).
- Play the HOP (M).
- You receive some REFLECTIVE GLASS.
- Go down and left.
- Place the REFLECTIVE GLASS and move it twice (N).
- Place the CHAIN and PADLOCK (O).
- Go right.
- Talk to Ernesto (P).
- Take the trumpet case, open it and take the TRUMPET (Q).
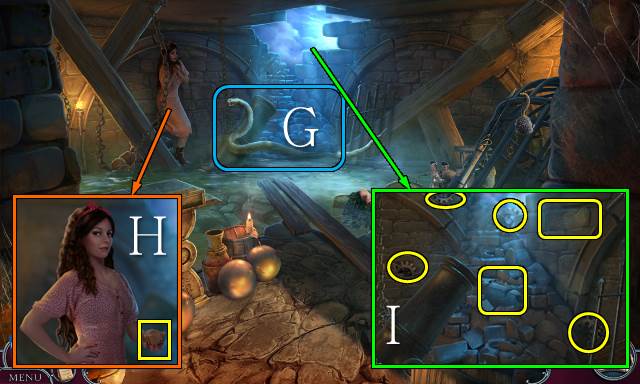
- Move the drapes; play the HOP (R).
- You receive a NOTE EMBLEM.
- Place the NOTE EMBLEM (S), move the items and take the MECHANISM HANDLE (T).
- Place the MECHANISM HANDLE (U).
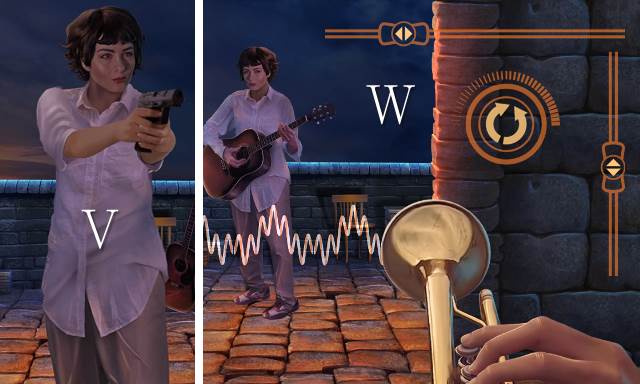
- Throw the DIAMOND NECKLACE (V).
- Use the TRUMPET for a mini-game (W).
- Congratulations, you have completed Cadenza: Havana Nights.
Created at: 2016-04-17