

- Welcome to the Chimeras: Cherished Serpent Walkthrough
- A series of deaths plague a small town, but who or what caused them?
- Whether you use this document as a reference when things get difficult or as a road map to get you from beginning to end, we're pretty sure you'll find what you're looking for here.
- This document contains a complete Chimeras: Cherished Serpent game walkthrough featuring annotated screenshots from actual gameplay!
- We hope you find this information useful as you play your way through the game. Use the walkthrough menu below to quickly jump to whatever stage of the game you need help with.
- This walkthrough was created by Margie B, and is protected under US Copyright laws. Any unauthorized use, including re-publication in whole or in part, without permission, is strictly prohibited.
Walkthrough Menu
General Tips
- This is the official guide for Chimeras: Cherished Serpent.
- This guide won't tell you when to zoom into a location; the screenshots show each zoom scene.
- Hidden-object puzzles are referred to as HOPs. Only the locations of the HOPs will be shown.
- Use the Map to fast travel to a location.
Chapter 1: Town Square
- Select scene.
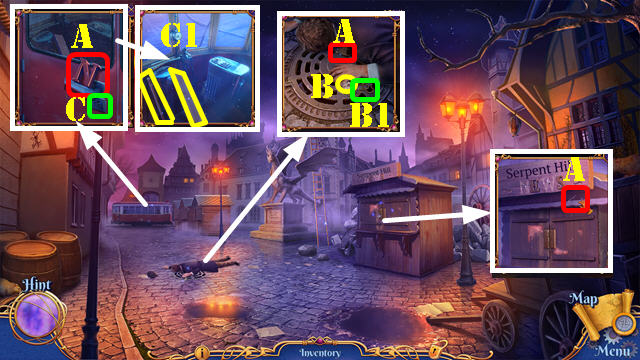
- Take LETTER N, CUFFLINK, and HOOK (A).
- Move hand and look at note (B); take LONG CHAIN (B1).
- Use CUFFLINK and select (C); take PLANK 1/4 and BROKEN CANE (C1).
- HOOK and LONG CHAIN on BROKEN CANE; take IMPROVISED HOOK.
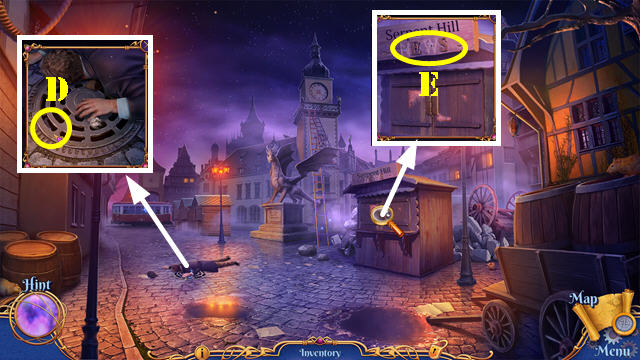
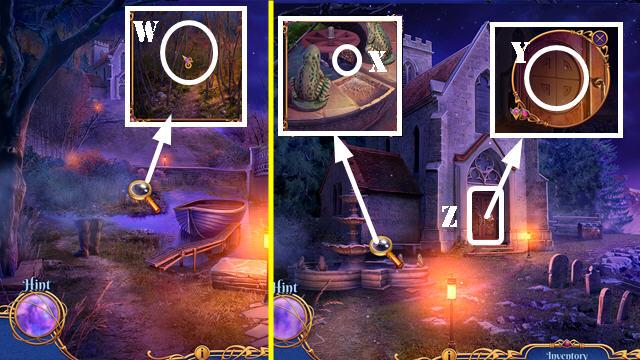
- Use IMPROVISED HOOK (D); receive LETTER W.
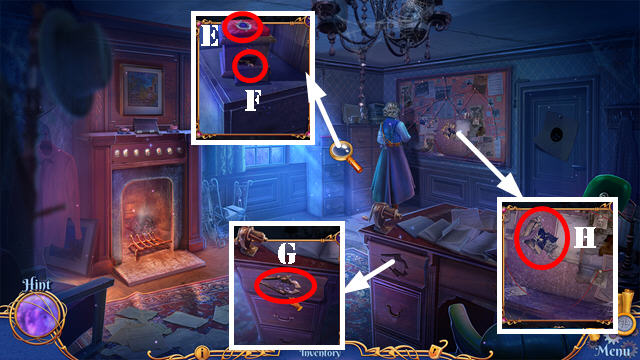
- Place LETTER N and LETTER W (E). Play HOP; receive TRAM STEERING WHEEL.
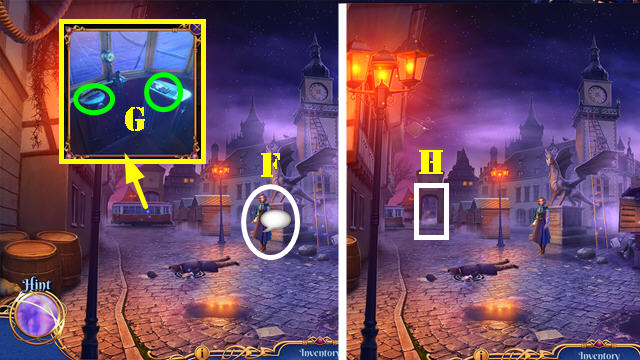
- Talk (F); receive TRAM CRANK.
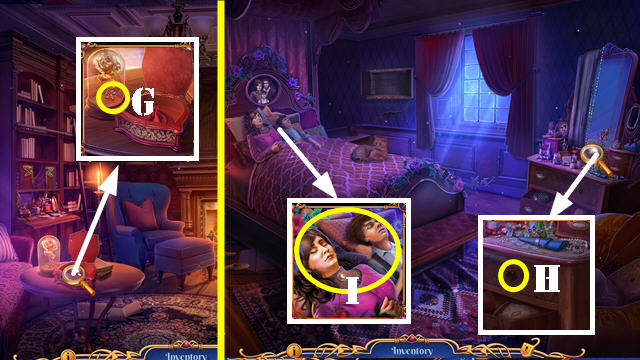
- Place TRAM STEERING WHEEL and TRAM CRANK (G).
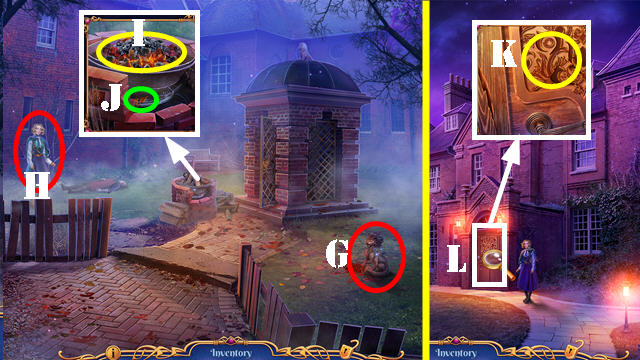
- Go (H).
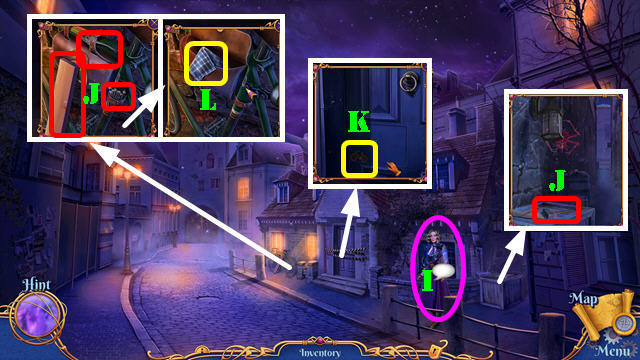
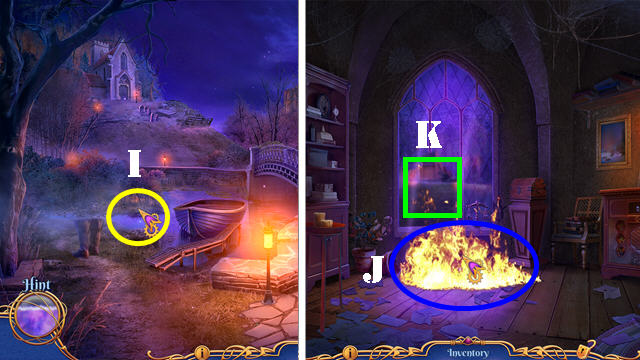
- Talk (I); receive SHERIFF'S FOLDER.
- Take PLANK 2/4, PLIERS, SMALL HAMMER, and NAILS (J).
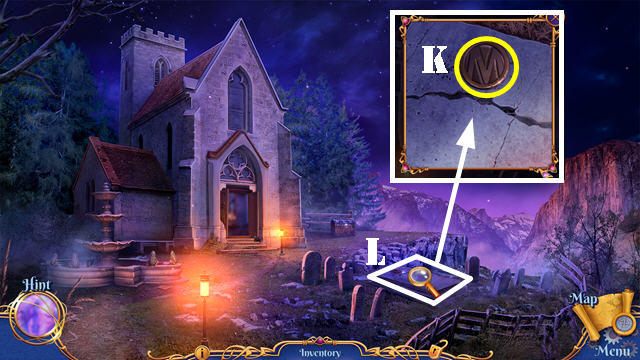
- Remove tape; take BICYCLE EMBLEM (K) and select door.
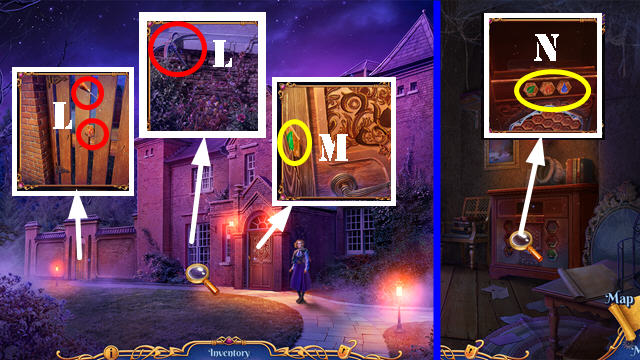
- Place BICYCLE EMBLEM; take SHERIFF'S HANDKERCHIEF (L).
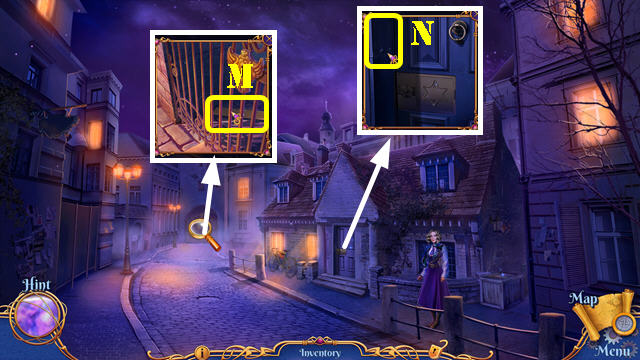
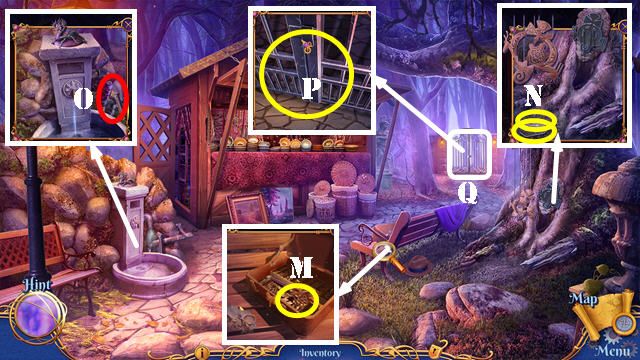
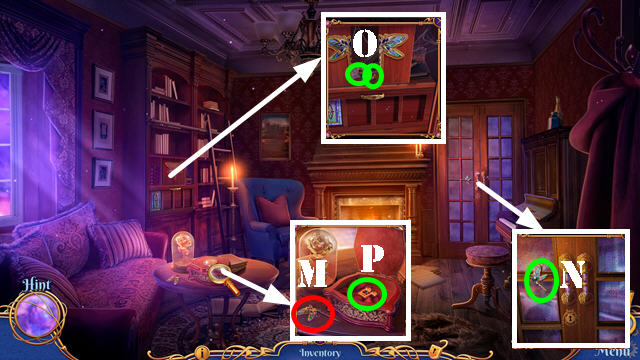
- Use IMPROVISED HOOK (M); receive PLANK 3/4.
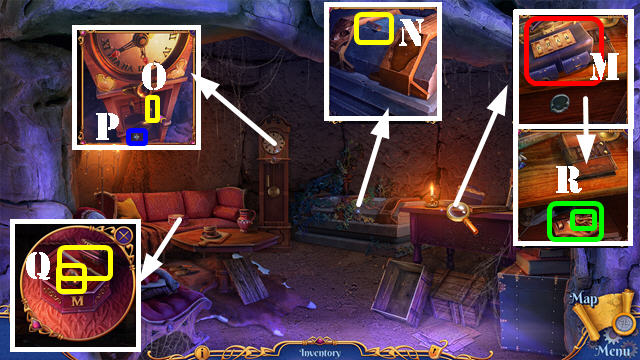
- Use PLIERS (N); receive PLANKS.
- Walk down.
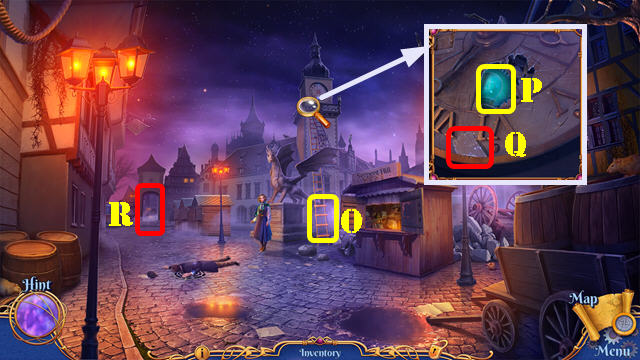
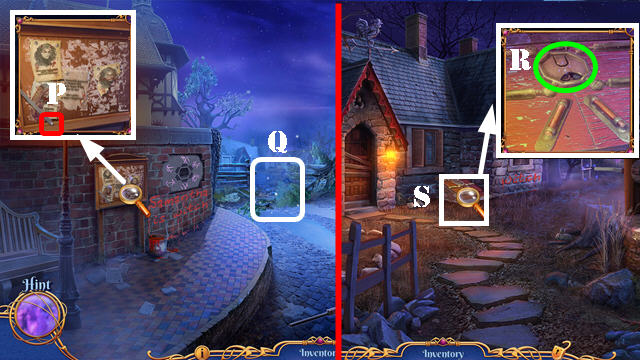
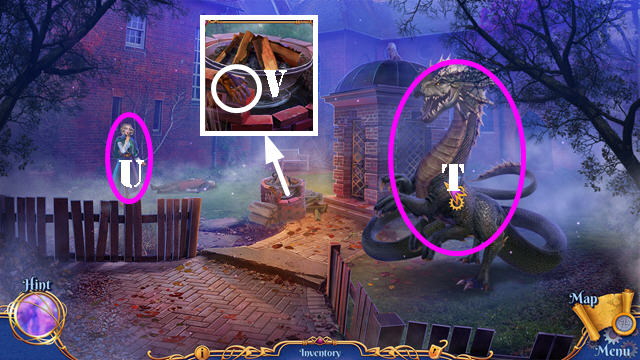
- Place PLANKS; use NAILS and SMALL HAMMER (O). Use SMALL HAMMER; take BULB (P).
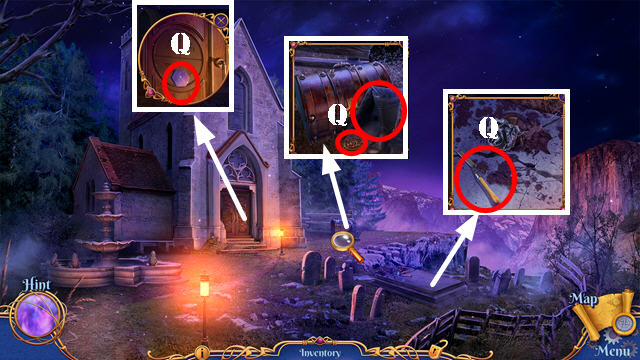
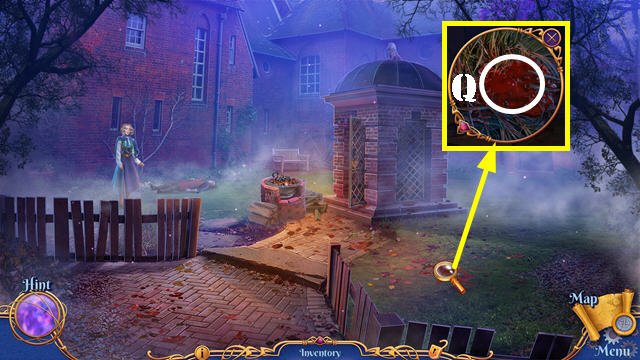
- Use SHERIFF'S HANDKERCHIEF (Q); receive SHARD.
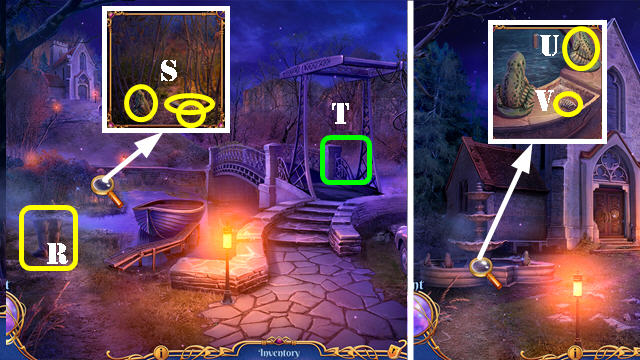
- Go (R).
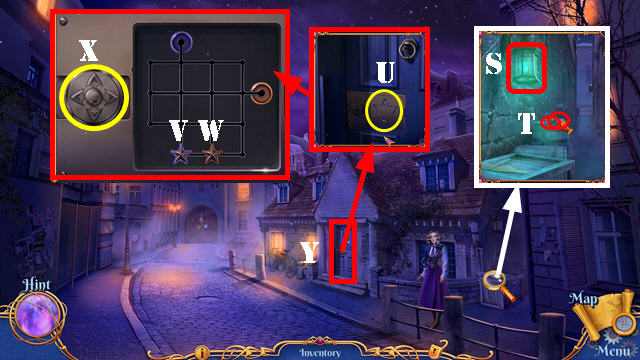
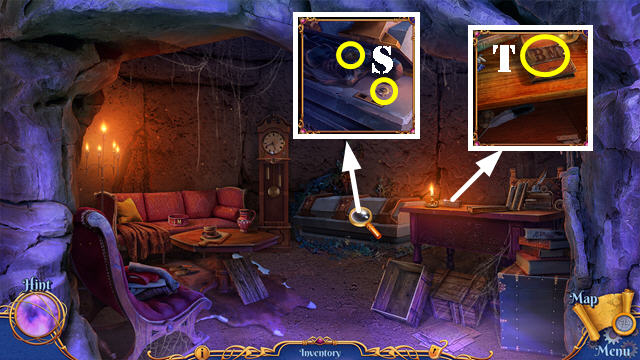
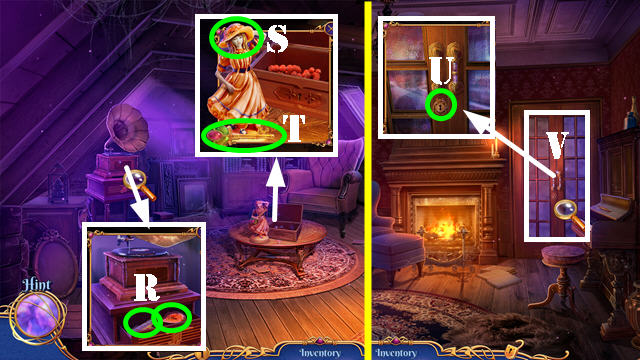
- Place BULB (S); take SHERIFF'S BADGE PART and MAGNET (T).
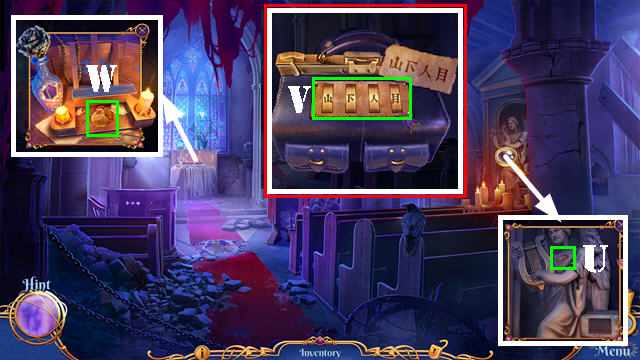
- Select SHERIFF'S FOLDER; play HOP; receive SHERIFF'S BADGE PART.
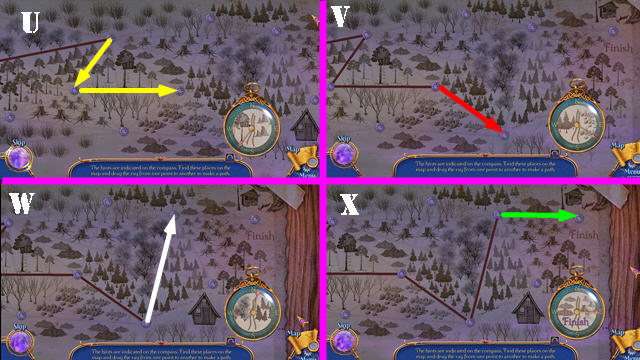
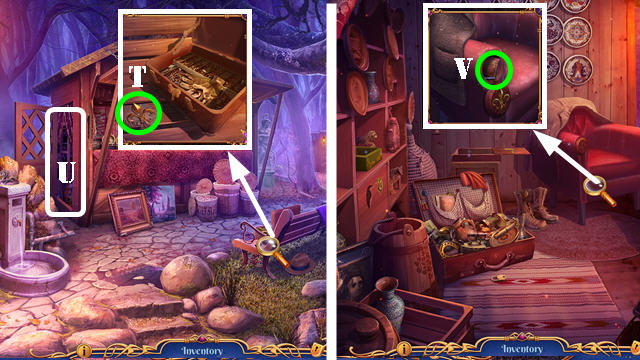
- Place two SHERIFF'S BADGE PARTS (U).
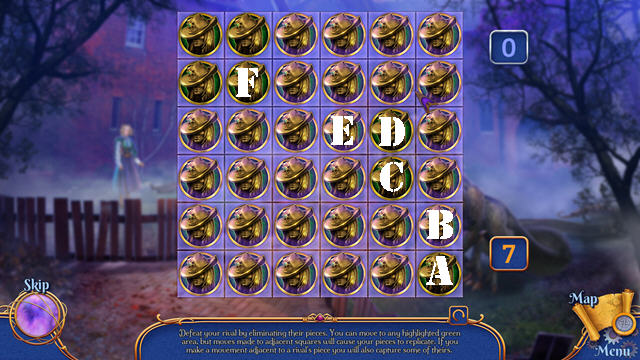
- Use the arrows (X) to move the stars (up-down-left-right).
- Solution: (W right-up-left)-(V right-up-left)-(W down-right-down-left-up-right)-(V up).
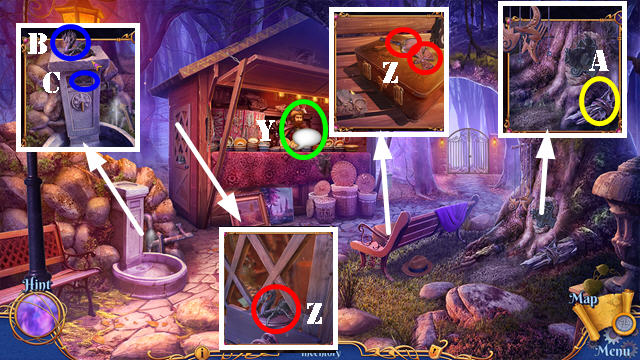
- Enter (Y).
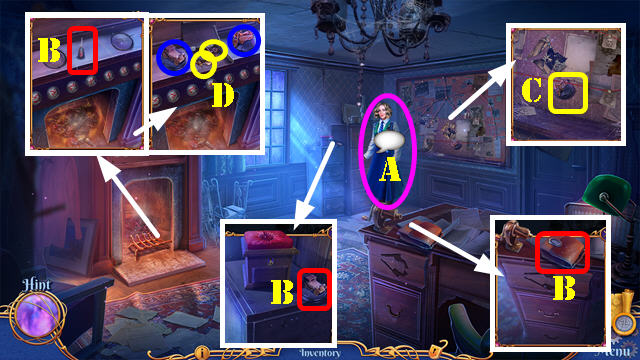
- Talk (A).
- Take CAR FIGURINE, SHERIFFS BAG, and GLUE (B).
- Use SHARD (C); take MOTORCYCLE FIGURINE.
- Place MOTORCYCLE FIGURINE and CAR FIGURINE (blue); take GUN and GOLDEN EAGLE (D).
- GOLDEN EAGLE on SHERIFFS BAG; take BADGE OF HONOR.
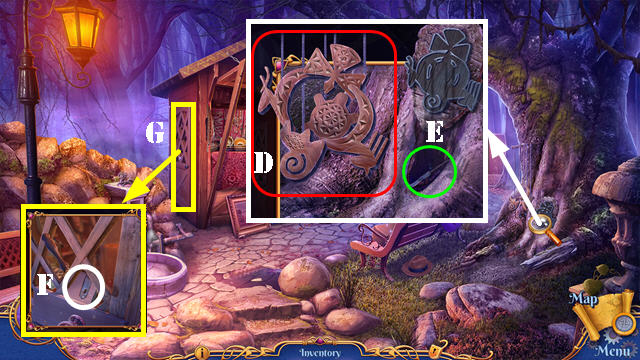
- Place BADGE OF HONOR (E); take GUN (F).
- Place two GUNS and select (G). Play HOP; receive CARDBOARD MOSAIC PART.
- Place CARDBOARD MOSAIC PART (H).
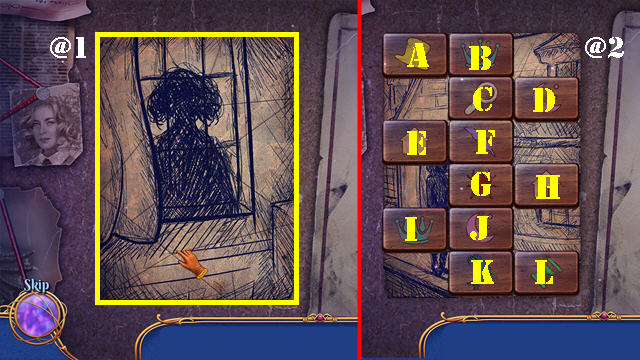
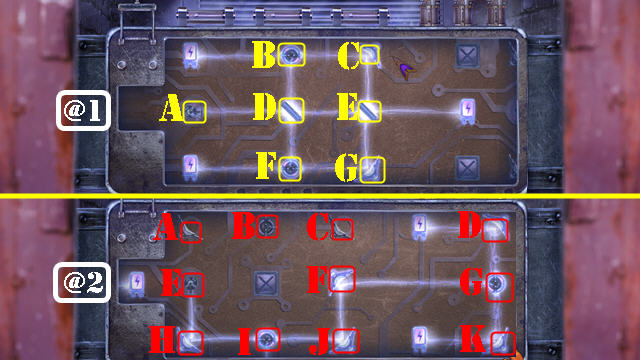
- Solution one (@1).
- Solution two (@2): (B-I)-(J-D)-(E-H)-(A-E)-(A-L)-(K-D)-(B-G)-(F-G)-(C-G).
- Take WOMAN DRAWING.
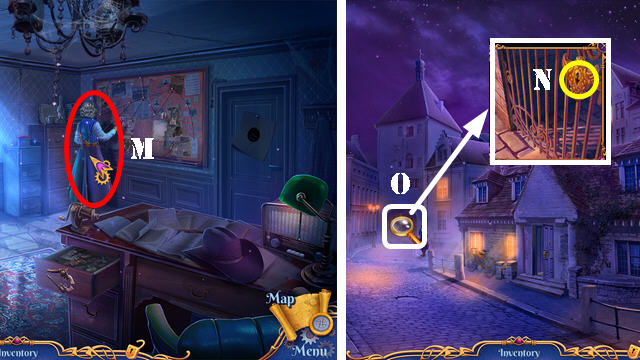
- Give WOMAN DRAWING (M); receive GATE KEY.
- Walk down.
- Use GATE KEY (N) and select.
- Go (O).
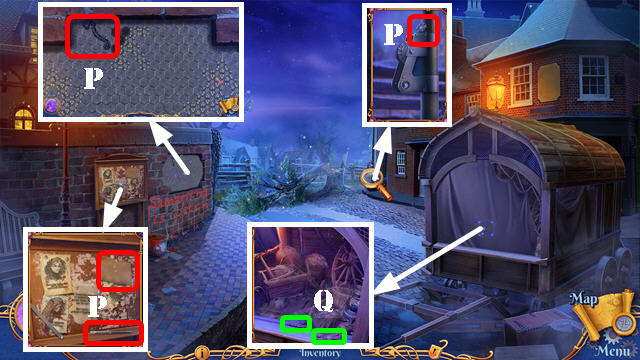
- Take STONE TILE 1/4, CHISEL, BLANK PAPER, and DRAGON HANDLE (P).
- Use SHARD and select twice; take ROPE and BLUNT PENCIL (Q).
- Walk down.

- Use CHISEL; take STONE TILE 2/4 (R).
- Go (S).
- Place DRAGON HANDLE; take STONE TILE 3/4 (T).
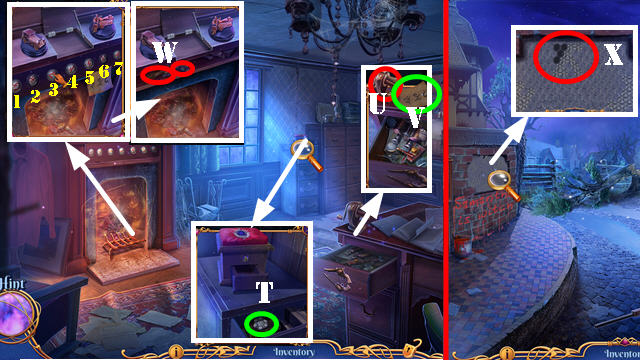
- Use BLUNT PENCIL (U). Place BLANK PAPER; take FIREPLACE CODE (V).
- Place FIREPLACE CODE; select 2-6-3. Take STONE TILES and BRUSH (W).
- Go to Outskirts.
- Place STONE TILES (X).
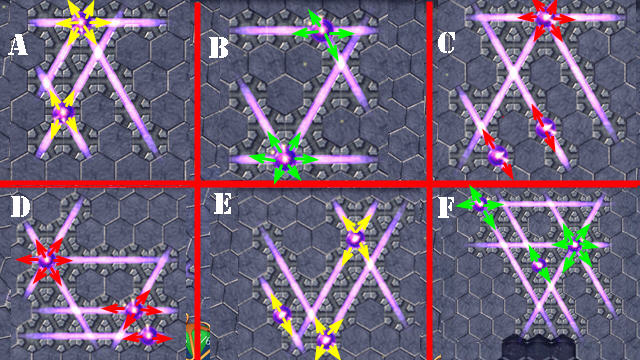
- Solutions: (A-F).
- Take MECHANISM PART.
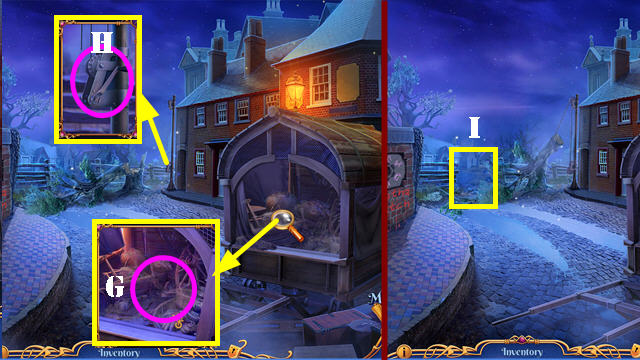
- Use BRUSH (G). Play HOP; receive FLAGPOLE HANDLE.
- Place ROPE, FLAGPOLE HANDLE, and MECHANISM PART (H).
- Select Scene.
- Go (I).
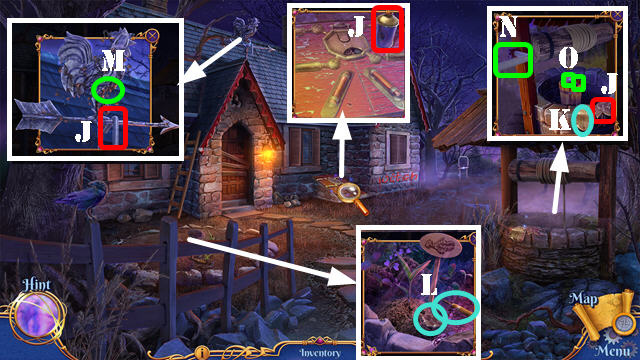
- Take CELLAR EMBLEM 1/3, INSECT SPRAY, and WELL CRANK (J).
- Look at note (K).
- Use INSECT SPRAY; take SCREWDRIVER and CELLAR EMBLEM 2/3 (L).
- Use SHARD (M); take IVY.
- Place WELL CRANK and select (N); take BUTTERFLY CLASP and OVEN MITT (O).
- Walk down.
- Use SCREWDRIVER (P); take CELLAR EMBLEMS.
- Go (Q).
- Place CELLAR EMBLEMS (R). Play HOP.
- Go (S).

- Take POTION RECIPE, BROKEN BALL, BASILISK DOLL, and SAMANTHA'S BAG (T).
- Look at note (U).
- Use OVEN MITT (V); receive BUTTERFLY CLASP and WITCH FIGURINE.
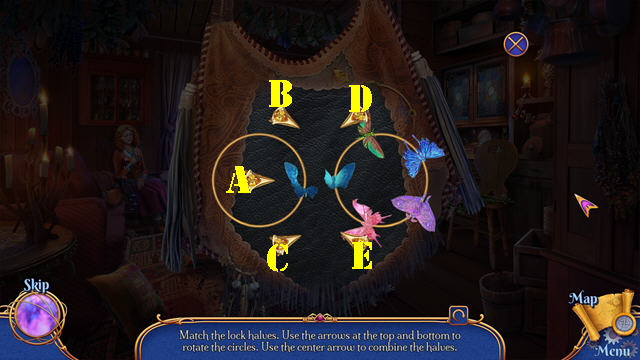
- Place two BUTTERFLY CLASPS on SAMANTHA'S BAG.
- Solution (B-A)-(B-E-A)-(B-E-A)-(B-B-E-A)-(C-E-A).
- Take SAMANTHA'S RING and HEALING SPICE.
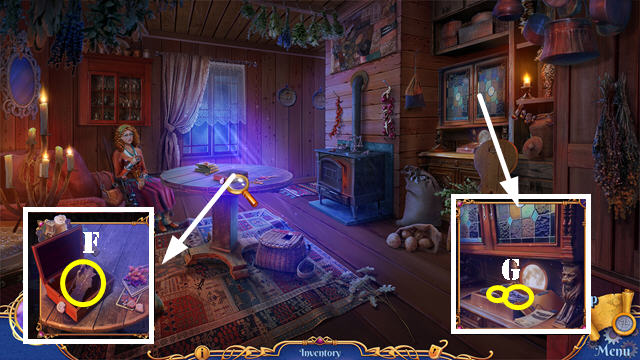
- Use SAMANTHA'S RING; take MAGE FIGURINE (F).
- Place WITCH FIGURINE and MAGE FIGURINE; take LAVENDER and LADLE (G).
- Walk down.
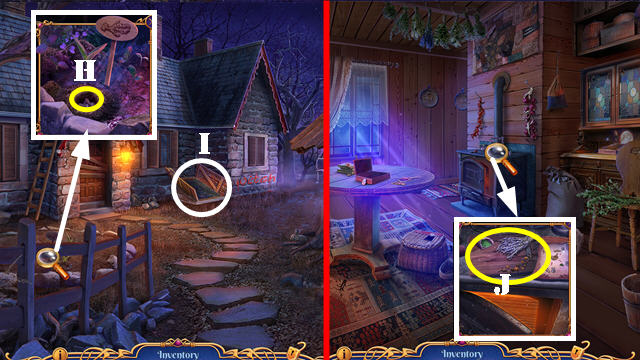
- Use LADLE; take GINGER ROOT (H).
- Go (I).
- Place POTION RECIPE, IVY, LAVENDER, HEALING SPICE, and GINGER ROOT (J).
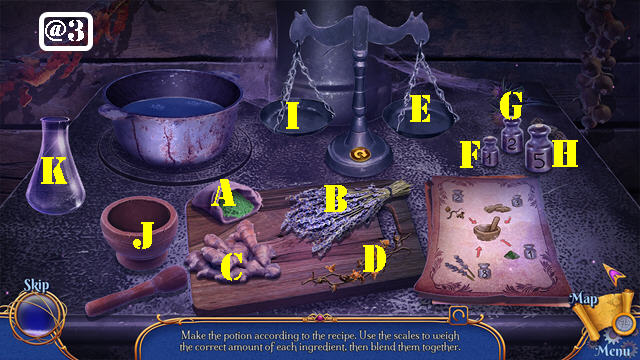
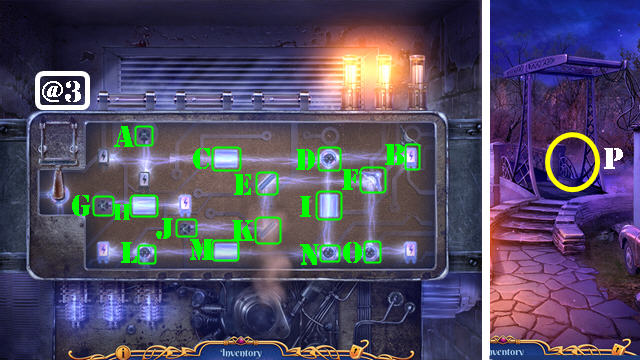
- Solution (@3): (Cx2)-(F-E)-(G-E)-(I).
- (Dx4)-(remove weight 1 from scale)-(I).
- (Bx5)-(F-E)-(H-E)-(I).
- (Remove weights 5 and 2 from scale)-(Ax3)-(I).
- (Jx2)-(K).
- Take POTION FOR SAMANTHA.
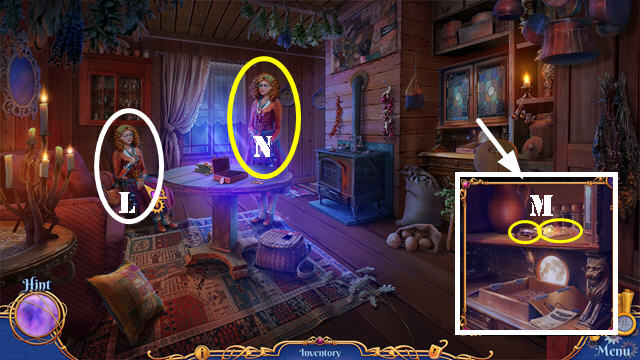
- Give POTION FOR SAMANTHA (L); receive SAMANTHA'S BUSINESS CARD.
- Use SAMANTHA'S BUSINESS CARD; take LIGHTER and BALL SHARDS (M).
- BALL SHARDS and GLUE on BROKEN BALL; take MAGIC BALL. Give MAGIC BALL (N). Play HOP; receive COMPASS.
- Give BASILISK DOLL (N).
Chapter 2: Trading Store
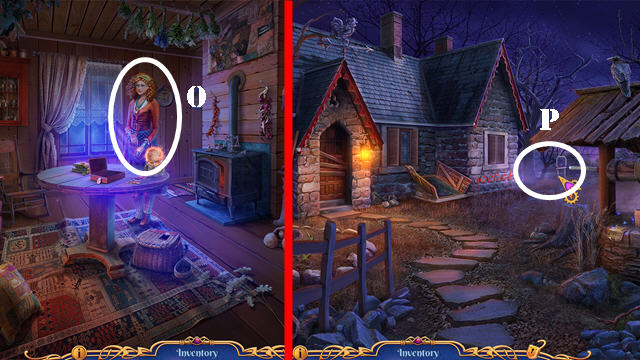
- Talk (O).
- Walk down.
- Place COMPASS (P).
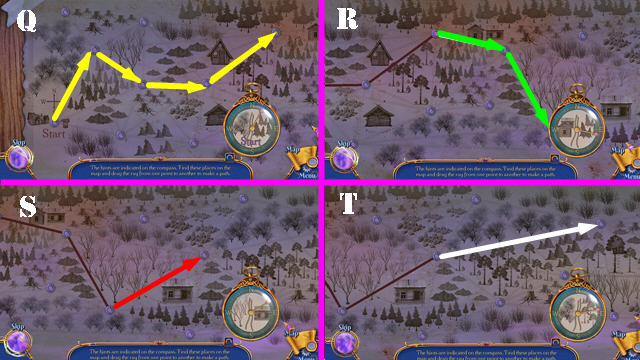
- Solution (Q-X).
- Talk (Y).
- Take BROKEN FIGURINE, WOODEN ORNAMENT and MIRROR (Z).
- Use LIGHTER; take GILLS (A).
- GILLS on BROKEN FIGURINE; take LEVIATHAN FIGURINE.
- Place LEVIATHAN FIGURINE (B); take WOODEN ORNAMENT (C).
- Place two WOODEN ORNAMENTS. Solution (D). Take PICKLOCK (E).
- Place MIRROR and use PICKLOCK (F).
- Enter (G).
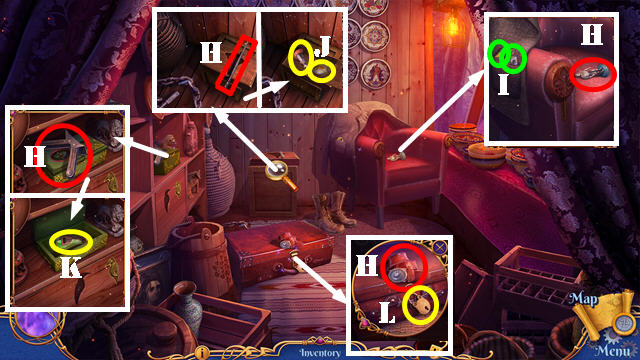
- Take BROKEN JACK, JACK BAR, MERCHANT'S BELT, and MAN FIGURINE (H).
- Use LIGHTER; take INK DEVELOPER and CADUCEUS (I).
- Place CADUCEUS; take OILER and WOMAN FIGURINE (J).
- Place MAN FIGURINE and WOMAN FIGURINE; take ACID (K).
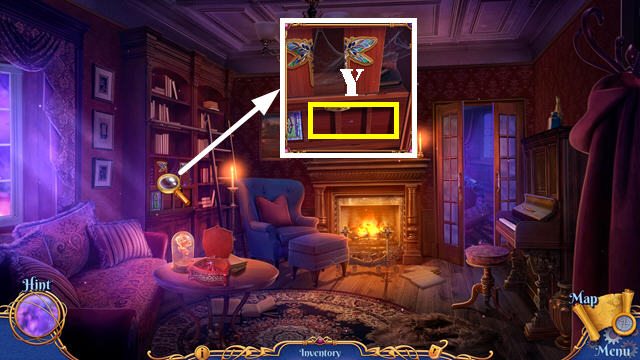
- Use ACID (L). Play HOP; receive DRAGONFLY AMULET.
- Walk down.
- Place DRAGONFLY AMULET; take SMALL RAKE (M).
- Use SMALL RAKE; take WRENCH and JACK LEVER (N).
- Use MERCHANT'S BELT; take JACK PART (O).
- JACK PART, JACK LEVER, JACK BAR, and OILER on BROKEN JACK; take JACK.
- Use JACK (P).
- Go (Q).
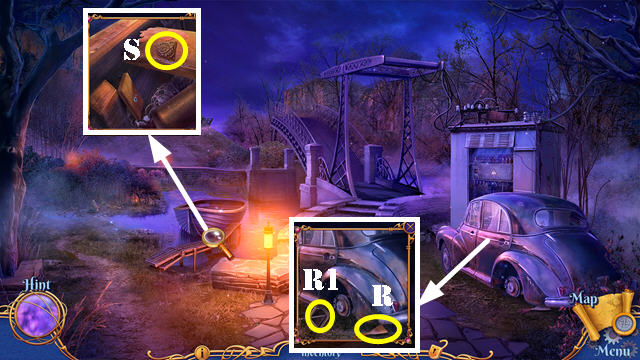
- Use JACK (R1; take SCRAPER (R).
- Use SCRAPER; take DECORATIVE TILE 1/4 (S).
- Walk down.
- Use SCRAPER; take FLEUR-DE-LIS (T).
- Go (U).
- Place FLEUR-DE-LIS; take MERCHANT'S WALLET and FUSE 1/3 (V).
- Go to Pond.

- Look at note on MERCHANT'S WALLET; take HEX KEY.
- Use HEX KEY; take CAR HANDLE (W).
- Place CAR HANDLE (X). Play HOP; receive BIRD AMULET.
- Go to Trading Store.
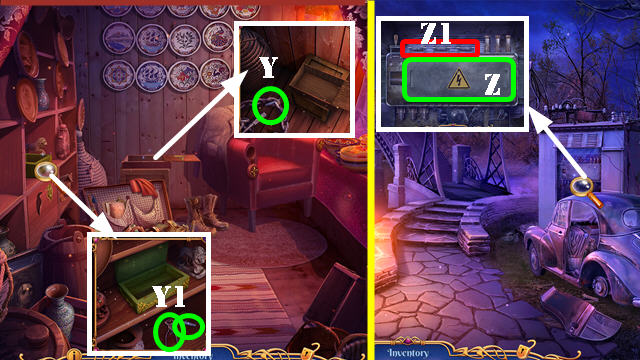
- Place BIRD AMULET; take FUSE 2/3 and BOLTCUTTERS (Y1).
- Use BOLTCUTTERS; take FUSES (Y).
- Go to Pond.
- Place FUSES (Z1); remove panel (Z).
- Solution one (@4): (Ax2-E-Cx2).
- Solution two (@5): (E-I-Jx3-F-Gx2-Dx2-Kx3).
- Solution three (@6): (K-Fx2-Ox3-N-I-Dx3-C-M-L-H-Gx2).
- Go (P).
- Take DECORATIVE TILE 2/4, STAINED-GLASS TILE, RUBBER BOOTS, and PRUNERS HALF (Q).
- Walk down.
- Use RUBBER BOOTS (R); take DECORATIVE TILE 3/4, BROKEN PRUNERS, and FROG STATUETTE (S).
- Go (T).
- Place FROG STATUETTE (U); take PRUNERS SPRING (V).
- Walk down.
- PRUNERS HALF and PRUNERS SPRING on BROKEN PRUNERS; take PRUNERS.
- Use PRUNERS (W). Play HOP; receive VALVE.
- Go to Outside Chapel.
- Place VALVE; take DECORATIVE TILE (X).
- Place DECORATIVE TILE (Y).
- Enter (Z).
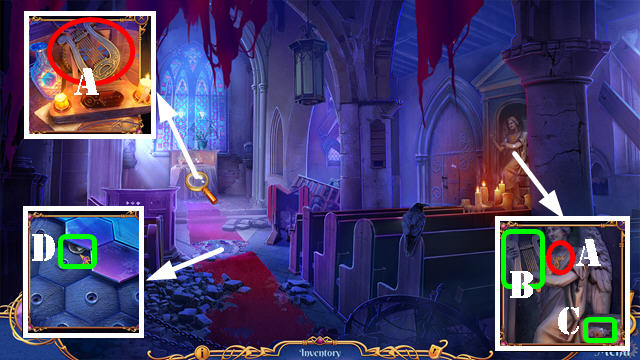
- Take MARTIN'S LOCKET and HARP (A).
- Place HARP (B); take SOLVENT (C).
- Use MAGNET (D); take METALLIC KEYCHAIN.
- Walk down.
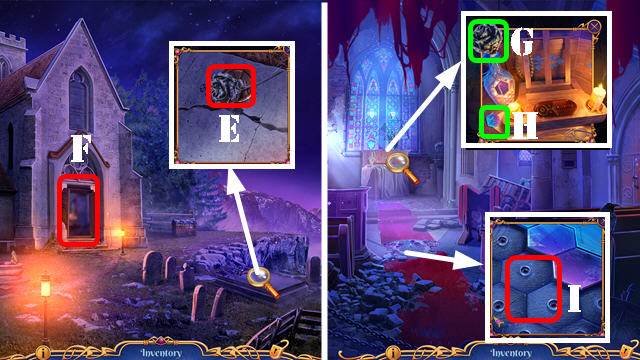
- Use SOLVENT; take ARTIFICIAL FLOWER (E).
- Go (F).
- Place ARTIFICIAL FLOWER (G); take STAINED-GLASS TILE (H).
- Place two STAINED-GLASS TILES (I).
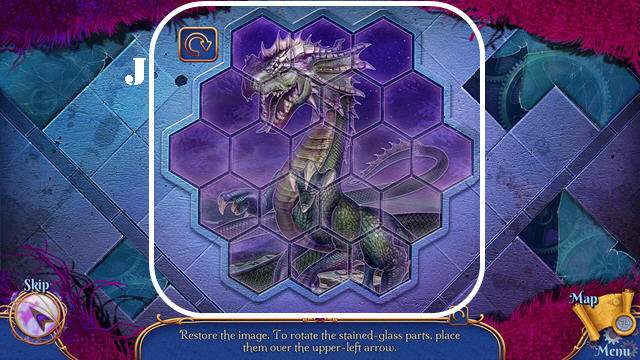
- Solution (J).
- Take BASILISK EMBLEM.
- Walk down.
- BASILISK EMBLEM on MERCHANT'S WALLET; take SECRET KEY.
- Use SECRET KEY (K).
- Go (L).
- Take MARTIN'S SUITCASE (M).
- Use PRUNERS; take WEIGHT (N).
- Place WEIGHT (O); take MARTIN'S SIGNET RING (P).
- Use MARTIN'S SIGNET RING; take GOLDEN EGG and FILE (Q).
- Use METALLIC KEYCHAIN; take MASK and SERPENT EMBLEM (R).
- Place MASK; take VICTORIA'S PENDANT and MARTIN'S PENDANT (S).
- FILE on MARTIN'S SUITCASE; take MONOGRAM B.
- MARTIN'S PENDANT on MARTIN'S LOCKET; take MONOGRAM M.
- Place MONOGRAM B and MONOGRAM M (T). Play HOP; receive STONE HEART.
- Go to Chapel.
- Place STONE HEART; take CODE (U).
- CODE on MARTIN'S SUITCASE; solution (V); take LATIN PLATE HALF.
- Place LATIN PLATE HALF; take ROOSTER EMBLEM (W).
- Go to Martin's Lair.
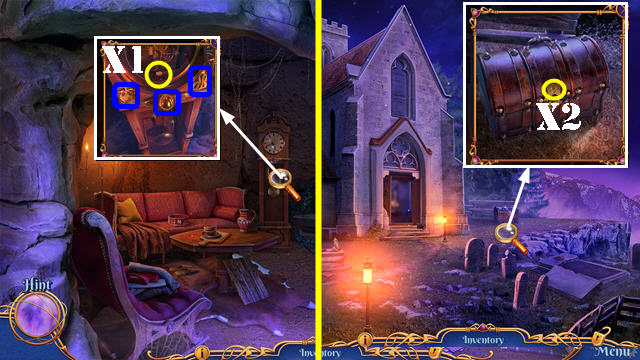
- Place ROOSTER FIGURINE, GOLDEN EGG, and SERPENT EMBLEM (blue); take GOLDEN BUTTON (X1).
- Walk down.
- Place GOLDEN BUTTON (X2). Play HOP; receive PICKAXE.
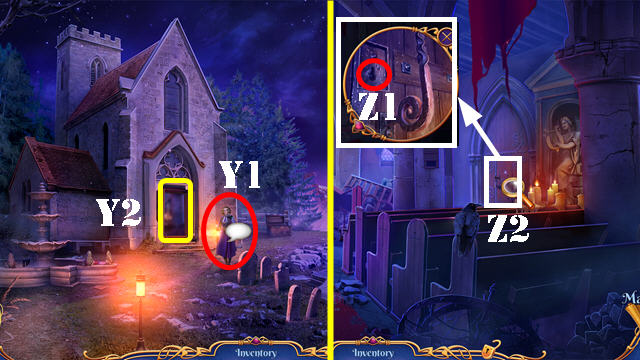
- Talk (Y1); receive MARTIN'S KEY.
- Go (Y2).
- Use MARTIN'S KEY (Z1).
- Go (Z2).
Chapter 3: Secret Room
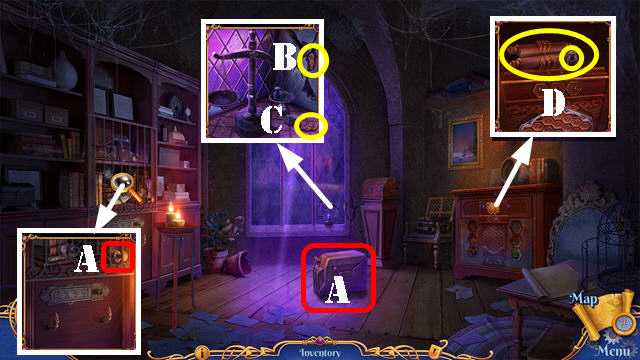
- Take EMPTY JERRICAN and LARGE WEIGHT (A).
- Use PICKAXE (B); take OWL EMBLEM (C).
- Place OWL EMBLEM; take SCROLL and SMALL WEIGHT (D).
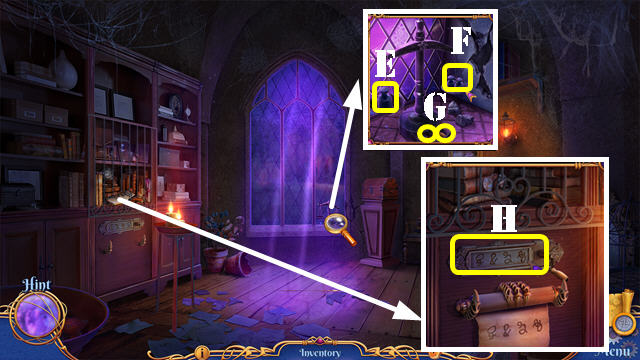
- Place LARGE WEIGHT (E) and SMALL WEIGHT (F); take LIBRARY CRANK and WATER TILE (G).
- Select SCROLL and use INK DEVELOPER; take LIBRARY CODE.
- Place LIBRARY CRANK and LIBRARY CODE; Solution (H). Play HOP; receive DIARY.
- Go to Pond.
- Use EMPTY JERRICAN (I); receive JERRICAN WITH WATER.
- Go to Secret Room.
- Use JERRICAN WITH WATER (J).
- Go (K).
- Take GRAPPLING HOOK, FIRE TILE, and AWL (L).
- Use AWL; take LEAF TILE (M).
- Walk down.
- Place LEAF TILE, FIRE TILE, and WATER TILE (N).
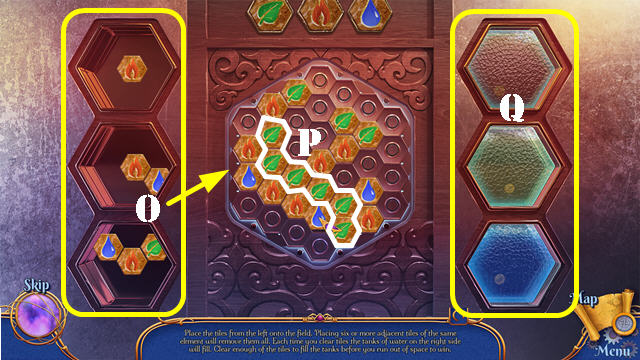
- Solution is random. Place the tiles from the left (O) onto the field. Placing six or more adjacent tiles (P) of the same element will remove them all. Clear enough of the tiles to fill the tanks of water (Q) to win the game.
- Take HANDSAW.
- Go to Outside Mansion.
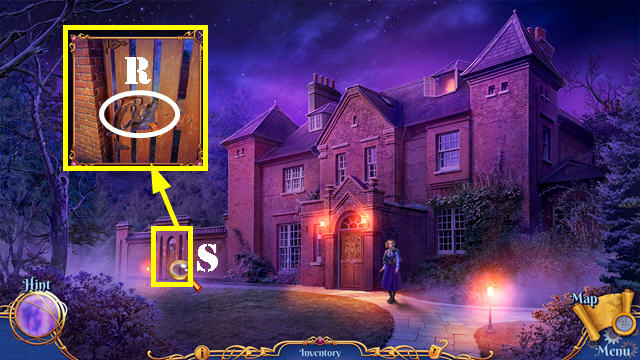
- Use HANDSAW; drag back and forth until door opens (R).
- Go (S).
- Receive FLARE GUN.
- Use FLARE GUN (T).
- Talk (U).
- Take LEATHER GLOVE (V).
- Walk down.
- Use LEATHER GLOVE 4x; take LOTUS EMBLEM and PATTERN PART 1/4 (W1).
- Go (W2).
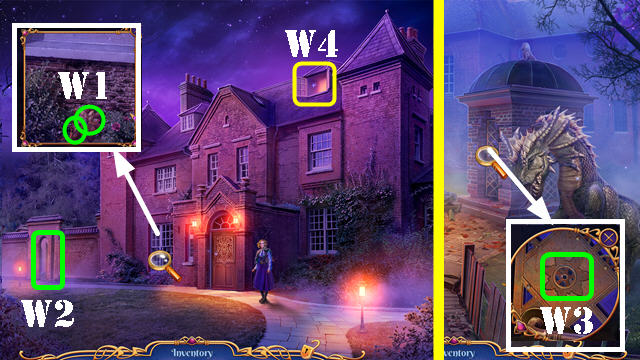
- Place LOTUS EMBLEM (W3). Play HOP; receive CABLE.
- Walk down.
- CABLE on GRAPPLING HOOK. Use GRAPPLING HOOK and go (W4).
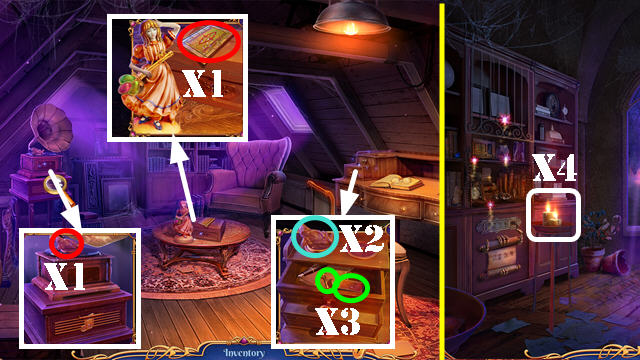
- Take DEVIL FIGURINE and SHOWCASE PART 1/3 (X1).
- Place DEVIL FIGURINE (X2); take MATCHES and PATTERN PART 2/4 (X3).
- Go to Secret Room.
- Use MATCHES (X4). Play HOP; receive BOX KEY.
- Go to House Attic.
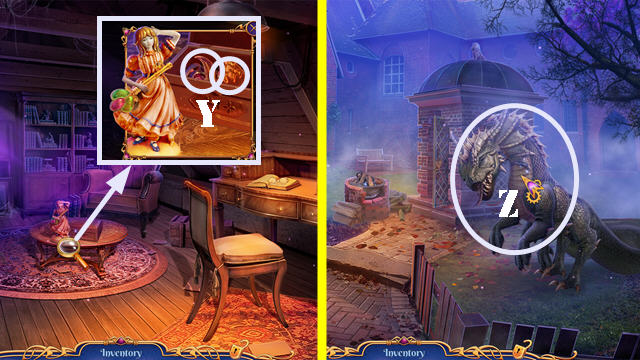
- Use BOX KEY; take MARTIN'S RING and PATTERN PART 3/4 (Y).
- Go to Backyard.
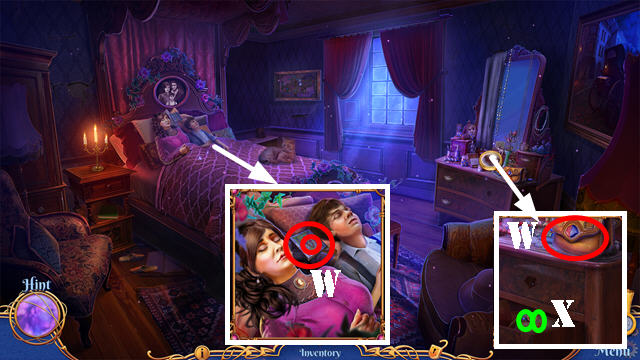
- MARTIN'S RING on DIARY. Play HOP; receive MAGIC STONE.
- Use MAGIC STONE (Z).
- Solution (A-B)-(B-C)-(B-D)-(E-F).
- Take BASILISK DOLL (G).
- Talk (H); receive FLAMMABLE SUBSTANCE.
- Place BASILISK DOLL; use FLAMMABLE SUBSTANCE and MATCHES (I). Take PATTERN PARTS (J).
- Walk down.
- Place PATTERN PARTS (K).
- Enter (L).
- Take DRAGONFLY AMULET HALF (M).
- Select door. Use WRENCH; take DRAGONFLY AMULET HALF (N).
- Place two DRAGONFLY AMULET HALVES and select; take SYRINGE and REVIVAL INSTRUCTIONS (O).
- Place VICTORIA'S PENDANT; take MUSIC EMBLEM (P).
- Go to Backyard.
- Use SYRINGE (Q); receive BASILISK'S BLOOD.
- Go to House Attic.
- Place MUSIC EMBLEM; take PORCELAIN HAT and SHOWCASE PART 2/3 (R).
- Place PORCELAIN HAT (S); take GLASS KEY (T).
- Go to Drawing Room.
- Use GLASS KEY (U).
- Enter (V).
- Take HANDBAG, GOLDEN HANDLE, and SHOWCASE PARTS (W).
- Place GOLDEN HANDLE and select; take WING TOKEN and LAZURITE (X).
- Walk down.
- Place SHOWCASE PARTS (Y). Play HOP; receive GRAMOPHONE CRANK.
- Go to House Attic.

- Place GRAMOPHONE CRANK (A); take ANGEL FIGURINE and PAW TOKEN (B).
- Place ANGEL FIGURINE (C); take DATURA (D).
- Go to Victoria's Room.
- Place WING TOKEN and PAW TOKEN (E).
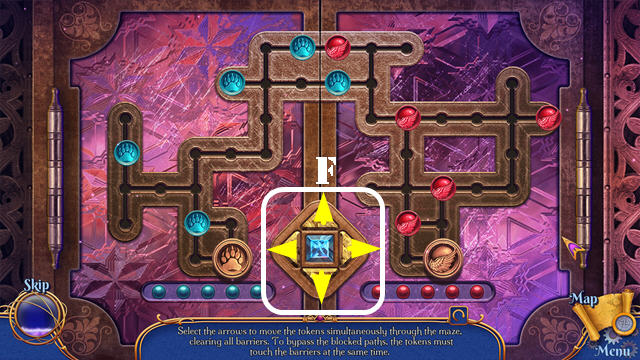
- Solution (F): (Up-Left-Up-Left x2-Down-Right-Up x2).
- (Down-Right x2-Up-Right x2-Up x2).
- (Right x2-Left x2-Down-Left x3).
- (Down-Up x2-Left-Right-Down x2).
- (Right-Up x3-Down).
- (Right-Down x2-Left-Up-Right).
- Take LIVING WATER and GLASS CUTTER.
- Walk down.
- Use GLASS CUTTER; take RUBY (G).
- Go to Victoria's Room.
- LAZURITE and RUBY on HANDBAG; select; take VICTORIA'S BRACELET.
- Use VICTORIA'S BRACELET (H). Play HOP; receive HEALING HERB.
- Select REVIVAL INSTRUCTIONS 2x; place the following items in the bottle; LIVING WATER, DATURA, HEALING HERB, and BASILISK'S BLOOD. Select twice and receive POTION OF AWAKENING.
- Use POTION OF AWAKENING (I).
- Congratulations, you've completed Chimeras: Cherished Serpent!