

Walkthrough Menu
- General Tips
- Chapter 1: A Trip to Scotland
- Chapter 2: Wedding Day
- Chapter 3: A Second Attempt
- Chapter 4: The Dark District
- Chapter 5: The Truth Comes Out
- Chapter 6: The Chimera Curse
General Tips
- This is the official guide for Chimeras: Cursed and Forgotten.
- This guide will not mention each time you have to zoom into a location; the screenshots will show each zoom scene.
- Hidden-object puzzles are referred to as HOPs. This guide will not show screenshots of the HOPs, but it will mention when a HOP is available and the inventory item you'll collect from it.
- This guide will give step-by-step solutions for all puzzles that are not random. Please read the instructions in the game for each puzzle.
Chapter 1: A Trip to Scotland
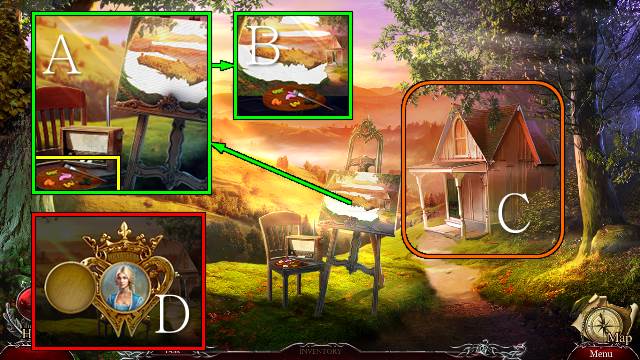
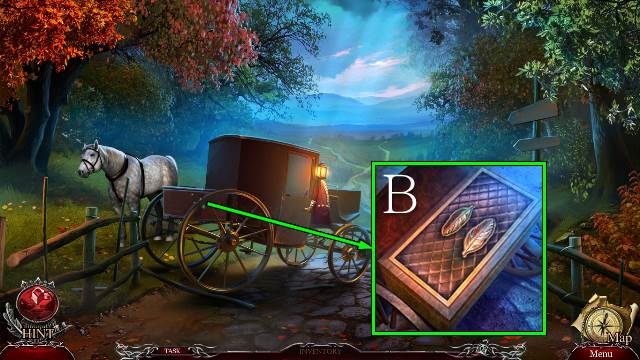
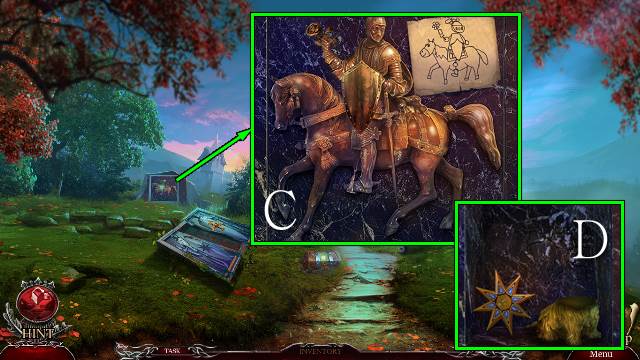
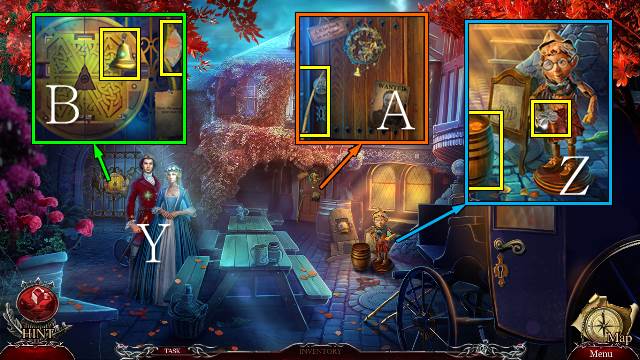
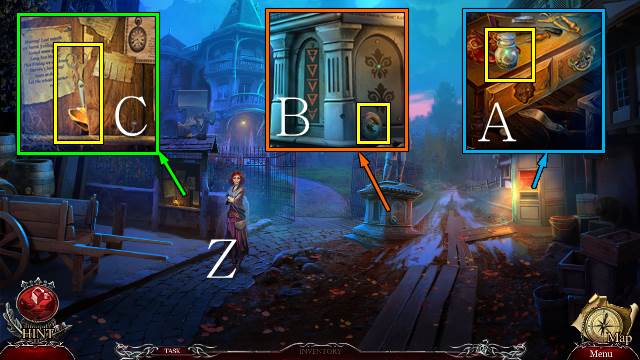
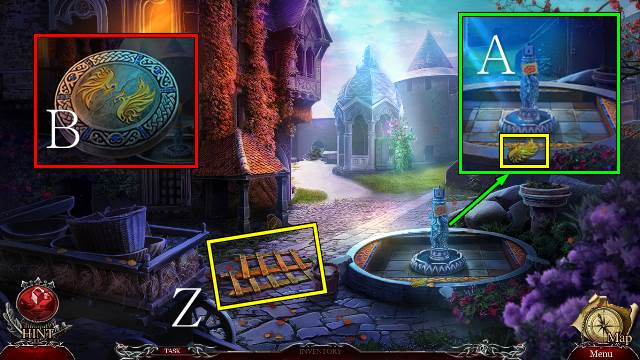
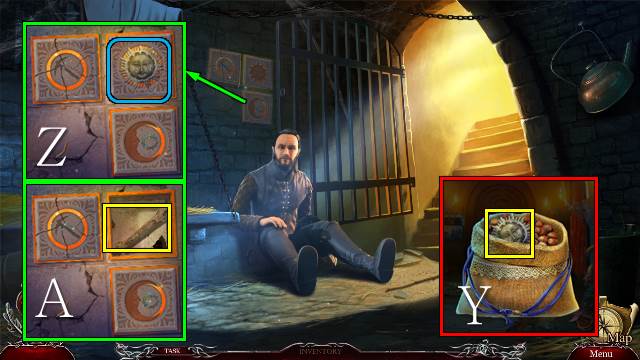
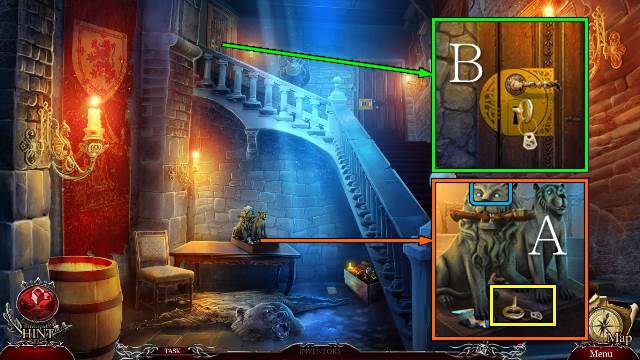
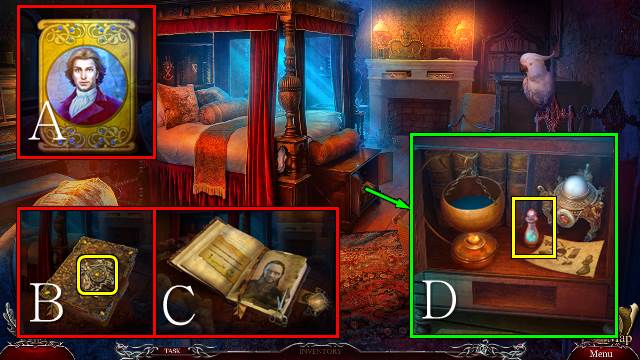
- Take the PALETTE (A); place the PALETTE and use the brush (B).
- Play the HOP (C).
- You receive an AMULET.
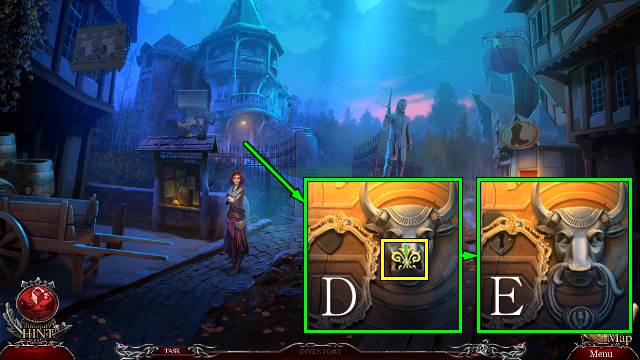
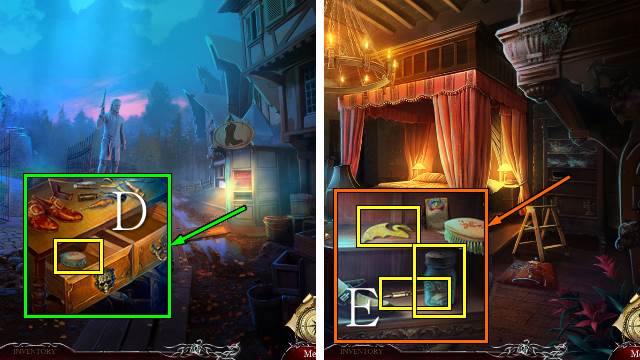
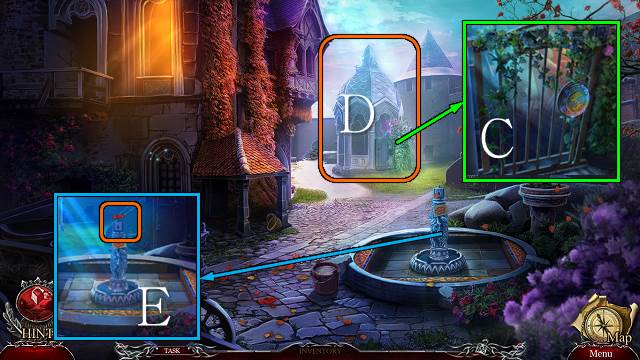
- Access the AMULET and restore it; close the FAMILY AMULET (D).
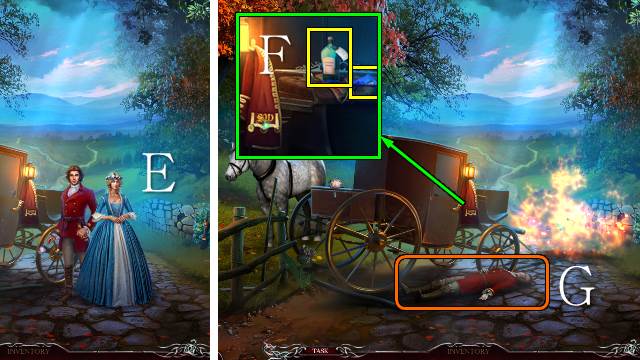
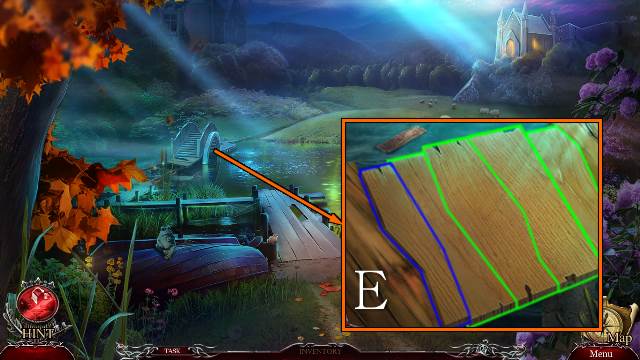
- Talk to the girl (E).
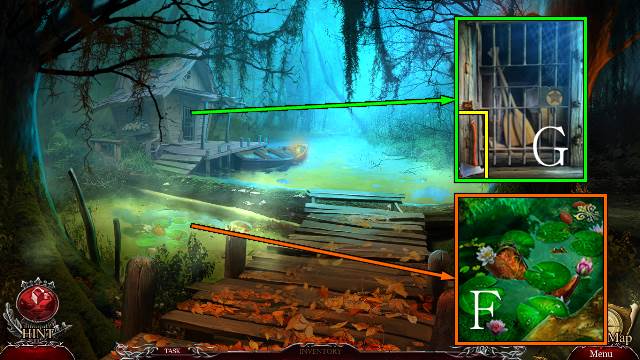
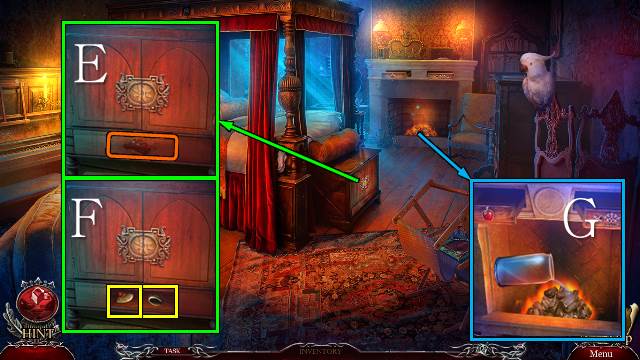
- Take STAINED GLASS SHARD 1/5 and the MEDICINE (F).
- Give the MEDICINE to William (G); you receive DAGGER.
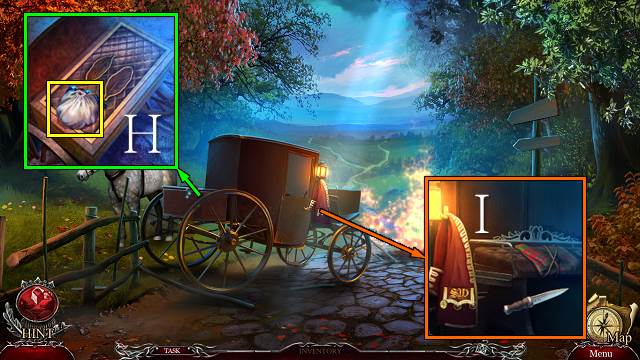
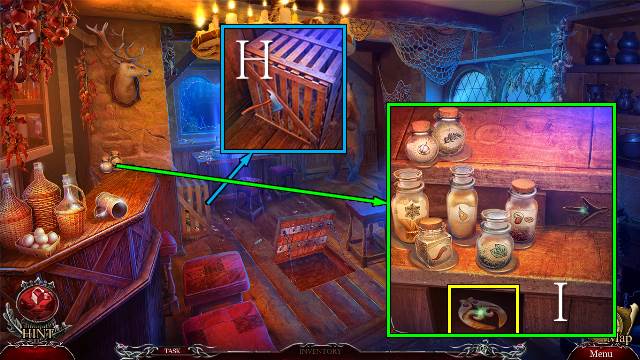
- Take the PURSE (H).
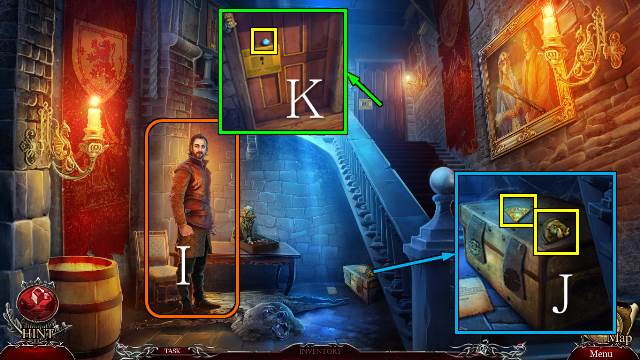
- Use the DAGGER and take the BLANKET (I).
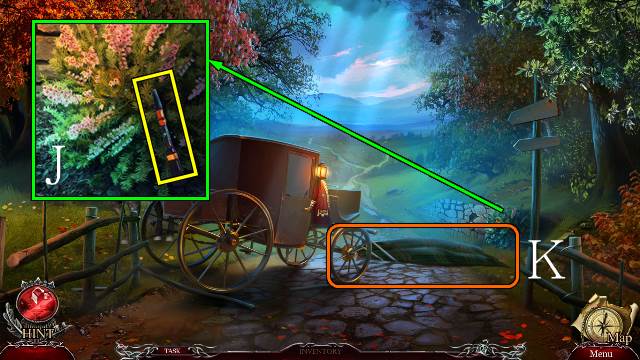
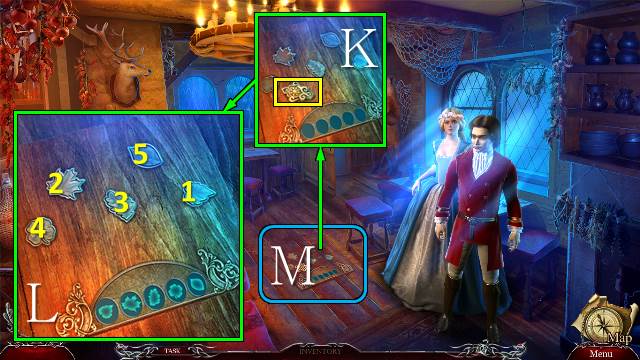
- Take PIPE 1/4 (J).
- Use the BLANKET (K).
- Go forward.
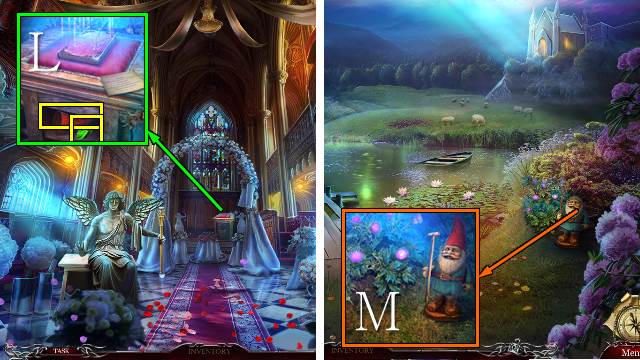
- Talk to the woman (L); you receive a PUZZLE PIECE.
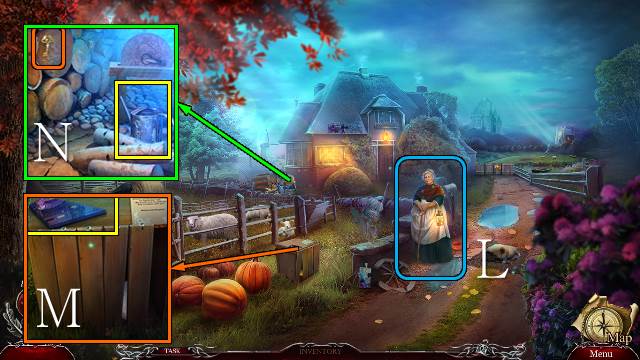
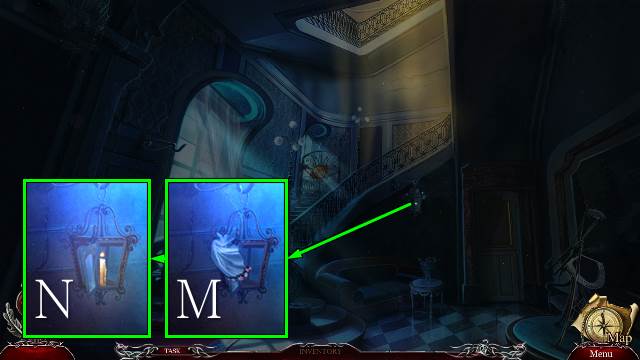
- Take STAINED GLASS SHARD 2/5 (M).
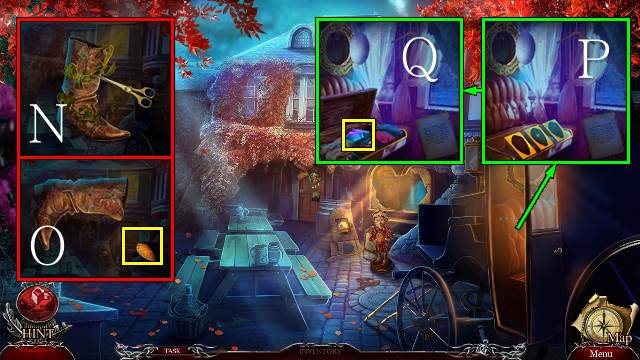
- Move the key and take the WATERING CAN (N).
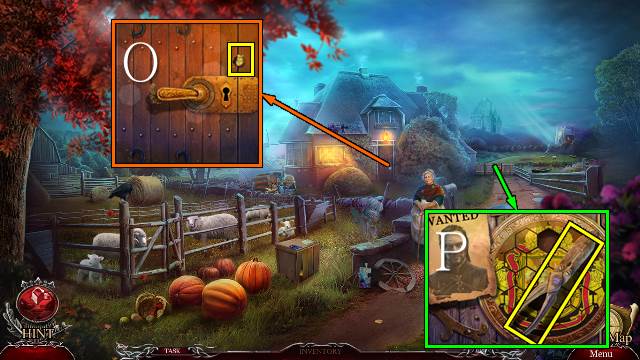
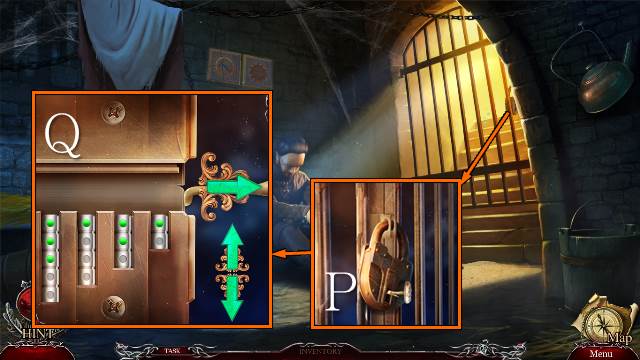
- Take the CLASP (O).
- Take the BROKEN PRUNER (P).
- Walk down.
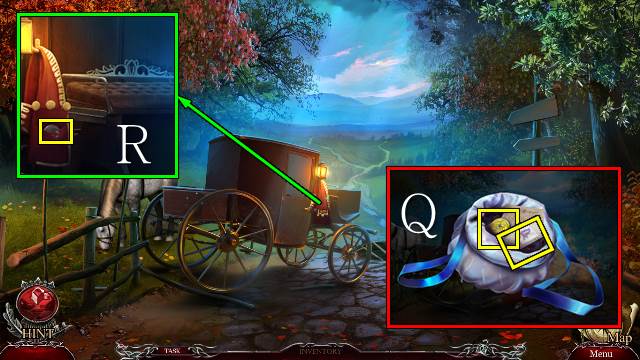
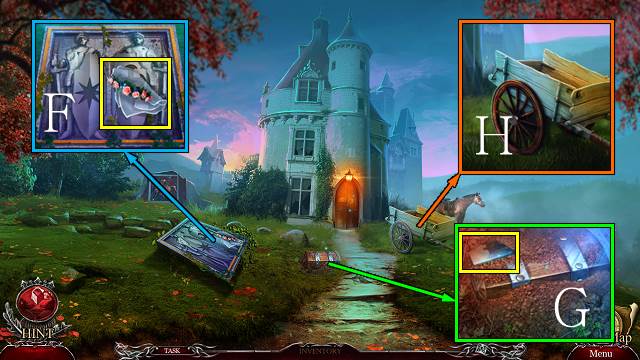
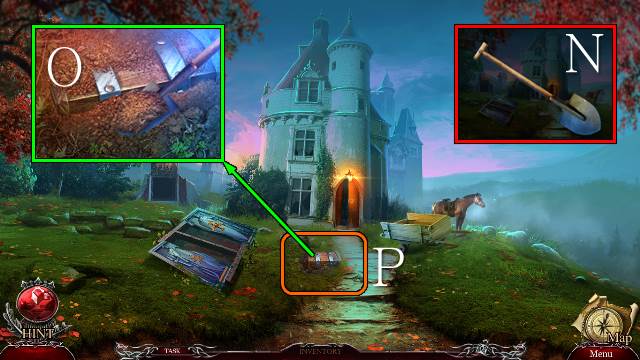
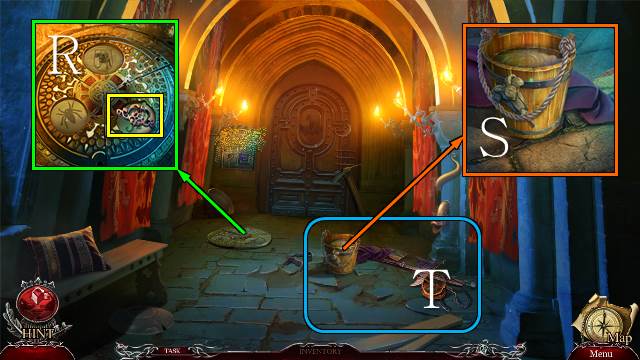
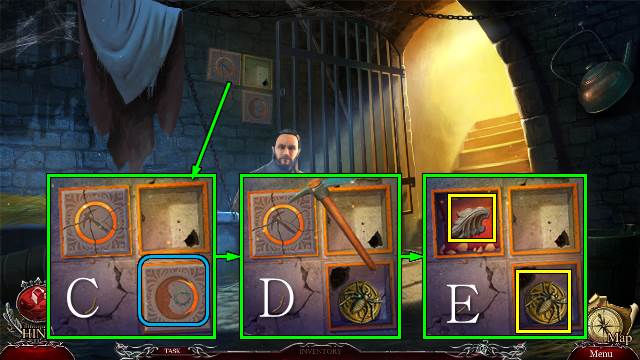
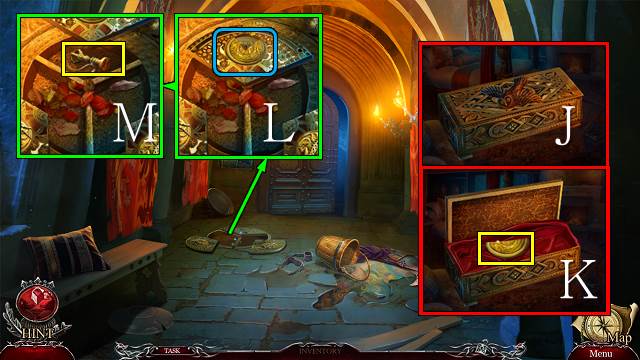
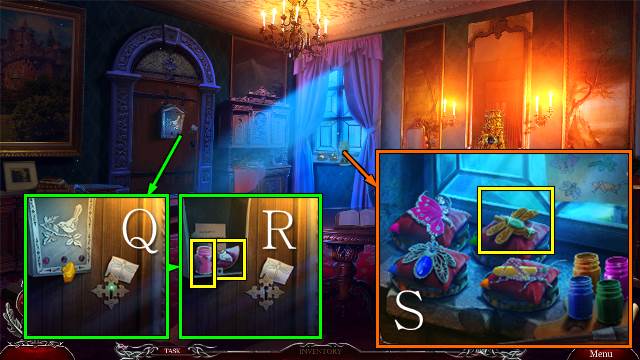
- Access the PURSE and open it; move the items and take the PAPER, CLASP and FEATHER AMULET (Q).
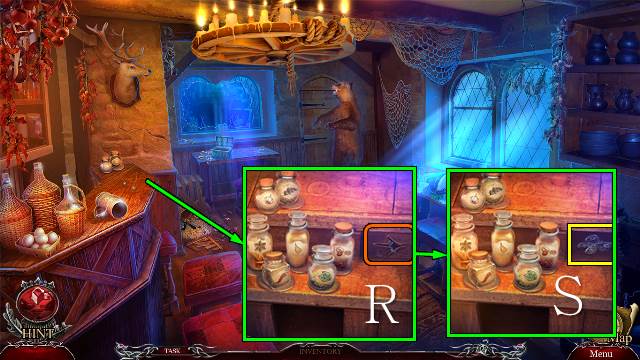
- Place the two CLASPS; take the COIN (R).
- Walk forward.
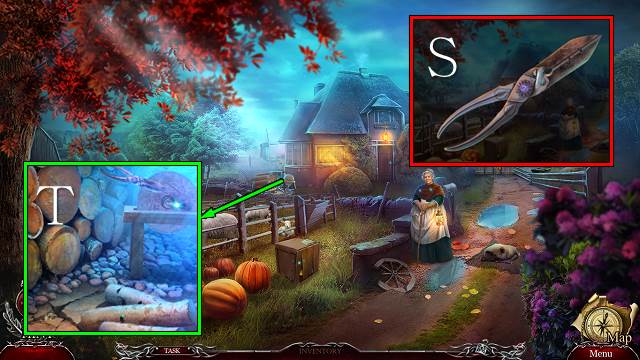
- Access the BROKEN PRUNER; use the COIN and take the DULL PRUNER (S).
- Place the DULL PRUNER and turn the wheel; you receive a PRUNER (T).
- Walk down.
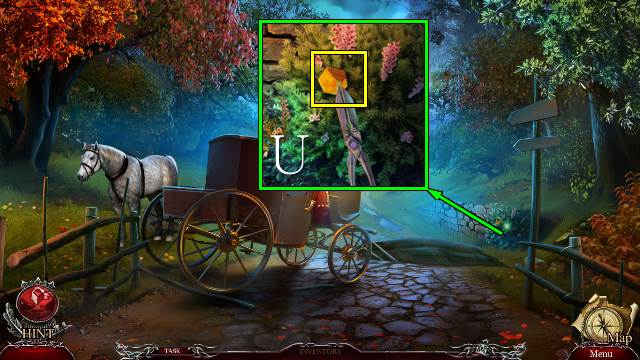
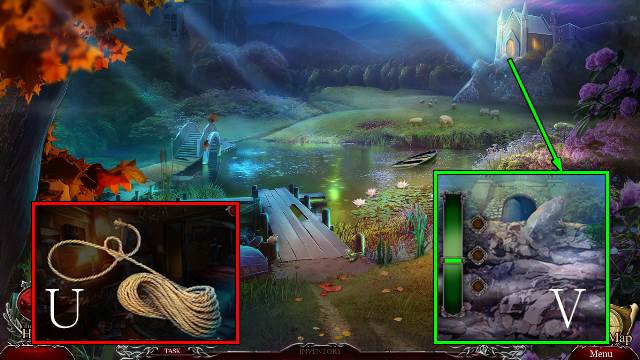
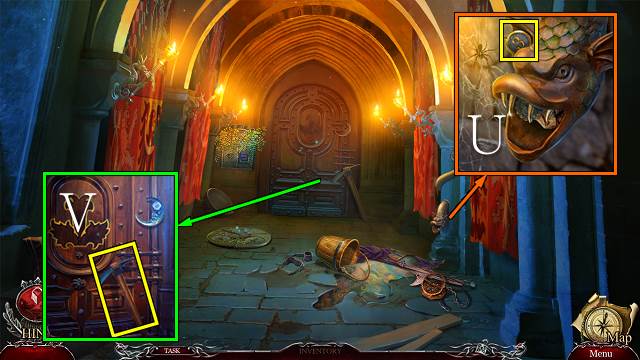
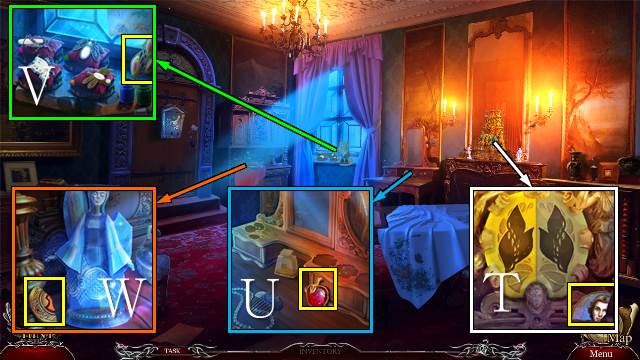
- Use the PRUNER; take the PUZZLE PIECE (U).
- Walk forward.
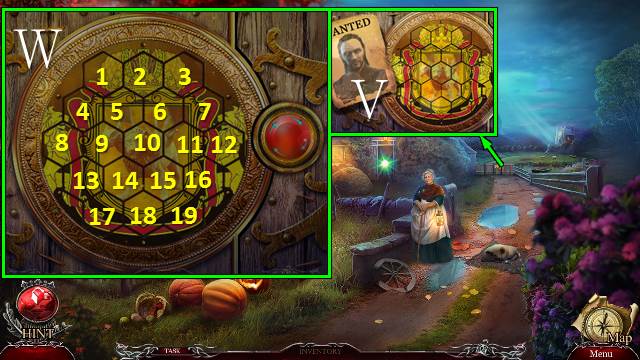
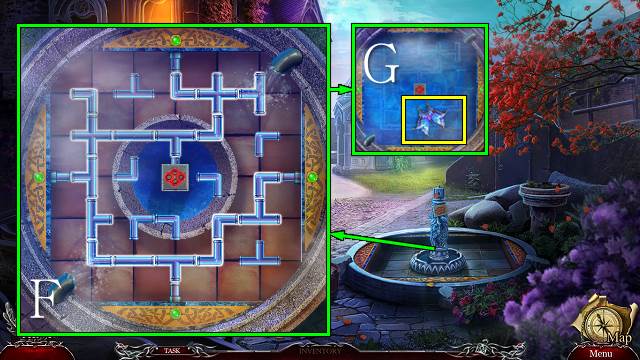
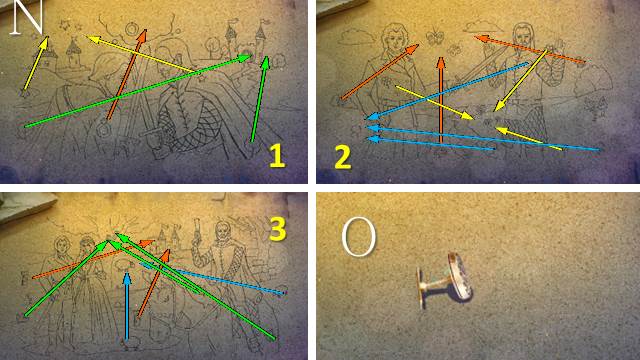
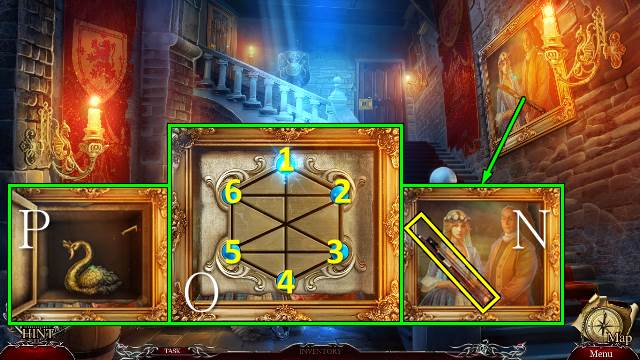
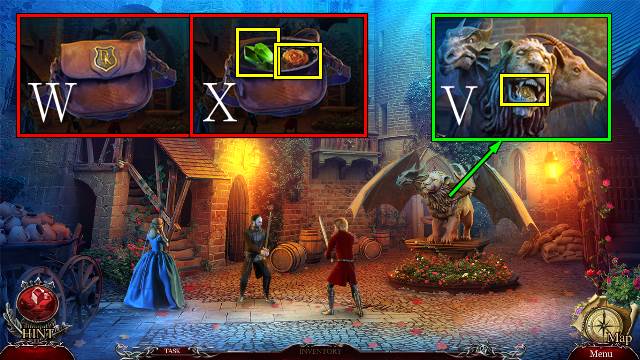
- Place the two PUZZLE PIECES (V) for a mini-game (W).
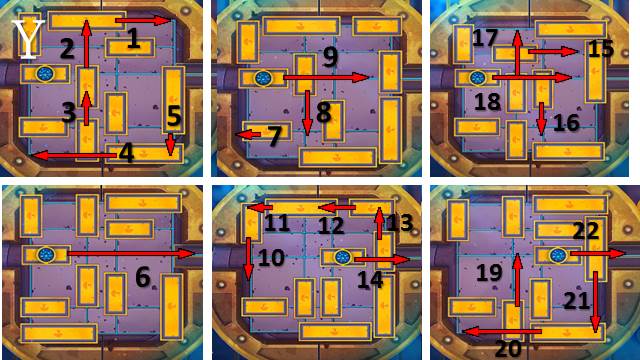
- Solution (the rotations are random): 1-9, 2-18, 3-8, 4-7, 5-16, 6-18, 7-17, 10-19, 11-12, 12-16, 13-18, 14-15, 15-17, 16-19, 18-19, 17-18.
- Go forward.
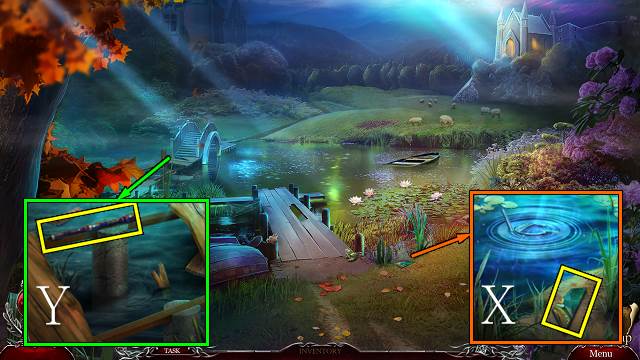
- Take STAINED GLASS SHARD 3/5; use the WATERING CAN to get a FULL WATERING CAN (X).
- Take PIPE 2/4 (Y).
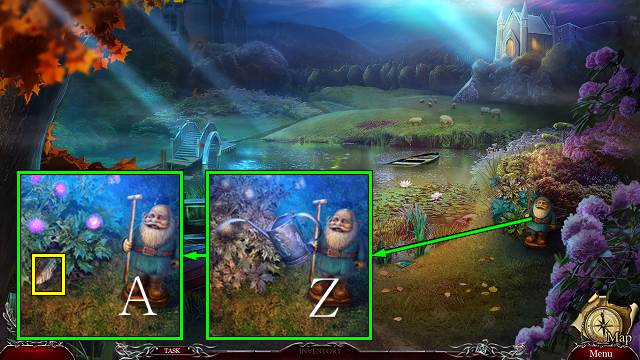
- Use the FULL WATERING CAN (Z); take the FEATHER AMULET (A).
- Walk down twice.
- Place the two FEATHER AMULETS; open the chest for a mini-HOP (B).
- You receive a CANE.
- Go forward.
- Take the HOUSE KEY with the CANE (C).
- Place and turn the HOUSE KEY; move the handle (D).
- Go left.
- Take the KNITTING NEEDLES (E).
- Take the THREAD and BROKEN BAGPIPE (F).
- Walk down.
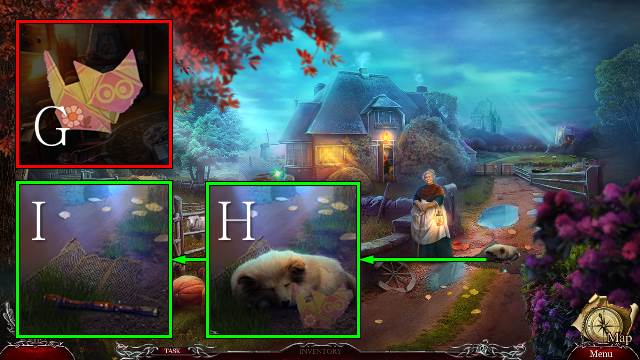
- Access the PAPER and fold it 5 times; attach some THREAD and take the PUPPY'S TOY (G).
- Use the PUPPY'S TOY (H); take PIPE 3/4 and the NET (I).
- Go forward.
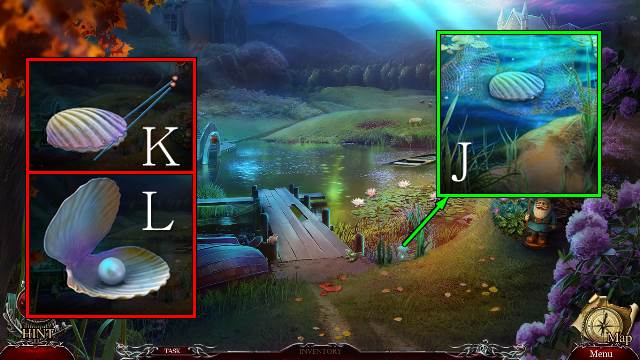
- Use the NET and take the SHELL (J).
- Access the SHELL and use the KNITTING NEEDLES (K); take the PEARL (L).
- Go down and left.
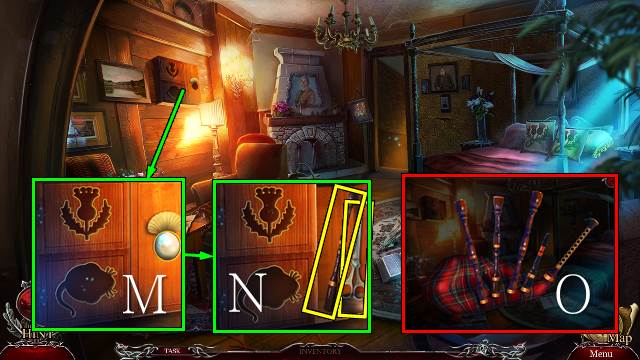
- Place the PEARL and open the cabinet (M); take the SCISSORS and PIPE 4/4 (N).
- Access the BROKEN BAGPIPE and remove the pipes; place the PIPES and take the BAGPIPE (O).
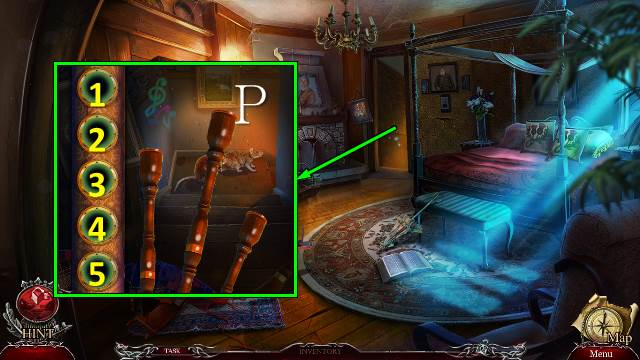
- Place the BAGPIPE for a mini-game (P).
- Solution: 2-3-1-5, 5-1-3-2-4, 1-4-2-5-3.
- Go forward.
- Use the KNITTING NEEDLES (Q); take the MOUSE AMULET (R).
- Walk down.
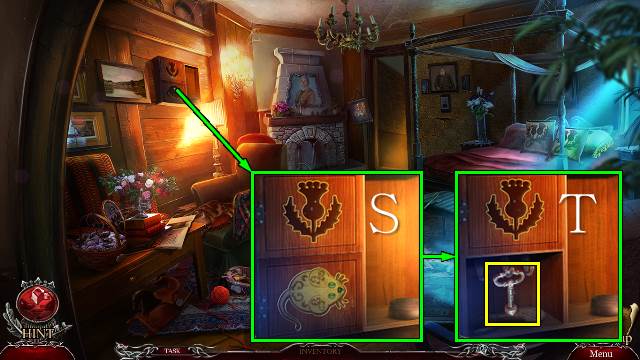
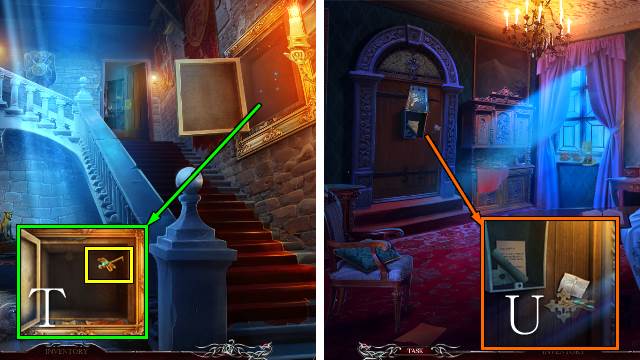
- Place the MOUSE AMULET and open the cabinet (S); take the ROUND KEY (T).
- Go forward.
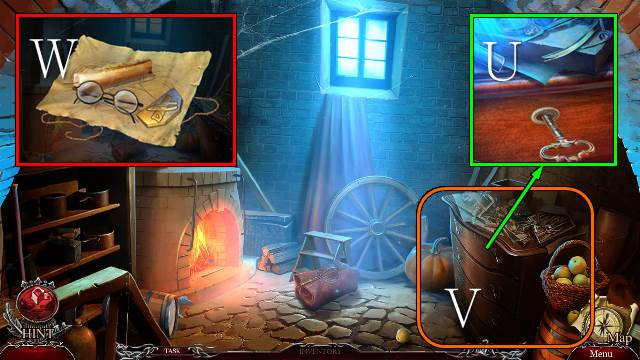
- Use the ROUND KEY (U).
- Play the HOP (V).
- You receive a PACKAGE.
- Access and open the PACKAGE; take the GLASSES, CANDLE and CLASP (W).
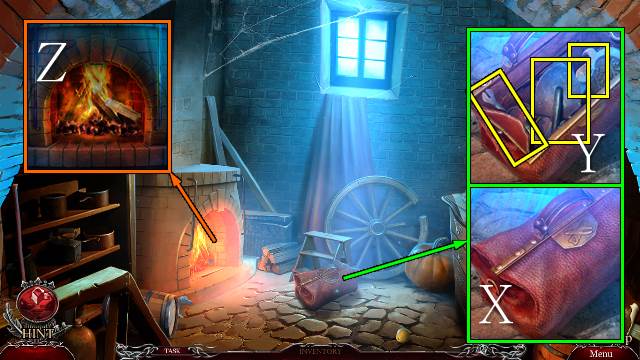
- Place the CLASP (X); take the SHOVEL BLADE, SAW and NAIL PULLER (Y).
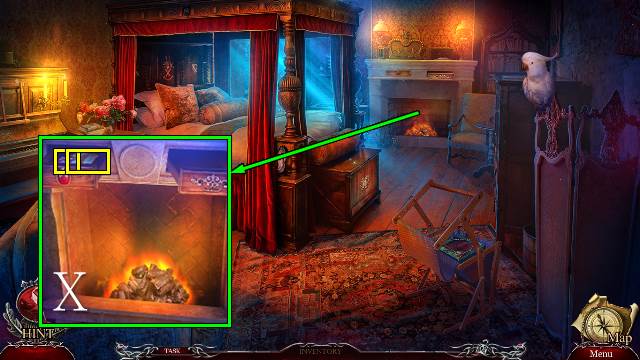
- Use the CANDLE to get a LIT CANDLE (Z).
- Walk down twice.
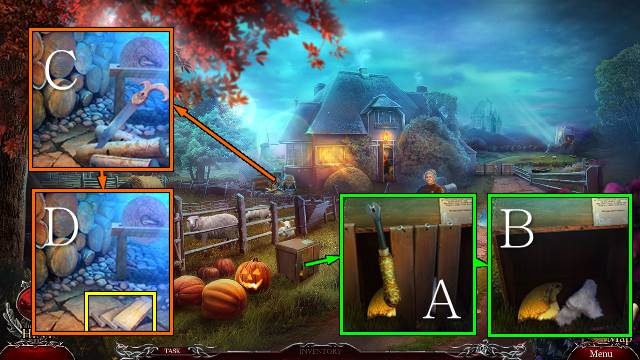
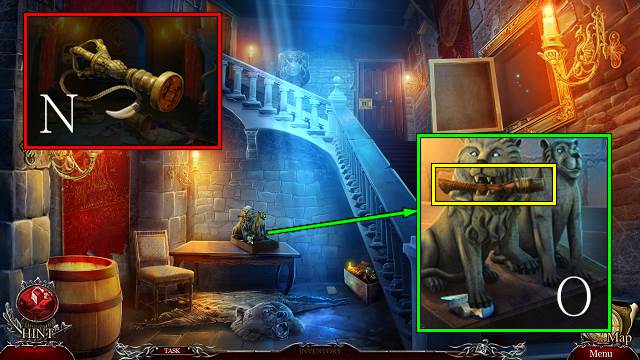
- Use the NAIL PULLER (A); take the WOOL and HORSE AMULET 1/3 (B).
- Use the SAW (C); take the PLANKS (D).
- Go forward.
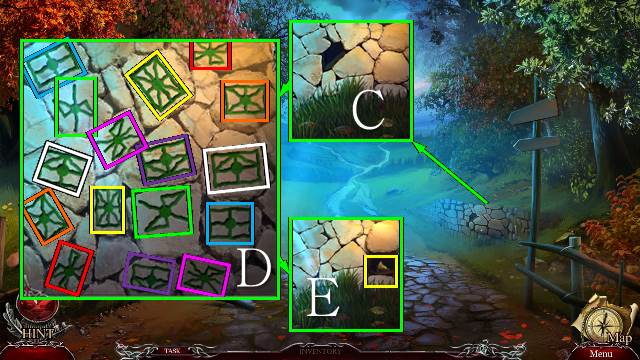
- Place the PLANKS for a mini-game (E).
- Go forward.
Chapter 2: Wedding Day
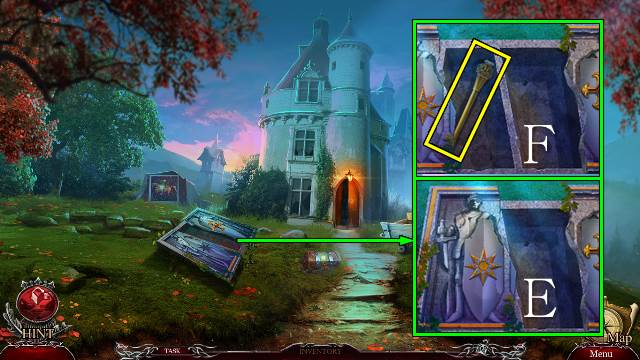
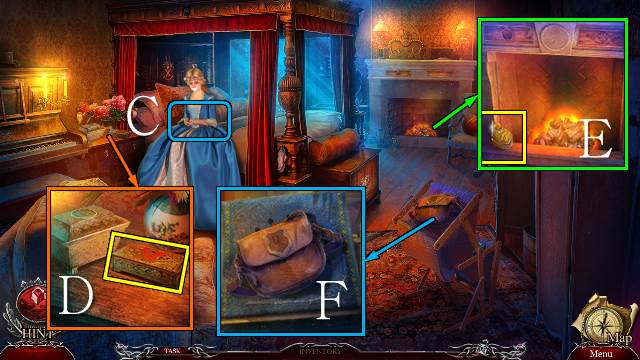
- Take the VEIL (F).
- Take STAINED GLASS SHARD 4/5 (G).
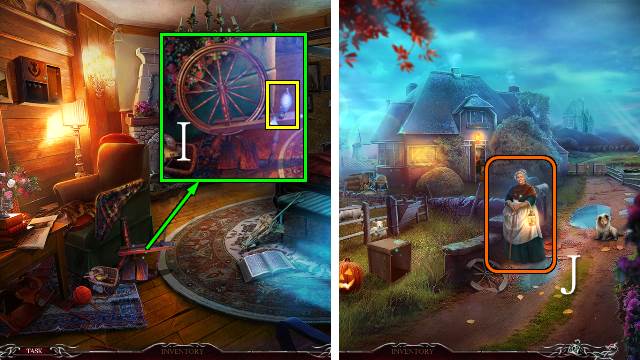
- Take the SPINNING WHEEL with the COIN (H).
- Go to the Country House.
- Place the SPINNING WHEEL and WOOL; turn the wheel and take the YARN (I).
- Walk down.
- Give the YARN to the woman (J); you receive a BADGE.
- Go forward twice.
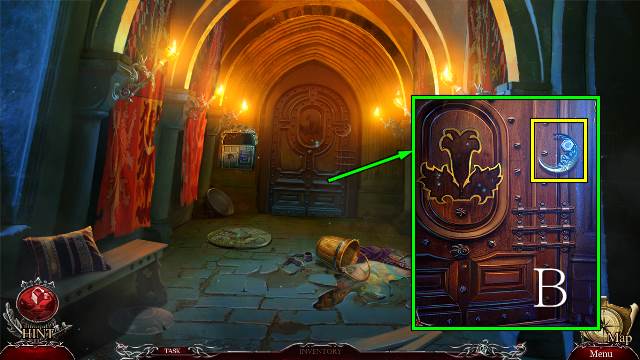
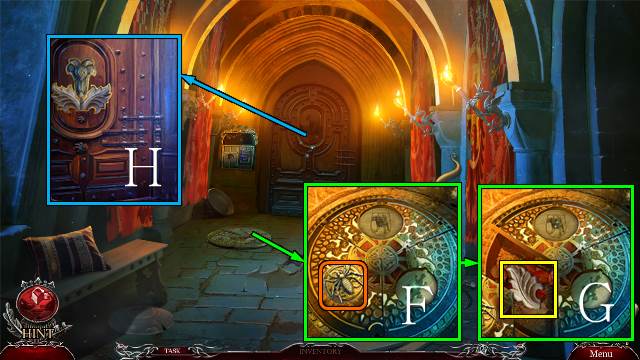
- Access the BADGE, turn it over and take the PIN (K).
- Use the PIN and open the door (L).
- Go forward.
- Use the VEIL (M); place the LIT CANDLE (N).
- Take the FLOWER KEY (O).
- Take the GAUNTLET and CROSS AMULET (P).
- Walk down.
- Place the CROSS AMULET (Q); take the WING (R).
- Go to the Country House.
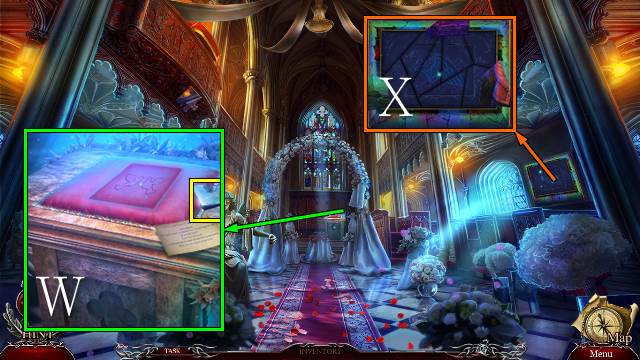
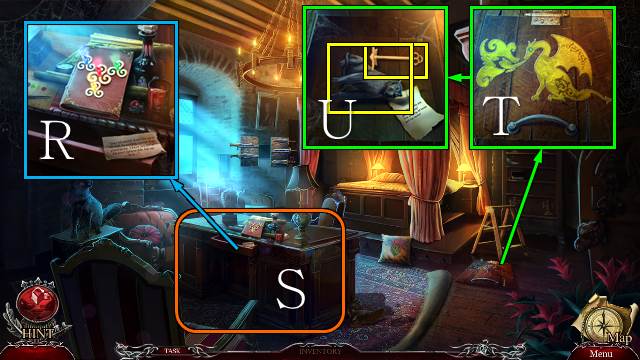
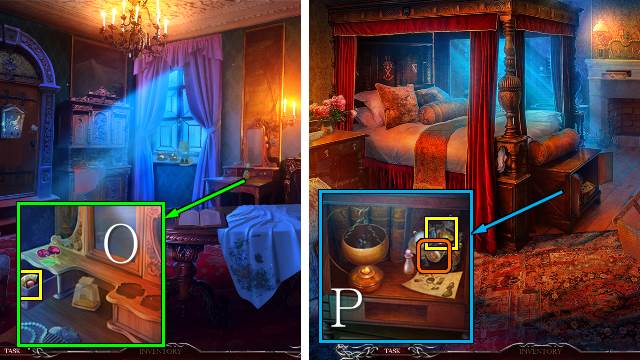
- Place the FLOWER KEY and open the cabinet (S); take the ROPE and SCHEME and check the calendar (T).
- Walk down and forward.
- Access the ROPE and turn it into a LASSO (U).
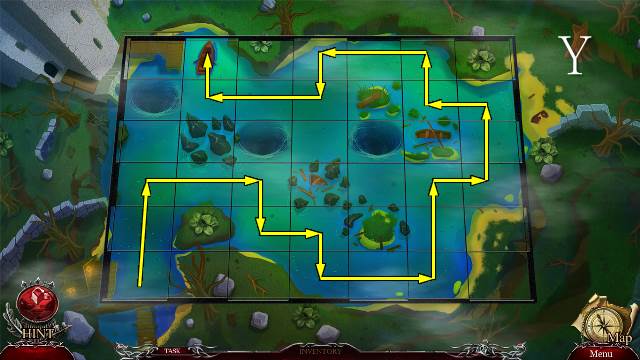
- Use the LASSO for a mini-game (V).
- Go right.
- Take STAINED GLASS SHARD 5/5 (W).
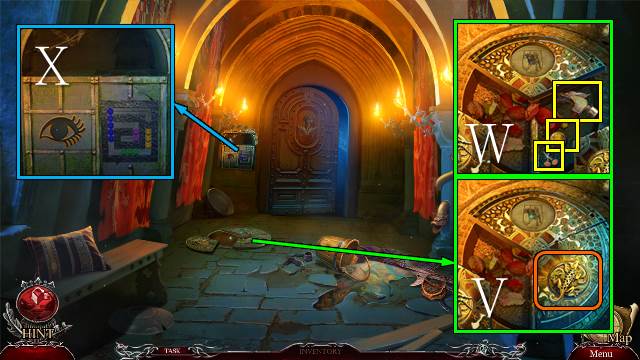
- Place the STAINED GLASS SHARDS (X).
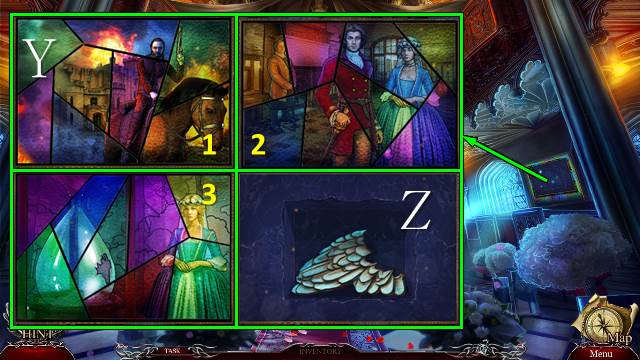
- Play the mini-game (Y).
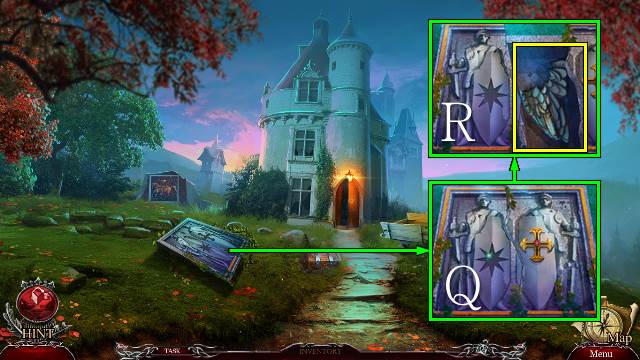
- Take the WING (Z).
- Place the two WINGS; take the SHIELD (A) and HORSE AMULET 2/3 (B).
- Go down and left.
- Place the GAUNTLET, SHIELD and SCHEME for a mini-game (C).
- Solution: select head, shield and gauntlet each three times.
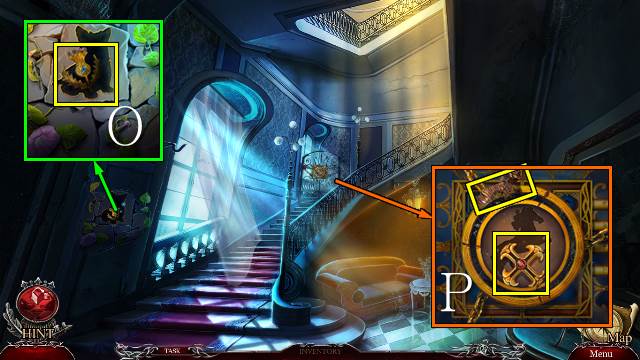
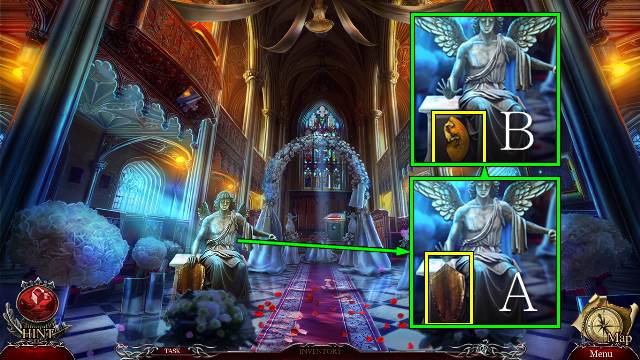
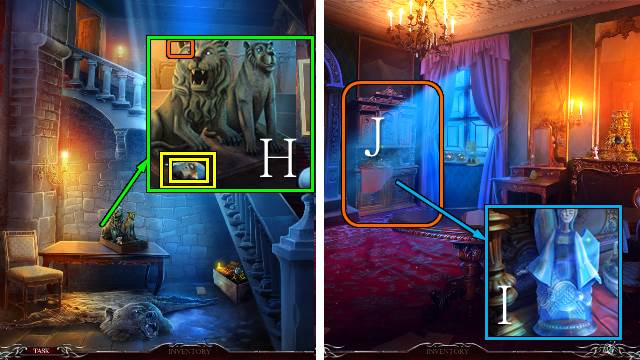
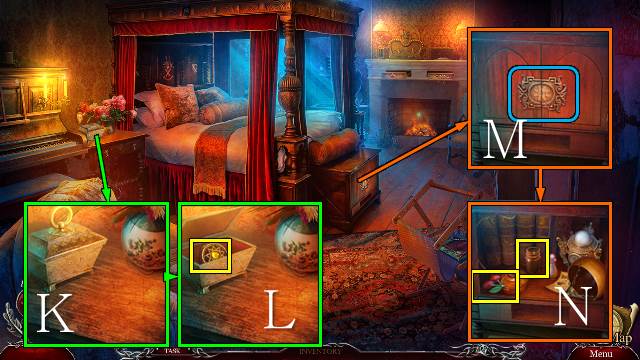
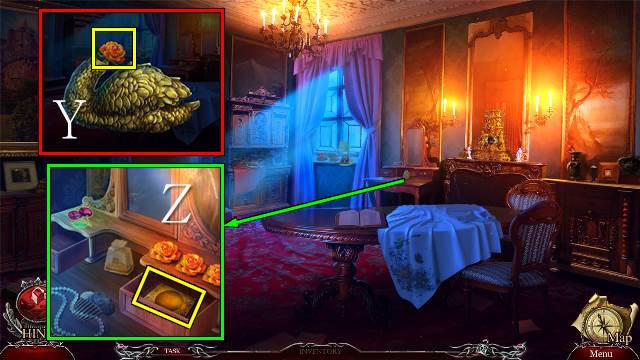
- Take the SCOTTIE DOG CARVING and STAR AMULET (D).
- Place the STAR AMULET (E); take the SCEPTER (F).
- Go down and right.
- Place the SCEPTER; take the SCOTTIE DOG CARVING and BOX (G).
- Go down, left and forward.
- Place the two SCOTTIE DOG CARVINGS and move the tile (H); take the SQUARE KEY (I).
- Go to the Chapel.
- Access the BOX and place the SQUARE KEY for a mini-game (J).
- Take the BOOK (K).
- Place the BOOK and take the GREEN CRYSTAL and CAP (L).
- Walk down.
- Place the CAP to receive a SHOVEL HANDLE (M).
- Go left.
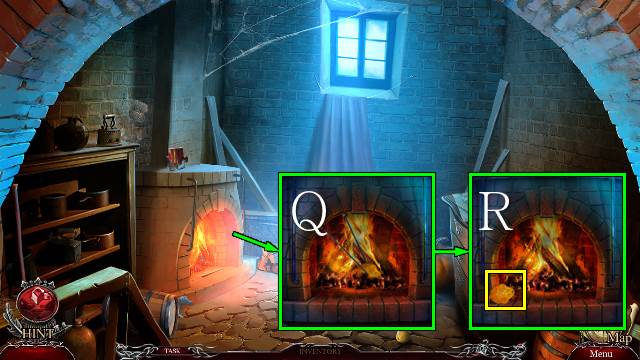
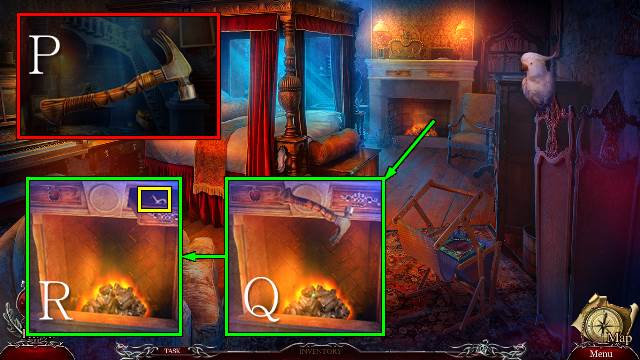
- Access the SHOVEL BLADE and place the SHOVEL HANDLE; take the SHOVEL (N).
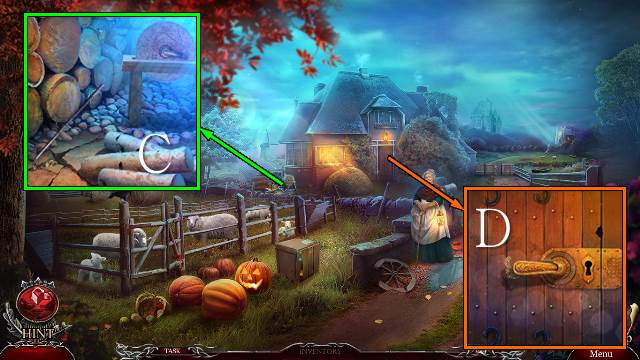
- Use the SHOVEL (O).
- Play the HOP (P).
- You receive HORSE AMULET 3/3.
- Go forward.
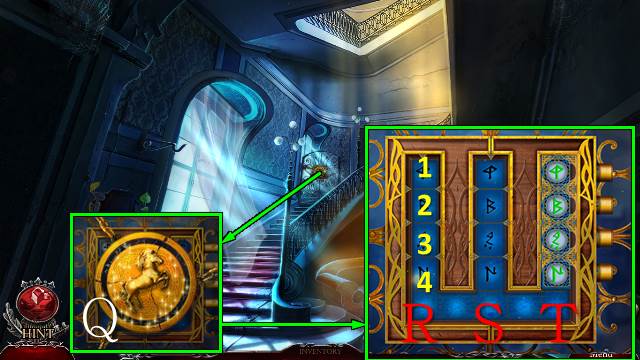
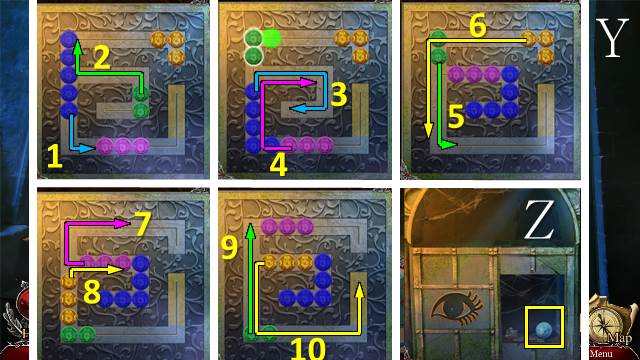
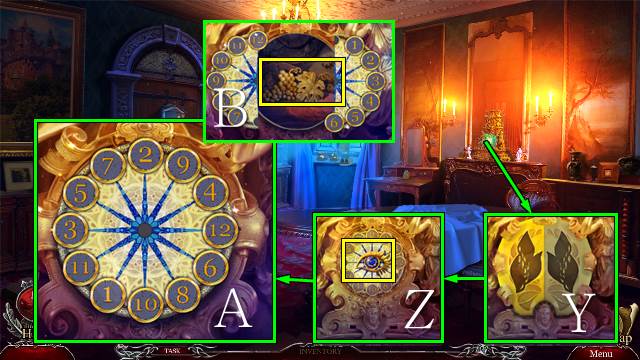
- Place the HORSE AMULET for a mini-game (Q).
- Solution:R4-S4, R3-T3, S4-T4, R2-S2, T4-R4, T3-S3, R4-S4, R1-T1, S4-T4, S3-R3, T4-R4, S2-T2, R4-S4, R3-T3, S4-T4.
- Open the gate.
- Go forward.
Chapter 3: A Second Attempt
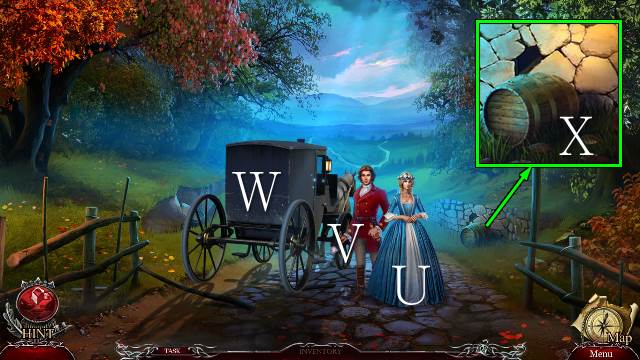
- Talk to Elizabeth (U).
- Talk to William (V).
- Move the carriage (W).
- Take BARREL 1/5 (X).
- Go forward.
- Talk to William (Y).
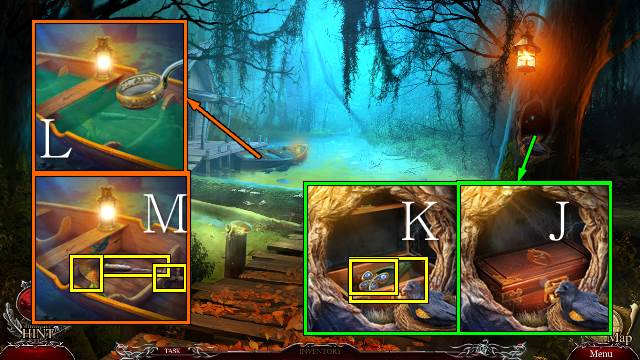
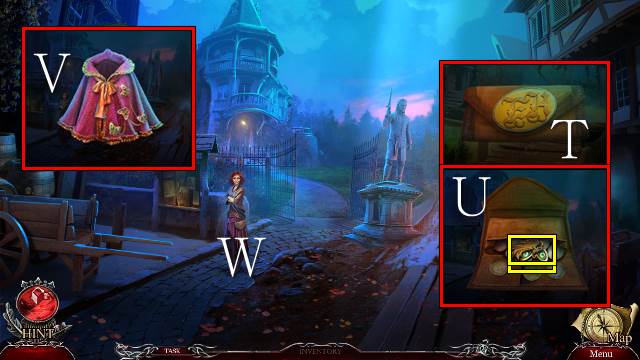
- Remove the broken glasses and place the GLASSES; take BARREL 2/5 and the CLOVERLEAF (Z).
- Take the BROKEN FISHING ROD (A).
- Take the STONE and BELL (B).
- Walk down.
- Place the STONE (C) for a mini-game (D).
- Take the BELL (E).
- Go forward.
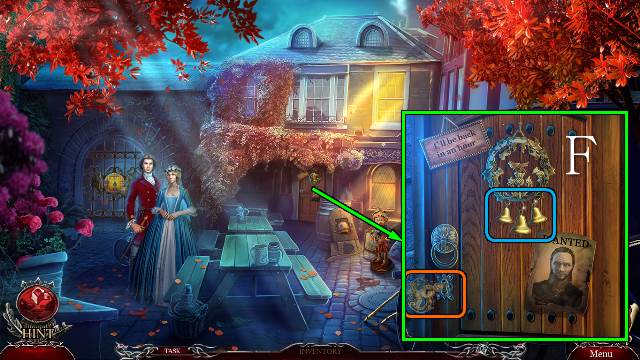
- Place the two BELLS to receive the TAVERN KEY; use the TAVERN KEY (F).
- Go forward.
- Talk to Elizabeth to receive BROOCH 1/4 (G).
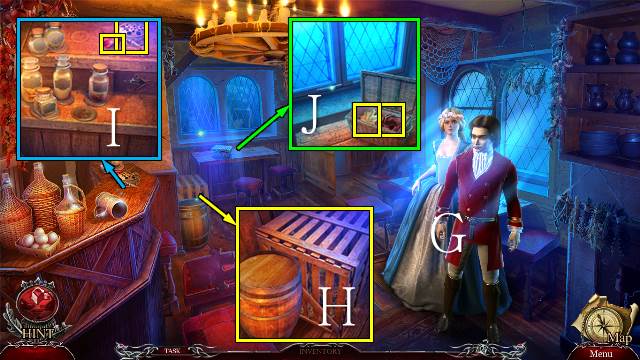
- Take BARREL 3/5 (H).
- Take the RED CRYSTAL and FISHING LINE (I).
- Open the basket and take the MAPLE LEAF and SCARF (J).
- Take the BELT CLASP (K); place the MAPLE LEAF and CLOVER LEAF for a mini-game (L).
- Play the HOP (M).
- You receive BARREL 4/5.
- Go forward.
- Place the BELT CLASP and take the BULL'S RING (N); remove the scarf, place the SCARF and take the HOOK (O).
- Walk down.
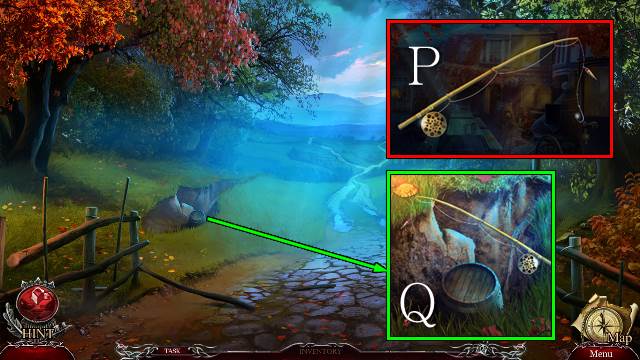
- Access the BROKEN FISHING ROD and attach the FISHING LINE and HOOK; take the FISHING ROD (P).
- Take BARREL 5/5 with the FISHING ROD (Q).
- Go forward twice.
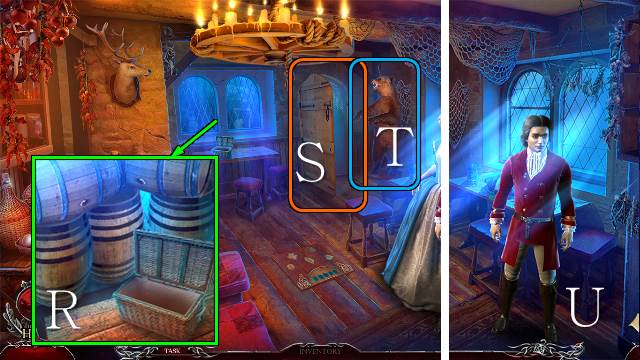
- Move the latch and place the BARRELS (R).
- Use the TAVERN KEY (S).
- Move the bear (T).
- Talk to William (U); you receive the CARRIAGE KEY.
- Go forward.

- Use the CARRIAGE KEY (V).
- Take the BIG KEY and TORN CAPE (W).
- Place and turn the BIG KEY for a mini-game (X).
- Solution (Y).
- Go left.
Chapter 4: The Dark District
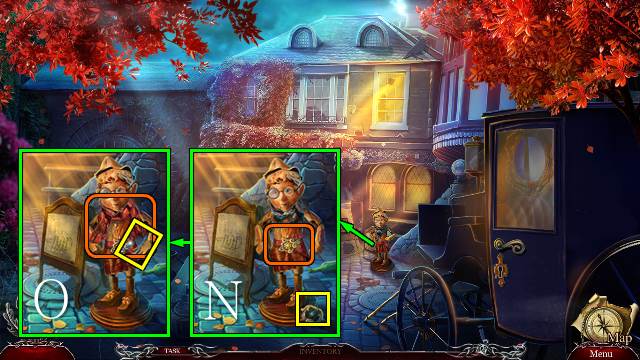
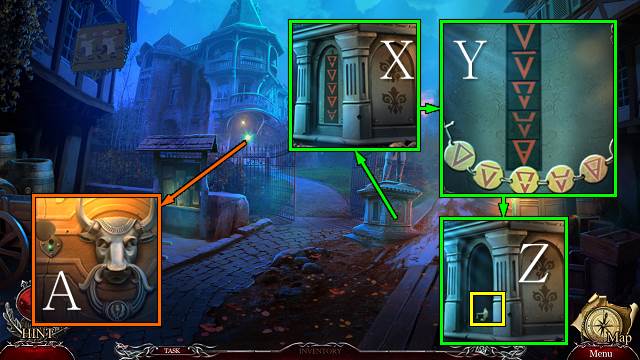
- Talk to the girl (Z) and receive the EH MONOGRAM.
- Take the SALTCELLAR (A).
- Take the PHOENIX (B).
- Take the YELLOW CRYSTAL with the SCISSORS (C).
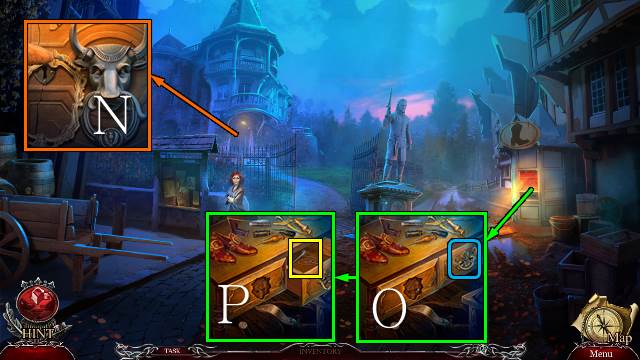
- Take the LILY (D); place the BULL'S RING (E).
- Go forward.
- Take the BOOT (F).
- Take the AXE (G).
- Go to the Tavern.
- Use the AXE for a mini-HOP (H).
- You receive a LADLE.
- Place the SALTCELLAR for a mini-game; take the TALISMAN (I).
- Go to the Swamp.
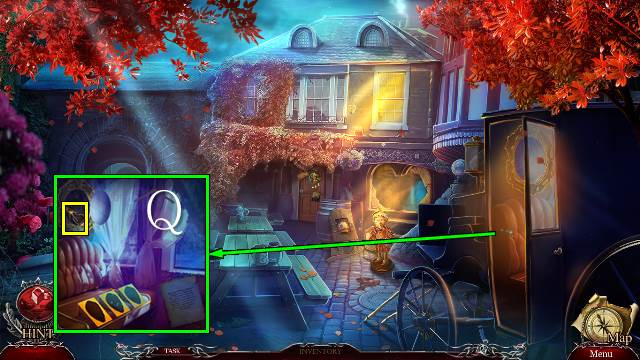
- Move the bark and place the TALISMAN (J); take BROOCH 2/4 and the WALLET (K).
- Use the LADLE three times (L); take PINECONE 1/3, the SCREWDRIVER and HANDLE (M).
- Walk down.
- Take the FRAME with the SCREWDRIVER (N).
- Remove the handle and place the HANDLE (O); take the NEEDLE AND THREAD (P).
- Walk down.
- Place the FRAME and take the BIRD FOOT (Q).
- Go forward.
- Use the BIRD FOOT (R); take BROOCH 3/4 (S).
- Go forward and left.
- Access the WALLET and place the EH MONOGRAM (T); inspect the card.
- Open the compartment, move the coins and take the BIRD and BROOCH 4/4 (U).
- Access the TORN CAPE, use the NEEDLE AND THREAD and place the BROOCH; take the CAPE (V).
- Give the CAPE to the girl (W) to receive a BRACELET.
- Place the BRACELET (X) for a mini-game (Y).
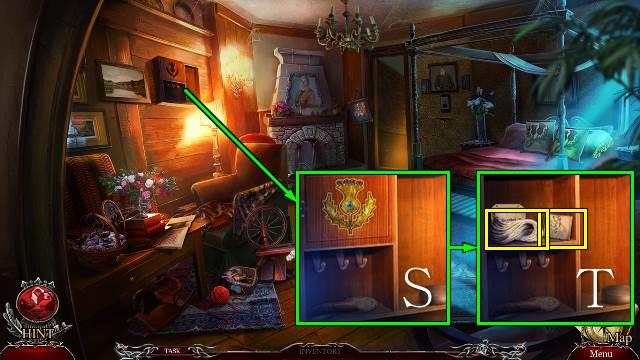
- Take the MANSION KEY (Z).
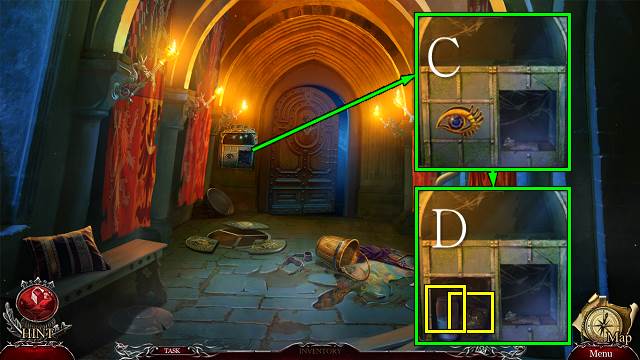
- Place and turn the MANSION KEY (A).
- Go left.
- Take the CHEST (B).
- Take the SKULL AMULET with the SCISSORS (C).
- Walk down.
- Place the SKULL AMULET and take the BRUSH (D).
- Go left.
- Use the BRUSH; take DRAGON 1/3, the GLASS JAR and PEN (E).
- Walk down and forward.
- Access the GLASS JAR, open it and take the FROG (F).
- Release the FROG for a mini-game; take the LILY (G).
- Walk down.
- Place the two LILIES (H); take the SWORD (I).
- Go left.
- Place the SWORD for a mini-game (J).
- Take the INK (K).
- Walk down and forward.

- Access the CHEST and place the INK and PEN; take DRAGON 2/3 and the SEEDS (L).
- Use the SEEDS and take PINECONE 2/3 (M).
- Walk down twice.
- Access the BOOT and use the SCISSORS (N); turn over the boot to get PINECONE 3/3 (O).
- Place the PINECONES (P); move the clothes and take the BLUE CRYSTAL (Q).
- Go left twice.
- Place the BLUE, YELLOW, RED and GREEN CRYSTAL (R).
- Play the HOP (S).
- You receive DRAGON 3/3.
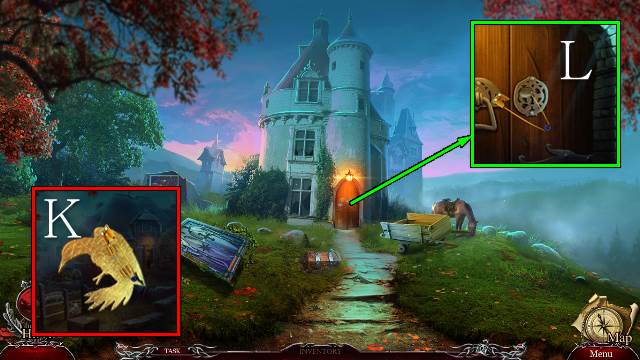
- Place the DRAGON (T); lift the hatch and take the STAR KEY and LION FIGURINE (U).
- Walk down and forward.
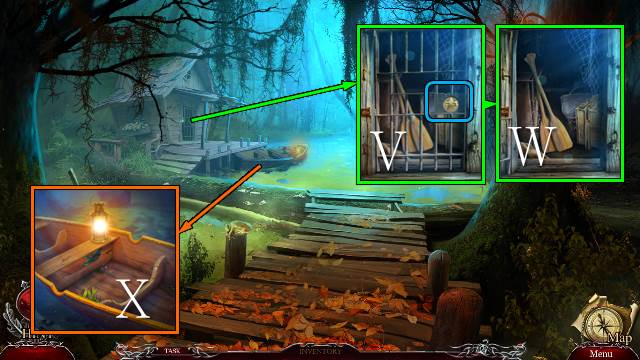
- Place the STAR KEY (V); open the gate and take the PADDLES (W).
- Place the PADDLES (X).
- Play the mini-game (Y).
- Try to walk forward.
- Take the BROKEN LADDER (Z).
- Take the BIRD (A).
- Access the PHOENIX, place the two BIRDS and take the PHOENIX AMULET (B).
- Place the PHOENIX AMULET (C).
- Play the HOP (D).
- You receive a VALVE.
- Place the VALVE (E).
- Play the mini-game (F).
- Take the BUTTERFLY (G).
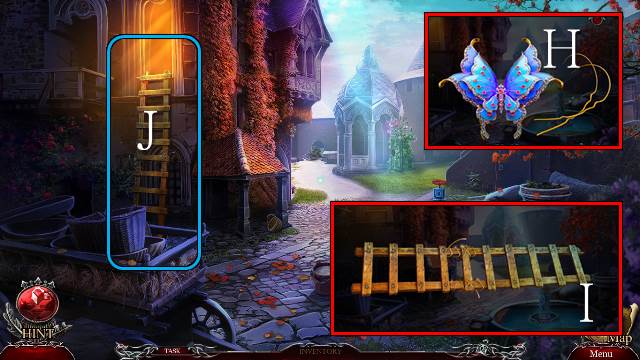
- Access the BUTTERFLY, remove the antennae and take the WIRE (H).
- Access the BROKEN LADDER, join the two pieces and use the WIRE; take the LADDER (I).
- Place the LADDER (J).
- Go forward.
Chapter 5: The Truth Comes Out

- Talk to Storm (K).
- Take ROSE 1/3 (L).
- Take the SCREW (M).
- Use the SCISSORS for a mini-game (K).
- Solution (N).
- Take the CELL KEY (O).
- Place the CELL KEY (P) for a mini-game (Q).
- Go forward.
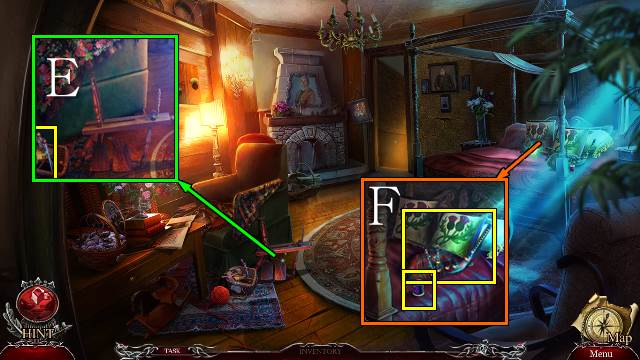
- Take the DRAWER HANDLE (R).
- Knock over the bucket (S).
- Play the HOP (T).
- You receive a STONE FLOWER.
- Take the NUMBER (U).
- Take the PICKAX (V).

- Remove the vines and place the SCREW (W); use the PICKAX and take the BAG and NUMBER (X).
- Walk down.
- Access and open the BAG and take the STONE SUN (Y).
- Place the STONE SUN (Z); take the WRENCH (A).
- Go forward.
- Take the STONE MOON with the WRENCH (B).
- Walk down.
- Place the STONE MOON (C) and use the PICKAX (D); take the SPIDER AMULET and STONE LEAF (E).
- Go forward.
- Place the SPIDER AMULET (F); take the STONE LEAF (G).
- Place the STONE FLOWER and two STONE LEAVES (H).
- Go forward.
- Talk to William (I).
- Take LIZARD AMULET 1/4 and PICTURE SHARD 1/3 (J).
- Take the CRYSTAL BALL (K).

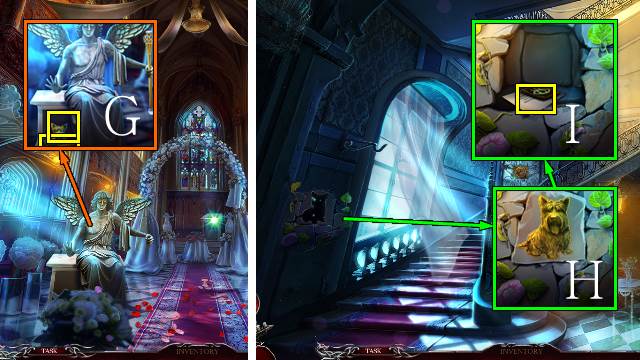
- Take the HANDKERCHIEF (L); place the LION FIGURINE and take LIZARD AMULET 2/4 (M).
- Take the FIDDLE BOW and use the SCISSORS for a mini-game (N).
- Solution (O): 1-2-3-4-5-6-3-5-2-6-1-4.
- Take the SWAN (P).
- Walk down.
- Use the FIDDLE BOW (Q); take LIZARD AMULET 3/4 and the BELT (R).
- Go forward.

- Access the BELT and remove the LATCH with the SCISSORS (S).
- Place the LATCH (T).
- Play the HOP (U).
- You receive LIZARD AMULET 4/4.
- Walk down.
- Place the LIZARD AMULET (V); take the HAMMER HEAD, CHIP and NAILS (W).
- Place the CHIP for a mini-game (X).
- Solution (Y).
- Take the CRYSTAL BALL (Z).
- Go forward.
- Place the two CRYSTAL BALLS and take the BEDROOM KEY (A).
- Look through the keyhole; place and turn the BEDROOM KEY (B).
- Go left.
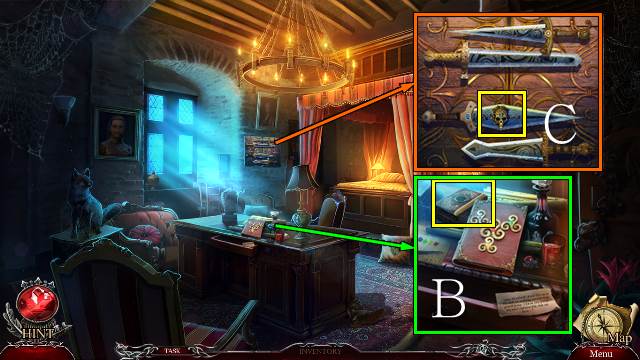
- Use the SCISSORS (C).
- Give the FAMILY AMULET to Elizabeth (C).
- Take the CASE (D).
- Take PICTURE SHARD 2/3 (E).
- Take the PURSE and place the NEEDLE AND THREAD for a mini-game (F).
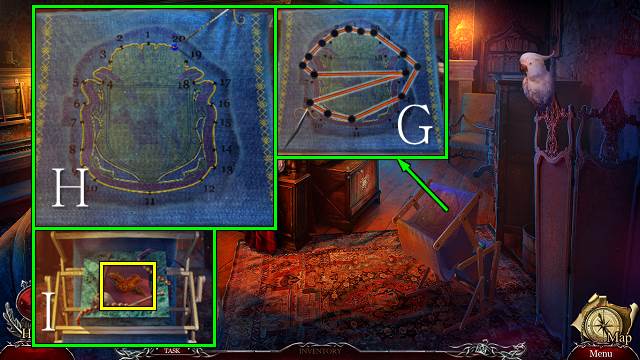
- Solution 1 (G).
- Solution 2 (H).
- Take the OWL AMULET (I).
- Walk down twice.
- Access the CASE and place the OWL AMULET (J); take PICTURE SHARD 3/3 (K).
- Place the PICTURE SHARDS (L); take the COUNT'S SEAL (M).
- Go forward.
- Access the COUNT'S SEAL and take the LION'S FANG (N).
- Place the LION'S FANG and take the HAMMER HANDLE (O).
- Go left.
- Access the HAMMER HEAD, place the HAMMER HANDLE and take the HAMMER (P).
- Place the DRAWER HANDLE and NAILS and use the HAMMER (Q); open the drawer and take the HALL KEY (R).
- Walk down.
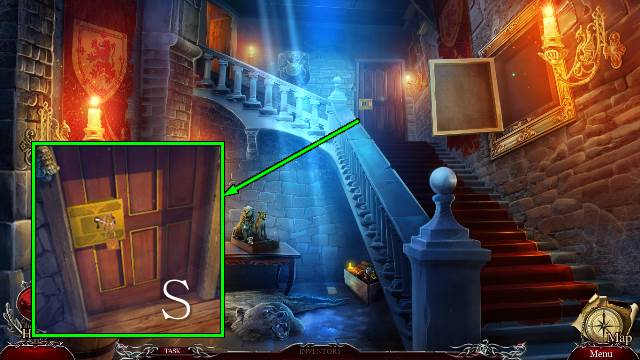
- Place and turn the HALL KEY (S).
- Go forward.
Chapter 6: The Chimera Curse
- Take PORTRAIT PART 1/3 (T).
- Take the RUBY APPLE (U).
- Take the SILVER SHARD (V).
- Take ELIZABETH'S MEDALLION 1/3 (W).
- Go down and left.
- Place the RUBY APPLE; take the GOLDEN SHARD and PORTRAIT PART 2/3 (X).
- Go down and forward.
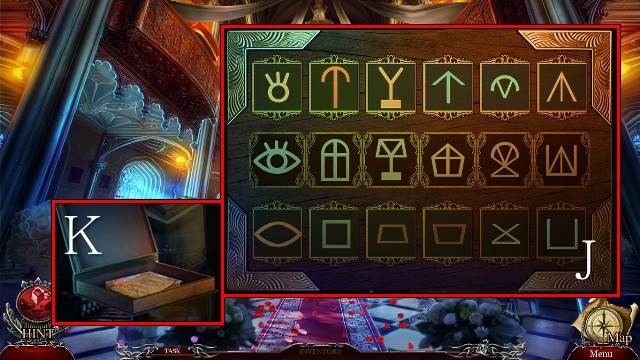
- Place the SILVER SHARD and GOLDEN SHARD (Y); take the EYE AMULET and place the two NUMBERS for a mini-game (Z).
- Move the following numbers (A): 12-4-9-2-12-11-3-5-7-11-10-1-3-5-7-10-9-4-6-8-1-3-5-7-9-8-1-3-5-7-8-6-1-3-5-6-4-1-3-4-2-1-2.
- Take the GRAPE BUNCH (B).
- Walk down twice.
- Place the EYE AMULET (C); take the JAR and FOLIO (D).
- Go forward and left.
- Place the GRAPE BUNCH (E); take the LION'S EAR and ELIZABETH'S MEDALLION 2/3 (F).
- Use the JAR to get a JAR WITH COAL (G).
- Walk down.
- Place the LION'S EAR and take the CHIMERA'S EYE and CRYSTAL PIECE (H).
- Go forward.
- Place the CRYSTAL PIECE (I).
- Play the HOP (J).
- You receive the SIGNET RING.
- Walk down and left.
- Use the SIGNET RING (K); take the STAR AMULET (L).
- Use the SIGNET RING (M); take the CHERRY and RED PAINT and move the bowl (N).
- Walk down and forward.
- Place the CHERRY and take ELIZABETH'S MEDALLION 3/3 (O).
- Walk down and left.
- Place ELIZABETH'S MEDALLION and take the HEXAGON and CHIMERA'S EYE (P).
- Walk down and forward.
- Use the HEXAGON and HANDKERCHIEF (Q) and take PINK PAINT and PORTRAIT PART 3/3 (R).
- Place the RED PAINT and PINK PAINT for a mini-game (S).
- Take the DRAGONFLY.
- Walk down.
- Place the DRAGONFLY and take the CASTLE KEY (T).
- Go forward.
- Place the CASTLE KEY (U).
- Go forward.
- Place the two CHIMERA'S EYES and take the DK MONOGRAM (V).
- Access the PURSE and place the DK MONOGRAM (W); take the GREEN STONE and ROSE 2/3 (X).
- Walk down.
- Access the SWAN, remove the head and take ROSE 3/3 (Y).
- Place the ROSES and take the PORTRAIT FRAME (Z).
- Walk down and left.
- Access the PORTRAIT FRAME and place the PORTRAIT PARTS; take WILLIAM'S PORTRAIT (A).
- Access the FOLIO and place the STAR AMULET (B); use the SCISSORS and take STORM'S PORTRAIT (C).
- Place the JAR WITH COAL, STORM'S PORTRAIT, WILLIAM'S PORTRAIT and the GREEN STONE; take the MAGIC DUST (D).
- Go to the Yard.
- Use the MAGIC DUST (E).
- Congratulations, you have completed Chimeras: Cursed and Forgotten.
Created at: 2016-06-24