

Walkthrough Menu
- General Tips
- Chapter 1: The Archives
- Chapter 2: Sebastian's House
- Chapter 3: Laura's House
- Chapter 4: Frank's House
- Chapter 5: Scott's Mansion
General Tips
- This is the official guide for Chimeras: Mark of Death.
- This guide will not mention when you have to zoom into a location; screenshots will show each zoom scene.
- The screenshots will show where to play a Hidden-Object Puzzle (HOP) and what inventory item will be received.
- Some inventory items require further actions.
- This guide will give step-by-step solutions for all puzzles which are not random. Read the instructions in the game for each puzzle.
Chapter 1: The Archives
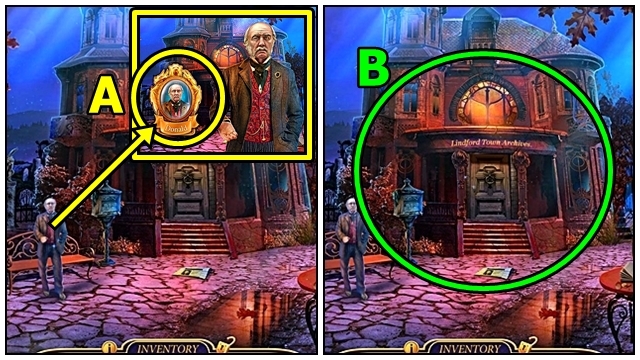
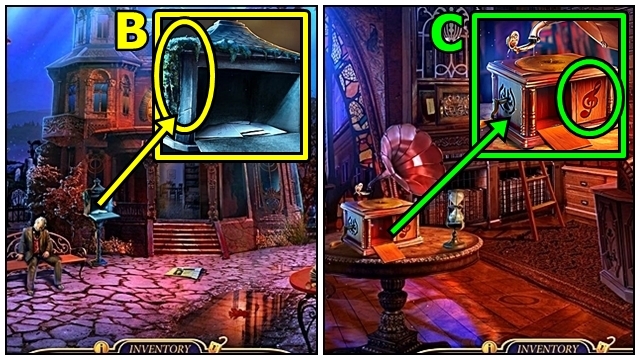
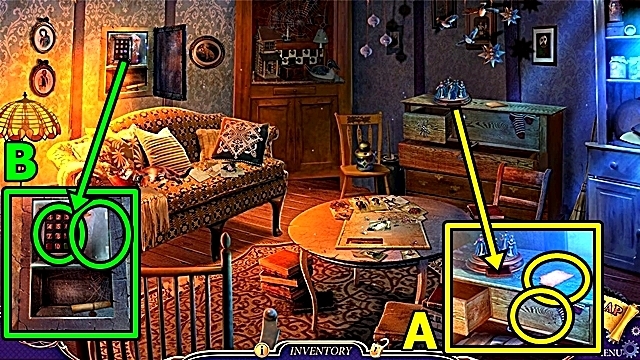
- Talk to Donald (A); take the Chimera Marker.
- Examine anywhere (B).
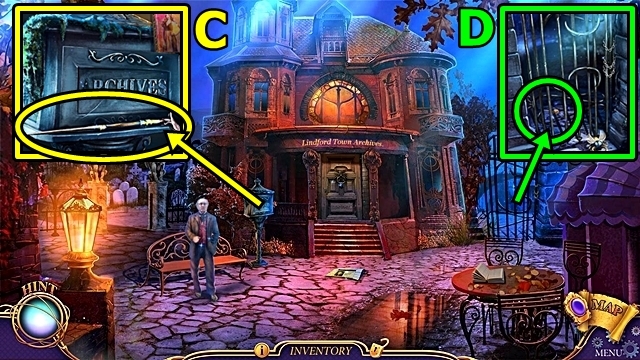
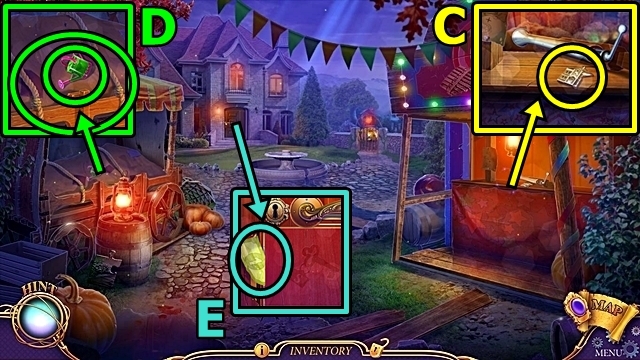
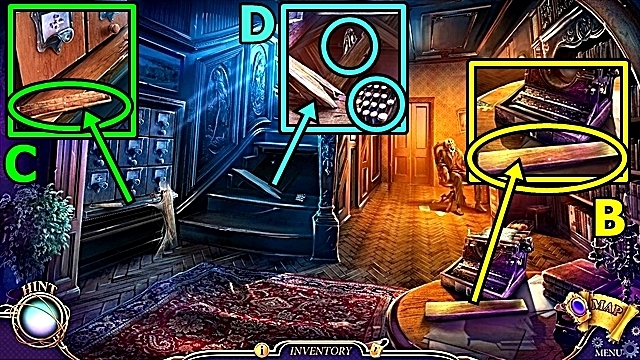
- Take the CANE (C).
- Use the CANE (D); take the HAIRPIN.
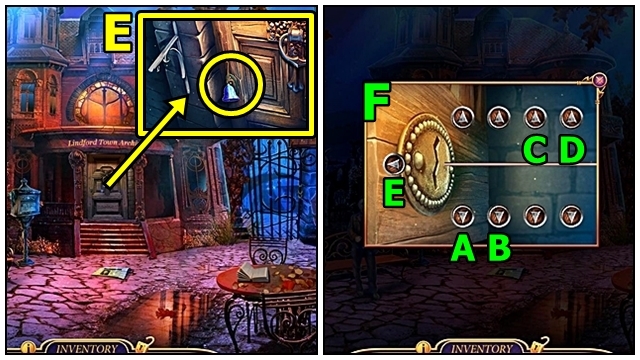
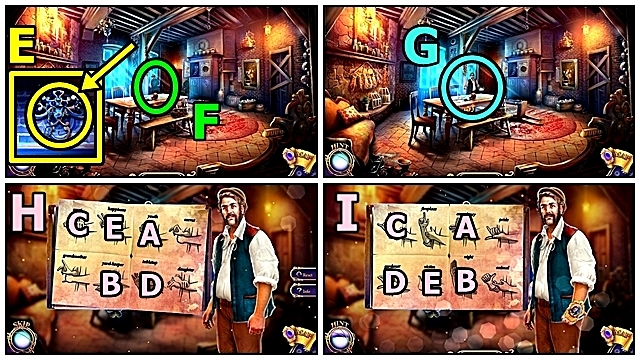
- Take the BELL (1/3) (E). Insert the HAIRPIN; play the mini-game.
- Solution: Ax2-B-Cx2-D-E (F).
- Enter the Town Archives.
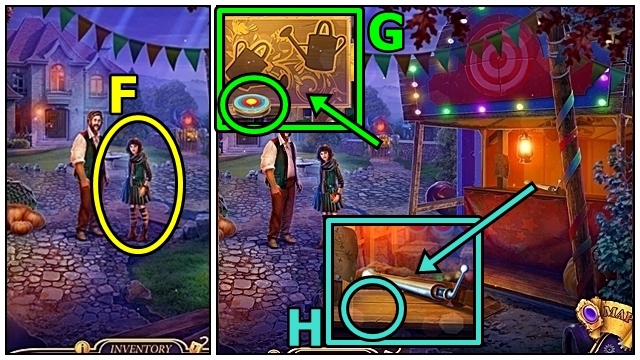
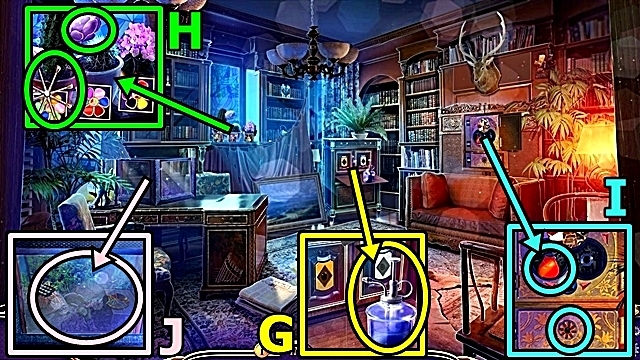
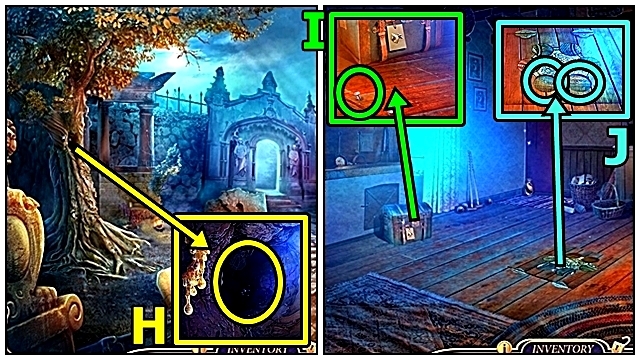
- Take the HANDLE (G).
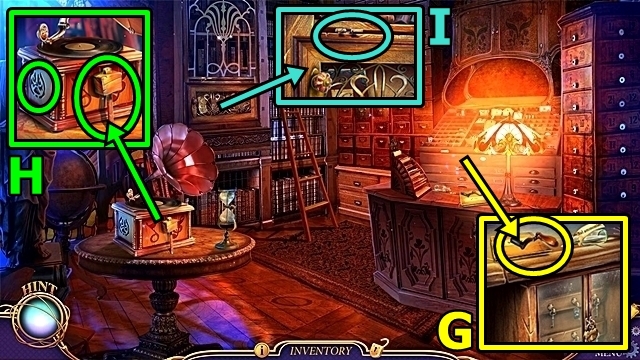
- Take the MALLET (H). Insert the HANDLE; receive the RECORD.
- Use the RECORD (I); receive the LETTER A.
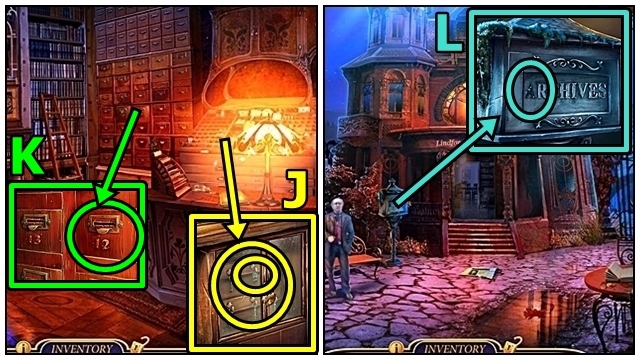
- Use the MALLET (J); take the TOKEN.
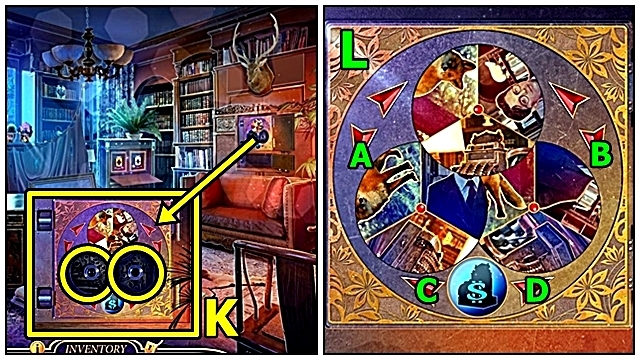
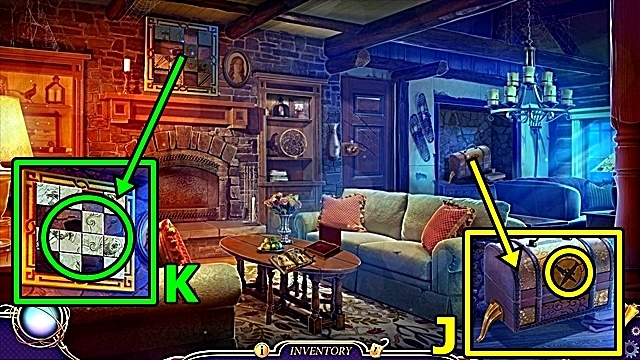
- Insert the TOKEN (K). Take the RING and DOSSIER.
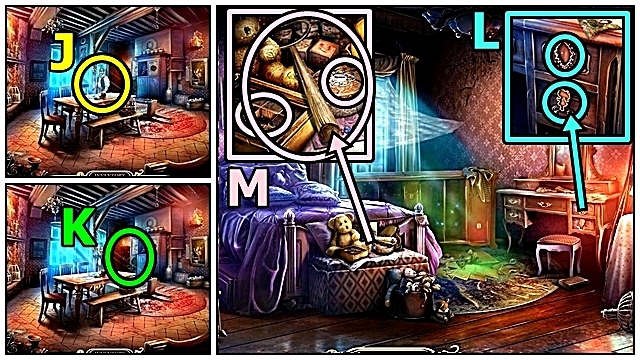
- Move down.
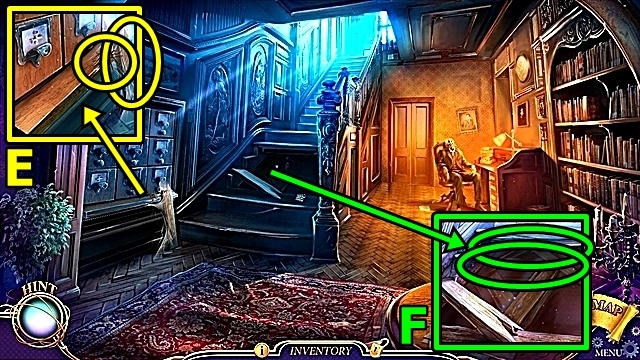
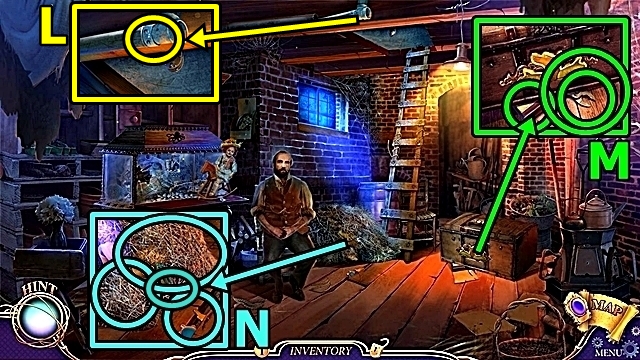
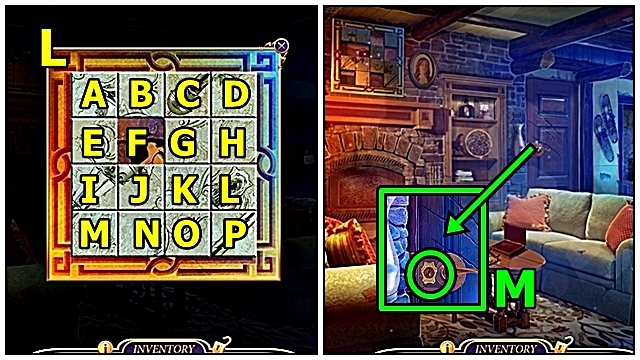
- Insert the LETTER A (L); take the LANTERN. Move the letters; take the LANTERN PART and NOTE.
- Move forward.
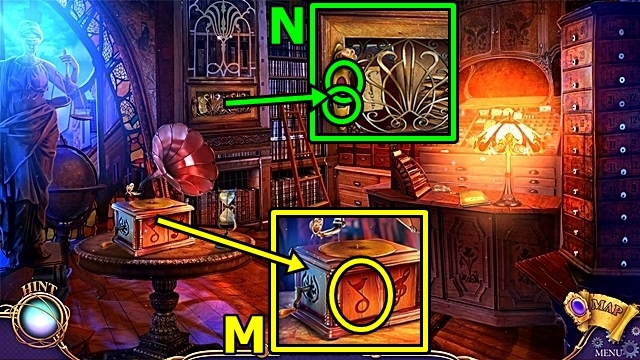
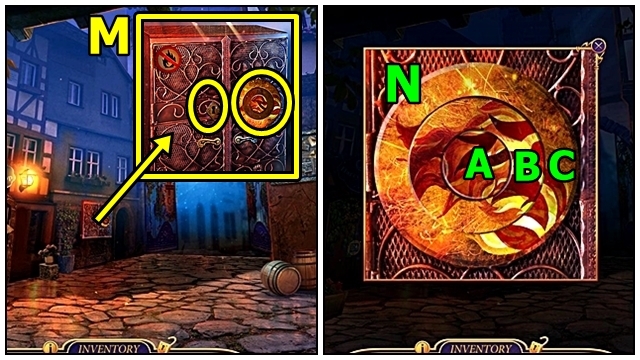
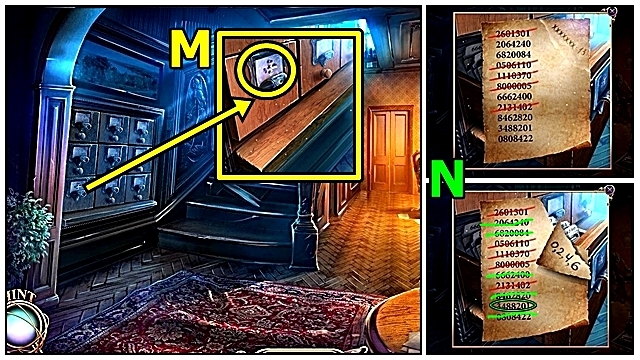
- Add the NOTE (M); take the SPRAY NOZZLE and RING.
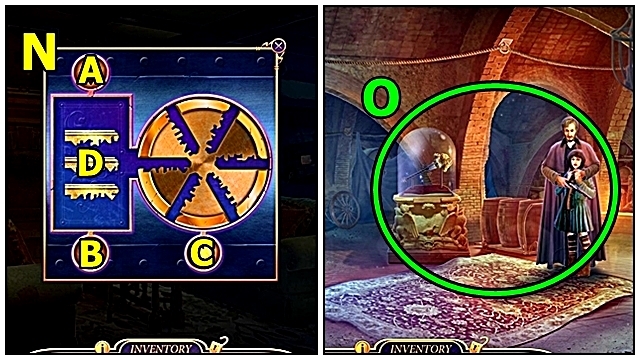
- Insert the RINGS (N); play the HOP. Receive the CASE INFORMATION.
- Move down.
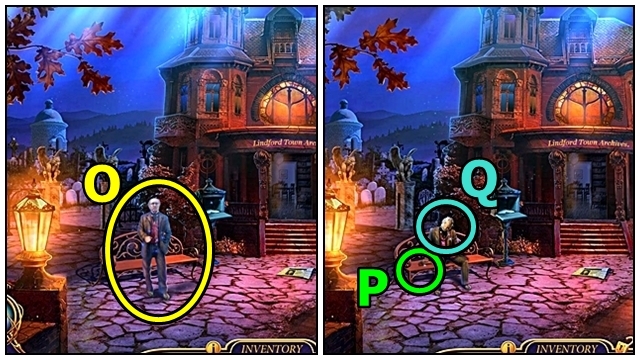
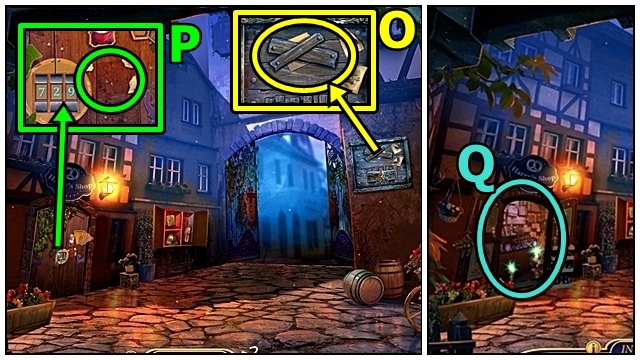
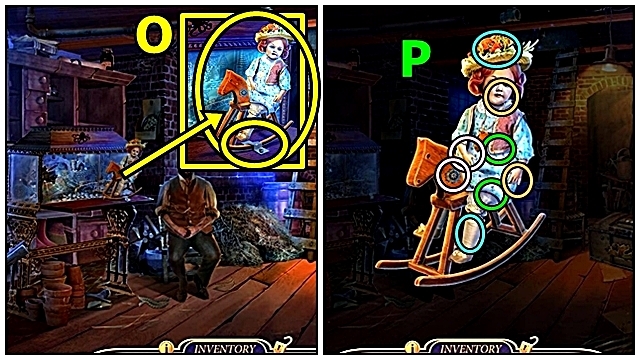
- Offer the CASE INFORMATION (O).
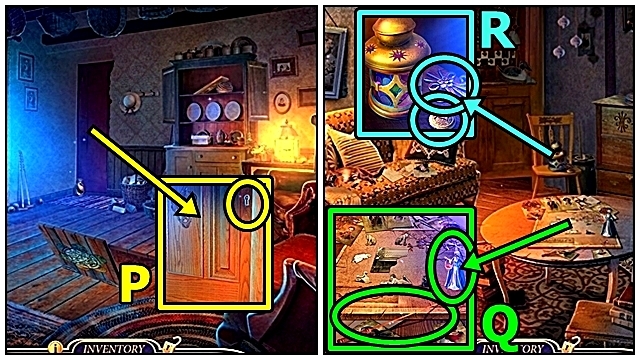
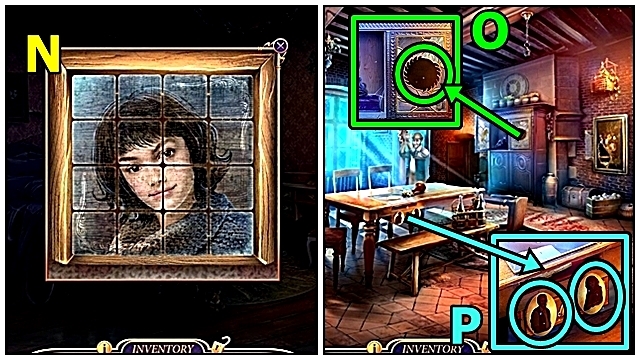
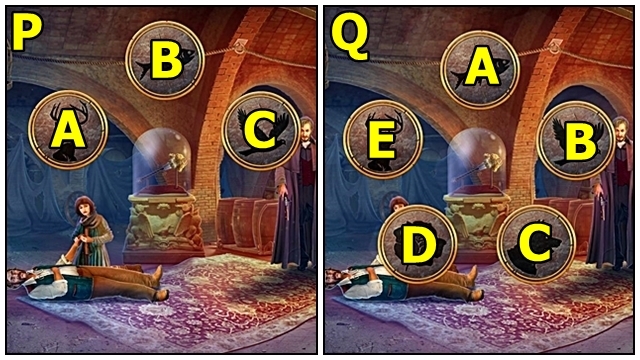
- Take DONALD'S WALLET (P).
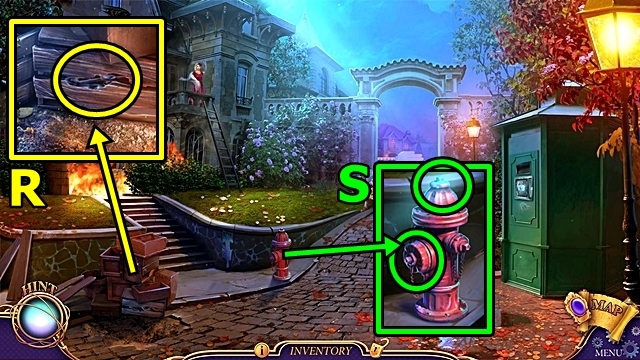
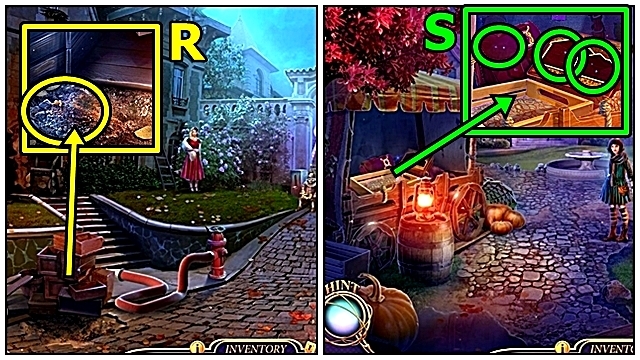
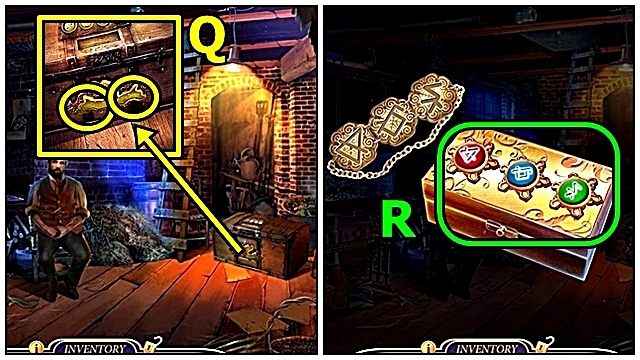
- Play the mini-game (Q).
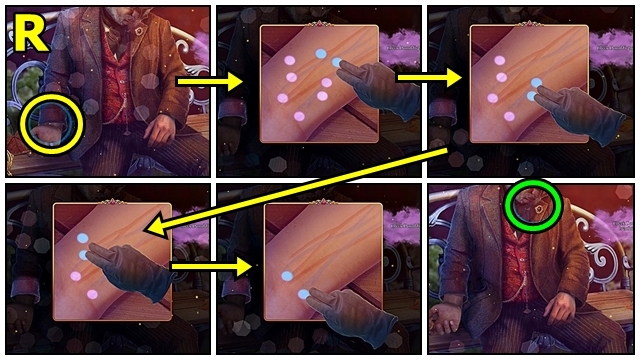
- Solution: (R).
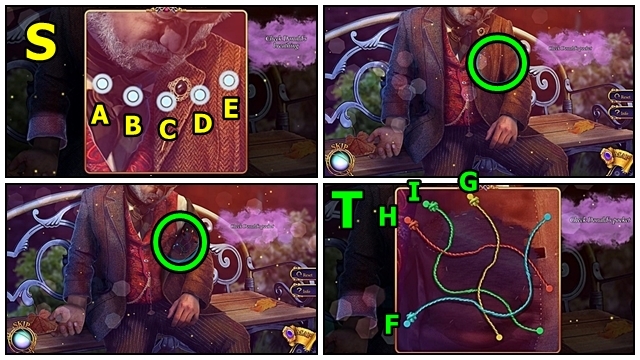
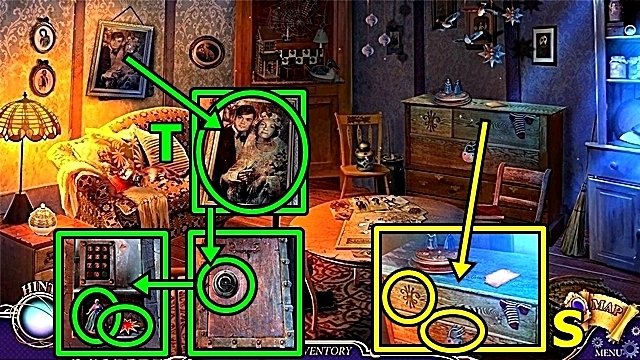
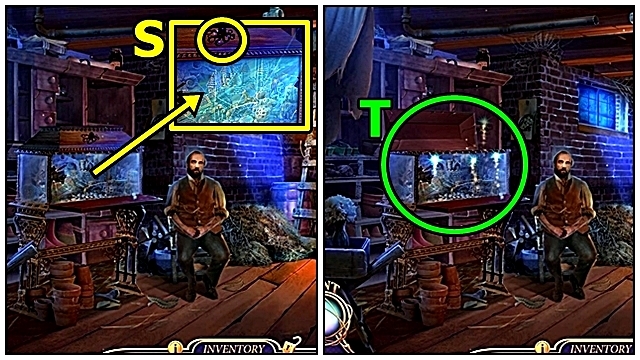
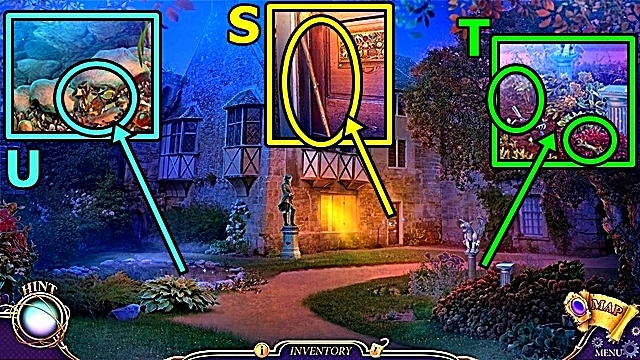
- Solution: A-D-E, C-A-D-E, C-B-E-D-A (S); F-G-H-I (T). Take the FLASK WITH POISON.
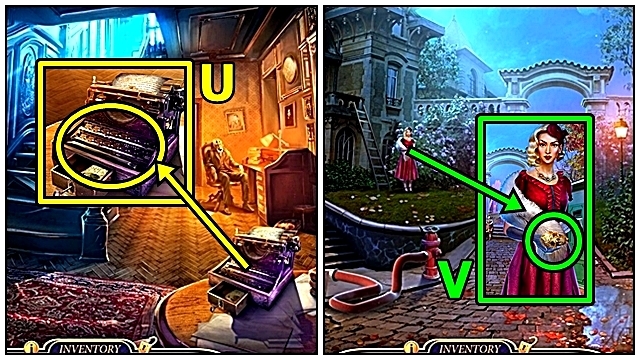
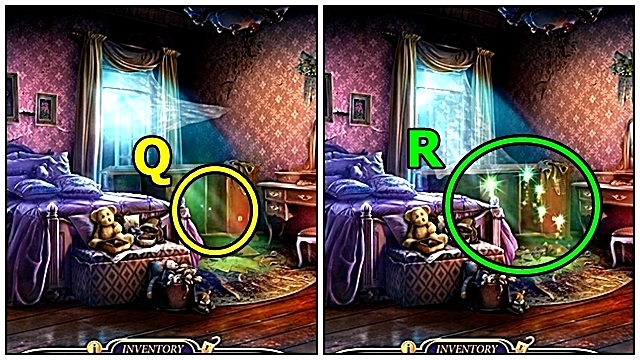
- Add the SPRAY NOZZLE to the FLASK WITH POISON (inventory); take the SPRAY.
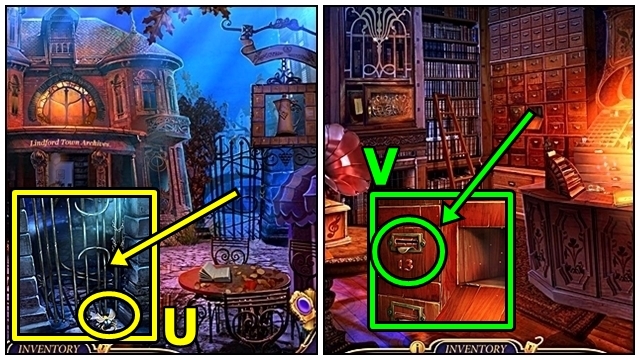
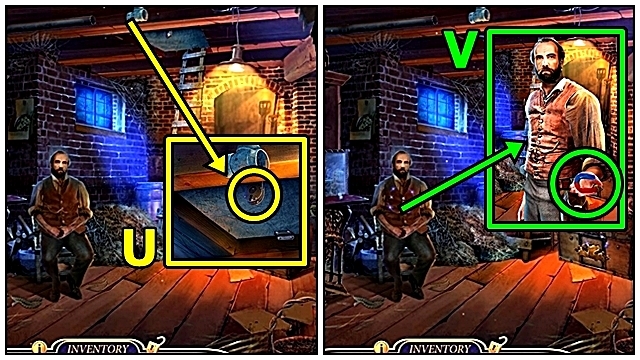
- Use the SPRAY (U); take the TOKEN.
- Move forward.
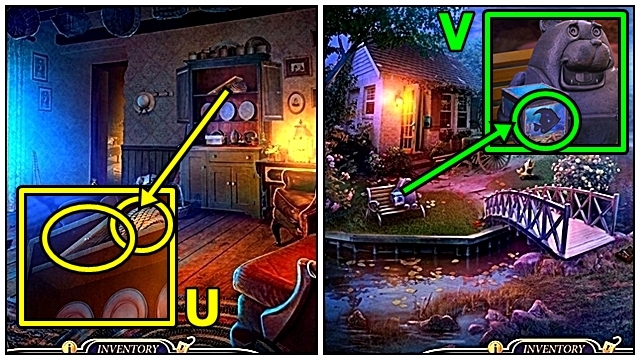
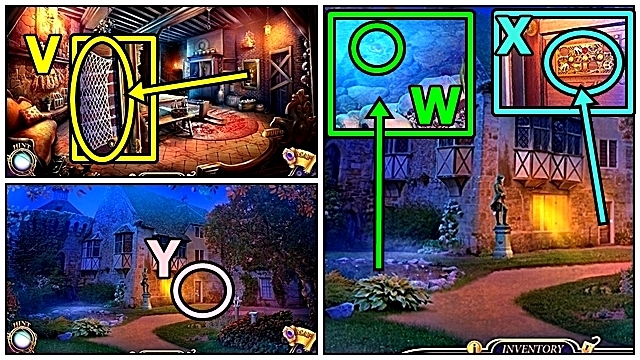
- Insert the TOKEN (V); take the CHIMERA SYMBOL and Chimera Marker.
- Move down.
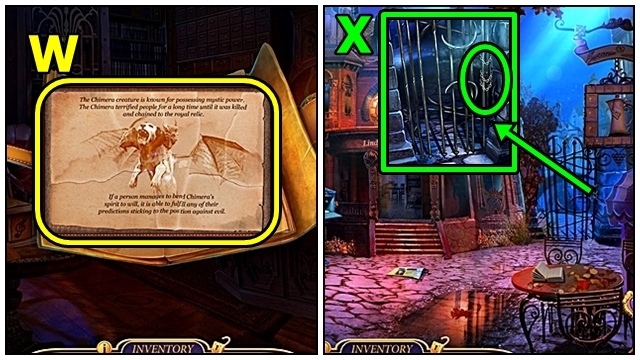
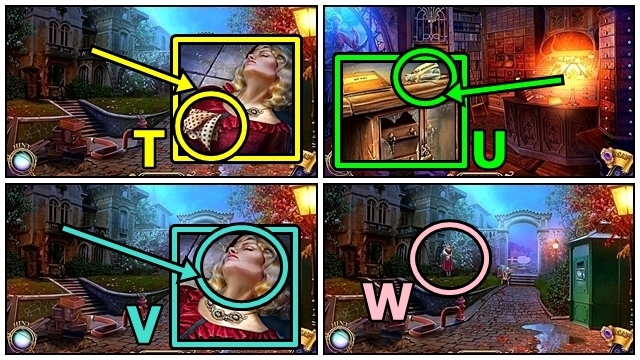
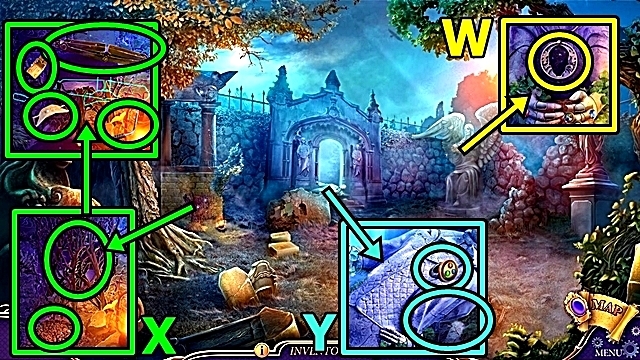
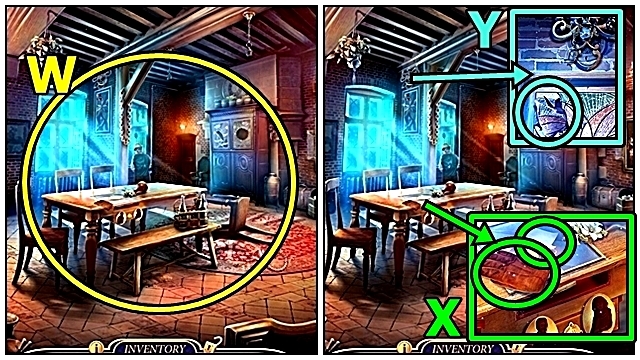
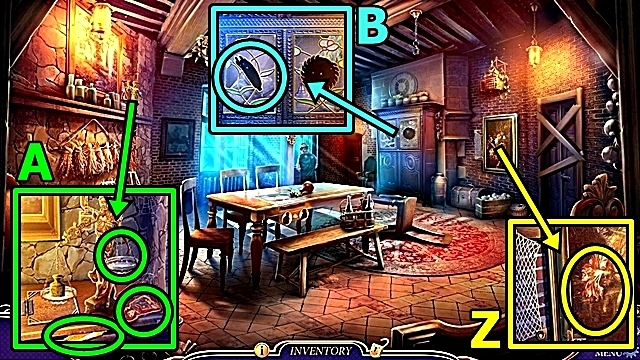
- Add the CHIMERA SYMBOL to the DOSSIER (inventory); take the RAZOR. Play the mini-game.
- Solution: (W). Move the picture; take the BOLT CUTTERS.
- Use the BOLT CUTTERS (X).
- Enter the Alley.
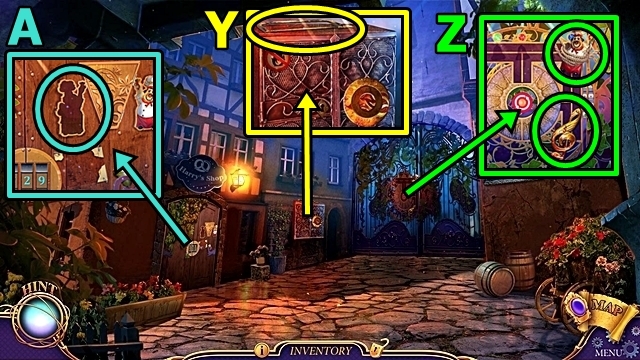
- Take the BROKEN HACKSAW (Y).
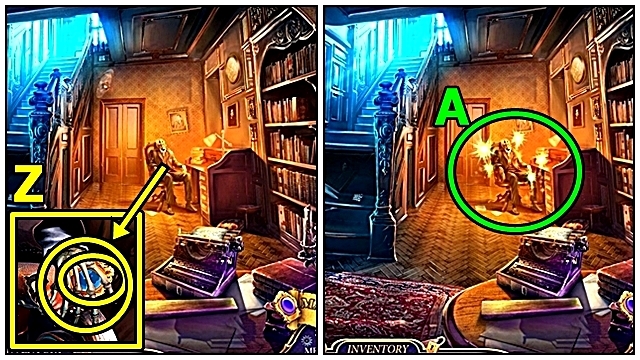
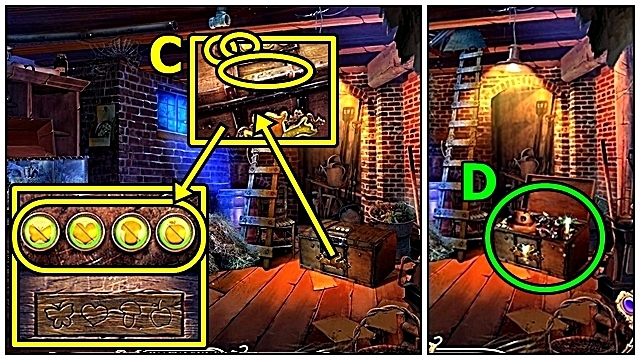
- Take the TREBLE CLEF (Z). Use the RAZOR; receive the COOK FIGURINE.
- Insert the COOK FIGURINE (A); take the CHISEL.
- Move down.
- Use the CHISEL (B); take the HACKSAW HANDLE.
- Enter the Town Archives.
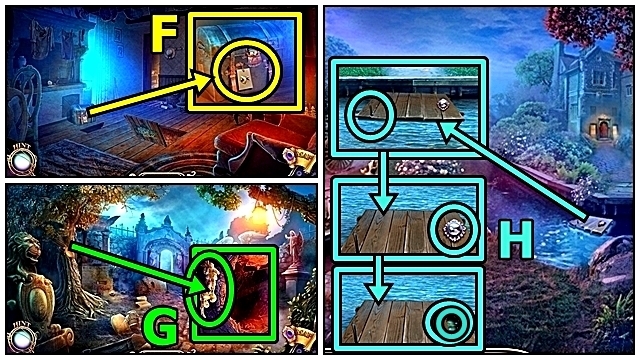
- Insert the TREBLE CLEF (C); take the LANTERN PART.
- Return to the Alley.
- Add the HACKSAW HANDLE to the BROKEN HACKSAW (inventory); take the HACKSAW.
- Use the HACKSAW (D); receive the BELL (2/3).
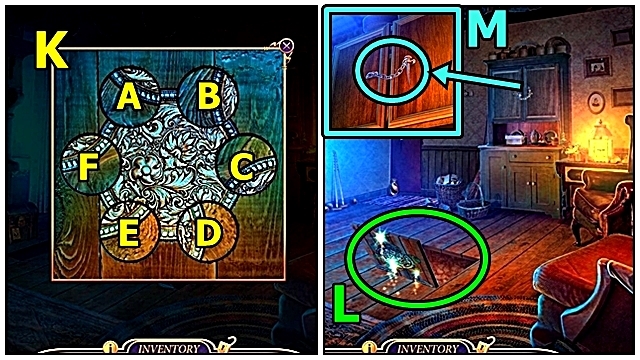
- Add the LANTERN PARTS to the LANTERN (inventory); play the mini-game.
- Solution: (E). Take the BELL (3/3).
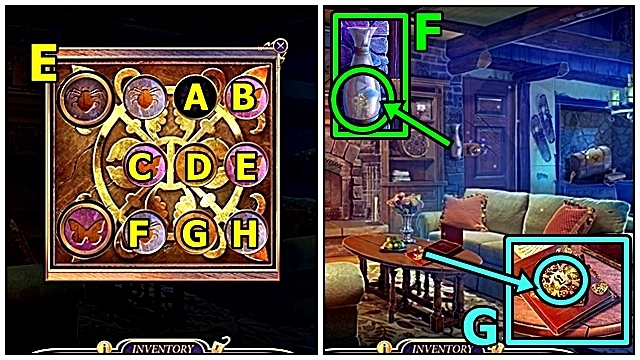
- Insert the BELLS (F); play the mini-game.
- Solution: (G).
- Solution: (H).
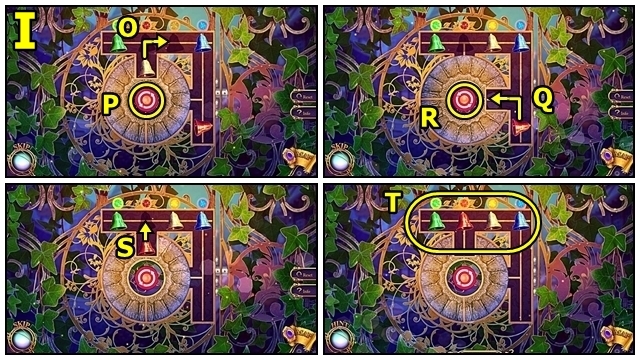
- Solution: (I).
- Move forward.
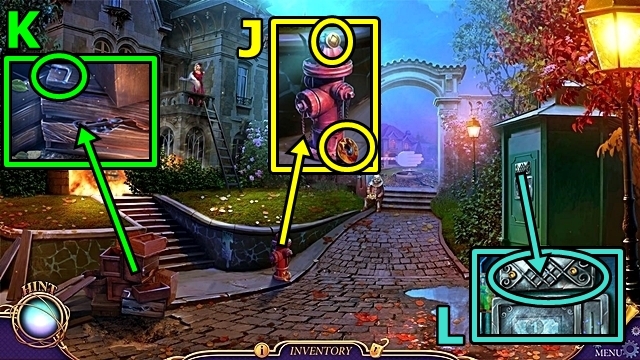
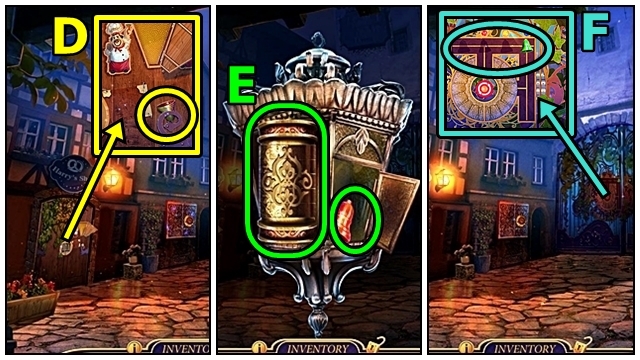
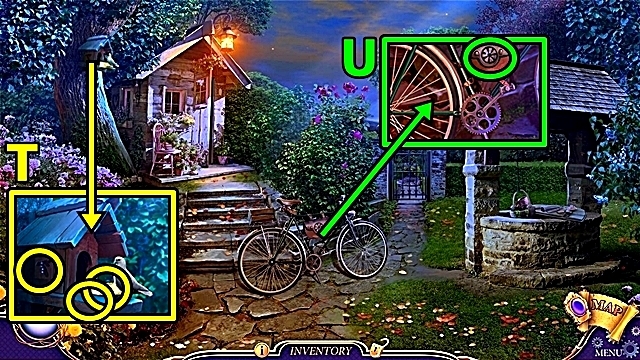
- Take the METAL DISK (J) and COIN (1/4).
- Take the HEX KEY (K).
- Use the HEX KEY (L); take the FIREBOX KEY.
- Move down.
- Insert and turn the FIREBOX KEY (M); take the HOSE. Insert the METAL DISK; play the mini-game.
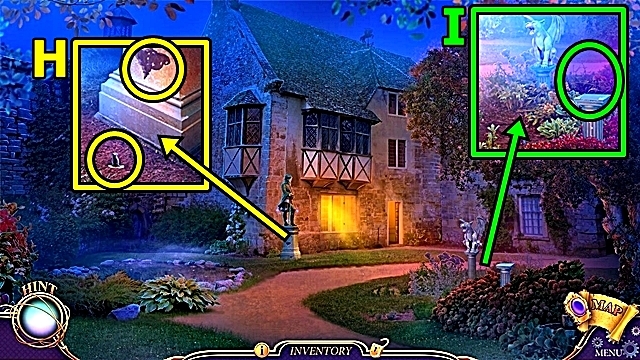
- Solution: B-C-B-C-Bx2-Ax7 (N). Take the NAIL PULLER.
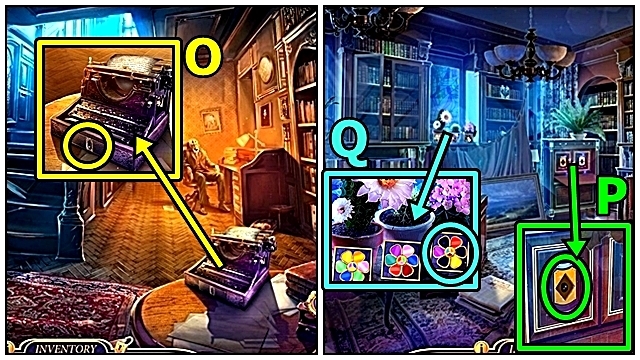
- Use the NAIL PULLER (O); receive the COMBINATION.
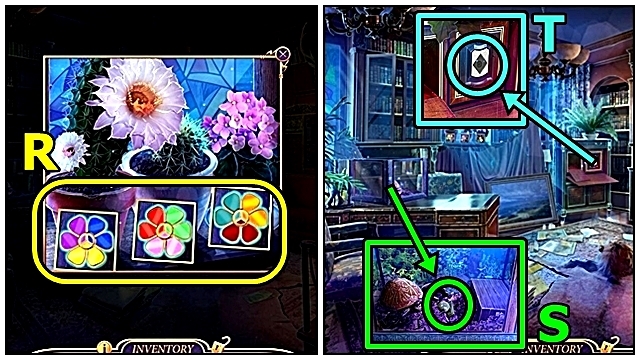
- Add the COMBINATION (P); turn the dials to 3-9-1.
- Play the HOP (Q); receive the CLOWN CAP.
- Move forward.
- Use the NAIL PULLER (R); take the HYDRANT HANDLE.
- Add the HOSE (S) and HYDRANT HANDLE. Turn the handle.
- Take the HANDKERCHIEF (T).
- Return to the Town Archives.
- Use the HANDKERCHIEF (U); receive the HANDKERCHIEF WITH SMELLING SALTS.
- Return to the Residential Street.
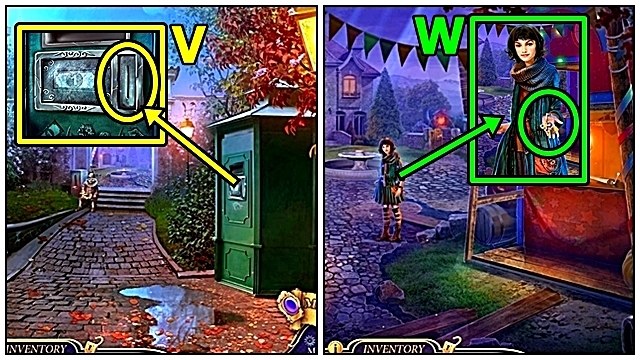
- Use the HANDKERCHIEF WITH SMELLING SALTS (V).
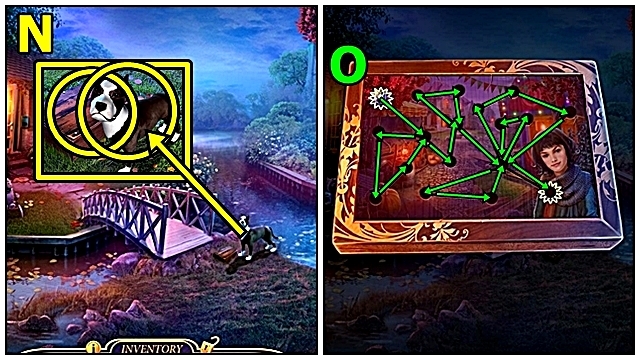
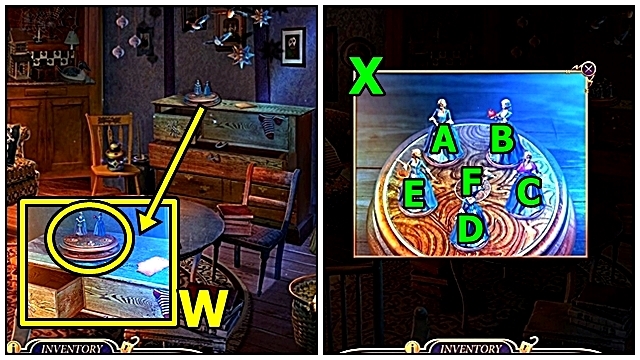
- Talk to Patricia (W); play the mini-game.
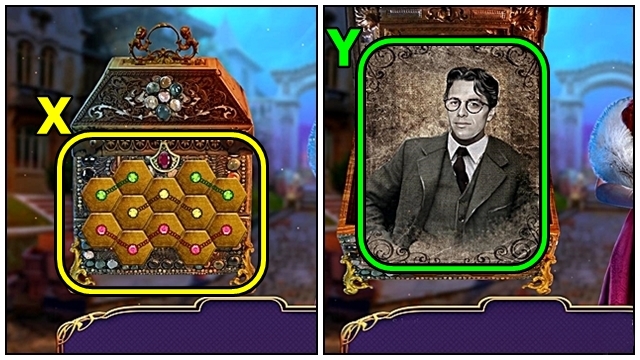
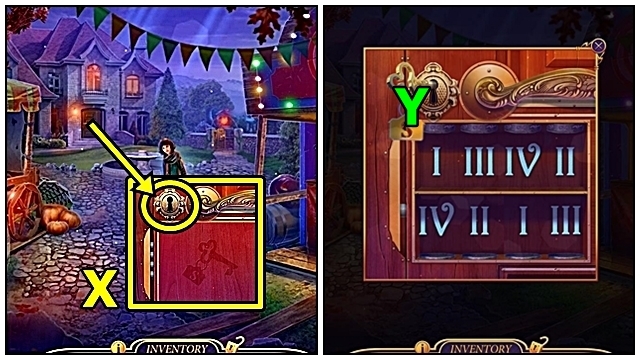
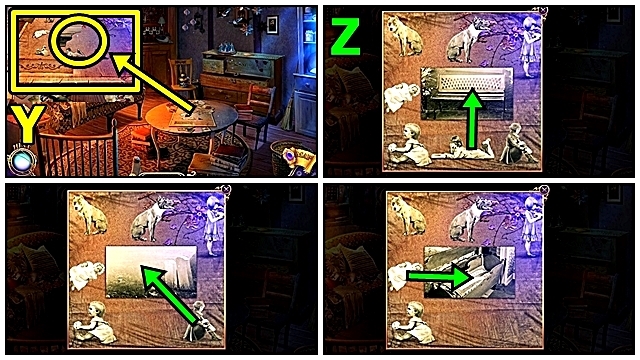
- Solution: (X). Take the COIN (2/4) and Chimera Marker. Play the mini-game.
- Solution: (Y). Take the LETTER D.
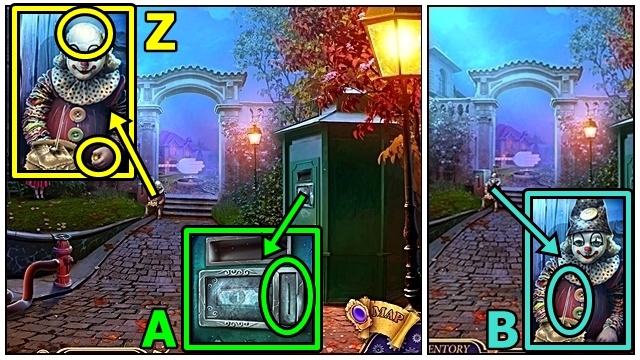
- Place the CLOWN CAP (Z); take the COIN (3/4).
- Insert the LETTER D onto DONALD'S WALLET (inventory); take the COIN (4/4).
- Insert the COINS (A); take the TICKET.
- Place the TICKET (B).
- Move forward.
Chapter 2: Sebastian's House
- Take the HOUSE EMBLEM (C).
- Take the WATERING CAN (D). Use the RAZOR; lift the cloth. Take the MILLET and LEMON.
- Take the BILL (1/4) (E).
- Talk to Laura (F).
- Take the BBS (G).
- Place the BBS (H). Add a BB. Play the mini-game.
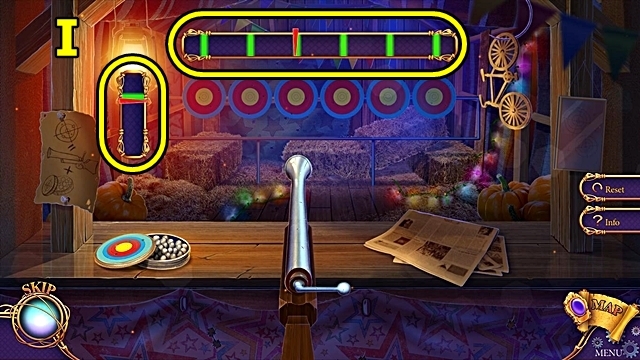
- Solution: The screenshot shows how to set the levers to hit all targets (I). Take the BIKE EMBLEM.
- Return to the Alley.
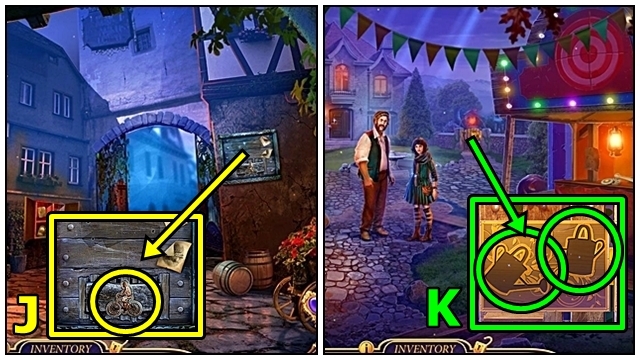
- Remove the old bike emblem (J); add the BIKE EMBLEM; take the WATERING CAN.
- Return to the Fairgrounds.
- Add the WATERING CANS (K); play the mini-game.
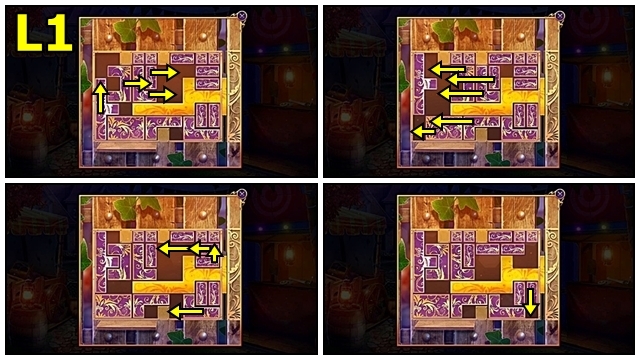
- Solution: (L1).
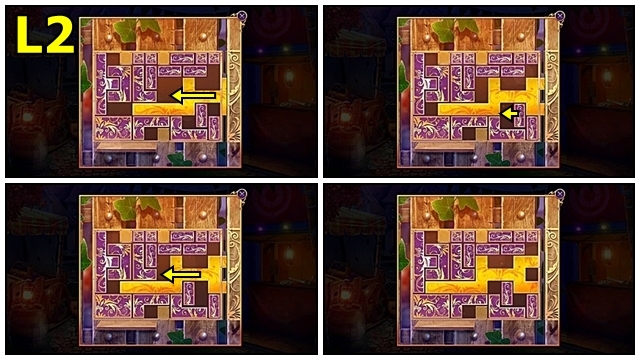
- Solution: (L2).
- Move forward.
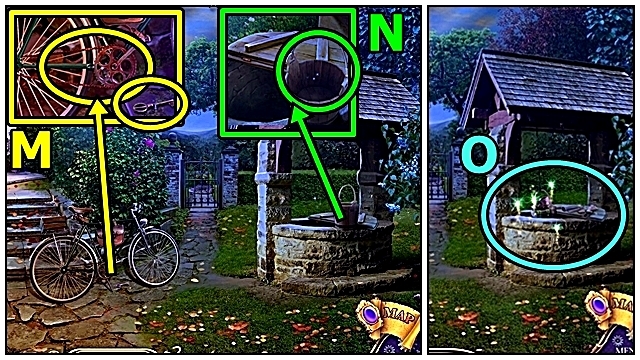
- Take the SHED KEY (M). Use the LEMON; take the CHAIN.
- Add the CHAIN (N).
- Play the HOP (O); receive the HOUSE EMBLEM.
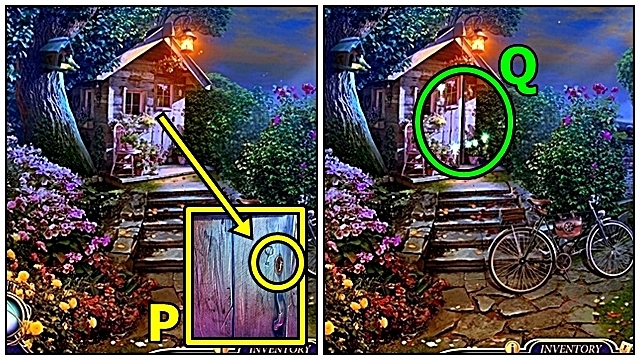
- Insert the SHED KEY (P).
- Play the HOP (Q); receive the TROWEL.
- Return to the Residential Street.
- Use the TROWEL (R); take the BAG CLASP.
- Move forward.
- Insert the HOUSE EMBLEMS (S); take the BILL (2/4). Insert the BAG CLASP; take the PINECONE INLAY.
- Move forward.
- Offer the MILLET (T); take the BILL (3/4). Insert the PINECONE INLAY; take the WHEEL SHAPE.
- Insert the WHEEL SHAPE (U); take the SCREWDRIVER and BILL (4/4).
- Return to the Residential Street.
- Insert the BILLS (V); take the BOUQUET.
- Move forward.
- Offer the BOUQUET (W); take the HOUSE KEY.
- Insert the HOUSE KEY (X); play the mini-game.
- Solution: (Y).
- Enter Sebastian's House.
- Lift the fingers (Z); take the Chimera Marker.
- Play the HOP (A); receive SEBASTIAN'S BAG.
- Take the PLANK (B).
- Take the RULER (C).
- Take the MACHINE PART (1/3) (D). Use the RULER; receive SEBASTIAN'S SCARF.
- Use SEBASTIAN'S SCARF (E); take the PLANK.
- Add the PLANKS (F).
- Go upstairs.
- Take the WATER MISTER (G).
- Take the SAFE HANDLE (H). Use the WATER MISTER; take the GOLD PENDANT.
- Take the GLASS PETAL (1/3) (I). Insert and turn the SAFE HANDLE; take the SUCTION CUP and MONOGRAM S.
- Use the SUCTION CUP (J); take the MACHINE PART (2/3) and LOCK PART.
- Insert the MONOGRAM S onto SEBASTIAN'S BAG (inventory); take the Chimera Marker and LOCK PART.
- Insert the LOCK PARTS (K); play the mini-game.
- Solution: Dx2-Ax2-B-D-B-D-Bx2-C-Dx2 (L). Take the TYPEWRITER KEY.
- Move down.
- Insert the GOLD PENDANT (M); play the mini-game.
- Solution: (N). Move the note; take the GLASS PETAL (2/3).
- Insert the TYPEWRITER KEY (O); take the GOLD HANDLE.
- Go upstairs.
- Insert the GOLD HANDLE (P); open the cupboard; take the GLASS PETAL (3/3).
- Add the GLASS PETALS (Q); play the mini-game.
- Solution: (R). Take the TREE EMBLEM.
- Insert the TREE EMBLEM onto SEBASTIAN'S BAG (inventory); take the TIE CLIP.
- Use the TIE CLIP (S); take the SILVER HANDLE.
- Insert the SILVER HANDLE (T); open the cupboard; take the MACHINE PART (3/3).
- Move down.
- Add the MACHINE PARTS (U); take the LETTER.
- Return to the Residential Street.
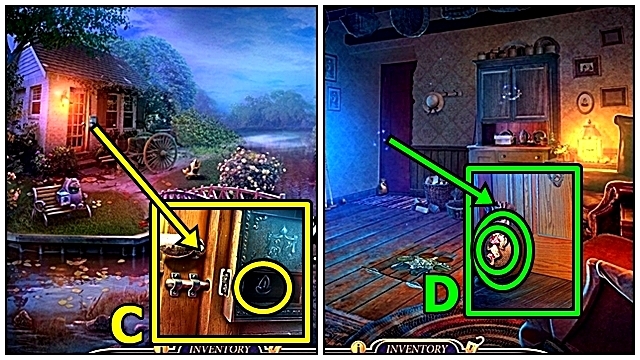
- Offer the LETTER (V). Take the SKULL.
- Return to the Square, then enter the Cemetery.
Chapter 3: Laura's House
- Insert the SKULL (W); take the SUN EMBLEM.
- Insert the SUN EMBLEM onto SEBASTIAN'S BAG (inventory); take the WOODEN SPOON.
- Use the RAZOR (X); take the STONE RING (1/4). Use the WOODEN SPOON; replace the items; receive the JACK.
- Take the STONE RING (2/4) (Y). Use the JACK.
- Move forward.

- Take the SPREADER (Z). Use the SCREWDRIVER; take the STONE RING (3/4).
- Take the FISH PIECE (A). Use the SPREADER; take the FISH EYE.
- Take the BROKEN PLIERS (B). Insert the FISH EYE; take the SAIL AMULET and BOLT. Add the FISH PIECE; take the STONE RING (4/4).
- Insert the SAIL AMULET (C).
- Enter the Garden House.
- Take GIRL SHAPE (D). Use the RAZOR; take the FIRE STRIKER and COLORED DISK.
- Return to the Cemetery.
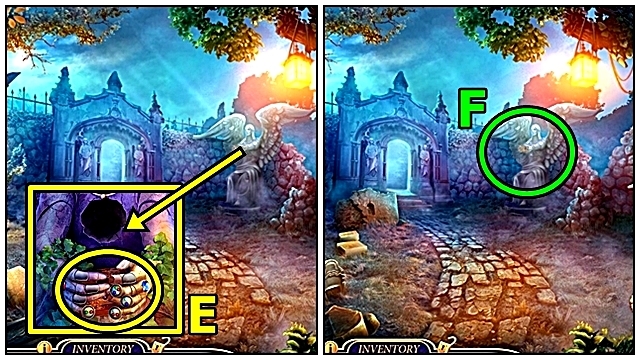
- Add the STONE RINGS (E).
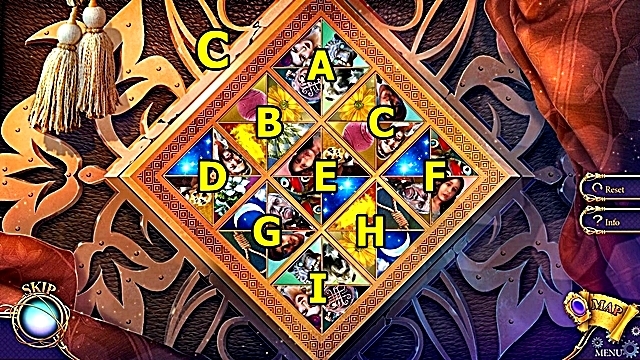
- Play the mini-game (F).

- Solution: B-E-C-A-B-F-Ex2-C-A-B-C-F-E-F-L-I-K-Jx4-H-K-Jx4-M-K-M-N-L-J-H-Jx3-K (G). Receive the BOX.
- Use the FIRE STRIKER (H); take the PLIER PART.
- Return to the Garden House.
- Break the BROKEN PLIERS (inventory); add the PLIER PART and BOLT; take the PLIERS.
- Use the PLIERS (I); take the COLORED DISK.
- Insert the COLORED DISKS (J); play the mini-game.
- Solution: Bx4-Cx4-E-Bx5-F-Ax5-D (K).
- Play the HOP (L); receive VINEGAR.
- Use the VINEGAR (M); take the BREAD.
- Move down.
- Offer the BREAD (N). Use the PLIERS; take the LION'S HEAD.
- Insert the LION'S HEAD on the BOX (inventory); play the mini-game.
- Solution: (O). Read the note; take the SECRET KEY.
- Enter the Garden House.
- Insert the SECRET KEY (P).
- Enter the Secret Room.
- Take the PRINCESS FIGURINE (1/3) (Q) and POINTER.
- Take the DECORATION (R) and LAURA'S LOCKET.
- Use the SCREWDRIVER (S); remove the hook; take the MAGNIFIER and FISH SHAPE. Insert the DECORATION; take the DIAL and GREEN STAR.
- Remove the picture (T). Remove the dial; add and turn the DIAL. Take the PRINCESS FIGURINE (2/3) and RED STAR.
- Move down.
- Use the POINTER (U); receive the BOARD and ROPE.
- Move down.
- Insert the FISH SHAPE (V); take the PRINCESS FIGURINE (3/3).
- Return to the Secret Room.
- Add the PRINCESS FIGURINES (W); play the mini-game.
- Solution: C-F-A-C-D-A-B-D-E-B-F-E (X). Take the MONOGRAM L.
- Add the MONOGRAM L to LAURA'S LOCKET (inventory); open the locket. Unfold the paper; take the DRAWING PART.
- Add the DRAWING PART (Y); play the mini-game.
- Solution: (Z). Take the PENCIL.
- Use the MAGNIFIER (A). Touch the paper, then use the PENCIL. Take the CODE.
- Add the CODE (B); enter 7-4-5-1, then the green button. Play the mini-game.
- Solution: Ex3-Cx2-Bx3-Gx3-H-F-Ax3-D-Ix2 (C). Take the BLUE STAR.

- Insert the RED STAR (D), GREEN STAR and BLUE STAR.
- Play the HOP (E); receive the CUFFLINK.
- Move down.
- Use the CUFFLINK (F); take the SCRAPER.
- Return to the Cemetery.
- Use the SCRAPER (G); receive the RESIN.
- Move forward.
- Throw the ROPE (H); take the CAMEO. Add the RESIN, then the BOARD.
Chapter 4: Frank's House
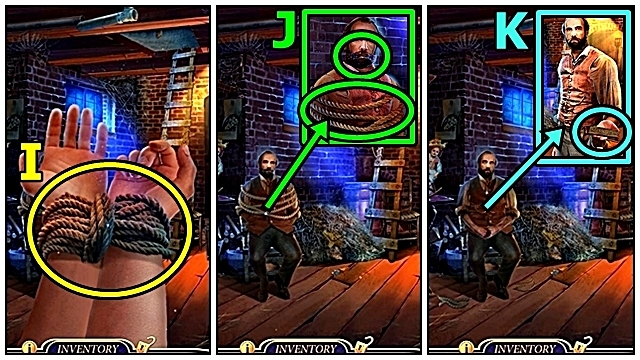
- Use the RAZOR (I).
- Remove the gag (J); use the RAZOR.
- Talk to Gregor (K); receive the Chimera Marker. Take the HINT.
- Use the SCREWDRIVER (L); receive the PIPE.
- Use the PIPE (M); take the BOX and PLIERS.
- Move the hay (N); take the BACKPACK. Use the PLIERS; take the BOX BUTTON and DOG SHAPE.
- Use the SCREWDRIVER (O); take the TOY.
- Examine the TOY (inventory); play the mini-game.
- Solution: (P). Take the DOG SHAPE.
- Add the DOG SHAPES (Q); take the BRACELET.
- Add the BOX BUTTON and the BRACELET to the BOX (inventory); set the symbols (R). Take the OCTOPUS.
- Insert the OCTOPUS (S).
- Play the HOP (T); receive the MONOGRAM F.
- Insert the MONOGRAM F onto the BACKPACK (inventory); examine the belt; remove and take the BUCKLE.
- Insert the BUCKLE (U).
- Talk to Gregor (V). Take the MAGNET.
- Move up.
- Examine anywhere (W).
- Take the GLOVE (X). Use the MAGNET; take the LOCK PART.
- Use the GLOVE (Y); receive the SHARD.
- Use the SHARD (Z); take the WEIGHT.
- Take LAURA'S PICTURE (A). Use the PLIERS; receive the CORN. Add the WEIGHT; take the LOCK PART.
- Insert the CORN (B); take the SIGN LANGUAGE GUIDE.
- Move down.
- Insert the HINT (C), then the LOCK PARTS. Set the symbols.
- Play the HOP (D); receive the BOAT HOOK.
- Move up.
- Use the BOAT HOOK (E); receive the CHANDELIER and HANDCUFFS.
- Use the CHANDELIER (F).
- Use the SIGN LANGUAGE GUIDE (G); play the mini-game.
- Solution: (H-I). Take the Chimera Marker.
- Use the HANDCUFFS (J).
- Open the door (K).
- Enter Laura's Bedroom.
- Insert the CAMEO (L); take the CUBE. Insert the GIRL SHAPE; take the TOKEN (1/3) and SILVER KEY.
- Take the NET HANDLE (M). Insert the SILVER KEY; take the TOKEN (2/3) and FISHING LINE. Insert the CUBE. Play the mini-game.
- Solution: (N). Take the GRAIN TOKEN.
- Move down.
- Insert the GRAIN TOKEN (O); take FRANK'S PICTURE.
- Add FRANK'S PICTURE (P) and LAURA'S PICTURE. Take the RESPIRATOR and CLIPS.
- Enter Laura's Bedroom.
- Use the RESPIRATOR (Q).
- Play the HOP (R); receive the DISC (1/3).
- Move forward.
Chapter 5: Scott's Mansion
- Take the RAKE HANDLE (S).
- Take the RUSTY WRENCH (T). Add the RAKE HANDLE; receive the RAKE.
- Use the RAKE (U); take the POUCH and ACID.
- Return to Frank's Room.
- Pour the ACID on the RUSTY WRENCH (inventory); take the WRENCH.
- Use the WRENCH (V); receive the NET.
- Return to Outside Scott's Mansion.
- Add the NET then CLIPS to the NET HANDLE (inventory); take the NET.
- Use the NET (W); receive the DISC (2/3).
- Use the SHARD on the POUCH (inventory); take the DISC (3/3).
- Place the DISCS (X).
- Play the mini-game (Y).

- Solution: C-B-A-B-A-C (Z).
- Enter Scott's Mansion.

- Take the CHEST LEG (A).
- Take the DUSTER (B). Add the CHEST LEG; take the TILE (1/5) and SHOEHORN.
- Use the DUSTER (C); take the TOKEN (3/3).
- Add the TOKENS (D); play the mini-game.
- Solution: D-G-F-C-D-G-H-E-B-A-D-G-H-E-B-A-D (E). Take the BROOCH and HOOK.
- Unravel the FISHING LINE (inventory); add the HOOK; attach the line to the hook; take the HOOK ON LINE.
- Use the HOOK ON LINE (F); receive the DIARY KEY.
- Insert the DIARY KEY (G); play the HOP; receive the TILE (2/5).
- Move down.
- Insert the BROOCH (H); take the SCARAB and DRAGON FIGURE. Use the SHOEHORN; take the TWO DAGGERS.
- Place the DRAGON FIGURE (I); take the TILE (3/5).
- Enter Scott's Mansion.
- Insert the TWO DAGGERS (J); take the TUBE and TILE (4/5).
- Insert the SCARAB onto the TUBE (inventory); remove the top; take the TILE (5/5).
- Add the TILES (K); play the mini-game.
- Solution: B-A-E-F-J-N-O-K-J-N-O-K-G-C-B-F-J-K-G-C-B-F-E-I-J-F-E-I-J-K-L-H-G-K-L-H-G-K-L-P-O-K-G-H-L-K-O-P-L-H-D-C-G-K-L-H-D-C-G-K-J-N-O-K-J-N-O-K-G-F-J-N-O-P-L-K-O-N-M-I-J-K-L-P-O-N-M-I-J-K-L-P-O-N-J-K-O-P-L-K-J-N-O-P (L). Take the GOLDEN KEY.
- Insert the GOLDEN KEY (M); play the mini-game.
- Solution: B-D-C-B-D-C-B-D-C-A-D-C-D-C-D (N).
- Enter Scott's Cellar.
- Examine anywhere (O). Play the mini-game.
- Solution: A-C-B; B-C-A (P).
- Solution: D-B-E-C; C-D-B-A-E (Q).
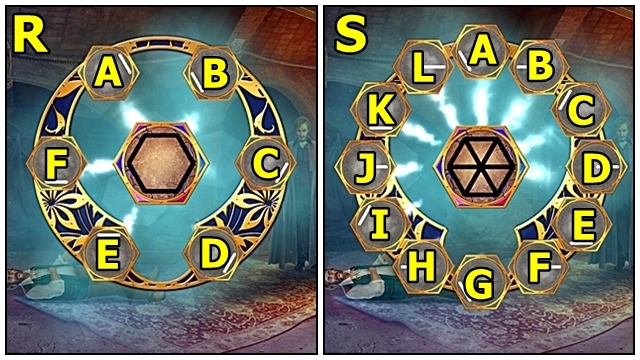
- Solution: C-B-A-F-E-D (R).
- Solution: D-B-L-J-H-F-E-G-I-K-A-C (S).

- Solution: H-F-B-G-C (T).
- Solution: N-G-P-L-J-D (U).
- Congratulations! You've completed Chimeras: Mark of Death.
Created at: 2017-06-02