

Walkthrough Menu
- General Tips
- Chapter 1: The Healer's House
- Chapter 2: Finding Dr. Barnes
- Chapter 3: The Merchant
- Chapter 4: Helping Edward
- Chapter 5: Creating the Medicine
General Tips
- This is the official guide for Chimeras: Mortal Medicine.
- This guide does not mention each time you have to zoom into a location; the screenshots show each zoom scene.
- Hidden-object puzzles are referred to as HOPs. This guide does not show screenshots of the HOPs, however, it is mentioned when a HOP is available and the inventory item collected.
- Use the Map to travel quickly to a location.
Chapter 1: The Healer's House
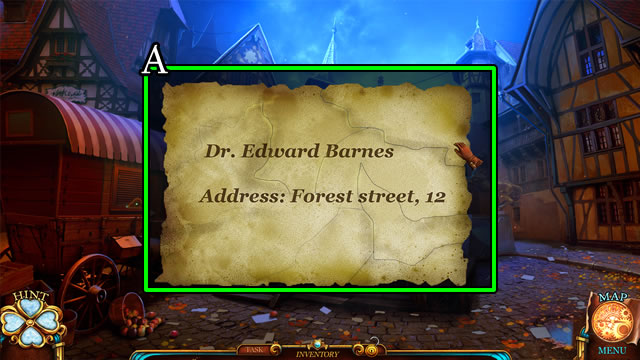
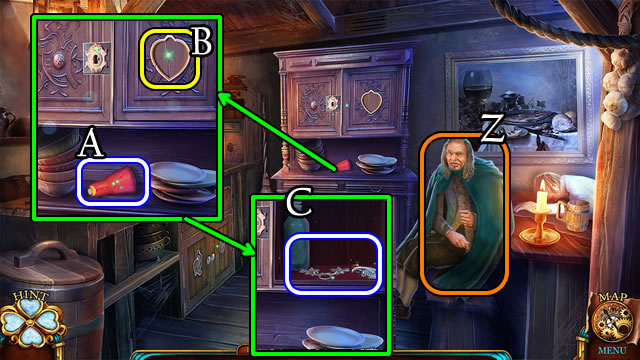
- Play the HOP to receive the HEALER'S TORN ADDRESS.
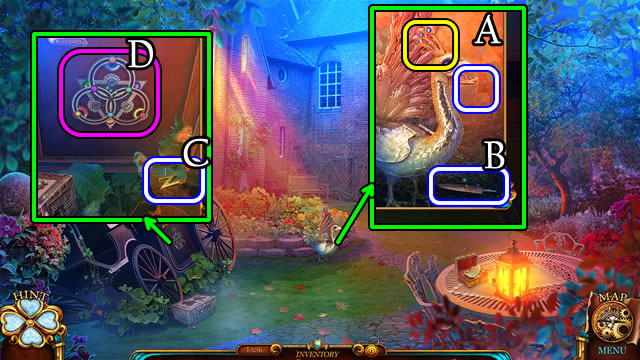
- Assemble the HEALER'S TORN ADDRESS for the HEALER'S ADDRESS (A).
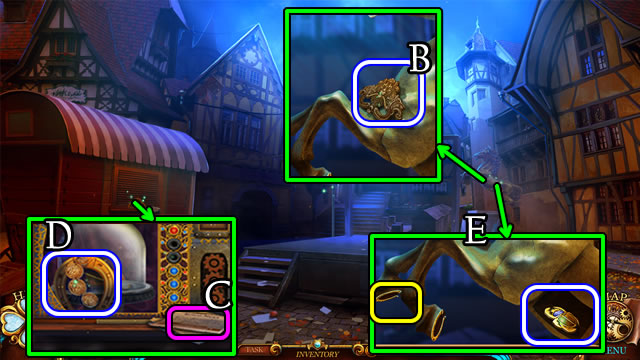
- Take the CARVED HANDLE (B).
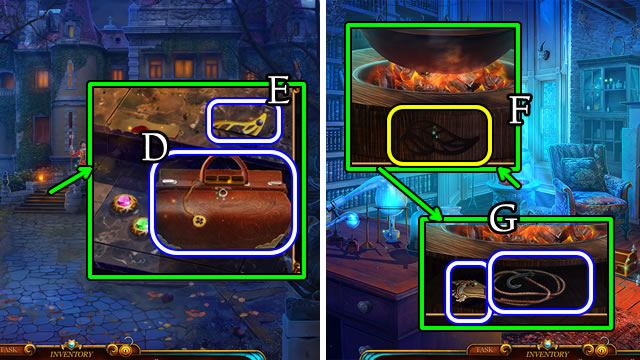
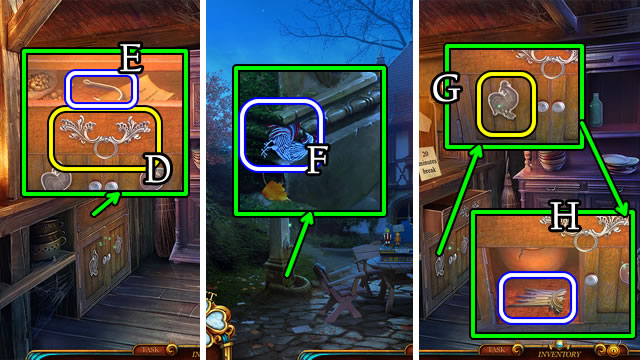
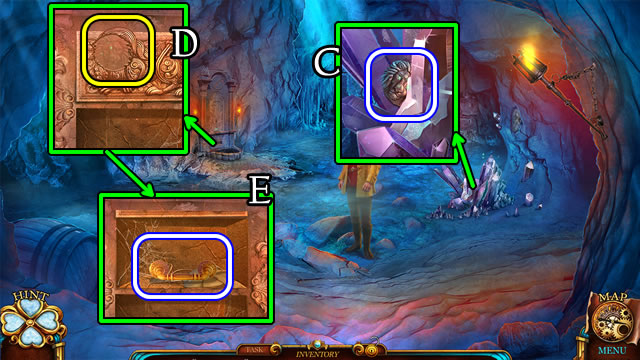
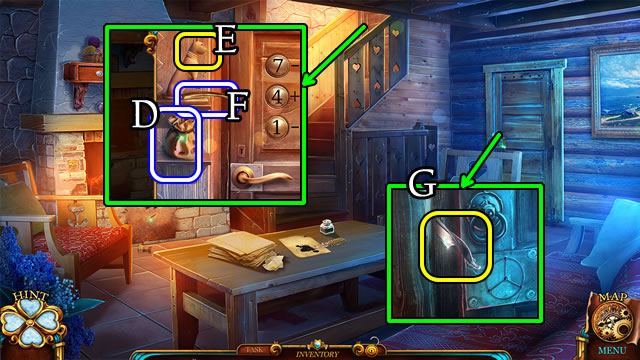
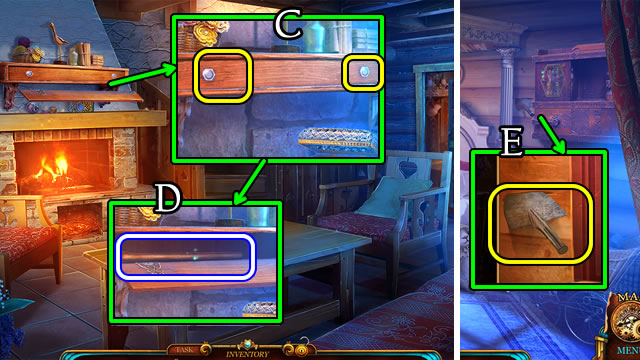
- Read the note (C); placed the CARVED HANDLE. Take the NECKLACE and GOLD HORSESHOE (D).
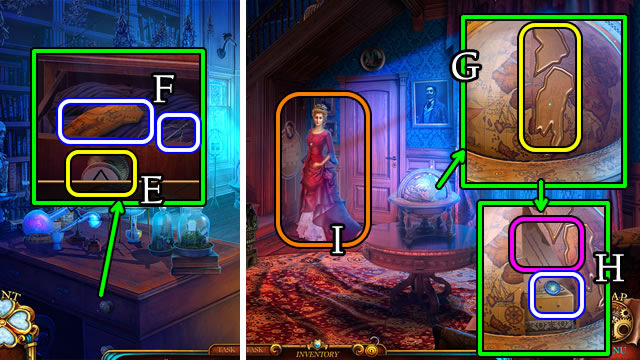
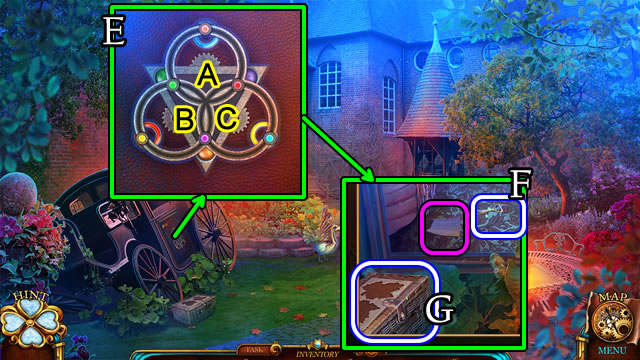
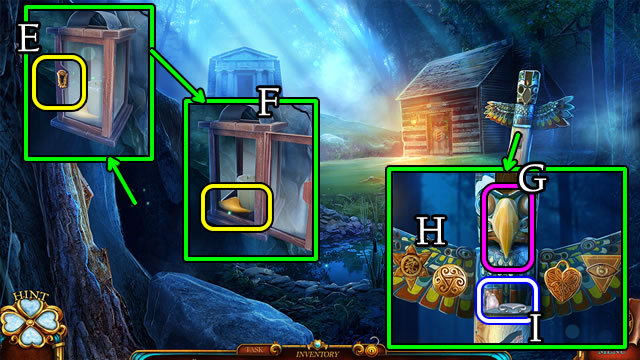
- Place the GOLD HORSESHOE; take the BEETLE (E).
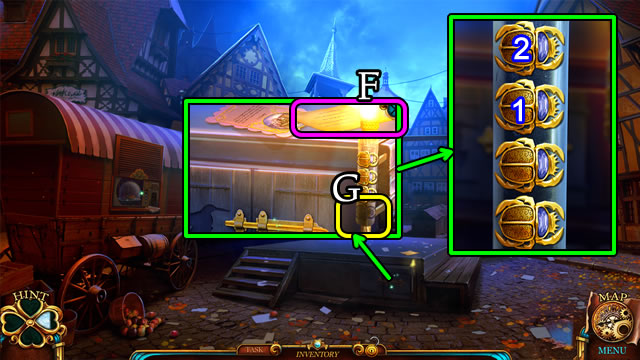
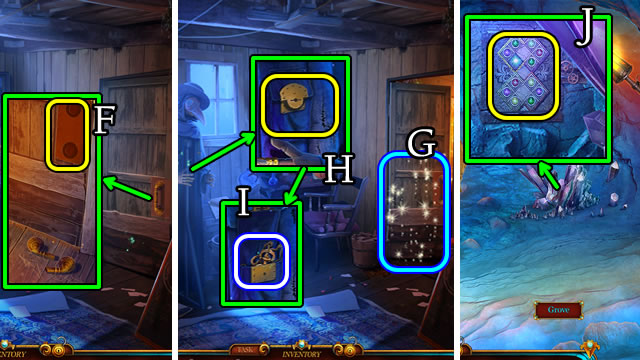
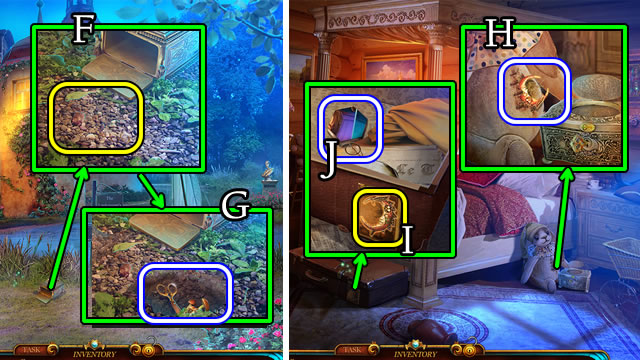
- Read the note (F); place the BEETLE (G).
- Solution (1-2).
- Receive a TORCH.
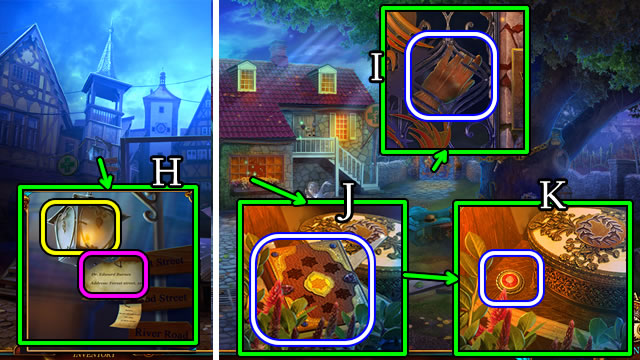
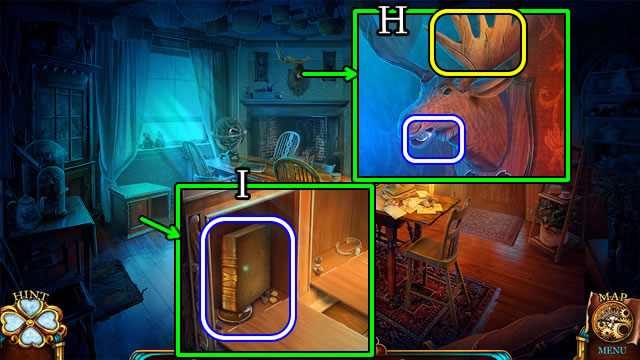
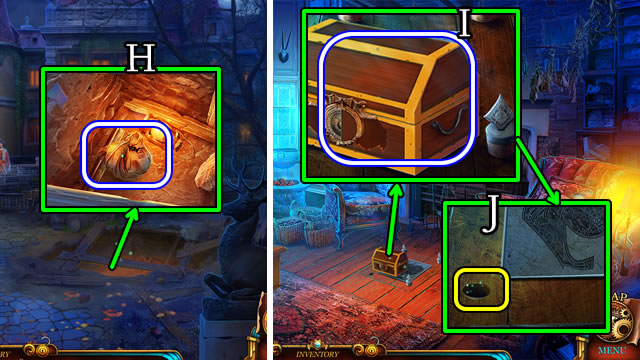
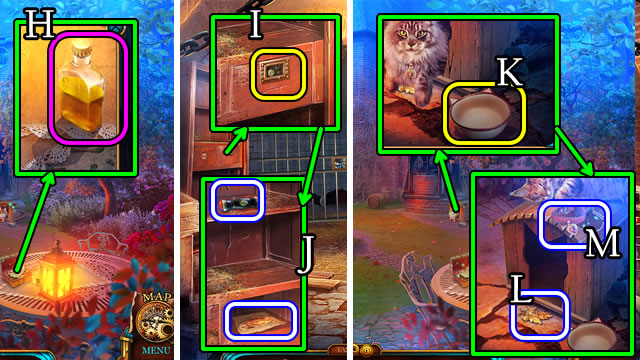
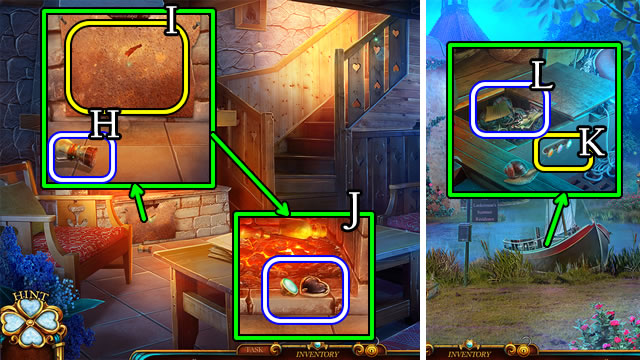
- Use the TORCH. Place the HEALER'S ADDRESS (H).
- Walk forward.
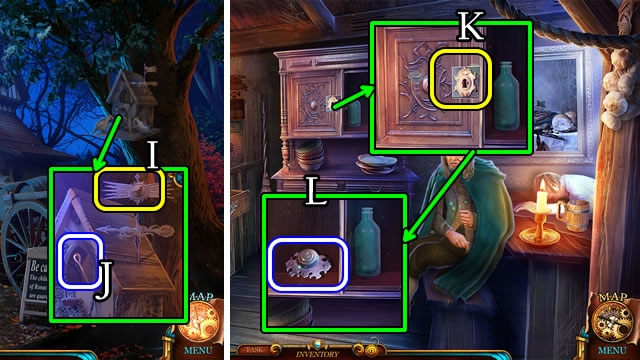
- Take the LEATHER GLOVE (I).
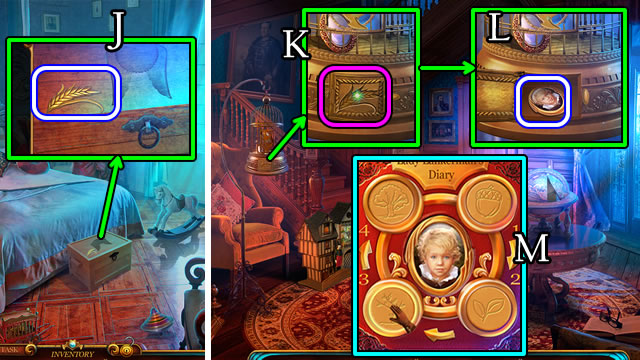
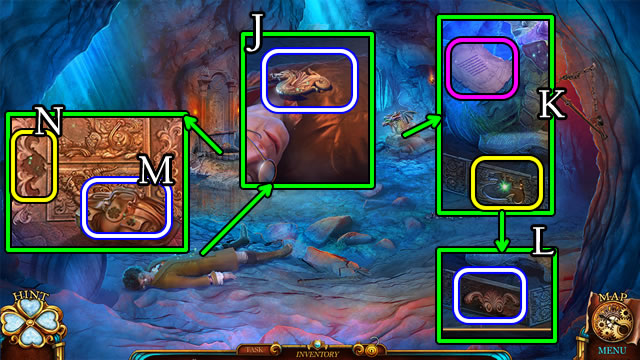
- Take the HEALER'S BOOK (J).
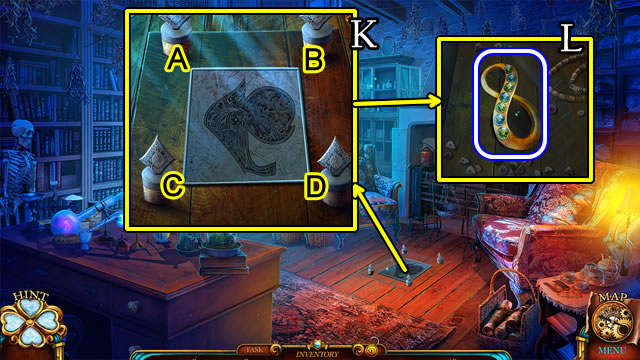
- Use the LEATHER GLOVE to remove the glass. Take the BUTTON (K).
- Walk down.
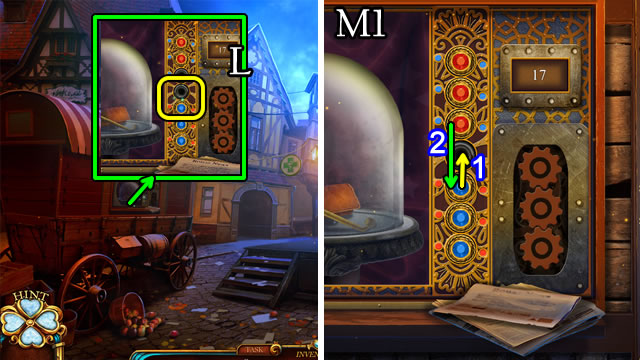
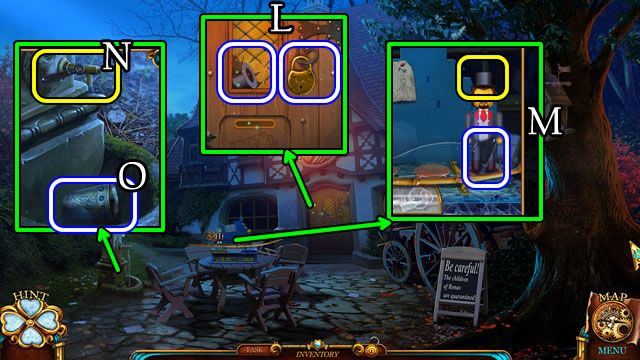
- Place the BUTTON (L).
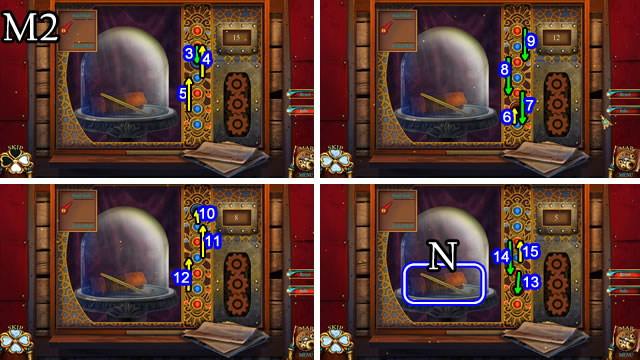
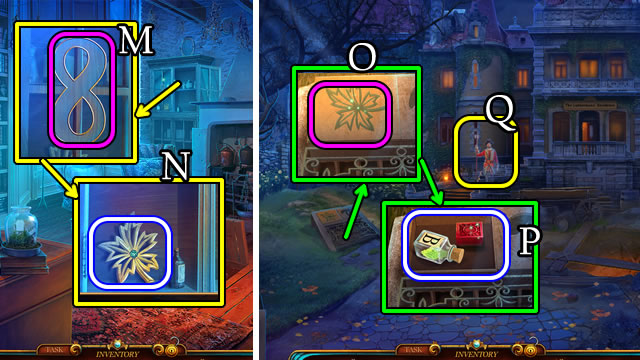
- Solution for Hard or Casual Mode (M1). 1-2.
- Solution for Hard or Casual Mode (M2). 3-15.
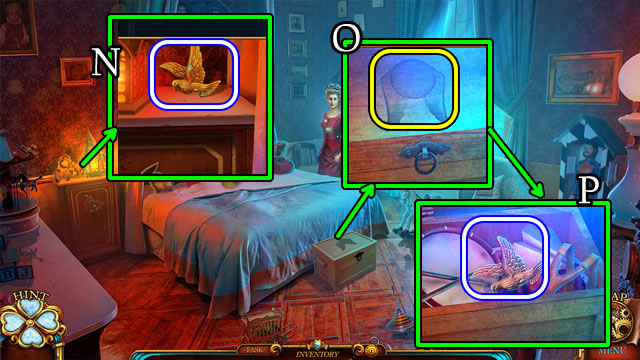
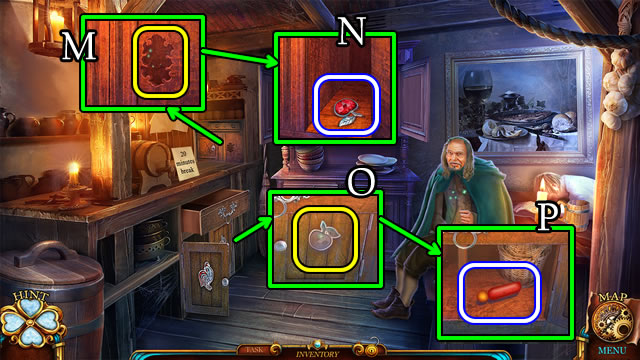
- Take the THIN METAL ROD and SCROLL (N).
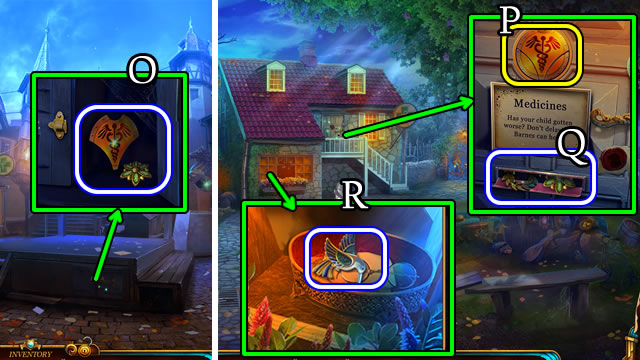
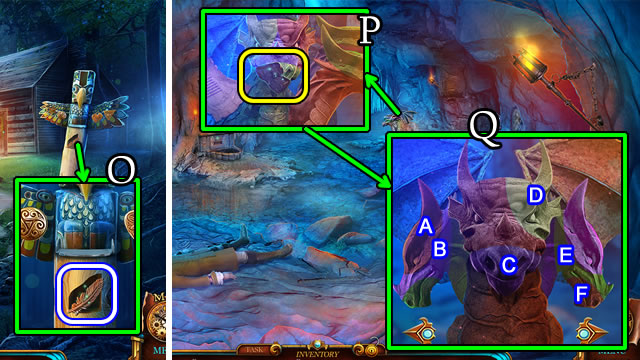
- Use the THIN METAL ROD to open the latch. Take the HEALER'S EMBLEM and 1/7 FLOWERS (O).
- Walk forward.
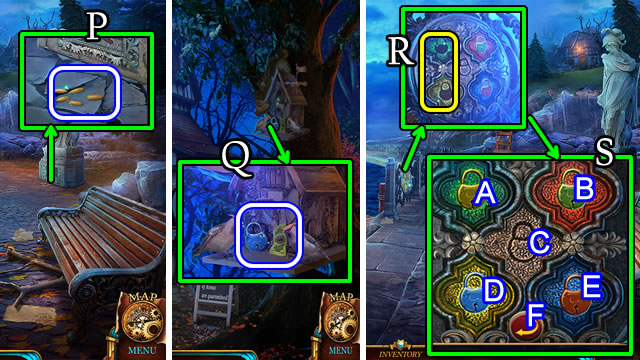
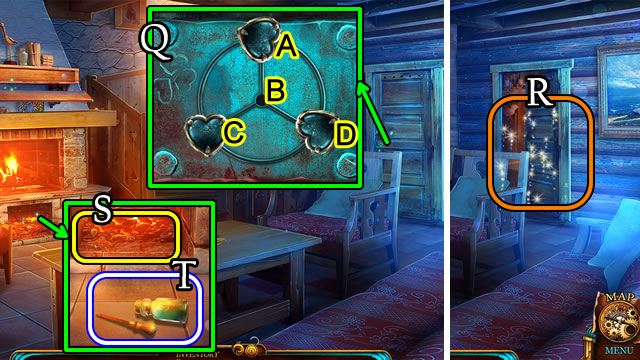
- Place the HEALER'S EMBLEM (P).
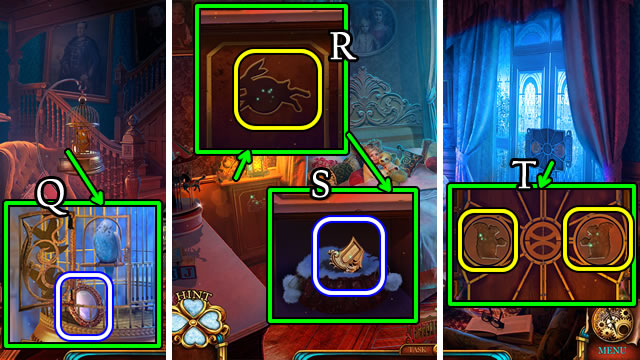
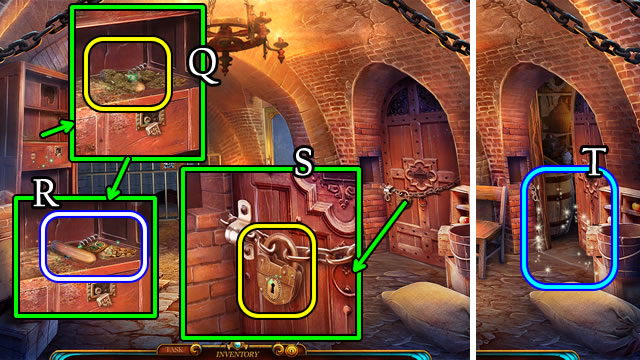
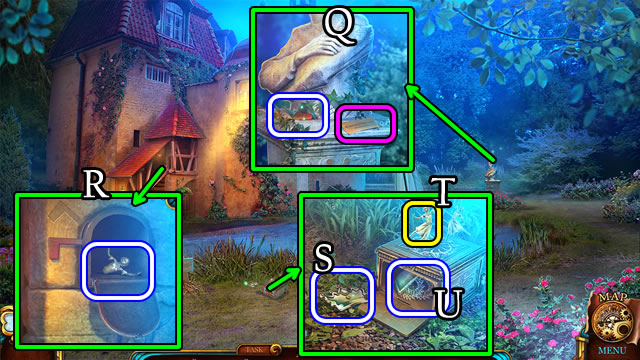
- Take 2/7 FLOWERS and LAUREL WREATH (Q).
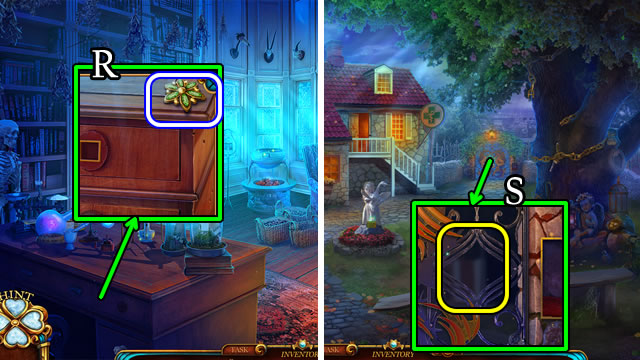
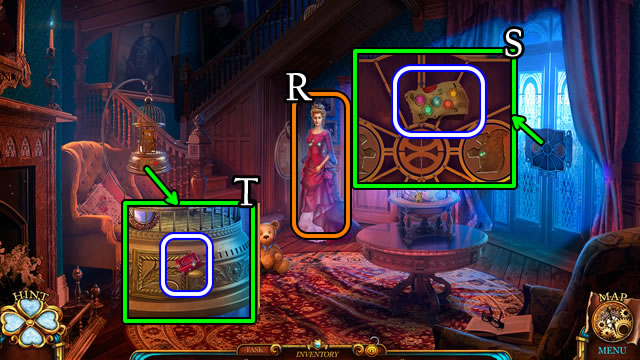
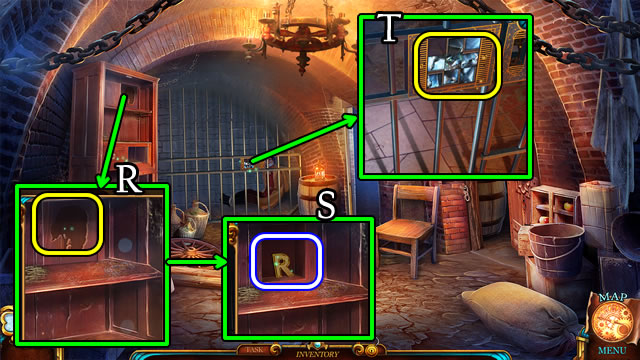
- Place the LAUREL WREATH to open the box. Take the BIRD AMULET (R).
- Walk down.
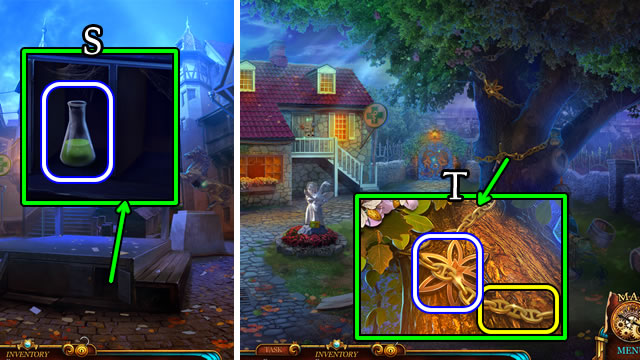
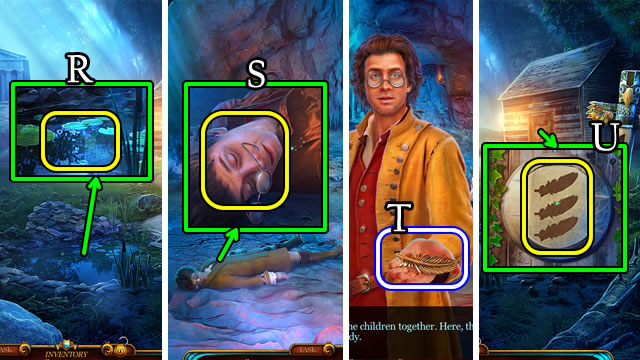
- Place the BIRD AMULET on the door; take the ACID (S).
- Walk forward.
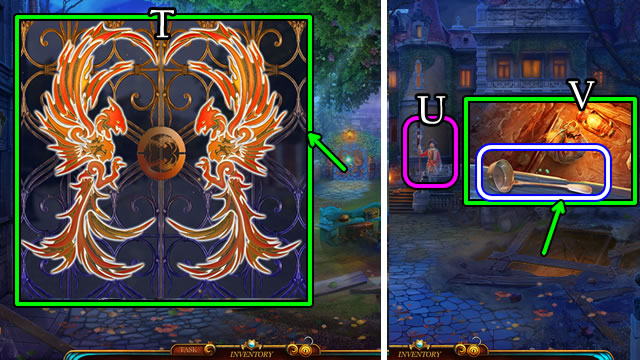
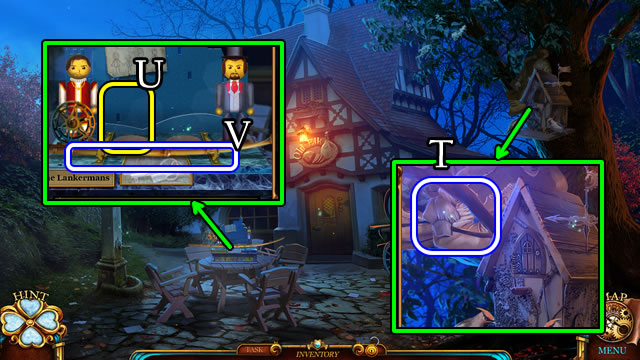
- Use the ACID to receive a STAR EMBLEM (T).
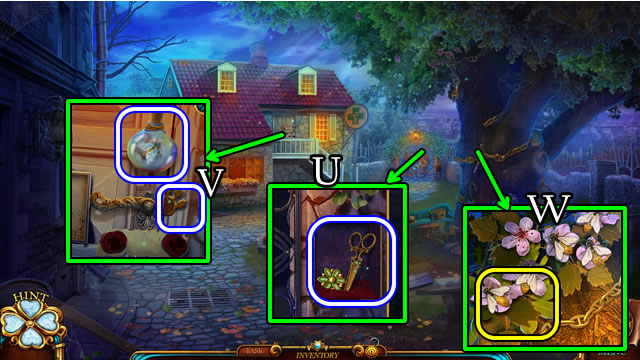
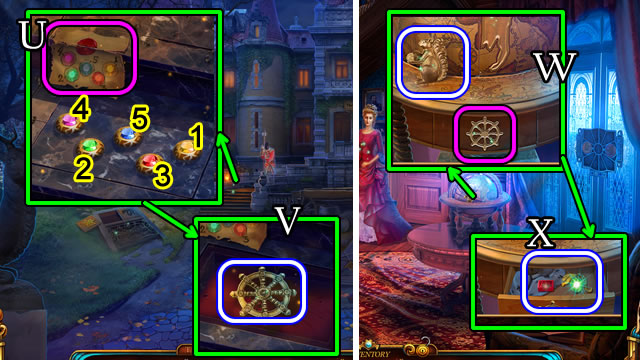
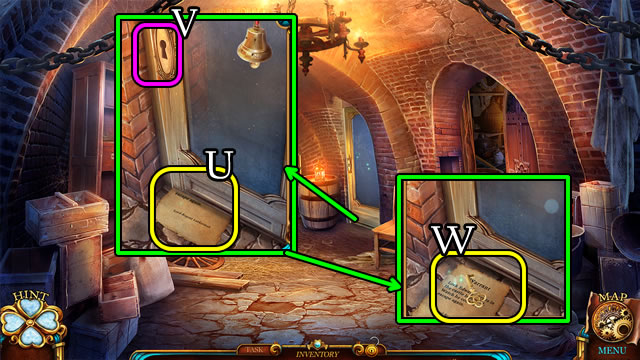
- Place the STAR EMBLEM to open the compartment. Take 3/7 FLOWERS and SCISSORS (U).
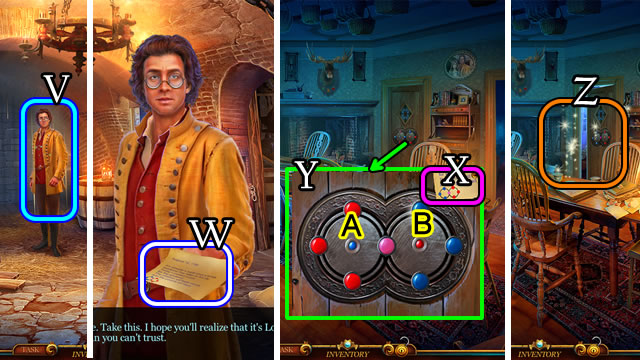
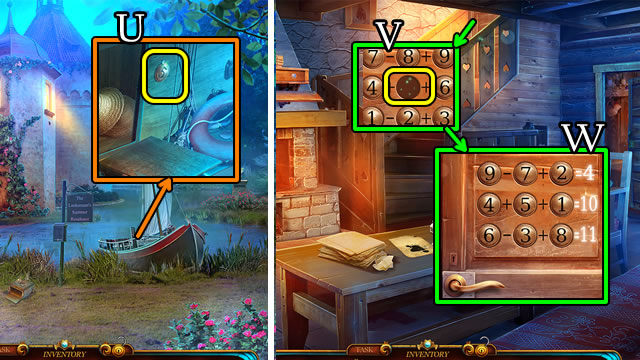
- Use the SCISSORS. Receive a PAW PRINT and BEE (V).
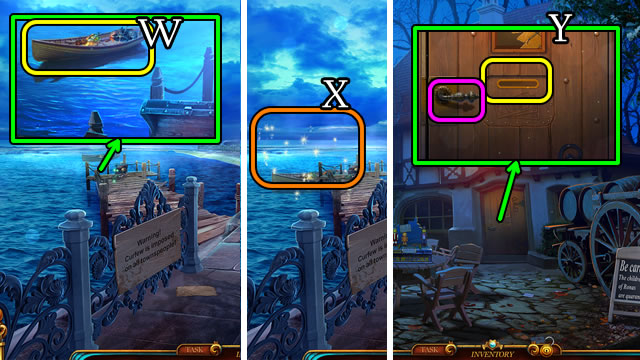
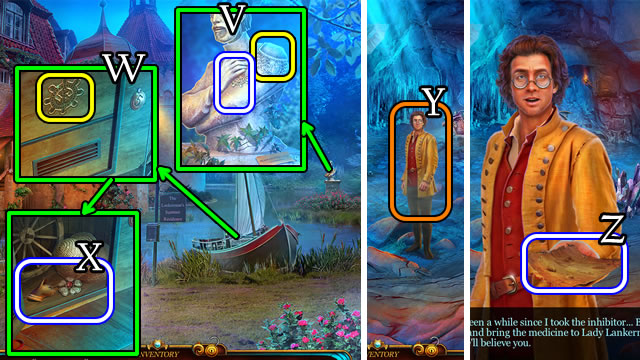
- Place the BEE (W).
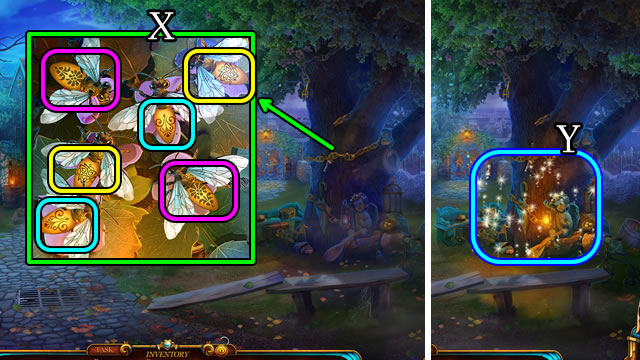
- Solution (X).
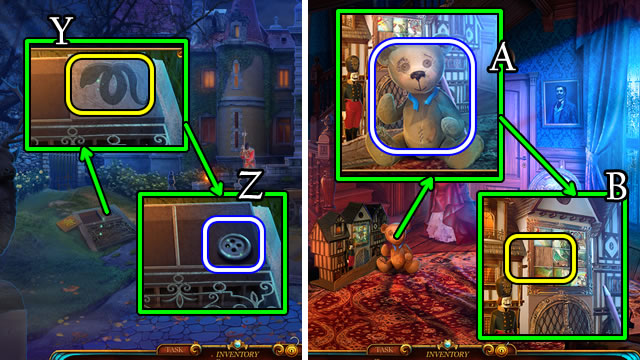
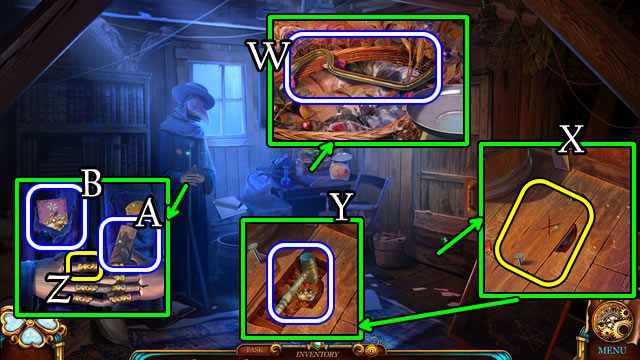
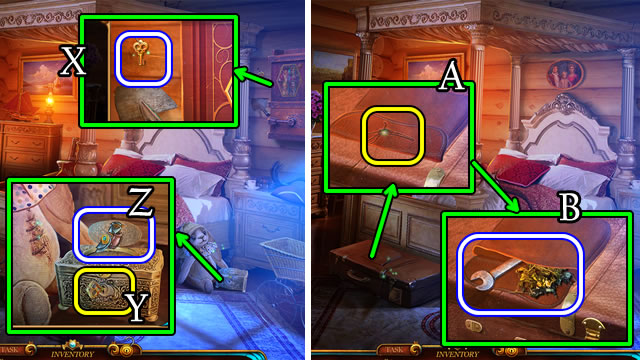
- Play the HOP (Y); receive the HEALER'S HOUSE KEY.
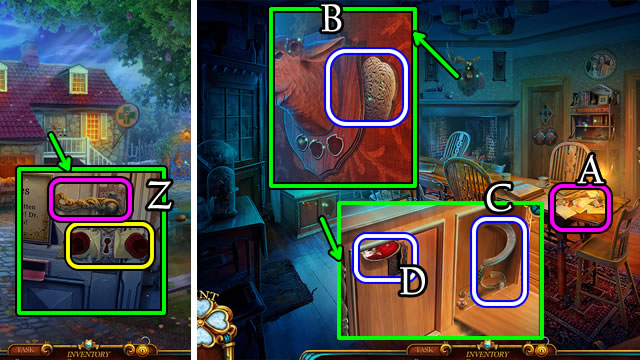
- Break the seal; use the HEALER'S HOUSE KEY; pull the handle (Z).
- Walk forward.
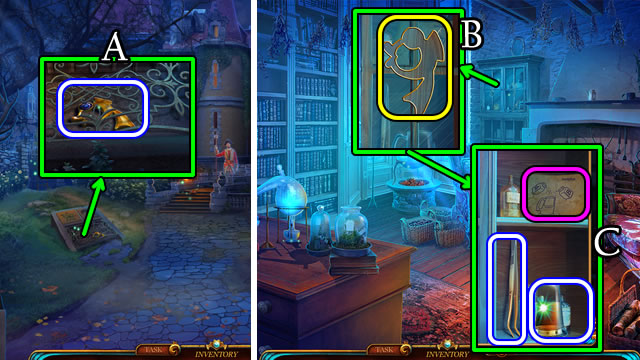
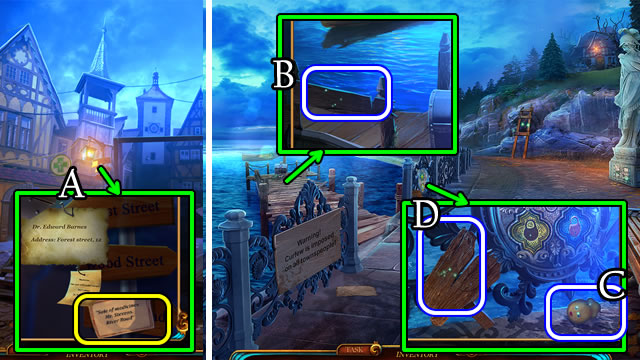
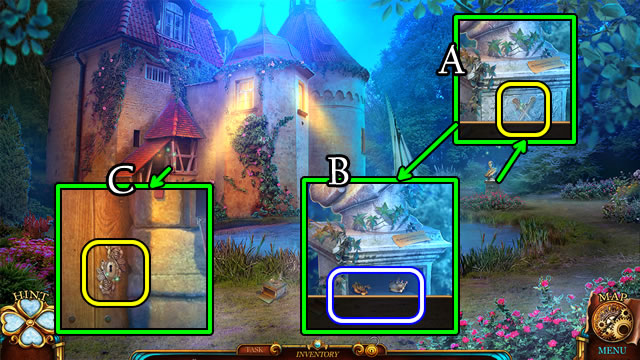
- Read the note (A).
- Take the CABINET PART (B).
- Place the CABINET PART on the cabinet door to take the SICKLE (C). Take the RED BERRY (D).
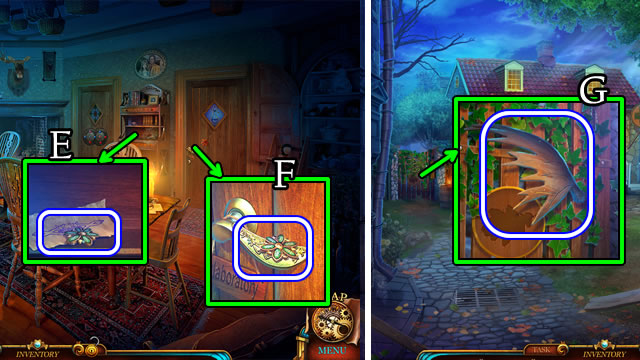
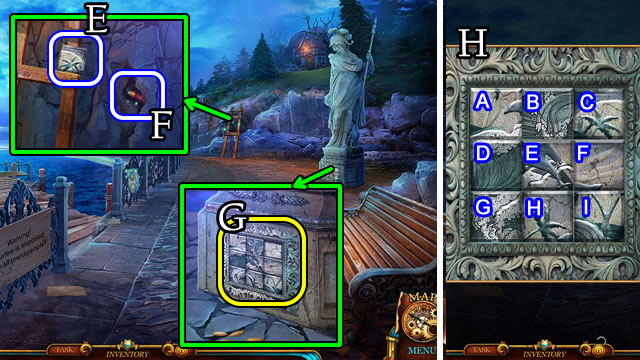
- Take 4/7 FLOWERS (E).
- Take 5/7 FLOWERS (F).
- Walk down.
- Use the SICKLE; tale the ANTLER (G) and receive TWIGS.
- Walk forward.
- Place the ANTLER; take the CABINET KEY (H).
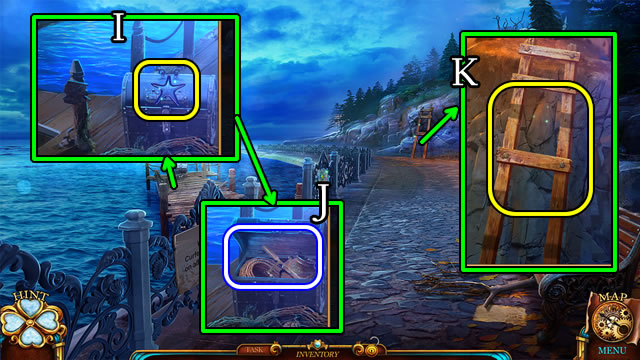
- Use the CABINET KEY to open the cabinet door. Take the BOOK and GOLD BERRY (I).

- Place the BOOK (J).
- Solution (K).
- Read the note; take the RIBBON (L).
- Combine the TWIGS and RIBBON for a BROOM.
- Use the BROOM to uncover and take the HARNESS and GLOBE FRAGMENT (M).
- Walk down 2x.

- Place the HARNESS; take the COIN (N).
- Walk forward 2x.
- Use the COIN; receive a PAW PRINT (O).
- Combine the SCROLL and 2 PAW PRINTS. Take the GREEN BERRY and 6/7 FLOWERS.
- Place the RED, GOLD and GREEN BERRIES. Take the LABORATORY KEY (P).
- Use the LABORATORY KEY; pull the handle (Q).
- Walk forward.
- Take 7/7 FLOWERS (R).
- Combine the HEALER'S BOOK and 7/7 FLOWERS. Open and take the GATE PATTERN FRAGMENT and CLOVER EMBLEM.
- Walk down 2x.
- Place the GATE PATTERN FRAGMENT (S).
- Solution (T).
- Walk forward to the Street. Speak to the guard (U).
- Take the LADLE (V).
- Return to the Laboratory.

- Take the BOW (W). Use the LADLE for an EYE (X).
- Walk down.
- Place the EYE. Take the SQUARE HANDLE (Y).
- Walk forward.
- Place the SQUARE HANDLE; take the RULER (Z).
- Return to the Street.
- Use the RULER; take the FISH AMULET (A).
- Return to the Laboratory.
- Place the FISH AMULET (B).
- Read the note; take the BEER MUG and TWEEZERS (C).
- Return to the Street.
- Take the HEALER'S BRIEFCASE (D). Use the TWEEZERS to take the PETAL AMULET (E).
- Return to the Laboratory.
- Place the PETAL AMULET (F).
- Take the ROPE WITH HOOK and CHEST LOCK PART (G).
- Return to the Street.
- Use the ROPE WITH HOOK for a PACKAGE (H).
- Open the PACKAGE to take the CHEST LATCH, POWDER A and CORK.
- Return to the Laboratory.
- Take the CHEST (I).
- Place the CORK (J).
- Solution (K). Cx2-Dx3-Bx2-Ax4-Dx2.
- Take the INFINITY AMULET (L).
- Place the INFINITY AMULET (M).
- Take the MAPLE LEAF (N).
- Return to the Street.
- Place the MAPLE LEAF (O).
- Take the POWDER B and 1/3 RED BUTTONS (P).
- Combine the BEER MUG and POWDERS A and B; select 2x to receive a SEDATIVE.
- Give the SEDATIVE (Q).
- Walk forward.
Chapter 2: Finding Dr. Barnes
- Speak to the woman (R).
- Take the CODE (S).
- Take 2/3 RED BUTTONS (T).
- Walk down.
- Place the CODE (U).
- Select 1-5.
- Take the WHEEL EMBLEM (V).
- Walk forward.
- Take the SQUIRREL EMBLEM. Place the WHEEL EMBLEM (W).
- Take 3/3 RED BUTTONS and the SNAKE AMULET (X).
- Walk down.
- Place the SNAKE AMULET (Y); take the BEAR'S EYE (Z).
- Combine the HEALER'S BRIEFCASE and 3/3 RED BUTTONS. Depress the buttons. Take the PICTURE PIECE and DRAWER HANDLE.
- Walk forward.
- Take the TORN BEAR (A).
- Place the PICTURE PIECE (B).
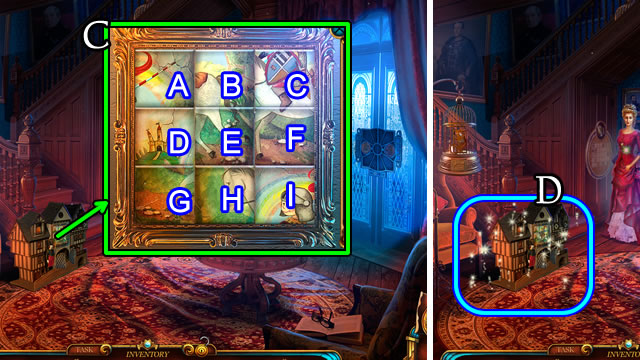
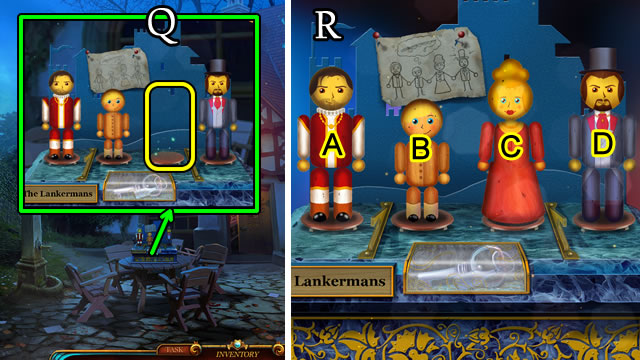
- Solution (C). (D-A)-(F-C)-(G-H)-(G-D)-(F-E)-(C-F)-(I-F)-(G-H)-(F-C)-(C-B)-(H-I)-(I-F)-(F-C).
- Play the HOP (D) for a LADY LANKERMAN'S DIARY.
- Return to the Laboratory.
- Remove, then place the DRAWER HANDLE (E). Take the GLOBE FRAGMENT and NEEDLE AND THREAD (F).
- Return to the Living Room.
- Place the 2 GLOBE FRAGMENTS (G).
- Take the note and BEAR'S EYE (H).
- Combine the TORN BEAR, 2 BEAR'S EYES and BOW; use the NEEDLE AND THREAD for a TEDDY BEAR.
- Give the TEDDY BEAR (I).
- Walk forward.
- Take the WHEAT EMBLEM (J).
- Walk down.
- Place the WHEAT EMBLEM (K).
- Take SAM'S PORTRAIT (L).
- Combine the LADY LANKERMAN'S DIARY and SAM'S PORTRAIT.
- Solution (M).
- Take the WINGED AMULET.
- Walk forward.
- Take the DOVE (N).
- Place the WINGED AMULET (O).
- Take the DOVE (P).
- Walk down.
- Place 2 DOVES to open the cage. Take SAM'S LOCKET (Q).
- Open SAM'S LOCKET; take the RABBIT EMBLEM.
- Walk forward.
- Place the RABBIT EMBLEM (R).
- Take the CHEST LOCK PART (S).
- Combine the CHEST, 2 CHEST LOCK PARTS and CHEST LATCH. Open and take the SQUIRREL EMBLEM.
- Walk down.
- Place the 2 SQUIRREL EMBLEMS (T).
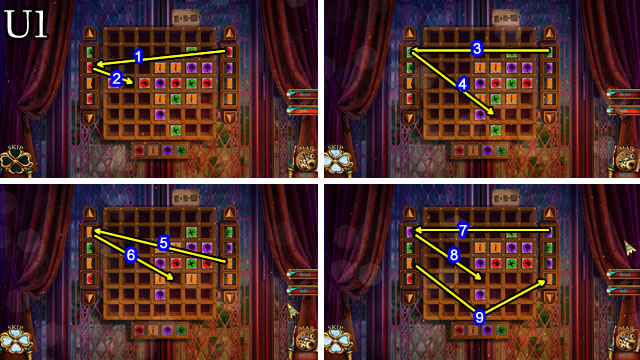
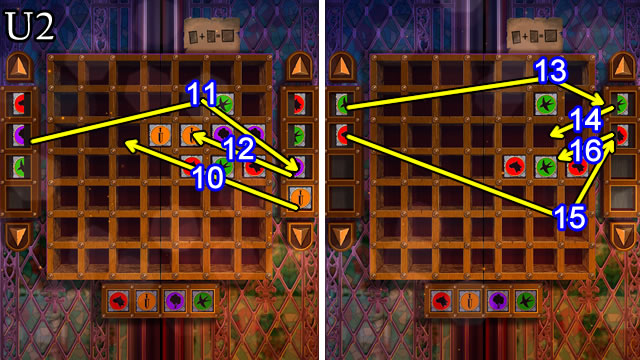
- Solution 1-9 (U1).
- Solution 10-16 (U2).
- Walk to the Balcony.
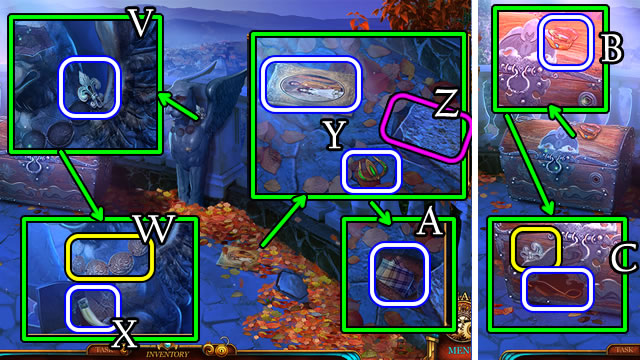
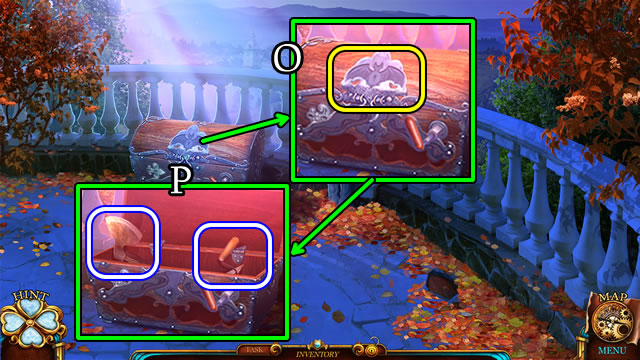
- Take the FLEUR-DE-LIS (V).
- Place the NECKLACE (W); take the FANG (X).
- Uncover and take the BARNES FAMILY PORTRAIT and 1/3 TRIDENTS (Y).
- Use the FANG (Z).
- Take the TORN HANDKERCHIEF (A).
- Take the 2/3 TRIDENTS (B).
- Place the FLEUR-DE-LIS. Take the WIRE (C).
- Walk down.

- Use the TORN HANDKERCHIEF; take the GRIFFIN EYE (D).
- Walk to the Balcony.
- Place the GRIFFIN EYE to receive a LEVER (E).
- Place the LEVER; take 3/3 TRIDENTS (F).
- Walk down.
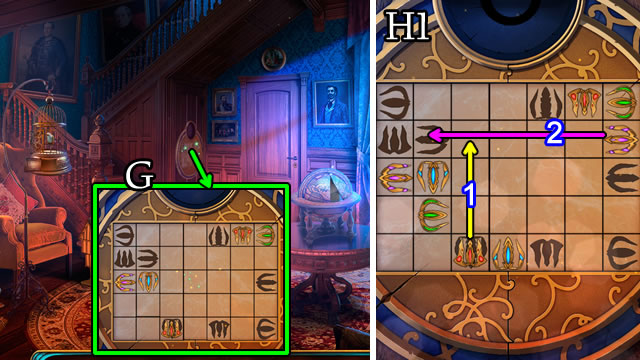
- Place the 3/3 TRIDENTS (G).
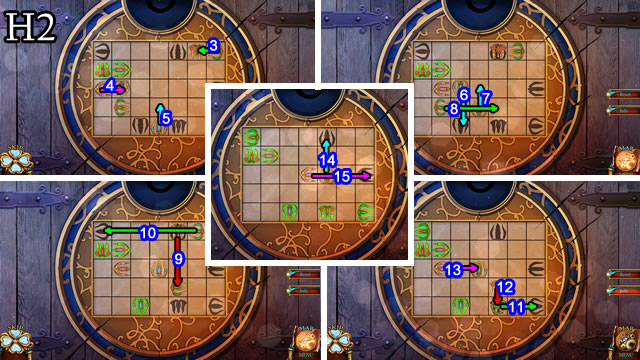
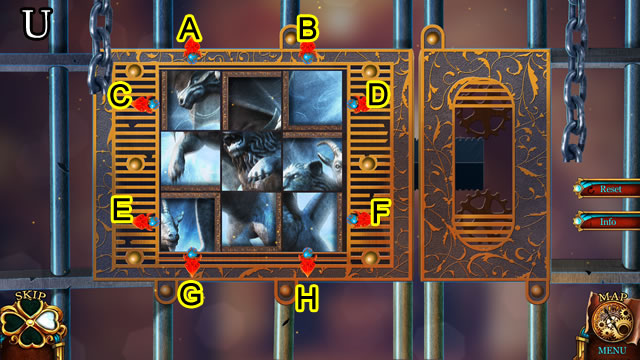
- Solution 1-2 (H1).
- Solution 3-15 (H2).
- Enter the Palace Basement.
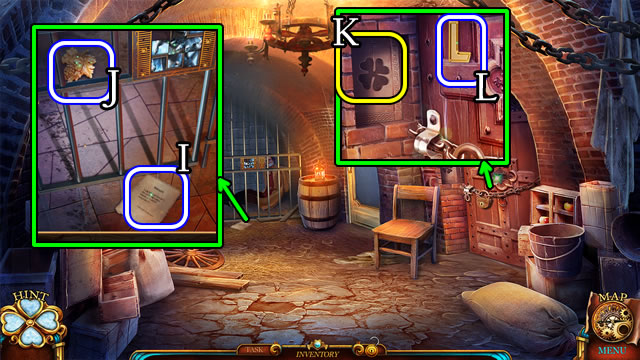
- Select the scene. Take the WARRANT (I).
- Use the WIRE to get the GRAPE EMBLEM (J).
- Place the CLOVER; take the BELL CLAPPER (K).
- Take the LETTER L (L).
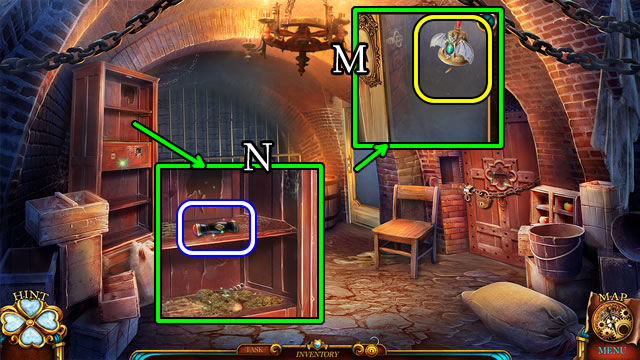
- Place the BELL CLAPPER. Select the bell. Receive a BAT AMULET (M).
- Take the KNIFE HANDLE (N).
- Return to the Balcony.
- Place the BAT AMULET (O).
- Take the AXE and TROWEL (P).
- Return to the Palace Basement.
- Use the TROWEL (Q).
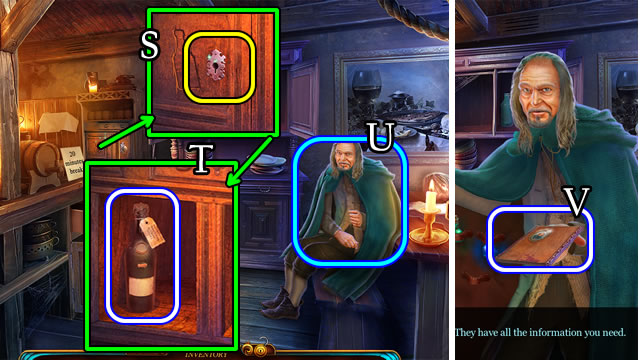
- Take the CORKSCREW and OWL AMULET (R).
- Use the CORKSCREW (S).
- Play the HOP (T). Receive LORD LANKERMAN'S BAG.
- Place the WARRANT (U). Use the CORKSCREW (V).
- Select the warrant, then key (W).
- Walk forward.

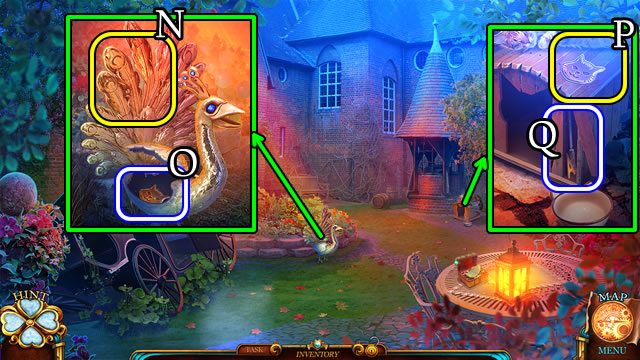
- Place the OWL AMULET (X).
- Take the PEACOCK HEAD FEATHERS and LETTER E; read the note (Y). Take the SEALED MILK BOTTLE (Z).
- Place the PEACOCK HEAD FEATHERS; take the BUTTON (A).
- Take the BROKEN KNIFE (B).
- Take the LETTER N (C).
- Select for a puzzle (D).
- Solution (E). A-B-Ax2-C-B-A-B-A-B.
- Uncover and take the BOTTLE OPENER (F). Read the note (pink). Take the BASKET (G).
- Use the BOTTLE OPENER (H). Take the OIL.
- Walk down.
- Replace the BUTTON (I); take the KNIFE HANDLE, PEACOCK FEATHER and read the underlying note (J).
- Combine the BROKEN KNIFE, KNIFE HANDLE and OIL for a KNIFE.
- Combine the SEALED MILK BOTTLE and KNIFE for MILK.
- Walk forward.
- Use the MILK (K).
- Take the GRAPE EMBLEM (L). Select, then take the COLLAR AMULET (M).
- Combine the BASKET and 2 GRAPE EMBLEMS. Take the SUNFLOWER EMBLEM and PEACOCK FEATHERS.
- Place the PEACOCK FEATHER and PEACOCK FEATHERS (N). Take the CAT EMBLEM (O).
- Place the CAT EMBLEM (P). Take the FILE and LETTER A (Q).
- Walk down.
- Place the SUNFLOWER EMBLEM (R).
- Take the LETTER R (S).
- Combine the LORD LANKERMAN'S BAG and the LETTERS L, N, R, E and A. Take the papers and PICTURE PIECE.
- Use the PICTURE PIECE (T).
- Solution (U). G-B-C-F.
- Give the BARNES FAMILY PORTRAIT (V).
- Take the DR. BARNES' NOTE (W).
- Return to Inside Healer's House.
- Place the DR. BARNES' NOTE (X).
- Solution (Y). B-A-B-A-B-A-B.
- Play the HOP (Z) for SUSIE'S DIARY.
- Open SUSIE'S DIARY; take the MR. STEPHEN'S ADDRESS.
- Return to the Square.
Chapter 3: The Merchant
- Place the MR. STEPHEN'S ADDRESS (A).
- Walk to the Pier.
- Use the AXE. Take 1/3 BOARDS (B).
- Take 1/4 DOLL PARTS (C). Use the AXE; take 2/3 BOARDS (D).
- Take the TILE (E). Use the FILE for 2/4 DOLL PARTS (F).
- Place the TILE (G).
- Solution (H). (A-E)-(A-F)-(A-C)-(B-H)-(D-I)-(G-H).
- Take 3/3 BOARDS and the STARFISH.
- Place the STARFISH (I).
- Take the HACKSAW and ROPE (J).
- Place 3/3 BOARDS and ROPE (K).
- Walk forward.
- Take the DOLL HAT. Use the HACKSAW for a GOLD LOCK (L).
- Place the DOLL HAT. Take the VALVE HANDLE (M).
- Use the VALVE HANDLE (N); take the CUP (O).
- Walk down.
- Use the CUP for SEEDS (P).
- Walk forward.
- Give the birds the SEEDS. Take 1/3 MONEY and the SILVER LOCK (Q).
- Walk down.
- Place the GOLD and SILVER LOCKS (R).
- Solution (S). Fx2-E-F-C.
- Take the PIPE.
- Walk forward.
- Use the PIPE; receive a COAT (T).
- Unfold the COAT for 2/3 MONEY and SAM DOLL.
- Place the SAM DOLL (U). Take the FISHING ROD (V).
- Walk down.
- Use the FISHING ROD (W).
- Play the HOP (X) to receive 3/3 MONEY.
- Walk forward.
- Use the 3/3 MONEY. Pull the handle (Y).
- Walk forward.
- Speak to the man (Z).
- Take 3/4 DOLL PARTS (A). Place the COLLAR AMULET (B).
- Take the DRAWER HANDLE and ROOSTER EMBLEM HEAD (C).
- Use the DRAWER HANDLE (D). Take the HOOK and note (E).
- Walk down.
- Place the ROOSTER EMBLEM HEAD. Take the ROOSTER (F).
- Walk forward.
- Place the ROOSTER (G); take the WIND VANE PART (H).
- Walk down.
- Place the WIND VANE PART (I); take the KNITTING NEEDLE (J).
- Walk forward.
- Use the KNITTING NEEDLE (K).
- Take the BAR CABINET HANDLE (L).
- Place the BAR CABINET HANDLE (M).
- Take the APPLE EMBLEM (N).
- Place the APPLE EMBLEM (O).
- Take 4/4 DOLL PARTS (P).
- Walk down.
- Place the 4/4 DOLL PARTS (Q).
- Solution (R). Ax4-Cx4-Bx6.
- Take the BAR KEY.
- Walk forward.
- Use the BAR KEY (S).
- Take the WHISKEY (T).
- Give the WHISKEY (U); take the MERCHANT'S NOTES (V).
- Combine the MERCHANT'S NOTES and DR. BARNES' NOTE. Take the NOTEBOOK.
- Return to the Boy's Bedroom.
- Give the NOTEBOOK (W).
- Return to the Square.
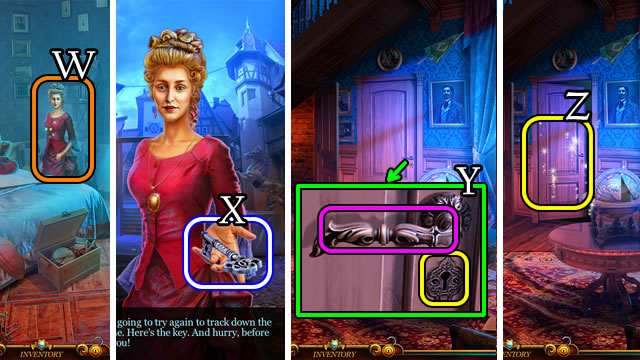
- Speak to the woman; take the STUDY KEY (X).
- Return to the Living Room.
- Use the STUDY KEY; pull the handle (Y).
- Play the HOP (Z); receive the ACCOUNT BOOK.
- Take the OAK LEAF from the ACCOUNT BOOK.
- Return to Outside Healer's House.
Chapter 4: Helping Edward
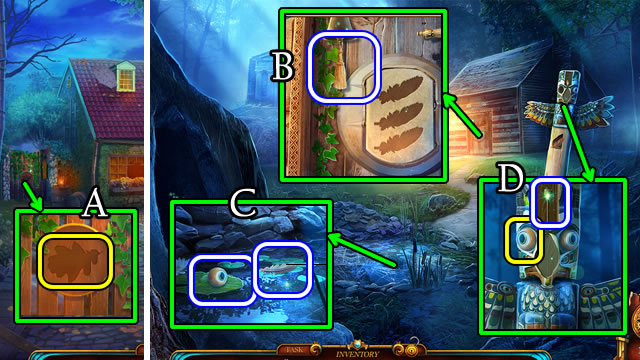
- Place the OAK LEAF (A).
- Walk to the Grove.
- Use the HOOK to get TASSEL (B).
- Use the TASSEL. Take the TOTEM EYE and 1/3 FEATHERS (C).
- Place the TOTEM EYE; take the HAIRPIN (D).
- Use the HAIRPIN (E); take the TOTEM BEAK (F).
- Place the TOTEM BEAK (G) for a puzzle.
- Solution (H).
- Take the FLINT AND STEEL (I).
- Use the FLINT AND STEEL to light the cave lantern.
- Enter the Cave.
- Take the DRAGON EMBLEM (J).
- Read the note. Place the DRAGON EMBLEM (K).
- Take the STONE DECORATION (L).
- Take the LEATHER BAG (M).
- Place the STONE DECORATION. Take the CHISEL (N).
- Walk down.
- Use the CHISEL for 2/3 FEATHERS. Take the underlying CHIMERA PIECE (O).
- Return to the Cave.
- Place the CHIMERA PIECE (P).
- Solution (Q). (B-E)-(C-F)-(A-D).
- Take the THREE-LEAF CLOVER.
- Combine the LEATHER BAG and THREE-LEAF CLOVER. Take the EMPTY FLASK and YELLOW RING.
- Walk down.
- Place the EMPTY FLASK for FLASK OF WATER (R).
- Return to the Cave.
- Use the FLASK OF WATER (S).
- Take 3/3 FEATHERS (T).
- Walk down.
- Place the 3/3 FEATHERS (U).
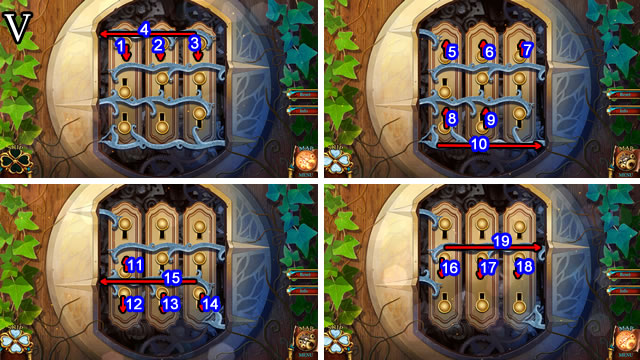
- Solution 1-19 (V).
- Enter the Cabin.
- Uncover and take the CROWBAR (W).
- Use the CROWBAR; remove the board (X).
- Take the HAMMER and 1/5 GOLDEN CROWNS (Y).
- Place the YELLOW RING (Z).
- Take the WEDGE (A) and 2/5 GOLDEN CROWNS; read the note (B).
- Return to the Cave.
- Use the WEDGE and HAMMER. Take the LION AMULET (C).
- Place the LION AMULET (D).
- Take the IRON HANDLE (E).
- Return to the Cabin.
- Replace the IRON HANDLE (F).
- Play the HOP (G) to receive a FOUR-LEAF CLOVER.
- Combine the LEATHER BAG and FOUR-LEAF CLOVER. Take the PIN.
- Use the PIN (H). Take EDWARD'S POCKET WATCH (I).
- Combine EDWARD'S POCKET WATCH and the PIN. Uncover and take the JEWELED TILE.
- Return to the Cave.
- Place the JEWELED TILE (J).
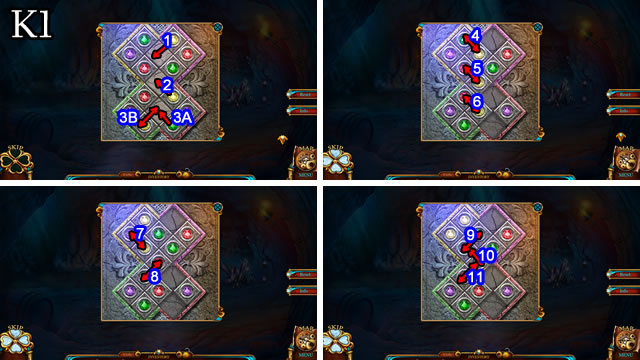
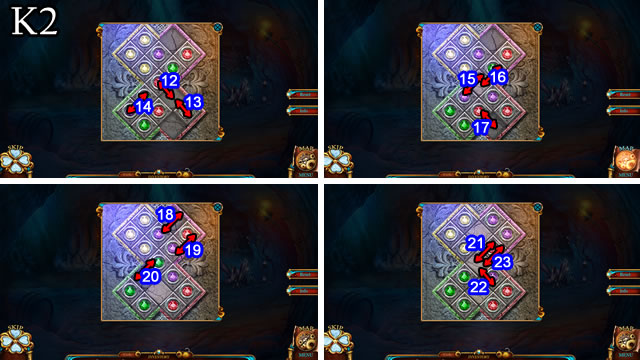
- Solution 1-11 (K1).
- Solution 12-23 (K2).
- Take the WEIGHT.
- Return to the Cabin.
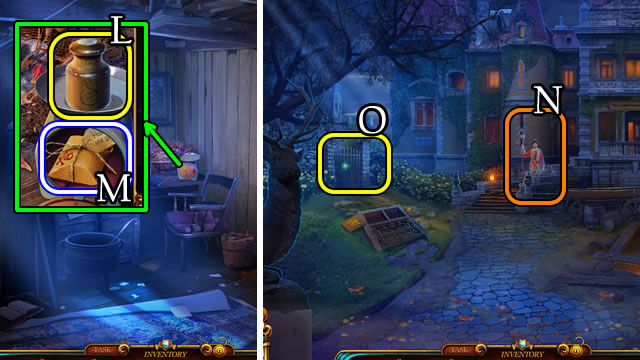
- Place the WEIGHT (L).
- Take the POISONOUS HERB (M).
- Return to the Street.
- Give the POISONOUS HERB; take the MAP (N).
- Place the MAP (O) for a puzzle.
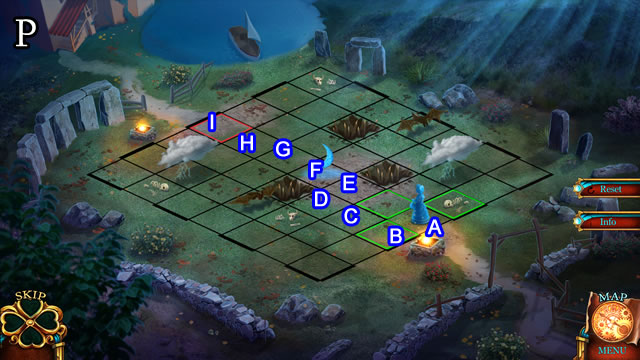
- Solution (P). B-A-B-C-D-E-F-G-H-I.
- Take the MAILBOX FLAG; read the note (Q).
- Use the MAILBOX FLAG; take the DANCING WOMAN (R).
- Take 3/5 GOLDEN CROWNS (S). Place the DANCING WOMAN (T); take the SHOULDER DECORATION (U).
- Place the SHOULDER DECORATION; take the STEERING WHEEL (V).
- Use the STEERING WHEEL (W). Take the CAT HEAD and FIVE-PETALED FLOWER (X).
- Combine the LEATHER BAG and FIVE-PETALED FLOWER. Take the INHIBITOR.
- Return to the Cave.
- Give the INHIBITOR (Y).
- Take the MEDICINE RECIPE and the underlying SWORD EMBLEM (Z).
- Return to By the River.
Chapter 5: Creating the Medicine
- Place the SWORD EMBLEM (A).
- Take 4/5 GOLDEN CROWNS and the SUMMER RESIDENCE KEY (B).
- Use the SUMMER RESIDENCE KEY (C).
- Walk forward.
- Take the BAG (D).
- Place the CAT HEAD (E); take the BLADE HANDLE (F).
- Place the BLADE HANDLE; receive a BLADE (G).
- Combine the BAG and BLADE; take PLIERS and 1/3 BLACK HEARTS.
- Take the VIAL (H). Use the PLIERS and remove the cover (I).
- Take 2/3 BLACK HEARTS and a GREEN BUTTON (J).
- Walk down.
- Place the GREEN BUTTON (K).
- Read the note. Take 5/5 GOLDEN CROWNS (L).
- Combine the ACCOUNT BOOK and 5/5 GOLDEN CROWNS. Take the LORD'S PLAN.
- Return to the Boy's Bedroom.

- Give the LORD'S PLAN; take the GLASS FLOWER (M).
- Return to the Summer Residence.
- Place the GLASS FLOWER (N); take 3/3 BLACK HEARTS (O).
- Place 3/3 BLACK HEARTS (P).
- Solution (Q). D-A-C-B.
- Play the HOP (R) for a FIRE POKER.
- Use the FIRE POKER (S).
- Use the FLASK OF WATER. Take the SCREWDRIVER and FLASK WITH LIQUID (T).
- Walk down.
- Use the SCREWDRIVER; receive a NUMBER BUTTON (U).
- Walk forward.
- Place the NUMBER BUTTON (V).
- Solution (W).
- Walk forward.
- Take the GILDED BOX KEY (X).
- Place and select the GILDED BOX KEY (Y). Take the MECHANICAL BIRD (Z).
- Select the MECHANICAL BIRD. Take the PICTURE PIECE and BIRD LEG EMBLEM.
- Place the BIRD LEG EMBLEM (A).
- Take the WRENCH and WILD HERBS (B).
- Walk down.
- Use the WRENCH (C).
- Take the SPADE HANDLE (D).
- Walk forward.
- Place the SPADE HANDLE to receive a SPADE (E).
- Walk down 2x.
- Use the SPADE (F).
- Take the SCISSORS and MUSHROOMS (G).
- Return to the Second Floor.
- Use the SCISSORS to take the MOON EMBLEM (H).
- Place the MOON EMBLEM (I). Uncover and take the PICTURE PIECE (J).

- Place the 2 PICTURE PIECES (K).
- Solution (L).
- Take the VIAL OF YELLOW POWDER.
- Combine the VIAL and MEDICINE RECIPE. Add the FLASK WITH LIQUID, MUSHROOMS, WILD HERBS and VIAL OF YELLOW POWDER for MEDICINE.
- Return to the Boy's Bedroom.
- Give the MEDICINE (M).
- Congratulations. You have completeted Chimeras: Mortal Medicine.
Created at: 2016-12-09