

Walkthrough Menu
- General Tips
- Chapter 1: Munich
- Chapter 2: The Keepers
- Chapter 3: The Wanderer
- Chapter 4: The Sphere of Order
General Tips
- This is the official guide for Chimeras: The Signs of Prophecy.
- This guide will not show when you have to zoom into a location; the screenshots will show each zoom scene.
- Hidden-object puzzles are referred to as HOPs. This guide will not show screenshots of the HOPs, however, it will mention when an HOP is available and the inventory item you'll collect from it.
- Use the Map to fast travel to a location.
Chapter 1: Munich
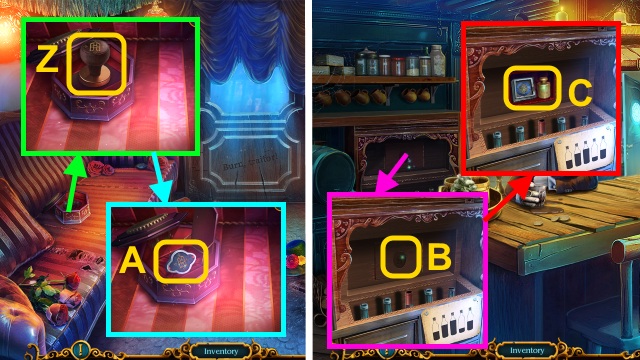
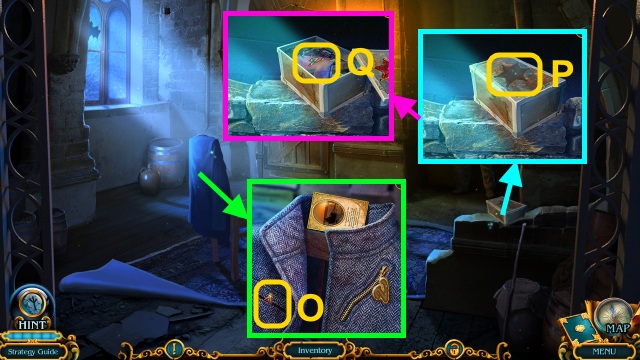
- Open the BAG; take the IDENTIFICATION, HANDKERCHIEF, note, and GOLD COINS (1/3) (A).
- Take the GOLD COINS (2/3) (B).
- Take the GOLD COINS (3/3) (C).

- Talk to the woman; give the GOLD COINS (D).
- Receive the CHIMERA'S HEART.
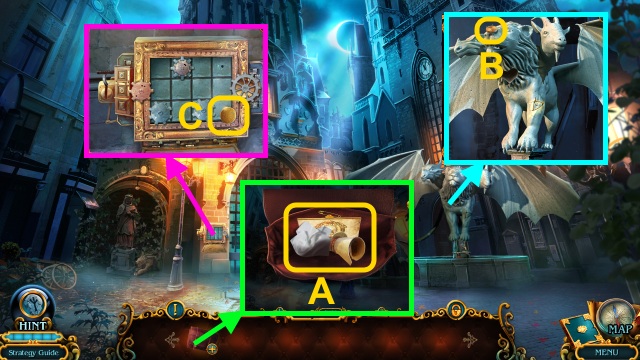
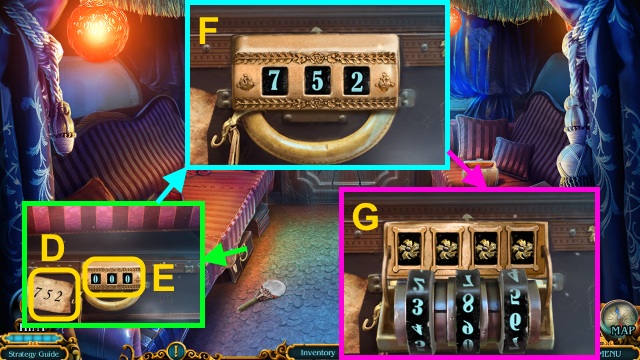
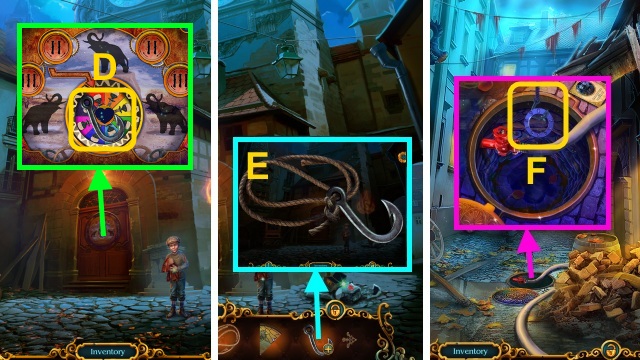
- Place the CHIMERA'S HEART (E); receive the GEAR.
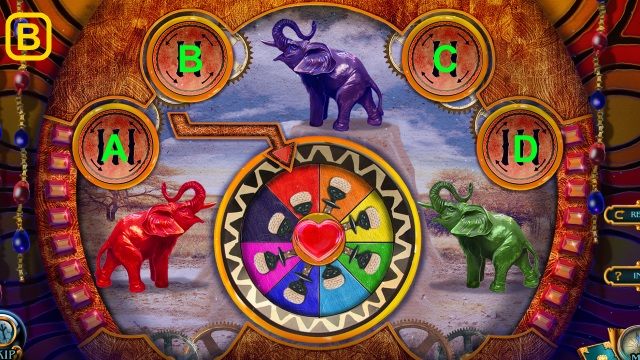
- Place the GEAR for a mini-game (F).
- Solution (G): F-G-K-J-I-E-F-G-C.
- G-C-D-H-L-K-G-C-B-A-E-I-J-F-B.
- F-J-K-L-H-D-C-B-F-J-K-L-H-D-C-B-A-E-I-J-K.
- L-H-D-C-B-A-E-I-J-K-L-H-D-C-B-A-E-I-J-F-E-I.
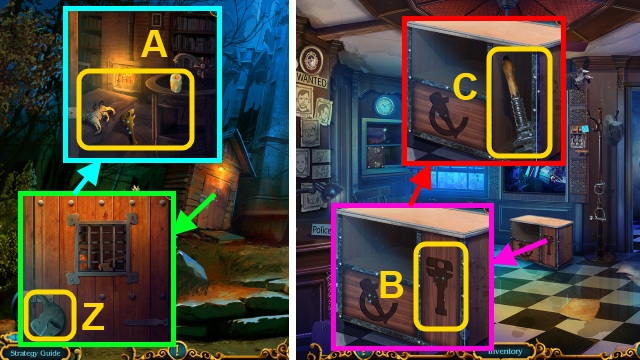
- Walk forward.
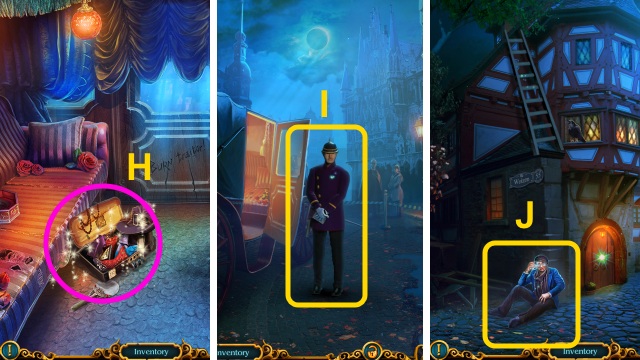
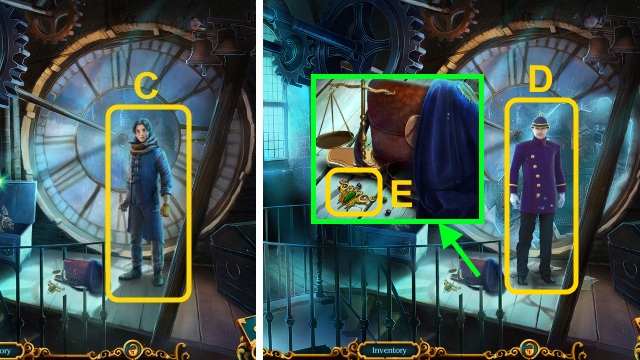
- Talk to the man; give the IDENTIFICATION (H).
- Take the MAGNET (I).
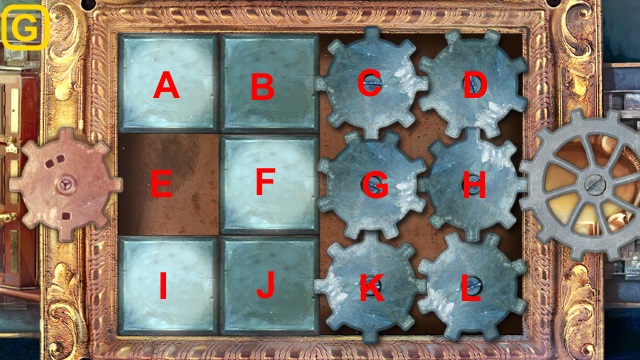
- Remove the handle (J); use the MAGNET (K).
- Pull the key; take the TRUNK KEY (L).
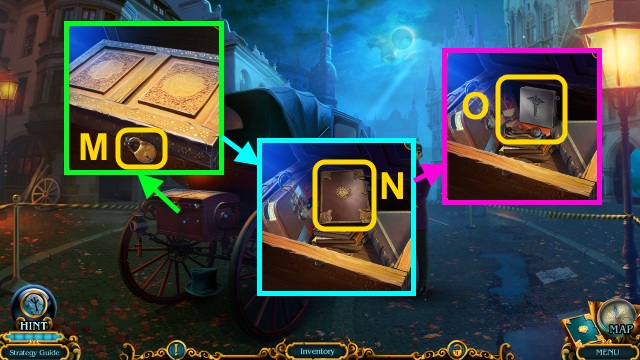
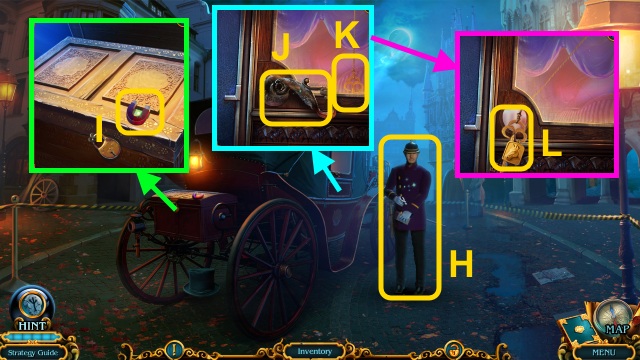
- Use the TRUNK KEY (M).
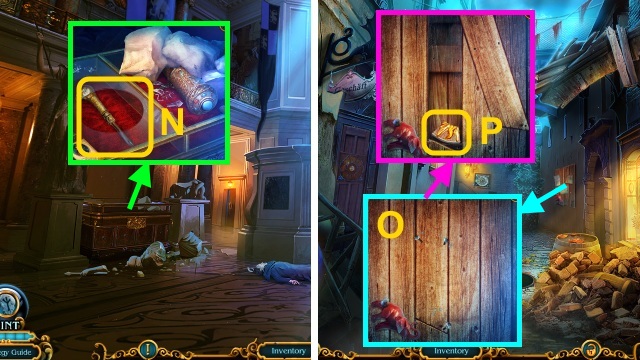
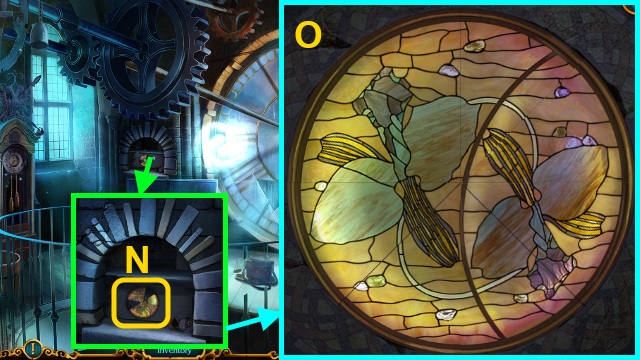
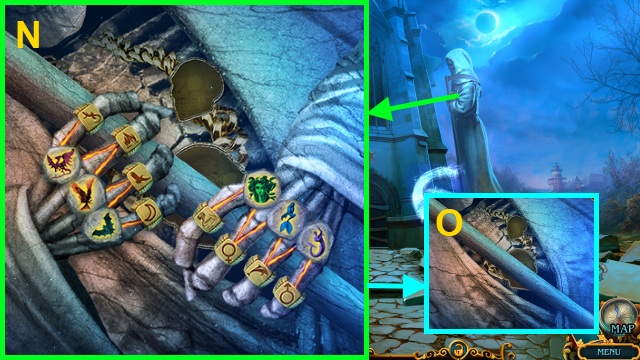
- Read the album (N).
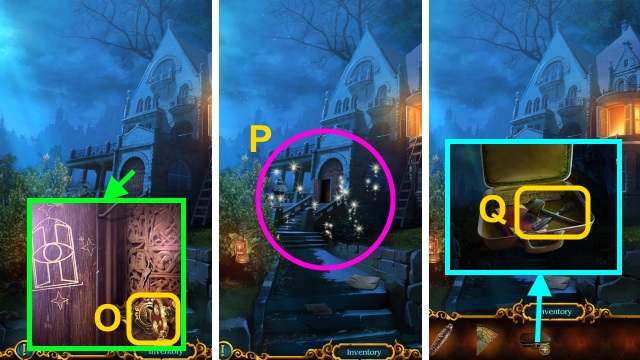
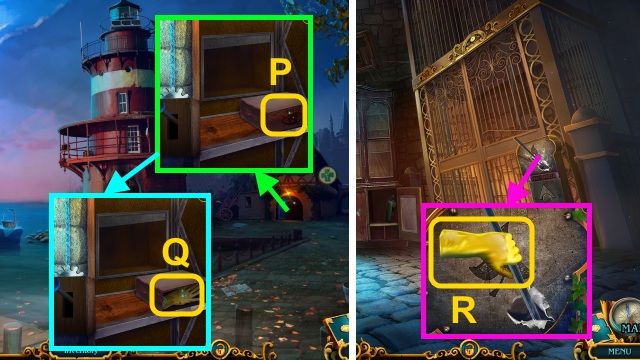
- Take the FIRST-AID KIT and CARRIAGE HANDLE (O).
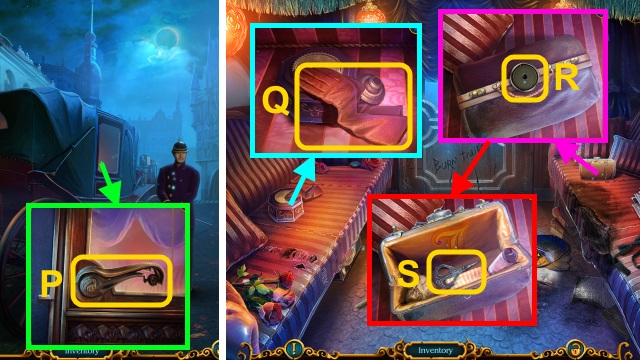
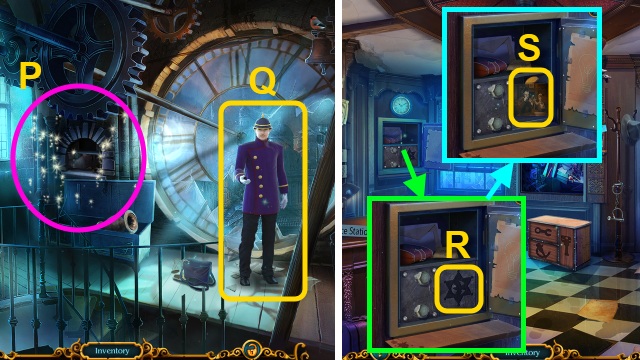
- Use the CARRIAGE HANDLE (P).
- Enter the Carriage.
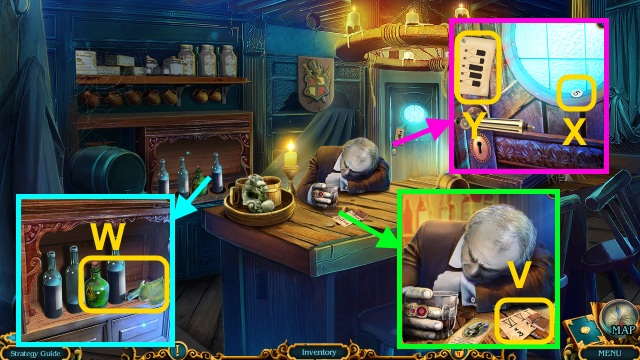
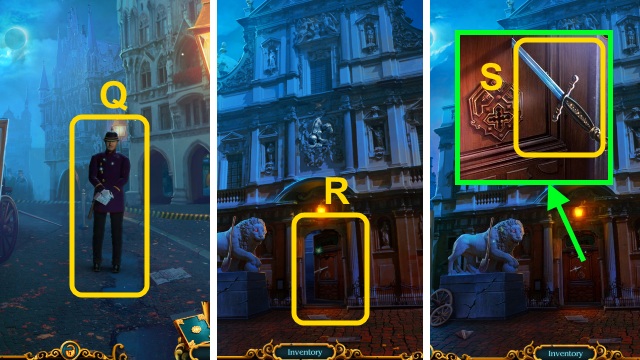
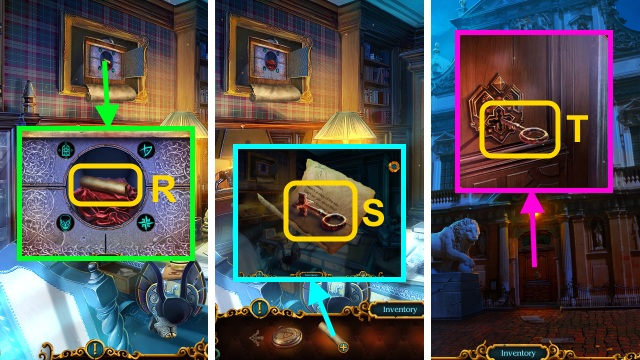
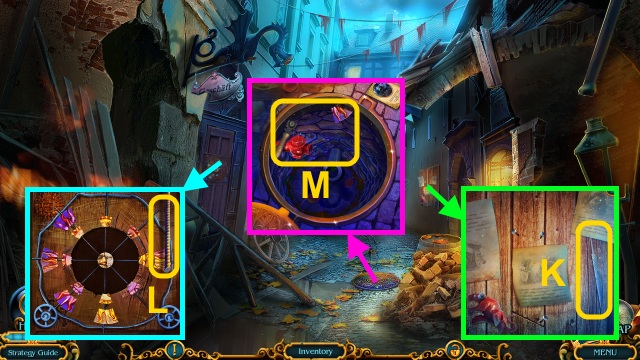
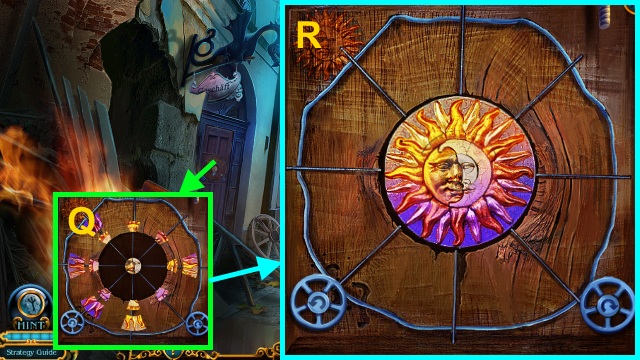
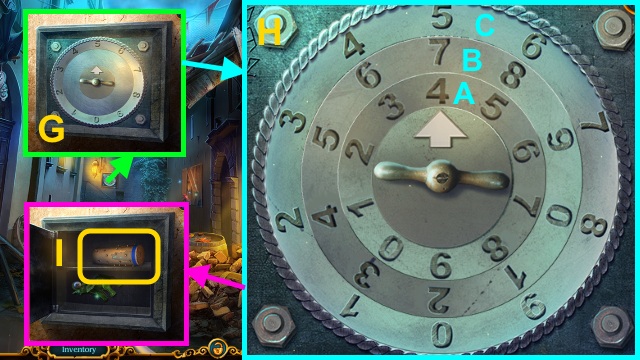
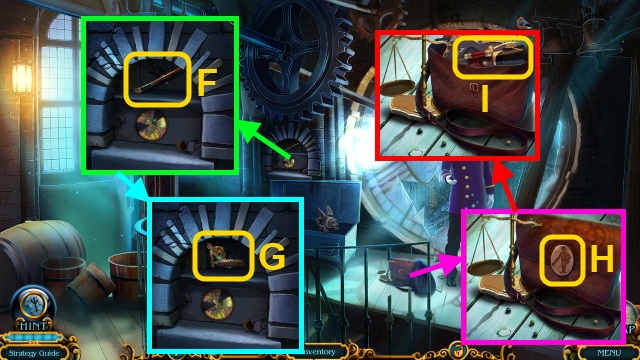
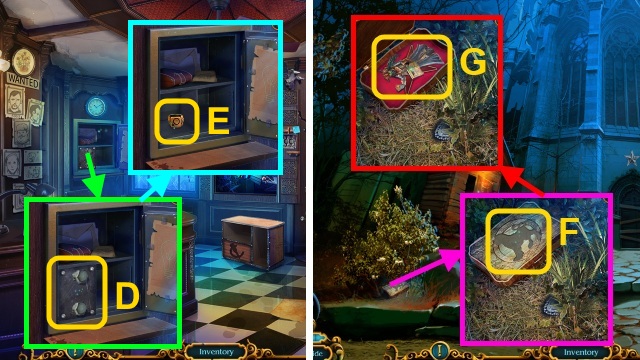
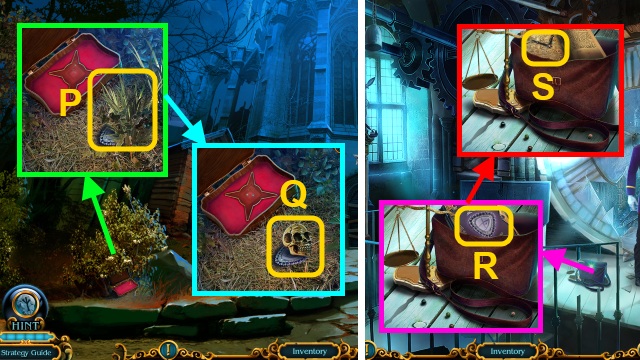
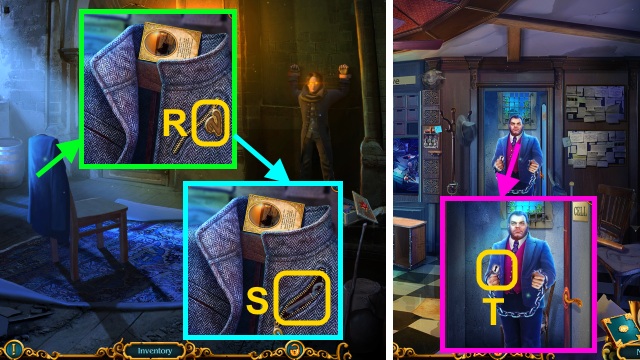
- Take the GLOVES and SAFE DIAL (Q).
- Place the SAFE DIAL (R); turn it 3x.
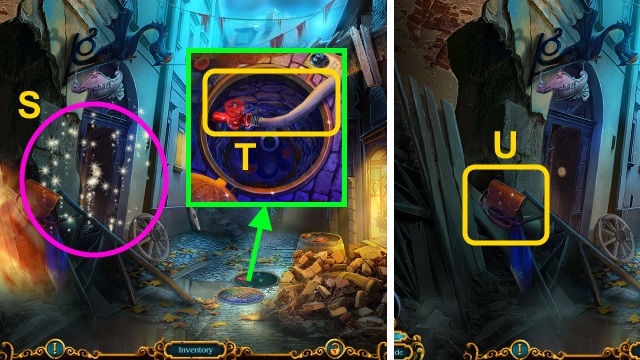
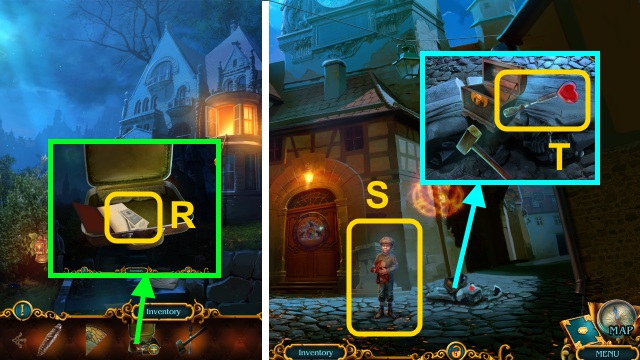
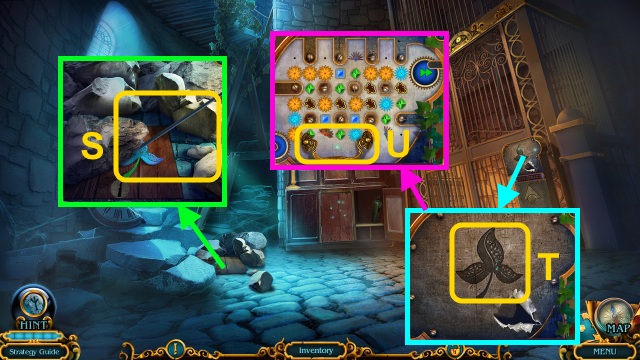
- Take the SCISSORS (S).
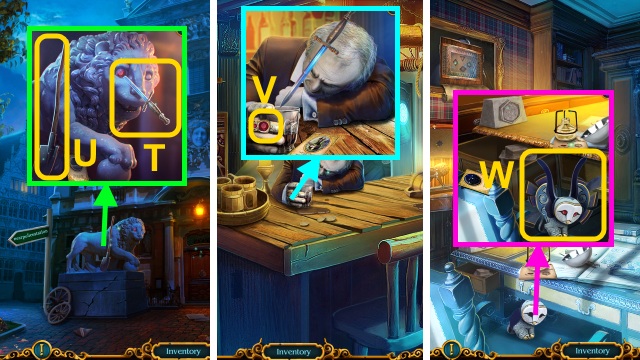
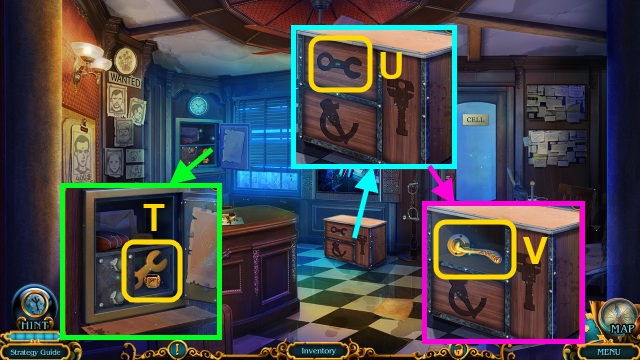
- Use the SCISSORS; take the SHATTERED AMULET (1/3) (T).
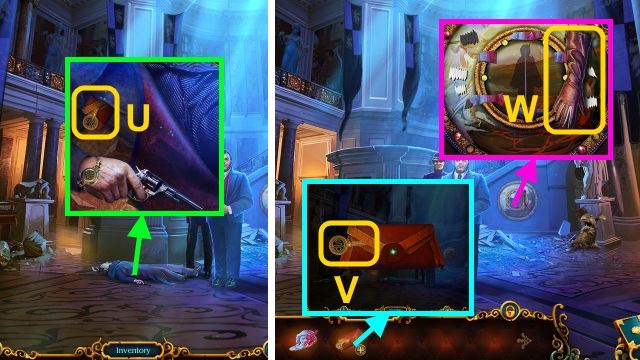
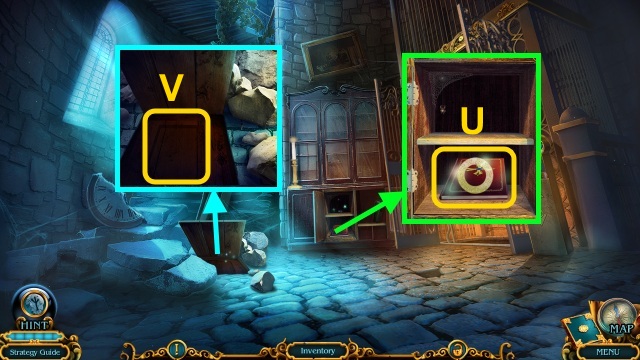
- Use the GLOVES; take the SHATTERED AMULET (2/3) and NOTE WITH CODE (U).
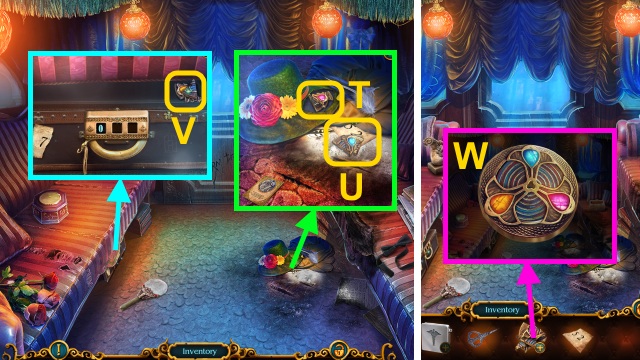
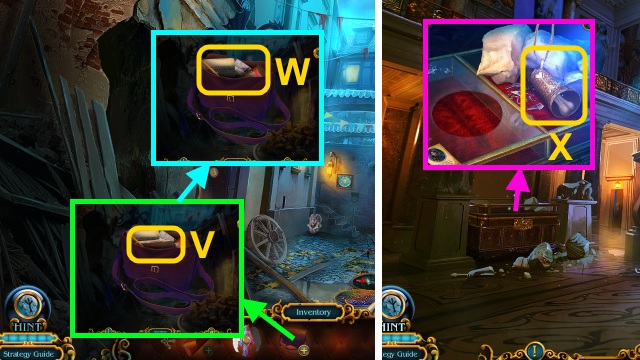
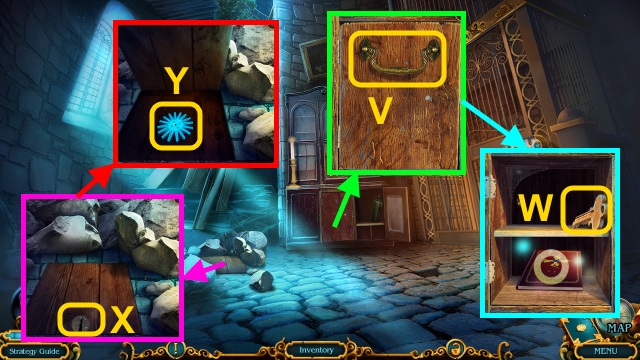
- Pull the trunk; take the SHATTERED AMULET (3/3) (V).
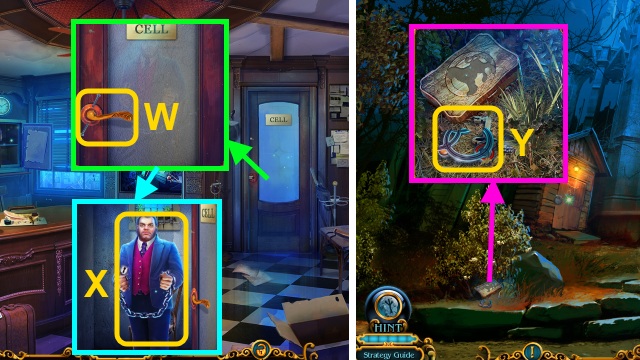
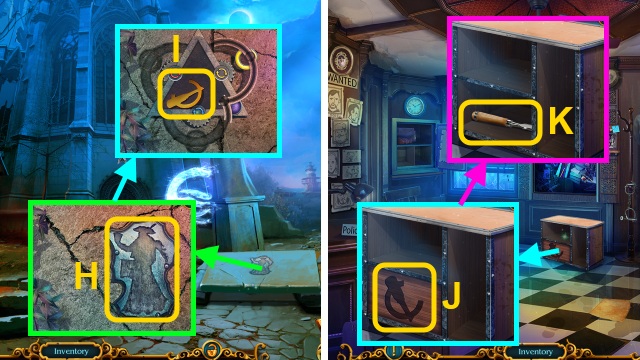
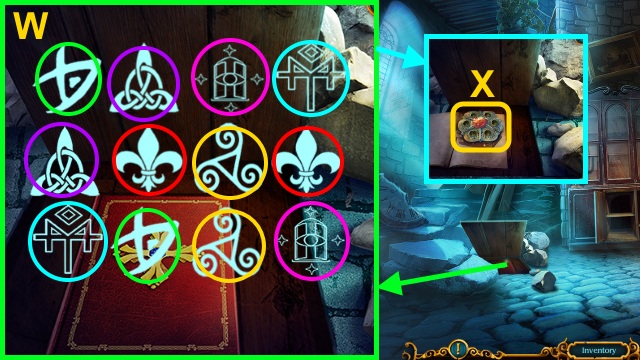
- Examine the SHATTERED AMULET (3/3); arrange the pieces (W).
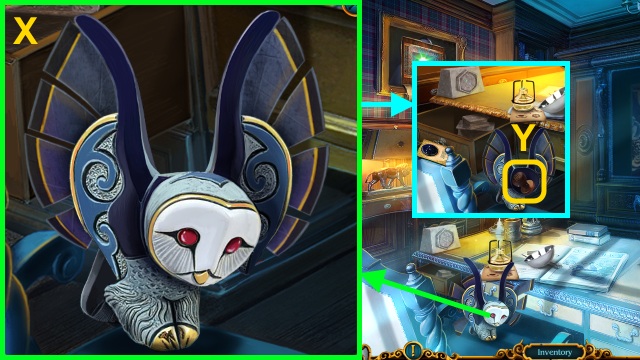
- Take the PETAL AMULET.
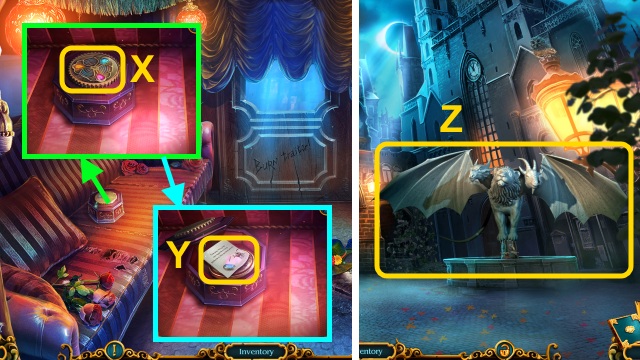
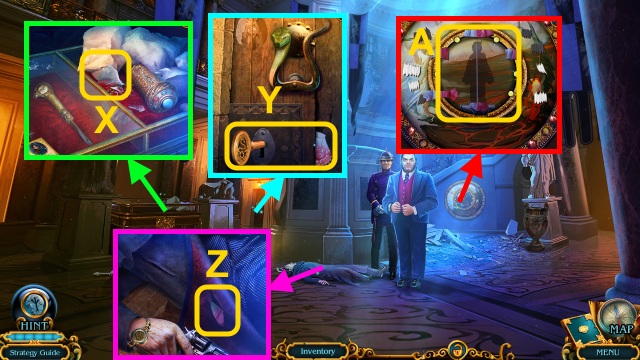
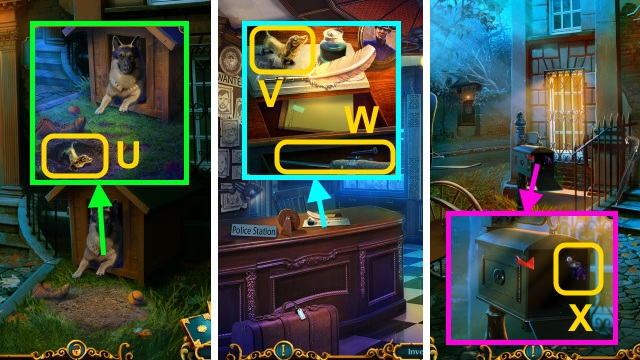
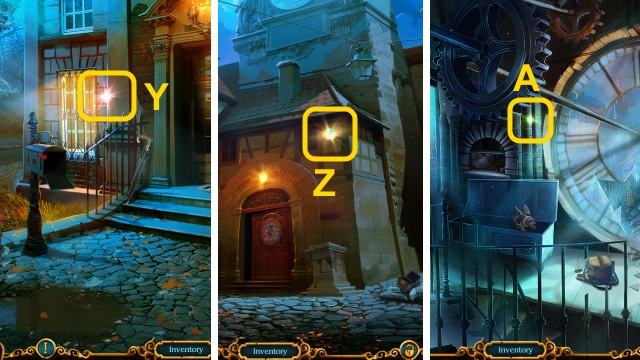
- Place the PETAL AMULET (X); take the note and CHIMERA TAMER (Y).
- Walk down twice.
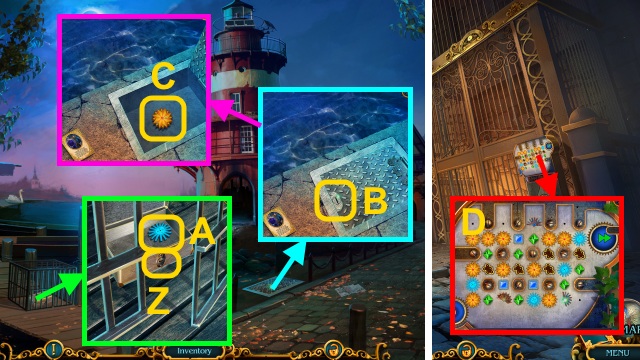
- Use the CHIMERA TAMER (Z).

- Take the CHIMERA TOY (A).
- Examine the CHIMERA TOY; take the CODE WHEEL (B).
- Walk forward.
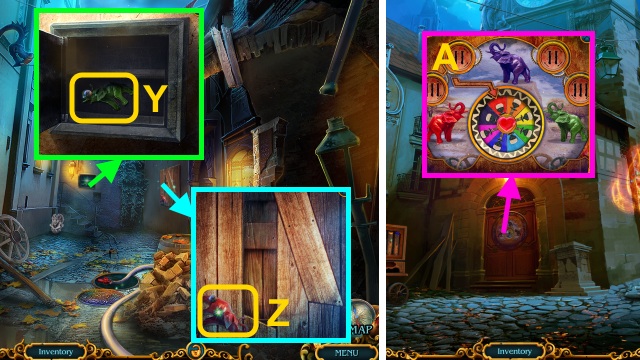
- Use the SCISSORS (C); take the CODE WHEEL.
- Enter the Carriage.
- Place the NOTE WITH CODE (D) and CODE WHEELS (E); enter the code (F).
- Arrange the dials (G).
- Play the HOP to receive the PUB'S ADDRESS (H).
- Walk down.
- Give the PUB'S ADDRESS (I).
- Walk right.
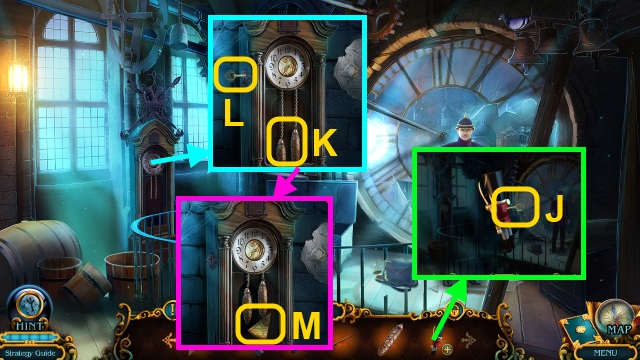
- Talk to the man (J); receive the CADUCEUS.
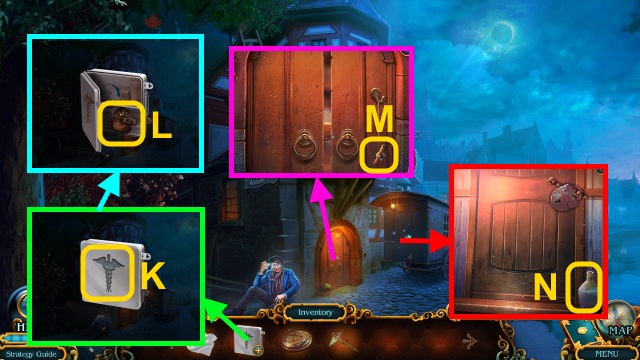
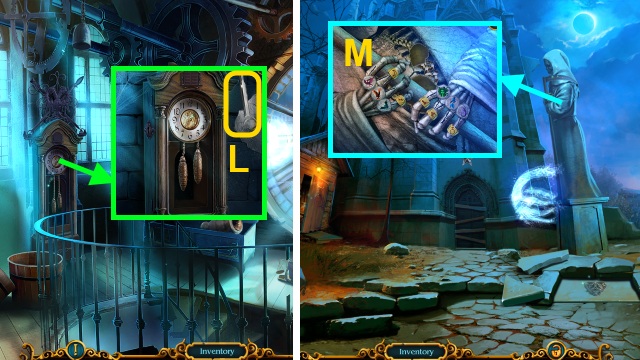
- Place the CADUCEUS on the FIRST-AID KIT (K); take the ASPIRIN (L).
- Take the VALVE (M).
- Take the BOTTLE (N).
- Walk down twice.
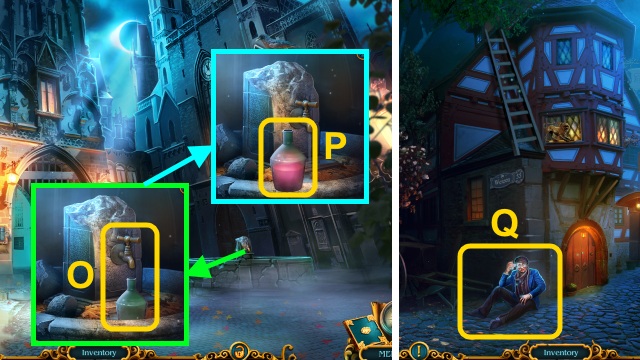
- Place the BOTTLE and VALVE (O); turn the valve 3x.
- Use the ASPIRIN; take the HEADACHE REMEDY (P).
- Walk forward, then right.
- Give the HEADACHE REMEDY (Q); receive the WAGON KEY.
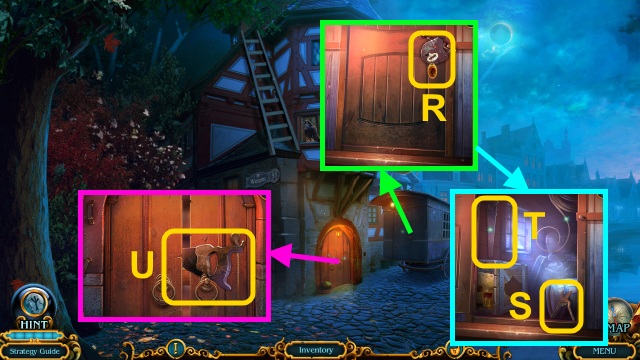
- Use the WAGON KEY (R); open the door.
- Take the RUSTY PRUNERS (S) and SAW (T).
- Use the SAW (U); open the door.
- Walk forward.
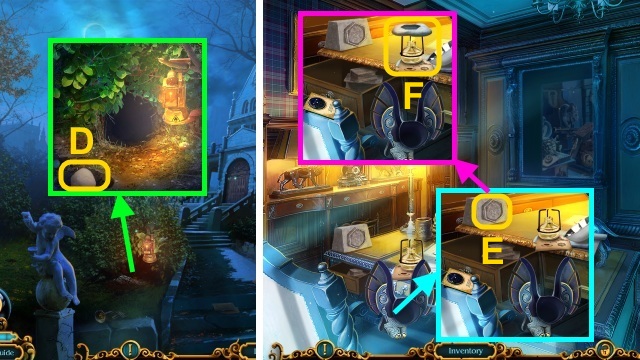
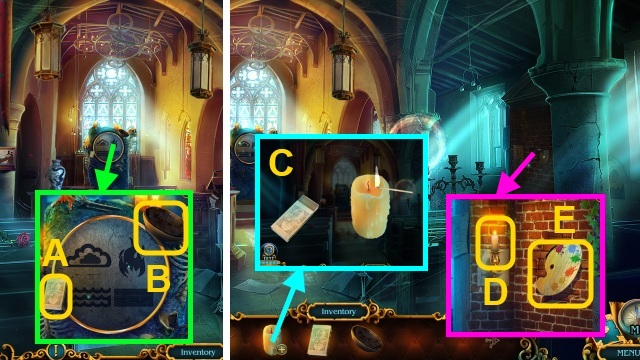
- Take the LIGHTER, CODE, and CORKSCREW (V).
- Take the LEAF AMULET and KEROSENE (W).
- Take the CASH REGISTER BUTTON (X) and WINE SKETCH (Y).
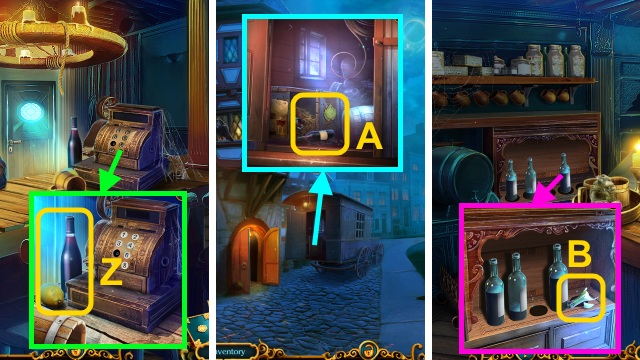
- Take the LEMON and WINE (Z).
- Walk down.
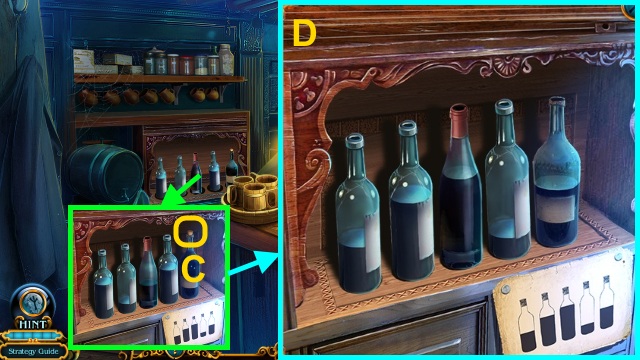
- Place the LEAF AMULET; take the WINE (A).
- Walk forward.
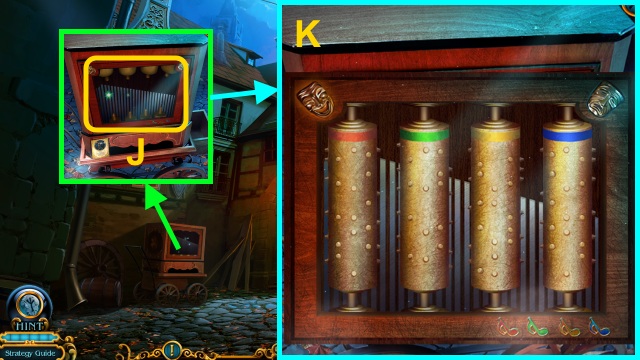
- Move the glass; place 2 bottles of WINE and WINE SKETCH (B).
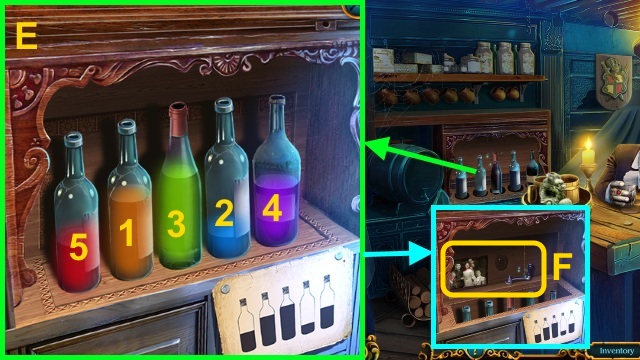
- Use the CORKSCREW for a mini-game (C).
- Solution (D-E).
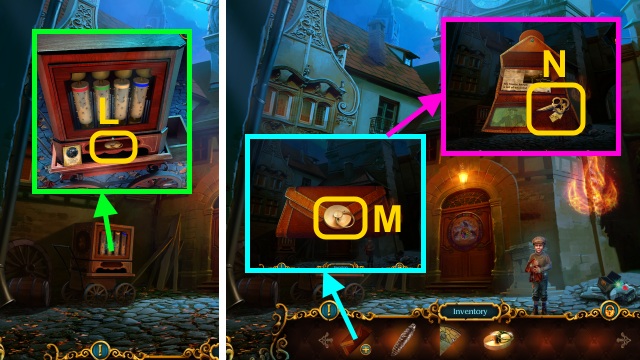
- Take the photo and CASH REGISTER LEVER (F).
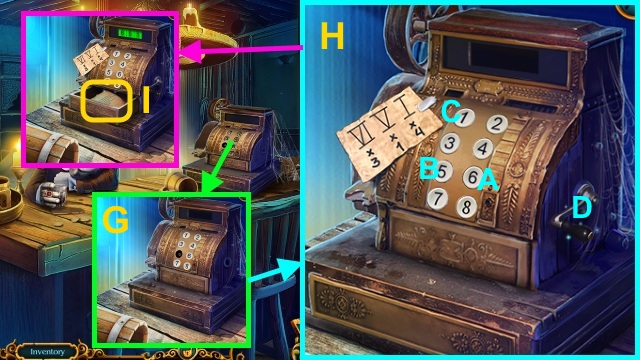
- Place the CASH REGISTER BUTTON, CASH REGISTER LEVER, and CODE for a mini-game (G).
- Solution (H): Ax3-B-Cx4-D.
- Take the note and JULIA'S MONOGRAM (I).
- Go to the Carriage.
- Place JULIA'S MONOGRAM; take the COPPER KEY (J).
- Go to the Pub.
- Use the COPPER KEY (K); open the door.
- Play the HOP to receive WALTER'S DIARY (L).
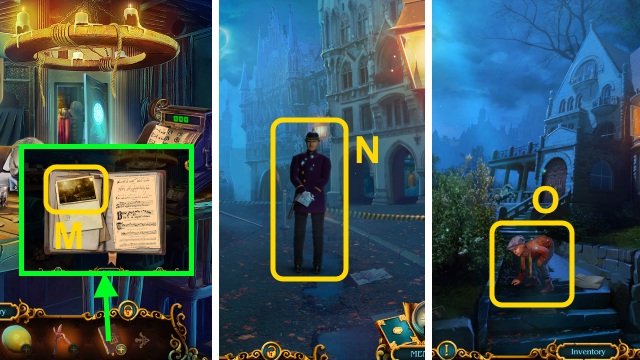
- Read WALTER'S DIARY; take the MANSION ADDRESS (M).
- Walk down twice.
- Give the MANSION ADDRESS (N).
- Walk left.
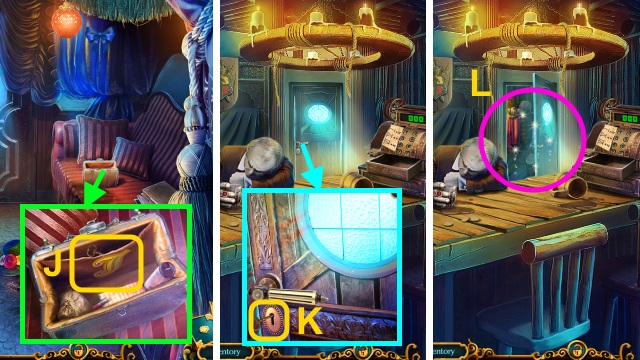
- Talk to the boy; receive the LENS (O).
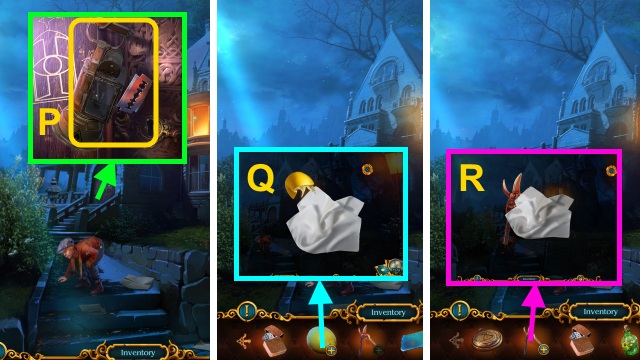
- Take the RAZOR BLADE and BROKEN LANTERN (P).
- Use the RAZOR BLADE and HANDKERCHIEF on the LEMON (Q); take the LEMON-SOAKED HANDKERCHIEF.
- Combine the LEMON-SOAKED HANDKERCHIEF and RUSTY PRUNERS; take the PRUNERS (R).
- Walk down, then right.

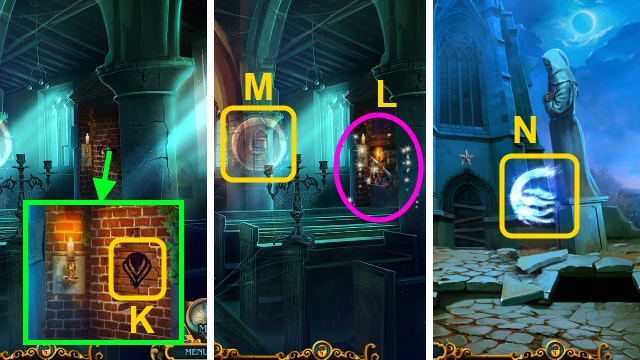
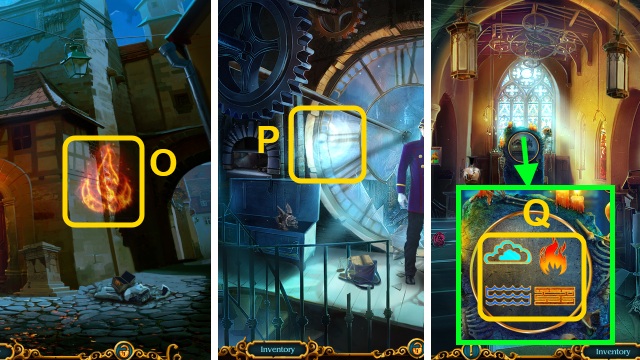
- Use the RAZOR BLADE (S); receive the WICK.
- Open the BROKEN LANTERN; use the WICK, LENS, KEROSENE, and LIGHTER (T).
- Close the door; take the LANTERN (U).
- Walk down, then left.

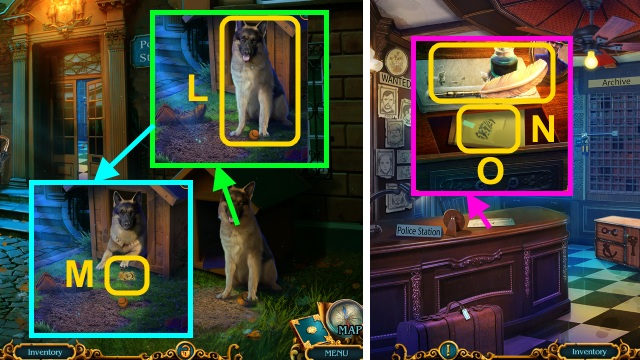
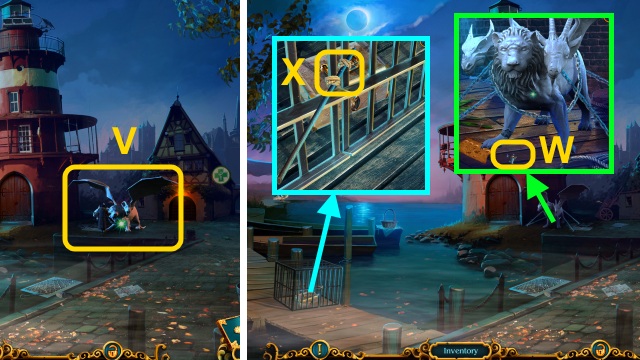
- Place the LANTERN (V); use the PRUNERS (W).
- Take the FIGURINE (X).
- Give the FIGURINE (Y); receive the SLINGSHOT.
- Walk down, then right.
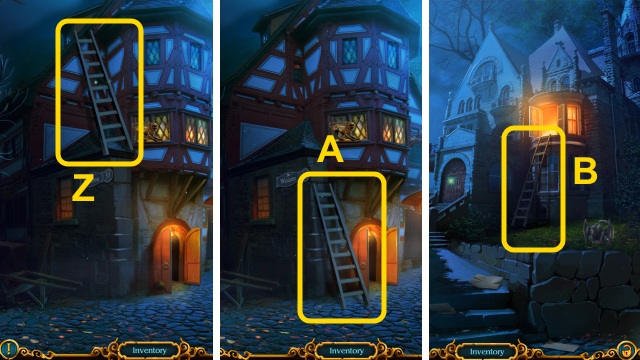
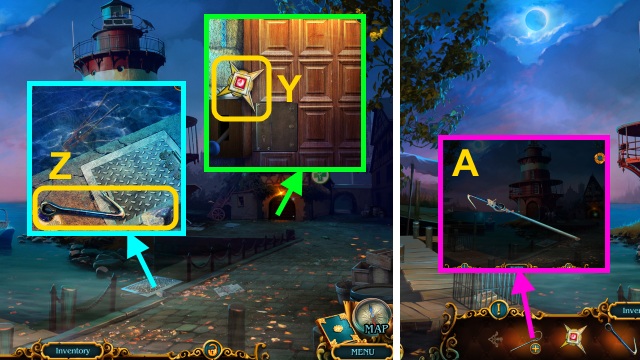
- Use the SLINGSHOT (Z).
- Take the LADDER (A).
- Walk down, then left.
- Place the LADDER (B).
- Go forward.
Chapter 2: The Keepers
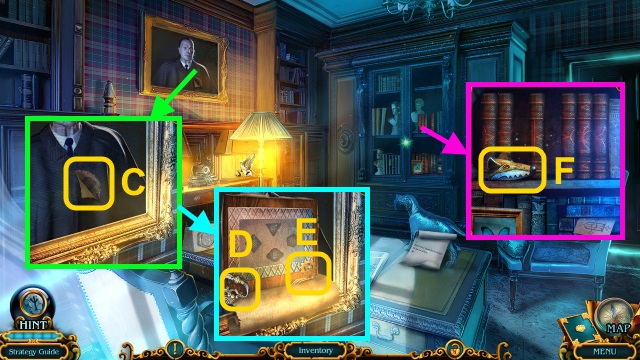
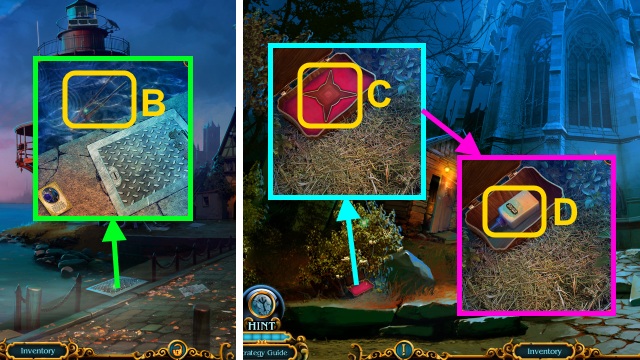
- Use the RAZOR BLADE (C); take the SILVER HANDLE (D) and MOUSE FOOT (E).
- Take the MOUSE HEAD (F).
- Take the STRANGE AMULET (G) and BROKEN MOUSE (H).
- Place the SILVER HANDLE (I); open the drawer.
- Take the WIND-UP KEY and BOOK (J).
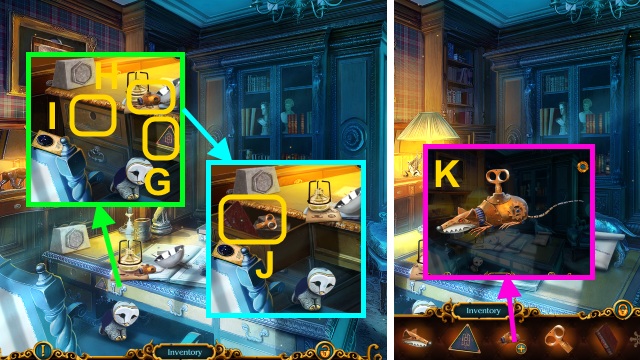
- Combine the MOUSE HEAD, MOUSE FOOT, and WIND-UP KEY with the BROKEN MOUSE; take the WIND-UP MOUSE (K).
- Walk down.
- Examine the cat; give the WIND-UP MOUSE (L).
- Take the BOOK (M).
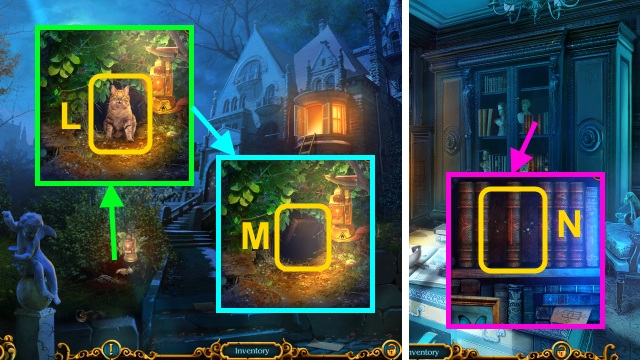
- Walk forward.
- Place the BOOKS for a mini-game (N).
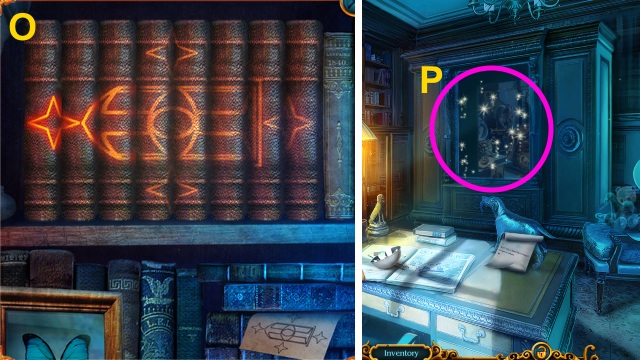
- Solution (O).
- Play the HOP to receive the MUSEUM ADDRESS (P).
- Walk down twice.
- Give the MUSEUM ADDRESS (Q).
- Go forward.
- Examine the door (R).
- Take the DAGGER (S).
- Place the DAGGER; turn it 3x (T).
- Receive the RUBY.
- Take the SHOVEL (U).
- Go to the Pub.
- Use the DAGGER; take the RUBY (V).
- Go to the Office.
- Place the 2 RUBIES; open the wings for a mini-game (W).
- Solution (X).
- Take the SEAL OF THE KEEPERS (Y).
- Go to the Carriage.
- Use the SEAL OF THE KEEPERS (Z); take the STRANGE AMULET (A).
- Go to the Pub.
- Use the SEAL OF THE KEEPERS (B); take the STRANGE AMULET and WEIGHT (C).
- Go to Outside House.
- Use the SHOVEL; take the SOFT CLAY (D).
- Go forward.
- Use the SOFT CLAY (E).
- Use the KEROSENE and LIGHTER; place the clay (F).

- Place the bowl and WEIGHT (G); pour the metal.
- Take the STRANGE AMULET (H).
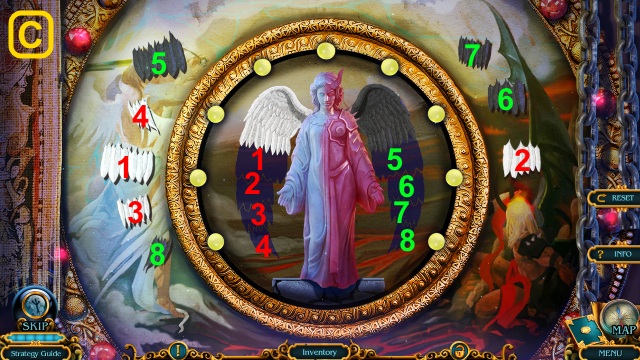
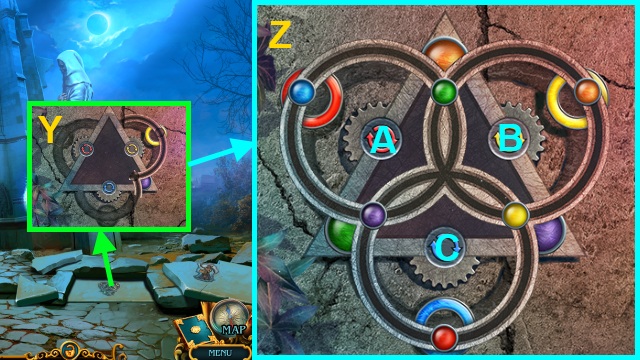
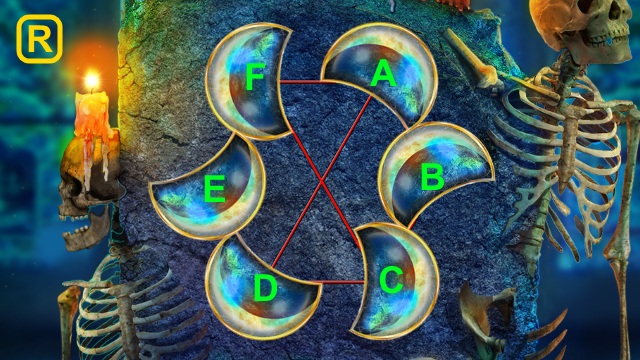
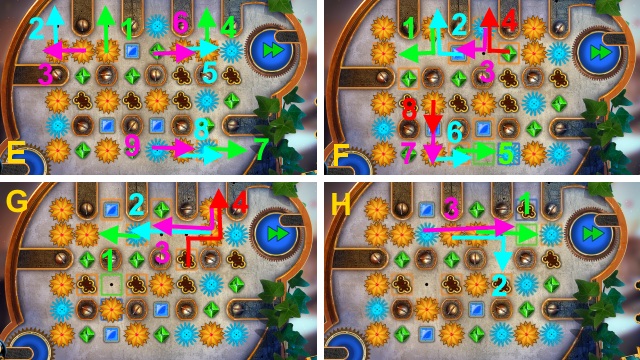
- Place the 4 STRANGE AMULETS for a mini-game (I).
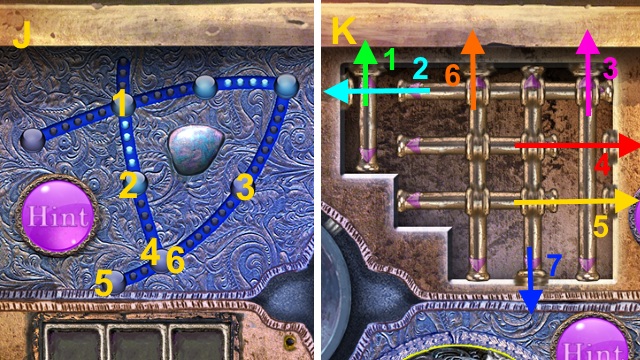
- Solution (J-M).
- Solution (N-Q).
- Take the PACKAGE (R).
- Open the PACKAGE; take the MUSEUM KEY (S) and letter.
- Go to Outside Museum.
- Use the MUSEUM KEY (T).
- Walk forward.
- Receive the BAS-RELIEF PIECE.
- Take the PURSE (U).
- Examine the PURSE; take the KEY (V).
- Take the GLOVE (W).
- Use the GLOVE (X); receive the GLASS SHARD.
- Use the KEY; take the BAS-RELIEF PIECE (Y).
- Use the GLASS SHARD; take the BAS-RELIEF PIECE (Z).
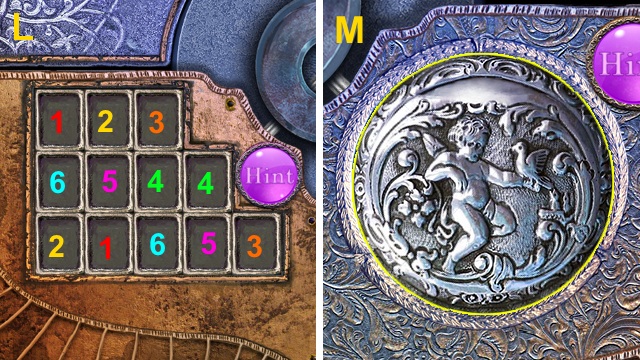
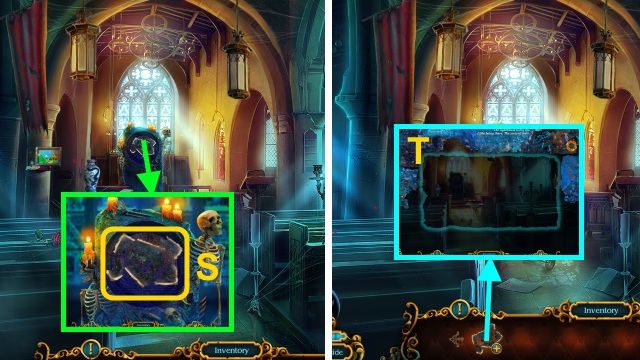
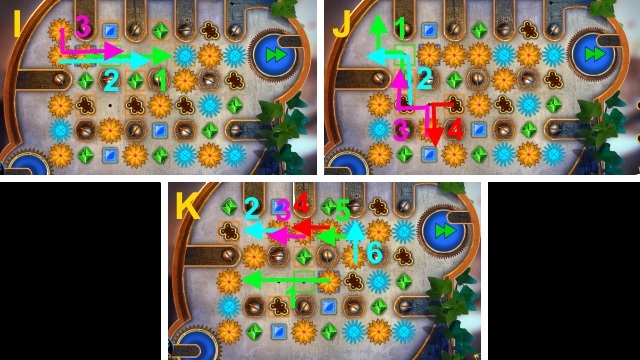
- Place the BAS-RELIEF PIECES for a mini-game (A).
- Solution (B): (A-I)(C-A-J)(I-C)(H-A-J)(G-B)(F-A-J)(B-I)(C-A-J)(D-A-J)(I-A-J)(E-A-J).
- Solution (C).
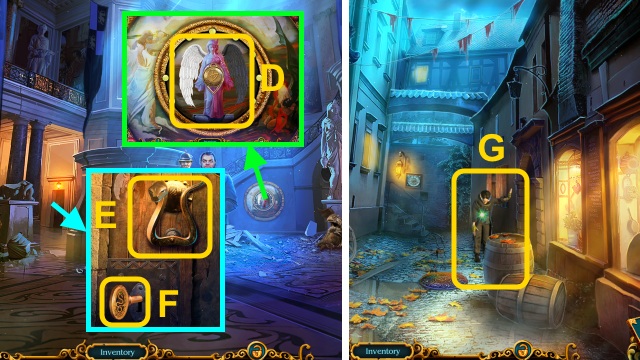
- Place the CHIMERA TAMER; take THE WANDERER'S SIGN (D).
- Use THE WANDERER'S SIGN (E); turn the key (F).
- Walk left.
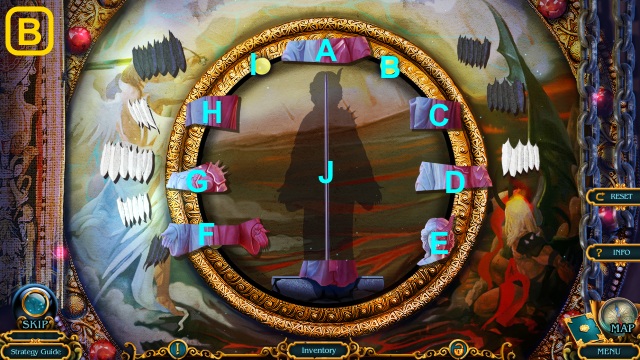
- Examine the Wanderer (G).
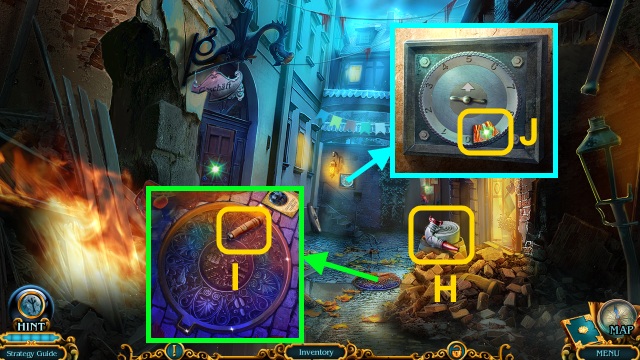
- Take the HOSE (H).
- Take the FILE HANDLE (I).
- Take the SHOP PUZZLE PIECES (1/3) (J).
- Place the FILE HANDLE (K); receive the FILE.
- Use the FILE (L); receive the ROD.
- Use the ROD; take the SHOP PUZZLE PIECES (2/3) and GLASS CUTTER (M).
- Walk down.
- Use the GLASS CUTTER; take the ANTIQUE NAIL PULLER (N).
- Walk left.
- Move the papers; use the ANTIQUE NAIL PULLER (O).
- Take the SHOP PUZZLE PIECES (3/3) (P).
- Place the SHOP PUZZLE PIECES (3/3) for a mini-game (Q).
- Solution (R).
- Play the HOP to receive the VALVE (S).
- Place the VALVE and HOSE (T).
- Take THE WANDERER'S BAG (U).
- Open THE WANDERER'S BAG; read the book (V).
- Receive the BONE CHARM; take the PENCIL and BARREL ORGAN WHEEL (W).
- Walk down.
- Receive the POLICE STATION ADDRESS.
- Place the BONE CHARM; take the BONE (X).
- Go to Near Police Station.
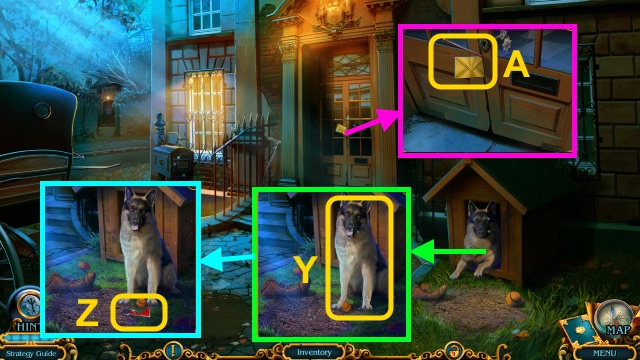
- Examine the dog; give the BONE (Y).
- Take the FLAG (Z).
- Use the PENCIL; receive the MAILBOX PLATE (A).
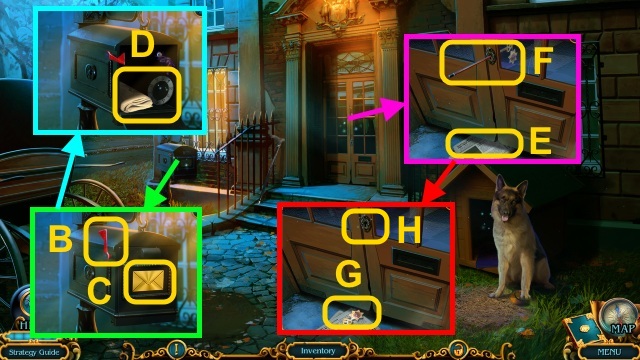
- Place the FLAG (B) and MAILBOX PLATE (C); open the mailbox.
- Take the NEWSPAPER and RING (D).
- Place the NEWSPAPER (E); use the PENCIL (F).
- Move the newspaper; take the POLICE STATION KEY (G).
- Use the POLICE STATION KEY (H).
- Walk forward.
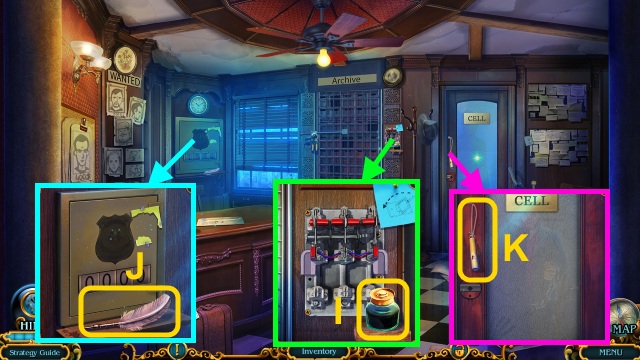
- Take the INKWELL (I).
- Take the FEATHER (J).
- Take the WHISTLE (K).
- Walk down.
- Use the WHISTLE (L).
- Take the TOKEN (M).
- Walk forward.
- Place the FEATHER and INKWELL (N).
- Use the PENCIL; take the SAFE CODE (O).
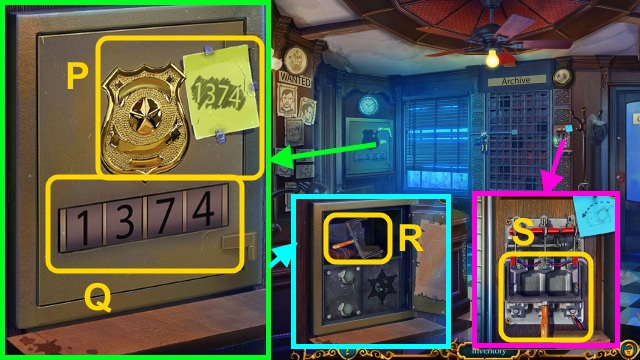
- Place the TOKEN and SAFE CODE (P); enter the code (Q).
- Take the ARCHIVE ACTIVATOR (R).
- Place the ARCHIVE ACTIVATOR (S); pull it for a mini-game.

- Solution (T).
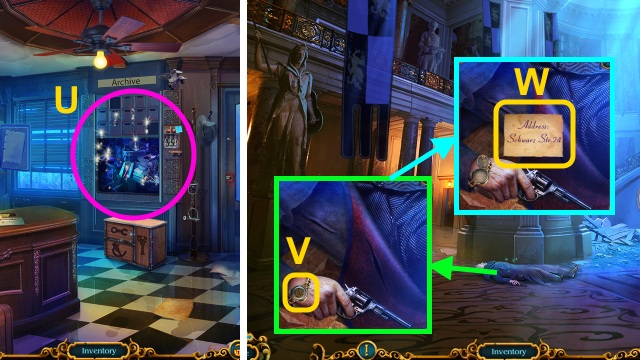
- Play the HOP to receive MAX'S AMULET (U).
- Go to the Museum.
- Place MAX'S AMULET (V); take the WANDERER'S ADDRESS (W).
- Go to Near Clock Tower.
Chapter 3: The Wanderer
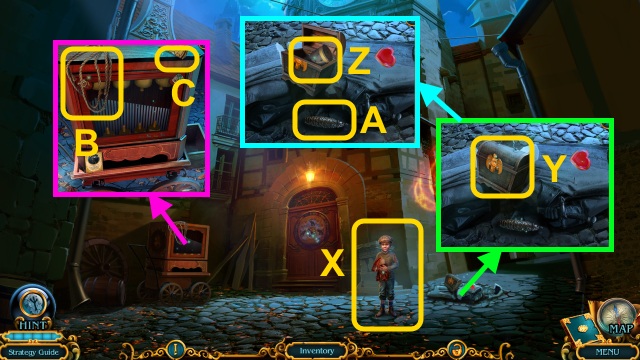
- Talk to the boy (X); receive the BARREL ORGAN WHEEL.
- Use the WANDERER'S SIGIL (Y); take the BARREL ORGAN WHEEL (Z) and CONE (A).
- Take the ROPE (B) and HIDING-PLACE PART (C).
- Take the HOOK (D).
- Combine the HOOK and ROPE (E); take the ROPE WITH HOOK.
- Go to the Street.
- Use the ROPE WITH HOOK; take the RING (F).
- Place the 2 RINGS for a mini-game (G).
- Solution (H): Bx2.
- Take the BARREL ORGAN WHEEL (I).
- Go to Near Clock Tower.
- Place the BARREL ORGAN WHEELS for a mini-game (J).
- Solution (K).
- Take the BROTHERHOOD SEAL (L).
- Use the BROTHERHOOD SEAL on the PURSE (M); take the MANSION KEY (N).
- Go to Outside House.
- Use the MANSION KEY (O).
- Play the HOP to receive MAX'S SUITCASE (P).
- Open MAX'S SUITCASE; take the ARCHITECT'S SET (Q).
- Open the book; take the MONEY (R).
- Go to Near Clock Tower.
- Give the MONEY (S); receive the SPADE.
- Use the ARCHITECT'S SET (T); take the HEART-SHAPED FIGURINE.
- Go to Near Police Station.
- Use the SPADE; take the STATUETTE (U).
- Walk forward.
- Place the STATUETTE (V); take the SCREWDRIVER and SCREWS (W).
- Walk down.
- Use the SCREWDRIVER; take the MACHINE PART (X).
- Go to the Street.
- Use the SCREWDRIVER (Y); take the MACHINE PART.
- Use the SCREWDRIVER (Z); receive the MACHINE PART.
- Go to Near Clock Tower.
- Place the MACHINE PARTS and HEART-SHAPED FIGURINE for a mini-game (A).
- Solution (B): C-A-Bx2-D.
- Walk forward.
- Talk to the Wanderer (C).
- Talk to Wolfgang (D).
- Take the SECRET SIGN (E).
- Take the BRUSH (F); place the SECRET SIGN.
- Take the FIGURINE and CONE (G).
- Move the cloth 2x; place the FIGURINE (H).
- Move the newspapers; take the NUTCRACKER (I).
- Take the WIND-UP KEY (J).
- Place the CONES (K); use the WIND-UP KEY (L).
- Take the HIDING-PLACE PART (M).
- Place the HIDING-PLACE PARTS for a mini-game (N).
- Solution (O).
- Play the HOP to receive THE WANDERER'S NOTES (P).
- Give THE WANDERER'S NOTES (Q); receive the POLICEMAN'S KEY.
- Go to the Police Station.
- Use the POLICEMAN'S KEY (R); examine the photo (S).
- Take the GOLDEN RING and TOOL KEY (T).
- Place the TOOL KEY (U); take the DOOR HANDLE (V).
- Place the DOOR HANDLE and SCREWS; use the SCREWDRIVER (W).
- Open the door; talk to WALTER (X).
- Receive the TEMPLE ADDRESS.
- Go to Near Temple.
- Take the STONE CIRCLE and BARN KEY (Y).
- Use the BARN KEY (Z); take the TOOL KEY, LION KEY, and CANDLE (A).
- Go to the Police Station.
- Use the TOOL KEY (B); take the WRENCH (C).
- Use the WRENCH (D); take the GOLDEN RING (E).
- Go to Near Temple.
- Place the LION KEY (F); take the ORGAN GRINDER FIGURINE (G).
- Place the ORGAN GRINDER FIGURINE (H); take the TOOL KEY (I).
- Go to the Police Station.
- Place the TOOL KEY (J); take the CHISEL (K).
- Go to the Clock Tower.
- Use the CHISEL (L); receive the GOLDEN RING.
- Go to Near Temple.
- Place the 3 GOLDEN RINGS for a mini-game (M).
- Solution (N).
- Take the SCYTHE (O).
- Use the SCYTHE (P); take the SKULL and THE WANDERER'S SYMBOL (Q).
- Go to the Clock Tower.
- Turn the book; place THE WANDERER'S SYMBOL (R).
- Take the CLOCK HANDS (S).
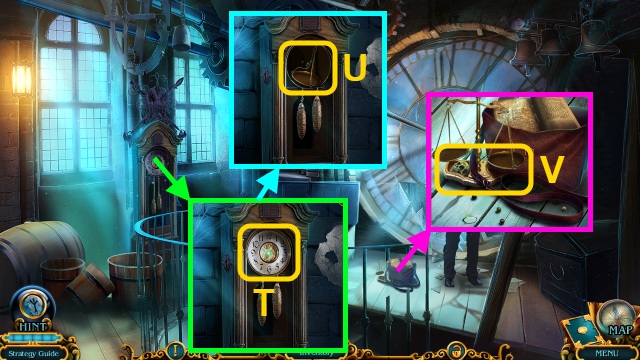
- Place the CLOCK HANDS (T); take the SCALE PAN (U).
- Place the SCALE PAN; take the SKULL (V).
- Go to Near Temple.
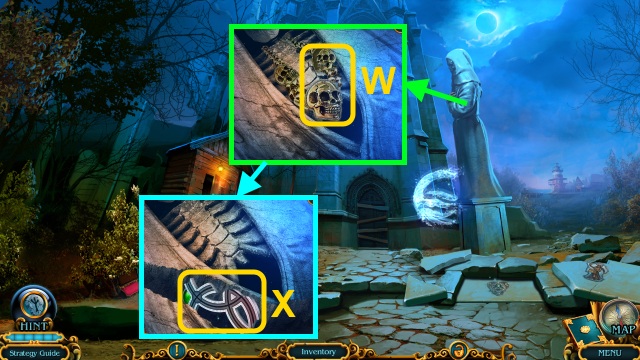
- Place the SKULLS (W); take the STONE CIRCLE (X).
- Place the 2 STONE CIRCLES for a mini-game (Y).
- Solution (Z): B-C-A-C-B-C-B-C.
- Enter the Temple.
Chapter 4: The Sphere of Order
- Take the MATCHES (A) and BOWL (B).
- Combine the MATCHES and CANDLE (C); take the LIT CANDLE.
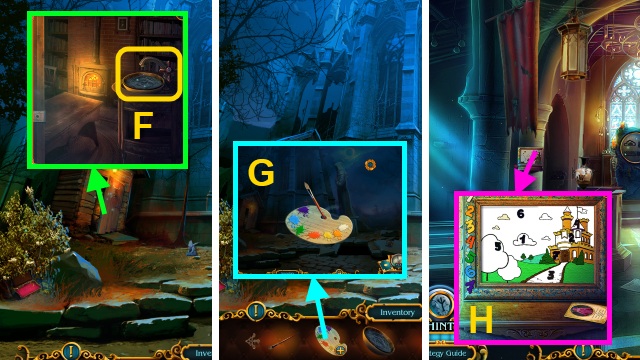
- Place the LIT CANDLE (D); take the PALETTE (E).
- Walk down.
- Place the BOWL; turn the valve (F).
- Take the WATER BOWL.
- Combine the BRUSH, PALETTE, and WATER BOWL; take the PAINT (G).
- Enter the Temple.
- Use the PAINT for a mini-game (H).
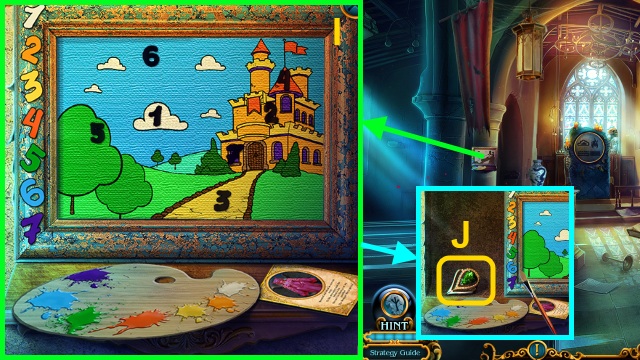
- Solution (I).
- Take the GEM (J).
- Place the GEM (K).
- Play the HOP to receive the ENERGY LENS (L).
- Use the ENERGY LENS (M); receive the ELEMENT SYMBOL.
- Walk down.
- Use the ENERGY LENS (N); receive the ELEMENT SYMBOL.
- Walk down.
- Use the ENERGY LENS (O); receive the ELEMENT SYMBOL.
- Walk forward.
- Use the ENERGY LENS (P); receive the ELEMENT SYMBOL.
- Go to the Temple.
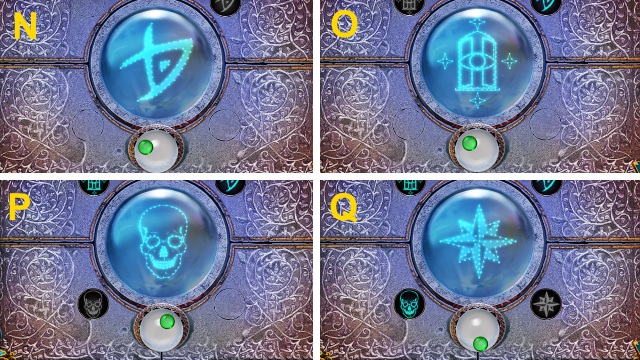
- Place the ELEMENTS SYMBOLS for a mini-game (Q).
- Solution (R): (F-C)(A-D)(F-C)(F-C)(F-C)(A-D)(F-C)(A-D)(F-C).
- Take the MAP (S).
- Examine the MAP for a mini-game (T).
- Solution (U).
- Take the DOCKS ADDRESS.
- Go to the Docks.
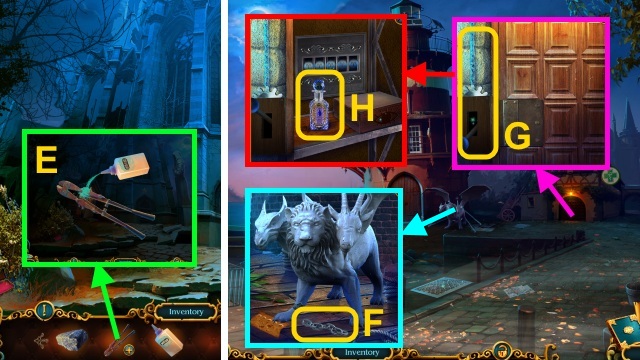
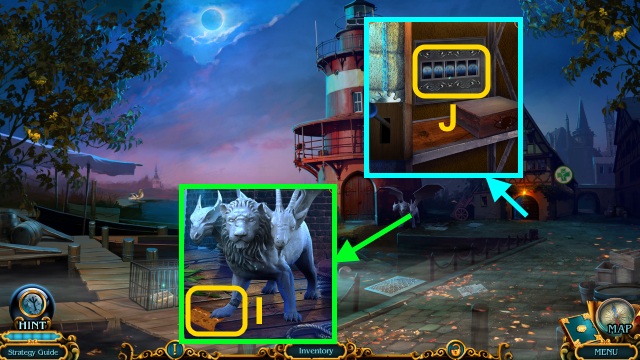
- Examine the Chimera (V).
- Take the CLAW (W).
- Use the CLAW (X); receive the STICK.
- Take the CROSS AMULET (Y).
- Take the GRAPNEL and STONE (Z).
- Combine the STICK and GRAPNEL (A); take the STICK WITH GRAPNEL.
- Use the STICK WITH GRAPNEL; take the RUSTY BOLT CUTTER (B).
- Walk down.
- Place the AMULET CROSS (C); take the SOLUTION (D).
- Combine the RUST BOLT CUTTER and SOLUTION (E); take the BOLT CUTTER.
- Walk right.
- Use the BOLT CUTTER; take the CHAIN (F).
- Place the CHAIN; pull the lever (G).
- Take the MEDICINE FOR CHIMERA (H).
- Give the MEDICINE FOR CHIMERA; take the PHARMACY CODE (I).
- Place the PHARMACY CODE for a mini-game (J).
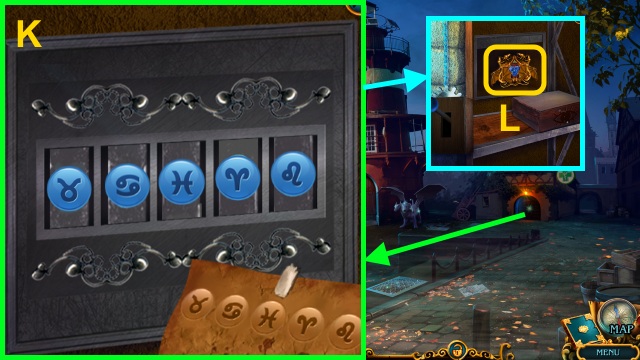
- Solution (K).
- Take the CHIMERA TAMER (L).
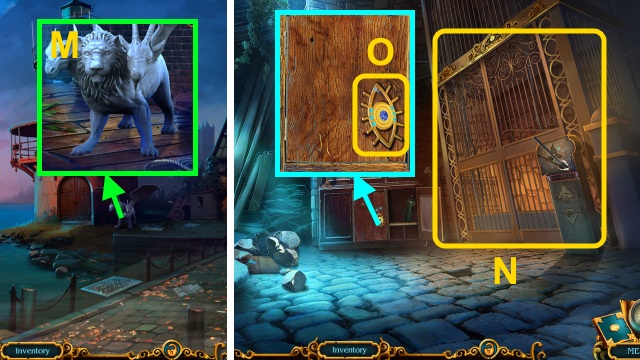
- Use the CHIMERA TAMER (M).
- Walk forward.
- Examine the gate (N).
- Take the EYE AMULET (O).
- Walk down.
- Use the EYE AMULET (P).
- Take the RUBBER GLOVES (Q).
- Walk forward.
- Use the RUBBER GLOVE (R); receive the SCRAP.
- Use the SCRAP (S); take the FLOWER.
- Place the FLOWER (T); take the DOOR HANDLE (U).
- Place the DOOR HANDLE (V); open the door.
- Take the FLAT KEY (W).
- Use the FLAT KEY (X); take the GEAR (Y).
- Walk down.
- Open the cage; use the FLAT KEY (Z).
- Take the GEAR (A).
- Use the FLAT KEY (B); take the GEAR (C).
- Walk forward.
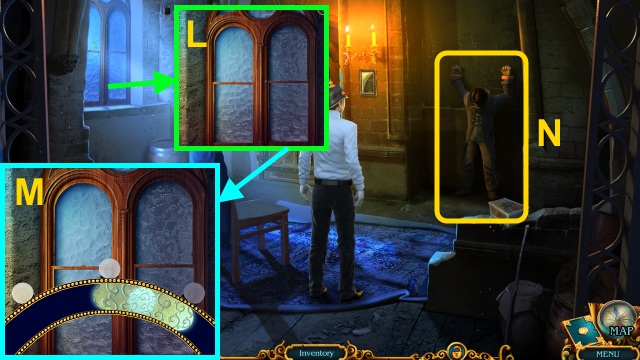
- Place the GEARS for a mini-game (D).
- Solution (E-K).
- Go right.
- Use the stone for a mini-game (L); stop the indicator inside the scale 3x (M).
- Examine the Wanderer (N).
- Take the POLICE BADGE (O).
- Place the POLICE BADGE (P); take the MONOGRAM (Q).
- Place the MONOGRAM (R); take the HANDCUFFS KEY (S).
- Go to the Police Station.
- Use the HANDCUFFS KEY (T); receive the MAGIC SYMBOL.
- Go to the Lighthouse.
- Use the MAGIC SYMBOL (U); take the ANCIENT BOOK.
- Place the ANCIENT BOOK for a mini-game (V).
- Solution (W).
- Take the SPHERE OF ORDER and LENS OF ELEMENTS (X).
- Go to Near Police Station.
- Use the LENS OF ELEMENTS (Y); receive the CRYSTAL (1/6).
- Walk left.
- Use the LENS OF ELEMENTS (Z); receive the CRYSTAL (2/6).
- Walk forward.
- Use the LENS OF ELEMENTS (A); receive the CRYSTAL (3/6).
- Walk down, then right.
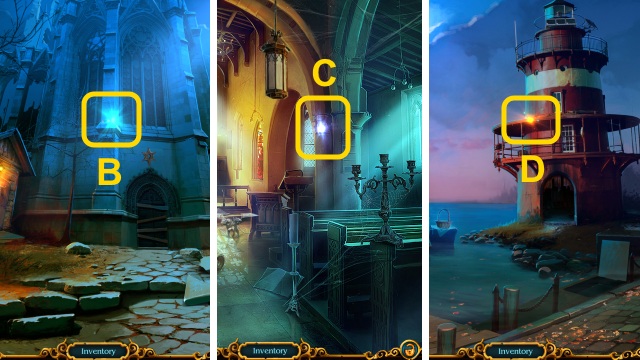
- Use the LENS OF ELEMENTS (B); receive the CRYSTAL (4/6).
- Enter the Temple.
- Use the LENS OF ELEMENTS (C); receive the CRYSTAL (5/6).
- Walk down, then right.
- Use the LENS OF ELEMENTS (D); receive the CRYSTAL (6/6).
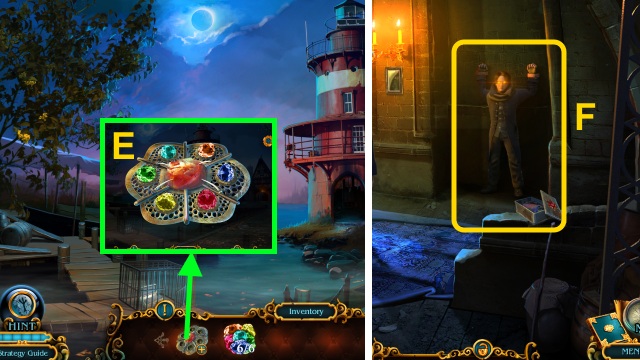
- Combine the CRYSTALS and SPHERE OF ORDER (E); take the CHARGED SPHERE OF ORDER.
- Walk forward, then right.
- Use the CHARGED SPHERE OF ORDER (F).
- Congratulations! You have completed Chimeras: The Signs of Prophecy.
Created at: 2015-11-13