

Walkthrough Menu
- General Tips
- Chapter 1: A Mysterious Package
- Chapter 2: Two Good Deeds
- Chapter 3: The Flying Basket
- Chapter 4: The Toy Factory
- Chapter 5: The Road to the Ice Castle
- Chapter 6: Saving Christmas
General Tips
- This is the official guide for Christmas Eve: Midnight's Call.
- This guide will not mention each time you have to zoom into a location; the screenshots will show each zoom scene.
- Hidden-object puzzles are referred to as HOPs. This guide will not show screenshots of the HOPs, but it will mention when a HOP is available and the inventory item you'll collect from it.
- This guide will give step-by-step solutions for all puzzles that are not random. Please read the instructions in the game for each puzzle.
Chapter 1: A Mysterious Package
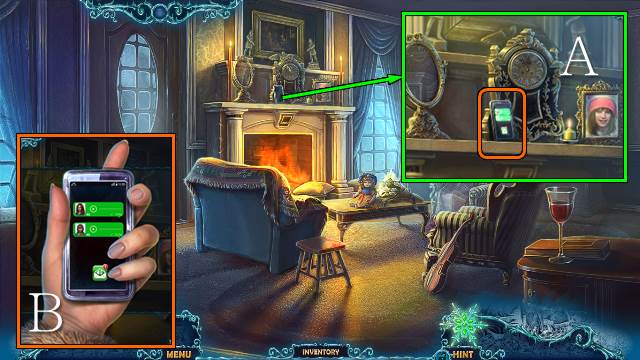
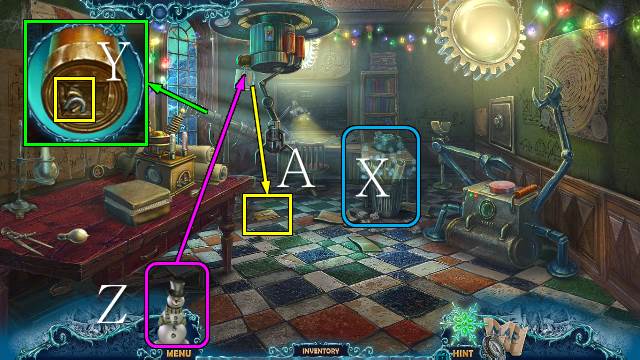
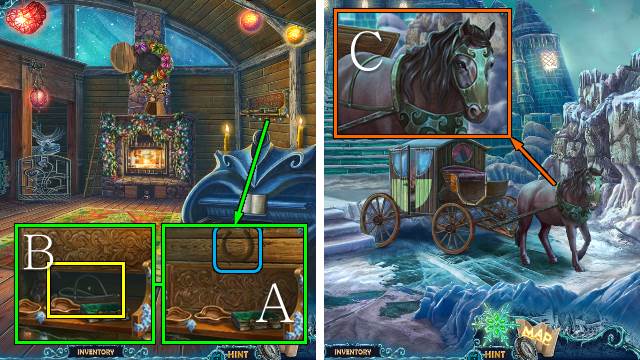
- Answer the phone (A).
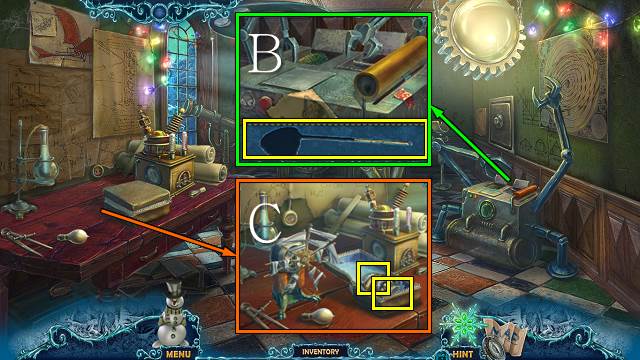
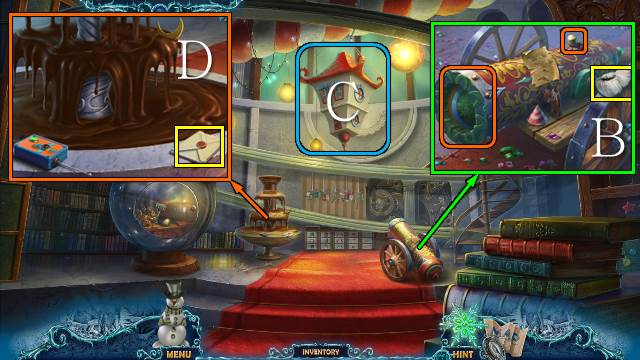
- Play both messages (B).
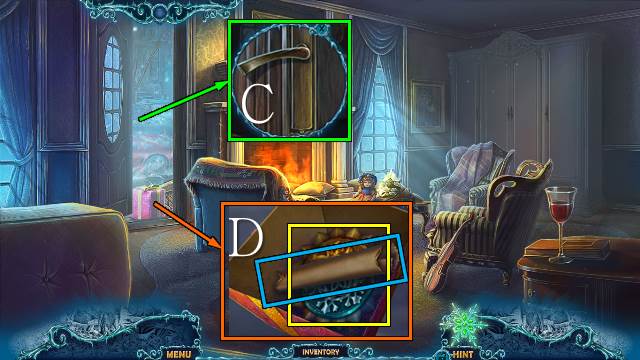
- Answer the door (C).
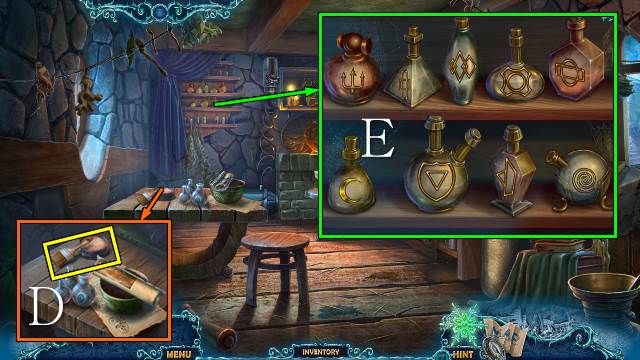
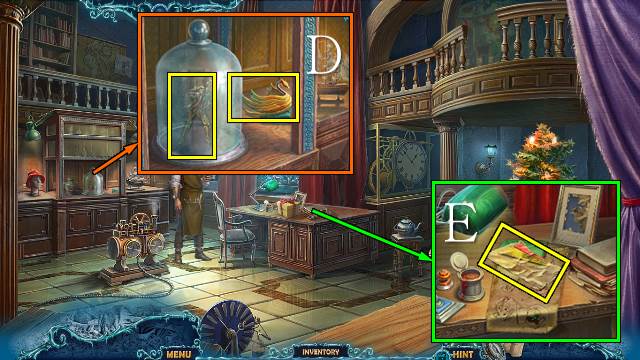
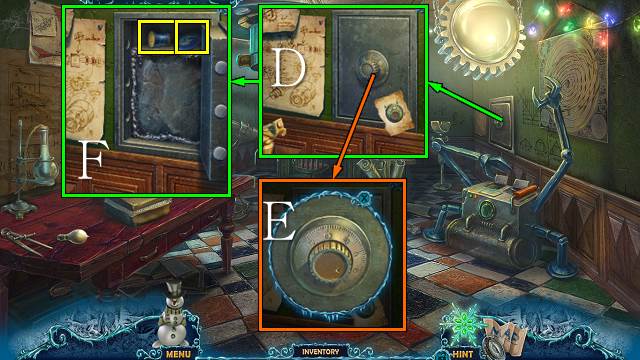
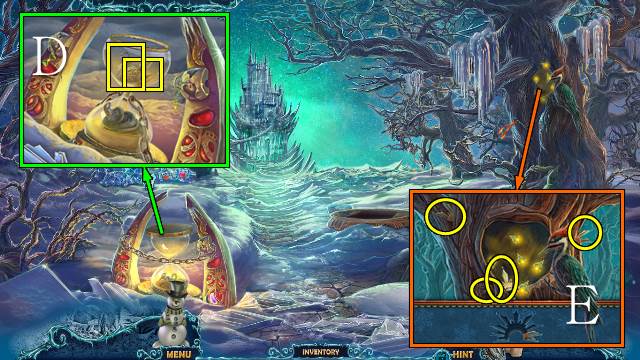
- Open the box; take the scroll and MEDALLION (D).
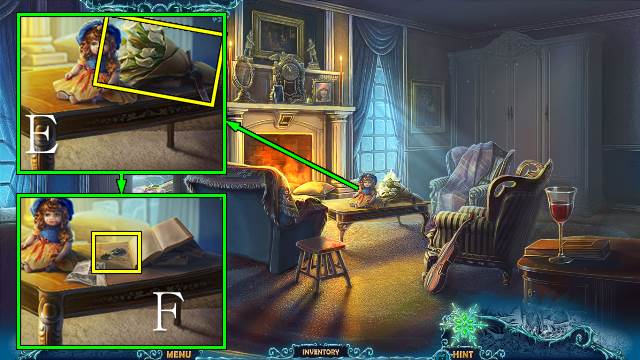
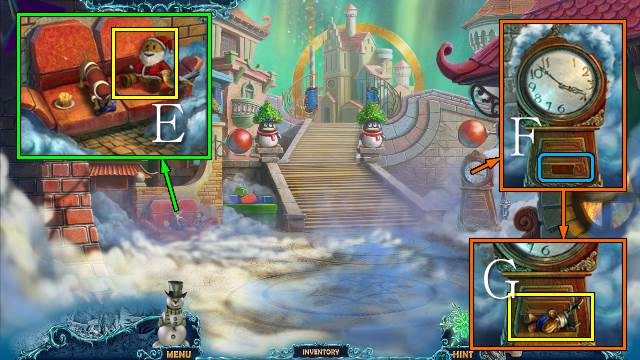
- Take the FLOWERS (E); move the doll and the clipping and take the CAR KEY (F).
- Go forward.
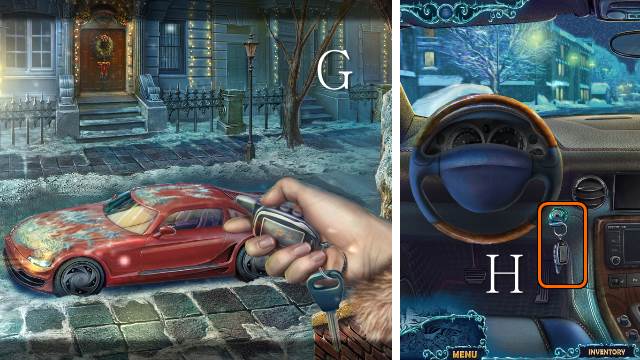
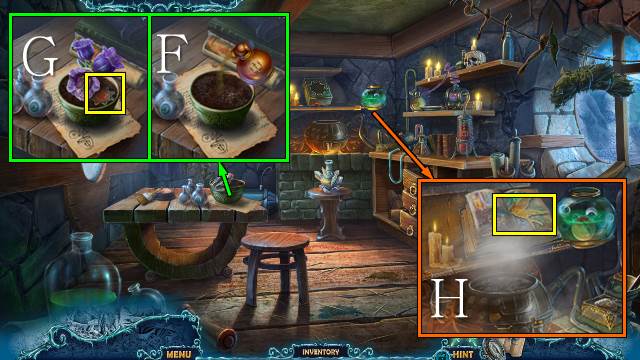
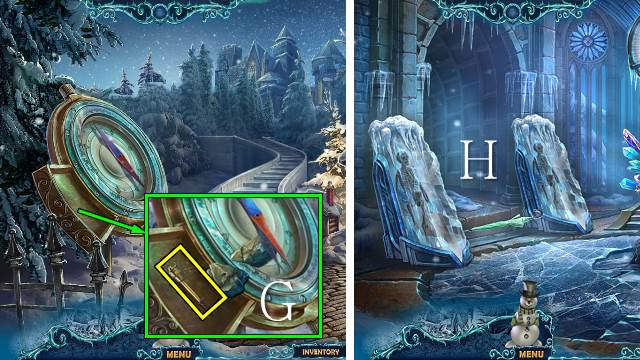
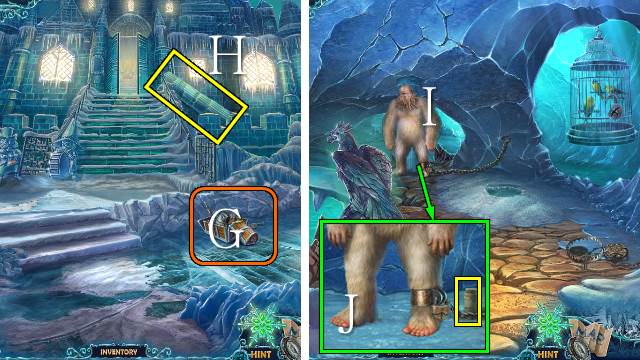
- Use the CAR KEY (G).
- Enter the car.
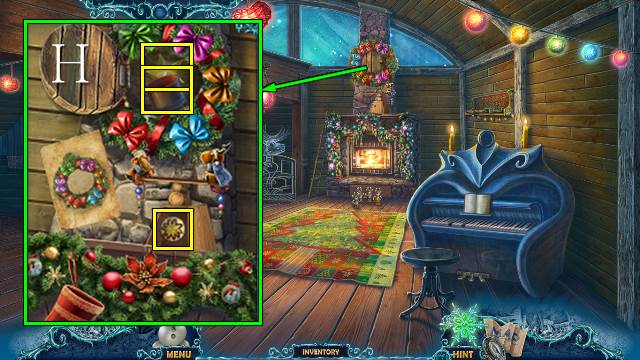
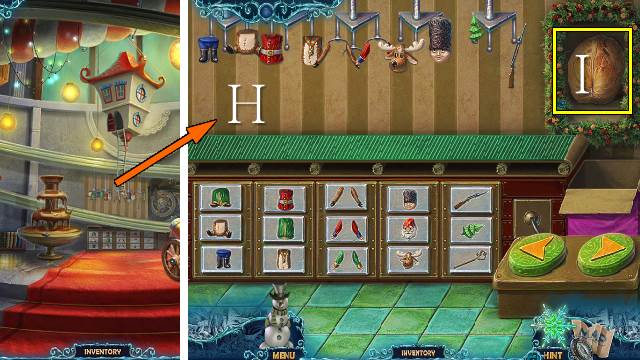
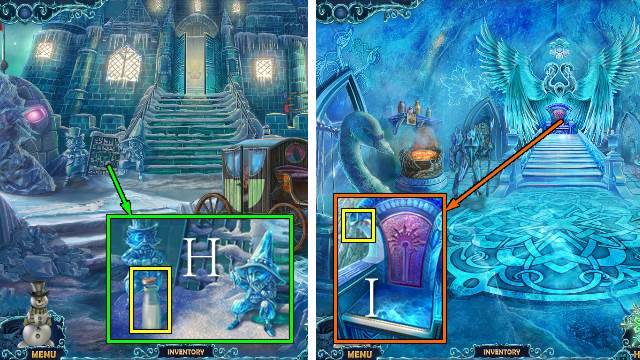
- Put the CAR KEY in the ignition and turn it (H).
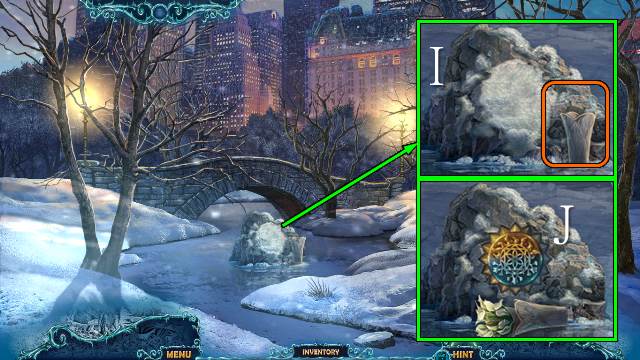
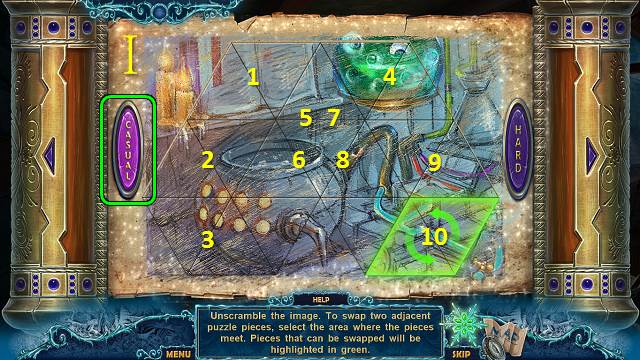
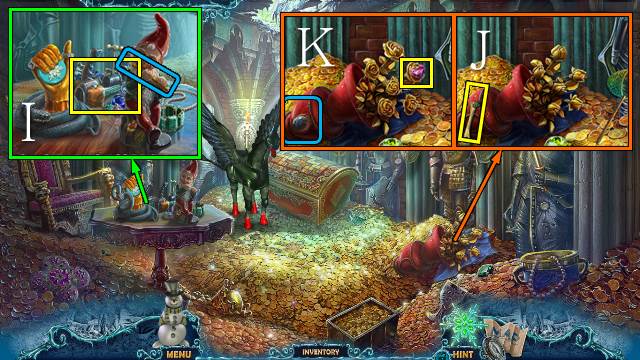
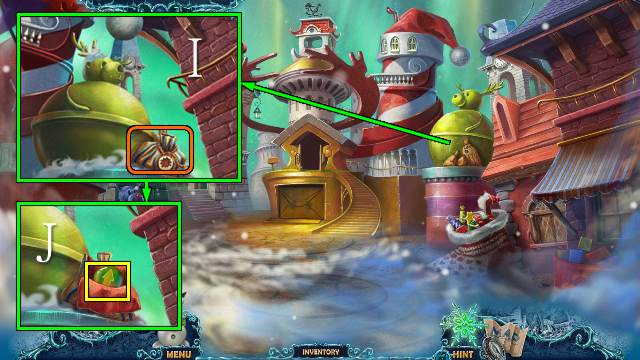
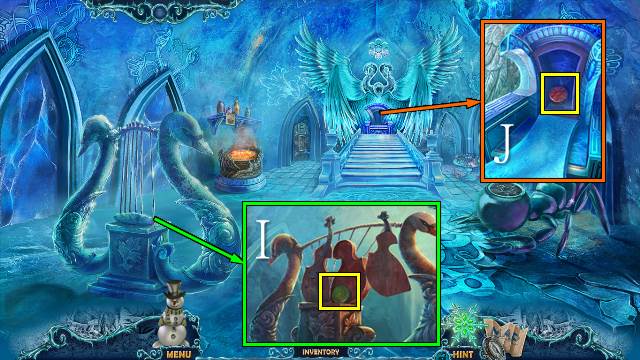
- Place the FLOWERS (I) and MEDALLION (J).
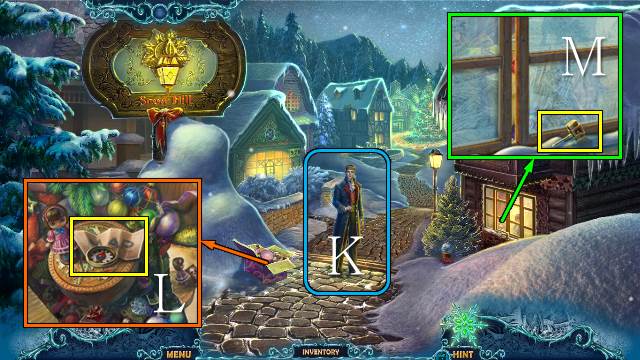
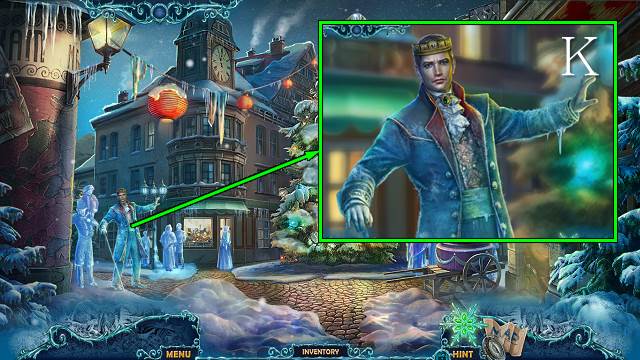
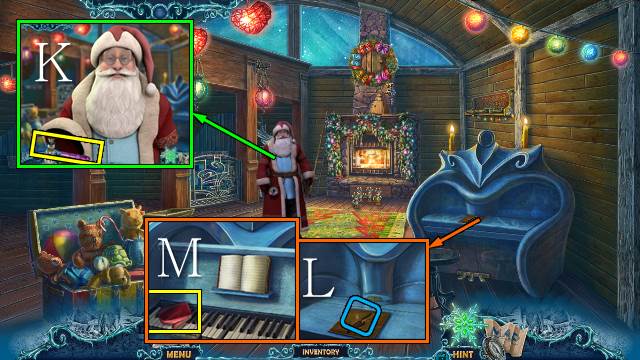
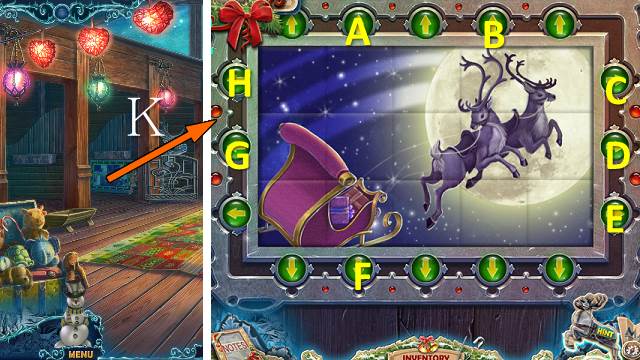
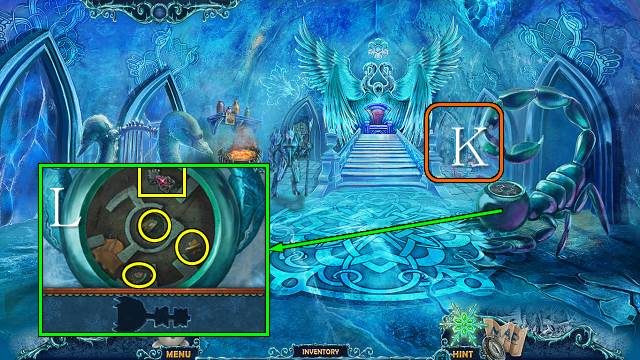
- Talk to the King (K).
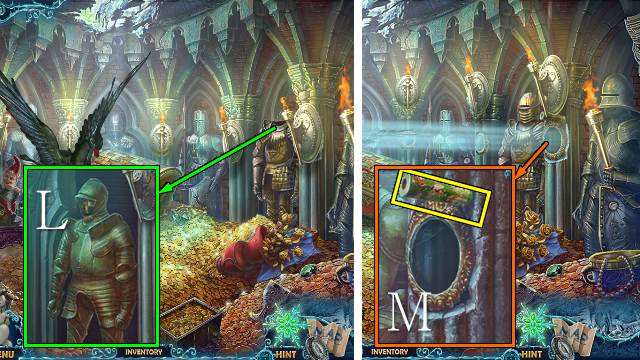
- Take the map (L).
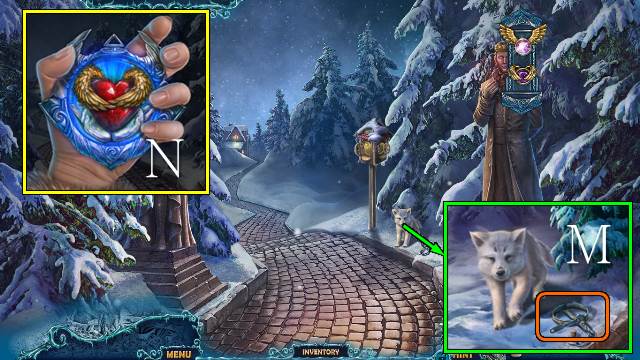
- Take the HAMMER (M).
- Go forward.
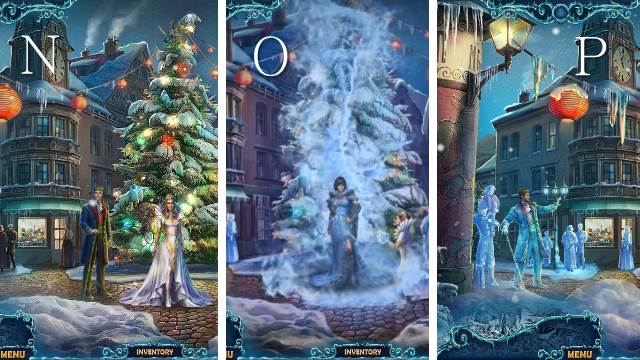
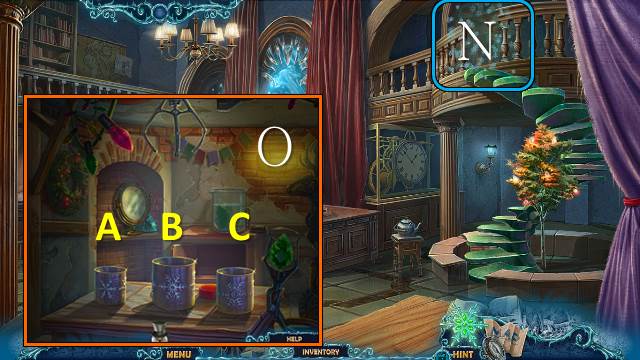
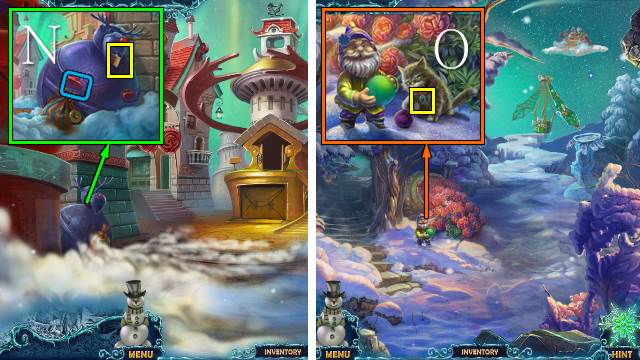
- Talk to the King and Queen (N).
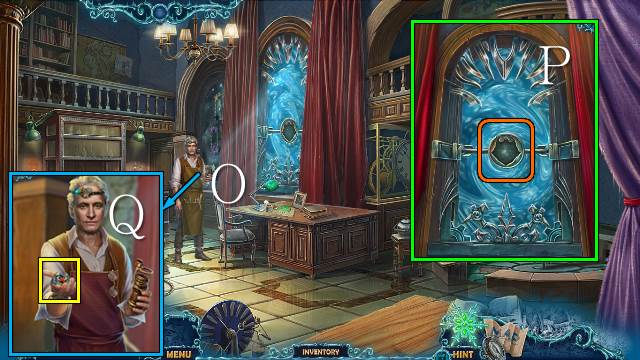
- Talk to the evil woman (O).
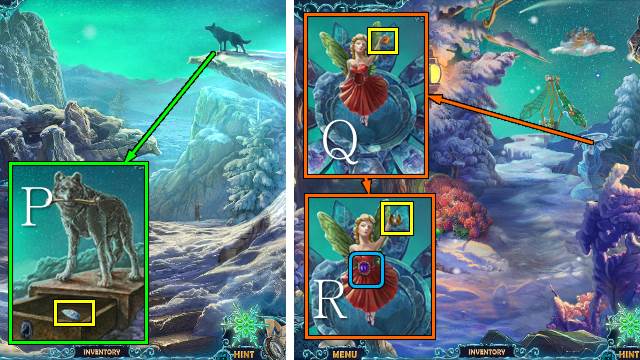
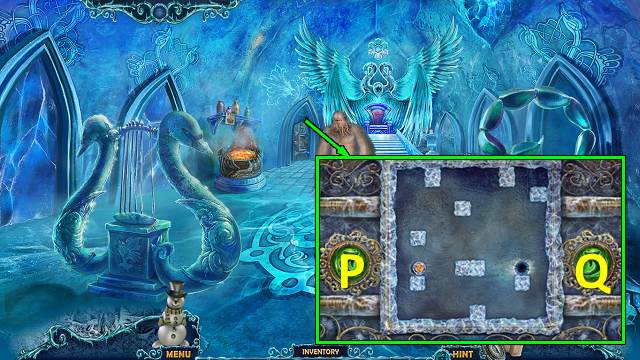
- Talk to the King (P).
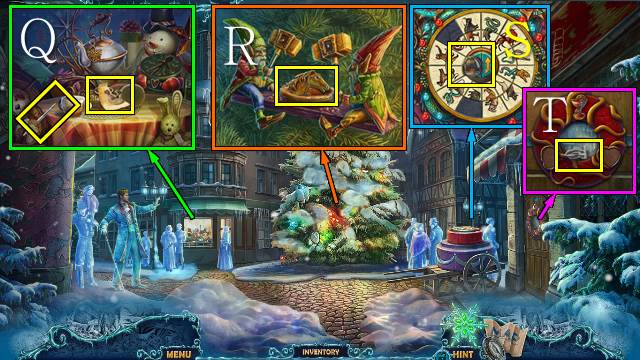
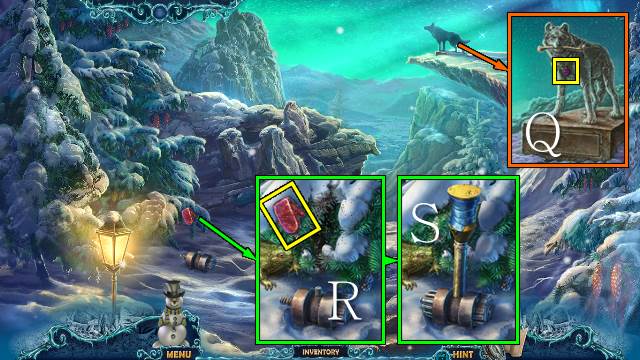
- Open the window; take the PAINTBRUSH and INSTRUCTIONS (Q).
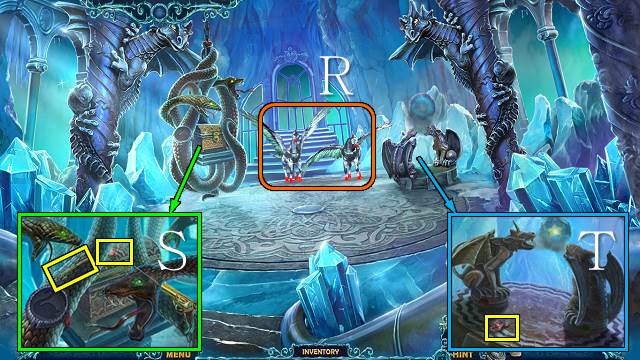
- Move the branches; place the HAMMER and take the HORSE EMBLEM (R).
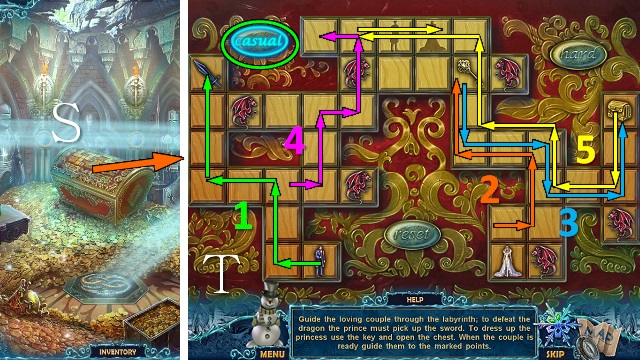
- Take the DOLL'S HEAD (S).
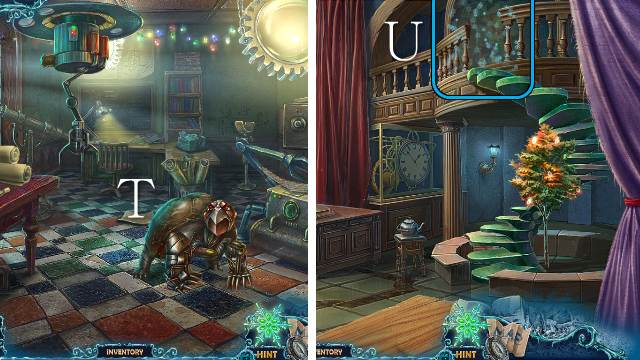
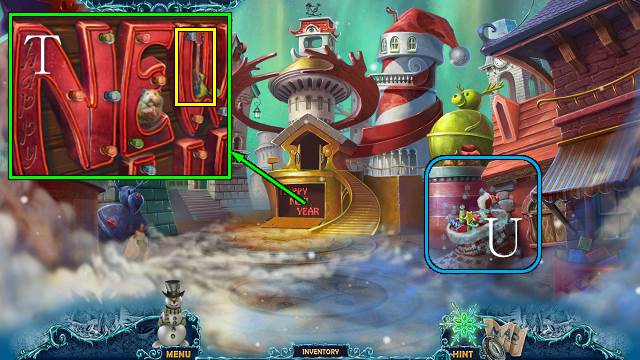
- Take the DOLL'S ARM (T).
- Walk down.

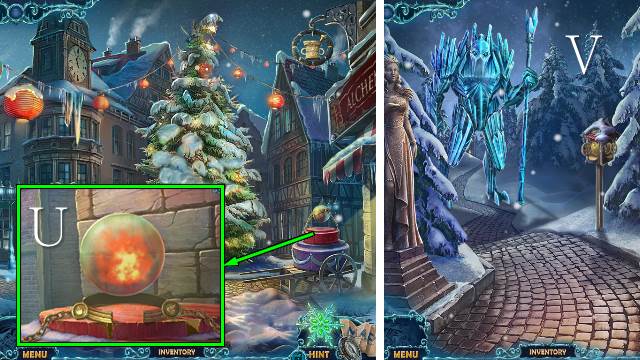
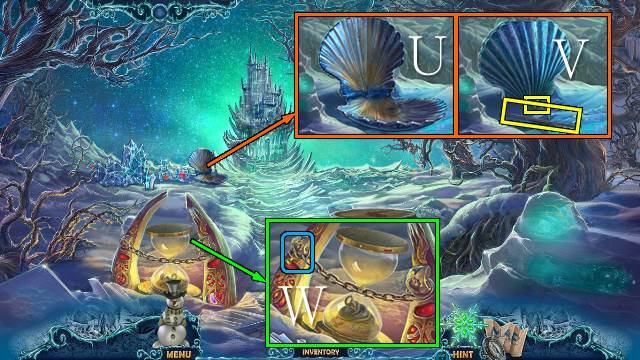
- Place the HORSE EMBLEM; take the VOODOO DOLL (U).
- Go forward.
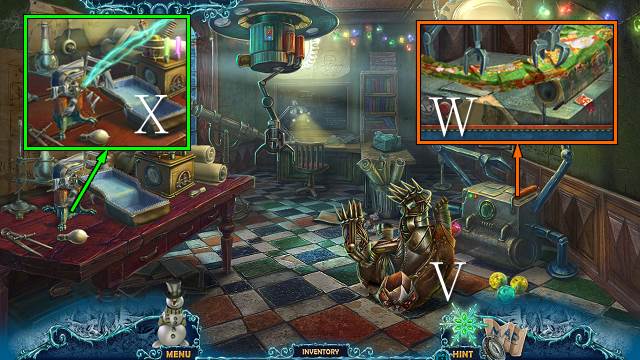
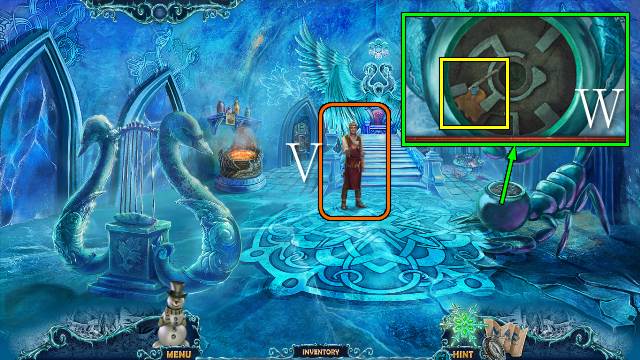
- Place the VOODOO DOLL; take the RED GEM and TAROT CARD (V).
- Walk down.
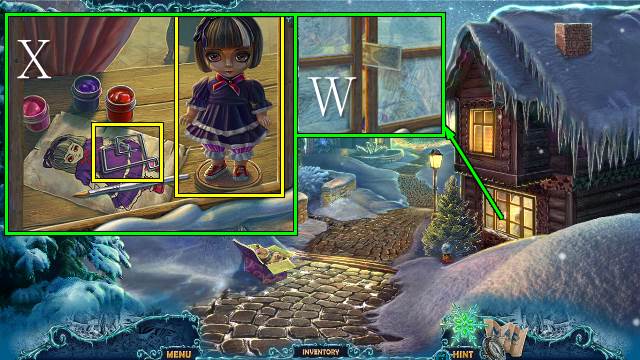
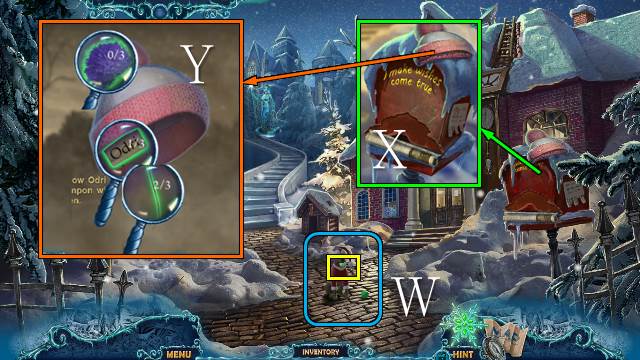
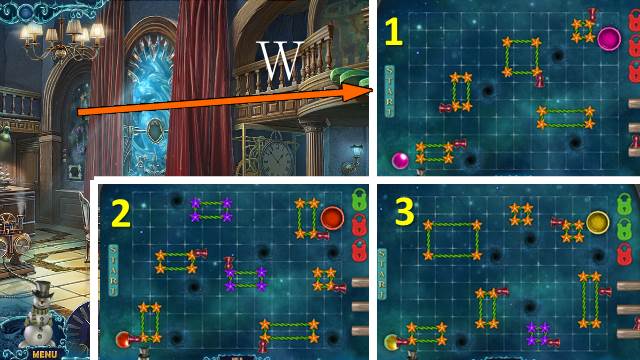
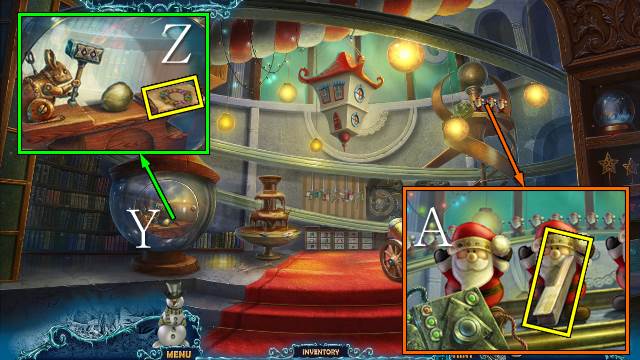
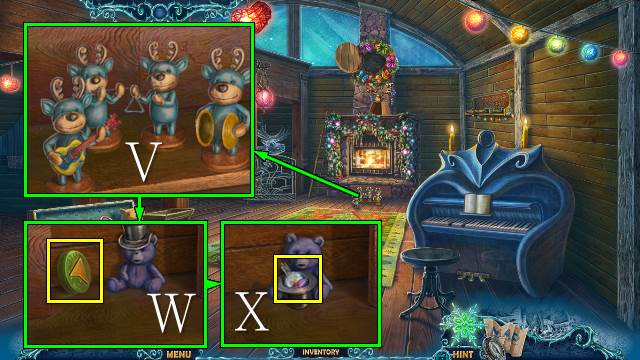
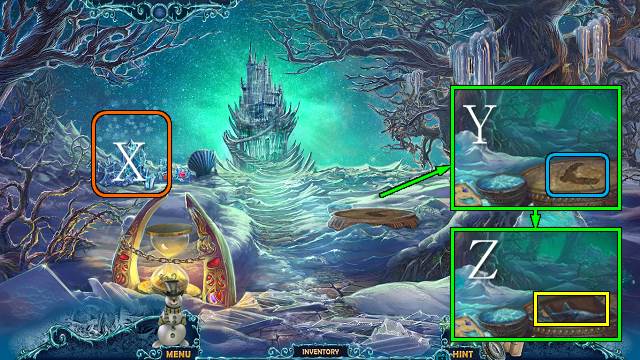
- Use the TAROT CARD and open the window (W); place the DOLL'S HEAD, DOLL'S ARM and PAINTBRUSH, paint the doll, bend the wire and take the DOLL and WIRE (X).
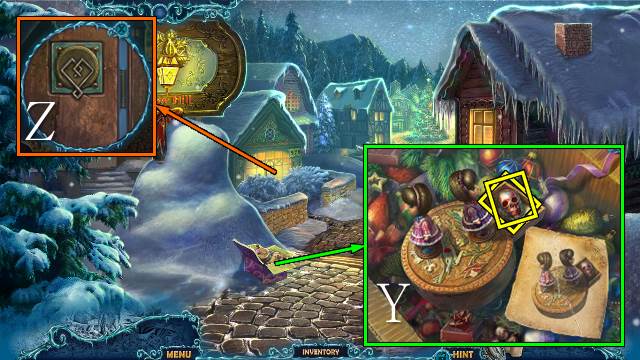
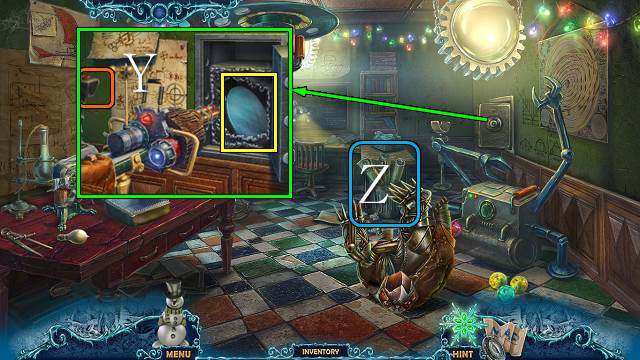
- Place the DOLL and INSTRUCTIONS; turn each doll three times and take the SKULL and CALENDAR PIECE (Y).
- Place the WIRE and turn the handle (Z).
- Go left.
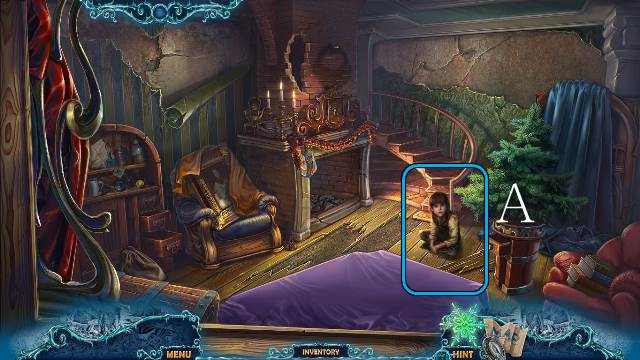
- Talk to the boy (A).
- Go down and forward.
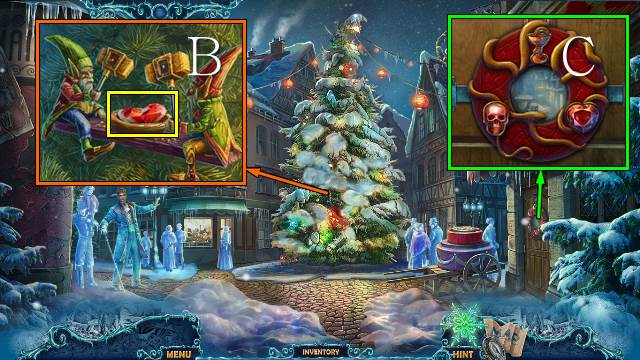
- Place the RED GEM, move the hammers and take the HEART (B).
- Place the HEART and SKULL (C).
- Go right.
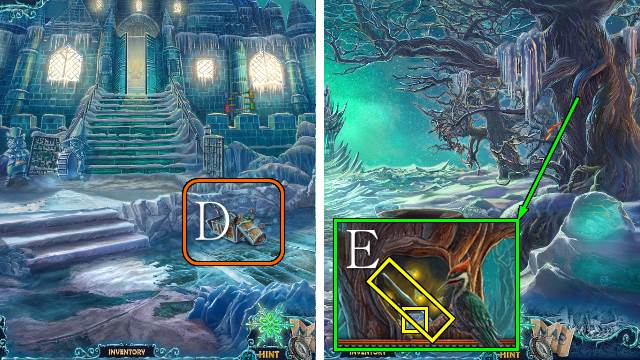
- Take the GLUE and read the paper (D).
- Use the GLUE for a mini-game (E).
- You receive the GROWTH POTION.
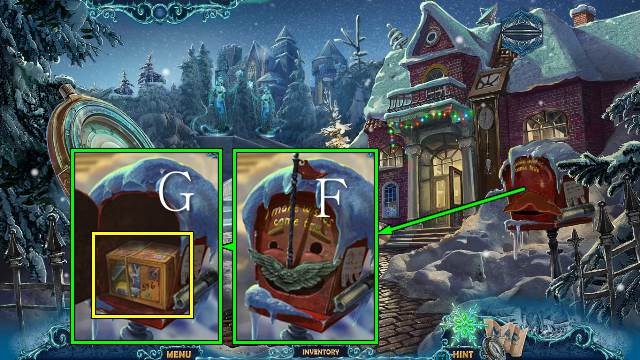
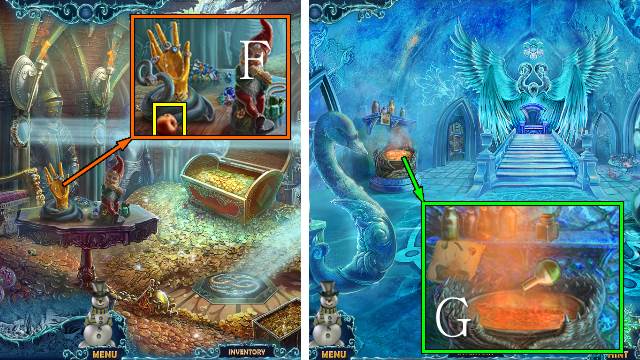
- Use the GROWTH POTION (F); take the BOOK KEY (G).
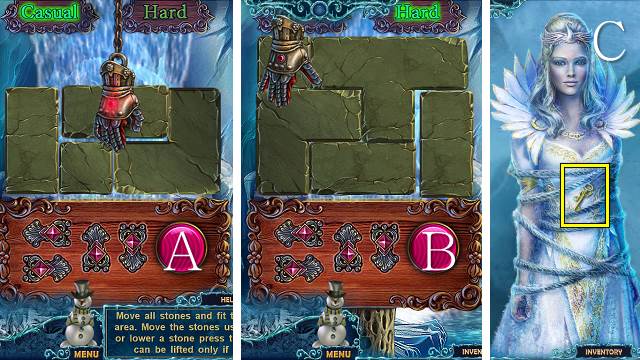
- Place the BOOK KEY; take the BIRDFEEDER KEY and play the mini-game (H).
- Casual solution (I).

- Hard solution (J).
- Play the HOP.
- You receive the POTION.
- Walk down.
- Use the POTION (K).
- Go left.
- Try to walk forward.
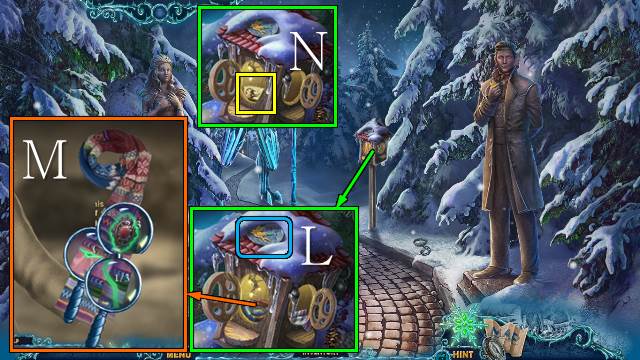
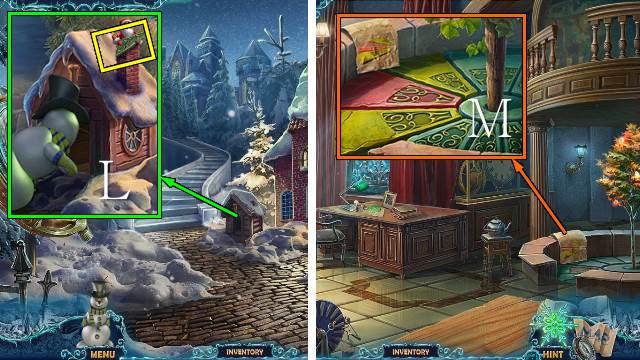
- Place the BIRDFEEDER KEY; take and inspect the scarf (L).
- Use the magnifying glass to find the clues (M).
- Take the CALENDAR PIECE (N).
- Walk down.
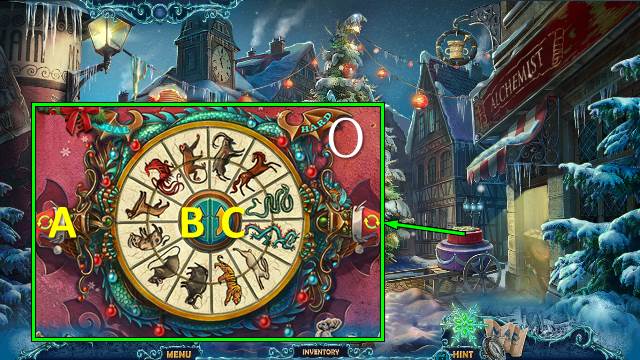
- Place the CALENDAR PIECES for a mini-game (O).
- Casual: C3-A-C-A-C-A-C-A-C5-A-B-A-C5-A-B-A-B-A-B-A-B-A-C2-A-B-A-C2-A-C-A-C6.
- Hard: B-A-B3-A-C-A-C-A-C2-A-B4-A-C-A-C-A-C-A-C5-A-B-A-B-A-C3-A-B-A-B-A-C3-A-B-A-B2.
- Take the BRACELET (P).
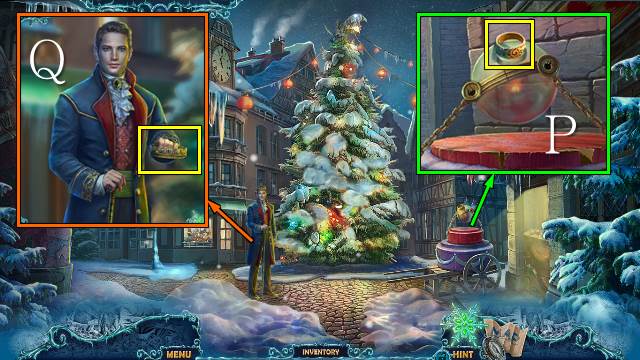
- Talk to the King; take the CROWN (Q).
- Go left.
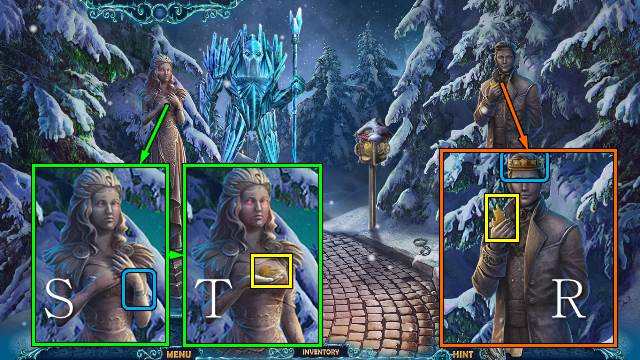
- Place the CROWN; take the SYMBOL (R).
- Place the BRACELET (S); take the SYMBOL (T).
- Walk down.
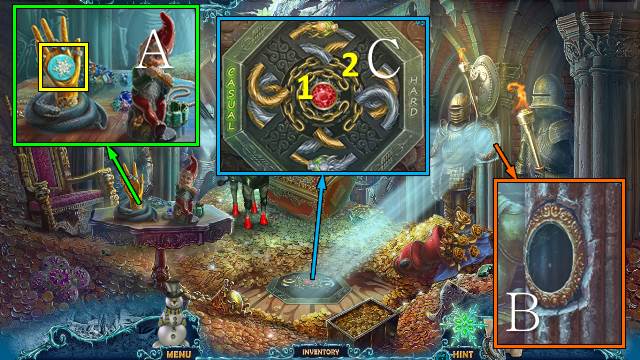
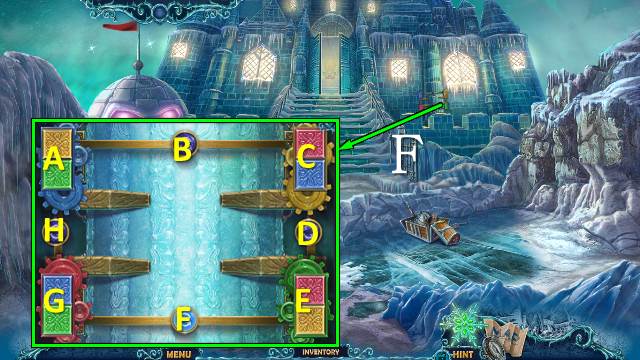
- Place the SYMBOLS; take the FIRE SPHERE (U).
- Go left.
- Throw the FIRE SPHERE (V).
- Go forward.
Chapter 2: Two Good Deeds
- Take BUTTON 1/2; interact twice with the dog (W).
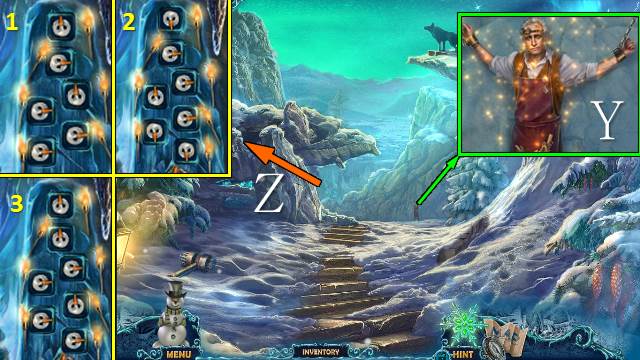
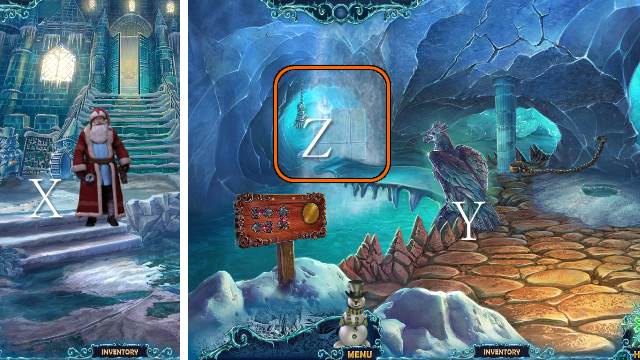
- Take the hat (X); search for the clues (Y).
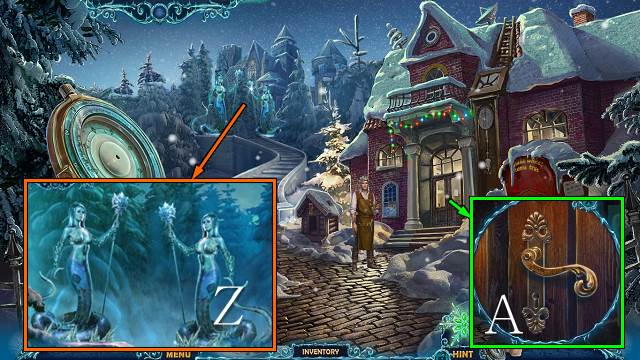
- Talk to the Lamias (Z).
- Turn the handle (A).
- Go right.
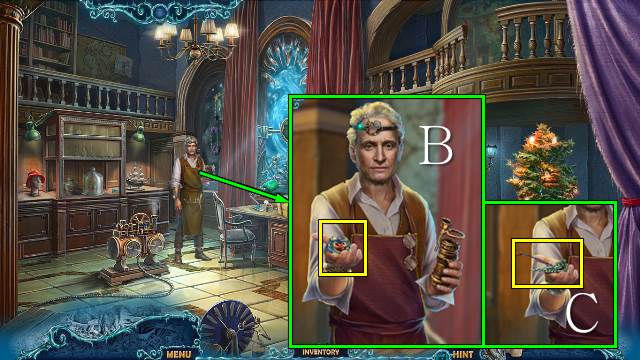
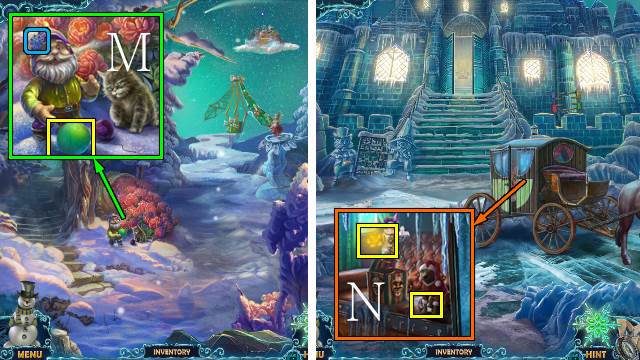
- Talk to Robert and take the medallion (B); take the MAILBOX KEY (C).
- Remove the glass; take the BOY STATUE and TIARA (D).
- Take the CODE SOLUTION (E).
- Walk down.
- Read the paper and use the MAILBOX KEY (F); take the PACKAGE FOR BOY (G).
- Walk down.
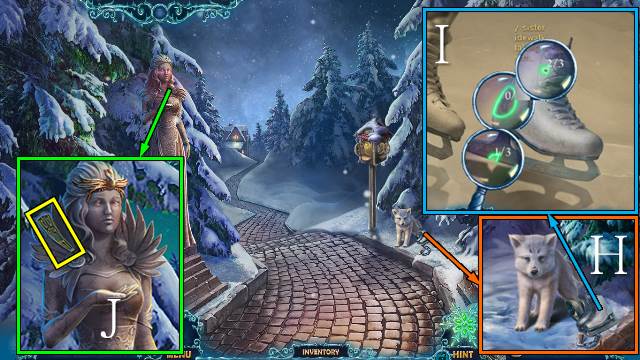
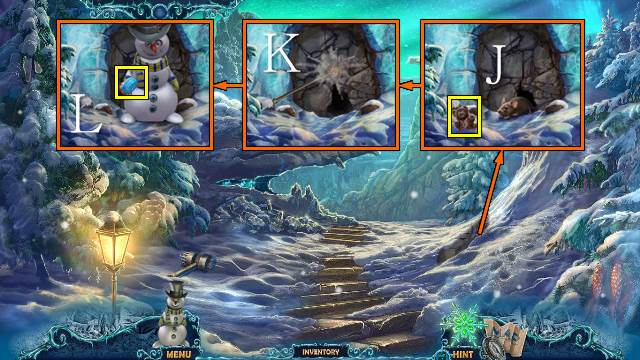
- Take the skates (H); search for clues (I).
- Place the TIARA; take the GRATE (J).
- Walk down twice and go left.
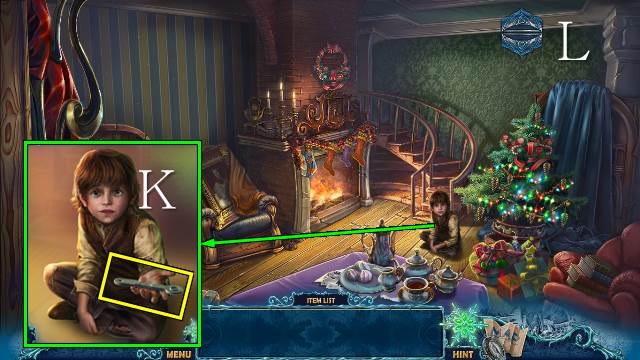
- Give the PACKAGE FOR BOY to the boy (K).
- Play the reverse HOP (L).
- Take the LATCH KEY (K).
- Go forward and left.
- Use the LATCH KEY (M).
- Take the MEDALLION (N).
- Go forward and right.
- Talk to Robert (O).
- Place the MEDALLION (P).
- Talk to Robert; take the MEDALLION (Q).
- Walk down.

- Use the MEDALLION (R).
- Go forward.
- Try to talk to Odri; open the door (S).
- Go forward.

- Talk to Odri again (T).
- Talk to Evil Odri (U).
- Take the PART OF SNOWFLAKE (V).
- Walk down twice.
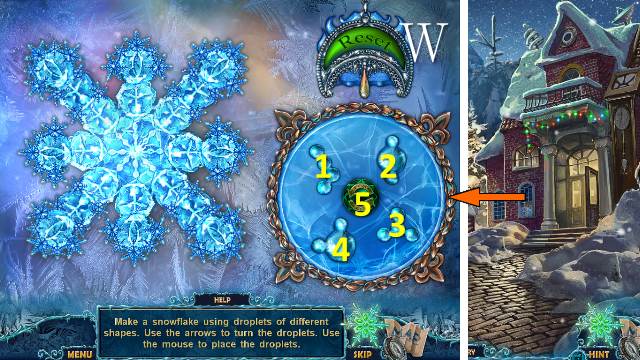
- Place the PART OF SNOWFLAKE for a mini-game (W).
- Solution: 1-5-1-5-1-5-1-3-5-3-5-3-5-3-4-5-4-5-2.
- Take the SNOWFLAKE.
- Go forward twice.
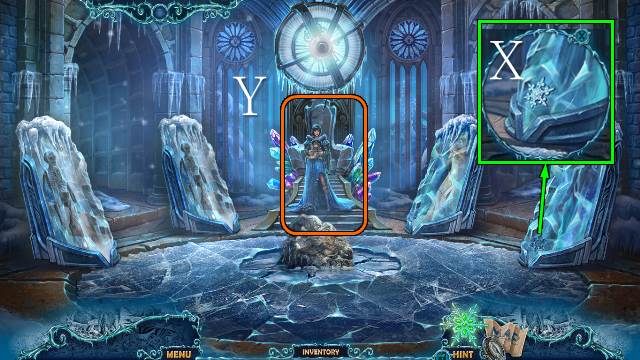
- Place the SNOWFLAKE (X).
- Try to go right.
- Talk to Odri (Y).
- Go right.
Chapter 3: The Flying Basket
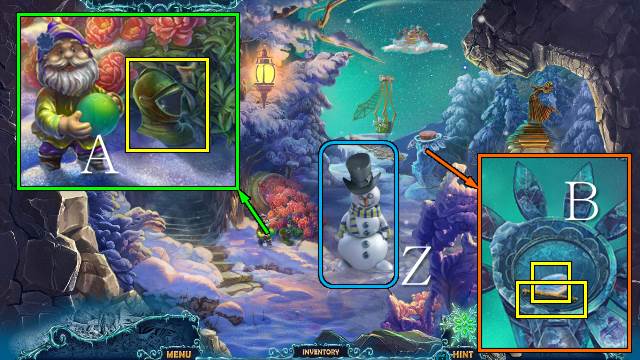
- Talk to the snowman; he will join you (Z).
- Take the KNIGHT'S HEAD (A).
- Take the FLUTE and ROSE INLAY (B).
- Take the BROKEN WING (C).
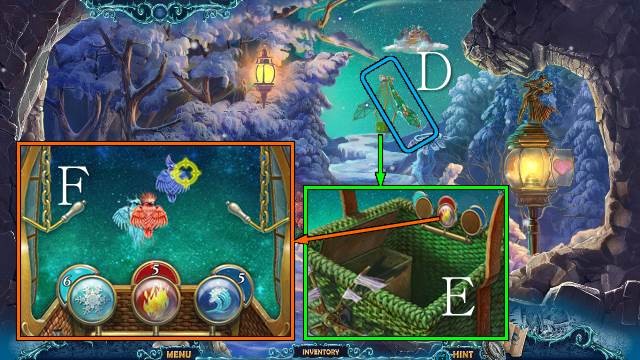
- Take the BROKEN FAN (D).
- Use the snowman on the umbrella (E).
- Take the UMBRELLA (F).
- Take the DOGHOUSE PIECE (G).
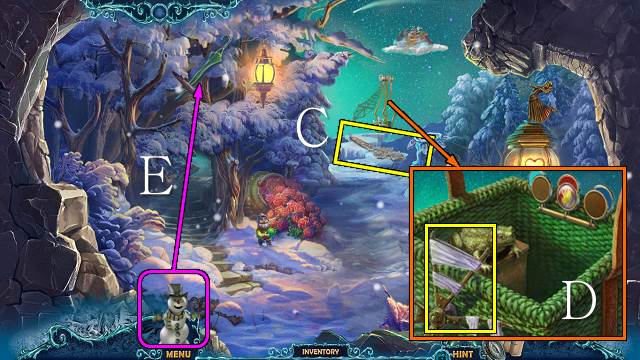
- Go left.

- Take the CODE and ZIPPER PULL (H).
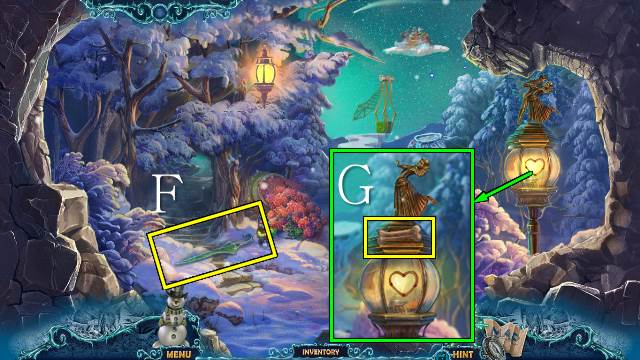
- Use the snowman on the tree (I); take the LADLE (J).
- Talk to Robert; take the STAR (K).
- Go to the yard At Robert's House.
- Place the DOGHOUSE PIECE and take the STAIR; use the snowman to receive BUTTON 2/2 (L).
- Go right.
- Place the CODE SOLUTION, the STAIR and GRATE; change the colors of the steps (M).
- Play the HOP (N).
- HOP mini-game solution (O): A-B, C-A, B-A, B-C, A-B, A-C, B-C.
- You receive the COMPASS ARROW.
- Walk down.
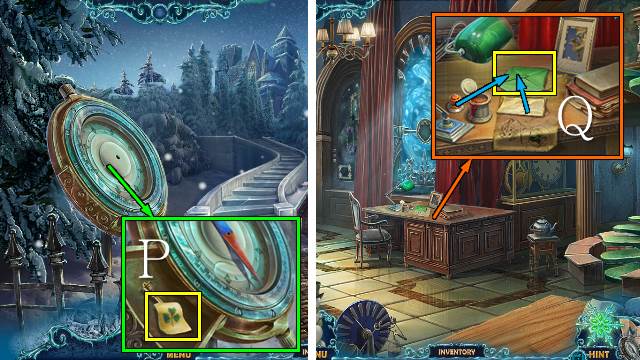
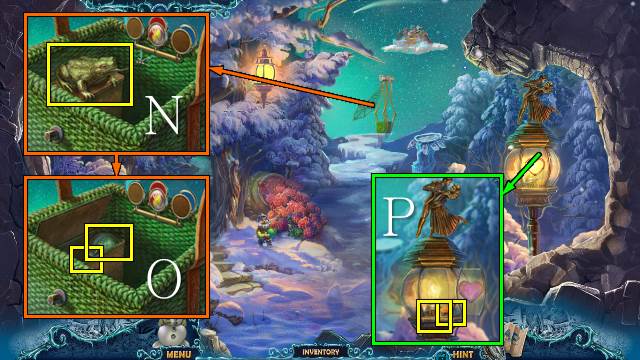
- Place the COMPASS ARROW; take the PAGE WITH CLOVER (P).
- Go right.
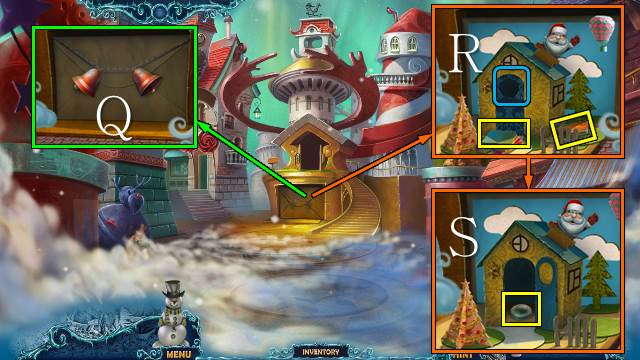
- Place the PAGE WITH CLOVER, fill and seal the envelope and take the LETTER (Q).
- Walk down.
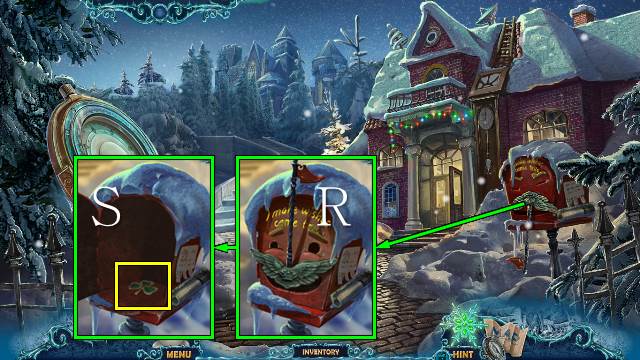
- Post the LETTER (R), open the mailbox and take the BOOK KEY (S).
- Go right.
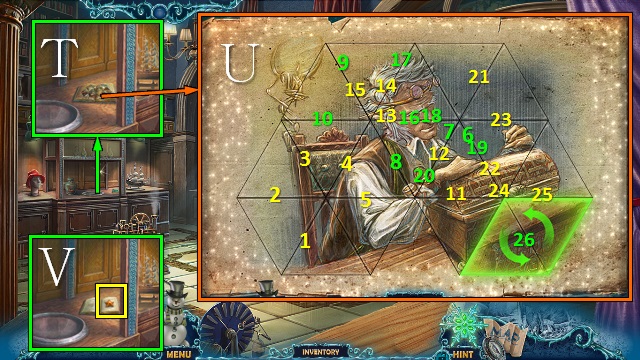
- Place the BOOK KEY and open the book (T); play the mini-game (U).
- Turn the pages twice and take the STAR (V).
- Place the two STARS for a mini-game (W).
- Go forward.
- Play the HOP (X).
- You receive the FLINT.
- Open the telescope and take the PUZZLE PIECE; look through the telescope (Y).
- Use the snowman on the mechanism (Z).
- Take the GAME PIECE (A).
- Open the three compartments, take the items and take the BUTTERFLY NET (B).
- Place the BROKEN FAN and ZIPPER PULL; open the case and take the COG and PUZZLE PIECE (C).
- Place the CODE (D) and turn the knob to 10, 70 and 90 (E); take the PART OF APPARATUS and LEVER (F).
- Walk down twice.
- Use the FLINT; take the TORCH (G).
- Go forward twice.
- Place the UMBRELLA and go left (H).
- Use the TORCH.
- Place the FLUTE and take the LASER (I).
- Take the STONE BONE and take the DRAGONFLY with the BUTTERFLY NET (J); place the ROSE INLAY and take the LANTERN GEM (K).
- Place the KNIGHT'S HEAD (L).
- Take the WRAPPING PAPER (M).
- Go down and right.
- Use the DRAGONFLY and take the FROG (N); take the CANNONBALL and POWER CORD (O).
- Place the BOY STATUE and LANTERN GEM; take the BRACELET and CARROT (P).
- Go left.
- Place the STONE BONE; take the GEM FLOWER (Q).
- Place the FROG and take the LEFT MITTEN (R); place the COG and LEVER and pull the lever (S).
- Go to Robert's Secret Room.
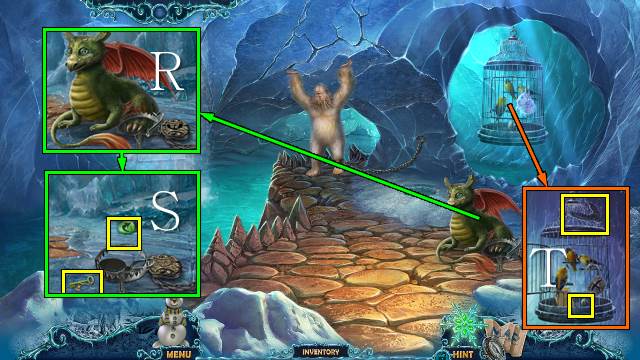
- Interact with the creature (T).
- Walk down.
- Play the HOP (U).
- You receive the MARBLES.
- Go forward.
- Throw the MARBLES (V).
- Place the BROKEN WING and WRAPPING PAPER; take the WING (W).
- Plug in the POWER CORD and take the FAN (X).
- Place the LASER and push the button; take the MIRROR (Y).
- Play the HOP (Z).
- You receive the YARN.
- Go to the Treasure Vault.
- Place the BRACELET and take the PART OF MECHANISM (A).
- Place the MIRROR (B).
- Place your two PUZZLE PIECES for a mini-game (C).
- Casual: 1-2, 2-1-2, 2-1-2, 2-1-2.
- Hard: 2-1-2-1-2, 1, 1, 1.
- Go to the Garden.
- Place the WING (D).
- Place the FAN (E).
- Place the PART OF APPARATUS and PART OF MECHANISM for a mini-game (F).
Chapter 4: The Toy Factory
- Play the HOP (G).
- You receive a BUTTON.
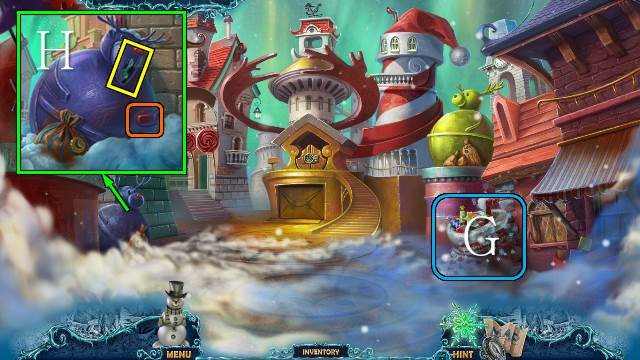
- Place the LEFT MITTEN; take the MUSICAL NOTE (H).
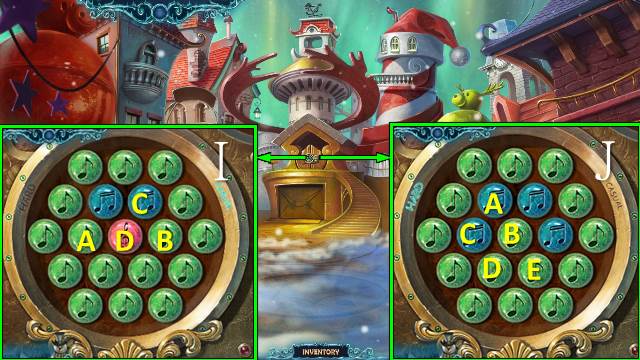
- Place your two BUTTONS for a mini-game.
- Casual (I): Ax2-Bx5-Cx3-Dx3.
- Hard (J): Ax1-Bx3-Cx4-Dx1-Ex1.
- Go forward.
- Talk to Santa; take the FLUTE (K).
- Place the MUSICAL NOTE (L); take the RIGHT MITTEN (M).
- Walk down.
- Place the RIGHT MITTEN; take the ELF PIECE (N).
- Walk down.
- Place the YARN; take the WOLF SYMBOL (O).
- Go left.
- Place the WOLF SYMBOL; take the GLASS PETAL (P).
- Walk down.
- Place the GLASS PETAL and take the ELF PIECE (Q); place the GEM FLOWER and take the CYMBALS (R).
- Go down and left.
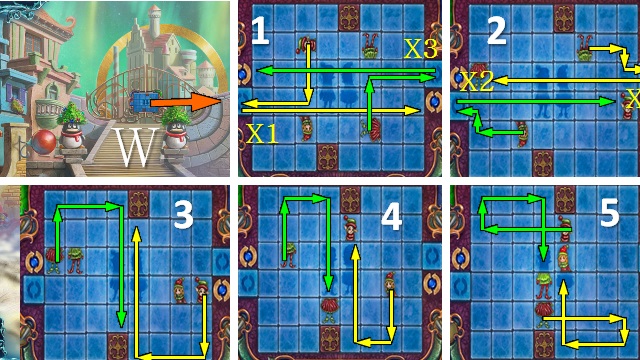
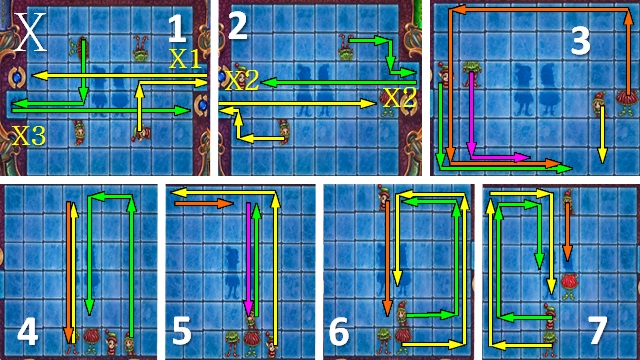
- Place the GAME PIECE and ELF PIECE for a mini-game (S).
- Casual solution (T).
- Hard solution (U).
- Take the BUTTON (V).
- Go to Santa's Square and go left.
- Place the square BUTTON and ELF PIECE for a mini-game (W).
- Casual solution.
- Hard solution (X).
- Go forward.
- Open the glass door (Y).
- Take the WREATH PICTURE (Z).
- Take the PIANO KEY (A).
- Take the WHITE FLUFF and move the streamer; place the CANNONBALL and push the button (B).
- Play the HOP (C).
- You receive a BOW.
- Take the ENVELOPE (D).
- Walk down.
- Use the WHITE FLUFF; take the SANTA TOY (E).
- Place the ENVELOPE (F); take the REINDEER (G).
- Go to the Reindeer Stable.
- Place the BOW, REINDEER and the WREATH PICTURE and change the colors of the bows to match the picture; take the HOUSING FOR FIRECRACKERS, YELLOW STAR and SUN (H).
- Walk down.
- Place the SUN (I); take the BUTTON (J).
- Go forward.
- Open the gate.
- Place the two BUTTONS for a mini-game (K).
- Solution: A-H-B-D-F-G-E-A-C.
- You receive a BIT OF CHRISTMAS FOLIAGE.
- Go down and left.
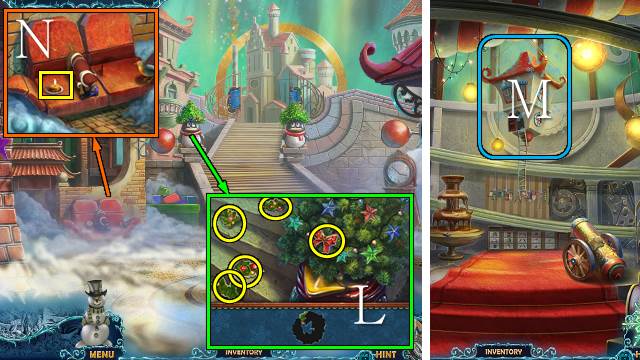
- Reconstruct the wreath, using the BIT OF CHRISTMAS FOLIAGE; take the WREATH (L).
- Go forward.
- Play the HOP (M).
- You receive some MATCHES.
- Walk down.
- Use the MATCHES; take the MELTED WAX (N).
- Go to the Treasure Vault.
- Use the MATCHES; take the MELTED WAX (O).
- Go to the Reindeer Stable.
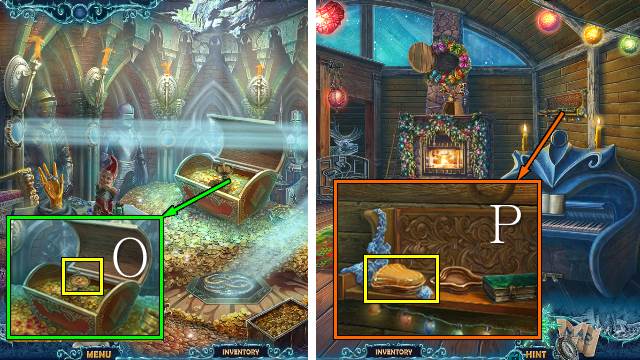
- Use the MELTED WAX and take the SMALL BELL; repeat (P).
- Walk down.
- Place the two SMALL BELLS (Q).
- Take the STACK OF PAPER and CARROT and place the WREATH (R); take the BUTTON (S).
- Take the GUITAR (T).
- Play the HOP (U).
- You receive a BARREL OF HONEY.
- Walk forward.
- Place the FLUTE, GUITAR and CYMBALS (V); take the BUTTON (W), place the BARREL OF HONEY and take the HEALING POTION (X).
- Go to the Cave.
- Give the HEALING POTION to Robert (Y).
- Place the two CARROTS for a mini-game (Z).
- Go left.
Chapter 5: The Road to the Ice Castle
- Move the paper and take the MEAT (A).
- Take the KEY TO CAGE (B).
- Use the snowman on the icy branch (C).
- Take the COLLAR (D).
- Go to the Street.

- Use the MEAT; take the FREEZING LIQUID (E).
- Go forward.
- Push the button and remove it, place the SANTA TOY and the new BUTTON and push it (F); take the HAPPY sign (G).
- Place the BUTTON with arrow for a mini-game (H).
- Take the NUT (I).
- Walk down twice.
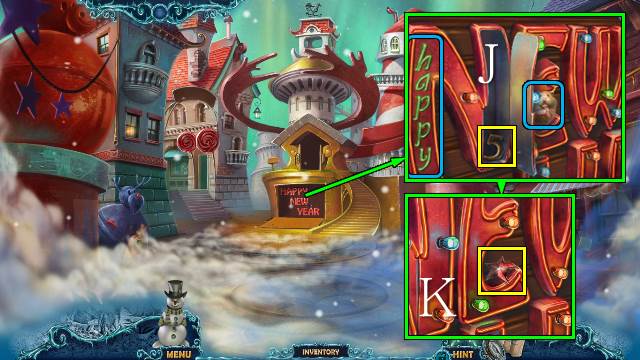
- Place the HAPPY sign and take the NUMBER 5 (J); give the NUT to the hamster and take the RED STAR (K).
- Go left.

- Place the YELLOW STAR and RED STAR and take the KEY; place the STACK OF PAPER, push the crocodile and take the CONFETTI (L).
- Go forward.
- Place the HOUSING FOR FIRECRACKERS and CONFETTI; place the cap and the trigger and take the FIRECRACKER (M).
- Walk down twice.
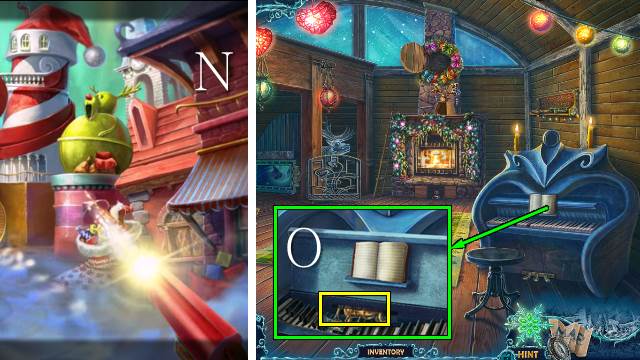
- Use the FIRECRACKER (N).
- Go forward.
- Place the PIANO KEY and KEY; take the SQUIRREL WITH HAMMER (O).
- Go to the Toy Factory.
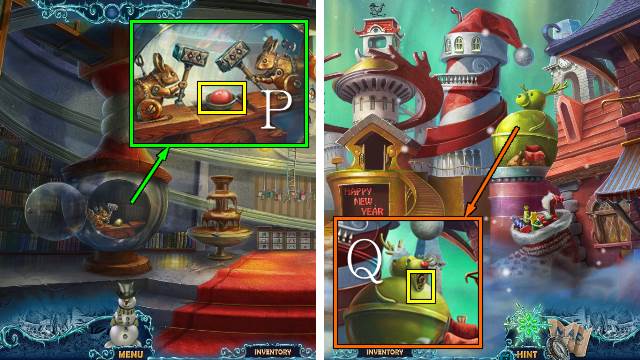
- Place the SQUIRREL WITH HAMMER; take the RED NOSE (P).
- Walk down twice.
- Place the RED NOSE; take the NUMBER 12 (Q).
- Go left.
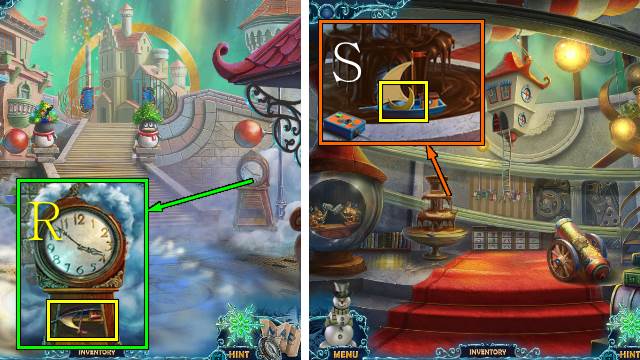
- Place the NUMBER 5 and NUMBER 12; take the SAILBOAT (R).
- Go forward.
- Place the SAILBOAT and push the button; take the MOON (S).
- Walk down twice.

- Place the MOON (T); take the METAL BAR (U).
- Go left and forward.
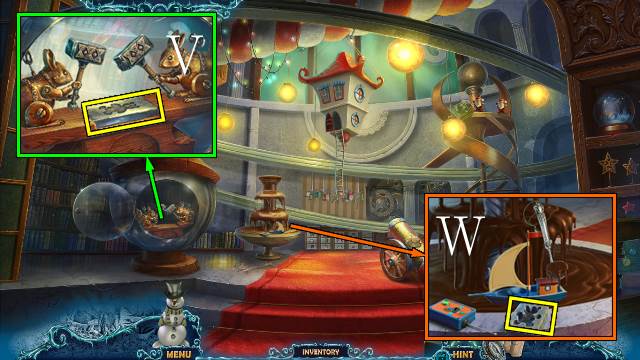
- Place the METAL BAR; take the CHOCOLATE MOLD (V).
- Place the CHOCOLATE MOLD and LADLE; take the CHOCOLATE BEAR (W).
- Go to the Cave.
- Interact twice with the dog (X).
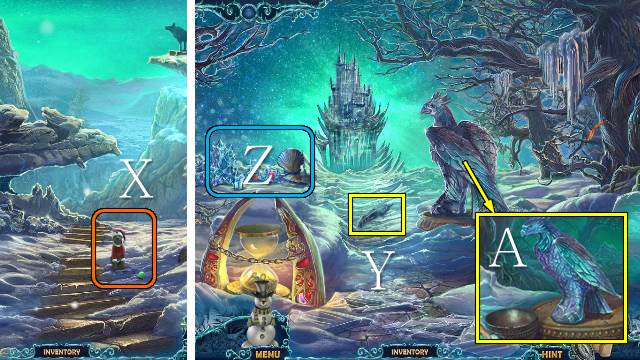
- Go left.
- Take the FEATHER OF BLACK SWAN (Y).
- Play the HOP (Z).
- You receive a CHIP.
- Use the FREEZING LIQUID; take the EAGLE (A).
- Go forward.
Chapter 6: Saving Christmas

- Take the SMALL FLOWER (B).
- Open the doors (C).
- Go forward.
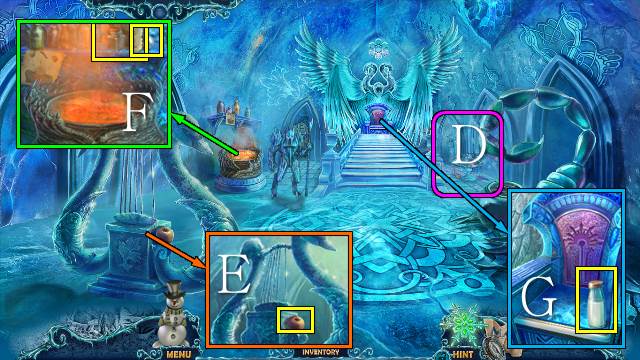
- Play the HOP (D).
- You receive a SCEPTER.
- Take the APPLE (E).
- Take the SOLUTION and FLASK OF HOT WATER (F).
- Take the MILK BOTTLE (G).
- Walk down.
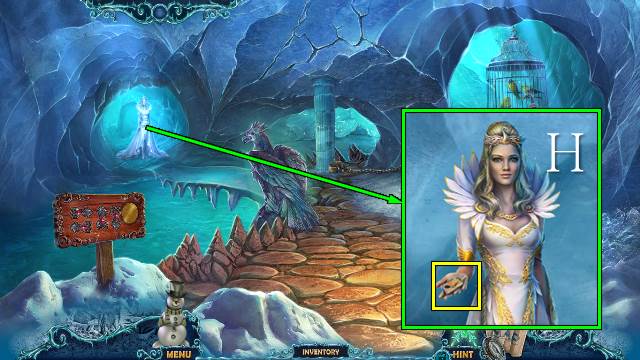
- Place the MILK BOTTLE; take the MILK (H).
- Go forward.
- Use the MILK; take the KEY TO TRAP (I).
- Walk down three times.
- Place the CHOCOLATE BEAR (J) and SCEPTER (K) and use the snowman (L); you receive a MASK and DRUM.
- Walk down.
- Place the SMALL FLOWER; take the SMALL BALL (M).
- Go to the area Near Odri's Castle.
- Open the carriage.
- Place the SMALL BALL and MASK; take the HORSESHOE and FIREFLIES (N).

- Place the DRUM (O).
- Place the CHIP for a mini-game.
- Solution: P-Qx2-Px6.
- Go left.
- Use the HEALING POTION and KEY TO TRAP (R); take the BUTTON and KEY (S).
- Use the FLASK OF HOT WATER and receive the FLASK; place the KEY TO CAGE and take the paper, ICE PEARL and EAGLE AMULET (T).
- Walk down twice.
- Use the ICE PEARL (U); take the paper, PART OF KEY and BOW (V).
- Use the KEY (W).
- Play the HOP (X).
- You receive a PISTOL WITH SUCTION CUP.
- Place the EAGLE AMULET (Y); take the SAWFISH (Z).
- Go to the Reindeer Stable.
- Place the HORSESHOE (A); take the HARNESS (B).
- Go to the area Near Odri's Castle.
- Place the COLLAR and HARNESS (C).
- Play the HOP (D).
- You receive a WOODPECKER.
- Walk down.
- Place the WOODPECKER and FIREFLIES; take the ICICLE and TILE (E).
- Go forward.
- Place the TILE for a mini-game (F).
- Solution: E-F-C-B-H-D-E-G-F.
- Play the HOP (G).
- You receive a VIOLIN.
- Take the ICE COLUMN (H).
- Go left.
- Use the ICE COLUMN (I).
- Take the GLUE (J).
- Go down and forward.
- Play the HOP (K).
- You receive a FREEZING WEAPON.
- Use the GLUE; restore the key, using the PART OF KEY, and take the KEY and ARROW (L).
- Go down and left.
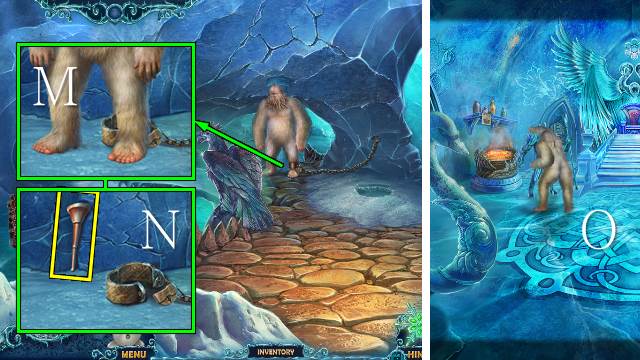
- Use the KEY and take the YETI (M) and HORN (N).
- Go down and forward.
- Release the YETI (O).
- Place the BUTTON for a mini-game.
- Solution: Q-Px3-Q-P-Qx2.
- Go forward.
- Use the FREEZING WEAPON (R).
- Take the TWEEZERS and retrieve the KEY with the PISTOL WITH SUCTION CUP (S).
- Take the ARROW (T).
- Walk down.
- Talk to Robert (U).
- Place the FLASK and take the SCORPION VENOM with the TWEEZERS (V).
- Walk down.
- Talk to Santa (X).
- Go left.
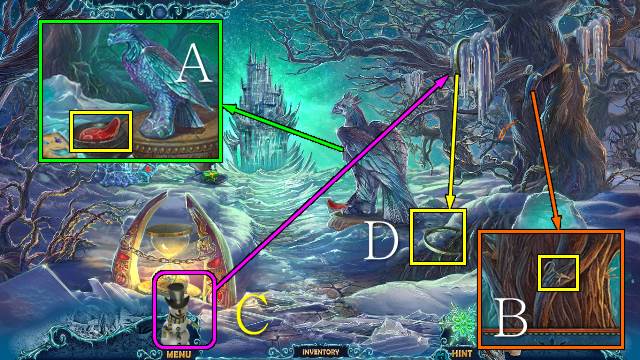
- Place the EAGLE (Y).
- Zoom in for a mini-game (Z).
- Place the two ARROWS to trigger the mini-game.
- Casual (A) and Hard (B) solutions.
- Take the PART OF HOURGLASS (C).
- Walk down twice.
- Place the KEY, turn the hourglass, open it with the PART OF HOURGLASS and take the KEY TO CAGE and PART OF CROWN (D).
- Restore the crown using the PART OF CROWN; take the CROWN (E).
- Go to the Treasure Vault.
- Use the HORN and the APPLE; take the POISONED APPLE (F).
- Go to the Hall.
- Use the FEATHER OF BLACK SWAN, POISONED APPLE and SCORPION VENOM; you receive the THAWING POTION (G).
- Go down and left.
- Use the THAWING POTION and SAWFISH; you receive the MUSICAL AMULET (H).
- Go down and forward.
- Use the ICICLE and MUSICAL AMULET; place the VIOLIN and BOW and take the STATUE ORNAMENT (I).
- Place the CROWN; take the STATUE ORNAMENT (J).
- Go forward.
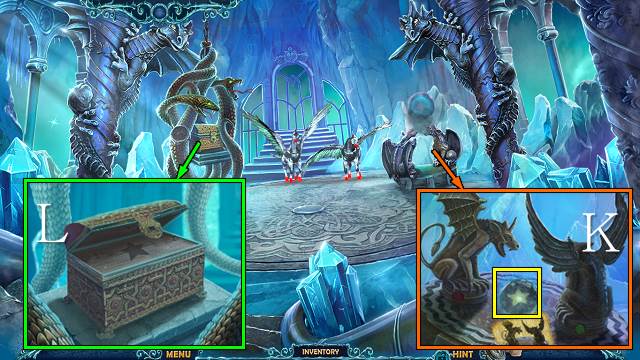
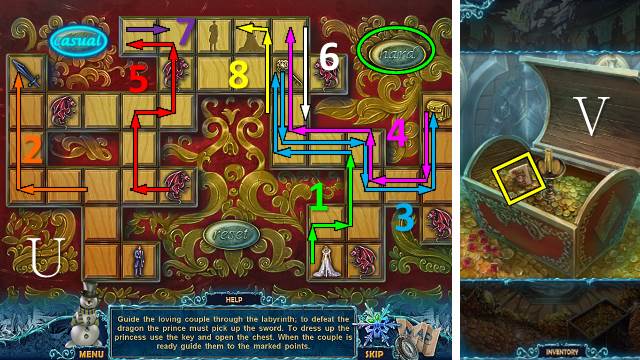
- Place the two STATUE ORNAMENTS and SOLUTION; move the gargoyle parts and take the STAR (K).
- Place the KEY TO CAGE, open the chest and place the STAR for a mini-game (L).
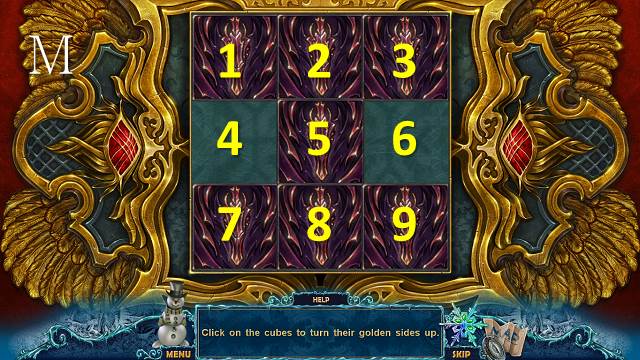
- Solution (M): 5(left)-8-7-4-5(left)-8-7-4-5(right)-8-5(left)-2-5(down)-4-5(up)-8-7(right)-1-4(down)-5-6-9-8-5-2(down)-3-2(left)-5-6(up)-8-5(right)-4-5(down).
- Congratulations, you've completed Christmas Eve: Midnight's Call.
Created at: 2014-12-24