

- Welcome to the Game Name Walkthrough
- Can you bring back magic and rescue your mom in time for Christmas?
- Whether you use this document as a reference when things get difficult or as a road map to get you from beginning to end, we're pretty sure you'll find what you're looking for here.
- This document contains a complete Game Name game walkthrough featuring annotated screenshots from actual gameplay!
- We hope you find this information useful as you play your way through the game. Use the walkthrough menu below to quickly jump to whatever stage of the game you need help with.
- This walkthrough was created by Laurie Murphy, and is protected under US Copyright laws. Any unauthorized use, including re-publication in whole or in part, without permission, is strictly prohibited.
Walkthrough Menu
- General Tips
- Chapter 1: Memories
- Chapter 2: Sorceress
- Chapter 3: Castle
- Chapter 4: Grandfather Christmas
General Tips
- This is the official guide for Christmas Stories: The Christmas Tree Forest.
- This guide won't tell you when to zoom into a location; the screenshots show each zoom scene.
- Hidden-object puzzles are referred to as HOPs. Only the locations of the HOPs will be shown.
- Use the Map to fast travel to a location.
Chapter 1: Memories
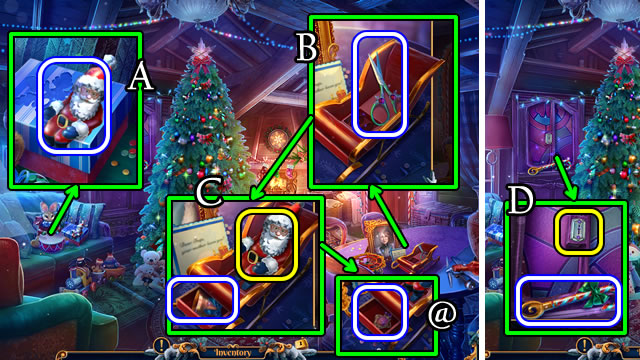
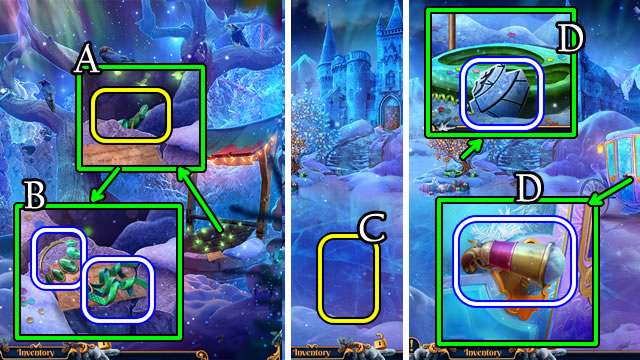
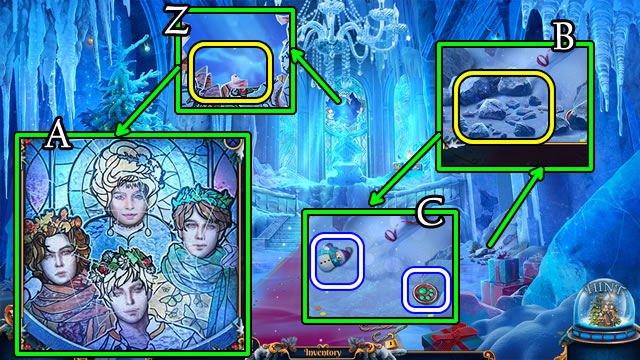
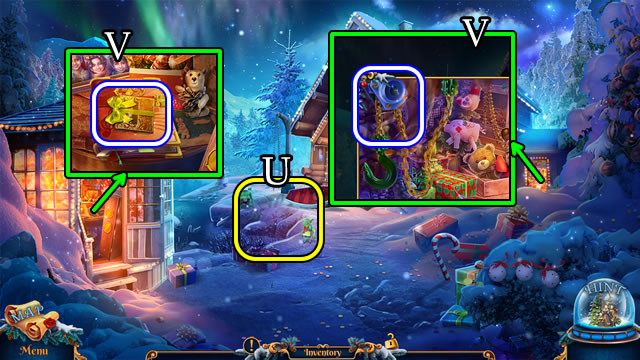
- Take TOY SANTA (A).
- Take SCISSORS (B); place TOY SANTA; take BRONZE BELL (C), SILVER KEY (@).
- Take CANDY CANE; place, select SILVER KEY (D) for MINI-HOP; take WARM CLOTHES.
- SCISSORS on WARM CLOTHES; take GOLDEN BELL.

- Take JINGLE-BELLS; place BRONZE BELL, GOLDEN BELL (E); select 1-4.
- Go forward.
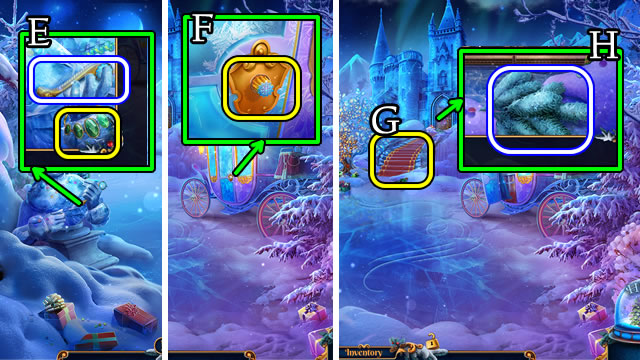
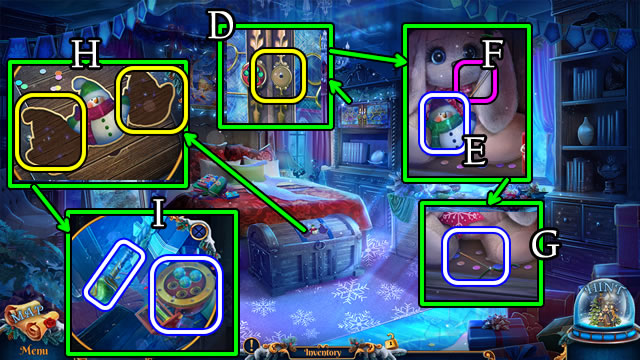
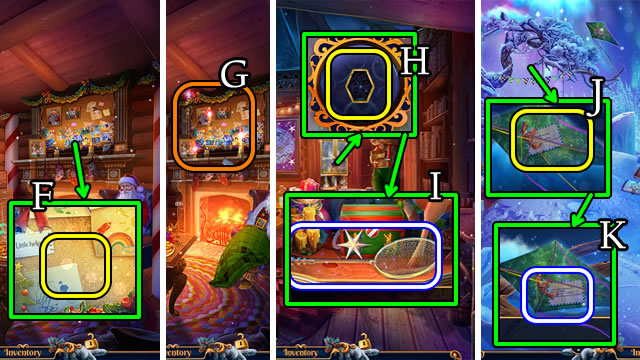
- Speak to character; take 1/3 LIGHTBULB (F).
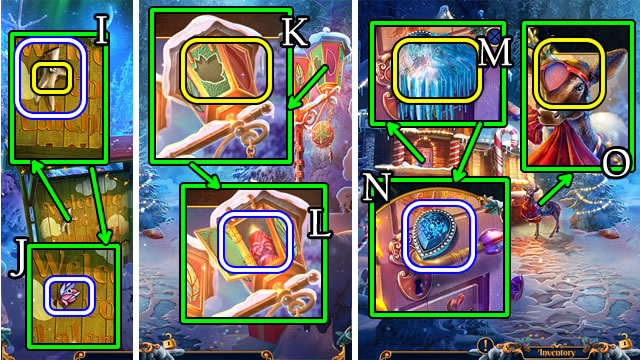
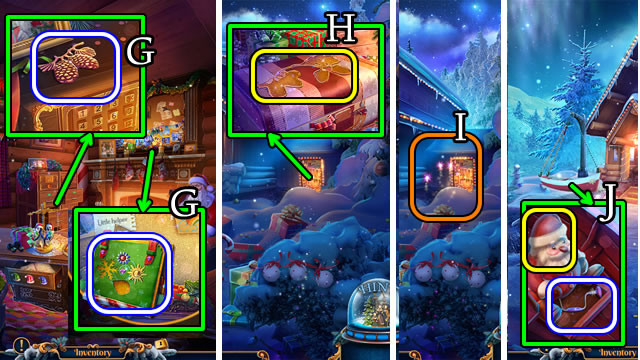
- Take HAIRPIN; WREATH BRANCHES (G).
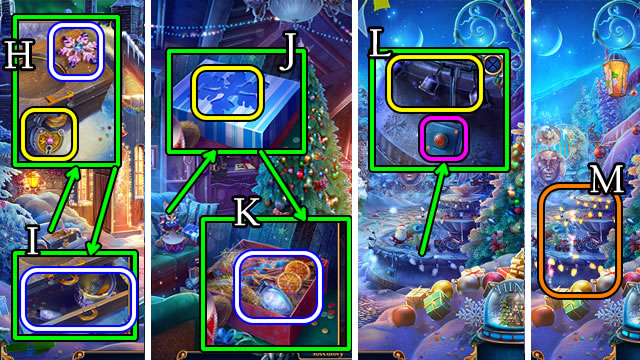
- Take SNOWFLAKE; use HAIRPIN (H); take PAINTBRUSH AND PAINT, 2/3 LIGHTBULB (I).
- Go left.
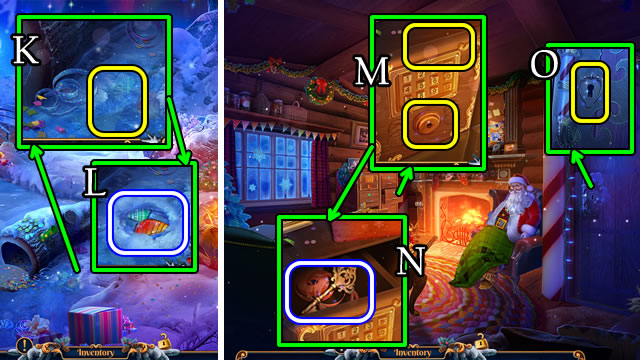
- Place SNOWFLAKE (J); take CINNAMON STICKS, 3/3 LIGHTBULB (K).
- Go forward.
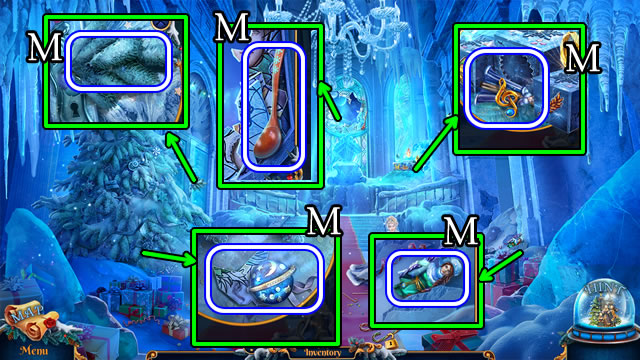
- Place 3/3 LIGHTBULB; select switch (L) for HOP (M); receive VIOLIN.
- Go left.
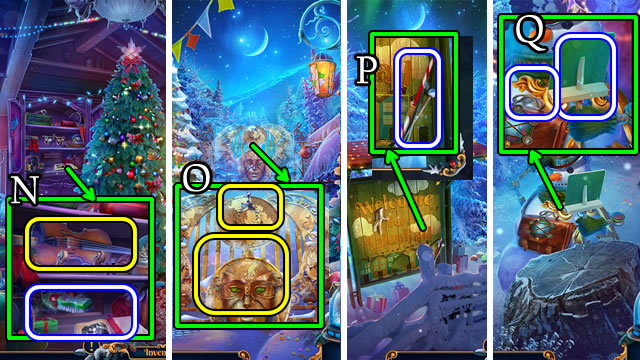
- Place VIOLIN; take BRUSH, ORNAMENTS (N).
- Go forward.
- RIBBON, CINNAMON STICKS and ORNAMENTS on WREATH BRANCHES for FANCY WREATH.
- Use BRUSH, PAINTBRUSH AND PAINT and FANCY WREATH (O); speak to character.
- Go forward.
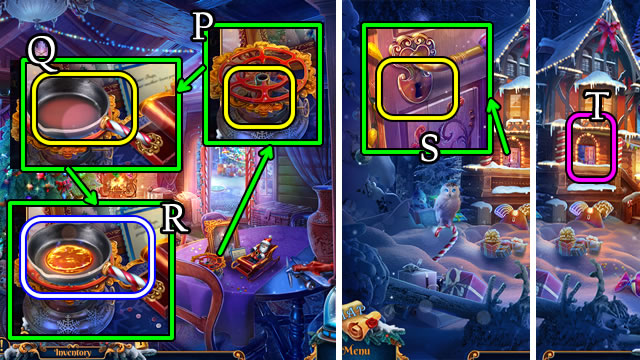
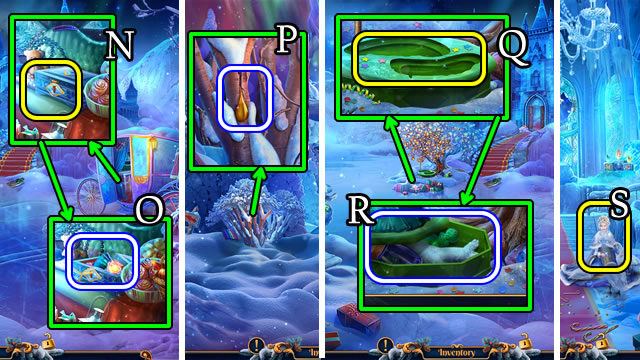
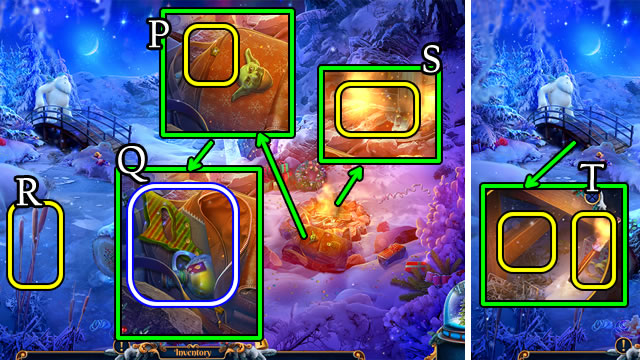
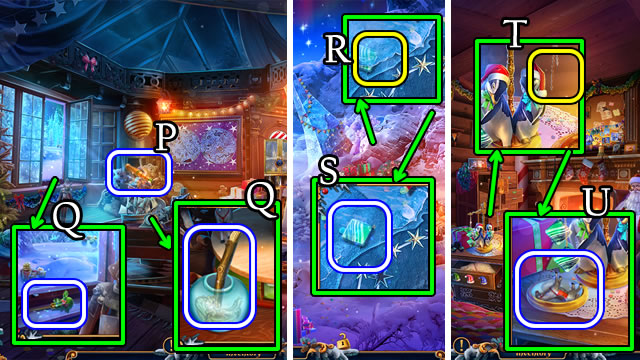
- Take CLOCK HAND, DRUMSTICKS (P).
- Take SNOW SHOVEL, BENT SLEIGH RUNNER (Q).
- Go down, then left.
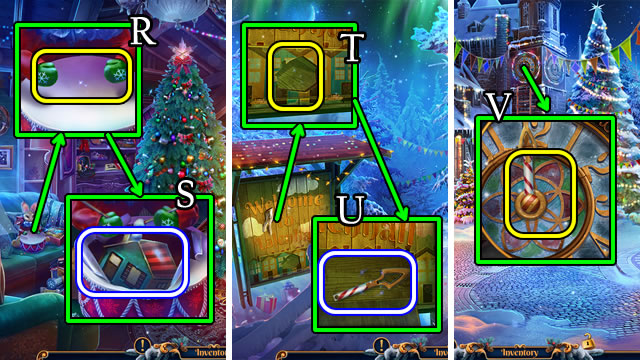
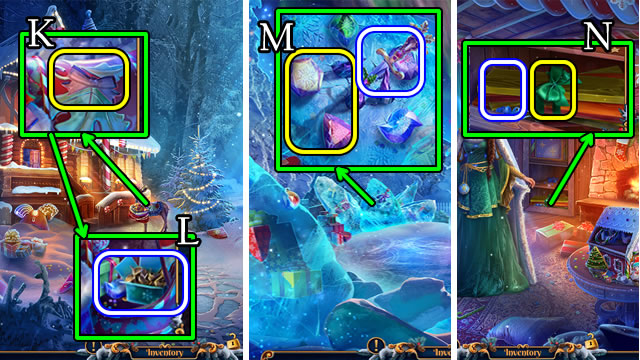
- Place DRUMSTICKS (R); take WOODEN HOUSE (S).
- Go forward 2x.
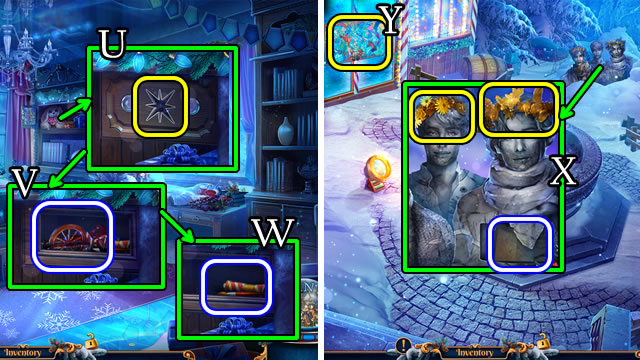
- Place WOODEN HOUSE (T); take CLOCK HAND (U).
- Go down.
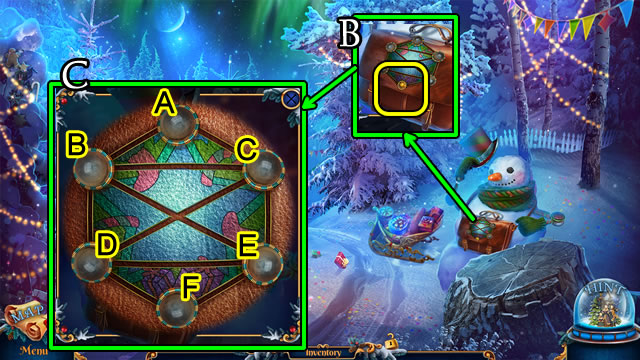
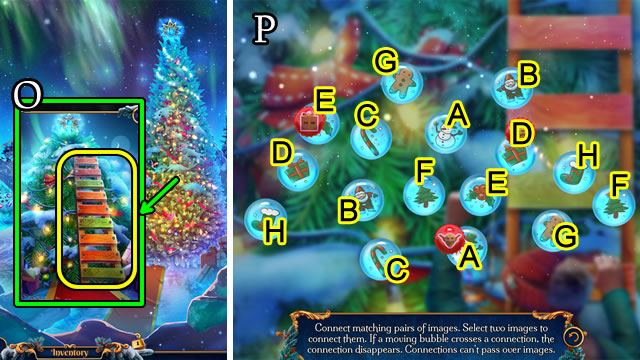
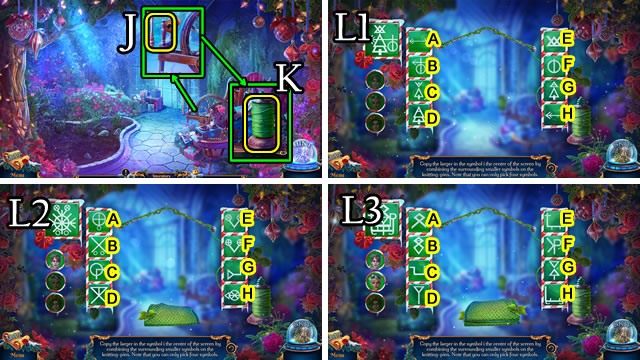
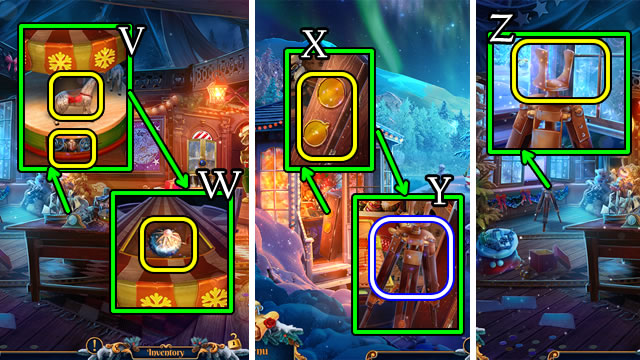
- Place CLOCK HAND 2x (V).

- Solution (W1). (D-F)-(E-C)-(B-D)-(C-G)-(A-B)-(C-H).
- Solution (W2). Rotate gears: A-B-Cx3-D-Ex3-Fx2-Gx2-Hx2.
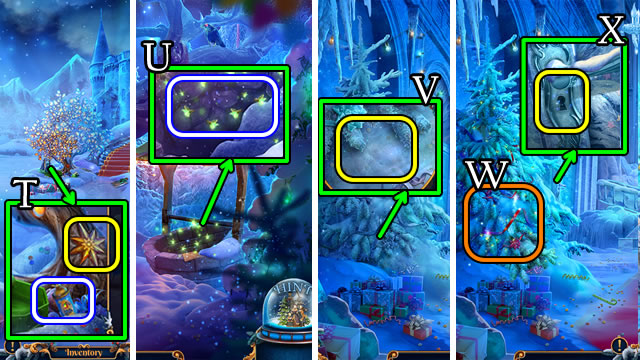
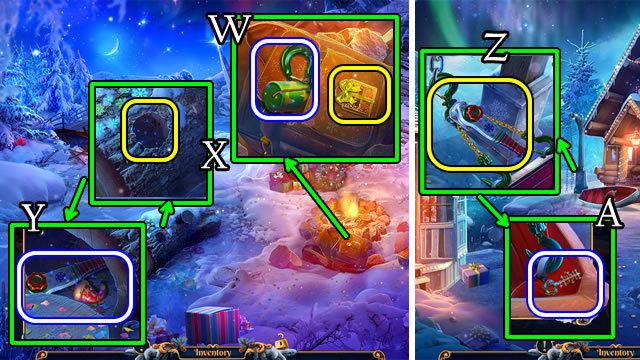
- Take note, OILCAN.
- Go forward.
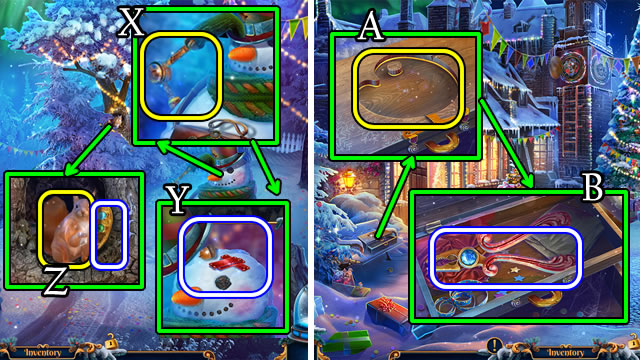
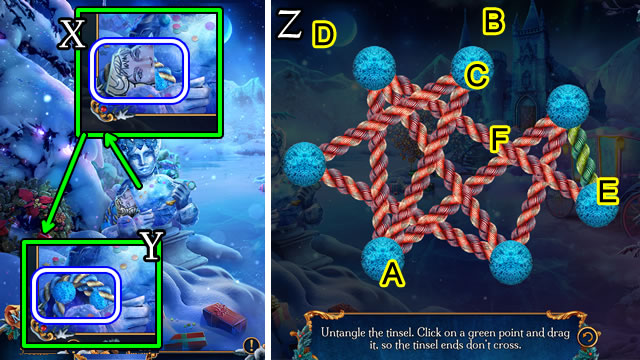
- Use OILCAN (X); take METAL FASTENERS, ACORN (Y).
- Give ACORN (Z); receive PALETTE SHAPE.
- Go down.
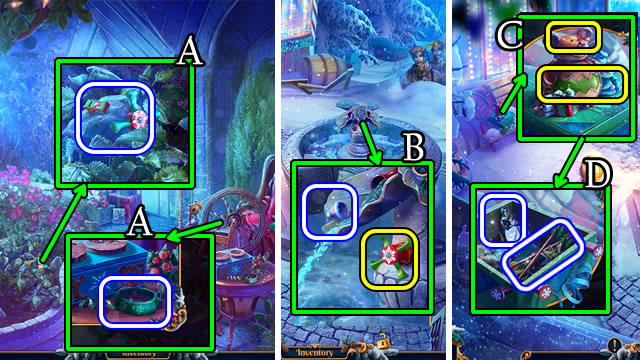
- Place PALETTE SHAPE (A); take PLIERS (B).
- PLIERS on BENT SLEIGH RUNNER.
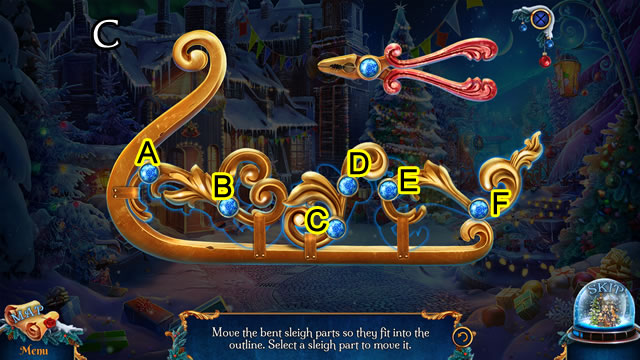
- Solution (C). Ax3-Bx3-Cx2-Dx3-Ex3-Fx2.
- Take SLEIGH RUNNER.
- Go forward.
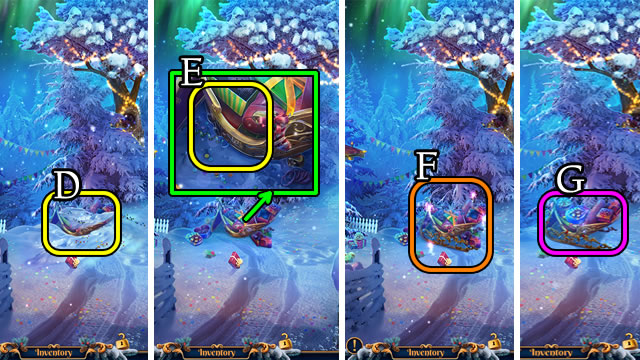
- Use SNOW SHOVEL (D); place SLEIGH RUNNER, METAL FASTENERS (E) for HOP (F); select (G).
- Go forward.
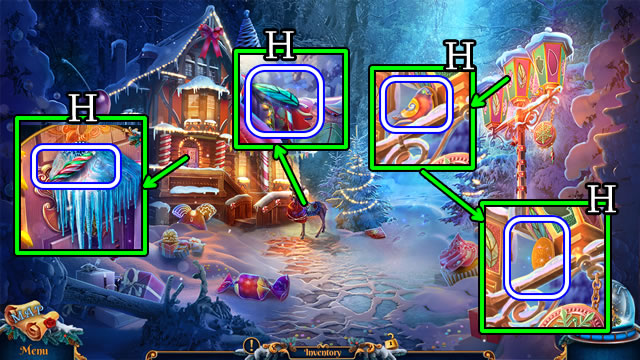
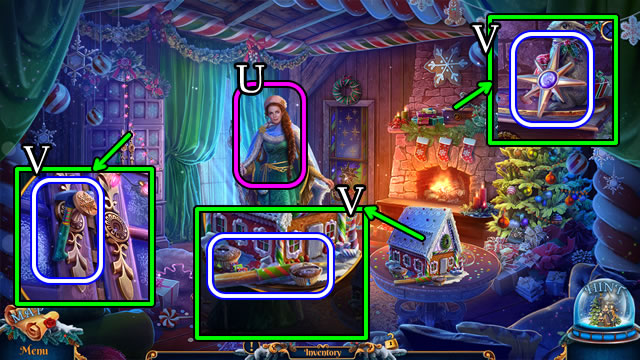
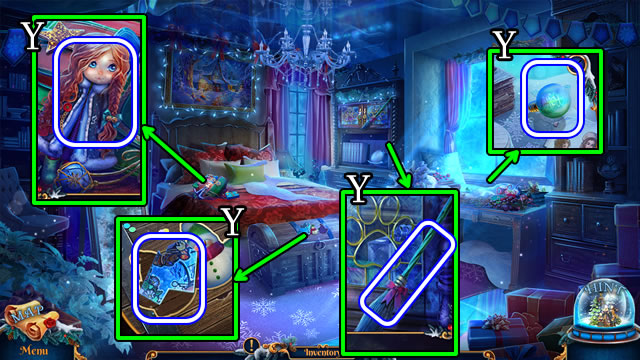
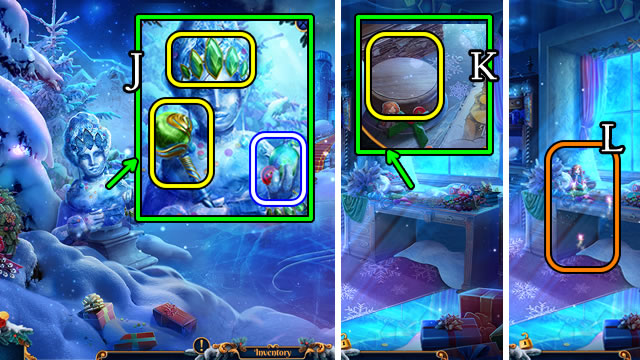
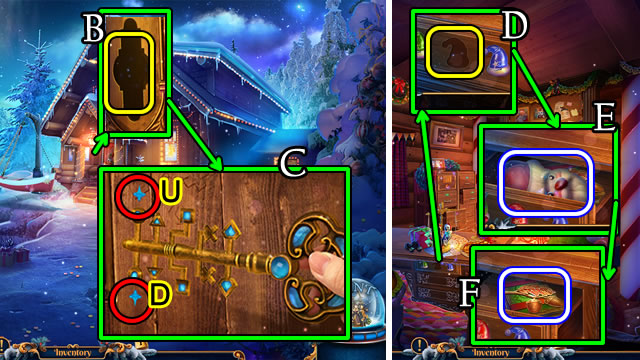
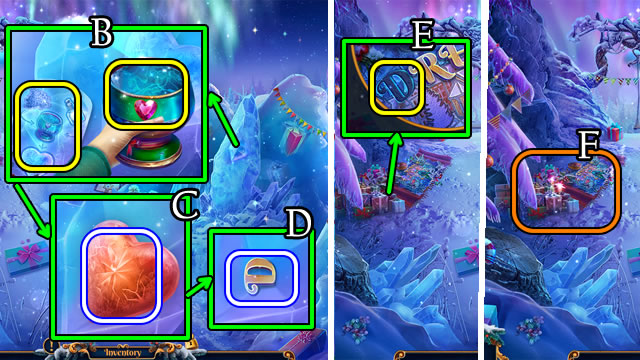
- Select house; take 1/3 ICICLE PENDANT; STAINED-GLASS LEAF; BIRD, COIN (H).
- Go down.
- Use COIN; take ANTLER (I), STAINED-GLASS FLOWER (J).
- Go forward.
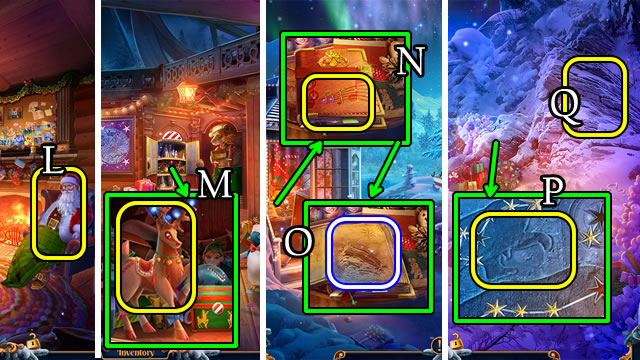
- Place STAINED-GLASS LEAF, STAINED-GLASS FLOWER (K); open; take BURNING CANDLE (L).
- Use BURNING CANDLE; (M) receive KEY PIECES; take FOREHEAD DECORATION (N).
- Place FOREHEAD DECORATION, ANTLER (O) for MINI-HOP; receive MOLDING CLAY, TOY FRYING PAN.
- Return to Inga's House.
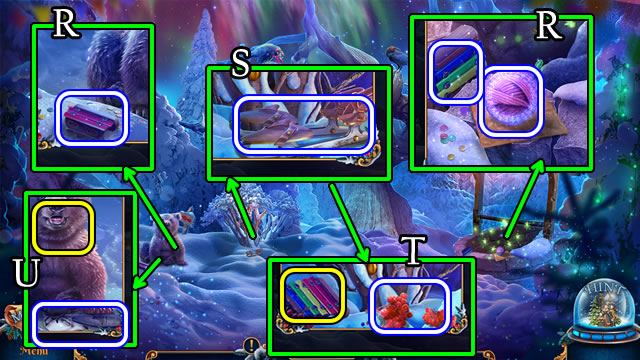
- Use BURNING CANDLE (P); place TOY FRYING PAN, COIN (Q); take MOLTEN METAL (R).
- MOLTEN METAL, MOLDING CLAY on KEY PIECES for HOUSE KEY.
- Return to Forest Edge.
- Place, select HOUSE KEY (S).
- Go (T).
Chapter 2: Sorceress
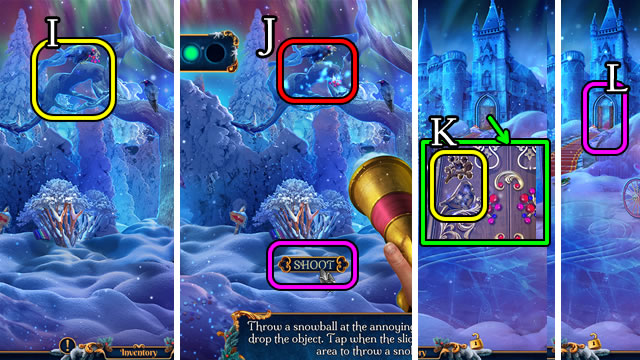
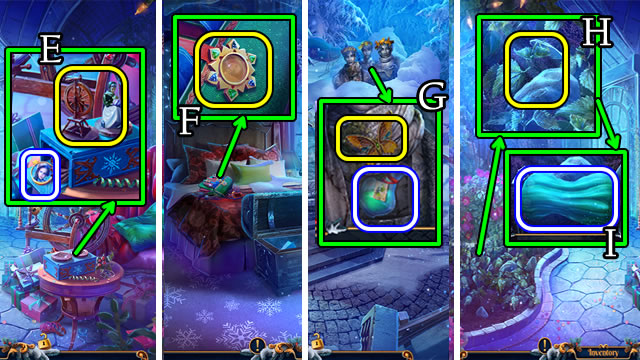
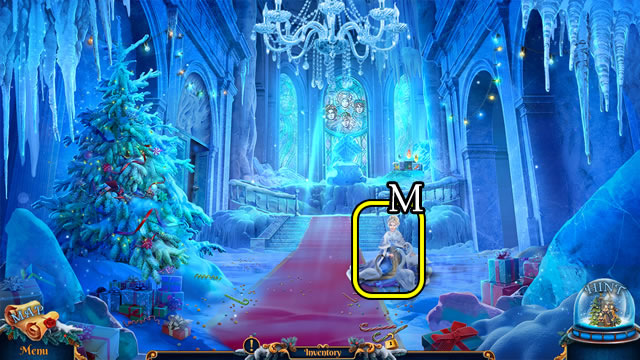
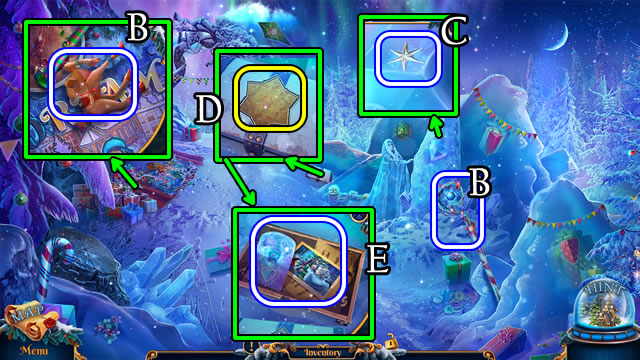
- Speak to character (U); play MINI-HOP; receive MAGICAL LANTERN; speak to character; receive 2/3 ICICLE PENDANT.
- Take STAR INSERT; HAMMER; PEG (V).
- Go down 2x.
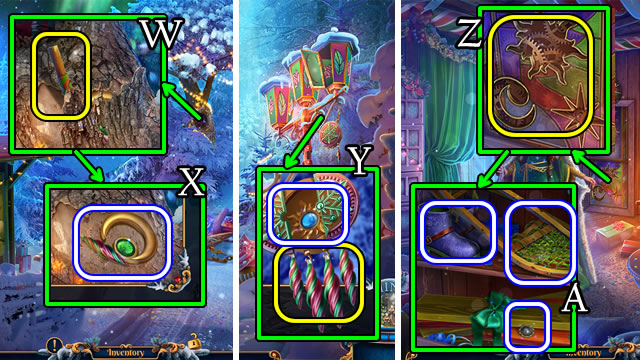
- Use PEG, HAMMER (W); take 3/3 ICICLE PENDANT, MOON INSERT (X).
- Go forward.
- Place 3/3 ICICLE PENDANT; take SUN INSERT (Y).
- Go forward.
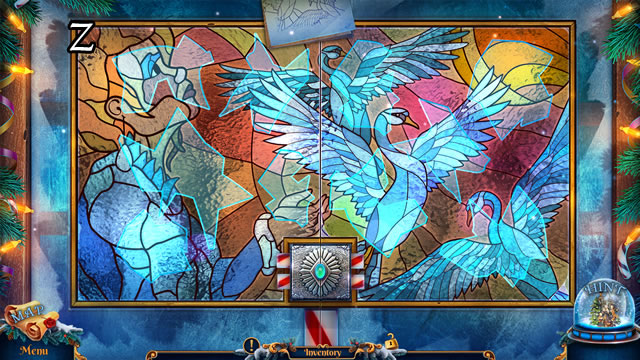
- Place STAR INSERT, MOON INSERT and SUN INSERT (Z); open; take BRIGHT BUTTON, OLD SNOWSHOES and SNOW BOOTS (A).
- Go down 2x.
- Place BRIGHT BUTTON (B).
- Solution (C). A-B-C-D-E-F-D-B-E-C-A.
- Take BUNNY STATUETTE, GINGERBREAD SNOWMAN and SNOWSHOE STRAPS.
- Go forward 2x.
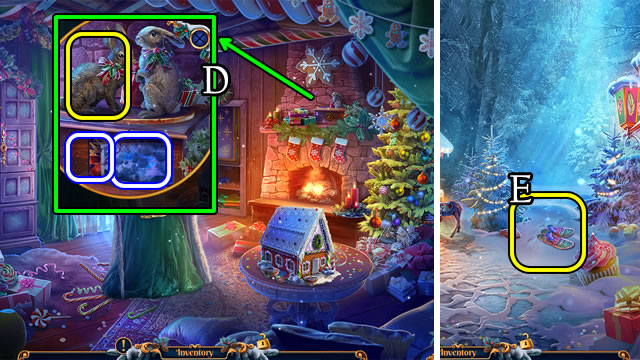
- Place BUNNY STATUETTE; take FOREST MAP, TWINE (D).
- Go down.
- TWINE, SNOWSHOE STRAPS and SNOW BOOTS on OLD SNOWSHOES for SNOWSHOES.
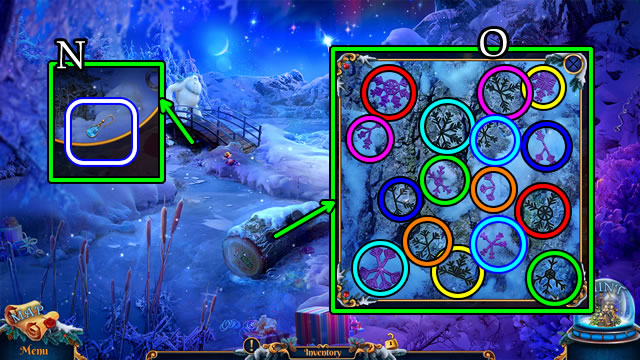
- Place SNOWSHOES, FOREST MAP (E).
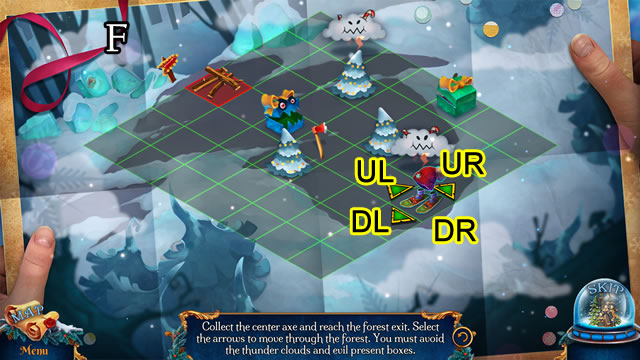
- Solution (F). URx2-ULx3-DL-UL-DR-DL-UR-UL-DR-UL-DL-ULx2.
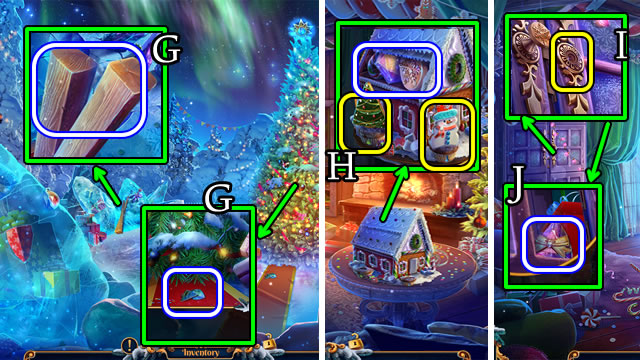
- Take LADDER BASE; GINGERBREAD TREE, 1/4 MAGICAL STONE (G).
- Return to Sorceress' House.
- Place GINGERBREAD SNOWMAN, GINGERBREAD TREE; take CUPBOARD KNOB, 2/4 MAGICAL STONE (H).
- Place, select CUPBOARD KNOB (I); take 3/4 MAGICAL STONE, BOW DECORATION (J).
- Go down.
- Place BOW DECORATION (K); take 4/4 MAGICAL STONE, NAILS (L).
- Return to Christmas Glade.
- Place 4/4 MAGICAL STONE; take DAGGER, MOTHER'S BROOCH (M).
- Return to Sorceress' House.
- Use DAGGER; take WOODEN PLANKS (N).
- Return to Christmas Glade.
- WOODEN PLANKS, NAILS and HAMMER on LADDER BASE for LADDER.
- Place LADDER, MAGICAL LANTERN (O).
- Solution (P). (A-A)-(B-B)-(C-C)-(D-D)-(E-E)-(F-F)-(G-G)-(H-H).
- Receive LANTERN WITH LIGHTS.
- Return to Sorceress' House.

- Give LANTERN WITH LIGHTS (Q); speak to character.
Chapter 3: Ice Castle
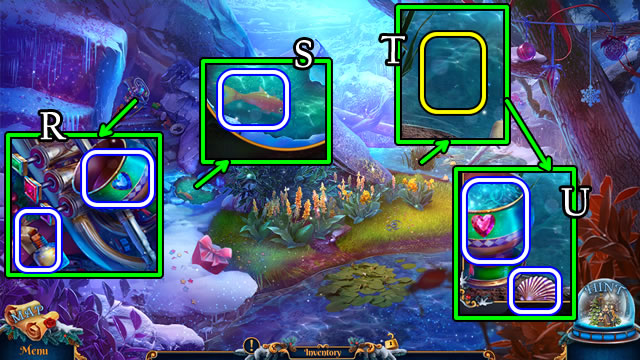
- Take ROUTE CLUE, note and 1/2 XYLOPHONE PART; 2/2 XYLOPHONE PART (R).
- Take OLD SKATES (S); place 2/2 XYLOPHONE PART; use CANDY CANE; take BERRIES (T).
- Give BERRIES; take 1/5 PICTURE PIECE, GRINDSTONE (U).
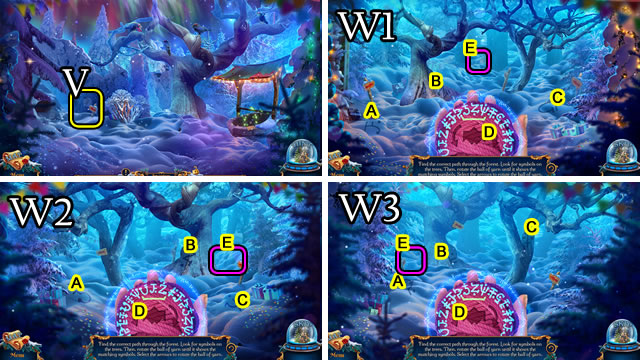
- Place ROUTE CLUE (V).
- Solution (W1). A-B-C-Dx2-E.
- Solution (W2). A-B-C-Dx2-E.
- Solution (W3). A-B-C-Dx4-E.
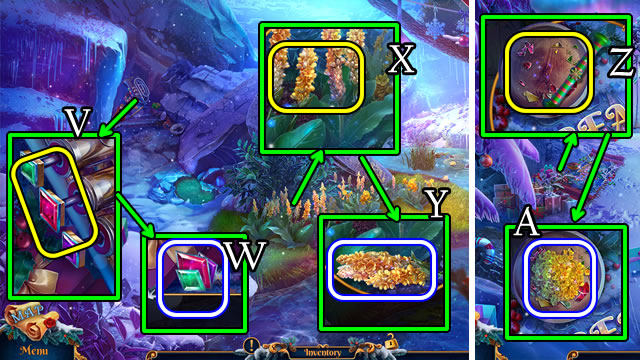
- Take 2/5 PICTURE PIECE (X), ROPE GARLAND (Y).
- Inspect ROPE GARLAND.
- Solution (Z). Drag A to B; C to D; E to F.
- CANDY CANE on ROPE GARLAND for GARLAND WITH HOOK.
- Go down.
- Use GARLAND WITH HOOK (A); take CRYSTAL BRACELET, LACES (B).
- Go forward.
- LACES, GRINDSTONE on OLD SKATES for SKATES.
- Use SKATES (C).
- Take SNOW GUN; 3/5 PICTURE PIECE (D).
- Place CRYSTAL BRACELET; take FORGED HANDLE (E).
- Place, select FORGED HANDLE (F) for MINI-HOP; receive CARPET.
- Place CARPET (G); take 1/3 ICY BRANCH (H).
- Go down.
- Use SNOW GUN (I).
- Solutions vary (J).
- Take DOOR DECORATION.
- Go forward.
- Place BIRD, DOOR DECORATION (K); select door.
- Go (L).
- Speak to character; play MINI-HOP; receive KEY.
- Take 2/3 ICY BRANCH; PAINTED SPOON; TREBLE CLEF, WINTER FIGURINE; GLASS PLANET, 4/5 PICTURE PIECE; BROKEN GRYLA FIGURINE (M).
- Go down.
- Use KEY (N); take MAGIC LIGHT, FIGURINE PART (O).
- Go down.
- Use PAINTED SPOON for RESIN (P).
- Go forward.
- FIGURINE PART, RESIN on BROKEN GRYLA FIGURINE for GRYLA FIGURINE.
- Place WINTER FIGURINE, GRYLA FIGURINE (Q); take 3/3 ICY BRANCH, JAR and RESTORATIVE MEDICINE (R).
- Go forward.
- Give RESTORATIVE MEDICINE (S); speak to character; receive DEPLETED CRYSTAL.
- Go down.
- MAGIC LIGHT on DEPLETED CRYSTAL for MINI-HOP; receive AMBER TREE CRYSTAL.
- Place AMBER TREE CRYSTAL; take MAGIC COLORS (T).
- Go down.
- Use JAR (U) for JAR OF FIREFLIES.
- Go forward 2x.
- Place 3/3 ICY BRANCH, MAGIC COLORS and JAR OF FIREFLIES (V); play HOP (W); receive GRYLA'S KEY.
- Place, select GRYLA'S KEY (X).
- Go left.
- Select window; take 1/3 SPOTLIGHT BULBS; BROOM; GRYLA'S OLD DOLL; 5/5 PICTURE PIECE (Y).
- Go down.
- Place 5/5 PICTURE PIECE (Z).
- Solution (A).
- Take WINTER'S TIARA.
- Use BROOM (B); take SNOWMAN SHAPE, PAW KNOB (C).
- Go left.
- Place PAW KNOB (D); take SNOWMAN SHAPE (E); select (F), take NEEDLE AND THREAD (G).
- Place SNOWMAN SHAPE 2x (H); take WINTER'S STAFF, SPOTLIGHT BASE (I).
- Go down 2x.
- Place WINTER'S TIARA, WINTER'S STAFF; take BUTTONS, 2/3 SPOTLIGHT BULBS (J).
- Return to Gryla's Room.
- BUTTONS, NEEDLE AND THREAD and JINGLE-BELLS on GRYLA'S OLD DOLL for GRYLA'S DOLL.
- Place GRYLA'S DOLL (K) for HOP (L); receive SMALL STAFF.
- Go down.
- Use SMALL STAFF (M).
- Go right.
- Take 3/3 SPOTLIGHT BULBS, PRUNERS; SCREWDRIVER (N).
- Return to Gryla's room.

- Use SCREWDRIVER (O); take BATTERY (P).
- BATTERY, 3/3 SPOTLIGHT BULBS on SPOTLIGHT BASE for CHRISTMAS SPOTLIGHT.
- Return to Courtyard.
- Place CHRISTMAS SPOTLIGHT (Q); take SUNFLOWER BADGE, GRYLA'S RING (R).
- Go down.
- Place SUNFLOWER BADGE (S); take FLOWER WREATH (T).
- Go left.
- Use GRYLA'S RING (U); take SPINNING WHEEL FIGURINE (V), GOLDEN PAINT (W).
- Return to Courtyard.
- Use GOLDEN PAINT, FLOWER WREATH; take MAGIC DRAWING (X).
- Place MAGIC DRAWING (Y).
- Solution (Z).
- Select doors.
- Go forward.
- Take COLORED KNOB, WHISTLE; MOUSE SCARF (A).
- Go down.
- Place COLORED KNOB; take MOUSE CAP (B).
- Place MOUSE CAP, MOUSE SCARF (C); take SPINNING WHEEL FIGURINE, MAGIC KNITTING NEEDLES (D).
- Go forward.
- Place SPINNING WHEEL FIGURINE 2x; take LITTLE GRYLA CAMEO (E).
- Return to Gryla's Room.
- Place LITTLE GRYLA CAMEO (F) for MINI-HOP; receive IRON BUTTERFLY.
- Return to Courtyard.
- Place IRON BUTTERFLY; take FERTILIZER (G).
- Go forward.
- Use FERTILIZER, PRUNERS (H); select leaf bunch; select, take NETTLE (I).
- Place NETTLE (J); MAGIC KNITTING NEEDLES (K).
- Solution (L1). A-E-F-D.
- Solution (L2). B-E-G-C.
- Solution (L3). A-C-H-D.
- Take THREE NETTLE SHIRTS.
- Go down 2x.
- Give THREE NETTLE SHIRTS (M); speak to character; receive MEDALLION.
Chapter 4: Grandfather Christmas
- Select bridge; take EARRING (N).
- Solution (O).
- Take SAIL.
- Use EARRING (P); take OIL, HANDSAW (Q).
- Use HANDSAW (R); receive REEDS.
- SAIL, OIL on REEDS for TORCH.
- Place TORCH for FLAMING TORCH (S).
- Use FLAMING TORCH, HANDSAW (T).
- Go forward.
- Use WHISTLE (U).
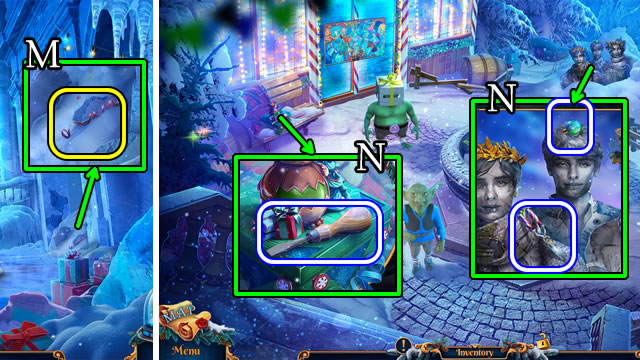
- Take GIFT INSERT; CHAIN HOIST (V).
- Go down.
- Place GIFT INSERT; take SNAP HOOK, FIRECRACKER (W).
- Place FIRECRACKER (X); take SANTA'S CAP, LEVER HANDLE (Y).
- Go forward.
- LEVER HANDLE, SNAP HOOK on CHAIN HOIST for CHAIN HOIST WITH LEVER.
- Place, select CHAIN HOIST WITH LEVER (Z); take KEY (A).
- Place KEY (B).
- Solution (C). U-Dx2-U-D.
- Go forward.
- Speak to character; receive BEARD HANDLE.
- Place SANTA'S CAP (D); take FIGURE HEAD (E), ACORN (F); open, select book.
- Take PHOTO ALBUM; PINECONE (G).
- Go down.
- Place ACORN, PINECONE (H) for HOP (I); receive WINTER TILE.
- Place FIGURE HEAD; take DRILL (J).
- Go down.
- Use DRILL (K); take AUTUMN TILE, 1/2 GEMSTONE (L).
- Go forward 2x.
- WINTER TILE, AUTUMN TILE on PHOTO ALBUM; play MINI-HOP; receive CODE.
- Place BEARD HANDLE, CODE (M); take WORKSHOP KEY (N).
- Place, select WORKSHOP KEY (O).
- Go forward.
- Select, take BROKEN TELESCOPE (P).
- Take RESIN; AWL (Q).
- Go down 3x.
- Use AWL (R); take 2/2 GEMSTONE (S).
- Go forward 2x.
- Place 2/2 GEMSTONE (T); take HORSE FIGURINE, LENS (U).
- Go forward.
- Place HORSE FIGURINE; use SCREWDRIVER (V); take GLASS COMET (W).
- Go down 2x.
- Place GLASS PLANET, GLASS COMET (X); take TRIPOD (Y).
- Go forward 2x.
- LENS, RESIN on BROKEN TELESCOPE for TELESCOPE.
- Replace TRIPOD; place TELESCOPE (Z).

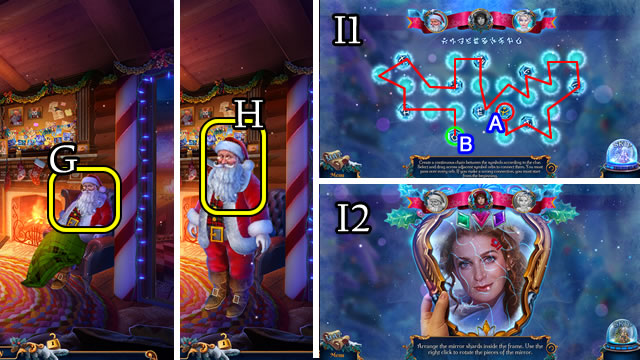
- Solution (A). Use A, B and C to focus as shown (D); use arrows (E) to find images 1-5.
- Go forward.
- Take STAFF; BROKEN REINDEER (B).
- Use STAFF for 1/3 STAR (C).
- Place MEDALLION (D); take WARMTH POTION RECIPE, GRYLA'S PHOTO (E).
- Go down 2x.
- Place GRYLA'S PHOTO (F) for HOP (G); receive GRANDFATHER CHRISTMAS'S SIGNET.
- Go forward.
- Use GRANDFATHER CHRISTMAS'S SIGNET (H); take BUTTERFLY NET, 2/3 STAR (I).
- Go forward.
- Use BUTTERFLY NET (J); take REINDEER ANTLER, GRYLA'S LETTER (K).
- Go down 2x.
- Give GRYLA'S LETTER (L); speak to character; receive MIRROR, REINDEER HEAD.
- Go forward.
- REINDEER HEAD, REINDEER ANTLER on BROKEN REINDEER for REINDEER FIGURINE.
- Place REINDEER FIGURINE (M) for MINI-HOP; take MUSICAL NOTE.
- Go down 2x.
- Place TREBLE CLEF, MUSICAL NOTE (N); take MAP (O).
- Return to Near River.
- MIRROR for 3/3 STAR.
- Place 3/3 STAR, MAP (P) for MAP WITH HIDDEN PATH.
- Place MAP WITH HIDDEN PATH (Q).
- Go to Waterfall Source.
- Take DROPS OF WARMTH, GOBLET (R).
- Use GOBLET; take GOLDFISH (S).
- Place GOLDFISH (T); take note, SHELL and SPRING WATER (U).
- Use SHELL (V); take DECORATIONS (W).
- Use SHELL (X); take MEDICINAL FLOWERS (Y).
- Return to Gryla's Cliff.
- Place MEDICINAL FLOWERS (Z); take GROUND FLOWERS (A).
- Place WARMTH POTION RECIPE, SPRING WATER, GROUND FLOWERS and DROPS OF WARMTH (B); take GRANDFATHER CHRISTMAS' HEART (C), LETTER D (D).
- Place LETTER D (E) for HOP (F); receive 1/2 LOTUS.
- Go down 2x.
- Give GRANDFATHER CHRISTMAS' HEART (G); speak to character; receive 2/2 LOTUS.
- DECORATIONS, 2/2 LOTUS and MOTHER'S BROOCH on MIRROR for GRYLA'S REFLECTION.
- Give GRYLA'S REFLECTION (H).
- Solution (I1). Connect from A to B.
- Solution (I2).
- Congratulations, you have completed playing Christmas Stories: The Christmas Tree Forest.