
Walkthrough Menu
- General Tips
- Walkthrough
- Paris, November 3, 2008
- La Valletta, November 4, 2008
- Island of Gozo, November 4, 2008
- La Valletta, November 5, 2008
- Island of Gozo, November 5, 2008
- Istanbul, November 6, 2008
- La Valletta, November 7, 2008
- Island of Gozo, November 7, 2008
- Somewhere, November 8, 2008
- La Valleta, November 9, 2008
- Island of Gozo, November 9, 2008
General Tips
Tips for the Menu Bar:
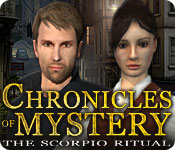
- To get to the Menu Bar, move the cursor to the top of the screen. You will then see tabs for MAIN MENU, SAVE GAME, LOAD GAME, OPTIONS, and NOTES. A complete record of all dialogues will be available under NOTES, so you can refer to it later.
- The NOTES section also includes Sylvie’s diary, which has additional story details.
- When you select a Document or diary entry, you can page through it to read multiple pages.
- There appear to be unlimited Save slots. At least we had two per chapter with no difficulty.
- Saved games are saved with a thumbnail picture and a timestamp.
Tips for the Cursor and Character Movement:
- The cursor will turn into an eye anywhere you can click to get some more background information about items in the scene.
- The cursor will turn into a magnifying glass anywhere you can zoom in for a closer look.
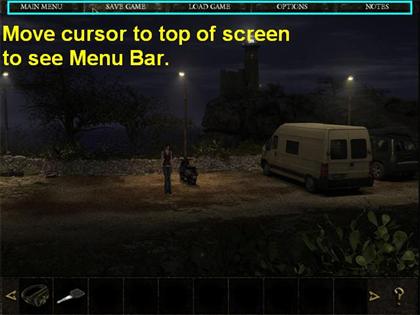
- The cursor will turn into a hand anywhere you can interact with the scene or pick up an object.
- When the cursor is a hand, identifying information about the object the cursor is touching will appear at the very top of the scene.
- Click wherever you want Sylvie to go.
- Sometimes it is easier to make Sylvie go to an area that doesn’t have a text label.
- Double-click to make Sylvie run.
- The cursor will turn into a sideways arrow anywhere there is an exit from the current scene.
- You will be able to go back and forth between available locations in the Chapter.
- If Sylvie refuses to leave an area, it means there is an action or object that you missed, but it may be in any of the available locations.
Tips for Using Items from your Inventory:
- Inventory items appear in the slots in the inventory tray at the bottom of the scene.
- Use the arrows on the side to scroll through your inventory.
- Right-click to get a zoom view of an item from your inventory.
- Once you have the zoom view, you may be able to left-click on parts of the item, like removing the top from a bottle.
- Left-click to pick up an item from your inventory.
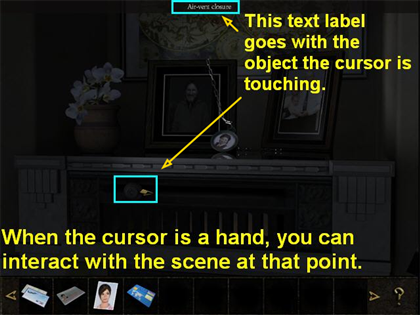
- If you want to use an item from your inventory in the scene, first left-click to pick up the item. Now position it in the scene so that the text label at the top of the scene mentions the inventory object; left-click again to use the object.
- You can only use an inventory item in the scene if the cursor is at a spot where its name appears in the top text label.
- Right-click to return an item to your inventory.
- Some items will move on their own from the inventory slots at the bottom of the screen to the Documents section of your Notes. For example, Sylvie’s credit card goes into your inventory when you first collect it, but then moves to Documents.
- To view items which moved out of your inventory, move the cursor to the top of the screen so you get the Menu Bar, then choose NOTES.
Walkthrough:
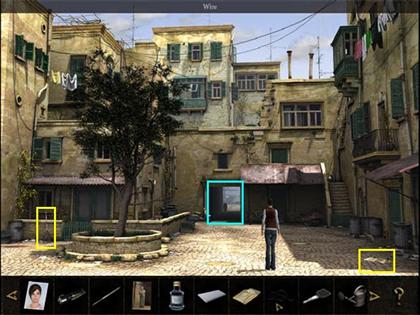
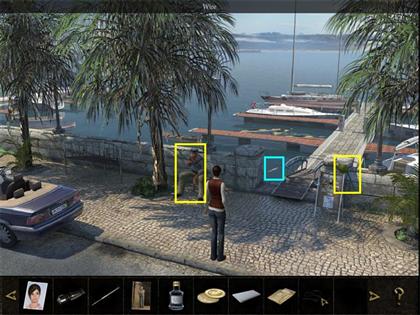
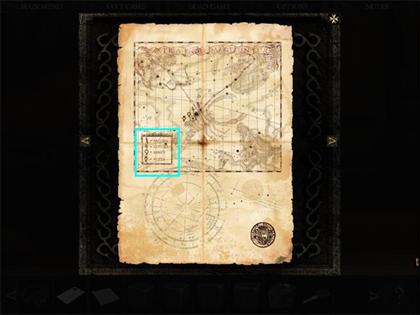
- Items you can collect or interact with are marked in yellow.
- Parts of the scene you can examine for more detail are marked in light blue.
Introduction
- Watch the movie. Some knights are carrying a mysterious box marked with a scorpion. Part of the rock causeway breaks, and the knights stumble, causing a rod to come loose from the center of the scorpion design. A bright light shoots up from the box, and most of the knights fall to the ground. One, who fell below the level of the box, is still conscious, and manages to reach up and push the rod back in. The light shuts off.
Paris, November 3, 2008
- Sylvie receives a telephone call from her Uncle Olivier, who invites her to come to Gozo to view an underground temple he has found hidden beneath some other ruins. Sylvie agrees, and must quickly prepare for the trip.
- Take the airline ticket from the top of the desk.
- Open the desk drawer.
- Take the passport, credit card, and extra photo.
- You can try to look at Sylvie’s books, but she doesn’t have time.
- Go to the fireplace. Look at the family photos on the mantel.
- While still in the zoom scene, left-click on the air vent on the left side of the mantel to close the fireplace vent and put out the fire.
- Collect your suitcase from the right of the scene.
- Try to go out the door. Sylvie will say she needs to turn everything off first and go back to turn off the light. This will end the Chapter.
La Valletta, November 4, 2008
- You arrive at Uncle Olivier’s study, but he is missing!
- Your starting inventory includes the old photo and a scooter key.
- The other items you collected from your desk in Paris have moved to the Documents file under NOTES on the Menu Bar.
- Walk to the desk.
- Open the unlocked drawer.
- Collect a photo of your uncle, a bottle with some dried glue, a ballpoint pen cartridge, and the flashlight. You can right-click on any of these items in your inventory to get a closer look.
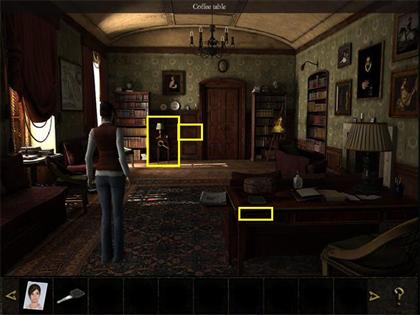
- There is a small table labeled “coffee table” just to the left of the door into the hallway. Walk to it.
- Open the jewelry box on top of the coffee table.
- Collect the Malta coins inside the jewelry box.
- Also examine the pipe on the table.
- Now look at the paneling on the wall above the table. You will find one panel has a lock and a crack, but you can’t open it yet. You remember that there is a secret compartment behind the panel.
- Go through the door into the hallway.
- Go to the Recess just to the right of the door that goes back into the study. This is directly opposite the secret compartment.
Vase in the Recess Puzzle
- There is a vase in the compartment. You can move each of its sections individually. Turn the pieces until you can read the Latin phrase on the vase, Ad Majorem Gloriam Dei.
- When you have all of the pieces set correctly, you will hear a click.
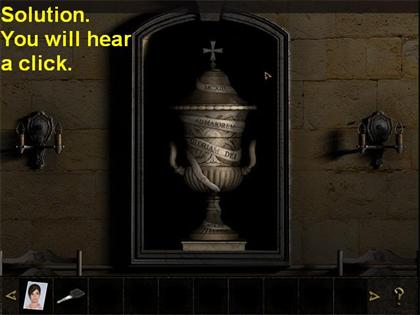
- The phrase is a version of a Latin motto, Ad Majorem Dei Gloriam, meaning “For the Greater Glory of God,” adopted by many Jesuit organizations. It’s not clear whether this unusual word order is supposed to have meaning in the game.
- Time to go back into the study. Go back through the grey door.
- This time, try the scooter key on the crack in the panel. The secret compartment will open, although the key will be bent.
- You will see two objects: an old book and a letter.
- First examine the book. Sylvie will have a brief vision of the Knights, which she thinks may relate to a painting.
- Keep clicking through the pages of the book. You will read about the history of the Knights Hospitaller (the Knights of Malta), and eventually come to a section of the book written in some kind of cipher.
- Now examine the letter. This will turn out to be two different letters, so make sure you page through and read both. One is to a man named James Anderson, a translator who has been working on the cipher.
- The other letter is to you. It explains that the underground temple was taken over by order of the government, and your uncle is no longer allowed access. However, he believes he has solved part of the mystery, and he is going back to the temple site on Gozo (the second largest island in the Malta region) to test his theory.
- You decide to try to get in touch with James Anderson.
- Go back to the hallway.
- You can check the mailbox on the door, but it will be empty.
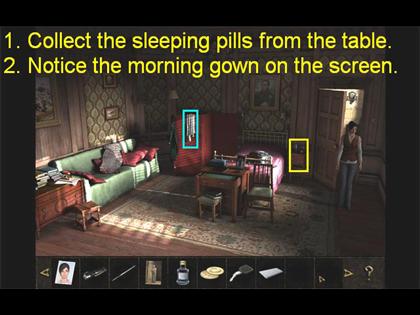
- Go upstairs to your uncle’s bedroom.
- Odd—his morning gown/robe is still here. He certainly wouldn’t leave on a long trip without it. But Gozo is just a quick day trip from La Valletta, so perhaps he went there.
- Check the night table next to the bed.
- You will find some sleeping pills. Collect them.
- You can look around the room some more, but there’s nothing else important to find now.
- Go back downstairs.
- Look at the double doors to the outside. When you click on the left one, you will be outside the flat.
- There is a man standing there.
- If there is no man, and Sylvie starts talking about “Siesta time,” you have more to do in Uncle Olivier’s flat.
- Once the man is there, talk to him as much as possible. He will tell you he is a police officer named Granc. He suspects your uncle of stealing some tablets from the dig site after he lost permission to do his research there.
- Go over and try your key in the scooter. Hmmm, it’s bent from opening the secret compartment. You’ll have to fix it before you can use the scooter.
- There is some wire on the ground on the left. Pick it up.
- Move the cursor to the bottom of the scene and exit.
- You are now in the Plaza. You will see an old man sitting on a bench by the fountain.
- Talk to the old man. He remembers you from when you were a little girl, but he doesn’t know where your uncle is.
- Go to the man standing in front of the corner shop and talk to him. His name is Kawlata. He also knows you and your uncle.
- Mr. Kawlata will fix the scooter key if you leave it with him. You agree to go to the docks and take a message to his brother: “This evening, no.”
- There is a narrow street between the two buildings on the right. The text label is “Backstreet.”
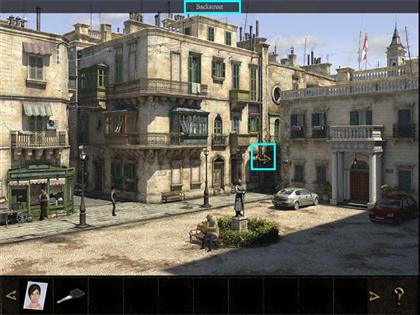
- First you will go into the Courtyard. There is nothing to see here yet, just some trashcans and the back windows of the flats.
- Straight ahead you can see a boat through an archway. That is the way to the Marina, so go there.
- At the Marina, you see a parrot sitting on a sign on the right, and another old man sitting on a bench on the left. This is Mr. Kawlata’s brother.
- Talk to the brother and give him the message.
- The parrot will continually interrupt your conversation, with surprisingly on point comments.
- Don’t bother paying to look at the pier now.
- Go talk to the parrot, also; It wants a fish.
- Look around and you will see a fish swimming near the pier, but there is no way to get it.
- Go back into the courtyard. This time when you look around, you will see several things you can pick up.
- There is a newspaper on the ground on the right side of the scene. Collect it.
- There is an old fishing net propped against the wall on the left side of the scene. The text label calls this "a leaky ladle." Collect it.
- All of this would be useful, except there are big holes in the net. Maybe you can find some way to fix it.
- Go back to the Plaza, where the corner shop is.
- Look by the fountain. Someone has left a cane.
- Collect the cane.
- Use the cane to hook the watering can next to the fountain.
- Put the cane back when you are done.
- Go over to the corner store.
- Talk to Mr. Kawlata. He will give you back the repaired scooter key. You will automatically pay him; you don’t need to use the coins from inventory.
- You also ask to borrow some pliers.
- Collect the small green pliers from the work table.
- Left-click on the pliers in your inventory and use them on the wire in your inventory. This will cut the wire into small pieces.
- Put the pliers back on the work table by locating the spot that says "pliers + table."
- Right-click on the watering can in your inventory.
- Left-click on the rose, the part at the end of the spout that has holes in it. It will disassemble.
- Left-click on the cut wires and then on the rose.
- Left-click the rose-plus-wires and then on the “leaky ladle” to repair the fishing net.
- Go back to the backstreet.
- Go through the courtyard to the marina.
- Net the fish.
- Give the fish to the parrot.
- The parrot doesn’t want the fish. (About now you should start to suspect that the old man is a ventriloquist and this was all his idea of a joke.) Don’t worry; just keep the fish in your inventory. Sylvie will have a use for it later.
- Continue talking to the parrot. You should be able to ask it about James Anderson’s address.
- If you don’t have an option to ask about James Anderson, you either didn’t open the secret compartment in the study in Uncle’s flat, or you didn’t read the letter completely.
- In this game just collecting a document isn’t enough to proceed. In order for Sylvie to have the information she needs, you must first collect a document, then left-click on it in inventory to get a zoom scene, and then right-click on the document in the zoom scene to unfold it and read it.
- If you have the letter from the secret compartment but you just didn’t read it yet, exit the conversation with the parrot. Read the letter by doing the left-click, right-click sequence. Then talk to the parrot again and you should be able to ask about James.
- Once you ask about James, the parrot will tell you his address: Pjazza Skola 5-R.
- Remember you can always check the NOTES section if you need to review previous dialogue for things like phone numbers and addresses. Just move the cursor to the top of the screen to see the menu bar with the NOTES tab.
- Wrap the fish in the newspaper if you didn’t already.
- Head back to the courtyard. Sylvie will automatically put the fishing net back where she found it when you go through the courtyard.
- Go back to the Plaza.
- There’s James Anderson’s building around the corner from Uncle’s flat! Walk to it.
- Call 5-R on the phone. No answer.
- Go back to the street in front of Uncle’s flat.
- Use the repaired key on the scooter. This ends the Chapter. (If the scooter won’t start, you either missed something in the Chapter or you didn’t have Mr. Kawlata fix the key after you bent it.)
Island of Gozo, November 4, 2008
- You arrive in a parking lot and park the scooter.
- You notice a police car to the right, but it’s empty.
- Look around the parking lot; you will find a press pass on the ground. Sylvie decides she should probably hide her connection with Uncle Olivier for now.
- Go to the cactus in the front of the scene and take a leaf. It’s sticky.
- Right-click on the bottle of dried glue, then left-click on its cap to open it.
- Now combine the cactus leaf and the glue bottle. The text label will change to “bottle with glue” instead of “bottle with dried glue.”
- Left-click on the press pass in your inventory; then left-click on the glue bottle. Now the label says “press pass with glue.”
- Left-click on Sylvie’s old picture, then on the press pass. Voila! Fake ID.
- Leave the scene to the left, to the area marked Camping.
- There is an archaeologist sitting in a chair by a trailer. Speak with him. Eventually he will tell you to talk to the police if you want to see inside the temple.
- Keep walking left.
- Go into the Temple.
- A policewoman is on duty. She wants some coffee. If you can bring her a cup, she’ll let you inside briefly.
- Try to look at the generator. She will tell you to keep away from it.
- Go back to the Camping area. The archaeologist has gone inside the trailer and is asleep.
- Look at the cases on the ground to the right of the trailer.
- Take the gas can.
- Go look at the door to the trailer. It is locked.
- Take the ballpoint pen cartridge from your inventory and bend it on the grate/step just below the door. (If by chance you tried the ballpoint cartridge on the secret compartment in Uncle Olivier’s study, it is already bent and you can skip this step.)
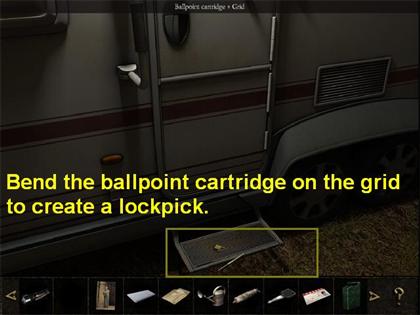
- Now use the bent cartridge as a lockpick to open the door.
- Go inside. It is very dark.
- Take the flashlight from your inventory and hang it on the hook by the shelf above the computer. This will give you enough light to see.
- Now you need to collect several things. Take the brush and the spatula from on top of the boxes.
- Take the thermos of coffee from behind the laptop.
- Take the metal detector from the desk.
- Click on the drawer of the desk.
- It’s hard to see, but there are two photos in the drawer. One is a photo of a tablet with strange writing, and one is a photo of four tablets. Take both.
- Shut the drawer again.
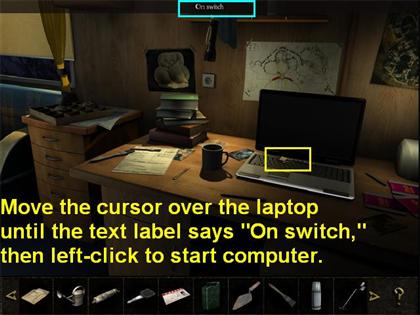
- Move the cursor over the laptop keyboard until it says “on switch;” then click it to turn on the computer.
- You will see a photo of the temple. Click on the printer icon to print it. You can’t pick up the print-out until you leave the zoom scene, though.
- Once you are out of the zoom scene, click on the printer on the right of the laptop to take the print-out.
- From now on, the print-out will be available in Documents under NOTES if you want to look at it again.
- Once you have taken everything you need, Sylvie will automatically pick up the flashlight. If she does not, you’ve missed an item, probably a photo in the drawer.
- Once you have everything go back outside.
- Now right-click on the thermos in your inventory so you get a zoom scene of it. Left-click on the cap to remove it.
- Combine the sleeping pills from your inventory with the coffee in the open thermos. This will make a “sleeping mixture.”
- Go back to the temple.
- Give the police officer the coffee. She will fall asleep.
- Now you can examine the generator.
- You can put the gas in by removing the cap. But it still needs water for the radiator.
- Go back out of the temple.
- Between the temple and the Camping area there is a spring.
- Fill the watering can with water.
- Go back to the Temple.
- Walk back to the generator.
- Put the water in the left side of the generator.
- Now, turn on the On switch and the lights will come on inside the Temple.
- Go inside.
- Walk down the steps on the right.
- Walk to the “Heart” of the chamber, where the scorpion design is on the floor.
- Examine the pedestals.
- You will see a portal off on one side. Walk over to it. Sylvie will have another vision of a Knight.
- As she walks off, she will see the shadow of a man. This can’t be good!
- Go back up the stairs and out of the Temple.
- Walk over to the fresh dig site.
- Use the metal detector. Look for a place where the text label says “Metal Detector + Metal” and the detector is beeping rapidly.
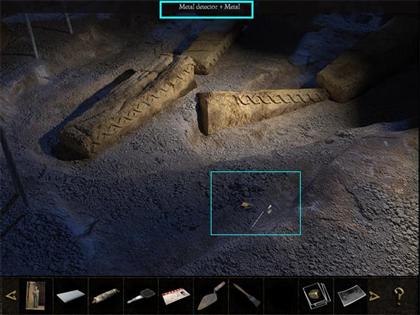
- You will find something near the center of the scene.
- First, use the spatula on the spot where the text label says “Spatula + Metal.”
- Then use the brush.
- You will unearth a ring of a Knight Hospitaller. Collect it.
- Turn off the generator.
- Go back to the parking lot.
- Use the key on the scooter and head back to La Valletta.
- If the scooter won’t turn on, you missed something. Did you see the portal and have the vision? Did you pick up the Knight’s ring from the dig site? Did you collect all of the items from the trailer, including the print-out, and both of the photographs from the drawer?
- Once you have everything, the scooter will start. This ends the Chapter.
La Valletta, November 5, 2008
- You are back in your Uncle’s flat the next morning.
- Go downstairs.
- Go out to the street.
- Walk over to the apartment building where James Anderson lives.
- This time, when you ring 5-R, he will answer.
- Go into James’ apartment.
- Talk with James and eventually give him the letter from your Uncle, and the photograph of the tablet that you found in the trailer. You agree to get the book for him from your Uncle’s flat.
- Go back to Uncle Olivier’s flat.
- Go to the secret compartment and open it.
- When you touch the book, you will have yet another vision.
- Then take the book.
- Go back to James Anderson’s apartment (you don’t need to phone this time, just go straight in).
- Give him the book.
- He will suggest that you be honest with the archeologist at the Temple.
- Take the scooter and go back to Gozo. This ends the Chapter.
Island of Gozo, November 5, 2008
- Check the trailer; the archaeologist is not there. He’s probably at the Temple.
- On your way past the Spring, you will meet a woman tourist. Talk to her. Sylvie decides she is nice.
- On to the temple.
- Talk to the archaeologist. He gives you a lot to think about.
- When you are done, you get a call from James, and happen to repeat the name of the place you’re going to. It’s an art gallery in Istanbul that may have the stolen blocks for sale.
- Go back to the parking lot.
- Take the scooter and leave. You will automatically go back to La Valletta, then on an airplane to Istanbul. This ends the Chapter.
Istanbul, November 6, 2008
- The first person that you see is a rickshaw driver working on his rickshaw. Talk to him. The rickshaw is broken.
- Look around, but there’s nothing else to see in this scene.
- Walk to the right. Now you can see an alley with a car parked, and the window of the art gallery you are looking for.
- Start by going into the alley to the left of the gallery.
- Notice a half-open window in the back of the gallery, but when you start to go towards it, a guard stops you.
- Talk to the guard for a while. He will tell you to go see the sights of the town.
- Go back out to the main street.
- Go right again. Now you can see the front door of the art gallery and another side street just to the right, and a man standing outside his store on the far corner past the art gallery.
- Go into the art gallery.
- There is another guard, and the woman who owns the gallery.
- Go talk to the woman first. Sylvie will have a confusing and silly conversation with the woman. At first she seems to be trying to hint that she would pay ransom for her uncle if he was kidnapped, but the woman doesn’t seem to understand what she’s talking about.
- Eventually she tells the woman her uncle wants to sell his whole collection and she shows the gallery owner the Knight’s ring she took from the temple. The woman wants to have it examined, so that doesn’t go anywhere.
- Also note that the gallery owner comments that Sylvie smells of fish—not surprising, since she still has a fish in her pocket.
- On your way out, stop and look at some of the items.
- Talk to the second guard.
- Leave the gallery.
- Out on the street, go talk to the man outside the tobacco shop, but he hasn’t seen your Uncle, at least not that he can recall.
- On the side street between the gallery and the tobacconist, examine the convertible, a Cabriolet.
- There is a mean cat in the Cabriolet. Sylvie decides she needs a distraction to draw away the guards.
- Now go back to the alley.
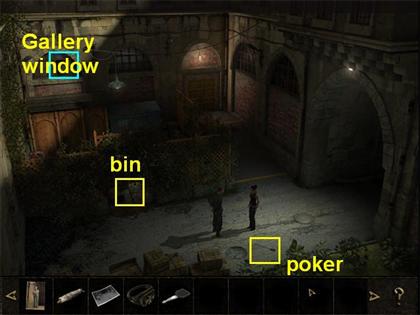
- Find a poker on the ground.
- Use the poker to get a toy ball out of one of the trash bins in the latticed yard on the left.
- You will have to move your cursor around carefully until you find the exact spot that just says “bin” before you can zoom in and see what’s inside it.
- Now that you have the ball and the poker, go back out to the main street.
- Walk back to the Cabriolet.
- Put the ball by the front tire. This will keep the car from rolling in the next steps.
- Give the fish to the cat. The cat doesn’t want it, and runs away.
- Shift the car from Park to Drive. According to Sylvie, this will let the car roll.
- Now the only thing holding the car is the ball. Use the poker to puncture the ball so it has a slow leak.
- Now Sylvie will automatically run all the way back to the alley. This lets the guard see her (giving her an alibi) when the sound of the car crash comes.
- The two guards will talk to each other on their walkie talkies. It was the boss lady’s car, and she’s mad.
- They have to both leave to take it to the garage for repairs.
- Apparently she has a habit of forgetting to put the handbrake on, so no one is surprised, just annoyed.
- With the guards gone, Sylvie has to figure out a way to get into the back of the gallery through the half open window. She is still hoping to find her Uncle. She mentions that she needs to build something like stairs.
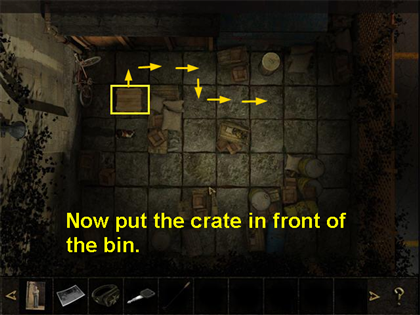
Building the Stairs Puzzle
- Go into the small yard on the left side below the window.
- You will see short crates and tall bins.
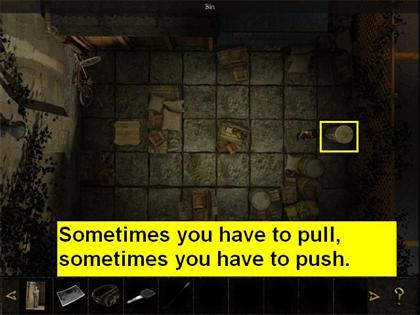
- Only one of the crates and one of the bins can move.
- You need to move the bin until it is next to the back wall.
- Then move the crate until it is in front of the bin. This will make your staircase.
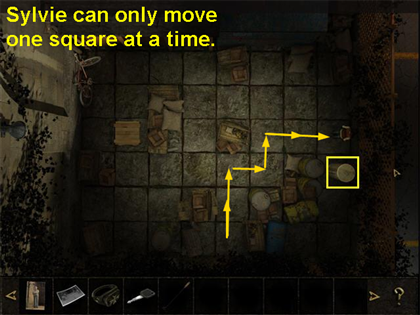
- Sylvie will move one square at a time.
- You need to position her so that she can pull the bin one square away from the right wall.
- Then walk Sylvie all the way around so she can push the bin into place, one square at a time.
- Once the bin is in place, walk Sylvie over to the crate for a similar maneuver.
- There are a few squares where you will think you can pull the crate, but it will go the other way instead. Just go back around and work from the other side.
- There doesn’t seem to be a timer on this puzzle, and it’s pretty easy once you figure out the mechanics of moving things.
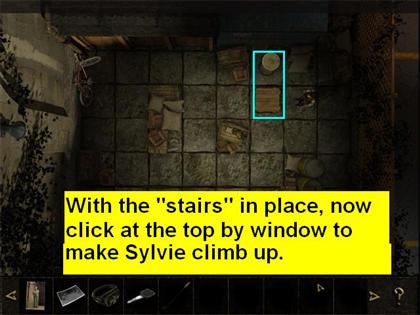
- In fact, the trickiest part is figuring out what to do once you have the bin and crate in place. Sylvie will say “It’s time for some gymnastics.”
- Now you must click on the half-open window, not the staircase you just built, and only then will Sylvie climb up and go into the gallery.
- Inside the gallery, part of the room is lit and part is dark. Look on the desk, in the lit part.
- Take the business card and powder-case out of the purse.
- Take the scarf off the desk.
- Right-click on the business card in inventory, and you will find Hebrew writing on the back. You will have to ask James to translate.
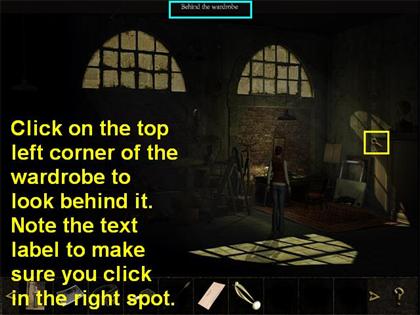
- Click on the top left corner of the wardrobe and you can look behind it.
- There is a bicycle pump and chain on the pegs behind the wardrobe. Take them.
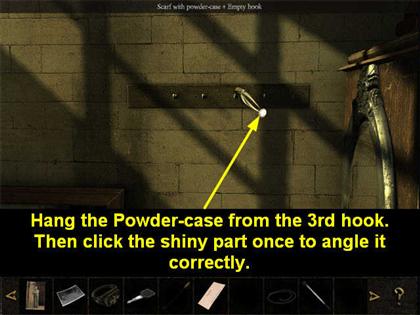
- Now Sylvie wants to explore the part of the room that is dark. Put the scarf and the powder-case together.
- Hang the scarf on the pegs.
- The powder-case is shiny. Click it once to turn it so the light is shining into the room.
- Follow the beam of light by clicking along it.
- Eventually Sylvie will come to a switch box. Click on it and you will get some additional light.
- Sylvie can see some crates, a big one and a little one. She can’t get them open.
- Take the poker from your inventory and use it on the crates. One has the large table that the archaeologist had the picture of. The other has the four stone cubes.
- Take the cubes and put them in your pocket.
- Someone will hit Sylvie from behind.
- When she comes to, the guards and the gallery owner are interrogating her. However, they have searched her, and she has nothing important. The four stones and the crate with the stone tablet are missing, but it’s obvious Sylvie couldn’t have carried them.
- The gallery owner decides Sylvie was just a sneak thief who didn’t find anything, and has the guards throw her out, then start looking for the real thief.
- James calls her and she tells him about the cubes.
- Outside again, go talk to the rickshaw driver. He still hasn’t repaired the rickshaw.
- Gives him the bicycle chain and the pump, and he fixes it.
- He offers her a ride, and she goes back to the airport, then back to La Valletta. This ends the Chapter.
La Valletta, November 7, 2008
- Back at Uncle Olivier’s flat. There’s been a burglary! There is an open window, and everything has been rummaged through, but nothing seems to be missing.
- Go upstairs—it doesn’t look like the thief got as far as the bedroom.
- Go downstairs and out to the street.
- Inspector Granc is there—talk to him about the intruder. He still believes Uncle stole the stones.
- Go around the corner to James Anderson’s apartment.
- Call James on the intercom and he will let you in.
- Go upstairs and discuss what happened in Istanbul. He will decide he needs to go to a monastery and work in secret.
- He advises Sylvie to go into hiding in Paris, but she refuses.
- He says he will mail her the translations when they are finished.
- He also tells Sylvie she should go back and talk to the archaeologist on Gozo.
- When you leave, you can try to start the scooter outside Uncle’s flat, but you will get a comment that you should look around the area more first.
- There’s nothing to see in the Plaza, but as soon as you step into the backstreet alley there will be a short movie of a man lurking in the shadows.
- When it ends, go back to James’ apartment and discuss it with him.
- This time when you go to the scooter, it will start. This will end the Chapter.
Island of Gozo, November 7, 2008
- Back in the Parking lot. This time there is a large white van to your right.
- Peek in the back window of the van. It has the same kind of crates as the art gallery in Istanbul. It’s locked, but you can get a better look later.
- Walk left to the Camping area.
- Stop by the door to the trailer. You will overhear the archaeologist on the phone with someone. He was the one who hit you and stole the tablets!
- Look down, just to the left of the trailer door, and you will see a suitcase.
- On top of the suitcase is a car key. Take the key.
- Go back to the van in the Parking lot.
- Open the van doors and look inside.
- The crates are nailed shut again.
- There is a blue toolkit. Open it and take out a hammer and a chisel.
- Use the hammer to remove the nails from the crate.
- Use the chisel to pry the crate open. Ah, ha! The tablet from the temple and the four stones.
- Put the four stones back in your pocket.
- Before you can get out of the van, the archaeologist returns. You hide in the back, and he doesn’t realize you’re there.
- There will be a brief movie while he drives the van to the airport, then onto a waiting plane. You fly…somewhere. This ends the Chapter.
Somewhere, November 8, 2008
- The van is locked. Use the chisel to pry open the doors and get out.
- There is a fountain in the center, and a closed entry gate to the right; but for now, let’s see if we can find where the archaeologist went.
- Go to the archway at the back of the courtyard. You can get there either by going to the left and then walking up the corridor, or going straight back until you are just to the left of the boarded up windows.
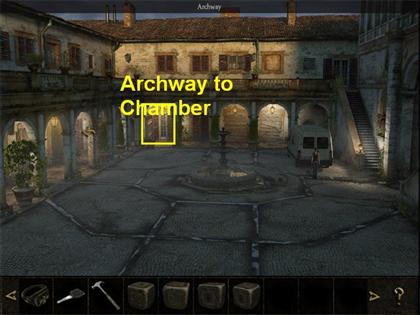
- You will see a movie and overhear a conversation between a Cardinal and the archaeologist. It sounds like the archaeologist is a member of the Knights Hospitaller!
- You learn several things. Inspector Granc works for Mossad. The archaeologist believes Mossad has Uncle Olivier.
- The archaeologist brought the tablet and the stones to the Cardinal for safekeeping. The Cardinal also wants “the thing” itself—probably whatever was in the scorpion chest.
- Walk back into the courtyard.
- Now go back to the archway again. The two men have gone.
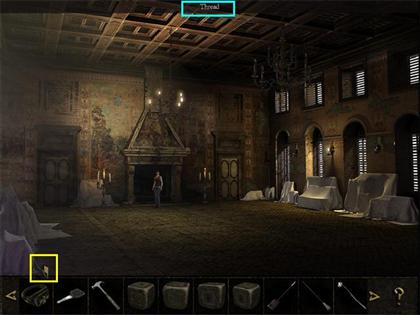
- Go into the “chamber:” a large room.
- Examine the fireplace. There are some strange symbols at the top, but they are too dirty to read.
- Notice that the men have gone through the door to the right of the fireplace.
- Go back out to the courtyard.
- Walk all the way to the right of the van, and you will notice a gate (“wicket”) that would break if you could strike it with something.
- Go to the central fountain. Notice a broken column next to the fountain that might break the gate, but it’s too heavy. You need a lever to start it rolling.
- Go to the boarded-up window closest to the van. You’ll know it’s the right one if you see a broom on its right.
- Take the broom.
- Now use the hammer on both sides of the plank until you can remove it.
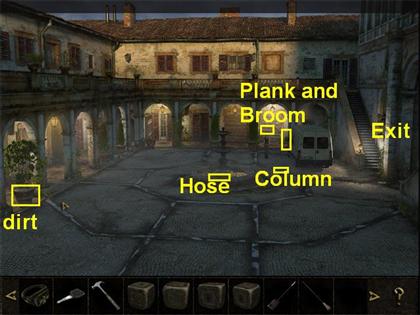
- Take the plank back to the fountain and wedge it next to the column. It still won’t roll—you need to smooth out the cobblestones.

- Walk to the center of the fountain and attach the hose.
- Turn the faucet. Just a little water is coming out, but that should be enough. The game makes a comment about algae, but you don’t have to do anything about that.
- Walk all the way to the left side of the courtyard.
- You will see a large potted plant. The text label will be “lawn with soil.” Click on it to collect some dirt.
- Walk back to the column piece.
- Put the dirt near the end of the hose on the ground. It will turn to mud.
- Now use the broom from your inventory to smooth out the mud.
- Click on the plank to push the column.
- You will see a movie as it rolls into the gate and opens the way.
- Go out through the gate.
- First go to your right, where there is a café.
- You will see a man, a priest, who looks like the one who was following you in Malta.
- Stop and collect some moist napkins from the café table. You can use them to clean the dirt from the fireplace symbols, if you decide to go back in.
- Now walk all the way to the left, past the gate, until you see a taxi.
- Talk to the taxi driver, and you will find out you are at the Vatican. You should go back in, and see what else you can learn.
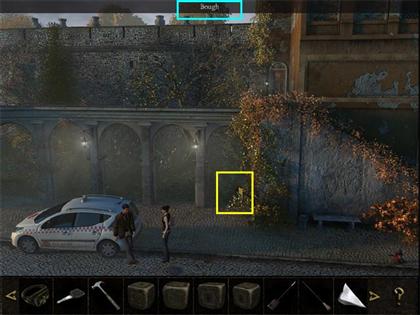
- On the way, stop and break off a bough from a tree. You will use this to make a handle for the moist napkins.
- Walk back through the gate into the courtyard.
- Go back by the archway into the chamber.
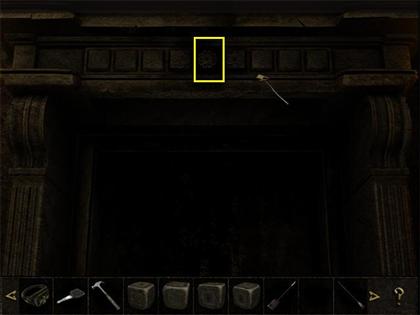
- At the fireplace, look all the way down to the floor.
- You will find a small shovel. Pick it up.
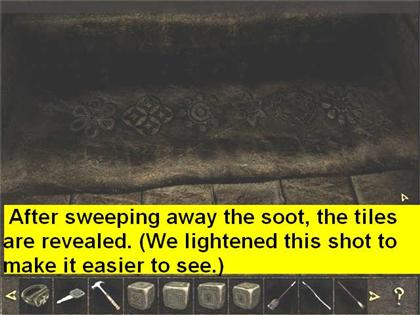
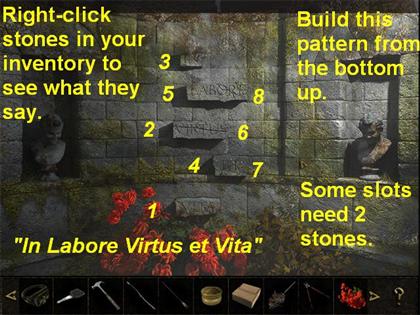
- There is soot down at the bottom. Use the broom to sweep it away. This will reveal six tiles with patterns like the ones up by the ledge.
- Unfortunately, this part of the game is very dark. It may be difficult to make out the patterns, even if you turn the brightness all the way up. We have provided a lightened screenshot, so you can see what they are.
- Look back up to the ledge. You still need to clean these off. You can try the moistened napkins, but it doesn’t quite work.
- Go back into the room view.
- Look around and you will find a piece of thread hanging on the furniture cloth near the lower left. Take it.
- Combine the thread with the bough and the moistened napkins to make a cleaning stick.
- Walk back to the fireplace.
- Use the cleaning stick on the dirty tiles at the mantel level of the fireplace.
- Now use the small shovel to press the top tiles in the sequence that matches the bottom tiles: 7 4 9 6 2 5.
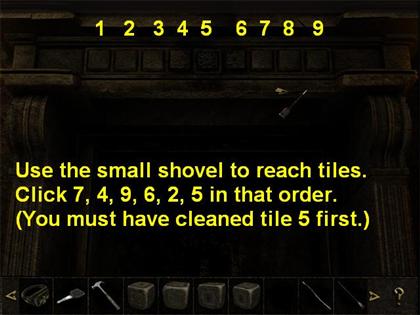
- A secret door will start to open, then close. You have to quickly put the small shovel into the opening to wedge it open.
- If it closes, just push the tiles in sequence again; then wedge it open.
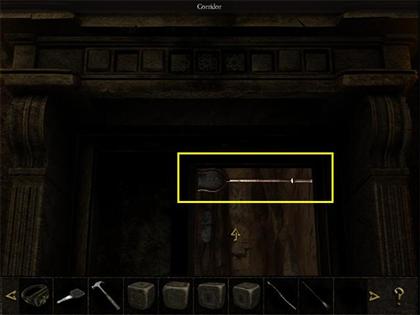
- Go through the secret opening into the Corridor.
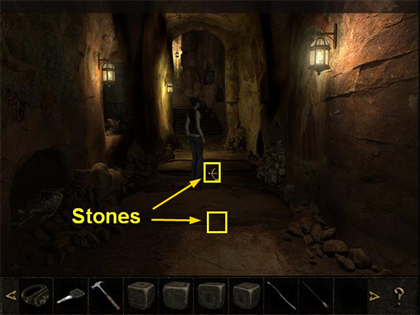
- You are now in the Corridor. Note that there are two large panels in the floor that are moving up and down. You have to stop the movement before you can cross.
- This part is tricky just in getting the timing right, but the actual process is pretty simple. Take a stone from the pile on the left. This stone will go into your inventory.
- You can go back and get another stone whenever you want.
- Position the cursor so it is over the center of the crack at the front of the moving tile. The text label will say “crack,” and the cursor symbol will change to a bracket.
- Left-click on the stone in your inventory and move it to a position where the text label says “stone + crack.”
- Now the question is when to click to drop the stone into the crack. The problem is that Sylvie doesn’t drop the stone exactly when you click. If you drop it at the wrong time, the stone just falls into the hole and you have to go get another stone. If you drop it at the right time, it will stick in the crack and the panel will stop moving.
- It may take a few tries, but there’s no real downside except frustration for getting it wrong, so just keep trying.
- Once you have the first panel stopped, do exactly the same thing for the second one.
- Now walk down the Corridor.
- You will emerge in a storage room.
- There are several things you need to pick up here. The first is a bottle cap on the floor. You’ll need it later.
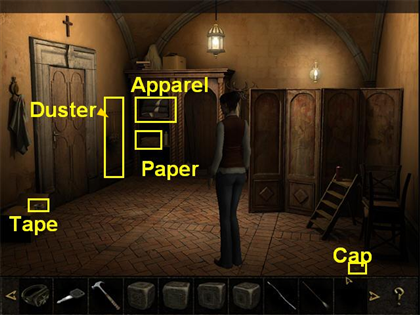
- You’ll find some scotch tape on the lower left. Collect it.
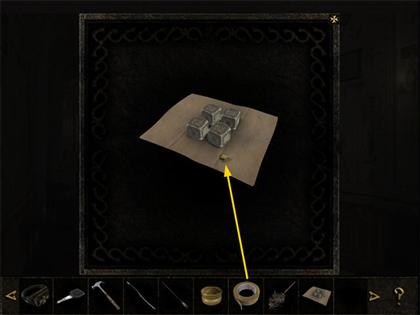
- There is packing paper in the closet against the wall. Combine the packing paper with each of the stones from your inventory.
- Then combine the scotch tape with the paper parcel. You’ll end up with a single wrapped, but not addressed, package.
- Take a nun’s habit from the shelves at the back left.
- Go behind the screen on the right side of the room. You will come back out dressed as a nun.
- Pick up the feather duster from the wall by the door.
- Now go out into the hallway.
- You will see a beautifully decorated room. There is a security guard at the far end.
- Closer to you is a mail cart. Look at it.
- Talk to the security guard. He will tell you how to clean the Cardinal’s office. (Carefully!)
- Go on into the Cardinal’s study at the end of the hall.
- Have a conversation with the Cardinal. He is obviously troubled about something.
- Start cleaning.
- The Cardinal will receive a phone call, and then ask you to leave so he can think. However, you have learned that Inspector Granc is with Mossad.
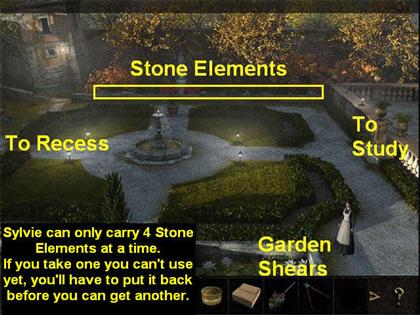
- Since you don’t have much else to do right now, go out to the garden and look around.
- You will find garden shears in the lower right. Pick them up.
- Walk on through the garden to the Recess on the far left.
- You can use the garden shears twice here. First, cut some flowers. You end up with a Flower Bouquet in your inventory.
- Then use the clippers on the vines on the back wall.
- You will get a phone call from James and agree to meet at the Temple on Gozo tomorrow.
Replacing the Bricks in the Wall
- Now you will see several slots where bricks have been removed from the wall. For reasons that aren’t entirely clear, Sylvie decides she should climb this wall; but first she has to build some handholds by replacing the missing bricks.
- The missing bricks are called “stone elements.” They are on top of the “low wall” at the back of the garden.
- However, there is one tricky bit of navigation here. If you click when the text label says “low wall,” you won’t walk over there. Instead, position the cursor above the wall, where there is no text label at all, or on one of the stone elements.
- To replace the bricks, you have to fill them in from the bottom up, because you need to stand on the lower bricks in order to reach the higher slots.
- You are trying to create the saying: “In Labore, virtus et vita.”
- You can examine each element in your inventory by right-clicking on it and then rotating it to see what it says.
- Remember you can only place the stone elements from the bottom to the top.
- The screenshot shows the final result and the position of the elements from the wall.
- The numbers refer to their positions on the original low wall in the center of the garden.
- Some slots need two stones.
- Now you need to climb up the wall. As in other parts of the game, clicking on the bricks themselves won’t do anything. Instead, click on your target—the very top of the wall. This will trigger a movie of Sylvie climbing up.
- Walk over to the Embrasure. You can’t see anything; Sylvie will say she sees a taxi, but she needs a long rope.
- Go back to the hall.
- The security guard is still there. Go back into the study. The Cardinal has left, so you can have a good look around.
- Go to the desk.
- Pick up the pen.
- Combine the pen with the package in inventory, and you will now have an addressed package.
- You can right-click on the package to see that Sylvie has addressed it to herself at her Uncle’s house.
- There is a notepad on the desk with a faint impression on it. Take the top sheet. Now you need something to reveal the writing.
- Right-click on the feather duster in inventory; then left-click on it. You will get one feather.
- Combine the feather in your inventory with the sooty broom, and you will get a feather with soot.
- Combine the feather with soot with the paper, and you will be able to read the number 1565.
- Sometime in here, Sylvie will notice that the painting of the Cardinal behind the desk is dusty. You need to clean it.
Getting into the Safe behind the Painting in the Cardinal’s Study
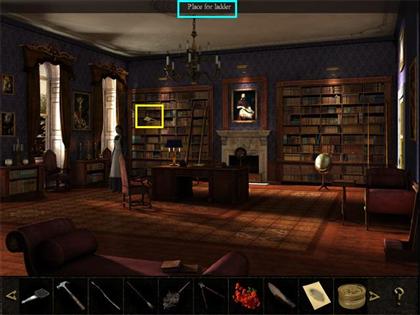
- Move your cursor along the bookcase, just to the left of the painting, until you get the text label “Place for Ladder.” Click there, and the leftmost ladder will automatically move over.
- Now move your cursor along the painting until you get the text “View of painting from ladder.” Click there; Sylvie will climb the ladder, and you will get a zoom view of the painting.
- Note that clicking on the ladder won’t do anything—you have to click on the painting to get Sylvie to climb the ladder.
- Use the feather duster from your inventory along the top of the painting a key will fall down on the right.
- Pick the key up while you are still in the zoom scene.
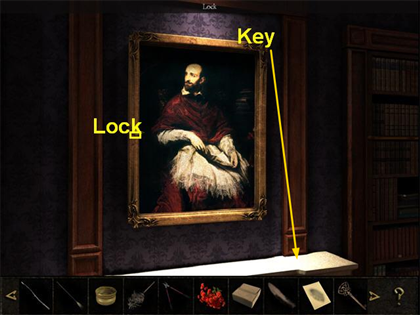
- Still in the zoom scene, move your cursor along the left side of the painting until the text says “Lock.” This is just a black dot on the frame.
- Use the key on the lock and the painting will swing open, revealing a safe.
- The combination to the safe is the number from the paper: 1565. To use the combination, click on each number in turn: 1, 5, 6, 5.
- The dial will automatically turn when you click on the number.
- If you get the combination wrong, the safe will just reset and you can start over.
- Click on the safe to open it.
- You will see two things: a Hospitaller Knight’s ring, and some papers. Examine both, reading all the papers, before putting them back.
- Close the safe.
- Put the painting back into position on the wall.
- Time to mail the package. Go back into the hallway.
- Walk past the security guard and put the package on the mail cart.
- Take the burning candle from the front table.
- Combine it with the bottle cap, so you have a Cap with Wax.
- Put the candle back.
- Go back into the study.
- Climb back up on the ladder again by clicking on the painting.
- Open the safe.
- Take the ring.
- Combine the ring with the Cap with Wax to make a wax impression.
- Put the ring back and close everything up.
- Now go out in the hallway and take a quick look around. If the Security Guard is gone, go back in the study and proceed with finding some rope. If he's still there, you missed something (you probably need to go back and read the documents in the safe completely).
- Now you still need some rope. Go over to the curtains on the left.
- You will notice two cords hanging down. If the text says “View of curtain from chair” and you click on it, Sylvie will climb on the chair. However, if you try to cut the cords now with the garden shears, they will be too short, so Sylvie will say, “Short rope, long fall” and refuse to cut them.
- Climb back down off the chair so you are back in room view.
- Walk over to the bookcase.
- Move your cursor along until the text says “Place for ladder.”
- Click there, and the ladder will move back from the painting to the window.
- Now move your cursor along the window and you will see “View of curtain from ladder.”
- Click there, and Sylvie will climb the ladder.
- This time she can reach high enough, so use the garden shears twice to cut each of the cords.
- Combine the two cords in your inventory.

- Leave the study.
- Go back out to the garden.
- Walk all the way over to the Recess.
- Click on the top of the wall to climb up.
- Now you can try to put the rope on the Embrasure on the left, but Sylvie will say it won’t hook on.
- Combine the hammer in your inventory with the cord so you have a kind of hook to stick it with.
- Put the hammer/cord combination onto the Embrasure and you will be able to climb down.

- At the bottom, you will see the same Taxi Driver, but he won’t recognize Sylvie because she is dressed as a nun. She asks him to take her to the airport, but says she doesn’t have any money. (It’s unclear why, since she still has her Credit Card in her Documents, but it’s probably because she wasn’t planning to come to Italy and doesn’t have any cash, and she wants to conceal her identity somewhat.)
- After some conversation, she will give the Taxi Driver the Flower Bouquet as a birthday present for his girlfriend, and he will agree to take her. This ends the Chapter.
La Valleta, November 9, 2008
- Back in the bedroom at Uncle Olivier’s flat.
- Go downstairs and check the mail. You will find three things: the package with the stones, the translation from James, and a bill (Sylvie calls it a check) from a transport company for bringing her scooter back from Gozo. At least that explains why the scooter will be outside the door again!
- Go outside to the Plaza and talk to Mr. Kawlata at the corner store.
- Mr. Kawlata will agree to make a ring from the wax impression, if Sylvie takes a message to his brother.
- Talk to the old man by the fountain.
- Go to the Backstreet into the Courtyard.
- Go through the Courtyard to the Marina.
- Give the message to the brother.
- Talk to the parrot.
- Return to the Plaza.
- Talk to Mr. Kawlata and he will give you the replica ring.
- Get on the scooter, and go to Gozo. This ends the Chapter.
Island of Gozo, November 9, 2008
- In the parking lot, check the car. Maybe it belongs to James. Today is the day you are supposed to meet at the Temple.
- Go to the Temple.
- Before you go inside, go over to the Fresh Dig Site.
- Return to the main view. You will notice a telescope.
- Click on the telescope, where the cursor turns to the eye, and Sylvie will mention that the planets are aligning.
- It is essential that you click on the telescope, or you won’t be allowed to solve the puzzle inside.
- Go into the Temple. There doesn’t seem to be anyone here.
- Go down the stairs.
- Walk into the Heart of the Chamber on the scorpion design.
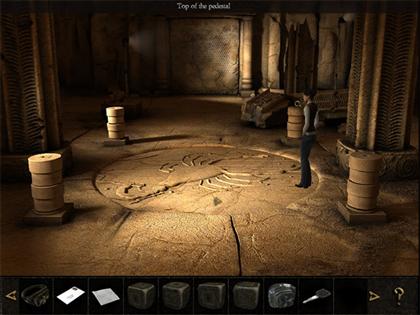
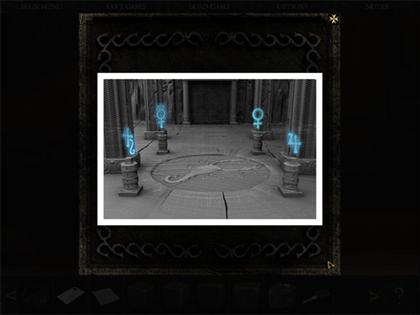
- Now you will see four stone pillars in the same position as in the photograph you printed out from the archaeologist’s computer.
- You can look at the print-out again in Documents if you need a reminder. Just click on NOTES at the top of the screen.
- Apparently each pillar is supposed to represent one of the four planets: Saturn, Jupiter, Venus, and Mercury.
- That order was mentioned in the Vatican documents in the safe. You can also review those in Documents if you need to.
- The puzzle itself is pretty simple, but the mechanics are a little strange.
Stone Pillar Puzzles
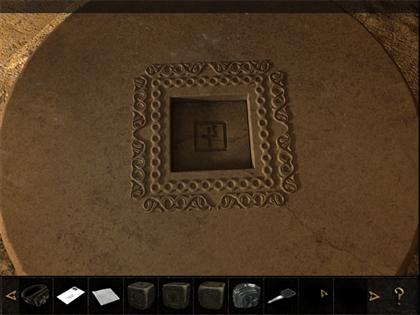
- Click on the top of a pedestal with an empty cursor. You will get a zoom scene that shows a planet symbol.
- Right-click on a stone in your inventory; then, turn it until you can see the planet symbol. You need to find the stone that matches the symbol on the column.
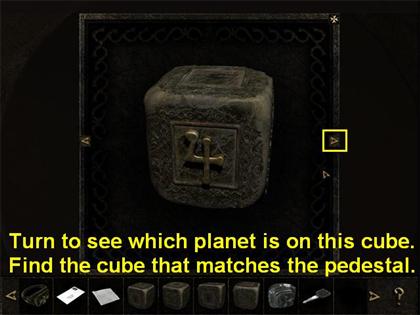
- When you have found the correct stone and turned it so the planet symbol is up, then and only then, pick up the stone with a left-click and put it into the hole in the top of the pedestal in the zoom scene. It won’t work if you haven’t opened the zoom scene first.
- Now that the stone is in place, you will be back to room view. Click the cursor on the front of the pedestal that you just put a stone on top of.
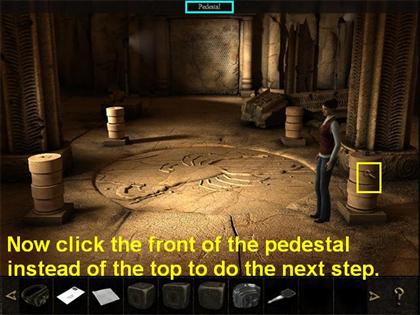
- With the stone in place on top, the four segments of the pedestal can turn. Turn them so that the symbol on the highest segment matches the symbol on the top of that pedestal. Then complete the order: Saturn, Jupiter, Venus, and Mercury.
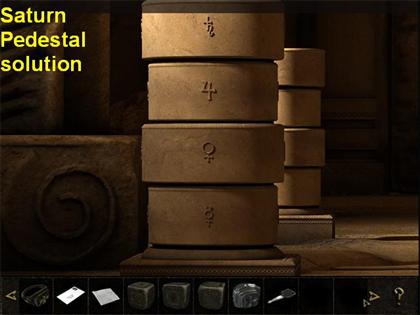
- Saturn pedestal: the segments from top to bottom areSaturn, Jupiter, Venus, Mercury.
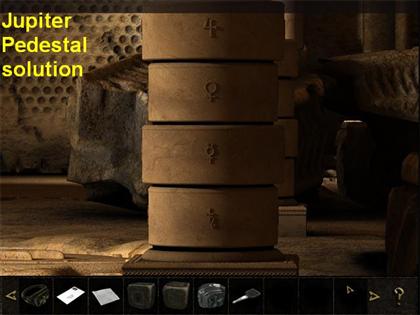
- Jupiter pedestal: the segments from top to bottom areJupiter, Venus, Mercury, Saturn.
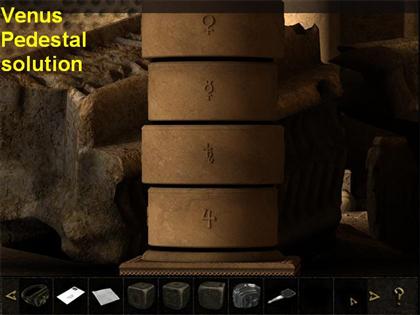
- Venus pedestal: the segments from top to bottom areVenus, Mercury, Saturn, Jupiter.
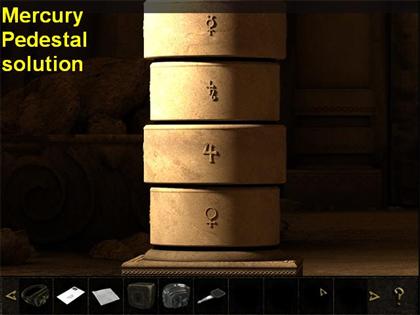
- Mercury Pedestal: the segments from top to bottom areMercury, Saturn, Jupiter, Venus.
- Sylvie will say something about each pedestal being correct as you complete them.
- Once you have all four pedestals completed, you are done.
- Enjoy the ending movie!
Created at: 2009-11-20