

Walkthrough Menu
- Chapter 1: Uncle's Souvenirs
- Chapter 2: Uncle's House in France
- Chapter 3: France, 1626
- Chapter 4: A Failed Date
- Chapter 5: At Home
- Chapter 6: The Time Machine
- Chapter 7: France, 1626 Again
- Chapter 8: Ancient India
- Chapter 9: The Maya Civilization
- Chapter 10: Back in Ancient India
- Chapter 11: Back in France, 1626
Chapter 1: Uncle's Souvenirs
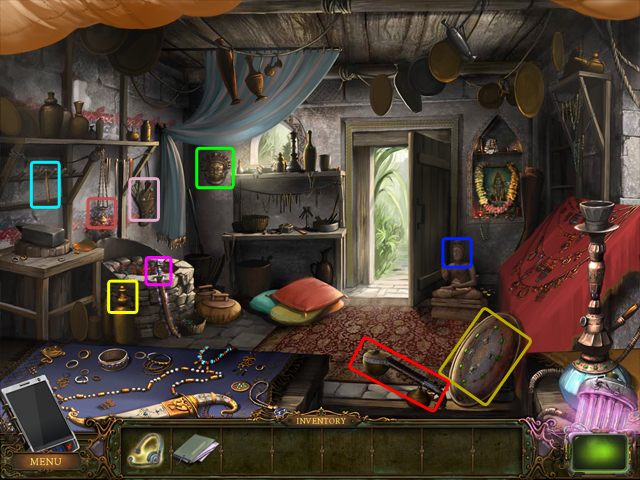
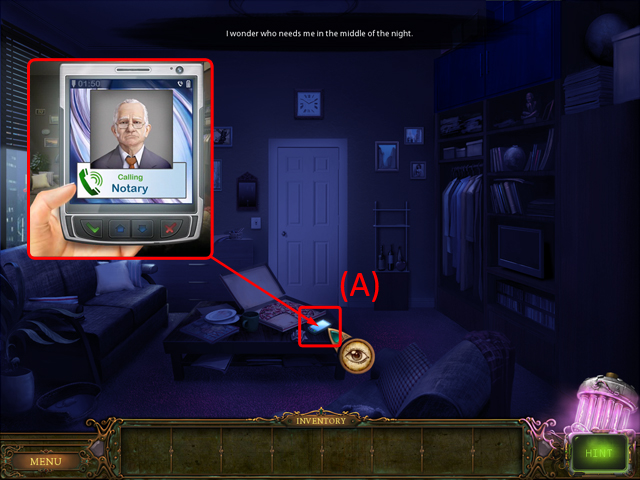 • Pick up the ringing phone (А).
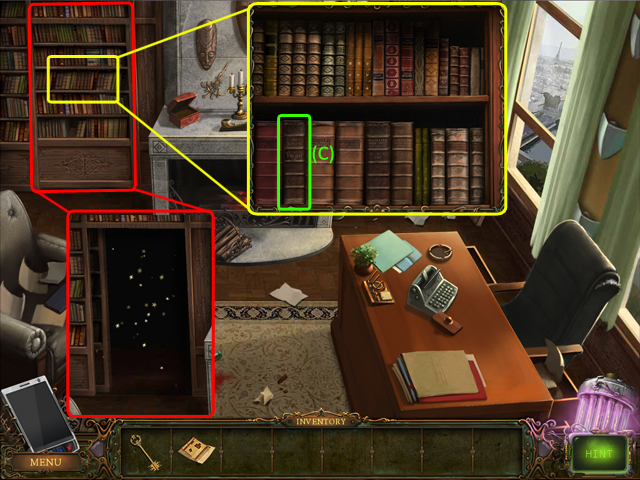
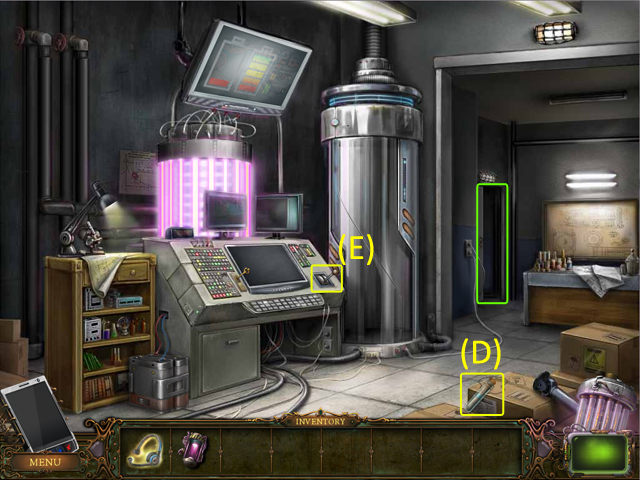
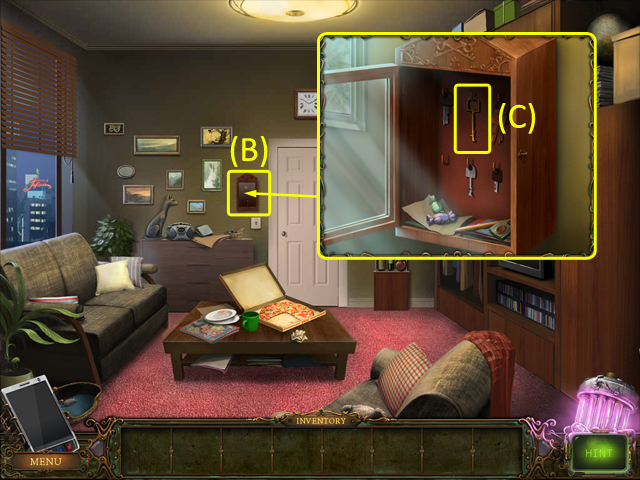 • Find the BOX for the uncle's souvenirs in the closet. • Zoom
into the key locker (B). • Select the KEY (C) in the middle of
the upper row.
• Find the BOX for the uncle's souvenirs in the closet. • Zoom
into the key locker (B). • Select the KEY (C) in the middle of
the upper row.
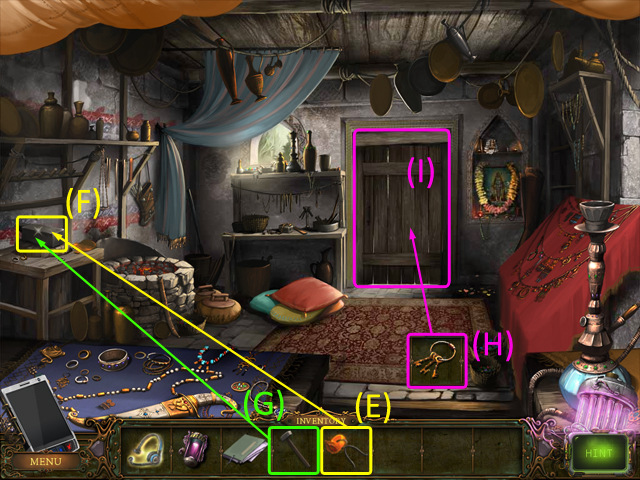
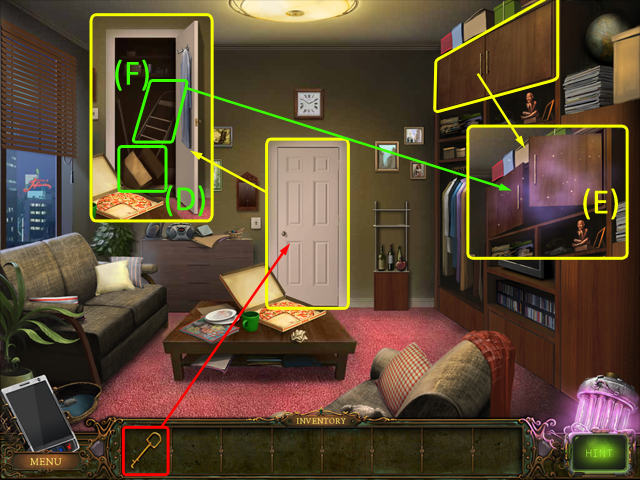 • Use the KEY on the closet door. • Pick up the BOX (D). •
Open the upper shelf (E). • Use the STEPLADDER (F) on the
upper shelf. • Collect the uncle's souvenirs in the upper
shelf.
• Use the KEY on the closet door. • Pick up the BOX (D). •
Open the upper shelf (E). • Use the STEPLADDER (F) on the
upper shelf. • Collect the uncle's souvenirs in the upper
shelf.
Chapter 2: Uncle's House in France
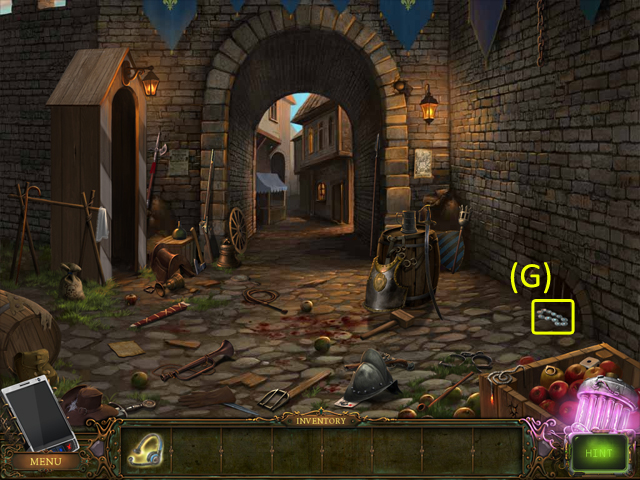
 • Do the uncle's study. • As soon as you're finished with the
study, the MATCHES (G) and the COAL SCOOP (H) are added to the
inventory.
• Do the uncle's study. • As soon as you're finished with the
study, the MATCHES (G) and the COAL SCOOP (H) are added to the
inventory.
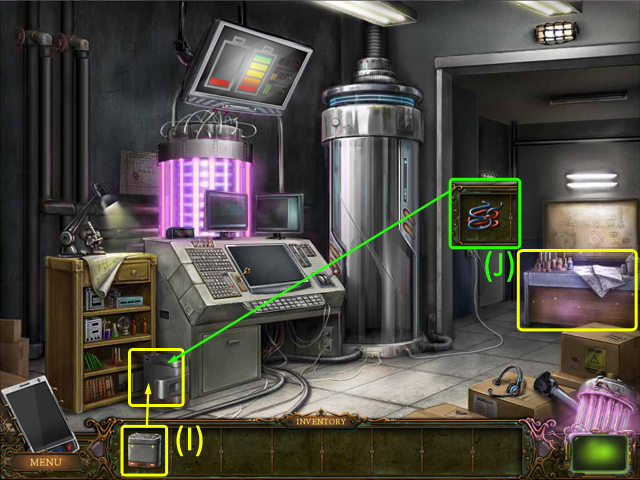
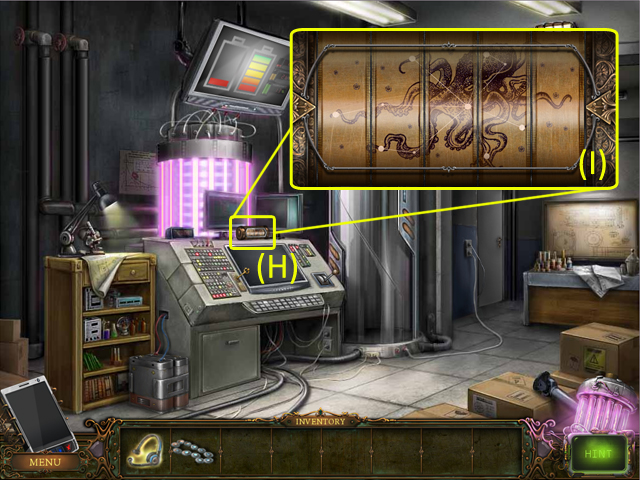
 • Use the SAFE KEY (I) on the uncle's safe (J). • Take the
TIME MACHINE KEY (K) and the HOUSE PLAN (L) from the safe.
• Use the SAFE KEY (I) on the uncle's safe (J). • Take the
TIME MACHINE KEY (K) and the HOUSE PLAN (L) from the safe.
 • Put the HOUSE PLAN (M) on the table and click on it. It will
be blown by the wind right into the pool of wine (N). • Use
the MATCHES (O) on the wood in the fireplace (P).
• Put the HOUSE PLAN (M) on the table and click on it. It will
be blown by the wind right into the pool of wine (N). • Use
the MATCHES (O) on the wood in the fireplace (P).
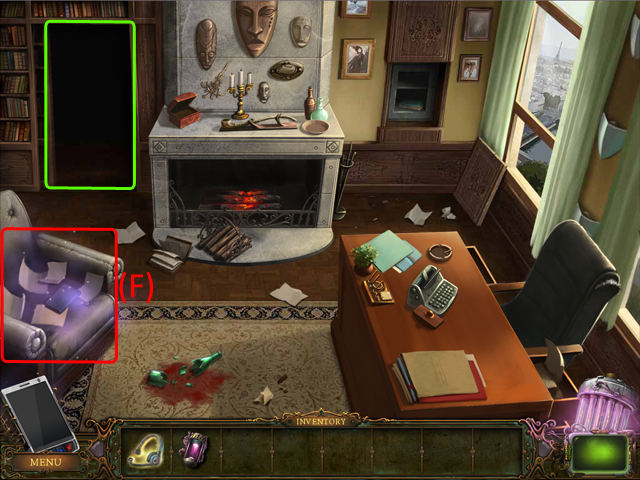
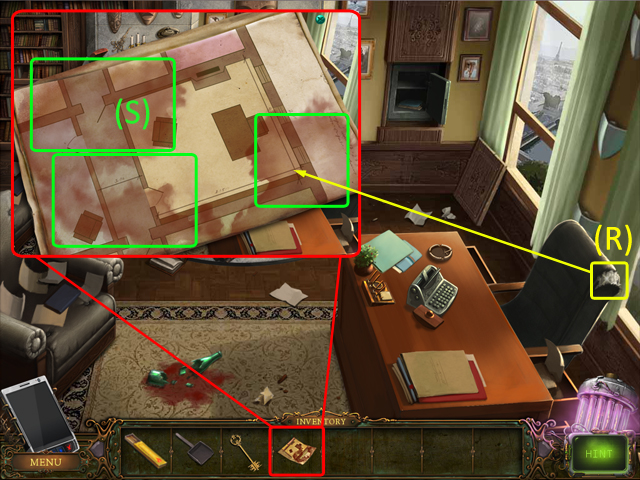 • Pick up the SOAKED PLAN and click on the stains to zoom in.
• Click on the torn back of the armchair to get some STUFFING
(R). • Use the STUFFING on the stains (S).
• Pick up the SOAKED PLAN and click on the stains to zoom in.
• Click on the torn back of the armchair to get some STUFFING
(R). • Use the STUFFING on the stains (S).
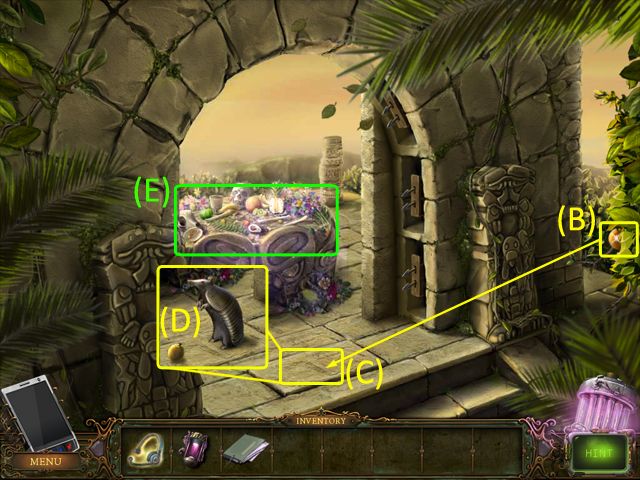
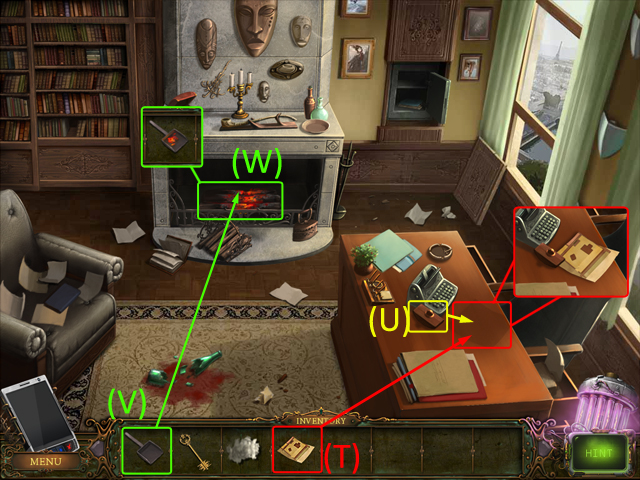 • Put the HOUSE PLAN (T) back on the table. • Press the plan
with the paperweight (U). • Use the COAL SCOOP (V) on the
fireplace to sweep the coal (W).
• Put the HOUSE PLAN (T) back on the table. • Press the plan
with the paperweight (U). • Use the COAL SCOOP (V) on the
fireplace to sweep the coal (W).
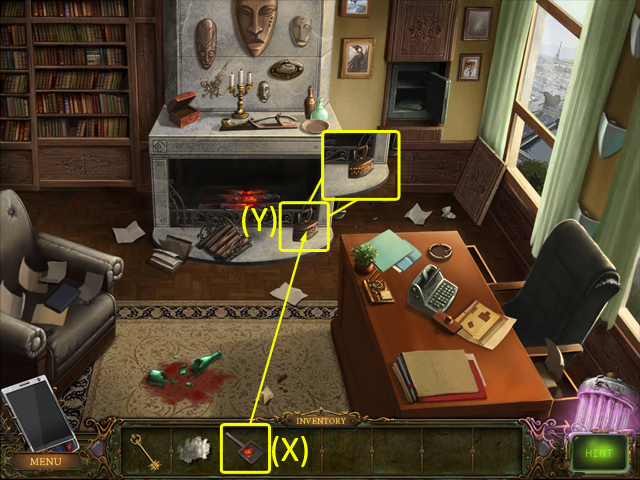 • Use the SCOOP WITH COAL (X) on the old IRON (Y). • Pick up
the heated IRON.
• Use the SCOOP WITH COAL (X) on the old IRON (Y). • Pick up
the heated IRON.
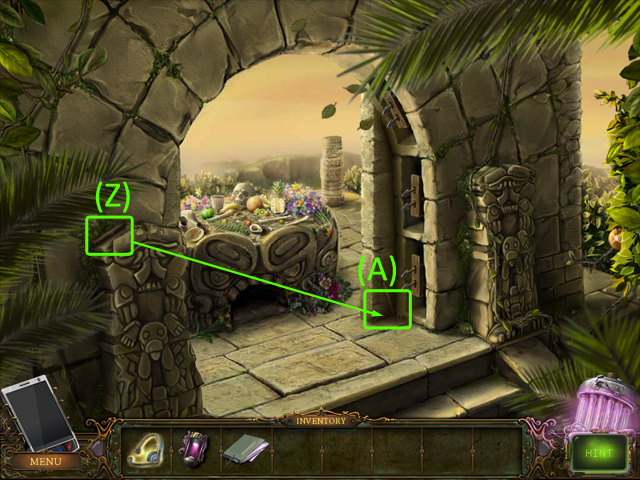
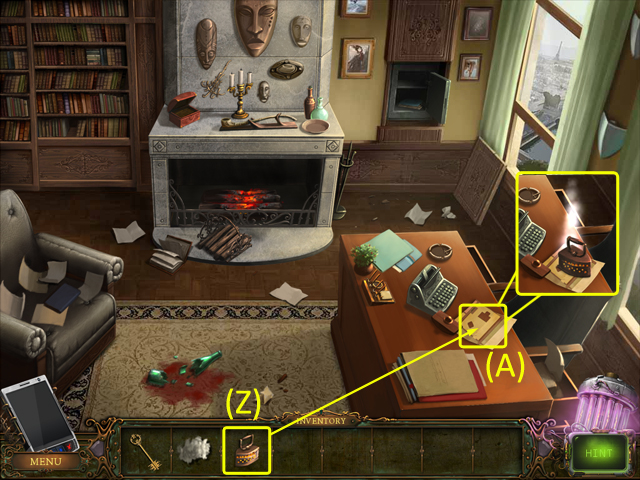 • Put the IRON (Z) on the HOUSE PLAN (A).
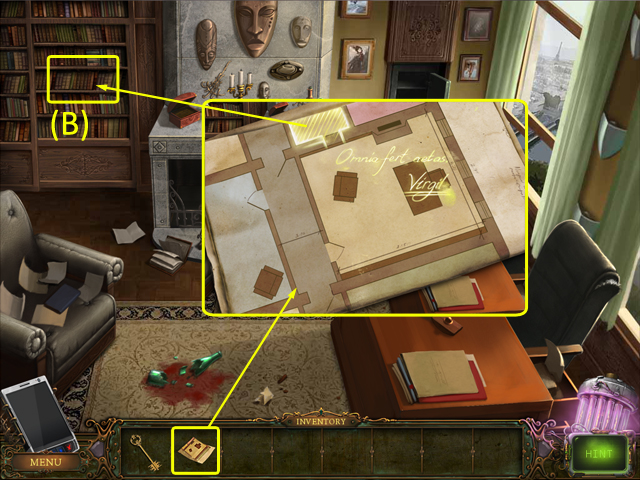 • Zoom into the HOUSE PLAN to find the secret door behind the
book shelf (B).
• Zoom into the HOUSE PLAN to find the secret door behind the
book shelf (B).
 • Select the volume of Virgil (C) to get to the secret
laboratory.
• Select the volume of Virgil (C) to get to the secret
laboratory.
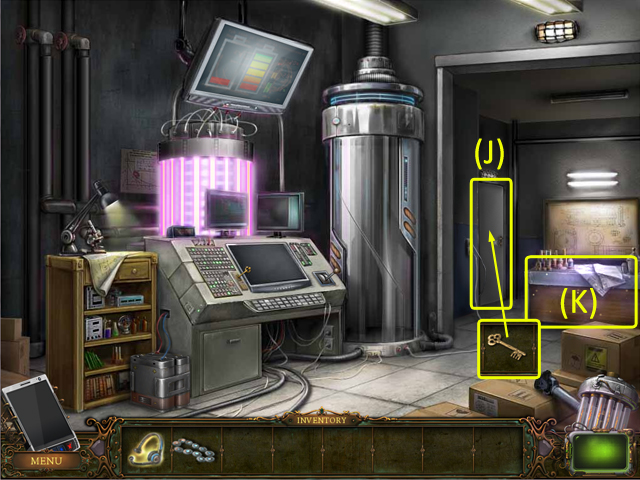
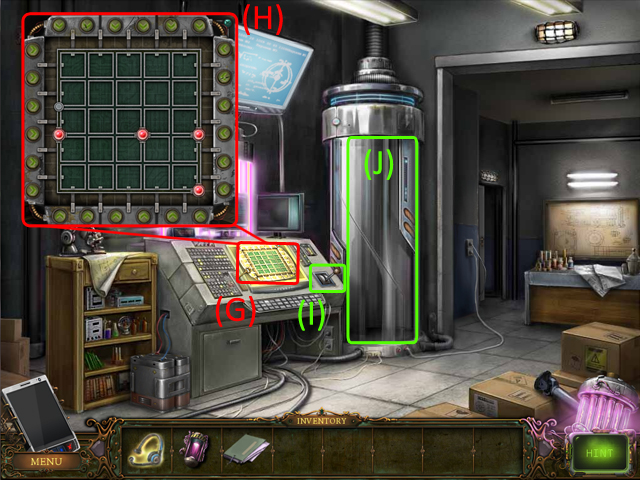
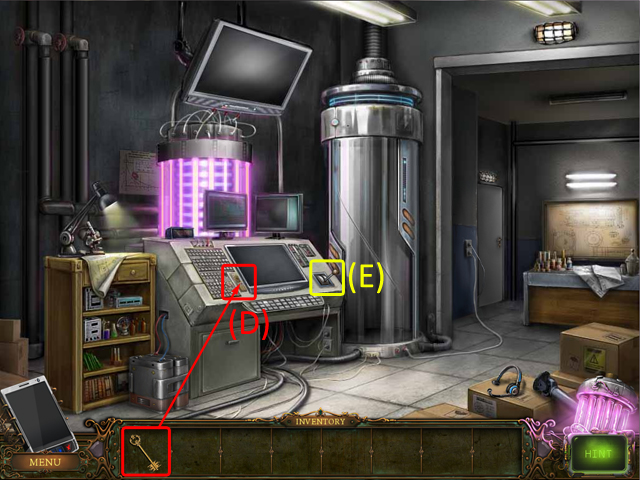 • Insert the TIME MACHINE KEY (D) into the slot on the panel.
• Click on the time machine lever (E) to find that the battery
and wiring have burned out.
• Insert the TIME MACHINE KEY (D) into the slot on the panel.
• Click on the time machine lever (E) to find that the battery
and wiring have burned out.
 • Disconnect the BURNED BATTERY (F). • Use the BURNED BATTERY
on the workbench (G) to start the mini-game.
• Disconnect the BURNED BATTERY (F). • Use the BURNED BATTERY
on the workbench (G) to start the mini-game.
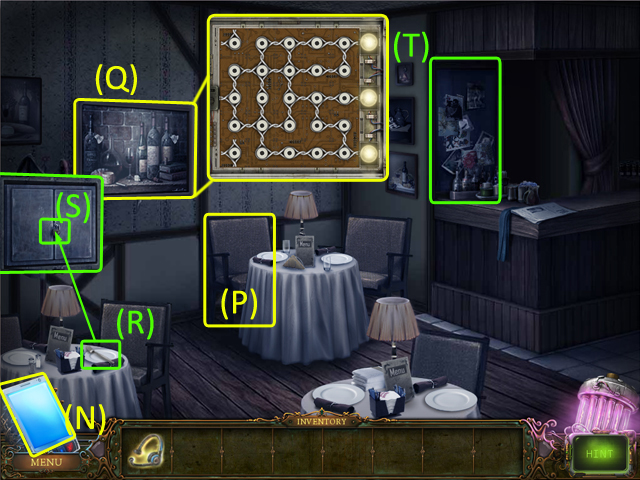
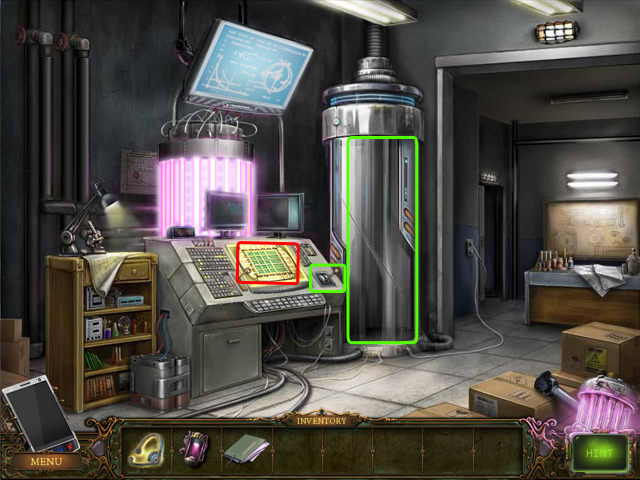
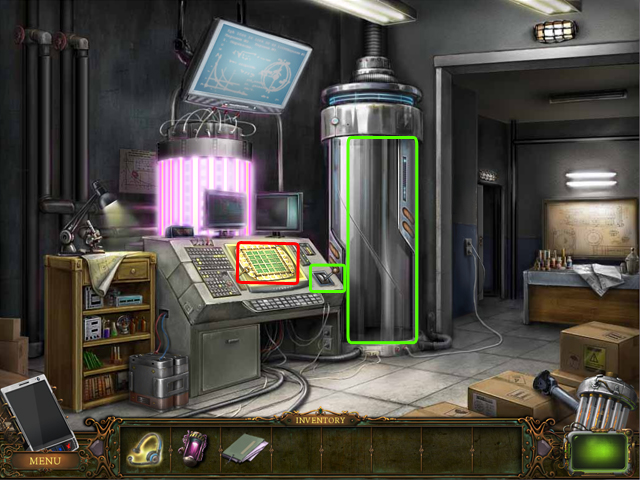
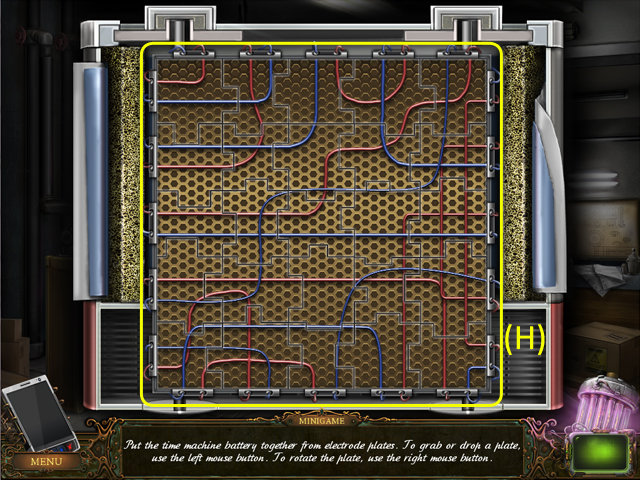 • Play the mini-game to repair the BURNED BATTERY. • Put the
time machine battery together from electrode plates. • To take
or drop a plate, use the left mouse button. • To rotate the
plate use the right mouse button. • See the screenshot for the
final solution (H).
• Play the mini-game to repair the BURNED BATTERY. • Put the
time machine battery together from electrode plates. • To take
or drop a plate, use the left mouse button. • To rotate the
plate use the right mouse button. • See the screenshot for the
final solution (H).
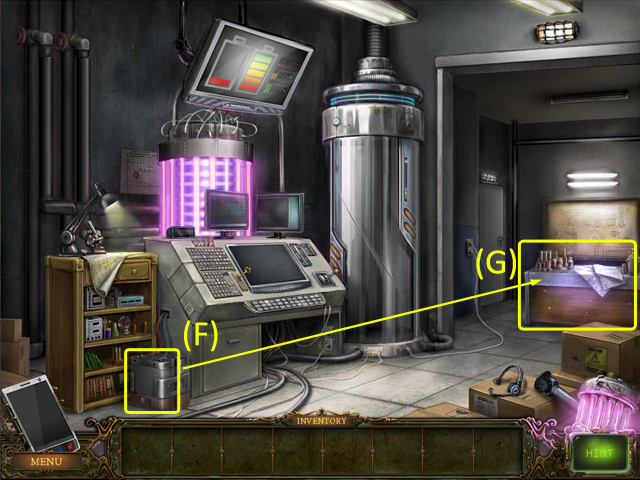
 • Connect the REPAIRED BATTERY (I). • Find the new WIRING (J)
on the workbench. • Start the time machine. Click on the time
capsule.
• Connect the REPAIRED BATTERY (I). • Find the new WIRING (J)
on the workbench. • Start the time machine. Click on the time
capsule.
Chapter 3: France, 1626
 • Pick up the LINGUO-TRANSLATOR (K). • Click on the musketeer
(L) at the wall.
• Pick up the LINGUO-TRANSLATOR (K). • Click on the musketeer
(L) at the wall.
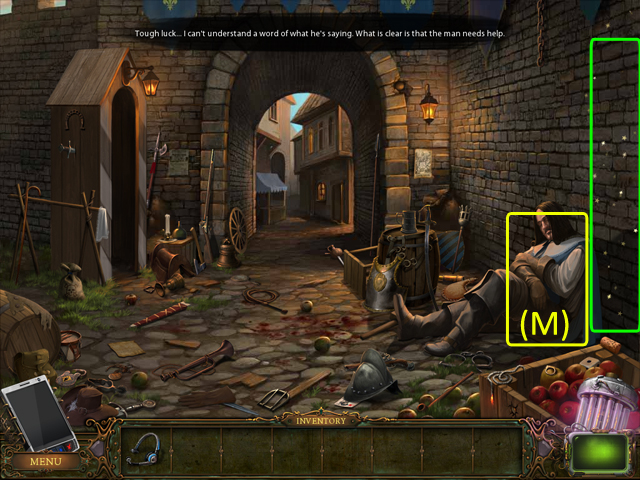 • Click on the unconscious musketeer (M). • Leave the
location.
• Click on the unconscious musketeer (M). • Leave the
location.
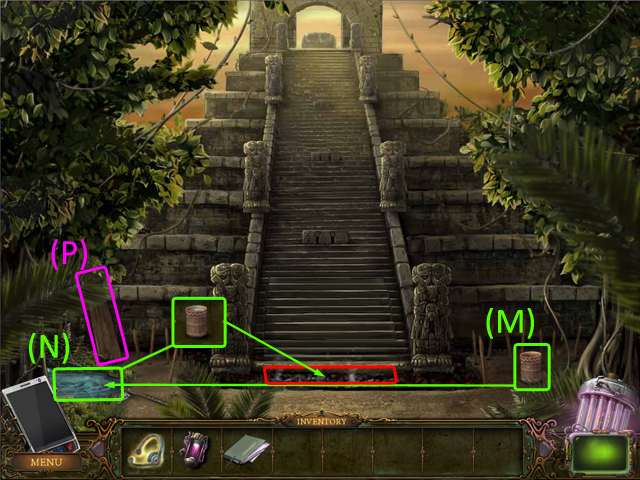
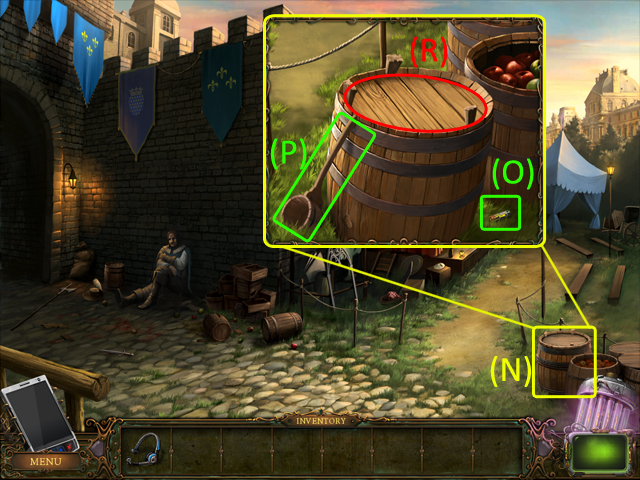 • Zoom into the area with the barrels (N). • Pick up the
TRANSLATOR BATTERY (O). • Take the LADLE (P). • Click on the
barrel lid (R) to find it tightly closed.
• Zoom into the area with the barrels (N). • Pick up the
TRANSLATOR BATTERY (O). • Take the LADLE (P). • Click on the
barrel lid (R) to find it tightly closed.
 • Use the TRANSLATOR BATTERY (S) on the TRANSLATOR (T). • Pick
up the STONE (U) on the pavement.
• Use the TRANSLATOR BATTERY (S) on the TRANSLATOR (T). • Pick
up the STONE (U) on the pavement.
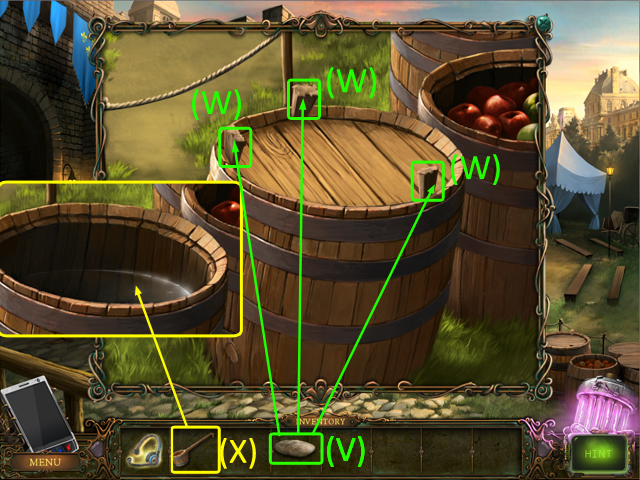 • Take the STONE (V) and remove all three wedges (W). • Click
on the lid to open the barrel. • Take the LADLE (X) and draw
some water.
• Take the STONE (V) and remove all three wedges (W). • Click
on the lid to open the barrel. • Take the LADLE (X) and draw
some water.
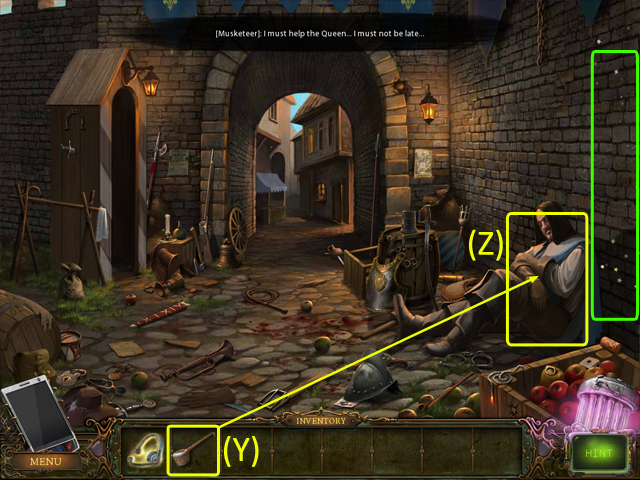 • Use the LADLE OF WATER (Y) on the musketeer (Z). • Leave the
location to find some cloth to bandage the musketeer.
• Use the LADLE OF WATER (Y) on the musketeer (Z). • Leave the
location to find some cloth to bandage the musketeer.
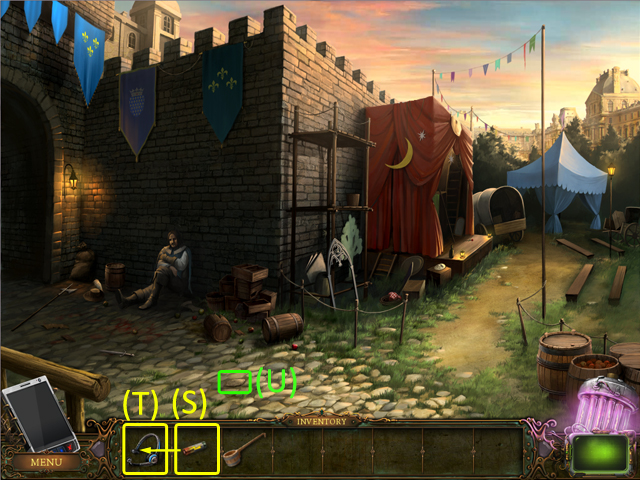
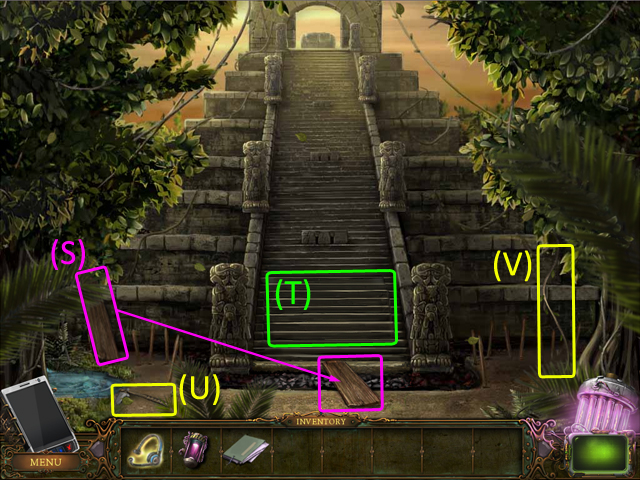
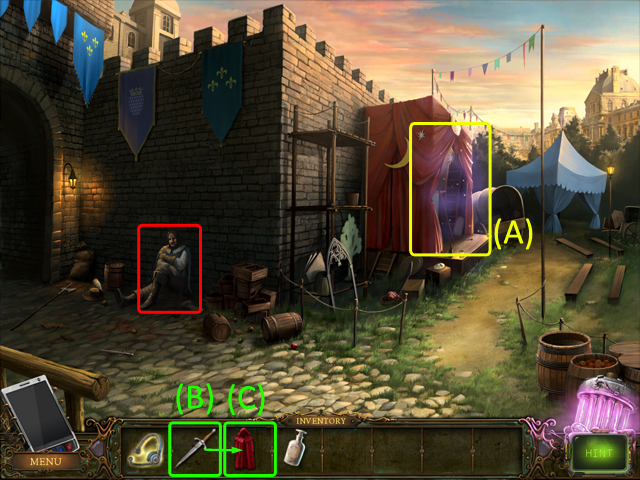 • Make a click in the center of the theatrical stage (A). •
After HO scene, the DAGGER, MACKINTOSH and HARTSHORN will be
added to the inventory. • Combine the DAGGER (B) with the
MACKINTOSH (C) to cut it to pieces. • Return to the musketeer.
• Make a click in the center of the theatrical stage (A). •
After HO scene, the DAGGER, MACKINTOSH and HARTSHORN will be
added to the inventory. • Combine the DAGGER (B) with the
MACKINTOSH (C) to cut it to pieces. • Return to the musketeer.
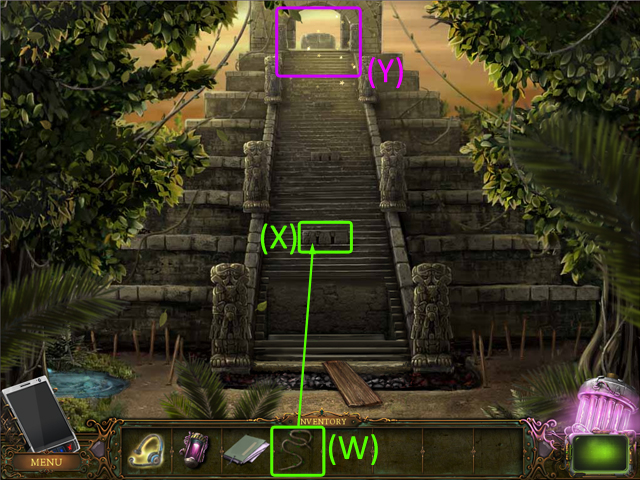
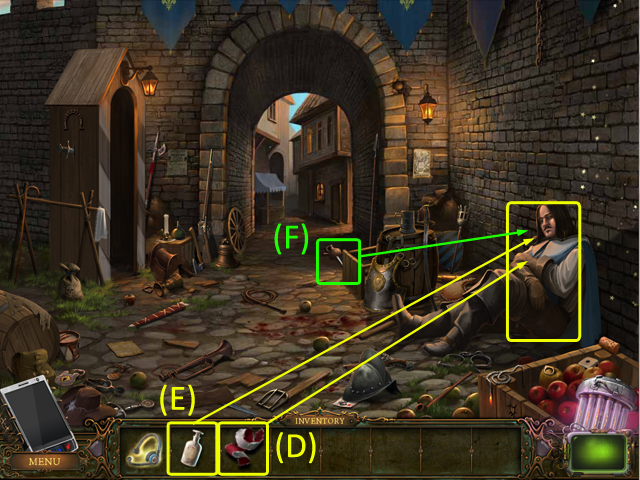 • Put the BANDAGE (D) on the musketeer. • Give him some
HARTSHORN (E). • Find the musketeer's epee (F) in HO scene and
return it to him.
• Put the BANDAGE (D) on the musketeer. • Give him some
HARTSHORN (E). • Find the musketeer's epee (F) in HO scene and
return it to him.
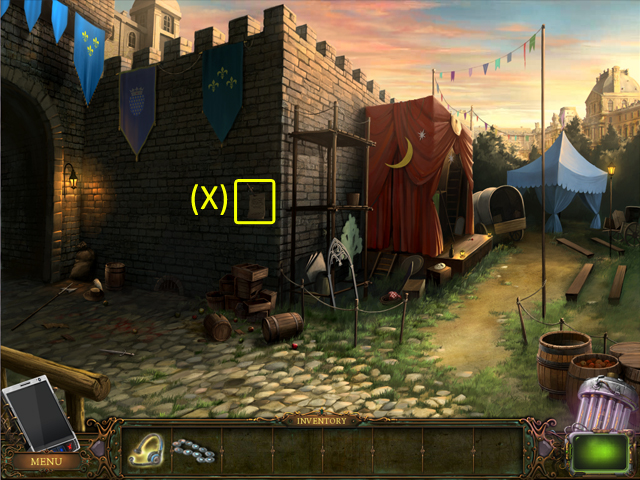
 • Find the dropped DIAMOND PENDANT (G). • Return to the
uncle's laboratory.
• Find the dropped DIAMOND PENDANT (G). • Return to the
uncle's laboratory.
Chapter 4: A Failed Date
 • Take the cylinder with a message (H) on the time machine. •
Play the mini-game to read the message. • Put the image
together rotating 5 vertical fragments. • To rotate a
fragment, use the left mouse button. • See the screenshot as a
sample of solution (I).
• Take the cylinder with a message (H) on the time machine. •
Play the mini-game to read the message. • Put the image
together rotating 5 vertical fragments. • To rotate a
fragment, use the left mouse button. • See the screenshot as a
sample of solution (I).
 • Click on the door (J) to find that it is closed. • Find the
KEY (K) on the workbench. • Use the KEY on the door.
• Click on the door (J) to find that it is closed. • Find the
KEY (K) on the workbench. • Use the KEY on the door.
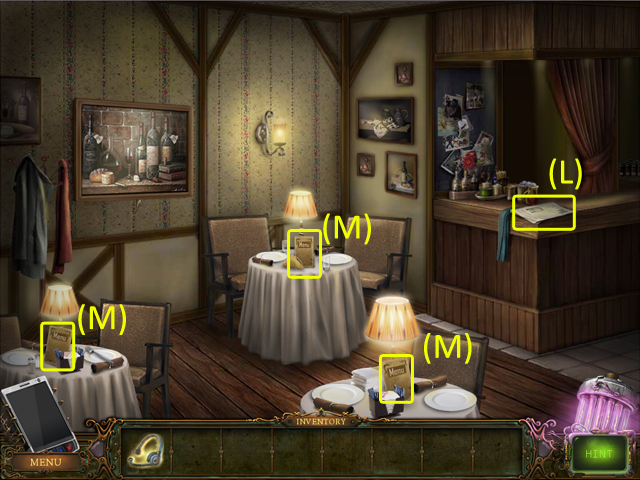 • Look through the newspaper (L). • Examine the menu (M).
 • Read Alan's messages (N) to find out that you have stuck
back in time. • Suddenly the lights go off. • Click on the
picture (Q), to make sure that the board is hidden behind it.
• Move the chair (P) to the picture. • Take the picture
off(Q). • Take the fork (R). • Use it on the switch board lock
(S) to open it. • Play mini-game, to fix the lights. • Click
on the notice board (T) to find Alan's card.
• Read Alan's messages (N) to find out that you have stuck
back in time. • Suddenly the lights go off. • Click on the
picture (Q), to make sure that the board is hidden behind it.
• Move the chair (P) to the picture. • Take the picture
off(Q). • Take the fork (R). • Use it on the switch board lock
(S) to open it. • Play mini-game, to fix the lights. • Click
on the notice board (T) to find Alan's card.
Chapter 5: At Home
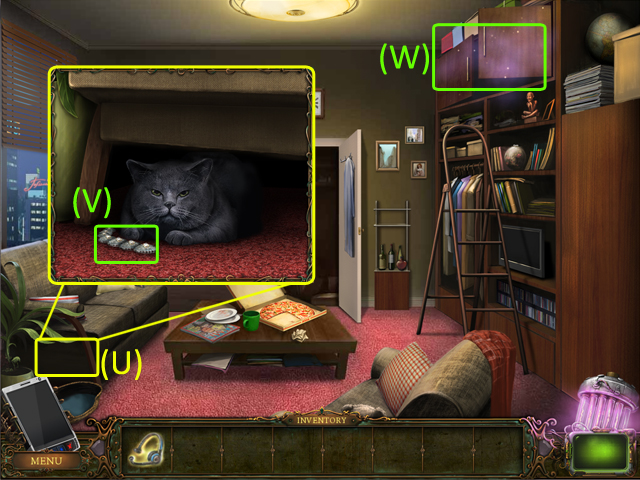 • Click on the sofa (U) to find the cat underneath. • Try to
take the DIAMOND PENDANT (V) away from the cat. • Find the TOY
MOUSE in the upper shelf (W).
• Click on the sofa (U) to find the cat underneath. • Try to
take the DIAMOND PENDANT (V) away from the cat. • Find the TOY
MOUSE in the upper shelf (W).
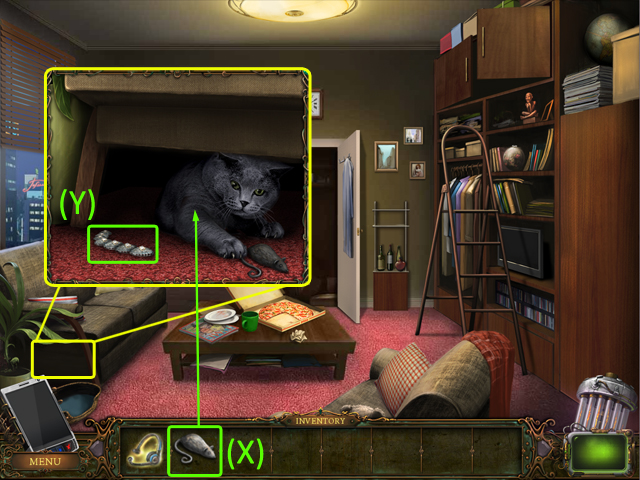 • Use the TOY MOUSE (X) on the cat. • Take the DIAMOND PENDANT
(Y) away.
• Use the TOY MOUSE (X) on the cat. • Take the DIAMOND PENDANT
(Y) away.
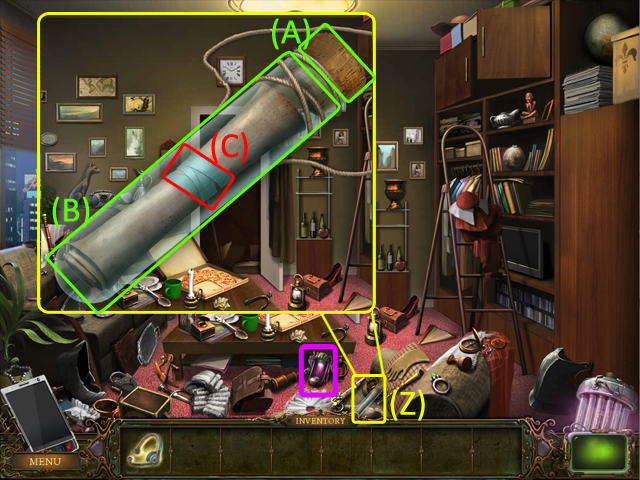 • Read Alan's message (Z) which lies in the armchair. • Open
the tube (A). • Get the letter (B) out of the tube. • Unfold
the letter (C). • Read about the TEMPORAL CONTAINER that Alan
has sent you, and pick up it. • Play the HO scene.
• Read Alan's message (Z) which lies in the armchair. • Open
the tube (A). • Get the letter (B) out of the tube. • Unfold
the letter (C). • Read about the TEMPORAL CONTAINER that Alan
has sent you, and pick up it. • Play the HO scene.
Chapter 6: The Time Machine
 • Find Alan's message (D) again. • Try to start the time
machine (E) to find out that in needs restarting. • Exit the
laboratory to look for the uncle's INSTRUCTIONS.
• Find Alan's message (D) again. • Try to start the time
machine (E) to find out that in needs restarting. • Exit the
laboratory to look for the uncle's INSTRUCTIONS.
 • Collect the uncle's INSTRUCTIONS (F) in the armchair. • Get
back to the laboratory.
• Collect the uncle's INSTRUCTIONS (F) in the armchair. • Get
back to the laboratory.
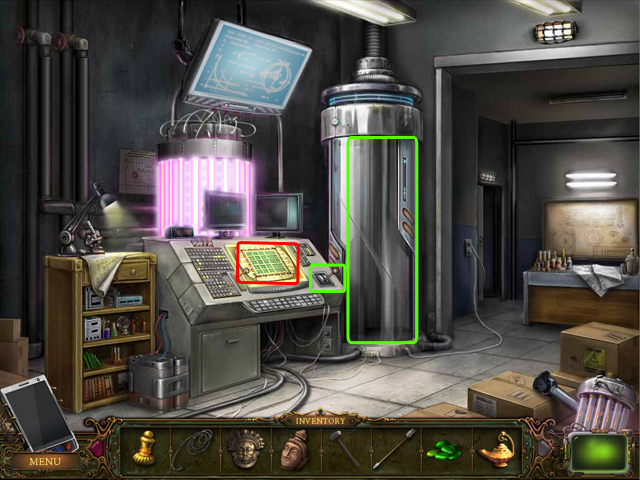
 • Click on the time machine (G) to invoke the mini-game. •
Move the chips with indicators vertically and horizontally
using the side arrows of the field. • Put all chips in the
corresponding holes. • See the screenshot for the final
solution (H). • Use the starting lever (I). • Click on the
time capsule (J).
• Click on the time machine (G) to invoke the mini-game. •
Move the chips with indicators vertically and horizontally
using the side arrows of the field. • Put all chips in the
corresponding holes. • See the screenshot for the final
solution (H). • Use the starting lever (I). • Click on the
time capsule (J).
Chapter 7: France, 1626 Again
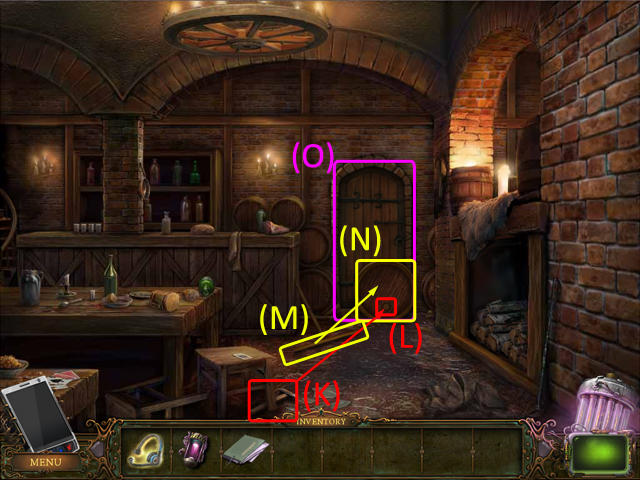 • Pick up the HAMMER (K) and use it on the cork (L) in the
barrel. • Pick up the STICK (M) and use it as a lever on the
barrel (N). • Talk to the musketeer. • Go to the kitchen (O)
and collect items from other epochs.
• Pick up the HAMMER (K) and use it on the cork (L) in the
barrel. • Pick up the STICK (M) and use it as a lever on the
barrel (N). • Talk to the musketeer. • Go to the kitchen (O)
and collect items from other epochs.
 • Reset the time machine as you did last time. • Use the
starting lever . • Click on the time capsule.
• Reset the time machine as you did last time. • Use the
starting lever . • Click on the time capsule.
Chapter 8: Ancient India
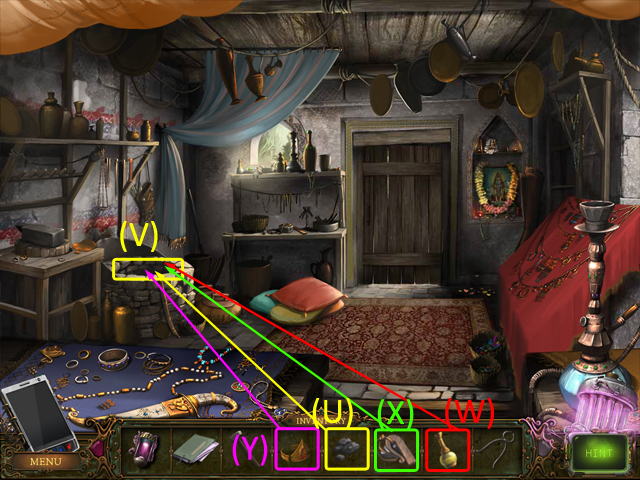
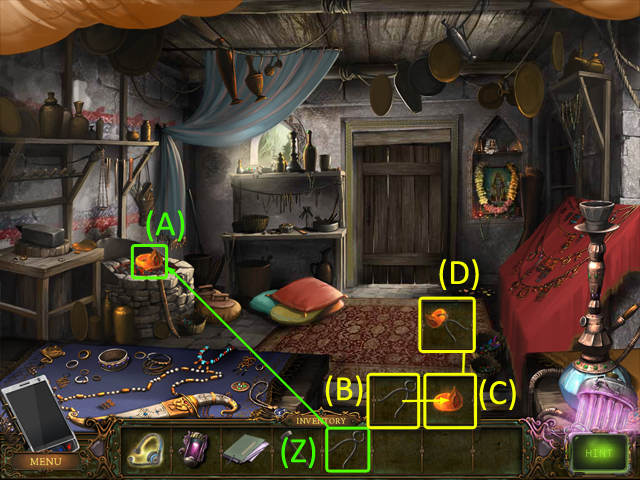
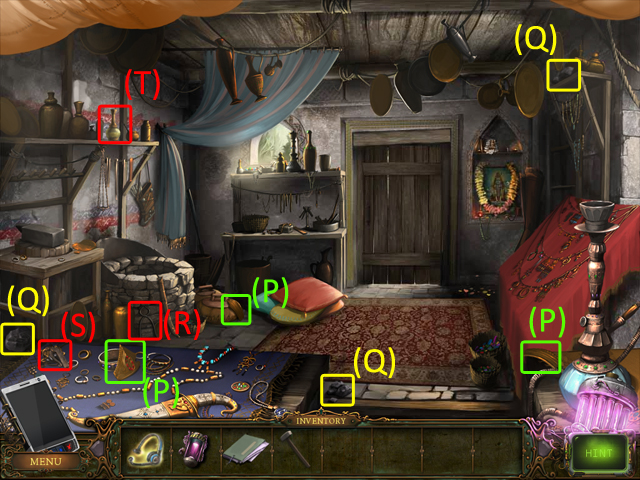 • Play the HO scene. • Pick up the DIADEM PIECES (P). •
Collect the COALS (Q). • Take the TONGS (R). • Take the FLEET
AND STEEL (S). • Take some OIL (T) to splash on the coals.
• Play the HO scene. • Pick up the DIADEM PIECES (P). •
Collect the COALS (Q). • Take the TONGS (R). • Take the FLEET
AND STEEL (S). • Take some OIL (T) to splash on the coals.
 • Put the COALS (U) into the horn (V). • Splash some OIL (W)
onto the horn. • Use the FLEET AND STEEL (X) to fire the horn.
• Now you can put the DIADEM (Y) in the horn.
• Put the COALS (U) into the horn (V). • Splash some OIL (W)
onto the horn. • Use the FLEET AND STEEL (X) to fire the horn.
• Now you can put the DIADEM (Y) in the horn.
 • Use the TONGS (Z) on the red-hot DIADEM (A) in the horn. •
The DIADEM will be added to the inventory. • Use the TONGS (B)
on the DIADEM (C) in the inventory. • The item DIADEM IN TONGS
(D) will be added to the inventory.
• Use the TONGS (Z) on the red-hot DIADEM (A) in the horn. •
The DIADEM will be added to the inventory. • Use the TONGS (B)
on the DIADEM (C) in the inventory. • The item DIADEM IN TONGS
(D) will be added to the inventory.
 • Drag the DIADEM IN TONGS (E) to the anvil (F). • Use the
HAMMER (G) on the DIADEM IN TONGS. • After you've repaired the
DIADEM, the BUNCH OF KEYS (H) will be added to the inventory.
• Use the BUNCH OF KEYS on the door (I) to enter the garden.
• Drag the DIADEM IN TONGS (E) to the anvil (F). • Use the
HAMMER (G) on the DIADEM IN TONGS. • After you've repaired the
DIADEM, the BUNCH OF KEYS (H) will be added to the inventory.
• Use the BUNCH OF KEYS on the door (I) to enter the garden.
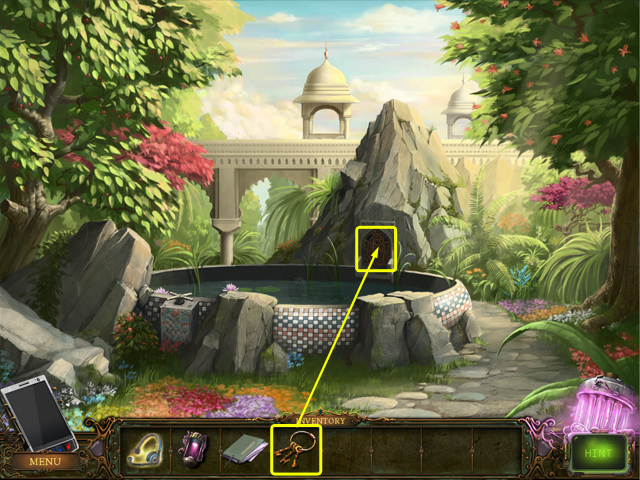 • Use the BUNCH OF KEYS on the grating in the rock.
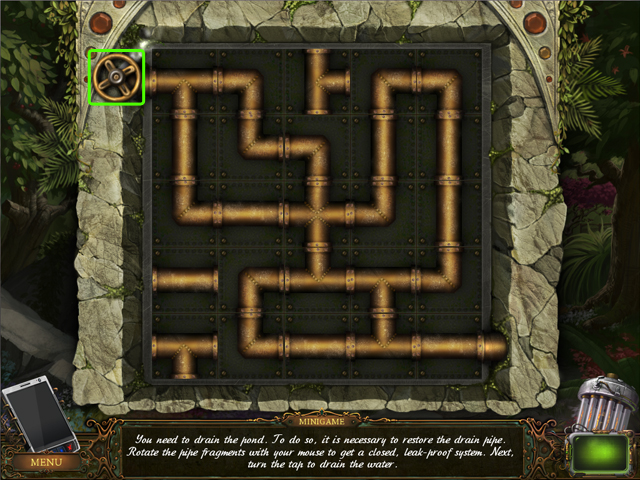 • Restore the drain pipe to drain the pond. • Rotate the pipe
fragments with your mouse to get a closed leakproof system. •
Turn the tap to drain the water. • See the screenshot for the
final solution. • Turn the round valve.
• Restore the drain pipe to drain the pond. • Rotate the pipe
fragments with your mouse to get a closed leakproof system. •
Turn the tap to drain the water. • See the screenshot for the
final solution. • Turn the round valve.
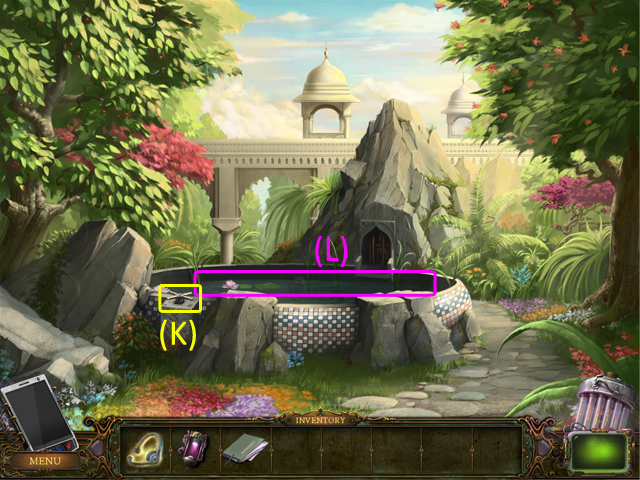 • Turn the valve near the pond (K). • Collect the items from
other epochs at the bottom of the dried pond (L).
• Turn the valve near the pond (K). • Collect the items from
other epochs at the bottom of the dried pond (L).
 • Reset the time machine as you did last time. • Use the
starting lever. • Click on the time capsule.
• Reset the time machine as you did last time. • Use the
starting lever. • Click on the time capsule.
Chapter 9: The Maya Civilization
 • Pick up the JAR (M) and use it on the spring (N). • The JAR
OF WATER (O) will be added to the inventory. • Use the JAR OF
WATER on the coals. • Take the PLANK (P).
• Pick up the JAR (M) and use it on the spring (N). • The JAR
OF WATER (O) will be added to the inventory. • Use the JAR OF
WATER on the coals. • Take the PLANK (P).
 • Put the PLANK (S) over the coals. • Click on the steps (T),
they collapse. • Pick up the STONE AXE (U). • Use the STONE
AXE on the LIANA (V).
• Put the PLANK (S) over the coals. • Click on the steps (T),
they collapse. • Pick up the STONE AXE (U). • Use the STONE
AXE on the LIANA (V).
 • Use the LIANA (W) on the stone (X) in the steps, so that it
hangs over the collapsed steps. • Click on the top of the
pyramid (Y) to go upstairs.
• Use the LIANA (W) on the stone (X) in the steps, so that it
hangs over the collapsed steps. • Click on the top of the
pyramid (Y) to go upstairs.
 • Take the branch (Z). • Put the branch in the aperture (A)
between the gate and the gate wing.
• Take the branch (Z). • Put the branch in the aperture (A)
between the gate and the gate wing.
 • Pick the FRUIT (B) from the tree. • Put the FRUIT on the
flagstone (C). • An armadillo will run out from under the
altar (D) and discharge the trap with arrows. • Collect the
items on the altar (E).
• Pick the FRUIT (B) from the tree. • Put the FRUIT on the
flagstone (C). • An armadillo will run out from under the
altar (D) and discharge the trap with arrows. • Collect the
items on the altar (E).
 • Reset the time machine as you did last time. • Use the
starting lever . • Click on the time capsule.
• Reset the time machine as you did last time. • Use the
starting lever . • Click on the time capsule.
Chapter 10: Back in Ancient India
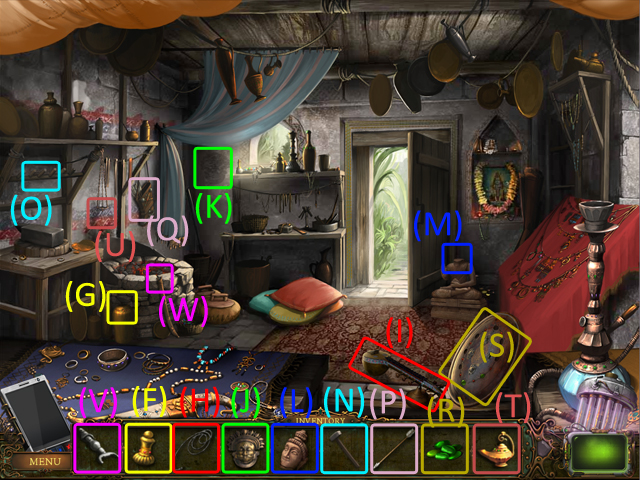 • Use the LID (F) on the jar (G). • Use the STRINGS (H) on the
sitar (I). • Use the MASK (J) on the wall (K). • Use the
STATUE HEAD (L) on the statue (M). • Use the HAMMER (N) on the
anvil (O). • Use the ARROWS (P) on the quiver (Q). • Use the
STONES (R) on the shield (S). • Use the AROMA LAMP (T) on the
horn (U). • Use the HILT (V) on the sword (W).
• Use the LID (F) on the jar (G). • Use the STRINGS (H) on the
sitar (I). • Use the MASK (J) on the wall (K). • Use the
STATUE HEAD (L) on the statue (M). • Use the HAMMER (N) on the
anvil (O). • Use the ARROWS (P) on the quiver (Q). • Use the
STONES (R) on the shield (S). • Use the AROMA LAMP (T) on the
horn (U). • Use the HILT (V) on the sword (W).
 • See the screenshot for the final solution.
Chapter 11: Back in France, 1626
 • Reset the time machine as you did last time and go to the
France of 1626 again.
• Reset the time machine as you did last time and go to the
France of 1626 again.
 • Click on the musketeer's note (X) to play the mini-game.
 • Find 7 or 10 (depending on the game level) differences
between the two pictures. • Click on each found difference
with your mouse to highlight it in both pictures. • See the
screenshot for the final solution.
• Find 7 or 10 (depending on the game level) differences
between the two pictures. • Click on each found difference
with your mouse to highlight it in both pictures. • See the
screenshot for the final solution.
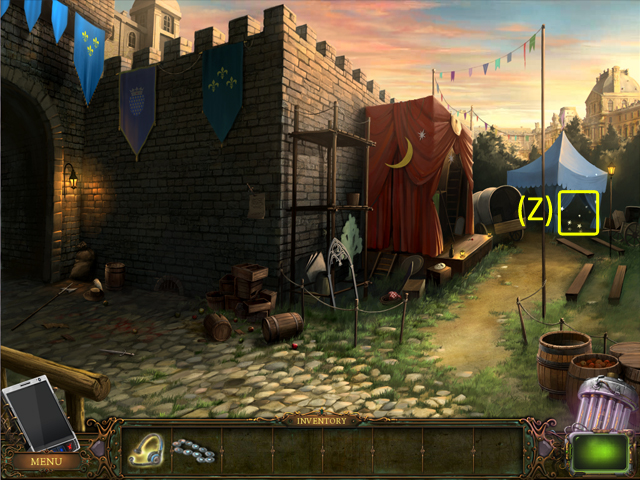 • Enter the tent (Z) and return the DIAMOND PENDANT to the
musketeer. Congratulations! You have completed Chronoclasm
Chronicles!
• Enter the tent (Z) and return the DIAMOND PENDANT to the
musketeer. Congratulations! You have completed Chronoclasm
Chronicles!
Created at: 2012-06-29