

Walkthrough Menu
- General Tips
- Chapter 1: Hochwald
- Chapter 2: Zeppelin
- Chapter 3: Garden
- Chapter 4: Dungeon
- Chapter 5: Hidden Room
- Chapter 6: Free Ink
- Chapter 7: Machine
- Chapter 8: Gaining Access
- Chapter 9: Destroy the Machine
General Tips
- This is the official guide for Clockwork Tales: Of Glass and Ink.
- Select Options to adjust Music and Sound Volume. You may also adjust Custom Cursor, Voiceovers and Full Screen.
- You may choose between Casual, Advanced and Expert Mode.
- Hidden-object puzzles are referred to as HOPs in this guide. Items listed in teal are hidden, or they require additional actions to locate. Interactive items in HOPs are color-coded.
- HOPS may be random; our lists may vary from yours.
- Puzzles may be skipped after a short wait.
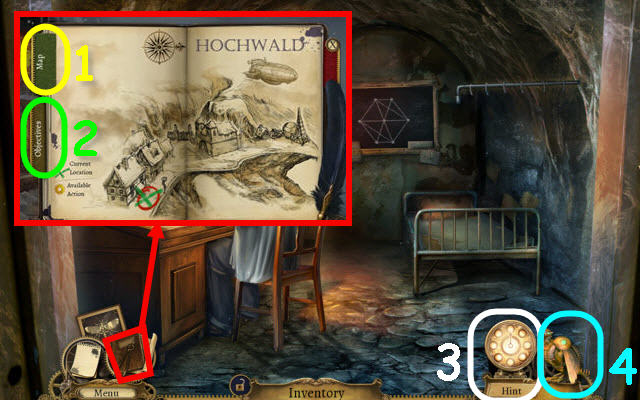
- Open your journal to view map (1) to see what locations have tasks to complete. You can also fast travel to any location by selecting the desired area on the map.
- Select the Objectives tab (2) to see what objectives are completed or still need to be worked on.
- You may select the Hint button (3) for help in game play or HOP areas.
- You will acquire Matthew (4) during the game and you can use him to reach items that are beyond your grasp.
Chapter 1: Hochwald
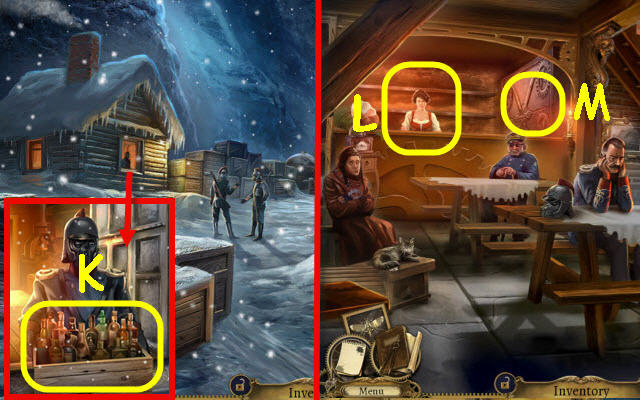
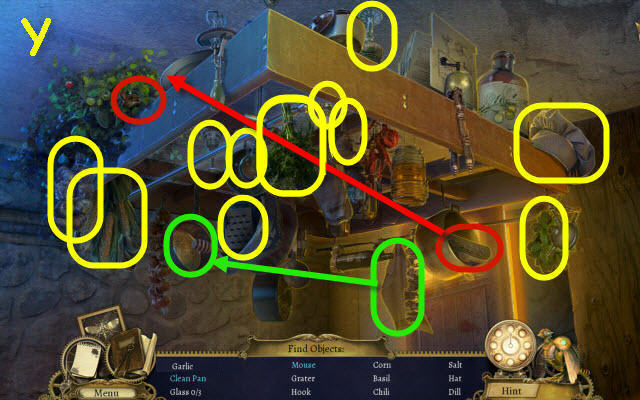
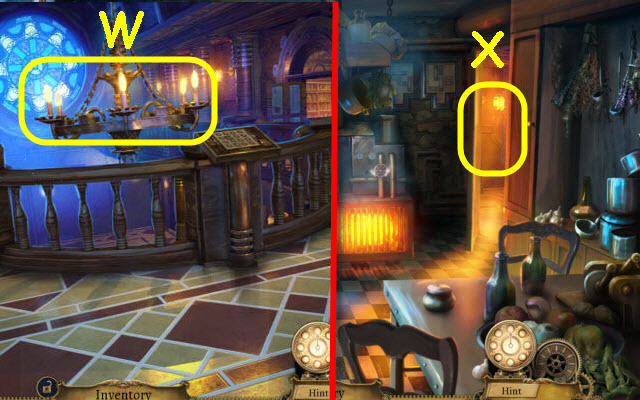
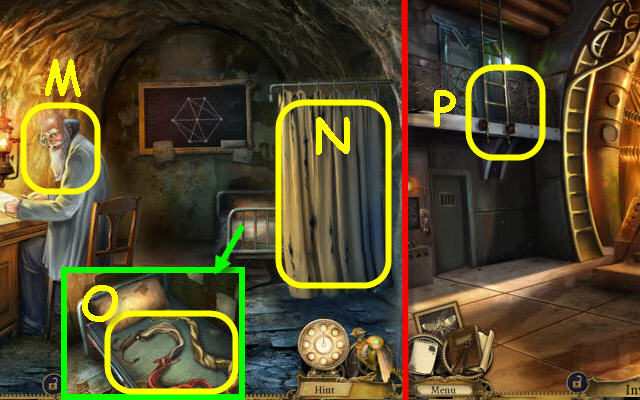
- Go left into the Inn.
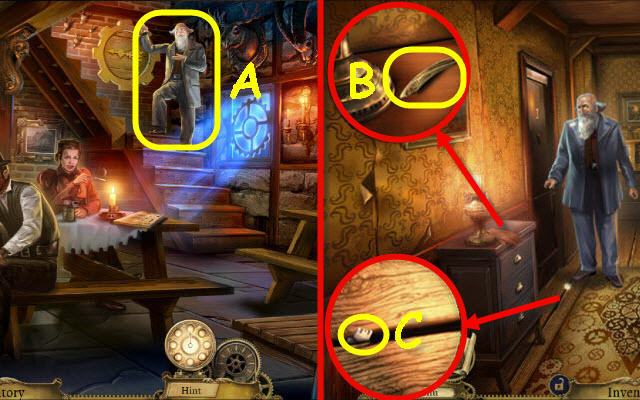
- Speak to Ink (A).
- Go upstairs.
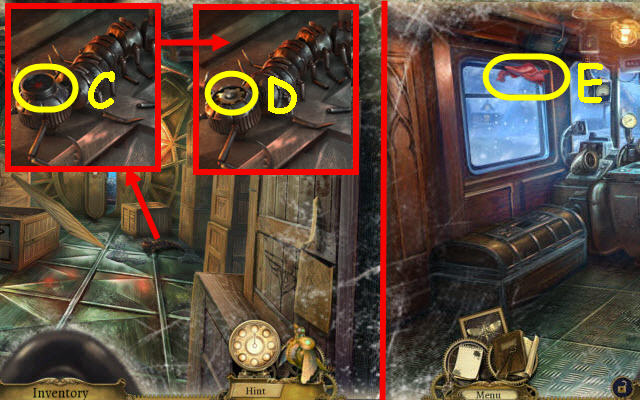
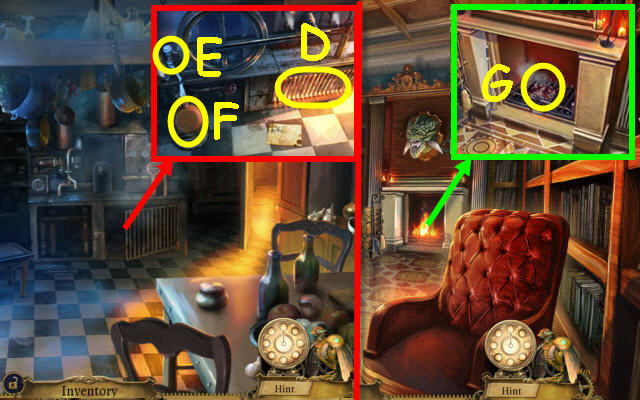
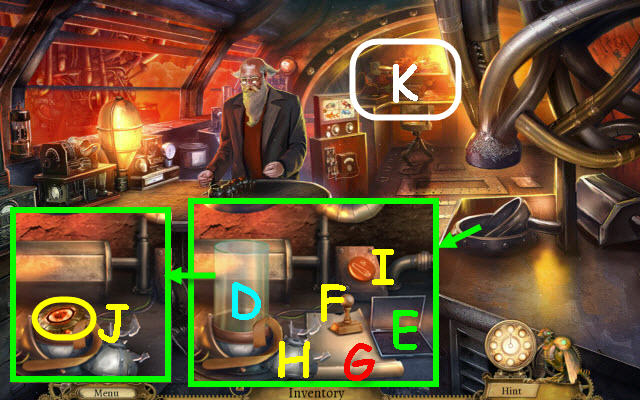
- Examine the chest and move the gloves; take the TWEEZERS (B).
- Examine the crack and use the TWEEZERS to get the KEY TO ROOM 1 (C).
- Give the KEY TO ROOM 1 to Ink.
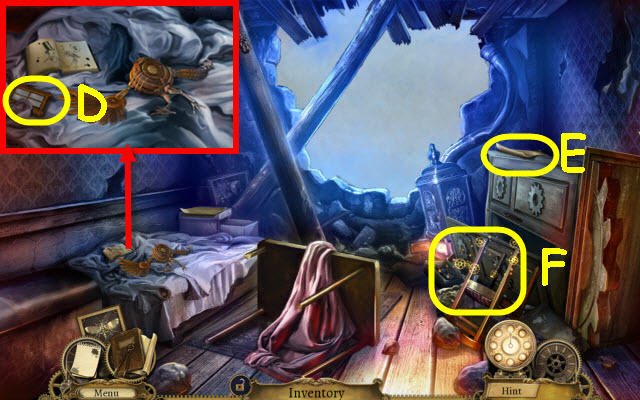
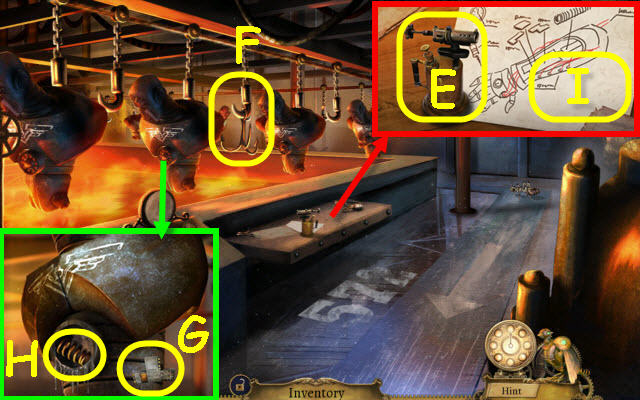
- Examine the bed; take the DOLLHOUSE WINDOW (D).
- Read the note (E).
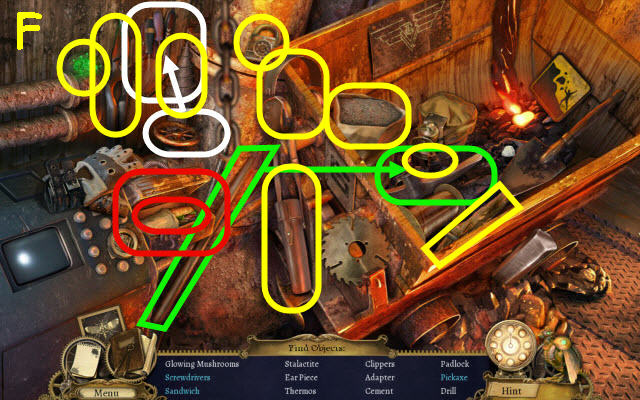
- Examine the overturned chair to access a HOP (F).
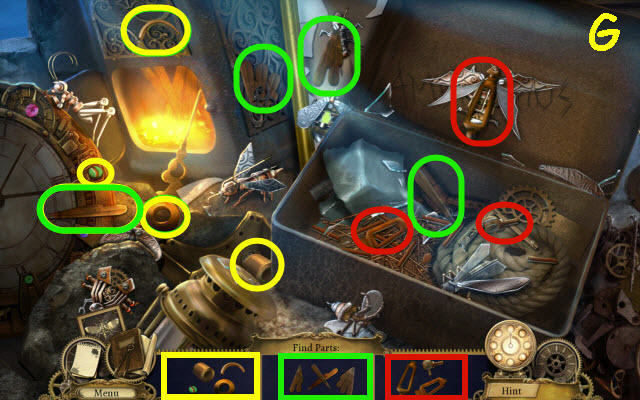
- Play the HOP.
- You will receive a CROW WING (G).
- Back out three times.
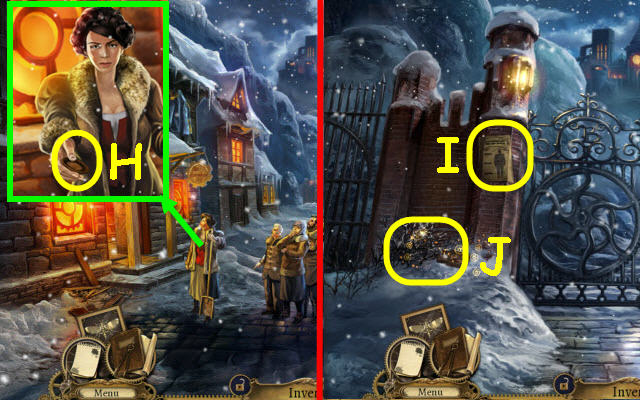
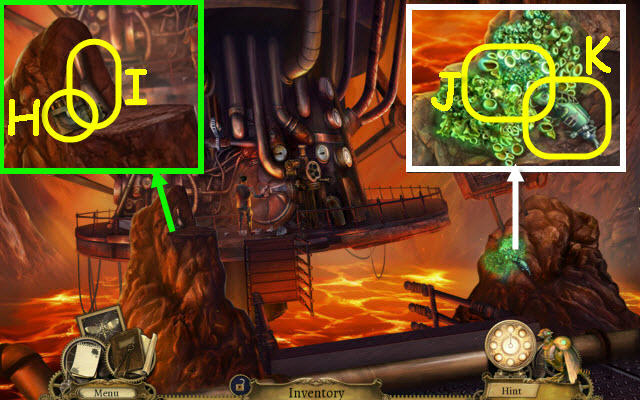
- Speak to the lady; take the DOLLHOUSE ROSETTE (H).
- Go forward to the gate.
- Read the note (I).
- Examine the snow pile to access a HOP (J).
- Play the HOP.
- Remove the cloth.
- Find and use the items in the order marked.
- You will receive the DOLLHOUSE DOOR (K).
- Back out.
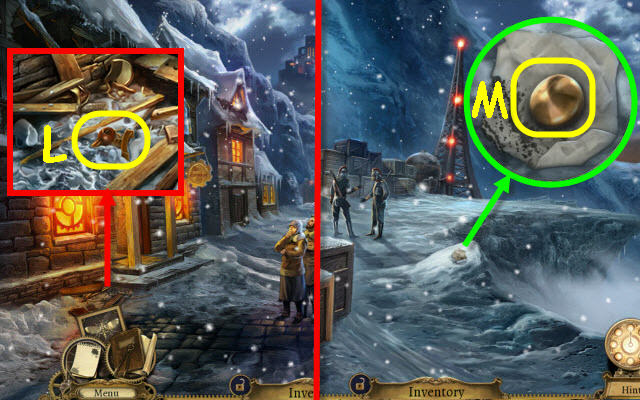
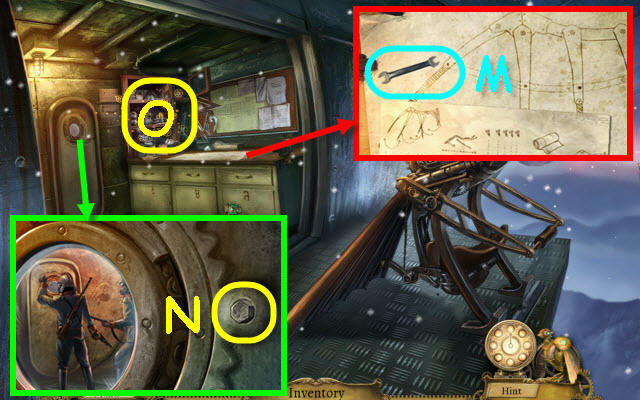
- Examine the boards and move them three times; take the CROW HEAD (L).
- Go up the right path.
- Examine the crumpled note and read it; take the DOORKNOB (M).
- Back out and enter the Inn.
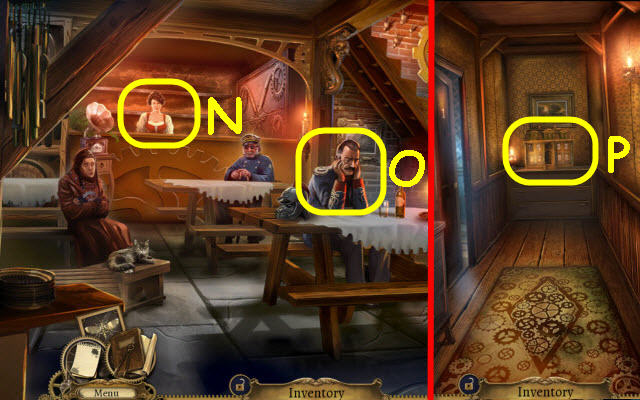
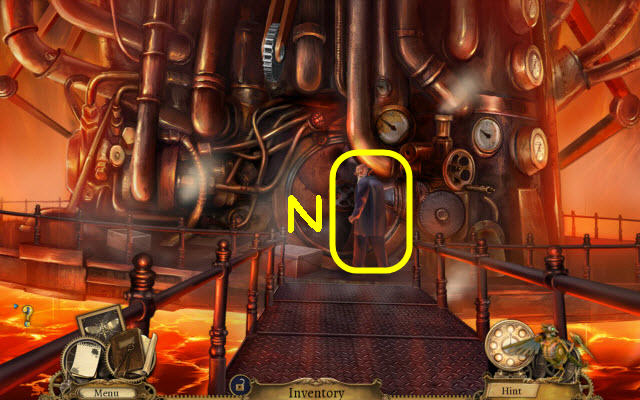
- Speak to the barmaid (N) and soldier (O).
- Go upstairs.
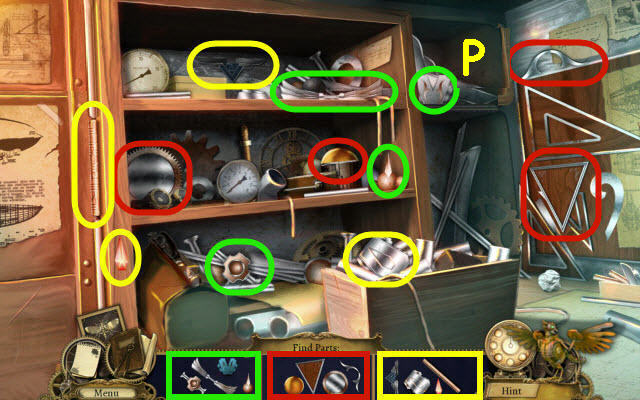
- Examine the dollhouse and place the DOLLHOUSE WINDOW, DOLLHOUSE ROSETTE and DOLLHOUSE DOOR on it. Select the dollhouse to trigger a puzzle (P).
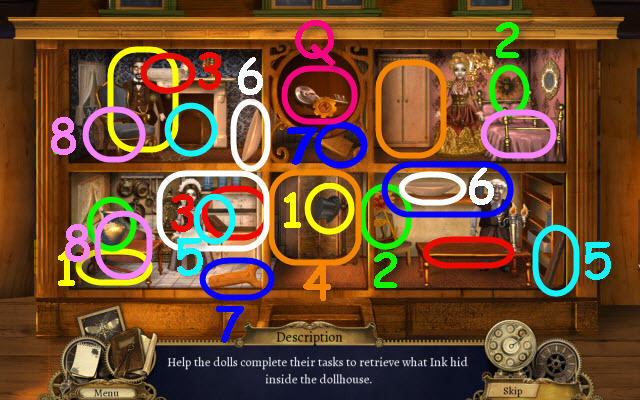
- Retrieve the items pictured in the upper middle to help the dolls.
- To solve the puzzle, select the items in the numbered order and place it on its matching colored location.
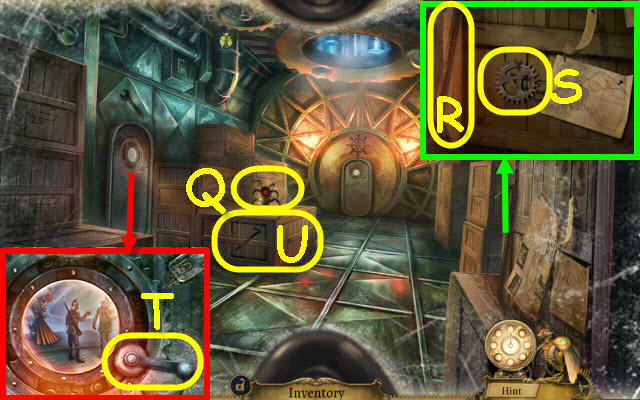
- Take the KEY TO ROOM 2 (Q).
- Go left into Inks Room.
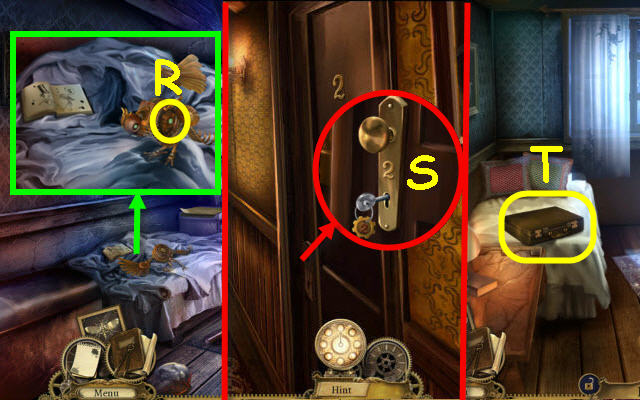
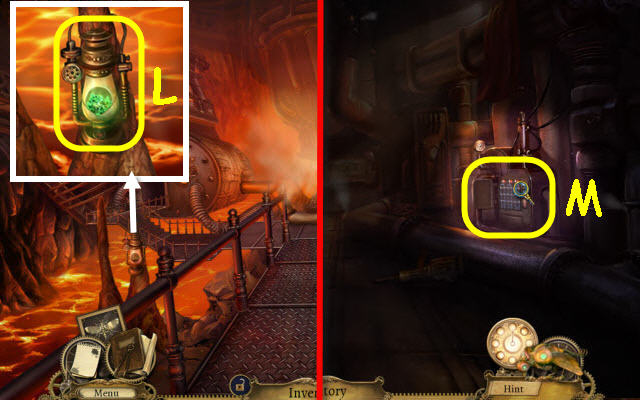
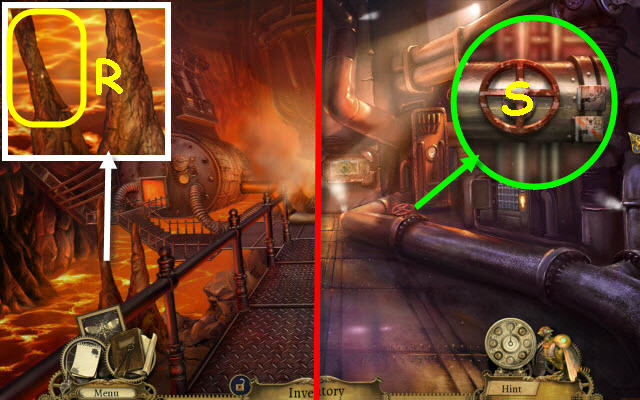
- Examine the bed and place CROW HEAD and CROW WING on Matthew. Select Matthew twice; take the DEAD POWER CUBE (R).
- Back out.
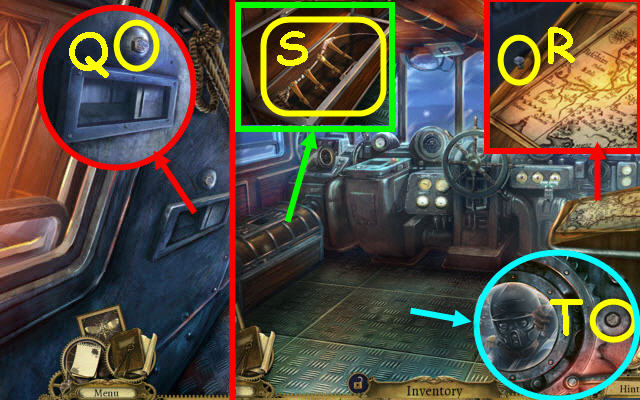
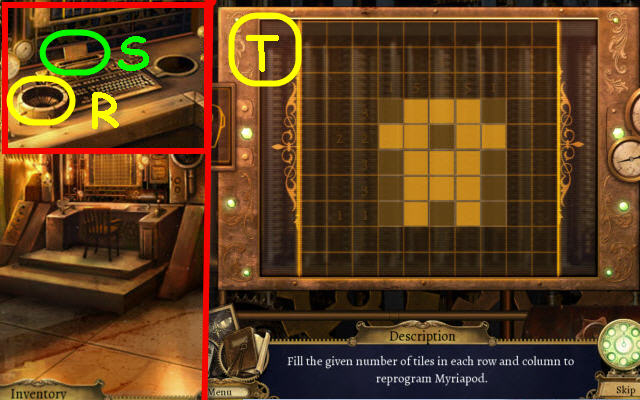
- Examine the door plate and place the DOORKNOB on it; use the KEY TO ROOM 2 in the keyhole. Select the key or knob (S).
- Go right into Room 2.
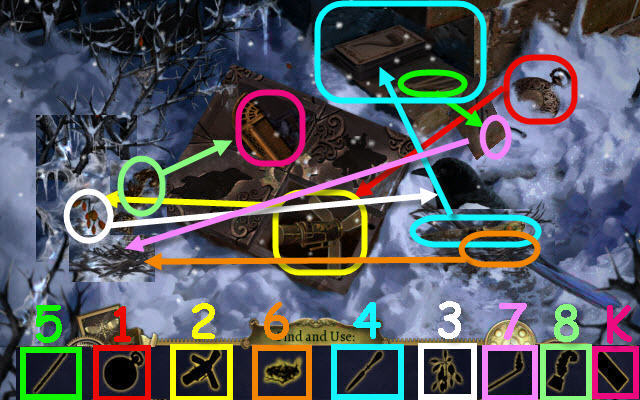
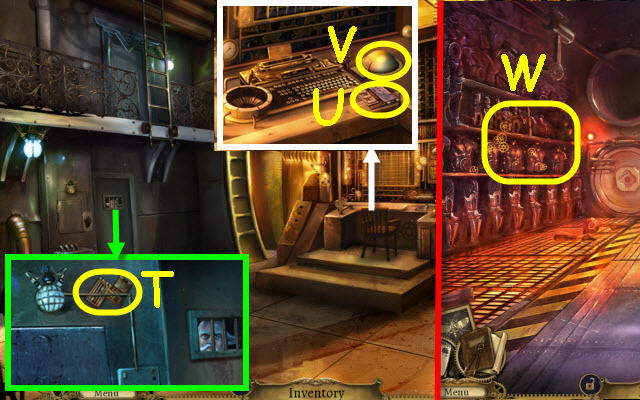
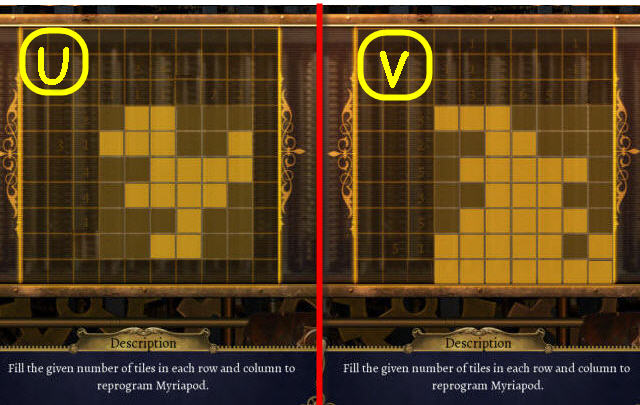
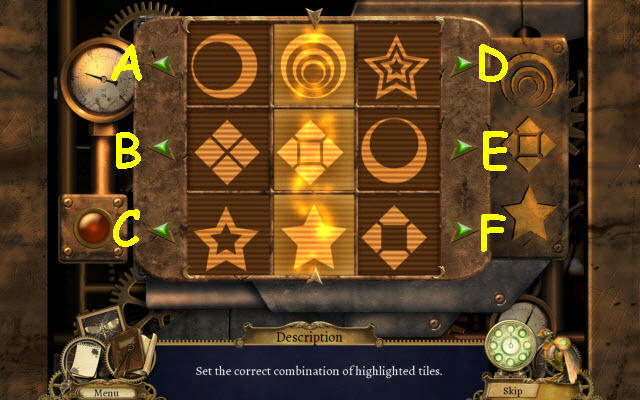
- Examine the suitcase to trigger a puzzle (T).
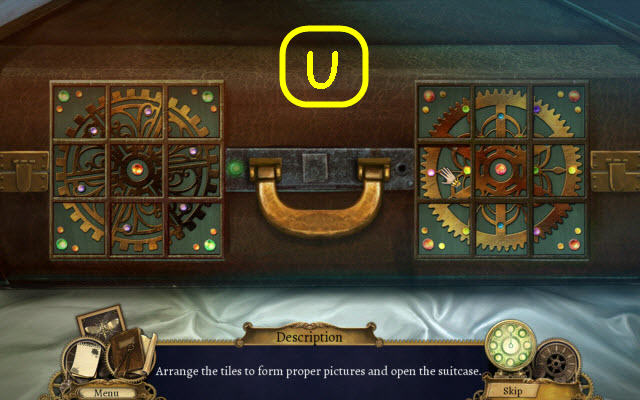
- Swap any two tiles to complete the pictures.
- See screenshot for solution (U).
- Open the suitcase.
- Examine the suitcase and read the four notes.
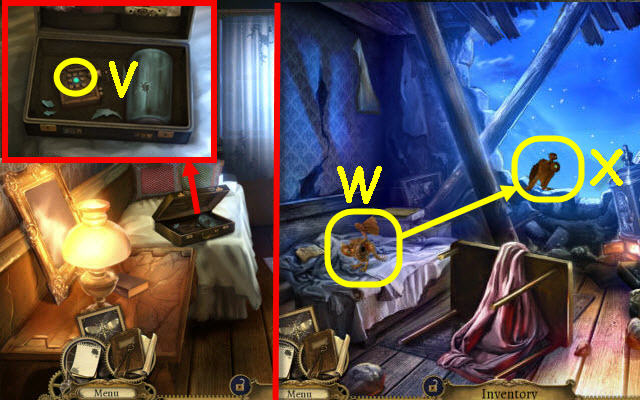
- Place the DEAD POWER CUBE in the charger and turn the handle; take the CHARGED POWER CUBE (V).
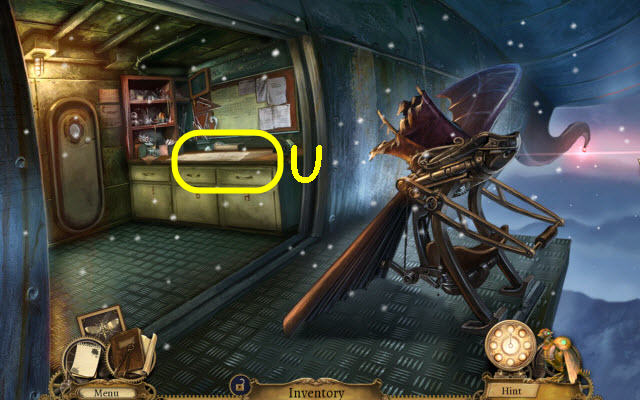
- Back out and enter Inks Room.
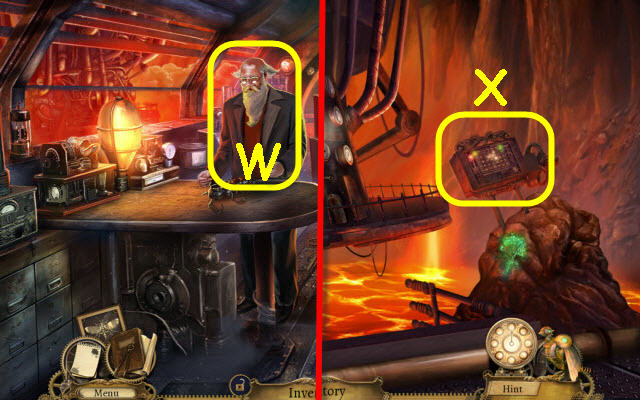
- Examine Matthew and place the CHARGED POWER CUBE on him (W).
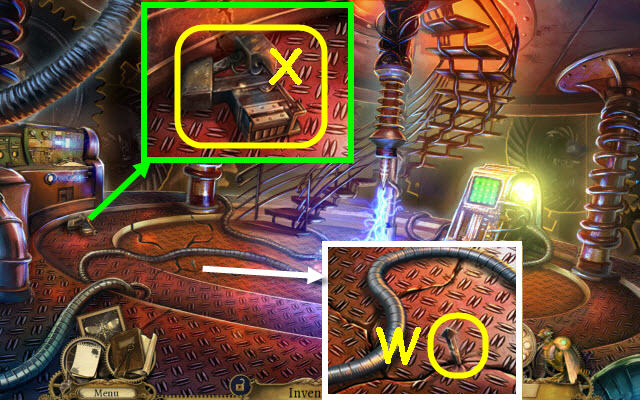
- Take Matthew (X). He will now be added to your toolbar and you can use him to reach items out of your reach.
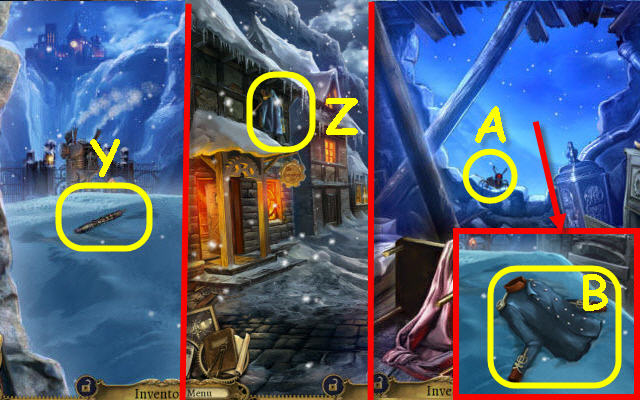
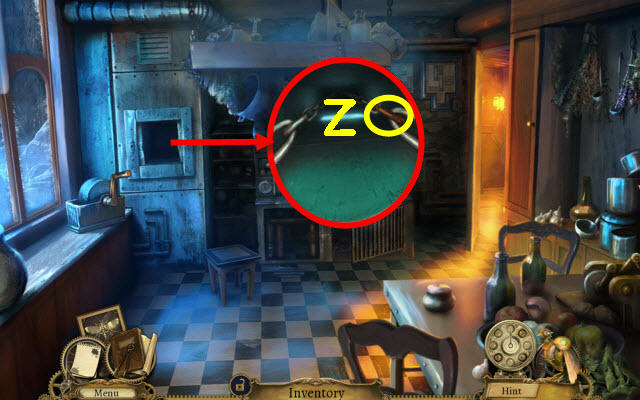
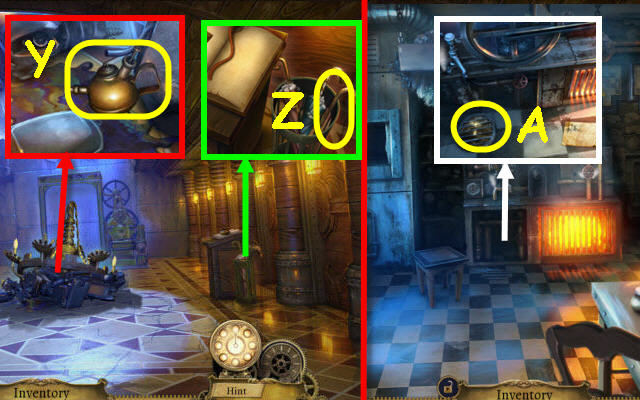
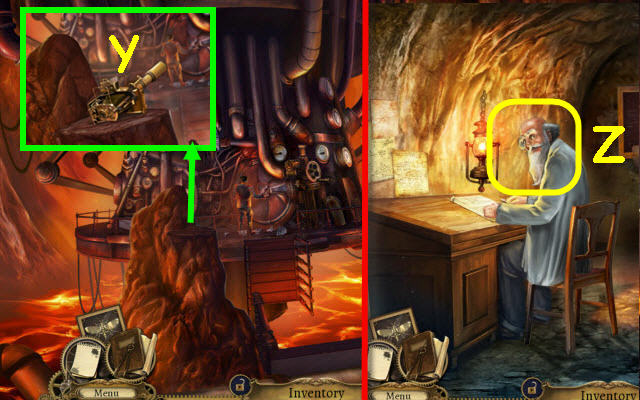
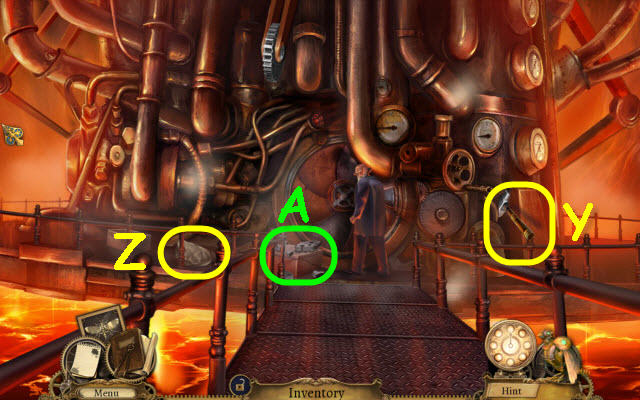
- Use Matthew to get the MECHANICAL LOCK PICK (Y).
- Jump out the window to Main Street.
- Use Matthew on the jacket (Z).
- Return to Inks Room.
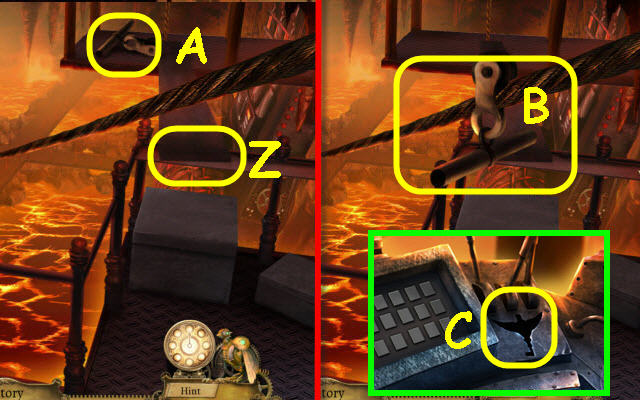
- Use Matthew on the Myriapod (A).
- Zoom into the hole in the wall; take the MILITARY JACKET (B).
- Go to the gate.
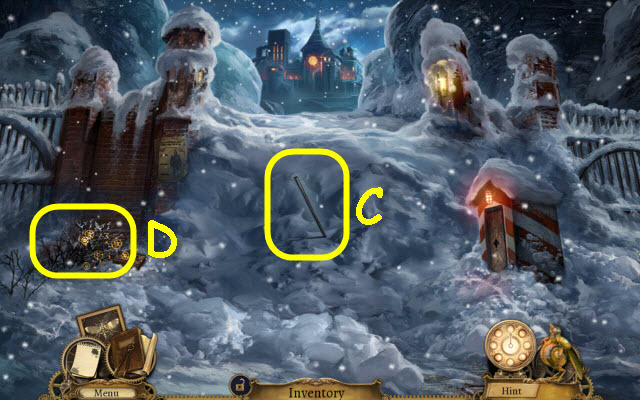
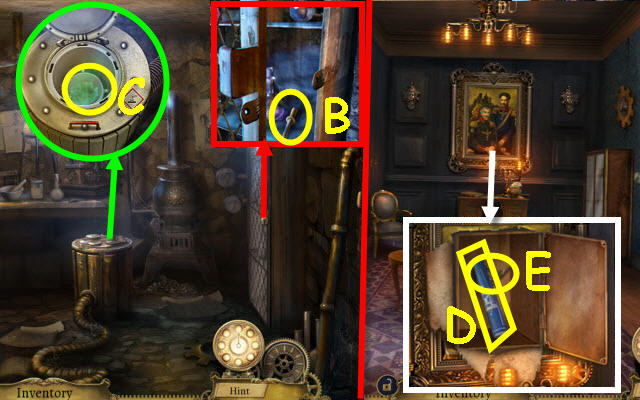
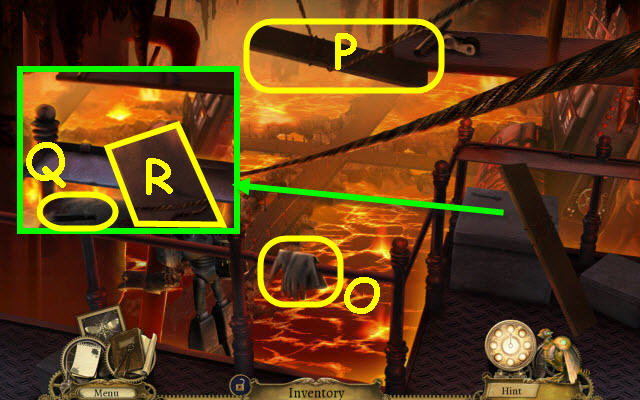
- Take the IRON ROD (C).
- Examine the brambles to access a HOP (D).
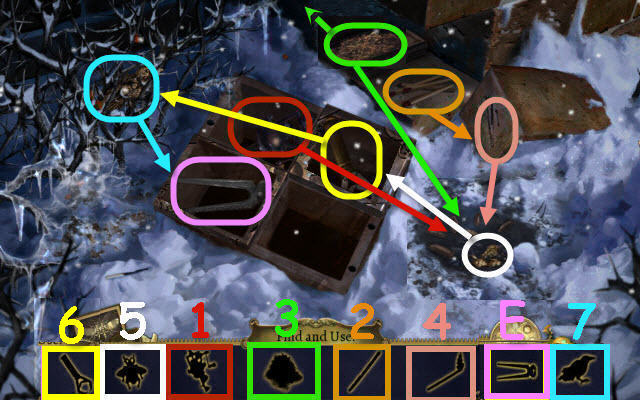
- Play the HOP.
- Find and use the items in the order marked.
- You will receive the WIRE CUTTERS (E).
- Back out.
- Examine the shovel head and place the IRON ROD on it; take the SNOW SHOVEL (F).
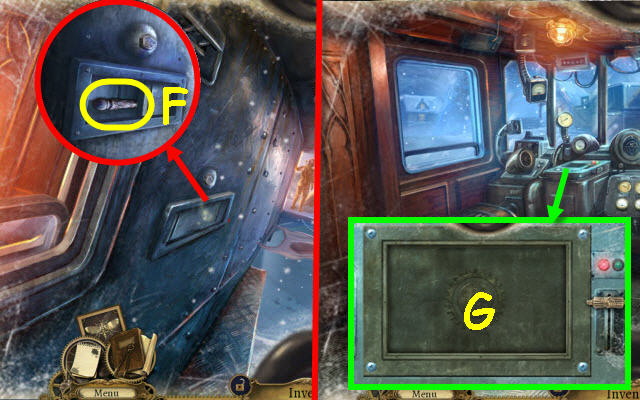
- Open the panel and pull the lever (G).
- Go forward.
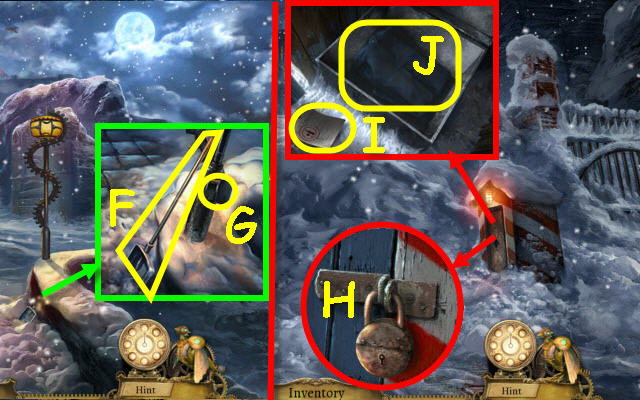
- Use the SNOW SHOVEL on the shack and zoom into the door. Use the MECHANICAL LOCK PICK on it and remove the lock (H).
- Examine the opened shack; take the LIQUOR LICENSE (I).
- Use the WIRE CUTTERS on the wire and remove it. Open the lid; take the SOLDIER'S TROUSERS (J).
- Back out and go up the right.
- Examine the window and give the LIQUOR LICENSE to the soldier; take the INN SUPPLIES (K).
- Go to the Gearwheel Inn.
- Give the INN SUPPLIES to the barmaid (L).
- Examine the right side of the bar to trigger a puzzle (M).
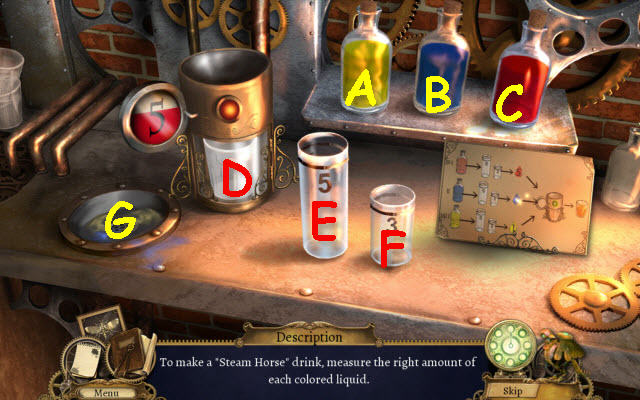
- Make the drink per the directions.
- To solve the puzzle, select the following: C-E, E-D, B-E, E-F, E-D, (F will empty automatically), A-F, F-E, A-F, F-E and F-D.
- If you need to empty a vial you can use the drain (G).
- Open the mixer compartment (D); take the 'STEAM HORSE' DRINK.
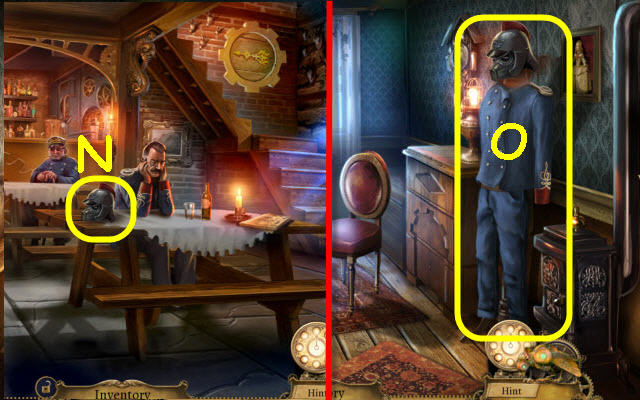
- Give the 'STEAM HORSE' DRINK to the soldier; take the HELMET (N).
- Go upstairs and enter Room 2.
- Place the MILITARY JACKET, SOLDIER'S TROUSERS and HELMET on the dummy; select the uniform (O).
- Go to the Zeppelin Landing.
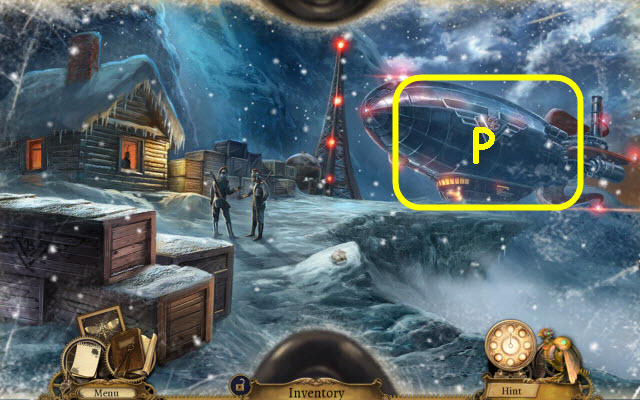
- Board the Zeppelin (P).
Chapter 2: Zeppelin
- Use Matthew on the Myriapod (Q).
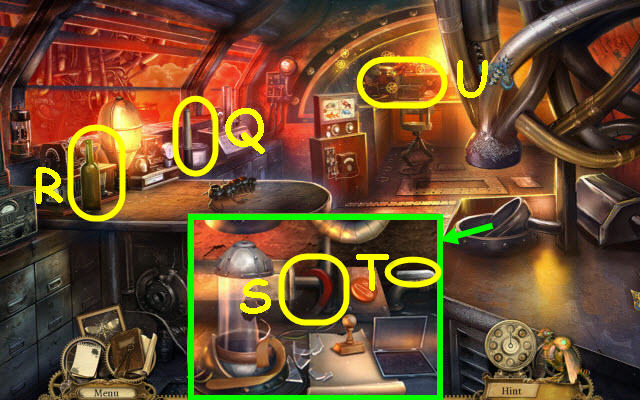
- Examine the CROWBAR (R) and take it.
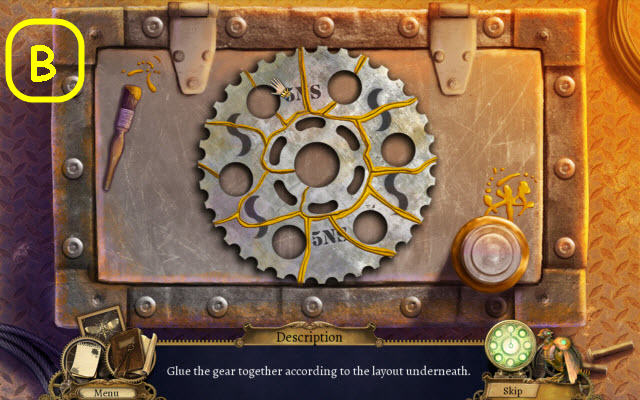
- Examine the diagram and take the GEAR 1/3 (S).
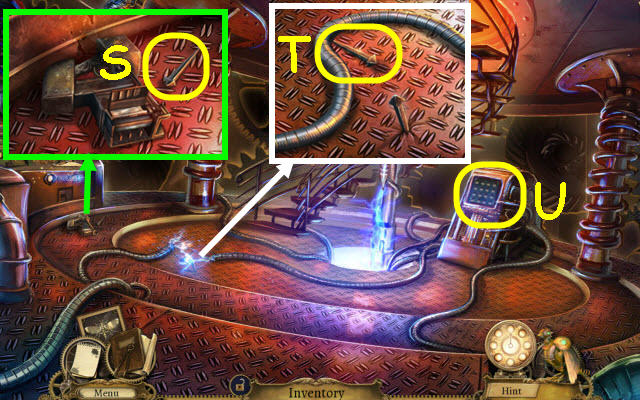
- Examine the door; take the CRANK HANDLE (T).
- Use the CROWBAR on the large crate and examine it to trigger a puzzle (U).
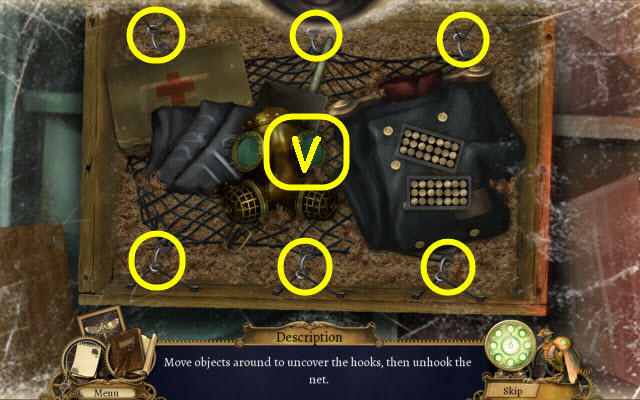
- Move the items to unhook the net.
- See screenshot for solution (V).
- Take the unhooked CARGO NET.
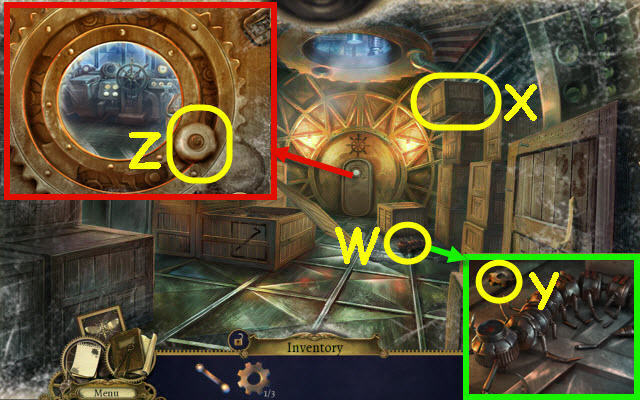
- Use the CARGO NET on the Myriapod (W).
- Use Matthew on the teetering crate (X).
- Examine the Myriapod; take the GEAR 2/3 (Y).
- Examine the rear door and place the CRANK HANDLE on the stem (Z).
- Select the handle to go forward.
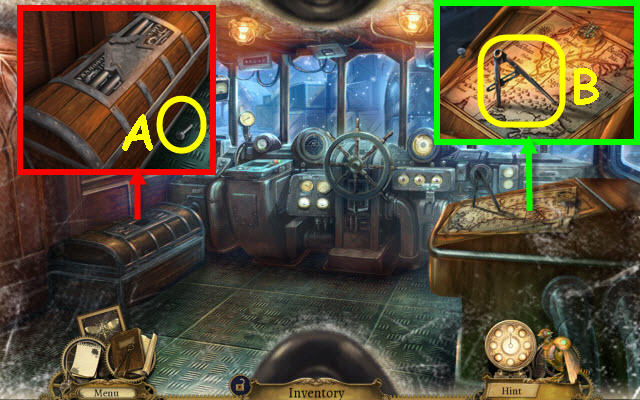
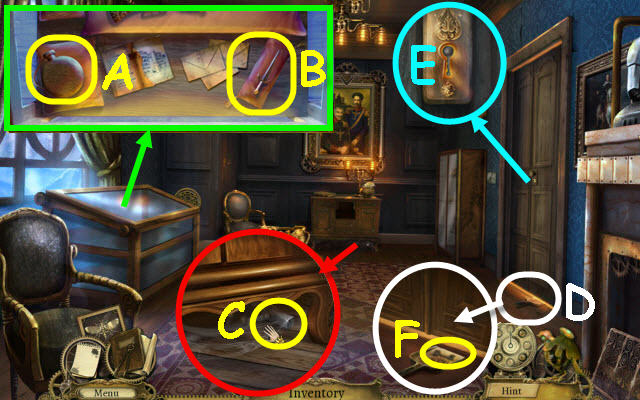
- Examine the map; take the COMPASS (A).
- Examine the chest; take the BOLT 1/5 (B).
- Back out.
- Examine the Myriapod and use the COMPASS on the head. Take the CAMERA SHUTTER (C) and GEAR 3/3 (D).
- Go forward.
- Remove the cloth and exit out the window (E).
- Examine the panel and open it; take the SCREWDRIVER (F).
- Go left.
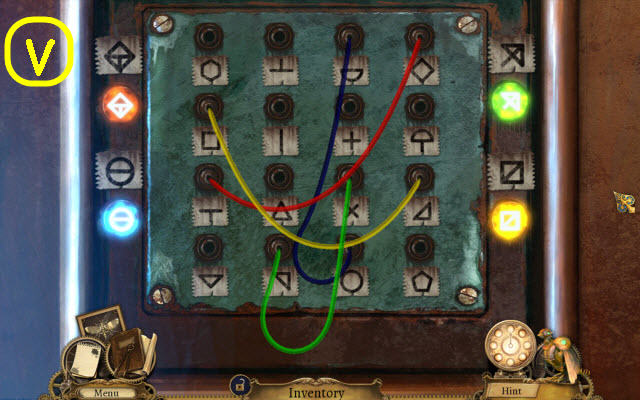
- Examine the controls; use the SCREWDRIVER on the panel and remove it (G).
- Place the 3 GEARS on it to trigger a puzzle.
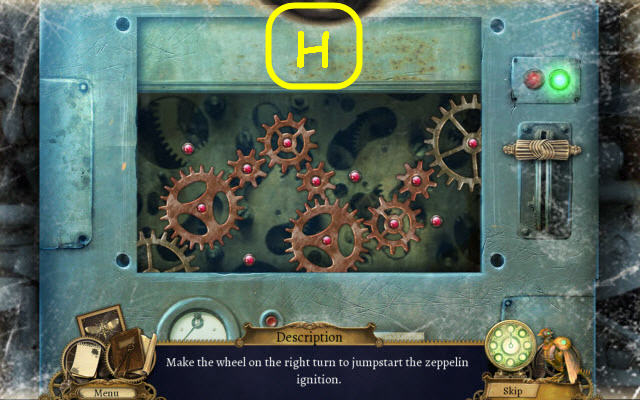
- Place the GEARS so they are all turning.
- See screenshot for solution (H).
- Pull the lever when complete.
- Exit through the left window after the cutscene.
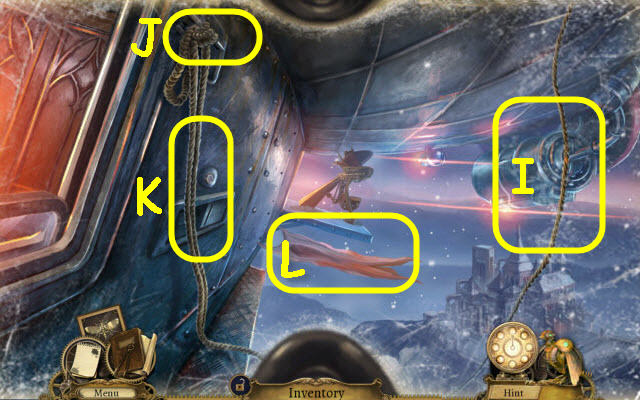
- Use Matthew on the rope; take the ROPE (I).
- Attach the ROPE on the cleat (J).
- Use Matthew on the rope (K).
- Take the TEXTILE (L).
- Go forward.
- Examine the counter; take the WRENCH (M).
- Examine the window and use the WRENCH to get the BOLT 2/5 (N).
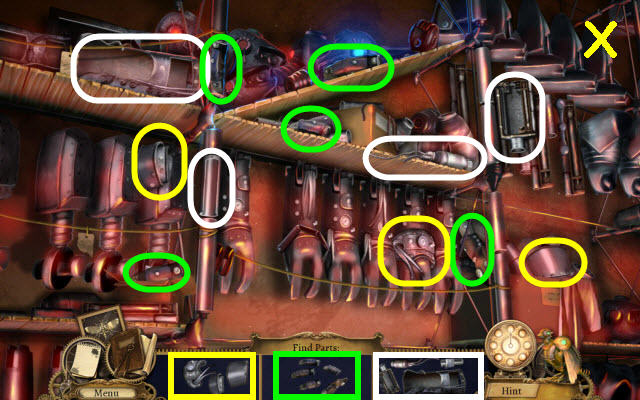
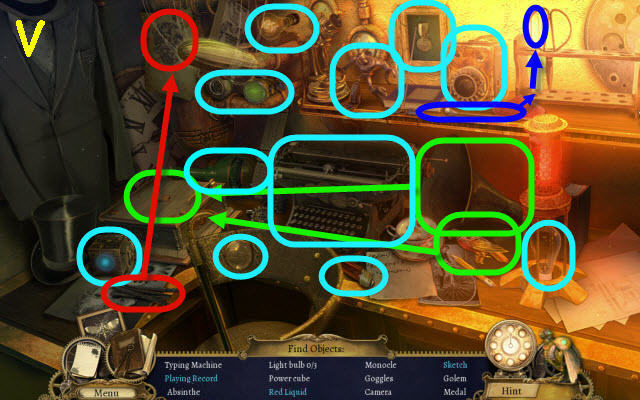
- Examine the cabinet to access a HOP (O).
- Play the HOP.
- Open the cabinet (P) to get a piece marked in green. Close the cabinet to get a piece in red.
- You will receive the BARBER'S EMBLEM.
- Back out.
- Examine the panel and use the WRENCH to get the BOLT 3/5 (Q).
- Go left.
- Examine the map; use the WRENCH to get the BOLT 4/5 (R).
- Examine the chest and place the BARBER'S EMBLEM on it; open the lid and take the GLIDER WING RACK (S).
- Examine the floor panel and use the WRENCH to get the BOLT 5/5 (T).
- Go to the Balcony.
- Examine the counter and place the TEXTILE, GLIDER WING RACK and 5 BOLTS on it (U).
- You will trigger a puzzle.
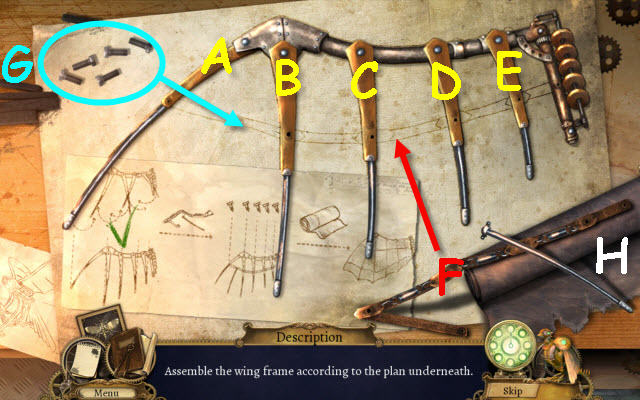
- Assemble the wing.
- To solve the puzzle, select the following wing frame sections and drag them over their place on the scheme: E, D, B, A, E and D.
- Place the belt on the frame (F).
- Place the bolts on the frame (G).
- Cover with the textile (H).
- Take the REPAIRED GLIDER WING.
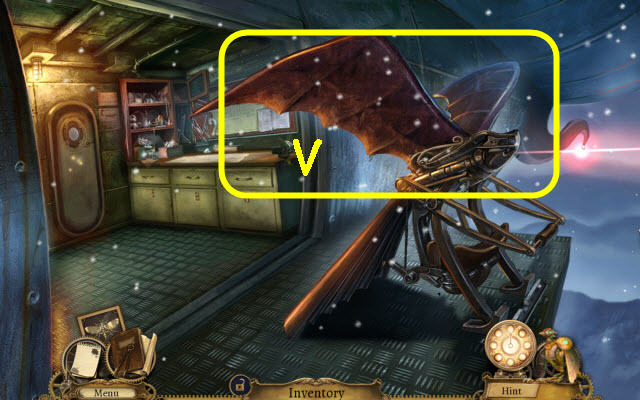
- Place the REPAIRED GLIDER WING on the glider (V).
- Select the glider.
Chapter 3: Garden
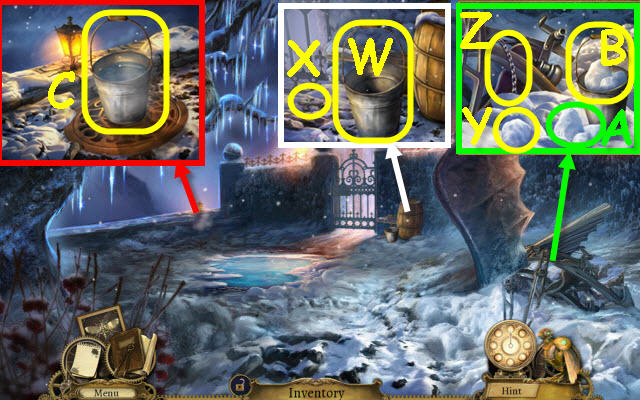
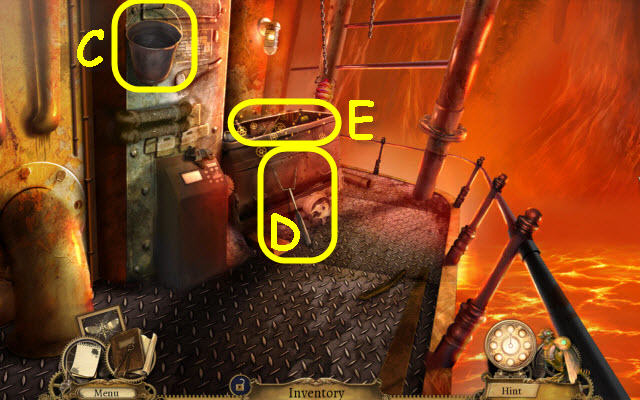
- Examine the barrel; take the BUCKET (W) and METAL SPIKE (X).
- Examine the glider; take the SNOWBALL (Y) and CHAIN (Z).
- Place the BUCKET on the snow and place the snow (A) in it; take the BUCKET WITH SNOW (B).
- Examine the vent and place the BUCKET WITH SNOW on it; take the BUCKET WITH WATER (C).
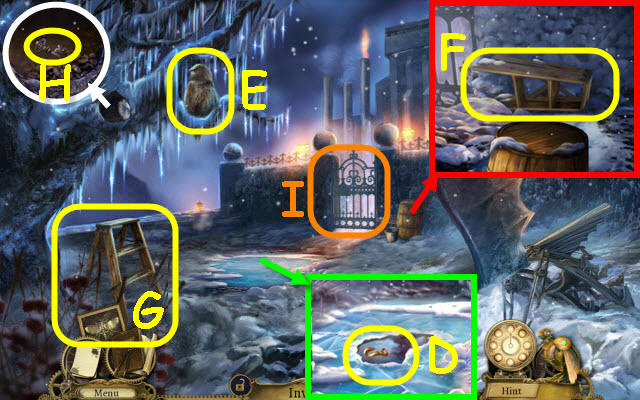
- Examine the ice and use the METAL SPIKE on it three times; use the CHAIN on the hook to get a HOOK ON A CHAIN (D).
- Use the SNOWBALL on the owl (E).
- Examine the barrel; use the BUCKET WITH WATER on the ground before it and move the barrel. Take the LADDER (F).
- Place the LADDER under the branch (G).
- Examine the hole in the tree and use the HOOK ON A CHAIN to get the GARDEN GATE KEY (H).
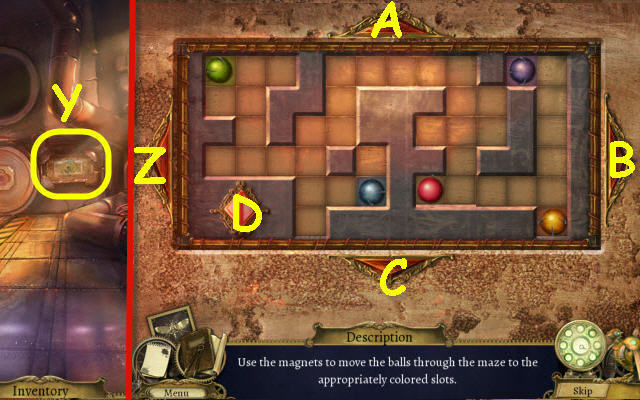
- Examine the gate and use the GARDEN GATE KEY on it to trigger a puzzle (I).
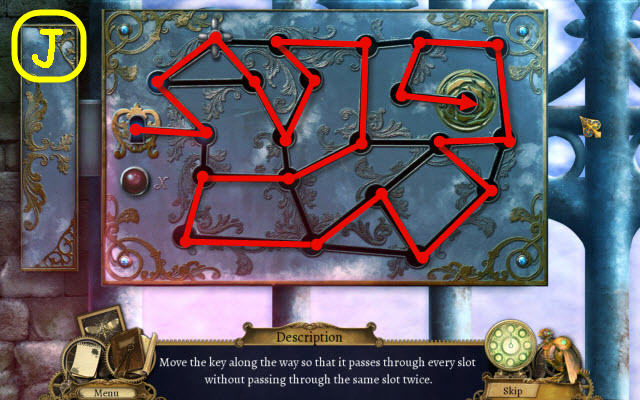
- Guide the key through every slot.
- See screenshot for solution (J).
- Go through the newly-opened gate.
Chapter 4: Dungeon
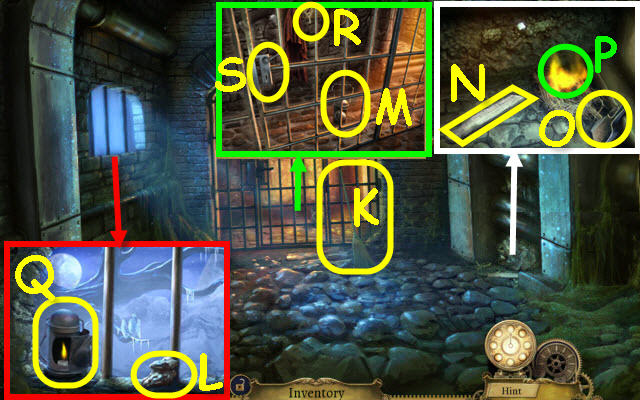
- Take the BROOM (K).
- Examine the window; take the FLINT (L).
- Examine the cell door and use the BROOM on the lantern; take the LAMP (M).
- Examine the STICK (N) and take it and the DUSTPAN (O).
- Use the FLINT on the hay and use the STICK on the burning hay to get a BURNING STICK (P).
- Examine the window; place the LAMP on the sill and open it. Use the BURNING STICK on the candle; place the CAMERA SHUTTER on it and select it twice (Q).
- You will now have Matthew on the toolbar again.
- Examine the cell door and use Matthew to get the CELL KEY (R).
- Use the CELL KEY on the lock and turn it (S).
- Go forward.

- Examine the doorway; take the ELEVATOR KEY (T).
- Examine the dumbwaiter and use the ELEVATOR KEY on it (U).
- Take the CREST PART 1/4 (U1).
- Examine the tiles to trigger a puzzle (V).
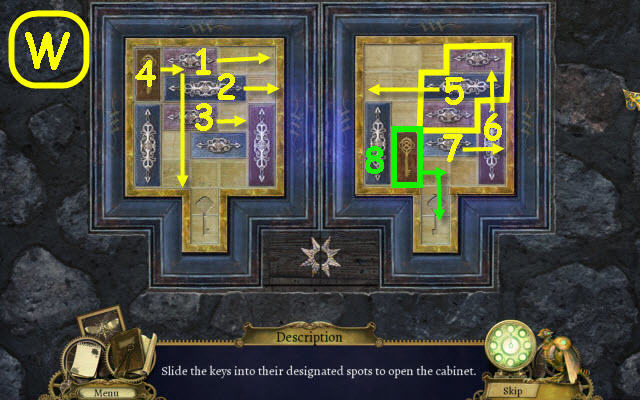
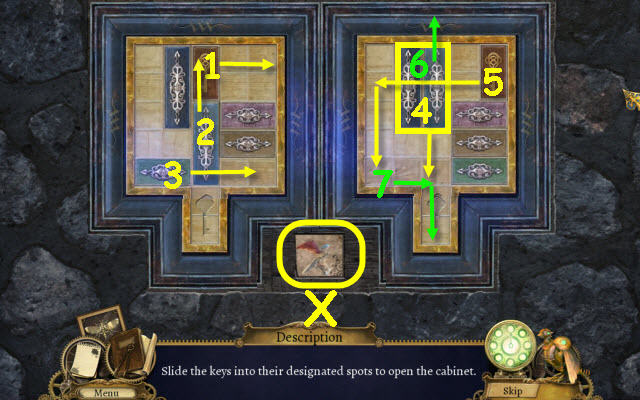
- Free the keys.
- To solve the left puzzle, slide the tiles in the order listed (W).
- To solve the right puzzle, slide the tiles in the order listed; take the CREST PART 2/4 (X).
- Examine the hanging pots to access a HOP.
- Play the HOP.
- You will receive the HOOK (Y).
- Examine the dumbwaiter and zoom into the back wall; place the HOOK on the chain (Z).
- Go into the dumbwaiter.
- Examine the display case and open it; take the EMPTY CANTEEN (A) and LETTER OPENER (B).
- Examine under the cabinet and use the BROOM on the cobwebs; take the ROCK HAMMER (C).
- Examine the bottom of the door and place the DUSTPAN under it (D).
- Examine the keyhole and use the LETTER OPENER in it (E).
- Examine the dustpan and pull it out; take the SALON KEY (F).
- Reexamine the keyhole and use the SALON KEY on it.
- Go to the Dungeon.
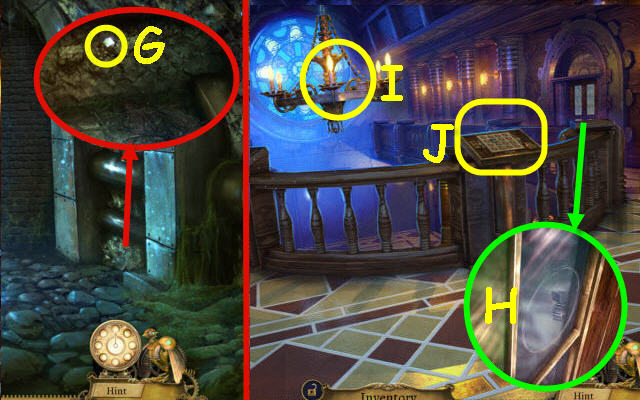
- Examine under the pipes and zoom into the diamond; use the ROCK HAMMER to get the DIAMOND (G).
- Go to the salon and then right through the doors.
- Examine the door and use the DIAMOND on the glass; select the glass and then select the lock (H).
- Use Matthew on the chandelier to get a RED QUARTZ (I).
- Examine the panel to trigger a puzzle (J).
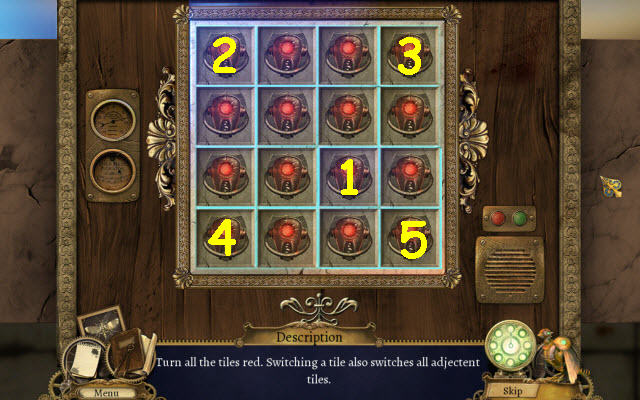
- Turn all the lights red.
- To solve the puzzle, select the tiles listed (1-5).
- Take the CREST PART 3/4.
- Go through the door on the right.
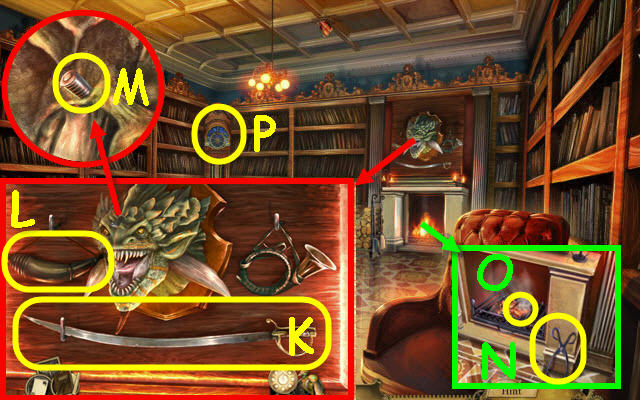
- Examine above the lizard head; take the BLUNT BLADE (K) and EMPTY GUNPOWDER HORN (L).
- Zoom into the lizard's forehead; use the LETTER OPENER to get the BULLET (M).
- Examine the fireplace; take the TONGS (N).
- Use the TONGS to get an EMBER (O).
- Examine the clock to trigger a puzzle (P).
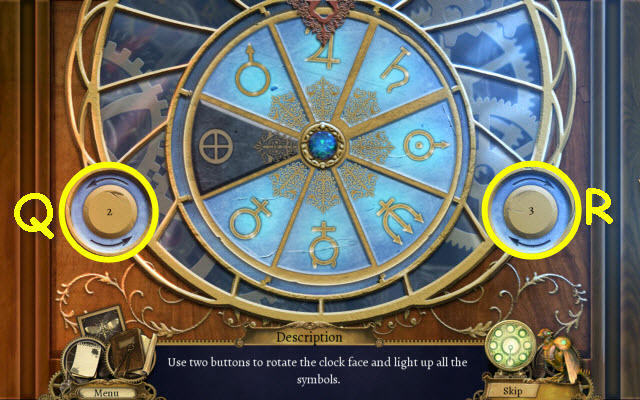
- Light up all the symbols.
- To solve the puzzle, select the following buttons: Qx3, R, Qx2, R and Q.
- Take the CREST PART 4/4.
- Go to the Salon.
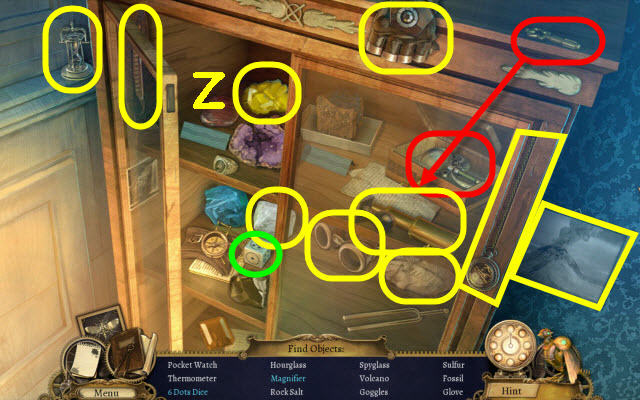
- Examine the glass cabinet on the right to access a HOP.
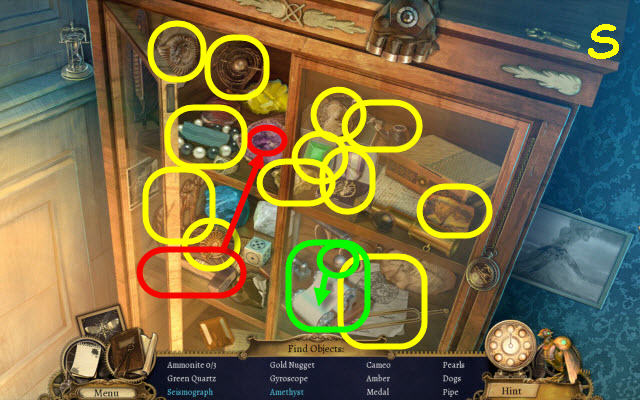
- Play the HOP.
- You will receive the GREEN QUARTZ (S).
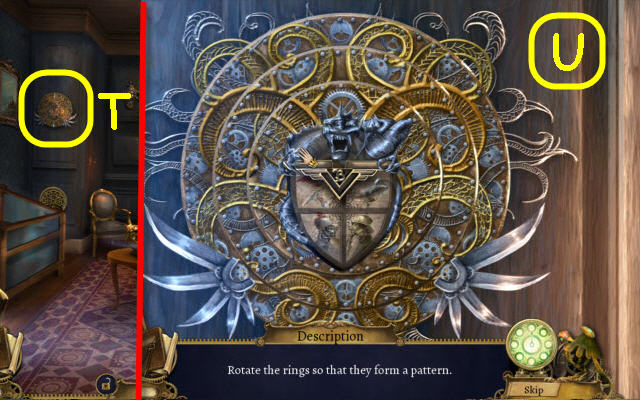
- Examine the crest and place the 4 CREST PARTS on it to trigger a puzzle (T).
- Rotate the rings and complete the pattern.
- To solve the puzzle, rotate the outer ring first, the middle ring second and the smallest ring last to line up the patterns (U).
- Take the BLUE QUARTZ.
- Go to the Library.

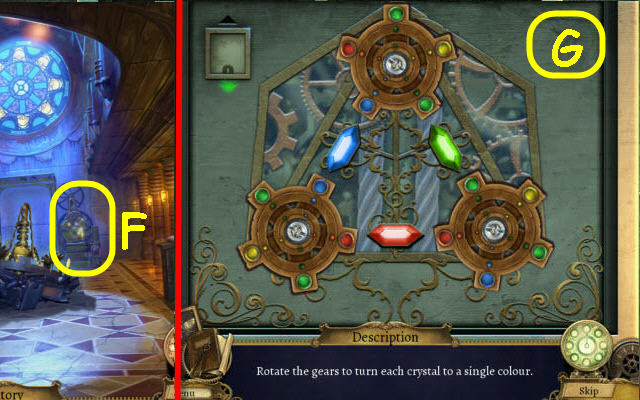
- Examine the control panel and place the RED QUARTZ, GREEN QUARTZ and BLUE QUARTZ on it to trigger a puzzle (V).
- Arrange the mirrors to connect matching colored gems.
- See screenshot for solution (W).
- Go left into the Hidden Room.
Chapter 5: Hidden Room

- Flip the LEVER (X) and take it.
- Go to the Salon.
- Examine the glass cabinet to access a HOP (Y).
- Play the HOP.
- You will receive the SULFUR (Z).
- Back out.
- Examine the grindstone; use the BLUNT BLADE on it to get a SHARP BLADE (A).
- Examine the hanging pots to access a HOP (B).
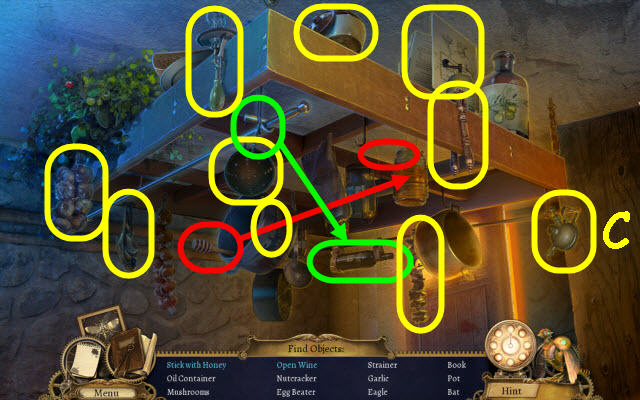
- Play the HOP.
- You will receive an EMPTY OIL CAN (C).
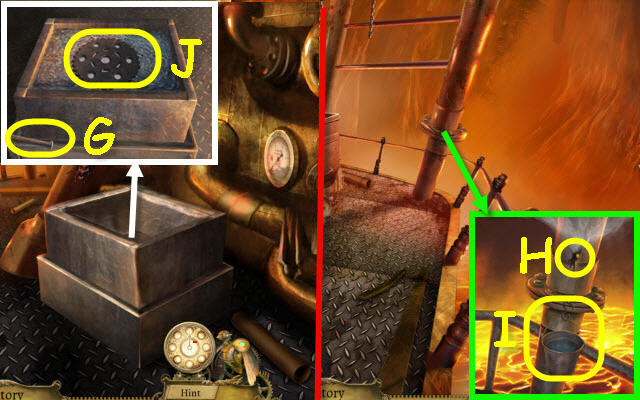
- Examine the furnace and open the panel; place the EMBER inside (D).
- Turn the valve (E); place the EMPTY CANTEEN in the water to get a FULL CANTEEN (F). If the water shuts off before you fill the canteen, use the canteen on the valve.
- Go to the Library.
- Examine the fireplace and use the FULL CANTEEN on the embers; take the CHARCOAL (G).
- Go to the Hidden Room.
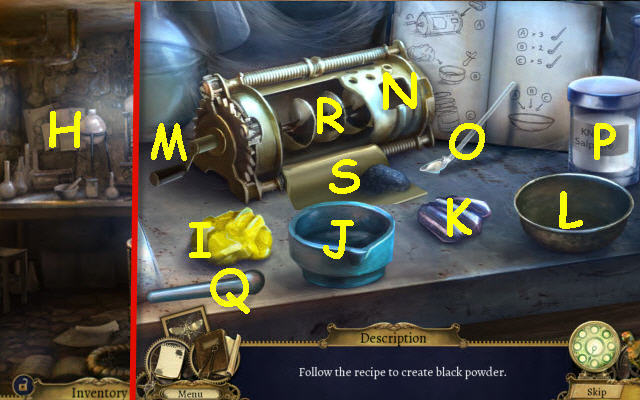
- Examine the lab table and place the SULFUR and CHARCOAL on it to trigger a puzzle (H).
- Create the black powder.
- To solve the puzzle, select the following: K-N, M, R, I-J, Q-J, P, O, S-Lx3, J-Lx2, P-Lx5, right click to drop the spoon, and Q-L.
- Use the EMPTY GUNPOWDER HORN on the bowl (L) to get GUNPOWDER.
- Go to the Salon.
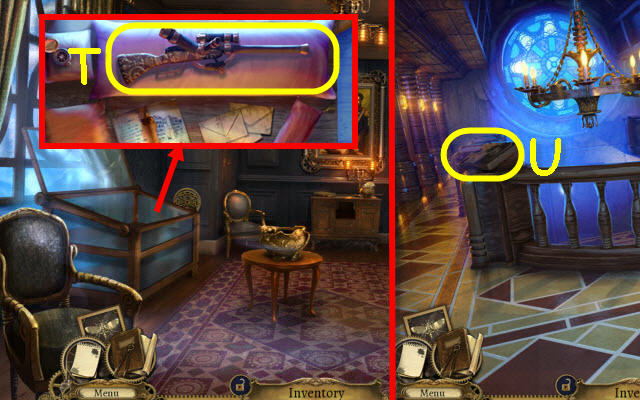
- Examine the display case and use the GUNPOWDER and BULLET on the rifle. Take the RIFLE (T).
- Go through the door on the right.
- Examine the controls and place the LEVER on it to trigger a puzzle (U).
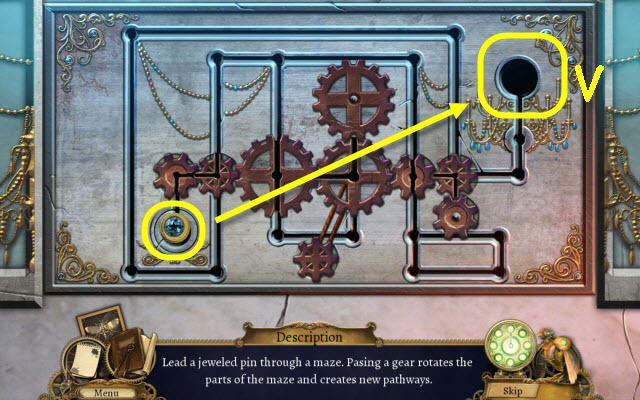
- Guide the jewel to the exit.
- To solve the puzzle, move the jewel as follows: Up, right, up, right x2, down, right-down-left-up x4, up, left, down, right, up, left, down, left, up, right, down, right and up (V).
- Use the RIFLE on the chandelier (W).
- Back out twice and go right to the Downstairs Lobby (X).
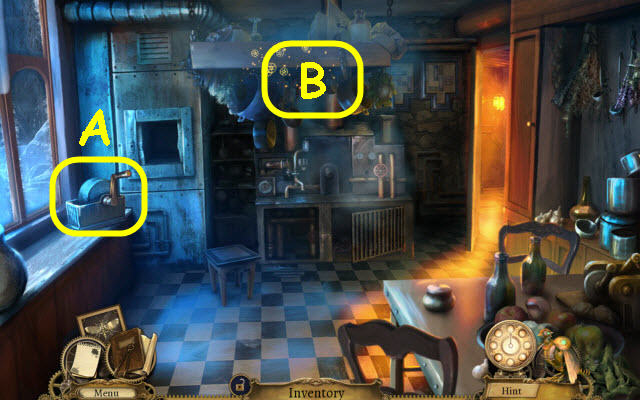
- Examine the golems and use the EMPTY OIL CAN on the dripping oil; take the FULL OIL CAN (Y).
- Examine the umbrella stand; take the CANE (Z).
- Back out.
- Examine the furnace and zoom into the drain (A); use the CANE in the drain to get the CUPBOARD KEY.
- Go to the Hidden Room.
- Examine the cabinet and use the CUPBOARD KEY on the padlock; take the PIPETTE (B).
- Examine the container; use the FULL OIL CAN on it and open the lid. Use the PIPETTE to get the ACID (C).
- Go to the Salon.
- Examine the painting; use the SHARP BLADE on it and select it twice. Use the ACID on the gears and open the safe; take the OLD BLUEPRINTS (D) and PENDANT KEY (E).
- Go to the Downstairs Lobby.
- Examine the mechanism and use the PENDANT KEY on the lock to trigger a puzzle (F).
- Rotate the gears so matching colors face each other.
- See screenshot for solution (G).
- Go forward.
Chapter 6: Free Ink
- Go forward after the cutscene.
- Examine the left rock; take the GOLEM PART 1/5 (H) and PUTTY KNIFE (I).
- Examine the right rock and use the PUTTY KNIFE to get the GLOWING MUSHROOMS (J).
- Take the MECHANICAL LIZARD (K).
- Back out.
- Examine the lantern and place the GLOWING MUSHROOMS inside; take the SHROOMS LAMP (L).
- Go up the left walkway.
- Use the SHROOMS LAMP anywhere in the room and find the electric panel (M).
- Zoom into the panel to trigger a puzzle.
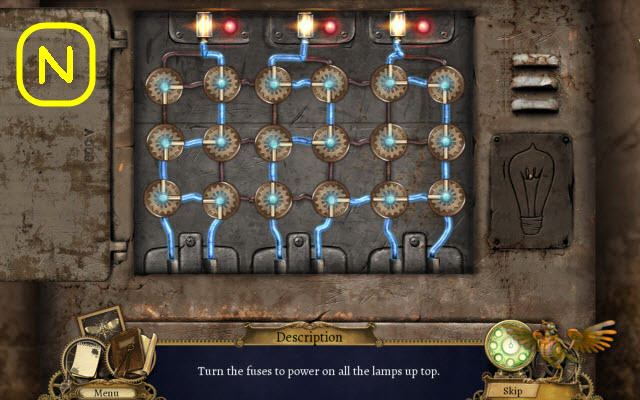
- Power up the top three lamps.
- See screenshot for solution (N).
- Take the JACKHAMMER (O).
- Examine the left grate; take the GOLEM PART 2/5 (P).
- Use Matthew to get the FLAG (Q).
- Back out.
- Examine the stalagmite and use the JACKHAMMER on it; take the STALAGMITE (R).
- Go left to the Storeroom.
- Examine the valve and use the STALAGMITE on it (S).
- Back out and go up the right walkway.
- Examine the door; take the GOLEM PART 3/5 (T).
- Examine the controls; take the GOLEM PART 4/5 (U).
- Select the ball two times to get the STEEL BALL (V).
- Go to the Storeroom.
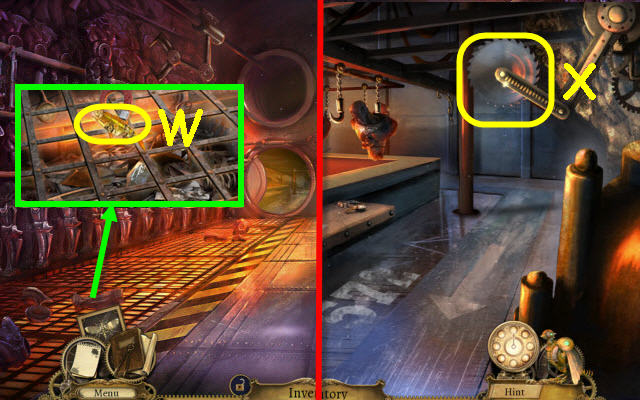
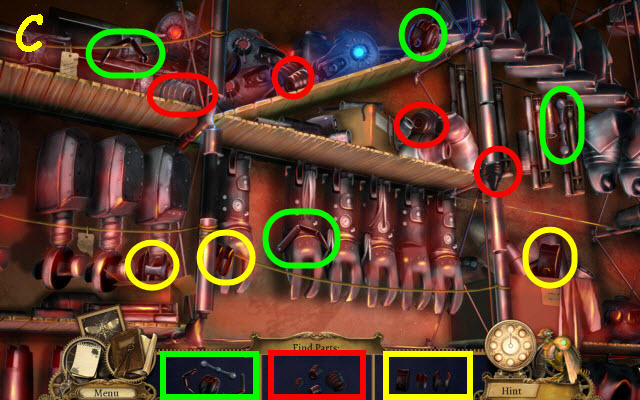
- Examine the golem parts on the shelves to access a HOP (W).
- Play the HOP.
- You will earn the GOLEM HAND CHASSIS (X).
- Examine the panel and place the STEEL BALL in the center to trigger a puzzle (Y).
- Place the balls into their matching colored slots.
- To solve the puzzle, select the following: B, A, Z, C, B, C, Z, C, Z, A, Z, C, Z, C, B, C, Z, A, Z, A, Z, A, Z, B, C, Z, C, B, A, B, A, B, C, and Z.
- You may reset the puzzle with the button (D).
- Go forward.
- Examine the workbench; take the BLOW TORCH (E).
- Take the HOOK (F).
- Examine the golem torso; take the GOLEM PART 5/5 (G).
- Use the BLOW TORCH on the panel; take the SPRING (H).
- Examine the workbench; place the GOLEM HAND CHASSIS, SPRING and 5 GOLEM PARTS on the table to trigger a puzzle (I).
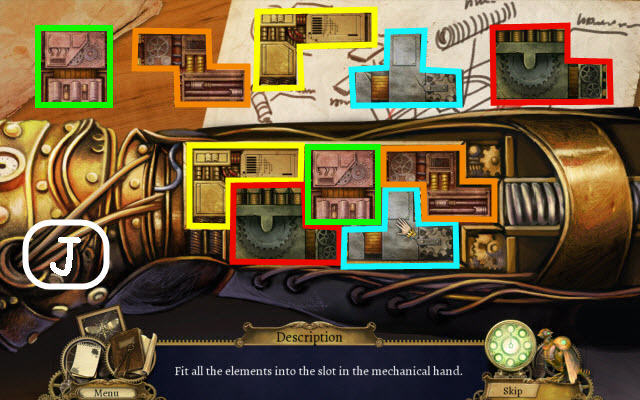
- Place the elements into the hand.
- See screenshot for solution (J).
- Take the MECHANICAL HAND.
- Go to the Machine.
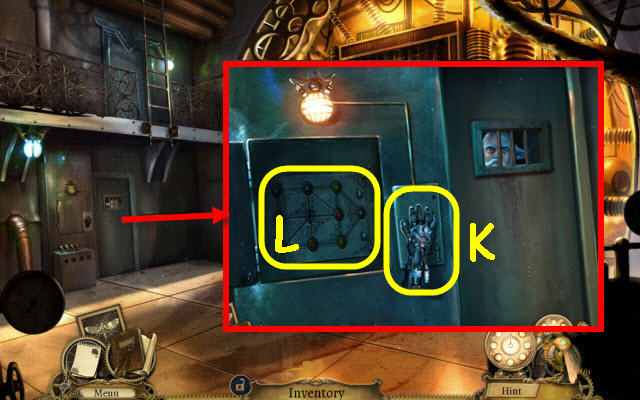
- Examine the door and place the MECHANICAL HAND on the handprint (K).
- Select the opened panel to trigger a puzzle (L).
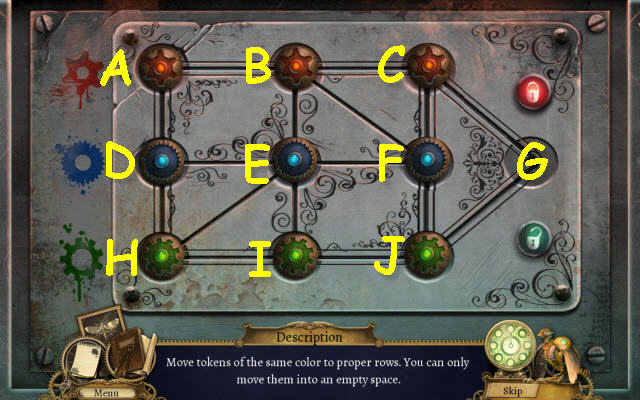
- Place the tokens in their matching colored rows.
- To solve the puzzle, select the following tokens: C, B, E, I, H, D, A, B, E, I, J, G, C, B, E, F, J, I, H, D, A, B, C, G, J, I, H, D, E, F, J and G.
- Enter Ink's Cell.
Chapter 7: Machine
- Give the OLD BLUEPRINTS to Ink (M).
- Take the CURTAIN (N).
- Examine the bed and select the sheet. Place the FLAG, CURTAIN and HOOK by the rolled sheet; take the GRAPPLING HOOK (O).
- Back out.
- Examine the balcony and use the GRAPPLING HOOK on the ladder (P).
- Go up the ladder.
- Take the SPYGLASS (Q) and BOTTLE (R).
- Examine the mechanism; take the MAGNET (S) and CHALK (T).
- Examine the desk to access a HOP (U).
- Play the HOP.
- You will receive the CAMERA (V).
- Go to the Storeroom.
- Examine the grate and use the MAGNET on it; take the MECHANICAL FISH (W).
- Go forward.
- Examine the blade and use the BOTTLE on it to get a GLASS TUBE (X).
- Go to the Bridge.
- Examine the left rock and place the CAMERA and SPYGLASS on it. Select the camera to get a MACHINE SCHEMATICS (Y).
- Go to the Cell.
- Give the MACHINE SCHEMATICS to Ink (Z).
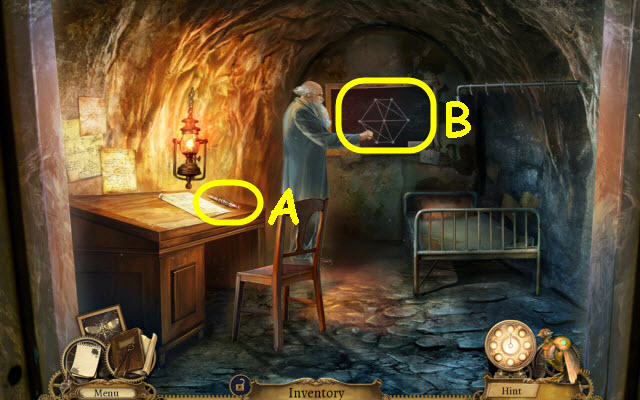
- Take INK'S PEN (A).
- Examine the chalkboard and use the CHALK on it to trigger a puzzle (B).
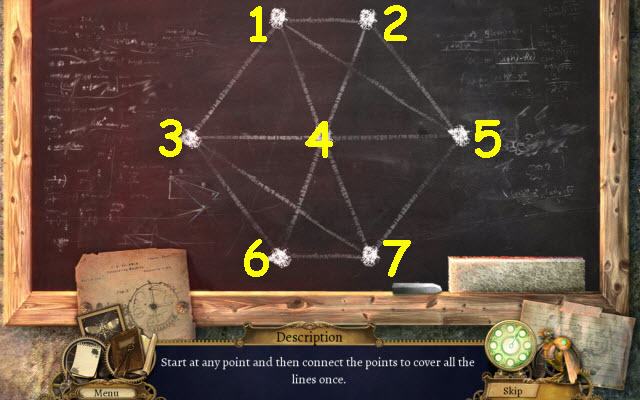
- Connect the points and cover all the lines.
- To solve the puzzle, select the points as follows: 2, 1, 5, 2, 4, 1, 3, 4, 5, 7, 6, 3, 7, 4 and 6.
- Go to the Storeroom.
- Examine the shelves to access a HOP.
- Play the HOP.
- You will receive the MYRIAPOD TAIL (C).
- Go to the Office.
- Examine the mechanism and remove the lid; place the GLASS TUBE on the stand (D).
- Use INK'S PEN on the ink pad (E).
- Use the stamper (F) on the pad and then stamp the sheet (G).
- Select the sheet and place it in the tube; replace the lid (H) and select the tube to seal it.
- Push the button (I).
- Open the tube; take the MYRIAPOD BRAIN (J).
- Examine the desk to access a HOP (K).

- Play the HOP.
- You will receive the MECHANICAL BIRD (L).

- Examine the mechanism and place the MECHANICAL LIZARD, MECHANICAL FISH and MECHANICAL BIRD in their respective areas to trigger a puzzle (M).
- Assemble and collect the 7 gears.
- To solve the puzzle, select the following: N, collect 1, 3, 4, Q, P, collect 2, N, Q, collect 5, move the turtle head to collect 6, and move the bird wing to collect 7.
- Take the MACHINE CARD.
- Back out.
- Examine the computer desk and place the MYRIAPOD BRAIN in the left slot (R) and the MACHINE CARD in the upper slot (S) to trigger a puzzle.
- Fill in the spaces using the numbers on the top and bottom as your guide.
- See screenshots for solution to set 1 (T).
- See next screenshot for solution to set 2 (U) and set 3 (V).
- You will earn a REPROGRAMMED BRAIN.
- Go up the ladder.
- Give the REPROGRAMMED BRAIN and MYRIAPOD TAIL to Ink (W).
- Go to the Bridge.
- Examine the control panel to trigger a puzzle (X).
- Set the middle column to match the symbols on the right.
- To solve the puzzle, select the following arrows: Cx2, Dx2, Ex2, C, A and F.
- Go forward.
Chapter 8: Gaining Access
- Take the HAMMER (Y) and HEAVY STONE (Z).
- Examine the broken gear to trigger a puzzle (A).
- Assemble the gear.
- To turn a piece, select it and when it pulses select it again to turn it.
- See screenshot for solution (B).
- Take the FRACTURED GEAR.
- Go right to the Right Balcony.
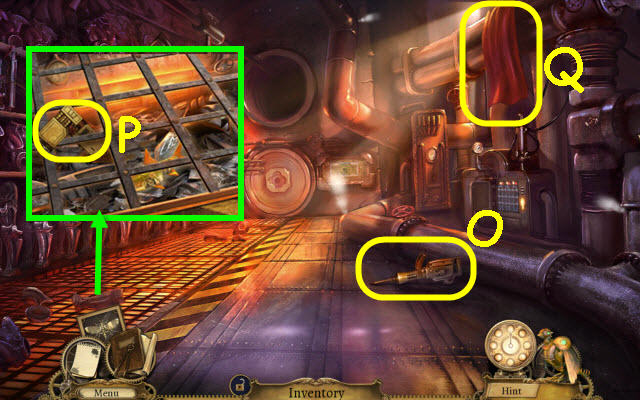
- Take the BUCKET (C) and IRON ROD (D).
- Examine the bin to access a HOP (E).
- Play the HOP.
- You will receive the CONCRETE (F).
- Back out and go left.
- Examine the form; take the CHISEL (G).
- Back out and go right.
- Examine the pipe and place the BUCKET on the hook; use the CHISEL on the crack and use the HAMMER on the CHISEL (H).
- Take the WATER IN A BUCKET (I).
- Back out and go left.
- Examine the form and use the CONCRETE, WATER IN A BUCKET and FRACTURED GEAR in it; select the gear to remove it (J).
- Back out and go right.
- Examine the bin to access a HOP.
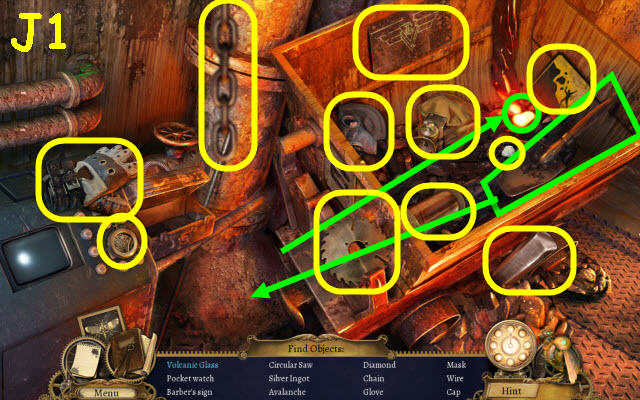
- Play the HOP.
- You will receive the SILVER INGOT (J1).
- Back out and go left.
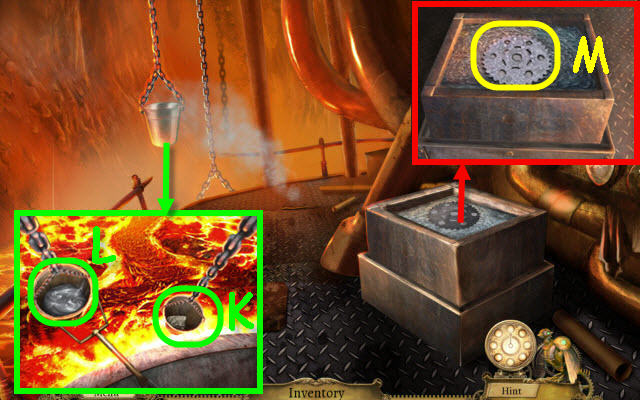
- Examine the bucket and place the SILVER INGOT in the left one and the HEAVY STONE in the right one (K).
- Use the IRON ROD on the left bucket; take the MELTED METAL (L).
- Examine the mold and place the MELTED METAL in it; take the BIG GEAR (M).
- Back out.
- Give the BIG GEAR to Ink (N).
- Go forward.
Chapter 9: Destroy the Machine
- Go up the stairs.
- Take the RUBBER GLOVES (O).
- Use Matthew on the board (P).
- Examine the box; take the NAILS 1/4 (Q) and move the board (R).
- Back out.
- Examine the nail gun; take the NAILS 2/4 (S).
- Examine the sparking wire and use the RUBBER GLOVES on it; take the NAILS 3/4 (T).
- Examine the device to trigger a puzzle (U).
- Connect the wires to combine the symbols making up the matching colored outer symbols.
- The layout of inner symbols may be different but the combinations will be the same.
- See screenshot for solution (V).
- Examine the crack; take the NAILS 4/4 (W).
- Examine the gun and place the 4 NAILS in it; take the NAIL GUN (X).
- Go up the stairs.
- Examine the rail and use the NAIL GUN on the board (Z); take the PULLEY (A).
- Place the PULLEY on the rope and select it (B).
- Place the PENDANT KEY in the recess (C).
- Congratulations! You have successfully completed Clockwork Tales: Of Glass and Ink.
Created at: 2013-09-18