

Walkthrough Menu
General Tips
 • When you first start a new game, you can choose Casual or
Expert mode. Casual mode has sparkles while Expert mode does
not. Expert mode also has slower hit and skip recharge times.
• From the main menu you can play the game, change your
character. In the options menu you change the volume of the
various categories, full screen options and difficulty after
starting the game. • There are 2 cases in this game. The 2nd
case is locked until you finish the 1st case. The 2nd case is
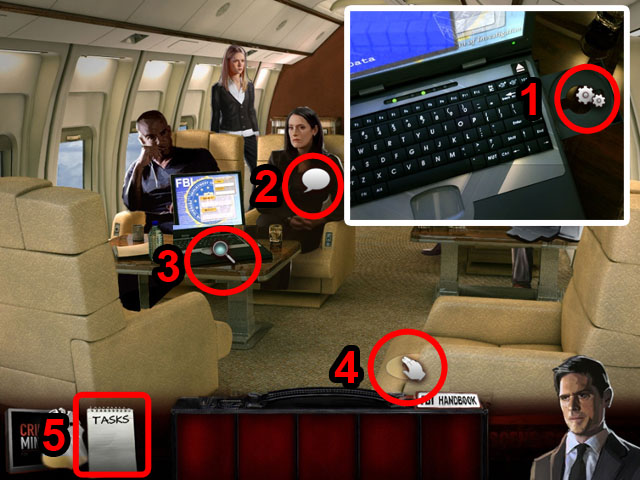
almost 3 times as long as the first one. • There are 4 types
of cursors in the game: the gears cursor (1) appears when you
can use an item in that section. The speech cursor (2) is used
for talking with people. The magnifying glass cursor (3) is
used for viewing a scene more closely. Use the hand cursor (4)
for interacting with objects and using inventory items. • To
scroll through inventory items, press the arrows on either
side. • There is a list of current tasks available next to the
left side of the inventory tray (5) and a hint button to the
left of that. • In the Hidden Object Scenes, items in blue are
scrambled. You can either guess what the item name really is
or find question marks in the scene to unscramble them
automatically. The items on the find lists are highlighted in
green on the screenshots. • Objects in green are currently
hidden from view. They are also scrambled and will unscramble
when you open the area they are hiding behind. • The Hidden
Object Scenes and the puzzles are not randomized in this game.
• When you first start a new game, you can choose Casual or
Expert mode. Casual mode has sparkles while Expert mode does
not. Expert mode also has slower hit and skip recharge times.
• From the main menu you can play the game, change your
character. In the options menu you change the volume of the
various categories, full screen options and difficulty after
starting the game. • There are 2 cases in this game. The 2nd
case is locked until you finish the 1st case. The 2nd case is
almost 3 times as long as the first one. • There are 4 types
of cursors in the game: the gears cursor (1) appears when you
can use an item in that section. The speech cursor (2) is used
for talking with people. The magnifying glass cursor (3) is
used for viewing a scene more closely. Use the hand cursor (4)
for interacting with objects and using inventory items. • To
scroll through inventory items, press the arrows on either
side. • There is a list of current tasks available next to the
left side of the inventory tray (5) and a hint button to the
left of that. • In the Hidden Object Scenes, items in blue are
scrambled. You can either guess what the item name really is
or find question marks in the scene to unscramble them
automatically. The items on the find lists are highlighted in
green on the screenshots. • Objects in green are currently
hidden from view. They are also scrambled and will unscramble
when you open the area they are hiding behind. • The Hidden
Object Scenes and the puzzles are not randomized in this game.
Murder Case 1
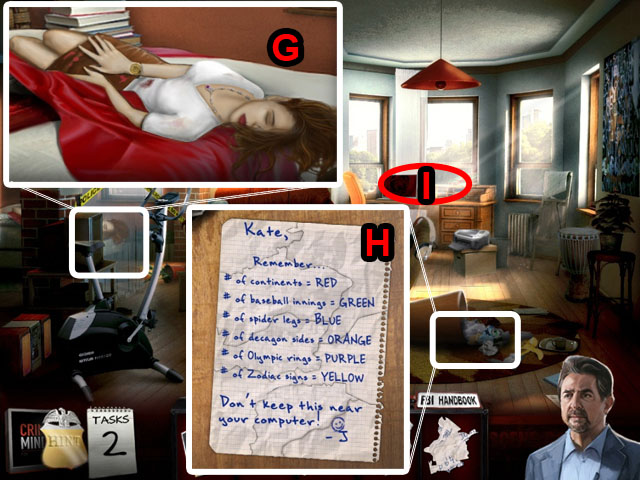
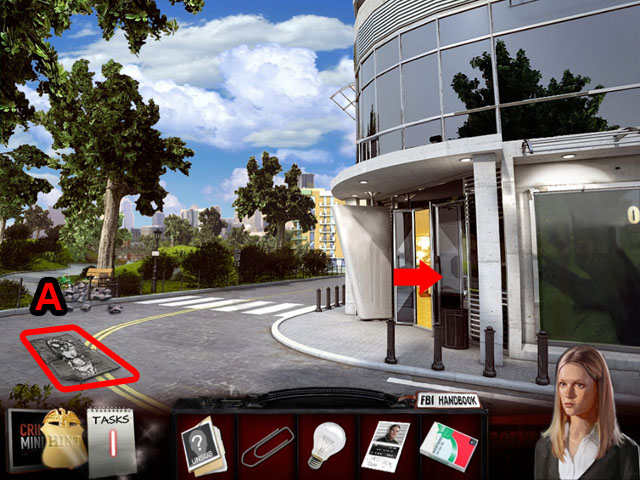
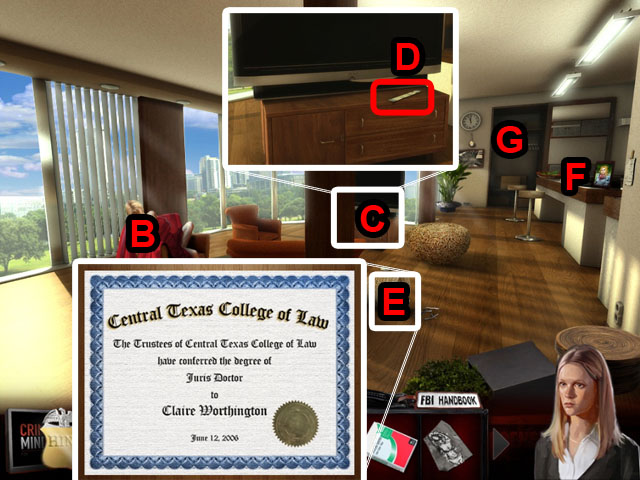
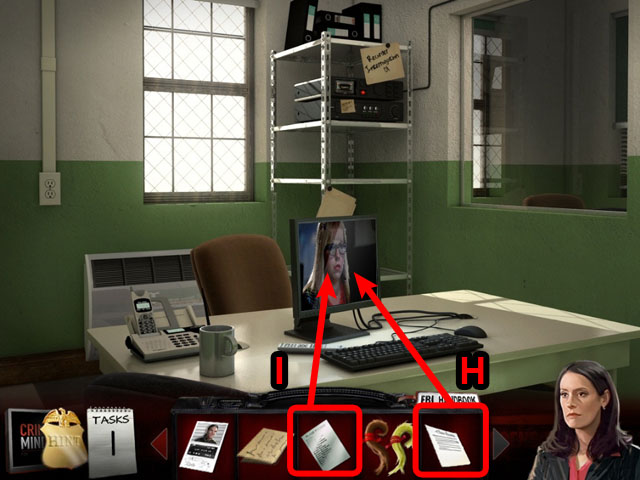
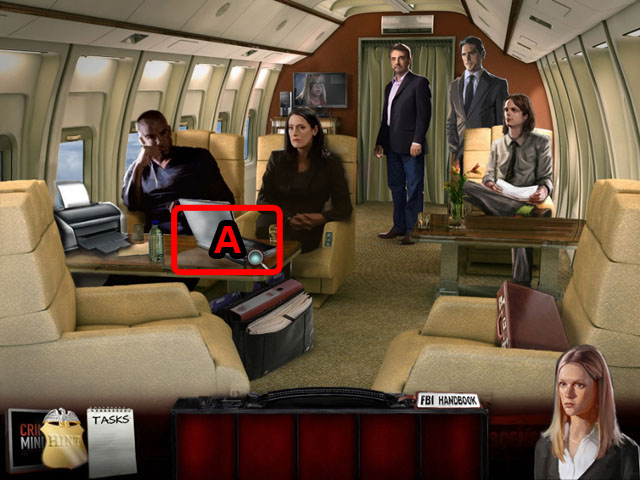
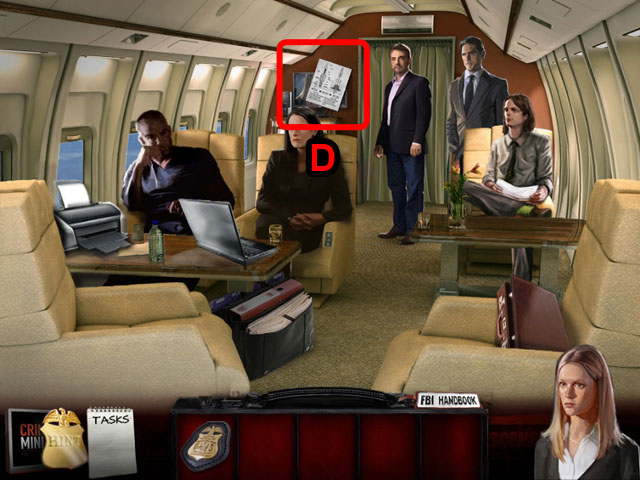
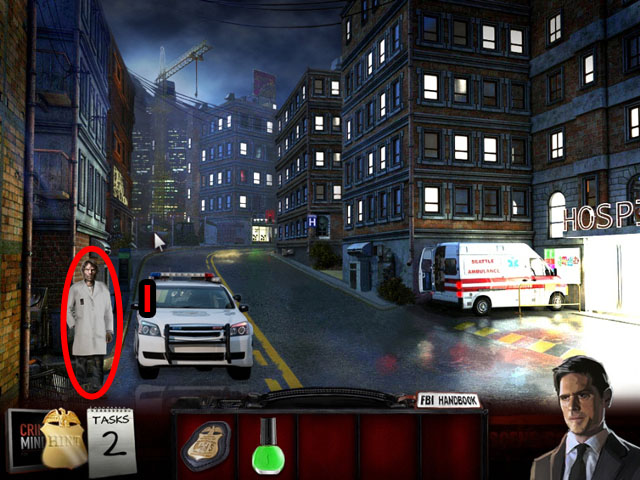
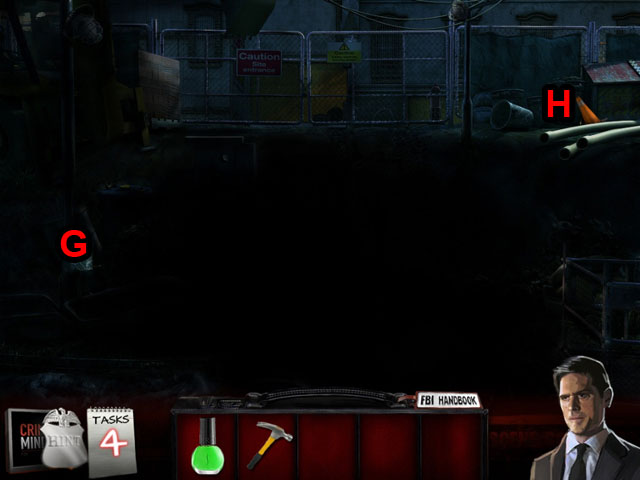
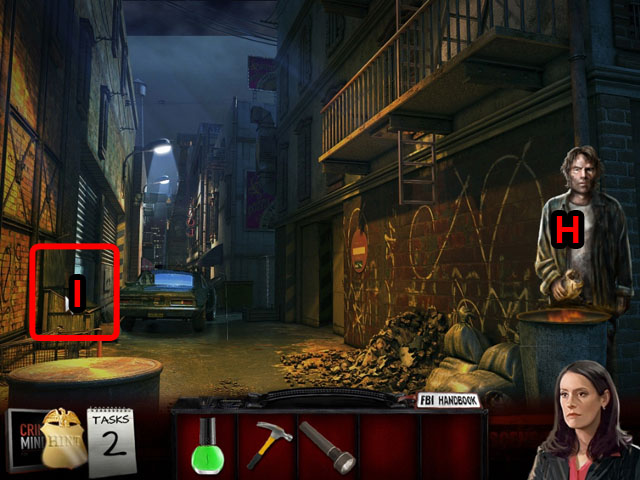
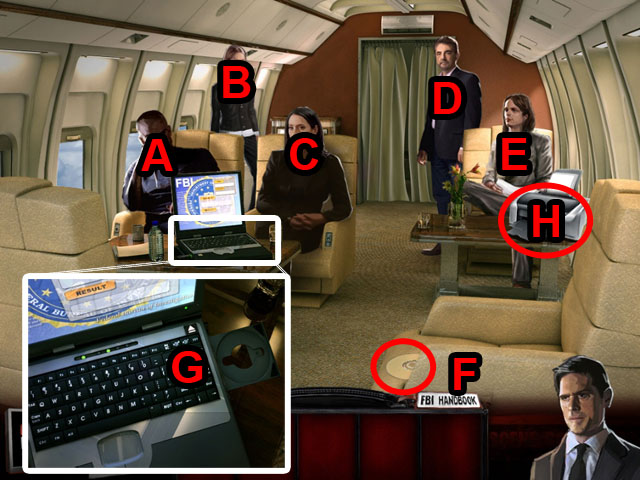 • Talk to the characters in the plane (A, B, D, and E). • Talk
to the woman in the middle last (C), then pick up the CD (F).
• Use the CD on the CD holder (G) and wait for the fax to
start running. • Take the FAX (H) and give it to the woman in
the middle (C).
• Talk to the characters in the plane (A, B, D, and E). • Talk
to the woman in the middle last (C), then pick up the CD (F).
• Use the CD on the CD holder (G) and wait for the fax to
start running. • Take the FAX (H) and give it to the woman in
the middle (C).
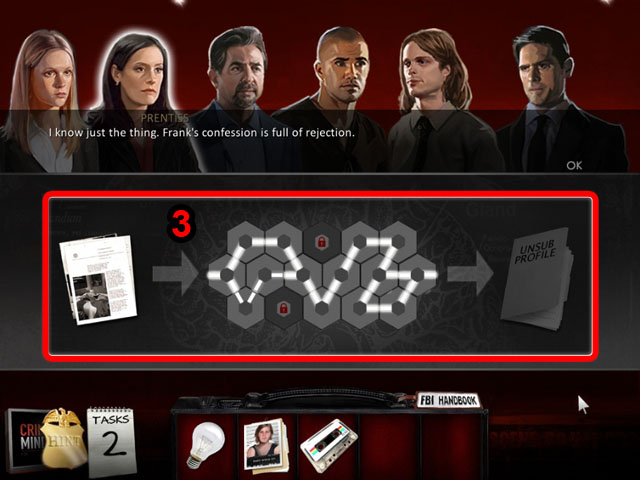
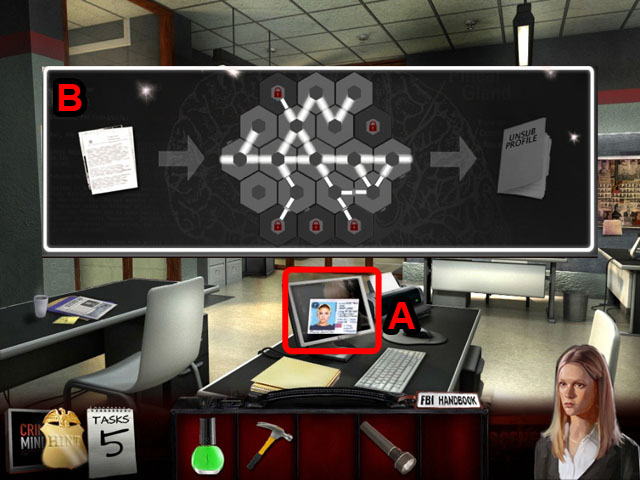
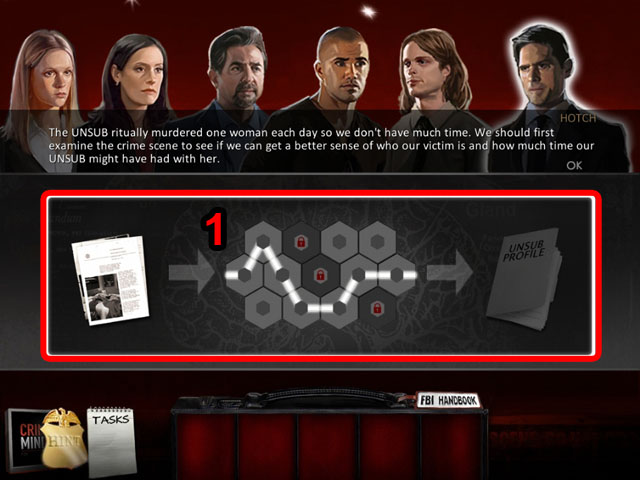 • Create unbroken lines out of the hexes to finish this
mini-game. • Press one hex and then another to switch their
places. • The pieces with the locks on them cannot be moved.
If there is a line on a locked piece, work outwards from that
hex. • See the screenshot for the final solution (1). • After
finishing you will receive the UNSUB PROFILE.
• Create unbroken lines out of the hexes to finish this
mini-game. • Press one hex and then another to switch their
places. • The pieces with the locks on them cannot be moved.
If there is a line on a locked piece, work outwards from that
hex. • See the screenshot for the final solution (1). • After
finishing you will receive the UNSUB PROFILE.
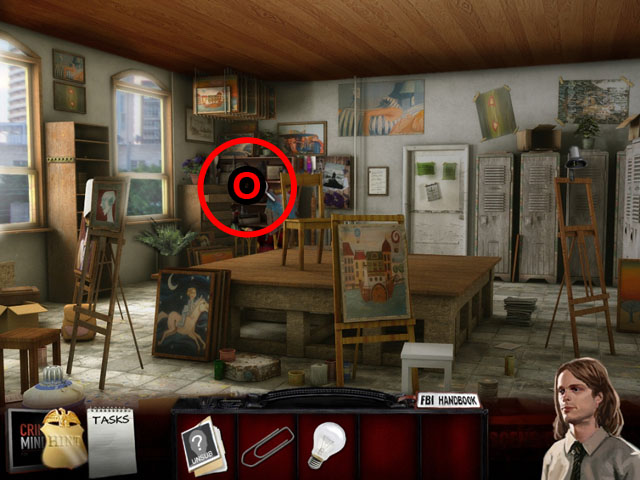
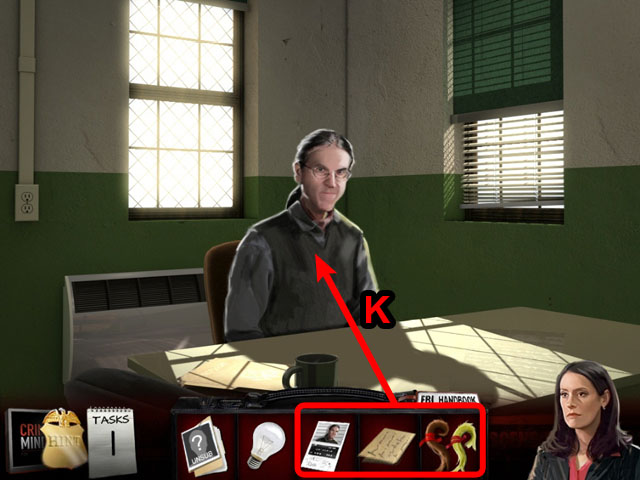
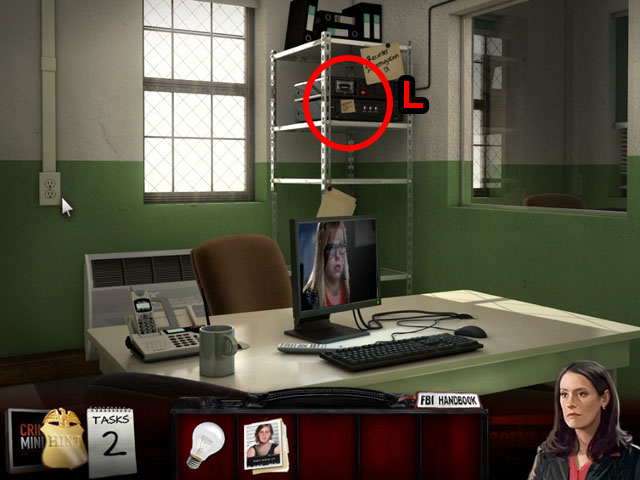
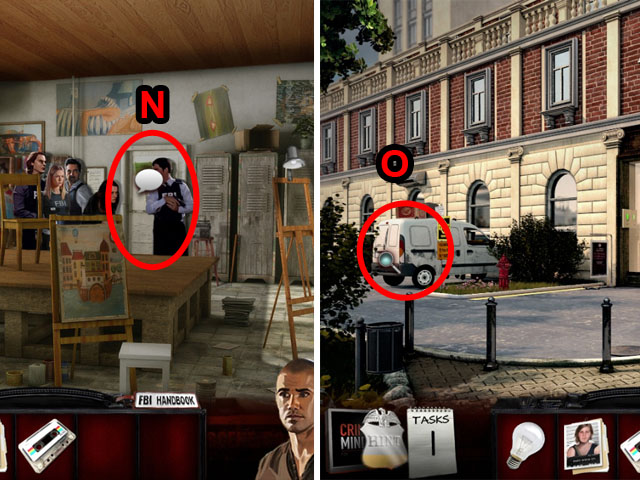
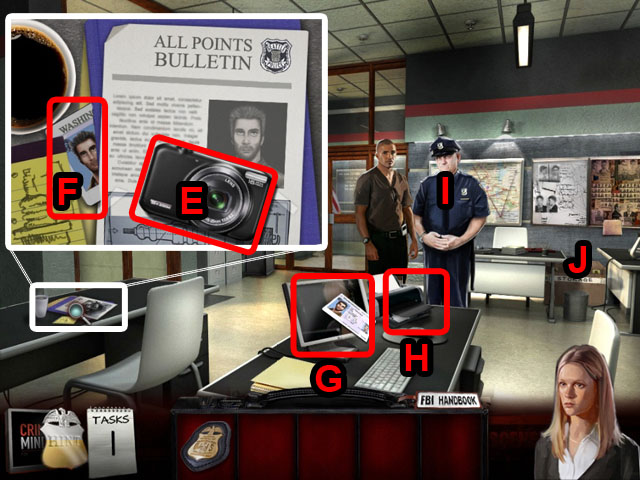
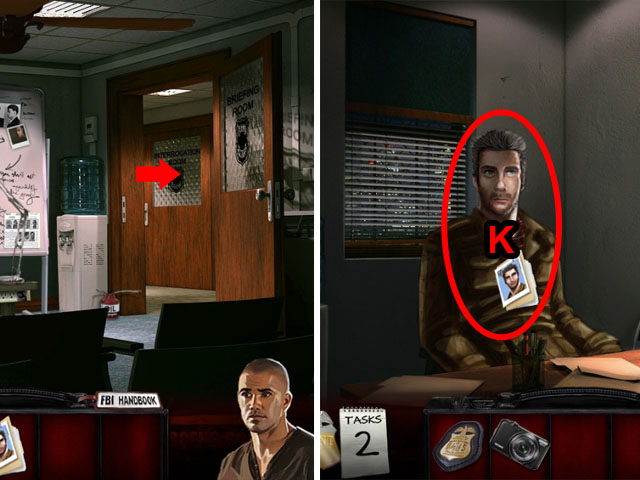
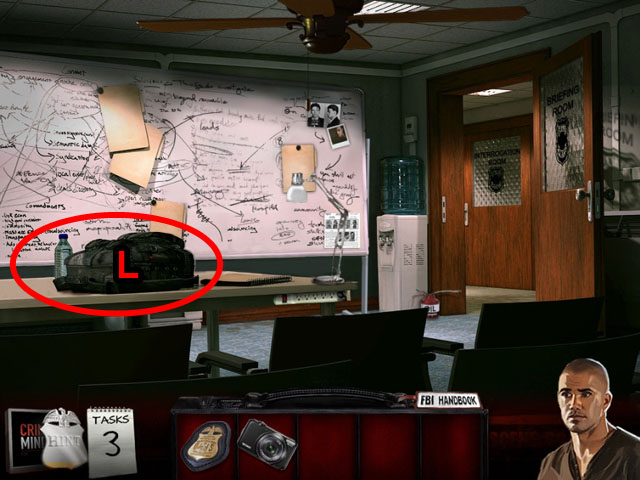
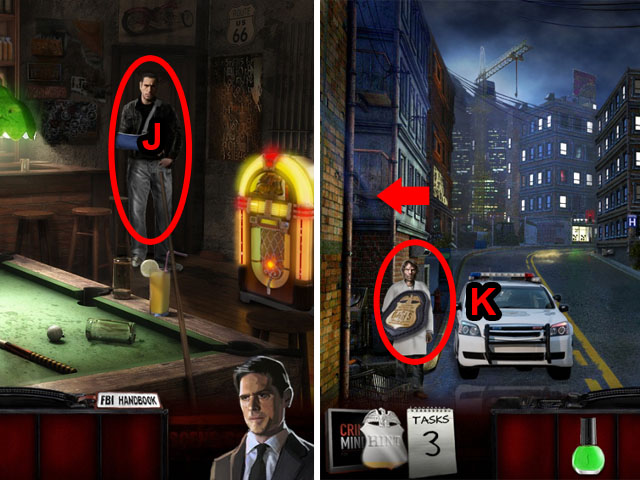
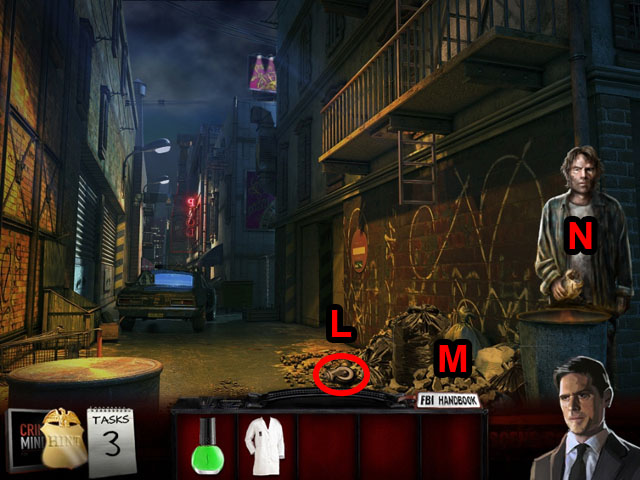
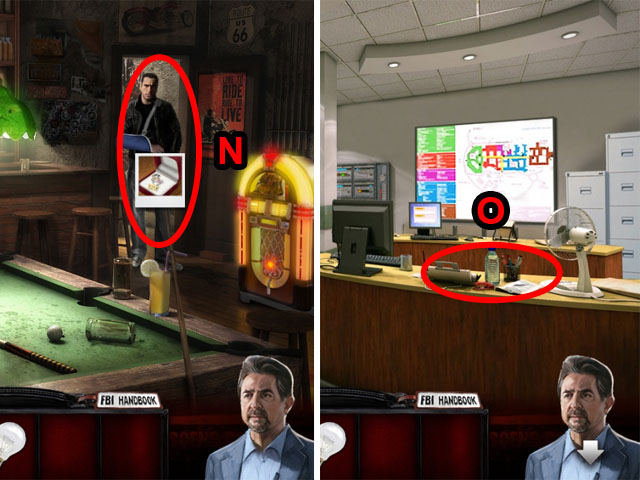
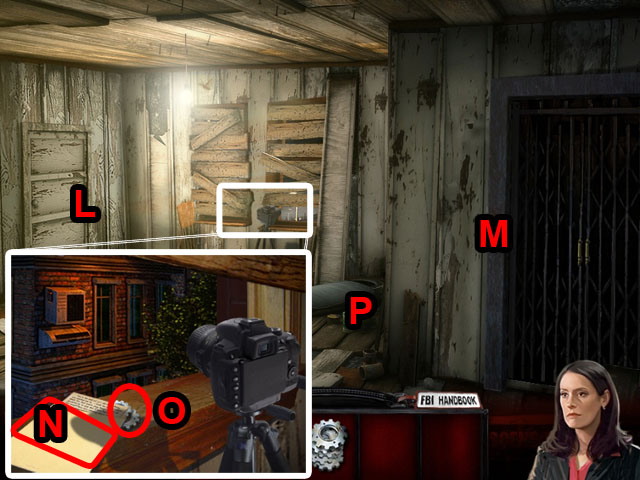
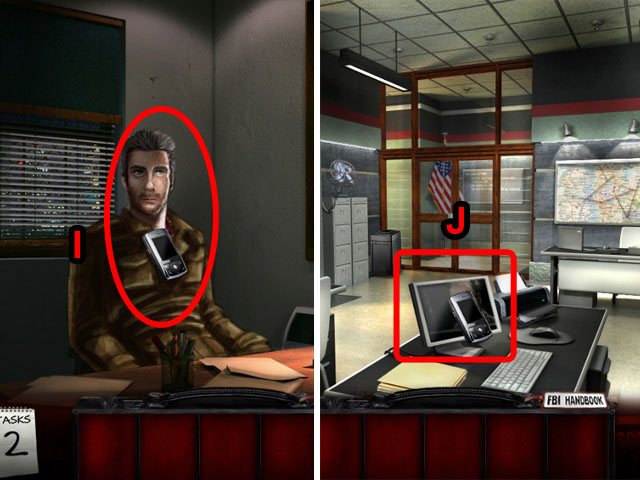
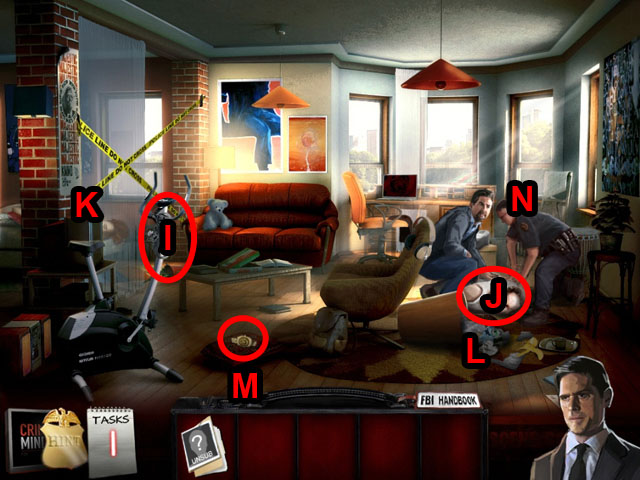 • Talk to the man in the middle of the room. • Collect the
HANDCUFFS (I) and the WATCH (M). • Use the HANDCUFFS on the
man (J). • Check the body behind the screen (K) and collect
the watch (M). • Inspect the papers on the ground (L) to find
out you need some more pieces, or you can zoom in on the
Hidden Object Scene in the back (N).
• Talk to the man in the middle of the room. • Collect the
HANDCUFFS (I) and the WATCH (M). • Use the HANDCUFFS on the
man (J). • Check the body behind the screen (K) and collect
the watch (M). • Inspect the papers on the ground (L) to find
out you need some more pieces, or you can zoom in on the
Hidden Object Scene in the back (N).
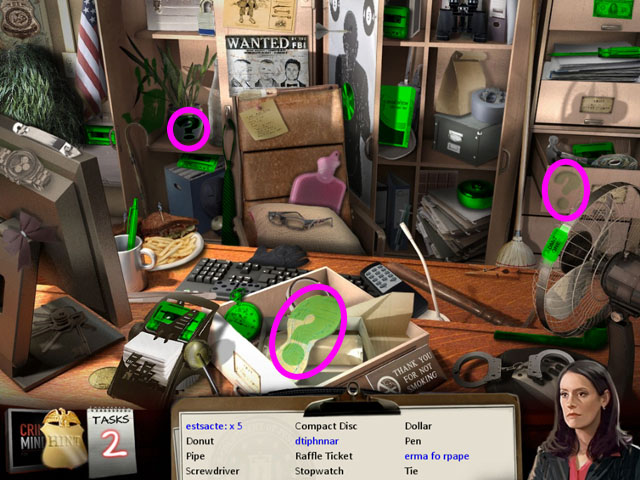
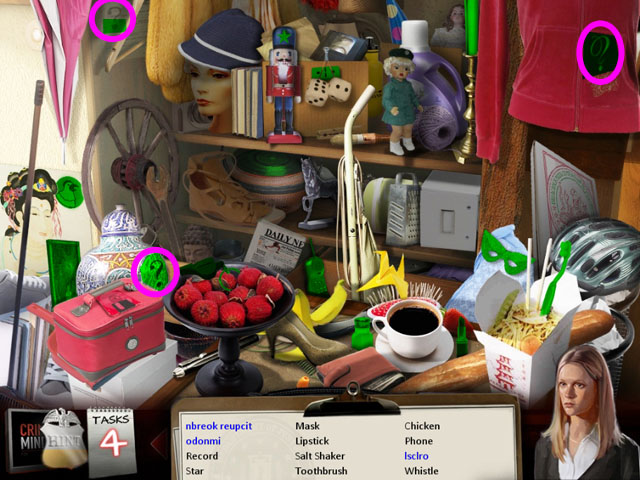
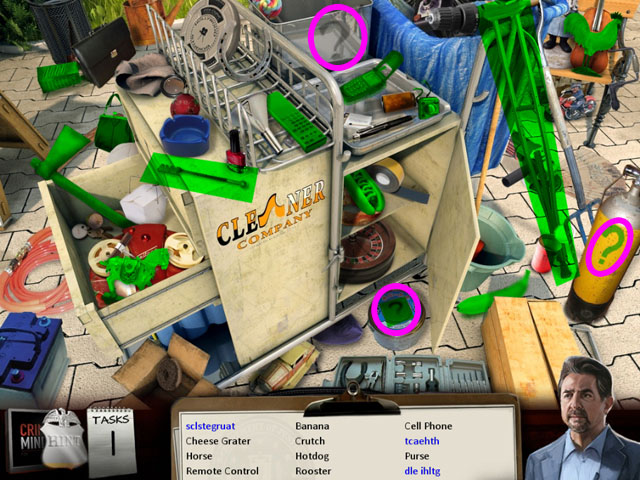
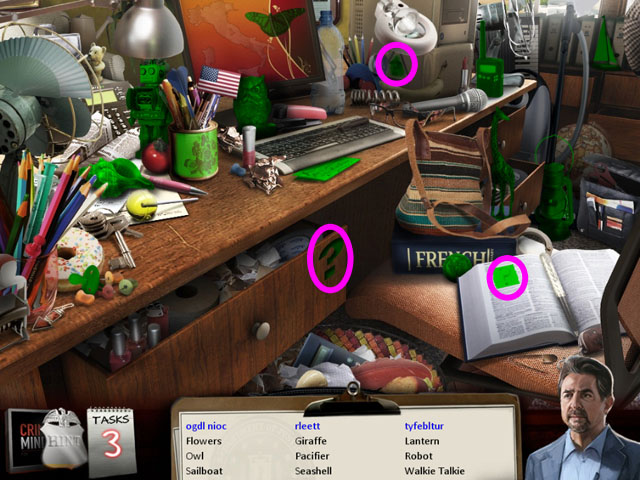
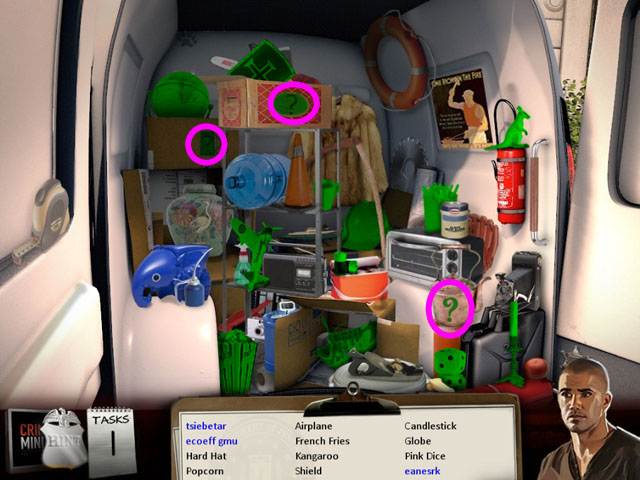
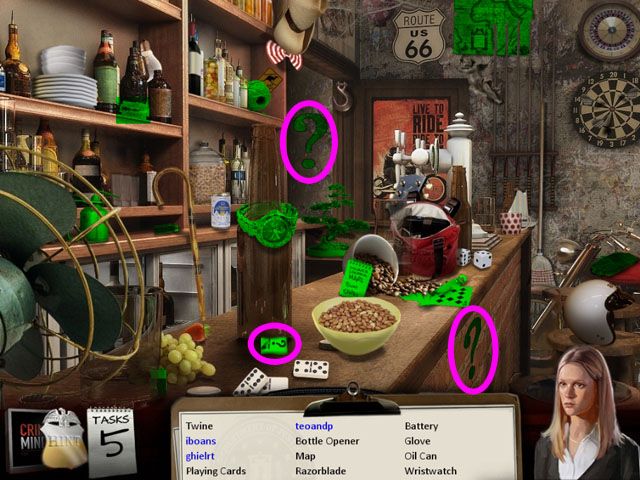
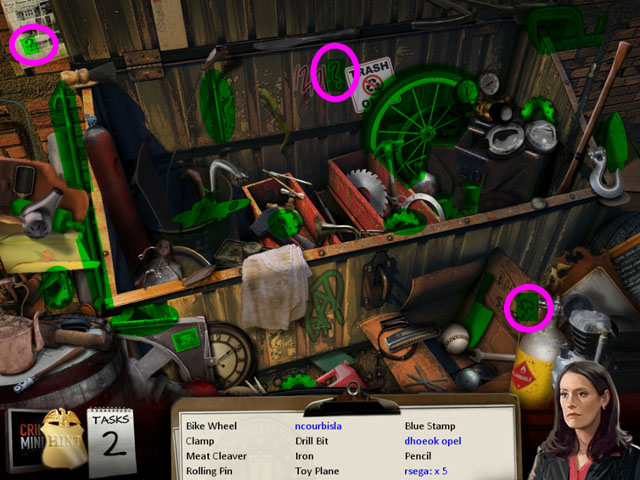
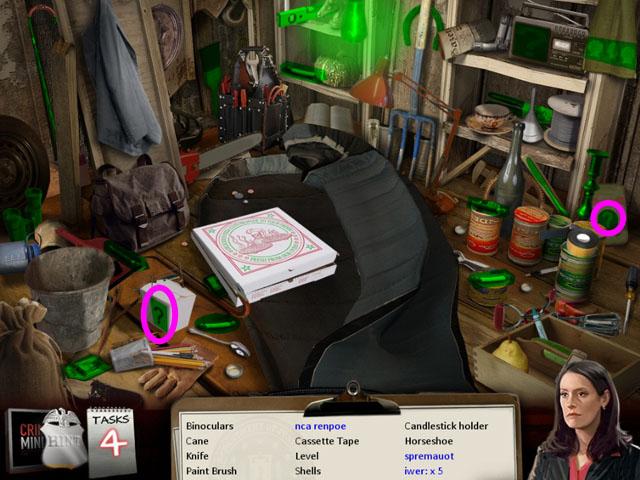
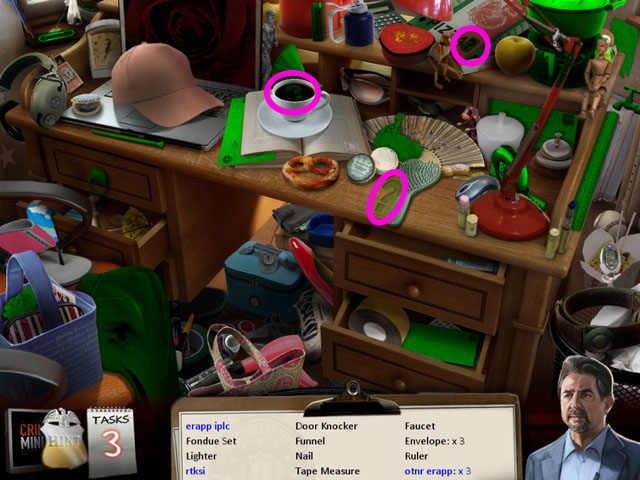 • Find all of the hidden objects. • Some of the hidden
object's names are mixed up. You can either guess at the
meaning or find one of the questions marks (?) in the scene to
unscramble them. • The question marks are circled in purple. •
When you are finished you will receive a PAPERCLIP, SKIRT and
TORN PAPERS.
• Find all of the hidden objects. • Some of the hidden
object's names are mixed up. You can either guess at the
meaning or find one of the questions marks (?) in the scene to
unscramble them. • The question marks are circled in purple. •
When you are finished you will receive a PAPERCLIP, SKIRT and
TORN PAPERS.
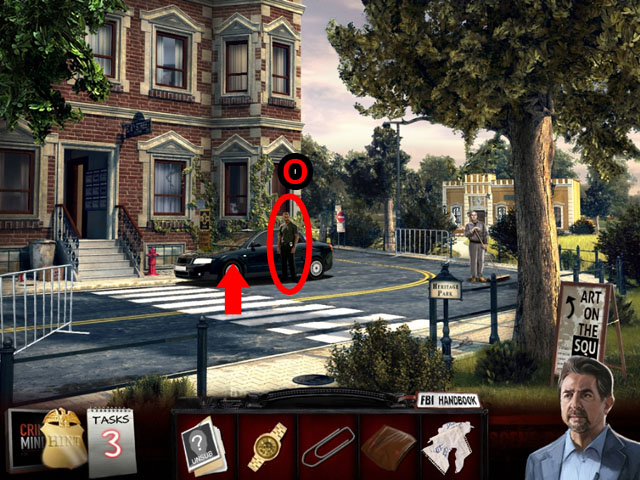 • Exit the scene towards the bottom. • Talk to the man by the
car (O) and enter the car to go back to the police station.
• Exit the scene towards the bottom. • Talk to the man by the
car (O) and enter the car to go back to the police station.
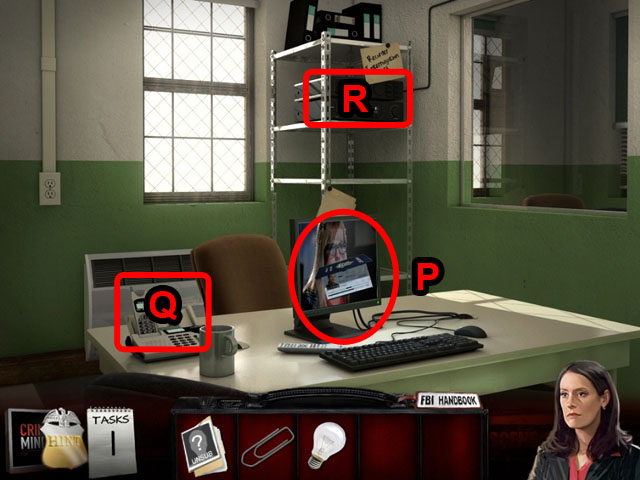
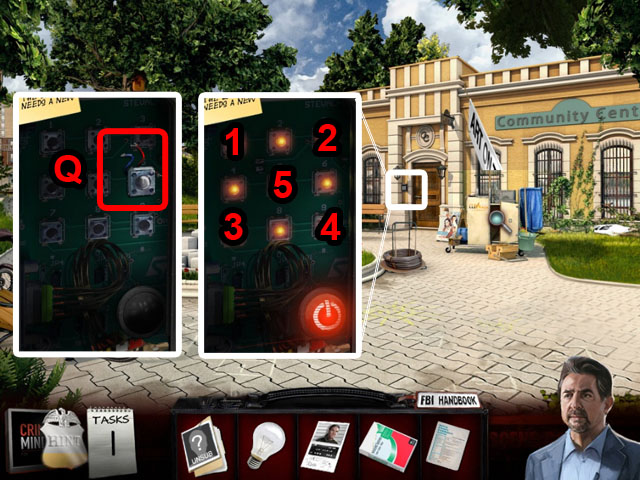
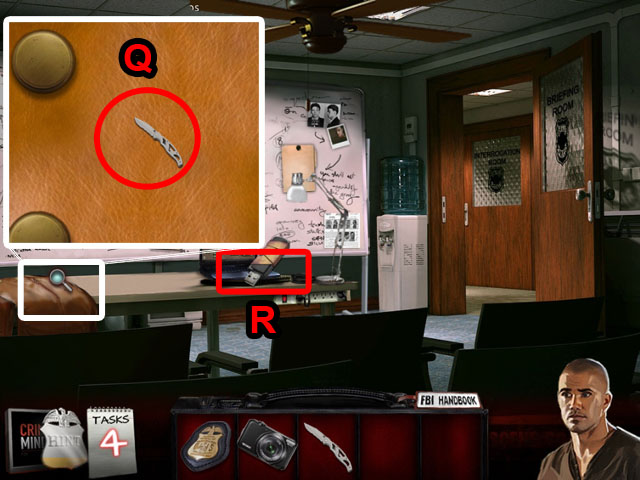
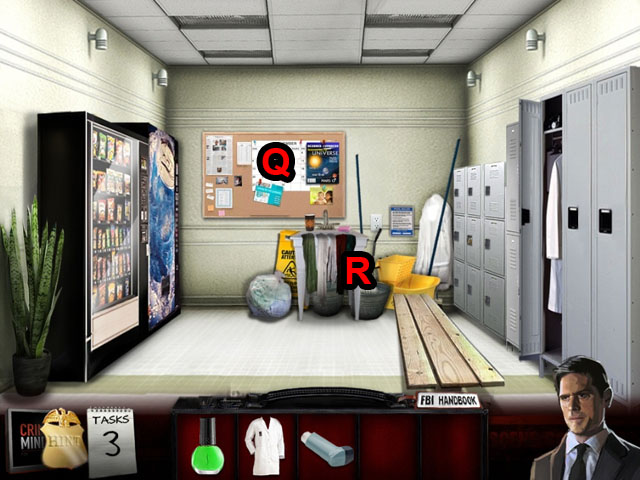
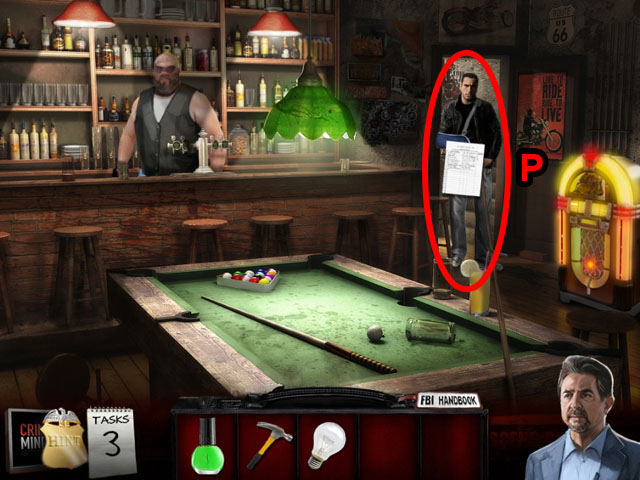
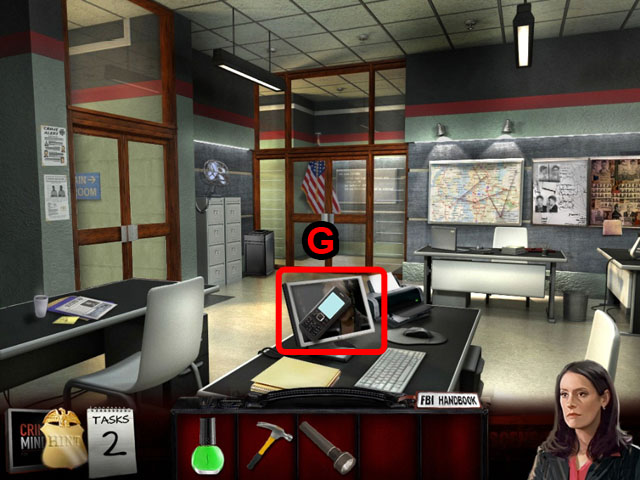
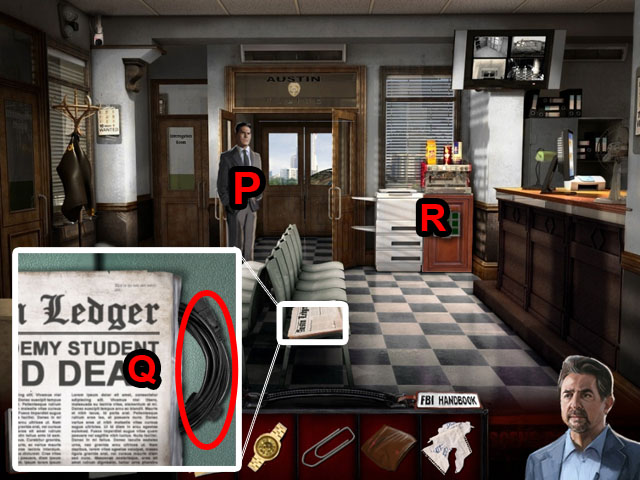 • Zoom in on the newspaper and take the POWER CORD (Q). • Talk
to the man (P) and then zoom in on the machine to the right
(R).
• Zoom in on the newspaper and take the POWER CORD (Q). • Talk
to the man (P) and then zoom in on the machine to the right
(R).
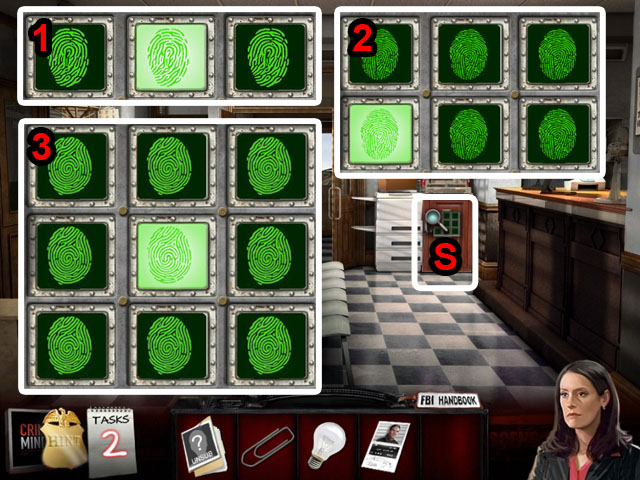
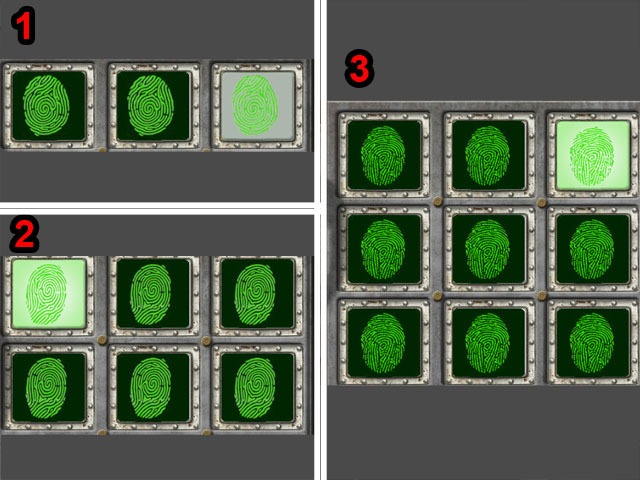 • The object of this mini-game is to find the one print out of
the sequence that is not the same as the others. • Once you
find the different fingerprint you can press it to continue to
the next test. The first set of prints only has 3 items (1),
the second is 6 (2) and the last is 9 (3). • The screenshot
has one possible solution, but the types of fingerprints are
randomized. • If you make a mistake it will show you what the
differences are. If you remember this, you can look for it
next time you get the same fingerprints.
• The object of this mini-game is to find the one print out of
the sequence that is not the same as the others. • Once you
find the different fingerprint you can press it to continue to
the next test. The first set of prints only has 3 items (1),
the second is 6 (2) and the last is 9 (3). • The screenshot
has one possible solution, but the types of fingerprints are
randomized. • If you make a mistake it will show you what the
differences are. If you remember this, you can look for it
next time you get the same fingerprints.
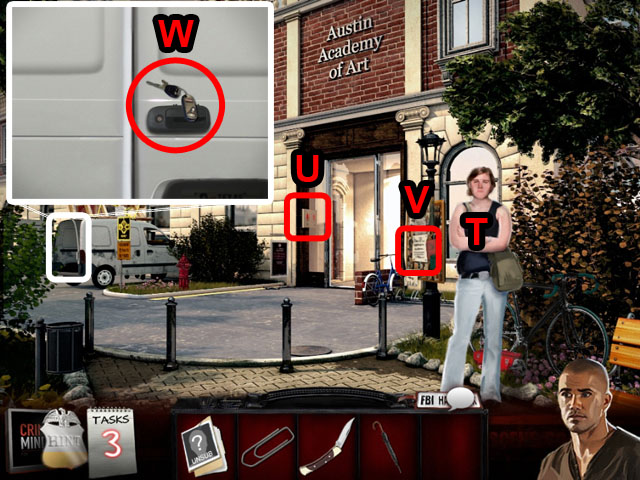
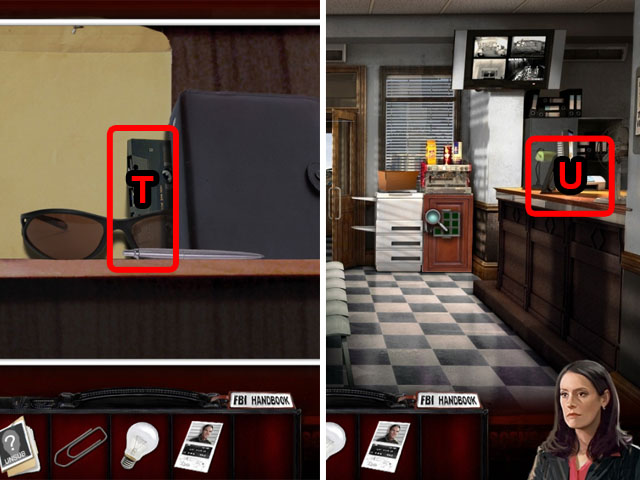
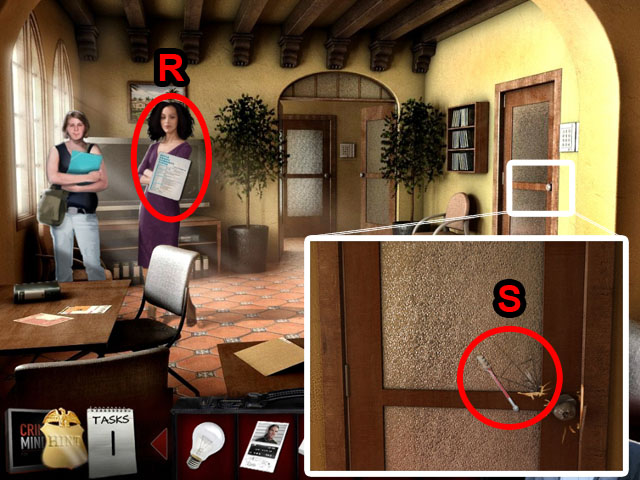
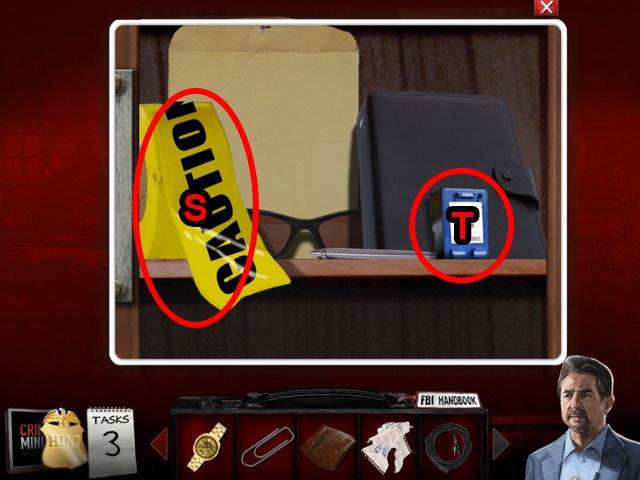 • Take the PRINTER CARTRIDGE (T) and the POLICE TAPE (S). •
Exit the police station through the door and go back to the
original area.
• Take the PRINTER CARTRIDGE (T) and the POLICE TAPE (S). •
Exit the police station through the door and go back to the
original area.
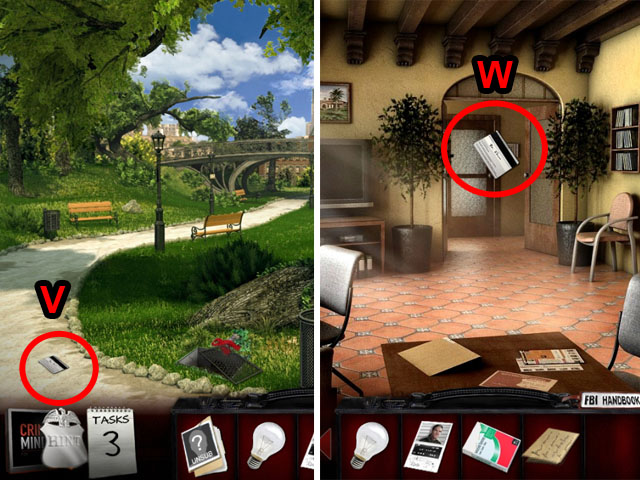
 • Talk to the gardener (U); give him the POLICE TAPE and he
will leave. • Take the SCISSORS (V) and enter the car again to
go back to the police station.
• Talk to the gardener (U); give him the POLICE TAPE and he
will leave. • Take the SCISSORS (V) and enter the car again to
go back to the police station.
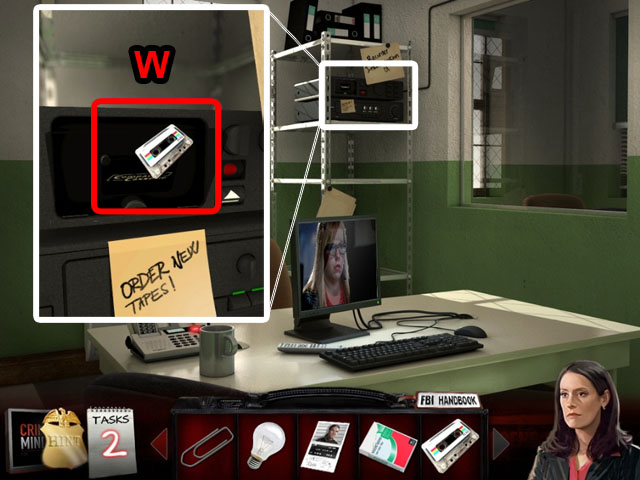
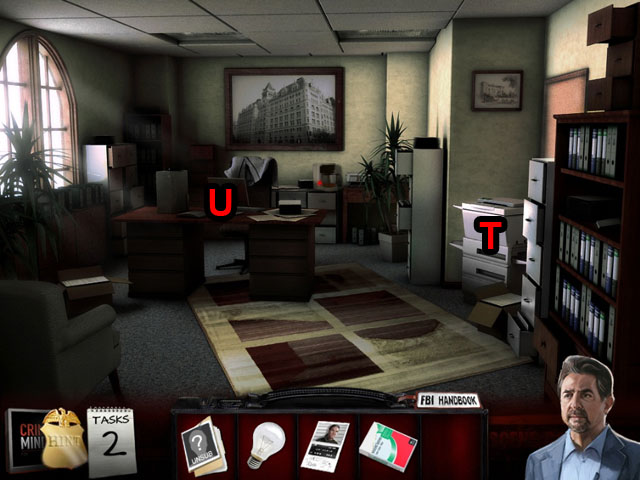
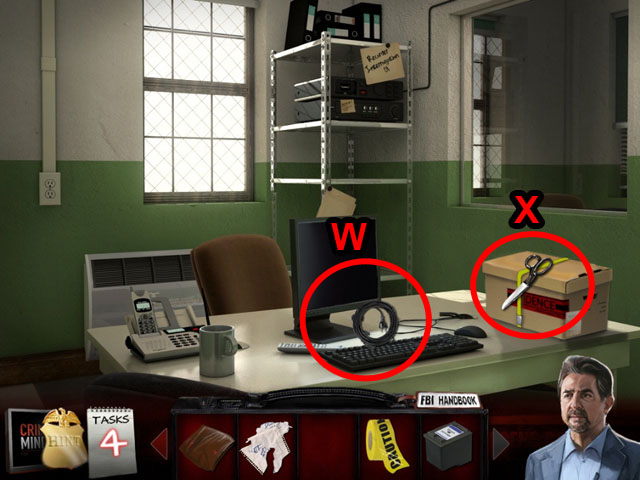 • Enter your office by going to the left. • Cut the tape with
the SCISSORS (X) and use the POWER CORD on the computer (W). •
Zoom into the box (X).
• Enter your office by going to the left. • Cut the tape with
the SCISSORS (X) and use the POWER CORD on the computer (W). •
Zoom into the box (X).
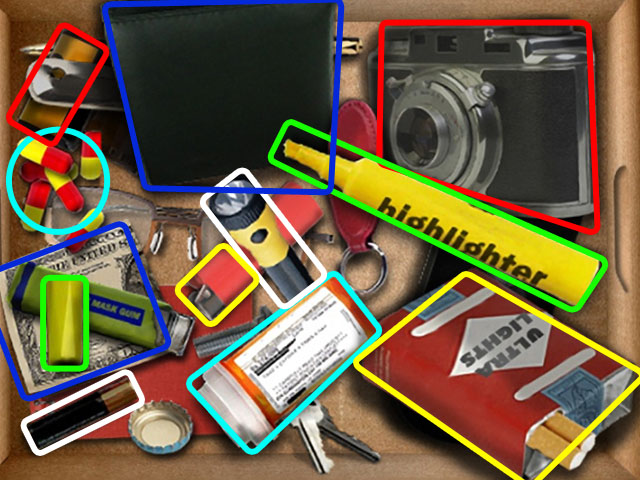
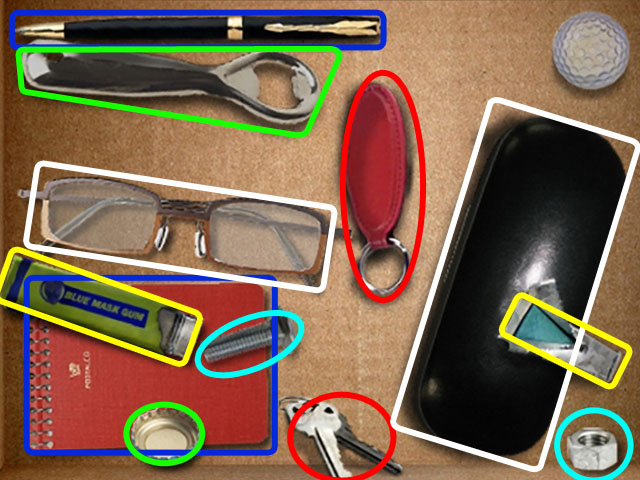
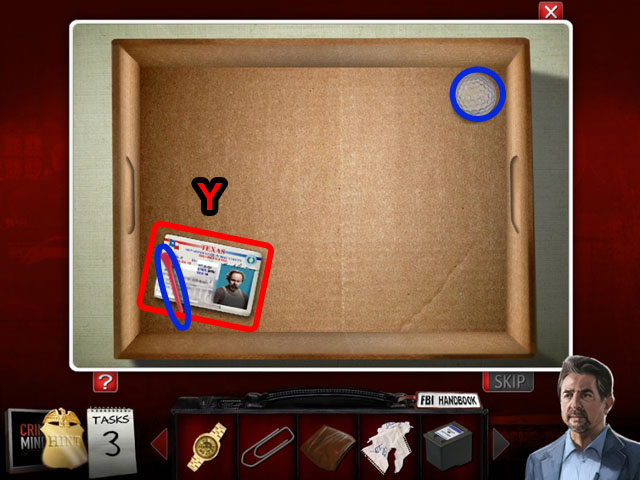 • Match the objects in the box to similar objects to remove
them. • In the screenshot the objects that go together are
highlighted in the same colors. • Once you remove the top two
layers only one object will be left – the LICENSE (Y).
• Match the objects in the box to similar objects to remove
them. • In the screenshot the objects that go together are
highlighted in the same colors. • Once you remove the top two
layers only one object will be left – the LICENSE (Y).
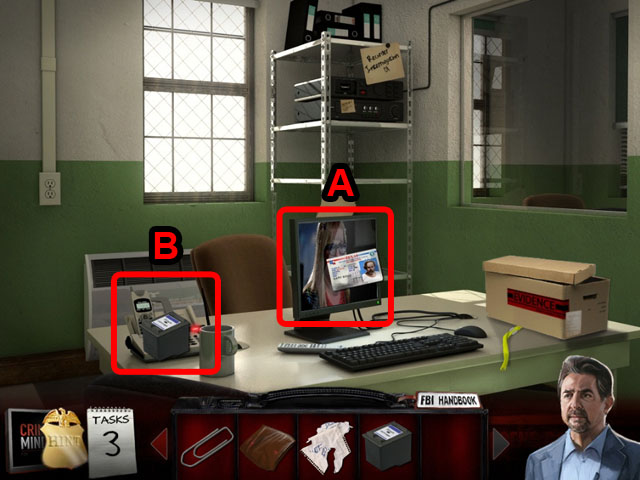 • Use the LICENSE on the computer (A) and then talk to the
analyst. • Use the INK CARTRIDGE on the fax and then take the
LANDLORD PROFILE after it prints out (B).
• Use the LICENSE on the computer (A) and then talk to the
analyst. • Use the INK CARTRIDGE on the fax and then take the
LANDLORD PROFILE after it prints out (B).
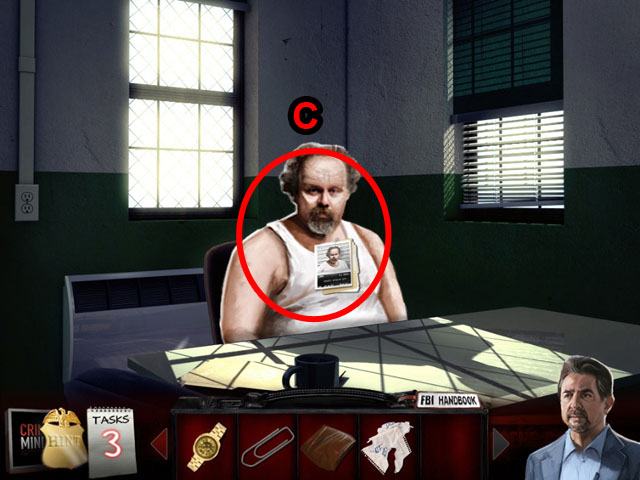 • Exit your office and enter the interrogation room. • Talk to
the landlord and then show him the LANDLORD PROFILE (C).
• Exit your office and enter the interrogation room. • Talk to
the landlord and then show him the LANDLORD PROFILE (C).
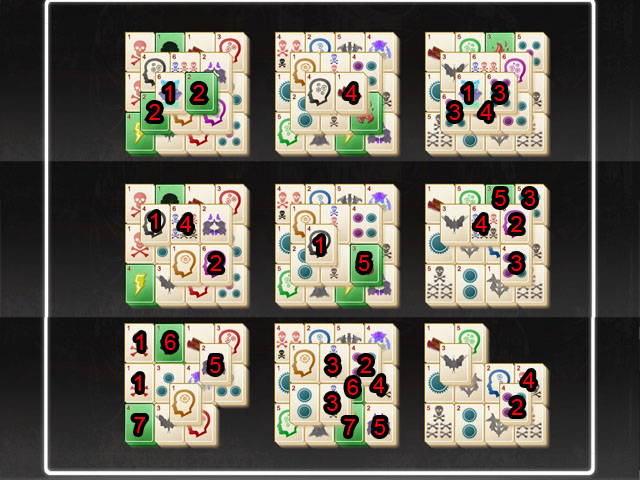
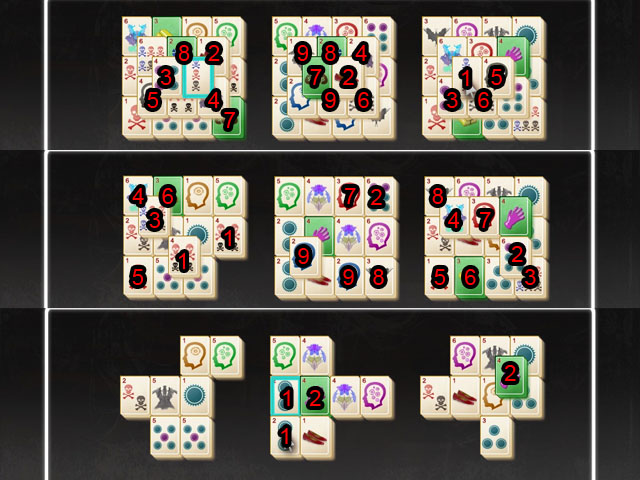 • Play the game of mahjong to complete the interrogation. •
You need to remove all of the green blocks to finish the
mini-game. • You can only match tiles that do not have other
tiles on top of them and have a space either to the left or
the right. • Follow the directions in the screenshot in order
to remove all of the green tiles (1-9, 1-9, 1-2). Tiles with
the same number are matches and the order is from top to the
bottom.
• Play the game of mahjong to complete the interrogation. •
You need to remove all of the green blocks to finish the
mini-game. • You can only match tiles that do not have other
tiles on top of them and have a space either to the left or
the right. • Follow the directions in the screenshot in order
to remove all of the green tiles (1-9, 1-9, 1-2). Tiles with
the same number are matches and the order is from top to the
bottom.
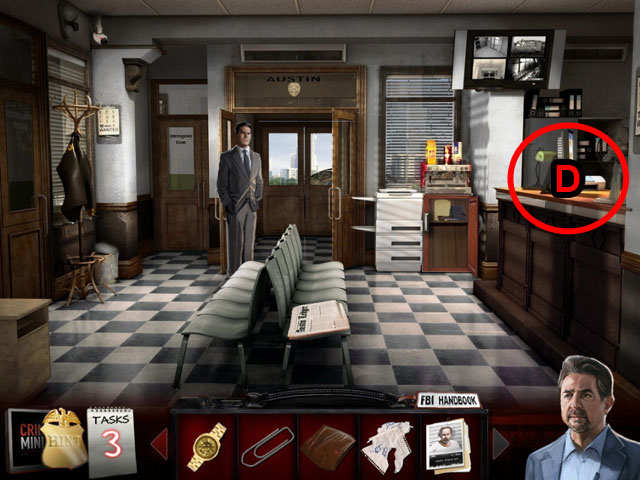 • Exit the interrogation room and zoom in on the Hidden Object
Scene on the desk (D).
• Exit the interrogation room and zoom in on the Hidden Object
Scene on the desk (D).
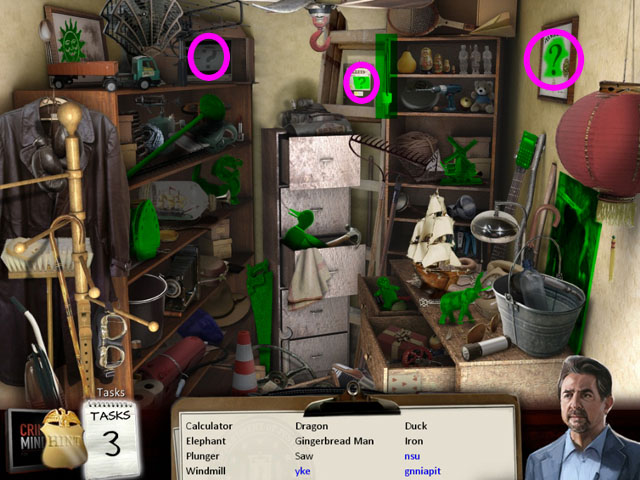
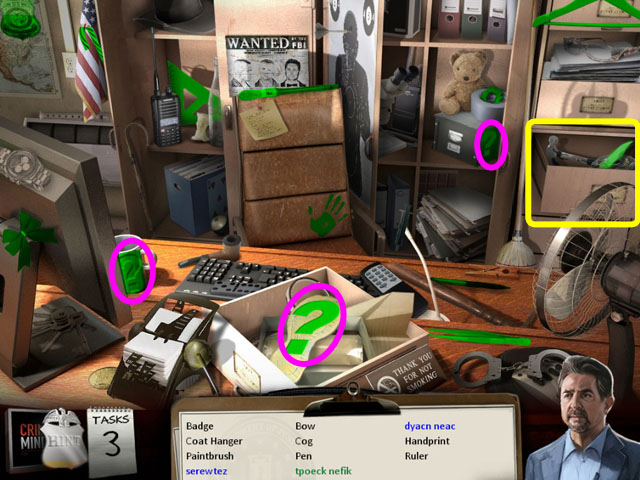 • Collect all of the hidden objects. Use the 3 question marks
circled in purple to unscramble the letters. • Find the pocket
knife in the drawer circled in yellow to unscramble it. • You
will receive the POCKET KNIFE.
• Collect all of the hidden objects. Use the 3 question marks
circled in purple to unscramble the letters. • Find the pocket
knife in the drawer circled in yellow to unscramble it. • You
will receive the POCKET KNIFE.
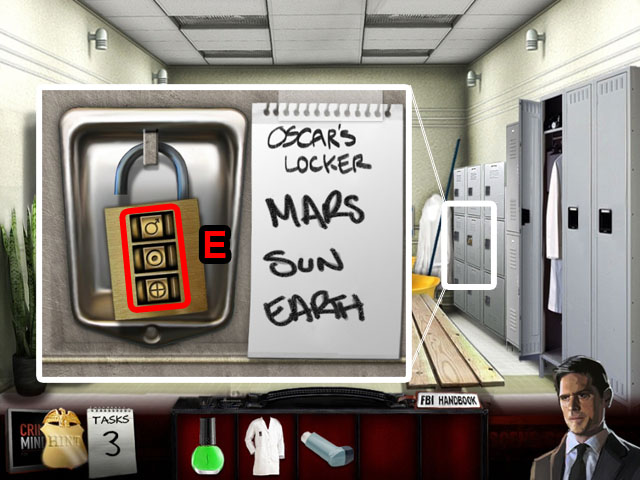
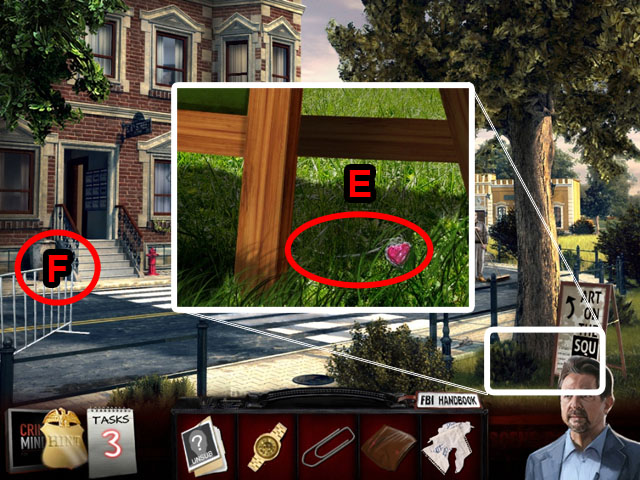 • Exit the police station and go back to the crime scene. •
Zoom in on the sign to the right (E) and take the LOCKET. •
Zoom in on the Hidden Object Scene (F).
• Exit the police station and go back to the crime scene. •
Zoom in on the sign to the right (E) and take the LOCKET. •
Zoom in on the Hidden Object Scene (F).
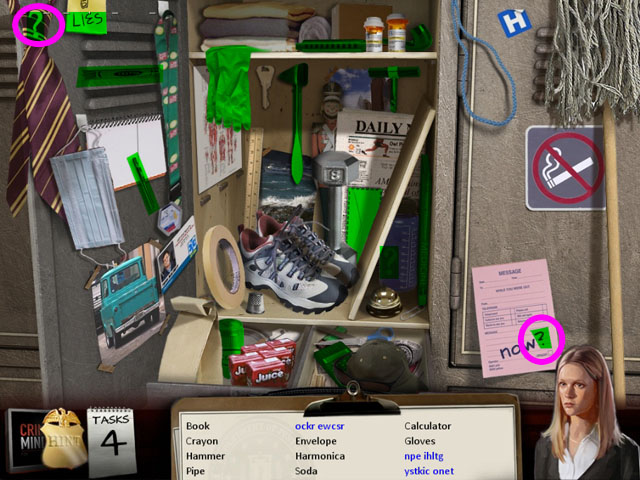
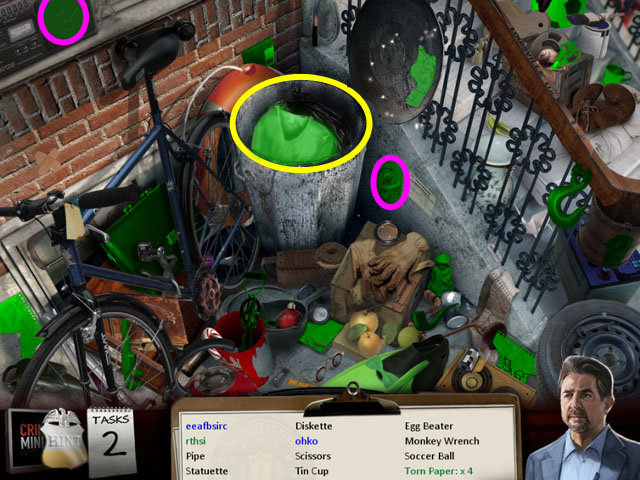 • Collect all of the hidden objects. Use the 2 question marks
circled in purple to unscramble the letters. • Find the shirt
in trashcan circled in yellow to unscramble it. • You will
receive the SHIRT and the TORN PAPERS.
• Collect all of the hidden objects. Use the 2 question marks
circled in purple to unscramble the letters. • Find the shirt
in trashcan circled in yellow to unscramble it. • You will
receive the SHIRT and the TORN PAPERS.
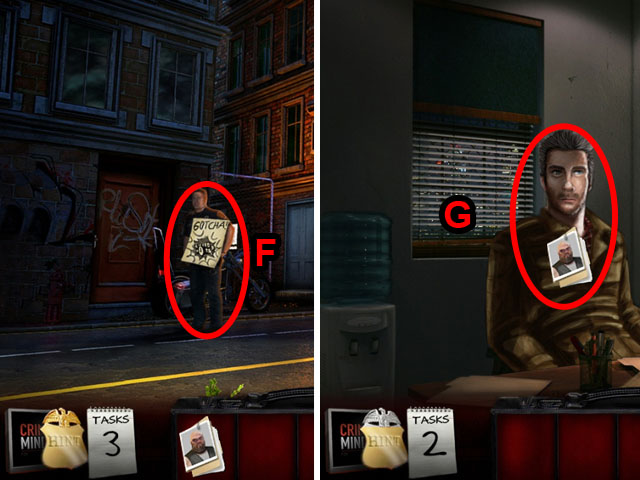
 • Enter the house and zoom in on the body to the left (G). •
Place the SHIRT, DRESS, NECKLACE and WATCH on the body in the
correct positions shown. • Zoom in on the trashcan with the
papers and use both TORN PAPERS on the space where the note
was (H). • Assemble the ripped pieces like a jigsaw puzzle.
Press and hold to move them around and press once quickly to
rotate them. • Once you have completed the puzzle, take the
CODE and use it on the computer in the back (I).
• Enter the house and zoom in on the body to the left (G). •
Place the SHIRT, DRESS, NECKLACE and WATCH on the body in the
correct positions shown. • Zoom in on the trashcan with the
papers and use both TORN PAPERS on the space where the note
was (H). • Assemble the ripped pieces like a jigsaw puzzle.
Press and hold to move them around and press once quickly to
rotate them. • Once you have completed the puzzle, take the
CODE and use it on the computer in the back (I).
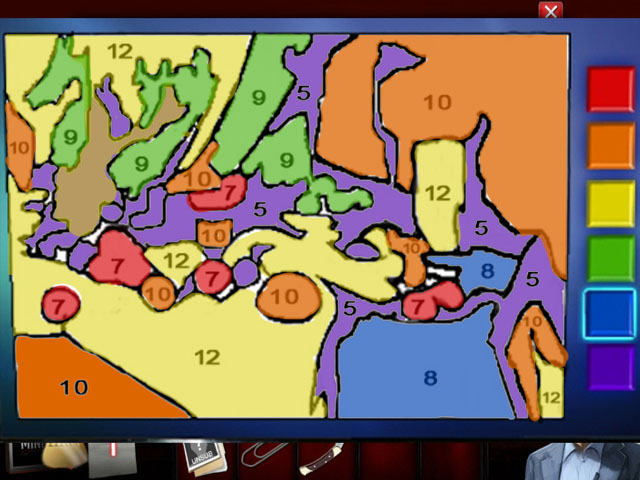 • Use the hints from the code to figure out how to paint the
paint by numbers scene on the computer. • Red is 7, like the
number of continents. • Green is 9, like the number of
baseball innings. • Blue is 8, like the number of spider legs.
• Orange is 10 like the number of decagon sides. • Purple is
5, like the number of Olympic rings. • Yellow is 12 like the
number of zodiac signs. • Press a color and then a number to
color that area. Once all of the areas have been filled in
correctly you will get into the computers email.
• Use the hints from the code to figure out how to paint the
paint by numbers scene on the computer. • Red is 7, like the
number of continents. • Green is 9, like the number of
baseball innings. • Blue is 8, like the number of spider legs.
• Orange is 10 like the number of decagon sides. • Purple is
5, like the number of Olympic rings. • Yellow is 12 like the
number of zodiac signs. • Press a color and then a number to
color that area. Once all of the areas have been filled in
correctly you will get into the computers email.
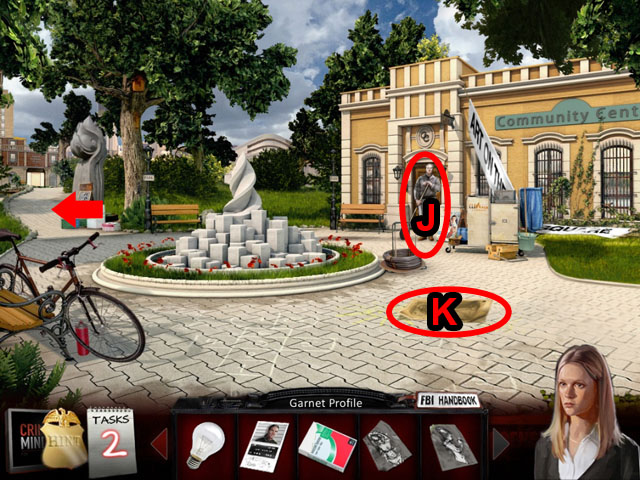
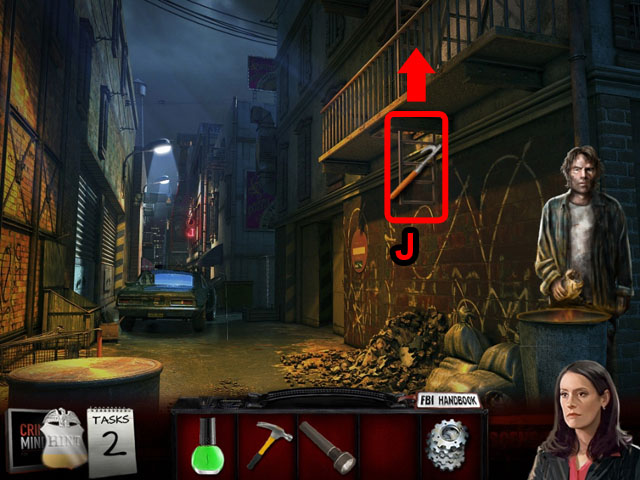
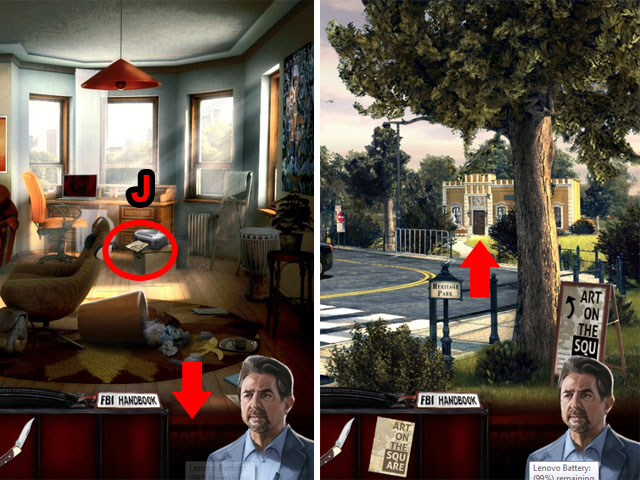 • Take the FLYER from the printer and leave the house (J). •
Travel across the way to the community center.
• Take the FLYER from the printer and leave the house (J). •
Travel across the way to the community center.
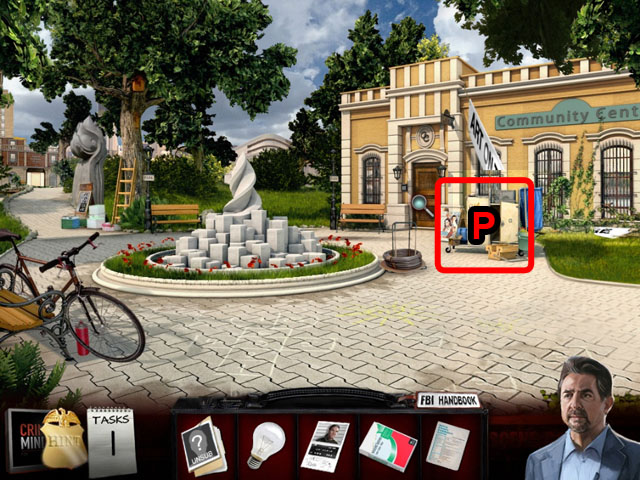
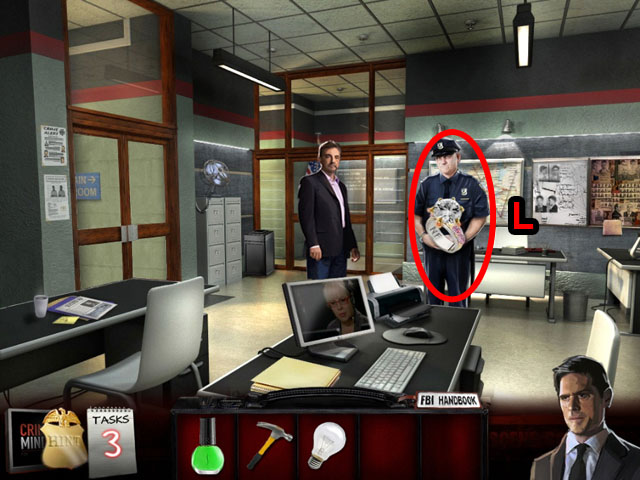
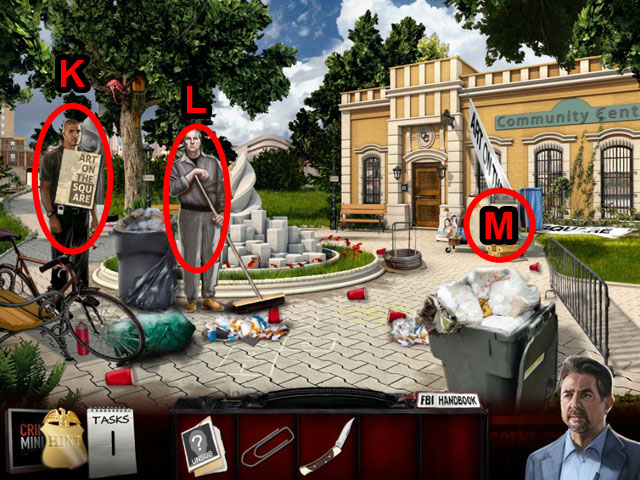 • Give Morgan the FLYER (K) and talk to the groundskeeper 2
times (L). • Zoom in on the cart (M). It is locked, and you
will need a tool to pry it open. • Exit to the left to the
park.
• Give Morgan the FLYER (K) and talk to the groundskeeper 2
times (L). • Zoom in on the cart (M). It is locked, and you
will need a tool to pry it open. • Exit to the left to the
park.
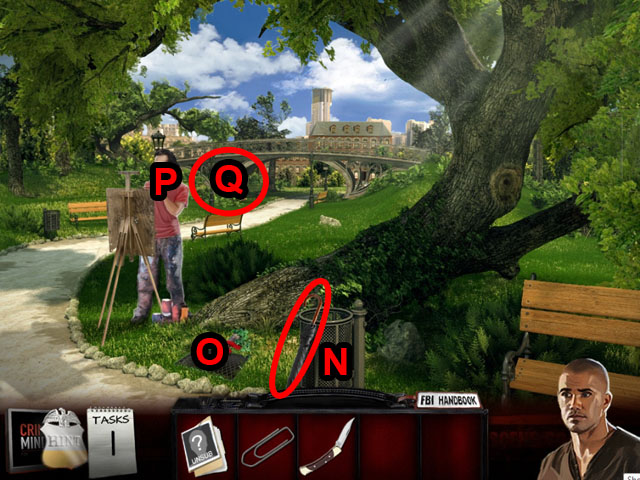 • Take the UMBRELLA (N). • Zoom in on the grate (O). You will
need a screwdriver to open it. • Talk to the man painting (P)
and then zoom in on the Hidden Object Scene behind him (Q).
• Take the UMBRELLA (N). • Zoom in on the grate (O). You will
need a screwdriver to open it. • Talk to the man painting (P)
and then zoom in on the Hidden Object Scene behind him (Q).
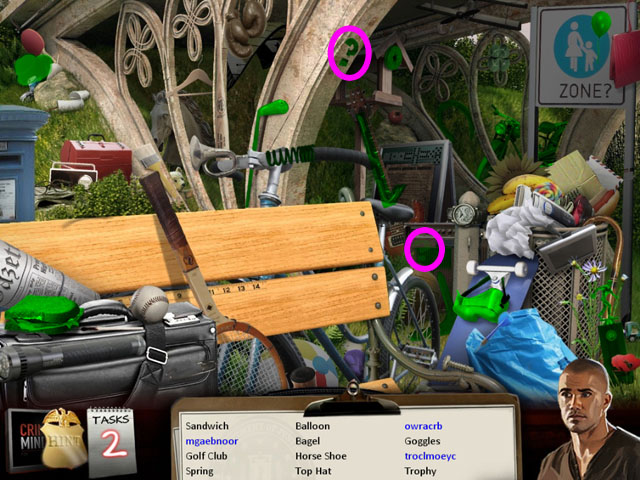 • Find all of the hidden objects and the 2 question marks in
purple to unscramble the object names. • Once you have
finished you will receive the CROWBAR.
• Find all of the hidden objects and the 2 question marks in
purple to unscramble the object names. • Once you have
finished you will receive the CROWBAR.
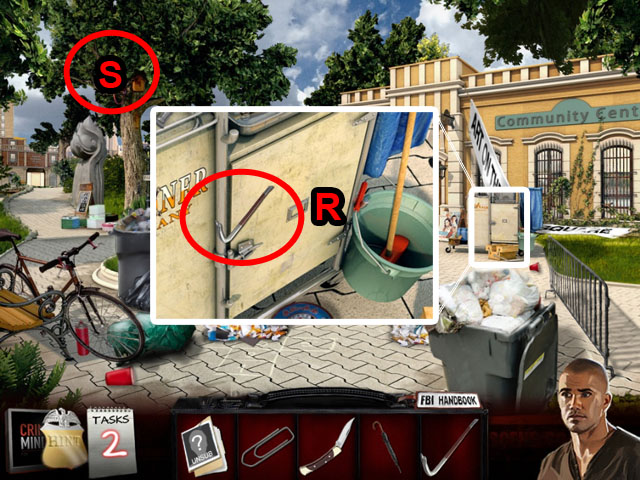 • Return to the community center and use the CROWBAR to open
the cart (R). • There is a purse up the tree that is too high
to reach (S). • Zoom into the cart again a play the Hidden
Object Scene.
• Return to the community center and use the CROWBAR to open
the cart (R). • There is a purse up the tree that is too high
to reach (S). • Zoom into the cart again a play the Hidden
Object Scene.
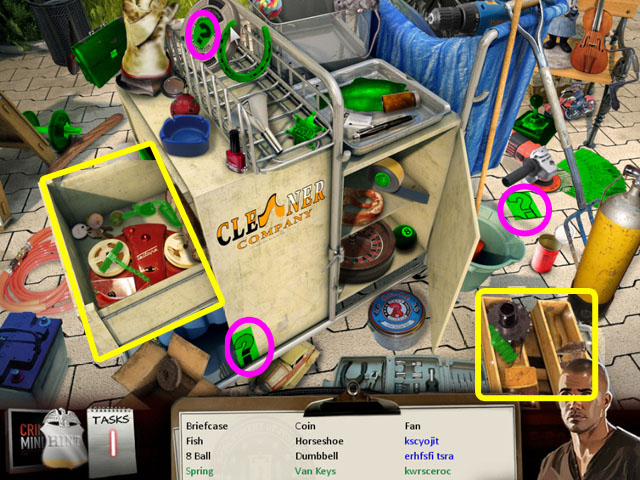 • Find all of the hidden objects and the 3 question marks in
purple to unscramble the object names. • Pull out the drawer
and open the case highlighted in yellow to find more objects
listed in green. • Once you have finished you will receive the
VAN KEYS.
• Find all of the hidden objects and the 3 question marks in
purple to unscramble the object names. • Pull out the drawer
and open the case highlighted in yellow to find more objects
listed in green. • Once you have finished you will receive the
VAN KEYS.
 • Return to the park and go under the bridge in the back. •
Talk to the student (T) and then zoom into the notice board
(V) to investigate it. • Zoom into the intercom and you will
find that you need a student ID (U). • Zoom into the back of
the van and use the VAN KEYS to unlock it (W). • Enter the van
Hidden Object Scene.
• Return to the park and go under the bridge in the back. •
Talk to the student (T) and then zoom into the notice board
(V) to investigate it. • Zoom into the intercom and you will
find that you need a student ID (U). • Zoom into the back of
the van and use the VAN KEYS to unlock it (W). • Enter the van
Hidden Object Scene.
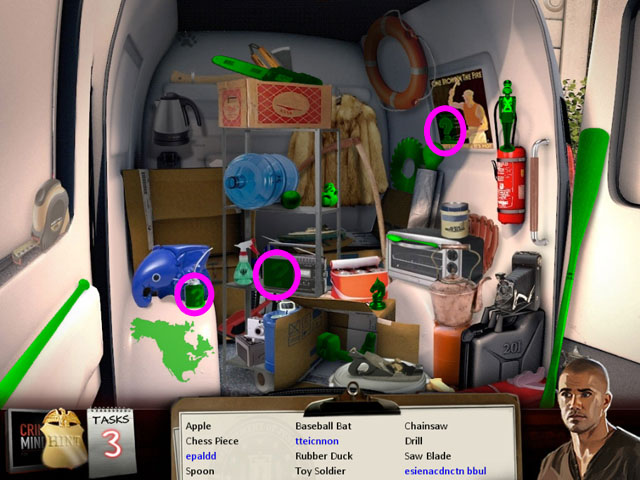 • Find all of the hidden objects and the 3 question marks in
purple to unscramble the object names. • Once you have
finished you will receive the INCANDESCENT BULB.
• Find all of the hidden objects and the 3 question marks in
purple to unscramble the object names. • Once you have
finished you will receive the INCANDESCENT BULB.
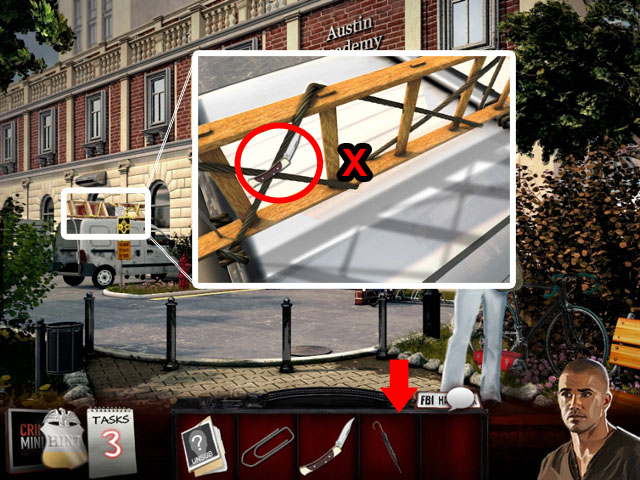 • Zoom in on the top of the van and use the KNIFE 2 times to
free the ladder (X). • Collect the LADDER and go back to the
community center.
• Zoom in on the top of the van and use the KNIFE 2 times to
free the ladder (X). • Collect the LADDER and go back to the
community center.
 • Use the LADDER underneath the tree (A) and then the UMBRELLA
to get the bag (B). • After zooming in on the bag lock, there
will be a puzzle. • Press the cylinders of the puzzle to
rotate them. The flowers from one side need to match the
flowers on the other side. • See the screenshot for the final
solution (C). • Once open, take the LETTER (D) and the
HANDKERCHIEF (E).
• Use the LADDER underneath the tree (A) and then the UMBRELLA
to get the bag (B). • After zooming in on the bag lock, there
will be a puzzle. • Press the cylinders of the puzzle to
rotate them. The flowers from one side need to match the
flowers on the other side. • See the screenshot for the final
solution (C). • Once open, take the LETTER (D) and the
HANDKERCHIEF (E).
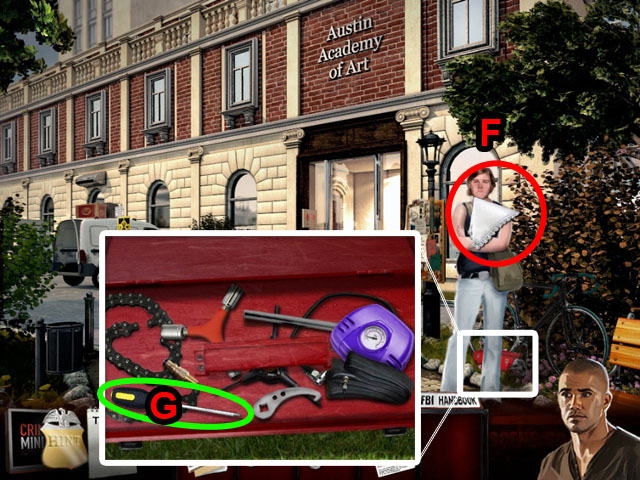 • Return to the student near the van and give her the
HANDKERCHIEF (F). • Once she is gone zoom in on the toolbox
and take the SCREWDRIVER (G). • Go back to the park scene.
• Return to the student near the van and give her the
HANDKERCHIEF (F). • Once she is gone zoom in on the toolbox
and take the SCREWDRIVER (G). • Go back to the park scene.
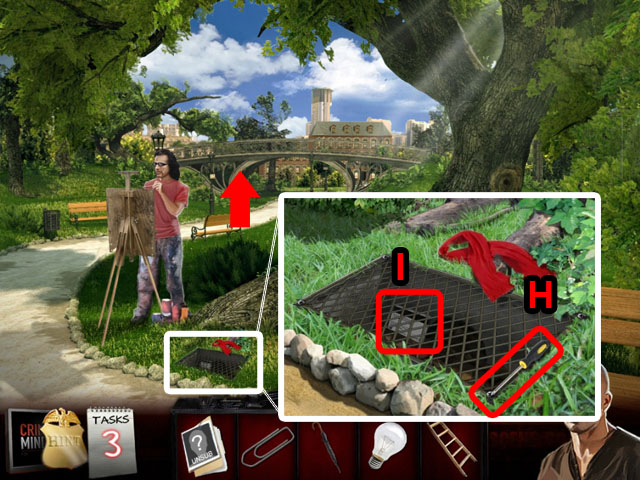 • Zoom in on the grate and use the SCREWDRIVER on it (H). •
Only the tip of the screwdriver will work to unscrew each
screw. There are 4 of them. • Take the ID CARD (I) and return
to the school.
• Zoom in on the grate and use the SCREWDRIVER on it (H). •
Only the tip of the screwdriver will work to unscrew each
screw. There are 4 of them. • Take the ID CARD (I) and return
to the school.
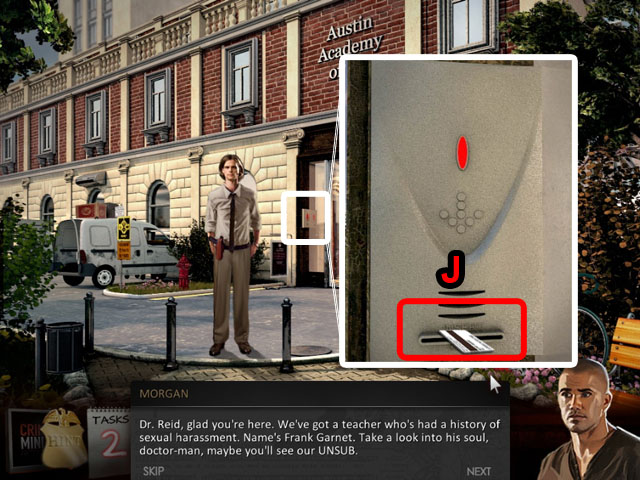 • Talk Dr. Reid and use the ID CARD on the entrance (J). •
Enter the school.
• Talk Dr. Reid and use the ID CARD on the entrance (J). •
Enter the school.
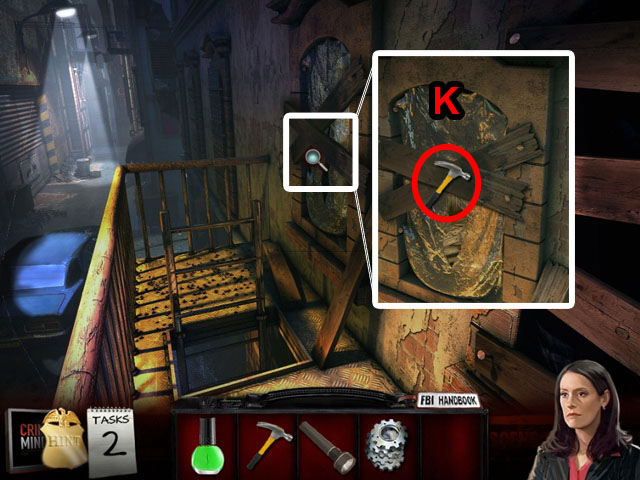
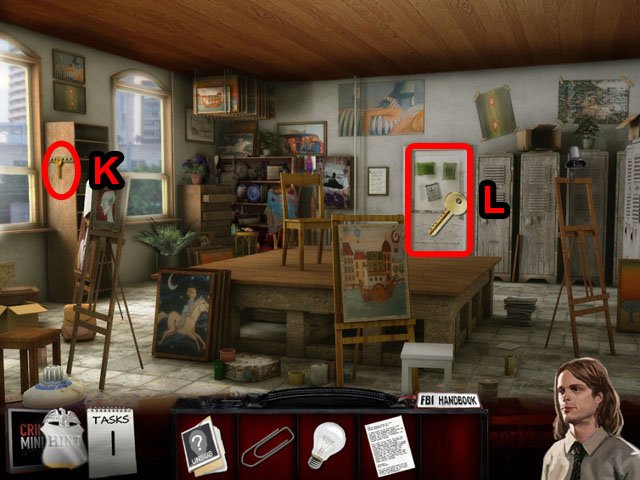 • Take the KEY from the left hook (K) and use it on the door
in the back to open it (L). • Go through the door.
• Take the KEY from the left hook (K) and use it on the door
in the back to open it (L). • Go through the door.
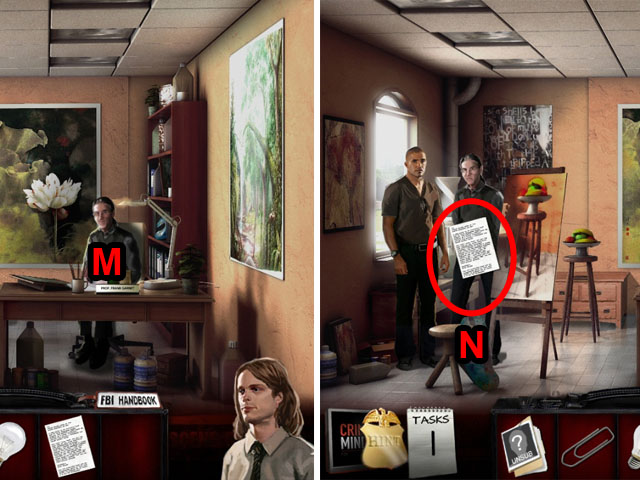 • Talk to the professor (M) and then show him the LETTER after
he tries to run (N).
• Talk to the professor (M) and then show him the LETTER after
he tries to run (N).
 • Exit the room and zoom in on the Hidden Object Scene in the
corner (O).
• Exit the room and zoom in on the Hidden Object Scene in the
corner (O).
 • Find all of the hidden objects and the 3 question marks in
purple to unscramble the object names. • Once you have
finished you will receive GARNET'S PASSPORT.
• Find all of the hidden objects and the 3 question marks in
purple to unscramble the object names. • Once you have
finished you will receive GARNET'S PASSPORT.
 • Enter your office and use the PASSPORT on the computer (P).
• Take the PROFILE from the printer (Q). • Inspect the tape
recorder to find out that you need a new tape (R).
• Enter your office and use the PASSPORT on the computer (P).
• Take the PROFILE from the printer (Q). • Inspect the tape
recorder to find out that you need a new tape (R).
 • The object of this mini-game is to find the one print out of
the sequence that is not the same as the others. • Once you
find the different fingerprint you can press it to continue to
the next test. The first is only 3 (1), the second is 6 (2)
and the last is 9 (3). • The screenshot has one possible
solution, but the types of fingerprints are randomized. • If
you make a mistake it will show you what the differences are.
If you remember this, you can look for it next time you get
the same fingerprints. • Zoom in on the area when you are done
(S).
• The object of this mini-game is to find the one print out of
the sequence that is not the same as the others. • Once you
find the different fingerprint you can press it to continue to
the next test. The first is only 3 (1), the second is 6 (2)
and the last is 9 (3). • The screenshot has one possible
solution, but the types of fingerprints are randomized. • If
you make a mistake it will show you what the differences are.
If you remember this, you can look for it next time you get
the same fingerprints. • Zoom in on the area when you are done
(S).
 • Take the TAPE (T) and zoom in on the Hidden Object Scene
(U).
• Take the TAPE (T) and zoom in on the Hidden Object Scene
(U).
 • Find all of the hidden objects and the 3 question marks in
purple to unscramble the object names. • Once you have
finished you will receive CASSETTE TAPES and the REAM OF
PAPER.
• Find all of the hidden objects and the 3 question marks in
purple to unscramble the object names. • Once you have
finished you will receive CASSETTE TAPES and the REAM OF
PAPER.
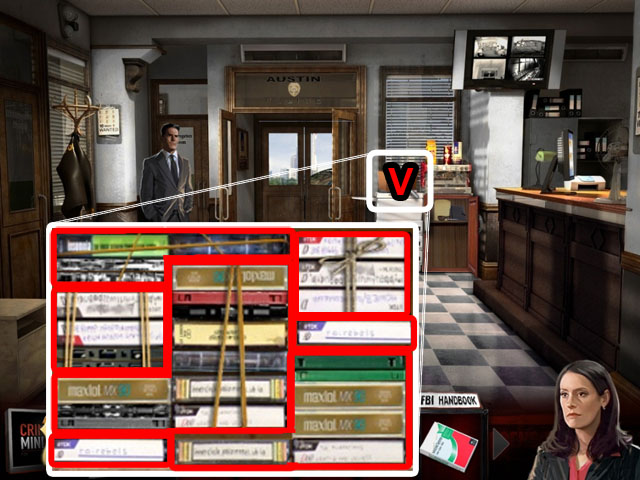 • Zoom in on the box on top of the printer (V) and use the
CASSETTE TAPE and the group of CASSETTE TAPES to start the
mini-game. • Pick up the cassettes and stack them inside the
box in a way that all of them fit without any spaces. • The
tapes will be highlighted in red when they are in the wrong
position outside the box, or overlapping with another tape. •
See the screenshot for one possible solution. • Once you have
finished placing the tapes, take the BLANK TAPE from the top
right corner.
• Zoom in on the box on top of the printer (V) and use the
CASSETTE TAPE and the group of CASSETTE TAPES to start the
mini-game. • Pick up the cassettes and stack them inside the
box in a way that all of them fit without any spaces. • The
tapes will be highlighted in red when they are in the wrong
position outside the box, or overlapping with another tape. •
See the screenshot for one possible solution. • Once you have
finished placing the tapes, take the BLANK TAPE from the top
right corner.
 • Return to your office and use the BLANK TAPE on the tape
recorder (W). • Exit the room to start the next sequence.
• Return to your office and use the BLANK TAPE on the tape
recorder (W). • Exit the room to start the next sequence.
Murder Case 2
 • Take the SKETCH off the ground (A). • Enter the building.
 • Inspect the body to see some things missing (B). • Zoom in
on the TV (C) and take the PAPER SCRAP (D). • Zoom in on the
trashcan and use the PAPER SCRAP on the other strips of paper
(E). • Switch the places of the strips to solve the puzzle.
When a strip is in the correct position, it will be
highlighted in a brighter color. • Use the letters and the
seal to help you line things up. • Once finished, take the
DIPLOMA. • Inspect the locked briefcase (F). • Enter the
Hidden Object Scene in the closet (G).
• Inspect the body to see some things missing (B). • Zoom in
on the TV (C) and take the PAPER SCRAP (D). • Zoom in on the
trashcan and use the PAPER SCRAP on the other strips of paper
(E). • Switch the places of the strips to solve the puzzle.
When a strip is in the correct position, it will be
highlighted in a brighter color. • Use the letters and the
seal to help you line things up. • Once finished, take the
DIPLOMA. • Inspect the locked briefcase (F). • Enter the
Hidden Object Scene in the closet (G).
 • Find all of the hidden objects and the 3 question marks in
purple to unscramble the object names. • Once you have
finished you will receive a BROKEN PICTURE.
• Find all of the hidden objects and the 3 question marks in
purple to unscramble the object names. • Once you have
finished you will receive a BROKEN PICTURE.
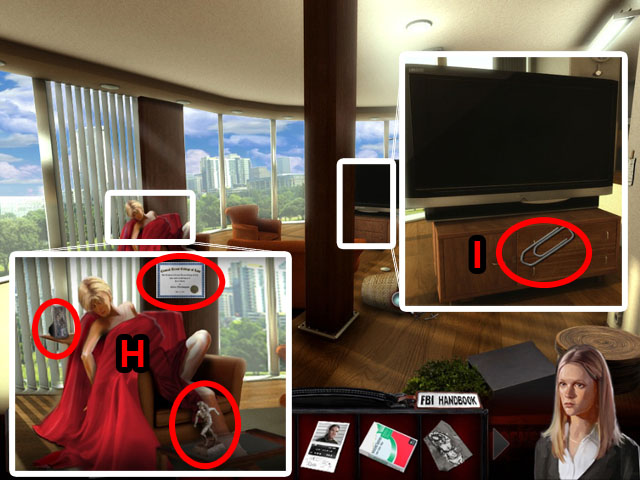 • Zoom in on the TV and use the PAPER CLIP to open the console
(I). • Take the TROPHY. • Zoom in on the woman (H) and place
the TROPHY, PICTURE and the CERTIFICATE. • Exit the apartment
and enter the hidden object scene on the left.
• Zoom in on the TV and use the PAPER CLIP to open the console
(I). • Take the TROPHY. • Zoom in on the woman (H) and place
the TROPHY, PICTURE and the CERTIFICATE. • Exit the apartment
and enter the hidden object scene on the left.
 • Find all of the hidden objects and the 3 question marks in
purple to unscramble the object names. • Once you have
finished you will receive another AUGUST'S SKETCH.
• Find all of the hidden objects and the 3 question marks in
purple to unscramble the object names. • Once you have
finished you will receive another AUGUST'S SKETCH.
 • Exit to the left and pick up another AUGUST'S SKETCH from
the ground (K). • Talk to the groundskeeper (J) and exit to
the left.
• Exit to the left and pick up another AUGUST'S SKETCH from
the ground (K). • Talk to the groundskeeper (J) and exit to
the left.
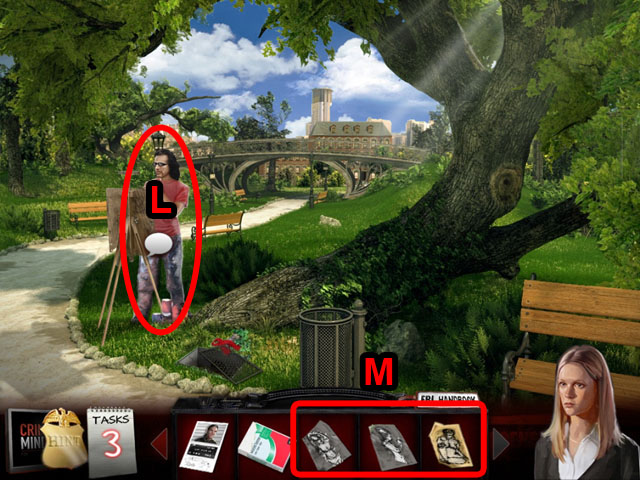 • Talk to the artist August (L) and then give him the 3 AUGUST
SKETCHES (M) to start the interrogation.
• Talk to the artist August (L) and then give him the 3 AUGUST
SKETCHES (M) to start the interrogation.
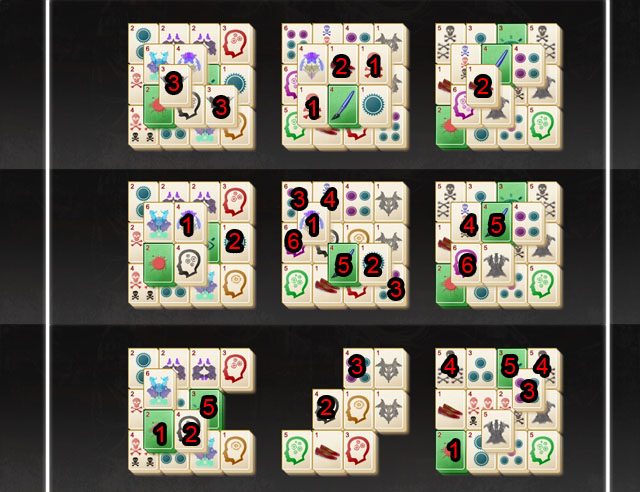 • Play the game of mahjong to complete the interrogation. •
You need to remove all of the green blocks to finish the
mini-game. • You can only match tiles that do not have other
tiles on top of them and have a space either to the left or
the right. • Follow the directions in the screenshot in order
to remove all of the green tiles (1-3, 1-6, 1-5). Tiles with
the same number are matches and the order is from top to the
bottom. • You will receive the BRIEFCASE KEY when you are
finished.
• Play the game of mahjong to complete the interrogation. •
You need to remove all of the green blocks to finish the
mini-game. • You can only match tiles that do not have other
tiles on top of them and have a space either to the left or
the right. • Follow the directions in the screenshot in order
to remove all of the green tiles (1-3, 1-6, 1-5). Tiles with
the same number are matches and the order is from top to the
bottom. • You will receive the BRIEFCASE KEY when you are
finished.
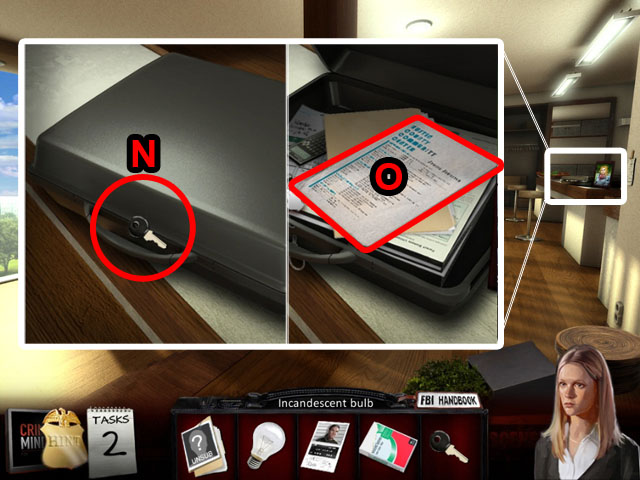 • Go right 3 times to go back to the apartment. • Zoom in on
the briefcase and use the BRIEFCASE KEY (N). • Take the
documents from inside (O).
• Go right 3 times to go back to the apartment. • Zoom in on
the briefcase and use the BRIEFCASE KEY (N). • Take the
documents from inside (O).
 • Exit the apartment and you will switch characters. • Go to
the right to the community center and inspect the cart (P).
• Exit the apartment and you will switch characters. • Go to
the right to the community center and inspect the cart (P).
 • Find all of the hidden objects and the 3 question marks in
purple to unscramble the object names. • Once you have
finished you will receive a GLASS CUTTER and a LED BULB.
• Find all of the hidden objects and the 3 question marks in
purple to unscramble the object names. • Once you have
finished you will receive a GLASS CUTTER and a LED BULB.
 • Zoom in on the door and use the LED BULB (Q). • Turn all of
the red lights to green to finish this mini-game. • When you
click on one light it will turn that light and any lights to
the left, right, up or down from it to the opposite colors. •
To finish in the shortest amount of moves, follow the
directions in the screenshot (1-5). • Once finished, enter the
community center.
• Zoom in on the door and use the LED BULB (Q). • Turn all of
the red lights to green to finish this mini-game. • When you
click on one light it will turn that light and any lights to
the left, right, up or down from it to the opposite colors. •
To finish in the shortest amount of moves, follow the
directions in the screenshot (1-5). • Once finished, enter the
community center.
 • Talk to the director of the center (R). • Zoom in on the
door and use the GLASS CUTTER to open it (S)
• Talk to the director of the center (R). • Zoom in on the
door and use the GLASS CUTTER to open it (S)
 • Inspect the top of the copy machine (T). • Zoom in on the
desk (U).
• Inspect the top of the copy machine (T). • Zoom in on the
desk (U).
 • Find all of the hidden objects and the 3 question marks in
purple to unscramble the object names. • Once you have
finished you will receive a LETTER.
• Find all of the hidden objects and the 3 question marks in
purple to unscramble the object names. • Once you have
finished you will receive a LETTER.
 • Exit the room and the community center. Go to the left to
the park. • Find the PASSCARD on the ground (V) and return to
the community center. • Use the PASSCARD on the door in the
back (W).
• Exit the room and the community center. Go to the left to
the park. • Find the PASSCARD on the ground (V) and return to
the community center. • Use the PASSCARD on the door in the
back (W).
 • Find all of the hidden objects and the 3 question marks in
purple to unscramble the object names. • Once you have
finished you will receive a MURDER PAINTING and a LOCKER KEY.
• Exit the community center and go to the art school through
the park.
• Find all of the hidden objects and the 3 question marks in
purple to unscramble the object names. • Once you have
finished you will receive a MURDER PAINTING and a LOCKER KEY.
• Exit the community center and go to the art school through
the park.
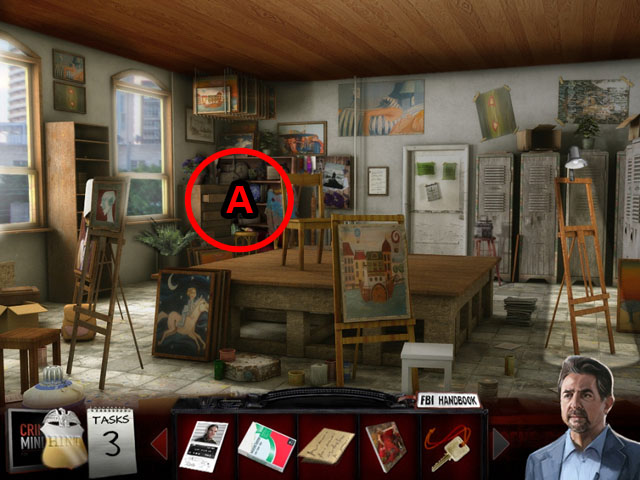 • Enter the art school and zoom in on the corner of the studio
(A).
• Enter the art school and zoom in on the corner of the studio
(A).
 • Find all of the hidden objects and the 3 question marks in
purple to unscramble the object names. • Once you have
finished you will receive an ART SCHOOL ROSTER.
• Find all of the hidden objects and the 3 question marks in
purple to unscramble the object names. • Once you have
finished you will receive an ART SCHOOL ROSTER.
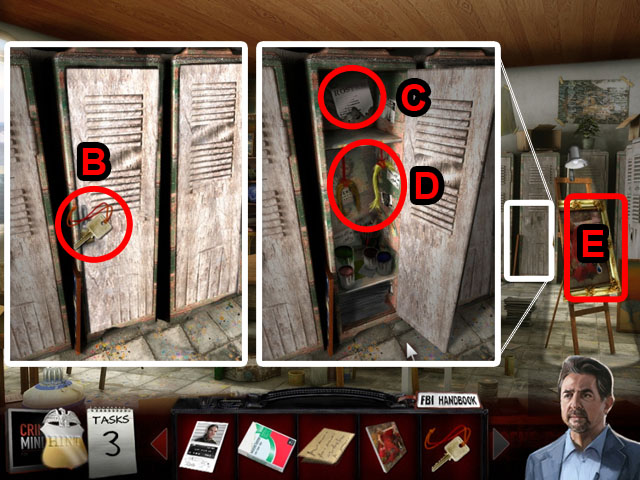 • Zoom in on the lockers and use the LOCKER KEY to open it
(B). • Take the COMMUNITY CENTER ROSTER PIECE (C) and the HAIR
(D). • Use the MURDER PAINTING on the easel and then zoom in
(E).
• Zoom in on the lockers and use the LOCKER KEY to open it
(B). • Take the COMMUNITY CENTER ROSTER PIECE (C) and the HAIR
(D). • Use the MURDER PAINTING on the easel and then zoom in
(E).
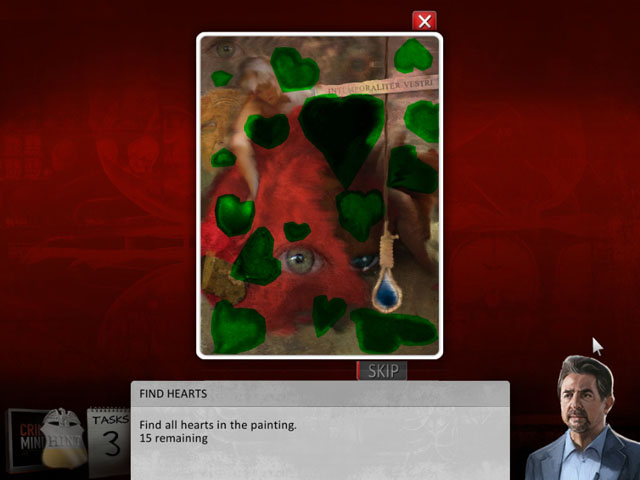 • Find all of the 15 hearts in the image.
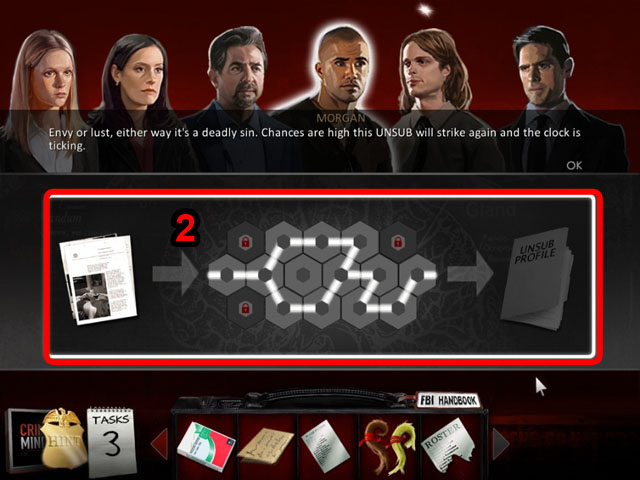 • Create unbroken lines out of the hexes to finish this
mini-game. • Press one hex and then another to switch their
places. • The pieces with the locks on them cannot be moved.
If there is a line on a locked piece work outwards from that
hex. • See the screenshot for the final solution (2).
• Create unbroken lines out of the hexes to finish this
mini-game. • Press one hex and then another to switch their
places. • The pieces with the locks on them cannot be moved.
If there is a line on a locked piece work outwards from that
hex. • See the screenshot for the final solution (2).
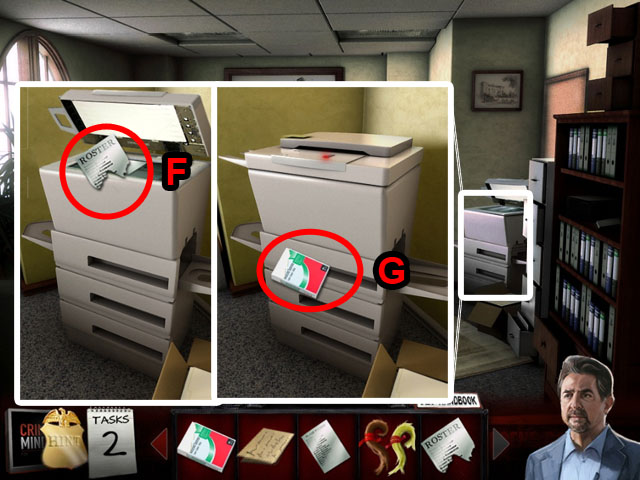 • Return to the community center and enter the office on the
right. • Zoom in and use the COMMUNITY CENTER ROSTER PIECE on
the top of the copier (F). • Use the PAPER on the bottom of
the copier to copy the complete COMMUNITY CENTER ROSTER (G).
• Return to the community center and enter the office on the
right. • Zoom in and use the COMMUNITY CENTER ROSTER PIECE on
the top of the copier (F). • Use the PAPER on the bottom of
the copier to copy the complete COMMUNITY CENTER ROSTER (G).
 • Exit the community center and go back to the apartment. •
Enter the car to go back to the police station and go in your
office to the left. • Use the ART SCHOOL ROSTER (I) and the
COMMUNITY CENTER ROSTER (H) on the analyst.
• Exit the community center and go back to the apartment. •
Enter the car to go back to the police station and go in your
office to the left. • Use the ART SCHOOL ROSTER (I) and the
COMMUNITY CENTER ROSTER (H) on the analyst.
 • This mini-game will have you eliminating suspects until only
2 are left. • Look at the 5 facts at the bottom and click on
any of the suspects that do not match the description in the
fact. • Once you have eliminated everyone using the 5 facts
the mini-game will end; see the screenshot for the final
suspects (J).
• This mini-game will have you eliminating suspects until only
2 are left. • Look at the 5 facts at the bottom and click on
any of the suspects that do not match the description in the
fact. • Once you have eliminated everyone using the 5 facts
the mini-game will end; see the screenshot for the final
suspects (J).
 • Enter the interrogation room. • Use GARNET'S PROFILE, the
LETTER and the HAIR on Garnet (K) to start the next
interrogation.
• Enter the interrogation room. • Use GARNET'S PROFILE, the
LETTER and the HAIR on Garnet (K) to start the next
interrogation.
 • Play the game of mahjong to complete the interrogation. •
You need to remove all of the green blocks to finish the
mini-game. • You can only match tiles that do not have other
tiles on top of them and have a space either to the left or
the right. • Follow the directions in the screenshot in order
to remove all of the green tiles (1-6, 1-5, 1-7). Tiles with
the same number are matches and the order is from top to the
bottom. • You will receive JEN'S PROFILE when you are
finished.
• Play the game of mahjong to complete the interrogation. •
You need to remove all of the green blocks to finish the
mini-game. • You can only match tiles that do not have other
tiles on top of them and have a space either to the left or
the right. • Follow the directions in the screenshot in order
to remove all of the green tiles (1-6, 1-5, 1-7). Tiles with
the same number are matches and the order is from top to the
bottom. • You will receive JEN'S PROFILE when you are
finished.
 • Return to the office and take the CASSETTE (L).
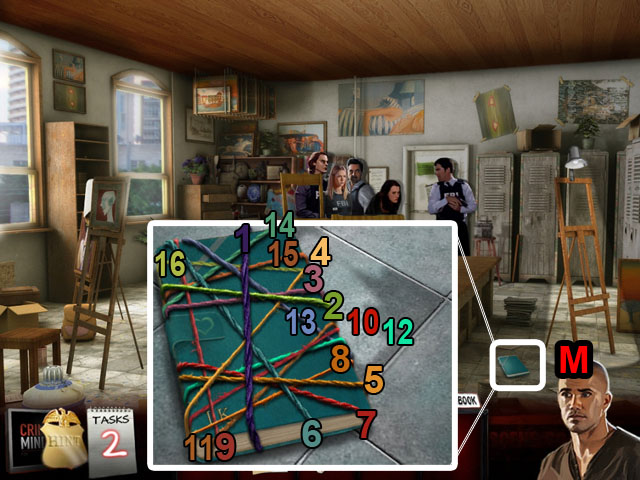 • Exit the police station and then go to the art institute. •
Talk to the group of officers and then you will switch
characters. • Inspect the journal on the ground (M). • Remove
all of the threads wrapping the journal to open it. • You can
only remove the outermost thread, follow the color coded
numbers in the screenshot for the solution (1-16).
• Exit the police station and then go to the art institute. •
Talk to the group of officers and then you will switch
characters. • Inspect the journal on the ground (M). • Remove
all of the threads wrapping the journal to open it. • You can
only remove the outermost thread, follow the color coded
numbers in the screenshot for the solution (1-16).
 • Create unbroken lines out of the hexes to finish this
mini-game. • Press one hex and then another to switch their
places. • The pieces with the locks on them cannot be moved.
If there is a line on a locked piece work outwards from that
hex. • See the screenshot for the final solution (3).
• Create unbroken lines out of the hexes to finish this
mini-game. • Press one hex and then another to switch their
places. • The pieces with the locks on them cannot be moved.
If there is a line on a locked piece work outwards from that
hex. • See the screenshot for the final solution (3).
 • Inspect the door once again (N). • Exit the art institute
and zoom in on the back of the van to play the next Hidden
Object Scene (O).
• Inspect the door once again (N). • Exit the art institute
and zoom in on the back of the van to play the next Hidden
Object Scene (O).
 • Find all of the hidden objects and the 3 question marks in
purple to unscramble the object names. • Once you have
finished you will receive some BATTERIES.
• Find all of the hidden objects and the 3 question marks in
purple to unscramble the object names. • Once you have
finished you will receive some BATTERIES.
 • Return inside and use the CASSETTE and the BATTERIES (Q) on
the tape player (P).
• Return inside and use the CASSETTE and the BATTERIES (Q) on
the tape player (P).
 • Play the game of mahjong to complete the interrogation. •
You need to remove all of the green blocks to finish the
mini-game. • You can only match tiles that do not have other
tiles on top of them and have a space either to the left or
the right. • Follow the directions in the screenshot in order
to remove all of the green tiles (1-4, 1-5, 1-7). Tiles with
the same number are matches and the order is from top to the
bottom. • You will receive JEN'S PROFILE when you are
finished.
• Play the game of mahjong to complete the interrogation. •
You need to remove all of the green blocks to finish the
mini-game. • You can only match tiles that do not have other
tiles on top of them and have a space either to the left or
the right. • Follow the directions in the screenshot in order
to remove all of the green tiles (1-4, 1-5, 1-7). Tiles with
the same number are matches and the order is from top to the
bottom. • You will receive JEN'S PROFILE when you are
finished.
 • Talk with everyone on the plane. • Zoom in on the computer
(A).
• Talk with everyone on the plane. • Zoom in on the computer
(A).
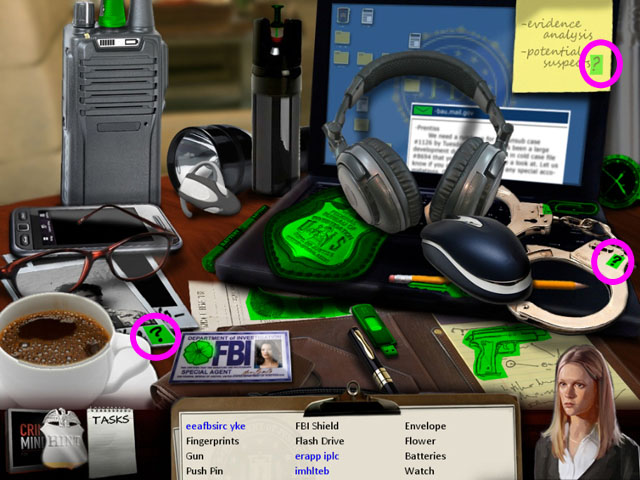 • Find all of the hidden objects and the 3 question marks in
purple to unscramble the object names. • Once you have
finished you will receive the BRIEFCASE KEY and FBI SHIELD.
• Find all of the hidden objects and the 3 question marks in
purple to unscramble the object names. • Once you have
finished you will receive the BRIEFCASE KEY and FBI SHIELD.
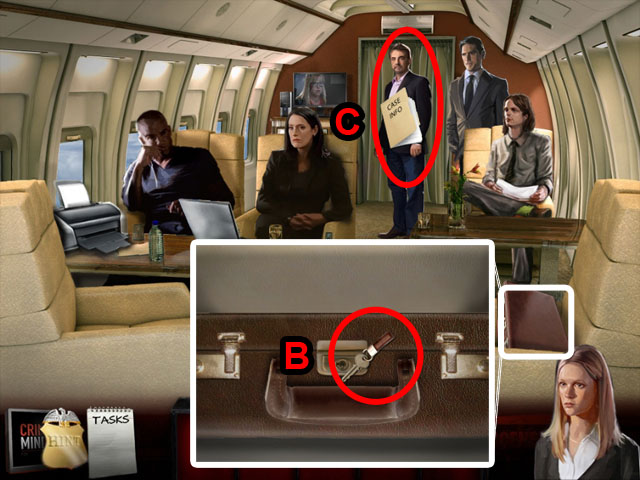 • Zoom in on the briefcase and use the BRIEFCASE KEY to open
it (B). Take the CASE INFO. • Use the CASE INFO on the man in
the back (C).
• Zoom in on the briefcase and use the BRIEFCASE KEY to open
it (B). Take the CASE INFO. • Use the CASE INFO on the man in
the back (C).
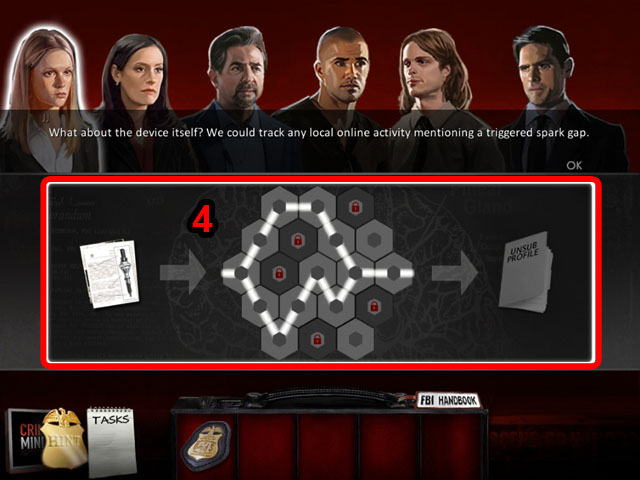 • Create unbroken lines out of the hexes to finish this
mini-game. • Press one hex and then another to switch their
places. • The pieces with the locks on them cannot be moved.
If there is a line on a locked piece work outwards from that
hex. • See the screenshot for the final solution (4). • You
will receive the DEVICE DESCRIPTION.
• Create unbroken lines out of the hexes to finish this
mini-game. • Press one hex and then another to switch their
places. • The pieces with the locks on them cannot be moved.
If there is a line on a locked piece work outwards from that
hex. • See the screenshot for the final solution (4). • You
will receive the DEVICE DESCRIPTION.
 • Use the DEVICE DESCRIPTION on the analyst on the monitor
(D).
• Use the DEVICE DESCRIPTION on the analyst on the monitor
(D).
 • Zoom in on the desk and take the ID (E) and the CAMERA (F).
• Use the ID on the monitor (G) and take the MILITIA LEADER
PROFILE (H) from the printer. • Talk to the police officer
(I). • Inspect the box (J); you will need something to open
it. • Go into the briefing room.
• Zoom in on the desk and take the ID (E) and the CAMERA (F).
• Use the ID on the monitor (G) and take the MILITIA LEADER
PROFILE (H) from the printer. • Talk to the police officer
(I). • Inspect the box (J); you will need something to open
it. • Go into the briefing room.
 • Enter the interrogation room and show the PROFILE to the
militia leader (K).
• Enter the interrogation room and show the PROFILE to the
militia leader (K).
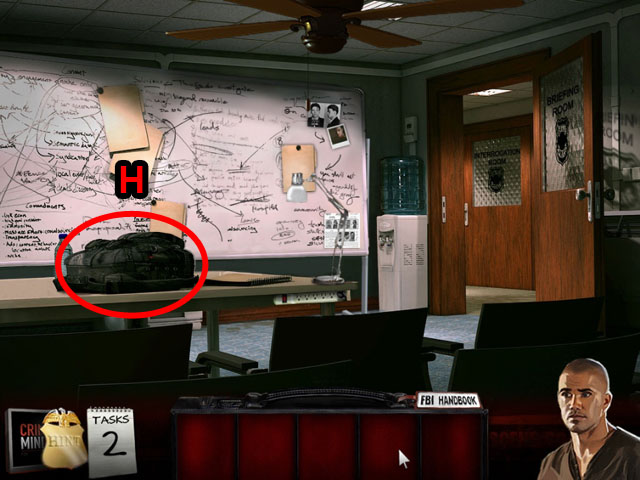
 • Exit the room and zoom into the backpack (L).
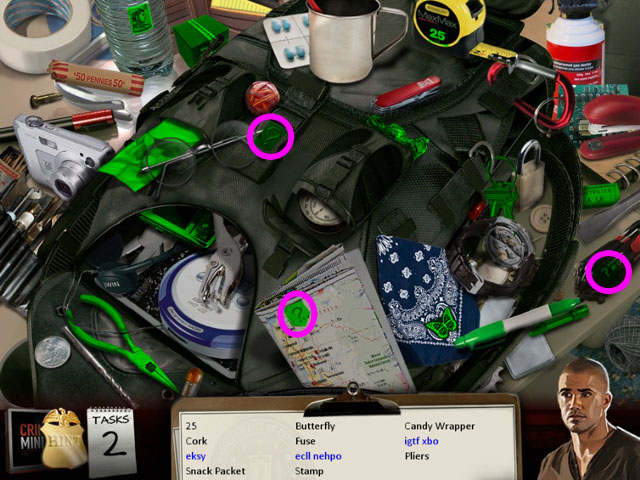
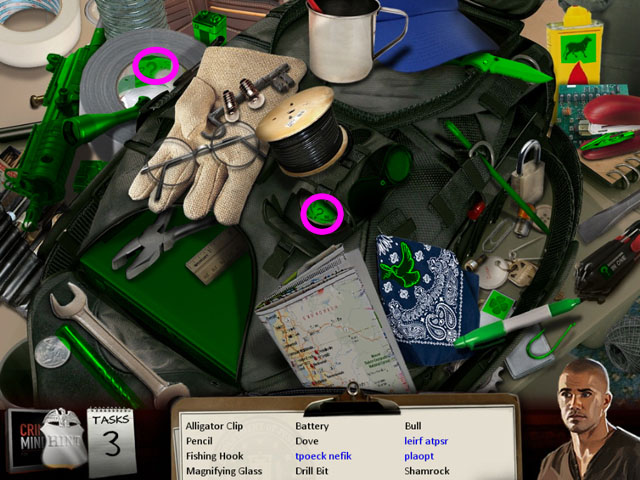 • Find all of the hidden objects and the 2 question marks in
purple to unscramble the object names. • Once you have
finished you will receive the LAPTOP, UTILITY KNIFE and RIFLE
PARTS.
• Find all of the hidden objects and the 2 question marks in
purple to unscramble the object names. • Once you have
finished you will receive the LAPTOP, UTILITY KNIFE and RIFLE
PARTS.
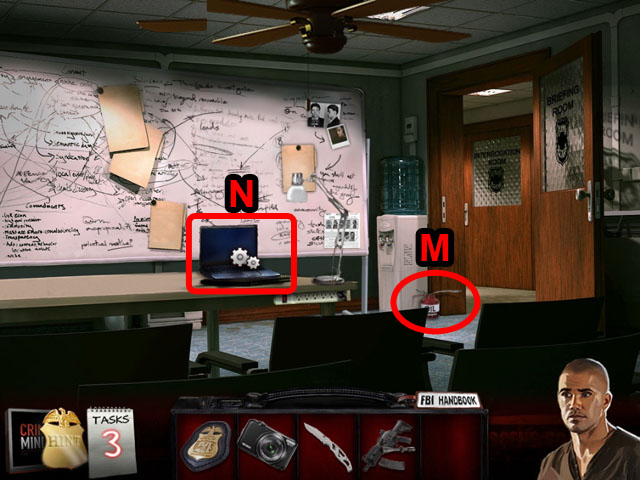 • Use the LAPTOP (N) on the desk. • Take the OIL (M) from the
corner. • Return to the first room.
• Use the LAPTOP (N) on the desk. • Take the OIL (M) from the
corner. • Return to the first room.
 • Inspect the storage container and use the OIL on it (O). •
Remove all of the wires in the box starting from the top. You
cannot remove a wire if it has any other wires on top of it. •
Remove the wires in the color coded order shown in the
screenshot (1-10). • Take the POWER CORD at the bottom of the
box.
• Inspect the storage container and use the OIL on it (O). •
Remove all of the wires in the box starting from the top. You
cannot remove a wire if it has any other wires on top of it. •
Remove the wires in the color coded order shown in the
screenshot (1-10). • Take the POWER CORD at the bottom of the
box.
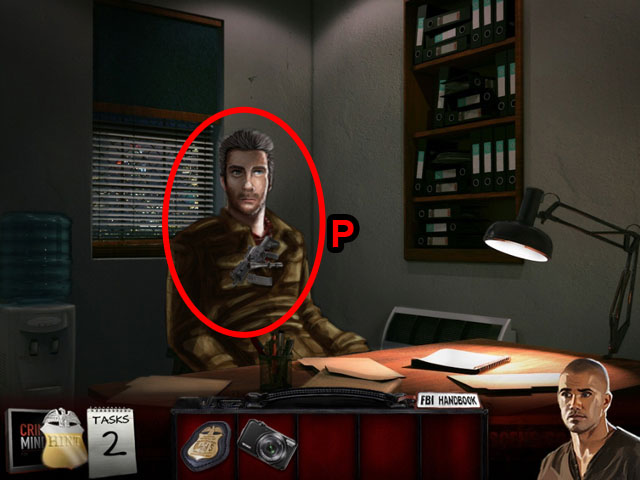 • Return to the interrogation room and use the MACHINE GUN
PARTS on the militia leader (P) to start the next
interrogation.
• Return to the interrogation room and use the MACHINE GUN
PARTS on the militia leader (P) to start the next
interrogation.
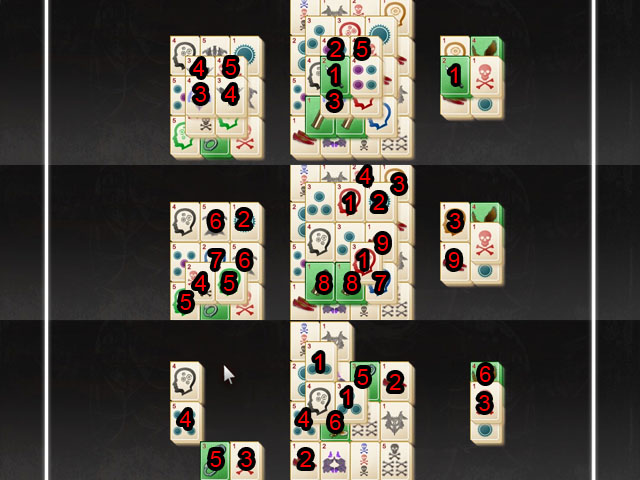 • Play the game of mahjong to complete the interrogation. •
You need to remove all of the green blocks to finish the
mini-game. • You can only match tiles that do not have other
tiles on top of them and have a space either to the left or
the right. • Follow the directions in the screenshot in order
to remove all of the green tiles (1-5, 1-9, 1-6). Tiles with
the same number are matches and the order is from top to the
bottom.
• Play the game of mahjong to complete the interrogation. •
You need to remove all of the green blocks to finish the
mini-game. • You can only match tiles that do not have other
tiles on top of them and have a space either to the left or
the right. • Follow the directions in the screenshot in order
to remove all of the green tiles (1-5, 1-9, 1-6). Tiles with
the same number are matches and the order is from top to the
bottom.
 • Exit the interrogation room and use the POWER CORD with the
laptop (R). • Zoom in on the jacket and use the KNIFE on it to
find the USB DRIVE (Q). • Use the USB DRIVE on the laptop to
try to hack it.
• Exit the interrogation room and use the POWER CORD with the
laptop (R). • Zoom in on the jacket and use the KNIFE on it to
find the USB DRIVE (Q). • Use the USB DRIVE on the laptop to
try to hack it.
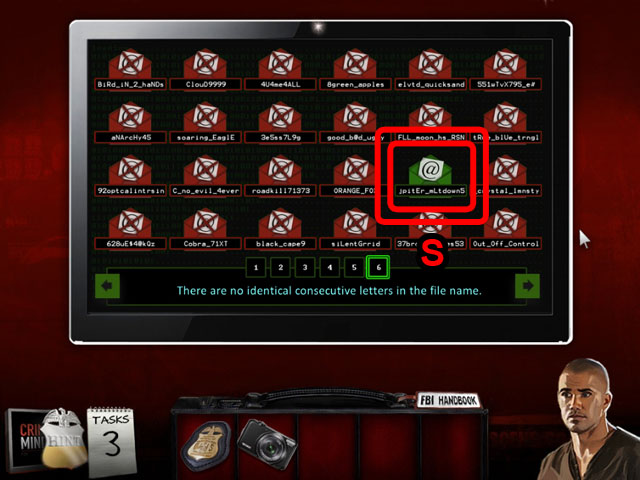 • This mini-game will have you eliminating files until only 1
is left. • Look at the 5 facts at the bottom and click on any
of the files that do not match the description in the fact. •
Once you have eliminated everyone using the 5 facts the
mini-game will end; see the screenshot for the final solution
(S).
• This mini-game will have you eliminating files until only 1
is left. • Look at the 5 facts at the bottom and click on any
of the files that do not match the description in the fact. •
Once you have eliminated everyone using the 5 facts the
mini-game will end; see the screenshot for the final solution
(S).
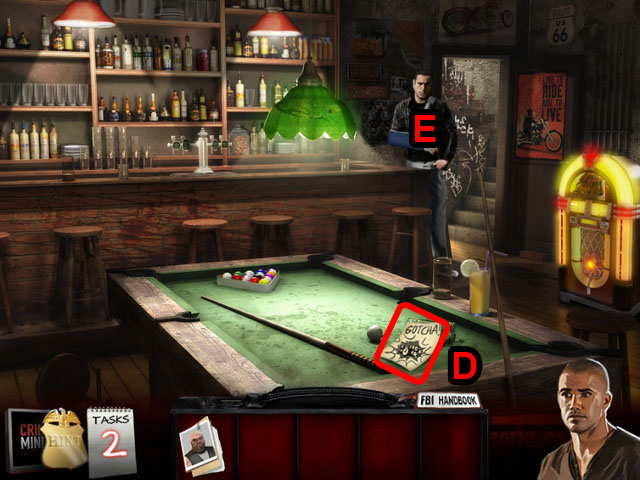
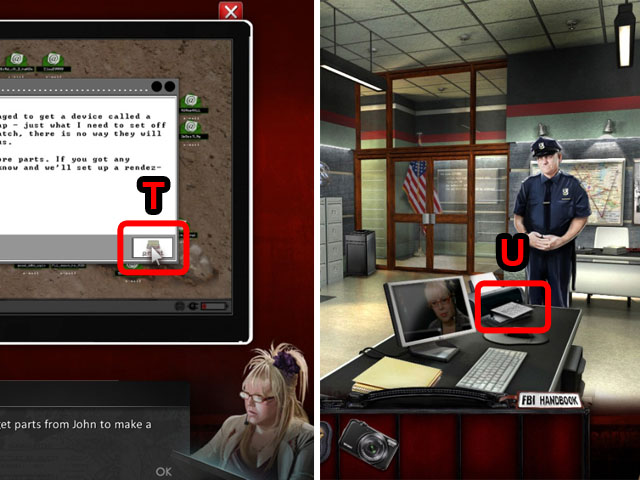 • Read the email and press the PRINT button (T). • Go back to
the main room and take the EMAIL from the printer (U).
• Read the email and press the PRINT button (T). • Go back to
the main room and take the EMAIL from the printer (U).
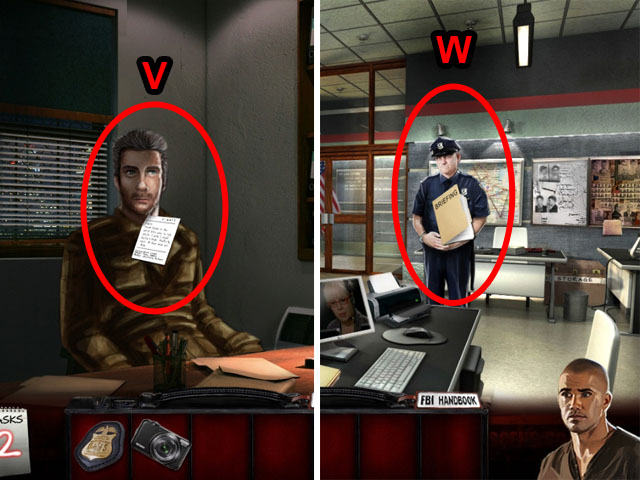 • Return to the interrogation room and use the EMAIL on the
leader (V). • Once finished, give the BRIEFING INFO to the
police officer (W) and go outside to the left.
• Return to the interrogation room and use the EMAIL on the
leader (V). • Once finished, give the BRIEFING INFO to the
police officer (W) and go outside to the left.
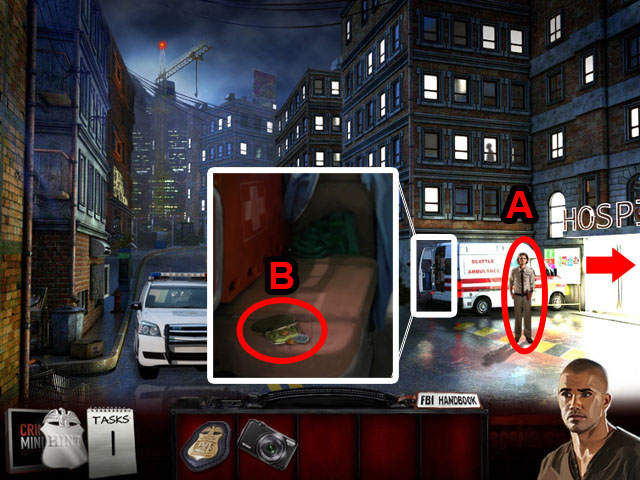 • Talk to Reid and you will switch characters to him (A). •
Zoom in on the back of the ambulance (B) and take the QUARTER.
• Talk to Reid and you will switch characters to him (A). •
Zoom in on the back of the ambulance (B) and take the QUARTER.
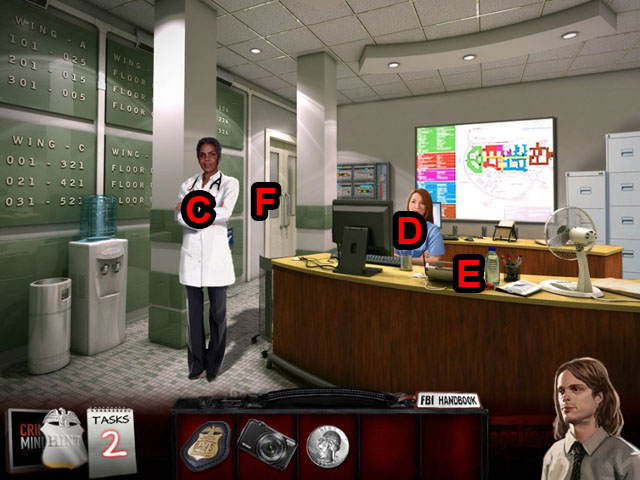 • Talk to the CHIEF OF STAFF (C) and the NURSE (D). • Inspect
the patient sign in (E) and the door in the back (F) you will
need a passkey.
• Talk to the CHIEF OF STAFF (C) and the NURSE (D). • Inspect
the patient sign in (E) and the door in the back (F) you will
need a passkey.
 • Exit the hospital and go down the street. • Zoom in on the
bush outside the saloon (G) to enter a Hidden Object Scene.
• Exit the hospital and go down the street. • Zoom in on the
bush outside the saloon (G) to enter a Hidden Object Scene.
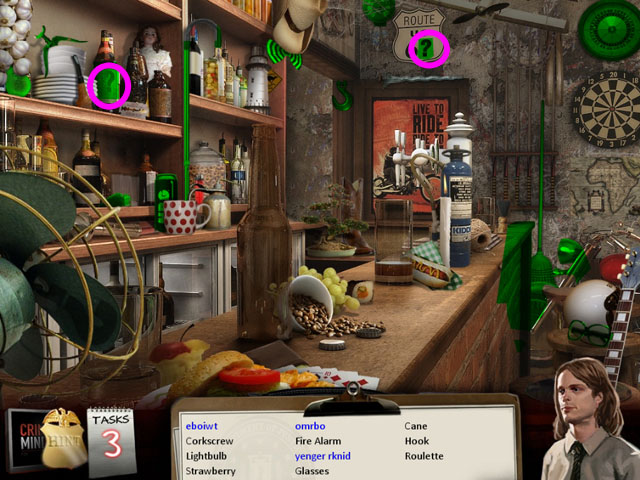
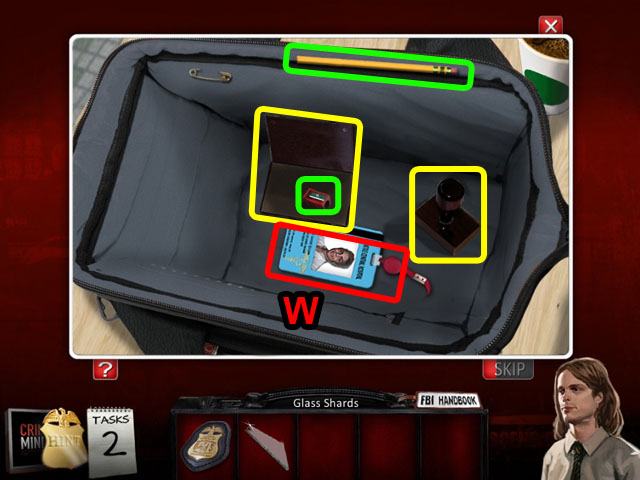
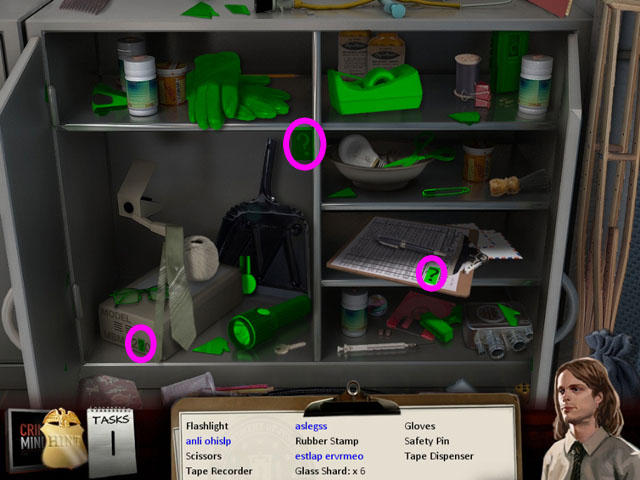
 • Find all of the hidden objects and the 3 question marks in
purple to unscramble the object names. • Open the lunchbox to
find the glass shard. • Once you have finished you will
receive the GLASS SHARDS.
• Find all of the hidden objects and the 3 question marks in
purple to unscramble the object names. • Open the lunchbox to
find the glass shard. • Once you have finished you will
receive the GLASS SHARDS.
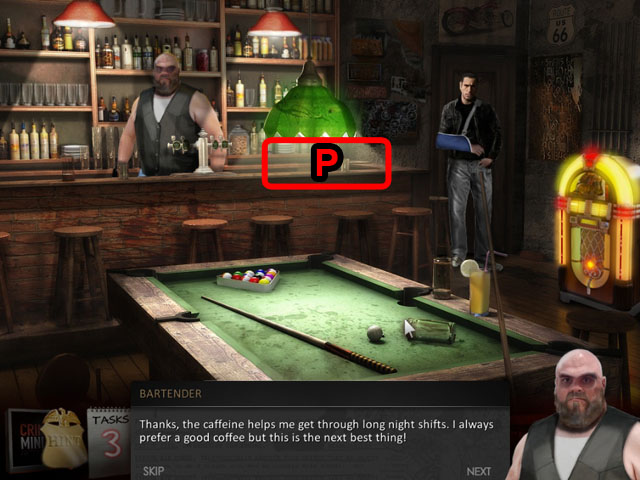
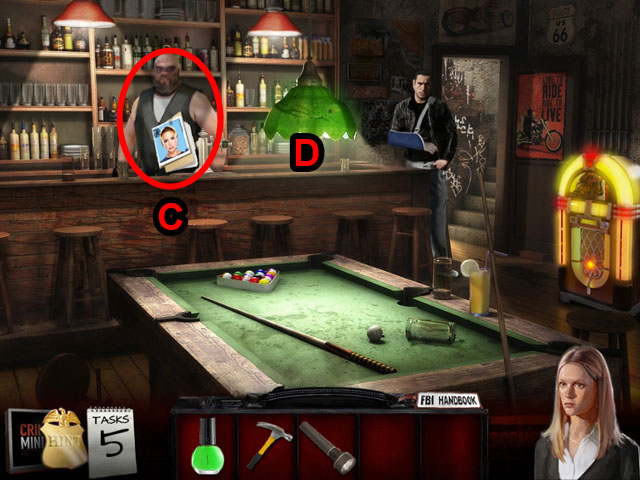
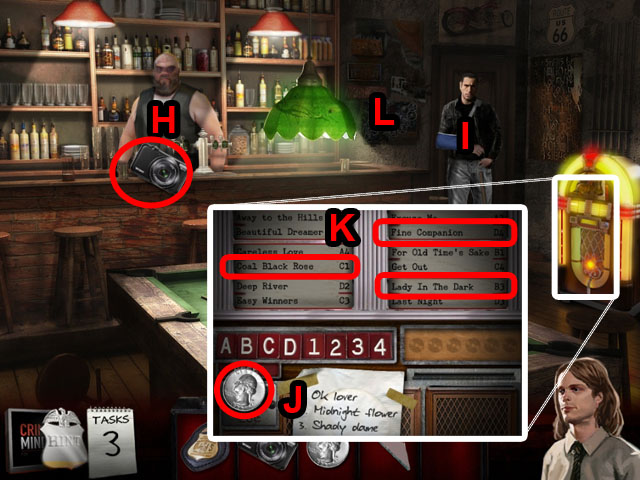 • Enter the saloon and zoom in on the jukebox. • Use the
QUARTER on the jukebox (J) and then input the correct sequence
to get a ticket. • The hint for the correct songs is written
on the paper at the bottom. All the names are changed into
related words. • The solution is D4C1B3, type it with the
number/letter buttons (K) and then take the CODE PAPER. • Talk
to the bartender and use the camera to get a PICTURE (H). •
Talk to the man in the corner (I) and inspect the wall (L).
• Enter the saloon and zoom in on the jukebox. • Use the
QUARTER on the jukebox (J) and then input the correct sequence
to get a ticket. • The hint for the correct songs is written
on the paper at the bottom. All the names are changed into
related words. • The solution is D4C1B3, type it with the
number/letter buttons (K) and then take the CODE PAPER. • Talk
to the bartender and use the camera to get a PICTURE (H). •
Talk to the man in the corner (I) and inspect the wall (L).
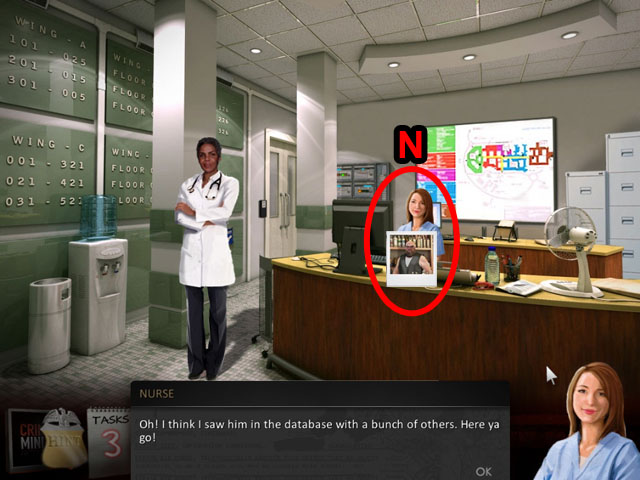 • Return to the hospital and give them the BARTENDER PICTURE
(N). • They will give you SURVEILLANCE PICTURES.
• Return to the hospital and give them the BARTENDER PICTURE
(N). • They will give you SURVEILLANCE PICTURES.
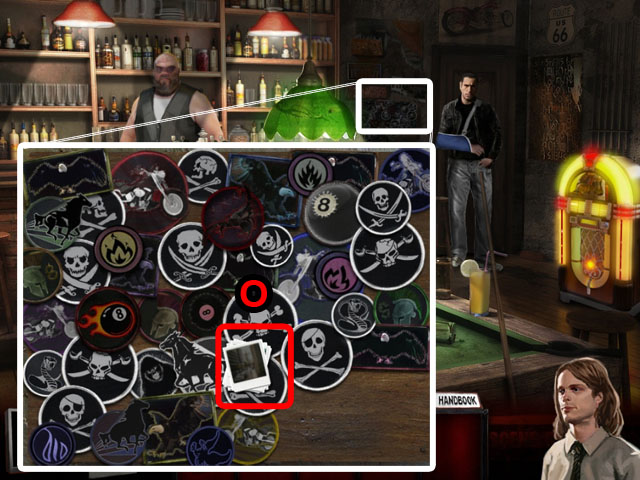 • Return to the saloon and use the SURVEILLANCE PICTURES on
the wall (O).
• Return to the saloon and use the SURVEILLANCE PICTURES on
the wall (O).
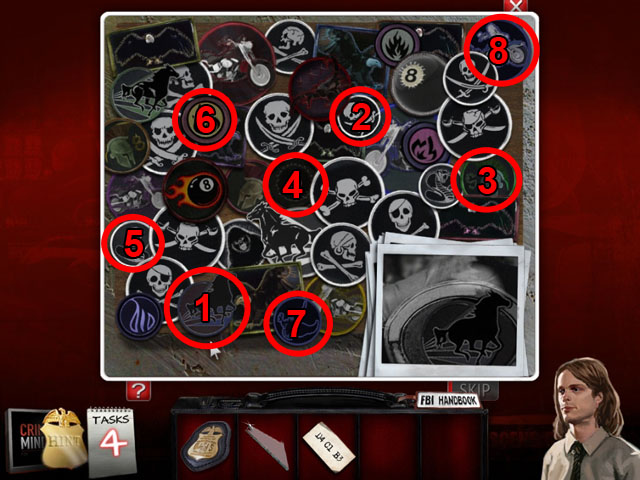 • Find the patches from the pictures in order. Each picture
will show one of the patches in this scene; find it to move to
the next one. • See the screenshot for the positions and the
correct order (1-8).
• Find the patches from the pictures in order. Each picture
will show one of the patches in this scene; find it to move to
the next one. • See the screenshot for the positions and the
correct order (1-8).
 • Inspect the Hidden Object Scene on the bar (P).
 • Find all of the hidden objects and the 2 question marks in
purple to unscramble the object names. • Once you have
finished you will receive the NRG DRINK.
• Find all of the hidden objects and the 2 question marks in
purple to unscramble the object names. • Once you have
finished you will receive the NRG DRINK.
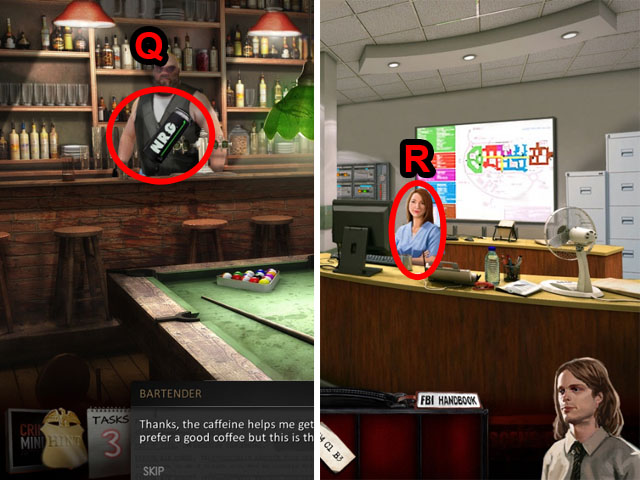 • Give the NRG DRINK to the bartender (Q) and then go talk to
the nurse (R).
• Give the NRG DRINK to the bartender (Q) and then go talk to
the nurse (R).
 • Outside the saloon, zoom in on the bike and use the CODE
PAPER on it (S). • Put in the code from the paper and press
the buttons until they match, then take the MEDICINE BAG (T).
• Outside the saloon, zoom in on the bike and use the CODE
PAPER on it (S). • Put in the code from the paper and press
the buttons until they match, then take the MEDICINE BAG (T).
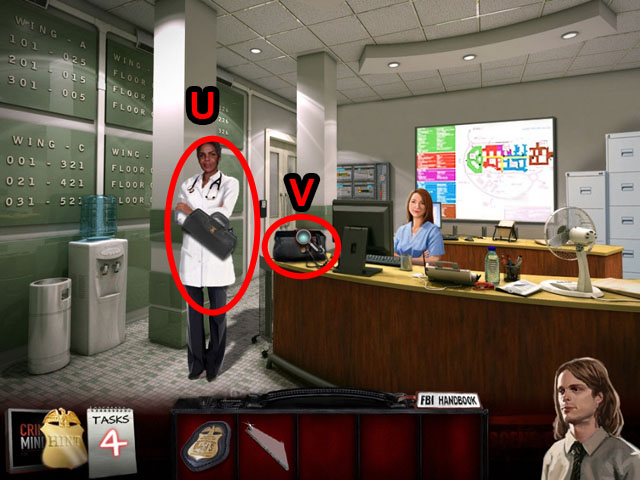 • Give the MEDICINE BAG to the chief of staff (U) in the
hospital and then inspect it further (V).
• Give the MEDICINE BAG to the chief of staff (U) in the
hospital and then inspect it further (V).
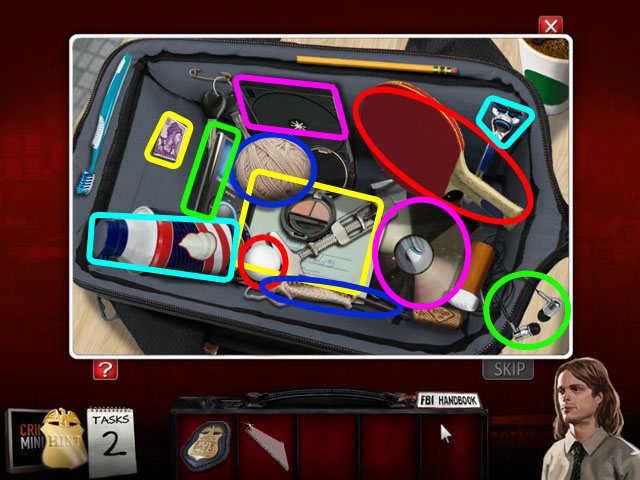
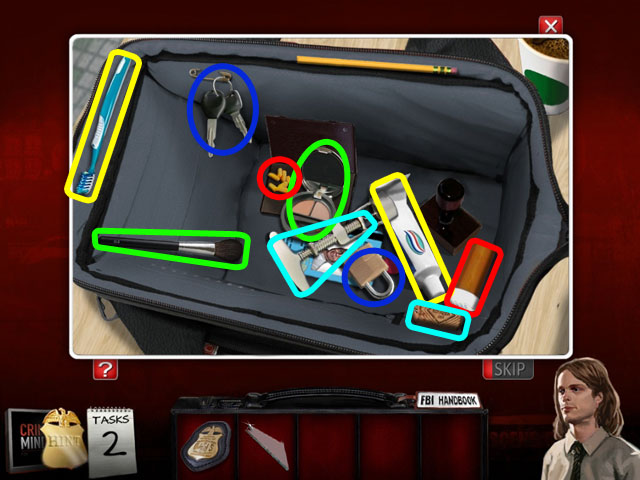
 • Match the objects in the bag to similar objects to remove
them. • In the screenshot the objects that go together are
highlighted in the same colors. • Once you remove the top two
layers only one object will be left – the ID CARD (W).
• Match the objects in the bag to similar objects to remove
them. • In the screenshot the objects that go together are
highlighted in the same colors. • Once you remove the top two
layers only one object will be left – the ID CARD (W).
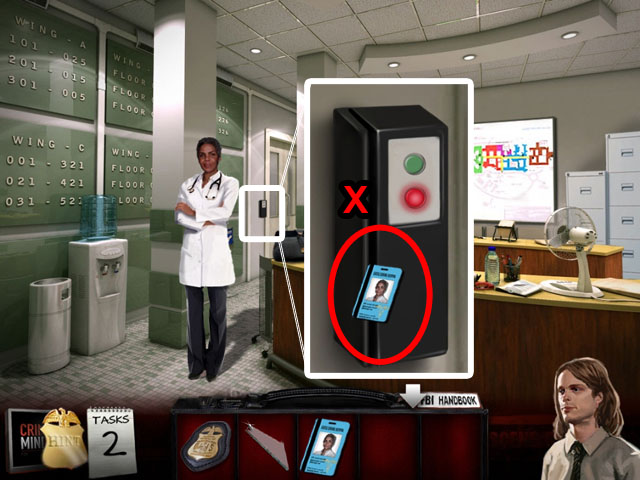 • Use the ID CARD on the door to enter the hallway (X).
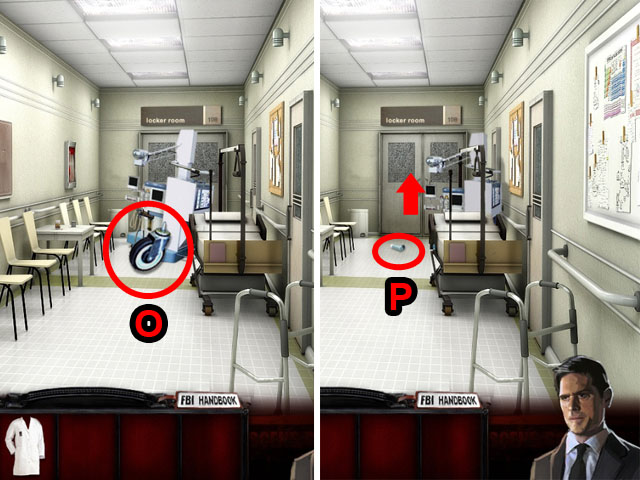
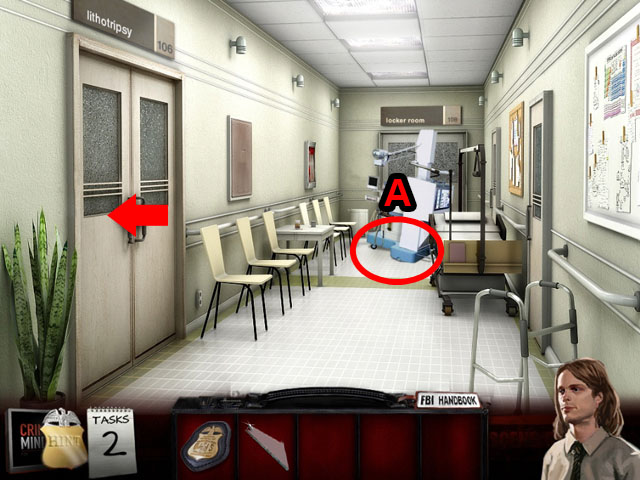 • Inspect the equipment with the broken wheel (A) and then go
to the left to the operating room.
• Inspect the equipment with the broken wheel (A) and then go
to the left to the operating room.
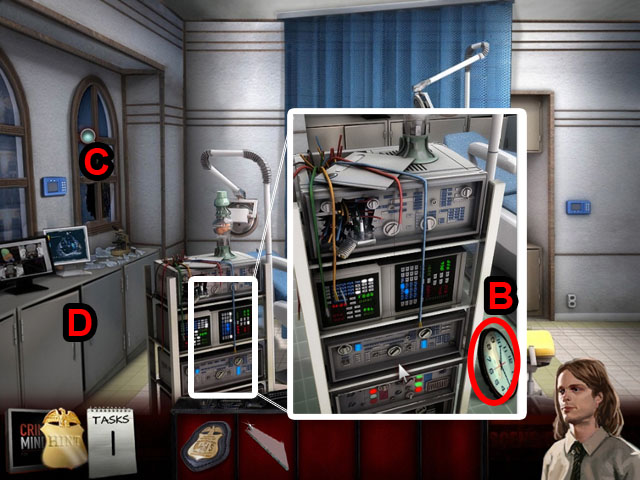 • Zoom in on the machine and take the BROKEN CLOCK (B). • Zoom
in on the broken window; you need more glass shards (C). •
Zoom in on the Hidden Object Scene behind the doors (D).
• Zoom in on the machine and take the BROKEN CLOCK (B). • Zoom
in on the broken window; you need more glass shards (C). •
Zoom in on the Hidden Object Scene behind the doors (D).
 • Find all of the hidden objects and the 3 question marks in
purple to unscramble the object names. • Once you have
finished you will receive the NAIL POLISH and the GLASS
SHARDS.
• Find all of the hidden objects and the 3 question marks in
purple to unscramble the object names. • Once you have
finished you will receive the NAIL POLISH and the GLASS
SHARDS.
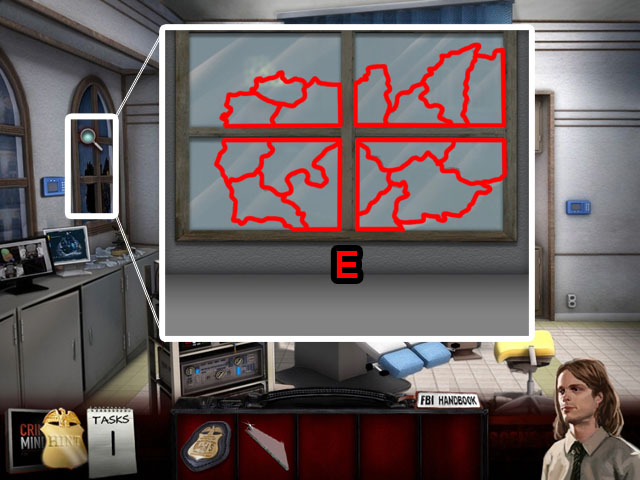 • Zoom in and use the 2 GLASS SHARDS on the window. • Pick up
the pieces from the bottom and use them on the window. • The
pieces do not need to rotate, so start with the edge pieces
first and put them in the correct locations. • See the
screenshot for the final solution (E).
• Zoom in and use the 2 GLASS SHARDS on the window. • Pick up
the pieces from the bottom and use them on the window. • The
pieces do not need to rotate, so start with the edge pieces
first and put them in the correct locations. • See the
screenshot for the final solution (E).
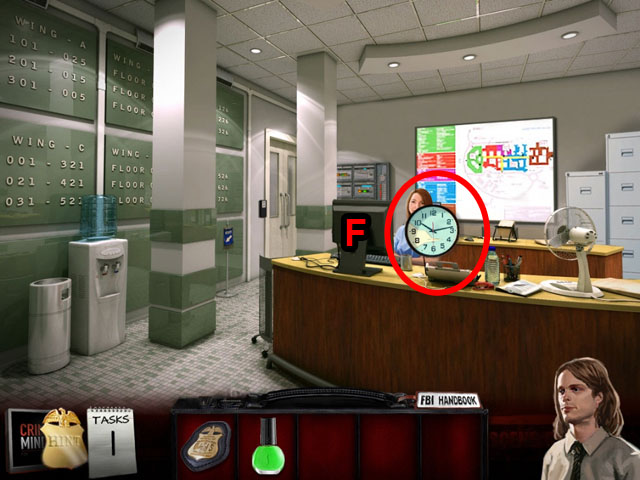 • Return to the nurse and give her the BROKEN CLOCK (F). • You
will receive the RESIDENT'S RECORD.
• Return to the nurse and give her the BROKEN CLOCK (F). • You
will receive the RESIDENT'S RECORD.
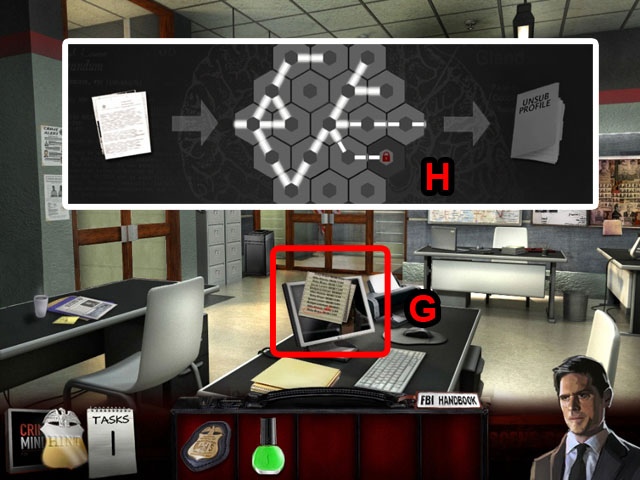 • Return to the police car and use it to go back to the police
station. • Use the RESIDENT'S RECORD on the analyst (G). •
Create unbroken lines out of the hexes to finish this
mini-game. • Press one hex and then another to switch their
places. • The pieces with the locks on them cannot be moved.
If there is a line on a locked piece work outwards from that
hex. • See the screenshot for the final solution (H).
• Return to the police car and use it to go back to the police
station. • Use the RESIDENT'S RECORD on the analyst (G). •
Create unbroken lines out of the hexes to finish this
mini-game. • Press one hex and then another to switch their
places. • The pieces with the locks on them cannot be moved.
If there is a line on a locked piece work outwards from that
hex. • See the screenshot for the final solution (H).
 • Exit the police station to go back to the hospital. • Talk
to the homeless person (I) in the resident coat.
• Exit the police station to go back to the hospital. • Talk
to the homeless person (I) in the resident coat.
 • Travel to the saloon and talk to the man in the back about
his inhaler (J). • Show the homeless person your BADGE and
receive the RESIDENT COAT (K). • Enter the alleyway.
• Travel to the saloon and talk to the man in the back about
his inhaler (J). • Show the homeless person your BADGE and
receive the RESIDENT COAT (K). • Enter the alleyway.
 • Pick up the WHEEL on the ground (L). • Talk to the homeless
person again (N) and then inspect the pile of garbage (M). •
Return to the hospital hallway.
• Pick up the WHEEL on the ground (L). • Talk to the homeless
person again (N) and then inspect the pile of garbage (M). •
Return to the hospital hallway.
 • Use the WHEEL on the broken cart (O) and take the INHALER
once the cart is out of the way (P). • Enter the locker room.
• Use the WHEEL on the broken cart (O) and take the INHALER
once the cart is out of the way (P). • Enter the locker room.
 • Zoom in and inspect the bulletin board (Q). • Zoom in on the
Hidden Object Scene (R).
• Zoom in and inspect the bulletin board (Q). • Zoom in on the
Hidden Object Scene (R).
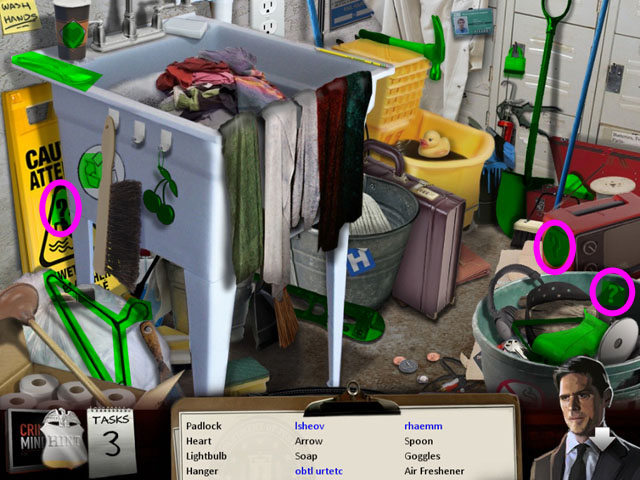 • Find all of the hidden objects and the 3 question marks in
purple to unscramble the object names. • Once you have
finished you will receive the HAMMER and the SHOVEL.
• Find all of the hidden objects and the 3 question marks in
purple to unscramble the object names. • Once you have
finished you will receive the HAMMER and the SHOVEL.
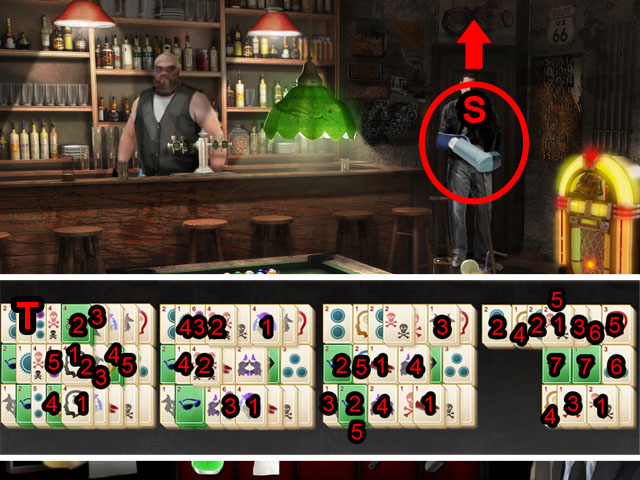 • Return to the saloon and give the INHALER to the man (S). •
Play the game of mahjong to complete the interrogation (T). •
You need to remove all of the green blocks to finish the
mini-game. • You can only match tiles that do not have other
tiles on top of them and have a space either to the left or
the right. • Follow the directions in the screenshot in order
to remove all of the green tiles (1-5, 1-4, 1-5, 1-7). Tiles
with the same number are matches and the order is from top to
the bottom. • After winning the interrogation, move through
the door in the back.
• Return to the saloon and give the INHALER to the man (S). •
Play the game of mahjong to complete the interrogation (T). •
You need to remove all of the green blocks to finish the
mini-game. • You can only match tiles that do not have other
tiles on top of them and have a space either to the left or
the right. • Follow the directions in the screenshot in order
to remove all of the green tiles (1-5, 1-4, 1-5, 1-7). Tiles
with the same number are matches and the order is from top to
the bottom. • After winning the interrogation, move through
the door in the back.
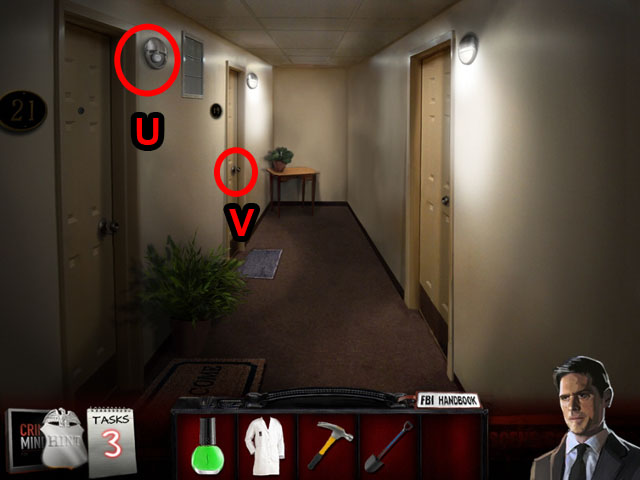 • Inspect the locked door (V) and the broken light (U). • Go
back to the alleyway across from the hospital.
• Inspect the locked door (V) and the broken light (U). • Go
back to the alleyway across from the hospital.
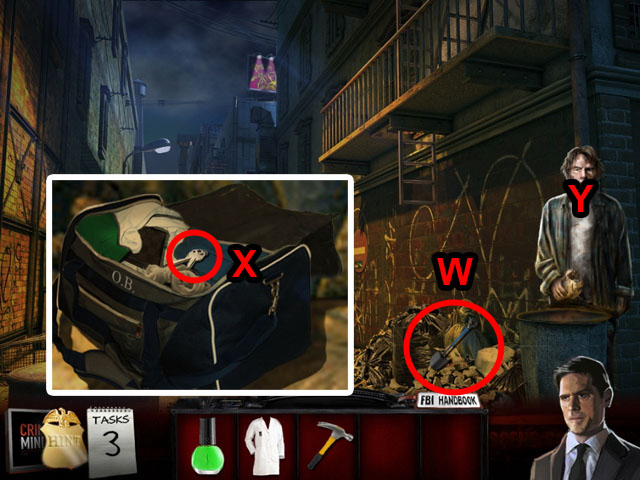 • Use the SHOVEL on the garbage pile (W). • Take the APARTMENT
KEY (X) from the bag after opening it. • Interrogate the
homeless person (Y).
• Use the SHOVEL on the garbage pile (W). • Take the APARTMENT
KEY (X) from the bag after opening it. • Interrogate the
homeless person (Y).
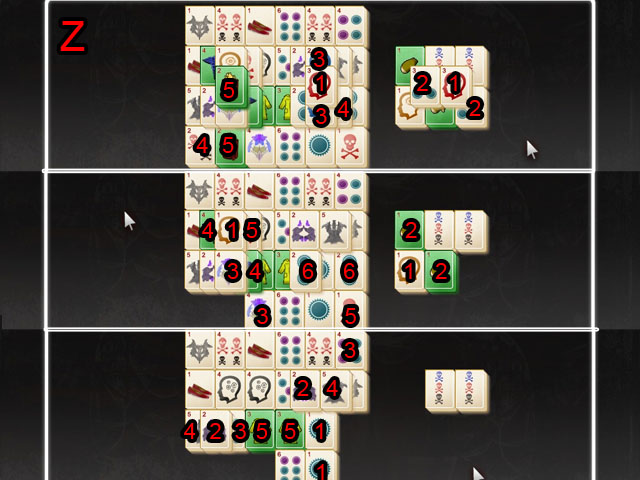 • Play the game of mahjong to complete the interrogation (Z).
• You need to remove all of the green blocks to finish the
mini-game. • You can only match tiles that do not have other
tiles on top of them and have a space either to the left or
the right. • Follow the directions in the screenshot in order
to remove all of the green tiles (1-5, 1-6, 1-5). Tiles with
the same number are matches and the order is from top to the
bottom.
• Play the game of mahjong to complete the interrogation (Z).
• You need to remove all of the green blocks to finish the
mini-game. • You can only match tiles that do not have other
tiles on top of them and have a space either to the left or
the right. • Follow the directions in the screenshot in order
to remove all of the green tiles (1-5, 1-6, 1-5). Tiles with
the same number are matches and the order is from top to the
bottom.
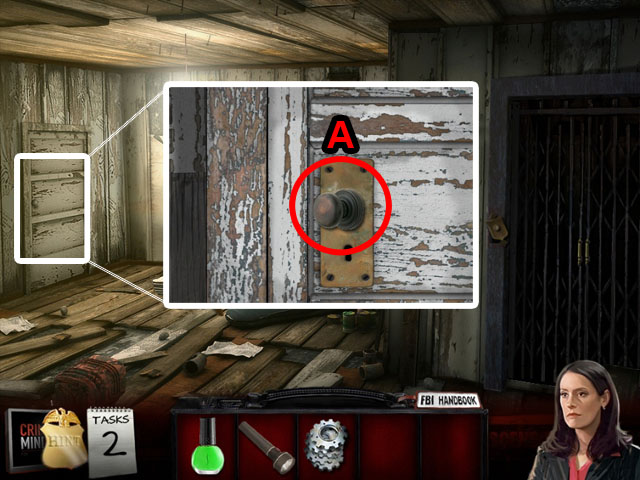
 • Return to the hallway behind the saloon and use the
APARTMENT KEY on the lock (A). • Enter the apartment.
• Return to the hallway behind the saloon and use the
APARTMENT KEY on the lock (A). • Enter the apartment.
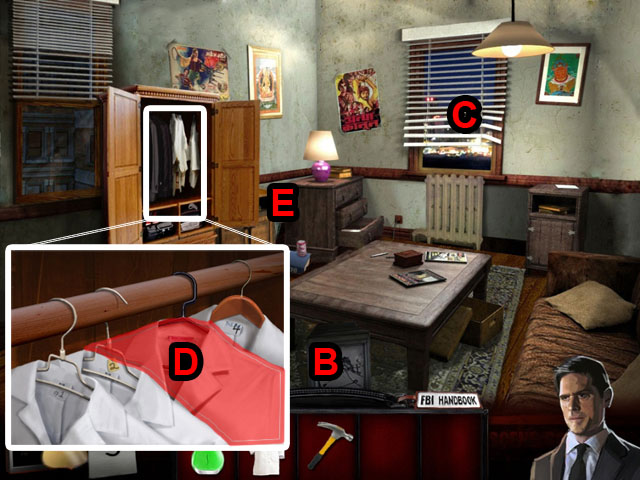 • Inspect the broken TV (B). • Zoom in on the window and
inspect the blood (C). • Zoom in on the bureau and use the
RESIDENT COAT on the hanger (D). • Enter the Hidden Object
Scene in the corner (E).
• Inspect the broken TV (B). • Zoom in on the window and
inspect the blood (C). • Zoom in on the bureau and use the
RESIDENT COAT on the hanger (D). • Enter the Hidden Object
Scene in the corner (E).
 • Find all of the hidden objects and the 3 question marks in
purple to unscramble the object names. • Once you have
finished you will receive the ROPE.
• Find all of the hidden objects and the 3 question marks in
purple to unscramble the object names. • Once you have
finished you will receive the ROPE.
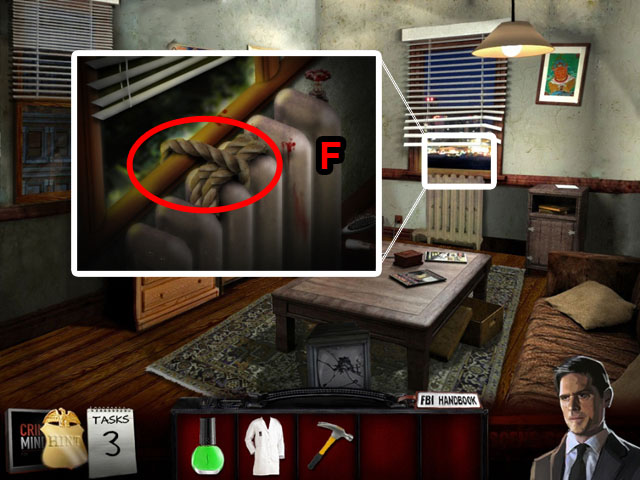 • Use the ROPE on the radiator (F) and then exit through the
window.
• Use the ROPE on the radiator (F) and then exit through the
window.
 • Inspect the power box in the corner (G) and then enter the
Hidden Object Scene (H).
• Inspect the power box in the corner (G) and then enter the
Hidden Object Scene (H).
 • Find all of the hidden objects and the 2 question marks in
purple to unscramble the object names. • Open the dumpster to
find the baseball, crowbar, keys, and light bulb. • Once you
have finished, you will receive the CROWBAR and the
INCANDESCENT LIGHTBULB.
• Find all of the hidden objects and the 2 question marks in
purple to unscramble the object names. • Open the dumpster to
find the baseball, crowbar, keys, and light bulb. • Once you
have finished, you will receive the CROWBAR and the
INCANDESCENT LIGHTBULB.
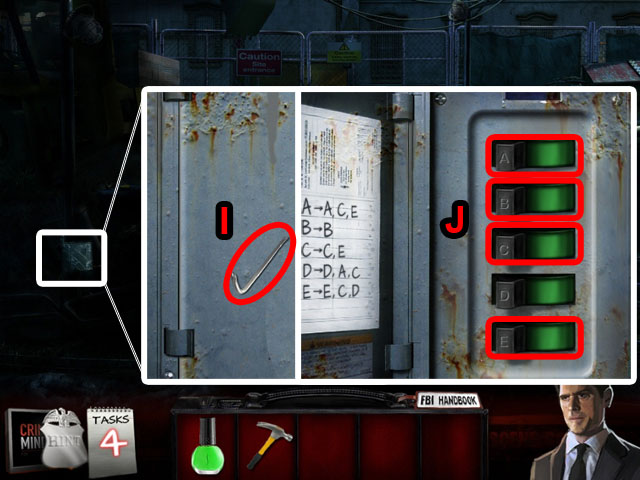 • Use the CROWBAR to open the power box (I). • In this
mini-game you need to flick the circuit breakers in a way that
all of them remain green. • On the left is a code key, which
tells you which breaker switches with the other breakers. •
Use the code key to help you find the correct order. You will
never need to flick a breaker more than once and the order is
not important. • The final solution is A, B, C, E in any order
(J).
• Use the CROWBAR to open the power box (I). • In this
mini-game you need to flick the circuit breakers in a way that
all of them remain green. • On the left is a code key, which
tells you which breaker switches with the other breakers. •
Use the code key to help you find the correct order. You will
never need to flick a breaker more than once and the order is
not important. • The final solution is A, B, C, E in any order
(J).
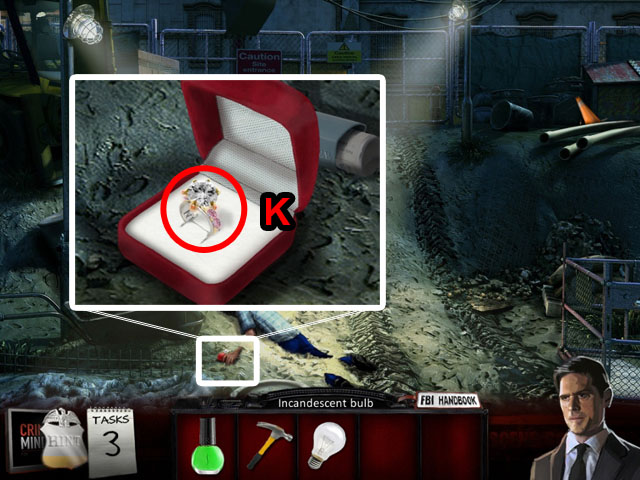 • Zoom in on the hand, open the jewelry box and take the RING
(K).
• Zoom in on the hand, open the jewelry box and take the RING
(K).
 • Give the police officer the RING (L).
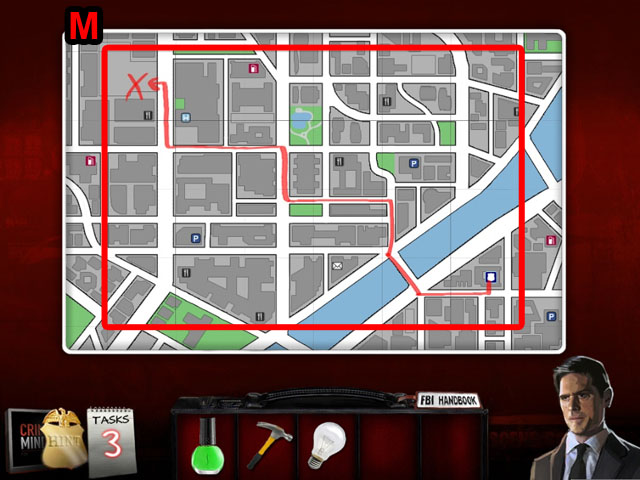 • Press any of the map pieces to rotate them. • Recreate the
correct map by rotating all of the pieces so that they match.
• See the screenshot for the answer (M); once finished, you
will receive the PICTURE OF THE RING. • You will then switch
characters to Rossi.
• Press any of the map pieces to rotate them. • Recreate the
correct map by rotating all of the pieces so that they match.
• See the screenshot for the answer (M); once finished, you
will receive the PICTURE OF THE RING. • You will then switch
characters to Rossi.
 • Exit the police station and return to the saloon. Give the
PICTURE OF THE RING to the brother (N). • Take the ENTRANCE
RECORD from the front desk of the hospital (O).
• Exit the police station and return to the saloon. Give the
PICTURE OF THE RING to the brother (N). • Take the ENTRANCE
RECORD from the front desk of the hospital (O).
 • Show the ENTRANCE RECORD to the brother (P) and then talk to
the bartender. • Enter the hallway.
• Show the ENTRANCE RECORD to the brother (P) and then talk to
the bartender. • Enter the hallway.
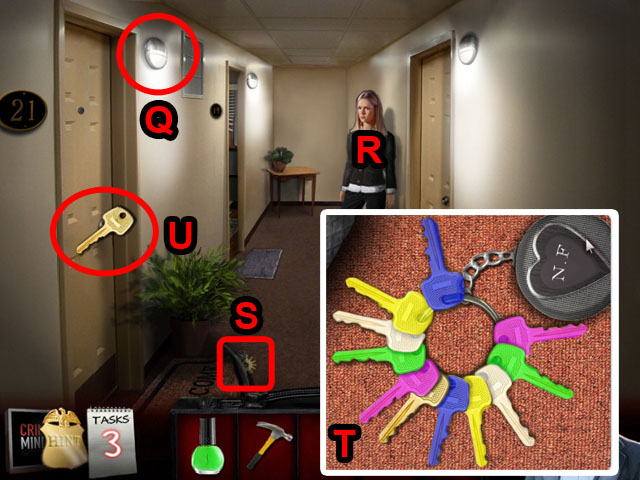 • Talk to the other detective (R). • Use the INCANDESCENT
LIGHTBULB on the fixture to light the hallway (Q). • Lift up
the rug (S) and look at the keys. • Match the keys on the
chain to find the one key that has no match. • See the
screenshot for the answer; the keys that match are the same
color (T). • You will receive the APARTMENT KEY; use it on the
lock (U) and enter the room.
• Talk to the other detective (R). • Use the INCANDESCENT
LIGHTBULB on the fixture to light the hallway (Q). • Lift up
the rug (S) and look at the keys. • Match the keys on the
chain to find the one key that has no match. • See the
screenshot for the answer; the keys that match are the same
color (T). • You will receive the APARTMENT KEY; use it on the
lock (U) and enter the room.
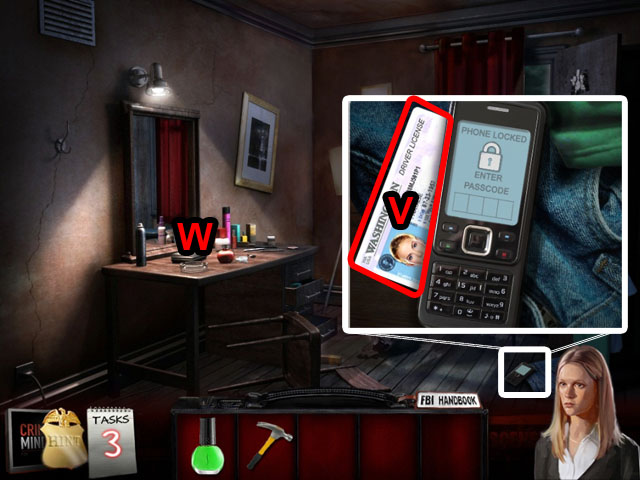 • Zoom in on the phone and take the DRIVER'S LICENSE (V). •
Start the Hidden Object Scene (W).
• Zoom in on the phone and take the DRIVER'S LICENSE (V). •
Start the Hidden Object Scene (W).
 • Find all of the hidden objects and the 2 question marks in
purple to unscramble the object names. • Once you have
finished you will receive the FLASHLIGHT.
• Find all of the hidden objects and the 2 question marks in
purple to unscramble the object names. • Once you have
finished you will receive the FLASHLIGHT.
 • Return to the police station and use the DRIVER'S LICENSE on
the analyst (A). • Create unbroken lines out of the hexes to
finish this mini-game. • Press one hex and then another to
switch their places. • The pieces with the locks on them
cannot be moved. If there is a line on a locked piece work
outwards from that hex. • See the screenshot for the final
solution (B). • You will receive the WAITRESS PROFILE.
• Return to the police station and use the DRIVER'S LICENSE on
the analyst (A). • Create unbroken lines out of the hexes to
finish this mini-game. • Press one hex and then another to
switch their places. • The pieces with the locks on them
cannot be moved. If there is a line on a locked piece work
outwards from that hex. • See the screenshot for the final
solution (B). • You will receive the WAITRESS PROFILE.
 • Exit the police station and go to the saloon. • Show the
bartender the WAITRESS PROFILE (C). • Zoom in on the Hidden
Object Scene (D).
• Exit the police station and go to the saloon. • Show the
bartender the WAITRESS PROFILE (C). • Zoom in on the Hidden
Object Scene (D).
 • Find all of the hidden objects and the 3 question marks in
purple to unscramble the object names. • Once you have
finished, you will receive the LOCKER COMBINATION.
• Find all of the hidden objects and the 3 question marks in
purple to unscramble the object names. • Once you have
finished, you will receive the LOCKER COMBINATION.
 • Return to the hospital locker room. • Zoom in on the locker
and use the LOCKER COMBINATION on it (E). • Press the buttons
to switch the symbols. Find the symbols that match the words
on the combination; they are written on the bulletin board in
the same room. • Opening the locker will start a Hidden Object
Scene.
• Return to the hospital locker room. • Zoom in on the locker
and use the LOCKER COMBINATION on it (E). • Press the buttons
to switch the symbols. Find the symbols that match the words
on the combination; they are written on the bulletin board in
the same room. • Opening the locker will start a Hidden Object
Scene.
 • Find all of the hidden objects and the 2 question marks in
purple to unscramble the object names. • Once you have
finished you will receive the CELLPHONE PASSWORD.
• Find all of the hidden objects and the 2 question marks in
purple to unscramble the object names. • Once you have
finished you will receive the CELLPHONE PASSWORD.
 • Return to the waitress' apartment room. • Zoom in on the
cellphone and use the CELLPHONE PASSWORD on it (F). • Type in
the numbers 5317 to access it. • Take the CELLPHONE and exit
the apartment to switch detectives.
• Return to the waitress' apartment room. • Zoom in on the
cellphone and use the CELLPHONE PASSWORD on it (F). • Type in
the numbers 5317 to access it. • Take the CELLPHONE and exit
the apartment to switch detectives.
 • Show the CELLPHONE to the analyst at the police station (G).
• Go back to the alleyway.
• Show the CELLPHONE to the analyst at the police station (G).
• Go back to the alleyway.
 • Talk to the homeless man (H) and then enter the Hidden
Object Scene (I).
• Talk to the homeless man (H) and then enter the Hidden
Object Scene (I).
 • Find all of the hidden objects and the 3 question marks in
purple to unscramble the object names. • Once you have
finished, you will receive the SMALL GEARS and the HOOKED
POLE.
• Find all of the hidden objects and the 3 question marks in
purple to unscramble the object names. • Once you have
finished, you will receive the SMALL GEARS and the HOOKED
POLE.
 • Use the HOOKED POLE to get the fire escape (J) and then
travel up.
• Use the HOOKED POLE to get the fire escape (J) and then
travel up.
 • Inspect the boarded up window and use the HAMMER to take the
boards off (K). • Enter the building.
• Inspect the boarded up window and use the HAMMER to take the
boards off (K). • Enter the building.
 • Inspect the door to find it without a handle (L). • Inspect
the controls to the door on the right (M); it is missing some
gears. • Zoom in on the camera and read the letter (N). • Take
the LARGE GEARS (O). • Enter the Hidden Object Scene (P).
• Inspect the door to find it without a handle (L). • Inspect
the controls to the door on the right (M); it is missing some
gears. • Zoom in on the camera and read the letter (N). • Take
the LARGE GEARS (O). • Enter the Hidden Object Scene (P).
 • Find all of the hidden objects and the 2 question marks in
purple to unscramble the object names. • Once you have
finished you will receive the COLORED WIRES.
• Find all of the hidden objects and the 2 question marks in
purple to unscramble the object names. • Once you have
finished you will receive the COLORED WIRES.
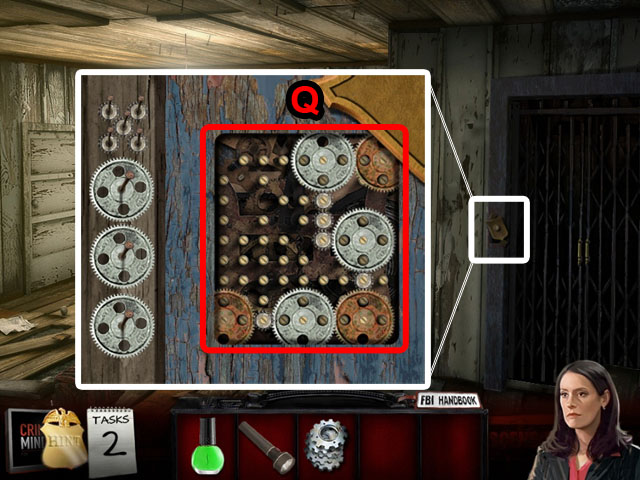 • Zoom in on the panel and place the SMALL and LARGE GEARS
(Q). • The gears will be placed off to the left. Pick them up
and drag them to positions on the grid. • You can only place a
gear where there is a screw in the panel. • Once the gears are
touching, they will spin together. Get all of the gears to
spin to finish the mini-game.
• Zoom in on the panel and place the SMALL and LARGE GEARS
(Q). • The gears will be placed off to the left. Pick them up
and drag them to positions on the grid. • You can only place a
gear where there is a screw in the panel. • Once the gears are
touching, they will spin together. Get all of the gears to
spin to finish the mini-game.
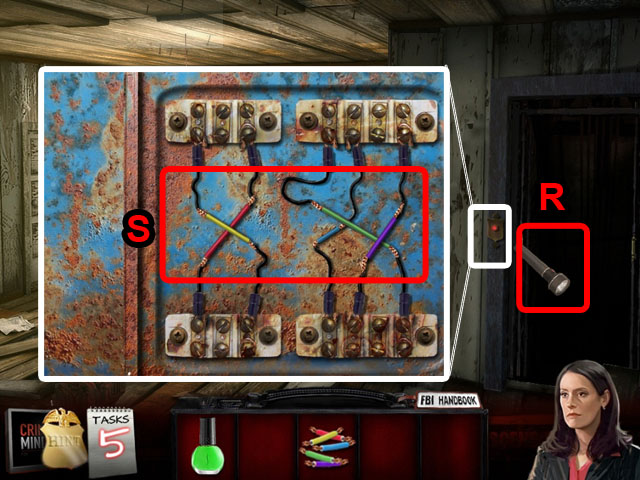 • Use the FLASHLIGHT on the dark elevator shaft (R) and then
use the wires. • Pick up the wires and place them in the
correct position to power the elevator. • Press once to pick
up and once to place. Press the wire twice to rotate it. • All
of the wires only fit perfectly into one position. See the
screenshot for the solution (S).
• Use the FLASHLIGHT on the dark elevator shaft (R) and then
use the wires. • Pick up the wires and place them in the
correct position to power the elevator. • Press once to pick
up and once to place. Press the wire twice to rotate it. • All
of the wires only fit perfectly into one position. See the
screenshot for the solution (S).
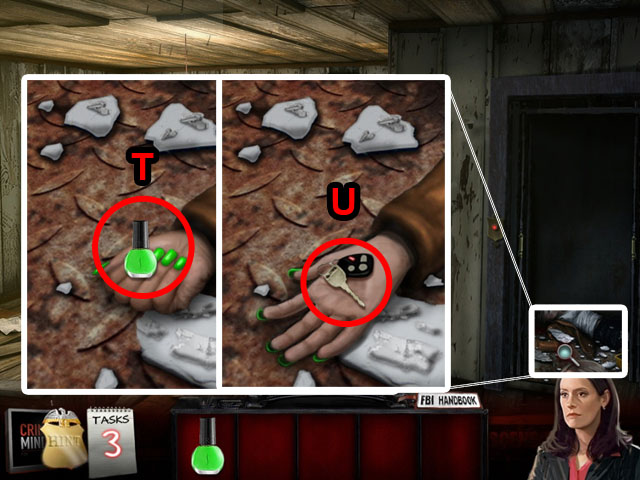 • Inspect the dead body and use the NAIL POLISH on her
fingernails (T). • Take the CAR KEYS (U) after her hand opens
up.
• Inspect the dead body and use the NAIL POLISH on her
fingernails (T). • Take the CAR KEYS (U) after her hand opens
up.
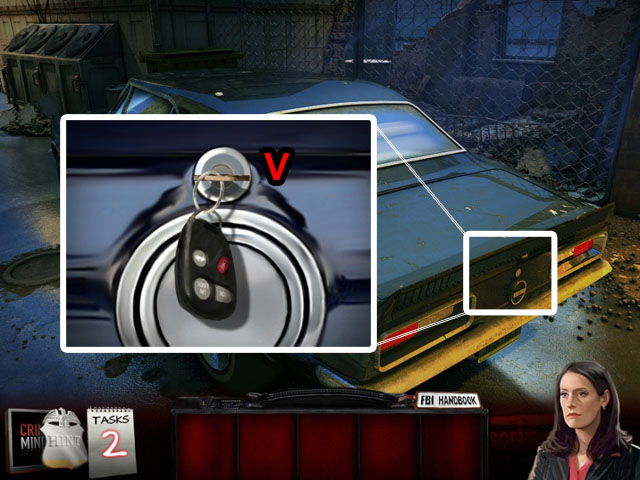 • Exit the abandoned building and go back down to the
alleyway. • Walk towards the old car. • Zoom in on the car
trunk and use the CAR KEYS to open it (V). • Enter the Hidden
Object Scene.
• Exit the abandoned building and go back down to the
alleyway. • Walk towards the old car. • Zoom in on the car
trunk and use the CAR KEYS to open it (V). • Enter the Hidden
Object Scene.
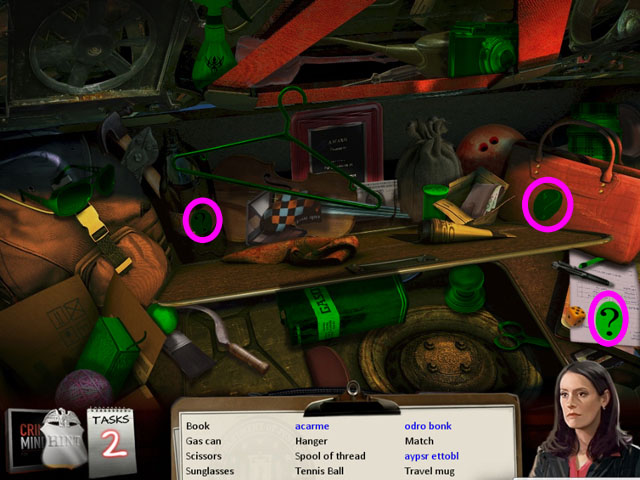 • Find all of the hidden objects and the 3 question marks in
purple to unscramble the object names. • Once you have
finished you will receive the DOOR HANDLE.
• Find all of the hidden objects and the 3 question marks in
purple to unscramble the object names. • Once you have
finished you will receive the DOOR HANDLE.
 • Return to the abandoned apartment and use the DOOR HANDLE to
open the door (A). • Take the COFFEE BEANS.
• Return to the abandoned apartment and use the DOOR HANDLE to
open the door (A). • Take the COFFEE BEANS.
 • Return to the police station. • Show the COFFEE BEANS to the
analyst (B).
• Return to the police station. • Show the COFFEE BEANS to the
analyst (B).
 • Create unbroken lines out of the hexes to finish this
mini-game. • Press one hex and then another to switch their
places. • The pieces with the locks on them cannot be moved.
If there is a line on a locked piece work outwards from that
hex. • See the screenshot for the final solution (C). • You
will receive the ERROL CASH PROFILE.
• Create unbroken lines out of the hexes to finish this
mini-game. • Press one hex and then another to switch their
places. • The pieces with the locks on them cannot be moved.
If there is a line on a locked piece work outwards from that
hex. • See the screenshot for the final solution (C). • You
will receive the ERROL CASH PROFILE.
 • You will automatically go to the saloon and switch
detectives. • Pick up the NOTE (D) and talk to the brother
(E).
• You will automatically go to the saloon and switch
detectives. • Pick up the NOTE (D) and talk to the brother
(E).
 • Exit the saloon and give the NOTE to the police officer (F).
• Return to the interrogation room and show the ERROL CASH
PROFILE to the militia leader (G). • Exit the room.
• Exit the saloon and give the NOTE to the police officer (F).
• Return to the interrogation room and show the ERROL CASH
PROFILE to the militia leader (G). • Exit the room.
 • Inspect the backpack to find a Hidden Object Scene (H).
 • Find all of the hidden objects and the 3 question marks in
purple to unscramble the object names. • Once you have
finished you will receive a CELLPHONE.
• Find all of the hidden objects and the 3 question marks in
purple to unscramble the object names. • Once you have
finished you will receive a CELLPHONE.
 • Show the CELLPHONE to the militia leader (I). • Then take it
to the analyst in the main room (J).
• Show the CELLPHONE to the militia leader (I). • Then take it
to the analyst in the main room (J).
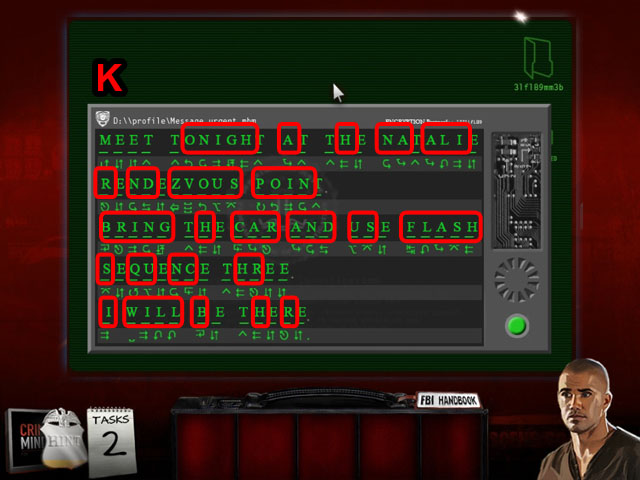 • Decipher the code in this mini-game to read the message. •
Press any of the symbols under the blanks to assign a letter
to it. You can only assign one letter to each symbol and the
already used letters are highlighted in green. • The game will
tell you if you get it wrong or right, so you can experiment
to find the right letter. • See the screenshot for the correct
decipherment (K).
• Decipher the code in this mini-game to read the message. •
Press any of the symbols under the blanks to assign a letter
to it. You can only assign one letter to each symbol and the
already used letters are highlighted in green. • The game will
tell you if you get it wrong or right, so you can experiment
to find the right letter. • See the screenshot for the correct
decipherment (K).
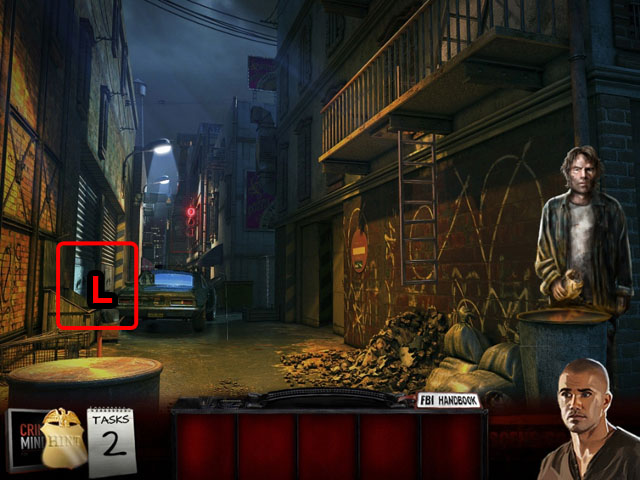 • Talk to the militia leader and then exit the police station
to go to the alleyway. • Enter the dumpster Hidden Object
Scene to the left of the car (L).
• Talk to the militia leader and then exit the police station
to go to the alleyway. • Enter the dumpster Hidden Object
Scene to the left of the car (L).
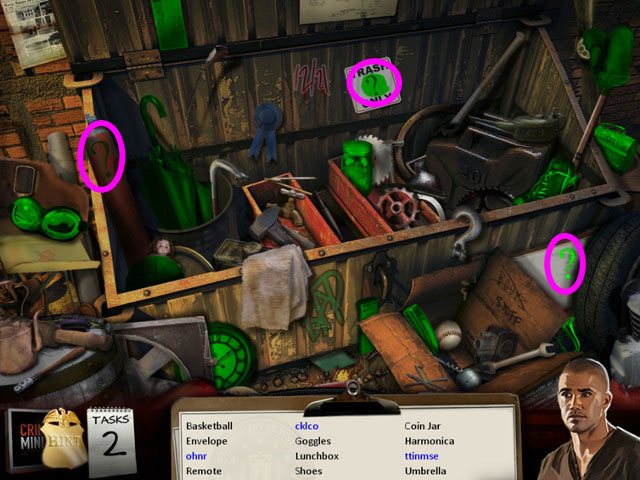 • Find all of the hidden objects and the 3 question marks in
purple to unscramble the object names. • Once you have
finished you will receive the MITTENS.
• Find all of the hidden objects and the 3 question marks in
purple to unscramble the object names. • Once you have
finished you will receive the MITTENS.
 • Give the MITTENS to the homeless man (M) and he will give
you the SEQUENCE 3 SCRAP. • Walk toward the car.
• Give the MITTENS to the homeless man (M) and he will give
you the SEQUENCE 3 SCRAP. • Walk toward the car.
 • Enter the driver's seat (N) and inspect the radio (O).
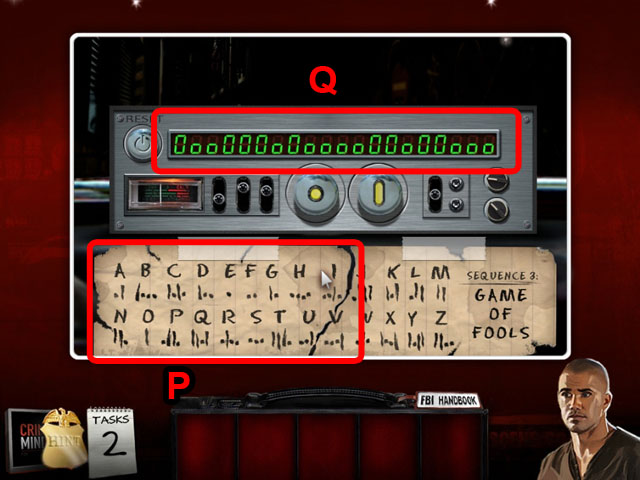 • Use the SEQUENCE 3 SCRAP on the missing piece (P). • Spell
out the words “game of fools” in the secret code with the 2
yellow buttons (Q). • You can reset if you make a mistake with
the button on the left.
• Use the SEQUENCE 3 SCRAP on the missing piece (P). • Spell
out the words “game of fools” in the secret code with the 2
yellow buttons (Q). • You can reset if you make a mistake with
the button on the left.
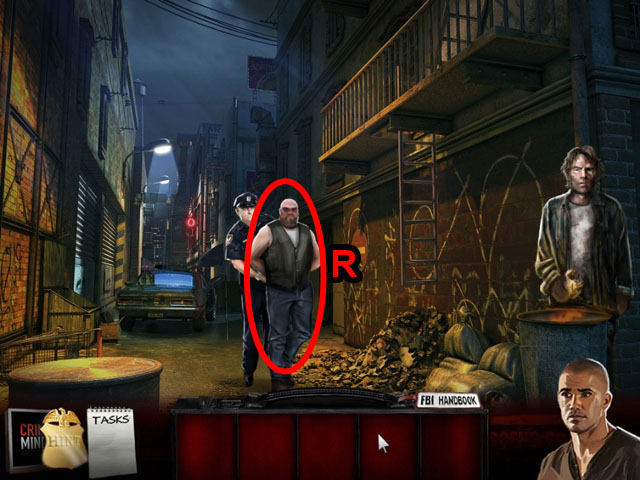 • Interrogate Errol once he comes out (R).
 • Play the game of mahjong to complete the interrogation (X).
• You need to remove all of the green blocks to finish the
mini-game. • You can only match tiles that do not have other
tiles on top of them and have a space either to the left or
the right. • Follow the directions in the screenshot in order
to remove all of the green tiles (1-6, 1-5, 1-5, 1-7, 1-8,
1-10). Tiles with the same number are matches and the order is
from top to the bottom, left to right.
• Play the game of mahjong to complete the interrogation (X).
• You need to remove all of the green blocks to finish the
mini-game. • You can only match tiles that do not have other
tiles on top of them and have a space either to the left or
the right. • Follow the directions in the screenshot in order
to remove all of the green tiles (1-6, 1-5, 1-5, 1-7, 1-8,
1-10). Tiles with the same number are matches and the order is
from top to the bottom, left to right.
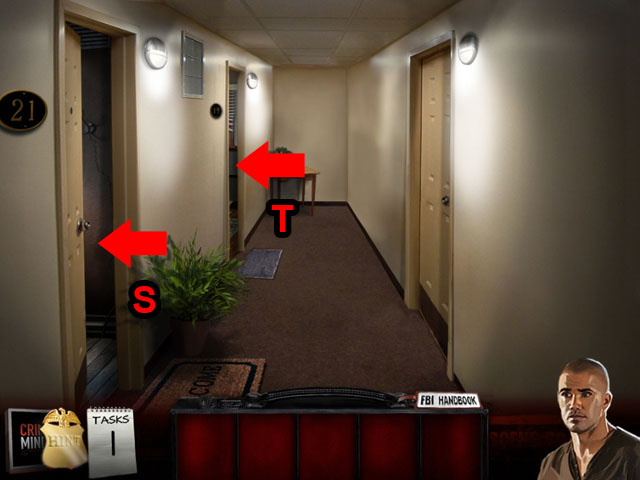 • Errol will now be following you as you walk around the
world, telling you if you are getting closer to the bomb. •
Enter the hallway behind the saloon. • Go into the first door
(S) and then go into the second door (T). • Jump out the back
window.
• Errol will now be following you as you walk around the
world, telling you if you are getting closer to the bomb. •
Enter the hallway behind the saloon. • Go into the first door
(S) and then go into the second door (T). • Jump out the back
window.
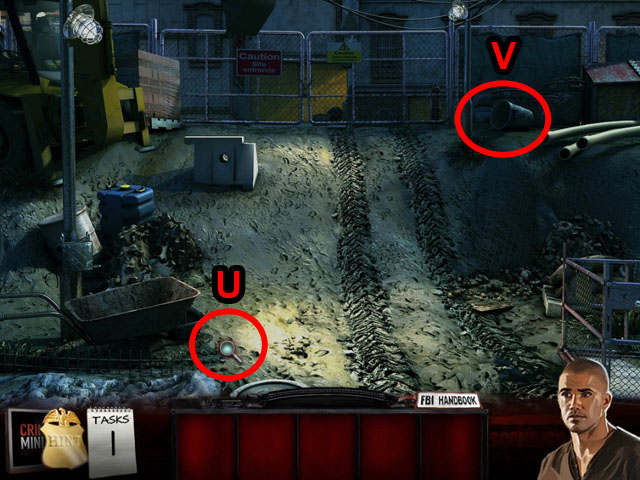 • Inspect the ground (U) and then enter the Hidden Object
Scene (V).
• Inspect the ground (U) and then enter the Hidden Object
Scene (V).
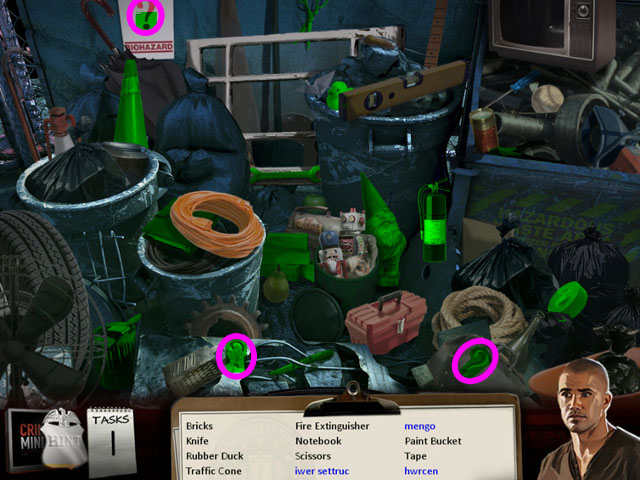 • Find all of the hidden objects and the 3 question marks in
purple to unscramble the object names. • Once you have
finished you will receive a WRENCH and some WIRES.
• Find all of the hidden objects and the 3 question marks in
purple to unscramble the object names. • Once you have
finished you will receive a WRENCH and some WIRES.
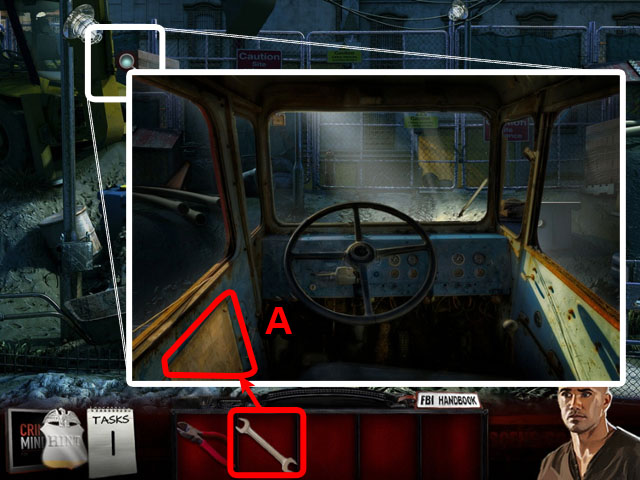 • Zoom in on the crane and inspect the panel (A). • Use the
WRENCH to take out the bolts.
• Zoom in on the crane and inspect the panel (A). • Use the
WRENCH to take out the bolts.
 • Press any of the bomb pieces to rotate them. • Finish the
puzzle by rotating all of the pieces so that they match. • See
the screenshot for the answer (B).
• Press any of the bomb pieces to rotate them. • Finish the
puzzle by rotating all of the pieces so that they match. • See
the screenshot for the answer (B).
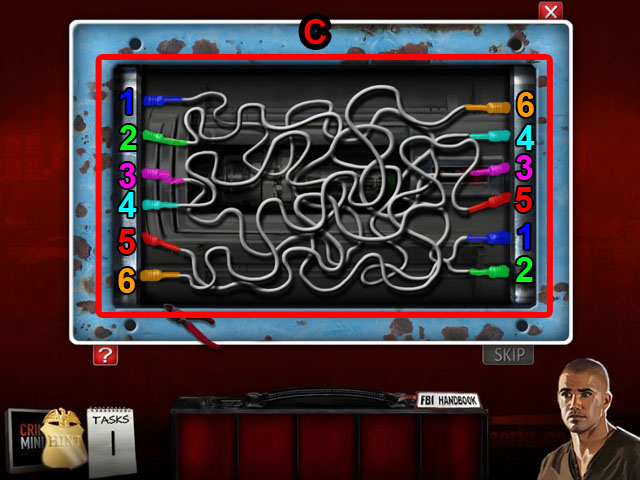 • Use the WIRE CUTTERS on the wires to start the puzzle (C). •
Cut the wire on the left side with the WIRE CUTTERS and then
cut the other side of the same wire on the right side. Repeat
the steps 6 times to diffuse the bomb. • See the screenshot
for the correct matches. • Congratulations! You finished
Criminal Minds!
• Use the WIRE CUTTERS on the wires to start the puzzle (C). •
Cut the wire on the left side with the WIRE CUTTERS and then
cut the other side of the same wire on the right side. Repeat
the steps 6 times to diffuse the bomb. • See the screenshot
for the correct matches. • Congratulations! You finished
Criminal Minds!
Created at: 2012-04-21