
WALKTHROUGH MENU
- General Tips
- Hotspots
- Coins and Upgrades
- The Pharaoh’s Mask
- World 1
- World 2
- World 3
- World 4
- World 5
- World 6
- World 7
- World 8
- World 9
GENERAL TIPS
- Upon startup, you can create your unique profile by clicking on Change Player button. There you can create new profiles in addition to your initial one as well as remove unneeded profiles.
- If you’re new to this type of game, or a seasoned veteran, you can turn the auto-hint and tutorial features on and off in the Options menu.
- Levels are broken up into a variety of gameplay types. Some are Hidden Objects screens. Some are Spot the Difference while others are Mirror images.
- You can tackle the list of levels in any world of the game in any order you choose. You will, however, need to complete each level to 100% before moving onto a new world.
- At the end of each world, you will encounter a puzzle that will use various items you’ve recovered throughout the levels of that world. Completing the puzzle is the key to moving on to the next world.
- You will find that certain levels can not be completed to 100% the first time through. Keep an eye out for items in later levels that can be used in prior levels to get you to 100%.
- Left click anywhere on the screen to get rid of an inventory item you have selected by accident.
- Occasionally, you will see Wipi appear on the edges of your screen. If you click on him before he gets away, you’ll be rewarded with an additional hint.
HOTSPOTS
- Hot spots are areas in each level in which you can interact with by either taking an item for later use or adding an item you’ve discovered elsewhere.
- You’ll know these spots when you see them, because a lock icon will appear as a part of your cursor, and description of the spot will appear at the bottom of the screen.
- Some hotspots will have to be returned to again after your first visit to a level, because an item needed will have to be discovered elsewhere.
COINS AND UPGRADES
- In each level, you’ll come across coins that can be taken. Each level will require you to find all these coins in order to complete the level to 100%.
- These coins can be used to buy helpful items to make your search easier by visiting the shop.
- In the shop you can see how much each item costs, and can get a description of the item’s function by highlighting it with your cursor.
- Some items can be purchased more than once.
THE PHARAOH’S MASK
- Within the levels in each world, you will come across pieces of Pharaoh’s ceremonials mask.
- The pieces of Pharaoh’s mask count towards a level’s requirements, but not all levels have mask pieces.
- Each world’s mask must be completed in order to unlock the final puzzle for each world in order to move on to the next.
WORLD 1: CAIRO
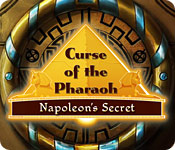
FREESTANDING DOOR 1
- Pick up the Pharaoh mask piece hidden beneath the table at the bottom of the screen.
- Pick up and use the tent pole to brace the tent in the middle of the screen.
- Look for the rest of the differences in the scene, as well as the coins.
- Small stone disc is towards lower left side of the picture.
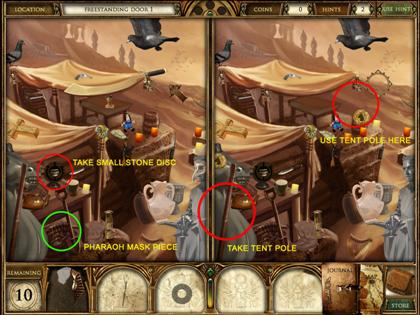
FREESTANDING DOOR 2
- Take the chipped column piece and replace it in the standing column on the left side of the screen.
- Pick up the small liquid vial for use later in the Cairo world puzzle.
- Recover the Pharaoh mask piece on the right side of the screen.
- Continue to find the hidden objects on the list as well as the coins.
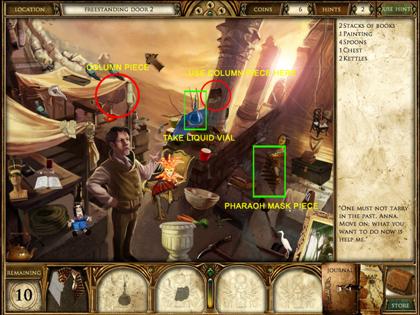
ANCIENT DIG SITE
- Pick up the piece of the Pharaoh’s mask in the top left corner.
- Take the piece of the wall from the bottom left corner and place it in its original place in the wall on the right side of the screen.
- Continue to spot the differences between the two scenes, and find the coins.
ANTECHAMBER
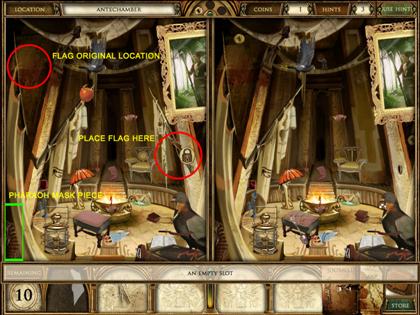
- Pick up the flag from the top left of the screen and place it in the flag stand opposite the other flag.
- Take the Pharaoh’s mask piece from the bottom left corner of the screen.
- Look for the rest of the differences in the scene, as well as the coins.
DIG SITE 2
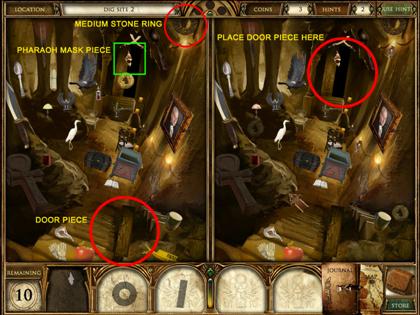
- Pick up the medium stone ring at the top of the screen for later use in the Cairo world puzzle.
- Take the door piece at the bottom of the image, and place it in the doorway at the back of the screen.
- Take the Pharaoh mask piece at the top of the screen.
- Continue to spot the differences on the screen, and recover the coins.
HIDDEN ROOM
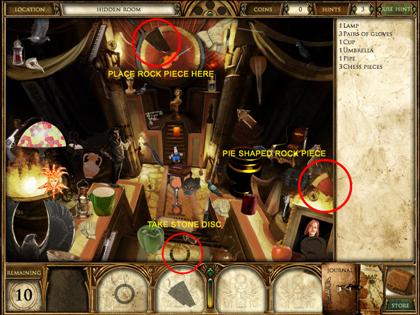
- Pick up the pie shaped rock piece from the right side of the screen, and return to its spot at the top of the screen.
- Continue to find the hidden objects here, as well as the coins.
- Large stone disc is in the bottom center of the screen.
CAIRO WORLD PUZZLE – RING PUZZLE
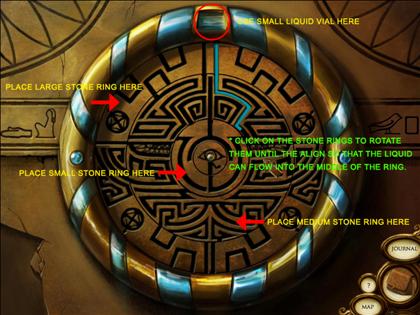
- Place the large, medium, and small stone ring with their respective spots within the outer ring.
- Pour the small liquid vial into the reservoir at the top of the ring.
- Click on the individual rings until the align allowing the water to flow from the top to the middle of the completed ring. NOTE: clicking on the small stone ring will rotate both it, and the large stone ring together.
WORLD 2: BASILICA SAN MARCO
BASILICA SAN MARCO 1
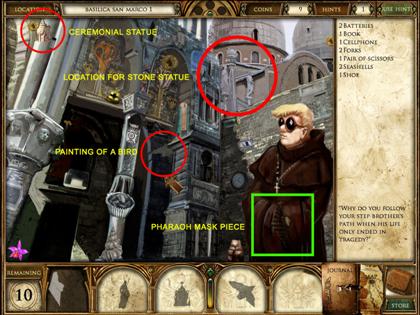
- Pick up the Pharaoh mask piece hidden in the monk’s robe.
- Take the ceremonial statue piece for use in another level at the top left corner of the screen.
- Take the painting of the bird from the middle of the screen for use in the Basilica San Marco world puzzle later.
- Make note of the location where you’ll place the stone statue, found in a later level.
- Continue to find the rest of the hidden objects, as well as the coins.
BASILICA SAN MARCO 2
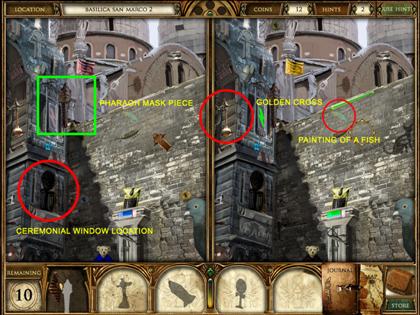
- Take the painting of a fish from the brick wall for later use in the Basilica San Marco world puzzle.
- Pick up the golden cross on the left side of the screen.
- Take note of the location for the decorative window that you will find in a later level.
- Take the Pharaoh mask piece from the stone archway.
- Continue to spot the differences in the two images, as well as find the hidden coins.
PRESBYTERY
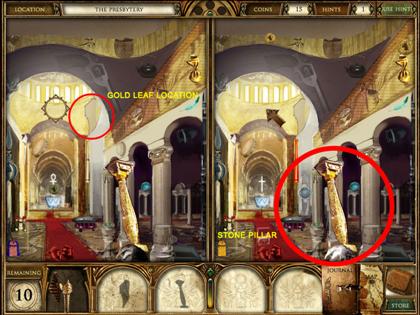
- Take the stone pillar hidden in the columns.
- Take note of the location of the gold leaf at the top of the image. You’ll find it in another level.
- Continue to spot the differences in the two images, as well as find the hidden coins.
THE SACRISTRY
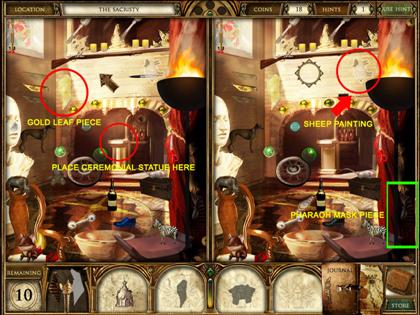
- Take the sheep painting from the back wall for later use in the Basilica San Marco world puzzle.
- Pick up the gold leaf piece from the back wall, and go back to the Presbytery to restore it.
- Place the ceremonial statue from Basilica San Marco 1 on the pedestal at the back of the room.
- Take the Pharaoh mask piece hidden in the red drapery on the right side of the room.
- Continue to spot the differences in the two images, as well as find the hidden coins.
THE BAPTISTRY
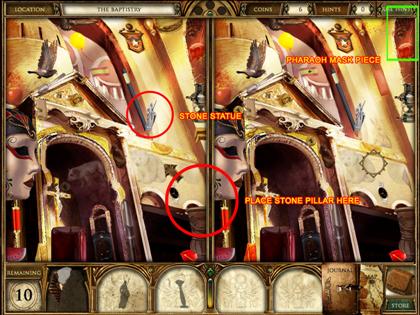
- Take the stone figure and use it back in Basilica San Marco 1.
- Pick up the Pharaoh mask piece from the top right corner.
- Place the pillar piece you found in the Presbytery in its place in the bottom right corner of the screen.
- Continue to spot the differences in the two images, as well as find the hidden coins.
PALA D’ORO
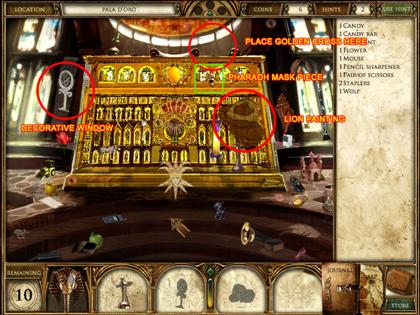
- Take the decorative window from the left side of the screen and use it back in Basilica San Marco 2.
- Take the painting of the Lion from the golden wall in the middle of the screen for use in the Basilica San Marco world puzzle.
- Pick up the Pharaoh mask piece from the top of the golden wall.
- Place the golden cross in its place on top of the golden wall you got in Basilica San Marco 2.
- Continue to search for the hidden objects in the scene as well as the coins.
BASILICA SAN MARCO WORLD PUZZLE – ANIMAL FRESCOS
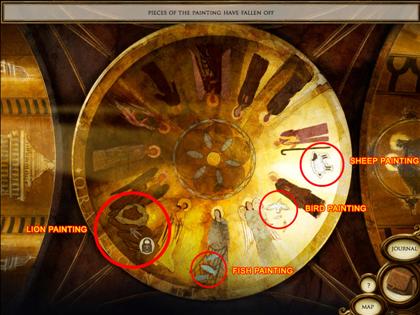
- Place each of the four animal paintings into their locations on the ceiling mural to complete this puzzle.
WORLD 3: CANALS OF VENICE
GRAND CANAL 1
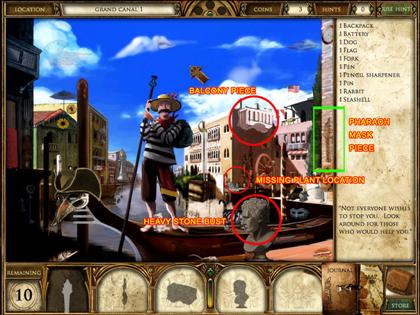
- Pick up the Pharaoh mask piece from the brick wall on the right side of the screen.
- Take the heavy stone bust from the front of the screen for use later in the Canals of Venice world puzzle.
- Take the stone balcony for use in a later level from the building façade.
- Make note of the empty plant pot location. You’ll find the plant in a later level.
- Continue to find the hidden objects in this level as well as the coins.
GRAND CANAL 2
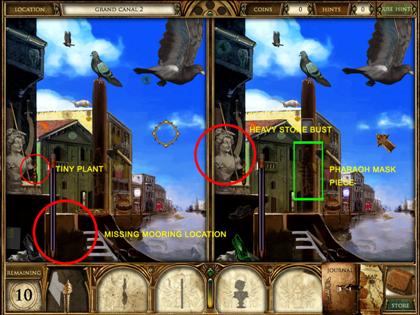
- Take the Pharaoh mask piece from the pier mooring in the center of the screen.
- Take the heavy stone bust from the left side of the screen for later use in the Canals of Venice world puzzle.
- Take the small tree from the building façade on the left side of the screen, and use it back in Grand Canal 1.
- Take note of the missing mooring pole position. You will find it in a later level.
- Continue to spot the differences between the two images, as well as find the hidden coins.
RIALTO BRIDGE
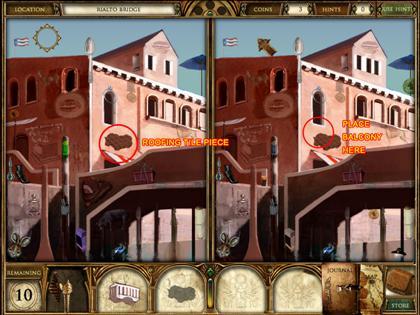
- Take the roofing tile for use in a later level from the middle of the image.
- Place the balcony from Grand Canal 1 below the central window in the screen.
- Continue to spot the differences between the two images, as well as find the hidden coins.
THE DAM
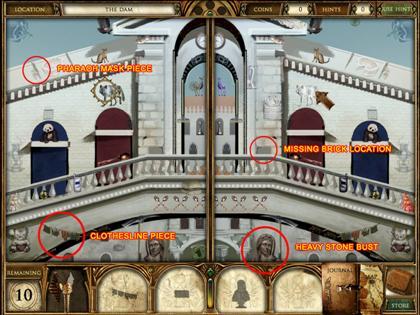
- Take the heavy stone bust from the bottom of the screen for use in the Canals of Venice world puzzle.
- Take the clothesline hanging below the bridge for use in a later level.
- Pick up the Pharaoh mask piece on the roof of the dam.
- Take note of the location of the missing brick. You’ll find it in a later level.
- Continue to spot the differences between the two images, as well as find the hidden coins.
INNER CANAL

- Take the heavy stone bust from the front of the screen for use in the Canals of Venice world puzzle.
- Pick up the Pharaoh mask piece from the right side of the screen towards the top.
- Use the clothesline you got at the Dam and place it below the smaller of the two existing clotheslines at the back of the screen.
- Take the mooring pole from the bottom left of the screen for use back in Grand Canal 2.
- Continue to spot the differences between the two images, as well as find the hidden coins.
FLOATING BUILDING
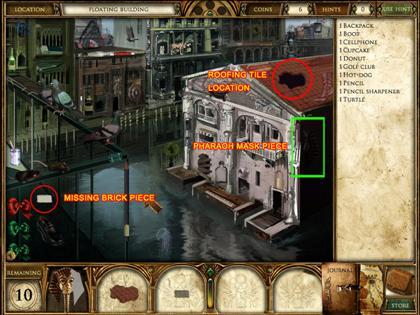
- Use the roofing tile you received in Rialto Bridge on the roof of the building here.
- Take the Pharaoh mask piece from the dark side of the floating building.
- Take the cement brick from the balcony and use it back in the Dam.
- Continue to search for the hidden objects here, as well as the coins.
CANALS OF VENICE WORLD PUZZLE – BUST/BOOKS
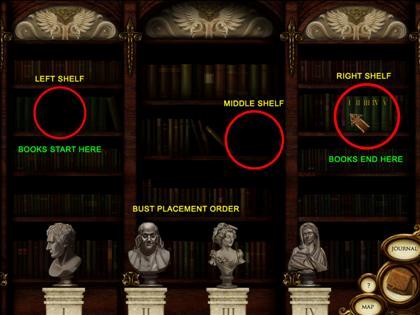
- First, click on the four stone pedestals until they are of the same height and lining up with the dotted line at the bottom of the screen.
- Next, move your cursor over each of the pedestals to get a hint as to where each of the busts should go.
- Finally, you have to move the books labeled I through IV from their shelf on the left side of the screen to right side of the screen where the book V is sitting.
- In order to do this, you have to swap books back and forth from the left middle and right shelves. The books have to be moved in numerical order, and must always be stacked next to each other on any given shelf in numerical order (i.e. I must always come before IV).
- Following this sequence where 1-4 corresponds with volumes I through IV, and L, M, and R correspond with moving each book to either the left, middle, or right shelves – you will arrive at the solution: 1R, 2M, 1L, 2R, 1R, 3M, 1L, 2M, 1M, 4R, 1R, 2L, 1L, 3R, 1M, 2R, 1R
WORLD 4: FABRICCI PALACE
FOYER 1
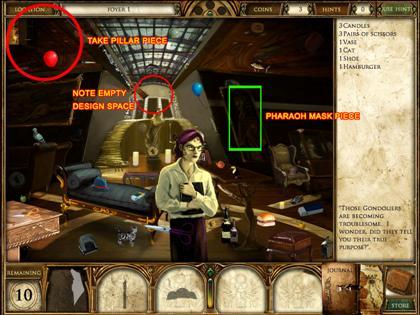
- Take the Pharaoh mask piece hidden in painting on the right.
- Note the empty design space above door at the back.
- Take the pillar from the top left of scene.
- Find the rest of the objects and the three coins and then move on.
FOYER 2
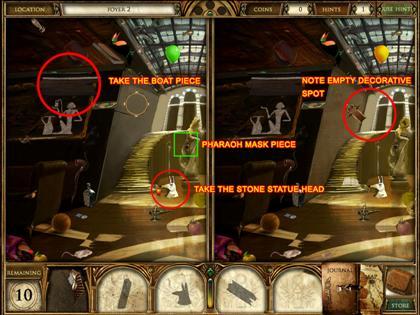
- A Pharaoh piece is hidden in statue at right.
- Take the model boat piece from above hieroglyphs for use in the world puzzle.
- Note that the decoration on the wall middle of screen is missing.
- Take the statue head at base of stairs.
- Finish the scene by spotting the differences and find all three coins.
THE LIBRARY
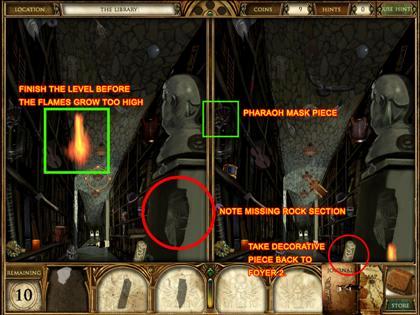
- This is a fire level. If you don’t complete the level before the fire burns everything, you will need to start this level over.
- Take the decorative piece from the base of the statue to use in Foyer 2.
- Note the missing section of the statue, you’ll find it in a later level.
- Take the decorative piece from the base of the statue to use back in Foyer 2.
- Note the missing section of the statue, you’ll find it in a later level.
- Take the chunk of rock from the Inner Court to repair the statue on the lower right.
- Spot all the differences quickly and locate the coins to finish this scene.
TOMB TUNNEL
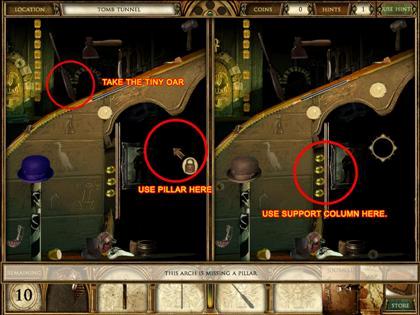
- Take the support column from the middle of the screen for use in the world puzzle.
- Use the Pillar picked up from the Foyer 1 and place it in the shadows on the right.
- Take the tiny oar near the yellow gems in the top left for use in the world puzzle.
- Spot the differences and find the coins to finish this level.
OUTER COURT
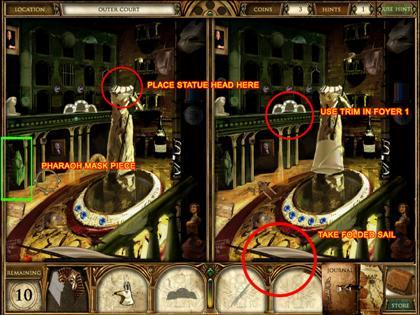
- Take a piece of the Pharaoh mask near pillars left side.
- Place statue head on top of statue in the center of the room.
- Pick up the folded sail from bottom of screen for use in the world puzzle.
- Take decorative trim in middle of scene for use in Foyer 1 near statue.
- Locate all the differences in this scene, find the coins and then move on.
INNER COURT

- Pharaoh mask piece obscured in the wall on the left side of screen
- Chunk of rock at the right side of the tunnel entrance for use in library.
- Pick up the tiny oar at the bottom of the screen for use in the world puzzle.
- Place support column from Tomb Tunnel near existing column on the left.
- Find all the objects and all the coins to complete this scene.
FABRICCI PALACE WORLD PUZZLE – SHIP IN A BOTTLE
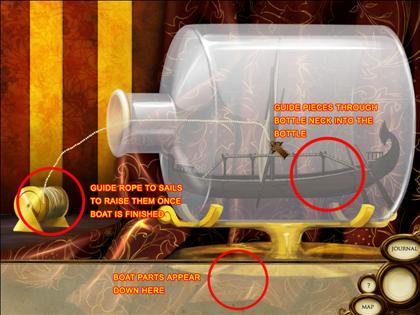
- Carefully guide ship pieces through bottleneck to reconstruct ship.
- Guide the twine through the opening to the sail to raise it.
WORLD 5: ARSENAL
PORTA MAGNA 1
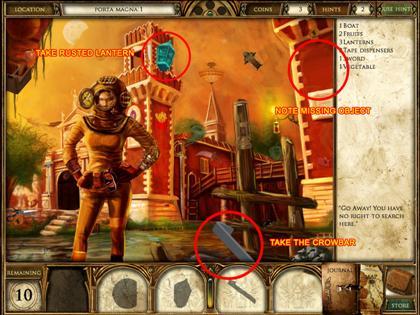
- Take crowbar from bottom of screen near wooden posts.
- Note circular space at the top right of the scene.
- Take rusted lantern from top of tower.
- Find the rest of the objects and all three coins to complete this level.
PORTA MAGNA 2
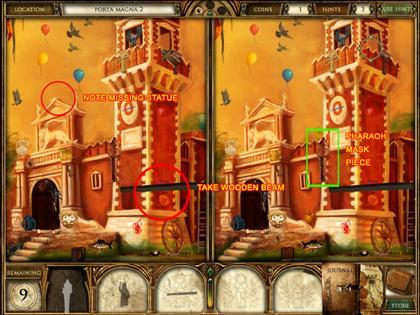
- Take wooden beam at base of the tower.
- Pick up the piece from the Pharaoh’s Mask from left side of tower. Note empty statue base above winged lion on the left.
- Spot all the differences and find all three coins to move on.
DOCKYARD
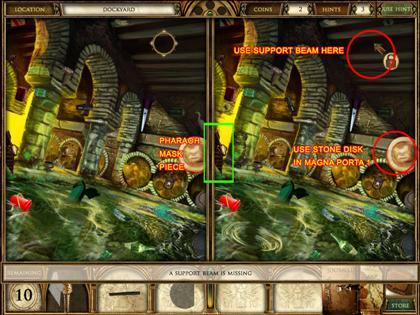
- Place support beam from Porta Magna 1 in missing slot top right.
- Pharaoh piece let side of map.
- Pick up another piece of the Pharaoh’s mask from left edge of the scene.
- Take circular stone carving from the right side for use in Porta Magna 1.
- Spot all the differences between the two scenes and then locate all three coins.
INNER BUILDING
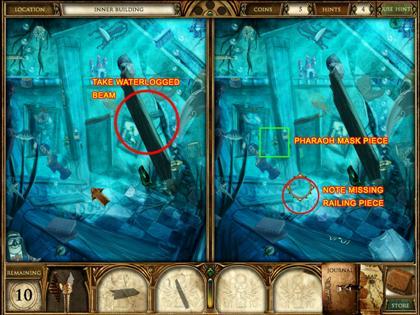
- This is an underwater level. You have a limited amount of time to complete the level before the water level gets too high, then you’ll have to restart.
- Take the large waterlogged piece of wood from center of the scene.
- Grab the piece of the Pharaoh’s mask near wooden pillar on the left.
- Note missing railing piece on stairs bottom right.
- Quickly locate all the differences and all three coins before the water fills up.
TUNNEL
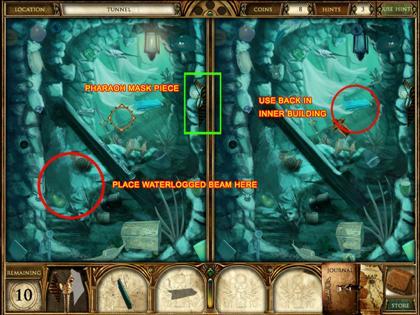
- Pick up the piece of the Pharaoh’s mask from the right side.
- Take blue wooden hand rail near the sheets at the back of the screen for use in the Inner Building location.
- Place wooden beam from inner building just below existing beam.
- Spot the differences and locate all three coins before you move to the next scene.
SUNKEN SHIP
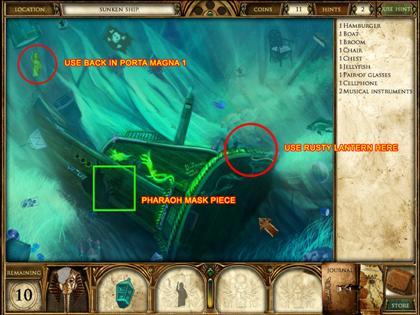
- Take the Statue for Porta Magna 2 from top left corner of the scene.
- There’s a piece of the Pharaoh’s mask near hole in ship’s side.
- Use rusty lantern at the back of the ship.
- Find all of the hidden objects and all three coins to complete this scene.
ARSENAL WORLD PUZZLE – LOCKED CHEST
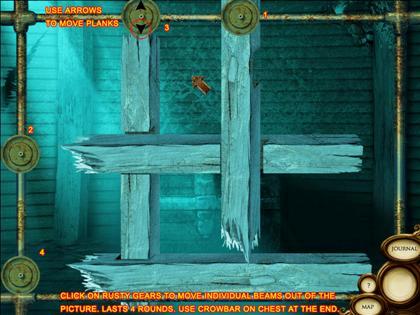
- A series of interconnected planks are attached to gears. Each gear can be clicked on, which allows you to move a plank either left to right, or up and down. Remove them all from the scene in order to proceed. There are 4 rounds. If you get stuck just click on each gear until you can move a plank.
- Use crowbar at the end to open up the chest.
WORLD 6: THE JOURNAL OF NAPOLEON
NAPOLEON’S TENT 1
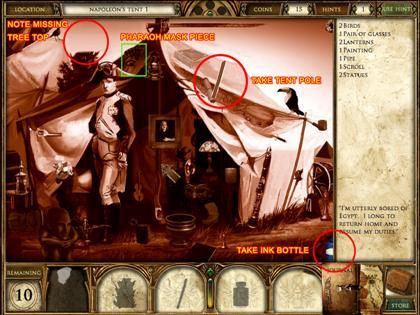
- Pick up the small bottle of ink in the bottom right corner for use in the world puzzle.
- Take the tent pole section top right part of the tent ceiling.
- Pick up a piece of the Pharaoh’s mask from just above Napoleon’s head.
- Note that the top of tree to the left of Napoleon is missing.
- Find the rest of the objects and the coins and move on to the next scene.
NAPOLEON’S TENT 2
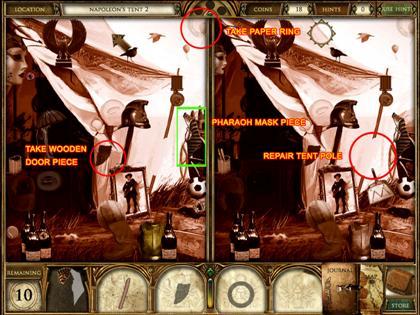
- Take a piece of the pharaoh’s mask from the right side of image near wagon wheel.
- Grab the Paper Ring from the top right corner of the scene for use in the world puzzle.
- Take the Wooden Door piece on the right of the tent entrance.
- Repair tent pole with section from Napoleon’s tent 1.
- Find all the differences in this scene and all coins and move on to the Venice Canals.
VENICE CANALS
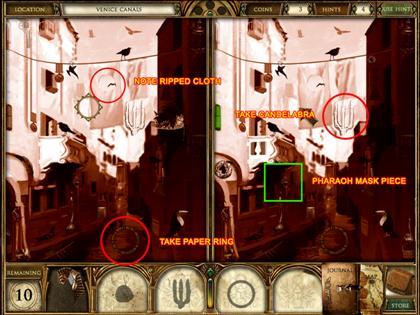
- Note the cut linen section of sheet on the clothesline in the center of the scene.
- Take the Paper ring from the bottom of screen.
- There is a piece of the Pharaoh’s mask below the balcony bottom left.
- Take candelabra near hanging sheet.
- Find all the differences here and locate all three coins and then move on.
THE DOOR
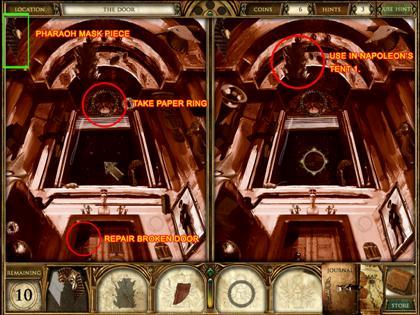
- Take the Paper ring from above window.
- Grab a piece from the Pharaoh’s mask from the top left corner.
- Pick up the missing tree piece top right in arch above window.
- Replace broken door using the piece of the door at bottom of the scene.
- Spot the differences in this scene pick up all the coins and then go to the Secret Chamber.
SECRET CHAMBER
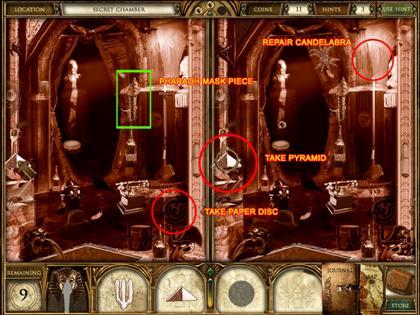
- Take the Pharaoh’s mask piece near back of screen at doorway.
- Pick up the small paper disc near the bottom right corner of the scene for use in the world puzzle.
- Repair candelabra using the Candelabra from the top right of screen.
- Take pyramid piece from left side of screen.
- Finish the scene by finding the difference’s in this and of all the coins.
NAOS
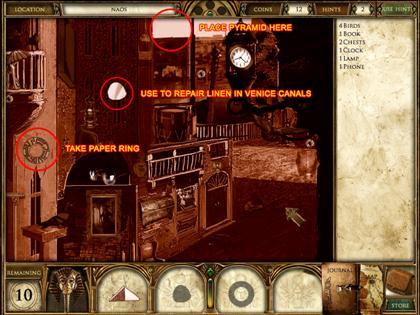
- Take the paper ring from the right side of the screen under the balcony for use in the world puzzle.
- Circular piece of linen for Venice Canals can be found near window on building facade.
- Place pyramid at top the top of the image, left of the large lantern.
- Find all the objects and the three coin and then go back to the Venice Canals.
JOURNAL OF NAPOLEON WORLD PUZZLE
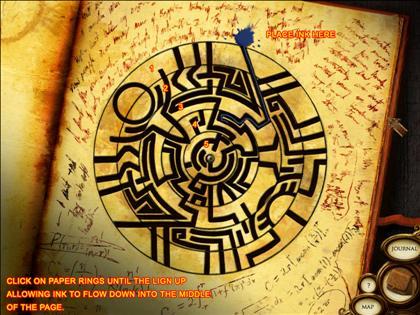
- Place the ink you collected in the reservoir at the top.
- Place the paper rings in their respective slots within the scene.
- Click on the rings until they all line up so that ink can flow into the center of the image.
- Here are some hints to controlling the rings:Ring 1 – controls itself Ring 2 – controls rings 1, 2, and 3 Ring 3 – controls rings 3, and 4 Ring 4 – controls rings 4, and 5 Ring 5 – controls rings 2, 3, and 5
WORLD 7: DOGE’S PALACE
EXTERIOR 1
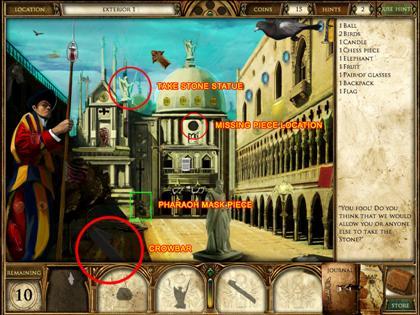
- Take the marble statue from atop the building on the left.
- Pick up the Pharaoh mask piece from the bottom of the building at the back.
- Pick up the crowbar to the left of the guard for use in the world puzzle.
- Take note of the missing piece in the circular hole beneath the building’s dome. The piece will be found in a later level.
- Continue searching for the hidden objects, and coins.
EXTERIOR 2
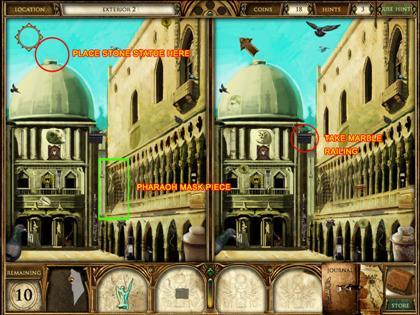
- Take the Pharaoh piece from the center of the screen to left of the building.
- Place the statue from Exterior 1 atop the dome of the building.
- Take stone railing beneath the dome and to the left.
- Continue spotting the differences, and searching for the coins.
BRIDGE OF SIGHS
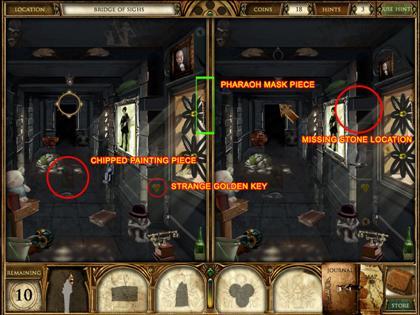
- Pick up the Pharaoh piece in the window on the right of the screen.
- Take the chipped painting piece on the floor in the middle of the scene.
- Take the strange golden key down and to the left of the window for use in the world puzzle.
- Make note of the missing brick location on the column just to the left of the window. You’ll find it in a later level.
- Continue spotting the difference, and searching for the coins.
THE LAGOON
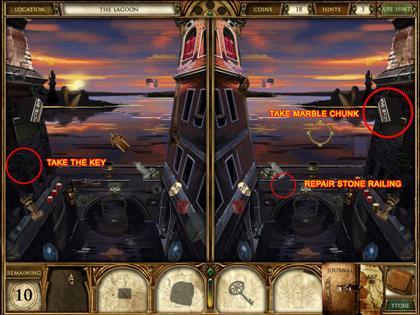
- Take the small on the left side of the screen in the brick wall for use in the world puzzle.
- Replace the stone railing on the walkway near the bottom of the screen.
- Take the chunk of marble form the left side of the screen just above where you found the key.
- Finish the mirrored level, and find the coins.
INNER FOYER
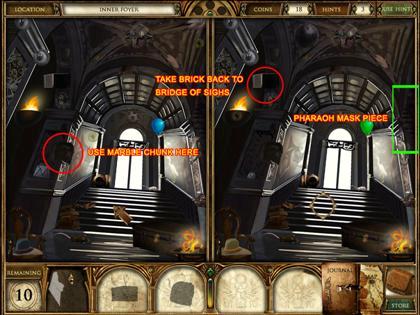
- Take the Pharaoh piece on the right side of the screen above the stairs in the shadows.
- Use the chunk of marble to repair the broken part of the doorway arch on the left.
- Take the brick at the top left corner, and use it back in the Bridge of Sighs.
- Continue spotting the differences, and finding the coins.
DOGE’S SANCTUARY
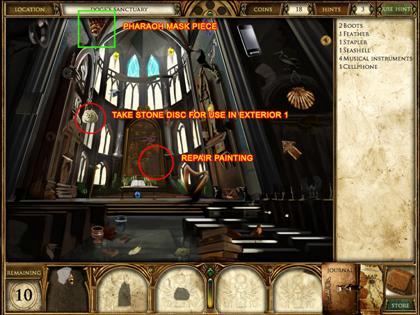
- Take the Pharaoh mask piece from the top of the screen, and just left of the windows.
- Take the stone disc to the left of the altar at the back.
- Use the chipped painting piece to repair the painting behind the altar.
- Finish finding the hidden objects, and the coins.
DOGE’S PALACE WORLD PUZZLE – GOLDEN DOOR
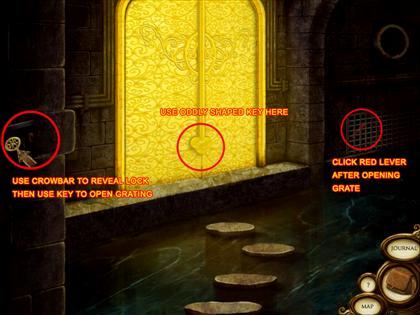
- Place the oddly shaped golden key into the golden door.
- Then, use the crowbar to loosen the brick on the left side of the scene.
- Use your other key in the lock you discover to open the grating on the right.
- Depress the red level to open the golden door and retrieve the mysterious stone.
WORLD 8: AMARNA
SMALL ATEN TEMPLE 1
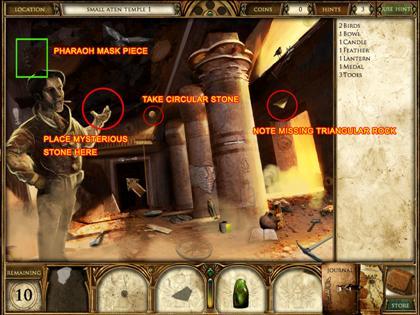
- Use the mysterious stone to restore the man on the left.
- Take the Pharaoh piece that is above the man’s head.
- Pick up the small circular stone that is above the darkened doorway.
- Finish finding the hidden objects, as well as the coins.
SMALL ATEN TEMPLE 2
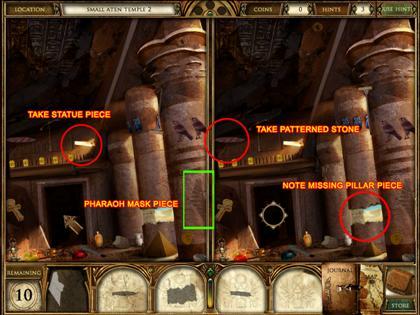
- Pick up the Pharaoh piece from the column on the right side of the screen.
- Take the patterned stone piece for use in the world puzzle above and to the left of the darkened doorway.
- Note the missing pillar section on the bottom right corner of the screen. You’ll find it in a later level.
- Take the broken statue piece up and to the right of the darkened doorway for use in a later level.
- Finish spotting the differences and finding the coins.
GREAT TEMPLE
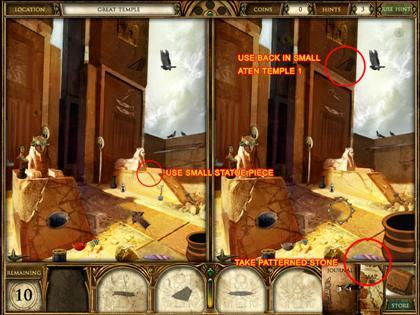
- Take the patterned stone piece for use in the world puzzle at the bottom of the screen.
- Use the broken statue piece to repair the Sphinx’s toe on the right side of the screen.
- Take the triangular rock piece on the large stone pillar, and use it in Small Aten Temple 1.
- Finish spotting the differences, and finding the coins.
NORTHERN PALACE
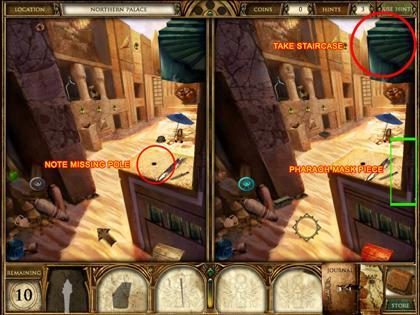
- Pick up the Pharaoh piece from the right side of the screen in the shadows.
- Note the missing doorway post near the small black hole at the front of the scene. You’ll find the post in a later level.
- Take the stone staircase at the upper right hand corner.
- Finish spotting the differences and searching for coins.
ROYAL PALACE
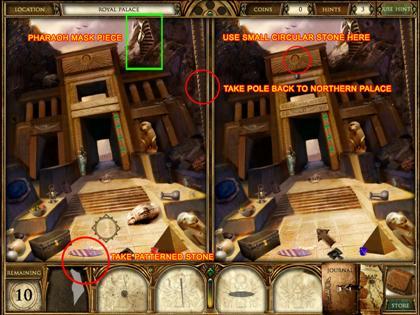
- Take the Pharaoh piece that is to the right of the top of the palace entrance.
- Put the small circular stone you collected earlier in the small recess at the top of the palace.
- Take the patterned stone piece at the bottom of the screen for use in the world puzzle.
- Take the large post on the right side of the screen back to the Northern Palace.
- Continue spotting the differences, and searching for coins.
SECRET ROOM
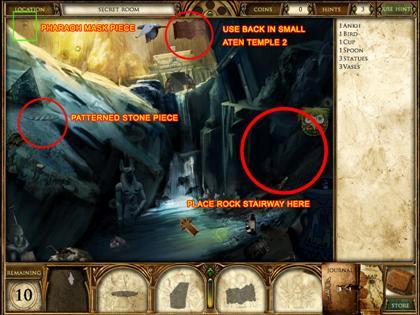
- Pick up the Pharaoh piece in the top left corner of the screen.
- Take the patterned rock piece on the rock ledge on the left side of the screen for use in the world puzzle.
- Take the jagged chunk of rock above the waterfall back to Small Aten Temple 2.
- Place the rock stairway on the rock face on the right side of the screen below the darkened doorway.
- Finish finding the hidden objects as well as the coins.
ARMANA WORLD PUZZLE
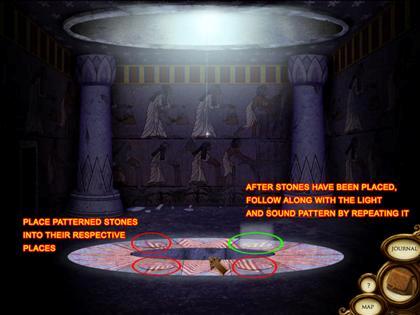
- Place the patterned stone pieces into their matching holes on the floor.
- Then replay the sequence of musical notes you hear by pressing on the stones.
- Repeat this for a few rounds to win the puzzle.
WORLD 9: HIDDEN TEMPLE OF PARENNEFER
CAUSEWAY 1
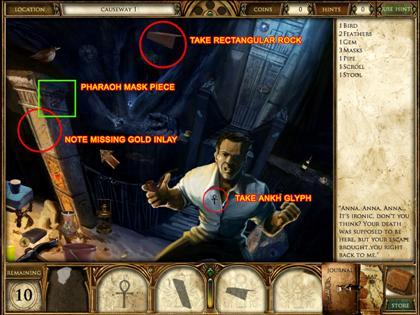
- Pick up the Pharaoh mask piece on the bridge pillar on the left side of the screen.
- Note the missing gold inlay on the bridge pillar that you will find in a later level.
- Take the rectangular stone chunk above the bridge.
- Take the Ankh glyph from the man’s shirt.
- Finish finding the hidden objects, and the coins.
CAUSEWAY 2

- Take the Pharaoh piece from the shadows on the left side of the screen.
- Take the small stone disc the rock wall on the right side of the screen.
- Note the missing bridge section at the bottom of the screen, you’ll find it in a later level.
- Finish spotting the differences in the scene as well as the coins.
OUTER COURT
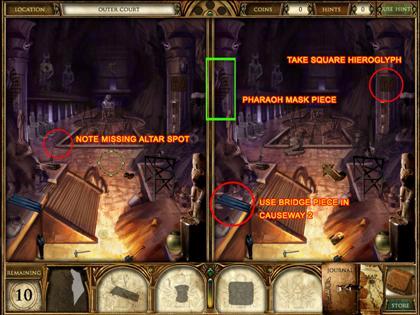
- Pick up the Pharaoh piece on the darkened column on the top left corner of the screen.
- Take the wooden slats from the bottom left corner of the screen, and use it back in Causeway 2.
- Take the square hieroglyph from the right side of the screen on the column.
- Note that there is a missing altar to the right of the three sitting statues; you’ll find it in a later level.
- Finish spotting the differences here, as well as the coins.
INNER COURT
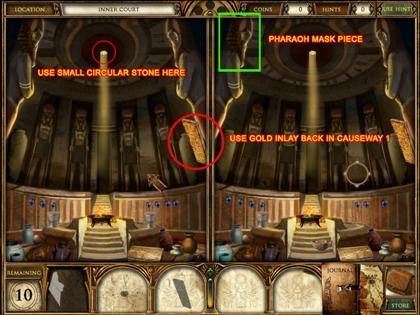
- Use the small stone disc to plug the light leak at the top of the screen.
- Pick up the Pharaoh piece from the top left corner of the screen.
- Take the golden inlay plate from the right side of the screen and bring it back to Causeway 1.
- Finish spotting the differences, and finding the coins.
HYPOSTYLE HALL
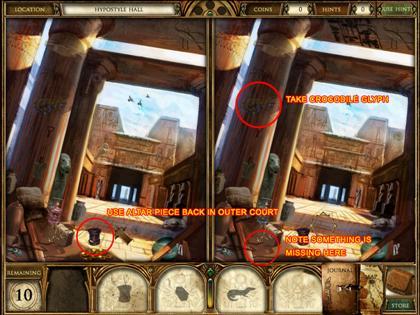
- Pick up the granite altar at the bottom of the screen, and use it in the Outer Court.
- Pick up the crocodile glyph on the column on the left hand side of the screen.
- Note that something was taken from the bottom of the screen on the left; you’ll find it in a later level.
- Finish spotting the differences here, as well as the coins.
SANCTUM
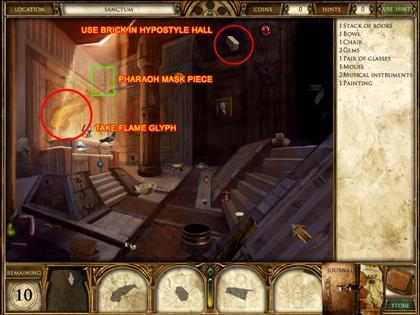
- Take the brick from the top of the screen and use it back in the Hypostyle Hall where something was missing.
- Pick up the Pharaoh mask piece below the light crack above the altar.
- Take the painted flame glyph from the wall above the altar.
- Finish finding the hidden objects, as well as the coins.
- Add the chunk of rock to the stairwell.
HIDDEN TEMPLE OF PARENNEFER WORLD PUZZLE – FINAL
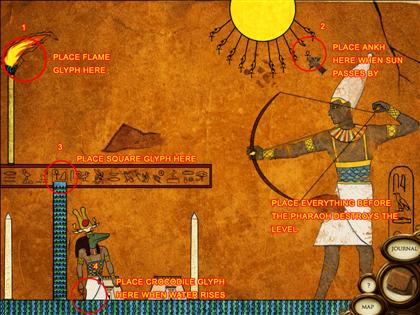
- Take the glyphs you have acquired over this world and place them in their proper places to stop the Pharaoh from destroying everything. If he does. You’ll have to restart the level.
- Place the fire glyph above the torch on the left side of the screen.
- Place the ankh in the empty sunray as it passes by.
- Place the golden hieroglyph in the line of glyphs on the left side of the screen.
- When the water fills up, place the crocodile glyph in the water.
Created at: 2009-03-07