

Walkthrough Menu
- General Tips & Information
- Prologue: A Terrific Party
- Chapter One: The Crime Scene
- Chapter Two: Monty’s Secret
- Chapter Three: A Perfect Investigator
- Chapter Four: What Did Happen at Kingsley’s Party?
- Chapter Five: A New Lead
- Chapter Six: New Sudden Revivals
- Chapter Seven: Looking For the Past
- Chapter Eight: Revelations
General Tips & Information
- There are two modes of game play. When setting up your profile, select "Limited Time" for a challenging, timed game. Not selecting this feature gives you unlimited time, but your game time is measured by an increasing timer.
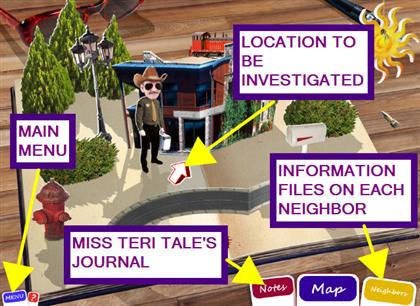
- From the Map screen, you can select "Notes" to read Teri’s journal. The "Neighbors" tab has information files on all the neighbors, and the white arrows indicate locations that need to be investigated. You may also find you need to interact with various objects within the map. The "Menu" tab will take you to the main menu.
- Required actions will be written in yellow and will have a corresponding sparkling zone in the game screen. Items not yet available will be tinted.
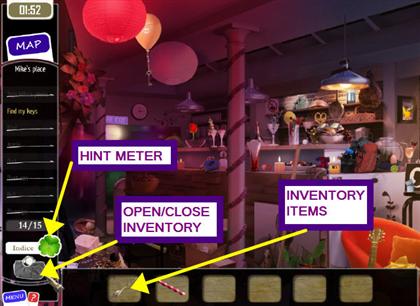
- Hints are unlimited and are used by selecting the clover in the left column during game play. Once the clover refills, another hint will become available.
- Selecting the purse or bag directly below the clover will open your inventory. Note that you may be required to combine items. Select one item and use it on another to combine the two.
- NOTE* With the exception of the action and inventory items, the hidden objects are randomized. Your solutions may vary!
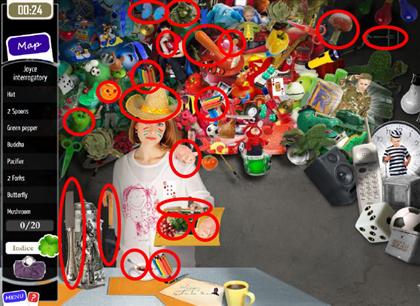
Prologue: A Terrific Party
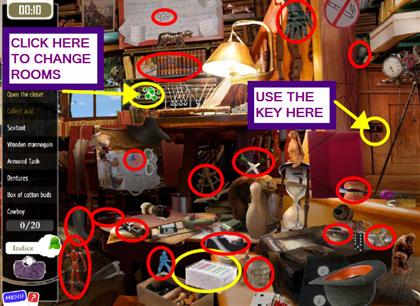
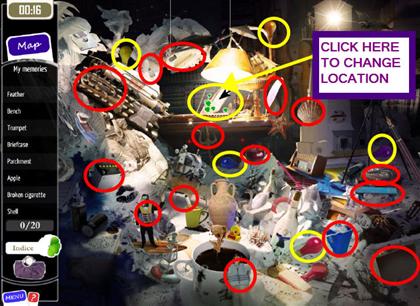
- A small party for new resident Mike is still going strong, but Miss Teri needs to leave.
- Locate the glowing green light switch to turn on the lights.
- Find the hidden objects as they become available.
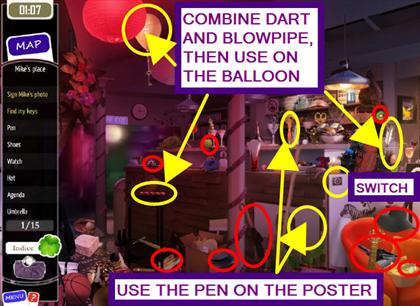
- Take the pen from your inventory and use it on the photo of Mike.
- Inside your inventory, combine the dart and the blowpipe.
- Use the loaded blowpipe on the balloon.
- Action and inventory items are marked in yellow.
- The next morning Miss Teri’s phone is ringing. Answer the call by clicking on the cell phone.
- Sheriff Allen delivers bad news. Norman "Monty" Montgomery, the deputy mayor, has been murdered!
Chapter One: The Crime Scene
- Miss Teri is upset at the death of her deputy and lets Sheriff Allen know she wants to be part of the case.
- After reading the journal, select the "Map" tab.
- Select the arrow pointing to Mike’s house, the scene of the crime.
- Collect all the hidden objects.
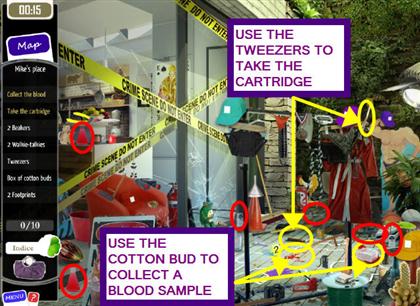
- Take the cotton bud from the inventory and use it on the blood spatter.
- Take the tweezers from the inventory and collect the bullet cartridge.
- Dust and collect the 10 fingerprints.

- Collect the hidden objects as they become available.
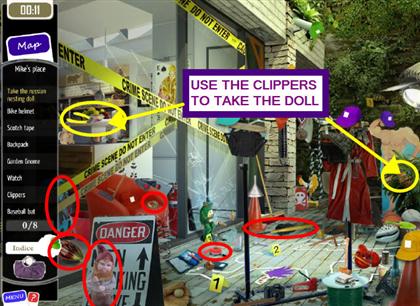
- Take the clippers from the inventory and use them on the Russian nesting doll.
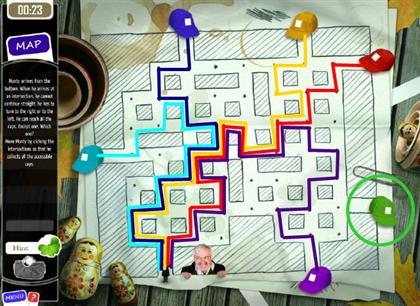
- The object of this mini-game is to find paths to three of the four hats. The green hat is not obtainable following the rules of the game.
- Move by making left or right turns only. You cannot go straight. The path to each hat is marked in the same color as the hat.
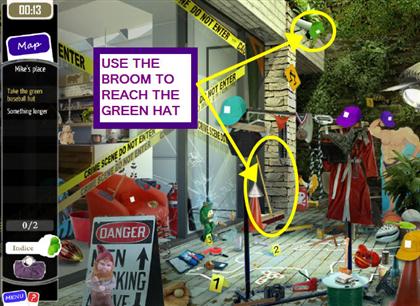
- You need to find "Something longer." Collect the broom.
- Take the broom from the inventory and use it to reach the green hat.
- After speaking with Alyssa and the sheriff, you are returned to the map.
- Select "Question Alyssa."
- Locate all the hidden objects as they become available.
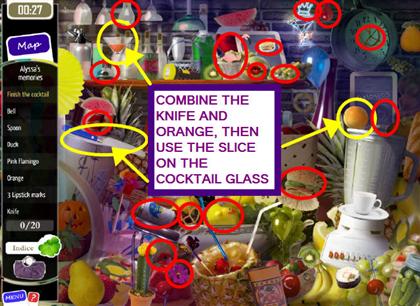
- In your inventory, combine the knife and orange to make an orange slice.
- Use the orange slice on the cocktail glass.
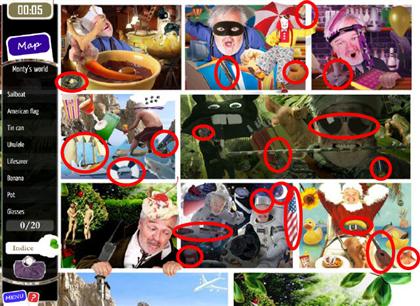
- On the map, select "Monty’s World."
- Collect all the hidden objects. Remember that many of the hidden objects are randomized, so your solution may differ.
- On the map, find the arrow pointing to the bush and select "Question Mike."
- Mike is in a total panic. You will not be able to question him in this state.
- Three options appear: question, shake, or comfort. Selecting the first two options will have no results.
- Select "Comfort" and Miss Teri will reassure Mike.
- On the map, Mike is now out of the bush. Select "Question Mike."
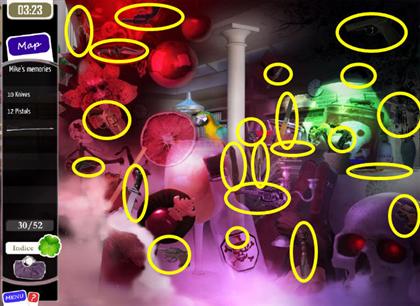
- Many of the items are hidden behind the crows. Locate the thirty crows.
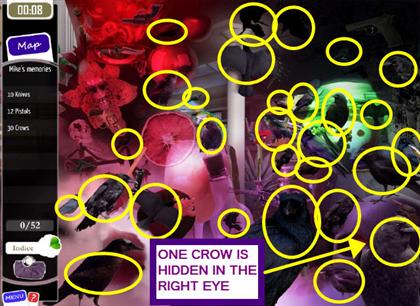
- After you find the crows, you can locate the 10 knifes and 12 pistols.
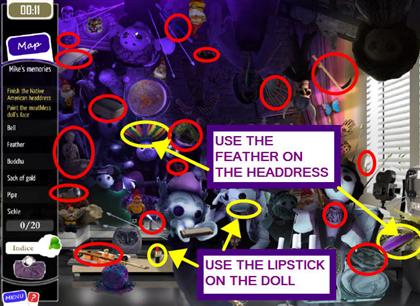
- Locate all the hidden objects as they become available.
- Take the feather from the inventory and use it on the Indian headdress.
- Take the lipstick from the inventory and use it on the doll’s face.
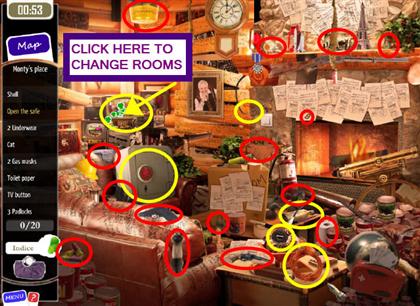
Chapter Two: Monty’s Secret
- After reading the journal, go to the map and select "Priscilla’s home."
- Locate the 25 clovers.

- Locate all the hidden objects.
- On the map, select "The Edward’s home." Miss Teri’s cell phone appears.
- Rebecca is home, but she is not opening the door. You need to call her.
- To find Rebecca’s number, look at the mailbox. The number is 555-4363.
- Enter "4363" into the cell phone and select the green Call button.
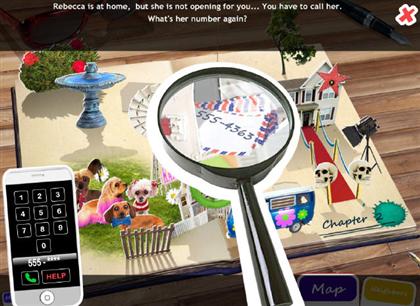
- On the map, select "The Edward’s home."
- Find the hidden objects as they become available.
- Take the CD from the inventory and use it on the green space.
- Take the banana from the inventory and use it on the yellow space.
- Take the flower from the inventory and place it on the blue space.
- The blurred sections become visible after placing the inventory objects.
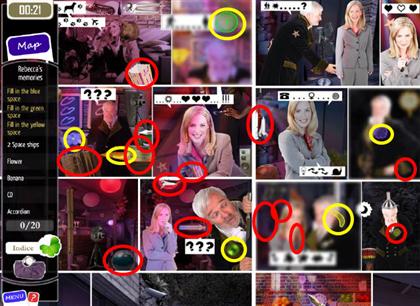
- On the map, select "Rebecca’s World."
- Locate all the hidden objects.
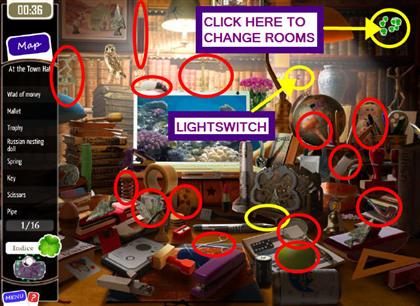
- On the map, select "The Town Hall." You will need a code to enter the archives.
- The code is the name of the Kingsley’s dog. You can look in the neighbor files to find the answer.
- Click on the green space on the code lock and use your keyboard to type "JASON."
- Hit Enter or select the OK button.
- On the map, select the "The Town Hall."
- Locate all the hidden objects as they become available. You cannot perform the actions at this time.
- There are two rooms at this location. Select the bubbling clovers to go to the other room.
- Turn on the lamp by selecting the small chain.
- Locate all the hidden objects as they become available.
- Select the bubbling clovers to return to the first room.
- Take the key from the inventory and use it on the cupboard door.
- Take the cotton swab from the inventory and use it on the black spot on the safe door.
- Taking the acid sample will trigger a mini-game.
- In this mini-game, you need to find the piece that matches the example.
- Selecting a piece will bring up the option to choose a red "X" to eliminate it as a possibility, or a green check to indicate it is a perfect match.
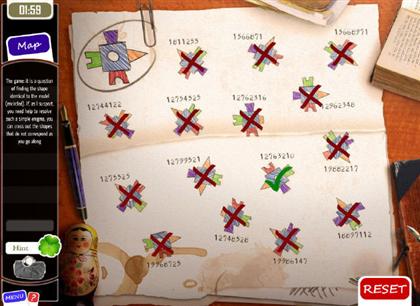
- The number on the matching piece references a book. Find book number 1276310.
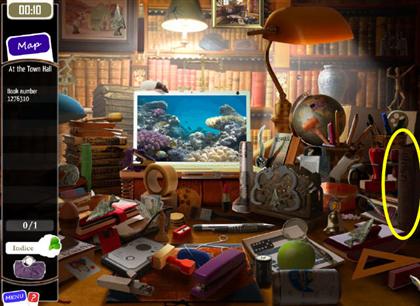
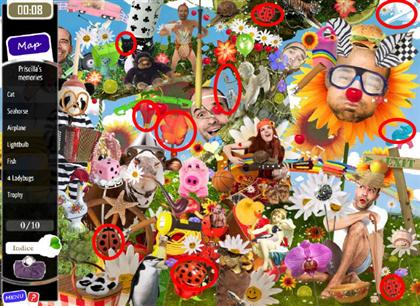
- At the map, select "My Memories."
- Locate all the hidden objects.
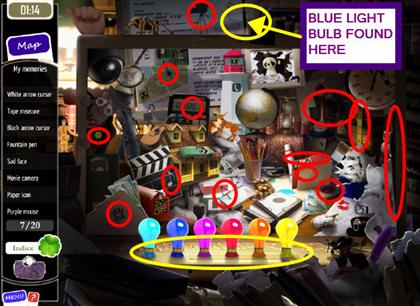
- Select the bubbling shamrocks to change location.
- Find the blue light bulb.
- Take each bulb from the inventory and place it in the color coordinated socket.
- Locate all the hidden objects.
Chapter Three: A Perfect Investigator
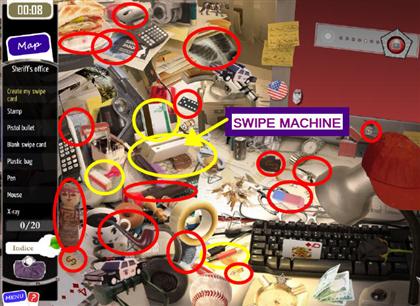
- After reading the journal, go to the map and select "Sheriff’s Office."
- Locate all the hidden objects as they become available.
- In the inventory, combine the card and pen, and then combine the signed card with the stamp.
- Take the card from the inventory and run it through the swipe machine.
- On the map, select "Sheriff’s World."
- Locate all the hidden objects.
- At the map, choose "Lab."
- Locate all the hidden objects.
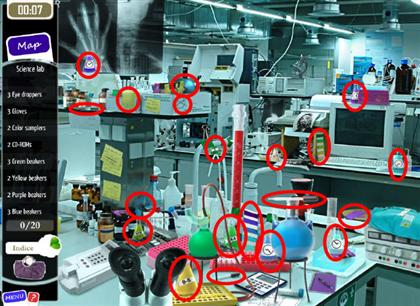
- Miss Teri wants to analyze the evidence.
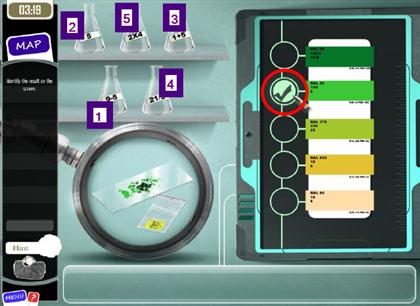
- In this mini-game, you need to use the products from lowest to highest.
- Use the eye-dropper to move the contents from the beakers to the slide in this order:
- Next, find the resulting color on the color chart. Select the second bubble from the top.
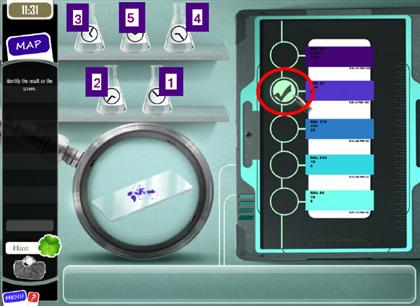
- For the second slide, move the contents from the beakers to the slide in this order:
- Find the resulting color on the color chart. Select the second bubble from the top.
- The blood is identified as Monty’s.
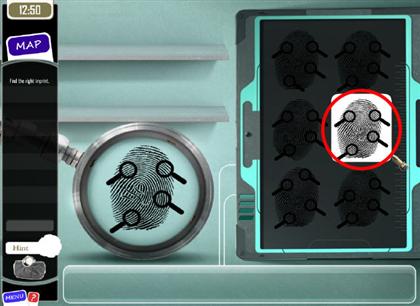
- Find the matching fingerprint.
- The fingerprint belongs to Mike.
- Back at the map, select "The Masakowsky’s Home."
- Locate all the hidden objects as they become available.
- Take the hammer from the inventory and use it to break the bottle; then take the key.
- Take the key from the inventory and use it on the desk drawer.
- This opens a new area. Click on the bubbling clovers.

- Find all the hidden objects.
- Select the bubbling clover to return to the main scene.
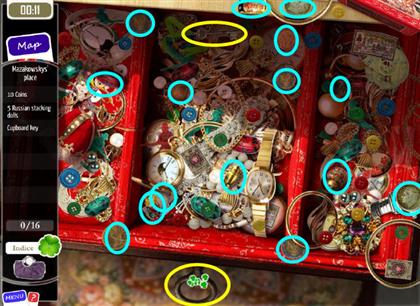
- Take the key from the inventory and open the green cupboard.
- The inventory ledger shows that the killer did not purchase the dolls from the Masakowskys.
Chapter Four: What Did Happen at Kingsley’s Party?
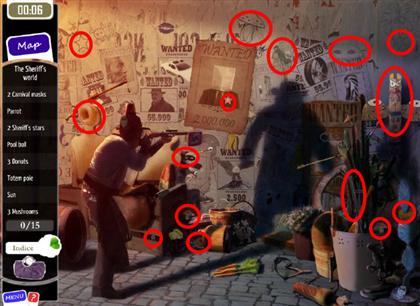
- After reading the journal, go to the map and select "The Kingsley’s Home."
- Locate all the hidden objects as they become available. The blurred areas become available after you insert the correct item.
- In your inventory, combine the egg and the pan.
- Take the fried egg from the inventory and use it on the yellow space.
- Take the thermostat button from the inventory and use it on the red space.
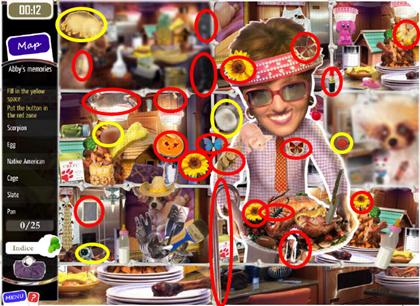
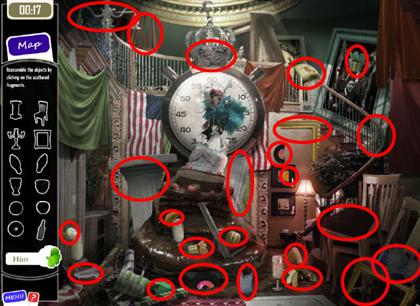
- In this screen, the objects have been broken into two pieces.
- Find the two pieces that correspond to each silhouette in your list.
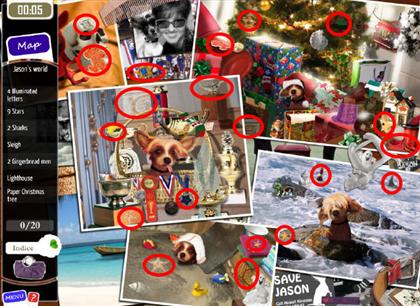
- From the map, select "Jason’s World."
- Locate all the hidden objects as they become available.
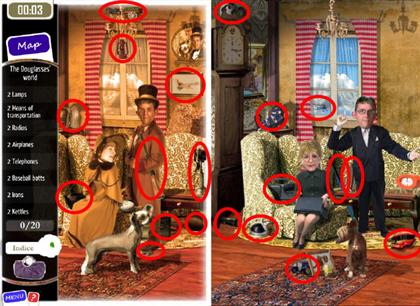
- At the map, select "The Douglasses’ Home."
- Find the 16 utensils.
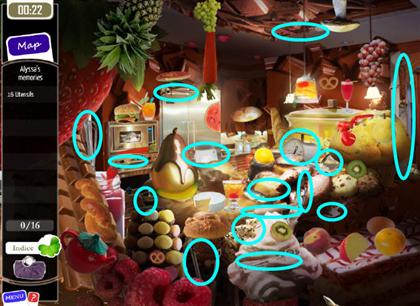
- Locate all the hidden objects as they become available.
- In this jigsaw-style mini-game, assemble all the pieces.
- If necessary, fast-click to rotate a puzzle piece.
Chapter Five: A New Lead
- After reading the journal, go to the map and select "The Sheriff’s Office."
- Locate all the hidden objects as they become available.
- As you collect items, new areas will be added to the screen.
- Select the bubbling clovers to change rooms.
- Locate all the hidden objects as they become available.
- As you collect items, new areas will be added to the screen.
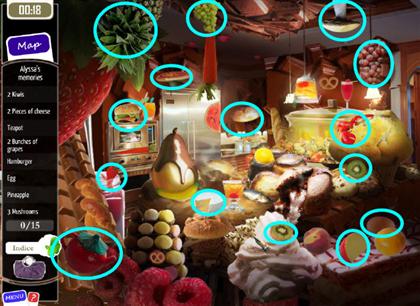
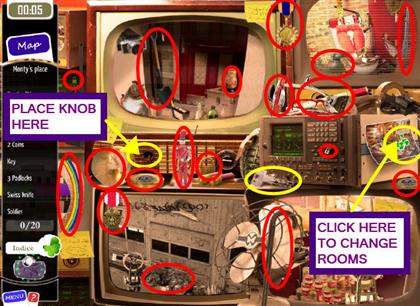
- At the map, select "Monty’s Home."
- Locate all the hidden objects as they become available.
- Inside the inventory, combine the copper wire and clippers.
- Take the cut copper wire from the inventory and use it to repair the light.
- An additional area will appear.
- You cannot complete the room at this time, so select the bubbling clovers to change rooms.
- Locate all the hidden objects as they become available.
- Take the TV knob from the inventory and use it on the television.
- Additional items will appear in the television.
- Select the bubbling clovers to change rooms.
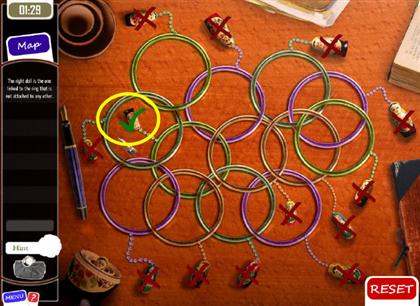
- Take the key from the inventory and open the safe.
- Inside is a newspaper describing a treasure hidden in the town.
- The object of the mini-game is to find the doll that is not linked to any other dolls.
- Selecting a doll will bring up the option to choose a red "X" to eliminate it as a possibility, or a green check to indicate it is the correct choice.
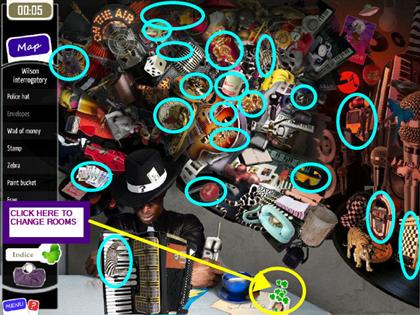
- At the map, select "Wilson’s House."
- Find all the microphones.
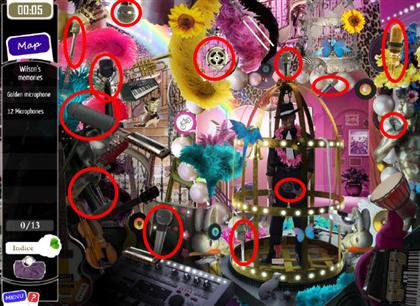
- Locate all the hidden objects as they become available.
- Select the bubbling clovers to change rooms.
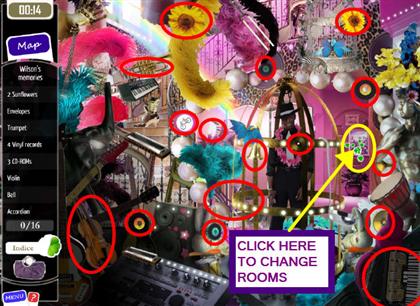
- Locate all the hidden objects as they become available.
Chapter Six: New Sudden Revivals
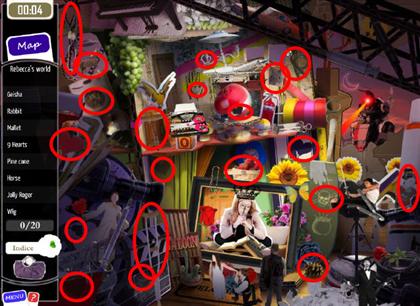
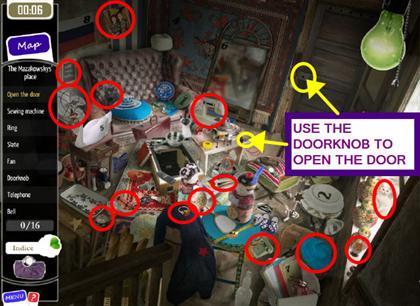
- Read the journal; then go to the map and select "The Masakowsky’s Home."
- Locate the 10 Eiffel Towers.
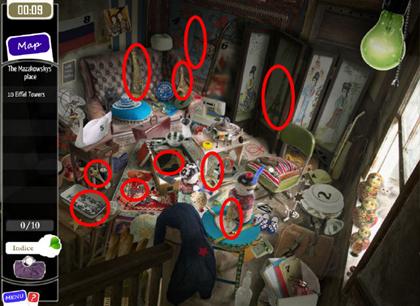
- Locate all the hidden objects as they become available.
- Take the doorknob from the inventory and use it on the door.
- Inside the room, Miss Teri finds the murdered Masakowskys.
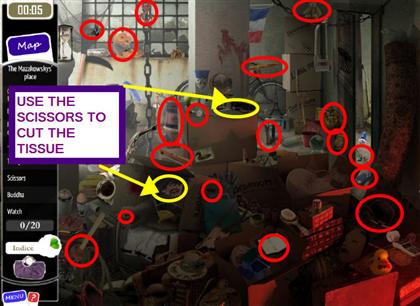
- Locate all the hidden objects as they become available.
- Take the scissors from the inventory and cut the square of tissue.
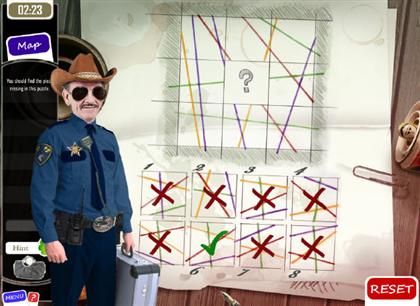
- In this mini-game, find the piece that matches the center square.
- Selecting a piece will bring up the option to choose a red "X" to eliminate it as a possibility, or a green check to indicate it is the correct choice.
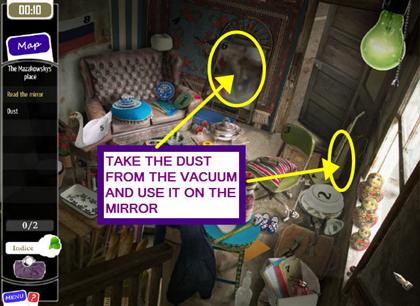
- Find the vacuum cleaner bag.
- Take the vacuum bag from the inventory and use it on the mirror.
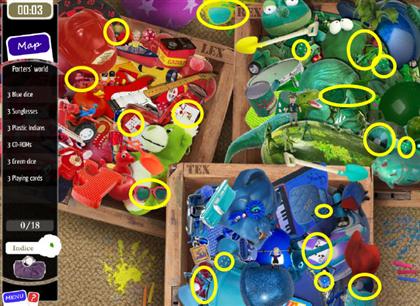
- From the map, select "Maza’s World."
- Find all the hidden objects.

- At the map, choose "The Porter’s Home."
- Locate all the hidden objects as they become available.
- Select the bubbling clovers to change rooms.
- Locate all the hidden objects as they become available.
Chapter Seven: Looking For the Past
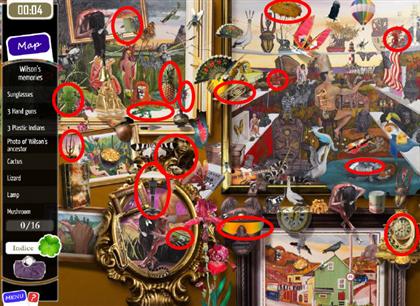
- After reading the journal, go to the map and select "The Kingsley’s Home."
- Locate all the hidden objects.
- Back at the map, select "Kingsley’s World."
- Locate all the hidden objects.
- On the map, choose "The Porter’s Home."
- Locate the 21 vehicles and the old photo.
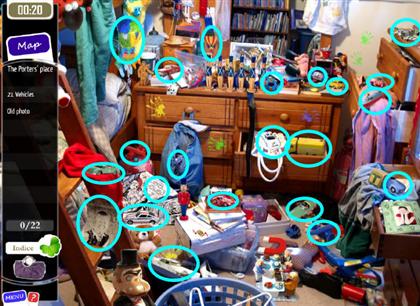
- On the map, select "Porter’s World."
- Find all the hidden objects.
- From the map, go to "The Douglasses’ Home."
- Find the match and the matchbox; then combine them inside the inventory.
- Take the lit match from the inventory and use it on the candle.
- Pull the handle to open the blinds.
- Find the remaining hidden objects.

- From the map, go to "Douglasses’ World".
- Locate all the hidden objects.
- Back at the map, select "The Edwards’ Home."
- Turn on the light by clicking the light switch.
- Locate all the hidden objects as they become available.
- Take each key from the inventory and use it on the color coordinated locks.
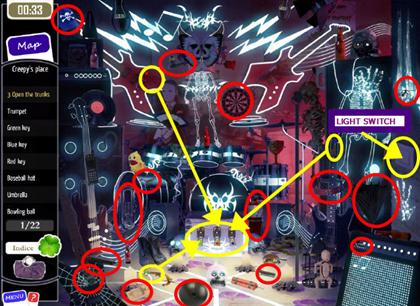
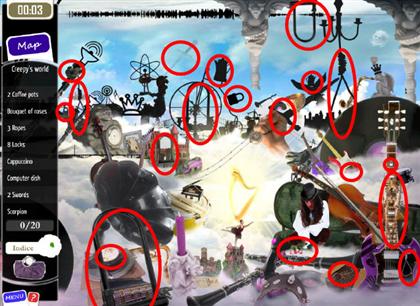
- On the map, select "Creepy’s World."
- Locate all the hidden objects as they become available.
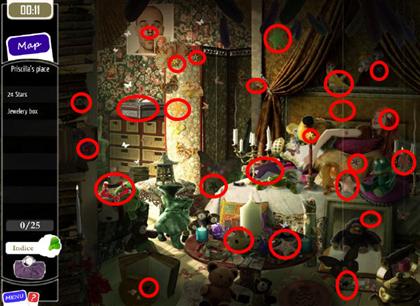
- Return to the map and go to "Priscilla’s Home."
- Locate the twenty-four stars and jewelry box.
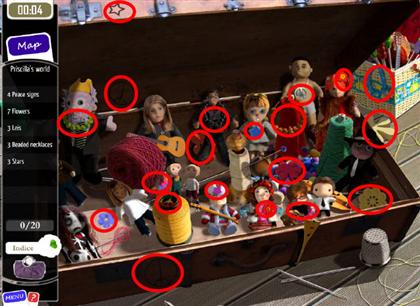
- On the map, choose "Priscilla’s World."
- Locate all the hidden objects.
Chapter Eight: Revelations
- Read Miss Teri’s journal and go to the map.
- Select "On the Killer’s Trail."
- Ring the doorbell. Additional areas will appear in this scene as you play.
- Take the key.
- Click on the white door at the end of the hall.
- Move the green shower curtain to find Mike’s body.
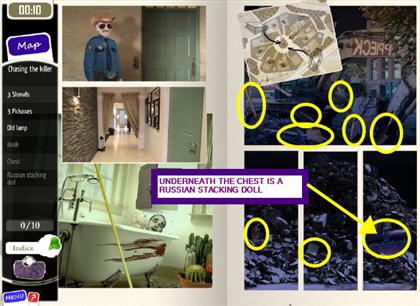
- Take the key from the inventory and open the cupboard.
- Take the agenda.
- Take the Russian stacking doll.
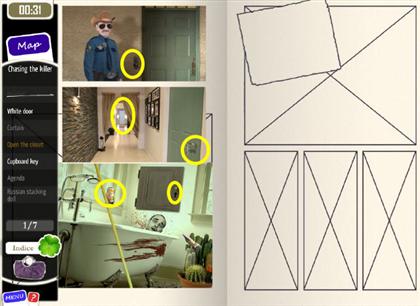
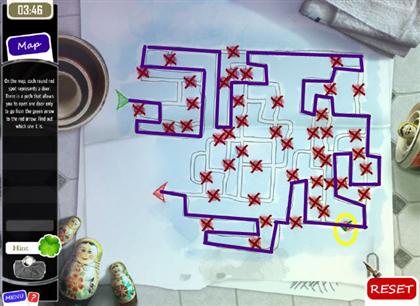
- The object of this mini-game is to find the path in which you will only pass through one red "door."
- Selecting a red dot will bring up the option to choose a red "X" to eliminate it as a possibility, or a green check to indicate it is the correct choice.
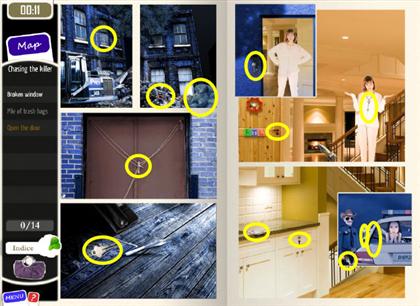
- Locate all the hidden objects as they become available.
- Additional areas will appear in this scene as you play.
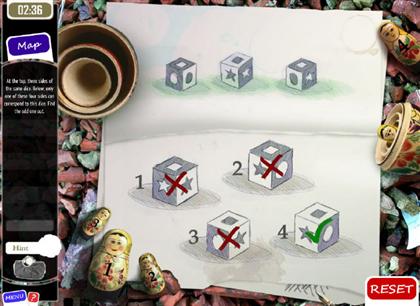
- In this mini-game, locate the cube that is the same as the ones displayed at the top of the screen.
- Selecting a cube will bring up the option to choose a red "X" to eliminate it as a possibility, or a green check to indicate it is the correct choice.
- Locate all the hidden objects as they become available.
- Additional areas will appear in this scene as you play.
- Take the pincers from the inventory and use them on the door chains.
- Take the key.
- Ring the doorbell.
- Take the key from Mrs. Porter.
- Take the key from the inventory and unlock the drawer.
- Take the screwdriver and use it to open the triplet’s door.
- Take the ID card and the handcuffs.
 Congratulations!
Created at: 2009-10-18