

Walkthrough Menu
- General Tips
- Chapter 1: The Hotel
- Chapter 2: The Desert
- Chapter 3: Cairo
- Chapter 4: The Island
- Chapter 5: Basement
- Chapter 6: Control Room
General Tips
- This is the official guide for Dangerous Games: Illusionist.
- This guide will not mention each time you have to zoom into a location; the screenshots will show each zoom scene.
- Hidden-object puzzles are referred to as HOPs. This guide will not show screenshots of the HOPs, however, it will mention when an HOP is available and the inventory item you'll collect from it.
- This guide will give step-by-step solutions for all puzzles which are not random. Please read the instructions in the game for each puzzle.
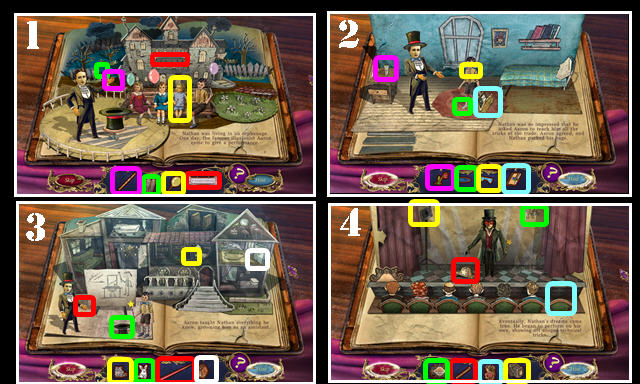
Chapter 1: The Hotel
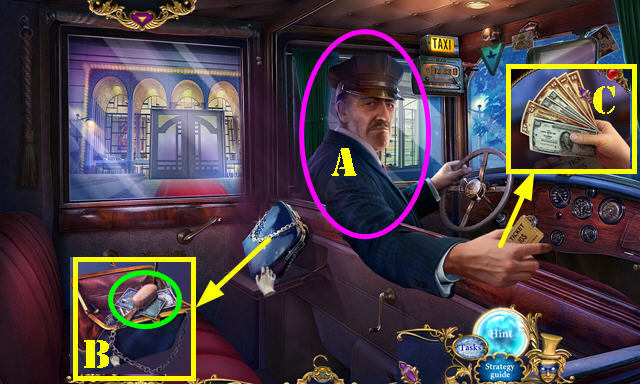
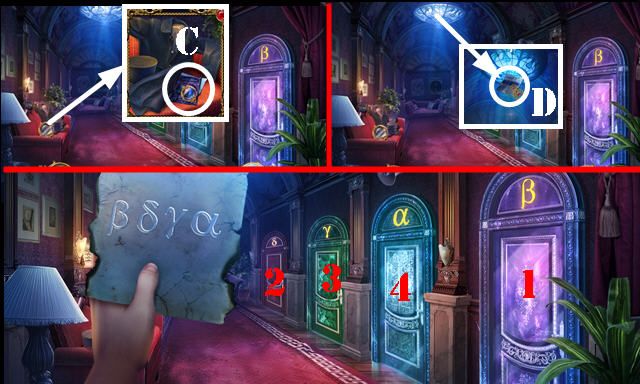
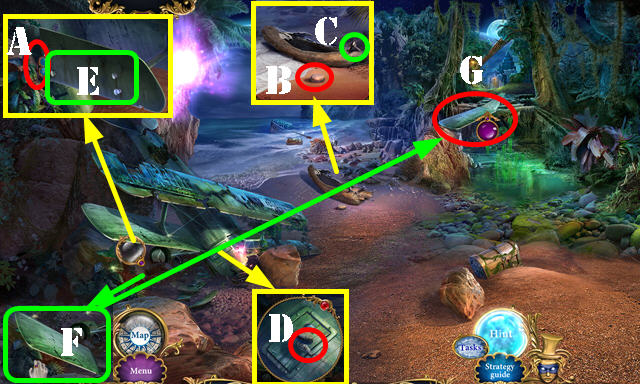
- Talk to the driver (A).
- Take the HANDBAG and open it; move the brush, take the INVITATION, LIPSTICK and MONEY (B).
- Place the MONEY and fan it; hand the $5, $2, $1, $2 bills (C).
- Open the car door and exit.
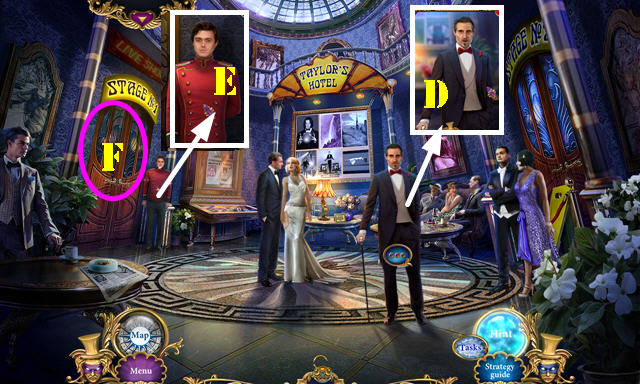
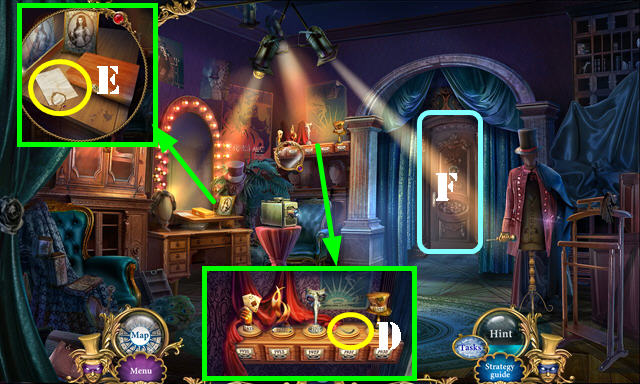
- Talk to the man (D).
- Give the INVITATION (E).
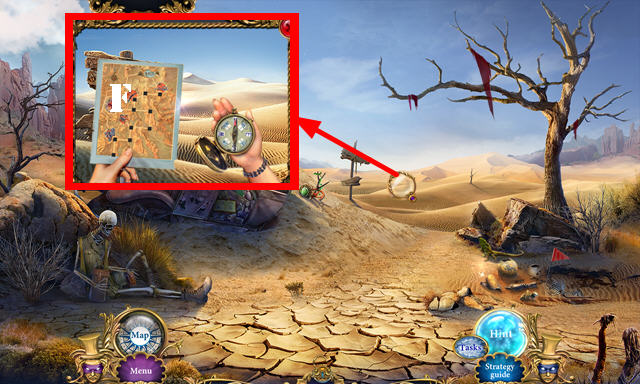
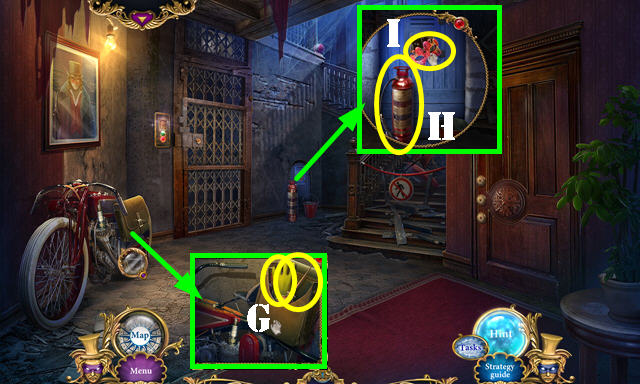
- Go through the door (F).
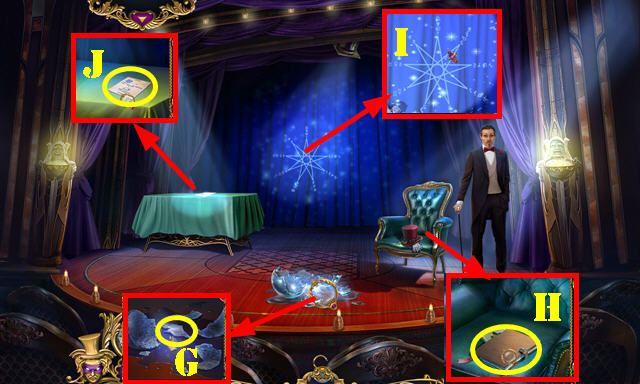
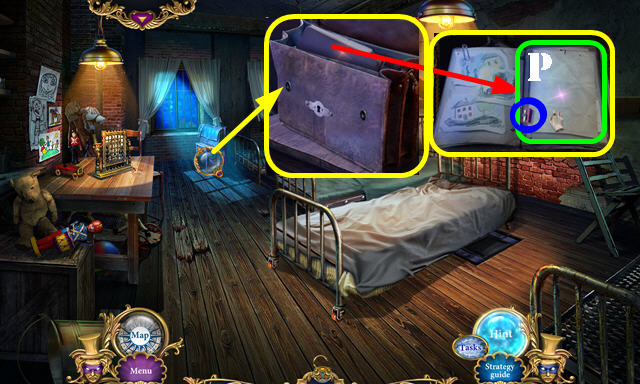
- Take the SHARP GLASS (G).
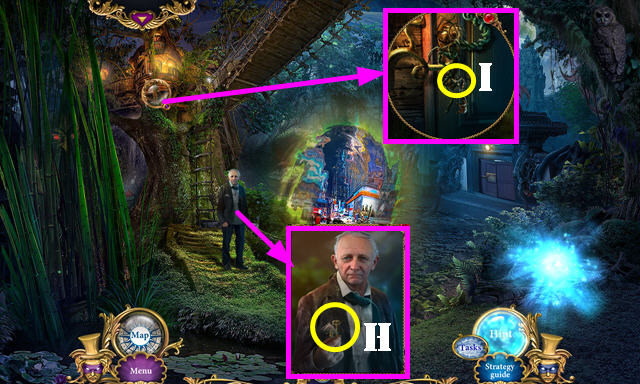
- Remove the items; look at the book (H) and take the RING.
- Open the clasps on the RING; take the DIAMOND (inventory).
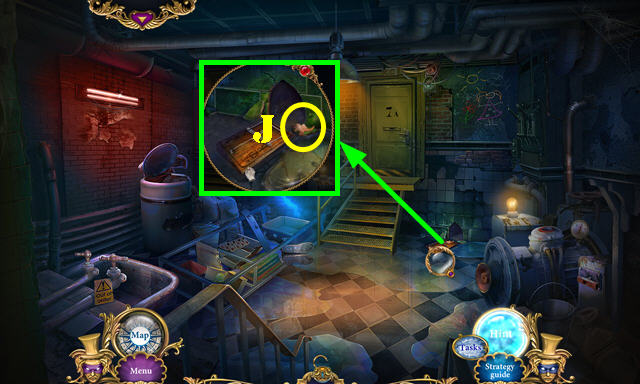
- Use the SHARP GLASS to get the MAGIC CLOTH (I).
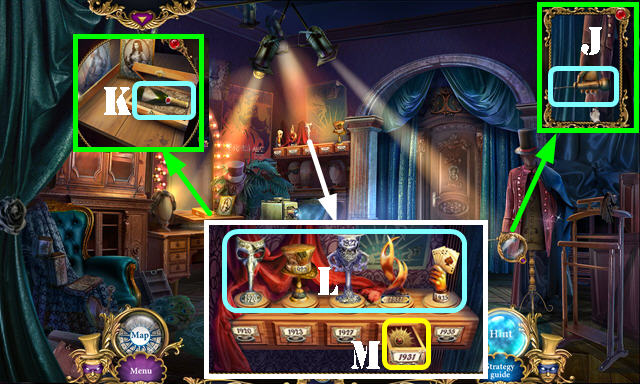
- Read the note (J).
- Walk down.
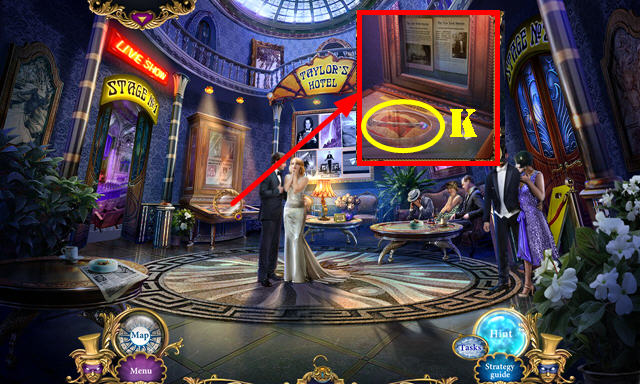
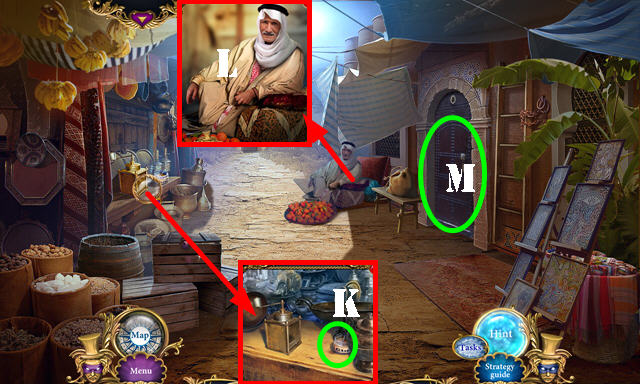
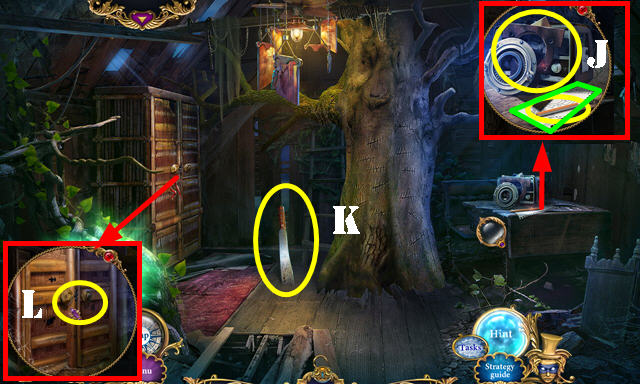
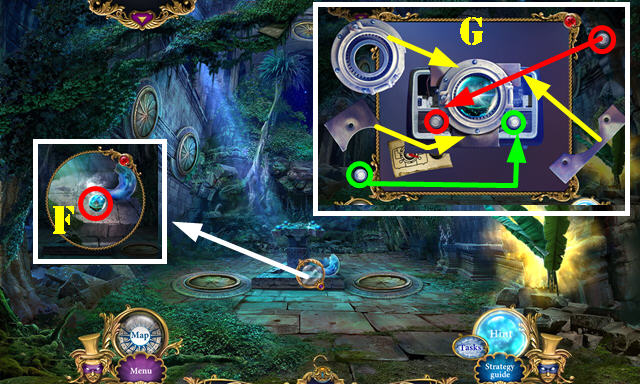
- Use the DIAMOND; remove the glass and take the MAGIC WAND (K).
- Return to the Stage.
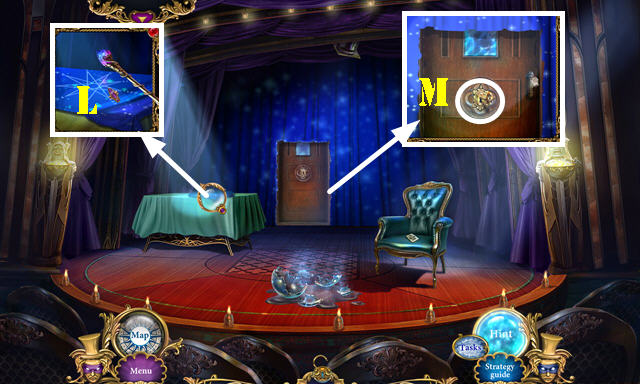
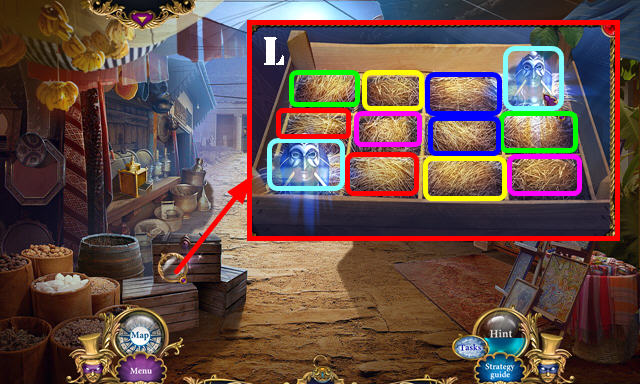
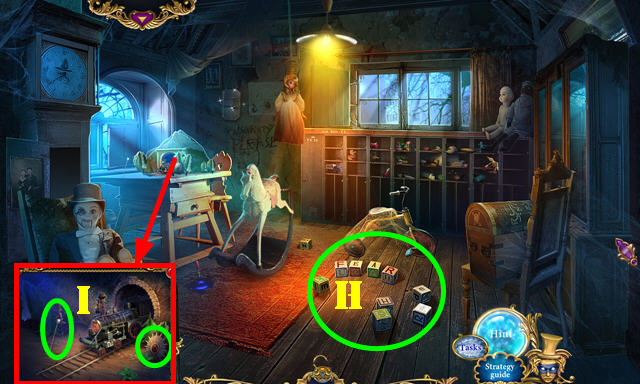
- Place the MAGIC CLOTH and MAGIC WAND (L) for a HOP; play it to get the KEY.
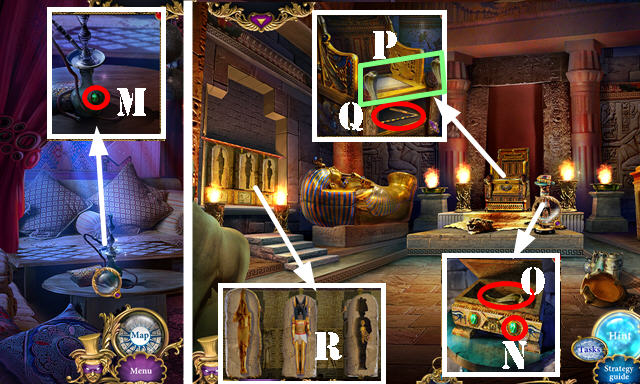
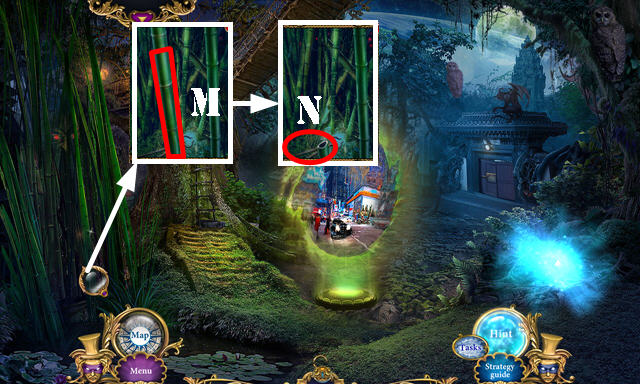
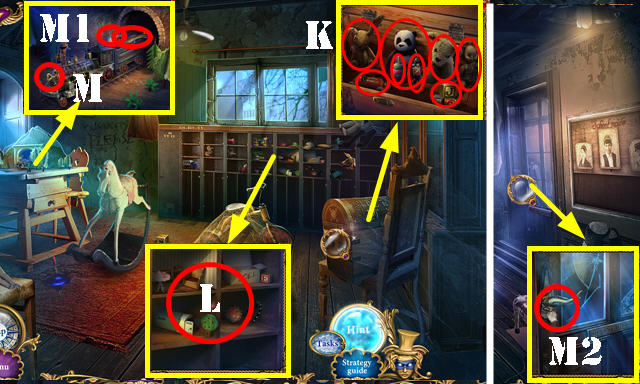
- Use the KEY (M) and go through the door.
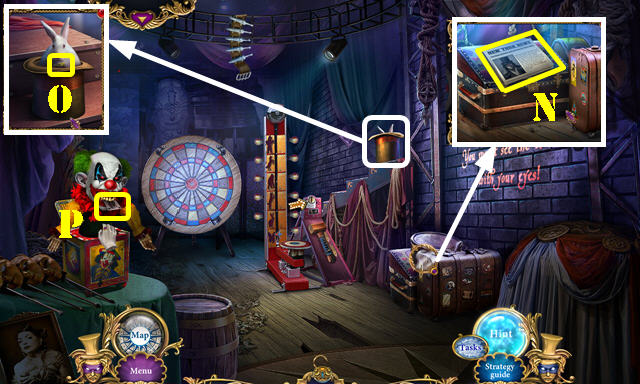
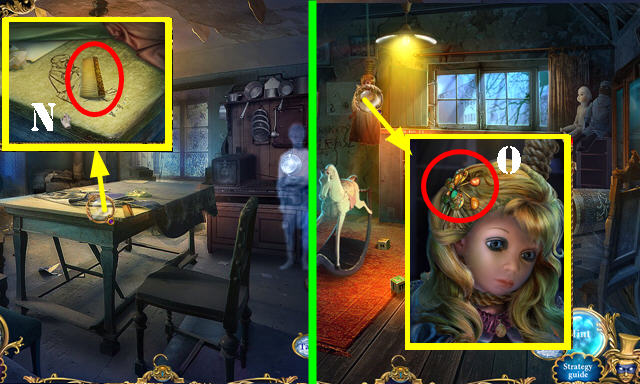
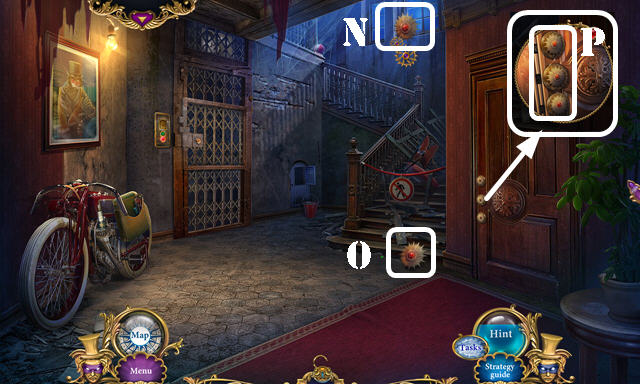
- Move the suitcases; look at the newspaper (N).
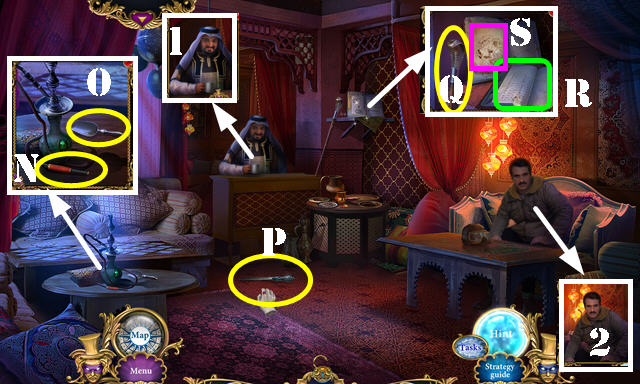
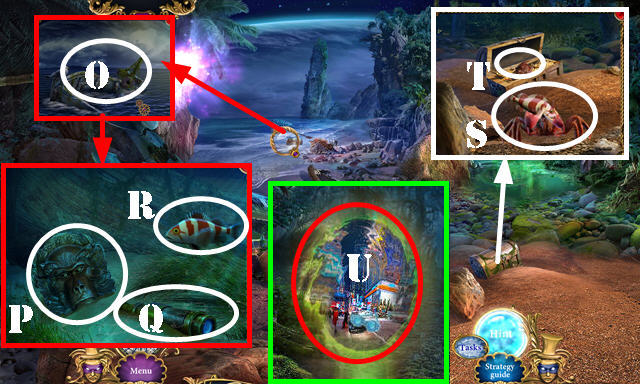
- Use the MAGIC WAND; take the CASE EMBLEM (O).
- Touch the box; take the CARD 1/3 (P).
- Walk down.
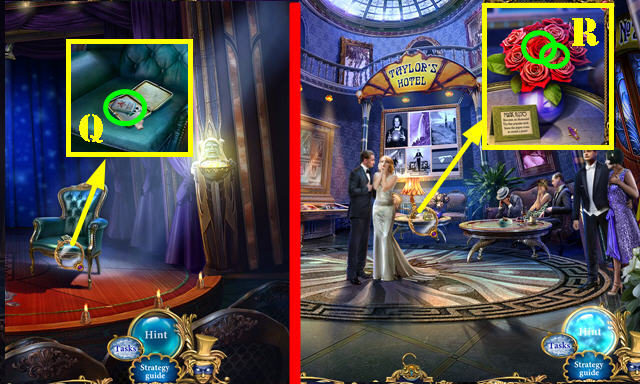
- Place the CASE EMBLEM and open the case; take the LIGHTER and the CARD 2/3 (Q).
- Walk down.
- Open the LIGHTER and flick it 3x; take the LIT LIGHTER (inventory).
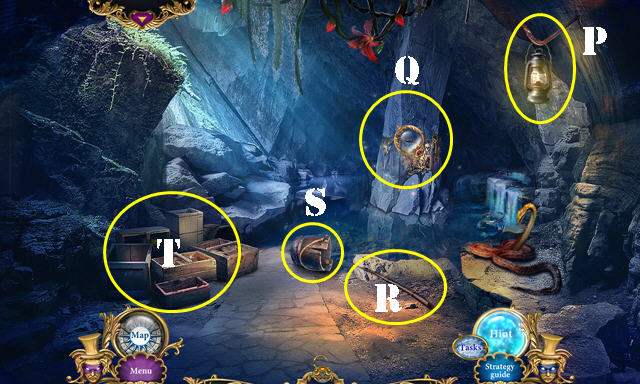
- Use the LIT LIGHTER; take the RED ROSE and TOKEN (R).
- Return to Backstage.
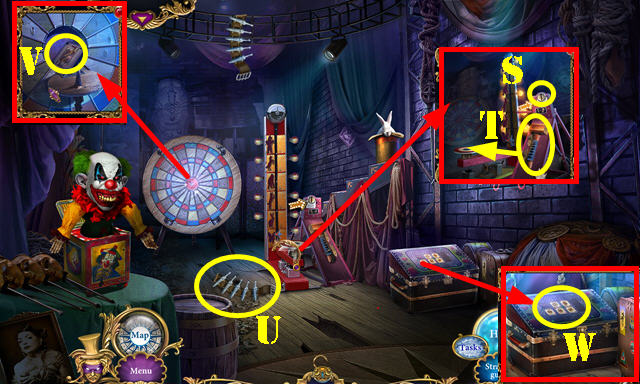
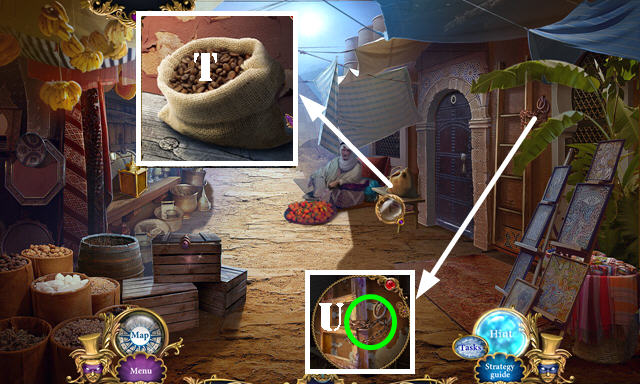
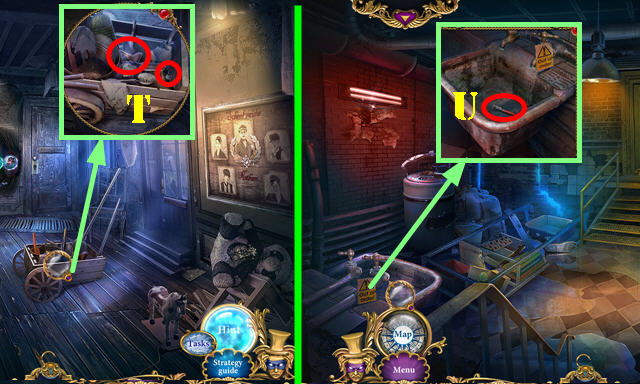
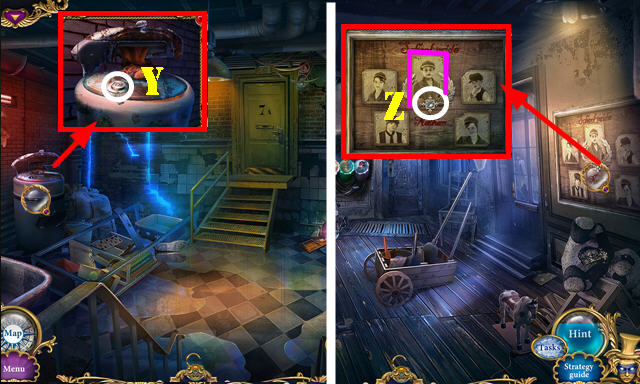
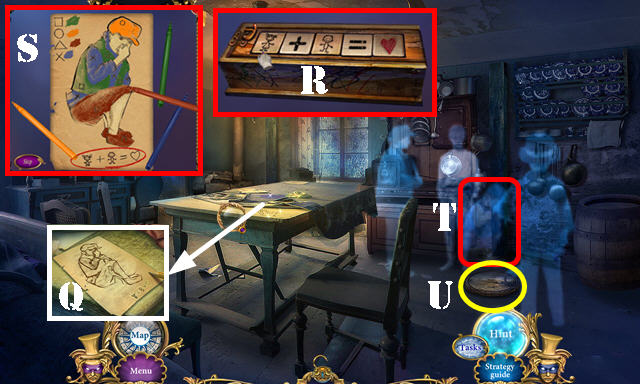
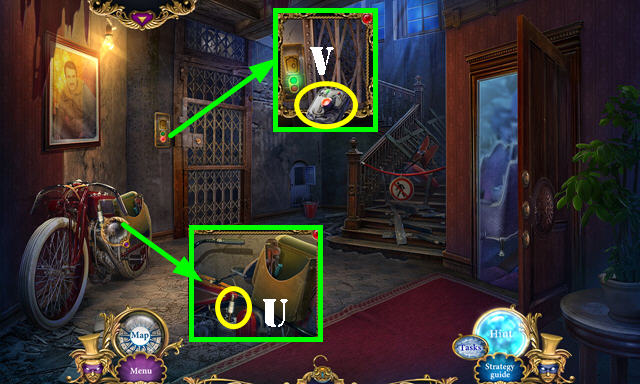
- Use the TOKEN (S); take and then use the HAMMER (T).
- Take the KNIVES (U).
- Throw the KNIVES; take the CARD 3/3 (V).
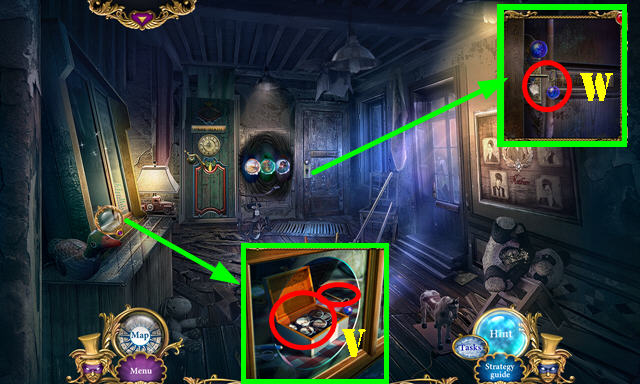
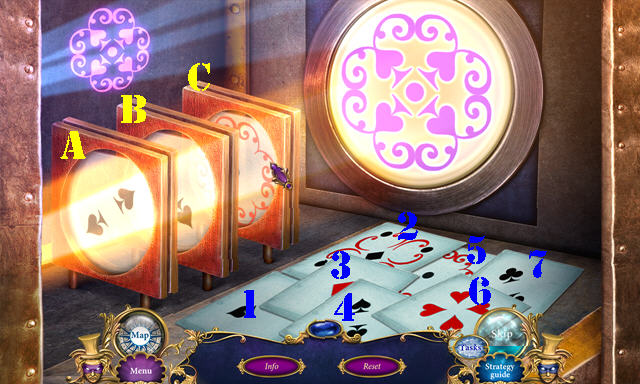
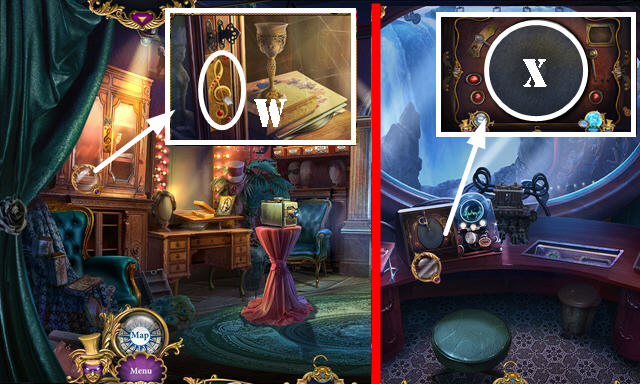
- Place the 3 CARDS for a puzzle (W).
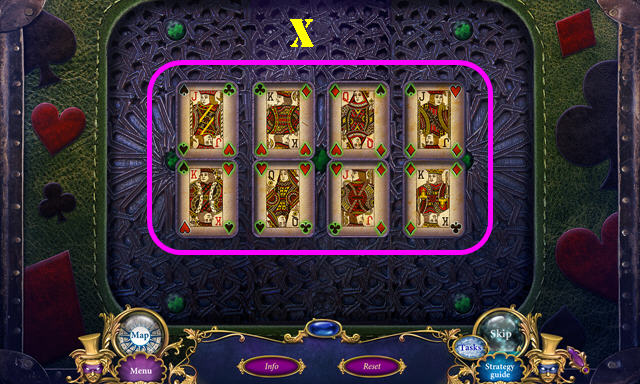
- Solution (X).
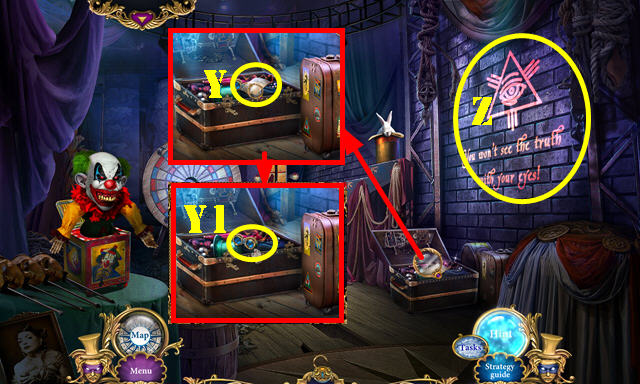
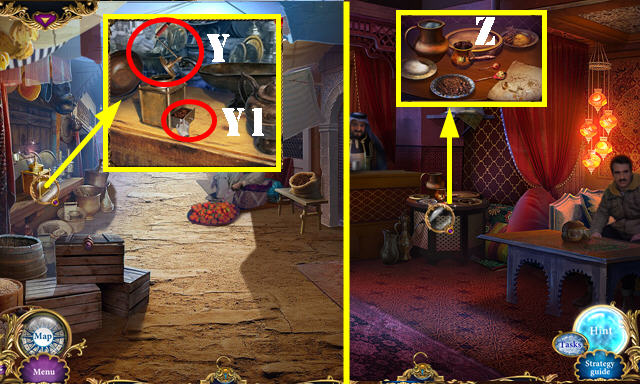
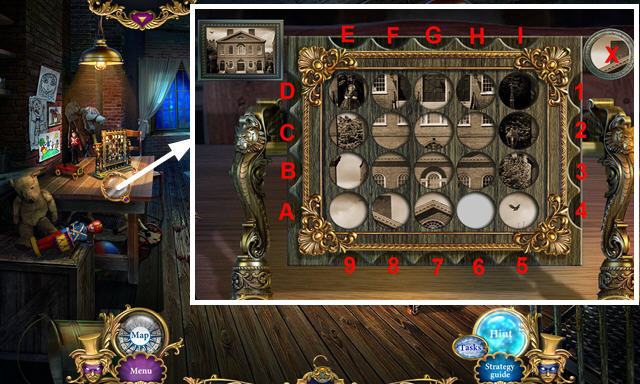
- Open the suitcase; read the note (Y) and take the TRUTH GOGGLES (Y1).
- Place the TRUTH GOGGLES for a puzzle (Z).
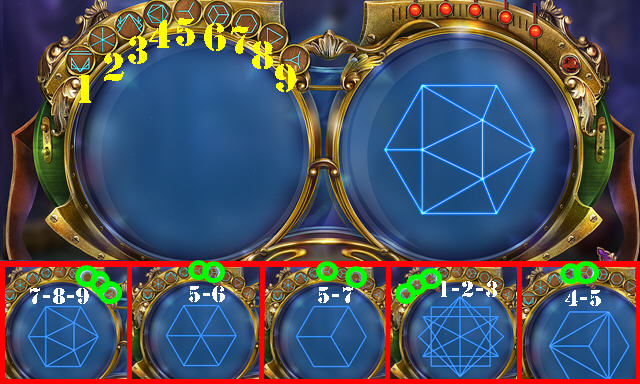
- First level (7-8-9).
- Second level (5-6).
- Third level (5-7).
- Fourth level (1-2-3).
- Fifth level (4-5).
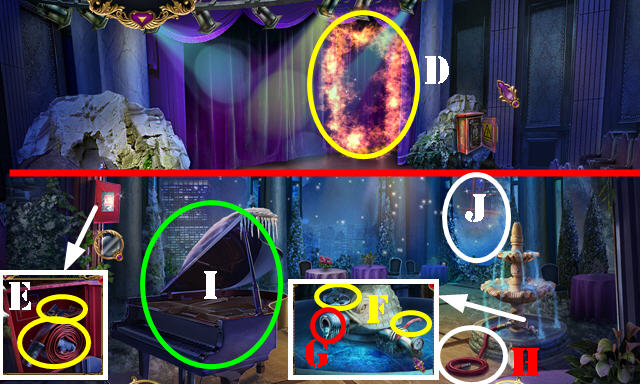
- Go through the wall.
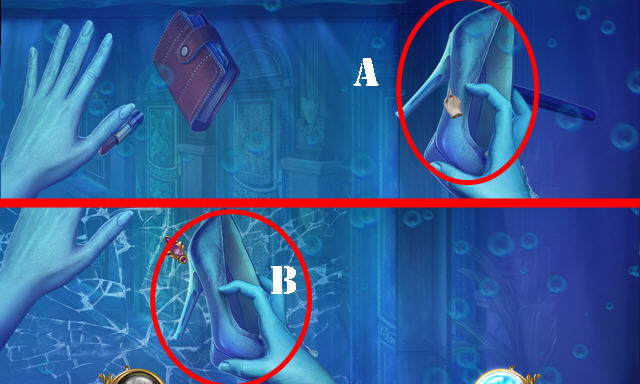
- Take the shoe (A); remove all other items.
- Crack the glass with the shoe (B).
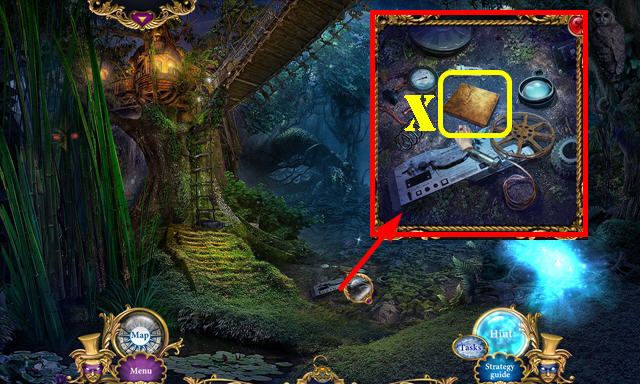
- Move the items and look at the card (C); take the PAPER.
- Place the PAPER (D).
- Touch the doors in order 1-4.
- Take the STACK OF BOOKS 1/5-5/5 (green).
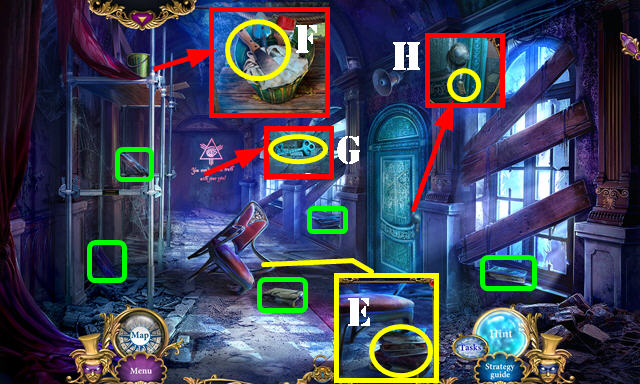
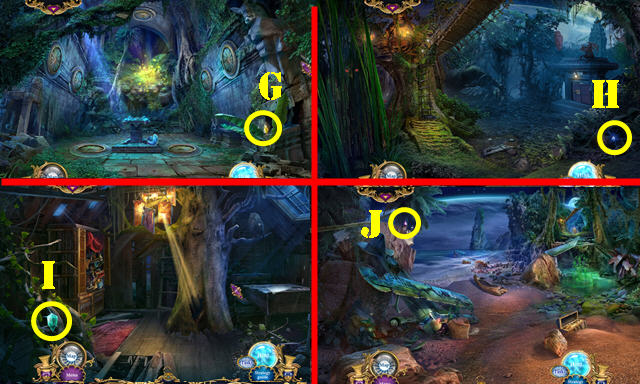
- Place the STACK OF BOOKS (E); try to take the scraper (F) to activate a HOP; play it to get the SCRAPER.
- Touch the wall. Use the SCRAPER; take the KEY (G).
- Open the lock and use the KEY (H).
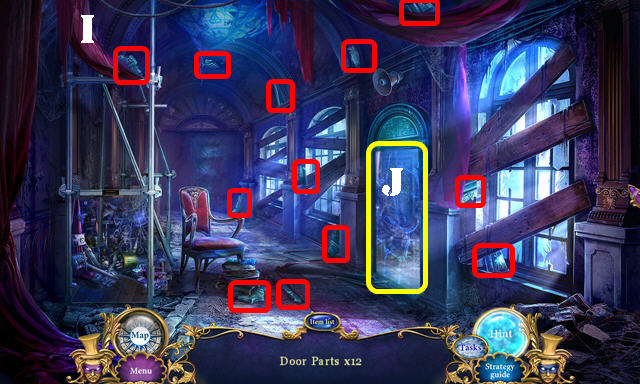
- Find the 12 DOOR PARTS (I).
- Go through the door (J).
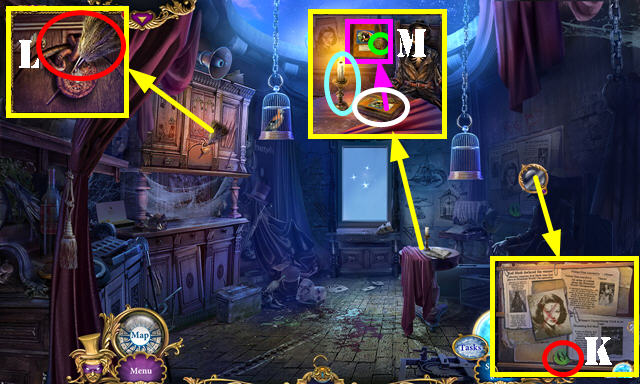
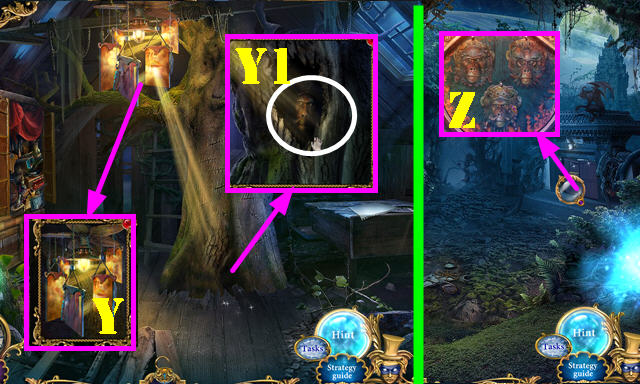
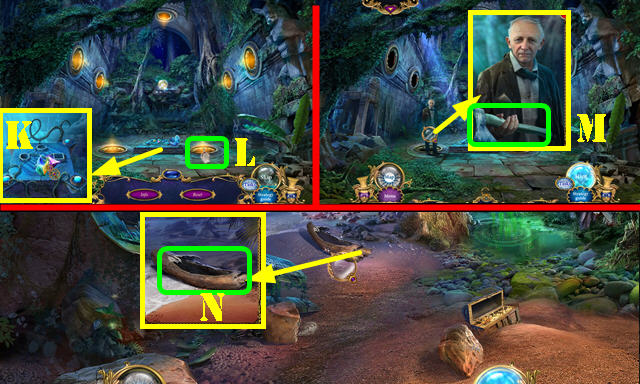
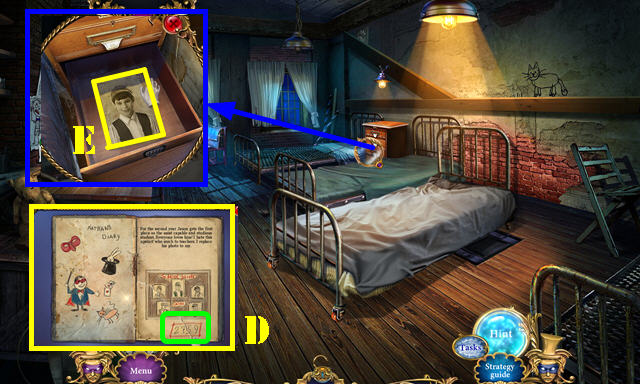
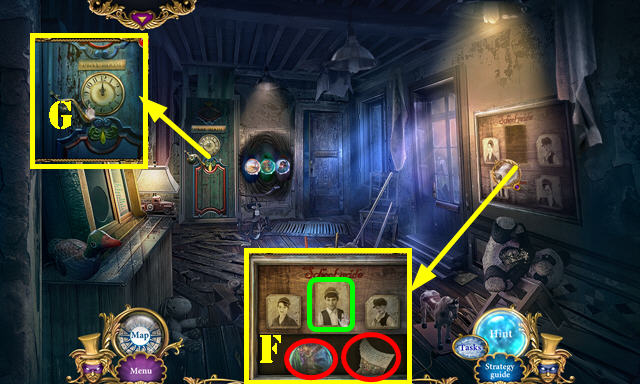
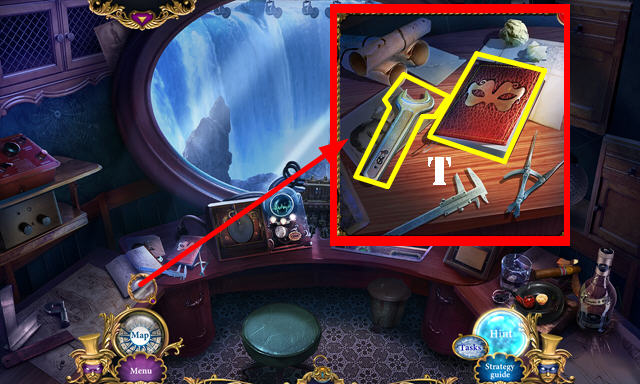
- Take the DIARY EMBLEM (K); look at the articles.
- Take the FEATHER DUSTER (L).
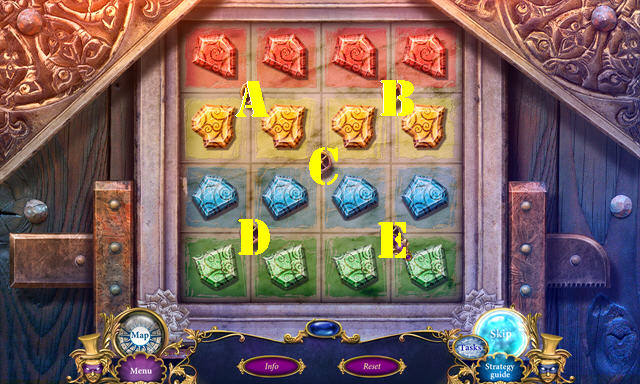
- Use the LIT LIGHTER (light blue) and the FEATHER DUSTER (white). Place the DIARY EMBLEM (M) for a puzzle.
- Solution (1-4).
- Take the ACID-TRICK GLOVE and look at the note.

- Use the ACID-TRICK GLOVE (N) to activate a HOP; play it to get the BIRD.
- Touch the left cage and then place the BIRD (O).
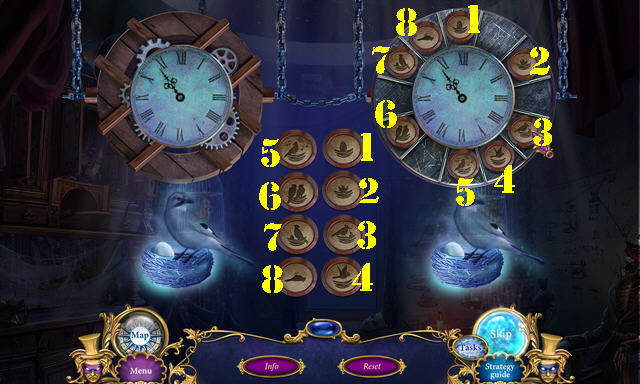
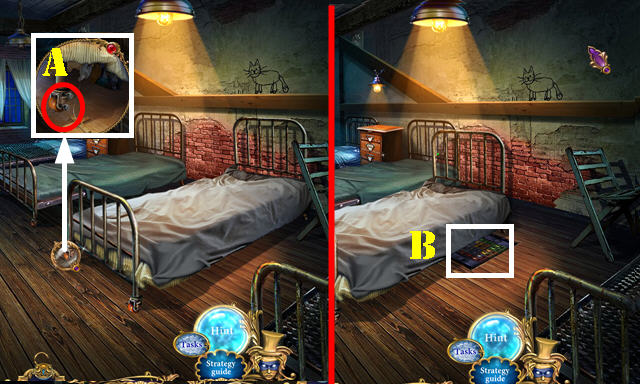
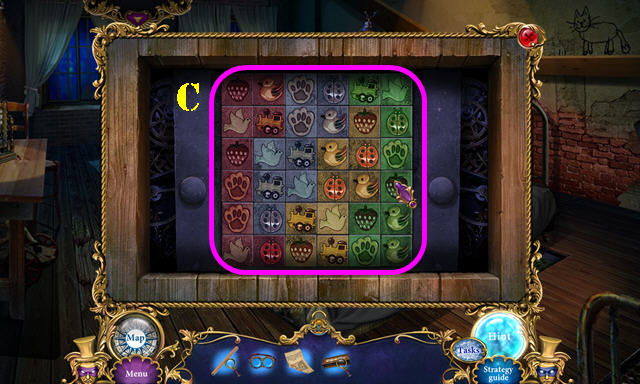
- Look at the clocks for a puzzle (P).
- Solution (1-8).
Chapter 2: The Desert
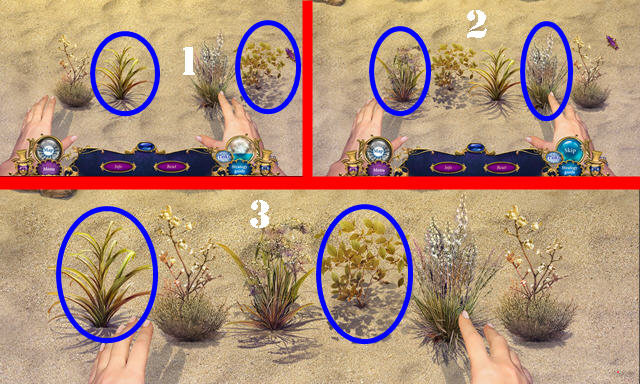
- Grab the plants in order: 1-3.
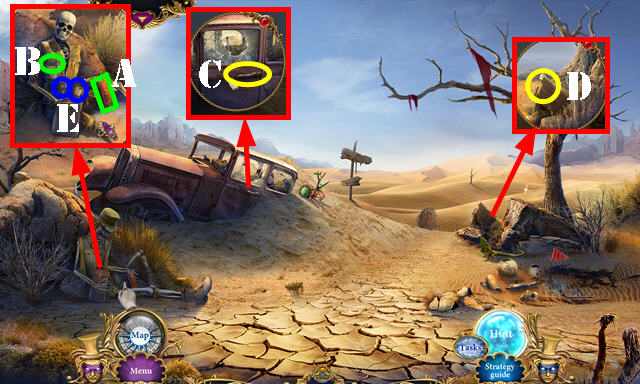
- Take the DICTIONARY (A) and RUSTY RAZOR (B).
- Open the door for a HOP (C); play it to get the COMPASS.
- Open the RUSTY RAZOR (inventory).
- Use the RUSTY RAZOR (D) to get the SHARP RAZOR.
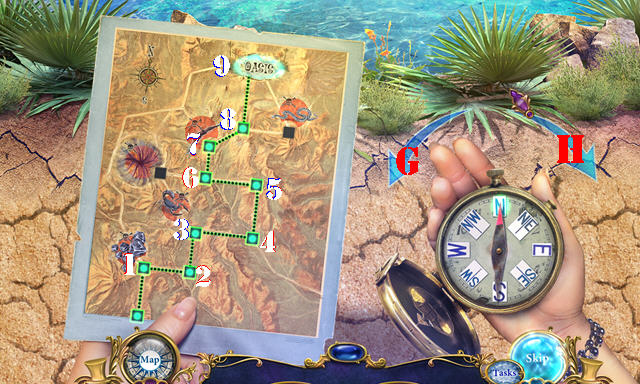
- Use the SHARP RAZOR; open the bag and take the ANUBIS FIGURINE and MAP (E).
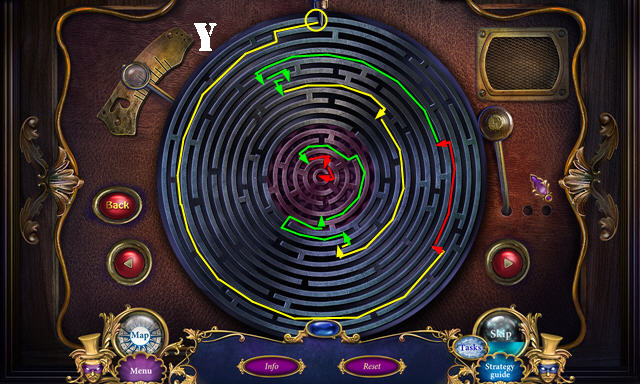
- Place the MAP and COMPASS (F) for a puzzle.
- Solution: 1-Hx2-2-Gx2-3-Hx2-4-Gx2-5-Gx2-6-Hx2-7-H-8-G-9.
- Give the DICTIONARY (I) to the man and swap the words (J). Talk to the man and take the SHOVEL (K).
- Take the CINNAMON and LAMP (L).
- Take the SHAWL from the LAMP (inventory). Then, assemble the lamp as shown (M). Open the lamp; use the LIT LIGHTER on the wick and close it; take the LAMP.
- Walk down.
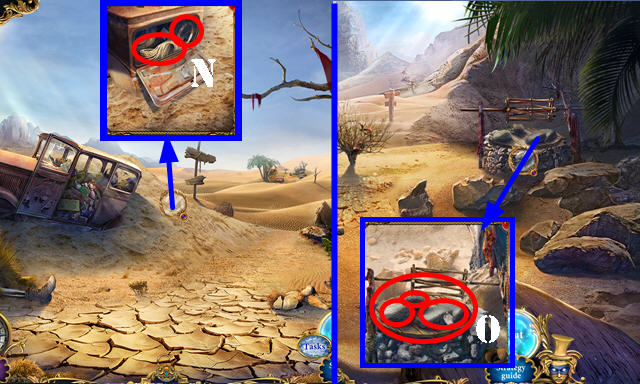
- Use the SHOVEL; open the box; take the ROPE and RIMS 1/2 (N).
- Go forward.
- Remove the three rocks and the cover (O). Use the ROPE in the well.
- Hang the LAMP (P).
- Play the HOP (Q) to get the TORCH.
- Take the FISHING ROD (R) and BROKEN BUCKET (S).
- Play the puzzle (T).

- Solution (U).
- Take the SCRAPER (V).
- Walk down.
- Use the SCRAPER to get the DRIED RESIN (W).
- Walk down.
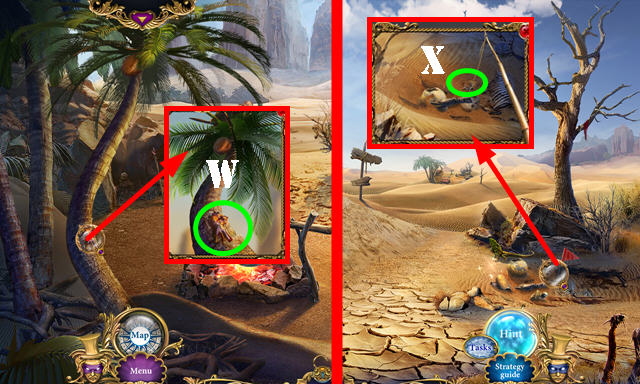
- Use the FISHING ROD to get the GLOVE (X).
- Go forward.
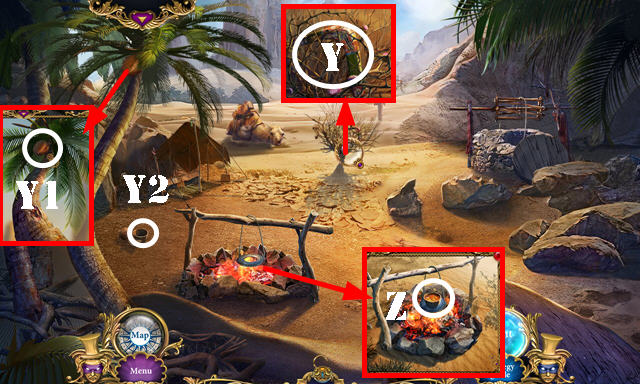
- Use the GLOVE; take the BOOMERANG (Y).
- Use the BOOMERANG (Y1); take the COCONUT HALF (Y2).
- Place the SHAWL on the TORCH; take the TORCH (inventory).
- Place the COCONUT HALF and then put the DRIED RESIN in it (Z). Dip the TORCH in the resin to get the LIT TORCH.
- Go to the Grotto.

- Use the LIT TORCH (A); take the RIMS 2/2 (B).
- Place the 2 RIMS on the BROKEN BUCKET. Assemble the pieces and take the EMPTY BUCKET (inventory-C).
- Place the EMPTY BUCKET; take the BUCKET WITH WATER (D).
- Walk down.
- Give the BUCKET WITH WATER (E) to go to Cairo.
Chapter 3: Cairo
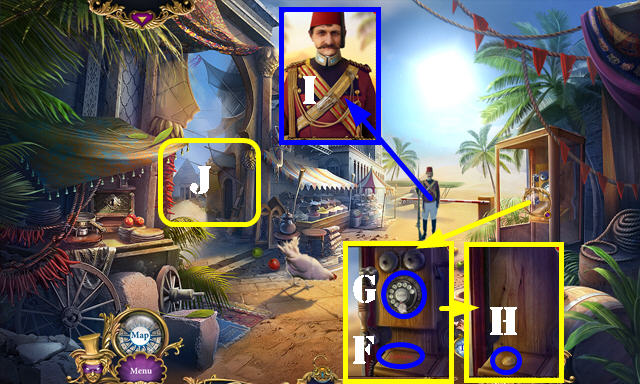
- Use the LIPSTICK (F).
- Use the dial (G).
- Take the COIN 1/2 (H).
- Talk to the man (I).
- Go to the Market (J).
- Take the GLUE (K).
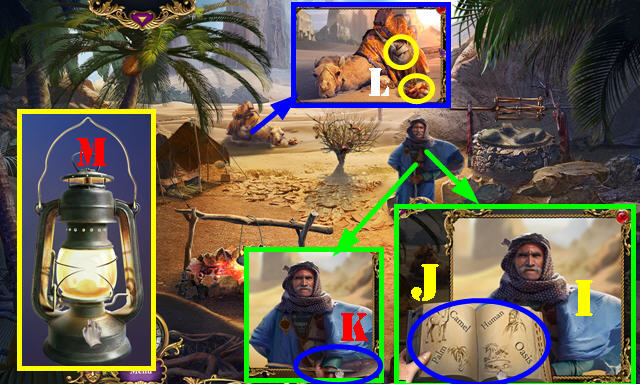
- Talk to the man (L).
- Enter the Cafe (M).
- Talk to the men (1-2).
- Take the MOUTHPIECE (N), TROWEL (O), FILE (P) and CANE (Q).
- Touch the CANE 3x; take the COBRA 1/2 (inventory).
- Place the DICTIONARY (R); take the COFFEE RECIPE (S).
- Walk down.
- Open the bag. Use the TROWEL to get the TROWEL WITH COFFEE (T).
- Use the FILE (U); take the LADDER.
- Walk down.

- Place the TROWEL WITH COFFEE; take the ROASTED COFFEE BEANS (V).
- Place the LADDER for a HOP (W); play it to get the BOX KEY.
- Use the BOX KEY (X); take the SUGAR.
- Return to the Market.
- Remove the broken handle. Place the MOUTHPIECE; open it and place the ROASTED COFFEE BEANS (Y). Close it and spin it. Open the drawer and take the GROUND COFFEE (Y1).
- Go to the Cafe.
- Place the COFFEE RECIPE, CINNAMON, GROUND COFFEE and SUGAR for a puzzle (Z).
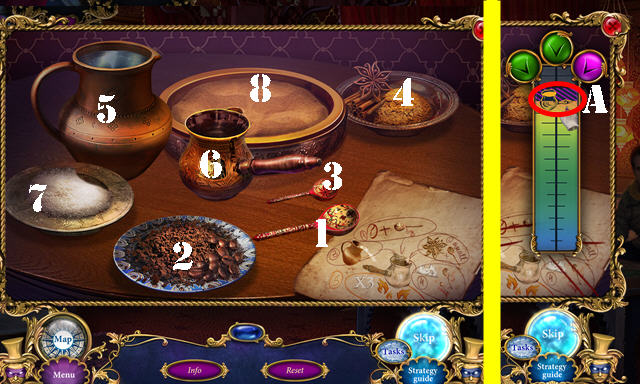
- Solution: 1-2, 3-4, 5-6, 1-7, 3-7.
- Place 6-8, then stop the meter once it reaches the pot (A). Repeat this step two more times (you have to place 6-8 on each of the tries).
- Take the ARABICA COFFEE.
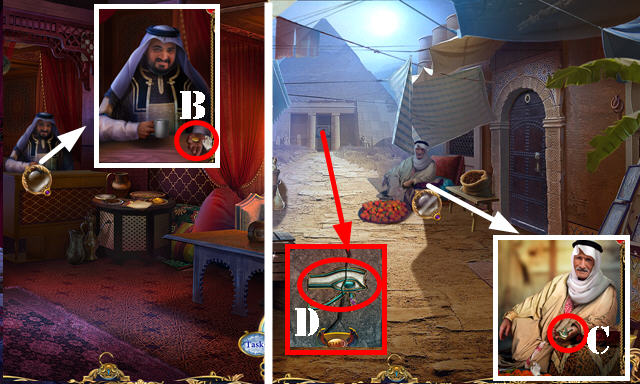
- Give him the ARABICA COFFEE; take the COIN 2/2 (B).
- Walk down.
- Give him the 2 COINS; take the EYE OF HORUS (C).
- Place the EYE OF HORUS for a puzzle (D).
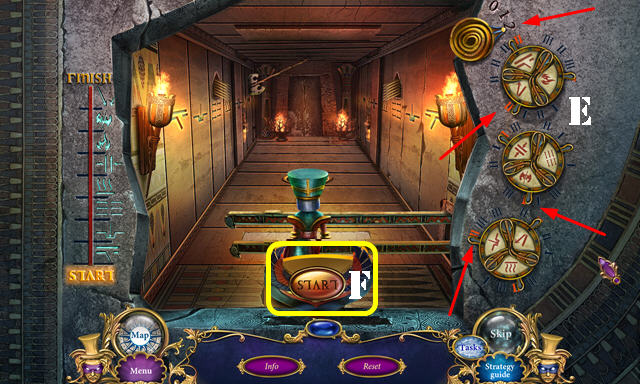
- Solution (E). Press Start (F).
- Go forward.

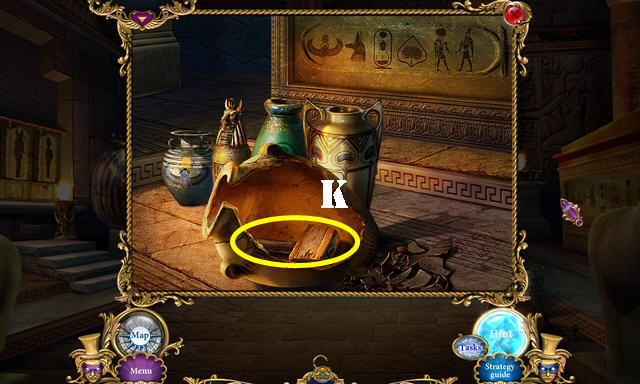
- Take the BROKEN FIGURINE (G) and TWEEZERS (H).
- Assemble the BROKEN FIGURINE in inventory (I). Put the GLUE on it and touch it; take the OSIRIS FIGURINE.
- Zoom into the vases (J).
- Place the VASES as shown; take the HAMMER (K).
- Walk down.
- Use the HAMMER; match the pairs (L).
- Take the TUT FIGURINE.
- Go to the Cafe.
- Use the TWEEZERS to get the JADE (M).
- Go to the Pyramid.
- Place the JADE (N); take the COBRA 2/2 (O).
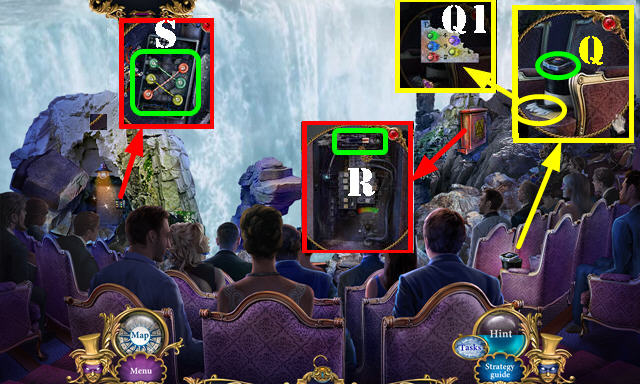
- Place the 2 COBRAS (P); take the FLAIL (Q).
- Place the TUT FIGURINE, ANUBIS FIGURINE, and OSIRIS FIGURINE for a puzzle (R).
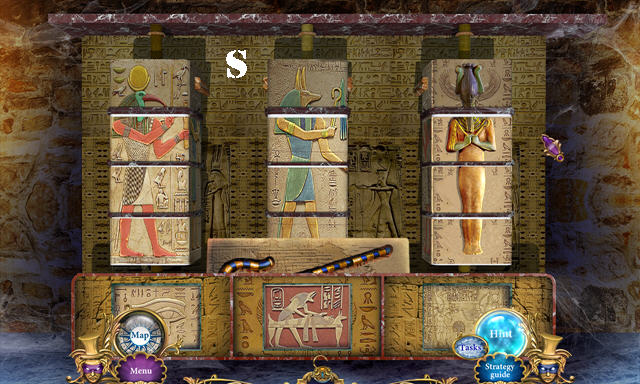
- Solution (S).
- Take the CROOK.
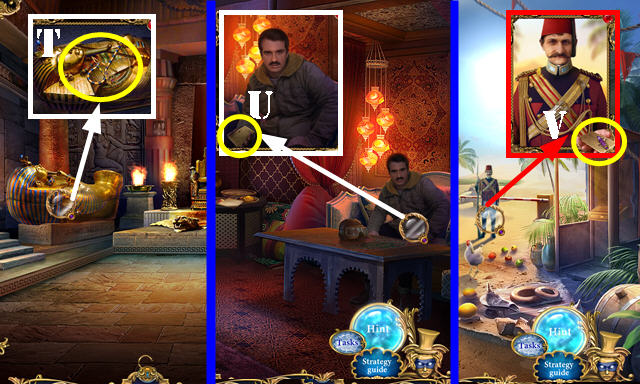
- Place the FLAIL and CROOK (T) for a HOP; play it to get the GOLDEN SCARAB.
- Return to the Cafe.
- Give the GOLDEN SCARAB; take the PILOT'S LICENSE (U).
- Walk down twice.
- Give the PILOT'S LICENSE (V).
Chapter 4: The Island
- Take the TRUTH GOGGLES (A), STONE (B), and FUNNEL (C).
- Use the STONE to activate a HOP (D); play it to get the WRENCH.
- Use the WRENCH (E); take and then place the wing (F-G).
- Go forward.
- Talk to the man; give him the RED ROSE; take the TREE HOUSE KEY (H).
- Use the TREE HOUSE KEY (I) and enter.
- Take the PENCIL and RADIO; look at the note (J).
- Take the MACHETE (K).
- Touch the door and then open it for a HOP (L): play it to get the UNDERWATER MASK.
- Walk down.
- Use the MACHETE (M) to receive the BAMBOO SPEAR; take the TONGS (N).
- Walk down.
- Use the UNDERWATER MASK (O); take the MASK 1/3 (P) and SPYGLASS (Q). Use the BAMBOO SPEAR to get the FISH (R).
- Touch the scene. Give the FISH to the crab (S). Open the chest; take the MASK 2/3 (T).
- Go forward.
- Touch the SPYGLASS 4x; take the LENS (inventory).
- Remove the broken lens from the TRUTH GOGGLES and place the LENS (inventory).
- Place the TRUTH GOGGLES for a puzzle (U).

- Slide the lever (V) until one of the buttons (W) lights up green. Slide the lever again until all 3 buttons turn green to move on to the next image.
- Solutions 1-4.
- Move the pieces aside; take the METAL PLATE (X).
- Go to the Tree House.
- Place the METAL PLATE and touch it 5x(Y).
- Touch 2x; take the MASK 3/3 (Y1).
- Walk down.
- Place the 3 MASKS for a puzzle (Z).
- Solution: C-Dx3-Ax3-B-Cx2-B-C-Ax3-Cx2-A-Ex2-C-B-E-Cx2-Bx3-E-Cx3-Ex2-C-E-Cx3-E-C-E.
- Enter the Temple.
- Remove all the glass. Use the TONGS to get the CRYSTAL BALL (F).
- Assemble the RADIO (inventory) and place the CRYSTAL BALL. Take the CRYSTAL CATCHER (G).
- Touch the plant. Use the CRYSTAL CATCHER; take the CRYSTAL 1/4 (G).
- Walk down.
- Use the CRYSTAL CATCHER; take the CRYSTAL 2/4 (H).
- Go into the Tree House.
- Use the CRYSTAL CATCHER; take the CRYSTAL 3/4 (I).
- Walk down twice.
- Use the CRYSTAL CATCHER; take the CRYSTAL 4/4 (J).
- Return to the Temple.
- Place the 4 CRYSTALS for a puzzle (K).
- Select (L).
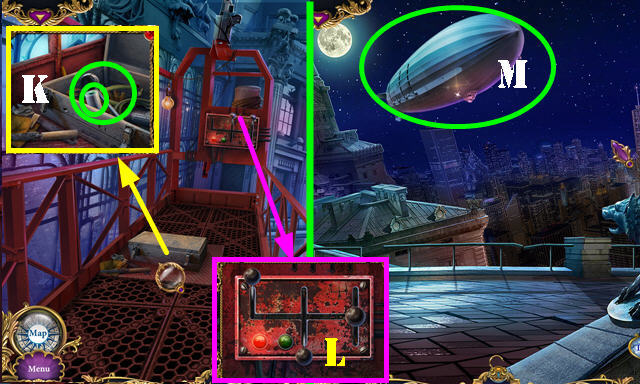
- Talk to Peter. Take the AXE (M).
- Walk down twice.
- Use the AXE (N).
Chapter 5: Basement
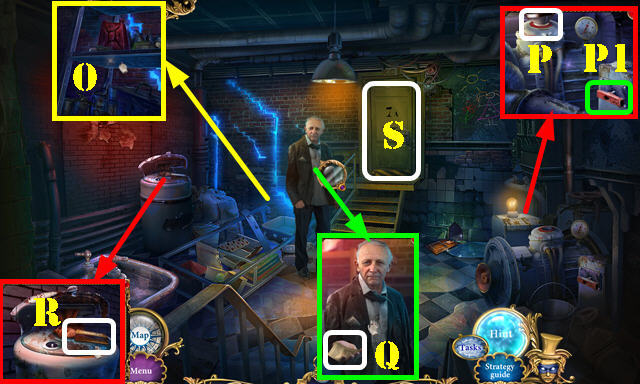
- Touch the shelf to activate a HOP (O); play it to get the KEROSENE.
- Remove the cover and place the FUNNEL (P); pour the KEROSENE in the funnel. Remove the funnel and replace the cover. Flip the handle (P1).
- Talk to Peter; take the DIARY PAGE (Q).
- Take the PENCIL BOX (R).
- Enter the Living Room (S).
- Take the PLUNGER; remove an item and take the BOLT 1/2 (T).
- Walk down.
- Use the PLUNGER; take the GLASS CUTTER (U).
- Return to the Living Room.
- Use the GLASS CUTTER and remove the glass; take the KEY and CHIPS (V).
- Use the KEY and enter the Bedroom (W).
- Place the CHIPS for a puzzle.
- Solution: X-D, X-4, X-D, X-4, X-D, X-4, X-D, X-4, X-D, X-4, X-C, X-3, X-C, X-3.
- X-C, X-3, X-C, X-3, X-C, X-3, X-D, X-7, X-6, X-5, X-9, X-8, X-A, X-H, X-F, X-I, X-G, X-E.
- Take the BUTTON (X).
- Return to the Basement.
- Place the BUTTON and push it; move the paper and take the SCREWDRIVER (Y).
- Go to the Living Room.
- Use the SCREWDRIVER to get the BOLT 2/2 (Z). Touch the picture (purple).
- Go to the Bedroom.
- Touch the scene 2x; place the 2 BOLTS (A); use the SCREWDRIVER.
- Zoom into the puzzle (B).
- Solution (C). Take the DIARY.
- Place the DIARY PAGE in the DIARY (inventory). Take the WARDROBE CODE (D) and turn the page.
- Place the WARDROBE KEY and enter the code 2759. Assemble JASON'S PHOTO and then take it (E).
- Walk down.
- Place JASON'S PHOTO; take the MOSAIC PART 1/3 and DIARY PAGE (F).
- Place the DIARY PAGE in the DIARY (inventory).
- Touch the clock and open the door (G). Go through it.
- Touch the blocks (H).
- Take the HATPIN and STAR 1/3 (I).
- Return to the Basement.
- Use the HATPIN; take the ELEPHANT SYMBOL (J).
- Return to the Playroom.
- Place the ELEPHANT SYMBOL; take the 8 TOYS (K).
- Place the 8 TOYS for a HOP (L); play it to get the TOY KEY.
- Use the TOY KEY and turn it (M); take the DOOR HANDLE and MOSAIC PART 2/3 (M1).
- Walk down.
- Place the DOOR HANDLE (M2) and pull it; go through the door.
- Take the COMB (N).
- Return to the Playroom.
- Use the COMB; take the BUTTERFLY COMB (O).
- Return to the Bedroom.
- Use the BUTTERFLY COMB; open the folder; take the PAPER and SHARPENER (P).
- Use the SHARPENER on the PENCIL (inventory).
- Return to the Dining Room.
- Place the PAPER and use the PENCIL; take the PAPER (Q).
- Enter the code on the PENCIL BOX (inventory) (R). Open it and take the MARKERS.
- Place the MARKERS on the PAPER (inventory) and color accordingly (S) to get the PAPER WITH MEMORY.
- Place the PAPER WITH MEMORY (T); take the MOSAIC PART 3/3 (U).
- Return to the Living Room.
- Place the 3 MOSAIC PARTS for a puzzle (V).
- Solution (W).
- Use the TRUTH GOGGLES for a HOP; play it to get the FILM REEL (X).
- Place the FILM REEL for a puzzle (Y).
- Level one: 1/A-4/B-5/C.
- Level two: 6/A-3/B-5/C.
- Level three: 7/A-1/B-2/C.
- Level four: 3/A-7/B-2/C.
- Take the ANTENNA (D).
- Read the note (E).
- Go to the Staircase (F).
Chapter 6: The Control Room
- Open the satchel; take the OIL and RUBBER GLOVE (G).
- Take the FIRE EXTINGUISHER (H).
- Place the RED MASK SYMBOL (I); open the door and take the AWARD.
- Walk down.
- Use the OIL; take the AWL (J).
- Use the AWL; take the CHAMPAGNE BOTTLE (K).
- Place the AWARD and swap them as shown (L). Take the STAR 2/3 (M).
- Go to the Staircase.
- Use the CHAMPAGNE BOTTLE (N); take the STAR 3/3 (O).
- Place the 3 STARS (P); go through the door.
- Use the TRUTH GOGGLES on any of the people for a HOP; play it to get the WIRES.
- Take the ELEVATOR REMOTE (Q) and PANEL CLUE (Q1).
- Open the box; use the RUBBER GLOVE to get the BATTERY (R).
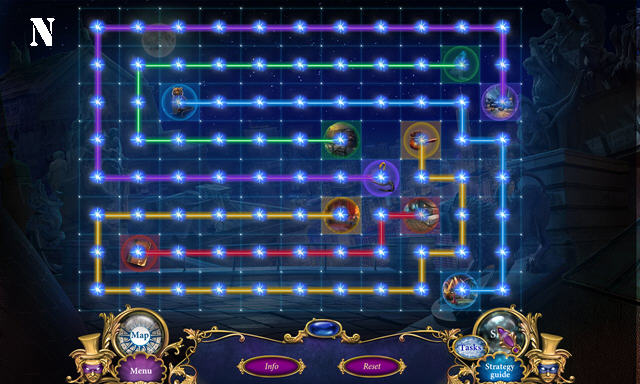
- Place the WIRES and connect them by selecting matching nodes (S).
- Enter the Control Room.
- Move the items; look at the book and take the WRENCH (T).
- Return to the Staircase.
- Use the WRENCH; take the SPRING (U).
- Place the BATTERY, ANTENNA, and SPRING on the ELEVATOR REMOTE (inventory). Close it and take the REMOTE.
- Place the REMOTE for a HOP (V); play it to get the TREBLE CLEF.
- Walk down.
- Place the TREBLE CLEF (W); open the door and remove all the items. Take the RECORD.
- Return to the Control Room.
- Place the VINYL RECORD for a puzzle (X).
- Solution (Y).
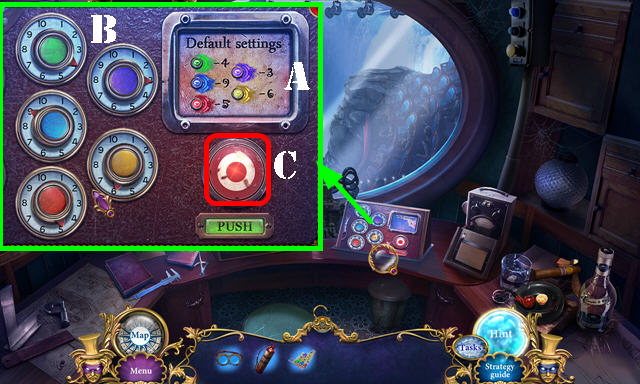
- Place the PANEL CLUE for a puzzle (A).
- Solution (B). Push (C).
- Level 2 solution (1-3).
- Use the FIRE EXTINGUISHER (D).
- Enter the Restaurant.
- Move the tables.
- Open the box; take the FLARE GUN and HOSE (E).
- Flip the lever and turn the valve (F). Place the HOSE (G) and touch it (H).
- Touch the piano (I) and exit (J).
- Open the toolbox; take the ROCKET and the LEVER (K).
- Place the ROCKET in the FLARE GUN (inventory) and then close it.
- Place the LEVER and position the levers as shown (L).
- Go forward.
- Use the FLARE GUN for a puzzle (M).
- Solution (N).
- Congratulations, you've completed Dangerous Games: Illusionist!
Created at: 2015-03-15