

Walkthrough Menu
- General Tips
- Chapter 1: Stage
- Chapter 2: Viewpoint
- Chapter 3: Train
- Chapter 4: Factory
- Chapter 5: Mansion
General Tips
- This is the official guide for Danse Macabre: Curse of the Banshee.
- This guide won't tell you when to zoom into a location; the screenshots show each zoom scene.
- Hidden-object puzzles are referred to as HOPs. Only the locations of the HOPs will be shown.
- Use the Map to fast travel to a location.
Chapter 1: Stage
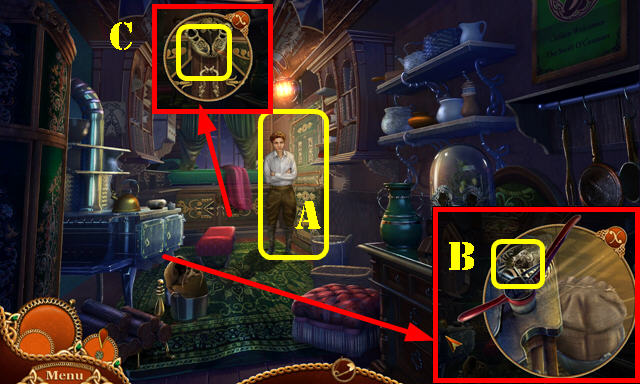
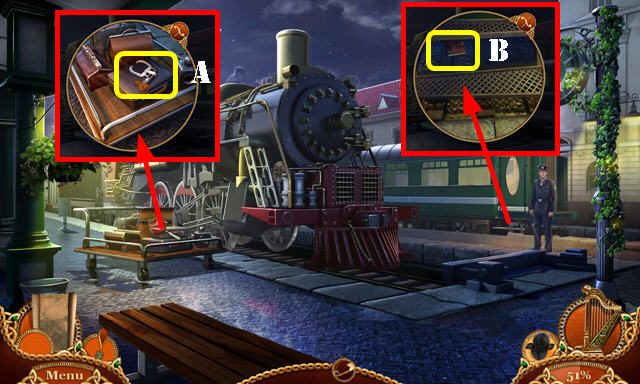
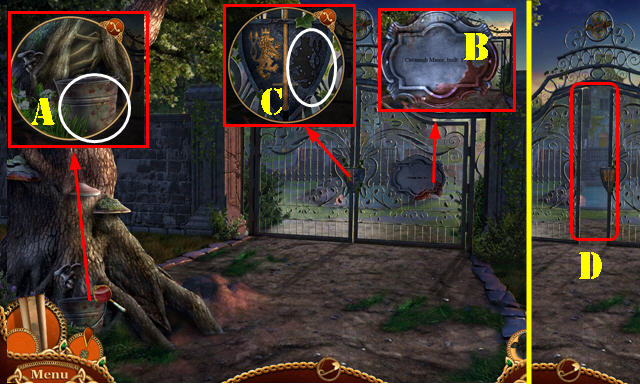
- Open door and talk (A).
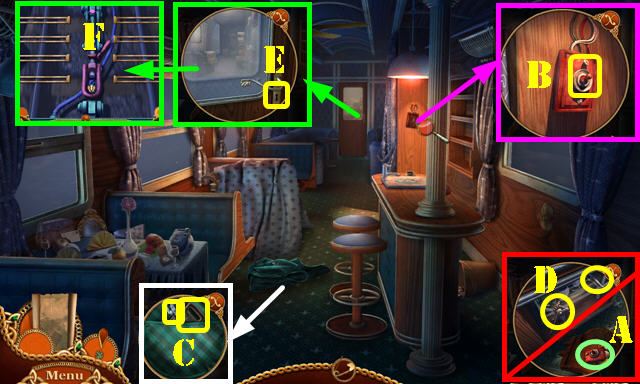
- Take LEAVES 1/2 and TROUPE LOGO (B).
- Select TROUPE LOGO twice.
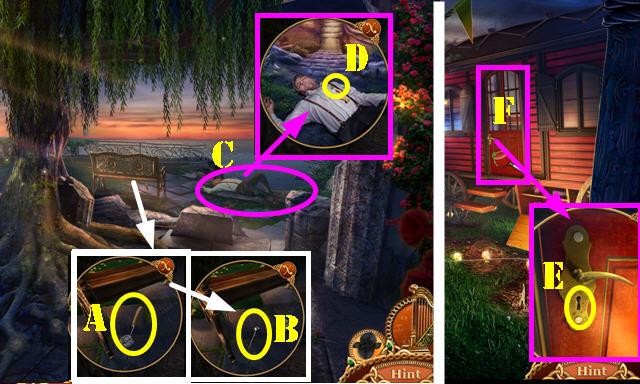
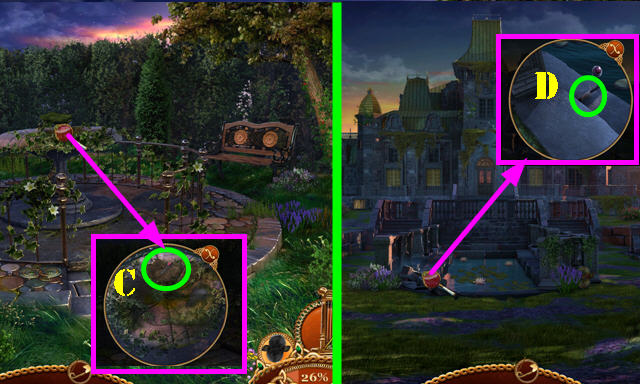
- Place TROUPE LOGO (C). Play HOP: receive O'CONNOR MEDALLION.
- Go (A).
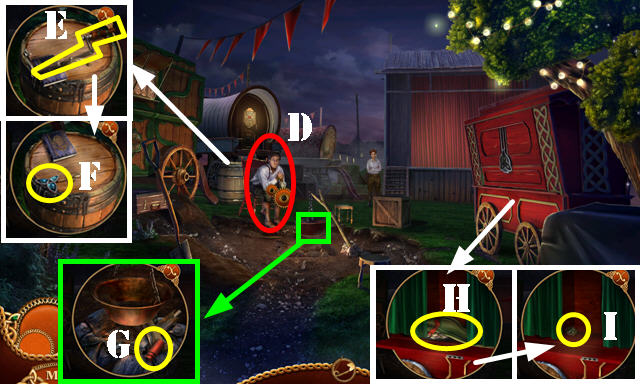
- Give O'CONNOR MEDALLION (D).
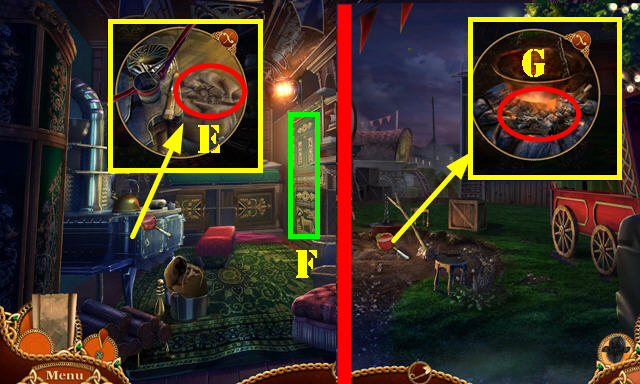
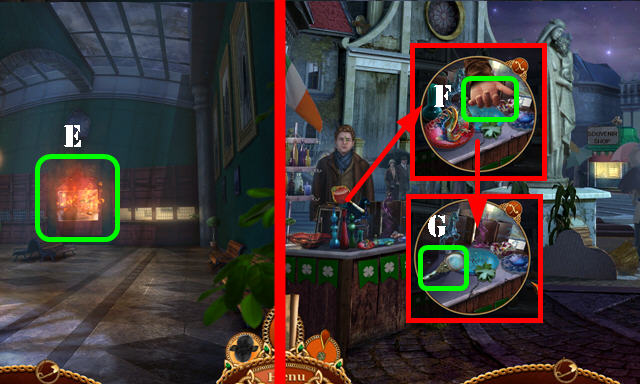
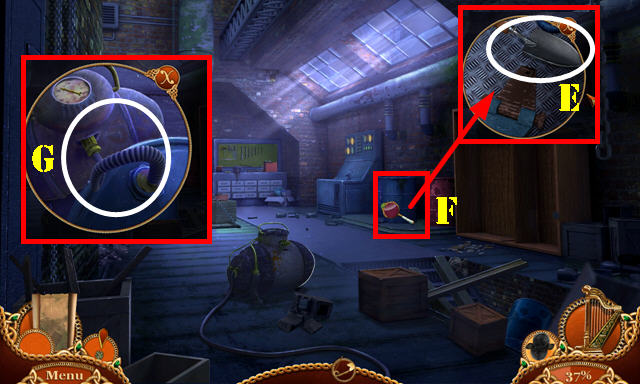
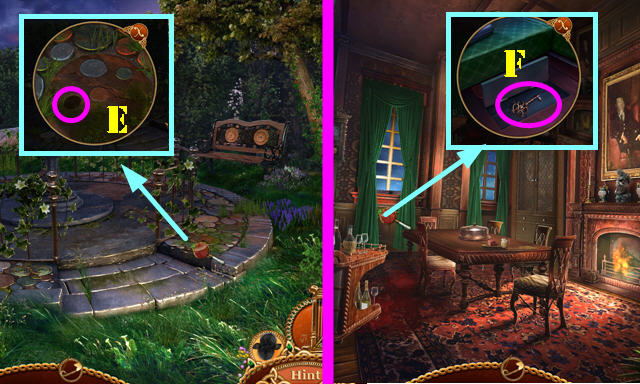
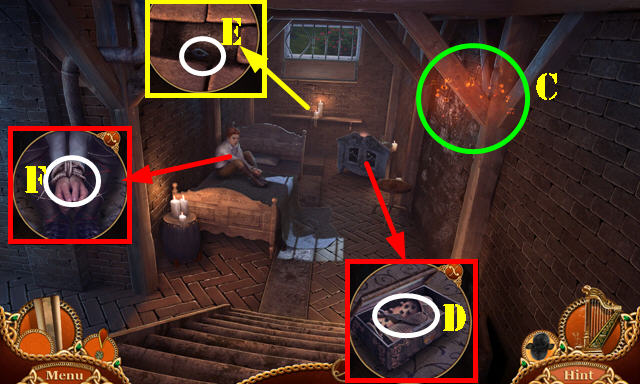
- Take BROKEN SAW (E).
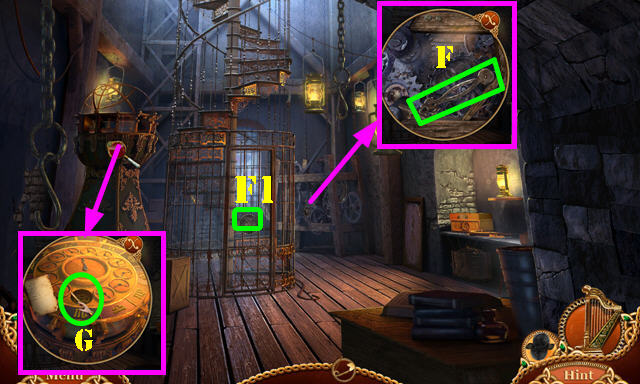
- Select book and take CELTIC SIGIL (F).
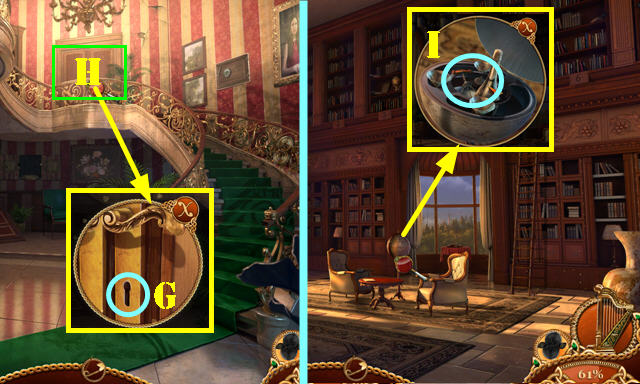
- Take SANDPAPER (G).
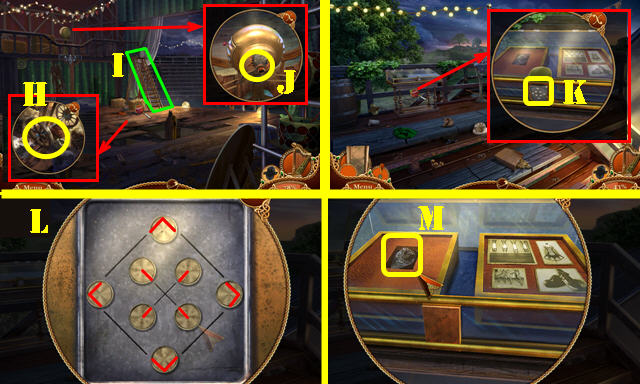
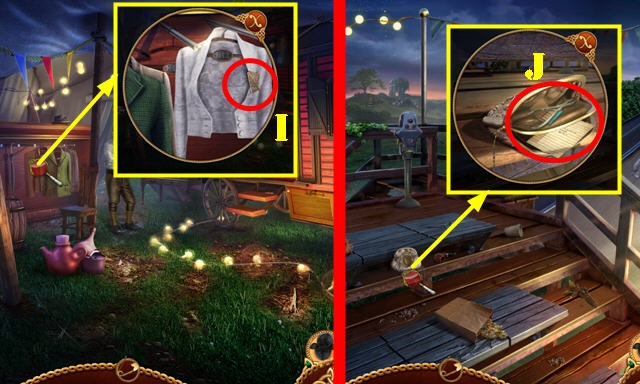
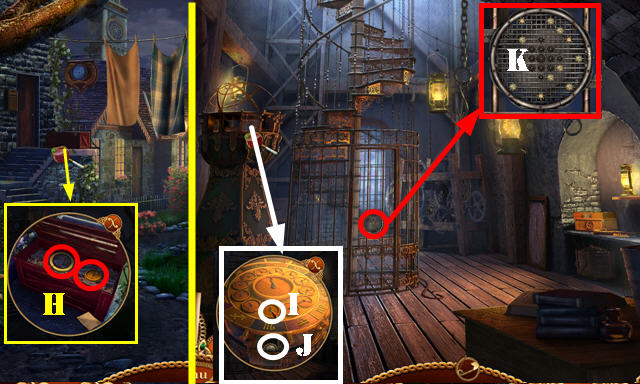
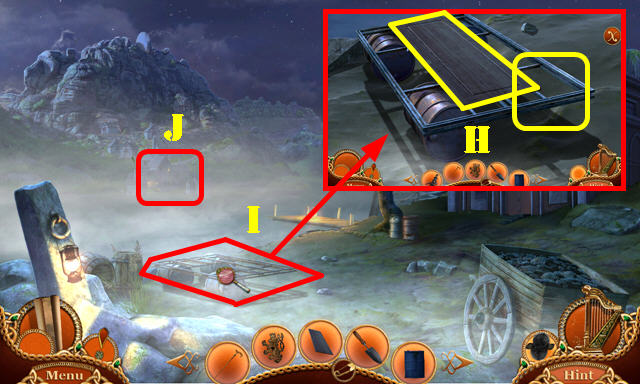
- Place CELTIC SIGIL and select. Take OLD JACKET (H); move item; take CLOVER ORNAMENT (I).
- Walk down.
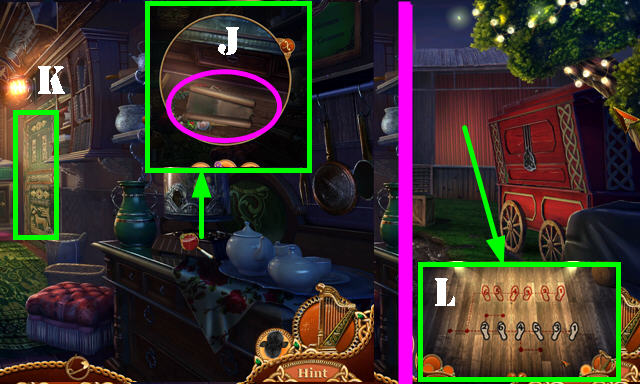
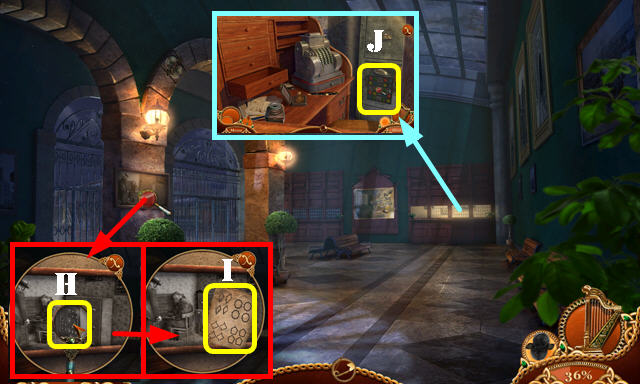
- Place CLOVER ORNAMENT; select. Take Map; move items; take BOOK HOLDER (J).
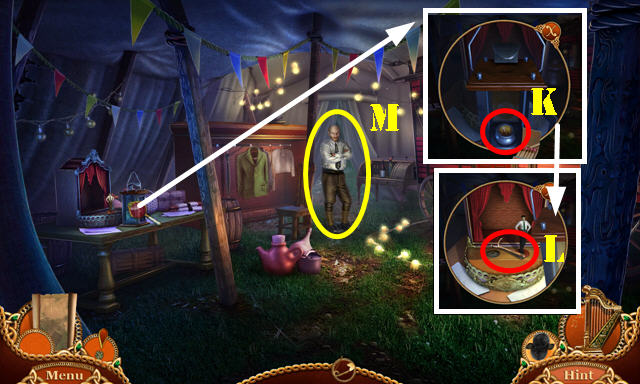
- Go (K).
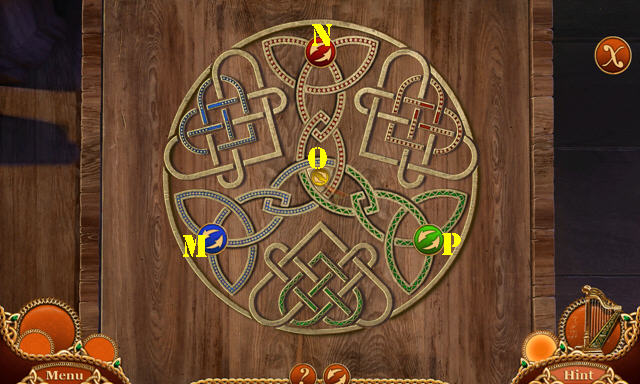
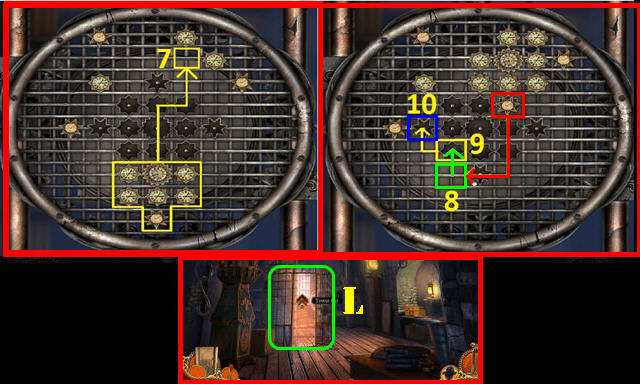
- Play puzzle (L).
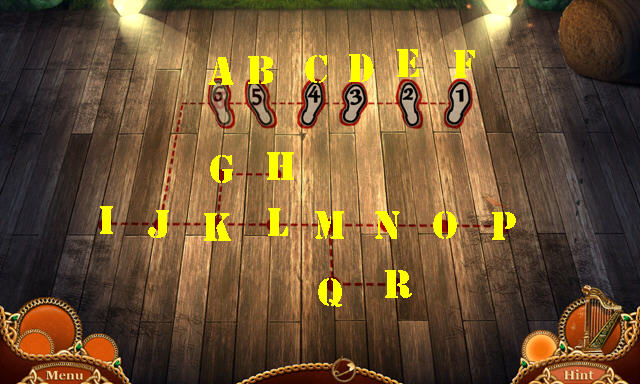
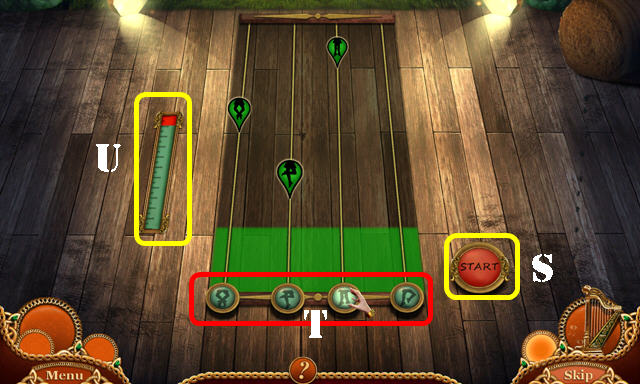
- Solution one: (K-I)-(L-H)-(M-R)-(N-G)-(O-Q)-(P-F)-(I-E)-(Q-D)-(R-C)-(G-B)-(H-A).
- Solution two is random. Press Start (S). Select buttons (T) once dance moves are near green area. Fill meter to win! (U).
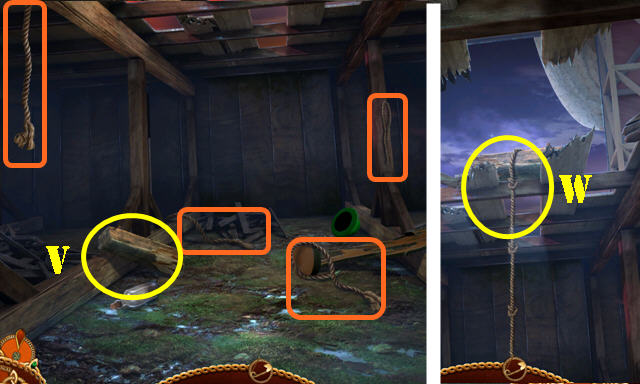
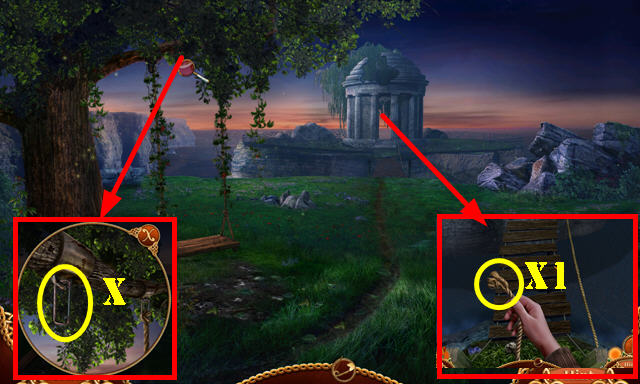
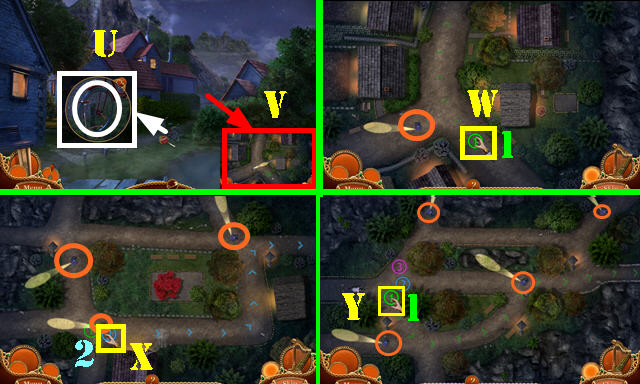
- Take ROPES 1/4-4/4 (orange) and BROKEN BEAM (V).
- ROPES 4/4 on BROKEN BEAM; select 3x; receive GRAPPLING HOOK.
- Use GRAPPLING HOOK and go (W).
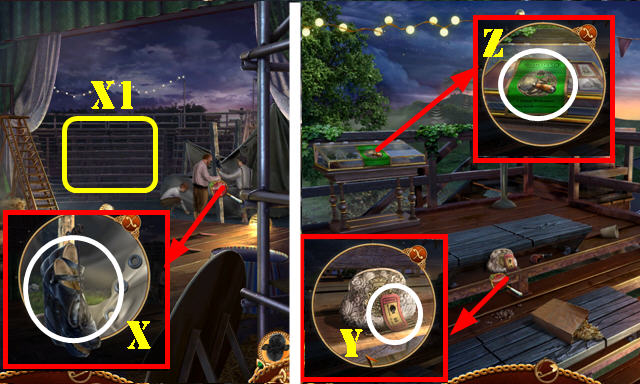
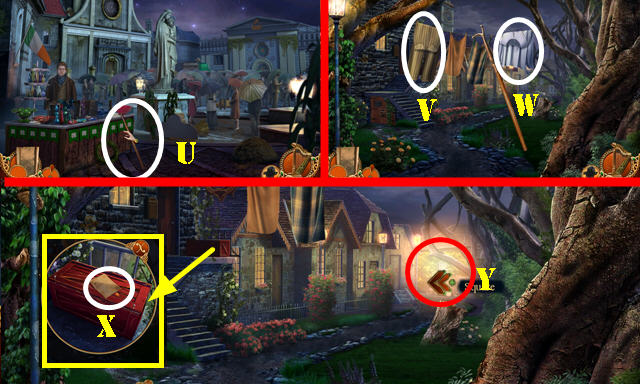
- Select shoe; take DANCE SHOE (X).
- Go (X1).
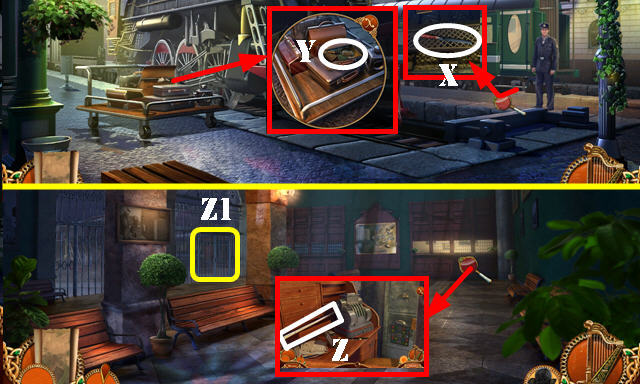
- Take PUNCHED TICKET (Y).
- Take SCRAPER and look at Flyer (Z).
- Walk down twice.
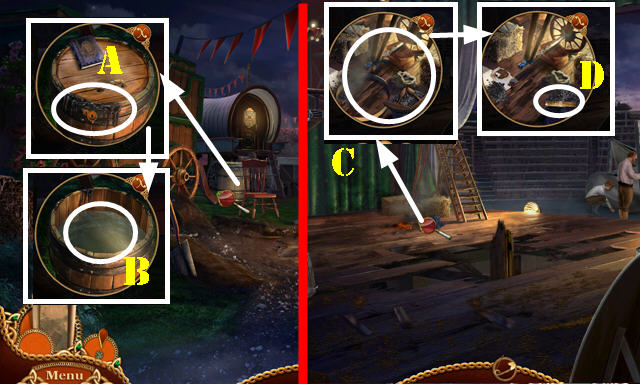
- Use SCRAPER (A); receive COLD TAR.
- Open barrel. Dip OLD JACKET (B); receive WET JACKET.
- Go to Stage.
- Use WET JACKET (C).
- Play HOP; receive BROKEN WHEEL. Select twice; take KNIFE (D).
- Go to Trailer.
- Use KNIFE; take CHARCOAL (E).
- Go (F).
- Place CHARCOAL and COLD TAR (G); receive HOT TAR.
- HOT TAR on BROKEN WHEEL; receive FIXED WHEEL.
- Go to Stage.
- Place FIXED WHEEL (H); move ladder (I).
- Take ORNATE TILE (J).
- Go to Seats.
- Place ORNATE TILE (K). Solution (L).
- Take LEAVES 2/2 (M).
- Go to Trailer.
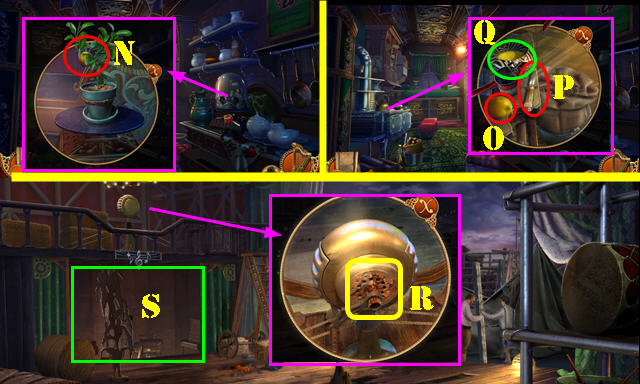
- Place LEAVES 2/2; take LEMON (N).
- Place LEMON (O); use knife (P) on lemon. Select lemon half; take LEMON JUICE (Q).
- Go to Stage.
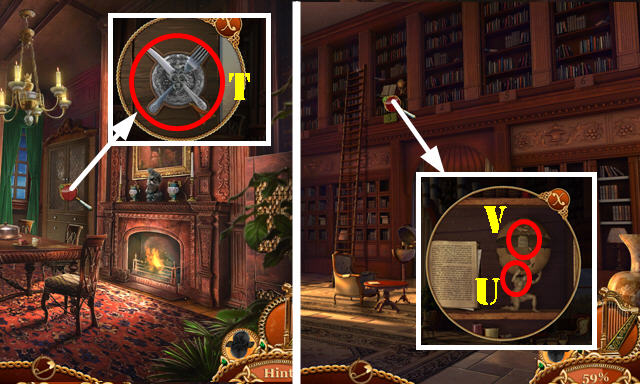
- Use LEMON JUICE and SANDPAPER; select handle (R).
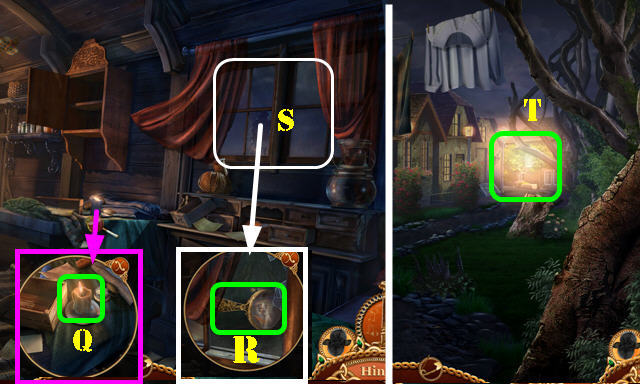
- Go (S).
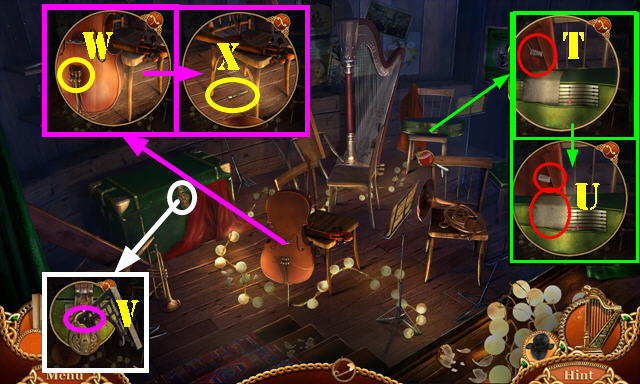
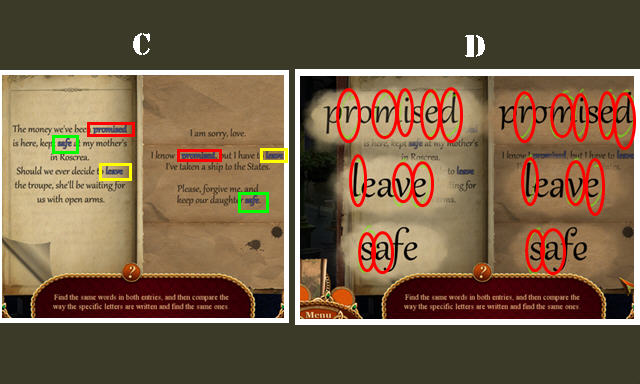
- Take OIL (T); look at two notes (U).
- Use BOOK HOLDER and DANCE SHOE (V). Play HOP: receive TUNING WRENCH.
- Use TUNING WRENCH; take INSTRUMENT WIRES 1/3-2/3 (W).
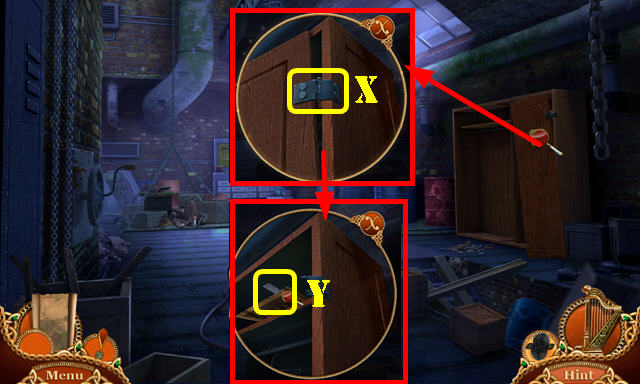
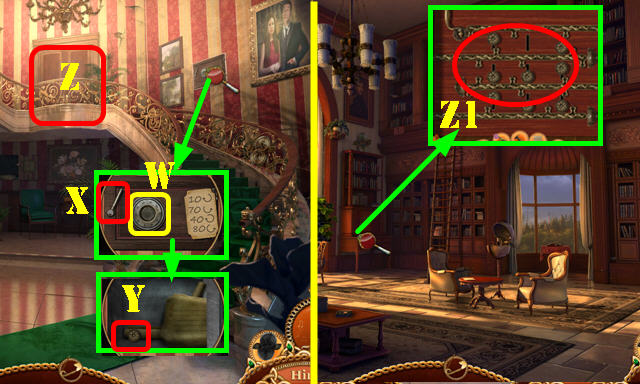
- Take FRETTING FILE (X).
- Walk down.
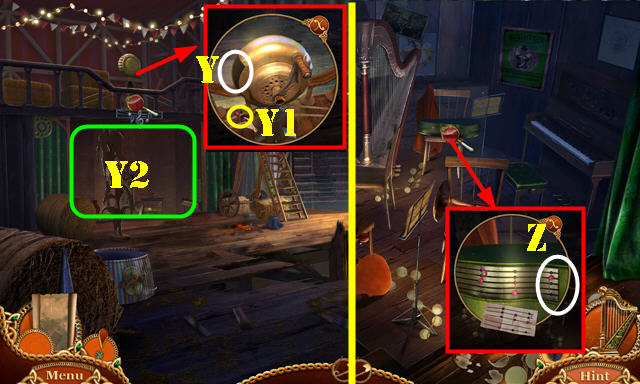
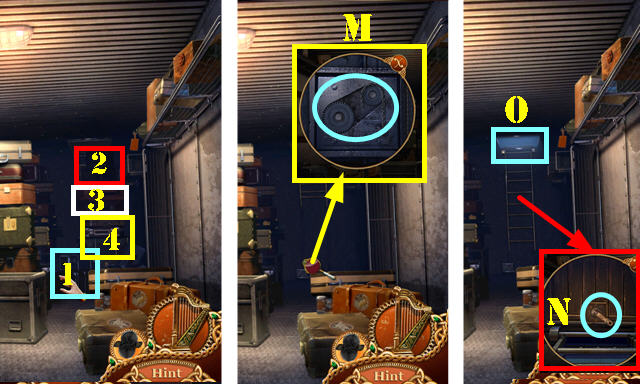
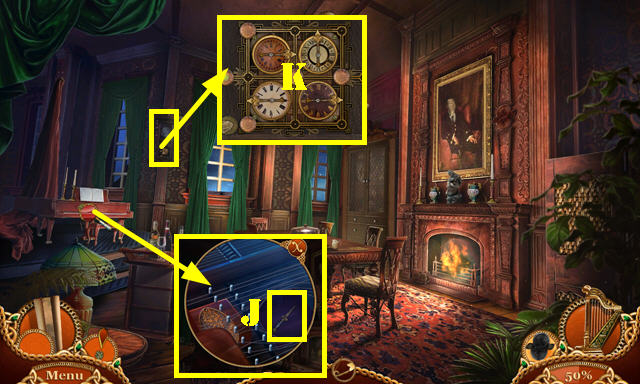
- Use FRETTING FILE (Y); take NOTE (Y1).
- Go (Y2).
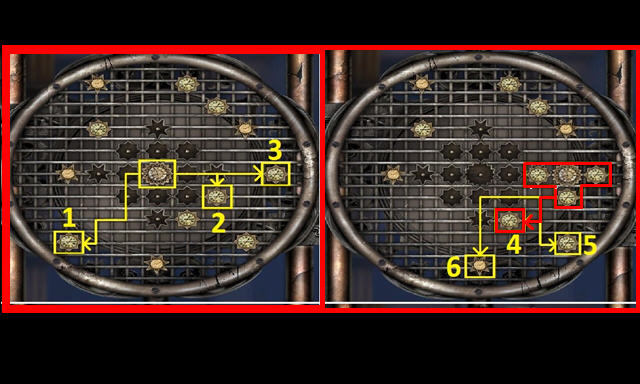
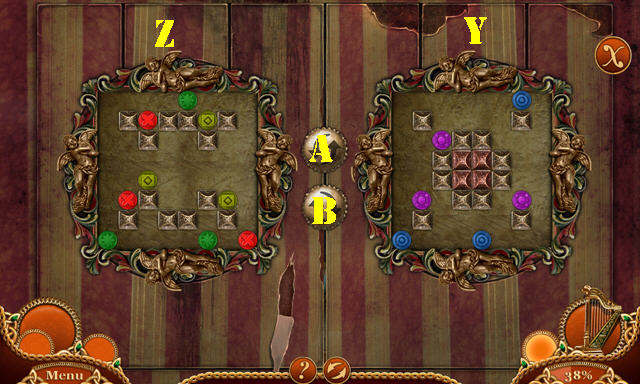
- Place NOTE (Z).
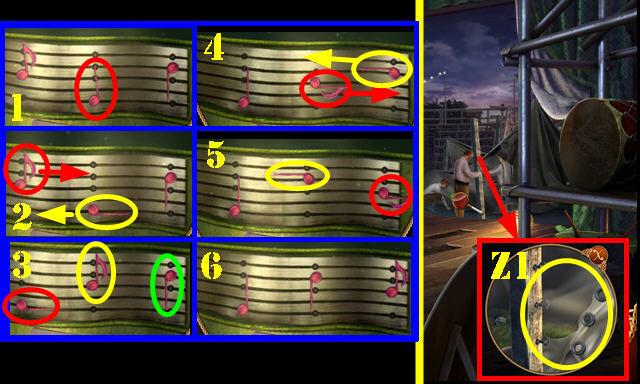
- Solution (1-6). Follow red-yellow-green.
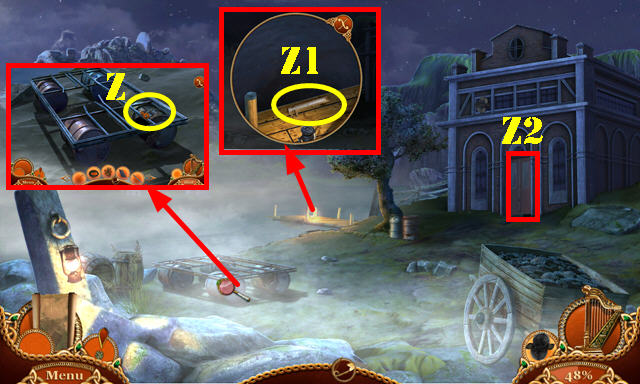
- Take DIRTY MIRROR and INSTRUMENT WIRES 3/3.
- Walk down.
- Place INSTRUMENT WIRES 3/3 (Z1) and zoom in.
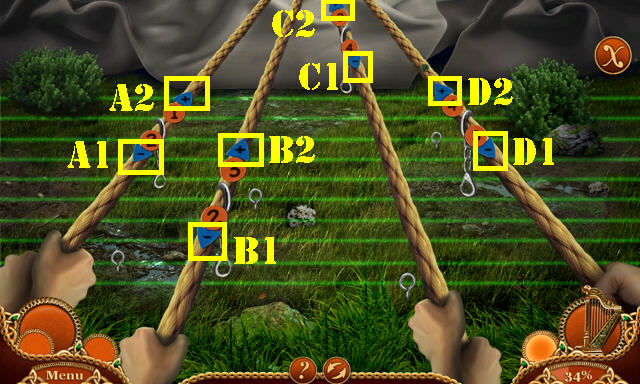
- Solution: A1-A2-A1-B2-B1-B2-C1x2-C2-C1-D2-D1x2-D2-D1-D2.
- Enter Tent.
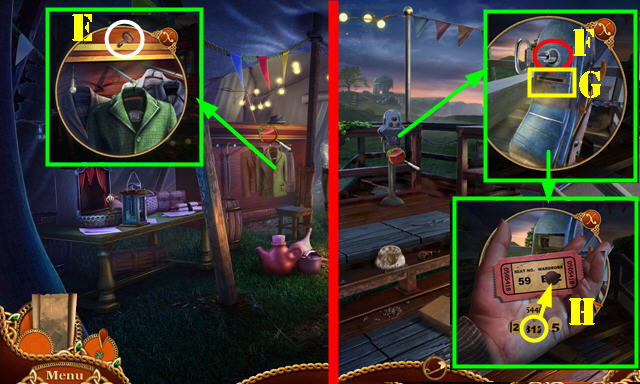
- Take PUNCHER KEY (E).
- Go to Seats.
- Use PUNCHER KEY (F) and PUNCHED TICKET (G).
- Drag number (H); take WARDROBE NUMBER.
- Go to Tent.
- Use WARDROBE NUMBER; select twice; take GOLDEN HARP (I).
- Go to Seats.
- Place GOLDEN HARP; take NAIL PLIERS, MATCHES, and LIBRARY CARD (J).
- Go to Tent.
- Open door; use OIL and MATCHES (K); take WINDOW HOOK (L).
- Give LIBRARY CARD (M).
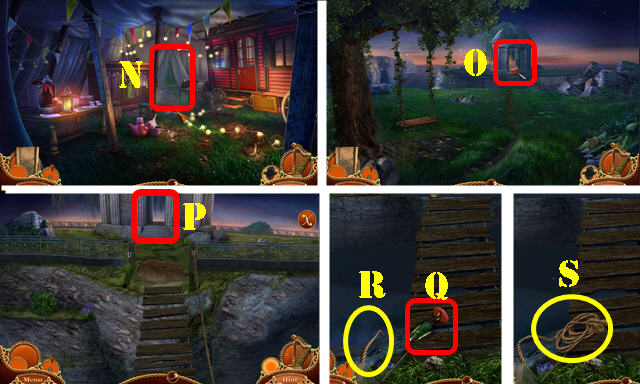
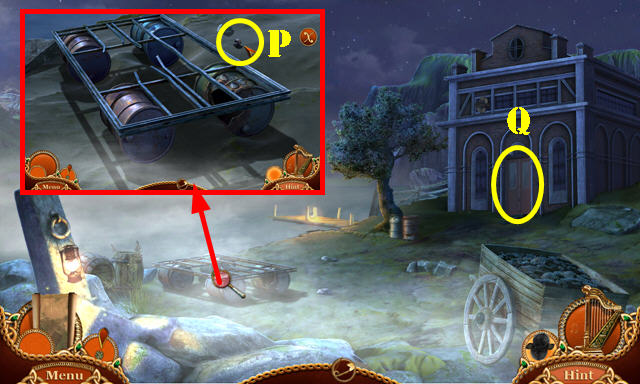
- Go (N-O). Try to go (P).
- Take DANCER FIGURINE (Q).
- Select rope twice (R-S).
- Go to Tent.
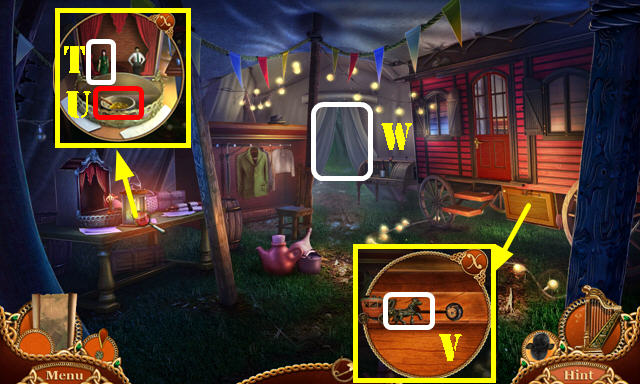
- Place DANCER FIGURINE (T); take ADHESIVE and WOODEN HORSE (U).
- Place WOODEN HORSE and select (V). Play HOP: receive SAW BLADE.
- Go (W).
- SAW BLADE on BROKEN SAW; select screw; receive HACKSAW.
- Use HACKSAW (X); take METAL CARABINER.
- Place METAL CARABINER (X1).

- Solution (1-12).
- Intersect line (Y).
- Go (Z).
Chapter 2: Viewpoint
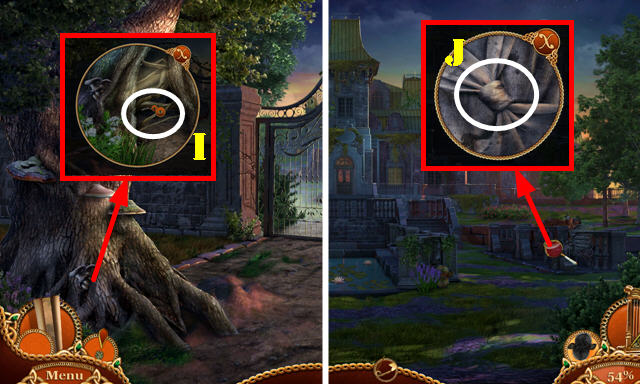
- Look at note; take BROKEN ICE PICK (A).
- Use NAIL PLIERS (B); receive PICK TOP.
- Talk (C). Take TRAILER KEY (D).
- PICK TOP and ADHESIVE on BROKEN ICE PICK; receive ICE PICK.
- Go to Tent.
- Use TRAILER KEY (E).
- Enter (F).

- Select crate and stool (G).
- Use ICE PICK; take SIGIL PIECE (H).
- Take SCARF, INK, and SIGHTSEEING PAMPHLET (I).
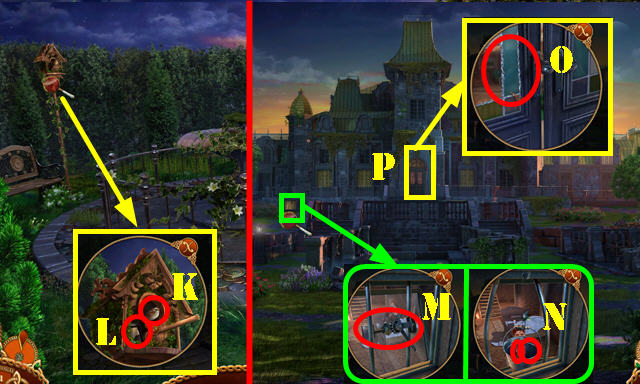
- Place DIRTY MIRROR (J); use brush (K); take MIRROR.
- Place SIGIL PIECE (L).
- Solution: M-P-O-M-O-P-O-N-Ox2.
- Take LETTER and BLUNT KNIFE.
- Use BLUNT KNIFE (Q); receive HEATED KNIFE.
- Select shards twice; use MIRROR AND HEATED KNIFE (R).
- Open window; go (S-T).
- Take BROOM HANDLE (U).
- WINDOW HOOK on BROOM HANDLE; receive HOOK POLE.
- Walk down.
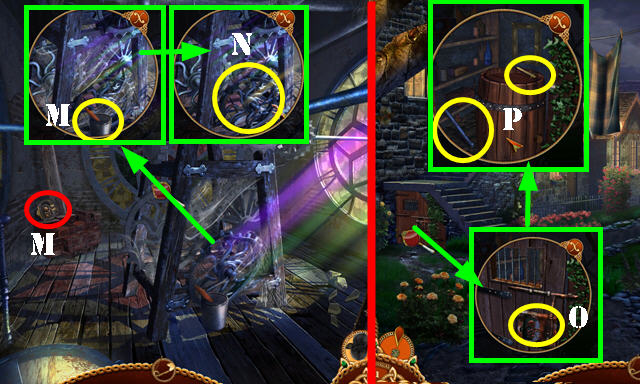
- Use HOOK POLE; select (V-W).
- Look at note (X).
- Go (Y).

- Talk (A).
- Select bundle; use SCARF; take IMPROVISED BROOM (B).
- Use SIGHTSEEING PAMPHLET (C). Play HOP; receive TOWER SNOWGLOBE.
- Place TOWER SNOWGLOBE; stop at 1-7-4-2 (D).
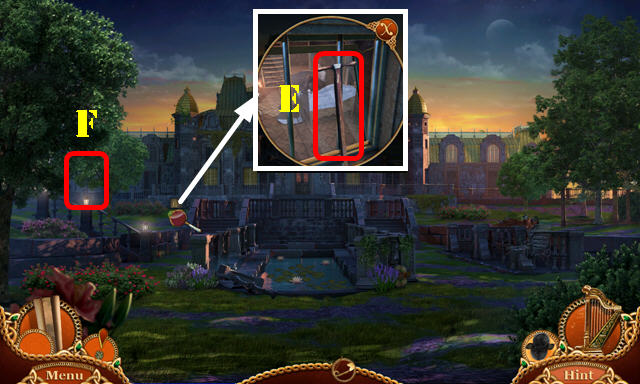
- Enter (E).
- Take CLOCK HAND (F).
- Look at sign (F1).
- Look at note; take PINS 1/2 (G).
- Walk down twice.
- Use CLOCK HAND; select twice; take METAL RING and CLOCK FACE (H).
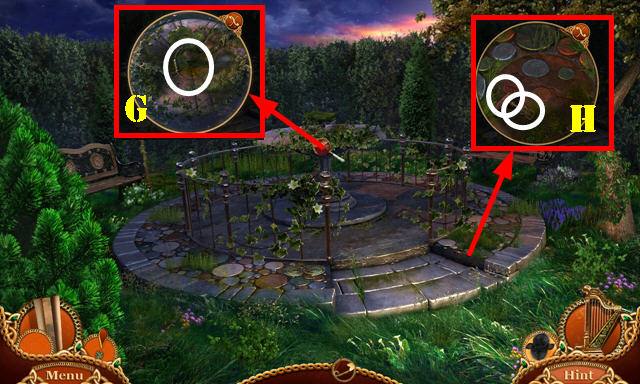
- Go to Clock tower.
- Place CLOCK FACE; select twice (I). Take MAIN TILE (J).
- Place MAIN TILE (K).
- Solution (1-8).
- Go (L).
- Take GREASE and CLOCKMAKER'S EMBLEM (M).
- Use IMPROVISED BROOM; take BENT COG (N).
- Walk down 3x.
- Place CLOCKMAKER'S EMBLEM (O); take PINS 2/2 and AXLE (P).
- Go to Clock tower.
- Place METAL RING; select 3x. Use PINS 2/2; take WINDING TOOL (Q).
- Place BENT COG; select and use WINDING TOOL; take METAL COG (R).
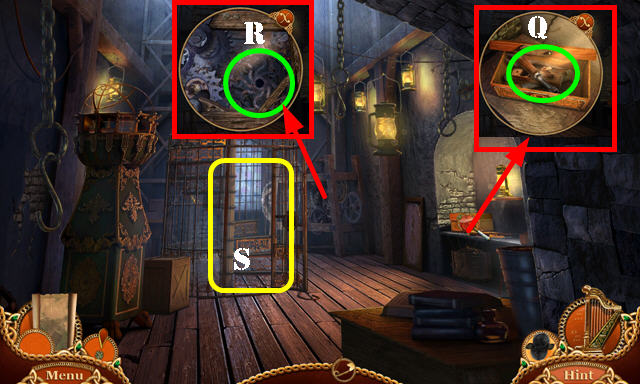
- Go (S).
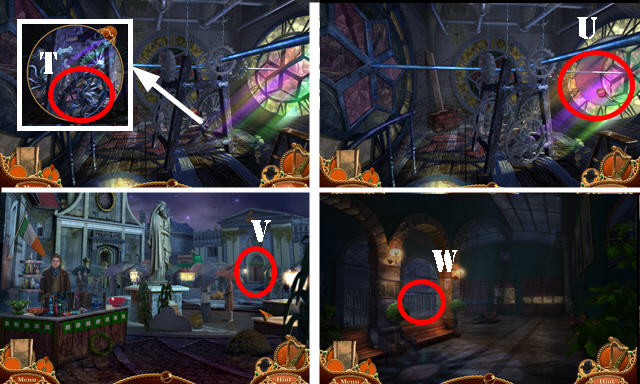
- Place METAL COG; use AXLE and WINDING TOOL (T).
- Play HOP (U); receive COINS 1/3.
- Walk down twice; go (V-W).
- Take RASP (X).
- Open briefcase; take TUBE BRUSH (Y).
- Walk down.
- Take METAL HANDLE (Z).
- Go (Z1).
Chapter 3: Train
- Place METAL HANDLE (A); take METAL GRABBER.
- Use METAL GRABBER (B); receive DIARY.
- LETTER on DIARY. Solution (C-D).
- Take COINS 2/3 and DIARY ENTRY.
- Walk down.
- Place DIARY ENTRY (E). Play HOP; receive TRAIN INFORMATION. Take COINS 3/3.
- Walk down.
- Give COINS 3/3 (F).
- Move item; take MAGNIFYING GLASS (G).
- Go to Train station.
- Use MAGNIFYING GLASS and select (H); take LOCK CLUE (I).
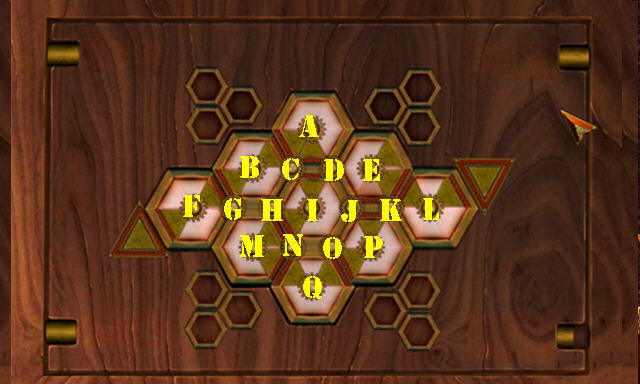
- Place LOCK CLUE (J).
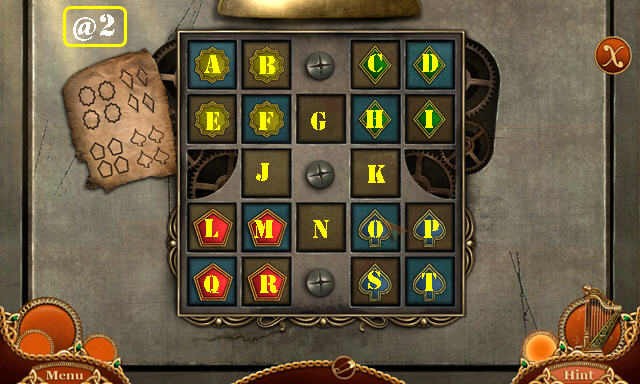
- Solution (@2): (L-Q)-(M-L)-(S-O)-(B-M)-(A-J)-(E-A)-(G-E)-(H-B)-(C-F)-(K-C).
- (O-S)-(P-G)-(T-H)-(N-T)-(M-P)-(R-O)-(L-N)-(J-R)-(F-L)-(G-M)-(H-J)-(I-F).
- (D-G)-(O-D)-(S-I)-(N-K)-(M-S)-(K-M)-(S-N)-(G-S)-(F-O)-(E-K)-(J-E).
- (M-G)-(N-F)-(O-J)-(K-M)-(P-H)-(M-P)-(J-O)-(F-M)-(G-F).
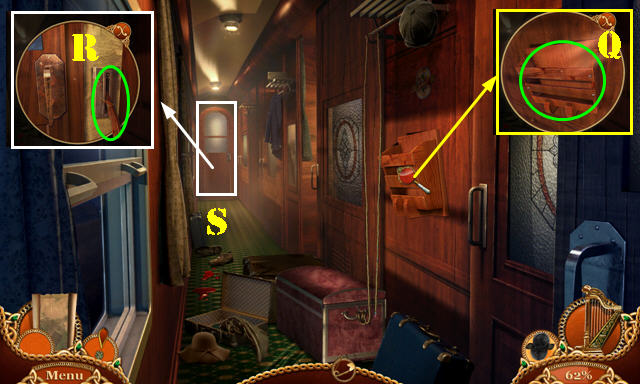
- Take LAMP CABLE and INCOMPLETE TICKET.
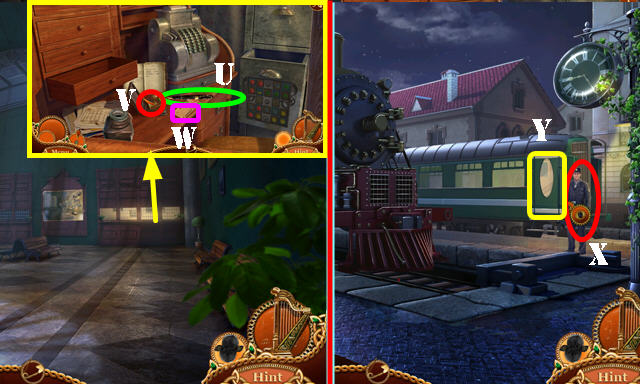
- Place INK, TRAIN INFORMATION, and INCOMPLETE TICKET. Select pen (U) twice. Select stamp (V). Take TICKET (W).
- Go to Train tracks.
- Give TICKET (X).
- Enter (Y).
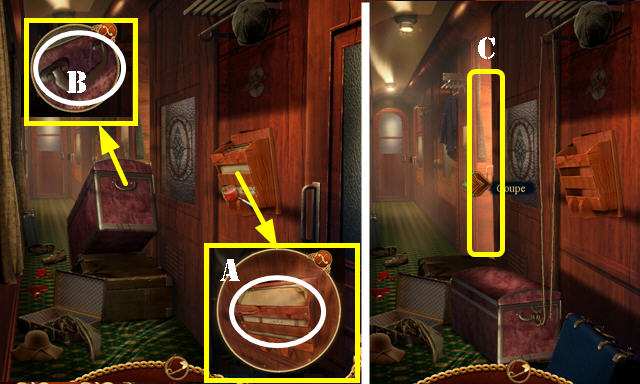
- Look at newspaper (A).
- Use LAMP CABLE (B).
- Go (C).
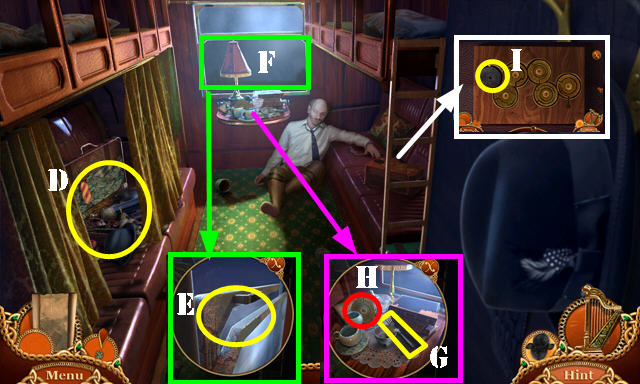
- Open curtain. Play HOP (D): receive SCREW.
- Use GREASE (E); open window (F).
- Take IMPROVISED LOCKPICK 1/2 (G).
- Use SCREW (H); receive DISC DECORATION.
- Place DISC DECORATION (I).

- Solution one (J).
- Solution two: F-Gx2-F-G-Ix3-C-B-D-Mx2-Nx2-Qx3-Nx2-Ix4-O-L-Px4-K-M-Qx3-Px2-L-Ex2.
- Read letter; take STAPLE REMOVER.
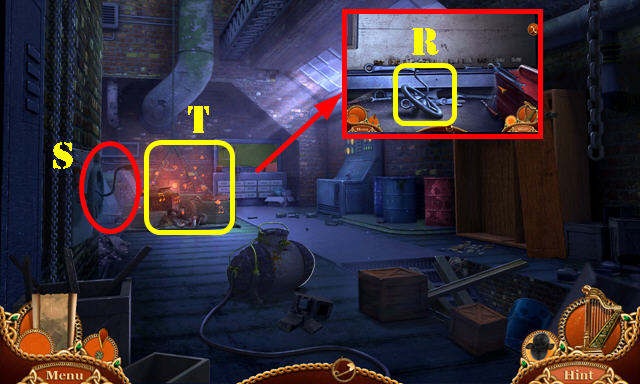
- Walk down.
- Use STAPLE REMOVER (Q); receive WOODEN BOARD.
- RASP on WOODEN BOARD; receive WOODEN LEVER.
- Use WOODEN LEVER (R).
- Go (S).
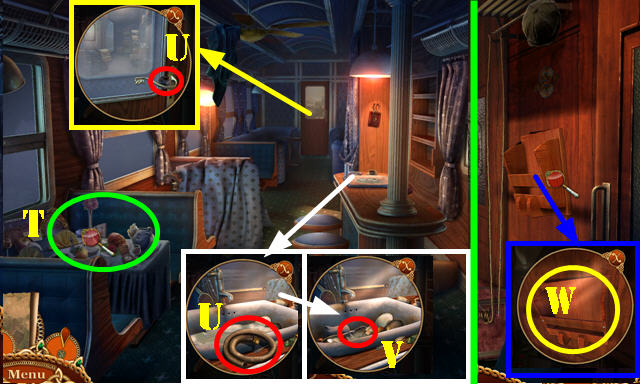
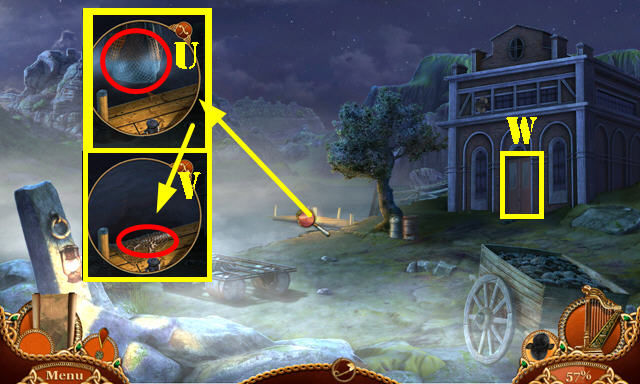
- Play HOP (T); receive SPATULA.
- Take RUBBER TUBE and BEER GLASS 1/2 (U).
- Use TUBE BRUSH; take PEELER (V).
- Walk down.
- Use SPATULA (W); receive IMPROVISED SCOOP.
- Go to Dining car.
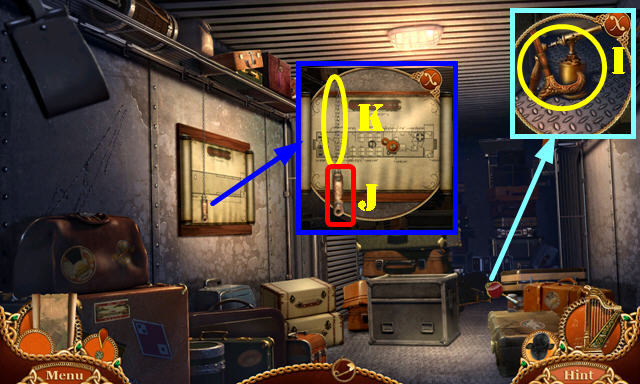
- Use IMPROVISED SCOOP; take SWITCH (A).
- Use PEELER; select; place SWITCH and pull it (B).
- Take CAN OPENER and BEER GLASS 2/2 (C).
- Place BEER GLASS 2/2; take CAR JACK and IMPROVISED LOCKPICK 2/2 (D).
- Use IMPROVISED LOCKPICK (E); play puzzle (F).
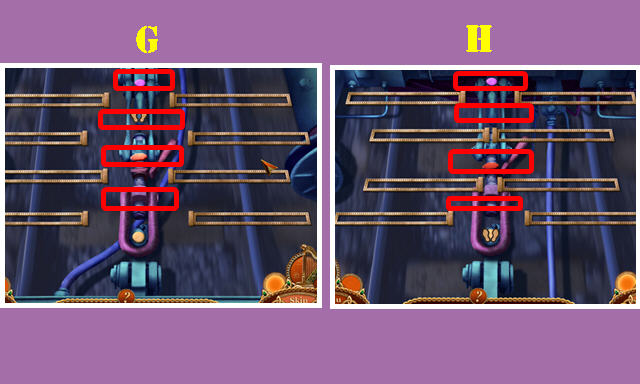
- Pass through all marked areas once area is clear. Solution is random (G-H).
- Move all suitcases out of way.
- Take OLD CANE and WELDING TORCH (I).
- Use WELDING TORCH; take EMERGENCY CRANK (J). Take CHAIN (K).
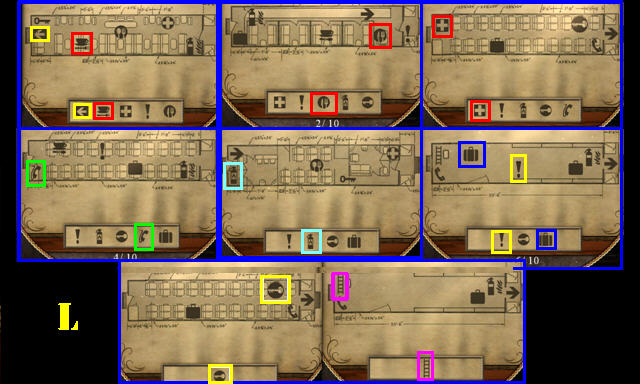
- Solution shown in no particular order (L).
- Select 1-4.
- Open gate; place CHAIN (M).
- Place EMERGENCY CRANK (N).
- Go (O).
Chapter 4: Factory
- Take DISCHARGE PORT (P).
- Go (Q).
- Take MECHANISM HANDLE (R).
- Place MECHANISM HANDLE (S).
- Play HOP (T); receive WIRE COIL.
- Walk down.
- Use WIRE COIL (U); take MANOR KEY CHAIN (V).
- Take LION and KEY PENDANT from MANOR KEY CHAIN.
- Go (W).
- Use KEY PENDANT (X); take WOODEN DOOR.
- Look at paper; take METAL STRIP (Y).
- Walk down.
- Use METAL STRIP (Z); receive SHELL. Select barrel.
- Use SHELL; take WOODEN CALIPER (Z1).
- Go (Z2).
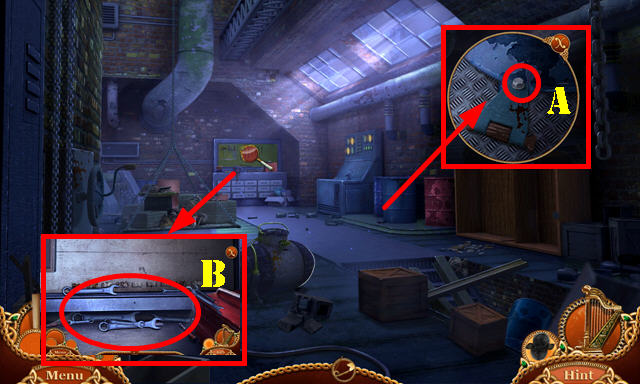
- Use WOODEN CALIPER (A); receive SCREW SIZE.
- Play puzzle (B).
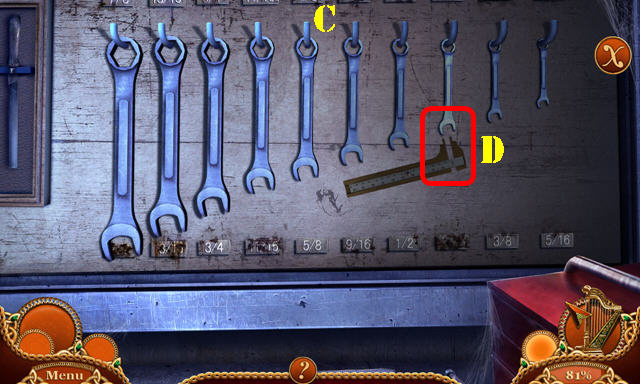
- Hang all tools on board in any order and swap as shown. Solution (C).
- Use SCREW SIZE (D); receive BOX-END TOOL.
- Use BOX-END TOOL; remove cover and take SMALL SHOVEL (E).
- Take METAL BARREL (F).
- DISCHARGE PORT on RUBBER TUBE; receive COMPRESSOR TUBE.
- Place METAL BARREL and COMPRESSOR TUBE (G); select tube and receive AIR BARREL.
- Walk down.
- Place WOODEN DOOR and AIR BARREL (H).
- Push (I).
- Go (J).
- Take CLIMBER PLANT (K).
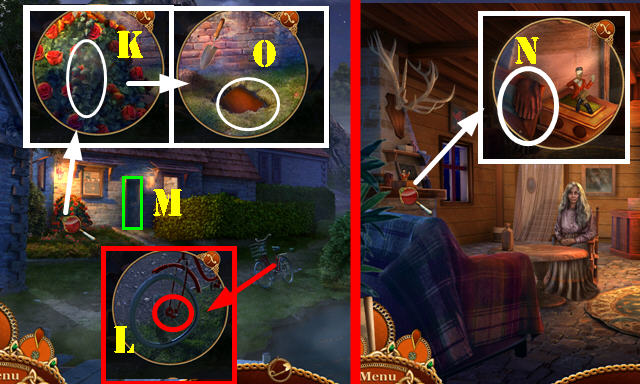
- Use CAN OPENER (L); receive DEFORMED WHEEL.
- Enter (M).
- Take GLOVES (N).
- Walk down.
- Use GLOVES and SMALL SHOVEL; take PHOTO ALBUM (O).
- Go (M).
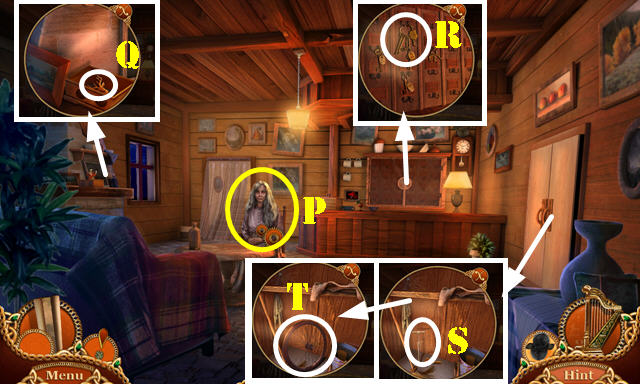
- Give PHOTO ALBUM (P). Play HOP: receive CERAMIC FIDDLE.
- Place CERAMIC FIDDLE; take ORNATE STAG (Q).
- Place ORNATE STAG; take CLOSET KEY (R).
- Use CLOSET KEY; take PUMP (S).
- Place DEFORMED WHEEL; take BICYCLE WHEEL (T).
- Walk down.
- Place BICYCLE WHEEL and use PUMP (U).
- Play puzzle (V).
- Select numbers shown (W-X-Y) when the officers are in the positions shown (orange). Note the position of the flashlights.
- Take SMALL BUCKET (A).
- Look at sign (B).
- Place LION (C).
- Go (D).
- Take MOWER (E).
- Go (F).
- Take BUCKET HANDLE (G).
- Use MOWER; take VIOLIN ORNAMENT 1/2 and RAKE HEAD (H).
- Go to Manor gate.
- Use RAKE HEAD (I); receive DRILL BIT.
- Go forward.
- Use DRILL BIT (J). Play HOP; receive SEED.
- Go to Garden.
- Give SEED (K); take METAL PLATE (L).
- Walk down.
- Use CAR JACK and METAL PLATE (M); open window.
- BUCKET HANDLE and CLIMBER PLANT on SMALL BUCKET; receive ROPE AND BUCKET.
- Use ROPE AND BUCKET; look at note; take LIGHTER and METAL ARROWS 1/4 (N).
- Use LIGHTER (O); select twice.
- Enter (P).
Chapter: 5 Mansion
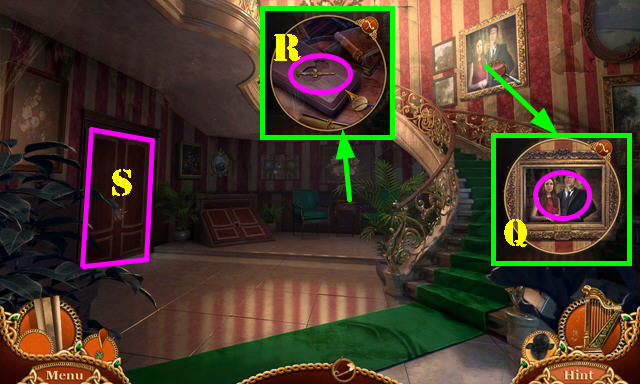
- Select painting (Q).
- Take METAL ARROWS 2/4 (R).
- Go (S).
- Open curtains; take BROKEN SUGAR TONGS (T). Move cushions.
- Use OLD CANE; receive BURNT CANE. Take VIOLIN ORNAMENT 2/2 and IRELAND FLAG (U).
- Walk down.
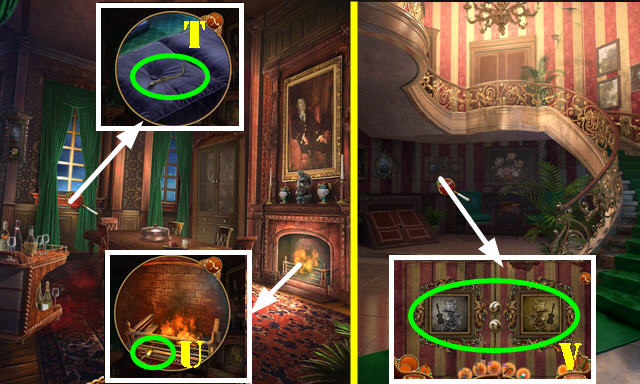
- Place VIOLIN ORNAMENT 2/2 (V).
- Solution one (Y): B-Ax2-Bx2-Ax2.
- Solution two (Z): Bx5-Ax3-Bx2-A-B.
- Take WEED POISON and METAL ARROWS 3/4.
- Go to Garden.
- Use WEED POISON; take HAIRPIN (C).
- Walk down.
- Use HAIRPIN (D); receive STONE DECORATION.
- Go to Garden.
- Place STONE DECORATION (E). Play HOP; receive ORNATE DECORATION.
- Go to Dining room.
- Place ORNATE DECORATION; take LIBRARY KEY (F).
- Walk down.
- Use LIBRARY KEY (G).
- Go (H).
- Place IRELAND FLAG; take BOTTLE OPENER (I).
- Go to Dining room.
- Use BOTTLE OPENER; open compartment; take METAL ARROWS 4/4 (J).
- Place METAL ARROWS 4/4 (K).
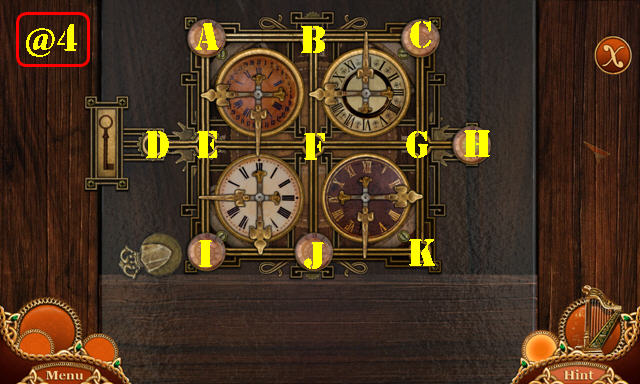
- Solution (@4): (I-J)-(A-I)-(F-B)-(D-F)-(B-A)-(G-C)-(F-H).
- Take CROWN CREST.
- Walk down.
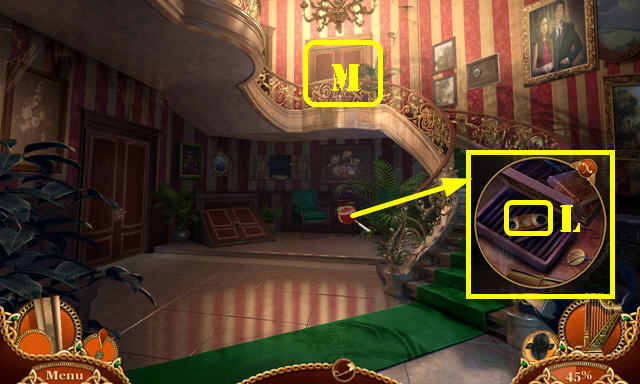
- Place CROWN CREST; take CIGAR CUTTER (L).
- Go (M).
- Use CIGAR CUTTER; take SHELVES LAYOUT and CUTLERY EMBLEM (N).
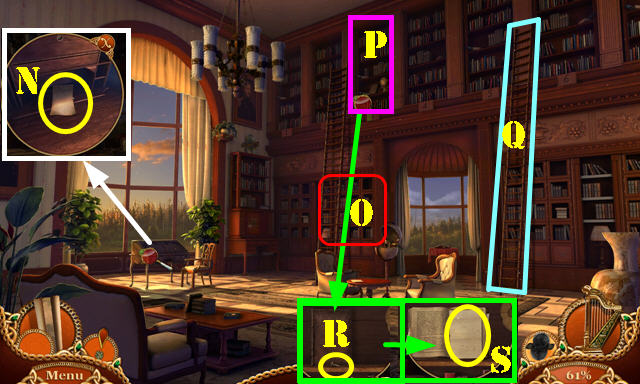
- Place SHELVES LAYOUT (O). Select (P).
- Select ladder (Q).
- Take SCREW (R). Open book; take PAT'S LETTER (S).
- Go to Dining room.
- Place CUTLERY EMBLEM (T). Play HOP: receive PORCELAIN ARM.
- Go to Library.
- Place PORCELAIN ARM (U); take SAFE CODE (V).
- Walk down.
- Place SAFE CODE; select dial 4x (W); pull handle (X).
- Look at note; take ORNATE BOLT (Y).
- Go (Z).
- Place ORNATE BOLT (Z1).
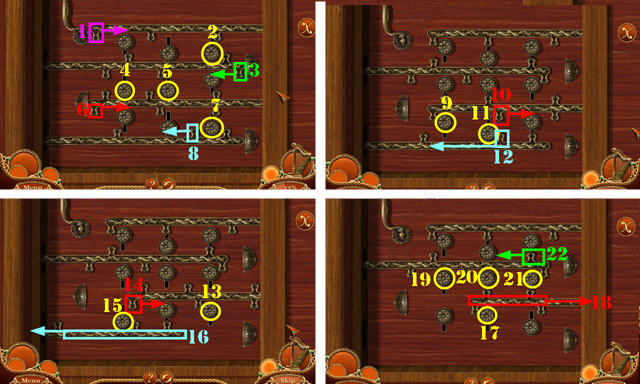
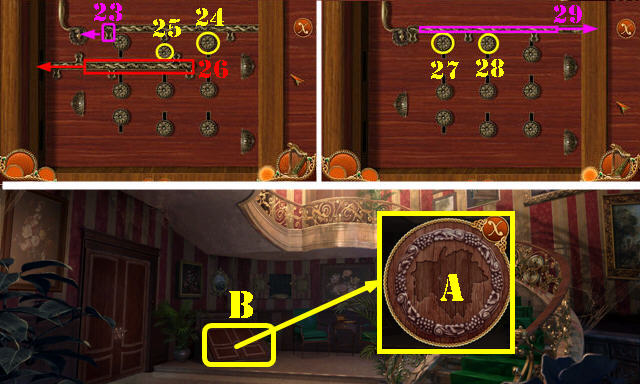
- Solution (1-29).
- Look at note; take GRAPE EMBLEM.
- Walk down.
- Place GRAPE EMBLEM (A).
- Go (B).
- Play HOP (C); receive O'CONNOR MEDALLION.
- Use O'CONNOR MEDALLION; take TONGS PART (D).
- TONGS PART and SCREW on BROKEN SUGAR TONGS; receive SUGAR TONGS.
- Use SUGAR TONGS; take SHARP EARRING (E).
- SHARP EARRING on BURNT CANE; receive CANE DAGGER.
- Use CANE DAGGER (F).
- Walk down.
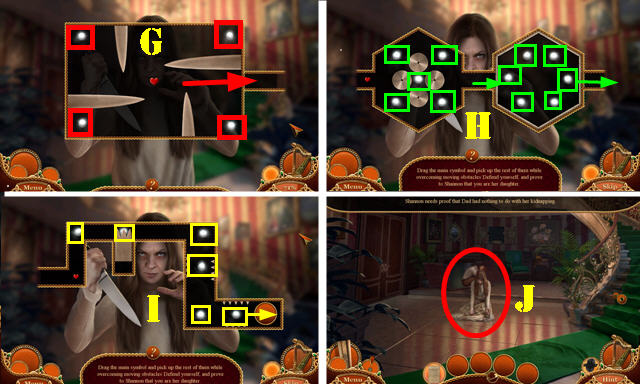
- Solution (G-H-I). Pick up the main symbols and select a question of your choice when it pops up.
- Use PAT'S LETTER (J).
- Congratulations, you've completed Danse Macabre: Curse of the Banshee!
Created at: 2017-08-18