

Walkthrough Menu
- General Tips
- Chapter 1: Death of a Ballerina
- Chapter 2: Club de Celeste
- Chapter 3: 45 Albion Road
- Chapter 4: Cotton Avenue Records
- Chapter 5: Fairfax Lodge
General Tips
- This is the official guide for Danse Macabre: Deadly Deception.
- This guide will not mention each time you have to zoom into a location; the screenshots will show each zoom scene.
- Hidden-object puzzles are referred to as HOPs. This guide will not show screenshots of the HOPs, but it will mention when a HOP is available and the inventory item you'll collect from it.
- This guide will give step-by-step solutions for all puzzles that are not random. Please read the instructions in the game for each puzzle.
Chapter 1: Death of a Ballerina
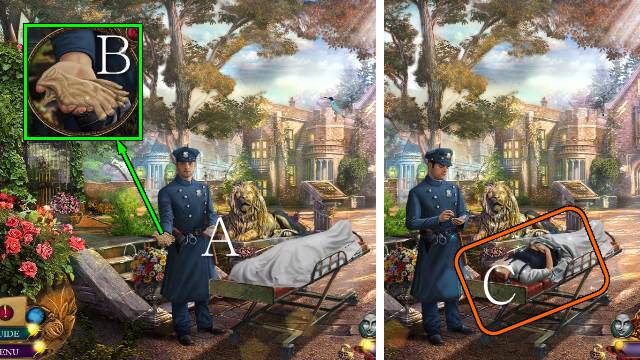
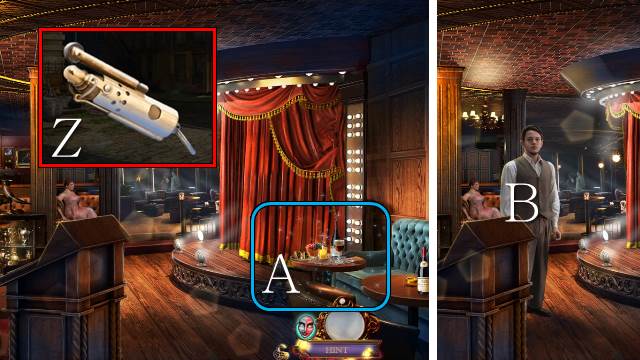
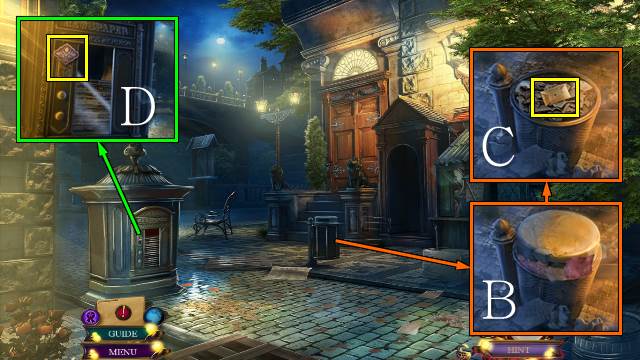
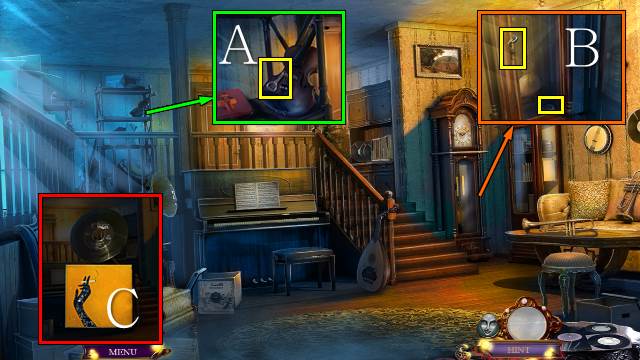
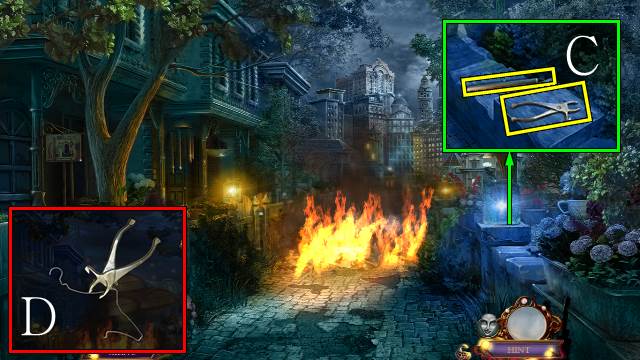
- Talk to the policeman (A); take the GLOVES (B).
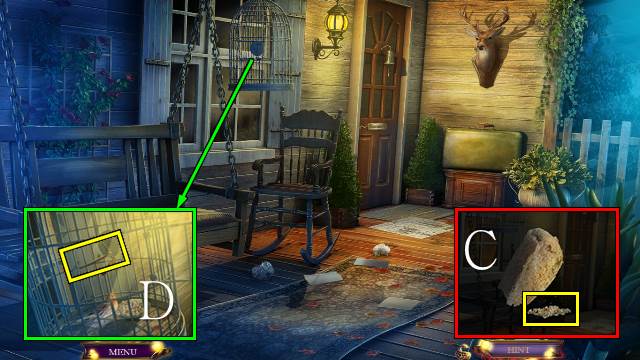
- Use the GLOVES (C).
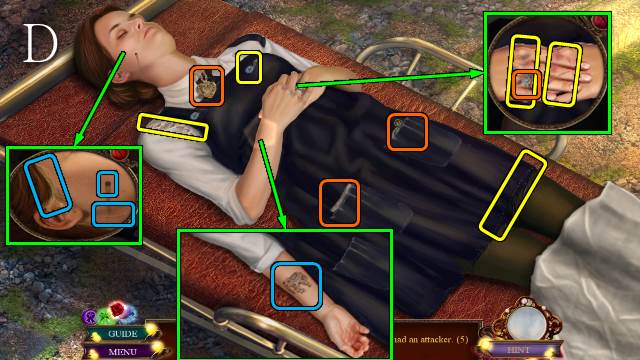
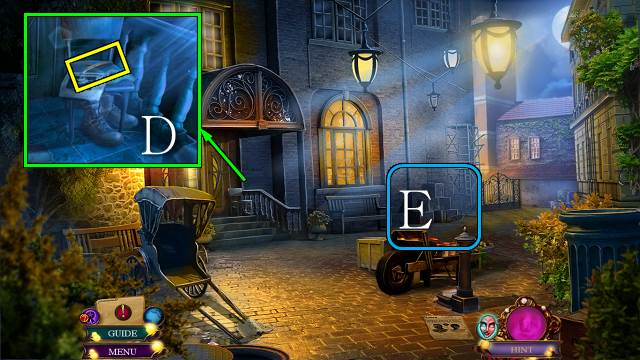
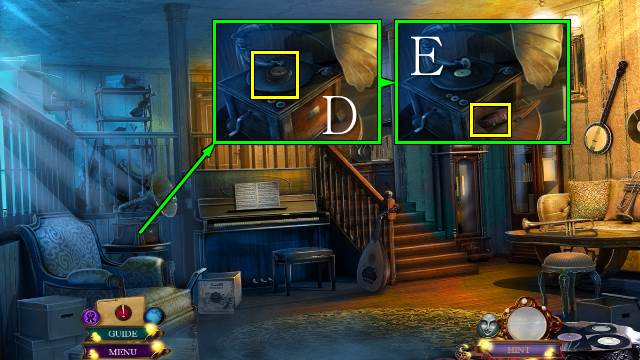
- Find the clues (D).
- You receive the VICTIM'S LOCKET.
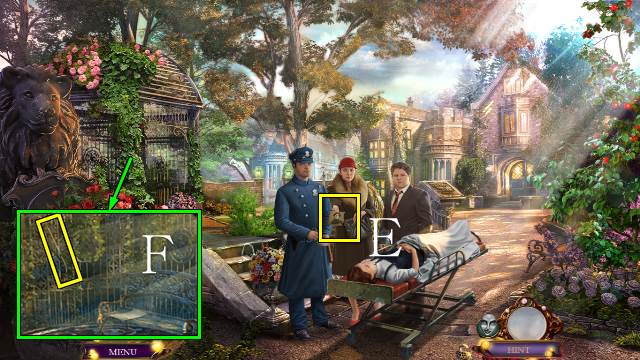
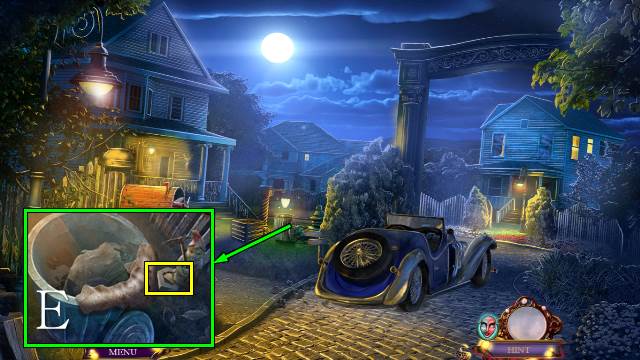
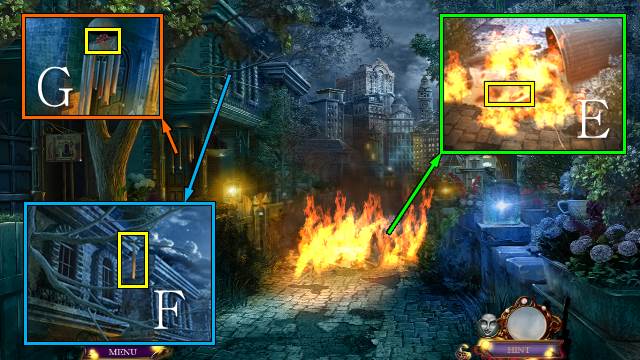
- Take MARION'S PHOTO (E).
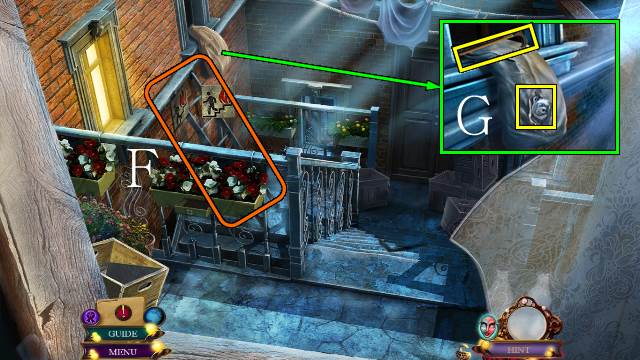
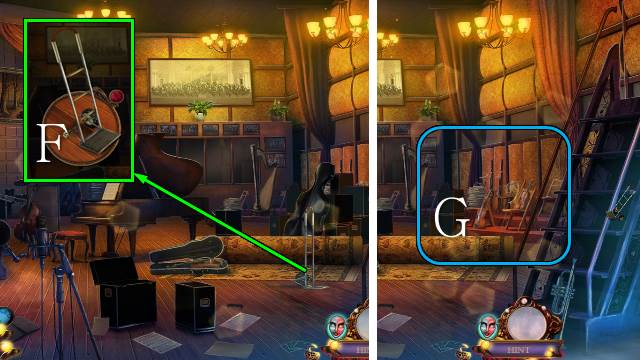
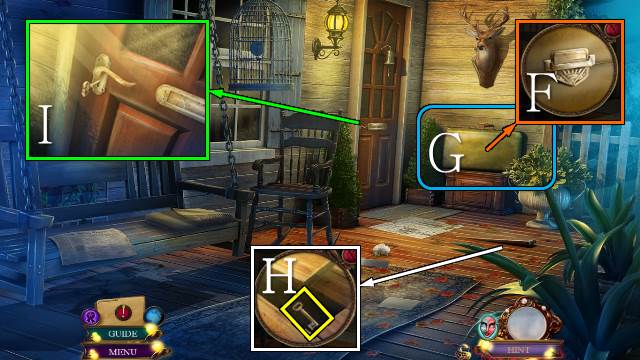
- Move and take the RUSTY BAR (F).
- Walk forward.
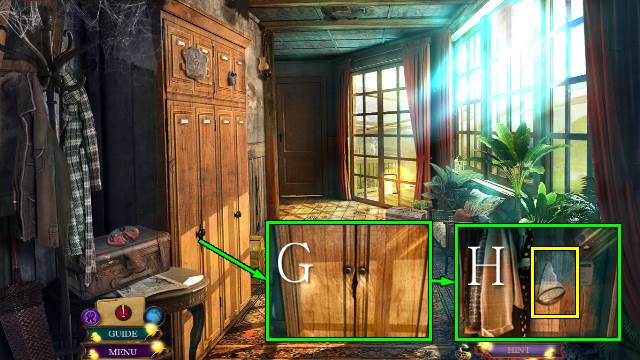
- Open the cupboard (G); move the coats and take the NET (H).
- Walk forward.
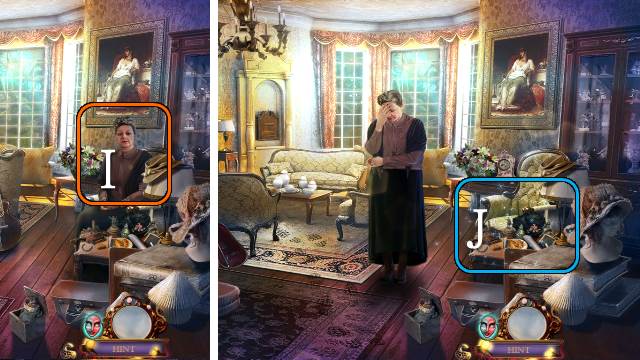
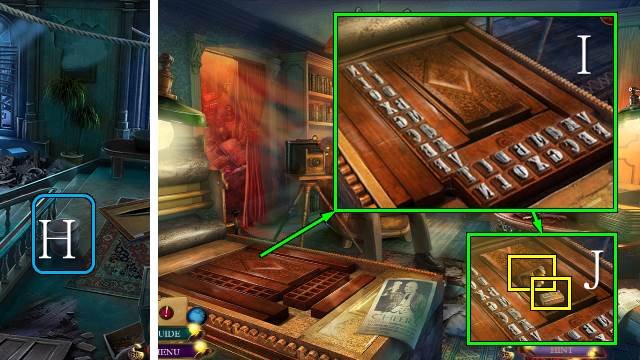
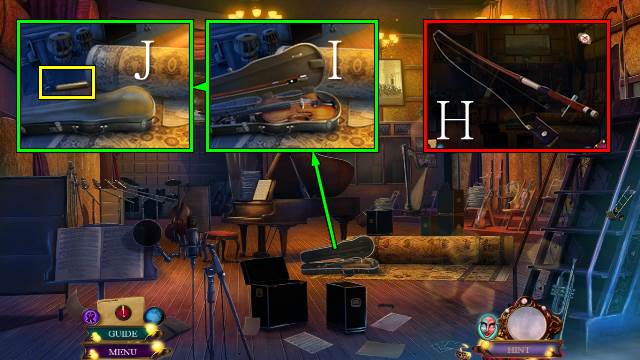
- Give Madame Compton MARION'S PHOTO (I).
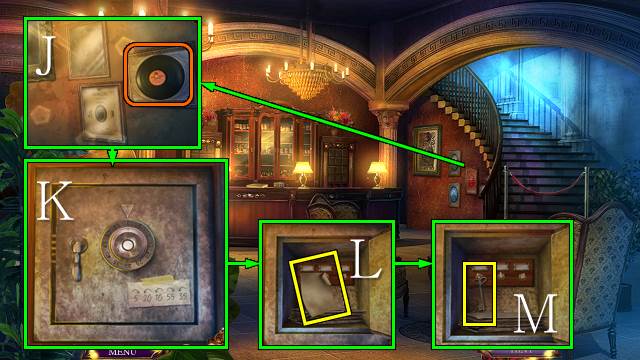
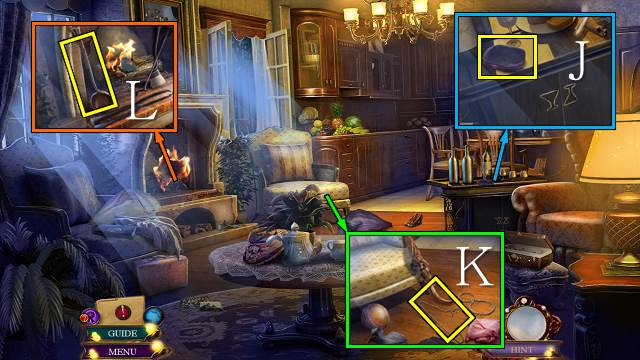
- Play the HOP (J).
- You receive FABRIC BUTTON 1/4.
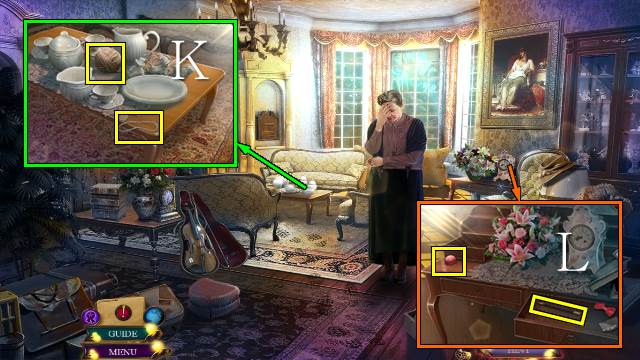
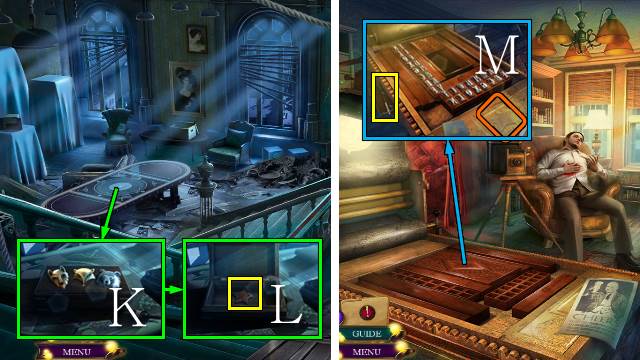
- Move the milk jug and take the RUBBER BAND and YARN (K).
- Open the drawer and take the PENCIL and FABRIC BUTTON 2/4 (L).
- Walk down twice.
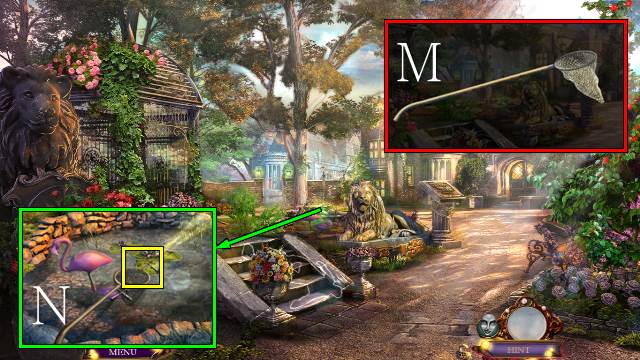
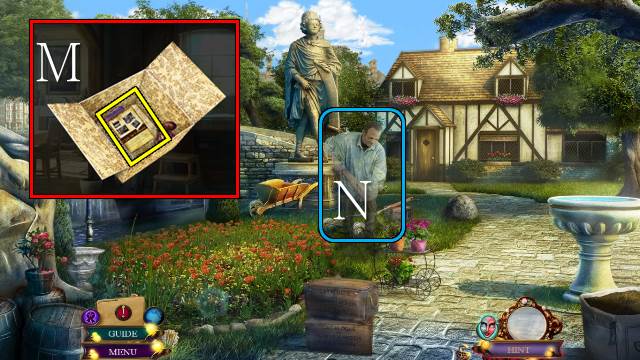
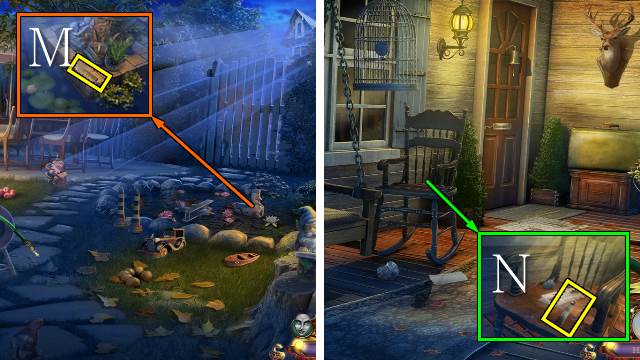
- Access the RUSTY BAR and attach the NET; you receive a BUTTERFLY NET (M).
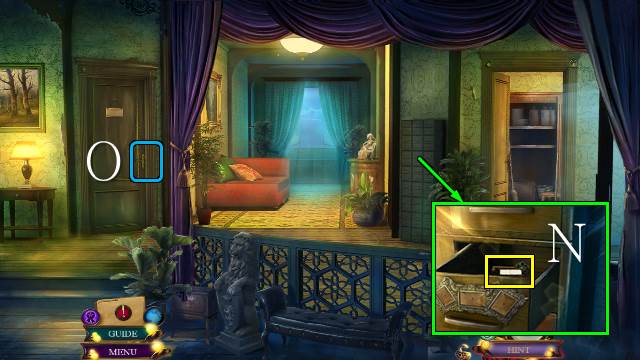
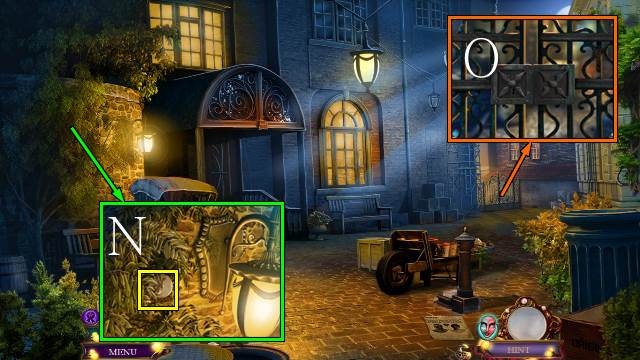
- Take the HAMMERS CHARM with the BUTTERFLY NET (N).
- Go forward.
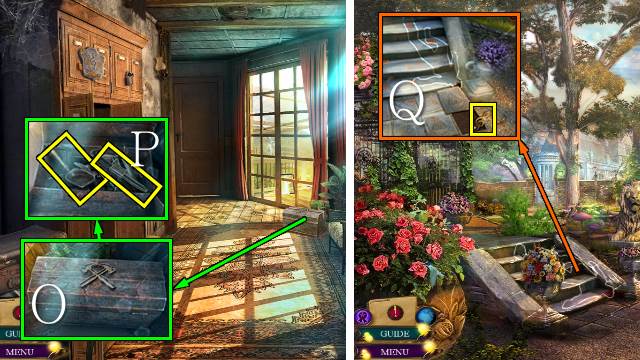
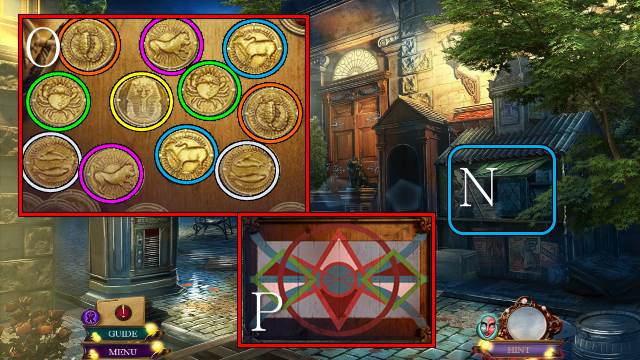
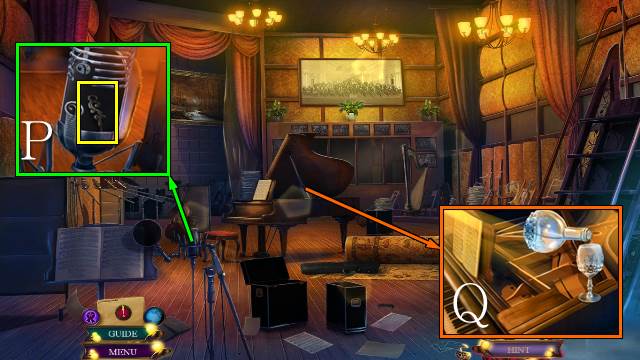
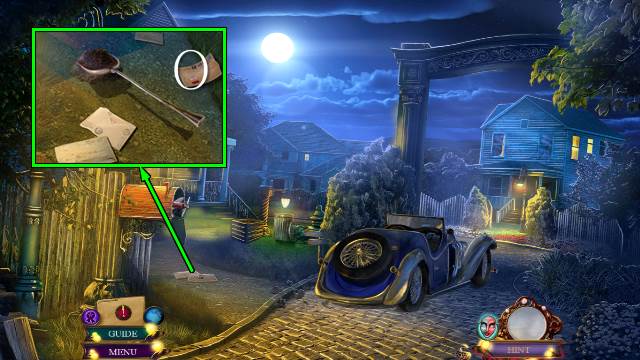
- Place the HAMMERS CHARM (O); take the SHOVEL and WRENCH (P).
- Walk down.
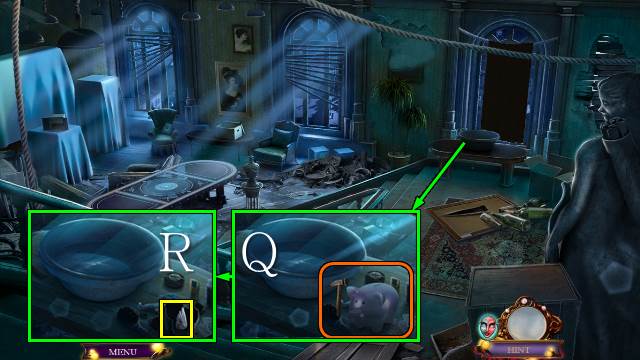
- Use the SHOVEL; take the TREBLE CLEF (Q).
- Walk forward.
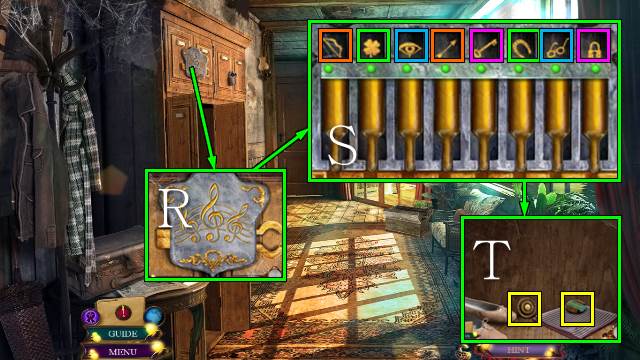
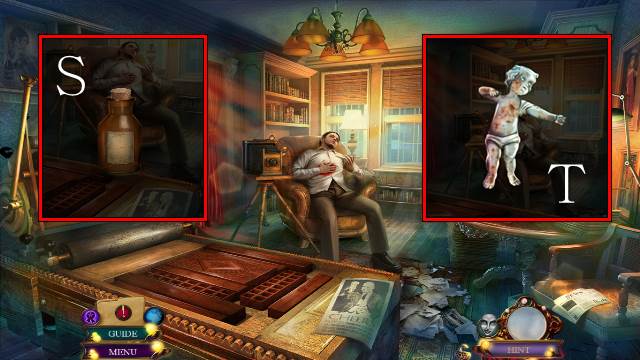
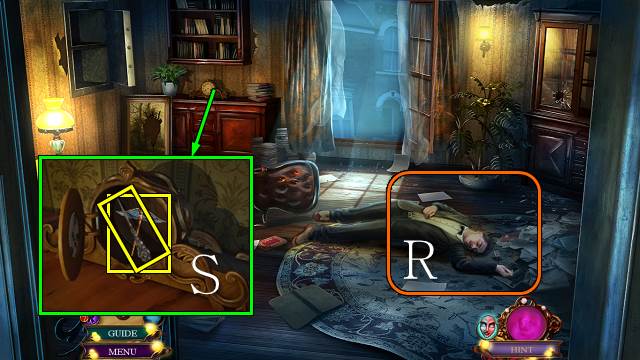
- Place the TREBLE CLEF (R) for a mini-game (S).
- Take the BRASS KNOB and COLORED DISC 1/3 (T).
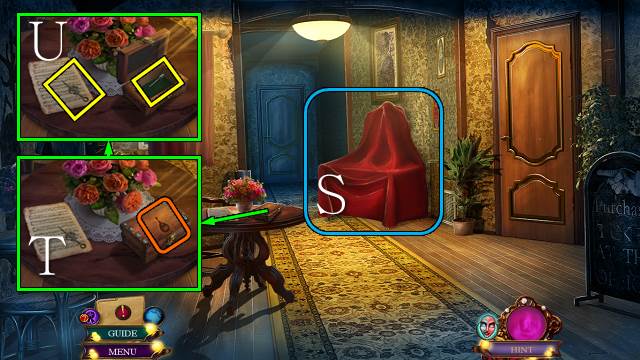
- Walk forward.
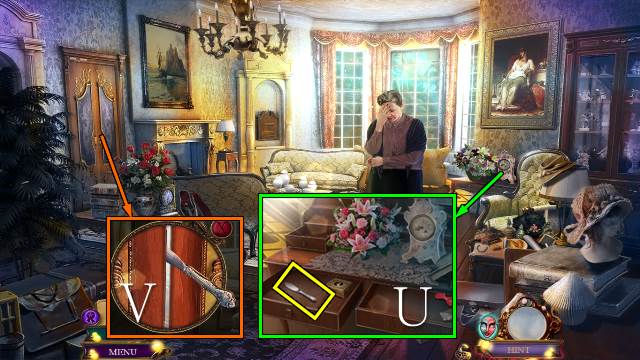
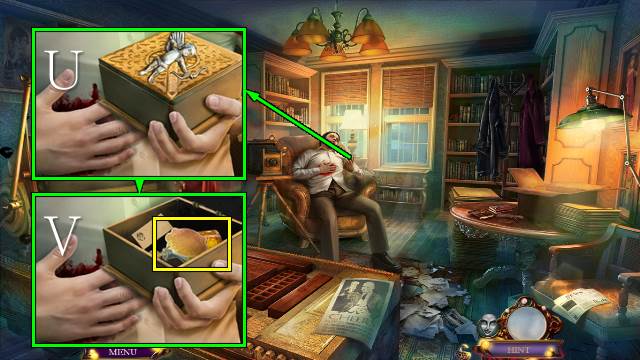
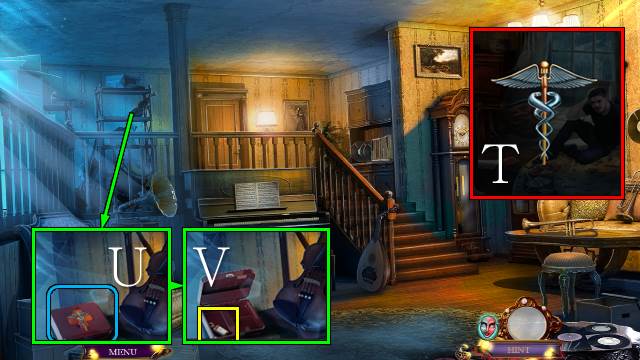
- Place the BRASS KNOB, open the drawer and take the BUTTER KNIFE (U).
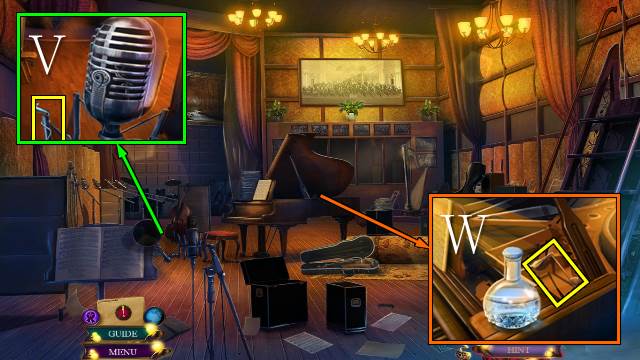
- Use the BUTTER KNIFE (V).
- Go left.
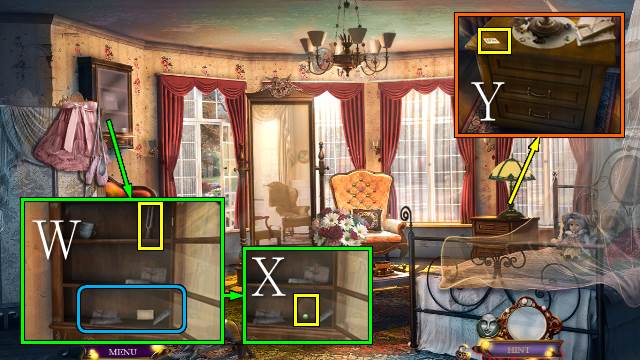
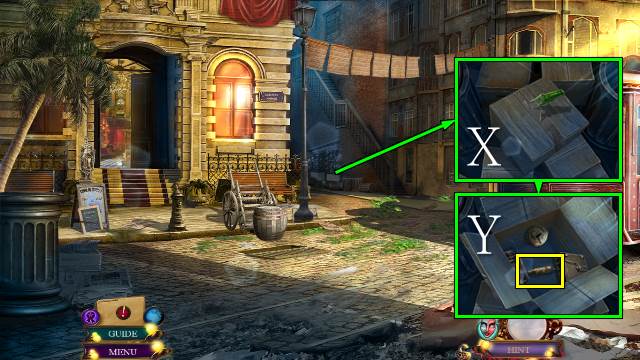
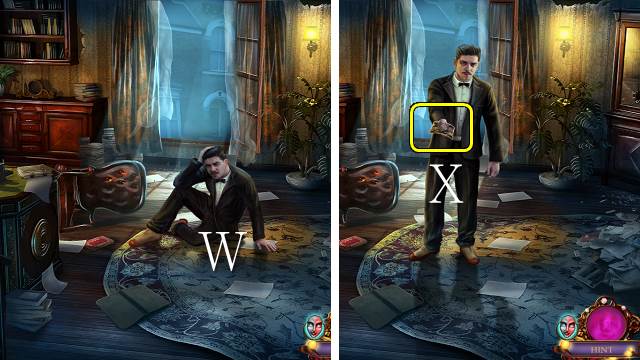
- Open the cabinet, move the letters, take the note and TUNING FORK (W), and FABRIC BUTTON 3/4 (X).
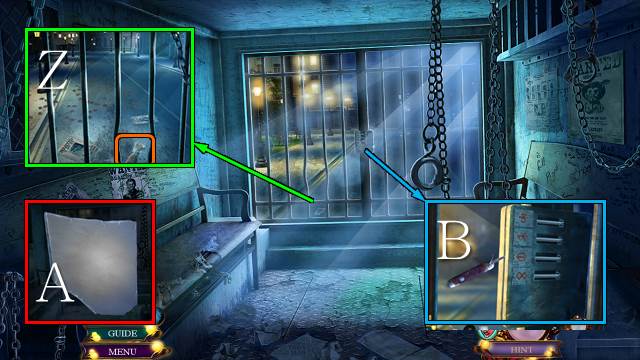
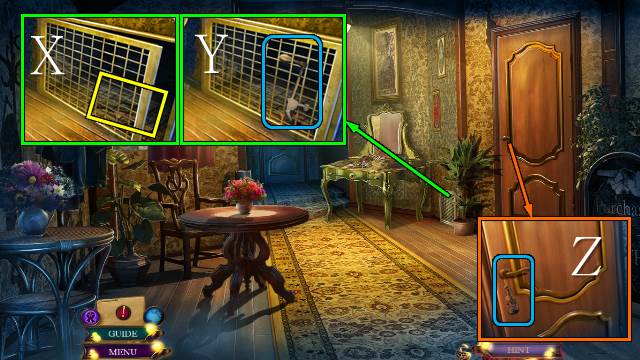
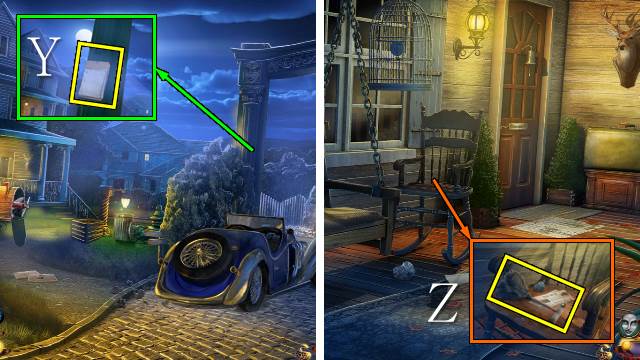
- Take the CODE (Y).
- Walk down.
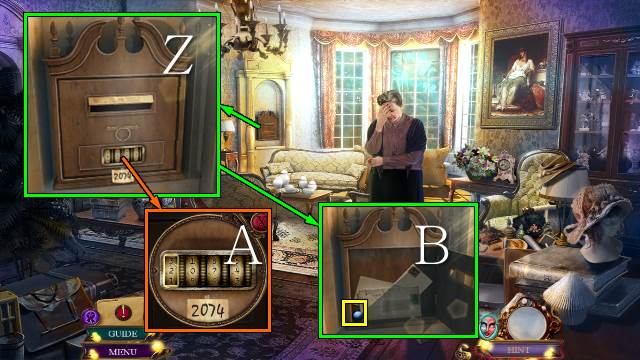
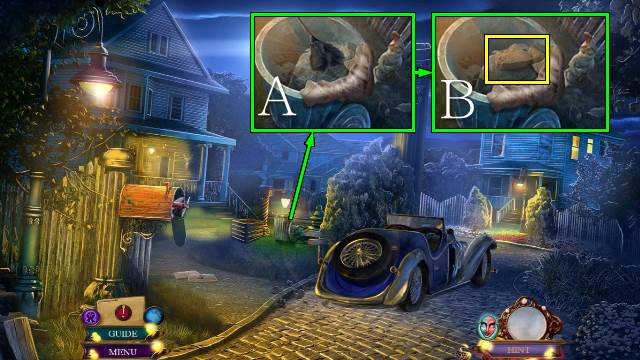
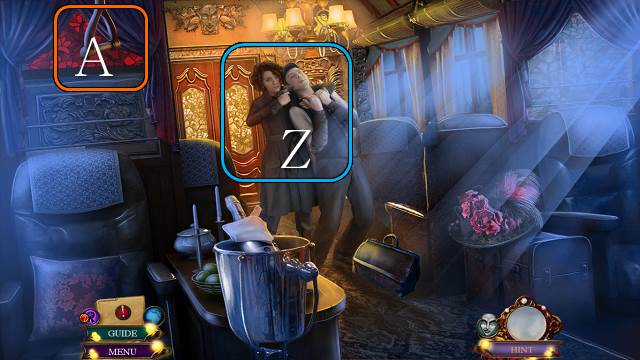
- Place the CODE (Z); enter 2074 (A) and take FABRIC BUTTON 4/4 (B).
- Go left.
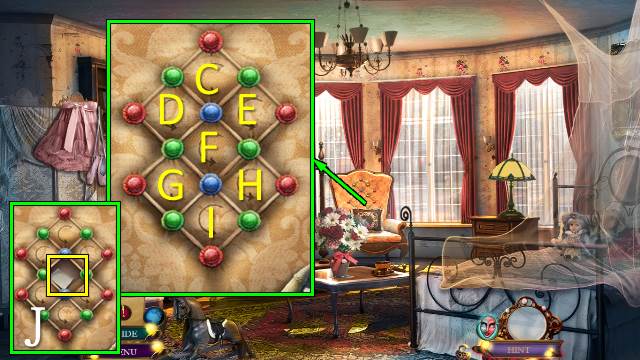
- Place the FABRIC BUTTONS for a mini-game.
- Solution: Cx2-D-Hx2-Ex3-Fx2-Hx2-G-Ix2.
- Take the THREATENING LETTER (J).
- Walk down.
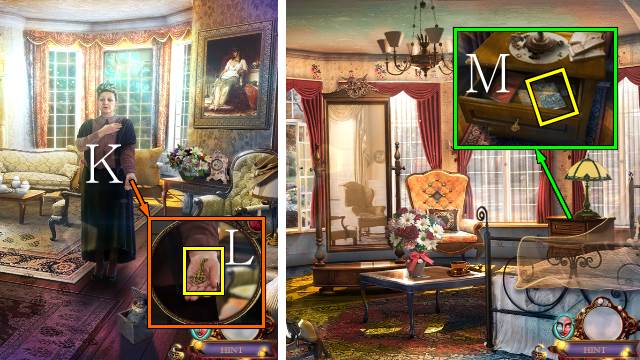
- Give the THREATENING LETTER to Madame Compton (K).
- Take the DRAWER KEY (L).
- Go left.
- Use the DRAWER KEY and open the drawer; take the VICTIM'S DIARY (M).
- Walk down.
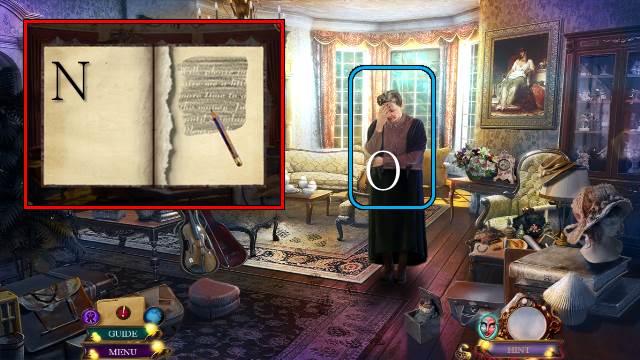
- Access and open the VICTIM'S DIARY; turn the page, use the PENCIL and take the LETTER FOR WILL (N).
- Show the LETTER FOR WILL to Madame Compton (O).
- Go forward.
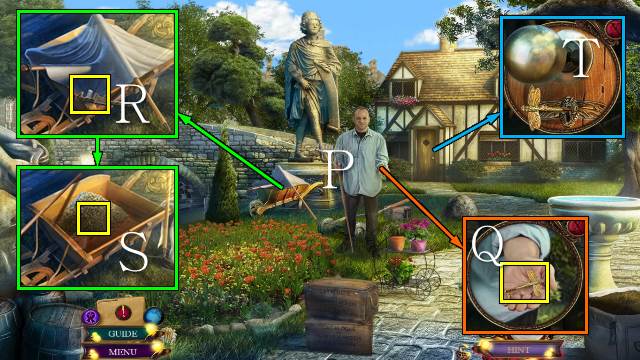
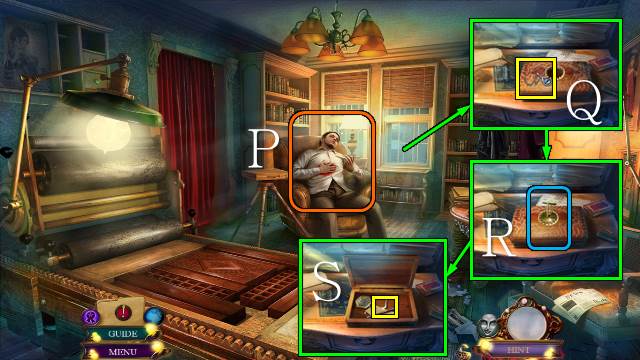
- Show the LETTER FOR WILL to Will (P).
- Take WILL'S KEY (Q).
- Use the WRENCH and take the GLASS CUTTER BLADE (R); move the tarp and take a PEBBLE (S).
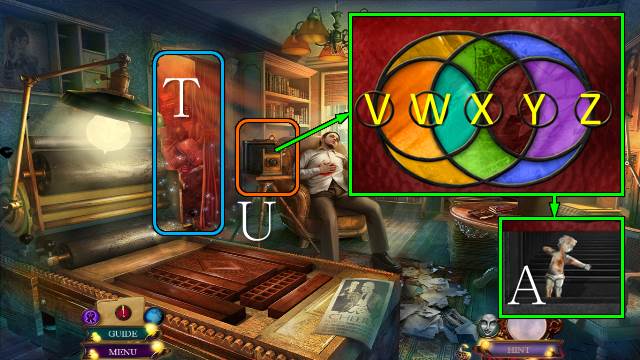
- Place and turn WILL'S KEY (T).
- Walk forward.
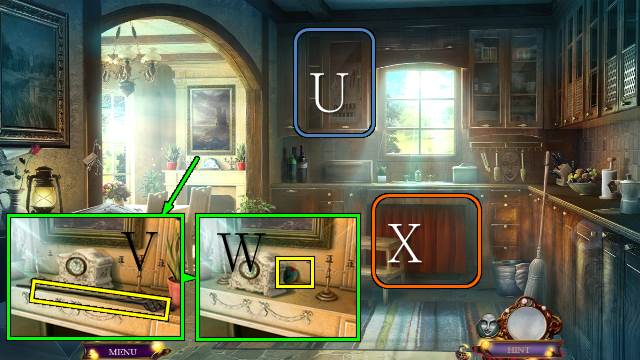
- Open the cabinet for a mini-HOP (U).
- You receive a FISHING LURE.
- Take the FIRE POKER (V), move the clock, read the notes and take COLORED DISC 2/3 (W).
- Open the curtain (X).
- Walk down.
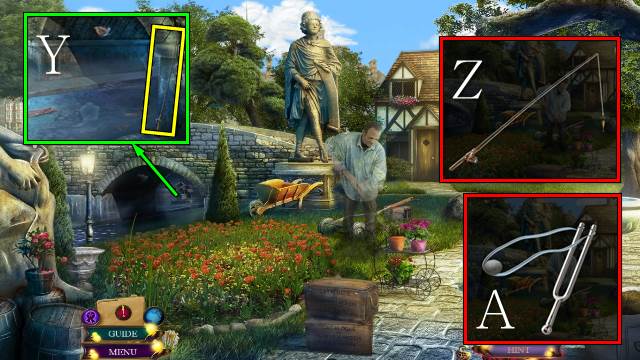
- Take the BROKEN FISHING POLE (Y).
- Access the BROKEN FISHING POLE and attach the YARN and FISHING LURE; you receive a FISHING POLE (Z).
- Access the TUNING FORK, attach the RUBBER BAND and PEBBLE; you receive a SLINGSHOT (A).
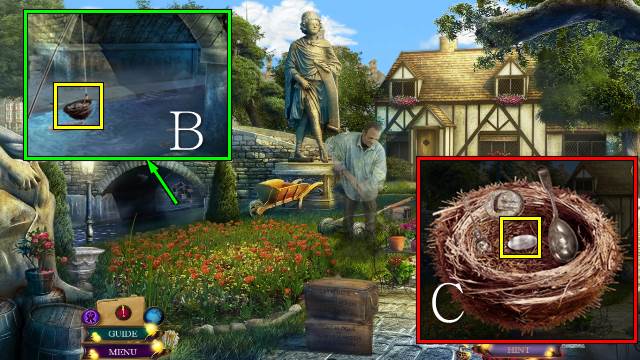
- Use the SLINGSHOT, then the FISHING POLE; take the BIRD'S NEST (B).
- Access the BIRD'S NEST, move the trinkets and take COLORED DISC 3/3 (C).
- Walk forward.
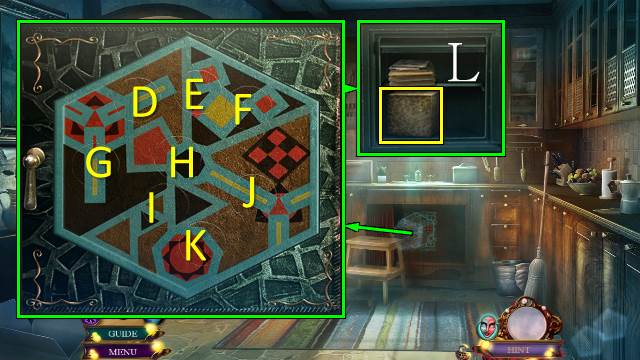
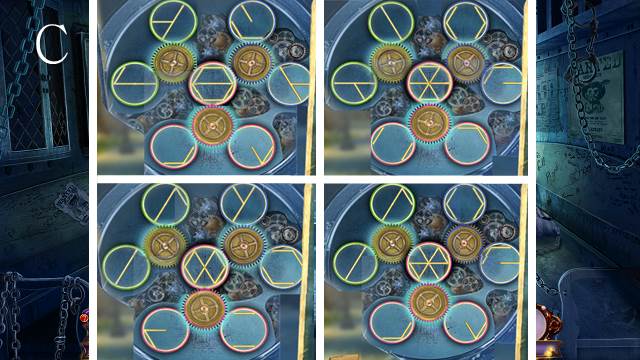
- Place the COLORED DISCS for a mini-game.
- Solution: swap D-J, E-I, F-H, G-K, turn Fx3-Kx2-Ex3-Dx3-Hx3-G.
- Take MARION'S POSSESSIONS (L).
- Walk down.
- Access MARION'S POSSESSIONS, open the box, move the items and take the CLUB DE CELESTE FLYER (M).
- Show the CLUB DE CELESTE FLYER to Will (N).
Chapter 2: Club de Celeste

- Walk forward.
- Take the PAPERWEIGHT and PAPER CUTOUTS (O).
- Walk down.
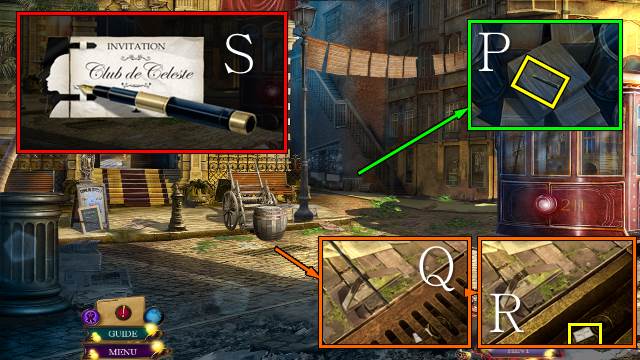
- Take the FOUNTAIN PEN (P).
- Place the PAPERWEIGHT and FIRE POKER (Q); take the DISCARDED INVITATION (R).
- Access the DISCARDED INVITATION, attach the PAPER CUTOUTS and use the FOUNTAIN PEN; you receive a CLUB DE CELESTE INVITATION (S).
- Go forward.
- Give the CLUB DE CELESTE INVITATION to the hostess (T).
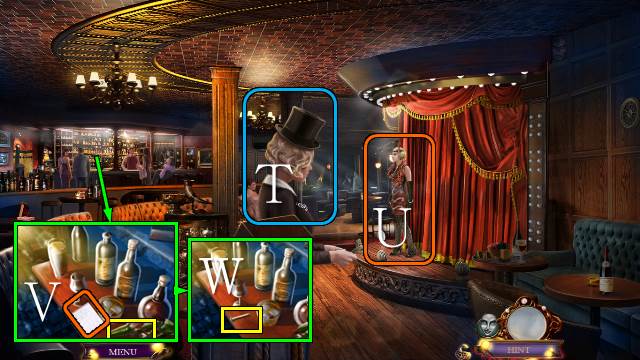
- Talk to the dancer (U).
- Take the note, BROKEN BOTTLE (V) and STRIKER WHEEL (W).
- Walk down.
- Use the BROKEN BOTTLE (X); move the items and take the BROKEN LIGHTER (Y).
- Walk forward.
- Access the BROKEN LIGHTER and attach the STRIKER WHEEL; you receive a LIGHTER (Z).
- Use the LIGHTER and play the HOP (A).
- You receive a GEAR CUFFLINK.
- Show MARION'S PHOTO to Danny, then show him the VICTIM'S LOCKET (B).
- Go right.

- Move the glass and box and take the WALLET (C).
- Take the CIGARETTE HOLDER (D).
- Access the GLASS CUTTER BLADE and attach the CIGARETTE HOLDER; you receive a GLASS CUTTER (E).
- Use the GLASS CUTTER; take the PYRAMID BOX (F).
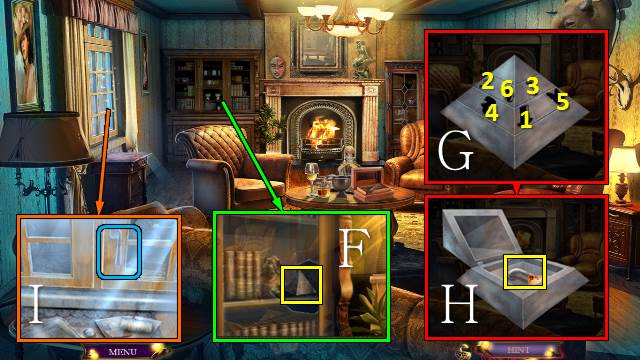
- Access the PYRAMID BOX and push the symbols in the indicated order (G); take the note and WINDOW HANDLE (H).
- Place and turn the WINDOW HANDLE (I).
- Go left.
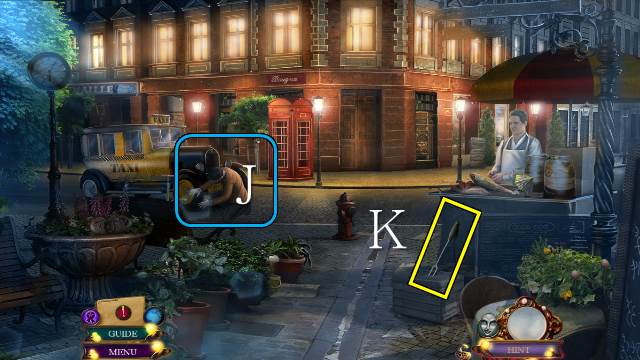
- Talk to the driver (J).
- Take the BARBECUE FORK (K).
- Go right.
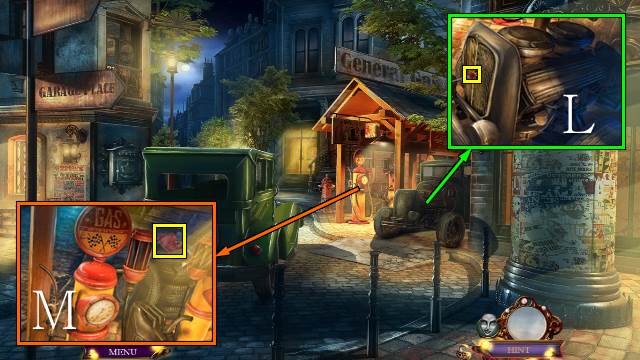
- Use the BARBECUE FORK; take the TELEPHONE EMBLEM (L).
- Take the SANDPAPER (M).
- Walk down.
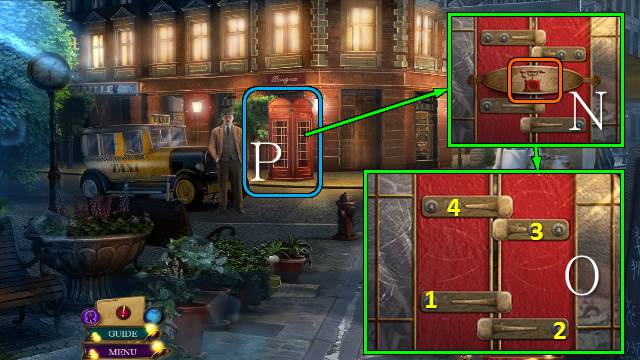
- Place the TELEPHONE EMBLEM (N) and move the latches by touching the bolts in the indicated order (O).
- Play the HOP (P).
- You receive a SMALL BAROMETER.
- Walk down.

- Place the SMALL BAROMETER (Q); take the CIGAR CUTTER (R).
- Access the CIGAR CUTTER, dismantle it and take the CIGAR CUTTER BLADE (S).
- Go left.
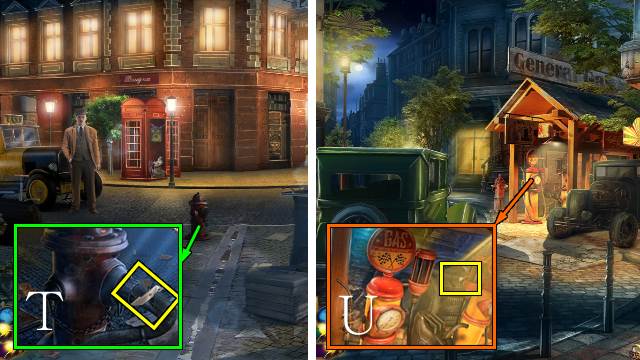
- Take the RUBBER HOSE PIECE with the CIGAR CUTTER BLADE (T).
- Go right.
- Use the CIGAR CUTTER BLADE and take the SOFT RUBBER (U).
- Walk down.
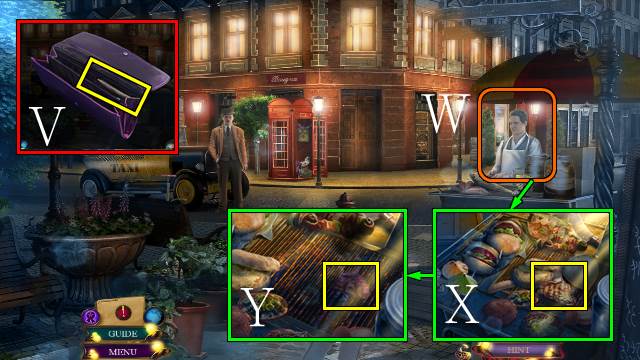
- Access the WALLET, open the zipper and take the DOLLAR (V).
- Talk to the vendor and give him the DOLLAR; you receive QUARTER 1/2 (W).
- Take the STEAK (X); move the items, place the SOFT RUBBER and take the MELTED SOFT RUBBER (Y).
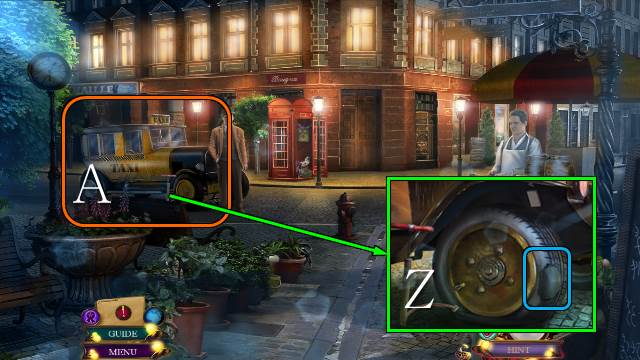
- Place the MELTED SOFT RUBBER and RUBBER HOSE PIECE; use the pump (Z).
- Get into the taxi (A).
Chapter 3: 45 Albion Road
- Use the SANDPAPER (B); take BRASS LETTER 1/3 (C).
- Take the TILE CENTER (D).
- Go forward.
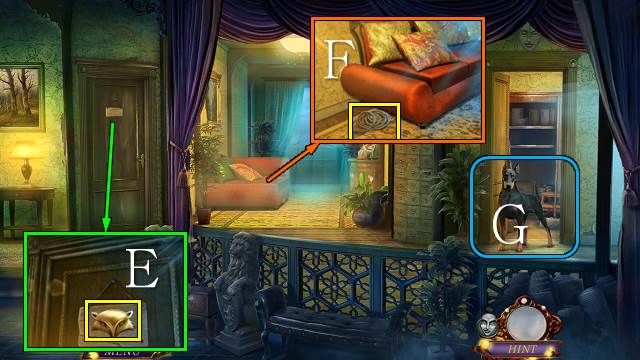
- Turn the sign and take the GOLD FOX (E).
- Move the couch three times and take the ROPE (F).
- Throw the STEAK to the dog; play the HOP (G).
- You receive the NIPPERS.
- Go forward.

- Move the flowers and take QUARTER 2/2 (H).
- Walk down twice.
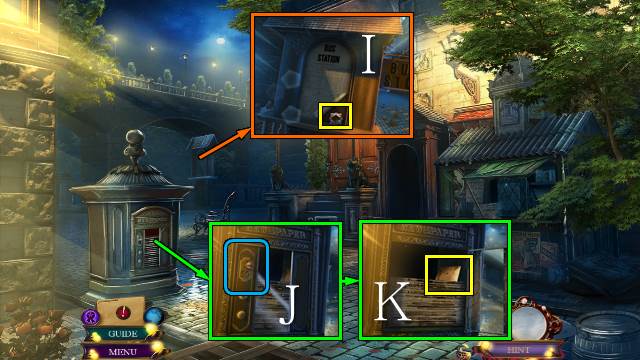
- Use the NIPPERS and take the HOLLOW TILE (I).
- Use the QUARTERS (J) and take BRASS LETTER 2/3 (K).
- Go forward twice.
- Access the HOLLOW TILE and place the TILE CENTER; take the FLOWER TILE (L).
- Place the FLOWER TILE and take BRASS LETTER 3/3 (M).
- Walk down.
- Place the BRASS LETTERS; take the note and DANNY'S KEY (N).
- Place DANNY'S KEY (O).
- Go left.
- Talk to Danny (P).
- Take the PENDANT (Q) and place the GEAR CUFFLINK (R); move the items and take the CUPID'S BOW (S).
- Use the ROPE; play the HOP (T).
- You receive the LIQUID SILVER.
- Open the camera (U).
- Play the mini-game.
- Solution: V-Y, V-X, X-Z, X-V, W-Z, X-Z, W-Z.
- Take the RUSTY CUPID (A).
- Walk down and forward.
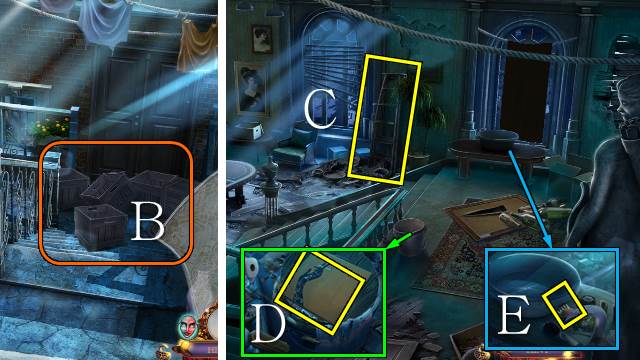
- Move the boxes (B).
- Go forward.
- Take the LADDER (C).
- Take the RECORD ALBUM (D).
- Read the note and take the RUSTY BACK SCRATCHER (E).
- Walk down.
- Place the LADDER (F).
- Use the CIGAR CUTTER BLADE, open the sack and take the SILVER BEAR and WALKING STICK (G).
- Go forward.
- Use the WALKING STICK for a mini-HOP (H).
- You receive a BAG OF LETTERS.
- Go to Danny's Room.
- Place the BAG OF LETTERS for a mini-game (I).
- Take the MATCHES and BRONZE WOLF (J).
- Go to the Ruined Apartment.
- Place the GOLD FOX, SILVER BEAR and BRONZE WOLF (K); take the WOODEN STAR (L).
- Go to Danny's Room.
- Move the paper and passport, place the WOODEN STAR; take the PAINTBRUSH (M).
- Walk down twice.
- Zoom into the kiosk and use the MATCHES for a HOP (N).
- HOP memory mini-game (O).
- HOP jigsaw mini-game (P).
- You receive a SMALL HAMMER.
- Go to the Ruined Apartment.
- Use the SMALL HAMMER (Q); take the CUPID'S WING (R).
- Go to Danny's Room.
- Access the LIQUID SILVER, open the bottle and place the PAINTBRUSH; you receive a PAINTBRUSH WITH SILVER (S).
- Access the RUSTY CUPID and use the PAINTBRUSH WITH SILVER; you receive a CUPID (T).
- Place the CUPID, CUPID'S BOW and CUPID'S WING (U); take the notes and FRAGRANCE OIL (V).
Chapter 4: Cotton Avenue Records
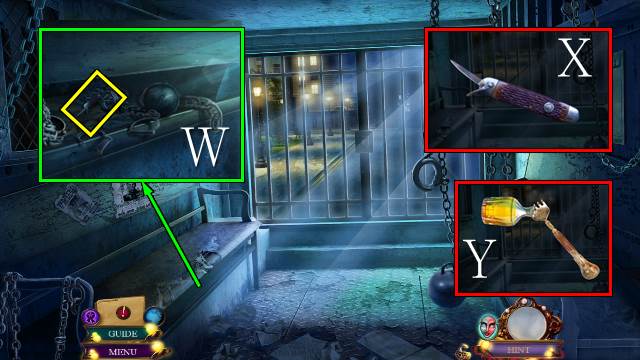
- Move the chains and take the UTILITY KNIFE (W).
- Access the UTILITY KNIFE, close the broken blade and open the small blade (X).
- Access the RUSTY BACK SCRATCHER and use the FRAGRANCE OIL on it; you receive the EXTENDED BACK SCRATCHER (Y).
- Take the PIECE OF GLASS with the EXTENDED BACK SCRATCHER (Z).
- Access the PIECE OF GLASS and use the PAINTBRUSH WITH SILVER to get a MIRROR (A).
- Use the UTILITY KNIFE and place the MIRROR for a mini-game (B).
- Solution (C).
- Go forward.
- Move the paper and take the GOLDEN FEATHER (D).
- Play the mini-HOP (E).
- You receive a CHISEL.
- Go forward.

- Take the UMBRELLA (F), move the paper and take SAFE COMBINATION 1/2 (G).
- Take the SAXOPHONE TOKEN (H), place the GOLDEN FEATHER and take SAFE COMBINATION 2/2 (I).
- Take the record and move the frame (J); place the SAFE COMBINATION for a mini-game (K).
- Take PHILLIP'S NOTE (L) and the GATE KEY (M).
- Walk down.
- Use the UMBRELLA and take the VIOLIN TOKEN (N).
- Go right.
- Use the GATE KEY (O).
- Take the DRUMS TOKEN (P).
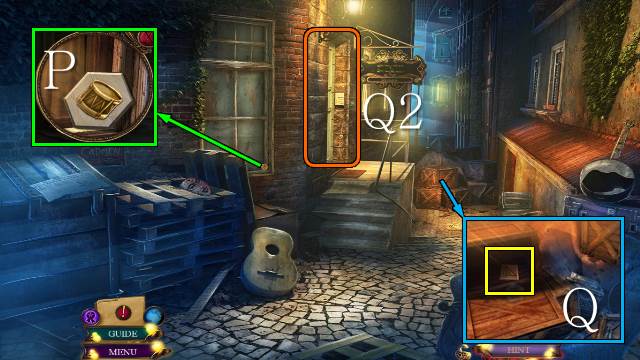
- Use the CHISEL; take the HARP TOKEN (Q).
- Zoom into the door for a mini-game (Q2).
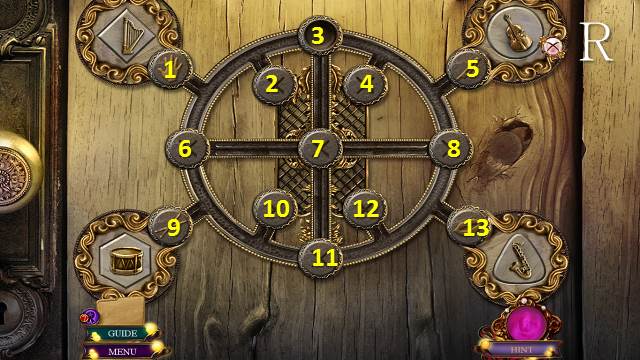
- Place the SAXOPHONE TOKEN, VIOLIN TOKEN, DRUMS TOKEN and HARP TOKEN(R).
- Solution: 11-13-8-7-3-5-8-7-6-1-3-6-9-11-12-8-7-6-9-11.
- Go left.
- Move the drape ; play the HOP (S).
- You receive CLOCK WEIGHT 1/2.
- Place the PENDANT (T); take the BOW SCREW and CLOCK HAND 1/2 (U).
- Go forward.
- Take SILVER SNAKE 1/2 (V).
- Take the PIANO HAMMER (W).
- Walk down.
- Use the PIANO HAMMER (X); take the VIOLIN (Y).
- Place the VIOLIN (Z).
- Go right.
- Take the BOTTLE OPENER (A).
- Take SILVER SNAKE 2/2, open the clock and take the PHONOGRAPH NEEDLE (B).
- Access the RECORD ALBUM and take out the RECORD ALBUM (C).
- Take the HANDTRUCK WHEEL (D), place the RECORD ALBUM and PHONOGRAPH NEEDLE and take the MUSIC BOX CYLINDER (E).
- Walk down and forward.
- Place the HANDTRUCK WHEEL; you receive the HANDTRUCK (F).
- Use the HANDTRUCK twice; play the HOP (G).
- You receive a BROKEN BOW.
- Access the BROKEN BOW and use the BOW SCREW; you receive a VIOLIN BOW (H).
- Place the VIOLIN BOW (I) and take CLOCK WEIGHT 2/2 (J).
- Go down and right.

- Place the CLOCK WEIGHTS and take the SMALL CRANK (K).
- Place the MUSIC BOX CYLINDER and SMALL CRANK for a mini-game (L).
- Go forward.

- Play the HOP (M).
- You receive a CRYSTAL GLASS.
- Open the safe and take KEY CHAIN 1/2 (N); move the papers and take the BASS CLEF (O).
- Go to the Recording Room.
- Place the BASS CLEF; take CLOCK HAND 2/2 (P).
- Use the BOTTLE OPENER and CRYSTAL GLASS; you receive a GLASS OF WATER (Q).
- Go to Phillip's Office.
- Give the GLASS OF WATER to Phillip (R).
- Place the CLOCK HANDS; take the SHOE HOOK and INCOMPLETE CADUCEUS (S).
- Walk down.
- Access the INCOMPLETE CADUCEUS and place the SILVER SNAKES; you receive the CADUCEUS SYMBOL (T).
- Place the CADUCEUS SYMBOL (U); take the PAINKILLERS (V).
- Go forward.
- Give the PAINKILLERS to Phillip (W).
- Give PHILLIP'S NOTE to Phillip.
- Take the picture (X).
Chapter 5: Fairfax Lodge
- Take the FLY REPELLENT RECIPE (Y).
- Go left.
- Take the DUSTER (Z).
- Walk down.
- Use the DUSTER (A) and take the BREAD (B).
- Go left.
- Access the BREAD, crumble it and take the BREADCRUMBS (C).
- Use the SHOE HOOK, place the BREADCRUMBS and take SMALL PICKAXE (D).
- Walk down.
- Place the SMALL PICKAXE and take the SUITCASE LOCK (E).
- Go left.
- Place the SUITCASE LOCK (F).
- Play the HOP (G).
- You receive a CORKSCREW.
- Use the CORKSCREW; take the LODGE KEY (H).
- Use the LODGE KEY (I).
- Go left.
- Take the PURSE (J).
- Move the items and take the WIRE HANGER (K).
- Take the FIREPLACE SHOVEL (L).
- Go left.
- Take the KNIFE HANDLE (M).
- Walk down twice.
- Place the KNIFE HANDLE to receive a KNIFE (N).
- Walk down.
- Move the letters; take the PILE OF DIRT with the FIREPLACE SHOVEL (O).
- Go left twice.
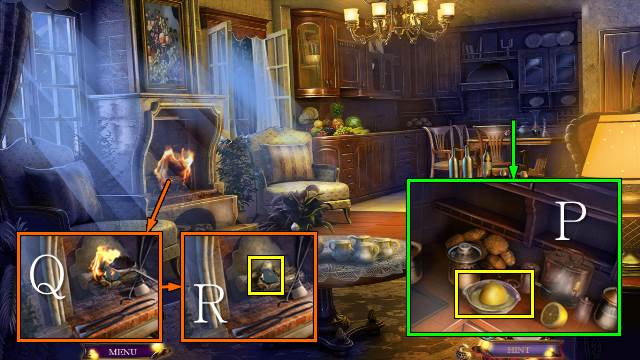
- Move the lemon, use the KNIFE, remove the lemon and take the LEMON JUICE (P).
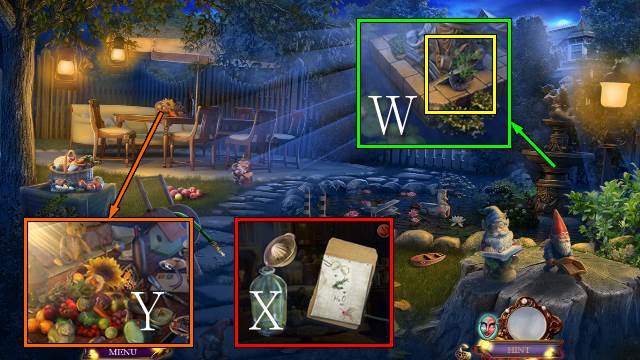
- Use the PILE OF DIRT (Q); take the BURNED PAPERS (R).
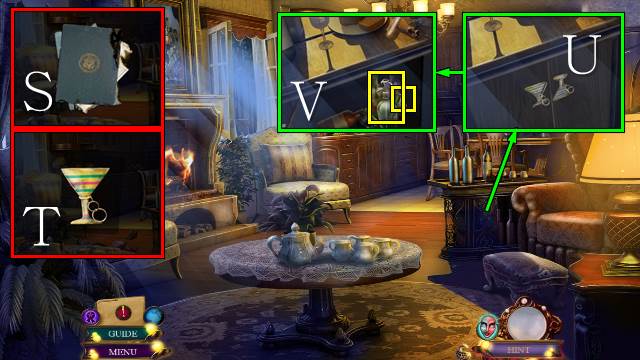
- Access the BURNED PAPERS (S), remove the notes and take the BURNED TICKET and KEY CHAIN 2/2 (T).
- Place the KEY CHAINS (U) and take the SIPHON BOTTLE and CLOVER LEAF 1/2 (V).
- Go left.
- Use the KNIFE and take the ROSEMARY (W).
- Access the SIPHON BOTTLE, place the FLY REPELLENT RECIPE, remove the bottle top, place the LEMON JUICE and ROSEMARY and take the FLY REPELLENT (X).
- Use the FLY REPELLENT for a mini-HOP (Y).
- You receive the ZIPPER PULL.
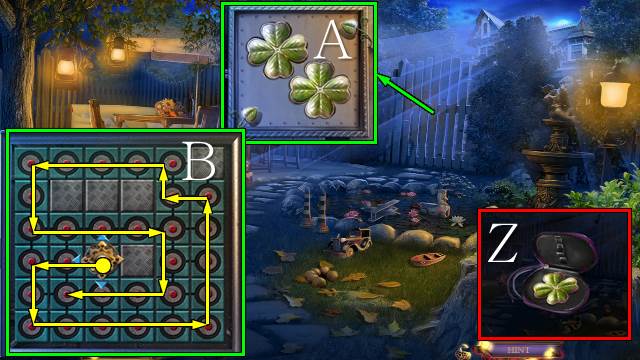
- Access the PURSE and place the ZIPPERPULL; take CLOVER LEAF 2/2 (Z).
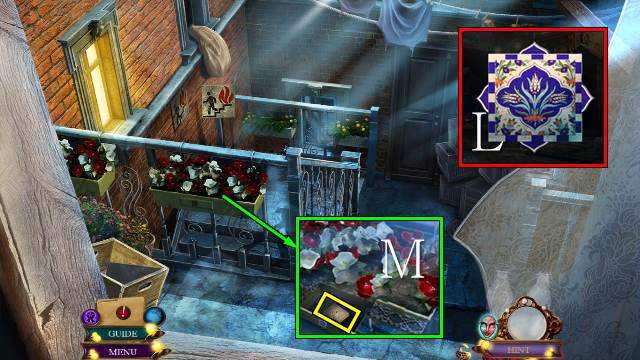
- Place the CLOVER LEAVES (A) for a mini-game (B).
- Go forward.
- Take the PLIERS and WIND CHIME 1/2 (C).
- Access the WIRE HANGER, use the PLIERS four times and take the LONG HOOK (D).
- Take the HOT CRANK HANDLE with the LONG HOOK (E).
- Take WIND CHIME 2/2 with the LONG HOOK (F).
- Place the WIND CHIMES and take the VALVE HANDLE (G).
- Walk down.
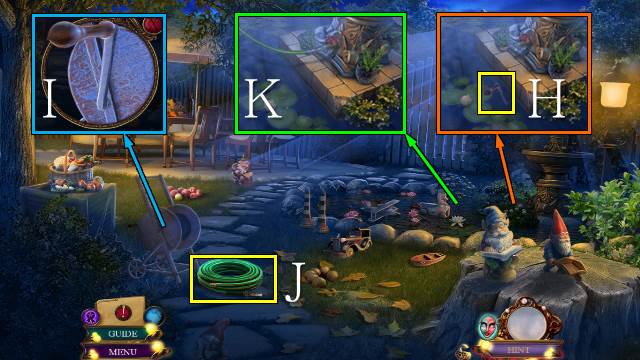
- Put the HOT CRANK HANDLE in the water to get a CRANK (H).
- Place the CRANK (I).
- Take the GARDEN HOSE (J).
- Place the VALVE HANDLE and GARDEN HOSE and turn the valve (K).
- Go forward.
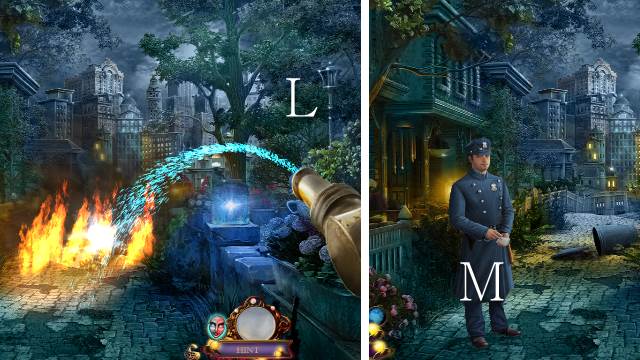
- Pick up the hose and move it over the fire (L).
- Give the BURNED TICKET to the police man; you receive the WANTED POSTER (M).
- Go forward.
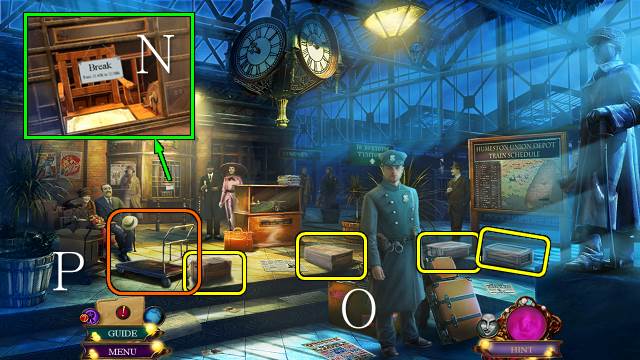
- Inspect the ticket booth (N).
- Collect the four boxes (O) and move the trolley (P).
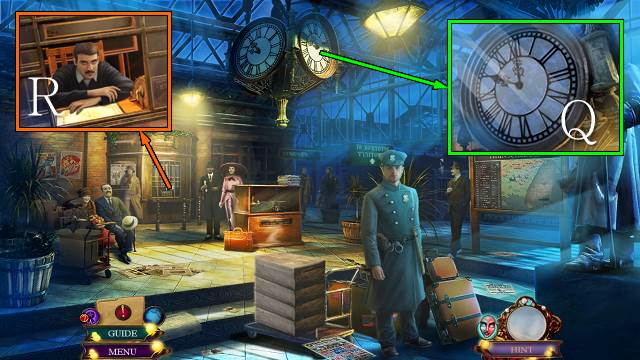
- Change the time to 10 o'clock (Q).
- Talk to the vendor; you receive the DISPLAY CASE KEY (R).
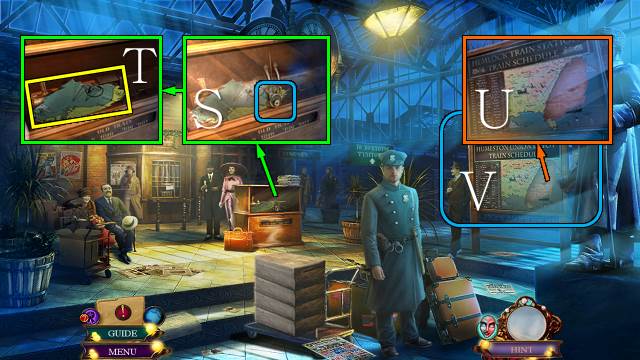
- Use the DISPLAY CASE KEY (S); take the MAP PIECE (T).
- Place the MAP PIECE (U).
- Play the HOP (V).
- You receive the TRAIN SCHEDULE.
- Give the TRAIN SCHEDULE to the policeman.
- Go forward.
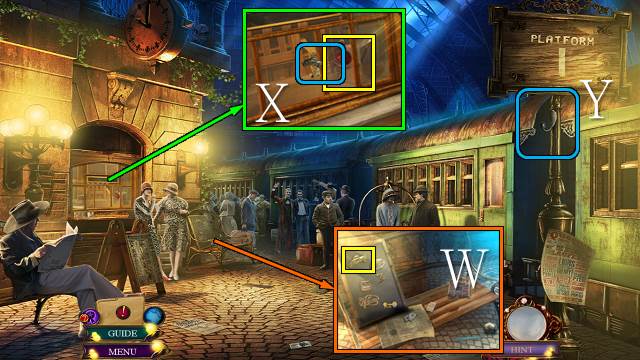
- Take the FRIDGE MAGNET (W).
- Use the FRIDGE MAGNET, open the window and take the SIGNAL LAMP (X).
- Place the SIGNAL LAMP (Y).
- Use the WANTED POSTER (Z).
- Pull the emergency brake (A).
- Congratulations, you have completed Danse Macabre: Deadly Deception.
Created at: 2015-03-29