

Walkthrough Menu
- General Tips
- Chapter 1: Rink
- Chapter 2: Hotel
- Chapter 3: Donald's House
- Chapter 4: Theater
- Chapter 5: Scott's Store
General Tips
- This is the official guide for Danse Macabre: Thin Ice.
- This guide will not show when you have to zoom into a location; the screenshots will show each zoom scene.
- Hidden-object puzzles are referred to as HOPs. This guide will not show screenshots of the HOPs, however, it will mention when an HOP is available and the inventory item you'll collect from it.
- Use the Map to fast travel to a location.
Chapter 1: Rink
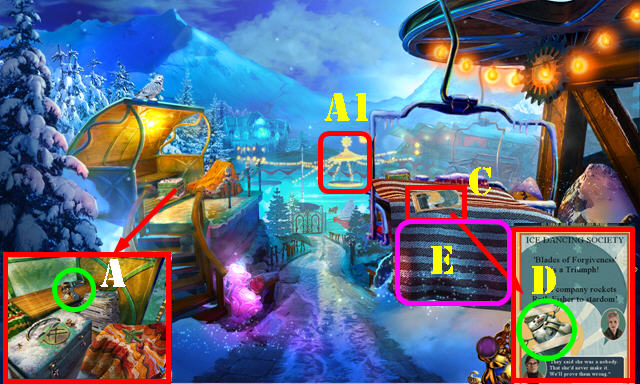

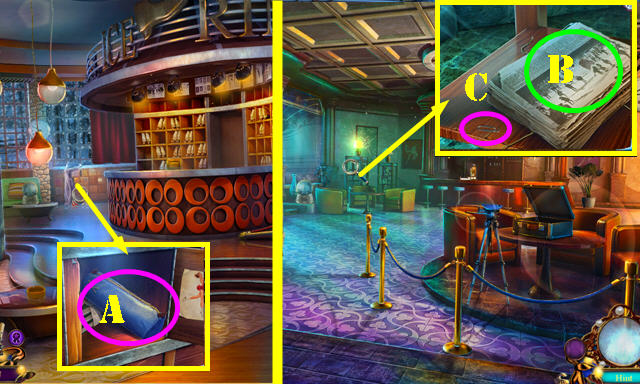
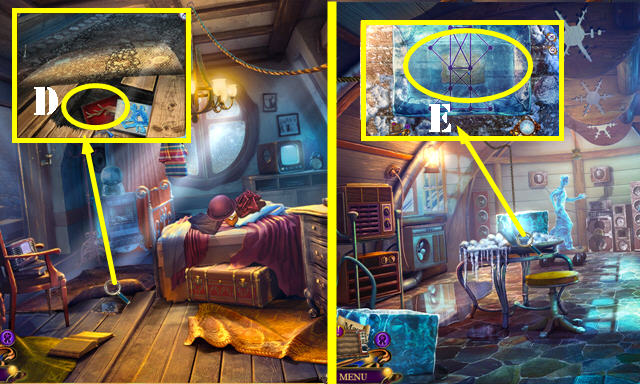
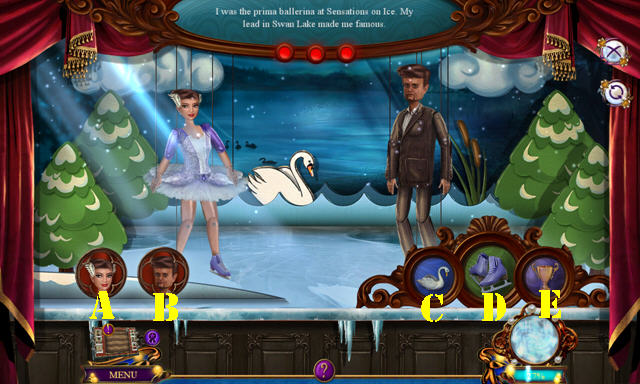
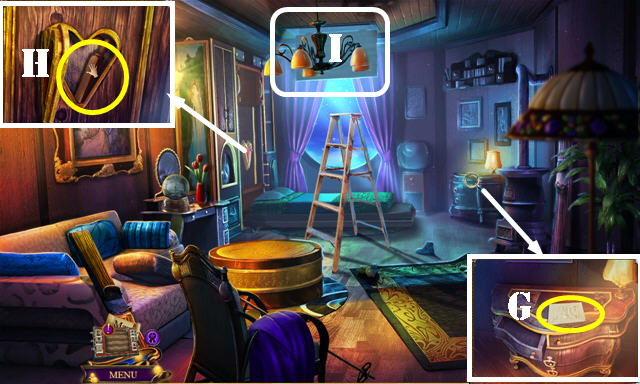
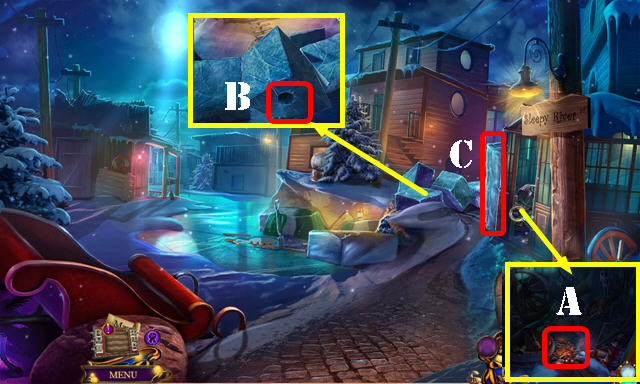
- Take the HAIRDRYER (A).
- Remove the tag from the HAIRDRYER; take the COMPACT MIRROR and remove the cover (inventory).
- Go forward (A1).
- Take the BROOM (B) and the Map (B1).
- Walk down.
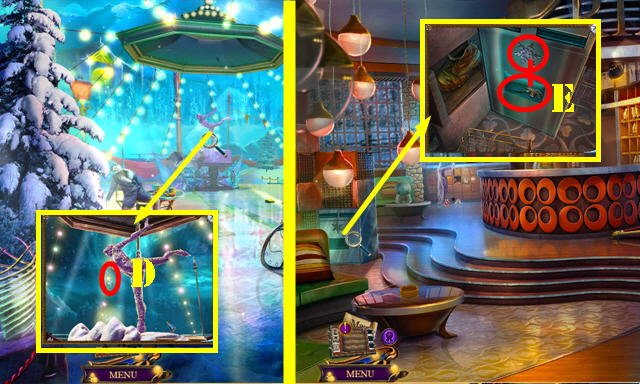
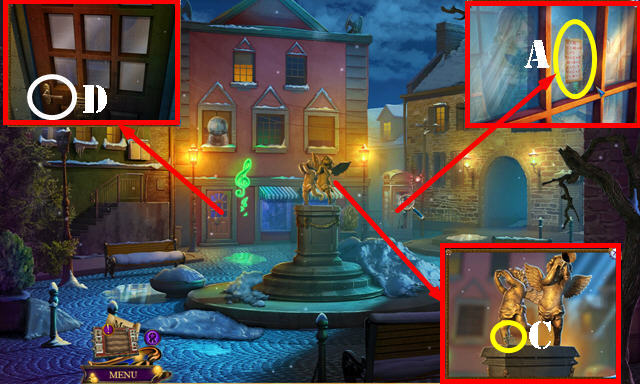
- Use the BROOM (C); take the SNOWMAN EMBLEM (D) and the note.
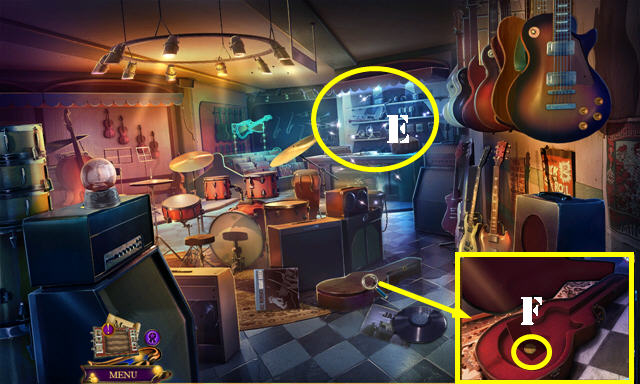
- Remove the blanket for a HOP (E); play it to get the BATTERIES.
- Place the BATTERIES in the HAIRDRYER (inventory).
- Go forward (A1).
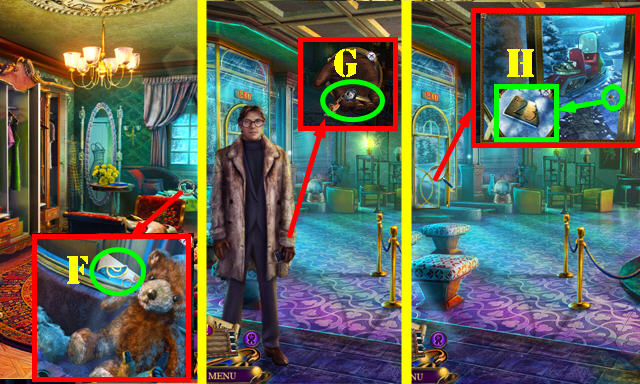
- Use the HAIRDRYER (F). Open the gate and go forward.

- Talk to Donald Perry.
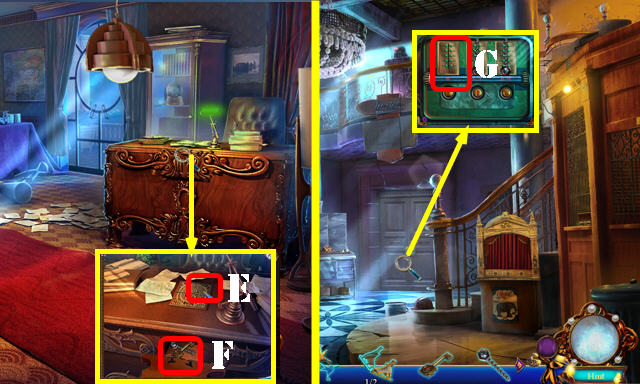
- Remove the hat (G) and use the COMPACT MIRROR (H).
- Play the HOP (H1) to get the BUTTON.
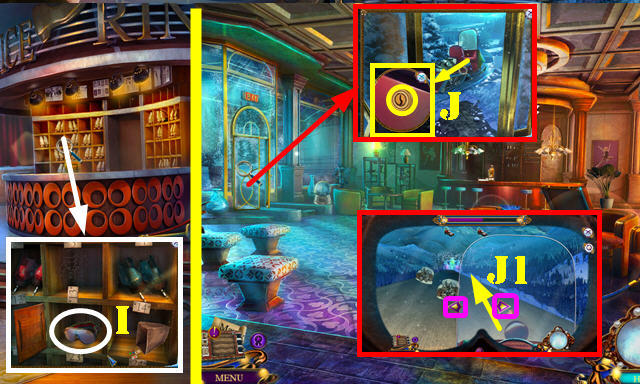
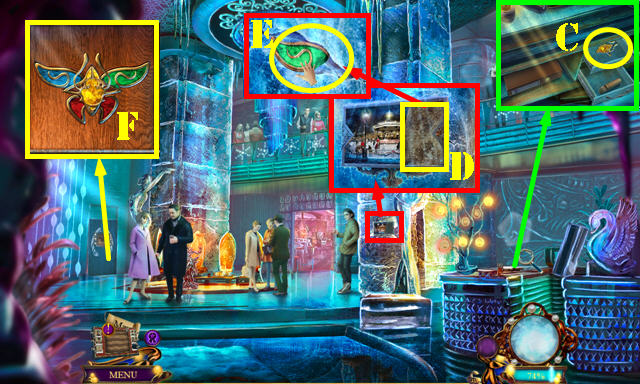
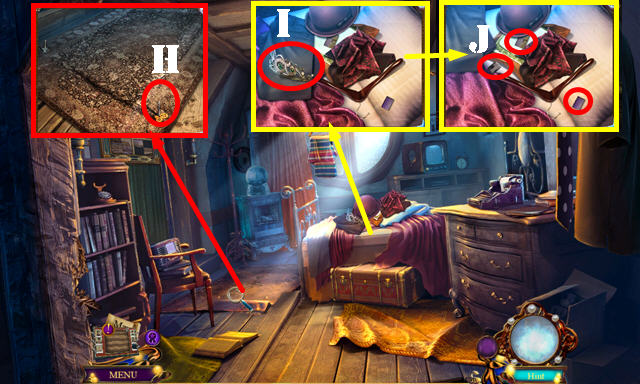
- Place the BUTTON and make matches. Solution (I).
- Take the envelope (J). Read the note and take the FOX EMBLEM.
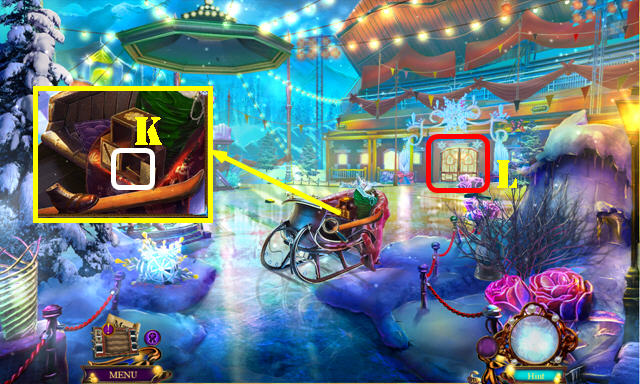
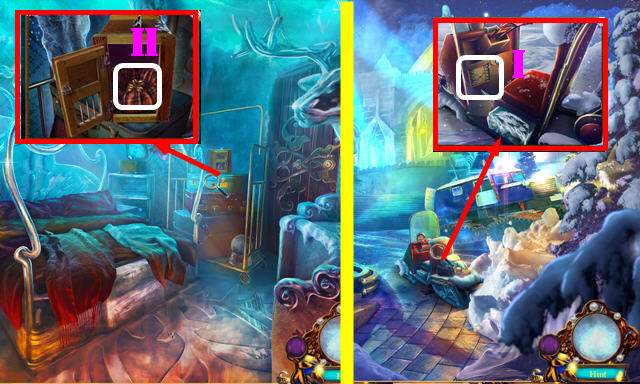
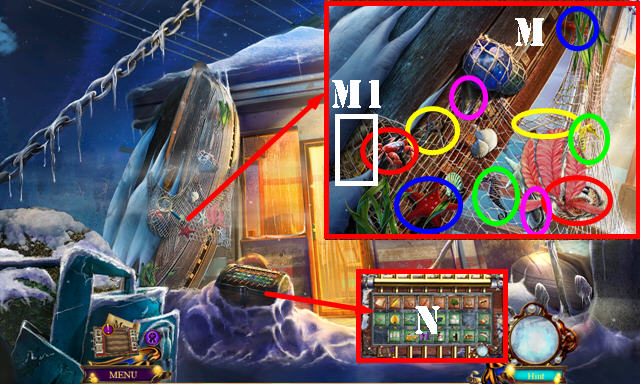
- Place the SNOWMAN EMBLEM; take the PICKAXES 1/2 (K).
- Enter (L).
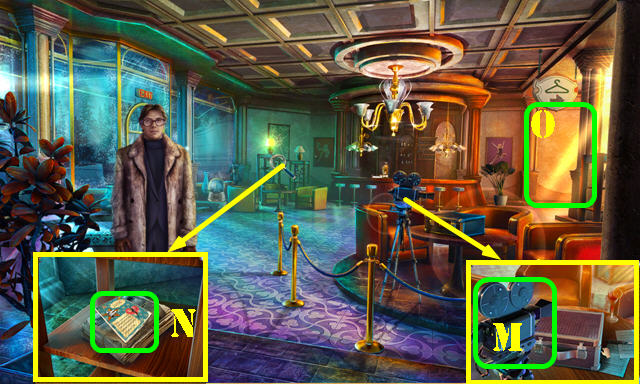
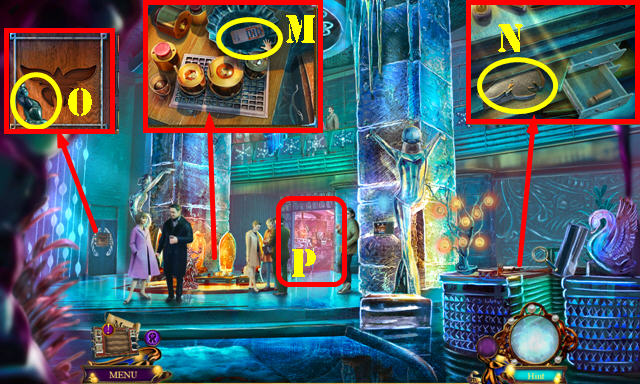
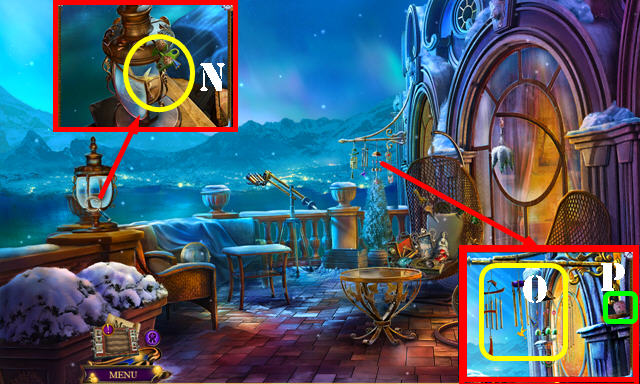
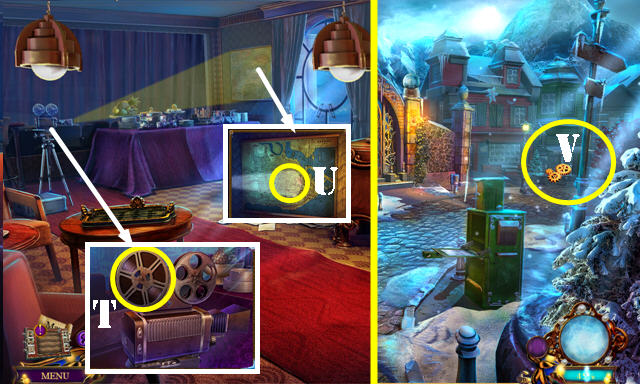
- Take the VIDEO CAMERA (M).
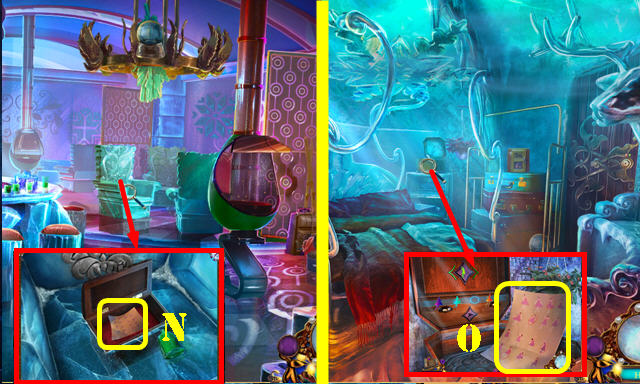
- Take the note (N).
- Go (O).
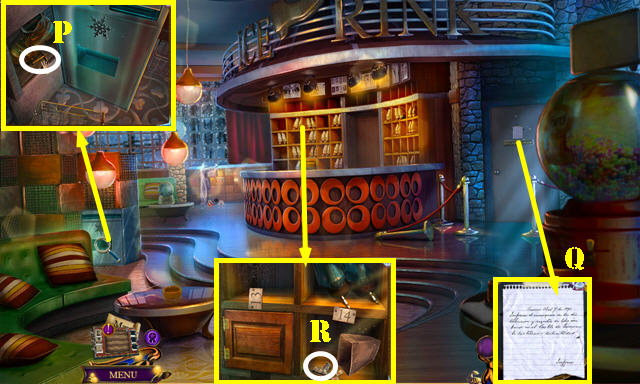
- Move the shoe; take the PICKAXES 2/2 (P).
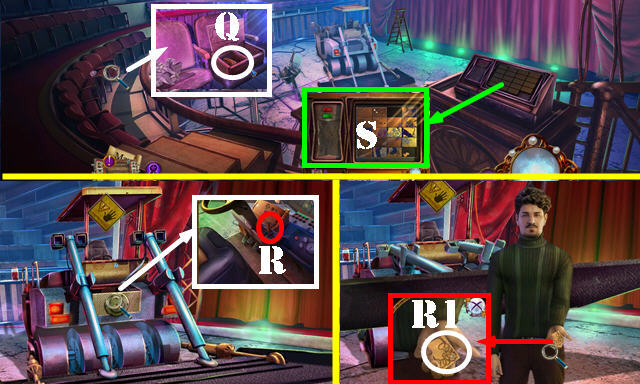
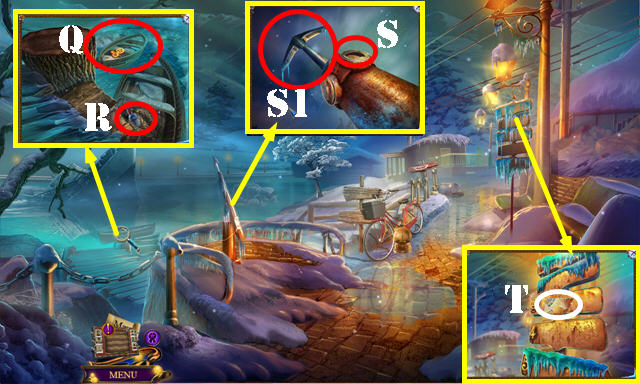
- Take the note (Q).
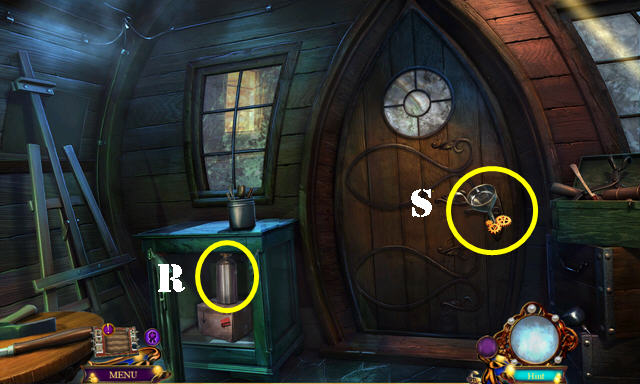
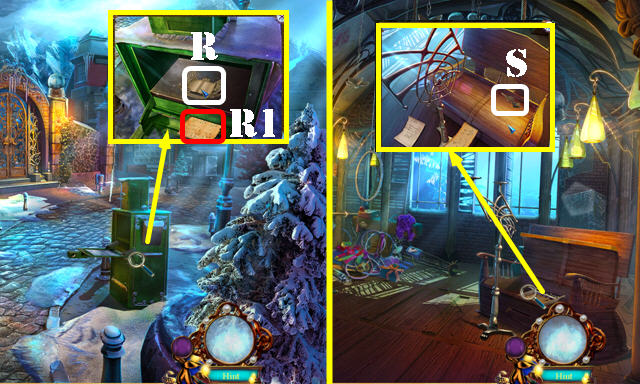
- Shake the bag; take the SKATE EMBLEM (R).
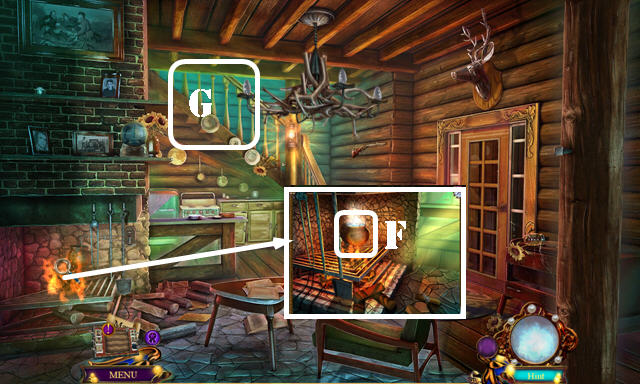
- Walk down 3x.
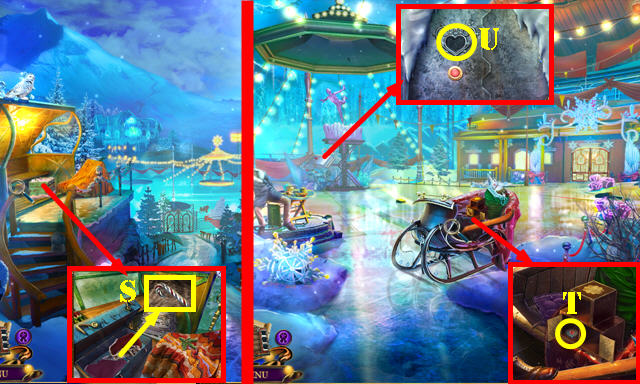
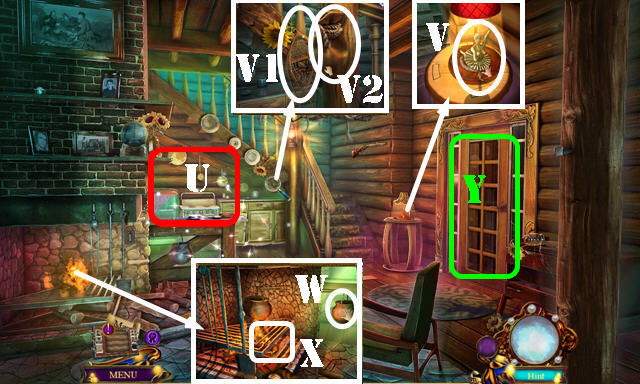
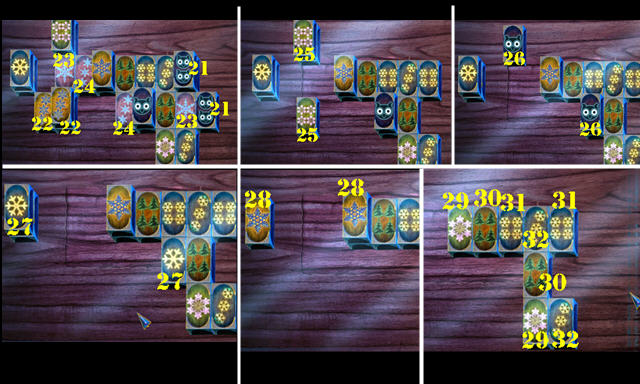
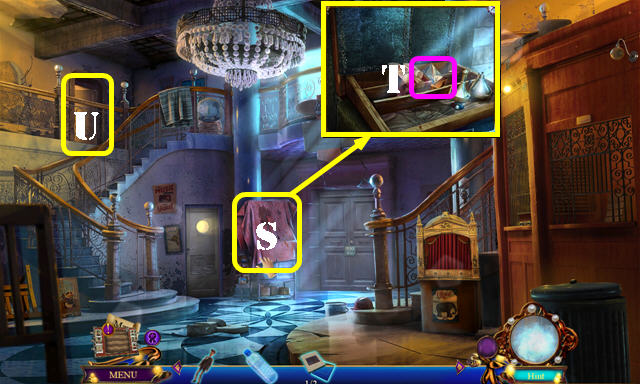
- Place the 2 PICKAXES; open the box, move the cloth and take the CANDY CANE EMBLEM (S).
- Go forward.
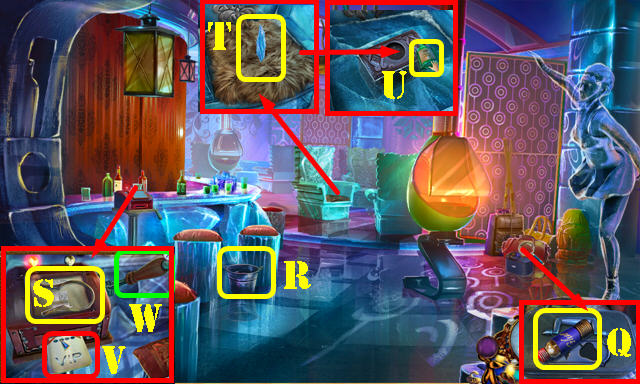
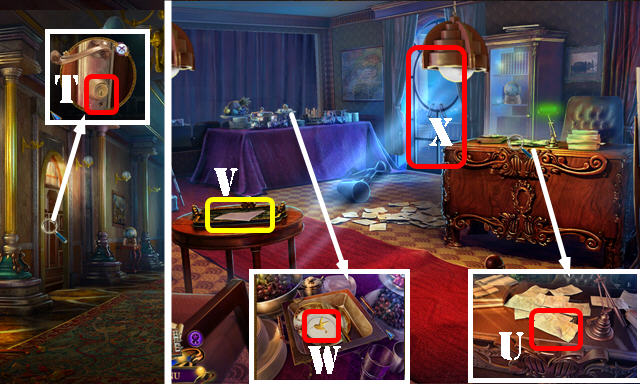
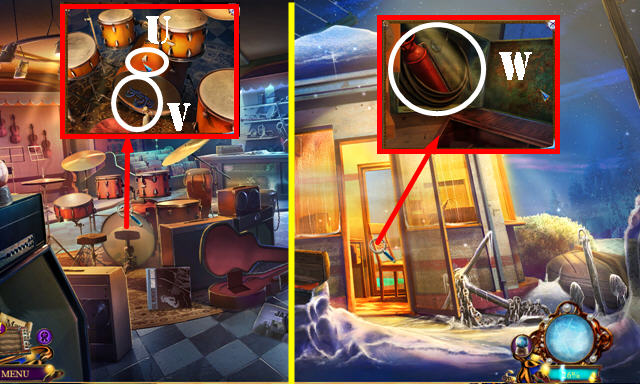
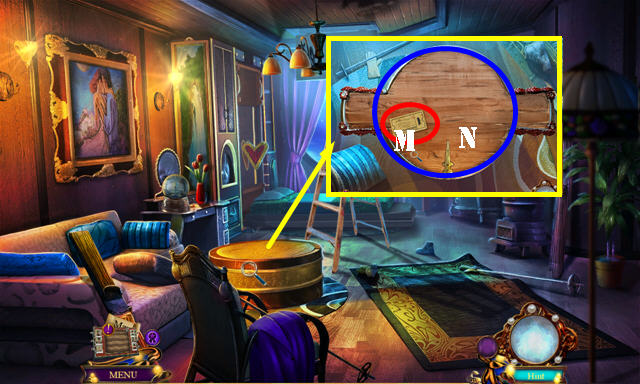
- Place the CANDY CANE EMBLEM; take the METALLIC HEART (T).
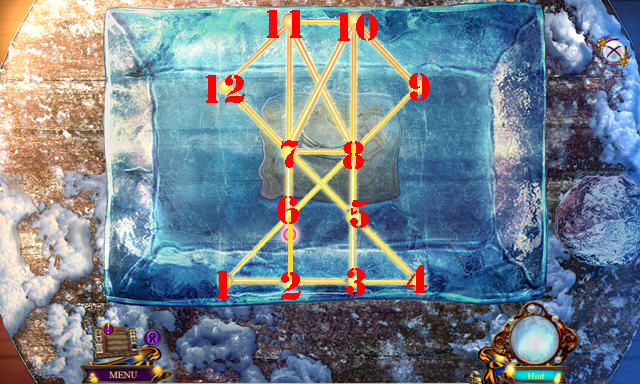
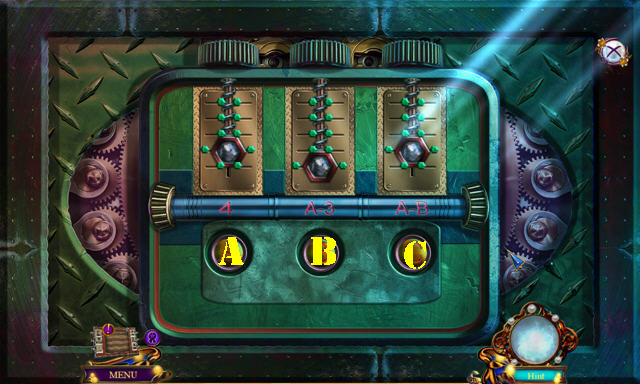
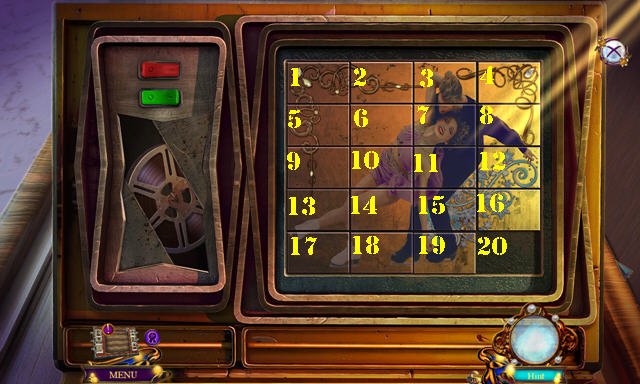
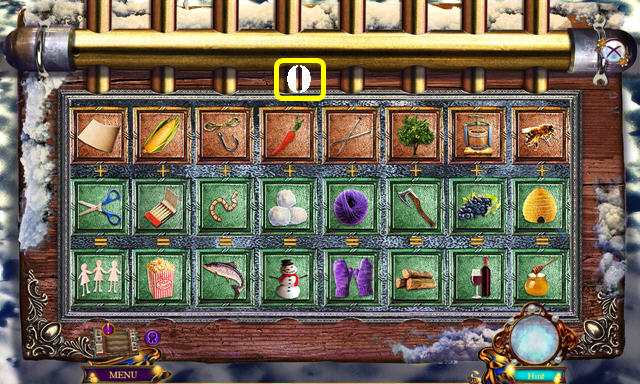
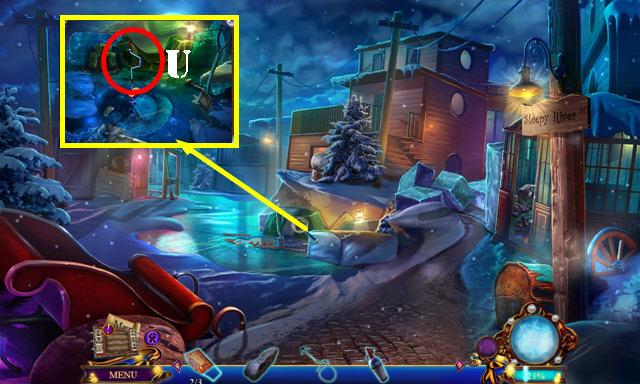
- Place the METALLIC HEART (U) for a puzzle.
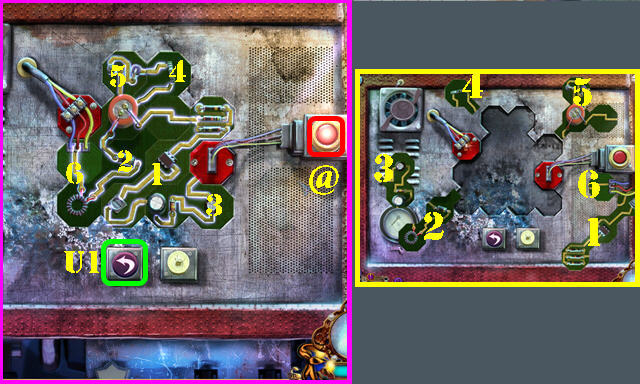
- Solution 1-6. Select a piece and then the button (U1) to rotate a piece, then put in place. Push the button (@).
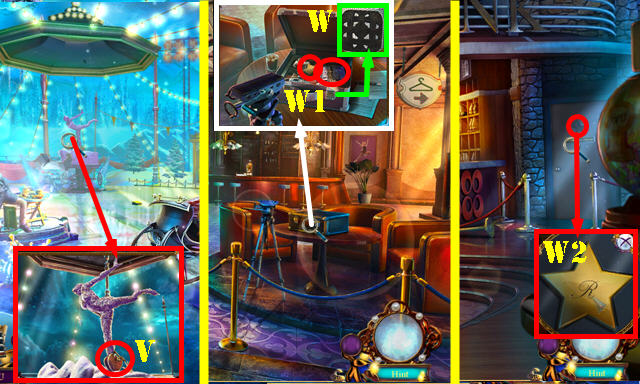
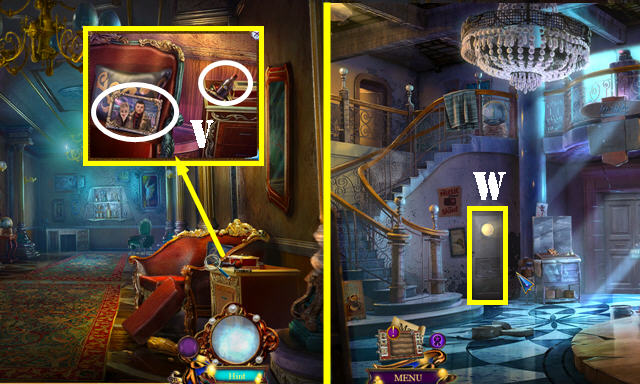
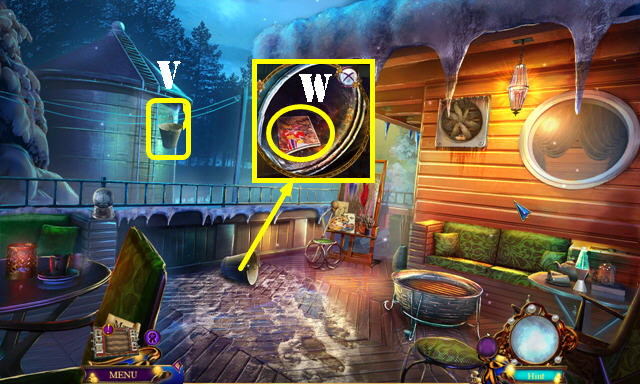
- Take the PURSE (V).
- Open the PURSE; move two items and take the COPPER BUCKLE (inventory).
- Go to the Rink Lobby.
- Place the COPPER BUCKLE (W); open the suitcase; take the TORN PHOTO and ENGRAVED STAR (W1).
- Go to the Lounge.
- Place the ENGRAVED STAR (W2) and go through the door.
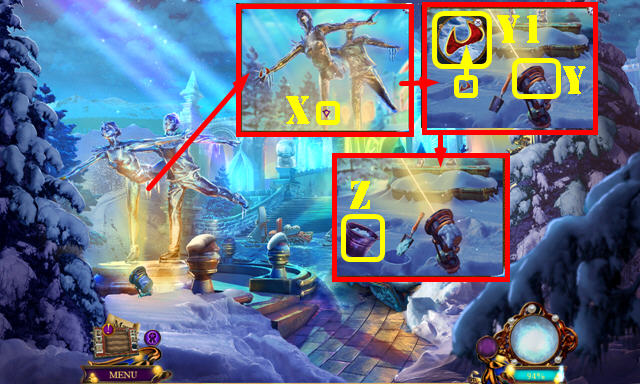
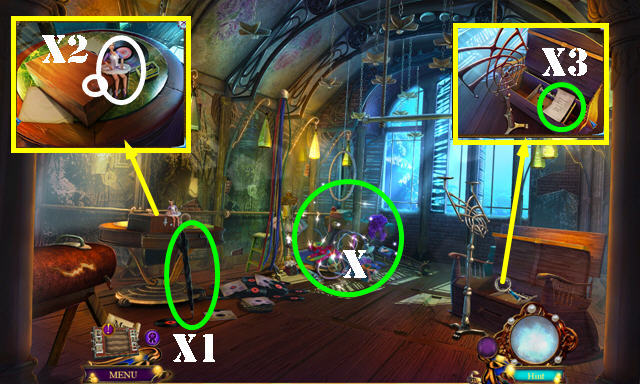
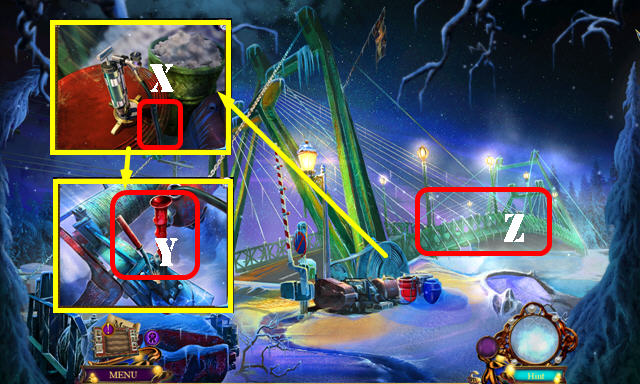
- Pull the string (X).
- Open the door for a HOP (X1); play it to get the BEAR EMBLEM.
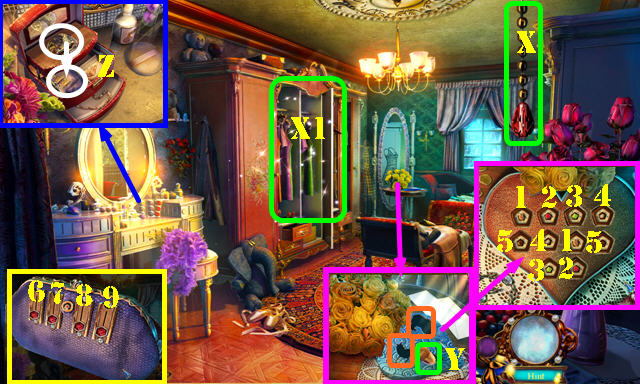
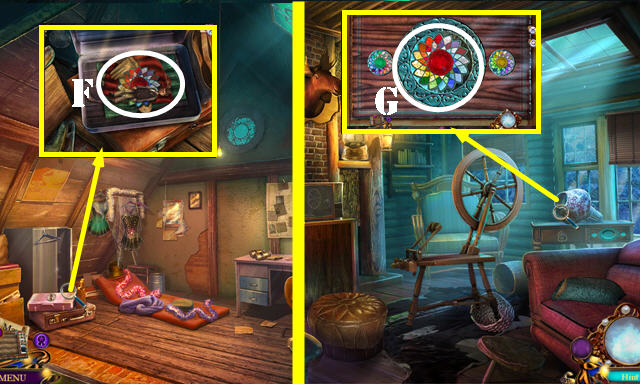
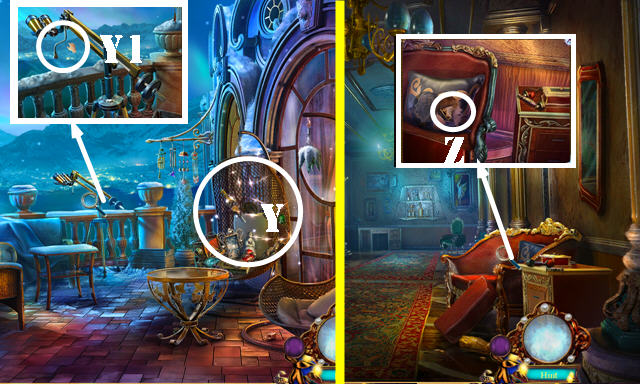
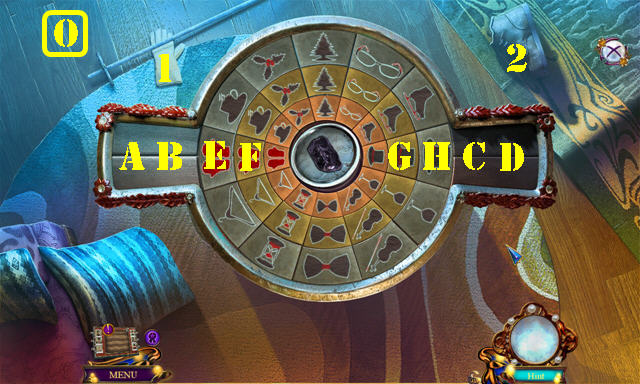
- Take the ACORN EMBLEM (Y). Place the BEAR EMBLEM and FOX EMBLEM (orange). Open the box for a matching puzzle. Solution (1-5). Take the BRASS KEY.
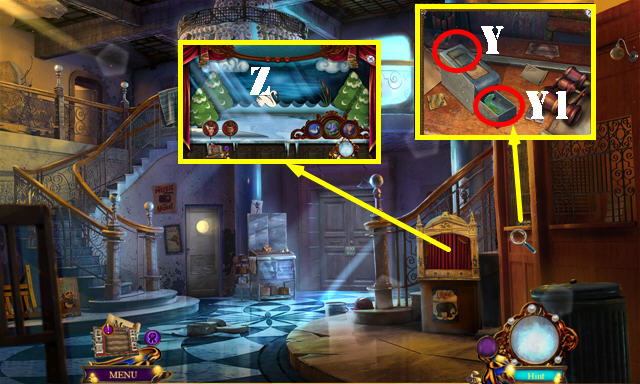
- Place the SKATE EMBLEM; take the NAIL KIT (Z).
- Select the buttons 7-6-9-8 on the NAIL KIT; take the MAKEUP BRUSH and NAIL FILE (inventory).
- Walk down.
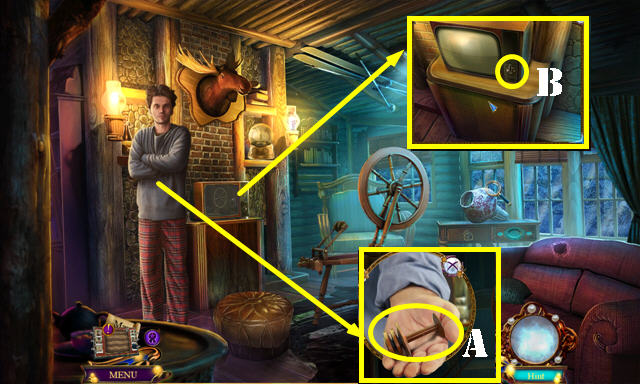
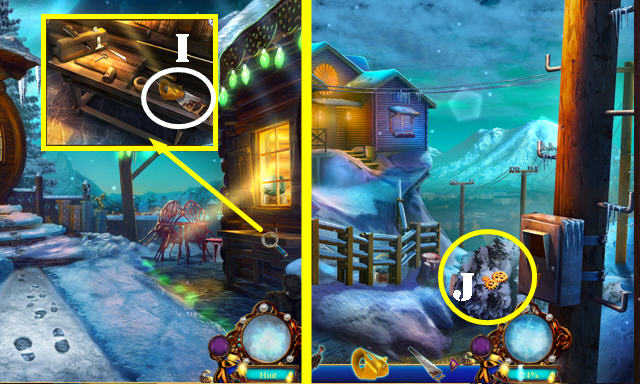
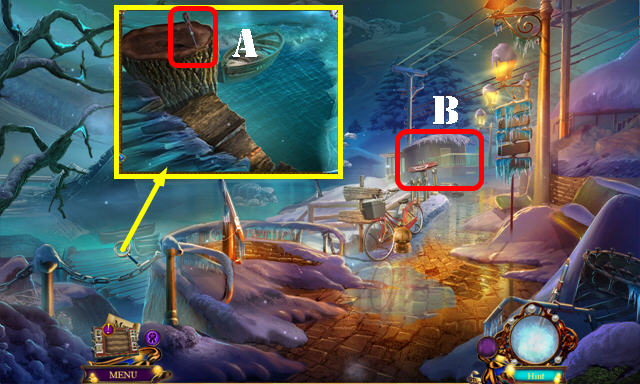
- Use the BRASS KEY; take the POLE BAG (A).
- Walk down.
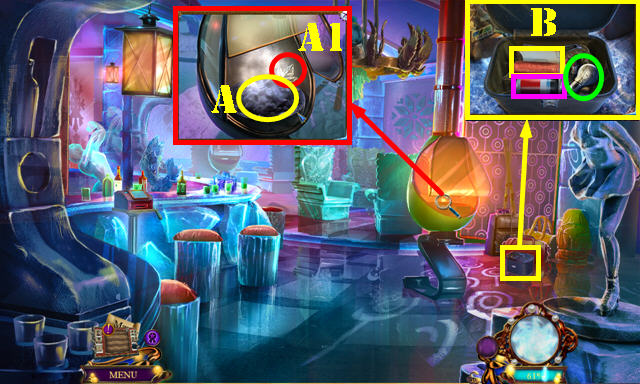
- Use the NAIL FILE (B); touch the paper and take the PAPERCLIP (C).
- Use the PAPERCLIP on the POLE BAG; take the SKI POLE (inventory).
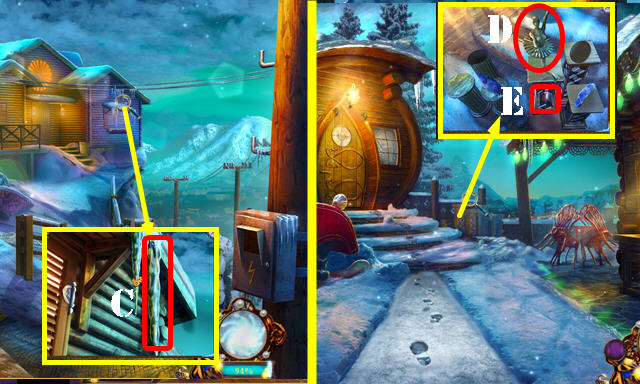
- Walk down.
- Use the SKI POLE to get the SILVER SNOWFLAKE (D).
- Return to the Lounge.
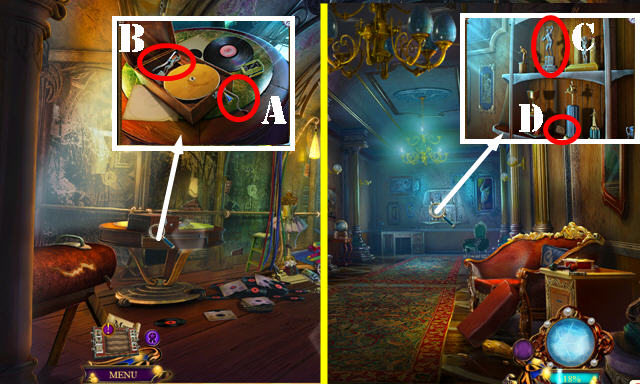
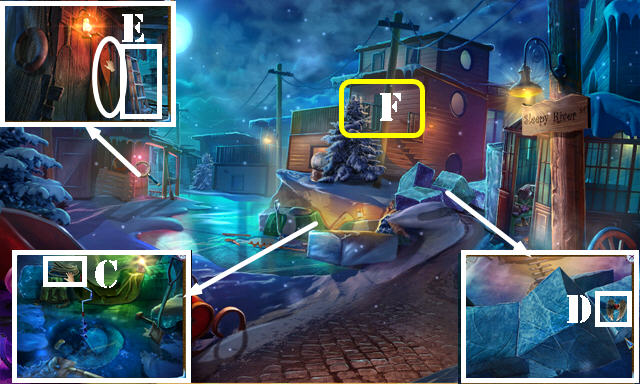
- Place the SILVER SNOWFLAKE; take the PLIERS (E).
- Go to Ruth's Dressing Room.
- Move the bear and use the PLIERS; take the BLUE SHARD and BLACKMAIL NOTE (F).
- Walk down twice.
- Give the BLACKMAIL NOTE and take the SNOWMOBILE KEY (G).
- Open the door; take the NUMBER PLATE (H).
- Go to the Lounge.
- Place the NUMBER PLATE; take the SKI GOGGLES (I).
- Walk down.
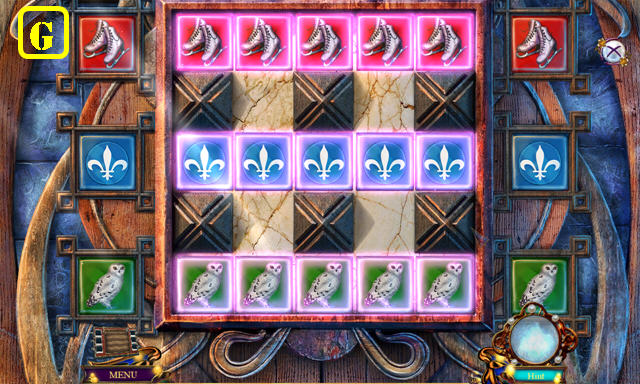
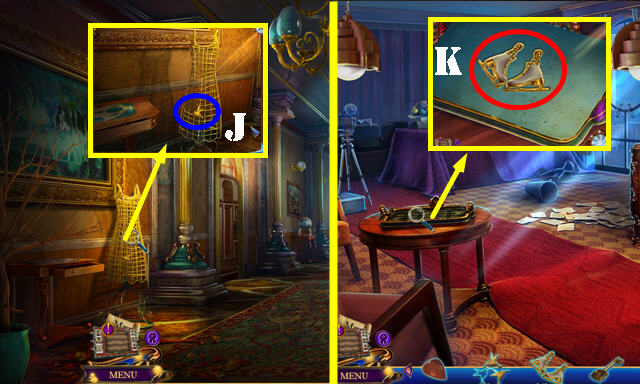
- Use the SNOWMOBILE KEY (J). Place the GOGGLES on the snowmobile for a puzzle. Use the arrows (purple) to navigate the course. Choose the correct lane (J1) to avoid the obstacles.
Chapter 2: Hotel

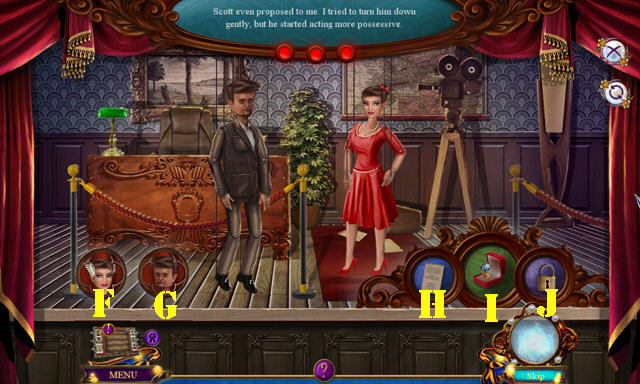
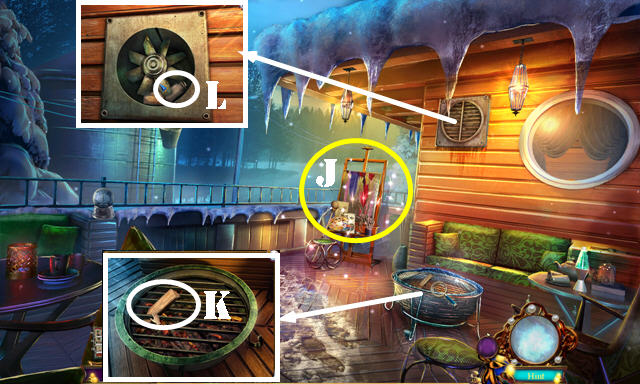
- Take the SCARF (K).
- Go (L).
- Take the V.I.P. PASS (M) and BROKEN BUTTERFLY (N).
- Take the CAT FIGURINE (O).
- Go (P).
- Take the BOTTLE OF GLUE (Q), EMPTY BUCKET (R) and LENS WRENCH (S).
- Take the ICE SHARD (T). Remove the cover and take the label (U).
- Place the V.I.P. PASS (V) and pull the handle (W) for a HOP; play it to get the MOLD INSTRUCTIONS.
- Use the MAKEUP BRUSH on the BOTTLE OF GLUE to get the BRUSH WITH GLUE (inventory).
- Remove the 2 covers from the VIDEO CAMERA; use the LENS WRENCH to get the LENS (inventory).
- Walk down twice.
- Select the arrow (X). Place the LENS (Y); take the RED SHARD (Y1).
- Place the EMPTY BUCKET (Z) to get the BUCKET OF SNOW.
- Return to the V.I.P. Bar.
- Use the SCARF; place the BUCKET OF SNOW (A) and take the LEAF EMBLEM (A1).
- Place the LEAF EMBLEM and the ACORN EMBLEM; take the LUBRICANT, SANDPAPER and LIGHT BULB (B).
- Walk down.
- Use the LUBRICANT; open the drawer and take the YELLOW SHARD (C).
- Place and then drag the SANDPAPER until it disappears. Use the BRUSH WITH GLUE and place the TORN PHOTO (D). Take the GREEN SHARD (E).
- Place the BLUE SHARD, RED SHARD, YELLOW SHARD and GREEN SHARD on the BROKEN BUTTERFLY to get the GLASS BUTTERFLY (inventory).
- Place the GLASS BUTTERFLY for a puzzle (F).
- Solution (G).
- Go through the door.
- Place the LIGHT BULB (H) for a HOP; play it to get the INSULATED FLASK.
- Take the DIAL (I) and open the cover (white).
- Walk down.
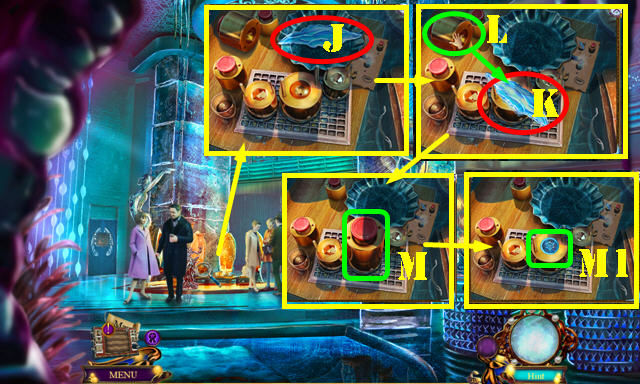
- Place the MOLD INSTRUCTIONS and touch it, then place the ICE SHARD (J).
- Move the shard here (K).
- Place this piece (L) over the shard.
- Use the INSULATED FLASK (M); remove the top and take the ICE TOKEN (M1).
- Go to the V.I.P. Bar.
- Place the ICE TOKEN; open the box and take the BALLERINA SKETCHES (N).
- Return to Ruth's Suite.
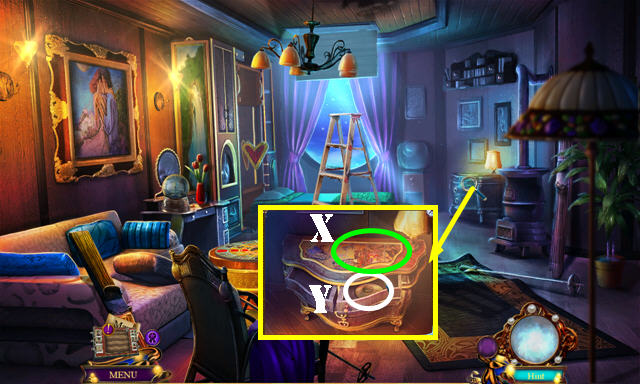
- Place the BALLERINA SKETCHES for a puzzle (O).
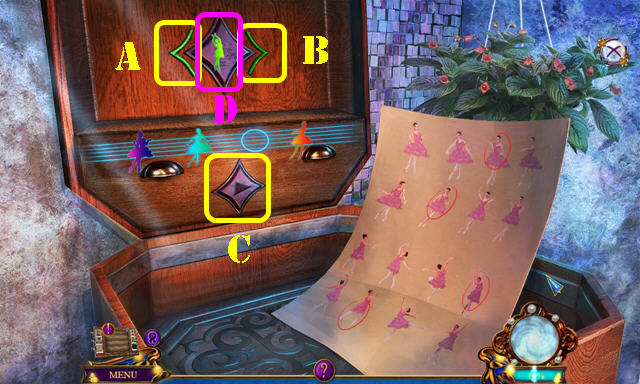
- Solution: Ax2-D-Ax3-D-B-D-B-D-C.
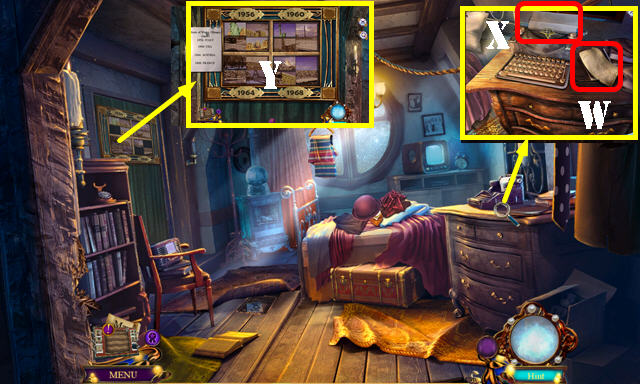
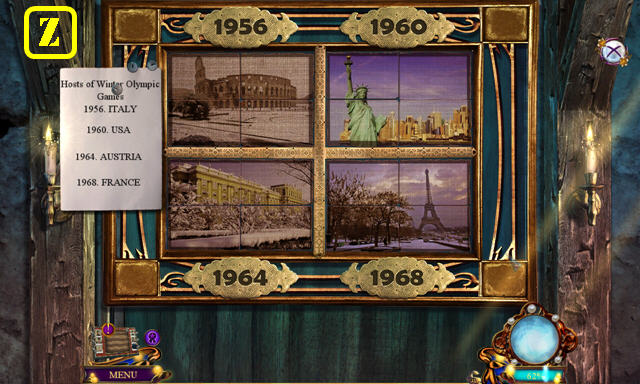
- Take RUTH'S DIARY.
- Open RUTH'S DIARY and flip 2 pages; take the SQUARE TOKEN (inventory).
- Place the SQUARE TOKEN (E).
- Play the HOP (F) to get the DOG EMBLEM.
- Move the pillow and the board; take the CLOVER CASE (G).
- Walk down.
- Place the DOG EMBLEM; read the note and take the BRASS CLOVER (H).
- Place the BRASS CLOVER on the CLOVER CASE; take the WIRES (inventory).
- Use the map to return to the Ice Hotel Entrance.
- Remove the cover; place the WIRES for a puzzle (I).
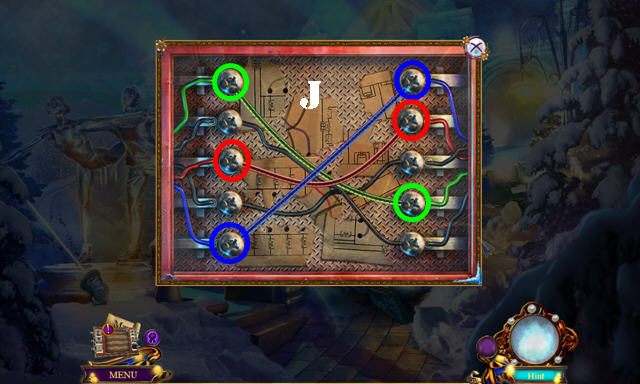
- Solution (J).
- Go to the Hotel Lobby.
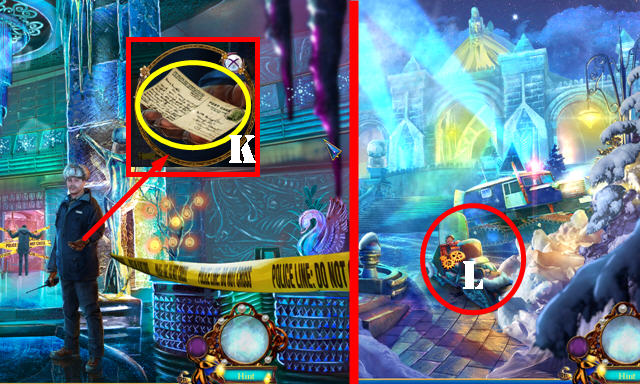
- Take DONALD'S ADDRESS (K).
- Walk down.
- Place DONALD'S ADDRESS (L).
Chapter 3: Donald's House
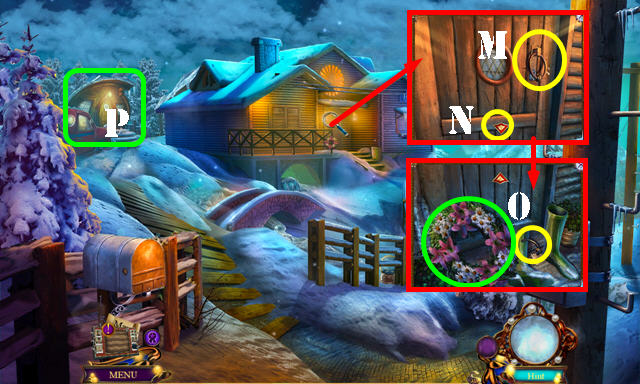
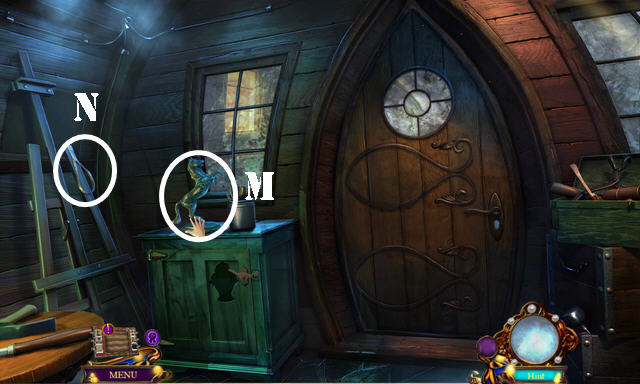
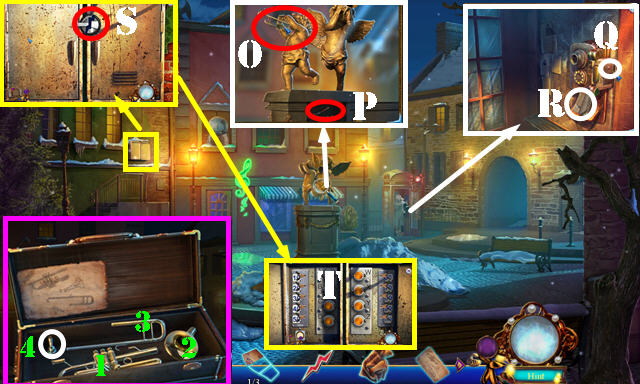
- Select the door knocker (M) and the arrow (N). Take the DOOR KNOCKER and WREATH (O).
- Select the WREATH 5x to get the BENT WIRE (inventory).
- Go (P).

- Place the CAT FIGURINE; take the FLYER BASE (Q).
- Place the DIAL (R). Go clockwise to IV, counterclockwise to II, counterclockwise to III and clockwise to I for a HOP; play it to get the MAILBOX FLAG.
- Walk down.
- Place the MAILBOX FLAG and flip it (S). Read the note and take the COTTAGE KEY (S1).
- Use the COTTAGE KEY (T) and go through the door.
- Play the HOP (U) to get the FORK.
- Take the BALLERINA FIGURINE (V), SNOWSHOES (V1) and GUNNY SACK (V2).
- Select the pot (W). Place the BENT WIRE (X) to get the HEATED WIRE.
- Use the DOOR KNOCKER on the GUNNY SACK; open the bag and take the WOOL (inventory).
- Go (Y).
- Talk to Gary and take the FLYER BOBBIN (A).
- Use the FORK to get the TV DIAL (B), then take the BELLS 1/3.
- Walk down twice.
- Use the HEATED WIRE to get the ICICLE (C).
- Go to the Backyard.
- Place the BALLERINA FIGURINE (D); take the BELLS 2/3 (E).
- Return to the Kitchen.
- Place the ICICLE to get the TONGS; take the HOT WATER (F).
- Go (G).
- Use the TONGS (H) and flip the carpet.
- Move the items; take the TIARA (I) and the three COLORED TILES (J).
- Return to the Backyard.
- Use the HOT WATER; take the BELLS 3/3 (K).
- Place the 3 BELLS (L).
- Go through the door.
- Take the HORSE FIGURINE (M) and THIN METAL STRAP (N).
- Walk down.
- Place the TV DIAL (O); take the FUNNEL and LIP BALM (P).
- Use the THIN METAL STRAP; read the note; take the SUNDAE BADGE and FLYER AXLE (Q).
- Place the FLYER BOBBIN and FLYER AXLE on the FLYER BASE to get the FLYER (inventory).
- Walk down.
- Place the SUNDAE BADGE; read the note; take the LIQUID NITROGEN (R).
- Place the FUNNEL (S) and use the LIQUID NITROGEN.
- Go through the door.

- Place the HORSE FIGURINE; take the BROKEN SAW (T).
- Return to the Rec Room.
- Use the LIP BALM; take the ENCRYPTED NOTE (U).
- Place the WOOL and FLYER; touch it and take the WOOL YARN (V).
- Return to Donald's Bedroom.
- Look at the code (W). Place the ENCRYPTED NOTE (X); take the CLUE RIDDLE.
- Place the COLORED TILES and CLUE RIDDLE for a puzzle (Y).
- Solution (Z).
- Go to the Secret Attic.
- Flip the knob (A).
- Play the HOP (B) to get the SAW BLADE.
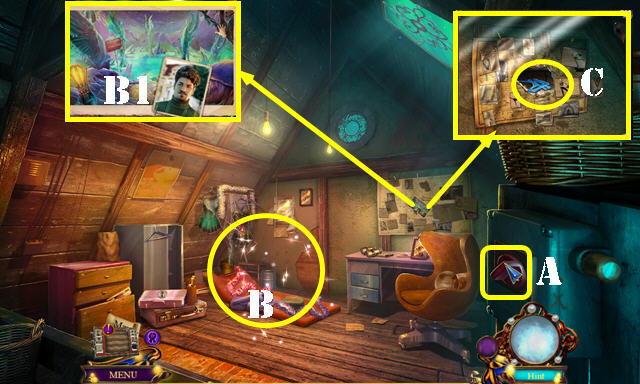
- Place the WOOL YARN; look at the picture (B1). Touch the yarn and take the SKATERS EMBLEM (C).
- Place the SAW BLADE on the BROKEN SAW to get the ELECTRIC SAW (inventory).
- Walk down.
- Place the SKATERS EMBLEM; take the REINDEER BADGE 1/2 (D).
- Return to Donald's Studio.
- Use the ELECTRIC SAW for a puzzle (E).
- Solution: 3-4-5-7-6-2-1-6-8-7-12-11-7-10-11-8-9-10-8-5-3-2.
- Remove the lid; take the KEYHOLE PENDANT.
- Return to the Secret Attic.
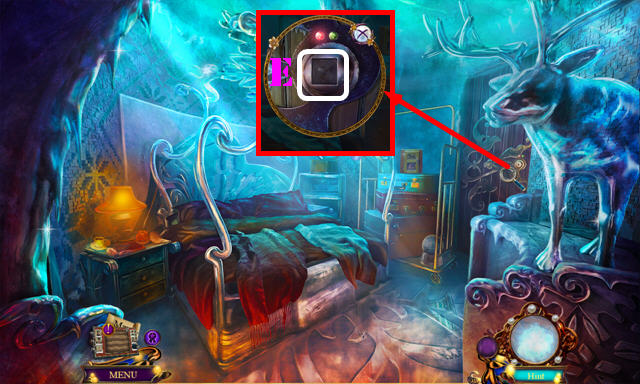
- Place the KEYHOLE PENDANT; read the note; take the MALE MARIONETTE and ICE MEDALLION (F).
- Go to the Rec Room.
- Place the ICE MEDALLION (G) for a puzzle.
- Solution (1-32).
- Take the REINDEER BADGE 2/2.
- Return to the Backyard.
- Place the 2 REINDEER BADGES; take the RIBBON and HANDSAW (I).
- Walk down.
- Use the HANDSAW 2x and place the SNOWSHOES (J).

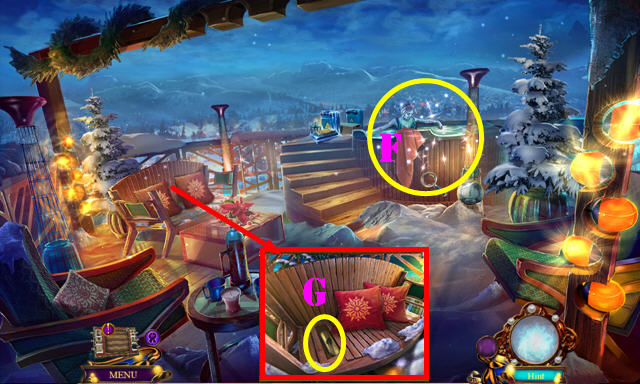
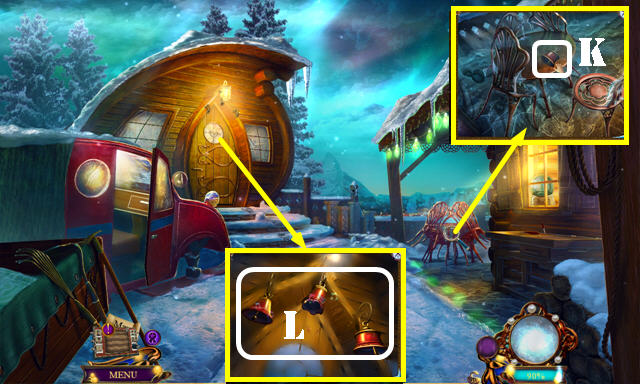
- Use the RIBBON for a HOP (K); play it to get the FANCY EMBLEM.
- Take the WATER BOTTLE (L).
- Place the FANCY EMBLEM (M); go through the gate.
Chapter 4: Theater
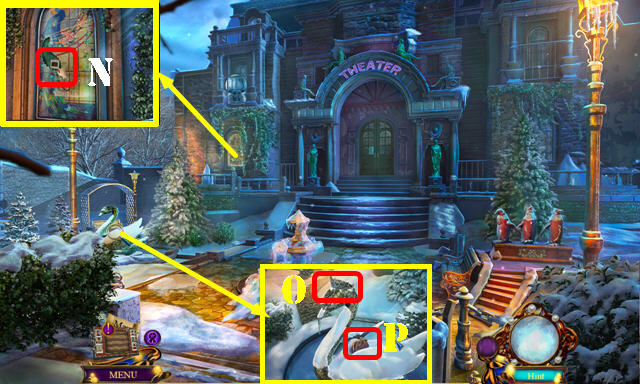
- Take the SLIDE 1/2 (N).
- Place the TIARA (O); take the COIN PURSE (P).
- Open the COIN PURSE; read the note and take the DOLLAR BILL (inventory).
- Walk down.
- Use the DOLLAR BILL; take the NEWSPAPER (Q).
- Take the B.I.T. TOKEN from the NEWSPAPER (inventory).
- Go to the Courtyard.
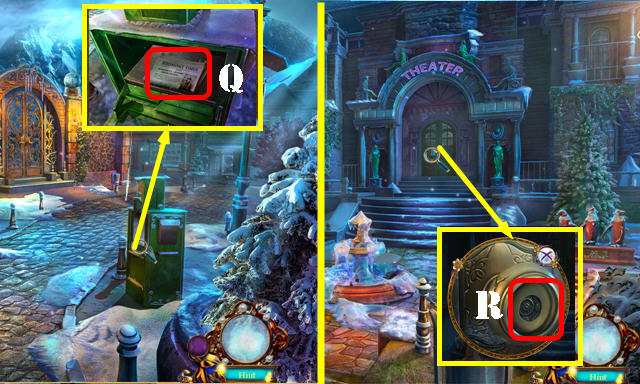
- Place the B.I.T. TOKEN (R) and go through the door.
- Remove the cloth (S); move the box and take the GLASS PYRAMID (T).
- Go (U).
- Take the SOLVENT and the picture (V).
- Walk down and enter (W).
- Play the HOP (X) to get the THEATER TICKET.
- Take the UMBRELLA (X1).
- Take the FEMALE MARIONETTE and GUITAR PICK (X2).
- Read the note (X3).
- Walk down.
- Insert the THEATER TICKET (Y); unfold the note and take the GLASS FEATHER (Y1).
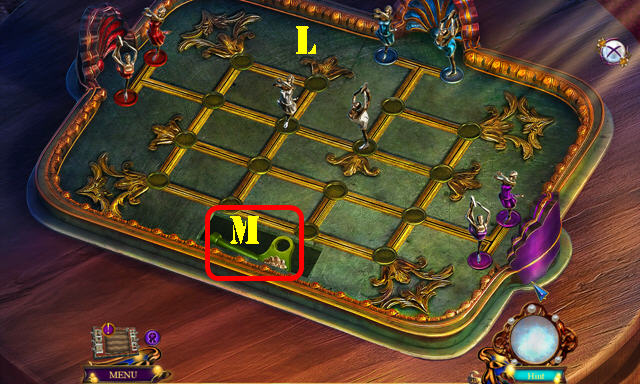
- Place the MALE MARIONETTE and FEMALE MARIONETTE for a puzzle (Z).
- Solution one: (A-C-D)-(A-B-C-E)-(A-B).
- Solution two: (A-B-D)-(A-B-C)-(A-B-E).
- Take the SLED TOKEN.
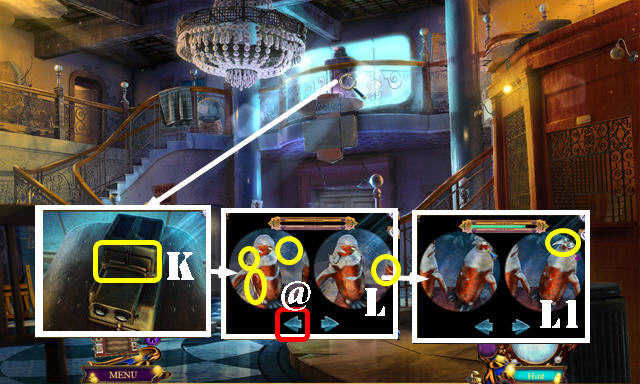
- Place the SLED TOKEN on the GLASS PYRAMID; take the SLIDE 2/2 (inventory).
- Place the 2 SLIDES for a puzzle (K).
- Solution (L-L1). Select the arrow (@).
- Take the PENGUINS PHOTO.
- Walk down.
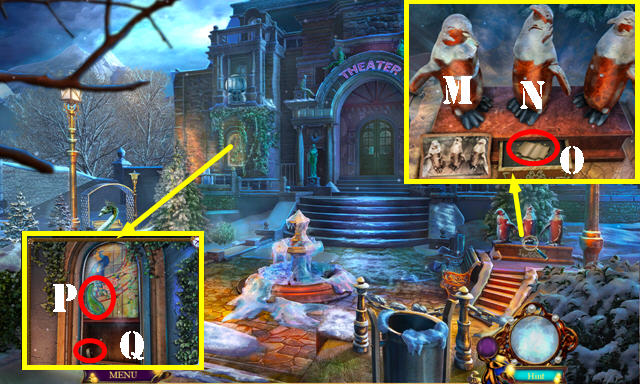
- Place the PENGUINS PHOTO for a puzzle. Solution: Mx2-Nx2.
- Take the BOOK EMBLEM (O).
- Place the GLASS FEATHER (P); take the COG (Q).
- Walk down.
- Place the BOOK EMBLEM (R); take the MUSIC ROLL (R1).
- Return to the Practice Room.
- Place the MUSIC ROLL and COG; take the OFFICE KEY (S).
- Return to the Hallway.
- Use the OFFICE KEY (T).
- Go through the door.
- Read the 2 notes (U-V).
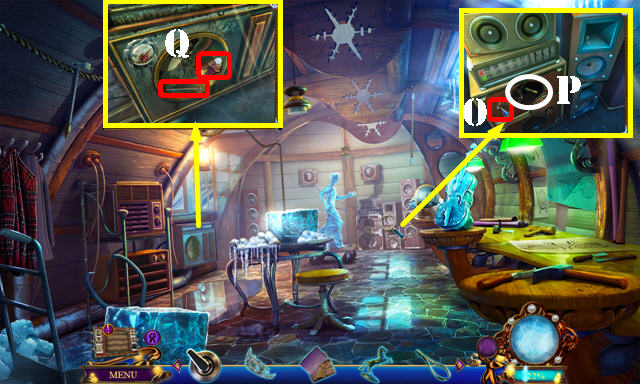
- Remove the lid; add the SOLVENT and use the WATER BOTTLE. Take the BIRD PENDANT 1/3 (W).
- Go (X).
- Spin the chair for a HOP (Y); play it to get the SCALPEL.
- Take the CRANK (Y1).
- Walk down twice.
- Use the SCALPEL; take the ICE SKATE EMBLEM 1/2 (Z).
- Return to the Practice Room.
- Use the CRANK (A); take the TROPHY (B).
- Return to the Hallway.
- Place the TROPHY (C); look at the note and take the DECORATIVE TILE (D).
- Go to Scott's Office.
- Place the DECORATIVE TILE (E); take SCOTT'S KEY and SPRING MECHANISM (F).
- Return to the Theater Lobby.
- Place the SPRING MECHANISM for a puzzle (G).
- Solution: Ax4-B-Cx3.
- Go through the door.

- Use the UMBRELLA (D).
- Take the WIRE CUTTERS (F).
- Go forward (F1).
- Remove three items; take the COMEDY MASK (G).
- Walk down.
- Place the COMEDY MASK; take the ICE SKATE EMBLEM 2/2 (H).
- Return to the Hallway.
- Use the WIRE CUTTERS; take the BIRD PENDANT 2/3 (J).
- Go to Scott's Office.
- Place the 2 ICE SKATE EMBLEMS (K) for a puzzle.
- Solution (L). Take the LAMP KEY (M).
- Go to the Balcony.
- Use the LAMP KEY; take the BIRD PENDANT 3/3 (N).
- Place the 3 BIRD PENDANTS (O); take the TRAGEDY MASK (P).
- Return to the Theater.
- Place the TRAGEDY MASK; take the CONTROL STICK (Q).
- Go forward.
- Place the CONTROL STICK (R).
- Take the PAINTED TILE (R1).
- Walk down.
- Place the PAINTED TILE (S) for a puzzle.
- Solution: 19-18-14-10-9-5-1-2-6-7-8-4-3-7-8-12-11-10-14-13-17-18-14-15-19-20.
- You receive the 8 MM FILM.
- Go to Scott's Office.
- Place the 8MM FILM (T); take the DROP POINT LOCATION (U).
- Return to Main Street.
- Place the DROP POINT LOCATION and go (V).
Chapter 5: Scott's Store
- Take the FUSE BOX SCHEMATICS (A).
- Take the HELM PENDANT (C).
- Use SCOTT'S KEY (D); go through the door.
- Play the HOP (E) to get the TRUMPET CASE.
- Open the case, move the guitar and place the GUITAR PICK; take the FAKE COIN (F).
- Play the puzzle (G).
- Solution (1-4).
- Take the PICTURE TOKENS.
- Walk down and go (H).
- Take the MOSAIC PIECE 1/3 (I). Remove the snow 3x and place the HELM PENDANT (J); take the BOLT EMBLEM.
- Go (K).
- Match the items (M). Take the RAG (M1).
- Place the PICTURE TOKENS for a puzzle (N).
- Solution (O).
- Take the TRUMPET INSTRUCTIONS.
- Return to the Drop Point Location.
- Place the TRUMPET INSTRUCTIONS on the TRUMPET CASE (inventory). Select 1-2-3-4 to get the TRUMPET.
- Place the TRUMPET (O); take the LEVER (P).
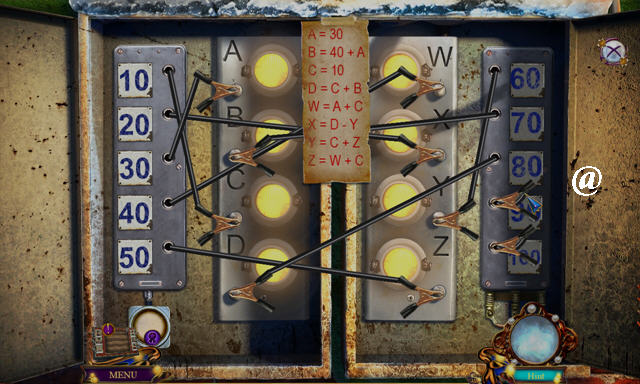
- Place the BOLT EMBLEM (S). Place the FUSE BOX SCHEMATICS for a puzzle (T).
- Solution: (A-30)-(B-70)-(C-10)-(D-80)-(W-40)-(X-20)-(Y-60)-(Z-50) (@).
- Use the FAKE COIN (Q); take the note and the TUNING PEG (R).
- Go to Scott's Store.
- Use the TUNING PEG (U); take the WATER SYMBOL (V).
- Return to the Control Booth.
- Place the WATER SYMBOL; take the HOSE (W).
- Walk down.
- Place the HOSE (X); read the note. Place the LEVER (Y) and pull it.
- Go (Z).
- Take the AWL (A).
- Go (B).
- Take the ROPE (C) and WINGS EMBLEM (D).
- Take the OAR and LADDER (E).
- Go (F).
- Read the note (G).
- Place the WINGS EMBLEM; take the WEDGE (H).
- Place the LADDER (I) and go up.
- Play the HOP (J) to get the NARWHAL TOKEN.
- Remove the lid; take the FIREWOOD (K).
- Remove the cover; place the WEDGE and take the SALT (L).
- Walk down.
- Take the ticket (M). Use the AWL (N) for a puzzle.
- Solution (O): Ex1-Fx1-1x3-Hx1-Gx1-1x3-Cx1-1x3-Bx1-1x3-Ax1-1x3-Dx1-1x1-Ax1-Bx1-2x4-Hx1-Gx1.
- 2x2-Cx1-2x4-Bx1-2x2-Ax1-2x4-Dx1-1x2-Hx1-2x4-Ex1-2x2-Ax1-2x3-Ex1-2x1-Dx1-1x4.
- Hx1-1x3-Dx1-1x3-Ax1-1x1-Ex1-2x2-Hx1-2x4-Gx1-2x2-Ax1-1x4-Ex1-Fx1-2x6-Cx1-2x2.
- Bx1-1x6-Dx1-2x2-Hx1-2x2-Dx1-2x4-Ax1-2x1.
- Take the FLINT.
- Walk down twice.
- Use the OAR (Q); take the SPRAY BOTTLE (R).
- Place the NARWHAL TOKEN (S); take the HARPOON (S1).
- Use the WATER BOTTLE and SALT on the SPRAY BOTTLE to get the DE-ICER (inventory).
- Use the DE-ICER and RAG; take the MOSAIC PIECE 2/3 (T).
- Go forward.
- Use the DE-ICER; take the HAND DRILL (U).
- Return to the Boat House Roof.
- Place the ROPE on the HARPOON to get the GRAPPLING HOOK (inventory).
- Use the GRAPPLING HOOK (V); take the MOSAIC PIECE 3/3 (W).
- Walk down.
- Place the 3 MOSAIC PIECES (X); take the INCOMPLETE TINDERBOX (Y).
- Open the INCOMPLETE TINDERBOX; place the FLINT in it to get the TINDERBOX (inventory).
- Walk down.
- Place the FIREWOOD and TINDERBOX for a HOP (A); play it to get the CAR JACK.
- Use the HAND DRILL and place the CAR JACK (B).
- Go (C).
- Talk to Michelle and Scott.
- Use the arrows to scroll through the options, select the correct item and then select the green checkmark. Solution (1-4).
- Congratulations, you've completed Danse Macabre: Thin Ice.
Created at: 2015-07-10