

Walkthrough Menu
- General Tips
- Chapter 1: The Gas Station
- Chapter 2: The Cinema
- Chapter 3: Penumbra Motel
- Chapter 4: The Road to the Mansion
- Chapter 5: The Mansion
General Tips
- This is the official guide for Dark Alleys: Penumbra Motel Standard Edition.
- This is an Adventure game.
- Rollover the Goals button to view a list of current goals.
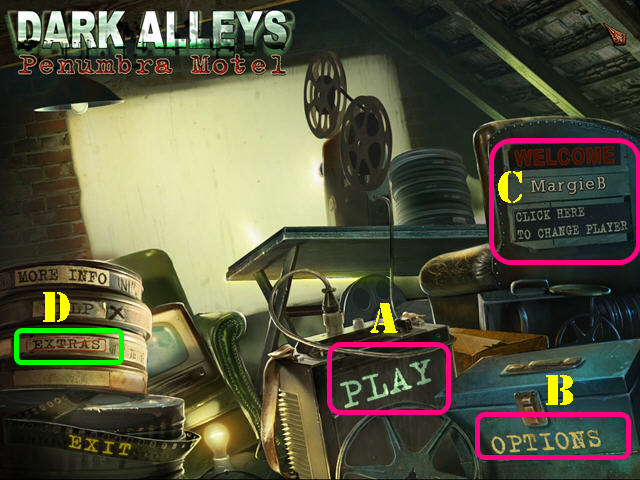
- Click on Play (A) to begin your adventure.
- The Options (B) Button allows you to change Play Mode, adjust the screen, music, cursor, and sound.
- The 'Click here to change player' button (C) can be used to manage your profiles in the game.
- The Extras (D) Button is only accessible in the Collector's Edition.
- The use of the Hint button is unlimited but you must wait for it to recharge between uses.
- All mini-games can be skipped once the skip button has recharged. Most puzzles have a RESET button; use it if you want to follow the solutions shown in this guide.
Chapter 1: The Gas Station
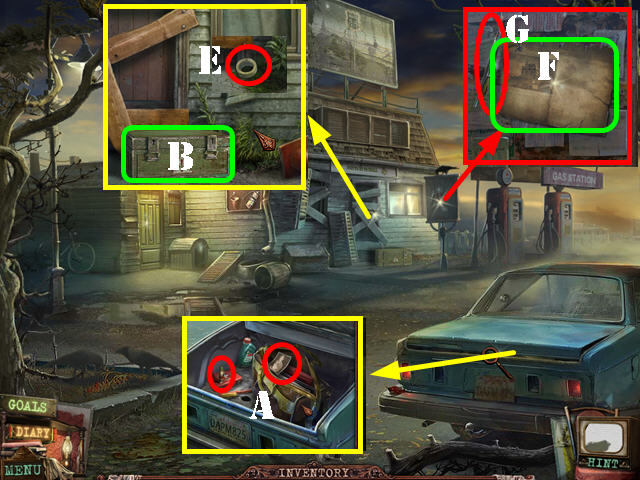
- Talk to the young man.
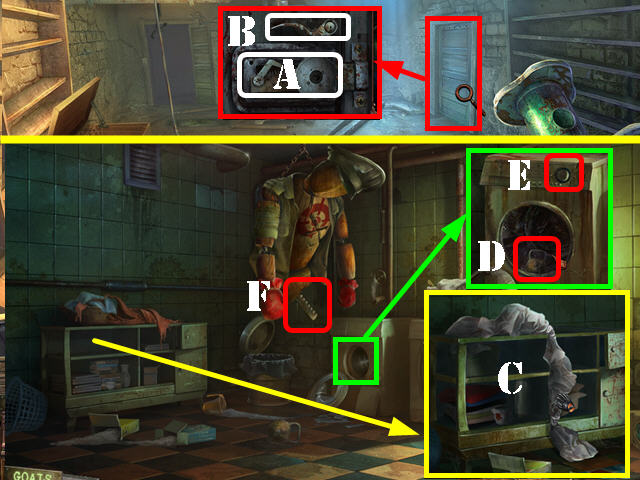
- Examine and then open the trunk of the car; take the GLUE and the photo (A).
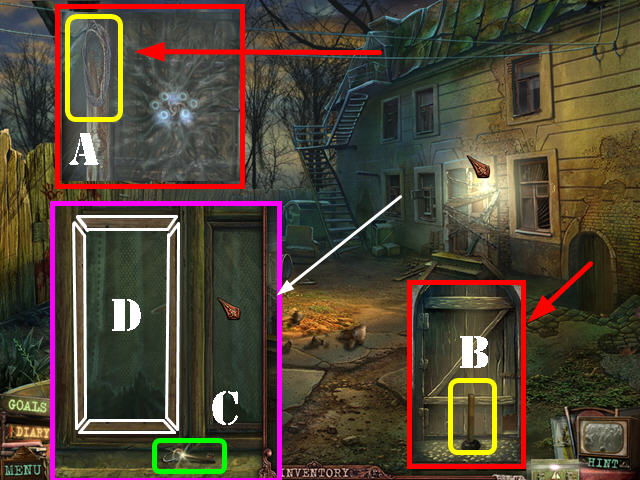
- Examine the boarded door; select the box (B).
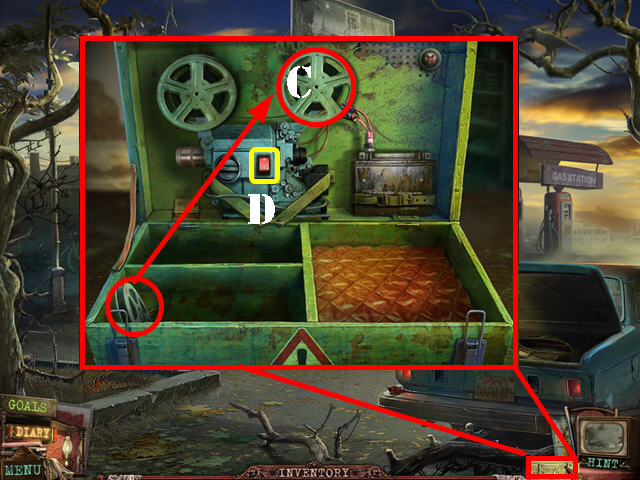
- Open the box and place the first FILM REEL on the projector (C) and press on the red button (D) to view the film.
- Take the TAPE that was below the box (E).
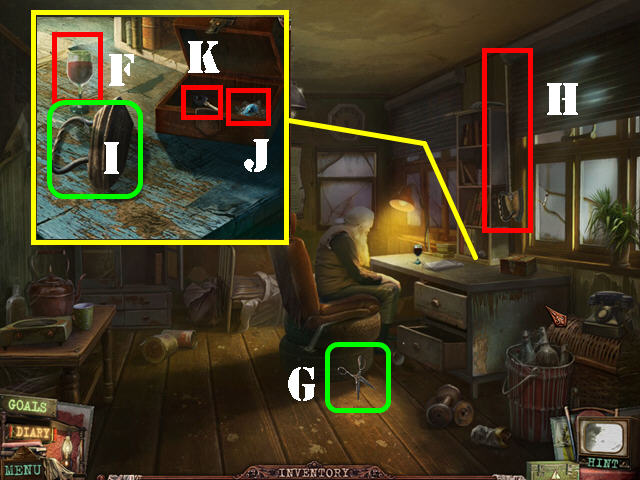
- Examine the bulletin board; take the newspaper article (F) and the HOOK (G).
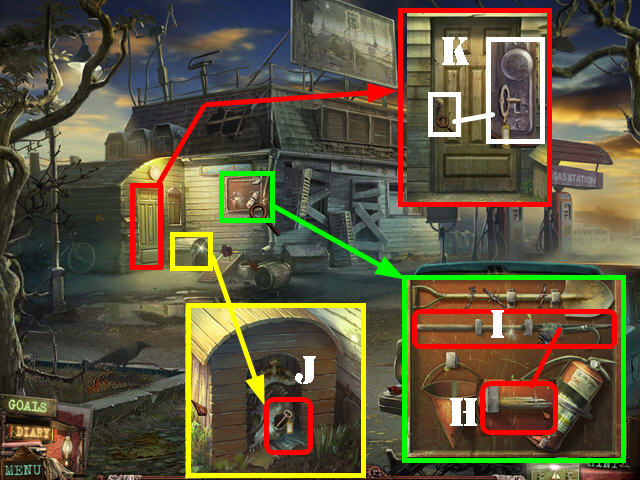
- Look at the board; zoom into the broken handle and apply the GLUE to it (H).
- Put the HOOK on the glue and then put the TAPE on the hook (I).
- Take the POLE.
- Take a closer look at the dog house; use the POLE to retrieve the KEY (J).
- Zoom into the side door lock and insert the KEY (K); turn the key and go through the door.
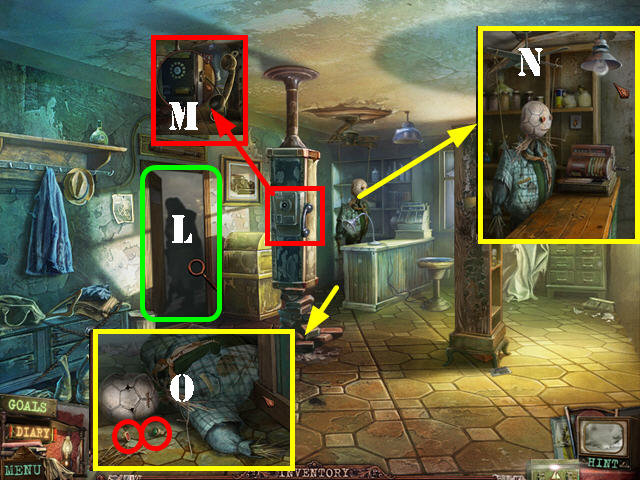
- Try to take a closer look at the open door on the left and the perpetrator will lock the door from the outside (L).
- Zoom into the pay phone; answer it and then hang the phone up (M).
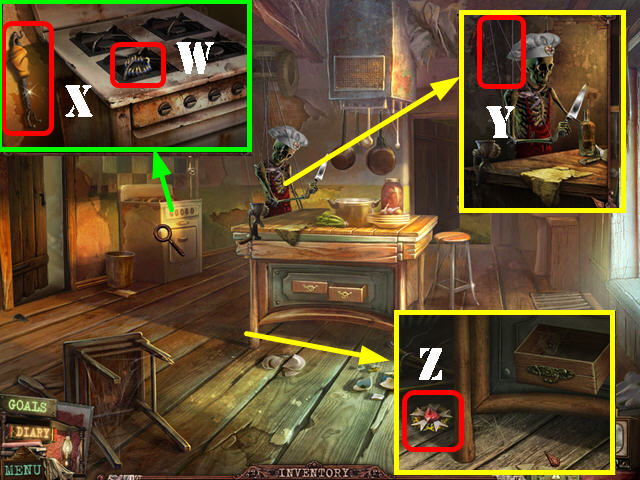
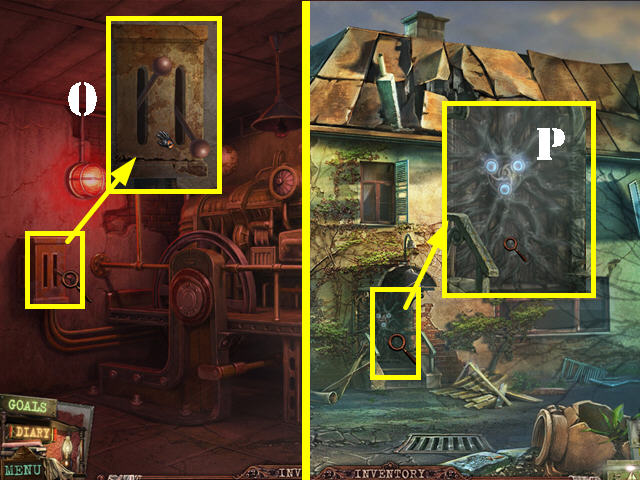
- Examine the mannequin; use the POLE on the fan (N).
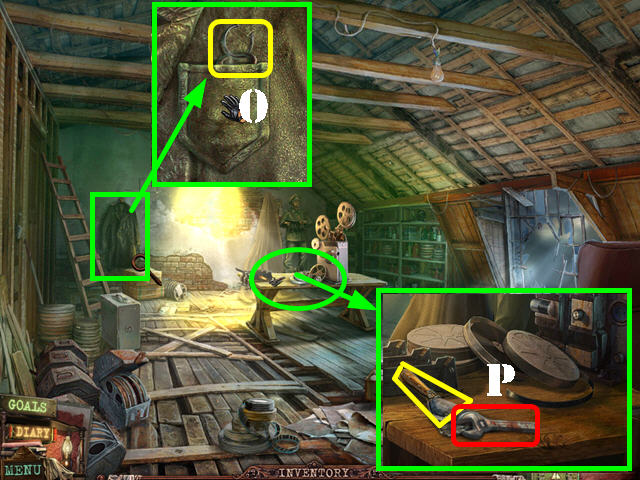
- Take a closer look at the fallen mannequin; take the 2 BUTTONS (O).
- Zoom into the cash register; add the 2 BUTTONS to the empty spaces to activate a puzzle.
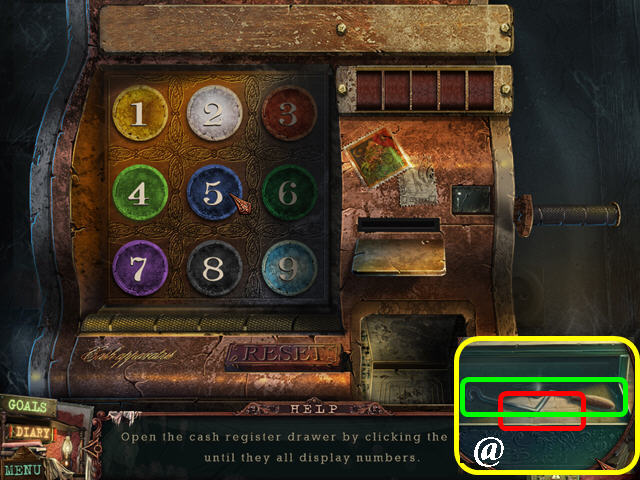
- Your goal is to press on the buttons in the right order until all the numbers appear on the buttons.
- To solve the cash register puzzle, press on the keys in this order: 1, 9, 5, 3, and 7.
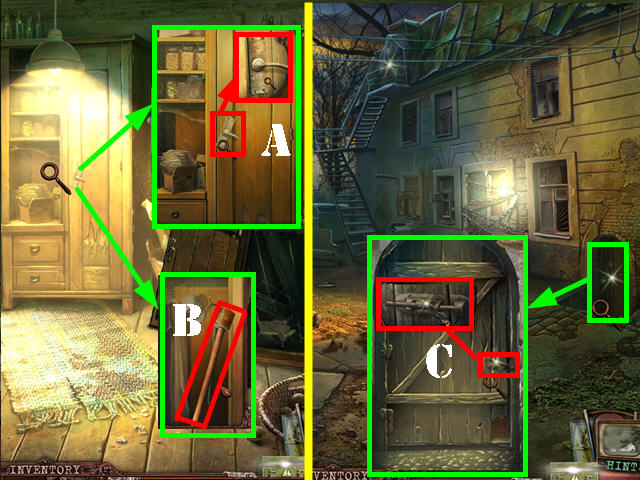
- Examine the cash register drawer; take the JACK HANDLE and the PAPER PART (@).
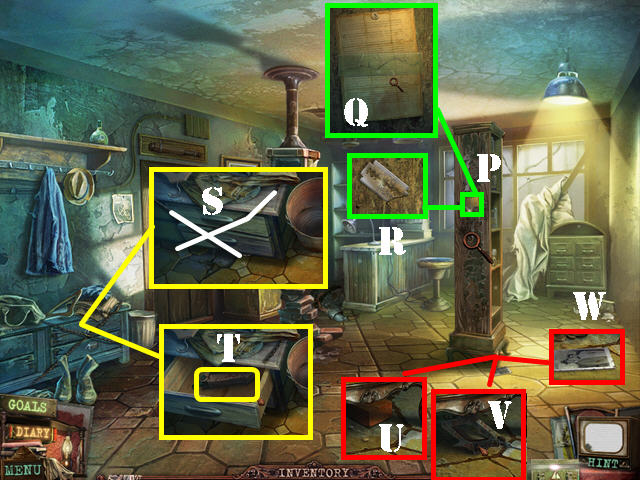
- Examine the side of the bookcase (P); put the TAPE over the torn paper and then add the PAPER PART to that.
- Take the diary note (Q) and the RAZOR BLADE (R).
- Examine the bureau; cut the 2 ropes with the RAZOR BLADE (S).
- Open the drawer and take the JACK (T).
- Examine the bottom of the bookcase and take the BRICK (U).
- Put the JACK below the bookcase and then add the JACK HANDLE to the jack (V).
- Press on the handle to drop the bookcase. Zoom into the floor and take the photo (W).
- Go out the door.
- Touch the dog.
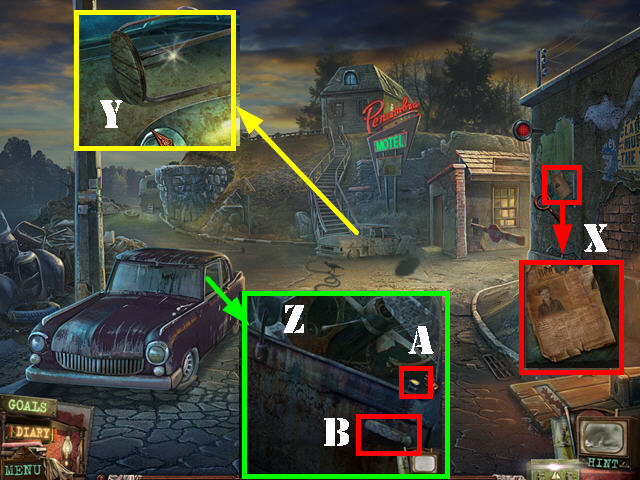
- Zoom into the diary note and take it (X).
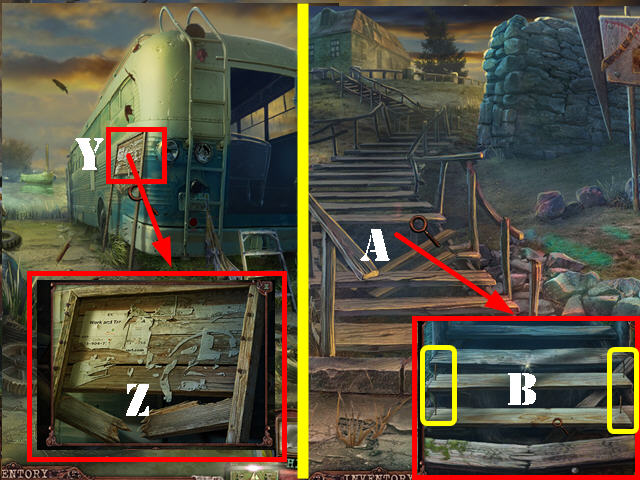
- Examine the car below the motel sign and take the first STOOL (Y).
- Examine the side car window; break the window with the BRICK (Z).
- Pull on the latch (A) and then on the handle (B).
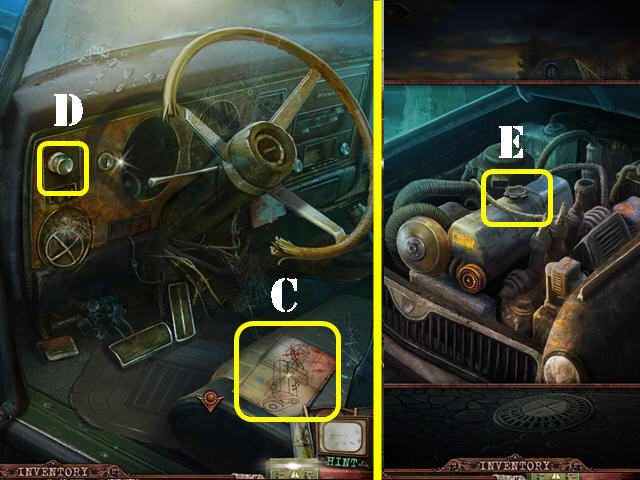
- Look at and then take the diagram on the seat (C).
- Push on the button to open the hood of the car (D).
- Zoom into the engine; take the RADIATOR CAP (E).
- Head towards the left side of the scene.
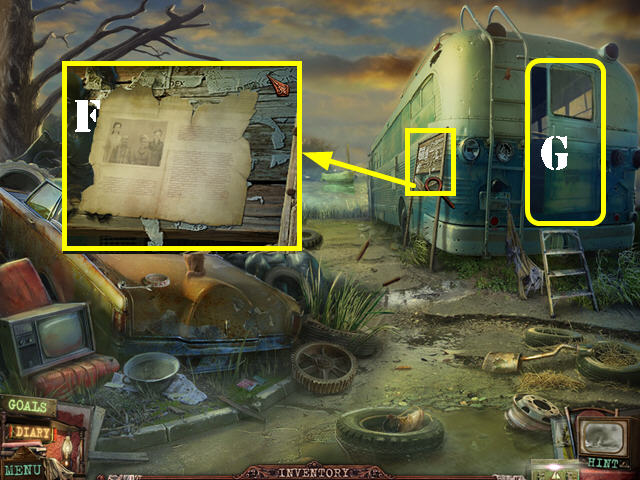
- Examine the sign; take the newspaper article (F).
- Open the bus door and go inside (G).
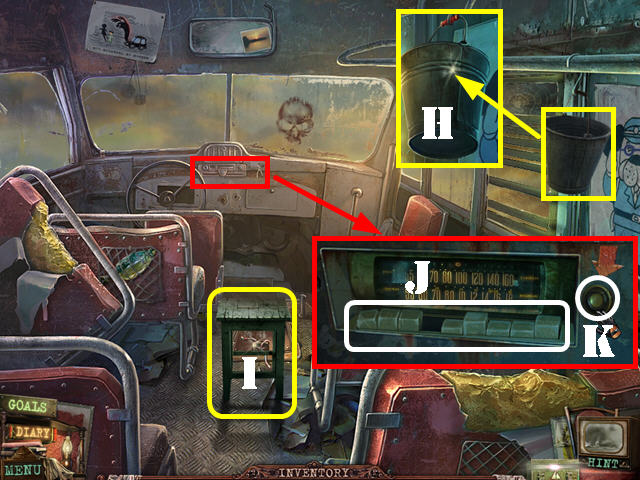
- Examine and then take the BUCKET (H).
- Take the second STOOL (I).
- Look at the radio; press on the buttons as shown in the screenshot (J) and then take the DOORBELL BUTTON (K).
- Walk down.
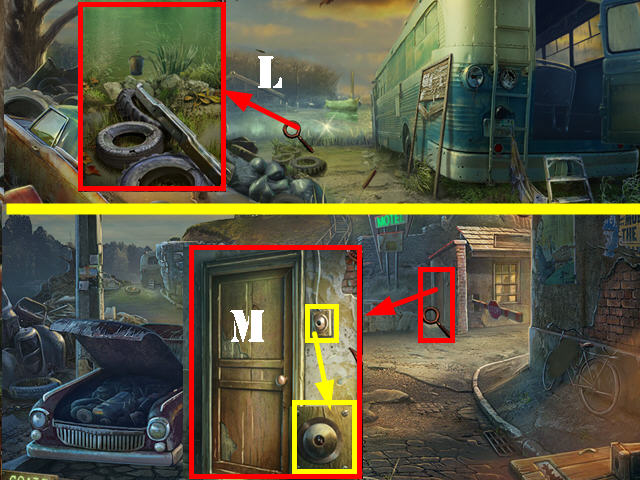
- Zoom into the water; put the BUCKET in it to get the BUCKET WITH WATER (L).
- Walk down.
- Zoom into the door and then the broken doorbell; put the DOORBELL BUTTON on the broken doorbell (M).
- Ring the bell and go through the door.
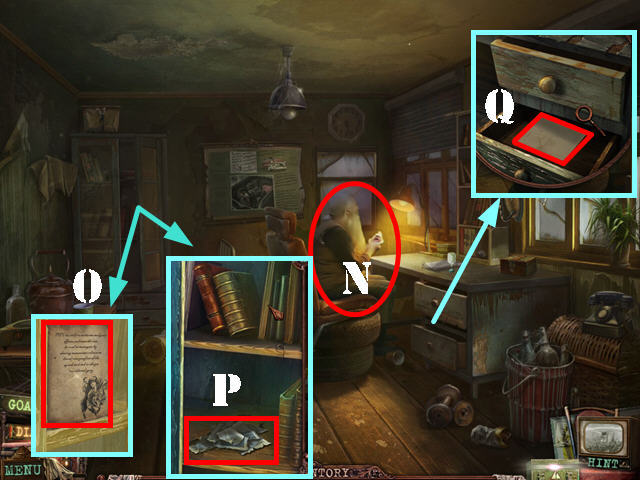
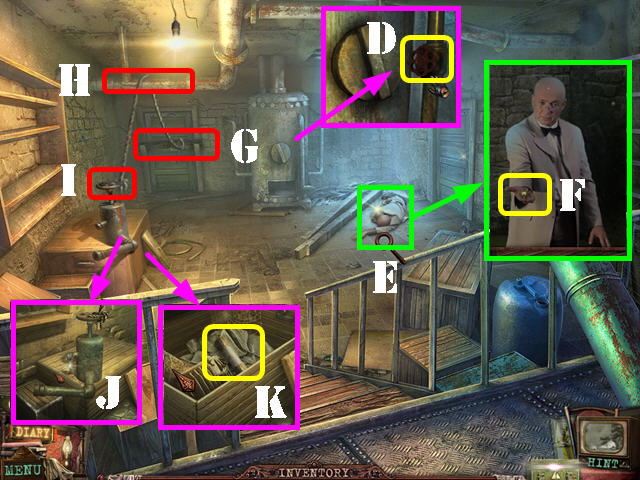
- Talk to the old man (N).
- Look at the closet door; take the diary note (O).
- Open the closet door; take the POSTCARD PIECES (P) and the PLIERS below it (not pictured).
- Look at the drawer; open it and zoom into it (Q). Put the POSTCARD PIECES on the box to activate a puzzle.
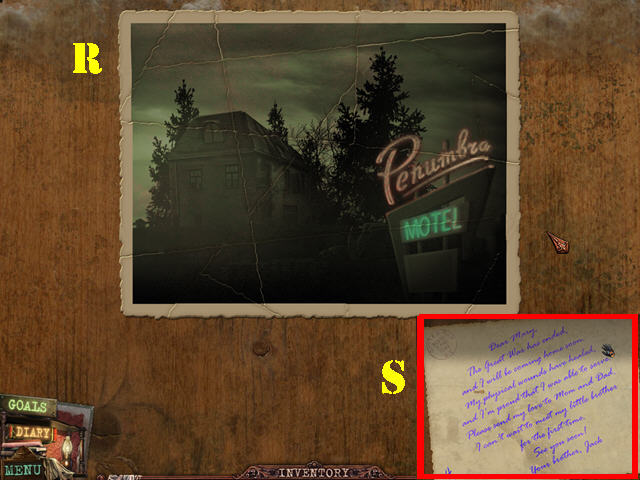
- Drag the pieces into place until the postcard has been completed.
- Please look at the screenshot for the solution (R).
- Take the postcard note after the puzzle has been completed (S).
- Return to the inside of the bus.
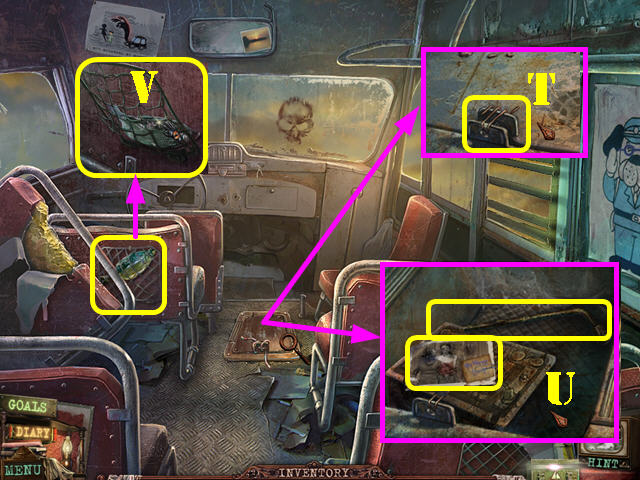
- Examine the hatch; cut the wires with the NIPPERS (T).
- Open the hatch; take the TIRE IRON and the FAMILY PHOTO (U).
- Examine the back of the seat; cut the wire with the NIPPERS and take the FISH (V).
- Walk down twice.

- Zoom into the car below the motel sign; use the TIRE IRON in the hole (W).
- Take the BELT (X).
- Go back inside the old man's room.
- Give the FAMILY PHOTO to the old man.
- Take the photo from the old man and you will automatically receive the PAPER CLIP (Y). Talk to the old man again and he will ask you for something to drink.
- Go back to the area outside the bus.
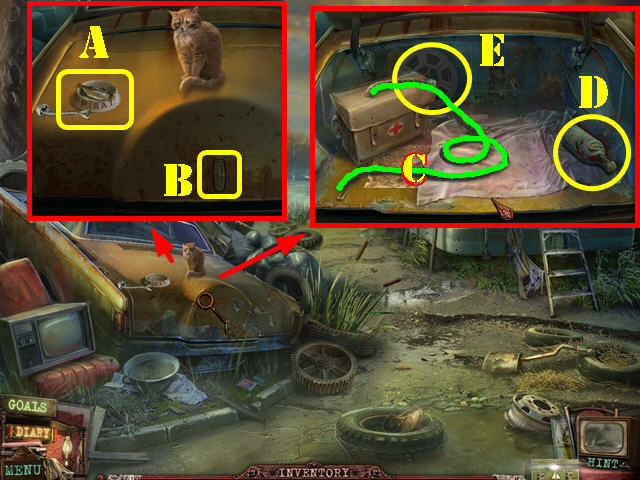
- Zoom into the cat on the car; put the FISH in the bowl (A).
- Open the lock cover and insert the PAPER CLIP into the lock (B).
- Open the trunk; take the ROPE (C), the BOTTLE WITH DRINK (D) and the FILM REEL (E). Play the reel now or later.
- Go back to the old man's room.
- Zoom into the table and put the BOTTLE WITH DRINK on the table to automatically fill the glass (F).
- Take the GLASS and give it to the old man.
- Take the SCISSORS on the floor (G).
- Cut the rope with the SCISSORS (H).
- Examine the table and take the IRON (I).
- Open the box and take the first WAR MEDAL (J) and the CAR KEY (K).
- Walk down.
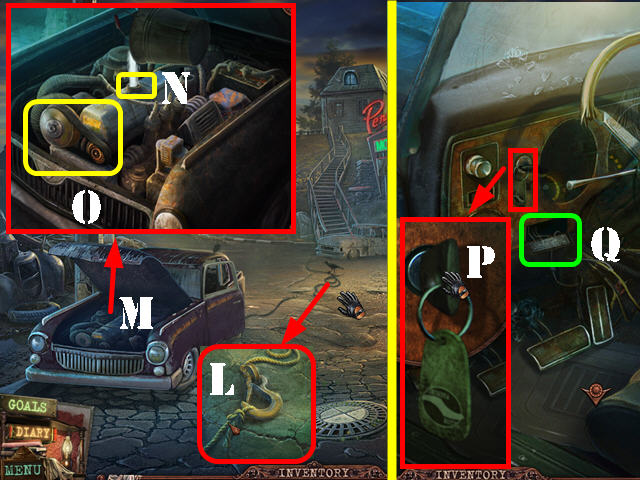
- Examine the hook and attach the ROPE to it (L).
- Examine the car engine (M).
- Pour the water from the BUCKET WITH WATER into the radiator (N). Note: make sure you removed the radiator cap first.
- Replace the RADIATOR CAP and put on the BELT (O).
- Enter the car; take a closer look at the ignition and insert the CAR KEY (P).
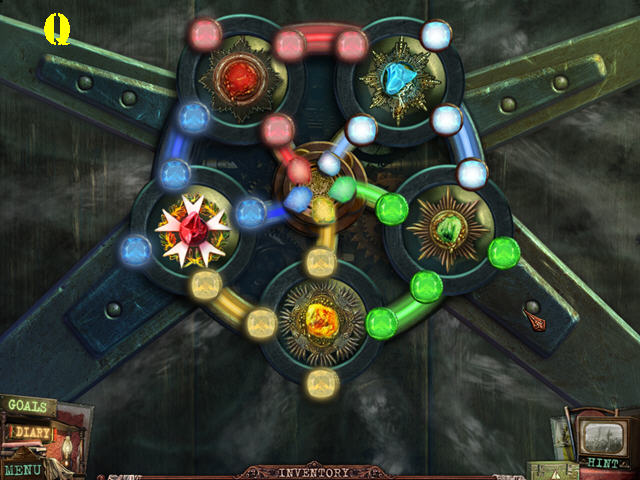
- Turn the key and zoom into the fuse box to trigger a puzzle (Q).
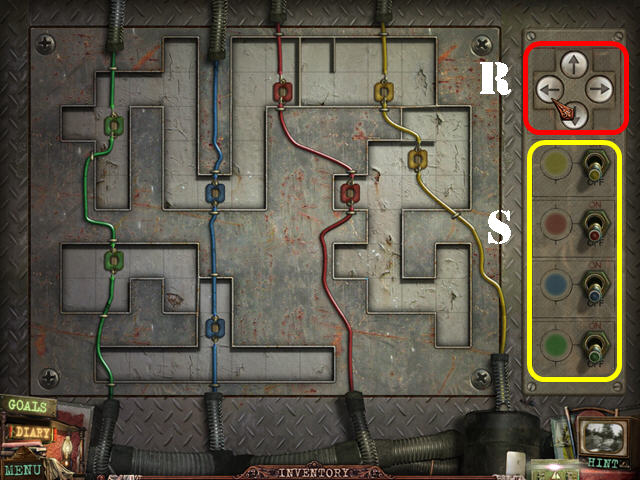
- You must place all the pieces into the wires of the same color. Use the arrows (R) to move the pieces in the direction the arrows are facing.
- Flip a switch (S) on the right to move the piece on the board of the same color. To move on to a different color, flip a switch of a different color.
- To solve the puzzle, follow the directions below.
- Green Switch: Left x 2, Down x 2, and Up.
- Blue Switch - Up and Left.
- Red Switch – Left x 2, Down x 4, Right x 2, Up x 2, Down, Left x 2, Up x 3, Left, Down.
- Yellow Switch – Down.
- Red Switch – Right.
- Blue Switch – Right, Down x 3, Left, Right, and Up.
- Yellow Switch- Right x 2, Up x 2, Down, and Left.
- Put the IRON on the pedal to move the car under the sign out of the way. Go up the steps.
Chapter 2: The Cinema
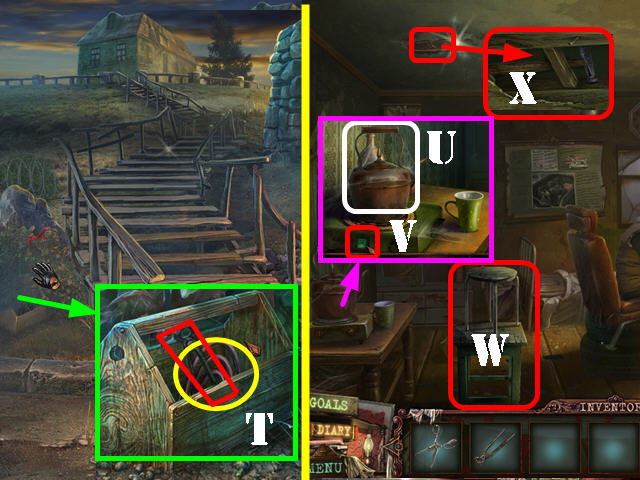
- Examine the bushes; take the leaves off and examine the toolbox. Take the NAIL PULLER and the HEATING ELEMENT (T).
- Try to go up the steps and they will collapse.
- Go back into the old man's room.
- Zoom into the table; put the HEATING ELEMENT on the burner. Select the teapot (U) to add it to the burner.
- Flip the switch (V) and take the BOILING WATER.
- Put the 2 stools on the ground on top of each other (W).
- Examine the ceiling and take the HAMMER (X).
- Go back to the area outside the bus.
- Zoom into the sign (Y) and put the BOILING WATER on it.
- Remove the nails with the NAIL PULLER. Take the BOARDS and the NAILS (Z).
- Walk down and go up the steps.
- Examine the collapsed steps (A); put the BOARDS down.
- Put the NAILS on the boards twice (B); use the HAMMER on the nails twice.
- Go up the steps.
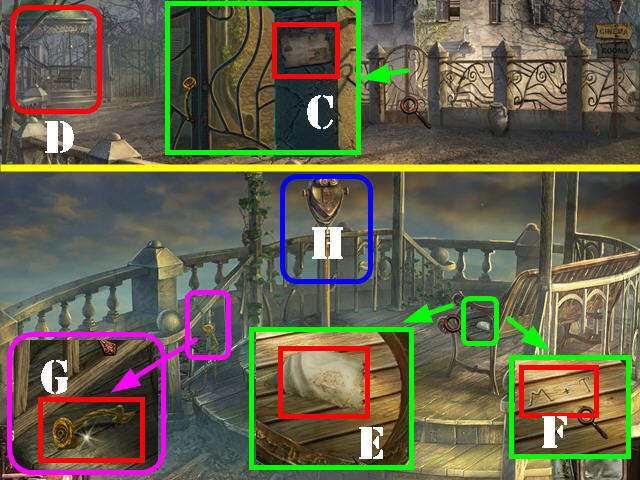
- Examine the gate; look at and take the diary note (C).
- Go to the gazebo on the left (D).
- Examine the bench and take the HANDKERCHIEF (E); note the initials carved on the bench (F).
- Examine the railing; press on the chains 3 times and take the GATE HANDLE (G).
- Examine the binoculars to activate a puzzle (H).
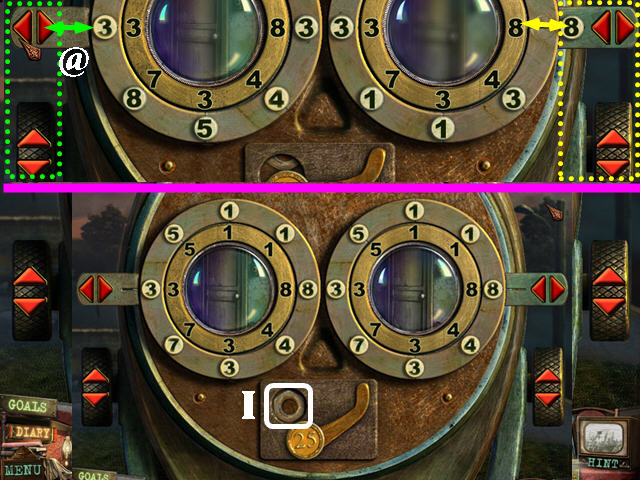
- Your goal is to place the numbers on the outer ring next to their matching number on the inner ring.
- The arrows on the left control the numbers on the outer left ring (green); the arrows on the right control the numbers on the right outer ring.
- Use the top arrows to place the numbers from the outer ring on the holding slot next to the arrows. For example, select the top arrows to move the number 3 into and out of the holding slot (@).
- Please look at the screenshot for the solution and take the NUT (I).
- Walk down and go right.
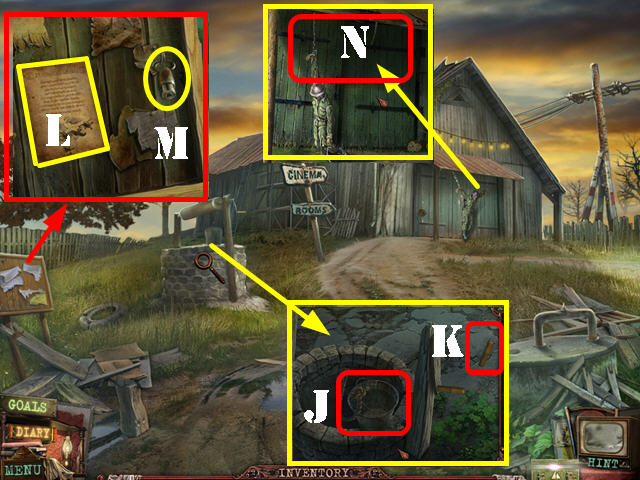
- Examine the well; touch the bucket (J) and take the WELL HANDLE (K).
- Zoom into the board; look at and take the diary note (L).
- Take the SQUARE KEY (M).
- Examine the skeleton on the cinema door; cut one of the ropes with the SCISSORS (N).
- Open the door and go through it.
- Examine the jacket; move the lapel and take the CROSS KEY (O).
- Examine the table; take the WRENCH and the DIRTY PUTTY KNIFE (P).
- Walk down and go right.
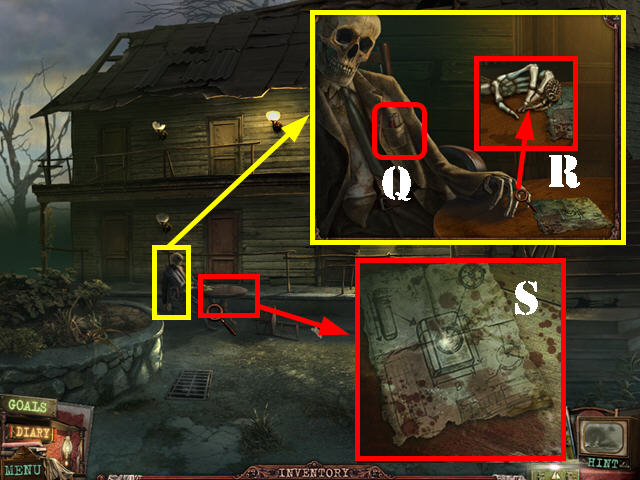
- Examine the skeleton; take the BROKEN LIGHTER from the jacket (Q).
- Note the ring on the hand (R).
- Zoom into the table; take the diary note (S).
- Walk down twice.
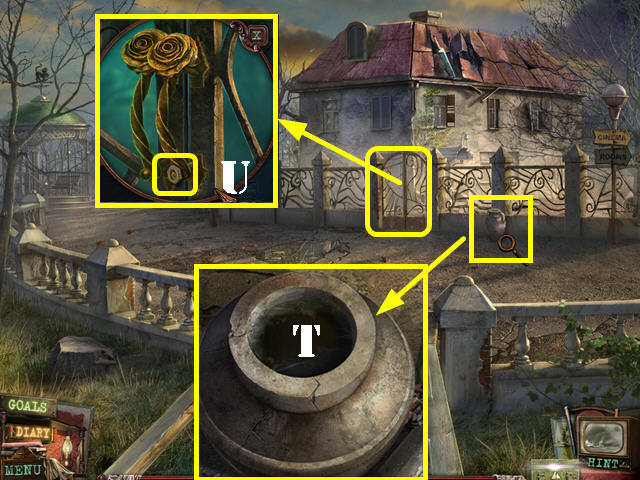
- Zoom into the vase; put the DIRTY PUTTY KNIFE in the water to get the CLEAN PUTTY KNIFE (T). Dip the HANDKERCHIEF in the same water to get the WET HANDKERCHIEF.
- Examine the gate; put the GATE HANDLE on the lock. Add the NUT on the handle and fasten the nut with the WRENCH (U).
- Open the gate and go through it.
- Talk to the young man.
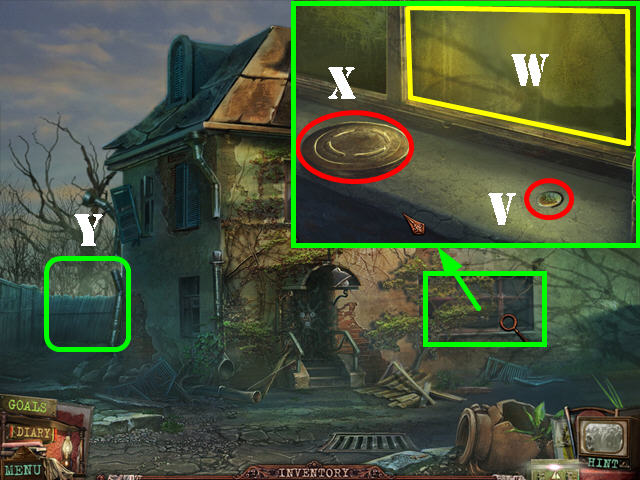
- Examine the window; take the COIN (V).
- Clean the window with the WET HANDKERCHIEF (W).
- Remove the leaves twice and take the FILM REEL (X).
- Go to the backyard (Y).
- Pet the dog to make it go away.
- Examine the attic door and take the ROPE (A).
- Examine the lower door; put the WELL HANDLE on the rubber suction cup; take the PLUNGER (B).
- Zoom into the window; take the STORAGE KEY (C).
- Remove the 4 moldings with the CLEAN PUTTY KNIFE (D).
- Put the PLUNGER on the glass; open the handle and go through it.
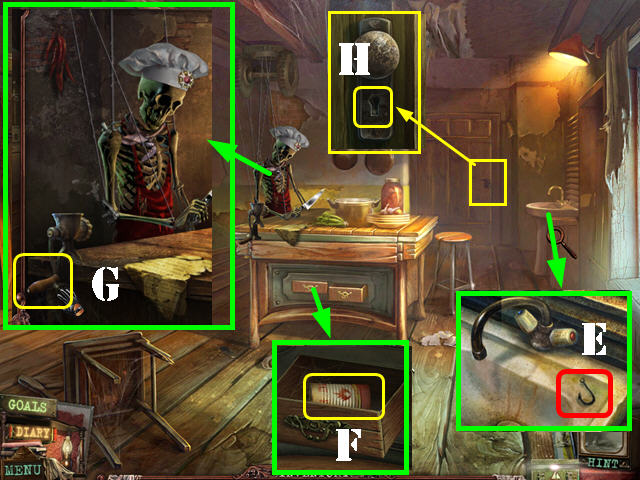
- Examine the sink; take the HOOK (E).
- Zoom into the side of the island; open the drawer and take the KEROSENE CAN (F).
- Examine the skeleton; take the MINCER HANDLE (G).
- Zoom into the back door; use the STORAGE KEY in the lock (H) and go through the door to access the storage room.
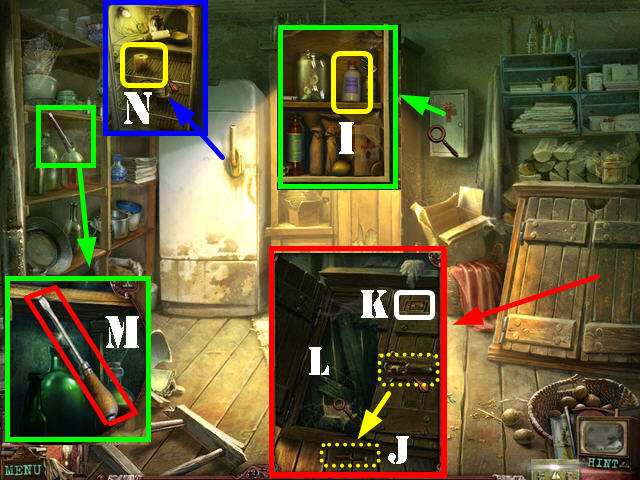
- Zoom into and open the medicine cabinet; take the AMMONIA JAR (I).
- Examine the storage door; touch the latch. Take the fallen LATCH (J) and the MATCHES (K).
- Open the left door; you need to find another way to get into the basement (L).
- Zoom into the shelf; put the MINCER HANDLE on the screwdriver part and take the SCREWDRIVER (M).
- Examine the refrigerator; pull on the handle and take the TOILET PAPER from inside the fridge (N).
- Walk down.
- Examine the left door; insert the SCREWDRIVER on the lock and go through the door.
- Talk to the Professor.
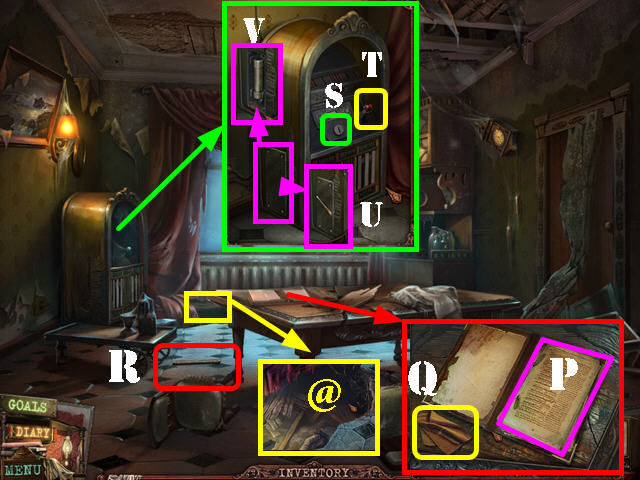
- Look at the book; take the diary note (P); take the RAG (Q).
- Take the METAL ROD on the ground (R).
- Look at the hole in the ground (@).
- Examine the jukebox; insert the COIN in the coin slot (S).
- Take the HANDLE (T).
- Zoom into the panel on the side of the jukebox. Remove the 4 screws with the SCREWDRIVER; take the SCREWS (U).
- Remove the panel and take the FUSE (V).
- Walk down.
- Zoom into the stove; light the stove with the MATCHES (W).
- Put the RAG on the poker; take the POKER WITH RAG (X).
- Heat the POKER WITH RAG on the flame to get the HOT POKER.
- Examine the skeleton; remove the rope attached to it with the HOT POKER (Y).
- Examine the ground and take the second WAR MEDAL (Z).
- Go back into the storage room.
- Zoom into the cabinet's door lock; put the SCREWS on the lock and fasten the screws with the SCREWDRIVER (A).
- Pull the latch to open the door.
- Put the TOILET PAPER on the stick and then add the KEROSENE CAN to the toilet paper; take the TORCH (B).
- Walk down twice.
- Examine the basement door; zoom into the latch, put the LATCH on the door and pull it (C).
- Open the door and go through it to access the basement.
- Examine the tank; take the VALVE (D).
- Examine the man on the ground; put the AMMONIA JAR on him (E). Take the third WAR MEDAL from him (F).
- Use the ROPE (the same rope can be used 3 times) on the back door (G), on the pipe above the door (H) and on the device (I).
- Zoom into the device and add the METAL ROD to it (J).
- Zoom into the chest. Open the chest and take the FUSE (K).
- Go through the back door to enter the generator room.

- Zoom into the metal bars; insert the TORCH in between them and light the torch with the MATCHES (L).
- Examine the device; add the 2 FUSES to it to activate a puzzle (M).
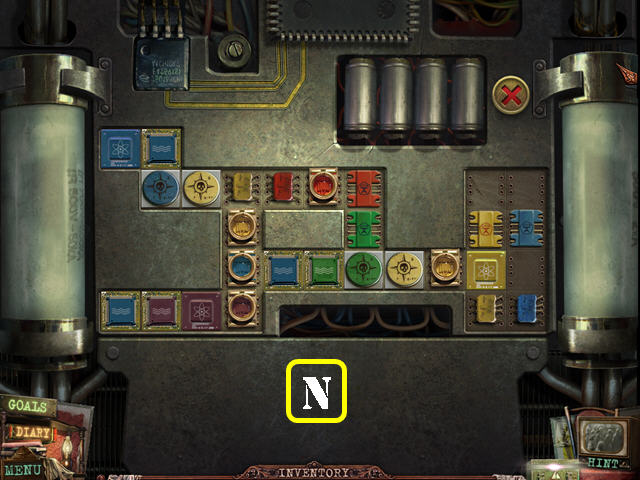
- Put the chips on the board into the right spots. Each chip next to each other must match in color or shape.
- Please look at the screenshot for the solution (N).
- Zoom into the panel and put the HANDLE on it (O).
- Pull the handle.
- Walk down 3 times.
- Zoom into the door (P); the 3 WAR MEDALS will be automatically placed in your inventory tray.
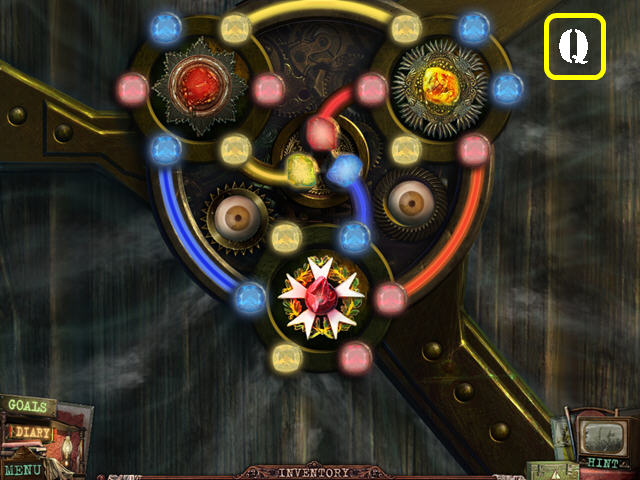
- Put the 3 MEDALS on the disks to activate the puzzle.
- Press in the center of the medals to rotate the disks. Press on the gems attached to one of the slider to switch the gems on both ends.
- The gems attached to each end of the slide need to match the colors of the slide.
- Please look at the screenshot for the solution (Q).
- Examine the door; open it and go through it to access the motel.
Chapter 3: Penumbra Motel
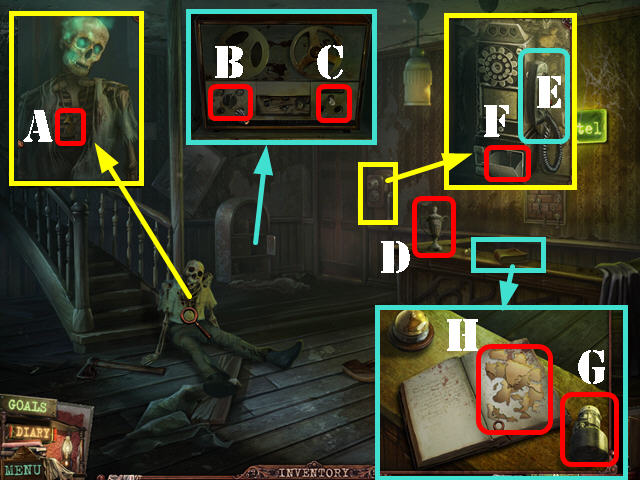
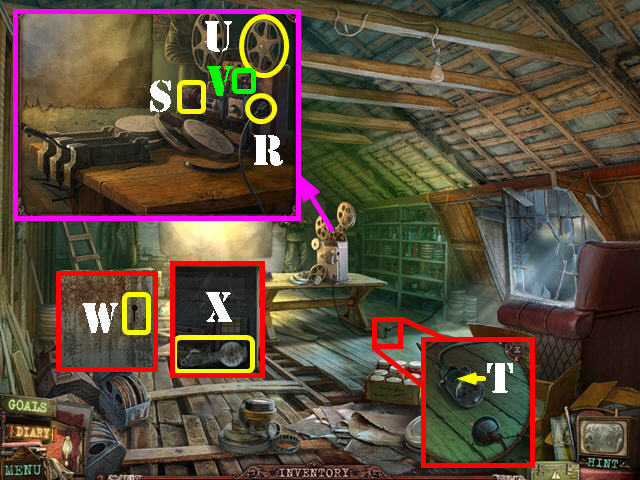
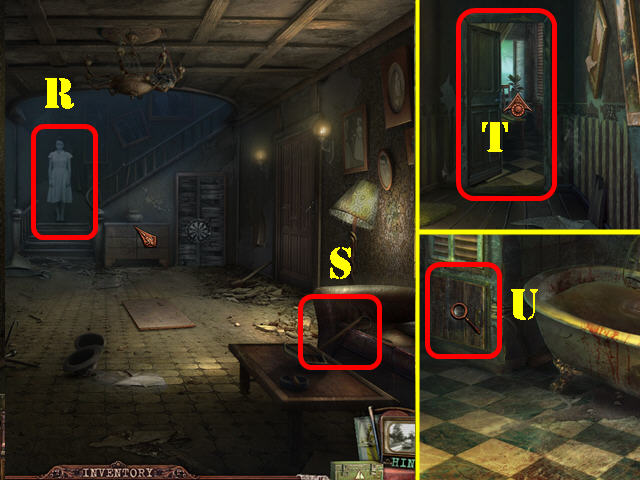
- Zoom into the skeleton; take the BRASS HORN (A).
- Examine the player; turn the left knob (B) and take the CAP on the right (C).
- Take the TROPHY (D).
- Examine the telephone; pick up the receiver (E) and then hang it up; take the KEY (F).
- Look at the book; take the LENS (G).
- Open the book and select the scraps to activate a puzzle (H).
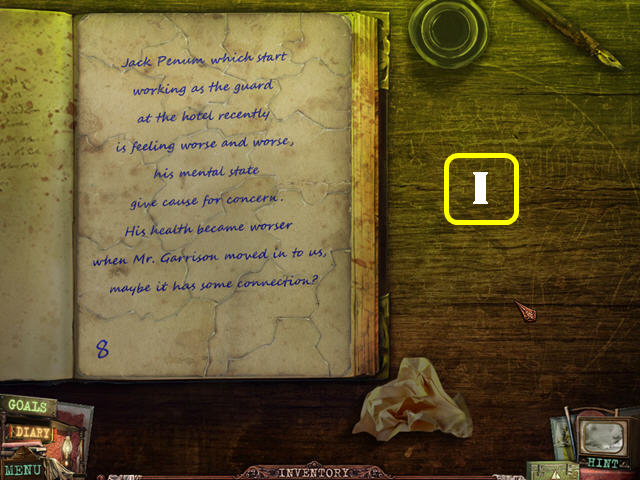
- Assemble the torn note to its original state.
- Please look at the screenshot for the solution (I).

- Go up the steps.
- Examine the table; open the book and take the diary note (J).
- Take the GOBLET (K).
- Examine the mannequin; take the GLASS PART (L).
- Zoom into the cabinet; put the GLASS PART on it to activate a puzzle (M).
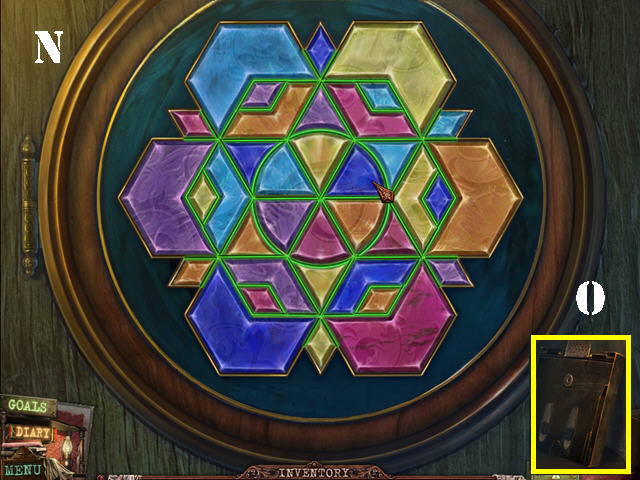
- Arrange the glass pieces so that none of the same colors come in contact with each other.
- Please look at the screenshot for the solution (N).
- Take the FILM (O).
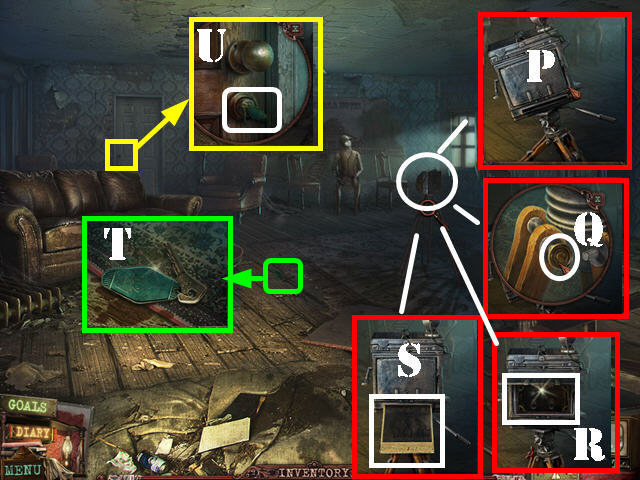
- Zoom into the tripod; touch the camera (P). Touch the bottom of the tripod and put the CAP in the hole (Q).
- Open the side of the camera and insert the FILM (R). Close the lid and press on it.
- Zoom back into the camera and take the photo (S).
- Zoom into the floor; take the KEY (T).
- Examine the back door; insert the KEY (with the green tag) in the lock and go through the door (U).
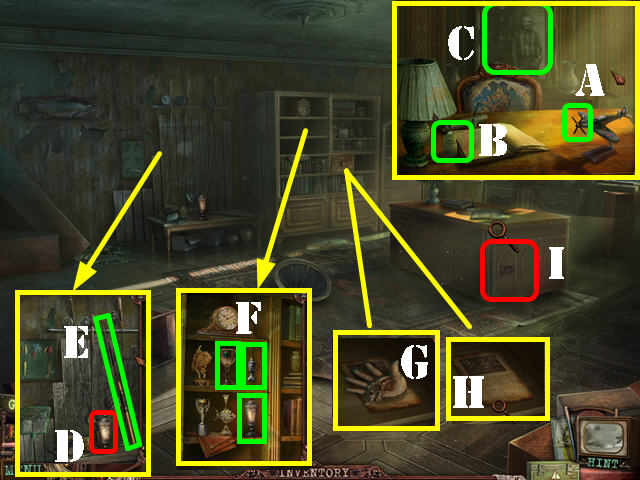
- Zoom into the desk; take the PROPELLER (A) and the SOLVENT JAR (B).
- Look at and take the photo (C).
- Examine the back wall; take the GOBLET (D).
- Put the HOOK on the fishing rod; take the FISHING ROD (E).
- Zoom into the left side of the shelves; put the 2 GOBLETS and the TROPHY on them (F).
- Examine the right side of the shelves and take the TABLE PART (G).
- Look at and take the diary note (H).
- Zoom into the side of the desk and put the TABLE PART on it (I) to activate a puzzle.
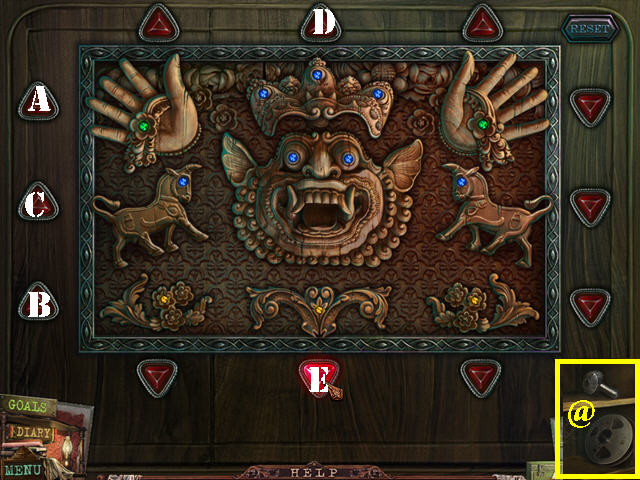
- Press on the arrows to enlarge the elements to the right size.
- To solve the puzzle, press on the arrows in this order: A, B, C, D, C, A x 2, and E.
- Zoom into the desk; take the SAFE HANDLE and the FILM REEL (@).
- Walk Down twice.
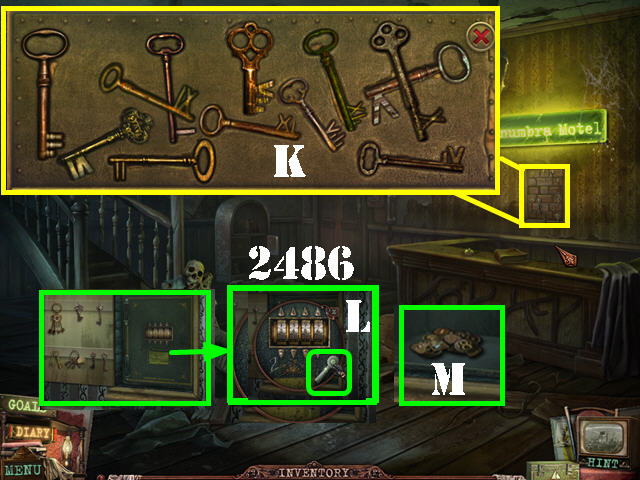
- Examine the key holder; put the KEY in the holder to activate a puzzle.
- Put the keys back into their matching spots.
- Please look at the screenshot for the solution (K).
- Take a closer look at the safe; add the SAFE HANDLE to it (L).
- Change the code to 2486 and press on the safe handle.
- Take the TAGS (M).
- Close the safe door and zoom into the keys.
- Add the TAGS to the board to activate a puzzle.
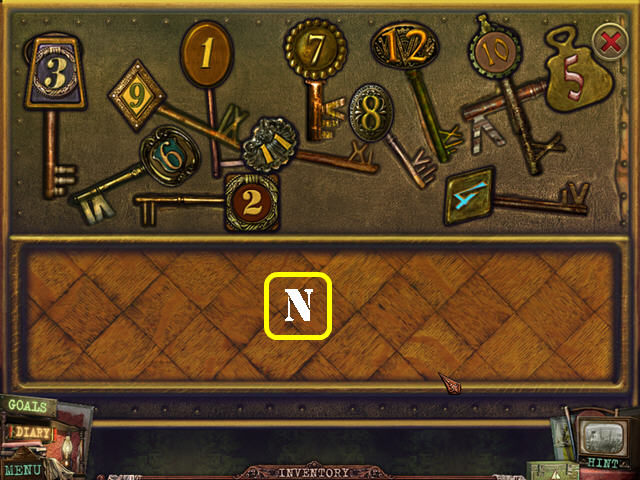
- Put the TAGS next to their matching keys.
- Please look at the screenshot for the solution (N).
- You will receive the BUNCH OF KEYS.
- Walk down twice and go right.
- Zoom into the device; put the VALVE on the tap (O).
- Turn the valve; touch the rope and take the TRIANGLE KEY (P).
- Go into the cinema.
- Examine the safe; put the TRIANGLE KEY (Q), SQUARE KEY (R) and the CROSS KEY (S) into the appropriate slots.
- Turn the handle in the center and take the EXTENSION CORD (T).
- Walk down and go right.

- Zoom into the door lock; insert the BUNCH OF KEYS into the lock (U). Note: the BUNCH OF KEYS will go back into inventory.
- Go through the door.
- Examine the desk; take the PIPE (V).
- Walk down and go up the steps.
- Zoom into the center door lock (W); insert the BUNCH OF KEYS in it and then go through the door.
- Examine the mirror; open the book after the mirror breaks (X).
- Put the PIPE on the book page; press on the ashes to reveal something on the book page. Take the diary note (Y).
- Take the PART OF KEY on the broken mirror (Z).
- Go through the doorway to access the bathroom (@).
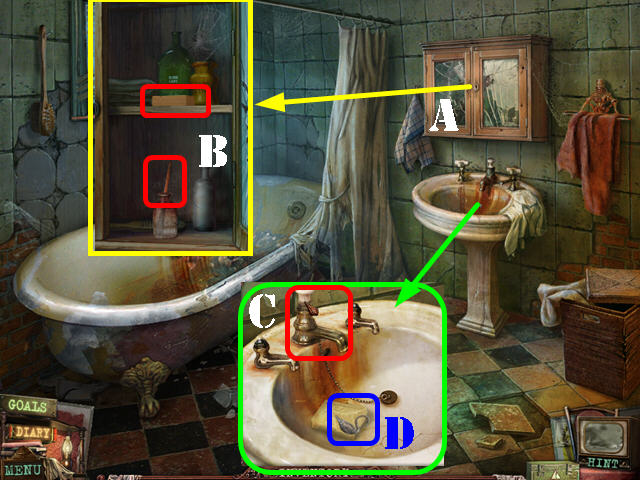
- Zoom into the medicine cabinet and open it (A).
- Take the SOAP and the BRUSH (B).
- Zoom into the sink; put the SOAP in the sink. Turn on the faucet (C) and take the PART OF KEY (D).
- Walk down 3 times and go through the lower right door.
- Examine the desk and zoom into the book; add the 2 PARTS OF KEYS into the lock (E) and take the WATCH (F).
- Walk down.
- Zoom into the grate; use the FISHING ROD to get the CIGAR CASE (G).
- Zoom into the table; put the CIGAR CASE down (H).
- Place the BROKEN LIGHTER and the WATCH on the cigar case.
- Open the case and take the BOX KEY (I).
- Go back through the door in the lower right.
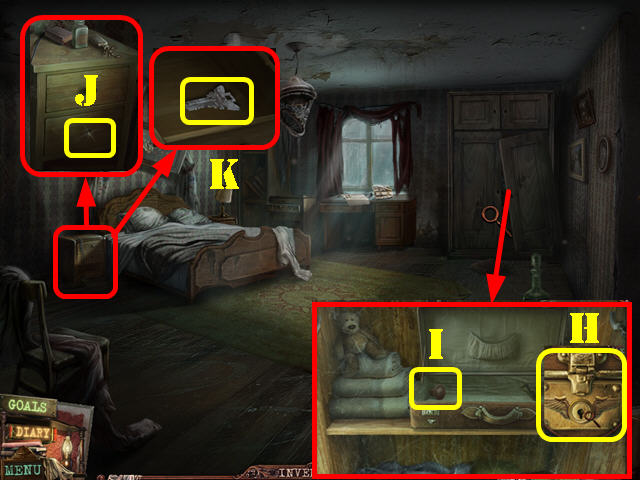
- Zoom into the pillow and then move it aside to reveal a box. Use the BOX KEY in the lock; take the fourth WAR MEDAL and the SCREWDRIVER (J).
- Zoom into desk.
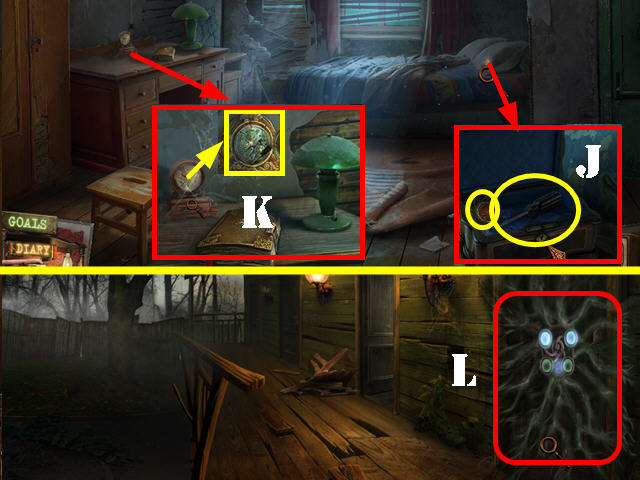
- Look at the clock and open the face cover; remove the screws with the SCREWDRIVER and take the GEARS (K).
- Walk down; go up the steps.
- Examine the glowing door (L); the 4 WAR MEDALS will be automatically added to your inventory tray.
- Add the 4 medals to the disks to activate a puzzle.
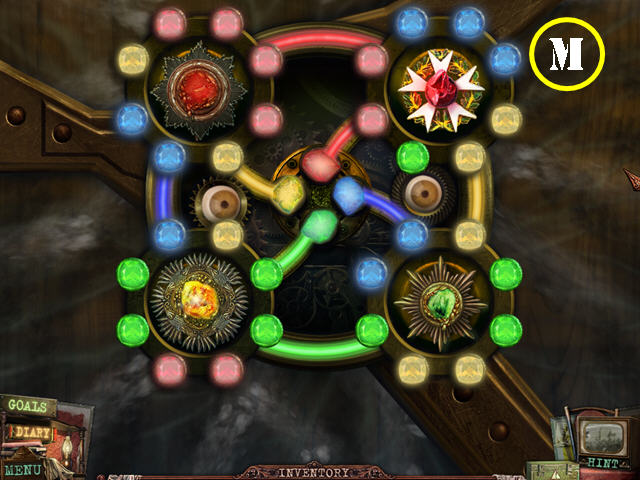
- Put the 4 MEDALS on the disks to activate the puzzle.
- Press in the center of the medals to rotate the disks. Press on the gems attached to one of the slider to switch the gems on both ends.
- The gems attached to each end of the slide need to match the colors of the slide.
- Please look at the screenshot for the solution (M).
- Go through the door.
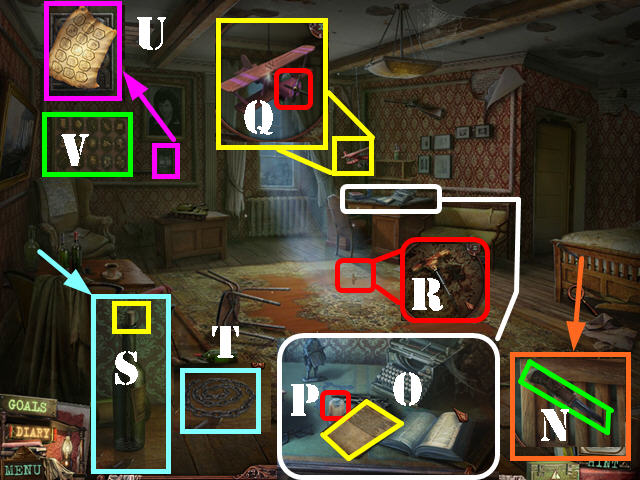
- Zoom into the foot of the bed; take the KNIFE (N).
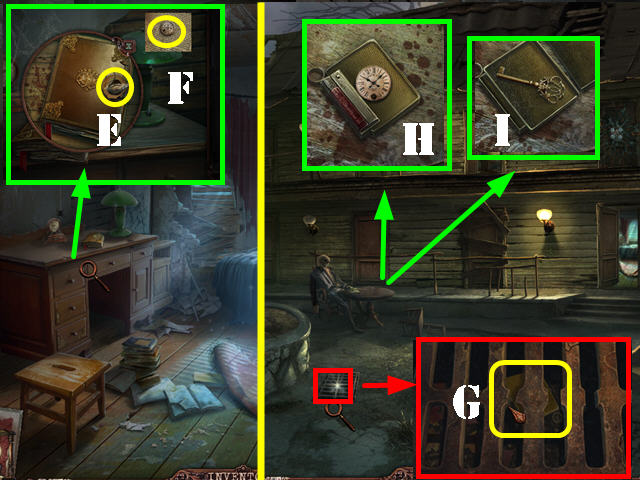
- Zoom into the desk; the typewriter will start typing by itself. Take the diary note (O).
- Add the SOLVENT JAR to the cap with dried glue (P). Remove the cap. Dip the BRUSH into the glue to get the BRUSH WITH GLUE.
- Zoom into the plane; add the BRUSH WITH GLUE to the nose and then add the PROPELLER to it (Q).
- Examine the carpet and take the CORKSCREW (R).
- Zoom into the table; remove the cork with the CORKSCREW (S). Touch the bottle and take the CHAIN (T).
- Examine the area below the picture; look, and then take the diary note with the puzzle solution (U).
- Examine the plaque on the wall to activate a puzzle (V).
- Use the rules of Rock, Paper, Scissors to solve the puzzle.
- Please look at the screenshot for the solution (W).
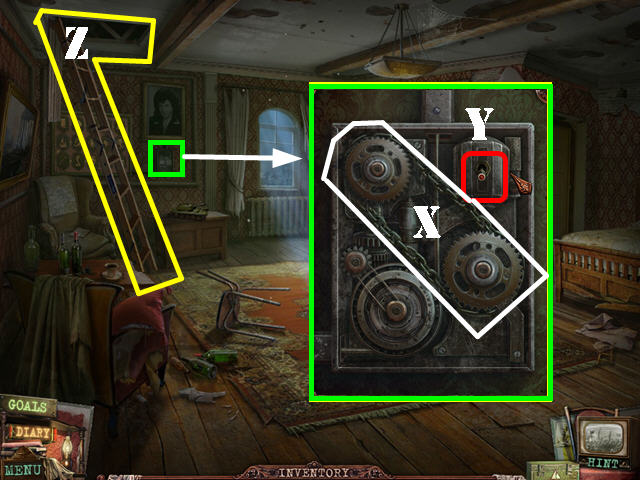
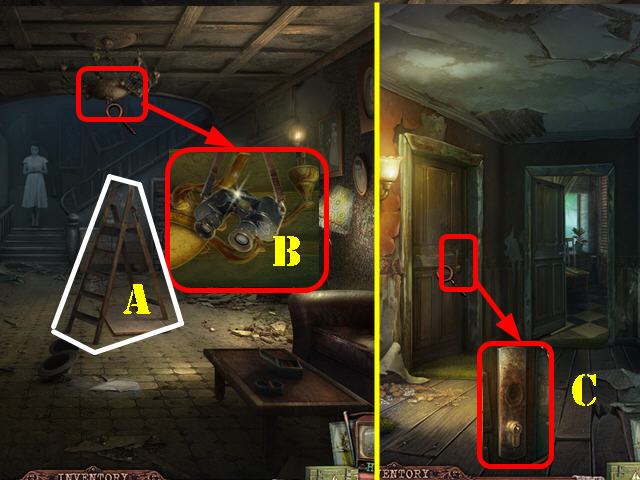
- Examine the device on the wall; add the CHAIN to it (X) and then hit the switch (Y) to lower the ladder.
- Go up the ladder (Z).

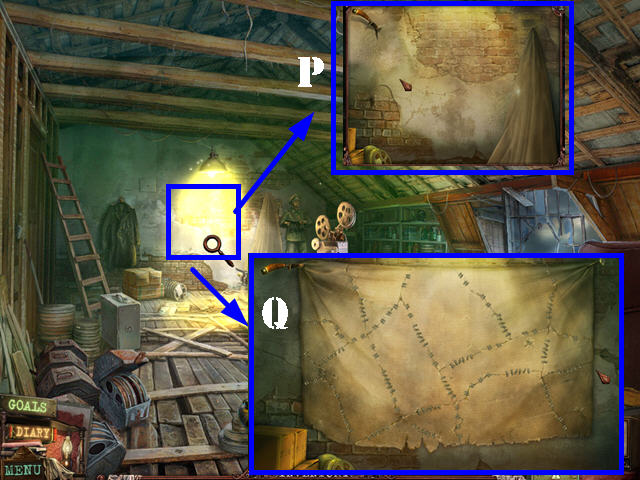
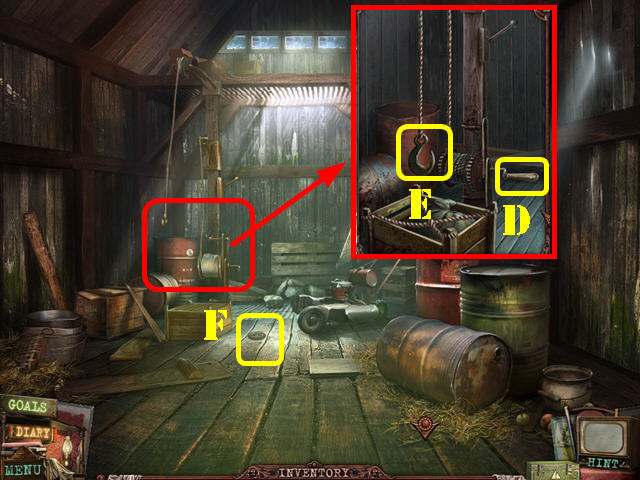
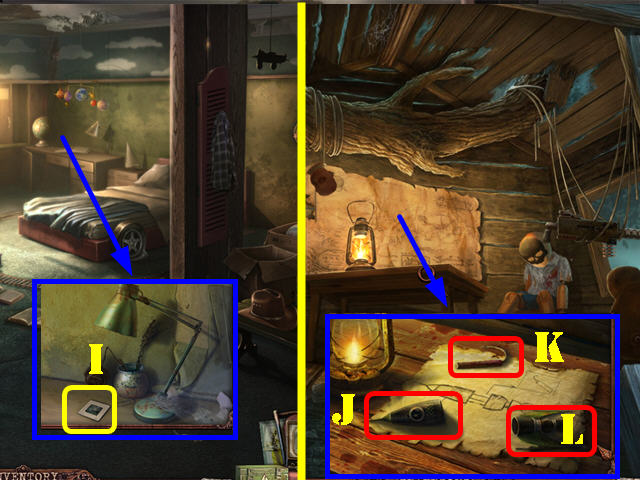
- Zoom into the box and take the HANDLE (A).
- Examine the map; take the diary note (B).
- Drag the nail (C) to the horseshoe and take the MAGNET.
- Walk down.
- Zoom into the desk; put the HANDLE on the drawer (D).
- Open the drawer and take the BULLET (E).
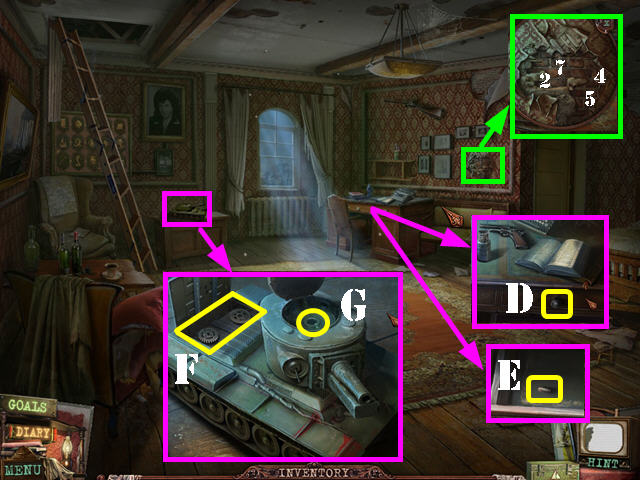
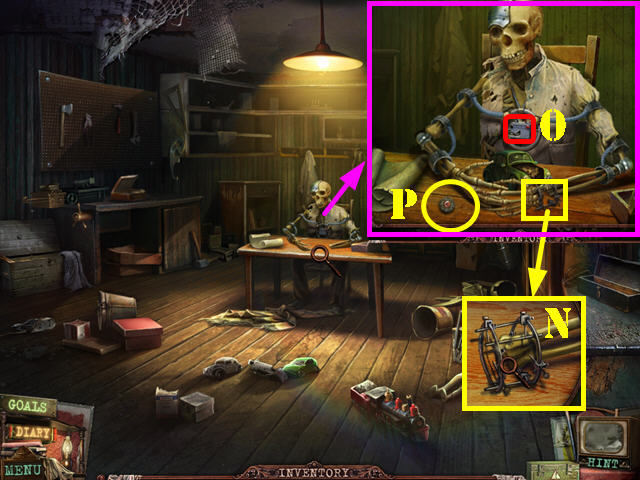
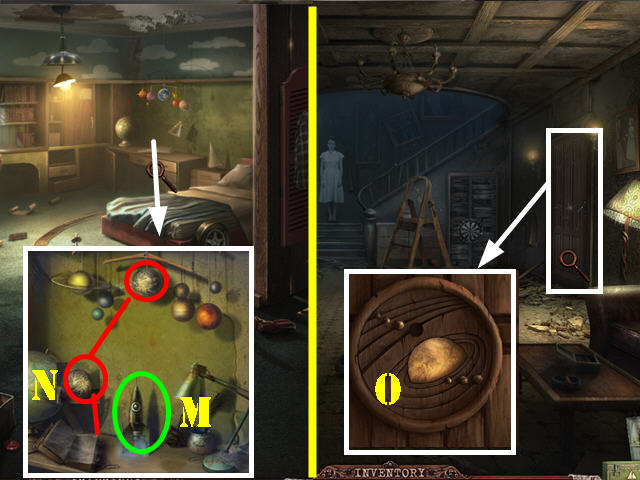
- Examine the toy tank.
- Open both lids; insert the GEARS (F) and BULLET (G).
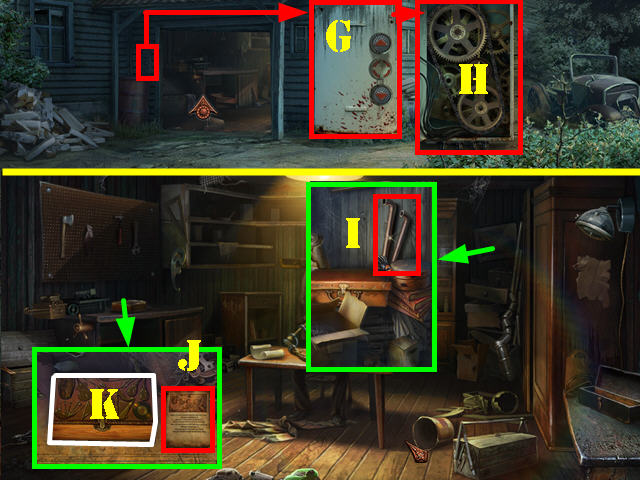
- Examine the wall; look at the code: 2754.
- Go back up the ladder.
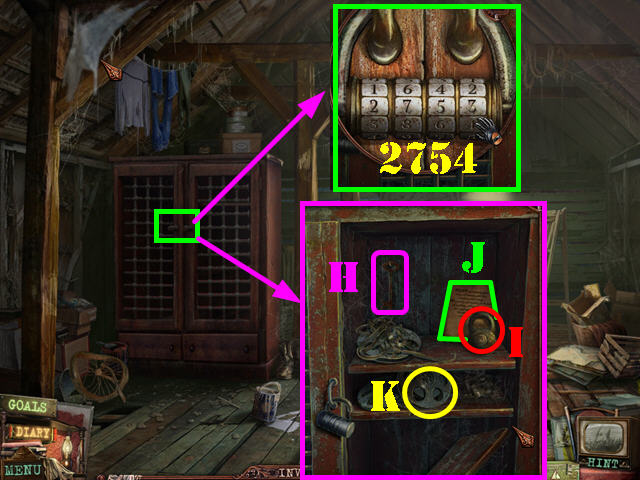
- Zoom into the cabinet door; change the numbers on the lock to 2754.
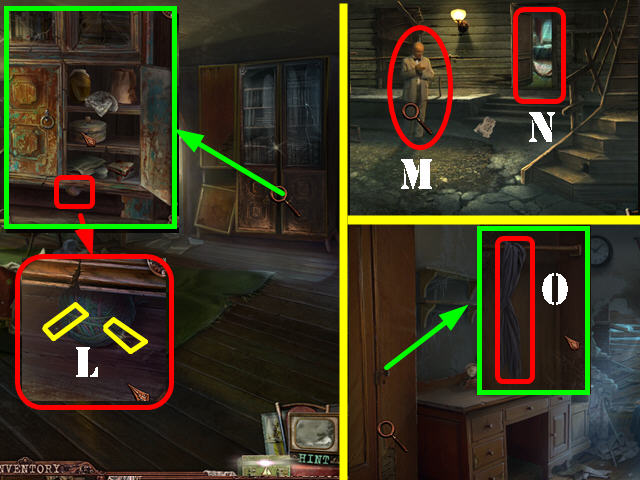
- Open the door; take the KEY (H), WEIGHT (I), diary note (J) and the fifth FILM REEL (K).
- Walk down 2 times. Go into the center door.
- Examine the broken case; open the door and a ball of yarn and needles will fall below the case.
- Examine the bottom of the case; remove the HOOK and the NEEDLE with the MAGNET (L).
- Walk down twice.
- Talk to the Professor (M).
- Go back into the lower right room (N).
- Zoom into and then open the closet door; use the HOOK on the shawl to obtain the THREAD (O).
Chapter 4: The Road to the Mansion
- Go back into the cinema.
- Examine the film projector; take a closer look at the film cutting machine. The 5 FILM REELS will be added automatically to the inventory tray.
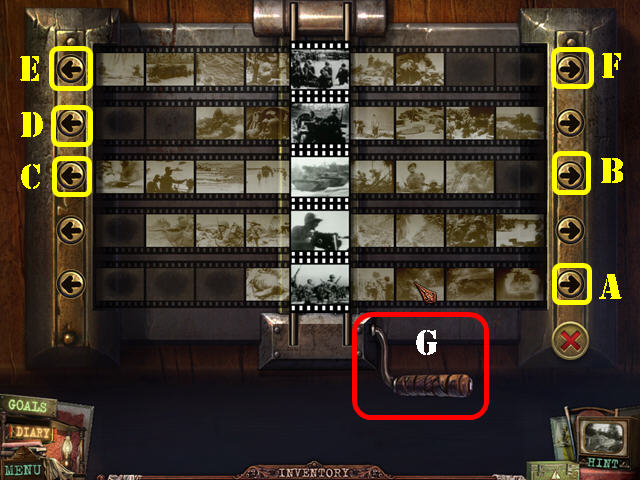
- Place the 5 FILM REELS on the device to activate a puzzle.
- Use the arrows to place the black and white pictures in the center.
- Selecting an arrow may move more than one line in some instances.
- To solve the puzzle, press on the arrows in this order: A x 3, B, C x 4, D x 2, E x 5, and F. Then press on the handle (G).
- The GLUED FILM will be added to inventory.
- Examine the back wall; put the KNIFE on the wall (P) and then attach the sheet to the knife.
- Examine the back wall; add the THREAD and the NEEDLE to the scene to activate a puzzle.
- Reassemble the canvas.
- Please look at the screenshot for the solution (Q).
- Examine the projector; add the EXTENSION CORD (R), and the LENS to it (S).
- Zoom into the ground; plug in the extension cord (T).
- Zoom into the projector; add the GLUED FILM to the projector (U) and flip the switch to watch the film (V).
- Examine the lock; use the KEY in the lock (W).
- Open the door and take the DETAIL (X).
- Go back to the basement.
- Zoom into the right door; insert the DETAIL into the lock (A) and flip the handle (B).
- Go through the door to access the laundry room.
- Examine the cabinet; tie the sheets together and take the TIED SHEETS (C).
- Zoom into the washing machine; add the WEIGHT to it (D) and press the button (E).
- Take the LOCK PART (F).
- Walk down 4 times and go right to access the well right outside the cinema.
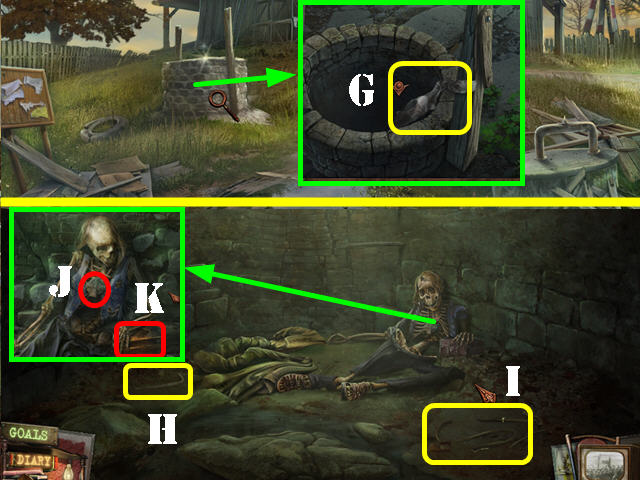
- Zoom into the well and add the TIED SHEETS to it (G).
- Go down into the well.
- Take the BRACKET (H) and the WHIP (I).
- Zoom into the skeleton; take the AMULET (J).
- Zoom into the box to activate a puzzle (K).
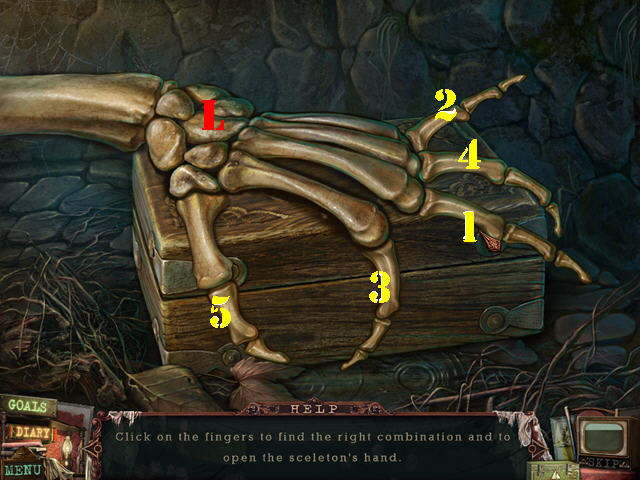
- Select the right combination of fingers to open the skeleton's hand.
- To solve the puzzle, press on the fingers in the order shown in the screenshot (1-5).
- Take the SKELETON HAND (L).
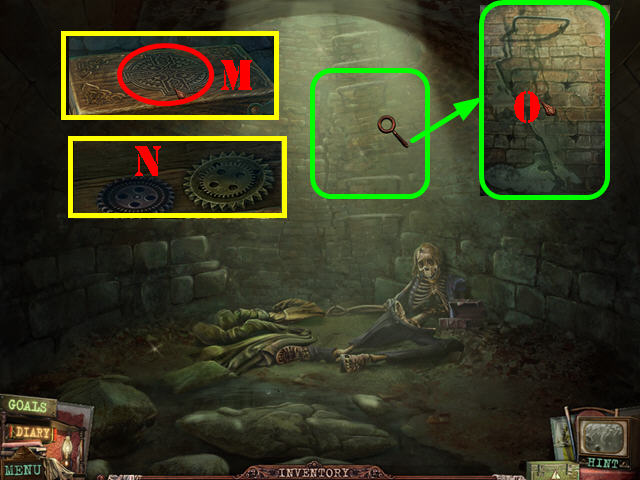
- Put the AMULET on the niche (M) and take the GEARS (N).
- Examine the wall; put the BRACKET on it and exit the well (O).

- Go to the backyard behind the motel.
- Examine the door; put the LOCK PART and the GEARS on it to activate a puzzle.
- Move the square frame cursor across the board to select the gear pieces. Press on the gears within the frame to rotate those gears.
- In order not to disturb some of the pieces in the correct spots, move the square off the board so it does not touch any other pieces. The markings on the screenshots give you a good idea of where to place the frame.
- To solve the puzzle, please follow these steps: P x 2, Q x 1, R x 2, S x 2, and T x 3. The last part of the screenshot (@) shows the completed puzzle.
- Go through the door.
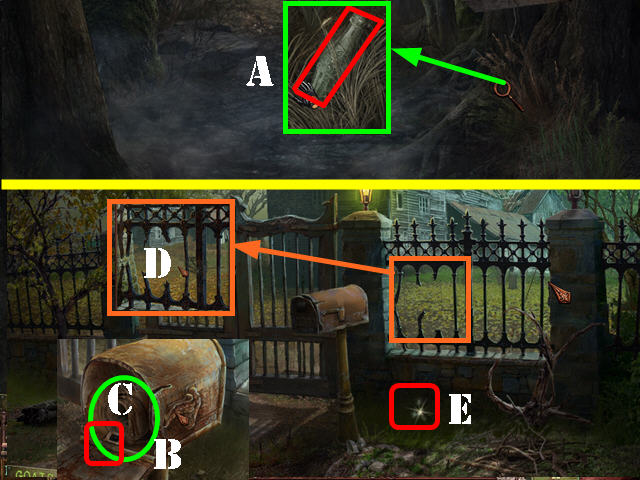
- Examine the bushes; press on them and take the BOTTLE (A).
- Go forward.
- Examine the mailbox; open it and take SLIDE 10 (B).
- Take the diary note from inside the mailbox (C).
- Examine the lattice; use the WHIP on it (D).
- Pick up the FINIAL (E) and go through the fence.
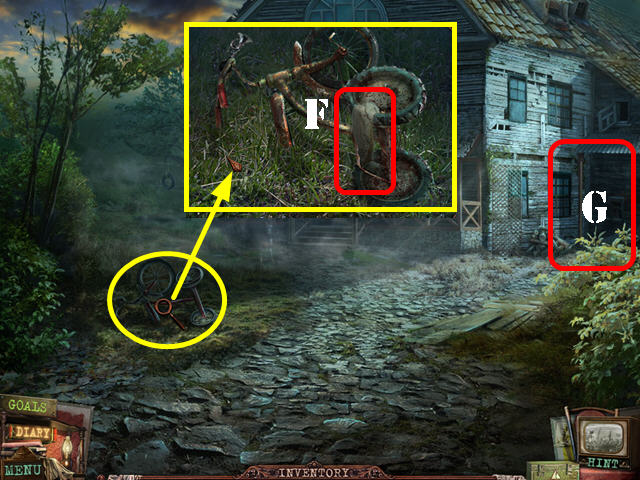
- Examine the tricycle; take the RAG (F).
- Go right (G).
- Examine the bushes; push them aside and take the ROCKET HEAD (H).
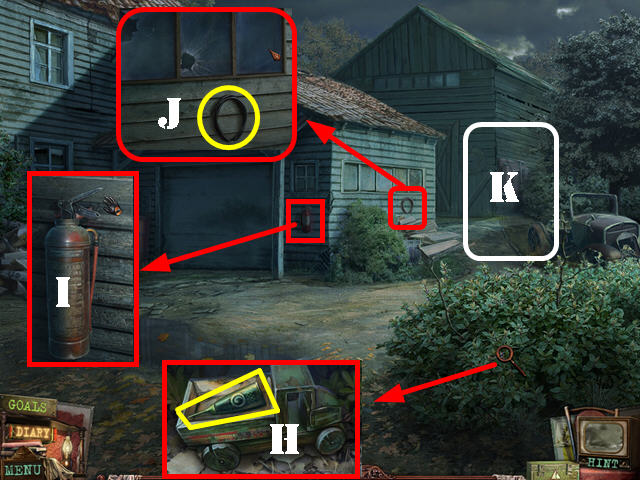
- Zoom into the FIRE EXTINGUISHER and take it (I).
- Examine the side of the building and take the HOSE (J).
- Go forward through the path on the right (K).
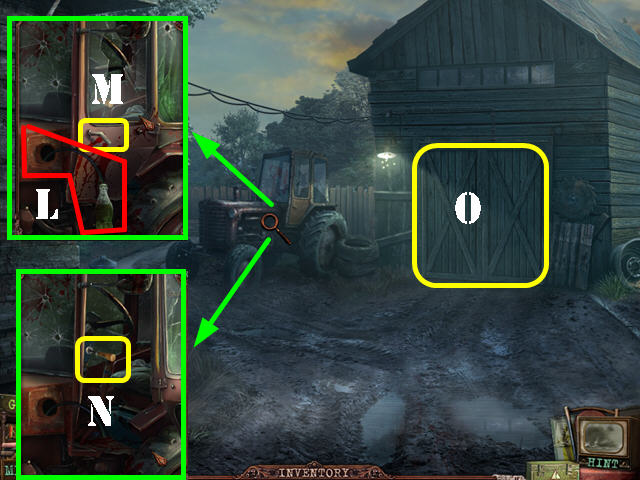
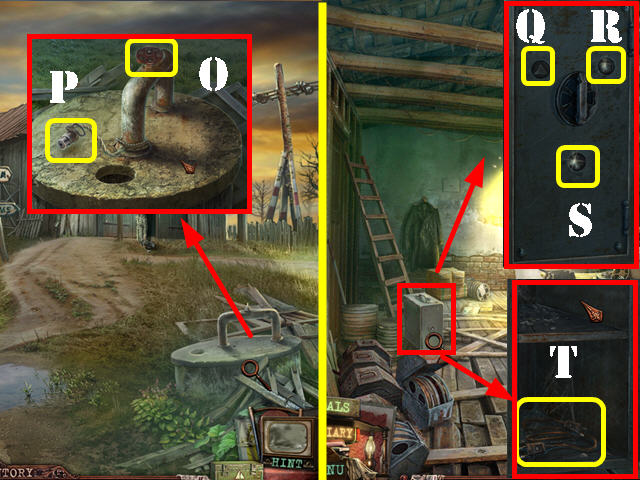
- Examine the tractor; remove the gas cap and insert the HOSE into it (L).
- Put the BOTTLE on the hose to get the BOTTLE WITH GAS.
- Use the FINIAL on the handle (M) and take the SCREWDRIVER (N).
- Open the barn door and go through it (O).
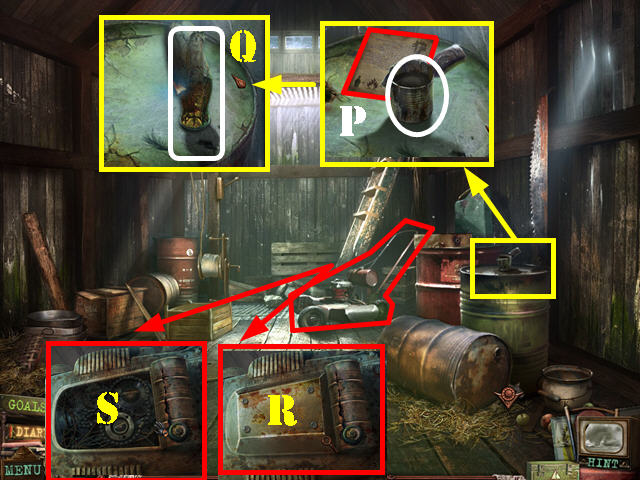
- Examine the top of the drum; take the CAN OF OIL and the diary note (P).
- Put the BOTTLE WITH GAS on top of the drum. Insert the RAG into the bottle. Light the rag with the MATCHES and take the EXPLOSIVE (Q).
- Examine the lawnmower; remove the nuts with the WRENCH (R) and take the CHAIN (S).
- Walk down.
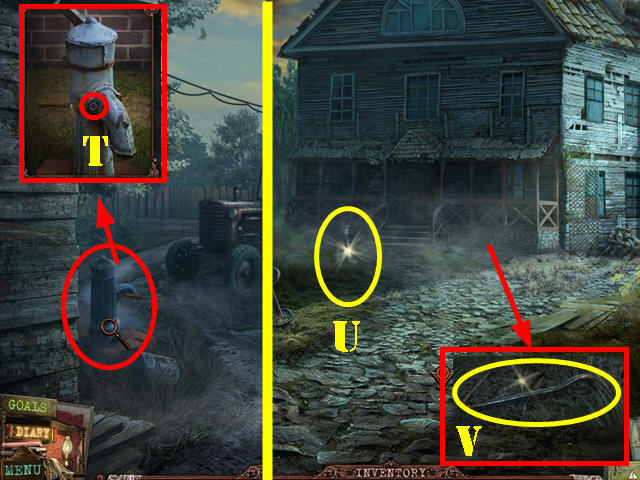
- Examine the water pump; put the CAN OF OIL on the rusty nut (T) to get the LEVER.
- Walk down twice.
- Throw the EXPLOSIVE at the dog (U).
- Put out the fire with the FIRE EXTINGUISHER.
- Examine the grassy area below the porch; take the HOOK (V).
- Go forward through the left path.
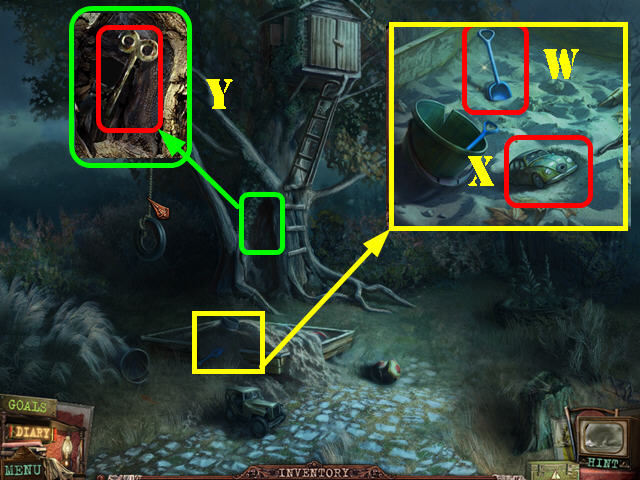
- Examine the sandbox; take the SHOVEL (W).
- Use the SHOVEL on the car; take the TOY CAR (X).
- Examine the tree bark; use the SCREWDRIVER on it and take the WIND-UP KEY (Y).
- Go up to the tree house and open the door.

- Zoom into the table; take the diary note (A) and SLIDE 8 (B).
- Examine the puppet and take the MIRROR (C).
- Go back into the barn.
- Zoom into the winch; put the LEVER on the side (D).
- Put the HOOK on the rope and turn the lever (E).
- Take the GEAR (F) on the ground.
- Walk down twice.
- Examine the control box and open it (G). Put the CHAIN and the GEAR on the mechanism (H).
- Press on the gears and then on the controls; go through the door.
- Examine the stack on the right; move all the items aside and take the WATER PIPE (I).
- Zoom into the worktable and take the diary note (J).
- Zoom into the box and put the BRASS HORN on the box to activate a puzzle (K).

- Drag the instruments so that all of them fit on the box and without overlapping.
- Instruments with a green outline are not overlapping; instruments with a red outline are overlapping.
- Please look at the screenshot for the solution (L).
- Take the BRACELET (M).
- Examine the skeleton and zoom into its arm. Add the BRACELET and then the SKELETON HAND to the arm (N).
- Put the TOY CAR in the skeleton's hand. Then put the WIND-UP KEY on the device around his neck (O).
- Take the fifth WAR MEDAL (P).
- Walk down twice.
- Zoom into the door and touch it.
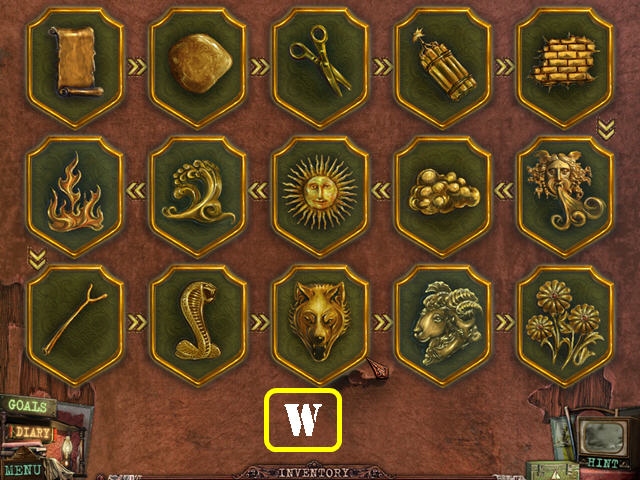
- Put the 5 MEDALS on the disks to activate the puzzle.
- Press in the center of the medals to rotate the disks. Press on the gems attached to one of the slider to switch the gems on both ends.
- The gems attached to each end of the slide need to match the colors of the slide.
- Please look at the screenshot for the solution (Q).
- Go through the door.
Chapter 5: The Mansion
- Talk to the little girl standing on the steps (R).
- Take the CANE (S).
- Go through the left door and then go through the open door to access the bathroom (T).
- Examine the pipes (U); add the WATER PIPE to it to activate a puzzle.
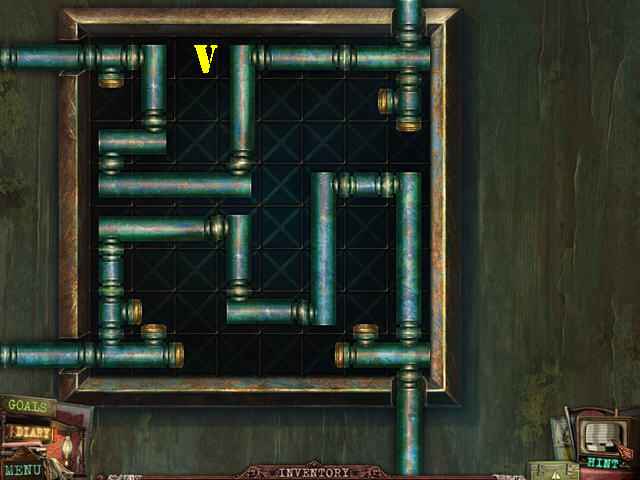
- Use all the tubes and caps to connect all the pipes together.
- Right-click on a piece to rotate it.
- Please look at the screenshot for the solution (V).

- Examine the tub.
- Press on the faucet (W) and then on the drain (X); take the DOOR HANDLE (Y).
- Go back to the tree house.
- Zoom into the ladder; put the CANE on it (Z). Take the LADDER on the ground (@).
- Walk down and go through the mansion door.
- Put the LADDER on the floor (A).
- Examine the chandelier and take the BINOCULARS (B).
- Go left.
- Examine the center door; put the DOOR HANDLE on (C). Open the door and go through it.
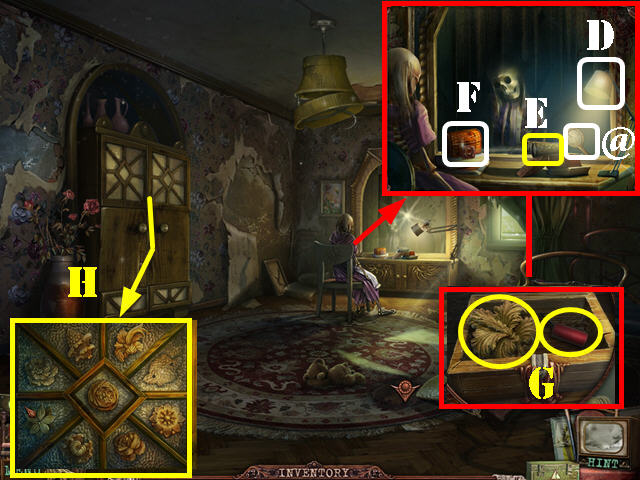
- Examine the vanity.
- Touch the lamp (D) and put the BINOCULARS on top of the books (E).
- Put the MIRROR below the lamp to melt the wax seal (@).
- Zoom into the box (F); open it; take the ROCKET EXPLOSIVE and the CABINET PART (G).
- Examine the cabinet; add the CABINET PART to it (H).
- Go through the cabinet to access the secret room.
- Zoom into the desk; take SLIDE 11 (I).
- Go back to the tree house.
- Examine the table. Put the ROCKET HEAD on the paper (J) and the ROCKET EXPLOSIVE on the table (K). The bottom half of the rocket is already on the table (L).
- Touch the rocket explosive and it will go into the bottom half of the rocket.
- Touch the rocket head to put all the pieces together.
- Take the ROCKET.
- Go back into the secret bedroom.
- Examine the desk.
- Put the ROCKET on the desk; light the bottom of the rocket with the MATCHES (M).
- Take the PLANET (N).
- Walk down 3 times.
- Zoom into the right door (O); add the PLANET to it. Zoom into the door to activate a puzzle.
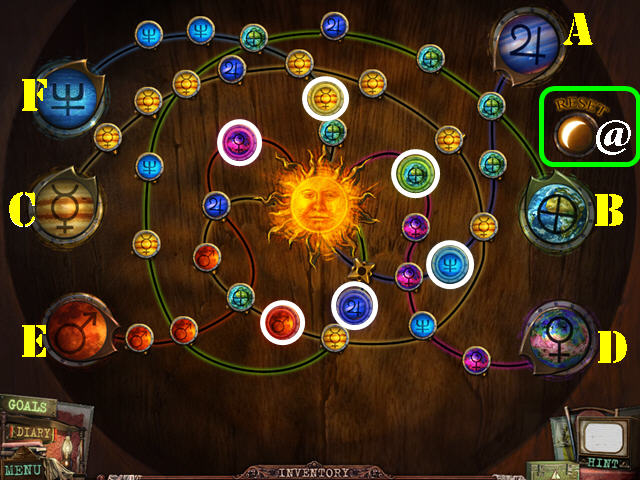
- Put the 6 planets into their matching spots (circled in white); press on one of the large planets (A-F) to make the smaller planets appear. Use the small planets to move other pieces along the track.
- Select the Restart (@) button if you need to start over.
- If the pieces fall into the center (sun) they will fall off the board.
- To solve the puzzle, press on the planets in this order: A, B, A, B x 2, A, B x 2, F x 4, C x 6, A, F, D x 4, C x 3, E x 2, B x 2, E x 2, and C.
- Go through the door.
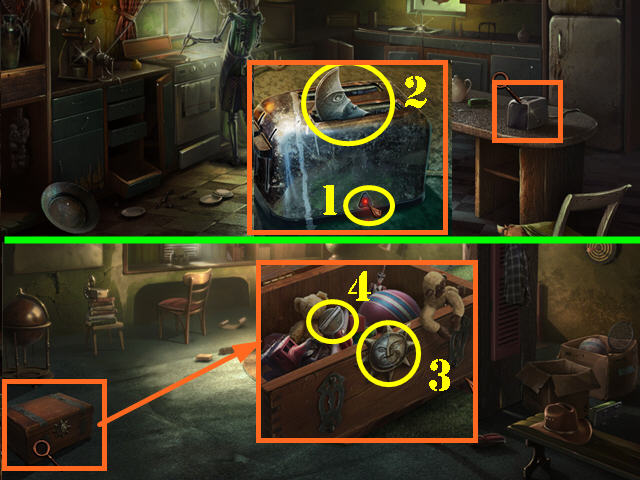
- Examine the toaster; push the button (1) and take the MOON (2).
- Go back to the secret bedroom.
- Zoom into the chest; put the MOON on the lock (3).
- Open the chest and take the HANDLE (4).
- Go back into the kitchen.
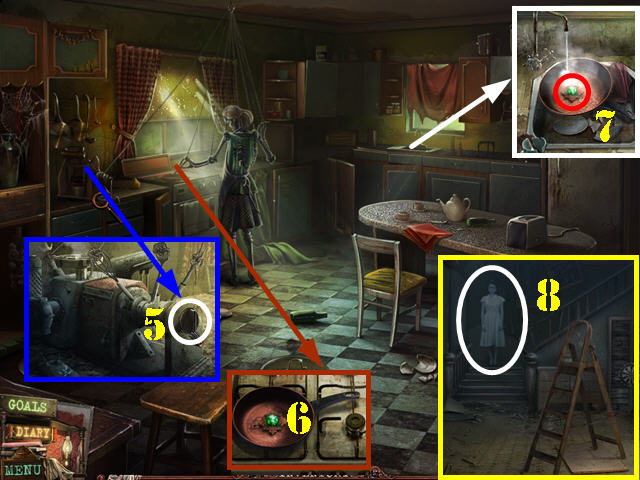
- Zoom into the food processor; put the HANDLE on it and turn the handle (5).
- Examine the stove and take the HOT PAN (6).
- Zoom into the sink; put the HOT PAN into the sink and take the sixth WAR MEDAL (7).
- Walk down.
- Talk to the little girl on the steps (8). Go up the steps after she's done talking.
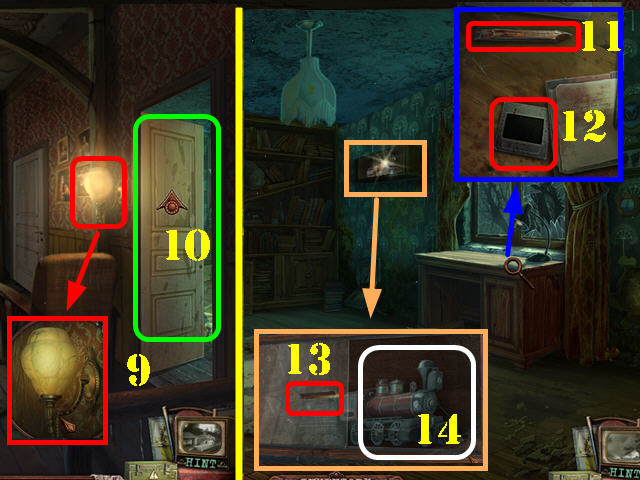
- Zoom into the lamp and turn it on (9).
- Open the right door and go through it (10).
- Examine the desk; take PENCIL (11) and the SLIDE 12 (12).
- Examine the shelf; put the PENCIL in the hole (13) and take the TRAIN (14).
- Walk down.
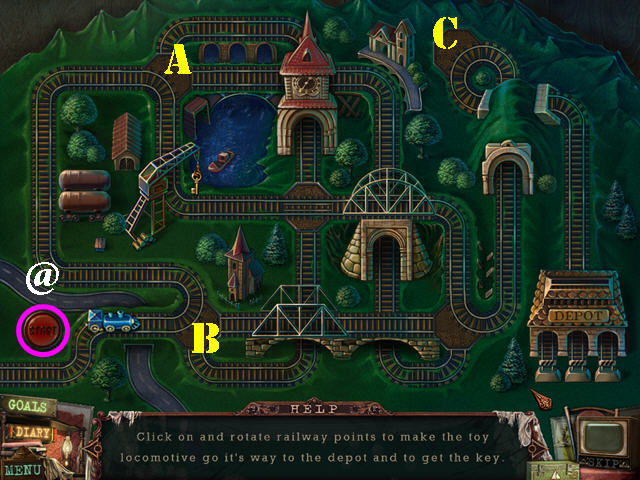
- Examine the model by the window; add the TRAIN to it to activate a puzzle.
- Position the tracks so the train can go to the depot and get the key.
- To solve the puzzle, press on the tracks in this order: A, B, B, and C and then press the start button (@).
- You will receive the KEY.
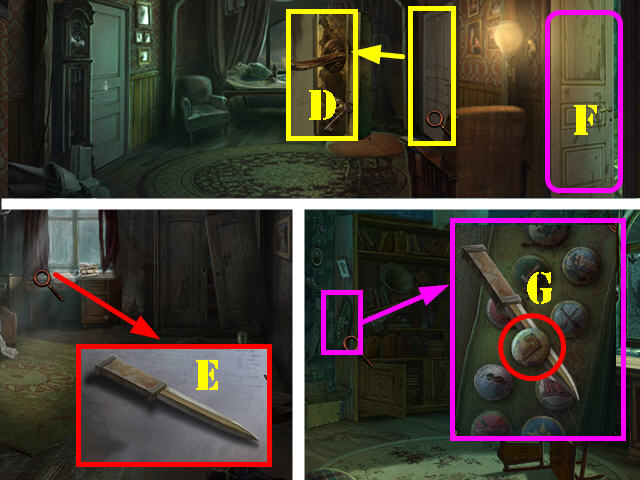
- Zoom into the far right door; use the KEY in the lock (D) and go through the door.
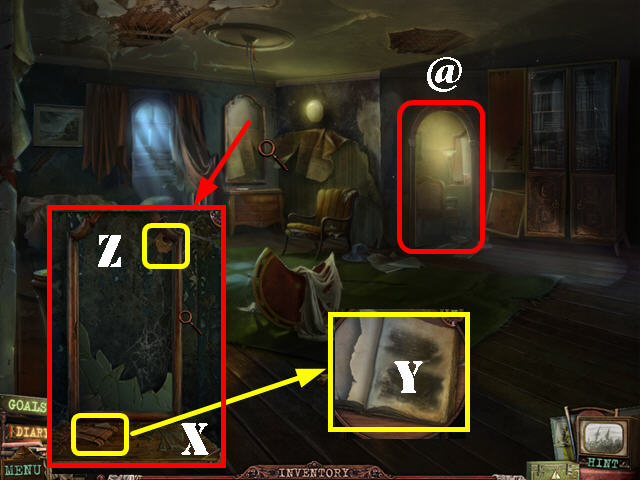
- Examine the desk; move the papers aside and take the KNIFE (E).
- Walk down and go through the right door (F).
- Examine the side of the bookcase; use the KNIFE on the BADGE (G).
- Walk down and go through the far right door (D).
- Examine the closet; open the door and zoom into the briefcase.
- Use the BADGE on the lock (H); open the briefcase and take the KNOB (I).
- Examine the nightstand; put the KNOB on the drawer (J). Open the drawer and take the KEY (K).
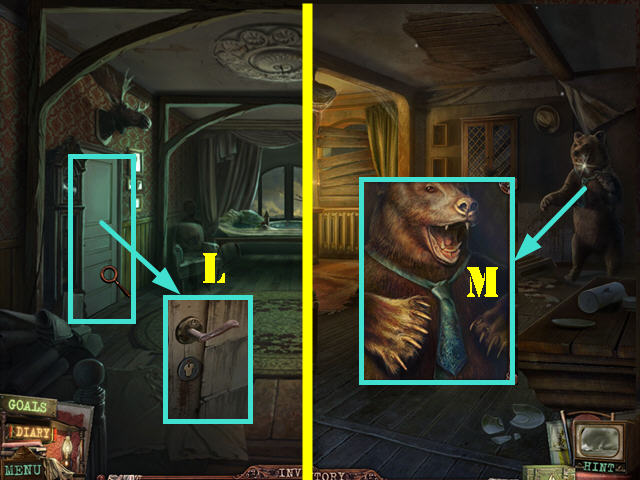
- Walk down and examine the left door. Use the KEY in the lock and go through the door (L).
- Examine the bear and take the TIE (M).
- Go back to the secret bedroom.
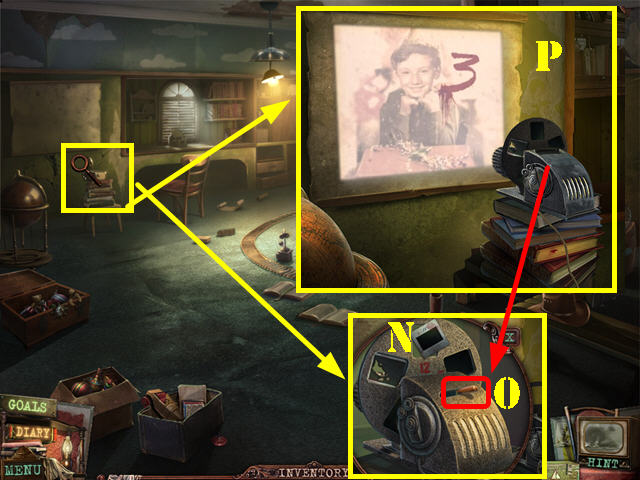
- Zoom into the projector; press on it and then put SLIDE 8, SLIDE 10, SLIDE 11, and SLIDE 12 into the slots marked with the same number (N).
- Press the button (O) and note the numbers 3852 that appear on the slides (P).
- Walk down 3 times and go up the steps. Enter the left door.
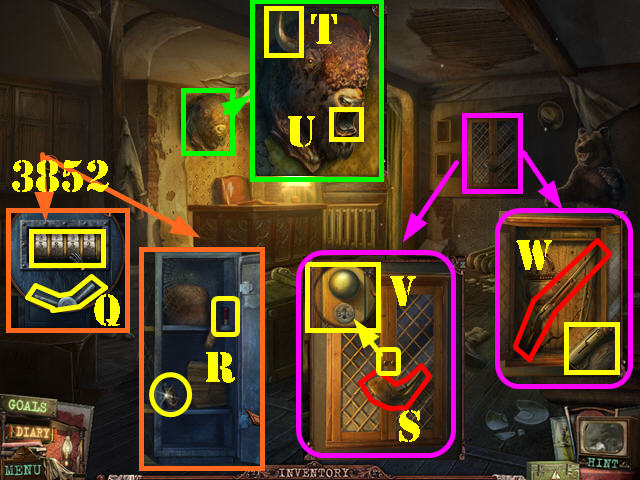
- Zoom into the cabinet; open the door and zoom into the safe. Turn the handle to lower the glass and input the numbers 3852 (Q).
- Take the BULLET and the PART OF MOLD (R).
- Look at the cabinet and take the HORN (S).
- Examine the buffalo head; put the HORN on the head (T) and take the KEY (U).
- Examine the cabinet's lock; insert the KEY into the lock (V).
- Take a closer look at the gun and insert the BULLET into it; take the GUN (W).
- Walk down twice.
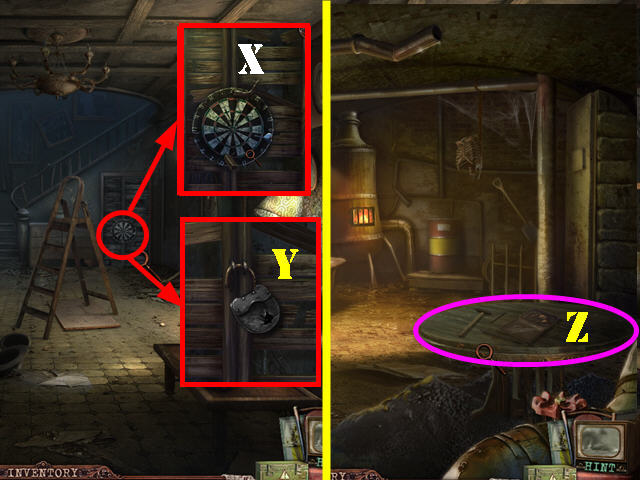
- Examine the dartboard; use the GUN on the dartboard (X). Open the door and go through it (Y).
- Take a closer look at the round table; zoom in closer to the pieces and add the PART OF MOLD to it to activate a puzzle (Z).
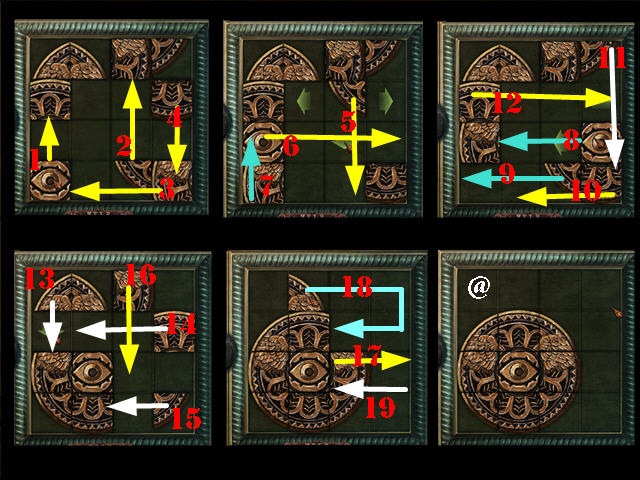
- Arrange the puzzle pieces in the correct order.
- Select any piece for arrows to appear; choose one of the arrows to move that piece in the direction the arrow is facing.
- To solve the puzzle, please follow the steps in the screenshot (1-19). The final part of the screenshot (@) shows the completed puzzle.
- You will receive the CAST.
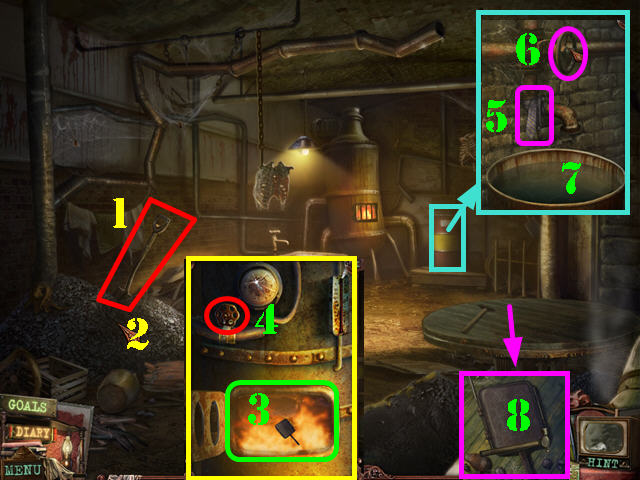
- Take the SHOVEL (1). Use the SHOVEL on the coals to get the SHOVEL WITH COAL (2).
- Zoom into the furnace; open the door and put the SHOVEL into it (3).
- Turn the valve (4). Put the CAST into the furnace to receive the HOT CAST.
- Examine the drum; put the TIE on the faucet (5) and turn the valve (6). Put the HOT CAST in the water to get the CHILLED CAST (7).
- Examine the table; put the CHILLED CAST on it. Touch the hammer on the table to automatically use it on the chilled cast (8).
- Touch the cast to get the MAGIC BUTTON.
- You will be taken outside the gate; walk down 2 times from there.
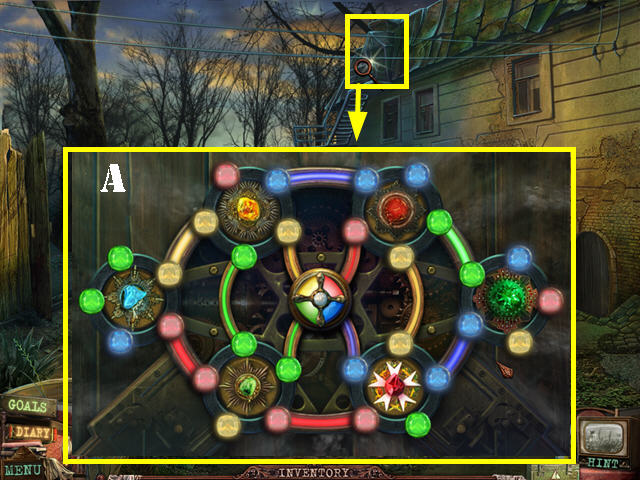
- Examine the attic door. Put the 6 MEDALS on the disks to activate the puzzle.
- Press in the center of the medals to rotate the disks. Press on the gems attached to one of the slides to switch the gems on both ends.
- The gems attached to each end of the slide need to match the colors of the slide.
- Please look at the screenshot for the solution (A).
- Enter the attic.
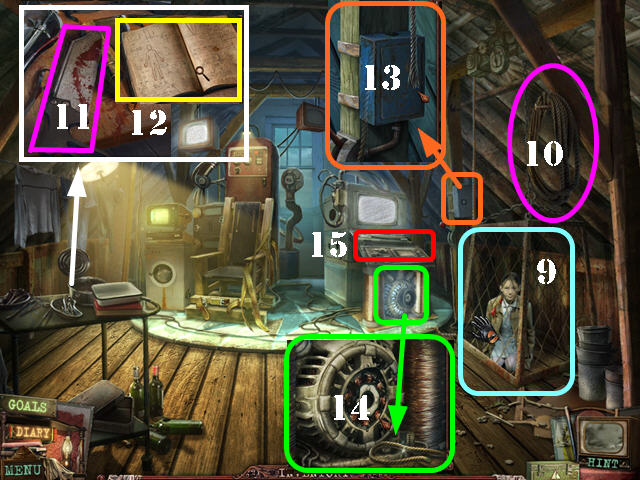
- Touch the cage (9).
- Take the ROPE (10).
- Examine the tray table; take the SAW (11); open the book and take the diary note (12).
- Examine the box; cut the cable with the SAW (13). Add the ROPE to the end of the cable.
- Examine the bottom of the device; touch the rope (14).
- Examine the controls (15); add the MAGIC BUTTON to it to activate a puzzle.
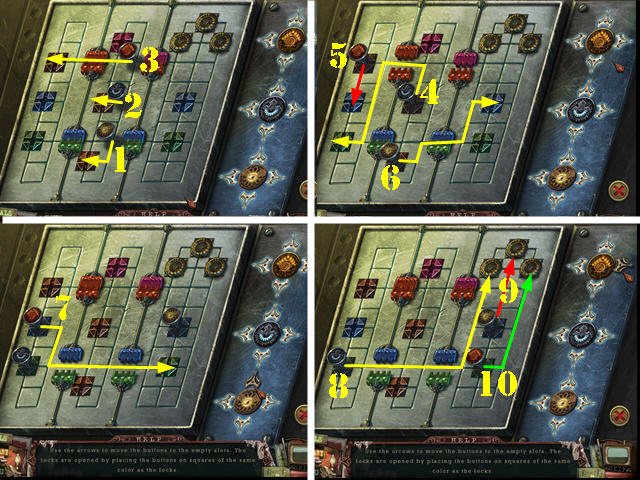
- Use the arrows to move the button to the empty slots.
- Place the buttons on squares of a particular color to unlock those locks. For example, if you want to unlock a green lock, place a button over a green square.
- To solve the puzzle, follow the moves shown on the screenshot (1-10).
- Congratulations, you have completed Dark Alleys: Penumbra Motel Standard Edition!
Created at: 2012-06-13