
Walkthrough Menu
- General Tips
- Chapter 1: Escaping the Murder Scene
- Chapter 2: The Basement
- Chapter 3: The Garden
- Chapter 4: The Town Outskirts
- Chapter 5: The Sewer
- Chapter 6: The Ship Deck
General Tips
- This is the official guide for Dark Cases: The Blood Ruby.
- This guide will not mention each time you have to zoom into a location; the screenshots will show each zoom scene.
- We will use the acronym HOP for Hidden-object puzzles. Interactive items will be color-coded and some will be numbered; please follow the numbers in sequence.
- The HOP lists may be random; our lists may vary from yours.
- Use the map to travel to a location.
Chapter 1: Escaping the Murder Scene
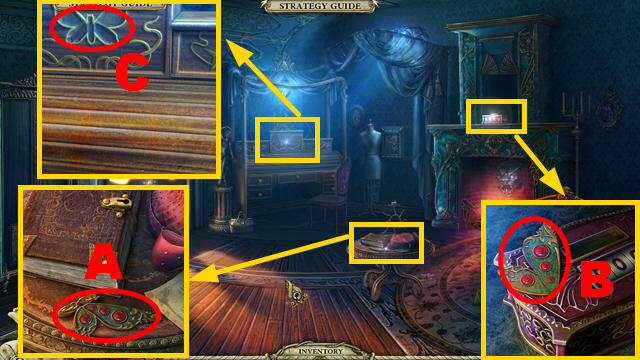
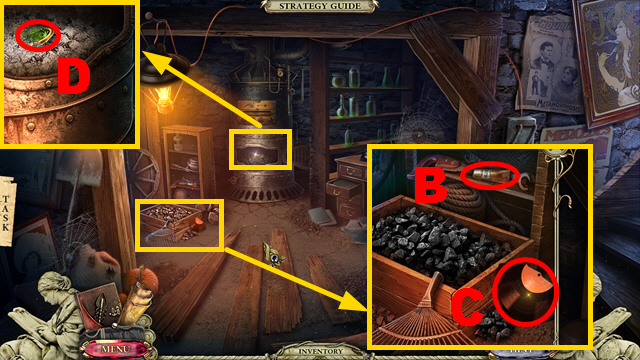
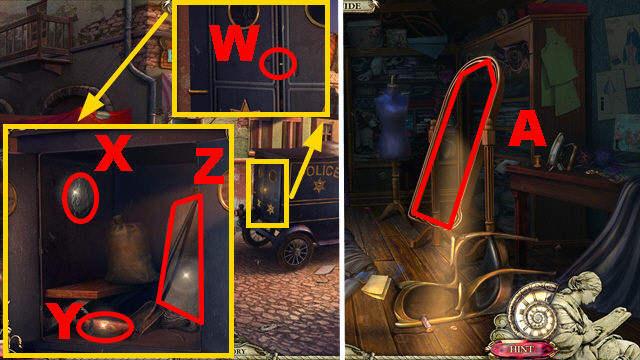
- Take the BUTTERFLY HALF (A).
- Take the BUTTERFLY HALF (B).
- Combine the 2 BUTTERFLY HALVES to create the BUTTERFLY.
- Insert the BUTTERFLY into the niche (C).
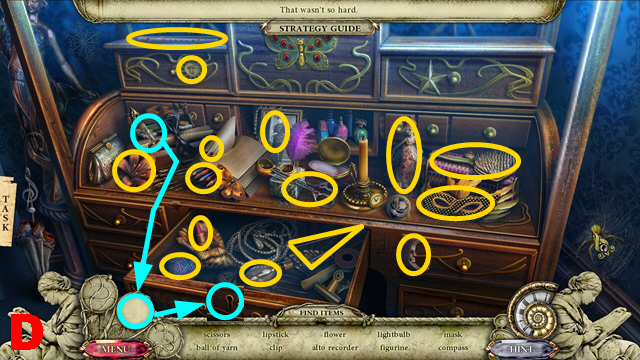
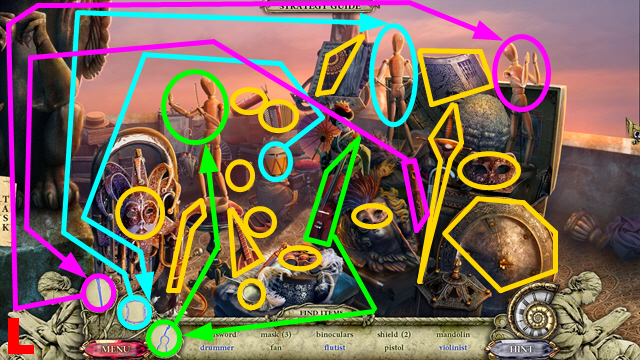
- Play the HOP.
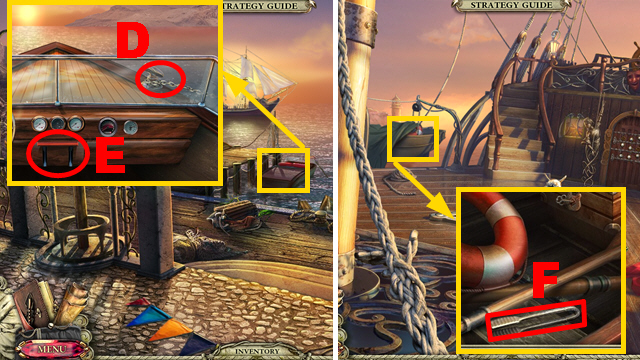
- You receive the CLIP and the SCISSORS (D).
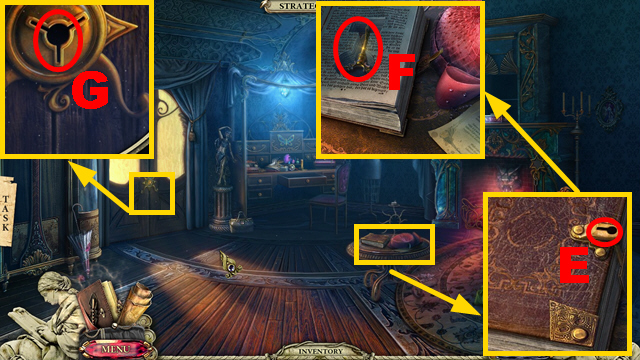
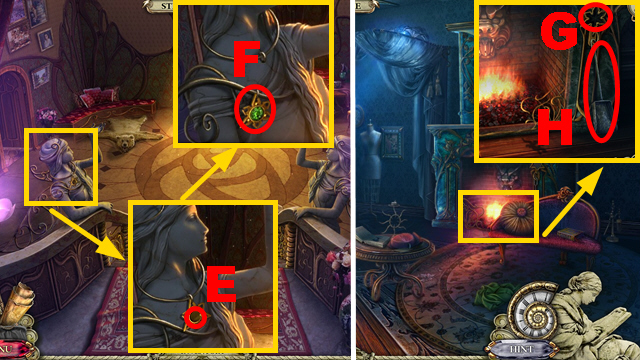
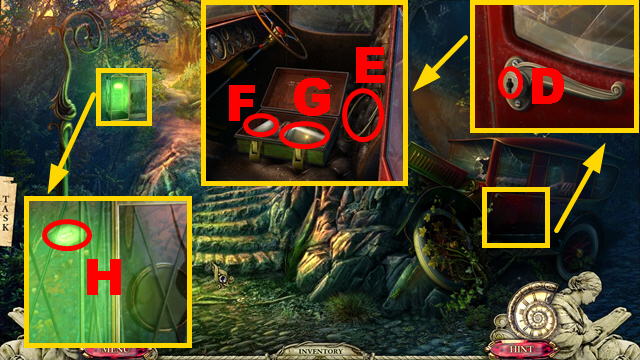
- Insert the CLIP into the lock (E); take the DOOR KEY (F).
- Insert the DOOR KEY into the lock (G); turn the key.
- Enter the Guest Room.
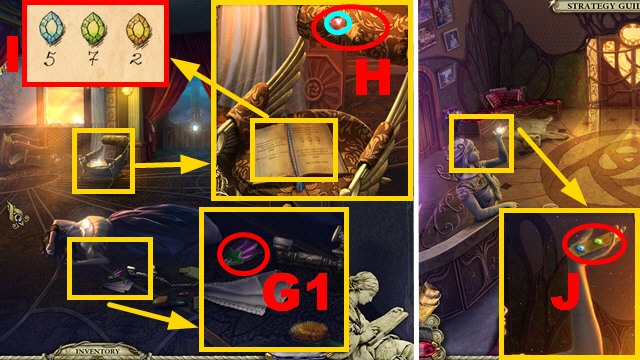
- Take the FLOWER SYMBOL (G1).
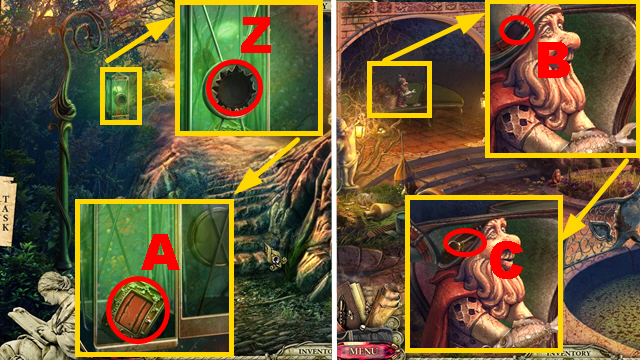
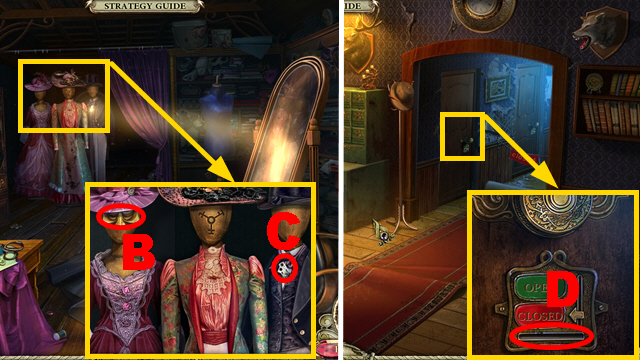
- Note the code (I); cut the seam with the SCISSORS (H) and take RED GEM 1/5 (blue).
- Go to the Lobby.
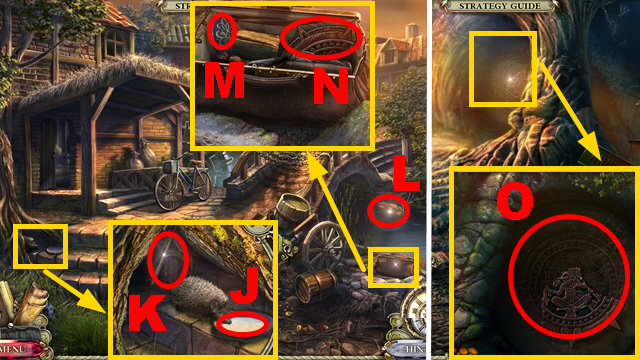
- Take the GEM PLATE (J).
- Go to the Boudoir.
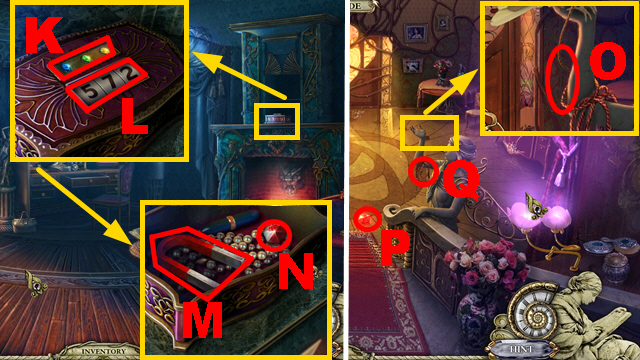
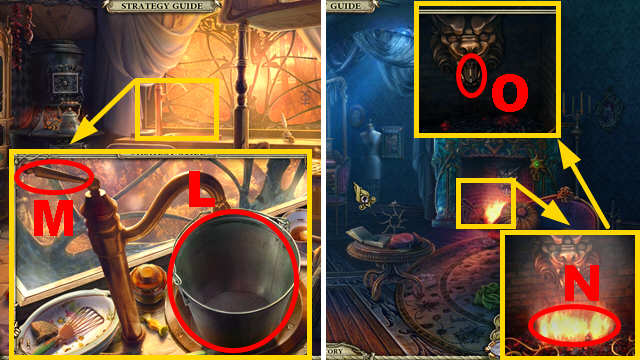
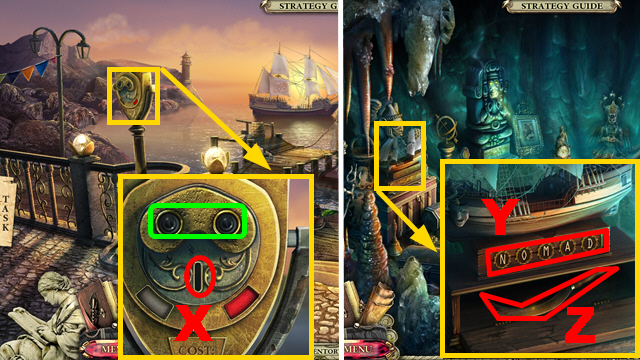
- Insert the GEM PLATE into the niche (K) and enter the correct code (L); take the MAGNET (M) and RED GEM 2/5 (N).
- Go to the Lobby.
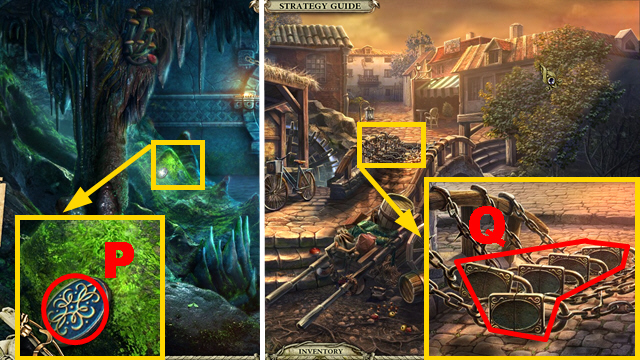
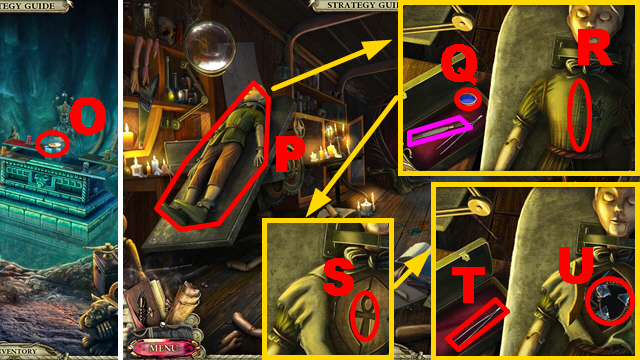
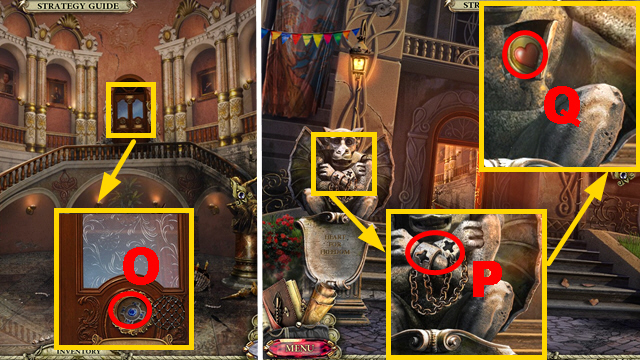
- Cut the rope with the SCISSORS (O).
- Take RED GEM 3/5 (P) and the COILED ROPE (Q).
- Combine the MAGNET and the COILED ROPE to acquire the MAGNET ON A ROPE.
- Walk down.

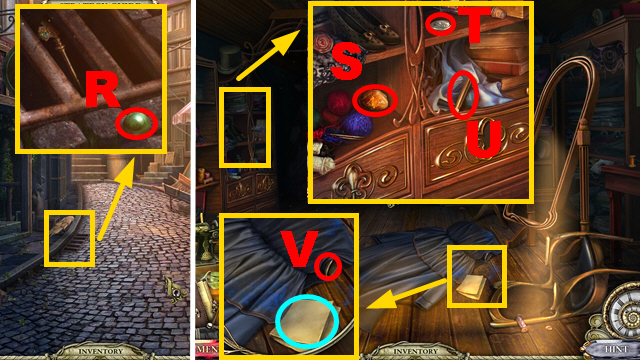
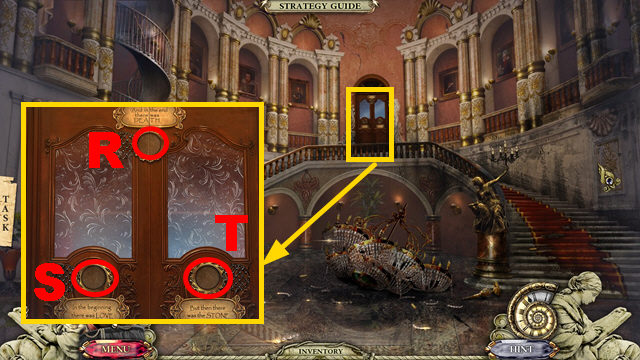
- Collect the KEY RING with the MAGNET ON A ROPE (R).
- Turn right.
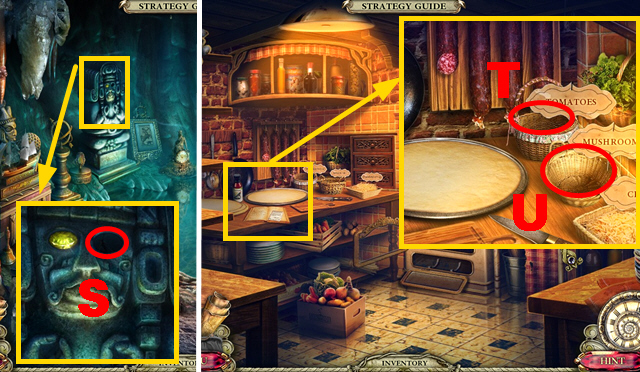
- Insert the correct key (green) of the KEY RING into the lock (S).
- Enter the Kitchen.
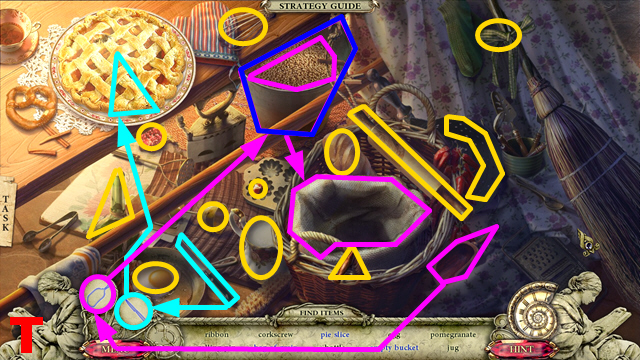
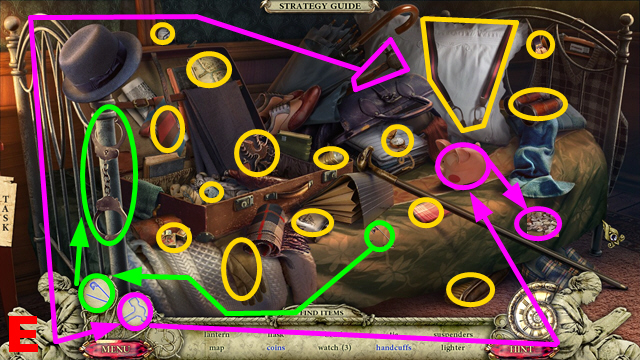
- Play the HOP.
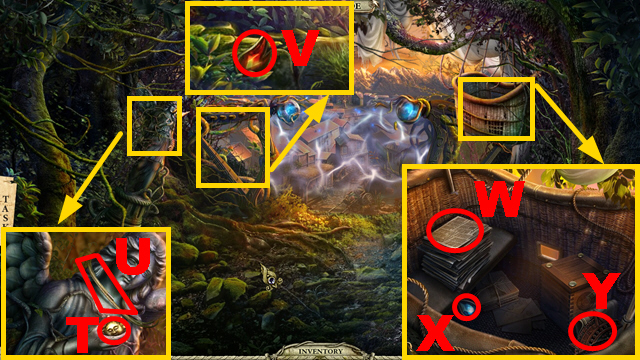
- You receive RED GEM 4/5 and the EMPTY BUCKET (T).
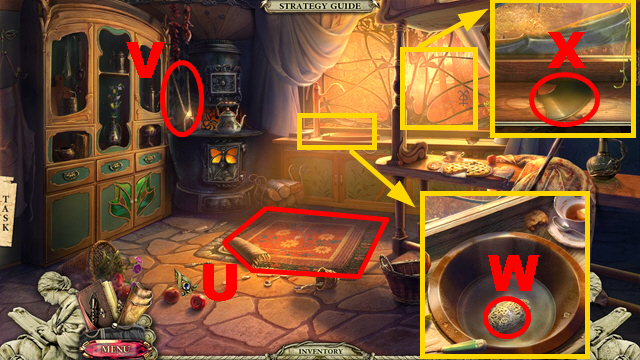
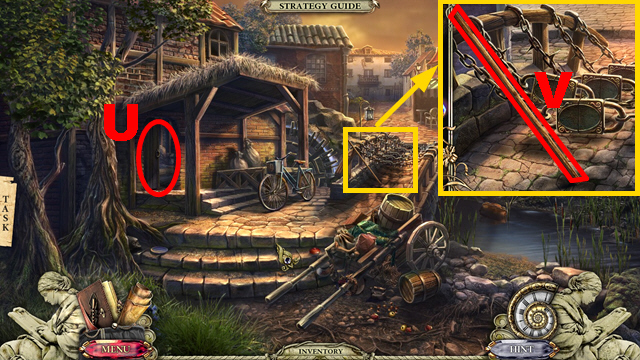
- Remove the carpet (U).
- Take the BLACKSMITH TONGS (V).
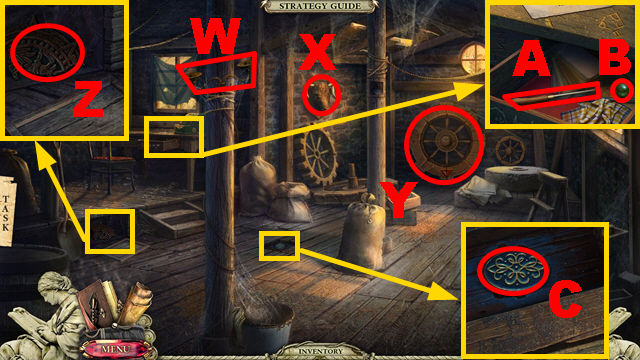
- Take the WET SPONGE (W).
- Take the RECORD PIECE (X).
- Walk down.
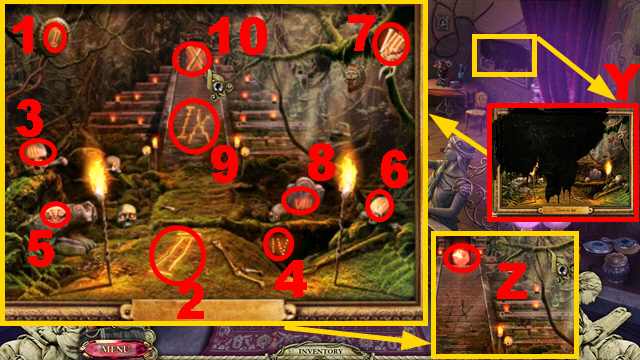
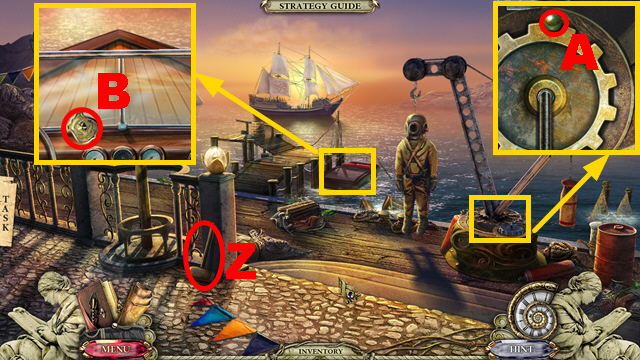
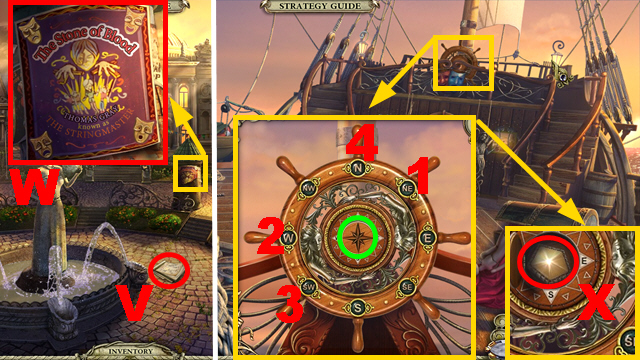
- Clean the portrait with the WET SPONGE (Y) three times.
- Solution: 1-10.
- Take RED GEM 5/5 (Z).
- Walk down.
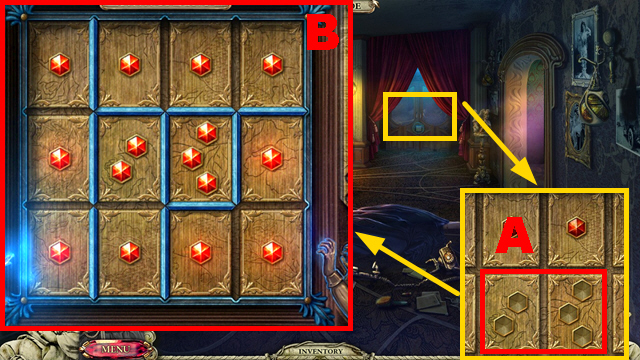
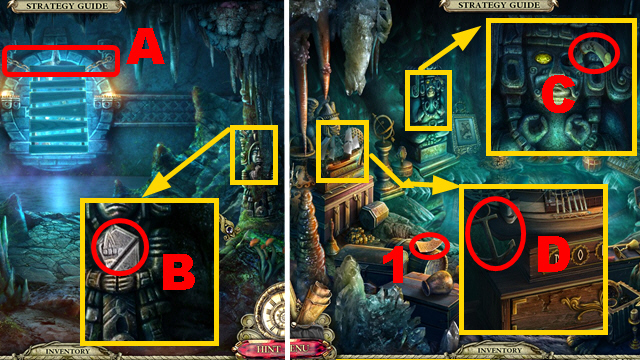
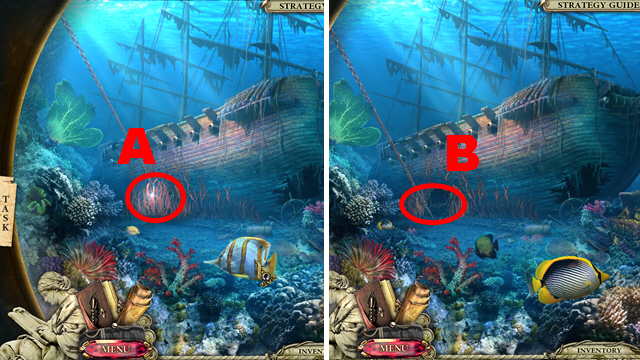
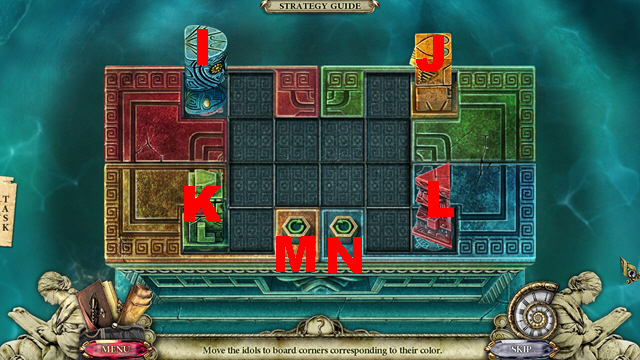
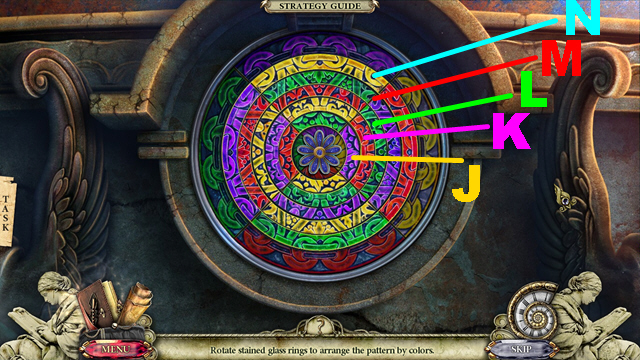
- Insert the 5 RED GEMS into the slots (A).
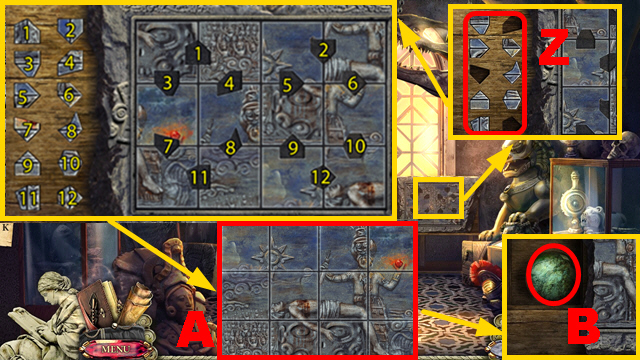
- Play the mini-game.
- To solve this puzzle (B), place the blue bars correctly.
- Enter the Study.
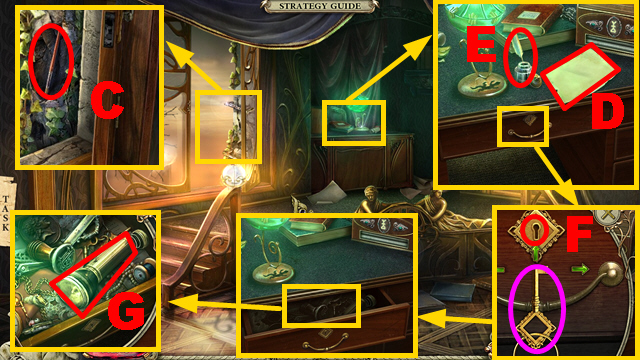
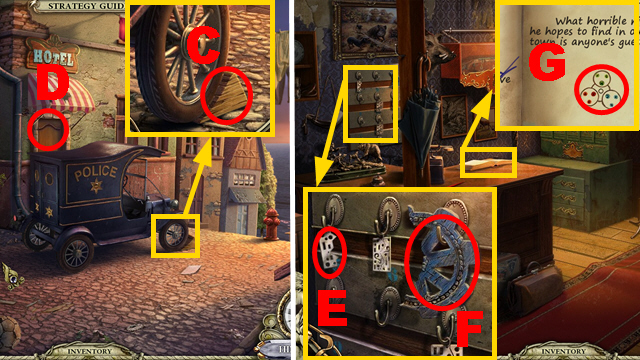
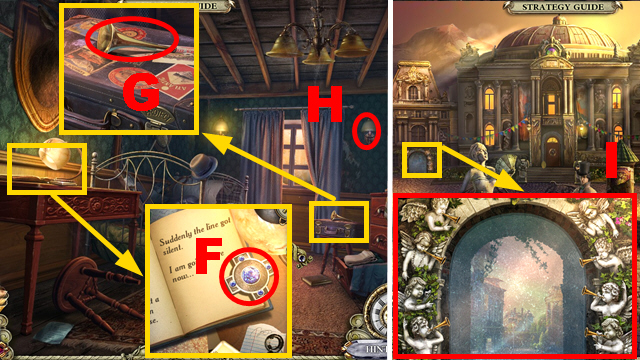
- Remove the stone; take the BRUSH behind it (C).
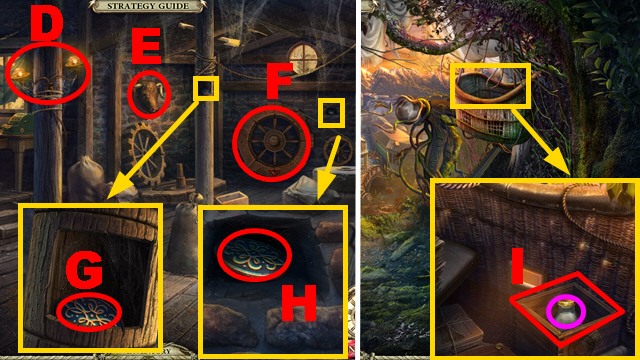
- Take the SHEET OF PAPER (D); take the INKPOT (E).
- Insert the correct key (purple) of the KEY RING into the lock (F); take the FLASHLIGHT WITHOUT A BATTERY (G).
- Go to the Kitchen.
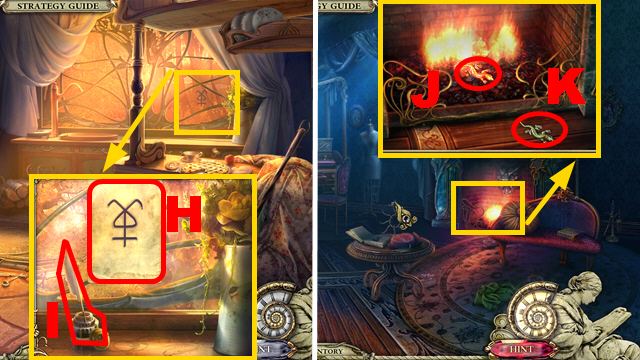
- Put down the SHEET OF PAPER (H), the INKPOT (I), and use the quill pen to draw on the paper sheet; take the MYSTERIOUS SYMBOL.
- Go to the Boudoir.
- Pull out the lizard with the BLACKSMITH TONGS (J); take the LIZARD (K).
- Go to the Study.
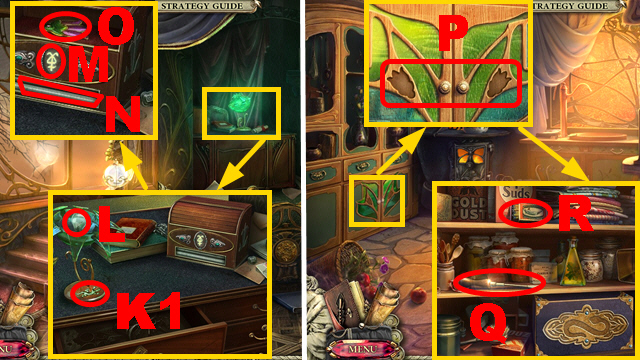
- Insert the LIZARD into the slot (K1); take the LIGHT BULB (L).
- Choose the correct symbol (M); insert the MYSTERIOUS SYMBOL into the box (N) and take the FLOWER SYMBOL (O).
- Go to the Kitchen.
- Insert the 2 FLOWER SYMBOLS into the slots (P); take the SCREWDRIVER (Q) and the MATCHES (R).
- Go to the Study.
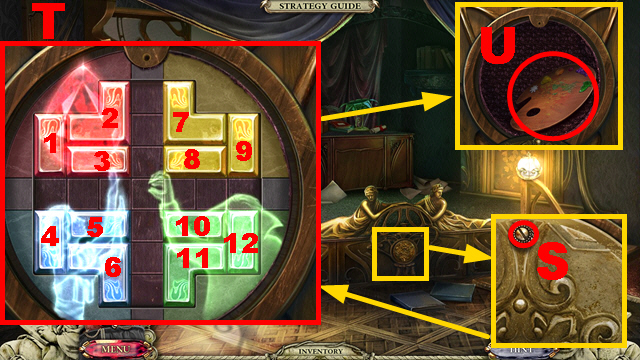
- Remove the screw with the SCREWDRIVER (S).
- Play the mini-game.
- Solution: (T): 9 up x3, 6 up x1, 2 right x1, 2 up x1, 1 right x1, 11 left x1, 4 left x1, 6 left x1, 3 right x1, 6 right x1, 2 down x1, 12 up x1, 5 right x2, 7 right x1, 8 down x2, 7 down x1, 10 down x1, 11 down x2, 4 left x2, 12 left x2, 12 up x1, 12 left x1, 10 up x3, 5 left x1, 5 up x2.
- 5 left x1, 7 up x2, 7 right x2, 8 right x2, 11 down x1, 4 down x1, 5 down x2, 7 up x1, 7 left x2, 2 up x1, 1 up x3, 8 down x1, 8 right x1, 5 down x1, 5 right x3, 11 right x2, 11 down x1, 4 down x2, 12 down x3, 7 down x1, 7 right x1, 10 left x2, 10 down x2, 7 left x1, 1 left x1.
- 1 up x1, 1 left x3, 2 left x1, 9 down x2, 6 right x1, 2 up x1, 2 left x1, 2 up x1, 2 left x2, 2 up x1, 3 down x2, 3 left x2, 7 right x1, 7 up x3, 9 left x3, 9 up x1, 11 up x1, 5 left x1, 5 up x3, 8 up x1, 8 right x2, 8 up x2, 9 down x1, 9 left x1, 5 left x1, 5 down x2, 5 right x2, 5 down x1.
- 9 right x2, 9 down x1, 7 down x2, 6 left x2, 6 up x1, 8 up x2, 7 right x2, 9 down x1, 6 down x3, 6 left x1, 7 left x1, 7 up x1, 7 left x1, 8 down x3, 7 up x1, 7 right x1, 9 up x3, 9 right x2, 9 up x1, 8 left x1, 8 up x2, 5 up x2, 11 right x2, 6 down x2, 10 right x2, 6 up x1, 11 up x1.
- 11 right x1, 6 right x1, 12 right x1, 12 down x1, 12 right x1, 10 left x2, 6 up x1, 6 left x1, 12 right x1, 6 down x2, 6 left x1, 5 left x3, 5 down x1, 5 left x1, 12 left x1, 12 up x4, 11 left x1, 11 down x1, 12 down x2, 12 right x3, 12 down x1, 10 right x4, 10 down x1.
- Take the PALETTE (U).
- Combine the BRUSH and the PALETTE to receive the BRUSH AND PALETTE.
- Go to the Kitchen.
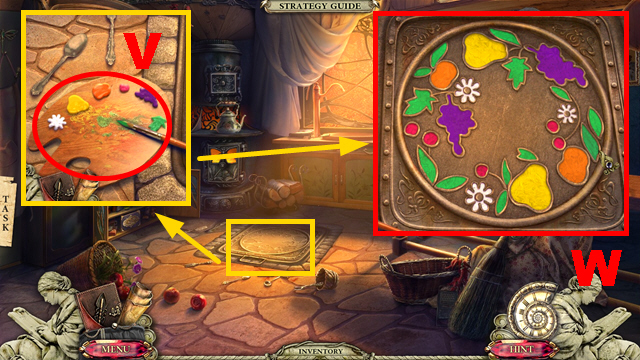
- Put down the BRUSH AND PALETTE (V).
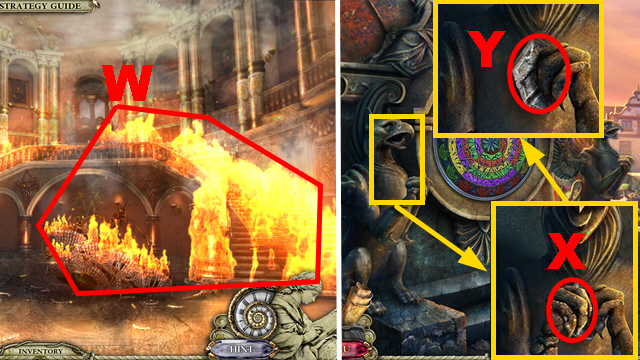
- Play the mini-game.
- To solve this puzzle (W), paint the elements correctly.
- Enter the Basement.
Chapter 2: The Basement

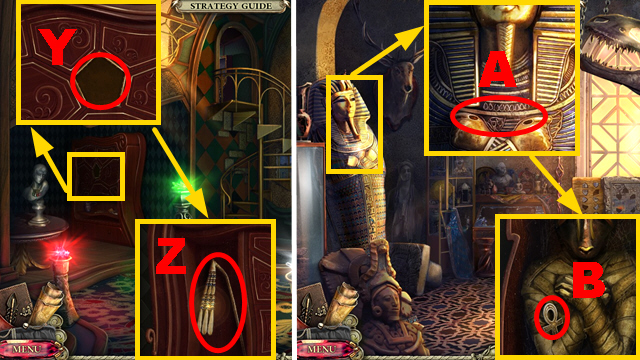
- Take the PAPER KNIFE (X).
- Go to the Guest Room.
- Open the compartment with the PAPER KNIFE (Y); take the BATTERY (green).
- Combine the FLASHLIGHT WITHOUT A BATTERY and the BATTERY to receive the WORKING FLASHLIGHT.
- Go to the BASEMENT.
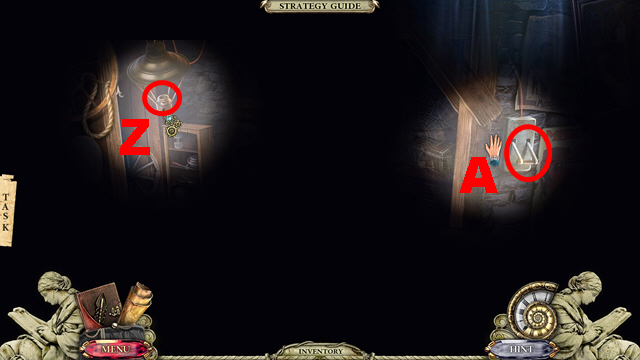
- Use the WORKING FLASHLIGHT to insert the LIGHT BULB into the lamp (Z); push the handle (A).
- Take the GLUE (B); take the RECORD PIECE (C).
- Take the GREEN STONE (D).
- Walk down twice.
- Insert the GREEN STONE into the amulet (E); take the STAR AMULET (F).
- Go to the Boudoir.
- Insert the STAR AMULET into the niche (G); take the SCOOP (H).
- Go to the Basement.
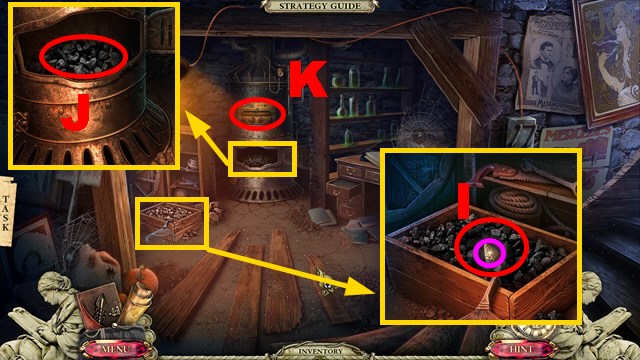
- Put the SCOOP into the coal to acquire the SCOOP OF COAL (I); take the WEIGHT (purple).
- Pour the SCOOP OF COAL into the oven (J); light the coal with the MATCHES.
- Play the mini-game (K).
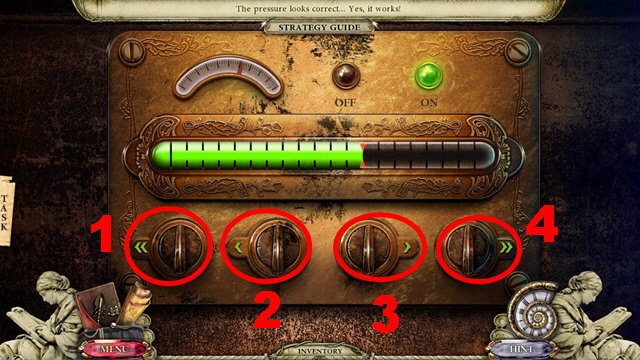
- Solution: 4, 3, 2, 1, 3, 2, 4, 2.
- Walk down.
- Put down the EMPTY BUCKET (L); turn the faucet (M) and take the BUCKET OF WATER.
- Go to the Boudoir.
- Pour the BUCKET OF WATER over the fire (N); connect the WEIGHT to the tiger (O).
- Enter the Attic.
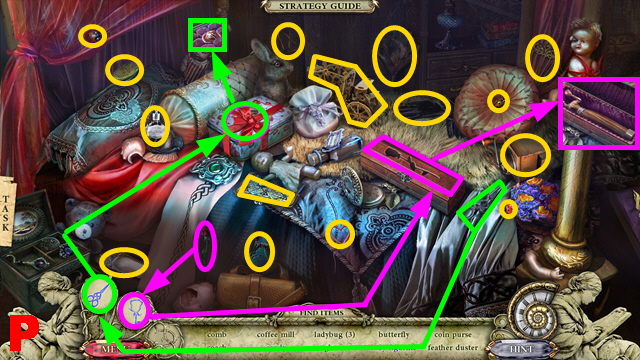
- Play the HOP.
- You receive the WOMAN FIGURINE and the FEATHER DUSTER (P).
- Go to the Basement.
- Remove the cobwebs with the FEATHER DUSTER (Q).
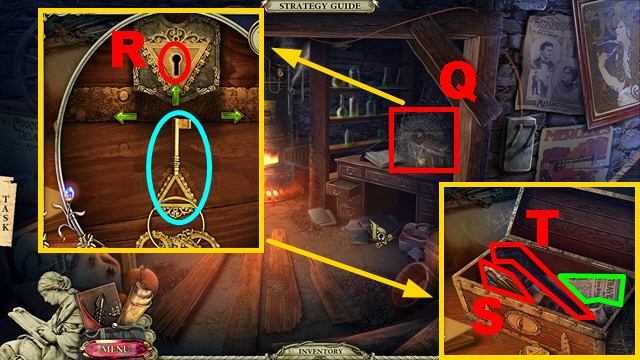
- Insert the correct key (blue) of the KEY RING into the lock (R); take the HEADLESS FIGURINE (S), the CROWBAR (T), and read the newspaper (green).
- Go to the Attic.
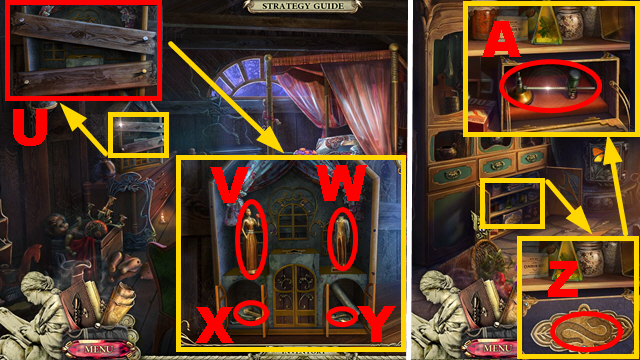
- Remove the nails with the CROWBAR four times (U); put down the LADY FIGURINE (V) and the HEADLESS FIGURINE (W).
- Take the CRANK (X) and the METAL SNAKE (Y).
- Go to the Kitchen.
- Insert the METAL SNAKE into the niche (Z); take the GLASS CUTTER (A).
- Go to the Guest Room.
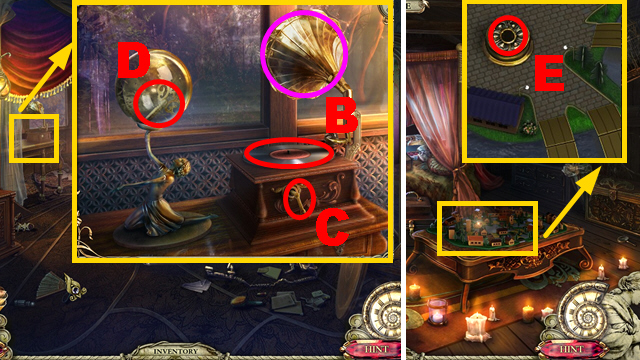
- Put down the 2 RECORD PIECES (B); apply the GLUE to the record.
- Connect the CRANK to the device (C); turn the crank.
- Turn the gramophone (purple); take the WINDING KEY (D).
- Go to the Attic.
- Insert the WINDING KEY into the slot (E); turn the key.
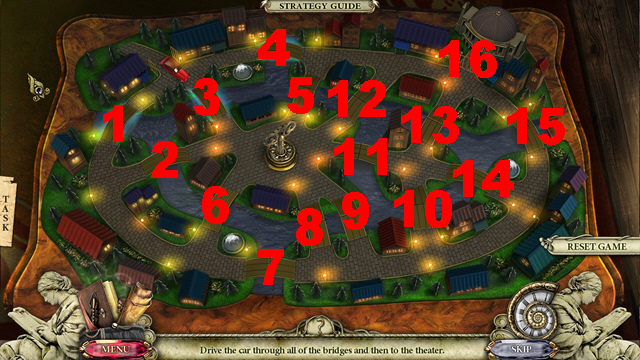
- Play the mini-game.
- Solution: 1-16.
- Take the HOOK (F).
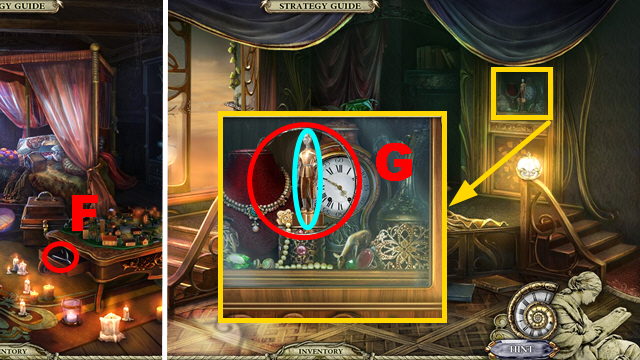
- Go to the Study.
- Cut the glass with the GLASS CUTTER (G); take the BOY FIGURINE (blue).
- Go to the Attic.
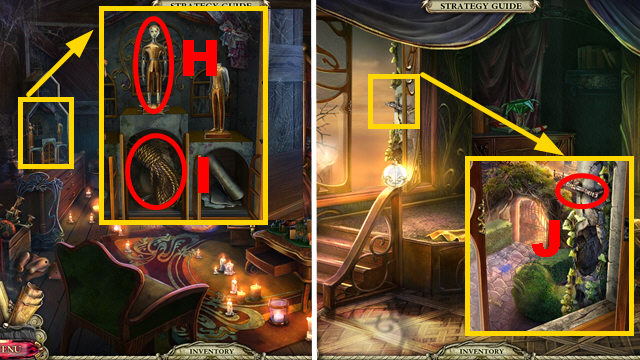
- Put down the BOY FIGURINE (H); take the ROPE (I).
- Combine the HOOK and the ROPE to receive the ROPE WITH A HOOK.
- Go to the Study.
- Connect the ROPE WITH A HOOK to the wall (J).
- Move forward to the Garden.
Chapter 3: The Garden
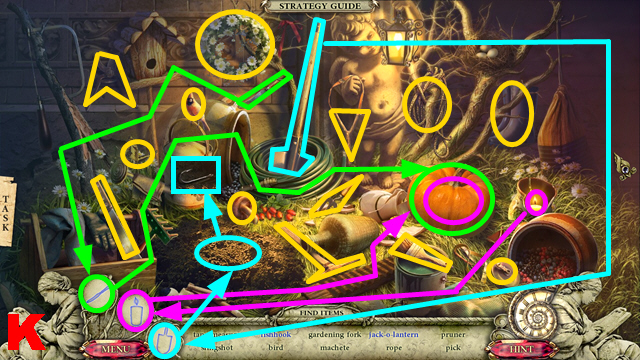
- Play the HOP.
- You receive the FISHHOOK and the RUSTY MACHETE (K).
- Cut the branches with the RUSTY MACHETE three times (L).
- Take the ROD WITHOUT HOOK (M); read the letter (N).
- Combine the HOOK and the ROD WITHOUT HOOK to receive the FISHING ROD.
- Collect the SILVER FISH with the FISHING ROD (O).
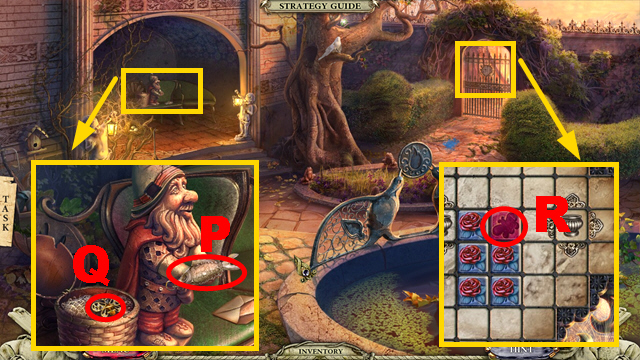
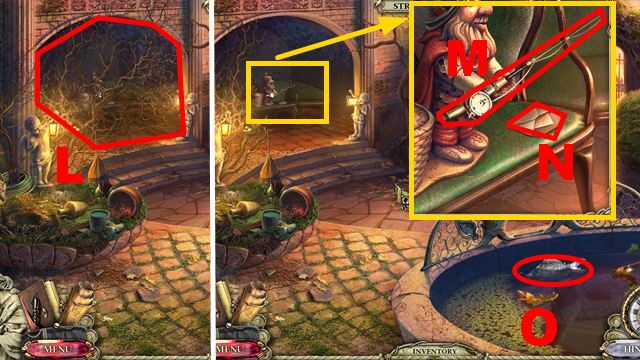
- Give the SILVER FISH to the gnome (P); take the DIAMOND BEE (Q).
- Insert the DIAMOND BEE into the niche (R).
- Play the mini-game.
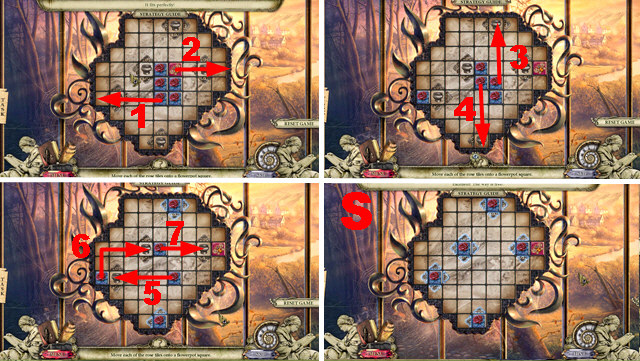
- Solution (S): 1-7.
- Move forward and turn left.
- Take the SUN DISC (T); take HARP STRING 1/3 (U).
- Take the FLAME TOKEN (V).
- Read the paper (W); take the WATER TOKEN (X) and the PATTERN FRAGMENT (Y).
- Walk down.
- Insert the SUN DISC into the slot (Z); take the HAT BUCKLE (A).
- Walk down.
- Put the HAT BUCKLE into the niche (B); take the CAR KEY (C).
- Move forward.
- Insert the CAR KEY into the lock (D).
- Take HARP STRING 2/3 (E); open the medicine box.
- Take the BANDAGE (F); take the GLASS JAR (G).
- Collect the firefly with the GLASS JAR (H) to receive the JAR WITH FIREFLY.
- Walk down.
- Put the BANDAGE on the raven (I) to receive the LEAF TOKEN.
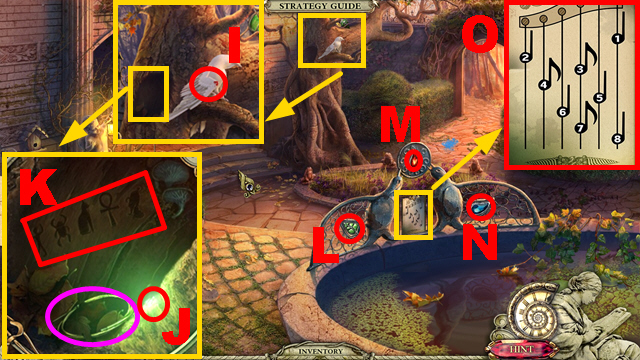
- Put the JAR WITH FIREFLY into the niche (J); make note of the code (K) and take HARP STRING 3/3 (purple).
- Insert the LEAF TOKEN (L), FLAME TOKEN (M), and WATER TOKEN (N) into the niches.
- Take the LEFT HARP NOTES (O).
- Move forward.
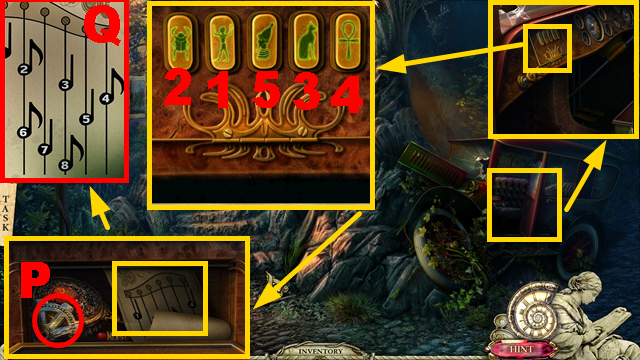
- Use the code you just noted to open this compartment.
- Solution: 1-5.
- Take the WHEEL FRAGMENT (P); take the RIGHT HARP NOTES (Q).
- Turn left.
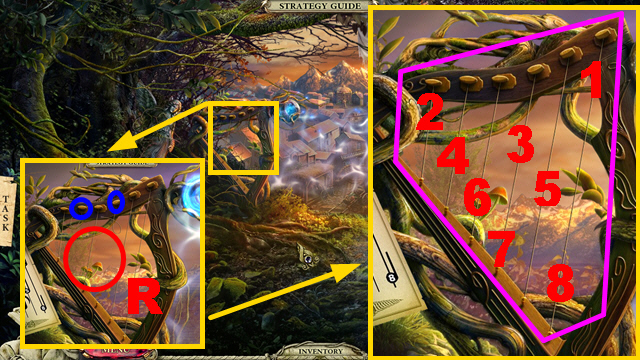
- Connect 2 HARP STRINGS to the left harp (R); tighten the strings (blue).
- Put down the LEFT HARP NOTES (purple).
- Play the mini-game.
- Solution: 1-8.
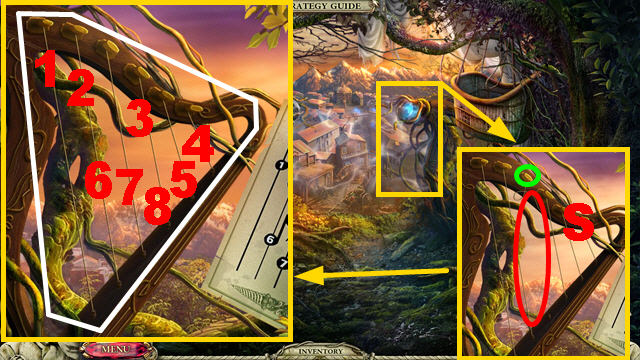
- Connect the HARP STRING to the right harp (S); tighten the string (green).
- Put down the RIGHT HARP NOTES (white).
- Play the mini-game.
- Solution: 1-8.
- Move forward.
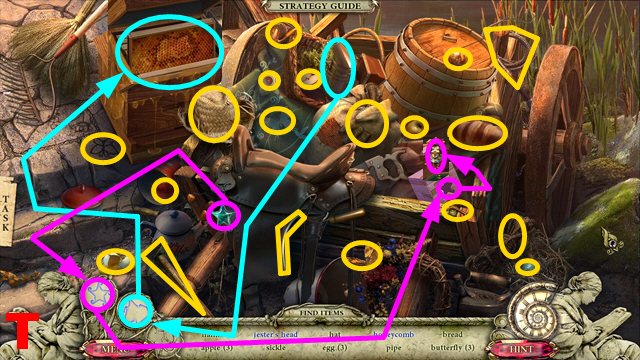
- Play the HOP.
- You receive the HONEYCOMB and the JESTER HEAD (T).
- Open the door (U).
- Take the STAFF (V).
- Go through the door.
- Activate elements W, Xx3, Y; take the PATTERN FRAGMENT (Z).
- Activate elements Wx2, X; take the CHISEL (A) and BALL 1/4 (B).
- Activate elements Xx2, Yx2; take BRIDGE SEAL 1/5 (C).
- Activate elements D, Fx3; take BRIDGE SEAL 2/5 (G).
- Activate elements Dx2, Ex3; take BRIDGE SEAL 3/5 (H).
- Walk down twice.
- Open the box with the CHISEL (I); take the MILK BOTTLE (purple).
- Move forward.
- Pour the MILK BOTTLE into the bowl (J); take the GAFF HOOK (K).
- Combine the GAFF HOOK and the STAFF to receive the GAFF.
- Pull in the bag with the GAFF (L); open the bag.
- Take BRIDGE SEAL 4/5 (M); take the PATTERN FRAGMENT (N).
- Walk down twice.
- Insert the 3 PATTERN FRAGMENTS into the niche (O).
- Enter the cave.
- Take BRIDGE SEAL 5/5 (P).
- Go to the Bridge.
- Insert the 5 BRIDGE SEALS into the slots (Q).
- Go across the bridge.
Chapter 4: The Town Outskirts
- Take BALL 2/4 (R).
- Enter the Atelier.
- Take the AMBER (S), DIME 1/5 (T), and the CRYPTIC MACHINE HANDLE (U).
- Read the note (blue); take COPPER TRUMPET 1/2 (V).
- Walk down and move forward to the Central Square.
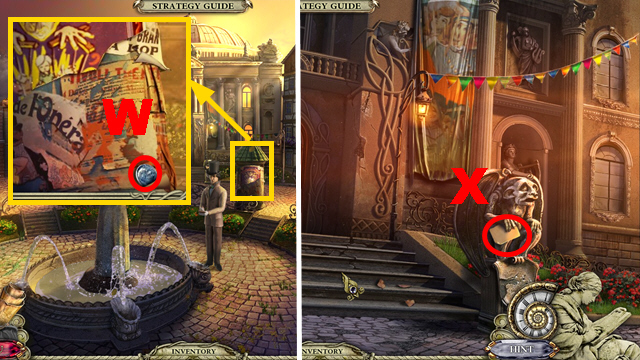
- Take DIME 2/5 (W).
- Move forward.
- Read the note (X).
- Walk down and turn right.
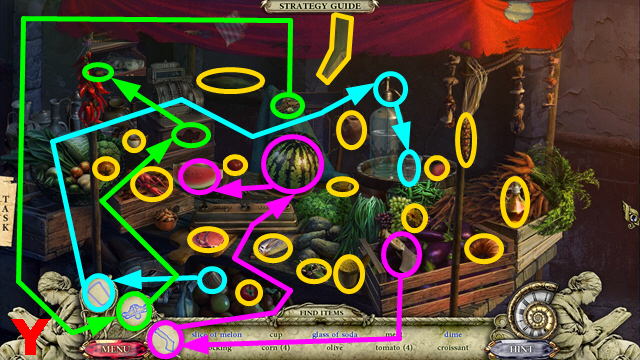
- Play the HOP.
- You receive the TOMATOES and DIME 3/5 (Y).
- Move forward.
- Take the MALLET (Z).
- Take BALL 3/4 (A).
- Take the SERVE BADGE (B).
- Walk down.
- Hit the wedge with the MALLET (C).
- Open the door (D).
- Go through the door.
- Take the HALF OF KEY (E) and the WHEEL FRAGMENT (F).
- Combine the 2 WHEEL FRAGMENTS to receive the WHEEL.
- Make note of the code (G).
- Go to the Watermill.
- Insert the WHEEL into the niche (H); take BALL 4/4 (I) and SHOTGUN SHELL 1/2 (J).
- Connect the CRYPTIC MACHINE HANDLE to the device (K); turn the handle.
- Solution: Lx2, M, Nx4, Ox5, Px3.
- Take the HERALDIC BEAR (Q).
- Go to the Town Outskirts.
- Insert the 4 BALLS into the slot (R); take the BASS-RELIEF FRAGMENT (S) and the HORSE (T).
- Walk down.
- Insert the HORSE into the niche (U); take the RULER (V).
- Go to the Eastern Street.
- Put the RULER between the door (W); open the door.
- Take the CHAIN (X), GAS CAN (Y), and MIRROR (Z).
- Go to the Atelier.
- Connect the MIRROR to the stand (A).
- Take the MASK HALF (B); take the HALF OF KEY (C).
- Combine the 2 HALVES OF KEY to receive the ROOM KEY.
- Go to the Hotel.
- Insert the ROOM KEY into the slot (D).
- Enter the room.
- Play the HOP.
- You receive the HERALDIC GRYPHON and the MUSICAL NOTE (E).
- Turn the page; take FREEDOM KEY 1/2 (F).
- Take COPPER TRUMPET 2/2 (G).
- Turn on the lamp (H).
- Go to the Central Square.
- Put down the 2 COPPER TRUMPETS (I).
- Play the mini-game.
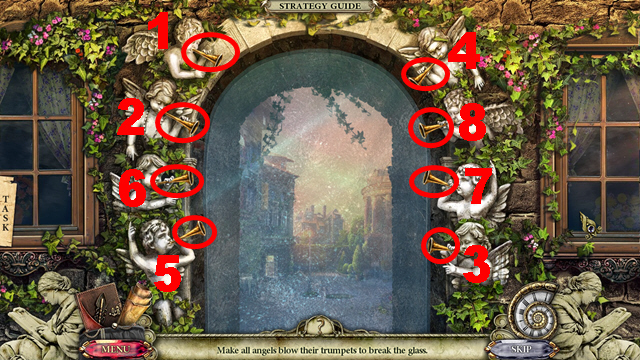
- Solution: 1-8.
- Turn left.
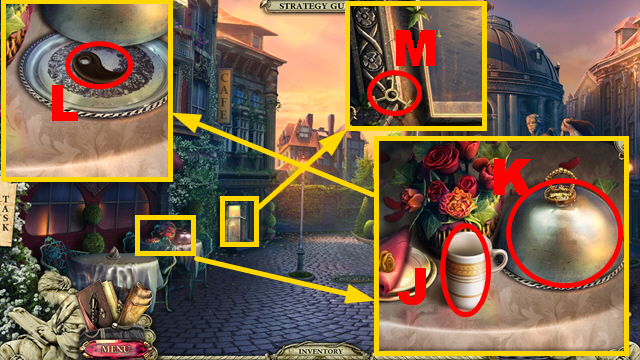
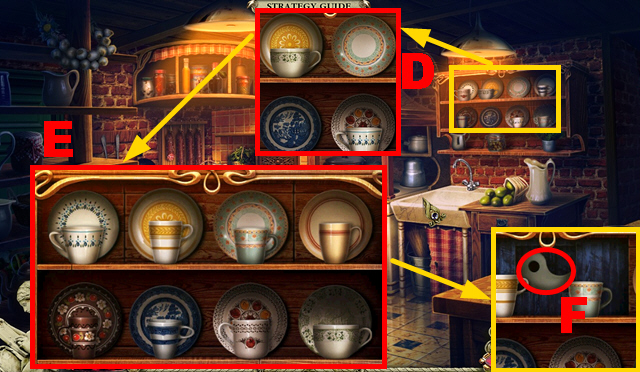
- Take the CUP (J); remove the cover (K).
- Take the YIN (L).
- Take the STAMP (M).
- Move forward.
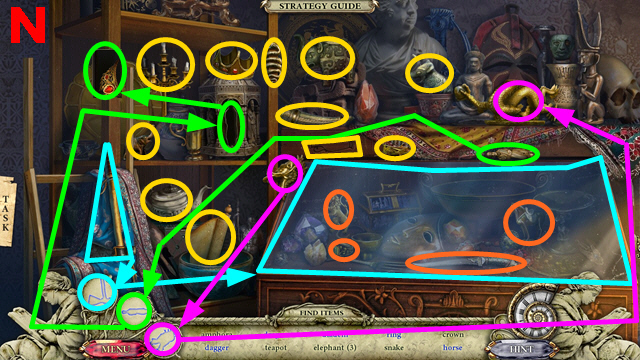
- Play the HOP.
- You receive the GOLD DIADEM and the HERALDIC LION (N).
- Go to the Atelier.
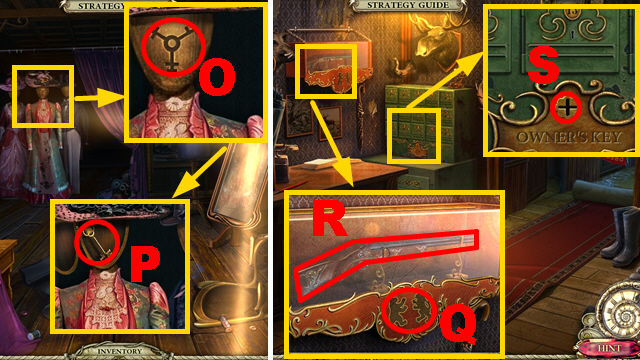
- Insert the STAMP into the niche (O); take the HOTELIER KEY (P).
- Go to the Hotel.
- Insert the HERALDIC BEAR and HERALDIC LION into the slots (Q); take the UNCHARGED SHOTGUN (R).
- Insert the HOTELIER KEY into the lock (S).
- Play the mini-game.
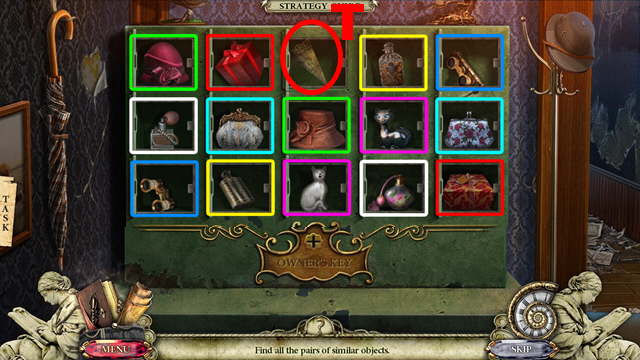
- To solve this puzzle, find pairs framed in the same color.
- Take the FAN SEGMENT (T).
- Walk down twice.
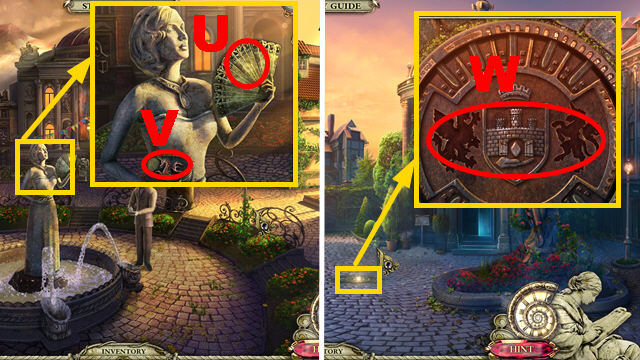
- Insert the FAN SEGMENT into the fan (U); take the HERALDIC UNICORN (V).
- Go to the Western Street.
- Insert the HERALDIC GRYPHON and HERALDIC UNICORN into the niches (W).
- Go down to the Sewer.
Chapter 5: The Sewer
- Take the PROTECTION BADGE (X).
- Go to the Hotel Room.
- Insert the SERVE BADGE and PROTECTION BADGE into the slots (purple); take the STRANGE CRYSTAL (Y) and SHOTGUN SHELL 2/2 (Z).
- Combine the 2 SHOTGUN SHELLS and the UNCHARGED SHOTGUN to receive the LOADED SHOTGUN.
- Go to the Underground Tunnel.
- Fire the LOADED SHOTGUN at the gate twice (A).
- Take the BASS-RELIEF FRAGMENT (B).
- Move forward.
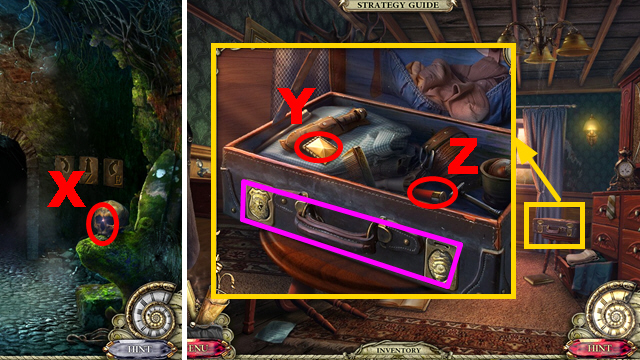
- Take the OBSIDIAN DAGGER (C).
- Take the ANCHOR (D).
- Read the note (1).
- Combine the ANCHOR and the CHAIN to receive the ANCHOR ON A CHAIN.
- Go to the Western Street.
- Open the window with the ANCHOR ON A CHAIN (E).
- Turn left.
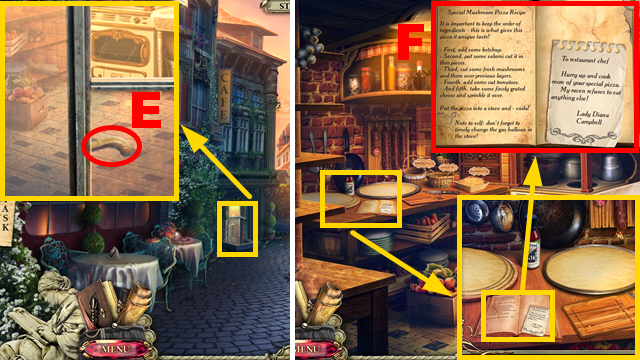
- Read the recipe (F).
- Go to the Sewer.
- Choose the following directions: right, forward, left, forward, right, forward.
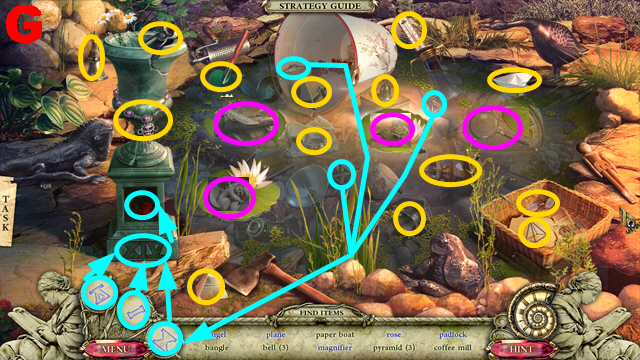
- Play the HOP.
- You receive the MAGNIFYING GLASS and the ROSE (G).
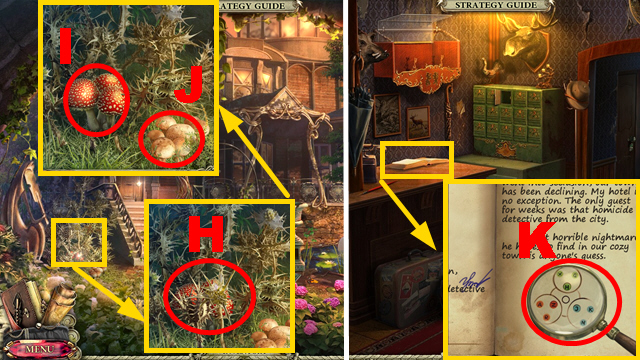
- Cut the branches with the OBSIDIAN DAGGER (H); take the POISONOUS MUSHROOMS (I) and the MUSHROOMS (J).
- Go to the Hotel.
- Put the MAGNIFYING GLASS on the code (K).
- Move forward.
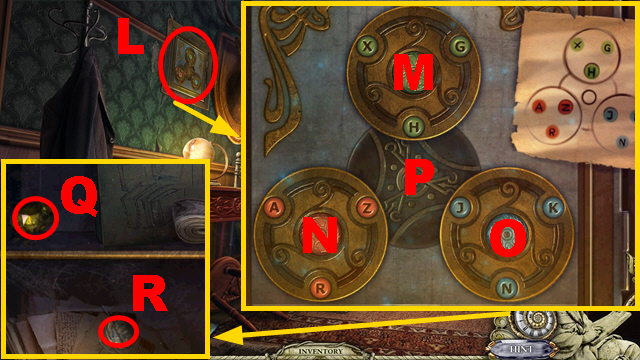
- Play the mini-game (L).
- Solution: O, Mx2, P, Ox2, Nx2, M, P, M, N, P, N, P, Mx2, Nx2, O.
- Take the YELLOW CRYSTAL (Q) and DIME 4/5 (R).
- Go to the Cave.
- Insert the YELLOW CRYSTAL into the niche (S).
- Go to the Restaurant Kitchen.
- Put down the TOMATOES (T) and MUSHROOMS (U).
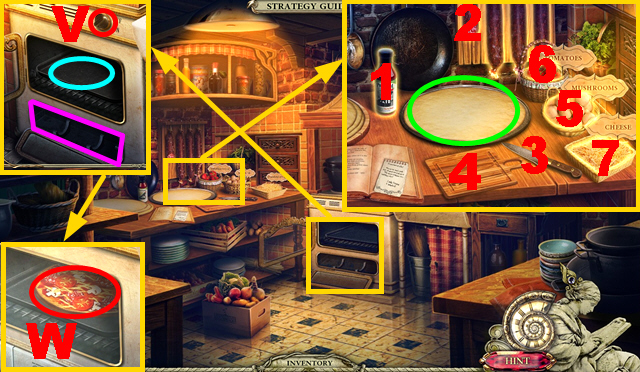
- Solution: 1, 2, 3, 4, 5, 3, 4, 6, 3, 4, 7.
- Take the RAW PIZZA (green).
- Insert the GAS CAN into the niche (purple); turn the button (V).
- Put the RAW PIZZA into the oven (blue); take the PIZZA (W).
- Go to the Town Outskirts.
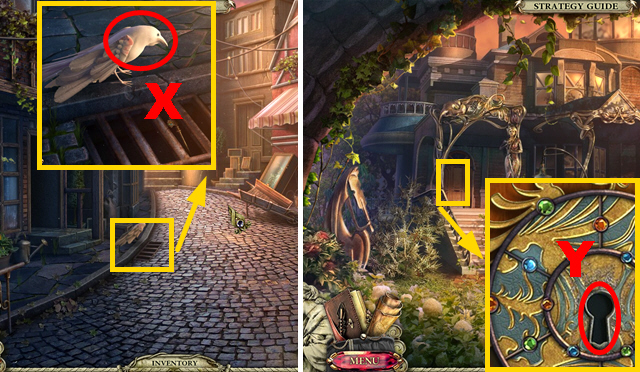
- Give the PIZZA to the raven (X) to receive the JEWELER KEY.
- Go to the Jeweler's Garden.
- Insert the JEWELER'S KEY into the lock (Y).
- Enter the Jeweler's House.
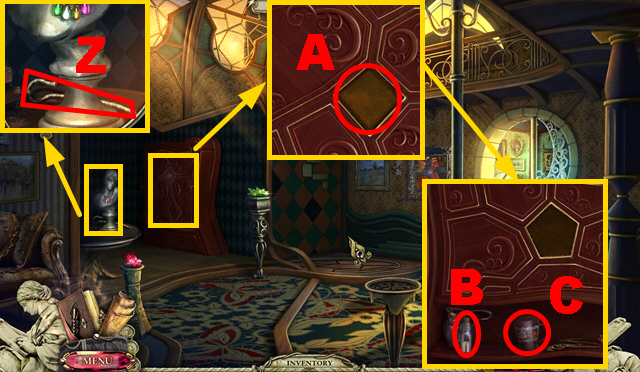
- Take the PHARAOH SCEPTER (Z).
- Insert the STRANGE CRYSTAL into the niche (A); take the MERCURY (B) and the CUP (C).
- Go to the Restaurant Kitchen.
- Put down the 2 CUPS (D).
- Play the mini-game.
- Swap the cups correctly (E).
- Take the YANG (F).
- Combine the YIN and YANG to receive the YIN-YANG SYMBOL.
- Go to the Museum.
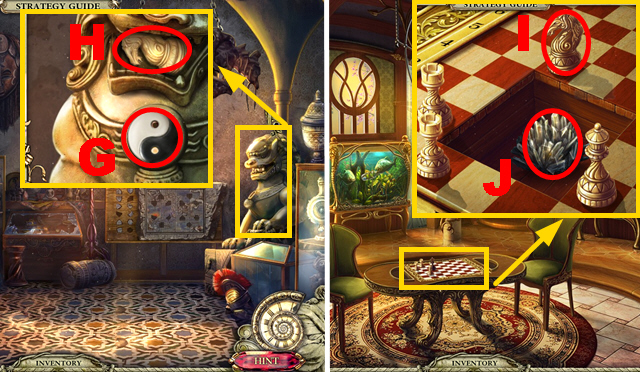
- Insert the YIN-YANG SYMBOL into the slot (G); take the WHITE KNIGHT (H).
- Go to the Jeweler's House and turn right.
- Put down the WHITE KNIGHT (I); take the CLUSTER OF CRYSTALS (J).
- Walk down.
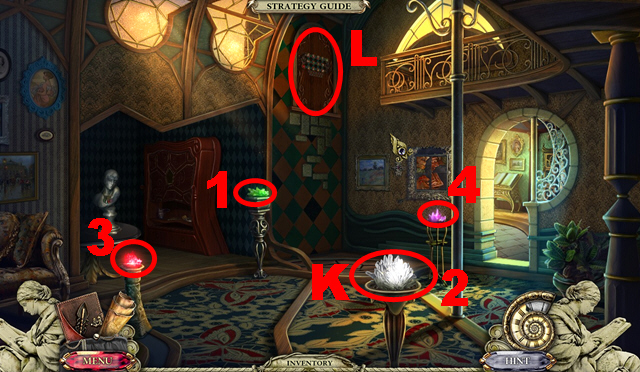
- Put down the CLUSTER OF CRYSTALS (K).
- Activate the crystals (1-4).
- Play the mini-game (L).
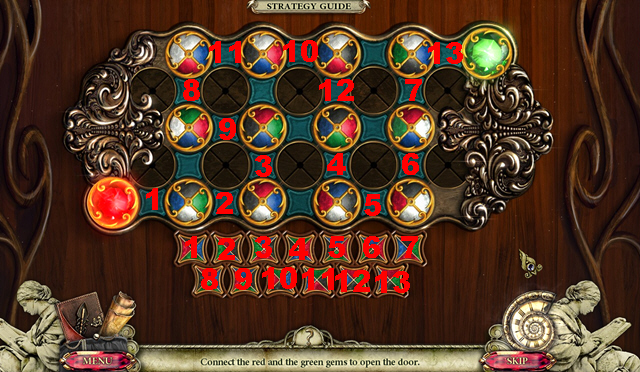
- Solution: 1-13.
- Go upstairs.
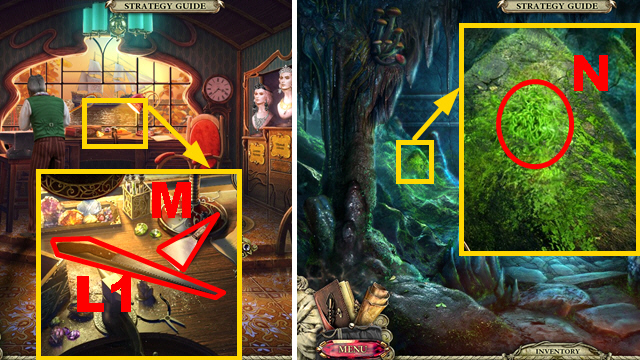
- Take the RAZOR SAW (L1); take the SCRAPER (M).
- Go to the Underground Tunnel.
- Collect the GLOWING MOSS with the SCRAPER (N).
- Go to the Hotel Room.
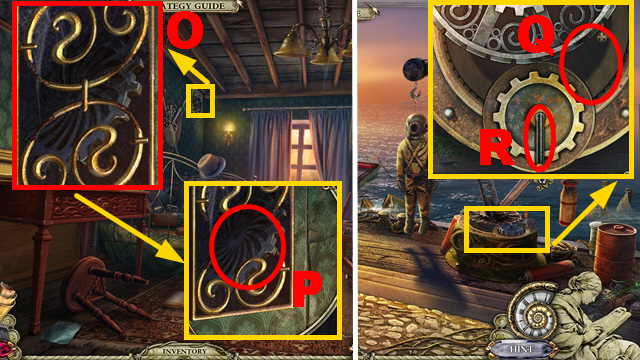
- Cut the grate with the RAZOR SAW four times (O); take the GEAR (P).
- Go to the Harbor.
- Connect the GEAR to the mechanism (Q); turn the lever (R).
- Go underwater.
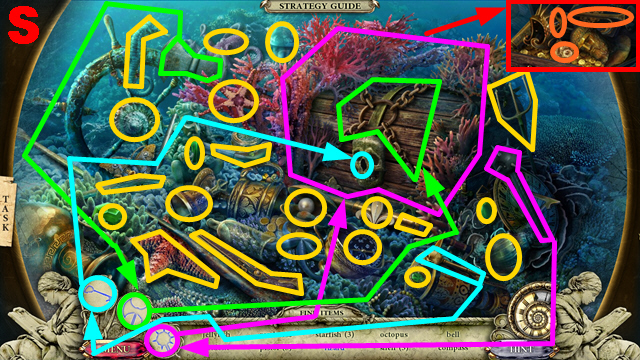
- Play the HOP.
- You receive the FLEUR-DE-LIS and the GOLDEN NUGGET (S).
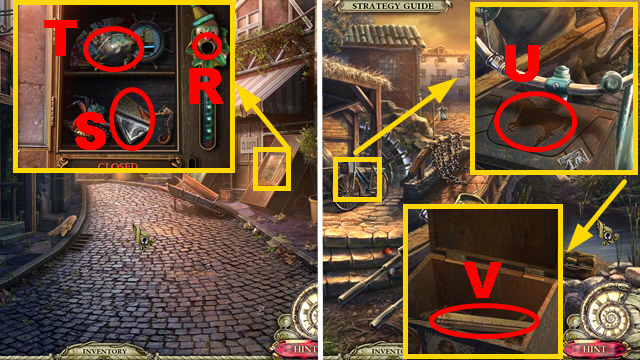
- Go to the Atelier.
- Insert the FLEUR-DE-LIS into the niche (T); take the SCALES SYMBOL (U).
- Go to the Hotel Room.
- Insert the SCALES SYMBOL into the slot (V); take DIME 5/5 (W).
- Go to the Harbor.
- Insert the 5 DIMES into the slot (X); look through the glasses (green).
- Go to the Cave.
- Solution (Y); take the BRONZE SICKLE (Z).
- Go to the Sunken Ship.
- Cut the corals with the BRONZE SICKLE (A).
- Play the mini-game (B).

- Solution: 1-2, 1-3, 4-5, 1-4, 6-4.
- Raise the anchor (C).
- Walk down.
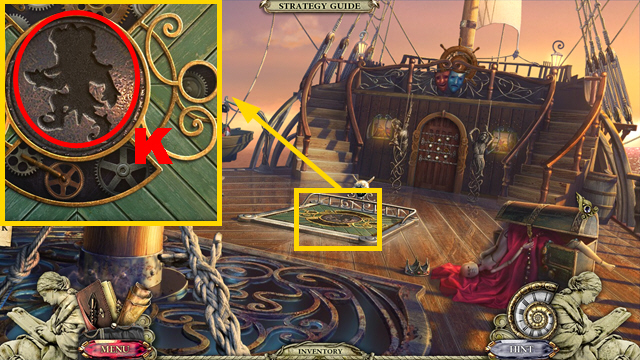
Chapter 6: The Ship Deck
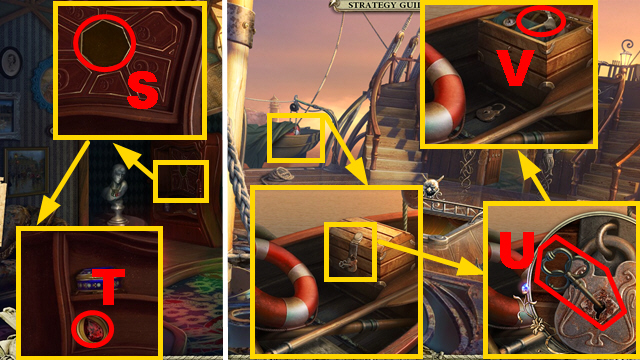
- Pull up the anchor (D); pull the handle (E).
- Take the KITCHEN TONGS (F).
- Go to the Sunken Ship.
- Acquire the CRAB with the KITCHEN TONGS (G); take the JESTER BODY (H).
- Go to the Jeweler's Living Room.
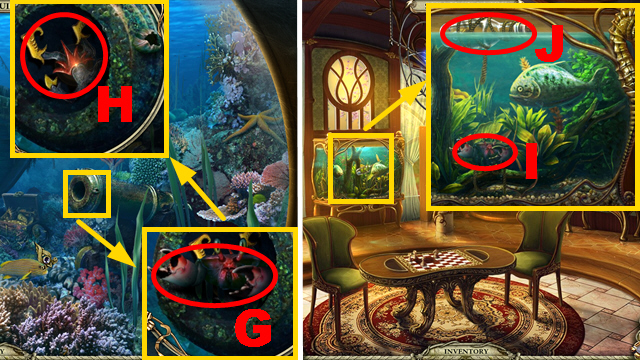
- Put the CRAB into the tank (I); take the GLASS EYE (J).
- Combine the JESTER HEAD and the JESTER BODY to receive the DANCING JESTER.
- Go to the Ship Deck.
- Insert the DANCING JESTER into the niche (K).
- Go down to the Cargo Hold.
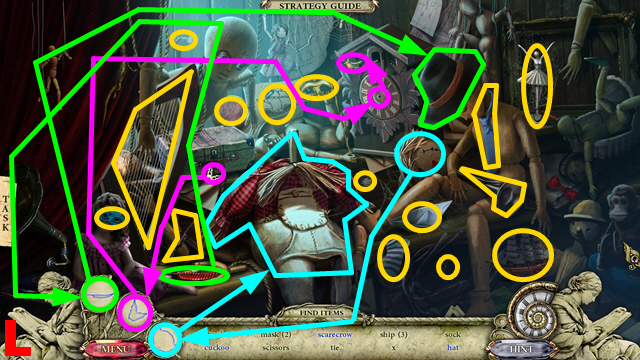
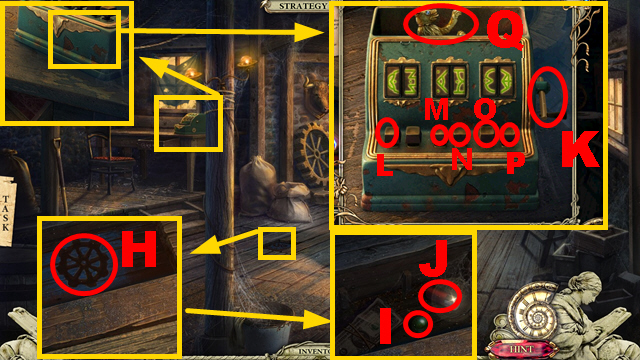
- Play the HOP.
- You receive the MUSICAL NOTE and the MEDIUM GLOBE (L).
- Walk down.
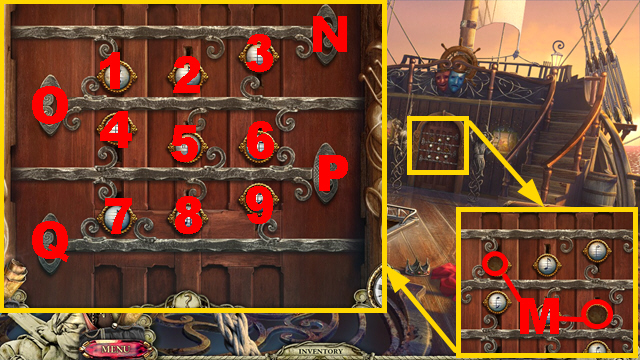
- Insert the 2 MUSICAL NOTES into the niches (M).
- Play the mini-game.
- Solution: N1, O56, P7, Q9, P8, Q7, P9, Q8, P456, O13, N23, P.
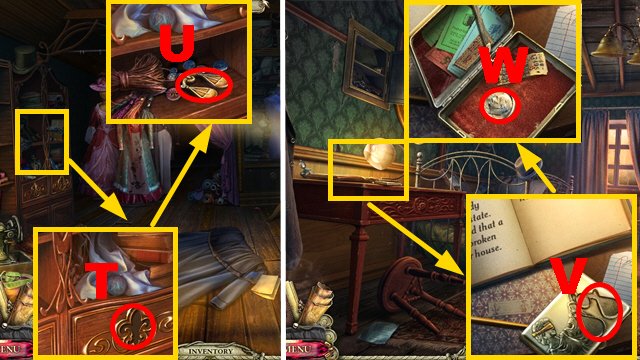
- Enter the Captain's Cabin.
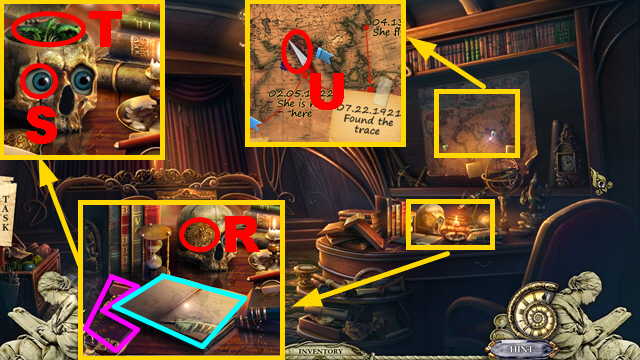
- Take the POSTER FRAGMENT (purple); read the book (blue).
- Remove the plate (R); insert the GLASS EYE into the niche (S); take the MANDRAKE (T).
- Take the MAGNETIC NEEDLE (U).
- Go to the Central Square.
- Read the note (V).
- Connect the POSTER FRAGMENT to its missing part (W).
- Go to the Ship Deck.
- Connect the MAGNETIC NEEDLE to the steering wheel (green).
- Solution: 1-4.
- Take the STRANGE CRYSTAL (X).
- Go to the Jeweler's House.
- Insert the STRANGE CRYSTAL into the slot (Y); take the PHARAOH WHIP (Z).
- Go to the Museum.
- Connect the PHARAOH SCEPTER and the PHARAOH WHIP to the statue (A); take the ANKH (B).
- Go to the Captain's Cabin.
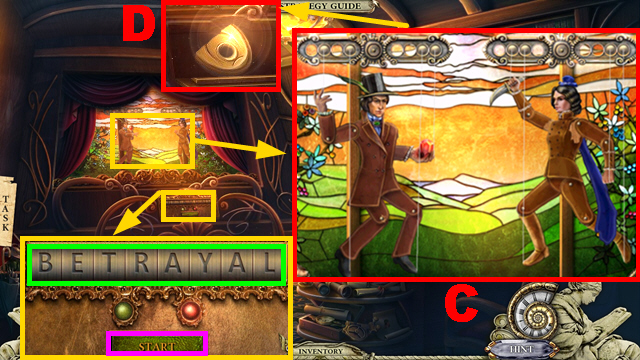
- Enter the correct code (green); push the button (purple).
- Play the mini-game.
- Solution (C).
- Take the MASK HALF (D).
- Go to the Theater Entrance.

- Put down the 2 MASK HALVES (E).
- Play the mini-game.
- Solution: H, G, F, H, I, H, F.
- Enter the Foyer.
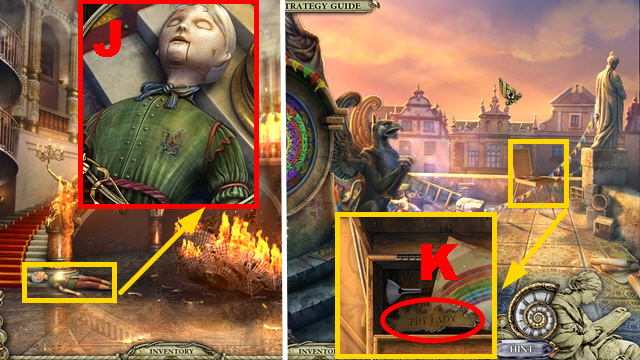
- Take the BROKEN PUPPET (J).
- Go upstairs.
- Take the PICTURE NAME (K).
- Play the HOP.
- You receive the EXTINGUISHER and the OIL CAN (L).
- Go to the Jeweler's House.
- Insert the PICTURE NAME into the slot (M).
- Play the mini-game.
- Solution (N); push the button (O).
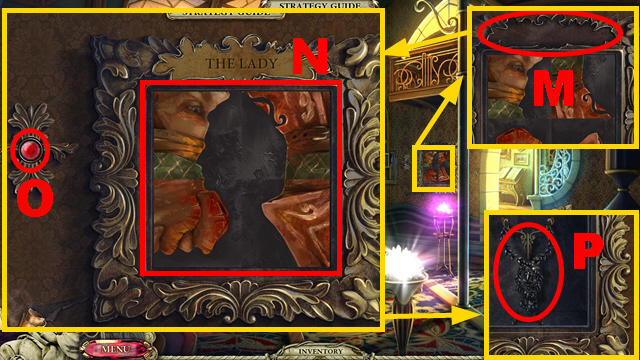
- Take the BLACK NECKLACE (P).
- Go upstairs.
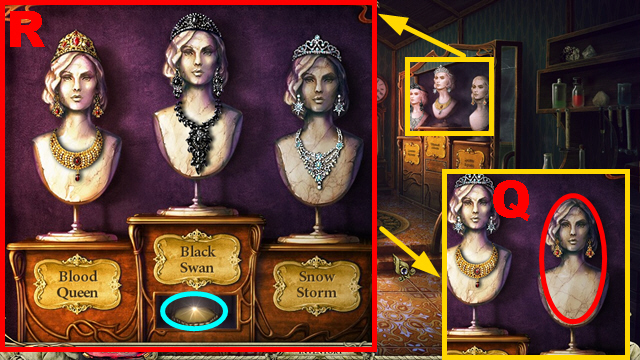
- Connect the GOLD DIADEM and BLACK NECKLACE to the bust (Q).
- Play the mini-game.
- Solution (R).
- Take the STRANGE CRYSTAL (blue).
- Walk down.
- Insert the STRANGE CRYSTAL into the niche (S); take the SYMBOL OF RUBY (T).
- Go to the Ship Deck.
- Pour the OIL CAN over the key (U); turn the key.
- Take the HAMMER (V).
- Go to the Foyer.
- Put out the fire with the EXTINGUISHER (W).
- Go upstairs.
- Hit the statue with the HAMMER (X); take the BASS-RELIEF FRAGMENT (Y).
- Go to the Museum.
- Put down the 3 BASS-RELIEF FRAGMENTS (Z).
- Play the mini-game.
- Solution part one: 1-12.
- Solution part two: (A).
- Take the LARGE GLOBE (B).
- Go to the Jeweler's Living Room.
- Insert the LARGE GLOBE and MEDIUM GLOBE into the device (C).
- Remove three books (D); take the ROUGH BLUE CRYSTAL (E).
- Go to the Jeweler's Lab.
- Give the ROUGH BLUE CRYSTAL to the jeweler (F) to receive the BLUE CRYSTAL.
- Go to the Cave.
- Insert the BLUE CRYSTAL into the niche (G).
- Play the mini-game (H).
- Solution: I, J, K, L, N, J, K, M, K, J, N, K, J, Nx2, I, L, N, I, L, M, I, L, N, I, J, K, L.
- Take the SYMBOL OF DEATH (O).
- Go to the Cargo Hold.
- Put down the BROKEN DOLL (P).
- Take the BLUE PAINT (Q).
- Cut the doll (R) with the scalpel (purple); insert the ANKH into the slot (S).
- Remove three glass shards (U) with the tweezers (T).
- Go to the Theater Roof.
- Put down the BLUE PAINT (V).
- Solution (1).
- Take the CINNABAR (blue).
- Go to the Cargo Hold.
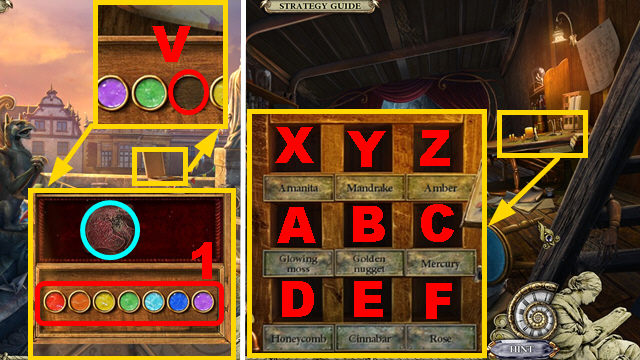
- Put down the POISONOUS MUSHROOMS (X), MANDRAKE (Y), AMBER (Z), GLOWING MOSS (A), GOLDEN NUGGET (B), MERCURY (C), HONEYCOMB (D), CINNABAR (E), and ROSE (F).
- Play the mini-game.
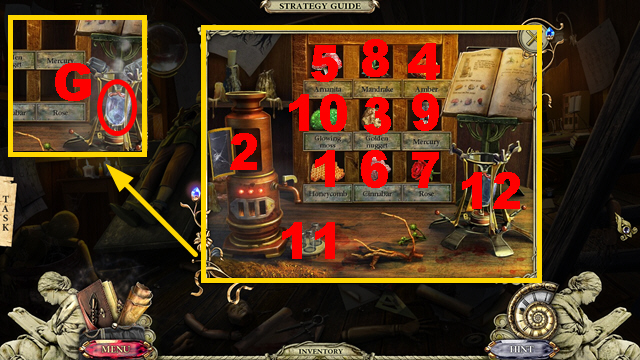
- Solution: 1, 2, 3, 2, 4, 2, 5, 2, 6, 2, 7, 2, 8, 2, 9, 2, 10, 2, 11, 12.
- Take the GLASS HEART (G).

- Insert the GLASS HEART into the doll (H).
- Go to the Theater Roof.
- You receive the WINDOW KEY.
- Insert the WINDOW KEY into the slot (I).
- Play the mini-game.
- Solution: Jx3, L, K, N, K, M, J, L.
- Walk down.
- Take FREEDOM KEY 2/2 (O).
- Walk down.
- Insert the 2 FREEDOM KEYS into the handcuffs (P); take the SYMBOL OF LOVE (Q).
- Move forward.
- Insert the SYMBOL OF DEATH (R), SYMBOL OF LOVE (S), and SYMBOL OF RUBY (T) into the slots.
- Congratulations, you have completed Dark Cases: The Blood Ruby.
Created at: 2013-10-13