

Walkthrough Menu
- General Tips
- Chapter 1: Entering the Theater
- Chapter 2: Catalina's House
- Chapter 3: The Ballet School
- Chapter 4: Following Dr. Parson
- Chapter 5: The Theater Revisited
General Tips
- This is the official guide for Dark Dimensions: Shadow Pirouette!
- This guide does not mention each time you have to zoom into a location; the screenshots show each zoom scene.
- Hidden-object puzzles are referred to as HOPs. This guide does not show screenshots of the HOPs, however, it is mentioned when a HOP is available and the inventory item collected.
- This guide gives step-by-step solutions for all puzzles that are not random. Please read the instructions in the game for each puzzle.
Chapter 1: Entering the Theater
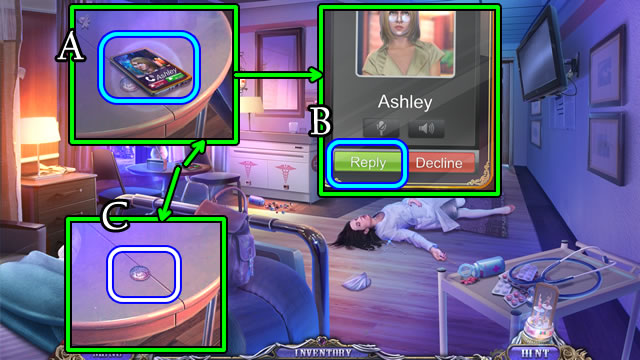
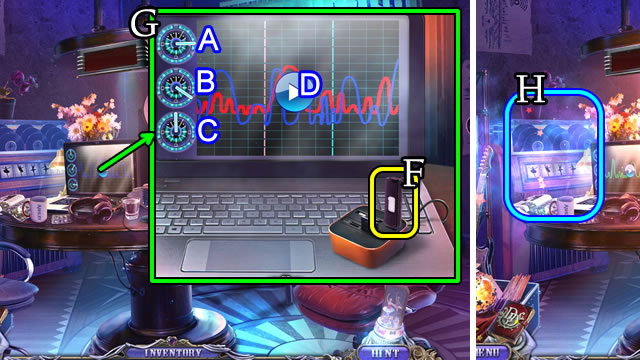
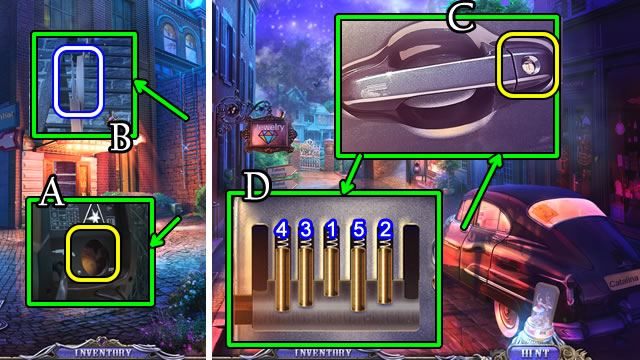
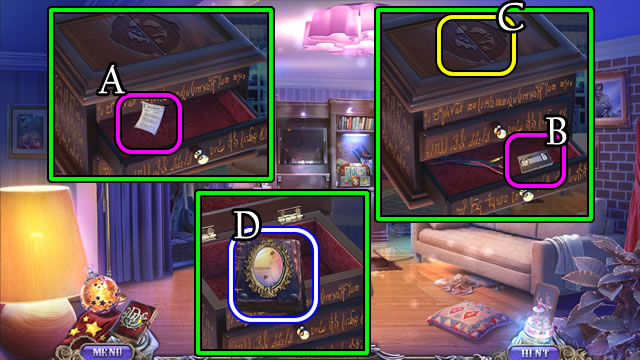
- Select the phone (A); touch Reply 3x (B).
- Take COIN 1/2 (C).
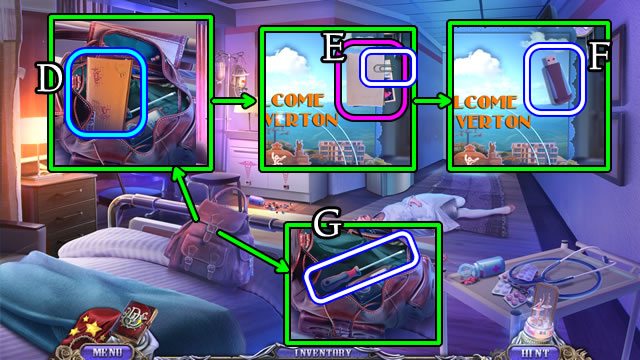
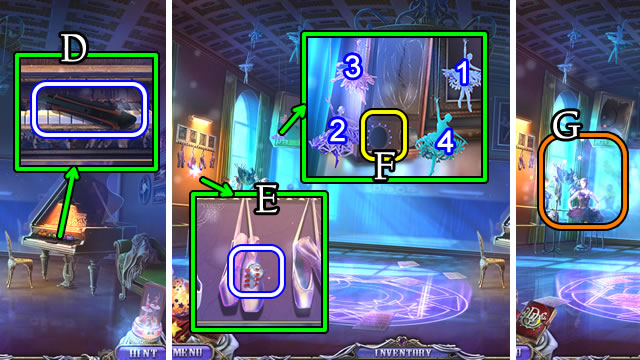
- Open, uncover and take the card (D). Take the note to receive a PAPER CLIP (E).
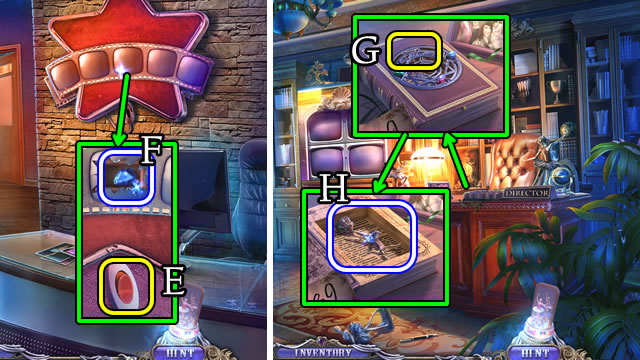
- Take the FLASH DRIVE (F).
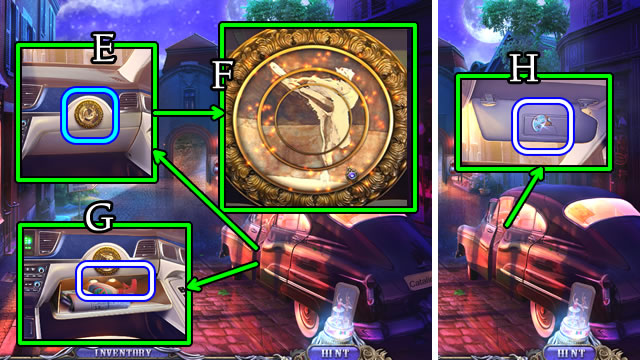
- Take the SCREWDRIVER (G).
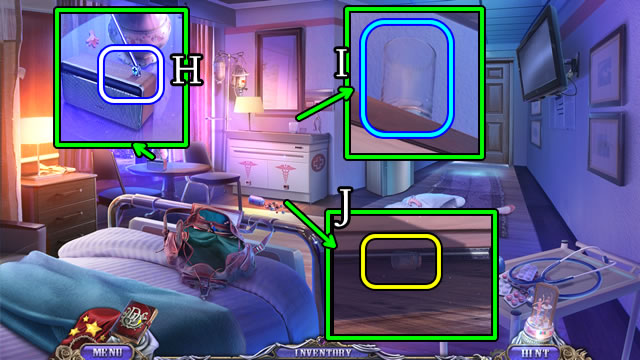
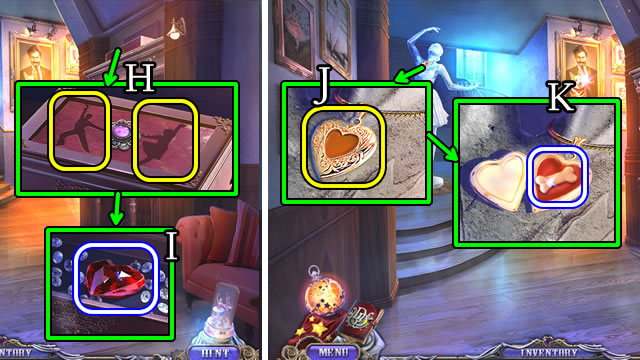
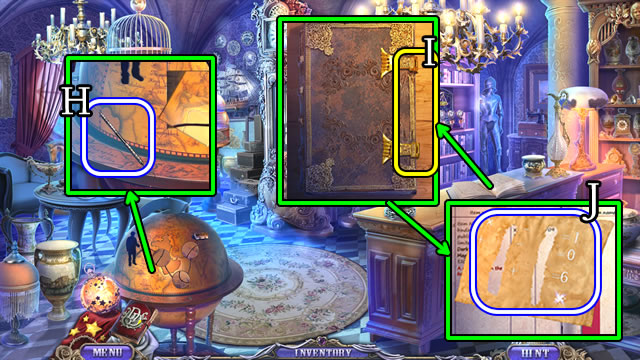
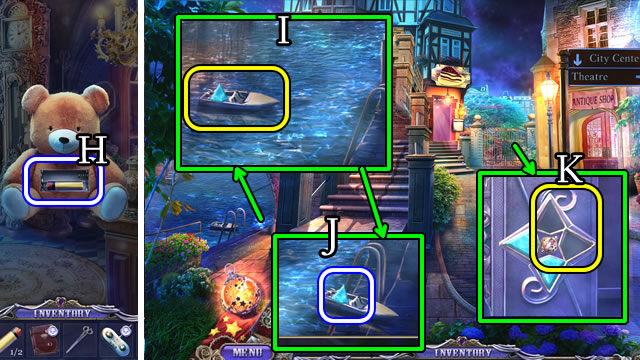
- Use the SCREWDRIVER (H); receive a SHORT ANTENNA.
- Select the SHORT ANTENNA 2x for a LONG ANTENNA (Inventory).
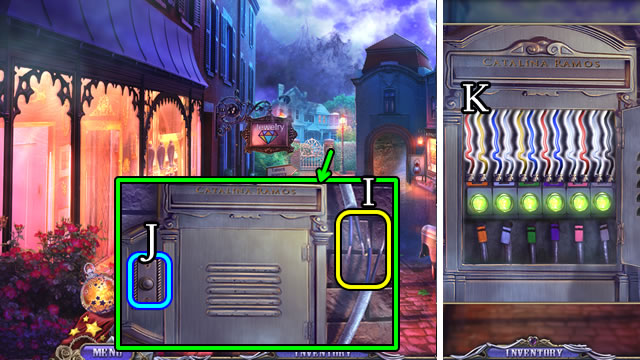
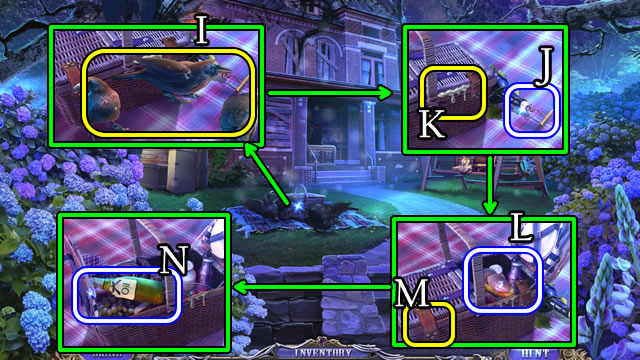
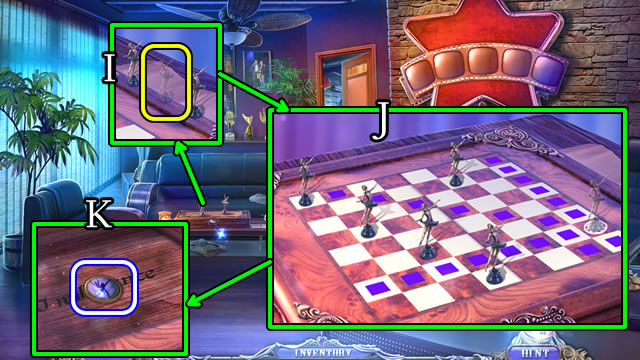
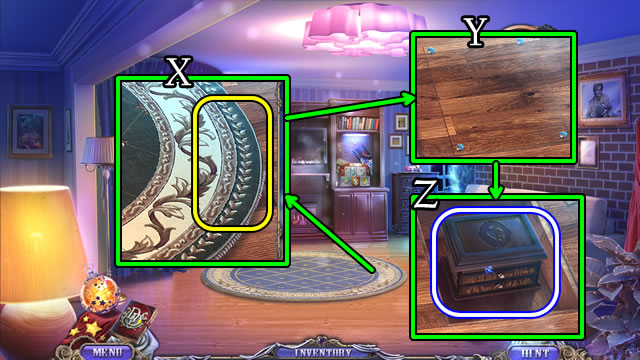
- Select the glass (I).
- Use the LONG ANTENNA (J) for a GLASS.
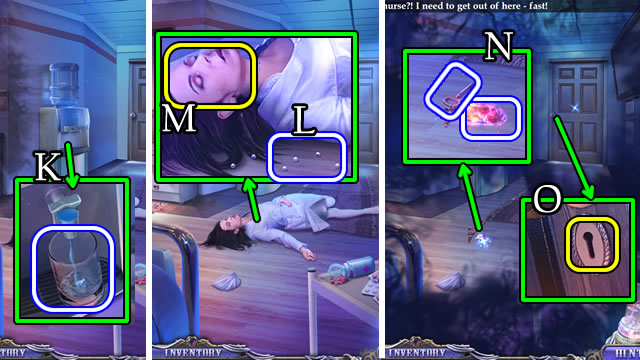
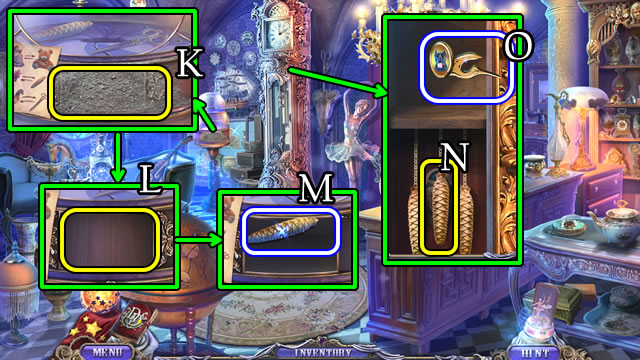
- Place the GLASS (K); receive WATER.
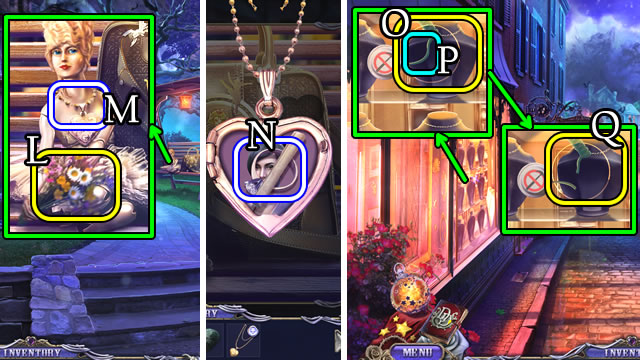
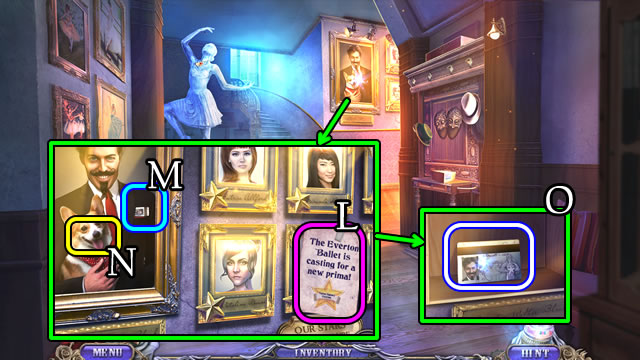
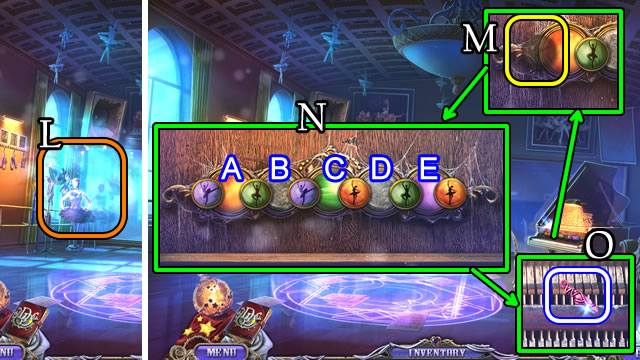
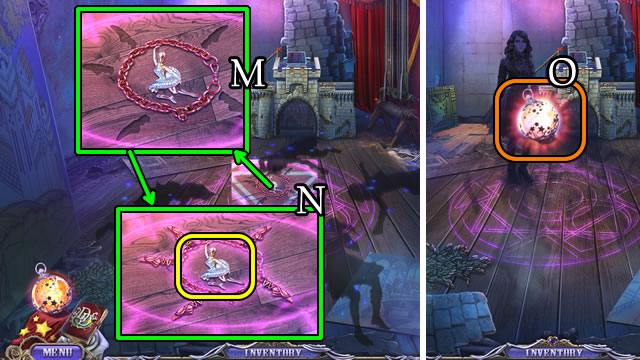
- Take the BEADS (L); use the WATER (M).
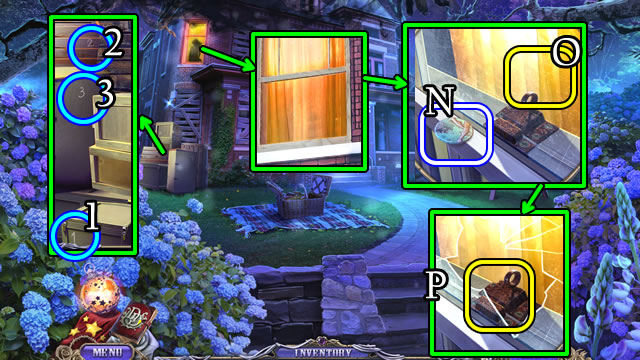
- Take the CRYSTAL and KEY (N).
- Use the KEY (O).
- Walk forward.
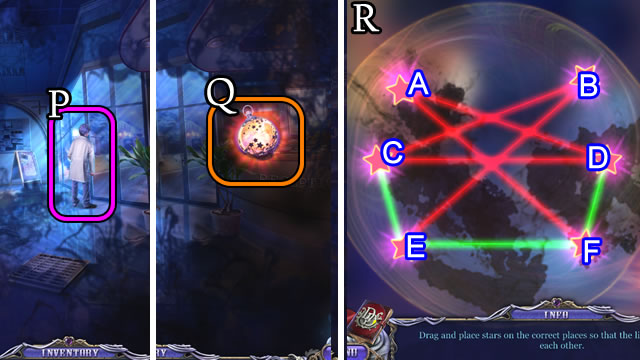
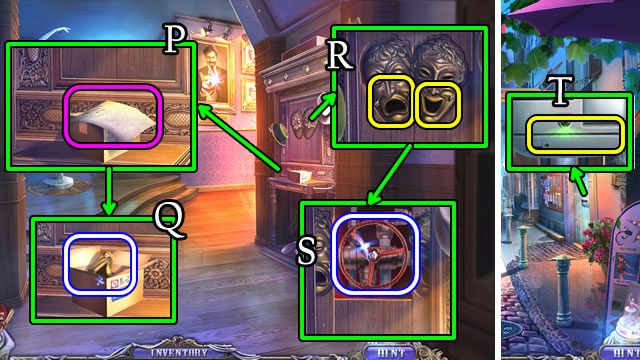
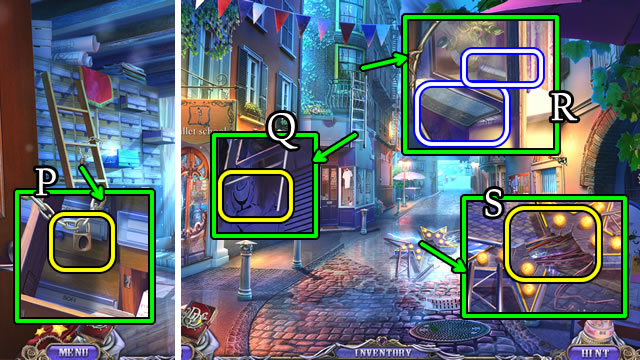
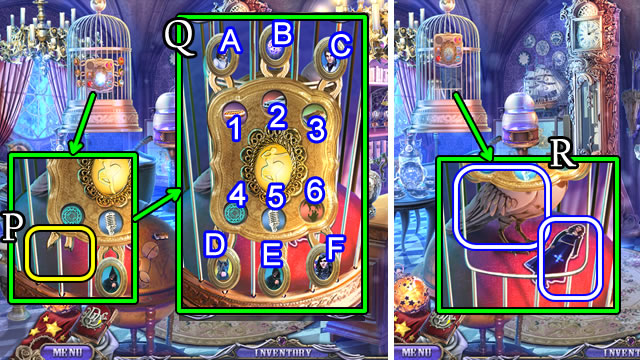
- Speak to the man (P) to receive a LANTERN.
- Combine the CRYSTAL and LANTERN for a Lantern (Inventory).
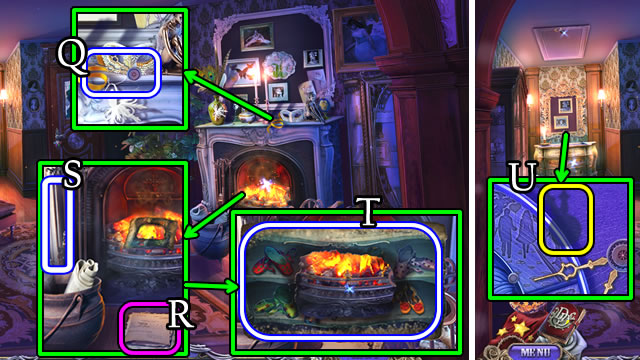
- Select and place the Lantern (Q).
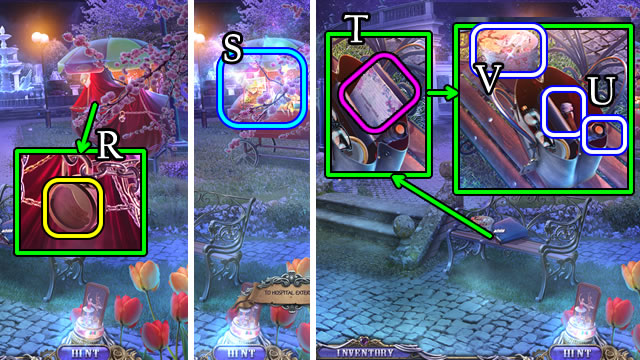
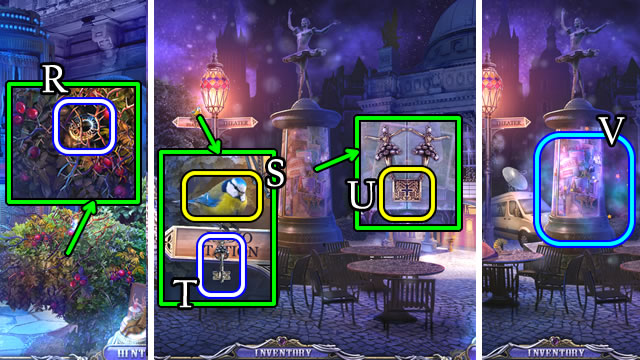
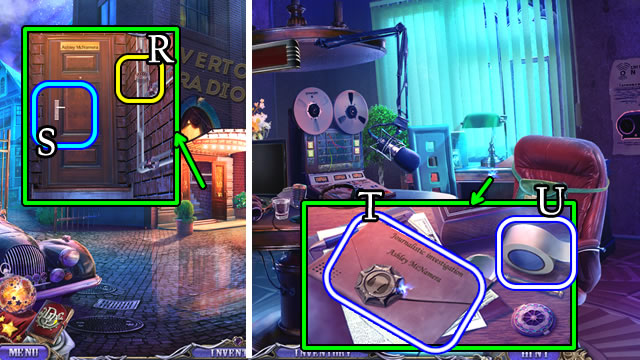
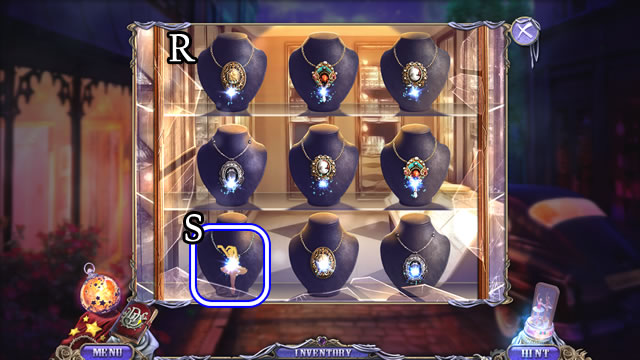
- Solution (R). A-B-A-B-D-B-A-C-A.
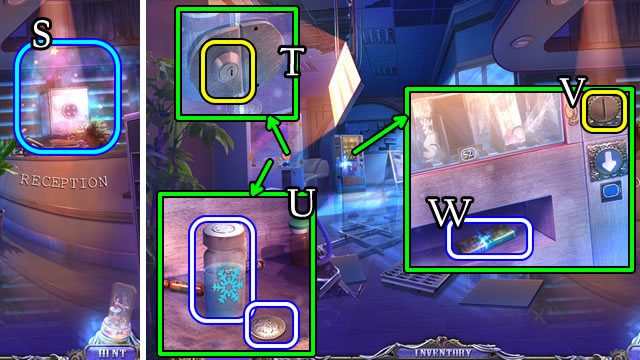
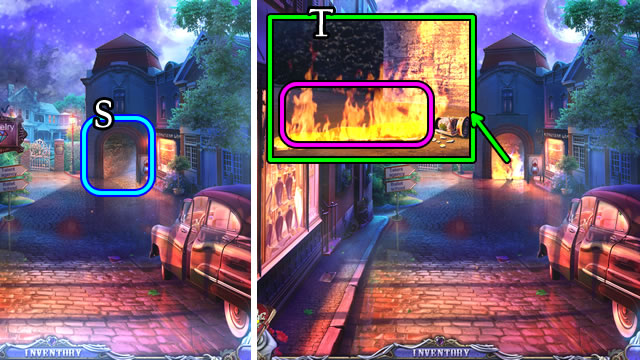
- Play the HOP (S) to receive a KEY CARD.
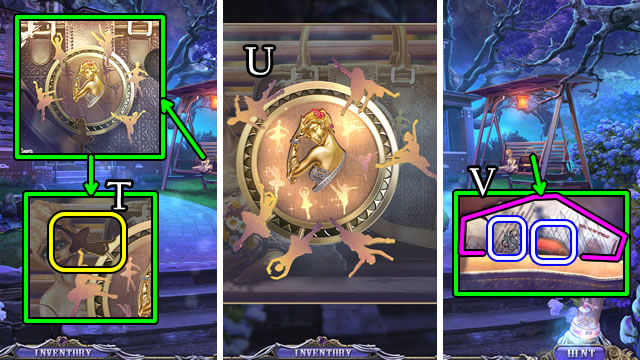
- Select the PAPER CLIP 2x; receive a BENT CLIP (Inventory).
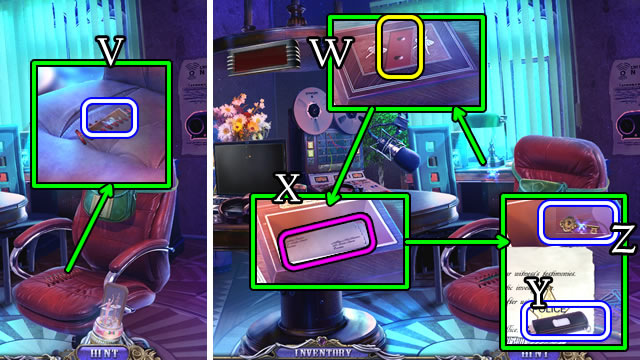
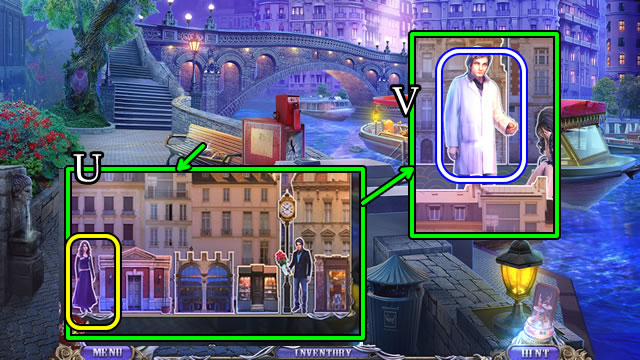
- Use the BENT CLIP (T). Take COIN 2/2 and LIQUID NITROGEN (U).
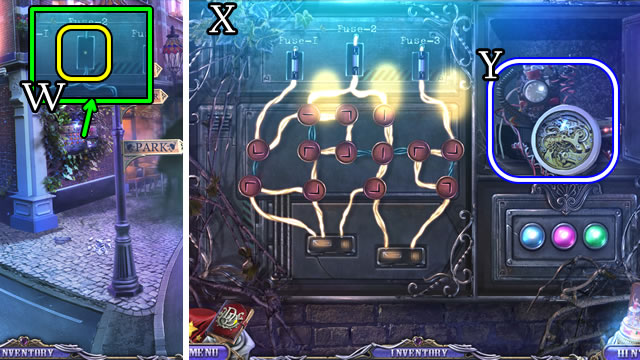
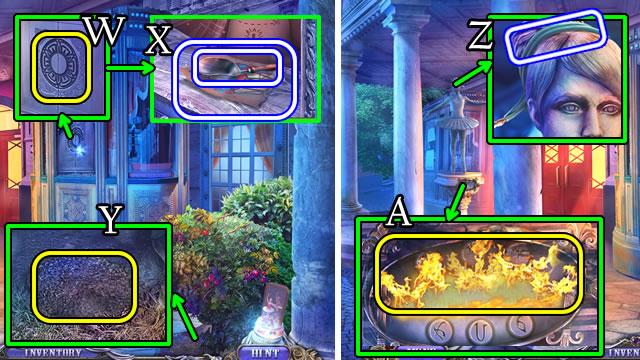
- Use COINS 2/2 (V). Take the PACK OF GUM (W).
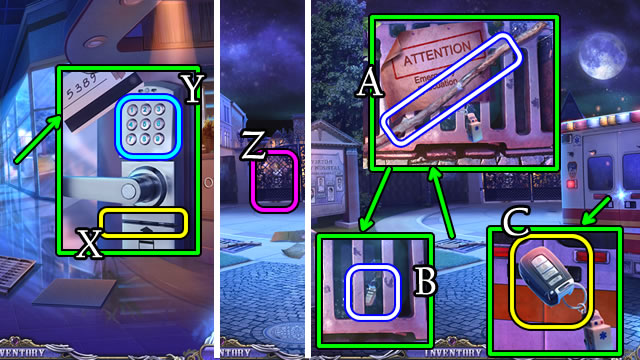
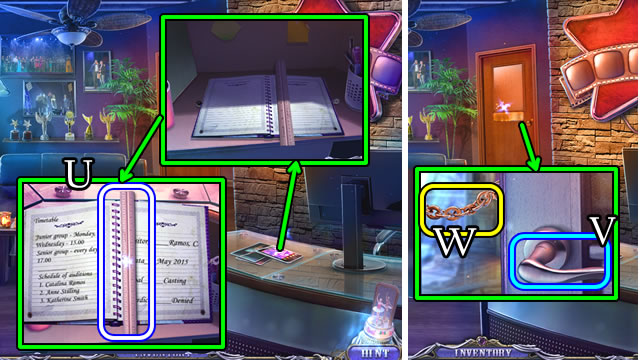
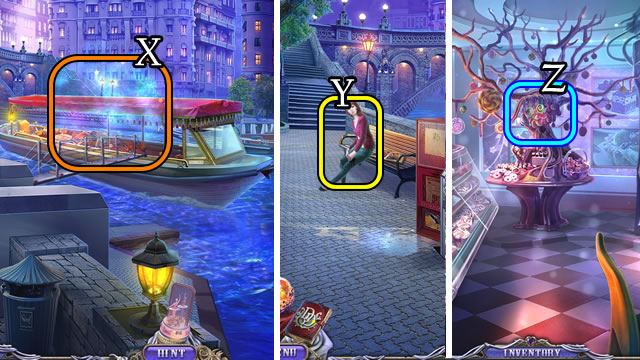
- Use the KEY CARD (X); touch 5-3-8-9 (Y).
- Walk forward.
- Speak to Ashley (Z); receive a LOCKPICK.
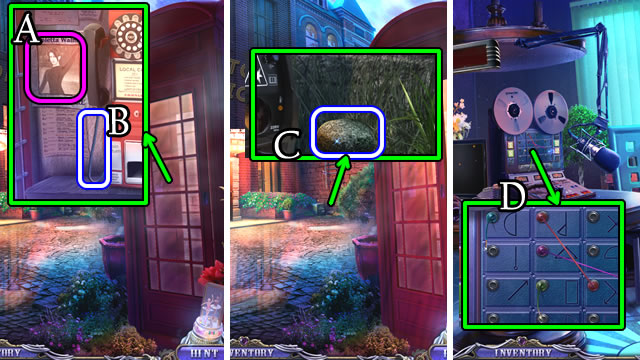
- Take the BRANCH (A).
- Open the PACK OF GUM; select a piece 3x for CHEWED GUM (Inventory).
- Combine the BRANCH and CHEWED GUM to receive a STICKY BRANCH (Inventory).
- Use the STICKY BRANCH to receive AMBULANCE KEYS (B).
- Use the AMBULANCE KEYS (C).
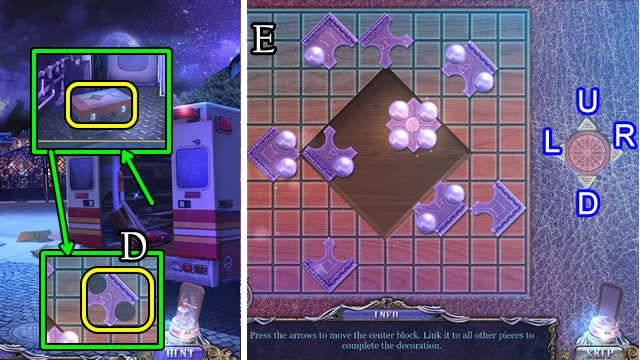
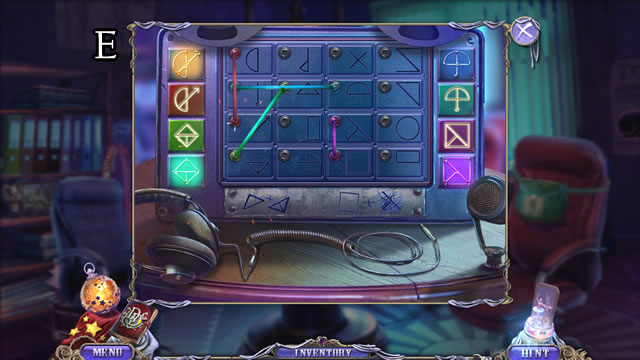
- Place the BEADS (D).
- Solution (E). U-R-U-L-Dx2-Lx2-D-L-Ux2-Dx3-Rx3-D-R-Lx2-U-Lx2-D.
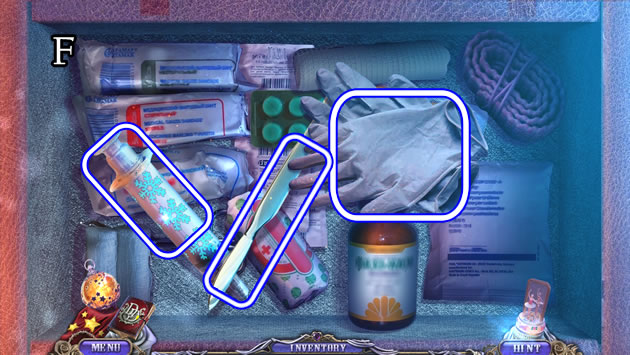
- Take the GLOVES, SCALPEL and EMPTY SYRINGE (F).
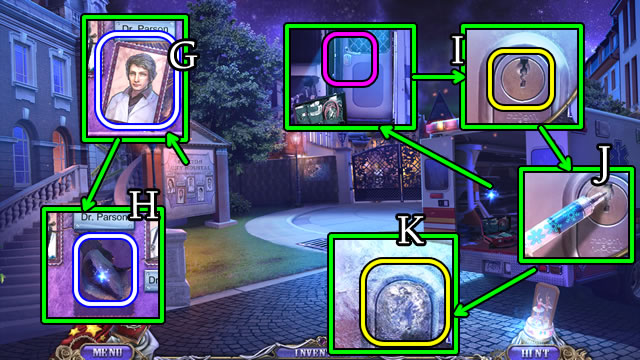
- Use the SCALPEL to receive DR. PARSON'S PHOTO (G). Take the STONE (H).
- Use the LOCKPICK (I).
- Combine the LIQUID NITROGEN and EMPTY SYRINGE for a FREEZING SYRINGE (Inventory).
- Use the FREEZING SYRINGE (J) and STONE (K). Touch the door.
- Touch the dashboard.
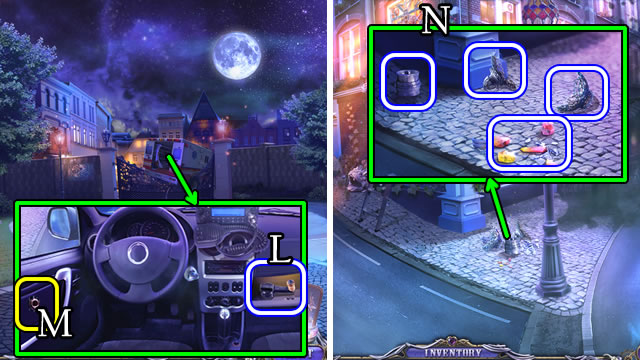
- Take (L), then place the CAR HANDLE (M).
- Walk left.
- Touch the shadows.
- Take BROKEN LANTERN 1/6, BROKEN LANTERN 2/6, BROKEN LANTERN 3/6 and the BROKEN CRYSTAL (N).
- Select (O). Receive BROKEN LANTERN 4/6.
- Scroll right.
- Take the FUSE (P).
- Use the GLOVES to receive a HOOK and a PADLOCK KEY (Q).
- Place the PADLOCK KEY (R) to play a HOP (S). Receive a HOTDOG.
- Open the purse; take the diary (T), FLASHLIGHT and SLEEPING PILLS (U).
- Take the MUSIC BOX (V).
- Scroll left.
- Place the FUSE (W) and use the FLASHLIGHT.
- Solution (X). Take the INCOMPLETE BOMB (Y).
- Combine the HOTDOG and SLEEPING PILLS for a DRUGGED HOTDOG (Inventory).
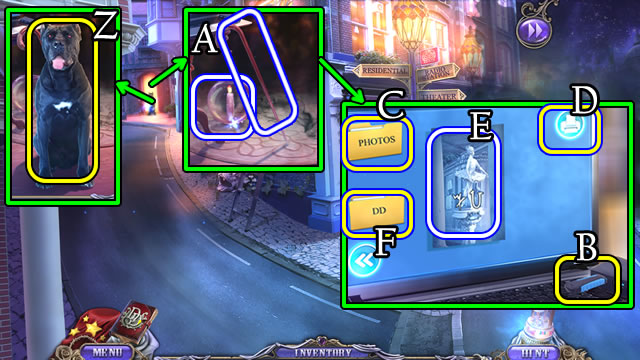
- Give the DRUGGED HOTDOG (Z).
- Take the HOOK and BROKEN LANTERN 5/6 (A).
- Place the FLASH DRIVE (B).
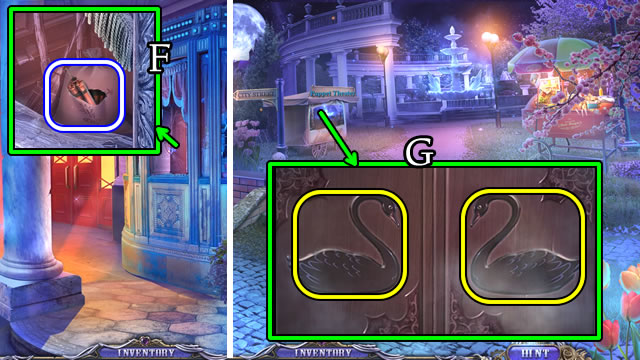
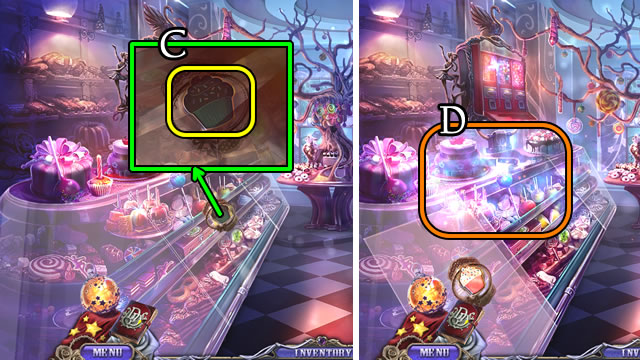
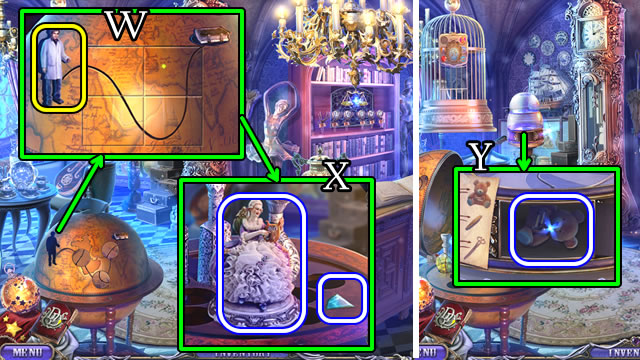
- Select (C) and scroll right 3x. Touch (D). Take PHOTO WITH CODE 1/2 (E). Select (F) and scroll right 4x.
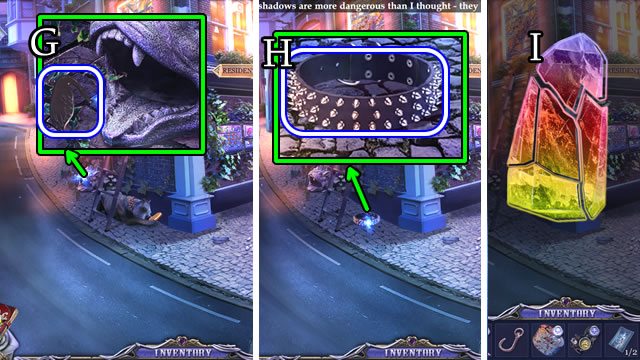
- Use the HOOK to take SWAN 1/2 (G).
- Take the COLLAR (H).
- Assemble the BROKEN CRYSTAL (I) for BROKEN LANTERN 6/6 (Inventory).
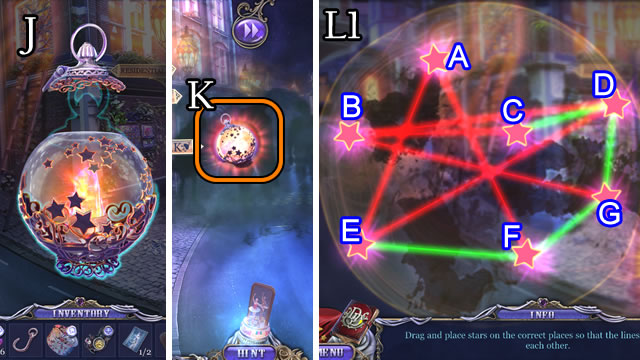
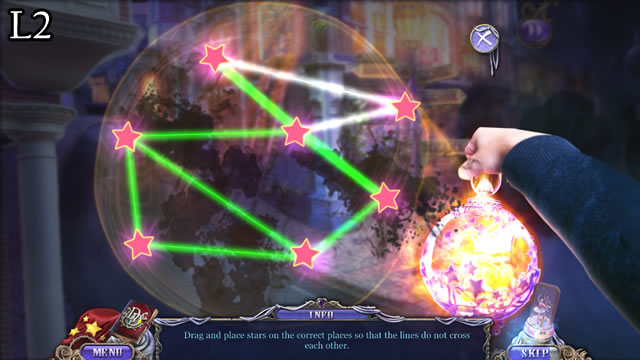
- Combine BROKEN LANTERN 6/6 pieces (J) for a Lantern (Inventory).
- Place the Lantern (K).
- Solution (L1-L2). A-B-A-B-E-B-C-D-C.
- Walk forward.
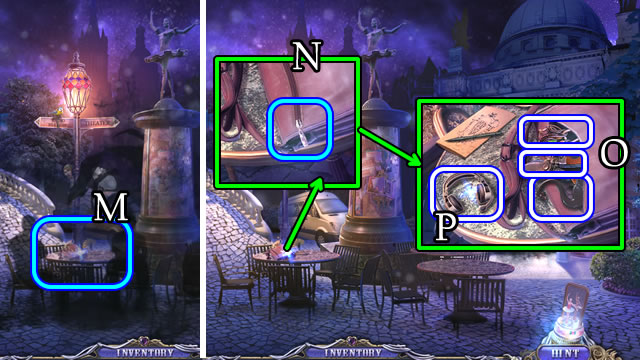
- Select (M).
- Attempt to open (N). Use the HOOK.
- Take the HAIRPIN, SWAN 2/2 and the SHEARS (O). Take the HEADPHONES (P).
- Walk forward.
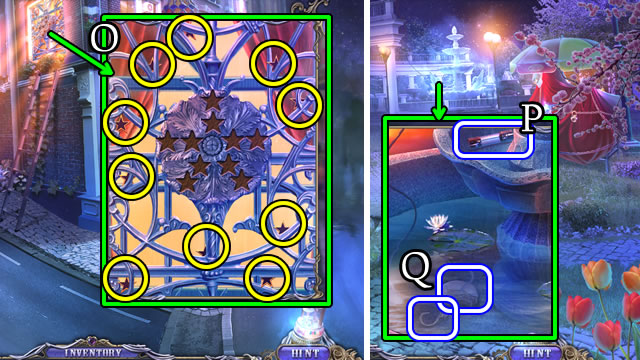
- Place the Lantern.
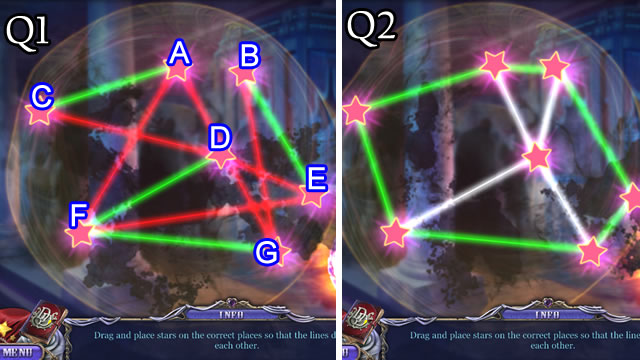
- Solution (Q1-Q2). B-E-B-A-F-A-D-A-D.
- Use the SHEARS for a BERRY. Take the CIRCLE ORNAMENT (R).
- Walk down.
- Give the BERRY (S); receive a CROSS KEY (T).
- Use the CROSS KEY (U) for a HOP (V). Receive PHOTO WITH CODE 2/2.
- Walk forward.
- Place the CIRCLE ORNAMENT (W); take the TROWEL and STREETLAMP INSTRUCTIONS (X).
- Use the TROWEL (Y).
- Use the HAIRPIN to receive WIRES 1/2 (Z).
- Select and use the TROWEL (A).
- Place the PHOTO WITH CODE 2/2.
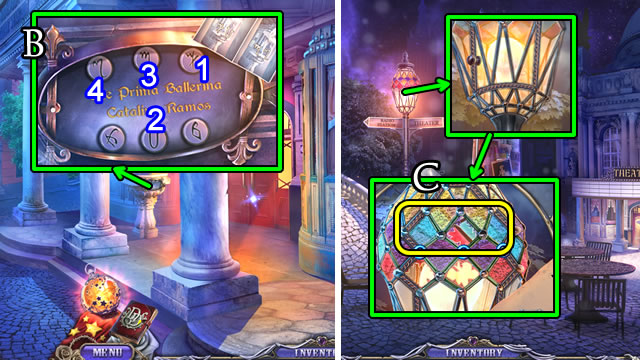
- Solution (B). 1-2-3-4.
- Receive COLORED GLASS 3/3.
- Walk down.
- Place COLORED GLASS 3/3 (C).

- Solution (D1). A-B-A-Bx2-Ax3-C-Bx2-Cx2-Bx2-Cx3-Bx2-C.
- Touch the lightbulb 2x (E) to receive a SMASHED BULB.
- Walk forward.
- Use the SMASHED BULB; take the DYNAMITE (F).
- Walk down 2x. Scroll right.
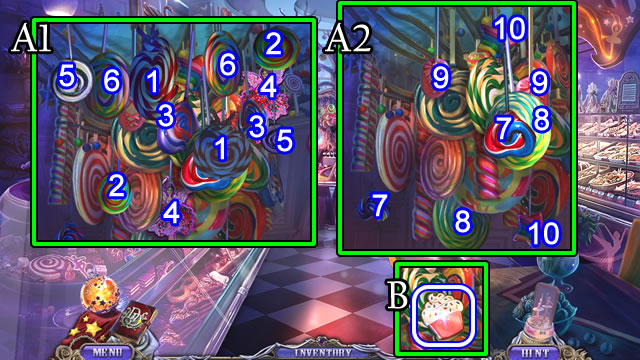
- Place SWANS 2/2 (G).
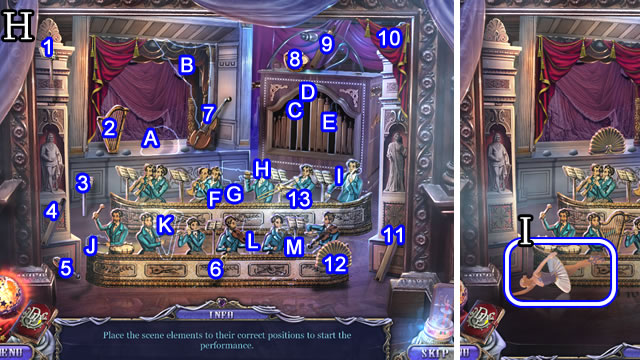
- Solution (H). A-12, B-10, C-4, D-11, E-9, F-6, G-1, H-13, I-7, J-8, K-2, L-3, M-5.
- Take the BALLERINA STATUETTE (I).
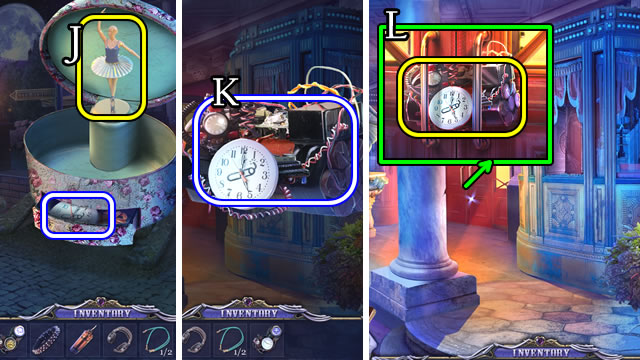
- Open the MUSIC BOX and take the photo. Place the BALLERINA STATUETTE (J). Take the CLOCKFACE (Inventory).
- Walk forward 2x.
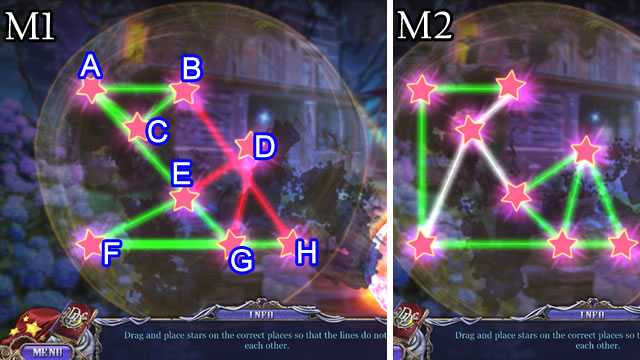
- Combine the INCOMPLETE BOMB, DYNAMITE and CLOCKFACE for a BOMB (K) (Inventory).
- Place the BOMB (L).
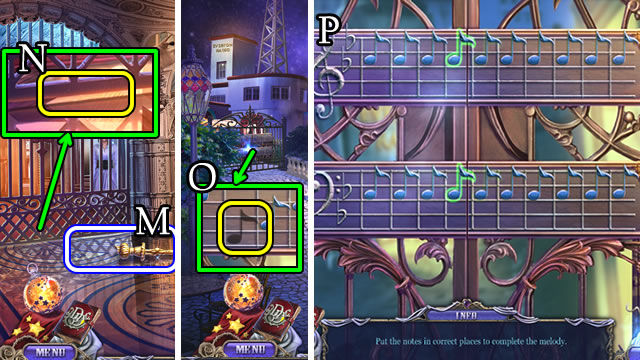
- Take (M), then place the CHANDELIER (N). Receive a NOTE.
- Walk down.
- Place the NOTE (O).
- Solution (P).
- Walk forward.
- Place the Lantern.
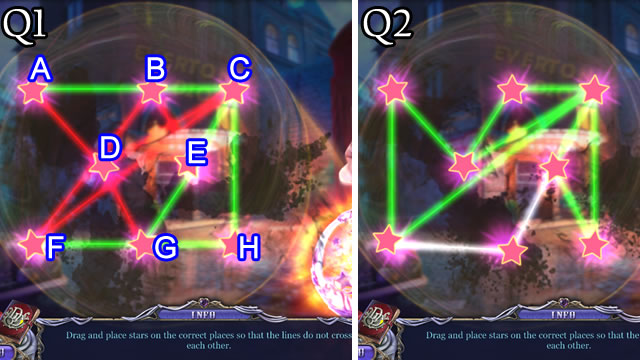
- Solution (Q1-Q2). C-B-E-G-F-C.
Chapter 2: Catalina's House
- Use the COLLAR (R); open (S) and enter.
- Touch the desk 2x.
- Take the FOLDER (T).
- Take the ADHESIVE TAPE (U).
- Select the FOLDER; place the HEADPHONES; take the notes and pictures. Take the LETTER OPENER (Inventory).
- Use the LETTER OPENER (V); receive a WOODEN TILE.
- Place the WOODEN TILE (W); take the letter (X) and POLICE FLASH DRIVE (Y). Take the LITTLE KEY (Z).
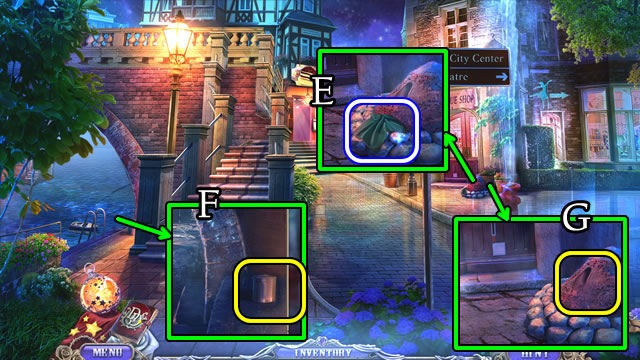
- Walk down.
- Take the photo (A); use the LETTER OPENER for WIRES 2/2 (B).
- Take the STONE (C).
- Enter the building.
- Place WIRES 2/2 (D).
- Solution (E).
- Place the POLICE FLASH DRIVE (F).
- Solution (G). Ax3-Cx2-Bx2-D.
- Play the HOP (H); receive FLOWERS.
- Walk down, then to the Residential Area.
- Use the ADHESIVE TAPE (I); touch the button (J).
- Solution (K).
- Walk to the Catalina's Yard.
- Place the FLOWERS (L); receive a PENDANT (M).
- Combine the PENDANT and LITTLE KEY. Take the note and RING (N) (Inventory).
- Walk down.
- Use the RING (O); use the LETTER OPENER (P); use the STONE (Q).
- Solution (R).
- Take the DANCER TOKEN (S).
- Walk to Catalina's Yard.
- Place the DANCER TOKEN (T).
- Solution (U).
- Take the KEY, EXTENDED MAGNET and note (V).
- Walk down 2x.

- Use the EXTENDED MAGNET (W) to receive a MICROPHONE.
- Enter the building.
- Play the HOP (X) for a WELDER BUTTON.
- Place the MICROPHONE (Y); take the WHISTLE (Z).
- Walk down.
- Place the WELDER BUTTON (A); take the LOCKPICK (B).
- Walk to the Residential Area.
- Use the LOCKPICK (C).
- Solution (D). 1-2-3-4-5.
- Select (E).
- Solution (F).
- Take the newspaper and THINNER (G).
- Take LOCK TILE 1/4 (H).
- Walk forward.
- Use the WHISTLE (I).
- Take the CORKSCREW (J). Use the THINNER (K).
- Take the SANDWICH (L). Use the LETTER OPENER (M).
- Take the OIL (N).
- Select the boxes 1-2-3.
- Take the LOCK TILE 2/4 (N). Use the STONE (O).
- Use the OIL (P).
- Walk forward.
- Take the CLOCK HANDS (Q).
- Take the paper (R) and POKER (S).
- Use the POKER. Take the PARTS OF THE BURNED PICTURE (T).
- Place the CLOCK HANDS (U).
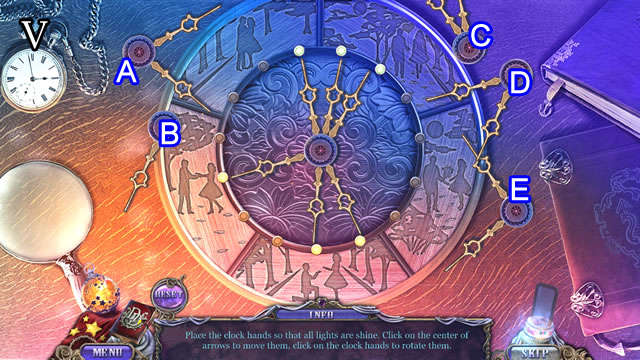
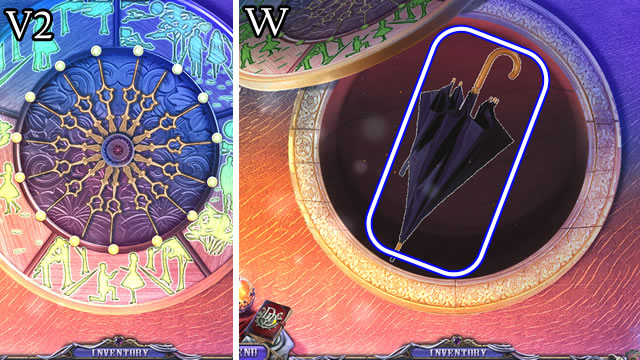
- Solution (V1-V2). Ax3-Bx10-Cx13-Dx9-E.
- Take the UMBRELLA (W).
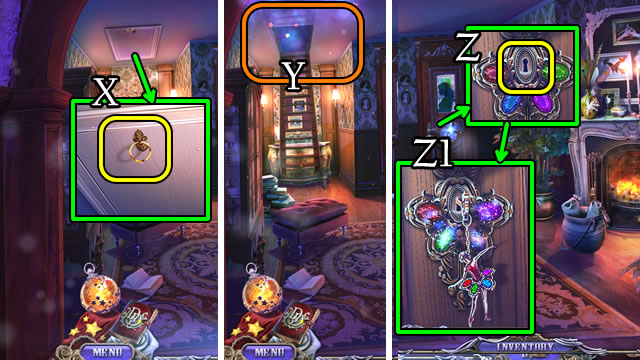
- Use the UMBRELLA (X).
- Place the Lantern to play the HOP (Y) for a DOLL PHOTO.
- Use the KEY (Z).
- Solution (Z1).
- Walk forward.
- Speak to the ghost.
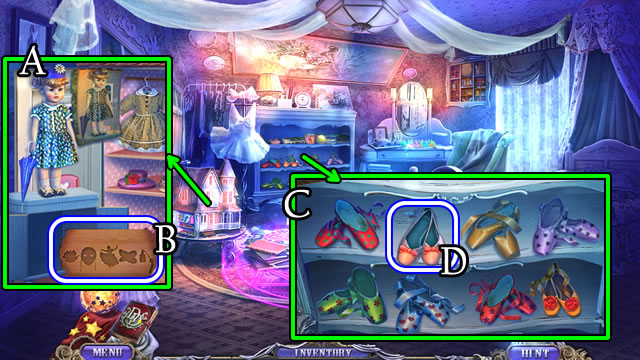
- Solution (A).
- Take the NOTCH (B).
- Solution (C).
- Take the POINTE SHOES (D).
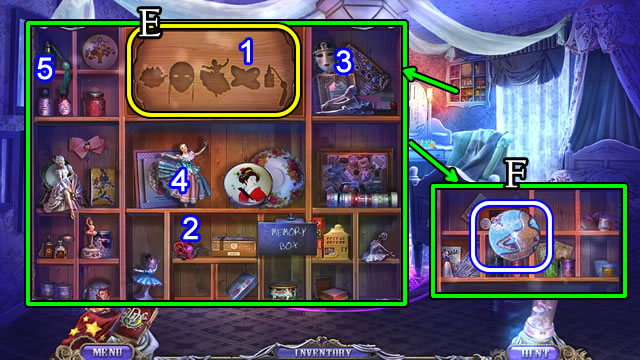
- Place the NOTCH (E).
- Place the POINTE SHOES (1). Select 2-3-4-5.
- Take the LOCK TILE 3/4 (F).
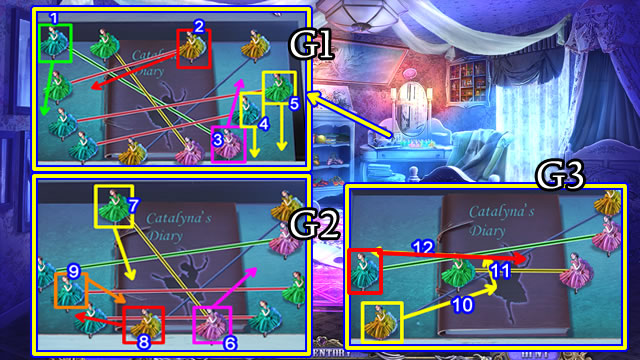
- Solution (G1-G2-G3).
- Take CATALINA'S DIARY.
- Select and open CATALINA'S DIARY (Inventory).
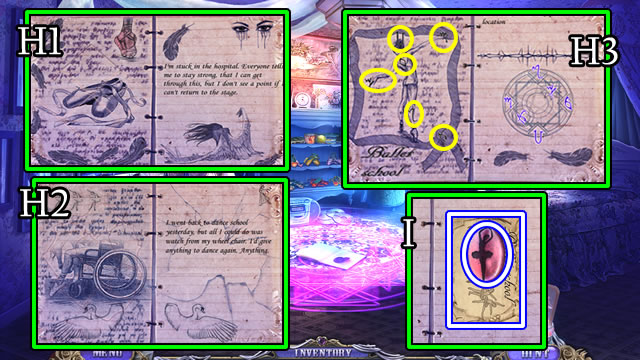
- Solution (H1-H2-H3).
- Take the BALLERINA BUTTON and HINT (I).
- Walk down.
- Use the Lantern to play the HOP (J) for FIRE.
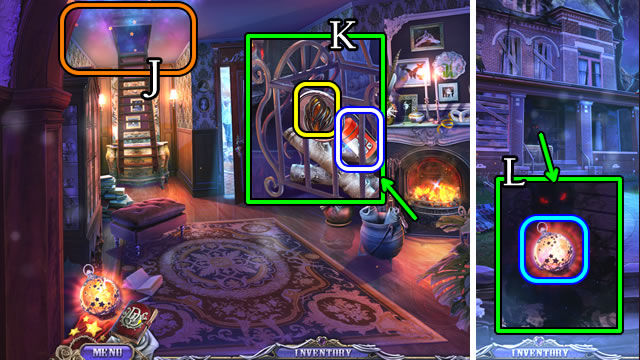
- Place the FIRE; take a FIRE EXTINGUISHER (K).
- Walk down.
- Use the Lantern (L).
- Solution (M1-M2). A-E-A-B-D-B-C-G-C.
- Give the SANDWICH (N).
- Take LOCK TILE 4/4 (O).
- Place LOCK TILE 4/4 (P).
- Solution (Q).
- Take TRAGEDY MASK HALF (R).
- Walk down.
- Attempt to enter the archway (S).
- Use the FIRE EXTINGUISHER (T).
- Walk through the archway.
- Use the Lantern.
Chapter 3: The Ballet School
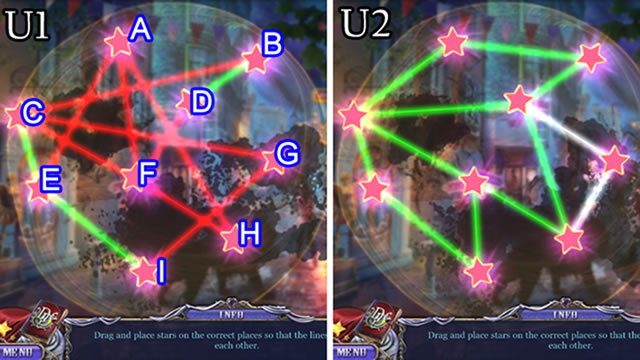
- Solution (U1-U2). F-G-F-E-F-E-A-B-A-B-D-B-D-G-D-G-H-G.
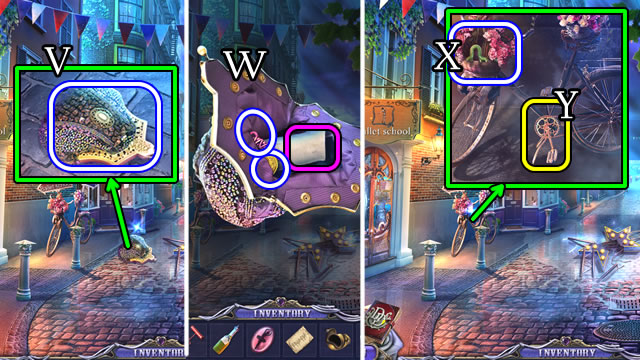
- Take the PURSE (V).
- Open the PURSE for REGISTER BUTTONS 2/3, POINTE SHOES 1/5. Select the photo 3x (W) (Inventory).
- Select the flowers; take the CATERPILLAR (X).
- Use the OIL (Y); receive a BICYCLE CHAIN.
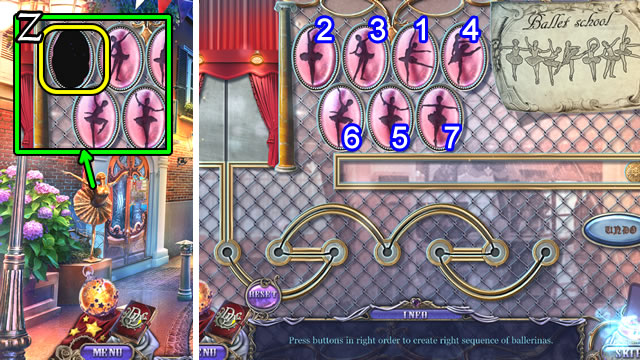
- Place the BALLERINA BUTTON (Z).
- Solution. 1-2-3-4-5-6-7.
- Walk left, then forward.
- Select the scene.
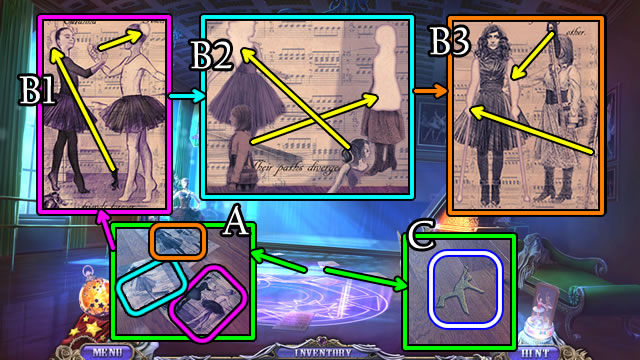
- Select (A).
- Solution (B1-B2-B3).
- Take the DANCING MAN (C).
- Take the KNIFE (D).
- Use the KNIFE; take the KNOB (E).
- Place the KNOB (F). Select 1-2-3-4.
- Play the HOP (G) to receive a DANCING WOMAN.
- Walk down.
- Place the DANCING MAN and DANCING WOMAN (H); take the HEART (I).
- Place the HEART (J); take the BONE TILE (K).
- Take the paper (L).
- Select the card (M); place the BONE TILE (N).
- Take the KEY (O).
- Take the note (P); use the KNIFE; take the COMEDY MASK HALF (Q).
- Place the TRAGEDY MASK HALF and COMEDY MASK HALF (R).
- Take the VALVE HANDLE (S).
- Walk down.
- Use the KEY (T).
- Walk right.
- Take the RULER (U); read the diary
- Select (V); use the RULER (W).
- Walk forward.
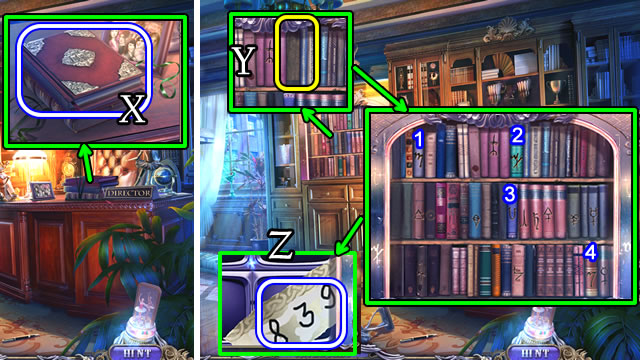
- Select, uncover and take the BOOK (X).
- Place the BOOK (Y).
- Select 1-2-3-4.
- Take the DESK CODE (Z).
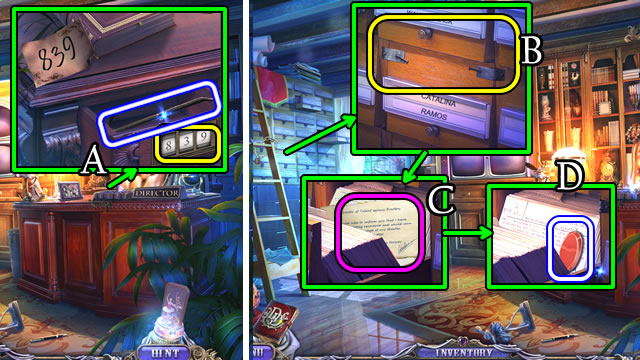
- Enter 8-3-9. Take the CROWBAR (A).
- Use the CROWBAR (B); take the notes (C). Uncover and take and BUTTON (D).
- Walk down.
- Place and touch the BUTTON (E). Take the CRYSTAL (F).
- Walk forward.
- Place the CRYSTAL (G); take the CHESS FIGURE (H).
- Walk down.
- Place the CHESS FIGURE (I).
- Solution (J).
- Take the BUTTON (K).
- Walk down, left and forward.
- Play the HOP (L) to receive a KEY.
- Place the BUTTON (M).
- Solution (N). C-D-E-A-B-C-D-C-A-B.
- Take POINTE SHOE 2/5 (O).
- Return to the Director's Office.
- Use the KEY (P); take the LADDER.
- Walk down 2x.
- Place the LADDER (Q).
- Take the RUBBER MAT and BOTTLE (R).
- Place the RUBBER MAT (S); walk forward.
Chapter 4: Following Dr. Parson

- Give the CATERPILLAR (T). Take the GLOVE and ACORNS (U).
- Use the GLOVE to take the TICKET (V).
- Use the TICKET (W).
- Play the HOP (X); receive a BANDAGE.
- Place the BANDAGE (Y).
- Walk right, then left.
- Select (Z).
- Solution (A1-A2).
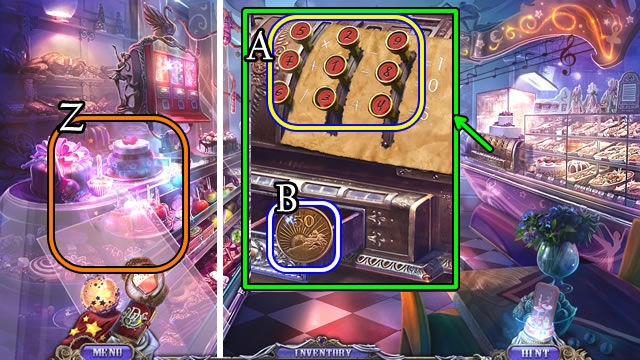
- Take the CAKE (B).
- Place the CAKE (C) for a HOP (D); receive a CARAMEL.
- Walk down.
- Take the HANDKERCHIEF (E).
- Place the HANDKERCHIEF (F) get a WET CLOTH.
- Place the CARAMEL (G).
- Walk right.
- Take the DENTAL TOOL (H).
- Use the DENTAL TOOL (I).
- Open, take the PAPER WITH SYMBOLS (J).
- Select the book.
- Use the WET CLOTH (K).
- Place the ACORNS (L); take the WEIGHT (M).
- Place the WEIGHT (N); take the LEVER (O).
- Place the LEVER (P).
- Solution (Q) A-5, B-6, C-3, D-1, E-4, F-2.
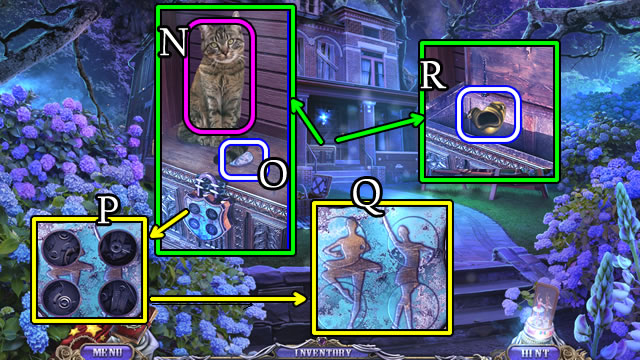
- Take the METAL BIRD and PAPER DOLL (R).

- Place the METAL BIRD; take the SCISSORS (S).
- Walk down 2x.
- Play the HOP (T); receive a CONTROLLER.
- Place the PAPER DOLL and buildings (U).
- Take the FIGURE OF DOCTOR (V).
- Walk right 2x.
- Place the FIGURE OF DOCTOR and rotate the tiles (W).
- Take the STATUE and ARROWS 1/2 (X).
- Place the STATUE; take the TOY WITH BATTERY (Y).
- Walk down, then left.
- Play the HOP (Z); receive a CUP OF COFFEE.
- Combine the BOTTLE and CORKSCREW to receive REGISTER BUTTONS 3/3.
- Place the REGISTER BUTTONS 3/3.
- Solution (A).
- Take COIN 2/2 (B).
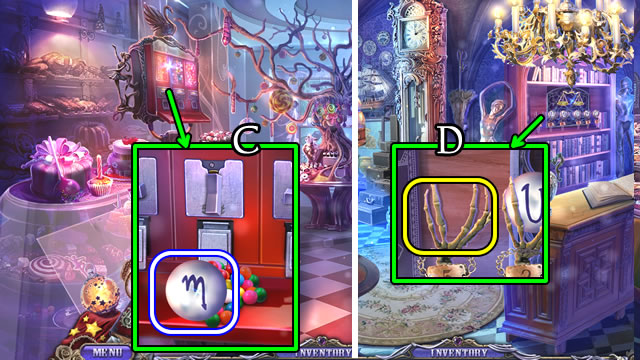
- Use COIN 1/2; take the BALL (C).
- Walk down and right.
- Place the BALL (D).

- Solution (E).
- Pull the lever to take BATTERY 1/2 (F) and DARK DIMENSION BOOK (G).
- Walk down.
- Select the TOY WITH BATTERY; take BATTERY 2/2 (H) (Inventory).
- Select the CONTROLLER 2x; add BATTERY 2/2 for a CONTROLLER (Inventory).
- Use the CONTROLLER (I); take ARROWS 2/2 (J).
- Place the ARROWS 2/2 (K).
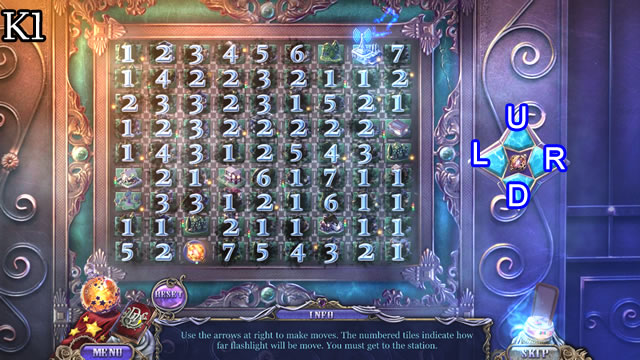
- Solution (K1). L-U-R-U-L-Ux2-Rx3-U.
- Walk forward.
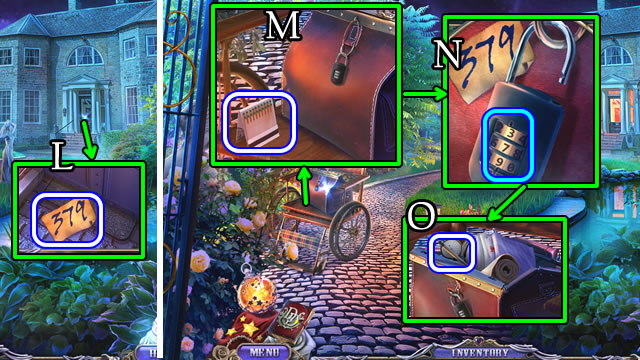
- Take SHEET WITH PASSWORD (L).
- Take the MATCHES (M).
- Enter 3-7-9 (N).
- Take the PENCIL (O).
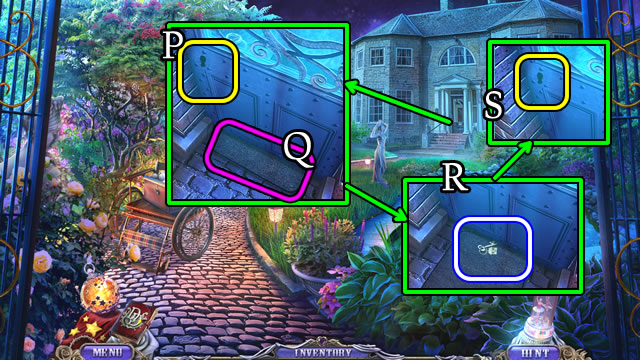
- Use the PENCIL (P); select (Q); take PARSON'S HOUSE KEY (R).
- Use PARSON'S HOUSE KEY (S).
- Walk forward.
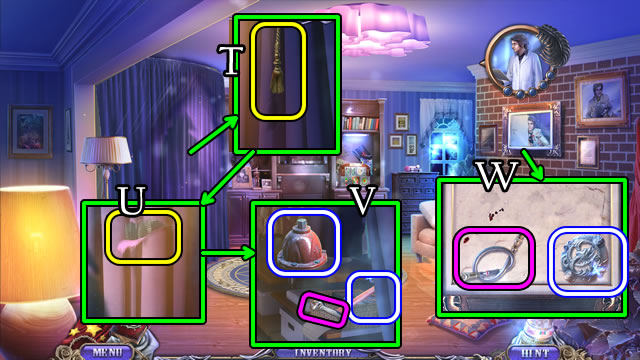
- Pull the cord (T); use the SCISSORS (U).
- Take the TOP OF HYDRANT, CLAW HAMMER and Wrench (V).
- Select the picture 3x. Take the SNAKE TOKEN and Brake Hose (W).
- Lift the rug (X); use the CLAW HAMMER (Y).
- Take the BOX (Z).
- Select the BOX; open (A), take a Police Report. Open (B) take the Cassette. Place the SNAKE TOKEN (C), take DR. PARSON'S DIARY (D) (Inventory).
- Take the Blueprint (E).
- Solution (F).
- Take the BUTTON (G).
- Select (H), touch (I). Take the WINDOW HANDLE (J).
- Replace the WINDOW HANDLE (K).
- Open DR. PARSON'S DIARY (Inventory).
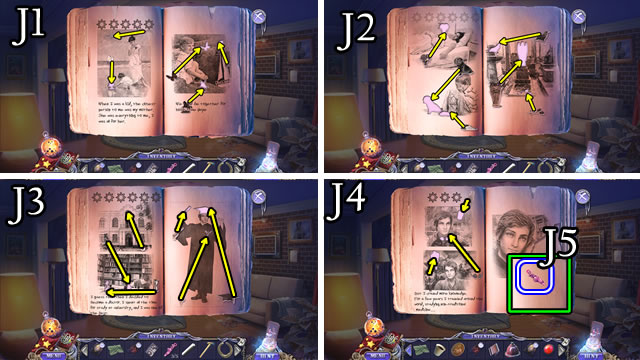
- Solution (J1-J2-J3-J4).
- Take POINTE SHOE 3/5 (J5).
- Walk forward, then down.
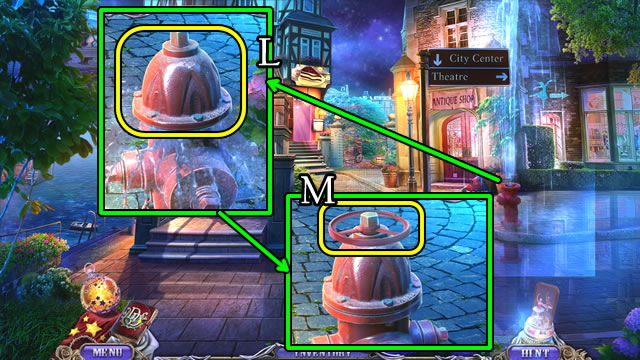
- Place the TOP OF HYDRANT (L); place the VALVE HANDLE (M).
- Walk right.
Chapter 5: The Theater Revisited
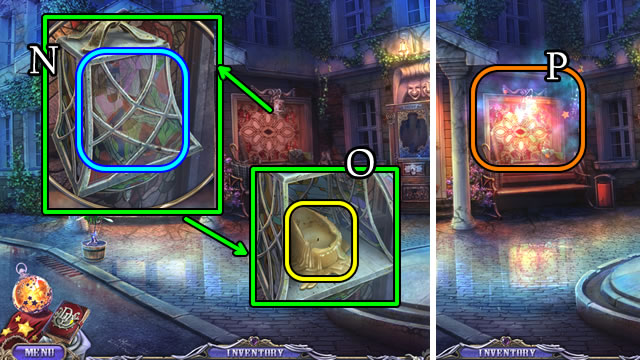
- Open (N), use the MATCHES (O).
- Play the HOP (P) for a BALLERINA.
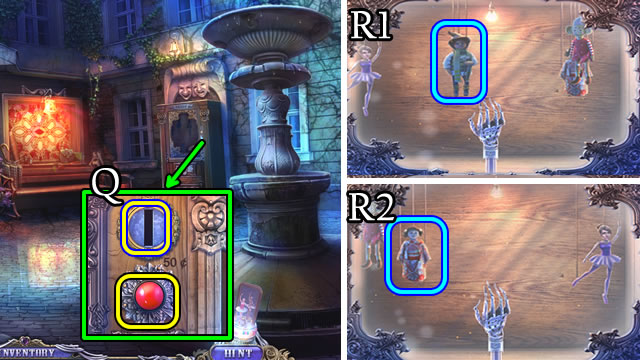

- Place the BUTTON; use the COIN (Q).
- Solution (R1-R2-R3-R4).
- Take FIGURE OF BALLERINA (S).
- Place the FIGURE OF BALLERINA and adjust (T).
- Walk forward.
- Use the Lantern.
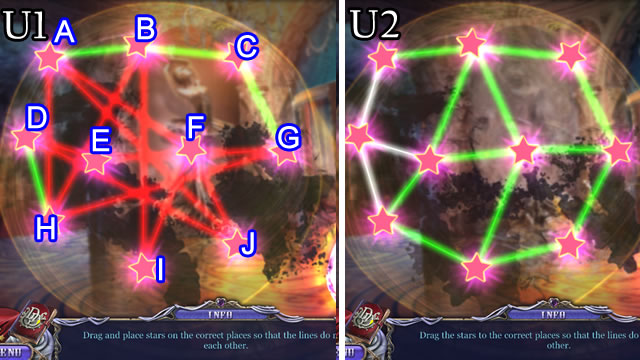
- Solution (U1-U2). F-H-F-D-J-D-E-J-E-I-E-I-A-E-A-D-H-D.
- Walk forward.
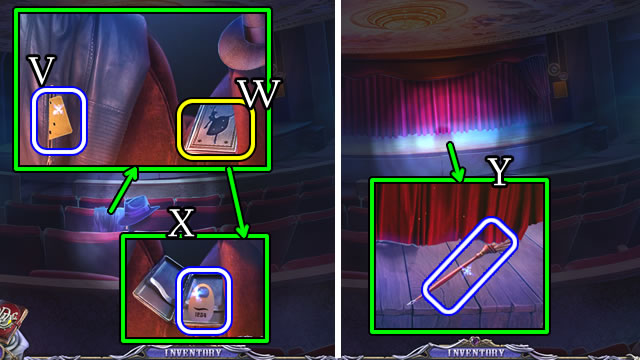
- Unzip; take the PUNCH CARD (V). Place the BALLERINA (W).
- Take the NUMBER (X).
- Take the BRUSH (Y).
- Walk down.

- Use the BRUSH (Z); take the CHALK (A).
- Give the NUMBER (B); receive a WALKING STICK.
- Walk forward.
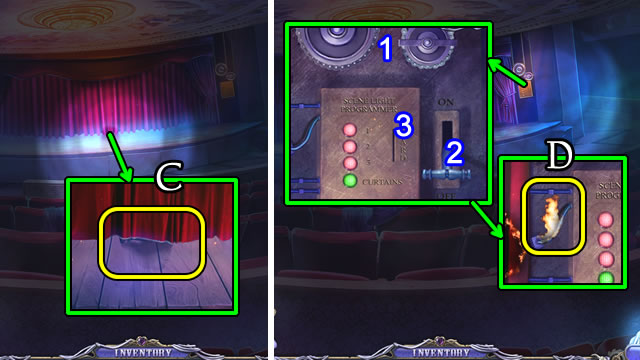
- Use the WALKING STICK (C) to receive a LEVER.
- Place the BICYCLE CHAIN (1), LEVER (2) and PUNCH CARD (3). Select the lever.
- Use the CUP OF COFFEE (D); select the lever.
- Walk forward.
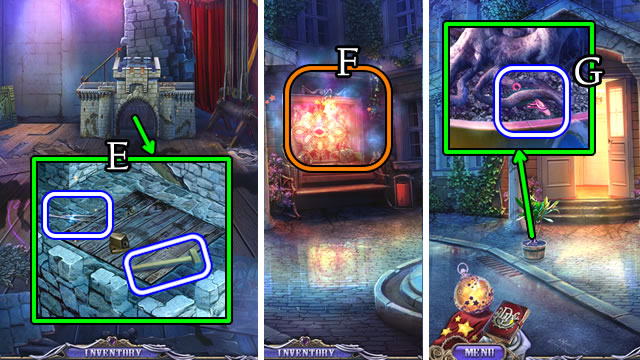
- Take the FORCEPS and SLEDGEHAMMER (E).
- Walk down 3x.
- Play the HOP (F) to receive a RING.
- Use the FORCEPS to receive POINTE SHOE 4/5 (G).
- Walk forward 3X.

- Place the RING (H) and select to take POINTE SHOES 5/5 (I).
- Use the WET CLOTH (J), place the Lantern (K) and use the CHALK (L). Repeat the three steps for each shadow.
- Place the POINTE SHOES 5/5 (M).
- Use the SLEDGEHAMMER (N).
- Place the Lantern (O).
- Congratulations! You have completed playing Dark Dimensions: Shadow Pirouette.
Created at: 2015-11-02