

Walkthrough Menu
- General Tips
- Chapter 1: The Water Amulet
- Chapter 2: The Earth Amulet
- Chapter 3: The Fire Amulet
- Chapter 4: The Air Amulet
- Chapter 5: The Finale
- The Prophecy Scrolls
General Tips
- This is the Official Guide for Dark Heritage: Guardians of Hope Standard Edition.
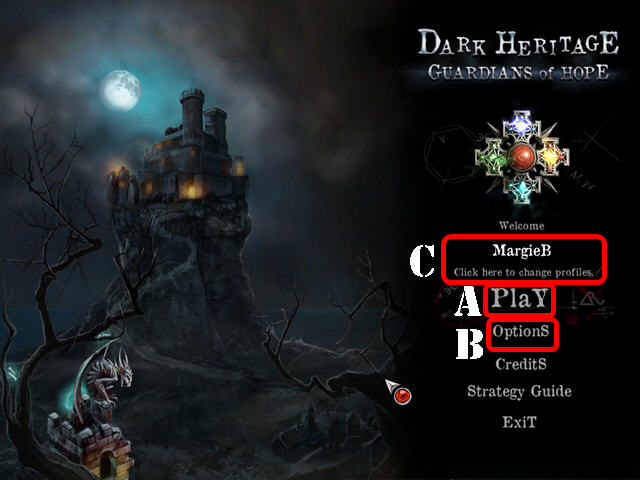
- Select 'Play' (A) to begin the main quest.
- The 'Options' (B) button allows you to adjust the screen, music, cursor, and sound.
- The 'Click here to change profiles' (C) can be used to manage your profiles in the game.
- This guide will refer to Hidden Object Scenes as 'HOS'. Items listed in red in a HOS require an extra step of interaction to find.
- You can skip a mini-game once the Skip button is fully charged.
- Items will stay in the inventory until no longer needed.
Chapter 1: The Water Amulet
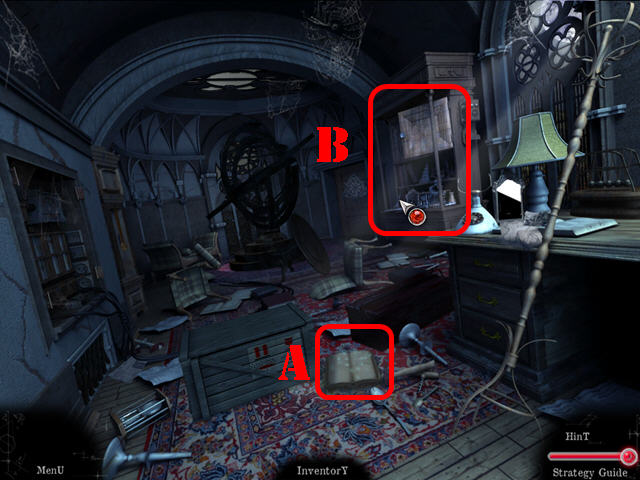
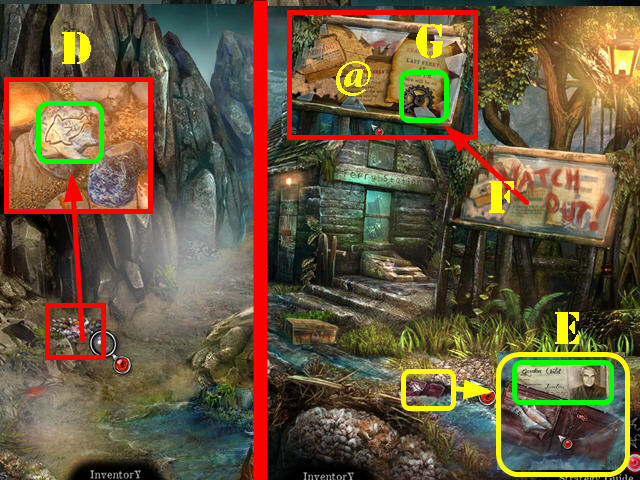
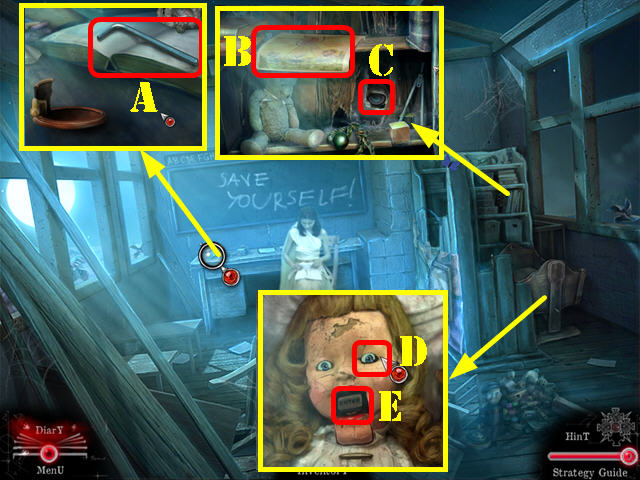
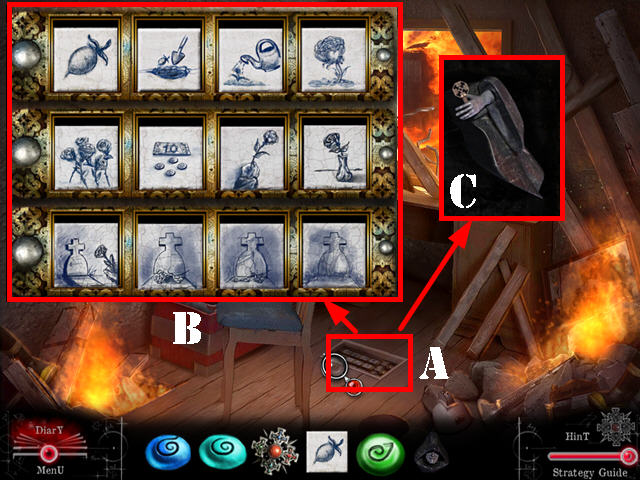
- Take the Diary (A).
- The MEDALLION FROM PROF. CHILD will go into inventory.
- Play the HOS by the cabinet (B).
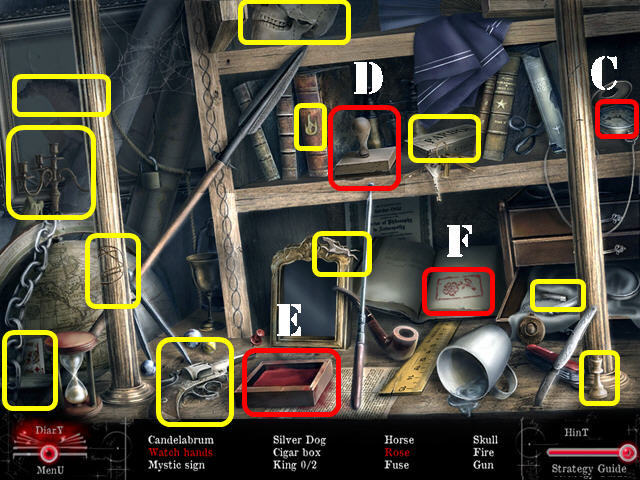
- Open the pocket watch and take the watch hands (C).
- Drag the stamp (D) to the ink pad (E); put the inked stamp on the book page and take the rose (F).
- The FUSE will be added to inventory.
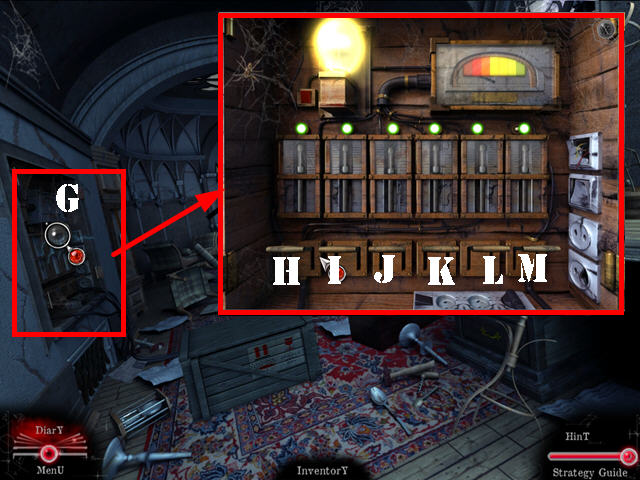
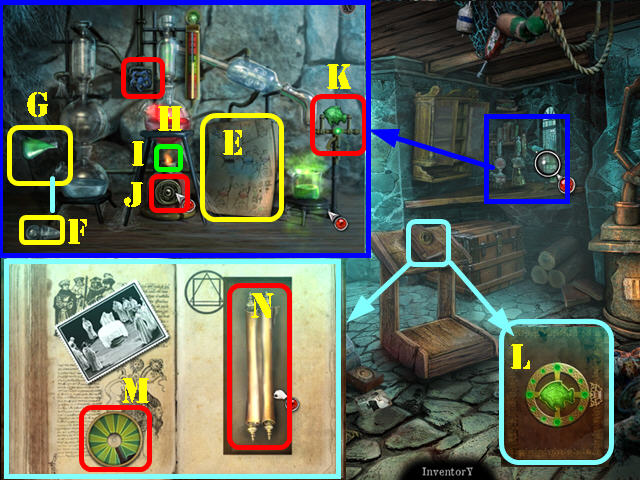
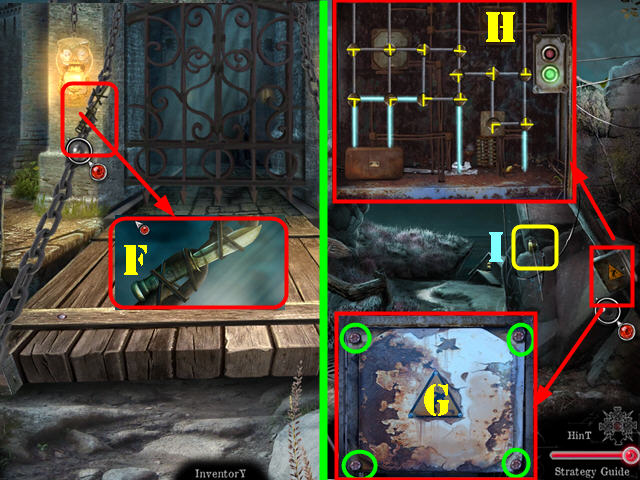
- Examine the fuse box (G); put the FUSE in the slot to activate the puzzle.
- Press on the levers until they all stay up.
- To solve the puzzle, press on the levers in this order: H, K, H L, I, and H.
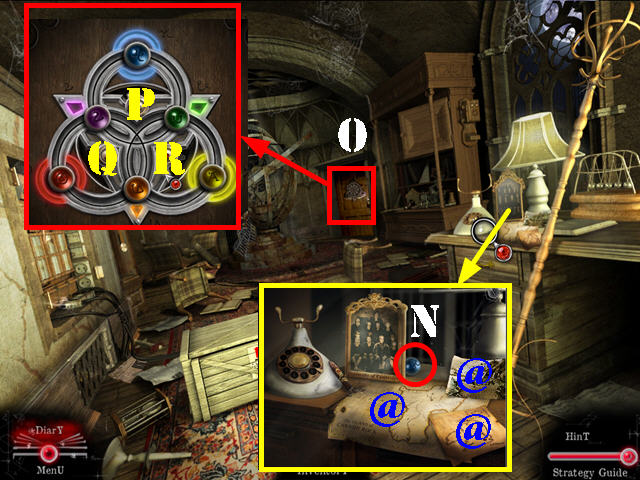
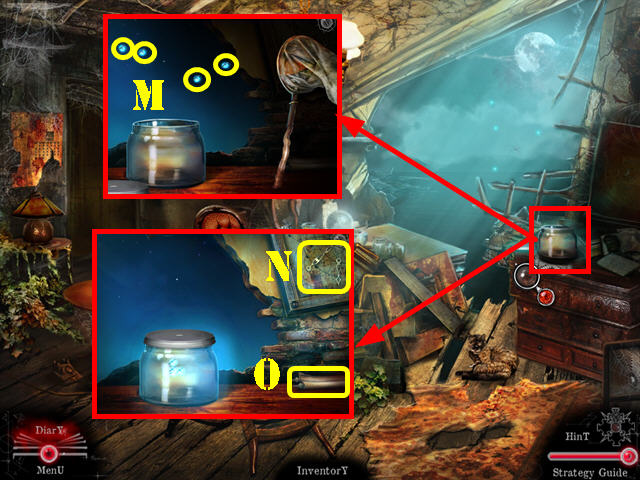
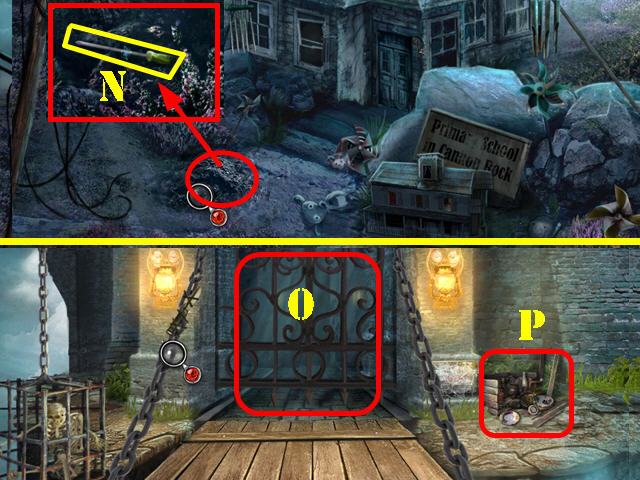
- Examine the table; take the BALL (N). Also look at the pictures and photos (@).
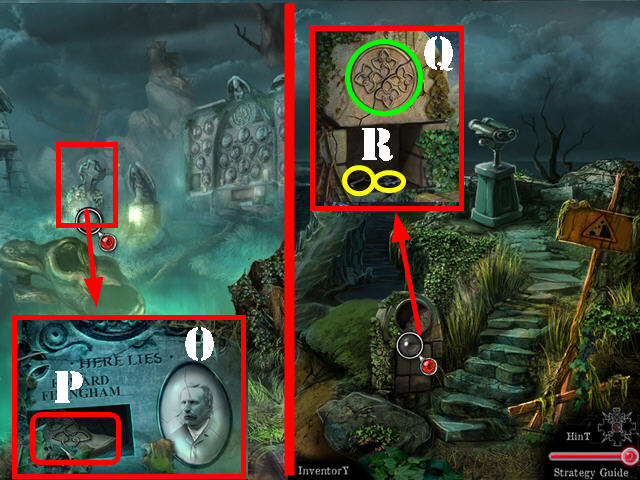
- Examine the door in the back and put the BALL in the slot to activate a puzzle (O).
- Select the small red buttons in the center to move the symbols around.
- Put the balls in the areas of the same color.
- To solve the puzzle, select the button in this order: Q, P, R, R, Q, R, and R.
- Go through the newly-opened door.
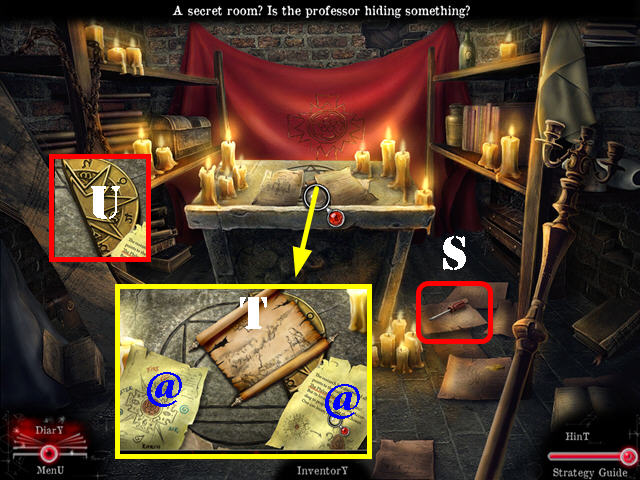
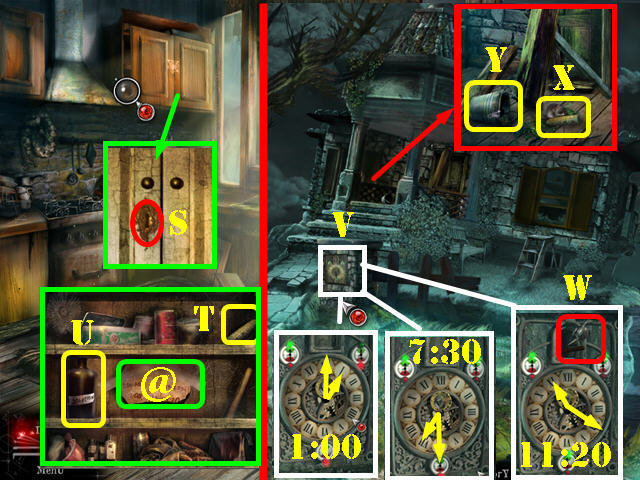
- Take the SCREWDRIVER (S).
- Inspect the table; look at the 2 papers (@) and then take the 1ST scroll (T).
- Take the first PART OF MYSTERIOUS DISK that appears below the scroll (U).
- Walk down.
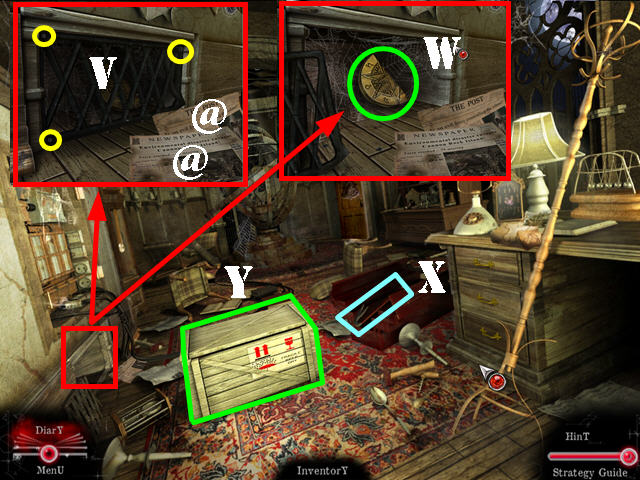
- Zoom into the vent; remove the 3 screws with the SCREWDRIVER (V).
- Take the second PART OF MYSTERIOUS DISK (W).
- Look at the newspaper clippings (@).
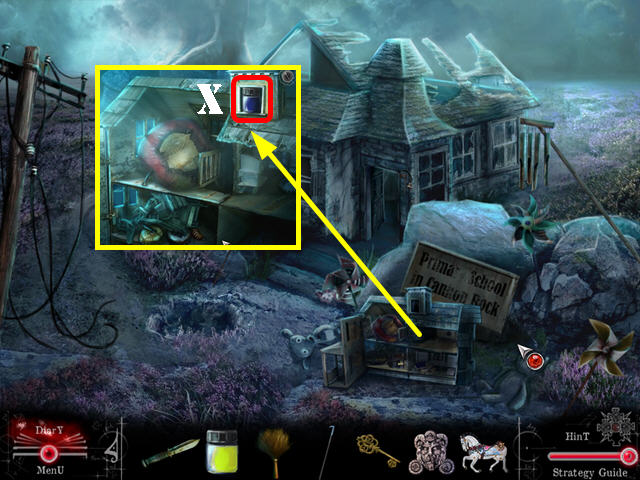
- Open the toolbox and take the CROWBAR (X).
- Remove the 4 boards on the crate with the CROWBAR (Y).
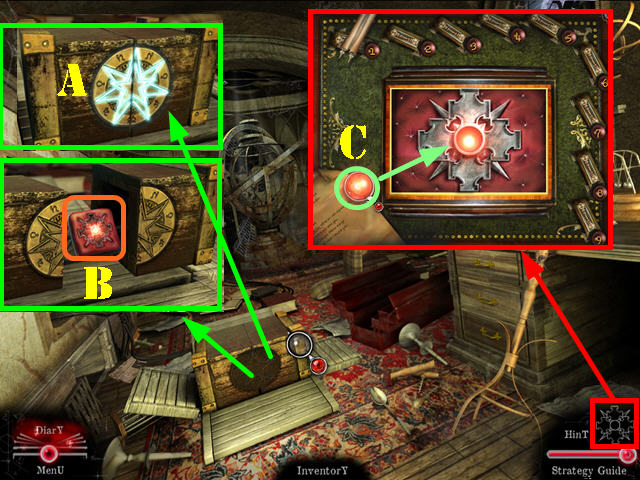
- Zoom into the crate; insert the 2 PARTS OF MYSTERIOUS DISKS into the slots (A) and take the MEDALLION (B).
- Zoom into the medallion in the lower right (C); drag the MEDALLION FROM PROF. CHILD into the center (D). You will be automatically transported to a new location.
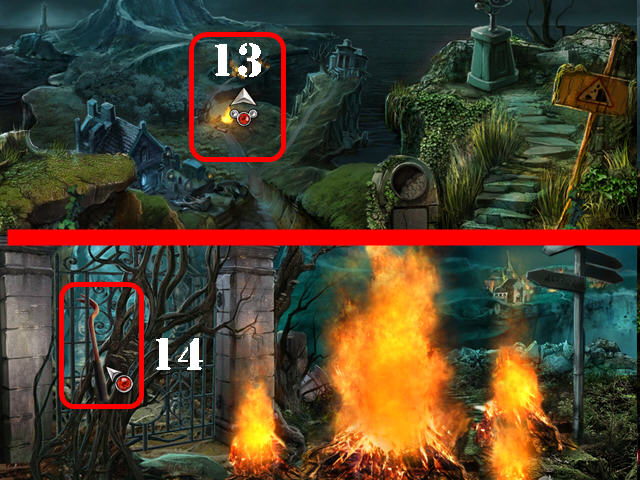
- Touch the man in the corner and he will walk away. Go right after the man walks away.
- Zoom into the stones; move the stones aside and take the LITTLE ROCK (D).
- Walk down and go left.
- Examine the wallet and pull out Child's ID (E).
- Look at the board; use the LITTLE ROCK on the glass 3 times (F).
- Take the GEAR (G) and look at the notes (@).
- Go left.
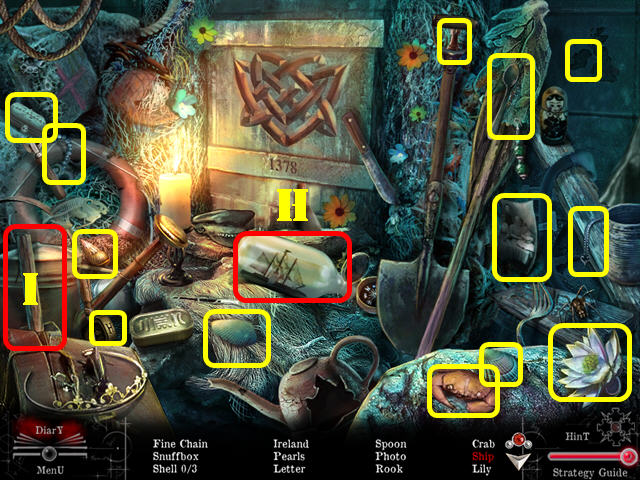
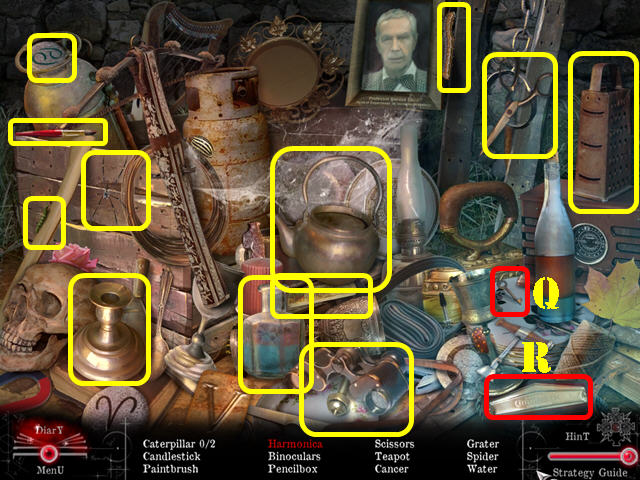
- Play the HOS.
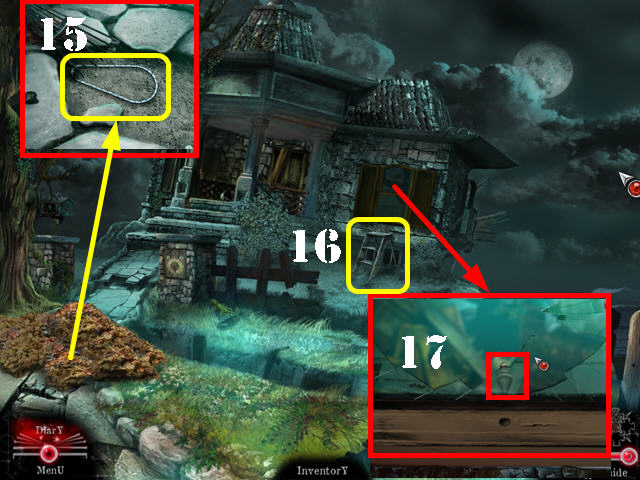
- Break the bottle (H) with the mallet (I) and take the ship.
- The first TILE will be added to inventory.
- Take the CLOTH (J).
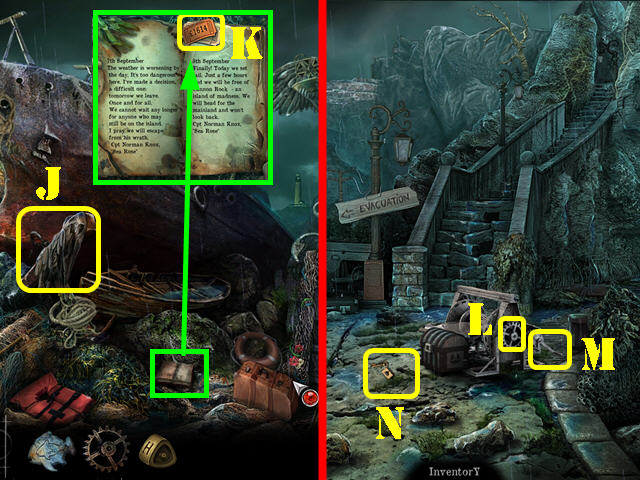
- Zoom into and read the captain's log; note the numbers on the ticket (K).
- Walk down twice.
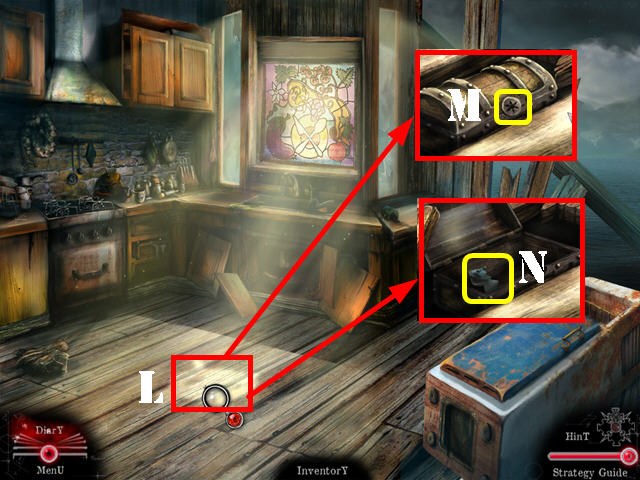
- Put the GEAR on the mechanism (L) and pull the handle (M).
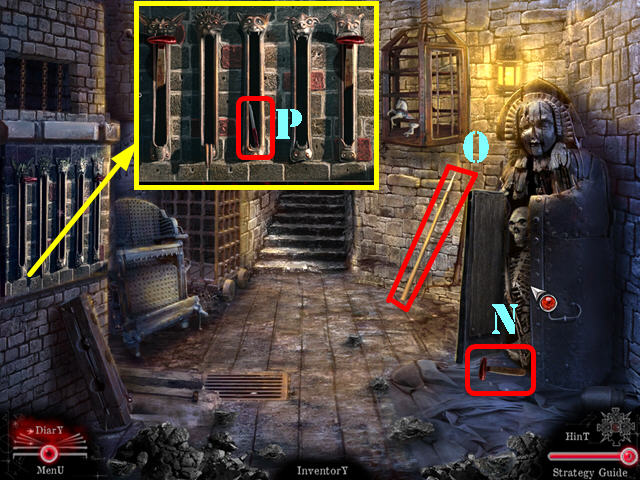
- Take the KEY on the ground (N).
- Go left.
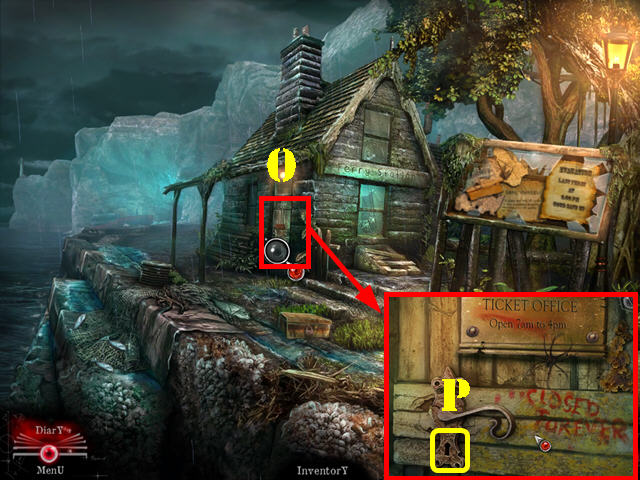
- Zoom into the ferry station door (O).
- Insert the KEY in the lock and go through the door (P).
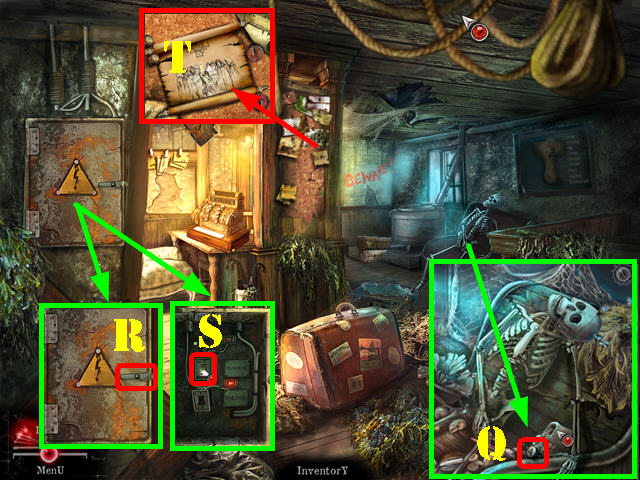
- Examine the skeleton; move his hand and take the BUTTON (Q).
- Examine the fuse box. Slide the latch (R) and flip the switch (S); this will allow you to turn on the lanterns outside.
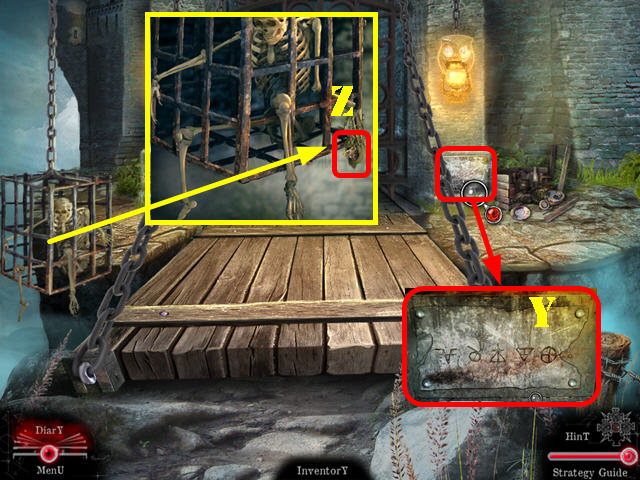
- Inspect the board; remove the 2 pictures and take the 2ND scroll (T).
- Walk down twice.
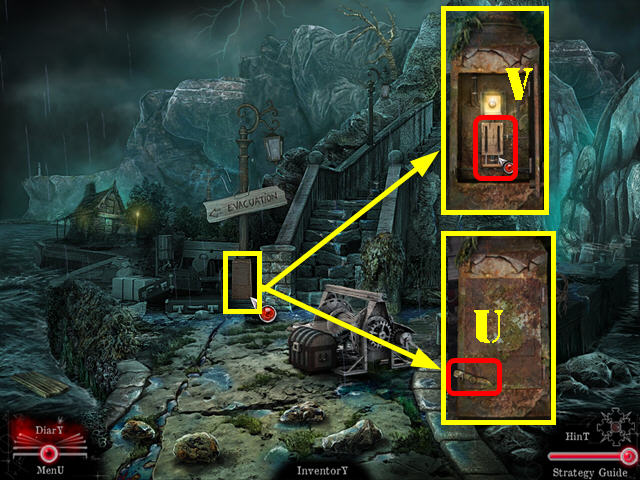
- Examine the base of the lamppost; slide the latch (U) to open the cover.
- Flip the switch (V) to light all the lamps. Note: This action cannot be performed unless you flipped the switch in the ferry station first.
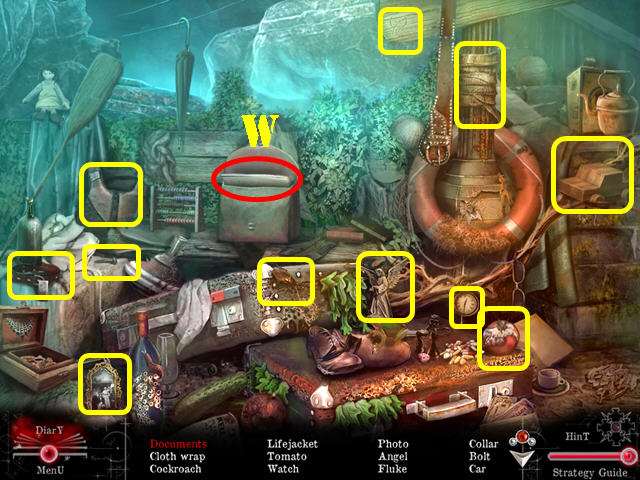
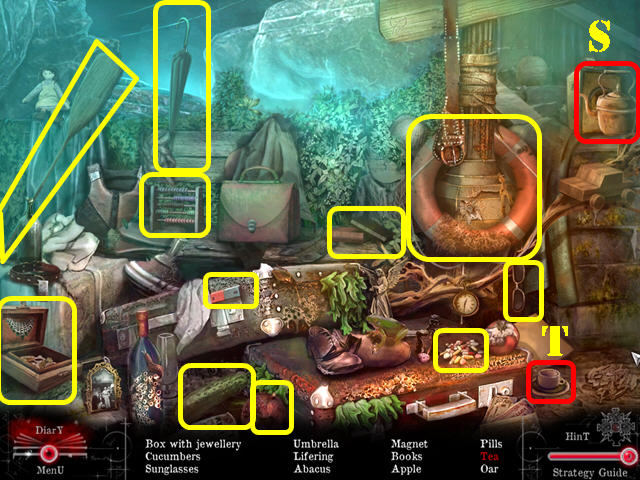
- Play the HOS.
- Open the purse and take the documents (W).
- The BOLT will be added to inventory.
- Go up the steps.
- Move 3 items aside and take the LEVER (X).
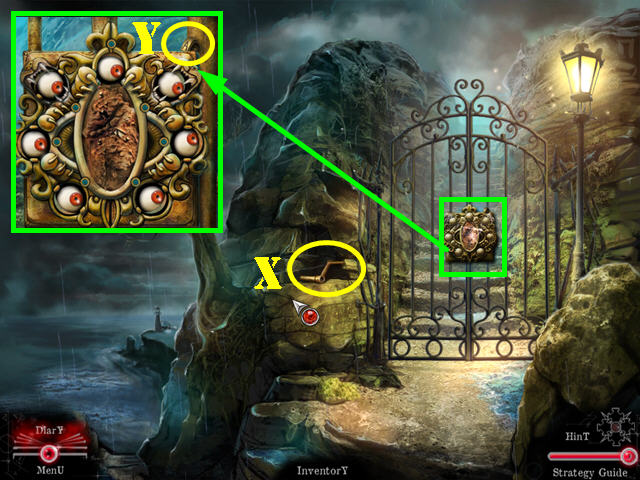
- Examine the gate and take the second TILE (Y).
- Return to the ferry station.
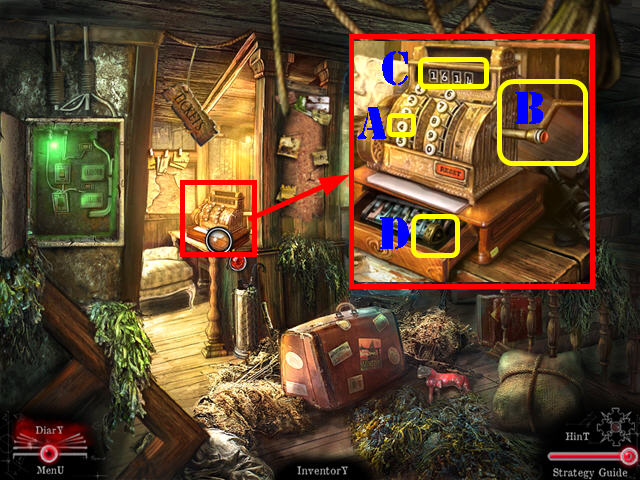
- Examine the cash register; put the BUTTON in the empty slot (A) and place the LEVER (B) on the side.
- Put the BOLT on the side of the lever to activate a puzzle.
- Punch in the correct code that will open the register. The code was found on the ticket in the captain's log and is recorded in your diary.
- Enter the code 1614 (C) and pull on the lever.
- Take the third and final TILE (D).
- Walk down twice.
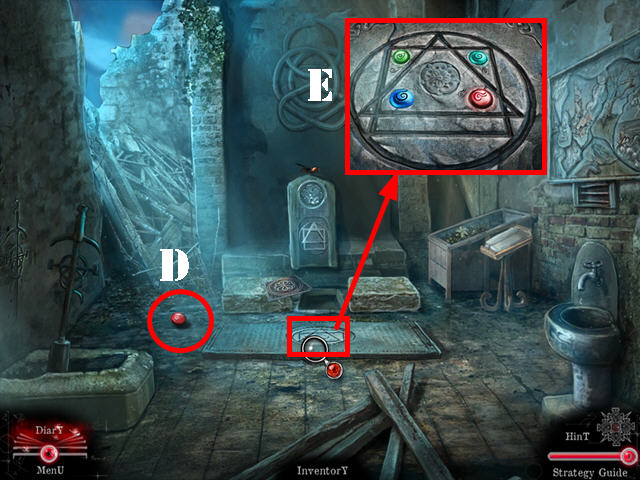
- Zoom into the chest to activate a puzzle.
- Drag the rings around until they are aligned correctly; use the clues etched on the stone as a clue.
- Please look at the screenshot for the solution (E).
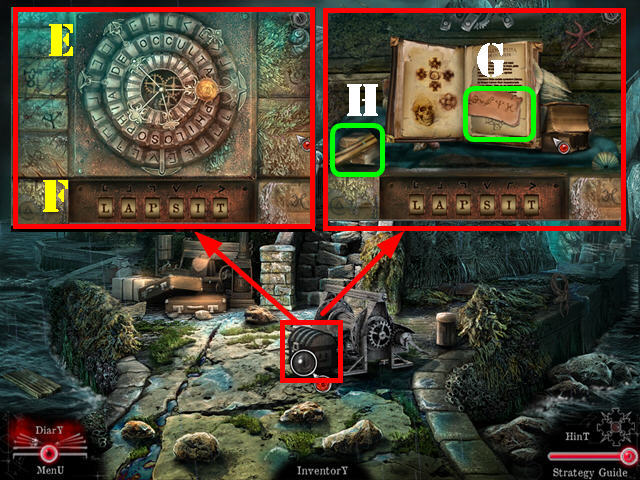
- Insert the 3 TILES in the slots to activate a puzzle.
- Look at the letters associated with the symbols etched directly above the tiles to spell out the correct word.
- Rotate the tiles until you spell:”LAPSIT” (F).
- Open the 'Philosphia De Occulta' book; note the symbols on the paper, they show the right path to take if you follow the order of the symbols (G).
- Read the 3RD scroll (H).
- Go right twice; left, right, and forward.
- Select the old man by the door.
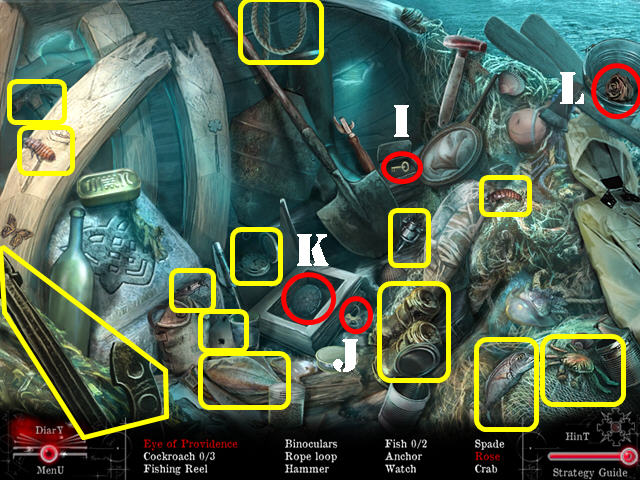
- Play the HOS.
- Open the box and take the key (I). Insert the key in the lock (J); open the book and take the eye of providence (K).
- Touch the bucket and take the rose (L).
- The HAMMER will be added to inventory.
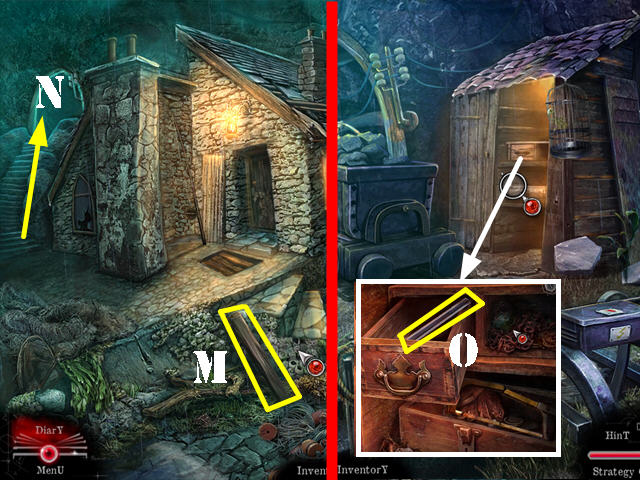
- Take the 1/2 PLANK (M).
- Go up the left steps (N).
- Zoom into the drawers; open the drawer and take the JIGSAW BLADE (O).
- Walk down twice.

- Zoom into the bottom of the lamppost; cut the 2 chains with the JIGSAW BLADE and take the LEVER (P).
- Go left.
- Zoom into the box; cut the lock with the JIGSAW BLADE and take the HOOK (Q).
- Walk down and then go right.
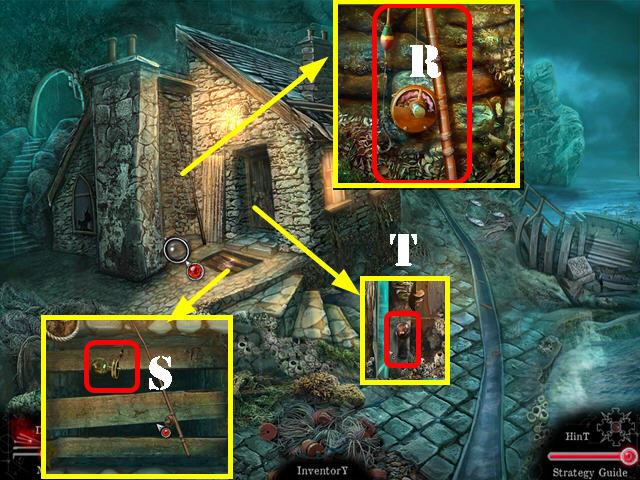
- Zoom into the fishing rod; add the HOOK to the line and take the FISHING ROD (R).
- Examine the grate; use the FISHING ROD in the grate and take the HANDLE (S).
- Zoom into the door; put the HANDLE on the door and go through it to access the fisherman's house (T).
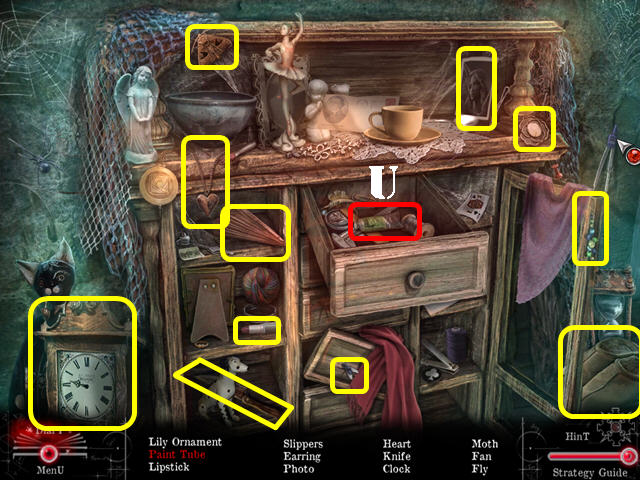
- Play the HOS.
- Open the drawer and take the paint tube (U).
- The KNIFE will be added to inventory.

- Cut the rope with the KNIFE to get the RUSTY KEY (V).
- Walk down twice and go left twice.
- Cut the net twice with the KNIFE and take the BOATHOOK (W).
- Go back into the ferry station.
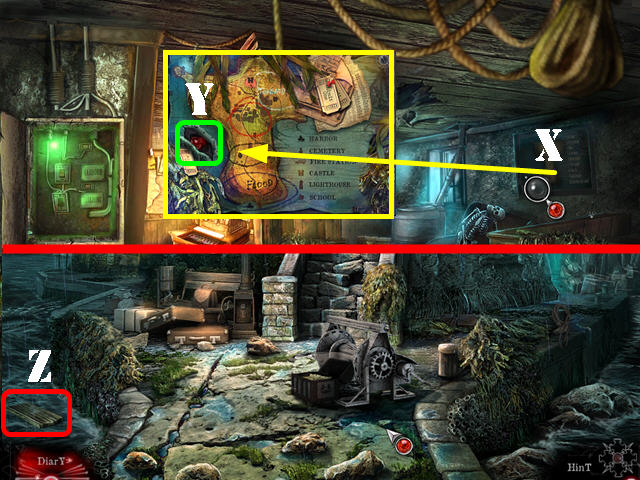
- Look at the map (X); cut the stitches with the KNIFE and take the CRYSTAL HEART (Y).
- Walk down twice.
- Use the BOATHOOK on the 2/2 PLANK in the water (Z) and then take it.
- Go right and then go up the left steps.
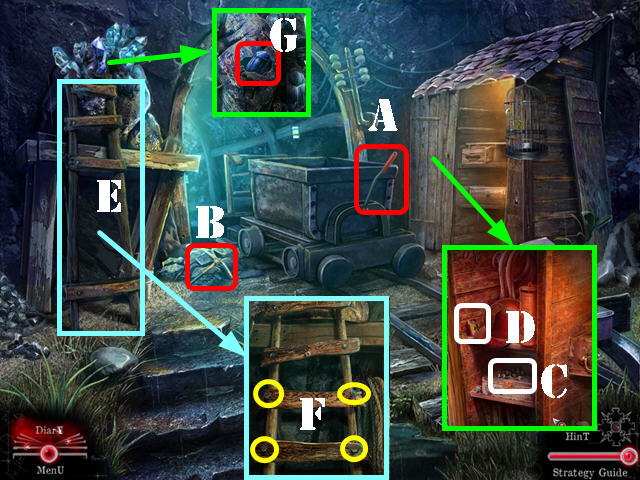
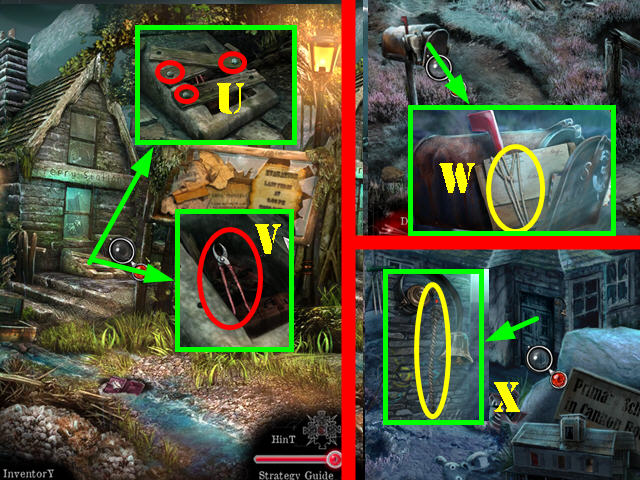
- Put the LEVER on the side of the cart and pull on the lever to dump the contents (A). Take the PICKAX (B).
- Zoom into the side of the shed; insert the RUSTY KEY in the lock. Take the NAILS (C) and the MATCHES (D).
- Examine the broken ladder (E); put the 2 PLANKS on it, followed by the NAILS.
- Use the HAMMER on the 4 nails (F).
- Zoom into the crystal and use the PICKAX on it 3 times. Take the CRYSTAL (G) and then take the LADDER.
- Walk down.
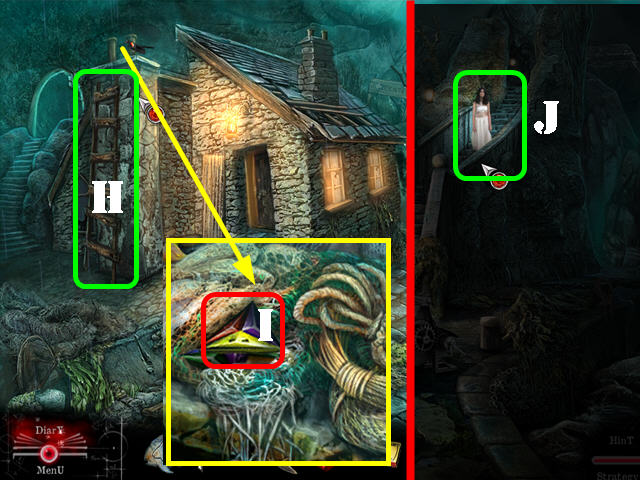
- Put the LADDER on the side of the house (H).
- Examine the roof and take the COLORED LENSES (I).
- Walk down and talk to the lady on the steps (J).
- Go left twice.
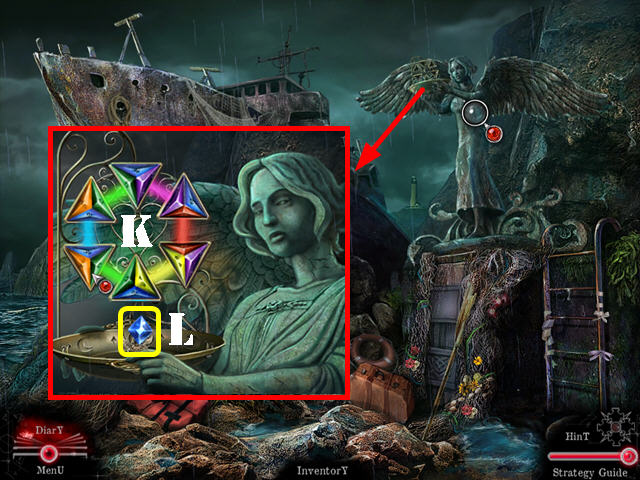
- Examine the statue; put the COLORED LENSES into the slots and put the CRYSTAL in the bowl to activate a puzzle.
- Rotate the lenses so all of the ones with the same color are facing each other.
- Please look at the screenshot for the solution (K).
- Take the MOONSTONE (L).
- Go back to the fisherman's house.
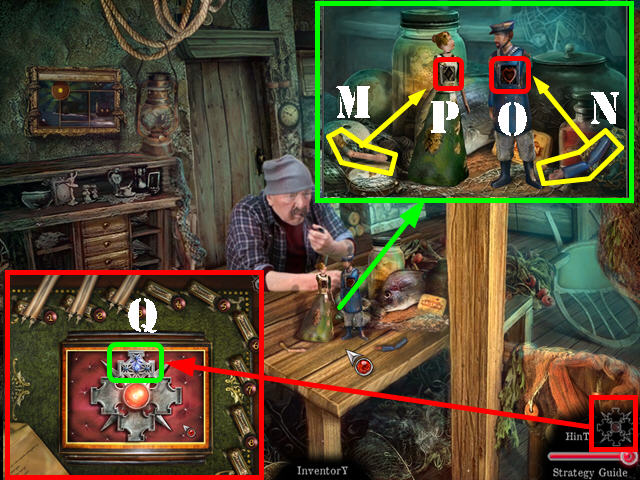
- Zoom into the figurines; attach the one arm to the lady (M) and the other arm to the man (N).
- Put the CRYSTAL HEART in the male's chest (O) and the MOONSTONE in the lady's chest (P).
- Take the Amulet in the center of the screen; insert into the Amulet into the Medallion (Q).
- Exit the Medallion and go through the back door.
Chapter 2: The Earth Amulet
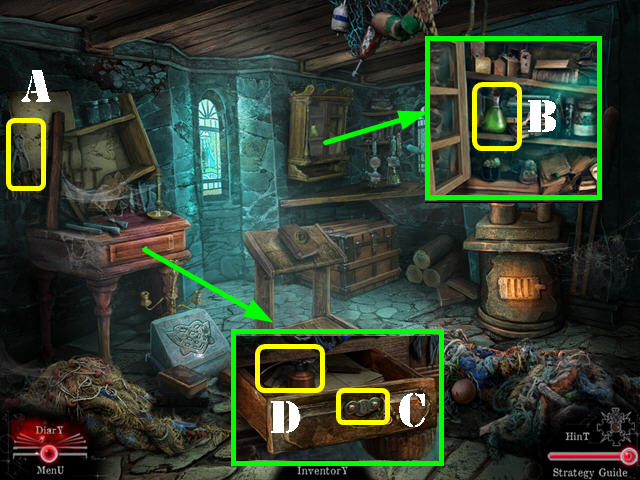
- Take the WIRE CUTTERS (A).
- Examine the cabinet; open the left door and take the LIQUID (B).
- Zoom into the drawer; use the WIRE CUTTERS to pull out both pins (C) and take the RUST REMOVER (D).
- Examine the flasks; look at the instructions (E).
- Remove the top (F); pour the LIQUID into the flask and rotate the valve (G).
- Put the flask on the burner (H); light the candle (I) with the MATCHES and spin the handle (J).
- Put the LITTLE ROCK on the bracket and touch it (K) and then take the STONE FISH.
- Zoom into the bookstand; put the STONE FISH on the book (L) and take the FISHERMAN'S KEY (M).
- Pick up the 4TH scroll (N).
- Walk down.
- Examine the picture; put the FISHERMAN'S KEY in the slot.
- Move the blocks around until you form the correct image.
- Please look at the screenshot for the solution and take the CIPHER (O).
- Walk down twice and go up the steps.
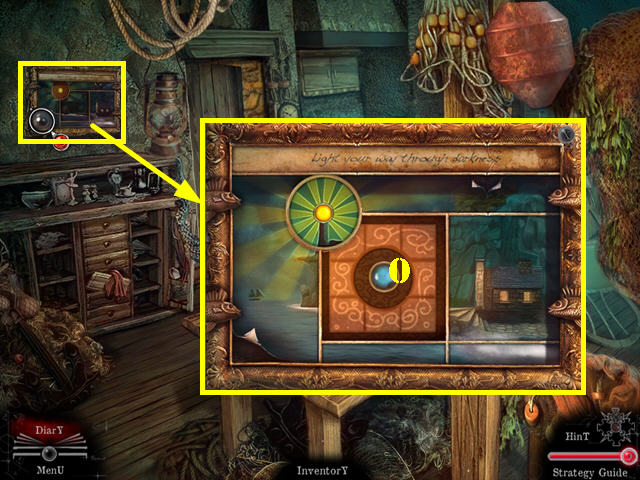
- Zoom into the puzzle (P); rotate the rings until they are aligned correctly. Rotating one ring will affect another. The center piece only moves itself.
- Please look at the screenshot for the solution (Q).
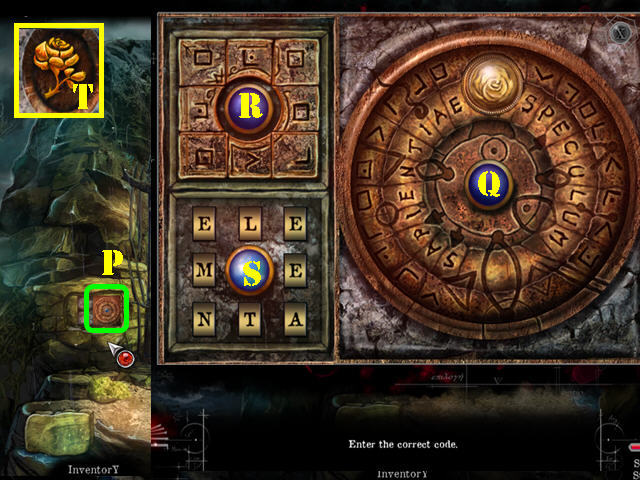
- Put the CIPHER over the blue button (R).
- Spell out the word ELEMENTA into the tiles (S).
- Take the ROSE (T).

- Zoom into the gate; use the RUST REMOVER in the center of the lock. Clean the residue with the CLOTH 2 times (U).
- Close all the eyes by selecting them in this order: A, E, C, A, F, D, A, G, and B.
- Put the ROSE in the center of the lock (V).
- Open the suitcase and examine it; open the book and zoom into the open book (@).
- Go through the gate.
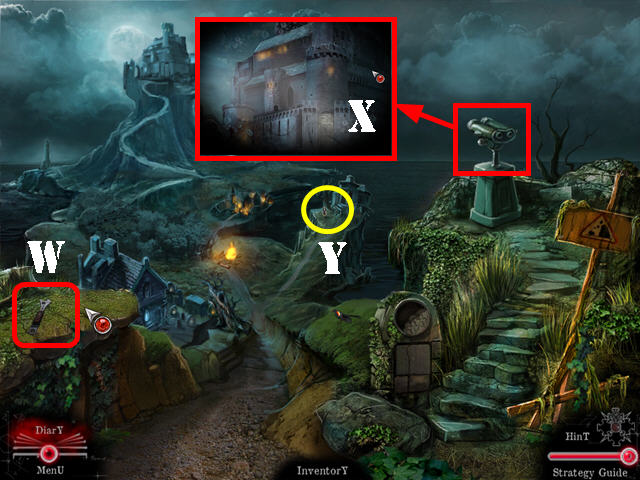
- Remove the 2 branches and take the WRENCH (W).
- Examine the telescope to view the castle (X).
- Examine the lady standing by the cliff; follow her (Y).
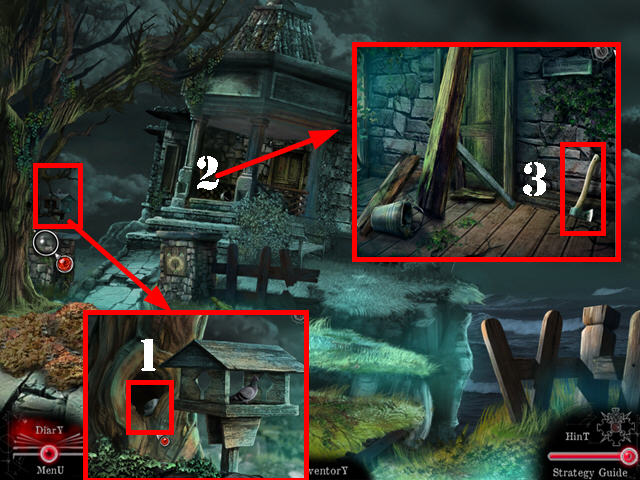
- Examine the birdhouse; remove the stone with the KNIFE and take the first PHOTO PART (1).
- Look at the porch; touch the door and debris will fall in front of it (2).
- Take the AXE (3).
- Walk down and go left.
- Move the 3 planks out of the way and zoom into the tree.
- Cut the tree with the AXE 3 times (4).
- Use the MATCHES on the lantern (5).
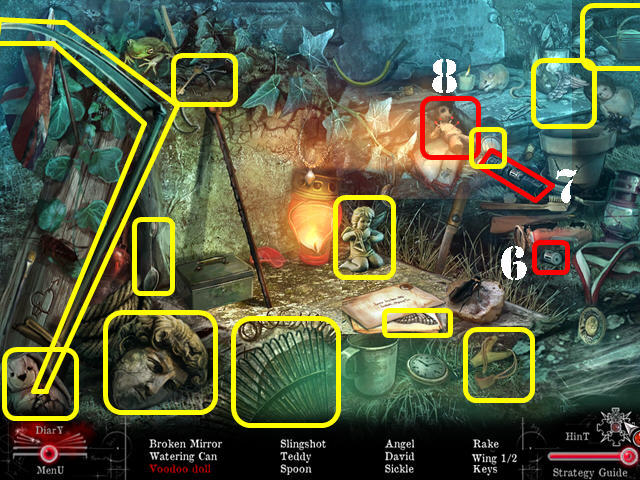
- Play the HOS.
- Put the battery (6) in the flashlight (7) and take the voodoo doll (8).
- The RAKE will be added to inventory.
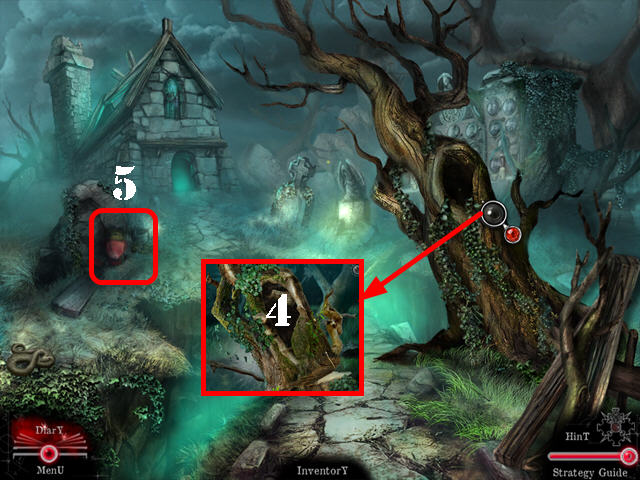
- Go towards the altar on the left.
- Take the SMALL LADDER (9).
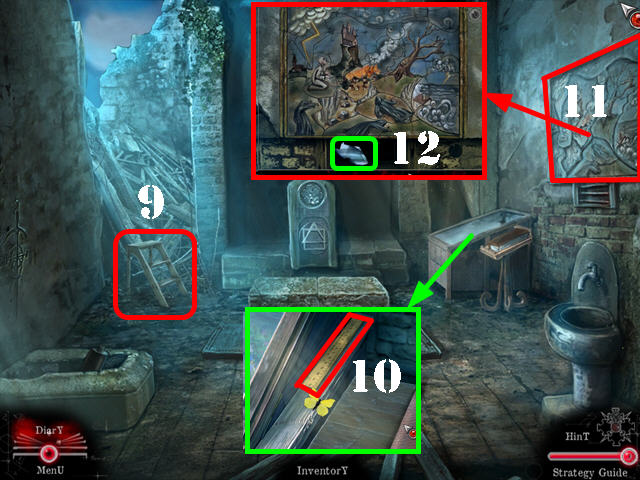
- Examine the case and take the RULER (10).
- Examine the picture on the wall to activate a puzzle (11).
- Repeat the 3 sets of sequences shown on the picture. The sequences are random.
- Take the second PHOTO PART (12).
- Walk down twice and head forward towards the fire (13).
- Remove the branch and take the CROWBAR (14).
- Walk down and take the right path.
- Examine the pile of leaves; use the RAKE on the leaves 3 times and take the CHAIN (15).
- Put the SMALL LADDER below the window (16).
- Examine the window and break the glass with the AXE (17).
- Open the latch and then the window; go through the window.
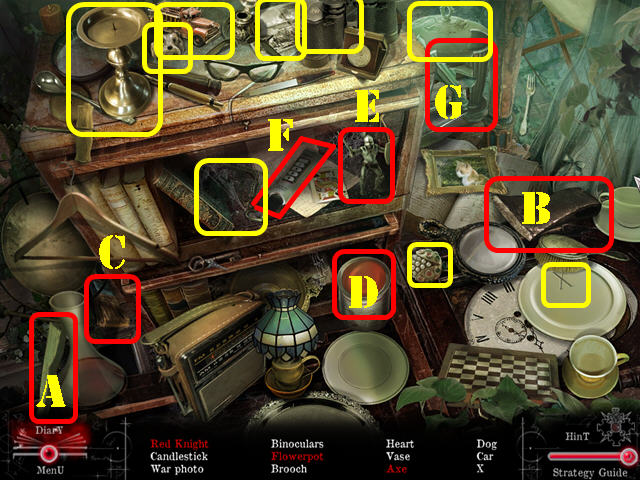
- Play the HOS.
- Drag the handle (A) to the axe head (B) and take the axe.
- Put the paintbrush (C) in the red paint (D); use the red paint brush on the knight (E) and take the red knight.
- Put the glue (F) on the broken flowerpot (G) and take the flowerpot.
- The GLUE will be added to inventory.
- Go through the back door to access the kitchen.
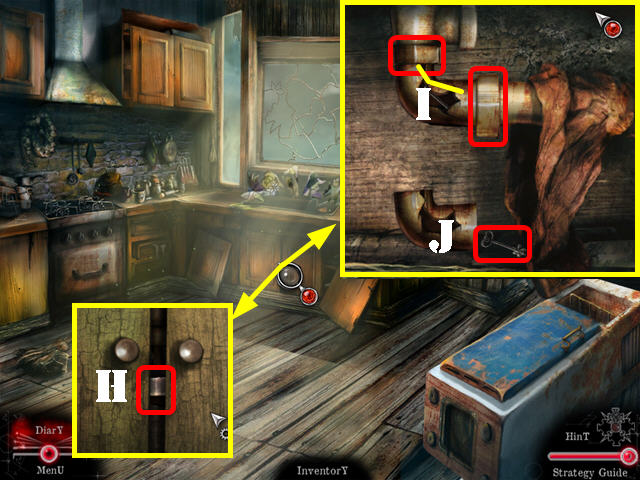
- Examine the doors below the sink. Put the RULER on the lock (H).
- Use the WRENCH on both clamps 3 times (I).
- Take the STRANGE KEY (J).
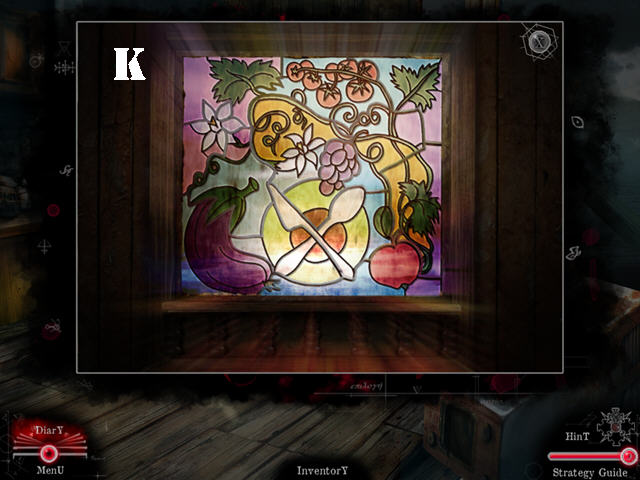
- Examine the window to activate a puzzle.
- Arrange the stained glass pieces into the right spots.
- Hold and drag a piece into the right spot. Rotate a piece by clicking on it several times.
- Please look at the screenshot for the solution (K).
- Examine the spot the light is shining on (L). Remove the floorboard with the CROWBAR.
- Zoom into the chest and insert the STRANGE KEY into the lock (M).
- Take the third PHOTO PART (N).
- Walk down 3 times and go left.
- Zoom into the tombstone; put the GLUE on the stone and insert the 3 PHOTO PARTS into the slots (O).
- Take the SIGN (P).
- Walk down.
- Examine the stone; insert the SIGN into the slot (Q).
- Take the TAP and the CABINET KEY (R).
- Go back to the kitchen.
- Zoom into the top cabinets; use the CABINET KEY in the lock (S).
- Take the CORN (T), SOLUTION (U), and look at the time codes (@).
- Walk down twice.
- Examine the mailbox (V). Enter the times: 1:00, 7:30, and 11:20 on the clock.
- Take the CUCKOO (W).
- Examine the porch; put the CORN by the bucket (X) and take the BUCKET (Y).
- Go back to the altar.
- Examine the sink; put the BUCKET in the sink.
- Put the TAP on the faucet and turn the tap (A); take the BUCKET WITH WATER (B).
- Walk down twice and go towards the fire.
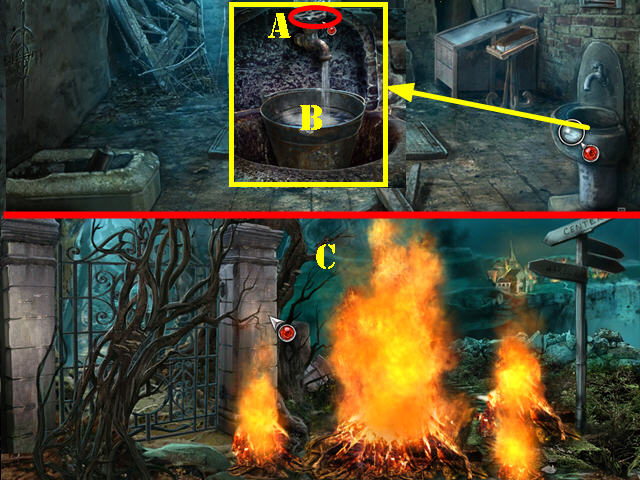
- Extinguish the fire with the BUCKET OF WATER (C) and go forward.
- Touch the caped person standing in the fire.
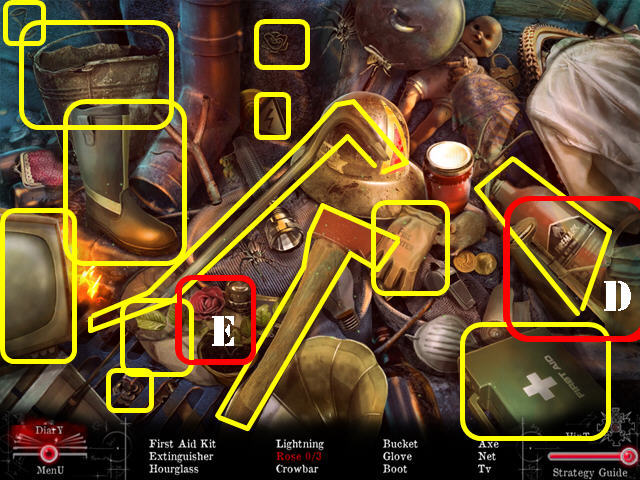
- Play the HOS.
- Drag the watering can (D) to the pot and take the rose (E).
- The BUTTERFLY NET will be added to inventory.
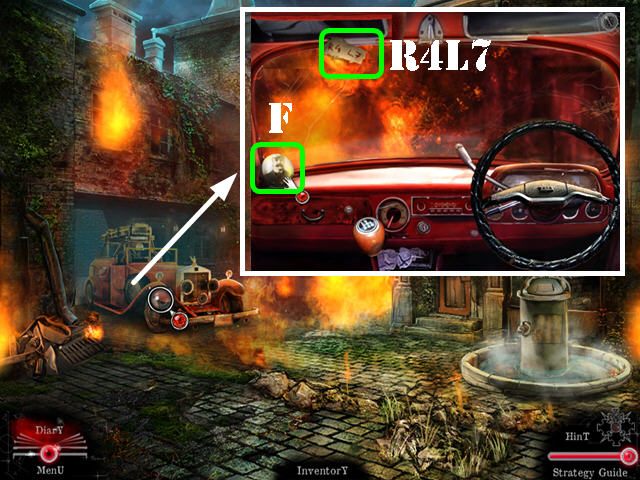
- Zoom into the fire truck and take the FIREMAN PHOTO (F).
- Flip up the visor and note the code (R4L7).
- Exit the truck; walk down twice and go left.
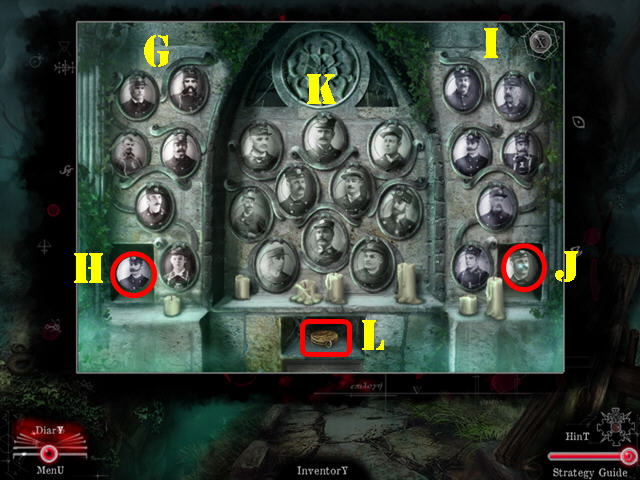
- Examine the picture wall; put the FIREMAN PHOTO into the empty frame on the left to activate a puzzle.
- Your goal is to put the photos into the correct frames. Drag one photo over the other to swap their positions.
- Arrange the pictures on the left as shown in the screenshot (G).
- Take the photo (H); put the photo into the empty slot on the right.
- Arrange the pictures on the right as shown in the screenshot (I).
- Take the photo (J); put the photo into the empty slot in the center.
- Arrange the pictures in the center as shown in the screenshot (K).
- Take the PENDULUM (L).
- Go back into the floating house.
- Examine the jar; catch the 4 fireflies with the BUTTERFLY NET (M).
- Take the SMALL HAND and the BIG HAND (N).
- Take the 5TH scroll (O).

- Examine the picture; put the CUCKOO at the top (P).
- Put the PENDULUM below the clock (Q).
- Put the SMALL HAND and the BIG HAND on the clock to activate a puzzle (R).
- Pick up a gear and place on one of the spindles until all the gears are spinning.
- Please look at the screenshot for the solution (S).
- Take the Amulet in the center of the screen; insert the Amulet into the Medallion (T).
- Exit the Medallion.
Chapter 3: The Fire Amulet
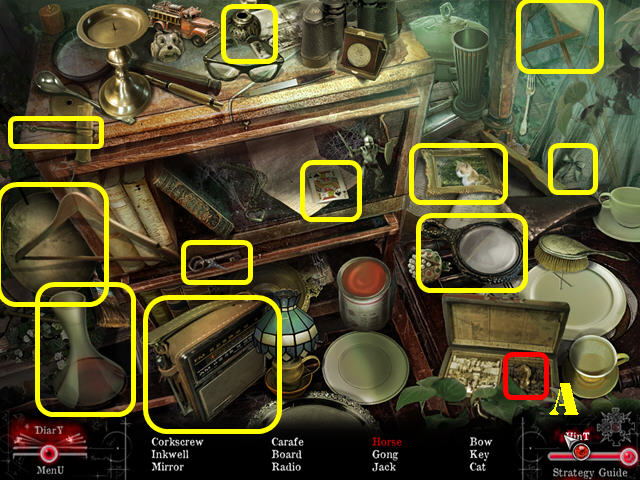
- Play the HOS.
- Open the chessboard and take the HORSE (A).
- The KEY will be added to inventory.
- Walk down twice; go towards the fire and then go forward.
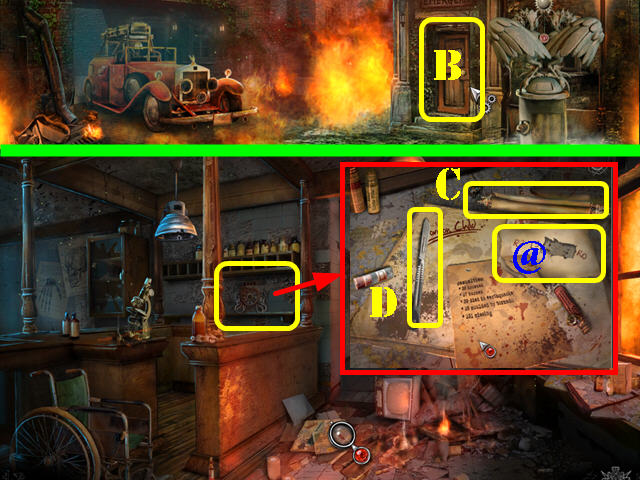
- Use the KEY on the door and then go through the door to access the lab (B).
- Examine the debris on the ground; take the 6TH scroll (C).
- Look at the incomplete code (@).
- Slide the SCALPEL out and then take it (D).
- Examine the wall behind the counter to activate a puzzle.
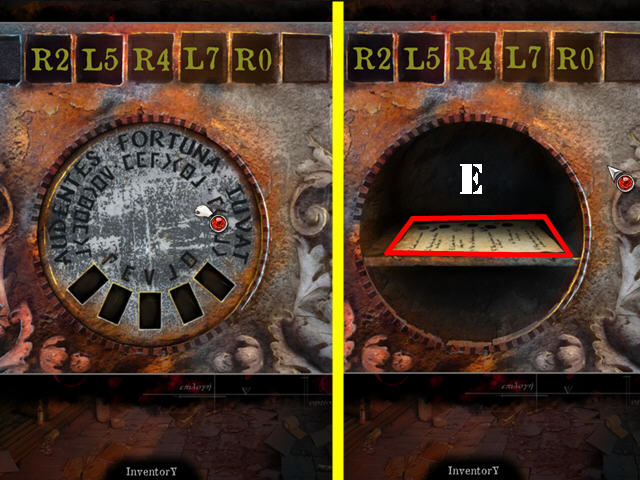
- Match the numbers and the symbols to enter the correct code. The incomplete code was in the lab and the rest of the code was on the fire truck's visor.
- Please look at the screenshot for the solution and turn the wheel. R is for turning right (clockwise) and L is for turning left (counterclockwise). To solve the puzzle turn the wheel: R2, L5, R4, L7, and R0.
- Remove the cover and take the RECIPE (E).
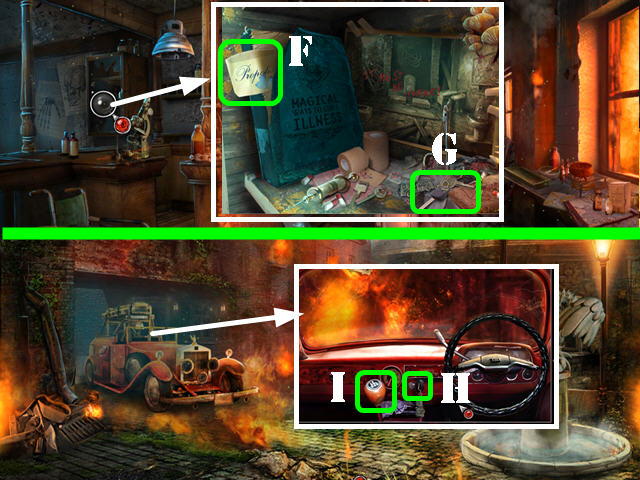
- Examine the shelf; cut the stitches with the SCALPEL and take the PROPOLIS (F).
- Move the 3 sheets of paper and take the CAR KEY (G).
- Walk down.
- Examine the fire truck; insert the CAR KEY into the ignition and turn the key (H).
- Shift the gear (I) to move the truck.
- Go through the left entryway.
- Touch the fire truck to activate a HOS; play it.
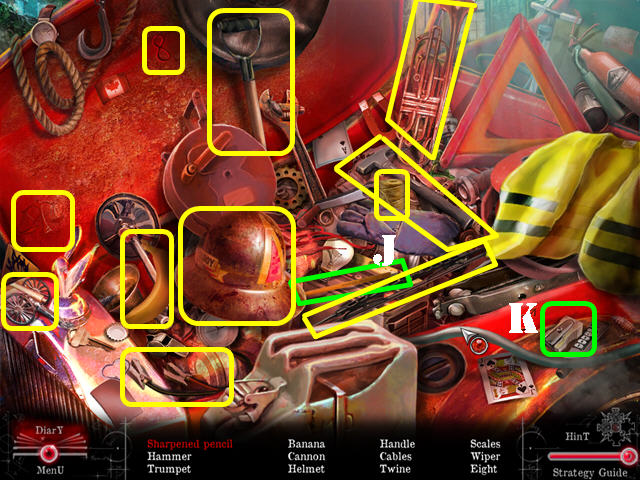
- Drag the pencil (J) to the pencil sharpener (K); take the sharpened pencil.
- The HANDLE will be added to inventory.
- Walk down.
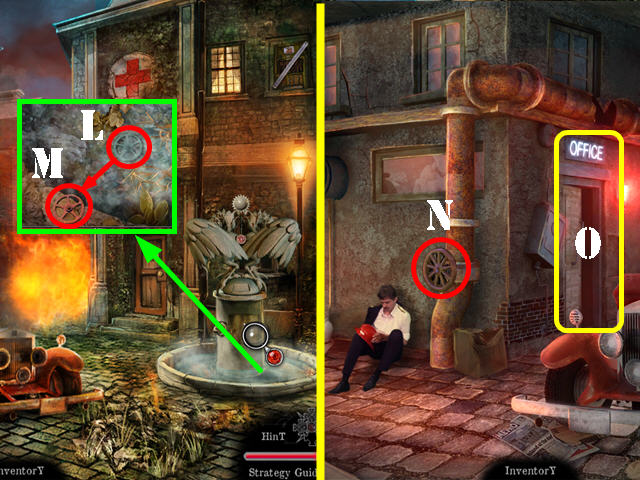
- Examine the water in the fountain; put the HANDLE on the valve (L).
- Take the VALVE (M).
- Go through the left entryway.
- Put the VALVE on the pipe and turn the pipe (N).
- Go through the office door (O).
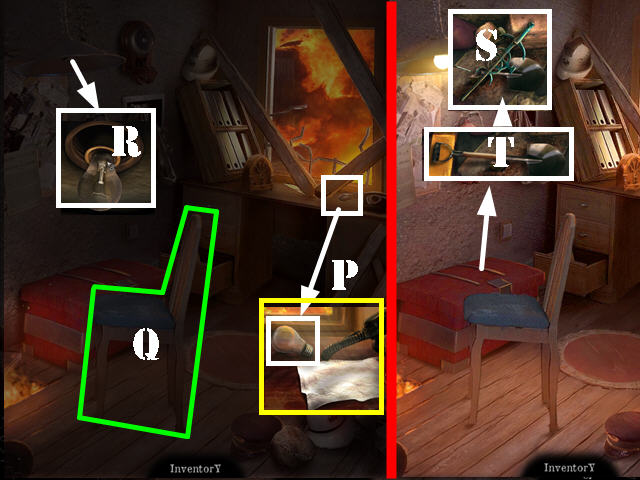
- Zoom into the desk and take the LIGHT BULB (P).
- Move the chair (Q).
- Examine the ceiling lamp; put the LIGHT BULB in the socket (R).
- Open and examine the chest; move 3 large items out of the way and take the LEVER (S).
- Put the HANDLE on the shovel head and take the SHOVEL (T).
- Walk down 4 times and go left.
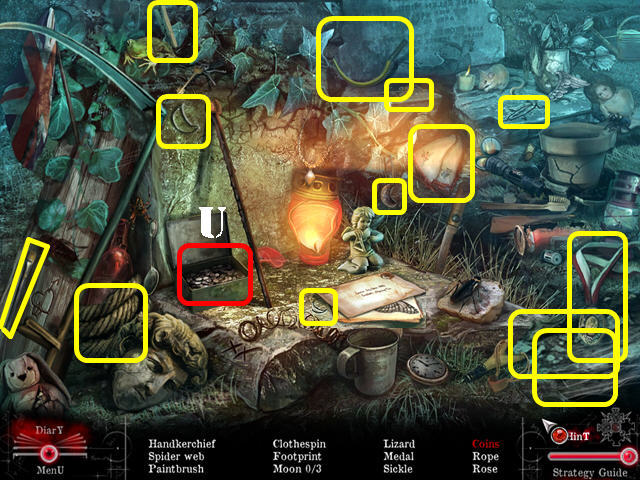
- Play the HOS.
- Open the box and take the coins (U).
- The SICKLE will be added to inventory.
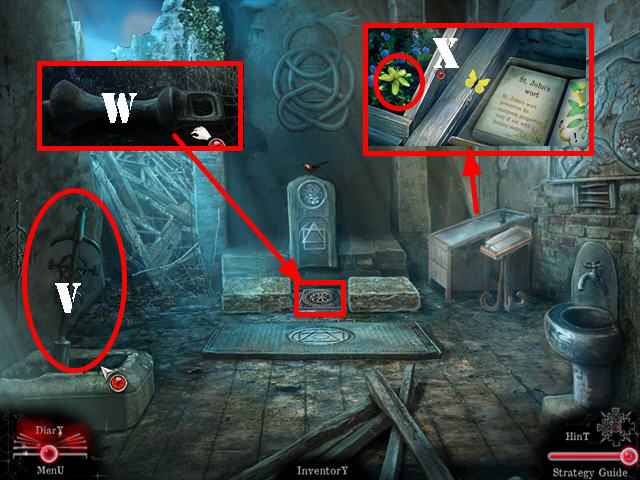
- Go into the altar.
- Put the LEVER into the slot (V) and then pull on the lever.
- Examine the ground; remove the grate and take the BELL CLAPPER (W).
- Zoom into the case; open the glass cover and cut the ST. JOHN'S WORT with the SICKLE (X).
- Go back to the outside of the lab.
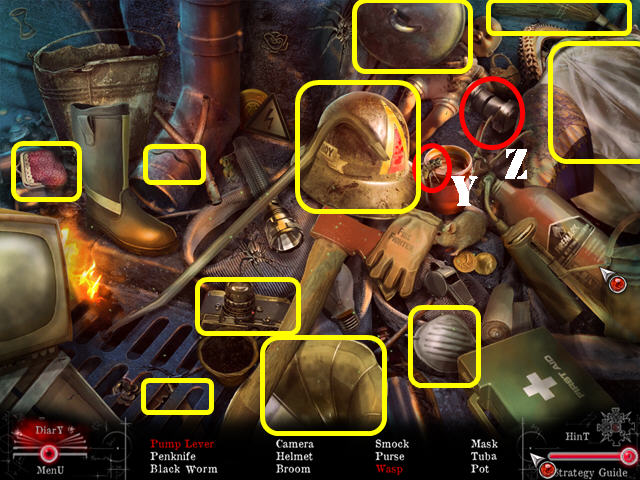
- Play the HOS.
- Open the honey jar and take the wasp (Y).
- Remove the cloth and take the pump lever (Z).
- The PUMP LEVER will be added to inventory.
- Go left.
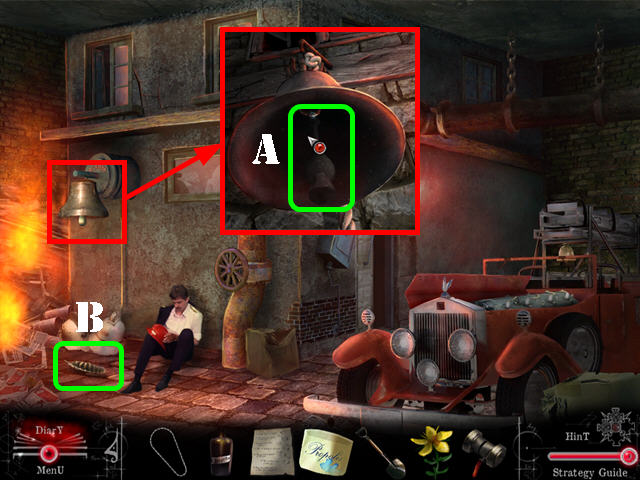
- Examine the bell; put the BELL CLAPPER in it (A) and ring the bell.
- Take the OWL FEATHER (B).
- Walk down and go into the lab.
- Examine the table and put the RECIPE on it (C). Look at the recipe to view the steps.
- Put the SOLUTION into the pot (D).
- Light the burner with the MATCHES (E).
- Put the OWL FEATHER and the PROPOLIS into the pot.
- Put the ST. JOHN'S WORT into the pestle; drag the crushed St. John's Wort into the pot (F).
- Put the spoon (G) into the salve mixture; put the spoon on the bandage and take the SALVE BANDAGE (H).
- Walk down and go left.
- Zoom into the injured man; put the SALVE BANDAGE on his arm (I).
- Take the Amulet in the center of the screen; insert the Amulet into the Medallion (J).
- Exit the Medallion.
Chapter 4: The Air Amulet
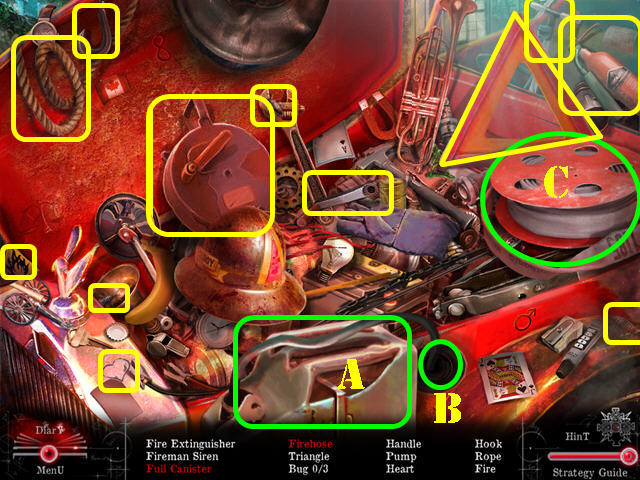
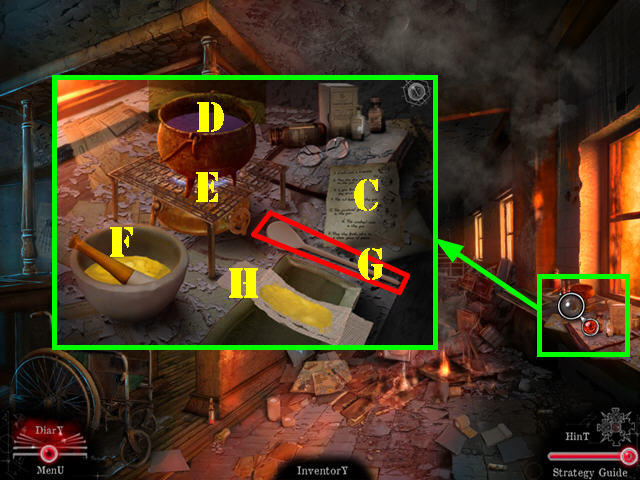
- Play the HOS.
- Touch the canister (A) and remove the cap (B); touch the hose and take the full canister.
- Move the life vest and take the firehose (C).
- The FIREHOSE will be added to inventory.
- Walk down.
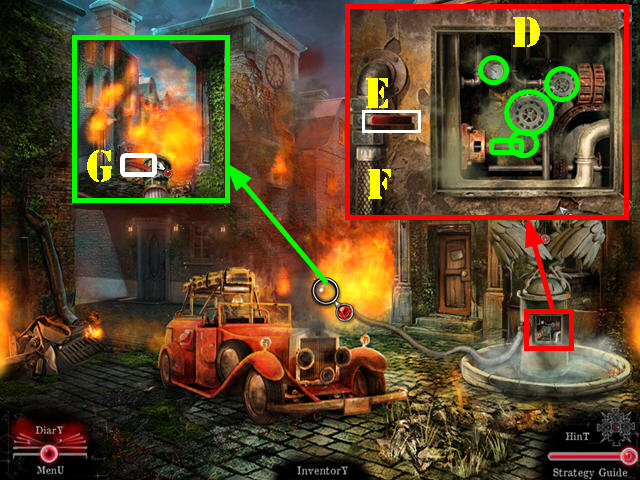
- Examine the mechanism on the fountain and open the cover.
- Drag the pieces into place – thermometer, 3 gears, and a small metal tube (D).
- Put the CHAIN over the gears.
- Put the PUMP LEVER into place (E).
- Attach the FIREHOSE to the pump and press on the lever (F).
- Zoom into the fire at the end of the hose and turn the lever (G) to extinguish the fire.
- Go forward.
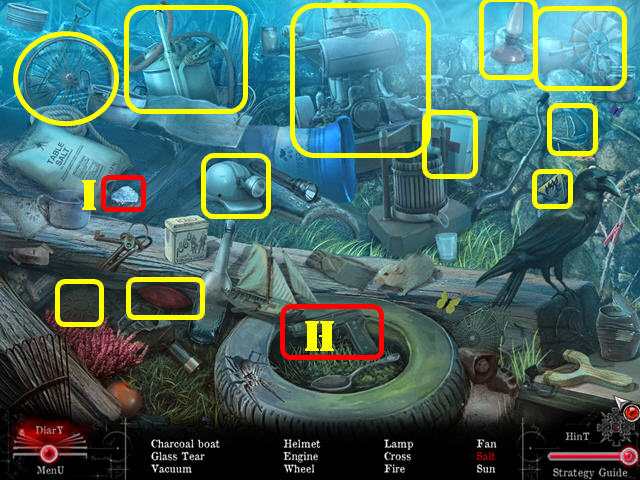
- Play the HOS.
- Shoot the salt bag with the gun (H) and take the salt (I).
- The PIECE OF STAINED GLASS will be added to inventory.
- Examine the fallen tree; cut the tree with the AXE 3 times (J).
- Go forward through the right path and enter the fisherman's house.
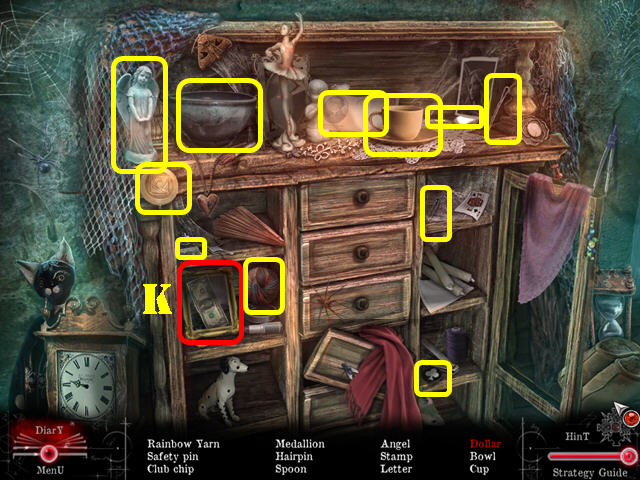
- Play the HOS.
- Flip the frame around and take the dollar (K).
- The SPOON will be added to inventory.
- Go through the back door.
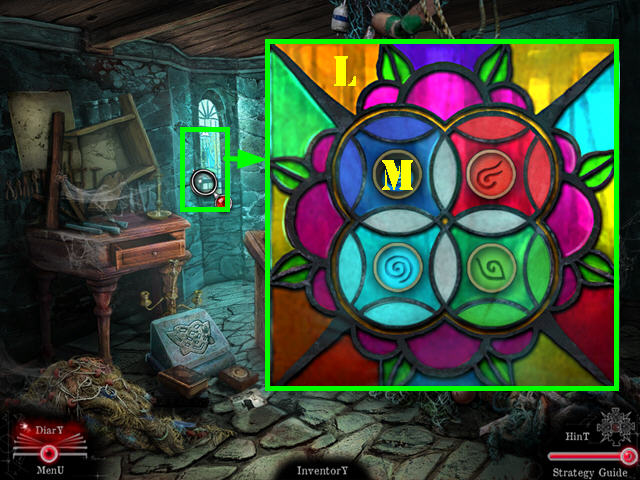
- Examine the stained glass window; insert the PIECE OF STAINED GLASS into the window to activate a puzzle.
- Move the stones so the outer edges match the color in the center.
- Please look at the screenshot for the solution (L).
- Take the WATER STONE (M).
- Walk down twice; take the right path and then head left.
- Zoom into the mound; dig in it with the SHOVEL 3 times and take the CROSS SCREWDRIVER (N).
- Go left.
- Touch the entryway for the gates to close (O) and activate a HOS (P).
- Play the HOS.
- Put the key (Q) in the lock and take the harmonica (R).
- The PAINTBRUSH will be added to inventory.
- Walk down twice; go right and down.
- Play the HOS.
- Drag the teapot (S) to the cup (T) and take the tea.
- The MAGNET will be added to inventory.
- Go left.
- Examine the area below the window; remove the 3 bolts with the WRENCH (U) and take the PLIERS (V).
- Walk down; go right and take the right path.
- Examine the mailbox; cut the rope with the PLIERS or the BLADE and take the ROPE (W).
- Go left.
- Examine the door; put the ROPE on the bell and pull on the rope (X). Enter the school.
- Examine the desk and take the STAR KEY (A).
- Chop the boards on the right with the AXE 3 times (not pictured).
- Examine the shelf; move the books aside and take the DRAWING (B).
- Use the SPOON on the doll eye and take the DOLL EYE (C).
- Look at the crib; put the DOLL EYE in the eye socket (D) and take the PUSH BUTTON (E).
- Walk down and go left.
- Examine the knife; cut the 3 wires around it with the PLIERS. Take the BLADE (F).
- Walk down twice.
- Examine the fuse box; use the STAR KEY on all four screws to remove the cover and activate a puzzle (G).
- Your goal is to cut off the power.
- Please look at the screenshot for the solution (H).
- Take the YELLOW PAINT (I).
- Take the right path and then go up the left steps to back to the mines.
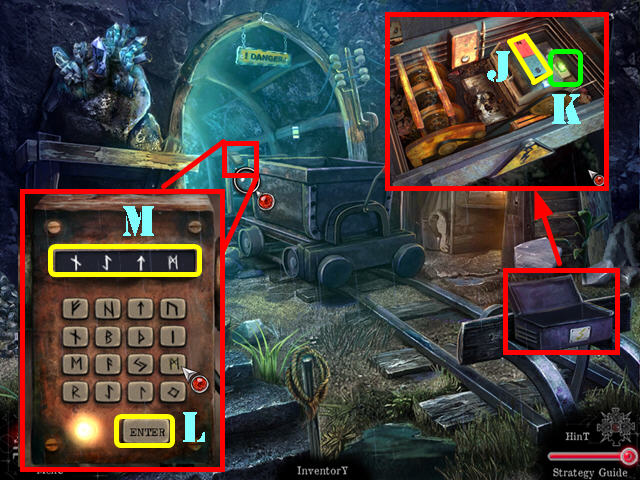
- Examine the box and open it.
- Put the MAGNET in the empty slot (J) and flip the switch (K).
- Examine the keypad behind the cart; put the PUSH BUTTON in the slot (L).
- Enter the code as shown in the screenshot (M) and then press enter (L).
- Play the HOS.
- Touch the gun in the lower center and then take the bullets (M).
- The DUSTER will be added to inventory.
- Open the sarcophagus and take the 1/3 LEVER (N).
- Take the FIREHOOK (O).
- Examine the left wall; take the FILE (P).
- Walk down twice.
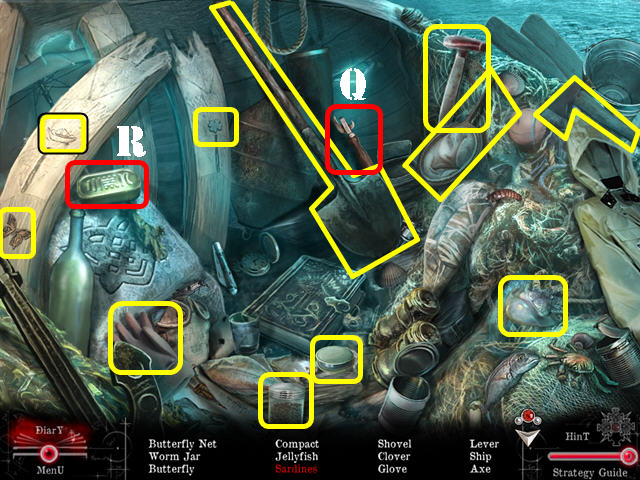
- Play the HOS.
- Use the can opener (Q) on the can (R); take the sardines.
- The LEVER will be added to inventory.
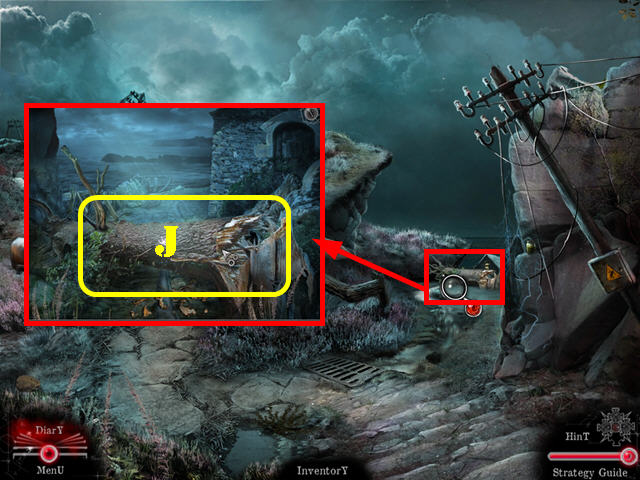
- Go into the house and then go into the back door.
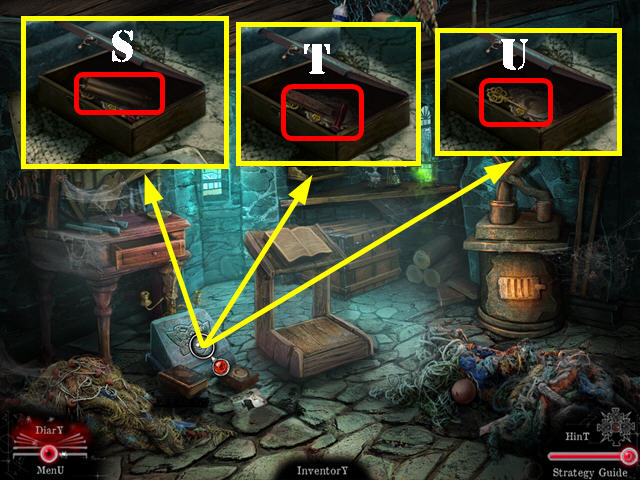
- Zoom into the items on the ground; use the FILE to open the box and take the 7TH scroll (S).
- Take the LEVER 3/3 (T) and the KEY (U).
- Walk down twice; go up the left steps and then go through the entryway.
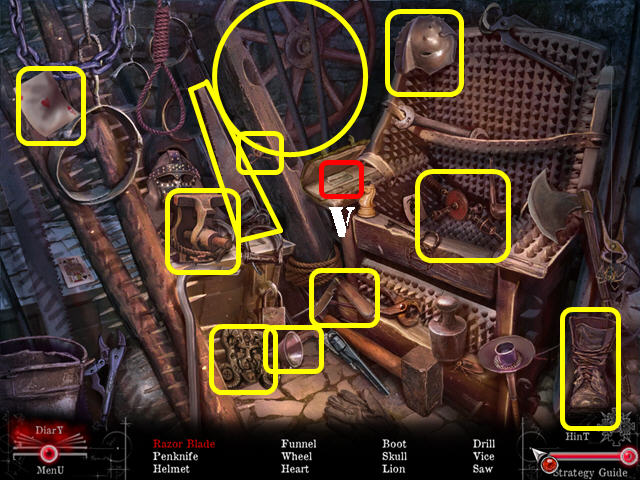
- Play the HOS.
- Open the case and take the razor blade (V).
- The LION BEAST will be added to inventory.

- Zoom into the left wall; insert the 3 LEVERS into the slots.
- You have to flip all the switches to the up position.
- To solve the puzzle, flip the switches in this order: 2, 3, 4, 5, and 3.
- Take the HORSE in the cage (W).
- Walk down twice; take the right path and then go left.
- Examine the doll house and take the BLUE PAINT (X).
- Go left.
- Examine the plaque; remove the cobwebs with the DUSTER 3 times. Note the symbols on the plaque (Y).
- Examine the cage; use the FIREHOOK on the cage. Cut the bag with the BLADE and take the DOG BEAST (Z).
- Walk down and go into the school.
- Examine the palette on the right; put the PAINTBRUSH, BLUE PAINT, YELLOW PAINT, and the DRAWING on it.
- Mix the paint to create new colors.
- Select yellow and blue to make green; then select it to add the green paint to the palette.
- Select red and blue to make purple; then select it to add the purple paint to the palette.
- Select yellow and red to make orange; then select it to add the orange paint to the palette.
- A drawing will be revealed after the orange, purple, and green colors have been added to the palette.
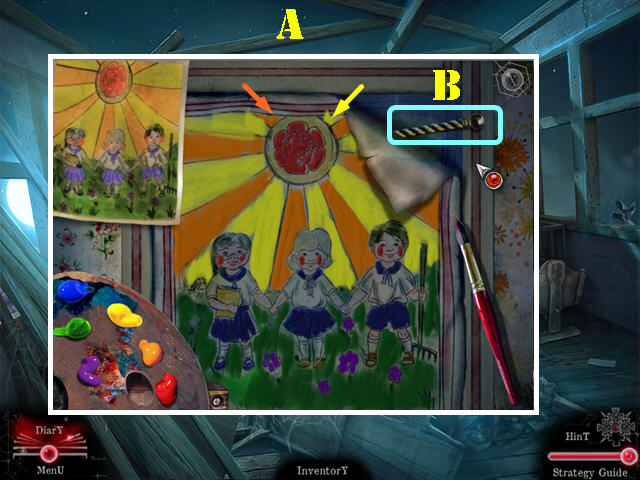
- Dip the paintbrush into the paint and then color in the parts of the drawing accordingly.
- Please look at the screenshot for the solution (A). Don't forget to paint the yellow and orange rays at the very top (yellow and orange arrows). The flowers are purple, the clothes are blue, the cheeks and the sun are red.
- Take the MUSIC BOX PART (B).
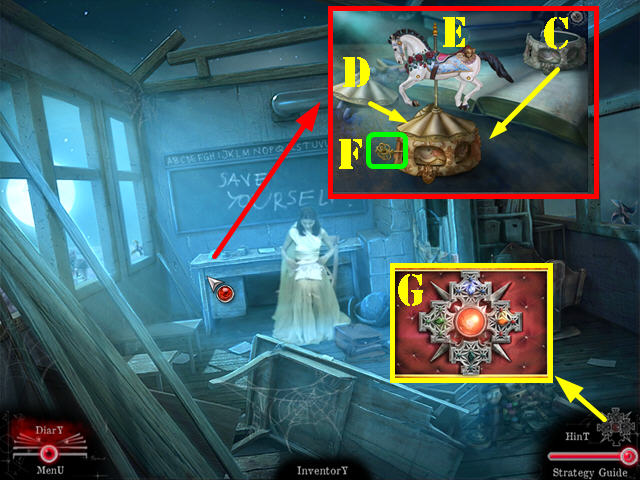
- Zoom into the desk; drag both pieces (C and D) to the music box base.
- Put the MUSIC BOX PART on top of the carousel and then put the HORSE on top of the pole (E).
- Insert the KEY into the lock (F).
- Take the Amulet in the center of the screen; insert into the Amulet into the Medallion.
- Take the MEDALLION (G).
- Walk down 3 times; go left and then go into the office.
Chapter 5: The Finale
- Examine the radio; remove the screws with the CROSS SCREWDRIVER (A).
- Take the AIR STONE (B).
- Go back to the mines and then go through the entryway.
- Examine the back door; put the LION BEAST and the DOG BEAST into the slots.
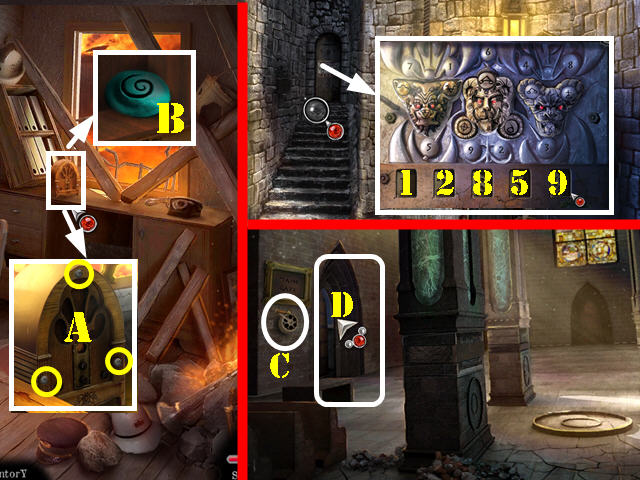
- Enter the correct code (12859).
- Go through the door to access the church.
- Turn the crank (C) and then go through the door (D).
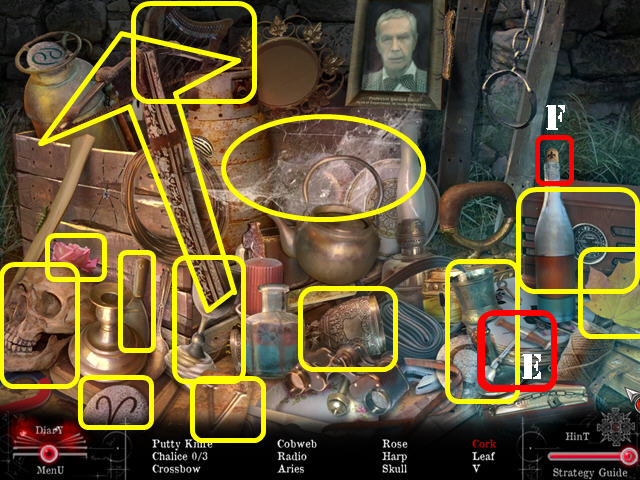
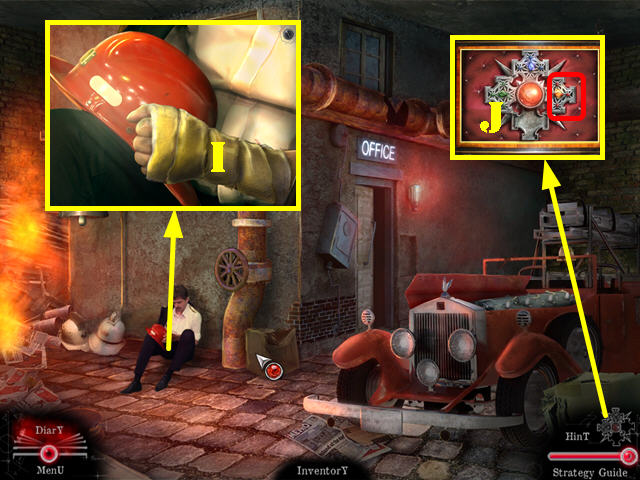
- Play the HOS.
- Remove the cork (E) with the corkscrew (F) and then take the cork.
- The PUTTY KNIFE will be added to inventory.
- Go forward.
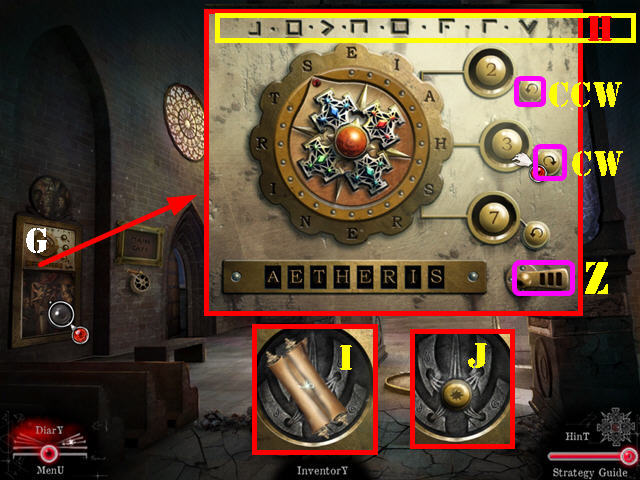
- Examine the left side of the wall; insert the MEDALLION into the slot (G).
- Remove the cement with the PUTTY KNIFE 3 times (H).
- Enter “AETHERIS “ into the slots by using the buttons on the side. The number next to each button turns the wheel the number of times shown on the button. Select clockwise or counterclockwise by pressing on the arrows next to the numbered buttons.
- Cw is for clockwise and ccw is for counterclockwise.
- To solve the puzzle, press the buttons in this order: cw 2, ccw 2, ccw 2, ccw 7, ccw 3, ccw 7, cw 3, and cw 3. Press on the lever to enter your solution (Z).
- Take the 8TH scroll (I).
- Press the button that appears behind the scroll (J).
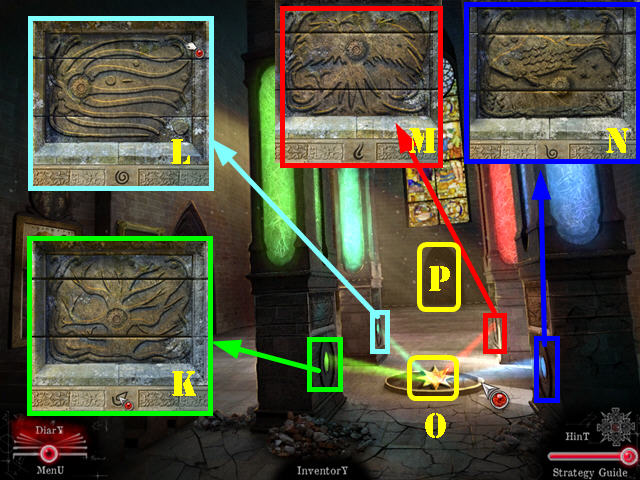
- Examine the bottom of the column; flip the pillar stones until they form the right element (K).
- Examine the bottom of the column; flip the pillar stones until they form the right element (L).
- Examine the bottom of the column; flip the pillar stones until they form the right element (M).
- Examine the bottom of the column; flip the pillar stones until they form the right element (N).
- Take the SUN (O) and go through the back door (P).
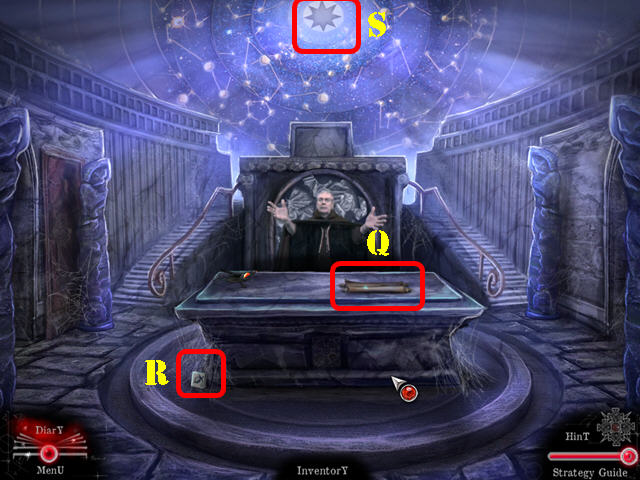
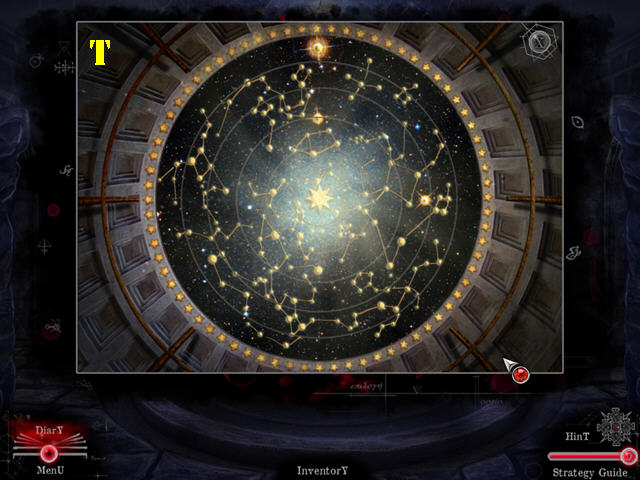
- Zoom into the ceiling; put the SUN in the center (S).
- Rotate the rings until they are all aligned correctly.
- Please look at the screenshot for the solution (T).
- Take the 9TH and final scroll (Q).
- Take the TILE (R).
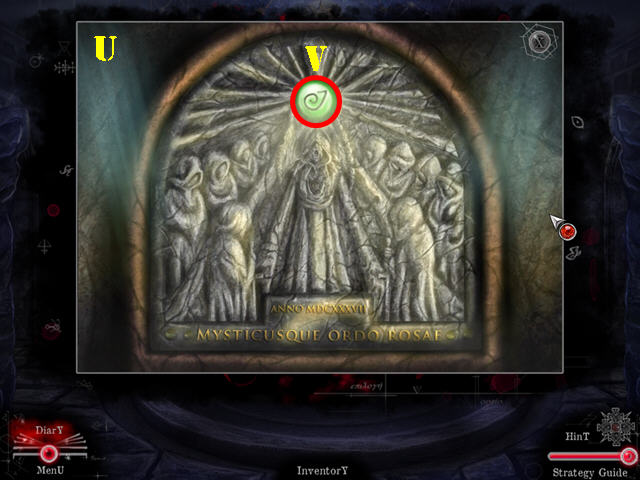
- Examine the relief in the back.
- Arrange the relief accordingly. Drag a piece into place and left-click it to rotate it.
- Please look at the screenshot for the solution (U).
- Press on the circle and take the EARTH STONE (V).
- Walk down; go through the left door and walk down twice.
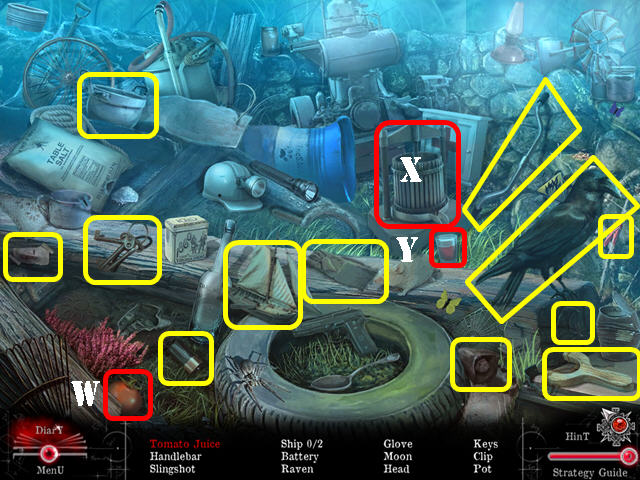
- Play the HOS.
- Drag the tomato (W) into the press (X) and take the tomato juice (Y).
- The PART OF STATUE will be added to inventory.
- Walk down; go left and then into the office.
- Move the rug out of the way and zoom into the ground (A).
- Put the TILE on the board to activate a puzzle.
- Arrange the 3 rows of tiles so they tell a story from left to right.
- Press on a tile to change the image. Please look at the screenshot for the solution (B).
- Take the PART OF STATUE (C).
- Walk down 4 times; go towards the left and then go to the altar.
- Take the FIRE STONE (D).
- Examine the ground; put the FIRE STONE, EARTH STONE, AIR STONE, and WATER STONE into the slots (E).
- Go underground.
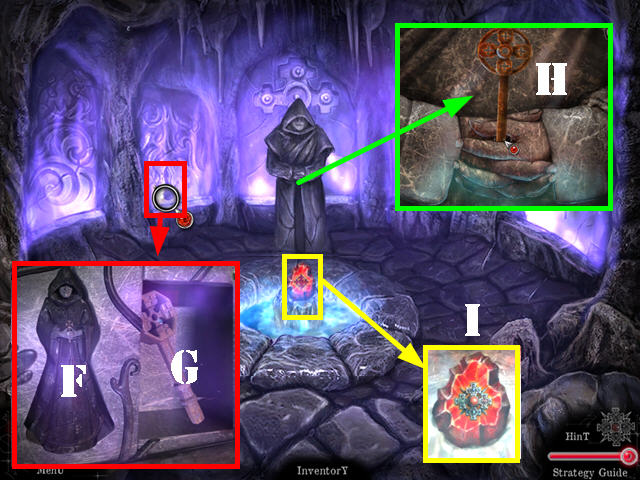
- Examine the left niche; put the 2 PARTS OF STATUES on the ground to activate a puzzle.
- Arrange the stones correctly. Drag a piece into place and left-click it to rotate it.
- Please look at the screenshot for the solution (F).
- Take the MYSTIC LEVER (G).
- Examine the statue; put the MYSTIC LEVER in the hands (H).
- Zoom into the altar; put the MEDALLION in the stone (I).
- Congratulations, you have completed Dark Heritage: Guardians of Hope Standard Edition!
The Prophecy Scrolls
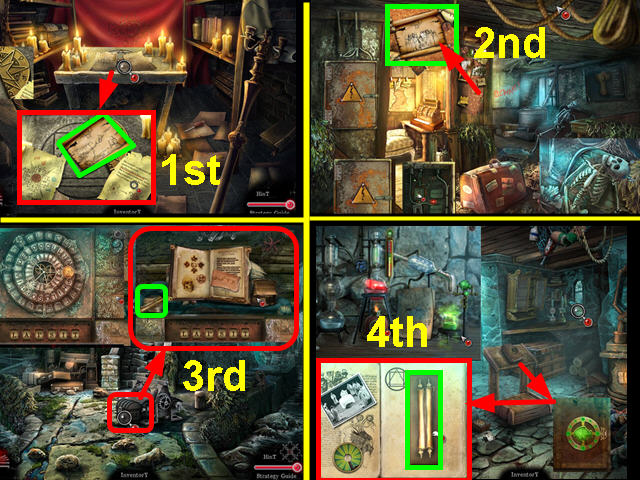
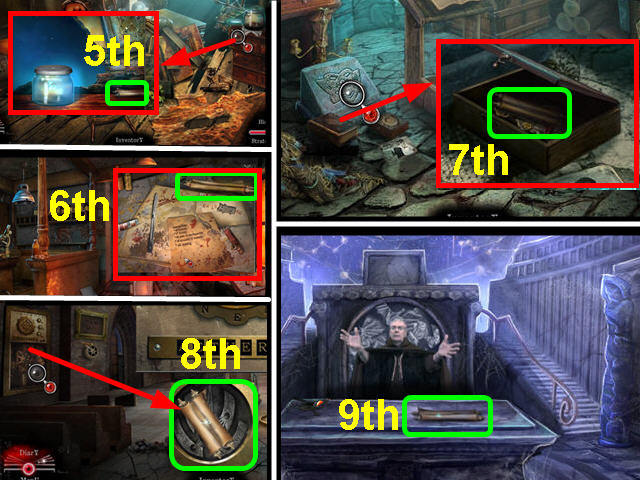
- There are 9 Prophecy Scrolls throughout the game. Below is a list of all their locations.
- Inspect the table in the secret room; look at the 2 papers and then take the 1st scroll.
- Inspect the board in the ferry station; remove the 2 pictures and take the 2nd scroll.
- Go to the harbor; solve the chest puzzle; open the 'Philosphia De Occulta' book and read the 3rd scroll.
- Pick up the 4th scroll in the back room of the fisherman's house after you unlock the book on the bookstand.
- Take the 5th scroll in the floating house after you catch the fireflies.
- Zoom into the items on the ground in the fisherman's back room; use the FILE to open the box and take the 7TH scroll.
- Take the 8TH scroll in the chapel after you solve the medallion mini-game.
- Take the 9TH and final scroll in the room with the master after you solve the sun puzzle.
Created at: 2012-06-29