

Walkthrough Menu
- General Tips
- Chapter 1
- Chapter 2
- Chapter 3
- Chapter 4
- Chapter 5
- Chapter 6
- Chapter 7
- Chapter 8
- Chapter 9
- Chapter 10
General Tips
- This is the official guide for Dark Parables: Portrait of the Stained Princess.
- This guide won't tell you when to zoom into a location; the screenshots show each zoom scene.
- Hidden-object puzzles are referred to as HOPs. Only the locations of the HOPs will be shown.
- Use the Map to fast travel to a location.
Chapter 1
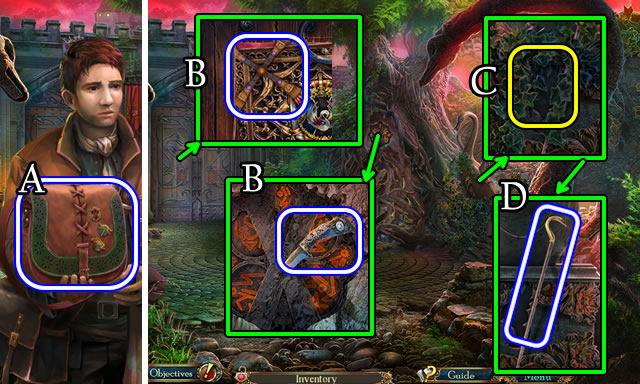
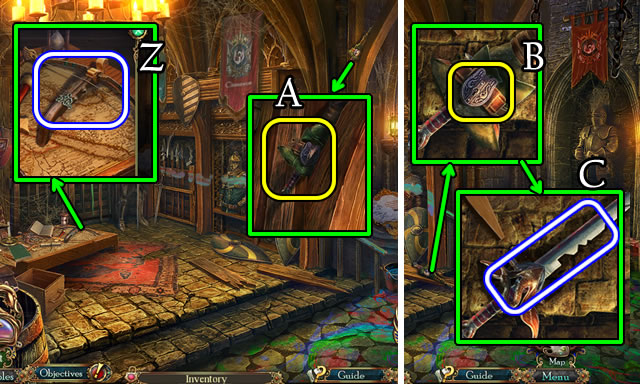
- Speak to character; take BAG (A).
- Take WINDMILL BLADES; CARVING KNIFE (B).
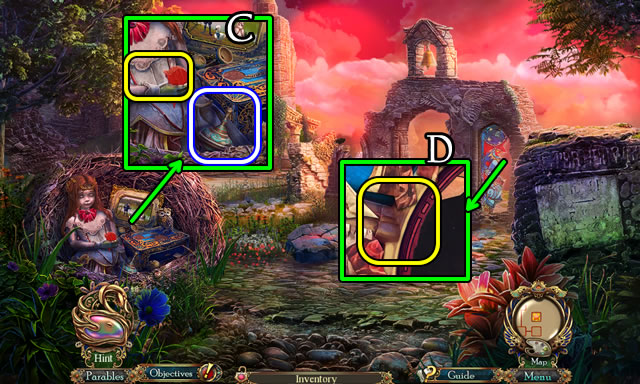
- Use CARVING KNIFE (C) for CANE (D).
- BAG for HAND MIRROR.
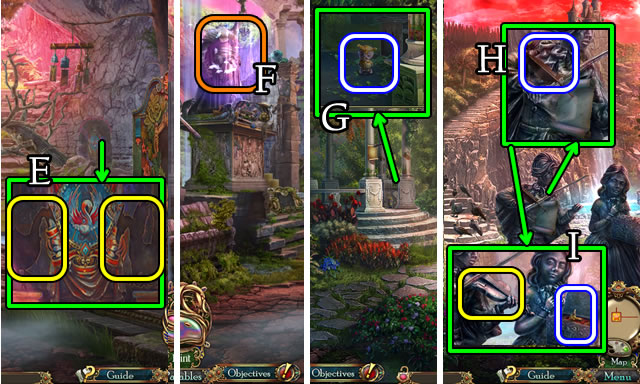
- Remove plate; use HAND MIRROR, CANE (E).
- Go forward.
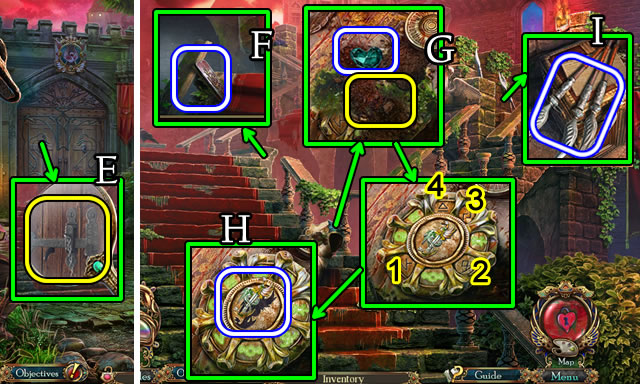
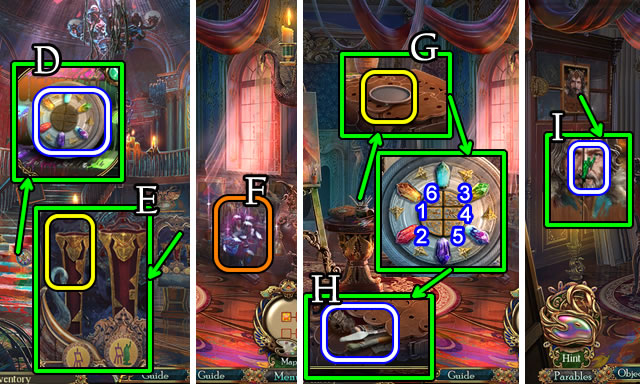
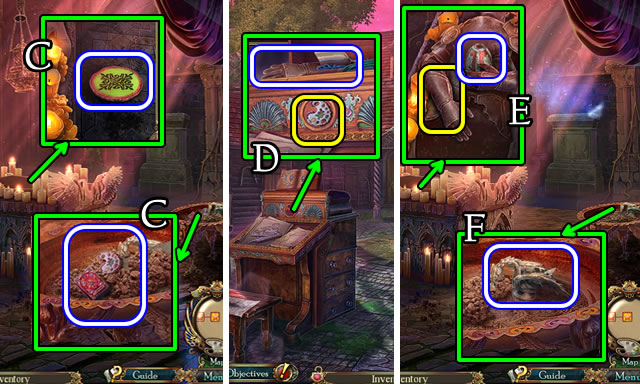
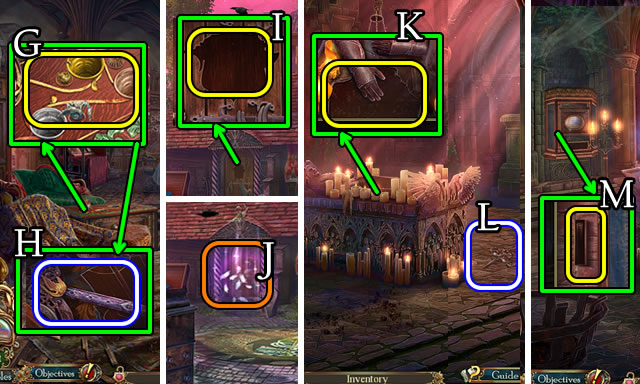
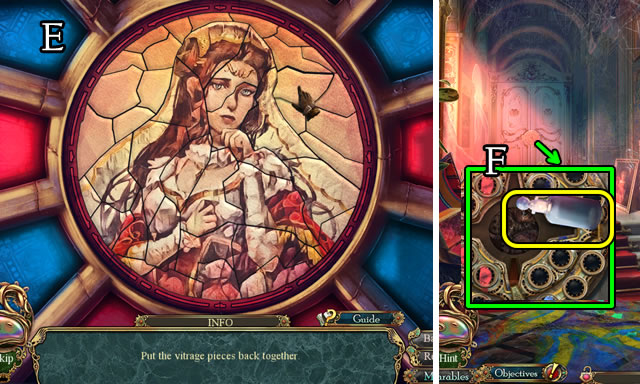
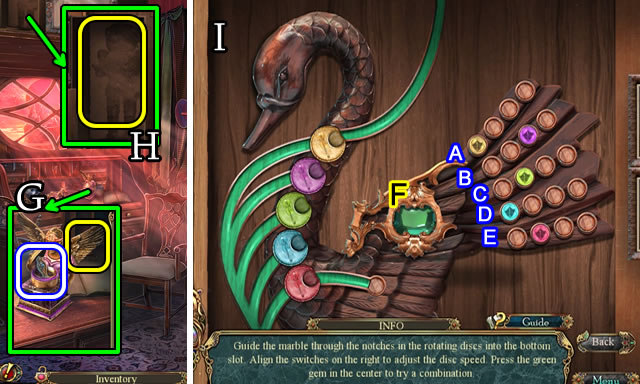
- Take BRUSH (F).
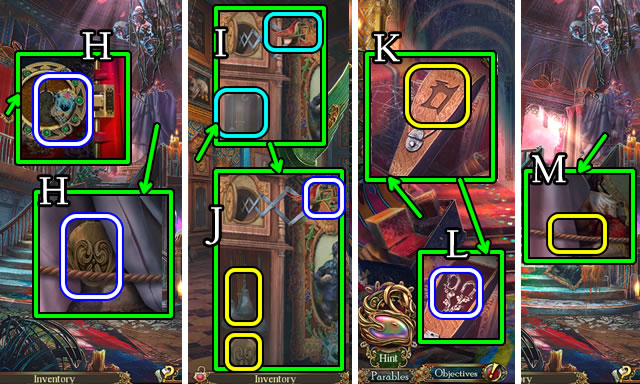
- Take GEM HEART; use BRUSH (G); select 1-4; take SWAN KNIGHT EMBLEM (H).
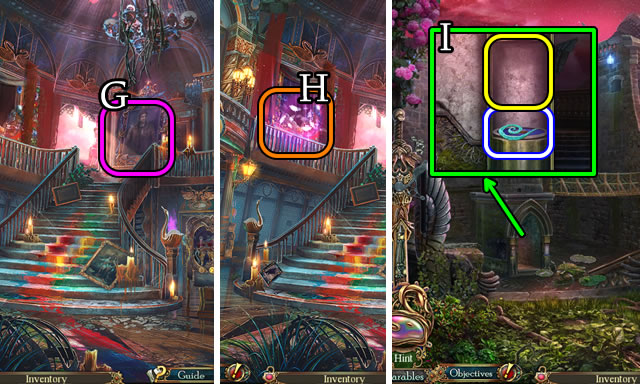
- Take SPEARS, note (I).
- Go down.
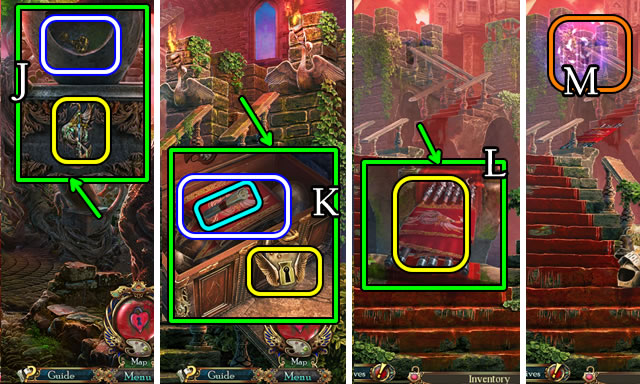
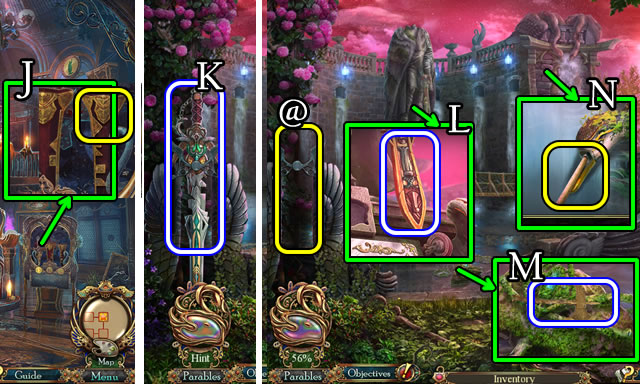
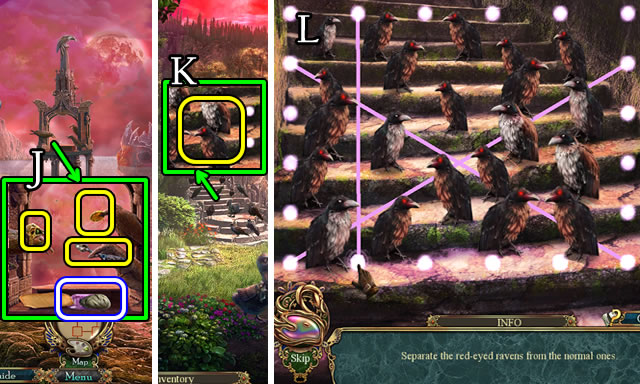
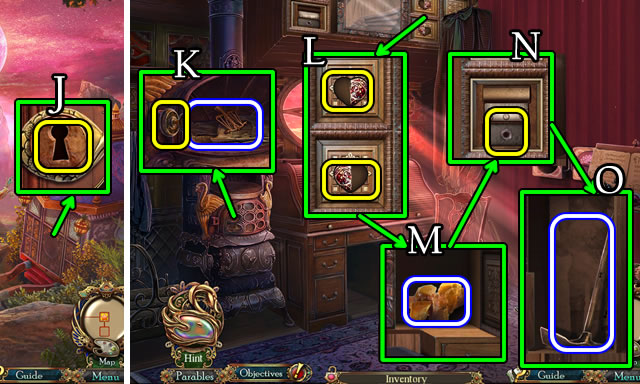
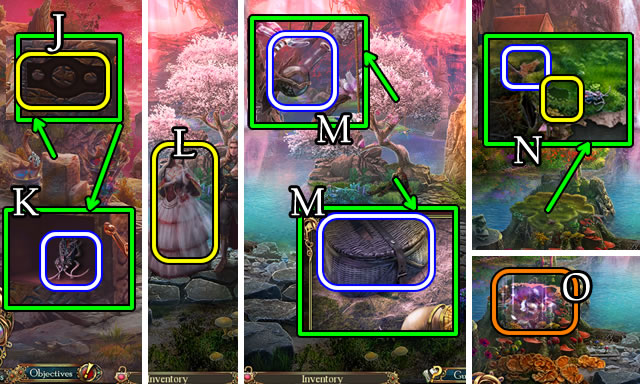
- Place SWAN KNIGHT EMBLEM; take TOWER CHEST KEY (J).
- Go forward.
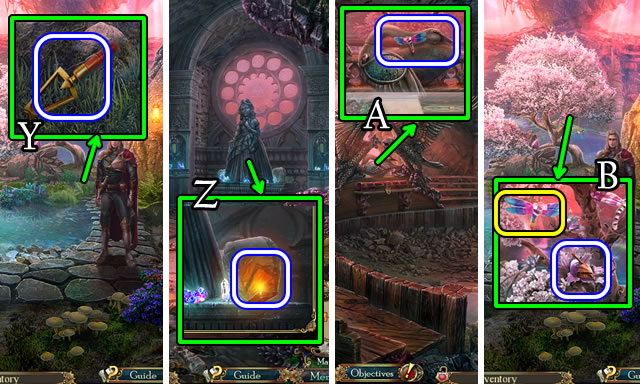
- Use TOWER CHEST KEY; take Map, FLAG (K).
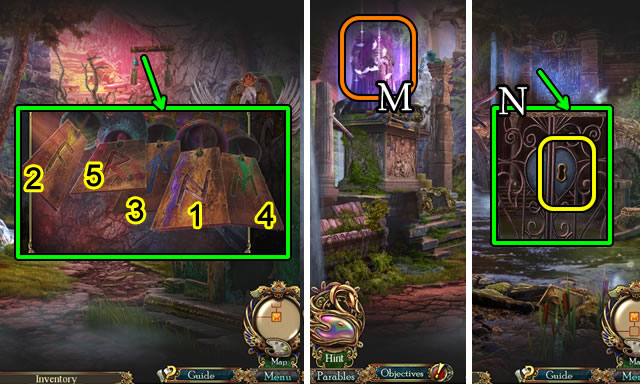
- Use SPEARS, FLAG (L); play HOP (M); receive TREE ORNAMENT.
- Go down.
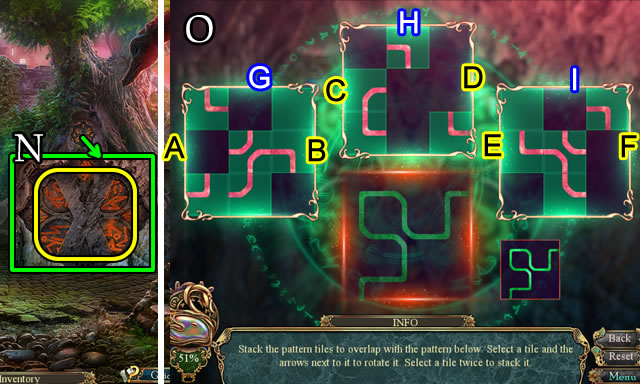
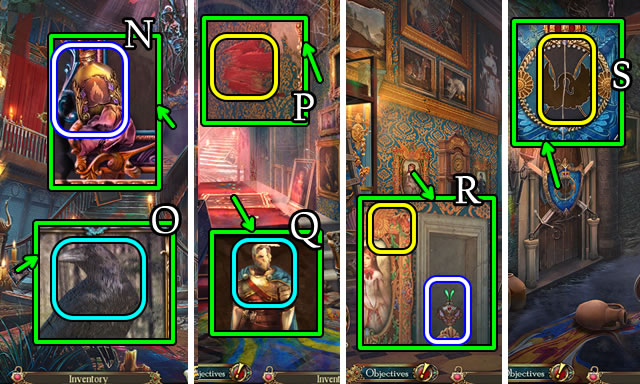
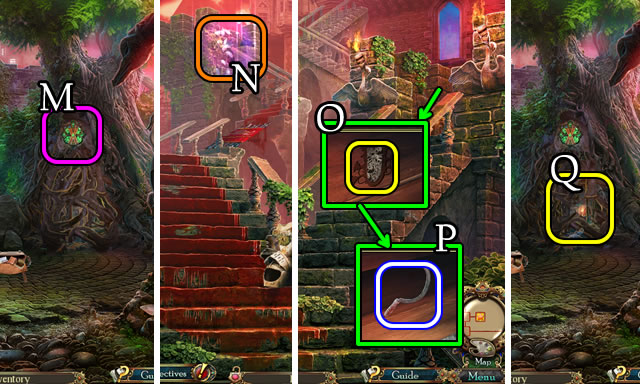
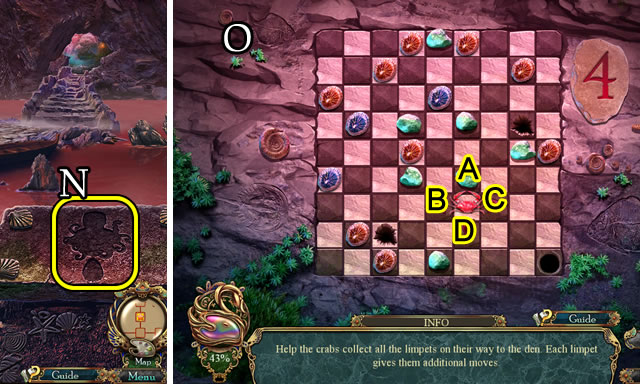
- Place TREE ORNAMENT (N).
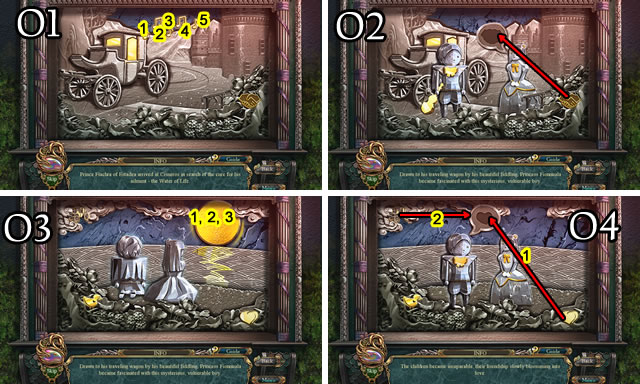
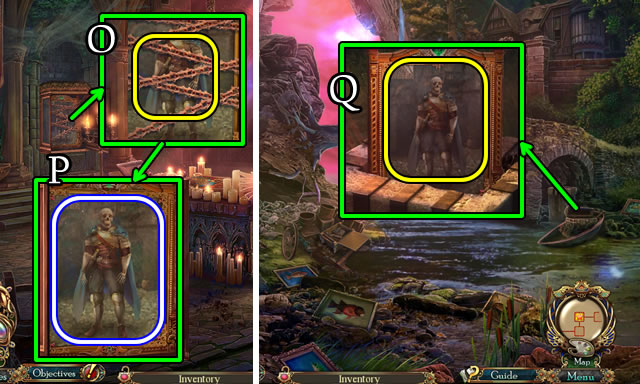
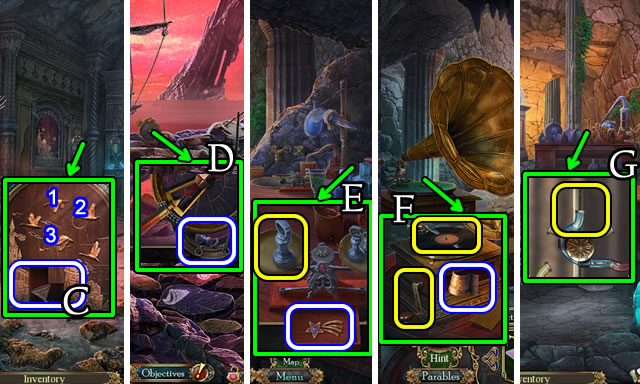
- Solution (O). G-A-G-I-Ex2-I-H-C-H.
- Speak to character; receive SIEGFRIED'S DIARY.
- Go right.
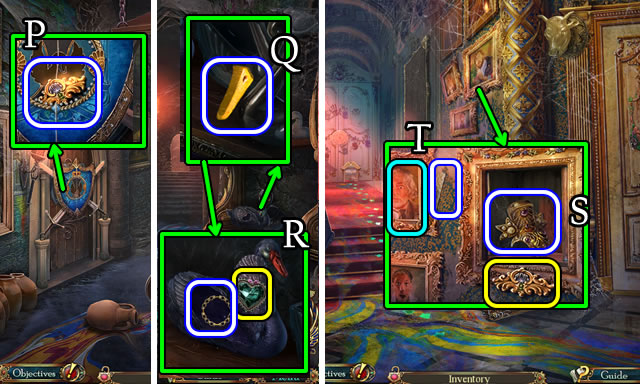
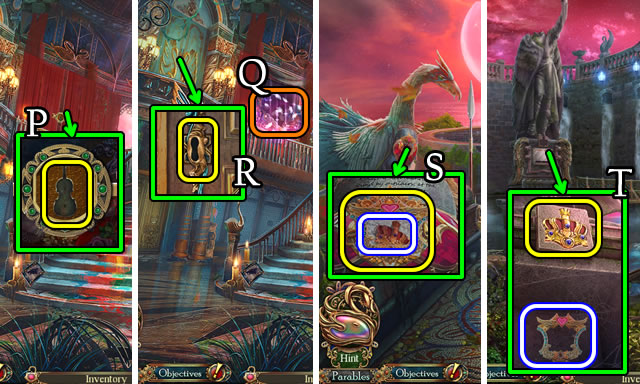
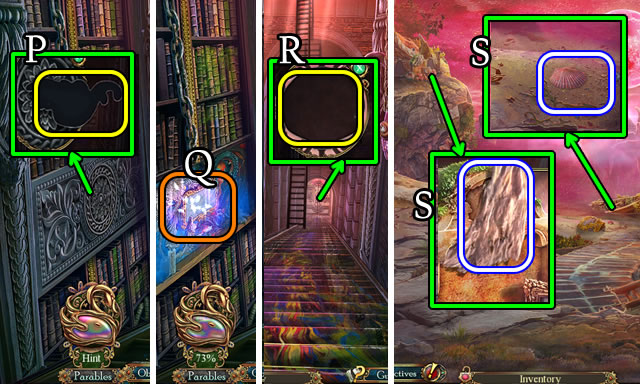
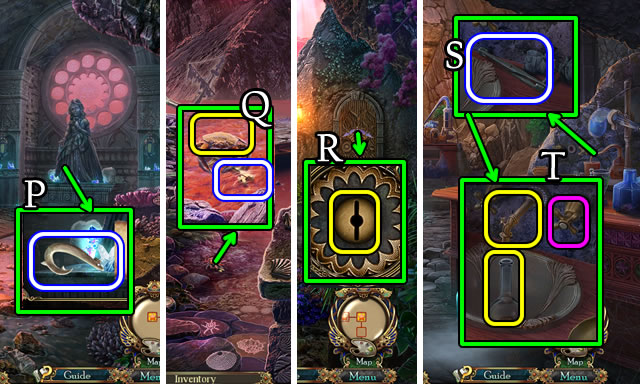
- Take FRAME DECORATION (P).
- Take GOLDEN BEAK (Q); place GEM HEART; take ENCRYPTED LOCK RING (R).
- Go forward.
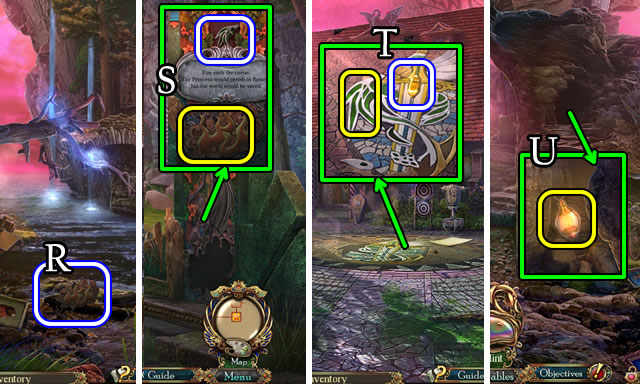
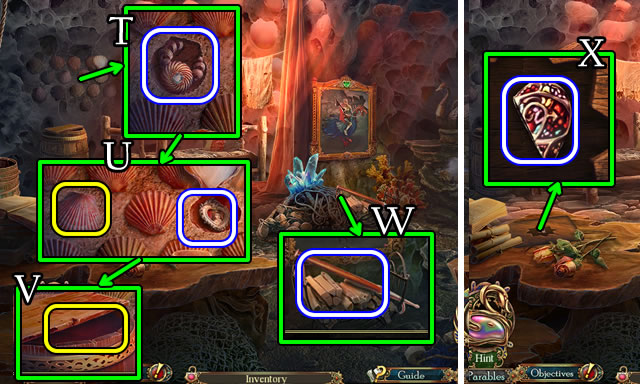
- Place FRAME DECORATION; take GOLDEN HEAD ORNAMENT (S); select portrait; take FOLDED PAPER (T).
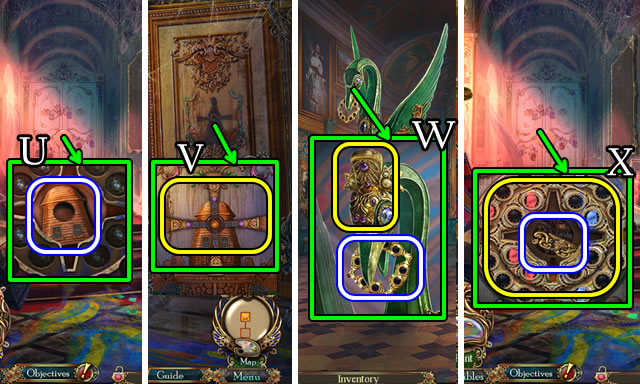
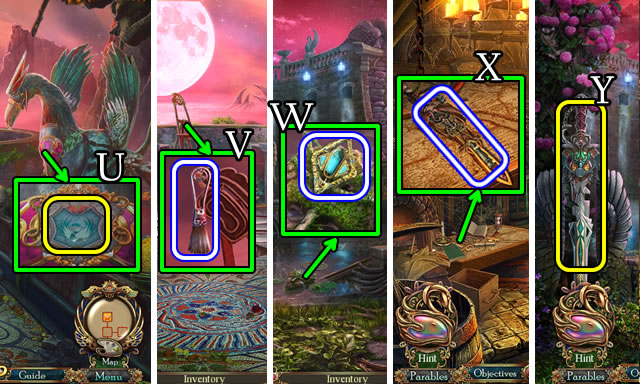
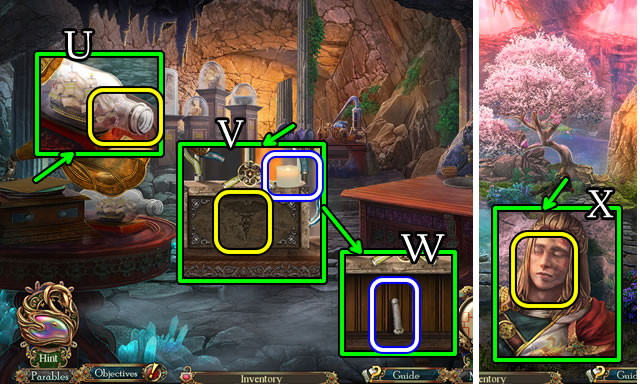
- Take WINDMILL TOWER (U).
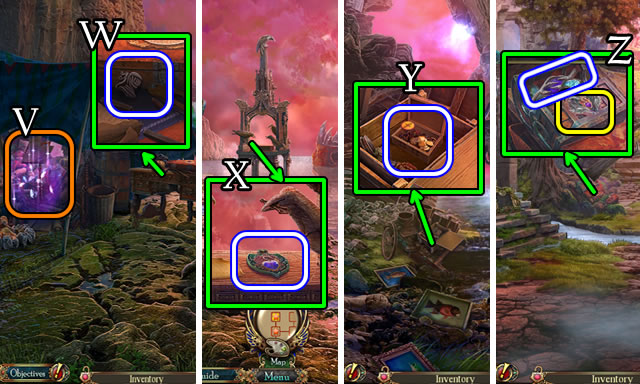
- Place WINDMILL TOWER, WINDMILL BLADES (V).
- Go right.
- Place GOLDEN HEAD ORNAMENT; take ENCRYPTED LOCK RING (W).
- Go down.
- Place 2 ENCRYPTED LOCK RINGS; take PIANO BOARD DECORATION (X).
- Go right.
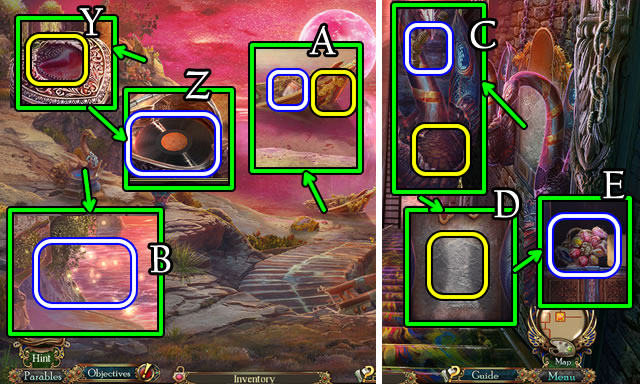
- FOLDED PAPER for SHEET MUSIC.
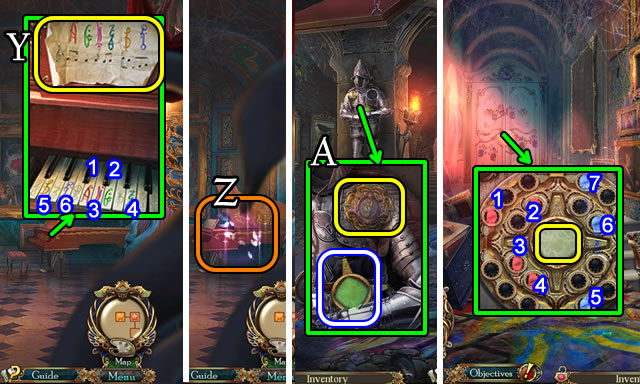
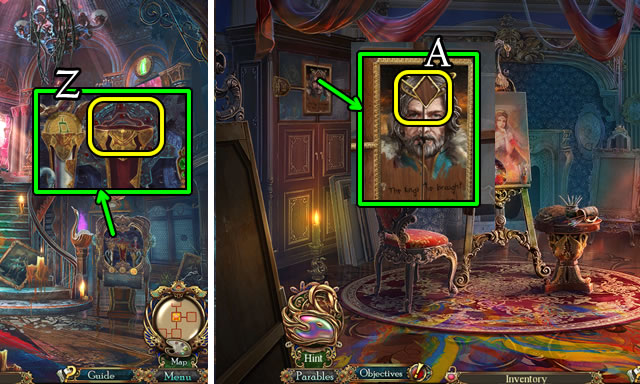
- Place SHEET MUSIC, PIANO BOARD DECORATION (Y); select 1-6 for HOP (Z); receive SHOULDER ORNAMENT.
- Return to Secret Passage.
- Place SHOULDER ORNAMENT; take LOCK CENTERPIECE (A).
- Go forward.
- Place LOCK CENTERPIECE; select 1-7.
- Go forward.
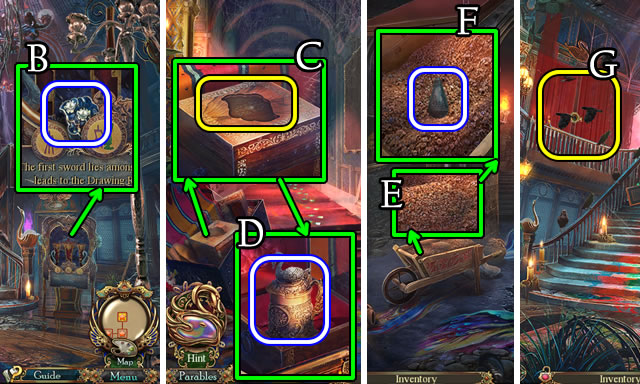
- Take CHEST MEDALLION (B).
- Go down.
- Take note; place CHEST MEDALLION (C); take TANKARD (D).
- Go down.
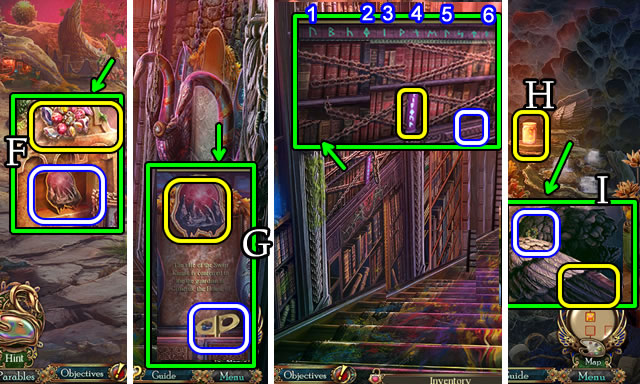
- Use TANKARD (E); receive IMPROVISED NOISEMAKER; take CLOCK WEIGHT (F).
- Return to Great Hall.
- Use IMPROVISED NOISEMAKER (G).
- Take ESTADEA'S SIGIL; note, CLOCK PENDULUM (H).
- Return to Gallery.
- Select bird; open (I), place CLOCK PENDULUM, CLOCK WEIGHT; take SEWING MACHINE EMBLEM (J).
- Go down.
- Place SEWING MACHINE EMBLEM (K); take SCISSORS (L).
- Go forward.
- Use SCISSORS (M); select painting.
Chapter 2
- Take PAINT REMOVER (N); select (O).
- Go down.
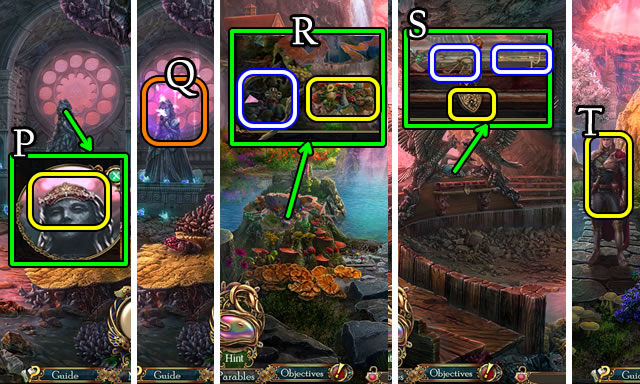
- Use PAINT REMOVER; receive WING DECORATION (P); select (Q).
- Go right.
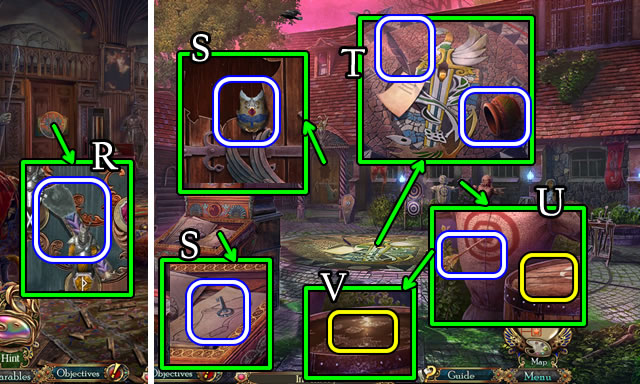
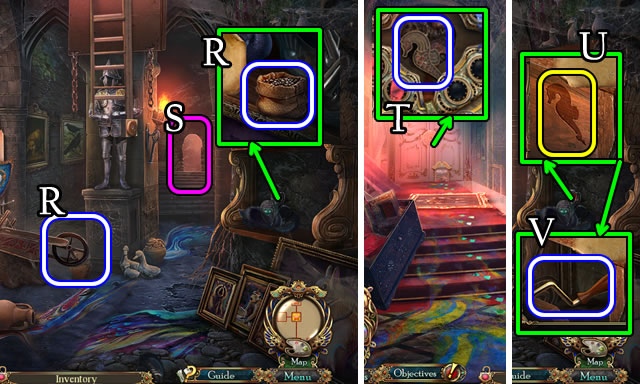
- Place WING DECORATION; take SIEGFRIED'S PENDANT (R).
- SIEGFRIED'S PENDANT on SIEGFRIED'S DIARY to take SWAN CREST.
- Return to Secret Passage.
- Place SWAN CREST (S).
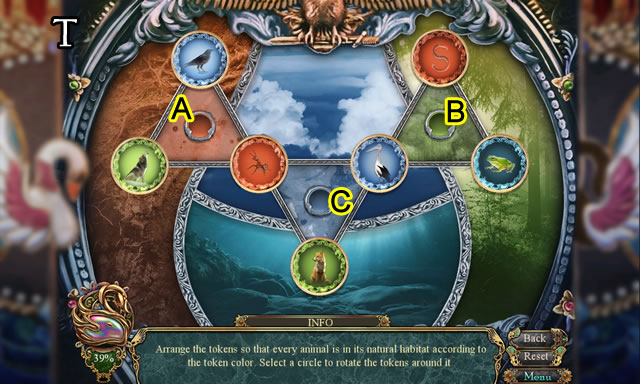
- Solution (T). A-B-C-A-B-C-B-C.
- Go left.
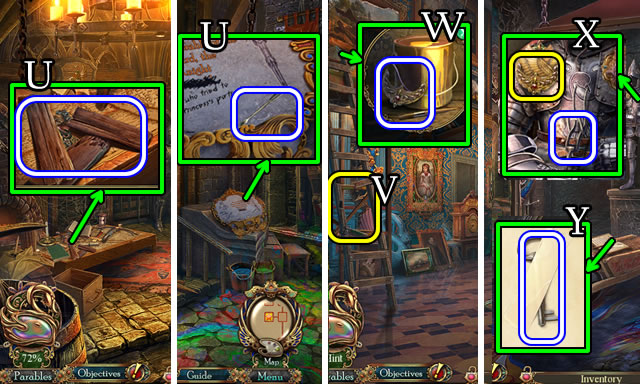
- Take LADDER BOARDS; CROSSBOW BOLT (U).
- Return to Gallery.
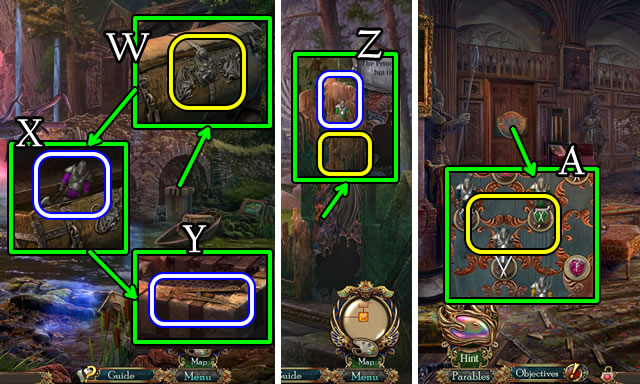
- Use LADDER BOARDS (V); take SHOULDER ORNAMENT PART (W).
- Return to Secret Passage.
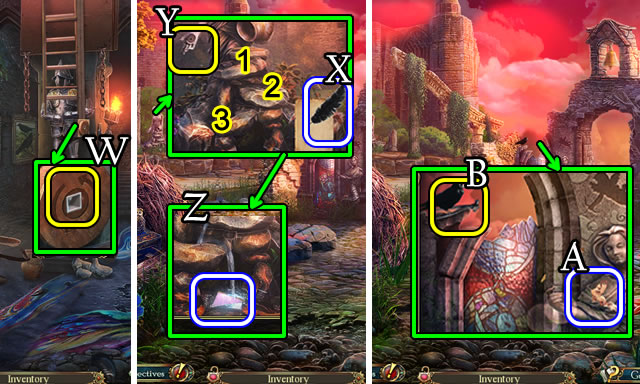
- Place SHOULDER ORNAMENT PART; take CROSSBOW PART (X).
- Take SCABBARD KEY (Y).
- Go left.
- Place CROSSBOW PART, CROSSBOW BOLT; receive CROSSBOW (Z).
- Use CROSSBOW (A).
- Use SCABBARD KEY (B); take SWORD KEY (C).
- Return to Great Hall.
- Select character.
Chapter 3
- Take PAINTING CASE TOKEN (D).
- Place SWORD KEY (E).
- Go left.
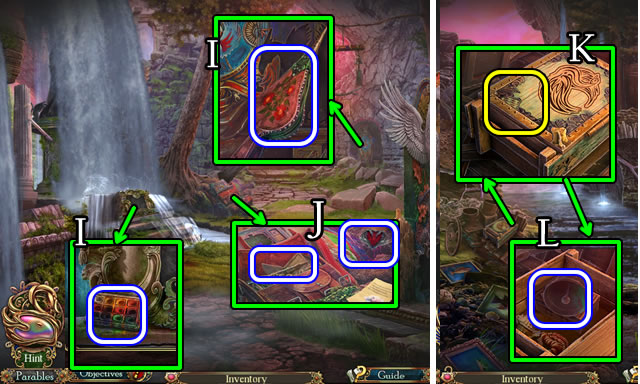
- Play HOP (F); receive INCOMPLETE SWORD KEY.
- Place PAINTING CASE TOKEN (G); select 1-6; take note; PALETTE KNIFE (H).
- Use PALETTE KNIFE (I); receive HILT DECORATION.
- Go down.
- HILT DECORATION on INCOMPLETE SWORD KEY for SWORD KEY.
- Place SWORD KEY (J).
- Go right.
- Take SWORD KEY (K).
- Take WOODEN SWORD BLADE (L).
- Place SWORD KEY (@); take MODEL AXE (M).
- Take note; place GOLDEN BEAK (N).
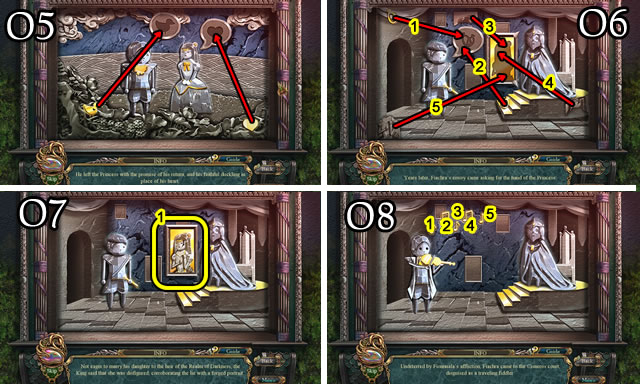
- Solution (O1-O8).

- Solution (09).
- Take MINIATURE FIDDLE.
- Go down.
- Place MINIATURE FIDDLE (P); play HOP (Q); receive TOWER KEY.
- Use TOWER KEY (R).
- Go left.
- Take CISNEROS CROWN; place ESTADEA'S SIGIL (S).
- Return to Atrium.
- Place CISNEROS CROWN; take EMBLEM FRAME (T).
- Return to Castle Keep.
- Place EMBLEM FRAME (U).
- Take note, STEEL BRUSH (V).
- Return to Atrium.
- Use STEEL BRUSH; take GEM (W).
- Return to Armory.
- Place WOODEN SWORD BLADE; take WOODEN SWORD KEY REPLICA (X).
- Return to Atrium.
- Replace SWORD KEY with WOODEN SWORD KEY REPLICA (Y).
- Go down.
- Place SWORD KEY (Z).
- Return to Drawing Room.
- Place GEM (A).
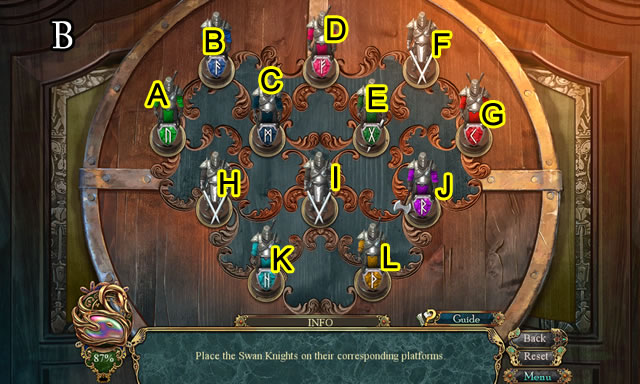
- Solution (B).
- Take note, SEWING KIT.
- Go down.
- Use SEWING KIT (C); speak to character; take CURSED PAINTING.
- Return to Castle Keep.
- Place CURSED PAINTING (D); speak to character.
Chapter 4
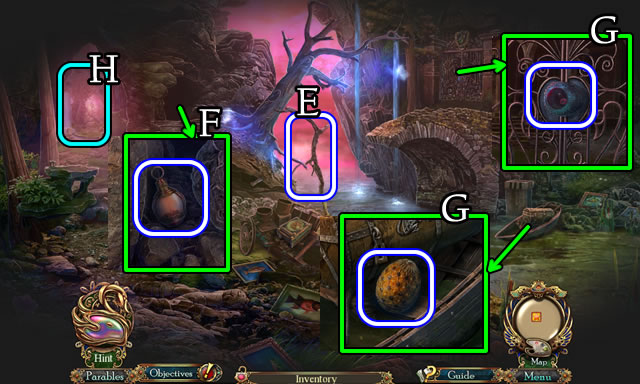
- Take BRANCH (E).
- Use BRANCH; take BROKEN LANTERN (F).
- Take BRONZE EGG; LONG CHIME (G).
- Go (H).
- Take BELLOWS; PALETTE (I).
- Take note; open, take PAINTBRUSH; take PRINCE'S AMULET (J).
- Go down.
- Place PALETTE, PAINTBRUSH (K); take note, SHORT CHIME (L).
- Go left.
- Place LONG CHIME, SHORT CHIME; select 1-5 for HOP (M); receive SWAN KEY.
- Go down.
- Use SWAN KEY (N).
- Go right.

- Take BLUE SWAN KNIGHT; note, MALLET (O).
- Take GOLDEN EGG; use BELLOWS (P).
- Take note, RED SWAN KNIGHT (Q); speak to character.
Chapter 5
- Take SCRAPER (R).
- Go right.
- Take IRON KEY; MODEL ARMOR (S).
- Take FIRST BLACK FEATHER, note and POT (T).
- Take MODEL ARROW; use MALLET (U), POT for POT WITH OIL (V).
- Return to River Fork.
- Use IRON KEY (W); take note, PURPLE SWAN KNIGHT (X) and BOLT CUTTERS (Y).
- Go left.
- Take scroll; use SCRAPER; receive GREEN SWAN KNIGHT (Z).
- Return to Deserted Hall.
- Place RED SWAN KNIGHT, BLUE SWAN KNIGHT, PURPLE SWAN KNIGHT and GREEN SWAN KNIGHT (A).
- Solution (B). (K-L)-(A-L)-(J-A)-(D-J)-(G-B)-(G-H)-(D-E)-(C-F)-(E-G).
- Go left.
- Take GAME TOKEN; MATCHES, PAINT SYMBOL (C).
- Return to Practice Yard.
- Place PAINT SYMBOL; take SCOOP, STATUE ARM (D).
- Return to Crypt.
- Place STATUE ARM; take BROKEN EGG (E).
- Use SCOOP; take note, EGG DECORATION (F).
- EGG DECORATION on BROKEN EGG for SILVER EGG.
- Go down.
- Place BRONZE, GOLDEN and SILVER EGGS (G); take note, INCOMPLETE ARMORY INSIGNIA (H).
- MODEL AXE, MODEL ARROW and MODEL ARMOR on INCOMPLETE ARMORY INSIGNIA for ARMORY INSIGNIA.
- Go right.
- Place ARMORY INSIGNIA (I) for HOP (J); receive SWAN KNIGHT SHIELD.
- Return to Crypt.
- Place SWAN KNIGHT SHIELD (K); speak to character; take CABINET LEVER (L).
- Place CABINET LEVER (M).

- Solution (N1-N3).
- Use BOLT CUTTERS (O); take CURSED KNIGHT'S PORTRAIT (P).
- Return to River Fork.
- Place CURSED KNIGHT'S PORTRAIT (Q); use POT WITH OIL, MATCHES; speak to character.
Chapter 6
- Take STELE TILE (R).
- Go left.
- Take scroll; place STELE TILE; take MOSAIC TILE (S).
- Return to Practice Yard.
- Place MOSAIC TILE; take LIGHT GEM (T).
- Return to River Fork.
- LIGHT GEM on BROKEN LANTERN for LIT LANTERN.
- Use LIT LANTERN (U).
- Go forward.
- Play HOP (V); receive BLUE GUARDIAN.
- Take note, KNIGHT'S HELMET (W).
- Take note, PRINCE'S AMULET PART (X).
- Go down.
- Place KNIGHT'S HELMET on box; take GAME TOKEN, COIN (Y).
- Go left.
- PRINCE'S AMULET PART on PRINCE'S AMULET.
- Place PRINCE'S AMULET; take RAVEN'S CLAWS (Z).
- Return to Brackish Water.
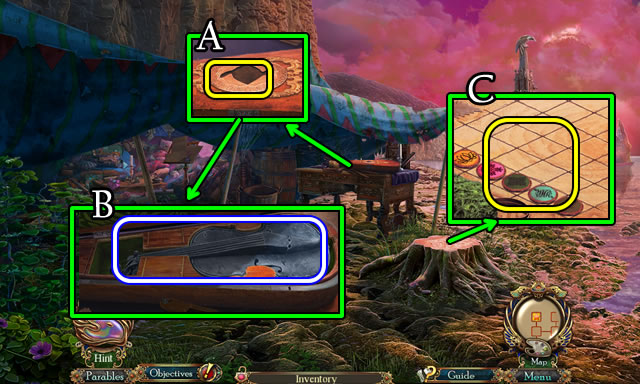
- Place RAVEN'S CLAWS (A); take STONE FIDDLE (B).
- Place 2 GAME TOKENS (C).
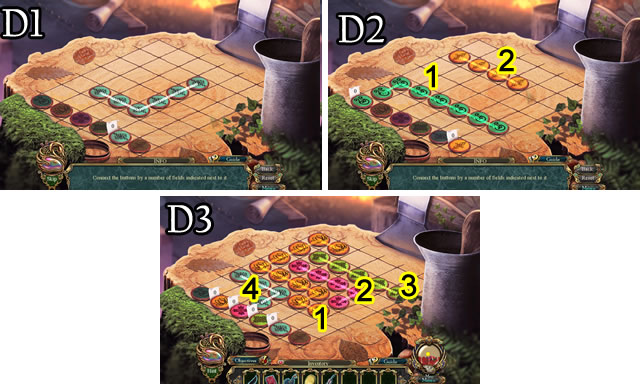
- Solution (D1-D3).
- Take GOLDEN GUARDIAN.
- Return to Shallow Riverbed.
- Place BLUE GUARDIAN, GOLDEN GUARDIAN (E).
- Play HOP (F); receive SILVER SPOON.
- Go forward.
- Take note, TOY BABY OWL (G).
- Take SECOND BLACK FEATHER (H); take note, place STONE FIDDLE; take RAVEN RING (I).
- Return to Brackish Water.
- Place COIN, RAVEN RING and SILVER SPOON; take RAVEN STONE (J).
- Return to Stairway.
- Place RAVEN STONE (K).
- Solution (L).
- Go forward.
Chapter 7
- Select (M).
- Go forward.
- Play HOP (N); receive CHEST DECORATION.
- Take note, place CHEST DECORATION (O); take SICKLE (P).
- Go down.
- Use SICKLE (Q).
- Go right.
- Take FOUNTAIN VALVE; note, POUCH WITH BIRDSEED (R).
- Go (S).
- Take SEAHORSE EMBLEM (T).
- Go down.
- Place SEAHORSE EMBLEM (U); take CRANK (V).
- Use CRANK (W).
- Go to Belfry.
- Take THIRD BLACK FEATHER, note (X); place FOUNTAIN VALVE (Y); select 1-3; take SUN MIRROR PART (Z).
- Take PORTRAIT PART (A); give POUCH WITH BIRDSEED (B); receive CANVAS PLIERS.
- Take SPINNING TOP; use CANVAS PLIERS; receive HEART HALF (C).
- Place PORTRAIT PART (D).
- Solution (E).
- Take ETCHING ACID.
- Return to Corridor.
- Use ETCHING ACID (F).
- Go forward.
Chapter 8
- Speak to character (G); receive TOY MOTHER OWL.
- Play HOP (H); receive MUSIC BOX.
- Go right.
- Take WIND EMBLEM; place MUSIC BOX (I).
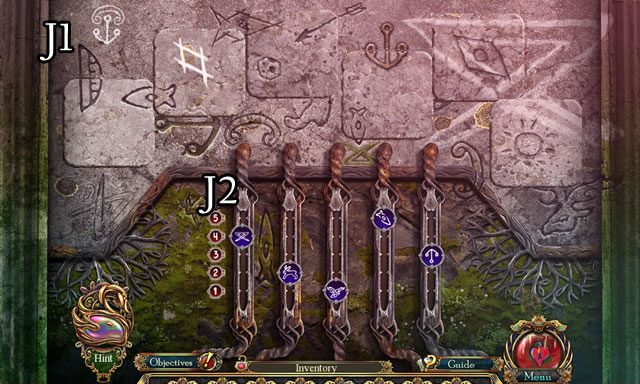
- Solution (J1-J2).
- Go forward.
- Speak to characters.
- WIND EMBLEM on SPINNING TOP for BLOOD MOON.

- Take note; EMPTY WINESKIN (K).
- Go up.
- Place TOY BABY OWL, TOY MOTHER OWL (L); Take CUPID FIGURINE (M).
- Place CUPID FIGURINE; take BRASS LOCK PART (N).
- Go (O).
- Place BRASS LOCK PART (P) for HOP (Q); receive SWAN MURAL.
- Place SWAN MURAL (R).
- Go to Seacoast.
- Take note, RAG; SHELL (S).
- Go left.
- Take SPIRAL BROOCH (T); place SHELL; take SMALL PORTRAIT (U); use EMPTY WINESKIN (V) for FULL WINESKIN.
- Take BOAT HOOK, FIREWOOD (W).
- Take HEART HALF (X).
- Go down.
- Place SMALL PORTRAIT (Y); take RECORD (Z).
- Use BOAT HOOK; take EMPTY JAR (A).
- Use EMPTY JAR for JAR OF FIREFLIES (B).
- Go down.
- Place SPIRAL BROOCH; receive FAUCET (C).
- Use FULL WINESKIN, RAG (D); take note, MOURNING FLOWERS (E).
- Return to Seacoast.
- Place MOURNING FLOWERS; take BROKEN ISLE EMBLEM (F).
- Go down.
- BLOOD MOON on BROKEN ISLE EMBLEM for ISLE EMBLEM.
- Place ISLE EMBLEM; take WINDING KEY (G).
- Select code; select 1-6; receive FURNACE KNOB.
- Return to Grotto.
- Place JAR OF FIREFLIES (H); place FIRST, SECOND and THIRD BLACK FEATHERS; take WAGON KEY (I).
- Go down.
- Use WAGON KEY (J).
- Go right.
- Place FURNACE KNOB; take SCALES EMBLEM (K).
- Place 2 HEART HALVES (L); take CLUMP OF WAX (M).
- Use WINDING KEY (N); take MINING PICK (O).

- Place FIREWOOD; use MATCHES; place CLUMP OF WAX (P); take HORSE FIGURINE (Q).
- Return to Waterway.
- Place SCALES EMBLEM; take note STAR AMULET (R).
- Return to Grotto.
- Use MINING PICK (S); receive FLYING SWAN.
- Place STAR AMULET (T).
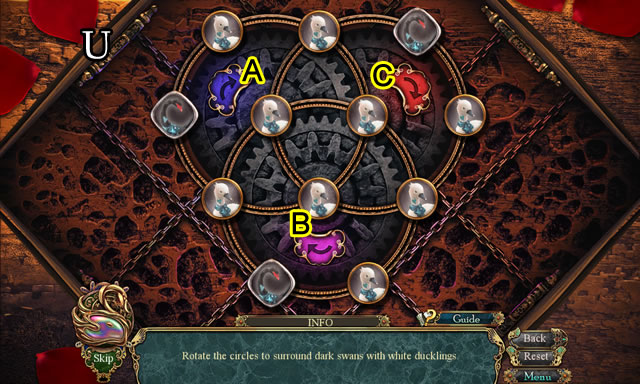
- Solution (U). Ax2-Bx3-Cx4.
- Take PRINCE'S SIGNET RING.
- Return to Abandoned Wagon.
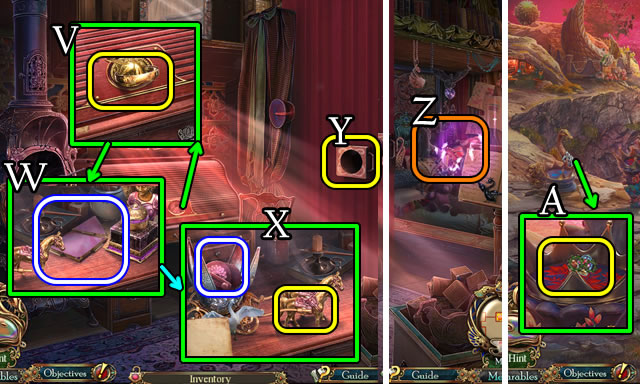
- Take note, use PRINCE'S SIGNET RING (V); take note, BROKEN SUN MIRROR (W); place HORSE FIGURINE; take CURTAIN SWITCH (X).
- Place CURTAIN SWITCH (Y) for HOP (Z); receive FLOWER OF BEAUTY.
- Go down.
- Place FLOWER OF BEAUTY (A).
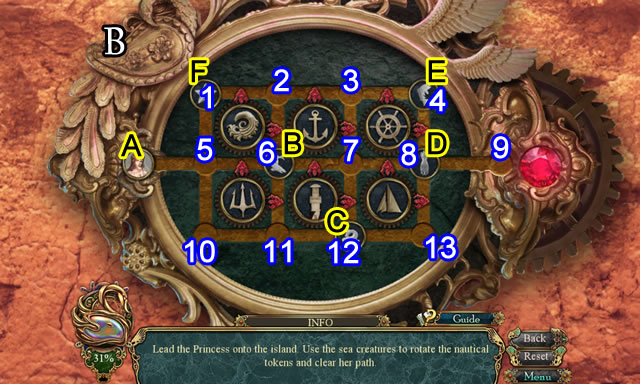
- Solution (B). (B-11)-(B-10)-(A-5)-(A-6)-(C-11)-(D-13)-(A-7)-(A-8)-(A-9).
Chapter 9

- Take ALEDA (C).
- Go forward.
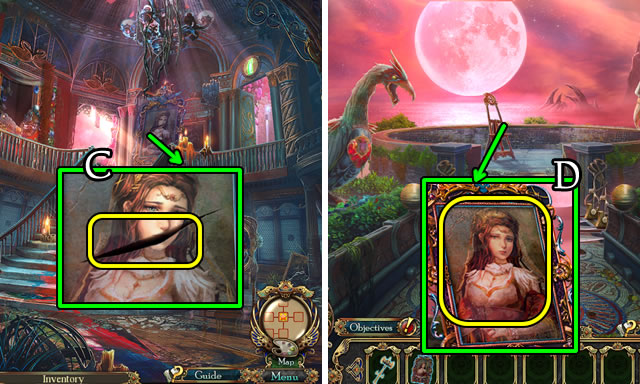
- Speak to character; take CARVED WING; OLD SHOVEL (D).
- Go down.
- Use OLD SHOVEL (E) for HOP (F); receive TOY PRINCE FIGURINE.
- Go right.
- Place CARVED WING; take CORSET HOOK (G).
- Place TOY PRINCE FIGURINE (H).
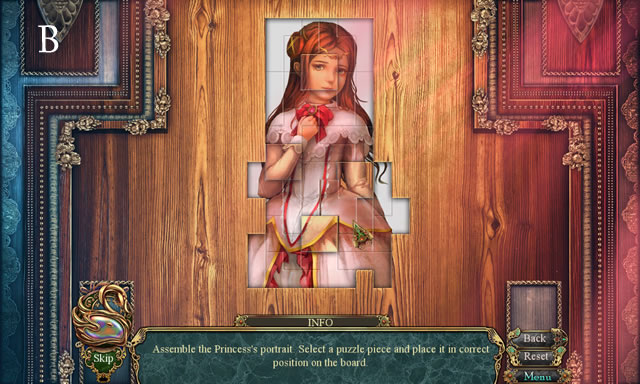
- Solution (I). Position pieces as shown (A-E); select F.
- Take STONE BRIDGE EMBLEM.
- Go down.
- Place STONE BRIDGE EMBLEM (J); take BEJEWELED BEETLE (K).
- Go forward 2x.
- Give ALEDA (L); speak to character.
- Take FLASK; FISHING BASKET (M).
- Take FLYING SWAN; place BEJEWELED BEETLE (N) for HOP (O); receive MEDICAL PENDANT.
- Go left.
- Take note, BONE HOOK (P).
- Return to Craggy Rock.
- BONE HOOK on FISHING BASKET for LITTLE FISH.
- Give LITTLE FISH take CHAMBER KEY (Q).
- Go forward.
- Use CHAMBER KEY (R).
- Go right.
- Take note, SPREADER (S); place FAUCET, FLASK; turn handle; receive FILLED FLASK (T).
- Take note; use CORSET HOOK (U); receive DIADEM PART.
- Take LIT CANDLE; place MEDICAL PENDANT (V); take note, SMELLING SALTS (W).
- Go down.
- Use SMELLING SALTS (X); speak to character.
Chapter 10
- Take BRASS HANDLE (Y).
- Go left.
- Place LIT CANDLE; take GRAMOPHONE CRANK (Z).
- Use SPREADER; take DRAGONFLY TRINKET (A).
- Go down.
- Place DRAGONFLY TRINKET; take FLYING SWAN (B).
- Go left.
- Place 3 FLYING SWANS; select 1-3; take GLASS FUNNEL (C).
- Return to Craggy Rock.
- Place, select BRASS HANDLE; take SCALE WEIGHT (D).
- Return to Cave Chamber.
- Place SCALE WEIGHT; take FALLING STAR (E).
- Place RECORD, GRAMOPHONE CRANK; take STATUE NECKLACE (F).
- Place GLASS FUNNEL, FILLED FLASK (G).
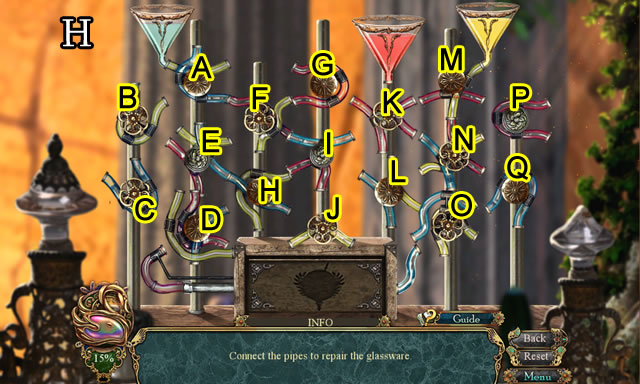
- Solution (H). Ax3-Bx5-Cx4-Dx2-Ex2-Fx4-G-H- Ix3-Jx3-K-Lx4-N-Ox3-Px3-Qx5.
- Take ANCHOR TOKEN, SUN MIRROR PART.
- Return to Stone Chapel.
- Place FALLING STAR (I); take DIADEM PART (J).
- Return to Craggy Rock.
- Place ANCHOR TOKEN; take BLACK SWAN SIGIL (K).
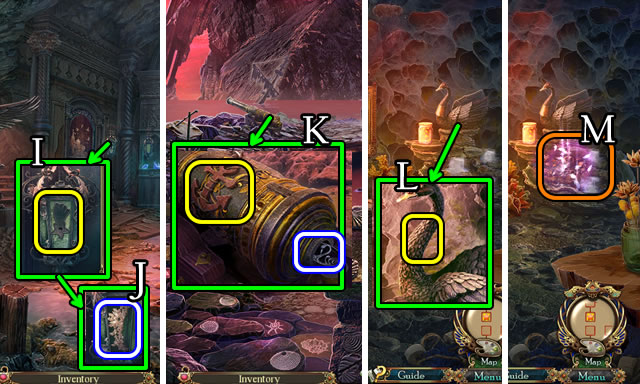
- Return to Grotto.
- BLACK SWAN SIGIL on STATUE NECKLACE.
- Place STATUE NECKLACE (L) for HOP (M); receive OCTOPUS BROOCH.
- Return to Craggy Rock.
- Place OCTOPUS BROOCH (N).
- Solution (O). B-Ax2-Bx3-A-B-A-Cx2-Ax2-C-D-Cx2-A-Cx2-Dx4-B-A-Cx2-Dx5.
- Take DIADEM PART.
- Return to Stone Chapel.
- Place 3 DIADEM PARTS (P) for HOP (Q); receive MUSHROOM MOTIF.
- Go down.
- Place MUSHROOM MOTIF; take SUN MIRROR PART, PADLOCK KEY (R).
- Go left.
- Use PADLOCK KEY; take note, KEYCHAIN; SWORD OF LIGHT (S).
- Go down.
- Give SWORD OF LIGHT (T); speak to character.
- Go forward.
- Speak to characters.
- 3 SUN MIRROR PARTS on BROKEN SUN MIRROR for SUN MIRROR.
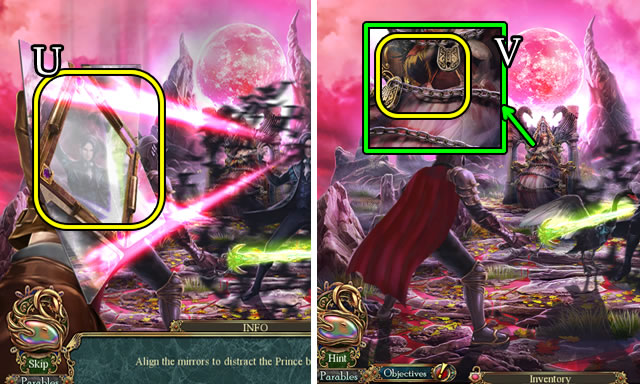
- Use SUN MIRROR (U).
- Solutions vary.
- Use KEYCHAIN (V).
- Congratulations, you have completed playing Dark Parables: Portrait of the Stained Princess.
Created at: 2019-10-18