

Walkthrough Menu
General Tips
- This is the official guide for Dark Parables: Queen of Sands.
- This guide will not show when you have to zoom into a location; the screenshots will show each zoom scene.
- Hidden-object puzzles are referred to as HOPs. This guide will not show screenshots of the HOPs, however, it will mention when an HOP is available and the inventory item you'll collect from it.
- Use the Map to fast travel to a location.
Chapter 1
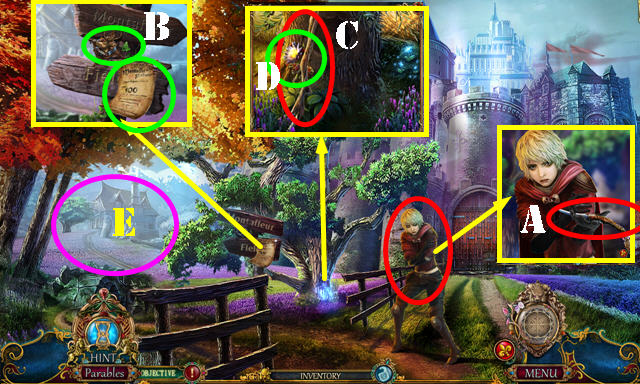
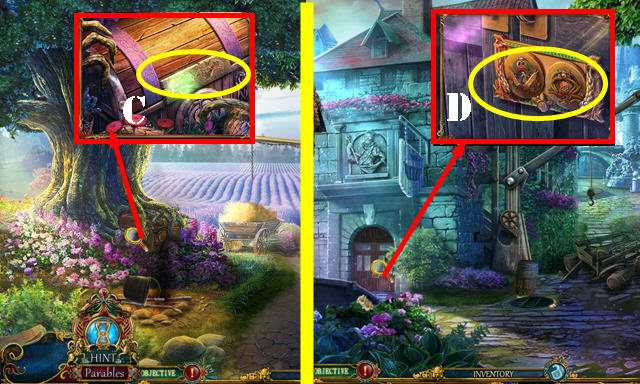
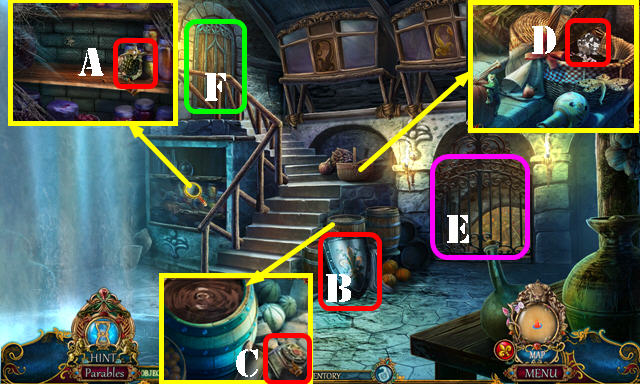
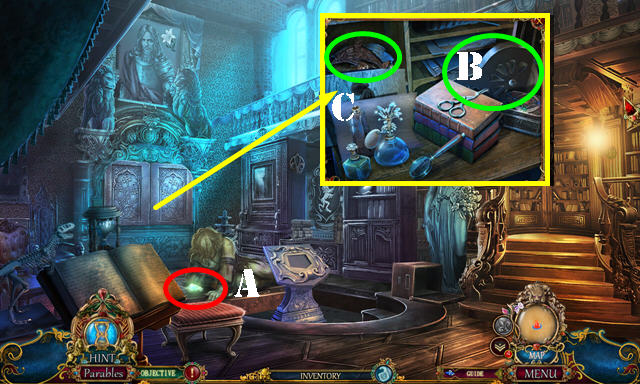
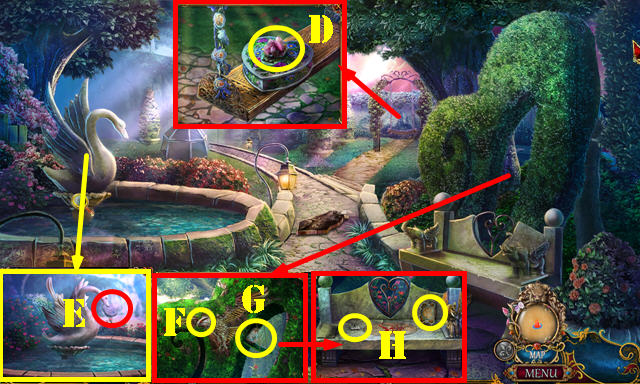
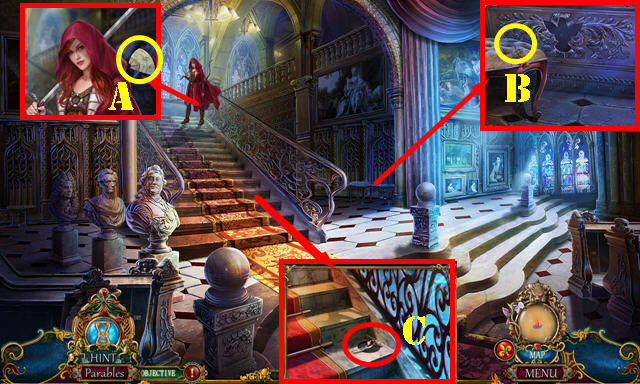
- Talk to Ruth; take RUTH'S KNIFE (A).
- Read the note; take the STAG CREST (B).
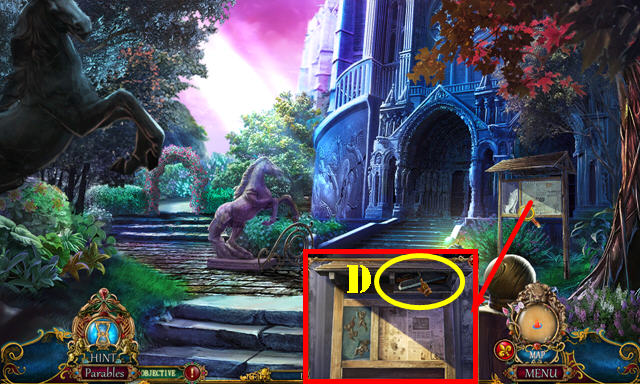
- Take the BRANCH (C). Use RUTH'S KNIFE to get the HEALING FLOWER (D).
- Select the two leaves of the HEALING FLOWER to get the HEALING HERBS (inventory).
- Use the HEALING HERBS on Ruth and then talk to her.
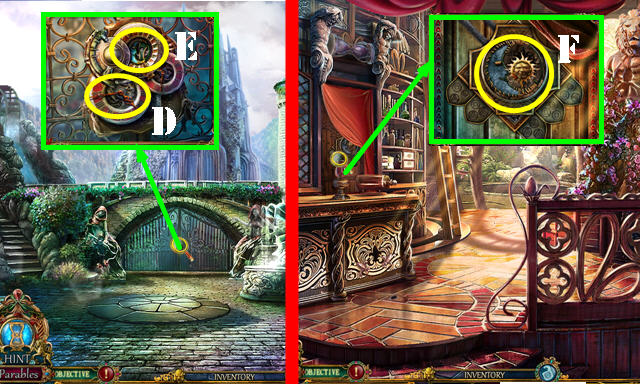
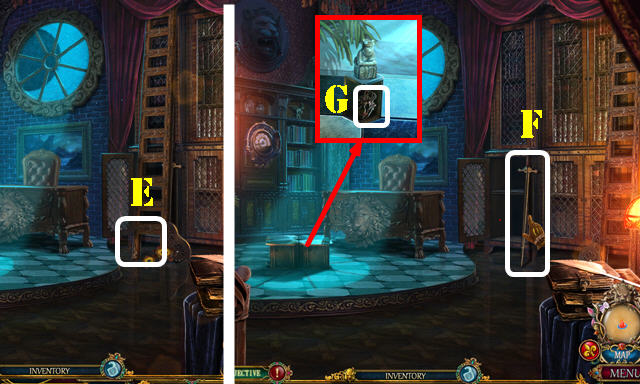
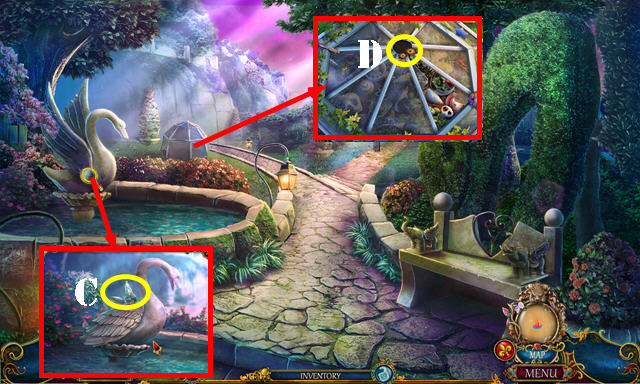
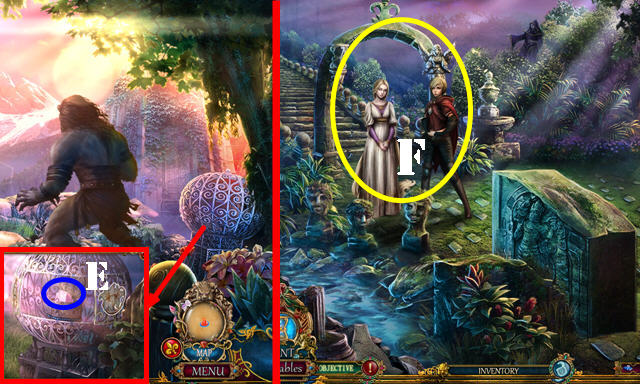
- Go (E).
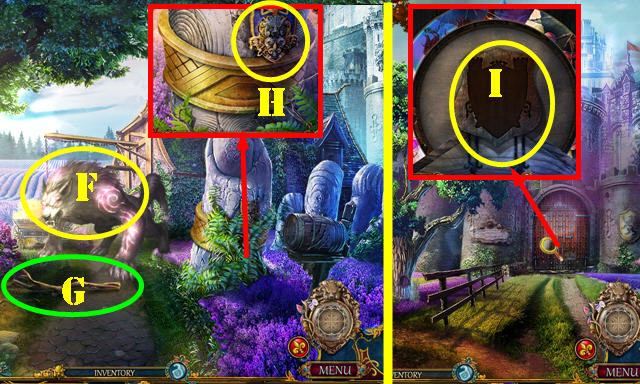
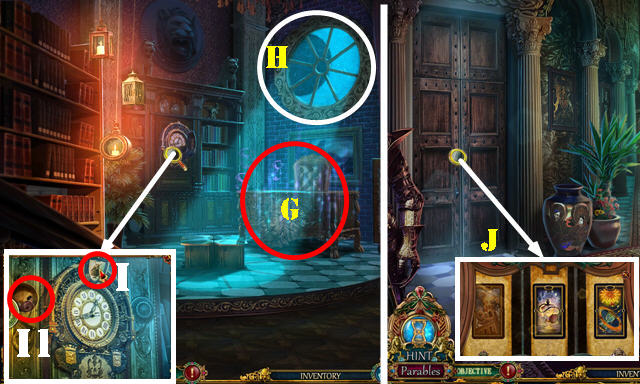
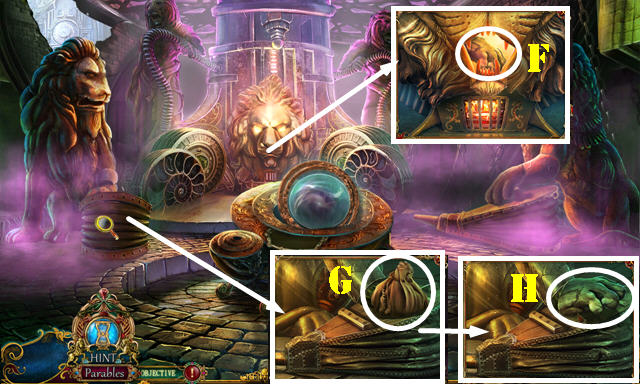
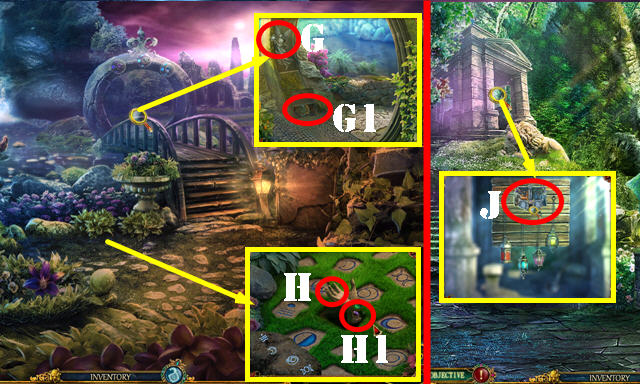
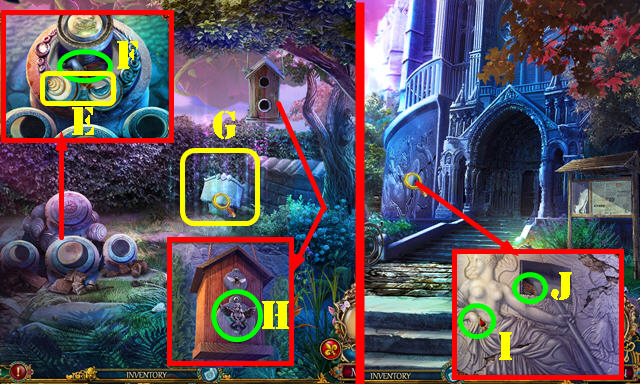
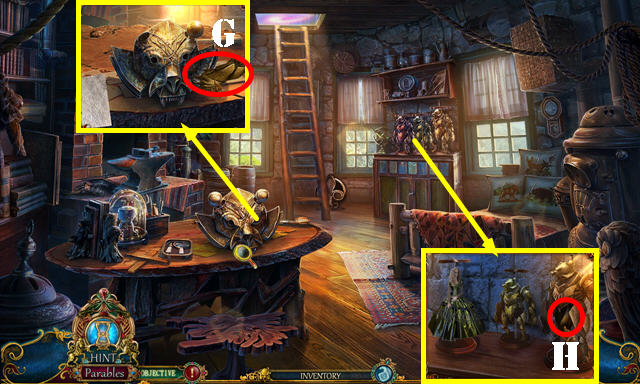
- Use the BRANCH (F); take the BRANCH (G).
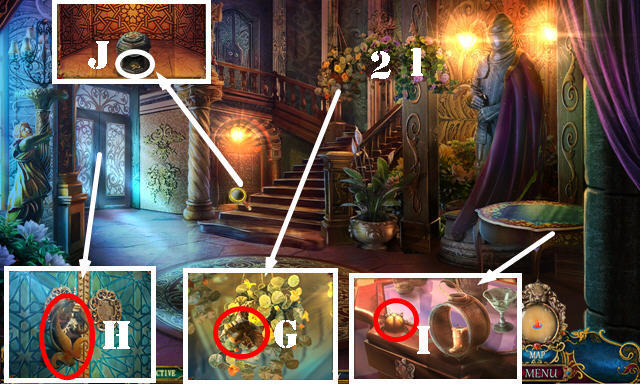
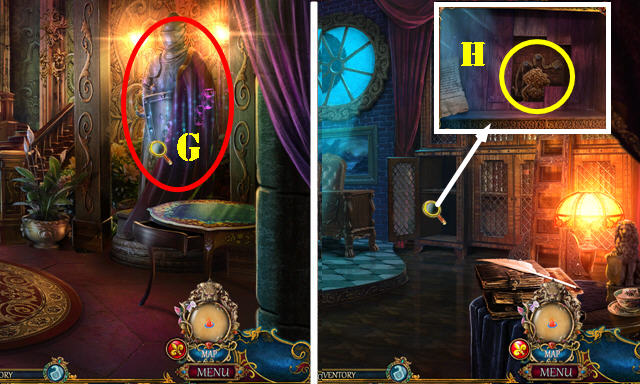
- Remove the leaves; take the MONTAFLEUR CREST (H).
- Walk down.
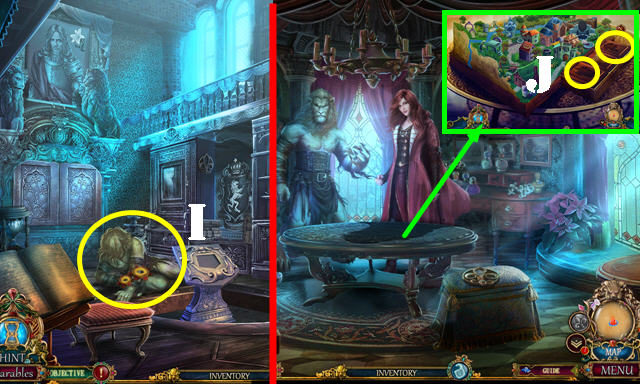
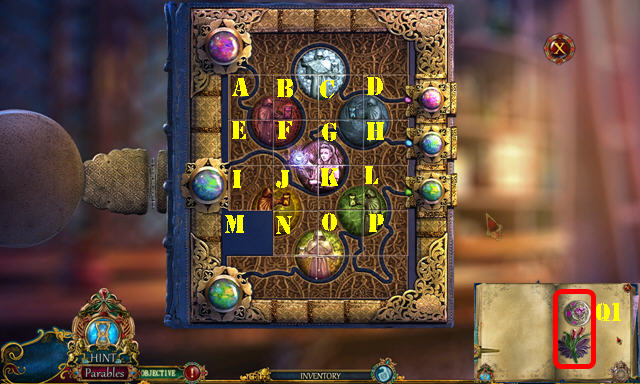
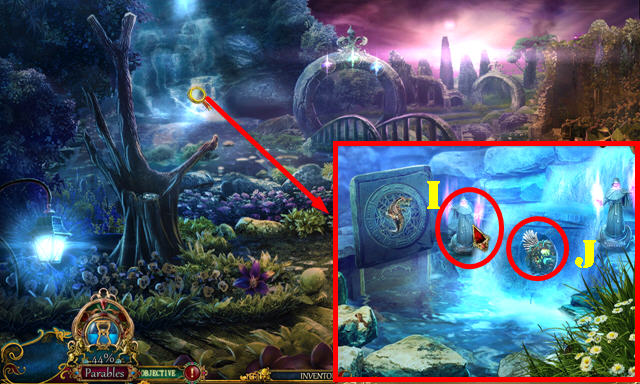
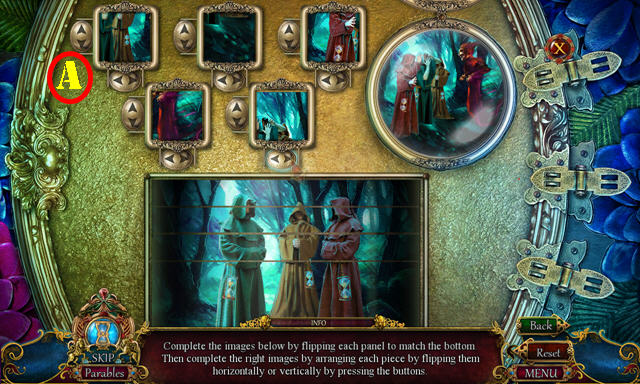
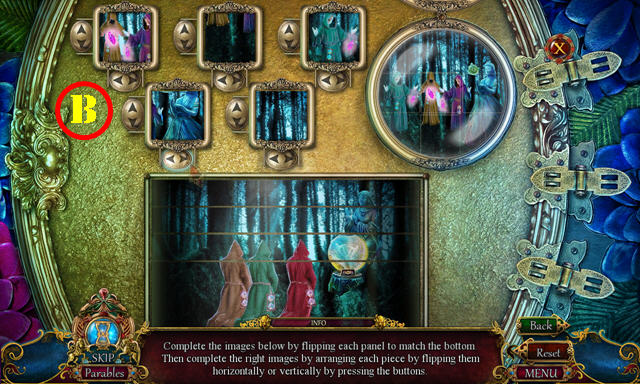
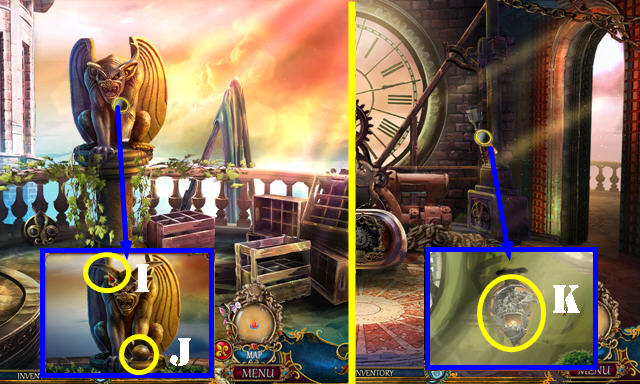
- Place the MONTAFLEUR CREST (I) for a puzzle.

- Solution (J).
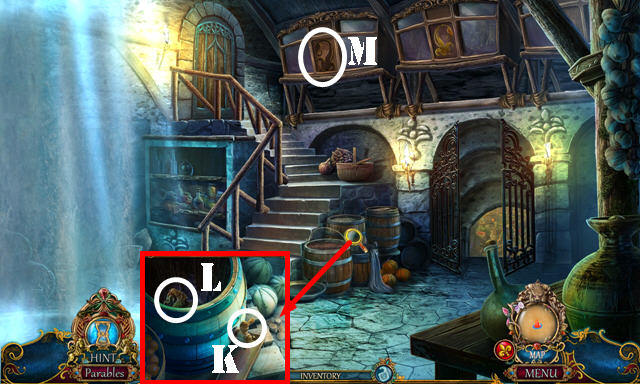
Chapter 2
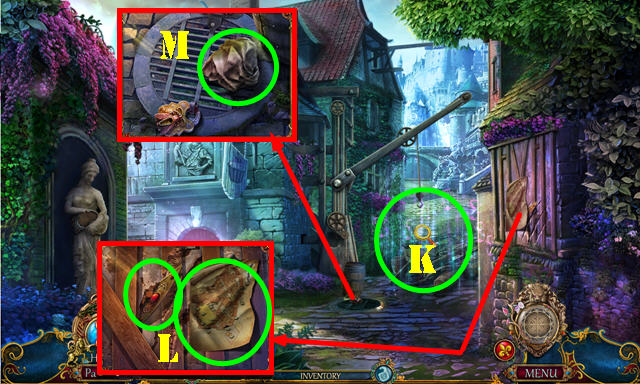
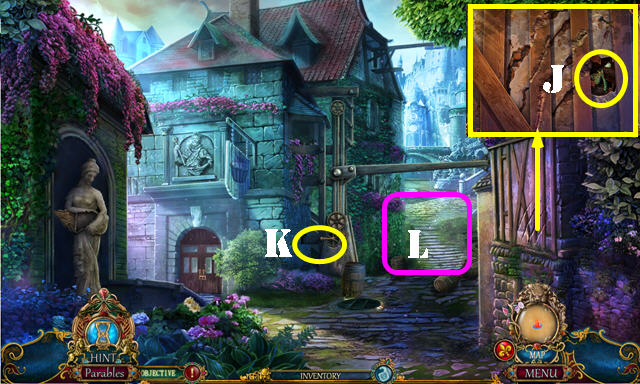
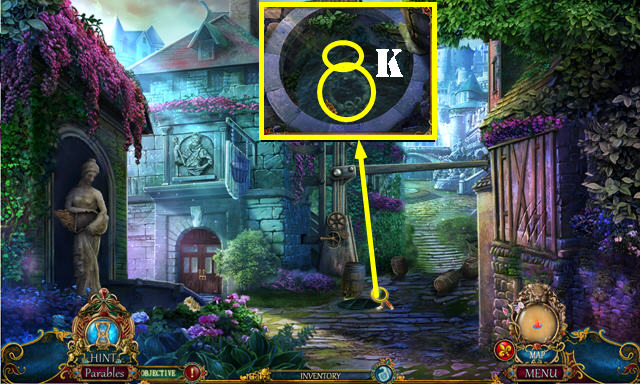
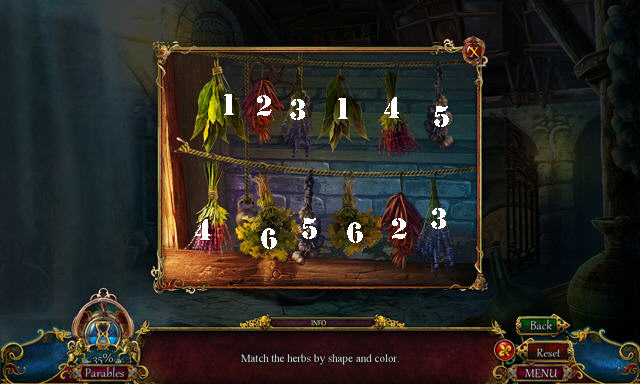
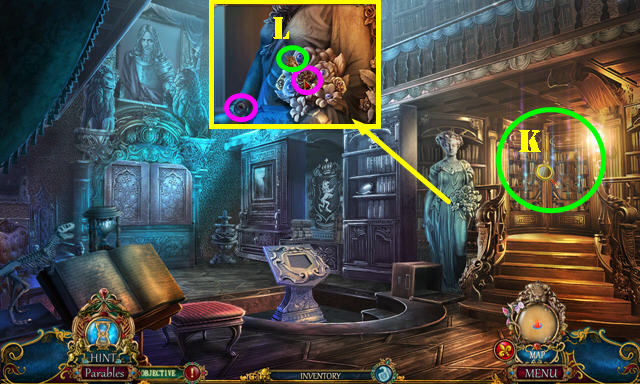
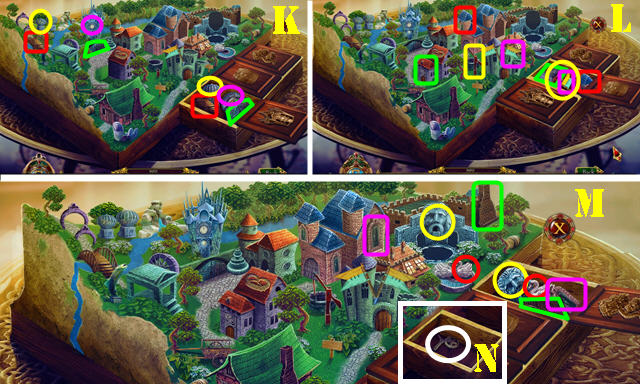
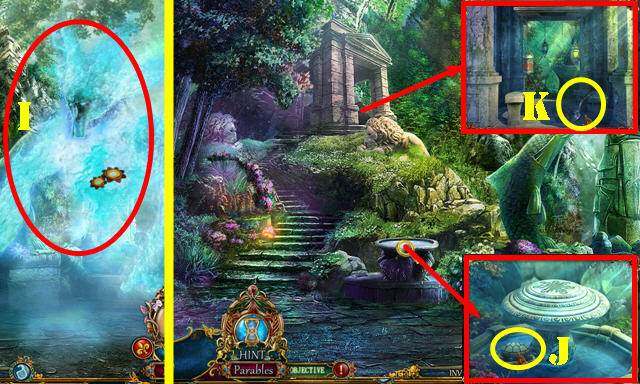
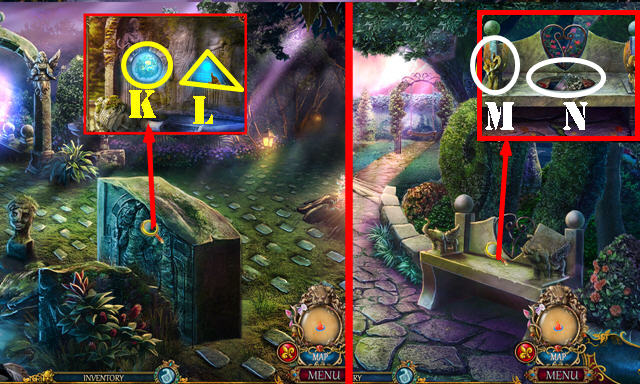
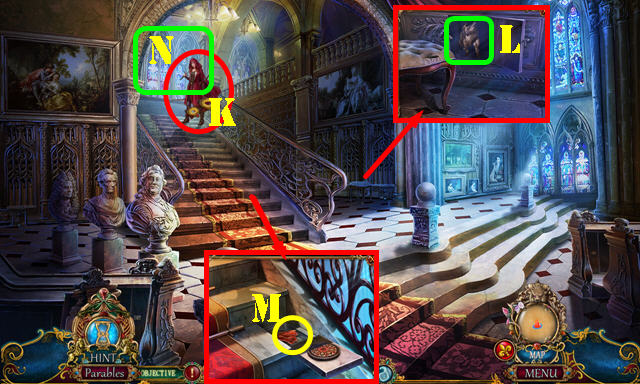
- Play the HOP (K) to get the FLINT AND STEEL.
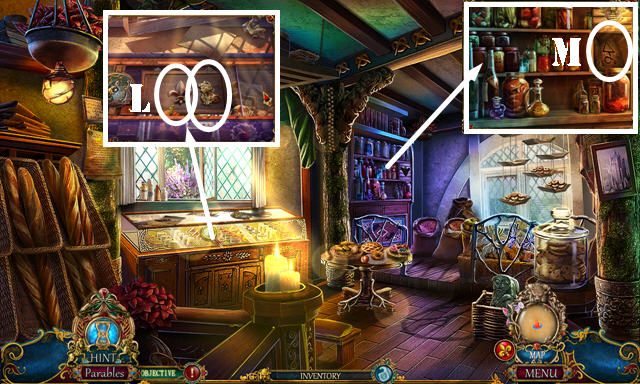
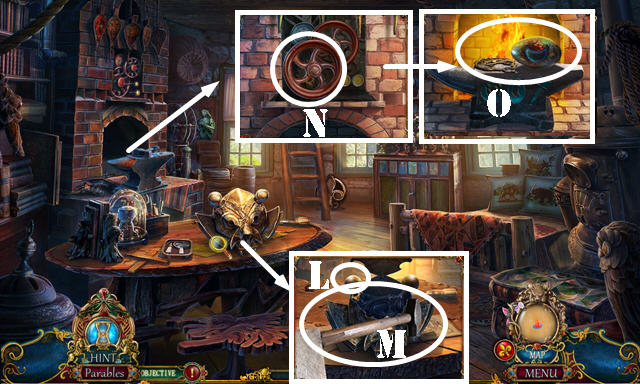
- Remove the map; take the JEWELED SHARD (L).
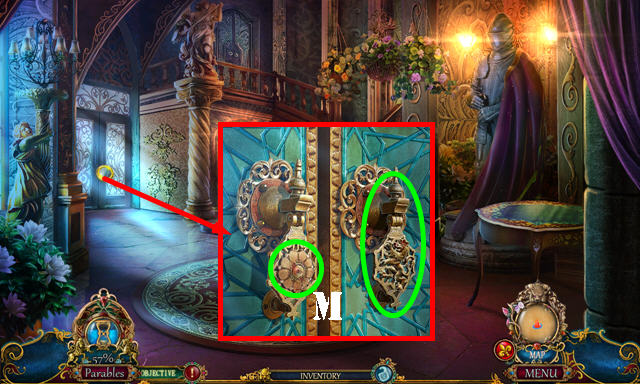
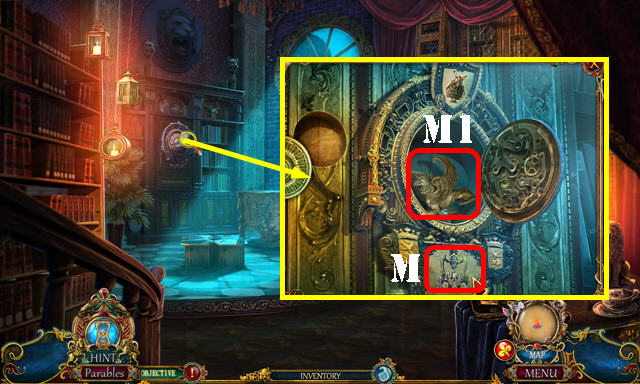
- Take the OILY CLOTH (M).
- Place the OILY CLOTH on the BRANCH; use the FLINT AND STEEL on the cloth to get the TORCH (inventory).
- Return to the Lavender Fields.
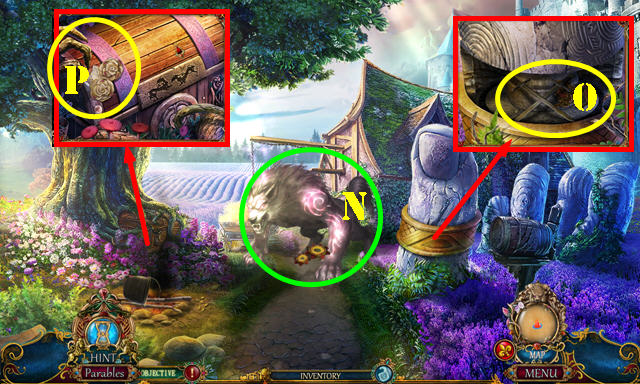
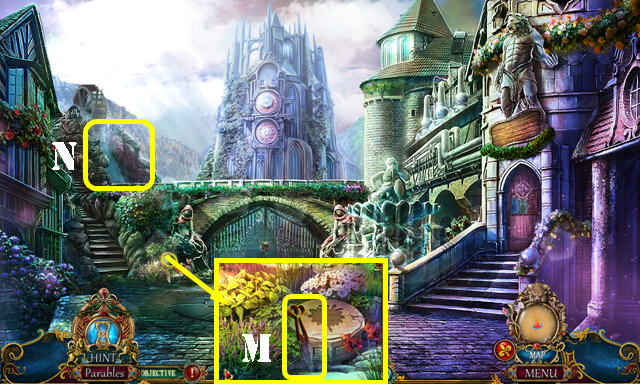
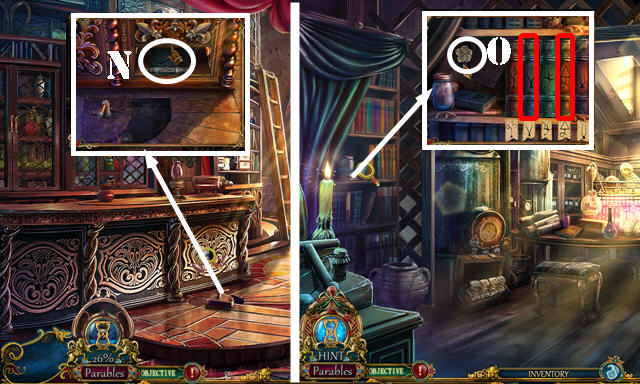
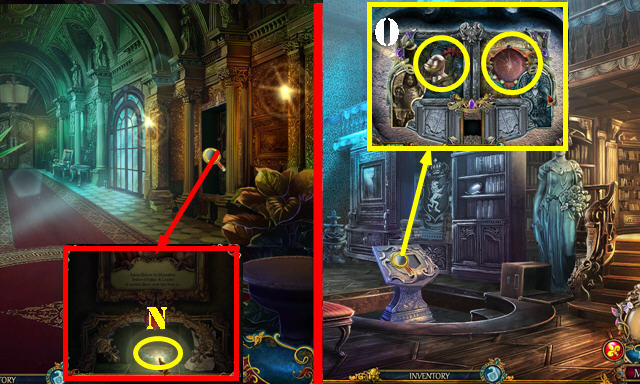
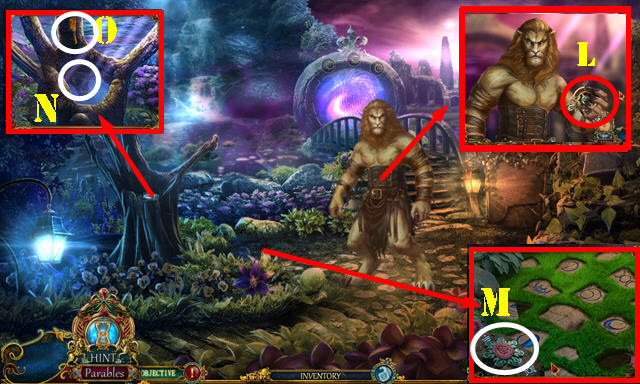
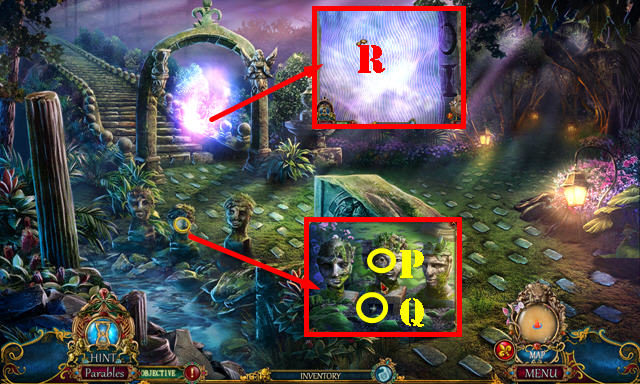
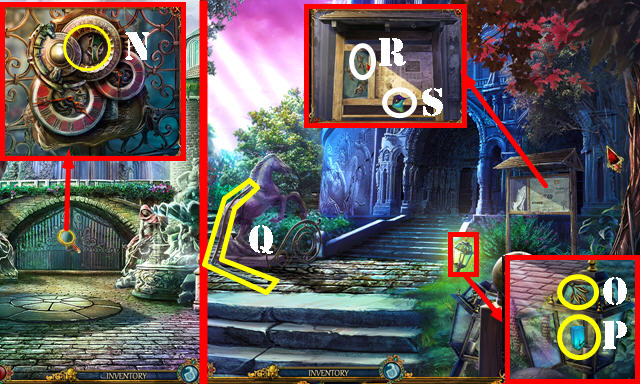
- Use the TORCH (N).
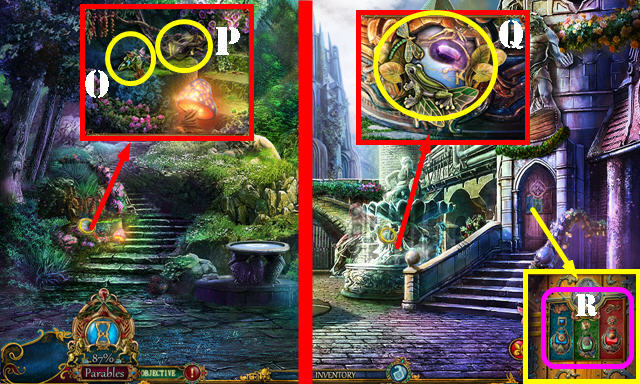
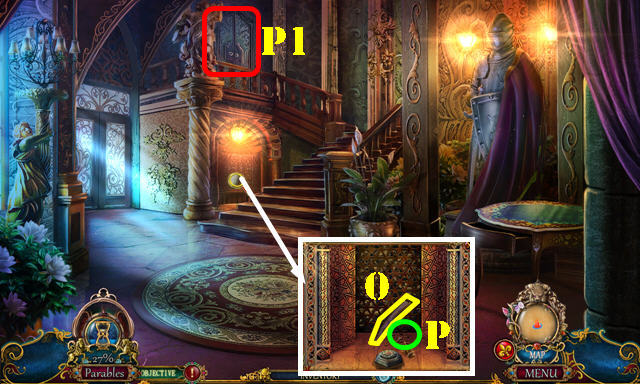
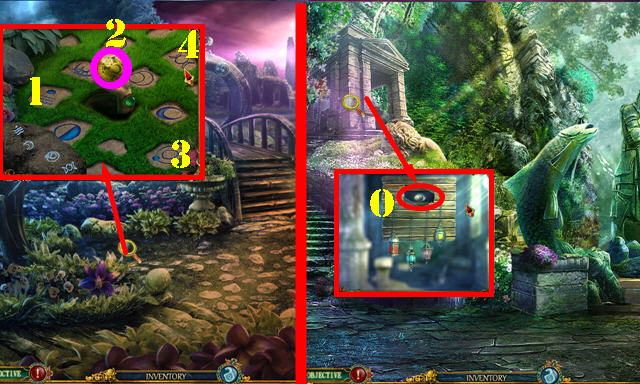
- Place the JEWELED SHARD; take the SWORDS EMBLEM and RUBY FERRET (O).
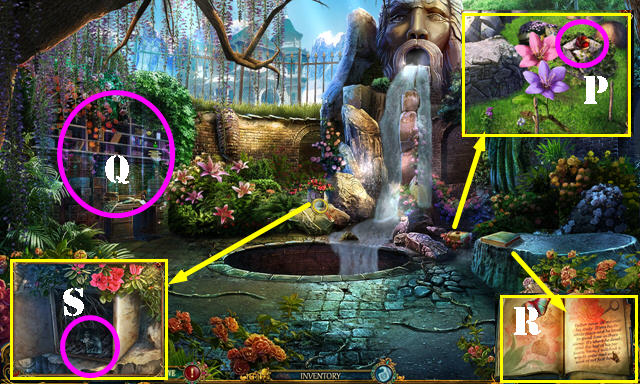
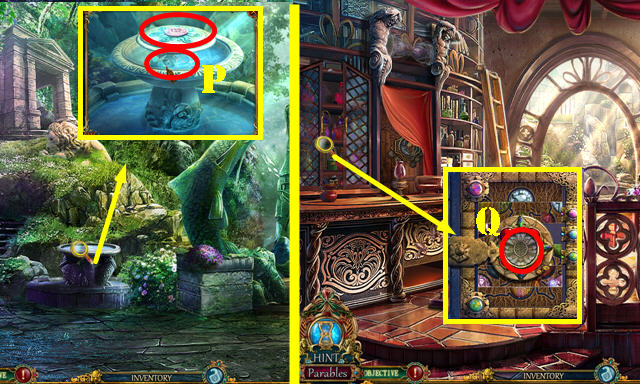
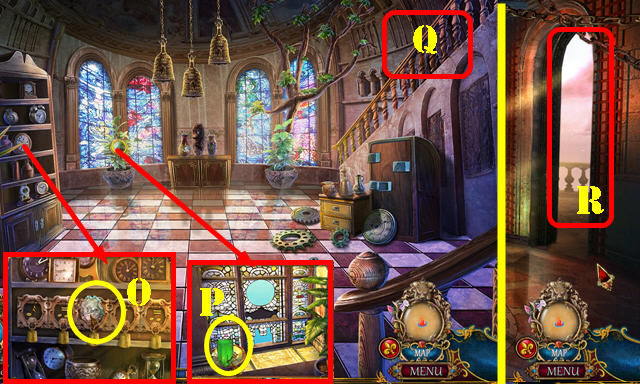
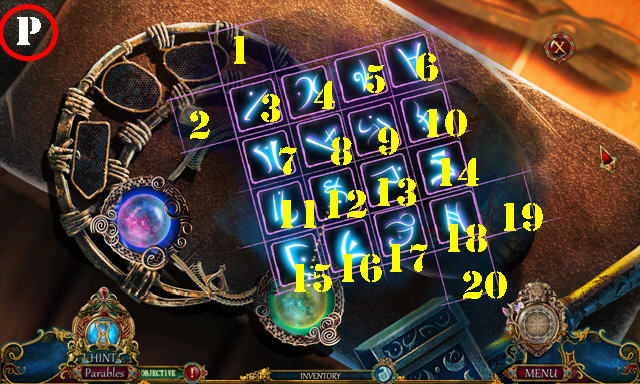
- Select each finger; take the MARBLE FLOWERS (P).
- Walk down.

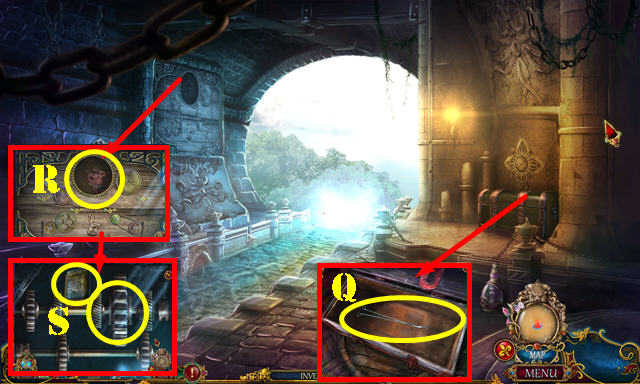
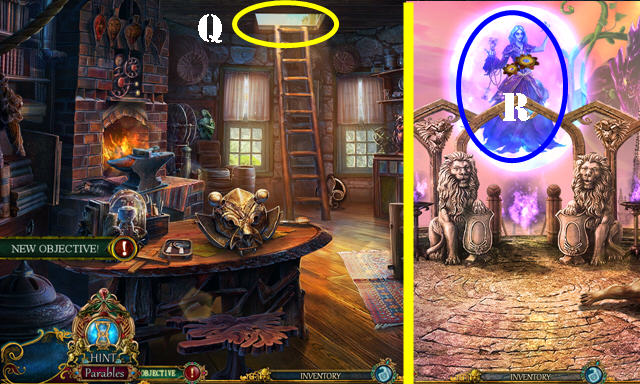
- Place the SWORDS EMBLEM; take the WHEAT CREST and WOODEN FRAME (Q).
- Go forward.
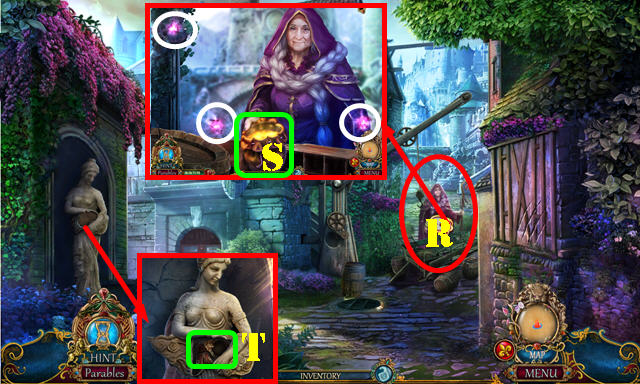
- Talk to the old lady (R); take the GOLDEN SAND (S); use it 3x (white). Take the POUCH OF GOLDEN SAND.
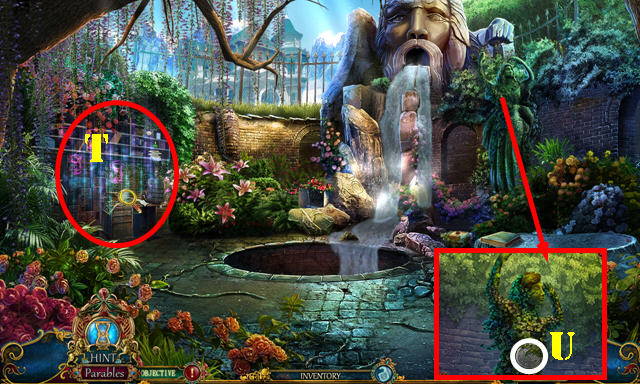
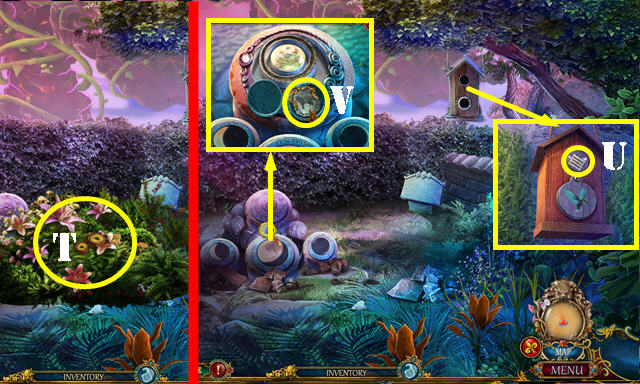
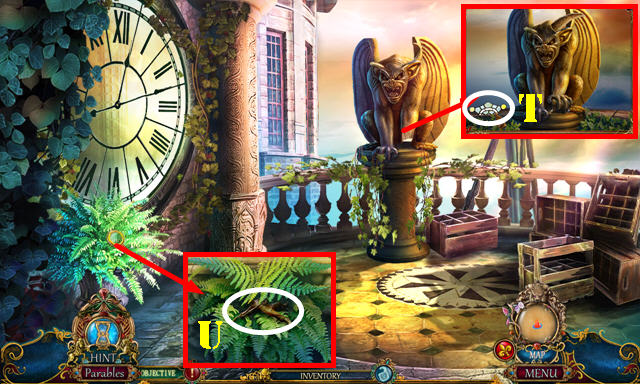
- Place the MARBLE FLOWERS; take the CLOAK EMBLEM and BROKEN PENDANT (T).
- Return to the Lavender Fields.
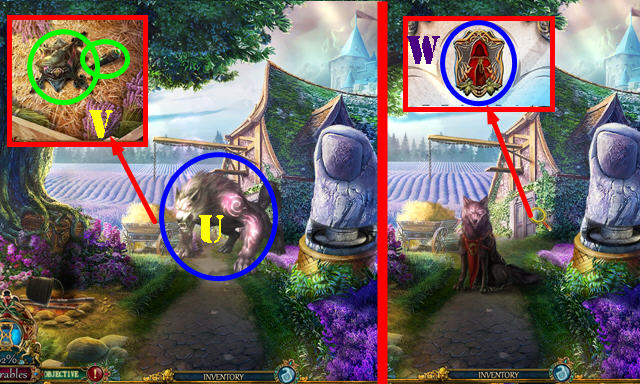
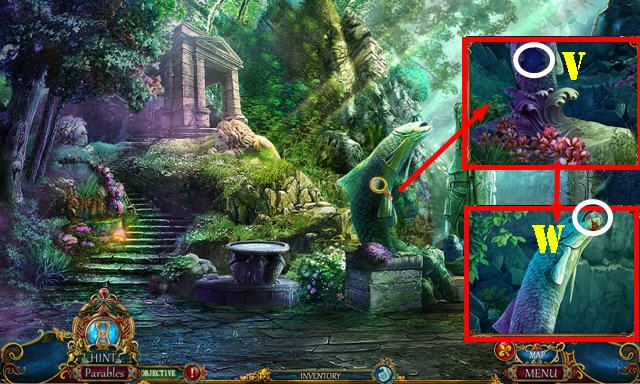
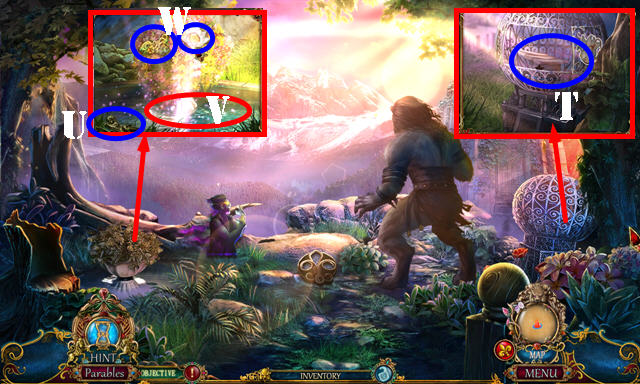
- Use the POUCH OF GOLDEN SAND (U).
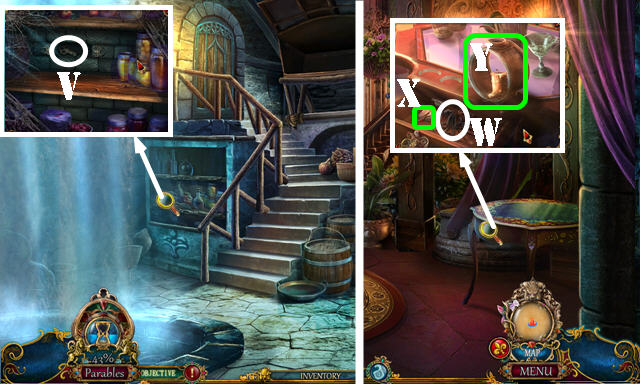
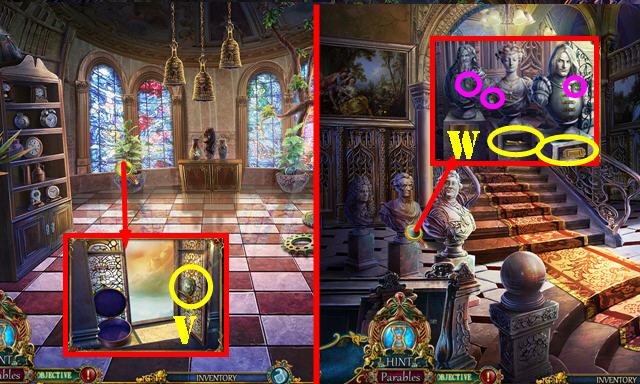
- Select the hay 3x; take the DOE CREST and FAUCET HANDLE (V).
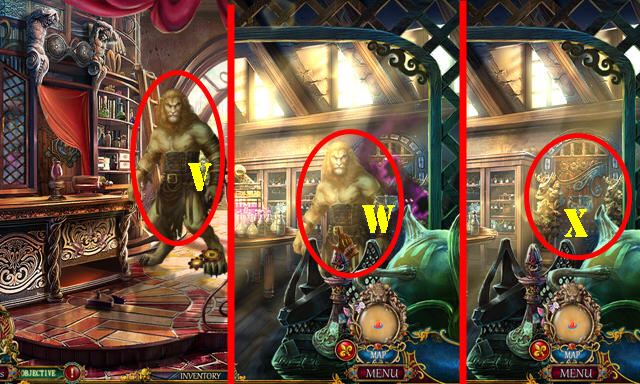
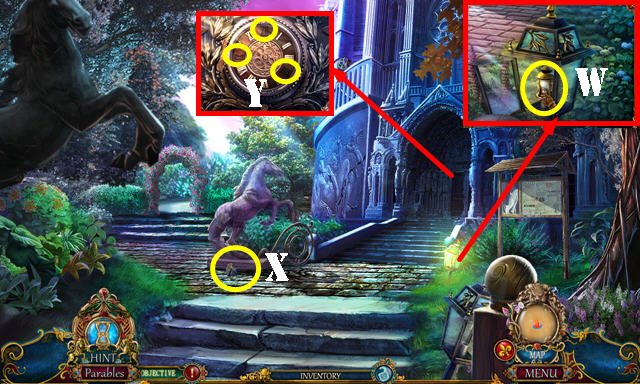
- Place the CLOAK EMBLEM and WOODEN FRAME for a puzzle (W).

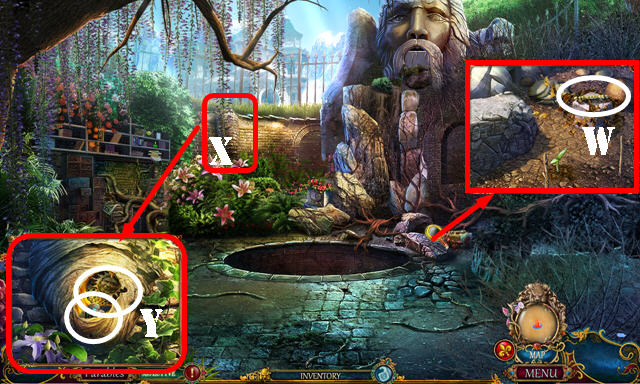
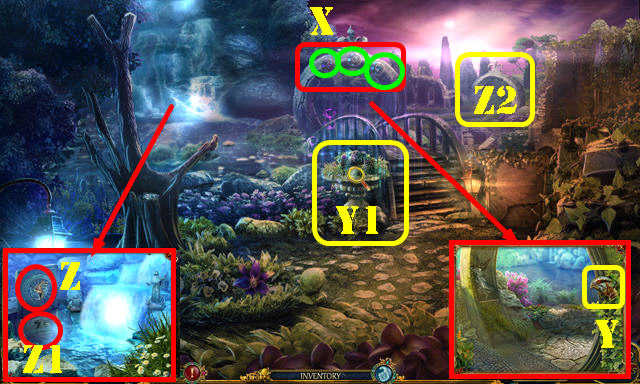
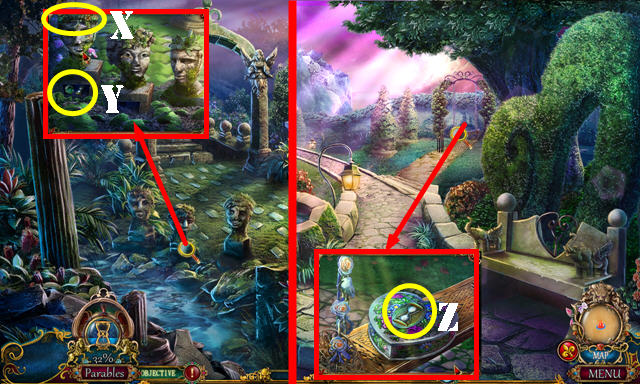
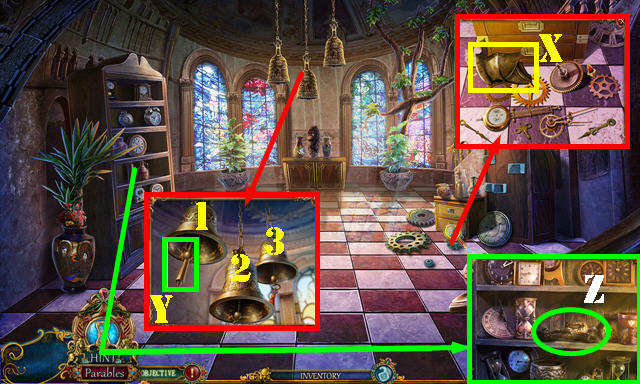
- Solution (1-4). Select the window parts until you form this image (X).
- Enter the Abandoned Cottage.
- Talk to Ruth.
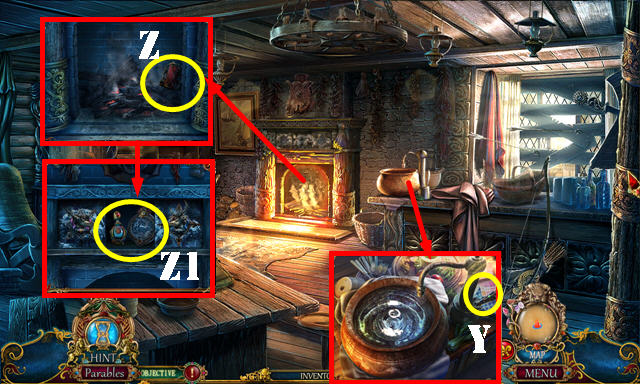
- Place the FAUCET HANDLE (Y) to get the POT WITH WATER.
- Use the POT WITH WATER; take the ENVELOPE EMBLEM (Z).
- Place the STAG CREST and DOE CREST; take the OCEAN PERFUME and DEER TOKEN (Z1).
- Walk down.

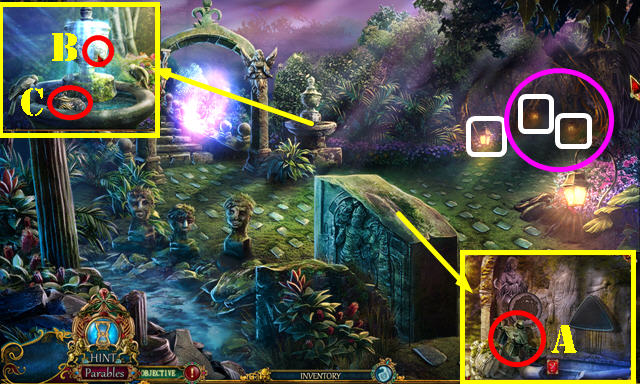
- Place the ENVELOPE EMBLEM; take the CADUCEUS (A).
- Enter the Abandoned Cottage.
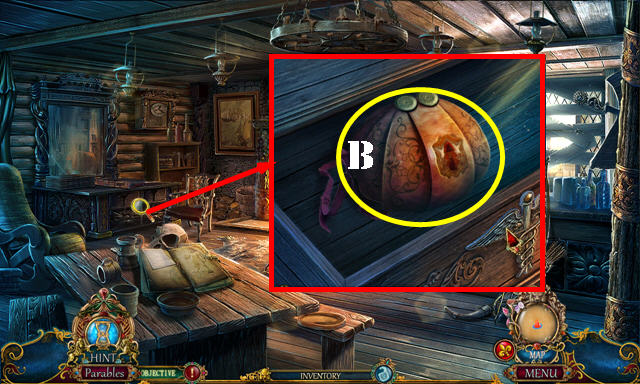
- Place the CADUCEUS; take the LEATHER POUCH (B).
- Open the LEATHER POUCH; take the JADE FERRET (inventory).
- Walk down.
- Place the JADE FERRET and RUBY FERRET (C) for the HOP; play it to get the BAKER CREST.
- Return to Main Street.
- Place the WHEAT CREST and BAKER CREST (D).
- Enter the Bakery.
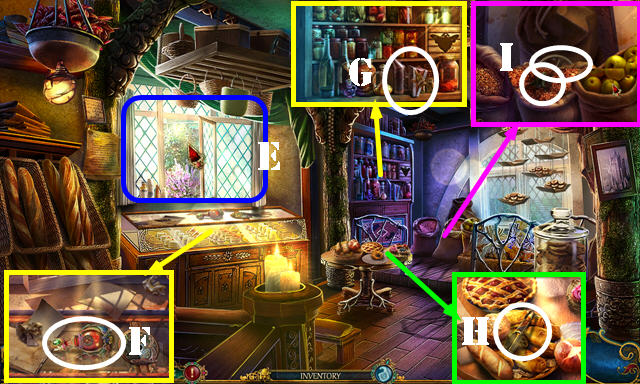
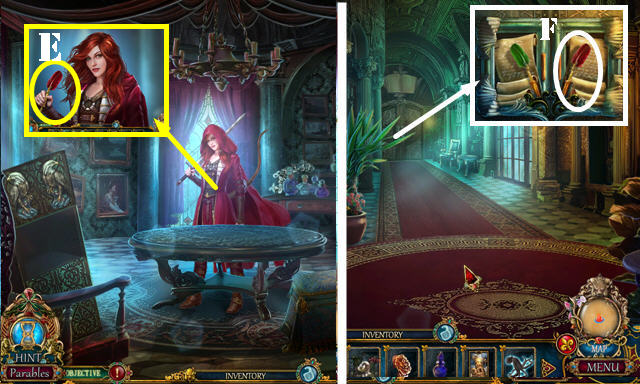
- Open the curtains (E).
- Take the ORCHID PERFUME (F) and SMOKER (G).
- Move the breads; take the TONGS (H).
- Select the grains 2x; take the FROG and GEAR WITH CRANK (I).
- Walk down.
- Use the TONGS to get the DRAGONFLY (J).
- Place the GEAR WITH CRANK (K).
- Go forward (L).
- Take the SHEARS (M).
- Remove the band from the SHEARS (inventory).
- Go to the Shrine (N).
- Take the FAIRY EMBLEM (O). Use the SHEARS; take the HERON (P).
- Walk down.
- Place the DRAGONFLY, FROG, and HERON for a HOP (Q); play it to get the MEADOW PERFUME.
- Place the OCEAN PERFUME, MEADOW PERFUME and ORCHID PERFUME (R).
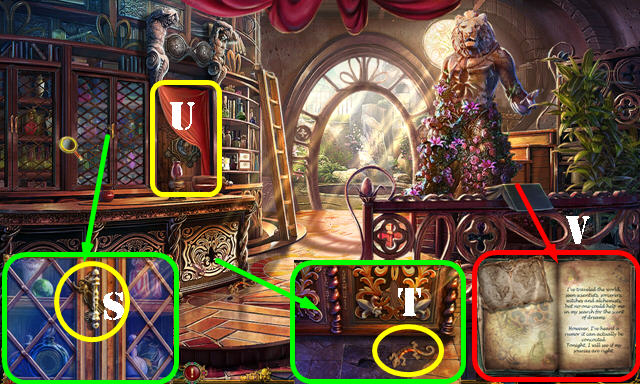
- Take the GOLDEN GODDESS (S) and JEWELED GECKO (T).
- Open the curtain (U).
- Look at the book (V).
- Go forward.
- Take the BRASS HANDLE (W).
- Use the SMOKER (X). Use the TONGS to get the GEM HEART and GOLDEN SUN (Y).
- Place the GEM HEART in the BROKEN PENDANT to get the LIONHEART PENDANT (inventory).
- Walk down.
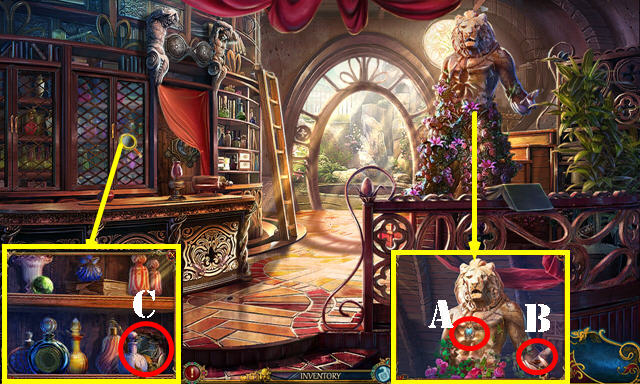
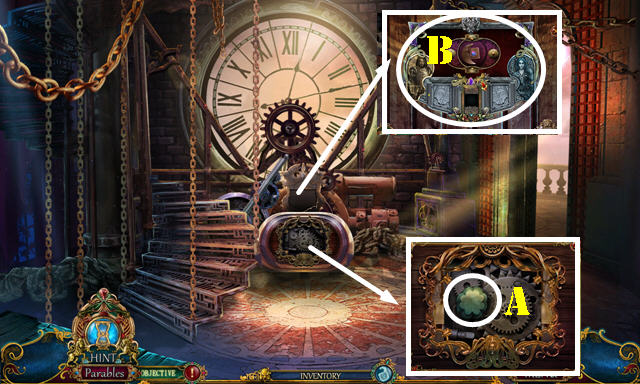
- Place the LIONHEART PENDANT (A); take the CLOCK HAND (B).
- Place the BRASS HANDLE; take the FLORAL ORB (C).
- Walk down.
- Place the CLOCK HAND (D); take the CRESCENT MOON (E).
- Enter the Perfume Shop.
- Place the GOLDEN SUN and CRESCENT MOON for a puzzle (F).
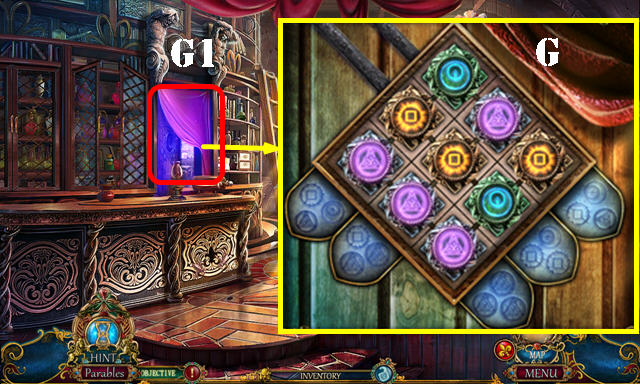
- Solution (G).
- Enter the Perfume Lab (G1).
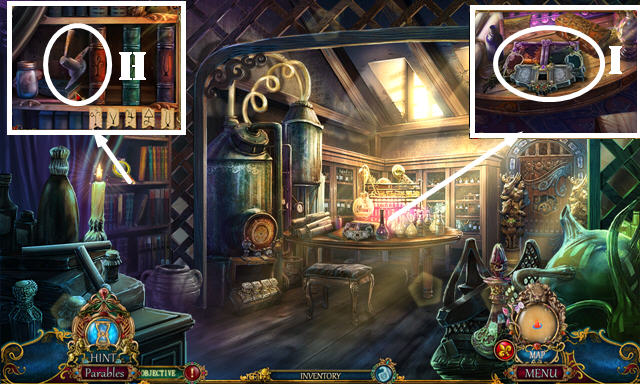
- Pull the curtain and move the jar; take the SMALL LEVER (H).
- Read the note; take the MECHANICAL BOARD (I).
- Walk down.
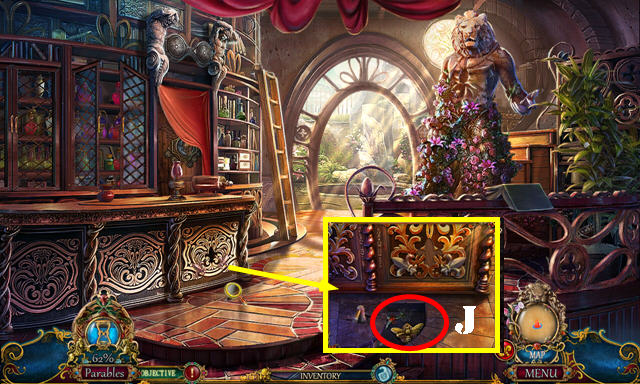
- Place the SMALL LEVER and turn it; take the GOLDEN BEE and FLY KEY (J).
- Return to Main Street.
- Use the FLY KEY and turn it; take the BEAR FRAGMENT and GOLDEN WREATH (K).
- Enter the Bakery.
- Place the BEAR FRAGMENT; take the FLEUR-DE-LIS and BRASS PORTRAIT (L).
- Place the GOLDEN BEE; take the DISTILLING BOOK (M).
- Put the BRASS PORTRAIT on the FLORAL ORB to get the GROWTH CRYSTAL (inventory).
- Return to the Perfume Shop.
- Place the FLEUR-DE-LIS; take the CHEMISTRY BOOK (N).
- Enter the Perfume Lab.
- Place the DISTILLING BOOK and CHEMISTRY BOOK; take the JEWELED FLOWER and MAN FRAGMENT (O).
- Return to the Backyard Garden.
- Place the GROWTH CRYSTAL (P).
- Play the HOP (Q) to get the PRESSURE GAUGE.
- Look at the book (R).
- Place the GOLDEN GODDESS and GOLDEN WREATH; take the WOMAN FRAGMENT (S).
- Return to the Perfume Lab.
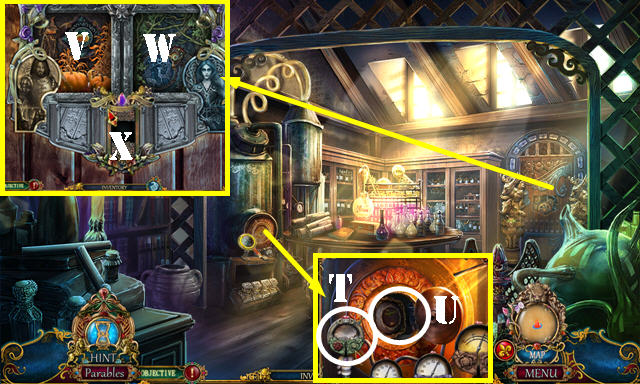
- Place the PRESSURE GAUGE and Select it (T); take the PUMPKIN TOKEN (U).
- Place the DEER TOKEN, MAN FRAGMENT, WOMAN FRAGMENT and PUMPKIN TOKEN on the MECHANICAL BOARD (inventory).
- Place the MECHANICAL BOARD. Select (V).
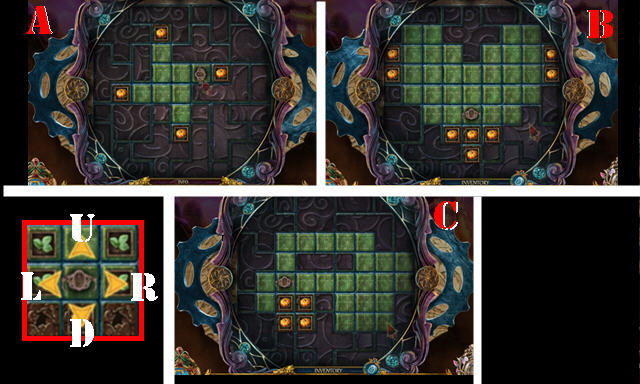
- Solution 1, part one (A): Dx2-U-Lx2-R-Ux2-D-Rx2.
- Solution 1, part two (B): Solution 2, part two (B): Dx2-Ux2-L-D-L-U-L-Ux2-Rx2-D-Lx2-R-Dx2-Rx2-U-R-D-R-U-R. Ux2-Lx2-D-Rx2-Lx5-D-L-U-R-U-L-Dx2-Rx2-U-R-Dx2-R-U-L-U-Rx2-D-R-U-L-U-R.
- Solution 3, part three (C): Rx2-Dx2-Rx2-Ux2-L-Ux2-Lx4-Dx3-U-Rx3-Dx2-Rx2-Ux2-Rx4-Lx3-Ux2-Lx2-Dx2. L-D-R-U-R-D-U-Rx2-Dx2-R-U-R-U-Lx4-Rx3-Ux2-Lx4-Ux2-L-U-R-U-Rx6-U-L-D-Lx5-Ux2-Rx4-D-R-D-Lx4-Rx3-Ux2-Lx4-Ux2.
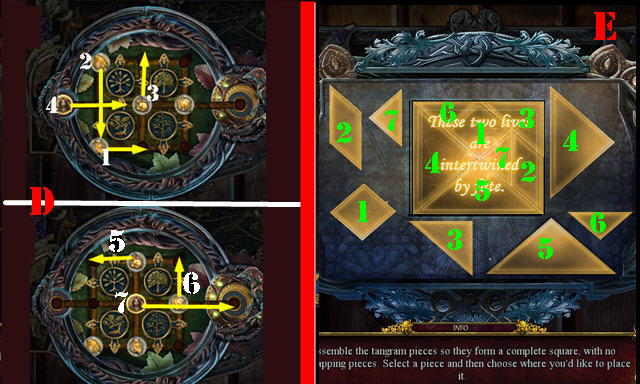
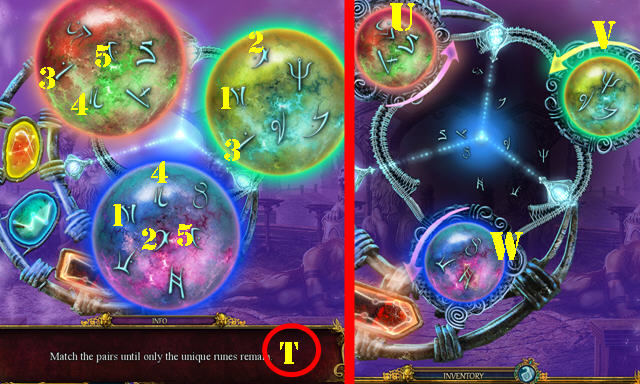
- Select the scroll, select (W) and then the emblem for a puzzle. Solution two (1-7)(D).
- Select the scroll, then (X) for a puzzle. Solution three (1-7)(E).
- Select the engraved tablet; take the ORION STONE and MECHANICAL BOARD.
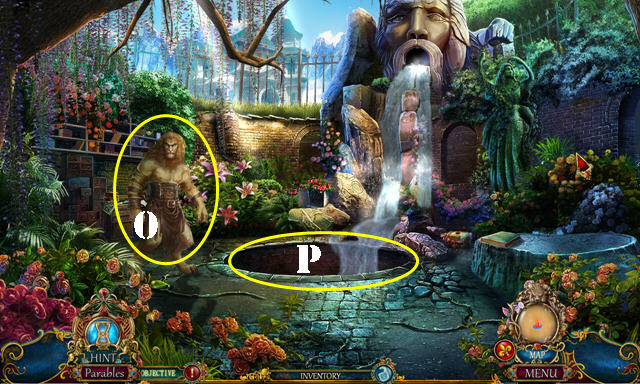
- Talk to Eric (O).
- Go to the Well Cellar (P).
Chapter 3
- Take the OWL BADGE (A), SHIELD (B) and HEXAGONAL PEDESTAL (C).
- Place the FAIRY EMBLEM; take the FAN EMBLEM (D).
- Open the gate (E) for a HOP; play it to get the WALKING CANE.
- Enter the Foyer (F).
- Select the two plants (1-2); take the BROKEN HANDLE (G).
- Take the COPPER LEAF (H) and BROKEN BEETLE (I).
- Place the HEXAGONAL PEDESTAL; take the SPIGOT (J).
- Walk down.
- Place the SPIGOT and turn it (K); take the LION HEAD (L).
- Place the COPPER LEAF (M) and select for a puzzle.
- Solution (1-6).
- Take the LEATHER POUCH.
- Place the LION HEAD on the BROKEN HANDLE to get the LION HANDLE (inventory).
- Take the KNIGHT TOKEN from the LEATHER POUCH (inventory).
- Go to the Foyer.
- Place the JEWELED FLOWER and the LION HANDLE (M).
- Enter the Grand Hall.

- Use the WALKING CANE (N) to get the GOLDEN HORSE.
- Take the BIRD EMBLEM (O).
- Enter the Portrait Gallery (P).

- Talk to Brianne (Q).
- Take the GLASS VIAL (R). Place the GOLDEN HORSE; take the TOWER CARD (R1).
- Place the BIRD EMBLEM (S); take the SILVER SPIDER (T).
- Place the FAN EMBLEM; take the GOLDEN ROSE (U).
- Return to the Well Cellar.
- Place the SILVER SPIDER; take the COPPER KEY (V).
- Go to the Foyer.
- Use the COPPER KEY and turn it; take the METAL OCTOPUS (W); select the match (X) and take the LANTERN (Y).
- Go to the Grand Hall.
- Place the LANTERN on the painting for a puzzle.
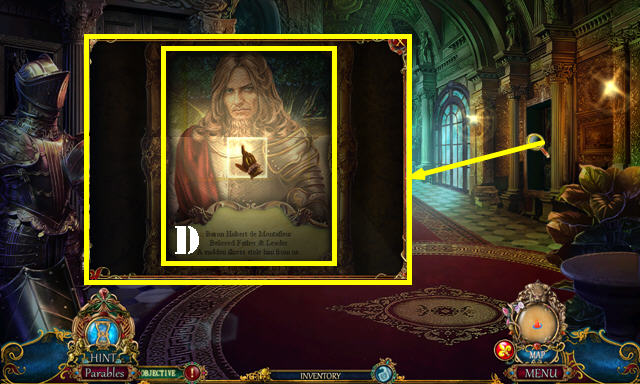
- Solution (D).
- Look at the note. Take the SANDMEN SCROLL.
- Go to the Portrait Gallery.
- Give the SANDMEN SCROLL (E); take the QUILL.
- Walk down.
- Place the QUILL (F).
- Go forward.
- Play the HOP (G) to get the PERFUME CARD.
- Select the window 2x (H).
- Place the OWL BADGE (I); take the BRACELET (I1).
- Walk down.
- Place the TOWER CARD and PERFUME CARD for a puzzle (J).

- Solution (1-12).
- Enter Hubert's Study.
- Play the HOP (K) to get the BELL EMBLEM.
- Place the BRACELET and GOLDEN ROSE (purple); take the CLOCK TOWER MODEL (L).
- Return to the Library.
- Place the BELL EMBLEM (M); take the GRIFFIN EMBLEM and WOODEN CARP (M1).
- Walk down.
- Place the GRIFFIN EMBLEM take the VIAL TOKEN (N).
- Place the KNIGHT TOKEN and VIAL TOKEN on the MECHANICAL BOARD to get the MECHANICAL BOARD SYMBOL (inventory).
- Go to Hubert's Study.
- Place the MECHANICAL BOARD SYMBOL for a puzzle (O).
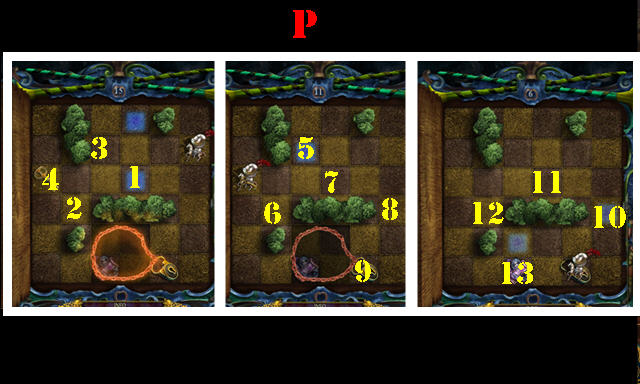

- Select the knight token twice. Solution one (1-13) (P).
- Select the scroll once and the vial token twice. Solution two (Qx3-Rx3-Sx2-T)-(X-W)-(U-W).
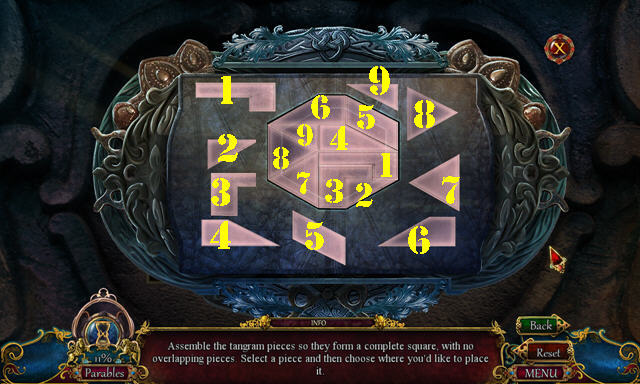
- Select the scroll and then the lower-center piece. Solution three (1-9).
- Select the engraved tablet; take the CASSIOPEIA STONE and MECHANICAL BOARD.
Chapter 4
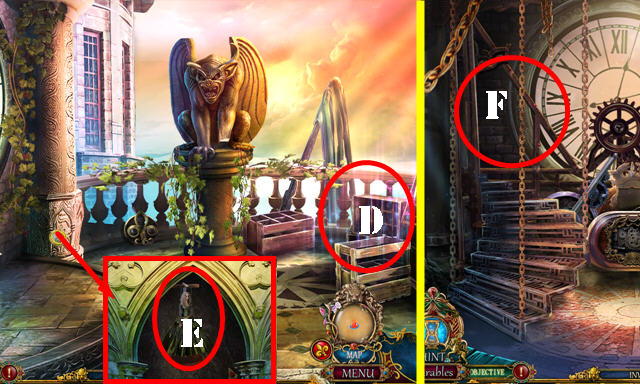
- Talk to Eric.
- Take the FRAME FRAGMENT (A).
- Take the IRON WHEEL (B); read the note.
- Place the METAL OCTOPUS; take the WOODEN DOLPHIN (C).
- Walk down.
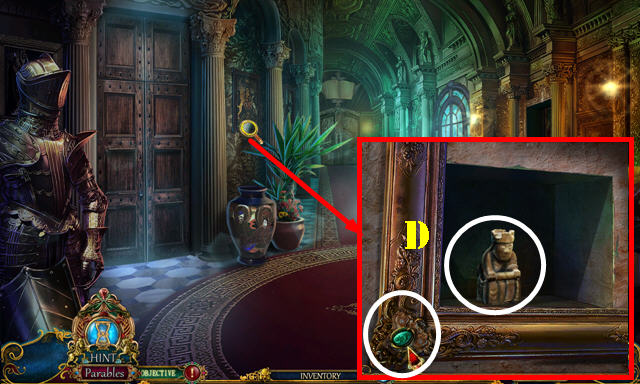
- Place the FRAME FRAGMENT; take the KING FIGURINE (D).
- Go forward.
- Place the IRON WHEEL (E); take the SWORD (F).
- Place the KING FIGURINE; take the BROKEN LOCKET (G).
- Return to the Foyer.
- Place the SWORD and SHIELD for a HOP (G); play it to get the BUTTERFLY EMBLEM.
- Return to the Library.
- Place the BUTTERFLY EMBLEM and read the note; take the TREE MODEL and LOCKET CHAIN (H).
- Place the LOCKET CHAIN on the BROKEN LOCKET to get the MONTAFLEUR FAMILY LOCKET (inventory).
- Go to Hubert's Study.
- Give the MONTAFLEUR FAMILY LOCKET (I).
- Return to the Portrait Gallery.
- Place the TREE MODEL and CLOCK TOWER MODEL for a puzzle (J).
- Solution (K-L-M).
- Take the MINIATURE GEARS (N).
- Return to the Foyer.
- Place the MINIATURE GEARS on the BROKEN BEETLE to get the MECHANICAL BEETLE (inventory).
- Place the MECHANICAL BEETLE; pull the lever (O); take the MECHANICAL RABBIT (P).
- Go to the Control Room (P1).
- Place the WOODEN CARP and WOODEN DOLPHIN; take the FORCEPS (Q).
- Place the MECHANICAL RABBIT (R). Use the FORCEPS; take the MASTER KEY FRAME (S).
- Play the HOP (T) to get the MASTER KEY MECHANISM.
- Move the leaves 2x; take the MAZE EMBLEM (U).
- Place the MASTER KEY MECHANISM and MAZE EMBLEM on the MASTER KEY FRAME to get the MASTER KEY (inventory).
- Walk down.
- Give the MASTER KEY (V).
- Go to the Perfume Lab.
- Select Eric (W). Enter the Perfume Factory (X).
Chapter 5

- Use the MASTER KEY (A) and zoom in for a puzzle.
- Solution one (B).
- Solution two (3-4-1) (C).
- Solution three (3-2-4-2-3) (D).
- Solution four (3-2-3-2-3-2-4-2) (E).
- Place the JEWELED GECKO; take the STONE PAW (F).
- Take the GOLDEN SAND (G). Place the STONE PAW (H).
- Return to the Shrine.
- Use the GOLDEN SAND (I).
- Take the TURTLE STATUE (J) and LADLE (K).
- Go to the Temple Entrance on the right.
- Talk to Eric. Take the JOURNAL LOCK (L).
- Take the FLORAL MEDALLION (M).
- Use the LADLE to get the GOLDEN LEAVES (N).
- Use the GLASS VIAL to get the TREE SAP (O).
- Walk down.
- Place the FLORAL MEDALLION; take the EYE OF LUNA (P).
- Return to the Perfume Shop.
- Place the JOURNAL LOCK and GOLDEN LEAVES; Select the journal for a puzzle (Q).
- Solution: G-F-E-I-J-F-B-A-E-F-B-C-D-H-G-F-B-C-D-H-L-K-J-I-E-F-J-K-G-F-J-K-G-C-D-H-G-K-L-H-G-K-L-H-G-H-L.
- K-G-H-D-C-G-K-L-H-G-K-L-H-D-C-G-F-J-N-M-I-J-F-E-I-J-K-O-P-L-K-O-N.
- J-K-G-F-J-K-G-H-L-K-O-P-L-H-G-K-J-N-O-P-L-K-J-I-M-N-O-P-L-K-J-N-O-K-J-I-M-N-O-K-J-I-M-N-O.
- P-L-K-O-P-L-K-O-N-J-K-O-P-L-K-J-N-O-P-L-K-O-N-J-K-O-P-L-K-O-P-L-K-J-N-M.
- Flip the page 2x. Take the LAVENDER INSIGNIA and HEART OF LUNA (Q1).
- Walk down.

- Play the HOP (T) to get the SILVER CROCODILE.
- Place the LAVENDER INSIGNIA; take the STONE SCALES and RUBY (U).
- Go to the Shrine.
- Place the STONE SCALES (V); take the BREATH OF LUNA (W).
- Go to the Temple Entrance.
- Place the EYE OF LUNA, BREATH OF LUNA and HEART OF LUNA (X); move the leaves and take the EAGLE HEAD (Y).
- Play the HOP to get the BRASS ELEPHANT (Y1).
- Place the SILVER CROCODILE (Z); take the WATER DRAGON EMBLEM (Z1).
- Go to the Temple Ruins (Z2).
Chapter 6
- Select the 3 lanterns (white).
- Take the SANDMAN STATUETTE (A).
- Place the WATER DRAGON EMBLEM (B); take the BRASS LEAVES and COPPER SNOWDROP (C).
- Go to the Temple Garden (purple).
- Take the HEALING STONE (D) and CIRCULAR RUNE (E).
- Place the EAGLE HEAD (F); take the COPPER LILY (G). Take the TWELVE SYMBOL and the FLOWER TOKEN (H).
- Walk down twice.
- Place the SANDMAN STATUETTE (I); take the RECHARGING SPHERE and BRASS WING (J).
- Place the BRASS WING on the BRASS ELEPHANT to get the WINGED ELEPHANT (inventory).
- Go to the Temple Ruins.
- Place the RECHARGING SPHERE (K); take the BROKEN RUNE (L).
- Go to the Temple Garden.
- Place the WINGED ELEPHANT (M); take the CEREMONIAL LANTERN (N).
- Walk down twice.
- Place the CIRCULAR RUNE and BROKEN RUNE; Select the runes in order (1-4); take the GODDESS SPHERE (purple).
- Walk down.
- Place the CEREMONIAL LANTERN; take the STONE EYE (O).
- Go to the Temple Ruins.
- Use the TREE SAP and then place the STONE EYE (P); take the TINY STAR (Q).
- Place the GODDESS SPHERE for a puzzle (R).
- Solution (S).
- Enter the Garden Crossroads.
- Talk to Eric.
- Place the COPPER LILY and COPPER SNOWDROP; take the STONE FEATHERS (T).
- Take the TRUMPET BOY (U). Use the HEALING STONE (V); take the TOPAZ and FLORAL CROWN (W).
- Walk down.
- Place the FLORAL CROWN (X); take the HOURGLASS and EMERALD (Y).
- Go to the Temple Garden.
- Place the HOURGLASS (Z); select the box for a puzzle.
- Solution (A-B).
- Look at the note and take the GLASS HANDLE.
- Place the STONE FEATHERS; take the FAIRY FRAGMENT (C).
- Place the GLASS HANDLE (D) for a HOP; play it to get the ORNATE STAR.
- Return to the Garden Crossroads.
- Place the ORNATE STAR; take the PRISM OF DREAMS (E); it will be used automatically. You will be transported to the Temple Ruins.
- Talk to Rapunzel and Ruth and (F) to get the MECHANICAL FINGER.
- Walk down.
Chapter 7
- Place the FAIRY FRAGMENT and TINY STAR (G); take the PERFUME TOKEN (G1).
- Place the MECHANICAL FINGER (H); take the AMETHYST (H1).
- Walk down.
- Place the FLOWER TOKEN and the PERFUME TOKEN on the MECHANICAL BOARD to get the MECHANICAL GAZEBO BOARD (inventory).
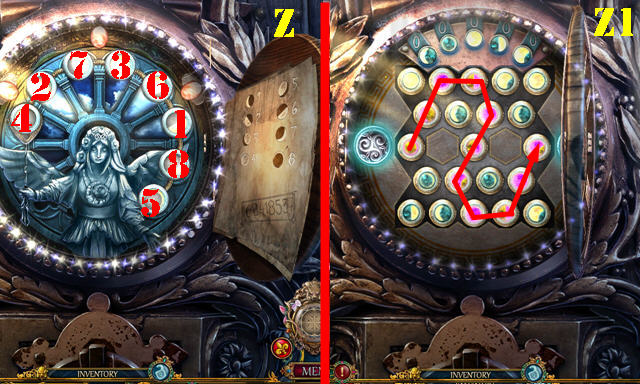
- Place the MECHANICAL GAZEBO BOARD and select it (J).
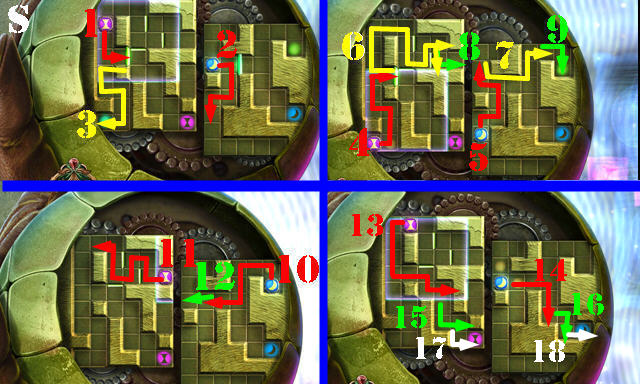
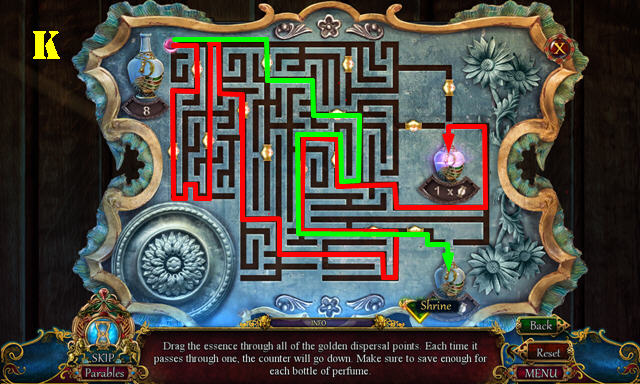
- Select the left side of the board and then the token for a puzzle. Solution one and two. Follow the red lines first and then the green (K).
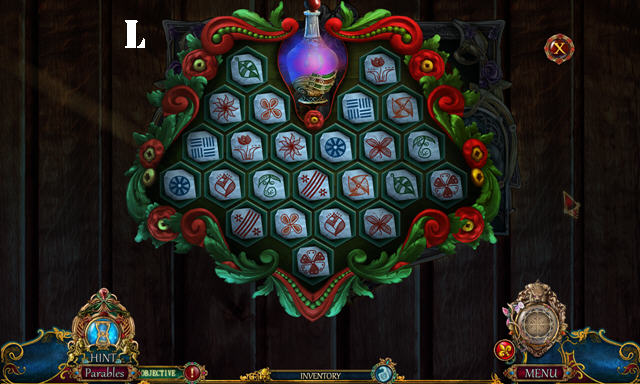
- Select the right side of the board and then the token for a puzzle. Solution two (L).
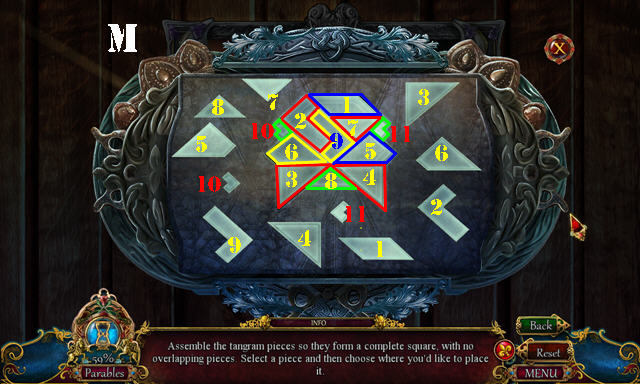
- Select the scroll and then the lower center for a puzzle. Solution three (M) (1-11).
- Select the engraved plate and take the AQUILA STONE, MECHANICAL BOARD and AQUAMARINE.
- Walk down.
- Place the RUBY, TOPAZ, EMERALD, AMETHYST and AQUAMARINE on the TURTLE STATUE; take the CLOCK KEY (inventory).
- Place the CLOCK KEY (N).
- Go forward.
- Remove the leaves 4x; place the BRASS LEAVES (O) and take the GOLDEN MOON (P).
- Take the SCYTHE (Q).
- Place the TRUMPET BOY (R); take the WOODEN BEE (S).
- Go through the arch to reach the Tower Garden.
- Use the SCYTHE for a HOP (T); play it to get the STARRY LAMP.
- Place the WOODEN BEE; take the FOUR SYMBOL (U).
- Take the LIONESS CREST (V).
- Walk down.
- Place the STARRY LAMP and Select it twice (W). Take the STONE HOOF (X).
- Take the NINE SYMBOL from the STONE HOOF (inventory).
- Place the TWELVE SYMBOL, FOUR SYMBOL and NINE SYMBOL for a puzzle (Y).
- Solution one (Z).
- Solution two (Z1).
- Enter the Tower Hall.
Chapter 8
- Talk to Brianne. Take the CRESCENT MOON (A).
- Select the cushion; take the BENT WIRE (B).
- Take the WOODEN HUMMINGBIRD (C).
- Walk down.
- Use the BENT WIRE; take the FULL MOON (D).
- Go to the Tower Garden.
- Place the CRESCENT MOON and FULL MOON (E); take the BLESSED ARROWS and MARBLE HAND (F).
- Play the HOP (G) to get the PEACOCK EMBLEM.
- Place the WOODEN HUMMINGBIRD; take the GODDESS EMBLEM (H).
- Walk down.
- Place the MARBLE HAND (I); take the MARBLE DISC (J).
- Enter the Tower Hall.
- Select the gate. Give the BLESSED ARROWS (K).
- Place the GODDESS EMBLEM; Select it when it falls and take the BROKEN FIGURINE (L).
- Place the MARBLE DISC; Select it and take the BELL ROPE (M).
- Go to the Upper Landing (N).
- Take the LION CREST (O).
- Place the PEACOCK EMBLEM; take the SILVER MOON (P).
- Place the GOLDEN MOON and SILVER MOON on the MECHANICAL BOARD to get the MECHANICAL CLOCK BOARD (inventory).
- Go to the Clock Room (Q) and then to the Tower Balcony (R).
- Take the STAINED-GLASS SHARD (T).
- Select the plant; take the BRONZE BELLRINGER (U).
- Walk down twice.
- Place the STAINED-GLASS SHARD; select the window and take the CUB CREST (V).
- Walk down.
- Place the LION CREST, LIONESS CREST and CUB CREST (purple); take the DRAWER HANDLE and BELL CLAPPER (W).
- Go to the Upper Landing.
- Place the DRAWER HANDLE; take the SHOULDER PART (X).
- Place the BELL CLAPPER and BELL ROPE (Y); Select 1-2-1-3-2 and take the BRONZE WORKER (Z).
- Go to the Clock Room.
- Place the BRONZE WORKER and the BRONZE BELLRINGER; take the STONE FRAGMENT (A).
- Place the MECHANICAL CLOCK BOARD (B).
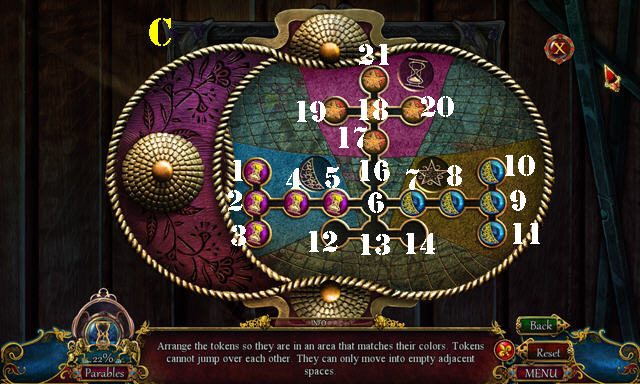
- Select the board and then the token for a puzzle. Solution one (C): (17-12)-(18-14)-(21-13)-(5-21)-(4-18)-(2-17)-(7-2)-(8-4)-(9-5)-(13-9)-(14-8)-(12-7)-(17-14).
- (18-12)-(21-13)-(5-21)-(4-18)-(2-17)-(7-2)-(8-4)-(9-5)-(10-16)-(5-10)-(4-9)-(2-8)-(1-7)-(16-1)-(17-2)-(18-4)-(21-5)-(7-21).
- (13-18)-(12-17)-(14-16)-(5-7)-(4-14)-(2-12)-(3-13)-(7-3)-(13-7)-(14-2)-(12-4)-(7-12)-(8-14)-(9-13)-(11-5).
- (13-11)-(14-9)-(16-14)-(17-13)-(18-8)-(19-7)-(13-19)-(12-18)-(7-12)-(18-7)-(20-13)-(7-20)-(8-18)-(13-8)-(12-7)-(14-17).
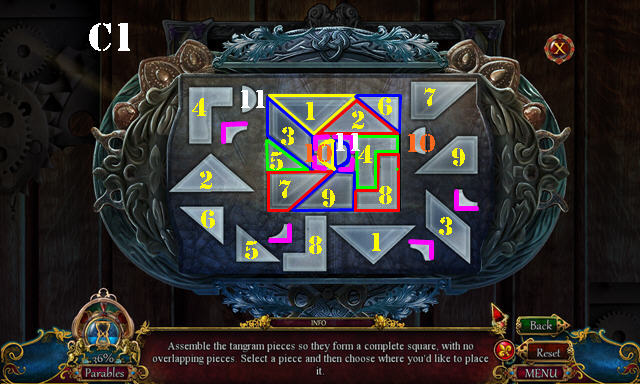
- Select the scroll and then the lower center for a puzzle. Solution 2 (C1).
- Select the engraved plate and take the MOON ESSENCE.
- Talk to Brianne.
- Go to the Tower Balcony.
- Play the HOP (D) to get the MOLD.
- Place the STONE FRAGMENT; take the GOLDILOCKS DOLL (E).
- Walk down and go to the Tower Workshop (F).
- Look at the note. Take the BEAR ARM (G).
- Place the SHOULDER PART and BEAR ARM on the BROKEN FIGURINE; take the BEAR FIGURINE (inventory).
- Place the BEAR FIGURINE and the GOLDILOCKS DOLL; take the GARGOYLE HORN (H).
- Return to the Tower Balcony.
- Place the GARGOYLE HORN (I); take the BRASS EAR and TORCH (J).
- Walk down.
- Use the TORCH; take the VALVE (K).
- Go to the Tower Workshop.
- Place the BRASS EAR (L); take the HAMMER (M).
- Place the VALVE (N). Place the MOLD, MOON ESSENCE and HAMMER for a puzzle (O).
- Solution (P): (14-6)-(18-10)-(20-13)-(10-14)-(9-10)-(13-8)-(5-9)-(4-5)-(3-4)-(9-13)-(5-9)-(4-5)-(8-4)-(7-8)-(2-7)-(4-2)-(5-3)-(6-4)-(10-5)-(14-6)-(9-10)-(13-14)-(8-13)-(10-9)-(14-10)-(13-20)-(7-8)-(9-18)-(8-14)-(17-9)-(18-13)-(20-17).
- (14-20)-(17-14)-(19-18)-(13-17)-(14-13)-)18-14)-(17-19)-(13-17)-(9-7)-(4-8)-(3-4)-(7-3)-(8-7)-(4-13)-(10-9)-(14-10)-(13-14)-(3-8)-(1-4)-(7-3)-(8-7)-(4-8)-(5-4)-(9-5)-(8-13)-(5-8)-(6-5)-(10-6)-(8-9)-(7-8)-(3-1)-(9-10)-(5-9)-(4-5)-(8-4)-(9-3)-(4-9)-(3-4)-(2-7)-(1-3)-(9-8)-(10-9)-(14-10)-(19-14)-(20-18).
- Take the CRESCENT FRAME.
- Place the ORION STONE, CASSIOPEIA STONE and AQUILA STONE on the CRESCENT FRAME; take LUNA'S AMULET (inventory).
- Place LUNA'S AMULET and go up (Q).
- Use LUNA'S AMULET for a puzzle (R).

- Solution one (S).
- Solution two (T).
- Solution three: Vx5-Wx6.
- Congratulations, you've completed Dark Parables: Queen of Sands!
Created at: 2015-06-19