

Walkthrough Menu
General Tips
- This is the official guide for Dark Parables: Requiem for the Forgotten Shadow.
- This guide will not tell you when you have to zoom into a location; the screenshots will show each zoom scene.
- Hidden-object puzzles are referred to as HOPs. This guide will not show screenshots of the HOPs, however, it will mention when an HOP is available and the inventory item you'll collect from it.
- Use the Map to fast travel to a location.
Chapter 1
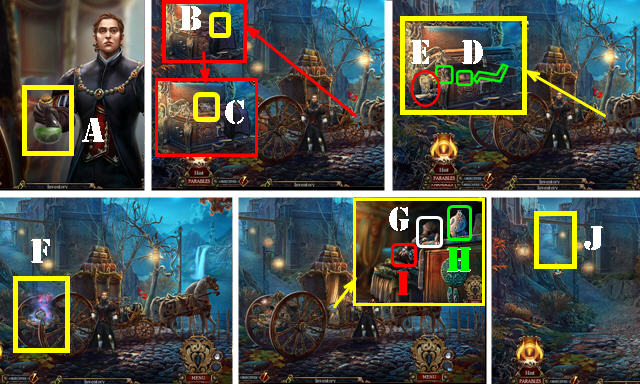
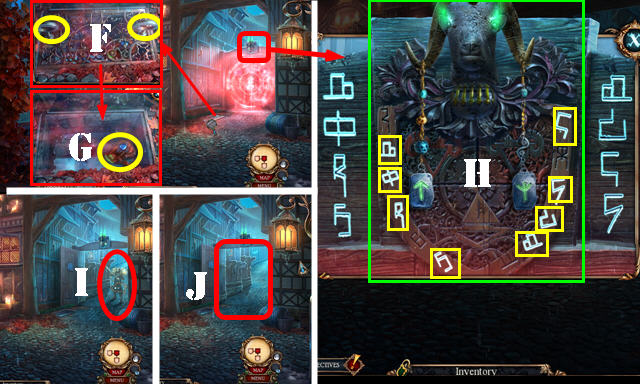
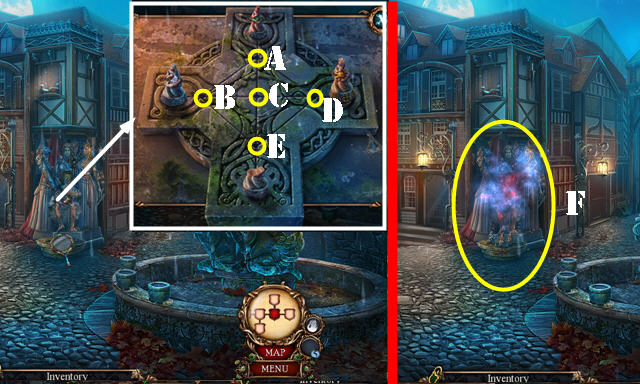
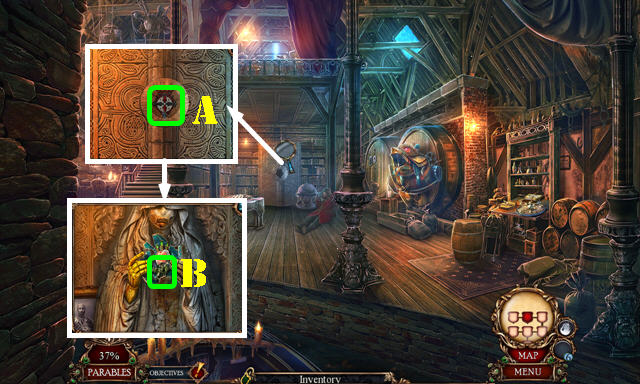
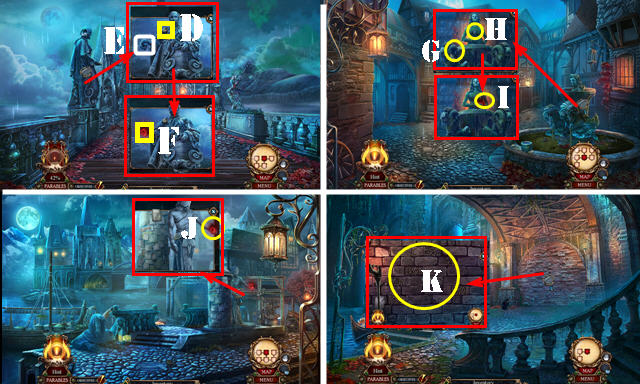
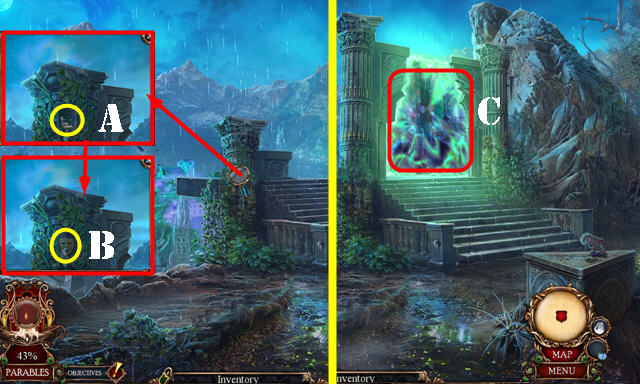
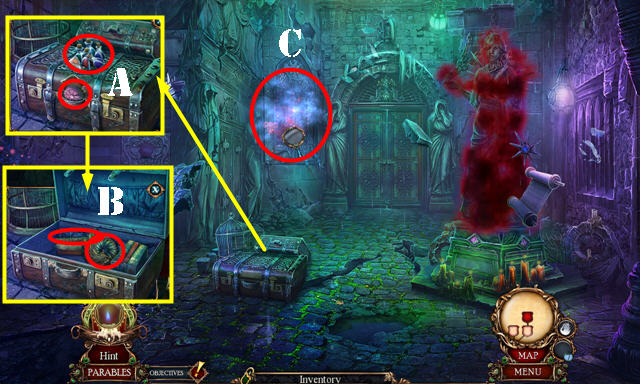
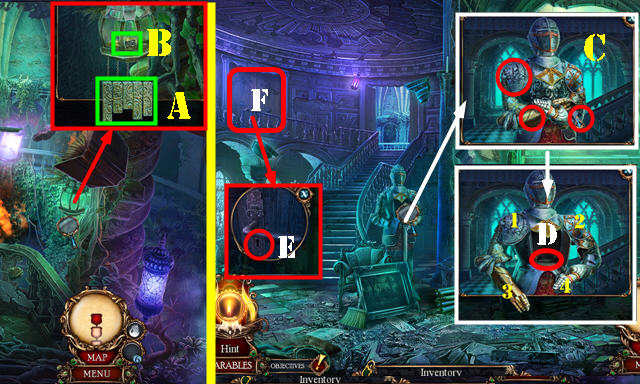
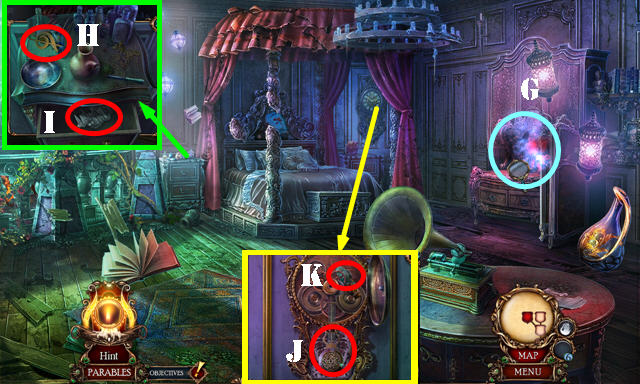
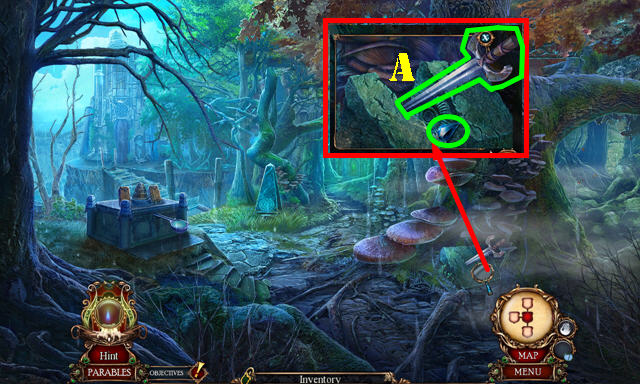
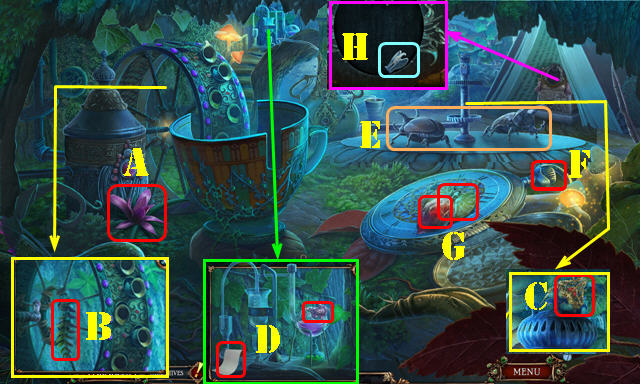
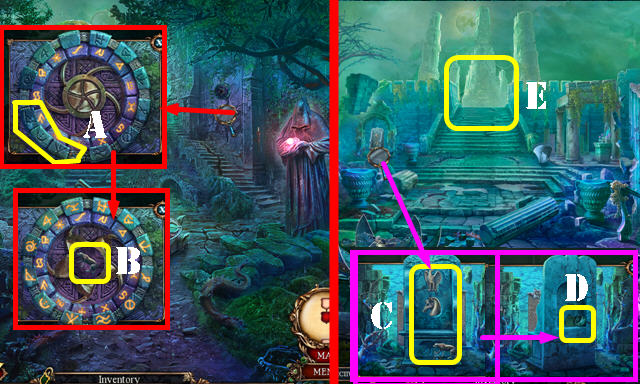
- Select the scene; take the ESSENTIAL OIL (A).
- Look at the note (B) and select the cloth; take the DUCHESS'S BADGE and MATCHES (C).
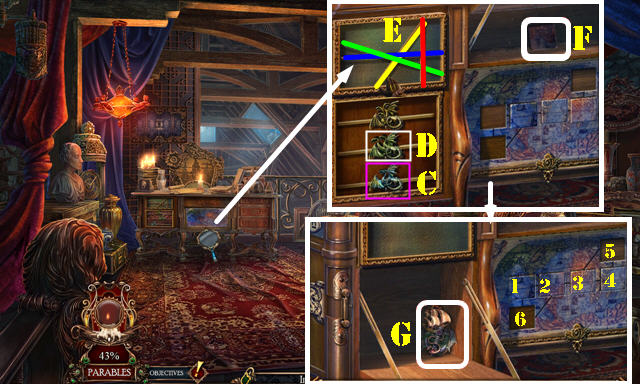
- Remove the coat; select the parts (D) and take the WINCH. Place the WINCH and turn it (E).
- Play the HOP (F) to get the OIL DIFFUSER.
- Use the ESSENTIAL OIL and MATCHES on the OIL DIFFUSER. Strike two matches to receive the ESSENTIAL OIL REMEDY.
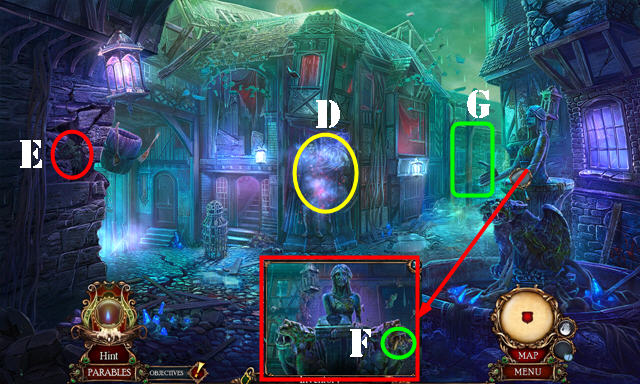
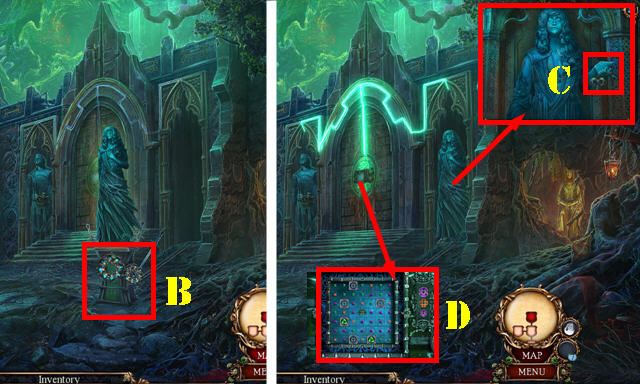
- Open the curtain; talk to the lady (G).
- Place the ESSENTIAL OIL REMEDY (H) and select it; open the curtain. Take the FAIRY MEDALLION (I); look at the note and take the FAIRY MEDALLION.
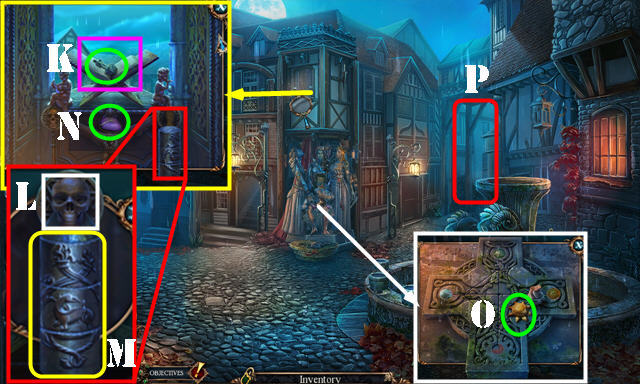
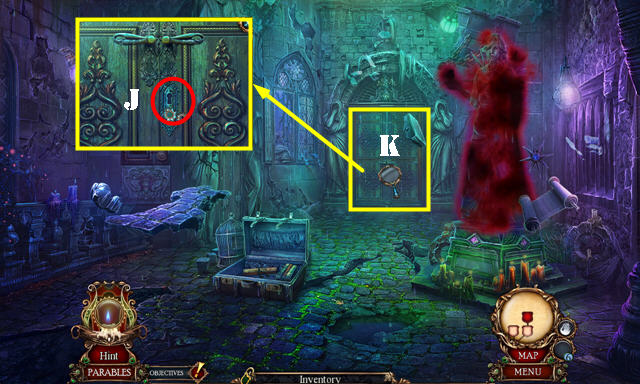
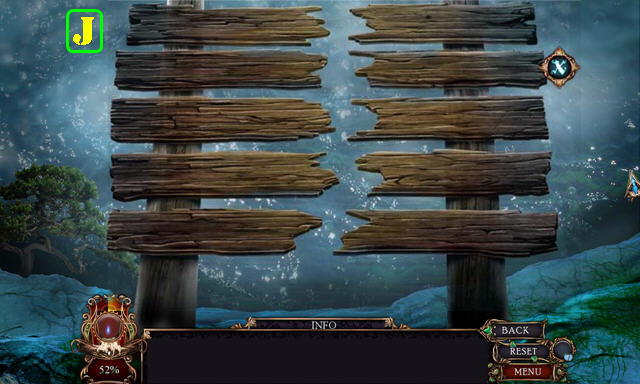
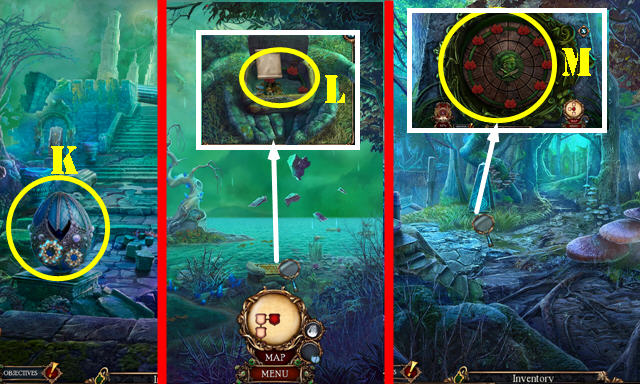
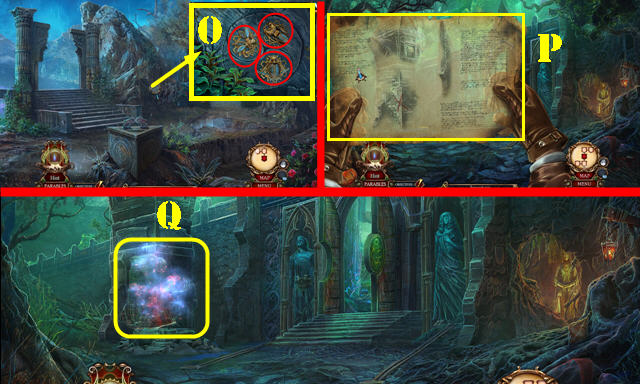
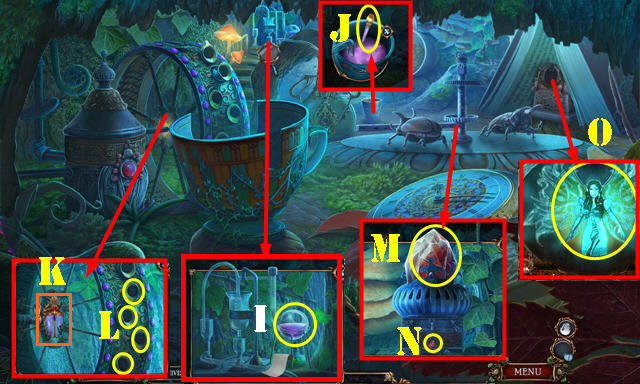
- Go to the Street Gate (J).
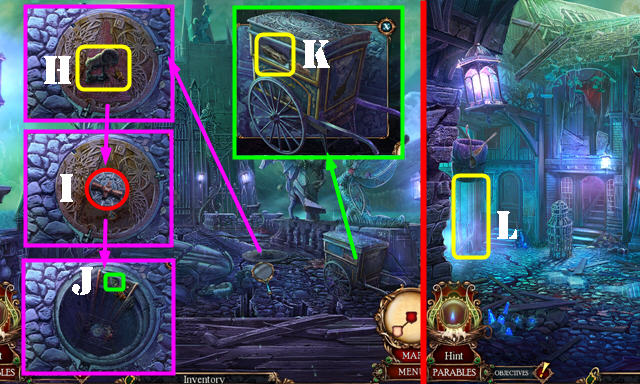
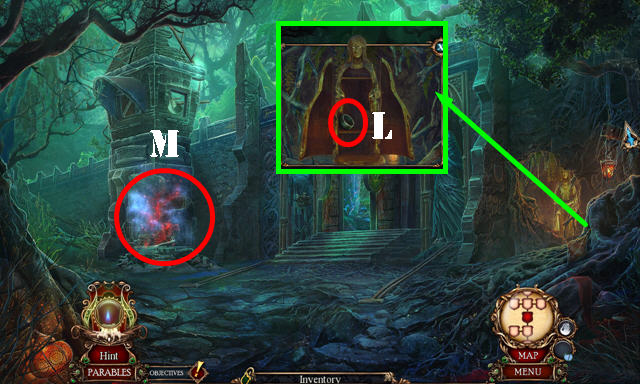
- Take the SUN GODDESS (K) and THUNDER WATER (L).
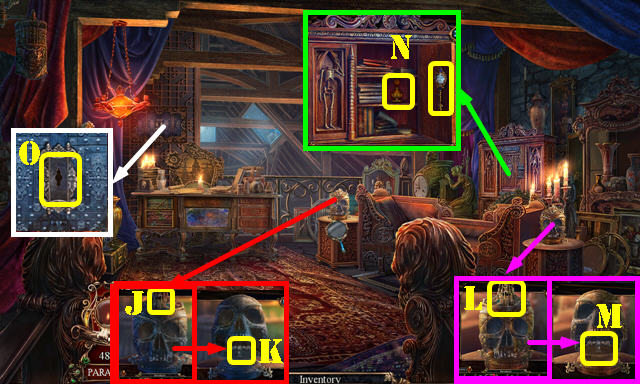
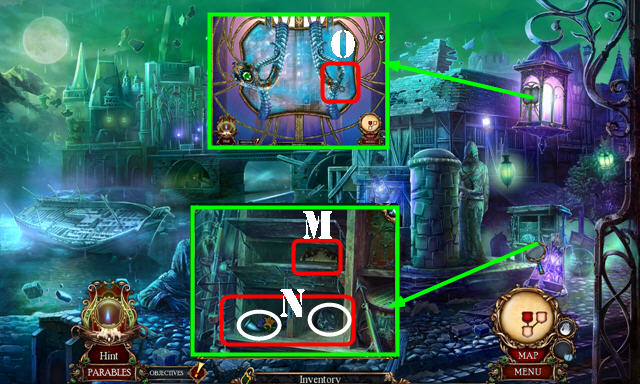
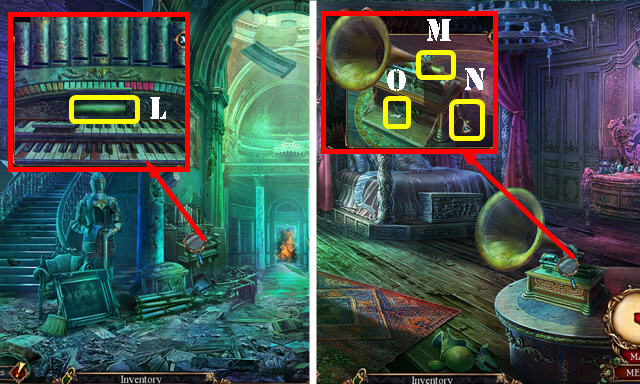
- Enter the Candle Shop (M).
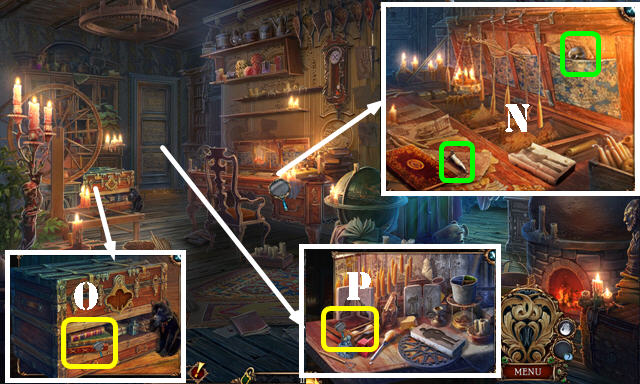
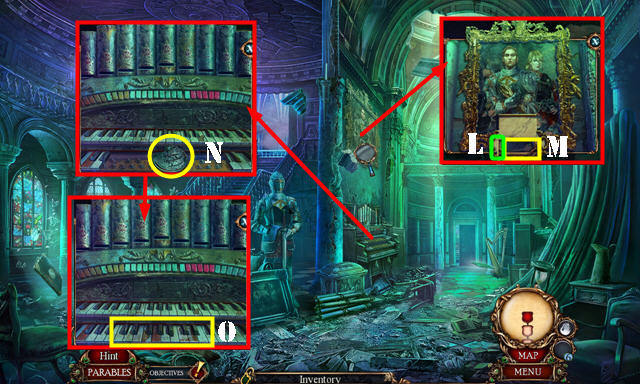
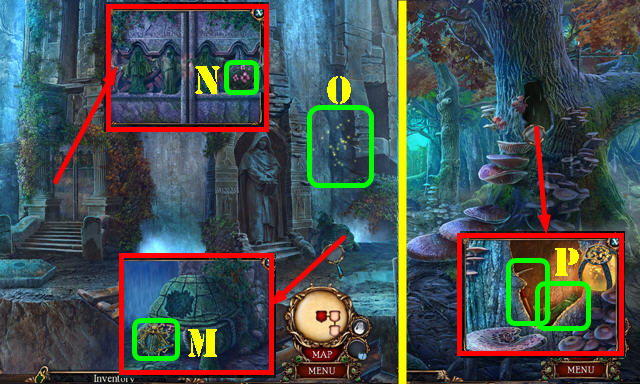
- Look at the book; take the HISTORIAN'S MARKER and SKULL (N).
- Look at the book (O).
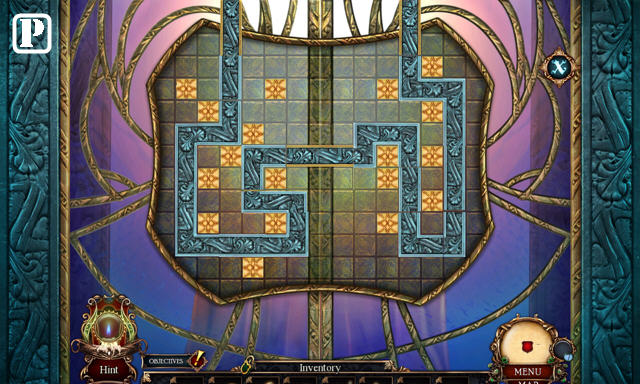
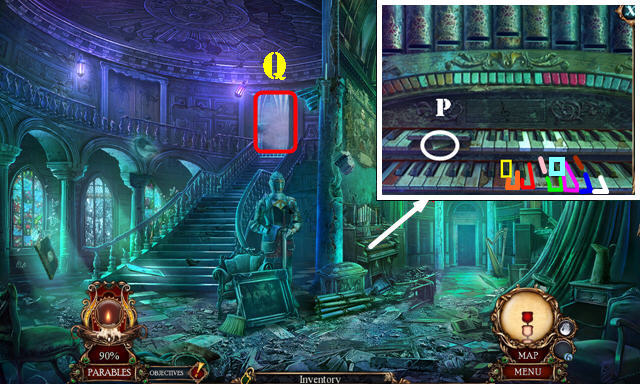
- Open the door and look at the book (P).
- Walk down.
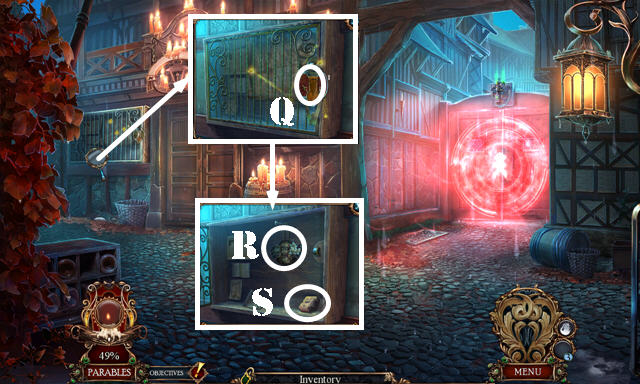
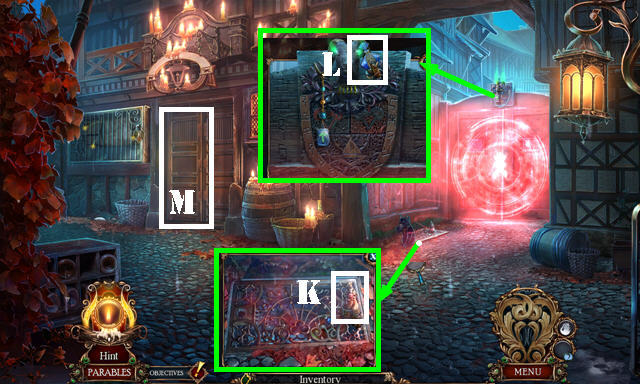
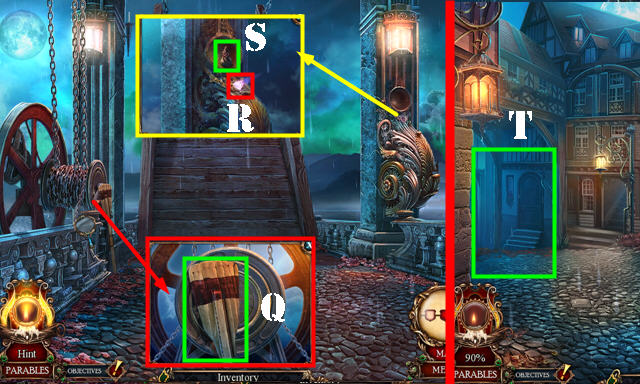
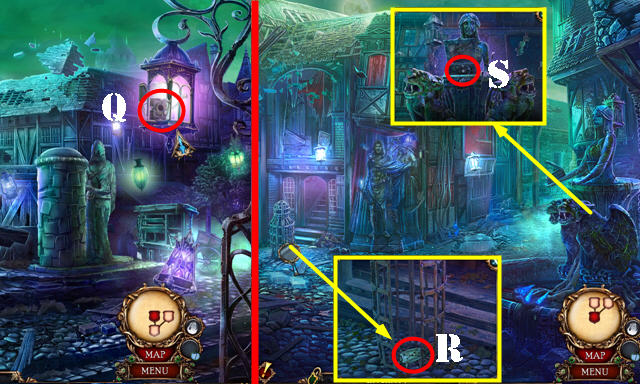
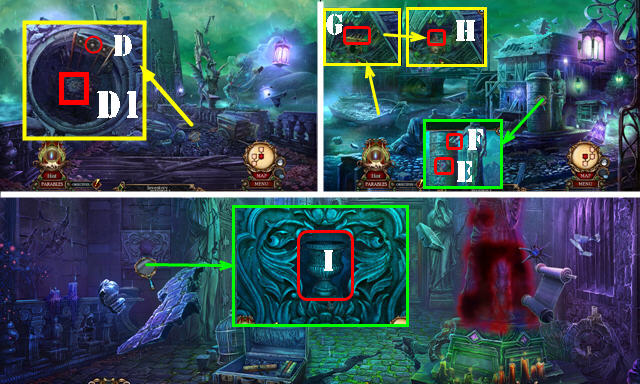
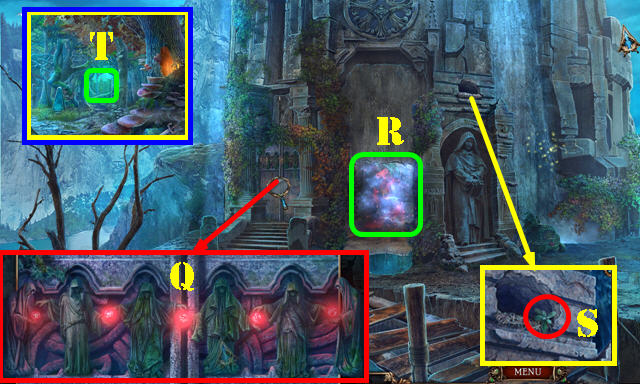
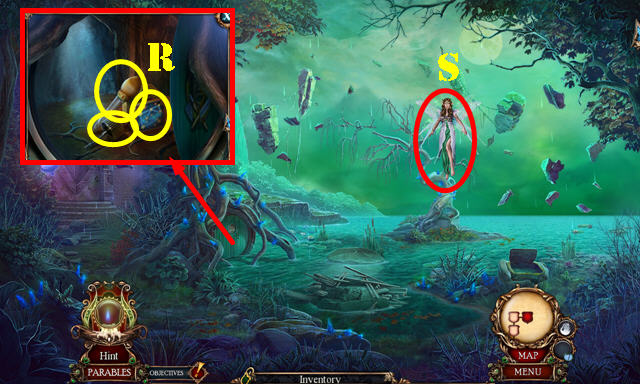
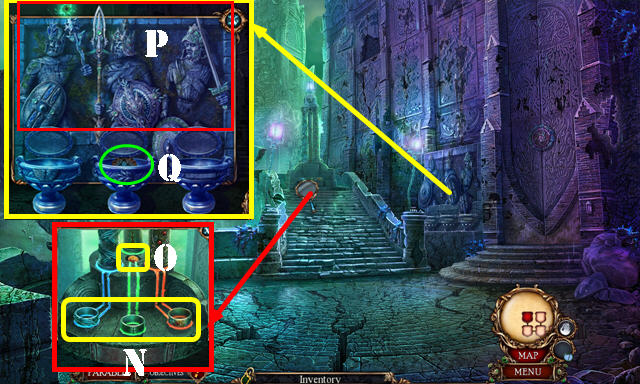
- Place the HISTORIAN'S MARKER (Q). Select twice; take the FAIRY HEAD (R). Look at the note; take the MOLD PIECE (S).
- Place the FAIRY HEAD on the FAIRY MEDALLION; look at the note and take the FAIRY MEDALLION. Select the map.
- Go to the Candle Shop.
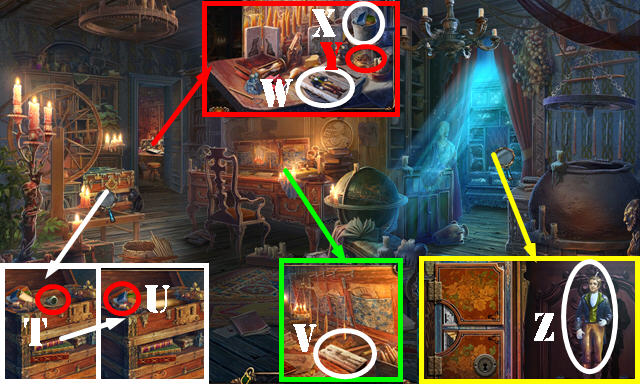
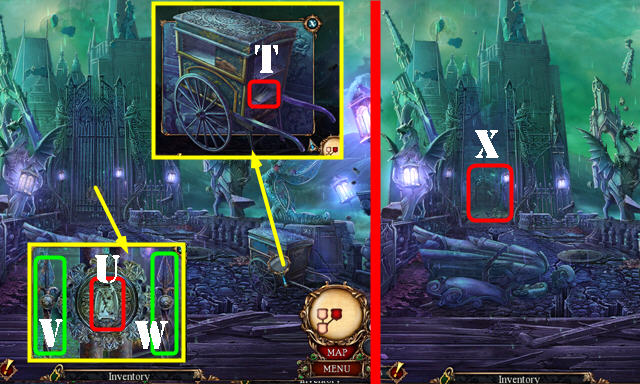
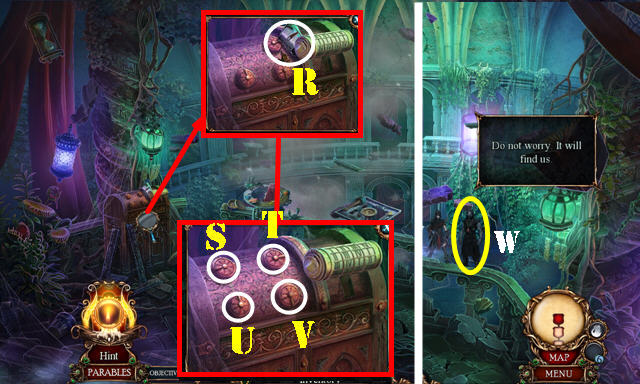
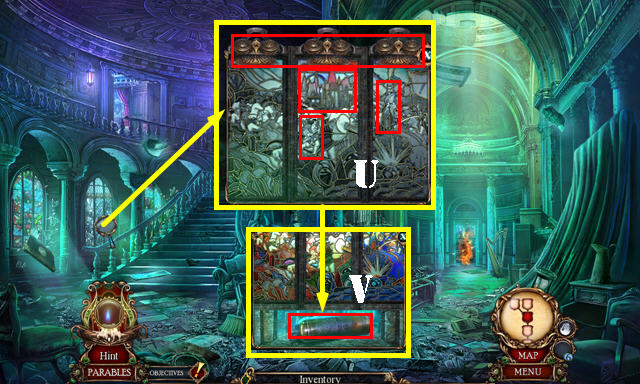
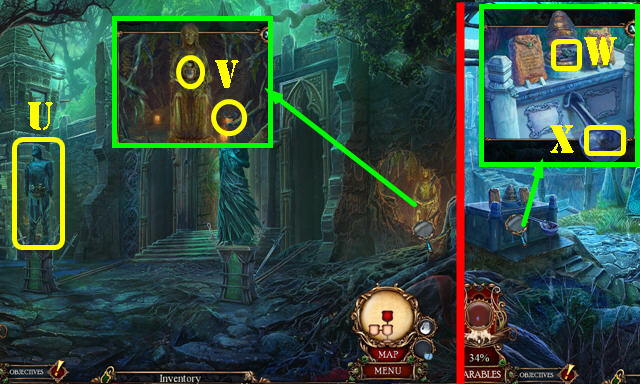
- Place the FAIRY MEDALLION; take the INCOMPLETE RING (T). Look at the note; take the WAX CHUNKS (U).
- Place the MOLD PIECE; take the MOLD (V).
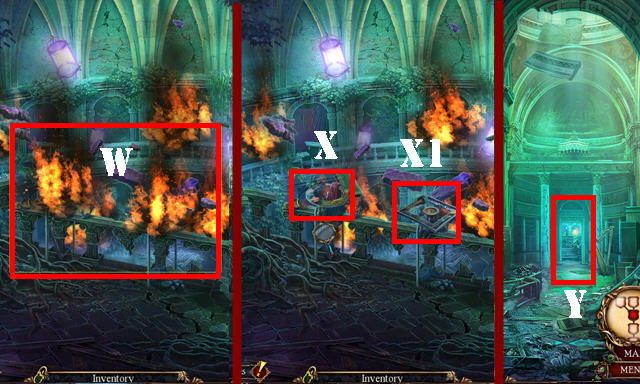
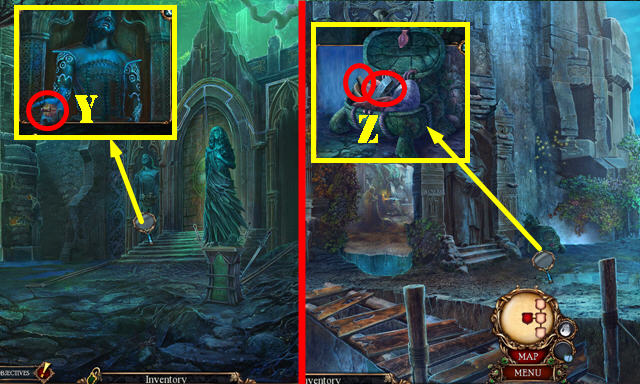
- Place the MOLD (W) and WAX CHUNKS (X). Select the burner (Y) and pour the wax. Open the mold; take the WAX FIGURINE (W).
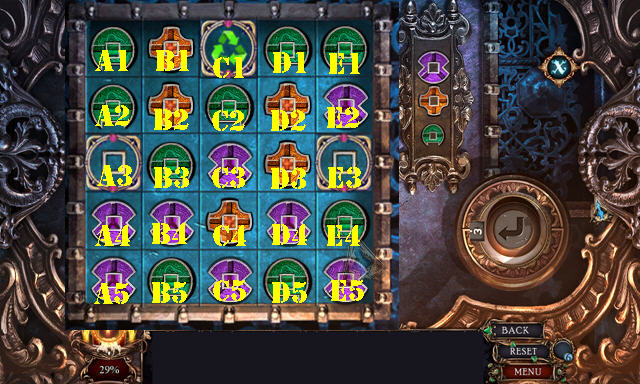
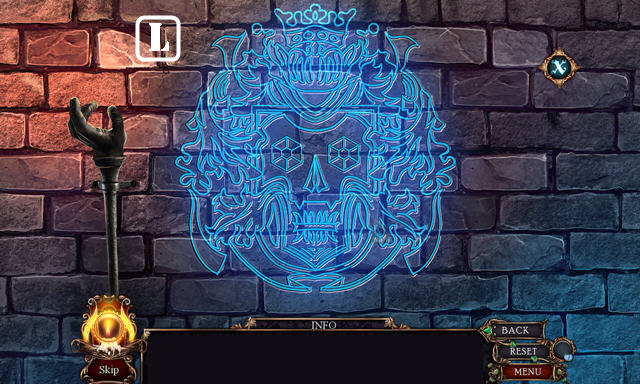
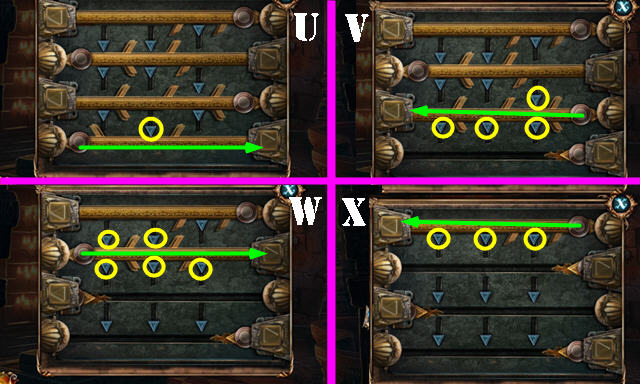
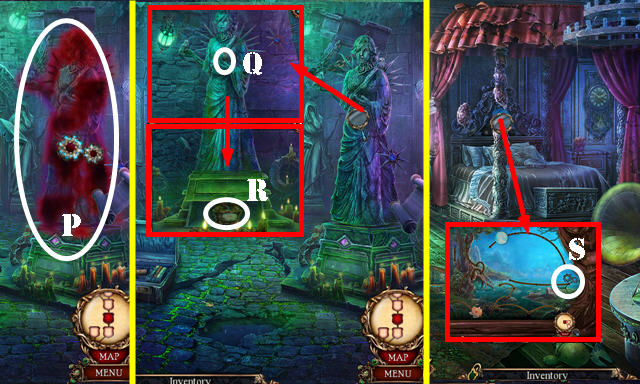
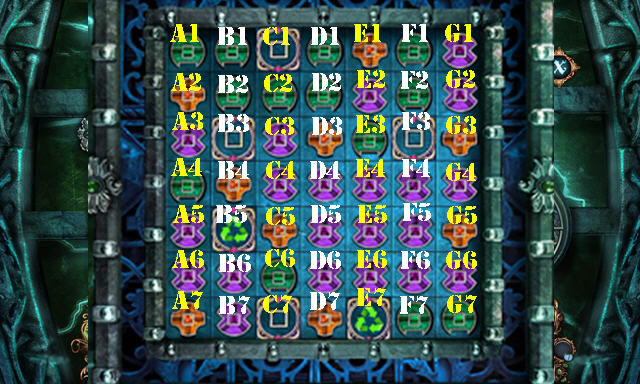
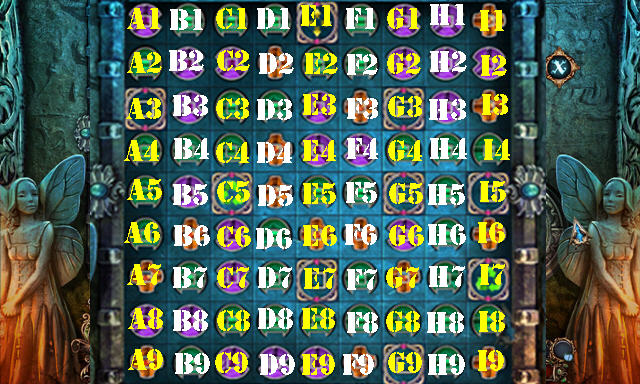
- Open the curtain; place the WAX FIGURINE for a puzzle (Z).
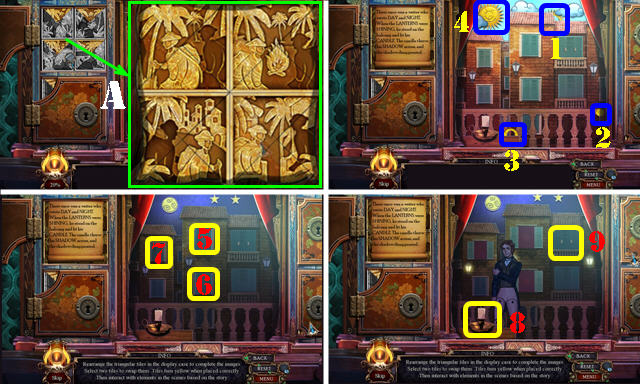

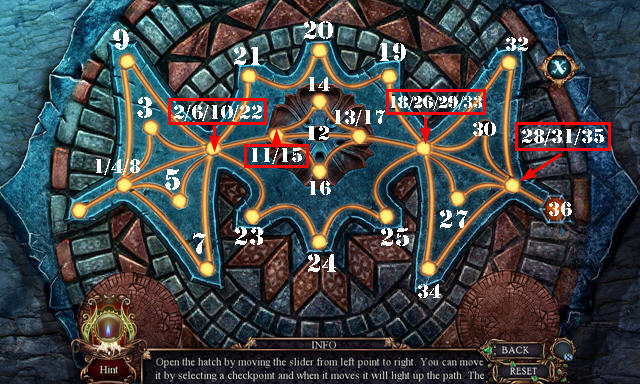
- Swap pieces (A). Select (1-9).
- Select (10-11). Swap pieces (B). Select (12-20).
- Swap Pieces (C). Select (21-27).
- Swap Pieces (D). Select (28-32).
- Take the STAR KEYS (E).
- Walk down.
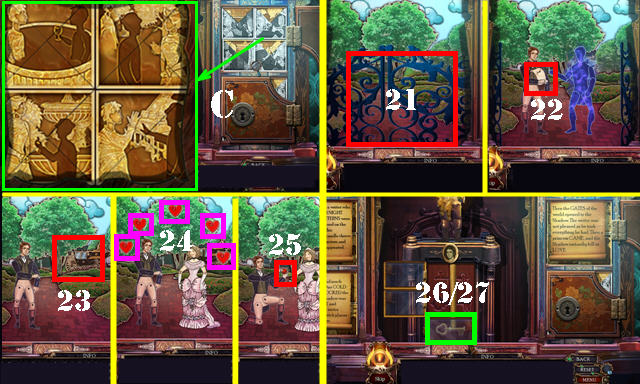
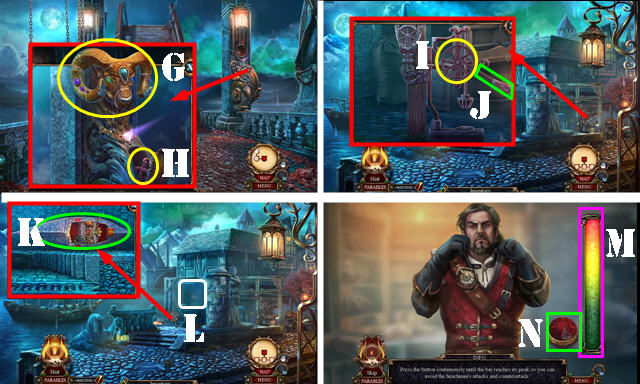
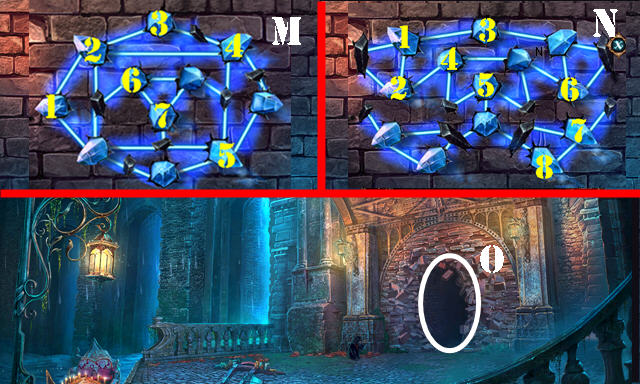
- Use the STAR KEYS (F); turn each one and remove the grate. Select the pouch 2x (G); take the RUNE STONE.
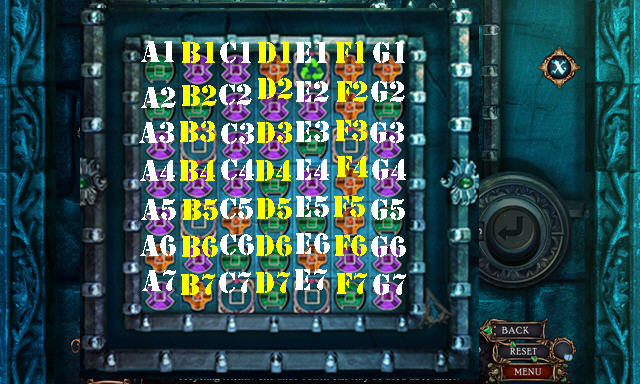
- Place the RUNE STONE for a puzzle. Solution (H).
- Talk to the man (I).
- Go to the Square (J).
- Select the scene and talk to the man. Select the scene 3x.
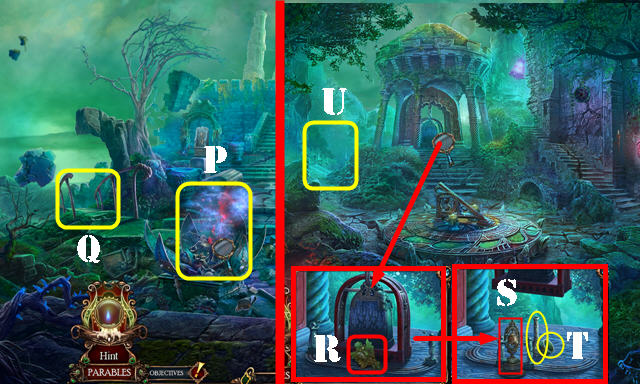
- Take the BLACK PAWN and look at the book (K).
- Place the SKULL (L); arrange as shown (M). Take the PROTECTIVE STONE (N).
- Take the SUN STONE (O).
- Go to the Bridge (P).
- Take the PADDLE (Q); pull the handle and open the compartment.
- Place the PROTECTIVE STONE (R); take the MAIDEN GODDESS (S).
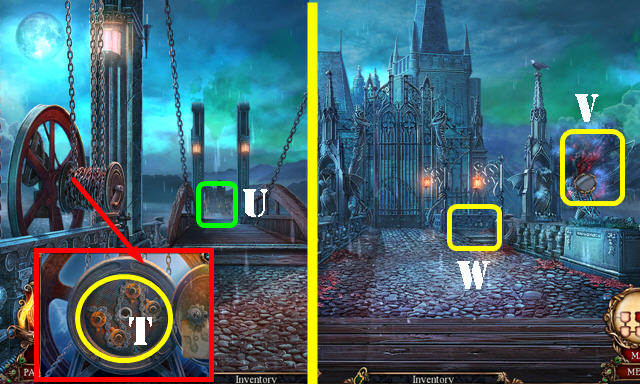
- Walk down. Go to the City Docks (T).
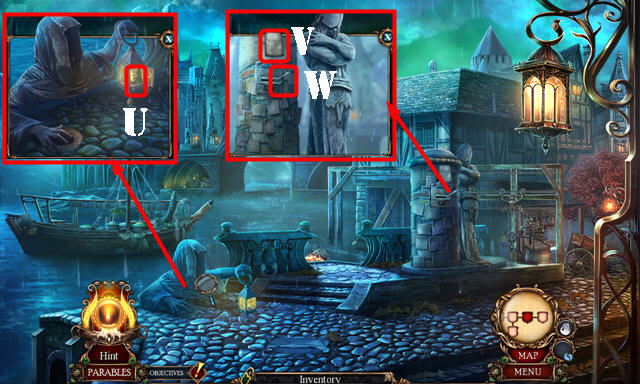
- Open the lantern; take the MOON GODDESS (U).
- Read the note (V); take the PIN (W).
- Walk down.
- Place the MAIDEN GODDESS, MOON GODDESS, and SUN GODDESS for a puzzle. Select (D-A-B-E-C-D-A-B-C).
- Play the HOP (F) to get the RAM'S HEAD.
- Go to the Bridge.
- Place the RAM'S HEAD (G); take the TRANSMISSION WHEEL (H).
- Return to the City Docks.
- Remove the wheel; place the TRANSMISSION WHEEL (I) and pull the handle (J).
- Place the PADDLE (K).
- Enter the Warehouse (L).
- Fill the bar 3x (M) by continuously pressing the button (N).
Chapter 2
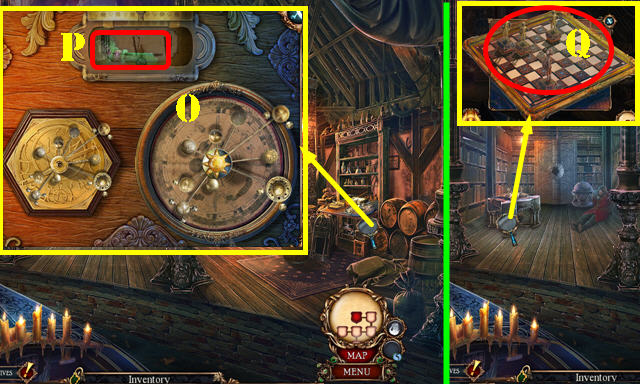
- Place the SUN STONE. Select a planet on the right and the matching one will light up on the left side. Position the ones on the right (O) in the same spot as the left ones.
- Take the TRAPPED WIND (P).
- Place the BLACK PAWN for a puzzle (Q).
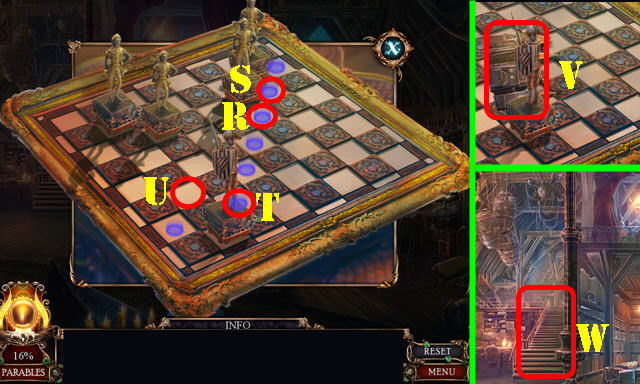
- Solution (R-S-R-T-U-T).
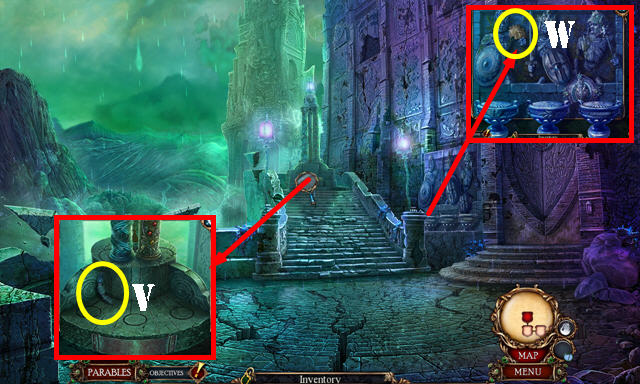
- Take DUKE'S PALACE (V).
- Go to the Warehouse Gallery (W).
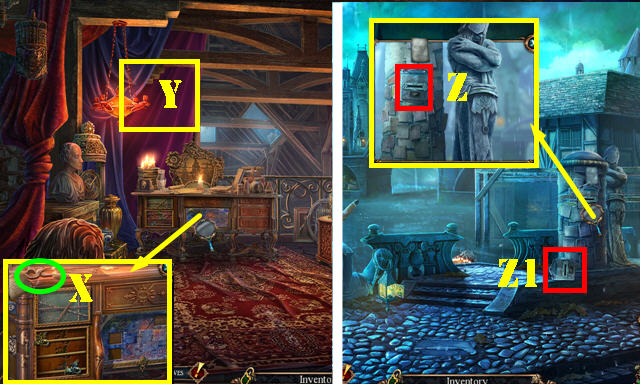
- Look at the note; take the NAIL PULLER (X).
- Select the curtain twice (Y).
- Walk down twice.
- Select the mailbox. Use the NAIL PULLER 2x (Z).
- Take the BROKEN MAILBOX (Z1).
- Open the BROKEN MAILBOX; take the TRADER'S EMBLEM.
- Go to the Warehouse.
- Place the TRADER'S EMBLEM (A). Select the egg twice; take the DRAGON PENDANT (B).
- Go to the Warehouse Gallery.
- Place the DRAGON PENDANT. Move (C) left 1x, and (D) right 2x.
- Remove the bars in order: yellow-blue-green-red (E).
- Select tile for a puzzle (F). Solution: (2-6)-(1-2)-(6-1)-(3-5)-(4-3)-(5-4).
- Take the TRADER'S COMPASS (G).
- Return to the City Docks.
- Place the TRADER'S COMPASS (H).
- Play the HOP (I) to get the TOWER OF DARKNESS.
- Return to the Warehouse Gallery.
- Place the TOWER OF DARKNESS (J); pull the lever (K).
- Place DUKE'S PALACE (L); pull the lever (M).
- Take the VAULT KEY and LIVING FIRE (N).
- Use the VAULT KEY for a puzzle (O).
- Solution: (C3 -C2)-(C2-D1)-(C2-D2)-(C3-B4)-(C2-B2)-(B4-B5)-(C2-B1)-(C3-D4)-(B2-A1)-(B5-A4).
- (D4-D5)-(D5-E5)-(C3-D3)-(D3-E2)-(D1-E1)-(D4-C5)-(D3-C4)-(C2-B3)-(A4-A5)-(A1-A2)-(D5-E4).
- Take the RUBY RING and BEAR MAINTENANCE KEY.
- Walk down.

- Use the BEAR MAINTENANCE KEY (P). Take the CHAIN (Q).
- Return to the Square.
- Use the THUNDER WATER, TRAPPED WIND, and LIVING FIRE (R). Take the SHADOW EYE (S).
- Go to the Bridge.
- Place the CHAIN (T); pull the handle.
- Go to the Palace Gate (U).
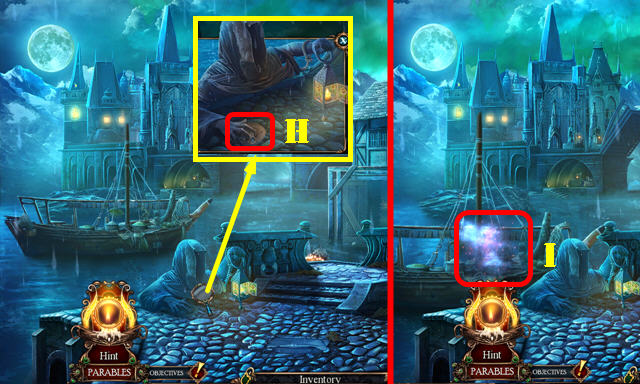
- Play the HOP (V) to get the RELIEF FIGURE.
- Go to Under the Bridge (W).
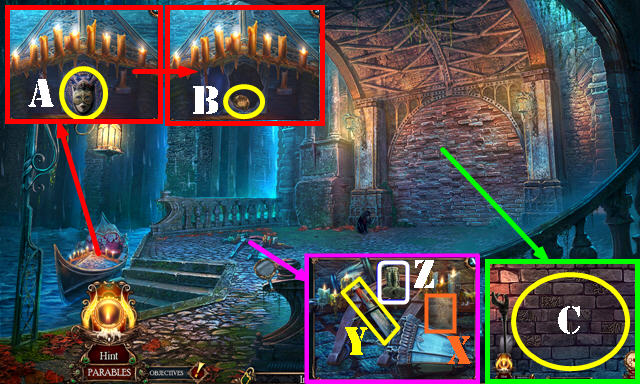
- Look at the note (X); take the BROKEN SWORD (Y). Use the PIN (Z); receive the CANDLE.
- Take the PRIESTESS'S MASK (A). Place the SHADOW EYE; take the CAPE BUCKLE (B).
- Look at the wall (C).
- Walk down.
- Place the CAPE BUCKLE (D); take the RAM'S HORN (E). Use the RUBY RING (F).
- Go to the Square.
- Place the RAM'S HORN (G); take the SHADOW GOD KEY (H). Use the RUBY RING (I).
- Go to the City Docks.
- Use the RUBY RING (J); receive the CHARGED RUBY RING.
- Go to Under the Bridge.
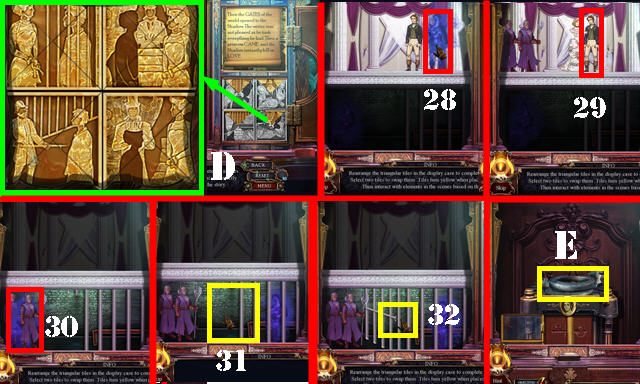
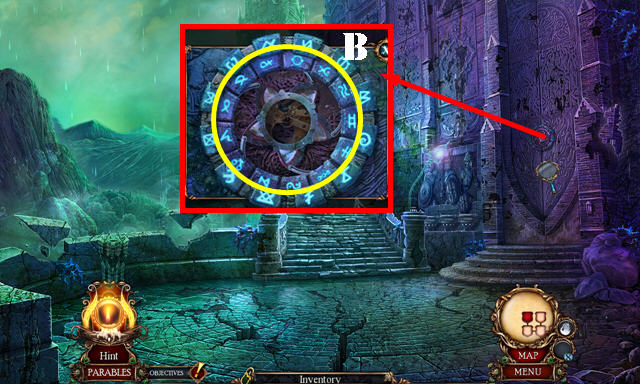
- Use the CHARGED RUBY RING for a puzzle (K).
- Solution (L-M-N).
- Go to the Temple (O).
- Place the RELIEF FIGURE (P): take SHADE'S CANDLE (Q).
- Place SHADE'S CANDLE and use the CANDLE (R); take the GODDESS KEY (S).
- Place the SHADOW GOD KEY and GODDESS KEY (T) for a puzzle.
- Select the yellow circles first and then slide the green arrow in the direction shown (U-V-W-X).
- Go through the door.
- Remove the cloth. Automatically receive the SAPPHIRE GEM.
Chapter 3
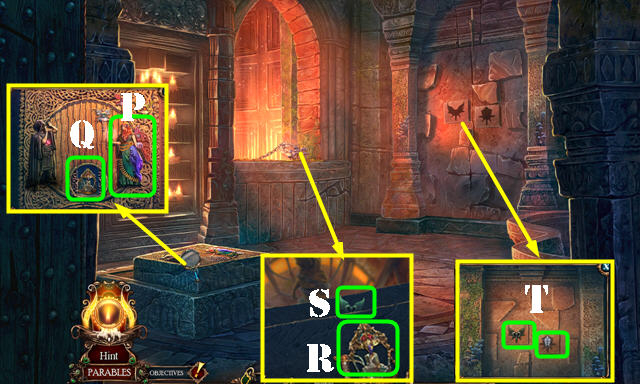
- Use the BROKEN SWORD 3x; take the SILVER FISH (A). Place the PRIESTESS'S MASK (B).
- Put the SAPPHIRE GEM on the INCOMPLETE RING; receive the SAPPHIRE RING.
- Use the SAPPHIRE RING (C). Go to the Shadow Realm.
- Play the HOP (D) to get the HATCH MECHANISM.
- Use the BROKEN SWORD; take the FLYING EAGLE (E).
- Take the BRONZE FISH (F).
- Go to the Ruined Gate (G).
- Take the RAM FIGURINE (H). Remove the cover; place the HATCH MECHANISM (I). Take the SNAKE HEAD (J).
- Place the FLYING EAGLE; take the GAUNTLET (K).
- Walk down and go to the Gloomy Docks (L).
- Open the DRAWER; take the FRAME SEGMENT (M).
- Place the SILVER FISH and BRONZE FISH and open both doors; take the LONG HORN and CURSED MEDALLION (N).
- Place the SNAKE HEAD for a puzzle (O).
- Solution (P).
- Take the PADLOCK KEY (Q).
- Walk down.
- Place the PADLOCK KEY; take the LOCK PLATE (R).
- Place the CURSED MEDALLION and open the box; take the STARFISH COG (S).
- Go to the Ruined Gate.
- Place the LONG HORN; take the WHITE KEY SET (T).
- Place the LOCK PLATE (U). Select (V-W).
- Go to the Courtyard (X).
- Take the GLASS COLORS and MECHANISM DIAL (A).
- Place the DUCHESS'S BADGE; take the NAUTILUS PENDANT and LONG CHIME STRIPE (B).
- Open the window and play the HOP (C) to get the FAMILY CREST.
- Walk down.
- Place the STARFISH COG (D); take the DYNAMITE (D1).
- Return to the Gloomy Docks.
- Place the FAMILY CREST (E); take the ROYAL URN (F).
- Use the DYNAMITE; take the BLACK KEY SET (G). Place the NAUTILUS PENDANT; take the GREAT PENDULUM (H).
- Return to the Courtyard.
- Place the ROYAL URN for a puzzle (I).
- Solution: (D4-E3)-(D4-E4)-(E4-D3)-(D3-D2)-(D2-C1)-(D2-D1)-(D4-D5)-(D2-C2)-(C1-B1)-(C2-C3)-(D5-D6)-(C2-B2)-(D2-E2)-(E4-F4)-(E4-F5).
- (D5-E5)-(F4-G4)-(G4-G3)-(C3-C4)-(B2-A2)-(E2-E1)-(E2-F2)-(A2-A1)-(C4-B4)-(F2-F1)-(B4-A3)-(F1-E1)-(F1-G2)-(A3-A4)-(F1-G1)-(A4-A5).
- (A5-A6)-(D6-D7)-(A5-B6)-(A6-A7)-(E5-F6)-(F6-G5)-(B6-C5)-(B6-B7)-(D6-C6)-(E5-E6)-(F6-G6)-(G6-G7)-(E6-F7).
- Take the MANOR KEY.
- Use the MANOR KEY (J).
- Go to Palace Hall (K).
- Place the FRAME SEGMENT (L); take the SMALL PENDULUM (M).
- Take the PAULDRON (N). Place the WHITE KEY SET and BLACK KEY SET for a puzzle (0).
- Sequence one: red-yellow-green-purple.
- Sequence two: orange-white-purple-pink-green.
- Sequence three: brown-red-orange-light blue-purple-white.
- Take the SHORT CHIME STRIPE (P).
- Go to the Balcony (Q).
- Take the VAMBRACE (R).
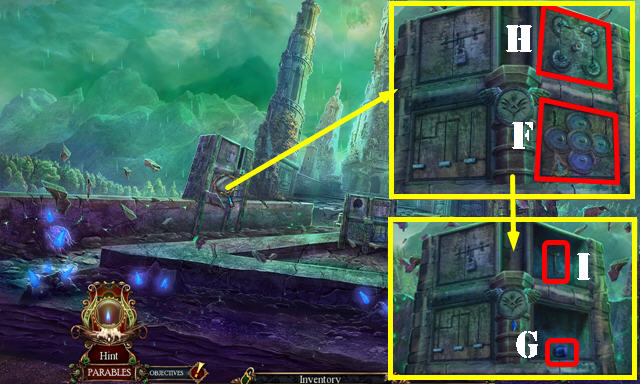
- Place the MECHANISM DIAL; select Sx2-T-Ux3-Vx2.
- Talk to the man (W).
Chapter 4
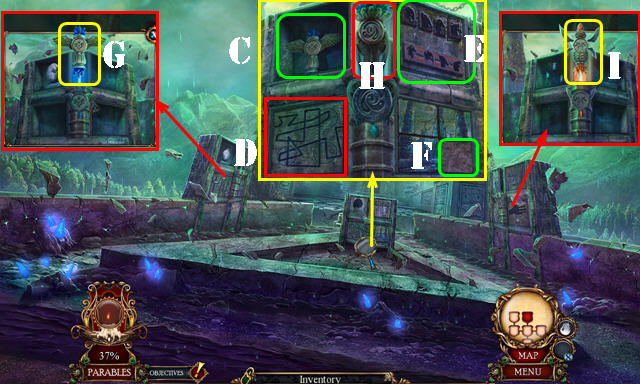
- Place the LONG CHIME STRIPE and SHORT CHIME STRIPE; pull the chimes twice (A). Take DUKE'S KEY (B).
- Walk down.
- Place the PAULDRON, GAUNTLET, and VAMBRACE (C).
- Select 1-4: Take the HANDLE (D).
- Use DUKE'S KEY (E); enter Duke's Room (F).
- Select the partition; play the HOP (G) to get the MAGIC GLASS WAND.
- Take the CLEF (H). Place the HANDLE; take the GLASS PALACE (I).
- Place the GREAT PENDULUM and SMALL PENDULUM (J). Remove the cover; take the STONE SWALLOW (K).
- Walk down.
- Place the CLEF; take the MUSIC CYLINDER (L).
- Go to Duke's Room.
- Place the MUSIC CYLINDER (M) and pull the handle (N). Take the GLASS ALLY (O).
- Walk down twice.
- Use the MAGIC GLASS WAND (P).
- Place the STONE SWALLOW (Q); take the DOWRY BOX (R).
- Take the FAIRY TREE from the DOWRY BOX.
- Return to Duke's Room.
- Place the FAIRY TREE for a puzzle (S).
- Solution (T).
- Take the FLOWER EMBLEM.
- Walk down.
- Place the FLOWER EMBLEM on the DOWRY BOX; take the GLASS ENEMY.
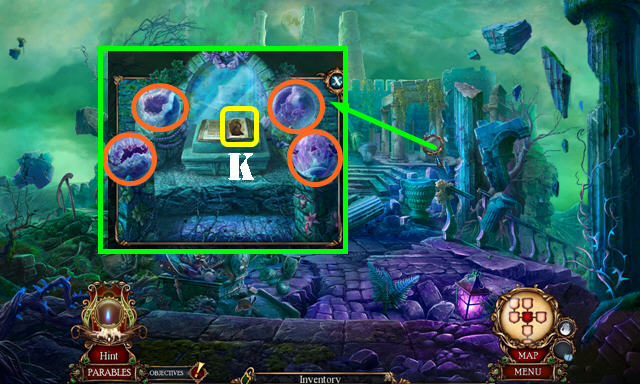
- Place the GLASS PALACE, GLASS ALLY, GLASS ENEMY, and GLASS COLORS (U). Take the FIRE EXTINGUISHER (V).
- Go to the Balcony.
- Use the FIRE EXTINGUISHER (W).
- Play both HOPs (X-X1).
- Walk down and go to the Atrium (Y).

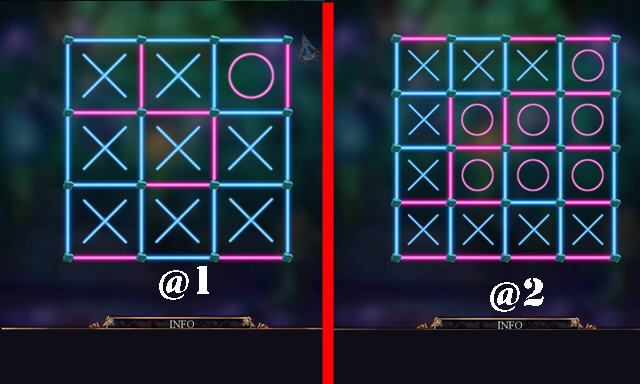
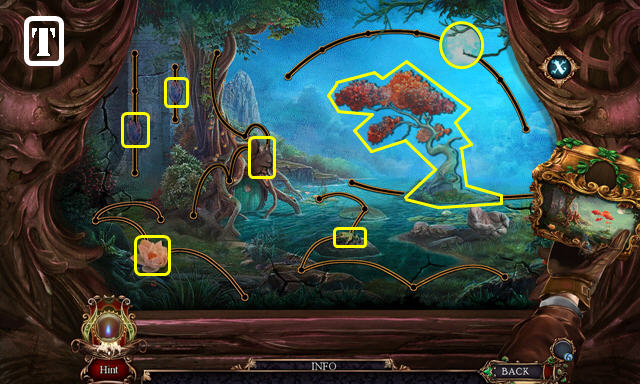
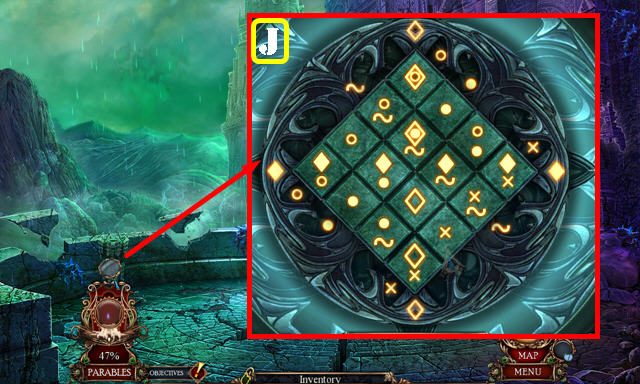
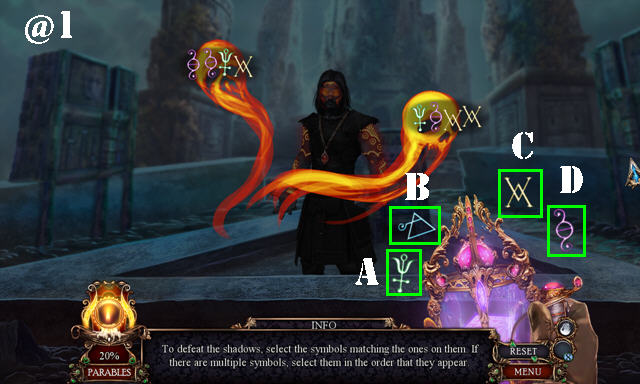
- Use the MAGIC GLASS WAND; connect the dots as shown (Z-Z1).
- Solution is random. Examples of both rounds are shown (@1-@2).
Chapter 5
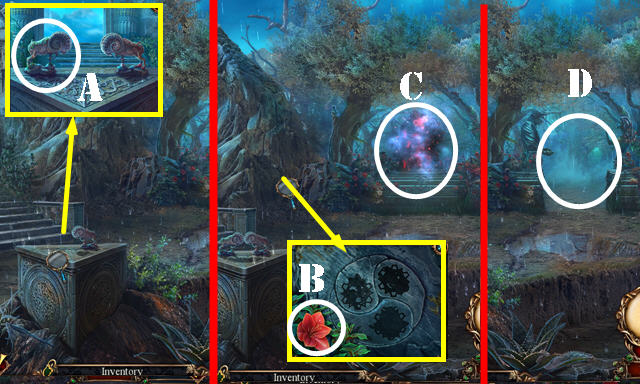
- Place the RAM FIGURINE (A).
- Take the VERMILION BUD (B).
- Play the HOP (C).
- Go to the Forest (D).

- Take the VIVID MUSHROOM (E).
- Select the branches 4x (F).
- Take the EMPTY SPRAY (G).
- Look at the two notes and take the LANTERN (H).
- Play the puzzle (I).

- Solution one (J).
- Solution two (K).
- Go to the Waterfall (L).
- Take the OWL (M) and SPRING MOSS (N).
- Use the LANTERN (O); receive the FIREFLY LANTERN.
- Walk down.
- Use the FIREFLY LANTERN; take the CLIMBING GEAR and PILGRIM STATUE (P).
- Return to the Waterfall.
- Place the PILGRIM STATUE. Swap into position (Q).
- Play the HOP (R); receive the GROOM'S SWORD.
- Use the CLIMBING GEAR; take the CLIFF SAGE (S).
- Go to the Forest and then go to the Gate (T).
- Use the GROOM'S SWORD (U).
- Take the BOTTLE and BLUE ROOTS (V).
- Walk down.
- Place the BLUE ROOTS, CLIFF SAGE, and VIVID MUSHROOM (W). Use the EMPTY SPRAY (X); receive the GROOM'S POTION.
- Go to the Gate.
- Use the GROOM'S POTION; take the TURTLE'S PENDANT (Y).
- Return to the Waterfall.
- Place the TURTLE'S PENDANT; take the WEDGE and MORTAR AND PESTLE (Z).
- Walk down.
- Use the WEDGE; take the BRIDE'S SWORD and SPLINTER CRYSTAL (A).
- Place the VERMILION BUD, SPRING MOSS, SPLINTER CRYSTAL in the MORTAR AND PESTLE. Select the pestle. Use the BOTTLE in the liquid; receive the BRIDE'S POTION.
- Go to the Gate.
- Use the BRIDE'S SWORD (B).
- Use the BRIDE'S POTION; take the DIVINE BRACELET (C).
- Play the puzzle (D).
- Solution: (D4-C3)-(C3-D3)-(C3-B4)-(D3-E2)-(E2-D2)-(E2-F2)-(D3-C4)-(D4-E4)-(F2-G1)-(F2-G2)-(D2-C2)-(B4-A3)-(A3-A2)-(D3-E3)-(E4-F4).
- (D2-E1)-(E1-D1)-(G1-F1)-(E4-E5)-(E5-E6)-(B4-A5)-(E5-F6)-(C2-B2)-(F6-F7)-(F4-G3)-(F4-G5)-(F7-G7)-(G3-G4)-(G4-F5)-(B4-C5)-(F6-G6).
- (E6-D7)-(B2-B1)-(E6-E7)-(D7-D6)-(B1-A1)-(D4-D5)-(A5-B6)-(B6-C6)-(C6-B7)-(A5-B5)-(A5-A4)-(B7-A6)-(B7-A7).
Chapter 6

- Go to the Ruins (E) and then to the River Bank (F).
- Talk to the fairy; use the MAGIC GLASS WAND (G).
- Take the FAIRY SEED (H).
- Take the HORSE ORNAMENT (I).
- Remove the insect (J).
- Walk down.
- Use the FAIRY SEED (K); play the HOP to get the FAIRY SIGIL.
- Go to the River Bank.
- Place the DIVINE BRACELET and FAIRY SIGIL. Look at the note; take the LAURELS and WASP (L).
- Return to the Forest.
- Place the LAURELS for a puzzle (M).

- Solution (N).
- Take the BEETLE.
- Walk down.
- Place the OWL, WASP, and BEETLE (O); take JACK'S MAP.
- Return to the Gate.
- Place the map as shown (P).
- Play the HOP (Q) to receive the MERRY MEN SYMBOL.
- Return to the River Bank.
- Place the MERRY MEN SYMBOL; take the PIPETTE, BOLIDE SHARD, and WATCH CROWN (R).
- Use the MAGIC GLASS WAND on the scene.
- Talk to the fairy (S).
Chapter 7
- Take the FAIRY FLOWER (A), BUG WEED (B), and PRISM (C).
- Look at the note; take the EMBLEM OF WISDOM (D).
- Use the BUG WEED (E).
- Use the WATCH CROWN (F); take the CRYSTAL and FAIRY SIGIL (G).
- Take the EAGLE ORNAMENT (H).
- Place the FAIRY FLOWER (I).
- Use the PIPETTE; take the POTION (J).
- Place the PRISM (K); select each nodule (L). Take the ENCHANTED PRISM (K).
- Place the CRYSTAL (M); take the CRYSTAL POWDER (N).
- Place the FAIRY SIGIL for a puzzle (O).
- Solution: (E5-E4)-(E4-F3)-(E5-F5)-(F5-G4)-(G4-H3)-(H3-G2)-(G4-H4)-(F3-F2)-(E4-D5)-(E4-D4)-(F2-F1)-(E5-D6)-(E4-F4)-(H4-H5)-(H5-G6).
- (H4-I4)-(G2-G1)-(H4-I3)-(G2-H2)-(F3-E2)-(F3-E3)-(H5-H6)-(D6-D7)-(H2-I1)-(I1-I2)-(E2-D1)-(G1-H1)-(D5-E6)-(H6- I6)-(E3-D3)-(D4-C3).
- (C3-D2)-(D1-C1)-(D7-C7)-(D7-D8)-(C7-B7)-(B7-A7)-(B7-B6)-(B7 A6)-(C7-C6)-(E6-F6)-(C1-B1)-(C1-B2)-(B2-A1)-(B1-A2)-(F6-G7)-(C3-C4).
- (B2-C2)-(C4-B4)-(A7-B8)-(B8-B9)-(H6-H7)-(H7-I8)-(B2-B3)-(I8-I9)-(I9-H9)-(C6-B5)-(B4-A4)-(B8-C9)-(D8-D9)-(B8-A8)-(D8-C8)-(B4-A5).
- (D8-E8)-(E8-F8)-(B8-A9)-(E8-F9)-(F8-F7)-(I6-I7)-(F8-G8)-(D9-E9)-(I8-H8).
- Take the LANTERN HULL.
- Use the BOLIDE SHARD on the LANTERN HULL. Use the CRYSTAL POWDER, POTION, and ENCHANTED PRISM; take SHADE'S LANTERN.
- Walk down.
- Play the HOP (P) to get the BELL.
- Go to the Garden (Q).
- Take the EMBLEM OF POWER (R).
- Put down the BELL (S); take the OIL and SPRING RING (T).
- Go to the Tower Wall (U).
- Take the RUNE ARCH (V) and EMBLEM OF LOVE (W).
- Walk down.
- Place the RUNE ARCH (A); take the WOLF ORNAMENT (B).
- Walk down.
- Place the EAGLE ORNAMENT, HORSE ORNAMENT, and WOLF ORNAMENT (C). Take the AUTUMN RING and GAME TILES (D).
- Go to the Summoning Platform (E).
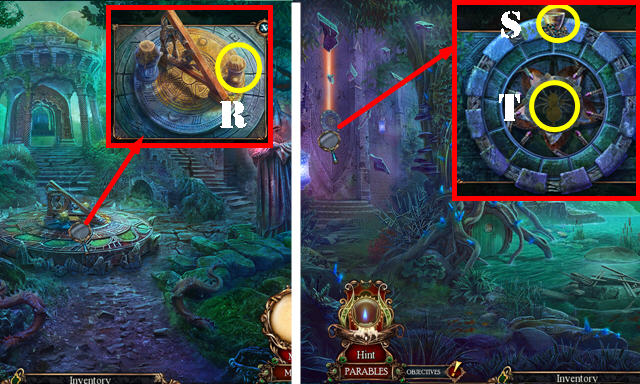
- Turn the circles as shown (F). Take the SKULL EYE (G).
- Turn the circles as shown (H). Take the RUSTY KEY (I).
- Go to the Tower Wall.
- Place the GAME TILES for a puzzle. Solution (J).
- Take the EMBLEM OF KNOWLEDGE.
- Return to the Ruins.
- Place the EMBLEM OF WISDOM, EMBLEM OF POWER, EMBLEM OF KNOWLEDGE, and EMBLEM OF LOVE (orange).
- Take the DIVINE CAT (K).
- Walk down.
Chapter 8
- Place the DIVINE CAT; take the SUMMER RING (L).
- Play the HOP (M) to get the WARRIOR'S SPEAR.
- Return to the Tower Wall.
- Place the SPRING RING, AUTUMN RING, and SUMMER RING (N). Take the SUN CANDLE (O).
- Place the WARRIOR'S SPEAR; swap the weapons and shields as shown (P). Take the ROSETTE TILE (Q).
- Walk down.
- Place the SUN CANDLE (R); play the HOP to get the MECHANICAL SPIDER.
- Return to the River Bank.
- Use the OIL (S) and place the MECHANICAL SPIDER (T).
- Return to the Summoning Platform .

- Open the door; arrange the sliders as shown (U).
- Arrange the circles as shown (V); take the PADLOCK KEY.
- Use the PADLOCK KEY; place the SKULL EYE (W); take the SMALL HAMMER.
- Take the NAUTILUS STONE (X). Use the RUSTY KEY and SMALL HAMMER; take the MUMMIFIED HAND (Y).
- Place the MUMMIFIED HAND; take the TOPAZ CONDUCTOR (Z).
- Return to the Waterfall.
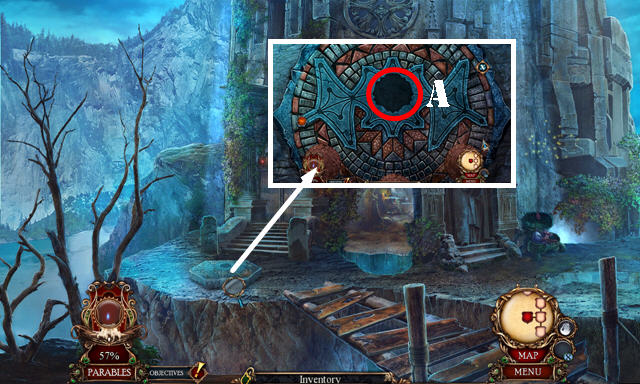
- Place the ROSETTE TILE for a puzzle (A).
- Solution (1-36).
- Take the RUNE RING.
- Return to the Tower Wall.
- Place the RUNE RING (B).
- Return to the Summoning Platform.
- Place the NAUTILUS STONE; take the TANZANITE CONDUCTOR (C).
- Rotate the circles as shown (D); take the ANIMAL TILE.
- Place the ANIMAL TILE and select it. Swap as shown (E). Take the TILE.
- Place the TILE (F); take the EMERALD CONDUCTOR.
- Place the TANZANITE CONDUCTOR (G), EMERALD CONDUCTOR (H), and TOPAZ CONDUCTOR (I).
- Use SHADE'S LANTERN on the scene for a puzzle.
- Solution (@1): (Dx2-A-D-Cx2)-(D-A-B-C-D-B-Cx2-Ax2-D)-(D-Ax2-Cx3-Bx2-Dx2-A-C-Bx2-D).
- Congratulations, you've completed Dark Parables: Requiem for the Forgotten Shadow.
Created at: 2017-03-29