

Walkthrough Menu
General Tips
- This is the official guide for Dark Parables: Return of the Salt Princess.
- This guide won't tell you when to zoom into a location; the screenshots show each zoom scene.
- Hidden-object puzzles are referred to as HOPs. Only the locations of the HOPs will be shown.
- Use the Map to fast travel to a location.
Chapter 1
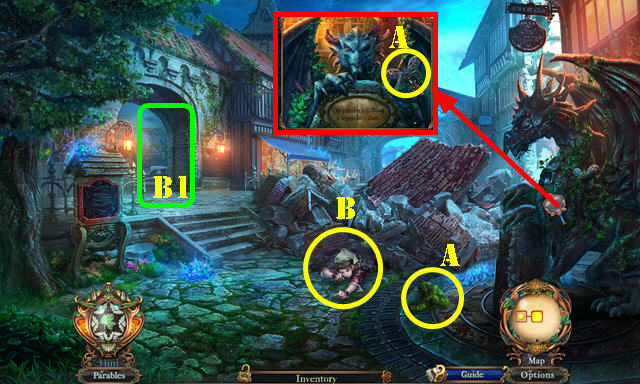
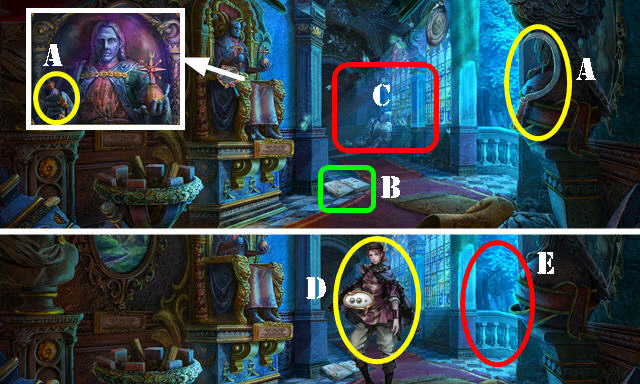
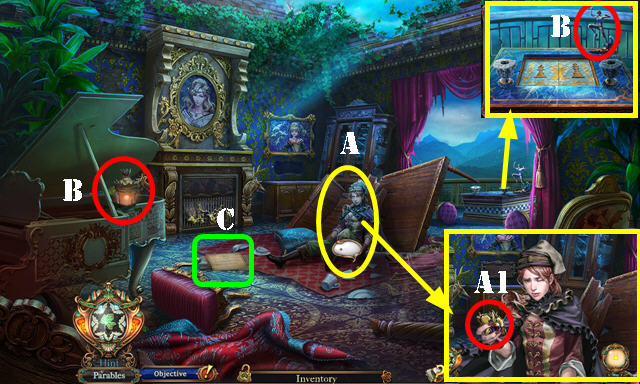
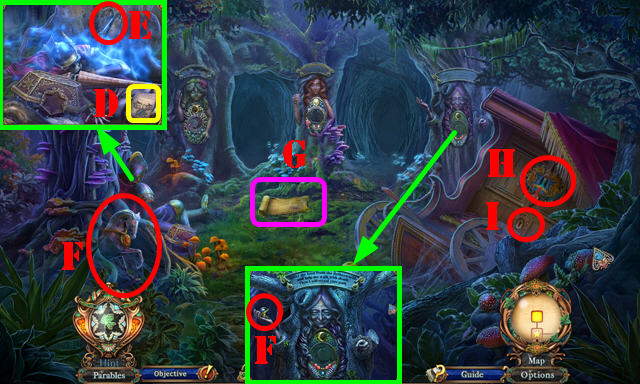
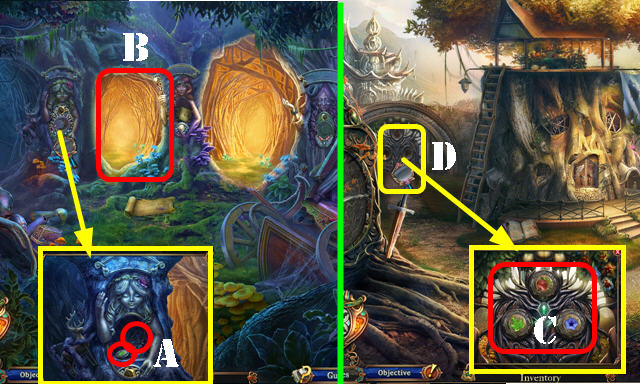
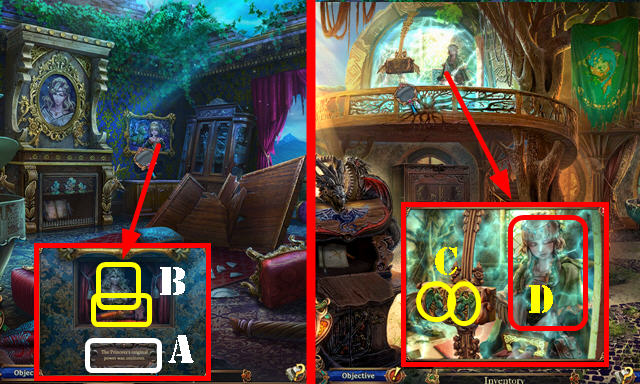
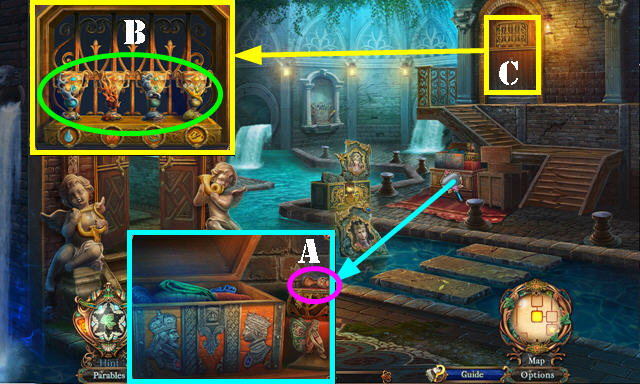
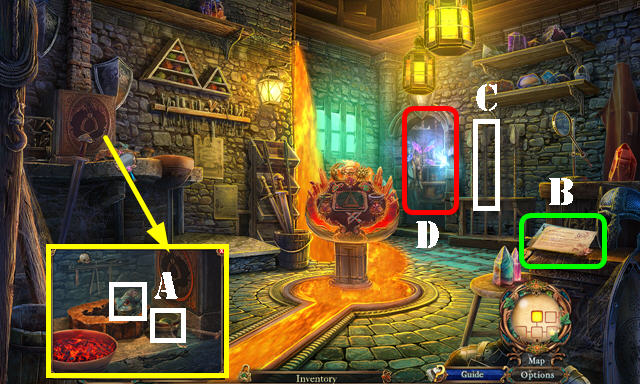
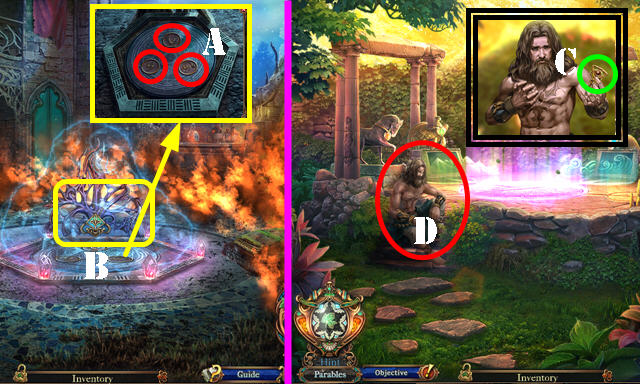
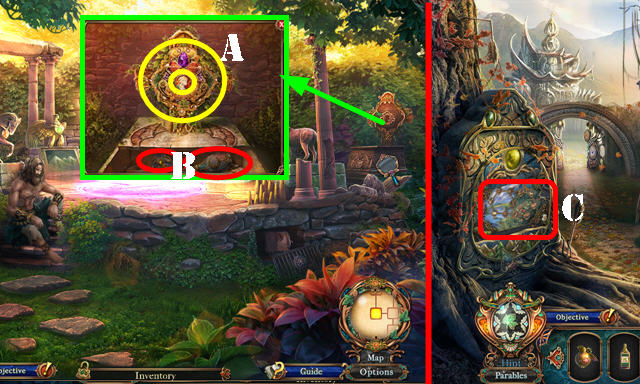
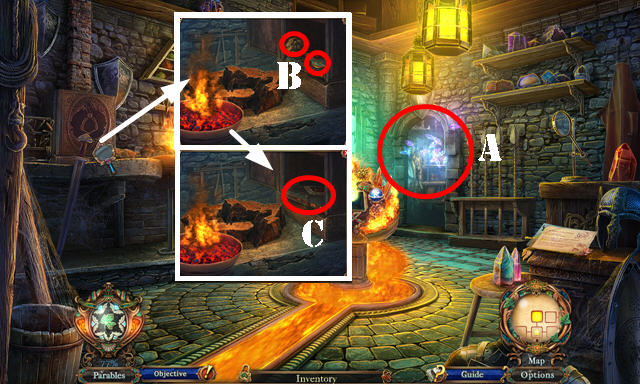
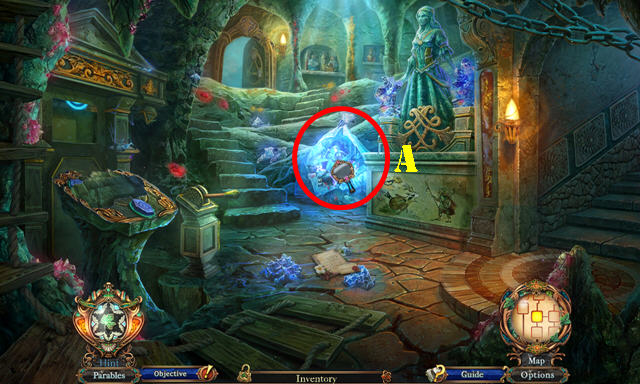
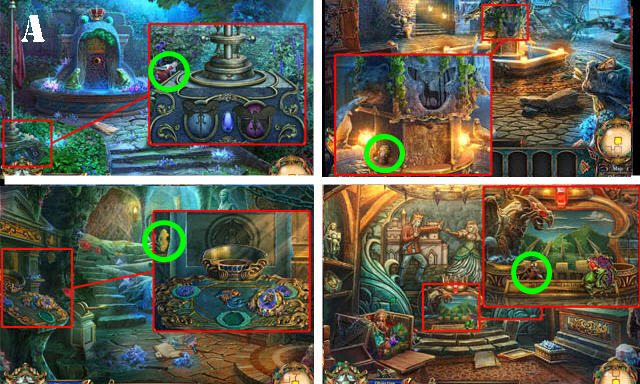
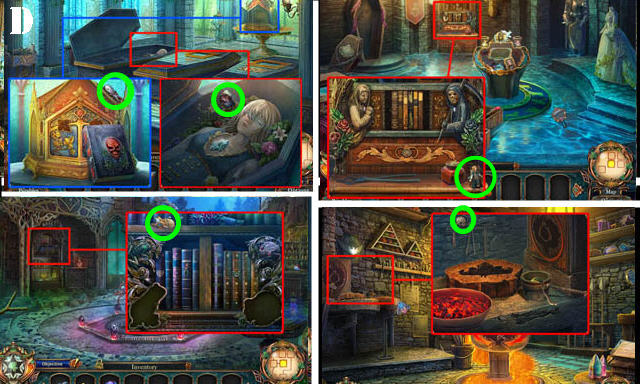
- Take MOSSY FAUCET and BUTTERFLY GEM (A).
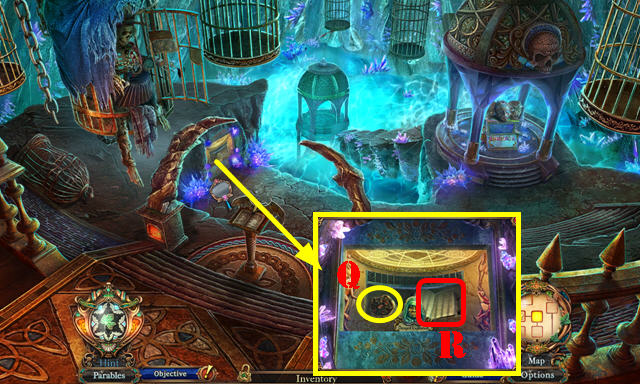
- Select rocks 3x; talk (B).
- Go (B1).
- Select scene.
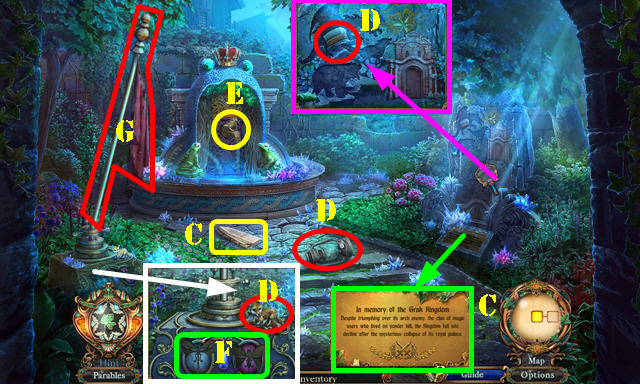
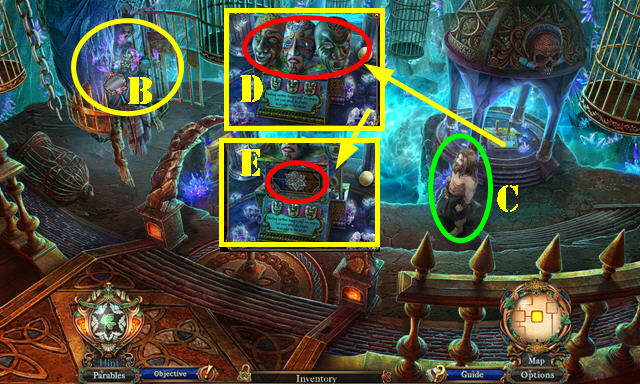
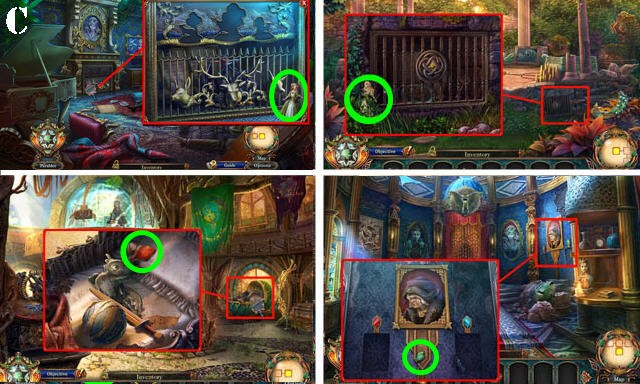
- Look at newspaper and sign (C).
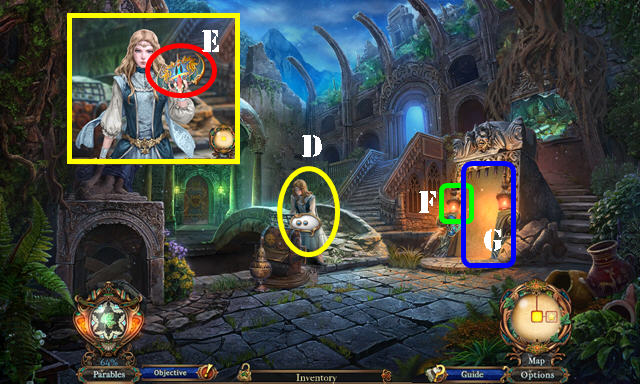
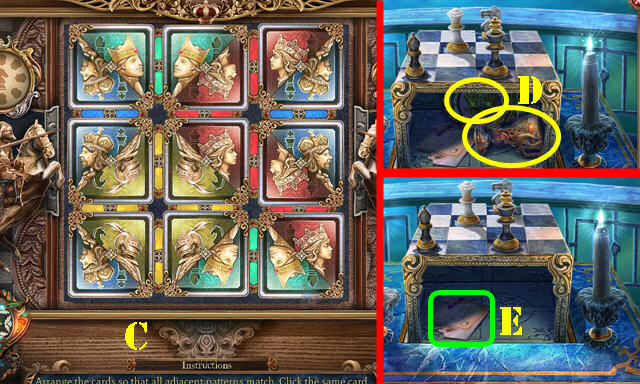
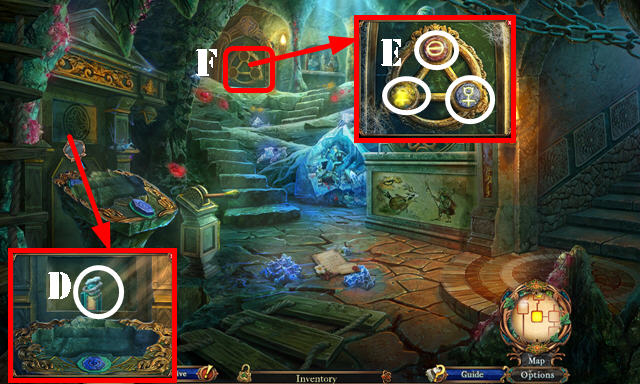
- Take LANTERN, BRUSH, and FOX ACCESSORY (D).
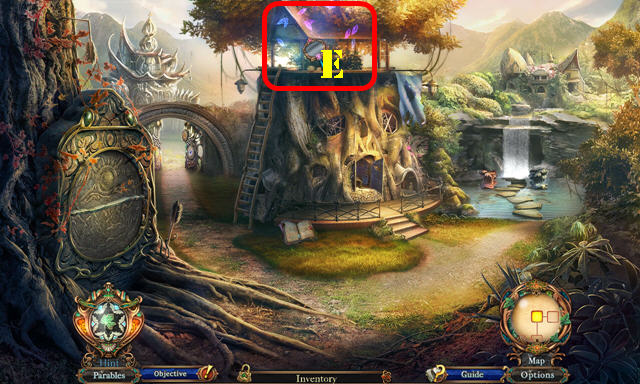
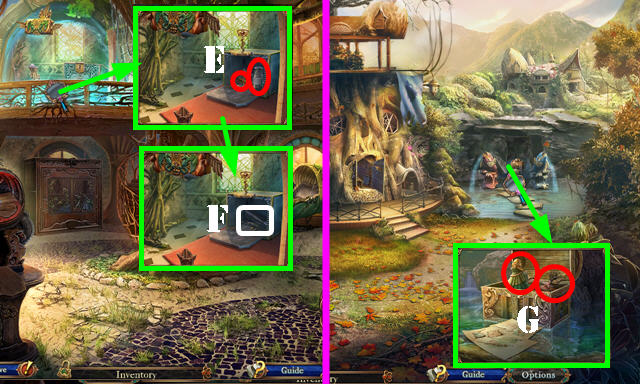
- BRUSH on MOSSY FAUCET; receive FROG FAUCET.
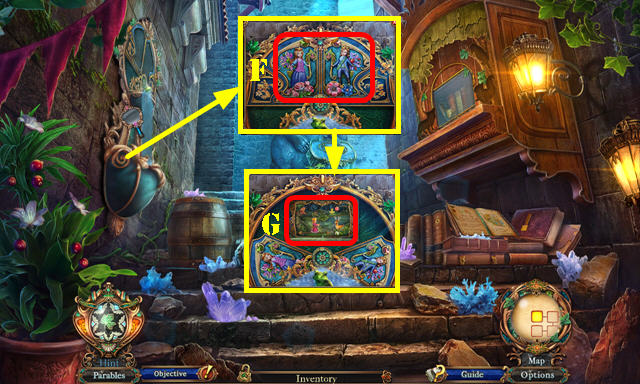
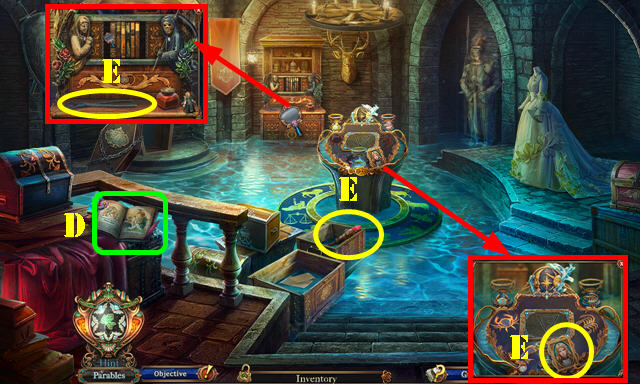
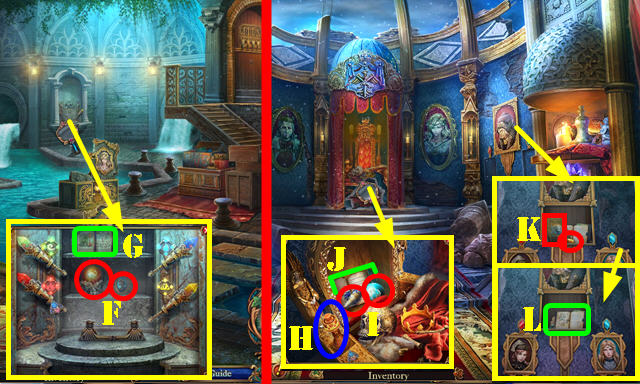
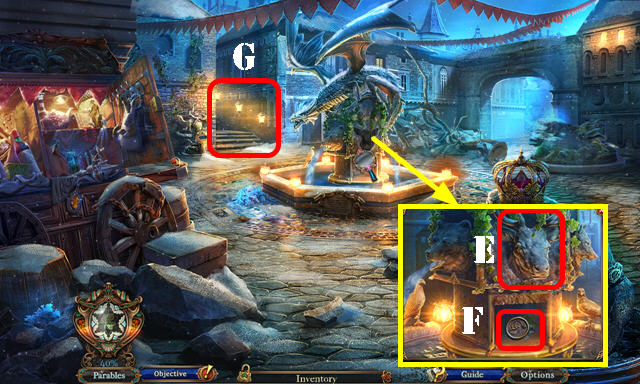
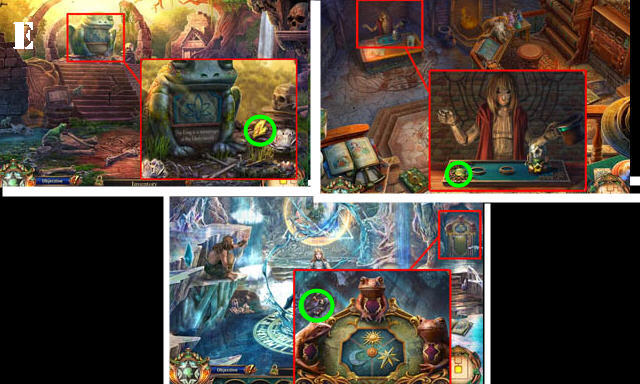
- Place FROG FAUCET (E). Play HOP; receive DRAGONFLY GEM.
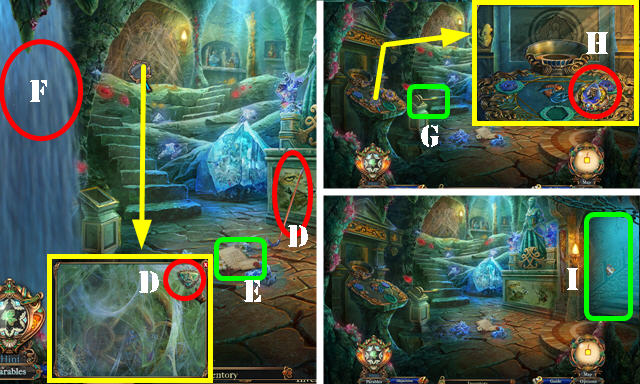
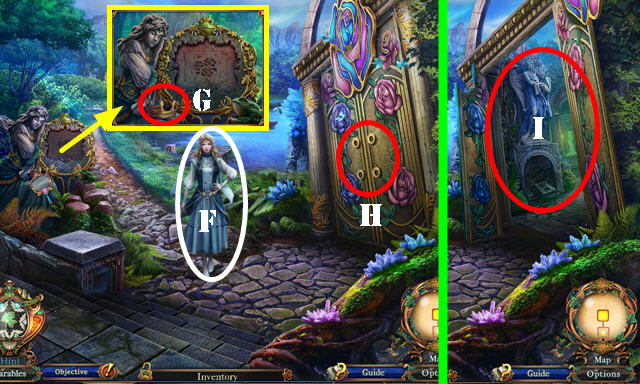
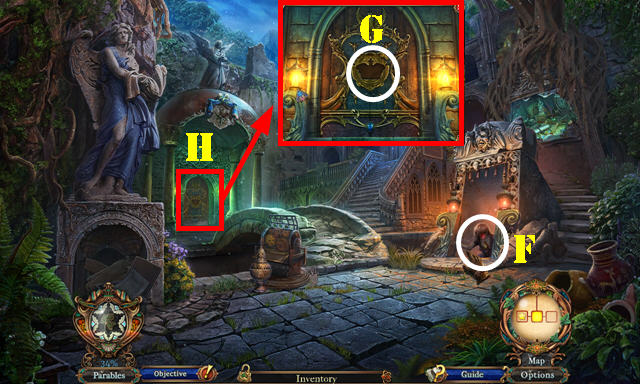
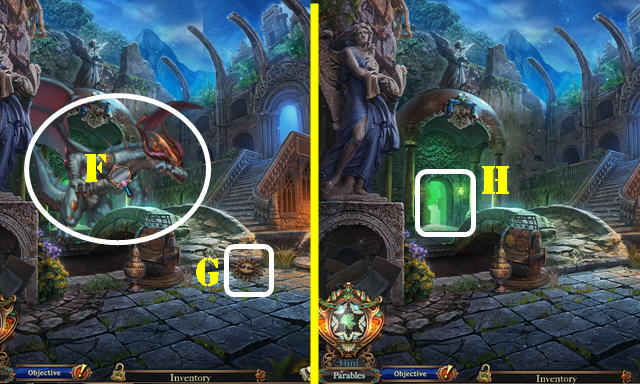
- Place BUTTERFLY GEM and DRAGONFLY GEM (F); take FLAGPOLE (G).
- Walk down.
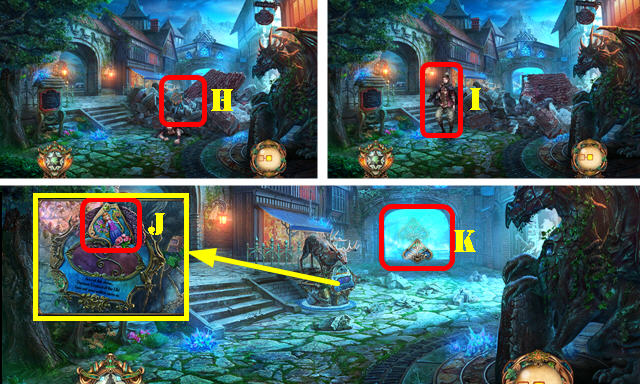
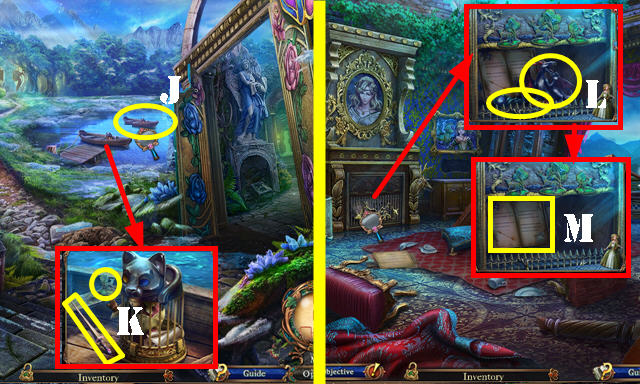
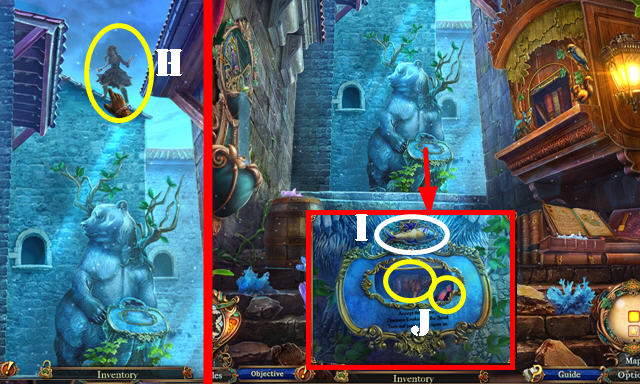
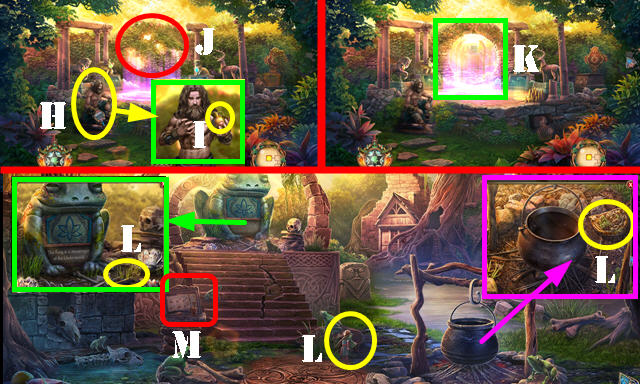
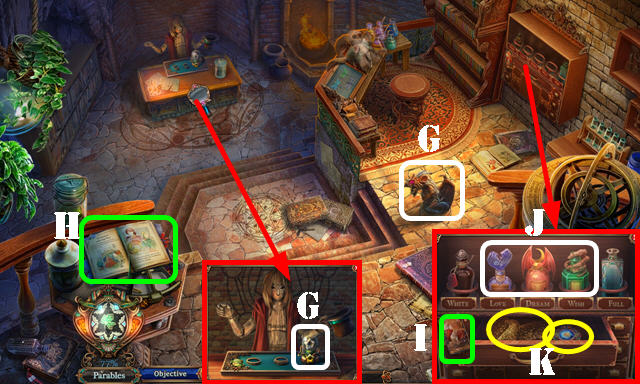
- Use FLAGPOLE (H).
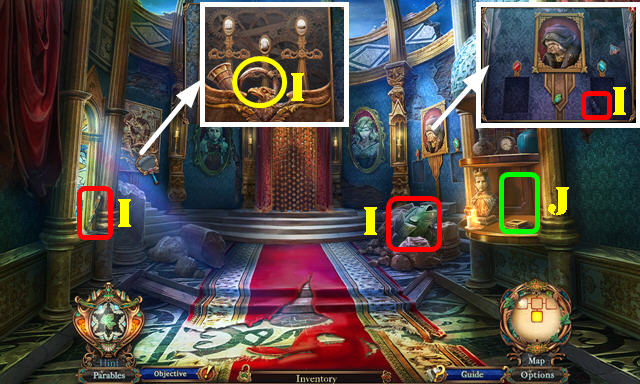
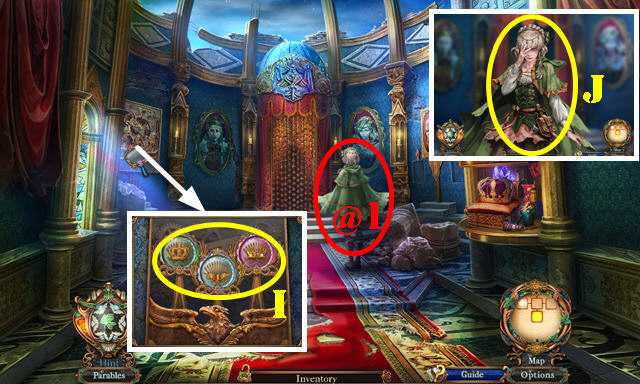
- Talk (I).
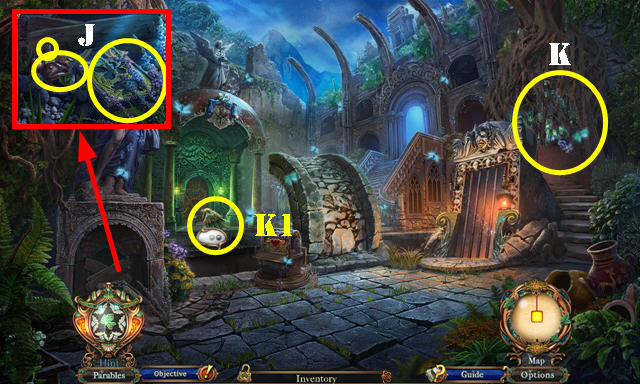
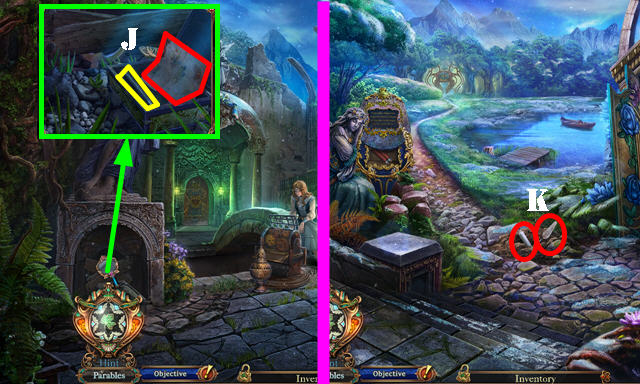
- Take PRINCESS ADORNMENT (J).
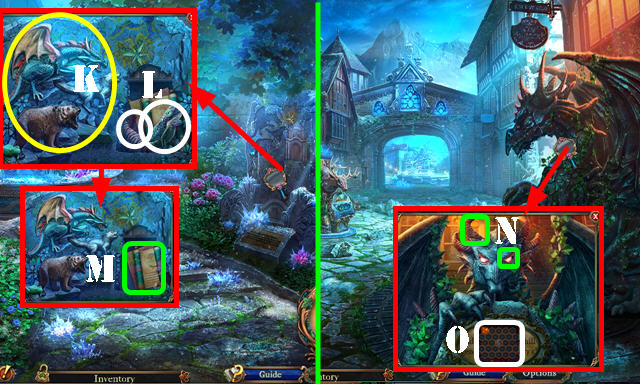
- Go (K).
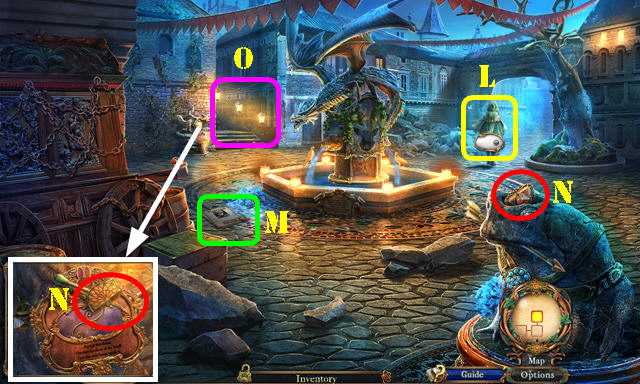
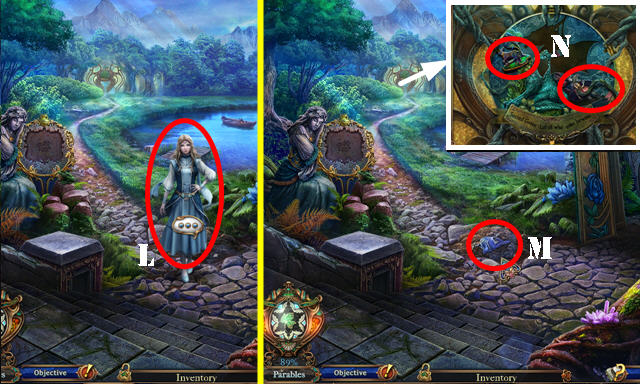
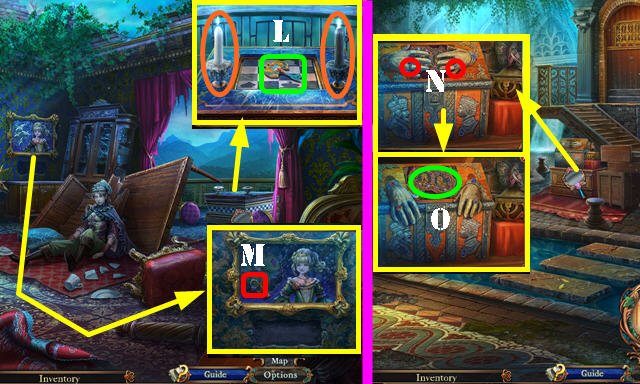
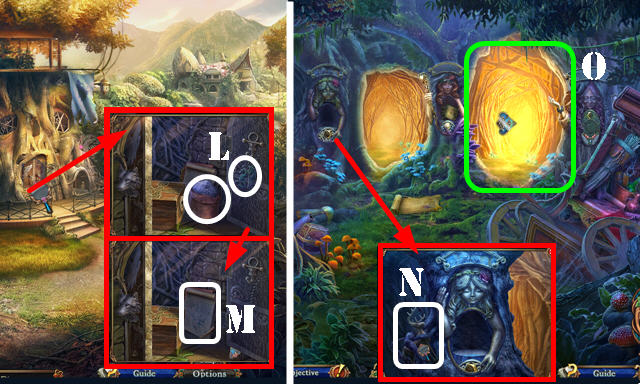
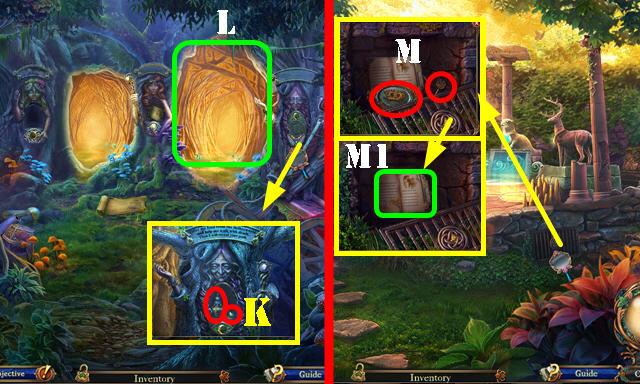
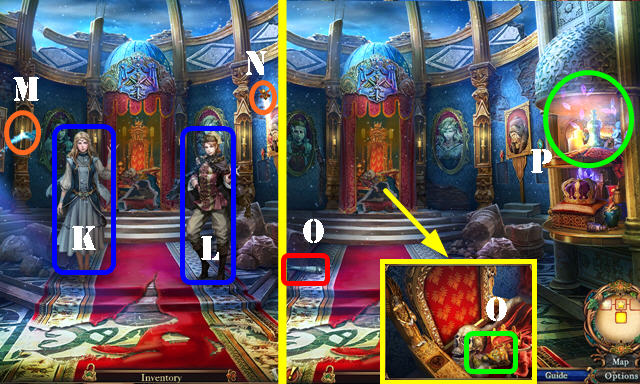
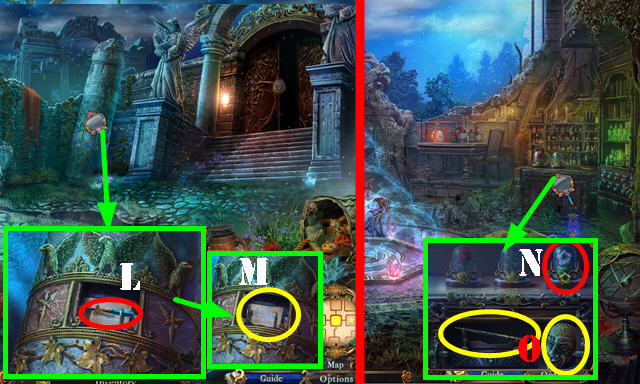
- Talk (L).
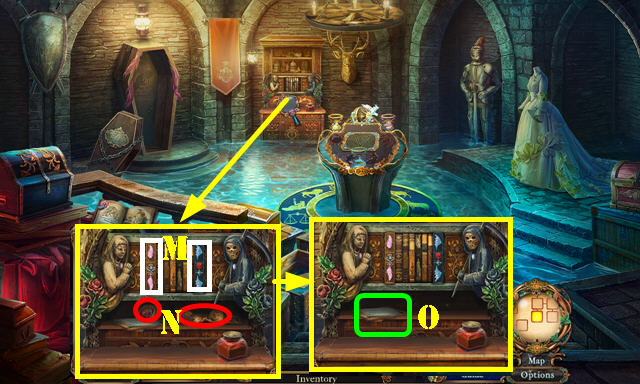
- Look at newspaper (M).
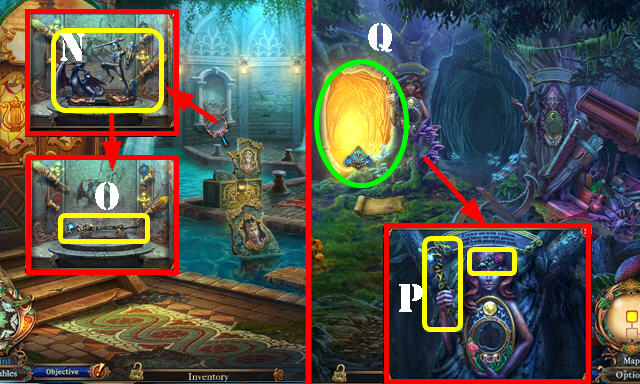
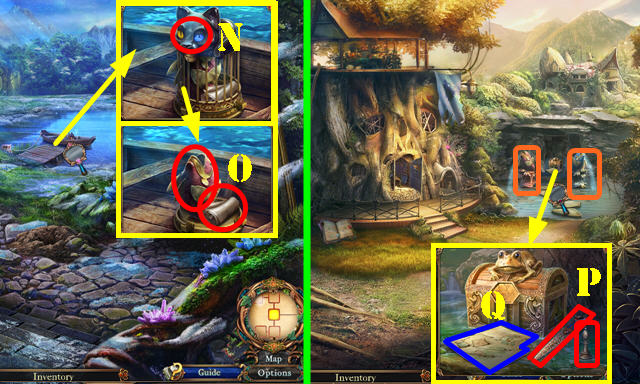
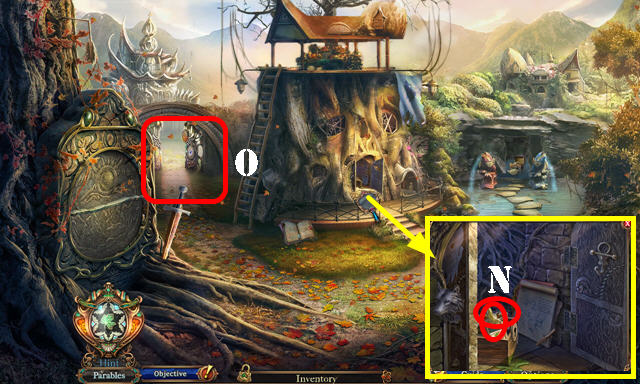
- Take ANDALUSITE PENDANT and SLUICE LEVER (N).
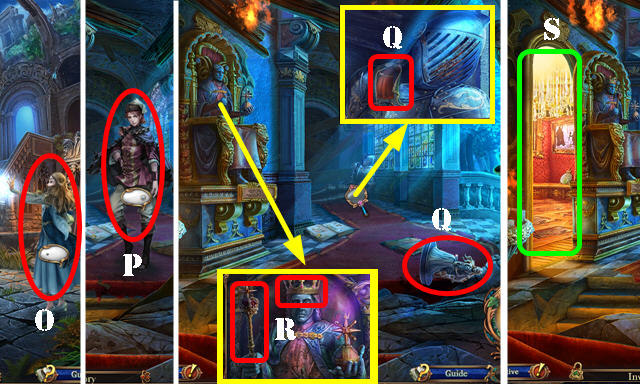
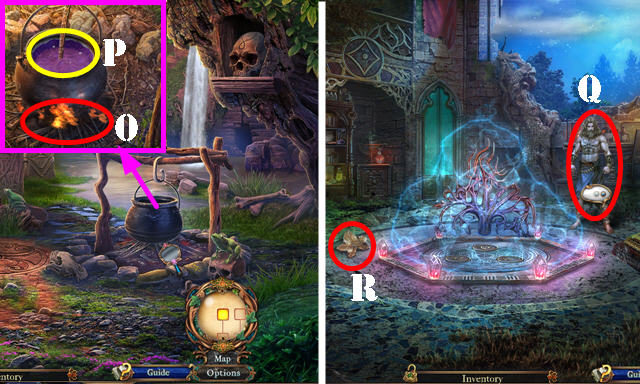
- Go (O).
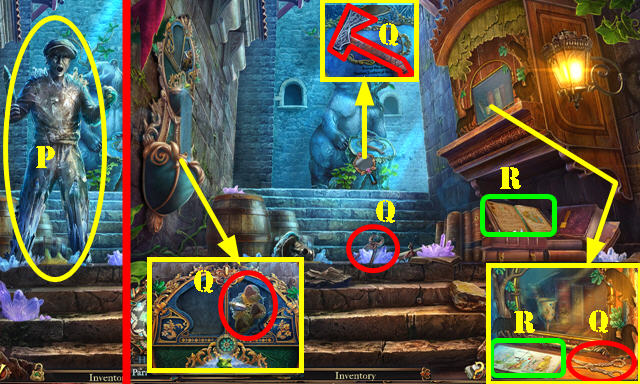
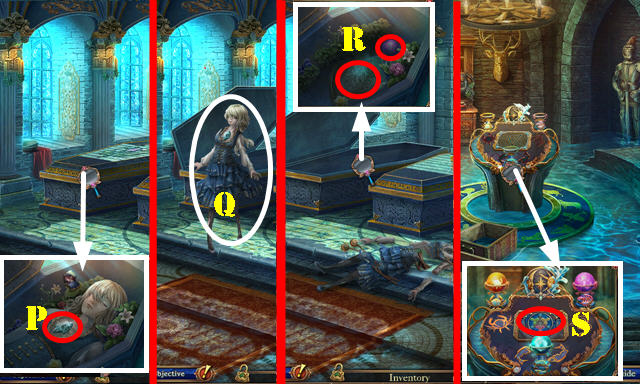
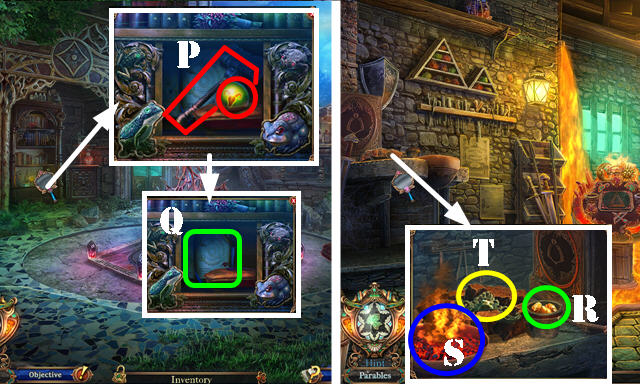
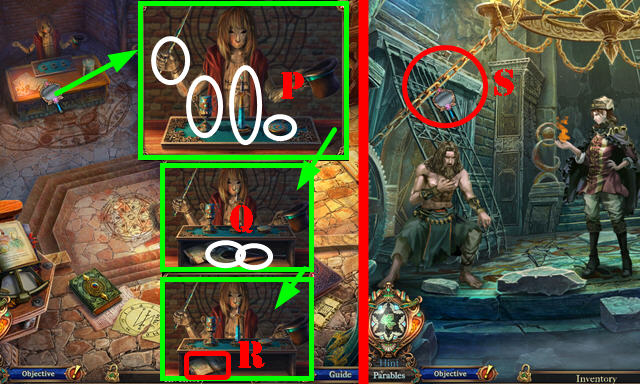
- Select statue (P).
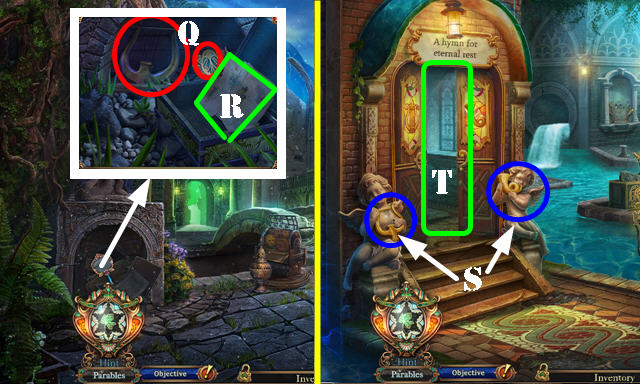
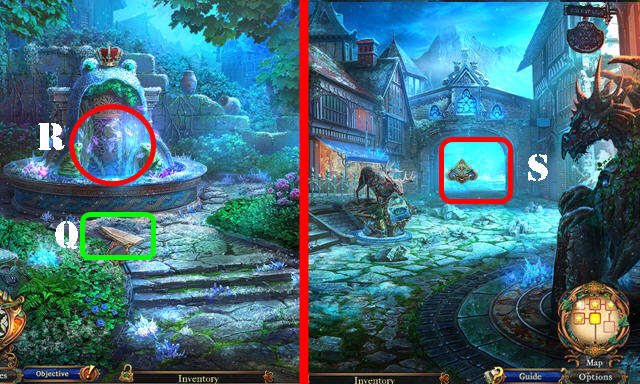
- Take BOLT CUTTER, SHEARS, HATCHET, and CRYSTAL TABLET (Q).
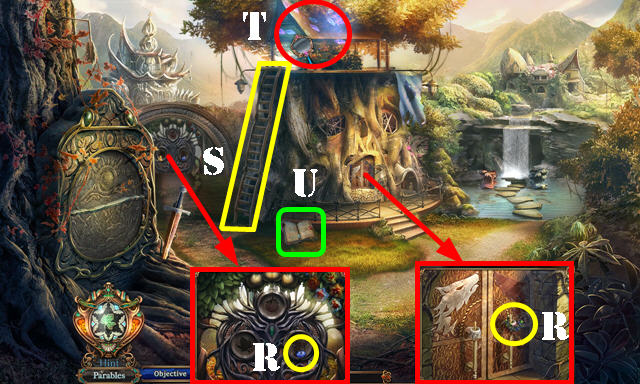
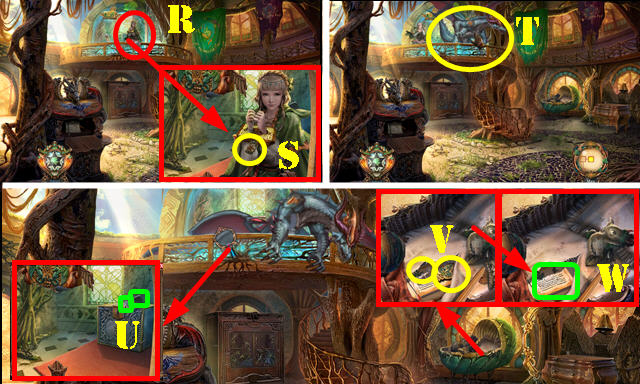
- Look at notes (R).
- Walk down.
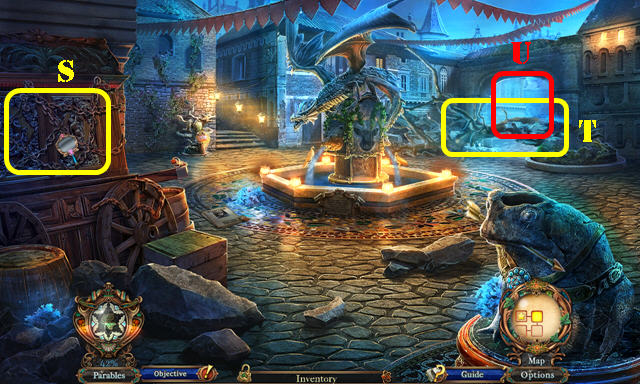
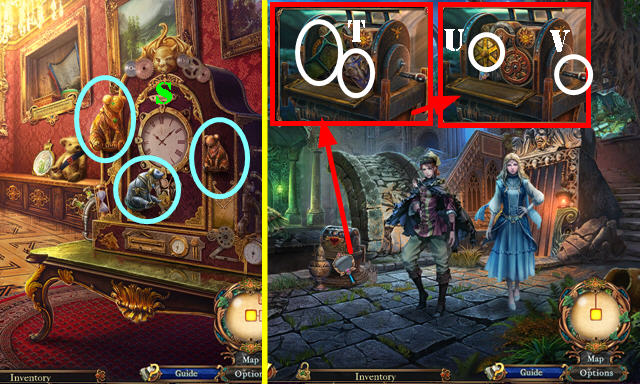
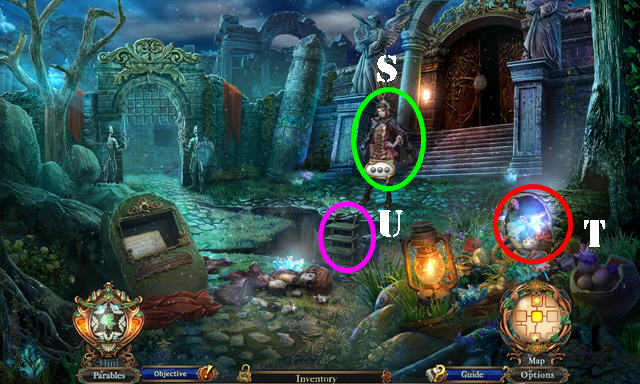
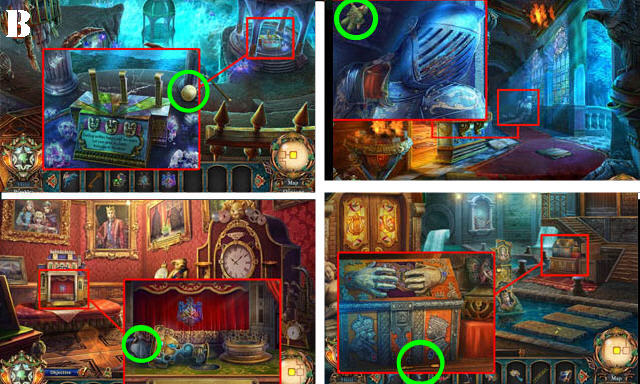
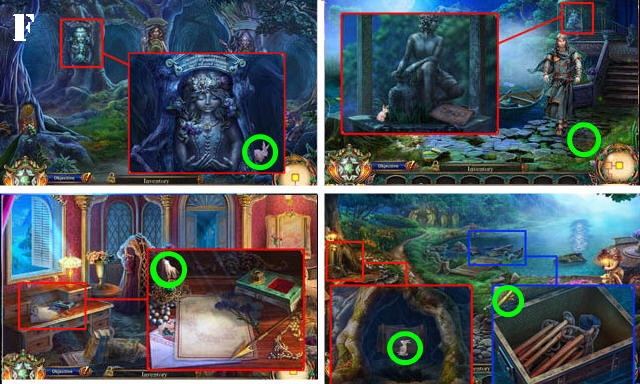
- Use BOLT CUTTER (S). Play HOP; receive PRINCE ADORNMENT.
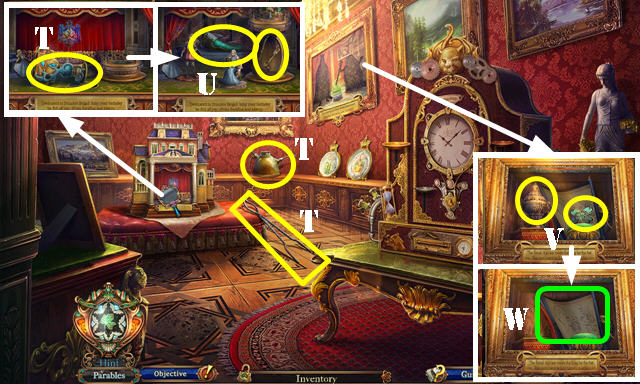
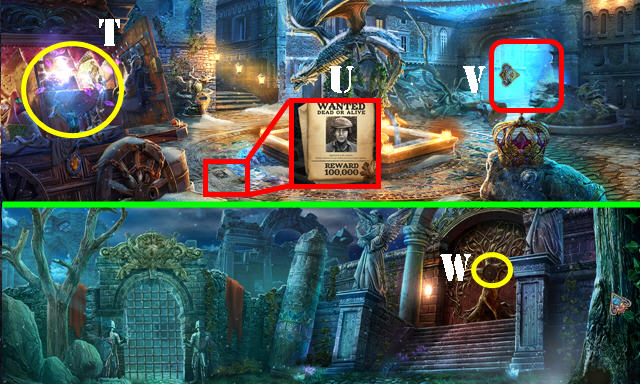
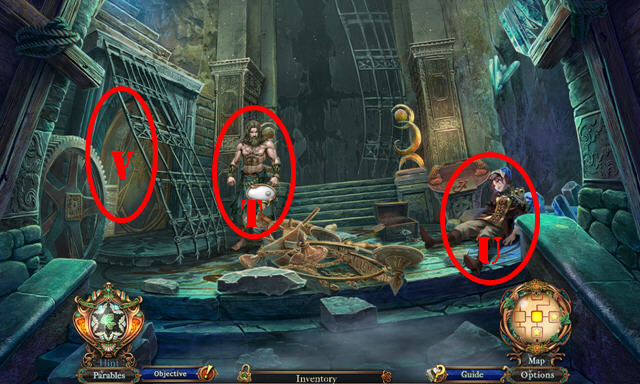
- Use HATCHET (T).
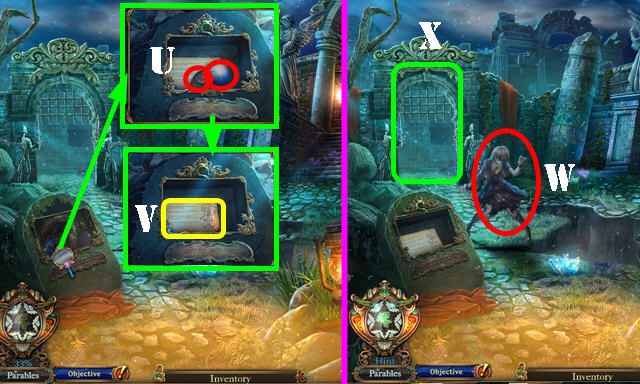
- Go (U).
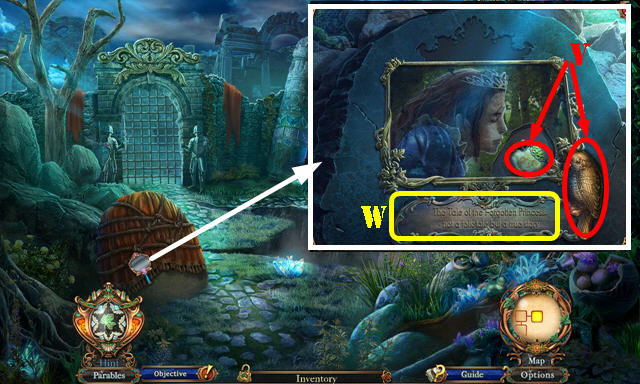
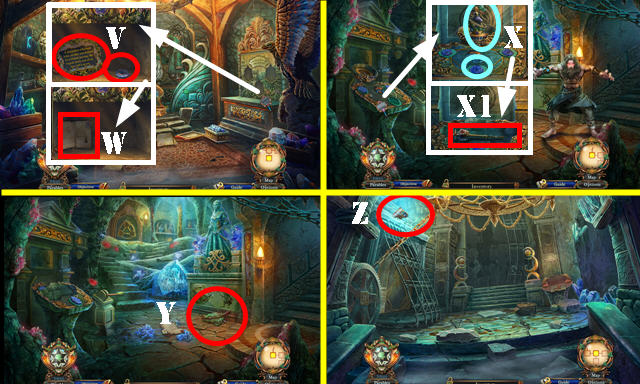
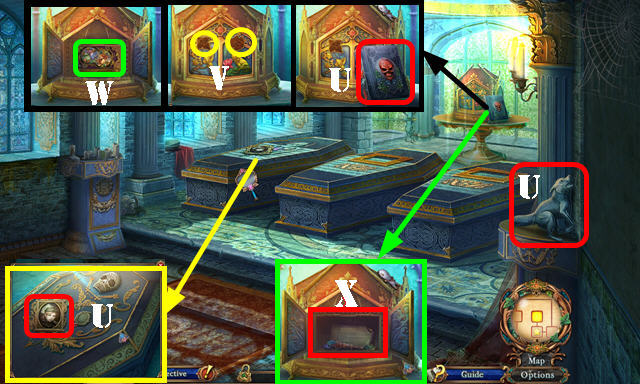
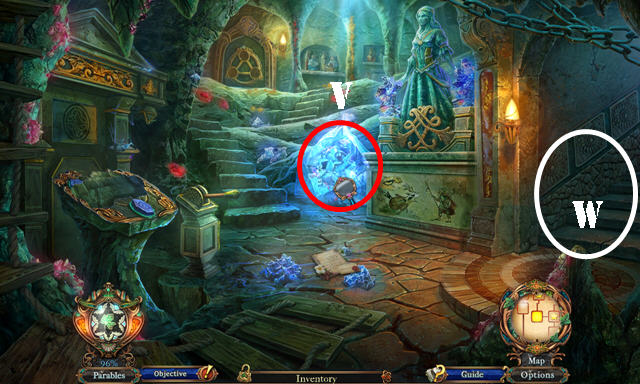
- Use SHEARS; take APPLE TOKEN and CUCKOO ACCESSORY (V).
- Read plaque (W).
- Walk down twice.
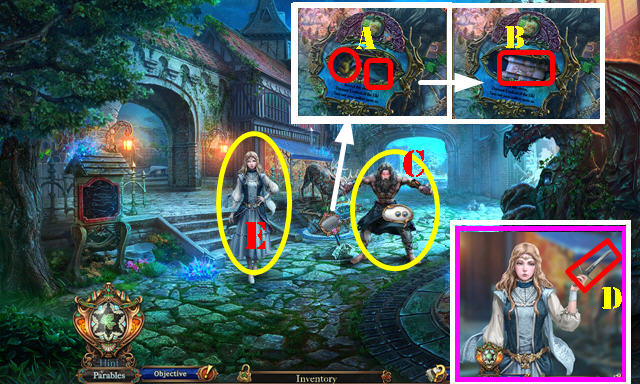
- Place APPLE TOKEN; take MATCHBOX and SQUIRREL ACCESSORY (A).
- Look at note (B).
- Talk (C).
- Take DAGGER (D).
- Talk (E).
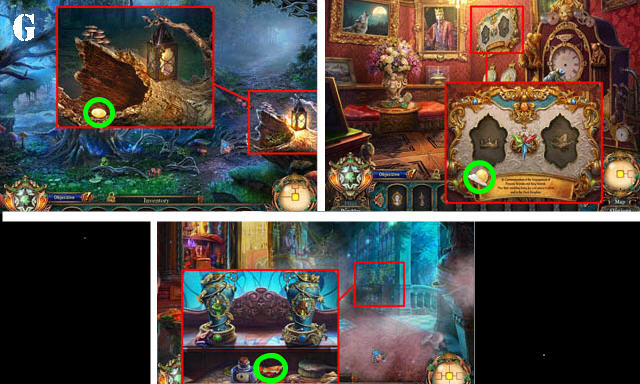
- Return to Alley.
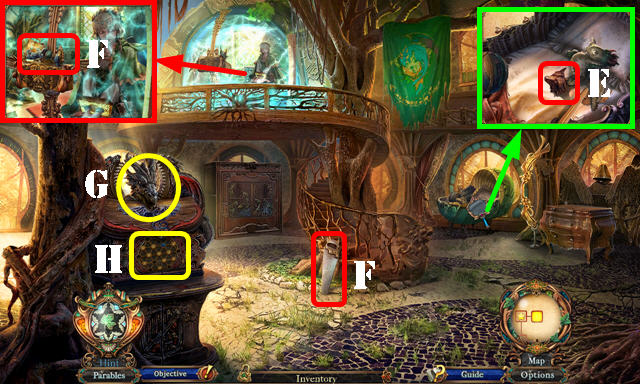
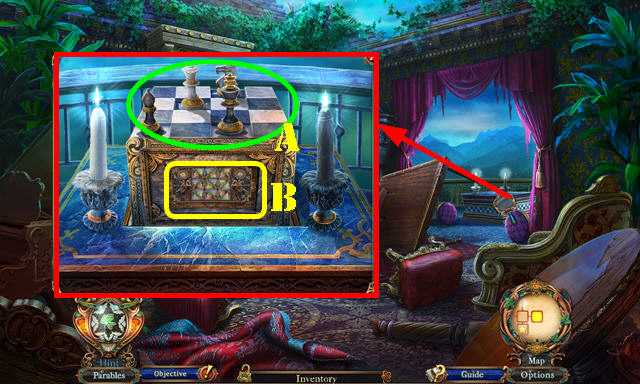
- Place PRINCESS ADORNMENT and PRINCE ADORNMENT (F).
- Select puzzle (G).
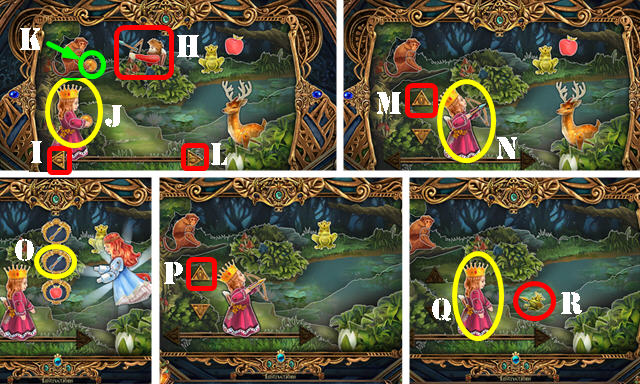
- Solution: H-Ix2-J (throw ball) and select (K) right away so monkey can catch ball. Repeat until monkey catches ball.
- Select (K) once more.
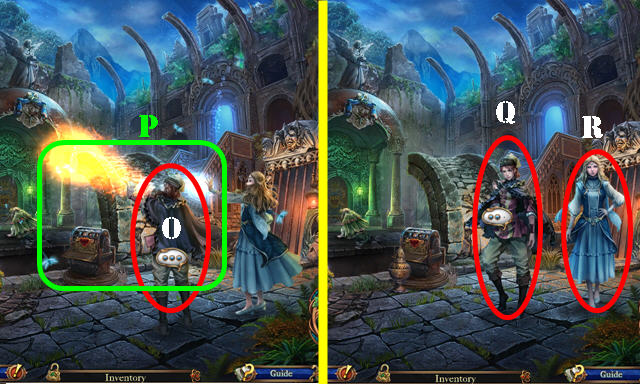
- Lx2-princess grabs bow.
- Mx2 (raise bow)-N (shoot apple)-O-Px2 (raise bow and arrow)-Q (shoot arrow)-Rx2.
- Take KEROSENE and DRAGON MOSAIC RELIEF.
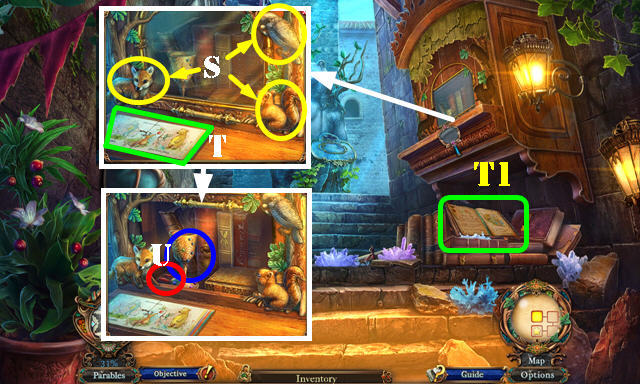
- Place FOX ACCESSORY, SQUIRREL ACCESSORY, and CUCKOO ACCESSORY (S).
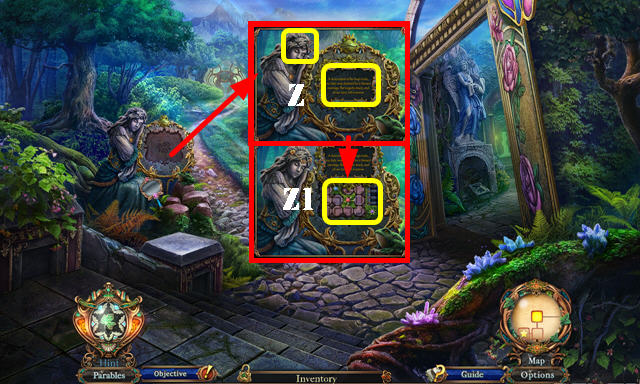
- Look at notes (T-T1).
- Open glass door; take GOBLET and RABBIT TOKEN (U).
- Walk down.
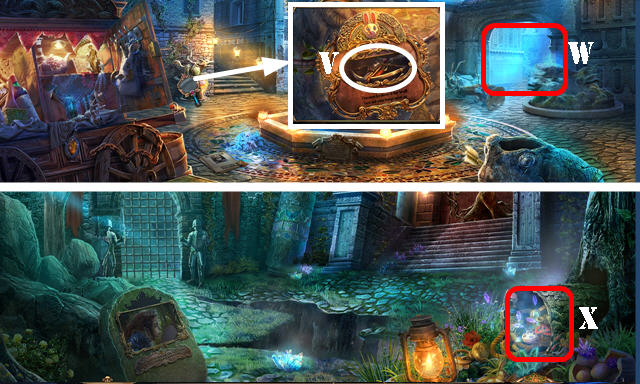
- Place RABBIT TOKEN; take CROSSBOW (V).
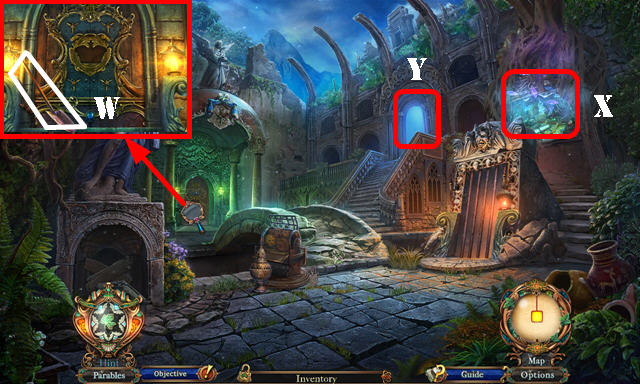
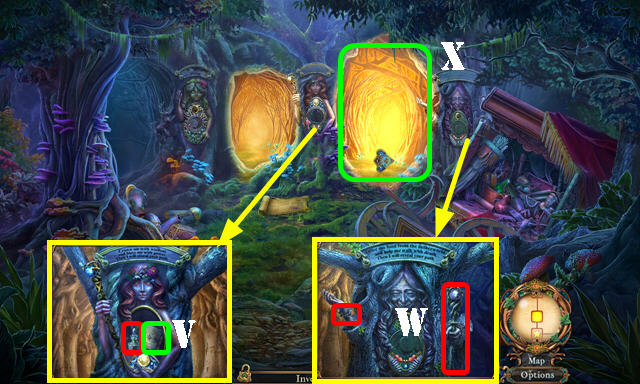
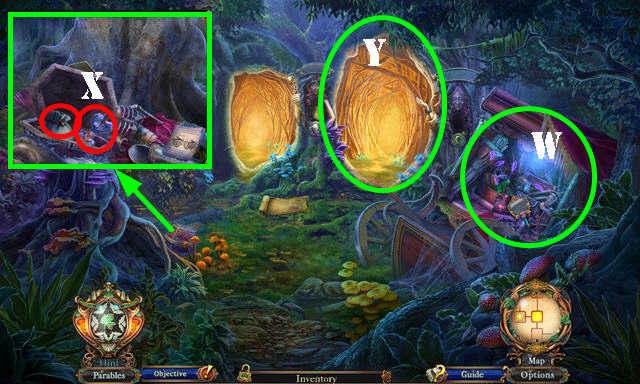
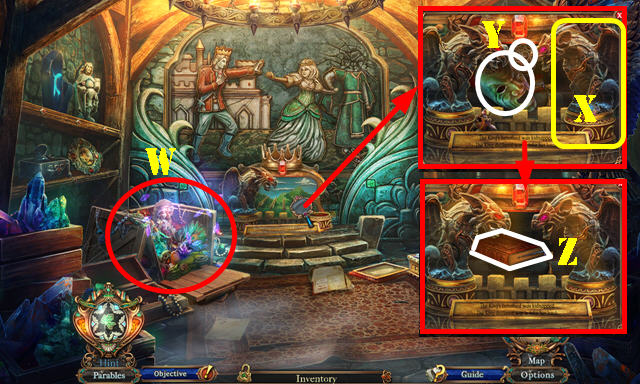
- Go (W).
- KEROSENE and MATCHBOX on LANTERN; receive LIT LANTERN.
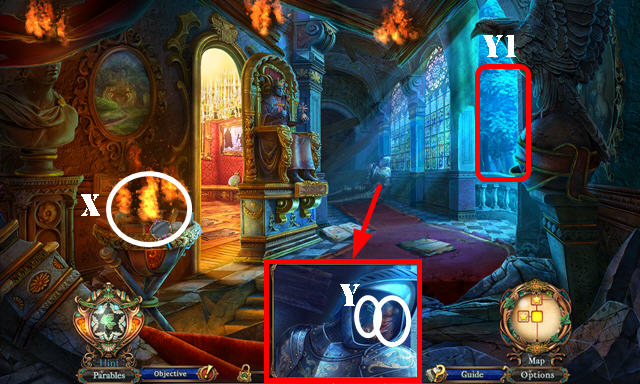
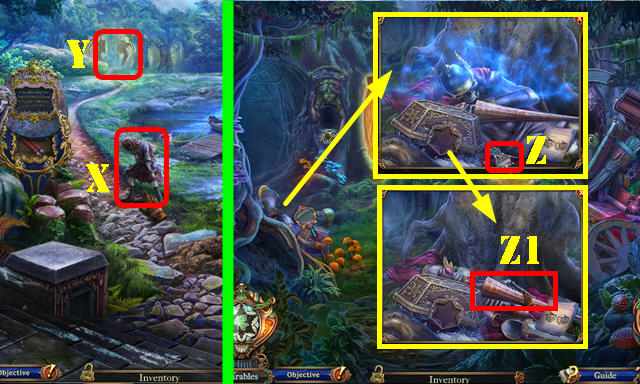
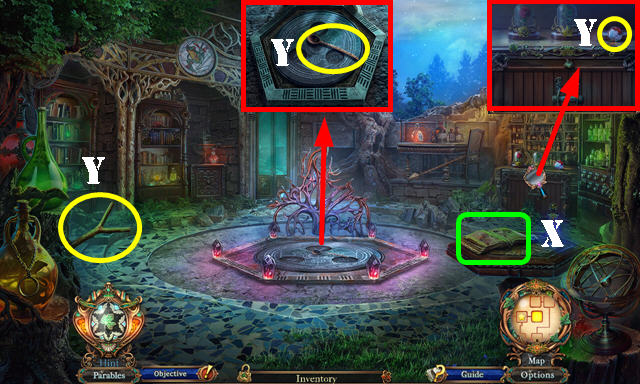
- Place LIT LANTERN (X). Play HOP; receive DECORATIVE CROWN.
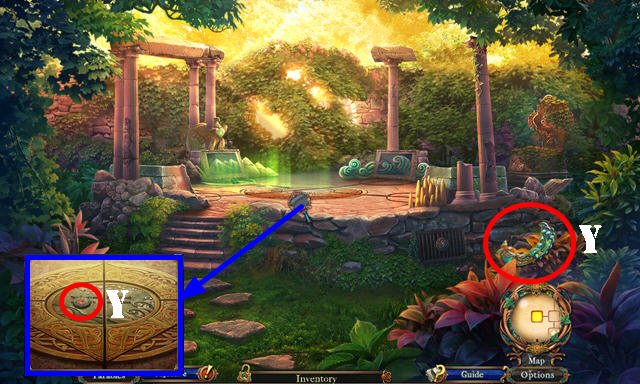
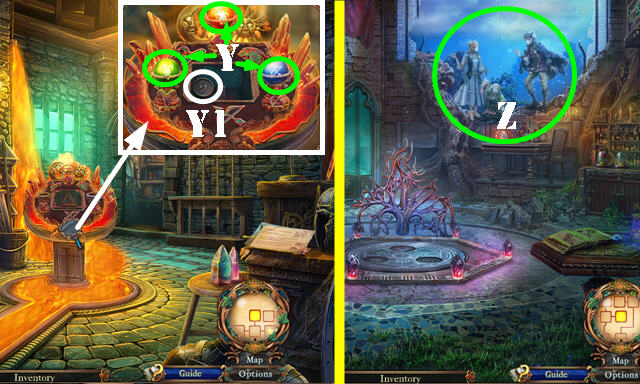
- Walk down.
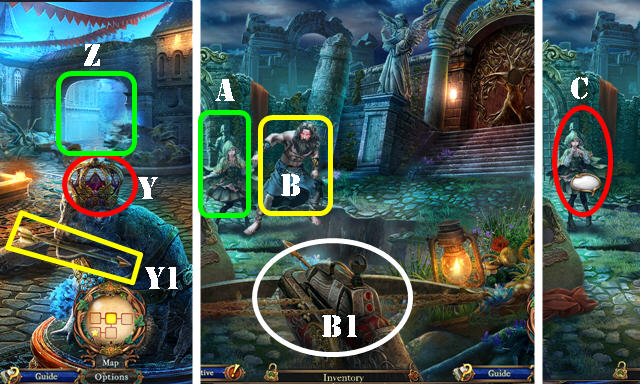
- Place DECORATIVE CROWN (Y); take ARROW (Y1).
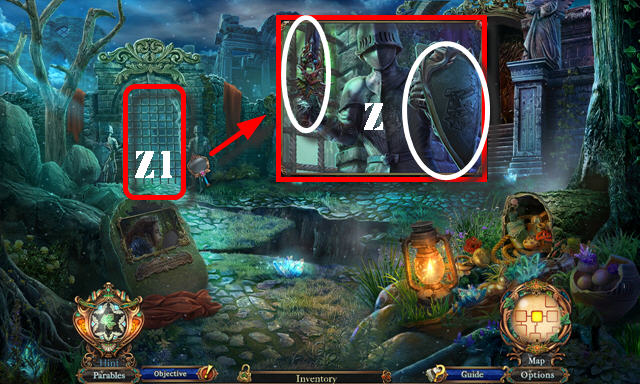
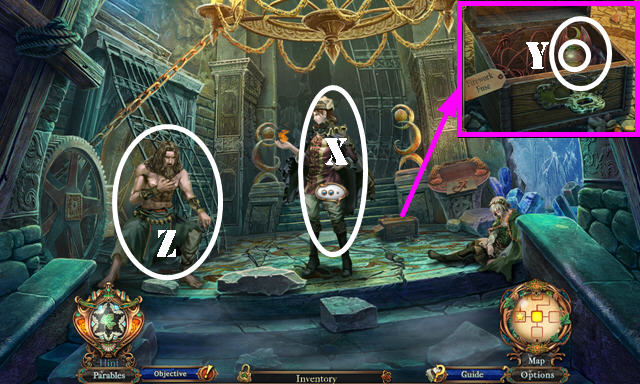
- Go (Z).
- Talk (A).
- Use CROSSBOW (B).
- Add ARROW and select (B1).
- Talk (C).
- Take CROWBAR and SILLIMANITE PENDANT (D).
- Look at note (E).
- Use GOBLET (F); receive GOBLET WITH WATER.
- Place SLUICE LEVER and pull (G). Take KING MEDALLION (H).
- Go (I).
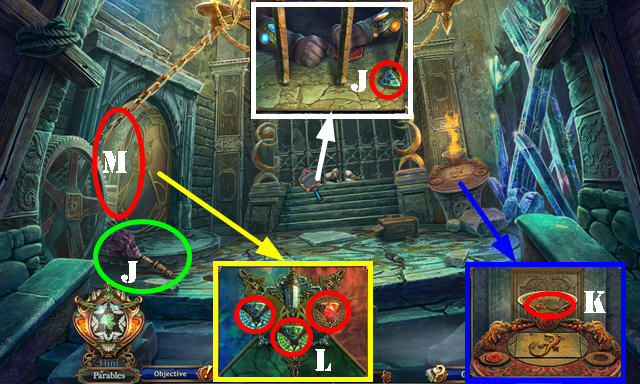
- Take KYANITE PENDANT and FEATHER DUSTER (J).
- Use GOBLET WITH WATER; take CAGE KEY (K).
- Place CRYSTAL TABLET; insert ANDALUSITE PENDANT, KYANITE PENDANT, and SILLIMANITE PENDANT (L).
- Go (M).
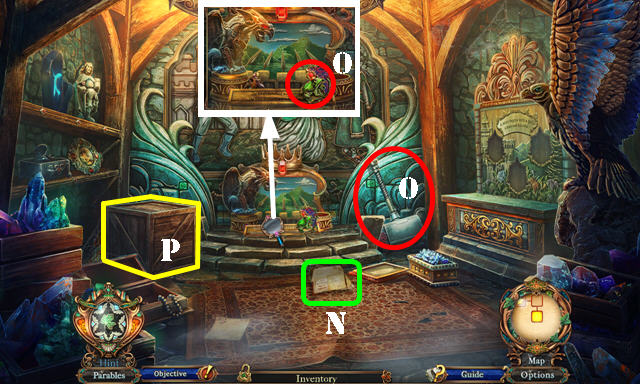
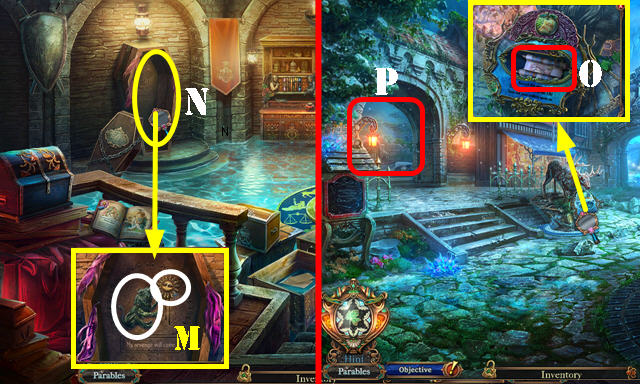
- Look at note (N).
- Take FROG IVY EMBLEM and SLEDGEHAMMER (O).
- Use CROWBAR (P). Play HOP; receive FIRE SPIRIT STATUETTE.
- Walk down.
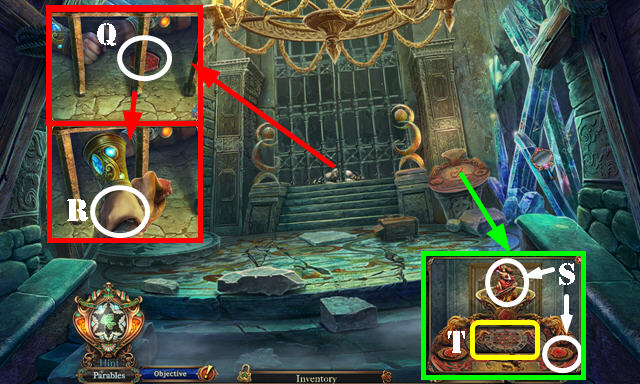
- Try to take runestone (Q).
- Use DAGGER (R) to receive FIRE RUNESTONE.
- Place FIRE RUNESTONE and FIRE SPIRIT STATUETTE (S).
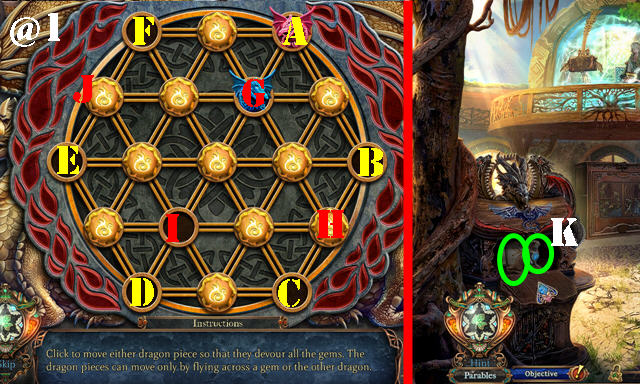
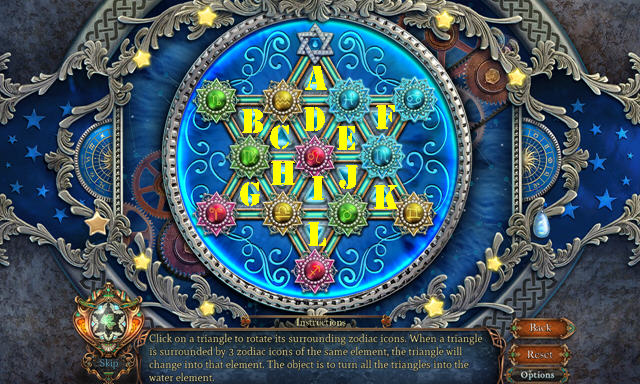
- Select puzzle (T).
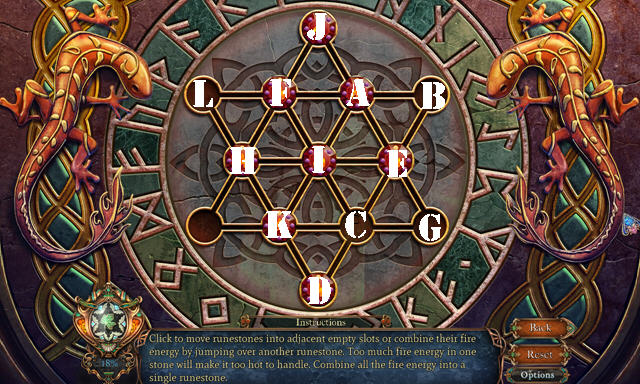
- Solution: (A-B)-(B-C)-(D-E)-(F-C)-(C-G)-(G-A)-(H-I)-(I-E)-(E-B)-(B-F)-(J-H)-(K-L).
- Take SOLWOOD EMBLEM.
- Walk down.
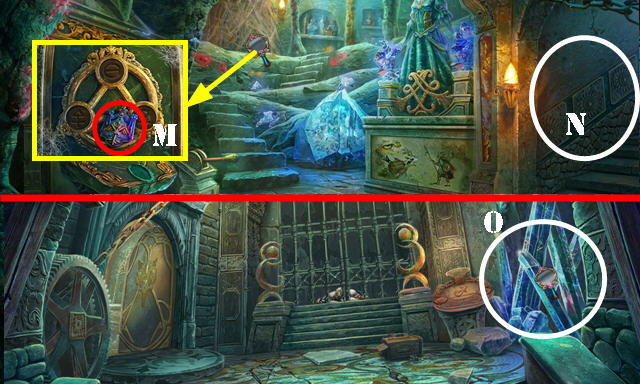
- Use FEATHER DUSTER; take KINGDOM EMBLEM (M).
- Go (N).
- Use SLEDGEHAMMER and go (O).

- Take NET, PRINCESS MEDALLION, and MEDIUM SILVER BEAR (P).
- Use CAGE KEY (Q). Play HOP; receive DRAGON MEDALLION.
- Look at note (R).
- Place SOLWOOD EMBLEM, FROG IVY EMBLEM, and KINGDOM EMBLEM (S).
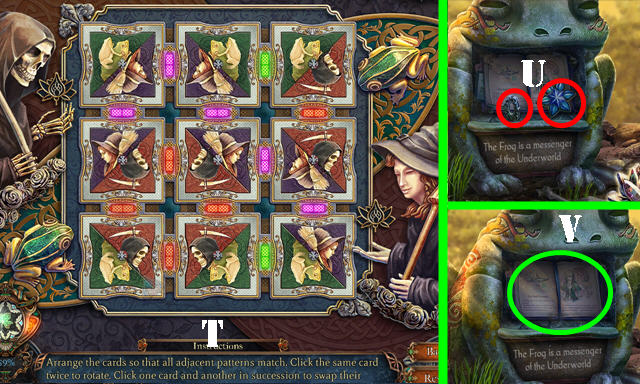
- Select puzzle (T).
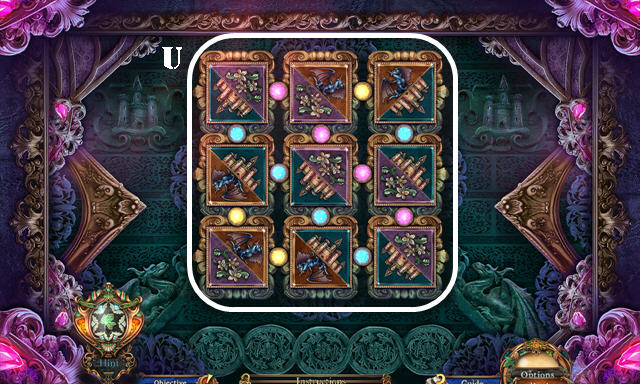
- Solution (U).
- Take RED ROSE HANDLE and UNDINE STATUETTE.
- Go to Crystal Cave.
- Place KING MEDALLION, DRAGON MEDALLION, and PRINCESS MEDALLION; Take WATER RUNESTONE and IVY PLAQUE (V).
- Look at note (W).
- Walk down twice.
- Place UNDINE STATUETTE and WATER RUNESTONE (X); take ROYAL SCEPTER (X1).
- Take DRAGON HEAD RELIEF (Y).
- Go to Salt Mine and then to Corridor (Z).
Chapter 2
- Take SICKLE and WHITE ROSE HANDLE (A).
- Look at note (B).
- Use NET (C).
- Talk (D).
- Go (E).
- Talk (F).
- Take ROYAL CROWN (G).
- Use RED ROSE HANDLE and WHITE ROSE HANDLE (H).
- Go (I).
- Select twice; take BIG GOLD BEAR, MOSS REMOVER, and DRY HEATHER (J).
- Use SICKLE (K). Play HOP; receive PRINCESS DOLL.
- Select (K1).
- Walk down.
- Talk (L).
- Take WITCH CANVAS SCRAP (M).
- Use MOSS REMOVER; take FIRE GUARD DOLL and DOE CARVING (N).
- Go to Courtyard.
- Talk (O).
- Walk down twice.
- Talk (P).
- Take WATER GUARD DOLL and KING CANVAS SCRAP (Q).
- Place ROYAL CROWN and ROYAL SCEPTER (R).
- Go (S).
- Take OIL CAN, FIRE TONGS, and WATER CHALICE (T).
- Place FIRE GUARD DOLL, WATER GUARD DOLL, and PRINCESS DOLL; take IVY TIARA and DRAGON TAIL RELIEF (U).
- Place KING CANVAS SCRAP and WITCH CANVAS SCRAP; take EMPTY CENSER and CLOVER BROOCH (V).
- Look at note (W).
- Walk down.
- Use FIRE TONGS (X); receive BURNING CHARCOAL.
- Use OIL CAN and open helmet; take LITTLE BRONZE BEAR and DRAGON CLAW RELIEF (Y).
- Go (Y1).
- Place IVY PLAQUE and IVY TIARA (Z).
- Select puzzle (Z1).

- Solution: Ax2-Bx3-Cx2-Dx2-E-F-Gx3-H-I-J-Kx2-Lx3.
- Take KING'S RING and GOLDEN GEAR (M).
- Look at note (N).
- Go to Courtyard.
- Talk (O).
- Open EMPTY CENSER; place BURNING CHARCOAL and DRY HEATHER; close lid and take SMOKING CENSER.
- Use SMOKING CENSER (P).
- Talk (Q-R).
- Go to Gallery.
- Place BIG GOLD BEAR, MEDIUM SILVER BEAR, LITTLE BRONZE BEAR (S). Play HOP; receive EAGLE INSIGNIA.
- Go to Courtyard.
- Place EAGLE INSIGNIA; take DRAGON WING RELIEF and MINI SHIELD (T).
- Place GOLDEN GEAR (U); select handle (V).
- Take SPADE (W).
- Play HOP (X); receive ACORN WREATH.
- Go (Y).
- Talk (A); take FLOWER BROOCH (A1).
- Take SOLDIER FIGURINE and GARDEN LANTERN (B).
- Look at note (C).
- Talk (A).
- Walk down.
- Talk (D); take DRAGONSLAYER ESCUTCHEON (E).
- Place GARDEN LANTERN (F).
- Go (G).

- Take LADDER, MINI BREASTPLATE, and FLOWER MEDAL (H).
- Select twice (I).
- Walk down.
- Place FLOWER BROOCH and CLOVER BROOCH; take BLACK CANDLE and look at note (J).
- Walk down.
- Use SPADE; take WHITE CANDLE and PAINTING KNIFE (K).
- Go to Salon.
- Place BLACK CANDLE and WHITE CANDLE (orange); take DRAGONSLAYER KEY (L).
- Use PAINTING KNIFE; take QUEEN'S RING (M).
- Go to Waterway.
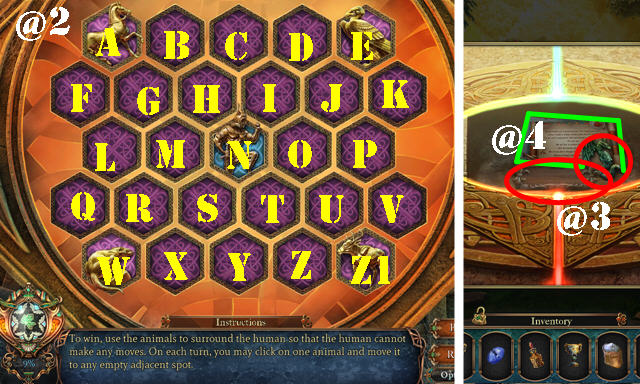
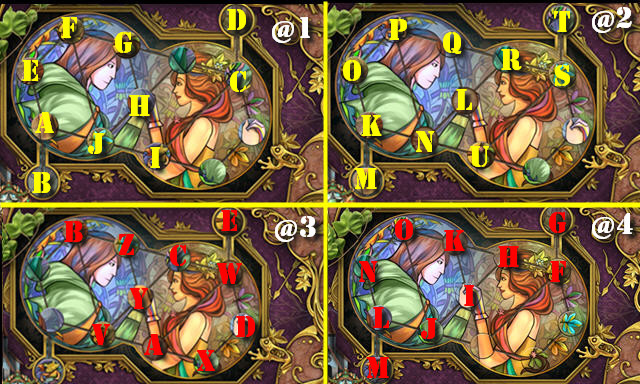
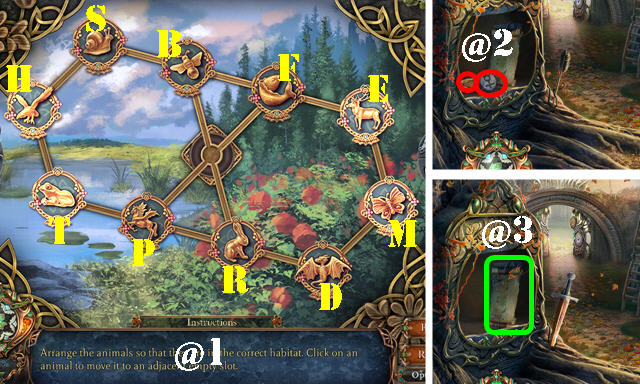
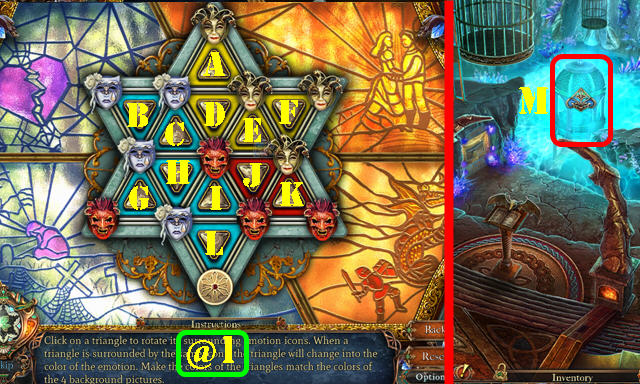
- Place KING'S RING and QUEEN'S RING (N); select puzzle (O).
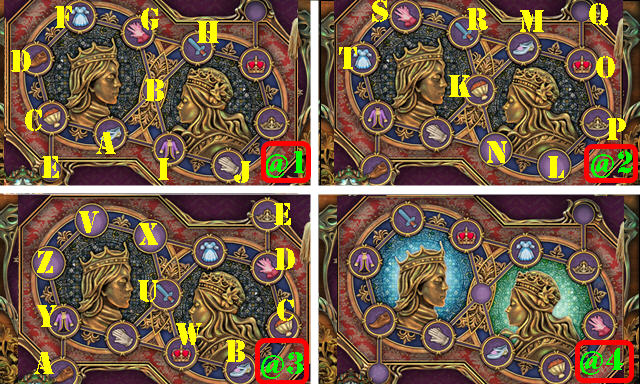
- Solution @1: (A-B)-(C-A)-(D-E)-(F-D)-(G-F)-(H-G)-(B-H)-(A-B)-(I-C)-(J-A).
- Solution @2: (K-L)-(M-N)-(O-K)-(P-Q)-(L-P)-(N-L)-(K-N)-(R-K)-(S-O)-(T-M).
- Solution @3: (U-V)-(W-X)-(Y-Z)-(A-Y)-(B-W)-(C-B)-(D-C)-(E-D).
- Solved image (@4).
- Take DRAGON HEART RELIEF and GREY WOLF DECORATION.
- Walk down twice.
- Place DRAGON HEAD RELIEF, DRAGON CLAW RELIEF, DRAGON TAIL RELIEF, DRAGON WING RELIEF, and DRAGON HEART RELIEF (A).
- Go (B).
- Talk (C).
- Select skeleton; look at note (D); take GRAPPLING HOOK (E).
- Take SMALL HELMET and STONE HORSE (F).
- Look at note (G).
- Place DRAGON ESCUTCHEON (H) and use DRAGONSLAYER KEY (I). Play HOP; receive STAG CARVING.
- Walk down.
- Use GRAPPLING HOOK (J); take MINI LANCE and FAWN CARVING (K).
- Go to Salon.
- Place DOE CARVING, STAG CARVING, and FAWN CARVING; take DRAGON FIGURINE and BLACKTHORN CANE (L).
- Look at note (M).
- Go to Waterway.
- MINI SHIELD, MINI BREASTPLATE, MINI HELMET, and MINI LANCE on SOLDIER FIGURINE; take DRAGONSLAYER FIGURINE.
- Place DRAGON FIGURINE and DRAGONSLAYER FIGURINE (N); take OAK STAFF (O).
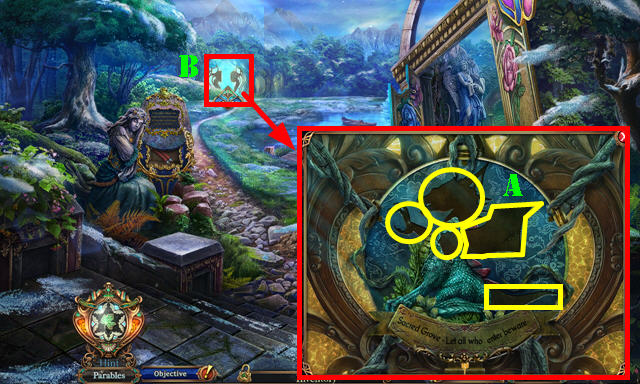
- Go to Sacred Grove.
- Place OAK STAFF and ACORN WREATH (P).
- Go (Q).
Chapter 3
- Take TOPAZ CAT'S EYE and BLACKBERRIES BRACELET (R).
- Place LADDER (S).
- Play HOP (T); receive FULL MOON CREST.
- Look at note (U).
- Walk down.
- Place FULL MOON CREST; take ELIXIR OF AWAKENING and look at note (V).
- Place BLACKTHORN CANE and BLACKBERRIES BRACELET (W).
- Go (X).
- Take NEW MOON CREST and FRUIT MEDAL (Y).
- Walk down.
- Place NEW MOON CREST; take LEAF MEDAL and DRAGON COGWHEEL (A).
- Go (B).
- Place FLOWER MEDAL, LEAF MEDAL, and FRUIT MEDAL (C).
- Go (D).
- Select 3x; take RED WOLF DECORATION (E).
- Take HANDSAW and WIND CHALICE (F).
- Place DRAGON COGWHEEL (G).
- Select puzzle (H).
- Solution (@1): (A-B)-(B-C)-(C-D)-(D-E)-(E-F)-(F-A)-(G-H)-(H-I)-(I-J)-(J-G)-(G-I).
- Take STONE OTTER and look at note (K).
- Walk down.
- Place GREY WOLF DECORATION and RED WOLF DECORATION; take SALT and CELESTIAL WING CHARM (L).
- Look at note (M).
- Walk down.
- Use HANDSAW (N); receive STONE ELK.
- Go (O).

- Place STONE OTTER, STONE HORSE, and STONE ELK (blue).
- Select puzzle (P).
- Solution (@2): (E-J-I)-(A-G-H-N)-(Z1-U-T)-(W-X-Y)-(I-H)-(T-S).
- (N-M)-(Y-X)-(H-G)-(S-R)-(X-S)-(M-H)-(S-M)-(H-B)-(R-L)-(L-F).
- Take INFERNAL WING CHARM and FLEUR PLAQUE (@3). Look at note (@4).
- Go to Salon.
- Place FLEUR PLAQUE (A); take HAMMER and QUEEN BUST (B).
- Go to Dragon Fort.
- Place CELESTIAL WING CHARM and INFERNAL WING CHARM (C).
- Use ELIXIR OF AWAKENING (D); receive CROWN EMBLEM.
- Select scene.
- Walk down.
- Play HOP (E); receive EAGLE PLATE.
- Go to Courtyard.
- Select (F).
- Place CROWN EMBLEM (G).
- Enter (H).
- Take ROCK FISH VASE, BLACK KING, ANGEL'S TRUMPET, and CHISEL (I).
- Place QUEEN BUST (J). Play HOP; receive OLD MOON CREST.
- Go to Sacred Grove.
- Place OLD MOON CREST; take ELIXIR OF SLEEP and AMBER CAT'S EYE (K).
- Go (L).
- Use CHISEL and HAMMER; take KING PLATE and CELTIC KNOT KEY (M). Look at note (M1).
- Go to Lakefront.
- Place TOPAZ CAT'S EYE and AMBER CAT'S EYE (N); lift cage; take WOOD FISH VASE and ROUGH CLOTH (O).
- Go to Solwood.
- Place ROCK FISH VASE and WOOD FISH VASE (orange).
- Take JEWELLED DIRK and BLACK BISHOP (P). Look at note (Q).
- Go to Dragon Fort.
- Talk (R).
- Use CELTIC KNOT KEY (S).
- Select dragon; use ELIXIR OF SLEEP (T).
- Take SOLDIER'S LOCKET and WHITE KNIGHT (U).
- Use JEWELLED DIRK; take IVY ORNAMENT and WHITE QUEEN (V). Look at note (W).
- Walk down 3x.
- Select (X).
- Go (Y).
- Use SOLDIER'S LOCKET (Z). Take RUSTED LANCE (Z1).
- Go to Salon.
- Place BLACK KING, WHITE QUEEN, WHITE KNIGHT, and BLACK BISHOP (A).
- Select puzzle (B).
- Solution (C).
- Take FIRE CHALICE and PRINCESS PLATE (D).
- Look at note (E).
- Walk down.
- SALT and ROUGH CLOTH on RUSTED LANCE; take DRAGONLANCE.
- Use DRAGONLANCE (F).
- Take SUN TRINKET (G).
- Go (H).
- Talk (@1).
- Place EAGLE PLATE, PRINCESS PLATE, and KING PLATE (I).
- Talk (J).
Chapter 4
- Talk (K and L).
- Select either butterfly (M or N).
- Talk (L).
- Take TACK PULLER and EARTH CHALICE (O).
- Play HOP (P); receive FAIRY KEY.
- Walk down.
- Use TACK PULLER; take FROG ORNAMENT and ANGEL'S HARP (Q).
- Look at note (R).
- Go to Waterway.
- Place ANGELS' TRUMPET and ANGEL'S HARP (S).
- Go (T).
- Take WOLF MOSAIC RELIEF, SERAFINA MINIATURE PORTRAIT, and BOOK OF DEATH (U).
- Place IVY ORNAMENT and FROG ORNAMENT (V).
- Select puzzle (W).
- (@1): (A-B)-(C-D)-(E-A)-(F-E)-(G-F)-(H-G)-(I-H)-(J-C)-(F-I)-(H-F).
- (@2): (K-L)-(M-N)-(O-K)-(P-O)-(Q-P)-(R-Q)-(L-R)-(N-L)-(K-N)-(O-M)-(P-K)-(Q-O)-(R-P)-(S-Q)-(T-R)-(U-T).
- (@3): (V-W)-(X-V)-(Y-X)-(Z-A)-(B-Y)-(C-B)-(Y-Z)-(W-Y)-(D-C)-(A-D)-(Y-W)-(C-Y)-(W-C)-(E-A)-(C-E)-(D-C)-(A-D)-(X-A)-(D-X)-(C-D)-(E-W)-(Z-C).
- (@4): (F-G)-(H-F)-(I-H)-(J-K)-(L-I)-(M-J)-(N-M)-(O-N)-(J-O)-(N-L)-(O-N)-(I-O)-(K-J)-(O-I)-(N-K)-(L-O)-(M-N)-(J-M)-(N-J)-(M-L)-(O-N)-(K-O)-(I-K)-(H-I)-(F-H)-(G-F).
- Take AQUA KEY CRYSTAL and look at note (X).
- Walk down.
- Use FAIRY KEY; take ROYAL SEAL (A).
- Place WATER CHALICE, WIND CHALICE, FIRE CHALICE, and EARTH CHALICE (B).
- Enter (C).
- Look at note (D).
- Take MERCY MINIATURE PORTRAIT, PLIERS, and IGNIS KEY CRYSTAL (E).
- Walk down.
- Place AQUA KEY CRYSTAL and IGNIS KEY CRYSTAL; take CANCER ORB and BLUE SKELETON CAMEO (F).
- Look at note (G).
- Go to Throne Room.
- Use ROYAL SEAL (H); take FISH TOKEN and PISCES ORB (I). Look at note (J).
- Place SERAFINA MINIATURE PORTRAIT and MERCY MINIATURE PORTRAIT; take BOOK OF IMMORTALITY and GOLD NUGGET (K).
- Look at note (L).
- Go to Secret Room.
- Place BOOK OF DEATH and BOOK OF IMMORTALITY (M).
- Take RED SKELETON CAMEO and BOLAS (N).
- Look at note (O).
- Go to Chapel.
- Place BLUE SKELETON CAMEO and RED SKELETON CAMEO. Select (P).
- Use BOLAS and then PLIERS (Q); receive WATER ESSENCE GEM.
- Take SCORPIO ORB and SHIELD WITH KINGDOM SEAL (R).
- Return to Secret Room.
- Place CANCER ORB, SCORPIO ORB, and PISCES ORB. Select puzzle (S).
- Solution: A-D-K-I-H-I-H-G-I-H-L-I-J-L-J-I.
- K-J-F-K-Jx2-D-E-C-D-B-C-I-A-B-A-B-F-A-F-A.
- Take GREEN LION TRINKET.
- Place GREEN LION TRINKET and SUN TRINKET (M).
- Go (N).
- Look at note (O).
- Go (P).
- Look at note (Q).
- Play HOP (R); receive OAK TREE EMBLEM.
- Walk down and go to Plaza (S).
- Play HOP (T); receive SWORD WITH KINGDOM SEAL.
- Look at note (U).
- Go (V).
- Place OAK TREE EMBLEM and go (W).
- Look at note (X).
- Take STONE CAMEO, SPEAR, WOODEN SPOON, and V SHAPED BRANCH x3 (Y).
- Walk down.
- Place SWORD WITH KINGDOM SEAL and SHIELD WITH KINGDOM SEAL (Z).
- Go (Z1).
- Take TOAD ETCHING and RUBBER BAND (A).
- Look at note (B).
- Place SPEAR (C).
- Play HOP (D); receive ELK HEAD SCULPTURE.
- Go to Plaza.
- Place ELK HEAD SCULPTURE (E); take PERIAPT OF THUNDER and FROG MURAL FRAGMENT (F).
- Go (G).
- Select (H).
- Place FISH TOKEN (I); take BEAR MOSAIC RELIEF and DRAGON EYE (J).
- Go to Recreation Area.
- Place WOLF MOSAIC RELIEF, DRAGON MOSAIC RELIEF, and BEAR MOSAIC RELIEF (K).
- Take FROG ETCHING and DRAGON HORN (L).
- Look at note (M).
- Walk down.
- Place DRAGON EYE and DRAGON HORN (N).
- Select puzzle (O).
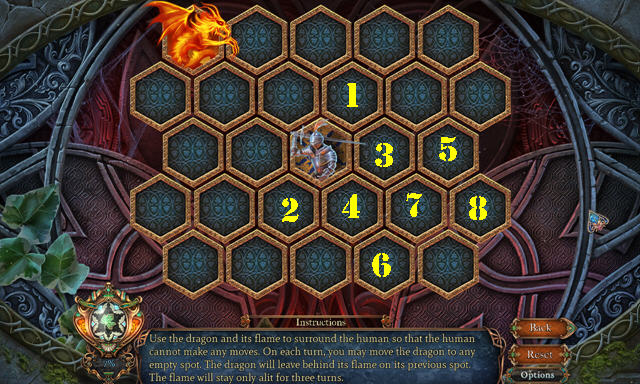
- Solution: 1-8.
- Take LEO ORB and FIRE BELLOWS.
- Go to Alchemist Library.
- Place TOAD ETCHING and FROG ETCHING; take ARIES ORB and MALLET (P).
- Look at note (Q).
- Go to Smelting Chamber.
- Place GOLD NUGGET (R).
- Use FIRE BELLOWS (S).
- Use HAMMER; take GOLD FROG FRAME (T).
- Walk down.
- Place GOLD FROG FRAME and FROG MURAL FRAGMENT; take PERIAPT OF FLIGHT and SAGITTARIUS ORB (U).
- Look at note (V).
- RUBBER BAND on V-SHAPED BRANCH and select. Place WATER ESSENCE GEM; take LOADED SLINGSHOT.
- Use LOADED SLINGSHOT (W).
- Go (X).
- Place LEO ORB, ARIES ORB, and SAGITTARIUS ORB (Y); take PERIAPT OF LIGHTNING (Y1).
- Go to Alchemist's Library.
- Talk (Z).
Chapter 5
- Place PERIAPT OF THUNDER, PERIAPT OF FLIGHT, and PERIAPT OF LIGHTNING (A).
- Go (B).
- Select scene.
- Take ASCLEPIUS ROD KEY (C).
- Talk (D).
- Go to Dragon Fort.
- Use ASCLEPIUS ROD KEY; take HEALING DRAUGHT and FROG KNOB (E).
- Look at note (F).
- Walk down.
- Place FROG KNOB; take FEMALE WOOD CARVING and WITHERING LIQUID (G).
- Go to Stone Sanctuary.
- Use HEALING DRAUGHT (H); take VIAL OF DRAGON BLOOD (I).
- Talk (H).
- Use WITHERING LIQUID (J).
- Go (K).
- Take MALE WOOD CARVING, CROIX KEY, and EMBOSSED LAND ART (L).
- Look at note (M).
- Go to Solwood.
- Use CROIX KEY; take PEPPERMINT EXTRACT and ROPE LADDER (N).
- Go (O).

- Place FEMALE WOOD CARVING and MALE WOOD CARVING; take PICKAXE and OBSIDIAN LOTUS (P).
- Look at note and picture (Q).
- Go to Shrine.
- Use OBSIDIAN LOTUS (R).
- Select puzzle (S).
- Solution (T).
- Take SNOWFLAKE GEM and BRONZE KEY (U).
- Look at note (V).
- Go to Sacred Grove.
- Play HOP (W); receive IVY STONE RING.
- Place SNOWFLAKE GEM; take SNOW FAIRY DUST and POTION OF HATE (X).
- Go (Y).
- Place STONE CAMEO and IVY STONE RING (A); take MOONDROPS and EMBOSSED SKY ART (B).
- Go to Solwood.
- Place EMBOSSED LAND ART and EMBOSSED SKY ART; select puzzle (C).
- (B-Bee)-(S-Snail)-(H-Hawk)-(T-Toad)-(F-Fish)-(D-Dragon)-(R-Rabbit)-(P-Pegasus)-(E-Elk)-(M-Moth).
- Solution (@1): B-S-H-T-P-B-F-E-M-D-R-B-F-S-E-M-D-R-B-S.
- M-D-R-B-S-M-E-D-E-M-S-B-R-E-D-H-T-P-F.
- M-H-T-P-F-M-S-B-R-E-D-H-T-P-F-M-S-B-R.
- E-D-H-P-T-P-H-D-E-R-B-S-M-F-T-H-D-E-R.
- B-S-M-F-T-H-D-E-R-B-S-M-F-T-H-D-P.
- Take MERCURY SYMBOL and FLINT (@2).
- Look at note (@3).
- Go to Shrine.
- Use FLINT (O).
- Add PEPPERMINT EXTRACT, MOONDROPS, SNOW FAIRY DUST; use WOODEN SPOON. Add VIAL OF DRAGON BLOOD; take FLAME EXTINGUISHING POTION (P).
- Go to Alchemist Library.
- Use FLAME EXTINGUISHING POTION on scene.
- Talk (Q).
- Take ENGRAVED LEAF TILE (R).
- Walk down.
- Talk (S).
- Play HOP (T); receive FIRE HERALDRY.
- Place ROPE LADDER and go (U).
- Use PICKAXE (V). Play HOP; receive NOVELTY CUP.
- Go (W).
- Talk 2x (X).
- Use BRONZE KEY; take POTION OF NIGHTMARES and SALT SYMBOL (Y).
- Talk (Z).
- Go to Smelting Chamber.
- Play HOP (A); receive WATER HERALDRY.
- Place FIRE HERALDRY; take SULFUR SYMBOL and NOVELTY COIN (B).
- Look at note (C).
- Go to Caverns.
- Place WATER HERALDRY; take POTION OF DESPAIR (D).
- Place MERCURY SYMBOL, SALT SYMBOL, and SULPHUR SYMBOL (E).
- Go (F).
- Take GUARDIAN SCULPTURE and MOONFLOWER JAR (G).
- Look at note (H) and card (I).
- Place POTION OF HATE, POTION OF DESPAIR, and POTION OF NIGHTMARES (J).
- Take ENGRAVED HAWK TILE and SOLAR SIGIL (K).
- Go to Outer Wall.
- Place ENGRAVED LEAF TILE and ENGRAVED HAWK TILE; take NOVELTY SWORD (L).
- Look at note (M).
- Go to Alchemist Library.
- Place MOONFLOWER JAR (N). Take NOVELTY WAND and HAPPY FACE MASK (O).
- Go to Arcane Laboratory.
- Place NOVELTY CUP, NOVELTY COIN, NOVELTY SWORD, and NOVELTY WAND (P).
- Take AXE and PESTLE (Q).
- Look at note (R).
- Go to Salt Mine.
- Use AXE (S).
Chapter 6
- Talk (T-U); receive SULFUR CORE GEM.
- Go to Crystal Cave (V).
- Play HOP (W); receive STELLAR SIGIL.
- Place GUARDIAN SCULPTURE (X); take ANGRY FACE MASK and SPHERICAL SHELL (Y).
- Look at note (Z).
- Go to Caverns.
- Play HOP (A); receive SAD FACE MASK.
- Go to Underground Lake.
- Play HOP (B); receive LUNAR SIGIL.
- Talk (C).
- Place ANGRY FACE MASK, SAD FACE MASK, and HAPPY FACE MASK (D).
- Select puzzle (E).
- Solution (@1): Kx2-J-Ix2-L-H-I-G-H-Bx2-G-K-Ex2-J-Ix2-Ax2-Fx2-I-E-D-F-G-E.
- Go (M).
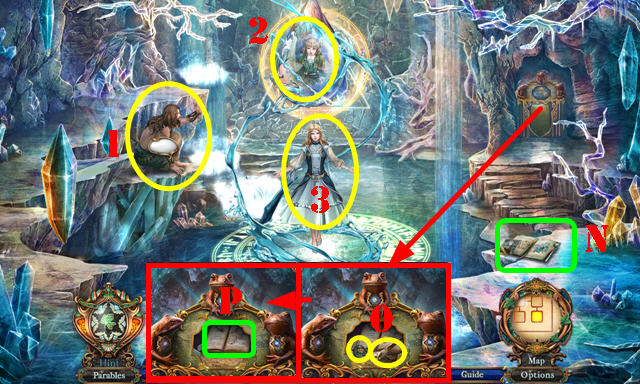
- Talk (1-2-3).
- Look at note (N).
- Place LUNAR SIGIL, SOLAR SIGIL, and STELLAR SIGIL; take WIRE CUTTER and FROG WITCH EMBLEM (O).
- Look at note (P).
- Walk down.
- Place FROG WITCH EMBLEM; take FIRE SEEDS (Q).
- Look at note (R).
- Walk down.
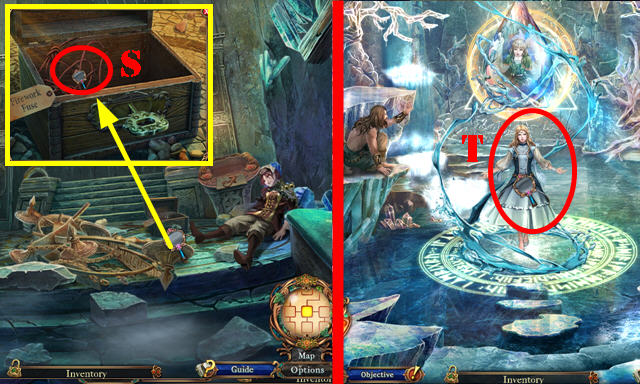
- Use WIRE CUTTER (S); receive FIREWORK FUSE.
- SULFUR CORE GEM, PESTLE, FIRE SEEDS, and FIREWORK FUSE in SPHERICAL SHELL; take MAGIC BOMB.
- Go to Abyss.
- Use MAGIC BOMB (T).
- Congratulations, you've completed Dark Parables: Return of the Salt Princess.
Parables
- Parables (A-D).
- Parables (E-G).
Created at: 2018-04-13