

Walkthrough Menu
- General Tips
- Chapter 1: The Tower
- Chapter 2: Royal Tomb
- Chapter 3: Palace
- Chapter 4: Strategy Room
- Chapter 5: Princess Althea's Room
- Chapter 6: Princess Theresa's Room
General Tips
- This is the official guide for Dark Parables: The Little Mermaid and the Purple Tide.
- This guide does not mention each time you have to zoom into a location; the screenshots show each zoom scene.
- Hidden-object puzzles are referred to as HOPs. This guide does not show screenshots of the HOPs, however, it is mentioned when a HOP is available and the inventory item collected.
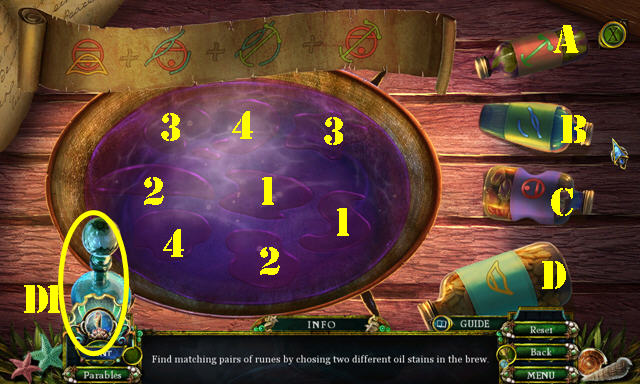
- This guide will give step-by-step solutions for all puzzles that are not random. Please read the instructions in the game for each puzzle.
- Use the map to travel quickly to a location.
Chapter 1: The Tower
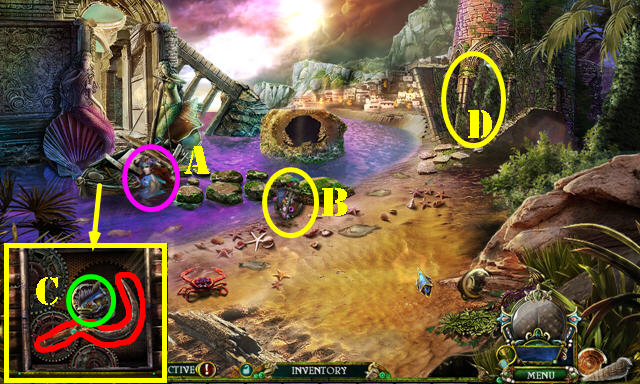
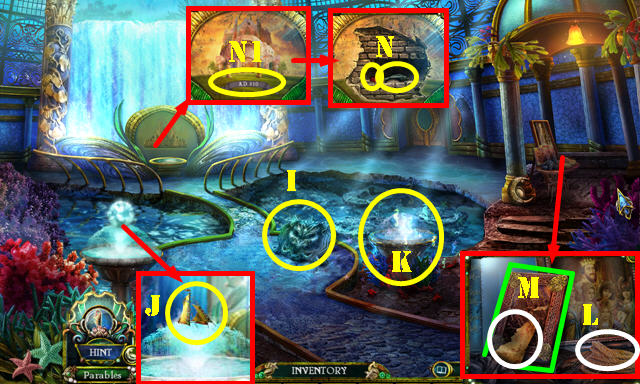
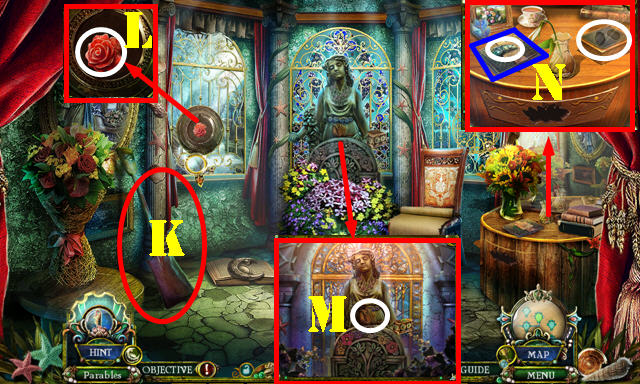
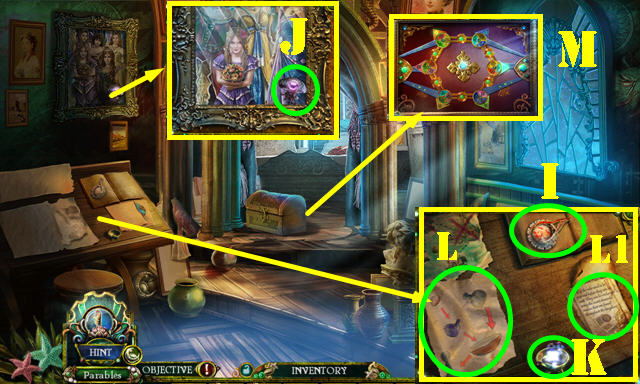
- Talk to the girl (A).
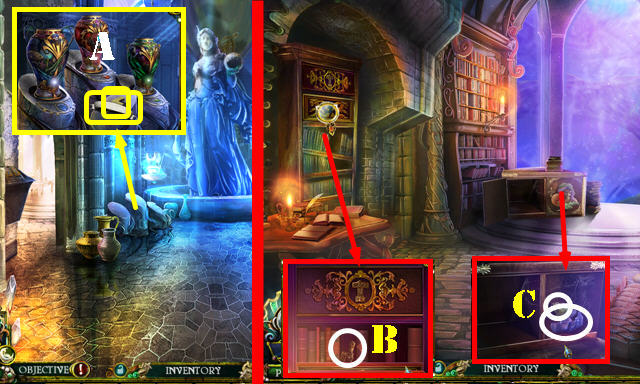
- Take the ANCHOR EMBLEM (B) and place it; take the EEL EMBLEM and SICKLE (C).
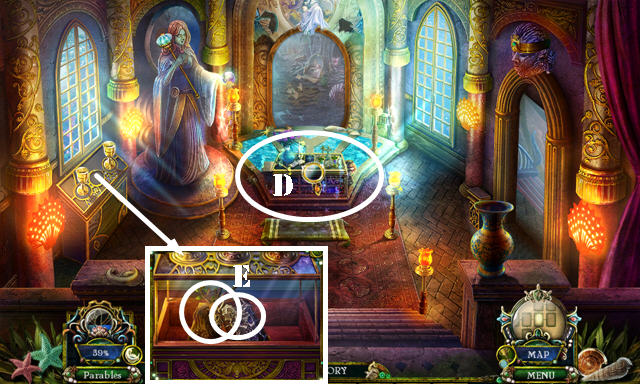
- Use the SICKLE (D); enter the Tower.
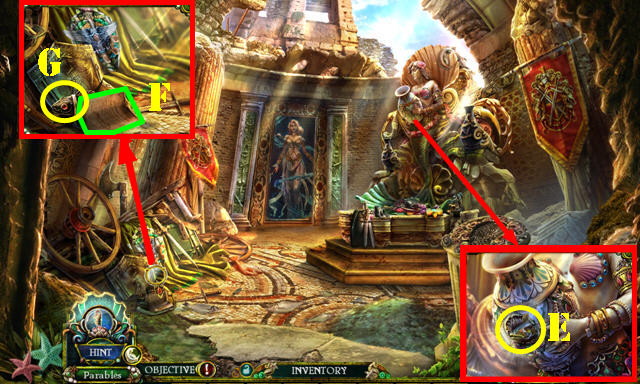
- Place the EEL EMBLEM for a HOP (E); play it to get the SAILBOAT GEAR.
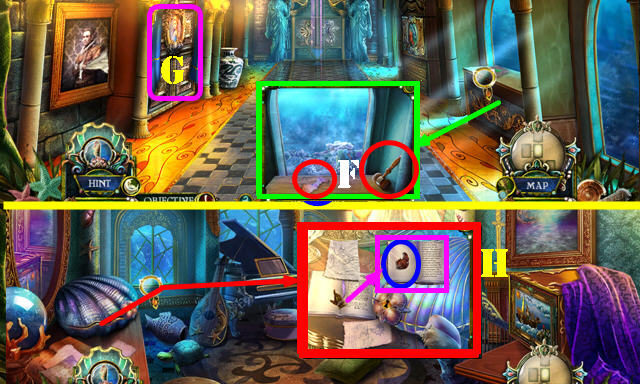
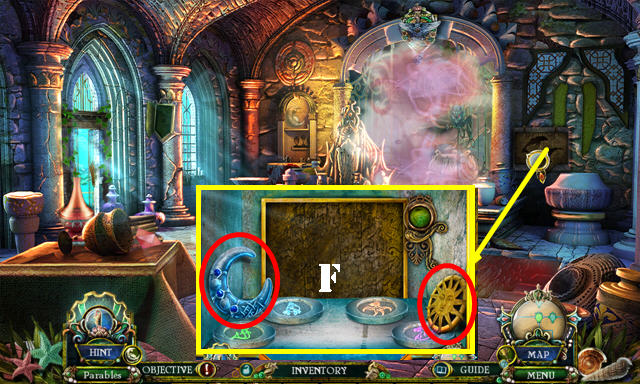
- Read the note and flip it (F); take the METAL FISH (G).
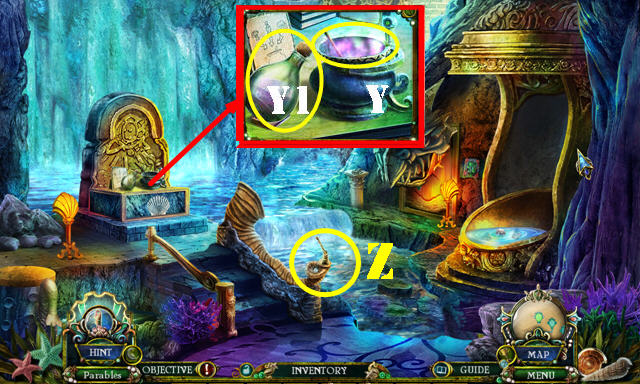
- Open the METAL FISH; take the SEA FISH (inventory).
- Walk down.
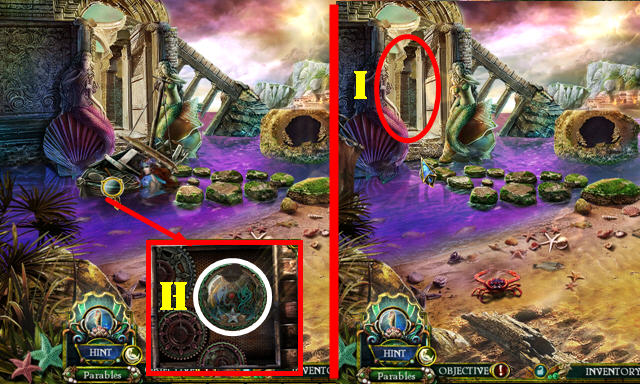
- Place the SAILBOAT GEAR (H).
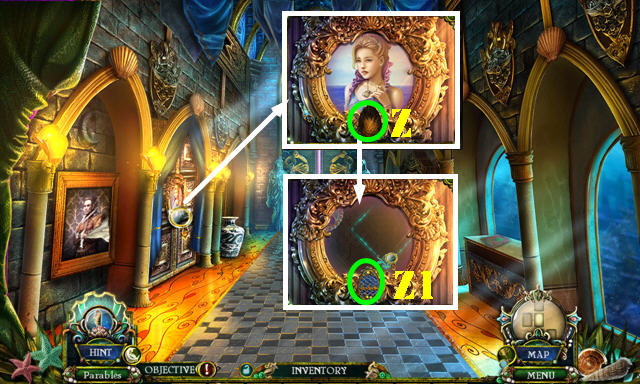
- Enter the Ruined Path (I).
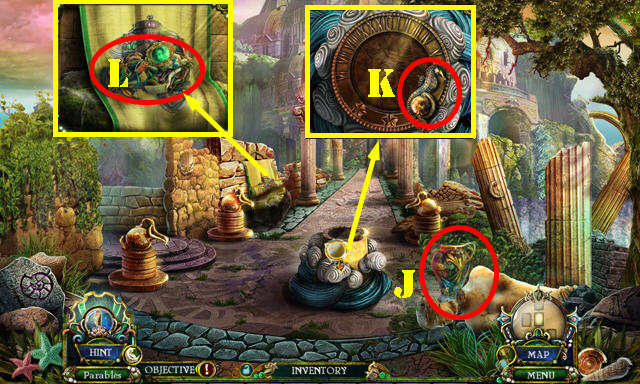
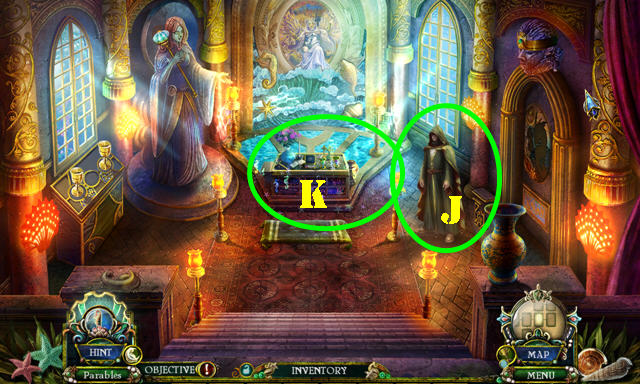
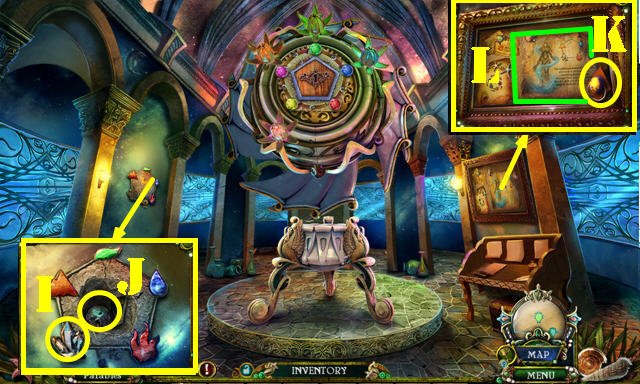
- Take the AQUATIC VASE (J).
- Take the SEA HORSE (K).
- Open the flag; take the EMERALD MERMAID (L).
- Go forward.
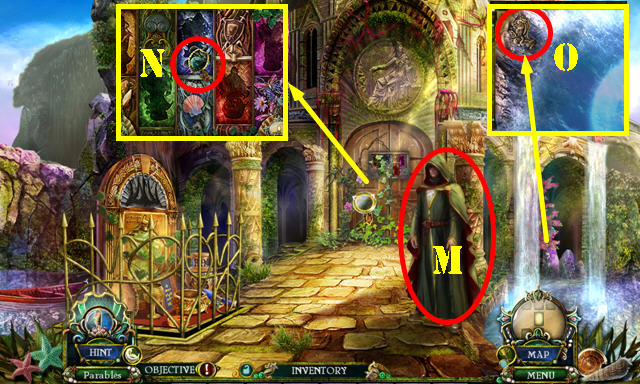
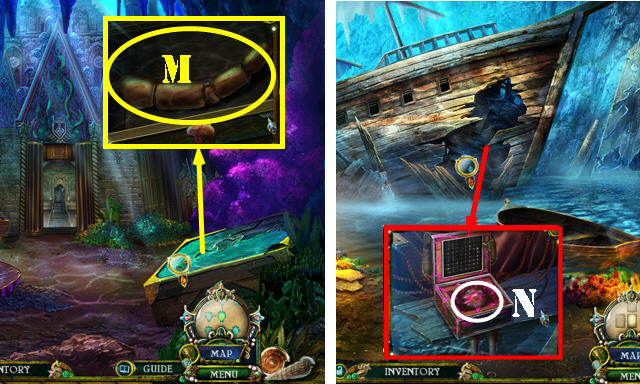
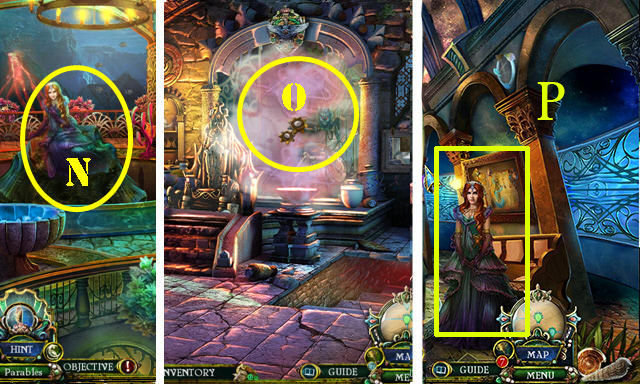
- Talk to the stranger (M).
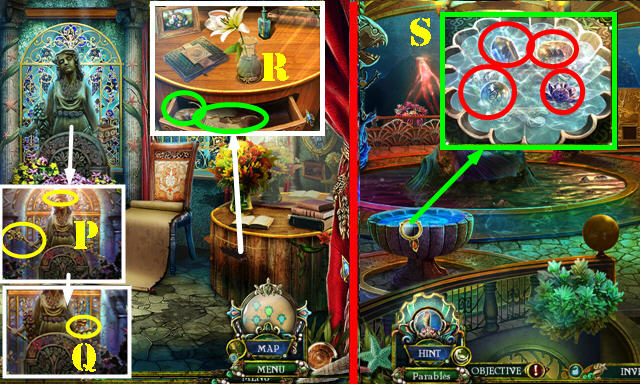
- Use the SICKLE; take the SEA TURTLE (N).
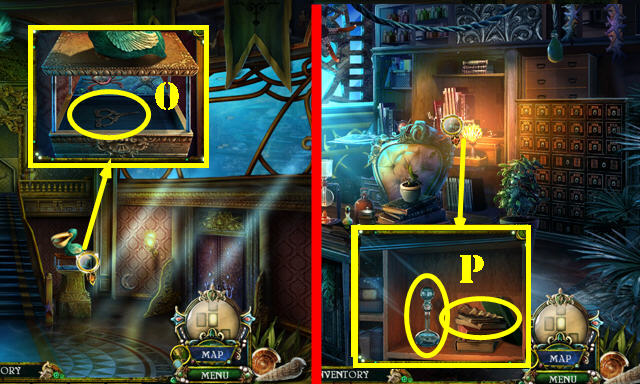
- Take the BLOWING WIND DISK (O).
- Walk down and go left to the Outdoor Garden.
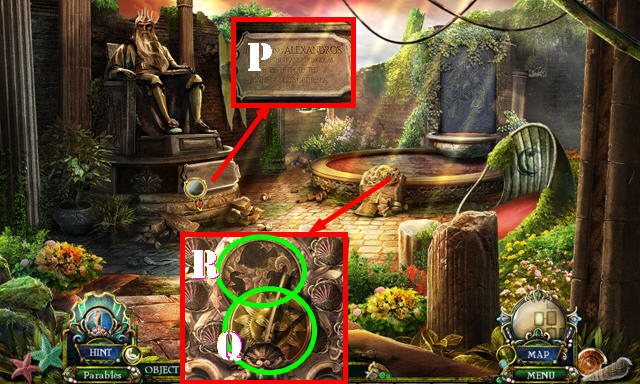
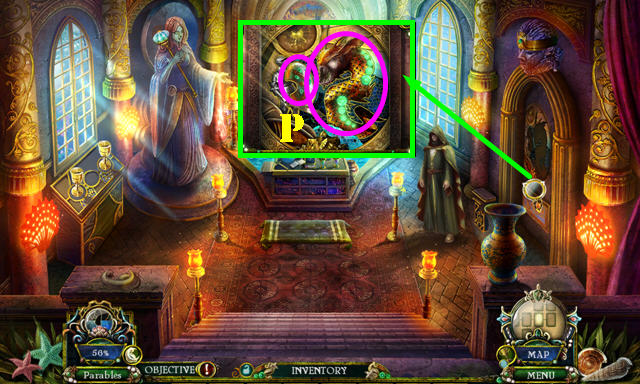
- Read the plaque (P).
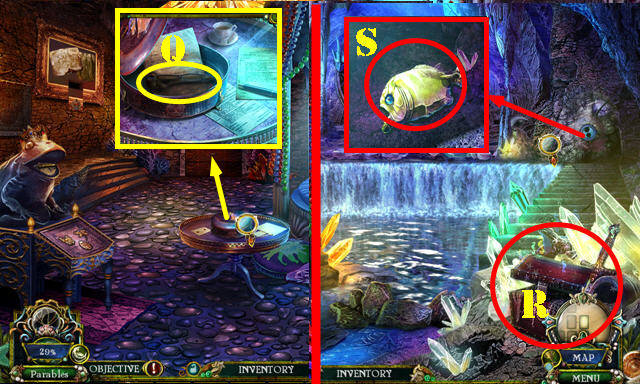
- Take the SUNDIAL (Q).
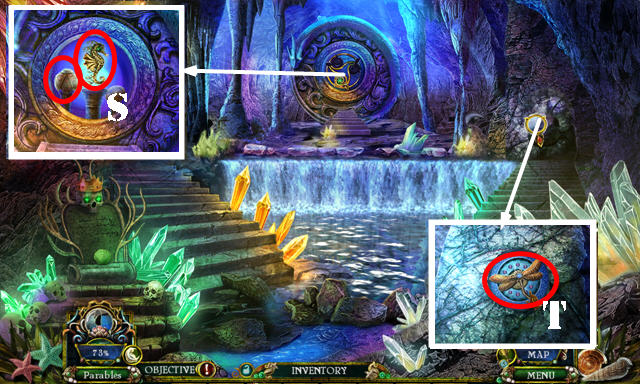
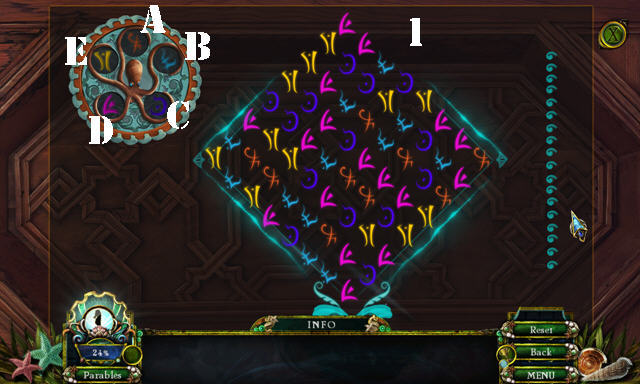
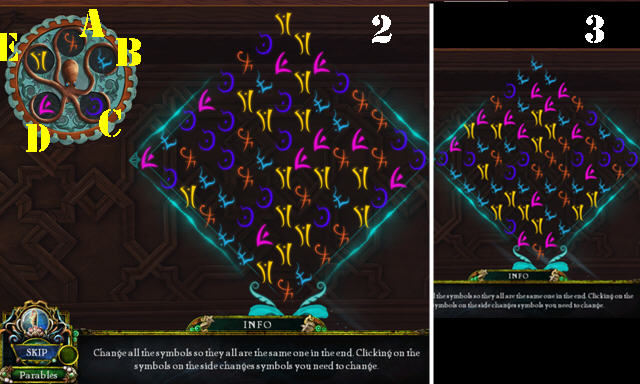
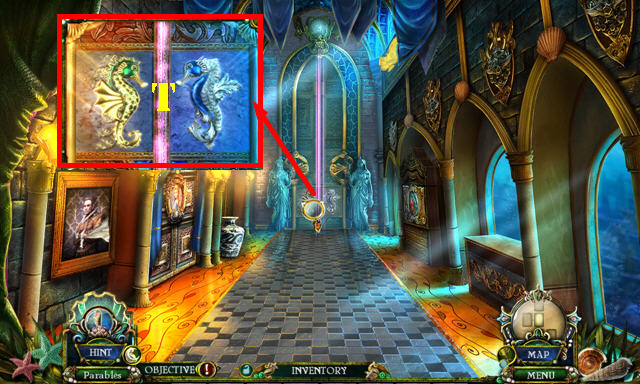
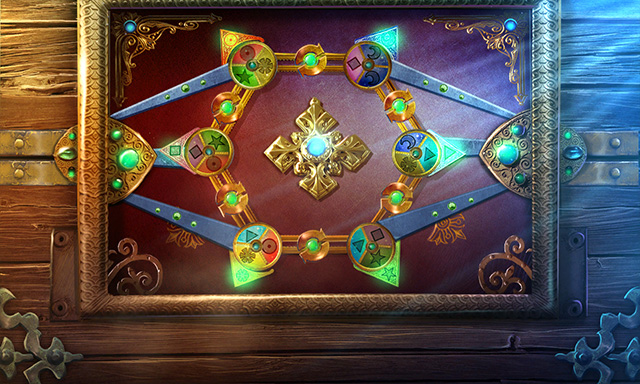
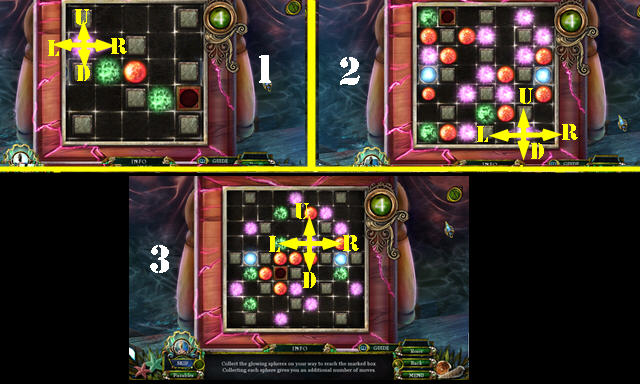
- Place the SEA TURTLE, SEA HORSE, and SEA FISH (R) for a puzzle.
- Solution (1-3). The disk placements are random, but the final image is always the same.
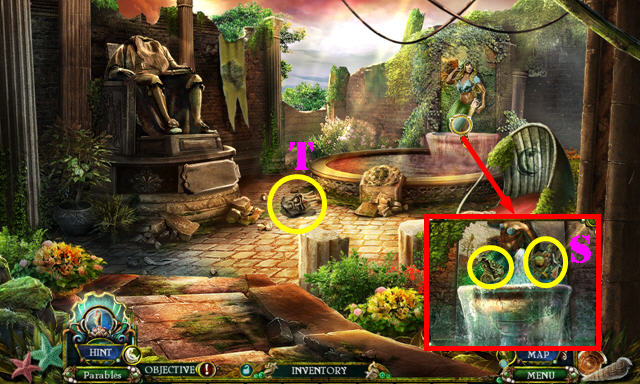
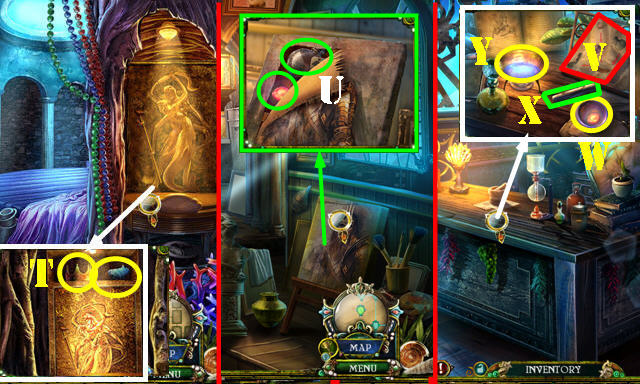
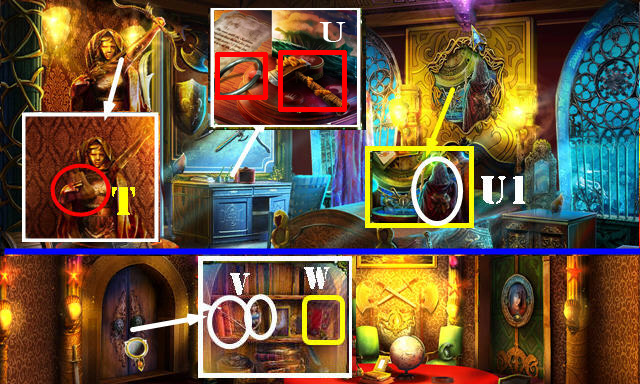
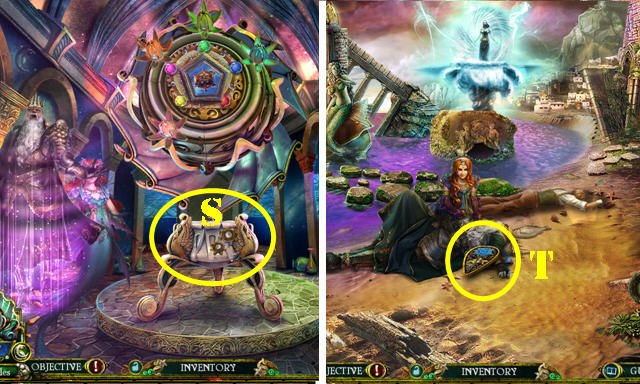
- Take the CRASHING WAVE DISK and TOPAZ MERMAID (S).
- Take the STONE KING'S HEAD (T).
- Take the IMPERIAL CROWN from the STONE KING'S HEAD (inventory).
- Walk down.
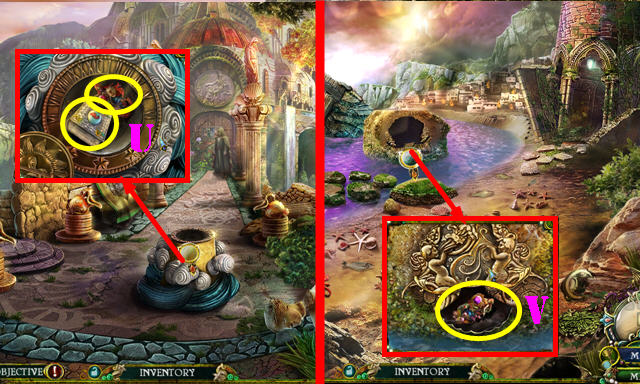
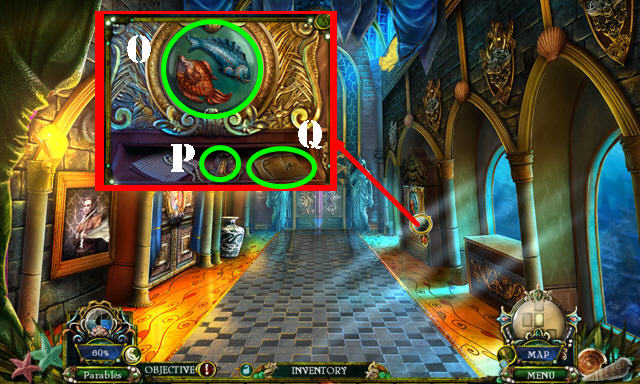
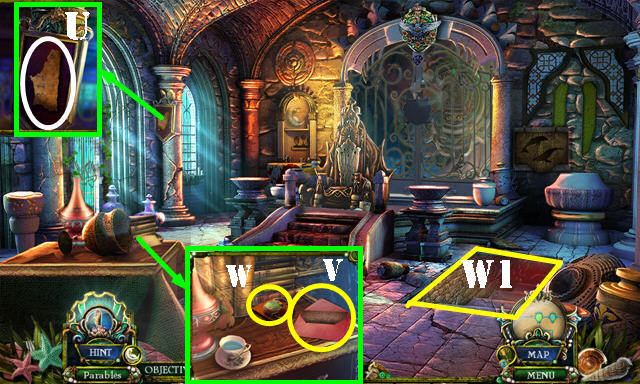
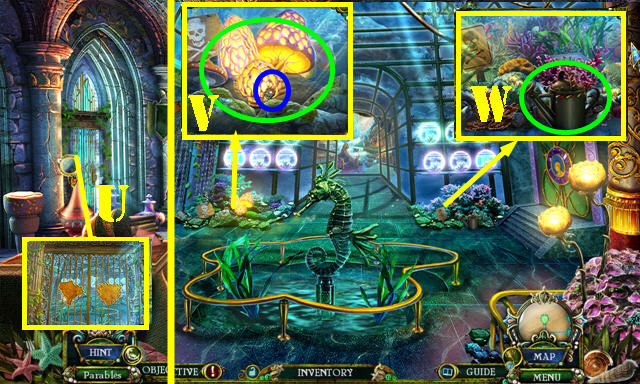
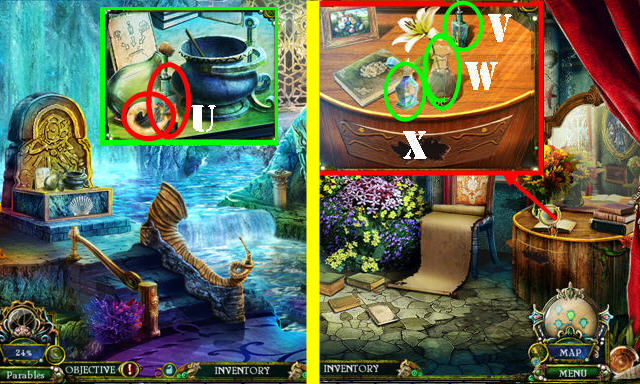
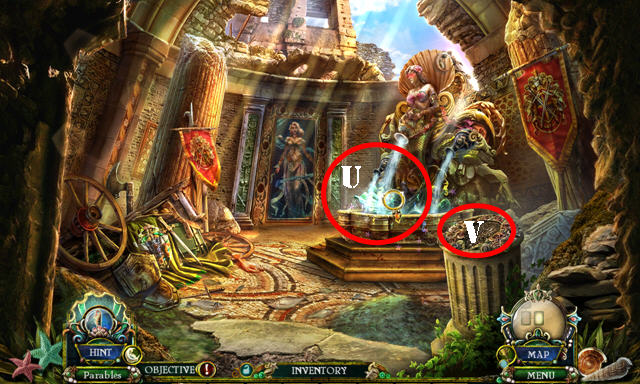
- Place the SUNDIAL and touch it; take the RUBY MERMAID and BOOK OF SEA CREATURES (U).
- Walk down.
- Place the BLOWING WIND DISK and CRASHING WAVE DISK; take the AMETHYST MERMAID and SHIELD INSIGNIA (V).
- Return to the Temple Entrance.
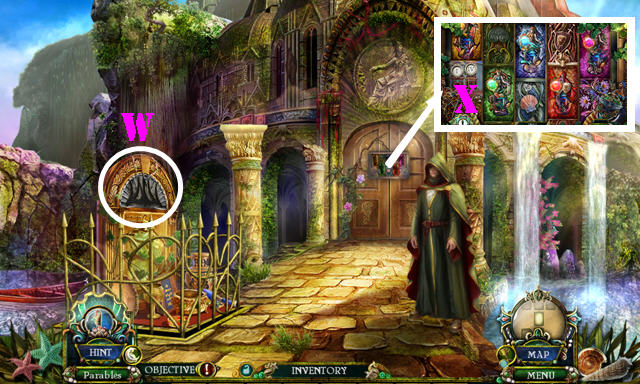
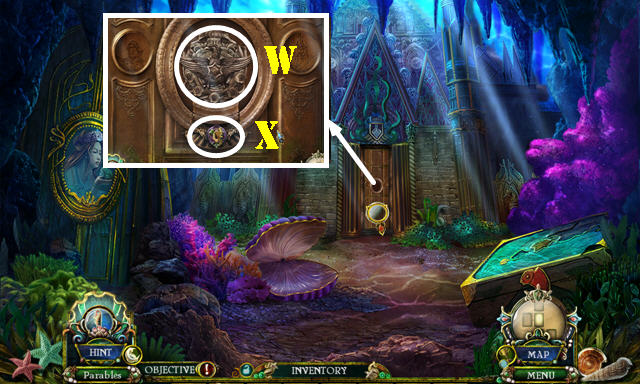
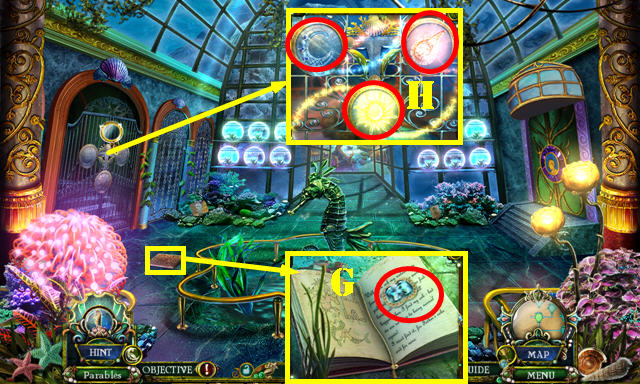
- Place the IMPERIAL CROWN (W) for a HOP; play it to get the SAPPHIRE MERMAID.
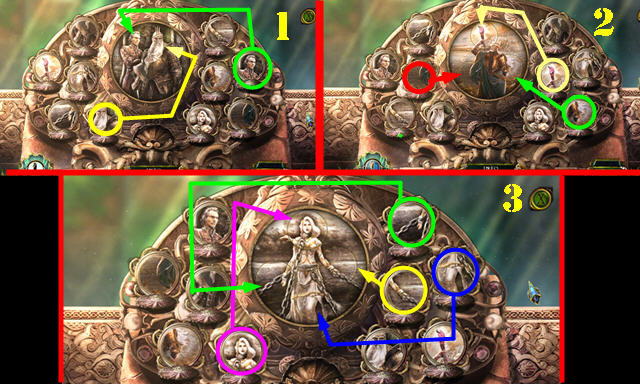
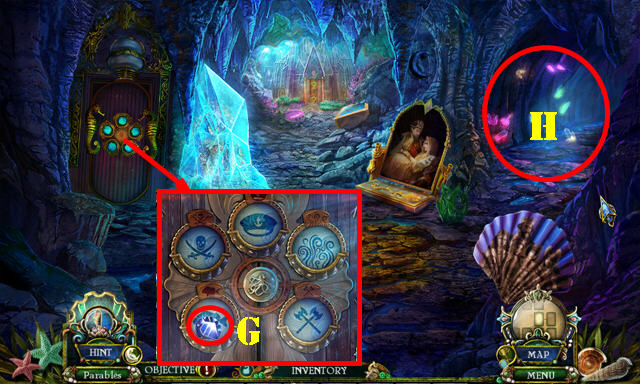
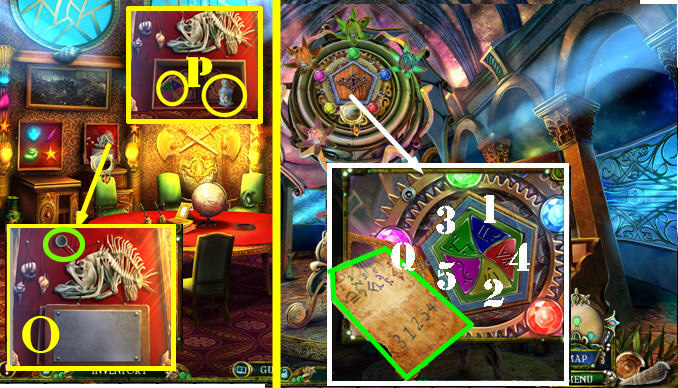
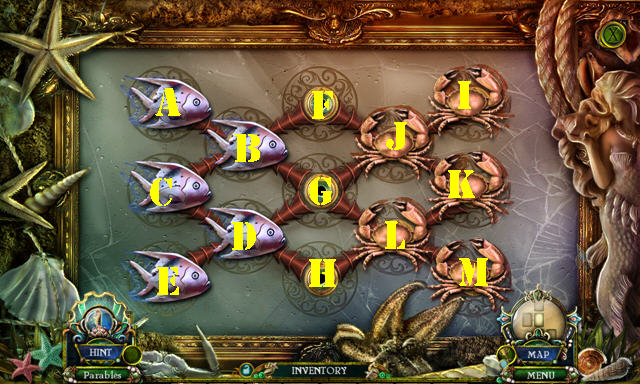
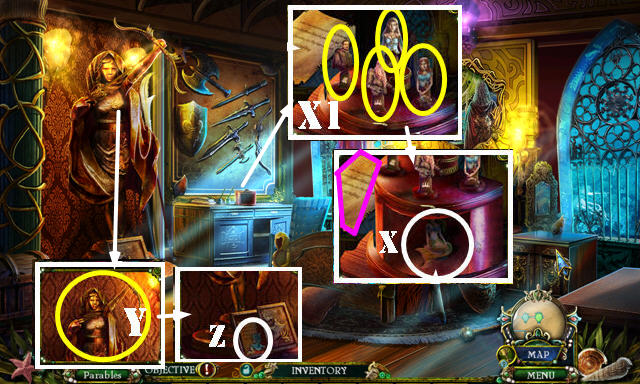
- Place the EMERALD MERMAID, TOPAZ MERMAID, SAPPHIRE MERMAID, RUBY MERMAID, and AMETHYST MERMAID for a puzzle (X).
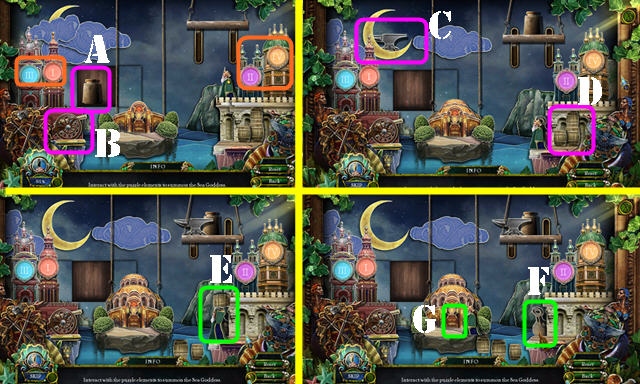
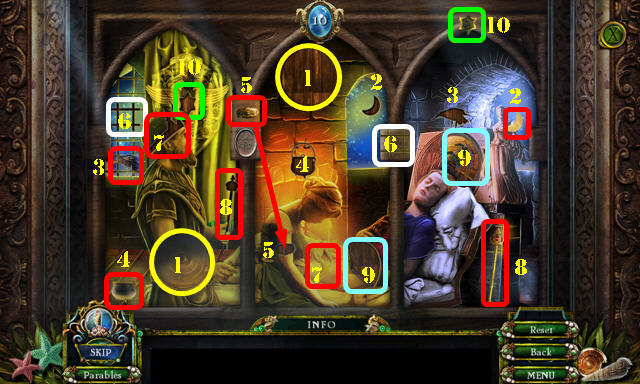
- Solution: Swap numerals and place them in order: III, I, II, IV (orange). Touch the weight (A).
- Hit the cannon 3x (B).
- Touch the 3 clouds and select the anvil (C).
- Select a barrel (D) and then the king (E) to throw it. Repeat 3x until the King goes across.
- Select the weight (F) and then the door (G).
- Enter Temple Hall.
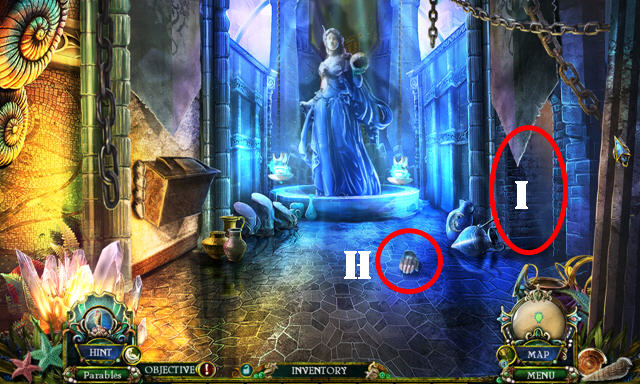
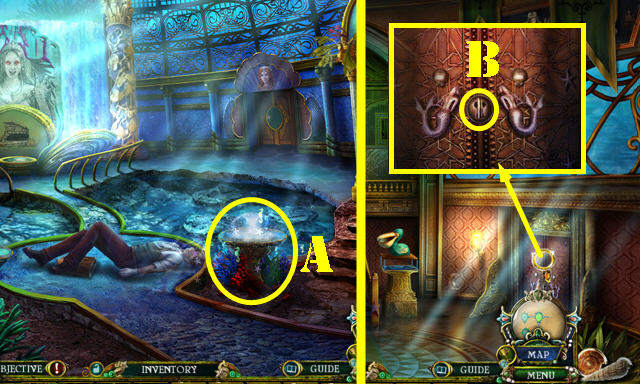
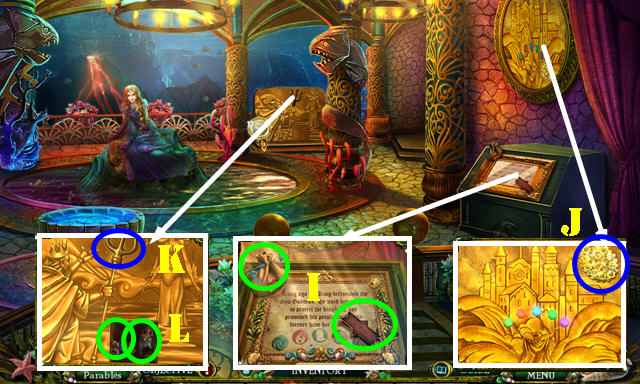
- Take the MARBLE RIGHT HAND (H).
- Go right (I).
- Talk to the man to get the BOOK OF SORCERY (J).
- Play the HOP (K) to get the FISH KEY.
- Walk down.
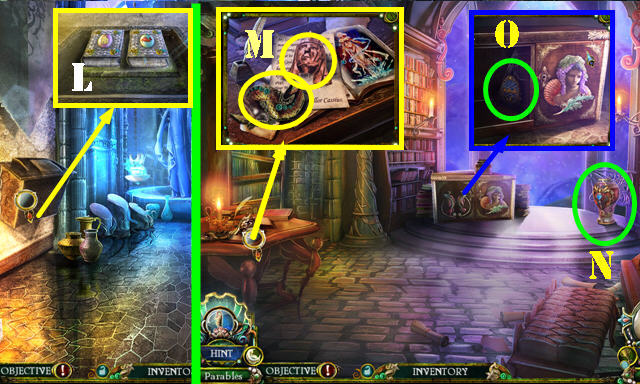
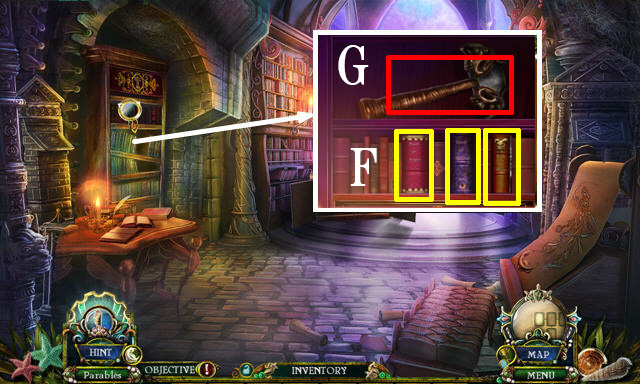
- Place the BOOK OF SEA CREATURES and BOOK OF SORCERY (L). Enter the Library.
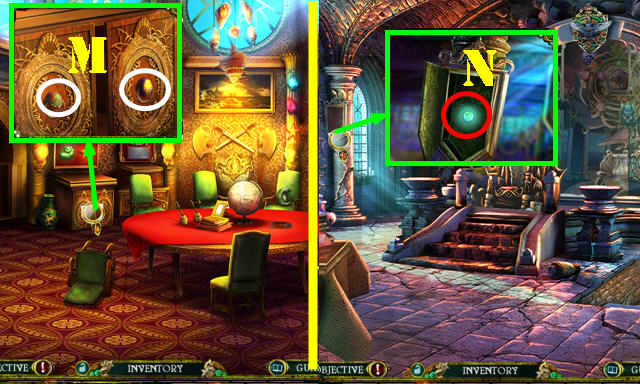
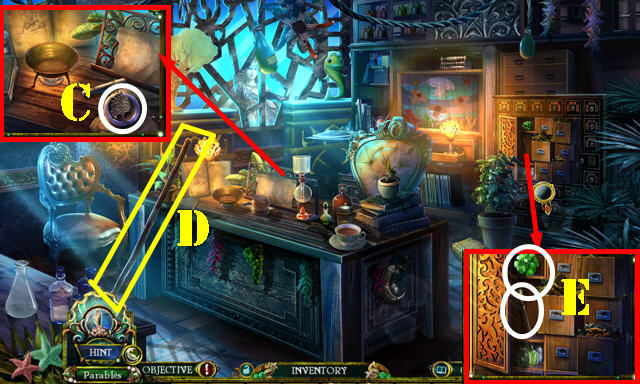
- Take the EEL INSIGNIA and MARBLE STATUE HEAD (M).
- Take the MOLTEN VASE (N).
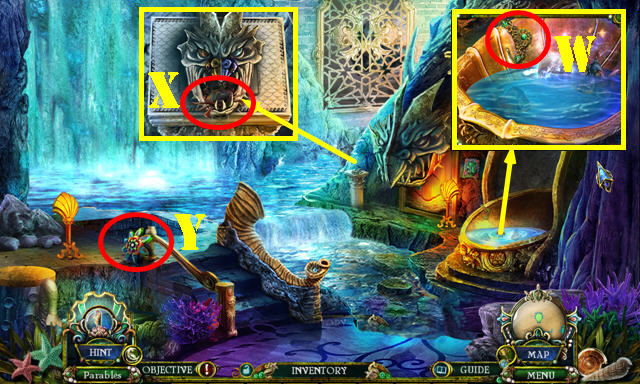
- Place the FISH KEY and turn it; take the WATER PENDANT (O).
- Return to the Room of Worship.
- Place the SHIELD INSIGNIA and the EEL INSIGNIA (P).
- Enter the Royal Tomb.
Chapter 2: Royal Tomb
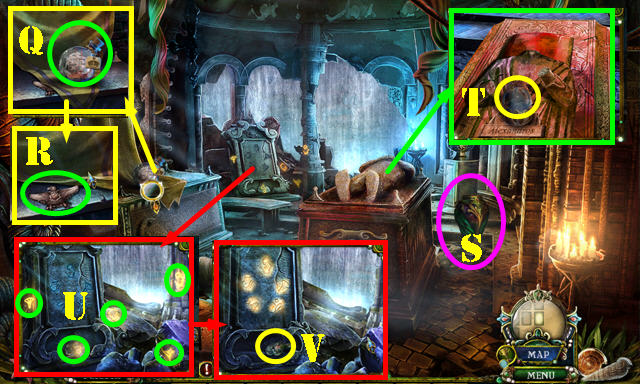
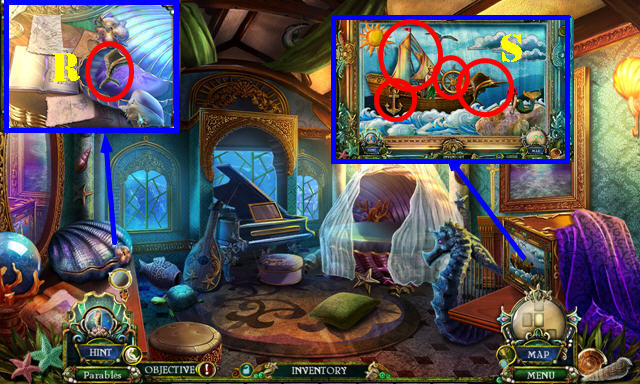
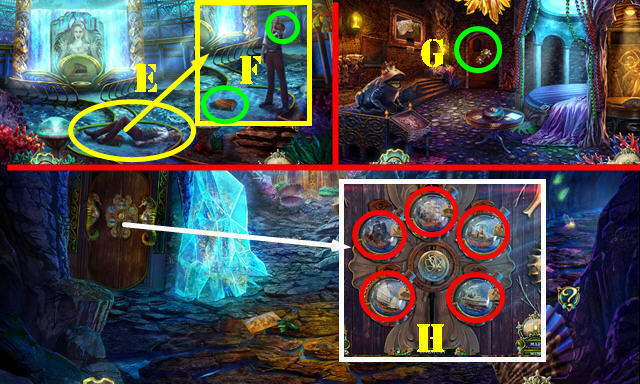
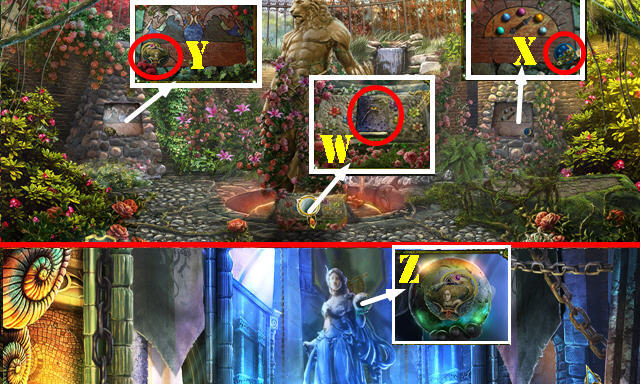
- Take the CAPTAIN SHIP BOTTLE (Q). Lift the cloth; take the PALACE EMBLEM PIECE (R).
- Take the TWIGGED VASE (S) and SEA SOUL GLOBE (T).
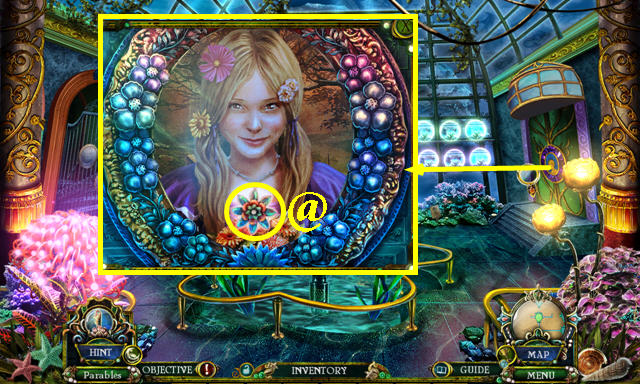
- Select the 5 symbols (U); take the KEY PART (V).
- Talk to the ghost.
- Walk down twice.
- Place the AQUATIC VASE, MOLTEN VASE and TWIGGED VASE. Take the MURAL BANNER and THUNDERBOLT EMBLEM (A).
- Go to the Library.
- Place the THUNDERBOLT EMBLEM; take the KEY PART (B).
- Place the 2 KEY PARTS together; take the MAIDEN KEY (inventory).
- Use the MAIDEN KEY and turn it; take the MARBLE LEFT HAND and FROG FIGURINE (C).
- Return to the Royal Tomb.
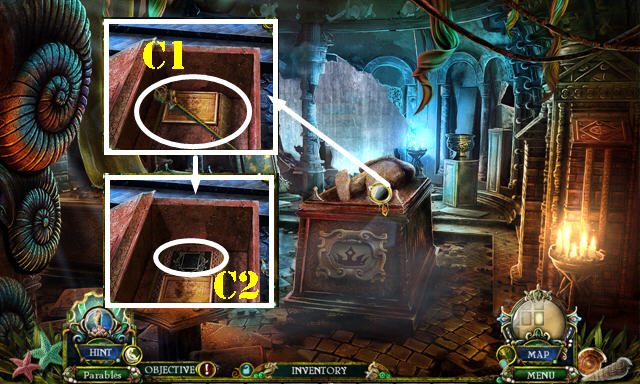
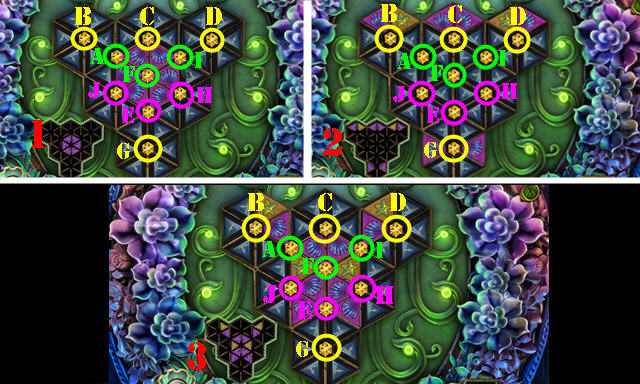
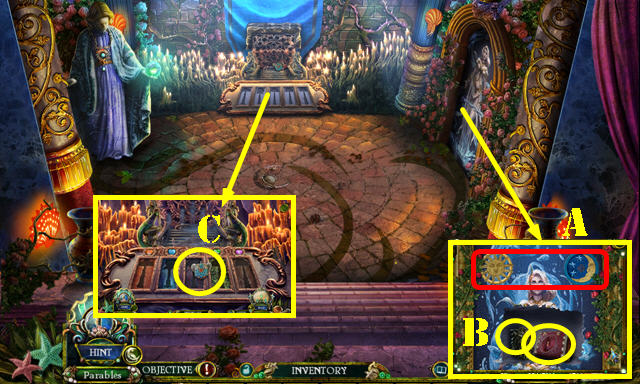
- Place the MARBLE STATUE HEAD, MARBLE RIGHT HAND, and MARBLE LEFT HAND. Take the KING'S SCEPTER (C1).
- Move the cover and select the puzzle (C2).
- Solution 1: Dx2-Rx2-U-Rx2-Dx3.
- Solution 2: (Ux3-R-D), (Lx3-Ux2).
- Solution 3: (R-U-Rx2-D-R-D-Rx2-Ux2), (L-R), (Ux2-Lx3-Ux2-Lx2).
- Take the CLOUDY ORB.
- Walk down.
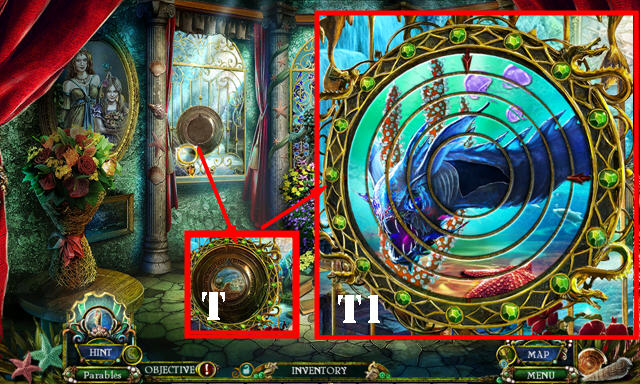
- Place the CLOUDY ORB (E).
- Go forward (F).
- Take the SHELL MIRROR (G).
- Go right (H).

- Take the CONCH MIRROR and CRYSTAL PENDANT (I).
- Play the HOP (J) to get the HEART-SHAPED GEM.
- Walk down and try to go forward (K).
- Look at the photo (K1).
- Go forward (K).
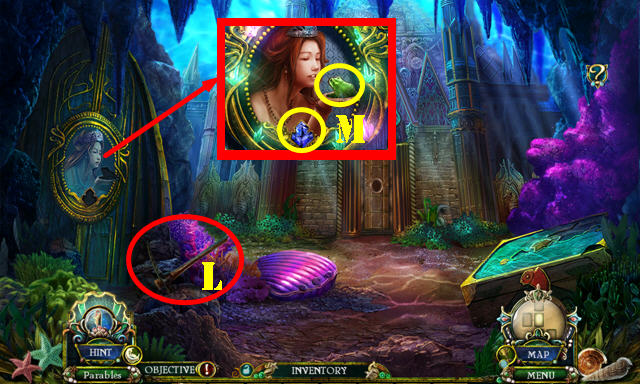
- Take the PICKAX (L).
- Place the FROG FIGURINE and CRYSTAL PENDANT (M).
- Enter Princess Naida's Room.
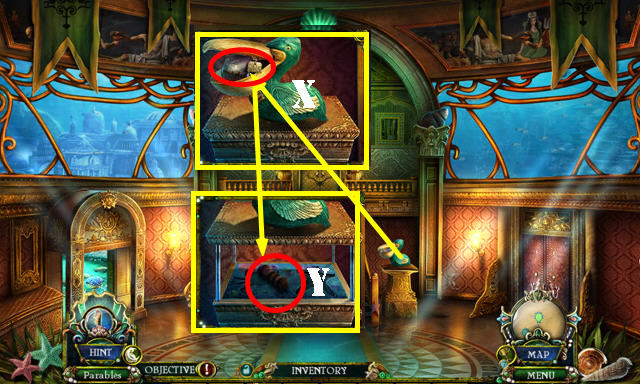
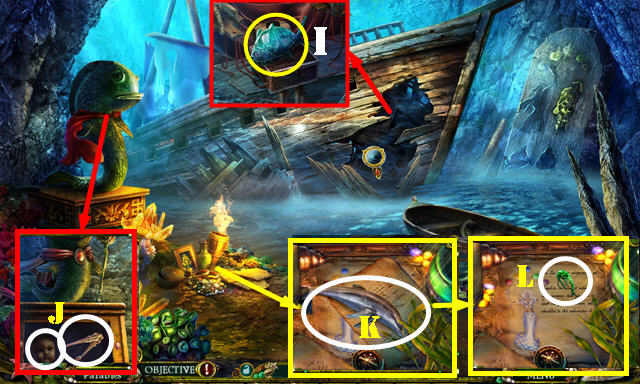
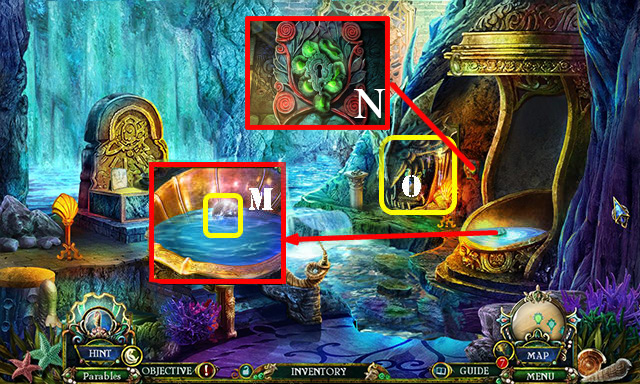
- Take the PIRATE SHIP BOTTLE and QUEEN'S SCEPTER (N).
- Place the HEART-SHAPED GEM; take the NAUTILUS MIRROR and SAPPHIRE STONE (O).
- Walk down.
- Place the CONCH MIRROR, SHELL MIRROR, and NAUTILUS MIRROR. Take the BUTTERFLY TOKEN and RUBY STONE (P).
- Return to the Underground Tunnel.
- Place the KING'S SCEPTER and QUEEN'S SCEPTER (Q). Take the BROKEN PALACE EMBLEM and TOY SHIP WHEEL (R).
- Place the PALACE EMBLEM PIECE on the BROKEN PALACE EMBLEM to get the PALACE EMBLEM (inventory).
- Return to the Crystal Cave.
- Place the RUBY STONE, and SAPPHIRE STONE; take the BRONZE SEA HORSE and LADYBUG TOKEN (S).
- Use the PICKAX; take the DRAGONFLY TOKEN (T).
- Return to Princess Naida's Room.

- Place the BUTTERFLY TOKEN, LADYBUG TOKEN, and DRAGONFLY TOKEN (U).
- Select the scroll twice; take the PALACE KEY (V).
- Walk down.
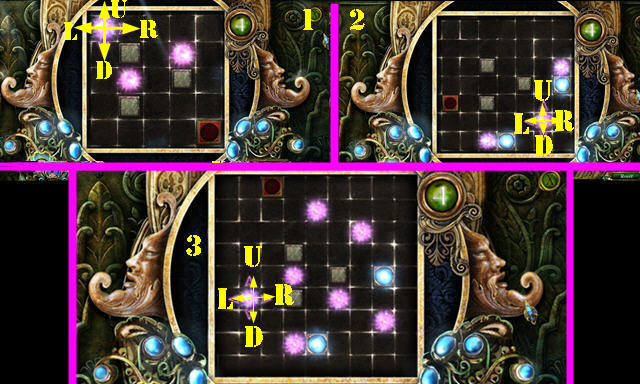
- Place the PALACE EMBLEM (W). Use the PALACE KEY (X) and turn it for a puzzle.
- Solution: 1-10; you'll need to interact with some items to find them.
- Go forward.
Chapter 3: Palace
- Open the pelican's beak; take the STEAMSHIP BOTTLE (X), then take the CONCH BRUSH (Y).
- Go forward.
- Take the SEA ANEMONE FOSSIL (Z).
- Place the WATER PENDANT (Z1) and touch for a mini-game.
- Solution part 1: C-D-B-C-E-D-A-B-C-E-D-A-B-E-C-D-E-B (1).
- Solution part 2: E-A-B-C-E-D-B-A-C-E-D-B-C-A-E (2).
- Solution 3: E-D-B-E-B-C-A-E-B-E-D-C-A-B (3).
- Take the MALLET and BLUEPRINT PIECE (F).
- Enter Princess Calliope's Room (G).
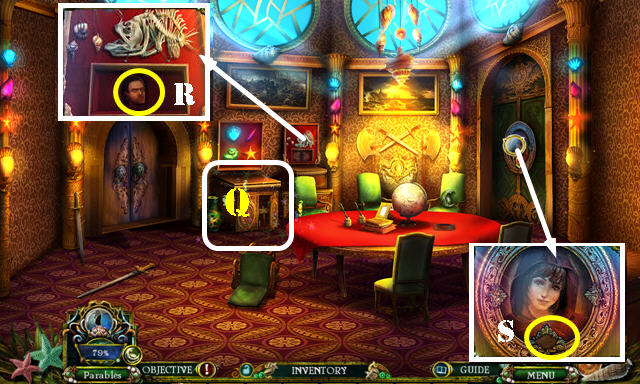
- Move all the papers; look at the book and take the RED FISH (H). Talk to the Chancellor's Spirit.
- Walk down twice and take the left door to the Balcony.
- Take the GARGOYLE HEAD (I).
- Use the MALLET; take the TOY SHIP MAINSAIL (J).
- Play the HOP (K) to get the SHELL KEY.
- Take the BLUEPRINT PIECE and ROPE (L). Open the book (M).
- Drag the CONCH BRUSH to clean the dirt; place the MURAL BANNER (N1). Take the BLUE FISH and RIGHT EYE GEM (N).
- Return to the Hallway.
- Place the RED FISH and BLUE FISH (O). Take the TOY SHIP ANCHOR (P). Open the book (Q).
- Go to Princess Calliope's Room.
- Use the SHELL KEY; take the TOY SHIP FIGUREHEAD (R).
- Place the TOY SHIP WHEEL, TOY SHIP MAINSAIL, TOY SHIP ANCHOR, and TOY SHIP FIGUREHEAD to activate a mini-game (S).
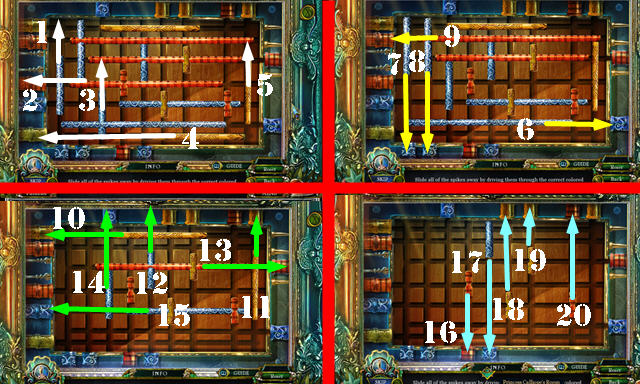
- Solution (1-20).
- Take the SILVER SEA HORSE.
- Walk down.
- Place the BRONZE SEA HORSE and SILVER SEA HORSE (T).
- Go forward.
- Take the BLUEPRINT PIECE (U).
- Select the envelope twice and read the letter (V). Take the JASPER HANDLE (W).
- Go down to the Strategy Room (W1).
Chapter 4: Strategy Room
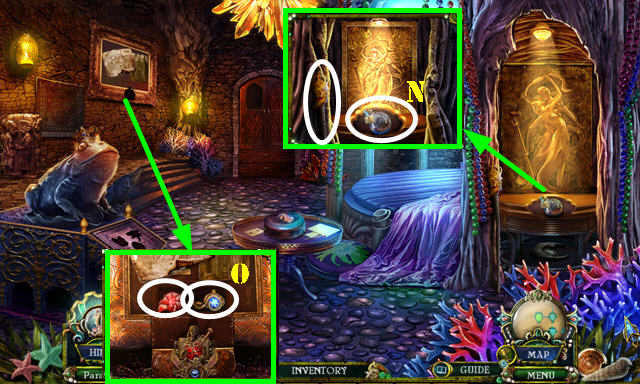
- Take the BLUEPRINT PIECE and MACHINE KEY. Look at the book (X).
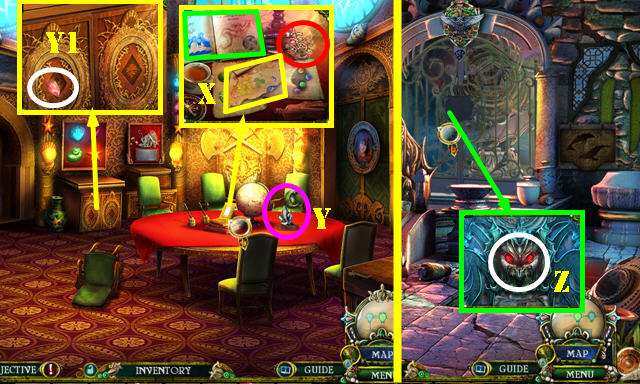
- Grab the MURAL PIECE (Y) and the LEFT EYE GEM (Y1).
- Place the 3 BLUEPRINT PIECES on the BLUEPRINT PIECE; take the MACHINE BLUEPRINT (inventory).
- Walk down.
- Place the RIGHT EYE GEM and the LEFT EYE GEM on the GARGOYLE HEAD (inventory).
- Place the GARGOYLE HEAD (Z). Select the mini-game to begin.
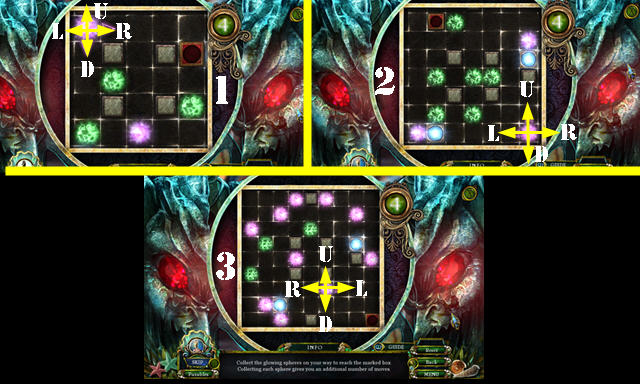
- Solution part 1: Dx2-R-L-Dx2-Rx4-Ux3.
- Solution part 2: (Lx3-U-Lx3-D-R), (U-L-Dx2-Lx4-Ux3).
- Solution part 3: (L-Ux2-Lx3-U-L-U-Rx2-U-R-U-D-R-D-R-Ux2-Rx2-Dx3), (D-L-U-R), (R-Dx5).
- Go forward.
- Place the MURAL PIECE (I); take the QUARTZ JELLYFISH and CASTLE CREST (J).
- Take the AMETHYST HANDLE (K). Look at the note (L).
- Return to the Strategy Room.
- Place the JASPER HANDLE and AMETHYST HANDLE (M) for a HOP; play it to get the GOLDEN SHIELD.
- Walk down.
- Place the CASTLE CREST and GOLDEN SHIELD; take the LUMINESCENT ORB (N).
- Return to the Strategy Room.
- Place the LUMINESCENT ORB (O); take the MYSTERIOUS CONTROLLER and SMALL EMPTY VIAL (P).
- Return to the Machine Room.
- Use the MACHINE KEY; place the MACHINE BLUEPRINT and MYSTERIOUS CONTROLLER for a puzzle (Q).
- Solution: 1-5. Touch the center for another puzzle.
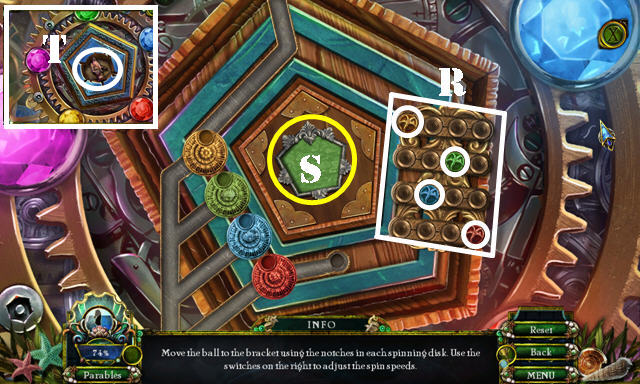
- Solution: Arrange the balls as shown (R). Touch the center (S). Take the CORAL FOSSIL.
- Zoom back in to the controller; take the KING DOLL (T).
- Walk down.
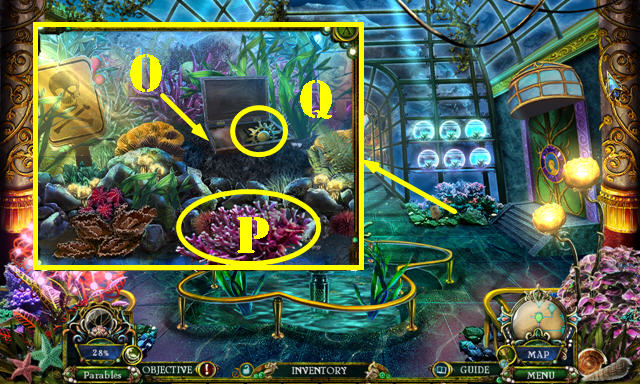
- Place the SEA ANEMONE FOSSIL and CORAL FOSSIL (U). Enter the Greenhouse.
- Take the EEL'S LONG TOOTH and the TOADSTOOL (V).
- Take the WATERING CAN (V1).
- Go forward.
- Take the FLORAL CROWN (W), CRAB EMBLEM (X), and EARTH PENDANT (Y).
- Use the WATERING CAN (Z) to get the CAN OF WATER.
- Walk down.
- Place the EARTH PENDANT (@); select the mini-game.
- Solution 1: Ex4, Gx5, Dx2, I, Fx2, Ex4, Ax3, Fx5, Bx3, Ax4, F, I.
- Solution 2: Cx3, Ax2, Cx3, Ix2, Dx2, Fx4, C, Ax4, Bx4, Fx2, Cx3, Ex2, Gx5, H, Ex3, Gx3, Ex3, Gx2.
- Solution 3: Bx2, Ax4, F, B, Ax2, D, Ix2, Dx2, I, Dx3, Ix4, Jx5, G, E, Hx2, Ex3, Jx2, Ex1, Hx3, Ex1, Gx3, Ex1, Gx3, E, Cx3.
- Enter Princess Daphne's Room.
- Take the GARDEN SHOVEL (K).
- Take the ROSE TOKEN (L) and WOODEN DOLL BODY (M).
- Take the EEL'S SHORT TOOTH and WOODEN BOX (N). Open the book (blue) and read it.
- Walk down.
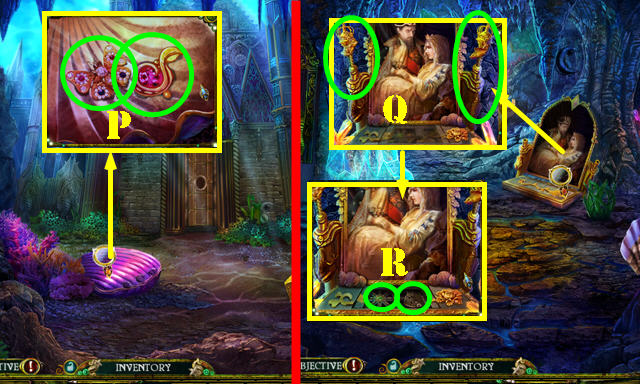
- Use the GARDEN SHOVEL 3x (O); take the PURPLE CORAL (P).
- Open the box; take the GOLDEN SUN and HORN MOUTHPIECE (Q).
- Go forward.
- Place the HORN MOUTHPIECE (R).
- Place the EEL'S LONG TOOTH and EEL'S SHORT TOOTH (S) for a HOP; play it to get the ROSE DIAL PLATE.
- Return to Princess Daphne's Room.
- Place the ROSE DIAL PLATE for a puzzle (T). Solution (T1).
- Return to the Waterfall.
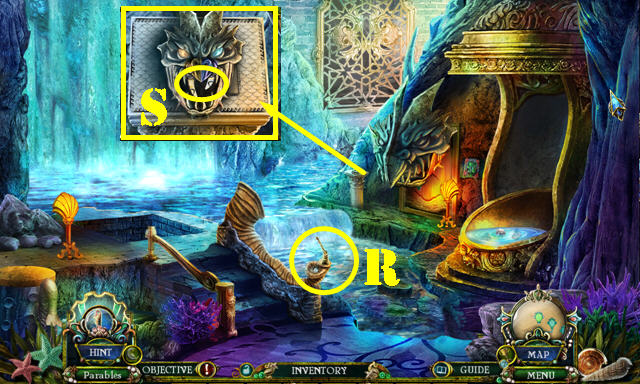
- Take the METAL HOOK and PLANT REVIVAL SOLUTION (U).
- Return to Princess Daphne's Room.
- Put down the PLANT REVIVAL SOLUTION (V) and use the CAN OF WATER (W). Put down the SMALL EMPTY VIAL to get the SMALL FULL VIAL (X).
- Return to the Waterfall.
- Place the TOADSTOOL, PURPLE CORAL, and SMALL FULL VIAL (Y). Take the EEL POISON (Y1).
- Touch the horn )Z) to use the EEL POISON and get transported back to the Balcony.
- Talk to Pinocchio.
- Play the HOP (A) to get the PHARMACY KEY.
- Walk down.
- Use the PHARMACY KEY (B); turn it and go through the door.
- Take the TREE ORNAMENT (C) and WOODEN SHAFT (D).
- Take the IVY TOKEN and PAINTBRUSH (E).
- Place the METAL HOOK and ROPE on the WOODEN SHAFT; take the LONG HOOK (inventory).
- Return to the Hallway.

- Use the LONG HOOK (F); open the pouch; take the MAGIC INK and CITRINE JELLYFISH (G).
- Return to the Balcony.
- Place the TREE ORNAMENT (H).
- Enter Princess Althea's Room.
Chapter 5: Princess Althea's Room
- Take the BRONZE COMET (I) and CARNELIAN JELLYFISH (J).
- Place the MAGIC INK (K) and dip the PAINTBRUSH in it; take the ANTIDOTE RECIPE (L). Read the note (L1).
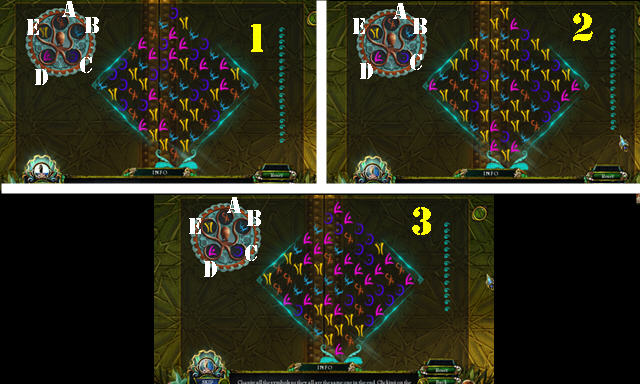
- Play the mini-game (M).
- Rotate discs with symbols on them until the green from the triangles shine. Use the switch to exchange places of discs. Solution (N).
- Take the STARFISH EMBLEM from inside the chest.
- Walk down twice.
- Place the CRAB EMBLEM and STARFISH EMBLEM; take the ANTIQUE SCISSORS (O).
- Go to the Herbal Pharmacy.
- Place the QUARTZ JELLYFISH, CITRINE JELLYFISH, and CARNELIAN JELLYFISH; take the ELIXIR and UNICORN HORN (P).
- Return to Princess Naida's Room.
- Place the UNICORN HORN; take the WOODEN DOLL LEFT ARM (Q).
- Return to the Crystal Cave.
- Play the HOP (R) to get the DECORATIVE PLAQUE.
- Place the IVY TOKEN and ROSE TOKEN; take the BASS COIN (S).
- Return to Princess Naida's Room.
- Place the DECORATIVE PLAQUE; take the FISH CROWN and SHARK COIN (T).
- Return to Princess Althea's Room.
- Use the ANTIQUE SCISSORS; take the SAMPAN BOTTLE and GLOWING PEARL (U).
- Return to the Herbal Pharmacy.
- Place the ANTIDOTE RECIPE (V).
- Place the GLOWING PEARL (W); use the pestle (X) on it twice. Place the ELIXIR (Y) and touch the bowl for a puzzle.
- Solution 1: C-D, B-C, A-B, A-C.
- Solution 2: 1-4.
- Take the ANTIDOTE (D1).
- Return to the Balcony.
- Use the ANTIDOTE on Pinocchio (E). Talk to him; take the WOODEN ORB and WARDROBE KEY (F).
- Return to Princess Naida's Room.
- Place the WARDROBE KEY (G) for a HOP; play it to get the BATTLESHIP BOTTLE.
- Return to the Underground Tunnel.
- Place the CAPTAIN SHIP BOTTLE, PIRATE SHIP BOTTLE, STEAMSHIP BOTTLE, SAMPAN BOTTLE, and BATTLESHIP BOTTLE (H). Enter the Forgotten Cave.
- Take the MACKEREL COIN (I).
- Place the FISH CROWN on the fish; take the WOODEN DOLL HEAD and TONGS (J).
- Move two papers; take the DOLPHIN (K); move one more paper and take the SHRIMP COIN (L).
- Return to the Palace Entrance.
- Place the BASS COIN, SHARK COIN, MACKEREL COIN, and SHRIMP COIN. Take the WOODEN DOLL RIGHT ARM (M).
- Return to the Forgotten Cave.
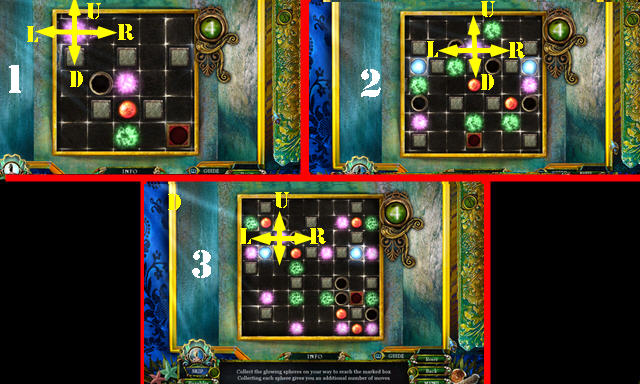
- Place the WOODEN DOLL RIGHT ARM, WOODEN DOLL HEAD, WOODEN DOLL LEFT ARM. Place the WOODEN ORB (N); zoom into it for a puzzle.
- Solution 1: R-D-Rx2-D-R.
- Solution 2: (L-U-Lx2-D-Ux3-Rx2-U-Rx2-U-Dx2), (Ux3-R).
- Solution 3: Rx2-Ux2-Lx2-U-Lx2-Dx5.
- Take the CHARGED WOODEN ORB.
- Talk to the ghost.
- Return to the Balcony.
- Give the CHARGED WOODEN ORB to Pinocchio (Y).
- Talk to Pinocchio. You get transported to the Grand Hall.
- Play the mini-game (Z).
- Solution 1: E-B-E-A-C-B-D-A-E-C-D-B-E-A-C.
- Solution 2: D-B-C-E-B-A-C-E-B-A-D-C-E.
- Solution 3: E-A-C-D-B-A-C-D-E-B.
- Take the WHALE.
- Return to the Throne Room.
- Place the DOLPHIN and WHALE. Take the DAY MEDALLION and SILVER CRESCENT (F).
- Go to the Greenhouse.
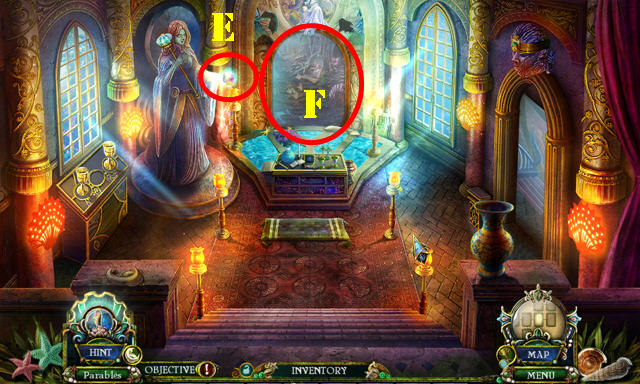
- Open the book; take the BLUE CRYSTAL (G).
- Place the SILVER CRESCENT, GOLDEN SUN, and BRONZE COMET (H). Enter the Viewing Room.
- Talk to the princess.
- Take the METAL TILE and FISH FOOD (I).
- Take the YELLOW CRYSTAL (J).
- Place the BLUE CRYSTAL and YELLOW CRYSTAL on the WOODEN BOX; take the TRIDENT and CORAL KEY (inventory).
- Place the TRIDENT (K); take the SNOW INSIGNIA and GODDESS DOLL (L).
- Return to the Waterfall.
- Use the FISH FOOD in the water; use the TONGS to get the STORM INSIGNIA (M).
- Use the CORAL KEY and turn it; take the FLORAL BATON and HERMIT CRAB FIGURINE (N) to activate a HOP. Play the HOP (O) to get the LILY GEM.
- Return to Princess Daphne's Room.
- Place the FLORAL CROWN and FLORAL BATON (P). Take the THUNDER INSIGNIA (Q).
- Place the LILY GEM; take the TSUNAMI INSIGNIA and GOLDEN BOW (R).
- Return to the Viewing Room.
- Place the SNOW INSIGNIA, STORM INSIGNIA, THUNDER INSIGNIA, and TSUNAMI INSIGNIA (S). Play the puzzle.
- Solution: J-F, L-H, B-L, D-J, I-D, M-B, A-M, E-I, B-A, D-E, F-B, H-D, C-H, K-F, F-C, H-K.
- Talk to the princess to get the STAFF GLOBE (N).
- Return to the Throne Room.
- Place the STAFF GLOBE (O).
- Talk to the princess to get the FIRE PENDANT (P).
- Return to the Strategy Room.
- Play the HOP (Q) to get the MACHINE INSIGNIA.
- Place the METAL TILE and press it; take the WOODEN DOLL HEAD (R).
- Place the FIRE PENDANT (S); enter Princess Theresa's Room.
Chapter 6: Princess Theresa's Room
- Take the WOODEN DOLL CAPE (T).
- Take the RING HANDLE and FIRE HAMMER (U).
- Examine (U1).
- Walk down.
- Place the RING HANDLE; take GOLDEN ARROW and DAUGHTER DOLL (V).
- Open the book (W).
- Return to Princess Theresa's Room.
- Place the WOODEN DOLL HEAD and WOODEN DOLL CAPE on the WOODEN DOLL BODY to get the CHANCELLOR DOLL (inventory).
- Place the GODDESS DOLL, DAUGHTER DOLL, KING DOLL, and CHANCELLOR DOLL (X1). Read the note (purple).Take the MERMAID FIGURINE (X).
- Place the GOLDEN ARROW and GOLDEN BOW (Y); open the box, read the note, and take the EEL FIGURINE (Z).
- Return to the Machine Room.
- Place the MACHINE INSIGNIA; take the SIREN FIGURINE (Z1).
- Walk down.
- Put down the MERMAID FIGURINE, SIREN FIGURINE, EEL FIGURINE, and HERMIT CRAB FIGURINE for a puzzle (Z2).
- Solution 1: R-Dx2-R-Dx2-Rx2.
- Solution 2: (L-Dx2-Lx2-U), (D-L-Dx2-Lx2-D).
- Solution 3: (U-Lx2-Dx2-R), (R-D-L-Dx2).
- Take the BROKEN ANCIENT STAFF.
- Place the STAFF GLOBE on the BROKEN ANCIENT STAFF; take the ANCIENT STAFF (inventory).
- Go forward.
- Use the ANCIENT STAFF (S) to automatically go back to the Shoreside.
- Talk to the princess. Take the ROSE EMBLEM (T).
- Go to the Tower.
- Play the HOP to receive the WATER GOBLET (U).
- Place the ROSE EMBLEM (V).
- Go forward.
- Take the BOOK OF HATRED (W), NIGHT MEDALLION (X), and GODDESS KEY (Y).
- Return to Temple Hall.
- Place the GODDESS KEY (Z).
- Go forward.
- Place the DAY MEDALLION and the NIGHT MEDALLION (A). Take the BOOK OF ANGER and LION HEAD (B).
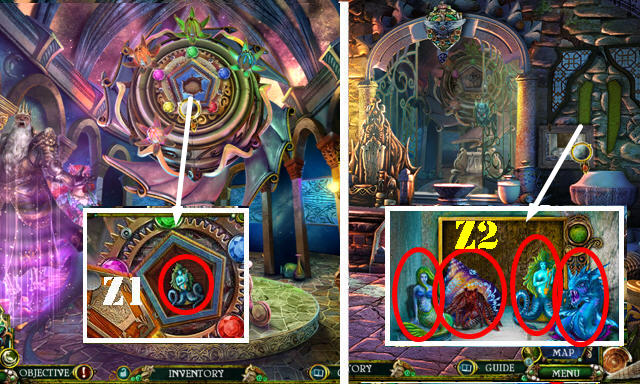
- Take the SEA SOUL INSIGNIA (C).
- Place the SEA SOUL INSIGNIA on the SEA SOUL GLOBE (inventory).
- Return to the Room of Worship.
- Play the HOP (D) to get the WATER HAMMER.
- Place the WATER GOBLET; take the BOOK OF DOOM and WOODEN HAMMER (E).
- Return to the Library.
- Place the BOOK OF ANGER, BOOK OF HATRED, and BOOK OF DOOM (F); take the METAL HAMMER (G).
- Return to the Secret Garden.
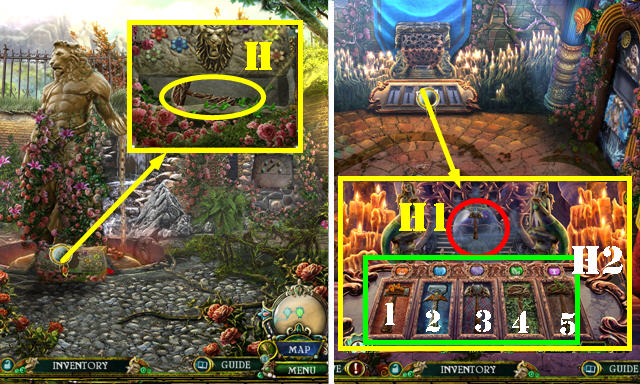
- Place the LION HEAD; press down all the flowers and take the EARTH HAMMER (H).
- Return to the Goddess Secret Chamber.
- Place the SEA SOUL GLOBE (H1).
- Place the FIRE HAMMER, WATER HAMMER, METAL HAMMER, EARTH HAMMER, and WOODEN HAMMER (H2).
- Select the hammers in this order: 2-4-3-5-1 for a puzzle to appear.
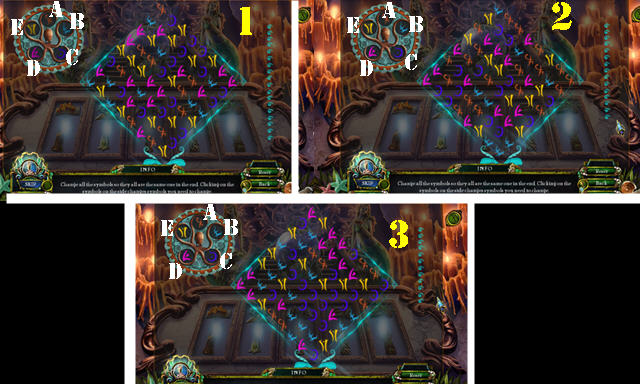

- Solution 1: C-E-A-B-C-E-D-A-C-E-D-B-C-A-B-E-D-B.
- Solution 2: C-D-E-C-A-B-D-C-A-E-D-B.
- Solution 3: E-C-B-D-E-D-C-B-A-E-C-D.
- Take the BLOOD VIAL.
- Return to the Shoreside.
- Use the BLOOD VIAL on the king (F).
- Congratulations, you've completed Dark Parables: The Little Mermaid and the Purple Tide!
Created at: 2014-12-12