

Walkthrough Menu
- General Tips
- Chapter 1: Stars Hollow
- Chapter 2: Egeskov
- Chapter 3: Sky Kingdom
- Chapter 4: Back to Reality
- Chapter 5: The Witch's Hut
- Chapter 6: The Tower
General Tips
- This is the official guide for Dark Parables: The Match Girl's Lost Paradise.
- This guide won't tell you when to zoom into a location; the screenshots show each zoom scene.
- Hidden-object puzzles are referred to as HOPs. Only the locations of the HOPs will be shown.
- Use the Map to fast travel to a location.
Chapter 1: Stars Hollow
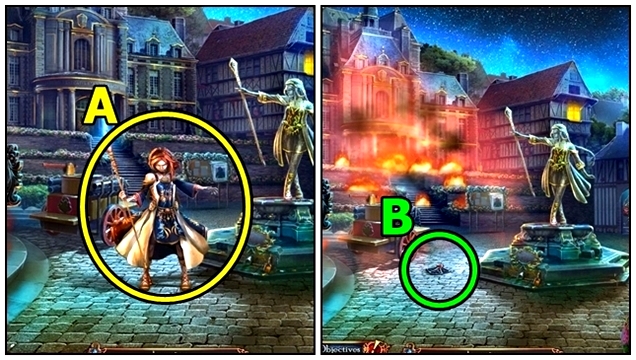
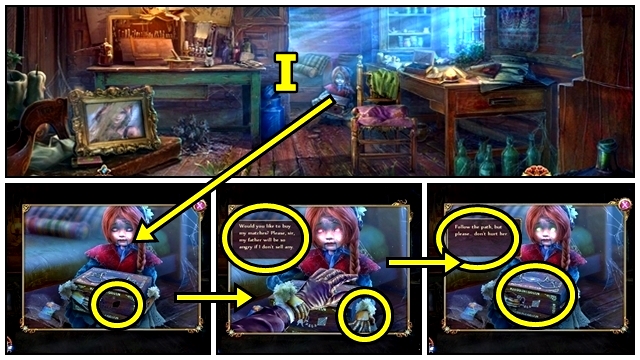
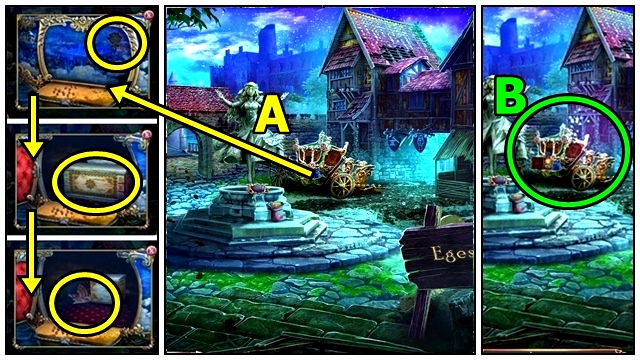
- Talk (A).
- Take ORNAMENT PART (B).
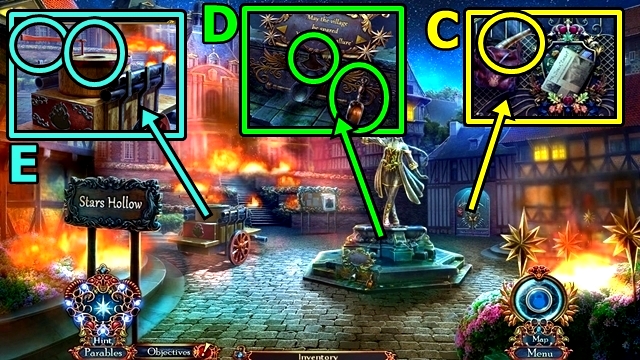
- Take FIRE NOZZLE (C).
- Take SCOOP (D). Add ORNAMENT PART; take NOZZLE PART.
- NOZZLE PART on FIRE NOZZLE (inventory); receive SPRAY NOZZLE.
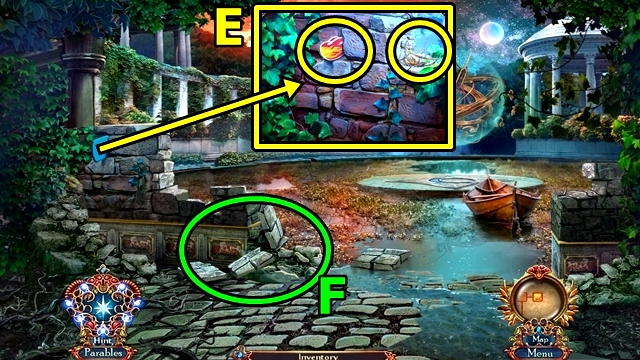
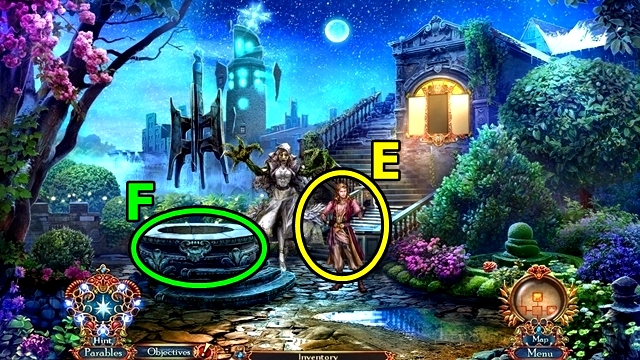
- Add SPRAY NOZZLE (E); pump handle.
- Enter Mansion.
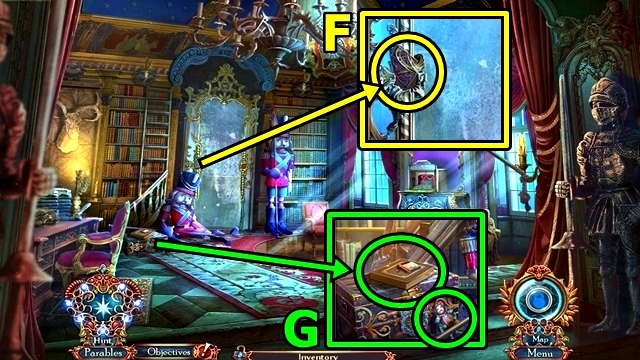
- Take SUNDIAL PART (F).
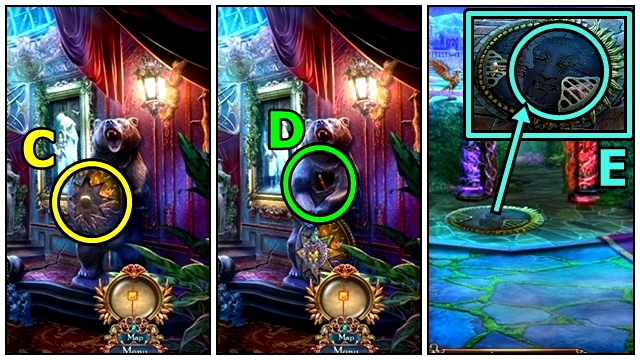
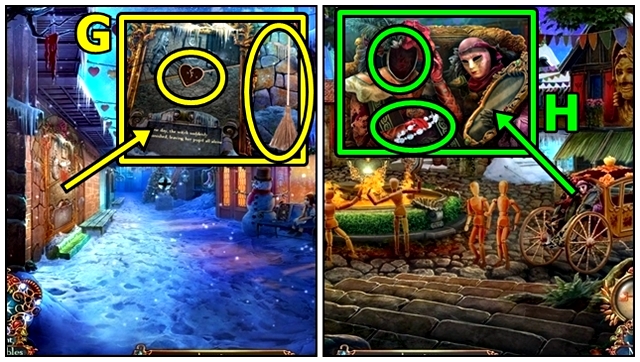
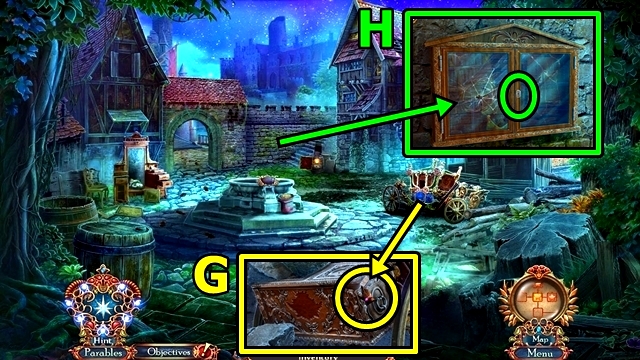
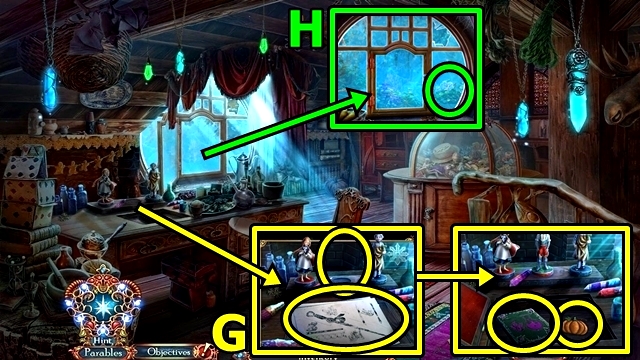
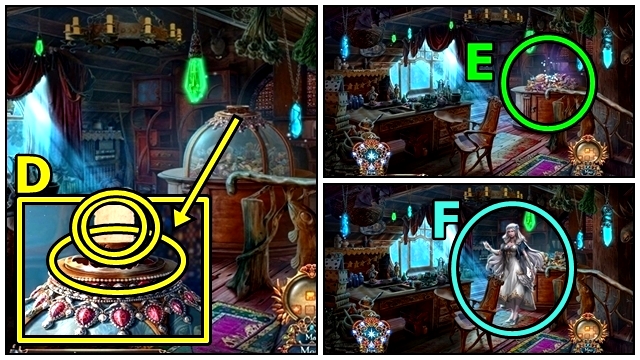
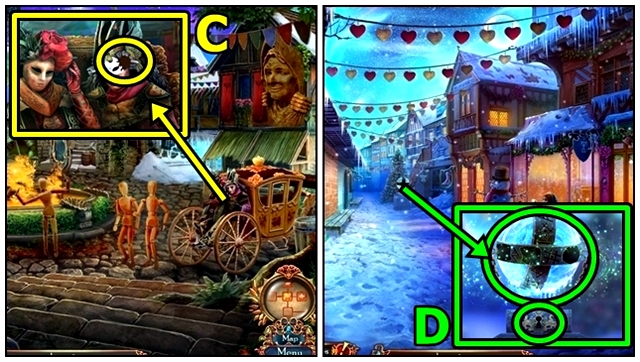
- Take LANDOWNER FIGURINE (G). Examine. Take INCOMPLETE MATCHBOX.
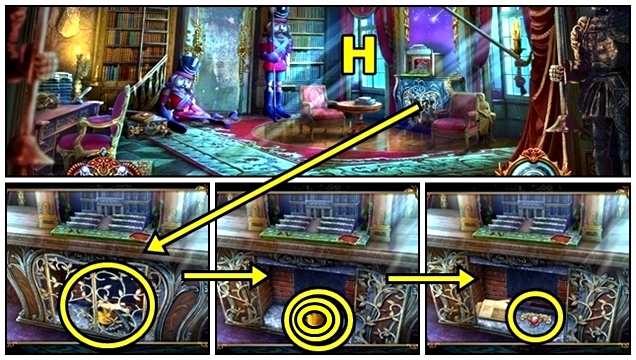
- Open (H). Take FLAME EMBLEM. Use SCOOP; receive SCOOP WITH ASHES. Read. Take FRAME ORNAMENT.
- Move down.
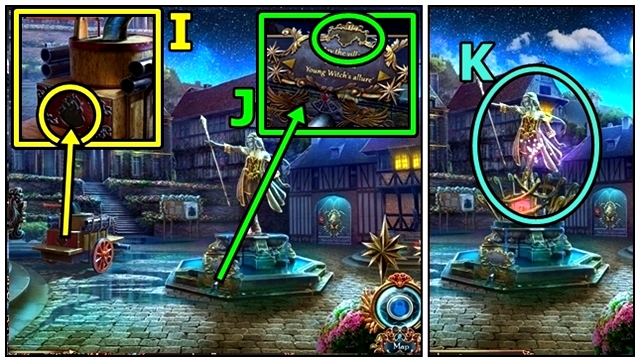
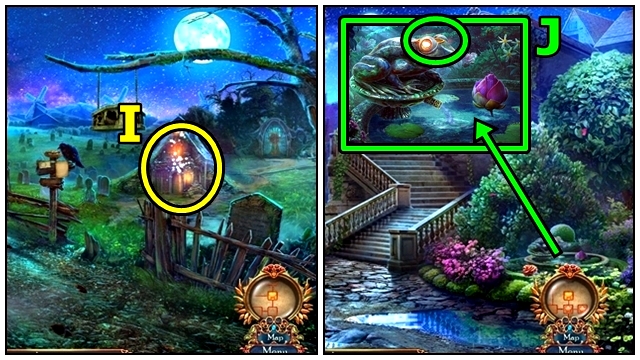
- Insert FLAME EMBLEM (I). Take Map and PHOENIX ORNAMENT.
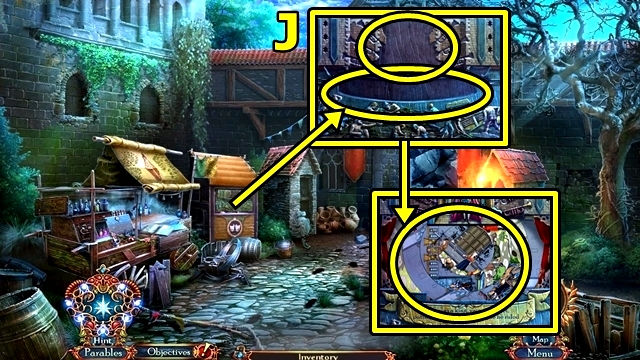
- Insert FRAME ORNAMENT (J); take CLOTH.
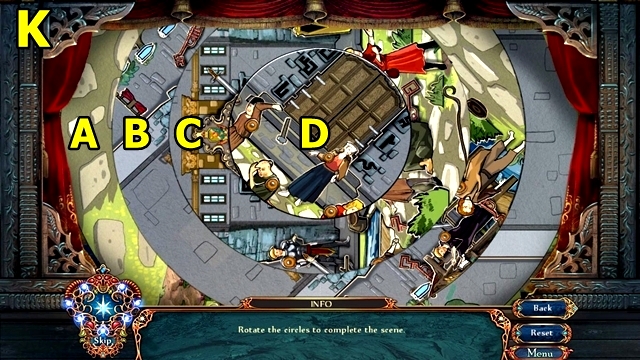
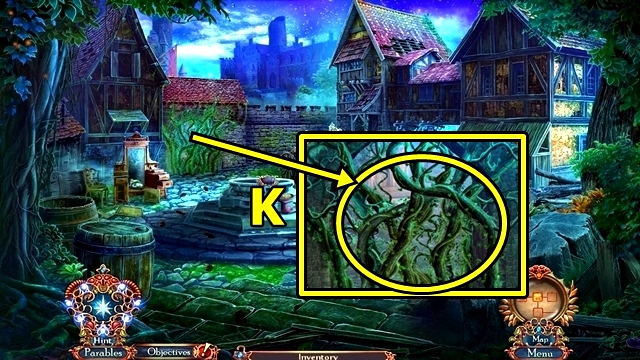
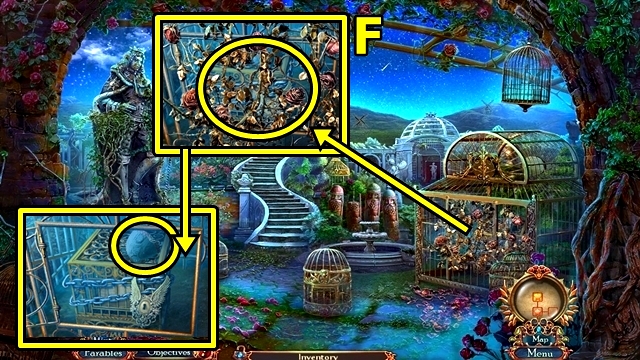
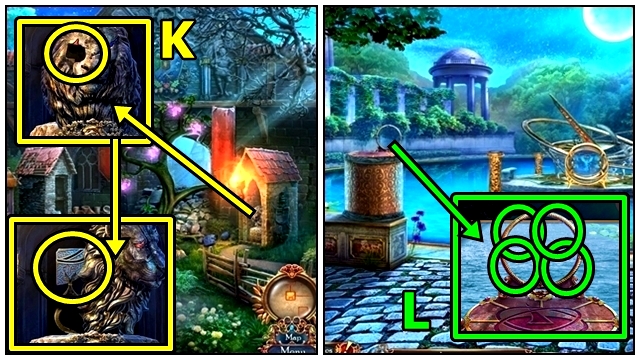
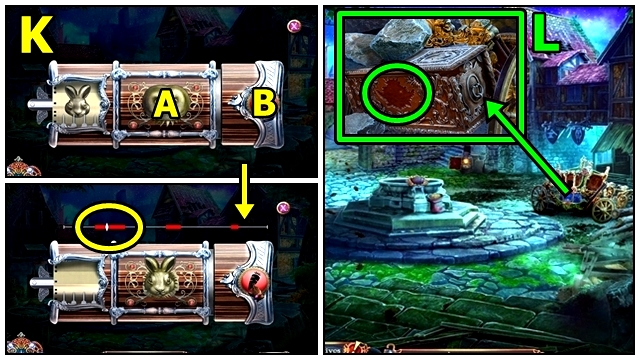
- Play HOP (K); receive MIRROR ORNAMENT.
- Enter Mansion.
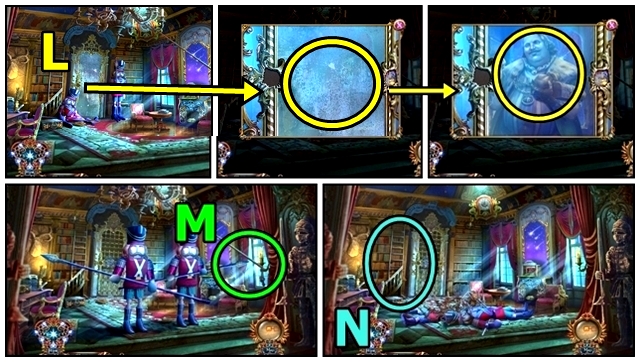
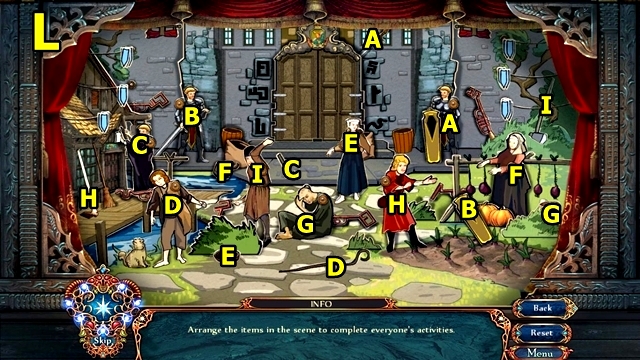
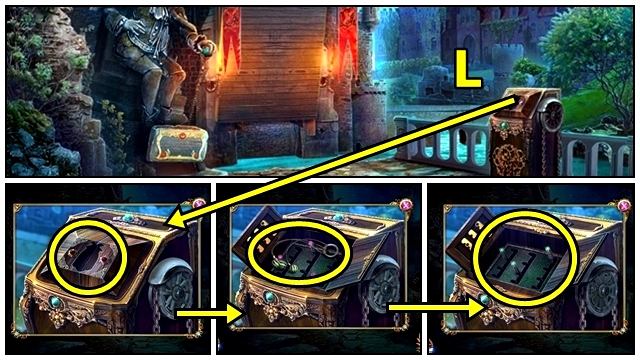
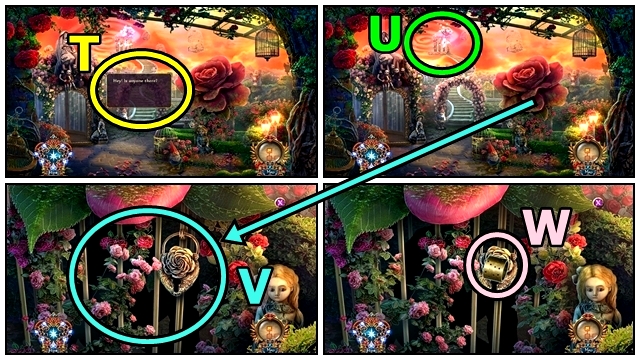
- Use CLOTH (L). Talk.
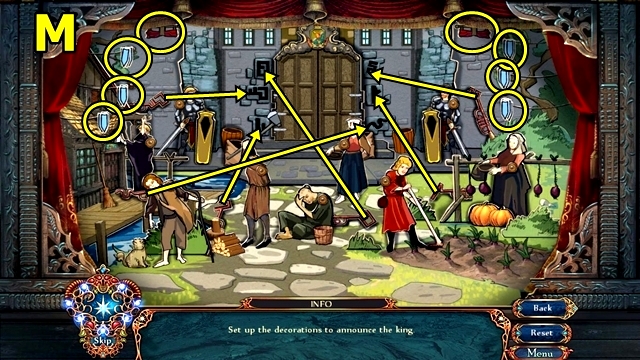
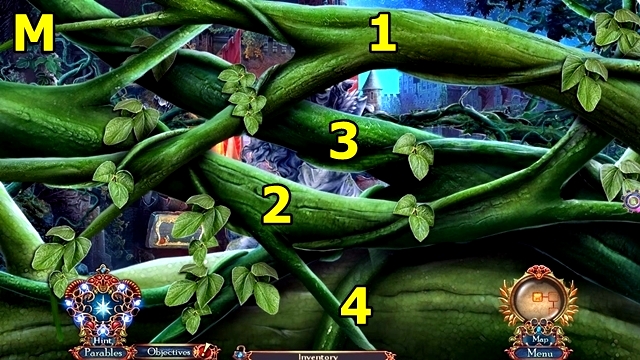
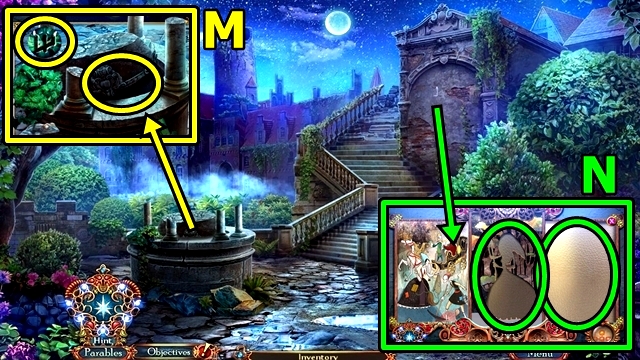
- Pull (M).
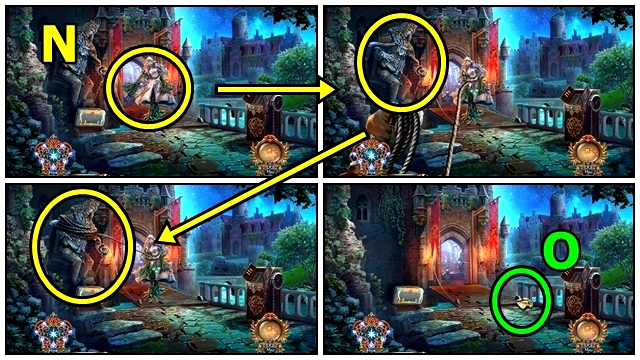
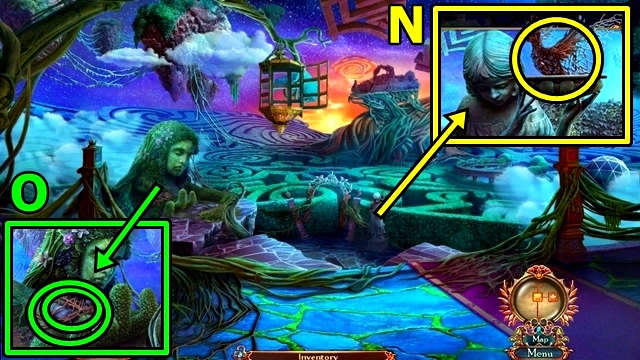
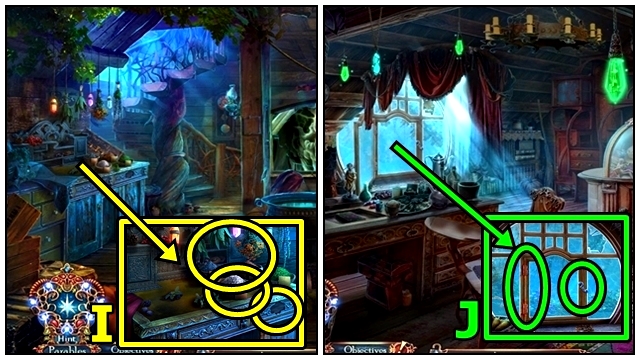
- Move (N).
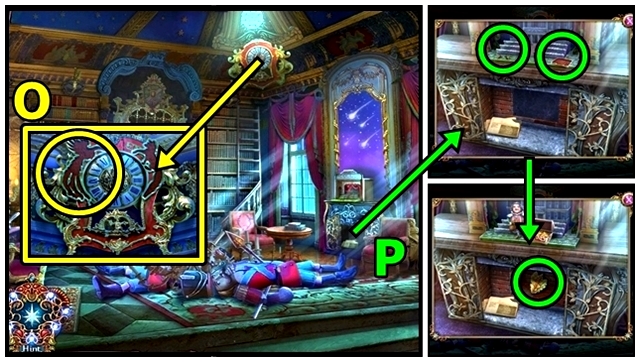
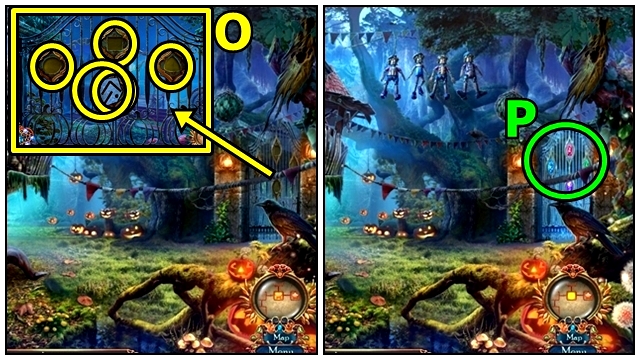
- Insert PHOENIX ORNAMENT (O). Take CHEST FIGURINE.
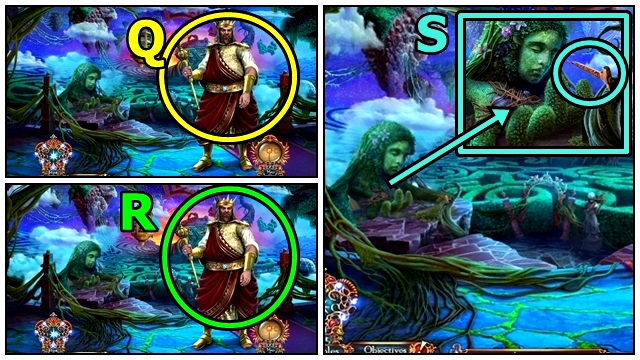
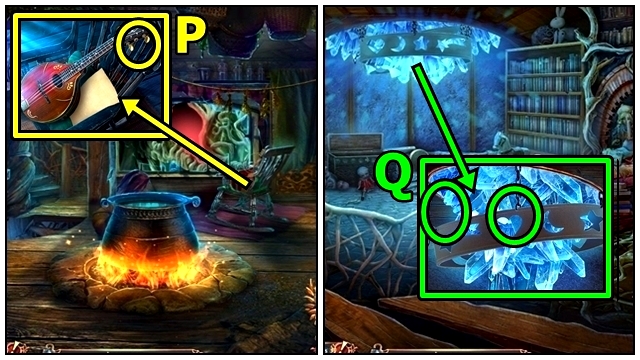
- Place LANDOWNER FIGURINE and CHEST FIGURINE (P). Take OAK LEAF INSIGNIA.
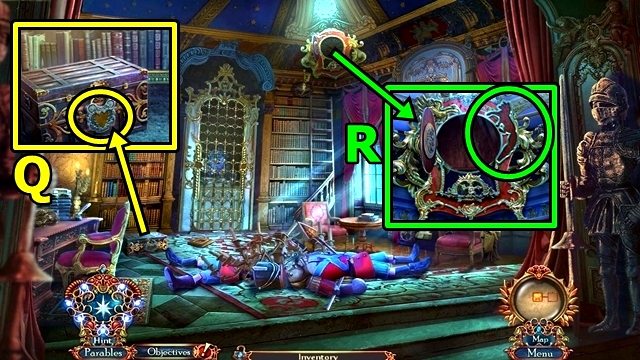
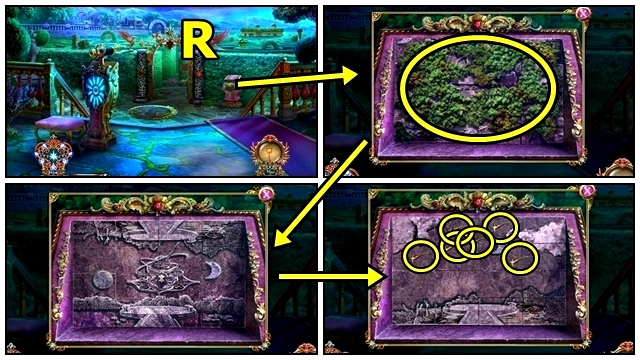
- Insert OAK LEAF INSIGNIA (Q); take FOX ORNAMENT.
- Insert FOX ORNAMENT (R); take FACE ORNAMENT.
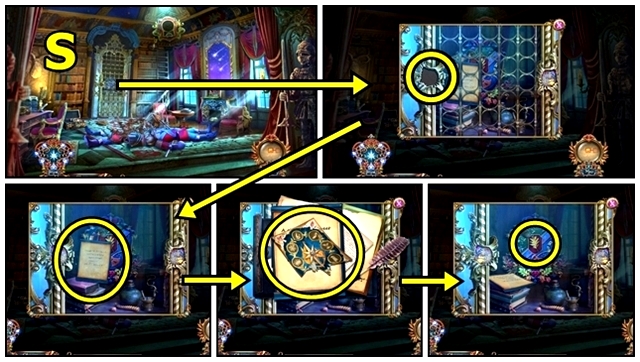
- FACE ORNAMENT on MIRROR ORNAMENT (inventory).
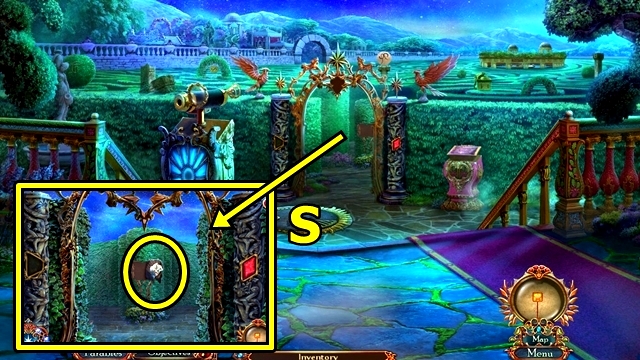
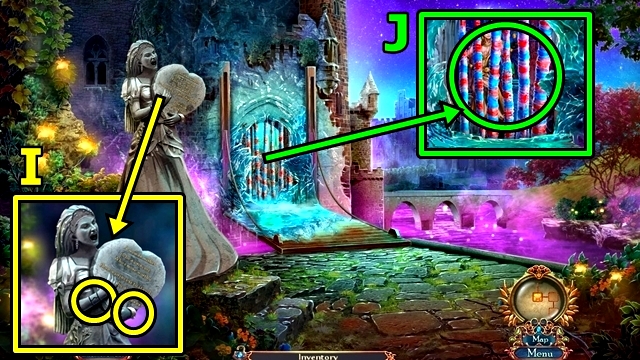
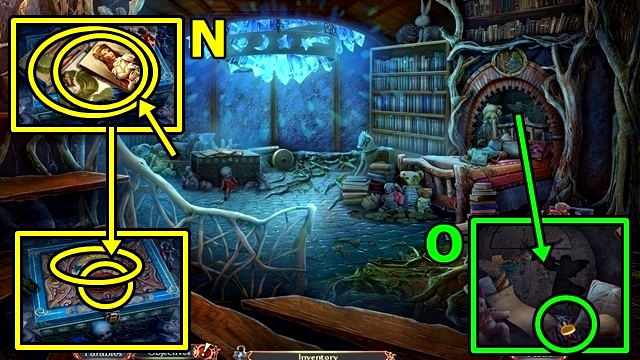
- Add MIRROR ORNAMENT (S). Examine; take TORN MATCHBOX LABEL. Move. Take ROYAL INSIGNIA.
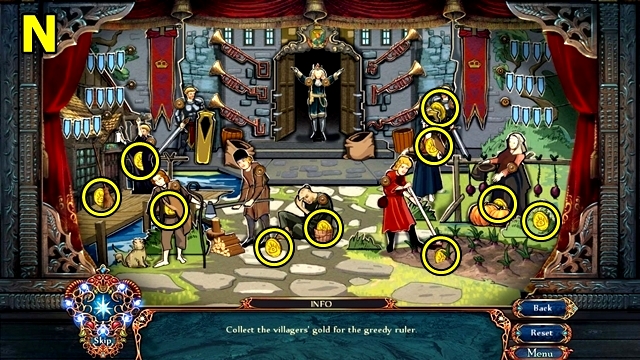
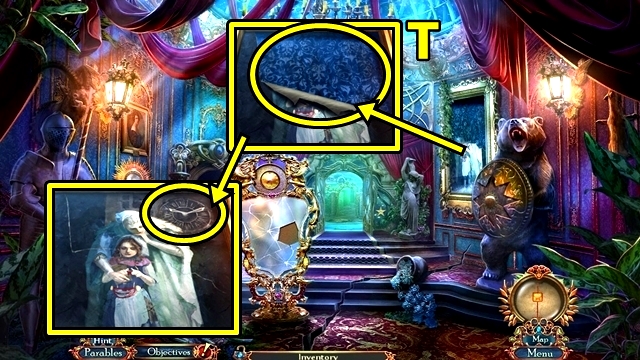
- Move down.
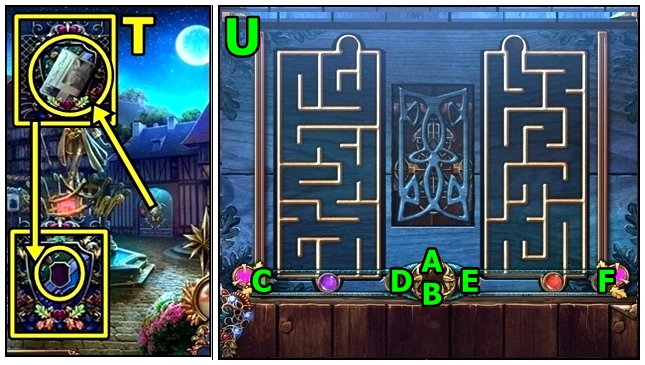
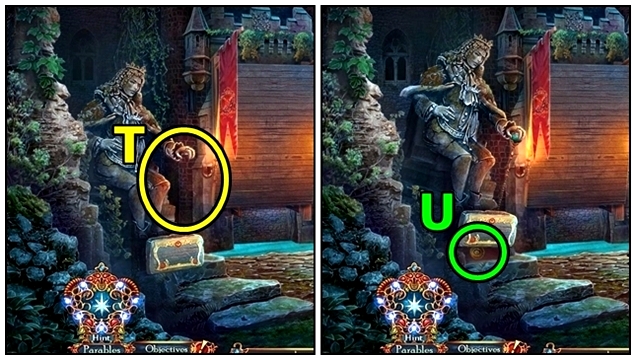
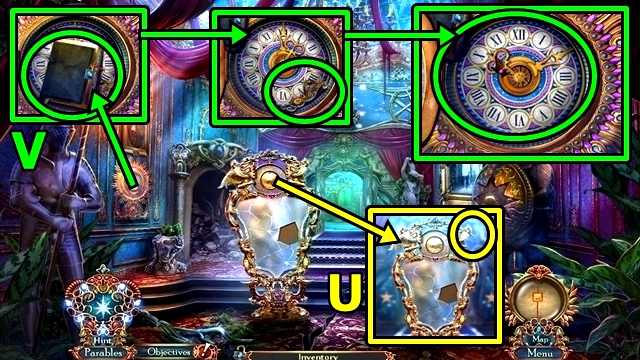
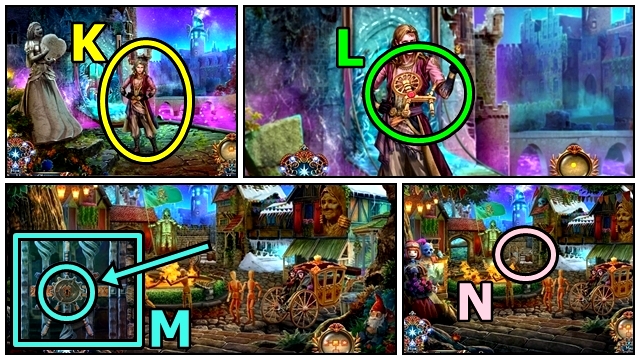
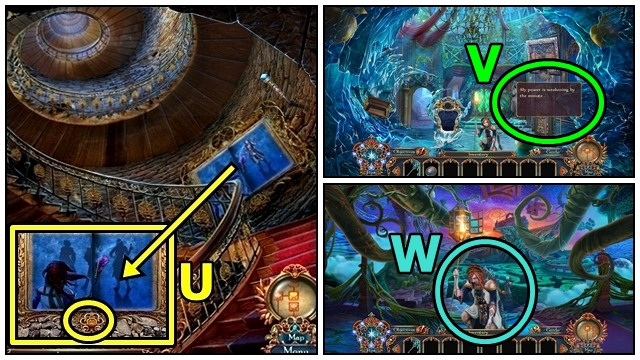
- Read (T). Add ROYAL INSIGNIA. Examine.
- Solution (U): A-Ex2-D-Ax2-D-A-Bx2-F-A-D-A-F-B-F-Ax2-C-Ex2-A-C-B-C-A-F-A-Ex2-Bx2-E-Ax2-Dx4-A-Cx2-Fx2-A-E-A-D-A.
- Go to Countryside.
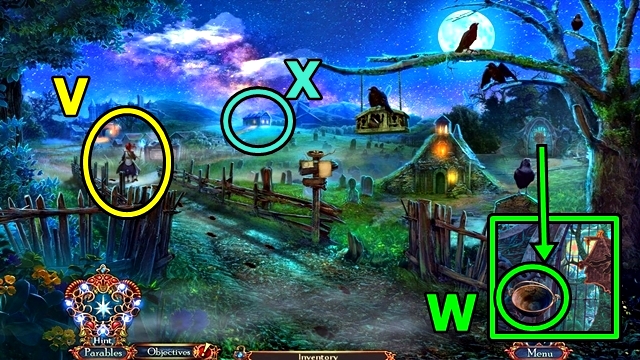
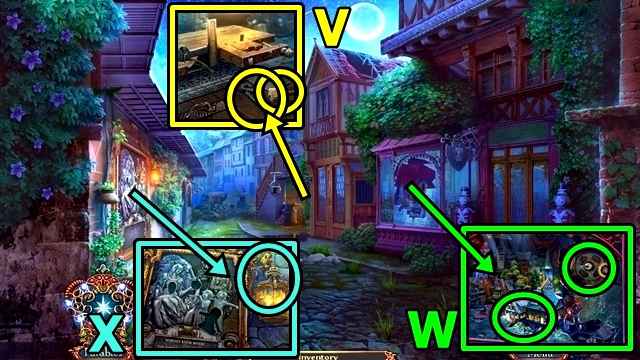
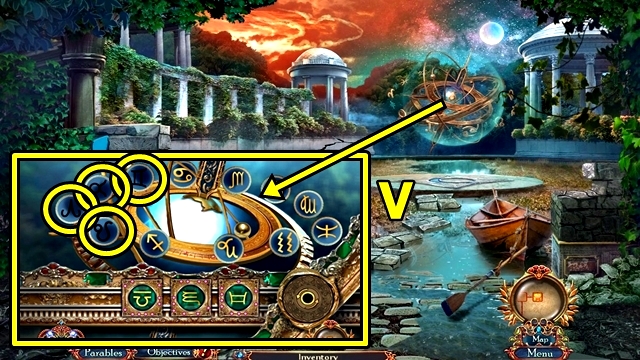
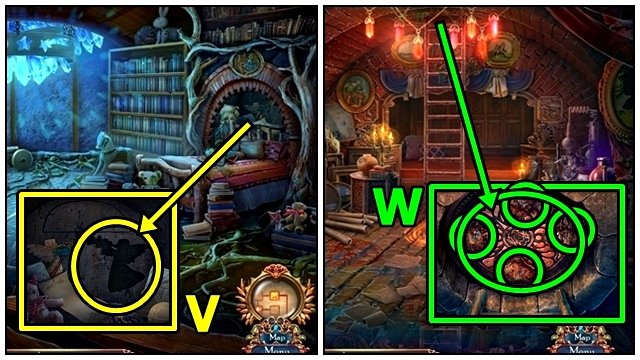
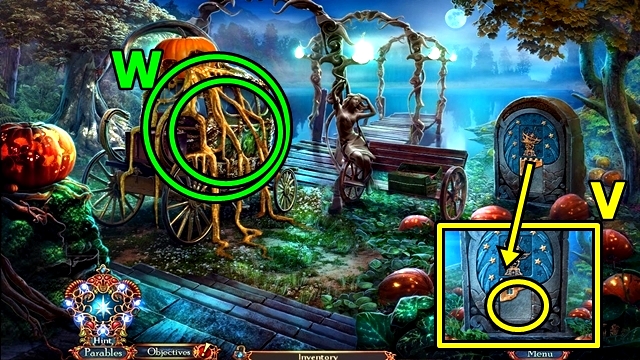
- Talk (V).
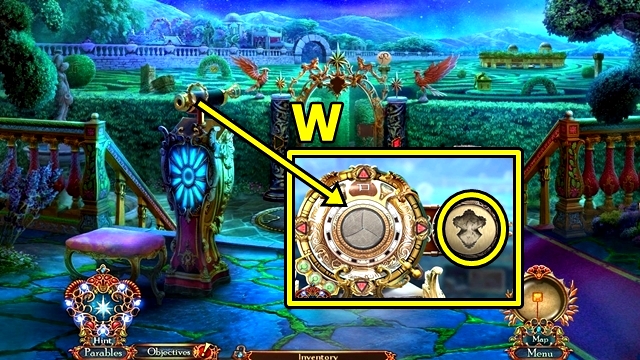
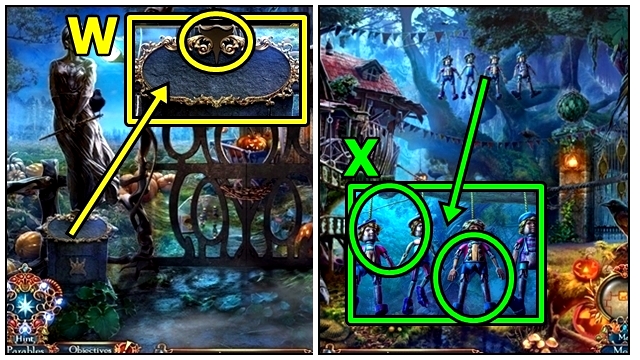
- Take EMPTY BUCKET (W).
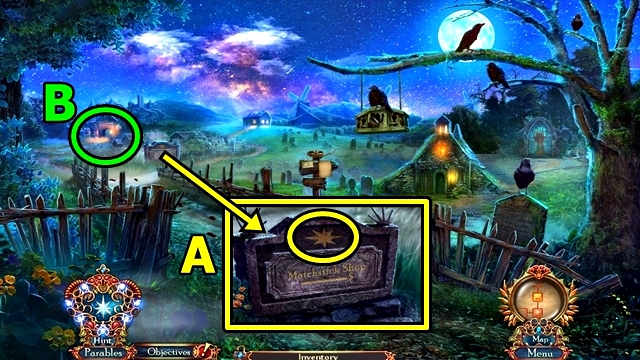
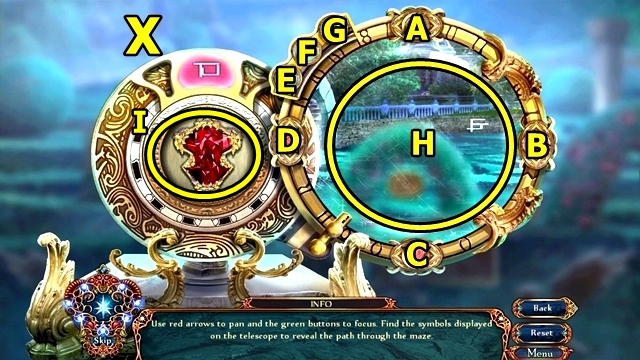
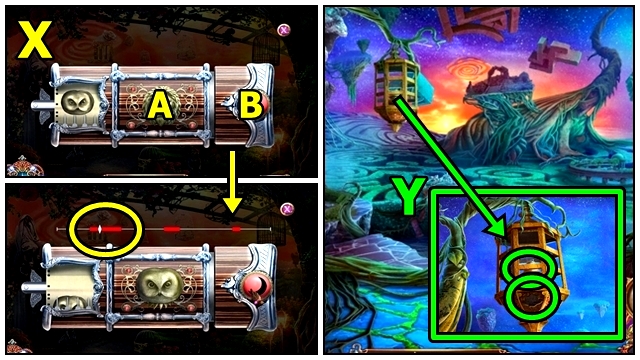
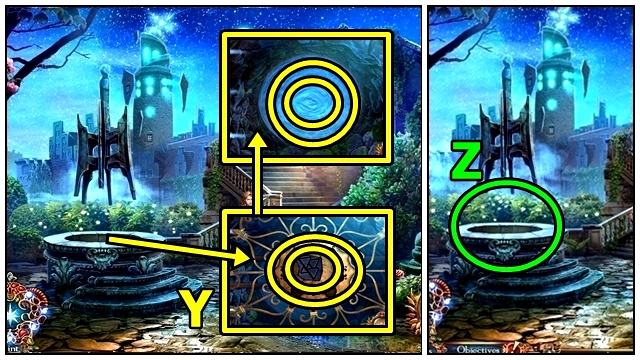
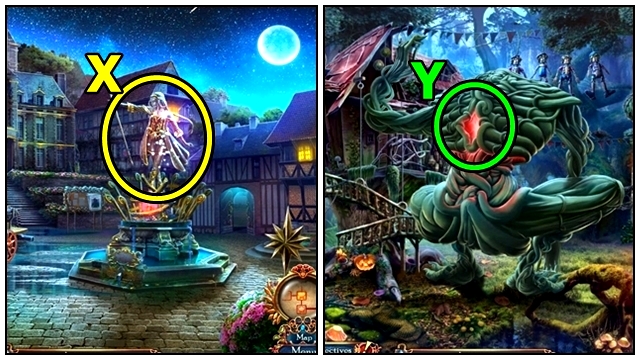
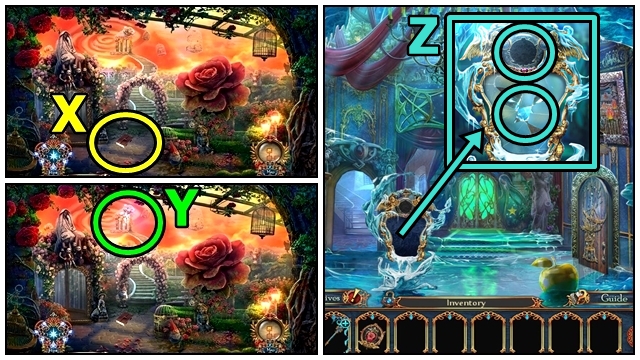
- Go to Matchstick Shop (X).
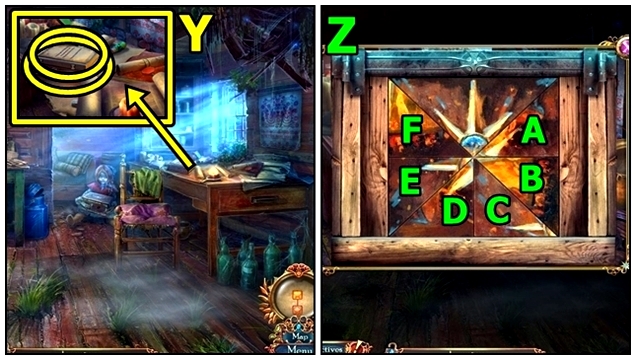
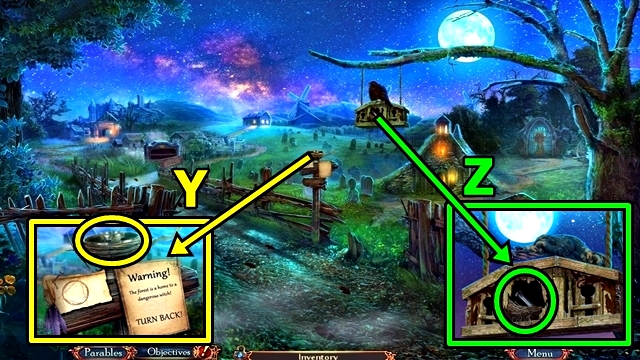
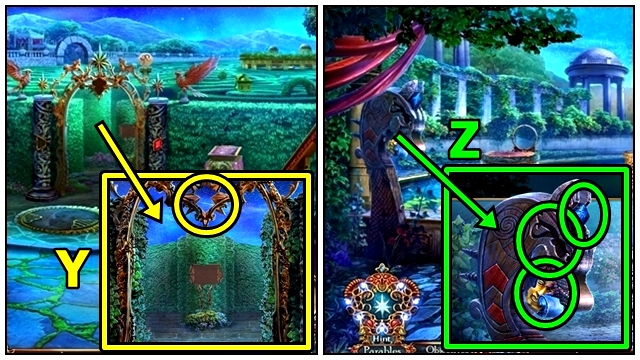
- Read (Y). Examine.
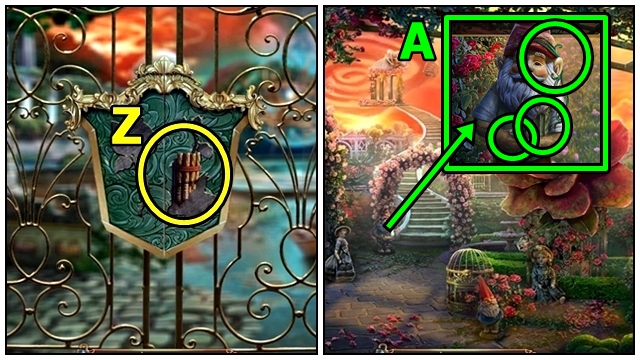
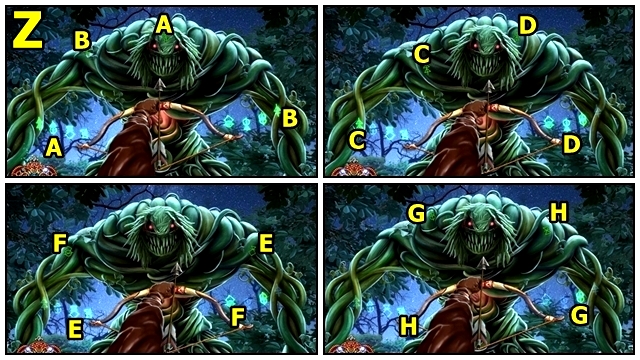
- Solution (Z): (A-E)-(B-D)-(C-F). Take MATCHSTICK SHOP LOGO.
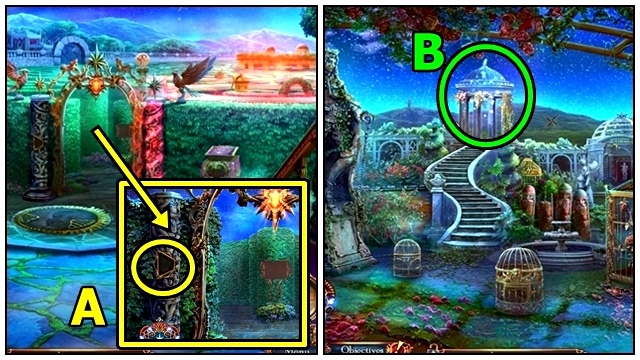
- Move down.
- Insert MATCHSTICK SHOP LOGO (A). Take GOLD COIN and OLD KEY.
- Go to Gatehouse (B).
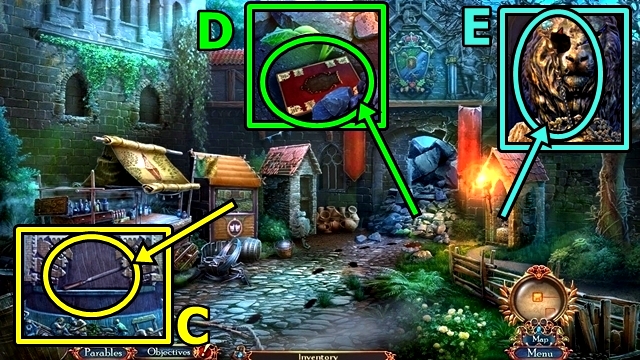
- Take METAL FILE (C).
- Take ROYAL DIARY (D).
- Take KING'S SCEPTER (E).
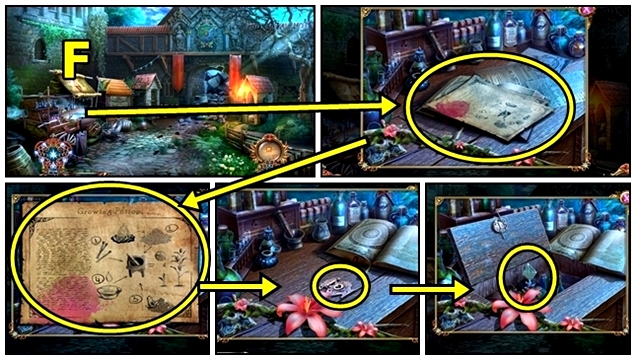
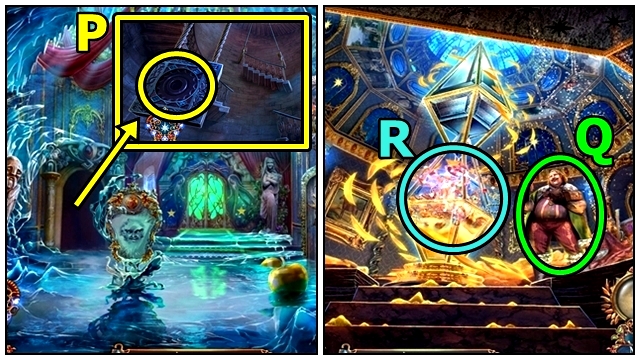
- Examine (F). Take GROWTH POTION RECIPE. Insert OLD KEY; take TOY BOX PART.
- Move down.
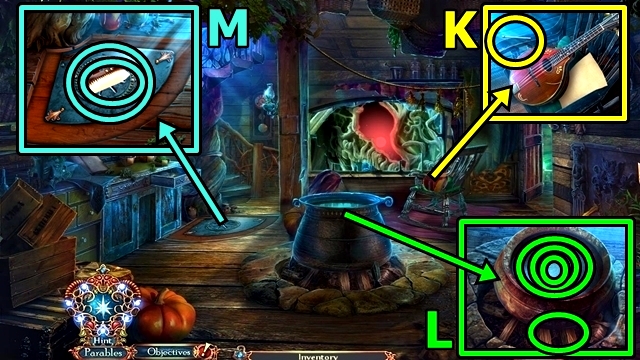
- Use METAL FILE (G).
- Examine (H). Play HOP; receive KING PLATE.
- Return to Matchstick Shop.
- Insert TOY BOX PART (I). Talk. Offer GOLD COIN. Talk. Open box; take PHOSPHORUS MATCHES and SCROLL PLATE.
- Return to Gatehouse.
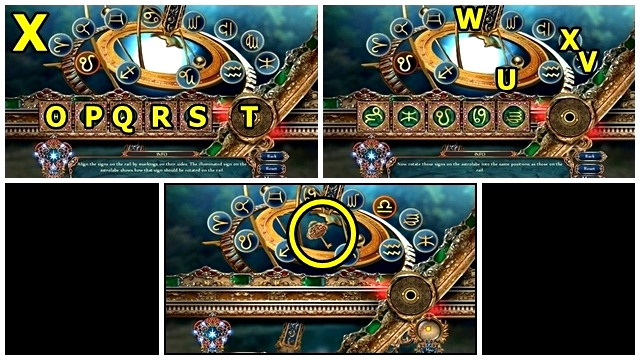
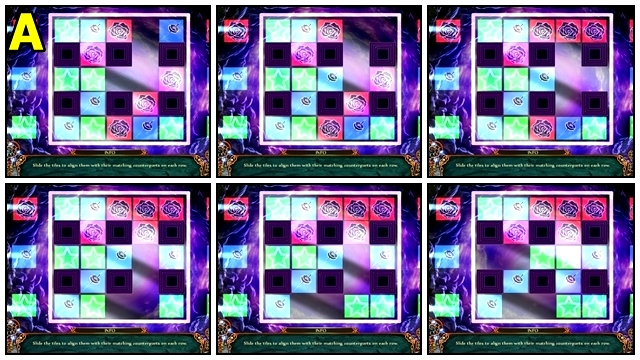
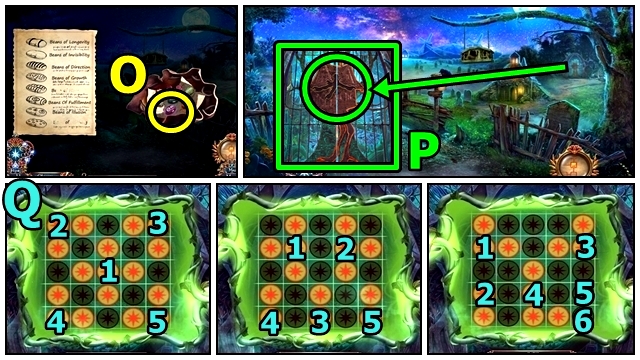
- Add KING PLATE and SCROLL PLATE (J). Examine.
- Solution: D-Cx2-Bx3-Ax2 (K).
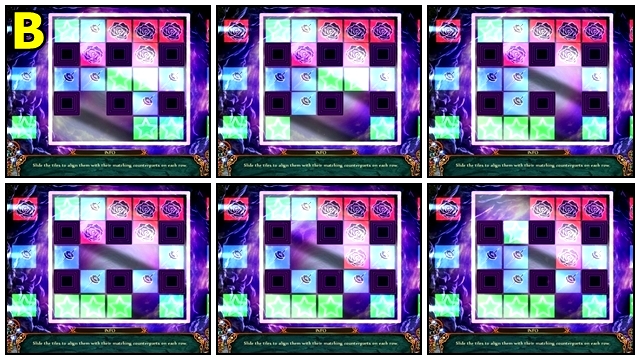
- Solution: (L).
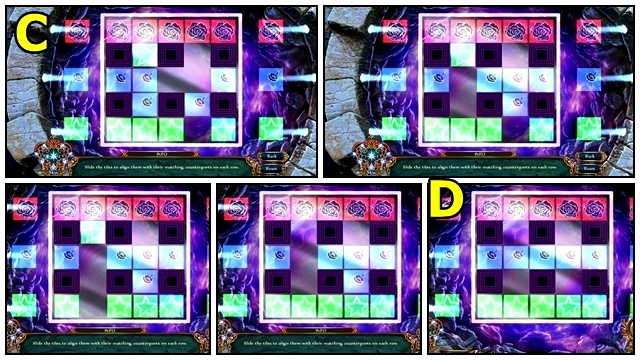
- Solution: (M).
- Solution: (N). Take STARDUST.
- Return to Village Square.

- Use EMPTY BUCKET (O); receive BUCKET OF WATER.
- Return to Matchstick Shop.
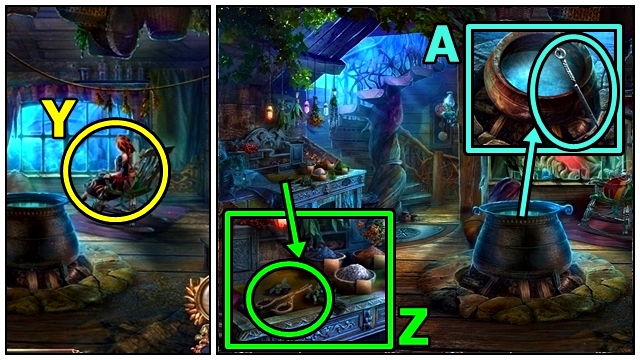
- Add GROWTH POTION RECIPE, STARDUST, PHOSPHORUS MATCHES, BUCKET OF WATER and SCOOP WITH ASHES (P). Examine recipe. Add matches, ashes, stardust and water in order shown to bowl. Take GROWTH POTION.
- Return to Gatehouse.
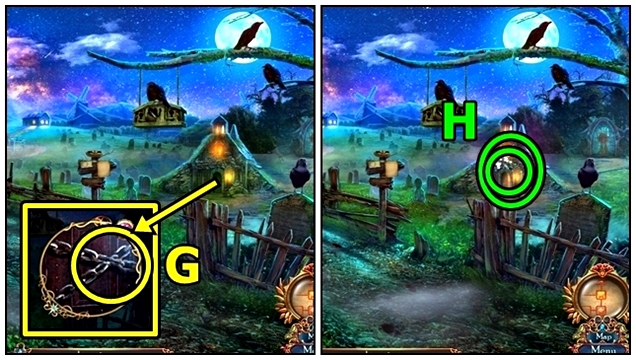
- Use GROWTH POTION (Q).
- Move forward.
Chapter 2: Egeskov
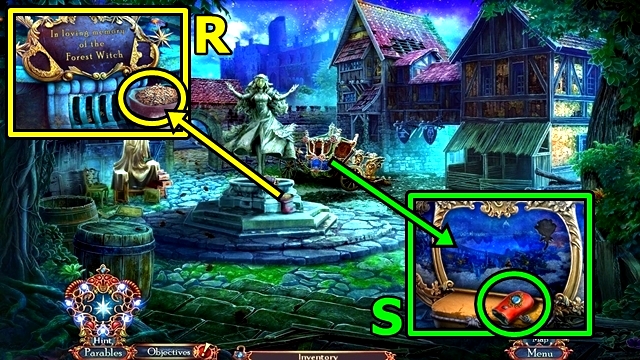
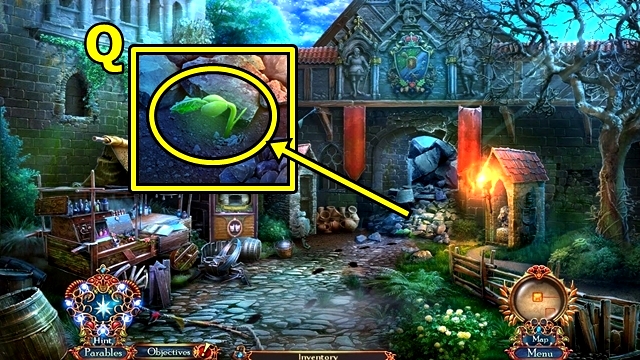
- Take SEEDS (R).
- Empty (S). Take SKY KINGDOM INSIGNIA.
- Go to Drawbridge.
- Add KING'S SCEPTER (T).
- Take COG (U).
- Move down, go right to Starlight Lane.
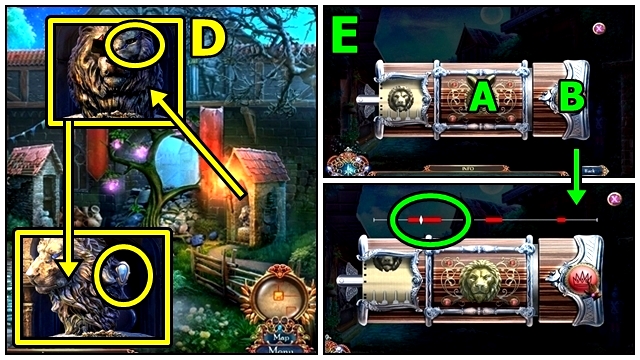
- Take PLIERS and WOODEN HAMMER (V).
- Take KNOB (W). Add COG. Take LION MUSIC CYLINDER.
- Use PLIERS (X); take LIT LANTERN.
- Return to Countryside.
- Add SEEDS (Y).
- Take CHISEL (Z).
- Return to Town Remnants.
- SKY KINGDOM INSIGNIA on ROYAL DIARY (inventory); take GOLDEN ROSE.
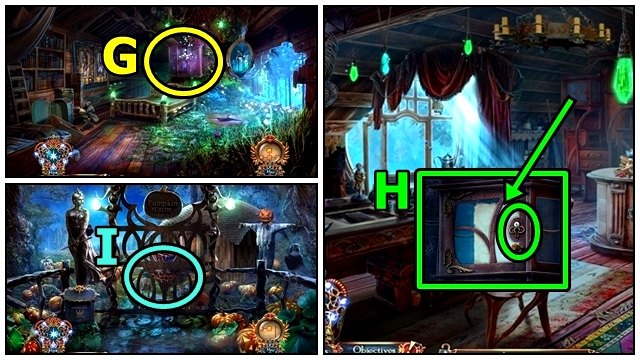
- Insert GOLDEN ROSE (A); take ORNATE BOX. Add LIT LANTERN.
- Play HOP (B); receive MUSIC BOX.

- Take BROKEN HATCHET (C). Remove. Talk. Use CHISEL and WOODEN HAMMER; receive SAPPHIRE EYE. Add KNOB; take GOLDEN APPLE.
- Move down.
- Insert SAPPHIRE EYE (D). Take FOREST PENDANT.
- Return to Starlight Lane.
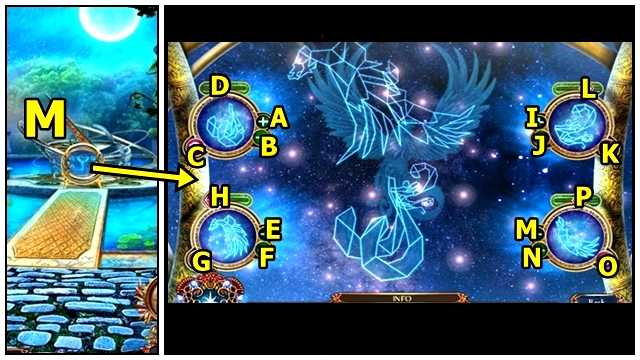
- LION MUSIC CYLINDER on MUSIC BOX (inventory).
- Solution (E): A-Bx2. Press B when pointer is on red. Take BAS-RELIEF PART.
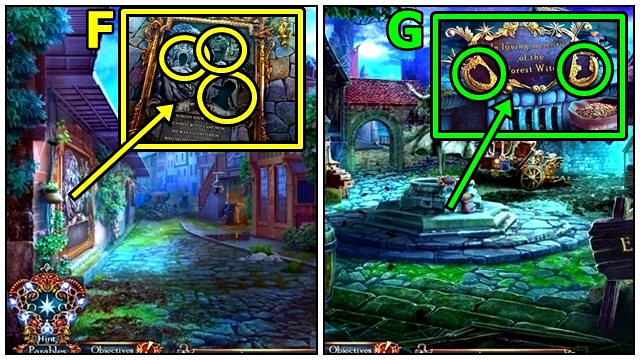
- Add GOLDEN APPLE, FOREST PENDANT and BAS-RELIEF PART (F). Take WITCH TILE.
- Move down.
- Open ORNATE BOX (inventory); take ROPE and ORNATE HEART.
- Add ORNATE HEART and WITCH TILE (G).
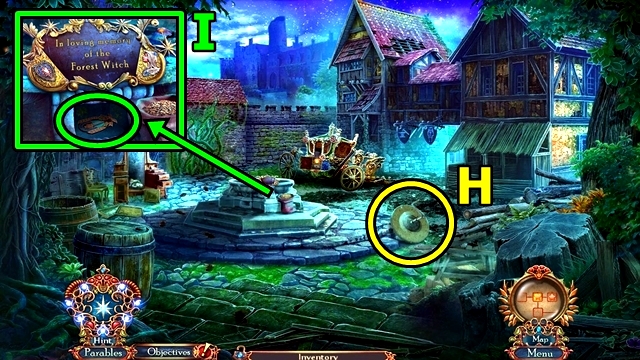
- Take GRINDING STONE (H).
- Take BRIDGE INSIGNIA (I).
- Go to Starlight Lane.
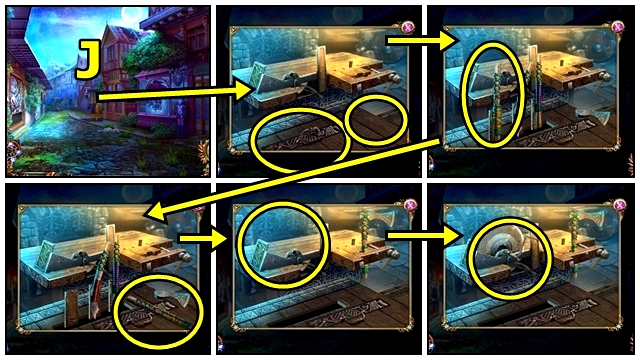
- Add BROKEN HATCHET (J). Open. Choose handle. Grab handle. Add GRINDING STONE; turn lever. Receive HATCHET.
- Move down.
- Use HATCHET (K).
- Go to Drawbridge.
- Insert BRIDGE INSIGNIA (L). Take BOLAS. Adjust levers to match screenshot.
- ROPE on BOLAS (inventory); receive ROPE WITH BOLAS.
- Use HATCHET (M).
- Throw ROPE WITH BOLAS (N). Attach. Push.
- Take RUBY EYE (O).
- Move forward.

- Talk (P). Receive SUNDIAL PART.
- Take SCRAPER (Q).
- Move forward.
- Use SCRAPER (R). Rearrange tiles. Select stars. Take BROKEN WING.
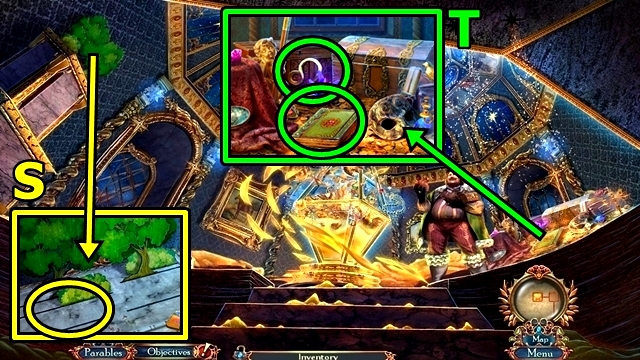
- Take CANVAS PIECE (S).
- Move down.
- Add CANVAS PIECE (T). Note time.
- Add BROKEN WING (U).
- Open (V); close book. Take DRAGON EYE. Adjust time. Take DRAINED NAVIGATOR GEM.
- Move forward.
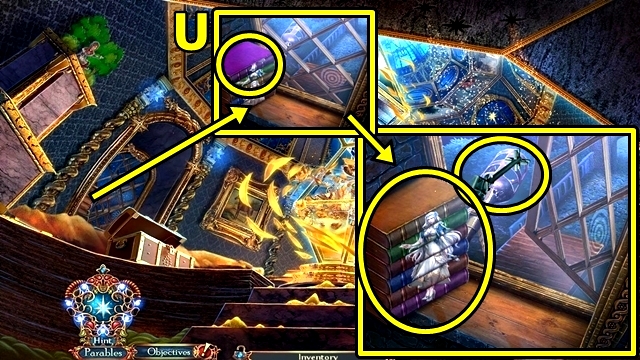
- Add DRAINED NAVIGATOR GEM (W).
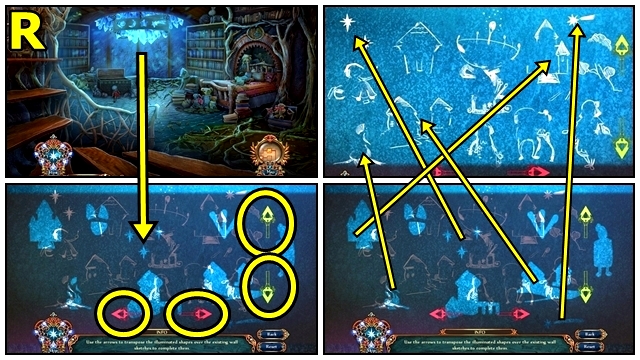
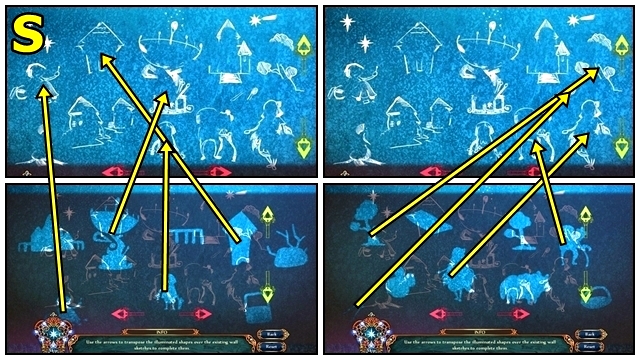
- Solution (X): Cx2-F-Bx16-H; Cx8-Dx7-H; Ax6-Dx8-H; E-Cx16-Bx14-H; F-Ax14-Dx7-H; G-Bx8-H; Dx17-H; E-Cx11-Dx4-H. Take CHARGED NAVIGATOR GEM (I).
- Add CHARGED NAVIGATOR GEM (Y).
- Go right to Courtyard.
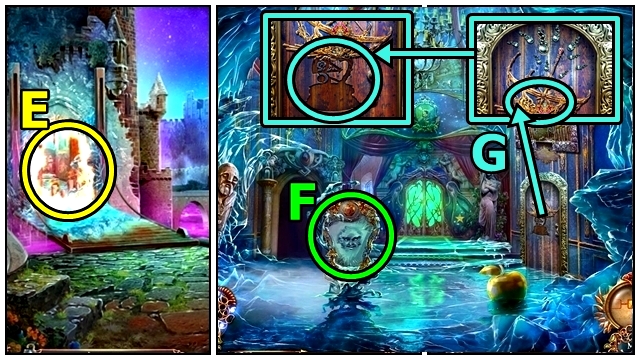
- Take ENCHANTED JEWEL (Z). Add DRAGON EYE; take SUN PLATE.
- Move down.
- Insert ENCHANTED JEWEL (A).
- Move left to Rose Terrace.
- Play HOP (B); receive SHIELD MOTIF.
- Return to Castle Hallway.
- Add SHIELD MOTIF (C).
- Take SICKLE (D).
- Move forward.
- Add SUN PLATE (E); take TOTEM FACE PART.
- Return to Rose Terrace.
- Use SICKLE (F). Take TOTEM HEAD.
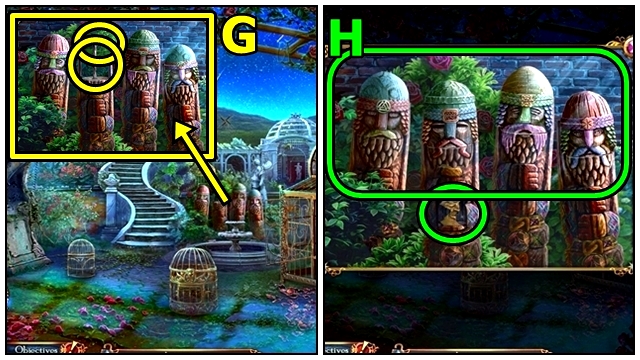
- Add TOTEM FACE PART and TOTEM HEAD (G).
- Arrange faces (H). Take MOON PLATE.
- Move down.
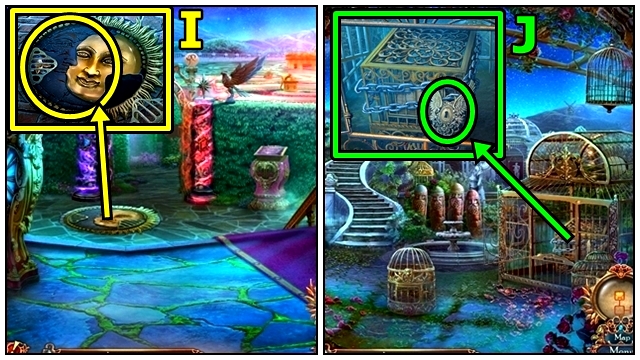
- Add MOON PLATE (I); take WINGED KEY.
- Return to Rose Terrace.
- Insert WINGED KEY (J). Examine; take SUNDIAL PART.
- Return to Gatehouse.
- Add RUBY EYE (K); take SUNDIAL PART.
- Return to Courtyard.
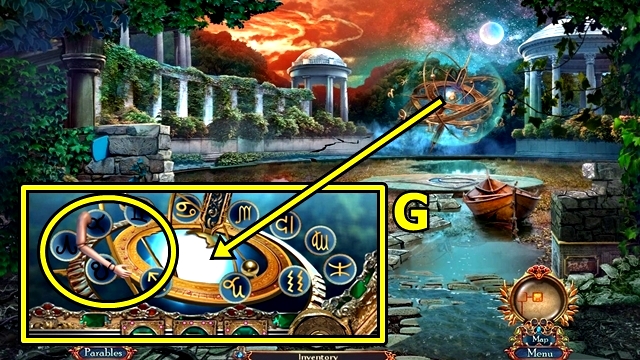
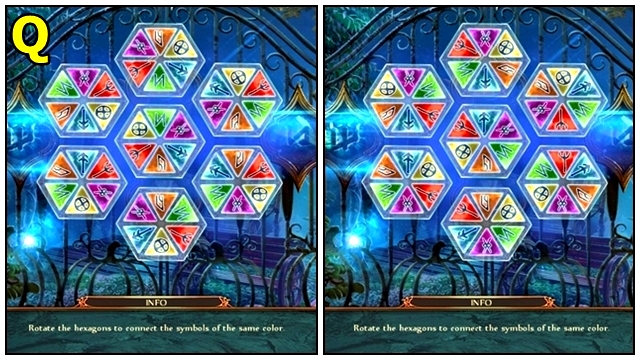
- Add SUNDIAL PARTS (L).
- Solution (M): Cx3-Ax4-slide D to match image; Gx2-F-slide H to match image; Kx3-Ix3-slide L to match image; O-Mx3.
Chapter 3: Sky Kingdom
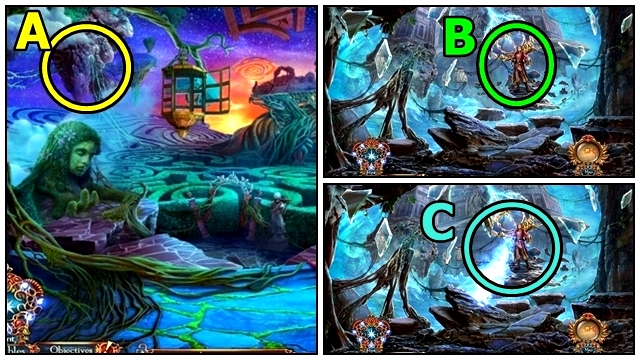
- Talk (N).
- Use (O). Receive HATCHET and ARIES TOKEN.
- Take HANDKERCHIEF (P).
- Move forward.
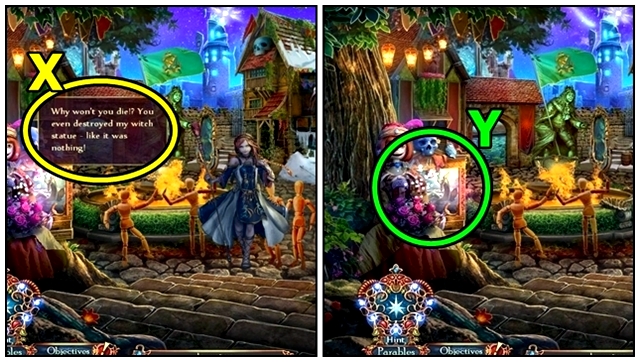
- Talk (Q).
- Push (R).
- Take ICE PICK (S).
- Move forward to Rose Terrace.
- Talk (T).
- Play HOP (U); receive RED ROSE TILE.
- Talk (V).
- Take OWL MUSIC CYLINDER (W).
- Move down.
- OWL MUSIC CYLINDER on MUSIC BOX (inventory).
- Solution (X): A-Bx2. Press B when pointer is on red. Take FLOWER DECORATION.
- Insert FLOWER DECORATION (Y); take OIL.
- Move right to Courtyard.
- Take PAN FLUTE (Z).
- Return to Rose Terrace.
- Take VINE ROPE (A). Add PAN FLUTE. Take WHITE ROSE TILE.
- Return to Courtyard.

- Add RED ROSE TILE and WHITE ROSE TILE (B).
- Talk (C).
- Use HATCHET (D).
- Take SOUL ORNAMENT (E). Use ICE PICK; take FIERY EMBLEM.
- Move tiles (F).
- Take DOLL ARM (G).
- Return to Castle Hallway.

- Add FIERY EMBLEM (H). Take DOLL HEAD.
- Take BROKEN HEART (I). Add SOUL ORNAMENT; take RUBY BRACELET.
- Return to Rose Terrace.
- Take BOOK (J). Add DOLL ARM and DOLL HEAD. Take KNAPSACK.
- Move down.
- Open KNAPSACK (inventory); receive GIANT MATCHSTICK.
- Add GIANT MATCHSTICK and VINE ROPE (K). Take PADDLE.
- Move right.
- Add PADDLE (L).
- Remove butterflies (M). Take RUSTY SHEARS and ILLUSORY FLAME.
- Move down.
- Use ILLUSORY FLAME (N); take TAURUS SYMBOL.
- OIL, then HANDKERCHIEF on RUSTY SHEARS (inventory); receive GARDEN SHEARS.
- Use GARDEN SHEARS (O); take CRANK.
- Move down.
- Add CRANK (P).
- Enter Vault.
- Talk (Q).
- Play HOP (R); receive GIRL FIGURINE.
- Add GIRL FIGURINE (S). Receive GEMINI TOKEN.
- Examine (T). Take LEO SYMBOL.
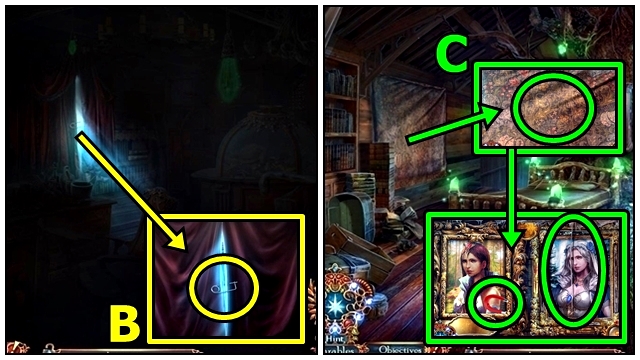
- Add BOOK (U). Rearrange books; take STAR GEM.
- Return to Courtyard.
- Add ARIES TOKEN, TAURUS SYMBOL, LEO SYMBOL and GEMINI TOKEN (V).

- Solution (W): A-C, (C-D)x3, A-B, (B-D)x2, (A-D). Ex2, Fx3. G-J, G-I, G-H; (G-K)x2, (H-K)x2, I-K, (J-K)x3. Lx3, M, N.
- Solution (X): P-S, Q-R, P-Q, O-P; (O-T)x2, P-T, (Q-T)x2, (R-T)x2, (S-T)x3. Ux3, Vx2, Wx3, X. Take ROSE KEY.
- Return to Rose Terrace.

- Insert ROSE KEY (Y).
- Talk (Z).
- Take STAR BOX (A).
- Return to Vault.
- STAR GEM on STAR BOX (inventory); receive GOLDEN STARS.
- Add GOLDEN STARS (B).
Chapter 4: Back to Reality
- Take TORCH (C).
- Take COIN OF DESIRE (D).
- Move down.
- Play HOP (E); receive SPINDLE BOX.
- Add TORCH (F); receive LIT TORCH.
- Go right to Starlight Lane.
- Take BROOM (G). Add BROKEN HEART; take MASK.
- Move down.
- Add MASK (H); take AQUAMARINE BRACELET.
- Return to Drawbridge.
- Add RUBY BRACELET (I) and AQUAMARINE BRACELET. Take TOY WAND.
- Use LIT TORCH (J).
- Talk (K).
- Take SPINDLE WHEEL EMBLEM (L).
- Move down.
- SPINDLE WHEEL EMBLEM on SPINDLE BOX (inventory); receive SPINDLE KEY.
- Insert SPINDLE KEY (M).
- Go to Wishing Well (N).
- Talk (O).
- Use BROOM (P); open.
- Solution: (Q). Take BRASS ORNAMENT.
- Return to Starlight Lane.
- Add TOY WAND (R). Take WITCH FIGURINE.
- Return to Vault.
- Play HOP (S); receive MIRROR FRAME.
- Add WITCH FIGURINE (T); take CROWN.
- Add BRASS ORNAMENT (U); take MANNEQUIN HAT.
- Return to Drawbridge.
- Add CROWN (V); take PORTAL SEAL.
- Move down.
- Add MANNEQUIN HAT (W); take MIRROR.
- MIRROR on MIRROR FRAME (inventory); take GOLDEN MIRROR.
- Add GOLDEN MIRROR (X); take MAGIC SPINDLE.
- Go to Wishing Well.
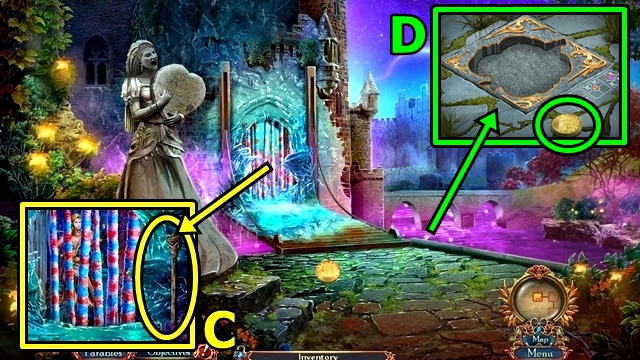
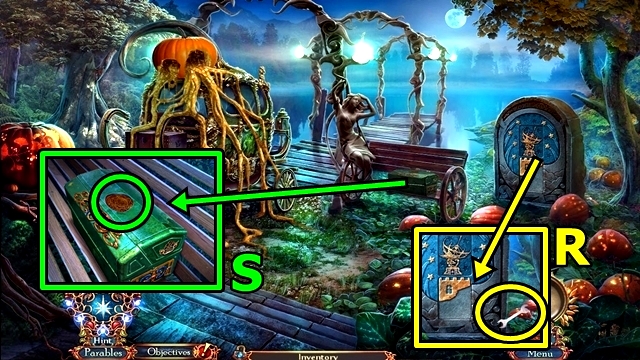
- Take SQUARE FROST RUNE (Y); add PORTAL SEAL. Add MAGIC SPINDLE, then COIN OF DESIRE.
- Examine (Z).
- Solution: (A).
- Solution: (B).
- Solution: (C). Final result (D).
- Talk (E). Take BAG OF MAGIC BEANS.
- Examine (F).
- Move down.
Chapter 5: The Witch's Hut
- Take LOCKPICK (G).
- Use LOCKPICK (H); take WARDROBE EMBLEM and SMALL CROWN.
- Return to Countryside.
- Play HOP (I); receive MURAL PANEL.
- Return to Wishing Well.
- Add SMALL CROWN (J); take RABBIT MUSIC CYLINDER.
- Move down.
- RABBIT MUSIC CYLINDER on MUSIC BOX (inventory).
- Solution (K): A-Bx2. Press B when pointer is on red. Take EURIG EMBLEM.
- Insert EURIG EMBLEM (L). Take STAFF HANDLE and MAGIC BEANS LIST.
- Return to Wishing Well.
- Take OVAL RUNIC GEM (M). Add STAFF HANDLE; take MURAL PART.
- Add MURAL PANEL and MURAL PART (N). Take BIRD-CLAW INSIGNIA.
- Return to Countryside.
- Open BAG OF MAGIC BEANS (inventory); add MAGIC BEANS LIST. Take ILLUSORY BEANS (O).
- Insert BIRD-CLAW INSIGNIA (P); take DRAWING PART. Add ILLUSORY BEANS.
- Solution: (Q).
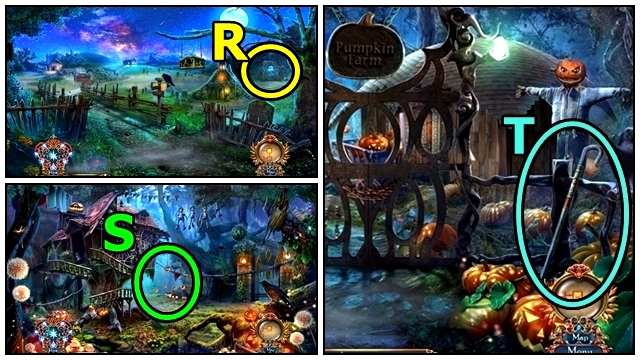
- Go to Forest Path (R).
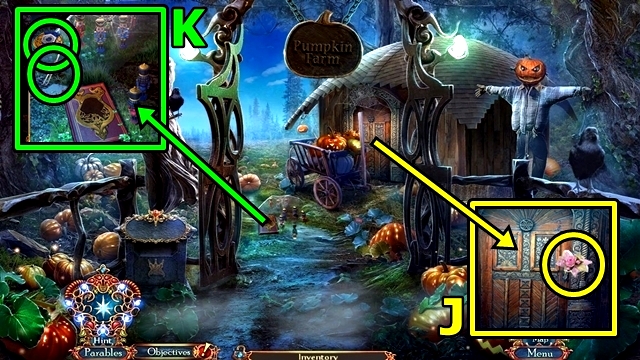
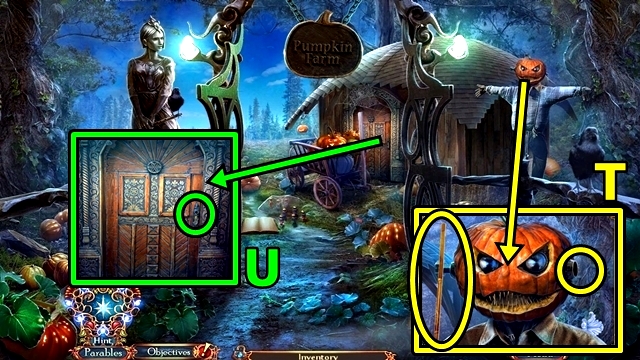
- Go to Pumpkin Farm (S).
- Take SHEPHERD'S STAFF (T).
- Move down.
- Use SHEPHERD'S STAFF (U). Take WOODCUTTER'S KNIFE.
- Take INCOMPLETE DOLL CLUE (V). Use WOODCUTTER'S KNIFE; take AMELIA'S AMULET.
- Move forward.
- Add AMELIA'S AMULET (W); take DRAWING PART.
- Move down.
- DRAWING PARTS on INCOMPLETE DOLL CLUE (inventory); receive DOLL CLUE.
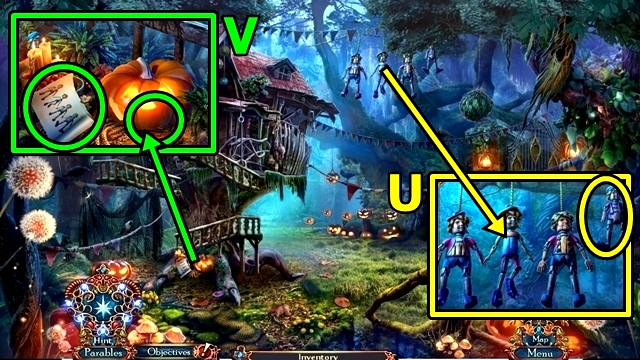
- Add DOLL CLUE (X); pull dolls.
- Enter Witch's Hut.
- Talk (Y).
- Take SCISSORS (Z).
- Take FIRE POKER (A).
- Move up to Arcane Lab.
- Take SAFETY PIN (B).
- Move down, go right to Loft.
- Use SCISSORS (C). Take MAGNET and THREAD.
- Use SCISSORS (D), then FIRE POKER. Take WAND.
- Read (E). Use SAFETY PIN.
- Play HOP (F); receive PINOCCHIO FIGURINE.
- Return to Arcane Lab.
- Read (G). Add PINOCCHIO FIGURINE. Take INGREDIENT BOOK and PUMPKIN EMBLEM.
- Use MAGNET (H); receive DRAWER ORNAMENT.
- Move down.
- Add INGREDIENT BOOK (I). Take BAKING POWDER. Insert DRAWER ORNAMENT. Read; take ANIMAL FAT.
- Go to Arcane Lab.
- Use ANIMAL FAT (J). Open; take RUSTY MATCHSTICK EMBLEM.
- Move down.
- Take MATCHES (K).
- Use MATCHES (L). Add RUSTY MATCHSTICK EMBLEM, THREAD, then BAKING POWDER. Take MATCHSTICK EMBLEM.
- Take BRUSH (M). Insert MATCHSTICK EMBLEM.
- Go down to Basement.
- Move items (N). Read. Insert PUMPKIN EMBLEM and WAND. Take VINE-COVERED HEART and QUIVER WITH ARROWS.
- Take LUTE PEG (O).
- Move down.
- Insert LUTE PEG (P). Take LUTE STRING.
- Return to Basement.
- Use ANIMAL FAT (Q), then LUTE STRING.
- Solution (R): Use arrows to move left-right, up-down.
- Solution: (S).
- Move forward.
- Take DAMAGED BOW (T).
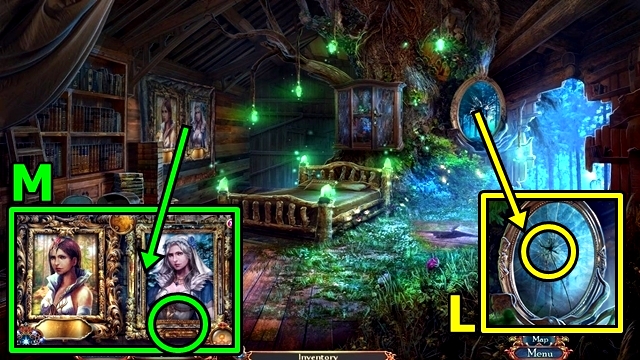
- Take ANGEL FIGURINE (U). Add BRUSH; receive RECTANGLE FROST RUNE. Add DAMAGED BOW; press; take BOW.
- Move down.
- Add ANGEL FIGURINE (V); read; take SHARPENING STONE.
- Move forward.
- Use SHARPENING STONE (W). Press runes.
- Move up to Village Square.
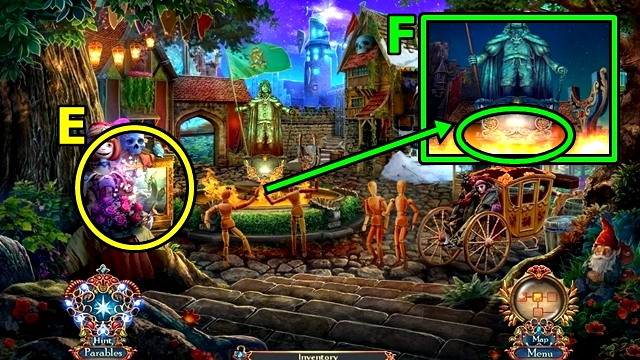
- Play HOP (X); receive EMERALD DECORATION.
- Return to Forest Path.
- QUIVER WITH ARROWS on BOW (inventory); receive BOW AND ARROW.
- Use BOW AND ARROW (Y).
- Solution: (Z).
- Talk (A).
- Take PUMPKIN DECORATION (B).
- Take TRIANGULAR RUNIC GEM (C).
- Return to Arcane Lab.
- Read (D). Add EMERALD DECORATION and PUMPKIN DECORATION.
- Play HOP (E); receive DAMAGED WAND.
- Talk (F).
- Return to Loft.
- Play HOP (G); receive CABINET KEY.
- Return to Arcane Lab.
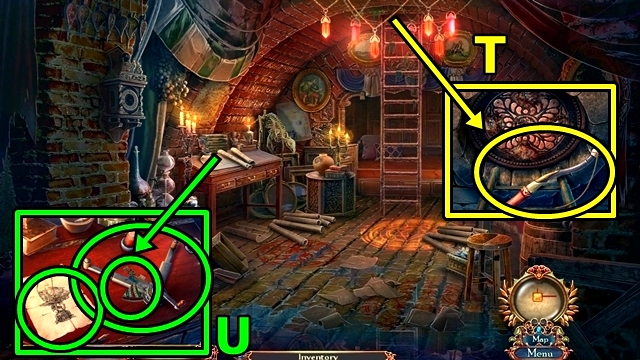
- Insert CABINET KEY (H). Read. Take ACID and BOLT.
- Return to Forest Path, move forward to Pumpkin Farm.
- Use ACID (I).
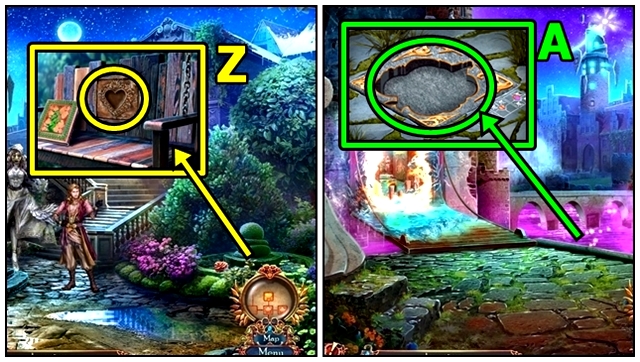
- Take FRAME ORNAMENT (J).
- Take TWEEZERS and TOOLBOX EMBLEM (K).
- Return to Loft.
- Use TWEEZERS (L); receive SQUARE RUNIC GEM.
- Add FRAME ORNAMENT (M); take MATCH GIRL BADGE.
- Return to Pumpkin Farm.

- Add MATCH GIRL BADGE (N). Read; take OCTAGONAL RUNIC GEM.
- Move down.
- Take ANGULAR FROST RUNE (O). Add OVAL RUNIC GEM, TRIANGULAR RUNIC GEM, SQUARE RUNIC GEM and OCTAGONAL RUNIC GEM.
- Examine (P).
- Solution: (Q).
- Go right to Glassy Lake.
- Take WRENCH KEY (R).
- Add TOOLBOX EMBLEM (S); take PUMPKIN KNOB and NAIL.
- Return to Pumpkin Farm.
- Take LONG POLE (T). Add BOLT, then WRENCH KEY. Take MOSAIC PART.
- Add PUMPKIN KNOB (U). Take SCYTHE BLADE.
- Return to Glassy Lake.
- Add MOSAIC PART (V); take GLASS WAND GEM.
- GLASS WAND GEM on DAMAGED WAND (inventory); receive MAGIC GLASS WAND.
- SCYTHE BLADE on LONG POLE (inventory); add NAIL. Receive SCYTHE.
- Use SCYTHE (W); then MAGIC GLASS WAND.
Chapter 6: The Tower
- Talk (X).
- Play HOP (Y); receive MOSAIC.
- Go to Wishing Well.
- Insert VINE-COVERED HEART (Z); take SUN EMBLEM.
- Return to Drawbridge.
- SUN EMBLEM on MOSAIC (inventory); receive MOSAIC TILE.
- Insert MOSAIC TILE (A). Examine.
- Solution: (B). Take SNOWFLAKE DECORATION and BAS-RELIEF PART.
- Move down.
- Add SNOWFLAKE DECORATION (C). Take FROST KEY.
- Go to Starlight Lane.
- Insert FROST KEY (D); take FROST ORB.
- Return to Drawbridge.
- SQUARE FROST RUNE, ANGULAR FROST RUNE and RECTANGLE FROST RUNE on FROST ORB (inventory); receive GLOWING FROST ORB.
- Use GLOWING FROST ORB (E).
- Enter Castle Hallway.
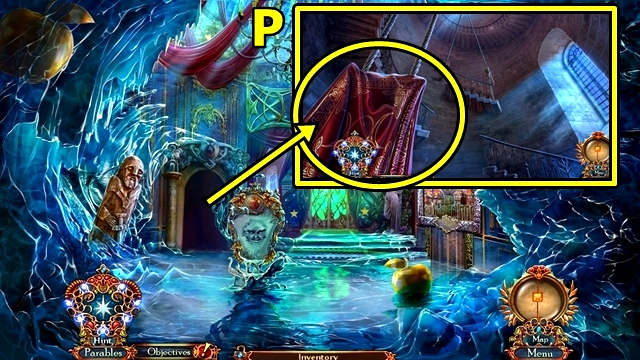
- Talk (F).
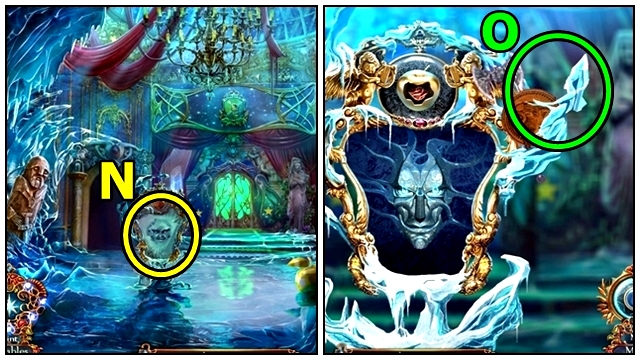
- Look down (G). Add BAS-RELIEF PART.
- Enter Staircase.
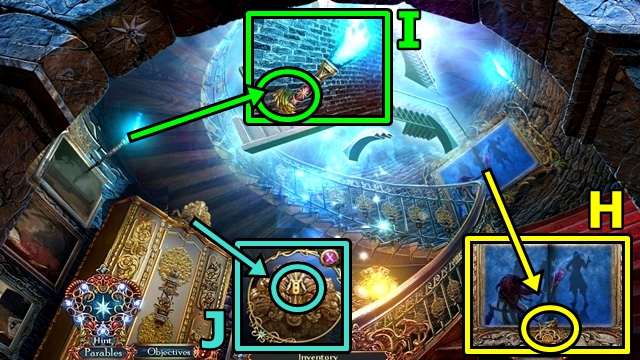
- Take BRASS BIRD FOOT (H).
- Take BRASS BIRD WING (I).
- Add WARDROBE EMBLEM (J).
- Play HOP (K); receive ENCHANTED HAMMERHEAD.
- Move down.
- Add BRASS BIRD WING and BRASS BIRD FOOT (L). Take HAMMER HANDLE.
- Go to Staircase.
- ENCHANTED HAMMERHEAD on HAMMER HANDLE (inventory); receive ENCHANTED HAMMER.
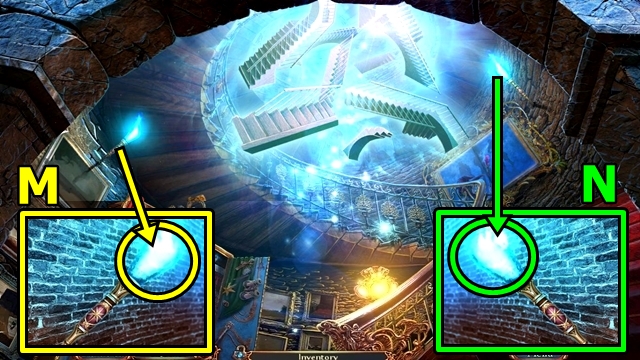
- Use ENCHANTED HAMMER (M).
- Use ENCHANTED HAMMER (N).
- Move up to Tower.
- Talk (O). Examine.
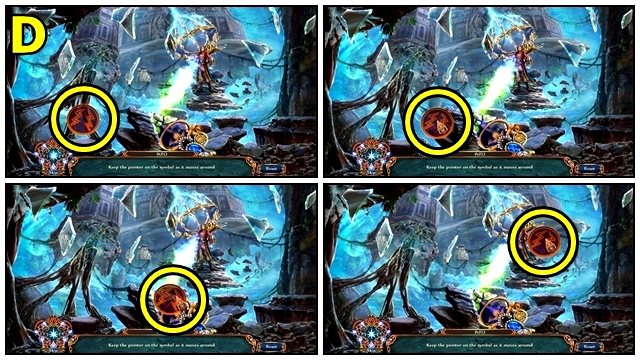
- Use GLOWING FROST ORB (P).
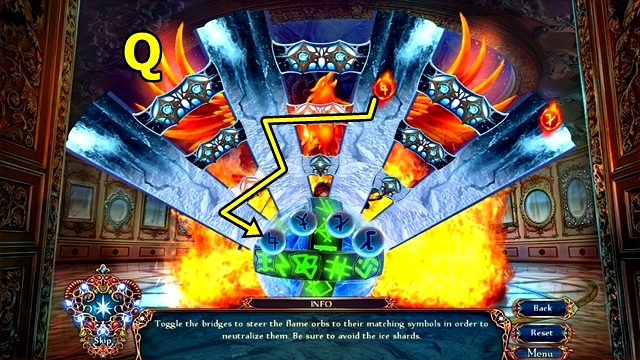
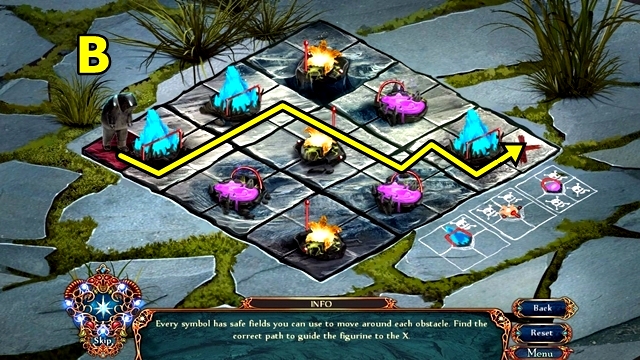
- Solution: Solution is random. Screenshot shows how to move flames (Q).
- Talk (R).
- Talk (S).
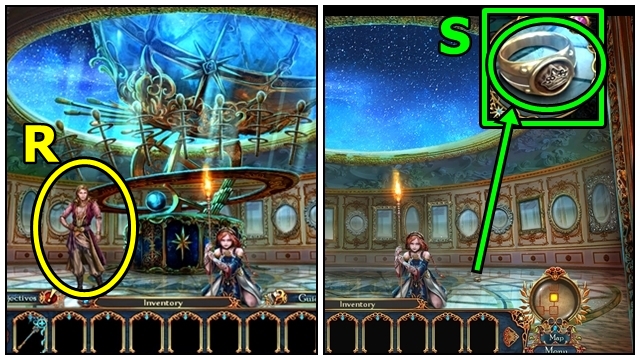
- Take JULIAN'S RING (T).
- Move down.
- Insert JULIAN'S RING (U); take SHIELD TOKEN.
- Move down.
- Talk (V).
- Move forward.
- Talk (W).
- Move forward to Rose Terrace.
- Read (X).
- Play HOP (Y); receive APPLE EMBLEM.
- Return to Castle Hallway.
- Insert APPLE EMBLEM (Z) and SHIELD TOKEN. Take GEM OF ILLUSION.
- Move forward.
- GEM OF ILLUSION on BROKEN WAND (inventory); receive MAGIC GLASS WAND.
- Use MAGIC GLASS WAND (A).
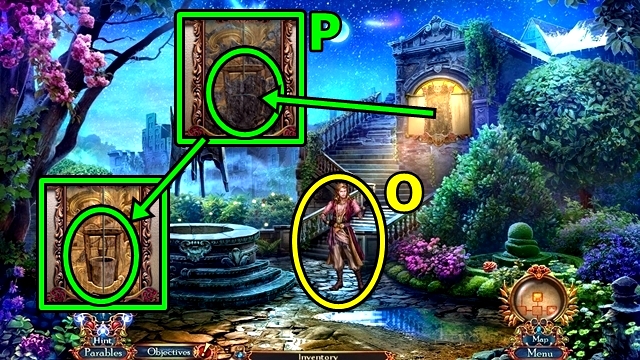
- Go to Distorted Garden.
- Talk (B).
- Use MAGIC GLASS WAND (C).
- Solution: (D).
- Congratulations! You've completed Dark Parables: The Match Girl's Lost Paradise.
Created at: 2018-11-30