

Walkthrough Menu
- General Tips
- Chapter 1
- Chapter 2
- Chapter 3
- Chapter 4
- Chapter 5
- Chapter 6
- Chapter 7
- Chapter 8
- Parables
General Tips
- This is the official guide for Dark Parables: The Swan Princess and the Dire Tree.
- This guide will not tell you when you have to zoom into a location; the screenshots will show each zoom scene.
- Hidden-object puzzles are referred to as HOPs. This guide will not show screenshots of the HOPs, however, it will mention when an HOP is available and the inventory item you'll collect from it.
- Use the Map to fast travel to a location.
Chapter 1
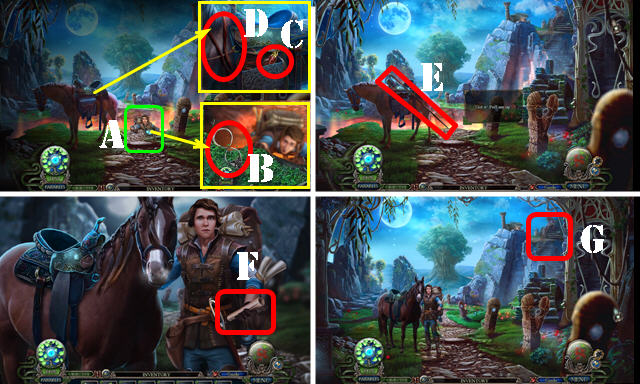
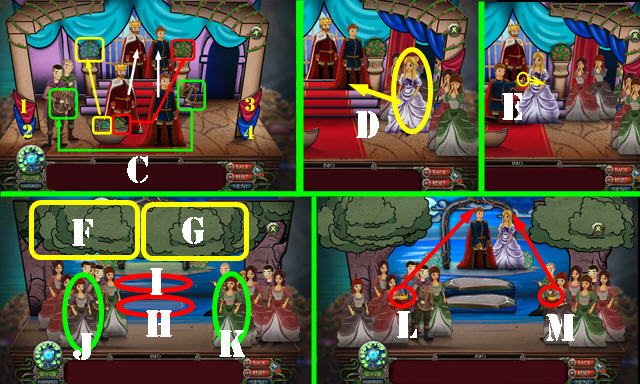
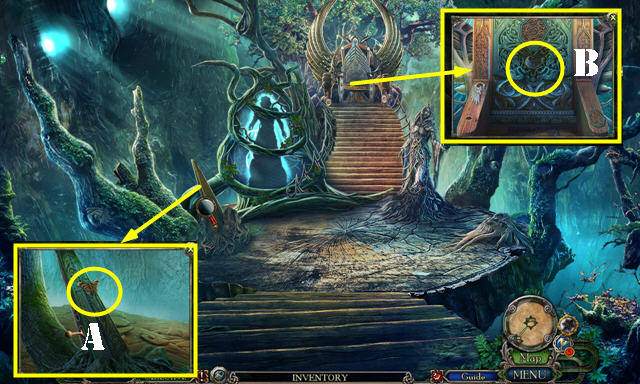
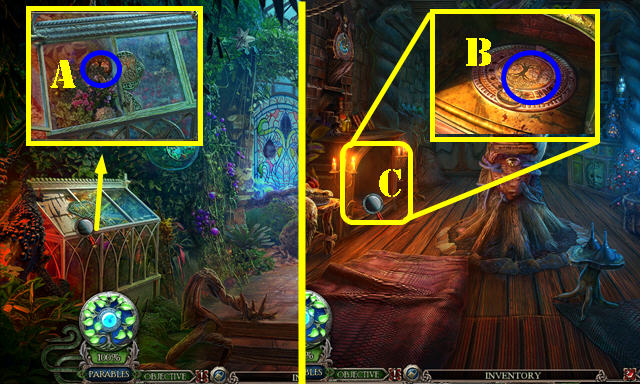
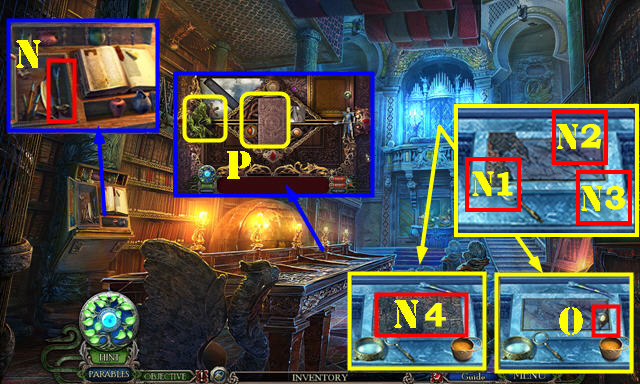
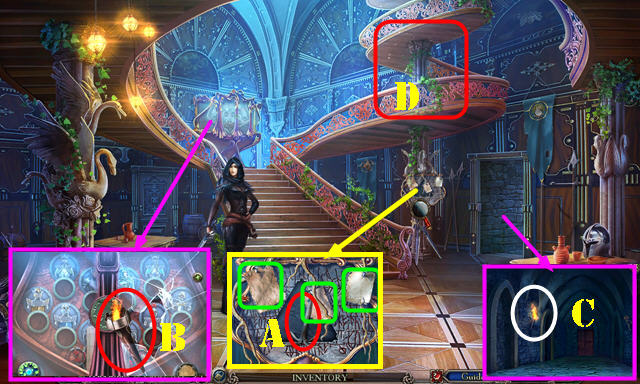
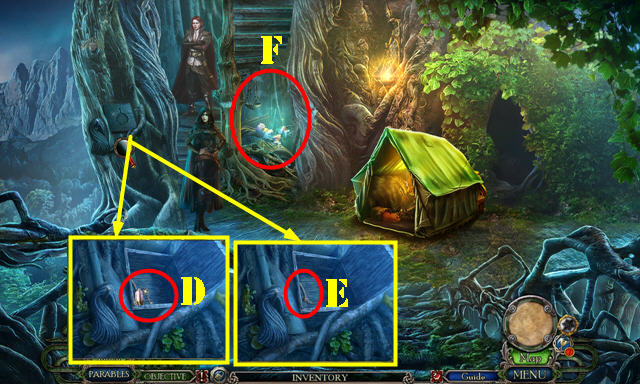
- Talk to the man (A). Take the TAILOR'S SNIPPERS (B).
- Open the bag; take the WATER JUG (C).
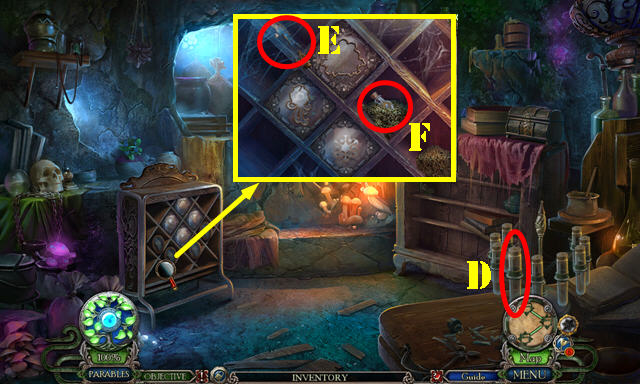
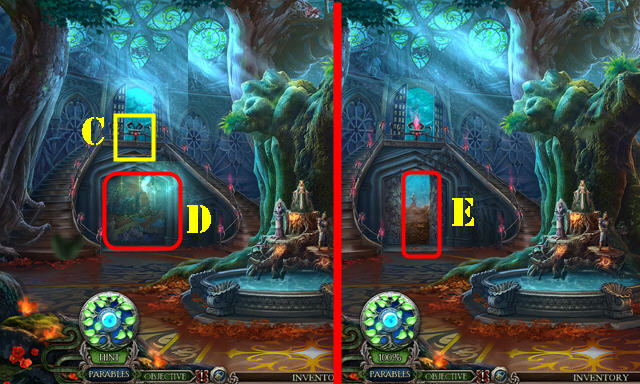
- Use the TAILOR'S SNIPPERS twice (D); select the rope (E).
- Take the PRINCESS' LETTER (F).
- Select the 3 symbols on the PRINCESS' LETTER; take the EYE.
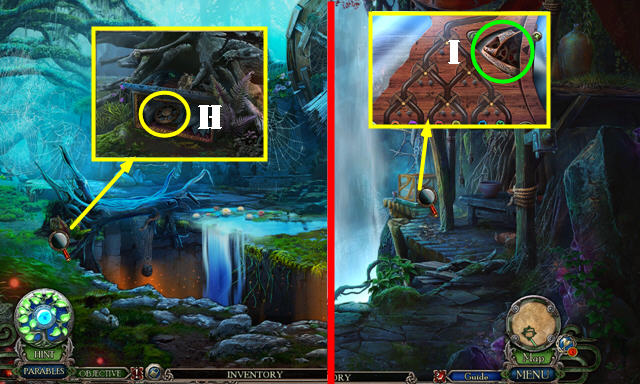
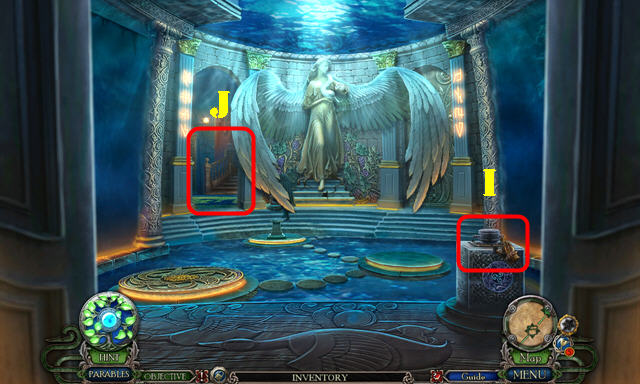
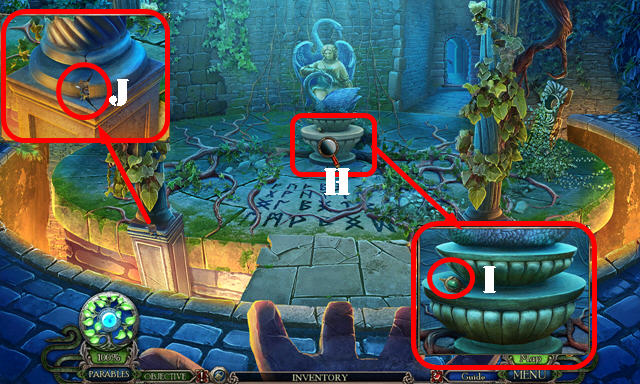
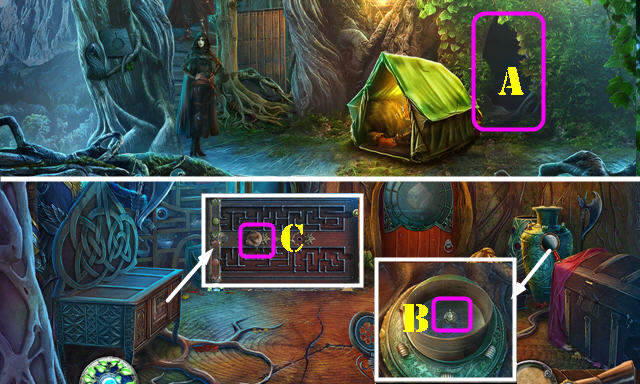
- Go to Highpoint (G).
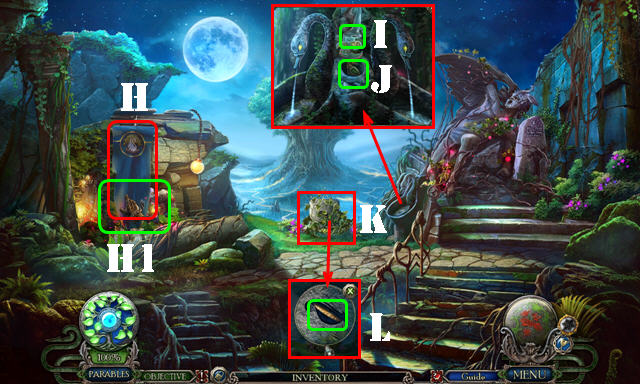
- Take the BANNER POLE (H); play the HOP (H1) to receive the BEAR.
- Use the WATER JUG (I); take the EAGLE (J).
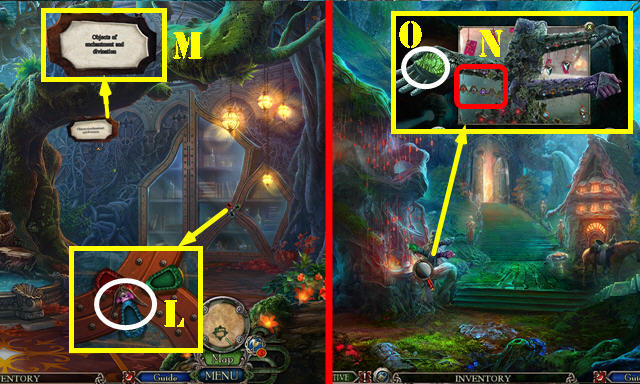
- Use the TAILOR'S SNIPPERS twice (K); take the GOLD COIN (L).
- Walk down.
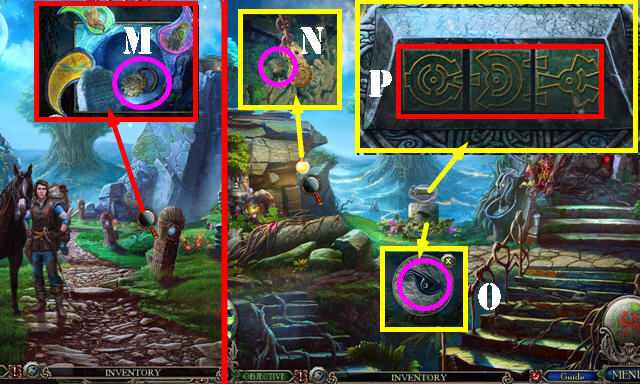
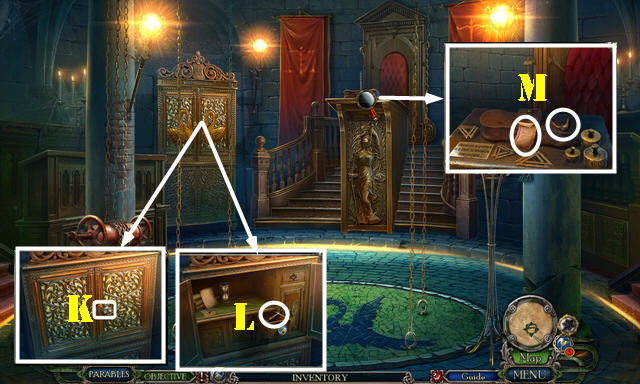
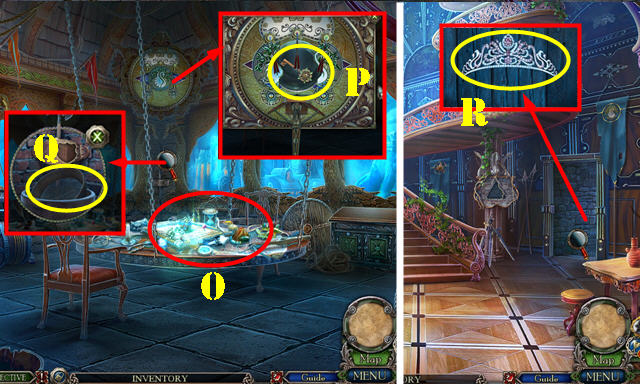
- Place the EAGLE and BEAR; take the SUN EMBLEM and UNPOLISHED LENS (M).
- Go forward.
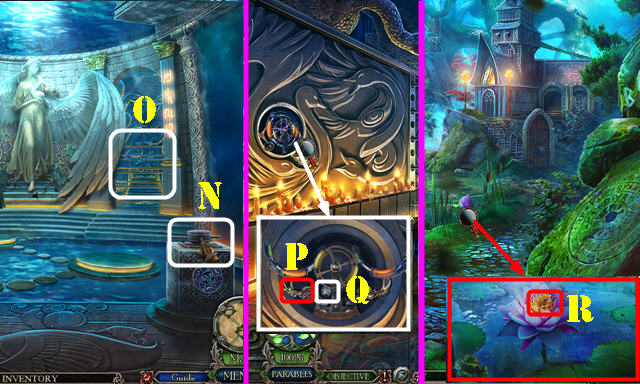
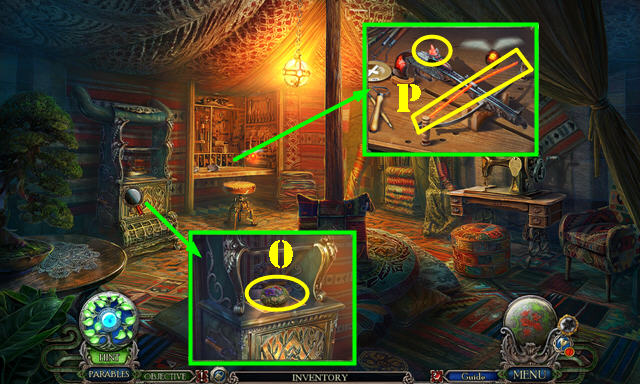
- Place the SUN EMBLEM; receive the LANTERN. Take the POLISHING STONE (N).
- Use the POLISHING STONE 2x on the UNPOLISHED LENS; receive the LENS.
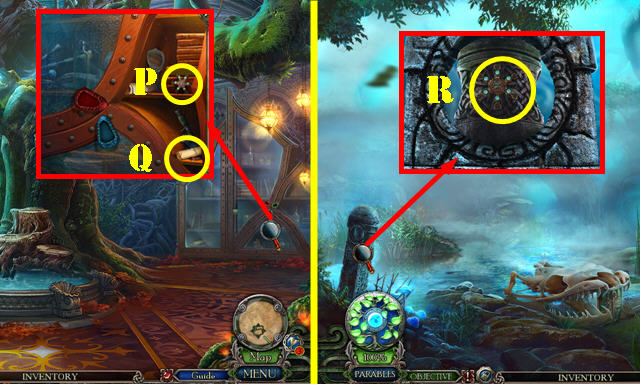
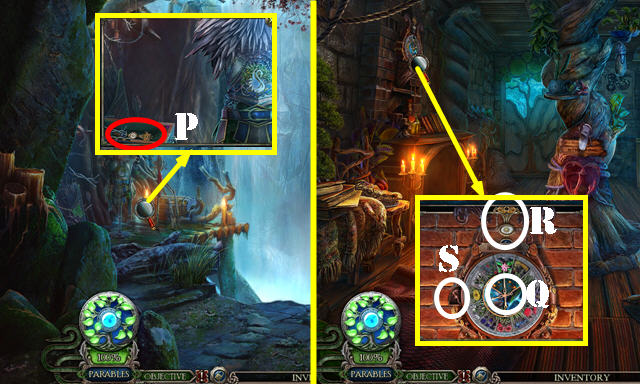
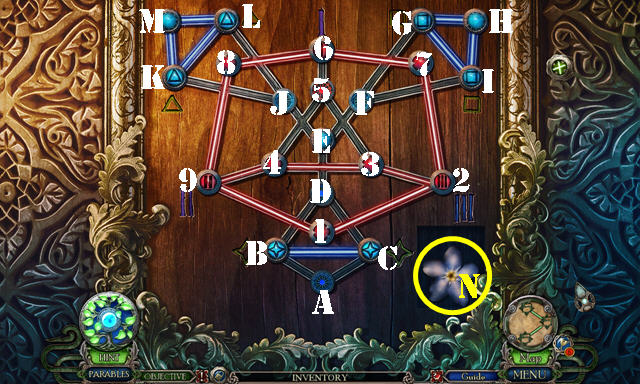
- Place the EYE (O); adjust the images as shown (P). Remove the broken lens; place the LENS. Select the button on the right twice for a puzzle.
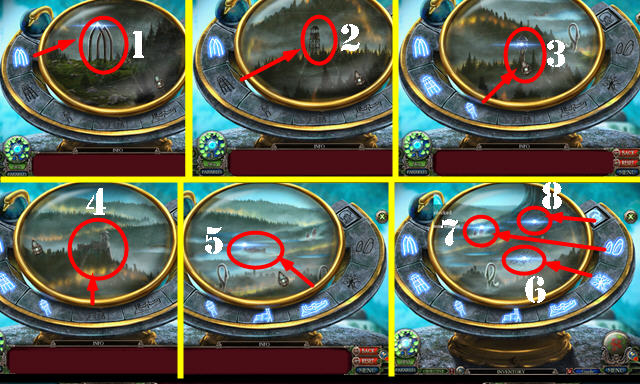
- Solution (1-8).
- Take the NAVIGATION ORB.
- Walk down.
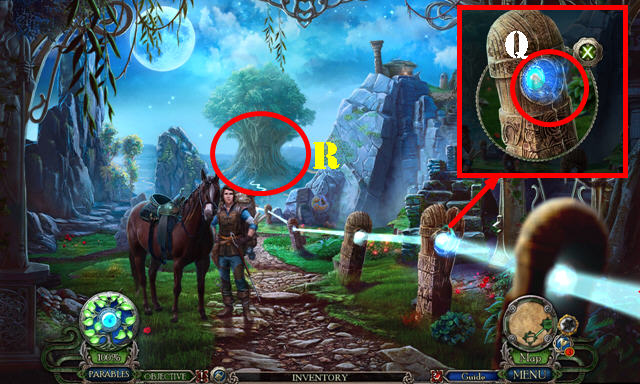
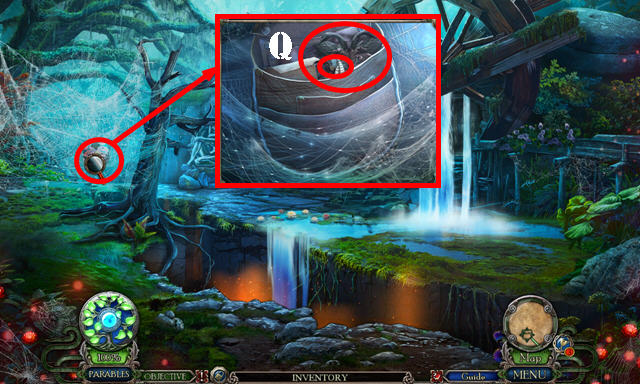
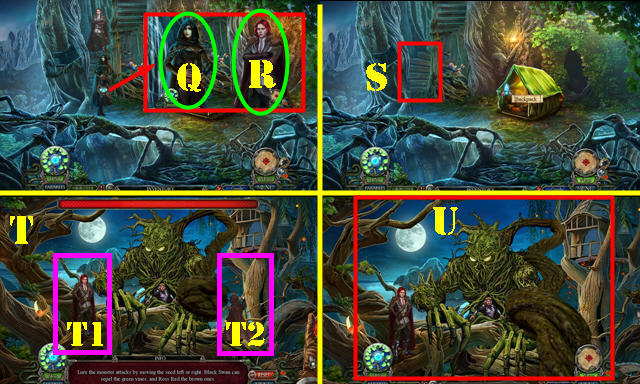
- Place the NAVIGATION ORB (Q).
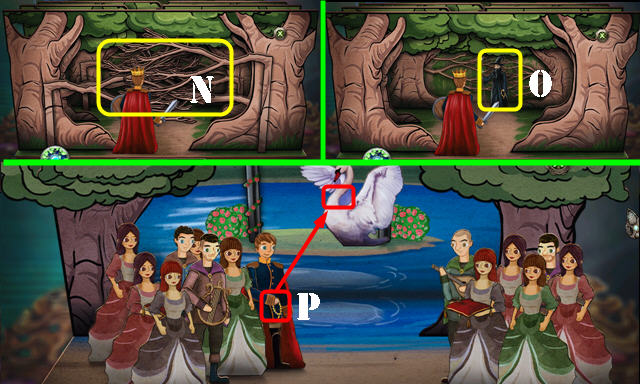
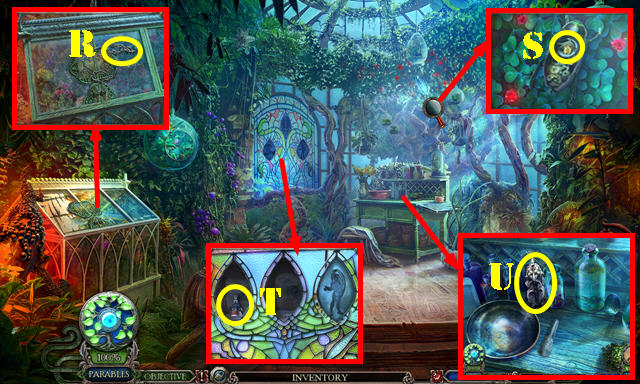
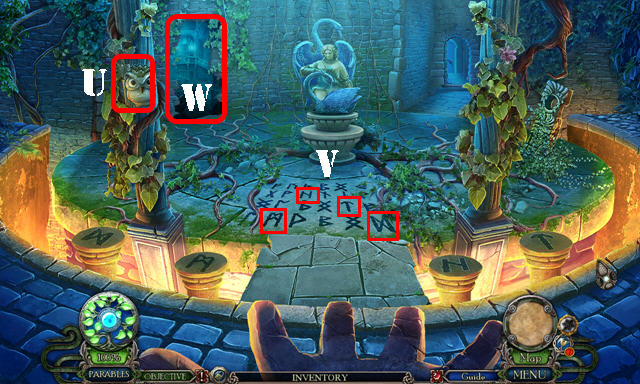
- Go to the Tree Base (R).
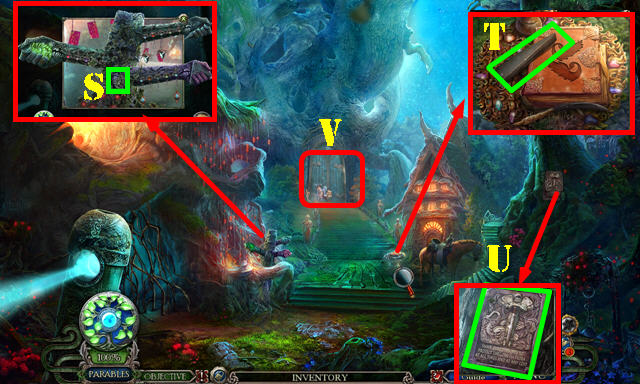
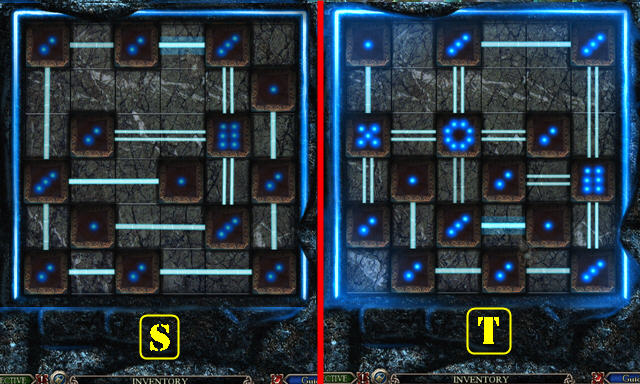
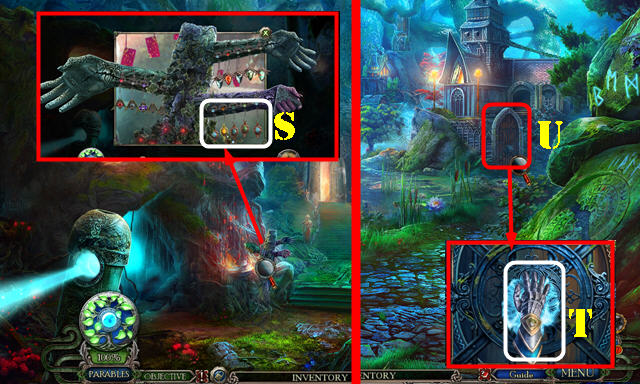
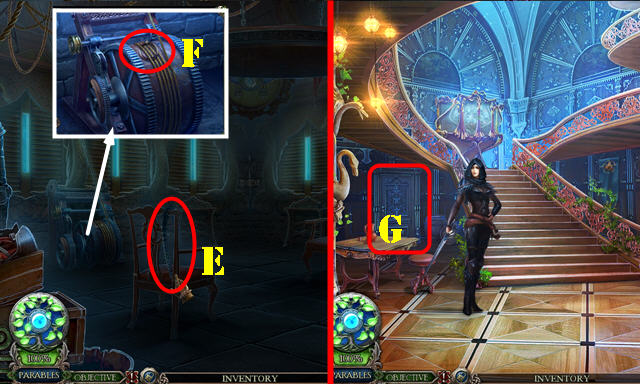
- Take the TOTEM PIECE (S) and WEDGE (T).
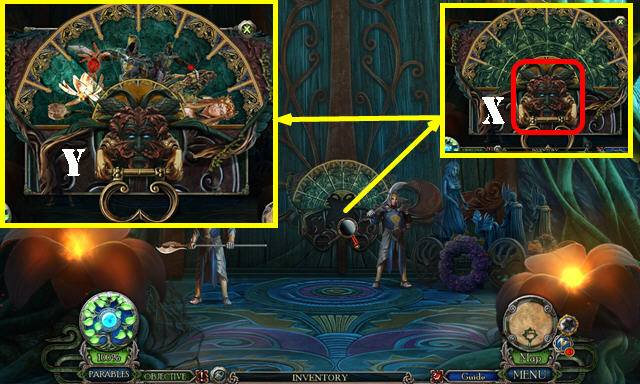
- Look at the sign (U).
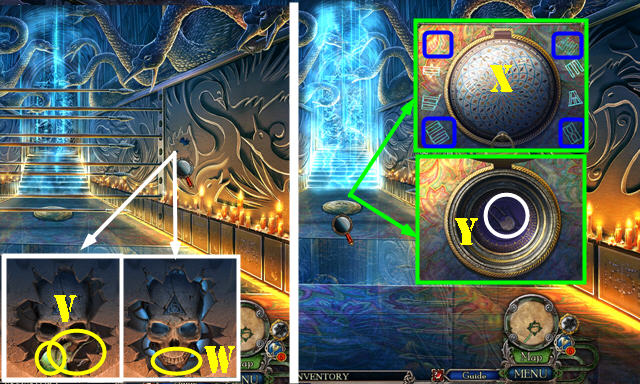
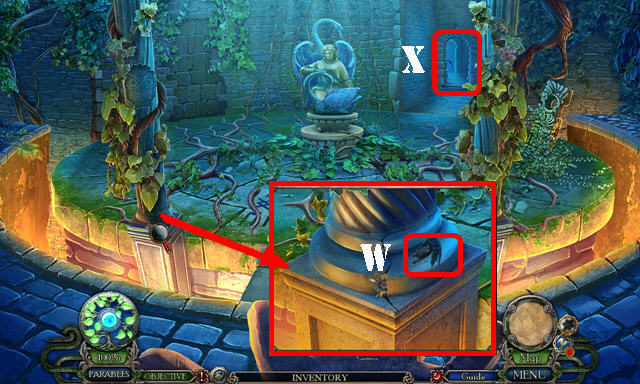
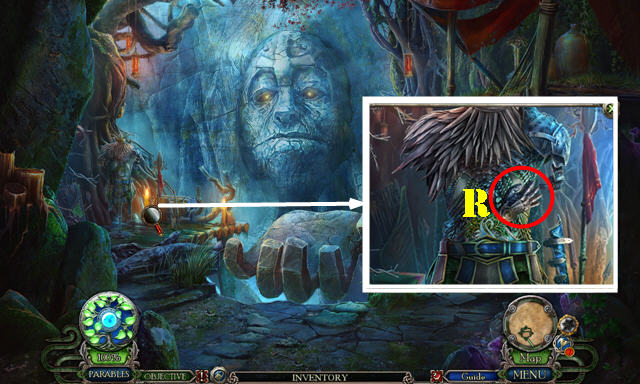
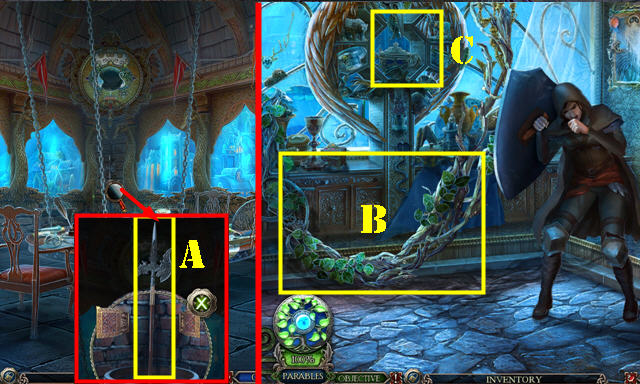
- Go to the Gate (V).
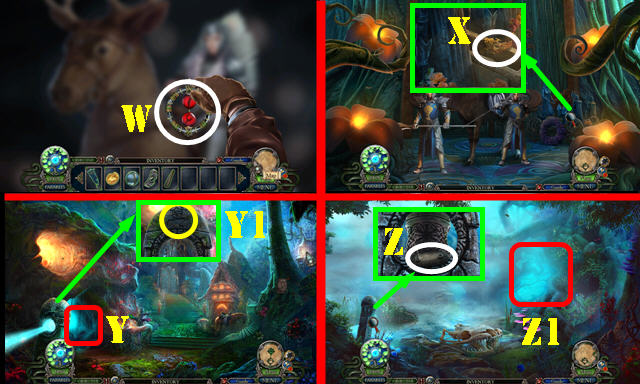
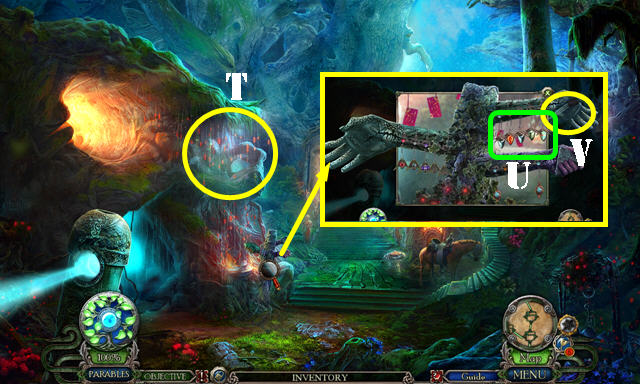
- Take the GUARD TALISMAN (W).
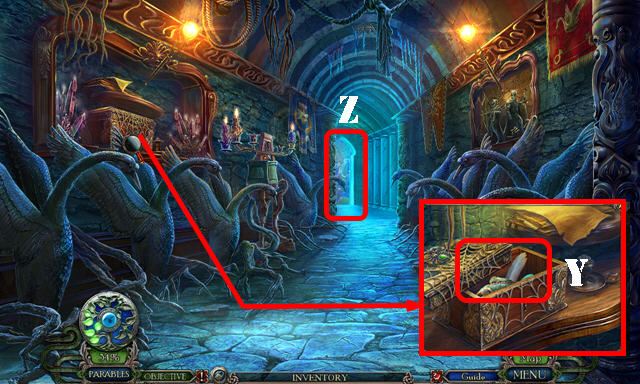
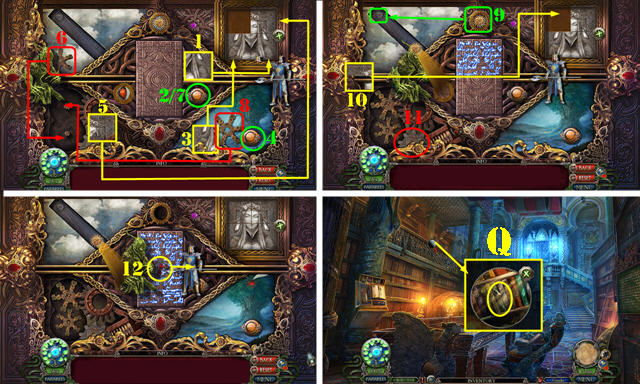
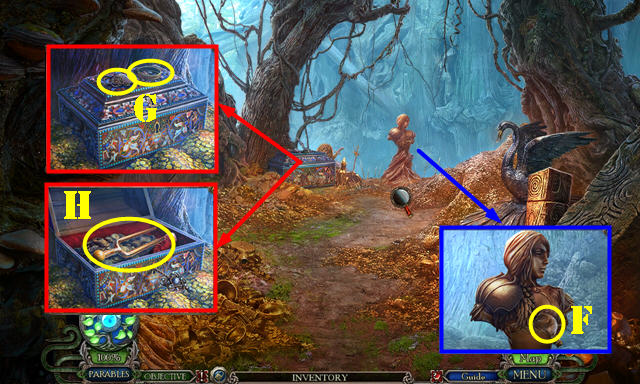
- Use the WEDGE and select it. Move six items; take the EVIL SWAN and FROG (X).
- Walk down.
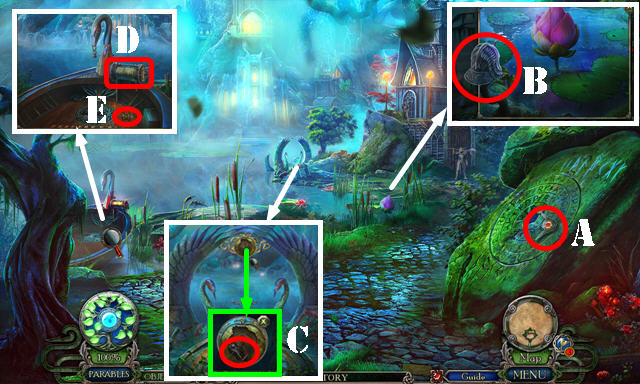
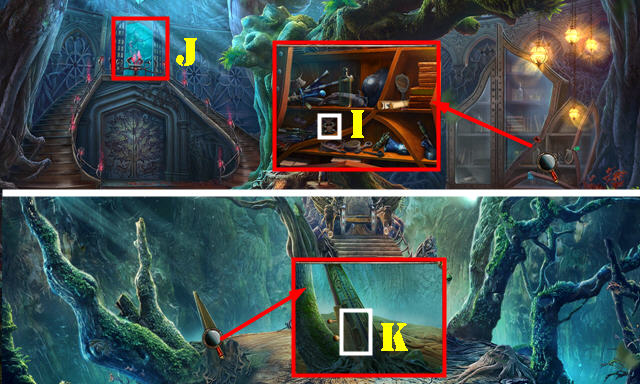
- Place the FROG (Y1); go to the Glade (Y).
- Take the RAFT WINCH (Z).
- Go to the Swamp (Z1).
Chapter 2
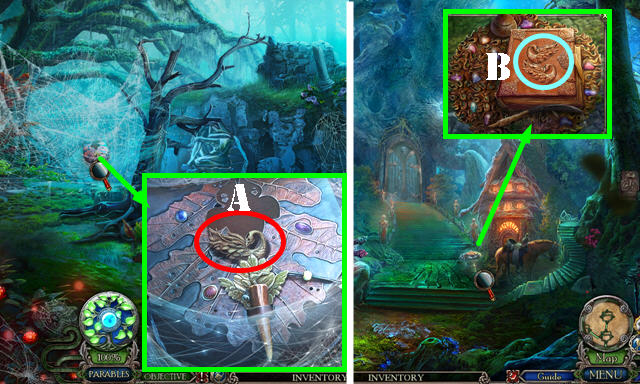
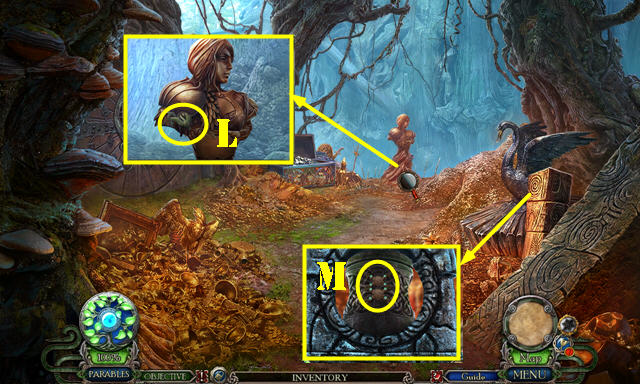
- Take the GOOD SWAN (A).
- Walk down twice.
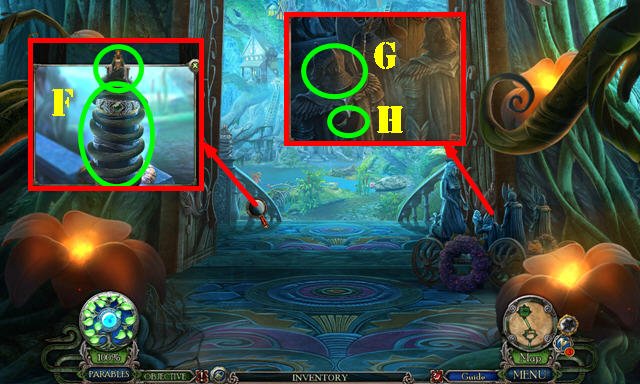
- Place the EVIL SWAN and GOOD SWAN (B); select the book for a puzzle.
- Place the pieces (C). Select 1-4.
- Select the ladies on the right 5x; place the bride (D).
- Place the ring (E).
- Select (Fx2)-(Gx2)-H-I-J-K.
- Place L-M. Select Nx3-Ox2. Place P.
- Take the BATTLE LEAF.
- Go to the Swamp.
- Place the BATTLE LEAF; look at the note; take the SERPENT SIGIL and KNOCKER BASE (Q).
- Walk down.
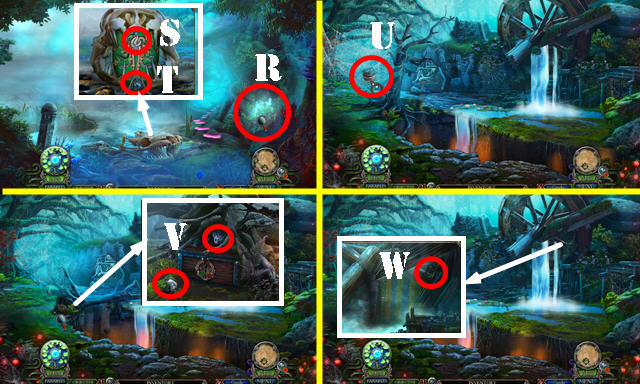
- Play the HOP (R) to get the SPIDER SICKLE.
- Place the SERPENT SIGIL (S); take the ONYX CHARM (T).
- Go to the Swamp.
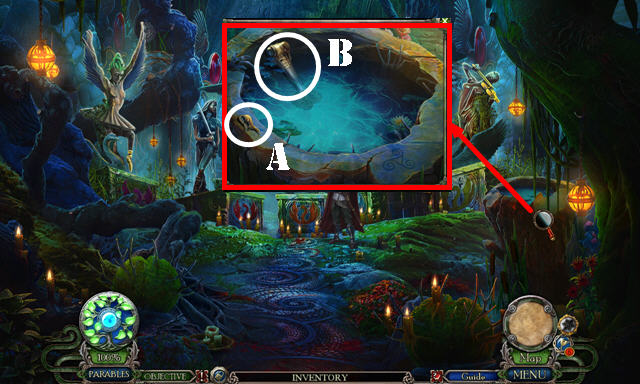
- Use the SPIDER SICKLE (U); take the CRYSTAL TOKEN and SILVER COIN (V).
- Use the BANNER POLE; take the KNOCKER PART (W).
- Place the KNOCKER PART on the KNOCKER BASE; receive the GATE KNOCKER.
- Go to the Gate.
- Place the GATE KNOCKER for a puzzle (X).
- Solution (Y).
- Go forward.
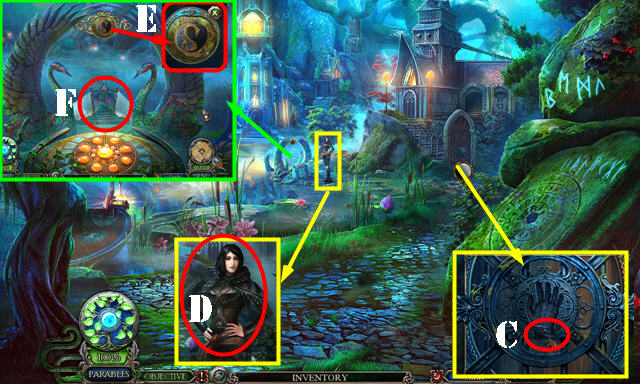
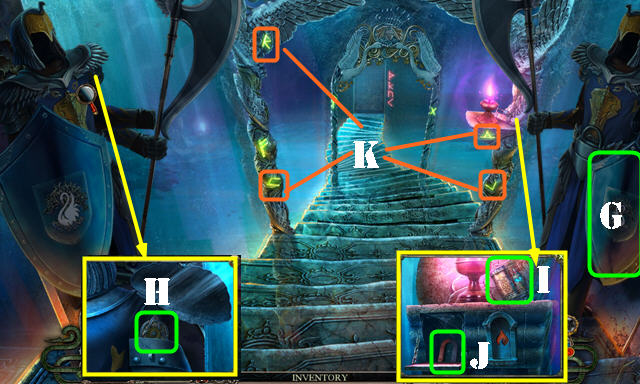
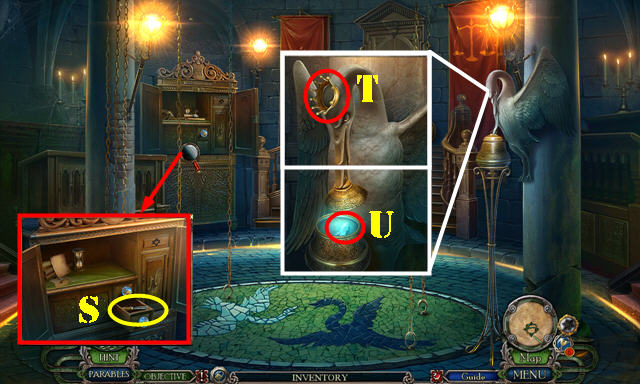
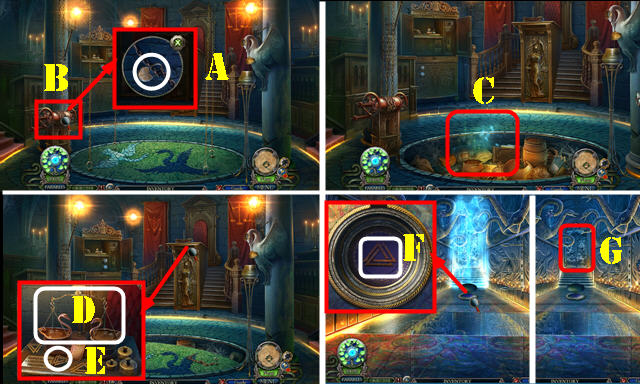
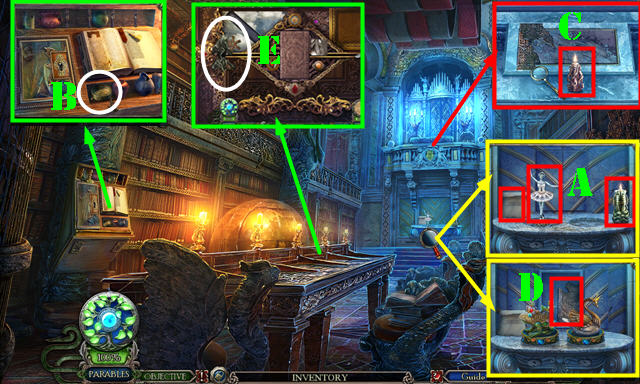
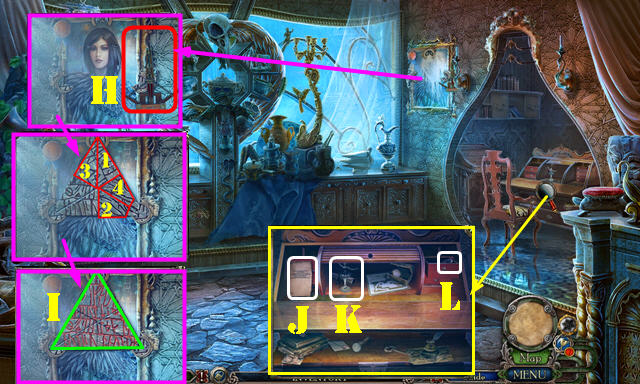
- Take the RUBY CHARM (A), GUARD'S HELMET (B) and SWAN GUARD STATUE (C).
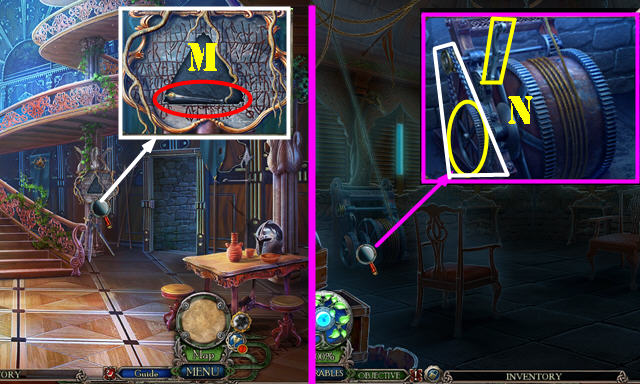
- Select the spool (D); take the WINCH DRUM (E).
- Walk down.
- Place the TOTEM PIECE; select the snake; take the FLORA STATUE and SNAKE TOTEM (F).
- Place the GUARD'S HELMET (G); take the WINCH CRANK (H).
- Place the WINCH CRANK and WINCH DRUM on the RAFT WINCH; receive the SWAN FERRY WINCH.
- Go forward.
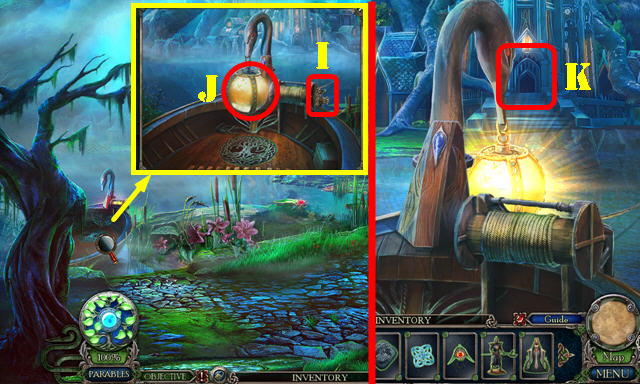
- Place the SWAN FERRY WINCH (I) and LANTERN (J).
- Go to Entrance Hall (K).
- Take the AMETHYST CHARM (L).
- Look at the sign (M).
- Return to the Tree Base.
- Place the AMETHYST CHARM, ONYX CHARM, and RUBY CHARM (N). Take the OTTER GEM (O).
- Return to Entrance Hall.
- Place the OTTER GEM and select it; take the RUNE TILE (P) and look at the note (Q).
- Return to the Glade.
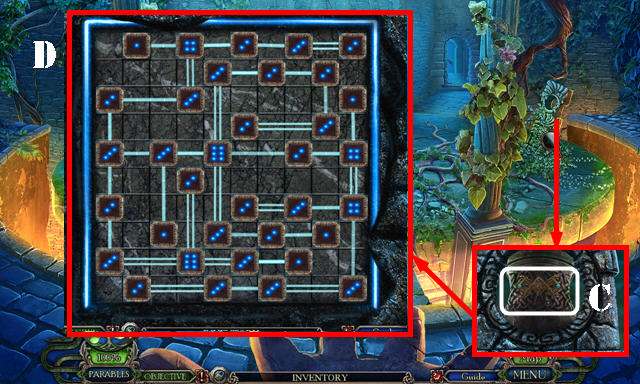
- Place the RUNE TILE for a puzzle (R).
- Solutions (S-T).
- Take the ILLUSION STONE.
- Go to the Swamp.

- Use the ILLUSION STONE, then find the matching symbols (U).
- Go to the Hideout (V).
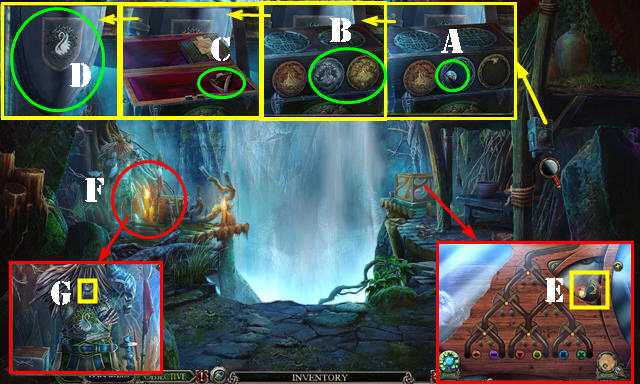
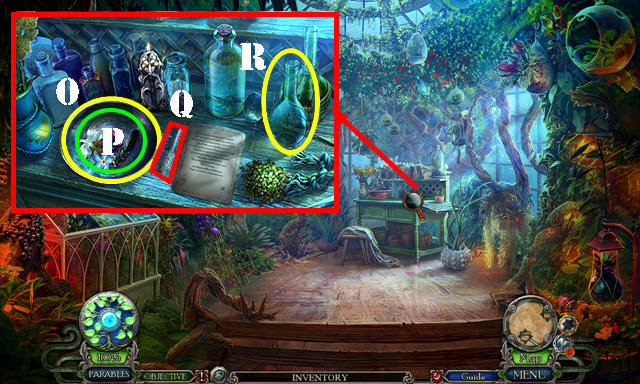
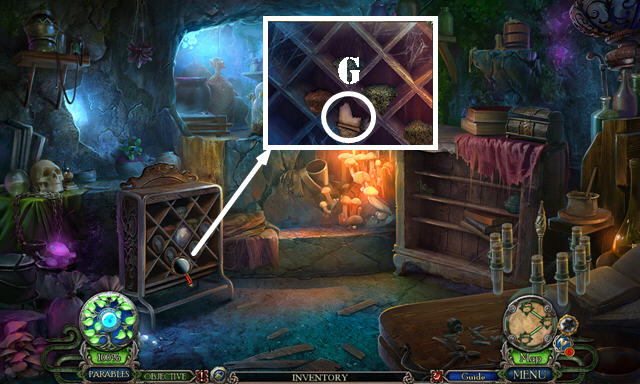
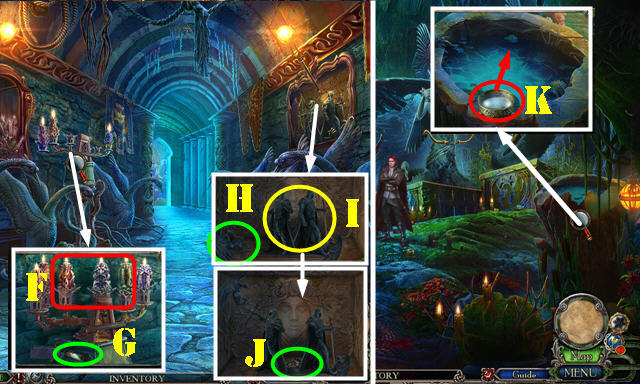
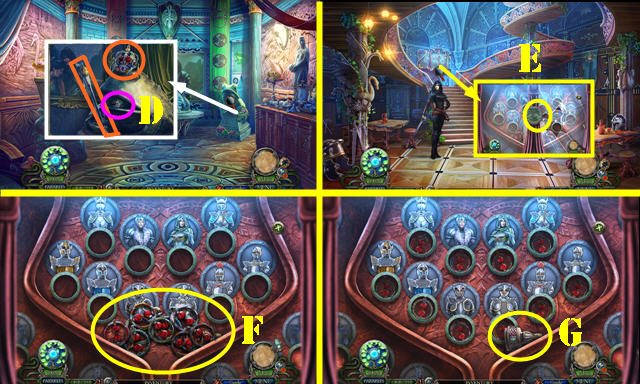
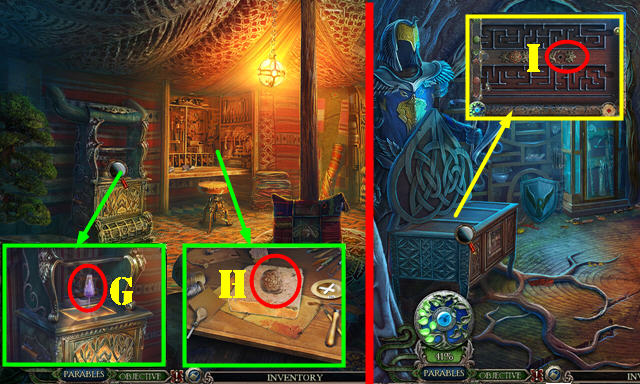
- Take the BRONZE SWAN (A). Place the SILVER COIN and GOLD COIN (B). Look at the book; take the VAULT MECHANISM (C) and SHIELD (D).
- Select the glass; take the BLACK SWAN (E).
- Play the HOP (F) to get the BLACK SWAN KEY. Take the BLUE FLAME (G).
- Walk down.
- Use the BLACK SWAN KEY; take the VAULT GEAR (H).
- Open the VAULT MECHANISM and place the VAULT GEAR on it receive the VAULT ACTIVATOR.
- Go to the Hideout.
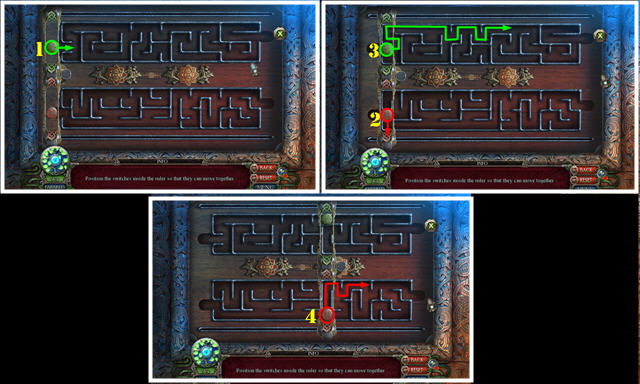
- Place the VAULT ACTIVATOR for a puzzle (I).
- Select each switch once (yellow), then press the button (J).
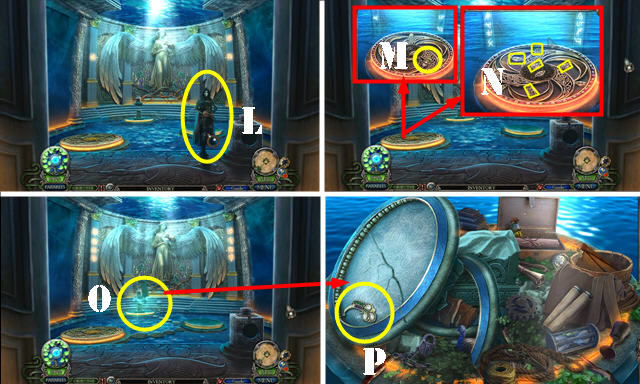
- Take the SWAN PRINCESS STATUE (K).
- Use the GUARD TALISMAN on the scene (L).
- Take the MAGICAL SEED (M).
- Return to Entrance Hall.
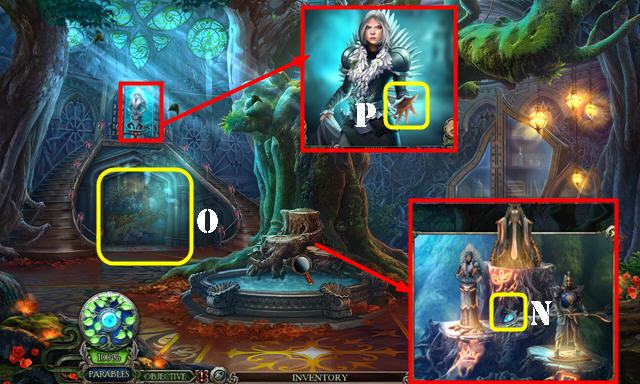
- Place the FLORA STATUE, SWAN GUARD STATUE and SWAN PRINCESS STATUE. Take the OPAL CHARM (N).
- Play the HOP (O).
- Talk to the lady; give her the MAGICAL SEED (P).
Chapter 3
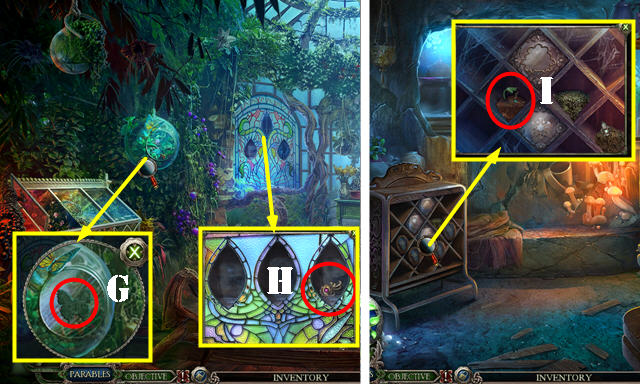
- Take the BUTTERFLY (A) and WHITE SWAN (B).
- Return to the Lake.
- Take the WINCH GEAR (C).
- Talk to the lady (D).
- Place the WHITE SWAN and BLACK SWAN (E).
- Go to the Lake Stairway (F).
- Place the SHIELD (G).
- Select the wing; take the DECORATED TALISMAN (H).
- Take the CRYPTEX (I).
- Place the BLUE FLAME; take the MAGNET (J).
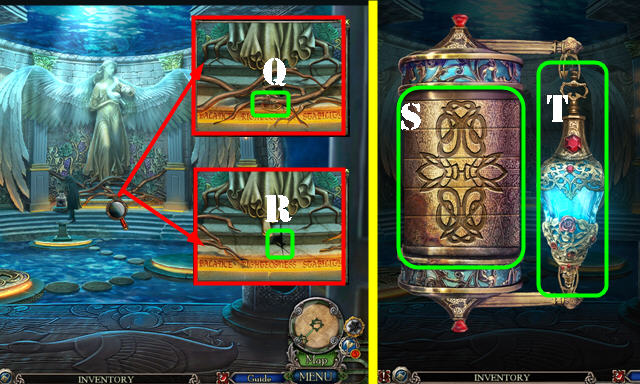
- Select the 4 symbols (K).
- Go forward.
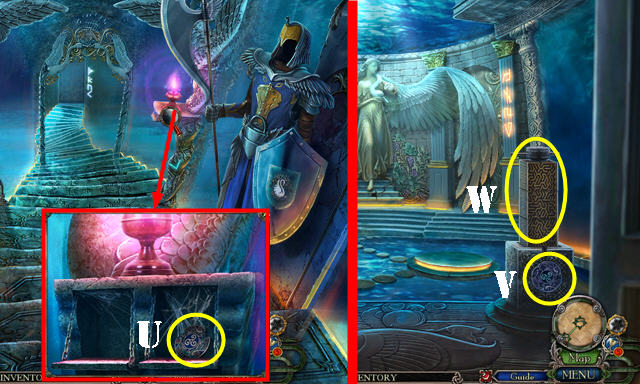
- Use the GUARD TALISMAN (L).
- Take the ORCHID EMBLEM (M). Select the symbols (N).
- Play the HOP (O) to get the RED FLAME.
- Place the DECORATED TALISMAN and CRYSTAL TOKEN; take the DYNAMO SWITCH (P).
- Take the SCALE PAN (Q). Select the branches twice; use the MAGNET (R); receive the CRYPTEX RING.
- Use the CRYPTEX RING on the CRYPTEX; solve the puzzle (S). Take the BLOOMING POTION (T).
- Walk down.
- Place the RED FLAME; take the TRISKELION (U).
- Go forward.
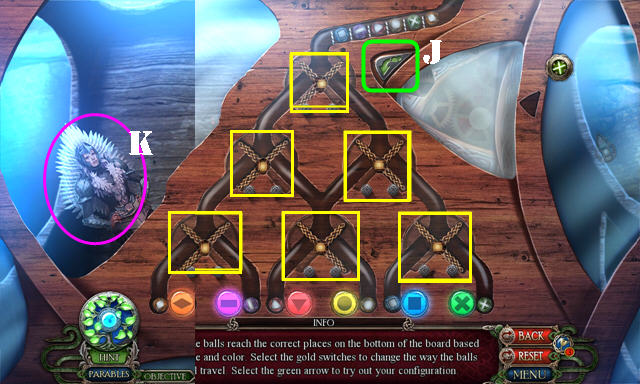
- Place the TRISKELION (V); zoom in for a puzzle (W).
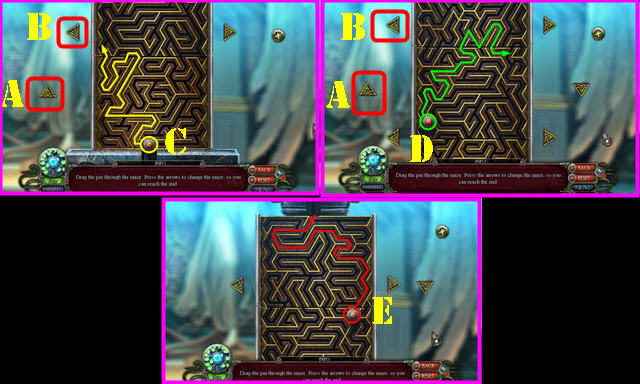
- Select B, then drag the ball as shown (C). Select A.
- Drag the ball as shown (D), then press B and A.
- Drag the ball as shown (E).
- Select the lever twice (F).
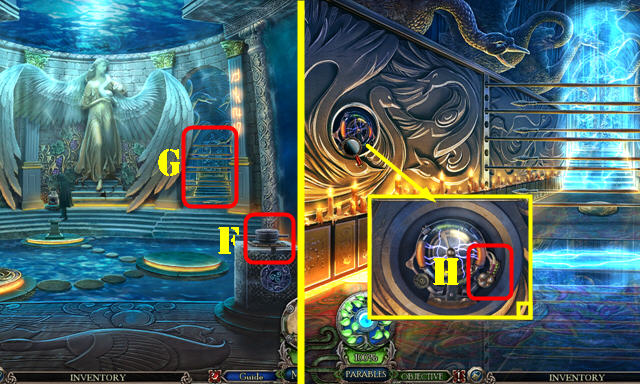
- Go to the Prison Tunnel (G).
- Place the DYNAMO SWITCH (H).
- Walk down.
- Select the lever (I).
- Enter the Rotunda (J).
- Take the DYNAMO SWITCH (K).
- Open the door and look at the note. Place the BRONZE SWAN; take the CLOCK HAND (L).
- Look at the note; take the JAWBONE (M).
- Walk down.
- Select the lever (N); go to the Prison Tunnel (O).
- Place the DYNAMO SWITCH (P); select the mechanism; take the PLATINUM SWAN (Q).
- Return to the Lake.
- Use the BLOOMING POTION; take the CROWN (R).
- Return to Rotunda.
- Place the PLATINUM SWAN; take the CHISEL (S).
- Place the CROWN (T): take the REVEALING POWDER (U).
- Return to the Prison Tunnel.
- Use the CHISEL; take the BALANCE BEAM and LILY PAD (V).
- Place the JAWBONE (W).
- Use the REVEALING POWDER and select the four symbols (X); take the PADLOCK (Y).
- Place the SCALE PAN on the BALANCE BEAM; take the SCALE MECHANISM.
- Return to the Rotunda.
- Use the PADLOCK (A).
- Select the crank (B).
- Play the HOP (C) to get the FIERY ORB.
- Place the SCALE MECHANISM (D); take the ACTIVATOR (E).
- Return to the Prison Tunnel.
- Place the ACTIVATOR (F) and select it.
- Go to the Cell (G).
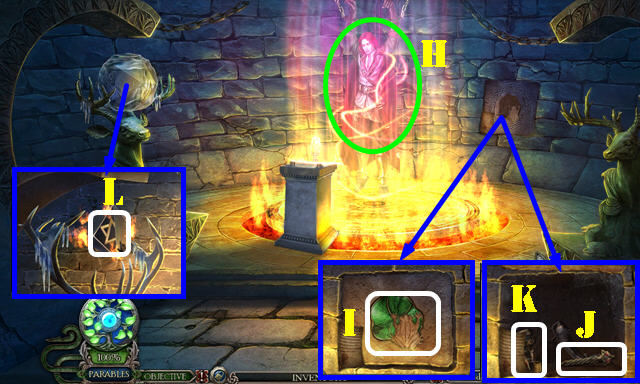
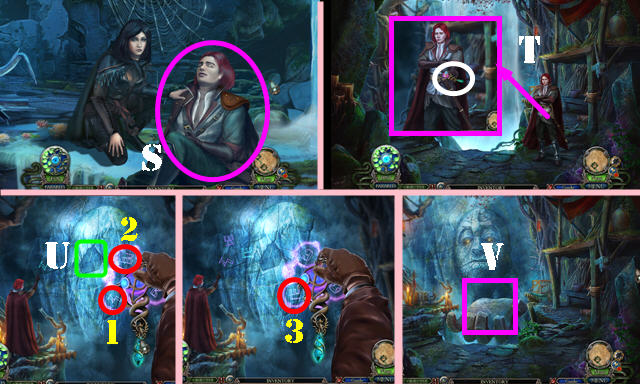
- Talk to the man (H).
- Look at the note; use the LILY PAD (I). Move four items; take the ABASEMENT SCEPTER (J).
- Move one item; take the SWAN HANDLE (K).
- Use the FIERY ORB; select 4 times and take the BALANCE SYMBOL (L).
- Return to the Rotunda.
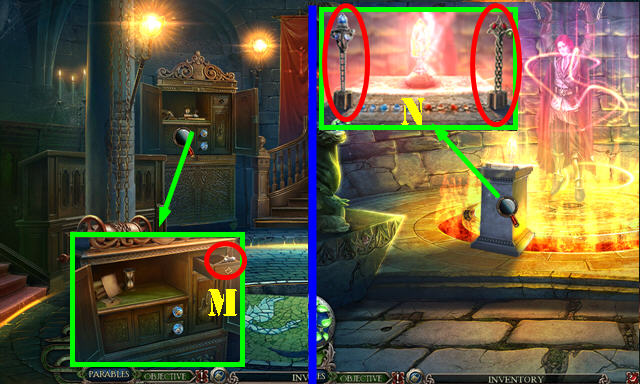
- Place the BALANCE SYMBOL; open the drawer and take the SPIRIT SCEPTER (M).
- Return to the Cell.
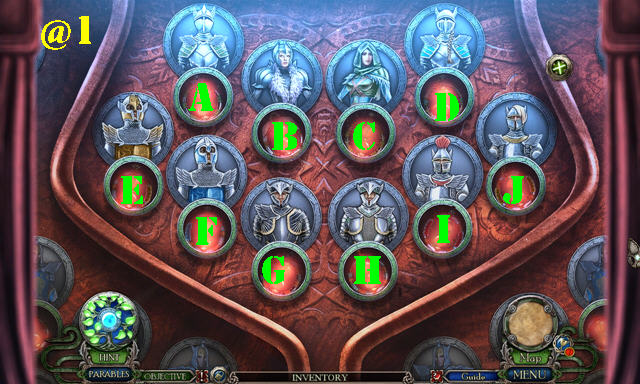
- Place the SPIRIT SCEPTER and ABASEMENT SCEPTER for a puzzle (N).
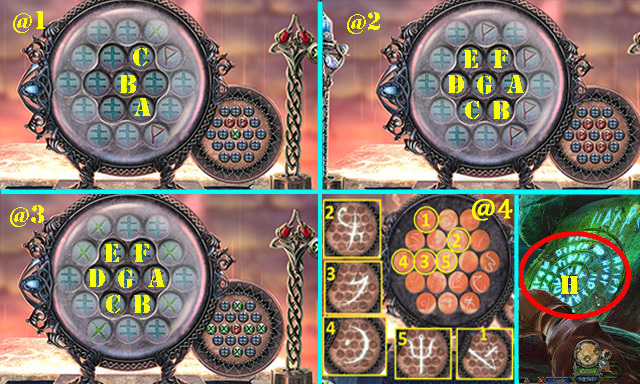
- Solution one (@1): Ax2-Bx3-Cx3-Bx3.
- Solution two (@2): A-B-Cx2-Dx3-G-Fx3-Cx4-G-Ax2.
- Solution three (@3): A-G-C-B-A-Fx3-Ex2-D-Cx2-G-B, Ax2-F-B-Ax2-Ex4, F-Gx4-D-A-Fx2-Ax4-F-Ax2-F-Dx5.
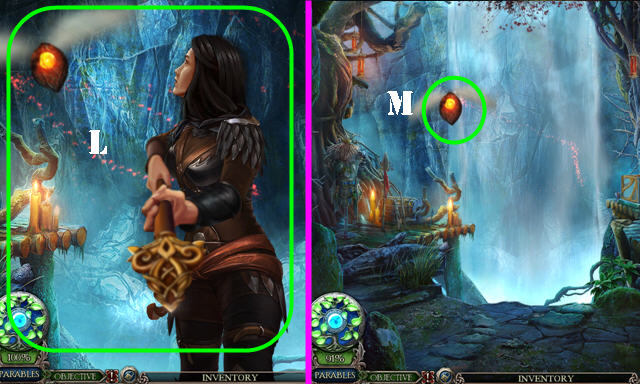
- Take the FORCE CRYSTAL.
- Return to the Lake.
- Use the FORCE CRYSTAL (H).
Chapter 4
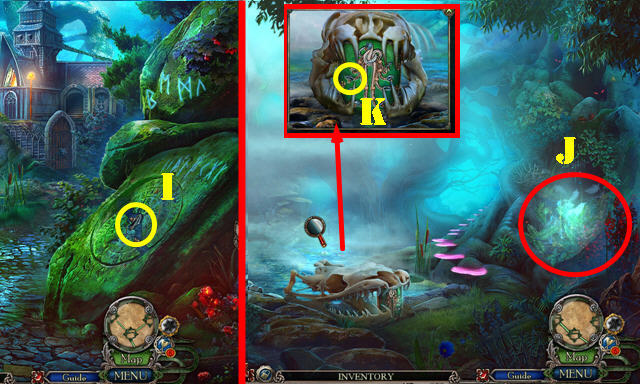
- Take the SERPENT HEAD (I).
- Go to the Glade.
- Play the HOP (J) to get the PRINCESS GLASS.
- Place the SERPENT HEAD (K).
- Go to the Swamp.
- Take the SUMMONING STAFF (L).
- Walk down.
- Use the SUMMONING STAFF (M).
- Go to the Druid's Hut (N).
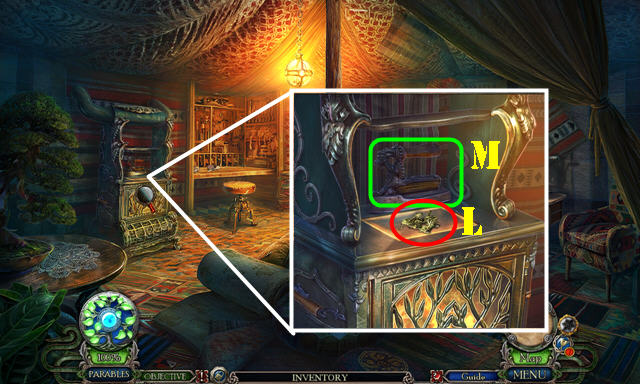
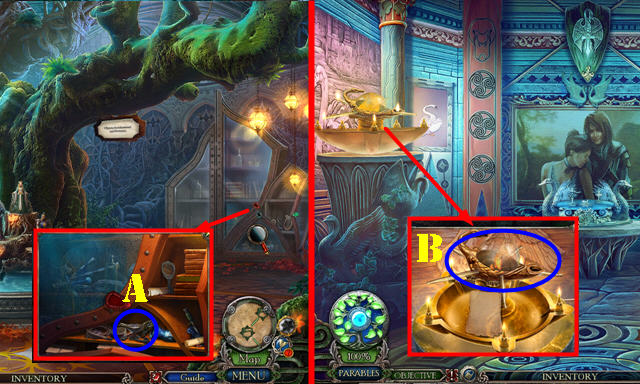
- Take the CORKSCREW (O) and FEATHER (P).
- Go to the Greenhouse (Q).
- Take the CHAIN (R) and TOPAZ CHARM (S).
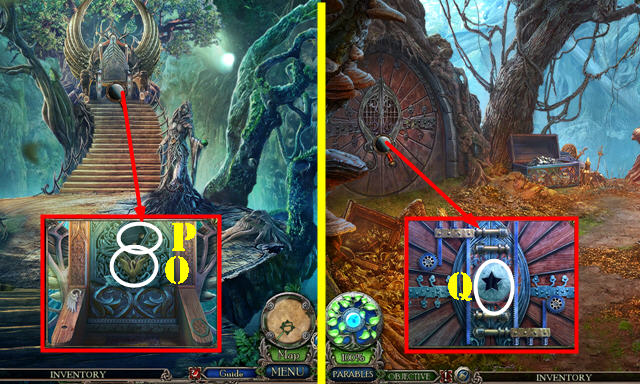
- Place the PRINCESS GLASS; take the RABBIT HANDLE (T).
- Take the CANDLE OF FREEDOM (U).
- Walk down.
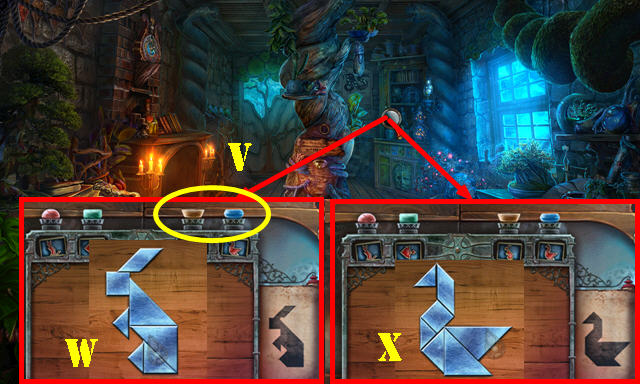
- Place the SWAN HANDLE and RABBIT HANDLE for a puzzle (V).
- Solution one (W).
- Solution two (X).
- Swap as shown (Y). Select (Z).
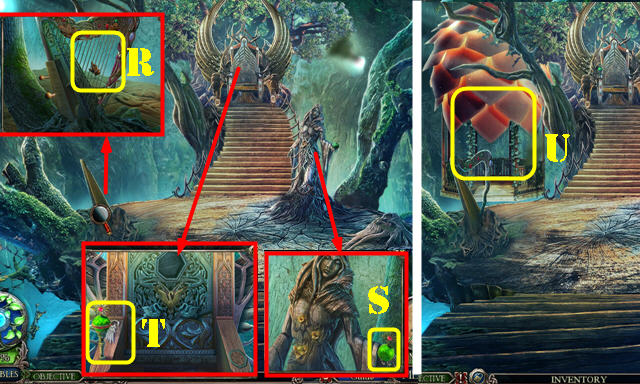
- Take the FERN SEAL (Z1).
- Go to the Greenhouse.
- Use the FERN SEAL and select it; take the DIRE TREE DISK (A).
- Walk down.
- Place the DIRE TREE DISK and select it (B); go to the Basement (C).
- Take the VIAL (D) and PRINCE GLASS (E).
- Place the ORCHID EMBLEM; take the POLLEN BOTTLE (F).
- Use the CORKSCREW on the VIAL; select the corkscrew. Select the five pieces; take the GLASS BUTTERFLY.
- Return to the Greenhouse.
- Place the GLASS BUTTERFLY (G); play the HOP to get the SAP EXTRACTOR.
- Place the PRINCE GLASS; take the CARNATION EMBLEM (H).
- Return to the Basement.
- Place the CARNATION EMBLEM; take the SPROUT and RUNE PIECE (I).
- Walk down.
- Place the SAP EXTRACTOR (J) and SPROUT (K).
- Take the RECIPE (L).
- Select the note (M).
- Return to the Tree Base.
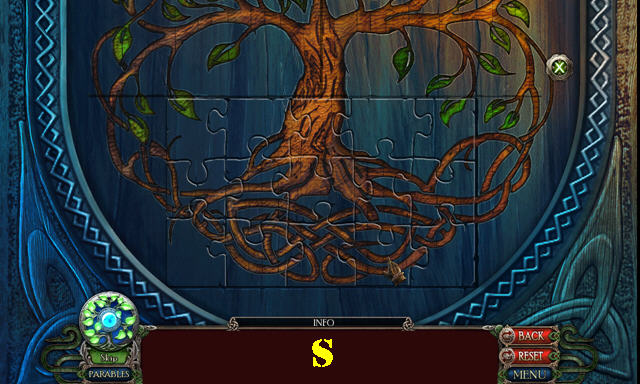
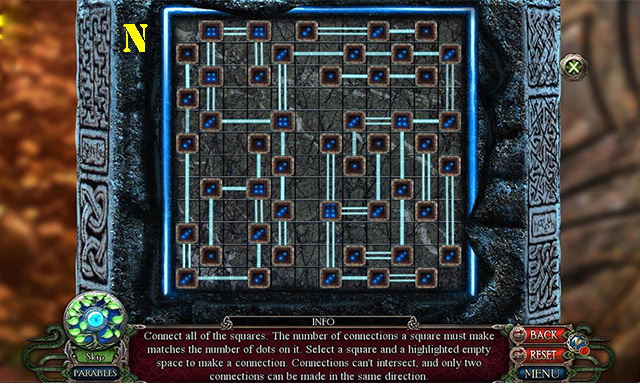
- Place the RUNE PIECE for a puzzle (N).
- Solution (O).
- Take the PLIERS.
- Return to the Hideout.
- Use the PLIERS; take the PENDULUM (P).
- Place the CHAIN on the PENDULUM.
- Return to the Druid's Hut.
- Place the CLOCK HAND (Q) and PENDULUM (R); take the FOX (S).
- Use the FOX on the SNAKE TOTEM; take the SERAPHITE CHARM.
- Return to the Tree Base.
- Play the HOP (T) to get the PEONY EMBLEM.
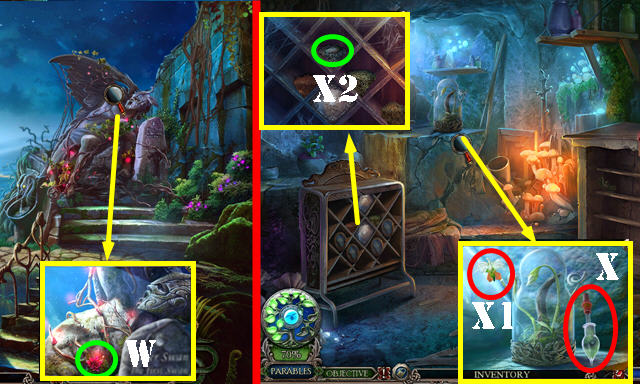
- Place the OPAL CHARM, TOPAZ CHARM and SERAPHITE CHARM (U); take the POLLEN COLLECTOR (V).
- Return to Highpoint.
- Take the DEVIL'S CLAW (W).
- Return to the Basement.
- Put down the POLLEN BOTTLE and use the POLLEN COLLECTOR (X); take the SWAN ORCHID (X1).
- Place the PEONY EMBLEM; take the CRICKET WINGS (X2).
- Return to the Greenhouse.
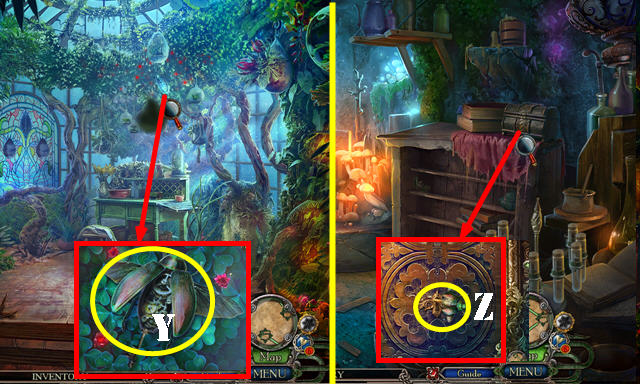
- Place the CRICKET WINGS; take the CRICKET KEY (Y).
- Return to the Basement.
- Use the CRICKET KEY (Z); receive the MECHANICAL MOTH. A puzzle will start automatically.
- Solution: (C-A)-(3-5)-(2-3)-(D-C)-(3-2)-(4-3)-(9-4)-(1-9)-(B-D)-(9-1)-(4-9)-(D-E)-(3-4)-(G-H).
- (L-M)-(4-3)-(9-4)-(K-L)-(J-K)-(4-9)-(E-J)-(5-4)-(F-E)-(3-5)-(E-D)-(2-3)-(I-F)-(3-2)-(4-3)-(9-4).
- (D-B)-(4-9)-(3-4)-(F-E)-(E-D)-(4-3)-(J-E)-(5-4)-(E-F)-(3-5)-(2-3)-(F-I)-(I-G)-(3-2)-(D-E)-(E-F).
- (2-3)-(C-D)-(3-2)-(D-E)-(4-3)-(E-J)-(3-4)-(F-E)-(A-C)-(B-A)-(E-D)-(2-3)-(C-B)-(D-C)-(1-2).
- (B-D)-(9-1)-(4-9)-(D-E)-(3-4)-(E-F)-(4-3)-(J-E)-(E-D)-(5-4)-(6-5)-(L-J)-(5-6)-(3-5)-(4-3)-(9-4).
- (D-B)-(4-9)-(3-4)-(F-E)-(E-D)-(4-3)-(J-E)-(5-4)-(E-F)-(6-5)-(G-I)-(F-G)-(5-6)-(3-5)-(D-E)-(5-3).
- (E-J)-(6-5)-(J-L)-(8-6)-(K-J)-(9-8)-(1-9)-(2-1)-(3-2)-(5-3)-(J-E)-(4-5)-(3-4)-(2-3)-(7-2)-(6-7)-(8-6).
- (9-8)-(B-D)-(4-9)-(5-4)-(E-F)-(4-5)-(D-E)-(5-4)-(E-J)-(F-E)-(3-5)-(4-3)-(E-D)-(3-4)-(2-3).
- (A-B)-(C-A)-(D-C)-(3-2)-(4-3)-(5-4)-(6-5)-(L-K)-(J-L)-(8-6).
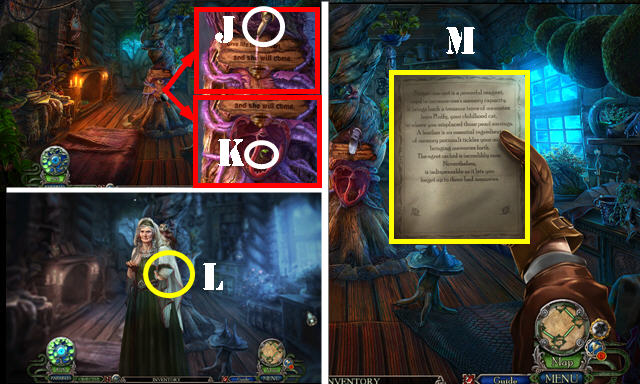
- Take the FORGET-ME-NOT (N).
- Return to the Greenhouse.
- Put down the RECIPE (O).
- Place the FEATHER, DEVIL'S CLAW, SWAN ORCHID and FORGET-ME-NOT (P).
- Select the pestle (Q).
- Select the mortar (P); take the MEMORY POTION (R).
- Go to the Swamp.
- Give the MEMORY POTION (S).
- Talk to the man; take the SUMMONING AMULET (T).
- Use the SUMMONING AMULET (U).
- Select the matching symbols (1-3).
- Go to the Underground Complex (V).
- Take the HARPY (W).
- Go to the Catacomb (X).
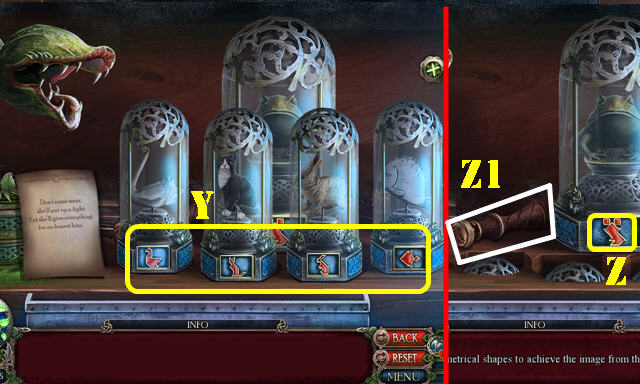
- Place the MECHANICAL MOTH; take the FISH KEY and PROPHESY FEATHER (Y).
- Go to the Crypts (Z).
- Take the WEASEL (A). Dip the PROPHESY FEATHER; take the PINE SEAL (B).
- Place the WEASEL on the SNAKE TOTEM; take the RUNE TILE.
- Return to the Underground Complex.
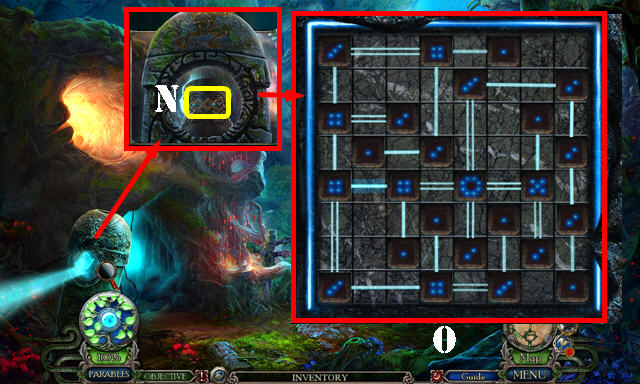
- Place the RUNE TILE for a puzzle (C).
- Solution (D).
- Take the GRANITE VAULT.
- Return to the Glade.

- Place the FISH KEY; take the TURQUOISE CHARM and AWL (E).
- Return to the Greenhouse.
- Place the PINE SEAL and open the door; take the PRUNING SHEARS and NARCISSUS EMBLEM (F).
- Go to the Basement.
- Place the NARCISSUS EMBLEM; take the ROYAL SCROLL and STONE VAULT PART (G).
- Place the STONE VAULT PART on the GRANITE VAULT; take the ROYAL SCROLL PART.
- Place the ROYAL SCROLL PART on the ROYAL SCROLL; receive the ROYAL SCROLL COMPLETE.
- Return to the Underground Complex.
- Use the PRUNING SHEARS (H); take the JADE CHARM (I).
- Use the AWL; receive the BROKEN SWAN FIGURINE (J).
- Return to the Crypts.
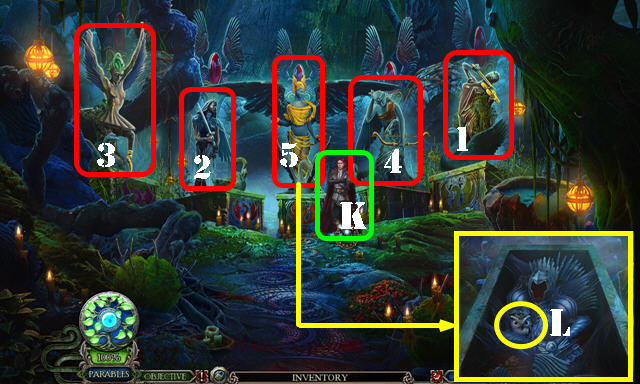
- Give the ROYAL SCROLL COMPLETE (K).
- Select 1-5.
- Open the tomb; take the LIBRARY OWL (L).
- Take the SWORD (M).
- Use the SWORD (N).
- Play the HOP (O) to get the FROG PRINCE.
- Select the backpack (P) and enter the Tent (Q).
- Take the GLUE (R).
- Put down the BROKEN SWAN FIGURINE (S). Select the stick (T); receive the SWAN FIGURINE.
- Return to the Underground Complex.
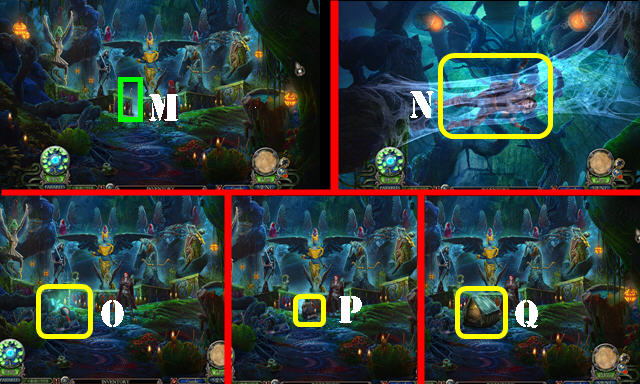
- Place the LIBRARY OWL (U).
- Move the leaves. Select the symbols (V).
- Go to the Archive (W).
Chapter 5
- Look at the note; take the WHITE BALLERINA and CANDLE OF JUSTICE (A).
- Take the RITUAL BOWL (B) and CANDLE OF ORDER (C).
- Place the SWAN FIGURINE and FROG PRINCE; take the BROKEN STONE TABLET (D).
- Take the DAMAGED MONSTER (E).
- Return to the Catacomb.
- Place the CANDLE OF FREEDOM, CANDLE OF JUSTICE and CANDLE OF ORDER (F); select the scroll (G).
- Place the HARPY (H); select the statues 4x (I); take the SCRIBE'S KEY (J).
- Go forward.
- Place the RITUAL BOWL in the water (K); receive the RITUAL WATER.
- Enter the Tent.
- Put down the DAMAGED MONSTER (L); select the iron (M); take the MONSTER.
- Walk down and then go to the Archive.
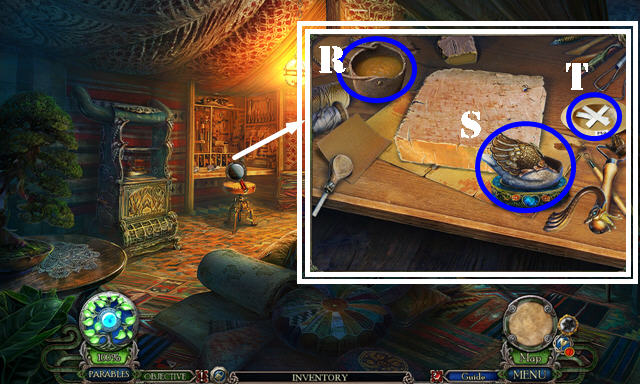
- Use the SCRIBE'S KEY; take the BRUSH (N).
- Put down the RITUAL WATER (N1), BRUSH (N2), BROKEN STONE TABLET (N3) and GLUE (N4). Select the tablet 3x; receive the STONE TABLET (N4).
- Take the CITRINE CHARM (O).
- Place the STONE TABLET and MONSTER for a puzzle (P).
- Solution (1-12).
- Take the PIN PULLER (Q).
- Return to the Hideout.
- Use the PIN PULLER; take the GAUNTLET (R).
- Return to the Tree Base.
- Place the TURQUOISE CHARM, CITRINE CHARM and JADE CHARM (S); receive the INSCRIBED TABLET.
- Go to the Lake.
- Use the GAUNTLET (T); enter the Barracks Hall (U).
Chapter 6
- Remove the three notes (green); take the GRAPPLING HOOK (A).
- Take the TORCH (B).
- Place the TORCH (C).
- Go to the Guard Tower (D).
- Take the SHUTTER MECHANISM CHAIN (E) and DRAWER PULL (F).
- Walk down and enter the Black Swan's Room (G).
- Take the BALLISTA (H).
- Place the INSCRIBED TABLET and select 1-4; take the INSCRIBED TABLET (I).
- Open the desk drawer; look at the note (J). Use the GRAPPLING HOOK; take the BLACK BALLERINA (K).
- Place the DRAWER PULL; take the SHUTTER HANDLE (L).
- Walk down.
- Place the INSCRIBED TABLET; take the SCEPTER (M).
- Go to the Guard Tower.
- Place the WINCH GEAR, SHUTTER MECHANISM CHAIN and SHUTTER HANDLE (N). Pull the handle.
- Play the HOP (O) to get the CROWN.
- Place the BALLISTA; select 4x and take the MEMORIAL ROOM KEY (P).
- Take the SIEVE (Q).
- Walk down.
- Place the CROWN for a puzzle (R).
- Solution one (S).
- Solution two (T).
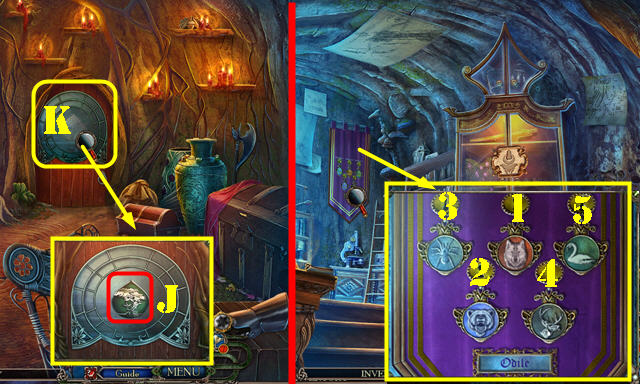
- Enter Odette's Room (U).
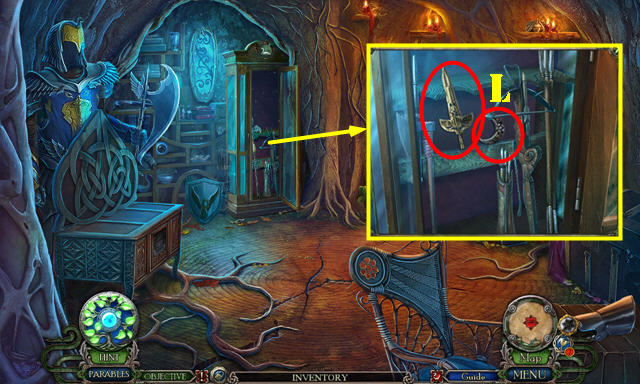
- Take the SPIDER GEM (V).
- Look at the note; take the SIEGE TOWER BADGE (W).
- Look at the note; take the SOUL STONE (X).
- Place the BLACK BALLERINA and WHITE BALLERINA (Y). Select the ballerinas twice; take the CHEST KEY (Z).
- Go to the Guard Tower.
- Place the SIEGE TOWER BADGE; take the PIKE (A).
- Return to the Black Swan's Room.
- Use the PIKE (B); play the HOP (C) to get the FROG CROWN.
- Return to Odette's room.
- Place the FROG CROWN and SCEPTER (orange); take the GUARD INSIGNIA (D).
- Walk down.
- Place the GUARD INSIGNIA (E) and look at the note. Select the 9 pieces (F); take the LAMP TOP (G) for a puzzle.
- Solution (@1): (A-I)-(E-D)-(H-J)-(B-G)-(F-G)-(C-H)-(A-E)-(C-G).
- Receive the PRINCESS TALISMAN.
Chapter 7
- Return to Entrance Hall.
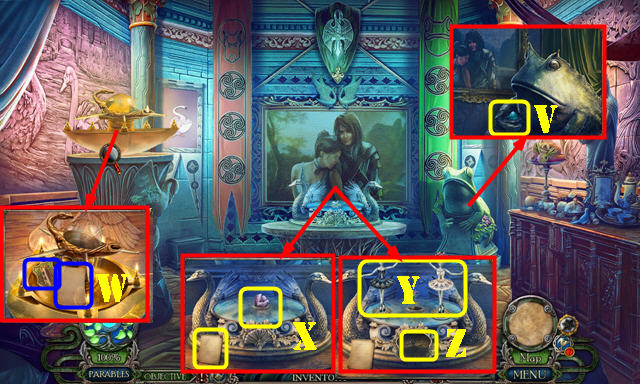
- Place the SPIDER GEM and select it; take the LAMP BASE (A).
- Place the LAMP TOP and SOUL STONE on the LAMP BASE; receive the LAMP.
- Return to Odette's Room.
- Place the LAMP; take the ETERNAL FLAME (B).
- Return to Entrance Hall.
- Use the ETERNAL FLAME (C).
- Play the HOP (D) to get the FLORA'S MOSAIC.
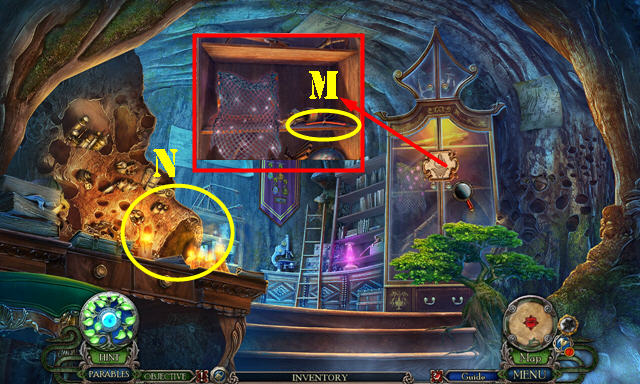
- Go to the Treasury (E).
- Take the CLAY (F).
- Take the MACE RING and MECHANICAL HEDGEHOG (G).
- Use the CHEST KEY and MEMORIAL ROOM KEY; take the TUNING FORK and RED GEM (H).
- Walk down.
- Place the RED GEM and select it; take the RUNE TILE (I).
- Go to the Throne Room (J).
- Place the TUNING FORK; take the BROKEN STRING (K).
- Return to the Treasury.
- Use the BROKEN STRING; take the COAT OF ARMS (L).
- Place the RUNE TILE for a puzzle (M).
- Solution (N).
- Take the MACE BASE.
- Go to the Throne Room.
- Place the COAT OF ARMS (O); take the STAR KEY (P).
- Go to the Treasury.
- Use the STAR KEY (Q); play the HOP to get the HARP STRINGS.
- Return to the Throne Room.
- Place the HARP STRINGS; select the strings 3x (R).
- Take the MACE TOP (S).
- Place the MACE TOP and MACE RING on the MACE BASE; receive the THRONE MACE.
- Place the THRONE MACE (T).
- Go to the Dire Tree Landing (U).
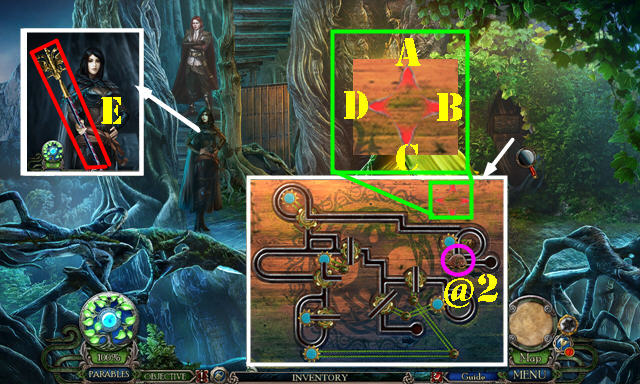
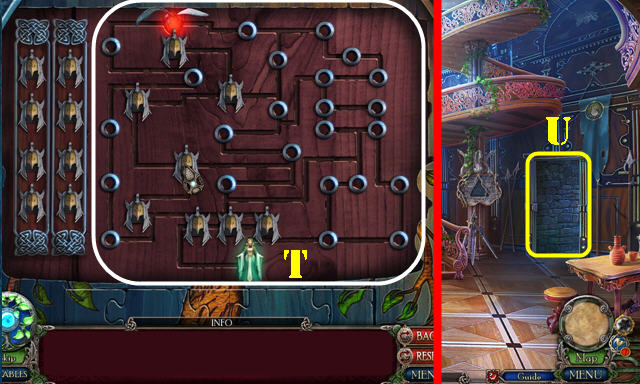
- Select the leaves; place the MECHANICAL HEDGEHOG for a puzzle (@2).
- Solution: Ax2-D-A-D-Ax2-Cx2-B-A-D-C-B-A-D-C-D-C-D-A-D-Bx2-C-B-C-B-Cx2-A-D-C-B.
- Talk to the Black Swan; take the SPEAR (E).
Chapter 8
- Enter the Guard's Outpost (A).
- Remove the lid and use the SIEVE; take FLORA'S LOCKET (B).
- Use the CLAY; receive the ORNAMENT IMPRINT (C).
- Walk down.
- Place FLORA'S LOCKET; take the MEDAL PULLER and CRYSTAL (D). Pull the string (E).
- Play the HOP (F) to get the FIRE ESSENCE.
- Go to the Tent.
- Place the FIRE ESSENCE; receive the FIRE (G).
- Place the ORNAMENT IMPRINT; take the FLORAL ORNAMENT (H).
- Go to the Guard's Outpost.
- Place the FLORAL ORNAMENT for a puzzle (I).
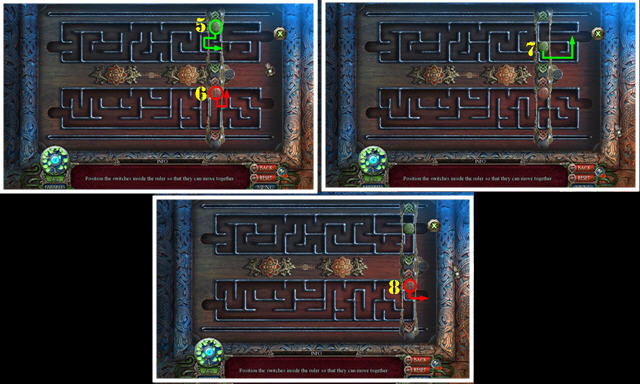
- Solution (1-8). Use the red and green arrows (orange) to pull the switches up or down. Drag the ruler to the right to move either piece in that direction.
- Take the DIRE TREE EMBLEM.
- Place the DIRE TREE EMBLEM (J).
- Enter the Seed Research Lab (K).
- Place the MEDAL PULLER and select 1-5; receive the SEED MEDAL.
- Walk down.
- Place the SEED MEDAL; take the SPEARHEAD and MOON SHIELD (L).
- Place the SPEARHEAD on the SPEAR; receive the COMMON SPEAR.
- Go to the Seed Research Lab.
- Place the CRYSTAL, MOON SHIELD and BUTTERFLY; take the FLAME TENDON (M).
- Play the HOP (N) to get the POISON.
- Go to the Tent.
- Put down the POISON; receive the POISON MIXTURE (O).
- Place the FLAME TENDON and FIRE (P); receive the ENCHANTED CROSSBOW and MAGIC SEED.
- Dip the COMMON SPEAR in the POISON MIXTURE; receive the POISONED SPEAR.
- Walk down.
- Give the POISONED SPEAR (Q) and ENCHANTED CROSSBOW (R).
- Go to the Treetop for a puzzle (S).The solution is random (T). If the vine is brown, move the seed to location (T1), if the vine is green, move it to (T2).
- Use the PRINCESS TALISMAN on the scene (U).
- Congratulations, you've completed Dark Parables: The Swan Princess.
Parables

- SE Parables (A).
- SE Parables (B).
- SE Parables (C).
- SE Parables (D).
Created at: 2016-08-05