

Walkthrough Menu
- General Tips
- Chapter 1: Town Square
- Chapter 2: Colossus
- Chapter 3: Tree House
- Chapter 4: Observatory
- Chapter 5: Town Center
- Chapter 6: Prison Cell
General Tips
- This is the official guide for Dark Realms: Lord of the Winds.
- This guide will not tell you when you have to zoom into a location; the screenshots will show each zoom scene.
- Hidden-object puzzles are referred to as HOPs. This guide will not show screenshots of the HOPs, however, it will mention when an HOP is available and the inventory item you'll collect from it.
- Use the Map to fast travel to a location.
Chapter 1: Town Square
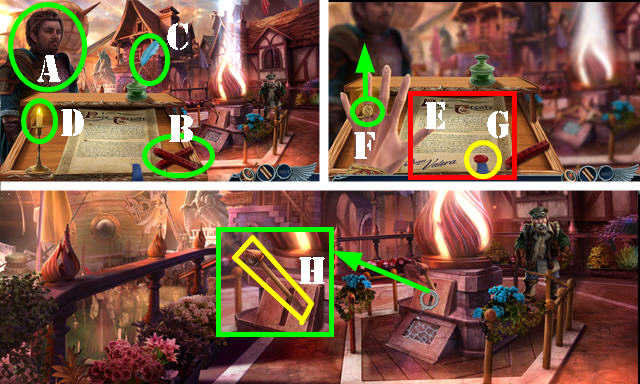
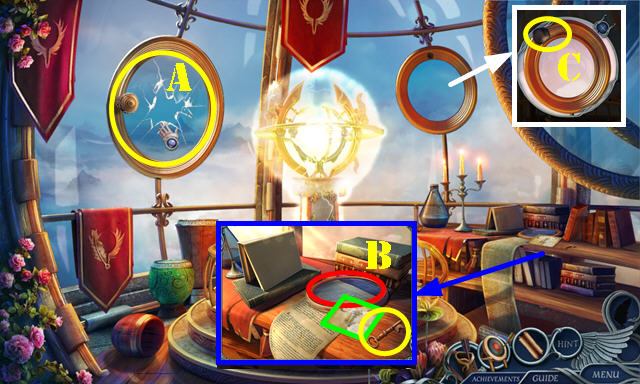
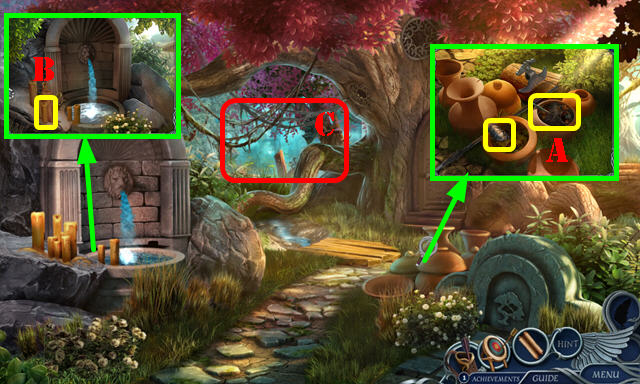
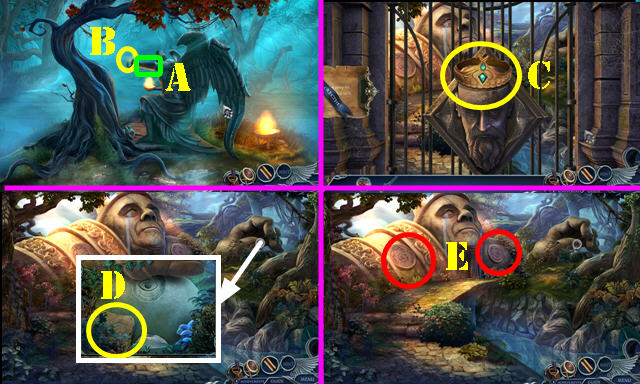
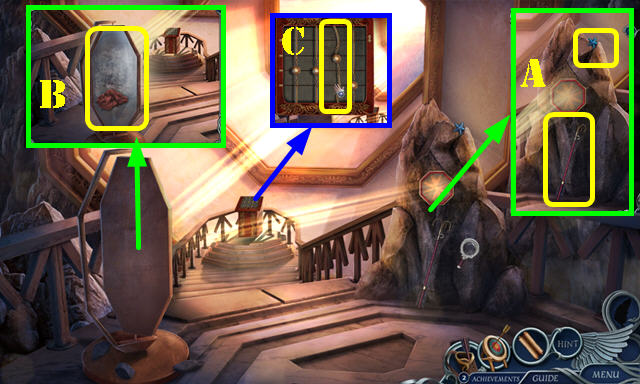
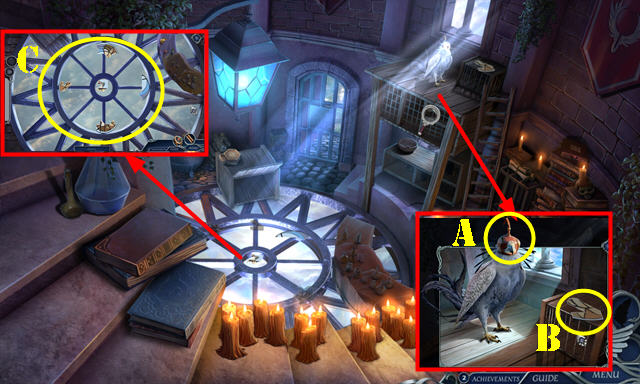
- Talk to the man (A).
- Take the SEALING WAX (B) and QUILL (C).
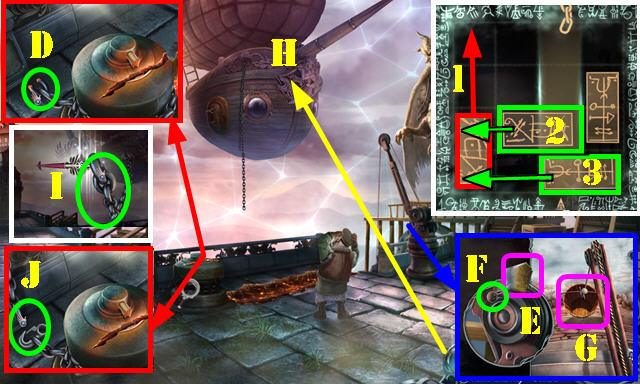
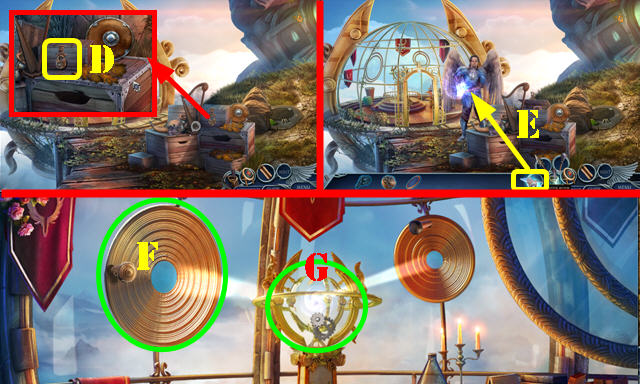
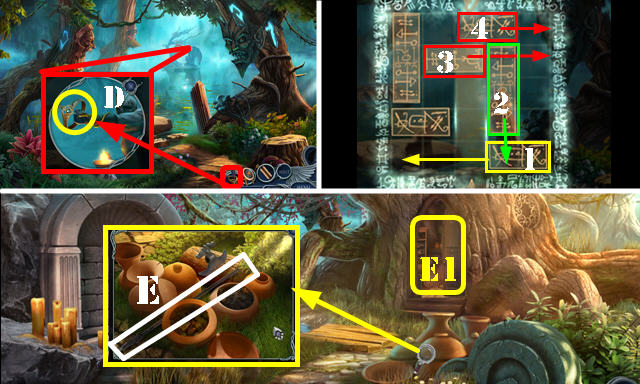
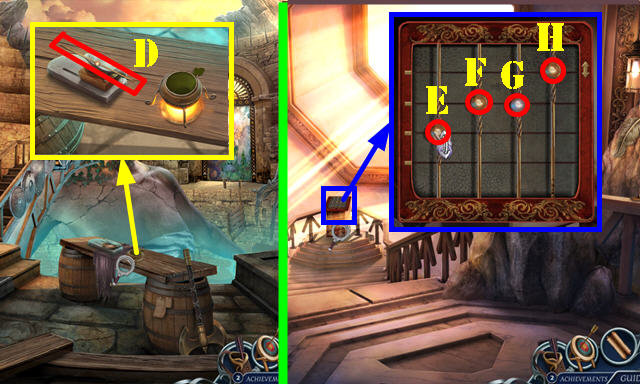
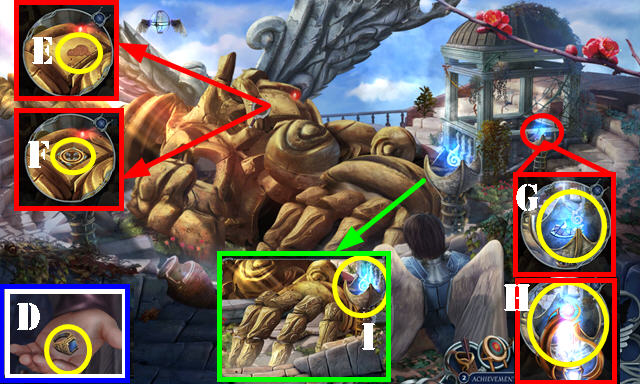
- Use the SEALING WAX (D) to get the MELTED SEALING WAX.
- Use the QUILL and MELTED SEALING WAX (E).
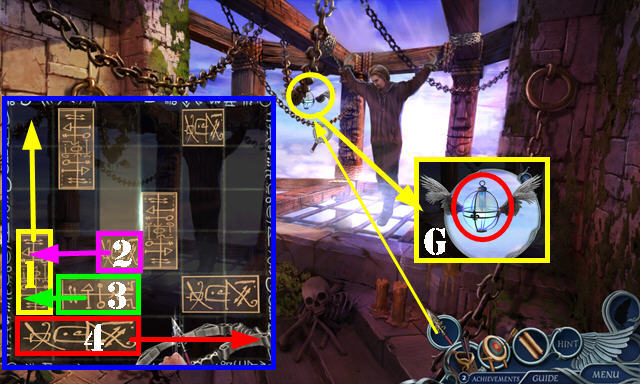
- Slip the SEAL RING off of the finger (F).
- Use the SEAL RING (G).
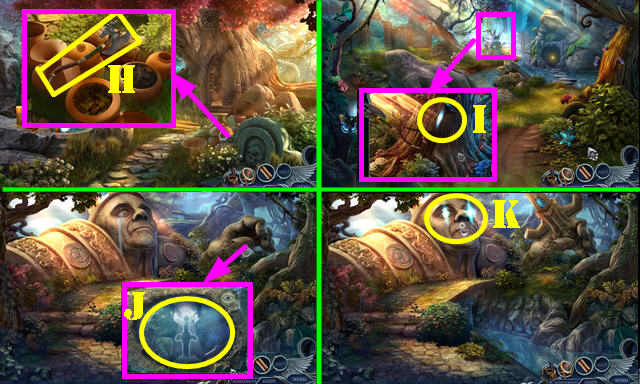
- Pull the lever (H).
- Select the chest and arrow on the scene.
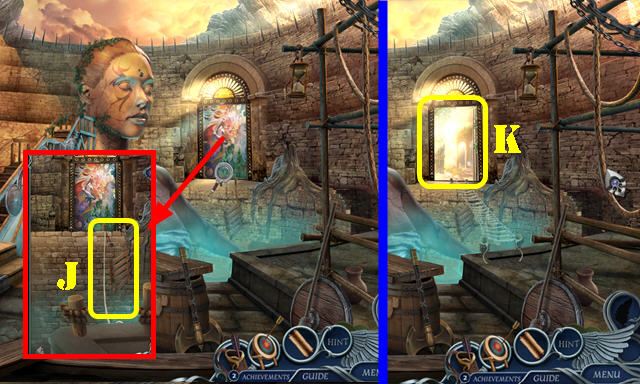
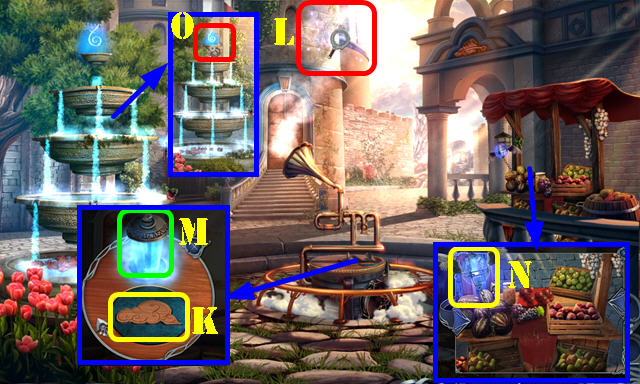
- Take the ROPE AND KEY (I). Take the RAG (J) and open the lid.
- Select the ROPE AND KEY; receive the CUPBOARD KEY. Select it again; receive the HOOK and ROPE.
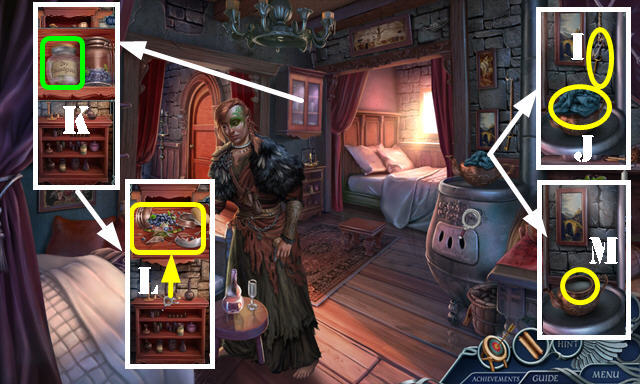
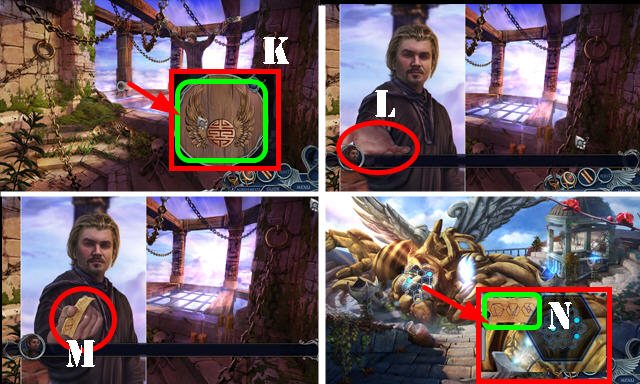
- Use the CUPBOARD KEY and open the doors; select the jar 3x (K). Take the SHATTERED JARS (L).
- Select the SHATTERED JARS 2x; take the BLUEBERRIES and BLOODGRASS.
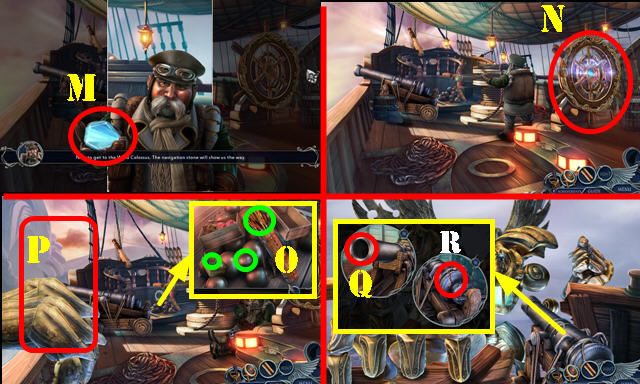
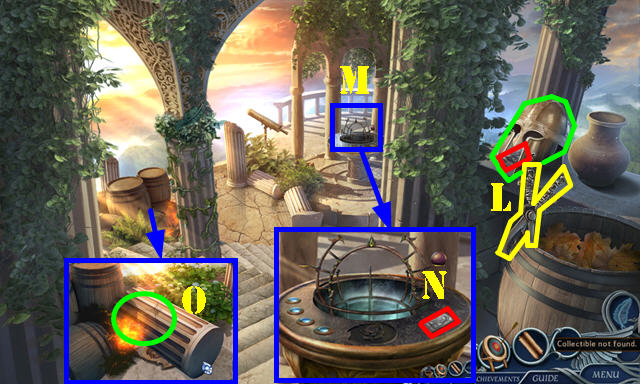
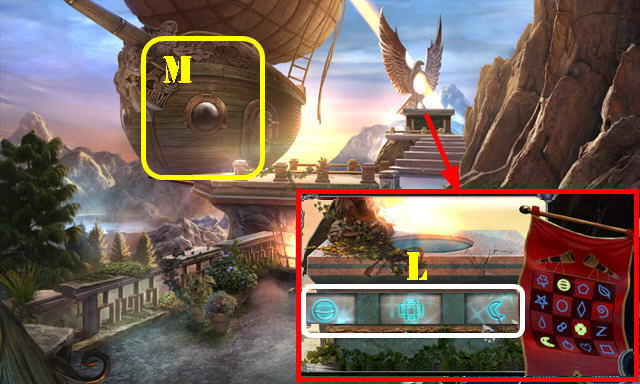
- Place the BLOODGRASS (M); play the HOP to get the BLOODGRASS BREW.
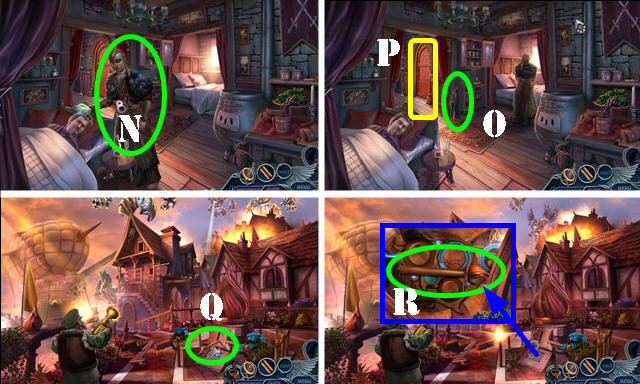
- Give the BLOODGRASS BREW (N).
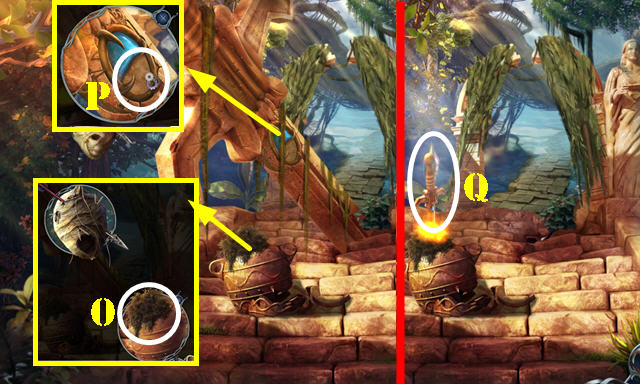
- Select the door (P).
- Take the Recovery arrow (O).
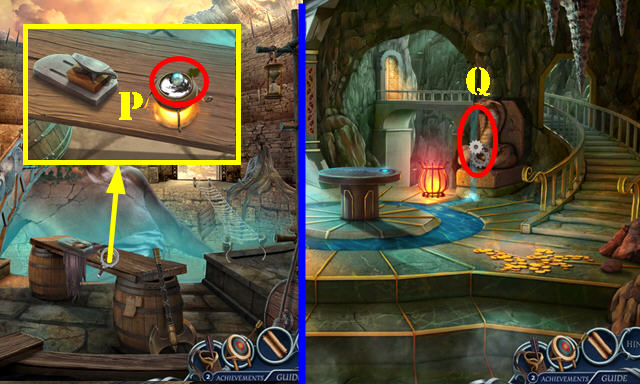
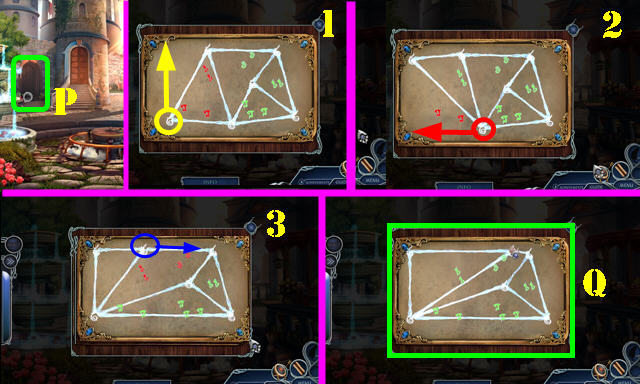
- Go to Town Square (P).
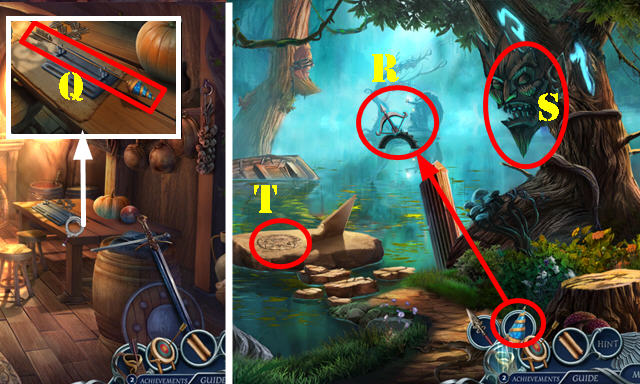
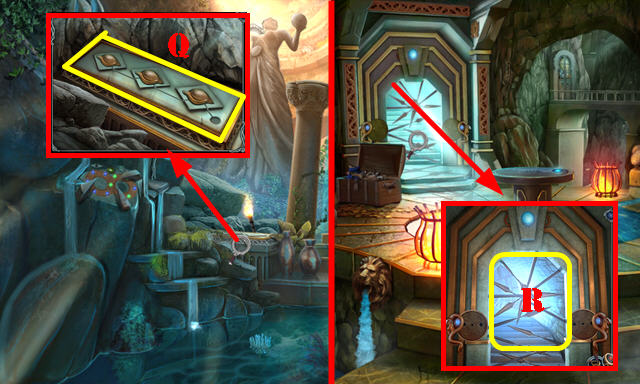
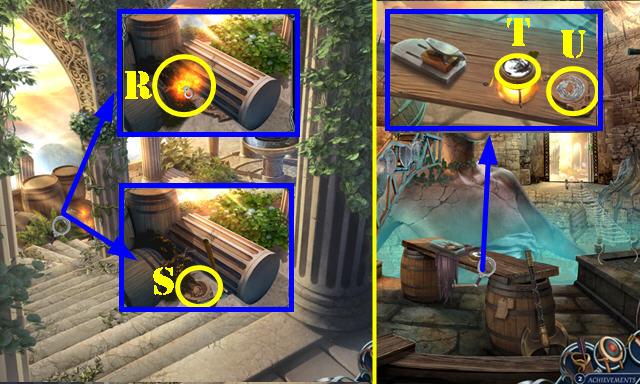
- Pull the lever (Q).Move two items and take the BROKEN LEVER (R).
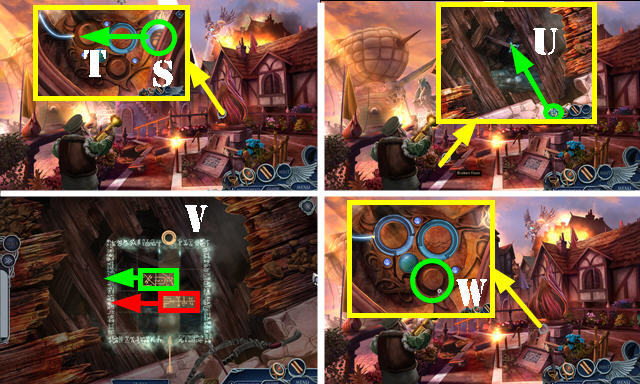
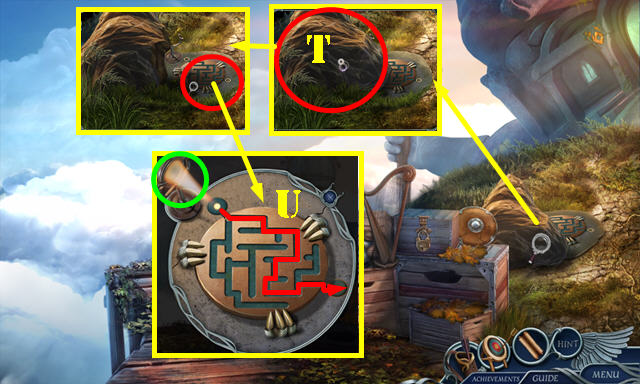
- Drag the ring (S) in place (T).
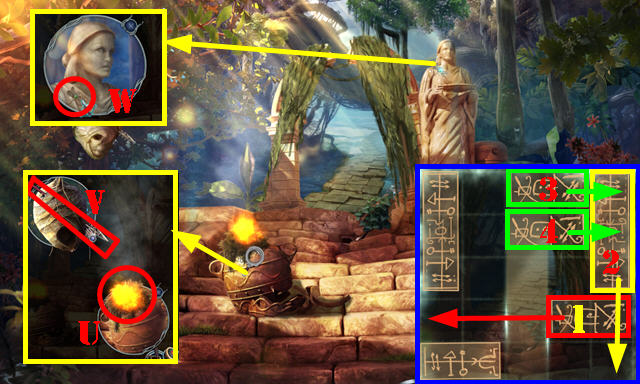
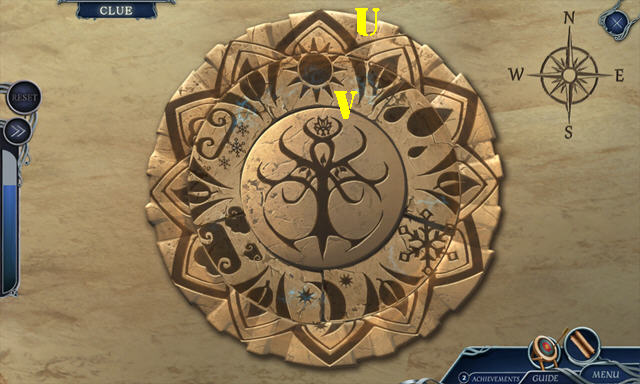
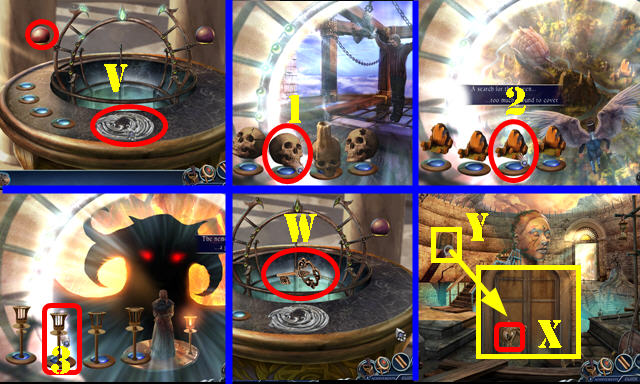
- Use the Recovery arrow for a puzzle (U). Solution (V).
- Take the SHIELD RING.
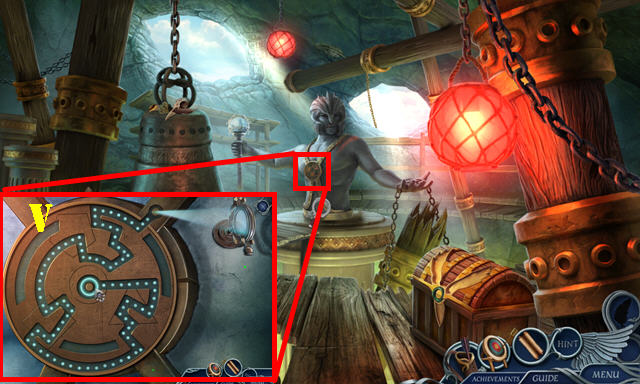
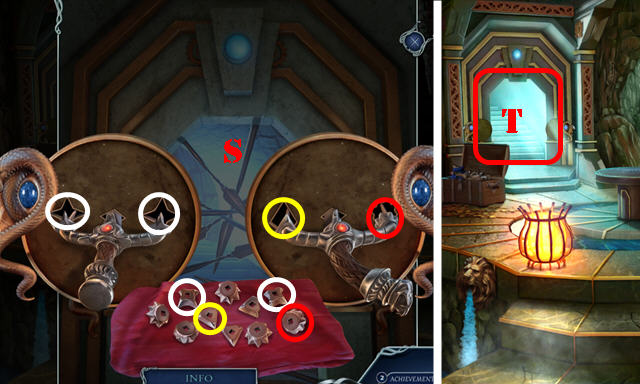
- Place the SHIELD RING for a puzzle (W).
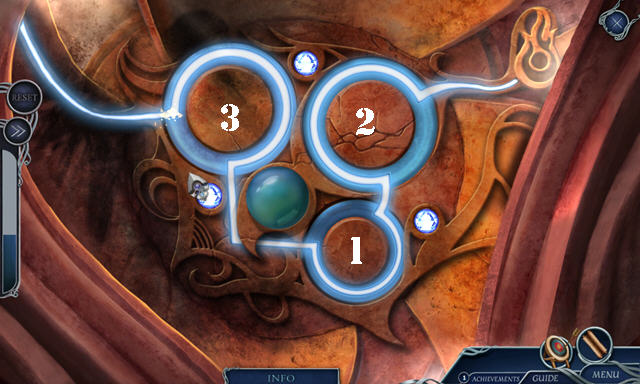
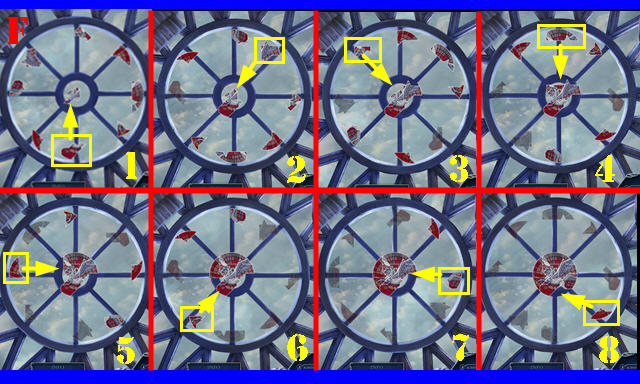
- Solution (X).Rotate the rings from 1-3 into the positions shown.
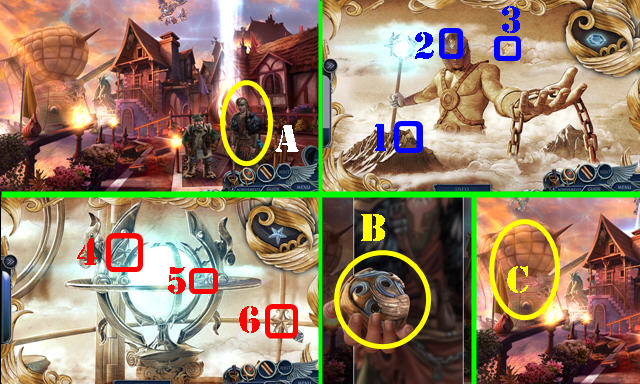
- Talk to the lady (A). Select the orb and then the scene for a puzzle.
- Select 1-3 and then select the scene. Select 4-6.
- Take the ORB (B).
- Go to the Royal Skyport (C).
- Remove the link (D); place the HOOK.
- Take the STEEL SHARD (E). Select the handle (F). Take the BUCKET (G).
- Place the ROPE on the BUCKET; take the ROPE AND BUCKET.
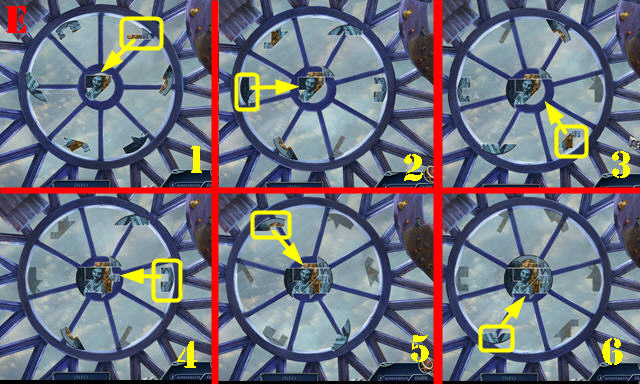
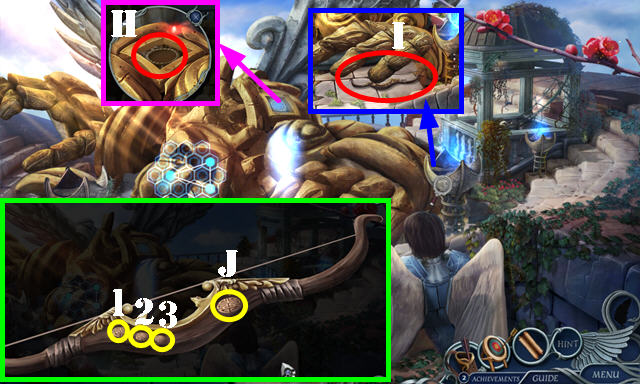
- Use the Recovery arrow for a puzzle (H). Solution (1-3).
- Select the chain twice (I-J).
- Walk down.
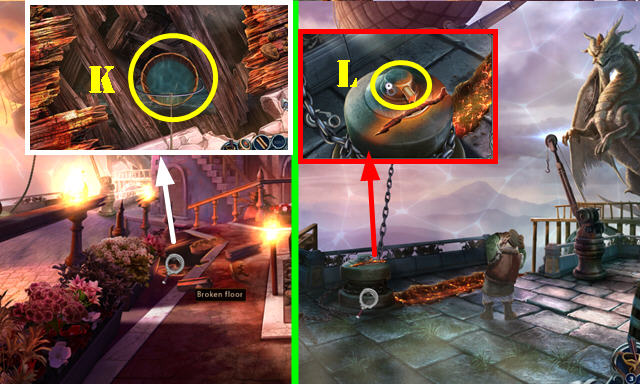
- Use the ROPE AND BUCKET; take the BUCKET OF WATER (K).
- Go to the Royal Skyport.
- Use the BUCKET OF WATER and remove the steel bar (L). Place the BROKEN LEVER and select it.
- Go forward.
- Take the NAVIGATION STONE (M).
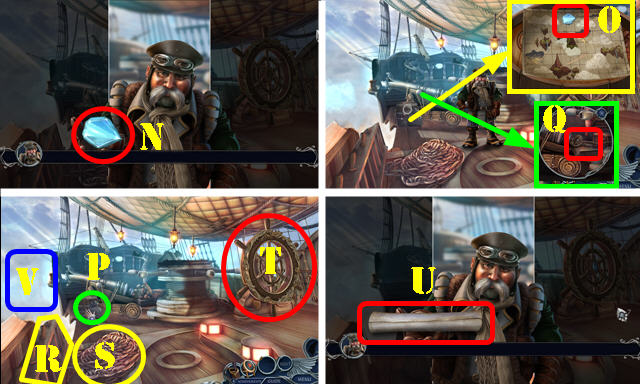
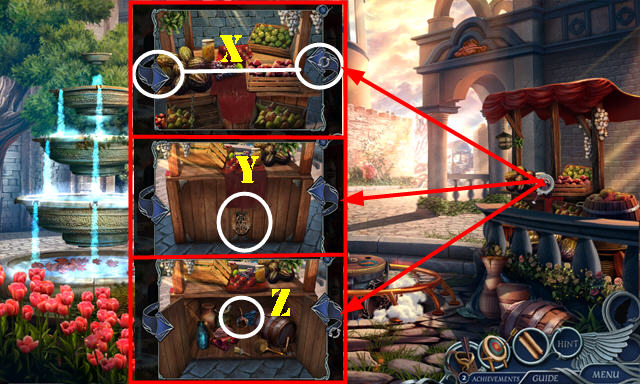
- Use the NAVIGATION STONE; play the HOP (N).
- Take the CANNONBALL and Explosive arrow. Open the box; take the FLINT (O).
- Go to the Royal Blimp (P).
- Use the STEEL SHARD on the FLINT; receive the FLINT AND STEEL.
- Place the CANNONBALL (Q) and use the FLINT AND STEEL (R) for a puzzle.
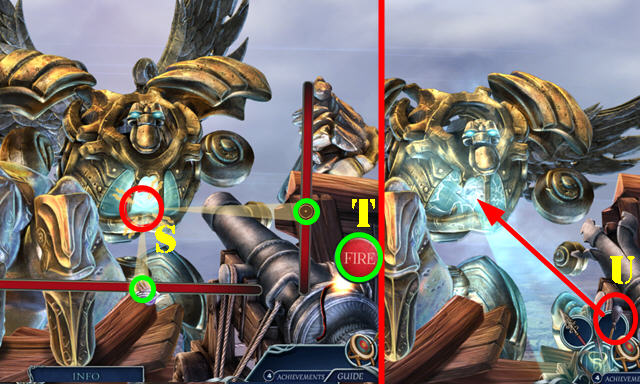
- Aim as shown (S) and select fire (T).
- Use the Explosive arrow (U).
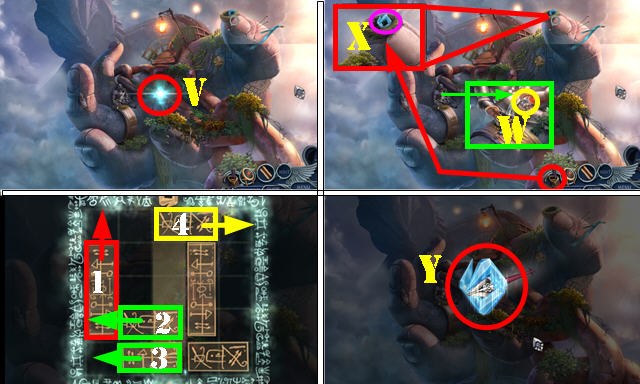
- Exit on the left. Go forward twice and select the light (V).
- Place the BLUEBERRIES (W).
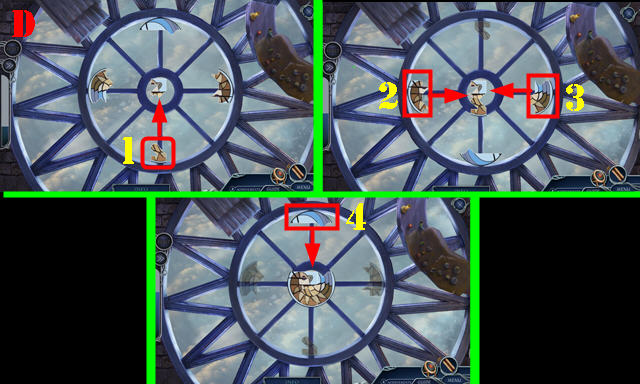
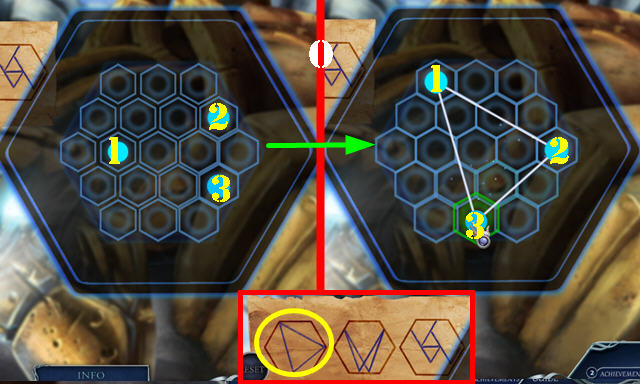
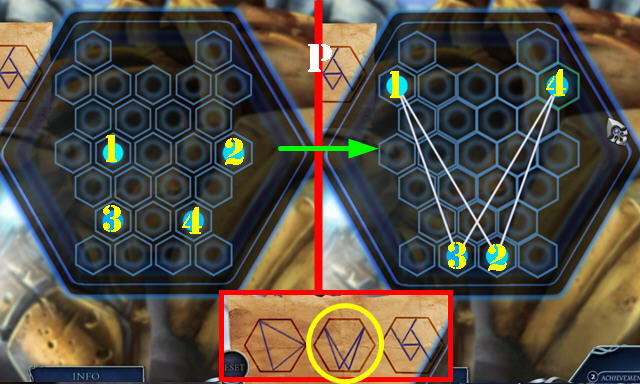
- Use the Recovery arrow for a puzzle (X).
- Solution (1-4).
- Take the BLUE CRYSTAL (Y).
- Go forward.
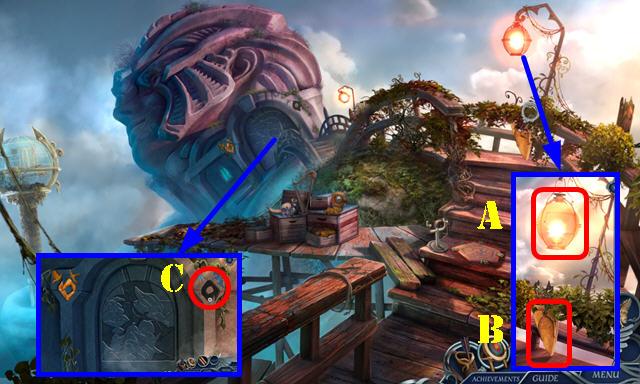
- Open the lamp; take the LAMP OIL (A).
- Select the leaves twice; take the STONE SHIELD (B).
- Place the BLUE CRYSTAL (C) for a puzzle.

- Make sure that only the shapes marked in yellow are depressed (D); press the blue crystal (E).
- Select the pieces marked in red (F).
- Make sure the pieces marked in green are depressed (G); press the gold crystal (H).
- Select the pieces marked in white (I).
- Solved puzzle (J).
Chapter 2: Colossus
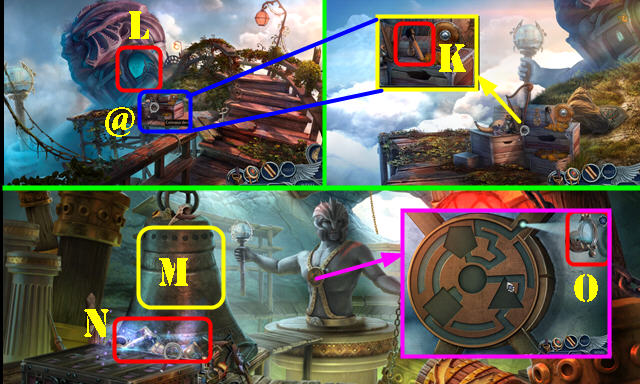
- Go to the Colossus Deck (@). Take the GONG MALLET (K).
- Enter the Colossus Head (L).
- Use the GONG MALLET (M); play the HOP to get the PICKAXE (N).
- Take the ORNATE LENS (O).
- Walk down.
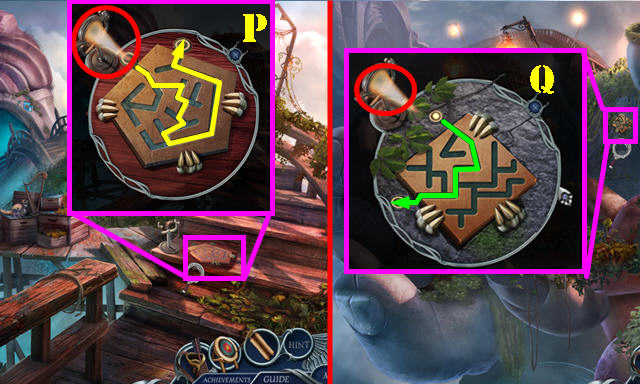
- Place the ORNATE LENS for a puzzle. Solution (P).
- Take the STONE PENTAGON and ORNATE LENS.
- Walk down.
- Place the ORNATE LENS for a puzzle. Solution (Q).
- Take the STONE SQUARE and ORNATE LENS.
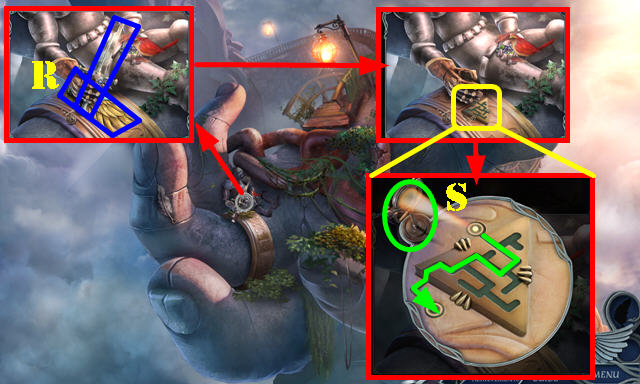
- Use the LAMP OIL; take the BROKEN SWORD and STONE WING 1/2 (R).
- Place the ORNATE LENS for a puzzle. Solution (S).
- Take the STONE TRIANGLE and ORNATE LENS.
- Go to the Colossus Deck.
- Use the PICKAXE 3x (T).
- Place the ORNATE LENS for a puzzle. Solution (U).
- Take the STONE CIRCLE and ORNATE LENS.
- Return to the Colossus Head.
- Place the ORNATE LENS, STONE CIRCLE, STONE TRIANGLE, STONE SQUARE and STONE PENTAGON for a puzzle.
- Solution (V).
- Walk down.
- Select the light (W).
- Take the STONE WING 2/2 (X).
- Return to the Colossus Head.
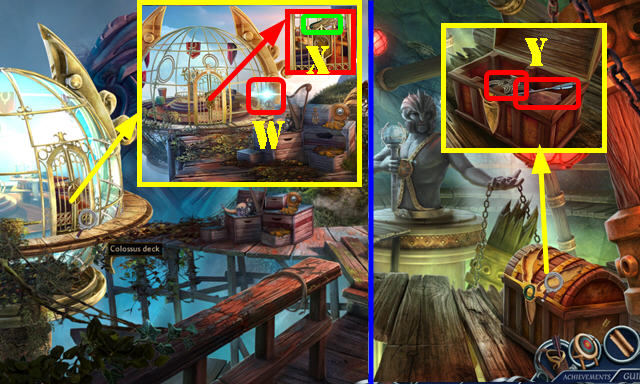
- Place the STONE SHIELD and STONE WING 2/2; take the Freezing arrow and MECHANISM PIECE (Y).
- Go to the Colossus Deck.
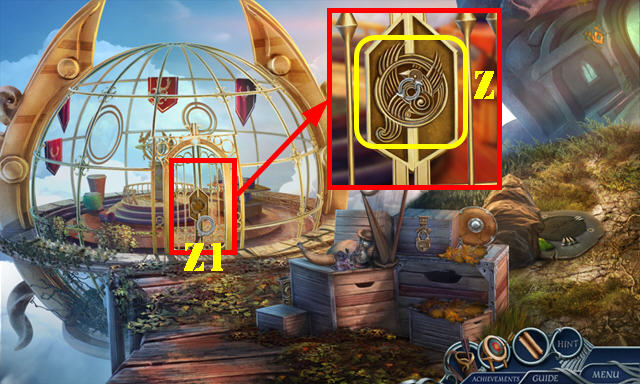
- Place the MECHANISM PIECE and rotate into place (Z).
- Enter the Heart of the Wind (Z1).
- Remove the glass (A).
- Look at the note; take the COPPER KEY and SMALL LENS (B).
- Place the GONG MALLET (C) to get the IMPROVISED HANDLE.
- Use the BROKEN SWORD on the IMPROVISED HANDLE.
- Place the SMALL LENS and IMPROVISED HANDLE (C). Select the handle.
- Walk down.
- Use the COPPER KEY and open the latch (D). Play the HOP to get the LARGE LENS.
- Use the Freezing arrow (E).
- Go to the Heart of the Wind.
- Place the LARGE LENS (F) and select it.
- Place the ORB (G) and select it. Select the scene for a puzzle.
- Solutions one and two (H-I). Receive the ORB.
- Take the DRAGONFLY 1/3 (J).
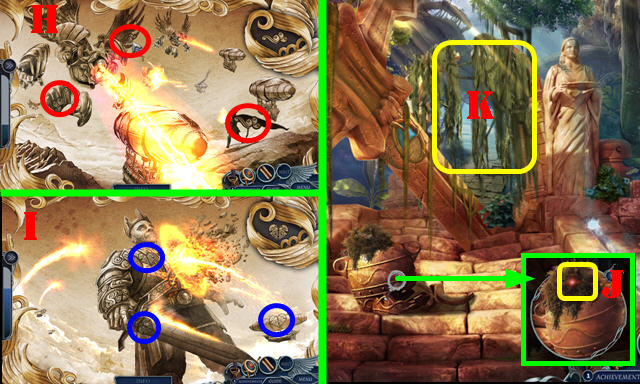
- Select the vines twice; go forward to the Hand Ruins (K).
- Take the GIANT GEM FRAGMENT (L).
- Select the arrow twice (M).
- Take the LENS (N).
- Walk down.
- Use the LENS (O).
- Place the GIANT GEM FRAGMENT (P); play the HOP.
- Take the ANCIENT SWORD (Q).
- Go forward.
- Use the ANCIENT SWORD; receive the GIANT LEAF (R).
- Go to the Fallen King (S).
- Use the ANCIENT SWORD; take the DRAGONFLY 2/3 (T).
- Walk down twice.
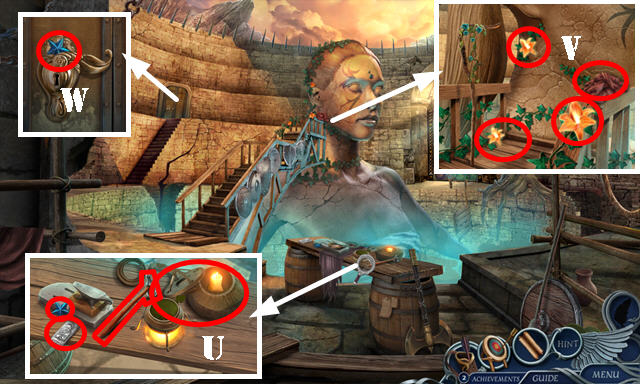
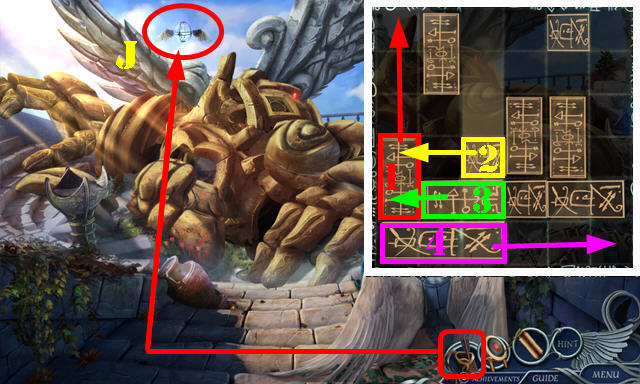
- Use the GIANT LEAF (U); take the Recovery arrow (V).
- Use the Recovery arrow for a puzzle (W). Solution (1-4).
- Take the DRAGONFLY 3/3.
- Go forward.

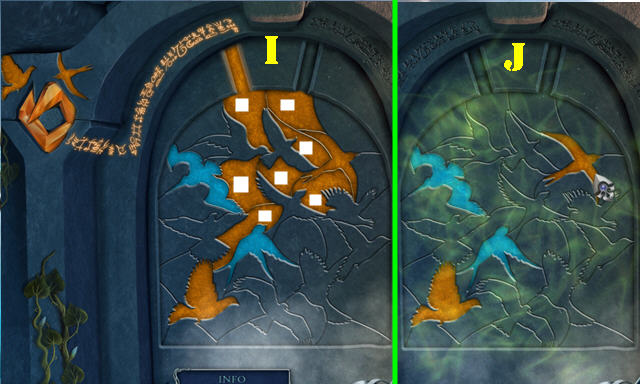
- Place the DRAGONFLY 3/3 for a puzzle (X).
- Swap the fish (Y) and press the button (Z).
- Go to the Tree House (Z1).
Chapter 3: Tree House
- Remove the lids; take the EAR TRUMPET and STONE BRACELET (A).
- Take the CANDLE (B).
- Go to the Lake of Essence (C).
- Use the Recovery arrow (D); solve the puzzle 1-4 and take the LEATHER POUCH.
- Select the LEATHER POUCH twice; receive the BOTTLE 1/3.
- Take the SPEAR (E).
- Enter the Hermit's Home (E1).
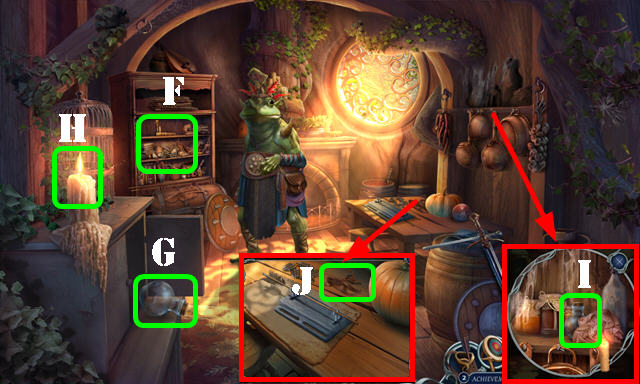
- Play the HOP (F) to receive the PURIFYING SCROLL.
- Open the cabinet; take the BOTTLE 2/3 (G).
- Use the CANDLE (H) to get the LIT CANDLE.
- Use the LIT CANDLE; take the BOTTLE 3/3 (I).
- Take the LEATHER STRAP (J).
- Use the BOTTLE 3/3 and LEATHER STRAP on the SPEAR to get the BOTTLE AND SPEAR.
- Walk down.
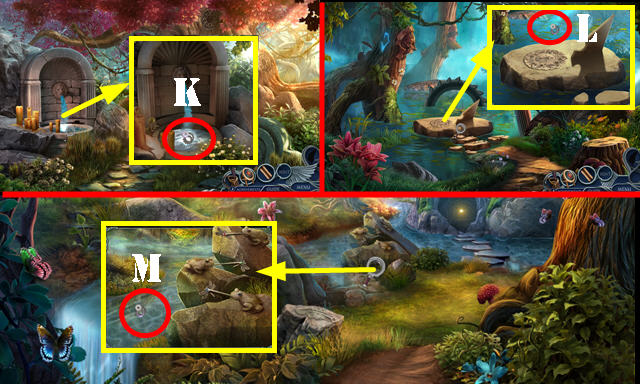
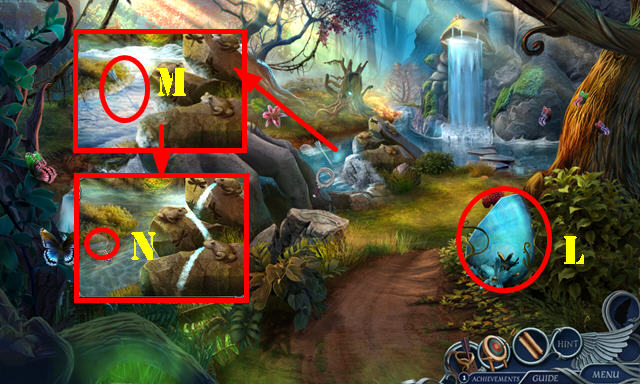
- Use the BOTTLE 2/2; get the GROUNDWATER (K).
- Go to the Lake of Essence.
- Use the BOTTLE AND SPEAR (L); receive the LAKE WATER.
- Walk down twice.
- Use the BOTTLE (M); receive the STEAM WATER.
- Use the GROUNDWATER, LAKE WATER, and STEAM WATER on the PURIFYING SCROLL for a puzzle.
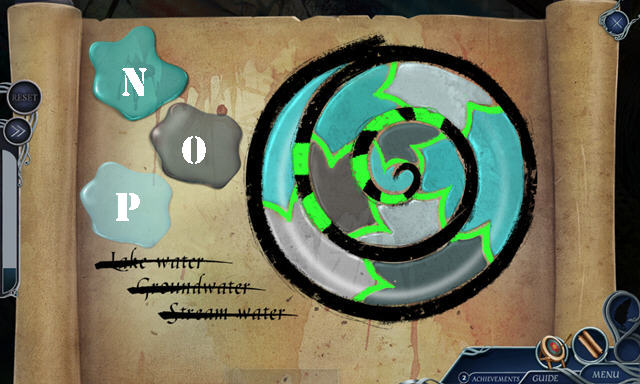
- Solution: N-O-N-P-O-N-P-N-O-P-N.
- Take the PURIFYING ARROWHEAD.
- Go to the Hermit's Home.
- Place the PURIFYING ARROWHEAD; take the Purifying arrow (Q).
- Go to the Lake of Essence.
- Use the Purifying arrow (R).
- Use the EAR TRUMPET (S).
- Play the puzzle (T).
- Rotate (U) as shown and swap (V) as shown.
- Go forward to the Island.
- Place the STONE BRACELET (A); take the GOLDEN CROWN (B).
- Return to the Fallen King.
- Place the GOLDEN CROWN (C).
- Select the SHRUBS 3x; look at the stone tablet (D).
- Play the puzzle (E).
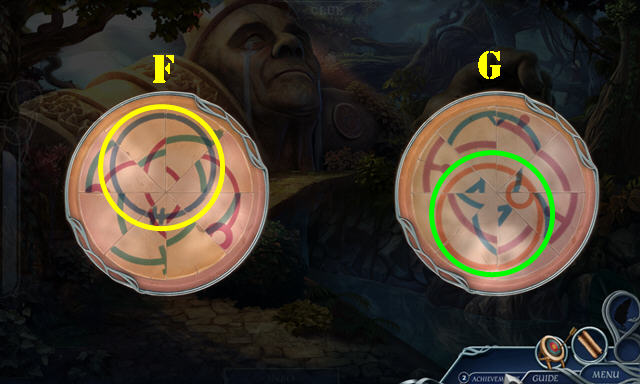
- Swap to form the blue and orange circles (F-G).
- Take the OLD SCEPTER.
- Select the OLD SCEPTER 2x; receive the SCEPTER HANDLE and SCEPTER HEAD.
- Go to the Tree House.
- Place the SCEPTER HANDLE; take the AXE (H).
- Walk down.
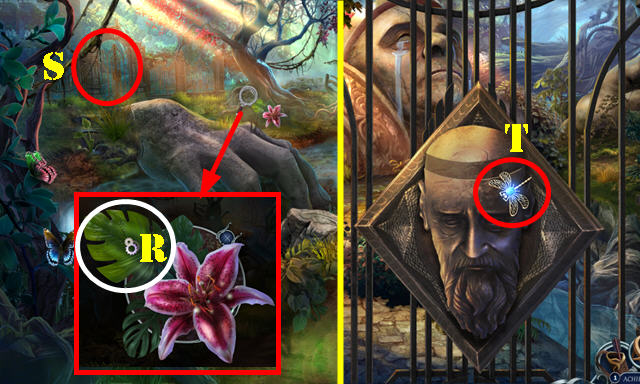
- Use the AXE (I); play the HOP to receive the SEEING STONE.
- Go to the Fallen King.
- Use the SEEING STONE and ANCIENT SWORD (J).
- Use the ORB (K).
- Try to go forward.
- Take the CRYSTAL STAR 1/2 and GEMMED RING (L).
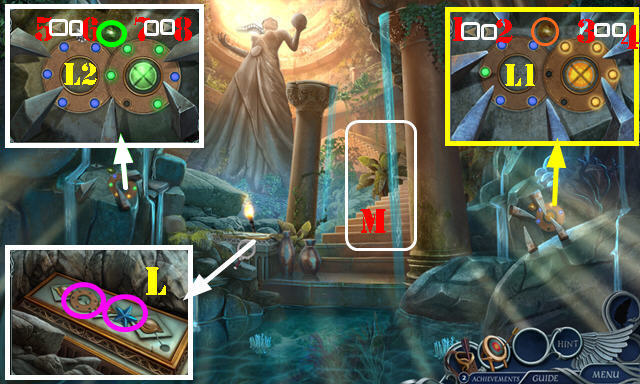
- Place the GEMMED RING for a puzzle (L1). Select: 1-4-4-4. Push the button (orange) to take the GEMMED RING.
- Place the GEMMED RING for a puzzle (L2). Solution: 8-5-8-5. Push the button (green) to take the GEMMED RING.
- Place the GEMMED RING for a puzzle (L1). Solution: 2-4-4-2.
- Go to the First Floor (M).
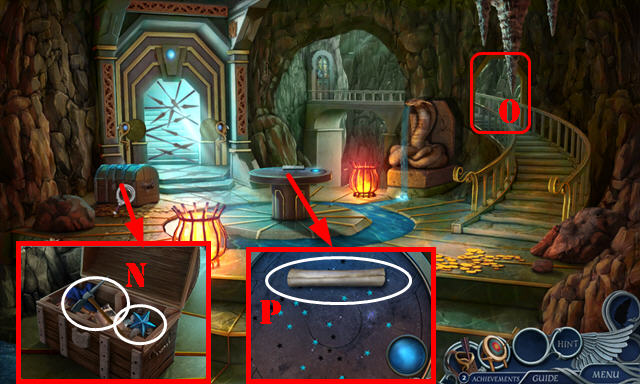
- Open the chest; take the SMALL PICKAXE and CRYSTAL STAR 2/2; look at the note (N).
- Try to go through the doorway (O).
- Take the Map and place the CRYSTAL STAR 2/2 for a puzzle (P).
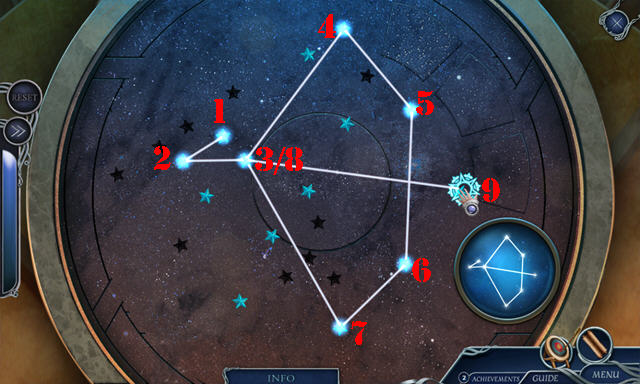
- Solution 1-9.
- Take the VIAL.
- Walk down.
- Use the VIAL (Q); play the HOP to get the VELVET BUNDLE.
- Select the VELVET BUNDLE twice; receive the SNAKE DAGGERS.
- Go to the First Floor.
- Use the SNAKE DAGGERS for a puzzle (R).
- Solution (S); push in the daggers.
- Go to the Second Floor (T).
- Take the SILVER BAR 1/3, CRYSTAL STAR 1/4, HAMMER and LANTERN (U).
- Take the FINE CLOTH, FIRELILY 1/3, FIRELILY 2/3 and FIRELILY 3/3 (V).
- Take the CRYSTAL STAR 2/4 (W).
- Walk down.
- Remove the candle from the LANTERN; place the FIRELILY 3/3; take the FIRELILY LANTERN.
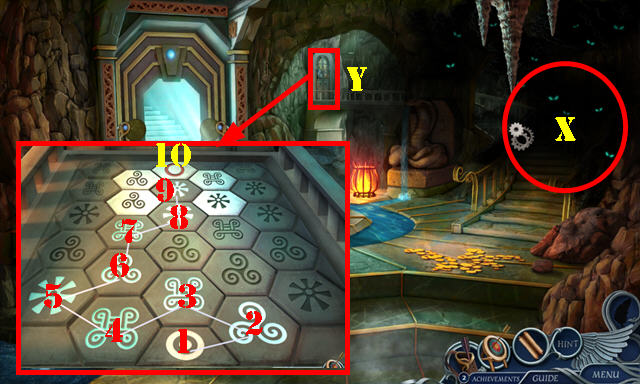
- Use the FIRELILY LANTERN (X).
- Pan down and play the puzzle. Solution 1-10.
- Go to the Observatory (Y).
Chapter 4: Observatory
- Take the HOOKED ARROW and CRYSTAL STAR 3/4 (A).
- Flip the mirror and use the FINE CLOTH on it; flip the mirror again (B).
- Take the BENT BAR (C).
- Return to the Second Floor.
- Place the BENT BAR and use the HAMMER; take the STRAIGHTENED BAR (D).
- Go to the Observatory.
- Place the STRAIGHTENED BAR for a puzzle. Solution: (move one space unless indicated otherwise): (F-up)-(E-down)-(F-down)-(E-up)-(E-down)- (F-down)-(E-up)-(E-down)-(F-down)-(E-up 3x)-(E-down 2x).
- Take the SUEDE BAG.
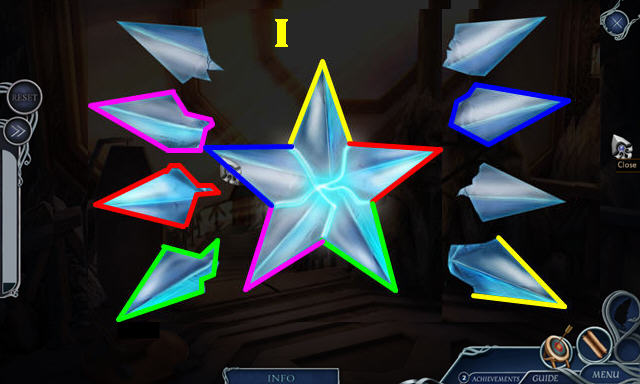
- Select the SUEDE BAG twice for a puzzle. Solution (I).
- Take the CRYSTAL STAR 4/4.
- Walk down.
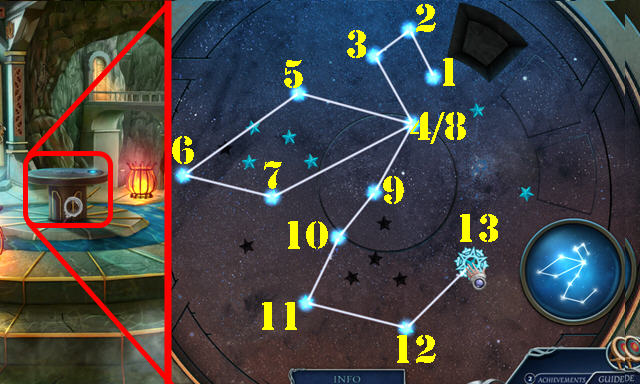
- Place the CRYSTAL STAR 4/4 for a puzzle. Solution 1-13.
- Take the ROPE.
- Go to the Second Floor.
- Place the ROPE on the HOOKED ARROW; take the Grappling arrow.
- Use the Grappling arrow and select it (J); play the HOP.
- Go to the Balcony (K).
- Take the CALIPERS, HELMET and SILVER BAR 2/3 (L).
- Go to the Occularium (M). Take the SILVER BAR 3/3 (N).
- Use the SMALL PICKAXE (O).
- Walk down.
- Place the SILVER BAR 3/3 and SCEPTER HEAD; use the CALIPERS to get the GLASS BALL (P).
- Walk down.
- Use the HELMET to get the WATER-FILLED HELMET (Q).
- Return to the Balcony.
- Use the WATER-FILLED HELMET (R). Use the SMALL PICKAXE; take the SILVER MOLD (S).
- Walk down.
- Put down the SILVER MOLD (U); select the melted metal (T). Take the OCCULARIUM ORNAMENT.
- Go to the Occularium.
- Place the GLASS BALL and OCCULARIUM ORNAMENT (V).
- Select 1-3. Take the ORNATE KEY (W).
- Walk down.
- Use the ORNATE KEY (X) and go to the Outcropping (Y).

- Move the leaves; take the CRYSTAL STAR 1/6, CRYSTAL STAR 2/6, CRYSTAL STAR 3/6, CRYSTAL STAR 4/6 and CRYSTAL STAR 5/6 (A).
- Take the CRYSTAL STAR 6/6 (B).
- Use the Recovery arrow (C) for a puzzle. Solution 1-4.
- Take the BANNER.
- Go to the Balcony.
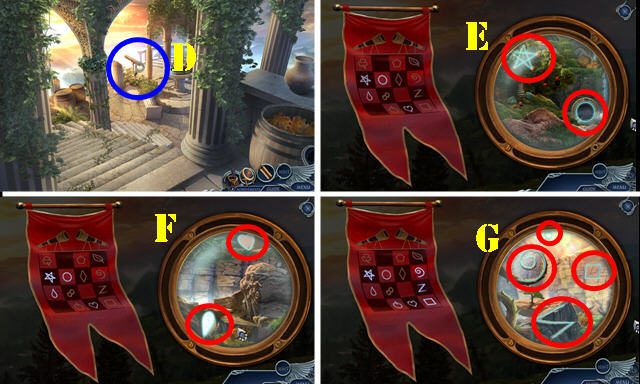
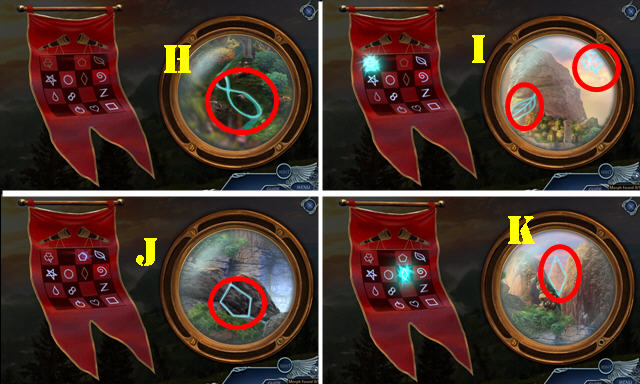
- Place the BANNER (D). Select items in E-K.
- You receive the BANNER.
- Go to the First Floor.
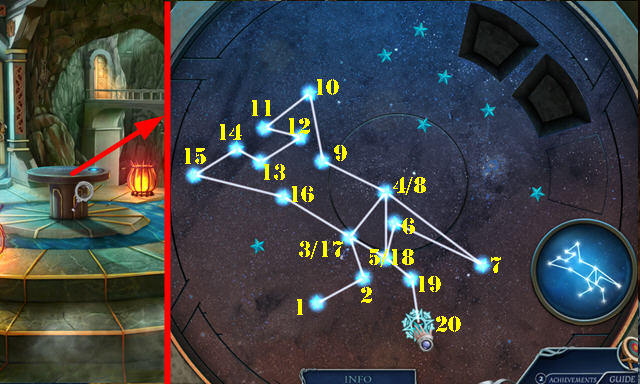
- Place the CRYSTAL STAR 6/6 for a puzzle.
- Solution 1-20.
- Take the FEATHER KNIFE.
- Go to the Outcropping.
- Use the FEATHER KNIFE; place the BANNER for a puzzle. Solution (L).
- Go to the Royal Blimp (M).
Chapter 5: Town Center
- Take the NAVIGATION STONE (N).
- Open the Map, place the NAVIGATION STONE and then take it (O).
- Move the two items (P); use the FEATHER KNIFE (Q). Move the chains and ladder (R-S).
- Use the NAVIGATION STONE (T); play the HOP.
- Take the Map (U).
- Go to Town Center (V).

- Take the NET (A) and AMULET 1/4 (B).
- Go to the Amphitheater (C).
- Take HARLON'S RING (D).
- Take the CLOUD EMBLEM (E); remove the cover and take the POWER CORE (F).
- Use the NET to get the GLASS PIECE 1/3 (G).
- Use the AMULET 1/4 (H); receive the AMULET 2/4.
- Use the AMULET 2/4 (I); receive the AMULET 3/4.
- Select the four energy rods on the POWER CORE and then select the core.
- Use the Recovery arrow for a puzzle (J).
- Solution (1-4).
- Take the ENERGY ROD 1/4.
- Walk down.
- Place the CLOUD EMBLEM (K); play the HOP (L). Take the ENERGY ROD 2/4 (M).
- Take the ENERGY ROD 3/4 (N).
- Use the AMULET 3/4 (O); receive the AMULET 4/4.
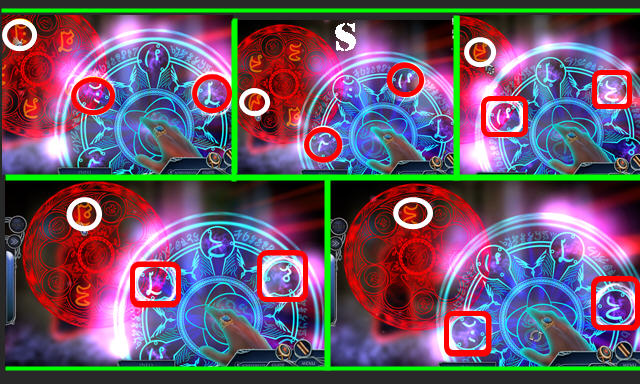
- Use the AMULET 4/4 for a puzzle (P). Solution (1-3). Final solution (Q).
- Enter the Guard Tower (P).
- Take the GLASS PIECE 2/3 (R).
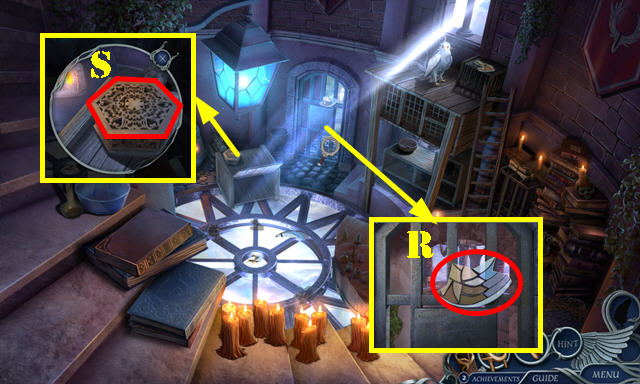
- Remove the lid and play the puzzle (S).
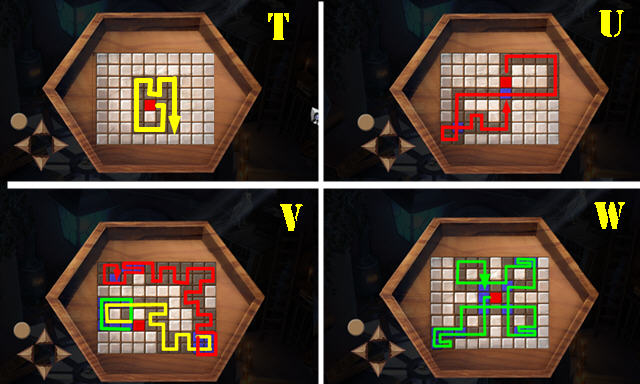
- Solution one (T).
- Solution two (U).
- Solution three (V).
- Solution four (W).
- Take the WINGED KEY.
- Walk down.
- Flip the close-up (X). Use the WINGED KEY (Y); receive the WINGED PADLOCK. Open the door and select 3x; take the FALCONER'S HOOD (Z).
- Take the RIGHT WING and LEFT WING from the WINGED PADLOCK.
- Go to the Guard Tower.
- Place the FALCONER'S HOOD (A); take the GLASS PIECE 3/3 (B).
- Place the GLASS PIECE 3/3 for a puzzle (C).
- Solution one (D).
- Solution two (E).
- Solution three (F).
- Go forward the Prison Cell.
Chapter 6: Prison Cell
- Use the Recovery arrow for a puzzle (G).
- Solution (1-4).
- Take the ENERGY ROD 4/4.
- Return to the Amphitheater.
- Place the ENERGY ROD 4/4 on the POWER CORE.
- Place the POWER CORE (H).
- Take the GUARD BOW (I).
- Open the GUARD BOW; select buttons 2-1-3; take the GUARD EMBLEM (J).
- Go to the Prison Cell.
- Place the RIGHT WING, LEFT WING and GUARD EMBLEM (K). Play the HOP.
- Give the GUARD BOW (L). Take the BEHEMOTH CODE (M).
- Return to the Amphitheater.
- Place the BEHEMOTH CODE for a puzzle (N).

- Move the dots to the spots shown. If you see a dot on spot 1, move that same dot 1 to the next position shown in the next screenshot.
- Solution one (O).
- Solution two (P).
- Solution three (Q).
- Walk down and go into the Halls of Judgement for a puzzle (R).
- Solutions (S).
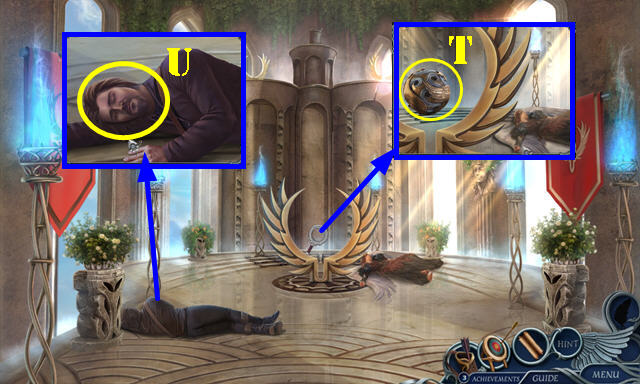
- Place the ORB (T).
- Talk to Nathaniel (U).
- Congratulations, you've completed Dark Realm: Lord of the Winds!
Created at: 2016-10-02