

Walkthrough Menu
- General Tips
- Chapter 1: Northpearl
- Chapter 2: The Dragonwoods
- Chapter 3: The Cliffs
- Chapter 4: The Ivory Tower
- Chapter 5: Aeterna
- Chapter 6: The Zeppelin
- Chapter 7: The Temple
- Chapter 8: The Castle
General Tips
- This is the official guide for Dark Realm: Queen of Flames.
- This guide will not show when you have to zoom into a location; the screenshots will show each zoom scene.
- Hidden-object puzzles are referred to as HOPs. This guide will not show screenshots of the HOPs, however, it will mention when an HOP is available and the inventory item you'll collect from it.
- Use the Map to travel to a location.
Chapter 1: Northpearl
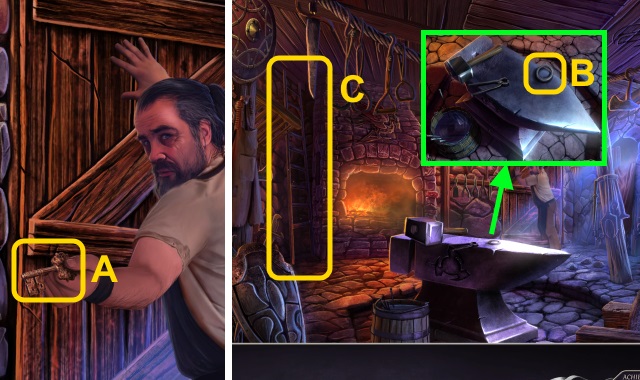
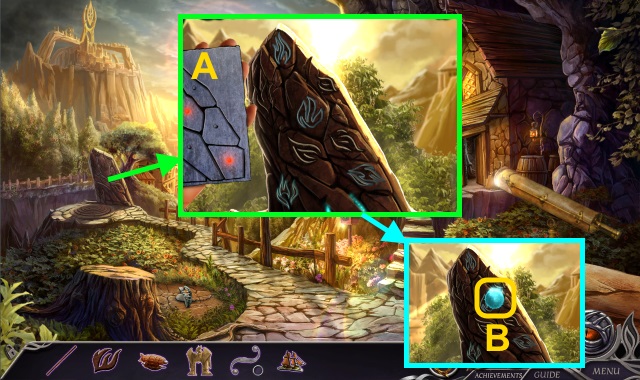
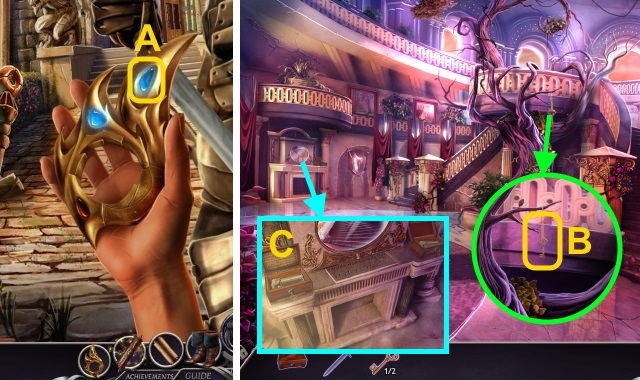
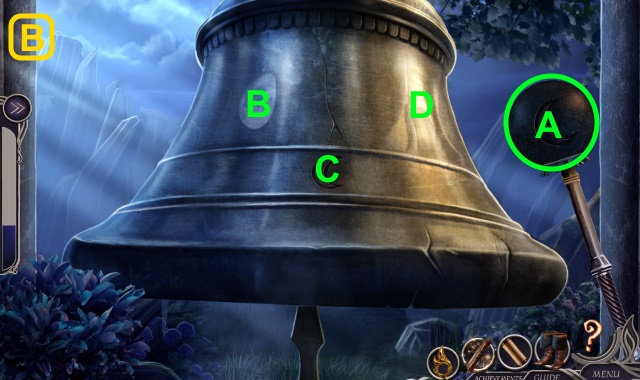
- Take the CHEST KEY (A).
- Take the TRAPDOOR HANDLE (B).
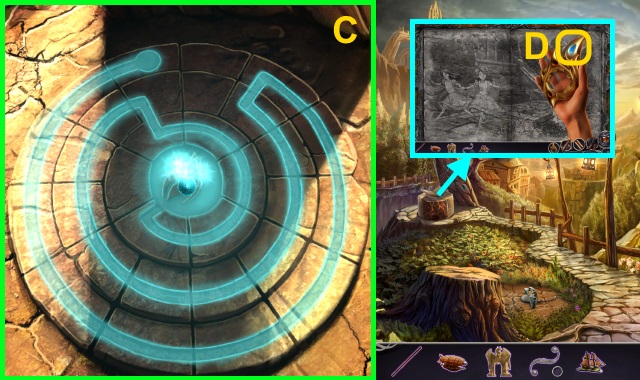
- Move the ladder (C).
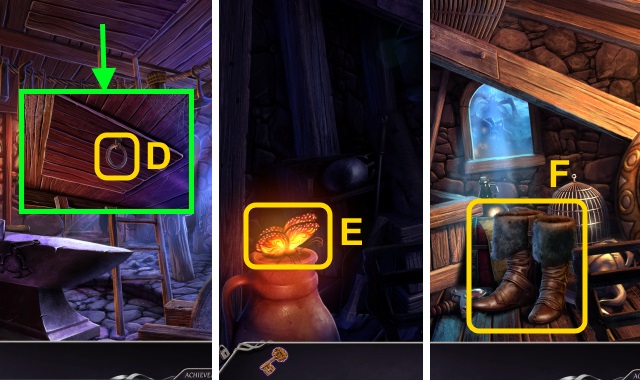
- Place the TRAPDOOR HANDLE (D); open the door.
- Go up.
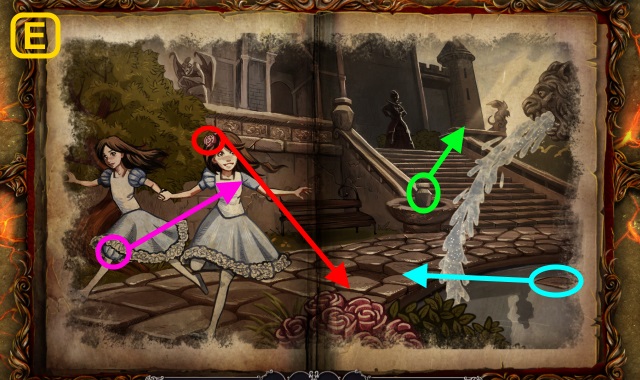
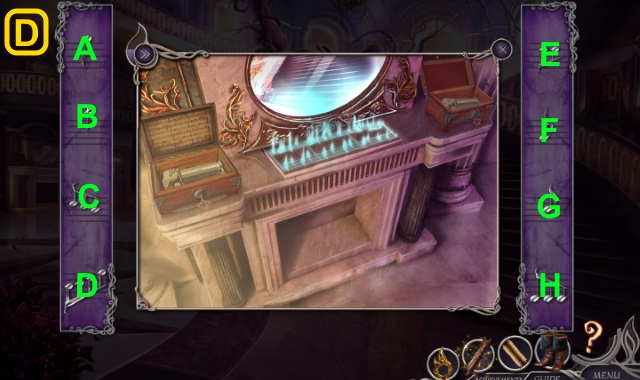
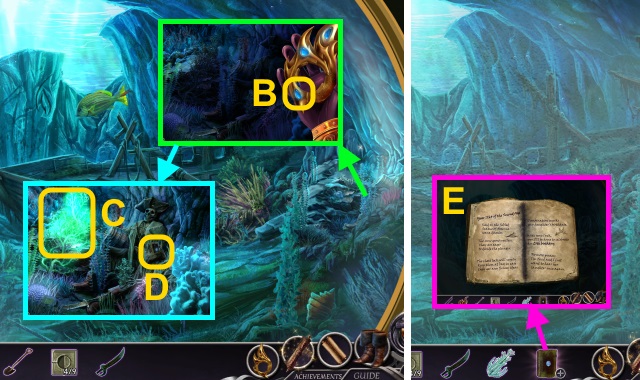
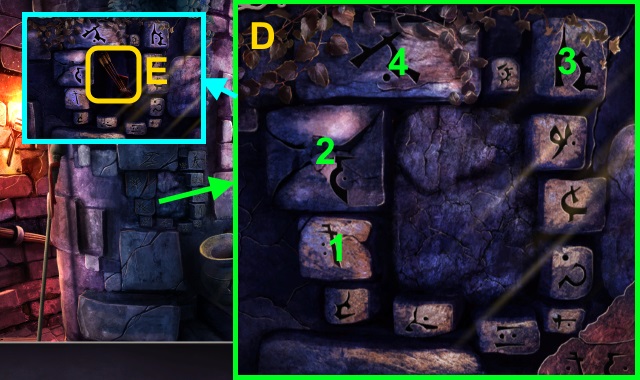
- Move the butterfly (E).
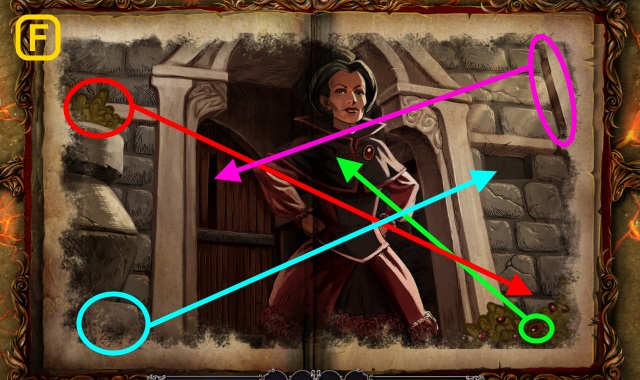
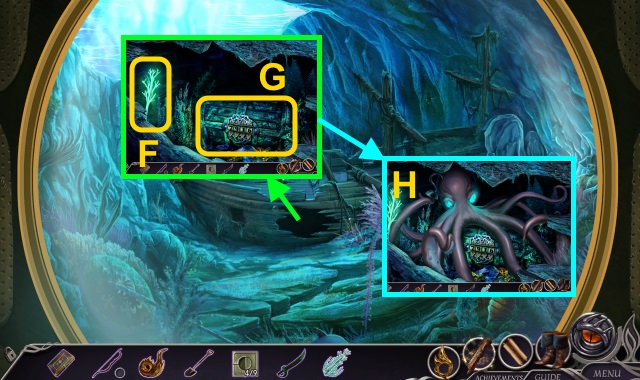
- Move the objects; take the Magic Boots (F).
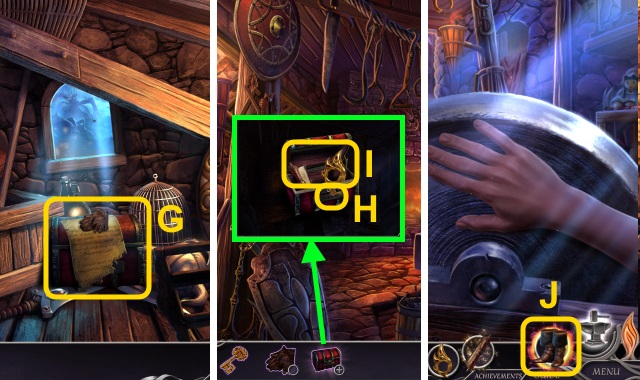
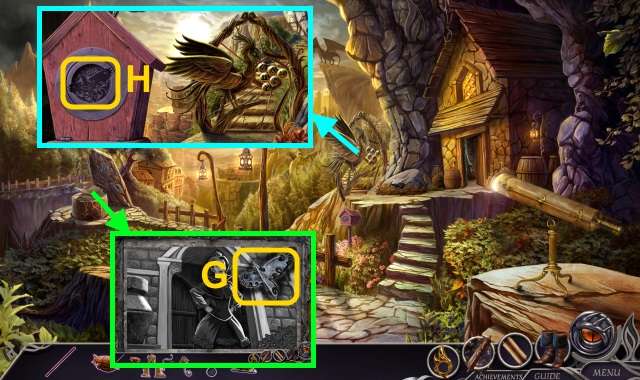
- Take the TORN GLOVES and note; take the LOCKED CHEST (G).
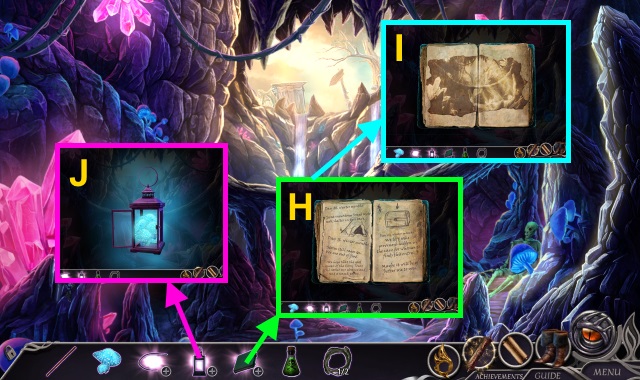
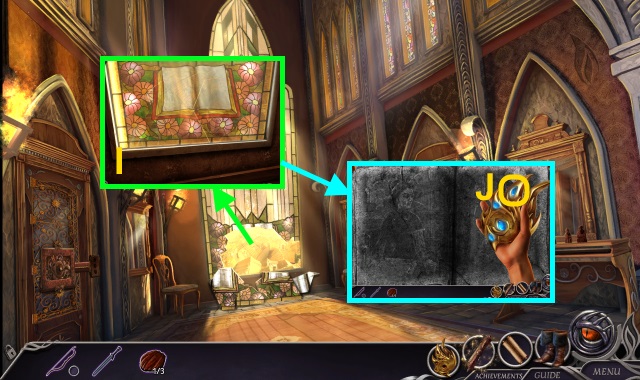
- Examine the LOCKED CHEST; use the CHEST KEY to open it (H).
- Take the Medallion Half and Journal (I).
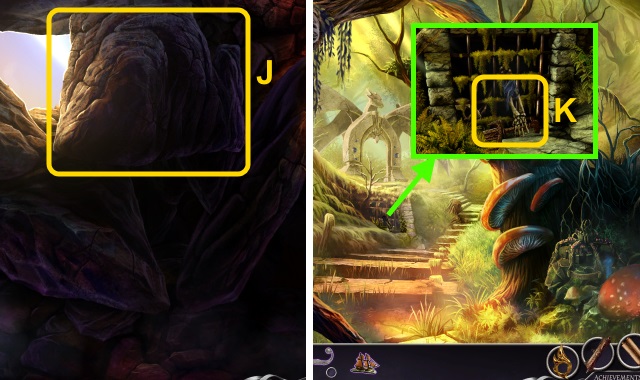
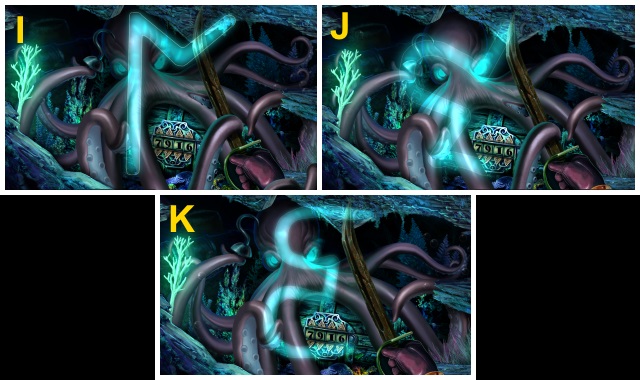
- Use the Magic Boots (J).
- Go left, forward, then left.
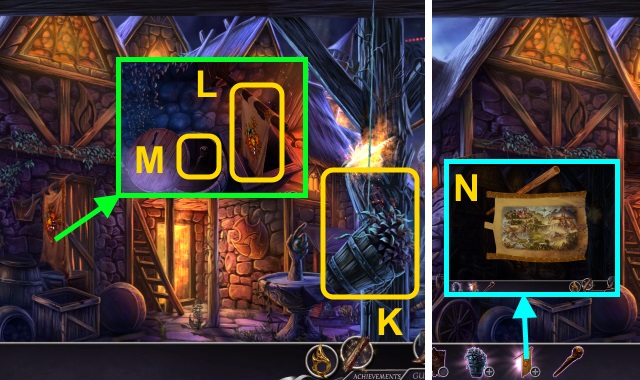
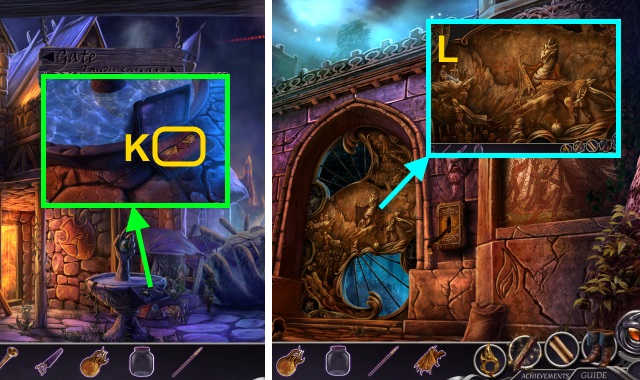
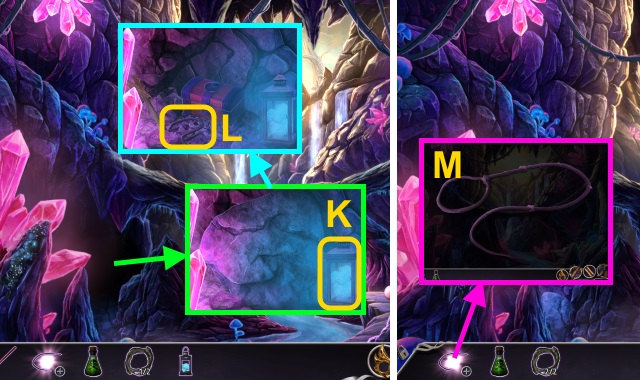
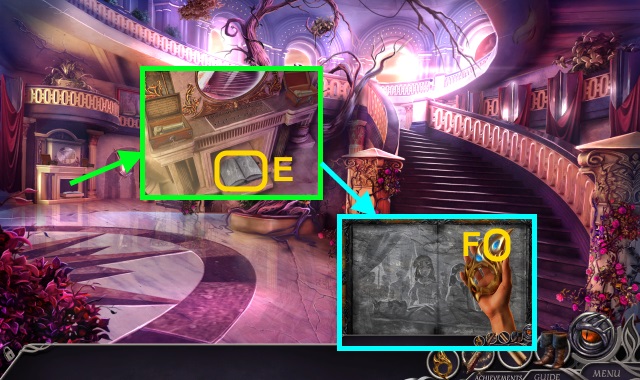
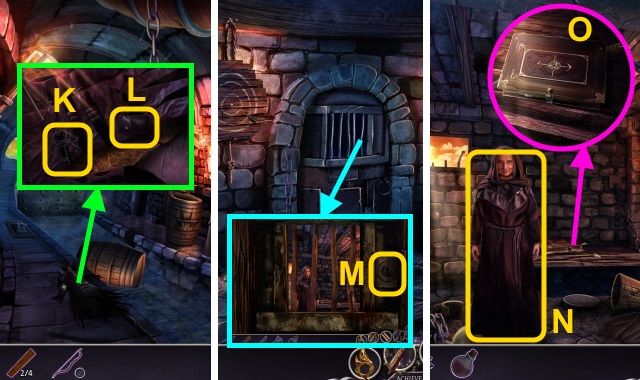
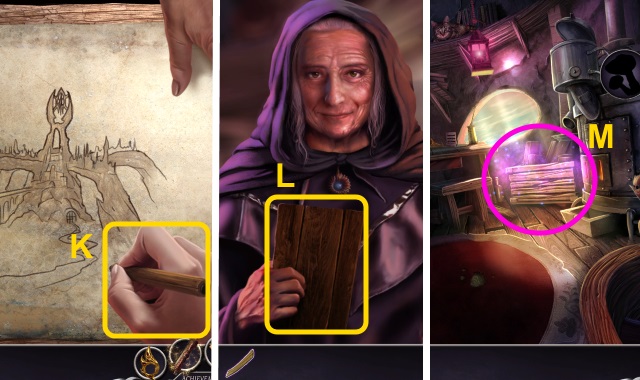
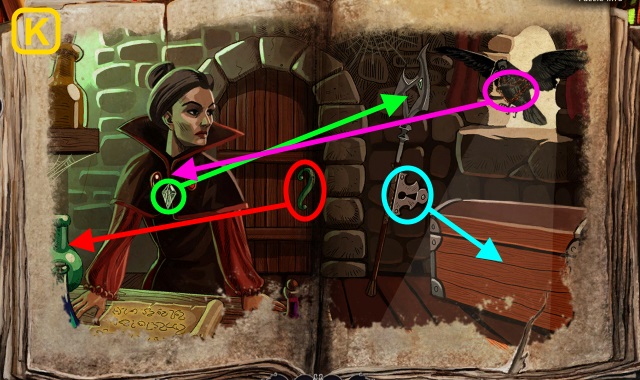
- Take the FLOWERPOT and sign (K).
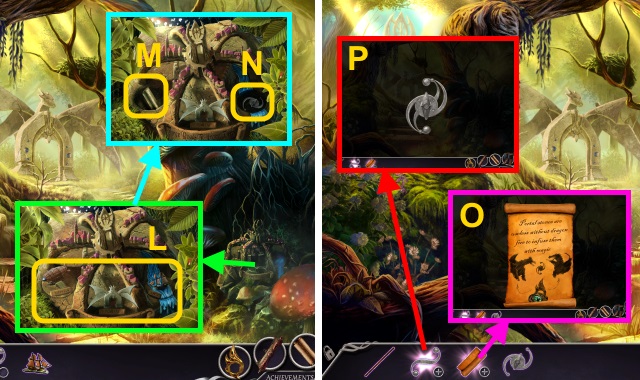
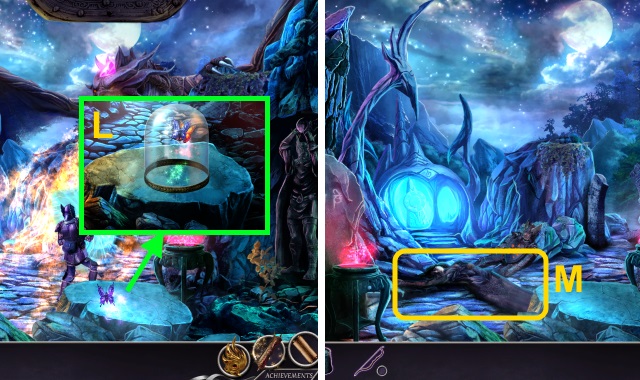
- Take the ROYAL FLAG (L).
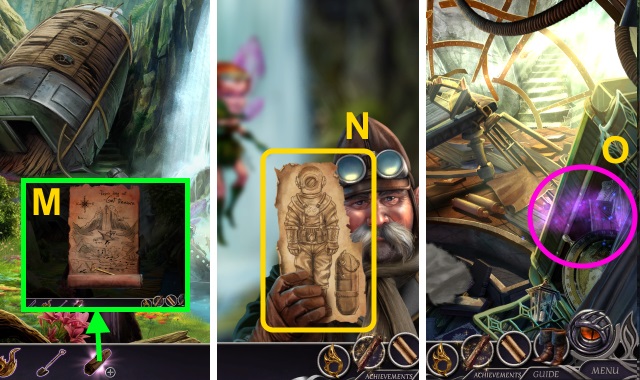
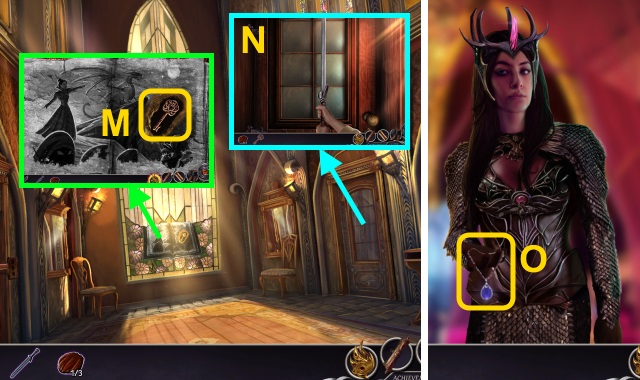
- Open the barrel; take the LEVER (M).
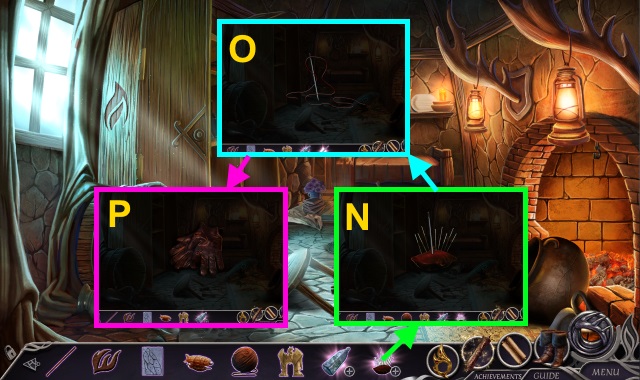
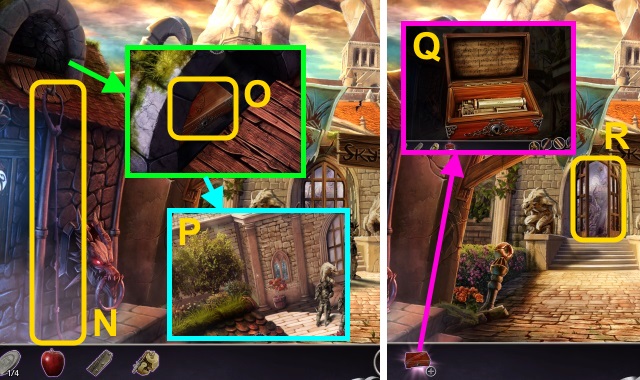
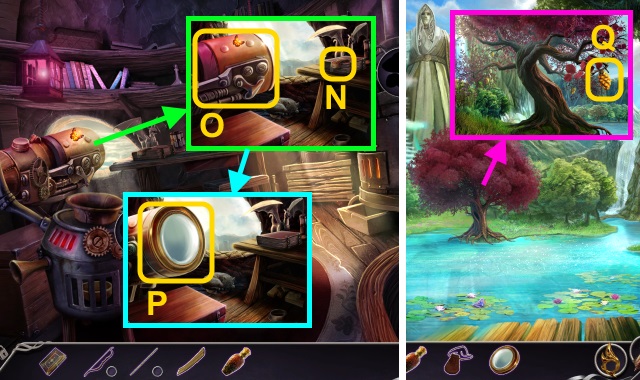
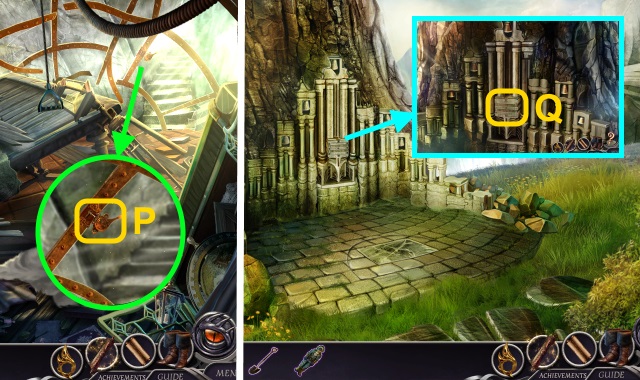
- Examine the ROYAL FLAG; move the flag to take the Map (N).
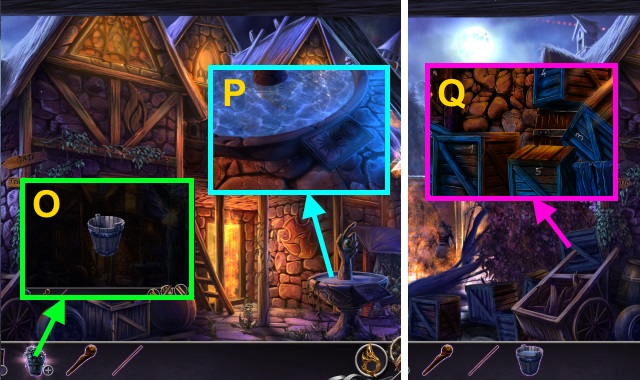
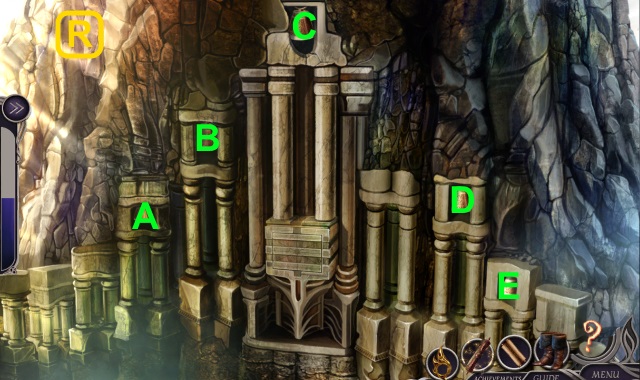
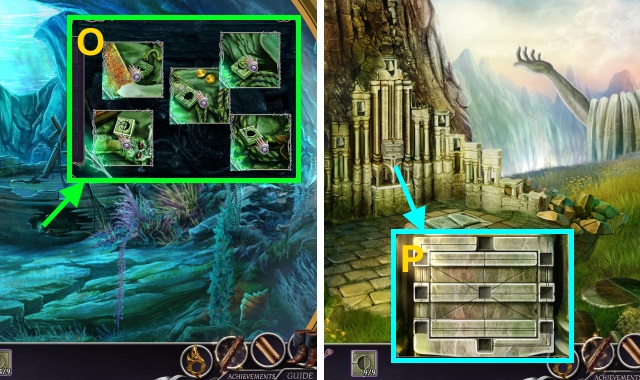
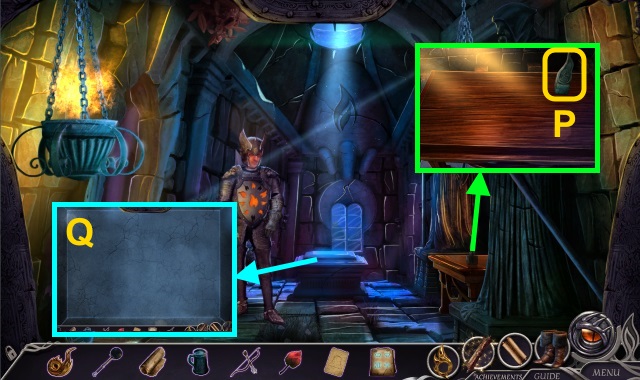
- Examine the FLOWER POT; remove the flowers to make the BUCKET (O).
- Use the BUCKET to make the BUCKET OF WATER (P).
- Go left.
- Use the Magic Boots.
- Go left.
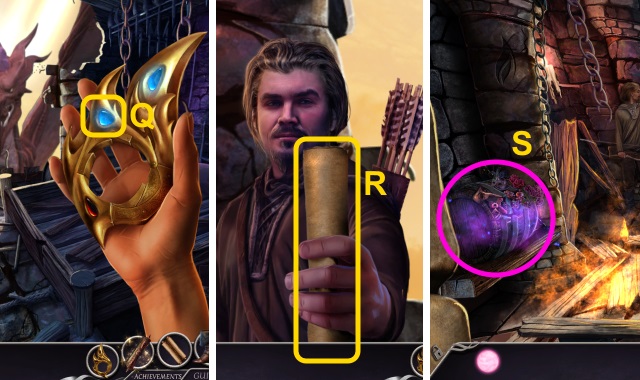
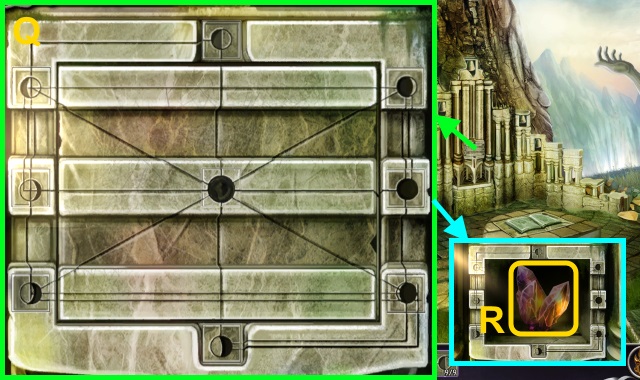
- Stack the boxes in number order (Q).
- Go up.
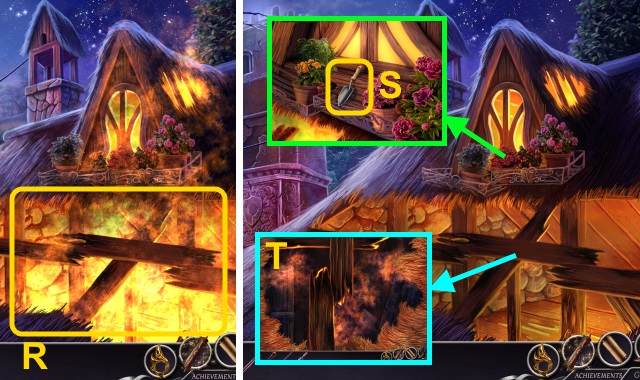
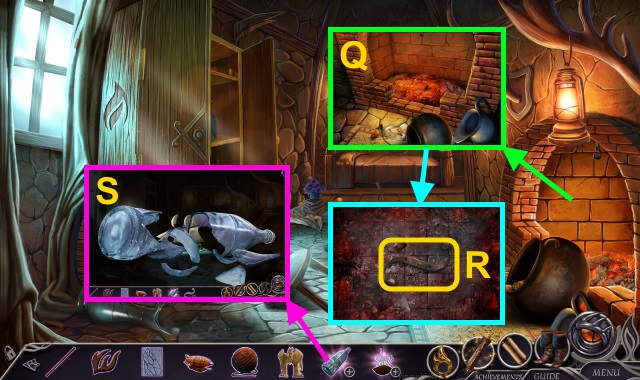
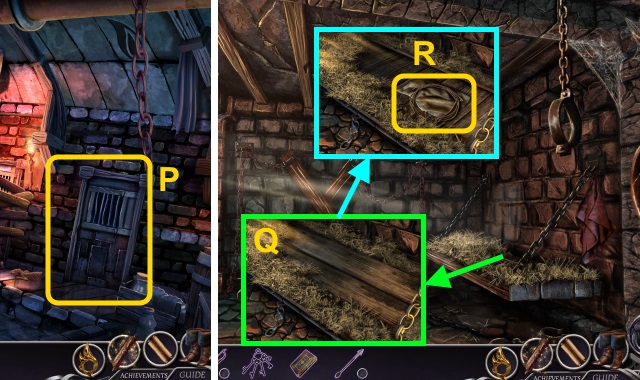
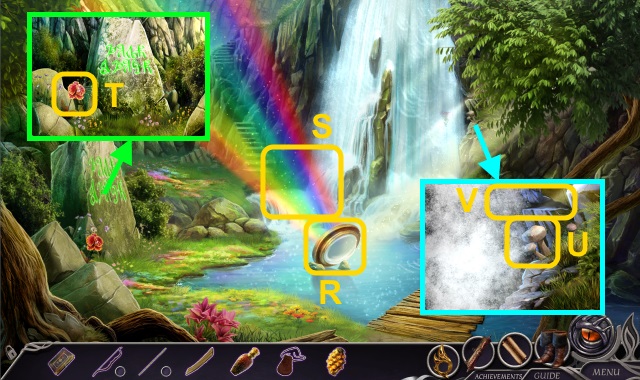
- Use the BUCKET OF WATER (R).
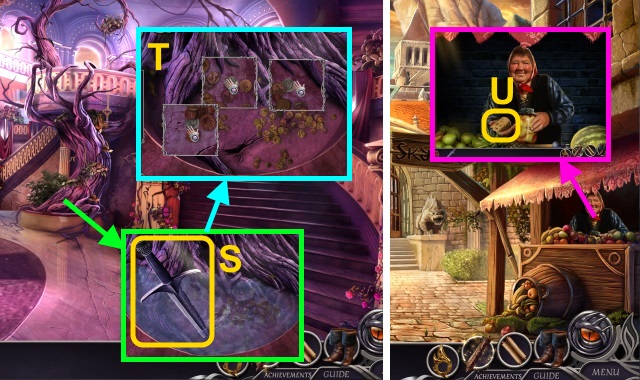
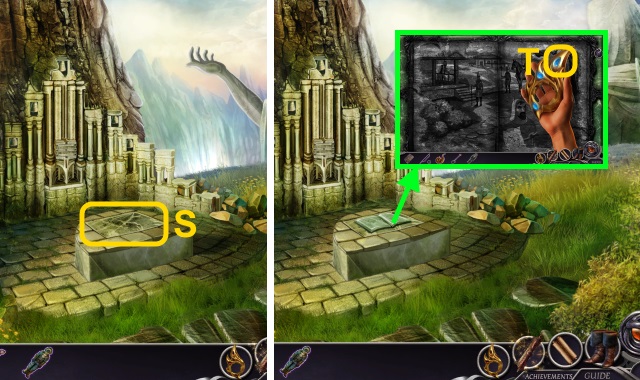
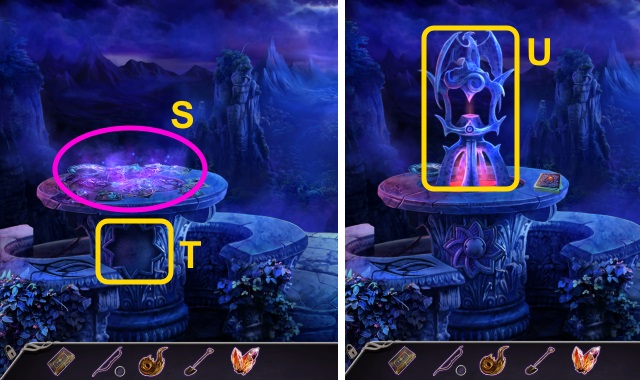
- Move the flowers; take the TROWEL (S).
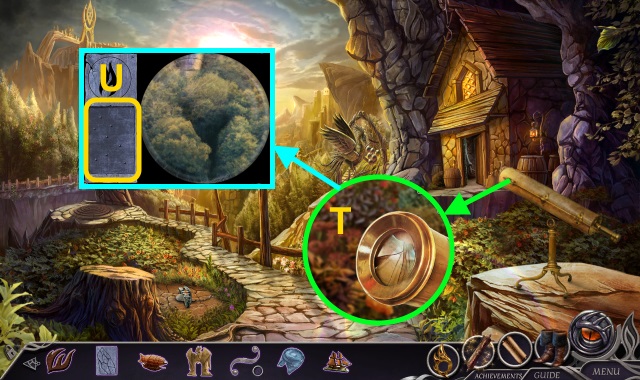
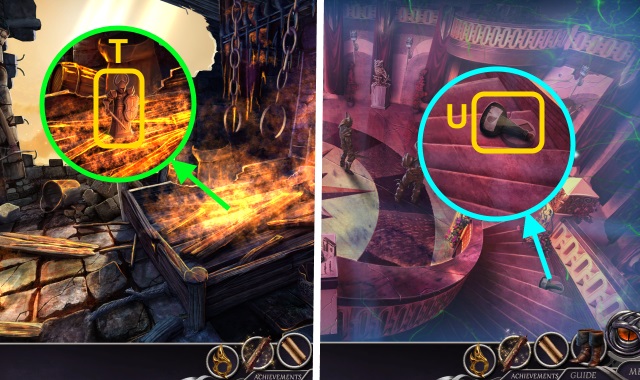
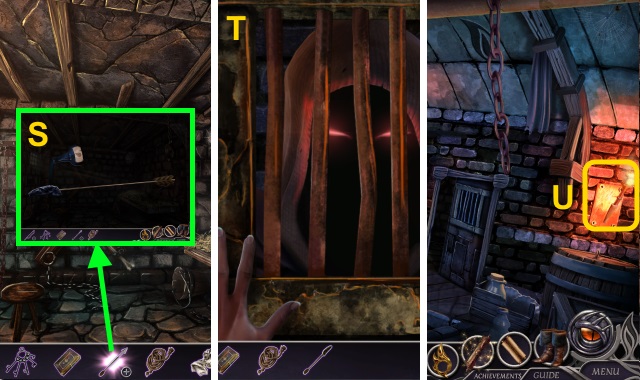
- Use the POLE for a mini-game (T).
- Stop the balls in the green circle to move forward.
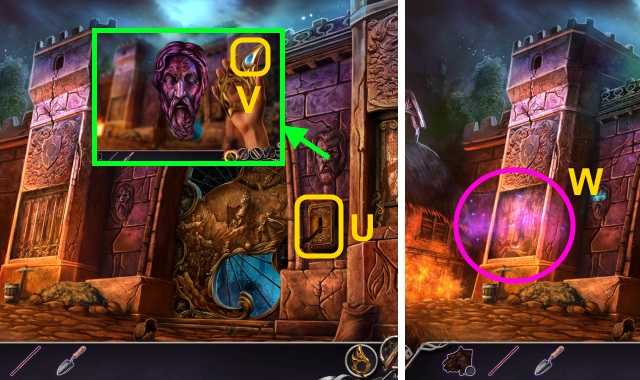
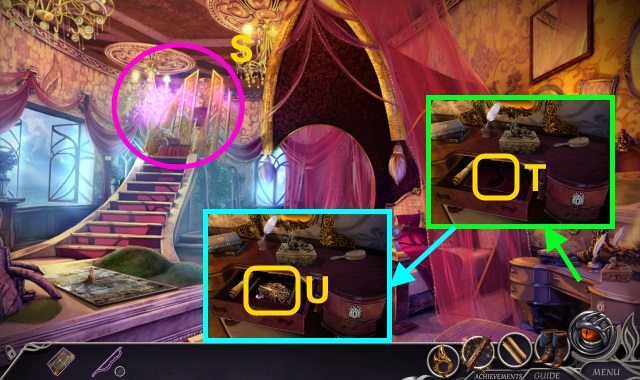
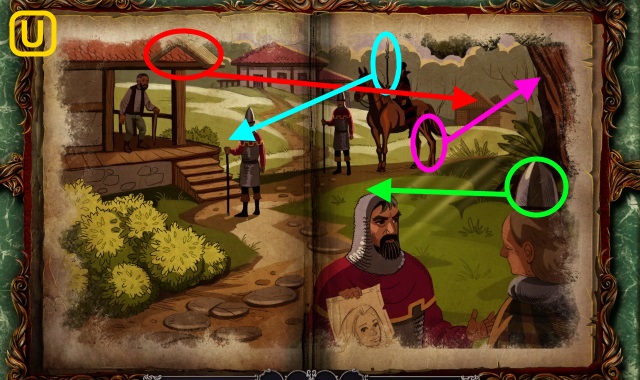
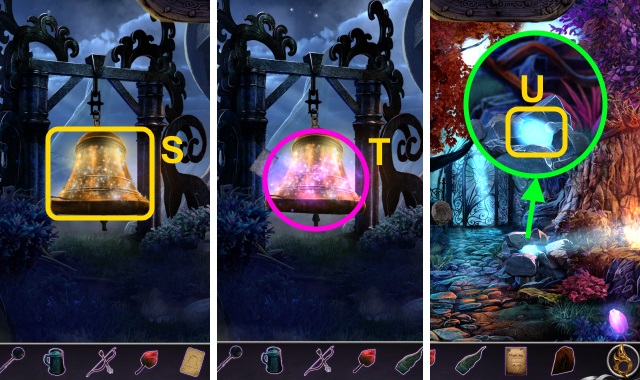
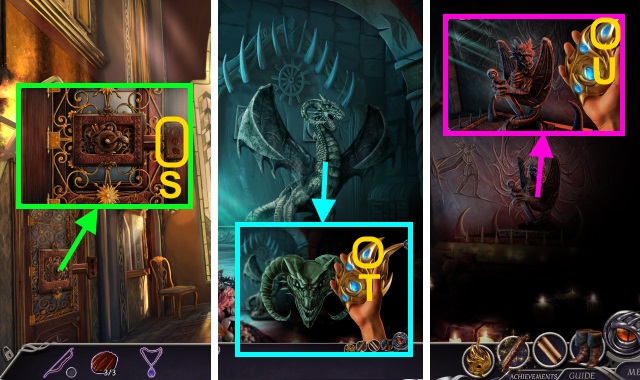
- Use the LEVER (U).
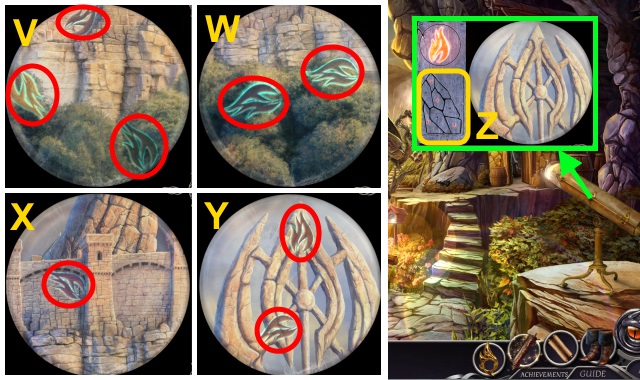
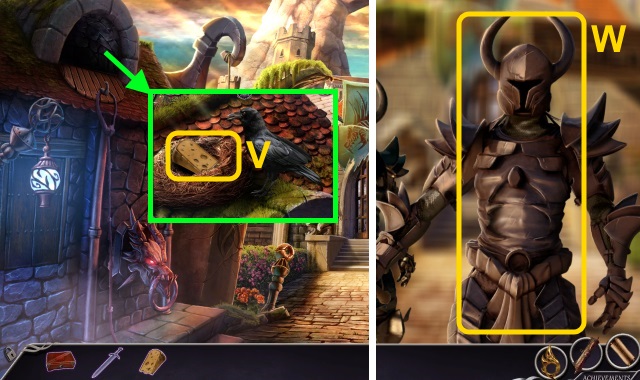
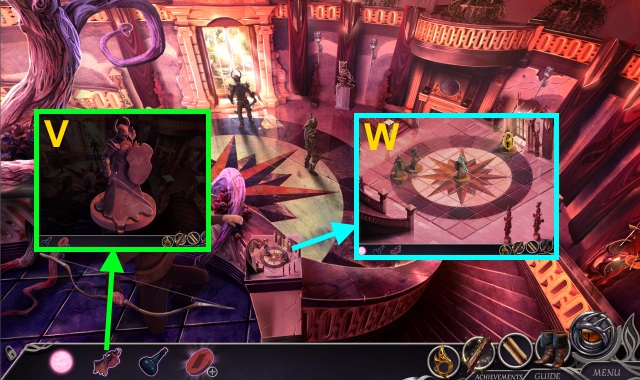
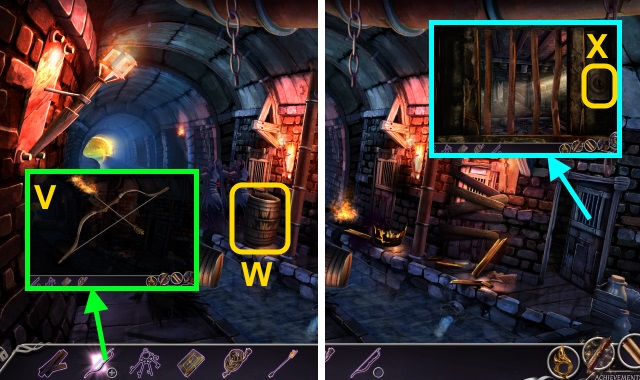
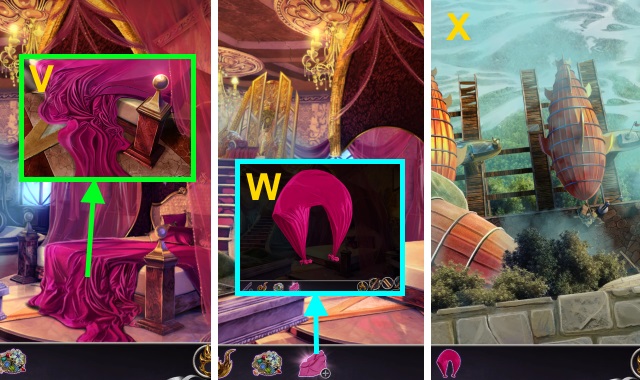
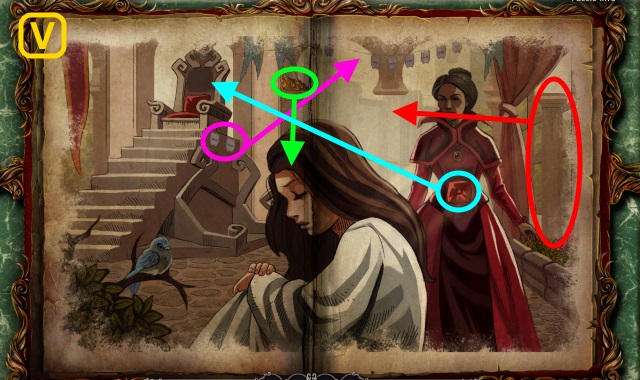
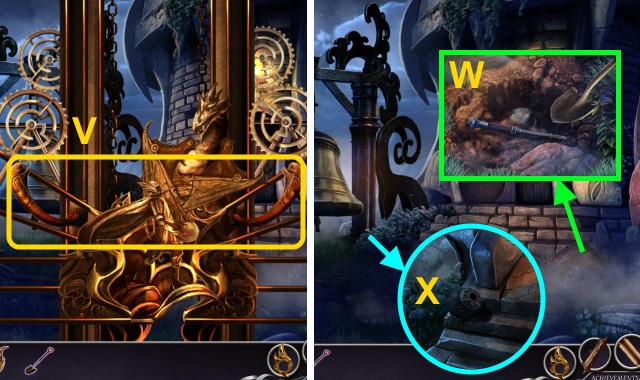
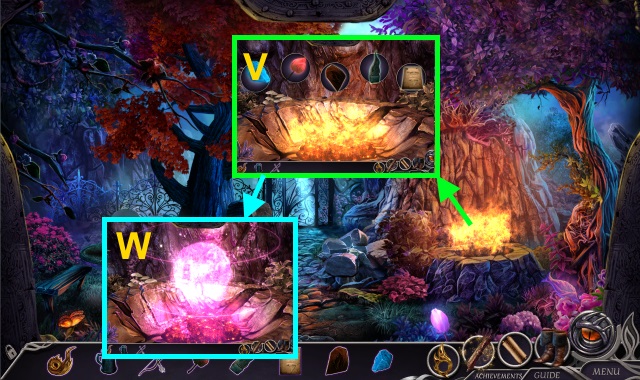
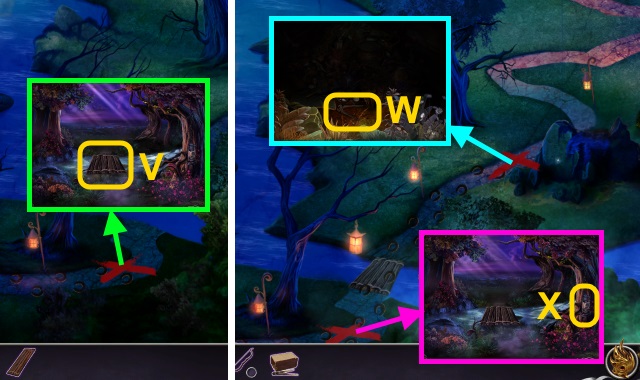
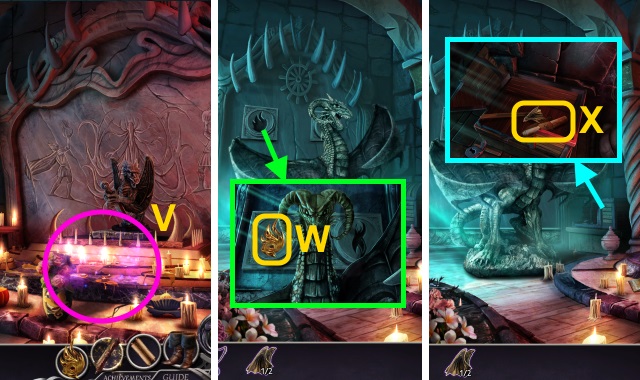
- Use Stone whisper (V).
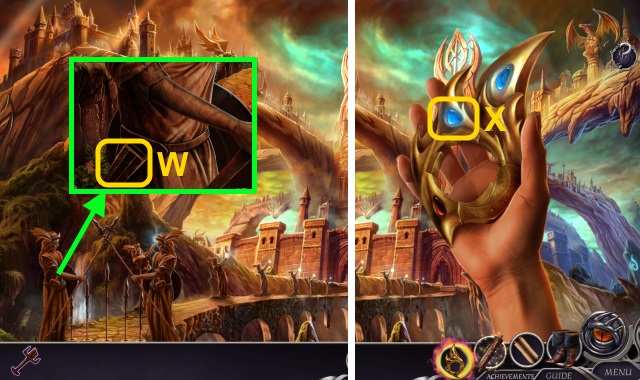
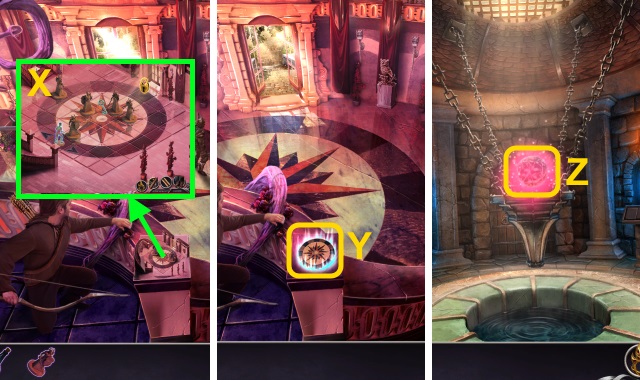
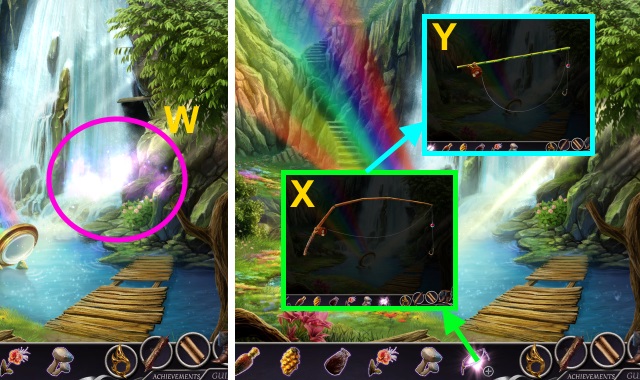
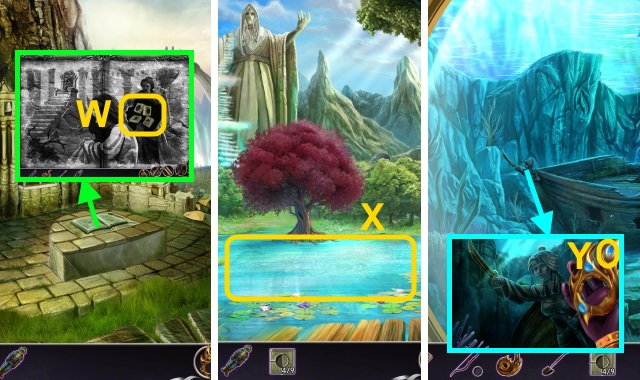
- Play the HOP to receive the MINIATURE TRUMPET (W).
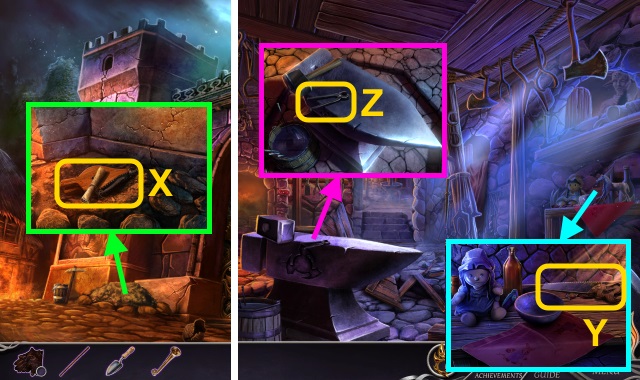
- Use the TROWEL; take the note and BELLOWS (X).
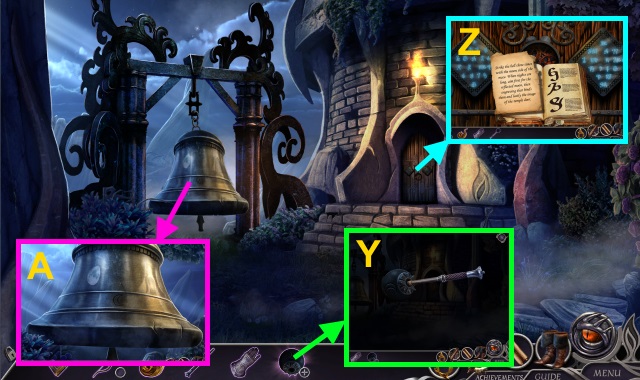
- Walk down three times.
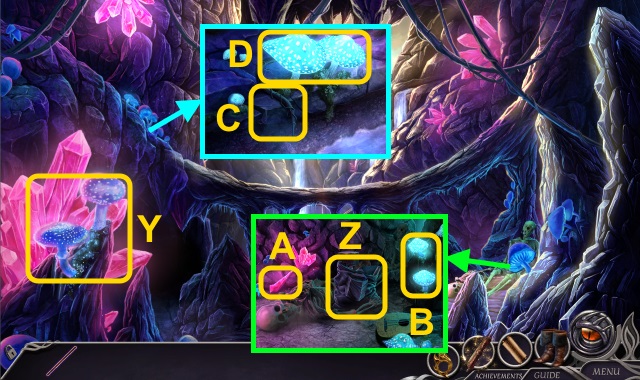
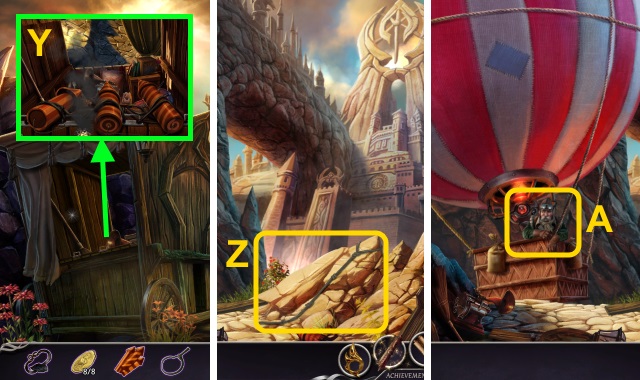
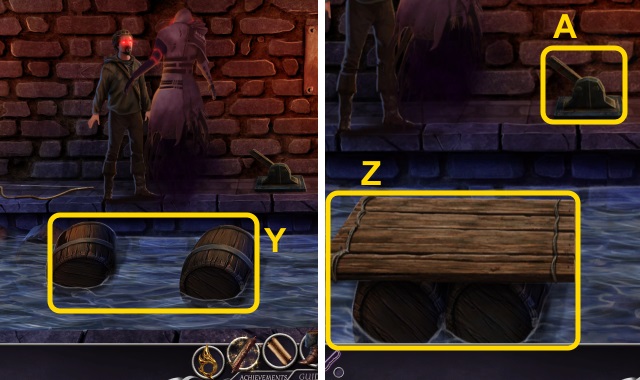
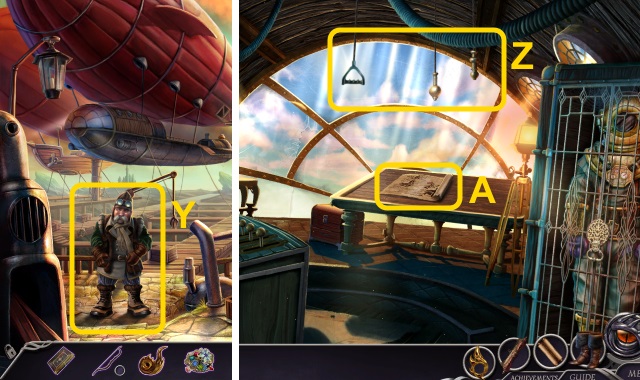
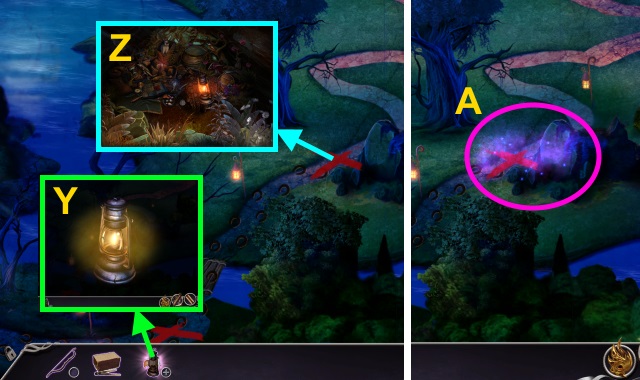
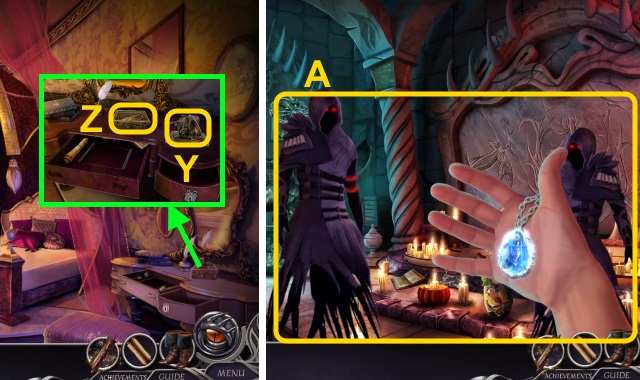
- Move the horse; take the HANDSAW and ANVIL SEAL PIECES (Y).
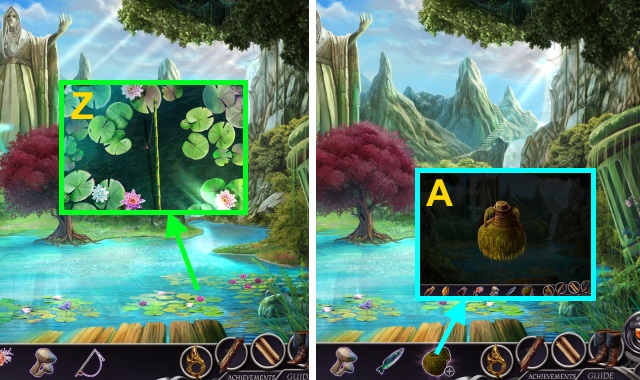
- Take the TONGS (Z).
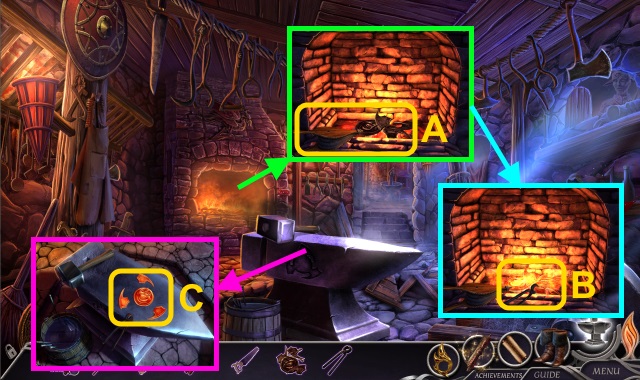
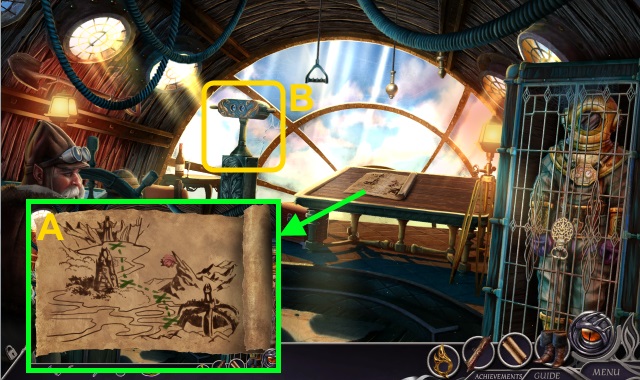
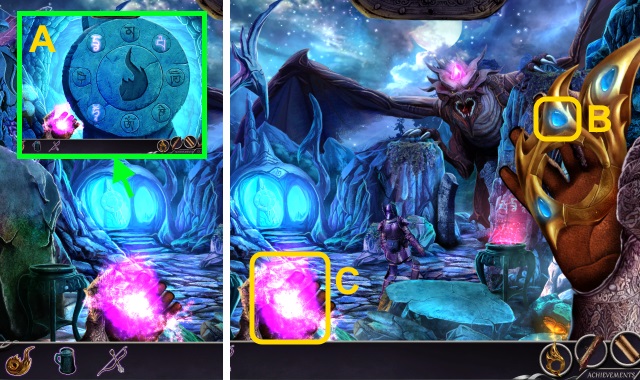
- Place the ANVIL SEAL PIECES; use the BELLOWS (A).
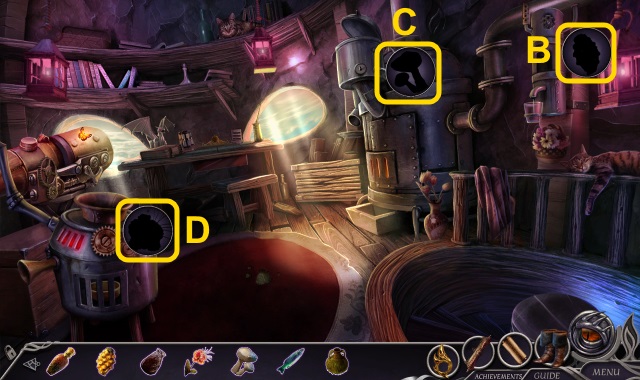
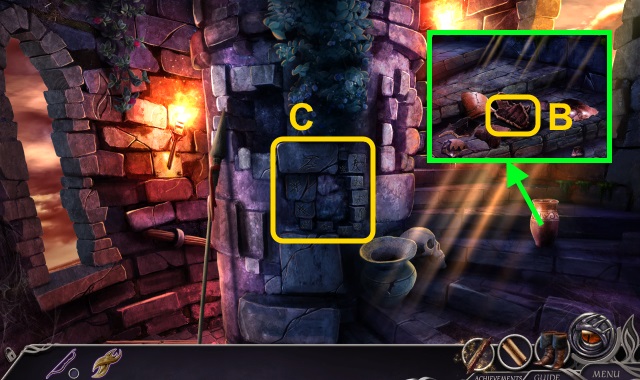
- Use the TONGS to take the HOT ANVIL SEAL PIECES (B).
- Place the HOT ANVIL SEAL PIECES (C); use the tools to make the ANVIL SEAL.
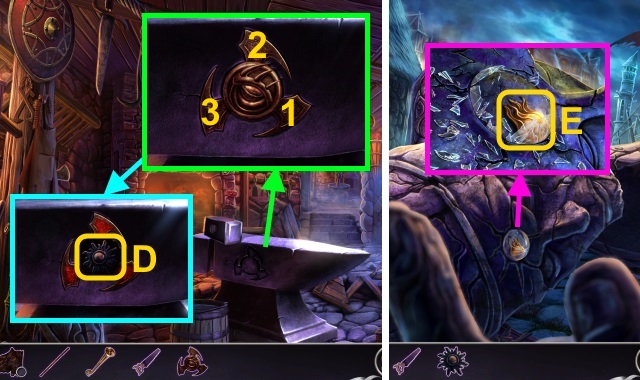
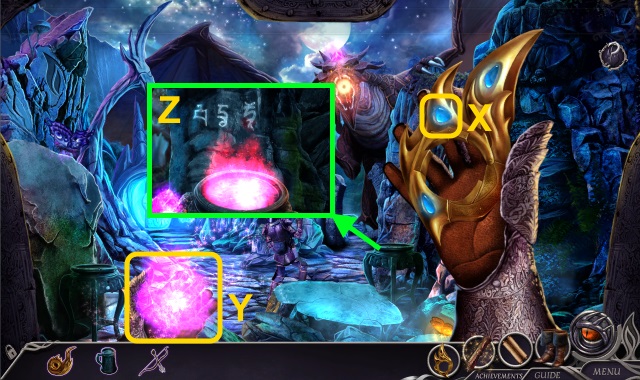
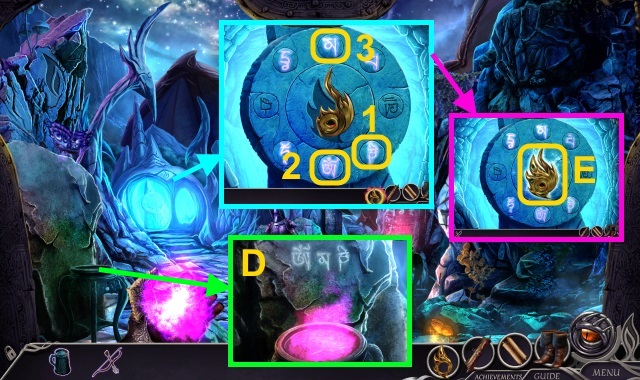
- Place the ANVIL SEAL; press the pieces in order (1-3).
- Take the Seal and SUN SYMBOL (D).
- Walk forward twice.
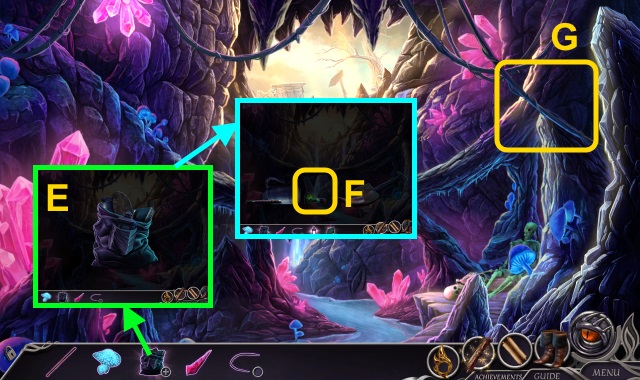
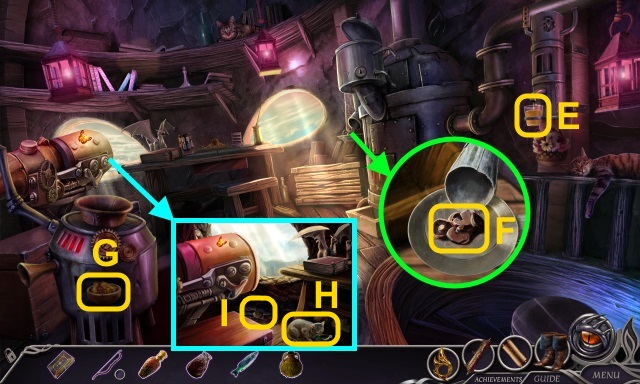
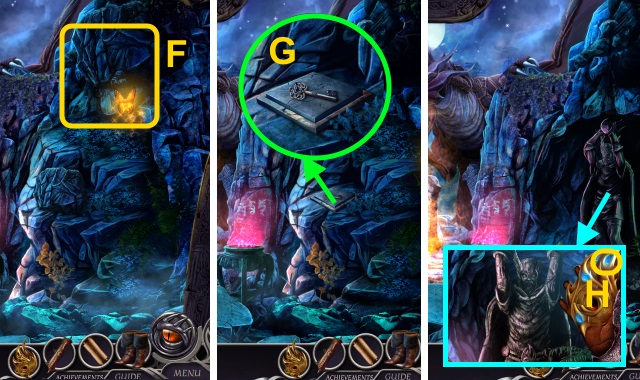
- Use the HANDSAW; take the MINIATURE FIRE SPHERE (E).
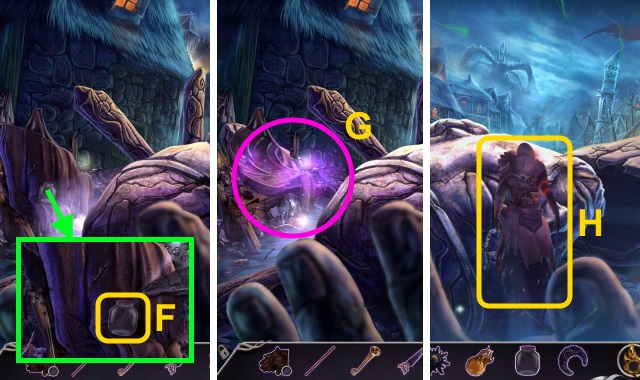
- Take the JAR (F); move the cloth.
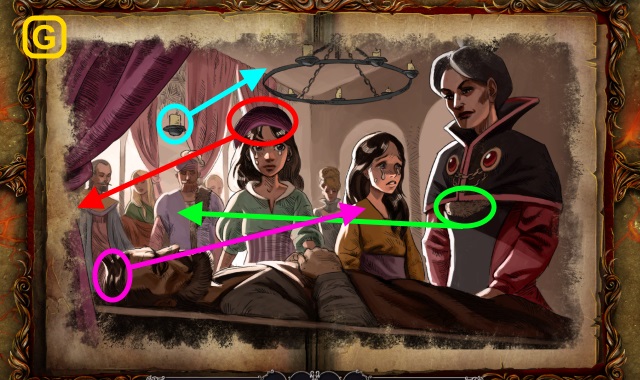
- Play the HOP to receive the MOON SYMBOL (G).
- Use the Magic Boots.
- Walk right.
- Examine the Banshee (H).
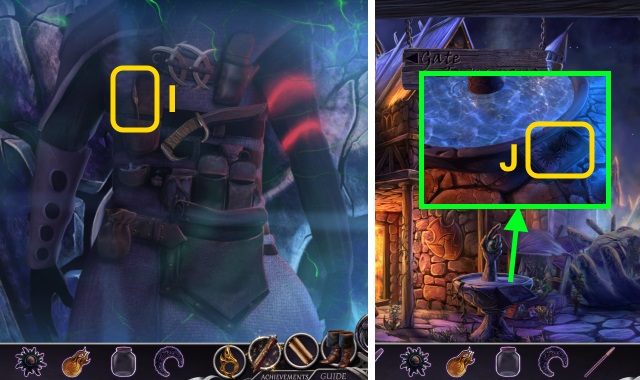
- Open the pouches; take the MINIATURE SPEAR (I).
- Walk down.
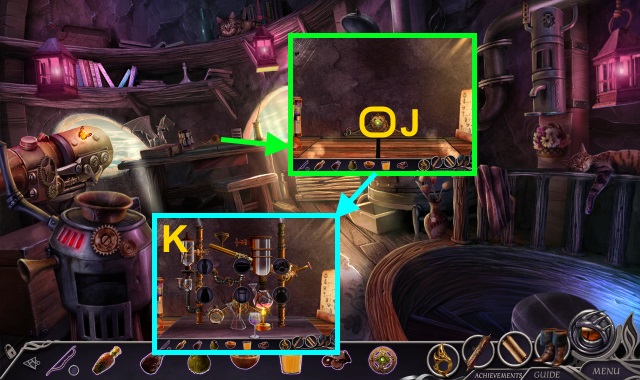
- Place the SUN SYMBOL and MOON SYMBOL (J).
- Open the box; take the MINIATURE DRAGON WINGS (K).
- Go left twice.
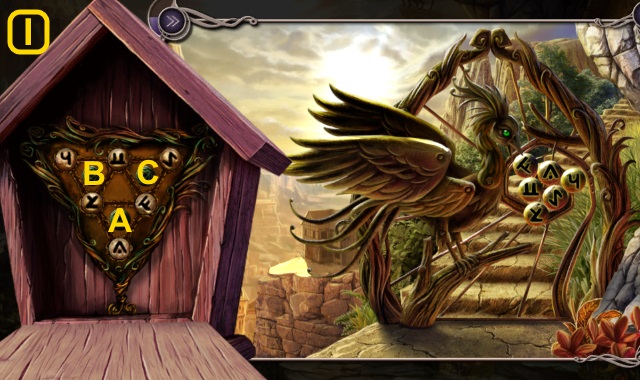
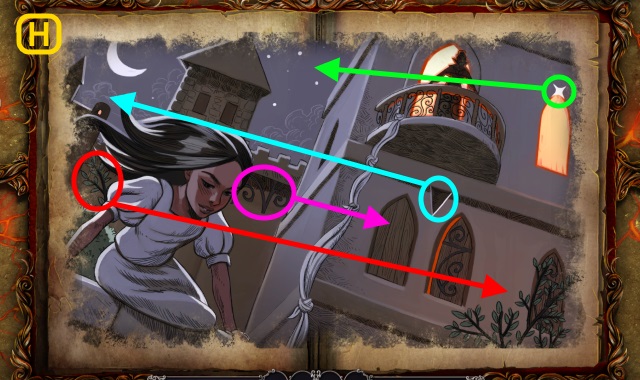
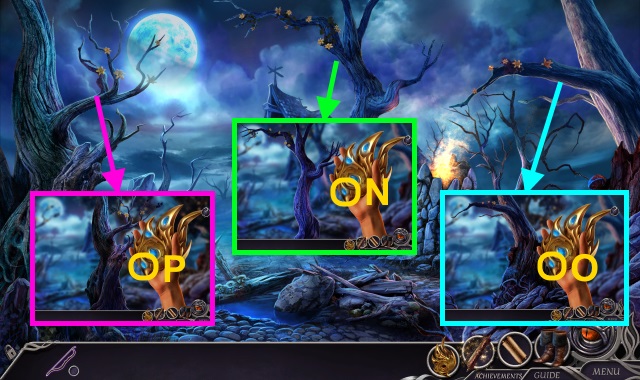
- Place the MINIATURE TRUMPET, MINIATURE FIRE SPHERE, MINIATURE SPEAR, and MINIATURE DRAGON WINGS (L); move them in order.
- Walk forward.
Chapter 2: The Dragonwoods
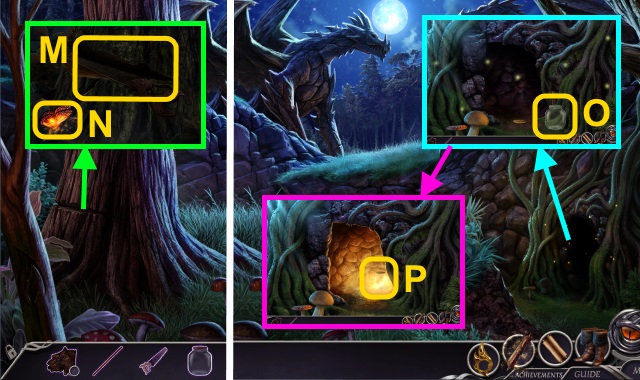
- Use the HANDSAW (M); examine the butterfly (N).
- Place the JAR (O); collect the fireflies.
- Close the jar; move it (P).
- Examine the cave.

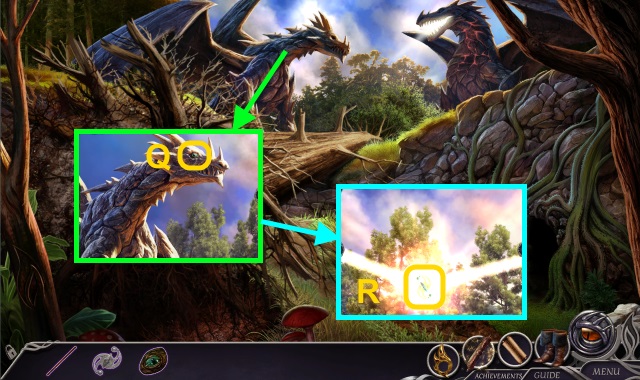
- Play the HOP to receive the FIRE SYMBOL (Q).
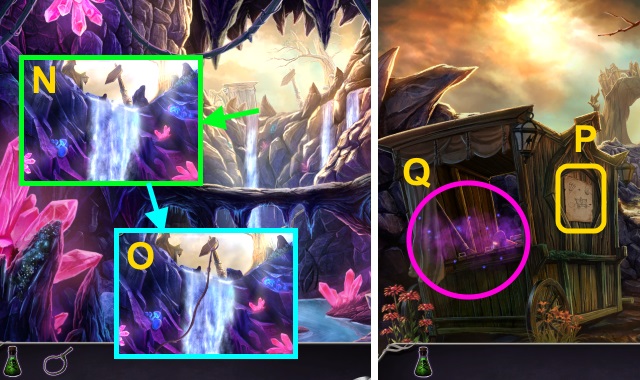
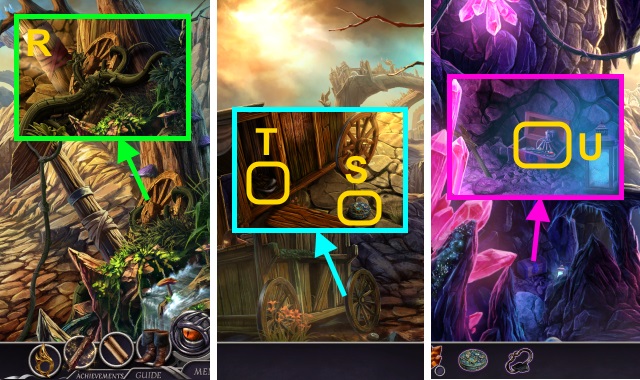
- Use the handsaw (R).
- Take the METAL PLATE (S).
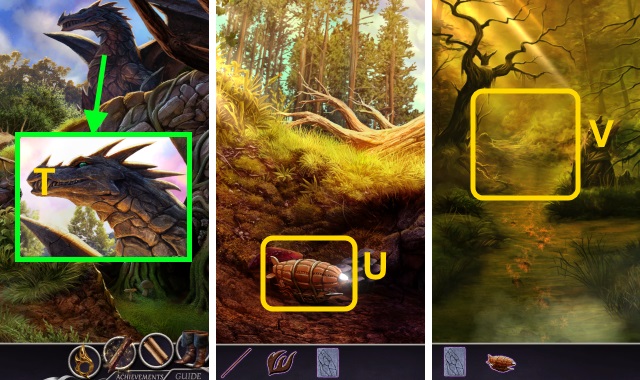
- Use Stone Whisper (T).
- Go under the tree.
- Take the TOY ZEPPELIN (U).
- Go up, then forward.
- Use the Magic Boots.
- Go right.
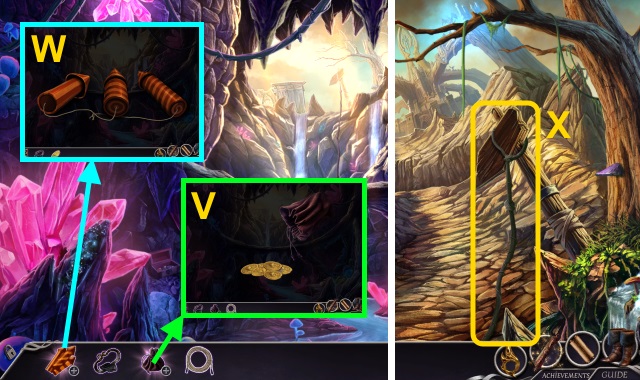
- Examine the path for a mini-game (V).
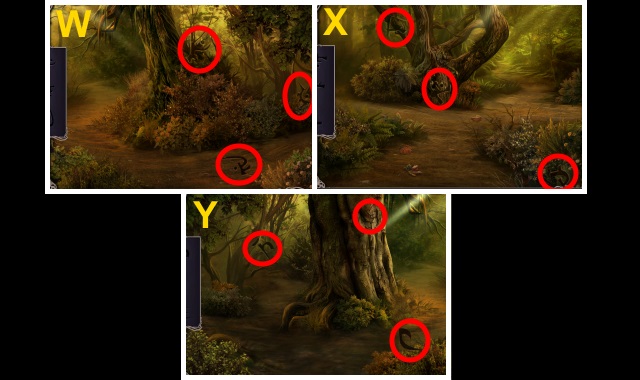
- Solution (W-Y).
- Walk left.
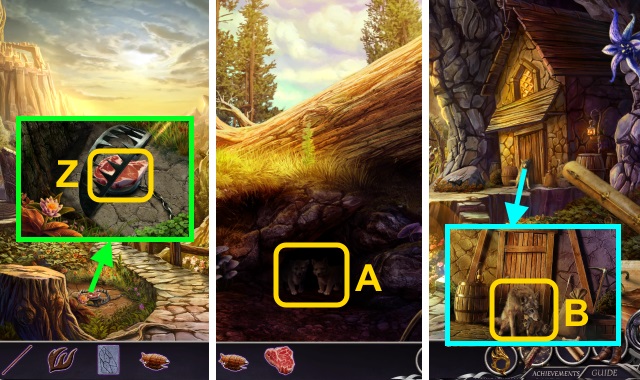
- Use the POLE; take the RAW MEAT (Z).
- Walk down, then under the tree.
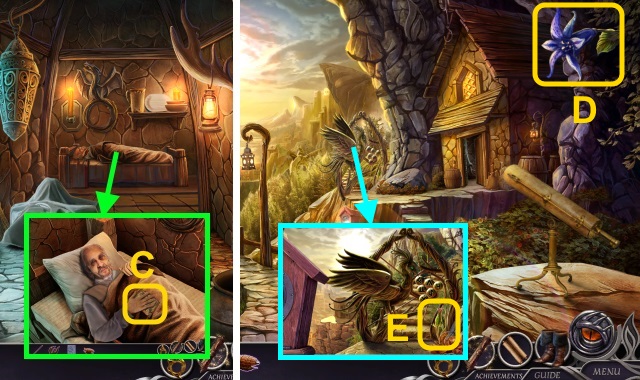
- Give the RAW MEAT (A); take the WOLF CUBS.
- Go up, then forward.
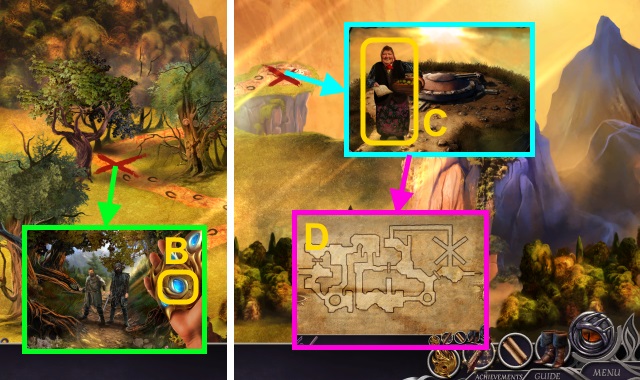
- Give the WOLF CUBS (B); open the door.
- Go forward.
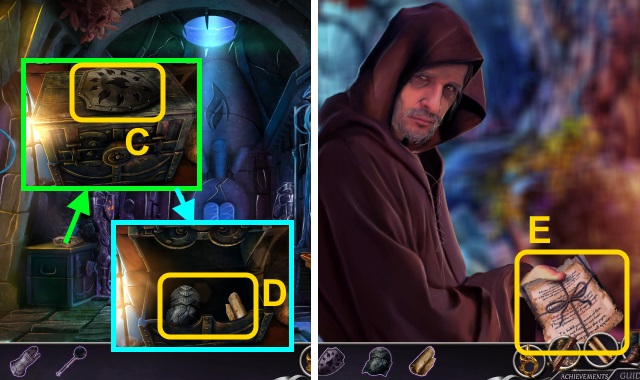
- Talk to the man; take the note (C).
- Walk down.
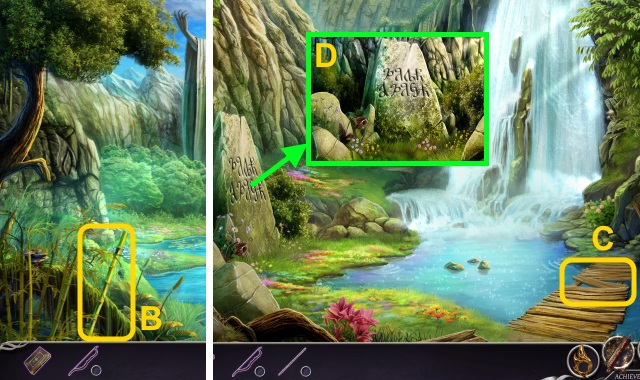
- Take the BLUEBELL (D).
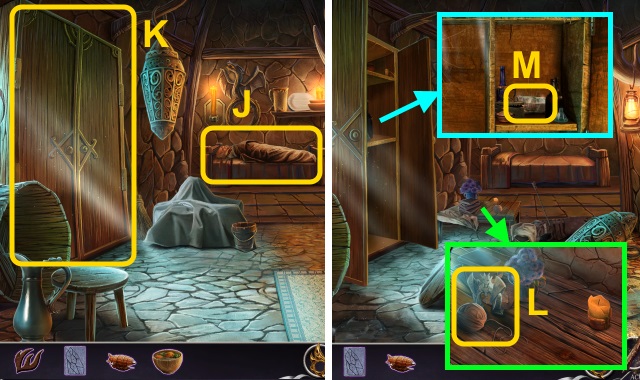
- Take the FIRE BLOSSOM (E).
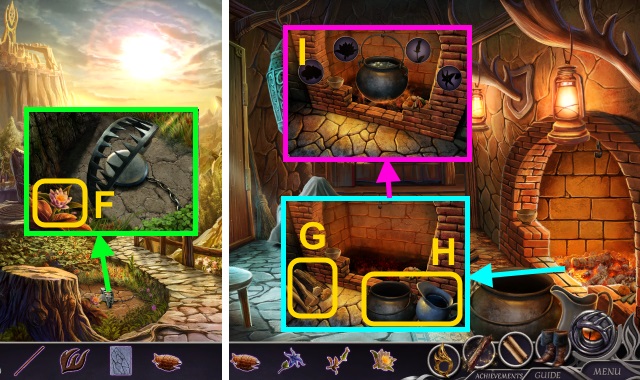
- Take the MORNING JASMINE (F).
- Go right.
- Move the wood (G), pot, and water (H).
- Place the vegetables, BLUEBELL, FIRE BLOSSOM, and MORNING JASMINE (I); use the bowl to take the BOWL OF SOUP.
- Give the BOWL OF SOUP (J).
- Examine the closet (K).
- Use the Magic Boots.
- Go forward.
- Take the TELEPORTATION MODEL and THREAD (L).
- Move the objects; take the SHIP IN A BOTTLE and PINCUSHION (M).
- Examine the PINCUSHION; take the LARGE NEEDLE (N).
- Use the THREAD on the LARGE NEEDLE to make the NEEDLE AND THREAD (O).
- Use the NEEDLE AND THREAD on the TORN GLOVES to make the GLOVES (P).
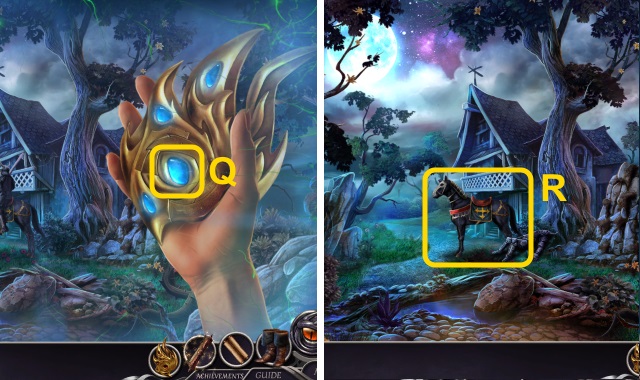
- Use the GLOVES (Q); take the TELEPORTATION STONE (R).
- Use the POLE on the SHIP IN A BOTTLE; take the ROUND GLASS and SHIP (S).
- Walk down.
- Move the cap (T); place the ROUND GLASS.
- Place the METAL PLATE for a mini-game (U).
- Solution (V-Y).
- Take the diagram (Z).
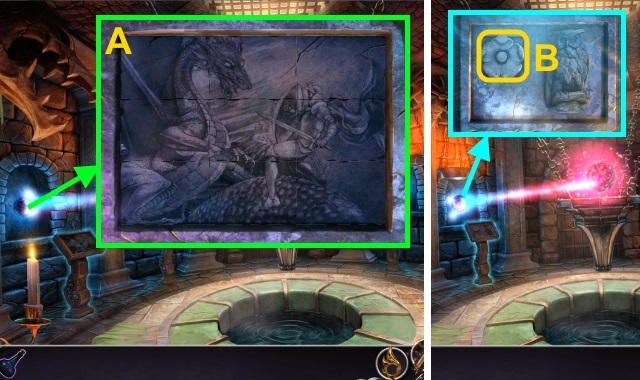
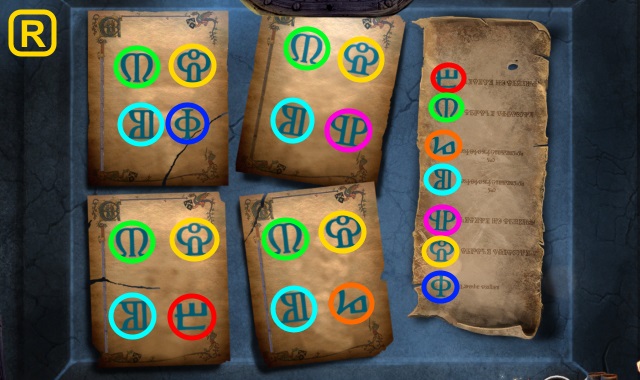
- Place the FIRE SYMBOL; press the symbols (A).
- Examine the orb for a mini-game (B).
- Solution (C).
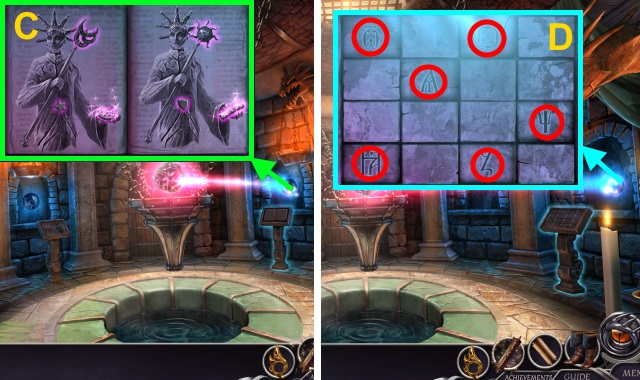
- Use Stone Whisper for a mini-game (D).
- Solution (E, F).
- Take the BIRD SYMBOL (G).
- Place the BIRD SYMBOL for a mini-game (H).
- Solution (I): Ax2, B, C.
- Use the Magic Boots.
- Move the rocks (J); gather the Seal, Map, Boots, Journal, and medallion Half.
- Go up, then forward.
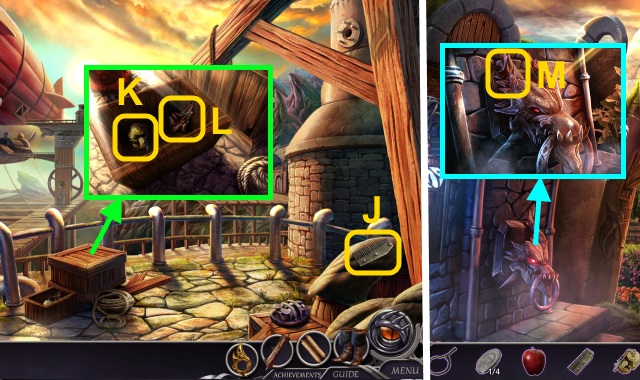
- Use the POLE (K); take the SWORD HILT.
- Place the TELEPORTATION MODEL, TOY ZEPPELIN, and SHIP (L); take the SCROLL (M) and TELEPORTATION STONE (N).
- Open the SCROLL; take the STONE EYE and scroll (O).
- Combine the 2 TELEPORTATION STONES to make the TELEPORTATION STONES (P).
- Walk down twice.
- Place the STONE EYE (Q); use Stone Whisper on both dragons.
- Place the TELEPORTATION STONES; take the INFUSED TELEPORTATION STONES (R).
- Go forward twice.
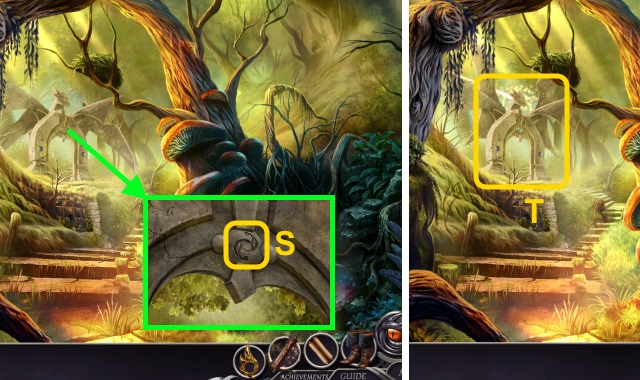
- Place the INFUSED TELEPORTATION STONES (S).
- Examine the gate for a mini-game (T).
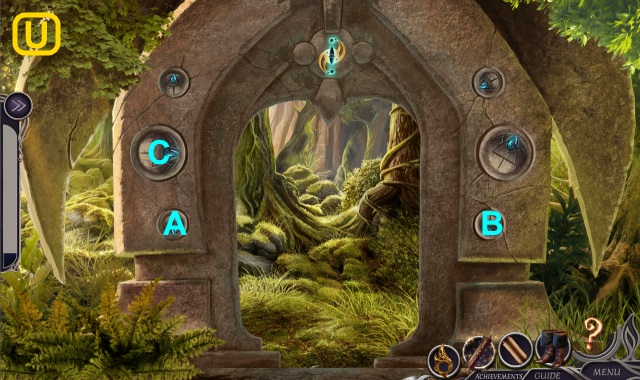
- Solution (U): A, B, Cx2.
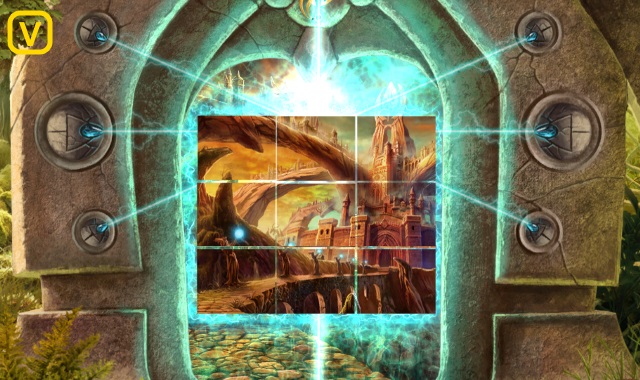
- Solution (V).
- Walk forward.
Chapter 3: The Cliffs
- Place the SWORD HILT (W).
- Try to go forward.
- Use Flame Shield (X).
- Try to go forward.
- Use the Magic Boots.
- Go left.
- Take the LARGE GLOWING MUSHROOMS (1/6) and (2/6) (Y).
- Take the Take the TRAVELER'S BAG (Z), SHARP CRYSTAL (A) and LARGE GLOWING MUSHROOMS (3/6) and (4/6) (B).
- Take the VINE PART (1/2) (C) and LARGE GLOWING MUSHROOMS (5/6) and (6/6) (D).
- Examine the TRAVELER'S BAG; take the EMPTY LANTERN and TRAVELER'S DIARY (E).
- Dump the bag; move the objects to take the HERBICIDE (F).
- Use the SHARP CRYSTAL to take the VINE (1/2) (G).
- Open the TRAVELER'S DIARY; take the page (H).
- Arrange the pieces (I); take the paper.
- Open the EMPTY LANTERN; place the GLOWING MUSHROOMS (J).
- Close the lantern; take the GLOWING LANTERN.
- Place the GLOWING LANTERN (K).
- Use the POLE; take the VINE PART (2/2) (L).
- Examine the VINE; place the VINE PART (2/2) to make the VINE (M).
- Use the VINE for a mini-game (N).
- Stop the targets inside the circle (O).
- Go up.
- Take the note (P).
- Move the curtain; play the HOP to receive the FIREWORKS (Q).
- Use the HERBICIDE (R); move the wheel.
- Take the TRINKET (S).
- Move the board; take the FLINT (T).
- Go down.
- Place the TRINKET in the slot; take the POUCH and FUSE (U).
- Open the POUCH; take the COINS (8/8) (V).
- Use the FUSE on the FIREWORKS; take the FIREWORKS (W).
- Go forward.
- Take the VINE (X).
- Use the FIREWORKS, VINE, and FLINT (Y).
- Go forward.
- Take the VINE (Z).
- Talk to the man (A); give him the COINS (8/8).

- Take the SILVER COIN (1/4) (B).
- Gather the cards to receive the DECK OF CARDS (1-4).
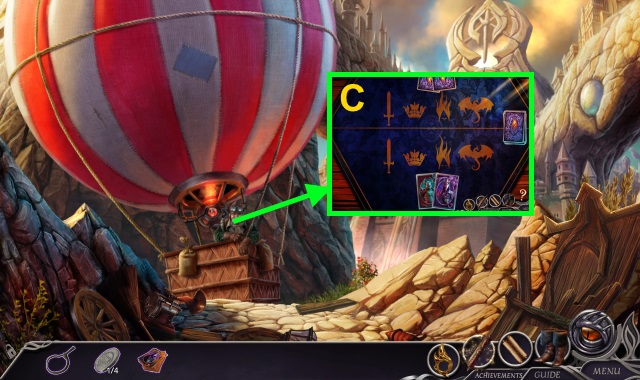
- Give the DECK OF CARDS for a mini-game (C).
- Solution is random.
- Go up.
Chapter 4: The Ivory Tower
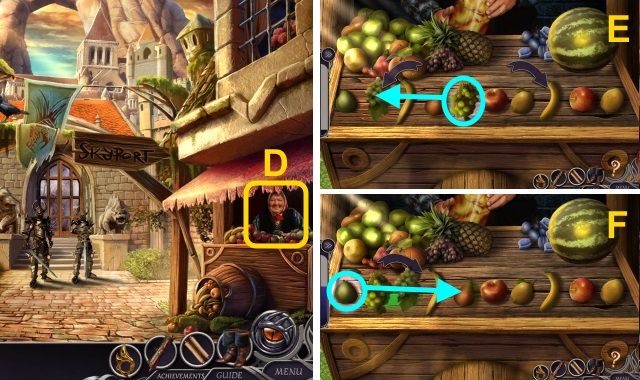

- Examine the stand for a mini-game (D).
- Solution (E-H).
- Take the APPLE (I).
- Go right.
- Take the COMB (J).
- Take the BELL (K) and DRAGON HORN (L).
- Walk down.
- Place the DRAGON HORN (M); use the Stone Whisper.
- Use the VINE (N).
- Take the MUSIC BOX (O).
- Scroll up; use the APPLE (P).
- Open the MUSIC BOX (Q); place the COMB and BELL.
- Open the door (R).
- Walk forward.
- Take the SWORD (S).
- Take the SILVER COINS (2/4), (3/4), and (4/4) (T).
- Walk down.
- Talk to the woman; give the SILVER COIN (4/4).
- Take the CHEESE (U).
- Place the CHEESE; take the MUSIC BOX KEY (1/2) (V).
- Use the SWORD for a mini-game (W).
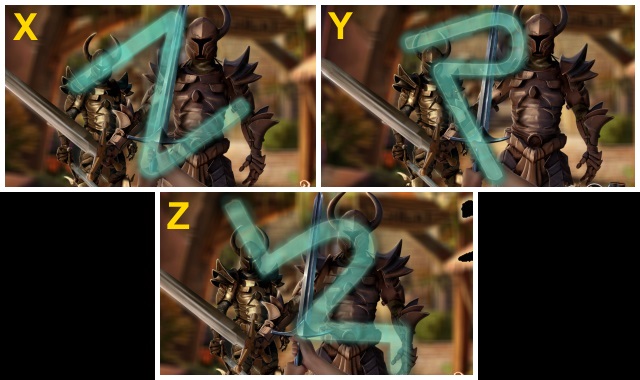
- Solution (X-Z).
- Use Stone Whisper (A).
- Walk forward.
- Use the SWORD to take the MUSIC BOX KEY (2/2) (B).
- Place the MUSIC BOX; use the MUSIC BOX KEY (2/2) for a mini-game (C).
- Solution (D): DBH, AFCG, CGDEF.
- Examine the book (E); use Stone Whisper for a mini-game (F).
- Solution (G, H).
- Take the SWAN HANDLE (I).
- Examine the SWAN HANDLE (J); take the LEFT SWAN HANDLE and RIGHT SWAN HANDLE.
- Go forward.
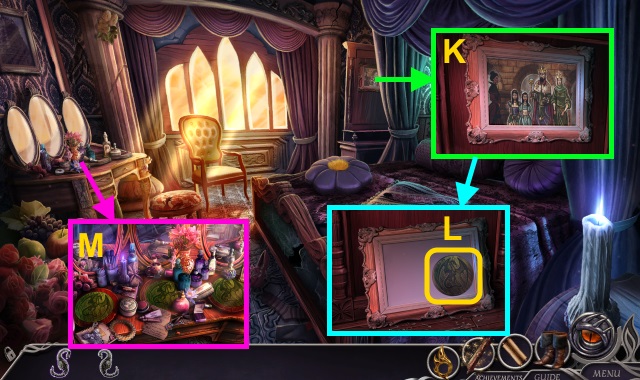
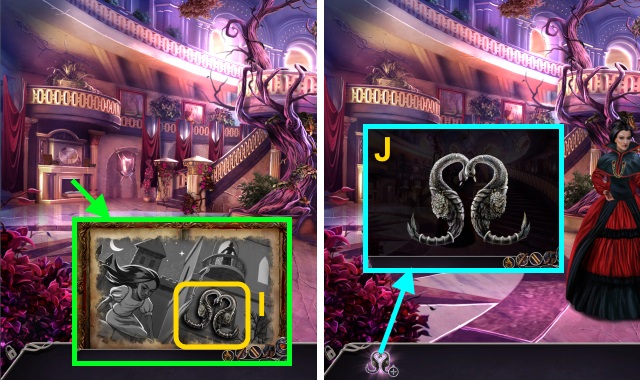
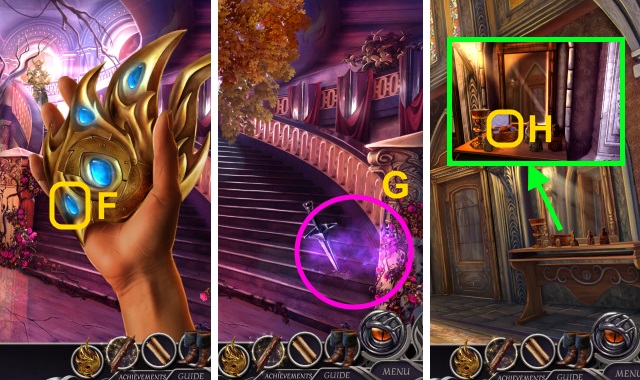
- Move the painting (K).
- Move the glass shards and painting; take the DRAGON FLAME (L).
- Move the makeup; place the DRAGON FLAME (M).
- Press the dragons.
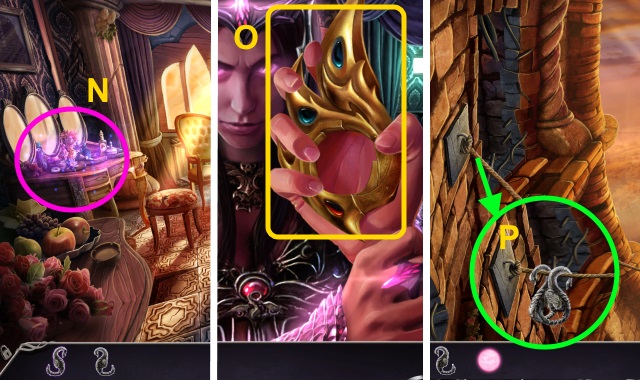
- Play the HOP to receive the ELDER ORB (N).
- Take the Medallion (O).
- Go forward.
- Place the LEFT SWAN HANDLE and RIGHT SWAN HANDLE (P).
- Use Flame Shield (Q).
- Use the Magic Boots.
- Walk right.
- Take the scroll (R).
- Play the HOP to receive the FIGURINE BODY (S).
- Place the FIGURINE BODY to receive the MELTED FIGURINE BODY (T).
- Walk down.
- Use the Magic Boots.
- Take the OIL and FIGURINE PEDESTAL (U).
- Place the MELTED FIGURINE BODY on the FIGURINE PEDESTAL to make the COMPLETED FIGURINE (V).
- Place the COMPLETED FIGURINE for a mini-game (W).
- Solution (X): right, up, up, up, down, left, right, up, left, left, up, up, up, right.
- Press the tile (Y).
- Go down the stairs.
- Place the ELDER ORB (Z); press it.
- Examine the wall for a mini-game.
- Solution (A).
- Press the orb.
- Press the flower to receive the clue (B).
- Press the orb; examine the wall for a mini-game.
- Solution (C).
- Press the orb; examine the wall for a mini-game.
- Solution (D).
- Walk down.
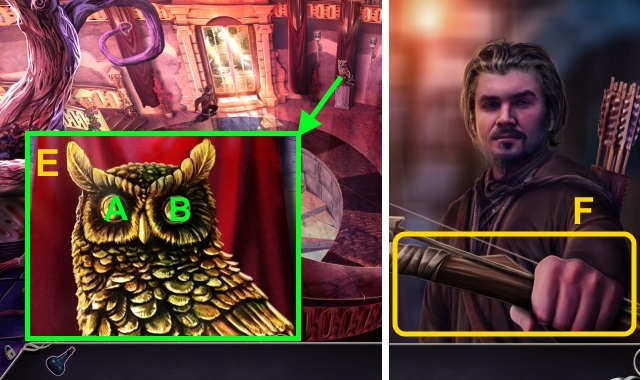
- Press the eyes in order (E): A, B, Ax2, B.
- Go downstairs, then forward.
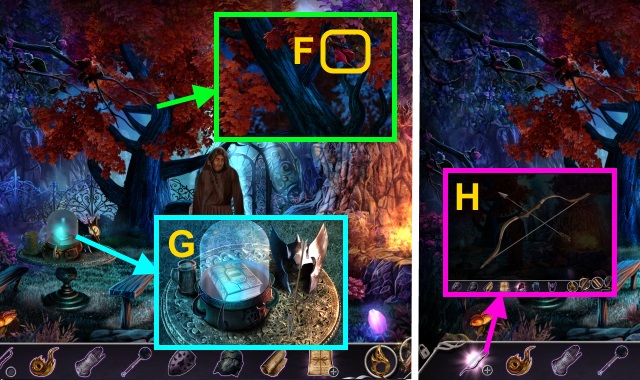
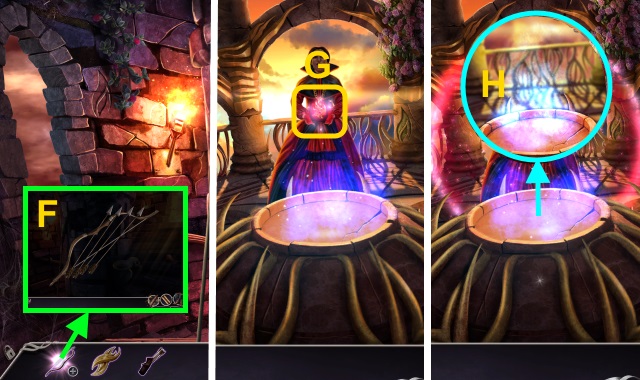
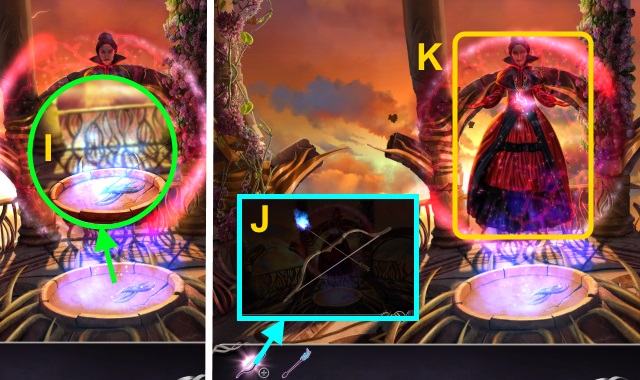
- Take the Bow (F).
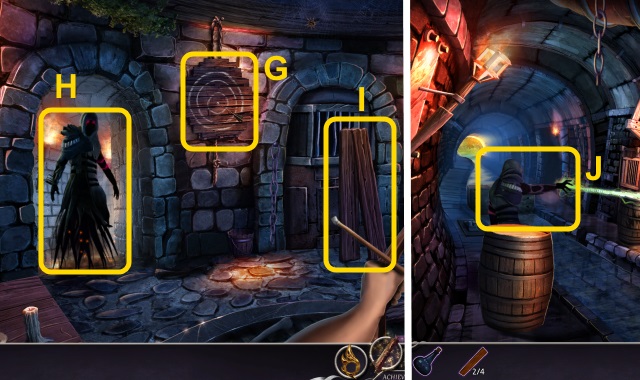
- Shoot the target (G).
- Shoot the banshee (H).
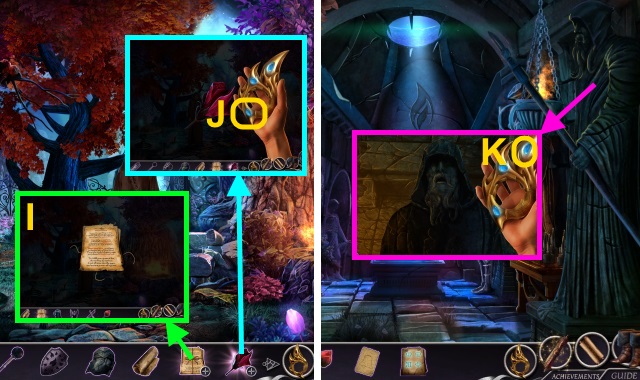
- Take the PLANK (1/4) and (2/4 (I).
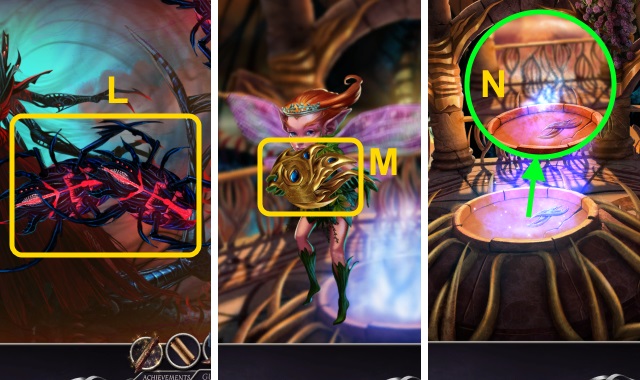
- Go forward.
- Shoot the banshee; you receive the BOW (J).
- Move the barrel; take the DUNGEON KEYS (K) and GRANNY'S POTION (L).
- Walk down.
- Use the DUNGEON KEYS (M).
- Give the GRANNY'S POTION (N).
- Take THE BOOK OF ELVEN LANGUAGE and ARROW (O).
- Walk down, then forward.
- Use the DUNGEON KEYS (P).
- Walk forward.
- Take the PLANK (3/4) and (4/4) (Q).
- Take the ROPE and RAG (R).
- Use the RAG and OIL on the ARROW to make the OILED ARROW (S).
- Walk down.
- Push the door (T).
- Use the OILED ARROW to make the FLAMING ARROW (U).
- Use the FLAMING ARROW on the BOW (V); shoot the barrel (W).
- You receive the BOW.
- Use the DUNGEON KEYS (X).
- Push the barrels (Y); place the PLANKS and ROPE (Z).
- Pull the lever (A).
Chapter 5: Aeterna
- Take the BAMBOO (B).
- Go forward.
- Take the BOARD (C).
- Use THE BOOK OF ELVEN LANGUAGE for a mini-game (D).
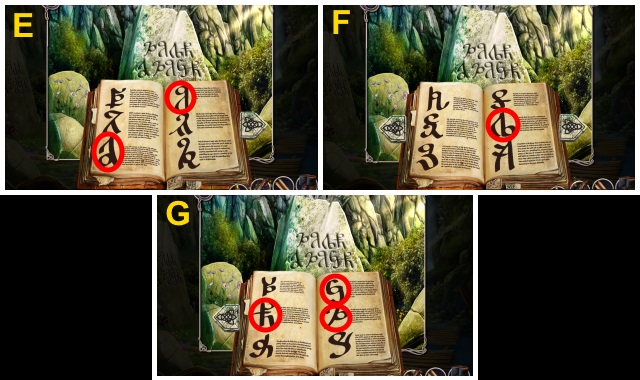
- Solution (E-G).
- Use Spark of Life (H).
- Walk down.
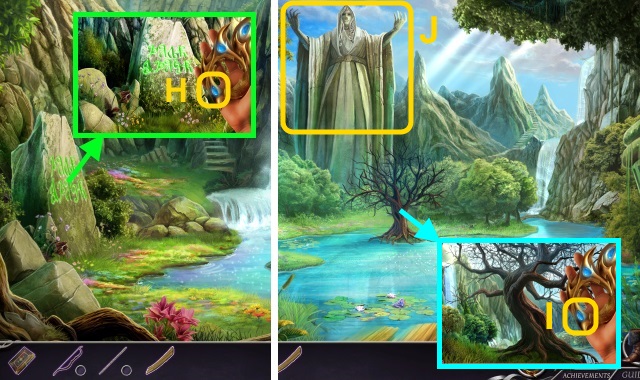
- Use Spark of Life (I).
- Examine the statue (J).
- Go up.
- Draw on the paper (K).
- Take the formula (L).
- Play the HOP to receive the MAGIC LIQUID (M).
- Take the EMPTY POUCH (N); move the light (O).
- Take the LENS (P).
- Walk down.
- Take the MANGOMOYA FRUIT (Q).
- Walk right.
- Place the LENS (R); use the EMPTY POUCH to receive the PIXIE DUST (S).
- Take the LAETUS CATTLEYA FLOWER (T).
- Take the GREY MUSHROOMS (U); place the BOARD (V).
- Play the HOP to receive the BROKEN FISHING ROD (W).
- Examine the BROKEN FISHING ROD (X); take the LINE WITH HOOK.
- Use the LINE WITH HOOK on the BAMBOO to make the BAMBOO WITH HOOK (Y).
- Walk down.
- Move the lilies; use the BAMBOO WITH HOOK to take the FISH and WINE AMPHORA (Z).
- Examine the WINE AMPHORA; remove the algae and cork (A).
- Go up.
- Place the MANGOMOYA FRUIT (B), GREY MUSHROOM (C), and LAETUS CATTLEYA FLOWER (D).
- Take the FRUIT JUICE (E) and BOILED MUSHROOMS (F).
- Open the grate; take the PRESSED FLOWER (G).
- Place the FISH (H); take the LOCKET (I).
- Place the LOCKET (J).
- Place the MAGIC LIQUID, PIXIE DUST, WINE AMPHORA, FRUIT JUICE, BOILED MUSHROOMS, and PRESSED FLOWER for a mini-game (K).
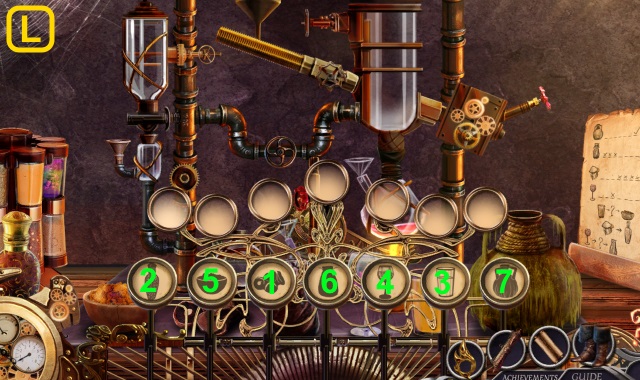
- Solution (L): 1-7.
- Take the potion (M); drink it.
- Open the scroll for a mini-game (N).
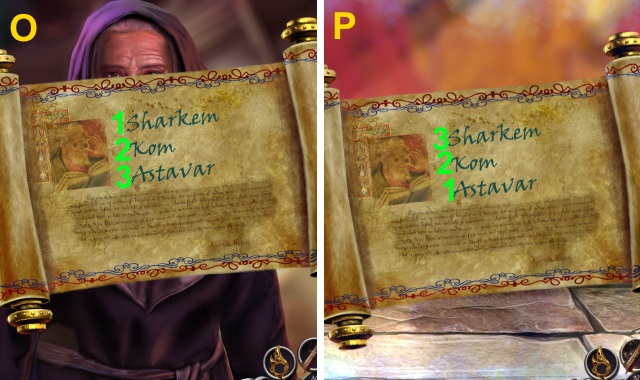
- Solution (O, P).
- Go forward.
- Take the TOWER PINNACLE (Q).
- Use the TOWER PINNACLE for a mini-game.
- Solution (R).
- Play the HOP to receive the MEDALLION HALF (S).
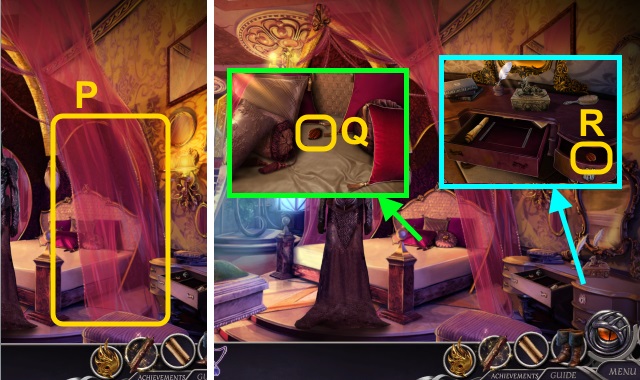
- Open the drawer; move the objects.
- Place the MEDALLION HALF (T).
- Take the GOLDEN SCISSORS and JEWELRY (U).
- Use the GOLDEN SCISSORS (V); take the BEDSPREAD.
- Examine the BEDSPREAD; make the PARACHUTE (W).
- Walk left.
- Use the PARACHUTE (X).
- Go forward, right, then forward.
Chapter 6: The Zeppelin
- Talk to the man; give the JEWELRY (Y).
- Pull the knobs (Z).
- Move the map (A); read it.
- Press the locations (A).
- Examine the telescope for a mini-game (B).
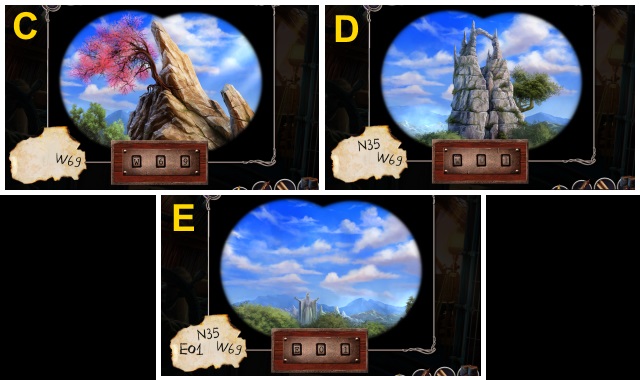
- Solution (C-E).
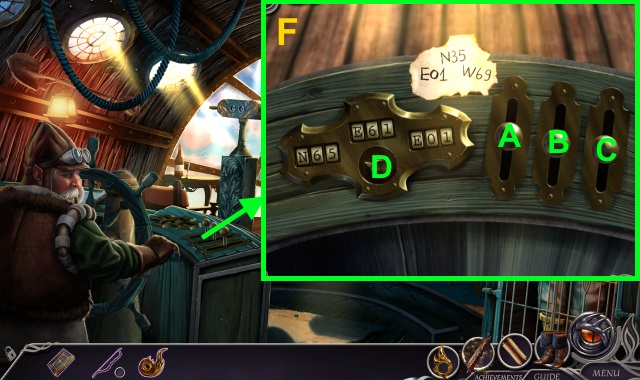
- Examine the levers for a mini-game.
- Solution (F): Ax2, B, Cx2, D, A, Bx2, C, D, Ax2, Bx2, Cx2.

- Take the cards (G).
- Move the wreckage; take the SHOVEL (H).
- Use the SHOVEL (I).
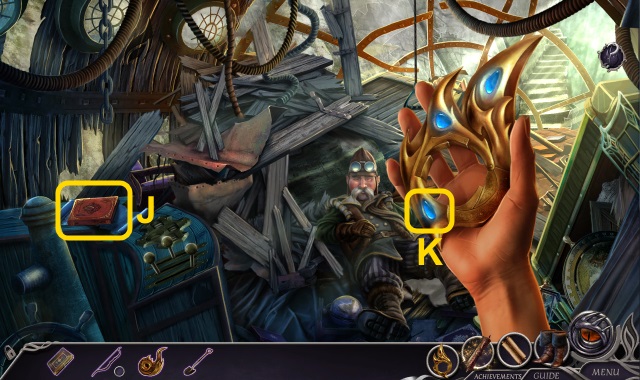
- Take the book (J); flip the pages.
- Use the Spark of Life (K).
- Walk down.
- Press the symbols (1-4).
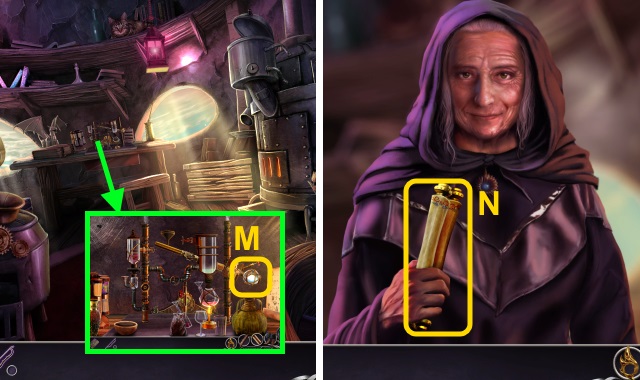
- Take the PILOT NOTES (L).
- Open the PILOT NOTES (M); take the KEY and map.
- Take the paper (N).
- Go up.
- Play the HOP to receive the DIVING SUIT (O).
- Use the KEY (P).
- Go forward.
- Use the Magic Boots.
- Walk left.
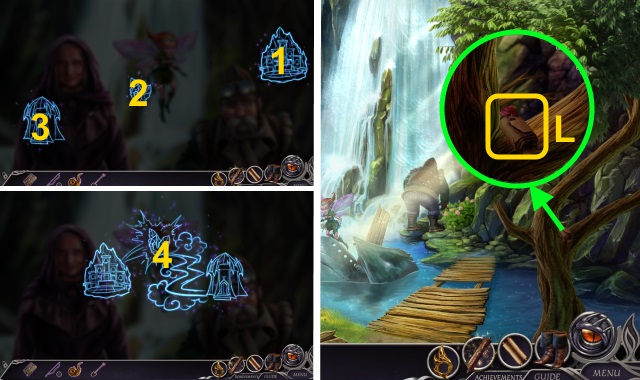
- Examine the shrine for a mini-game (Q).
- Solution (R): BDA, ECAD, ADBEC.
- Take the plaque (S).
- Use Stone Whisper for a mini-game (T).
- Solution (U, V).
- Take the STONE TOKEN (1/9) – (4/9) (W).
- Walk down three times.
- Use the DIVING SUIT (X).
- Use Stone Whisper (Y).
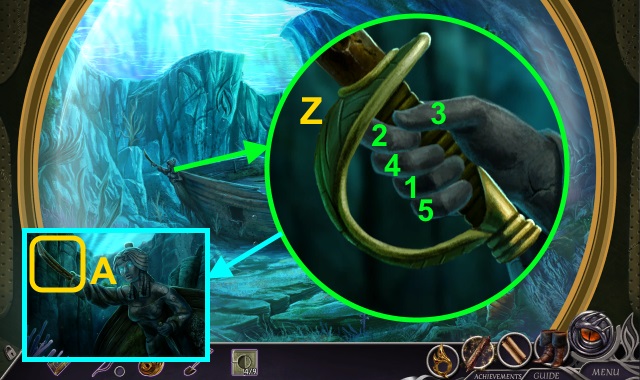
- Examine the sword for a mini-game.
- Solution (Z).
- Take the CUTLASS (A).
- Use Spark of Life (B).
- Use the CUTLASS to take the GLOWING CORAL (C).
- Take the CAPTAIN'S JOURNAL (D).
- Open the CAPTAINS JOURNAL (E); take the page.
- Place the GLOWING CORAL (F).
- Examine the chest (G).
- Use the CUTLASS for a mini-game (H).
- Solution (I-K).

- Examine the chest for a mini-game (L).
- Solution (M).
- Use the GLOWING CORAL (N).
- Take the STONE TOKEN (5/9) – (9/9) (O).
- Go up, right, then forward twice.
- Place the STONE TOKEN (9/9) for a mini-game (P).
- Solution (Q).
- Take the CRYSTAL (R).
- Walk down three times, then up twice.
- Play the HOP to receive the MARBLE FLOWER (S).
- Place the MARBLE FLOWER (T).
- Place the CRYSTAL (U).
- Walk forward.
Chapter 7: the Temple
- Turn the handles (V).
- Use the SHOVEL (W); take the MACE HANDLE and GAUNTLET.
- Use the MACE HANDLE (X); take the MACE HEAD.
- Use the MACE HANDLE on the MACE HEAD to make the MACE (Y).
- Use THE BOOK OF ELVEN LANGUAGE (Z).
- Take the page.
- Use the MACE for a mini-game (A).
- Solution (B): Ax2, B, C, D.
- Go forward.
- Use the Magic Boots.
- Walk left.
- Take the ARMOR EMBLEM (C).
- Open the chest; take the SHOULDER ARMOR and DECIPHER NOTE (D).
- Walk left.
- Take the MONK NOTES (E).
- Climb the tree; move the branches.
- Take the WITHERED ORACLE TREE BUD (F).
- Take the WATER CUP, ARROW, and HELMET (G).
- Use the ARROW on the BOW to make the BOW AND ARROW (H).
- Examine the MONK NOTES (I); take the note, MUSIC OF FIRE NOTES, and SONG LYRICS.
- Use the Spark of Life on the WITHERED ORACLE TREE BUD to make the ORACLE TREE BUD (J).
- Walk down.
- Use Stone Whisper (K).

- Place the GAUNTLET, ARMOR EMBLEM, SHOULDER ARMOR, and HELMET for a mini-game (L).
- Solution (M).

- Move the figurine for a mini-game (N).
- Solution (O).
- Take the IRON FIGURINE (P).
- Place the SONG LYRICS and DECIPHER NOTE for a mini-game (Q).
- Solution (R).
- You receive the MAGIC SONG LYRICS.
- Walk down.
- Use the MUSIC OF FIRE NOTES (S).
- Play the HOP to receive the BELL FIRE SYMBOL (T).
- Walk forward, then left.
- Use the MACE; take the BLUE STONE (U).
- Place the ORACLE TREE BUD, IRON FIGURINE, MAGIC SONG LYRICS, BLUE STONE, and BELL FIRE SYMBOL (V).
- Take the fire (W).
- Walk forward.
- Use Flame Shield (X).
- Use the fire (Y).
- Use the fire (Z).
- Press the symbols; place the MEDALLION HALF (A).
- Use Flame Shield (B).
- Use the fire (C).
- Use the fire (D).
- Press the symbols (1-3).
- Place the Medallion Half; take the Medallion (E).
- Use the BOW And ARROW (F).
- Take the GLASS BELL KEY (G); press the tile.
- Use Stone Whisper (H).

- Use Ancient Flame (I).
- Walk down.
- Use the GLASS BELL KEY (J).
- Take the GLASS BELL (K); take the book.
- Walk forward.
- Place the GLASS BELL (L).
- Use the WATER CUP (M).
- Walk forward.
- Use Spark of Life (N-P).
- Use the Magic Boots.
- Walk left.
- Use Ancient Flame (Q).
- Ride the horse (R).
Chapter 8: The Castle
- You receive the HAMMER, ROPES, and MATCHES.
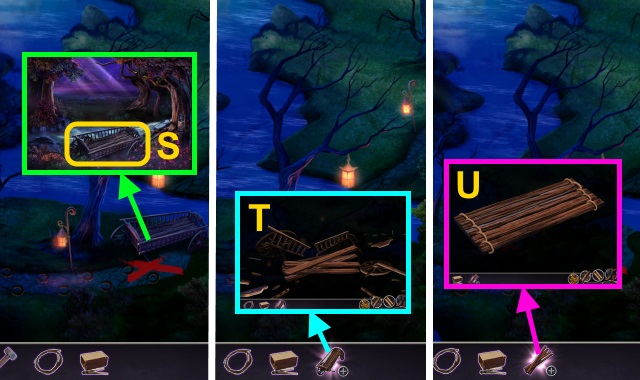
- Take the OLD CART (S).
- Use the HAMMER on the OLD CART; take the BOARDS (T).
- Examine the BOARDS; arrange them.
- Use the ROPES; take the IMPROVISED BRIDGE (U).
- Place the IMPROVISED BRIDGE (V).
- Take the PLIERS (W).
- Use the PLIERS to take the OLD LANTERN (X).
- Open the OLD LANTERN; use the MATCHES to make the LIT LANTERN (Y).
- Use the LIT LANTERN (Z).
- Play the HOP to receive the PENCIL (A).
- Use the Ancient Flame (B).
- Talk to the woman (C); take the SEWER MAP.
- Use the SEWER MAP on the hatch; use the PENCIL for a mini-game (D).

- Solution (E).
- Walk forward.
- Use the spark of Life (F).
- Play the HOP to receive the KNIGHT'S SWORD (G).
- Walk right.
- Move the figurines.
- Open the box; take the DRAGON SCALE (1/3) (H).
- Place the glass (I).
- Use Stone Whisper for a mini-game (J).

- Solution (K, L).
- Take the LOCKER KEY (M).
- Use the KNIGHT'S SWORD (N).
- Take the NECKLACE (O).
- Move the curtain (P).
- Move the pillows; take the DRAGON SCALE (2/3) (Q).
- Use the LOCKER KEY; take the DRAGON SCALE (3/3) (R).
- Walk down.
- Place the DRAGON SCALE (3/3) (S).
- Walk left.
- Use Stone Whisper (T).
- Use Stone Whisper (U).
- Play the HOP to receive the MINIATURE WING (1/2) (V).
- Place the Medallion (W).
- Take the scroll and MINIATURE WING (2/2) (X).
- Walk down, then right.
- Place the MINIATURE WING (2/2) (Y).
- Open the box; take the ETERNAL FLAME SYMBOL (Z).
- Walk down, then left.
- Use the NECKLACE (A).
- Walk left.
- Break the vase; move the shards.
- Take the symbols (B).
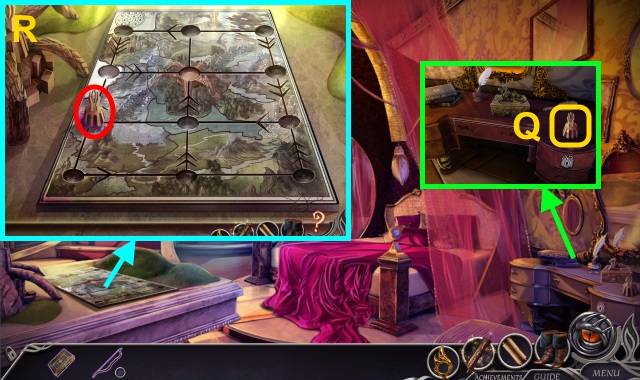
- Examine the stones for a mini-game (C).
- Solution (D): 1-4.
- Take the ARROWS (E).
- Use the ARROWS on the BOW to make the BOW AND ARROWS (F).
- Go up.
- Use the BOW AND ARROW (G).
- Place the ETERNAL FLAME SYMBOL (H).
- Go left, then right twice.
- Use the ARROW to make the MAGIC ARROW (I).
- Use the MAGIC ARROW on the BOW to make the BOW AND MAGIC ARROW (J).
- Use the BOW AND MAGIC ARROW (K).
- Move the beetles (L).
- Take the MEDALLION (M).
- Try to place the MEDALLION (N).

- Use Ancient Flame (O).
- Move the beetles (P).
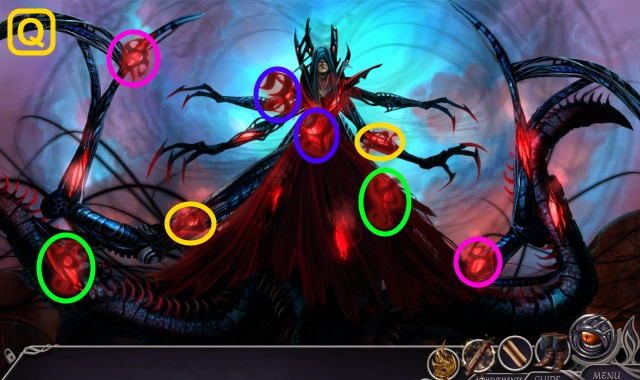
- Match the symbols (Q).
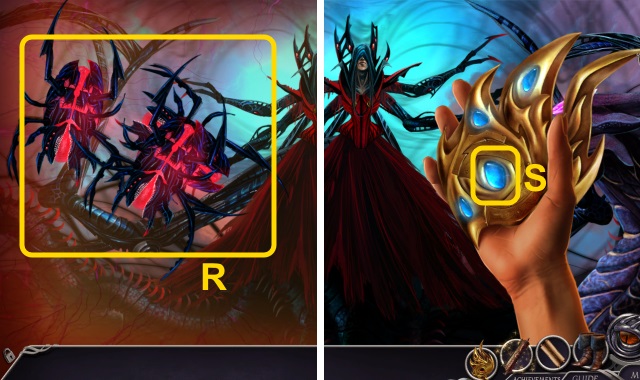
- Move the beetles (R).
- Use Ancient Flame (S).

- Match the symbols (T).
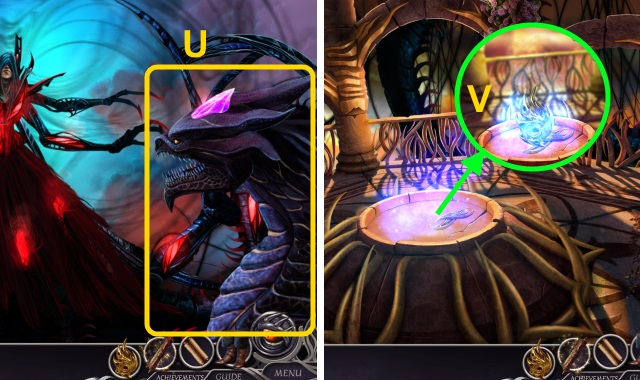
- Examine the dragon (U).
- Place the Medallion (V).
- Congratulations! You have completed Dark Realm: Queen of Flames.
Created at: 2014-10-31