

Walkthrough Menu
- General Tips
- Chapter 1: The Mansion
- Chapter 2: The Hospital
- Chapter 3: The Water System
- Chapter 4: The Airport
General Tips
- From the main menu you can play the game, adjust options, or see the credits and other games from this developer.
- In the options menu you can adjust the sound and music volume, set the cursor type, full screen mode and widescreen mode.
- At the bottom of the screen you can change the current player or make a new player.
- When you start a new game you must choose casual mode or advanced mode.
- Casual mode has a tutorial, more sparkles and the hint/skip gauge recharges faster.
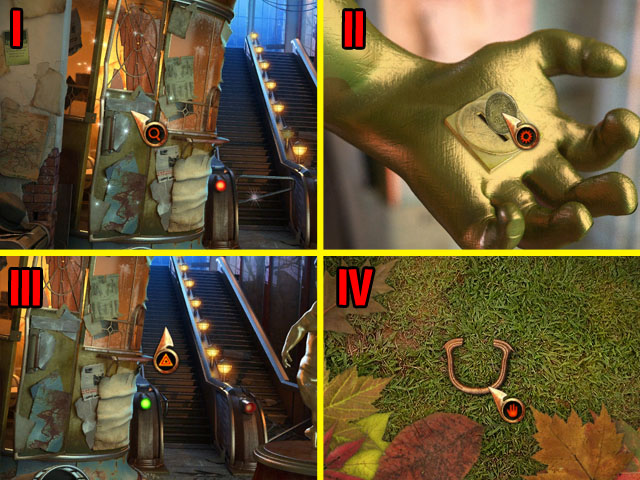
- There are 4 types of cursors in the game.
- The first cursor lets you inspect an area. This usually gives you a closer view or enters a Hidden Object Scene (I).
- The second cursor is a gear. It tells you that you can click on something to use it, or you can use an inventory item on it (II).
- The third cursor is the movement cursor (III).
- The last cursor is the hand cursor. It tells you when you can take an inventory item (IV).
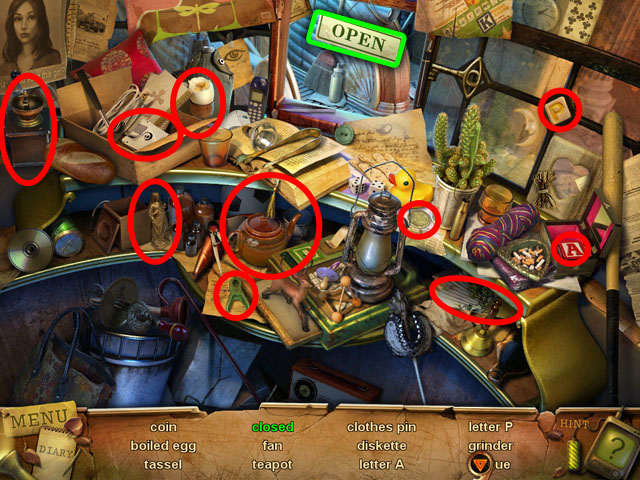
- The hidden objects in this game are randomized.
- Hidden objects written in green require doing something in the scene to unlock them. These items are never random.
- You can skip the mini-games after the skip button is full.
- Click 'Game Info' at the bottom right corner of the screen to find out more about any mini-game and the rules that you need to follow to beat it.
Chapter 1: The Mansion
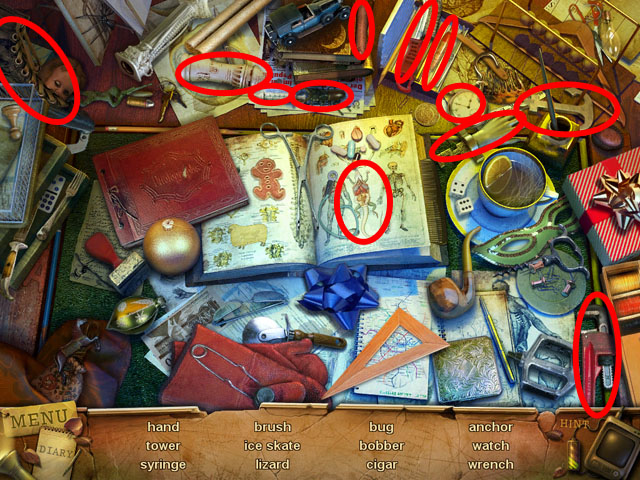
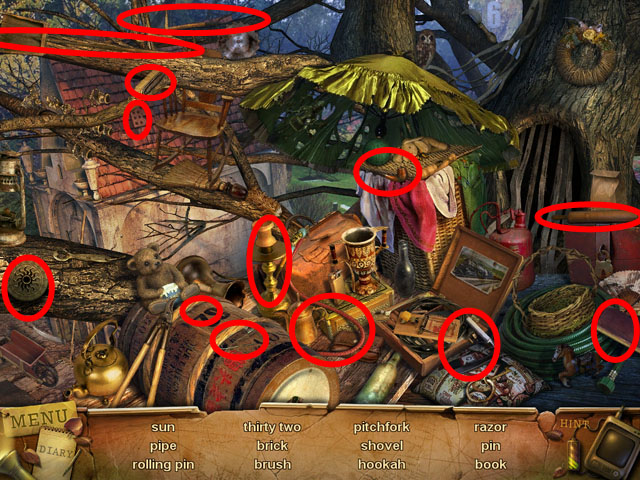
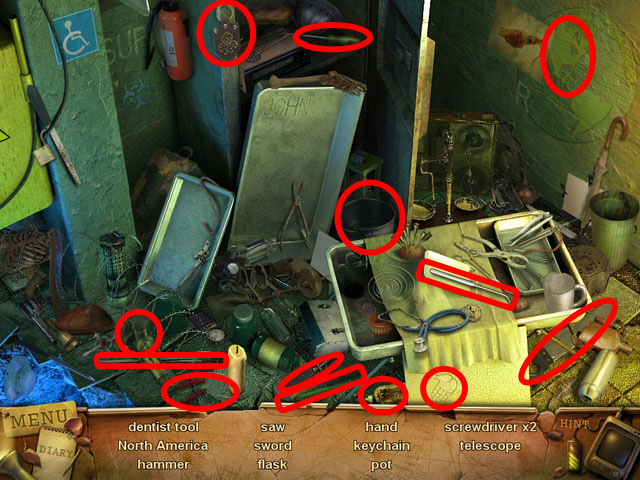
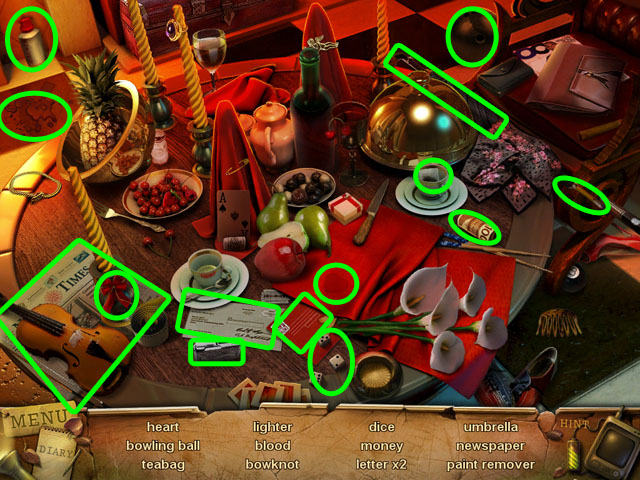
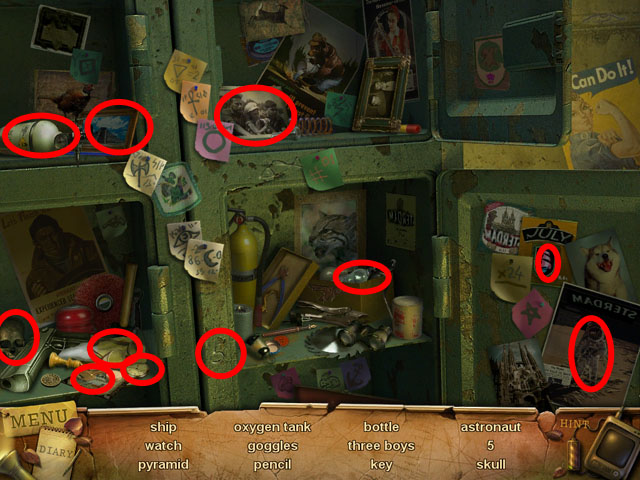
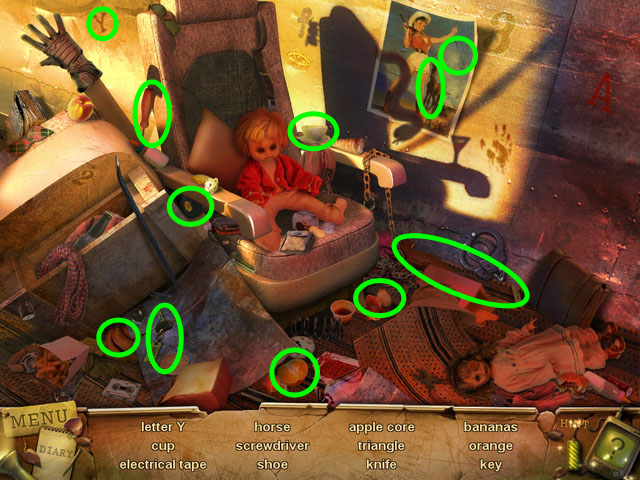
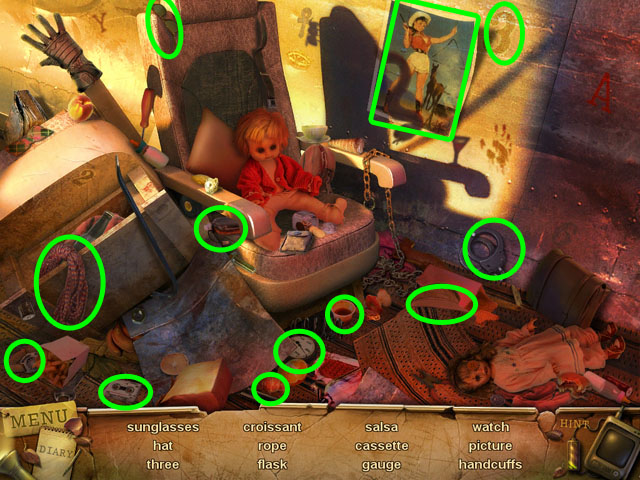
- Enter the room through the left door. It will be surrounded by sparkles that indicate it is a Hidden Object Scene.
- The objects listed in green involve doing something in the environment to collect them.
- Click on the OPEN sign to flip it over; click on the 'CLOSED' sign.
- The COIN will be added to inventory.
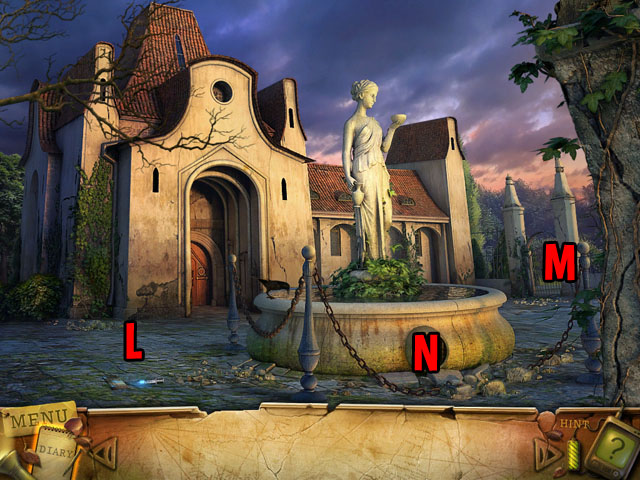
- Click on the base of the statue and read the inscription. It will tell you to put a coin in its palm to activate the turnstile.
- Click on the palm of the statue. Use the COIN from your inventory on it (C).
- Take the CARD from the other hand .
- Inspect the turnstile and use the card in the reader on the left.
- Click on the top of the stairs to continue to the next scene (F).
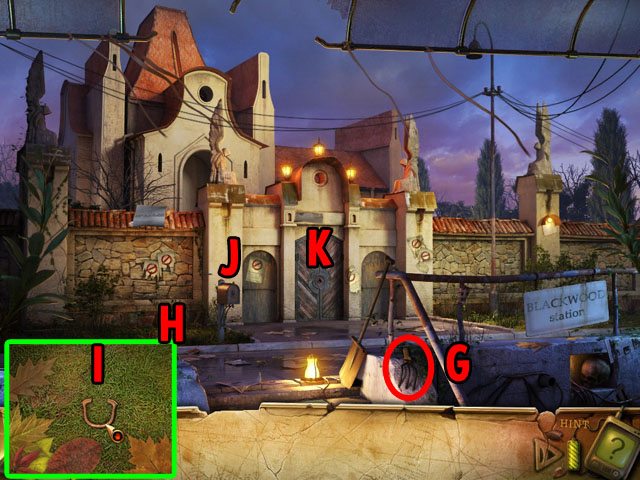
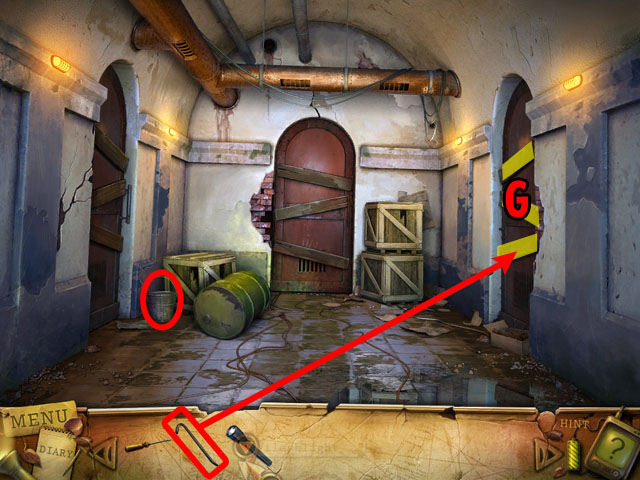
- Take the GARDEN TOOL on top of the rock (G).
- Click on the grass to the left of the mailbox (H).
- Use the GARDEN TOOL on the leaves to uncover the MAILBOX HANDLE. Click and drag to move the leaves with the TOOL.
- Take the MAILBOX HANDLE (I) and click on the mailbox to the right of the grass (J).
- Use the HANDLE on the front of the mailbox and then click again to open it.
- Click on the mail to read it and take the DOOR LOCK ASSEMBLY from the letters.
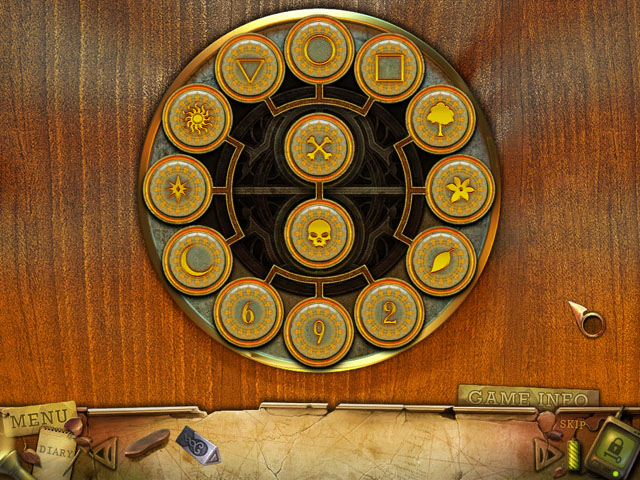
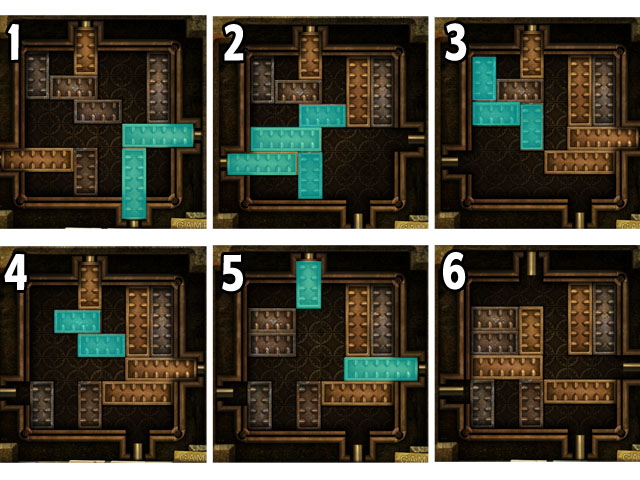
- Inspect the door (K) and use the DOOR LOCK ASSEMBLY in the middle triangular hole. This action will automatically take you to the first puzzle.
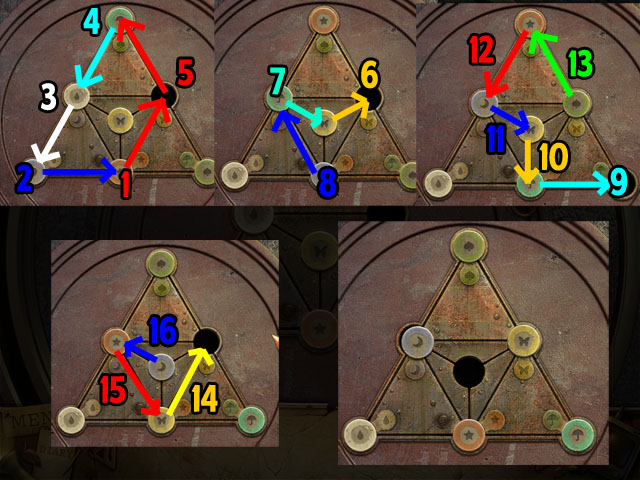
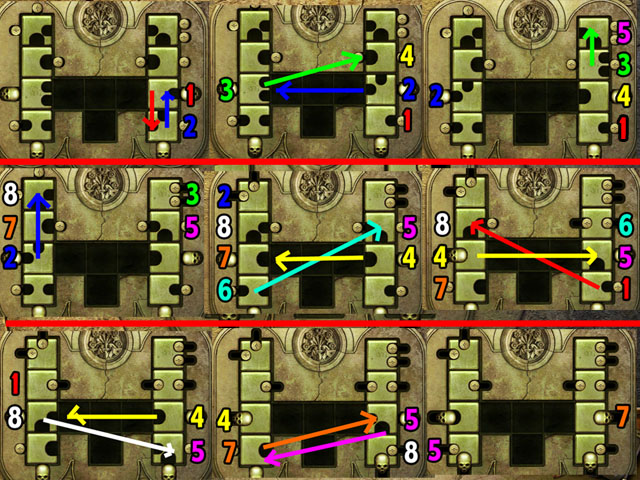
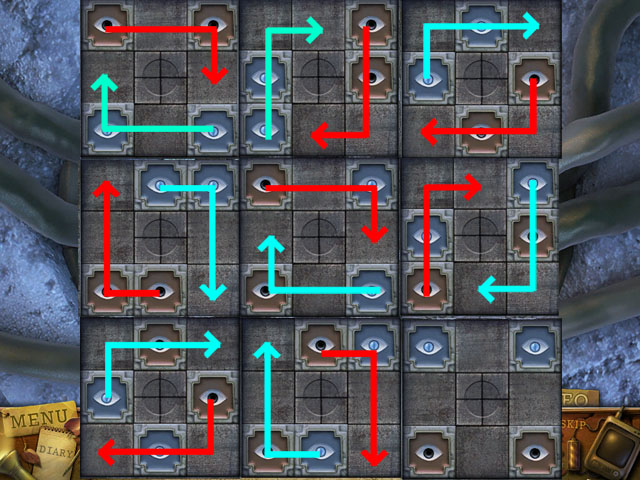
- Place the disks into the right spots.
- There are small icons under each hole that correspond with the correct disk that should be placed there. The disks are also color coded, as are the arrows in the screenshot.
- You can only move a disk into the space if it is connected to the space by a line and there are no other disks in the way.
- Use the middle area to hold disks while you rearrange the other disks around them.
- Follow the instructions in the screenshot to finish the puzzle. The steps are numbered from 1 to 16.
- If you get stuck, or the solution does not work, you can always exit the puzzle and enter again to restart it.
- Go through the door after completing the puzzle.
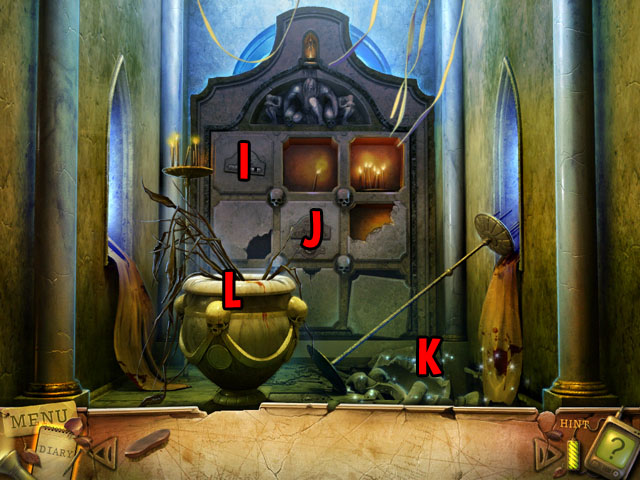
- Zoom into the area to the left of the statue base (L).
- You will start to lose consciousness when you touch the blue liquid in the syringe.
- Click on the piece of paper to the left to pick up the WARRANT.
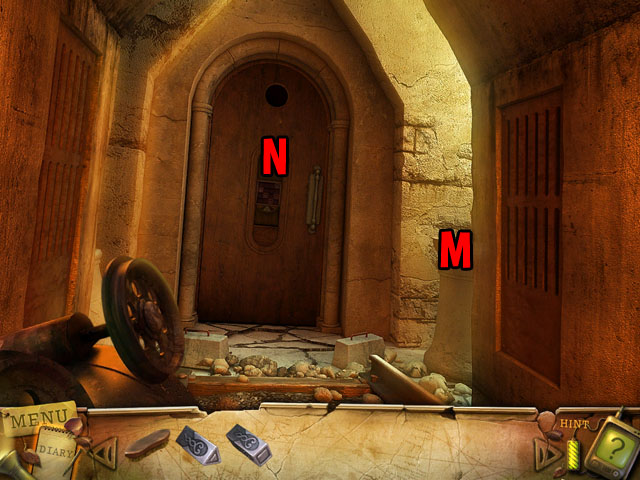
- Inspect the grate (N) at the base of the statue; you need to find a bar to pry the grate open.
- Exit through the gate on the right (M).
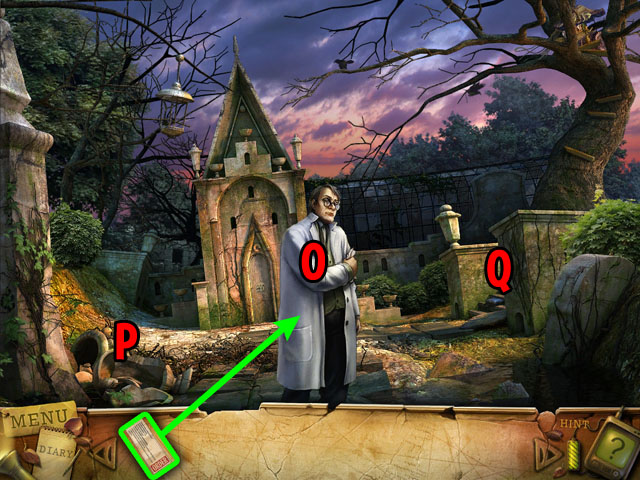
- Give the WARRANT to the man in the middle of the screen (O); he will leave after a short conversation.
- Inspect the bag on the stairs to the right (Q).
- Click on the license, inspect it again and you will start to lose consciousness again and will see a flashback of your sister.
- Once the cut scene has finished grab the GARDEN SHEARS that were under the bag.
- There is also a job offer that links your sister to this area.
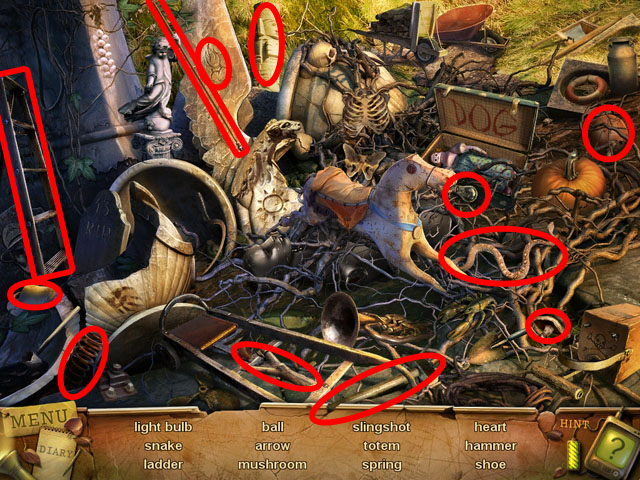
- Return to the main scene and click on the sparkling area to go to the next Hidden Object Scene (P).
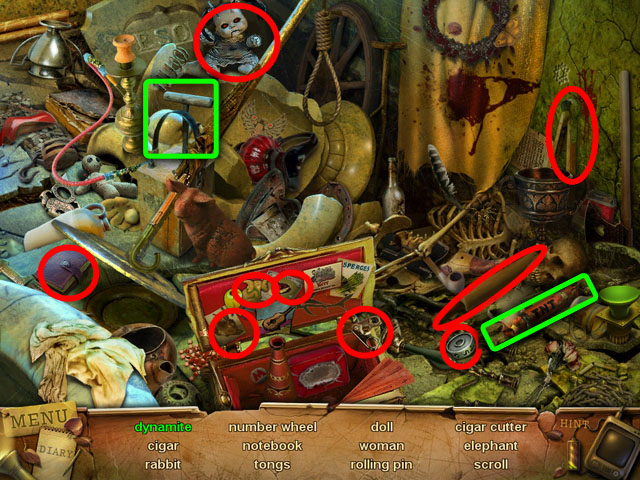
- Collect all of the hidden objects in the scene to receive a LIGHTBULB.
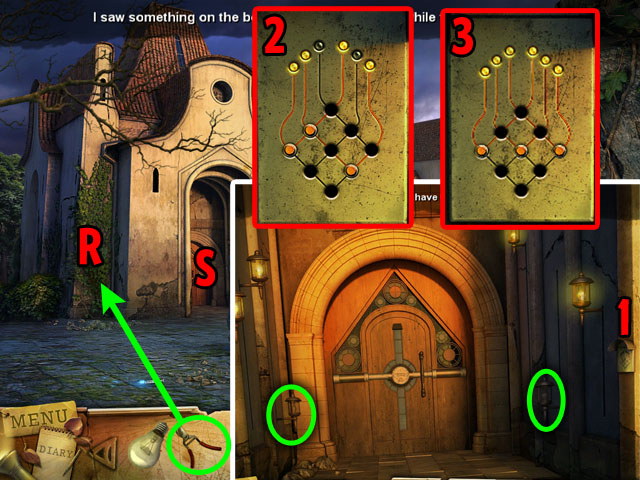
- Return to the previous scene with the statue.
- Cut the ivy on the wall with the GARDEN SEARS 3 times (R).
- Collect a second LIGHTBULB that was hidden behind the ivy.
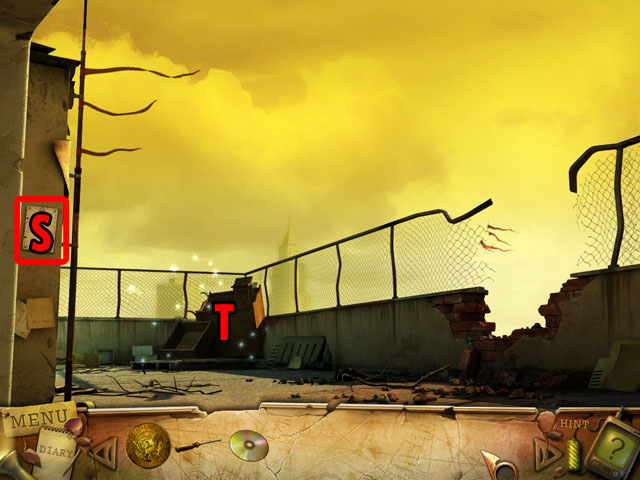
- Click on the door to the building (S) to go to the next scene.
- Click on the power panel (1) to the right of the entrance.
- The lamps are represented by the lights at the top of the power panel.
- If a light is not connected to any fuses or if the row it is connected to is empty, the lamp will be lowered to the ground and will shut off.
- Rearrange the fuses to match the screenshot (2). This will lower the two broken lamps.
- Place the 2 LIGHTBULBS in the lowered lamps circled in green.
- Rearrange the pieces again (3). This time making sure every lamp has only one fuse in its row. This will turn on all the lamps and unlock the door.
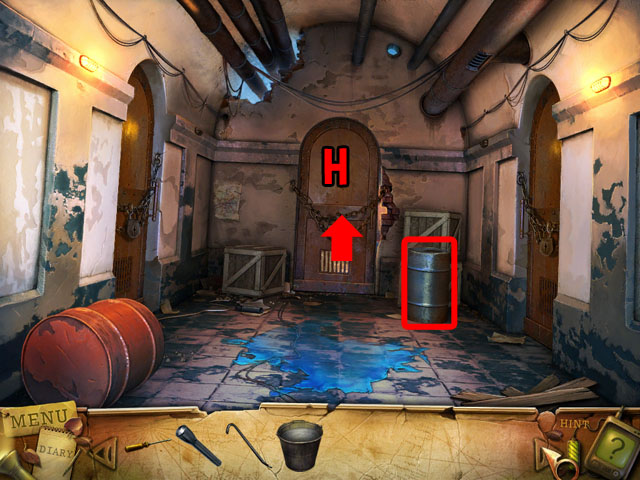
- Enter the building.
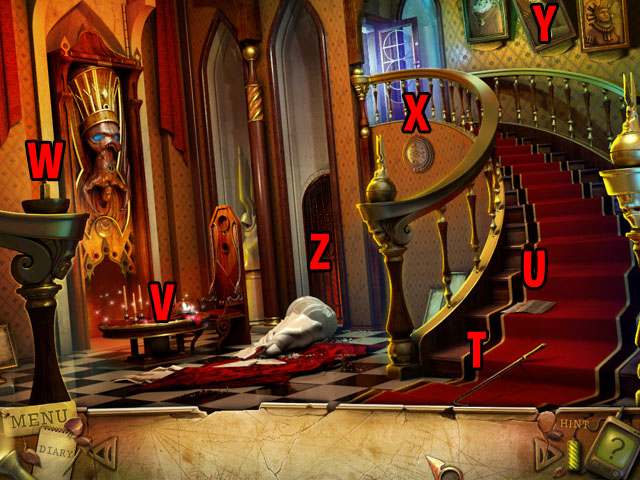
- Collect the POKER on the ground at the foot of the stairs (T).
- Check the fired notice above where the POKER was (U) for more story.
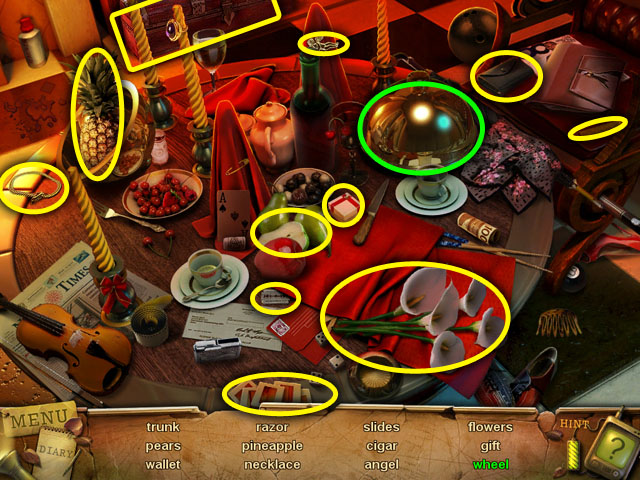
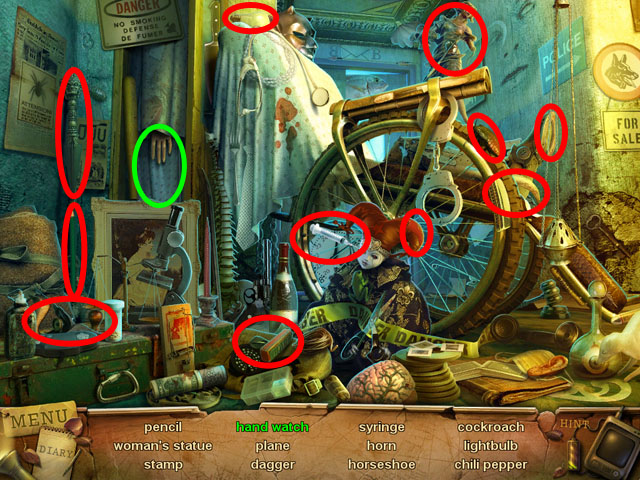
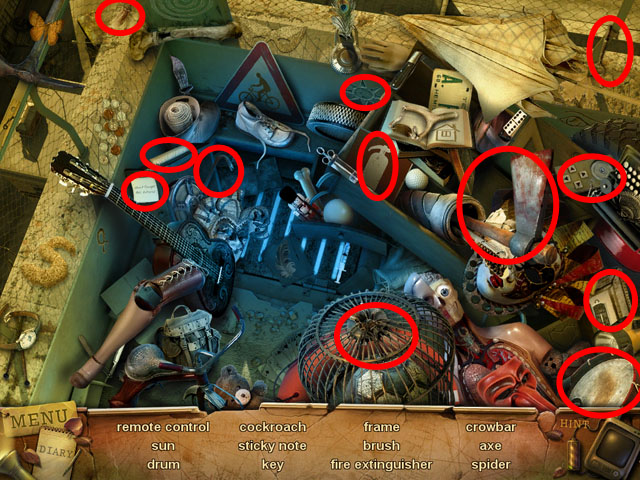
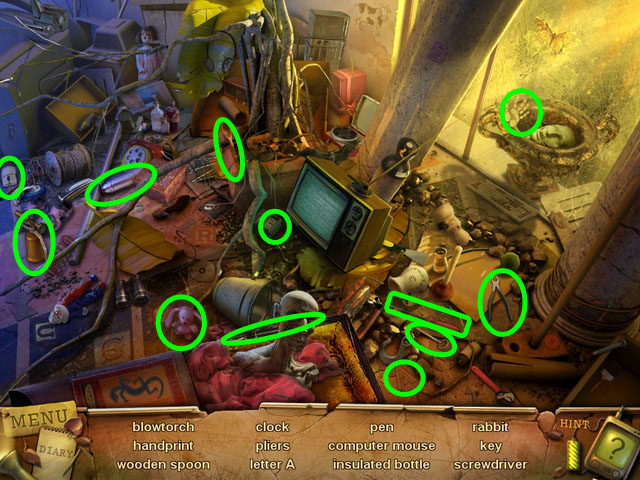
- Enter the Hidden Object Scene on the table (V).
- Collect all of the hidden objects in the scene and you will receive a WHEEL in your inventory.
- Open the lid circled in green to find the wheel.
- Leave the building and return to the statue outside. Inspect the grate again; use the POKER to pry it open.
- Take the STATUE from inside the grate and go back inside.
- Use the STATUE on the pedestal to the left on the screen (W) and then click the statue to open the door (Z) that your friend went through.
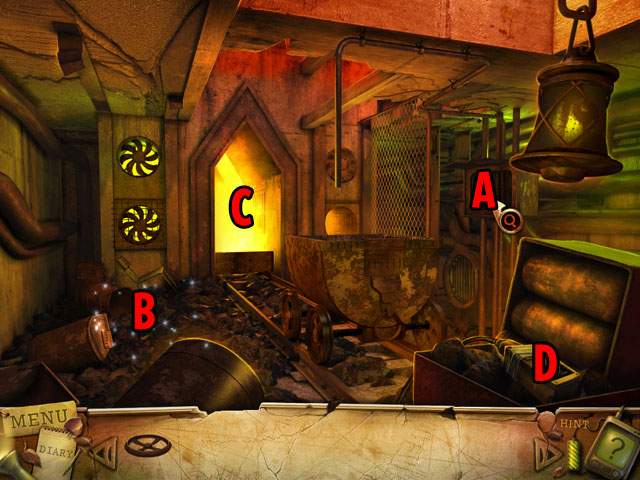

- Enter the door (C).
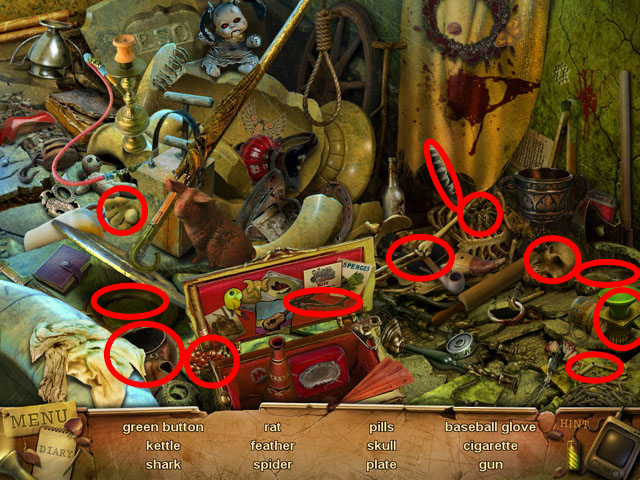
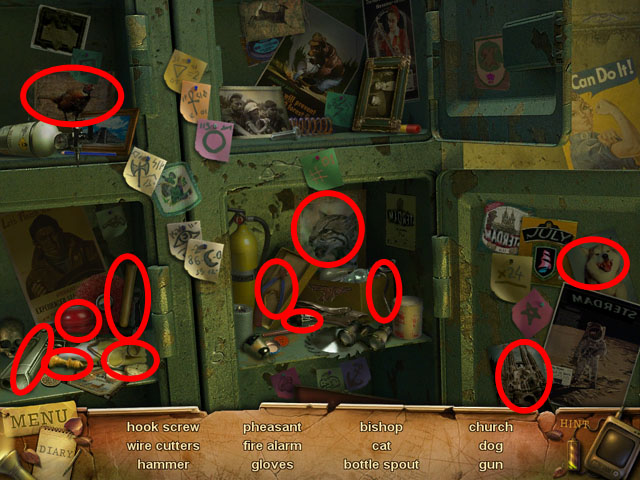
- Enter the Hidden Object Scene (B) in the bottom left hand.
- Drag the knife to the pumpkin; collect the jack-o'-lantern.
- You will receive the BOARDS after your search.
- In the main scene you can click on the pipes (A) to inspect them further.
- Place the WHEEL in the space to the right to start the mini-game (D).
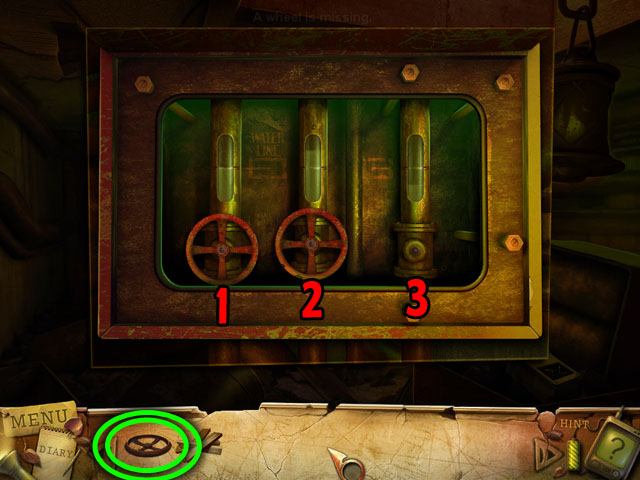
- Click wheel 1 to take water from above wheel 2 and add it to the water above wheel 1.
- Click wheel 2 to take water from wheel 3.
- Click wheel 3 to take water from wheel 1.
- The object of the mini-game is to get all of the water level in the middle above all the wheels.
- To solve the puzzle, click wheel 3 and then wheel 1.

- Return to the Entrance.
- Click on the base of the statue of the drained fountain to activate a search scene.
- The “Fleur de lis” can be made out of two different parts circled in green.
- The GOLD DIAMOND will be added to inventory.
- Return to the building and go upstairs.
- Inspect the papers on the ground circled in green for some more story information.
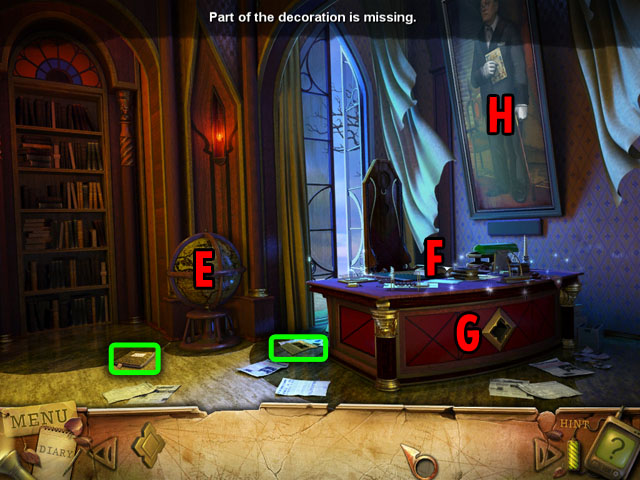
- Click on (F) to enter the next Hidden Object Scene.
- Collect all of the hidden objects in the scene to receive the HAMMER.
- After finishing the Hidden Object Scene, place the GOLD DIAMOND in the missing spot (G) in front of the desk.
- A board on the side of the desk will fall off.
- Read the letter and the diary for more story information; collect the BRUSH.
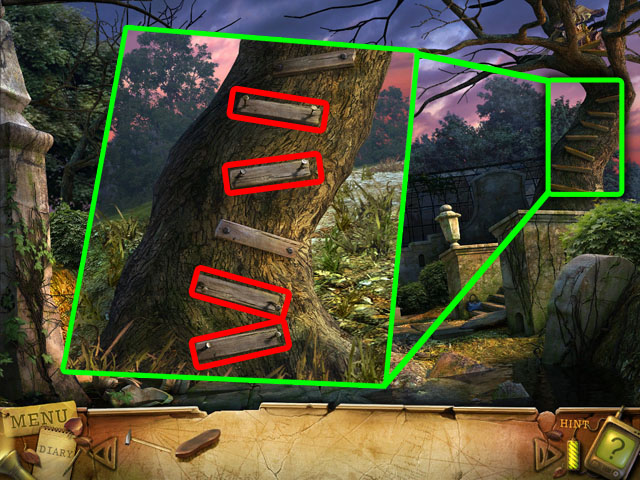
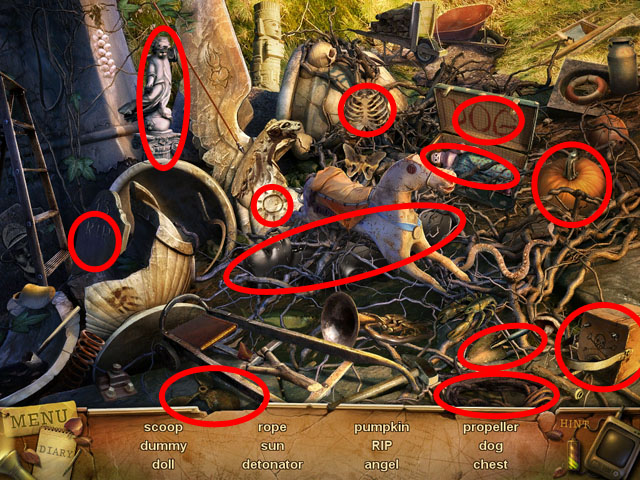
- Return to the garden through the gate near the statue.
- Zoom into the tree on the right; place the BOARDS on the tree.
- Use the HAMMER on the boards.
- Click on the tree to go to the next scene.
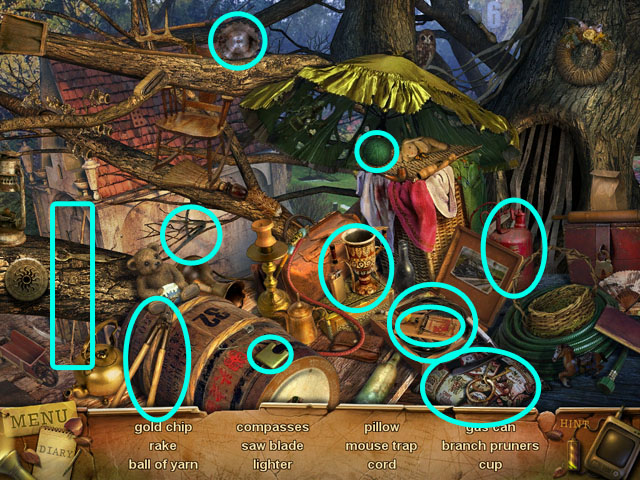
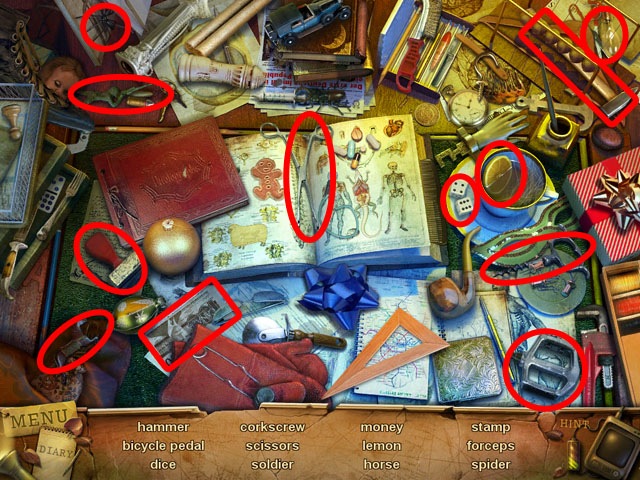
- Collect all of the hidden objects in the scene.
- The GOLD CHIP will be added to inventory.
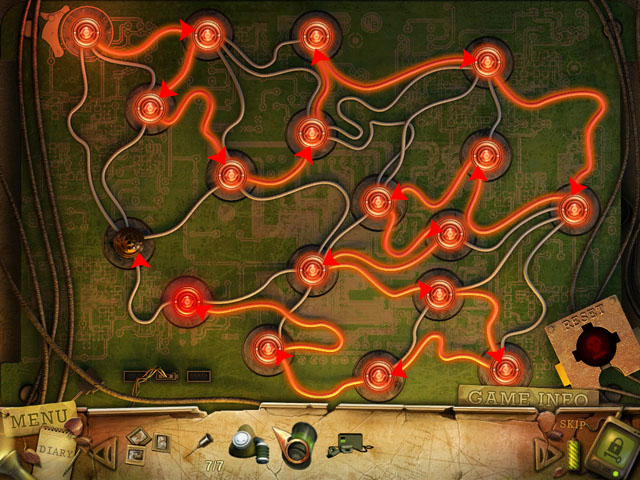
- Zoom into the crypt's door in the garden scene; place the GOLD CHIP on the puzzle to activate it.
- Rearrange the pieces on the board so that all of the circles and skulls can fit into them.
- Click on the pieces and drag them into an empty spot.
- There is a button on the top of the puzzle that will reset all of the pieces to their original place.
- Use the empty spot in the bottom middle to hold pieces while you switch places from left to right.
- Use the screenshot steps to help you complete the puzzle.
- First, switch the two pieces labeled 1 and 2 in the screenshot. First move the 1 piece to the bottom middle space and then move the 2 piece past it to the left. Take the 1 piece back and their places will be switched.
- Next, switch the 2 and 3 pieces in the same way, and then switch the 3 and the 4 pieces.
- In the 3rd step, switch the 3 piece and the 5 piece. To do this, first move the 4 and 1 pieces to the very left, then move the 3 piece to the bottom of the right side. Move the 5 piece to the left and then move the 3 piece up to the top. Replace all of the pieces you moved back to the right side.
- In the 4th step, do the same thing with the 2 piece, putting it at the top of the left column.
- Next, switch the 6 and the 7, then the 6 and the 4, and lastly the 5 and the 4. Use the bottom middle area to hold the piece you want to switch like before.
- Do the opposite for the right side: switch the 5 and the 1, then the 1 and the 4 and lastly the 8 and the 1.
- Now the top two positions in both columns should be locked in place.
- In the 7th step, switch the 4 and the 8 and then switch the 8 and the 5 on the right side.
- In the 8th and final step, switch the 7 and the 4, then the 7 and the 5 and lastly the 4 and the 5 to finish the puzzle.
- After finishing the puzzle enter the crypt through the door.
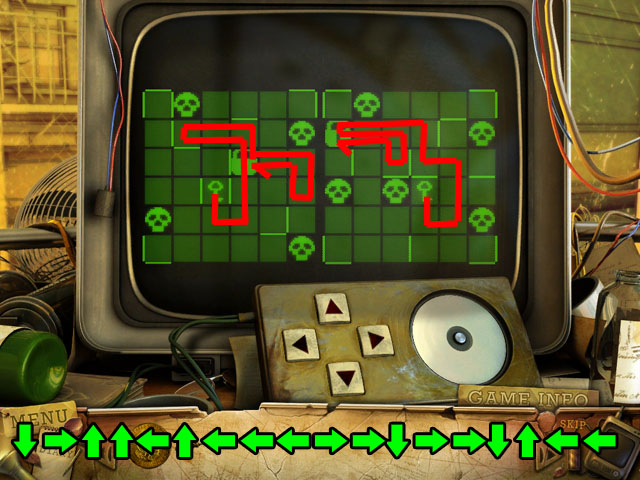
- Click on (K) to enter a Hidden Object Scene.
- Collect all of the hidden objects in the scene to receive the NUMERIC WHEEL.
- Press the lever marked in green to find the dynamite marked in green.
- Place the NUMERIC WHEEL in the missing spot (I). You must enter the correct date of death for Vincent Brown in the completed number slider.

- Return to the entrance of the house, with the stairs.
- Click on the three pictures; use the BRUSH to clean up the name plates underneath them.
- Vincent Brown dates are 1784-1856.
- Return to the crypt and put the number 1856 into the number wheel.
- Inspect the two papers and you will put one into your diary for later.
- Return to the office at the top of the stairs in the house.
- Click on the globe.
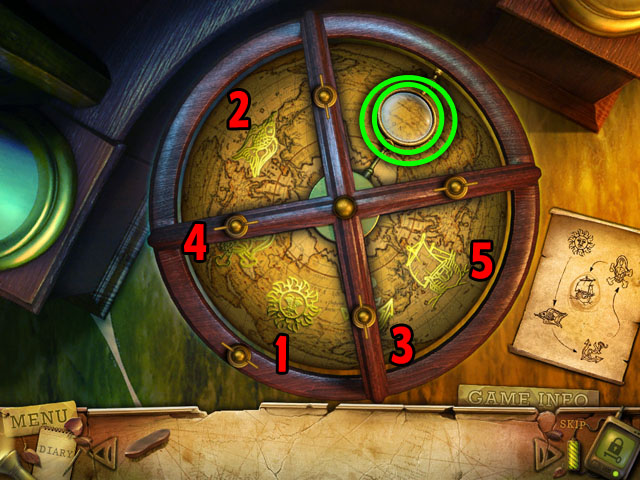
- When you enter the scene, the piece of paper from the crypt will appear off to the right.
- There is a magnifying glass on the globe, and many symbols.
- Put each symbol under the magnifying glass in order as written on the paper by clicking and dragging the globe.
- The order is sun (1), fish (2), anchor (3), skull (4) and ship (5).
- The previous action will reveal another Hidden Object Scene on the desk and also an altar to the left where a bookcase used to be.
- Collect all of the hidden objects in the scene to receive the STRANGE KEY.
- Return to the crypt and enter the Hidden Object Scene on the floor.
- Collect all of the hidden objects in the scene to receive the GREEN BUTTON.
- Use the STRANGE KEY on the middle door.
- Inside will be a strange object, pick it up to receive the ALTAR ELEMENT.
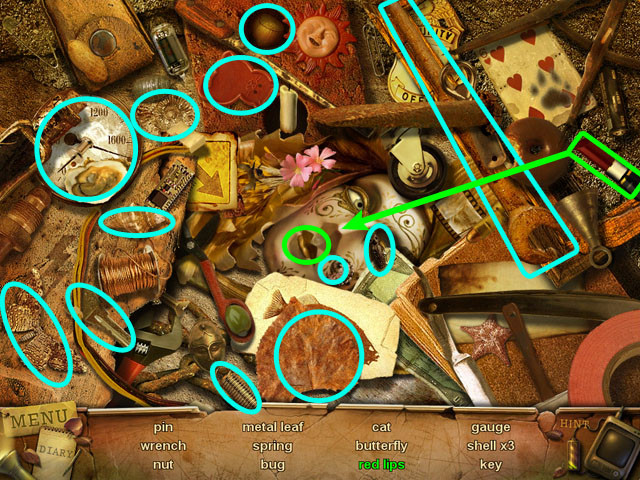
- Return to the previous scene and enter the Hidden Object Scene on the left.
- Collect all the items in the scene to receive the SCOOP.
- Return to the scene with the fountain and the statue.
- Enter the Hidden Object Scene at the base of the statue.
- Collect all the items in the scene to receive the SKULL MEDALLION.
- Return to the crypt and use the SCOOP on the soil in the large plant pot.
- You will see another MEDALLION with a number 2 on it. Collect this as well.
- Return to the garden and enter the Hidden Object Scene by the tree.
- Collect all the items to receive the SUN MEDALLION.
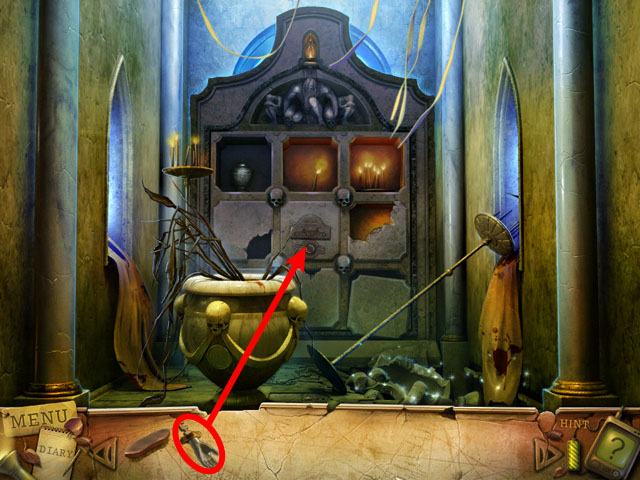
- Return to the house, in the first scene with the stairs, and inspect the strange statue to the left above the glowing red light.
- There is a puzzle there on the chest of the man in the statue.
- Use the MEDALLIONS on the puzzle to activate the puzzle.
- In this mini-game you must group the like symbols in the disk.
- There are two spaces in the middle composed of one group and then four groups around the edge of the circle.
- The skull and bones medallions go in the middle.
- The other groups are shapes, plants, numbers, and things in the sky.
- Drag and drop the medallions to switch their places.
- See the screenshot for the competed puzzle.
- The order of the groups and the order of pieces inside the groups do not matter.
- Once the puzzle is finished a door will open. Take the ALTAR ELEMENT from inside it.
- Enter the door at the bottom of the stairs.
- Use the GREEN BUTTON on the control to the right in the chest.
- Click the button to send a cart into the flames and cover them up.
- Go through the door in the back.
- Click on the basin to the right (M) and collect another ALTAR ELEMENT.
- Click on the door at the back of the room (N) to find that you need some puzzle pieces before you can enter this room.
- Return to the office at the top of the stairs and click on the altar to the left, circled in white.
- Use the 3 ALTAR ELEMENTS from your inventory in the middle and take the puzzle.
- The altar elements must go in the correctly shaped-hole in order to place them.
- Return to the previous door and use the puzzle pieces to start the next mini-game.
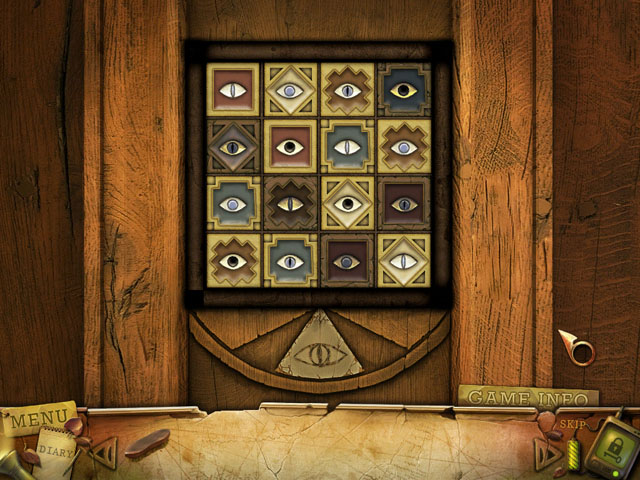
- The object of this mini-game is to place all of the eye tiles in a way so that each row and column is made of up different looking tiles.
- In each row and column the type of iris and shape of the background of any two tiles cannot match.
- The color of the tiles will not match as well, but that will happen anyway if all the tiles have different shapes. Only similar shapes have the same color.
- Some of the tiles are unmovable and will be there from the start.
- The other tiles will start on the side and can be moved around by clicking and then clicking again to place them.
- See the screenshot for one possible solution, there may be more.
Chapter 2: The Hospital

- Before you can get out of bed you need to cut the IV of blue liquid.
- If you try to stand up before that, the screen will become blurry.
- Click on the SCISSORS circled in red and use them on the IV tube.
- Take the large vial of BLUE INGREDIENT circled in green.
- Click in the middle of the screen to get up.
- Inspect the cabinet. There is a lock on the cabinet that you need the code to.
- There are some papers with story elements on the wall, circled in yellow.
- Click on the wheelchair to enter a Hidden Object Scene.
- Collect all of the hidden objects in the scene.
- Click the hand circled in green and it will lower down a bit; take the WRIST WATCH from its wrist.
- The COLORED PENCIL will be added to inventory.
- You will have another vision when you enter this area.
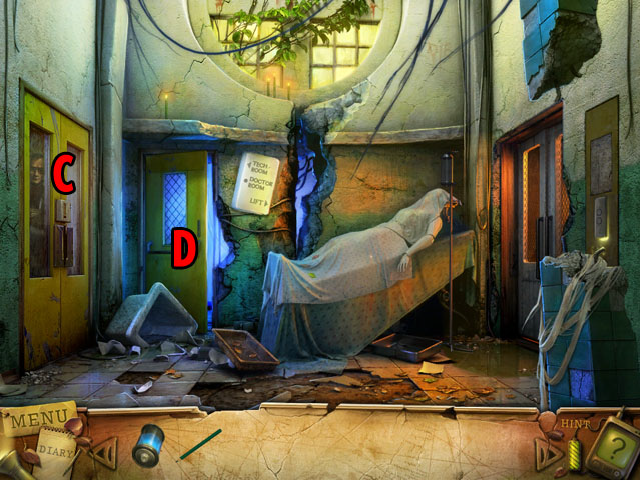
- On the left is a door that you cannot open yet (C). There is a man there that you can talk to, and he asks for your help.
- There is another door to the right of the first (D). Click that door to go to the next room.
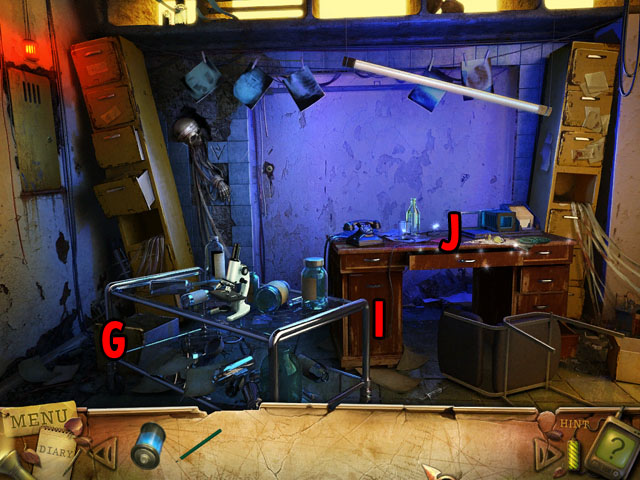
- Once you enter the next room, click on the left side of the desk (I) and collect the MASK on the top shelf.
- After finishing this scene you will have another vision.
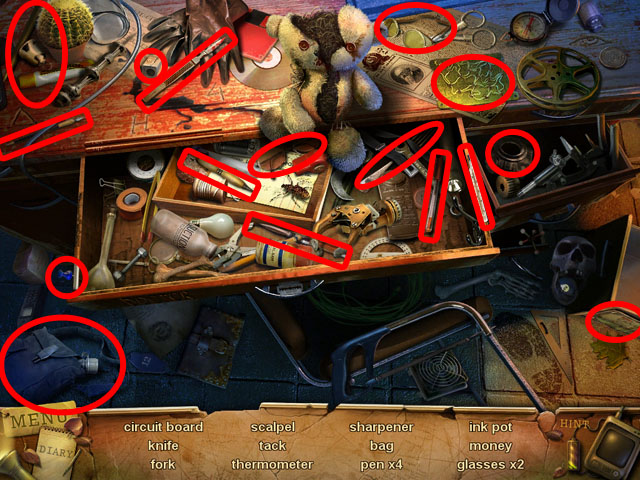
- Enter the Hidden Object Scene on top of the desk (J).
- Collect all of the hidden objects in the scene and you will receive a CIRCUIT BOARD in your inventory.
- In the previous scene click on the cabinet drawer in the lower right (G).
- Read the two files circled in red. One of these files has some important information on it for solving a puzzle later.
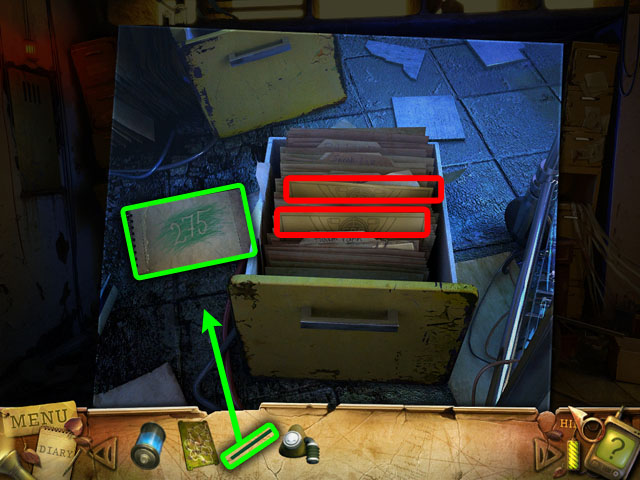
- Use the COLORED PENCIL on the paper circled in green.
- This will reveal the number to the lock in the second scene: 275.

- Go back two scenes to find the room with the wheelchair.
- A strange doll will come out of the ceiling and block your progress.
- Click on the locked cabinet to the right and enter the password from the last scene: 275.
- Take the BROKEN DIFIBRILLATOR and the ACCESS CARD inside the cabinet.
- Inspect the doll and you will see a group of 4 symbols inside 5 circles.
- Click on a symbol to move it to the empty space. There will be a blurred symbol behind it that shows you what should be in that position.
- The symbols can only travel two spaces at once as shown by the light red lines in the background.
- Move the symbols on the outside first to the opposite sides. Then worry about the symbols in the middle.
- When a symbol is in the correct place it will light up.
- After all of the symbols are arranged as in the screenshot the doll will disappear.

- Enter the Hidden Object Scene by the wheelchair.
- The SLIDES will be added to inventory.
- Click on the door to go to the next room. Use the ACCESS CARD on the door to the left to open it.
- Talk to the man that was behind the door to receive an ANTIDOTE RECIPE (L).
- Go through the door to the left.
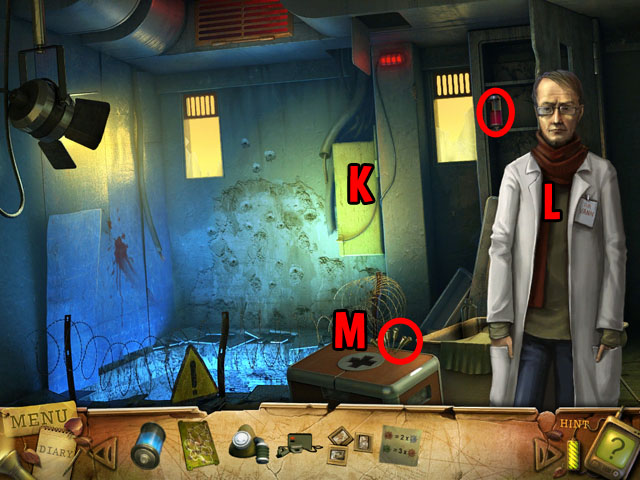
- Take the RED INGREDIENT on the top shelf, circled in red.
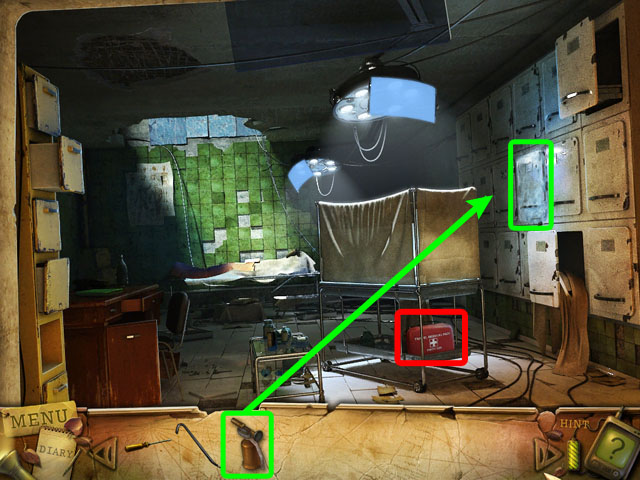
- Take the NEEDLES stuck above the first aid kit (M).
- Click on the defibrillator charging station (K) and use the DEFIBRILLATOR on it. Once the light turns green take the DEFIBRILLATOR again.
- Leave the room and go through the middle door of the next room.
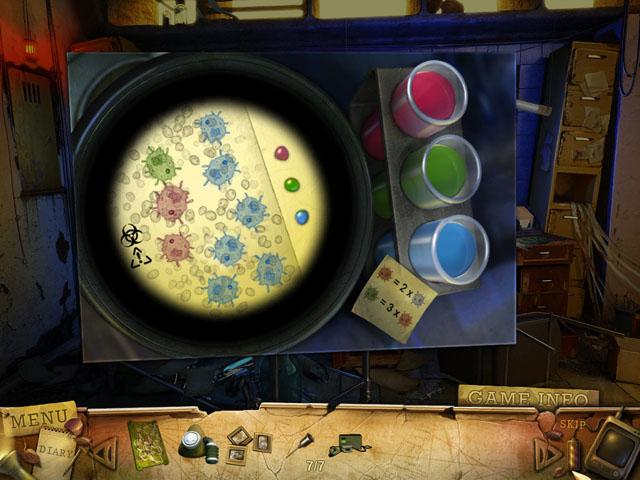
- Click on the microscope (H) to start the antidote mixing mini-game.
- Place the ANTIDOTE RECIPE on the scene.
- Add the BLUE INGREDIENT and the RED INGREDIENT to the right side of the scene.
- Use the eye dropper to color the different bacteria.
- The final solution is 6 green bacteria, 2 red bacteria, and 1 green bacterium.
- After finishing the puzzle, take the orange vial of ANTIDOTE.
- Return to the man in the locked room and give him the ANTIDOTE vial.
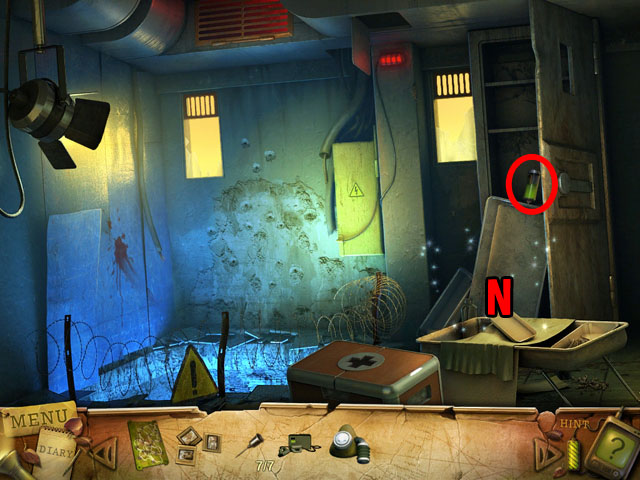
- Behind him there will be a vial of GREEN LIQUID in the locker circled in red.
- Enter the Hidden Object Scene (N).
- Collect all of the hidden objects in the scene.
- The TOOL will be added to inventory.
- Return to the room with the microscope and click on the locked power box on left (F).
- Use the TOOL to open the power box and then use the CIRCUIT BOARD on the empty space in the middle to start the next mini-game.
- In this mini game you must start from the top left corner and click on every fuse in the circuit board.
- The fuses are connected by wires and once you use a wire you cannot use it again. You also cannot travel through the same fuse more than once.
- If a move is illegal, clicking on that fuse will do nothing. Use the reset button in the bottom right corner if you get stuck.
- Follow the arrows in the screenshot to solve the puzzle.
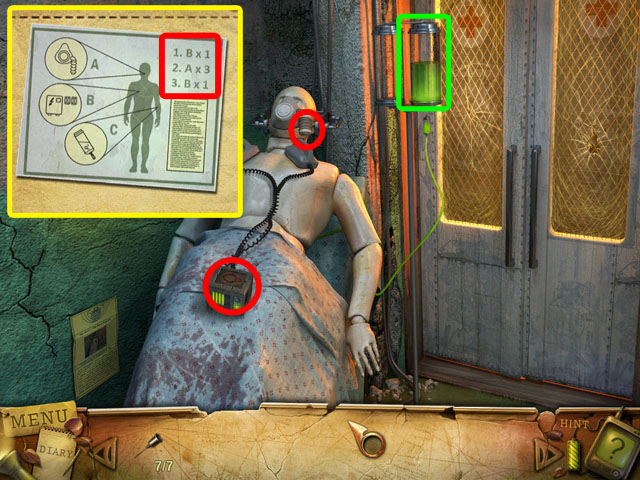
- Use the SLIDES on the slide projector in the same room.
- The final slide will show you how to resuscitate someone with the defibrillator, mask and green liquid.
- Go back one scene and click on the mannequin in the middle of the room to inspect it.
- Click again to remove the sheets.
- Add the MASK from your inventory to the mannequin's face, the GREEN LIQUID to the IV and the DEFIBRILLATOR to the chest.
- As stated in the slide, click the defibrillator 1 time, the mask 3 times, and the defibrillator 1 more time.
- The mannequin will sit up and give you another SLIDE.
- Take the slide in the other room and use it on the projector.
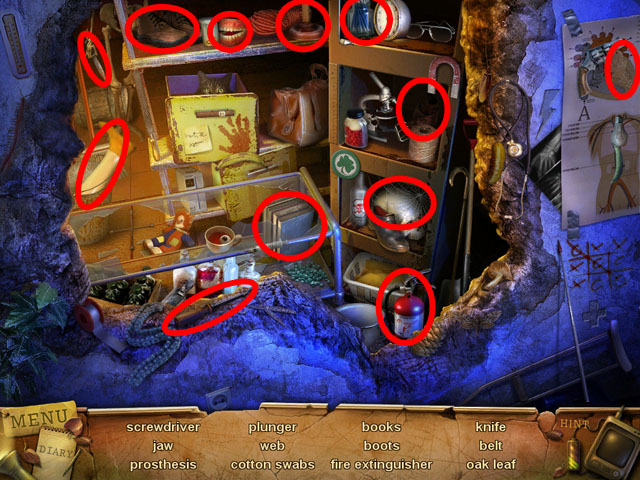
- After watching the animation click on the broken wall to enter another Hidden Object Scene.
- Collect all the items in the scene to receive a SCREWDRIVER.
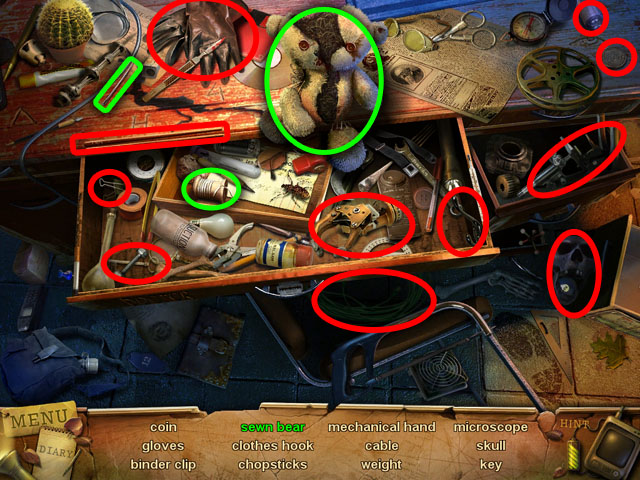
- When you finish finding the objects, click on the desk to start another Hidden Object Scene.
- Collect all of the hidden objects.
- To collect the “sewn bear” click on the thread in the drawer and add it to the needle, circled in green. Use the needle and thread to sew up the toy bear.
- The COIN will be added to inventory.
- Return to the room with the mannequin and click on the control panel to the right.
- Use the SCREWDRIVER on all 4 corners to open the panel.
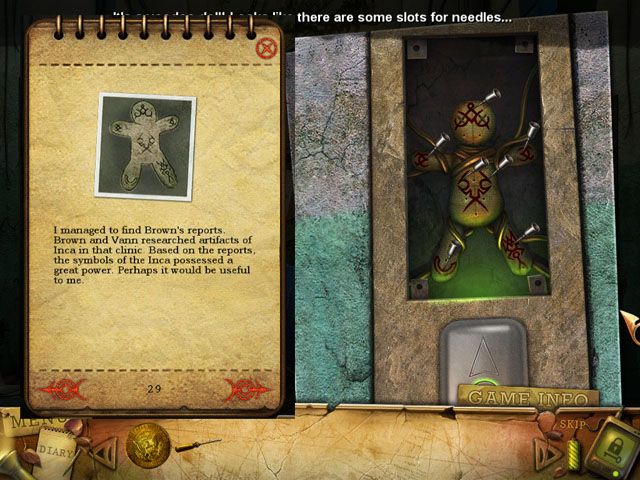
- There is a voodoo doll inside with many points on it that you can put NEEDLES from your inventory in.
- To take out a needle and click it a second time.
- Each needle that you put in will change the pattern on the doll. You must find the correct pattern to open up the door.
- In the files that you looked at below the microscope you already saw a file that shows the correct answer.
- You can either go back to that scene and look at the file again or click on your diary for the solution.
- Match the symbols with the ones in the picture as shown in the screenshot and the elevator will become available to you.
- Enter the elevator and inspect the panel to the left of the elevator door.
- Press the floor 1 button and exit the elevator once you arrive on the the 1st floor.
- Click on the area in front of the chair and collect the ROOF KEY. There is also a note here that says Mr. Brown has the morgue key.
- If you click on the computer screen you will see that the computer is missing a disc and a keyboard.
- The door to the outside is locked.
- Enter the Hidden Object Scene to the left.
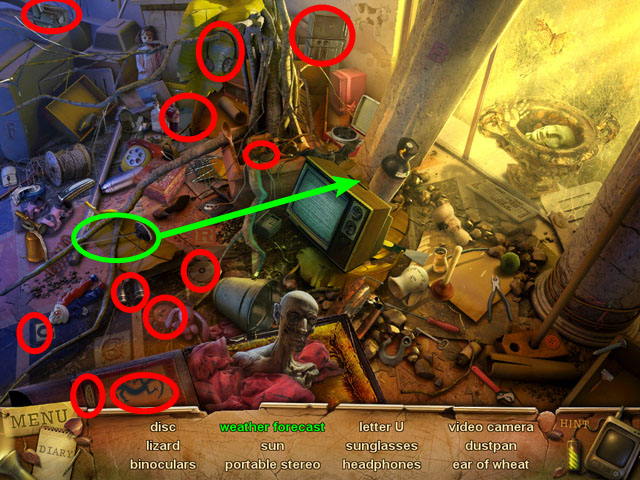
- Collect all of the hidden objects in the scene.
- Add the antenna to the TV in order to collect the WEATHER FORECAST.
- The CD will be added to inventory.
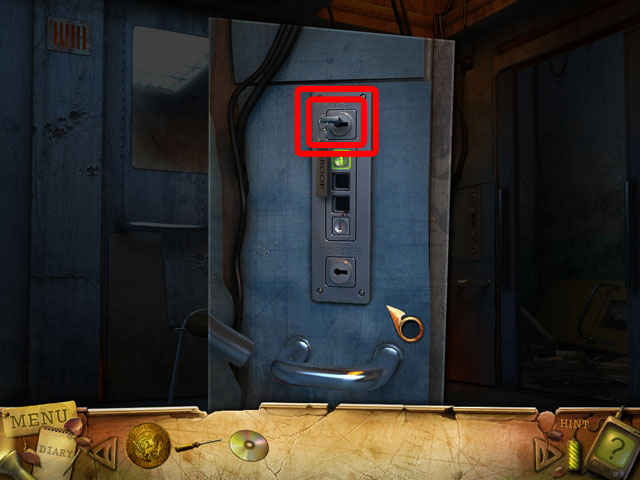
- Return to the elevator and use the ROOF KEY on the lock at the top of the panel.
- This will take you to the roof.
- Exit the elevator.
- Pinned to the wall on the left is a note about Mr. Brown (S).
- You can also see a view of the city from the hole to the right.
- Enter the Hidden Object Scene at the far corner of the roof (T).
- Collect all the items in the scene.
- The REMOTE CONTROL will be added to inventory.
- Return to the first floor.
- Go to the computer on the right and use the REMOTE CONTROL on the screen.
- Use the DISK on the remote control to activate the mini-game.
- To finish this mini game you must get both keys to the locks using the control pad's up, down, left and right buttons.
- Both keys will move at the same time, but if one is against the wall it will not move and the other key will.
- If either key hits a skull or goes off the edge the puzzle will reset.
- Follow the instructions on the screenshot for one possible solution. There are many possible solutions.
- Press the arrows at the bottom of the screenshot in the same exact order as given.
- After finishing the puzzle you can exit through the door that was previously locked.
- Take the CANDLE beside the posters.
- You will need something to break the TV to get another candle.
- There are some numbers on the signs at the top that may help later.
- The phone booth is locked and you can't access it.
- Enter the Hidden Object Scene near the tire.
- Collect all the items in the scene.
- Use the lipstick circled in green on the mask's lips to collect the RED LIPS.
- The KEY will be added to inventory.
- In the previous scene use the KEY on the lock to access the payphone.
- Click on the payphone and use the COIN on it.
- Enter the correct sequence of numbers to finish this mini-game. The 4 numbers are given on the signs in the main scene.
- When you enter a number in the correct position it will be written in red on the phone. If the number is wrong or in the wrong position a dot will be written instead.
- You can easily check for the correct position by pressing the same button 4 times.
- Enter the correct sequence 3128 and click on the secret entrance that appears.
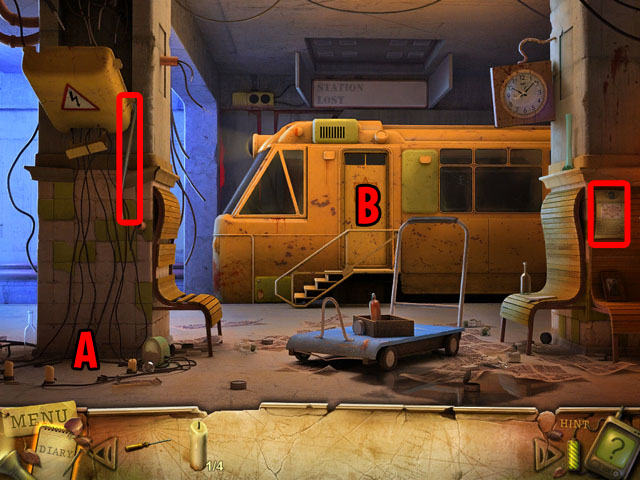
- Take the CROWBAR marked in red and read the note at the right side of the screen.
- The circle of candles (A) cannot be completed yet.
- The door to the train (B) will not open without power.
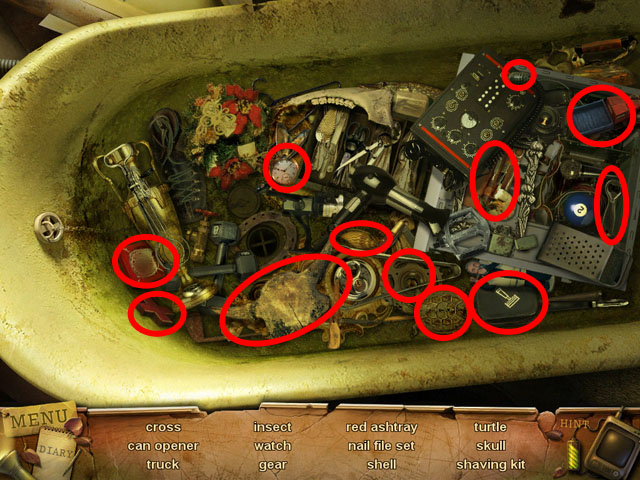
- Return to the previous scene and enter the Hidden Object Scene in the bathtub.
- Collect the items in the scene to receive a CROSS.
- Zoom into the TV and hit it with the CROWBAR 3 times to break it.
- Take the CANDLE from inside the broken TV.
- Return to the elevator and go to the 4th floor.
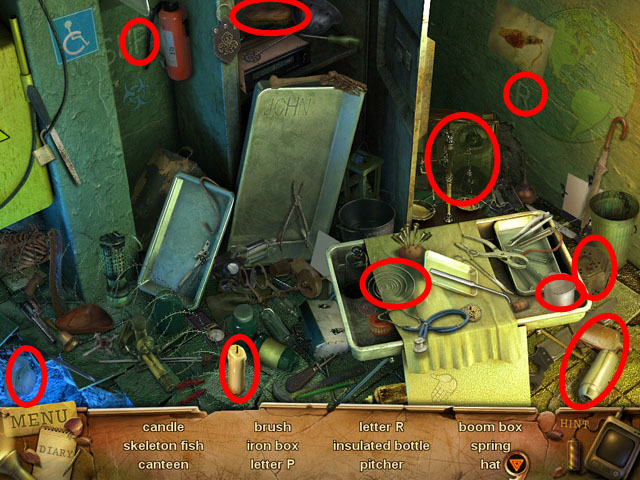
- In the room where you found the man that new the antidote there is a new Hidden Object Scene.
- Collect all the items in the scene to receive a CANDLE.
- Use the CROSS on the first aid kit in the main scene.
- When it opens collect the CANDLE and the MAP piece.
- Return to the 1st floor and go through the secret entrance behind the phone booth again.
- Enter the circle of candles.
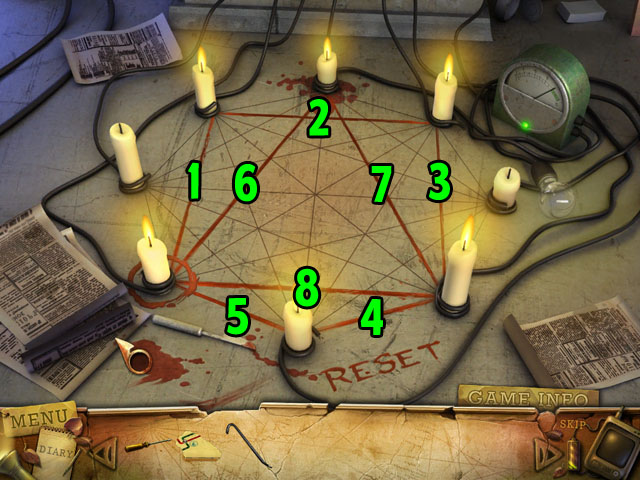
- Start the mini-game by clicking on one candle and then another to draw a line between them.
- To draw the next line, just click on another candle. After the first line, all of the lines must be connected.
- You cannot draw a line between two candles that already have a line.
- The answer to this puzzle is on the door to the train. Draw that symbol to continue.
- Follow the instructions in the screenshot to draw the symbol. This is one possible way of many.
- Enter the train.
Chapter 3: The Water System
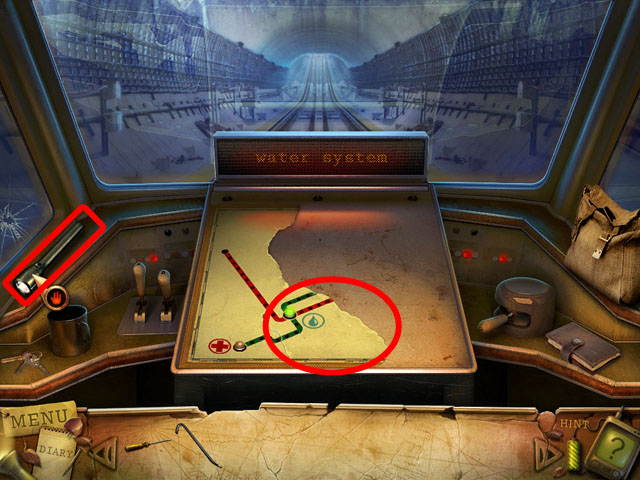
- Once inside the train use the MAP on the ripped map in the middle of the screen and click the piece you laid down to travel to that area.
- Click on the FLASHLIGHT on the left to add it to your inventory.
- Exit the train from the bottom of the screen.
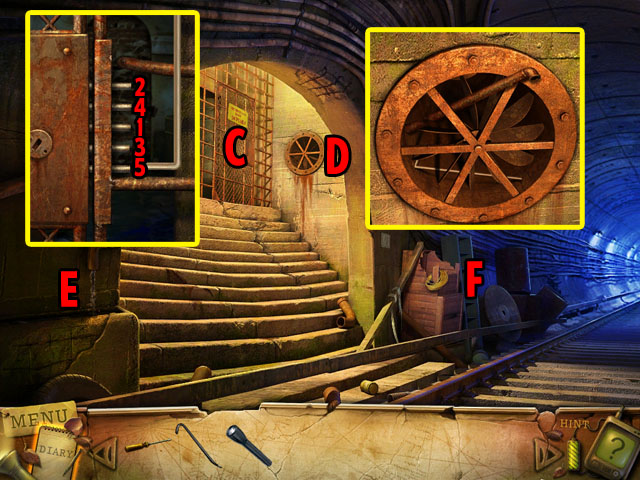
- There is a door at the top of the stairs which requires the use of a lock pick (C).
- There is a lock pick stuck in the fan to the right of the door (D), but you cannot get it yet.
- There is water flowing from a pipe to the left (E), but you need a bucket to collect it.
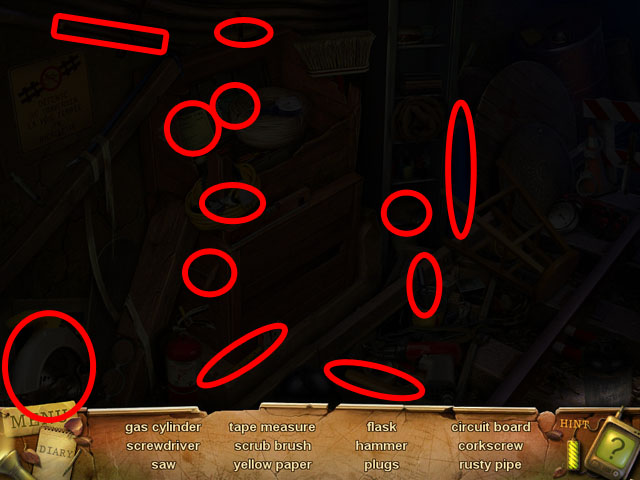
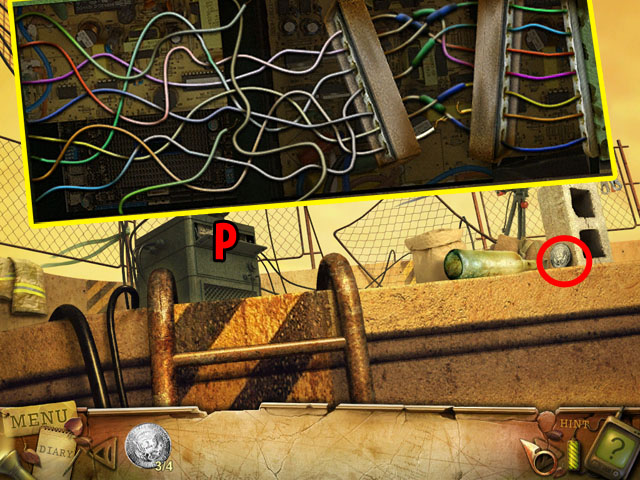
- Use the FLASHLIGHT on the area to the right (F) to enter the next Hidden Object Scene.
- Collect all the items in the scene to receive a PIPE.
- Use the PIPE on the fan to stop it (D) and then collect the LOCK PICK.
- Use the LOCK PICK on the door at the top of the stairs (C).
- Punch the hammers of the lock in the correct order to open the door. If you click one in the wrong order, everything will reset.
- Numbered from the top, the correct order is 3, 1, 4, 2, and then 5.
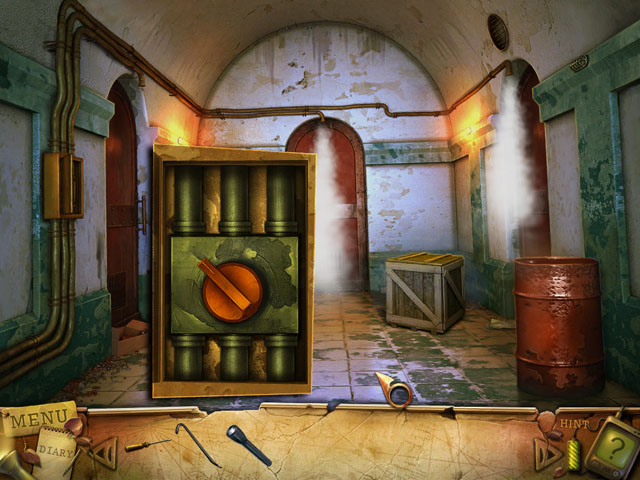
- Go through the open door. In the next scene go through the door on the right.
- This room is blocked by steam to the left and the right.
- Click on the control panel to the left and set the dial to the left.
- This will stop the steam from spraying the left door.
- Go through the left door.
- Take the BUCKET in the corner circled in red.
- Use the CROWBAR on the 3 boards blocking the right door (G).
- Go through the right door once it has been opened.
- In this scene there are locks on all the doors and a barrel with a key in it, marked in red (H).
- Go back to the first scene and use the BUCKET on the water pipe to collect some WATER.
- Take the BUCKET FULL OF WATER.
- Come back to the room with the locked doors and use the WATER on the barrel.
- Collect the KEY attached to the bobber in the barrel.
- Go through the door and watch the cut scene.
- Take the MORGUE KEY from your friend Vann.
- Take the train back to the clinic and go to the elevator.
- On your way back to the elevator, enter the Hidden Object Scene in the lobby.
- Collect all the items in the scene to receive a BLOW TORCH.
- Use the MORGUE KEY on the keyhole below the 1st floor button.
- Click the key to go to the morgue and exit the elevator.
- Use the BLOW TORCH 4 times on the frozen drawer marked in green.
- Take the MAP PIECE from inside the drawer once you open it.
- Take the FIRST AID KIT circled in red.

- Go back to the 1st floor and out to the train.
- Use the MAP PIECE on the map, and then go to the water system to meet Vann again.
- Use the FIRST AID KIT on Vann.
- Return to the train and click on the 3rd part of the map to go to the Mansion and search for more antidote ingredients.
- Exit the train and enter the Hidden Object Scene to the left.
- Collect all of the hidden objects in the scene to receive a CLOCK KEY.
- Travel up the escalator and then go inside the mansion from the first chapter.
- Click on the table to play the Hidden Object Scene.
- Collect all the items in the scene to receive some PAINT REMOVER.
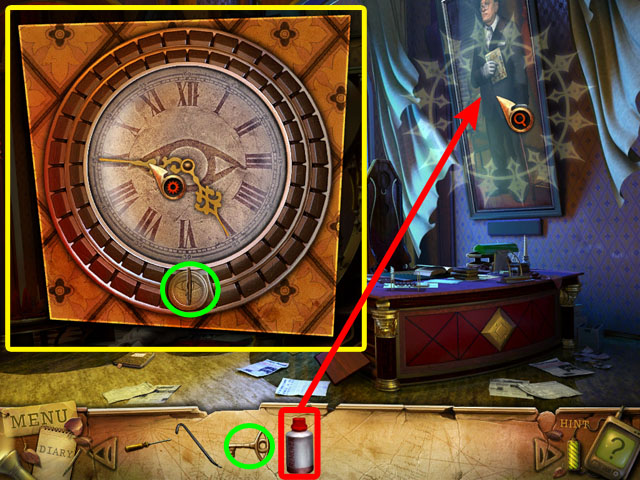
- Click on the clock in this room, on the side of the stairs and use the CLOCK KEY on it.
- Go into the room above the stairs, the study.
- Use the PAINT REMOVER on the painting to the right, which will reveal a clock.
- Set the clock downstairs to the same time as the clock in the painting: 5:45.
- Make sure to put the hands directly on the numbers.
- Take the STRANGE KEY.
- Go through the door below the clock and through the room with the train cart.
- Use the STRANGE KEY on the door here and enter the secret laboratory.
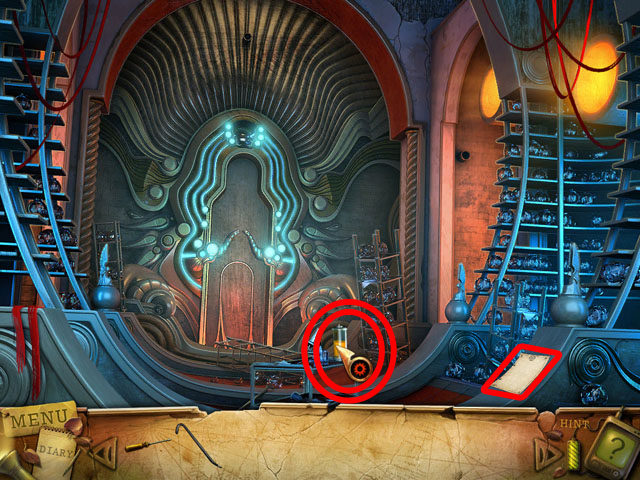
- Collect the ANITIDOTE circled in red.
- Read the note on the right.
- Go back to the train and click the second button to go to the water system stop.
- Enter the water system building and give the ANTIDOTE to Vann.
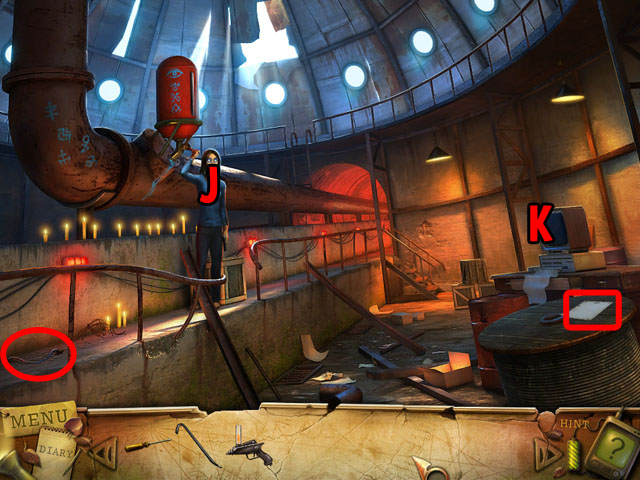
- Return to the last room in the water system building and use the SYRINGE GUN on your sister (J).
- Pick up the CORD circled in red on the left.
- Read the note to the right.
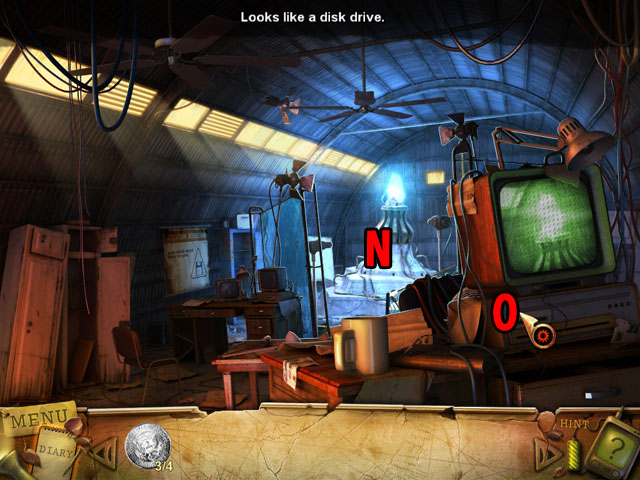
- Zoom into the computer in the back (K).
- Use the CORD on the plug below the monitor. It will print out another piece of the train map. Take the MAP PIECE.
- Travel back to the train and use the last MAP PIECE on the map to complete it.
- Click the button to go to the Airport.
- Exit the train.
Chapter 4: The Airport
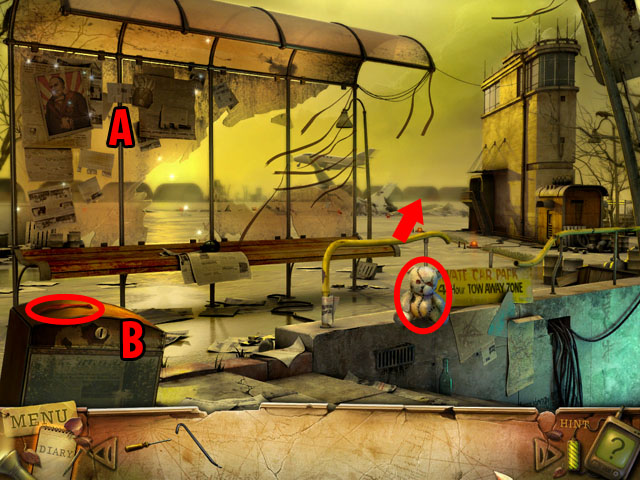
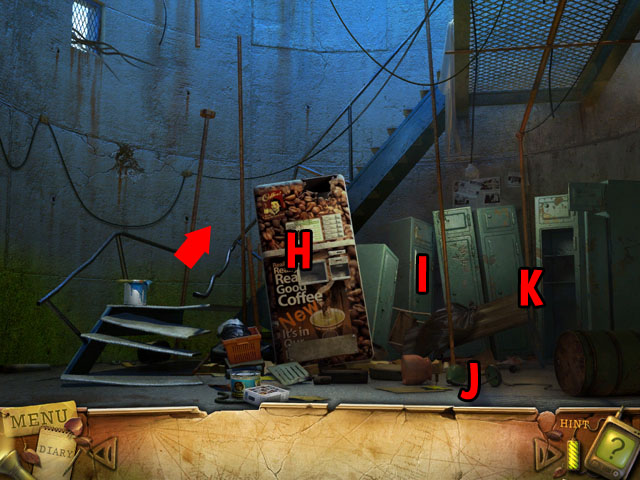
- Take the TEDDY BEAR and the BALLOON on top of the newspaper box (B).
- Click on the sparkling area (A) to start the next Hidden Object Scene.
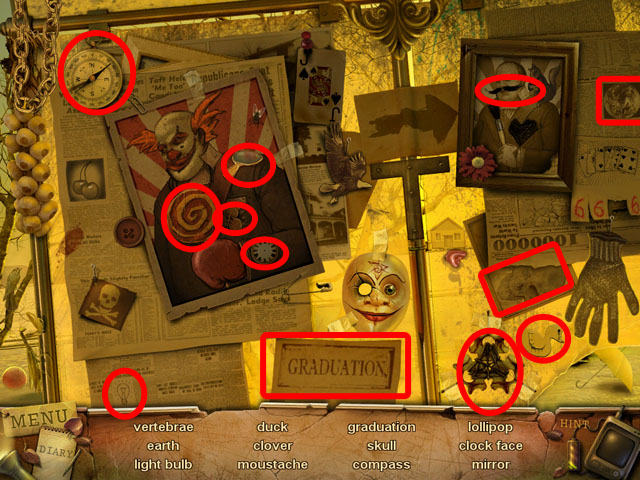
- Collect all the items in the scene to receive a MIRROR.
- Exit the scene to the top right to enter the airport.
- There are two exits in this area, one towards the building in the center, and one to the left.
- There is also a power box that you can open (C), but while the power is working you cannot touch the wires inside.
- The off switch for the power box is in the door to the left of it, but the switch itself is missing.
- Go to the left, to the air strip.
- Use your CROWBAR on the top of the box to the right and take out the OIL CAN.
- Inspect the broken light at the bottom of the screen.
- Use the SCREWDRIVER to remove the screw and take off the light cover. You will need some sort of glove to get the light bulb, which you do not have at this point.
- Going to the right will take you back to the air port, while going up will take you to the hanger.
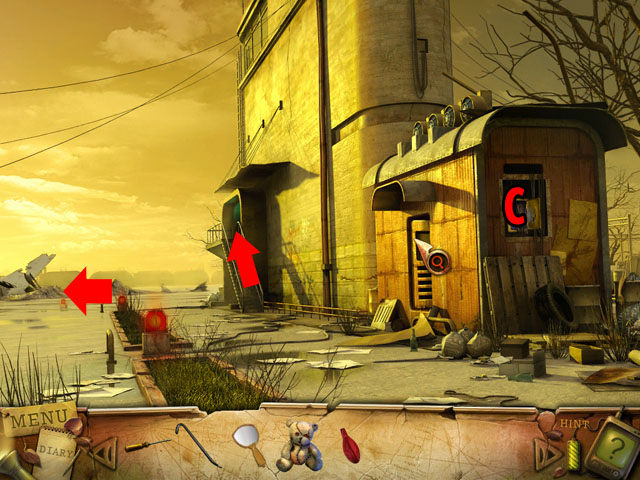
- Go up to the hanger.
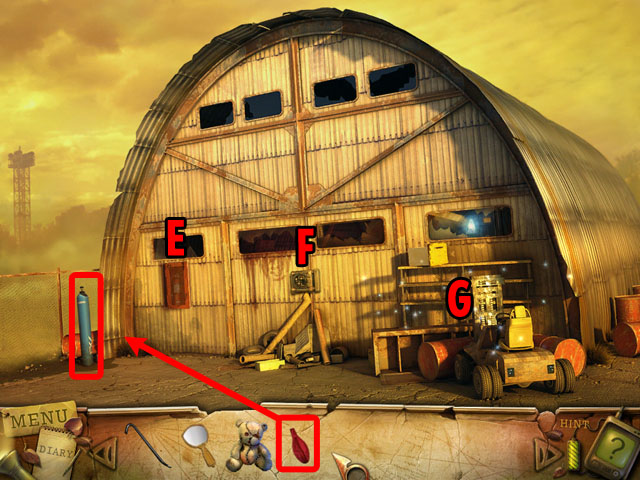
- Click on the gas tank marked in red.
- Use the BALLOON on the nozzle to the tank and then click on the knob at the top to fill it up.
- Take the HEART-SHAPED BALLOON.
- There is a fire extinguisher on the side of the hanger (E); use the OIL CAN on the peg at the top of the case.
- Open the case and take the FIRE EXTINGUISHER.
- There is a strange lock in the middle of the door (F) that is missing a skull piece.
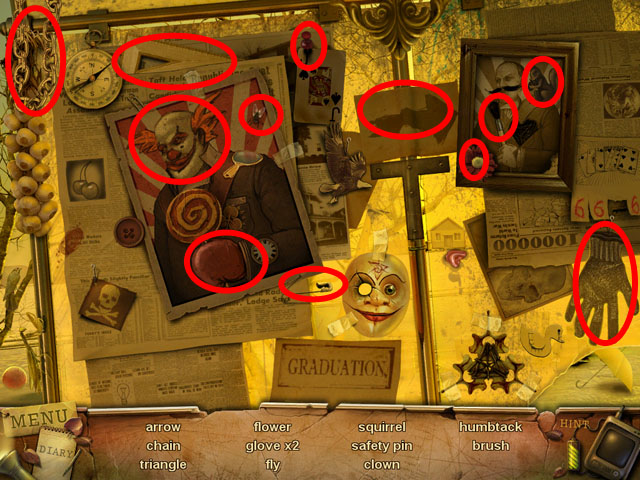
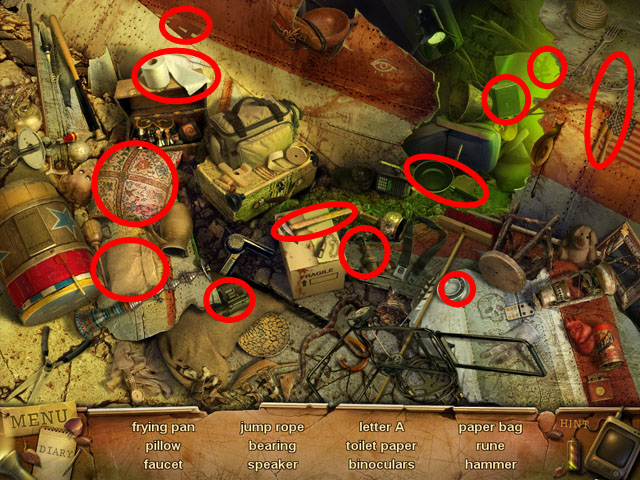
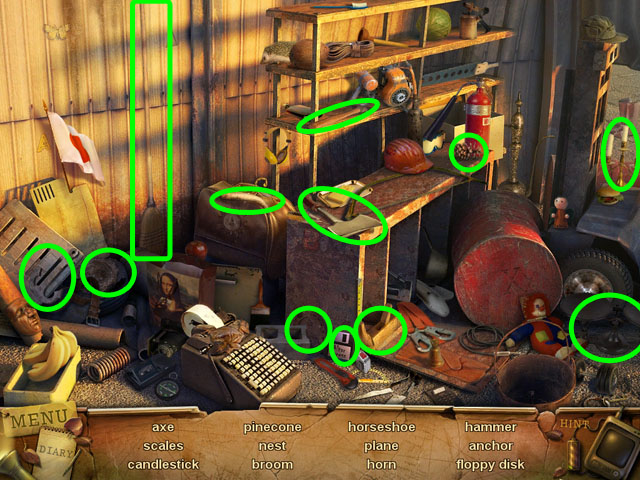
- Enter the Hidden Object Scene on the right (G).
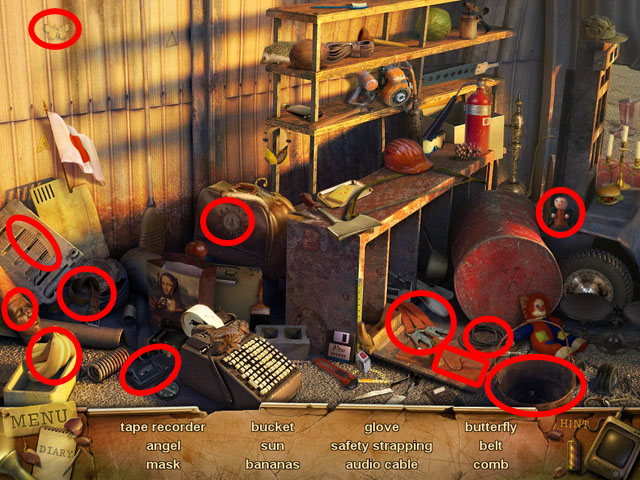
- Collect all of the hidden objects in the scene.
- The COMB will be added to inventory.
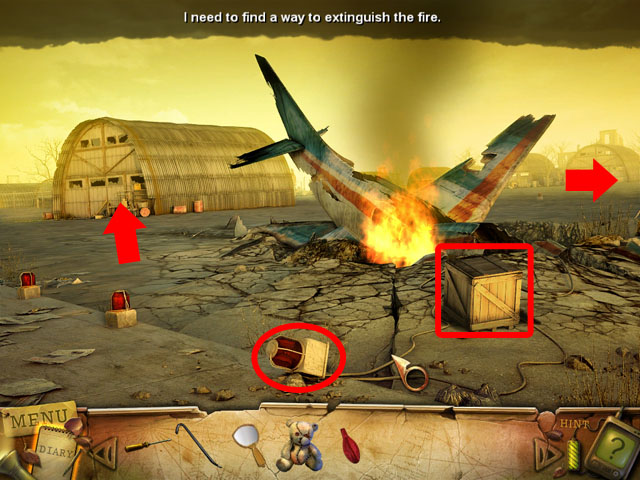
- Return to the scene with the burning plane.
- Use the FIRE EXTINGUISHER on the plane.
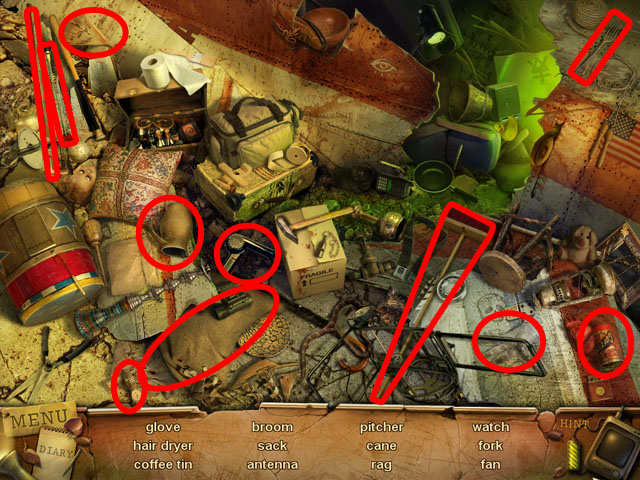
- Enter the Hidden Object Scene that appears.
- Collect all of the hidden objects in the scene and you will receive a FAN in your inventory.
- Return to the airport scene by clicking to the right.
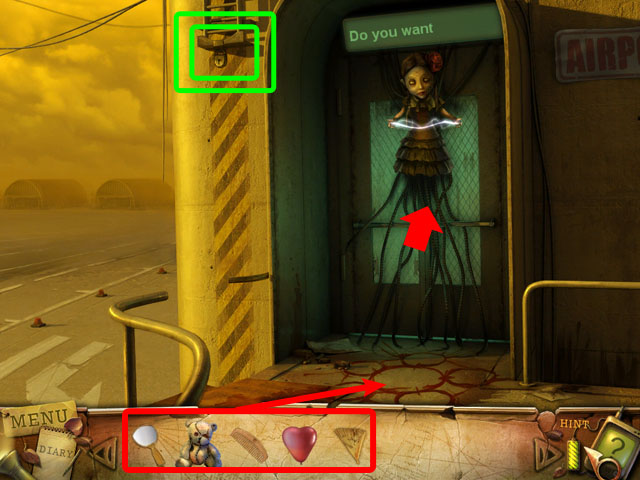
- Click towards the building and see the strange doll attached to the door.
- There is a ladder marked in green that you cannot get to yet in this location.
- Place all of your inventory items – the MIRROR, BEAR, COMB, BALLOON, and FAN – on the doll and they will be placed in front of her.
- After placing them all, the doll will disappear.
- Enter the building.
- There is a soda machine (H) in the middle of this room that only carries acid. You need a coin to buy some.
- You cannot get into the lockers (I and K) until the room is a little brighter.
- There is a lamp on the floor missing a light bulb (J).
- Go up the stairs.
- Take the SWITCH circled in red.
- Open the drawer next to the switch (M). There is a piggy bank inside.
- Click on the computer screen (L) and take the small KEY.
- Return outside and enter to door beside the power box.
- Use the SWITCH on the power switch and pull it to shut off the power.
- Go to the power box and open to door to find another COIN in the wires.
- Go down to the first scene with the bus stop.
- Use the KEY on the newspaper box and take another COIN.
- Enter the Hidden Object Scene.
- Collect all of the hidden objects in the scene and you will receive a GLOVE in your inventory.
- Return to the crashed plane and enter that Hidden Object Scene.
- Collect all of the hidden objects in the scene and you will receive a HAMMER in your inventory.
- After finishing the Hidden Object Scene, inspect the light again.
- Now you can use the GLOVE to take the LIGHT BULB.
- Return inside the airport building and use the LIGHT BULB on the lamp.
- You can now see the locker but you still need a key to open it.
- Enter the Hidden Object Scene to the right of the locker.
- Collect all of the hidden objects in the scene and you will receive a SKULL in your inventory.
- Go to the top of the building and smash the piggy bank with the HAMMER.
- Collect the COIN.
- Exit the building and go across the air strip to the hanger.
- Use the skull on the strange lock on the door.
- A puzzle will appear behind the lock, click the puzzle to start it.
- The object of this puzzle is to get the 4 pieces on the sides away from the pins.
- Once all the pins are not being pressed in by any pieces, you will have solved the puzzle.
- When you click a puzzle it will slide lengthwise until it hits another piece or the wall. You can slide it back to the original position by clicking again.
- Follow the steps in the screenshot to complete the puzzle.
- In each step click the highlighted pieces once. Make sure that the piece is able to slide before you click it, for some pieces the order doesn't matter.
- See the completed state in part 6 of the screenshot.
- After you are finished you will enter the hangar.
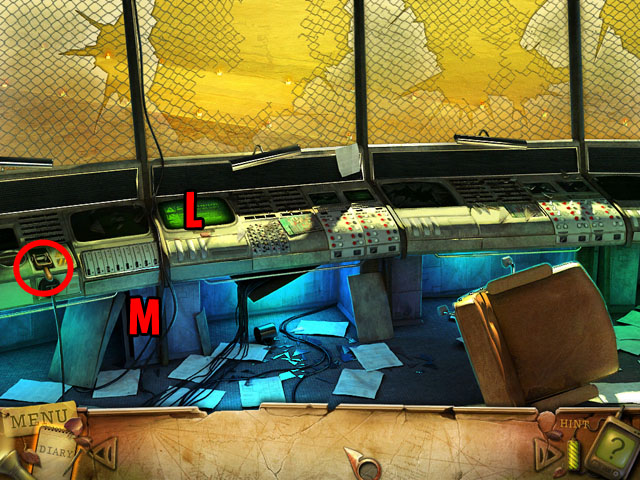
- There is a computer to the right (O) that can read a floppy disk.
- Click on the altar with the glowing crystal (N). You do not have the code that you need for this area yet.
- Exit the hanger and enter the Hidden Object Scene on the right.
- Collect all of the hidden objects in the scene and you will receive a FLOPPY DISK in your inventory.
- Go back inside the hangar.
- Use the FLOPPY DISK on the computer drive.
- Click on the paper that is printed out. It will show you the code that you need: 739.
- Go to the altar and enter the code.
- Click on the disc that pops up to start the next puzzle.
- The goal in this puzzle is to switch the places of the brown squares and the blue squares.
- For the solution the two brown squares with the eyes on them will be at the bottom and the two blue squares will be at the top.
- The squares can only move like a knight does in a game of chess, in an “L” shape.
- The pieces can move either one space horizontally and then two spaces vertically – or the opposite. The game will highlight what moves are possible.
- You cannot directly switch the pieces, because only one piece can be in any space at one time.
- Because the board is symmetrical, whenever you move a piece, move the piece on the opposite corner in the same exact fashion. This way you only have to solve half of the puzzle and the other half will solve itself.
- See the screenshot for a detailed example of how to simply finish the puzzle. Start from the top left corner and read across and down the rows.
- The final answer is in the bottom right corner of the screenshot.
- Return to the airport and go inside the building.
- Enter the Hidden Object Scene by the lockers.
- Collect all of the hidden objects in the scene and you will receive a GUN in your inventory.
- Exit the building and use the GUN on the ladder to the left of the door.
- Climb the ladder.
- Click on the radar dish (P) and solve a quick wire puzzle.
- The wires on the left each have a color, but they fade away as they go towards the right side.
- Match the colors of the wires on the right side to the wires on the left side.
- To match the wire, first click one wire end and then another. If they are correct a green light will flash, if they are incorrect a red light will flash.
- Follow the screenshot for the correct answer.
- The top wire is red, then purple, green, light blue, blue, yellow and orange.
- Most of the wires are pointing in the direction they belong.
- Collect the last COIN circled in red.
- Climb down the ladder and enter the building.
- Use the 4 COINS on the vending machine and click the acid button to receive a bottle of ACID. Take it.
- Go to the top of the building and click on the computer console.
- Click the landing button to authorize a plane landing and see another cut scene.
- Exit the building a click on the new plane to the left of the ladder to the roof.
- Use the ACID on the door to open it.
- Enter the plane.
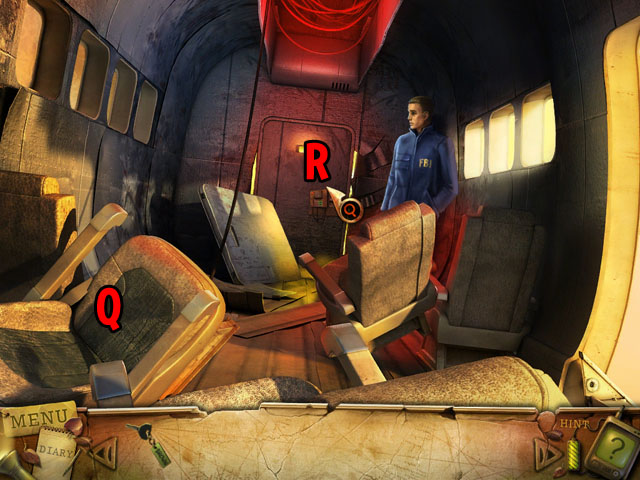
- When you first enter the plane the door to the cabin (R) will be locked.
- Enter the Hidden Object Scene to the left (Q).
- Collect all of the hidden objects in the scene.
- The LOCKER KEY will be added to inventory.
- Go back to the locker inside the building and use the LOCKER KEY to open it.
- Return to the plane and enter the Hidden Object Scene again.
- Collect all of the hidden objects in the scene and you will receive HANDCUFFS.
- Go to the door to the cabin (R) and use the FINGERPRINT on the green pad to open it.
- When the door opens place the HANDCUFFS on the doctor.
- Congratulations! You've just finished Dark Ritual!
Created at: 2011-04-26