

Walkthrough Menu
- General Tips
- Chapter 1: The Magical Key
- Chapter 2: The Ghostly Artifact
- Chapter 3: Enchanted
- Chapter 4: The Mirror Portal
- Chapter 5: The Secret Dungeons
- Chapter 6: The Ritual
General Tips
- This is the official guide for Dark Romance: A Performance to Die For.
- This guide won't tell you when to zoom into a location; the screenshots show each zoom scene.
- Hidden-object puzzles are referred to as HOPs. Only the locations of the HOPs will be shown.
- Use the Map to fast travel to a location.
Chapter 1: The Magical Key
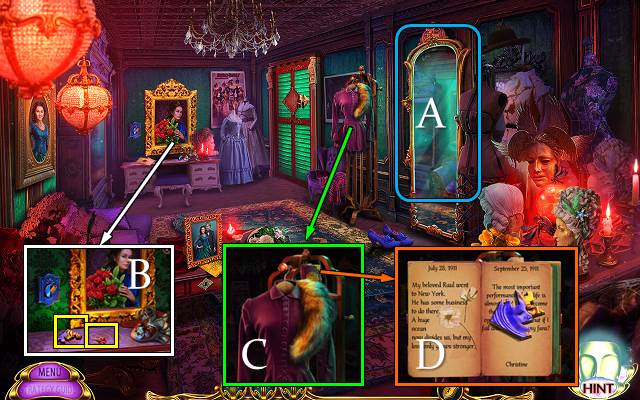
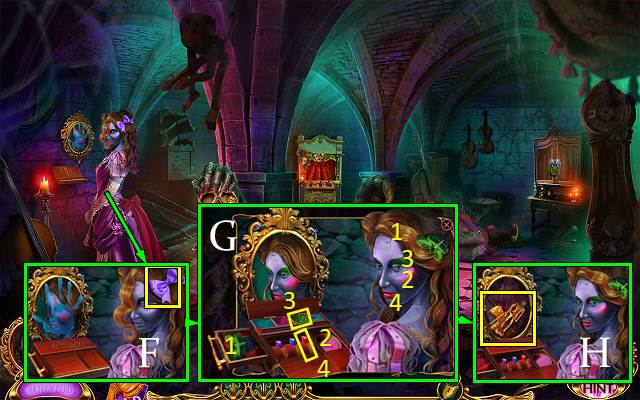
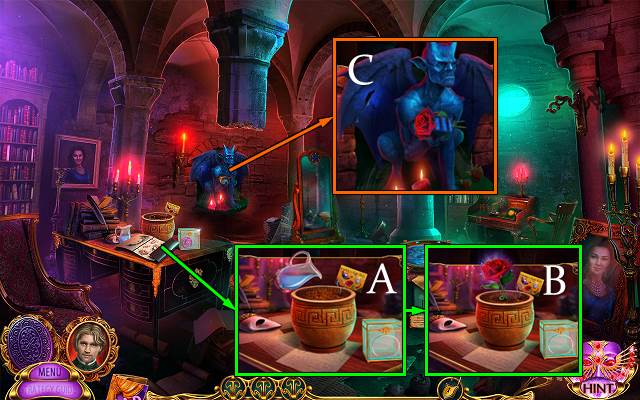
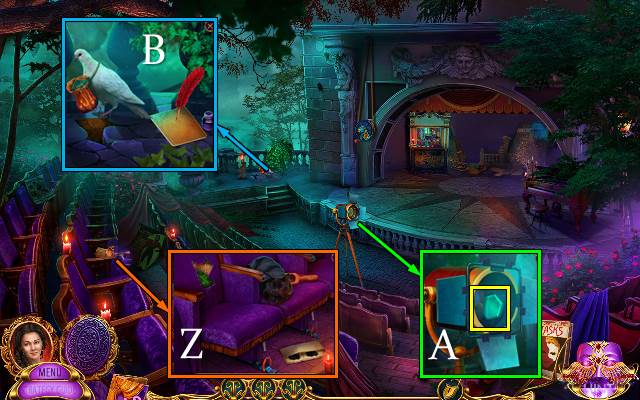
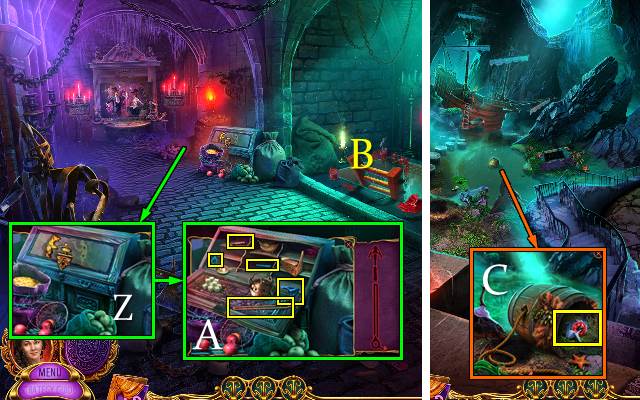
- Inspect (A).
- Take note, STUD EARRING and WARDROBE PIECE (B).
- Take FUR SCARF (C); open diary.
- Take WARDROBE PIECE (D).
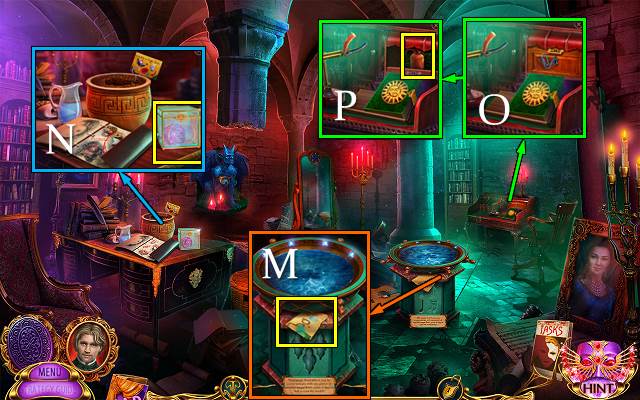
- Take HAIR PIN, hint mask, note and EMPTY JUG (E).
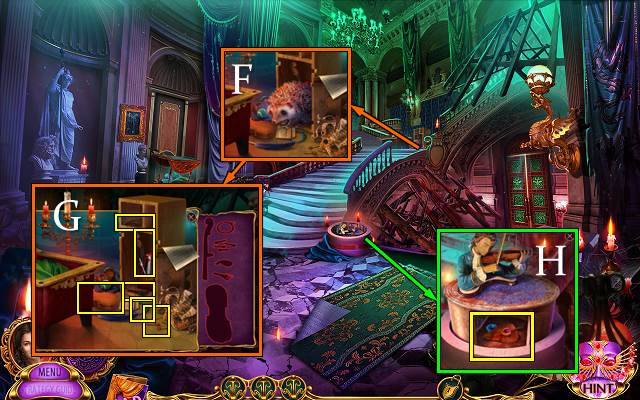
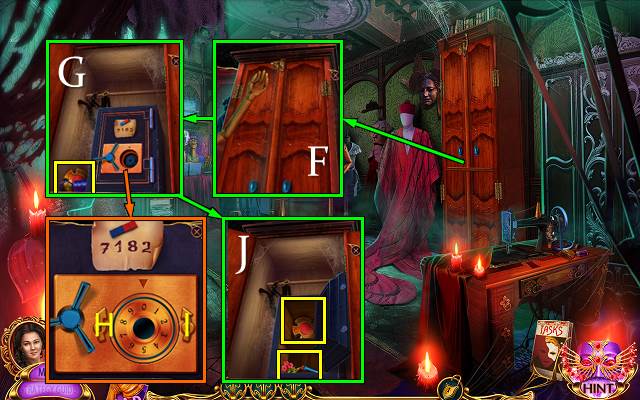
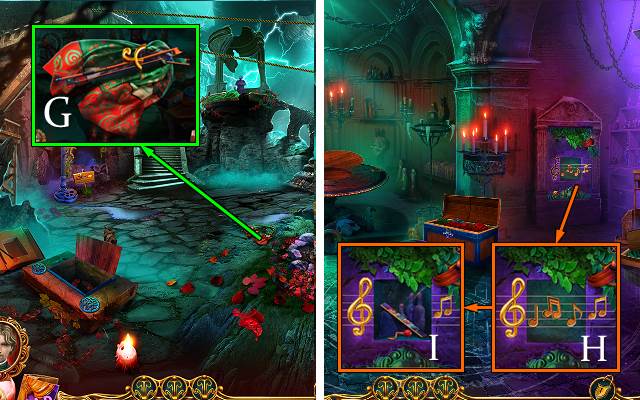
- Take note. Use HAIR PIN; take task book, WARDROBE PIECE and NUT (F).
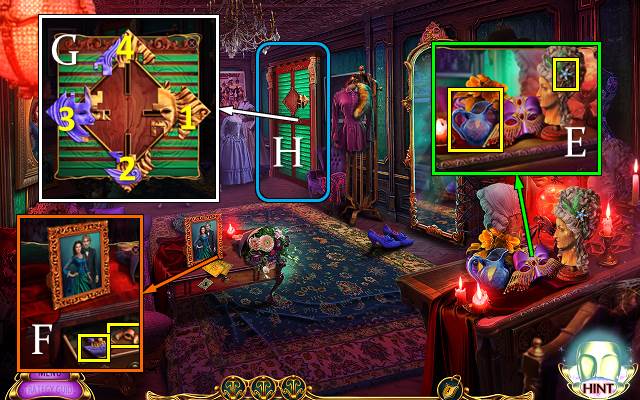
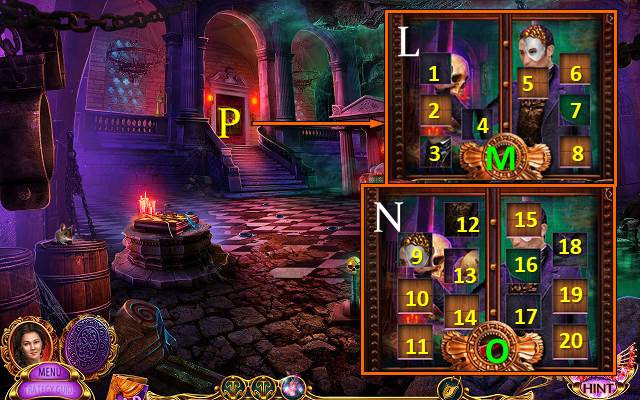
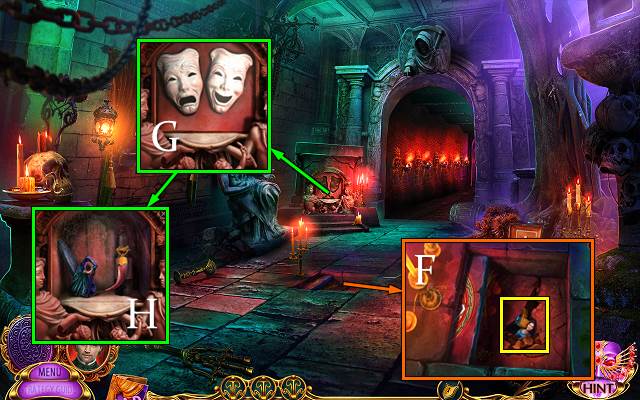
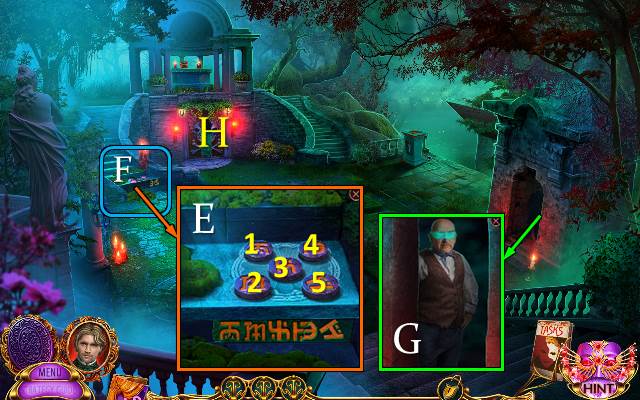
- Place WARDROBE PIECE x3 (G).
- Easy and hard solution: 1-2-3-4.
- Play HOP (H); receive POWDER CASE.
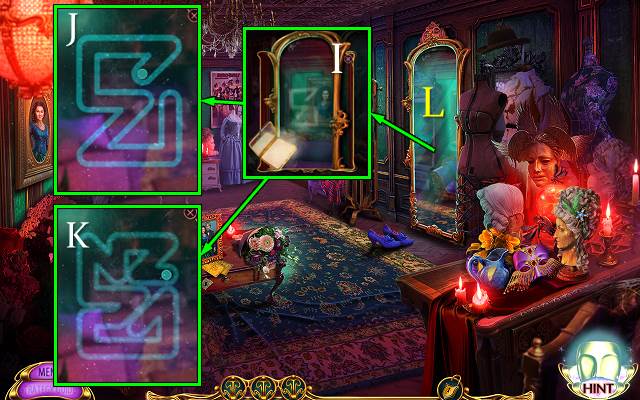
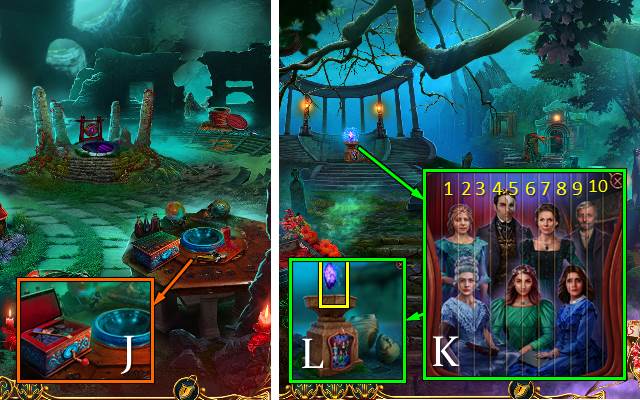
- Use POWDER CASE (I).
- Easy (J).
- Hard (K).
- Go (L).
- Receive CHRISTINE'S SEALED AMULET.
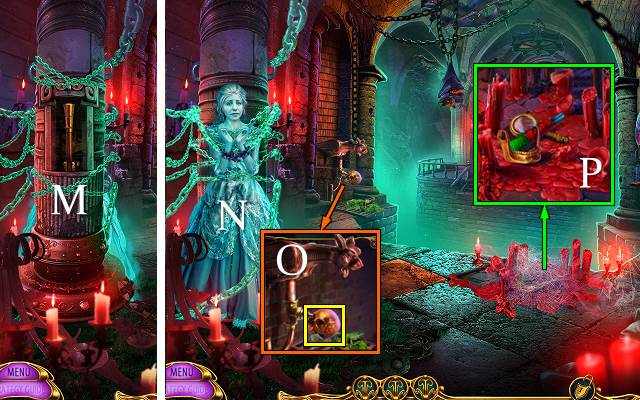
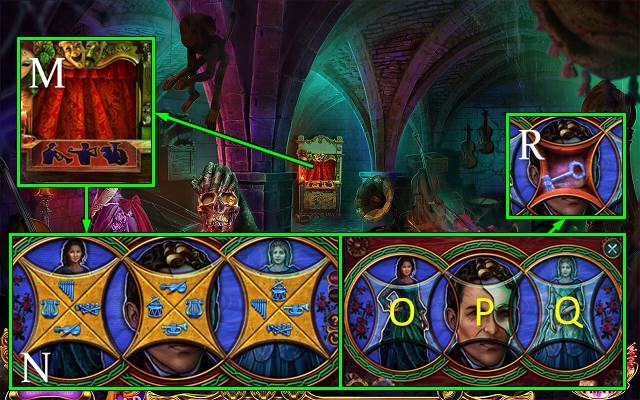
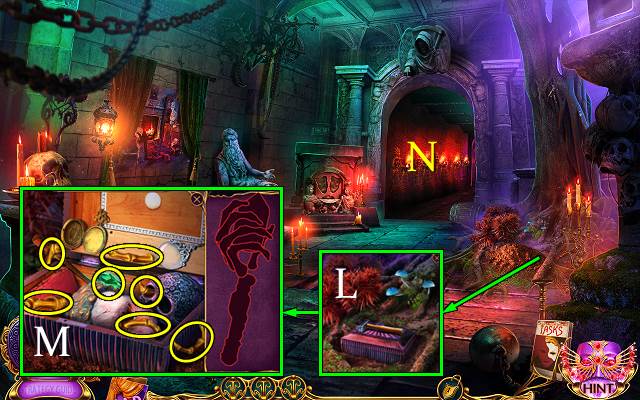
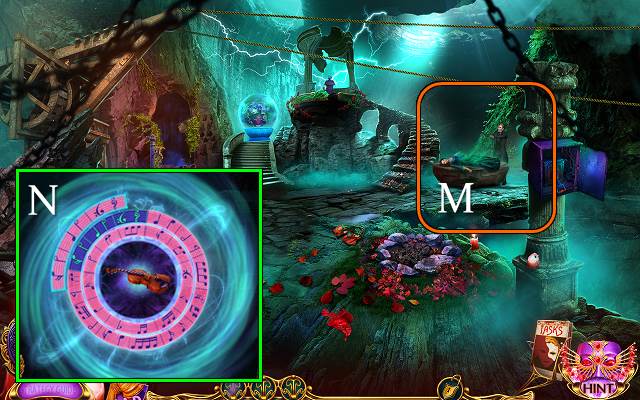
- Pull lever (M).
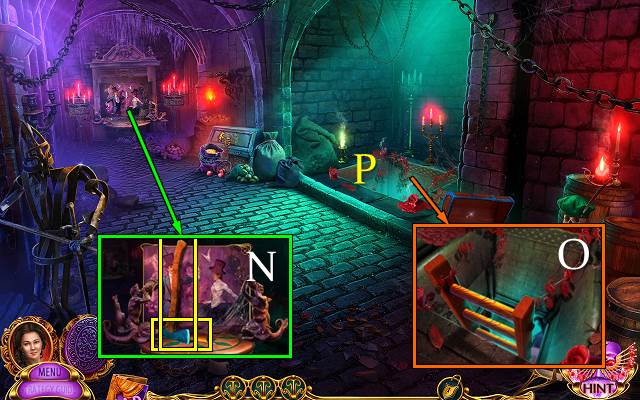
- Talk (N).
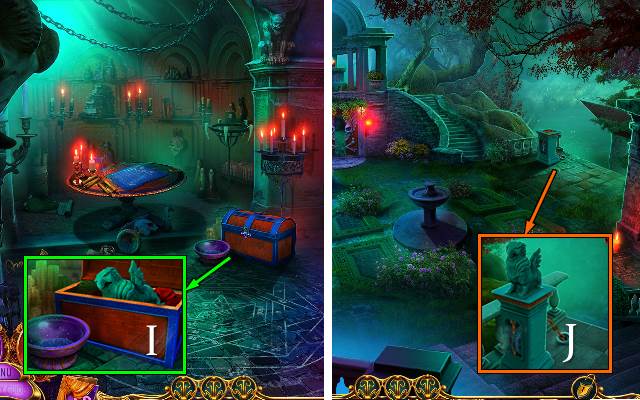
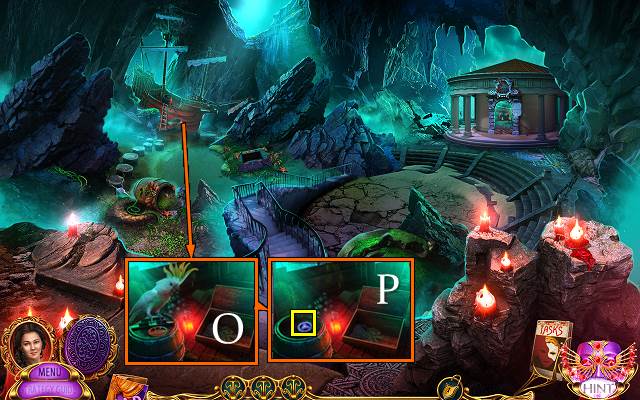
- Take BROKEN SKULL (O).
- Use FUR SCARF; take METAL JAW, LEVER and MAGNIFYING GLASS (P).

- METAL JAW and STUD EARRING on BROKEN SKULL; receive METAL SKULL.
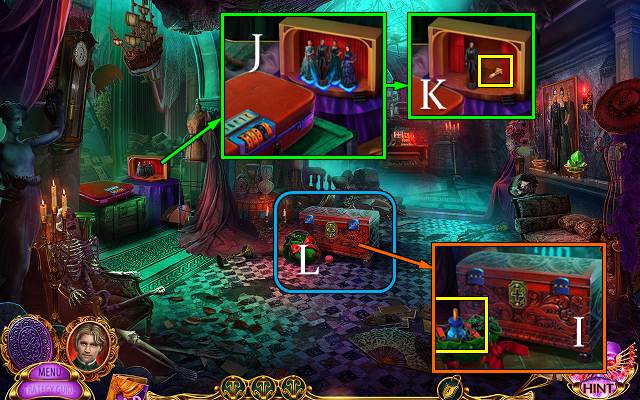
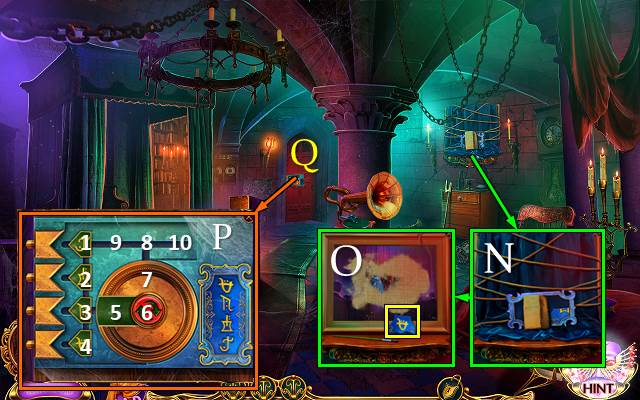
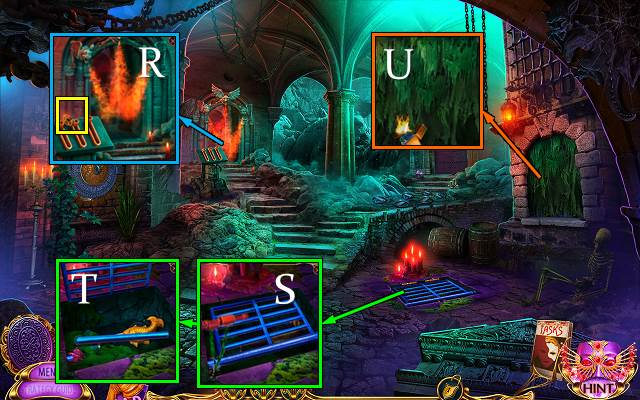
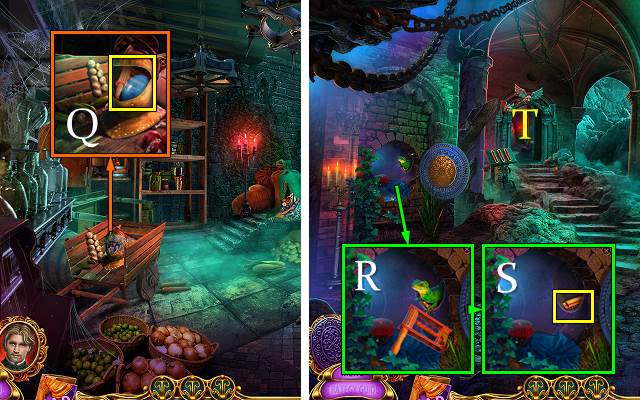
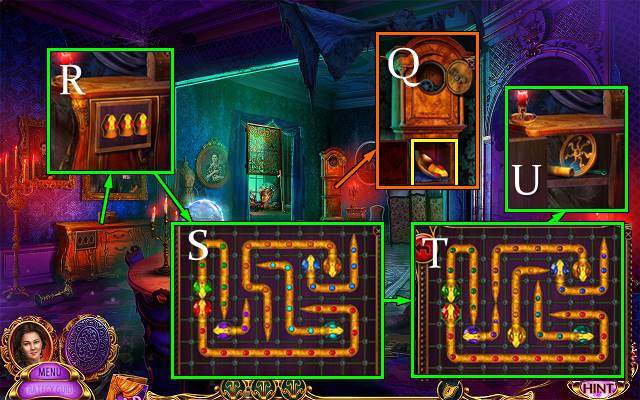
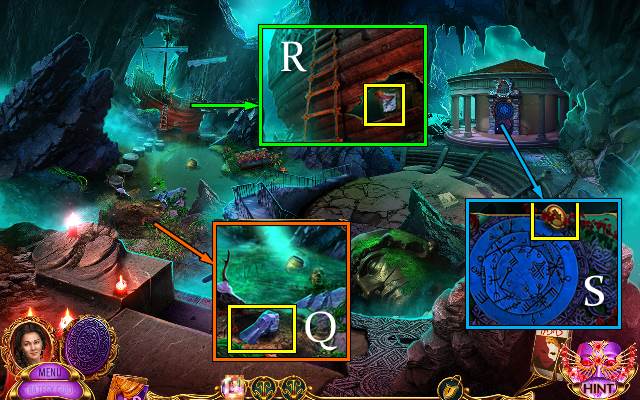
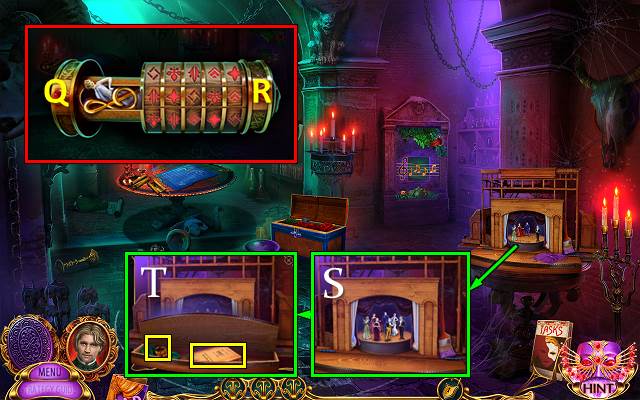
- Take map. Place METAL SKULL; take LANTERN, ROUND TILE and VALVE (Q).
- Place VALVE and NUT; take CENTRAL TILE (R).
- Place EMPTY JUG and take JUG OF WATER (S).
- Walk down.
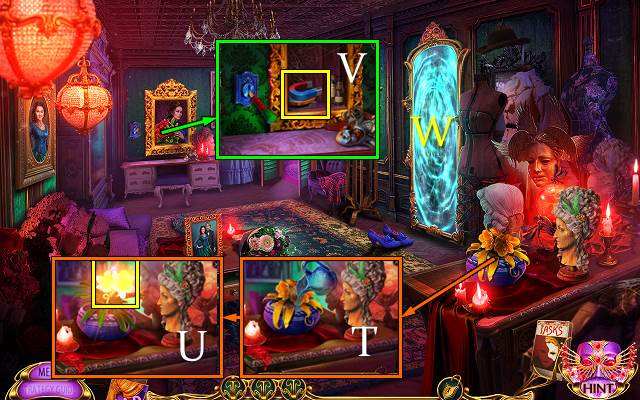
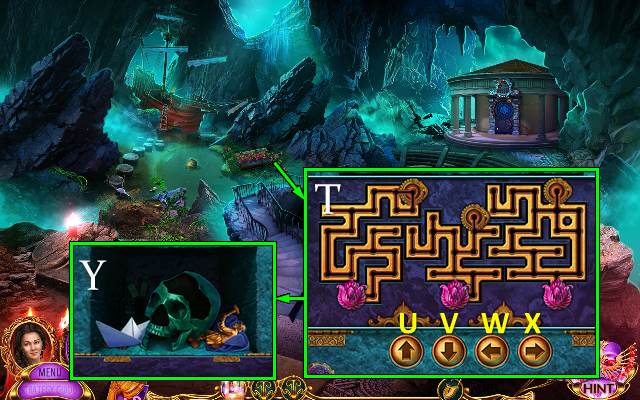
- Use JUG OF WATER (T).
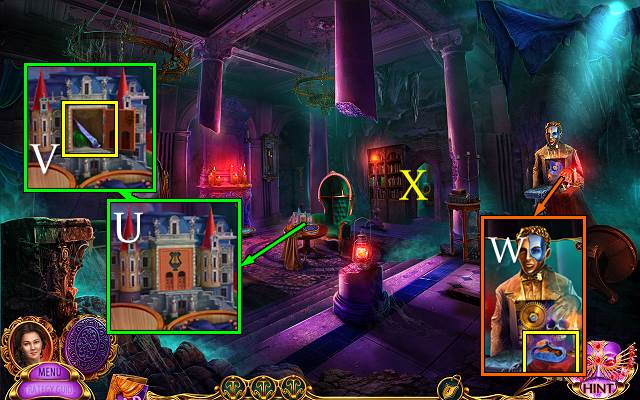
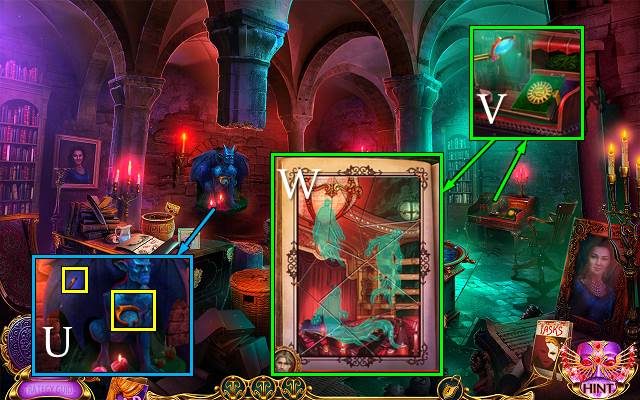
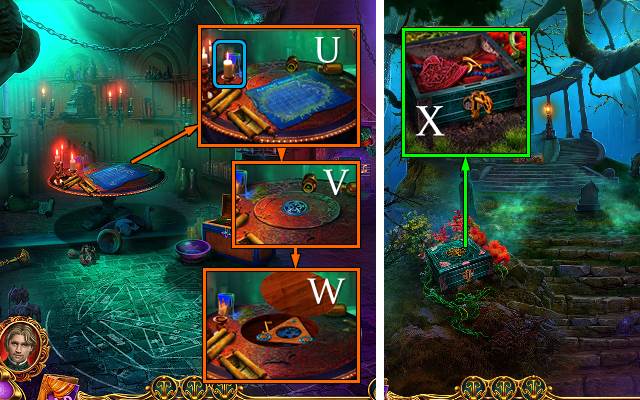
- Take GLOWING FLOWER (U).
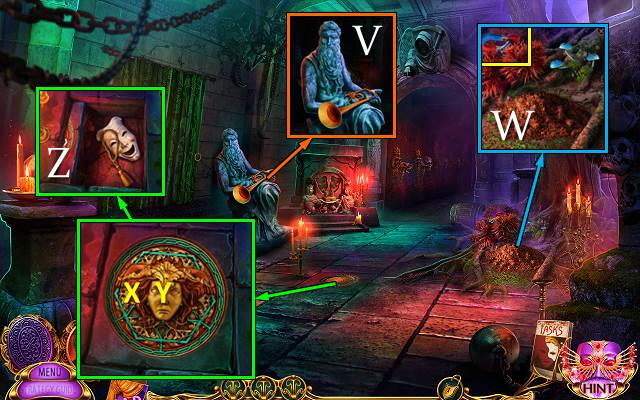
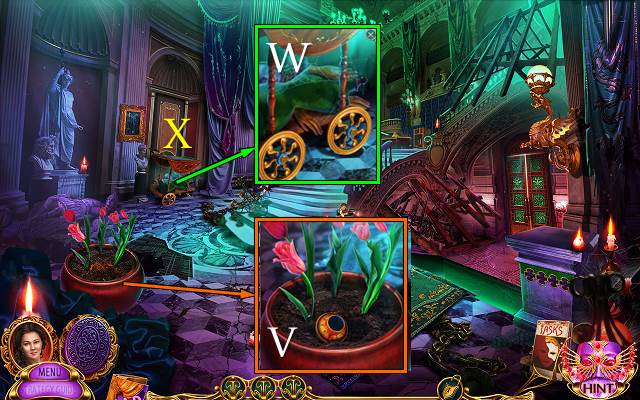
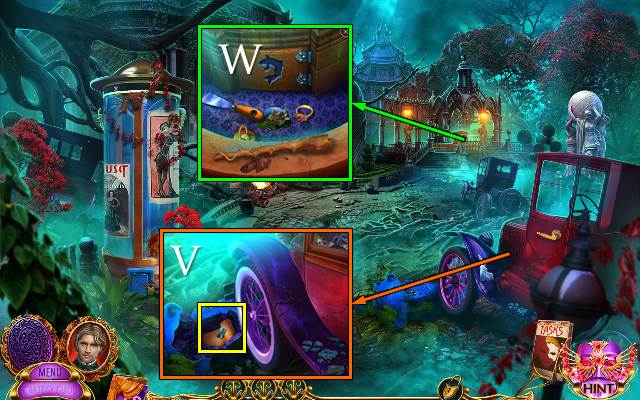
- Place LEVER; take MAGNET and MIRROR (V).
- Go (W).
- Replace GLOWING FLOWER and MIRROR inside LANTERN; receive LIT LANTERN.
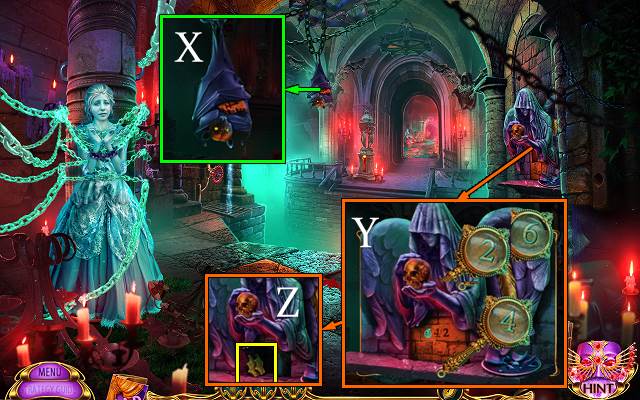
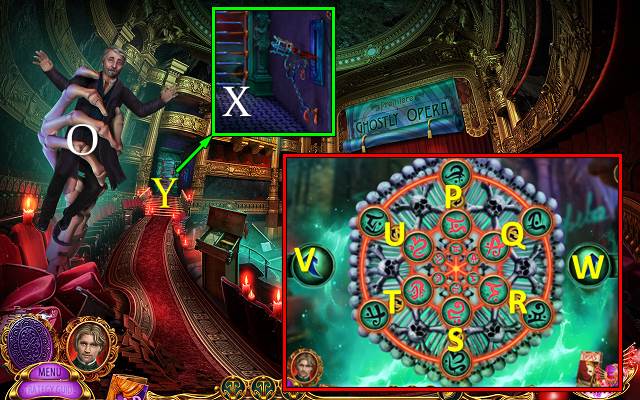
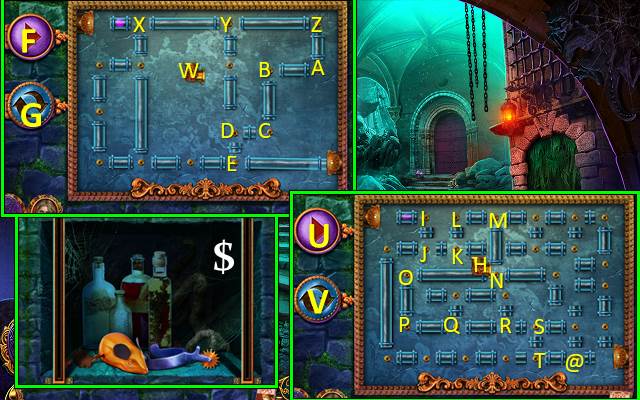
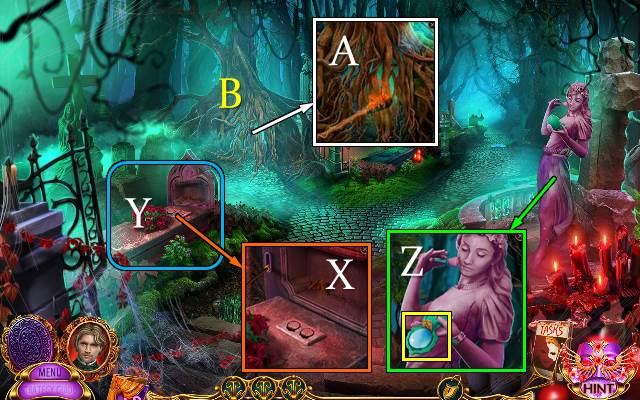
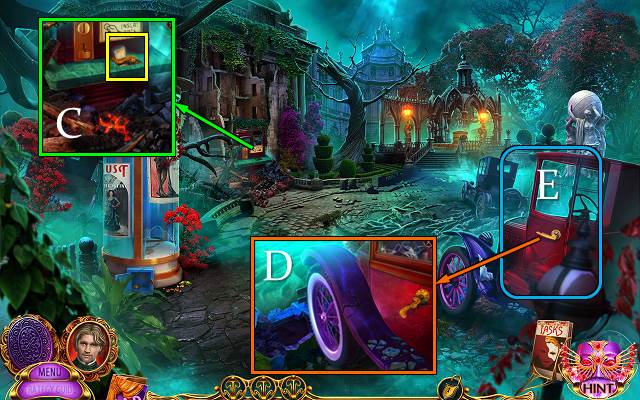
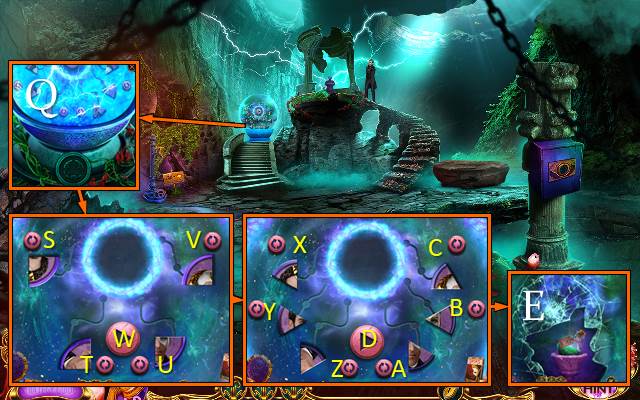
- Use LIT LANTERN; receive BRICK PIECE (X).
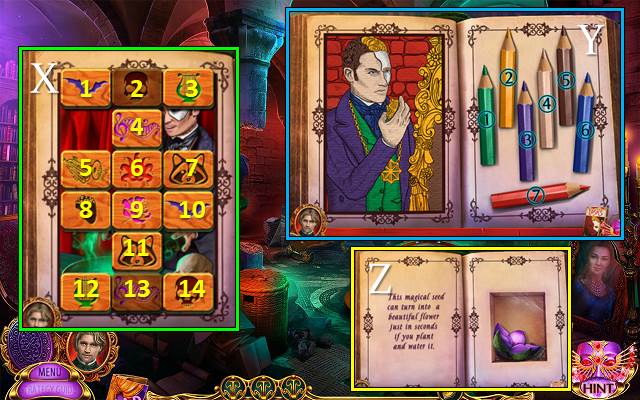
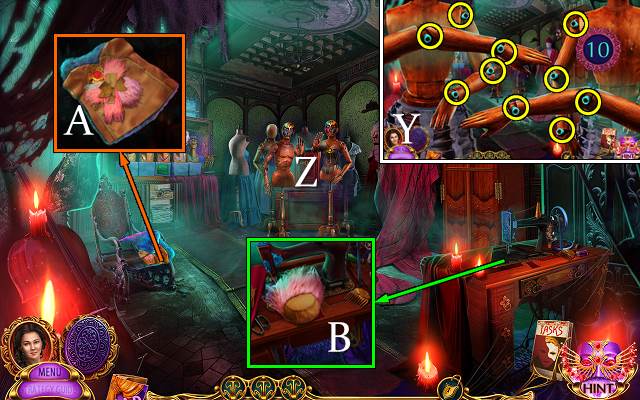
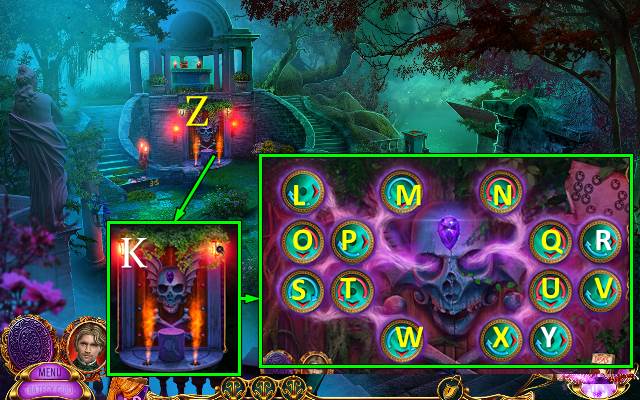
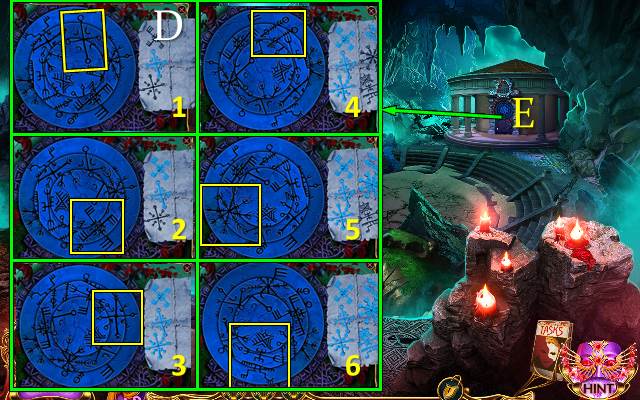
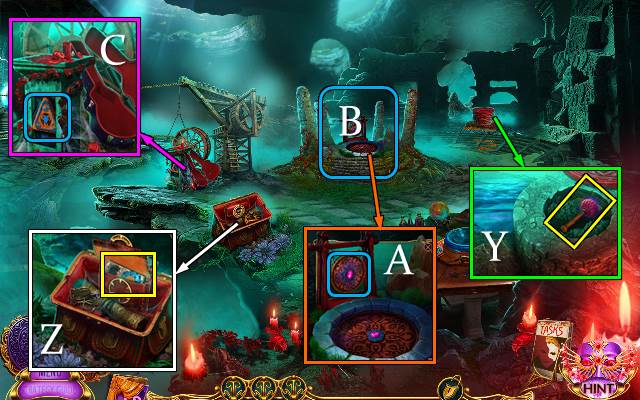
- Place BRICK PIECE. Place MAGNIFYING GLASS and find 6-4-2 (Y).
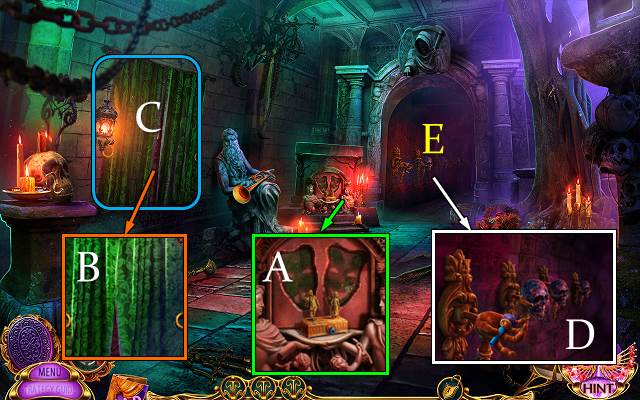
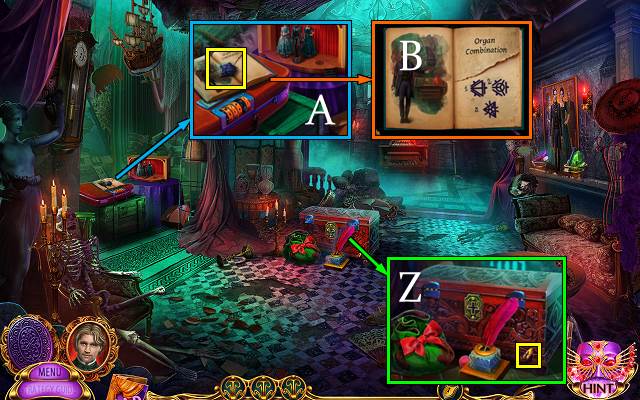
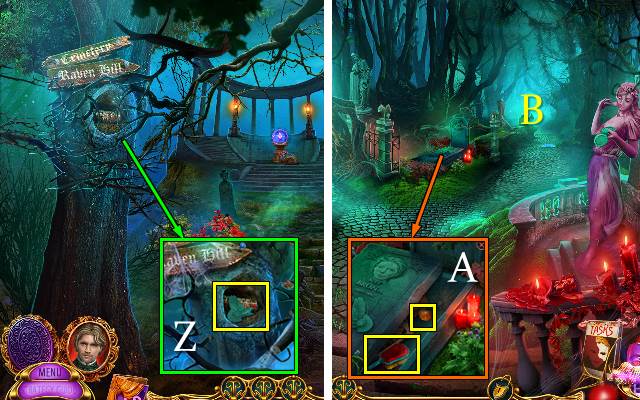
- Take BAT WINGS (Z).
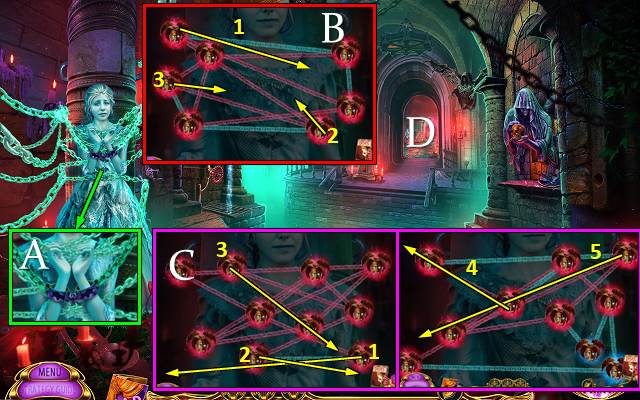
- Place BAT WINGS (A).
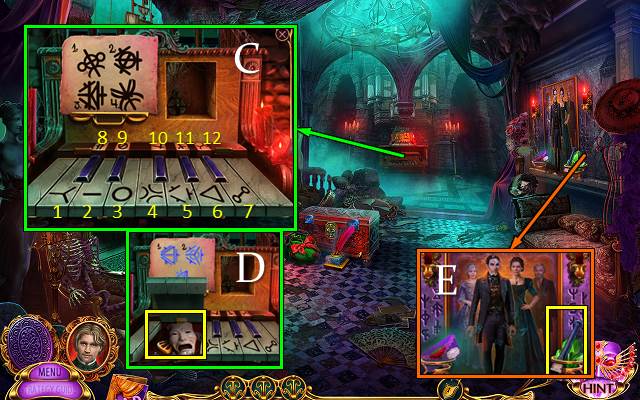
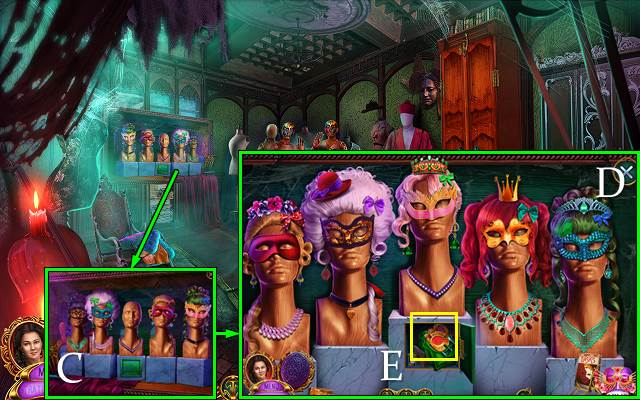
- Easy solution (B): 1-2-3.
- Hard solution (C): 1-2-3-4-5.
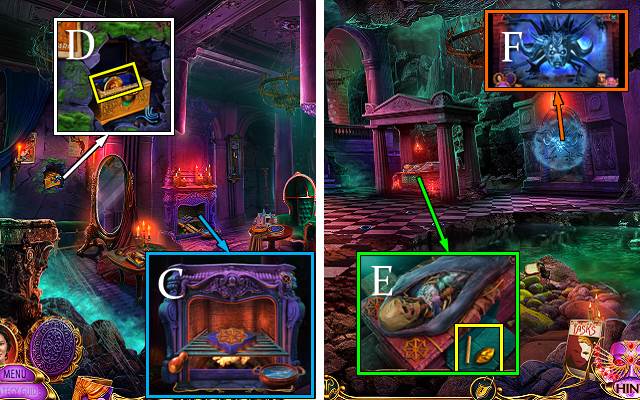
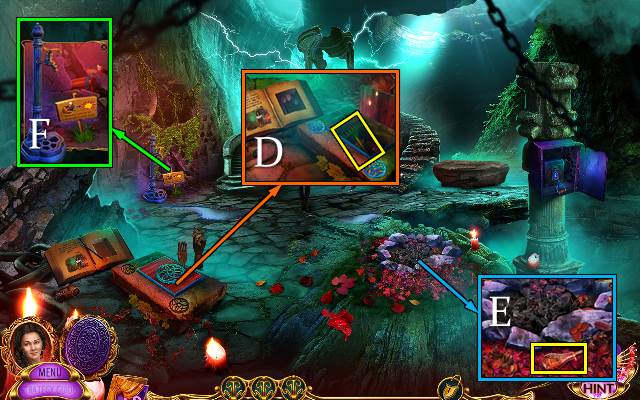
- Go (D).
- Receive NAIL FILE.
- NAIL FILE on CHRISTINE'S SEALED AMULET.
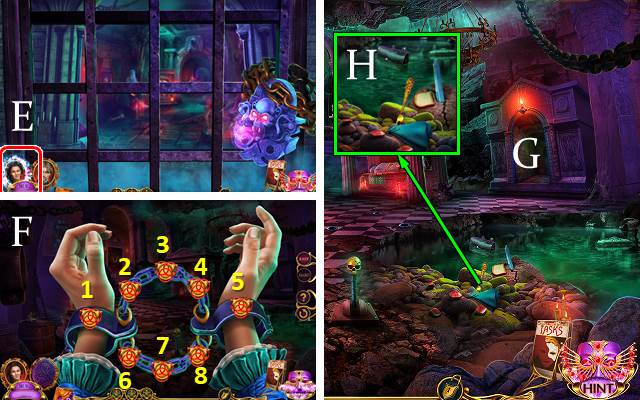
- Switch to Christine (E).
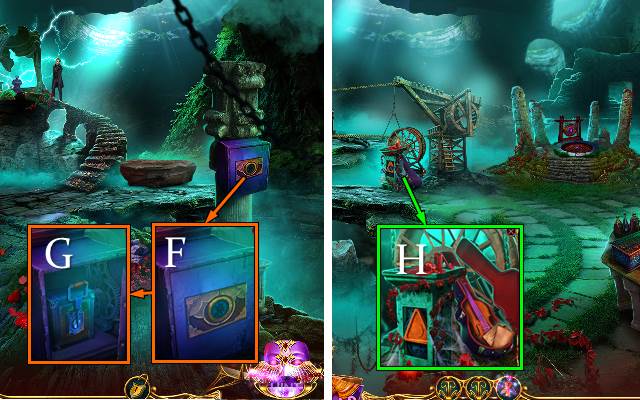
- Easy solution (F): 2-3-4-8.
- Hard solution (F): 8-4-3-7.
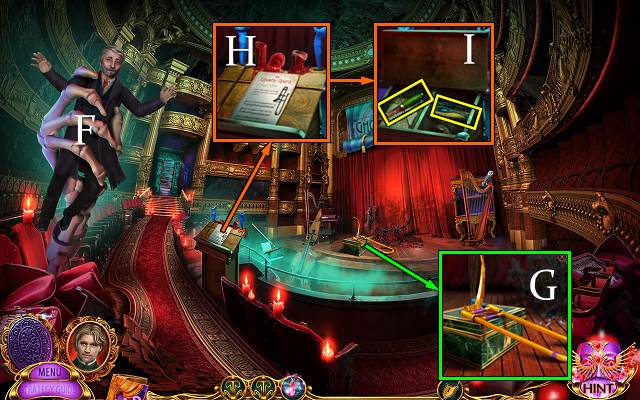
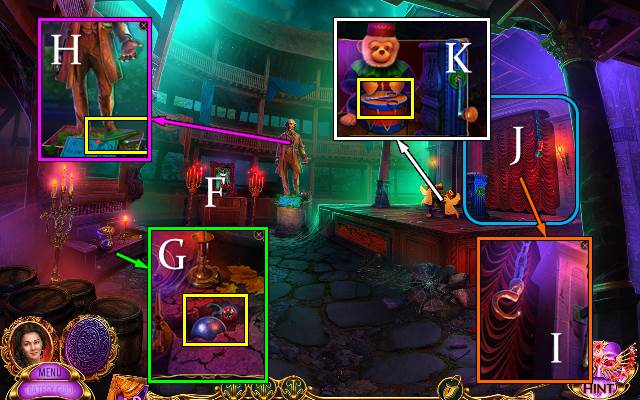
- Inspect (G).
- Take CLAWED FORK and SHAWL (H).

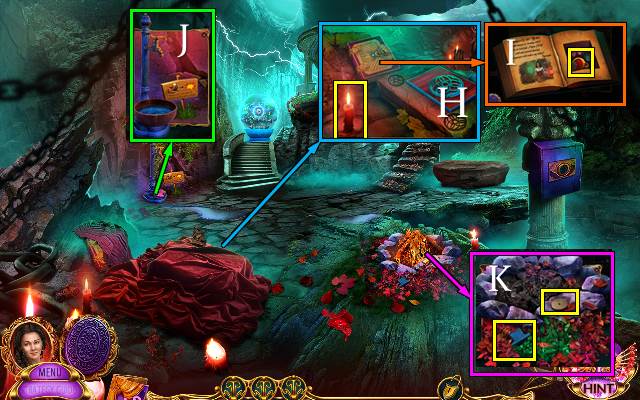
- Take VIOLIN BOW; take GLASS SHARD with SHAWL (I).
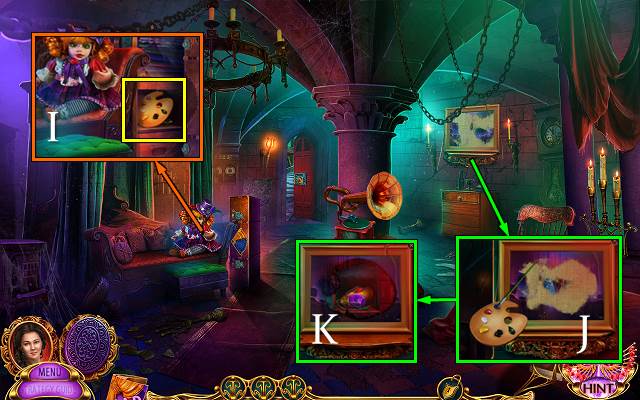
- Use GLASS SHARD; take note, DOOR AMULET and DANCER FIGURINE (J).
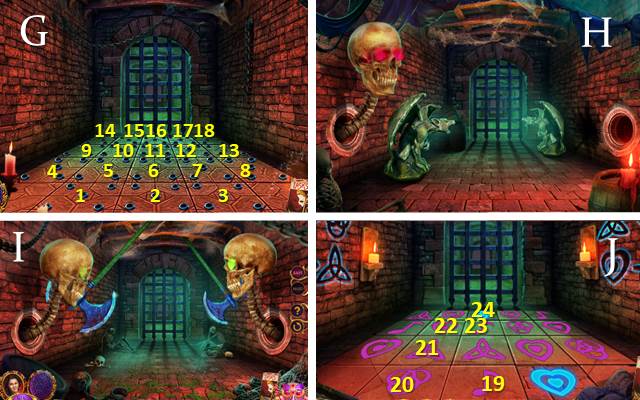
- Place DOOR AMULET (K).
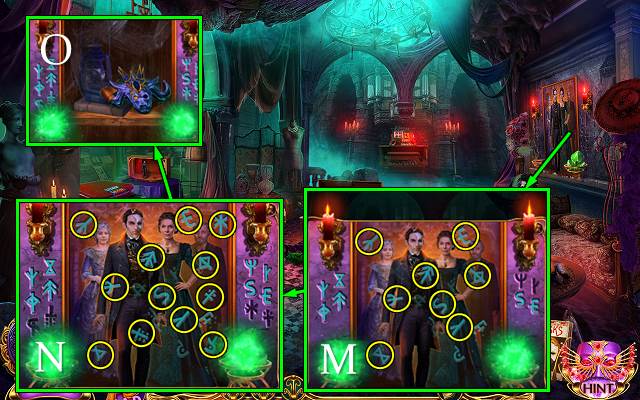
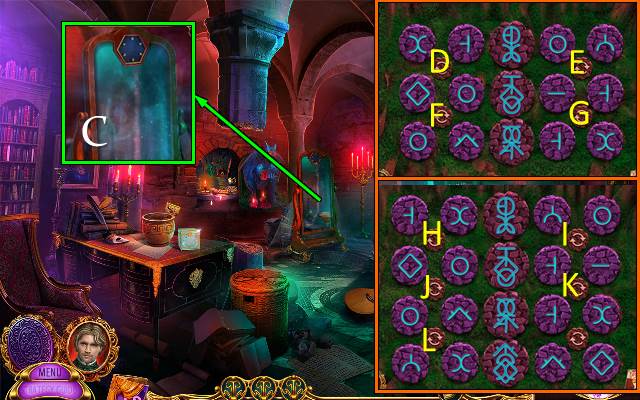
- Easy solution (L): (3-5)-(4-8)-(7-6)-(1-7)-M-(2-4).
- Hard solution (N): (9-15)-(13-9)-(17-19)-(18-14)-(16-18)-(12-17)-O-(12-16)-(10-13)-(10-20)-(11-20).
- Go (P).
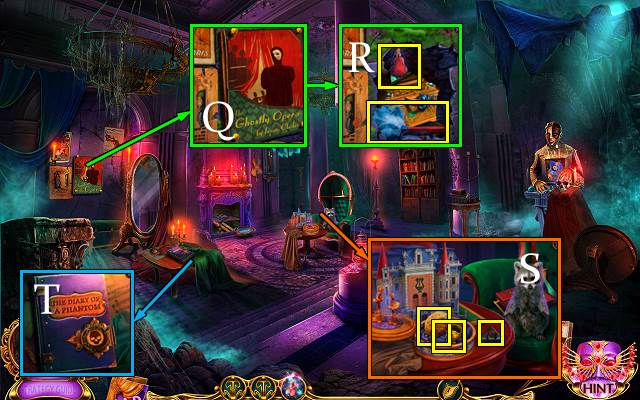
- Use CLAWED FORK (Q).
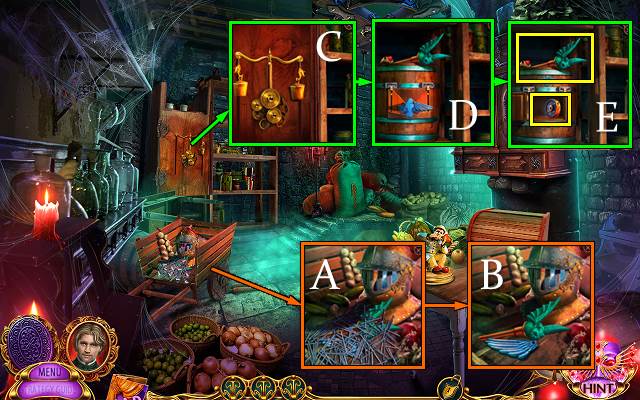
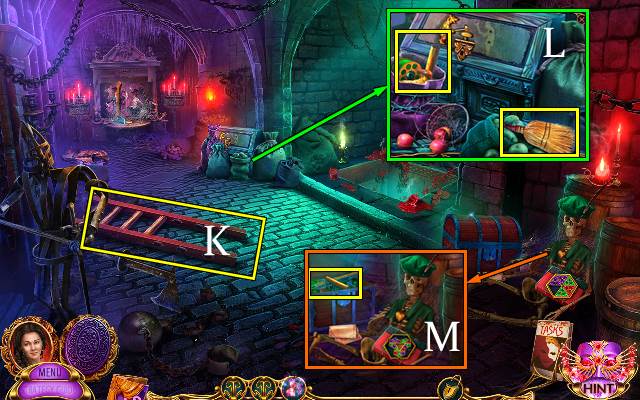
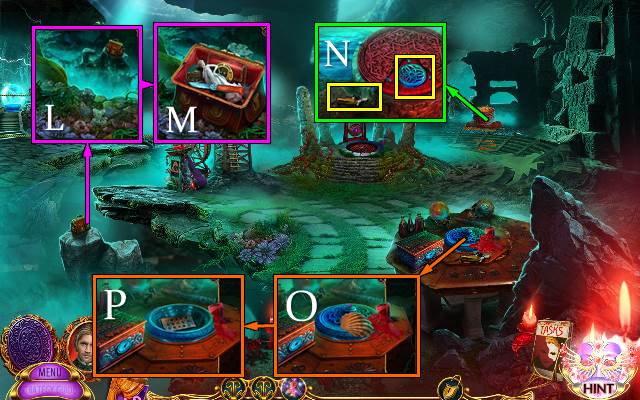
- Take DUSTER, PERFUME and TRIANGLE PARTS 1/3 (R).
- Place DANCER FIGURINE; take SPONGE, ISAAC'S RING and TRIANGLE PARTS 2/3 (S).
- Use ISAAC'S RING (T). Play HOP; receive ISAAC'S MASK.
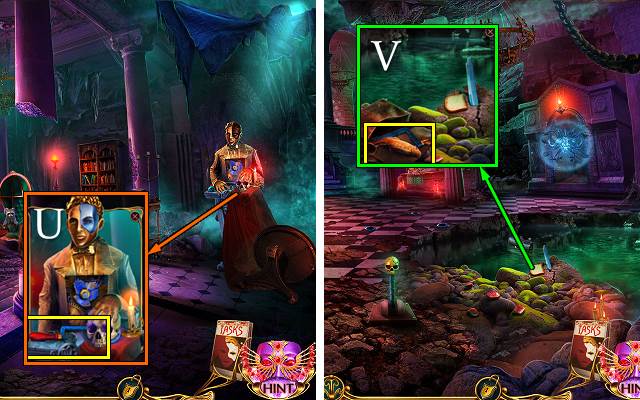
- Place ISAAC'S MASK; take BROKEN HACKSAW and HOOK (U).
- Walk down.
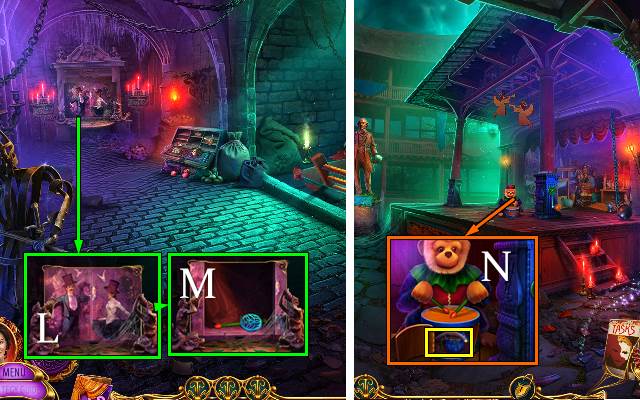
- HOOK on VIOLIN BOW; take HOOK ON BOW.
- Use HOOK ON BOW. Open bag; take FISH and HACKSAW PART (V).
- Go left.
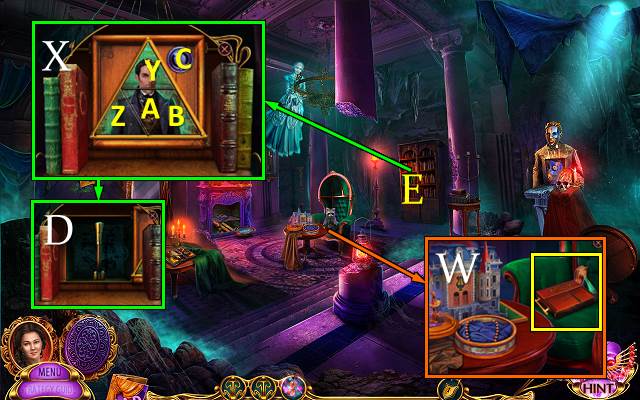
- Offer FISH; take UNFINISHED CHESS PIECE, MAKEUP BOX and TRIANGLE PARTS 3/3 (W).
- Move books; place TRIANGLE PARTS (X).
- Easy solution: (Y-A)-(Z-B)-Z-Cx2-A-Cx2.
- Hard solution: (Y-B)-(Z-Y)-(Z-B)-(A-B)-(Z-A)-(Y-B)-(Y-B)-(Y-B).
- Pull lever (D).
- Go (E).
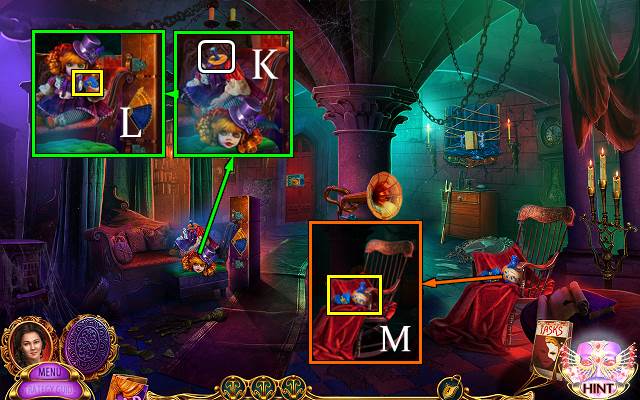
- Take RIBBON and place MAKEUP BOX. Use PERFUME and SPONGE (F).
- Solution (G).
- Take CHESS PIECES 1/2 and MUSICIAN SYMBOLS 1/3 (H).
- Take GEAR (I).
- Use DUSTER; take MUSICIAN SYMBOLS 2/3 and HACKSAW BLADE (J).
- HACKSAW PART and HACKSAW BLADE on BROKEN HACKSAW; receive HACKSAW.
- Use HACKSAW (K).
- Take MUSICIAN SYMBOLS 3/3 and NEEDLE AND THREAD 1/2 (L).
- Place MUSICIAN SYMBOLS (M).
- Easy and hard solution (N).
- Second solution easy: Px2-O-Q-Px2-Ox2-Qx2-Px2-Ox3-Qx3-Px2.
- Second solution hard: O-Px2-Ox2-Px2-O-Px2-Ox2-Px2.
- Take MAGICAL KEY (R).
- Walk down.
- Offer MAGICAL KEY (S).
- Switch to Raul (T).
- Receive MAGICAL KEY.
- Use MAGICAL KEY (U).
Chapter 2: The Ghostly Artifact
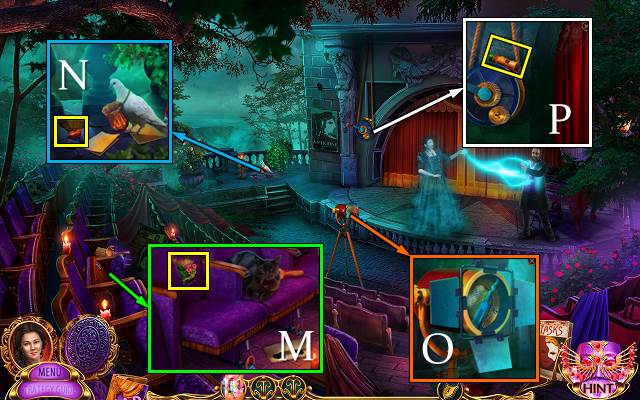
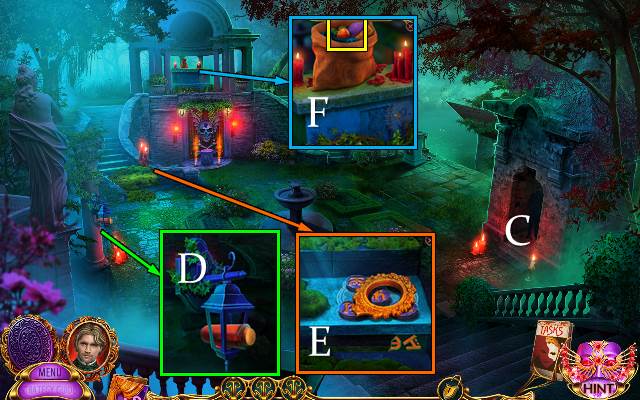
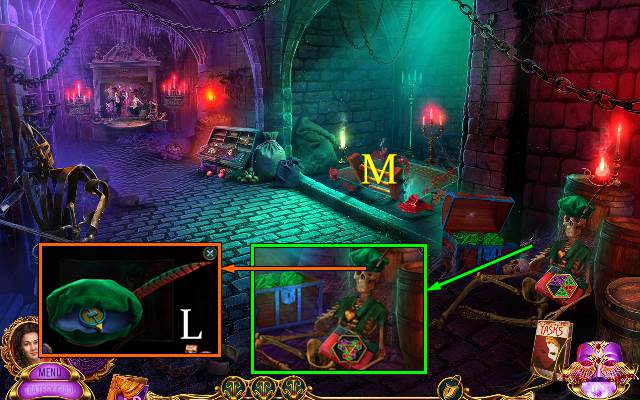
- Take BROKEN TROMBONE (V).
- Take BOX PEG with MAGNET (W).
- Place ROUND TILE and CENTRAL TILE; Xx3-Yx2.
- Take CURTAIN TASSELS 2/2 and THEATER MASKS 1/2 (Z).
- Take JEWEL BOX (A).
- BOX PEG on JEWEL BOX; take CURTAIN TASSELS 2/2 and GLOVE.
- Place CURTAIN TASSELS (B).
- Play HOP (C); receive FIERY SKULL.
- Take TROMBONE MOUTHPIECE; place FIERY SKULL (D).
- Go (E).
- Talk (F).
- Take TROMBONE PART (G).
- TROMBONE PART and TROMBONE MOUTHPIECE on BROKEN TROMBONE; receive TROMBONE.
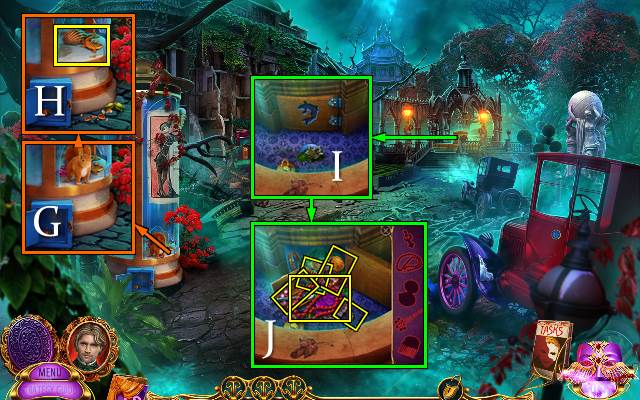
- Use TROMBONE (H); take TONGS and RUSTY KNIFE (I).
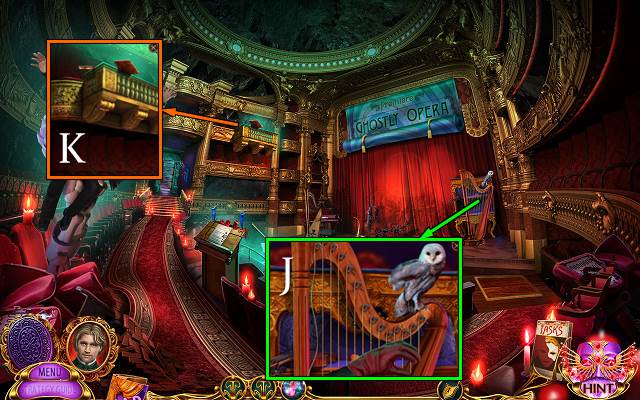
- Use GLOVE (J); receive OWL.
- Send OWL (K); receive MUSIC STAND.
- Walk down.
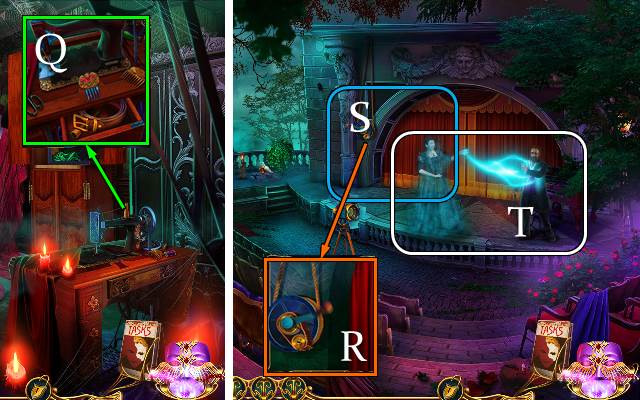
- Use MUSIC STAND; take HAMMER and open box (L).
- Take note; find pieces (M). Receive PROTECTIVE SCEPTER.
- Go (N).
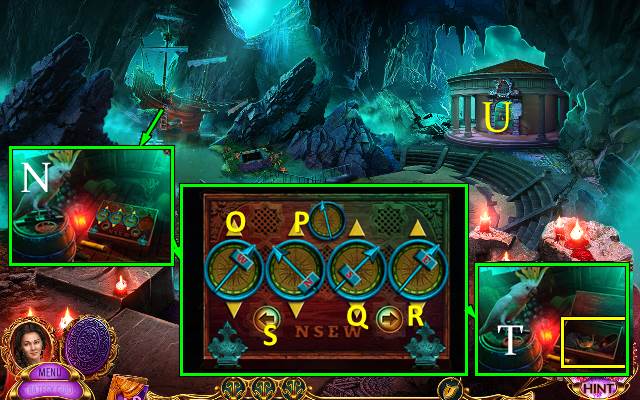
- Use PROTECTIVE SCEPTER (O).
- Easy solution: V-P-Vx3-U-V-R-S-Wx2-T-Vx3-Q.
- Hard solution: U-W-R-S-T-W-U-Wx2-Q-Wx2-S-P.
- Receive SHACKLES.
- Use SHACKLES (X).
- Go (Y).
- Take QUILL AND INK. Take BROKEN KEY with TONGS (Z).
- Take BROKEN FIGURINE (A).
- Use QUILL AND INK; take NOTE SHEET (B).
- Place NOTE SHEET (C).
- Easy solution: (2-5-6)-(1-3-5)-(1-4-6).
- Hard solution: (3-11-7)-(2-9-5)-(1-8-5)-(10-11-12).
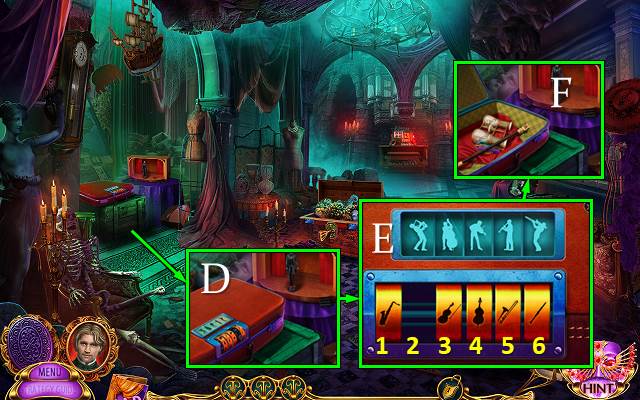
- Take THEATER MASKS 2/2 and KEY PART (D).
- Take note and CHISEL (E).
- Walk down twice.
- Use CHISEL and HAMMER; take FIGURINE PART and LIGHTER (F).
- Place THEATER MASKS (G).
- Take CLAW, FIGURINE PART and SHARPENING STONE (H).
- Go to Bruna's Room.
- SHARPENING STONE on RUSTY KNIFE; receive SHARP KNIFE.
- Pull ribbon and use SHARP KNIFE; take GLUE and SAW (I).
- FIGURINE PART x2 and GLUE on BROKEN FIGURINE; receive CHRISTINE'S FIGURINE.
- Place CHRISTINE'S FIGURINE (J).
- Take KEY PART (K).
- KEY PART x2 on BROKEN KEY; receive CHEST KEY.
- Use CHEST KEY (I).
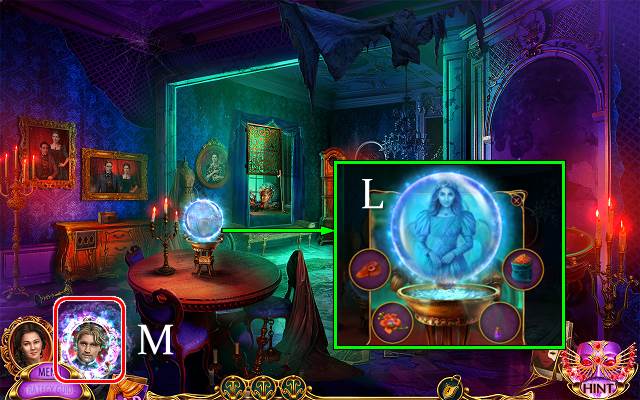
- Play HOP (L); receive CRYSTAL.
- Place CRYSTAL. Easy solution (M).
- Hard solution (N).
- Take DAMAGED GHOSTLY ARTIFACT (O).
- Walk down.
- Offer DAMAGED GHOSTLY ARTIFACT (P).
- Receive DAMAGED GHOSTLY ARTIFACT.
- LEATHER BELT from DAMAGED GHOSTLY ARTIFACT.
- Use LEATHER BELT and RIBBON; take CARVING KNIFE and SKULL EYES 1/2 (Q).
- CARVING KNIFE on UNFINISHED CHESS PIECE; receive CHESS PIECES 2/2.
- Place CHESS PIECES (R).
- Easy solution: (5-8)-(10-9)-(9-14)-(8-11)-(14-13)-(13-8)-(8-7)-(11-2).
- Hard solution: (9-13)-(5-14)-(14-7)-(13-17).
- Take LYRE EMBLEM, BROKEN CLIPPERS and BIRD WRENCH (S).
- Go (T).
- Place LYRE EMBLEM (U).
- Take CLIPPERS HALF and NEEDLE AND THREAD 2/2 (V).
- Use BIRD WRENCH; place GEAR and nut. Take FLINT AND STEEL and CHEESE (W).
- Go (X).

- Use NEEDLE AND THREAD; receive SKULL EYES 2/2 (Y).
- Place SKULL EYES; take RAZOR and SCREW AND NUT (Z).
- Offer CHEESE (A).
- Take OIL CAN and BOWL AND SPOON (B).
- Walk down.
- Use OIL CAN and FLINT AND STEEL. Use water. Take GRAVE EMBLEM (C).
- CLIPPERS HALF and SCREW AND NUT on BROKEN CLIPPERS; receive CLIPPERS.
- Use CLIPPERS; take COIN and GEM (D).
- Walk down.
- Place GRAVE EMBLEM; take METAL ROD and GEM (E).
- GEM x2 on DAMAGED GHOSTLY ARTIFACT; receive GHOSTLY ARTIFACT.
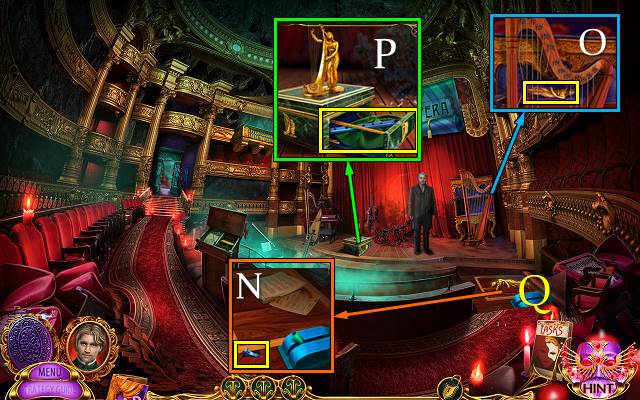
- Use GHOSTLY ARTIFACT (F).
- First solution easy (G): 1-5-6-11-12-17.
- First solution hard (G): 2-5-10-9-14-15.
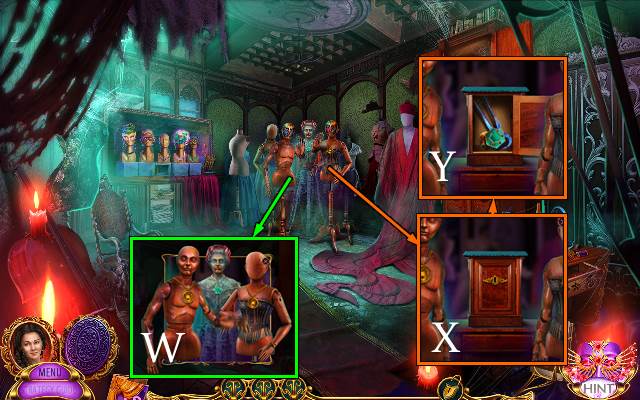
- Walk when heads are turned (H-I).
- Fourth solution easy and hard (J): 19-20-21-22-23-24.
Chapter 3: Enchanted
- Place METAL ROD (K).
- Take COMBINATION PART (L).
- Take COMBINATION PART and RECIPE BOTTLE (M).
- Take note and COMBINATION PLATE; use RAZOR (N).
- Take COMBINATION PART (O).
- COMBINATION PART x3 on COMBINATION PLATE.
- Place COMBINATION PLATE (P).
- Easy solution: 3-6-7-2-6-3-4-3-5-6-3-8-6-5.
- Hard solution: 3-6-7-6-8-2-3-6-7-6-8-4-3-1-2-3-5-6-3-2-9-8-6-5-6-3-10-8-6-5.
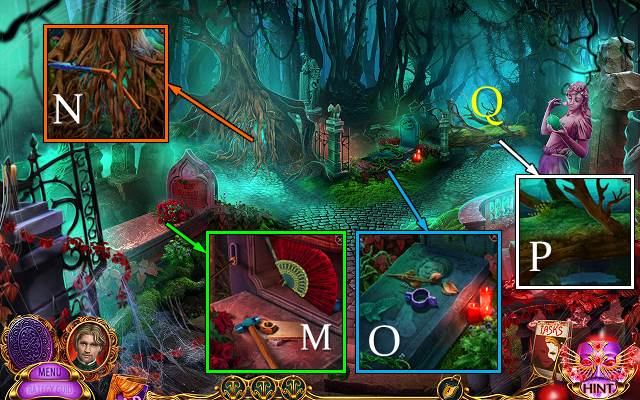
- Go (Q).
- Take FAN PARTS 1/2 (R).
- Take SEALED BERRY JAR and CLAWED CANE; remove cloth and note (S).
- Use BOWL AND SPOON; take MAGIC POWDER (T).
- Use COIN; take SPRAY BULB (U).
- MAGIC POWDER and SPRAY BULB on RECIPE BOTTLE; receive REVIVAL POTION.
- Use REVIVAL POTION (V).
- Take KEY (W).
- Use KEY (X).
- Go (Y).
- Talk (Z).
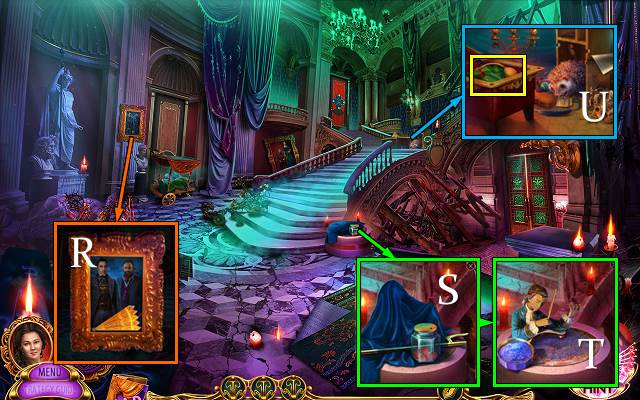
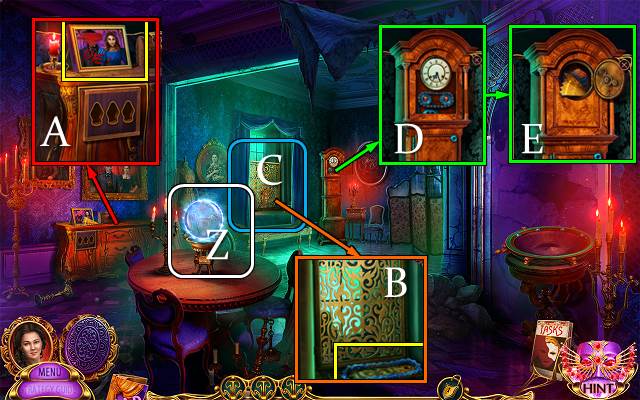
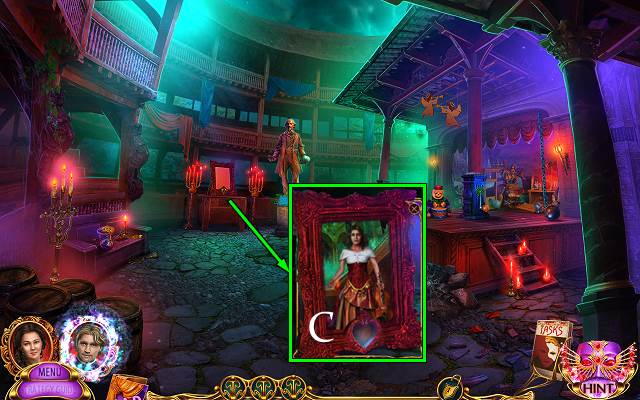
- Take PORTRAIT (A).
- Take CHAIN; use CLAWED CANE (B).
- Play HOP (C); receive PIN.
- Place CHAIN (D).
- Take FAN PARTS 2/2 and SAWDUST (E).
- Walk down.
- PIN on back of PORTRAIT; take CAN OPENER and note.
- CAN OPENER on SEALED BERRY JAR; receive BERRIES.
- Offer BERRIES (F).
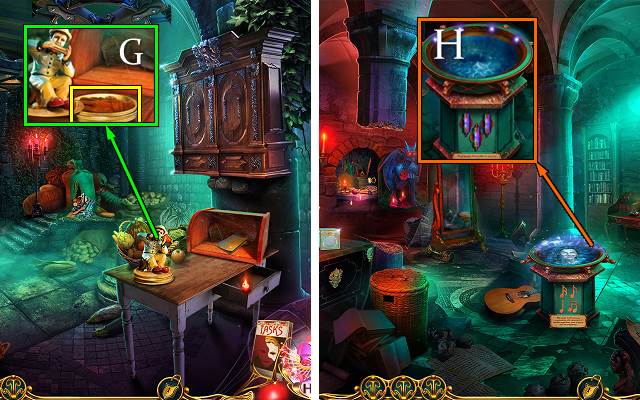
- Find items; receive VIOLIN (G).
- Place VIOLIN; take LEAF and NUT (H).
- Walk down.
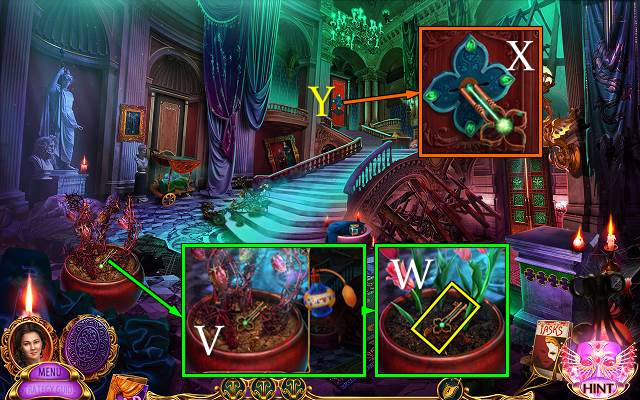
- Place FAN PARTS; take PAINT PALETTE and FLOWER (I).
- Place PAINT PALETTE (J).
- Take CRYSTAL and SNAKE SYMBOLS 1/3 (K).
- Go to Roselle's Room.
- Place SAWDUST, FLOWER, LEAF and CRYSTAL (L).
- Receive MANNEQUIN ARM.
- Switch to Raul (M).
- Use CLAW; take NAIL CLIPPERS (N).
- Use NAIL CLIPPERS; take HARPIST FIGURINE (O).
- Place HARPIST FIGURINE; take FLUTE and THICK CLOTH (P).
- Place FLUTE (N).
- Go (Q).
- Take GEAR (R).
- Use SAW (S).
- Take LEVER and FISH HOOK (T).
- Use LIGHTER (U).
- Easy solution: (W-X)-Gx2-F-Gx3-F-(X-Y)-G-F-Gx3-F-(Y-Z)-G-F-(Z-A)-G-F-(A-B)-Gx2-F-(B-C)-Gx2-F-(C-D)-G2-F-(D-E)-G3-F.
- Hard solution: (H-I)-V2-U-(I-J)-V2-U-(J-K)-V3-U-(K-L)-V2-U-(L-M)-V-U-(M-N)-V-U-(N-O)-V2-U-(O-P)-V3-U-(P-Q)-V3-U-V-U-(Q-R)-V3-U-V-U-(R-S)-V2-U-(S-T)-V2-U-(T-@)-V3-U-V-U.
- Take MOUSE CASE and BOOT SPUR ($).

- Use LEVER (W).
- Open bag; take note, BROKEN MECHANICAL MOUSE and PAPER CLIP (X).
- GEAR and MOUSE CASE on BROKEN MECHANICAL MOUSE; receive MECHANICAL MOUSE.
- Use MECHANICAL MOUSE (Y).
- Go (Z).
- Use THICK CLOTH (A).
- Take LEVERS 1/3 and BIRD WING (B).
- Place FISH HOOK and weight (C).
- Place BIRD WING (D).
- Take LEVERS 2/3, CRYSTAL RING, and CRYPTEX PART (E).

- Use BOOT SPUR (F).
- Play HOP (G); receive BOX HANDLE.
- Place BOX HANDLE (H).
- Take LEVERS 3/3 and AWL (I).
- Walk down.
- Place LEVERS (J).
- Go (K).
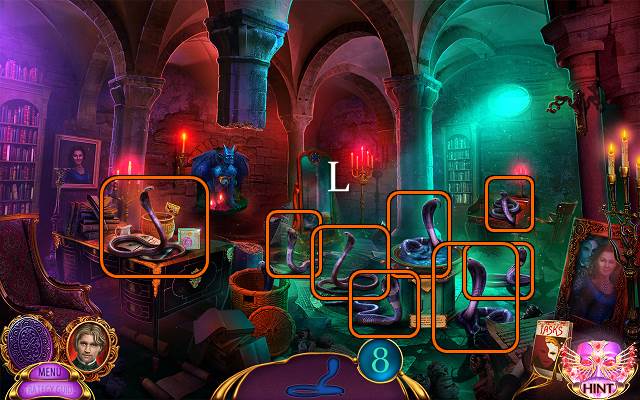
- Find 8 snakes (L).
- Take MAGIC MONOCLE INSTRUCTION (M).
- Read papers. Use CRYSTAL RING; take MONOCLE CRYSTAL (N).
- Use PAPER CLIP (O).
- Take note and OILCAN (P).
- Go to Storeroom.
- Use OILCAN; take LENS and NOISEMAKER (Q).
- Walk down.
- Use NOISEMAKER (R).
- Take HARMONICA (S).
- Go (T).
- Take MONOCLE FRAME and take SCREW with AWL (U).
- LENS, MONOCLE CRYSTAL, SCREW and MONOCLE FRAME on MAGIC MONOCLE INSTRUCTION; receive MAGIC MONOCLE.
- Place MAGIC MONOCLE (V).
- Solution (W).
- Second solution (X): (3-12)-(1-10)-(1-9)-(9-12)-(7-11)-(2-14)-(3-14)-(2-6)-(6-8)-(4-13)-(4-11)-(5-13).
- Third solution (Y).
- Take MAGIC SEED (Z).
- Place MAGIC SEED (A).
- Take MAGIC ROSE (B).
- Place MAGIC ROSE (C).
- Play HOP; take BOWL INLAYS 1/3 and ACID.
- Go to Bruna's Room.
- Place CRYPTEX PART (D).
- Hard and easy solution (E): (1-2)-(3-2)-(4-3)-(2-3)-(3-4)-(5-4)-(6-5)-(4-5)-(5-6).
- Take BATON and BOWL INLAYS 2/3 (F).
- Go to Storeroom.
- Place HARMONICA; take GLOVE and BOWL INLAYS 3/3 (G).
- Go to Isaac's Office.
- Place BOWL INLAYS (H).
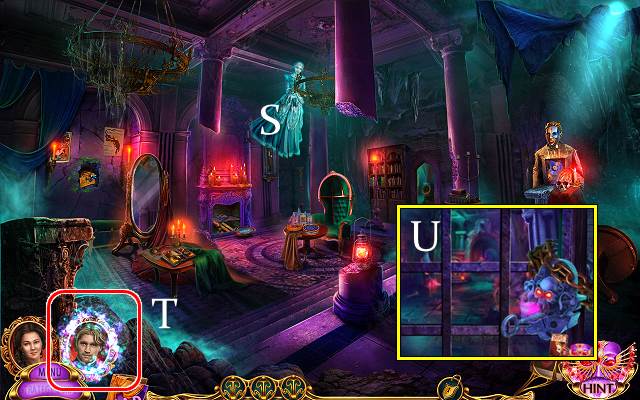
Chapter 4: The Mirror Portal
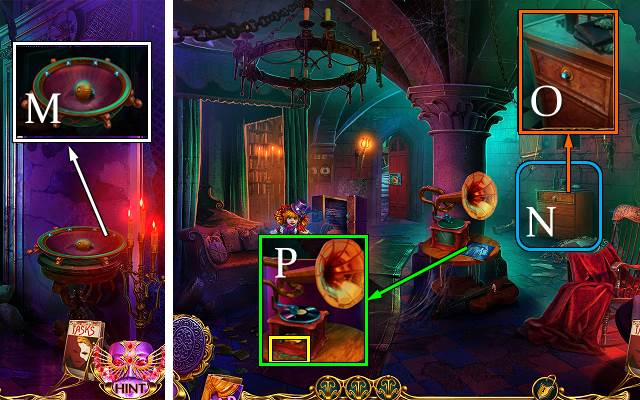
- Take DRAWER HANDLE (M).
- Walk down twice.
- Place DRAWER HANDLE (N).
- Play HOP (O); receive RECORD.
- Take note and play RECORD; take SNAKE SYMBOLS 2/3 and HEX KEY (P).
- Go to Roselle's Room.
- Use HEX KEY; take SNAKE SYMBOLS 3/3 and PLATE (Q).
- Place SNAKE SYMBOLS (R).
- Easy solution (S).
- Hard solution (T).
- Take note, WHEEL and TUNING FORK (U).
- Walk down.
- Use PLATE; take NUMBER DISC (V).
- Place WHEEL and NUT (W).
- Go (X).
- Use HEX KEY; find 10 screws (Y).
- Talk (Z).
- Take TORN WIG and STAIRS BUTTONS 1/4 (A).
- Place TORN WIG; receive WIG (B).
- Place WIG (C).
- Hard solution (D). Easy solution without tiaras.
- Take STAIRS BUTTONS 2/4, BROKEN SPOOL AMULET and SHAWL (E).
- Use MANNEQUIN ARM (F).
- Take STAIRS BUTTONS 3/4 and SPRING; place NUMBER DISC (G).
- Solution: H-I-H-I.
- Take note, SPOOL AMULET PART and STAIRS BUTTONS 4/4 (J).
- Walk down.

- Place STAIRS BUTTONS (K).
- Go (L).
- Use SPRING; take SPOOL AMULET PART (M).
- Take note and take HAND DRILL with TUNING FORK (N).
- Use SHAWL, open lamp and take LOCKPICK (O).
- Take UNFINISHED FLUTE (P).
- Go to Wardrobe Room.
- SPOOL AMULET PART x2 on BROKEN SPOOL AMULET; receive SPOOL AMULET.
- Place SPOOL AMULET; take BELT and FLUTE PART (Q).
- Go to Music Square.
- Place BELT (R).
- Play HOP (S); receive PRISON SPHERE.
- Use PRISON SPHERE (T).

- Easy solution (U).
- Hard solution (V).
- Receive ISAAC'S AMULET.
- Go to Wardrobe Room.
- Offer ISAAC'S AMULET (W).
- Receive SAFE KEY.
- Use SAFE KEY (X).
- Take BROKEN MIRROR PORTAL AMULET, PLIERS and FLUTE PART (Y).
- Go to Music Square.
- FLUTE PART x2 and HAND DRILL on UNFINISHED FLUTE; receive FLUTE.
- Use FLUTE; take SHOVEL and MEDAL (Z).
- Use MEDAL; take MIRROR TILE (A).
- MIRROR TILE on BROKEN MIRROR PORTAL AMULET; receive MIRROR PORTAL AMULET.
- Place MIRROR PORTAL AMULET (B).
Chapter 5: The Secret Dungeons
- Receive MIRROR PORTAL AMULET.
- FANG TALISMAN from MIRROR PORTAL AMULET.
- Use MIRROR PORTAL AMULET (C).
- Easy solution: Ex2-G-Fx3-D-E.
- Hard solution: I-Kx3-Ix2-K-J-Lx2.
- Move roses; place BATON. Take HAMMER, NUT, note, FAN and BOLT (M).
- Take BROKEN LANCE (N).
- Use GLOVE; take CLAMP (O).
- CLAMP, NUT and BOLT on BROKEN LANCE; receive LANCE.
- Use LANCE (P).
- Go (Q).
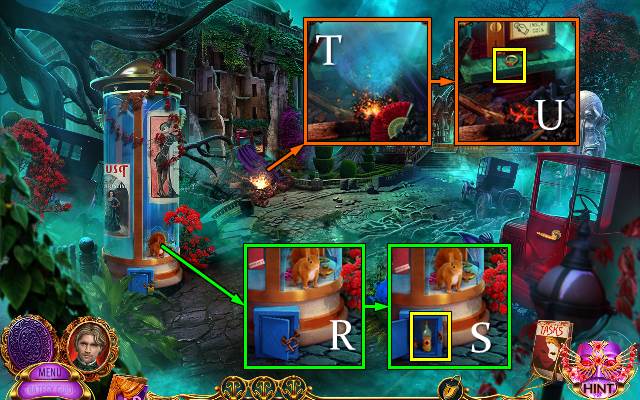
- Use ACID (R).
- Take KEROSENE (S).
- Use FAN (T).
- Take WEDDING RINGS 1/2 (U).
- Use HAMMER; take RAZOR BLADE and BANDAGE (V).
- Use FANG TALISMAN; take WEDDING RINGS 2/2, SCRAPER and TORCH BASE (W).
- Walk down.
- Place WEDDING RINGS (X).
- Play HOP (Y); receive BRACELET.
- Place BRACELET; take MIRROR GLASS and MATCHES (Z).
- BANDAGE, KEROSENE and MATCHES on TORCH BASE; receive LIT TORCH.
- Use LIT TORCH (A).
- Go (B).
- Talk (C).
- Take TUBE (D).
- Use SCRAPER; take MIRROR FRAME (E).
- Use RAZOR BLADE; receive ROPE. Take NUT (F).
- Walk down and right.
- Offer NUT (G).
- Take FISH AMULET and SEASHELL (H).
- Place FISH AMULET (I).
- Find items (J); receive MIRROR HANDLE.
- Go to Garden.
- MIRROR GLASS and MIRROR HANDLE on MIRROR FRAME; receive HAND MIRROR.
- Place HAND MIRROR (K).
- Easy solution: Qx2-V-N-Sx2-T-Wx2-L-P-Mx3-T.
- Hard solution: Wx2-Qx2-V-P-L-M-P-Sx2-T-Mx2-N-Yx3.
- Go (Z).

- Use ROPE; take BAG (A).
- Use SEASHELL; take BAG STAMP (B).
- Take CORKSCREW and PAINT REMOVER (C).
- Use PAINT REMOVER; take BAG STAMP and BROKEN SAW (D).
- Walk down.
- CORKSCREW on TUBE; receive CORK. Take BAG STAMP.
- BAG STAMP x3 on BAG; take PLATE PART and CLOTH.
- Place PLATE PART; select 1-5 (E).
- Play HOP (F); receive GHOSTLY DAGGER.
- Offer GHOSTLY DAGGER (G).
- Receive CHEST KEY.
- Go (H).
- Use CHEST KEY; take BRIDGE STATUETTE (I).
- Walk down.
- Take note; place BRIDGE STATUETTE (J).
- Take BROKEN LADDER (K).
- Move sacks and use PLIERS; take BROOM, HARPOON REEL and STEPS 1/3 (L).
- Use LOCKPICK; take note, STEPS 2/3 and BROKEN HARPOON (M).
- Use BROOM; take AXE and STEPS 3/3 (N).
- STEPS on BROKEN LADDER; receive LADDER.
- Place LADDER (O).
- Go (P).
- Use SHOVEL; take DOOR CODE 1/4 and STONE HAND (Q).
- Use AXE; take STRONG HORN and DOOR CODE 2/4 (R).
- Take ARROW BUTTON (S).
- Place ARROW BUTTON (T).
- Easy solution: X-U-X-U-Wx2-U-V-W-U-X-U-X-U-Xx2-W-U-X.
- Hard solution: X-U-W-U-X-Ux2-Wx2-V-W-U-X-Ux2-X-Ux2-W-V-W-U-X-U-Xx2.
- Take BROKEN SKULL, WOODCUTTER EMBLEM and DOOR CODE 3/4 (Y).
- Walk down.
- Place WOODCUTTER EMBLEM (Z).
- Find items (A); receive ARROW.
- Go (B).
- HARPOON REEL and ARROW on BROKEN HARPOON; receive HARPOON.
- Use HARPOON; take DOOR CODE 4/4 and SKULL EYE (C).
- Place DOOR CODE (E).
- Easy solution (D1-3).
- Hard solution (D1-6).
- Go (E).
- Talk (F).
- Use STRONG HORN and STONE HAND; take WEIGHT and SKULL EYE (G).
- Take HAIR PIN and DRUMSTICKS 1/2 (H).
- Place WEIGHT (I).
- Play HOP (J); receive HANDLE.
- Place HANDLE; take SCISSORS (K).
- Go to Secret Passage.
- Use SCISSORS; take COMPASS (L).
- Go (M).
- Take note; place COMPASS (N).
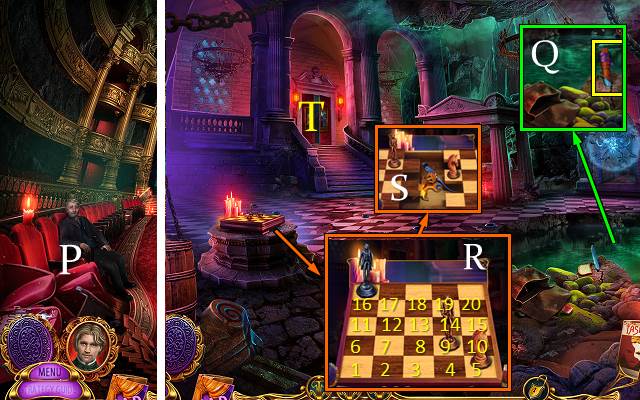
- Easy solution: S-P-Q-R-Ox3.
- Hard solution: S-P-R-Q-Ox3-Px2.
- Take EMPTY BOWL and SKULL JAW (T).
- Go (U).
- SKULL JAW and SKULL EYE x2 on BROKEN SKULL; receive SKULL.
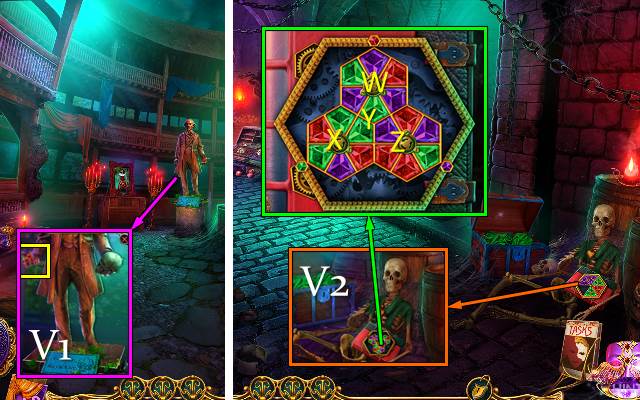
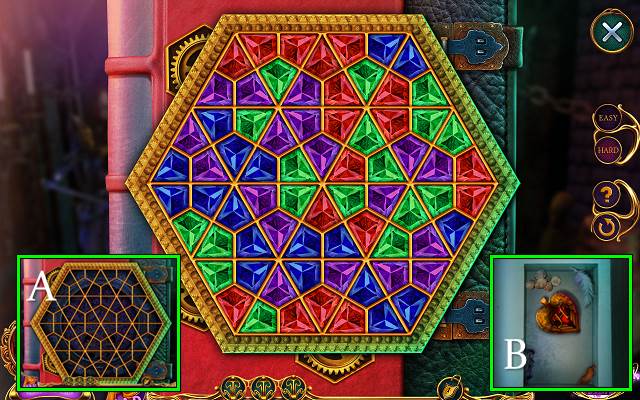
- Place SKULL; take HAT SYMBOLS 1/2 and GEM TRIANGLE (V1).
- Go to Secret Passage.
- Place GEM TRIANGLE (V2).
- Easy solution: Zx3-Xx2-Y-Xx3-W-Y-Wx2-Zx2-Xx5-Yx2-Wx2-Zx2-Yx2-Wx5-Z-Yx2.
- Hard solution (A): solution is random.
- Take note and HANNAH'S MEDALLION (B).
- Go to Amphitheater.
- Place HANNAH'S MEDALLION (C).
Chapter 6: The Ritual
- Use CLOTH; take HOOK ON ROPE and CAR HANDLE BASE (V).
- Use CORK (W).
- Take SHELL and SCREW (X).
- Take SAW HANDLE (Y).
- SAW HANDLE and SCREW on BROKEN SAW; receive SAW.
- Use SAW; take STONE BIRD and CRYPTEX (Z).
- Go to Cemetery.
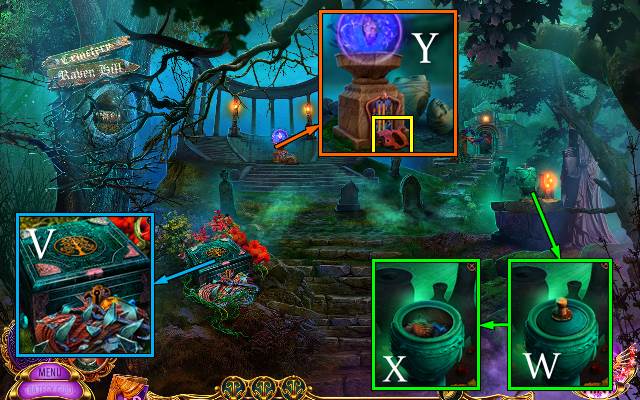
- Place STONE BIRD; take ROUGH BRUSH and COIN (A).
- Go (B).
- Use COIN; take CAR HANDLE PART (C).
- CAR HANDLE PART on CAR HANDLE BASE; receive CAR HANDLE.
- Replace CAR HANDLE (D).
- Play HOP (E); receive HORN.
- Go to Musician Graveyard.

- Use HORN (F).
- Go (G).
- Remove drapes. Take LIT CANDLE; use HAIR PIN (H).
- Take note and DYNAMITE STICK (I).
- Place EMPTY BOWL and take BOWL OF WATER (J).
- Use BOWL OF WATER; take HAT SYMBOLS 2/2 and DYNAMITE CAP (K).
- Go to Secret Passage.
- Place HAT SYMBOLS (L).
- Take CIRCLE EMBLEM 1/2 and DRUMSTICKS 2/2 (M).
- Go to Amphitheater.
- Place DRUMSTICKS; take WICK and SEEDS (N).
- Walk down.
- Offer SEEDS (O).
- Open barrel; take SPHERE AMULET (P).
- Go to Ritual Hall.
- Place SPHERE AMULET (Q).
- Easy solution: S-Tx2-Ux3-Vx2-W.
- Hard solution: Xx3-Y-Z-A-Bx3-Cx2-D.
- Take ISAAC'S RING (E).
- Place ISAAC'S RING (F).
- Pull lever (G).
- Open case; take note and BROKEN VIOLIN (H).
- Use HOOK ON ROPE (L).
- Open bag; take KNIFE and OPERA FIGURINES 1/3 (M).
- Use ROUGH BRUSH; take OPERA FIGURINES 2/3 and CIRCLE EMBLEM (N).
- Use SHELL (O).
- Open lid; take COMBINATION CODE (P).
- Go to Isaac's Storeroom.
- COMBINATION CODE on CRYPTEX.
- Easy solution: Q-R-Qx4-R-Qx4-R.
- Hard solution: R-Q-R-Qx3-R-Qx4-R.
- Take MUSIC EMBLEM and OPERA FIGURINES 3/3.
- Place OPERA FIGURINES (S).
- Take EMBLEM RING and PILE OF SHEET MUSIC (T).
- KNIFE on PILE OF SHEET MUSIC; take LEMON JUICE.
- Use LEMON JUICE and candle; take MECHANISM BLUEPRINT (U).
- Push button (V).
- Take MECHANISM BASE and BOX KEY (W).
- Go to Musician Graveyard.
- Use BOX KEY; take ROUND PLATE PART, MUSIC EMBLEM, CHAIN and STRINGS (X).
- Go right.
- Place ROUND PLATE PART; take MAGIC HAMMER (Y).
- Use EMBLEM RING; take GEAR and note (Z).
- Use MAGIC HAMMER (A).
- Play HOP (B); receive MECHANISM PART.
- MECHANISM BASE, CHAIN, GEAR and MECHANISM PART on MECHANISM BLUEPRINT; receive PLATFORM MECHANISM.
- Place PLATFORM MECHANISM (C).
- Receive CIRCLE EMBLEM 2/2.
- Place CIRCLE EMBLEM; take RAKE (D).
- Use RAKE; take GUNPOWDER (E).
- GUNPOWDER, WICK and DYNAMITE CAP on DYNAMITE STICK; receive DYNAMITE.
- Use DYNAMITE and LIT CANDLE (F).
- Take MUSIC EMBLEM, BOW and PORTRAIT PARTS 1/3 (G).
- Go to Isaac's Storeroom.
- Place MUSIC EMBLEM x3 (H).
- Take PORTRAIT PARTS 2/3 and BOX CRANK (I).
- Go to Ritual Hall.
- Use BOX CRANK; take PORTRAIT PARTS 3/3 (J).
- Walk down.
- Place PORTRAIT PARTS (K).
- Easy solution: (1-3)-(3-5)-(5-7)-(7-9)-(9-10)-(3-5)-(5-7)-(7-9)-(1-3)-(3-5)-(5-7)-(2-4)-(4-6)-(2-4)-(1-3).
- Hard solution: (4-5)-(5-6)-(6-7)-(7-8)-(8-9)-(9-10)-(4-5)-(5-6)-(6-7)-(7-8)-(8-9)-(6-7)-(7-8)-(2-3)-(3-4)-(4-5)-(5-6)-(2-3)-(3-4)-(4-5)-(1-2)-(2-3)-(3-4)-(1-2)-(2-3)-(1-2).
- Take CRYSTAL OF SOULS (L).
- Go to Ritual Hall.
- STRINGS, BOW and CRYSTAL OF SOULS on BROKEN VIOLIN; receive ENCHANTED VIOLIN.
- Use ENCHANTED VIOLIN (M).
- Align symbols (N).
- Congratulations, you have completed Dark Romance: A Performance to Die For.
Created at: 2018-08-24