

Walkthrough Menu
- General Tips
- Chapter 1: The Celebration
- Chapter 2: The Garden
- Chapter 3: The Dock
- Chapter 4: The Cliff
- Chapter 5: The Stone Forest
- Chapter 6: Gaspar's Cabinet
General Tips
- This is the official guide for Dark Romance: Romeo and Juliet.
- Hidden-object puzzles are referred to as HOPs. This guide will not show screenshots of the HOPs, however, it will mention when an HOP is available and the inventory item you'll collect from it.
- This guide will not mention each time you have to zoom into a location; the screenshots will show each zoom scene.
Chapter 1: The Celebration
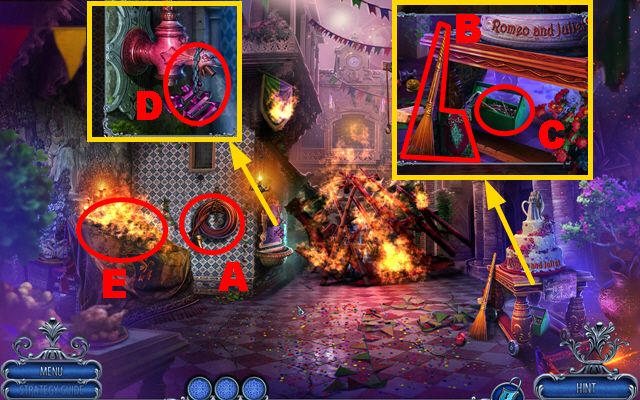
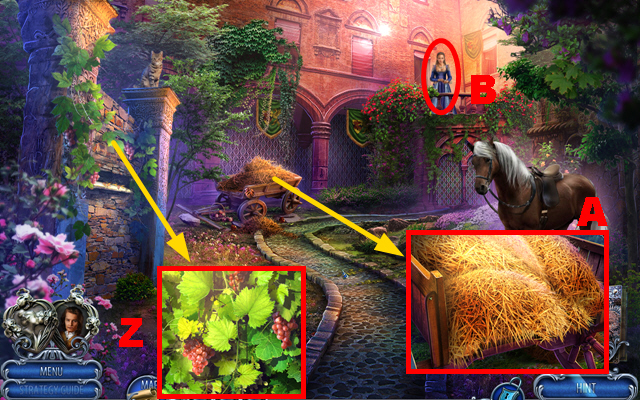
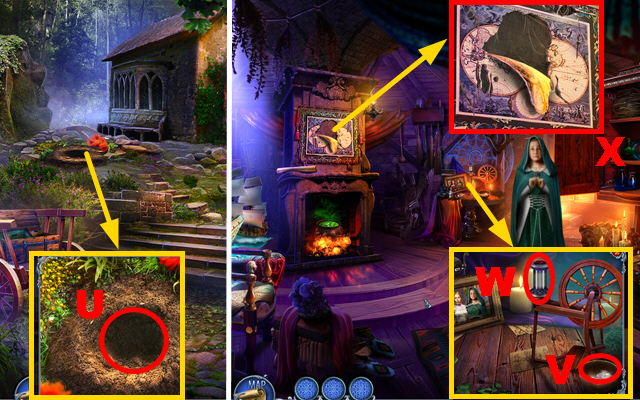
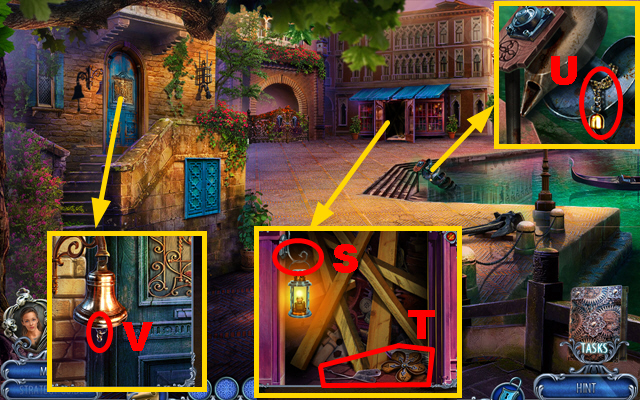
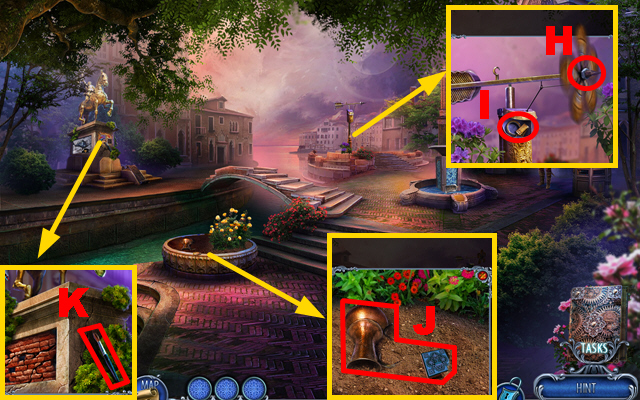
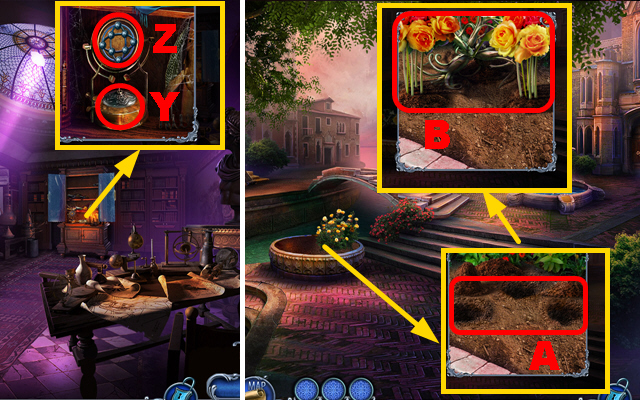
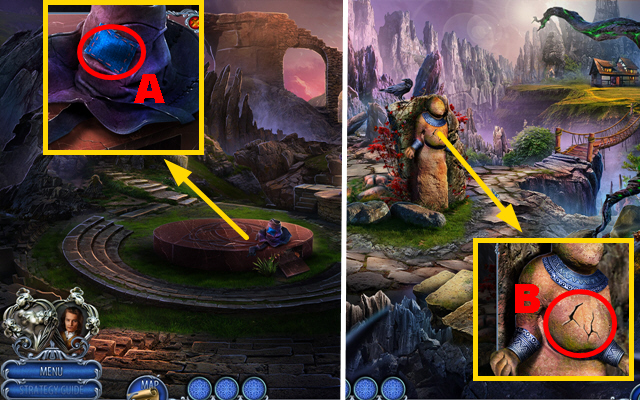
- Take the HOSE (A).
- Take the DUSTER, book, and move the device (B); take the TOOLBOX (C).
- Take the MONOGRAM and place the HOSE (D).
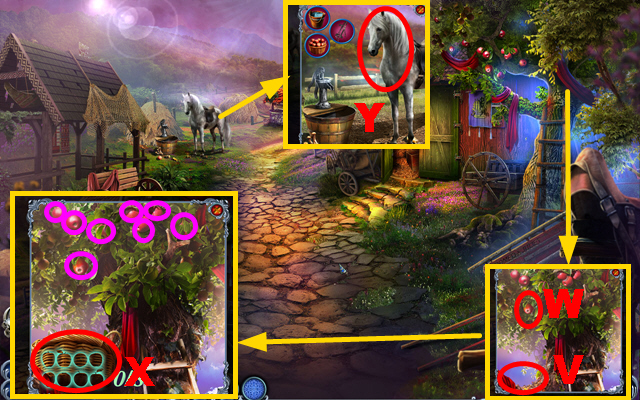
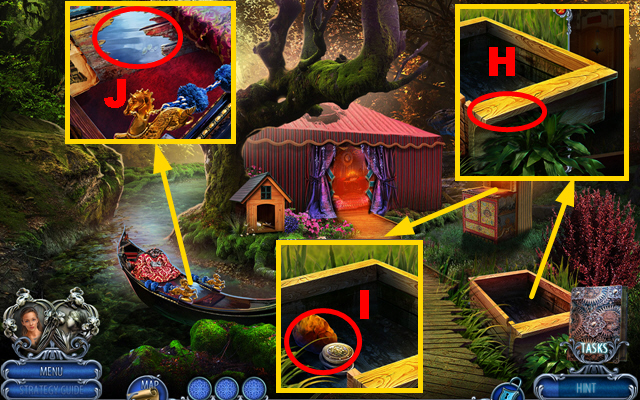
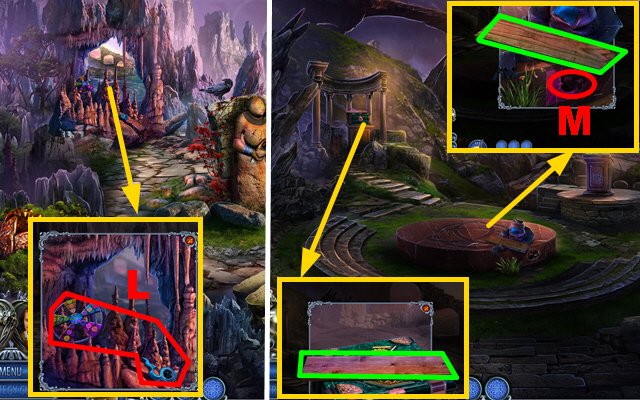
- Move the blanket and play the HOP (E); receive the WOODEN STICKS.
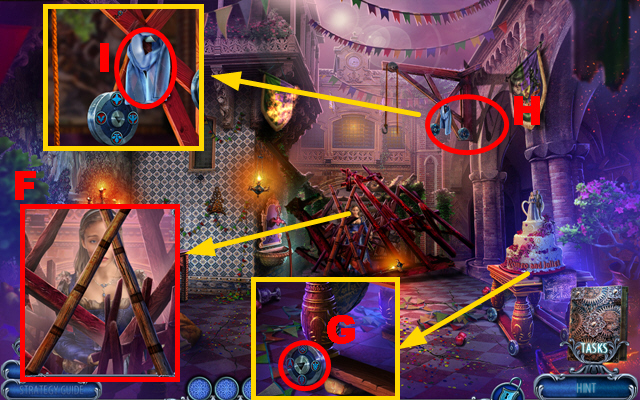
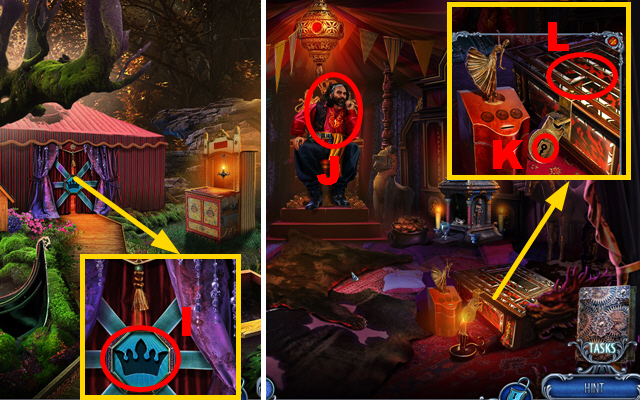
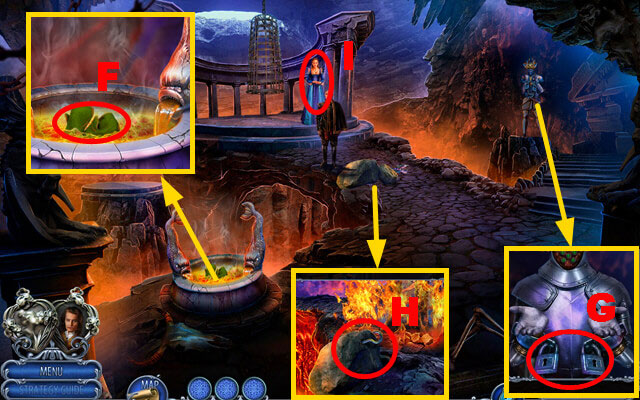
- Take the BROKEN LADDER, talk to Juliet, and take the SHOE (F).
- Apply the SHOE (G); receive the WHEEL.
- Use the WOODEN STICKS and TOOLBOX on the BROKEN LADDER; receive the LADDER.
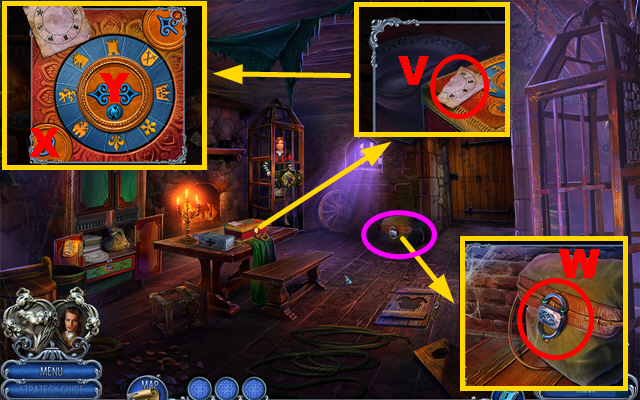
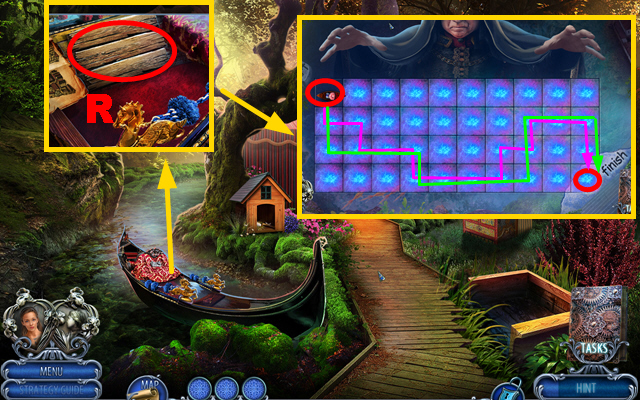
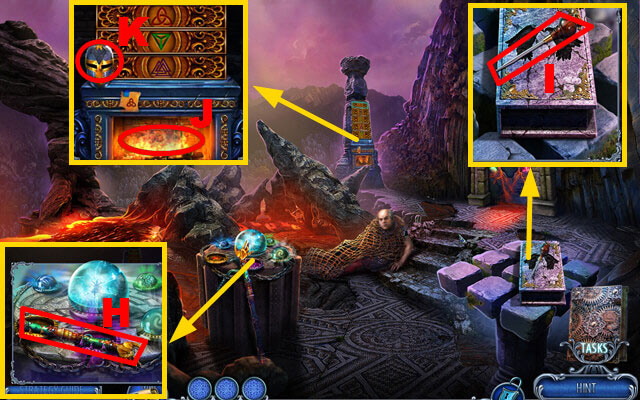
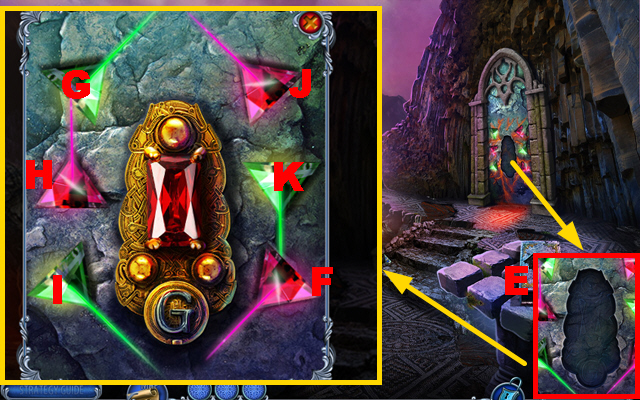
- Place the LADDER (H); take the SCARF and place the WHEEL (I).
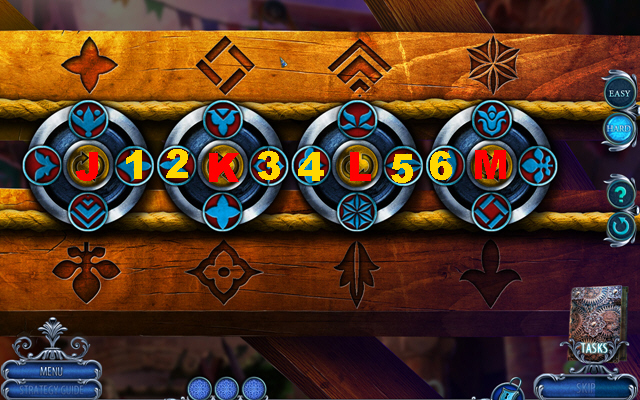
- Play the mini-game.
- Easy solution: L-K-J-Mx2-Kx2-Lx3.
- Hard solution: (1-2)-L-(5-6)-L-(5-6)-L-Kx2-(3-4)-(5-6)-Lx2-(5-6)-Mx3-J-(1-2)-K-Lx2-K-(3-4)-Kx2-Jx2-(1-2)-J-Lx2.
- Switch to Juliet.
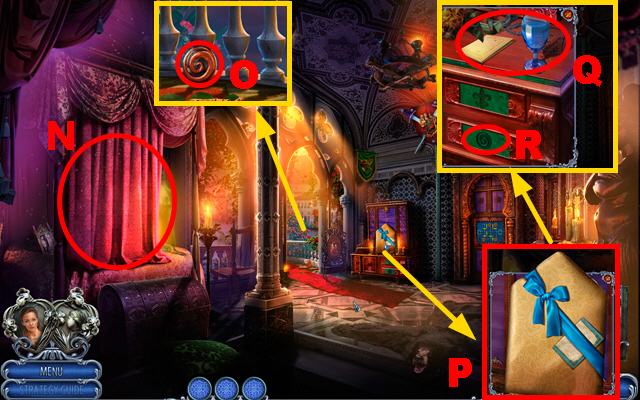
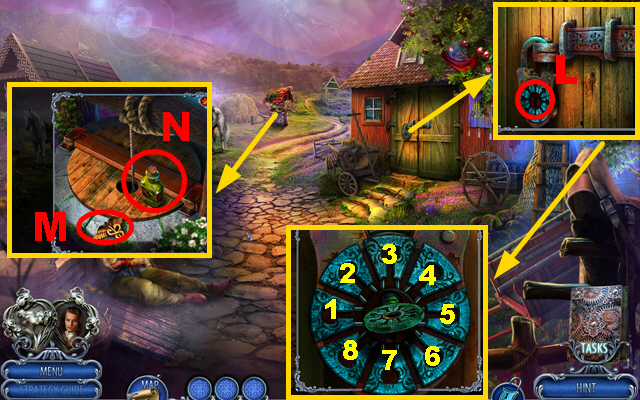
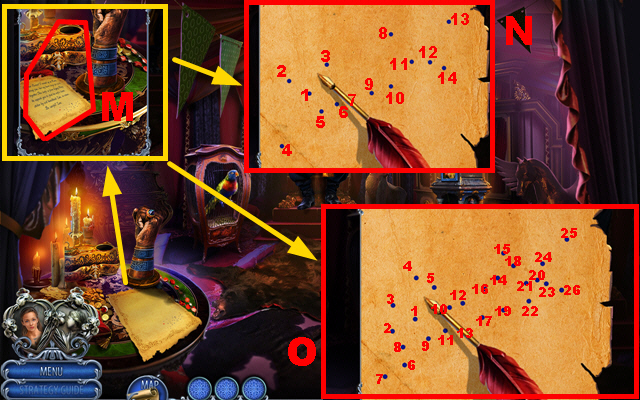
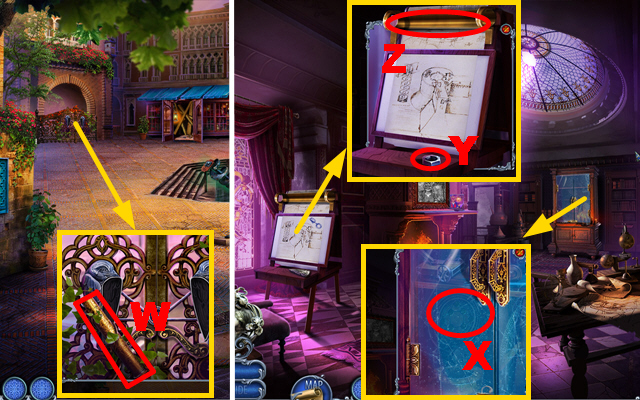
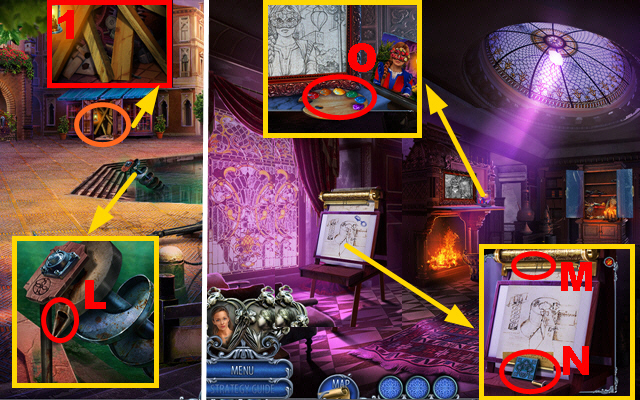
- Move the curtain and play the HOP (N); receive the GOLDEN ROSE.
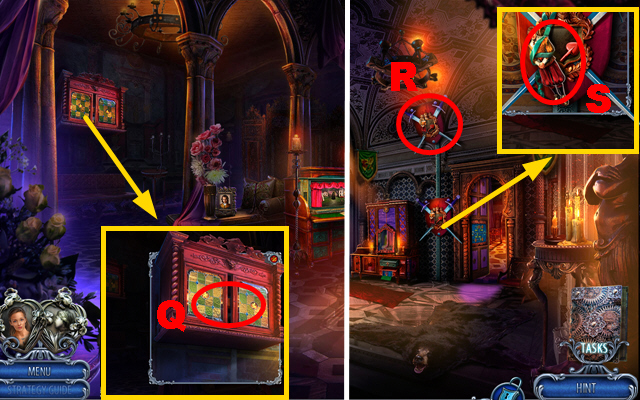
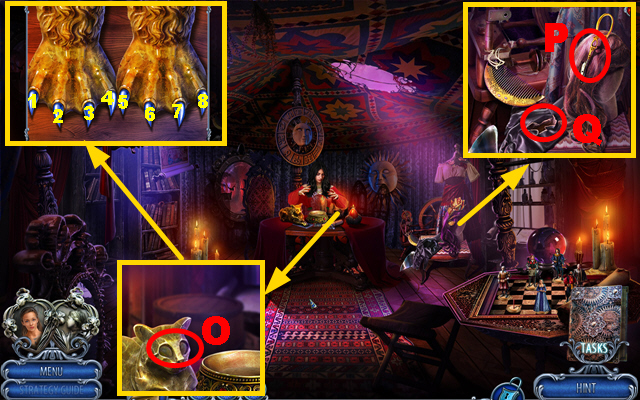
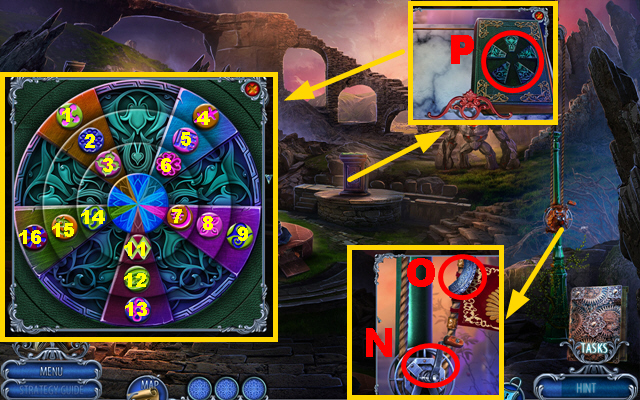
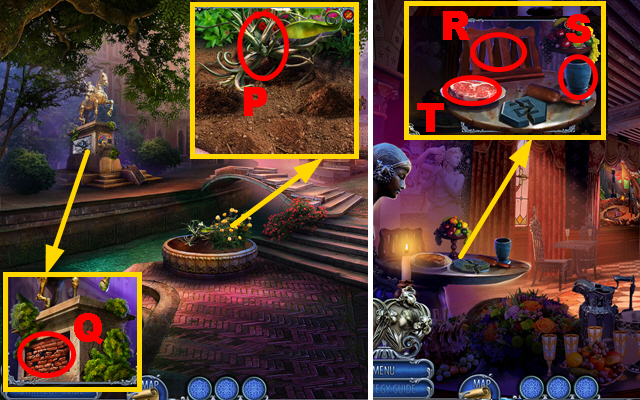
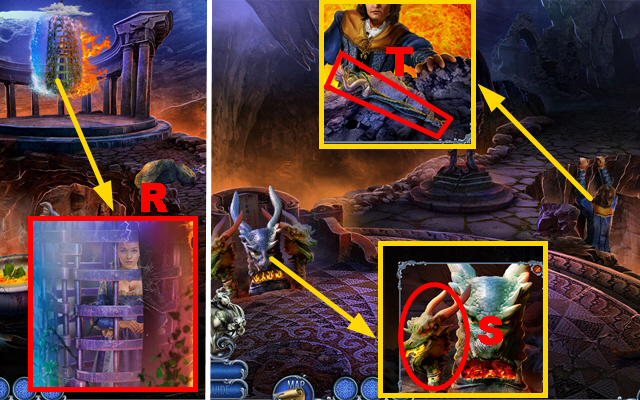
- Take the SPIRAL TOKEN (O).
- Take the card and open the package (P); take the note, GLASS OF WATER (Q), and place the SPIRAL TOKEN (R).
- Play the mini-game.
- Easy solution: (A-F)-(B-C)-(D-E)-green.
- Hard solution: (B-D)-(C-E)-(E-F)-green.
- Take the PLIERS and PHOENIX KEY.
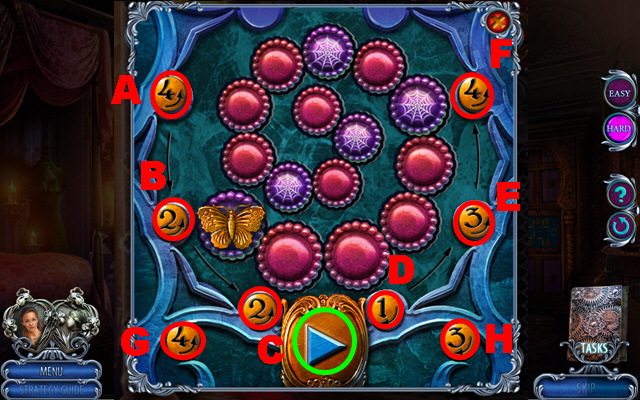
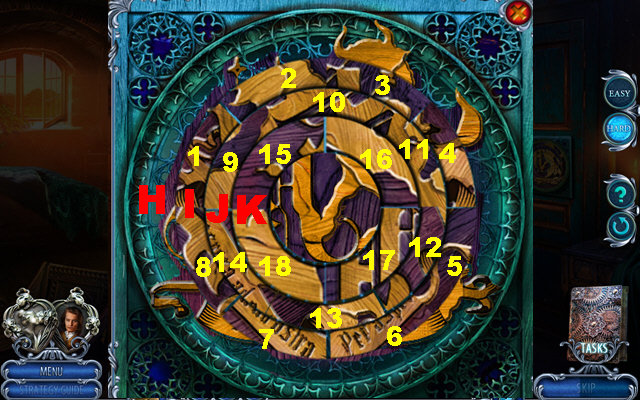
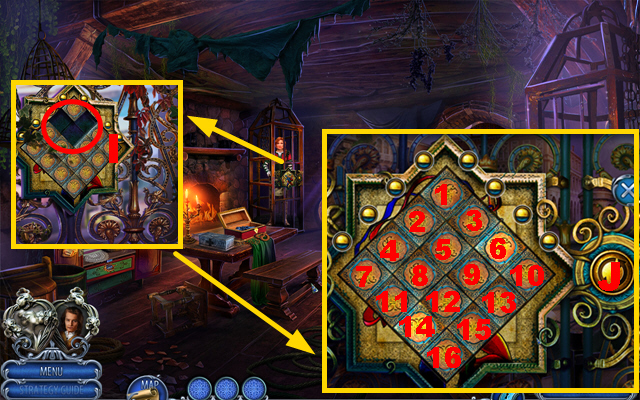
- Place the GOLDEN ROSE (I); play the mini-game.
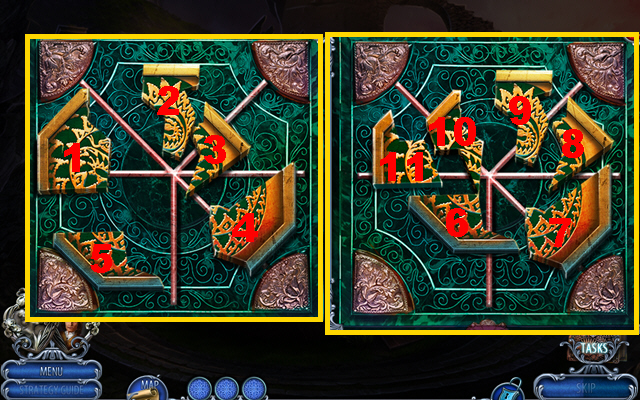
- Easy solution: (10-4)-(4-5)-(5-8)-(2-1)-(3-2)-(9-6)-(6-3)-(8-9)-(9-6)-(6-11).
- Hard solution: (10-4)-(4-5)-(5-8)-(2-1)-(3-2)-(9-6)-(6-3)-(8-9)-(9-6)-(6-11)-(7-8)-(10-4)-(2-5)-(4-1)-(5-4)-(1-2)-(4-1)-(2-5)-(3-2)-(9-6)-(6-3)-(5-6)-(6-11).
- Go forward.
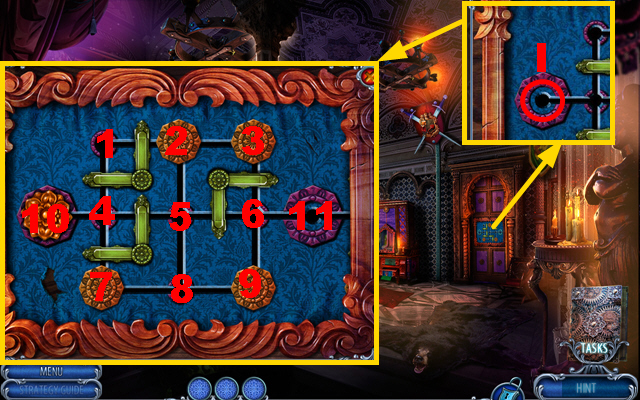
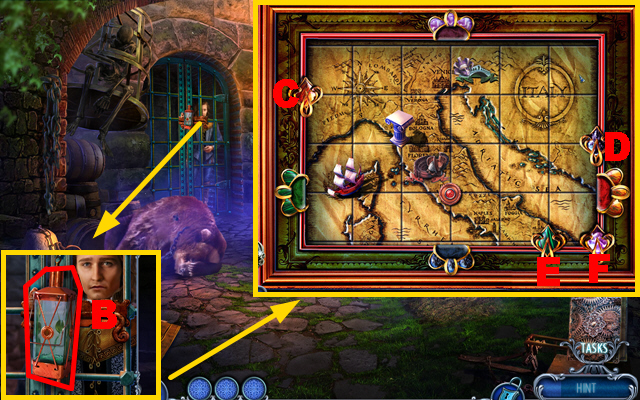
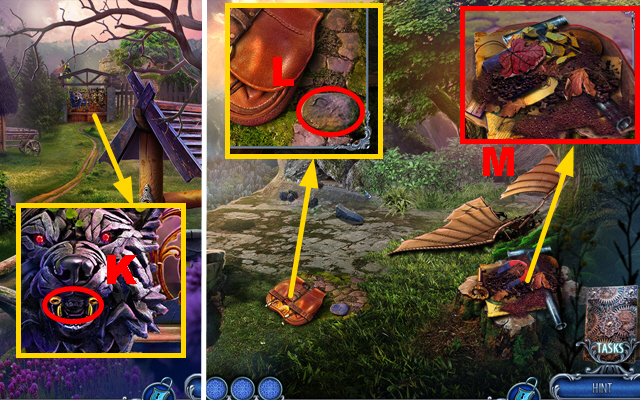
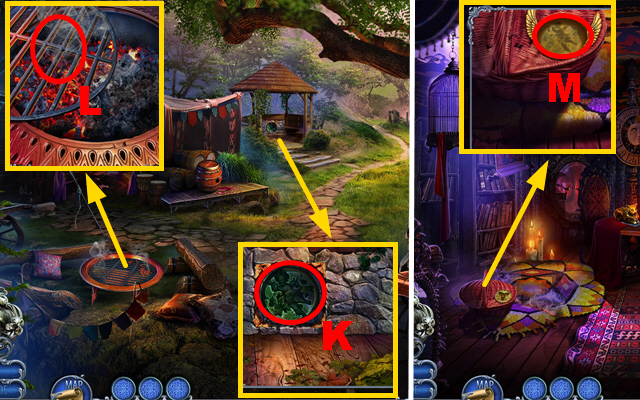
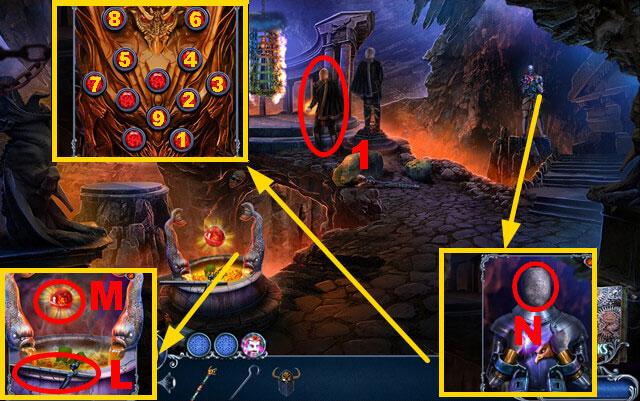
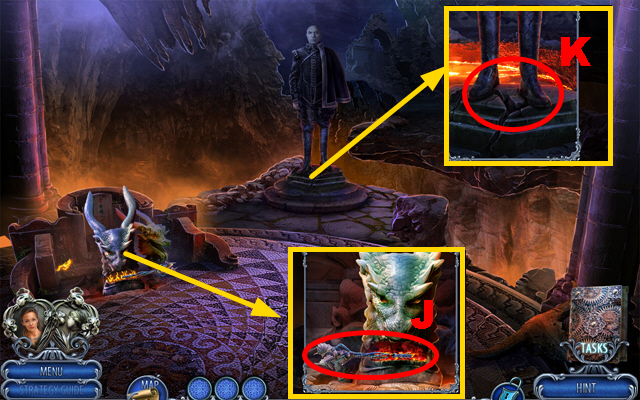
- Take the map, insert the PHOENIX KEY, take FIGURINE 1/2, and the DRILL HANDLE (J); use the GLASS OF WATER and take the CLAY (K).
- Take the DRILL BIT (blue), use the PLIERS, and receive the FLEUR-DE-LIS TOKEN (L); use the CLAY and take the UNFINISHED FLUTE (M).
- Place the DRILL BIT on the DRILL HANDLE; receive the DRILL.
- Use the DRILL on the UNFINISHED FLUTE; receive the FLUTE.
- Go back.
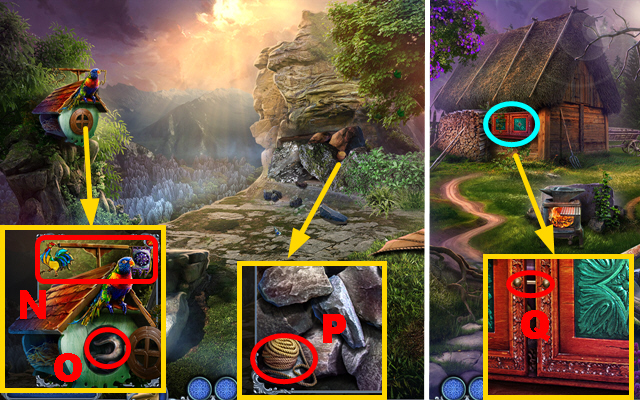
- Use the FLUTE (N).
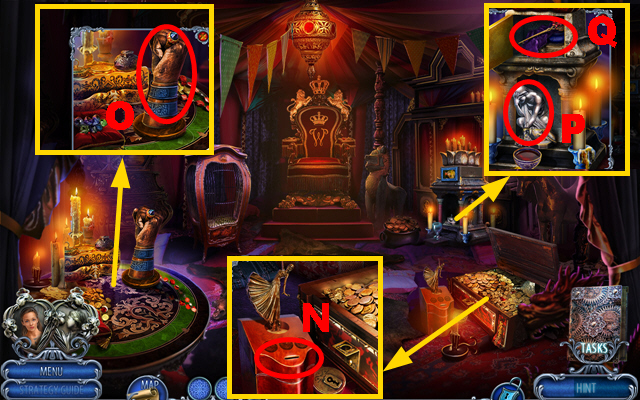
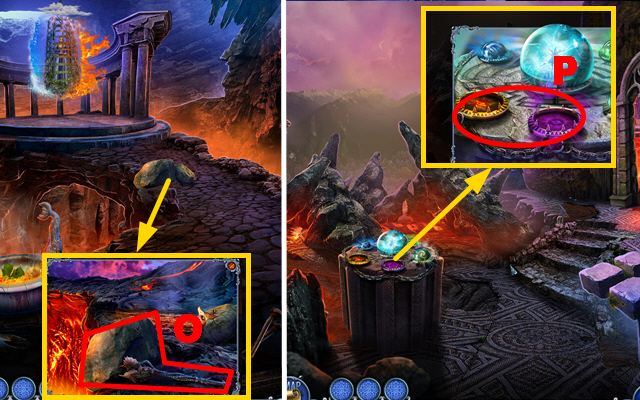
- Place the FLEUR-DE-LIS TOKEN, take the GAUNTLET, and JEWELED AMULET (O).
- Go forward.
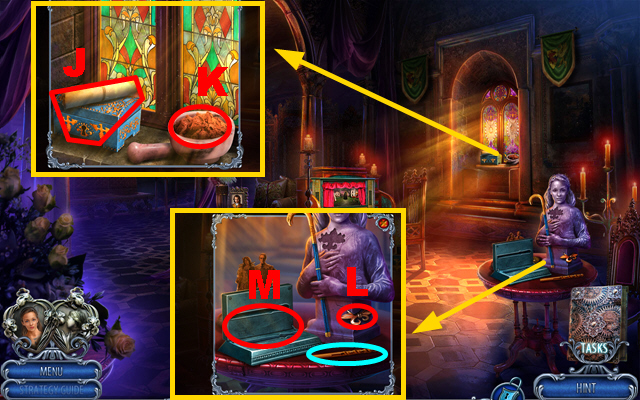
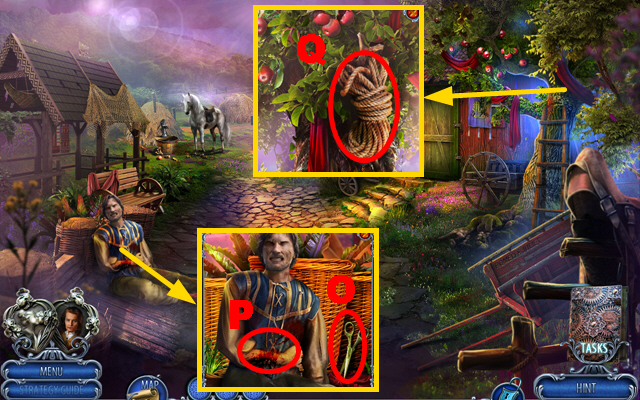
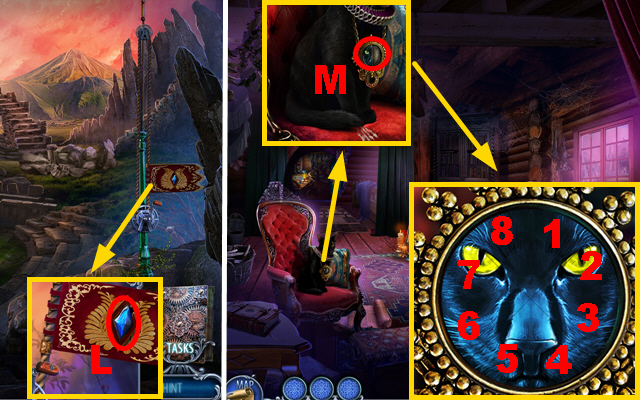
- Place the JEWELED AMULET and take the CANE (P).
- Use the CANE, take the BREAD BASKET, and LASSO (Q).
- Go back.
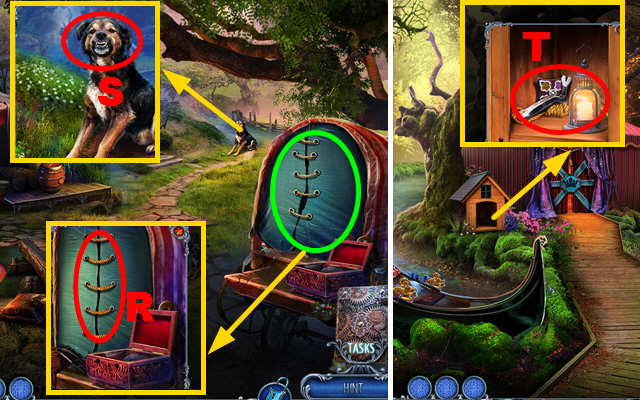
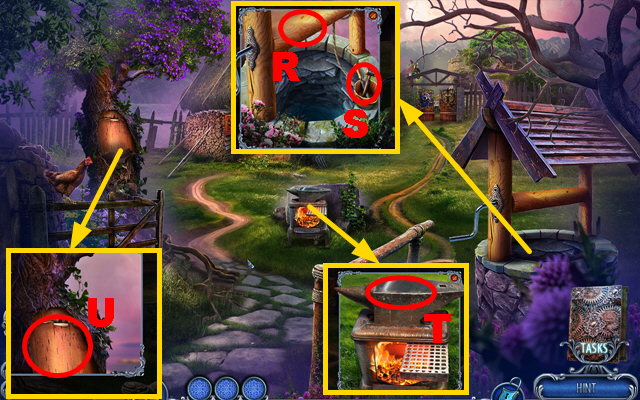
- Throw the LASSO (R).
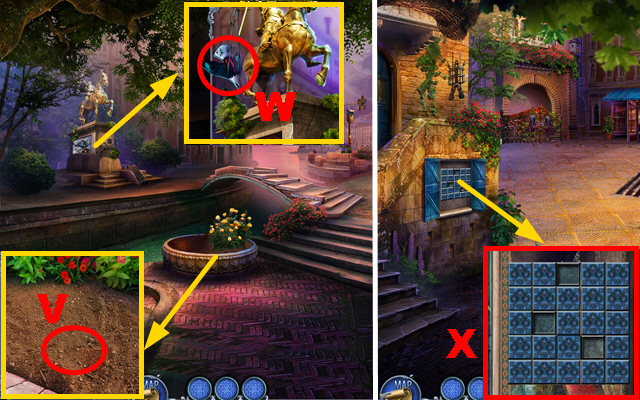
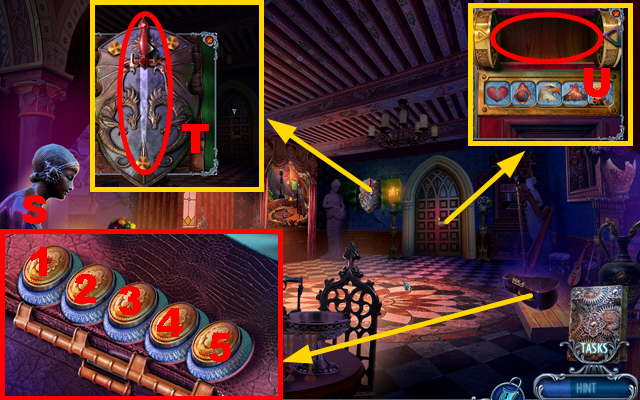
- Take FIGURINE 2/2 and ARROWHEAD 1/2 (S).
- Go forward.

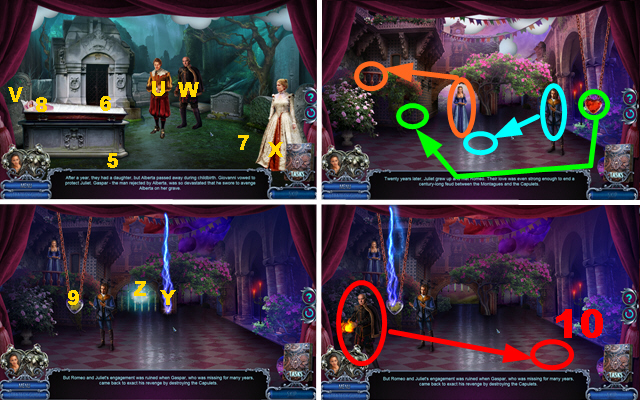
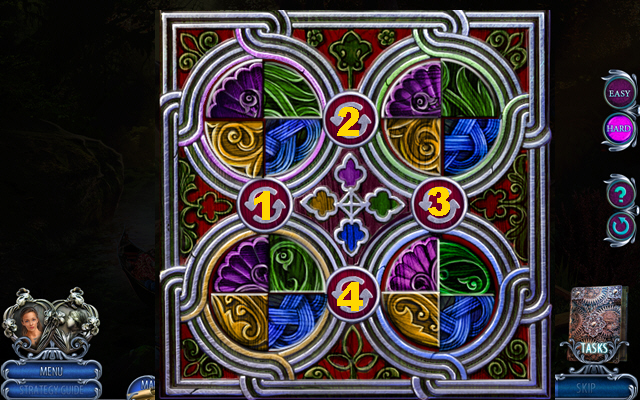
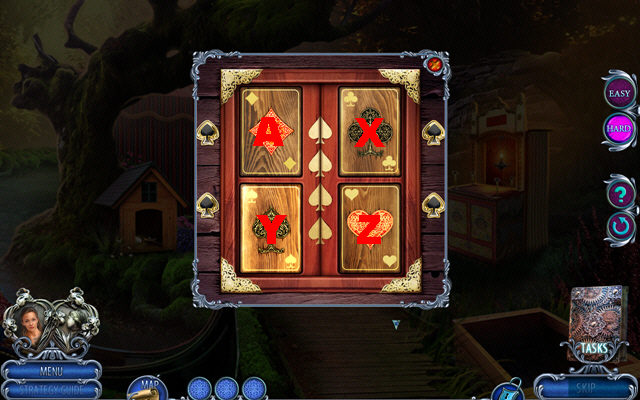
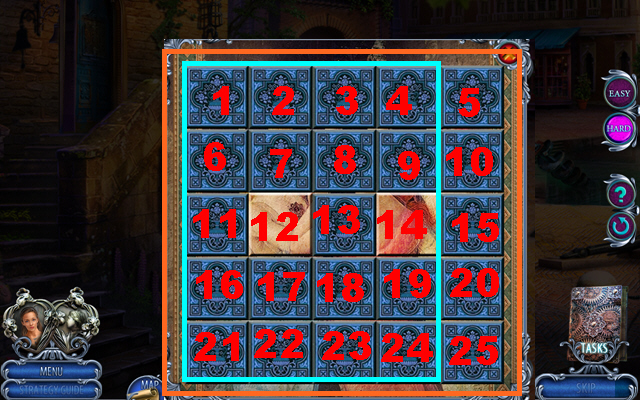
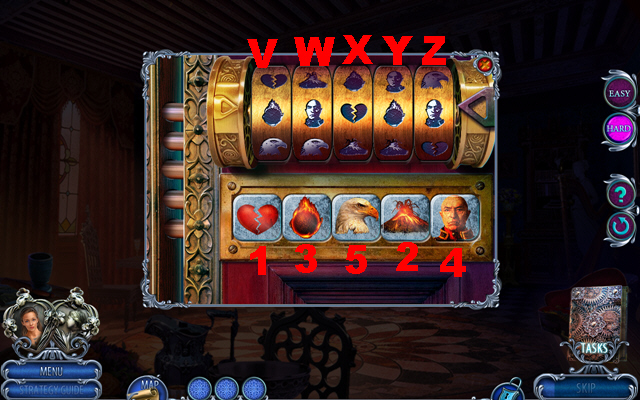
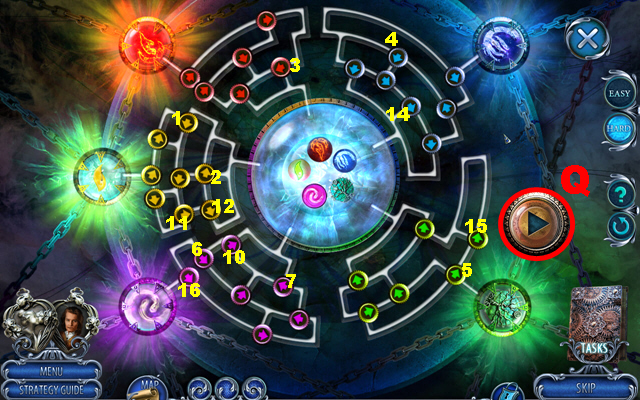
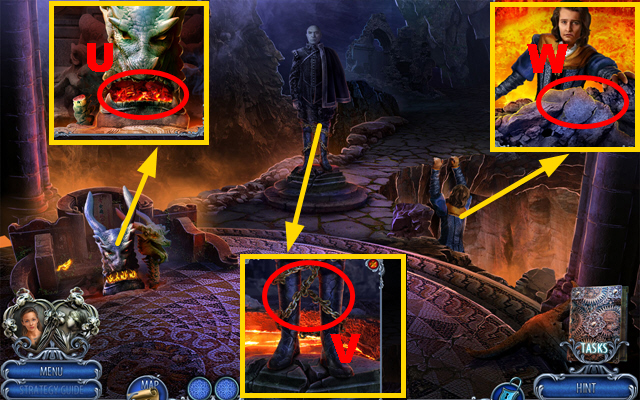
- Place 2 FIGURINES (T); play the mini-game.
- Solution: (1-4)-(U-5, V-6, W-7, X-8)-(orange-green-blue)-(Y-9, Z, 10).
- Take the PAPER and CAPULET CREST.
- Go back.
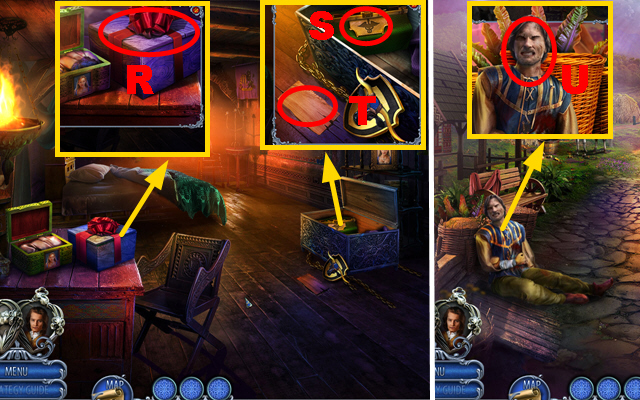
- Place the CAPULET CREST, take the CHAIN, and QUILL AND INK (A).
- Apply the QUILL AND INK to the PAPER; take JULIET'S MESSAGE.
- Give the BREAD BASKET and JULIET'S MESSAGE (B).
- Switch to Romeo; take the note.
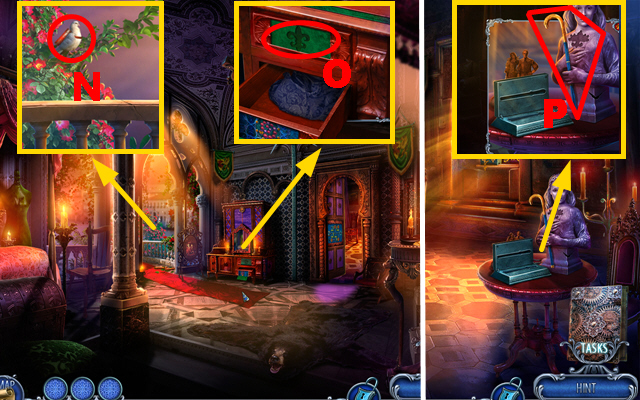
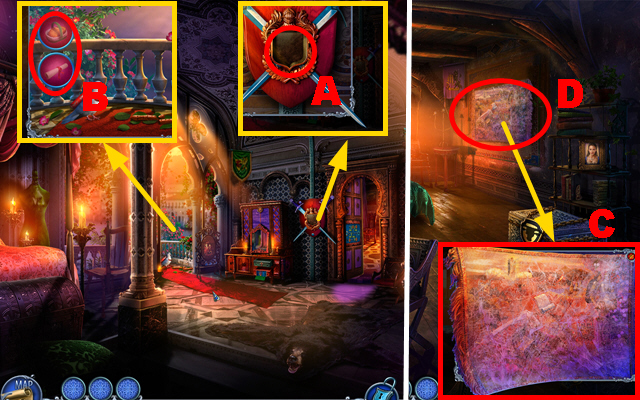
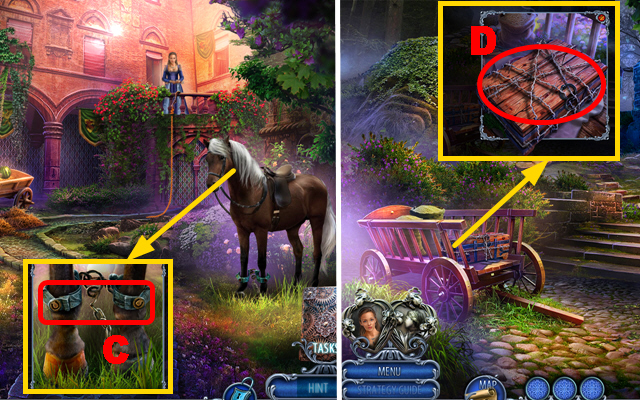
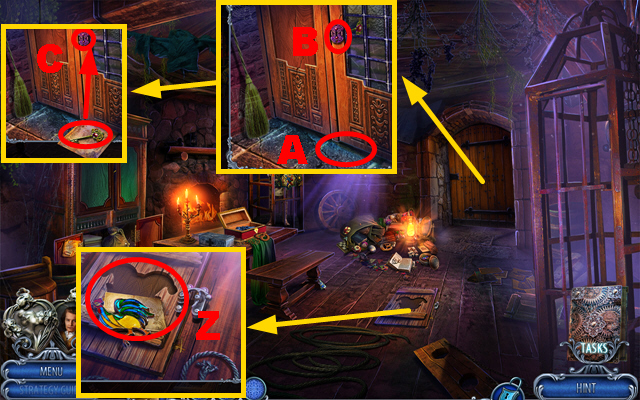
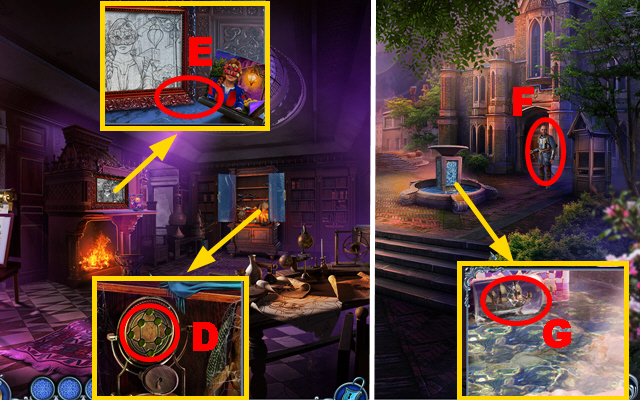
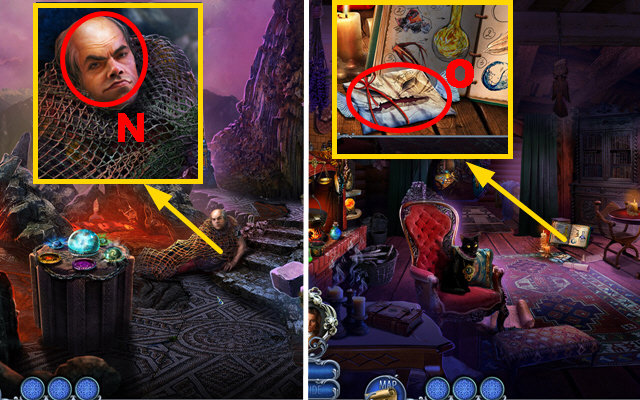
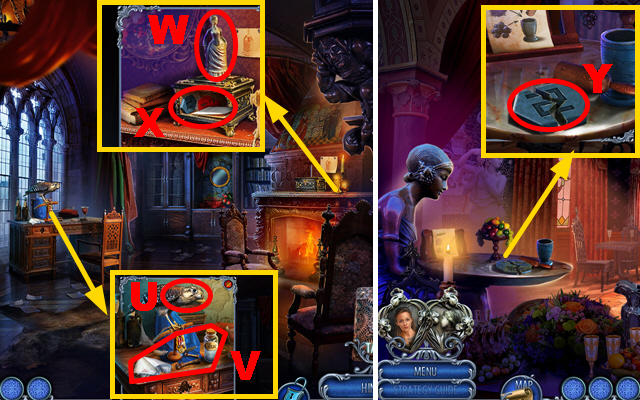
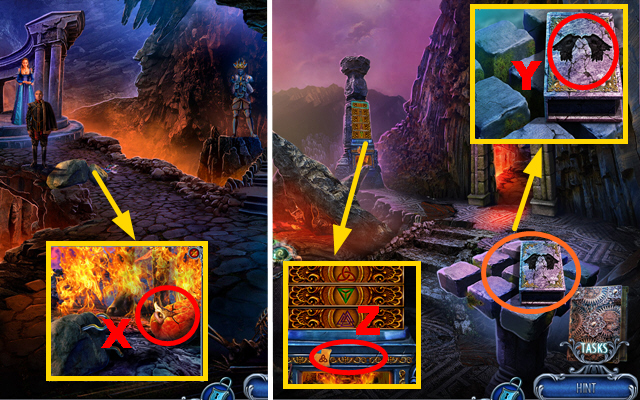
- Use the DUSTER (C) and play the HOP (D); receive the BULL AMULET.
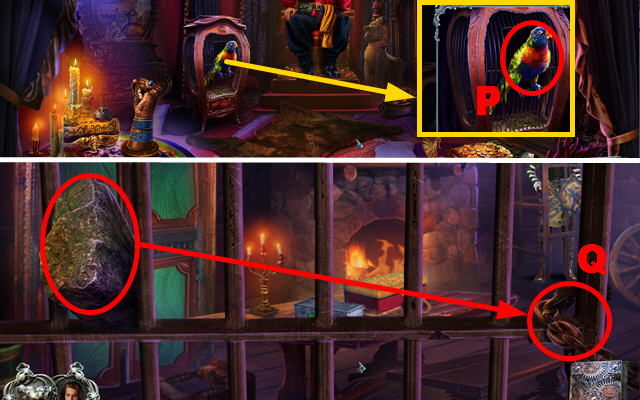
- Place the BULL AMULET and take the JULIET FIGURINE (E).
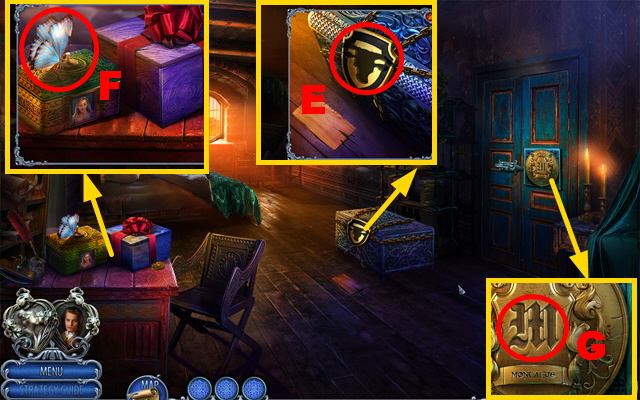
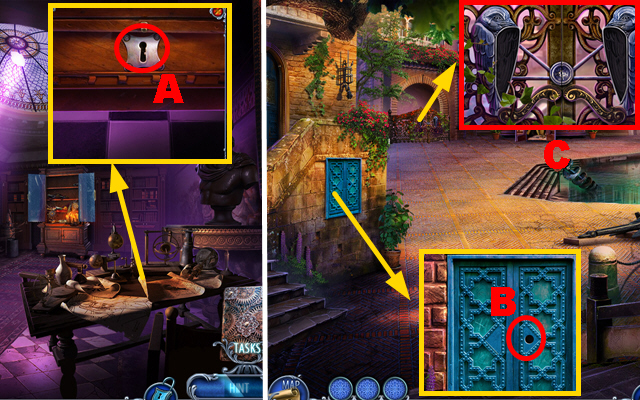
- Move the butterfly, place the JULIET FIGURINE, and take the EMERALD KEY (F).
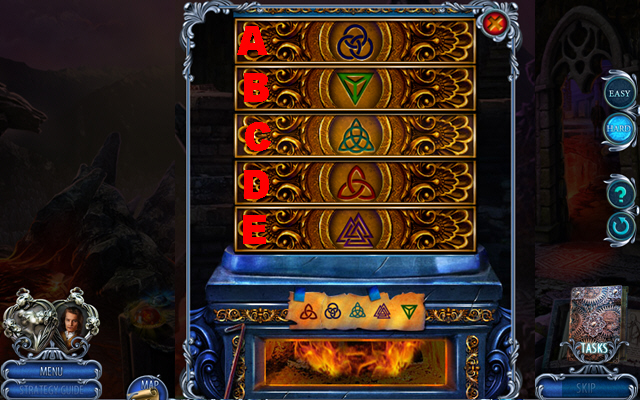
- Insert the MONOGRAM (G).
- Play the mini-game.
- Easy solution: Hx6-Ix7-Kx5-J.
- Hard solution: (18-16)-(17-15)-(18-17)-(9-10)-(13-14)-(14-12)-(10-11)-(6-7)-(4-5)-(1-8)-(2-3).
- Enter the Yard.
- Insert the EMERALD KEY (L); play the mini-game.
- Easy solution: 1-3-4-6-7-2-3.
- Hard solution: 8-3-4-6-7-4.
- Take the SAW and PITCHFORK.
- Take the MEDICAL BAG KEY (M); take the OLIVE OIL, use the SAW, pull the bucket, and take the BUCKET OF WATER (N).
- Take the SCISSORS (O) and use the SCARF (P).
- Take the ROPE (Q).
- Go back.
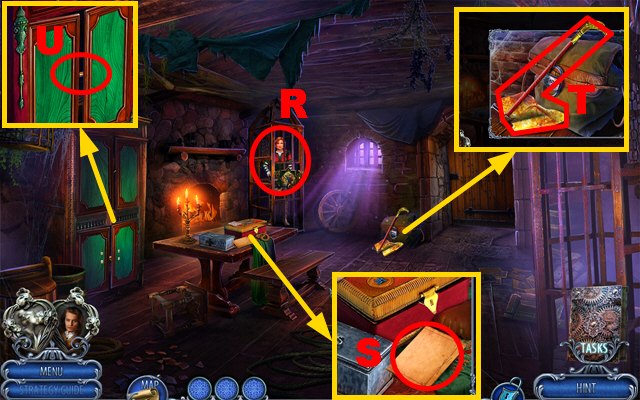
- Use the SCISSORS, take the CROWBAR, and BASKET (R).
- Place the MEDICAL BAG KEY and take the MEDICINE (S); use the CROWBAR, take the RUSTY PRUNERS, and BRIDLE (T).
- Apply the OLIVE OIL to the RUSTY PRUNERS; receive the PRUNERS.
- Go forward.
- Give the MEDICINE (U); take the HAND CANE.
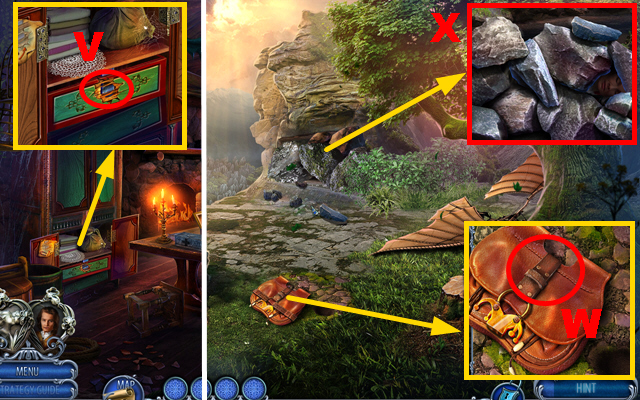
- Use the BASKET (V) and HAND CANE (W); collect 8 apples (purple) and take the BASKET OF APPLES (X).
- Give the BUCKET OF WATER, BASKET OF APPLES, and BRIDLE (Y).
Chapter 2: The Garden
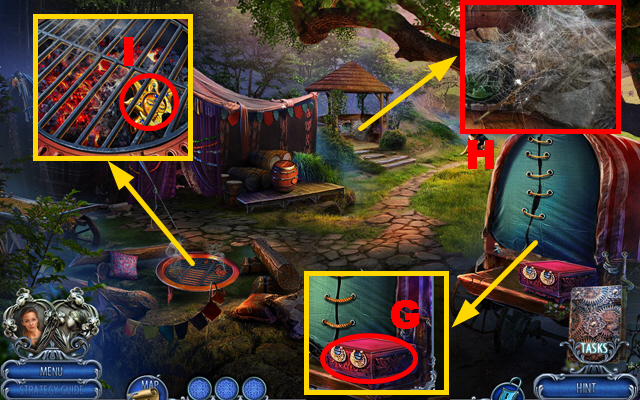
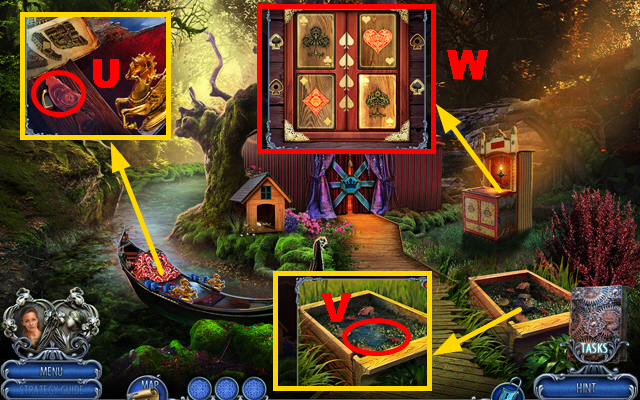
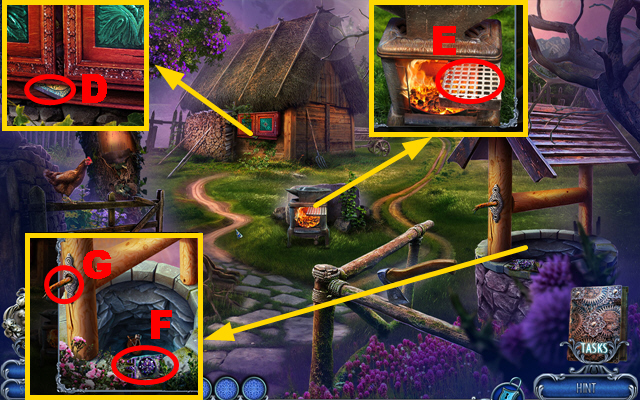
- Use the PRUNERS and take the HOOK (Z).
- Place the HOOK on the ROPE; receive the HOOK ON A ROPE.
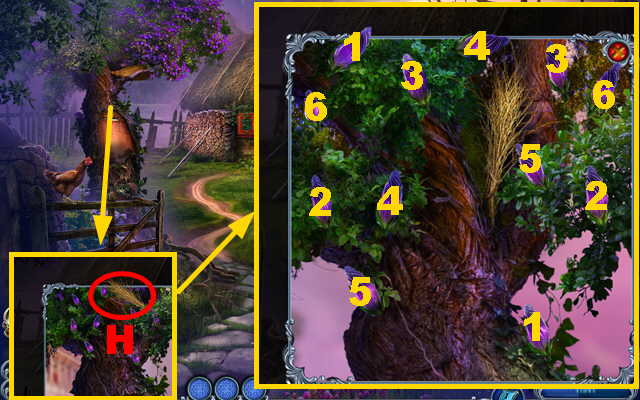
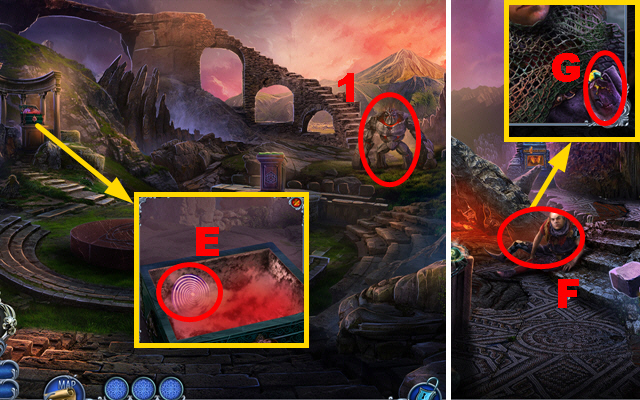
- Use the PITCHFORK (A) to play the HOP; receive the HORSESHOE KEY.
- Throw the HOOK ON A ROPE (B).
- Insert the HORSESHOE KEY (C).
- Switch to Juliet.
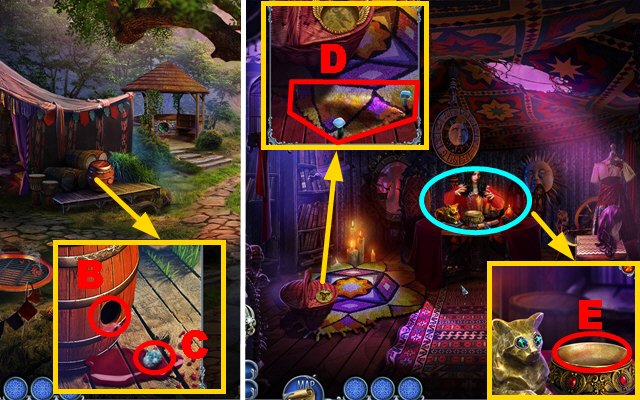
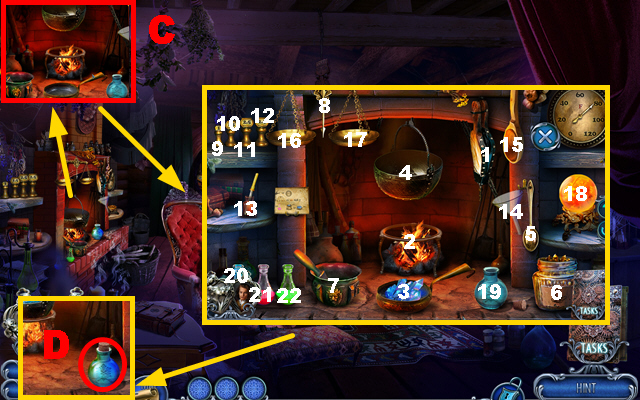
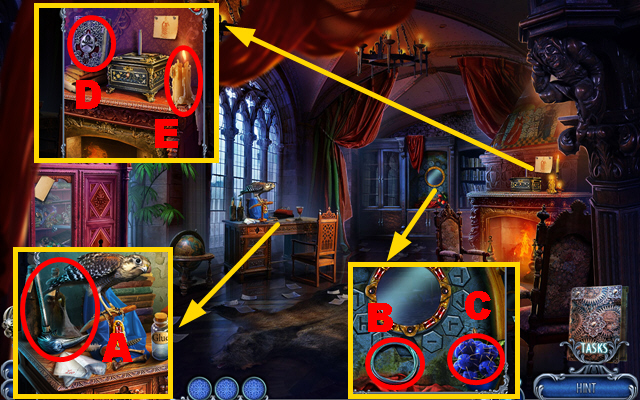
- Use the GAUNTLET, take the FILE, and ACID (D).
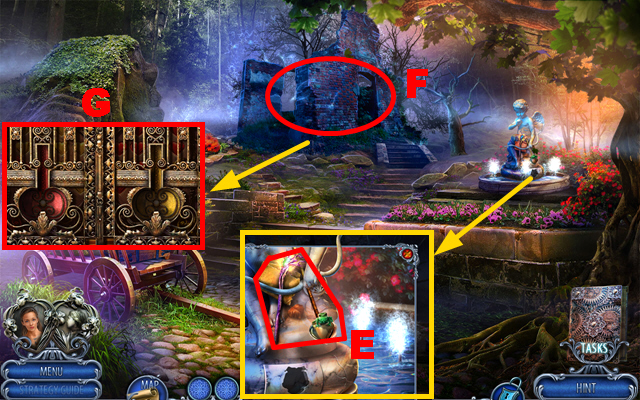
- Take the MAGIC STAFF, note, use the ACID, and receive ARROWHEAD 2/2 (E).
- Use the MAGIC STAFF (F).
- Place 2 ARROWHEADS (G).

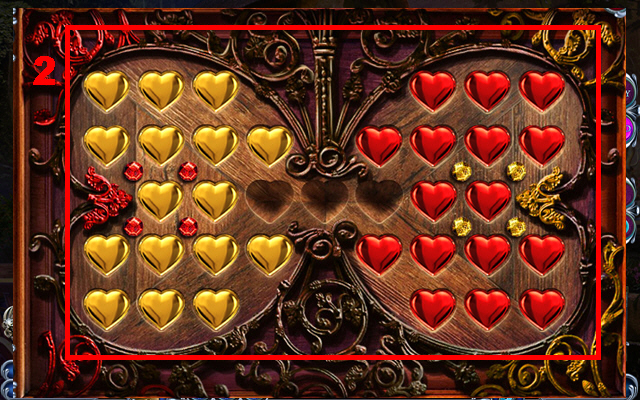
- Play the mini-game.
- Easy solution (1): Switch 14 yellow hearts to the right side and 14 red hearts to the left side.
- Hard solution (2): Switch 16 yellow hearts to the right side and 16 red hearts to the left side.
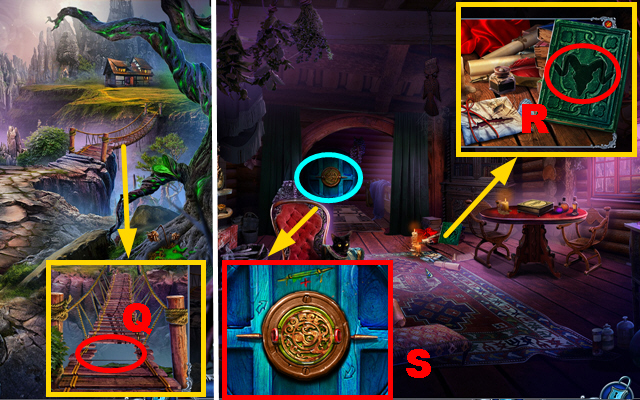
- Enter Lucretia's House.
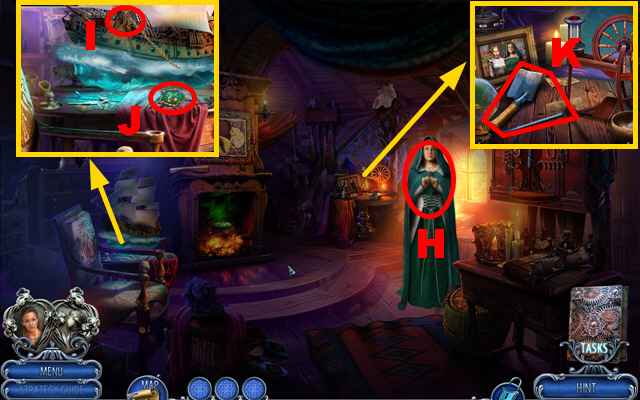
- Talk to the woman (H); take the MAGIC MAP.
- Place the CHAIN (I); take the STONE CREST (J).
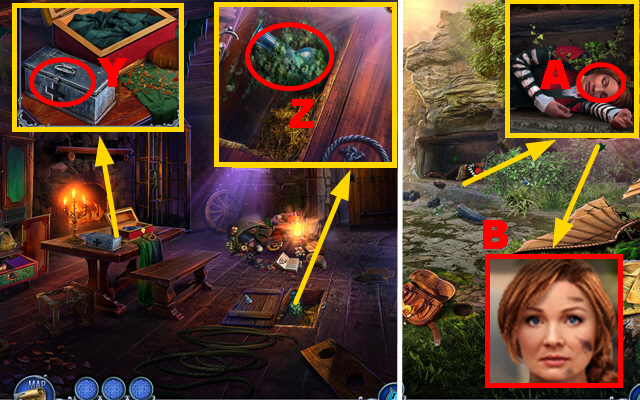
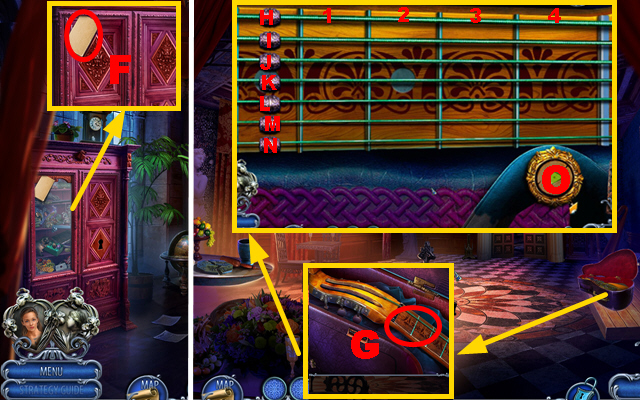
- Take the SHOVEL and NEEDLE (K).
- Take the note from the MAGIC MAP and use the NEEDLE on it.
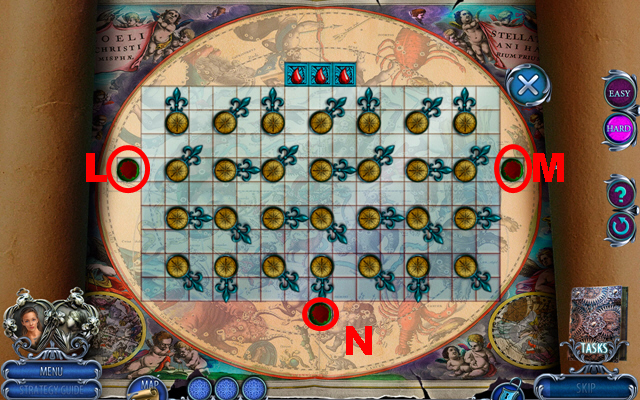
- Play the mini-game.
- Easy solution: (L-rightx2-rightx2-upx2-up-right-right-right-up)-(M-leftx2-leftx2-up-leftx2-up-left-upx2-left)-(N-up-left-up-upx2-upx2-upx2-up-right-right-up).
- Hard solution: (L-right-upx2-up-rightx2-rightx2-rightx2-up-right)-(M-left-up-left-left-upx2-leftx2-downx2-left-left-upx2-up)-(N-up-rightx2-rightx2-left-upx2-right-right-downx2-rightx2-upx2-left-left-upx2-rightx2-upx2-left-left-upx2-leftx2-downx2-left-left-upx2-left-left-up).
- Take EMERALD 1/2.
- Go back.

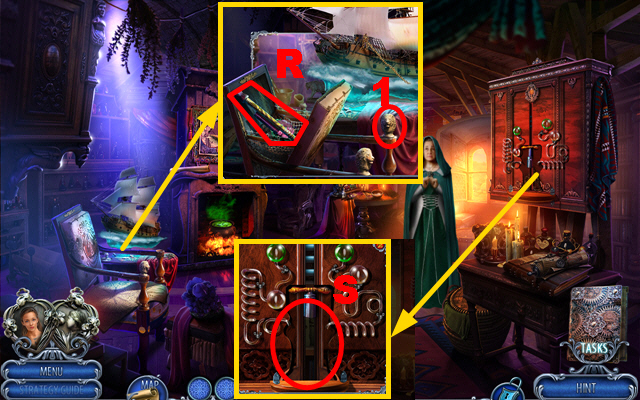
- Place the STONE CREST, take the TWEEZERS, and LION KNOB (O).
- Use the SHOVEL and take EMERALD 2/2 (P).
- Insert 2 EMERALDS, take the GLOVES, and GLASS VIAL (Q).
- Go forward.
- Place the LION KNOB (1); take the BLOWPIPE and PINCUSHION (R).
- Place the GLASS VIAL, pull the note, take the MAGIC COTTON SEEDS, and note (S).
- Go back.
- Use the MAGIC COTTON SEEDS and TWEEZERS (U); receive the COTTON.
- Go forward.
- Place the COTTON (V); take the MAGIC THREAD (W).
- Apply the MAGIC THREAD to the PINCUSHION; receive the NEEDLE AND THREAD.
- Use the NEEDLE AND THREAD (X).

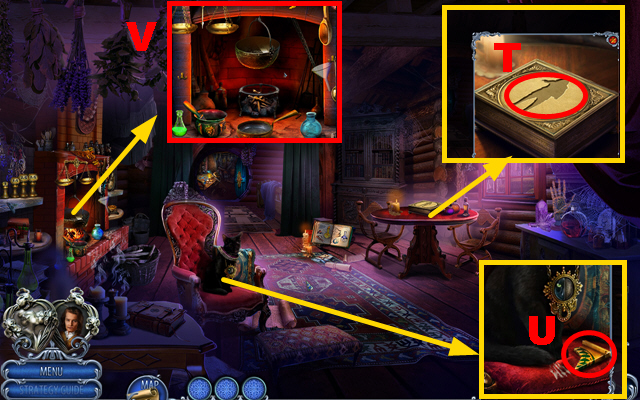
- Use the FILE (Y) and play the HOP (purple); receive the TRANQUILIZER DART.
- Use the GLOVES, take the EARRING, and OIL CAN (Z).
- Put the TRANQUILIZER DART into the BLOWPIPE; receive the TRANQUILIZER BLOWPIPE.
- Use the TRANQUILIZER BLOWPIPE (A).
- Take the OLD LAMP and use the OIL CAN (B); play the mini-game.
- Easy solution: (D-left-down)-(C-right-down-right)-(E-left-up-left-down-left)-(F-left-up-left-up).
- Hard solution: (D-left-down)-(C-right-down)-(E-up-right-down-left-down-left)-(F-left-up-right-down-left-up).
- Use the EARRING, take the THREAD, EYE 1/2, and SHAWL (G).
- Use the SHAWL, take EYE 2/2, and the CANE (H).
- Use the CANE and take the SUN AND MOON AMULET (I).
- Insert the SUN AND MOON AMULET (J).
- Take PUZZLE PART 1/2 (K).
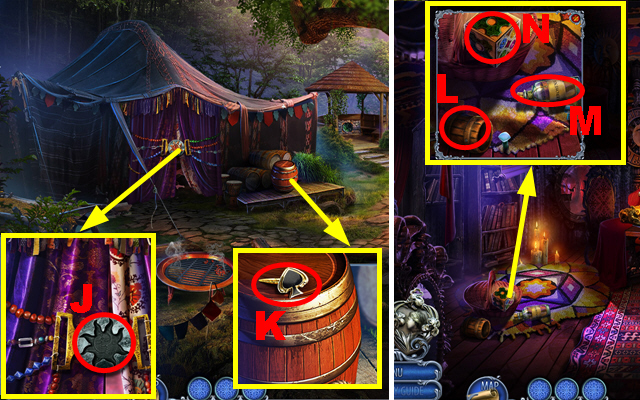
- Enter the Tent.
- Take the MUG (L), KEROSENE (M), and BOX (N).
- Place 2 EYES (O); play the mini-game.
- Easy solution: 8-7-6-4-3-1-5-2.
- Hard solution: 8-7-6-1-5-2-3-4.
- Take the NEEDLE.
- Place the NEEDLE on the THREAD; receive the THREAD AND NEEDLE.
- Take the SCISSORS PART (P); use the THREAD AND NEEDLE (Q) to receive the SHARP SHARD.
- Go back.
Chapter 3: The Dock
- Use the SHARP SHARD (R) and play the HOP (green); receive the MEAT.
- Give the MEAT (S).
- Go to the Dock.
- Use the OLD LAMP, take the BOX FRAGMENT, NAIL PULLER, and NOOSE (T).
- Place the BOX FRAGMENT on the BOX.
- Play the mini-game.
- Easy solution: 1-4-3-2.
- Hard solution: 1-3-2-4.
- Take the CRYSTAL BALL.
- Use the SCISSORS PART and take PUZZLE PART 2/2 (U).
- Place the MUG, receive the MUG OF WATER, and take the INKWELL (V).
- Place 2 PUZZLE PARTS (W).
- Play the mini-game.
- Easy solution: Z-A-Yx2.
- Hard solution: X-A-Yx2-Z-Xx3.
- Take the EMPTY LIGHTER.
- Go back.
- Use the NOOSE (B); take the BARRETTE (C).
- Enter the Tent.
- Use the NAIL PULLER and take the COTTON (D).
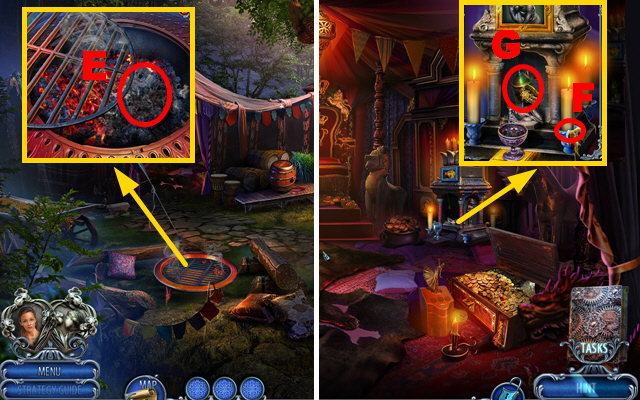
- Place the CRYSTAL BALL (E) and play the HOP (blue).
- Take the JOKER CARD.
- Go to the Dock.
- Put the COTTON and KEROSENE in the EMPTY LIGHTER; receive the LIGHTER.
- Use the LIGHTER and take the FIGURINE (F).
- Go to the Tent.
- Place the FIGURINE (G).
- Play the mini-game.
- Solution: Use the figurines (orange) to corner Gaspar (H).
- This puzzle is randomized.
- Take the CROWN INLAY.
- Go to the Dock.
- Place the CROWN INLAY (I).
- Go forward.
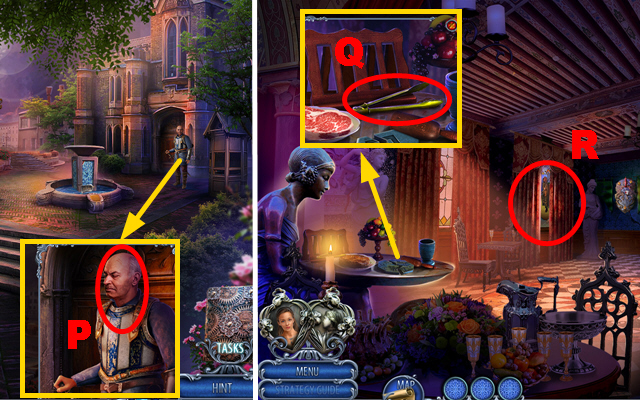
- Talk to Stefan (J); receive the KNIFE.
- Use the BARRETTE (K); take the QUILL and RUSTY SAW (L).
- Place the INKWELL and QUILL (M); play the mini-game.
- Easy solution (N): 1-14.
- Hard solution (O): 1-26.
- Take the MESSAGE TO ROMEO.
- Open the KNIFE; put the MESSAGE TO ROMEO into it; receive the KNIFE WITH MESSAGE.
- Give the KNIFE WITH MESSAGE (P).
- Switch to Romeo.
- Receive the KNIFE WITH MESSAGE, open it, take the note, and receive the KNIFE.
- Use the KNIFE and stone (Q).
- Inspect the area (R).
- Take the note (S), LUCAS' CANE, and RESIN-COVERED CRANK (T).
- Use LUCAS' CANE, take the HAIRPIN, and NIPPERS (U).
- Use the NIPPERS (W) and play the HOP (purple); receive the TORN SHEET.
- Place the TORN SHEET (V); play the mini-game.
- Easy solution: Xx2-Y-Xx4.
- Hard solution: Y-Xx3-Y-X.
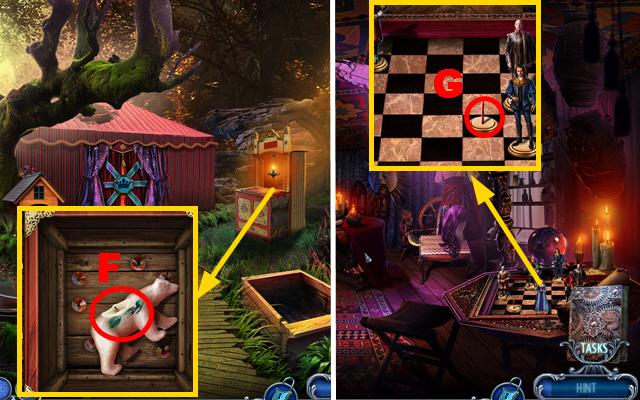
- Take the JESTER HAT INLAY and LOCK TILE 1/3.
- Take ROOSTER AND FLAG 1/2, the PARCHMENT, place the JESTER HAT INLAY, take the BEAR CLAW, and LOCK TILE 2/3 (Z).
- Use the PARCHMENT (A) and HAIRPIN (B); insert the key (C).
- Enter the Backyard.
- Take LOCK TILE 3/3 (D).
- Place the RESIN-COVERED CRANK and take the CRANK (E).
- Take the ROOSTER AND FLAG 2/2 (F); remove the broken crank and place the CRANK (G).
- Use LUCAS' CANE (H); play the mini-game.
- Easy solution: 1-5.
- Hard solution: 1-6.
- Take the BROOM.
- Go back.
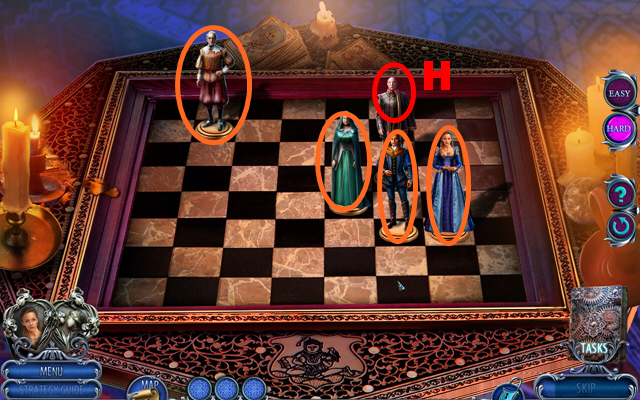
- Place 3 LOCK TILES (I); play the mini-game.
- Easy solution: (1-5)-(5-12)-(12-16)-(12-5)-(5-1)-(7-8)-(8-9)-(9-10)-(9-8)-(8-7)-(5-12)-(8-9)-15-J-11-Jx2-4-J-3-Jx2-14-Jx2-8-Jx3-12-Jx3-13-J-9-Jx2-5-J.
- Hard solution: (1-5)-(5-12)-(12-16)-(12-5)-(5-1)-(7-8)-(8-9)-(9-10)-(9-8)-(8-7)-11-Jx2-15-J-13-J-4-J-3-Jx2-14-Jx2-(8-9)-(5-12)-12-Jx2-8-Jx2-16-Jx2.
- Take the FANGS.
- Go forward.
Chapter 4: The Cliff
- Place the FANGS (K).
- Go forward.
- Use the BEAR CLAW and take the MEDICAL SYMBOL (L).
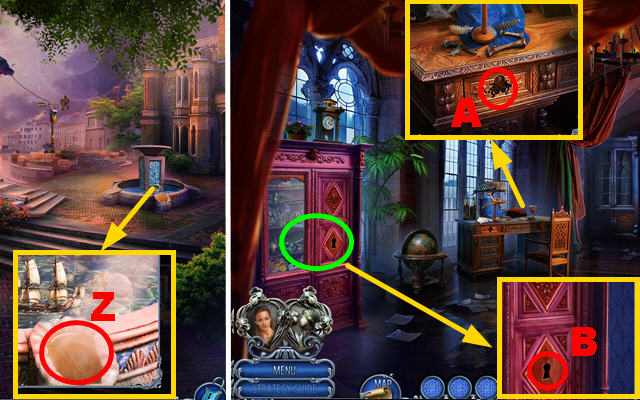
- Use the BROOM, take the MAGNET, PIPE, and RULER (M).
- Place the ROOSTER AND FLAG (N); take the HOOK (O).
- Take the ROPE (P).
- Go back.
- Use the RULER (Q) and play the HOP (blue); receive the CROSSCUT SAW.
- Place the ROPE and HOOK (R); take the HAMMER and FILE (S).
- Use the PIPE, HAMMER, and take the CROWBAR (T).
- Use the CROSSCUT SAW (U); receive WRITING TOOL 1/2.
- Go back.
- Use the MAGNET, take the ROCK, and WRITING TOOL 2/2 (V).
- Go to the Cliff.
- Use the FILE, take STEFAN'S WIFE'S LOCKET and the DYNAMITE (W).
- Use the CROWBAR (X).
- Go back twice.
- Place the MEDICAL SYMBOL, take the SCRAPER, and SMELLING SALTS (Y).
- Use the SCRAPER and take the GLASS VIAL (Z).
- Go to the Cliff.
- Give the SMELLING SALTS (A); receive LEONARA'S WORKSHOP ADDRESS (B).
- Open STEFAN'S WIFE'S LOCKET, select it, and put LEONARA'S WORKSHOP ADDRESS into it; receive the MESSAGE TO JULIET.
- Give the MESSAGE TO JULIET (C).
- Switch to Juliet; receive the LOCKET.
- Open the LOCKET; take LEONARA'S WORKSHOP ADDRESS from it.
- Give the LOCKET (D); receive the CANDLE.
- Go back twice.
- Use the CANDLE (E); receive the LIT CANDLE.
- Go forward twice.
- Place the LIT CANDLE (F); take BRACELET 1/2 and the OIL CAN (G).
- Use the OIL CAN on the RUSTY SAW; receive the SAW.
- Go back.
- Use the SAW (H) to receive the BOARDS; take the GOLD COINS and CLAY (I).
- Place the BOARDS (J).
- Go back.
- Place the CLAY and take the CRUDE MOLD (K).
- Place the CRUDE MOLD, use the MUG OF WATER, and take the BASKET AMULET (L).
- Enter the Tent.
- Insert the BASKET AMULET, take the HAMMER, and LANTERN (M).
- Go to the Gypsy King's Tent.
- Insert the GOLD COINS and take the ST. MARY FIGURINE (N).
- Place the ST. MARY FIGURINE (P), take the PIN, and BRACELET 2/2 (Q).
- Place 2 BRACELETS, take the NAILS, and JEWELED RING (O).
- Go back.
- Use the NAILS, HAMMER, and LEONARA'S WORKSHOP ADDRESS (R).
- Play the mini-game.
- Easy solution: (purple).
- Hard solution: (green).
- Place the LANTERN (S); take the JIMMY, PROPELLER, and METAL WING 1/2 (T).
- Use the PIN (U); receive the BELL CLAPPER.
- Place the BELL CLAPPER and select it (V).
- Take the SHUTTER (W).
- Enter Leonara's Workshop.
- Use the JEWELED RING, take the BROKEN DREDGE, and HANDLE (X).
- Take the NUT (Y); place the SHUTTER (Z).
- Use the JIMMY, take the note, ROCK HAMMER, and METAL WING 2/2 (A).
- Go back.
- Place the HANDLE, take the UNCHARGED STABILIZER, and PALETTE (B).
- Place 2 METAL WINGS (C).
- Go to Leonara's Workshop.
- Place the UNCHARGED STABILIZER (D) and PALETTE (E).
- Go back, enter the Park.
- Inspect the area (F).
- Use the ROCK HAMMER and take the SCOOP (G).
- Place the PROPELLER and NUT (H); take the RING ON CLASP and ROPE (I).
- Take the PITCHER and MURAL TILE 1/3 (J).
- Take the PAINTBRUSH (K).
- Go back.
- Use the ROPE (1) and play the HOP (orange); receive the COGWHEEL.
- Use the COGWHEEL, PITCHER and take the PITCHER OF WATER (L).
- Go left.
- Place the RING ON CLASP (M); take MURAL TILE 2/3 and the BOLT (N).
- Place the SCOOP and BOLT on the BROKEN DREDGE; receive the DREDGE.
- Use the PAINTBRUSH (O).

- Play the mini-game.
- Easy solution: (Q-1-2)-(R-3-4)-(S-5-6)-(T-7-8-9-10).
- Hard solution: (Q-1-2)-(R-3-4)-(S-5-6)-(T-7-8-9-10)-(P-11-12-13-14)-(U-15-16).
- Take the TELESCOPIC CANE, FUEL, and MASQUERADE MASK.
- Go to the Park.
- Use the DREDGE, take MURAL TILE 3/3, and the FLINT (V).
- Use the TELESCOPIC CANE (W); receive the BROKEN KITE.
- Go back.
- Place 3 MURAL TILES (X).
- Play the mini-game.
- Easy solution (blue): 1-4-13-16-24.
- Hard solution (orange): 1-5-8-16-20-23.
- Take the DAGGER BLADE, CRYPTEX, and FLOWER SEEDS.
- Go left.
- Use the FUEL and FLINT (Y); take the STABILIZER (Z).
- Go to the Park.
- Use the FLOWER SEEDS and PITCHER OF WATER (A); move flowers twice, take the FLOWERS, and ROPE (B).
- Place the ROPE and STABILIZER on the BROKEN KITE; receive the KITE.
- Use the KITE (C).
- Switch to Romeo; receive the STABILIZER.
- Place the STABILIZER (D).
- Play the mini-game.
- Easy solution: Ex5-Fx5-Gx2.
- Hard solution: Ex5-Fx5-Ex3-Fx3.
Chapter 5: The Stone Forest
- Take the GOAT HEAD AMULET (H); use the ROCK and take the DRAGON (I).
- Take ELEMENTS AMULET 1/2 (J).
- Take BOARD 1/3, use the GLASS VIAL, and receive the ACID (K).
- Take the COMBINATION, ELEMENTS AMULET 2/2, use the DYNAMITE, and DRAGON (L).
- Enter the Mage Arena.
- Take 2 BOARDS (green); place 2 ELEMENTS AMULETS and take the FIRE PEARL (M).
- Use the ACID (N); take the NECKLACE (O).
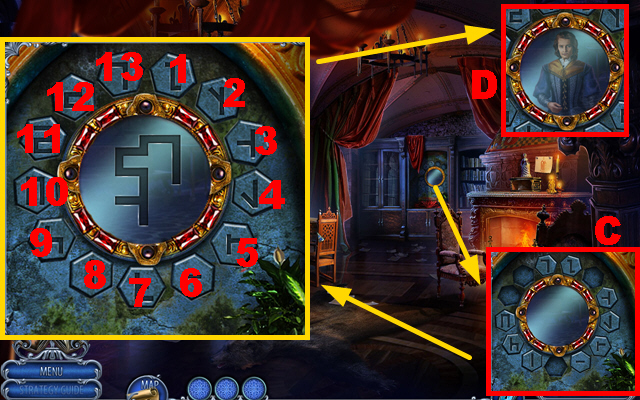
- Place the COMBINATION (P); play the mini-game.
- Easy solution: (14-6)-(13-5)-(2-4)-(11-8)-(14-7)-(3-12)-(16-9)-(15-1)-(14-3).
- Hard solution: (2-3)-(13-11)-(3-6)-(6-4)-(6-3)-(7-6)-(3-1)-(7-9)-(14-3)-(6-3)-(3-2)-(6-5)-(11-7)-(14-16)-(7-6)-(14-11)-(14-15)-(11-12)-(3-14)-(11-14)-(13-11)-(11-7)-(7-8)-(11-12)-(11-7).
- Turn a page; take the BATON.
- Go back.
- Place 3 BOARDS (Q).
- Go to the Hermit's Hut.
- Take the EMPTY VESSEL, insert the GOAT HEAD AMULET, and take the RECIPE (R).
- Use the BATON (S) and play the HOP (blue); receive the GASPAR FIGURINE.
- Place the GASPAR FIGURINE, take the MAGIC SYMBOL, and note (T).
- Take the TILE SHARD (U).
- Use the DRAGON, FIRE PEARL, and RECIPE (V).
- Go back.

- Place the NECKLACE (W); take the ICE BLADE (X).
- Use the EMPTY VESSEL (Y); receive the SULFUR.
- Go left.
- Place the TILE SHARD (Z).
- Play the mini-game.
- Easy solution: 1-2-3-5-4-5.
- Hard solution: 10-6-11-10-9-8-7-6.
- Take the MACE.
- Use the ICE BLADE and take the MANA CRYSTAL (A).
- Go back.
- Use the MACE, take the ANTIMAGIC GLOVE and NET (B).
- Go right.
- Place the SULFUR and MANA CRYSTAL (C); play the mini-game.
- Solution: (1-2)-(3-2)-(13-20-21-22-21)-(5-6)-(6-21)-(18-7)-(7-17)-(10-17)-(9-16)-(11-16)-(12-16)-(17-7)-(21-4)-(3-4)-(7-4).
- Take the FREEZING LIQUID (D).
- Go back, go left.
- Use the ANTIMAGIC GLOVE to take the HYPNODISK (E).
- Use the FREEZING LIQUID (1).
- Go forward.
- Throw the NET (F); take the PENDANT PART IN RESIN (G).
- Take the FIRE HAND, HOOK (H), and AWL (I).
- Place the PENDANT PART IN RESIN (J) to receive the PENDANT PART and take the BROKEN CROWN (K).
- Place the MAGIC SYMBOL on the BROKEN CROWN; receive the CROWN.
- Go back.
- Use the AWL (L); receive the BLUE GEMSTONE.
- Go back, go right.
- Place the PENDANT PART (M); play the mini-game.
- Easy solution: 2-1-4-8-3-7.
- Hard solution: 2-3-7-8-2-1-4.
- Receive the DAMAGED HAT.
- Place the HYPNODISK and BLUE GEMSTONE on the DAMAGED HAT; take the MIND CONTROL HAT.
- Go to the Place of Force.
- Place the MIND CONTROL HAT (N); take the MASQUERADE INVITATION.
- Go to the Hermit's Hut.
- Insert the MASQUERADE INVITATION (O).
- Switch to Juliet; take the RED STRING and MASQUERADE INVITATION.
- Place the FLOWERS and RED STRING on the MASQUERADE MASK.
- Give the MASQUERADE INVITATION (P).
- Enter the Hallway.
- Take the TONGS (Q).
- Open the curtain and play the HOP (R); receive the FLOWER BUTTON.
- Insert the FLOWER BUTTON, push buttons 1-5-2-4-3, and take the MONOCLE (S).
- Place the DAGGER BLADE, take the DAGGER, and ENVELOPE (T).
- Place the CRYPTEX (U).
- Play the mini-game.
- Easy solution: (Vx4-Wx2)-(Vx3-Wx2-Zx4-X)-(Wx4-Yx3-V-Zx2-Xx3)-(Wx2-Y-Vx4-Xx4-Z)-(W-Yx4-Vx2-Xx4-Z).
- Hard solution: (Vx4-Wx2-Zx2-Xx2)-(Vx3-Wx2-Zx3-X)-(Vx3-Wx4-Yx3-Z)-(Vx3-Wx2-Y-Xx2)-(Vx3-W-Yx4-Xx2).
- Push buttons 1-5.
- Go forward.
Chapter 6: Gaspar's Cabinet
- Take the RAVEN STAFF (A).
- Take the STRINGS (B) and use the TONGS to collect the BLUEBERRIES (C).
- Take the BOOK OF POISONS (D); place the ENVELOPE, take the note, and POISONOUS FRUIT (E).
- Take the note (F).
- Go back.
- Place the STRINGS (G); play the mini-game.
- Easy solution: (H-3)-(I-3)-(J-4)-(K-3)-(L-3)-(M-4)-(N-3)-O.
- Hard solution: (H-2)-(I-2)-(J-3)-(K-3)-(L-2)-(M-3)-(N-3)-O-(H-3)-(I-3)-(J-2)-(K-2)-(L-3)-(M-2)-(N-2)-O.
- Take the ALBERTA FIGURINE.
- Go back.
- Use the DAGGER (P); receive the SOOTHING LEAF.
- Use the RAVEN STAFF (Q); take the POISON SYMBOL.
- Place the POISON SYMBOL on the BOOK OF POISONS; take the SLEEPING POTION RECIPE.
- Go right.
- Place the SLEEPING POTION RECIPE (R), BLUEBERRIES, POISONOUS FRUIT, and SOOTHING LEAF (S); pour the mortar on the meat (T) and take the SLEEP-INDUCING MEAT.
- Go forward.
- Give the SLEEP-INDUCING MEAT (U); take the EMBROIDERED HANDKERCHIEF, GASPAR'S AMULET, and GLUE (V).
- Use the EMBROIDERED HANDKERCHIEF on the MONOCLE.
- Place the ALBERTA FIGURINE (W); take the note and RUNE 1/4 (X).
- Go back.
- Apply the GLUE and take RUNE 2/4 (Y).
- Go back.
- Use the MONOCLE, take the CUPBOARD KEY, and RUNE 3/4 (Z).
- Go to Gaspar's Cabinet.
- Insert the CUPBOARD KEY (B) and play the HOP (green); receive the SKULL AMULET.
- Place the SKULL AMULET, take RUNE 4/4, the STAKE, and WIRE SAW (A).
- Place 4 RUNES (C); play the mini-game.
- Easy solution: 1-11-2-12-13-5-1-8-9-7-4-6.
- Hard solution: 3-12-13-5-10-13-11-7-3-4-12-13-8-6-9.
- Give GASPAR'S AMULET (D); you switch to Romeo.
- Receive GASPAR'S AMULET.
- Go to the Place of Force.
- Use GASPAR'S AMULET (E); play the mini-game.
- Easy solution: Fx2-Jx6-Hx2-Ix6-Gx2-Kx2.
- Hard solution: Jx2-Kx2-Gx2-Jx4-Kx2-Hx4-Kx4.
- Go forward.
- Talk to Gaspar (1).
- Take the BLADE (L); use the FIRE HAND to collect the FIRE SPHERE (M).
- Place the CROWN (N); play the mini-game.
- Easy solution: 8-4-3-9-1-5.
- Hard solution: 1-2-3-4-5-6-7-3-5.
- Take the MAGIC SPHERE and BOOK DECORATION 1/2.
- Take the DRAGON TAIL STAFF and place the HOOK (O).
- Go back.
- Place the FIRE SPHERE and MAGIC SPHERE (P).
- Play the mini-game.
- Easy solution: 1-2-2-3-4-4-5-5-6-7-Q.
- Hard solution: 11-12-4-4-14-15-5-16-6-10-Q.
- Take the UNIFIED SPHERE.
- Go forward.
- Use the UNIFIED SPHERE (R); you switch to Juliet.
- Use the WIRE SAW and receive the DRAGON HEAD (S).
- Take the DRAGON HEAD STAFF (T).
- Place the DRAGON HEAD STAFF (U).
- Use the DRAGON HEAD (V); receive the CHAIN.
- Use the CHAIN and STAKE (W); you switch to Romeo.
- Use the BLADE and take BOOK DECORATION 2/2 (X).
- Go back.
- Place 2 BOOK DECORATIONS, open the book (Y), and play the HOP (orange); receive the OBELISK PICTURE.
- Place the OBELISK PICTURE (Z).
- Play the mini-game.
- Easy solution: (A-E)-(B-C)-(B-D)-(B-E).
- Hard solution: (A-D)-(D-E)-(B-E)-(A-C).
- Take the BONE and SHACKLES KEY.
- Go forward.
- Use the BONE (F); receive the FIREPROOF GLOVES.
- Insert the SHACKLES KEY (G); receive the SHACKLES.
- Use the SHACKLES and FIREPROOF GLOVES (H).
- Give Juliet the DRAGON TAIL STAFF (I).
- You switch to Juliet; receive the DRAGON TAIL STAFF.
- Place the DRAGON TAIL STAFF and take the DRAGON STAFF (J).
- Use the DRAGON STAFF (K).
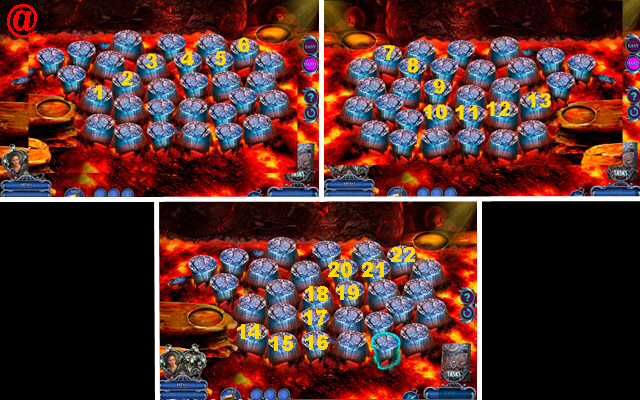
- Play the mini-game.
- Easy solution (%): 1-22.
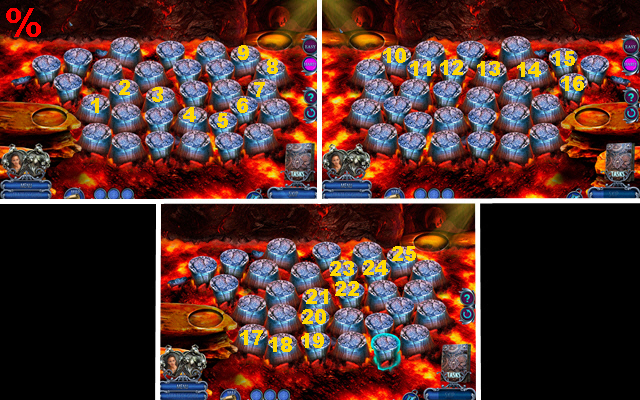
- Hard solution (@): 1-25.
- Congratulations! You have completed Dark Romance: Romeo and Juliet.
Created at: 2017-03-27